
MANUAL USER APOLLO-MULTI S
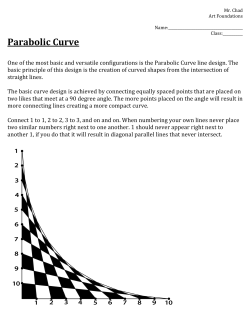
MANUAL SKIOLD MAKES A DIFFERENCE! USER APOLLO-MULTI S 981 003 400 Ver. 04 26-02-2014 SKIOLD A/S Kjeldgaardsvej 3 DK-9300 Sæby Tel: (+45) 99 89 88 87 Fax: (+45) 99 89 88 77 Contents 1. Introduction ............................................................................................ 4 1.1 Important information ...............................................................................................5 2. Apollo Multi S ......................................................................................... 7 2.1 Main menus and sub menus ....................................................................................8 2.1.1 Main menu ”GENERAL” ...................................................................................8 2.1.2 Main menus ”Department 001 and 002” ...........................................................9 2.1.3 In operation – status indicators.......................................................................10 2.1.4 Operational principle ......................................................................................11 2.2 Daily use ..................................................................................................................13 2.3 List of functions ......................................................................................................14 2.3.1 Temperature and humidity – setting the values ..............................................14 2.3.2 Ventilation.......................................................................................................15 2.3.3 Heating ...........................................................................................................16 2.3.4 RH control ......................................................................................................17 2.3.5 Wind Control...................................................................................................18 2.3.6 Curves ............................................................................................................21 2.3.7 Outside temperature compensation - reduction af max. ventilation ................27 2.3.8 Sprinkling and soaking menu 08 ....................................................................28 2.3.9 Historic data ...................................................................................................31 2.3.10 Test ................................................................................................................33 2.3.11 Measuring the water consumption ..................................................................35 2.3.12 Evaporative cooling and soaking menu 12 .....................................................37 2.4 Alarms ......................................................................................................................40 3. Ventilation system maintenance ........................................................ 41 3.1 System test ..............................................................................................................41 3.1.1 Apollo Multi / servo motors / emergency opening ...........................................42 3.1.2 Alarm output (not necessarily connected to external alarm device) ...............42 3.1.3 Cleaning .........................................................................................................42 3.1.4 Emergency opening batteries .........................................................................42 3.2 Trouble shooting .....................................................................................................43 3.3 Servomotors – Error indication .............................................................................44 981 003 400 3 SKIOLD A/S Kjeldgaardsvej 3 DK-9300 Sæby Tel: (+45) 99 89 88 87 Fax: (+45) 99 89 88 77 1. Introduction This manual describes all functions connected to the every-day use of the Apollo Multi S climatic computer. All functions regarding the daily administration of temperatures, humidity, heating, sprinkler systems, ramping curves etc. are described in this manual. Issues regarding wiring diagrams, installation, technical issues and programming of the Apollo Multi S are described in the Technical Manual (Part 2 of this manual) However, should you need any further information concerning the starting up and operation of the system please contact our service department on following numbers Tlf. +45 9989 8887 Fax. +45 9660 5490 4 981 003 400 SKIOLD A/S Kjeldgaardsvej 3 DK-9300 Sæby Tel: (+45) 99 89 88 87 Fax: (+45) 99 89 88 77 1.1 Important information General: IMPORTANT! Read the entire manual before you start using the system. IMPORTANT! The responsible owner/user of the system must make sure that ALL employees working with the system are familiar with the contents of this manual. IMPORTANT! The responsible owner/user of the system must make sure that the manual is updated in case of alterations to the system. IMPORTANT! A ventilation system can be delivered in various chimney dimensions depending the required capacity. If nothing else is stated on figures and drawings the dimensions are the same on all system sizes IMPORTANT! For alterations to the system SKIOLD A/S written consent is needed. SKIOLD A/S is not responsible for any unapproved alterations. Electrical connection: DANGER! Before you start using the system you MUST test the systems functions as described in this manual in order to ensure that the ventilators and servo motors are connected correctly. IMPORTANT! When wiring each component you MUST use cable glands for the lead-in of the wirings in order to protect the wirings and cables and to ensure the climatic computer is sealed and protected from moisture. IMPORTANT! A safety switch MUST be installed before the climatic computer as well as at each ventilator. 981 003 400 5 SKIOLD A/S Kjeldgaardsvej 3 DK-9300 Sæby Tel: (+45) 99 89 88 87 Fax: (+45) 99 89 88 77 IMPORTANT! Use of frequency motor and fault current switch: If the motor is connected to an electrical installation where a FI/HFI-switch is installed as extra protection, these must the type that disconnect when a fault current with a DC-content (pulsating direct current) is registered. The fault current switches must have following symbol: When in use: IMPORTANT! It is the user’s responsibility to make sure that the air velocity (draught) is not too high in the housing. IMPORTANT! The system has an automatic emergency opening feature. This MUST be tested frequently – see the section “Service”. IMPORTANT! During washing of the housing the humidity sensor MUST be covered or dismantled as it otherwise may be damaged. Do not sprinkle water directly at controls, servo motors and other electrical components. At Service: DANGER! The service switch at the control/ventilator must be disconnected and locked at any kind of system servicing that implies contact with electrical components IMPORTANT! The batteries for the servomotors must be changed every 3 years. This ensures that the servomotors are able to initiate the emergency opening of the air inlets. 6 981 003 400 SKIOLD A/S Kjeldgaardsvej 3 DK-9300 Sæby Tel: (+45) 99 89 88 87 Fax: (+45) 99 89 88 77 2. Apollo Multi S * GENERAL * 01 Temperature, wind T. room 001 20,2< T. room 002 22.1 Functions Measuring room temperature Measuring outside temperature Measuring room humidity (humidity sensor is extra equipment) Output (0-10VDC) for speed control exhaust Output (0-10VDC) for servo motor damper exhaust Output (0-10VDC) for servo motor air inlet Output (0-10VDC) for heating control On/off-relay for heating supply, alarm or extra ventilation Relay for alarm at min/max temp. Stand-alone curves for damper, ventilator and air inlet Sprinkler, soaking and high pressure cooling control Outside temperature compensation PC network opportunity - VentCom Controlling the ventilation in 2 departments Ramping-down curves 4 different languages 981 003 400 Apollo-Multi S 7 SKIOLD A/S Kjeldgaardsvej 3 DK-9300 Sæby Tel: (+45) 99 89 88 87 Fax: (+45) 99 89 88 77 2.1 Main menus and sub menus Main menu ”General”: General information / actual values (sub menu 01-04) Main menu ”Department 001” :Individual settings for department 001 (sub menu 01-12) Main menu ”Department 002” :Individual settings for department 002 (sub menu 01-12) 2.1.1 Main menu ”GENERAL” * GENERAL * 01 Temperature, wind T. room 001 20,2< T. room 002 22.1 Sub menu 01-04: 01 Standard display of actual temperature department 001 and 002 02 Date and time (date and time is set here) 03 Overview of actual values department 001 04 Overview of actual values department 002 8 981 003 400 SKIOLD A/S Kjeldgaardsvej 3 DK-9300 Sæby Tel: (+45) 99 89 88 87 Fax: (+45) 99 89 88 77 2.1.2 Main menus ”Department 001 and 002” * GENERAL * 01 Temperature, wind T. room 001 20,2< T. room 002 22.1 Sub menu 01-12: 01 02 03 04 05 06 07 08 09 10 11 12 Temperature- and humidity settings Ventilation settings Heating settings Humidity control Weather station (standard inactive) Ramping-down curves - status Outside temperature compensation Sprinkling, soaking or high pressure cooling Historic data Ventilation system test Counter A (e.g. water gauge) Counter B (e.g. water gauge) NOTE! If you do not press a button for approx. 1 minute, the Apollo Multi returns to the main menu ”GENERAL”. 981 003 400 9 SKIOLD A/S Kjeldgaardsvej 3 DK-9300 Sæby Tel: (+45) 99 89 88 87 Fax: (+45) 99 89 88 77 2.1.3 In operation – status indicators * GENERAL * 01 Temperature, wind T. room 001 20,2< T. room 002 22.1 Left of the blue display you find a vertical row of indicators. They show the current operational status of certain functions (see the description below). If the light is on, the function is active: Relay 1 Department 001 – e.g. used for on/off heating department 001 Relay 2 Department 001 – often used for sprinkling department 001 Relay 1 Department 002 – e.g. used for on/off heating department 002 Relay 2 Department 002 – often used for sprinkling department 002 Ventilation 100 % in the current department Ventilation 75-99 % in the current department Ventilation 50-74 % in the current department Ventilation 25-49 % in the current department 10 981 003 400 SKIOLD A/S Kjeldgaardsvej 3 DK-9300 Sæby Tel: (+45) 99 89 88 87 Fax: (+45) 99 89 88 77 2.1.4 Operational principle * GENERAL 02 Calendar time 13:08 date 01-01 * Switch between GENERAL, Department 001 and Department 002 By pressing both LINE buttons simultaneously you switch between the main menus: - GENERAL (General information / actual values) - Department 001 (individual settings for department 001) - Department 002 (individual settings for department 002) * GENERAL 02 Calendar time 13:08< date 01-01 Jump between the sub menus of the main menus: * Example: By pressing the MENU-button you jump from GENERAL sub menu 01 to GENERAL sub menu 02, where you can set and read the date and time. You jump to the general values for sub menu 03 and 04 by pressing the MENU-button again. Menu 03 and 04 contain the actual values for department 001 and 002 You use the same procedure for sub menus 01-12 of the main menus Department 001 and 002. Note! Only active sub menus are shown. (e.g. sub menu ”08 Sprinkling” is visible only when activated. * GENERAL 02 Calendar time 13:08< date 01-01 * Setting and changing values You change the values in the column of the cursor (<) by pressing the two +/- buttons. By pressing the + button once you change the setting by one digit upwards. By pressing the – button once you change the setting by one digit downwards. By pressing the button continuously the value changes until you stop pressing the button. * GENERAL 02 Calendar time 13:08< date 01-01 * Save new settings When you have entered the required value, you save the new setting by pressing the SET-button once. Apollo Multi confirms the change by changing the arrow shown next to the changed value into a star the instant you press SET. NOTE! If you do not press SET immediately after having changed the value, the Apollo Multi will return to the starting point. 981 003 400 11 SKIOLD A/S Kjeldgaardsvej 3 DK-9300 Sæby Tel: (+45) 99 89 88 87 Fax: (+45) 99 89 88 77 * GENERAL 01 Temperature, wind T. room 001 20.7 T. room 002 20.0< Move to the line below: * The LINE-buttons are used to put the cursor in place. Every time you press the right LINE-button You move the cursor down one line. * GENERAL 01 Temperature, wind T. room 001 20.7< T. room 002 20.0 Move to the line above: * Every time you press the left LINE-button You move the cursor up one line. Some functions cannot be activated or displayed from the 3 main menus or the sub menus of these 3. The functions are located in the Settings Menu. See the Technical Manual for further information on how to find the Settings Menu. NOTE! To activate and read ramping-down curves, you must enter the Settings Menu (See chapter ”Curves”). * GENERAL 01 Temperature, wind T. room 001 20.7 T. room 002 20.0< * Activate the settings menu Press both LINE buttons as well as the SET button simultaneously for approx. 5 seconds. If you do not press any buttons for approx. 1 minute, you automatically leave the settings menu. You can also leave the settings menu by pressing both LINE buttons as well as the SET button simultaneously for approx. 5 seconds. again. When the settings menu is active, the indictors are flashing to the left of the display to show, that the settings menu is open, and you have to be very careful before changing any values. You switch between the main menus GENERAL Department 001 Department 002 by pressing both LINE-buttons simultaneously. This also applies to the settings menu. 12 981 003 400 SKIOLD A/S Kjeldgaardsvej 3 DK-9300 Sæby Tel: (+45) 99 89 88 87 Fax: (+45) 99 89 88 77 2.2 Daily use * GENERAL * 01 Temperature, wind T. room 001 20.7 T. room 002 20.0< General data for daily use GENERAL 01 shows: 01 Temperature, wind Outside temperature, wind speed, wind direction, extra temperature sensor. Wind speed/wind direction and extra temperature are only visible when you have connected a weather station and an extra sensor to the Apollo Multi. * GENERAL * 02 Calendar time 14:22 date 10.02< General data for daily use By pressing the MENU-button once, you jump to GENERAL 02, where you find: 02 Calendar Time, date, year and alarm reset etc. You use the + / buttons to change the time and date. * GENERAL * 03 Actual room 001 temperature 24.2 RH 064 General data for daily use By pressing the MENU-button again, you jump to GENERAL 03, where you find: 03 Actual room 001 Temperature, humidity, ventilation, fan level, damper exhaust level, inlet level, heating level, and amount of water for two water gauges: A and B = Actual Liter pr. 24 hours A-1 and B-1 = Actual Liter pr. 24 hours yesterday * GENERAL * 04 Actual room 002 temperature 22.3 RH 068 General data for daily use By pressing the MENU-button again, you jump to GENERAL 04, where you find: 04 Actual room 002 Temperature, humidity, ventilation, fan level, damper exhaust level, inlet level, heating level, and amount of water for two water gauges: A and B = Actual Liter pr. 24 hours A-1 and B-1 = Actual Liter pr. 24 hours yesterday 981 003 400 13 SKIOLD A/S Kjeldgaardsvej 3 DK-9300 Sæby Tel: (+45) 99 89 88 87 Fax: (+45) 99 89 88 77 2.3 List of functions Apollo Multi has a list of standard and so-called ”lists” with standard settings for the various types of housing systems and ventilation principles. Setting the list by which to control the ventilation is done during set-up by your local electrician (see the technical manual). The ventilation system is now being controlled by the standard settings. When you start using the housing, a SKIOLD technician is required to adjust the standard settings to the specific conditions. The adjusted settings are saved in “List 1”, and Apollo Multi will now control the ventilation system according to these new settings. 2.3.1 Temperature and humidity – setting the values FUNCTION DESCRIPTION SPAN DEFAULT 0-50 °C -- 0-50 °C 20.0 0-99 % -- 0-99 % 60 01 temperature, RH * DEPARTMENT 1(2) * 01 temperature, RH temperature 20.7 < settemp. 20.0 Actual room temperature for department 1 or 2 By pressing both LINE-buttons you jump between department 001 and department 002 (or GENERAL). 01 temperature, RH * DEPARTMENT 1(2) * 01 temperature, RH temperature 20.7 settemp. 20.0< Required room temperature You can change the values when the cursor is next to settemp. You change the value by pressing the + / - buttons and you save your new value by pressing the SETbutton. 01 temperature, RH * DEPARTMENT 1(2) * 01 temperature, RH RH 000 < Set RH 060 Actual RH By pressing the LINE down button once, you jump to the actual humidity measured during the past 24 hours. 01 temperature, RH * DEPARTMENT 1(2) * 01 temperature, RH RH 000 Set RH 060< Required RH By pressing the LINE down button again you move the cursor to Set RH. Change by pressing the + / buttons, save by pressing SET NOTE! If you enter exactly 0,0°C as your room temperature, the fans are shut off and the dampers are closed. This can be useful, e.g. when soaking. 14 981 003 400 SKIOLD A/S Kjeldgaardsvej 3 DK-9300 Sæby Tel: (+45) 99 89 88 87 Fax: (+45) 99 89 88 77 2.3.2 Ventilation FUNCTION DESCRIPTION SPAN DEFAULT 0-100 % -- 1.0-10,0 °C 4.0 5-100 % 5 5-100 % 100 02 Ventilation * DEPARTMENT 1(2) * 02 Ventilation ventilation 100< prop. band 04.0 Actual ventilation level Press the MENU-button once and jump to 02 Actual ventilation level 02 Ventilation * DEPARTMENT 1(2) * 02 Ventilation ventilation 100 prop. band 04.0< Prop. band ventilation The temperature interval, where the ventilation is ramped from min. to max. 02 Ventilation * DEPARTMENT 1(2) * 02 Ventilation prop. band 04.0 minimum 005< Minimum ventilation The minimum percentage of ventilation possible. 02 Ventilation * DEPARTMENT 1(2) * 02 Ventilation minimum 005 maximum 100< 981 003 400 Maximum ventilation The maximum percentage of ventilation possible. 15 SKIOLD A/S Kjeldgaardsvej 3 DK-9300 Sæby Tel: (+45) 99 89 88 87 Fax: (+45) 99 89 88 77 2.3.3 Heating FUNCTION DESCRIPTION SPAN DEFAULT 0-100 % -- 0.0-9.9 °C 00.0 1.0-9.9 °C 02.0 0-100 % 000 0-100 % 100 03 Heating * DEPARTMENT 1(2) * 03 Heating heating 000 < neutral zone 00.0 Actual heating supply By pressing the MENU-button once you jump to 03 actual heating supply 03 Heating * DEPARTMENT 1(2) * 03 Heating heating 000 neutral zone 00.0< Neutral temperature interval If the temperature in the temperature interval stays below the set temperature, the heating supply remains constant. 03 Heating * DEPARTMENT 1(2) * 03 Heating neutral zone 00.0 prop. band 02.0< Prop. band heating supply The amount of degrees between which the heating supply is ramped from min. to max. 03 Heating * DEPARTMENT 1(2) * 03 Heating prop. band 02.0 minimum 000< Minimum heating supply NOTE! Minimum heating supply cannot be set higher than maximum heating supply. 03 Heating * DEPARTMENT 1(2) * 03 Heating minimum 000 maximum 100< 16 Maximum heating supply Note! Maximum heating supply cannot be set lower than the minimum heating supply. 981 003 400 SKIOLD A/S Kjeldgaardsvej 3 DK-9300 Sæby Tel: (+45) 99 89 88 87 Fax: (+45) 99 89 88 77 2.3.4 RH control FUNCTION DESCRIPTION SPAN DEFAULT 10-50 % 40 0-99 % 000 5-99 % 40 0-99 % 40 00.0-99 % 00,0 04 RH control * DEPARTMENT 1(2) * 04 RH control prop. band 040 < incr. heating 000 Prop. band RH Proportional band for relative humidity. 04 RH control * DEPARTMENT 1(2) * 04 RH control prop. band 040 incr. heating 000< Max. increase of the heating supply Max increase of the minimum heating supply when using Relative humidity control. 04 RH control * DEPARTMENT 1(2) * 04 RH control incr. heating 000 vent. RH stop 040 < RH control stop, vent. level If this ventilation level is exceeded, the RH control of the heating supply is overridden. 04 RH control * DEPARTMENT 1(2) * 04 RH control vent. RH stop 040 incr. vent. 040< Max. increase of min. vent. Max increase of the minimum ventilation when using RH control. 04 RH control * DEPARTMENT 1(2) * 04 RH control incr. vent. 040 coldstop 00.0< RH control unit stop due to temperature decrease - coldstop If the temperature falls below the set temperature by this amount of °C due to an increase in the minimum ventilation caused by a rise in RH, this ventilation level is maintained until the temperature is up again by 0,5°C. 981 003 400 17 SKIOLD A/S Kjeldgaardsvej 3 DK-9300 Sæby Tel: (+45) 99 89 88 87 Fax: (+45) 99 89 88 77 2.3.5 Wind Control FUNCTION * DEPARTMENT 1(2) * 05 wind control start point 01.0< prop. band 10.0 DESCRIPTION SPAN DEFAULT 1.0 – 99.9 m/s 1.0 1 – 50 m/s 10.0 0 – 100 % _ 0 – 100 % 090 05 Wind control Start point When the wind speed exceeds the entered start point (m/s), wind control is active. If start point is e.g. 3 m/s, wind control is active when the wind speed is more than 3 m/s. 05 Wind control * DEPARTMENT 1(2) * 05 wind control start point 01.0 prop. band 10.0< Prop. band wind control Here you set the amount of m/s from start point wind control to max. wind control. The more wind, the smaller air intake from the wind side of the building. 05 Wind control * DEPARTMENT 1(2) * 05 wind control prop. band 10.0 cal. reduction 000< Calculated reduction The calculated actual reduction in % of the air intake when wind control is active. 05 Wind control * DEPARTMENT 1(2) * 05 wind control cal. reduction 000 max. reduction 090< 18 Max. reduction By how many % should the air intake in the wind side be limited when wind control is active? With a start point of 1 m/s, and a prop. band of 10 m/s, the air intake at the wind side should be limited by 90%, when the wind speed exceeds 10 m/s. A wind speed of 1 m/s means no air intake limitation. 981 003 400 SKIOLD A/S Kjeldgaardsvej 3 DK-9300 Sæby Tel: (+45) 99 89 88 87 Fax: (+45) 99 89 88 77 FUNCTION DESCRIPTION SPAN DEFAULT 0 – 90° 10° 0 – 90° 10° 0 – 45 % 05 % 0-1-2-3 0 05 Wind control * DEPARTMENT 1(2) * 05 wind control max. reduction 090 n.z front 10< Wind direction degrees front How many degrees is the wind allowed to hit the front of the building by before wind control is active ? 05 Wind control * DEPARTMENT 1(2) * 05 wind control n.z front 10 n.z rear 10< Wind direction degrees rear How many degrees is the wind allowed to hit the rear of the building by before wind control is active ? 05 Wind control * DEPARTMENT 1(2) * 05 wind control n.z rear 10 hysterese dir. 05< hysterese dir - Pendling Sometimes, the wind direction measuring device changes position back and forth quite rapidly. At hysterese dir. you enter the required accuracy of the weather station to prevent the ventilation control from adjusting to these rapid changes. 05 Wind control * DEPARTMENT 1(2) * 05 wind control hysterese dir. 05 position fan 0< Position fan. Are used to adjust the ridge opening. Default is not to control the ridge opening via wind control. However, you can choose: 0= No influence of wind control 1= Influence wind control left 2= Influence wind control right 3= Constant influence wind control 981 003 400 19 SKIOLD A/S Kjeldgaardsvej 3 DK-9300 Sæby Tel: (+45) 99 89 88 87 Fax: (+45) 99 89 88 77 FUNCTION DESCRIPTION SPAN DEFAULT 0-1-2-3 1 0-1-2-3 2 ÷ 20 til +50 +25 1 - 10° 05.0° 05 Wind control * DEPARTMENT 1(2) * 05 wind control position fan 0 position outlet 1< Position outlet Used to control the air intake at the left side of the building. You can choose: 0= No influence of wind control 1= Influence wind control left 2= Influence wind control right 3= Constant influence wind control 05 Wind control * DEPARTMENT 1(2) * 05 wind control position outlet 1 position inlet 2< Position inlet Used to control the air intake at the right side of the building. You can choose: 0= No influence of wind control 1= Influence wind control left 2= Influence wind control right 3= Constant influence wind control 05 Wind control * DEPARTMENT 1(2) * 05 wind control position inlet 2 start limit 25.0< * DEPARTMENT 1(2) * 05 wind control start limit 25.0 pband limit. 05.0< Start limit At which outside temperature should the wind control gradually be deactivated. Vind kontrol: 05 P-band limit Proportional band for deactivationg the wind control, with a start limit of 25 °C and a proportional band of 5 °C, wind control will be completely deactivated at an outside temperature of 30 °C. I.e. at 30 °C both air inlets are 100 % open. 20 981 003 400 SKIOLD A/S Kjeldgaardsvej 3 DK-9300 Sæby Tel: (+45) 99 89 88 87 Fax: (+45) 99 89 88 77 2.3.6 Curves FUNCTION * DEPARTMENT 1(2) * 06 Curve start round 0< daycounter 001 DESCRIPTION SPAN DEFAULT 0 or 1 0 0-99 days 0 0-99 days 10 0-40 24 0-40 6 0-99 68 06 Curve Start new down step 01 = Start new down step curve Start value for temperature, minimum ventilation, humidity and daycounter (are copied from Settings Department 1). Daycounter is reset, and also this function is reset. 06 Curve * DEPARTMENT 1(2) * 06 Curve start round 0 daycounter 000< Daycounter Counts the days during curve down-step. 06 Curve * DEPARTMENT 1(2) * 06 Curve daycounter 000 final day 010< Final day for down step The day where the down step curves end. 06 Curve * DEPARTMENT 1(2) * 06 Curve final day 010 final set T 24.0 < Final set temperature Your required finishing temperatures at curve descend. 06 Curve * DEPARTMENT 1(2) * 06 Curve final set T 24.0 final min. v. 006< Final min. ventilation. Your required minimum ventilation at the final day of the curve. 06 Curve * DEPARTMENT 1(2) * 06 Curve final min. v. 006 final set RH 068< 981 003 400 Final set RH Your required humidity on the final day of the curve. 21 SKIOLD A/S Kjeldgaardsvej 3 DK-9300 Sæby Tel: (+45) 99 89 88 87 Fax: (+45) 99 89 88 77 To manage the curves, you must enter the SETTINGS MENU (described previously in this manual). Please note, that the menu is now called 08. FUNCTION DESCRIPTION SPAN DEFAULT Example: Curve control with interval days for temperature, humidity and minimum ventilation. 80 70 60 Temperature °C 50 Humidity % 40 Min Vent % 30 20 10 0 Day 40 Min Vent % Interval Days Day 32 Humidity % Day 32 Day 24 Temperature °C Day 24 Day 16 Day 16 Day 8 Day 8 Start-Day 5 Start-Day 5 24 66 5 5 23 67 6 3 22 68 7 8 21 69 8 8 20 70 9 8 19 71 10 8 Day 40 08 Curve * ADJ. DEPART. 1(2) * 08 Curve mode curve 0< start set T 30.0 0 Curve mode 0 = No curve control 1 = Curve control /down step curves 0–1 When the value is changed to 1, the digit ”1” is shown briefly, after which it is changes back to ”0”. However, the function is active. 08 Curve * ADJ. DEPART. 1(2) * 08 Curve mode curve 0 start set T 30.0< 22 Start set Temperature 2-50 °C 30 °C Required temperature at the beginning of the curve. 981 003 400 SKIOLD A/S Kjeldgaardsvej 3 DK-9300 Sæby Tel: (+45) 99 89 88 87 Fax: (+45) 99 89 88 77 FUNCTION DESCRIPTION SPAN DEFAULT 5-100 % 5 005-100 % 060 000-100 008 02.0 – 50.0 °C 28,0 000 – 100 % 010 000- 100 % 062 000-100 016 08 Curve * ADJ. DEPART. 1(2) * 08 Curve start set T 25.0 start min. v. 00.5< * ADJ. DEPART. 1(2) * 08 Curve start min. v. 00.5 start set RH 060< Start min. vent. Minimum ventilation at the beginning of the curve. 08 Curve Start set RH Required humidity at the beginning of the curve. 08 Curve * ADJ. DEPART. 1(2) * 08 Curve start set RH 060 final day 1 008< Final day curve point 1 Amount of days for the first point of the curve. 08 Curve * ADJ. DEPART. 1(2) * 08 Curve final day 1 008 final temp. 1 28.0< Final temperature curve point 1 Temperature at the first point of the curve. 08 Curve * ADJ. DEPART. 1(2) * 08 Curve final temp. 1 28.0 final min. 1 010< Final min. ventilation curve point 1 Minimum ventilation at the first point of the curve. 08 Curve * ADJ. DEPART. 1(2) * 08 Curve final min. 1 010 final RH 1 062< Final RH curve point 1 Humidity at the first point of the curve. 08 Curve * ADJ. DEPART. 1(2) * 08 Curve final RH 1 062 final day 2 016< 981 003 400 Final day curve point 2 Amount of days for the second point of the curve. 23 SKIOLD A/S Kjeldgaardsvej 3 DK-9300 Sæby Tel: (+45) 99 89 88 87 Fax: (+45) 99 89 88 77 FUNCTION DESCRIPTION SPAN DEFAULT 02.0 – 50.0 °C 26.0 000 – 100 % 015 000- 100 % 064 000-100 024 02.0 – 50.0 °C 24.0 000 – 100 % 020 08 Curve * ADJ. DEPART. 1(2) * 08 Curve final day 2 016 final temp. 2 26.0< Final temperature curve point 2 Temperature at the second point of the curve. 08 Curve * ADJ. DEPART. 1(2) * 08 Curve final temp. 2 26.0 final min. 2 015< Final min. ventilation curve point 2 Minimum ventilation at the second point of the curve. 08 Curve * ADJ. DEPART. 1(2) * 08 Curve final min. 2 13.4 final RH 2 064< Final RH curve point 2 Humidity at the second point of the curve. 08 Curve * ADJ. DEPART. 1(2) * 08 Curve final RH 2 064 final day 3 024< Final day curve point 3 Amount of days for the third point of the curve. 08 Curve * ADJ. DEPART. 1(2) * 08 Curve final day 3 024 final temp. 3 24.0< Final temperature curve point 3 Temperature at the third point of the curve. 08 Curve * ADJ. DEPART. 1(2) * 08 Curve final temp. 3 24.0 final min. 3 020< Final min. ventilation curve point 3 Minimum ventilation at the third point of the curve. 24 981 003 400 SKIOLD A/S Kjeldgaardsvej 3 DK-9300 Sæby Tel: (+45) 99 89 88 87 Fax: (+45) 99 89 88 77 FUNCTION DESCRIPTION SPAN DEFAULT 000- 100 % 066 000- 100 032 02.0 – 50.0 °C 22,0 000–100% 025 000-100 % 068 000- 100 040 08 Curve * ADJ. DEPART. 1(2) * 08 Curve final min. 3 020 final RH 3 066< Final RH curve point 3 Humidity at the third point of the curve. 08 Curve * ADJ. DEPART. 1(2) * 08 Curve final RH 3 066 final day 4 032< Final day curve point 4 Amount of days for the fourth point of the curve. 08 Curve * ADJ. DEPART. 1(2) * 08 Curve final day 4 032 final temp. 4 22.0< Final temperature curve point 4 Temperature at the fourth point of the curve. 08 Curve * ADJ. DEPART. 1(2) * 08 Curve final temp. 4 22.0 final min. 4 025< Final min. ventilation curve point 4 Minimum ventilation at the fourth point of the curve. 08 Curve * ADJ. DEPART. 1(2) * 08 Curve final min. 4 025 final RH 4 068< Final RH curve point 4 Humidity at the fourth point of the curve. 08 Curve * ADJ. DEPART. 1(2) * 08 Curve final RH 4 068 final day 5 040< 981 003 400 Final day curve point 5 Amount of days for the fifth point of the curve. 25 SKIOLD A/S Kjeldgaardsvej 3 DK-9300 Sæby Tel: (+45) 99 89 88 87 Fax: (+45) 99 89 88 77 FUNCTION DESCRIPTION SPAN DEFAULT 02.0 – 50.0 °C 20.0 000–100 % 030 000-100 % 070 08 Curve * ADJ. DEPART. 1(2) * 08 Curve final day 5 040 final temp. 5 20.0< Final temperature curve point 5 Temperature at the fifth point of the curve. 08 Curve * ADJ. DEPART. 1(2) * 08 Curve final temp. 5 20.0 final min. 5 030< Final min. ventilation curve point 5 Minimum ventilation at the fifth point of the curve. 08 Curve * ADJ. DEPART. 1(2) * 08 Curve final min. 5 030 final RH 5 070< 26 Final RH curve point 5 Humidity at the fifth point of the curve. 981 003 400 SKIOLD A/S Kjeldgaardsvej 3 DK-9300 Sæby Tel: (+45) 99 89 88 87 Fax: (+45) 99 89 88 77 2.3.7 Outside temperature compensation - reduction af max. ventilation FUNCTION DESCRIPTION SPAN DEFAULT 00.0-30.0 °C 22.0 01.0-10.0 °C 06.0 000-095 % 020 07 Reduction of max. vent. * DEPARTMENT 1(2) * 07 Decr. max. vent. setpoint 22.0< prop. band 06.0 Setpoint, reduction max. vent. If the outside temperature falls below this temperature, the ventilation decreases. 07 Reduction of max. vent. * DEPARTMENT 1(2) * 07 Decr. max. vent. setpoint 22.0 prop. band 06.0< Prop. band reduction The amount of °C where the ventilation decrease is ramped down from 0 to max. ventilation decrease. 07 Reduction of max. vent. * DEPARTMENT 1(2) * 07 Decr. max. vent. prop. band 06.0 max decrease 030< 981 003 400 Max. decrease of max. vent. The highest obtainable max. ventilation decrease. 27 SKIOLD A/S Kjeldgaardsvej 3 DK-9300 Sæby Tel: (+45) 99 89 88 87 Fax: (+45) 99 89 88 77 2.3.8 Sprinkling and soaking menu 08 FUNCTION DESCRIPTION SPAN DEFAULT 0–1–2–3 1 00:00-23:59 06:00 00:00-23:59 22:00 08 Sprinkler installation * DEPARTMENT 1(2) * 08 Sprinkler instal. 1< Mode starttime 08:00 Choose sprinkler installation. Choose between 4 different settings for sprinkling: 0 – 1 – 2 – 3 0 = Sprinkler not active. (turned off) 1 = Sprinkler program 2 = Soaking program (cleaning) 3 = Sprinkler permanent ON 08 Sprinkler installation * DEPARTMENT 1(2) * 08 Sprinkler instal. Mode 1 starttime 08:00< Start time sprinkling. Starting time for sprinkling, e.g. 08.00 AM. Change the starting time as you prefer. 08 Sprinkler installation * DEPARTMENT 1(2) * 08 Sprinkler instal. starttime 08:00 stoptime 20:00< Stop time sprinkling. The time you wish the sprinkling to stop. e.g. 20:00 in the evening. Change the stop time as you prefer. The setting start 08:00 stop 20:00 means that the sprinkling is turned off between 20:00 and 08:00. During this period of time, the pigs are inactive, and sprinkling is not required. 28 981 003 400 SKIOLD A/S Kjeldgaardsvej 3 DK-9300 Sæby Tel: (+45) 99 89 88 87 Fax: (+45) 99 89 88 77 FUNCTION DESCRIPTION SPAN DEFAULT -20,0-50.0 °C 18.0 00.0-50.0 °C 28,0 000 - 100 % 080 0/1 01 08 Sprinkler installation * DEPARTMENT 1(2) * 08 Sprinkler instal. Temp min spr. 18.0< Temp max spr. 28.0 Start temperature sprinkler As long as the outside temperature is below 18°C, sprinkling is shut off. When the outside temperature is 18 °C, sprinkling starts with maximum pause. 08 Sprinkler installation * DEPARTMENT 1(2) * 08 Sprinkler instal. Temp min spr. 18.0 Temp max spr. 28.0< Stop Temperature sprinkler When the outside temperature reaches this specific °C and above, sprinkling is maximal. Between temp min sprinkler and temp max sprinkler. The sprinkling pause is variable. 08 Sprinkler installation * DEPARTMENT 1(2) * 08 Sprinkler instal. Temp max spr. 28.0 RH stop level 080< RH stop level. If the RH increases above this stop level, the sprinklers are shut off. 08 Sprinkler installation * DEPARTMENT 1(2) * 08 Sprinkler instal. Stop level mode RH stop level 080 Mode stop level 1< 0 = RH stop level inactive. 1 = Sprinklers shut off, when RH reaches stop level. 981 003 400 29 SKIOLD A/S Kjeldgaardsvej 3 DK-9300 Sæby Tel: (+45) 99 89 88 87 Fax: (+45) 99 89 88 77 FUNCTION DESCRIPTION SPAN DEFAULT 08 Sprinkler installation. * DEPARTMENT 1(2) * 08 Sprinkler instal. mode stop level 01 Time on M:S 00:10< Sprinkler ON time. Settings are in minutes: seconds. 00:02-10:00 MM:SS 00:10 08 Sprinkler installation. * DEPARTMENT 1(2) * 08 Sprinkler instal. Time on M:S 00:10 min. off H:M 00:05< Min. Pause time. Time (pause) between the ON times for sprinkler at the temperature that is set in ”temp. max. mist”. Settings are in hours: minutes. 00:01-23:59 HH:MM 00:15 08 Sprinkler installation. * DEPARTMENT 1(2) * 08 Sprinkler instal. Min off H:M 00:05 Max off H:M 00:05< Max. Pause time. Time (pause) between the ON times for sprinkler at the temperature that is set in”temp. min.mist”. Settings are in hours: minutes. 00:01-23:59 HH:MM 00:30 08 Sprinkler installation * DEPARTMENT 1(2) * 08 Sprinkler instal. clean off H:M 00:30< clean on H:M 01:00 Clean off – soaking. Setting the time between soaking. 00:01-23:59 HH:MM 00:30 08 Sprinkler installation * DEPARTMENT 1(2) * 08 Sprinkler instal. clean off H:M 00:30 clean on H:M 01:00< 30 Clean on – soaking. Setting the soaking time. 00:01-23:59 HH:MM 01:00 981 003 400 SKIOLD A/S Kjeldgaardsvej 3 DK-9300 Sæby Tel: (+45) 99 89 88 87 Fax: (+45) 99 89 88 77 2.3.9 Historic data FUNCTION DESCRIPTION SPAN DEFAULT 09 Historic data * DEPARTMENT 1(2) * 09 History data min. temp. 22.3< time 21:34 Min. Temperature Shows the lowest inside temperature during the past 24 hours, and the time this temperature occurred. -40.0-50.0 °C -HH:MM 09 Historic data * DEPARTMENT 1(2) * 09 History data date 10-11 year 2009 < Date/Year The date and year of the lowest temperature – still only looking at the past 24 hours. DD-MM -YYYY 09 Historic data * DEPARTMENT 1(2) * 09 History data RH 000 ventilation 097< RH/Ventilation The RH and the ventilation percentage logged at the time of the lowest temperature (still looking at the past 24 hours) RH in % -Vent. in % 09 Historic data * DEPARTMENT 1(2) * 09 History data ventilation 097 heating 000< Ventilation/Heating The heating percentage logged at the time of the lowest temperature (still looking at the past 24 hours). Vent. in % -Heating in % 09 Historic data * DEPARTMENT 1(2) * 09 History data max. temp. 23.0 time 22:12 981 003 400 Max. temperature Shows the highest inside temperature during the past 24 hours, and the time this temperature occurred. -40.0-50.0 °C -HH:MM 31 SKIOLD A/S Kjeldgaardsvej 3 DK-9300 Sæby Tel: (+45) 99 89 88 87 Fax: (+45) 99 89 88 77 FUNCTION DESCRIPTION SPAN DEFAULT YYYY -- 09 Historic data * DEPARTMENT 1(2) * 09 History data date 10-11 year 2009< Date/Year The date and year of the highest temperature – still only looking at the past 24 hours. 09 Historic data * DEPARTMENT 1(2) * 09 History data RH 000 ventilation 097< RH/Ventilation The RH and the ventilation percentage logged at the time of the highest temperature (still looking at the past 24 hours). RH in % -Vent. in % 09 Historic data * DEPARTMENT 1(2) * 09 History data ventilation 097 heating 000< 32 Ventilation/Heating The heating percentage logged at the time of the lowest temperature (still looking at the past 24 hours). Vent. in % -Heating in % 981 003 400 SKIOLD A/S Kjeldgaardsvej 3 DK-9300 Sæby Tel: (+45) 99 89 88 87 Fax: (+45) 99 89 88 77 2.3.10 Test FUNCTION DESCRIPTION SPAN DEFAULT 0 or 1 0 005 - 100 % 030 000 - 100 % -- 000 - 100 % -- 000 - 100 % -- 10 Test ventilation * DEPARTMENT 1(2) * 10 Test ventilation mode test vent. 0 < vent. level 005 Mode test ventilation Choose 0= automatic ventilation Choose 1= manual ventilation NOTE!! Choose 0 after test normal 10 Test ventilation * DEPARTMENT 1(2) * 10 Test ventilation mode test vent. 1 vent. level 025< Vent. level When you choose one manual ventilation you move the cursor to vent. level and choose a ventilation level. 10 Test ventilation * DEPARTMENT 1(2) * 10 Test ventilation vent. level 025 level fan 025< Fan level At the ventilation level set above, you can now read the actual ventilation level of the exhaust fan in % 10 Test ventilation * DEPARTMENT 1(2) * 10 Test ventilation level fan 025 level outlet 047< Outlet level At the ventilation level set above, you can now read the actual ventilation level of the damper outlet in %. 10 Test ventilation * DEPARTMENT 1(2) * 10 Test ventilation level outlet 047 level inlet 029< 981 003 400 Inlet level At the ventilation level set above, you can now read the actual ventilation level of the air inlet in %. 33 SKIOLD A/S Kjeldgaardsvej 3 DK-9300 Sæby Tel: (+45) 99 89 88 87 Fax: (+45) 99 89 88 77 FUNCTION DESCRIPTION SPAN DEFAULT 0 -1 - 2 - 3 - 4 5-6 0 000 - 100 % -- 10 Test ventilation * DEPARTMENT 1(2) * 10 Test ventilation level inlet 029 mode reduction 0< Mode reduction Choose 0 – no air inlet or damper exhaust reduction at low outside temperature. Choose 1: actual outside temperature reduction of fan, air intake and damper. Choose 2: actual wind reduction of fan, air intake and damper. Choose 3: actual outside temperature and wind reduction of fan, air intake and damper. Choose 4: Maximum outside temperature reduction of fan, air intake and damper. Choose 5: Maximum wind reduction of fan, air intake and damper. Choose 6: Maximum outside temperature and wind reduction of fan, air intake and damper. 10 Test ventilation * DEPARTMENT 1(2) * 10 Test ventilation max. red. fan 000< max. red. outl. 000< max. red inl. 000< Max. reduction If your service technician has enteres a curve for reduction in the settings menu, you can see how much the fan and air intake are shut at low outside temperature and/or wind rediction. The same applies for damper exhaustion. The display shows “000”, if you have not entered any curve for reduction for damper and air intake. 34 981 003 400 SKIOLD A/S Kjeldgaardsvej 3 DK-9300 Sæby Tel: (+45) 99 89 88 87 Fax: (+45) 99 89 88 77 2.3.11 Measuring the water consumption The Apollo Multi S measures the water consumption is 1 department using 1 water gauges in each department. FUNCTION DESCRIPTION SPAN DEFAULT 000 - 100 % 020 % 11 Counter A data * DEPARTMENT 1(2) * 11 Counter A data wateruse dev. 020< count. 02:00 0000 Water use deviation You enter the percentage deviation relating to both the minimum and maximum water consumption acceptable for the department in question. If the deviation exceeds this percentage, the Apollo Multi shows an alarm text in the display (soft alarm, the alarm relay will remain inactive) An alarm caused by too low water consumption indicates problems with the water supply. An alarm caused by too high water consumption indicates pipe fracture. 981 003 400 35 SKIOLD A/S Kjeldgaardsvej 3 DK-9300 Sæby Tel: (+45) 99 89 88 87 Fax: (+45) 99 89 88 77 * DEPARTMENT 1(2) * 11 Counter A data count. 02:00 0000 count.-1 02:00 0000< The water consumption is registered continuously. The Apollo Multi summarized the water consumption at the times shown below. ”count.” shows the water consumption fir the current 24 hours. ”count. -1” shows the water consumption registered for the previous 24 hours. count. count. -1 count. count. -1 count. count. -1 count. count. -1 count. count. -1 count. count. -1 count. count. -1 count. count. -1 count. count. -1 count. count. -1 count. count. -1 count. count. -1 02:00 02:00 04:00 04:00 06:00 06:00 08:00 08:00 10:00 10:00 12:00 12:00 14:00 14:00 16:00 16:00 18:00 18:00 20:00 20:00 22:00 22:00 24:00 24:00 0000 0000 0000 0000 0000 0000 0000 0000 0000 0000 0000 0000 0000 0000 0000 0000 0000 0000 0000 0000 0000 0000 0000 0000 -- -- ”last consumption” is the water consumption for the past 24 hours. ”last consumption -1” is the water consumption for the previous 24 hours. last consump last consump -1 0000 0000 ”min flow l/10min” – enter the minimum amount of water to supply to the department every 10 minutes ”max flow l/min” – enter the maximum amount of water to supply to the department every minute. min flow l/10min max flow l/min 36 000 000 981 003 400 SKIOLD A/S Kjeldgaardsvej 3 DK-9300 Sæby Tel: (+45) 99 89 88 87 Fax: (+45) 99 89 88 77 2.3.12 Evaporative cooling and soaking menu 12 FUNCTION DESCRIPTION SPAN DEFAULT 0–1–2–3 1 00:00-23:59 Kl. 06:00 00:00-23:59 Kl. 22:00 12 Evaporative cool. installation * DEPARTMENT 1(2) * 12 Evaporative cool. Mode 1< Starttime 08:00 Choose evaporative cooling mode. Choose between 4 different settings for evaporative cooling. 0–1–2–3 0 = Evaporative cooling not active. (turned off) 1 = Evaporative cooling program 2 = Evaporative cooling program (soaking) 3 = Evaporative cooling permanent ON 12 Evaporative cool. installation * DEPARTMENT 1(2) * 12 Evaporative cool. Mode 1 starttime 08:00< Start time evaporative cooling. Starting time for evaporative cooling, e.g. 08.00 AM. Change the starting time as you prefer. 12 Evaporative cool. installation * DEPARTMENT 1(2) * 12 Evaporative cool. Starttime 08:00 Stoptime 20:00< Stop time evaporative cooling. Stop time time for evaporative cooling, e.g. 20:00 in the evening. Change the stop time as you prefer. The setting start 08:00 stop 20:00 means that the evaporative cooling is turned off between 20:00 and 08:00. During this period of time, the pigs are inactive, and evaporative cooling is not required. 981 003 400 37 SKIOLD A/S Kjeldgaardsvej 3 DK-9300 Sæby Tel: (+45) 99 89 88 87 Fax: (+45) 99 89 88 77 FUNCTION DESCRIPTION SPAN DEFAULT -20,0-50,0 °C 18,0 0,0-50,0 °C 28,0 0-100 % 80 % 0/1 1 12 Evaporative cool. installation * DEPARTMENT 1(2) * 12 Evaporative cool. Temp min mist 18.0< Temp max mist 28.0 Start temperature for EC. As long as the outside temperature is below 18 °C evaporative cooling is shut off. When the outside temperature is 18 °C evaporative cooling starts with maximum pause. 12 Evaporative cool. installation * DEPARTMENT 1(2) * 12 Evaporative cool. Temp min mist 18.0 Temp max mist 28.0< Temperature for max. EC. When the outside temperature reaches this specific °C and above evaporative cooling is maximal. Between temp min mist. and temp max mist. The evaporative cooling is variable. 12 Evaporative cool. installation * DEPARTMENT 1(2) * 12 Evaporative cool. Temp max mist 28.0 RH stop level 080< RH stop level. If the RH rises above this stop level, the evaporative cooling is shut off. 12 Evaporative cool. installation * DEPARTMENT 1(2) * 12 Evaporative cool. RH stop level 080 Mode stop level 1< Stop level mode. 0 = RH stop level inactive 1 = If the RH rises above this stop level, the sprinklers are shut off. 38 981 003 400 SKIOLD A/S Kjeldgaardsvej 3 DK-9300 Sæby Tel: (+45) 99 89 88 87 Fax: (+45) 99 89 88 77 FUNCTION DESCRIPTION SPAN DEFAULT 12 Evaporative cool. installation * DEPARTMENT 1(2) * 12 Evaporative cool. Mode stop level 1 Time on M:S 00:10< EC ON time. Settings are in minutes: seconds. 00:02-10:00 MM:SS 00:10 12 Evaporative cool. Installation * DEPARTMENT 1(2) * 12 Evaporative cool. Time on M:S 00:10 Min off H:M 00:05< Min. Pause time. Time (pause) between the ON times for sprinkler at the temperature that is set in ”temp. max. mist”. Settings are in hours: minutes. 00:01-23:59 HH:MM 00:15 12 Evaporative cool. installation * DEPARTMENT 1(2) * 12 Evaporative cool. Min off H:M 00:05 Max off H:M 00:05< Max. Pause time. Time (pause) between the ON times for sprinkler at the temperature that is set in ”temp. min. mist”. Settings are in hours: minutes. 00:01-23:59 HH:MM 00:30 12 Evaporative cool. installation. * DEPARTMENT 1(2) * 12 Evaporative cool. Clean off H:M 00:30< Clean on H:M 01:00 Clean off - soaking. 00:01-23:59 Setting the soaking OFF time. Settings are in hours: minutes. HH:MM 00:30 12 Evaporative cool. installation. * DEPARTMENT 1(2) * 12 Evaporative cool. Clean off H:M 00:30 Clean on H:M 01:00< Clean on - soaking. Settings are in hours: minutes. 981 003 400 00:01-23:59 Setting the soaking ON time. HH:MM 01:00 39 SKIOLD A/S Kjeldgaardsvej 3 DK-9300 Sæby Tel: (+45) 99 89 88 87 Fax: (+45) 99 89 88 77 2.4 Alarms *** ALARM *** DEPARTMENT 001 Room sensor defect ALARMS When an alarm occurs you see the following text flashing in the display: *** ALARM *** The display shows if the alarm has occurred in department 001 or 002, and it tells you what caused the alarm, e.g. “Room sensor defect”. At the same time, the extra relay is activated, and if you have installed an external alarm installation, this is switched on. The below mentioned alarms may occur for department 001 and 002: Nr. 1 = Room temperature sensor defect. Nr. 2 = Inside temperature below minimum. Nr. 3 = Inside temperature above maximum. Nr. 4 = Relative Temperature alarm - The inside temperature has decreased too much seen in relation to the setpoint – NOT APPLICABLE! Nr. 5 = Relative Temperature alarm – The inside temperature has increased too much seen in relation to the setpoint – NOT APPLICABLE! Nr. 6 = Memory: Data lost!! Go through the settings. Nr. 7 = Revolution counter defect – NOT APPLICABLE! *** ALARM *** DEPARTMENT 001 Room sensor defect RESET ALARM Press the SET-button to deactivate the alarm and remove the alarm message from the display. If you do not find and correct the cause of the alarm, the alarm will occur again. 40 981 003 400 SKIOLD A/S Kjeldgaardsvej 3 DK-9300 Sæby Tel: (+45) 99 89 88 87 Fax: (+45) 99 89 88 77 3. Ventilation system maintenance It is very important to ensure sufficient maintenance, supervision and cleaning of the entire ventilation system. WARNING! Never clean any components using high pressure water cleaning. Always use the lowest water pressure possible and avoid washing cables and cable glands directly. RECOMMENDATION! Use the check list below to ensure that all important issues are checked with planned intervals, e.g. after each batch in batch operated departments. Do this every 2. week Check Apollo Multi functions Check Dampers / servo motors Check Emergency opening Check Alarm functions (if in use) Clean the Apollo Multi Full system service/maintenance check Change emergency opening batteries Do this every 3. month Do this every 12. months Do this every 3. year 3.1 System test The everyday system user must be able to perform a standard functional system check. You can for example follow the below mentioned routine: 1. Choose an inside temperature of approx. 10° above the current inside temperature. Wait for approx. 5 minutes. a. Check that all fans have ramped down to minimum ventilation. Check that all dampers and air inlets (if they are adjustable) have placed themselves identically at the specified minimum level. Check that all wall/ceiling inlet valve flaps are positioned at the exact same position. b. Check that heating valves have opened to supply heating. 2. While all dampers and air inlets are positioned at the minimum level, you cut the power supply to the ventilation system. Wait for approx. 2 minutes. a. Check that all emergency opening functions on dampers and air inlets are active and open. 3. Choose an inside temperature of approx. 10° below the current inside temperature. Wait for approx. 5 minutes. a. Check that all fans have ramped up to maximum ventilation. Check that all dampers and air inlets (if they are adjustable) have placed themselves identically at the specified maximum level. b. Check that the heating valves have closed and have cut off the heating supply. 981 003 400 41 SKIOLD A/S Kjeldgaardsvej 3 DK-9300 Sæby Tel: (+45) 99 89 88 87 Fax: (+45) 99 89 88 77 3.1.1 Apollo Multi / servo motors / emergency opening We recommend that you go through the starting up procedure described in the technical manual, simply to ensure that the basic functions of the ventilation system work as they should. 3.1.2 Alarm output (not necessarily connected to external alarm device) Turn the power off – the alarm should now go off. Set the max. alarm temperature below the current temperature – the alarm should now go off. Set the min. alarm temperature above the current temperature – the alarm should now go off. 3.1.3 Cleaning You need to clean the exhaust chimney in order to maintain the output air volume. Use a brush to clean the exhaust chimney. High pressure water cleaning will damage the PUR tubes and the fan motor. Do not sprinkle water on electrical components. NOTE!! When cleaning the departments, remember to cover the humidity sensor of preferably remove the sensor while cleaning. Do not sprinkle directly on the control unit, servo motors and other electrical components. 3.1.4 Emergency opening batteries IMPORTANT!! Change the batteries every 3 years in order to ensure that the emergency opening functions. 42 981 003 400 SKIOLD A/S Kjeldgaardsvej 3 DK-9300 Sæby Tel: (+45) 99 89 88 87 Fax: (+45) 99 89 88 77 3.2 Trouble shooting Error No light in the Apollo Multi The system is not running Cause Safety switch is turned off A fuse is blown in the fuse box or in the Apollo Multi Solution Turn safety switch back on Turn the safety switch off Replace the fuse – you find extra Apollo multi fuses taped onto the inside of the cabinet. Re-connect the Apollo Multi. Turn off all fan safety switches HFI-relay has switched off due to motor defect, condensator defect or moisture in the Switch HFI relay on. switch. Switch the fan safety switches back on, one by one, to identify and disconnect the faulty motor. Fans are not running Unless your ventilation system consists of one single fan, the ventilation system can continue to operate with the remaining fans until an electrician or service technician changes the motor. Potential frequency converter Cut the power off for 5 minutes and error. restart. Vibration and noise during operation The damper is loose. Alarm indication on the servomotor control unit for damper and air inlets. Error 1. Overcurrent. RED LED ON Error 2. Battery error: RED LED flashes Error 3. Reset LA35 and service: GREED Led flashes. Error 4. No movement RED LED ON+ YELLOW LED ON, GREEN LED ON. Error 5. Power supply error 230VAC/24VAC. GREEN LED flashes, RED LED ON, YELLOW LED OFF. 981 003 400 Switch the safety switch off. Wait for 5 minutes. Re-tighten the damper in open position. Re-connect the Apollo Multi. 43 SKIOLD A/S Kjeldgaardsvej 3 DK-9300 Sæby Tel: (+45) 99 89 88 87 Fax: (+45) 99 89 88 77 3.3 Servomotors – Error indication Indication Error 1. Error Overcurrent. Check that the damper/air inlet valve/piano wire moves freely Battery error. Change the battery and cut off the 24 VAC power supply to reset the error RED LED ON Error 2. Solution RED LED flashes or Wait 30 hours for the next battery control after which the error resets itself. Error 3. Indication only. GREEN LED flashes Error 4. No movement. RED LED ON YELLOW LED ON GREED LED ON Indicates that the LA35 servomotor is resetting automatically, or the LA12/LA35 control unit is set to service mode. Check that the damper/air inlet valve/piano wire moves freely Check the cable between the control unit and the actuator. If the above seems OK, call SKIOLD service technician. Error 5. RED LED ON GREEN LED flashes YELLOW LED OFF. Power supply error. Check the power supply for the servomotor. LA12 is supplied by a 24 VAC transformer. LA35 is supplied by 230 VAC main power supply. LA12 error options: 1. HPFI relay disengaged. 2. Fuse blown in the control unit 3. Fuse blown in the transformer. LA35 error options: 1. HPFI relay disengaged. 2. Fuse blown in the control unit 3. Fuse blown in LA35 control unit If the servomotor problem is not solved by carrying out the procedures mentioned above, please contact the SKIOLD service department, phone no. +45 9989 8887. 44 981 003 400


© Copyright 2026