
Logitek Electronic Systems JetSet Reference Manual Includes JetStream Server Manual Revision 1.1
Logitek Electronic Systems JetSet Reference Manual Includes JetStream Server Manual Revision 1.1 September 2014 Logitek Electronic Systems, Inc. 5622 Edgemoor Drive Houston, Texas 77081 USA Tel Fax +1-713-664-4470 +1-713-664-4479 Email Web [email protected] www.logitekaudio.com Contents © 2011- 2014 Logitek Electronic Systems, Inc Notice Every effort has been made to supply complete and accurate information. However, Logitek Electronic Systems, Inc. assumes no responsibility for its use, nor any infringement of patents or other rights of third parties, which would result. Worldwide rights reserved. Except for your own personal use, no part of this publication may be stored in a retrieval system, transmitted or reproduced in any way, including but not limited to photocopy, photograph, magnetic or other record, without the prior agreement and written permission of Logitek Electronic Systems, Inc. Logitek is a trademark of Logitek Electronic Systems, Inc. This product may contain Axia® Livewire® technologies, including those covered under US Patent 7,555,107, Granted June 30, 2009; US Patent 7,577,095, Granted August 18, 2009; US Patent 7,970,019, Granted June 28, 2011; European Patents Number EP 1 432 203 B1, Granted February, 2013. Used under license from TLS Corp. All other trademarks acknowledged. All specifications are subject to change without notice. Document Revisions Date April 2014 May 2014 September 2014 Revision 0.1 1.0 1.1 Author John Davis John Davis John Davis Notes First draft JetSet Reference Manual Added JetStream Server Section Added Appendix D – Excel Export/Import Contents Document Revisions .................................................................................................................... 3 Contents ....................................................................................................................................... 4 1. Introduction .................................................................................................................... 14 About this Manual ............................................................................................................. 14 Intended Audience ........................................................................................................... 14 Manual Conventions ......................................................................................................... 14 About JetSet ...................................................................................................................... 15 About JetStream ................................................................................................................ 15 Differences Between JetSet and AE Config ......................................................................... 15 Key Concepts To Understand ............................................................................................ 16 The JetStream Is An Audio Router...................................................................................... 16 The JetStream Is A Hybrid of TDM and AoIP ..................................................................... 16 Mixing Buses ..................................................................................................................... 16 2. Network Setup ................................................................................................................ 17 Administrative Network vs Audio Network ........................................................................ 17 Using the Embedded PC ................................................................................................... 17 JetStream Server ................................................................................................................ 18 JetSet Functions Handled by JetStream Server.................................................................... 18 Other Useful Information in JetStream Server .................................................................... 18 3. How To Log In ................................................................................................................. 19 What You Need To Do Before Launching The Browser ..................................................... 19 Logging In From The Embedded PC .................................................................................. 20 Logging In From Another Computer on the LAN ................................................................ 20 Troubleshooting ................................................................................................................ 20 If you cannot reach the login page from the embedded PC ................................................ 20 If you cannot reach the login page from another computer on the LAN ............................. 21 Frequently Asked Questions .............................................................................................. 21 My computer is a MacBook/I run Ubuntu Linux. Can I use JetSet? ..................................... 21 Can I connect to the JetStream using an iPad, Android tablet, or mobile phone? ................ 21 4. How To Configure Inputs and Outputs ................................................................................. 22 The Local IO Page ............................................................................................................. 22 Adding Inputs.................................................................................................................... 23 Mandatory Fields .............................................................................................................. 23 Optional Fields.................................................................................................................. 24 Editing Outputs ................................................................................................................. 26 Adding Outputs................................................................................................................. 26 Mandatory Fields: ............................................................................................................. 27 Optional Fields: ................................................................................................................ 28 Frequently Asked Questions .............................................................................................. 28 What do I click to add an output to the network? .............................................................. 28 How is the IO Gain different from Normal Signal Level in the old AE Config system? ......... 29 4 Logitek JetSet Reference Manual 5. 6. 7. 8. 9. 10. A. How To Assign Outputs To The Network ....................................................................... 30 The Network IO Page........................................................................................................ 30 How To Add an Output To The Network .......................................................................... 30 Editing Inputs From The Network ...................................................................................... 32 Setting Up Consoles ........................................................................................................ 35 Fader Assignment Rules ..................................................................................................... 35 The Surface Settings Page .................................................................................................. 35 Surface Configuration ........................................................................................................ 36 Outputs ............................................................................................................................ 36 Independent Bus Switch.................................................................................................... 37 Pre Fader Aux Bus ............................................................................................................. 37 Assigning Sources To Faders .............................................................................................. 37 Adjusting the DSP Settings ............................................................................................. 39 How to adjust the default settings of each fader ................................................................. 39 How To Change The Label Name of the Fader .................................................................. 40 How To Change The Default Fader Level .......................................................................... 40 How To Change The Default Bus Settings .......................................................................... 40 How To Change The Default Lamp Settings....................................................................... 40 How To Change The Name Of A Mix Bus Output ............................................................. 41 How To Set Up A Mix Minus Bus ...................................................................................... 41 Adjusting The Control Settings ....................................................................................... 43 Setting Up Mute Groups.................................................................................................... 43 The System Information Page ......................................................................................... 45 Administrative Settings ................................................................................................... 46 Local JetStream Information .............................................................................................. 46 Computer Name ............................................................................................................... 46 JetNet Number.................................................................................................................. 46 Multicast Base Address ...................................................................................................... 47 Local IP Address ................................................................................................................ 47 Net 1 IP Address ............................................................................................................... 47 Net 2 IP Address ............................................................................................................... 47 Base TCP Port ................................................................................................................... 48 TCP Port Range ................................................................................................................. 48 vGuest TCP Port ................................................................................................................ 48 Multicast Port .................................................................................................................... 48 JetStream Settings .............................................................................................................. 48 Sample Rate ...................................................................................................................... 48 External Sync .................................................................................................................... 48 Master Mode .................................................................................................................... 48 Network Protocol .............................................................................................................. 49 International Setting .......................................................................................................... 49 Save JetStream To JetFile ................................................................................................... 49 Using The Mixing Grid .................................................................................................... 50 Logitek JetSet Reference Manual 5 B. C. 6 Understanding Mix Minus .............................................................................................. 51 Mix Minus, Defined .......................................................................................................... 51 Logitek’s Approach............................................................................................................ 51 Mix Minus in Television .................................................................................................... 51 Mix Minus In Radio ........................................................................................................... 52 Mix Minus Bus Attributes................................................................................................... 52 The Root Mix Bus.............................................................................................................. 53 Add Mic When Off ........................................................................................................... 53 Bus Always On .................................................................................................................. 53 Creating A Speakerphone .................................................................................................. 53 Creating A Split-Track Phone Recording ............................................................................ 54 JetStream Server ............................................................................................................. 55 Introduction ...................................................................................................................... 55 The JetStream Log Page ..................................................................................................... 55 The Display Log button ..................................................................................................... 56 The Run Init Triggers button .............................................................................................. 56 The Clear Log Display button ............................................................................................ 56 The Local JetStream Display .............................................................................................. 56 The Ping button ................................................................................................................ 56 The Soft Reset button ........................................................................................................ 56 The Hard Reset button ...................................................................................................... 57 The Full Reset Button ........................................................................................................ 57 The JetNet Clients List ....................................................................................................... 57 The Network Log Page ...................................................................................................... 58 The Display Log button ..................................................................................................... 58 The Clear Log Display button ............................................................................................ 58 The Reset Multicast button ................................................................................................ 59 The Presence Command 0 button ..................................................................................... 59 The Presence Command 1 button ..................................................................................... 59 The Presence Command 0++ button ............................................................................... 59 The Presence Command 1++ button ............................................................................... 59 The JetStream State Page ................................................................................................... 60 How to read the JetStream State Page ............................................................................... 60 The State Detail Editor ...................................................................................................... 61 The Pre-Fader Meter ......................................................................................................... 62 The Bus 0 – 255 Grid ........................................................................................................ 62 The Available Source Devices tab ...................................................................................... 62 Changing Routes In Real Time ........................................................................................... 62 The System Info Page ........................................................................................................ 64 Hardware Info................................................................................................................... 64 Local Streams To Network ................................................................................................. 65 Network Sources ............................................................................................................... 66 The External Communications Page ................................................................................... 67 Logitek JetSet Reference Manual D. Auxiliary Com Ports ........................................................................................................... 67 vGuest Com Ports ............................................................................................................. 68 JetStream Com Ports ......................................................................................................... 68 External Protocols.............................................................................................................. 68 How To Set Up Ross Overdrive ......................................................................................... 68 How To Set Up Sony ELC.................................................................................................. 69 The IP Client State Page .................................................................................................... 70 The Administrator Page ..................................................................................................... 71 The System Setup Tab ....................................................................................................... 71 Administrator Password ..................................................................................................... 71 Local JetStream Computer ................................................................................................. 71 Sampling Rate ................................................................................................................... 72 International Settings ......................................................................................................... 72 External Sync .................................................................................................................... 73 JetStream Buffer Status ...................................................................................................... 73 Trigger Table ..................................................................................................................... 73 vSnapshot Recall Commands ............................................................................................. 73 Allow Real Time Editor ...................................................................................................... 74 Display vGuest TCP/IP traffic in Network Log..................................................................... 74 Send Delay Time to NuMix monochrome surface.............................................................. 74 Fader Levels to Logs .......................................................................................................... 74 The User Setup Tab........................................................................................................... 76 The Profiles Tab ................................................................................................................ 77 The vGuest Profile ............................................................................................................. 77 JetSet Excel Export/Import (JetFiles) ............................................................................... 87 Function and Theory of Operation .................................................................................... 87 Saving and Managing Exported JetFiles .............................................................................. 88 Rules ................................................................................................................................. 88 Importing A Configuration File........................................................................................... 89 Auxiliary Files .................................................................................................................... 89 Backups ............................................................................................................................ 89 Editing the JetFile Spreadsheet ........................................................................................... 89 DSP Dest .......................................................................................................................... 89 IO Dest ............................................................................................................................. 89 IO Sources ........................................................................................................................ 90 Net Sources ...................................................................................................................... 90 Picks ................................................................................................................................. 90 Mutes ............................................................................................................................... 90 System .............................................................................................................................. 90 Writing Your Own Configurations ...................................................................................... 90 General Spreadsheet Rules ................................................................................................ 91 Editing the DSP Dest Spreadsheet ..................................................................................... 91 Device number ................................................................................................................. 93 Logitek JetSet Reference Manual 7 Surface Name 1 ................................................................................................................ 93 Surface Name 2 ................................................................................................................ 93 Unique Name ................................................................................................................... 93 Num Channels .................................................................................................................. 93 Slot ................................................................................................................................... 93 Left Pin ............................................................................................................................. 93 Right Pin ........................................................................................................................... 93 Center Pin......................................................................................................................... 93 LFE Pin.............................................................................................................................. 93 LS Pin ............................................................................................................................... 93 RS Pin ............................................................................................................................... 94 DSP Function .................................................................................................................... 94 Lamp On Color ................................................................................................................. 94 Lamp Off Color ................................................................................................................. 94 Fader Level ....................................................................................................................... 94 Default Bus ....................................................................................................................... 94 Editing the IO Dest Spreadsheet ........................................................................................ 94 Device number ................................................................................................................. 96 Surface Name 1 ................................................................................................................ 96 Surface Name 2 ................................................................................................................ 96 Unique Name ................................................................................................................... 96 Num Channels .................................................................................................................. 96 Send To Network .............................................................................................................. 96 Slot ................................................................................................................................... 96 Left Pin ............................................................................................................................. 96 Right Pin ........................................................................................................................... 96 Center Pin......................................................................................................................... 96 LFE Pin.............................................................................................................................. 96 LS Pin ............................................................................................................................... 97 RS Pin ............................................................................................................................... 97 Digital Format ................................................................................................................... 97 Default Gain ..................................................................................................................... 97 Default Source .................................................................................................................. 97 Network Latency ............................................................................................................... 97 Editing the DSP Sources Spreadsheet ................................................................................. 97 Device number ............................................................................................................... 100 Surface Name 1 .............................................................................................................. 100 Surface Name 2 .............................................................................................................. 100 Unique Name ................................................................................................................. 100 Num Channels ................................................................................................................ 100 Slot ................................................................................................................................. 100 Left Pin ........................................................................................................................... 100 Right Pin ......................................................................................................................... 100 8 Logitek JetSet Reference Manual Center Pin....................................................................................................................... 100 LFE Pin............................................................................................................................ 100 LS Pin ............................................................................................................................. 100 RS Pin ............................................................................................................................. 100 DSP Function .................................................................................................................. 101 Copy To Network ........................................................................................................... 101 Net Tx IP Address............................................................................................................ 101 Network Latency ............................................................................................................. 101 Default Gain ................................................................................................................... 101 Mix Minus Src Bus........................................................................................................... 101 Mix Minus Bus On .......................................................................................................... 102 Mix Minus Add Mic......................................................................................................... 102 Mix Minus Stereo ............................................................................................................ 102 Editing the IO Sources Spreadsheet ................................................................................. 102 Device number ............................................................................................................... 105 Surface Name 1 .............................................................................................................. 105 Surface Name 2 .............................................................................................................. 105 Unique Name ................................................................................................................. 105 Num Channels ................................................................................................................ 105 Slot ................................................................................................................................. 105 Left Pin ........................................................................................................................... 105 Right Pin ......................................................................................................................... 105 Center Pin....................................................................................................................... 105 LFE Pin............................................................................................................................ 105 LS Pin ............................................................................................................................. 105 RS Pin ............................................................................................................................. 105 Default Gain ................................................................................................................... 105 Default Pan ..................................................................................................................... 106 Default Mode.................................................................................................................. 106 Mix Minus Bus ................................................................................................................ 106 Copy to Network ............................................................................................................ 106 Net Tx IP Address............................................................................................................ 106 Network Latency ............................................................................................................. 106 GPI On ........................................................................................................................... 106 GPI Off ........................................................................................................................... 107 GPI Cough ...................................................................................................................... 107 GPO Start ....................................................................................................................... 107 GPO Stop ....................................................................................................................... 107 GPO Tally ....................................................................................................................... 107 Mute Group .................................................................................................................... 108 UDP IP Address .............................................................................................................. 108 UDP Port ........................................................................................................................ 108 UDP Start Command ...................................................................................................... 108 Logitek JetSet Reference Manual 9 UDP Stop Command ...................................................................................................... 108 Timer Reset ..................................................................................................................... 108 Fader Start ...................................................................................................................... 108 Cue Bus .......................................................................................................................... 108 Cue At Inf ....................................................................................................................... 108 Allow Mode .................................................................................................................... 108 Allow Effects ................................................................................................................... 108 Allow Pan ....................................................................................................................... 108 Allow Trim ...................................................................................................................... 108 Phantom Power .............................................................................................................. 108 SR Converter ................................................................................................................... 109 UK Tally .......................................................................................................................... 109 Editing the Net Sources Spreadsheet................................................................................ 109 Device number ............................................................................................................... 113 Surface Name 1 .............................................................................................................. 113 Surface Name 2 .............................................................................................................. 113 Unique Name ................................................................................................................. 113 Num Channels ................................................................................................................ 113 Default Pan ..................................................................................................................... 113 Default Mode.................................................................................................................. 113 Mix Minus Bus ................................................................................................................ 114 Lamp On Color ............................................................................................................... 114 Lamp Off Color ............................................................................................................... 114 JetNet ............................................................................................................................. 114 Source Type .................................................................................................................... 114 Destination IP Address .................................................................................................... 114 Network Latency ............................................................................................................. 114 GPI On ........................................................................................................................... 114 GPI Off ........................................................................................................................... 114 GPI Cough ...................................................................................................................... 115 GPO Start ....................................................................................................................... 115 GPO Stop ....................................................................................................................... 115 GPO Tally ....................................................................................................................... 115 Mute Group .................................................................................................................... 115 UDP IP Address .............................................................................................................. 115 UDP Port ........................................................................................................................ 115 UDP Start Command ...................................................................................................... 115 UDP Stop Command ...................................................................................................... 116 Timer Reset ..................................................................................................................... 116 Fader Start ...................................................................................................................... 116 Cue Bus .......................................................................................................................... 116 Cue At Inf ....................................................................................................................... 116 Allow Mode .................................................................................................................... 116 10 Logitek JetSet Reference Manual Allow Effects ................................................................................................................... 116 Allow Pan ....................................................................................................................... 116 Allow Trim ...................................................................................................................... 116 UK Tally .......................................................................................................................... 116 Editing the Picks Spreadsheet .......................................................................................... 116 Device Number .............................................................................................................. 118 Pick Count ...................................................................................................................... 118 Pick 1 – Pick xx ............................................................................................................... 118 Editing the Mutes Spreadsheet......................................................................................... 118 Mute Group .................................................................................................................... 120 Mute Device 1 ................................................................................................................ 120 Mute Device 2 ................................................................................................................ 120 Active ............................................................................................................................. 120 Cue................................................................................................................................. 120 Tally 1 ............................................................................................................................. 120 Tally 2 ............................................................................................................................. 120 Tally 3 ............................................................................................................................. 120 Editing the System Spreadsheet ....................................................................................... 121 Table Version .................................................................................................................. 123 Sample Rate .................................................................................................................... 123 External Sync Type .......................................................................................................... 123 JetNet Number................................................................................................................ 124 Country Code ................................................................................................................. 124 Net 1 IP Address ............................................................................................................. 124 Net 2 IP Address ............................................................................................................. 124 Multicast Base Address .................................................................................................... 124 JetNet Base Port .............................................................................................................. 124 Net Protocol ................................................................................................................... 124 Engine Type .................................................................................................................... 124 Slot 1 Card Type ............................................................................................................. 124 Slot 2 Card Type ............................................................................................................. 124 Slot 3 Card Type ............................................................................................................. 125 Slot 4 Card Type ............................................................................................................. 125 Slot 5 Card Type ............................................................................................................. 125 Slot 6 Card Type ............................................................................................................. 125 Slot 7 Card Type ............................................................................................................. 125 Slot 8 Card Type ............................................................................................................. 125 Slot 9 Card Type ............................................................................................................. 125 Slot 10 Card Type ........................................................................................................... 125 Slot 11 Card Type ........................................................................................................... 125 Slot 12 Card Type ........................................................................................................... 125 Slot 13 Card Type ........................................................................................................... 125 Slot 14 Card Type ........................................................................................................... 125 Logitek JetSet Reference Manual 11 Slot 15 Card Type ........................................................................................................... 125 Slot 16 Card Type ........................................................................................................... 125 Slot 17 Card Type ........................................................................................................... 125 Slot 18 Card Type ........................................................................................................... 125 Slot 19 Card Type ........................................................................................................... 125 Slot 20 Card Type ........................................................................................................... 126 JetStream Layout ............................................................................................................. 126 Surface Type ................................................................................................................... 126 Num of Devices .............................................................................................................. 126 Num of Faders ................................................................................................................ 126 Independ Bus Sw ............................................................................................................ 126 Pre-Fader Aux Bus........................................................................................................... 126 Settings ........................................................................................................................... 126 Last Hardware Found ...................................................................................................... 127 Unique Name ................................................................................................................. 127 Config File Name ............................................................................................................ 128 Config Save Date ............................................................................................................ 128 JetSet Name .................................................................................................................... 128 1st Port 1 Dest ................................................................................................................. 128 1st Port 2 Dest ................................................................................................................. 128 1st Port 3 Dest ................................................................................................................. 128 1st Port 4 Dest ................................................................................................................. 128 1st IO Dest....................................................................................................................... 128 1st Port 1 Source .............................................................................................................. 128 1st Port 2 Source .............................................................................................................. 128 1st Port 3 Source .............................................................................................................. 128 1st Port 4 Source .............................................................................................................. 128 1st Mix Minus Source ....................................................................................................... 128 1st IO Source ................................................................................................................... 129 1st Network Source .......................................................................................................... 129 End of System sheet ........................................................................................................ 129 12 Logitek JetSet Reference Manual Logitek JetSet Reference Manual 13 1. Introduction About this Manual This manual describes how to use the Logitek JetSet configuration system for the JetStream MINI and JetStream PLUS audio routers. Intended Audience This manual is aimed at Engineers and Technical Operators responsible for installing, configuring and supporting a Logitek Networked Console System. In the context of a system installation, or to become familiar with the entire Logitek Networked Console System, the reader should also reference: Surface Reference Manual for each surface you are installing JetStream MINI or JetStream PLUS Reference Manual It is assumed the person responsible for installing and configuring any PC application has a solid understanding of Microsoft Windows desktop operating systems, or has ready access to IT support. Manual Conventions The following conventions are used in this manual: This text indicates a menu choice to be made, with an arrow separating a multi-level selection, eg Control Panel Users & Passwords. This can be a menu choice in a Logitek application, or within Windows. Indicates a “see-also” section in this manual, or another Logitek manual. The exclamation symbol signifies an important note or critical information. This text represents a command, script block example, instruction to be typed, or directory path. TIP: 14 A useful tip from our knowledge base! Logitek JetSet Reference Manual About JetSet JetSet is Logitek’s web-based configuration system for the JetStream MINI and JetStream PLUS audio routers. Designed for and tested with desktop, laptop, tablet, and mobile phone browsers, JetSet is written in HTML-5 to be compatible with Internet Explorer, Firefox, Chrome, and Safari browers and optimized for speed and simplicity. About JetStream JetStream is Logitek’s brand of dense Audio over IP nodes and integrated audio router and mix engines. The JetStream MINI handles up to 128 audio channels in 2 rack units and is capable of mixing up to 36 faders spread across up to 4 consoles. The JetStream PLUS is capable of handling up to 240 audio channels and mixing up to 36 faders spread across up to 4 consoles in as few as 4 rack units. The process of setting up a JetStream MINI and JetStream PLUS are the same using JetSet. The only difference is the number of audio cards; the MINI has 8 slots and the PLUS has 16 slots. When you log into the JetStream, JetSet will tell you what kinds of cards are installed and how many slots are available. Because both the MINI and PLUS operate on the same system architecture, when this manual refers to a “JetStream” you should assume that what is being discussed applies to both models. Any features that are exclusive to either the MINI or the PLUS will be designated as such. Differences Between JetSet and AE Config If you’re used to using AE Config with the Logitek Audio Engine or with older versions of the JetStream, the primary difference is when you create a new input or output or if you’re editing an existing input or output, you are just changing that one component at that moment. AE Config required you to compile all of your changes and push them into the engine at once, resetting the engine to read the changes. JetSet edits or creates that input or output directly without requiring a reset to make it active. So the big difference now is when you hit Save, you’ve just made a real change to the live system. You’re not saving a file and pushing through multiple changes later, you’re making changes and saving on a live system as you go. It’s a whole new world. Logitek JetSet Reference Manual 15 Key Concepts To Understand Whether this is the first time you’ve installed a digital or Audio over IP console, or if this is one of many you’ve done in your career, Logitek approaches some things differently than you may be used to. The JetStream Is An Audio Router At its core, the JetStream is an audio router first and an Audio over IP appliance second. Your console is a control head for the router. The JetStream Is A Hybrid of TDM and AoIP We take a best of both world approach: the JetStream is a TDM audio router that mixes signals with extremely low latency. If the audio needs to leave the room, we use Audio over IP to send it to another device. However, if the audio doesn’t have to leave the JetStream it stays within the device. This simplifies the network, eliminating the need for edge and core switches to connect nodes and mix engines; we can accomplish the same thing with one core switch. [If you have no idea what an edge or core switch is, then you can appreciate why we opted for a simpler approach.] Mixing Buses In a traditional analog or digital console, you have a smattering of mix buses such as program, audition, control room monitor, cue, studio monitor, headphones, and a clean feed from a phone module going to dedicated outputs. One of the first calls our support department gets from a new customer usually begins with the question “Where do I plug in the monitor speakers?” Because the JetStream is an audio router, we create the mix buses internally in DSP. Then you route the bus you want to the output that you want. And because it’s a router, you can send the same mix or any combination of different mixes anywhere you want. Here’s a list of all of the mixes we create for you on a Mosaic, ROC, or Pilot: Program Aux 1 Aux 2 Aux 3 Aux 4 Aux 5 Aux 6 Aux 7 Aux 8 Studio/Guest Headphones Control Room Monitor Headphones Tone Generator Talkback Return Cue Mixer A (3 chan submixer) Router 1 Router 2 Router 3 Mix Minus 9 Mix Minus 18 Mix Minus 1 Mix Minus 10 Mix Minus 19 Mix Minus 2 Mix Minus 3 Mix Minus 4 Mix Minus 5 Mix Minus 6 Mix Minus 11 Mix Minus 12 Mix Minus 13 Mix Minus 14 Mix Minus 15 Mix Minus 20 Mix Minus 21 Mix Minus 22 Mix Minus 23 Mix Minus 24 Mix Minus 7 Mix Minus 8 Mix Minus 16 Mix Minus 17 Mono Program Mono Aux 1 Where will you route these things? That’s what we’re about to cover. 16 Logitek JetSet Reference Manual 2. Network Setup Administrative Network vs Audio Network On a JetStream, there are three network ports for three different LANs: Administrative (labeled ADMIN NET) Audio LAN 1 (labeled AUDIO NET 1 or LIVEWIRE 1) Audio LAN 2 (labeled AUDIO NET 2 or LIVEWIRE 2) The administrative network is controlled by the embedded microprocessor and is located near the USB and VGA ports. The audio network ports are located on the DSP card (also labeled SURFACE). JetSet runs on the administrative network. When the JetStream leaves the factory, this network card is set up to automatically obtain an IP address via DHCP. If no DHCP server is available, the embedded PC will set its own IP address via AutoIP. The audio networks operate on a different microprocessor that is mounted to the DSP card. While the administrative network informs the audio network microprocessor how you wish to do things, the audio data remains on a separate LAN. As of press time, all networked audio runs on AUDIO NET 2. AUDIO NET 1 is not currently used. Contact Technical Support for updated information. Because audio is not carried on the administrative network, this port can be connected to the same LAN used in your business office without needing to worry about flooding the office network with extra data. Using the Embedded PC Built into every JetStream is a small computer running on an Intel Atom processor, operating either Windows Embedded Standard 7 or Windows Embedded Standard XP. By connecting a monitor, keyboard, and mouse to the JetStream you will have full control of the embedded PC. The Windows Embedded operating system is nearly identical to its desktop counterpart. Changing the IP address of the administrative network port is the same process in Windows Embedded as in the full version of Windows. If you operate in an Active Directory environment, you can add the embedded PC to your corporate domain if you choose, or you can leave it outside of the domain. You will have the same experience with JetSet on a web browser using a keyboard, monitor, and mouse connected to the JetStream as you will on another computer connected to the administrative Logitek JetSet Reference Manual 17 network. If your JetStream uses Windows Embedded Standard XP, we strongly suggest that you download and use the Chrome browser instead of Internet Explorer. JetStream Server JetStream Server is a utility program that launches when Windows Embedded starts and should always be left running. Functions of JetStream Server include: Logging channel on/off commands and routes Logging network connections Interfacing with third party automation and ELC systems operating macros and salvos powering IP client software such as vMix+ providing a GUI on the JetStream State page that allows for administrative control Administers client setup Serves web pages for JetSet JetSet Functions Handled by JetStream Server On The Administrator page, the User Setup tab defines the usernames and passwords that are valid in JetSet. The default user is “user” with no password. You can change this and/or create new users and passwords by entering the desired user name and password on this page and checking “JS Config” as an allowed client for that user. Then click Save. If the open Internet can see port 80 of your JetStream, we strongly suggest using something more secure than “user” and no password. We also strongly suggest that you not leave your JetStream wide open like that on the Internet. Put it behind a firewall with the rest of your mission critical machines and set up a Virtual Private Network if you want remote access. You have a computer embedded into your audio router. Always follow good network security practices. Other Useful Information in JetStream Server On the Administrator page, the System Setup page will list the IP address of the admin network port and the JetStream name on the left side towards the bottom. This information is useful when logging into the JetStream from a remote web browser. Additional information about JetStream Server is in Appendix C. 18 Logitek JetSet Reference Manual 3. How To Log In Now that we have given you a brief overview of the different LANs, the embedded PC, and the JetStream Sever software, it’s time to put this all together and use it. Whether you plan to configure the unit by working directly on the embedded computer or whether you ultimately wish to remotely work on the JetStream across the administrative LAN you need to complete these steps. What You Need To Do Before Launching The Browser 1. Connect a monitor, keyboard, and mouse to the JetStream 2. Know the administrative IP address of the JetStream. The default is that the PC gets its address via DHCP. If you have a DHCP server on the admin network, it will get its address and you will be able to find the address either by running IPCONFIG from a command prompt or by looking on the System Setup tab in JetStream Server on the Administrator page. If you do not have a DHCP server on your LAN, the embedded computer will assign itself an address via AutoIP. You then can optionally assign a fixed IP address to the embedded computer’s network card by going into the Windows control panel and adjusting the settings of the network card. You also have the option of adding the embedded computer to your office’s Active Directory if that is present in your office and part of your networking plans. If you are going to log in to JetSet from the web browser on the same embedded PC, regardless of how the IP address is set, you can always access JetSet by typing in the loopback address into the address bar of the web browser: 127.0.0.1 3. Optionally, know the name of the embedded PC. The default name when the JetStream leaves the factory is the serial number. This may be changed by right-clicking on Computer in the Windows Start Menu and then selecting Properties. If you are in an Active Directory environment, you could put the name of the embedded PC into the web browser and reach the JetSet web page. Outside of a domain environment, it is best to use the IP address instead. 4. Know the username and password set up on the User Setup tab in JetStream Server on the Administrator page. The default is user with no password. To change this or to set up additional users, go to that tab in JetStream Server, edit the user information making sure that JS Config is checked on the desired user’s line, and click Save. Logitek JetSet Reference Manual 19 Logging In From The Embedded PC Launch a web browser window. On the address bar, enter one of the following and hit Enter: The loopback address: 127.0.0.1 The IP address of the admin network port: (example: 192.168.3.34) The computer name of the embedded PC [if in a domain network environment] (example: JSM-312 Logging In From Another Computer on the LAN Launch a web browser window. On the address bar, enter one of the following and hit Enter: The IP address of the admin network port: (example: 192.168.3.34) The computer name of the embedded PC [if in a domain network environment] (example: JSM-312 If you are successful, you will reach this Login page: Enter the username and password that are valid for the JetStream and click Connect. Troubleshooting If you cannot reach the login page from the embedded PC 20 Make sure JetStream Server is running (it’s okay if it’s minimized, but it must run to serve web pages.) Logitek JetSet Reference Manual Make sure you have entered in the correct IP address into the web browser. Try the loopback address (127.0.0.1) if you are using something different. To check to see what address the computer thinks it is, go to JetStream Server, select Administrator, and look at the left side of the System Setup screen. The entry for JetSet Address is what you want. Ensure that the Windows Firewall isn’t blocking JetStream Server. If you cannot reach the login page from another computer on the LAN Make sure JetStream Server is running (it’s okay if it’s minimized, but it must run to serve web pages.) Make sure you are connected to the administrative LAN and that your computer is on the same subnet as the JetStream admin port. Make sure you have entered in the correct IP address into the web browser. To check to see what address the computer thinks it is, go to JetStream Server, select Administrator, and look at the left side of the System Setup screen. The entry for JetSet Address is what you want. Ensure that the Windows Firewall isn’t blocking JetStream Server on the embedded PC Frequently Asked Questions My computer is a MacBook/I run Ubuntu Linux. Can I use JetSet? Yes. While JetStream Server runs in an Embedded Windows environment, because this is a webbased system you can connect to the JetStream using Chrome, Safari, or Firefox without an issue. We’re just another web page to you. Can I connect to the JetStream using an iPad, Android tablet, or mobile phone? Yes. We have tested JetSet with numerous mobile devices. Again, we’re just a web page. You will need a wireless access point on your LAN in order for your mobile device to see these wired devices, of course. Follow good security practices and incorporate encryption on your wireless networks, please. Logitek JetSet Reference Manual 21 4. How To Configure Inputs and Outputs The Local IO Page The JetStream MINI Local IO page The JetStream PLUS Local IO page After logging in, the Local IO page is the first thing you will see. You can navigate to this page from anyplace else in JetSet by clicking the Local IO button. 22 Logitek JetSet Reference Manual A JetStream MINI has 8 card slots for local inputs and outputs. A JetStream PLUS has 15 card slots for local inputs and outputs. JetSet will show 8 slots at a time; to navigate back and forth between the first 8 and second 8 slots on the PLUS, scroll to the bottom of the page and click on the left and right arrows. JetSet will show what kind of cards are installed in each slot or if no card is installed. This is automatically updated by JetStream Server as cards are installed. Adding Inputs To add an input, click the Add Input button at the top of the slot’s column. The input editor will appear. To save your work, click Upload to JetStream. To abandon any changes, click cancel. Changes are immediately active after clicking Upload. Mandatory Fields Surface Label: 2 fields of 8 characters. This text appears on the console for the operator. In television router parlance, these fields are the mnemonics. Logitek JetSet Reference Manual 23 Unique Name: This field is only seen in JetSet and in Logitek Command Builder. As the name implies, this text should be unique to the source so you can identify it and know it is different from another source. For example, you may have two sources where the surface label reads “Mic 1” but in the unique name one might say “Studio A Mic 1” and the other would say “Studio B Mic 1.” Num Channels: The number of channels used by the source. Valid entries are 1 for mono, 2 for stereo, and 6 for 5.1. Left Connection, Right Connection: These fields change dynamically as the number of channels is set. Choose from the drop-down box which input should be assigned to left or right. [If 5.1, the labels will read Left, Right, Center, LFE, Ls, Rs.] Note: Using the same input pin is allowed. You can also create multiple inputs with different unique names that use the same input pins if you need to. Example: you might create a stereo version of a source and a left only and right only version. Send To Network: Check Yes to send this source to other JetNet devices via Ethernet. Check No to keep this source local to this JetStream only. Latency: If set to low, many small Ethernet packets will be used to create a low latency stream. If set to high, fewer, larger Ethernet packets will be used to network the audio. Logitek recommends always using Low latency for best results, unless this audio is to be received by a PC using the JetNet Windows audio driver. Optional Fields Mix Minus Bus: Enter the number of the mix minus bus that this source should be subtracted from. See the DSP Settings chapter for more information on this feature. IO Gain: Enter a number in this box to raise or lower the gain of the source. Negative numbers lower the gain, positive numbers raise the gain. 0 makes no change to the level. Valid numbers are 20 to 20. Default Surface Lamp Colors: Changes the default color of the on/off switch for this input on consoles that support changing the on/off lamp color. The default color will follow the source wherever the input is routed. Surfaces that support this feature are Mosaic and ROC. Leaving this set to “Mixed” will result in the surface following the color defaults set in Surface Settings. GPI Inputs: Enter the desired GPI number. For Audio On, when the incoming GPI turns on the fader will turn on. For Audio Off, when the incoming GPI turns on, the fader will turn off. For Cough, when the incoming GPI turns on, the source will mute without turning the fader on or off; when the incoming GPI turns off the source will un-mute. See note below about GPI numbers. GPI Outputs: Enter the desired GPI number for the following functions: For Audio Start, the GPI output will momentarily pulse when the fader is turned on. For Audio Stop, the GPI output will momentarily pulse when the fader is turned off. For Audio Tally, the GPI input will latch on when the fader turns on and turn off when the fader is turned off. For Mute Group, enter the mute group number this microphone should be associated with. [See the Control Settings chapter for mute group setup.] 24 Logitek JetSet Reference Manual Logitek addresses its GPIs as follows in JetSet: 1-xx denotes the GPI inputs or outputs on the JetStream chassis. 101-1xx denotes the GPI inputs our outputs on the console connected to surface 1. 201-2xx denotes the GPI inputs or outputs on the console connected to surface 2. 301-3xx denotes the GPI inputs or outputs on the console connected to surface 3. 401-4xx denotes the GPI inputs or outputs on the console connected to surface 4. The number of GPI inputs and outputs will vary with each piece of equipment. See the users manual for the JetStream or console for the number of GPI inputs and outputs available on each piece of equipment. This addressing scheme will follow no matter how many GPI inputs or outputs exist on the hardware. UDP Control: Used to send UDP text strings when the fader turns on and off to send commands to automation computers without GPI connections. For UDP Port Number, enter the port number where we will send the text. For UDP IP Address, enter the IP Address where we will direct the UDP packets. For Start String enter the ASCII text that will be sent when the fader turns on. For Stop String, enter the ASCII text that will be sent when the fader turns off. UDP packets are sent on the AUDIO network. Timer Reset: Check Yes to reset the timer on the surface when this source’s fader turns on. Check No to not reset the timer when the source’s fader is turned on. Fader Start: Check Yes to turn the fader on when the fader knob is raised from zero and turn the fader off when the knob is returned to zero. This feature should always be set to yes when setting up a console in the UK or with the Ross Overdrive television automation system; otherwise, use as desired. Cue Bus: Set to Pre-Fader to always send audio at unity gain to the cue bus for this source. Set to Post Fader to respect the fader level before being sent to the cue bus. The default is pre-fader. Logitek recommends leaving this at the default setting. Cue @ Inf: (Cue At Infinity) When the fader is brought all the way to zero, turn on the cue bus. Turn the cue bus off when the fader is raised from zero. The default is No. Allow Mode: When enabled, the operator will be able to change the mode on consoles that support changing the mode between stereo, mono, phase inversion, right/right, left/left, silence/right, left/silence, blend, and 5.1. If set to No, this feature is locked out from the console but can still be accessed by an administrator via JetStream Server. Allow Effects: When enabled, an operator can change the EQ and dynamics for this source on consoles that have effects controls. If set to No, this feature is locked out from the console but still can be accessed by an administrator via JetStream Server. Allow Pan: When enabled, an operator can change the pan for this source on consoles that have a pan control. When set to no, the feature is locked out from the console but can still be accessed by an administrator via JetStream Server. Allow Trim: When enabled, allows the operator to adjust the gain of the fader from -10 to +10 dB Phantom Power: If this input is a microphone preamp card, phantom power is enabled for this input’s channels when set to Yes. If the card associated with this input is not a microphone preamp, the JetStream ignores this tick mark. Logitek JetSet Reference Manual 25 SR Converter: (Sample Rate Converter) When set to yes, the digital input uses the onboard sample rate converter to resample the AES signal to match the sample rate set on the JetStream Admin page. When set to no, incoming AES audio does not pass through the onboard sample rate converter; care must be taken to ensure that all sample rates match. Used to maintain precise timing in television systems. If the input is analog or microphone, this tick mark is ignored. When you’re finished, don’t forget to Upload to JetStream! Editing Outputs Click on the input on the Local IO page and edit using the same parameters as above. Adding Outputs To add an output, click the Add Output button over the slot where you wish to add an output. You will be taken to the output editor. 26 Logitek JetSet Reference Manual How to edit an output: Mandatory Fields: Surface Label: 2 fields of 8 characters. This label appears in JetStream Server and on some router control panels. Unique Name: As it implies, the text in this field should be unique from all other outputs. It will appear in some Logitek software, so make it as descriptive of a definition about the output as possible. Logitek JetSet Reference Manual 27 Default Source: This dropdown list shows every available mix bus created by the DSP (program, monitor, aux, mix minus, etc.) as well as every available input on the JetStream. Click to select what audio you want to be routed to this output by default. If no output is chosen, your output will be silent by default! Num Channels: Select the number of channels. 1 for mono, 2 for stereo, 6 for 5.1. Left Connection/Right Connection: These fields will react dynamically to the number of channels selection above. Use the drop down to choose which output pin should be assigned to the appropriate channel. Unlike the inputs, you cannot duplicate output numbers. Optional Fields: IO Gain: Enter a number in this box to raise or lower the gain of the output. Negative numbers lower the gain, positive numbers raise the gain. 0 makes no change to the level. Valid numbers are 20 to 20. Digital Format: Options are AES and S/PDIF. If S/PDIF is selected, certain copy protection flags used by consumer grade digital recorders are ignored. The rule of thumb is to set this checkbox to AES and move the tick mark to S/PDIF if you are unable to record. Most modern equipment doesn’t need this flag, but if you are using an old prosumer DAT recorder in your studio it comes in handy. If your output is analog, this tick box is ignored. Allowed Sources: If a router will be hung on this output, in addition to the default source, use this grid to assign check marks in the box to the right of the source. Any source with a check mark will be considered available by the router. On the left side of the label is an icon showing the type of source it is. The box icon shows it is local to the JetStream. A lightning bolt shows it comes from a JetNet PC driver. A dot with a dashed line shows it is networked from another JetStream. Allow a second or two for the checkbox to appear after you click. When you’re finished, don’t forget to click Upload to JetStream. Frequently Asked Questions What do I click to add an output to the network? That is covered in the next chapter, Network IO. 28 Logitek JetSet Reference Manual How is the IO Gain different from Normal Signal Level in the old AE Config system? The whole idea of Normal Signal Level confused a lot of people. Think of the new system this way: whether you are on an input or an output, it’s the same. To make something louder, put in a positive number. To make it softer, put in a negative number. To make no change, leave it at zero. Logitek JetSet Reference Manual 29 5. How To Assign Outputs To The Network The Network IO Page Click the Network IO box to navigate to this page. There are two tabs on this page. The Outputs to Network tab shows what streams are being sent from this JetStream to the network. The Inputs from Network tab lists the streams that the JetStream has found on the network from other devices. You will notice that inputs that you tagged to add to the network on the Local IO page will appear as streams on the Outputs to Network tab. JetSet lists them here after it has put that audio on the network. How To Add an Output To The Network Console outputs such as mix buses (Program, Aux, Monitor, Mix Minus) can be added to the audio network by clicking the Add New Output to Network button. The output editor will open. 30 Logitek JetSet Reference Manual 1. Name the stream in Stream Name. There are 2 fields of 8 characters. This is what the operator will see on the console or router panel. 2. Give it a Unique Name. This field appears in Logitek software. 3. Set the Default Source. This is the audio that will be sent to the network. 4. Set the number of channels. 1 = mono, 2 = stereo, 5. Set the latency. If this audio is going to be used by another JetStream, we recommend Low. If this audio is going to be used by a PC using JetNet audio drivers, we recommend High (PC). 6. If this output is routable (i.e. there is a virtual or physical router panel that will change what is routed to this output, add checkmarks to Set Allowed Sources. To add or remove a checkmark, click in the box to the right of the source description. If this output is not routable and only one source will be routed to the output, make no marks in this section and use the Default Source setting instead. You may need to allow for a second or two for the checkmarks to appear. 7. Click Upload to JetStream to create the output. The system will assign an IP address to the output during the upload process. Logitek JetSet Reference Manual 31 Editing Inputs From The Network Click on the Inputs From Network Tab. You will see a list of the streams that come from other JetStreams and JetNet devices. These inputs may be edited to assign functions such as mix minus bus assignments, GPI assignments, essentially anything you can do with a Local input over on the Local IO page. The primary difference between this editor and the one on the Local IO page is you cannot change the label, number of channels, or the address over here. 32 Logitek JetSet Reference Manual Mix Minus Bus: Enter the number of the mix minus bus that this source should be subtracted from. See the DSP Settings chapter for more information on this feature. IO Gain: Enter a number in this box to raise or lower the gain of the source. Negative numbers lower the gain, positive numbers raise the gain. 0 makes no change to the level. Valid numbers are 20 to 20. Default Surface Lamp Colors: Changes the default color of the on/off switch for this input on consoles that support changing the on/off lamp color. The default color will follow the source wherever the input is routed. Surfaces that support this feature are Mosaic and ROC. Leaving this set to “Mixed” will result in the surface following the color defaults set in Surface Settings. GPI Inputs: Enter the desired GPI number. For Audio On, when the incoming GPI turns on the fader will turn on. For Audio Off, when the incoming GPI turns on, the fader will turn off. For Cough, when the incoming GPI turns on, the source will mute without turning the fader on or off; when the incoming GPI turns off the source will un-mute. See note below about GPI numbers. GPI Outputs: Enter the desired GPI number for the following functions: For Audio Start, the GPI output will momentarily pulse when the fader is turned on. For Audio Stop, the GPI output will momentarily pulse when the fader is turned off. For Audio Tally, the GPI input will latch on when the fader turns on and turn off when the fader is turned off. For Mute Group, enter the mute group number this microphone should be associated with. [See the Control Settings chapter for mute group setup.] Logitek addresses its GPIs as follows in JetSet: 1-xx denotes the GPI inputs or outputs on the JetStream chassis. 101-1xx denotes the GPI inputs our outputs on the console connected to surface 1. 201-2xx denotes the GPI inputs or outputs on the console connected to surface 2. 301-3xx denotes the GPI inputs or outputs on the console connected to surface 3. 401-4xx denotes the GPI inputs or outputs on the console connected to surface 4. The number of GPI inputs and outputs will vary with each piece of equipment. See the users manual for the JetStream or console for the number of GPI inputs and outputs available on each piece of equipment. This addressing scheme will follow no matter how many GPI inputs or outputs exist on the hardware. UDP Control: Used to send UDP text strings when the fader turns on and off to send commands to automation computers without GPI connections. For UDP Port Number, enter the port number where we will send the text. For UDP IP Address, enter the IP Address where we will direct the UDP packets. For Start String enter the ASCII text that will be sent when the fader turns on. For Stop String, enter the ASCII text that will be sent when the fader turns off. UDP packets are sent on the AUDIO network. Timer Reset: Check Yes to reset the timer on the surface when this source’s fader turns on. Check No to not reset the timer when the source’s fader is turned on. Fader Start: Check Yes to turn the fader on when the fader knob is raised from zero and turn the fader off when the knob is returned to zero. This feature should always be set to yes when setting Logitek JetSet Reference Manual 33 up a console in the UK or with the Ross Overdrive television automation system; otherwise, use as desired. Cue Bus: Set to Pre-Fader to always send audio at unity gain to the cue bus for this source. Set to Post Fader to respect the fader level before being sent to the cue bus. The default is pre-fader. Logitek recommends leaving this at the default setting. Cue @ Inf: (Cue At Infinity) When the fader is brought all the way to zero, turn on the cue bus. Turn the cue bus off when the fader is raised from zero. The default is No. Allow Mode: When enabled, the operator will be able to change the mode on consoles that support changing the mode between stereo, mono, phase inversion, right/right, left/left, silence/right, left/silence, blend, and 5.1. If set to No, this feature is locked out from the console but can still be accessed by an administrator via JetStream Server. Allow Effects: When enabled, an operator can change the EQ and dynamics for this source on consoles that have effects controls. If set to No, this feature is locked out from the console but still can be accessed by an administrator via JetStream Server. Allow Pan: When enabled, an operator can change the pan for this source on consoles that have a pan control. When set to no, the feature is locked out from the console but can still be accessed by an administrator via JetStream Server. Allow Trim: When enabled, allows the operator to adjust the gain of the fader from -10 to +10 dB 34 Logitek JetSet Reference Manual 6. Setting Up Consoles The Logitek JetStream supports up to 36 faders divided across multiple ports. Despite their outward appearance, most consoles look identical to the JetStream. The Mosaic, ROC, and Pilot share the same addresses and the JetStream communicates with them identically. The Artisan console has a different mixing architecture from the other consoles and is treated differently. Fader Assignment Rules For the Artisan console, the following rule applies: The Jetstream supports one Artisan console with up to 32 faders on port 1 For all other consoles (Mosaic, ROC, Pilot) the following rules apply: Port 1 may be set up with 24 faders and Port 2 may be set up with 12 faders OR Port 1 may be set up with 18 faders, Port 2 may be set up with 6 faders, Port 3 may be set up with 6 faders, and Port 4 may be set up with 6 faders OR One mixer grid may be set up for routing purposes. See Appendix A. It is permissable to set up the console in the JetStream with more faders than physically exist on a console and control the excess faders virtually or just not assign anything to the excess faders. For example, you could configure port 1 as 24 faders and port 2 as 12 faders but plug in 12 fader Mosaic consoles to both COM ports. The Surface Settings Page All surfaces are defined on the Surface Settings page. There are 4 tabs, one for each port. You must save your changes before leaving the tab, or else your changes will be discarded. Changes take effect immediately after saving. Logitek JetSet Reference Manual 35 Surface Configuration Use the Num Faders drop down box to choose the maximum number of faders allowed on the port. Keep in mind the fader assignment rules at the beginning of the chapter. Set the check box Yes or No depending upon whether this console is an Artisan or not. You may give the console a Unique Name to help you identify the studio within the software. Outputs The Pre Fader/Post Fader Studio checkmark sets whether the Studio/Guest Headphones mix output will respect or ignore the Studio/Guest Headphones volume knob on the console. If set to prefader, the source that feeds Studio/Guest Headphones audio will still be controlled by the source select knob on the console but the level of the output will be at unity gain. The Pre Fader/Post Fader Cue checkmark sets whether the Cue mix output will respect or ignore the Cue volume knob on the console. If set to Pre Fader, the cue volume will be at unity gain. Note that the volume control only changes the cue speaker on the console; if you assign cue to an output on the JetStream, that output will always be at unity gain. Also, monitor muting only mutes the console cue speaker and not the cue mix assigned to a JetStream output. 36 Logitek JetSet Reference Manual The Surface Switch Lock Input/Pgm checkbox controls whether a fader can be taken out of program or if an input can be changed while the fader is on. If set to Yes, when the fader is turned on the operator is blocked from turning the program switch off or changing the route to the fader until bux zero (the main fader on/off switch) turns off. This prevents an operator from accidentally taking something off the air. If set to No, this interlock is defeated. Independent Bus Switch This feature instructs the JetStream to ignore the state of bus zero (the main fader on/off switch) for any fader where the checked auxiliary bus is turned on. For example, if Aux 1 is checked, any source where Aux 1 is turned on will feed that aux bus, even if the main fader is off. This is used in creating offline mixes. Pre Fader Aux Bus This feature instructs the JetStream to ignore the state of the console fader level for any fader where the checked auxiliary bus is turned on and instead feed that aux bus at unity gain. This is used in creating offline mixes. Using both Independent Bus Switching and Pre-Fader Aux bus on the same aux bus creates a mix where any source where the aux bus is pressed will always feed at unity gain to that mix bus’ output. Using those two features together with the Talkback Mic feature creates a very simple way for operators to punch microphones and sources in and out of an offline telephone recording mix. See Appendix B, Mix Minus Setup Guide for more information. Assigning Sources To Faders The source assignment grid gives you the ability to choose what sources appear on what faders. There are two types of marks on this grid: x and I. The x (check mark, tick mark) shows that the source is allowed on that fader. Make this mark by clicking in the box. The I mark (I bar, Initial Route) is the initial route or default route made upon a full reset of the JetStream. Make this mark by DOUBLE CLICKING in the box. If no I mark is made in a column, the JetStream will take the first x in the column as the default route. The lines in the grid are made up of three things: local sources, network sources, and mix buses. The columns in the grid are the faders and these router crosspoints: StudioIn: Items checked in this column will be choices available in the console studio/guest headphone selector. MonIn: Items checked in this column will be choices available in the console control room monitor selector. Logitek JetSet Reference Manual 37 PhonesIn: Items checked in this column will be choices available in the console headphones selector. TlkBkMic: Whatever is checked in this column will be considered the talkback microphone for the console. Only one line should be checked in this column. The Talkback Mic is routed to a mix minus when the TB button is pressed over the fader. It is also routed to the caller when the Add Mic When Off feature is enabled in Mix Minus setup. Usually this is set to the main host microphone, the output of Mixer A, or to an Aux bus set with Independent Bus Switching and Pre Fader Aux Bus enabled. CueDir: Cue Direct is a feature where a source may be routed directly into the cue speaker without being brought up on the console. (Bus 0 for the Cue Direct crosspoint must be turned on in order for the audio to appear in the cue speaker.) Example: an automation system has a dedicated preview output. This can be always available via Cue Direct. TalkRtn: The Talk Return is used as part of the studio intercom system. When certain buses are turned on, the audio in Talk Return is put into the monitors and headphones. Mon Mtr: Certain consoles have a switchable monitor meter. Assign sources and mixes in this column to change what is displayed on the monitor meter when the switched meter is turned on. MixA1, MixA2, MixA3: These three columns make up MixerA. One source can be selected in MixA1, one source in MixA2, and one source in MixA3. Those three sources will then be summed together as Mixer A Out. Commonly used to sum three microphones together and then sent to the Talkback Mic, this utility mixer can be used in a variety of offline mixing applications. Router 1: A router crosspoint with DSP control. Profanity delay can be assigned to this router. If program out is routed to Router 1 In and delay is applied to Router 1, then the output of Router 1 will be post-delay program audio. Router 2: Functions the same as Router 1. Router 3: Functions the same as Router 1. 38 Logitek JetSet Reference Manual 7. Adjusting the DSP Settings Within every console are fixed positions where the “magic happens.” The DSP settings page is the central place to edit the default behaviors of the console, control the mix minus system, and rename the mix buses. How to adjust the default settings of each fader Navigate to the tab for the port you wish to edit. In the Input column on the left, click on the desired fader. An editor opens. Logitek JetSet Reference Manual 39 How To Change The Label Name of the Fader Edit the Stream Name fields. How To Change The Default Fader Level Edit the Default Gain. Valid numbers are 0 – 255. In the UK, the default is 255. Outside of the UK, the default is 195 (-20 dBFS). The International Setting (US/UK) on the JetStream Admin page will set this globally; the setting on this page lets you adjust each fader individually if desired. How To Change The Default Bus Settings The grid shows which buses will be turned on by default; any bus with a checkmark in the box will be turned on at reset. The setting on this page lets you adjust each fader individually if desired. How To Change The Default Lamp Settings For consoles that support changing on/off lamp colors, this setting lets you choose the on/off color by fader. 40 Logitek JetSet Reference Manual The console will have its own color settings for each fader by default. This page lets you change the color by fader number. The setting on the input page lets you change the color by input. If you set no default color at the input, the JetStream will look to see if you have set a default color here. If you have not set a default color here, it will use the default set by the console. You must click the Upload To JetStream button for the changes to take effect. How To Change The Name Of A Mix Bus Output By default, we name the mix buses in the JetStream by the name of the mix and the port. But what if you want it to read “Program Studio A” instead of “Program Port 1”? Click on the desired mix bus in the output column on the right. An editor opens. Change the Stream Name. Click Upload to JetStream. How To Set Up A Mix Minus Bus Click the Mix Minus tab. Click on the mix minus bus you wish to work with from the list. An editor opens. Logitek JetSet Reference Manual 41 Name the mix minus in the Stream Name fields. The default is the mix minus number. You may find it helpful to note the device and/or studio the mix minus is associated with for easier routing. The Unique Name cannot be changed. In the Source Bus drop-down, choose the bus that this mix minus will be derived from. This is the root of the mix minus bus. For example, if the caller on a phone hybrid is to hear program minus the phone hybrid, choose the appropriate program bus from the list. Bus Always On: When checked, the JetStream will always feed mix minus audio, whether the source associated with the mix minus is on or not. If unchecked, audio will be present on the mix minus bus when a fader with the input tagged with this mix minus number is turned on. Add Mic When Off: When checked, the JetStream will route the talkback mic to the mix minus bus output when the input tagged with this mix minus number is turned off on the console. When the fader is turned on, the JetStream will switch to feeding the mix minus bus (normally program minus the tagged input). If you check both Bus Always On and Add Mic When Off, Bus Always On will win the conflict, as the bus never will be off. Bus is Stereo: When checked, the mix minus is a stereo bus. Otherwise it’s mono. For further discussion of the Mix Minus System, see Appendix B. 42 Logitek JetSet Reference Manual 8. Adjusting The Control Settings Click on the Control Settings button. Setting Up Mute Groups A Mute Group tells the JetStream which monitor bus to mute and what relays to turn on when microphones are on. Microphones are assigned to Mute Groups on the Local IO page or on the Network IO Page when you edit the source. The Mute Group setup tab on the Control Settings page sets what monitor bus to mute and what relays to turn on when the microphone calls for the group number tagged with the local or network input. Each group has the option to mute one monitor bus and turn on up to 3 GPIs. The multiple tallies allow for connecting multiple on air lights and record skimmers as needed. Check the Active box to engage the group. If this box is not checked, the JetStream will ignore the mute group. Logitek JetSet Reference Manual 43 For example, a main studio has 8 microphones, while the news booth has only one. The main studio monitors Port 1 Monitor Out. The news booth monitors Port 2 Monitor Out. The main studio’s on air light is connected to GPI out 1 and the news booth’s on air light is connected to GPI out 2. You would set up mute group 1 to mute port 1 monitor out and turn on GPI 1. You would set up mute group 2 to mute port 2 monitor out and turn on GPI 2. On each microphone input for the main studio you would put a 1 in the mute group box. On the news booth mic you would put a 2 in the mute group box. 44 Logitek JetSet Reference Manual 9. The System Information Page Click on the System Info box to navigate to this page. This page displays what cards the JetStream sees installed, the serial number, and the software revision. Logitek JetSet Reference Manual 45 10. Administrative Settings Click on the JetStream Admin button. Local JetStream Information Displays settings regarding the audio network system. Computer Name The name of the embedded PC. This cannot be changed from JetSet. JetNet Number Each Jetstream device has a unique JetNet number from 1 – 255. A JetStream device is an audio router such as a PLUS or MINI or a Windows PC with the JetNet Audio Driver. If more than one device is assigned the same JetNet Number, the network will not function properly on either device. 46 Logitek JetSet Reference Manual 0 is not a valid JetNet number. Multicast Base Address The base address used by the multicast system. Most customers should keep the default 239.193.0.0 address, but if the addresses used by JetStream conflict with other AoIP or multicast equipment it may be adjusted. The range 239.0.0.0 – 239.255.255.255 is considered an Administratively Scoped Block and is reserved for private use by the IANA so it will not conflict with any public networks. In most cases JetStreams will not conflict with other AoIP equipment on your LAN, but in large corporate environments the potential to conflict with videoconferencing and other equipment exists if we both happen to choose the same addresses. Generally speaking, Logitek devices operate as 239.193.jn.sn (where jn = the JetNet number set above and sn is the stream number that is assigned by the software) and 239.193.0.0 is used as the “announce channel” for the JetStreams to announce streams and changes to each other. If our addresses will conflict with something else on your network, contact support and we will help you choose the correct base address. Local IP Address This is the address of the ADMIN NET port. It cannot be changed from within the JetSet interface. Net 1 IP Address This is the address of the AUDIO NET 1 port. It should be set to a unique IP address on the network. Net 2 IP Address This is the address of the AUDIO NET 2 port. It should be set to a unique IP address on the network. Logitek’s standard is to set these addresses to 192.168.87.jnx and 192.168.87.jny, where jnx = Jet Net number 1 for NET 1 and jny = Jet Net number 2. Example: JetNet 5 is 192.168.87.51 and 192.168.87.52; JetNet 1 is 192.168.87.11 and 192.168.87.12. The reality is they can pretty much be anything as long as they are unique and in the same subnet. Try not to overthink it, as once they are set you rarely will ever need to look at them again. Logitek JetSet Reference Manual 47 Base TCP Port The TCP/IP port used by Logitek IP clients. This is set to 10200 as default. If this address conflicts with something else on your network, you will need to change the Base TCP port in all JetStreams and all Logitek IP clients to match your new value. TCP Port Range You cannot edit this field. Logitek reserves 12 TCP ports so we can do our thing. The range field will show what ports we are using based on the Base TCP Port. vGuest TCP Port You cannot edit this field. Logitek uses base port + 12 (normally 10212) for guest connections to third party systems. Multicast Port You cannot edit this field. Logitek uses base port + 2 (normally 10202) for its RTP over UDP multicast packets. Logitek’s IP clients such as vMix+ also use the base port (10200 by default) to communicate. If you change the base port, you will need to adjust the base port in the clients to match. JetStream Settings Sample Rate This is the sample rate that the JetStream will use for networking as well as what it will use for its outputs. If SR converters are turned on at the inputs, they will resample to this rate. External Sync Chooses how this JetStream will lock its sample rate clock. None: Does not rate-lock; operates on its internal sample rate clock only Network: rate locks to the master across the LAN AES: Locks to AES silence on the Ext. Sync input Video: Tri-level sync on the BNC Video Sync input Word Clock: Word clock on the BNC Video Sync Input PPS: Pulse per second sync from a GPS clock Master Mode Chooses how to handle being the master clock on the network. Options are Cannot Be Master, Preferred Master, Allowed To Be Master 48 Logitek JetSet Reference Manual Network Protocol Chooses which network protocol to follow. When this feature is made active, the options will be JetNet, Livewire, and AES 67. International Setting Chooses the metering standard and default behavior of the console. UK customers used to doing things the British way with UK model consoles should check the UK box. Customers in other countries should check the US box. USA: Zero is -20 dbFS. Unity gain is -10. On/Off switches control bus 0. Metering is a mix of average and PPM. UK: Unity gain is full scale. Fader start controls bus 0. On switch turns on machine start (bus 15). Off switch engages PFL (bus 2). Metering is PPM (peak) only. Save JetStream To JetFile This feature will export the configuration to a spreadsheet using Microsoft Excel .xls format. The exported information can then be read by Command Builder 5 for scripting in conjunction with JetStream Server. Command Builder 5 compiles a list of sources and destinations along with their respective addresses and provides for writing triggers calling for their unique name as opposed to their address. In addition, the configuration can be edited within a spreadsheet editor that reads and writes .xls format to manually configure the JetStream away from the web browser. This could be useful when deploying many JetStreams to different locations using a common configuration. The spreadsheet is detailed under Appendix D of this manual. Logitek JetSet Reference Manual 49 A. Using The Mixing Grid This is a new utility feature that is intended for transmission switching. This is a new feature still under development; this section will be completed accordingly. 50 Logitek JetSet Reference Manual B. Understanding Mix Minus The concept of Mix Minus has been with us for years. Sometimes you just need a clean feed to send to the field where the person on remote hears everything but their own voice to avoid getting caught up in a transmission delay. In this chapter, we’ll teach you everything you ever wanted to know about mix minus but were afraid to ask. Mix Minus, Defined A mix minus bus is what you get when you take a mixing bus like program and subtract one or more things from that bus. A crude way of accomplishing mix minus is to put everything on the console in both program and auxiliary 1 except for the remote source which only goes in program. Then you send program to air and aux 1 to the remote. Program hears everything and the remote hears everything but the audio they’re sending to the studio. Logitek’s Approach At Logitek we try to take the need to think away from the operator. We want the operator to concentrate on putting the remote on the air and not have to think about how to create the clean feed, so we create the mix minus off of the console automatically. We accomplish this by tagging inputs with the number of the mix minus bus that input should be removed from. An input can only be added to one mix minus bus. Example: if the mix minus bus feeding the phone hybrid is 1, then a 1 should be entered into the mix minus bus box in input settings. Only one number can be entered into the mix minus bus box. However, you can tag multiple inputs with the same mix minus bus. For example, the Comrex STAC phone system has two inputs to the JetStream, one for each hybrid but only one output from the JetStream sends mix minus audio to the phone system. Therefore, both hybrid inputs would be tagged with the same mix minus number so the hybrid gets program minus both callers. The STAC handles sending audio of one caller to the other if necessary. But a Telos dual hybrid phone system has two inputs (which receive two outputs from the JetStream). We would feed two mix minus busses to the Telos so each hybrid would hear each other but they wouldn’t hear themselves in their mix. Mix Minus in Television In television, mix minus is primarily used for IFB. The inputs where remote broadcasts come up on the console are the inputs that are tagged for mix minus. In most cases, these inputs are frame synchronizers, satellite receivers, and broadband (LiveU or similar) receivers. Logitek JetSet Reference Manual 51 In a perfect world, there’s a dedicated output for each mix minus, and the clean feeds are assigned within the IFB system or the live trucks dial into dedicated numbers based upon the receiver they are feeding. However, television is rarely a perfect world and there are usually more ENG receivers than there are phone couplers. In these instances, a routing matrix is set up on the console or within Logitek vMix+ software to switch which mix minus bus is feeding each coupler on the fly. Support can help you create this. In some stations, all studio microphones are tagged with the same mix minus number to create a clean feed without any studio microphones to feed IFB earpieces; in others mono program is routed to the IFB for the studio and everyone on the set hears everything. That’s a matter of personal preference… or a matter of what everyone on the set is already used to. Often in television we will also bring in a feed from master control as an input to the system and hook up a JetStream GPI input to the master control switcher. When the studio is off air, this would feed audio from master control to IFB and when the studio went to air it would then switch to the appropriate mix minus. This provides a confidence feed to the people in the field when they dial in before the show starts as well as lets them know that their IFB feed hasn’t dropped during a commercial break. Contact support to learn how to set this up. Mix Minus In Radio Generally speaking, music radio needs two things: 1. Mix minus to the telephone hybrid that acts like a speaker phone when the caller is off the air (also allowing for easy recording of phone calls off-air to be edited and played back) and changes to feeding program minus the phone hybrid when the caller is placed live on the air. 2. Mix minus to remote codecs, Skype, ISDN, etc. that’s always feeding program minus the remote At most stations, there is a dedicated phone hybrid to the studio, but the remote codecs may be shared among many studios. Therefore a routing matrix is set up either in the rack room (technical operations center, TOC, engineering office) and/or each studio to switch which studio’s mix minus feeds each device. Talk radio isn’t much different from music radio, other than they rarely will set up the speakerphone and offline recording feature. Like with the remote codecs, talk radio just feeds program minus phone down the line all the time; if the caller is spoken to off the air it’s done on a handset and outside the scope of the networked console system. Mix Minus Bus Attributes Each mix minus bus needs the following things defined. This is set up on the Mix Minus Bus tab of DSP Settings. 52 Logitek JetSet Reference Manual The Root Mix Bus What bus is the input being subtracted from? 99% of the time this is Program (or in television, Master 1). However, for creating mix minuses for record buses you could use an auxiliary bus or cue as the root to subtract the audio from. (Note that the input you are tagging will need to be assigned to this bus for any of this to work!) Add Mic When Off When this feature is checked, audio from the Talkback Mic (as defined in Surface Settings) is routed to the mix minus when the tagged input’s fader is turned off. When the fader turns on, the JetStream switches to mix minus (program minus source). Bus Always On When this feature is checked, the root mix bus always feeds out the mix minus bus, and if the tagged input is turned on, that input is subtracted from the mix. If neither Add Mic When Off nor Bus Always On is checked, the mix minus bus will be silent until the tagged input fader is turned on (and the root mix bus is selected on that fader) If both Add Mic When Off and Bus Always On are checked, Bus Always On will win the conflict and Add Mic When Off will be ignored You must select a root mix bus for the mix minus to work. Creating A Speakerphone The speakerphone can be fed by a single microphone, multiple microphones, or selectable microphones. 1. Set Up The Microphone – Define the talkback microphone on the Surface Settings page. For a single microphone, assign the default route to the desired microphone in the Talkback Mic column. For multiple microphones, assign a default route to the first microphone in MixA1 In, assign a default route to the second microphone in MixA2 In, and assign a default route to the third microphone in MixA2 In; then assign the default route in the Talkback Mic column to MixerA Out for that console’s port. For selectable microphones, choose an aux bus and enable Pre-Fader Aux Bus and Independent Bus Switching for that bus, then assign the output of that bus by assigning it as the default route in the Talkback Mic column. 2. Assign The Phone Hybrid To A Mix Minus Bus – Choose a mix minus bus and tag the phone hybrid input(s) with that mix minus number on the input under Local IO or Network IO (as applicable to where you wired the device). 3. Route The Output Of The Mix Minus Bus To The Phone Hybrid – This is done at the output that feeds the hybrid under Local IO. If the phone hybrid is connected to a different Logitek JetSet Reference Manual 53 JetStream, create a network output for the mix minus bus, then go to the JetStream where the hybrid is connected and route the mix minus audio from the network to the output under Local IO. Troubleshooting If the feed to the caller is silent, you probably don’t have anything routed to the Talkback Mic. Double-check step 1. If the feed to the caller never switches from the talkback mic feed to program minus telephone when the caller is taken live on air, the phone hybrid is either not assigned to a mix minus bus or it is assigned to the wrong one. Double-check steps 2 and 3. Creating A Split-Track Phone Recording Often, stations will record calls using VoxPro or Adobe Audition in split-track mode. The caller is sent to one channel and the host/presenter/disc jockey is sent to the other channel. This gives your talent the opportunity to edit themselves out if they talk over the caller at an important moment. Here’s how to make the magic happen: 1. Create a mono output and label it Phone Rec Host. Route the mix minus bus that the phone hybrid is tagged with to that output. As long as that mix minus bus it set up for Add Mic When Off, you will have a clean feed of your talent. 2. On the adjacent output pin, create another mono output and label it Phone Rec Caller. Route the phone hybrid input to this output. This sends a clean feed of the caller to the other channel This may be done either with analog or digital outputs as necessary. If your phone recorder is located on a different JetStream from the console, on the console JetStream, make a network output for the mix minus bus, and also network the phone hybrid if necessary. Then create the split track output on the JetStream where the phone recorder is wired to as described above. For proper playback, set the default mode for the console input of your VoxPro or Adobe Audition computer to mono. 54 Logitek JetSet Reference Manual C. JetStream Server Introduction The JetStream Server application monitors everything that the JetStream does and runs the macros and salvos that you program it to perform. It also handles the back-end communication between units, making sure that every JetStream keeps track of what sources are available on the system. Finally, it is the engine for JetSet and serves as a mini webserver to drive its web pages. JetStream Server launches when Embedded Windows starts and should always be left running, either maximized or minimized as you wish. The JetStream Log Page This page displays a running log of every function on the JetStream. Every button press or route will be logged here. Logitek JetSet Reference Manual 55 The Display Log button The log page will show the last few events as they happen. It is possible to scroll back a limited number of events by turning off the Display Log button. This will freeze the display and show scroll bars along the side; you can then scroll back to check earlier entries. Turning the Display Log button back on resumes from the current time. Even though you stop JetStream Server from displaying new entries when you click this button, Server will continue to log them in its daily log file. The daily log files are text documents stored in \Logitek\AECommLog with a file name of AECommLog_YYYYMMDD.log. This is a text file that can be opened in Notepad or another text editor. The Run Init Triggers button Init triggers are macros loaded into JetStream Server by Command Builder using the trigger init keywords. These triggers will run whenever JetStream Server starts. You can manually run the Init Triggers other times by clicking this button. The Clear Log Display button This button will clear the log on the screen. The display will begin to fill again as new commands are processed unless Display Log is turned off. Note that this does not clear the text file that is stored in \Logitek\AECommLog. The Local JetStream Display This display will show the JetSet Number for this JetStream (this is a unique identifier for every JetStream device on the network). The name is defined by the computer name of the embedded PC. The COM Port is set by default to COM 1; this is the port that the embedded computer uses to chat with the DSP card inside the box. This COM port may be adjusted on the Administrator page, but all systems that leave the factory should properly function using the default port. The Ping button Sends a ping command to the DSP card on the com port. If the status of the port is red, click this to test communication and reestablish the connection if the ribbon cable is properly connected. The Soft Reset button Sends a command to the DSP card to perform a soft reset. A soft reset tells the JetStream to read the current routing table in memory and perform every route again. This does not interrupt audio. This also does not read the default route table, so whatever routes are stored in the current state memory will be routed again as-is and not return to defaults. 56 Logitek JetSet Reference Manual The Hard Reset button Sends a command to the DSP card to restart the DSP and every I/O card connected to the frame. Used to recover operations if any card is jammed up and not functioning. Pressing this button will interrupt audio for 1 to 2 seconds and create a brief popping sound, as it is briefly interrupting power to every card on the frame. The Full Reset Button Sends a command to the DSP card to read the initial route table and return every route to its default. Fader channels that are on will turn off at full reset. Anything that isn’t currently routed to its default will change back to what has been set in the config as the initial route (the I bar in the grid). Depending upon the state of your JetStream and its initial route table, this will interrupt audio, as the console faders will turn off and many routes could potentially change. The JetNet Clients List This list will show the name, JetSet number, and IP Address of the network interface for every JetStream device on your Audio LAN. Items with green status boxes have recently responded to multicast pings on the network. If a client is on this list with a red status, it has failed to respond to a ping and may be down or its JetStream Server is not running. Clients who fail to respond to a ping may remain in this list up to a week before they are automatically purged; as soon as they come online and announce themselves they will turn green again. At the time of this manual’s writing, it is permissible for JetStream interfaces to show the same IP Address in this list, as we are ignoring that part of the IP Stack. The real addresses we care about are the multicast addresses which are different from the interface address. Once the Livewire protocol is fully implemented, this will change, and the interface address will need to be unique. We recommend setting unique IP interface addresses now to avoid conflicts when the Livewire update is rolled out. This is done in JetStream Server on the Administrator page. Logitek JetSet Reference Manual 57 The Network Log Page This page displays all of the audio network traffic between JetStreams. As devices announce themselves, this log will show the commands coming in and going out. The Display Log button As with the JetStream Log page, the log will constantly scroll as new commands are processed. Clicking to turn off the Display Log will pause this function and put scroll bars on the screen and let you scroll back a limited number of entries. Clicking again to turn the log back on will take away the scroll bars and return to logging from the current time. Even though the display may be turned off, Server will continue to write its log file in \Logitek\NetWorkLog with the file name NetworkLog_YYYYMMDD.log. This is a text file that may be opened in Notepad or another text editor. The Clear Log Display button This button clears the log buffer. Logging continues from the current time unless the display log is turned off. However, the log file being stored in \Logitek\NetworkLog continues to be written. 58 Logitek JetSet Reference Manual The Reset Multicast button Used in troubleshooting by Logitek staff. The Presence Command 0 button Used in troubleshooting by Logitek staff The Presence Command 1 button Used in troubleshooting by Logitek staff. The Presence Command 0++ button Used in troubleshooting by Logitek staff. The Presence Command 1++ button Used in troubleshooting by Logitek staff. This simulates the command that is sent when Server comes online for the first time. Logitek JetSet Reference Manual 59 The JetStream State Page This is a powerful page that lets you see exactly what the JetStream is doing and change what it is doing in real time. How to read the JetStream State Page The Destination Device column lists the destinations on the JetStream in device number order. Generally speaking, the first surface (port 1) comes first, followed by ports 2, 3, and 4. The last set of devices in the list are the outputs assigned to the output cards on the frame. The exact device numbers will vary with the firmware version your JetStream is running. If some ports are not defined in your configuration, expect to still scroll through a list of empty device numbers to get from port 1 to the outputs, as we reserve certain device numbers in case they are added later. The columns under Source Device (number, surface label, alias) are filled in as sources are routed to destinations. 60 Logitek JetSet Reference Manual The level column shows the fader level for that destination. This level is from 0 – 255, with 195 being unity. If no console is currently connected, the level will default to 195 (or to the value set for that fader in JetSet). If a console is connected, the level shown will be current position of the fader. You can change a fader level from this screen by double-clicking the number in the box for the desired destination. This launches the State Detail Editor. The level function (and for that matter, bus assignments, EQ, dynamics, pre-fader meter etc) is valid only for the destinations tied to the consoles. When you get down to the destination devices for the physical outputs on the page, those connections are outside of the DSP’s control. Therefore, the level will be zero and adjusting these controls will have no effect. The only thing you can do at the output stage is route something to the output. The State Detail Editor From this page, you can adjust the level by dragging the fader on screen. You can also change the mix bus assignment, mode, trim, and pan. Clicking on the tabs for dynamics and EQ will let you adjust those functions. All changes made in this editor are made in real time. Clicking the X will take you back to the state page. Logitek JetSet Reference Manual 61 The Pre-Fader Meter If the destination device supports a meter, Server will show a pre-fader meter in this column. Note that only console inputs and DSP crosspoints support meters. The Bus 0 – 255 Grid This grid will show you which buses are turned on for each device. If a bus number has a function tied to it on the console, Server lists its function above the bus number. For example, bus 0 is the fader on/off switch; bus 1 is program, bus 2 is cue, and so on. This display will change in real time as the buttons are pressed on the console. Also, you can click in the appropriate box and turn a bus on or off from this page and it will turn the button mapped to that function on the console on or off in real time. On some destinations, the function for the bus number will be different from what is written above the grid on the state page. For example, on the monitor and headphone in devices, turning on buses 1 and above are tied to different console and intercom functions. These functions are documented as part of Command Builder. On output destinations (the outputs to the I/O cards) the buses have no defined purpose by the console or router and can be used as virtual switches in vMix+ and other Command Builder macros. The Available Source Devices tab Hovering the mouse over the blue arrow on the Available Source Devices tab on the far right will make a list of sources pop out. These sources are mix buses created by the DSP, local inputs, and networked inputs. The default view of this list is sorted by device number. To sort by surface label, double-click on the “Surface Label” heading. To change back to numeric sort, double-click on the “number” heading. To retract the tab and make the bus grid visible again, hover the mouse pointer over the blue arrow. Changing Routes In Real Time Click to highlight the desired Destination Device. This may be a local output or a console location such as a fader. The line will be highlighted in red. Then, with the available sources tab popped out, find the desired source and double-click it. The source will immediately be routed to the destination. 62 Logitek JetSet Reference Manual Local Output Destinations do not have a DSP connection to drive a meter. Server will draw a meter when you force a route in real time as described above, but since there is no DSP connection the meter will not show data. If audio is present, it will be sent to the local (I/O card) output; we just don’t have a way of metering it in this location. Logitek JetSet Reference Manual 63 The System Info Page There are three tabs on this page: Hardware Info, Local Streams, and Network Sources Hardware Info This tab lists the I/O cards installed in the JetStream frame, their serial numbes, and the software revision number. To refresh the list, click the Scan Local JetStream button. 64 Logitek JetSet Reference Manual Local Streams To Network This tab lists the streams that are sent to the network by this particular JetStream, if any. Logitek JetSet Reference Manual 65 Network Sources This tab shows the streams that this JetStream is receiving from other devices. Items in red are from JetStream devices that have not answered a ping from this JetStream and may not be currently available. Items in black are from devices that have recently answered a ping. If a stream does not check in for one week, Server will clear them from the list. 66 Logitek JetSet Reference Manual The External Communications Page This page is used to make guest connections via IP and serial to automation systems and other devices Auxiliary Com Ports This is a legacy feature brought in from the Audio Engine Supervisor system for backward compatibility. Aux COM ports are used to send text out a serial port through a macro from Command Builder. To use an Aux port, enter the first Aux port number in the Lowest Aux Port box and enter the number of aux ports that will follow in the Number of Aux Ports box. (i.e. for one port, put a 1 in the box, if 3 ports will be used, put a 3 in the box. This will then populate the list of ports below; right-click on the port in the list to edit its baud rate, data bits, stop bits, and parity. Check the Aux Ports Active box to open the ports and make them ready for Server to use them. Logitek JetSet Reference Manual 67 vGuest Com Ports This is a legacy feature brought in from the Audio Engine Supervisor for backward compatibility. Automation systems that use the Logitek LP2 protocol make a vGuest connection. To set one up, enter the first COM port being used by vGuest in the Lowest vGuest Port box and then enter the number of ports being used. This populates the list of vGuest ports; right-click to edit the port settings. You must specify a vGuest profile number and set up a vGuest profile on the Administrator page to tell server what sources or destinations are permitted to be used by vGuest. Check the vGuest Ports Active box to open the ports and make them ready for use. JetStream Com Ports This is a list of the COM ports being used by JetStream Server. You cannot edit this list; it displays what ports are available, whether they are open or closed, and what they are being used for. External Protocols Used to set up connections via serial or TCP/IP to automation systems such as Sony ELC and Ross Overdrive. How To Set Up Ross Overdrive 1. Set the protocol to Ross Audio Protocol v1.02 2. On the Setup tab, define the surface by entering the surface number, the first fader number Ross is to control, and the number of faders that Ross is to control. Define the Master Fader; on Artisan consoles, choose either Artisan Master 1 or Artisan Master 2. On all other faders, choose Mosaic Route 1. Or, if no master fader control is desired, choose None. The Show in Network Log box tells Server to log incoming data. This is helpful for troubleshooting. 3. Now connect Logitek to Ross. Click the TCP/IP tab and enter the IP address and port number of the Vision Switcher. Leave the Computer Name field blank. 4. Now make it active. Go back to the Setup tab and check TCP/IP Connection Enabled. 68 Logitek JetSet Reference Manual How To Set Up Sony ELC. 1. Set the protocol to Sony ELC. 2. On the Setup tab, define the surface by entering the surface number, the first fader number Sony is to control, and the number of faders that Sony is to control. Define the Master Fader; on Artisan consoles, choose either Artisan Master 1 or Artisan Master 2. On all other faders, choose Mosaic Route 1. Or, if no master fader control is desired, choose None. The Show in Network Log box tells Server to log incoming data. This is helpful for troubleshooting. 3. Now connect Logitek to ELC. Click the TCP/IP tab and enter the IP address and port number of the Sony system. Leave the Computer Name field blank. 4. Now make it active. Go back to the Setup tab and check TCP/IP Connection Enabled. Logitek JetSet Reference Manual 69 The IP Client State Page This page lists which IP Clients are currently connected to Server. This page is for informational purposes and troubleshooting only; there is nothing to adjust on this page. 70 Logitek JetSet Reference Manual The Administrator Page There are 4 tabs on this page: System Setup, Special Functions, User Setup, and Profiles The System Setup Tab Administrator Password Normally left blank. If a password is entered in this field, this page will become password protected. However this is not very secure, as it is stored in clear text within the registry. Local JetStream Computer Here you define the JetStream Number (a unique identifier for the device between 1 and 255). If this number is changed, tab out of this field and close and restart Server for the change to take effect. The computer name is taken from the embedded PC’s computer name as set in Windows. Logitek JetSet Reference Manual 71 Multicast Base is the base address used by the multicast system. Most customers should keep the default 239.193.0.0 address, but if the addresses used by JetStream conflict with other AoIP or multicast equipment it may be adjusted. The range 239.0.0.0 – 239.255.255.255 is considered an Administratively Scoped Block and is reserved for private use by the IANA so it will not conflict with any public networks. In most cases JetStreams will not conflict with other AoIP equipment on your LAN, but in large corporate environments the potential to conflict with videoconferencing and other equipment exists if we both happen to choose the same addresses. Generally speaking, Logitek devices operate as 239.193.jn.sn (where jn = the JetNet number set above and sn is the stream number that is assigned by the software) and 239.193.0.0 is used as the “announce channel” for the JetStreams to announce streams and changes to each other. If our addresses will conflict with something else on your network, contact support and we will help you choose the correct base address. The COM port is the port used for Server to talk to the DSP. The default is COM 1 for all JetStreams. The Local IP Address is the Admin Net address; if no network cable is plugged in this will be blank. If you need to adjust this address you cannot adjust it here; change this in Windows. The Admin Net port is set to get an address automatically via DHCP by default. Net IP Address 1 and 2: the IP Address of the NIC for Audio Net 1 and Audio Net 2. You can adjust this address here in Server. We recommend using a unique address for each NIC. Base TCP Port: this is the base TCP port used by all Logitek applications. The default is 10200. Change this only if it conflicts with something else on your network. If the base is changed here, all other Logitek devices will need to be adjusted accordingly. Sampling Rate This is the sample rate that the JetStream will use for networking as well as what it will use for its outputs. If SR converters are turned on at the inputs, they will resample to this rate. International Settings Chooses the metering standard and default behavior of the console. UK customers used to doing things the British way with UK model consoles should check the UK box. Customers in other countries should check the US box. 72 Logitek JetSet Reference Manual USA: Zero is -20 dbFS. Unity gain is -10. On/Off switches control bus 0. Metering is a mix of average and PPM. UK: Unity gain is full scale. Fader start controls bus 0. On switch turns on machine start (bus 15). Off switch engages PFL (bus 2). Metering is PPM (peak) only. External Sync Chooses how this JetStream will lock its sample rate clock. None: Does not rate-lock; operates on its internal sample rate clock only Network: rate locks to the master across the LAN AES: Locks to AES silence on the Ext. Sync input Video: Tri-level sync on the BNC Video Sync input Word Clock: Word clock on the BNC Video Sync Input PPS: Pulse per second sync from a GPS clock JetStream Buffer Status Used in troubleshooting to make sure the circular buffers that process commands are running. If Show Buffer is checked and the console is operating and passing metering data, the read/write buffers will scroll very quickly. If the buffer is not processing commands, one or both of the pointers will be stuck. The trigger section operates the same way showing the processing of macros loaded into the system from Command Builder. We recommend leaving these boxes unchecked. If you do turn them on, immediately turn them off after you have verified operation. Trigger Table Displays the file name, date, and last upload of the trigger table from Command Builder. vSnapshot Recall Commands If checked, vSnapshot will include fader levels and channel on/off commands when the snapshot is recalled. If unchecked, we ignore the fader level and channel on/off commands captured but process the routes, bus assignments, eq, dynamics, etc. Logitek JetSet Reference Manual 73 The Special Functions Tab Allow Real Time Editor Turned on by default. When on, enables user to make changes in real time on the JetStream State page. If unchecked, user will not be able to change levels, make routes, or turn buses on and off. Display vGuest TCP/IP traffic in Network Log Turned on by default. Logs all vGuest traffic in Network Log. Useful for troubleshooting. Uncheck if the network log file is becoming too big. Send Delay Time to NuMix monochrome surface Turned off by default. The monochrome NuMix isn’t compatible with the JetStream, so this really won’t make much of a difference. Fader Levels to Logs By default, we check “Do NOT log any fader levels.” If you do need to log them, we offer a “Log only first and last fader levels” which will capture the starting and ending position when an operator 74 Logitek JetSet Reference Manual moves a fader. Logging fader levels can lead to very large JetStream logs, so we recommend logging fader levels only when necessary and turning it off right away after you’ve determined what you need. Logitek JetSet Reference Manual 75 The User Setup Tab This tab assigns rights to the user to Logitek software clients. As Server evolves, AE Config, vRoute, vButton, vDelay, vMix, and MatrixIP will be removed. vScreen becomes vMix+ and Command Builder and vGuest remain. For vMix+ and vGuest, entering a profile number ties the username to a profile as set up on the Profiles tab. The default user is “user” with no password. It is permissible to have the username repeated more than once as long as the password is unique on each entry. 76 Logitek JetSet Reference Manual The Profiles Tab Note: The vRoute, vButton, vDelay, and vMix programs are being replaced by vMix+. The vScreen tab will be renamed vMix+. Therefore, this tab may appear different on your system. The vGuest Profile Fill in allowed source devices on the left or allowed destination devices on the right. Device addresses that do not match the allowed sources are filtered out. It is recommended to either use sources or destinations but not both. Profile Title Enter a Profile Title that describes the purpose of this vGuest. This is not necessary for correct operation, however, it is provided to assist in quickly determining the function of the vGuest Profile. The vGuest profile works in the same fashion for IP vGuest clients as the vGuest serial. On the left, enter the Engine Number and Device Number for Allowed Source Devices. Server Logitek JetSet Reference Manual 77 will automatically fill in the Device Name and Alias fields. On the right, enter the JS Number and Device Number for Allowed Destination Devices. Supervisor will automatically fill in the Device Name and Alias fields. [Note: you may only use the JS number for the unit you are working on.] There is a common misconception that all sources to be used by vGuest must be entered into the source side and all destinations used by vGuest must be entered into the destination side. This is not necessarily the case. Rather, these lists represent two different modes of operation. It is possible to use both modes of operation at the same time, but only with great care. Mode 1 - Allowed Source Devices When a source is listed in this section, the JetStream will report to the vGuest client any time an JetStream command involving that source occurs. The device numbers in the following examples may differ greatly from valid device numbers in the JetStream; this documentation is being adopted from the AE-32 Audio Engine where vGuest originated. Use the examples to understand the concept, but use the device numbers that match with your system. Example: An automation computer is device0100. Anytime a fader with device 0100 routed to it is turned on, an on command is reported back to vGuest in order to trigger a play command on the computer. In this scenario, the following three sources are assigned in the grid under Allowed Source Devices: device0100 - Automation 1 device0101 - Automation 2 device0102 - Automation 3 When device0100 is routed to fader1 on surface1, Serverr sends a 54 (route) command out the vGuest port to the automation computer, showing that device0100 was routed to device000B on surface1. Most automation systems ignore this, however, when that fader is turned on, Server sends a 52 (bus on) command stating that device0100 bus0 is on. Automation systems with a Logitek interface will take that command and use it to start playing the cut. Likewise, when the fader is 78 Logitek JetSet Reference Manual turned off, Server sends a 53 (bus off) command stating that device0100 bus 0 is off. If the automation system is set to act on this, it could stop playing the cut. No matter what fader device0100 is routed to, a bus on command will send the 52 command for device 0100 and a bus off command will send a 53 command for 0100. This enables the operator to route the automation computer to any fader on the console and still have the remote starts follow. In this scenario, the other two playout cards would follow for device0101 and device0102. Mode 2 - Allowed Destination Devices When a destination is listed in this section, the vGuest client can route any source to that destination. The automation system can then, by sending a command via vGuest, execute a route command to send any source to the destinations listed in the Allowed Destination Device list. In addition to this, the automation system can send bus on and bus off commands to those destinations via vGuest and Server will send any bus on/off commands performed by the surface or triggers that involve those destinations, back to the automation system via vGuest. Any destinations not specified in the Allowed Destination Devices list are filtered out. Example: In this scenario, the following five destinations are assigned in the grid under Allowed Destination Devices: device000B - Fader 1 device000C - Fader 2 device000D - Fader 3 device006E - Output to Transmitter device006F - Output to Recorder The automation system can then send a command to route any source to faders 1, 2, or 3, as well as any source to the Transmitter and a Recorder. When faders 1, 2, or 3 are turned on or off, the information is returned back to the automation computer. Bus on/off commands are turned on and off on the outputs (6E and 6F) when 52/53 commands are issued. As those outputs do not have any assigned bus commands in the JetStream, it is possible to use those busses as virtual GPIs to keep track of tallies within their automation system. The automation system can also send text commands to the faders to print text on the consoles if the faders are included in the Allowed Destination Devices list. Logitek JetSet Reference Manual 79 Mode 1 & 2 - Using Both Modes Using both modes is complex, but possible. Example 1: When device0100 is routed to device000B (Fader 1), Server reports that device0100 has been routed to device000B. When the fader is turned on, Server reports a 52 command for both device0100 and device000B. When these double commands are issued, it is very easy to introduce circular logic and therefore problems. For best stability, do not route items in the source list to the destination list. This avoids having duplicate commands sent back to your automation system. When using both modes simultaneously, it is strongly recommended to do some prior planning around what needs to be accomplished. When remote starts for automation when live are required, only items in the Allowed Source Devices are required. If remote starts for automation and the ability to route automation directly to transmission are required, the following example may be of assistance. Example 2: Allowed Source Devices device0100 - Automation 1 device0101 - Automation 2 device0102 - Automation 3 Allowed Destination Devices device006E - output to transmission Devices in input settings but not in the vGuest profile device0103 - duplicate of Automation 1 (same input pins) - not assigned to surface device0104 - duplicate of Automation 2 (same input pins) - not assigned to surface device0105 - duplicate of Automation 3 (same input pins) - not assigned to surface When routing macros, it is best to configure the automation system to route the duplicate inputs to transmission. This allows remote starts while live, routing when automated, and no duplicate messages. vGuest Available Commands vGuest will process only the following subset of Logitek Protocol v2 (LP2) commands for vGuests: 80 Logitek JetSet Reference Manual 51H 81 Relay Pulse 52H 82 Turn On 53H 83 Turn Off 54H 84 Input Assign 55H 85 Input Mode 56H 86 Fader Level 5CH 92 Write Text Any communications from non-registered vGuests are ignored by Supervisor. All allowed commands must follow the LP2 command structure exactly. Commands from registered vGuests will be processed only if their Destination Device number is in the sending vGuest profile. Destination Device numbers greater than or equal to the lowest aloowed input device number must be one of the Device numbers in the Allowed Source Devices list. The location of these Device numbers can be limited to a specified surface if that surface number is given in the command. Using surface number equal to 0 will cause all surfaces to be checked for the Device number. Destination Devices in the range of reserved console buses must be one of the DSP channels in the Allowed Destination Devices list. Commands from the Engine or Triggers from Server will be sent to a vGuest only if the command's Destination Device number is in that vGuest profile. vGuest Commands Following is the list of supported commands and the format for each command structure. To build a command, lookup each byte in order (sequence #) adjusting the values where applicable. To be a valid command, the number of bytes to follow must be correct. Where a default value is shown, this is for reference only and these byte values must still be set. <00> denotes a byte in hex. All decimal values must be converted to hex. 51h - Momentary Relay Closure Momentarily turns on selected relay. Duration can be specified in 50ms increments. Seq Byte Description Notes 1 <02> Start byte 2 <07> Bytes to follow 3 <51> Command = Relay Pulse 4 <e#> AE Number 5 <d#> Device Number – High Byte Logitek JetSet Reference Manual 81 6 <d#> Device Number – Low Byte 7 <s#> Surface Number = 00 Always <00> for this command 8 <b#> Bus (Relay) Number <01> to <19> Number of relays depends on surface type 9 <dt> Data = Duration x 50ms <00> to <FF> Number of milliseconds in 50ms increments <00> = 500ms The following example will momentarily close Relay 15 on the Engine 2 relay bank: 02 07 51 02 00 01 00 0F 00 The following example will momentarily close Relay 10 on the Engine 2 relay bank for 200ms: 02 07 51 02 00 01 00 0A 04 TIP: This command is only applicable to GPI Outputs (relays). TIP: If the duration of the pulse is set to <00>, a 500ms pulse will be sent. 82 Logitek JetSet Reference Manual 52h - Turn on Turns the selected fader channel, bus, relay, switch or setting ON. Seq Byte Description Notes 1 <02> Start byte 2 <06> Bytes to follow 3 <52> Command = Set On 4 <e#> AE Number 5 <d#> Device Number – High Byte 6 <d#> Device Number – Low Byte 7 <s#> Surface Number <00> to <03> 8 <b#> Bus Number <00> to <FF> See Bus Number reference list for common mix busses The following example will turn on Engine 7, Surface 1, Fader 1 (device 00 0B): 02 06 52 07 00 0B 00 00 The following example will assign Engine 4, Surface 2, Fader 5 to the Aux1 bus: 02 06 52 04 00 37 00 03 audio to actually pass from the input device to the Aux1 output bus unless independent bus switching has been enabled. The following example will turn on source “Hard Disk 1” on Engine 3, Surface 1. Hard Disk 1 has a .device number of <0123>: 02 06 52 03 01 23 01 00 The following example will close (turn on) Relay 9 on the Engine 2 relay bank: 02 06 52 02 00 01 00 09 Logitek JetSet Reference Manual 83 53h - Turn off Turns the selected fader channel, bus, relay, switch or setting OFF. Seq Byte Description Notes 1 <02> Start byte 2 <06> Bytes to follow 3 <53> Command = Set On 4 <e#> AE Number 5 <d#> Device Number – High Byte 6 <d#> Device Number – Low Byte 7 <s#> Surface Number <00> to <03> 8 <b#> Bus Number <00> to <FF> See Bus Number reference list for common mix busses The following example will turn off the main bus (bus0) of Engine 3, Surface 3, Fader 4: 02 06 53 03 00 5E 00 00 54h – Input Assign Assigns a physical, network or DSP source to a destination physical, network or DSP output. Seq Byte Description Notes 1 <02> Start byte 2 <08> Bytes to follow 3 <54> Command = Assign 4 <e#> AE Number – Dest 5 <d#> Dest Device – High Byte 6 <d#> Dest Device – Low Byte 7 <s#> Surface Number <00> to <03> 8 <e#> AE Number – Source Must match destination Engine Number above 9 <s#> Source Device – High <00> to <FF> 10 <s#> Source Device – Low <00> to <FF> TIP: The engine number must be the same for the source and the destination. The following example will assign source number <02 34> to destination <00 6E> on Engine 5: 02 08 54 05 00 6E 00 05 02 34 84 Logitek JetSet Reference Manual 55h – Input Mode Sets the mode on the selected channel fader. Seq Byte Description Notes 1 <02> Start byte 2 <06> Bytes to follow 3 <55> Command = Mode 4 <e#> AE Number 5 <d#> Device Number – High Byte 6 <d#> Device Number – Low Byte 7 <s#> Surface Number <00> to <03> Use <00> if Device Number < 0100 8 <dt> Data = Mode Type <00> to <06> <00> = Stereo <01> = Mono <02> = Phase <03> = LL <04> = RR <05> = Lx <06> = xR The following example will set Mode to Left on Engine 2, Surface 1, Fader 9: 02 06 55 02 00 13 00 03 56h – Fader Level Sets the main fader level of the selected device. The DSP processor converts this into the actual gain. Seq Byte Description Notes 1 <02> Start byte 2 <06> Bytes to follow 3 <56> Command = Level 4 <e#> AE Number 5 <d#> Device Number – High Byte 6 <d#> Device Number – Low Byte 7 <s#> Surface Number <00> to <03> Use <00> if Device Number < 0100 8 <dt> Data = Fader Level <00> to <FF> See LP2 Command Reference for dB gain conversion table <00> = zero <c3> = unity <ff> = +10dB The following example will set the Fader Level on Engine 1, Surface 1, Fader 5 (device 00 0F) to 200: 02 06 56 01 00 0F 00 C8 Logitek JetSet Reference Manual 85 5Ch – Write Text This command will write text to a LCD display. Seq Byte Description Notes 1 <02> Start byte 2 <##> Bytes to follow 8 + number of characters in text string (in hex) 3 <5C> Command = Write Text 4 <e#> AE Number 5 <d#> Device Number – High Byte 6 <d#> Device Number – Low Byte 7 <s#> Surface Number <00> to <03> 8 <l#> Line Number See the individual control surface manuals for line number definitions 9 <c#> Starting Column Number The starting column positions are 1 to 33 on Numix series surface for small font 10 <ma> Message attribute <00> to <FF> See table below 11 <t1> First text character <00> to <FF> Standard ASCII Character set (not all characters may be supported) n <tn> Last text character <00> to <FF> Standard ASCII Character set (not all characters may be supported) TIP: Not all control surfaces and vTool programs support all features. The following example will send “Next” to First Line Position 1 of Surface 1, Fader 1, Overwrite, Normal video, White: 02 0C 5C 03 00 0B 00 00 00 00 4E 65 78 74 The following example will send “Next” to Second Line Position 3 of Surface 1, Fader 2, Insert, Normal video, Red: 02 0C 5C 03 00 0C 00 01 02 81 4E 65 78 74 Message Attribute Data Bits Bit 7 – Display Mode 0 = Overwrite Text 1 = Insert Text Bits 6 & 5 – Video attribute 0 = Normal 1= Flash continuously 2 = Reverse (reserved for future) Bits 2, 1 & 0 – Message Text color (same as Message Indicator command format) 0 = White 1 = Red 2 = Yellow 3 = Green 4 = Cyan 5 = Magenta 86 Logitek JetSet Reference Manual D. JetSet Excel Export/Import (JetFiles) Function and Theory of Operation There are two primary reasons why we want to export and import JetStream configuration information into a common spreadsheet format: 1. Triggers. One of the most popular features of the Logitek Audio Engine was the Command Builder scripting language to write macros to route sources, turn on lamps, fire relays, and perform countless functions using the Supervisor program. On the Audio Engine platform, one Supervisor computer connected to as many as 25 audio engines and provided a central place to control all of them. However, this created a central point of failure. When we set out to create the JetStream, we broke apart that central Supervisor by putting its functions in JetStream Server solely for its own machine. The JetStreams tell each other that machine x is telling machine y to turn on z, but x is only responsible for sending the message to y; y in turn performs z. This eliminates the central point of failure, but it requires that x and y know what sources and destinations each other have. In turn, we then need to tell Command Builder 5, which is at its heart a text editor, what those things are. After much trial and error, we came up with this solution: Command Builder 5 will read the exported .xls files from each JetStream on a network to build its list of sources and destinations. Because the .xls file includes the device numbers of both local sources (which are set either by JetSet automatically or manually through the .xls file) and network sources (which are dynamically assigned by JetStream Server as they automatically propagate) Command Builder 5 can keep track of all of the device numbers and simplify the process of writing triggers. Command Builder 5, in turn will upload the same trigger table to each JetStream Server. JetStream Server in turn will process the triggers that belongs to it and ignore those written for other machines. 2. Power Users. While JetSet offers a simple web interface, power users who are building dozens of identical studios in different locations need the capability of quickly installing a common configuration to a group of JetStreams to deploy the systems. The Excel export/import system lets these users build one master system and easily duplicate it as they build out their plants. While all Power Users will use Triggers, the vast majority of Trigger users will not need to learn how to be a Power User. Logitek JetSet Reference Manual 87 If all you intend to do is use Command Builder 5 with more than one JetStream, the most important thing you need to learn from this manual is how to save and manage the exported files. If you intend to import the configuration from one JetStream into another, you will also need to learn how to edit the JetFile spreadsheet. Saving and Managing Exported JetFiles As of this writing (September 2014), this function only works on the Administrator page of JetStream Server. While the same buttons exist in the JetSet administrator page in the web browser, they will not function until further notice. Click the Save to JetFile button. A standard Windows dialog box will appear where you can choose the path of the file and the file name. We suggest using something simple for file path, such as c:\logitek\configs and naming the file after the studio or rack or other easily understood identifier. After you have typed the file name and set the path, click Save. Rules 1. Do not save a JetStream’s configuration under a different name in the same folder. This is because Command Builder 5 will read every config found in the folder and you do not want it compiling the same JetStream more than once as that will do bad things. If you want to back up a configuration, move it to a different folder (example: c:\logitek\configs\backup) before you save a new one. At some point we will automate the backup process, but until further notice you must do that yourself. 2. In order for Command Builder 5 to know what is on the other JetStreams, you will need a copy of the .xls file for each JetStream in the config folder where you will be writing triggers. We recommend making your config folder sharable on each JetStream and export to each JetStream unit. This backs up your work in several places. Our plan is to automate this process and have each JetStream automatically back up the config folder to every JetStream on the network, but until this work is complete you will need to manually do it. 3. Spaces are valid in file names. All other Windows file name rules apply. For example, if we had three studios and a technical ops center, we might have a c:\logitek\configs folder that looks like this: studio a.xls studio b.xls studio c.xls toc.xls If we chose to keep backups of old files, they might live in c:\logitek\configs\backup and the file name might have the date or date and time added to the end. Until this process is automated, it is at your option. 88 Logitek JetSet Reference Manual Importing A Configuration File As of this writing, this function only works within the JetStream Server administration page. While similar buttons exist on the JetSet (web browser) administration page, they will not function until further notice. Click the Read From JetFile button. A standard Windows dialog box will appear. Select the appropriate path and file name and click Open. JetStream Server will read the file and immediately upload it to the JetStream. Take care when selecting files to only open the file intended for that JetStream. Auxiliary Files Longtime Logitek users will notice the absence of the DSP table and Command Library files that were used in the Audio Engine and JetStream up to version 4. Starting with this version (5.x) those files have been removed from the system and their functions saved within the JetFile and JetSet. Only the .xls JetFile is needed to back up the configuration of the JetStream. Backups Having backup copies of your JetFiles is always prudent. We recommend making backup copies of the JetFiles both on the other JetStreams as well as on other media and/or offsite storage. They are small files and fit easily onto a removable drive or in a folder on an administrative computer. Editing the JetFile Spreadsheet JetFiles are written in .xls (Excel 97-2003) format. We do not support the .xlsx format. Compatible spreadsheet software includes Microsoft Excel (contained in Microsoft Office 2013 and Office 365), Google docs, Open Office, and Libre Office as long as the .xls format is maintained. There are 8 tabs in the spreadsheet: DSP Dest, IO Dest, DSP Sources, IO Sources, Net Sources, Picks, Mutes, and System. DSP Dest Defines the DSP Destinations. These are the places you would route audio so it could be mixed. Includes faders, headphone selectors, monitor selectors, the Mixer A submixer, and the DSP router crosspoints IO Dest Defines the destination of the output cards. These are the places you would route audio directly to the output jacks. This also is where virtual routable outputs to the network are made which are sent as a stream on the audio network and not sent to a local output. Logitek JetSet Reference Manual 89 IO Sources Defines the definition of the input cards. These are the input jacks of the system. Net Sources These are input streams coming from other JetStreams. JetStream Server will compile the list of these sources after reading the lists of sources that each JetStream sends to each other via multicast. As in JetSet, editing this list gives you the options to add specific attributes to the network source when it is used on this JetStream’s console, such as assigning the source to a mix minus bus or mute group, lamp settings, or UDP control instructions. Picks Used to define pick lists for faders or output destinations on the console or router. The rows on this spreadsheet are the destination (either a fader or output address) and the columns list the device numbers of the sources allowed to be chosen on each row. Mutes Defines the mute groups on the JetStream. System Defines all of the administrative information about this JetStream. Writing Your Own Configurations It’s best to let the JetStream write the spreadsheet for you than for you to write the spreadsheet for the JetStream because of the amount of information involved. Start by setting up the IO card assignments in JetSet, define the surfaces, and fill in as much information on the administrative page such as JetNet Number and sample rate as possible. Then save to a JetFile. You might find some things like pick lists (surface settings, etc.) are easier in JetSet than in the spreadsheet. It’s okay to bounce back and forth as long as you save your work in the spreadsheet using the same name, then reading the JetFile before editing in JetSet (saving your work on every web page) before you save to the JetFile again before going back to the spreadsheet. [If that sounds too confusing, then just do as much as you can in JetSet (web browser) first, then save to a JetFile, and then pick it up in your spreadsheet. 90 Logitek JetSet Reference Manual You must assign every source and destination a device number. Sources and destinations have their own ranges of valid numbers. These ranges are defined on the system tab of the JetFile. For example, these ranges were set up on a JetStream Plus: 182 183 184 185 186 187 188 189 190 191 192 193 1st Port 1 Dest 1st Port 2 Dest 1st Port 3 Dest 1st Port 4 Dest 1st IO Dest 1st Port 1 Source 1st Port 2 Source 1st Port 3 Source 1st Port 4 Source 1st Mix Minus Source 1st IO Source 1st network Source 0x000B 0x006E 0x00BE 0x00D2 0x0100 0x0200 Generally speaking, we arrange the addresses so that the DSP destinations come first followed by IO destinations, followed by DSP sources, then mix minus buses, IO sources, and network sources. As long as none of these ranges step on each other, everything will work. General Spreadsheet Rules JetStream Server follows these rules: 1. The names of the tabs must be exactly as specified 2. The order of the tabs and fields is not relevant. However the titles of the columns must be spelled correctly in order for Server to parse it correctly. 3. Missing columns and tabs are ignored. 4. If a column is not spelled correctly, it is ignored. For best results, let Server create the spreadsheet by exporting from a working JetStream. Editing the DSP Dest Spreadsheet The following page shows a copy of the DSP Destinations spreadsheet. Subsequent pages define the columns and the text within. The destinations on this tab are virtual and are not tied to a specific physical output. They are internal crosspoints used to create the mixing console. Logitek JetSet Reference Manual 91 Device Number Surface Name 1 Surface Name 2 Unique Name Num Channels Slot Left Pin Right Pin DSP Function Lamp On Color Lamp Off Color Fader Level Default Bus 0x000B Fader 1 Port 1 Fader 1 Port 1 2 16 1 2 0 0,0,15 15,15,15 20 0x02081022 0x000C Fader 2 Port 1 Fader 2 Port 1 2 16 0x000D Fader 3 Port 1 Fader 3 Port 1 2 16 3 4 0 175 5 6 0 0x000E Fader 4 Port 1 Fader 4 Port 1 2 175 16 7 8 0 0x000F Fader 5 Port 1 Fader 5 Port 1 175 2 16 9 10 0 0x0010 Fader 6 Port 1 175 Fader 6 Port 1 2 16 11 12 0 175 0x0011 Fader 7 0x0012 Fader 8 Port 1 Fader 7 Port 1 2 16 13 14 0 175 Port 1 Fader 8 Port 1 2 16 15 16 0 0x0013 175 Fader 9 Port 1 Fader 9 Port 1 2 16 17 18 0 175 0x0014 Fader 10 Port 1 Fader 10 Port 1 2 16 19 20 0 175 0x0015 Fader 11 Port 1 Fader 11 Port 1 2 16 21 22 0 175 0x0016 Fader 12 Port 1 Fader 12 Port 1 2 16 23 24 0 175 0x0023 StudioIn Port 1 StudioIn Port 1 2 16 49 50 0 44 0x0024 Mon In Port 1 Mon In Port 1 2 16 51 52 0 44 0x0025 PhonesIn Port 1 PhonesIn Port 1 2 16 53 54 0 44 0x0026 TlkBkMic Port 1 TlkBkMic Port 1 1 16 55 0 175 0x0027 GPI Out Port 1 GPI Out Port 1 0 0x0028 GPI In Port 1 GPI In Port 1 0 0x0029 Cue Dir Port 1 Cue Dir Port 1 1 16 56 0 100 0x002A TalkRtn Port 1 TalkRtn Port 1 1 16 57 0 100 0x002B RightCue Port 1 RightCue Port 1 1 16 58 0 44 0x002C Mon Mtr Port 1 Mon Mtr Port 1 2 16 59 60 0 175 0x002D MixA1 In Port 1 MixA1 In Port 1 2 16 61 62 0 175 0x002E MixA2 In Port 1 MixA2 In Port 1 2 16 63 64 0 175 0x002F MixA3 In Port 1 MixA3 In Port 1 2 16 65 66 0 175 0x0030 Route1In Port 1 Route1In Port 1 2 16 67 68 0 175 0x0031 Route2In Port 1 Route2In Port 1 2 16 69 70 0 175 0x0032 Route3In Port 1 Route3In Port 1 2 16 71 72 0 175 92 Center Pin LFE Pin LS Pin RS Pin 0 0 Logitek JetSet Reference Manual Device number Expressed in hex, always in format of 0xDDDD where D is the device number. The range of valid numbers is defined on the system tab. Whatever value is entered is used provided it matches the defined range. If a number is used more than once, the last entry is accepted. Take care not to duplicate numbers. Surface Name 1 Logitek consoles and router controllers display 16 character source names, divided in two fields of 8 characters. This is the top line for the source label that the operator will see on the console or within JetStream Server. Maximum 8 characters. Surface Name 2 This is the second line of text that the operator will see, usually displayed below Surface Name 1 on the console. Maximum 8 characters. Unique Name Unique identifier for the destination. Command Builder 5 uses this text to find the device number to create a command. Num Channels The number of channels used by the destination. Valid entries are 1, 2, and 6 which represent mono, stereo, and 5.1 respectively. For the GPI destinations, use 0 as no audio is used. Slot The number of the slot that the source is connected to. Because these destinations are on the DSP card and the DSP card is installed in the 16th slot in the frame, all slot entries on this tab will be 16 with the exception of GPI In and GPI Out, which is left blank. Left Pin The channel number for the left channel on destinations that carry audio. Because the destinations on this card are not tied to physical inputs and outputs, we number pins sequentially. Pin numbers cannot be duplicated. Right Pin The channel number for the right channel on destinations that carry audio. See notes on Left Pin. Center Pin The channel number for the center channel on destinations that carry audio. Used for 5.1 destinations. See notes on Left Pin. LFE Pin The channel number for the Low Frequency Effects channel on destinations that carry audio. Used for 5.1 destinations. See notes on Left Pin. LS Pin The channel number for the Left Surround channel on destinations that carry audio. Used for 5.1 destinations. See notes on Left Pin. Logitek JetSet Reference Manual 93 RS Pin The channel number for the Right Surround channel on destinations that carry audio. Used for 5.1 destinations. See notes on Left Pin. DSP Function Used to define the feature word for the destination. Valid entries are: 0 = Other 1 = Mix Bus 2 = Monitor 3 = Delay 4 = Mix Minus 5 = Router Lamp On Color RGB value to set a default on button lamp color for the source, written in decimal. Separate with commas. Example: blue is 0,0,15. Lamp Off Color RGB value to set a default off button lamp color for the source, written in decimal. Separate with commas. Example: blue is 0,0,15. Fader Level The default fader level for the destination on a scale of 0 – 255. Unity gain is 195. Default Bus Determines what buses should be turned on for this destination when the JetStream resets to its defaults. Editing the IO Dest Spreadsheet The following page shows a copy of the IO Destinations Spreadsheet. Subsequent pages define the columns and text within. The IO Dest tab concerns destinations for local output cards and virtual network outputs. The virtual network outputs are routable destinations that are streamed to other AoIP devices. 94 Logitek JetSet Reference Manual Device Number Surface Name 1 Surface Name 2 Unique Name Num Channels Send to Network Y Slot Left Pin Right Pin Center Pin LFE Pin LS Pi n RS Pin Digital Format Default Gain Default Source Network Latency AES 0 0x00D8 Low 0x006E New Net 3264 U3264 2 0x006F New 10-2 Output Unique New 10-2 Output 2 10 3 4 S/PDIF 5 0x00D0 High 0x0070 New 10-3 Output Unique New 10-3 Output 2 10 5 6 AES 0 0x00BE High 0x0071 New Net 1950 U1950 2 AES 0 0x0072 New 13-1 Output Unique New 13-1 Output 2 13 1 2 S/PDIF 20 0x00BE High 0x0073 New 10-6 Output Unique New 10-6 Output 2 10 11 12 AES -5 0x00C2 High 0x0074 New 10-5 Output Unique New 10-5 Output 2 10 9 10 AES -15 0x00BF High 0x0075 New 13-2 Output Unique New 13-2 Output 2 13 3 4 AES 5 0x00CC High 0x0076 New Net 5802 U5802 2 AES 0 0x00BE High Logitek JetSet Reference Manual Y Y 95 Low Device number Expressed in hex, always in format of 0xDDDD where D is the device number. The range of valid numbers is defined on the system tab. Whatever value is entered is used provided it matches the defined range. If a number is used more than once, the last entry is accepted. Take care not to duplicate numbers. Surface Name 1 Logitek consoles and router controllers display 16 character source names, divided in two fields of 8 characters. The Surface Name for IO Destinations will be visible on the JetStream State page of JetStream Server. This will also serve as the surface label sent to other JetStreams on outputs to the network. Maximum 8 characters. Surface Name 2 This is the second half of the Surface Name. Maximum 8 characters. Unique Name Unique identifier for the destination. Command Builder 5 uses this text to find the device number to create a command. Num Channels The number of channels used by the destination. Valid entries are 1, 2, and 6 which represent mono, stereo, and 5.1 respectively. Send To Network Place a Y in this column for destinations that will be sent to the network instead of going to an output card. [If you put a Y in this column, leave the slot and pins columns blank for this line.] This denotes a virtual network output and thus cannot have a slot or pin assigned to it. Slot The number of the slot that the source is connected to. Valid slots are 1 – 15. The slots are defined on the System tab. Left Pin The IO card channel number for the left channel. Pin numbers cannot be duplicated. Right Pin The IO card channel number for the right channel. Pin numbers cannot be duplicated. Center Pin The IO card channel number for the center channel. Pin numbers cannot be duplicated. Used for 5.1 destinations. LFE Pin The IO card channel number for the Low Frequency Effects channel. Pin numbers cannot be duplicated. Used for 5.1 destinations. 96 Logitek JetSet Reference Manual LS Pin The IO card channel number for the Left Surround channel. Pin numbers cannot be duplicated. Used for 5.1 destinations RS Pin The IO card channel number for the Right Surround channel. Pin numbers cannot be duplicated. Used for 5.1 destinations. Digital Format Valid entries are AES and S/PDIF. Entering S/PDIF disables record inhibit flags used by older “prosumer” equipment. An entry in this column for an analog output is ignored. Default Gain Valid entries are -20 to 8. Adjusts gain of the output in dB. Zero means no gain adjustment. This number is ignored if the output is sent to the network; it only controls IO cards. Default Source The hex address of the device number of the IO Source or DSP Source routed to the output by default. Expressed as 0xdddd, where d is the device number. Network Latency Valid entries are Low and High. Low latency uses many small packets sent more frequently. High latency uses larger packets sent less often. Generally speaking, send high latency packets to computers using the JetNet driver and low latency packets to other JetStreams or other AoIP hardware. Text in this column is ignored if local IO card pins are present. Editing the DSP Sources Spreadsheet The following page displays the DSP Sources Spreadsheet. Subsequent pages define the columns and text within. DSP Sources are virtual devices that are not tied to a physical location. They are the outputs of mixing buses created by the console. DSP sources are routed internally to the network or to physical outputs on the IO Dest tab. For example, the program output is defined here on the DSP sources; to route program to an IO card, you would enter the address of program out from this tab on the IO Dest tab. Because the sources on this tab are virtual, they can be copied to the network by putting a Y in the Copy to Network column. An explanation of this follows. Logitek JetSet Reference Manual 97 Surfac e Name 1 Surf ace Nam e2 Unique Name 0x00BE Progra m 0x00BF Aux 1 0x00C0 Aux 2 0x00C1 Aux 3 0x00C2 0x00C3 Studio Monito r Port 1 Port 1 Port 1 Port 1 Port 1 Port 1 Program Port 1 Aux 1 Port 1 Aux 2 Port 1 Aux 3 Port 1 Studio Port 1 Monitor Port 1 0x00C4 Phone s Port 1 Port 1 Port 1 Port 1 Port 1 Port 1 Port 1 Port 1 Port 1 Port 1 Port 1 Port 1 Port 1 Port 1 Port 1 Port 1 Port 1 Phones Port 1 Tone Port 1 TalkBk 2 Port 1 MM 1 Port 1 MM 2 Port 1 MM 3 Port 1 Pgm Mono Port 1 Aux1Mono Port 1 Device Number 0x00C5 0x00C6 Tone TalkBk 2 0x00C7 MM 1 0x00C8 MM 2 0x00C9 MM 3 Pgm Mono Aux1M ono 0x00CA 0x00CB 0x00CC 0x00CD 0x00CE 0x00CF 0x00D0 0x00D1 0x00D2 0x00D3 0x00D4 98 Cue Phone sPF Mixer A Route 1 Route 2 Route 3 MM 4/5 MM 6/7 MM 8/9 Cue Port 1 PhonesPF Port 1 Mixer A Port 1 Route 1 Port 1 Route 2 Port 1 Route 3 Port 1 MM 4/5 Port 1 MM 6/7 Port 1 MM 8/9 Port 1 Sl ot Le ft Pi n Rig ht Pin Defa ult Gain 2 16 1 2 0 0 2 16 3 4 Y 0 0 2 16 5 6 Y 1 0 2 16 7 8 0 0 2 16 9 10 0 0 2 16 11 12 0 0 2 16 13 14 0 0 1 16 15 1 0 1 16 16 0 0 1 16 17 0 0 1 16 18 0 0 1 16 19 0 0 1 16 20 0 0 1 16 21 0 0 2 16 22 23 0 0 2 16 24 25 0 0 2 16 26 27 0 0 2 16 28 29 0 0 2 16 30 31 0 0 2 16 32 33 0 0 2 16 34 35 0 0 2 16 36 37 0 0 2 16 38 39 0 0 Cen ter Pin LF E Pi n L S Pi n R S Pi n DSP Funct ion Copy to Netw ork Net Tx IP Addr ess Netw ork Late ncy Num Chan nels Y MixMi nus Src Bus MixMi nus Bus On MixMinus Add Mic MixMinus Stereo Logitek JetSet Reference Manual 0x00D5 0x00D6 0x00D7 0x00D8 0x00D9 0x00DA 0x00DB 0x00DC MM 10/11 MM 12/13 MM 14/15 MM 16/17 MM 18/19 MM 20/21 MM 22/23 MM 24/25 Port 1 Port 1 Port 1 P1 Aux4 P1 Aux5 P1 Aux6 P1 Aux7 P1 Aux8 MM 10/11 Port 1 MM 12/13 Port 1 MM 14/15 Port 1 MM 16/17 P1 Aux4 MM 18/19 P1 Aux5 MM 20/21 P1 Aux6 MM 22/23 P1 Aux7 MM 24/25 P1 Aux8 Logitek JetSet Reference Manual 2 16 40 41 0 0 2 16 42 43 0 0 2 16 44 45 0 0 2 16 46 47 0 0 2 16 48 49 0 0 2 16 50 51 0 0 2 16 52 53 0 0 2 16 54 55 0 0 99 Device number Expressed in hex, always in format of 0xDDDD where D is the device number. The range of valid numbers is defined on the system tab. Whatever value is entered is used provided it matches the defined range. If a number is used more than once, the last entry is accepted. Take care not to duplicate numbers. Surface Name 1 Logitek consoles and router controllers display 16 character source names, divided in two fields of 8 characters. This will also serve as the surface label sent to other JetStreams on outputs to the network. Maximum 8 characters. Surface Name 2 This is the second half of the Surface Name. Maximum 8 characters. Unique Name Unique identifier for the DSP source. Command Builder 5 uses this text to find the device number to create a command. Num Channels The number of channels used by the DSP source. Valid entries are 1, 2, and 6 which represent mono, stereo, and 5.1 respectively. Slot The number of the slot that the source is connected to. Because these are virtual sources within the DSP card, the DSP slot 16 is used. Left Pin The IO card channel number for the left channel. Even though these are virtual channels, we must assign pins. Pin numbers cannot be duplicated. Use sequential numbers as you assign channels. Right Pin The IO card channel number for the right channel. Pin numbers cannot be duplicated. Center Pin The IO card channel number for the center channel. Pin numbers cannot be duplicated. Used for 5.1 destinations. LFE Pin The IO card channel number for the Low Frequency Effects channel. Pin numbers cannot be duplicated. Used for 5.1 destinations. LS Pin The IO card channel number for the Left Surround channel. Pin numbers cannot be duplicated. Used for 5.1 destinations RS Pin The IO card channel number for the Right Surround channel. Pin numbers cannot be duplicated. 100 Logitek JetSet Reference Manual Used for 5.1 destinations. DSP Function Used to define the feature word for the destination. Valid entries are: 0 = Other 1 = Mix Bus 2 = Monitor 3= 4= 5 = Router Copy To Network A Y in this box will send the source to other devices on the Audio LAN. Net Tx IP Address If this source is to be copied to the network, a valid multicast IP address for the stream is entered here. A valid address will start with the base address on the system page, changing the third octet from zero to the JetNet number of this machine as defined on the system page. The final octet is the stream number for that machine. (Example: base is 239.193.0.0. This is JetNet 12. This is the 10th stream output on the machine, thus the address is 239.193.12.10.) [NOTE: the mechanism for defining stream addresses without colliding with the automatic stream addressing system is still being worked out. Therefore, until further notice, let the JetSet web page perform this task.] Network Latency Valid entries are 0 and 1. 0 is high latency, 1 is low. Low latency uses many small packets sent more frequently. High latency uses larger packets sent less often. Generally speaking, send high latency packets to computers using the JetNet driver and low latency packets to other JetStreams or other AoIP hardware. Text in this column is ignored if the source is not being copied to the network. Default Gain Set this column to zero. Virtual sources cannot have their gain adjusted. Mix Minus Src Bus If a Mix Minus Bus is being defined on this line, this column will denote the number that the mix minus is being derived from. [A mix minus bus starts with a mix bus and then subtracts sources such as telephone hybrids or remote codecs from the mix.] Enter the bus number of the mix bus to base the mix minus upon. Only one bus can be entered here. Valid numbers are: 1= Program 2 = Cue 3 = Aux 1 4 = Aux 2 5 = Aux 3 6 = Aux 4 9 = Aux 5 10 = Aux 6 11 = Aux 7 Logitek JetSet Reference Manual 10 1 12 = Aux 8 Mix Minus Bus On If a Y is entered in this cell, the mix minus will always be on and sending audio. Otherwise, the bus is only created when an IO Source tagged with the mix minus bus number is turned on at the console. Do not use this feature if you are using Mix Minus Add Mic, as it conflicts. Mix Minus Add Mic If a Y is entered in this cell, the console’s talkback mic will be routed to the mix minus bus output when the IO source tagged with the mix minus bus number is turned off at the console. When the tagged IO source turns on at the console, the audio switches from talkback mic to mix minus. Used to create offline telephone record mixes. Do not use this feature if you are using Mix Minus Bus On, as it conflicts. Mix Minus Stereo If a Y is entered in this cell, a stereo mix minus bus is created. Number of pins must be set to 2 and a left and right pin must be defined. Editing the IO Sources Spreadsheet The following pages display the DSP Sources Spreadsheet. Subsequent pages define the columns and text within. Because of the width of this tab, it is broken into two pages in this manual. Within the spreadsheet it is one continuous tab. The IO Sources are the physical inputs to the JetStream. 102 Logitek JetSet Reference Manual Device Number Surface Name 1 0x0100 Mic 1 0x0101 0x0102 Surface Name 2 Num Channels Slot Left Pin Mic 1 1 1 1 50 Mic 2 Mic 2 1 1 2 50 Mic 3 Mic 3 1 1 3 45 0x0103 Mic 4 Mic 4 1 1 4 20 0x0104 Mic 5 Mic 5 1 1 5 20 0x0105 Mic 6 Mic 6 1 1 6 20 0x0106 Mic 7 Mic 7 1 1 7 0x0107 In 5-1 In 5-1 2 5 1 0x0108 Mic 8 Mic 8 1 1 8 0x0109 In 3-1 In 3-1 2 3 1 2 0x010A In 3-2 In 3-2 2 3 3 4 Unique Name Right Pin Center Pin LFE Pin LS Pin RS Pin Default Gain Default Pan Default Mode Mix Minus Bus Copy To Network 5 Lamp Off Color 0,0,15 15,15,15 20 2 20 20 5 1 Y 6 0x010B In 3-3 In 3-3 2 3 5 6 0x010C In 3-4 In 3-4 2 3 7 8 Y 0x010D In 3-5 In 3-5 2 3 9 10 Y 0x010E In 3-6 In 3-6 2 3 11 12 0x010F In 3-7 In 3-7 2 3 13 14 -10 0x0110 In 3-8 In 3-8 2 3 15 16 2 0x0111 In 5-2 In 5-2 2 5 3 4 20 0x0112 In 5-3 In 5-3 2 5 5 6 20 0x0113 In 5-4 In 5-4 2 5 7 8 20 0x0114 In 5-5 In 5-5 2 5 9 10 20 0x0115 In 5-6 In 5-6 2 5 11 12 20 Logitek JetSet Reference Manual Lamp On Color -5 Y Y 10 3 15,0,0 0,15,0 15,0,15 15,15,0 Network Tx IP Address Network Latency GPI On GPI Off GPI Co ugh G P O St art G P O St op G P O Ta lly 2 0 2 2 0 3 20 4 5 6 7 Mut e Gro up UDP IP Address UD P Po rt UDP Start Com mand UDP Stop Com mand 0 0 0 0 0 0 0 0 0 1 0 1 0 1 1 104 10 1 102 10 3 2 0 1 1 2 3 4 192.16 8.5.5 10 05 Start 5 Stop 5 Ti me r Re set Fa der Sta rt C u e B u s C u e At In f All ow Mo de Allo w Effe cts All ow Pa n Allow Trim Y Y Y Y Y Y Y Y Y Y Y Y Y Y Y Y Y Y Y Y Y Y Y Y Y Y Y Phantom Power SR Converter Y Y Y Y Logitek JetSet Reference Manual UK Tally Device number Expressed in hex, always in format of 0xDDDD where D is the device number. The range of valid numbers is defined on the system tab. Whatever value is entered is used provided it matches the defined range. If a number is used more than once, the last entry is accepted. Take care not to duplicate numbers. Surface Name 1 Logitek consoles and router controllers display 16 character source names, divided in two fields of 8 characters. This is the first half. Maximum 8 characters. Surface Name 2 This is the second half of the Surface Name. Maximum 8 characters. Unique Name Unique identifier for the source. Command Builder 5 uses this text to find the device number to create a command. Num Channels The number of channels used by the Source. Valid entries are 1, 2, and 6 which represent mono, stereo, and 5.1 respectively. Slot The number of the slot that the source is connected to. Valid slots are 1 – 15. The slots are defined on the System tab. Left Pin The IO card channel number for the left channel. Duplicate pins are allowed. Right Pin The IO card channel number for the right channel. Duplicate pins are allowed. Center Pin The IO card channel number for the center channel. Duplicate pins are allowed. Used for 5.1 destinations. LFE Pin The IO card channel number for the Low Frequency Effects channel. Duplicate pins are allowed. Used for 5.1 destinations. LS Pin The IO card channel number for the Left Surround channel. Duplicate pins are allowed. Used for 5.1 destinations RS Pin The IO card channel number for the Right Surround channel. Duplicate pins are allowed. Used for 5.1 destinations. Default Gain Adjusts gain of the output in dB. Zero or no entry means no gain adjustment. Logitek JetSet Reference Manual 10 5 Default Pan The default setting of the pan control when the source is routed to the fader. No entry or 0 denotes center. The pan control goes from left to right, 1 (closest to center) to 19 (farthest from center). Thus, valid entries range from L1 – L19, 0, R1 – R19. (example: to default to hard left, enter L19 in the cell) Default Mode The default mode setting when the source is routed to the fader. Stereo = default to number of channels defined by the source; 2 channels will be stereo, single channels will be mono Mono = sum to mono LL = Left channel in both channels RR = Right channel in both channels Lx = Left channel, silence right xR = Silence left, right channel Phase = Phase invert Blend = sum to mono, keep pan control active to weight mix (Artisan only) 5.1 = surround (Artisan only) Mix Minus Bus A number from 1 to 24 that assigns this input to a mix minus bus. Every input tagged with this number will be subtracted from its matching mix minus bus. Copy to Network With a Y in this cell, this source will be copied to the network and streamed to other AoIP devices. Net Tx IP Address If this source is to be copied to the network, a valid multicast IP address for the stream is entered here. A valid address will start with the base address on the system page, changing the third octet from zero to the JetNet number of this machine as defined on the system page. The final octet is the stream number for that machine. (Example: base is 239.193.0.0. This is JetNet 12. This is the 10th stream output on the machine, thus the address is 239.193.12.10.) [NOTE: the mechanism for defining stream addresses without colliding with the automatic stream addressing system is still being worked out. Therefore, until further notice, let the JetSet web page perform this task.] Network Latency Valid entries are 0 and 1. 0 is high latency, 1 is low. Low latency uses many small packets sent more frequently. High latency uses larger packets sent less often. Generally speaking, send high latency packets to computers using the JetNet driver and low latency packets to other JetStreams or other AoIP hardware. Text in this column is ignored if the source is not being copied to the network. GPI On Enter the GPI number for the GPI input that will remotely turn this source on. GPI inputs on the JetStream are addressed 1 – 12.* GPI Inputs on the first surface are addressed 101 – 112*. GPI Inputs on the second surface are addressed 201-212*. GPI Inputs on the third surface are addressed 301-312*. GPI Inputs on the fourth surface are addressed 401-412*. 106 Logitek JetSet Reference Manual *On a device with more than 12 GPI inputs, the ending number will match according to the numbering scheme. Example: a surface on port 1 with 25 GPI inputs will range 101-125. GPI Off Enter the GPI number for the GPI input that will remotely turn this source off. GPI inputs on the JetStream are addressed 1 – 12.* GPI Inputs on the first surface are addressed 101 – 112*. GPI Inputs on the second surface are addressed 201-212*. GPI Inputs on the third surface are addressed 301-312*. GPI Inputs on the fourth surface are addressed 401-412*. *On a device with more than 12 GPI inputs, the ending number will match according to the numbering scheme. Example: a surface on port 1 with 25 GPI inputs will range 101-125. GPI Cough Enter the GPI number for the GPI input that will remotely activate the cough mute (bus 8). GPI inputs on the JetStream are addressed 1 – 12.* GPI Inputs on the first surface are addressed 101 – 112*. GPI Inputs on the second surface are addressed 201-212*. GPI Inputs on the third surface are addressed 301-312*. GPI Inputs on the fourth surface are addressed 401-412*. *On a device with more than 12 GPI inputs, the ending number will match according to the numbering scheme. Example: a surface on port 1 with 25 GPI inputs will range 101-125. GPO Start Enter the GPI number for the GPI output that will pulse when the fader is turned on. GPI outputs on the JetStream are addressed 1 – 12.* GPI outputs on the first surface are addressed 101 – 112*. GPI outputs on the second surface are addressed 201-212*. GPI Inputs on the third surface are addressed 301-312*. GPI outputs on the fourth surface are addressed 401-412*. *On a device with more than 12 GPI outputs, the ending number will match according to the numbering scheme. Example: a surface on port 1 with 25 GPI outputs will range 101-125. GPO Stop Enter the GPI number for the GPI output that will pulse when the fader is turned off. GPI outputs on the JetStream are addressed 1 – 12.* GPI outputs on the first surface are addressed 101 – 112*. GPI outputs on the second surface are addressed 201-212*. GPI Inputs on the third surface are addressed 301-312*. GPI outputs on the fourth surface are addressed 401-412*. *On a device with more than 12 GPI outputs, the ending number will match according to the numbering scheme. Example: a surface on port 1 with 25 GPI outputs will range 101-125. GPO Tally Enter the GPI number for the GPI output that will latch on when the fader is turned on and turn off when the fader turns off. GPI outputs on the JetStream are addressed 1 – 12.* GPI outputs on the first surface are addressed 101 – 112*. GPI outputs on the second surface are addressed 201-212*. GPI Inputs on the third surface are addressed 301-312*. GPI outputs on the fourth surface are addressed 401-412*. *On a device with more than 12 GPI outputs, the ending number will match according to the numbering scheme. Example: a surface on port 1 with 25 GPI outputs will range 101-125. Logitek JetSet Reference Manual 10 7 Mute Group Enter the number of the matching mute group (set on the Mutes tab). Valid entries are 1 – 12. All sources tagged with 1 will belong to mute group 1, all sources tagged with 2 will belong to mute group 2, and so on. UDP IP Address Enter the IP address to send text over UDP when the fader is turned on or off UDP Port Enter the port to send text over UDP. UDP Start Command Enter the text string to send to the specified UDP address/port when the fader turns on. UDP Stop Command Enter the text string to send to the specified UDP address/port when the fader turns off. Timer Reset If a Y is in this cell, reset the console timer when its fader turns on Fader Start If a Y is in this cell, turn on bus 0 (fader on) when the fader is raised from infinity and off when the fader is returned to infinity. Most commonly used outside of North America. Cue Bus If a Y is in this cell, send audio to the cue bus post fader. The default is no entry. Cue At Inf If a Y is in this cell, turn on bus 3 (cue) when the fader is lowered to infinity and turn off bus 3 (cue) when the fader is raised from infinity. In the UK, Cue is known as PFL and this function will operate the PFL switch. Allow Mode If a Y is in this cell, allow user to change the mode of the source from consoles with a mode switch. Allow Effects If a Y is in this cell, allow user to change EQ and dynamics settings from consoles with EQ and dynamics controls. (On Artisan consoles, this also gives access to frame delay) Allow Pan If a Y is in this cell, allow user to adjust pan from consoles with pan controls. Allow Trim If a Y is in this cell, allow user to adjust trim from consoles with trim controls. [Note: older consoles such as Remora and Numix do not respect this setting.] Phantom Power If a Y is in this cell, turn on phantom power for this input (Mic input cards only; ignored by all other input cards.) 108 Logitek JetSet Reference Manual SR Converter If a Y is in this cell, disable the sample rate converter for this input. (Digital cards only; ignored by all other input cards.) UK Tally If a Y is in this box, turn on the start lamp when the fader is open. (UK consoles only, JetStream must be set to UK Mode on system tab.) Editing the Net Sources Spreadsheet The Net Sources tab is initially filled in by other JetStreams reporting their network channels to this JetStream. After the sources appear, this tab can be used to edit how this JetStream will treat the sources locally. For example, this is how you assign a mix minus bus to a networked remote codec or assign GPI control to a networked source. A copy of the spreadsheet appears below, followed by descriptions of the entries on subsequent pages. Because of the width of the spreadsheet, it is broken into three pages in the manual but is one continuous spreadsheet within the tab. When a JetStream starts and every few minutes afterwards, the JetStream Server application will announce what streams it has available on the network. All JetStreams and JetNet devices listen on the base multicast channel for these messages and build a list of channels from around the network as well as announce to the others what they have. By listening in on the “party line” announce channel, each device ensures that its list of sources is up to date. When a JetStream goes offline, the other units tag that machine’s channels as missing. If the machine stays offline for two weeks, the missing channels will be purged. If the machine comes back online before the purge, they are tagged as active and all of their settings persist. If the channels are purged before it comes back online, any surface settings or other customizations may need to be done again. When the JetFile is read, any customizations stored on the JetStream DSP are overwritten by the contents of the JetFile. Logitek JetSet Reference Manual 10 9 Device Number 0x0200 0x0201 Surface Name 1 Surface Name 2 Unique Name Aux 1 Mix Minus Bus Lamp On Color Lamp Off Color Jet Net 2 4 0,15,15 15,0,15 6 5 Num Channels Default Pan Default Mode AE6 Aux 1 AE6 AE6 Program AE6 Program 2 Net 2 Unique New Net 2 2 7 Dale 1a 2 10 Dale 2 2 10 John's Desk 2 30 6 0x0202 JSM-200 0x0203 Dale 1a 0x0204 Dale 2 0x0206 John's Desk 0x020A JSM-200 Net 1 2 7 0x0217 New Net 429 First row Old Excel 2 11 net 7345 slow packet 0x0218 New Net 7345 2 11 0x021C New Net 620 2 11 0x021D New Net 432 2 11 0x021E New Net 433 2 11 110 Logitek JetSet Reference Manual Source Type Destination IP Address Network Latency GPI On GPI Off GPI Cough GPO Start GPO Stop GPO Tally Mute Group UDP IP Address UDP Port UDP Start Command UDP Stop Command JSM 239.193.6.3 Low 301 302 303 401 402 403 12 192.168.87.12 1234 This is start This is stop JSM 239.193.6.1 Low JSM 239.193.7.18 Low WIN 239.193.10.1 High WIN 239.193.10.2 High WIN 239.193.30.1 High JSM 239.193.7.17 Low JSP 239.193.11.1 High JSP 239.193.11.2 High JSP 239.193.11.7 Low JSP 239.193.11.8 Low JSP 239.193.11.9 Low Logitek JetSet Reference Manual 11 1 Timer Reset Fader Start Y Cue Bus Cue At Inf Y Y Allow Mode Allow Effects Y Y Allow Pan Allow Trim UK Tally Y Y Y Y Y Y Y Y Y Y Y Y Y 112 Logitek JetSet Reference Manual Device number Expressed in hex, always in format of 0xDDDD where D is the device number. The range of valid numbers is defined on the system tab. Whatever value is entered is used provided it matches the defined range. This number is created by the DSP card and is filled in when the JetStream discovers the source on the network. This field should not need editing. Surface Name 1 Logitek consoles and router controllers display 16 character source names, divided in two fields of 8 characters. This is the first half. Maximum 8 characters. This cell is filled in by information sent from its host device and should not need editing. Surface Name 2 This is the second half of the Surface Name. Maximum 8 characters. This cell is filled in by information sent from its host device and should not need editing. Unique Name Unique identifier for the source. Command Builder 5 uses this text to find the device number to create a command. This cell is filled in by information sent from its host device and should not need editing. Num Channels The number of channels used by the source. 1= mono, 2=stereo, 6=surround. This cell is filled in by information sent from its host device and should not need editing. Default Pan The default setting of the pan control when the source is routed to the fader. No entry or 0 denotes center. The pan control goes from left to right, 1 (closest to center) to 19 (farthest from center). Thus, valid entries range from L1 – L19, 0, R1 – R19. (example: to default to hard left, enter L19 in the cell) Default Mode The default mode setting when the source is routed to the fader. Stereo = default to number of channels defined by the source; 2 channels will be stereo, single channels will be mono Mono = sum to mono LL = Left channel in both channels RR = Right channel in both channels Lx = Left channel, silence right xR = Silence left, right channel Phase = Phase invert Blend = sum to mono, keep pan control active to weight mix (Artisan only) 5.1 = surround (Artisan only) Logitek JetSet Reference Manual 11 3 Mix Minus Bus A number from 1 to 24 that assigns this input to a mix minus bus. Every input tagged with this number will be subtracted from its matching mix minus bus. Lamp On Color RGB value to set a default on button lamp color for the source, written in decimal. Separate with commas. Example: blue is 0,0,15. Lamp Off Color RGB value to set a default off button lamp color for the source, written in decimal. Separate with commas. Example: blue is 0,0,15. JetNet The ID number of the JetNet device, as set on the system tab. Valid numbers are 1 – 255. This information is sent by the host when the source is announced and should not be edited. Source Type JSM = From a JetStream, announced via JetNet. WIN = From a JetNet Windows Audio Driver, announced via the JetNet Control PC app. Destination IP Address The multicast address of the source coming from the other JetStream computer. This information is sent by the host when the source is announced and should not be edited. Network Latency Low = Low latency (aka Fast Audio) packets, sent by other JetStreams. High = High latency (aka Slow Audio) packets, usually sent by PCs using the JetNet Windows Audio Driver, although these can also originate from JetStream devices. This information is sent by the host when the source is announced and should not be edited. GPI On Enter the GPI number for the GPI input that will remotely turn this source on. GPI inputs on the JetStream are addressed 1 – 12.* GPI Inputs on the first surface are addressed 101 – 112*. GPI Inputs on the second surface are addressed 201-212*. GPI Inputs on the third surface are addressed 301-312*. GPI Inputs on the fourth surface are addressed 401-412*. *On a device with more than 12 GPI inputs, the ending number will match according to the numbering scheme. Example: a surface on port 1 with 25 GPI inputs will range 101-125. GPI Off Enter the GPI number for the GPI input that will remotely turn this source off. GPI inputs on the JetStream are addressed 1 – 12.* GPI Inputs on the first surface are addressed 101 – 112*. GPI Inputs on the second surface are addressed 201-212*. GPI Inputs on the third surface are addressed 301-312*. GPI Inputs on the fourth surface are addressed 401-412*. *On a device with more than 12 GPI inputs, the ending number will match according to the numbering scheme. Example: a surface on port 1 with 25 GPI inputs will range 101-125. 114 Logitek JetSet Reference Manual GPI Cough Enter the GPI number for the GPI input that will remotely activate the cough mute (bus 8). GPI inputs on the JetStream are addressed 1 – 12.* GPI Inputs on the first surface are addressed 101 – 112*. GPI Inputs on the second surface are addressed 201-212*. GPI Inputs on the third surface are addressed 301-312*. GPI Inputs on the fourth surface are addressed 401-412*. *On a device with more than 12 GPI inputs, the ending number will match according to the numbering scheme. Example: a surface on port 1 with 25 GPI inputs will range 101-125. GPO Start Enter the GPI number for the GPI output that will pulse when the fader is turned on. GPI outputs on the JetStream are addressed 1 – 12.* GPI outputs on the first surface are addressed 101 – 112*. GPI outputs on the second surface are addressed 201-212*. GPI Inputs on the third surface are addressed 301-312*. GPI outputs on the fourth surface are addressed 401-412*. *On a device with more than 12 GPI outputs, the ending number will match according to the numbering scheme. Example: a surface on port 1 with 25 GPI outputs will range 101-125. GPO Stop Enter the GPI number for the GPI output that will pulse when the fader is turned off. GPI outputs on the JetStream are addressed 1 – 12.* GPI outputs on the first surface are addressed 101 – 112*. GPI outputs on the second surface are addressed 201-212*. GPI Inputs on the third surface are addressed 301-312*. GPI outputs on the fourth surface are addressed 401-412*. *On a device with more than 12 GPI outputs, the ending number will match according to the numbering scheme. Example: a surface on port 1 with 25 GPI outputs will range 101-125. GPO Tally Enter the GPI number for the GPI output that will latch on when the fader is turned on and turn off when the fader turns off. GPI outputs on the JetStream are addressed 1 – 12.* GPI outputs on the first surface are addressed 101 – 112*. GPI outputs on the second surface are addressed 201-212*. GPI Inputs on the third surface are addressed 301-312*. GPI outputs on the fourth surface are addressed 401-412*. *On a device with more than 12 GPI outputs, the ending number will match according to the numbering scheme. Example: a surface on port 1 with 25 GPI outputs will range 101-125. Mute Group Enter the number of the matching mute group (set on the Mutes tab). Valid entries are 1 – 12. All sources tagged with 1 will belong to mute group 1, all sources tagged with 2 will belong to mute group 2, and so on. UDP IP Address Enter the IP address to send text over UDP when the fader is turned on or off UDP Port Enter the port to send text over UDP. UDP Start Command Enter the text string to send to the specified UDP address/port when the fader turns on. Logitek JetSet Reference Manual 11 5 UDP Stop Command Enter the text string to send to the specified UDP address/port when the fader turns off. Timer Reset If a Y is in this cell, reset the console timer when its fader turns on Fader Start If a Y is in this cell, turn on bus 0 (fader on) when the fader is raised from infinity and off when the fader is returned to infinity. Most commonly used outside of North America. Cue Bus If a Y is in this cell, send audio to the cue bus post fader. The default is no entry. Cue At Inf If a Y is in this cell, turn on bus 3 (cue) when the fader is lowered to infinity and turn off bus 3 (cue) when the fader is raised from infinity. In the UK, Cue is known as PFL and this function will operate the PFL switch. Allow Mode If a Y is in this cell, allow user to change the mode of the source from consoles with a mode switch. Allow Effects If a Y is in this cell, allow user to change EQ and dynamics settings from consoles with EQ and dynamics controls. (On Artisan consoles, this also gives access to frame delay) Allow Pan If a Y is in this cell, allow user to adjust pan from consoles with pan controls. Allow Trim If a Y is in this cell, allow user to adjust trim from consoles with trim controls. [Note: older consoles such as Remora and Numix do not respect this setting.] UK Tally If a Y is in this box, turn on the start lamp when the fader is open. (UK consoles only, JetStream must be set to UK Mode on system tab.) Editing the Picks Spreadsheet This is the surface settings pick list, built by the tick mark grid on the surface settings page in JetSet. Logitek strongly suggests you edit this data in the web page and not in the spreadsheet. An example spreadsheet is on the next page, followed by a description of the contents on subsequent pages. 116 Logitek JetSet Reference Manual Device Number Pick Count Pick 1 Pick 2 Pick 3 Pick 4 Pick 5 Pick 6 Pick 7 Pick 8 Pick 9 Pick 10 Pick 11 Pick 12 Pick 13 Pick 14 Pick 15 Pick 16 Pick 17 0x000B 27 0x0204 0x0109 0x010A 0x010B 0x010C 0x010D 0x010E 0x010F 0x0110 0x0107 0x0111 0x0112 0x0113 0x0114 0x0115 0x0116 0x0117 0x000C 26 0x0204 0x0109 0x010A 0x010B 0x010C 0x010D 0x010E 0x010F 0x0110 0x0107 0x0111 0x0112 0x0113 0x0114 0x0115 0x0116 0x0117 0x01 0x000D 25 0x0204 0x0109 0x010A 0x010B 0x010C 0x010D 0x010E 0x010F 0x0110 0x0107 0x0111 0x0112 0x0113 0x0114 0x0115 0x0116 0x0117 0x01 0x000E 24 0x0204 0x0109 0x010A 0x010B 0x010C 0x010D 0x010E 0x010F 0x0110 0x0107 0x0111 0x0112 0x0113 0x0114 0x0115 0x0116 0x0117 0x01 0x000F 22 0x0204 0x0109 0x010A 0x010B 0x010C 0x010D 0x010E 0x010F 0x0110 0x0107 0x0111 0x0112 0x0113 0x0114 0x0115 0x0116 0x0117 0x01 0x0010 21 0x0204 0x0109 0x010A 0x010B 0x010C 0x010D 0x010E 0x010F 0x0110 0x0107 0x0111 0x0112 0x0113 0x0114 0x0115 0x0116 0x0117 0x01 0x0011 20 0x0204 0x0109 0x010A 0x010B 0x010C 0x010D 0x010E 0x010F 0x0110 0x0107 0x0111 0x0112 0x0113 0x0114 0x0115 0x0116 0x0117 0x01 0x0012 19 0x0204 0x0109 0x010A 0x010B 0x010C 0x010D 0x010E 0x010F 0x0110 0x0107 0x0111 0x0112 0x0113 0x0114 0x0115 0x0116 0x0117 0x01 0x0013 18 0x0204 0x0109 0x010A 0x010B 0x010C 0x010D 0x010E 0x010F 0x0110 0x0111 0x0112 0x0113 0x0114 0x0115 0x0116 0x0117 0x0120 0x01 0x0014 21 0x0200 0x0201 0x0203 0x0204 0x0109 0x010A 0x010B 0x010C 0x010D 0x010E 0x010F 0x0110 0x0111 0x0112 0x0113 0x0114 0x0115 0x01 0x0015 21 0x0200 0x0201 0x0203 0x0204 0x010A 0x010B 0x010C 0x010D 0x010E 0x010F 0x0110 0x0111 0x0112 0x0113 0x0114 0x0115 0x0116 0x01 0x0016 20 0x0200 0x0201 0x0203 0x0204 0x010B 0x010C 0x010D 0x010E 0x010F 0x0110 0x0111 0x0112 0x0113 0x0114 0x0115 0x0116 0x0117 0x01 0x0023 6 0x00BF 0x00C0 0x00C1 0x0204 0x0100 0x00BE 0x0024 6 0x00BF 0x00C0 0x00C1 0x0204 0x0101 0x00BE 0x0025 6 0x00BF 0x00C0 0x00C1 0x0204 0x0102 0x00BE 0x002E 3 0x00BF 0x021D 0x021E 0x0031 3 0x00BF 0x00C0 0x00C1 0x0032 4 0x00BF 0x00C0 0x00C1 0x00CF 0x006F 5 0x00BF 0x00C0 0x00C1 0x00CB 0x0070 2 0x00BF 0x00C0 Logitek JetSet Reference Manual 0x00CC 11 7 Pic 18 0x01 The width of the table is defined by the number of tick marks for a particular device. The lines represent the destinations. Device Number The device number of the destination. Pick Count The number of choices for that destination Pick 1 – Pick xx Each pick is the device number of a source that is allowed to be routed to that destination. Editing the Mutes Spreadsheet This tab defines the microphone mute groups. In a mute group, when any tagged microphone is on, the monitors mute until the last tagged microphone is turned off. A copy of the spreadsheet is on the next page, with explanation on the page after that. 118 Logitek JetSet Reference Manual Mute Group Mute Device 1 Mute Device 2 1 2 3 4 5 6 7 8 9 10 11 12 0x0024 0x0025 0x0023 0x0024 0x0023 0x0025 Logitek JetSet Reference Manual Active Cue Y Y Y Tally 1 Tally 2 Tally 3 101 1 104 102 2 105 103 3 106 4 5 6 Y Y Y 11 9 Mute Group A number from 1 to 12. This is the number that is associated with microphones that belong to this group. Mute Device 1 The device number of the monitor mix bus that should mute when any of the group’s microphones are on. Expressed in hex as 0xDDDD. Mute Device 2 If a second monitor mis bus should mute when the group’s microphones are on, the device number is entered here. Expressed in hex as 0xDDDD. Mute Device 1 and Mute Device 2 allow you to mute two studios at once on this JetStream. If you need to mute monitors on a studio on a different JetStream you would use Command Builder 5 to send commands to the other frame. Active If a Y is in this box, allow this mute group to function. Otherwise it will be ignored. Cue If a Y is in this box, mute the monitors when the microphone is placed in cue. Otherwise, the channel will mute only when bus 0 (the on/off switch for the fader) is on. Tally 1 The GPI number of the GPI output that will turn on when the microphones are on. Use standard Logitek GPI numbering: JetStream GPIs are 1-15, port 1 consoles are 101-112, port 2 consoles 201212, port 3 301-312, port 4 401-412. If devices support more than 12 or 15 GPIs, the ending number matches the highest relay on the device. Tally 2 The GPI number of the second GPI output that will turn on when the microphones are on, using standard Logitek GPI numbering as described above. Tally 3 The GPI number of the third GPI output that will turn on when the microphones are on, using standard Logitek GPI numbering as described above. Multiple tallies allow you to connect more than one on-air light or to connect an on-air light and aircheck record skimmer. 120 Logitek JetSet Reference Manual Editing the System Spreadsheet These are the master system settings for the JetStream. The parameter is keyed to the index number. Blank rows can be inserted for clarity as long as the index numbers match their paremeters as show below. Index Parameter 0 1 2 3 4 5 7 9 11 12 13 Table Version Sample Rate External Sync Type JetNet Number Country Code Net 1 IP Address Net 2 IP Address Multicast Base Address JetNet Base Port Net Sync Master Net Protocol 50 48.0 K none 12 USA 192.168.87.77 192.168.87.78 239.193.0.0 10200 Allow JetNet 20 Engine Type JSP 21 22 23 24 25 26 27 28 29 30 31 32 33 34 35 36 37 38 39 40 Slot 1 Card Type Slot 2 Card Type Slot 3 Card Type Slot 4 Card Type Slot 5 Card Type Slot 6 Card Type Slot 7 Card Type Slot 8 Card Type Slot 9 Card Type Slot 10 Card Type Slot 11 Card Type Slot 12 Card Type Slot 13 Card Type Slot 14 Card Type Slot 15 Card Type Slot 16 Card Type Slot 17 Card Type Slot 18 Card Type Slot 19 Card Type Slot 20 Card Type Mic In 49 JetStream Layout 2 Ports 50 51 52 53 Port 1 Surface Type P1 Num of Devices P1 Num of Faders P1 Max Faders mixer 40 12 24 Logitek JetSet Reference Manual Value Analog In Analog In Digital In Digital In Mic In Analog Out SDI In SDI In Digital Out Digital Out Digital Out 12 1 54 55 56 57 58 70 71 72 73 74 75 76 77 78 90 91 92 93 94 95 96 97 98 110 111 112 113 114 115 116 117 118 130 131 132 133 134 135 136 137 138 122 P1 Independ Bus Sw P1 Pre-Fader Aux Bus P1 Settings P1 Last Hardware Found P1 Unique Name 10000000 01000000 000 Port 2 Surface Type P2 Num of Devices P2 Num of Faders P2 Max Faders P2 Independ Bus Sw P2 Pre-Fader Aux Bus P2 Settings P2 Last Hardware Found P2 Unique Name none Port 3 Surface Type P3 Num of Devices P3 Num of Faders P3 Max Faders P3 Independ Bus Sw P3 Pre-Fader Aux Bus P3 Settings P3 Last Hardware Found P3 Unique Name none Port 4 Surface Type P4 Num of Devices P4 Num of Faders P4 Max Faders P4 Independ Bus Sw P4 Pre-Fader Aux Bus P4 Settings P4 Last Hardware Found P4 Unique Name none Port 5 Surface Type P5 Num of Devices P5 Num of Faders P5 Max Faders P5 Independ Bus Sw P5 Pre-Fader Aux Bus P5 Settings P5 Last Hardware Found P5 Unique Name none 0 Studio Tag Logitek JetSet Reference Manual 150 151 152 153 154 155 156 none 157 158 Port 6 Surface Type P6 Num of Devices P6 Num of Faders P6 Max Faders P6 Independ Bus Sw P6 Pre-Fader Aux Bus P6 Settings P6 Last Hardware Found P6 Unique Name 160 172 174 Config file name Config Save Date JetSet Name C:\Logitek\Configs v5\JSP-12.xls 9/2/2014 9:51:58 PM jsp-PC 182 183 184 185 186 187 188 189 190 191 192 193 1st Port 1 Dest 1st Port 2 Dest 1st Port 3 Dest 1st Port 4 Dest 1st IO Dest 1st Port 1 Source 1st Port 2 Source 1st Port 3 Source 1st Port 4 Source 1st Mix Minus Source 1st IO Source 1st network Source 0x000B 0x006E 0x00BE 0x00D2 0x0100 0x0200 End of System sheet Table Version The version number of the DSP software without the decimal point. The initial release that supports JetSet is 5.0, therefore it would be written as 50. Sample Rate The master sample rate for the JetStream. If sample rate converters are engaged on digital inputs, all inputs will be resampled to this rate; if the sample rate converters are turned off the inputs must match this rate. All digital outputs will be set to this rate. Valid entries are 32.0 K, 44.1 K, 48.0K. Default is 48.0K. External Sync Type The format of external sync the JetStream should expect. None: Does not rate-lock; operates on its internal sample rate clock only Network: rate locks to the master across the LAN AES: Locks to AES silence on the Ext. Sync input Video: Tri-level sync on the BNC Video Sync input Word Clock: Word clock on the BNC Video Sync Input PPS: Pulse per second sync from a GPS clock Logitek JetSet Reference Manual 12 3 JetNet Number A unique number to identify this JetStream on the LAN. Valid entries are 1 – 255. Country Code Valid entries are USA and UK. In the UK mode, metering shifts to PPM only, the fader scale shifts to unity gain being at fully open (255). Bus 0 turns on when the fader opens and off when the fader closes. The on switch in US consoles is a machine start button in UK consoles. The off switch in US consoles is a PFL (cue) switch in UK consoles. Net 1 IP Address The IP address of the NIC for audio network 1. [Not the multicast address!] Set a fixed IP address that does not conflict on your network. Net 2 IP Address The IP address of the NIC for audio network 2. As with 1, this is a hardware address and not the multicast address. Multicast Base Address The base address that all multicast addresses on the system are created from. Also the address used for the “announce channel” where JetStreams report their sources. All JetStreams on the LAN should use the same base. Default is 239.193.0.0. JetNet Base Port The base TCP port used for Logitek virtual clients and guest connections to connect to JetStream Server. Default is 10200. Net Protocol Audio Networking Protocol used. Default is JetNet. Other valid entries include Livewire and AES67, but those are not supported at press time. Engine Type Tells the DSP how many card slots to use and features to support. Valid entries are JSP for JetStream Plus and JSM for JetStream Mini Slot 1 Card Type The type of card installed in this slot. Valid entries: Mic In Analog In Analog Out Digital In Digital Out SDI In Slot 2 Card Type See Slot 1 entry for more information. 124 Logitek JetSet Reference Manual Slot 3 Card Type See Slot 1 entry for more information. Slot 4 Card Type See Slot 1 entry for more information. Slot 5 Card Type See Slot 1 entry for more information. Slot 6 Card Type See Slot 1 entry for more information. Slot 7 Card Type See Slot 1 entry for more information. Slot 8 Card Type See Slot 1 entry for more information. Slot 9 Card Type See Slot 1 entry for more information. Slot 10 Card Type See Slot 1 entry for more information. Slot 11 Card Type See Slot 1 entry for more information. Slot 12 Card Type See Slot 1 entry for more information. Slot 13 Card Type See Slot 1 entry for more information. Slot 14 Card Type See Slot 1 entry for more information. Slot 15 Card Type See Slot 1 entry for more information. Slot 16 Card Type This is the DSP slot on a JetStream Plus. Leave blank. Slot 17 Card Type Reserved for future expansion. Slot 18 Card Type Reserved for future expansion. Slot 19 Card Type Reserved for future expansion. Logitek JetSet Reference Manual 12 5 Slot 20 Card Type Reserved for future expansion. JetStream Layout The number of active ports used. Example: if two consoles will be connected, this would be 2 Ports. Now we get into the port definitions. 50 51 52 53 54 55 56 57 58 Port 1 Surface Type P1 Num of Devices P1 Num of Faders P1 Max Faders P1 Independ Bus Sw P1 Pre-Fader Aux Bus P1 Settings P1 Last Hardware Found P1 Unique Name mixer 40 12 24 10000000 01000000 000 0 Studio Tag Surface Type None = no surface mixer = any kind of audio console other than the artisan Artisan = the Artisan TV console Num of Devices How many device numbers used by the surface Num of Faders How many faders are on the surface Independ Bus Sw Independent Bus Switching. An array of binary numbers. 8 numbers, one for each aux bus, first one is aux 1 and last is aux 8. 1 means on and 0 means off. When independent bus switching is enabled, we ignore bus 0 for any fader with that aux bus selected. Pre-Fader Aux Bus Pre-Fader Aux Bus means we ignore the fader position and send audio on the appropriate aux bus out at unity gain on that bus. An array of binary numbers. 8 numbers, one for each aux bus, first one is aux 1 and last is aux 8. 1 means on and 0 means off. Settings A three digit binary array, where 0 means off and 1 means on. First digit is for the studio monitor bus; 1 means pre fader and 0 means post fader. Second digit is for the cue bus. 1 means pre fader and 0 means post fader. Third digit is for locking the program bus on with bus 0. 1 means yes, 0 means no. 126 Logitek JetSet Reference Manual Last Hardware Found The last surface type that checked in with JetStream Server. Unique Name A unique name for the console to display in JetSet. This information repeats for a total of 6 surfaces. 70 71 72 73 74 75 76 77 78 90 91 92 93 94 95 96 97 98 110 111 112 113 114 115 116 117 118 130 131 132 133 134 135 136 137 138 Port 2 Surface Type P2 Num of Devices P2 Num of Faders P2 Max Faders P2 Independ Bus Sw P2 Pre-Fader Aux Bus P2 Settings P2 Last Hardware Found P2 Unique Name none Port 3 Surface Type P3 Num of Devices P3 Num of Faders P3 Max Faders P3 Independ Bus Sw P3 Pre-Fader Aux Bus P3 Settings P3 Last Hardware Found P3 Unique Name none Port 4 Surface Type P4 Num of Devices P4 Num of Faders P4 Max Faders P4 Independ Bus Sw P4 Pre-Fader Aux Bus P4 Settings P4 Last Hardware Found P4 Unique Name none Port 5 Surface Type P5 Num of Devices P5 Num of Faders P5 Max Faders P5 Independ Bus Sw P5 Pre-Fader Aux Bus P5 Settings P5 Last Hardware Found P5 Unique Name none Logitek JetSet Reference Manual 12 7 150 151 152 153 154 155 156 157 158 Port 6 Surface Type P6 Num of Devices P6 Num of Faders P6 Max Faders P6 Independ Bus Sw P6 Pre-Fader Aux Bus P6 Settings P6 Last Hardware Found P6 Unique Name none Config File Name The path and file name of the JetFile Config Save Date The date and time this JetFile was saved JetSet Name The computer name of the embedded PC in the JetStream 1st Port 1 Dest The device number of the first destination used by the surface, (think first mix bus address) 1st Port 2 Dest The device number of the first destination used by the surface, 1st Port 3 Dest The device number of the first destination used by the surface, 1st Port 4 Dest The device number of the first destination used by the surface, 1st IO Dest The device number of the first output on the IO cards 1st Port 1 Source The device number of the first source used by the console (think first fader input) 1st Port 2 Source The device number of the first source used by the console (think first fader input) 1st Port 3 Source The device number of the first source used by the console (think first fader input) 1st Port 4 Source The device number of the first source used by the console (think first fader input) 1st Mix Minus Source The device number of the first mix minus bus 128 Logitek JetSet Reference Manual 1st IO Source The first device number of the inputs from the IO cards 1st Network Source The first device number assigned to incoming network sources End of System sheet denotes the end of the file. Must be present in the last Paremeter in the tab. Logitek JetSet Reference Manual 12 9


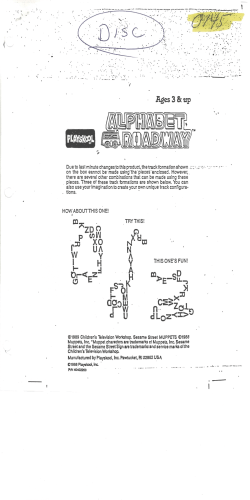


© Copyright 2026