
b.2202
b.2202
BALÓNY KUBÍČEK spol. s r.o.
Seat: Francouzská 81, 602 00 Brno
Office: Jarní 2a, 614 00 Brno
Czech Republic
tel.: +420 545 422 620
fax: +420 545 422 621
[email protected]
www.kubicekballoons.cz
Maintenance Manual
for use with the hot air balloon
(Applicable for balloons of serial number 640 and higher.)
Type:
...........................................
Model:
...........................................
Serial No.:
...........................................
Registration:
...........................................
The technical content of this document is approved under the authority of DOA, number EASA.21J.277
A f ull descr ipt ion of the balloon s ys tems and oper at ing procedures is prov ided in the Kubicek
Flight Manual for use w ith the hot air balloon.
This balloon is to be maintained in an airworthy condition in compliance with instructions and limitations
contained herein.
www.kubicekballoons.cz
intentionally left blank
Edition 2 / Revision 0, 15 Dec 2008
b.2202 maintenance manual for use with the hot air balloon
0.1 Record of revisions
Any revision of the present Manual must be recorded in the following table. The new or amended text in the revised
page will be indicated by a black vertical line in the margin, and the Revision No. and the date will be shown on the
bottom of the page.
All changes to the Maintenance Manual which were made before the date of the issue stated on the title page have
been incorporated into this Manual.
Revision
Number
Affected
Section
Affected
Pages
Date of
Issue
1
0
1
4
5
7
II, IV, VII
3
1, 3
1
4, 7
20 Jun 2009
2
0
2
7
II, IV
1
2, 10, 11, 12
28 Jan 2010
3
0
1
3
7
II, IV, VI, VII, VIII, IX
4
7, 8
2
25 Feb 2010
4
0
2
3
II, IV, VI
2
4, 5
27 Oct 2010
5
0
7
9
II, IV
9
1
22 Jul 2011
6
0
2
3
7
II, IV, VI, VII, VIII, IX
1
6, 7, 8
3 - 14
05 Nov 2012
7
0
3
7
II, IV
1
10, 11
11 Jan 2013
8
0
1
3
7
8
II, IV, VII, VIII
2
8
2, 5
1
19 Jun 2013
9
O
3
5
7
II, IV
5
3, 4, 8
1
01 Jul 2013
10
0
5
7
II, IV
5, 6, 7
4
30 Sep 2013
11
0
2
5
7
II, IV, VI, VIII, IX
1, 2
3, 4, 5
1, 4, 8, 13
23 Jun 2014
Edition 2 / Revision 11, 23 Jun 2014
II
www.kubicekballoons.cz
intentionally left blank
III Edition 2 / Revision 0, 15 Dec 2008
b.2202 maintenance manual for use with the hot air balloon
0.3 List of Effective Pages
Section
Page
Date of Issue
Section
Page
Date of Issue
0
I
II
III
IV
V
VI
VII
VIII
IX
15 Dec 2008
23 Jun 2014
15 Dec 2008
23 Jun 2014
15 Dec 2008
23 Jun 2014
19 Jun 2013
23 Jun 2014
23 Jun 2014
6
6-1
6-2
15 Dec 2008
15 Dec 2008
7
1
1-1
1-2
1-3
1-4
15 Dec 2008
19 Jun 2013
20 Jun 2009
25 Feb 2010
2
(Appr.)
2-1
2-2
23 Jun 2014
23 Jun 2014
7-1
7-2
7-3
7-4
7-5
7-6
7-7
7-8
7-9
7 - 10
7 - 11
7 - 12
7 - 13
7 - 14
23 Jun 2014
19 Jun 2013
05 Nov 2012
23 Jun 2014
19 Jun 2013
05 Nov 2012
05 Nov 2012
23 Jun 2014
05 Nov 2012
11 Jan 2013
11 Jan 2013
05 Nov 2012
23 Jun 2014
05 Nov 2012
3
3-1
3-2
3-3
3-4
3-5
3-6
3-7
3-8
11 Jan 2013
15 Dec 2008
15 Dec 2008
27 Oct 2010
01 Jul 2013
05 Nov 2012
05 Nov 2012
19 Jun 2013
8
8-1
8-2
19 Jun 2013
15 Dec 2008
9
9-1
22 Jul 2011
4
4-1
4-2
4-3
4-4
20 Jun 2009
15 Dec 2008
20 Jun 2009
15 Dec 2008
5
5-1
5-2
5-3
5-4
5-5
5-6
5-7
5-8
5-9
5 - 10
5 - 11
5 - 12
20 Jun 2009
15 Dec 2008
23 Jun 2014
23 Jun 2014
23 Jun 2014
30 Sep 2013
30 Sep 2013
01 Jul 2013
15 Dec 2008
15 Dec 2008
15 Dec 2008
15 Dec 2008
NOTE:
The sections identified with “Appr.“ have been approved by EASA.
Edition 2 / Revision 11, 23 Jun 2014
IV
www.kubicekballoons.cz
intentionally left blank
Edition 2 / Revision 0, 15 Dec 2008
b.2202 maintenance manual for use with the hot air balloon
Contents
0.1 Record of revisions............................................................................................................ II
0.3 List of Effective Pages........................................................................................................ IV
SECTION 1 – GENERAL................................................................................................ 1-1
1.1 Introduction.................................................................................................................... 1-1
1.2 Applicability.................................................................................................................... 1-1
1.3 Maintenance Categories..................................................................................................... 1-1
1.3.1 Category A Maintenance .......................................................................................... 1-1
1.3.2 Category B Maintenance ......................................................................................... 1-2
1.3.3 Category C Maintenance .......................................................................................... 1-2
1.3.4 Category D Maintenance ......................................................................................... 1-3
1.4 Warnings, Cautions and Notes............................................................................................. 1-3
1.5 Revisions........................................................................................................................ 1-4
1.6 Definitions and Abbreviations............................................................................................. 1-4
1.7 Balloon Technical Description............................................................................................. 1-4
1.8 Feedback From Operators................................................................................................... 1-4
SECTION 2 - AIRWORTHINESS LIMITATIONS................................................................... 2-1
2.1 Approval Statement.......................................................................................................... 2-1
2.2 Inspection Period............................................................................................................. 2-1
2.3 Personnel....................................................................................................................... 2-1
2.4 Inspection Procedure........................................................................................................ 2-1
2.5 Time Lifed Items............................................................................................................... 2-1
2.6 Minimum Fabric Strength................................................................................................... 2-2
2.7 Minimum Load Tape Strenght............................................................................................... 2-2
SECTION 3 - ENVELOPE REPAIRS AND MAINTENANCE....................................................... 3-1
3.1 General........................................................................................................................... 3-1
3.1.1 Preventative Maintenance (A)................................................................................... 3-1
3.1.2 Stitching and Thread............................................................................................... 3-1
3.1.3 French Fell Seams................................................................................................... 3-1
3.2 Fabric Repairs.................................................................................................................. 3-1
3.2.1 General................................................................................................................ 3-2
3.2.2 Replacement Fabric................................................................................................ 3-2
3.2.3 Repairs to Heavy Weight Fabric Panels (B)................................................................... 3-2
3.2.4 Repairs to Fire Resistant Panels (B)............................................................................ 3-2
3.2.5 Panel Replacement (B)............................................................................................ 3-2
3.2.6 Repairing With a Sewn Patch (B)............................................................................... 3-3
3.2.7 Adhesive Patches Without Overstitching (A)................................................................ 3-3
3.2.8 Adhesive Strip Repairs With Overstitching (B).............................................................. 3-4
3.3 Load Tape Repairs ............................................................................................................ 3-4
3.3.1 General (C)........................................................................................................... 3-4
3.3.2 Replacing a Damaged Crown Ring (C).......................................................................... 3-4
3.3.3 Replacing a Flying Cable by Opening the Turn-back (C)................................................... 3-5
3.3.4 Replacing a Kevlar Flying Cable (A)............................................................................ 3-5
3.3.5 Replacing a Ringlock (C).......................................................................................... 3-5
3.3.6 Envelope Mouth Load Tape Repair (C)......................................................................... 3-5
3.4 Tempilabel and Melting Link (A)........................................................................................... 3-5
3.5 Tempilabel (B)................................................................................................................. 3-5
3.6 Control Lines................................................................................................................... 3-6
3.6.1 General................................................................................................................ 3-6
3.6.2 Parachute Centralising Lines and Shroud Lines (B)........................................................ 3-6
3.6.3 Adjusting the Parachute Centralising Lines (B)............................................................. 3-6
3.6.4 Replacing of Rotation Vent Lines (A).......................................................................... 3-7
Edition 2 / Revision 11, 23 Jun 2014
VI
www.kubicekballoons.cz
3.6.5 Repairing Deflation System Control Lines.................................................................... 3-7
3.6.6.1 Replacing Deflation System Control Lines (A)..................................................... 3-7
3.6.6.2 Extending Deflation System Control Lines (A).................................................... 3-8
3.6.7 Smart Vent, Slide Vent and Lite Vent Shroud/Centralising Lines (B).................................. 3-8
3.6.8 Paralite Shroud lines (B).......................................................................................... 3-8
3.6.9 Paralite Centralising Lines (B).................................................................................. 3-8
3.6.10 Smart Vent, Slide Vent and Lite Vent Tapes (B)............................................................ 3-8
3.6.11 Lite Vent and Paralite Weight (A)............................................................................. 3-8
3.6.12 Pulleys (B).......................................................................................................... 3-8
3.6.13 Carabiners (A)...................................................................................................... 3-8
SECTION 4 - BASKET REPAIR AND MAINTENANCE............................................................ 4-1
4.1 Routine Maintenance (A).................................................................................................... 4-1
4.2 Wickerwork..................................................................................................................... 4-1
4.3 Rope Handles (B)............................................................................................................. 4-1
4.4 Basket PLYWOOD Floors, Load Bearing Wooden Frames and Runners (B)....................................... 4-1
4.5 Upholstery and Padded Suede / Leatherwork (A).................................................................... 4-2
4.6 Bottom edge Leather or Rawhide (A).................................................................................... 4-2
4.7 Sliding Shims (A).............................................................................................................. 4-2
4.8 Metal Basket frames (C)..................................................................................................... 4-2
4.9 Basket Wires (C)............................................................................................................... 4-2
4.10 Burner Support Rods (A)................................................................................................... 4-2
4.11 Carabiners (A)................................................................................................................ 4-3
4.12 Cylinder Straps (A).......................................................................................................... 4-3
4.13 Composite Floor.............................................................................................................. 4-3
4.13.1 Composite Floor Repair (D)..................................................................................... 4-3
4.13.2 Composite Floor Replacement (B)............................................................................ 4-3
SECTION 5 - BURNER REPAIRS AND MAINTENANCE......................................................... 5-1
5.1 General........................................................................................................................... 5-1
5.2 Sealing and Threaded Joints Techniques................................................................................ 5-2
5.2.1 O-rings and Rubber Seals......................................................................................... 5-2
5.2.2 Threaded Joints..................................................................................................... 5-2
5.3 Standard Maintenance Techniques....................................................................................... 5-2
5.3.1 Removing the Burner From the Burner Frame (B).......................................................... 5-2
5.3.2 Fuel Hoses Replacement (B)..................................................................................... 5-3
5.3.3 Removing the Manifold Block (B)............................................................................... 5-4
5.3.4 Disassembling the Main Blast Valve (MBV) (B).............................................................. 5-5
5.3.5 Disassembling the Whisper Burner (WB) and Pilot Burner (PB) (B)................................... 5-6
5.3.6 Disassembling the Whisper Burner (WB), Pilot Burner (PB), Piezo Igniter and Pressure Gauge (B) 5-7
5.3.7 Pressure Reducer Disassembly and Re-assembly (B)....................................................... 5-8
5.3.8 Pilot Burner Fuel Filter Replacement (B)..................................................................... 5-8
5.4 Troubleshooting............................................................................................................... 5-9
5.4.1 Pressure Gauge Repairs (B)....................................................................................... 5-9
5.4.2 Unefficient Removal of Condensation (A).................................................................... 5-9
5.4.3 Pilot Burner (B)..................................................................................................... 5-9
5.4.4 Cleaning the Pilot Burner Pressure Reducer (B)............................................................ 5-9
5.4.5 Main Blast Valve (B)................................................................................................ 5-10
5.4.6 Whisper Burner Valve and Pilot Burner Valve (B)........................................................... 5-10
5.4.7 Piezo Igniter (A).................................................................................................... 5-10
5.4.8 Repair of Leakage in Junction of the Descent Tube / Manifold Block (B)............................. 5-11
5.4.9 Vaporising Coil, Metal Covers and Lamellas (B)............................................................. 5-11
5.4.10 Swing Burner Socket (A)......................................................................................... 5-11
5.4.11 Adjustable Height Burner Frame (B)......................................................................... 5-11
VII Edition 2 / Revision 8, 19 Jun 2012
b.2202 maintenance manual for use with the hot air balloon
SECTION 6 – INSTRUMENT REPAIRS AND MAINTENANCE................................................... 6-1
6.1. Maintenance................................................................................................................... 6-1
SECTION 7 – INSPECTION SCHEDULE............................................................................. 7-1
7.1 General .......................................................................................................................... 7-1
7.2 Scheduled Inspections ...................................................................................................... 7-1
7.3 Non-scheduled Inspections ................................................................................................ 7-1
7.4 Documentation................................................................................................................ 7-1
7.5 Envelope ........................................................................................................................ 7-2
7.6 Parachute........................................................................................................................ 7-2
7.7 Smart Vent and Slide Vent................................................................................................... 7-2
7.8 Lite Vent......................................................................................................................... 7-3
7.9 Paralite........................................................................................................................... 7-3
7.10 Velcro Rip Panel .............................................................................................................. 7-3
7.11 Burner and Fuel System.................................................................................................... 7-3
7.12 Fuel Cylinders................................................................................................................. 7-4
7.13 Basket........................................................................................................................... 7-4
7.14 Ancillary Equipment......................................................................................................... 7-4
7.15 Inspection Criteria / Techniques......................................................................................... 7-5
7.15.1 Documentation .................................................................................................... 7-5
7.15.2 Envelopes ........................................................................................................... 7-5
7.15.2.1 General..................................................................................................... 7-5
7.15.2.2 Envelope................................................................................................... 7-5
7.14.2.3 Seams...................................................................................................... 7-5
7.15.2.4 Load Tapes................................................................................................ 7-5
7.15.2.5 Control Lines............................................................................................. 7-5
7.15.2.6 Control Line Pulleys..................................................................................... 7-5
7.15.2.7 Crown Ring................................................................................................ 7-6
7.15.2.8 Steel Flying Cables...................................................................................... 7-6
7.15.2.8 Kevlar Flying Wires...................................................................................... 7-6
7.15.3 Burner and Frame ................................................................................................. 7-6
7.15.3.1 Carabiners.................................................................................................. 7-6
7.15.3.2 Burner Frame............................................................................................. 7-6
7.15.3.3 Adjustable Height Burner Frames .................................................................. 7-6
7.15.3.4 Liquid and Vapour Hoses.............................................................................. 7-6
7.15.3.5 Burner – Functional Checks........................................................................... 7-6
7.15.3.6 Fuel Manifolds............................................................................................ 7-7
7.15.4 Baskets............................................................................................................... 7-7
7.15.4.1 Burner Support Rods................................................................................... 7-7
7.15.4.2 Basket wires.............................................................................................. 7-7
7.15.4.3 Basket Frames............................................................................................ 7-7
7.15.4.4 Woven Basket Sides..................................................................................... 7-8
7.15.4.5 Basket Floors Load Bearing Frames and Runners............................................... 7-8
7.15.4.6 Basket Leather and Rawhide......................................................................... 7-8
7.15.4.7 Cylinder Straps........................................................................................... 7-8
7.15.4.8 Basket Wall Straining Beams (if fitted)............................................................. 7-8
7.15.5 Ancillary Equipment .............................................................................................. 7-8
7.15.5.1 Quick Release (if fitted)................................................................................ 7-8
7.15.5.2 Pilot Restraint Harness (if fitted)................................................................... 7-8
7.15.5.3 Instruments (if fitted)................................................................................. 7-8
7.16 Fuel Cylinders ................................................................................................................. 7-9
7.16.1 General............................................................................................................... 7-9
7.16.2 Visual Inspection .................................................................................................. 7-9
7.16.3 Functional Check .................................................................................................. 7-9
7.16.3.1 Vapour Valve (if fitted) ................................................................................ 7-9
7.16.3.2 Liquid Valve. ............................................................................................. 7-9
Edition 2 / Revision 11, 23 Jun 2014
VIII
www.kubicekballoons.cz
7.16.3.3 Bleed Valve ............................................................................................... 7-10
7.16.3.4 Contents Gauge.......................................................................................... 7-10
7.16.3.5 Leak Check................................................................................................ 7-10
7.16.4 Periodic Inspection ............................................................................................... 7-10
7.17 Grab Testing................................................................................................................... 7-10
7.17.1 General Practice.................................................................................................... 7-10
7.17.2 Envelopes with Windows.......................................................................................... 7-11
7.18 Flight Test...................................................................................................................... 7-12
7.19 Non-scheduled Inspections ............................................................................................... 7-12
7.19.1 Envelope Overheat Inspection.................................................................................. 7-12
7.19.2 Powerline Contact Inspections ................................................................................ 7-12
7.19.3 Hard Landing Inspection........................................................................................ 7-12
7.19.4 Test Inflation After Envelope Repair.......................................................................... 7-13
7.20 Time Lifed Items............................................................................................................. 7-13
intentionally left blank............................................................................................................ 7-14
Section 8 - Appendices............................................................................................ 8-1
Appendix 1 - Flight Test Record................................................................................................. 8-1
Section 9 - Supplements.......................................................................................... 9-1
Introduction.................................................................................................................. 9-1
List of Supplements................................................................................................................ 9-1
IX Edition 2 / Revision 11, 23 Jun 2014
b.2202 maintenance manual for use with the hot air balloon
SECTION 1 – GENERAL
1.1 Introduction
This Maintenance Manual describes the correct way to maintain balloons built by BALÓNY KUBÍČEK spol. s r.o. (formerly
Kubíček s.r.o). If a balloon requires maintenance which is not covered by this manual then contact either your local
Kubicek dealer or KB direct.
It is essential that hot air balloons are properly maintained and that those who carry out this maintenance are correctly
trained and qualified. To make it clear who may carry out specific repairs the maintenance in this manual has been
divided into four categories as described in paragraph 1.3. In some countries certain operations may only be carried
out by certified repair stations.
Kubicek Balloons run courses covering all aspects of maintenance and repair work and these courses are available on
request.
Unless otheriwise specified the spare parts and materials are identified by a number in italic. In case there is a risk of
confusion of parts (e.g. load tapes), contact BALÓNY KUBÍČEK spol. s r.o. for advice.
c autions:
1. All materials and components used to repair a KB balloon must be approved by the company and have the correctpaperwork (EASA Form One if applicable)
2. Incorect use of specified parts or material or carrying out work other than described in this manual will render the
balloon non-airworthy and may cause an extreme danger.
3. In the case of a failure where the cause can not be established contact either a KB authorised repair station or KB
and have them make the repair.
1.2 Applicability
The information contained within this Manual applies to all BB (Type Certificate EASA.BA.003) and BB-S type (Type
Certificate EASA.BA.017) Kubicek Balloons of serial numbers 640 and higher.
1.3 Maintenance Categories
The degree of practical knowledge required to maintain a hot air balloon varies with the complexity of the procedure
and the facilities available. To make it clear precisely who is considered competent to carry our a particular procedure
balloon maintenance has been divided into four categories, A, B, C and D. Each of these categories is defined in the
following sub paragraphs. Each heading within this manual that relate to any maintenance or repair task has a letter,
A, B, C or D at the end of the heading: this is the lowest maintenance category for this particular procedure.
All work carried out on a balloon must be written in the balloon’s log book and signed for by the person carrying out
the work.
National aviation authorities may require a higher maintenance standard than stipulated in this manual.
1.3.1 Category A Maintenance
Category A maintenance may be carried out by a licensed balloon pilot.
Envelope
• Cleaning.
• Replacement of carabiners.
Edition 2 / Revision 0, 15 Dec 2008 1-1
www.kubicekballoons.cz
•
•
•
•
•
•
Replacement of damaged control lines.
Replacement of Temperature streamer.
Installation or removal of an instrument sensor
Removal or replacement of Scoop
Repairs to minor fabric damage below the first horizontal load tape
Repairs to the envelope using sticky patches
Basket
•
•
•
•
•
•
Cleaning
Re varnishing or oiling of wicker
Repair or replacement of suede or leather top trimming and padding
Repair or replacement of leather, rawhide and sliding shims
Removal / replacement of side wall padding
Removal / replacement of foam floor and cylinder straps
Burner
•
•
•
•
Cleaning not requiring disassembly
Lubrication not requiring disassembly
Replacement or adjustment of piezo igniter.
Removal / replacement of seals in Tema and Rego couplings
Burner Frame
• Cleaning
Fuel Cylinders
• Cleaning not requiring disassembly
• Removal / repair / replacement of padded jackets
• Removal / replacement of top padding rings.
• Any lubrication not requiring disassembly
• Removal / replacement of Rego seals and O rings not requiring disassembly
1.3.2 Category B Maintenance
Category B maintenance covers the common maintenance taks that may be carried out by individuals who have
undertaken a Kubicek Balloons maintenance course and who have a valid KB Maintenance Certificate.
The B category maintanance techniques are not listed in this paragraph however easily distiguishable in the folowing
chapters.
1.3.3 Category C Maintenance
Category C maintenance includes a more complex procedures that may only be carried out by individuals with written
approval from Kubíček Balloons for a specific repair process and, where appropriate, the correct national approvals.
Certain maintenance and repair techniques of the C category are described by the appropriate supplement of this
Manual, not the Maintenance Manual itself.
All welding must be made using TIG (Tungsten Inert Gas) according to an applicable national standard and must be
carried out by a welder approved by the appropriate national authority.
Envelopes
• Replacement of Smart Vent, Slide Vent and Lite Vent
• Swaging of Flying Cables
• Repairs involving more than 25% of panels above the equator
• Pre-cut and pre-sewn panels manufacturing
1-2 Edition 2 / Revision 8, 19 Jun 2012
b.2202 maintenance manual for use with the hot air balloon
Baskets
• Wickerwork repairs which extend across more than 20% of the total woven area of the basket or more than 15%
of one basket side.
• Wickerwork repairs which extend to the connection to the bottom or upper basket frame or junctions between
internal partitions
• Repairs of broken or distorted basket frames
• Replacement of Basket Wires
• Swaging of Basket Wires
• Replacement of basket floor
Burners
• Welding and straightening of a burner frame
• Any repair or modification of burner coil
• Swaging of fuel hoses
1.3.4 Category D Maintenance
Category D maintenance may only be carried out by Kubicek Balloons. No description is provided in this Manual.
Envelopes
• The replacement of more than 50% of the fabric present at the time that the envelope was manufactured with
respect to a number of panels
Baskets
• Wickerwork repairs which extend across more than 1/3 of the total woven area of the basket or more than 1/4
of one basket side
• Repairs of broken aluminium alloy tube frames
Burner units and burner frames
• The re-manufacture, repairing or welding of metal components or hose assemblies
Fuel Cylinders
• Repair to the aluminium, stainless steel or titanium shell of a cylinder or any of its screw threads.
Kubicek Balloons accept no responsibility for any consequences resulting from the carrying out of unauthorized
repairs.
1.4 Warnings, Cautions and Notes
The following definitions apply to Warnings, Cautions and Notes used in this manual:
WARNING:
Warns that, in all probability, the non-observation of these instructions and limits will lead to injury or danger of a fatal
accident.
CAUTION:
Warns that the non-observation of the corresponding instructions and prescribed limits could lead to damage.
NOTE:
Draws attention to any special item not directly related to safety but which is important or unusual.
Edition 2 / Revision 1, 20 Jun 2009 1-3
www.kubicekballoons.cz
1.5 Revisions
This manual is kept up to date by manufacturer’s bulletins. All bulletins are available at www.kubicekballoons.cz.
The following action must be taken to ensure the continued validity of your manual:
1. Make the required changes prescribed in the bulletin.
2. Insert the up to date List of Effective Pages.
3. Record the amendment in the Record of Amendments, section 0.1, page I.
The area affected by the revision is indicated by a black vertical line alongside the outer margin.
1.6 Definitions and Abbreviations
Operator - The person responsible for the condition of the balloon and the proper implementation of periodic
inspections and repairs.
Approved organisation - The person or organisation commissioned by the relevant national aviation authority to
carry out periodical inspections.
Periodical inspections - The mandatory inspections as determined by the manufacturer and the operator’s national
aviation authority.
Parts/Components All instrument, mechanisms, equipment, accessory or assembly used during balloon operating
and listed herein.
KB - Balony Kubíček spol. s r.o.
1.7 Balloon Technical Description
A complete desription of the balloon balloon, its systems, controls and equipement is provided in the Kubicek Balloons
Flight Manual (document no. B.2102), section 6.
1.8 Feedback From Operators
In case any technical trouble occurs every operator is obligated to report it to KB. This mainly concerns:
• Fire caused by a failure
• Burner defect which resulted to damage to the envelope
• Leaks or accumulation of the fuel in the basket crew space or balloon envelope
• Burner failure
• Failure of either the burner or the balloon control system
For reporting troubles and other technical questions operators are kindly asked to use the email:
[email protected].
1-4 Edition 2 / Revision 3, 25 Feb 2010
b.2202 maintenance manual for use with the hot air balloon
SECTION 2 - AIRWORTHINESS LIMITATIONS
2.1 Approval Statement
The Airworthiness Limitations section is EASA approved and specifies maintenance required under the applicable
certification basis.
2.2 Inspection Period
The balloon must undergo the annual/100 hour inspection after 12 calendar months or 100 hours of operation,
whichever is the sooner.
The envelope fabric with a reduced strenght must undergo the strenght test (grab-test) after every 50 hours of
operation or after 12 calendar months, whichever is the sooner.
2.3 Personnel
Inspections must be performed by an organisation approved by a relevant national airworthiness authority. Inspecting
personnel must be suitably trained.
2.4 Inspection Procedure
The annual/100 hour inspection description and checklist is provided in section 7 of this manual.
2.5 Time Lifed Items
When a time lifed item has reached the end of its life it must be replaced and the original item discarded. All items
replaced because they have reached the end of their life must be recorded in the balloon’s logbook. Other items are to
be replaced when worn or damaged.
Item
Part no.
Limit
All burner fuel hoses
53102.XX*,
53103.XX*
10 years
Fuel cylinders
-
According to instructions of
the respective manufacturer
Pressure Relief Valve - Schroeder Fire Balloon Fuel Cylinders
(VA 50, VA70)
3055.00
Pressure Relief Valve - Cameron Balloons Fuel Cylinders
(CB 497, CB 599, CB 2088, CB 426, CB 959, CB 2385, CB 2387,
CB 2380, CB 2383, CB 2900, CB 2901, CB 2902)
3160.00, 3161.00
Pressure Relief Valve - Thunder & Colt Fuel Cylinders
(V 20, V30, V40)
3160.00, 3161.00
Pressure Relief Valve - Linstrand Balloons Fuel Cylinders
(T30, V 20, V30, V40)
3198.00
10 years
(maximum storage life prior
to installation 5 years)
* XX is a two-digit code identifying the hose length and coupling
Edition 2 / Revision 11, 23 Jun 2014
2-1
www.kubicekballoons.cz
2.6 Minimum Fabric Strength
The envelope fabric is not given a time life limit. Its actual strength is a limiting factor.
Minimum fabric strength: 200 N/5cm (44 lb/2 in)
This value correspond to the lowest acceptable strength obtained by a grab test. A full description of the fabric grab
test and evaluation of its results is described in para 7.16.
2.7 Minimum Load Tape Strenght
Type of Load Tape
Minimum Strength
PES, width 25 mm, thickness 1.7 mm*
7 500 N
1 690 lb
PES, width 25 mm, thickness 2.7 mm**
12 500 N
2 810 lb
PES, width 20 mm
5 100 N
1 150 lb
PES, width 30 mm
15 000 N
3 370 lb
* Identified by a single longitudinal thread in a contrasting colour.
** Identified by two longitudinal threads in a contrasting colour.
NOTE:
There is no need to test and evaluate the load tape strenght. The fabric grab test is decisive.
2-2 Edition 2 / Revision 11, 23 Jun 2014
b.2202 maintenance manual for use with the hot air balloon
SECTION 3 - ENVELOPE REPAIRS AND MAINTENANCE
3.1 General
3.1.1 Preventative Maintenance (A)
A
B
C
D
Dirty patches on the envelope may be removed by wiping the effected area with a sponge soaked in clean water or
water containing a mild soapy solution. Then, before packing, the envelope should be allowed to dry completely.
Carabiners should be kept clean and their gates and threads oiled occasionally. Any surplus oil should be removed
before the envelope is packed.
3.1.2 Stitching and Thread
Envelope repairs must be made using a lock stitching; chain stitching is not permitted. All seams should be French
Fell Seams with both rows of stitches penetrating four layers of fabric. Needles must be in perfect condition and be
size 110.
The ends of stitch lines should always be ‘locked’ by overlapping for a minimum of 6 cm (2 1/2“) or back-tacking to
prevent the new seam from pulling apart.
When pulleys are replaced or loops remade copy the sewing on the original item.
Thread. A three strand metric 40 (210 denier) nylon or polyester thread must be used, ideally of a contrasting colour
to the fabric. The envelopes are manufactured using polyester thread.
3.1.3 French Fell Seams
The seam used in the manufacture of balloon envelopes is known as
French Fell or Balloon seam.
To make a French Fell seam correctly the two pieces of fabric are folded
together and the two rows of stitching each penetrate four layers of fabric
as shown it the illustration below. When whole panels of the balloon are
replaced this type of seam must be used. If load tapes are present they
should be unpicked and sewn back when the seam is complete. The ends
of stitch lines should always be ‘locked’ by overlapping for a minimum of
6 cm, or back-tacking to prevent the new seam from pulling apart.
French Fell Seam
The length of the stitch should be 2.5 to 5 mm (5 to 10 stitches per inch).
3.2 Fabric Repairs
Inspections must be carried out by an organisation, which is approved by the relevant national airworthiness authority.
Inspectors dealing with inspections/repairs must be trained.
Edition 2 / Revision 7, 11 Jan 2013
3-1
www.kubicekballoons.cz
3.2.1 General
Damaged fabric should be repaired by one of the following methods:
• Panel replacement
• Sewn patch
• Adhesive patch
The limitation for each type of repair is as follows:
• Replacement panels may be used anywhere on the envelope
• Sewn patches may be used anywhere on the envelope
• Adhesive repairs without over stitching may be used below the equator provided the damage being repaired
is not more than 10 cm (4”) in any dimension. An adhesive repair of this type may not be used if the damaged
extends to within 2.5 cm (1”) of a load tape. There must be a minimum of 10 cm (4”) between any two adhesive
patches on a single panel.
• Adhesive repairs with over stitching may be used below the equator provided the damage being repaired is not
more than 1.5 meters (5 ft) in any dimension. Adhesive patches with overstitching may be used above the equator provided the damage being repaired is not more than 10 cm (4”) in any dimension. An adhesive repair of this
type may not be used if the damaged extends to within 2.5 cm (1”) of a load tape. There must be a minimum of
10 cm (4”) between any two adhesive patches on a single panel.
3.2.2 Replacement Fabric
All replacement panels and patches must be made from the same material as was used in the original panel (no. 1441,
1436 or 1437). If in doubt, contact BK for advice.
note:
The fabric used in the original envelope build is recorded on the Envelope Fabric Index Plate which is on the fire resistant
fabric at the mouth of the envelope.
3.2.3 Repairs to Heavy Weight Fabric Panels (B)
B
C
D
Heavy weight fabric panels may only be repaired by panel replacement or a sewn patch. Only the same material may
be used (1437).
3.2.4 Repairs to Fire Resistant Panels (B)
B
C
D
Repairs to the fire resistant panels at the mouth of the balloon or to the scoop may only be made with fire resistant
fabric. Vertical load tapes, in the mouth area, must be always protected on the inside of the balloon by fire resistant
fabric.
3.2.5 Panel Replacement (B)
B
C
D
Unpick the damaged panel. If the damage extends to a load tape then this must first be unpicked. Remove the stitches
and carefully pull the seam apart. Extending the unpicking at least 10 am beyond the panel will make replacing it
easier. Remove all the thread from the area unpicked.
The panel that has been removed may be used as a template for the new panel. If the damaged panel can not be used
as a template then an adjacent panel of the same size may be removed and used instead.
The new panel should be stitched into the envelope using a French Fell seam (see Section 3.1.3).
notes:
1. When replacing a panel make sure that the warp and weft are in the same direction as the panel that is being replaced and that the fabric is correct way around (shiny side outside).
2. Where seams are attached to load tapes, the seam should be sewn first. The completed seam should then be sewn
to the load tape.
3-2 Edition 2 / Revision 0, 15 Dec 2008
b.2202 maintenance manual for use with the hot air balloon
3.2.6 Repairing With a Sewn Patch (B)
B
C
D
To make a fell seam a patch has to be wider by 21 mm (7/8”) on each side than the hole it is to cover and the fabric that
it has to be patched onto has to have the same allowance. Carry out the seam according to para 3.1.3.
•
•
•
•
•
•
•
•
Mark out the damaged area on the panel so that the patch will be parallel to the warp and weft of the fabric.
Cut a patch to shape that will cover the damaged area with an overlap of at least 90 mm (3 1/2”).
Fold under all four edges of the patch by 14 mm (9/16”).
Sew the patch to the panel, over the damaged area, using a single row of stitching close to the folded edge of
the patch.
Cut out the damaged area leaving 10 mm (3/8”) excess that can be folded back under the edge of the patch.
Fold the fabric back inside the patch and sew in place with a single row of stitching.
Seems constructed in this way are not true French Fell Seams however these repairs are acceptable
If the damage reaches to within 20 mm (13/16”) of a seam then the seam should be unpicked and the patch continued to the edge of the panel. The seam at the edge of the panel should be closed using a French Fell Seam.
Seamed Patch
3.2.7 Adhesive Patches Without Overstitching (A)
A
B
C
D
The limitations for adhesive repairs without overstitching are given in section 3.2.1 of this manual. Panels damaged
beyond this limit may be repaired by an adhesive patch with overstitching, a sewn patch or replacement of the panel.
Adhesive repairs may be in the form of circular or oval patches depending on the shape of the damage that requires
repair.
The patch should be cut with rounded corners and should have an overlap around the damage of at least 2.5 cm (1”).
A single patch may be applied to one surface of the envelope for holes with a maximum dimension of 3 cm (1 3/16”),
whilst two patches, one on each side of the fabric, should be used for larger holes.
Patches may be made either from balloon fabric applied using a contact adhesive (e.g. Evo-Stik) or from balloon repair
tape.
Edition 2 / Revision 0, 15 Dec 2008 3-3
www.kubicekballoons.cz
B
3.2.8 Adhesive Strip Repairs With Overstitching (B)
C
D
The limitations for adhesive repairs with overstitching are given in section 3.2.1 of this manual. Panels damaged
beyond this limit may be repaired by an adhesive patch with overstitching, a sewn patch or replacement of the panel.
Tears in the envelope up to 1.5 m (5 ft) long may be repaired by using strips of balloon fabric applied with a contact
adhesive (e.g. Evo-Stik) or with balloon repair tape. The edge of the tape must overlap the original fabric by 2.5 cm
(1”), and two rows of stitching must be sewn around the edge of the patch.
3.3 Load Tape Repairs
3.3.1 General (C)
C
D
Load tapes are essential to the structure of the balloon, and the balloon may not be flown if any load tapes are damaged.
Damaged load tapes must be replaced or repaired using tape of the same specification supplied by BK. Tape ends must
be heat sealed with a flame of hot-knife to prevent fraying.
The standard joint is a 2x50 cm (20”) overlap, secured with two sewn areas with a gap between them. Each sewn
area must have 14 or 25 (according to the type of load tape) rows of parallel stitching along the tape length (see
the illustration below, 25 rows are to be used for 30 mm wide load tape). Each end of a sewn area is to have 4 rows of
stitching across the sewn area. If a tape is damaged near to one of its ends it may be better to replace the section from
the damage area to the end with a new length of load tape. Repairs to the load tapes are to be completed before the
tapes are sewn back onto the fabric of the envelope.
Load Tape Repair
3.3.2 Replacing a Damaged Crown Ring (C)
A damaged crown ring must be replaced and may not be repaired.
C
D
All the load tapes that are attached to the crown ring must be unpicked and the crown ring replaced. Make sure that
the new crown ring (80 for all envelopes except BB142P, 50-054269 for BB142P) is orientated in the same way as the
one that it replaces with the small, rope attachment ring closest to the ground when the balloon is being inflated. The
load tapes are to be in sewn by copying the original joint. It is wise not to detach all load tapes at once but to replace
the load tapes gradually one by one.
3-4 Edition 2 / Revision 0, 15 Dec 2008
b.2202 maintenance manual for use with the hot air balloon
3.3.3 Replacing a Flying Cable by Opening the Turn-back (C)
C
D
To replace a damaged envelope flying cable unpick the
turn-back protector and the tape turn back. Thread on a
new flying wire (use only the wires supplied by BK) and resewing the turn back as shown in the appropriate diagram
below. Care must be taken not to damage the load tape
loop or the turn back.
If the load tape loop is damaged then cut off the damaged
section and heat seal the ends. Make up a new loop with a
minimum of 50 cm (20”) overlap at either end. Thread the
tape through the thimble of the flying wire and sew the
two sides of the replacement tape together as described
in para 3.3.1. Sew the replacement loop onto the original
load tape either by copying the original sewing or by
following the appropriate diagram beside.
Replacing a Flying Wire
NOTE:
The sewing is same for repairs mentioned in sec 3.3.1 and 3.3.2.
3.3.4 Replacing a Kevlar Flying Cable (A)
A
B
C
D
When replacing a damaged Kevlar flying cable detach its lower end from the carabiner and then untie the loop on
the upper end from the load tape loop. Make sure the new cable is of the same lenght as the removed one. Insert the
flying cable loop into the load tape loop, then pass the thimble end through the loop end. Tighten the loop by pulling
the cable while arranging the joint of the loops so the bends are as least sharp as possible. Attach the thimble end to
the carabiner.
3.3.5 Replacing a Ringlock (C)
C
D
A Ringlock must be replaced and not repaired. When a Ringlock is replaced the string lengths and knots must be
identical to the original. The Velcro must be sewn along all its edges. Load tape protective covering must remain.
3.3.6 Envelope Mouth Load Tape Repair (C)
C
D
If the load tape at the lower rim of the envelope mounth is damaged, the affected part is to be replaced by a new one.
Unpick the damaged part and replace it with a new one with the use of the same stitching as used for the original joint
of the tape. If the original seam is damaged or any uncertainity occurs contact BK for advice.
3.4 Tempilabel and Melting Link (A)
A
B
C
D
If the melting link has parted and the temperature flag fallen out replace the melting link and attach a new temperature
flag to it and check the tempilabel.
If a tempilabel does not show overheating - indicated temperature is below 138°C (280°F) – no further inspection is
required. Otherwise the envelope needs to be inspected according to the para 7.17.1. of this Manual.
3.5 Tempilabel (B)
B
C
D
If a tempilabel shows overheating - indicated temperature reaches 138°C (280°F) or damaged do not remove it but sew in a new one with the same temperature range
alongside the original.
Tempilabel
Edition 2 / Revision 9, 01 Jul 2013 3-5
www.kubicekballoons.cz
3.6 Control Lines
3.6.1 General
Damaged control lines must be replaced or repaired with identical lines. Contact BK if in doubt.
All replaced or repaired control lines and are to be secured by using the Safety turnback knot. When two lines are to be
secured together then the open loops should be joined together.
Damaged or broken vectran cords are to be replaced with new ones
(1011). Use a Double Fisherman‘s knot to join two parts of the cord
and a Bowline knot to fix the vectran cord to the edge of the vent
panel.
WARNING:
The overall length of the control lines must not be reduced. Certain spare
length alowing for envelope deformation and operational conditions
must remain.
Safety turnback knot
Double Fisherman‘s knot
3.6.2 Parachute Centralising Lines and Shroud Lines (B)
Bowline knot
B
C
D
If damaged a line should either be replaced or repaired. To repair a damaged line cut out the damaged area and
replacing it with new line. For a centralising line adjust the line to the correct length by using the process described
below. For a shroud line adjust the line to the correct length by comparing it to an adjacent undamaged line. Heat seal
all line ends.
3.6.3 Adjusting the Parachute Centralising Lines (B)
B
C
D
In envelopes with a parachute the centralising lines hold the parachute in the correct position so that it remains
centrally beneath the vent hole. By being the correct length the centralising lines ensure that the parachute seals
properly and always returns to this position when the rip line is released.
3-6 Edition 2 / Revision 6, 05 Nov 2012
b.2202 maintenance manual for use with the hot air balloon
To check and adjust the length of the centralising lines:
1. Have one person hold the envelope where an individual centralising line attaches to the envelope.
2. Pull the line and the relevant load tape taught so that the Velcro on the parachute is adjacent to the equivalent
Velcro patch on the envelope.
3. When the line is the correct length the centre of the Velcro patch on the parachute will be 6 ± 1 cm (6 1/2” ±
3/8”) outside the centre of the equivalent Velcro patch on the envelope. On XR envelopes this is to be established by direct measuring of the centralising lines. The correct length including loops (L) is 225 cm (8 1/2”) at
BB17XR and BBB20XR or 268 cm (8 3/4”) at BB22XR, BB26XR and BB30XR as shown on the picture below.
4. If the Velcro patches are not in this relationship on to another then the centralising line must be readjusted to
the correct length by releasing and retying the attachment knot where it is tied to the envelope.
5. Repeat this process with each of the centralising lines in turn until they are all the correct length.
6. Inflate the envelope and check visually that the parachute is seated correctly.
60 mm ± 10 mm
(2 1/2" ± 3/8")
knot to be adjusted
envelope load tape
to crown ring
Velcro patches
knot
parachute fabric
centralising line
XR models
centralising line
knot to be adjusted
L = 225 cm (8 1/2") - BB17XR, BB20XR
L = 268 cm (8 3/4") - BB22XR, BB26XR, BB30XR
L
Correct Measures for Adjusting the Parachute Centralising Lines
3.6.4 Replacing of Rotation Vent Lines (A)
A
B
C
D
Damaged rotation vent lines are to be replaced. The replacement line should be attached to the original line and the
line pulled through the pulley and D ring to exit from the side of the envelope in the normal way. The line can then be
trimmed to match the original.
3.6.5 Repairing Deflation System Control Lines
If any deflation system control line is damaged or too heat-shrunk then it shall be replaced or extended.
A B
C
D
3.6.6.1 Replacing Deflation System Control Lines (A)
Untie the damaged line from the attachment point and attach the new line to this point. As the damaged line is
removed through the shroud line pulley and lower pulley replace it with the new line. Inflate the balloon and check
that the lines deploys the parachute correctly. Adjust the length of the new line so that there is sufficient to allow for
distortion of the envelope during inflation and in flight.
Edition 2 / Revision 6, 05 Nov 2012
3-7
www.kubicekballoons.cz
A B
C
D
3.6.6.2 Extending Deflation System Control Lines (A)
If there is spare line at the attachment point then the knot at this point may be loosened, the surplus line pulled
through and the line reattached.
The now extended line may be pulled through and the line length adjusted to as same length as original.
3.6.7 Smart Vent, Slide Vent and Lite Vent Shroud/Centralising Lines (B)
B
C
D
If a line is damaged within 80 cm (32“) of the pulley that it is attached to then the damaged section may be cut out
and a new section of vectran line added. If the line is damaged elsewhere then the line must be replaced completely
using vectran line. The length of the new or repaired line should be checked against an undamaged line. A maximum
of three lines may be repaired.
3.6.8 Paralite Shroud lines (B)
B
C
D
If damaged a line should either be replaced or repaired. To repair a damaged line cut out the damaged area and replace
it with new line. Ensure that the replaced or repaired line is the correct length by making it the same length as an
adjacent line. Heat seal all line ends
3.6.9 Paralite Centralising Lines (B)
B
C
D
If damaged a line should is to be replaced. Ensure that the replaced line is the correct length by making it the same
length as an adjacent line.
3.6.10 Smart Vent, Slide Vent and Lite Vent Tapes (B)
B
C
D
B
C
D
B
C
D
If any of these tapes are damaged or worn then they must be replaced.
3.6.11 Lite Vent and Paralite Weight (A)
A
If the weight is damaged then it must be replaced with a new, identical, weight.
3.6.12 Pulleys (B)
Damaged pulleys must be replaced. If in doubt, contact BK to specify which type to use. When replacing a pulley resew
the attachment tape in exactly the same way that the original was sewn, paying particular attention to any heavy back
stitching that was on the original attachment.
CAUTION:
When replacing a pulley use one that is identical to the original. Never replace a pulley which can rotate about its vertical
axis with one that can not, or vice versa. Only use pulleys supplied by KB.
3.6.13 Carabiners (A)
A
B
C
D
Replace damaged carabiners. Use only steel Stubai carabiners of the same or higher loading capacity (30 kN carabiner
217, 40 kN carabiner 2784).
3-8 Edition 2 / Revision 8, 19 Jun 2012
b.2202 maintenance manual for use with the hot air balloon
SECTION 4 - BASKET REPAIR AND MAINTENANCE
4.1 Routine Maintenance (A)
A
B
C
D
The basket sides and floor should be pressure washed with clean water without additives. Once clean the basket should
be dried naturally and then stored so that it will remain dry. It is recommended to place the basket on a pallet.
If desired the cane and wicker sides may be painted with varnish or Danish oil.
The leather on the lower edge of the basket should be washed to remove dirt and grime. Once the leather is clean and
dry it should be treated in the following manner:
Baskets with rounded floor edge covered with leather:
The leather should be coated with two layers of a leather conserving treatment. The leather should be allowed to dry
completely between coatings.
Baskets with right-angled floor edge covered with rawhide:
Whiten the rawhide using a white shoe treatment.
The suede on the upper rim of the basket should be brushed with a suede brush.
4.2 Wickerwork
Damage to the wicker greater than 6 cm in both horizontal and vertical dimensions is to be repaired by reweaving.
4.3 Rope Handles (B)
B
C
D
Cut the damaged rope at least 50 cm beyond the damaged area in both directions and remove the damaged section.
Weave in a new section of rope, overlapping the undamaged sections by at least 50 cm (20“) at either end. Heat seal
all exposed rope ends. Secure the replacement rope to the undamaged sections using plastic ties or straps.
4.4 Basket PLYWOOD Floors, Load Bearing Wooden Frames and Runners (B)
B
C
D
Minor damage, limited to one side of the floor, may be repaired using common woodworking techniques. Cracks that do
not penetrate the floor or which penetrate the floor but are no longer than 50 cm (20“) on either side of the floor, may
be covered on the upper side of the floor by a thin metal plate that is screwed to the floor to cover the damaged area. If
this method is used then care must be taken to ensure that the screws do not go anywhere near the basket wires.
If there is major damage to the floor or a crack which penetrates the floor and is longer than 50 cm (20“) on either side
of the floor then the floor is to be replaced with identical one. Contact BK to specify which type to use if in doubt.
Scratching and limited wearing away of the load bearing wooden frame or runners is acceptable. If the any part of the
load bearing frame or a runner is cracked through more than 50% of its original thickness then it is to be removed and
replaced by a similar part from the manufacturer.
After replacing a section of a load bearing wooden frame or a runner paint the new wood and the area around it with
at least two coats of transparent synthetic protective wood varnish.
Edition 2 / Revision 1, 20 Jun 2009 4-1
www.kubicekballoons.cz
4.5 Upholstery and Padded Suede / Leatherwork (A)
A
B
C
D
To mend the soft parts of suede / leatherwork use common upholstery aids. Repair torn or damaged leather by sewing it
together or by patching with a similar material. If the padding under the suede or leather has been damaged or rubbed
away then repair the area by inserting soft upholstery padding before resewing the covering suede or leather.
Basket padding may be repaired using common sewing techniques.
4.6 Bottom edge Leather or Rawhide (A)
A
B
C
D
Baskets with leather (dark leather):
Damaged leather on the lower edge of the basket must be replaced. Unpick the damaged section and use it as a template
to create a new section. Cut the leather to shape with sheet metal shears. Punch 5 mm (3/16“) sewing holes along the
upper edge of the replacement section. Impregnate the leather properly with leather conserving treatment (see para
4.1 above). Secure the lower edge of the section to the underside of the floor with upholstery staples (Alternatively
tacks may be used). Sew the upper edge in place using 5mm (3/16“) diameter cord.
Baskets with rawhide (hard white):
Damaged rawhide may be replaced or patched.
If replacing a complete side then unpick the damaged section and use it as a template to create a new section. Cut
the rawhide to shape using a sharp knife. Punch 3 mm (1/8“) sewing holes along the upper edge of the replacement
section. Soak the rawhide in water until it is pliable. Secure the lower edge of the section to the undersside of the floor
with upholstery staples (Alternatively tacks may be used). Sew the upper edge in place using 3mm (1/8“) diameter
cord. Leave the rawhide to dry naturally.
If a patch is to be used then remove the damaged section and sew the edges back in place. Cut a patch from rawhide
that will overlap the damaged area by at least 70 cm (28“) on either side. Cut the rawhide to shape using a sharp knife.
Punch 3 mm (1/8“) sewing holes along the upper edge of the replacement section. Soak the rawhide in water until it is
pliable. Secure the lower edge of the section to the underside of the floor with upholstery staples (Alternatively tacks
may be used). Sew the upper edge in place using 3mm diameter cord. Leave the rawhide to dry naturally.
notes:
1. Rawhide contracts as it dries so it is essential to use a patch that is large enough to cover the damaged area when
the rawhide is dry.
2. If the basket wires are exposed when leather or rawhide is removed then inspect the exposed wires before the
leather or rawhide is replaced.
4.7 Sliding Shims (A)
A
B
C
D
C
D
C
D
C
D
Unscrew damaged sliding shims and replace with new ones.
4.8 Metal Basket frames (C)
If the top or bottom basket frame is either damaged or distorted then contact Kubicek Balloons for advice.
4.9 Basket Wires (C)
Damaged basket wires must be replaced and may not be repaired. Contact BK to specify which type to use.
4.10 Burner Support Rods (A)
A
B
Broken or cracked burner support rods must be replaced (50169 or 52153 according to the basket size).
4-2 Edition 2 / Revision 0, 15 Dec 2008
b.2202 maintenance manual for use with the hot air balloon
4.11 Carabiners (A)
A
B
C
D
Replace damaged carabiners. Use only steel Stubai carabiners of the same or higher loading capacity supplied by KB
(30 kN carabiner 271, 40 kN carabiner 2784).
4.12 Cylinder Straps (A)
A
B
C
D
Replace a cylinder strap that are worn or frayed through more than 15 % of its width or which has a damaged or
deformed buckle.
4.13 Composite Floor
D
4.13.1 Composite Floor Repair (D)
The technique of repair depends on actual damage. Contact KB for advice.
4.13.2 Composite Floor Replacement (B)
B
C
D
When necessary the composite floor is to be replaced in the same way as the plywood one. Their attachment to the
basket structure is the same.
Edition 2 / Revision 1, 20 Jun 2009 4-3
www.kubicekballoons.cz
intentionally left blank
4-4 Edition 2 / Revision 0, 15 Dec 2008
b.2202 maintenance manual for use with the hot air balloon
SECTION 5 - BURNER REPAIRS AND MAINTENANCE
5.1 General
This chapter provides instructions for service and maintenance of the Ignis burner of serial number 471 and above.
In case you deal with any older version or any other type of burner use either the respective manual or contact KB for
obtaining it.
WARNING:
Before starting any maintenance or repair work disconnect the burner from all fuel supplies and vent all the fuel from the
burner.
CAUTION:
It is essential that all fuel system and burner repairs are carried out in a clean environment. The presence of dirt or chemicals
may damage movable parts, rubber seals or bonded joints and cause blockage of the burner jets.
Main burner parts:
4
1
6
5
3
9
7
2
Pic. 1
1 – Vaporising coil with jet ring
2 – Manifold block
3 – Fuel hoses with couplings
4 – Gimbals
Edition 2 / Revision 1, 20 Jun 2009 8
5 – Whisper Burner (WB)
6 – Pilot Burner (PB)
7 – Main Blast valve (MBV) with lever
8 – Handle
9 – Whisper burner and Pilot burner with levers
5-1
www.kubicekballoons.cz
5.2 Sealing and Threaded Joints Techniques
5.2.1 O-rings and Rubber Seals
When disassembling sliding parts with O-rings the new O-rings must be used for reassembling. When disassembling
other types of joints the O-rings and seals must be inspected and replaced if damaged or deformed. A graphite-based
lubricant (Molyduval Attila GR is recommended) is to be used for lubricating O-rings on the sliding joints and silicone
grease for O-rings on other joints. We recommend to replace the O-rings after 12 months of intensive service.
5.2.2 Threaded Joints
a) General – When assembling burner parts and fuel hoses that are not fixed either with a sealant or sealed with PTFE
tape lubricate the threads with silicone grease. Otherwise the threaded joints on the parts of aluminium alloys may
jam.
b) Joints secured with a sealant – Threads must be clean and free from grease, dirt and old sealant. Smear the sealant
on the male thread and screw it in immediately. To shorten the drying time for sealants a spray activator may be
applied to the thread before the sealant is applied. Always comply with the drying times recommended by the sealant
manufacturer.
Common sealants:
• Loctite 243 – for securing threads against unintentional loosening (removable joints)
• Loctite 270 – for sealing and securing thread
c) Joints sealed with PTFE tape – Ensure that the threads are clean and free from grease, dirt and old tape. Burrs on the
threads may be removed with emery cloth or a wire brush.
When using PTFE Tape wrap the male thread in the direction of the thread. Keep tension on the tape whilst wrapping
the thread so that the tape is pulled into the thread. Use between 3 and 6 layers depending on the diameter of the
thread; the greater the diameter the more the layers of thread.
When the thread is correctly wrapped the tape must fill the space between
each thread and form a cone as seen on the picture 2.
CAUTION:
Keep the first thread free from tape to prevent tape being cut off during reassembly.
Loose pieces of tape could get into the fuel system and cause a blockage.
5.3 Standard Maintenance Techniques
5.3.1 Removing the Burner From the Burner Frame (B)
Pic. 2
B
C
D
It is recomended to remove the burner from the frame prior to each maintenance or repair on burner unit or fittings.
Removing the burner:
- unscrew the bolts (7) and remove the gimbal top (3)
- remove the burner
- keep the friction pad and, washers and spring discs (4, 5, 6) inside the gimbal or store them apart
Removing the burner units:
- pull aside the handle grip and unscrew the bolt (10)
- unscrew bolts (8) and (9)
- remove the burner unit
5-2 Edition 2 / Revision 0, 15 Dec 2008
b.2202 maintenance manual for use with the hot air balloon
Reassembling the burner into the burner frame:
- connect the burner units with the handle
- refit all the screws and tighten slightly
- tighten all the screws
- lubricate the burner frame tube and insert shims in this order: 4 – 5 – 6 – 5 - 4 (friction pad (4) – friction
washer (5) – spring disc (6) - friction washer (5) - friction pad (4))
- fit the frame and gimbal top, tighten the bolts (7)
Pic. 3
1 – Ignis burner unit (53115)
2 – Gimbals (52926)
3 – Gimbal top (52929)
4 – Gimbal friction pad (52934) – 2x
5 – Gimbal friction washer (52935) – 2x
6 – Spring disc (2734)
7 – Bolt M6x20 hex socket (2735) with spring
washer (1370) – 4x
8 – Bolt M6x8 with flange button head (2907)
9 – Bolt M6x20 with flange button head (2839)
or M6x25 (2906)
10 - Bolt M6x20 hex, countersunk head (2860)
7
3
4
5
6
4
8
2
9
1
10
5.3.2 Fuel Hoses Replacement (B)
B
C
D
WARNING:
Never try to repair damaged fuel hoses! Always replace the damaged hose with a new one supplied by BK.
Burner hose connections with 1/4“ NPT threads (fuel hose / REGO coupling) should be assembled with PTFE tape.
Burner hoses with 3/8“ BSP and M18 x1.5 parallel threads (fuel hose / TEMA 3810 coupling and hose / burner) should
be assembled with the appropriate sized Dowty seal (steel washer with bonded rubber insert).
These maximum recommended torque values should not be exceeded when replacing the following components:
• 1/4 NPT thread max. 20 Nm
• 3/8 BSP thread max. 20 Nm
NOTE:
It is recommended to lubricate burner hose connections with graphite powder.
Edition 2 / Revision 11, 23 Jun 2014
5-3
www.kubicekballoons.cz
B
5.3.3 Removing the Manifold Block (B)
C
D
It is recommended to remove the manifold block from the burner unit for easier maintenance of the blast valve, Whisper
Burner valve and Pilot burner valve and for removing the Pilot Burner with the pressure reducer.
Removing the manifold block:
- unscrew the fuel supply bolt (3)
- unscrew the bolts (4) – 4x
- take the manifold block out of the can:
NOTE:
If the can can not be easily removed, screw the fuel supply bolt back into the manifold block so there remain approximately
5 mm (1/5“) gap between the blot head and the vaporizer ring. Unblock the manifold block by tapping on the screw
head.
Mounting the manifold block:
- lubricate the O-ring (6) and insert it into the can (2)
- attach the manifold block
- insert the O-rings (5) -2x into the vaporiser connection ring , lubricate the bolt (3) thread with silicone grease
and srcew in – do not tighten
- tighten the bolts (3) and (4)
- adjust the position of the blow-off tube, its end should be right above one of the jets
4
6
2
3
5
1
4
Pic. 4
1 – Manifold block (53116)
2 – Vaporising coil with the can (53298, 53116)
3 – Fuel supply bolt (53264)
4 – Bolt M5x16 hex socket (2763) with spring washer (2817)– 4x
5 – O-ring 22x2,5 (3024) – 6x
6 – O-ring 96x2 (2912)
5-4 Edition 2 / Revision 11, 23 Jun 2014
b.2202 maintenance manual for use with the hot air balloon
5.3.4 Disassembling the Main Blast Valve (MBV) (B)
1
14
13
12
10
11
8, 9
5
7
3
6
4
2
B
C
D
Pic. 5
1 – Manifold block (53116)
2 – Handle body (53142)
3 – Handle tube (53146)
4 – Screw M4x60 (2834)
5 – Circlip (2984)
6 – Main Blast Valve Lever pin (53265)
7 – MBV lever – left/right (53287)
8 – Friction washer (53258)
9 – Distance washer 0.3 / 0.5 (53266)
10 – MBV cone case housing (53257)
11 – O-ring 17.86 x 2.62 (3299)
12 – O-ring 16 x 2.5 (2930)
13 – MBV spring (53192)
14 – MBV cone (53255)
Disassembly:
- unscrew the screw (4) – 2x
- remove the handle body (2) and handle tube (3)
- remove the circlip (5) and push out the lever pin (6)
- remove the lever (7) and washers (8) and (9)
- using the 13 mm tubular box spanner unscrew the cone case (10) and remove it together with the cone (14) and
spring (13)
Assembly:
- before the re-assembly clean the dirt and old grease from all the parts
- lubricate the MBV cone with the Molyduval Attila GR grease while avioding the grease to fill the O-ring groove
which makes the cone too difficult to insert
- put on the spring (13) and cone case (8) with O-rings (11, 12)
- lubricate the thread with the silicone grease and screw the prepared assembly into the manifold block (1)
- place the distance washer (9), friction washer (8), MBV lever (7) and push in the lever pin
- verify the clearace between the lever (7) and washer, it should be at least 0.3 mm (.012”). If necessary, remove or
replace the distance washers (9) so set the clearance 0.3 – 0.5 mm (.012” - .020”).
- secure the pin (6) with the circlip (5). If the circlip is too loose use a new one. s
- put on the handle tube (3) and secure it with screws (4) – 2x
Edition 2 / Revision 11, 23 Jun 2014
5-5
www.kubicekballoons.cz
5.3.5 Disassembling the Whisper Burner (WB) and Pilot Burner (PB) (B)
B
C
D
Disassembly:
- loosen the screws (5) and (8), not necassary to unscrew them fully
- unscrew the lever pin (6), remove the lever (4) and lever base (7) with the distance washer (9)
- using the 13 mm tubular box spanner unscrew the WB / PB cone case (10) and remove it from the manifold block
(1) together with the cone (2) and spring (3)
Assembly:
- before the re-assembly clean the dirt and old grease from all the parts
- lubricate the WB / PB cone with the Molyduval Attila GR grease while avioding the grease to fill the O-ring groove
which makes the cone too difficult to insert
- put on the spring (3) and cone case (10) with O-ring (11)
- lubricate the thread with the silicone grease and screw the prepared assembly into the manifold block (1)
- place the distance washer (9), lever base (7), WB / PB lever (4) and screw in the lever pin
- verify the clearace between the lever (4) and lever base (7), it should be at least 0.3 mm. If necessary, remove or
replace the distance washers (9) so set the clearance 0.3 – 0.5 mm.
- set the lever base (7) into a correct position and secure with the screw (8)
- secure the lever pin (6) with the screw (5)
1
2
3
11
10
9
Pic. 6
1 - Manifold block (53116)
2 – WB / PB cone (53284)
3 – WB / PB spring (53275)
4 – WB / PB lever – left / right (53273, 53132)
5 – adjusting screw M3 x 4 (2853)
6 – WB / PB lever pin (53196)
7- lever base left / right (53286)
8 – adjusting screw M5 x 10 (2974)
9 – distance washer (53180)
10 – WB / PB MBV cone case (53285)
11 – O-ring 17.86 x 2.62 (3299)
8
7
4
6
5
5-6 Edition 2 / Revision 10, 30 Sep 2013
b.2202 maintenance manual for use with the hot air balloon
5.3.6 Disassembling the Whisper Burner (WB), Pilot Burner (PB), Piezo Igniter and Pressure
Gauge (B)
B
C
D
Whisper Burner Disassembly and Re-assembly:
- using the spanner unscrew the WB (4) from the manifold block (1)
- place the O-ring (3) on the WB (4), lubricate the thread and O-ring with silicone grease
- screw the WB (4) into the manifold block (1) and fasten
Pilot Burner Disassembly and Re-assembly:
- remove the blow-off tube, its attachment is detailed on the pic. 8
- using the spanner loosen the PB with pressure reducer (2) in the lower part and unscrew from the manifold block
(1)
- place the O-ring (3) onto the the WB pressure reducer body (2), lubricate the thread and O-ring with silicone
grease
- screw the PB (2) into the manifold block (1) and fasten
- put on the blow-off tube (7), push it slightly to the surface of manifold block and fix its position
Piezo Igniter Disassembly and Re-assembly:
- loosen the screw (6), no need to unscrew it fully
- remove the igniter (5) from the manifold block (1)
- lubricate the hole for igniter in the manifold block (1) with silicone grease and insert the igniter (5)
- set the position of the igniter (5) against the PB head, the igniter needle is to be placed 3-4 mm (approx. 1/8”)
from the edge of the PB slot.
Pressure Gauge Disassembly and Re-assembly:
- loosen the screw (9), no need to unscrew it fully
- unscrew the pressure gauge (8) from the manifold block (1), hold the gauge carefully on the metal side
- wrap the pressure gauge thread with PTFE tape and screw it into the manifold block
- fix the gauge in correct position with the screw (9)
Pic. 7
1 – Manifold block (53170)
2 – Pilot burner with pressure reducer (53118)
7
3 – O-ring 17.86 x 2.62 (3299)
4 – Whisper burner (53125)
5
9
5 – piezo igniter (53114)
6 – screw M5 x 10 (2833)
4
2
7 – blow-off tube (53207)
8 – pressure gauge (50524)
3
9 – intake throttle (53208)
6
3
8
1
Edition 2 / Revision 10, 30 Sep 2013 6
5-7
www.kubicekballoons.cz
5.3.7 Pressure Reducer Disassembly and Re-assembly (B)
Pressure reducer disassemby:
- unscrew the PB from the pressure reducer
- unscrew the PR cup (4) from the chamber nut (1). The thread is secured by
Loctite 243.
- remove the piston (3) carefully
Pressure reducer assemby:
- while re-assembling lubricate the PTFE wiping seal with CARBAFLO BBL 50 and
insert the piston (3) carefully into the piston chamber (4).
- place the spring (2) and screw both piston chambers together. Secure the
thread with Loctite 243.
B
C
D
8
9
10
11
12
PB without the pressure reducer
7
In general the arrangement of PB with and without pressure reducer (supplied by a
vapour phase) is the same. The differential piston and pressure equalisation hole is
nor used.
6
5
4
3
Pic. 8
1 – PR chamber nut (53281)
2 – PR spring (53165)
3 – Difference piston (53123)
4 – PR cup (53137)
5 – PR filter (2828)
6 – Pilot burner jet (2795)
7 – Throttle ring (53208)
8 – Blow-off tube (53207)
9 – Pilot burner head (53117)
10 – Adjusting screw M3x4 (2853)
11 – Adjusting screw M5x10 (2833)
12 – Pilot burner leg (53141)
5.3.8 Pilot Burner Fuel Filter Replacement (B)
2
1
B
C
D
Filter I
Fuel filter is glued into the piston chamber, see pic. 8.
Filter II – only at on the pressure reducer version
Unscrew the filter plug (see pic. 9), unscrew the filter.
Lubricate the filter thread with Molyduval Atilla GR grease
prior to assembly.
5
2
1
2
3
4
CAUTION:
On version with vapour hose supply (without the pressure
reducer) a blidening bolt (no. 689) must be installed
instead of the fuel filter. Otherwise the liquid phase would
penetrate into the vapour phase circuit.
Pic. 9
1 – Filter II plug (53209)
2 – Fuel hose
3 – Filter (1137)
4 – O-ring 10x1 (2827)
5 – Sealing washer (2765)
5-8 Edition 2 / Revision 8, 19 Jun 2012
b.2202 maintenance manual for use with the hot air balloon
5.4 Troubleshooting
B
5.4.1 Pressure Gauge Repairs (B)
C
D
Replace a non-working pressure gauge with a new one.
A loose glass should be bonded with cyanoacrylate glue.
If a needle doesn’t point at zero pressure while disconnected fuel supply and Main Blast Valve open remove the glass
and set the needle correctly. It is necessary to pull the needle out and push its axe in the opposite direction at the
same time to prevent damage to the gauge mechanism.
After adjusting the needle position make sure the pressure gauge works correctly by pressurising it to at least 0.5 MPa.
Use nitrogen for pressurisation and verify the pressure with another correct pressure gauge.
5.4.2 Unefficient Removal of Condensation (A)
A
B
C
D
If the blow-off if insufficient check whether it is not blocked or has deformed ends. If necessary adjust its position.
Loosen the fixing screw and push the tube just to the bottom of the manifold block. The upper end of blow-off tube
must be oriented in the axis of any of the burner jets and approximately one half the jet should be covered while seen
from above.
5.4.3 Pilot Burner (B)
B
C
D
If the Pilot Burner valve control is too stiff or even jammed or the valve doesn’t seal enough or a fuel leaks around the
control lever: follow the instruction given in para 5.4.6. since the design of Pilot burner mechanism is similar to that
of Whisper Burner
If the amount of flame is too small, unstable or too big: Adjust by regulating the amount of intake air, see para 4.6.
If the regulating ring is fitted the amount of air can be regulated with opening and closing the intake holes with it.
Never close the hole fully.
If the burner extinguishes despite the fuel pressure is correct and pressure reducer working: Clean the Pilot Burner jet.
On burner with the Pilot Burner fed by vapour fuel check the dispersing gauze which must not be blocked with dirt or
carbon deposit. If so, replace it with a new one. Wash the fuel jet with petrol and blow with compressed air.
If still the Pilot Burner doesn’t work well: Check the fuel filters. Remove the filter, wash it with petrol and blow with
compressed air. If the filter is too dirty it should be replaced.
Filter I. stage see pic. 9, filter II. stage see pic. 8.
B
C
D
5.4.4 Cleaning the Pilot Burner Pressure Reducer (B)
While fed by a low-quality fuel the Pilot Burner function may be degraded due to blocking the pressure reducer with
oil segregated from the fuel. This is indicated by a weak flame and the jet stained with oil.
Remove the pressure reducer, disassemble it and clean. In the upper part is glued a fuel filter. Wash the whole part in
petrol an dry well. When disassembling and assembling the burner pay attention not to damage the piston seal by the
thread. Never use alkalic solvents for cleaning the piston.
A damaged piston seal is indicated by a fuel escaping from the deaerating hole in pressure reducer body Always use
a new piston instead trying to replace the damaged seal. Before inserting the piston into the pressure reduced body
lubricate the seal with a thin layer of PTFE lubricant CARBAFLO BBL 50.
Edition 2 / Revision 0, 15 Dec 2008 5-9
www.kubicekballoons.cz
NOTE:
A pressure reducer which is only little dirty can be cleaned by operating on a clean propane which forces the oil out. Let the
Pilot Burner burn for at least 2 hours. It is recommended to adjust the flame after cleaning.
B
5.4.5 Main Blast Valve (B)
C
D
Main Blast Valve control is too stiff or even jammed or the valve doesn’t seal enough:
1. Check the movement of the valve control lever mechanism. Change the damaged parts and lubricate the
mechanism with Molyduval Attila GR grease.
2. Check the condition and lubrication of the valve cone seal and cone case. If damaged replace the whole cone.
Lubricate the friction surface and seals with Molyduval Attila GR grease.
3. Check condition of the face seal and manifold block sealing seats If the sealing ring is damaged replace the
whole cone and clean well the bearing surfaces.
4. Check the MBV spring for permanent deformation. If the valve doesn’t seal while shut replace the spring with a
new one.
Fuel leakage around the lever mechanism, fuel pressure gauge, fuel hose connection or fuel filter II plug.
1. Check condition of the sealing rings and cone case. If the sealing is damaged replace the whole cone. Lubricate
the friction surface and sealing rings with Molyduval Attila GR grease.
2. Check condition of pressure gauge seals. Replace the PTFE tape on the gauge thread, screw the gauge, tighten
and fix the correct position with the screw.
3. Check whether the fuel hose is well tightened and condition of the USIT sealing washer on the fuel hose
connection thread. If necessary replace the sealing the sealing washer and tighten the hose.
4. Check condition and tightness of the fuel filter cover. If damaged replace the sealing washer with a new one and
tighten the cover.
B
5.4.6 Whisper Burner Valve and Pilot Burner Valve (B)
C
D
Valve control is too stiff or even jammed or the valve doesn’t seal enough:
1. Check condition of the sealing rings of the WB / PB cone and guiding surfaces of the WB / PB cone case. If
the seal is damaged replace the whole cone. Clean the friction surfaces and lubricate the sealing rings with
Molyduval Attila GR grease.
2. Check condition of the cone face seal and a bearing surface. If the seal is damaged replace the whole cone.
3. Check movement of the valve control mechanism. Change the damaged parts and lubricate the mechanism
with Molyduval Attila GR grease.
Fuel leakage around the lever mechanism, on the upper side of manifold block around the Whisper Burner leg:
1. Check condition of the sealing rings of the WB / PB cone and guiding surfaces of the WB / PB cone case. If
the seal is damaged replace the whole cone. Clean the friction surfaces and lubricate the sealing rings with
Molyduval Attila GR grease.
2. Check condition of the sealing ring and of the bearing surface. Replace the damaged sealing rings. Clean the
sealing surfaces and grind off a possible burrs.
5.4.7 Piezo Igniter (A)
A
B
C
D
Piezo igniter malfunction:
1. Check position of the piezo igniter needle. Clean carbon deposit from the ceramic part. Set the correct position
of the needle. Replace the non-working igniter with a new one.
5-10 Edition 2 / Revision 0, 15 Dec 2008
b.2202 maintenance manual for use with the hot air balloon
5.4.8 Repair of Leakage in Junction of the Descent Tube / Manifold Block (B)
B
C
D
When a leakage is detected replace the sealing rings with new ones. Do not release the stainless steel nut at the
descend tube end. Unscrew the screws fixing the manifold block and remove the block. Lubricate the new sealing rings
according to 5.3.3.
B
5.4.9 Vaporising Coil, Metal Covers and Lamellas (B)
C
D
If deformed, straighten the deformation by knocking or prising with a hardwood rod. Only small deformations within
approximately 3mm (1/8“) may be repaired. Strength test must be carried out after each repair involving shaping of
vaporising coil, see para 7.4.
5.4.10 Swing Burner Socket (A)
A
B
C
D
B
C
D
If damaged replace the rubber washers or swing sockets with a new ones.
5.4.11 Adjustable Height Burner Frame (B)
If the adjusting arm can’t maintain a fixed height it is necessary do adjust or pressurize the gas strut. This can be done
by an authorised gas strut supplier or by burner manufacturer.
In case the burner frame or the gas strut is damaged so the burner height can not be fixed, replace the damaged parts
with new ones.
Edition 2 / Revision 0, 15 Dec 2008 5-11
www.kubicekballoons.cz
5-12 Edition 2 / Revision 1, 20 Jun 2009
b.2202 maintenance manual for use with the hot air balloon
SECTION 6 – INSTRUMENT REPAIRS AND MAINTENANCE
6.1. Maintenance
Follow the instructions for use of a respective instrument
Edition 2 / Revision 0, 15 Dec 2008 6-1
www.kubicekballoons.cz
intentionally left blank
6-2 Edition 2 / Revision 0, 15 Dec 2008
b.2202 maintenance manual for use with the hot air balloon
SECTION 7 – INSPECTION SCHEDULE
7.1 General
This section of the Manual contains KB‘s recommended inspection schedule for all balloons manufactured by them.
It’s reccommended to copy the following tables and use them as a checklist for performing the inspections.
7.2 Scheduled Inspections
This section contains KB‘s recommended inspection schedule for all balloons manufactured by them.
All Kubicek balloons require the pre-inflation inspection before every free flight or tethered operation. Instructions
are provided in the respective section of the Flight Manual (document no. B.2102).
All Kubicek balloons require inspection each calendar year and after each 100 hours of flight or tethered operation,
whichever is the sooner. Inspections are to be carried out in accordance with Sections 7.4 to 7.14 using the methods
described in Sections 7.15 to 7.19.
Fuel cylinders require inspecting each 10 years.
Equipment manufactured by companies other than KB must be inspected in accordance with that manufacturers
schedule.
7.3 Non-scheduled Inspections
The following inspections are non-scheduled:
1.
2.
3.
4.
Envelope Overheat Inspections Powerline Contact Inspections Hard Landing Inspection
Test Inflation After Repair Para 7.19.1
Para 7.19.2
Para 7.19.3
Para 7.19.4
7.4 Documentation
The following documentation must be present at the time of the inspection.
1
Balloon’s log book with all the components to be inspected correctly listed.
2
Certificate of airworthiness.
3
Flight manual – the latest issue with all relative supplements.
4
Maintenance manual – latest issue.
5
Where components are made by another manufacturer the appropriate Flight and
Maintenance sections of these manuals.
6
Check that all applicable service bulletins and ADs have been actioned.
Edition 2 / Revision 11, 23 Jun 2014
7-1
www.kubicekballoons.cz
7.5 Envelope
1
Inspect that the crown ring is not corroded and that the crown line is undamaged.
2
Inspect the vertical and horizontal load tapes and the stitching where the tapes cross. Pay
particular attention to the tapes where they cross the vent hole and where the vertical tapes
attach to the crown ring and to the sewing around the top edge of the envelope.
3
Inspect the envelope fabric panels for condition, damage, repairs and porosity. Pay
particular attention to the overlapped panels of the rotation vents. If substantial fabric
porosity is suspected then a flight test should be performed, but only after a grab test has
demonstrated that the balloon is safe to fly (para 7.16).
4
Check that a melting link and temperature streamer are correctly attached inside the
envelope
5
Inspect the Tempilabel. Record the maximum temperature indicated by the label in the
balloon’s logbook. If overheating is indicated (over 138°C) then the envelope must be grab
tested (para 7.16).
6
When the envelope has a total of 260 hours or more of free and tethered flight it is to be
grab tested (para 7.16). A grab test may be also be performed at any time if the inspector
considers such a test to be necessary. Pay attention at GP and XR envelopes: the location of
tested fabric is different from other envelopes.
7
Inspect all the control lines and rotation lines along with their associated attachment
points and pulleys.
8
Inspect the vertical load tapes and stitching for burn damage and wear where the flying
cables attach to them at the mouth of the envelope. Make sure that the pockets that protect
these attachment are correctly covering the joints.
9
Check the flying cables for wear and heat damage. 10
Check that that the carabiners are undamaged
NOTE:
The fabric panels of a regular shaped envelope may be inspected by either inflating the envelope or by a panel by panel
inspection of the uninflated envelope. Special shape balloons must be inflated for the fabric panels to be inspected.
7.6 Parachute
1
Check the condition of the fabric.
2
Check that the centralising and shroud lines are in good condition and the knots secure.
3
Check that the loops on the parachute are undamaged and the stitching secure.
4
Check the correct length of the parachute centralising lines
7.7 Smart Vent and Slide Vent
7-2 1
Check the condition of the parachute (para 7.6).
2
Check the attachment of the lines to the crown ring.
3
Check the shroud/centralising line pulleys on the envelope and parachute edge and that
their attachments are secure and undamaged.
4
Check that the shroud/centralising lines are undamaged and that the ball stops are in place
and undamaged.
5
Check that the central tape and associated lines are undamaged
6
Check the rip line and venting lines are undamaged and correctly attached to the
envelope.
7
Check that the pulleys on both rip and venting lines are undamaged.
8
Check that the vent line bag is fitted in the basket
Edition 2 / Revision 8, 19 Jun 2012
b.2202 maintenance manual for use with the hot air balloon
7.8 Lite Vent
1
Check the condition of the parachute as in para 7.6.
2
Check the attachment of the lines to the crown ring.
3
Check the shroud/centralising line pulleys on the envelope and parachute edge and that
their attachments are secure and undamaged.
4
Check that the shroud/centralising lines are undamaged.
5
Check that the central tape and associated lines on the rip line are undamaged
6
Check that the central tape and associated lines on the venting line are undamaged.
7
Check that the weight on the reset line is undamaged
8
Check the rip, venting and reset lines are undamaged and correctly attached to the
envelope.
9
Check that the pulleys on the rip, venting and reset lines are undamaged.
10
Check that the venting and reset line bags is fitted in the basket
7.9 Paralite
1
Check the condition of the parachute as in para 7.6.
2
Check the centralising line rings on the envelope and parachute edge and that their
attachments are secure and undamaged.
3
Check that the shroud/centralising lines are undamaged.
4
Check that the weight on the reset line is undamaged
5
Check the rip and reset lines are undamaged and correctly attached to the envelope.
6
Check that the pulleys on the rip and reset lines are undamaged.
7.10 Velcro Rip Panel
1
Check along its entire length that the Velcro is not blocked with loose thread or grass and
that it functions correctly.
2
Inspect the fabric on either side of the Velcro.
3
With the Velcro sealed pull the panel taut and make sure that the length of the overlaying
tapes is at least 10 percent greater than the panel that they cover at that point. Check all the
overlaying tapes in this way.
4
Inspect the three ring lock and make sure that the fabric loop is not worn.
7.11 Burner and Fuel System
1
Inspect the burners, their frames and fuel hoses for condition and the hoses for date of
manufacture (para 7.19)
2
Carry out a functional check of the burner and fuel system
Edition 2 / Revision 6, 05 Nov 2012
7-3
www.kubicekballoons.cz
7.12 Fuel Cylinders
1
Check validity of the last inspection on each cylinder.
2
Remove the cylinder padded covers and perform an external visual inspection. The cylinder
must be free of deformation, scratches, dents and any other damage.
3
Check all valves and fittings for correct operation, damage and signs of corrosion.
4
Inspect the off-take bosses for signs of distortion, misalignment or depression, denoting a
heavy impact or misuse.
5
Check all pressure holding joints with leak detector (all threads into cylinder, all joints
between valves / regulators / connectors, valve stems (open and close the valves during
this test), the seal around the contents gauge and welds around bosses).
6
Check freedom of movement of contents gauges
7
Perform a functional check on each fuel cylinder
8
Make sure that all cylinders are fitted with padded covers
7.13 Basket
Check the condition of the following basket components:
1
Carabiners
2
Nylon support rods
3
Basket wires and eyelets.
4
Upper and lower basket frames. Check the stiffness of upper frame by trying to deform it and
general condition of both frames visually without removing any part of the basket.
5
Woven sides of the basket
6
Protective leather or rawhide on the lower edge of the basket
7
Rope handles
8
Cylinder straps
9
Fire extinguisher. Full and maintained according to the manufacturers instructions
10
Pilot restraint harness anchor (if fitted)
11
Basket floor
12
For aluminium alloy frame: passage of steel wire through the guide
13
Basket wall straining beams
7.14 Ancillary Equipment
7-4 1
Quick release (if fitted). Functional check and inspect the condition of the latch, bridle and
ropes for wear and deterioration. Check that the carabiner(s) are undamaged and operate
correctly..
2
Pilot restraint harness (if fitted). Functional check of buckle and quick release. Inspect all
tapes for wear
3
Instruments (if fitted). Check that they function correctly
Edition 2 / Revision 11, 23 Jun 2014
b.2202 maintenance manual for use with the hot air balloon
7.15 Inspection Criteria / Techniques
7.15.1 Documentation
Before starting the physical inspection of the equipment first confirm that all the serial numbers of the component
parts of the balloon are the same as those that are listed in the balloon’s log book. If there are any differences then
the list of equipment in the log book is to be revised by the inspector.
Studying the balloon’s log book and previous inspections will give an indication of the balloons age, the number of
flying hours that it has made, any previous grab tests and recent repairs.
Check that all applicable service bulletins and ADs have been made and recorded in the balloon’s log book. A list
of Service Bulletins which may apply to the balloon can be found on the KB‘s website. If there is no mention in the
logbook of a relevant Service Bulletin having been completed then contact KB.
Ensure that repairs conform to the manufacturers recommendations and have been made by a repairer considered
competent by the manufacturer to make such repairs.
When inspecting the balloon have the manufacturer’s manuals to hand so that any repairs or modifications can be
checked against those approved by the manufacturer.
7.15.2 Envelopes
7.15.2.1 General
An inspector may consider that a grab test is required under the terms of ‘at inspectors discretion’ if any one of the
following is present: fabric porosity, fading of the fabric, fungal attack or a suspicion that the logbook does not
accurately reflect the hours that the envelope looks as though it has flown.
7.15.2.2 Envelope
All holes in the envelope must be repaired in the manner described in section 3 of this manual.
7.14.2.3 Seams
All the seams on the envelope should be inspected with particular emphasis on parachute edges and all areas adjacent
to the points were pulleys, parachute centralising lines and rip lines are attached. If the balloon has been tethered
extensively then the seams on the underside of the envelope should be carefully inspected.
7.15.2.4 Load Tapes
All load tapes should be inspected with particular emphasis on the points of highest potential wear; these are crown
ring and flying wire attachment loops and the points where load tapes cross above the parachute, Smart, Slide or Light
Vent. If the balloon has been tethered extensively then the load tapes on the underside of the envelope should be
carefully inspected.
7.15.2.5 Control Lines
Stiffening of the outer cover of a control line is acceptable provided that the Kevlar core is not exposed.
7.15.2.6 Control Line Pulleys
All the pulleys should be inspected for wear, condition, security and damage. No damage or wear is acceptable.
Edition 2 / Revision 8, 19 Jun 2012
7-5
www.kubicekballoons.cz
7.15.2.7 Crown Ring
The crown ring should be free from damage or corrosion. Light surface corrosion or minor surface damage that could
abrade the load tapes may be removed with fine sandpaper. Note any damage or corrosion in the balloon logbook.
Damaged or more seriously corroded crown rings must be replaced.
7.15.2.8 Steel Flying Cables
Flying cables must be made from stainless steel. The ferrules and thimbles on each flying cable must be in good
condition and there may be no more than eight broken or damaged strands in each cable. Discolouration of the wires
is acceptable provided that the cable has not lost its springiness. Cables that do not meet these criteria must be
replaced.
If inspecting the envelope after power line contact look particularly at the flying cables. There must be no electrical
damage to the wires and the attachment loops on the envelope must be undamaged.
7.15.2.8 Kevlar Flying Wires
If used, inspect the Kevlar flying wires. Their elasticity must not be recuced along the entire lenght, all wires must be
free of heat or mechanical demage, the Nomex cover must not be excessively worn so that the yellow rope core would
be exposed. The thimble must not be slack.
7.15.3 Burner and Frame
7.15.3.1 Carabiners
Inspect the carabiners to make sure that they are not distorted, that their hinges work correctly, that the gates
close correctly and that they have no scores in them that are deeper than 1 mm (0.04“). Damaged carabiners must be
replaced.
7.15.3.2 Burner Frame
Check that the burner frame is undamaged and that it has not been repaired. Pay particular attention to the welds
that should be undamaged and show no signs of cracking. Check that the burner gimbals correctly and that there is no
damage to the Cardan joint. Inspect the pivoting burner frame sockets, securing bolts and rings .
7.15.3.3 Adjustable Height Burner Frames
Check that the adjustable height system works correctly and that it ‘locks’ in a variety of positions. Inspect that the
gas damper is not leaking.
7.15.3.4 Liquid and Vapour Hoses
Check that the hoses are to the correct specification (EN 853 1SN). Inspect them both visually and by flexing them
along their entire length. Look for damage, abrasion, cuts, and cracking; a visible sign of ageing. No steel braiding
should be visible and the hose must be flexible. Kinks, bulges and dents in a hose are not acceptable and the hose must
be replaced. Check the condition of the end fittings damaged or corroded fittings must be replaced. If the swaged end
of a hose is damaged then the hose must be replaced.
7.15.3.5 Burner – Functional Checks
Inspect the condition of the burner. The burner should be complete and undamaged. Pay particular attention to the
burner coil – make sure that there is no damage. Check that the burner jets are secure and that the burner pivots
correctly.
7-6 Edition 2 / Revision 6, 05 Nov 2012
b.2202 maintenance manual for use with the hot air balloon
Connect fuel supplies to the burner. Before turning the fuel and with all the burner controls turned off, check that the
fuel gauge on the burner reads zero. Check that, as the fuel supply is turned on, the fuel gauge reads correctly and that
there are no visible leaks in the system. Check all hose connections, manifold joints and valves for leaks.
On the first burner unit:
Open the pilot burner and ignite the pilot flame. The pilot light flame should burn constant once lit. Close the pilot
burner and make sure that the pilot flame extinguishes at once. Check for leaks around the pilot burner. Repeat the
operation three times to ensure repeatable operation.
Open the main blast valve. Check that the flame pattern is correct and that there are no leaks from the coil or the
manifold block. Run the burner for long enough to check that there is fuel coming from all the jets.
With the main blast valve closed open the whisper valve completely. Check that the flow of propane does not strike
the burner coil, that its flame pattern is parallel to burner coil and that there are no leaks. Close the valve and check
that the flame stops completely.
Turn off the fuel supply and vent the fuel lines.
Repeat these checks for each burner unit.
7.15.3.6 Fuel Manifolds
Although not forming a part of the equipment of a certified aircraft, fuel manifolds (if fitted) should be inspected to
the same standards as fuel hoses and tested in the same way. Check all joints for leaks.
7.15.4 Baskets
7.15.4.1 Burner Support Rods
Check that the burner support rods are undamaged, not repaired and not seriously distorted.
7.15.4.2 Basket wires
Inspect the basket wires throughout their visable length concentrating particularly on the points where the wires
enter metal frames. If used the plastic protecting tubes may not be worn through. Throughout the length of the
wires not more than 8 individual strands may be broken or damaged. Check that the thimbles and ferrules are in good
condition and that the wire turn back is protruding correctly and that there is no sign of the wires pulling through the
ferrule.
Rig the burner and basket in the normal way, connect the basket wires and check that they are not slack. Pull the centre
of each basket wire in turn in the centre away from its burner rod. The maximum distance that the wire can be pulled
away from the pole should be not greater than 16.5 cm (6.5 in).
If inspecting the basket after the balloon has been in contact with power lines then be particularly thorough when
inspecting the flying wires as it is possible that the wires may be heat damaged in areas that it is difficult to inspect.
In this case remove the wooden support frames on the underside of small baskets in order to inspect the point where
two flying wires cross under the floor.
7.15.4.3 Basket Frames
Inspect the frames of the basket for cracks, distortion or splits in the metal. Look particularly at all the metal joints.
In order to inspect some areas fully it may be necessary to peel back or remove the suede or leather covering.
Edition 2 / Revision 6, 05 Nov 2012
7-7
www.kubicekballoons.cz
7.15.4.4 Woven Basket Sides
Inspect the sides of the basket for damage and the and the area where the woven sides join the solid floor. Damage to
the wicker, greater than 6 cm (2 1/2“) in both horizontal and vertical dimensions, is to be repaired by reweaving. There
may be no sharp protrusions inside the basket that might cause injury .The weave should be sound and without rot,
fungal attack or woodworm. The wicker should be flexible and not so dry that it breaks easily.
It is acceptable for two adjacent upright canes to be broken, provided the next three uprights on either side of the
damaged area are intact. There should be no large areas in which the weave is worn below to 60% of its original
thickness.
7.15.4.5 Basket Floors Load Bearing Frames and Runners
Inspect the floor and load bearing frame or runners on the underside of the basket. Minor damage limited to one side
of the floor is acceptable. Cracks that penetrate the floor may not exceed 50 cm (20“) on either side of the floor. Any
repairs to the basket floor must have been made in accordance with this manual. No part of the load bearing frame or
basket runners may be broken or cracked through more than 50% of its original thickness.
7.15.4.6 Basket Leather and Rawhide
Inspect the leather or rawhide on the lower edge of the basket. Scratching and scuffing to the leather is acceptable but
there should be no holes where the edge of the basket floor can be seen.
7.15.4.7 Cylinder Straps
Check the straps for wear or damage. Metal locks must be undamaged and securely attached to the strap. Webbing may
not be worn through more than 15% of its original width or thickness.
7.15.4.8 Basket Wall Straining Beams (if fitted)
Check the tapes and metal for wear and damage. No more than 15% of the original tape width may be worn. If the
straps are too loose, tighten the tensioners in the lower part. Adjust tension of both tensioners accordingly to keep
correct shape of the basket.
7.15.5 Ancillary Equipment
7.15.5.1 Quick Release (if fitted)
Check the condition of the latch mechanism. Inspect for signs of distortion or wear. Check the operation of the latch
and locking pin. Inspect the webbing strap (if fitted) for signs of wear, cuts, heat damage or degradation. If the
webbing has any defects it must be replaced. Check the condition of the restraint rope for wear or damage.
7.15.5.2 Pilot Restraint Harness (if fitted)
Check the condition and function of all buckles, quick release and fittings. Check the condition of the belt and its
stitching.
7.15.5.3 Instruments (if fitted)
The best practice is to proceed according to the instructions of the instrument‘s maufacturer. The specific procedures
may vary however it is usual to check
Check the altimeter against the site elevation or against a calibrated reference altimeter.
Check an electronic variometer for initial needle deflection when switched on, that the needle returns to zero after
a few seconds, and that the needle returns to zero when the instrument is turned off. Whilst it is on check that the
needle deflects in the correct direction when moved sharply up or down.
7-8 Edition 2 / Revision 11, 23 Jun 2014
b.2202 maintenance manual for use with the hot air balloon
7.16 Fuel Cylinders
7.16.1 General
If there is any doubt whether damage or a defect found on a cylinder during an inspection is acceptable then KB or the
manufacturer of the cylinder must be contacted and advice sought.
If a cylinder is unsuitable for further service as part of a hot air balloon then this means that it is also unsuitable for
the safe storage of liquefied gases separate from the balloon.
If a cylinder is passed as acceptable as part of a hot air balloon this does not exempt the owner or operator from any
other national or international regulations or legal obligations regarding propane cylinders in storage or transit.
Inspection frequency:
• Annual - Functional test & external visual inspection.
• Periodic - Annual inspection, internal inspection and proof pressure test . 10 years from the date of manufacture and every 10 years thereafter for Schroeder Fire Balloons fuel cylinders. For other manufacturer‘s cylinders these intervals may vary.
NOTE:
Periodic inspection of fuel cylinders can only be carried out by respective manufacturer or by an individual or service
authorised by the cylinder manufacturer.
7.16.2 Visual Inspection
Carry out the external inspection of the cylinder free of its padded cover. Draw particular attention to the welds and
its nearby area, scratches or abrasions, dents, offtake bosses deviation or any other signs of impact or misuse. The
bottom ring is a part that provides a good evidence of the manner of a cylinder use.
7.16.3 Functional Check
NOTE:
Leak tests detailed in this section are to be visual checks made by applying a leak detecting fluid.
7.16.3.1 Vapour Valve (if fitted)
Without a vapour hose connected open the vapour valve and check that no gas comes out. With the valve open check
that there are no leaks from the joint between the regulator and the boss or around the base of the boss.
Connect a vapour hose, turn the vapour valve on, light the pilot flame and, whilst the vapour is flowing check that
there is no leak from the vapour hose quick release. Turn the vapour valve on the cylinder off and make sure that the
flame goes out and the flow of vapour stops.
7.16.3.2 Liquid Valve.
Remove the dust cover if one is fitted. Open the cylinder valve fully. Check that there is no flow of liquid from the valve.
Close the valve. Vent the liquid connector by depressing the central spigot with a plastic rod. Attach a burner hose to
the cylinder valve. Check that all the burner valves are closed and then open the tank valve and check that there are
no leaks from the hose to tank connection, from the valve operating mechanism or the valve stem where it enters the
cylinder. Operate the burner for at least 15 seconds and check that the burner pressure remains constant. Turn the
cylinder valve off and operate the burner until no more gas flows – this should take just a few seconds. Disconnect the
burner hose.
Edition 2 / Revision 6, 05 Nov 2012
7-9
www.kubicekballoons.cz
7.16.3.3 Bleed Valve
Check for leaks around the base of the valve and the valve outlet. Open and close the valve to check that it operates
correctly.
7.16.3.4 Contents Gauge
With a full or more than half full cylinder check that the contents gauge works correctly by leaning the cylinder
forwards and backwards. As the cylinder is tipped the pointer should move.
7.16.3.5 Leak Check
Check all threads into the cylinder, all joints between valves / regulators / connectors, valve stems (open & close the
valve during this test), the seal around contents gauges and the welds around the bosses.
7.16.4 Periodic Inspection
Periodic inspection of fuel cylinders can only be carried out by respective manufacturer or by an individual or service
authorised by the manufacturer.
7.17 Grab Testing
7.17.1 General Practice
Standardly the envelope fabric is to be tested in these locations:
•
•
•
About 2 m (6.5 ft) below the deflation system aperture rim, at 3 positions minimum, one time over a seam.
If more fabric colours are used in this part of envelope, test each of them.
If more than one type of fabric are used anywhere on the envelope (such as heavy fabric in addition to standard
rip-stop), test each of them in its uppermost row of panels.
Besides the tests listed above the following envelope models require
additional testing in these locations:
All GP models
Minimum three different locations in the 4th and
5th row of panels above the mouth
BB17XR
Minimum three different locations in the row of
panels above the 3rd horizontal load tape
BB20XR, BB22XR,
BB26XR, BB30XR
Minimum three different locations in the row of
panels above the 4th horizontal load tape
When grab testing fabric it is important to apply the stress evenly over
a specific area of fabric. The fabric must be gripped with the jaw edges
carefully aligned so that the same fibres are being pulled from each end.
At O, E, N, Z, P, GP and XR envelope models the load is to be applied in
horizontal direction, i.e. parallel to the horizontal load tapes.
At D and ED envelope models the load is to be applied in both directions
of fibers (i.e. warp and weft) in each tested location. If the direction of
fibers is diffucult to find just make the test in directions 45 degrees from a
horizontal load tape on both sides.
Grab Test
7-10 Edition 2 / Revision 7, 11 Jan 2013
b.2202 maintenance manual for use with the hot air balloon
The distance between the jaws must be 8 - 10 cm (3“ - 4“). The edges of the clamp must be parallel to the fabric so that
the fibres are loaded evenly. The jaws must be tightened so that the fabric does not move. One clamp should be held
stationary and the other pulled away from it with a spring balance.
The load applied on the tested fabric: 13 kg (28.6 lb).
If the fabric withstands a pull of 13 kg (28.6 lb) then it may be passed as airworthy.
If the fabric fails between 10 and 13 kg (22 and 28.6 lb) then it may be passed as airworthy with the following
limitations:
• The Maximum Take Off Weight (MTOW) is reduced by 10% from that published in the Flight Manual for the balloon.
• The balloon may only be flown under favourable weather conditions.
• Maximum wind speed for XR models take-off reduced to 5 m/s (10 kts)
• Maximum rate of climb and descent for XR models reduced to 5 m/s (1 000 fpm)
• The grab test must be repeated annually or after each 50 flying hours, whichever is the sooner
If the fabric fails below 10 kg (22 lb) then all the weak fabric must be replaced.
7.17.2 Envelopes with Windows
On envelopes fitted with transparent windows the load test also need to be performed
over the entire window both in horizontal and vertical direction to inspect strength of
the transparent foil and the seam. The clamps are to be attached to the surrounding
fabric, not the window itself.
Grab Test of the Window
Edition 2 / Revision 7, 11 Jan 2013
7-11
www.kubicekballoons.cz
7.18 Flight Test
If a Flight Test is to be carried out then a careful record of the weather conditions must be made along with all the
parameters included in the test form. Contact KB before conducting a flight test and discuss with them whether there
is any information that they will require in addition to that contained on the standard form.
A flight test must be made in stable air conditions and at a weight close to the MTOW for the size of envelope being
tested. Unless otherwise directed by KB follow the instructions and record the details as specified in the Flight Test
Report (see Appendix 1).
The balloon must only be test flown by a pilot holding an appropriate licence according to the requirements of the
operator‘s local aviation authority.
7.19 Non-scheduled Inspections
Pre flight inspections are contained in the KB Flight Manual (document no. B2102), Section 4.
7.19.1 Envelope Overheat Inspection
If the maximum temperature indicated on the tempilabel is below than 138°C (280°F) then no further inspection is
required. Replace the streamer in the balloon using a new melting link.
If the maximum temperature indicated is 138°C (280°F) or higher then:
1. Sew a new tempilabel alongside the original. Do not remove the original.
2. Inspect the envelope fabric in the top half of the envelope for signs of heat damage and grab test the top of the
envelope as described in para 7.17.
3. Inspect the lines for heat damage and replace any that are damaged.
4. Record the dropping of the temperature streamer, the inspection of the envelope, the max temperature recorded on the old tempilabel, the fitting of a new tempilabel, the results of the grab test and any remedial repairs
in the balloon’s log book.
7.19.2 Powerline Contact Inspections
After contact with power lines the balloon must be inspected thoroughly as for an annual/100 hour inspection. Pay
particular attention to all metal parts, particularly the basket wires, envelope suspension cables, fuel cylinders and
basket. See chapter 7.
7.19.3 Hard Landing Inspection
After a hard landing following items must be inspected for mechanical damage or malfunction according to instructions
stated above:
• basket floor and floor runners
• nylor rods
• basket upper rim
• fuel cylinder straps
• burner frame
• fuel contents gauges on each fuel cylinder
7-12 Edition 2 / Revision 6, 05 Nov 2012
b.2202 maintenance manual for use with the hot air balloon
7.19.4 Test Inflation After Envelope Repair
Whilst cold inflated an internal inspection of the envelope must be performed to make sure that the control lines are
not tangled.
The test inflation should include a full hot inflation and cycling of all the envelope controls to confirm that they
function correctly. For this inflation the balloon must be loaded to a minimum of 50% of its MTOW.
7.20 Time Lifed Items
See section 2.5 Time Lifed Items of this manual.
Edition 2 / Revision 11, 23 Jun 2014
7-13
www.kubicekballoons.cz
intentionally left blank
7-14 Edition 2 / Revision 6, 05 Nov 2012
b.2202 maintenance manual for use with the hot air balloon
Section 8 - Appendices
Appendix 1 - Flight Test Record
Date
Launch field
Altitude (AMLS)
Air temperature
QNH
Wind direction/speed
Time of climbing
to 100 m (300 ft)
Empty weight (without fuel
cylinders)
Envelope air temperature
during steady level flight
Full weight of cylinders
Temperature after 30s
Load weight
Descent after 30s
Take - off weight
Fuel pressure
Altitude AGL with the balloon
descending 2 m/sec (400 ft/min)
when heating was started
Altitude loss
Altitude AGL with the balloon
climbing at the 1 m/sec (200 ft/
min) when heating was completed
Time of heating:
Operation of the deflation system:
Operation of the rotation vent:
Operation of the rip panel:
Further observations, notices or found out failures:
Take - off time:
Landing field and time:
Flight time:
Conclusion
The balloon flight test has been conducted in compliance with the approved scheme. Considering the balloon
performance and the function of all components the requirements of airworthiness were:
a/ met
b/ met after fixing the failures found out
c/ not met
Pilot in command
Record received on behalf of:
Edition 2 / Revision 8, 19 Jun 2012
Date:
technical inspector
Signature:
8-1
www.kubicekballoons.cz
intentionally left blank
8-2 Edition 2 / Revision 0, 15 Dec 2008
b.2202 maintenance manual for use with the hot air balloon
Section 9 - Supplements
Introduction
This section lists supplements containing essential information for the propper maintenance of a particular balloon.
Where the information in a supplement differs from the main section of the Maintenance Manual the supplement is
to be complied with.
List of Supplements
Number
Edition 2 / Revision 5, 22 Jul 2011 Description
Revision
Date of Issue
9-1
LET US HELP YOU!
In case that you have any suggestion, difficulty, problem or comment, please contact our
technical department at:
[email protected]
+420 545 422 642
DO Approval EASA.21J.277
BALÓNY KUBÍĆEK spol. s r. o.
e-mail: [email protected] • www.kubicekballoons.cz
Brno 602 00 • Francouzská 81 • Czech Republic
office: Brno 614 00 • Jarní 2a • Czech Republic
tel.: +420 545 422 620, • fax: +420 545 422 621
© Copyright BALONY KUBÍČEK spol. s r.o.
2014

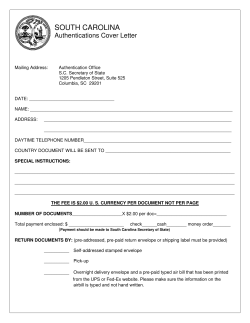


© Copyright 2026