
ASX Clear (Futures) Static Data Portal
ASX Clear (Futures) Static Data Portal User Manual – ETD only Clearing Participants ASX Limited ASX Clear (Futures) Static Data Portal User Manual Table of Contents 1. CLEARING PARTICIPANT – ETD ONLY ....................................................................................................... 4 1.1. INTRODUCTION.......................................................................................................................................... 4 1.1.1. Purpose of ASX Clear (Futures) Static Data Portal ....................................................................... 4 1.1.2. Audience for this Manual................................................................................................................ 4 1.2. SETUP AND ACCESS .................................................................................................................................. 5 1.2.1. System Setup ................................................................................................................................. 5 1.2.2. Accessing ASX Clear (Futures) – Static Data Portal ..................................................................... 5 1.2.3. Session Timeout ............................................................................................................................ 5 1.2.4. Changing your password ............................................................................................................... 5 1.3. OPERATING HOURS................................................................................................................................... 5 1.4. USER ACCESSIBILITY................................................................................................................................. 6 1.4.1. Creating Users ............................................................................................................................... 6 1.4.1.1. Clearing Participant Administrator User Setup ................................................................................................ 6 1.4.1.2. Clearing Participant Submitter / Approver Setup ............................................................................................. 7 1.5. ADMINISTRATION FUNCTIONALITY............................................................................................................... 8 1.5.1. Create a new user .......................................................................................................................... 8 1.5.2. User Search ................................................................................................................................... 9 1.5.3. Edit User ........................................................................................................................................ 9 1.6. CLIENT CLEARING ACCOUNT HIERARCHY ................................................................................................. 10 1.7. WORKFLOWS STATUS & ACTION STATES ................................................................................................. 11 1.8. APPROVED STATUS STATES .................................................................................................................... 12 1.9. RECORD SEARCH PAGE .......................................................................................................................... 14 1.9.1. Quick Search................................................................................................................................ 14 1.9.2. Search Criteria ............................................................................................................................. 15 1.9.3. Search Results ............................................................................................................................. 19 1.9.4. Viewing and Editing Records ....................................................................................................... 21 1.9.4.1. Viewing Approved Records............................................................................................................................ 21 1.9.4.2. Viewing an Edited Record.............................................................................................................................. 21 1.9.4.3. View / Editing a record currently in the process of being edited .................................................................... 21 1.9.5. Workflow Approval / Rejection Process ....................................................................................... 22 1.9.5.1. Clearing Participant Entity Workflow Approval / Rejection Process .............................................................. 23 1.9.5.2. Client Account Workflow Approval / Rejection Process................................................................................. 24 1.10. CLEARING PARTICIPANT ENTITY RECORDS ............................................................................................... 25 1.10.1. Accessing an editing an existing Clearing Participant record ...................................................... 25 1.10.2. Clearing Participant Entity Details ................................................................................................ 26 1.10.3. Clearing Participant Entity Contacts............................................................................................. 27 1.11. CLIENT ENTITY RECORDS ........................................................................................................................ 30 1.11.1. Creating a new Client Entity Record ............................................................................................ 30 1.12. CLIENT ACCOUNT RECORDS .................................................................................................................... 30 1.12.1. Creating a new Client Account ..................................................................................................... 30 1.12.2. Accessing and editing an existing Client Account ........................................................................ 31 1.12.3. Client Account Details .................................................................................................................. 32 1.12.4. Client Account Address ................................................................................................................ 36 2. CONTACTING SUPPORT ............................................................................................................................. 38 2.1. 2.2. 3. ASX ONLINE HELPDESK SUPPORT ........................................................................................................... 38 ASX CLEARING OPERATIONS .................................................................................................................. 38 APPENDICES ................................................................................................................................................ 39 3.1. APPENDIX 1 – REGISTRATION FORM......................................................................................................... 39 3.2. APPENDIX 2 – DIGITAL CERTIFICATE PROCEDURE ..................................................................................... 39 3.2.1. Pre-requisites for Enrolment of a Digital Certificate ..................................................................... 39 3.2.2. Download and Installation of the Root Digital Certificate ............................................................. 39 3.2.3. Enrolment, Downloading and Installation Procedure of the user certificate ................................. 40 3.2.4. Exporting / Importing Procedure .................................................................................................. 42 3.2.4.1. Exporting a Certificate .................................................................................................................................... 42 3.2.4.2. Importing a Certificate .................................................................................................................................... 44 3.3. APPENDIX 3 – TROUBLESHOOTING ........................................................................................................... 47 3.3.1. Browser-related Error Messages ................................................................................................. 47 © Copyright 2014 ASX Limited ABN 98 008 624 691. All rights reserved 2014 2. ASX Limited ASX Clear (Futures) Static Data Portal User Manual 3.3.1.1. This website only supports Internet Explorer 7, 8 and 9 Issue ...................................................................... 47 3.3.1.2. HTTP 403 Forbidden Issue ............................................................................................................................ 47 3.3.1.3. JavaScript Issue............................................................................................................................................. 47 3.3.2. Digital Certificate Issues............................................................................................................... 49 3.3.2.1. 3.3.2.2. 3.3.2.3. 3.3.2.4. 3.3.2.5. 3.3.2.6. 3.3.2.7. 3.3.2.8. 3.3.3. 3.4. Issues with Enrolment for a Digital ID: ........................................................................................................... 49 Issues with Download and Installation of a Digital Certificate ....................................................................... 50 Issues with Importing and Exporting Digital Certificates ................................................................................ 50 Digital Download and Installation Issues ....................................................................................................... 50 Digital Certificate Could Not Be Installed ....................................................................................................... 50 ID Format Unselected .................................................................................................................................... 51 Using Digital Certificates Issues .................................................................................................................... 52 Digital Certificate Revoked............................................................................................................................. 52 Static Data Portal Access Issues ................................................................................................. 53 3.3.3.1. Cannot view Static Data Portal link on the application Selection Page. ........................................................ 53 3.3.3.2. On Clicking the Static Data Portal link, access denied error is displayed ..................................................... 53 APPENDIX 4 – CLIENT ENTITY CONFIGURATION FORM AND USER GUIDE .................................................... 53 This document has been compiled with a view to informing prospective users of the ASX Clear (Futures) Client Clearing Service for ASX 24 Exchange Traded Derivatives (ETDs) and Over The Counter (OTC) Trades. Please note: Recipients of this document are asked not to forward this paper outside of their organisations and not to publish the material in any way without ASX’s prior permission; This paper does not constitute legal or financial advice; The proposals outlined in this document are subject to refinement by ASX based on expert and customer feedback, ASX Clearing Board approval and regulatory clearance. © Copyright 2014 ASX Limited ABN 98 008 624 691. All rights reserved 2014 3. ASX Limited ASX Clear (Futures) Static Data Portal User Manual 1. Clearing Participant – ETD only 1.1. Introduction 1.1.1. Purpose of ASX Clear (Futures) Static Data Portal ASX Clear (Futures) Static Data Portal (SDP) is a web based system that provides Clearing Participants the access to directly enter and update Static Data used within the clearing process for Exchange Traded Derivative (ETD) products. This Static Data includes but is not limited to, Client Accounts and Clearing Participant Entities and Standard Settlement Instructions. 1.1.2. Audience for this Manual The ASX Clear (Futures) Static Data Portal User Manual has been written for ASX Clear (Futures) Clearing Participants. The Clearing Participants users of the ASX Clear (Futures) Static Data Portal include: • Clearing Participant Administrator User • Clearing Participant Submitter User • Clearing Participant Approver User This user guide covers the following subject areas: 1) Introduction and system overview 2) User access and administration functionalities 3) Client Clearing Account Structure 4) Workflows and Actions 5) Approvals and Rejections 6) Static Data Portal Web Pages 7) FAQs 8) Contacting ASX Support © Copyright 2014 ASX Limited ABN 98 008 624 691. All rights reserved 2014 4. ASX Limited 1.2. 1.2.1. ASX Clear (Futures) Static Data Portal User Manual Setup and Access System Setup To access the ASX Clear (Futures) - Static Data Portal, you need to have the following: 1.2.2. • Internet Explorer 7, 8 or 9. • JavaScript enabled browser • ActiveX Controls set to “Enabled” • Onsite MSI package installed for Windows XP Operating System Accessing ASX Clear (Futures) – Static Data Portal Open your browser and navigate to https://asxstaticdata.connect.asxonline.com In order to log in to the Static Data Portal you will need to have the following: • An Active ASX Online user profile (user name and password) • An enrolled and installed Digital Certificate supplied by ASX • Relevant User profile set up in the SDP. See 2.4 User Access for more details on obtaining the above and logging into the SDP 1.2.3. Session Timeout Session timeout and disconnection occurs after 60 minutes of inactivity and any unsaved information will be lost. To continue using the ASX Clear (Futures) – Static Data Portal you are required to log in and authenticate again. 1.2.4. Changing your password Passwords to use the ASX Clear (Futures) service are the same as the password used to access the ASX Online service. If you are given an ASX Online password for the first time, you will need to change that password initially in ASX Online before trying to login to the ASX Clear (Futures) Static Data Portal. ASX Online passwords expire every 45 days and you will be prompted by the system to create a new password. If your password has expired, a message will be displayed when you next attempt to log in to ASX Clear (Futures) Static Data Portal. You will not be able to log in until you have changed your password. All password changes are conducted through ASX Online. To change your password, follow the prompts presented to you on screen. Please note: the following requirements must be met when setting your password: 1. 1.3. Passwords must contain characters from at least three (3) of the following four (4) classes: • English upper case letters, i.e. A-Z • English lower case letters, i.e. a-z • Numeric Values, i.e. 0-9 • Non-alphanumeric special characters of: $ (dollar sign) or _ (underscore) 2. Passwords may not contain the username or any part of the user’s full name 3. Passwords must be between 8-12 characters long 4. New passwords must not be the same as the previous password Operating Hours The ASX Clear (Futures) Static Data Portal is available to users 24x7 365 days per year. © Copyright 2014 ASX Limited ABN 98 008 624 691. All rights reserved 2014 5. ASX Limited ASX Clear (Futures) Static Data Portal User Manual Note: Changes to Static Data will not be reflected in daily EOD Static Data Reports unless the change was made and approved prior to 6pm AEDST Mon – Fri. Changes made outside of these hours will be reflected in Static Data Reports available at the end of the next business day. 1.4. User Accessibility The first user(s) at any Clearing Participant will need to be set up by the ASX as a Clearing Participant Administrator User (see section 2.4.1.1 Clearing Participant Administrator User Set Up for details on how to do this). This Administrator User will then be able to create and update further users (Clearing Participant Administrators, Submitters and Approvers) 1.4.1. Creating Users The ASX Clear (Futures) – Static Data Portal uses user types and permissions to control access. There are three user types associated with the portal, namely: 1. Clearing Participant Administrator – This user controls the right to assign user permissions for the Clearing Participant. This user can assign a user against either: • Clearing Participant Administrator • Clearing Participant Submitter • Clearing Participant Approver 2. Clearing Participant Submitter – This user can enter and submit static data information for approval. 3. Clearing Participant Approver – This user reviews and either approves or rejects static data submitted by the Clearing Participant Submitter. Section 2.5.1 provides step by step instructions on how the Administrator Users can create further user profiles within the SDP. Note: More than one user role can be assigned against a user by the Clearing Participant Administrator. Where a user has been assigned against a Clearing Participant Submitter and Clearing Participant Approver role, that user cannot approver his/her own work. 1.4.1.1. Clearing Participant Administrator User Setup To create an ASX Clear (Futures) Static Data Portal Clearing Participant Administrator User, you should: 1 1. Ensure you have an active 1ASX Online profile: Contact ASX Online Help Desk 2. Complete, scan and email the following form to: [email protected] 3. Receive Clearing Participant Administration User credentials from ASX Clearing Operations by email 4. Enrol and Download Digital Certificate - Digital Certificate Procedures 5. Confirm login at the following link: https://asxstaticdata.connect.asxonline.com Users must login to ASX Online and change their password to activate their account © Copyright 2014 ASX Limited ABN 98 008 624 691. All rights reserved 2014 6. ASX Limited ASX Clear (Futures) Static Data Portal User Manual Tip: If a user setup by a Clearing Participant administrator is unable to access the ASX Clear (Futures) Static Data Portal, they can refer to the Appendix 3: Troubleshooting. Appendix 3: Troubleshooting highlights three most common areas that can prevent users from accessing ASX Clear (Futures) Static Data Portal: 1.4.1.2. • Browser Related Issues • Digital Certificate Issues • Static Data Portal Access Issues. Clearing Participant Submitter / Approver Setup To create an ASX Clear (Futures) Static Data Portal Clearing Participant Submitter or Approver role, you should: 2 1. Ensure you have an active2 ASX Online profile: Contact ASX Online Help Desk 2. Ask your Clearing Participant Administrator to create a Clearing Participant User profile and request a Digital Certificate – refer to Administration Functionality 3. Enrol and Download Digital Certificate - Digital Certificate Procedures 4. Confirm login at the following link: https://asxstaticdata.connect.asxonline.com As per foot note 1 © Copyright 2014 ASX Limited ABN 98 008 624 691. All rights reserved 2014 7. ASX Limited 1.5. ASX Clear (Futures) Static Data Portal User Manual Administration Functionality The Administration functionality of the ASX Clear (Futures) Static Data Portal enables a Clearing Participant Administrator to: 1.5.1. • Create, • Edit, and • Disable 1) Clearing Participant Administrator user accounts 2) Clearing Participant Submitter user accounts 3) Clearing Participant Approver user accounts Create a new user 1. Create a new user by first clicking on the ‘User Management’ link in the navigation panel on the left hand side of the screen. The User Management Search screen will appear as per below: 2. Click on the ‘Create New User’ button. 3. Clearing Participant Administrators will be able to search for usernames that have already been set up in ASX Online against their Firm. ASX Online usernames are case sensitive. 4. If a match is found, the following details will be populated: © Copyright 2014 ASX Limited ABN 98 008 624 691. All rights reserved 2014 8. ASX Limited ASX Clear (Futures) Static Data Portal User Manual • ASX Online User Name • First Name • Last Name • Email Address • Firm Code 5. Input a relevant Contact Number for the Clearing Participant User 6. Nominate one or more user roles : • Submitter • Approver Clearing Participants have the ability to manage their own Users and User privileges. Request a digital certificate on the user’s behalf, by checking ‘Request Certificate’ and click “Create User” to apply changes. This will send a request to ASX Online Help Desk who will provide a VeriSign digital certificate to the User. 7. 1.5.2. 1.5.3. Click the ‘Close’ button to end the user creation process. User Search 1. Go to the ‘User Management’ screen. 2. Input the Username. 3. Click ‘Search’ 4. Results will appear in summary form Edit User 1. Locate the Clearing Participant User in question as per User Search 2. Click on the Clearing Participant User in the search results 3. Make the following changes as appropriate: • Roles – Submitter/Approver • Revoke Certificate – Send request to ASX Online Help Desk • Request Certificate – Send request to ASX Online Help Desk • Activate or Disable User Access © Copyright 2014 ASX Limited ABN 98 008 624 691. All rights reserved 2014 9. ASX Limited 1.6. ASX Clear (Futures) Static Data Portal User Manual Client Clearing Account Hierarchy Within the Static Data Portal there are two entity types: Clearing Participant Entity (Level 1) – this is set up by the ASX prior to the CP on-boarding. All Clearing Participant details such as ABN, LEI, Address, Contact Details are appended to the Clearing Participant Entity by the ASX. A unique 3-digit Clearing Participant code is assigned to each CP Entity. See section 2.10 Clearing Participant Entity Records for more details. Client Entity (Level 2) – this is set up by the ASX upon request from either the CP or the Client Directly. In order to set up a new Client entity the Client (or the Clearing Participant on behalf of the client) must fill in and submit to the ASX the Client Entity Configuration Form. A unique 3-digit Client code is assigned to each Client Entity. The following diagram illustrates the relationship between each Entity type record for Clearing Participant and Clients that can clear across Futures only. For reference, the following conditional terminology is used: 1 : 1 = 1 and only 1 Entity record is associated with its related Entity partner. 0 : * = 0 to many Entity records are associated with its related Entity partner. In order to read the diagram, apply the condition at the arrow pointing away from the Entity that you wish to map the relationship for. I.e. a Clearing Participant can have 0 : * Client Accounts associated with it. Clearing Participant Entity 1:1 Level 1 0:* 0:1 0:* Client Entity Client Account Level 2 Exceptions to the rules above include: - A Futures House Participant Entity will not be managed within the Static Data Portal - A Client Account that has been configured as an Omnibus Account will not be associated with a Client Entity. © Copyright 2014 ASX Limited ABN 98 008 624 691. All rights reserved 2014 10. ASX Limited 1.7. ASX Clear (Futures) Static Data Portal User Manual - Book / Funds will not be associated with a Futures Client Account as all positions will be allocated to the Client Account. - A Futures Client Account cannot be configured as an Omnibus Account. The creation and allocation of Omnibus Client Accounts will be as per the existing configuration and allocation process within Secur / Genium. Workflows Status & Action States In order to create or edit existing records within the Static Data Portal, a workflow approval process is enforced to ensure that data is verified and validated prior to being deployed. The following workflow status states are assigned by the system based on the action performed by a Clearing Participant user. Action Status User Role who can perform action Save Saved Submitter Rules The record has been saved to the system but has not yet been deployed Mandatory and functional field validation rules are not applied when saving a record into the system A Submitter user can save a record into the system An Approver user does not have the ability to approve or reject records that have a status of ‘saved’ Cancel Deleted Submitter A record that is currently in the process of being created, but is not yet approved can be deleted from the system. The delete can only apply from the saved state The edit performed against an Approved record can be deleted from the system. The delete can only apply from the saved state A deleted record cannot be viewed or retrieved at a later date Submit Submitted Submitter The record has been submitted for approval by the submitter user Mandatory and functional field validation rules are applied when submitting a record in the system An Approver user will have the ability to approve or reject records that have a status of ‘submitted’ Approve Approved Approver The submitted record has been approved by the Approver user and is now deployed to the system Or Where the record submitted (CP Submitted) for review and approval by the ASX was approved © Copyright 2014 ASX Limited ABN 98 008 624 691. All rights reserved 2014 11. ASX Limited ASX Clear (Futures) Static Data Portal User Manual Action Status User Role who can perform action Reject Rejected Approver Rules The submitted record has been rejected by the Approver user and will be available to be amended prior being either resubmitted or deleted from the system by the Submitter user Where a record has been rejected a Reject reason will need to be appended to the record Approve CP Submitted ASX User The CP Submitted status will be triggered where the Clearing Participant has attempted to make a Client Account Inactive from either an Active or Hold State Reject ASX Reject ASX User The CP Submitted record has been reviewed and rejected by the ASX. The record can be amended prior to being either resubmitted or deleted from the system by the Participant Submitter user Where a record has been rejected the ASX will append a Reject reason to the rejected record 1.8. Approved Status States Once a record has traversed through the workflow approval process, an approved status will be assigned to the record. The approved status represents the end / deployed state of the record and can be one of the following: Status Description Rules Active The record is active within the system All active records associated with the Clearing Participant users Firm code can be viewed within the system Inactive The record is not active within the system As a Clearing Participant user, a Client Account as well as the Book / Funds associated with the Client Account can be made Inactive As a Clearing Participant user, any Client Accounts set to Inactive can still be viewed within the system Hold A Hold status can be representative of a number of scenarios where no action can be taken against the record. Hold is applicable in the scenario where the Client Entity has defaulted In a default scenario where the Client has defaulted, as a Participant user the Client Account can be set to Hold. As a Clearing Participant user, any Client Accounts set to Hold can still be viewed within the system © Copyright 2014 ASX Limited ABN 98 008 624 691. All rights reserved 2014 12. ASX Limited ASX Clear (Futures) Static Data Portal User Manual Status Description Rules Pending A Client Entity record is neither active nor inactive within the system and is in the process of being setup and configured prior to being made Active for trading. Therefore Client Accounts and Book / Funds can be created against the Client Entity but only in a Pending status. Where a Client Entity has been set to Pending, Client Accounts records created against the Client Entity can only be created in a Pending status Once the Client Entity has been set to Active, all Client Accounts records associated with the Client Entity will be set to Active automatically As a Clearing Participant user, Client Accounts set to Pending can still be viewed within the system against the Pending Client Entity A record cannot be set to Pending once it has become Active within the system © Copyright 2014 ASX Limited ABN 98 008 624 691. All rights reserved 2014 13. ASX Limited 1.9. ASX Clear (Futures) Static Data Portal User Manual Record Search Page Once login and authentication is successful for the Static Data Portal the Clearing Participant User will be presented with the Record search Page. The record search page allows a user to search for: - Clearing Participant details associated with their Clearing Participant Entity Code - Client Account details associated with their Clearing Participant Entity Code The Record Search Page has been divided into the following components: Quick Search Search Criteria Search Results 1. Quick Search 2. Search Criteria 3. Search Results The following sections provide information on how to retrieve information stored within the Static Data Portal using each of the above components. 1.9.1. Quick Search The Quick Search pane allows a Clearing Participant user to quickly return records within the Search Results pane without the need to specifically enter Search Criteria © Copyright 2014 ASX Limited ABN 98 008 624 691. All rights reserved 2014 14. ASX Limited ASX Clear (Futures) Static Data Portal User Manual The following quick search links are available along with the associated description: Quick Search Description Search for all Saved Records Return all Saved Records associated to the Clearing Participant User Search for all Submitted Records Return all Submitted Records associated to the Clearing Participant User Search for all Rejected Records Return all Rejected Records associated to the Clearing Participant User Search for all CP Submitted Records Return all CP Submitted Records associated to the Clearing Participant User Search for all ASX Rejected Records Return all ASX Rejected records associated to the Clearing Participant User Note: Results returned as a result of a quick search link will be displayed irrespective of the Account hierarchy structure and will be grouped based on the entity structure as follows: 1.9.2. - CP Entity - Client Entity - Client Account Search Criteria The Search Criteria pane allows a Clearing Participant User (Submitter / Approver) to specify individual search criteria to return specific search results. Multiple search criteria fields can be combined in order to further restrict or confine the search results returned. A description of the individual search criteria fields applicable within the Static Data Portal are defined below: Quick Search Field Type Description Application Clearing Participant Code Drop Down This will be locked to the Firm code associated with the Clearing Participant User Id When used in isolation, all records associated with the Firm code will be returned in the search results pane © Copyright 2014 ASX Limited ABN 98 008 624 691. All rights reserved 2014 15. ASX Limited ASX Clear (Futures) Static Data Portal User Manual Quick Search Field Type Description Application Client Entity Code Drop Down All Clients associated with the Clearing Participant Firm will be visible within the dropdown list Where a Client Entity Code has been selected from the drop down list, the Client Accounts associated with that specific Client Entity Code will be returned in the search results pane along with the Parent information Where a Client Entity has been selected from the drop down list, - - Client Entity Name - - ABN - - LEI and - - Company Registration Number fields cannot be edited Client Entity Name Free Text A search can be performed on a Client Entity Name Where a Client Entity Code has been selected, the Client Entity Name is returned and cannot be edited Client Entity ABN Number A search can be performed on an ABN assigned against a Client Entity. A Client Entity Name can be entered as text without wildcard characters or with wildcard characters added. Wild card characters include: * = matches zero or more characters Client Accounts matching the Client Entity Name text string entered will be returned in the search results pane along with the Parent information Client Accounts matching the Client Entity ABN entered will be returned in the search results pane along with the Parent information Where a Client Entity Code has been selected, the Client Entity ABN cannot be edited Client Entity LEI Free Text A search can be performed on an LEI assigned against a Client Entity. Client Accounts matching the Client Entity LEI entered will be returned in the search results pane along with the Parent information Where a Client Entity Code has been selected the LEI cannot be edited Client Entity Company Registration Number Free Text A search can be performed on an Company Registration Number assigned against a Client Entity. Client Accounts matching the Client Entity Company Registration Number entered will be returned in the search results pane along with the Parent information Where a Client Entity Code has been selected the Company Registration Number cannot be edited © Copyright 2014 ASX Limited ABN 98 008 624 691. All rights reserved 2014 16. ASX Limited ASX Clear (Futures) Static Data Portal User Manual Quick Search Field Type Description Application Client Account Code Drop Down All Client Accounts associated with the Participant Firm will be visible within the dropdown list Where a Client Account Code has been selected from the drop down list, the Client Account Code will be returned in the search results pane along with the Parent information Where a Client Account has been selected from the drop down list, - - Client Account Name - - Swapswire Id fields cannot be edited Client Account Name Free Text A search can be performed on a Client Account Name A Client Account Name can be entered as text without wildcard characters or with wildcard characters added. Where a Client Account Code has been selected, the Client Account Name is returned and cannot be edited Wild card characters include: * = matches zero or more characters Client Account(s) matching the Client Account Name text string entered will be returned in the search results pane along with the Parent information Swapswire Id N/A N/A N/A Book / Fund Code N/A N/A N/A Book / Fund Name N/A N/A N/A Clearing Participant Status Drop Down Options available will be either ‘Blank’ or ‘Active’ When used in isolation, all records associated with the Clearing Participant will be returned Clearing Participant Outstanding Actions Drop Down Options available will be either ‘Blank’ or ‘Saved’ or ‘Submitted’ or ‘Rejected’ When used in isolation all records matching the status entered will be returned When combined with Clearing Participant Status, the records returned will act as a union / join between the two status’ Client Entity Status Drop Down Options available will be either ‘Blank’ or ‘Active’ When used in isolation, all records associated with the Client Entity will be returned Client Entity Outstanding Actions Drop Down This will be blank N/A © Copyright 2014 ASX Limited ABN 98 008 624 691. All rights reserved 2014 17. ASX Limited ASX Clear (Futures) Static Data Portal User Manual Quick Search Field Type Description Application Client Account Status Drop Down Options available will be either ‘Blank’ or ‘Active’ or ‘Inactive’, ‘Pending’ or ‘Hold’ When used in isolation, all records associated with the Client Account will be returned When combined with Clearing Participant Status, the records returned will act as a union / join between the two status’, i.e. Active (CP) + Active (Client Account), will only return records where the CP AND associated Client Account are Active - Client Account Outstanding Actions Drop Down When used in isolation all Client Accounts matching the status entered will be returned Options available will be either ‘Blank’ or ‘Saved’ or ‘Submitted’ or ‘Rejected’ or ‘CP Submitted’ or ‘ASX Rejected’ When combined with Client Account Status, the records returned will act as a union / join between the two status’, i.e. Active + Saved, will only return Client Account records that are Active that also have a Saved workflow appended against it. - Book / Fund Status Drop Down N/A N/A Book / Fund Outstanding Actions Drop Down N/A N/A Filter Inactive Check Box Allows a user to filter Inactive records from the Search result pane Inactive records will be either omitted (where check box has been checked) or displayed (where check box has been unchecked) © Copyright 2014 ASX Limited ABN 98 008 624 691. All rights reserved 2014 18. ASX Limited 1.9.3. ASX Clear (Futures) Static Data Portal User Manual Search Results The results of either a Quick Search or specific Search Criteria appended will be visible within the Search Results pane. The search results pane provides a visual representation of the Client Clearing Account Hierarchy related to the Clearing Participant. Each row represents a unique record within the Account Hierarchy structure Colours are assigned to an Outstanding Action for quick identification. The colours applicable against each Outstanding Action status are as follows: Status Functional Rule Colour Saved Where the record has a Workflow Status = ‘Saved’ Light Yellow Submitted Where the record has a Workflow Status = ‘Submitted’ Light Orange Reject Where the record has a Workflow Status = ‘Reject’ Light Red CP Submitted Where the record has a Workflow Status = ‘CP Submitted’ Light Orange ASX Rejected Where the record has a Workflow Status = ‘ASX Rejected’ Light Red The results returned in the search result pane can be either expanded or collapsed to vary the information returned as per the Account Hierarchy. A description of the individual search result fields retuned is defined below: Search Results Description CP Returns the Firm code associated with the Clearing Participant User Id Ledger Returns the Ledger allocated to the Clearing Participant record. Each Ledger will be displayed on a unique row Clearing Type Indicator Indicates the Clearing Type Indicator (Client) assigned to the Clearing Participant & Ledger combination Client Entity Code Returns either the Client Entity Code (CPM Client) or Capital C Client (where there is a Nominated Person) or a Nominated Person associated with the © Copyright 2014 ASX Limited ABN 98 008 624 691. All rights reserved 2014 19. ASX Limited ASX Clear (Futures) Static Data Portal User Manual Participant. When the mouse cursor is hovered over the Client Entity Code, the Name assigned to the Client Entity is returned NP Indicator for Nominated Person, can be either Y (when Client Entity has been configured as a Nominated Person) or Blank (where a Client Entity code has been configured as a CPM Client or Capital C Client) Capital C Client Returns the Capital C Client where the Client Entity has been configured as a Nominated Person Client Account Code Returns each Client Account Code associated with the Client Entity Client Account Name Returns the name associated with the Client Account Code Client Account Type Returns the Client Account Type (ICA) Book / Fund Code N/A Book / Fund Name N/A Status Returns the individual ‘Approval’ status associated with each record displayed. In order to view the Approved record, the status will be represented as a hyperlink which can be clicked to open up the page associated with that record Outstanding Actions Returns the individual ‘Workflow’ status and Firm who performed the last update associated with each record displayed. In order to view the Workflow record, the status and User Role will be represented as a hyperlink which can be clicked to open up the page associated with that record. Where a record does not have a Workflow status (i.e. currently in the process of being edited or created), the field will be blank Last Actioned Date Returns the last date and time the record was updated or modified. In order to search for a record where specific search criteria have been appended, use the following steps: Step Action User 1. Data Entry Submitter or Approver 2. Click ‘Search’ button Submitter or Approver 3. View Data Submitter or Approver Description Select or enter criteria in the available fields within the Search Criteria pane. Search results will be retuned based on the search criteria entered © Copyright 2014 ASX Limited ABN 98 008 624 691. All rights reserved 2014 20. ASX Limited 1.9.4. ASX Clear (Futures) Static Data Portal User Manual Viewing and Editing Records Records exist within the system in either an: - Approved state or; Edited/Workflow state (i.e. where a workflow status is applied) Either state can be viewed within the system in order to allow a Clearing Participant user to view changes currently being made to a record (where permissions allow) or at the very least allow a Clearing Participant user to observe that changes are being made to a record by another user. In order to view either record state, the action to do so is initiated via the Record Search page – Search Results pane. 1.9.4.1. Viewing Approved Records In order to view an Approved record state, the ‘Status’ column in the Search Result pane will be populated with the Approval status applied to the record. The approved record can be viewed by clicking the hyperlink in the appropriate records column. This will bring the user to the pages related to that specific record. Where no ‘hyperlink’ has been provided, the user does not have access to the record 1.9.4.2. Viewing an Edited Record Records that are currently in the process of being edited (i.e. have a workflow status appended) can be viewed via the Record Search page. In order to identify where a record is currently being edited by another user, the ‘Outstanding Actions’ column in the Search Result pane will be populated with: - Workflow Status (i.e. Saved, Submitted etc) User Role (ASX or Clearing Participant or Client) currently in the process of making the change The edited record can be viewed by clicking the hyperlink in the column. This will bring the user to the pages related to that specific record Where no ‘hyperlink’ has been provided, the user does not have access to the record currently being edited. 1.9.4.3. View / Editing a record currently in the process of being edited Where a record is currently in the process of being edited by another User (either an ASX User or Clearing Participant or Client User) other than the user currently editing the record, the user logged into the portal will not be able to edit the production / deployed or edited record. In order to alert the user to this, a message will be appended to the record There will be no option to Save or Submit the record to the system. © Copyright 2014 ASX Limited ABN 98 008 624 691. All rights reserved 2014 21. ASX Limited ASX Clear (Futures) Static Data Portal User Manual Note: An ASX User has the ability to complete the workflow of a Client or Clearing Participant initiated workflow. In order to commence editing the record again, the user who initiated the edit will need to complete and closeout the workflow associated with the record. Where a record is not currently being edited, the ‘Outstanding Actions’ columns will be left blank. 1.9.5. Workflow Approval / Rejection Process In order to either deploy a new record or changes made to an existing record to the system, the record must be validated and approved by the Clearing Participant Approver. Similarly, to prevent either a new record or changes to an existing record from being deployed, the record can be validated and rejected by the Clearing Participant Approver. Where a Clearing Participant Approver has rejected a record, a rejection reason must be applied to the rejected record. The approval / rejection process follows the ‘four eyes’ verification principle that requires validation by a second party before changes can take effect within the system. A user can be both an Submitter and Approver, but the user cannot Approve / Reject their own changes. The workflow Approval / Rejection process applies to each Entity within the system and varies based on the Entity type and whether the record is either newly created or an edit to an existing record. The following diagrams illustrate the workflow process for each Entity type © Copyright 2014 ASX Limited ABN 98 008 624 691. All rights reserved 2014 22. 1.9.5.1. Clearing Participant Entity Workflow Approval / Rejection Process At a high level the following diagram illustrates the workflow associated with approval / rejection associated with an edit of an existing Clearing Participant Entity record. Please note that this has not been differentiated by the Participant user role. Colours identify the workflow status applicable: Clearing Participant Entity – Approval Workflow Process Save Delete or Submit? Clearing Participant Save or Submit? Edit CP Entity Details Enter CP Entity Details Saved Submit Status Legend Delete Submit Save or Submit? Submit Saved CP Entity record is deleted from system Enter CP Entity Details Edit CP Account? Status = ‘New’ Yes No Status = ‘Saved’ Status = ‘Deleted’ Status = ‘Submitted Status = ‘Approved Status = ‘Reject’ Approver Reviews CP Entity Details Rejected Approved Approve or Reject? CP Entity record Approved ASX Limited ASX Clear (Futures) Static Data Portal User Manual 1.9.5.2. Client Account Workflow Approval / Rejection Process At a high level the following diagram illustrates the workflow associated with approval / rejection associated with both the creation of a new and the edit of an existing Client Account record. Please note that this has not been differentiated by the Participant user role. Colours identify the workflow status applicable. Client Account – Workflow Process Status Legend Approve Status = ‘New’ Approve or Reject? Status = ‘Saved’ Status = ‘Deleted’ Reject ASX Status = ‘Submitted Append Rejection Reason to Record ASX Reviews Submitted Changes Status = ‘Approved Status = ‘Reject’ Status = ‘CPSubmitted’ Status = ‘ASXReject’ ASX Receives Message Alert Save or Submit? Edit Client Account? Save Enter Client Account Details Save Save Clearing Participant Submit Create New Client Account Enter Client Account Details Submit or Close Close? Submit Submit Save or Submit? Submit Save or Submit? No Enter Client Account Details Delete or Submit? Delete Submit Saved Client Account record is deleted from system Enter Client Account Details Edit Client Yes Account? No Approve Approve or Reject? © Copyright 2014 ASX Limited ABN 98 008 624 691. All rights reserved 2014 Yes No Client Account record Approved No Rejected Approver Reviews Client Account Details Edit Client Account? System checks field impact on Downstream systems 24. Yes Impact Identified? Approver reviews rejected message Yes System Sends Message Alert to ASX ASX Limited ASX Clear (Futures) Static Data Portal User Manual 1.10. Clearing Participant Entity Records Details associated with each Clearing Participant are maintained across a number of pages assessable by a tabbed page design layout Clearing Participant information is associated with the following tabs: - 1.10.1. Details Contacts Accessing an editing an existing Clearing Participant record Access to existing Clearing Participant Entity information saved into the Database is via the Record Search page. Use the following steps to access the information: Step Action User Description 1. Data Entry Submitter or Approver On the record search page and within the Search Criteria pane, select the Clearing Participant Code from the drop down list 2. Click ‘Search’ button Submitter or Approver 3. View Data Submitter or Approver Search results will be retuned based on the search criteria entered 4. Click ‘Approval Status’ hyperlink Submitter or Approver The Approval Status hyperlink will appear next to the Clearing Participant record in the Status column within the Search Results pane. Once clicked the Clearing Participant Entity record will be displayed 5. Commence editing information against the Clearing Participant Entity Submitter The Clearing Participant submitter can commence editing existing information appended against the Clearing Participant © Copyright 2014 ASX Limited ABN 98 008 624 691. All rights reserved 2014 25. ASX Limited 1.10.2. ASX Clear (Futures) Static Data Portal User Manual Clearing Participant Entity Details Clearing Participant details such as name and address information can be found on the Clearing Participant Entity Details tab. Information that can be amended on this page include the following: Field Description LEI Legal Entity Identifier of the Clearing Participant ABN The Australian Business Number of the Clearing Participant Field is mandatory Address The street address of the Clearing Participant. Use multiple lines as appropriate, i.e.: Address Line 1: Level 16, Chifley Tower - Field is mandatory Address Line 2: 2 Chifley Square Address Line 3: [leave blank] © Copyright 2014 ASX Limited ABN 98 008 624 691. All rights reserved 2014 26. ASX Limited ASX Clear (Futures) Static Data Portal User Manual Field Description City / Suburb City / Suburb associated with the street address Field is mandatory State Available Australian States where Country has been set to Australia, otherwise the field is hidden where Country is other than Australia Postcode / Zip Post Code / Zip associated with the Street Address Field is mandatory Country Country associated with the street address Field is mandatory 1.10.3. Clearing Participant Entity Contacts Contact details associated with the Clearing Participant are captured on the Clearing Participant Entity Contacts tab. © Copyright 2014 ASX Limited ABN 98 008 624 691. All rights reserved 2014 27. ASX Limited ASX Clear (Futures) Static Data Portal User Manual Information that can be amended on this page includes the following: Field Description Legal Contact Job Title Job Title associated with the Legal Contact 1 and 2 Legal Contact 1 information is mandatory Legal Contact 1 First Name First Name associated with the Legal Contact 1 and 2 Legal Contact 1 information is mandatory Legal Contact 1 Last Name Last Name associated with the Legal Contact 1 and 2 Legal Contact 1 information is mandatory Legal Contact 1 Phone Phone Number associated with the Legal Contact 1 and 2 Legal Contact 1 information is mandatory Legal Contact 1 Email Email Address associated with the Legal Contact 1 and 2 Legal Contact 1 information is mandatory Operations Contact 1 Job Title Job Title associated with the Operations Contact 1 and 2 Operations Contact 1 information is mandatory Operations Contact 1 First Name First Name associated with the Operations Contact 1 and 2 Operations Contact 1 information is mandatory Operations Contact 1 Last Name Last Name associated with the Operations Contact 1 and 2 Operations Contact 1 information is mandatory Operations Contact 1 Phone Phone Number associated with the Operations Contact 1 and 2 Operations Contact 1 information is mandatory Operations Contact 1 Email Email Address associated with the Operations Contact 1 and 2 Operations Contact 1 information is mandatory Contact in Case of Default 1 Job Title Job Title associated with the Contact in Case of Default 1 and 2 Contact in Case of Default 1 information is mandatory Contact in Case of Default 1 First Name First Name associated with the Contact in Case of Default 1 and 2 Contact in Case of Default 1 information is mandatory Contact in Case of Default 1 Last Name Last Name associated with the Contact in Case of Default 1 and 2 Contact in Case of Default 1 information is mandatory © Copyright 2014 ASX Limited ABN 98 008 624 691. All rights reserved 2014 28. ASX Limited ASX Clear (Futures) Static Data Portal User Manual Field Description Contact in Case of Default 1 Phone Phone Number associated with the Contact in Case of Default 1 and 2 Contact in Case of Default 1 information is mandatory Contact in Case of Default 1 Email Email Address associated with the Contact in Case of Default 1 and 2 Contact in Case of Default 1 information is mandatory © Copyright 2014 ASX Limited ABN 98 008 624 691. All rights reserved 2014 29. ASX Limited ASX Clear (Futures) Static Data Portal User Manual 1.11. Client Entity Records 1.11.1. Creating a new Client Entity Record Client Entity records are set up by the ASX upon request from the CP on behalf of their CPM client. Given some CPM Clients may not wish to disclose details on the form (such as Alternate Clearing Participant) ASX will also accept forms submitted directly by the CPM Client. In order to request a new Client Entity to be set up please request your CPM client to fill out the Client Entity Configuration form in the Appendix. Also in the same section see the User Guide on how to fill this form out. Please note: A Clearing Participant user will not have access to the Client Entity record configured by the ASX in the portal. 1.12. Client Account Records Details associated with each Client Account are maintained across a number of pages assessable by tabbed page design layout Client Account information is associated with the following tabs: - 1.12.1. Details Address Creating a new Client Account In order to create a new Client Account record, use the following steps: Step Action User Description 1. Click ‘Add new Client Account’ link in Navigation bar Submitter This link allows a Clearing Participant user to create a new Client Account. Once clicked, the Client Account tabbed page will be presented to the user The following page will then be presented where a Clearing Participant Code / Ledger combination is required to be appended the Client Account: In order to create a new Client Account record, use the following steps: Step Action User Description 1. Choose a Clearing Participant Code from the drop down list Submitter The Clearing Participant code will be locked to the Clearing Participant Code associated with the user logged into system The list of Ledgers configured under your Clearing Participant code will be returned. © Copyright 2014 ASX Limited ABN 98 008 624 691. All rights reserved 2014 30. ASX Limited ASX Clear (Futures) Static Data Portal User Manual 2. Observe and choose the Ledger the you would like the Client Account to be created under Submitter 3. Click the ‘Create Client Accounts’ button Submitter The Clearing Participant Ledger combination is chosen, by clicking the ‘Create Client Accounts’ button, the system will display the Client Account Page 4. Commence appending Client Account Information Submitter The Clearing Participant submitter can commence entering information against the Client Account 1.12.2. Accessing and editing an existing Client Account Access to existing Client Account information is via the Record Search page. Use the following steps to access and edit the information: Step Action User Description 1. Data Entry Submitter or Approver Enter search criteria to return a Client Account record 2. Click ‘Search’ button Submitter or Approver 3. View Data Submitter or Approver Search results will be retuned based on the search criteria entered 4. Navigate to Client Account Submitter or Approver Navigate through the Client Clearing Account Hierarchy until the relevant Client Account can be located 5. Click ‘Approval Status’ hyperlink Submitter or Approver The Approval Status hyperlink will appear next to the Client Account record in the Status column within the Search Results pane. Once clicked the Client Account record will be displayed 6. Commence editing information against the Client Account Submitter The Clearing Participant submitter can commence editing existing information appended against the Client Account © Copyright 2014 ASX Limited ABN 98 008 624 691. All rights reserved 2014 31. ASX Limited ASX Clear (Futures) Static Data Portal User Manual Once saved or submitted, the Client Account code will be automatically generated by the system on a separate page as follows: 1.12.3. Client Account Details Client Account details such as associated Client Entity, Ledger and Account type etc can be found on the Client Account Details tab. © Copyright 2014 ASX Limited ABN 98 008 624 691. All rights reserved 2014 32. ASX Limited ASX Clear (Futures) Static Data Portal User Manual Information presented to a Clearing Participant user on this screen includes the following: Field Description Status The ‘Approved’ status of the Client Account can be amended. Refer to the following diagram for Approval Status states associated with a Client Account: Blank (New Record) Active Pending This next status will be set by the status assigned to the Client Entity Inactive Hold Active Active Inactive Inactive Active Clearing Participant Code The Clearing Participant code will be set to the Clearing Participant Firm Code and cannot be changed Client Entity Code The Client Entity is a drop down list of all of the Clients configured in the system Once the Client Account has been saved into the system, the Client Entity Code cannot be amended This field is not required for a Client Account configured as an Omnibus Account and will be hidden where the ‘Omnibus’ Account Type has been selected Client Entity Legal Name The legal name associated with the Client Entity selected. This field is output only and cannot be changed © Copyright 2014 ASX Limited ABN 98 008 624 691. All rights reserved 2014 33. ASX Limited ASX Clear (Futures) Static Data Portal User Manual Field Description Client Account Code The Client Account code is the unique code associated with the Client Account. The Client Account Code is auto generated by the system for a new record once the record has been saved or submitted The Client Account code is an 8 digit auto generated alphanumeric id which can be broken down into the following components: - - Where the Client Account has been configured as an ICA Account (where Segregation Code = I) Client Account Code = <Client Entity Code (3 Character Code)><Account Code (2 Character Code)>00<Segregation Code> Example: Client Entity Code = DEL Account Code = AA (the next ICA Client Account for Client Entity DEL will increment this value to AB) Level 2 Code = 00 Segregation Code = I (ICA) DELAA00I Once generated, the Client Account Code cannot be amended Client Account Name The name of the Client Account Client Account Ledger The Ledger will be prepopulated with the Ledger chosen from the previous page. This field is output only and cannot be changed Clearable Products (OTC & Futures) Tick boxes that represent whether the Client Account is required for OTC Client Clearing or Futures Client Clearing. Role The role will be set to Counterparty and cannot be changed Account Type Account Type can be set to: The Client Account Name cannot be blank Both tick boxes can be ticked which implies that the Client Account is applied across both OTC and Futures Client Clearing - - ICA (Individual Client Account) Please note that Futures Omnibus accounts are not managed within the Static Data Portal and are managed as per the existing process directly through Genium. Once appended, the Account Type cannot be amended © Copyright 2014 ASX Limited ABN 98 008 624 691. All rights reserved 2014 34. ASX Limited ASX Clear (Futures) Static Data Portal User Manual Field Description Inherit Details from Client Entity This tick box will apply the ABN, LEI & Company Registration number fields from the Client Entity to the Client Account Where the Inherit tick box has been ticked, the ABN, LEI and Company Registration Number fields cannot be amended. Any changes that occur at the associated Client Entity will be inherited automatically The Inherit tick box will not be available where the Client Account has been configured as an Omnibus account ABN Australian Business Number The ABN can be applied individually where the Inherit Details from Client Entity tick box has not been ticked, or automatically where the Inherit Details from Client Entity tick box has been ticked An ABN or LEI or Company Registration Number is required to be appended against the ICA LEI Legal Entity Identifier The LEI can be applied individually where the Inherit Details from Client Entity tick box has not been ticked, or automatically where the Inherit Details from Client Entity tick box has been ticked An ABN or LEI or Company Registration Number is required to be appended against the ICA Company Registration Number International Company Registration Number The Company Registration Number can be applied individually where the Inherit Details from Client Entity tick box has not been ticked, or automatically where the Inherit Details from Client Entity tick box has been ticked An ABN or LEI or Company Registration Number is required to be appended against the ICA © Copyright 2014 ASX Limited ABN 98 008 624 691. All rights reserved 2014 35. ASX Limited 1.12.4. ASX Clear (Futures) Static Data Portal User Manual Client Account Address Client Account Address details specifically for the Client Account can be found on the Client Account Address tab. Information presented to a user on this screen includes the following: Field Description Status The ‘Approved’ status of the Client Account can be amended. Refer to the following diagram for Approval Status states associated with a Client Account: Blank (New Record) Active Pending This next status will be set by the status assigned to the Client Entity Inactive Hold Active Active Inactive Inactive © Copyright 2014 ASX Limited ABN 98 008 624 691. All rights reserved 2014 Active 36. ASX Limited ASX Clear (Futures) Static Data Portal User Manual Field Description Inherit Address from Client Entity This tick box will apply the Address details appended against the Client Entity to the Client Account Where the Inherit tick box has been ticked, the Address fields cannot be amended. Any changes that occur at the associated Client Entity will be inherited automatically The Inherit tick box will not be available where the Client Account has been configured as an Omnibus account Address The street address of the Client Account. Use multiple lines as appropriate, i.e.: Address Line 1: Level 3 <Field is required> Address Line 2: 20 Bridge St Address Line 3: [leave blank] The Address can be applied individually where the Inherit Address from Client Entity tick box has not been ticked, or automatically where the Inherit Address from Client Entity tick box has been ticked City / Suburb City / Suburb associated with the street address The City / Suburb can be applied individually where the Inherit Address from Client Entity tick box has not been ticked, or automatically where the Inherit Address from Client Entity tick box has been ticked Field is required State Available Australian States where Country has been set to Australia, otherwise the field is hidden where Country is other than Australia The State can be applied individually where the Inherit Address from Client Entity tick box has not been ticked, or automatically where the Inherit Address from Client Entity tick box has been ticked Postcode / Zip Post Code / Zip associated with the Street Address The Postcode / Zip can be applied individually where the Inherit Address from Client Entity tick box has not been ticked, or automatically where the Inherit Address from Client Entity tick box has been ticked Field is required Country Country associated with the street address The Country can be applied individually where the Inherit Address from Client Entity tick box has not been ticked, or automatically where the Inherit Address from Client Entity tick box has been ticked Field is required © Copyright 2014 ASX Limited ABN 98 008 624 691. All rights reserved 2014 37. ASX Limited ASX Clear (Futures) Static Data Portal User Manual 2. Contacting Support 2.1. ASX Online Helpdesk Support Phone: 1800 682 484 Email: [email protected] 2.2. ASX Clearing Operations Phone: 1800 240 033 or +612 8298 8479 Email: [email protected] © Copyright 2014 ASX Limited ABN 98 008 624 691. All rights reserved 2014 38. ASX Limited ASX Clear (Futures) Static Data Portal User Manual 3. Appendices 3.1. Appendix 1 – Registration Form Registration Form for ASX Clear (Futures) Static Data Portal (Clearing Participant or Client) Administrator user. Static_Data_Portal_ Registration_Form.pdf 3.2. Appendix 2 – Digital Certificate Procedure To obtain a digital certificate, your Clearing Participant or Client Administrator user must first create the user in ASX Clear (Futures) Static Data Portal as outlined previously. After the ASX Online Help Desk has pre-registered the certificate, you will receive an email with details on how to enrol. The email will be sent to the email address that has been registered in ASX Online. Before enrolling and downloading a digital certificate please ensure the following checklist has been followed: 3.2.1. 3.2.2. 3 Pre-requisites for Enrolment of a Digital Certificate ActiveX Controls set to “Enabled” Onsite MSI package installed for Windows XP Operating System. Download and Installation of the Root Digital Certificate Click “Install CA” from the Digital Id Centre site3 to install the CA. Ensure above-mentioned CA has been installed to “Trusted Root Certification Authorities”. During installation, select the format ‘My ID for Microsoft Internet Explorer…’ Download can only occur once, so the user should not delete their digital certificate. Detailed Instructions and URL to install the root CA is provided in the confirmation email. © Copyright 2014 ASX Limited ABN 98 008 624 691. All rights reserved 2014 39. ASX Limited 3.2.3. ASX Clear (Futures) Static Data Portal User Manual Enrolment, Downloading and Installation Procedure of the user certificate The enrolment form is accessed through the Digital ID Centre secure website hosted by VeriSign. The enrolment website is accessed via: https://pki.verisign.com.au/services/ASXOperationsPtyLtd/client/userEnrollMS.htm. 4 2. When loading the enrolment page for the first time, you will see a Security Warning dialog for a program digitally signed by Microsoft. This program is required to enrol for a certificate. It is safe to run it on your computer and its authenticity is proved by a digital signature. Click Yes. 3. The following screen is displayed: 4. The following fields must be entered exactly as advised by ASX Online Help Desk: • First Name • Last Name • E-mail Address • Passcode4. Provided with the confirmation email © Copyright 2014 ASX Limited ABN 98 008 624 691. All rights reserved 2014 40. ASX Limited ASX Clea 5. The only field not case sensitive is the Passcode. The Challenge Phrase is a unique phrase set by the user and not shared with anyone. It might only be needed if a non-Internet Explorer browser is used for downloading the digital certificate or during certificate renewal. 6. You will be requested to specify the level of security for your Private Key. It is recommended that High protection is selected for better private key protection. 7. This popup window appears for confirmation of your e-mail address. 8. If the address is correct, click on OK. The warning window “Web Access Confirmation” appears. 9. If you have confirmed that the web site is authentic, click on “Yes” to request the certificate. The following warning window appears: 10. Click on “Yes” to add the certificate to your computer. 11. After the certificate is successfully installed you should receive a confirmation page To confirm that the certificate has been successfully installed, open the Internet Explorer browser and click on: \Tools\Internet Options…\Content\Certificates… and check that the expiration date is one year in the future. ASX has configured the following policy relating to the Passcode expiry period and the lockout threshold for invalid entries: The Passcode expiration for enrolment is set to one month from the date of issue. The lockout threshold is set to three attempts. The fourth invalid entry will lockout the registration record and will require the ASX to reset the Passcode for the user. © Copyright 2014 ASX Limited ABN 98 008 624 691. All rights reserved 2014 ASX Limited 3.2.4. ASX Clear (Futures) Static Data Portal User Manual Exporting / Importing Procedure As a digital certificate can only be downloaded from the VeriSign website once, this manual outlines the steps to export a digital certificate from one PC to another. This will be required for Business Continuity Processing/Disaster Recovery (BCP/DR) sites where a certificate will need to be installed on the BCP/DR PC in addition to the normal production PC. Before importing or exporting a digital certificate please ensure the following checklist has been followed: Private keys must be included in any import or export (i.e. ensure .pfx format is imported/exported, not .cer). PKCS#12 format must be used (it is specifically designed for private keys). 3.2.4.1. Exporting a Certificate 1. In Internet Explorer click on Tools, then Internet Options. Select the Content tab and then click in the Certificates button. 2. In the “Certificates” window select the certificate that you wish to export then click ‘Export’. © Copyright 2014 ASX Limited ABN 98 008 624 691. All rights reserved 2014 42. ASX Limited ASX Clear (Futures) Static Data Portal User Manual 3. The Certificate Export Wizard window then appears. Ensure that you have checked “Yes, export the private key” then click ‘Next’ to begin the Export. 4. It is recommended that you Enable strong protection then click ‘Next’. 5. You are required to setup a password to protect the private key. This password will be required in order to import the certificate. © Copyright 2014 ASX Limited ABN 98 008 624 691. All rights reserved 2014 43. ASX Limited ASX Clear (Futures) Static Data Portal User Manual 6. Click on the ‘Browse’ button to select the destination for the export of the certificate. 7. Once this has been confirmed, click ‘Next’, then click ‘Finish’. 8. A confirmation box will appear confirming that the export was successful. 3.2.4.2. Importing a Certificate 1. In Internet Explorer, Click on the ‘Tools’ menu, then ‘Internet Options’. 2. Select the ‘Content’ tab and then click on the ‘Certificates’ button. 3. In the Certificates window, click Import. © Copyright 2014 ASX Limited ABN 98 008 624 691. All rights reserved 2014 44. ASX Limited ASX Clear (Futures) Static Data Portal User Manual 4. The Certificate Import Wizard window appears. 5. Please click ‘Next’. 6. Click ‘Browse’ to navigate to the location where the certificate was originally exported to. 7. Please ensure that you change the file type from the default X 509 Certificate to Personal Information Exchange (*.pfx) in the File of Type drop down box. 8. Select the certificate that you wish to import and click ‘Open’. Click ‘Next’ to proceed. © Copyright 2014 ASX Limited ABN 98 008 624 691. All rights reserved 2014 45. ASX Limited ASX Clear (Futures) Static Data Portal User Manual 9. You will then be prompted for the password for the private key. This is the same password that was used when exporting the certificate originally. You are required to enter the password for the private key and then click ‘Next’. 10. Windows will then allow you to select where you have the certificate stored. 11. Click ‘Next’ once completed. 12. Click ‘Finish’ to complete the Certificate Import Wizard. A confirmation box will appear confirming that the import was successful. © Copyright 2014 ASX Limited ABN 98 008 624 691. All rights reserved 2014 46. ASX Limited ASX Clear (Futures) Static Data Portal User Manual 13. The certificate has now been successfully exported and imported. 3.3. 3.3.1. Appendix 3 – Troubleshooting Browser-related Error Messages 3.3.1.1. This website only supports Internet Explorer 7, 8 and 9 Issue The application will automatically check your browser for compatibility. You will need to try a different browser version if you try to access the site and get the message. Please note that the current implementation does not support Internet Explorer 6. 3.3.1.2. HTTP 403 Forbidden Issue Why do I get the error message, “HTTP 403 Forbidden”? This can happen if there is not a valid digital certificate stored on the computer. You can check your certificate in Internet Explorer by going to Tools-> Internet Options -> Content -> Certificates>Personal. The certificate issued should match your login name. 3.3.1.3. JavaScript Issue Why do I get the error message, “JavaScript must be enabled to use this site. Please enable JavaScript in your browser and try again”? The application checks to see if JavaScript is enabled before it renders the pages in full. If JavaScript is not enabled, you will not be able to enter any data. It should be possible to enable JavaScript through the ‘Internet Options>Programs>Manage addons>Toolbars and Extensions section of your browser. Consult Internet Explorer Help for more information on how to do this for your browser version. © Copyright 2014 ASX Limited ABN 98 008 624 691. All rights reserved 2014 47. ASX Limited ASX Clear (Futures) Static Data Portal User Manual It might be necessary to shut down all instances of Internet Explorer before changes take effect. © Copyright 2014 ASX Limited ABN 98 008 624 691. All rights reserved 2014 48. ASX Limited 3.3.2. ASX Clear (Futures) Static Data Portal User Manual Digital Certificate Issues Most problems and errors that encountered relating to digital certificates occurred during enrolment, download, installation and importing and exporting. If several key pieces of information are known and precautions taken, most of the problems and errors outlined in this document can be prevented. Below is a summary of the key information that can prevent most of the problems and errors occurring. 3.3.2.1. Issues with Enrolment for a Digital ID: Ensure Check ActiveX Controls are enabled. If operating system is Windows XP, ensure Onsite MSI package is installed. Enrolment can only occur once for each passcode, so ensure details are correct. There are five fields which are mandatory to be entered (First Name, Last Name, Your E-mail Address, Passcode and Challenge Phrase). Note that it is not mandatory to check the “Protect Your Private Key” checkbox or to enter comments. During this process, there are three possible errors: Incorrect Passcode If invalid username or passcode is entered, then the following error message will be displayed: Passcode “Already In Use” If the passcode selected has already been used to generate a digital id, then the following error message will be displayed: Digital ID Could Not Be Generated If there is an issue with ActiveX controls for the browser, this error will occur. © Copyright 2014 ASX Limited ABN 98 008 624 691. All rights reserved 2014 49. ASX Limited ASX Clear (Futures) Static Data Portal User Manual This issue may occur on a XP machine that did not have the required ActiveX Controls installed. Installation of the Onsite MSI package resolved this issue and allowed the digital certificate to be downloaded. Please refer to your internal technical support for further information relating to this. 3.3.2.2. Issues with Download and Installation of a Digital Certificate Ensure user has clicked on “Install CA” from the Digital Id Centre site to install the CA. Ensure above-mentioned CA has been installed to “Trusted Root Certification Authorities”. During installation, select the format ‘My ID for Microsoft Internet Explorer…’ Download can only occur once, so the user should not delete their digital certificate. 3.3.2.3. Issues with Importing and Exporting Digital Certificates Private keys must be included in any import or export (i.e. ensure .pfx format is imported/exported, not .cer). PKCS#12 format must be used (it is specifically designed for private keys). 3.3.2.4. Digital Download and Installation Issues Once the user’s Digital ID has been generated, it needs to be downloaded and installed on the user’s machine. This process is attempted directly after enrolment. During this process, there are two errors that are possible. 3.3.2.5. Digital Certificate Could Not Be Installed This error occurs for a variety of reasons listed below in the error: © Copyright 2014 ASX Limited ABN 98 008 624 691. All rights reserved 2014 50. ASX Limited ASX Clear (Futures) Static Data Portal User Manual This error occurs because the root certificate has not been installed. By returning to the Digital ID Centre website: https://pki.verisign.com.au/services/ASXOperationsPtyLtd/digitalidCenter.htm And by clicking on “Install CA”, this issue was resolved (note it must be installed in the “Trusted Root Certification Authorities” store, otherwise the issue will not be resolved). 3.3.2.6. ID Format Unselected If a user does not select / specify an ID format from the dropdown list, then the following error message is displayed: © Copyright 2014 ASX Limited ABN 98 008 624 691. All rights reserved 2014 51. ASX Limited ASX Clear (Futures) Static Data Portal User Manual 3.3.2.7. Using Digital Certificates Issues After a digital certificate has been installed, it can be used to log into ASX Clear (Futures) Static Data Portal. Before the ASX Clear (Futures) Static Data Portal website can be opened, it will require the user to select a digital certificate to use as part of authentication. A list of all available digital certificates installed on the user’s machine will be available to be selected. In the figure below, two digital certificates are available for selection (User 1 and User 2): 3.3.2.8. Digital Certificate Revoked An “Incorrect Username in the Certificate” error message will be displayed when a user attempts to log into ASX Clear (Futures) Static Data Portal: When their digital certificate has been revoked. Using another person’s digital certificate. Below is an example of the error message: © Copyright 2014 ASX Limited ABN 98 008 624 691. All rights reserved 2014 52. ASX Limited 3.3.3. ASX Clear (Futures) Static Data Portal User Manual Static Data Portal Access Issues 3.3.3.1. Cannot view Static Data Portal link on the application Selection Page. If the users have valid ASX Online login credentials and valid SSO certificate, they will be able to access the application selection page. However if they have not been enabled for ASX Clear (Futures) Static Data Portal they will not be able to view the access link. For any support regarding Static Data Portal access please contact ASX Clearing Operations. 3.3.3.2. On Clicking the Static Data Portal link, access denied error is displayed If the users can view the Static Data Portal link on the application selection page, they have been enabled for ASX Clear (Futures) Static Data Portal. Access denied message on clicking the Static Data Portal link implies that there is an issue with user’s firm access. The user must follow the instructions on the screen. 3.4. Appendix 4 – Client Entity Configuration Form and User Guide Client Clearing Forms Client Static Data - Client v0 4.pdf Forms User Guide v1.0.pdf © Copyright 2014 ASX Limited ABN 98 008 624 691. All rights reserved 2014 53. ASX Limited ASX Clear (Futures) Static Data Portal User Manual Disclaimer This document provides general information only and may be subject to change at any time without notice. ASX Limited (ABN 98 008 624 691) and its related bodies corporate (“ASX”) makes no representation or warranty with respect to the accuracy, reliability or completeness of this information. To the extent permitted by law, ASX and its employees, officers and contractors shall not be liable for any loss or damage arising in any way, including by way of negligence, from or in connection with any information provided or omitted, or from anyone acting or refraining to act in reliance on this information. The information in this document is not a substitute for any relevant operating rules, and in the event of any inconsistency between this document and the operating rules, the operating rules prevail to the extent of the inconsistency. © Copyright 2014 ASX Limited ABN 98 008 624 691. All rights reserved 2014. ASX Trademarks The trademarks listed below are trademarks of ASX. Where a mark is indicated as registered it is registered in Australia and may also be registered in other countries. Nothing contained in this document should be construed as being any licence or right to use of any trademark contained within the document. ASX® © Copyright 2014 ASX Limited ABN 98 008 624 691. All rights reserved 2014 54.


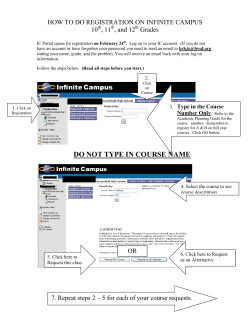
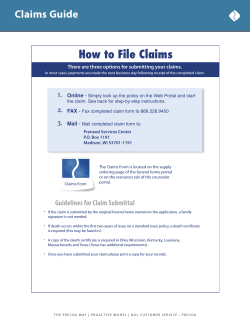


© Copyright 2026