
Operator's Manual 3100B High Frequency Oscillatory Ventilator
3100B
High Frequency Oscillatory Ventilator
Operator's Manual
767164
0601G
Copyright 2001 SensorMedics Corporation
Printed in U.S.A.
___________________________________________________________________________________________________________________
Revisions
iii
3100B
High Frequency Oscillatory Ventilator
___________________________________________________________________________________________________________________
Revision
Changes
Pages
Date
A
Original Release
All
January 1993
_______________________________________________________________________________________________
B
Revisions to meet FDA requirements and
All
January 1996
3100B device specification changes
_______________________________________________________________________________________________
C
2.9–2.12
May 1998
1.9, 6.5, 6.9
1.9, 2.3, 4.14, 4.15, 6.5,
6.7, 7.13-7.15, 8.2, 8.3
6.7
Warning re: use in environments >28°C added
_______________________________________________________________________________________________
D
Performance Graphs updated
Performance Check procedure updated
Piston Centering instructions removed
Addresses and phone numbers updated
Ad.1
October 1998
Indications for Use and Adverse Effects updated
1.2
Precautions updated
1.4
CE Mark information added
2.7
Tech. Support phone numbers removed
7.9, 7.11
Pa Control Valve changed to Pa Adjust Control, Pa
Adjust Valve changed to Pa Control Valve
7.16
Treatment Strategies updated
8.2
Bias Flow, Frequency, % Inspiratory Time, and Oscillatory
Pressure Amplitude strategies updated
8.3, 8.4, 8.5, 8.6
General Aspects of Clinical Strategy updated
8.6, 8.7, 8.8
Disease-Specific Variations to General Clinical Strategies
updated
8.10
Non Invasive Gas Monitoring
recommendations updated
8.11
Suctioning Guidelines updated
8.13
_______________________________________________________________________________________________
767164
0601G
___________________________________________________________________________________________________________________
iv
Revisions
3100B High Frequency Oscillatory Ventilator
_______________________________________________________________________________________________
Revision
Changes
Pages
Date
E
Changed page numbering system
All
September 1999
Alarm levels readjust modified
5
Patient Circuit Calibration Procedure Label modified
7
Ventilator Performance Checks Label modified
8
Mean Pressure Limit specifications modified
13
Air Cooling Inlet Flow specifications modified
18, 52
3100B HFOV Block Diagram removed
25
Mean Pressure Limit instructions removed
27, 43, 68, 84, 86, 87
Oscillator Subsystem airflow specifications modified
35
Warning Alarms instructions modified
37, 45
Set Max Pa Alarm instructions modified
44
Patient Circuit Calibration instructions modified
66, 78
Ventilator Performance Check instructions modified
67, 68
Driver Diaphragm Lubrication procedure added
75
_______________________________________________________________________________________________
F
Corrected the company phone number
Indications of Use section—removed the last sentence
Changed the patient circuit warning
Replaced the Patient Circuit Calibration Procedure label
Updated the Driver Replacement Record Label
Changed the driver-replacement hours to 2000
Changed the Mean Pressure Limit to “Automatic”
Updated Figures 2.1 through Figure 2.4
Added Figure 2.5
Modified figure 3.2 (changed the Y axis from 50 to 60 cm)
Changed the oscillator system operational life to read
“more than 2,000 hours”
Changed the LPM values in Section F
Changed the warning alarm description
Low bias flow rate note added
Changed the safety alarms description
Modified Figure 4.1
Removed “Piston Centering” from the fifth paragraph
under Mean Pressure Adjustment
Changed the statement describing the affects of changing
the “% Inspiratory Control”
vii
1
2
7
10
10
13
20–23
24
31
January 2001
32
34
37
37
37-38
42
43
45
767164
0601G
___________________________________________________________________________________________________________________
Revisions
v
3100B
High Frequency Oscillatory Ventilator
___________________________________________________________________________________________________________________
Revision
Changes
Pages
Date
F (cont.)
Changed the warning alarm description
45
January 2001
Low Bias Flow Rates note added
46
Modified Figure 4.2
50
Changed the LPM value in item 27 of Chapter 4
52
Modified item 37 of Chapter 4
55
Modified item 42 of Chapter 4
56
Changed the patient circuit warning
61
Modified Figure 5.3
62
Changed the patient circuit warning
66
Changed step 6a of the “Start-up Procedures”
67
Changed steps 7b, 7c, 9, and 10 of the “Start-up Procedures” 68
Changed steps 13, 14, 16, and 17 of the
“Start-up Procedures”
69
Changed steps 18 and 20 of the “Start-up Procedures”
70
Changed “Emptying the Water Trap” section
74
Changed “Changing the Patient Circuit”
76
Changed “Patient Circuit Calibration”
78
Changed “F. Scheduled Periodic Maintenance” to
indicated “every 2,000 hours” of operation
82
Updated the “Visual/Audible Alarm Occurring” table
85
Changed the description of part number 771384-102
89
Changed the part number 463202 to 770566 and changed
its description
90
Added part number 765298
90
Changed item 3 under “Weaning”
96
Removed the first paragraph of Section E
101
_______________________________________________________________________________________________
G
767164
0601G
Changed the section “A. Treatment Strategies”
Changed “Frequency” and “% Inspiratory Time”
Added the section “Mean and Range of 3100B Settings”
Changed “General Aspects of Clinical Strategy”
Added the section “Oxygenation”
Changed “Ventilation” and “Weaning”
Removed “Mean and Range of 3100B Settings” and added
“Summary of MOAT II Clinical Management Strategies” and
“Summary of Weaning Strategy from MOAT II Clinical Trial”
91
92
92
95
95
96
97
June 2001
___________________________________________________________________________________________________________________
vi
Revisions
3100B High Frequency Oscillatory Ventilator
_______________________________________________________________________________________________
Revision
Changes
Pages
Date
G (cont.)
Removed “Summary of HFOV Therapeutic Intervention
June 2001
and Rationale”
98
Changed “C. Adverse Effects”
99
_______________________________________________________________________________________________
767164
0601G
___________________________________________________________________________________________________________________
Company Addresses
vii
3100B
High Frequency Oscillatory Ventilator
___________________________________________________________________________________________________________________
Manufacturer
SensorMedics Corporation
22705 Savi Ranch Parkway
Yorba Linda, California 92887-4645
Telephone: (800) 231 2466
(714) 283 2228
FAX: (714) 283 8493
Authorized European Representative
SensorMedics BV
Rembrandtlaan 1b
3723 BG Bilthoven
The Netherlands
Telephone: +31 (30) 2289711
FAX: +31 (30) 2286244
On the Internet at www.sensormedics.com.
767164
0601G
___________________________________________________________________________________________________________________
Precautions
ix
3100B
High Frequency Oscillatory Ventilator
___________________________________________________________________________________________________________________
Caution: Federal law restricts this device to sale by, or on the order of a physician.
Caution: Not suitable for use in the presence of flammable anesthetics.
Service of this instrumentation is restricted to factory trained personnel only.
767164
0601G
___________________________________________________________________________________________________________________
Table of Contents
xi
3100B
High Frequency Oscillatory Ventilator
___________________________________________________________________________________________________________________
1
Introduction...................................................................................................................................... 1
A. Indications for Use ....................................................................................................................... 1
B. Contraindications ......................................................................................................................... 1
C. Adverse Effects of the Device on Health ..................................................................................... 1
D. Warnings ..................................................................................................................................... 1
E. Precautions.................................................................................................................................. 3
F. Explanation of Symbols ............................................................................................................... 6
G. Exterior Labels ............................................................................................................................ 7
2
Specifications ................................................................................................................................ 13
A. Controls ..................................................................................................................................... 13
B. Indicators ................................................................................................................................... 14
C. Pressure Measurement ............................................................................................................. 15
D. Alarms ....................................................................................................................................... 16
E. Electrical .................................................................................................................................... 17
F. Pneumatic Connections ............................................................................................................. 18
G. Physical ..................................................................................................................................... 19
H. Performance .............................................................................................................................. 20
3
Description of System and Safety Features ....................................................................... 25
A. Introduction ................................................................................................................................ 25
B. External Air/O2 Blender ............................................................................................................. 25
C. External Humidifier .................................................................................................................... 25
D. Pneumatic Logic and Control..................................................................................................... 27
Bias Flow........................................................................................................................... 27
Mean Pressure Adjust....................................................................................................... 27
Patient Circuit Calibration.................................................................................................. 27
E. Patient Circuit ............................................................................................................................ 28
F. Oscillator Subsystem ................................................................................................................. 32
G. Airway Pressure Monitor ........................................................................................................... 34
H. Electronic Control and Alarm Subsystem .................................................................................. 35
I. Electrical Power Supply............................................................................................................... 36
J. Safety Features .......................................................................................................................... 37
4
Location and Function of Controls, Indicators, and Connections ............................. 41
A. Introduction ................................................................................................................................ 41
B. Front and Side Panel – Control Package................................................................................... 42
C. Rear Panel – Control Package .................................................................................................. 50
767164
0601G
___________________________________________________________________________________________________________________
xii
Table of Contents
3100B High Frequency Oscillatory Ventilator
___________________________________________________________________________________________________________________
D. System Column and Patient Circuit ........................................................................................... 53
5
Assembly and Installation ........................................................................................................ 57
A. Introduction ................................................................................................................................ 57
B. Unpacking.................................................................................................................................. 57
C. Assembly ................................................................................................................................... 57
D. Pre-use Cleaning and Disinfection ............................................................................................ 64
6
Operational Verification and Start-up Procedures ........................................................... 65
A. Introduction ................................................................................................................................ 65
B. Start-up Procedures................................................................................................................... 66
C. Performance Verification ........................................................................................................... 71
7
Maintenance and Troubleshooting ........................................................................................ 73
A. Introduction ................................................................................................................................ 73
B. Exterior Cleaning ....................................................................................................................... 73
C. Operator Maintenance Procedures............................................................................................ 73
Emptying the Water Trap .................................................................................................. 74
Changing the Compressed-gas Inlet Filter Cartridge Elements ........................................ 74
Changing the Power Failure Alarm Battery ....................................................................... 75
Cleaning the Column Lint Filter......................................................................................... 76
Changing the Patient Circuit ............................................................................................. 76
Lubrication of the Driver Diaphragm.................................................................................. 76
D. Patient Circuit Calibration .......................................................................................................... 78
E. Other Scheduled Periodic Calibration........................................................................................ 78
Control Package DC Power Supply .................................................................................. 79
Airway Pressure Monitor Transducer ................................................................................ 81
F. Scheduled Periodic Maintenance............................................................................................... 82
G. Troubleshooting......................................................................................................................... 82
Special Environmental Considerations.............................................................................. 82
Electrostatic Discharge ..................................................................................................... 82
Electromagnetic Interference ............................................................................................ 83
Troubleshooting Chart....................................................................................................... 84
H. Supplies and Replacement Parts .............................................................................................. 89
767164
0601G
___________________________________________________________________________________________________________________
Table of Contents
xiii
3100B
High Frequency Oscillatory Ventilator
___________________________________________________________________________________________________________________
8
Clinical Guidelines....................................................................................................................... 91
A. Treatment Strategies ................................................................................................................. 91
Adjusting the 3100B’s Controls to Execute the Treatment Strategies............................... 91
Therapeutic Objectives ..................................................................................................... 95
General Aspects of Clinical Strategy................................................................................. 95
Summary of MOAT II clinical management strategies ...................................................... 97
Summary of weaning strategy from MOAT II Clinical Trail ................................................ 98
B. Disease-Specific Variations to General Clinical Strategies ........................................................ 98
Homogeneous Lung Disease Without Significant Air Leak ............................................... 98
Non-Homogeneous Lung Disease, Air Leak Syndromes, and Airway Disease ................ 98
C. Adverse Effects ......................................................................................................................... 99
D. Recommended Monitoring Frequency..................................................................................... 100
Arterial Blood Gases ....................................................................................................... 100
Non Invasive Blood Gases (tcO 2, tcCO 2, and SpO2)....................................................... 100
Chest X-ray ..................................................................................................................... 100
E. Suctioning Guidelines .............................................................................................................. 101
In Index ...............................................................................................................................................103
767164
0601G
___________________________________________________________________________________________________________________
Chapter 1 Introduction
1
A.
Indications for Use
___________________________________________________________________________________________________________________
A. Indications for Use
The SensorMedics 3100B is indicated for use in the ventilatory support and
treatment of selected patients 35 kilograms and greater with acute respiratory
failure
B. Contraindications
The SensorMedics 3100B Oscillatory Ventilator has no specific
contraindications.
C. Adverse Effects of
the Device on Health
In the adult ARDS prospective, non-randomized trial, adverse effects identified
were hypotension, and mucus plugging. Significant adverse cardiovascular
effects were rare in the 30 patients entered into the study with only one patient
exited from the study for hypotension. Only one patient required re-intubation
for narrowing of their endotracheal tube by mucus encrustment.
In the pediatric randomized trial of the 3100A ventilator, adverse effects
identified were lung overdistention, air leak, and hypotension. There were no
statistical differences in any of the adverse effects as compared to those
reported in the conventionally treated patients with the exception of
hypotension. The HFOV treated group had few but statistically significant more
frequent incidences of hypotension however, without evidence of serious
compromise of cardiovascular status.
High frequency ventilation, as with conventional positive pressure ventilation,
has inherent risks. These possible adverse effects include: under/over
ventilation, under/over humidification, chronic obstructive lung disease,
necrotizing tracheal bronchitis (NTB), atelectasis, hypotension, pneumothorax,
pneumopericardium, pneumomediastinum, pneumoperitoneum, and pulmonary
interstitial emphysema (PIE). The reported frequency of these occurrences are
similar to conventional ventilation.
D. Warnings
767164
0601G
The following Warnings must be read and understood before an attempt is
made to operate the Model 3100B HFOV:
___________________________________________________________________________________________________________________
2
Chapter 1 Introduction
D. Warnings
___________________________________________________________________________________________________________________
Do not attempt to defeat the proper connection of the ground wire as it may
cause damage to the device or interconnected equipment and could be
injurious to the patient or to those associated with the device use. This device is
factory equipped with a hospital-grade AC power plug. Grounding reliability can
only be assured when connected to a tested receptacle labeled “Hospital
Grade.”
Do not operate radio transmitters within 20 feet of this instrument. This may
result in erroneous pressure readings leading to false alarms and automatic
shutdown.
Do not shorten the 30” bias flow tube provided with the patient circuit as this
may reduce the maximum ∆P by allowing the oscillatory pressures to be
attenuated by closer proximity to the volume of the humidifier canister.
Do not attempt to substitute a circuit configuration from any other instrument.
Use of a non-3100A or a non-3100B circuit can result in injury to the patient or
to the operator, and it may cause damage to the equipment. The Patient Circuit
described in this manual is specifically designed for patient use with the Model
3100B HFOV.
Only SensorMedics approved lubricants should be used. Use of any other
lubricants could result in damage to the Driver Diaphragm or Bellows Water
Trap Membrane causing ventilator failure or patient injury.
The operational verification and startup procedure (Chapter 6) must be followed
before ventilation of a patient commences. If at any time during the operational
verification and startup procedure any abnormal function of the Model 3100B
HFOV is noted, do not proceed with patient ventilation as this could cause
patient injury or death; immediately contact SensorMedics Technical Support
before proceeding any further.
An audible alarm indicates the existence of a condition potentially harmful to the
patient and should not go unattended. Failure to respond to alarms could result
in injury (including death) to the patient and/or damage to the ventilator.
Ensure that the cooling fan at the rear of the driver enclosure is operational.
Under no circumstances should the ventilator be used in the presence of
flammable anesthetics due to the possibility of explosion.
767164
0601G
___________________________________________________________________________________________________________________
Chapter 1 Introduction
3
E.
Precautions
___________________________________________________________________________________________________________________
Under no circumstances should a proximal airway gas temperature of 41°C be
exceeded. This could result in injury to the patient's airway membranes.
Do Not use the 3100B ventilator in environments where the ambient
temperature is at or above 84°F (28°C). Use of the ventilator in these
environments will result in extreme reduction in relative humidity in the patient’s
airway and possible desiccation of the patient airways.
Failure to comply with the recommended maintenance procedures described in
Chapter 7 could result in injury to the patient or operator or could result in
damage to the equipment.
E. Precautions
The following Precautions must be read and understood before an attempt is
made to operate the Model 3100B HFOV:
Follow closely the recommendations contained in Chapter 8, Clinical
Guidelines, regarding the use of chest radiographs to monitor patient condition.
During HFOV, as with all ventilators, the relationship between improvement in
lung compliance, inadvertent increases in lung volume, increased pleural
pressure, and decreased venous return is a matter of concern, since it may
result in decreased cardiac output.
Patient size is an important guideline as to lung volume and anatomical dead
space, as well as the metabolic demand placed on ventilation. While the
maximum displacement volume of the 3100B is approximately 365 ml, the
actual volume delivered to the patient is dependent on power setting, frequency,
endotracheal tube size, and patient respiratory system compliance. It is
recommended that the operator review Section 8 of this manual, “Clinical
Guidelines.”
The patient's tcPCO 2 and tcPO2 or SpO 2 should be monitored continuously to
insure that blood gases are at the proper level. It is important that an
unrestricted and unobstructed patient airway be maintained during HFOV. To
insure a patent airway, always maintain proper suctioning procedures as
described in the Suctioning Guidelines Section of Chapter 8, Clinical Guidelines.
Since only proximal airway pressure is measured, no alarm will occur in the
event of an obstruction or restriction.
767164
0601G
___________________________________________________________________________________________________________________
4
Chapter 1 Introduction
E. Precautions
___________________________________________________________________________________________________________________
Ensure that the stopcock is closed prior to performing a Patient Circuit
Calibration. If the Water Trap Stopcock is left open, Patient Circuit Calibration
(39-43 cmH2O) may not be achievable, and the deliverable Pa will be reduced.
Deviation from the assembly methods described in Chapter 5, Assembly and
Installation, could damage the Model 3100B, render it mechanically unstable, or
cause it to malfunction. If any questions arise regarding the assembly
procedure, please contact SensorMedics Technical Support immediately before
proceeding.
Care should be taken not to crimp or perforate any of the control or sensing
lines (running to or from the Patient Circuit) during assembly, operating or
cleaning of the ventilator as this will cause malfunction of the Safety Alarms,
Warning Alarms, Caution Alarms, and/or Pressure Limit Controls.
The driver diaphragm of the 3100B has been coated with a special lubricant
during assembly. Please do not clean the driver diaphragm with cleaning
solvents as it may degrade the materials causing premature wear of the driver
diaphragm.
When connecting the Patient Circuit, make certain that it is properly supported
and oriented by the support arm as described in Chapter 5, Assembly and
Installation. Failure to do so could result in inadvertent Patient Circuit
disconnection due to oscillatory forces or could result in collection of humidifier
condensate in the patient airway.
If the temperature probe is wiped with alcohol, allow the alcohol to evaporate
completely before inserting it into the circuit. A high residual of alcohol can
weaken the acrylic adapter and cause fracturing.
Proper operation of the ventilator must be verified prior to each use. Refer to
Chapter 6, Operational Verification and Startup Procedures. The alarm
functions tested in this procedure verify the capability of the device to detect
and indicate conditions which could have a harmful effect on the patient.
Touch the outer metal cabinet of the instrument before touching any other
component to avoid possible instrument component damage from Electrostatic
Discharge.
767164
0601G
___________________________________________________________________________________________________________________
Chapter 1 Introduction
5
E.
Precautions
___________________________________________________________________________________________________________________
When the ventilator is connected to a patient, it is imperative that someone be
in attendance at all times in order to react to any alarms and to detect other
indications of a problem.
The Inlet Filter Cartridges for the blended gas and the air inputs to the ventilator
must be changed at least every 500 hours of operation as described in Chapter
7, Maintenance and Troubleshooting. Failure to replace a Filter Cartridge or
substitution of an unauthorized cartridge could result in injury to the patient
and/or damage to the equipment. Use only SensorMedics Inlet Filter Cartridges.
The filter cartridge body must be screwed back on securely. Cross-threaded or
loose installation will result in leaks and possible dislodging of the cartridge
body. If the cartridge body is dislodged, it will cause the ventilator to cease
functioning.
The cover enclosing the Control Package, Column, or any other portion of the
ventilator must not be removed by the user. To avoid electrical shock hazard,
please refer all service requiring cover removal to a qualified biomedical
equipment service technician.
Recheck and readjust alarm levels after any parameter change has been made.
Troubleshooting with the 3100B should be done “OFF PATIENT” to avoid any
potentially dangerous situations such as abrupt changes in the Pa.
Do not use extraneous ventilator circuit attachments (such as a suction port)
without a secondary external alarm capable of detecting ventilator
disconnection. Due to their inline pressure characteristics, such attachments
could possibly keep the Pa alarm from detecting an accidental ventilator circuit
disconnection.
Fractional concentration of inspired oxygen should be verified with an oxygen
monitor. Administration of excessive oxygen to a patient may be harmful. It is
imperative that the prescribed gas mixture is delivered by the blending system.
The Water Trap must be drained at intervals as described in Chapter 7,
Maintenance and Troubleshooting. If the ventilator is operating, leave a small
amount of water at the bottom of the Water Trap container to act as a flow and
pressure seal between the ventilator and the output of the drain.
767164
0601G
___________________________________________________________________________________________________________________
6
Chapter 1 Introduction
F. Explanation of Symbols
___________________________________________________________________________________________________________________
To help prevent patient injury due to humidifier malfunction, the use of a
humidifier with the following characteristics is strongly recommended:
Thermally protected heater.
Alarms on over-filled water reservoir.
Alarms on under-filled water reservoir.
Alarms when electrically open or shorted temperature probe detected.
Alarms at probe temperatures > 41°C.
Alarms when dislodged temperature probe detected.
Do not place on the Control Package of the ventilator any fluid-containing
accessories, accessories that weigh more than ten pounds, or accessories that
extend more than six inches above the ventilator electronics package or beyond
its sides. This could cause damage to the ventilator, or could cause the
ventilator to tip over, resulting in patient or user injuries and/or damage to the
equipment.
Do not overturn the Patient Circuit Calibration screw, as this may cause damage
to the device. When it is nearing its adjustment limit, it will reach a mechanical
stop.
Do not allow liquids to penetrate the air vents of the ventilator as this may result
in machine failure or malfunction.
Do not use a liquid sterilization agent on the outside of the ventilator as this may
cause damage.
F. Explanation of
Symbols
The following symbols are used on this device:
Circuit Breaker On
Circuit Breaker Off
Attention, Consult Accompanying Documents
Alternating Current / Voltage
767164
0601G
___________________________________________________________________________________________________________________
Chapter 1 Introduction
7
G.
Exterior Labels
___________________________________________________________________________________________________________________
Equipment of Type B
Position Lock—clockwise rotation locks instrument top. Counterclockwise rotation unlocks instrument top, allowing it to be swiveled
for best view of front controls and displays.
G. Exterior Labels
This section identifies the labels attached to the exterior of the 3100B. All labels
are shown at approximately their actual size. Your system may not have all of
the labels listed.
Patient Circuit Calibration
Procedure
PATIENT CIRCUIT CALIBRATION PROCEDURE
OFF-PATIENT
IMPORTANT–Before use on a patient, each patient circuit must be
calibrated to the Model 3100B by following this procedure:
1. Insert stopper in Patient Circuit “Y” and turn on Bias Flow gas.
2. Rotate Mean Pressure ADJUST control to “Max.”
3. Set Max Pa Alarm to 59 cm H2O.
4. Adjust Bias Flow to 20 LPM.
5. Depress and hold RESET (Oscillator OFF).
6. Observe Mean Pressure display and adjust Patient
Circuit Calibration screw for a reading of 39–43 cm H2O.
P/N 772754A
Figure 1.1. Patient Circuit Calibration Procedure Label.
The Patient Circuit Calibration Procedure Label describes the steps necessary
to calibrate the patient circuit to the 3100B. This procedure is also explained in
the Patient Circuit Calibration Section of Chapter 7, Maintenance and
Troubleshooting.
Ventilator
Performance
Checks
767164
0601G
___________________________________________________________________________________________________________________
8
Chapter 1 Introduction
G. Exterior Labels
___________________________________________________________________________________________________________________
Figure 1.2. Ventilator Performance Checks Label.
The Ventilator Performance Checks Label assists in setting Power, Mean
Pressure Adjust, and Bias flow controls to achieve specific ranges of ∆P and
Pa. These procedures are explained in the Performance Verification Section of
Chapter 6, Operational Verification and Start-up Procedures.
767164
0601G
___________________________________________________________________________________________________________________
Chapter 1 Introduction
9
G.
Exterior Labels
___________________________________________________________________________________________________________________
Blender/Cooling Gas Filter
Replacement Record
Figure 1.3. Blender/Cooling Gas Filter Replacement Record Label.
The Blender/Cooling Gas Filter Replacement Record Label provides a place to
document the 500 hour gas filter changes. For more information, see the
Operator Maintenance Procedures Section of Chapter 7, Maintenance and
Troubleshooting.
Driver Replacement Record
767164
0601G
___________________________________________________________________________________________________________________
10
Chapter 1 Introduction
G. Exterior Labels
___________________________________________________________________________________________________________________
Figure 1.4. Driver Replacement Record Label.
The Driver Replacement Record Label provides a place to document the 2000
hour replacement of the Oscillator Subassembly. For more information, see the
Scheduled Periodic Maintenance Section of Chapter 7, Maintenance and
Troubleshooting.
767164
0601G
___________________________________________________________________________________________________________________
Chapter 1 Introduction
11
G.
Exterior Labels
___________________________________________________________________________________________________________________
Radio Frequency Interference
(RFI) Warning
– WARNING –
DO NOT OPERATE RADIO-TRANSMITTERS
WITHIN 20 FEET OF THIS INSTRUMENT.
THIS MAY RESULT IN ERRONEOUS
PRESSURE READINGS LEADING TO
FALSE ALARMS AND AUTOMATIC SHUTDOWN.
– SEE OPERATOR’S MANUAL –
P/N 768559C
Figure 1.5. Radio Frequency Interference Warning Label.
The Radio Frequency Interference (RFI) Warning Label refers to the possible
problems caused by interference from hand-held radio transmitters. The RFI
warning is also discussed in the Troubleshooting Section of Chapter 7,
Maintenance and Troubleshooting.
Name Rating Label
Figure 1.6. Name Rating Label.
The Name Rating Label lists specific information on each individual instrument:
the Model Name and Number, the Voltage and Current Rating, the Serial
Number, and the instrument’s Catalog Part Number. (The example shown is for
the 115V, 7.5A, 60Hz model; your instrument may have a different rating.)
767164
0601G
___________________________________________________________________________________________________________________
12
Chapter 1 Introduction
G. Exterior Labels
___________________________________________________________________________________________________________________
Battery Attachment
Figure 1.7. Battery Attachment Label.
The Battery Attachment Label indicates the correct position for the installed
Power Failure Alarm Battery. For directions on changing the battery, see the
Changing the Power Failure Alarm Battery Section of Chapter 7, Maintenance
and Troubleshooting.
Battery Specification
Figure 1.8. Battery Specification Label.
The Battery Specification Label indicates the type of Power Failure Alarm
Battery (9V alkaline) that must be used. For directions on changing the battery,
see the Changing the Power Failure Alarm Battery Section of Chapter 7,
Maintenance and Troubleshooting.
767164
0601G
___________________________________________________________________________________________________________________
Chapter 2 Specifications
13
A.
Controls
___________________________________________________________________________________________________________________
A. Controls
Bias Flow
0–60 liters per minute (LPM) Continuous, 15-turn control.
Resolution
2.5 LPM.
Accuracy
± 10% of full scale at the following conditions: air or oxygen @ 70°F and 760
Torr.
Mean Pressure Adjust
Approximately 3–55 cmH2O minimum range; Bias Flow dependent. (Refer to
Ventilator Performance Checks in Chapter 6.)
Resolution
0.1 cmH2O on airway pressure digital meter, 1-turn control.
Accuracy
Non-calibrated control knob.
Mean Pressure Limit
Automatic.
Power
At 100% power, ∆P >90 cmH20 max amplitude of proximal airway pressure.
Resolution
Frequency - Hz
Graduated 10-turn locking dial, not calibrated in % power.
3–15 Hz oscillator frequency.
Resolution
0.1 Hz on digital meter, 10-turn control.
Accuracy
± 5% of full scale.
% Inspiratory Time
30–50% of oscillatory cycle.
Resolution
± 1% as read on digital meter.
Accuracy
± 5% of full scale.
Start/Stop
Oscillator enable/disable.
Set Max Pa Alarm Thumbwheel
0–59 cmH2O mean airway pressure.
Resolution
1 cmH2O.
Accuracy
Within ± 2 cmH20.
767164
0601G
___________________________________________________________________________________________________________________
14
Chapter 2 Specifications
B. Indicators
___________________________________________________________________________________________________________________
Set Min Pa Alarm Thumbwheel
0–59 cmH2O mean airway pressure.
Resolution
1 cmH2O.
Accuracy
Within ± 2 cmH20.
45-Sec Silence
Inhibits audible alarm function for 45 seconds (± 5 seconds).
Reset
Resets Pa >60 cmH2O and <5 cmH2O alarms if condition has been corrected;
always resets power failure alarm. Resets Max Pa visual alarm.
Patient Circuit Calibration
Adjusts maximum mean pressure that can be obtained with a specific Patient
Circuit (refer to Chapter 7 for setup procedure).
AC Power
On/off.
B. Indicators
Oscillator Enabled
Green LED (Light Emitting Diode) on Start/Stop pushbutton.
Oscillator Stopped
Red LED.
45-SEC Silence
Yellow LED on pushbutton.
Pa >60 cmH2O
Red LED.
Pa <5 cmH2O
Red LED.
Set Max Pa Exceeded
Red LED.
Set Min Pa Exceeded
Red LED.
Power Failure
Red LED (Power Failure / Reset Pushbutton).
Oscillator Overheated
Yellow LED.
Battery Low
Yellow LED.
Source Gas Low
Yellow LED.
767164
0601G
___________________________________________________________________________________________________________________
Chapter 2 Specifications
15
C.
Pressure Measurement
___________________________________________________________________________________________________________________
∆P
Digital meter readout of ∆P to the nearest cmH2O.
% Inspiratory Time
Digital meter readout of set % inspiratory time.
Frequency - Hz
Digital meter readout of set oscillator frequency in Hertz.
Mean Pressure Monitor
Digital meter readout of mean airway pressure measurement to the nearest
tenth of a cmH2O.
Elapsed Time
Digital readout of hours of power applied to the Model 3100B HFOV to nearest
tenth of an hour.
Set Max Pa
Thumbwheel switch marked in cmH2O.
Set Min Pa
Thumbwheel switch marked in cmH2O.
Alarm (audible)
3K-Hertz modulated tone.
AC Power
Visual indication of AC power applied (I/0).
C. Pressure Measurement
Range
–130 to +130 cmH2O airway pressure.
Resolution
0.1 cmH2O.
Accuracy
Within ± 2% of reading or ± 2 cmH2O, whichever is greater, assuming periodic
calibration as described in Chapter 7.
Transducer Pressure Limit
20 psig.
Warning
Failure to comply with the recommended maintenance procedures for the
Airway Pressure Monitor as described in Chapter 7 could result in injury to the
patient or operator or could result in damage to the equipment.
767164
0601G
___________________________________________________________________________________________________________________
16
Chapter 2 Specifications
D. Alarms
___________________________________________________________________________________________________________________
D. Alarms
Safety
Audible and visual indicators, machine intervention.
Pa > 60 cmH2O
Indicators activated, oscillator stopped, and dump valve opened when limit
exceeded.
Resolution
Preset.
Accuracy
± 2% of pressure monitor reading or ± 2 cmH2O, whichever is greater.
Pa < 5 cmH2O
Indicators activated, oscillator stopped, and dump valve opened when limit
exceeded.
Resolution
Preset to 5 cmH2O.
Accuracy
± 2% of pressure monitor reading or ± 2 cmH2O, whichever is greater.
Warning
Audible and visual indicators, operator intervention.
Set Max Pa exceeded
Indicators activated when set limit exceeded.
Range
0–59 cmH2O.
Resolution
1 cmH2O.
Accuracy
± 2% of pressure monitor reading or ± 2 cmH2O, whichever is greater.
Set Min Pa exceeded
Indicators activated when set limit exceeded.
Range
0–59 cmH2O.
Resolution
1 cmH2O.
Accuracy
± 2% of pressure monitor reading or ± 2 cmH2O, whichever is greater.
Caution
Visual alarm, operator intervention.
Oscillator Overheated
Indicator activated when oscillator coil reaches a temperature of 150°C.
Accuracy
± 5%.
767164
0601G
___________________________________________________________________________________________________________________
Chapter 2 Specifications
17
E.
Electrical
___________________________________________________________________________________________________________________
Battery Low
Indicator activated when battery which operates power failure alarm is low and
must be replaced.
Source Gas Low
Indicator activated when blended gas or oscillator air cooling source pressure
drops below 30 psig limit.
Accuracy
45-second Silence
Accuracy
± 5% in source gas mode.
Indicator Activated for 45 seconds when pushbutton pushed.
± 5 seconds.
Power Failure
Audible and visual indicators activated when power switch turned off, power
plug unplugged, or insufficient supply voltage within the electronics package.
Oscillator Stopped
Audible and visual indicators activated when patient’s airway ∆P falls below 5 to
7 cmH2O.
Warning
An audible alarm indicates the existence of a condition potentially harmful to the
patient and should not go unattended. Failure to respond to alarms could result
in injury (including death) to the patient and/or damage to the ventilator.
E. Electrical
Power Requirements
115 VAC, 7.5A, 60 Hz
100 VAC, 7.5A, 50 Hz
220 VAC, 4.0A, 50 Hz
240 VAC, 4.0A, 50 Hz.
Leakage Current
<100 Microamperes.
Overload Protection
Dual electromagnetic circuit breaker.
Power Line Connection
3-wire grounded hospital-grade plug.
Safety Standards
Designed to CSA C22.2 No.125 and UL-544. Designed to IEC 601-1.
767164
0601G
___________________________________________________________________________________________________________________
18
Chapter 2 Specifications
F. Pneumatic Connections
___________________________________________________________________________________________________________________
European Regulatory
Approvals
The 3100B Oscillatory Ventilator complies with the Medical Device Directive,
MDD 93/42/EEC, and is labeled with the CE Mark as shown below.
Warning
Do not attempt to defeat the proper connection of the ground wire. Improper
grounding may cause damage to the device or interconnected equipment and
could be injurious to patient or to those associated with the device use. This
device is factory equipped with a hospital-grade AC power plug. Grounding
reliability can only be assured when connected to a tested receptacle labeled
“Hospital Grade.”
F. Pneumatic Connections
Inlet From Blender (Air/O2)
DISS oxygen fitting.
Pressure Range
40–60 psig.
Maximum Flow
60 LPM ± 10%.
Overpressure Protection
75 psig ± 15% relief valve.
Air Cooling Inlet
DISS air fitting.
Pressure Range
40–60 psig.
Flow
25 LPM±10%
Overpressure Protection
75 psig ± 15% relief valve.
Outlet to Humidifier
Overpressure Protection
Pa Control Valve
3/8" barbed fitting.
5 psig ± 15% relief valve.
Coded green, Luer bulkhead.
767164
0601G
___________________________________________________________________________________________________________________
Chapter 2 Specifications
19
G.
Physical
___________________________________________________________________________________________________________________
Pa Limit Valve
Coded blue, Luer bulkhead.
Dump Valve
Coded red, Luer bulkhead.
Pa Sensing
Coded white, Luer bulkhead.
G. Physical
Materials
All materials used in the construction of the 3100B instrument and its breathing
circuit are non-toxic and pose no safety risk to the patient or operator.
Dimensions of Column and
Control Package
Height: 53.8"
Width: 18.6"
Depth: 11.4"
Weight: 143 lbs.
Pedestal
5 legs each with 4" diameter locking wheels, 28" width across bottom of
pedestal.
Precaution
Do not place on the control package of the ventilator any fluid-containing
accessories, accessories that weigh more than 10 pounds, or accessories that
extend more than six inches above the ventilator electronics package or beyond
its sides. This could cause damage to the ventilator, or could cause the
ventilator to tip over, resulting in patient or user injuries and/or damage to the
equipment.
Required Environmental and
Operational Conditions
1. Temperature: 5–28°C
2. Humidity: 15%–95% (non-condensing)
3. Certain specific environmental factors such as Electrostatic Discharge (ESD)
and Electromagnetic Interference (EMI) require special consideration by the
operator. For an in-depth discussion of these factors, see the
Troubleshooting section of Chapter 7, Maintenance and Troubleshooting.
767164
0601G
___________________________________________________________________________________________________________________
20
Chapter 2 Specifications
H. 3100B Performance Graphs
___________________________________________________________________________________________________________________
H. 3100B Performance Graphs
3–Ohm Driver
Distal Tidal Volume vs.
Frequency at Maximum Power
260
240
• Two % I-Time Settings
• Single ET Tube Size (7mm)
• Single Compliance
220
(19ml/cmH2O)
200
Tidal Volume - ml
180
50% I Time
160
33% I Time
140
120
100
80
60
40
3
6
9
12
15
Frequency (Hz)
Figure 2.1
767164
0601G
___________________________________________________________________________________________________________________
Chapter 2 Specifications
21
H.
3100B Performance Graphs
___________________________________________________________________________________________________________________
3–Ohm Driver
Distal Tidal Volume vs. Power
Setting at 33% I–Time
• Three ET Tube Sizes
• Single Compliance
(19ml/cm H2O)
Figure 2.2
3–Ohm Driver
Distal Tidal Volume vs.
Frequency at Maximum Power
and 33% I–Time
• Three ET Tube Sizes
• Single Compliance
(19ml/cm H2O)
767164
0601G
___________________________________________________________________________________________________________________
22
Chapter 2 Specifications
H. 3100B Performance Graphs
___________________________________________________________________________________________________________________
Figure 2.3
767164
0601G
___________________________________________________________________________________________________________________
Chapter 2 Specifications
23
H.
3100B Performance Graphs
___________________________________________________________________________________________________________________
3–Ohm Driver
Distal Tidal Volume vs.
Frequency at Maximum Power
and 50% I–Time
• Three ET Tube Sizes
• Single Compliance
(19ml/cm H2O)
Figure 2.4
767164
0601G
___________________________________________________________________________________________________________________
24
Chapter 2 Specifications
H. 3100B Performance Graphs
___________________________________________________________________________________________________________________
3–Ohm Driver
Distal Tidal Volume vs. Power
Setting at 50% I–Time
300
280
• Three ET Tube Sizes
• Single Compliance
260
9.0 ETT (3Hz)
240
(19ml / cm H2O)
220
7.0 ETT (3 Hz)
Tidal Volume - ml
200
180
160
5.0 ETT (3 Hz)
140
120
100
9.0 ETT (15Hz)
80
7.0 ETT (15Hz)
60
40
20
5.0 ETT (15Hz)
0
10
9
8
7
6
5
4
3
2
1
0
Power Setting
Figure 2.5
767164
0601G
___________________________________________________________________________________________________________________
Chapter 3 Description of System and Safety Features
25
A.
Introduction
___________________________________________________________________________________________________________________
A. Introduction
The system consists of eight subsystems, six included as part of the Model
3100B and two provided by the user:
Subsystems Provided by the
User
1. External Air/O2 Blender and Oxygen Monitor
2. External Humidifier
Subsystems Included with
Ventilator
3. Pneumatic Logic and Control.
4. Patient Circuit.
5. Oscillator Subsystem.
6. Airway Pressure Monitor.
7. Electronic Control and Alarm Subsystem.
8. Electrical Power Supply.
B. External Air/O 2
Blender
Both oxygen and air pressure sources are required as specified in Chapter 2.
These sources feed a user-provided Air/Oxygen Blender. The air source also
provides cooling to the Oscillator Subsystem by means of a special pneumatic
control system. The flow requirements for both the blender and for the air
cooling of the Oscillator Subsystem are described in Chapter 2.
Precaution
Fractional concentration of inspired oxygen should be verified with an oxygen
monitor. Administration of excessive oxygen to a patient may be harmful. It is
imperative that the prescribed gas mixture is delivered by the blending system.
It is the responsibility of the user to provide an Oxygen/Air Blender and Oxygen
Concentration Monitor. The blender shall be capable of 60 L/min flow. When
used in conjunction, the accuracy shall be ± 3%. Monitoring should be
accomplished at an outlet of the blender in an unpressurized state.
C. External Humidifier
767164
0601G
Although functioning in harmony with the Patient Circuit Subsystem, the
External Humidifier is treated as a separate subsystem because it is provided
by the user. The humidifier that is used must be a heated humidifier specifically
manufactured for pediatric/adult use. It must be capable of covering a flow
range up to 60 LPM. The temperature control can be either closed or open loop;
however, proximal airway gas temperature must be monitored. Two ports for the
___________________________________________________________________________________________________________________
26
Chapter 3 Description of System and Safety Features
C. External Humidifier
___________________________________________________________________________________________________________________
temperature probe are provided on the Patient Circuit. These will be discussed
in the next section.
Warning
Under no circumstances should a proximal airway gas temperature of 41°C be
exceeded. This could result in injury to the patient's airway membranes.
Warning
Do Not use the 3100B ventilator in environments where the ambient
temperature is at or above 84°F (28°C). Use of the ventilator in these
environments will result in extreme reduction in relative humidity in the patient’s
airway and possible desiccation of the patient airways.
Precaution
To help prevent patient injury due to humidifier malfunction, the use of a
humidifier with the following characteristics is strongly recommended:
a. Thermally protected heater.
b. Alarms on overfilled water reservoir.
c. Alarms on under filled water reservoir.
d. Alarms when open or shorted temperature probe is detected.
e. Alarms at probe temperatures > 41°C.
f. Alarms when dislodged temperature probe is detected.
The connection of the humidifier into the Model 3100B HFOV System will be
further described in Chapter 5, Assembly and Installation. Standard humidifier
adapters are required, and two are provided for connecting the 3/8" I.D. tubing
to and from the humidifier.
767164
0601G
___________________________________________________________________________________________________________________
Chapter 3 Description of System and Safety Features
27
D.
Pneumatic Logic and Control
___________________________________________________________________________________________________________________
D. Pneumatic Logic
and Control
The Blender feeds pressurized blended gas to the Model 3100B Pneumatic
Logic and Control Subsystem through an oxygen DISS fitting. Four pneumatic
controls are part of this subsystem:
Bias Flow
This control sets the flow of the blended gas that continuously moves past the
patient airway.
Mean Pressure Adjust
This control adjusts the Mean pressure level on which the oscillatory waveform
is superimposed. This Mean pressure along with the oscillatory waveform
characteristics determines the resultant Pa. This control determines the level of
Patient Circuit expiratory limb Control Valve restriction in the manner described
in the Patient Circuit section below.
Patient Circuit Calibration
This control is a screwdriver adjustment used to set the maximum mean
pressure that can be attained with a particular Patient Circuit under specified
conditions (see Chapter 7, Maintenance and Troubleshooting.) This control is
used only when the Patient Circuit is replaced or the Pa control valve
diaphragm of the existing Patient Circuit is changed. The control is necessary
because the individual elastic and dimensional characteristics of the Pa control
valve diaphragm interact with the valve control line pressure to determine the
control dial maximum setting.
Precaution
Do not overturn the Patient Circuit Calibration as this may cause damage to the
device. When it is nearing its adjustment limit, it will reach a mechanical stop.
The range, resolution, and accuracy of the pneumatic controls—and the
characteristics of the various pneumatic connections are described in Chapter
2. Chapter 4 provides a detailed description of the functions and use of each
control.
E. Patient Circuit
767164
0601G
___________________________________________________________________________________________________________________
28
Chapter 3 Description of System and Safety Features
E. Patient Circuit
___________________________________________________________________________________________________________________
Warning
Do not attempt to substitute another circuit configuration as this could result in
injury to the patient and/or the operator, or cause equipment malfunction. The
Patient Circuit described in this manual is specifically designed for patient use
with the Model 3100B HFOV.
The Patient Circuit combines the three elements necessary for ventilation of the
patient using HFOV techniques: bias flow/ Mean pressure, pressure oscillations,
and pressure limiting. The Patient Circuit is illustrated in Figure 3.1.
Figure 3.1. Details of Patient Circuit.
767164
0601G
___________________________________________________________________________________________________________________
Chapter 3 Description of System and Safety Features
29
E.
Patient Circuit
___________________________________________________________________________________________________________________
During normal operation, humidified, blended bias gas flows into the continuous
flow line from the External Humidifier. This gas flows into and through the
inspiratory limb of the Patient Circuit, through the “Y” coupler and then into the
expiratory limb of the Patient Circuit. While passing through the “Y” coupler, the
fresh gas exchanges oxygen and carbon dioxide at the ET tube/patient
connection.
A proximal airway pressure sensing line made of 1/8" Tygon tubing runs from
the “Y” coupler to the Airway Pressure Monitor via a white Luer bulkhead fitting
near the Patient Circuit connection. The pressure signal is processed to
determine various pressure measurements and alarm conditions. The Airway
Pressure Monitor and tubing are discussed in a following section.
The expiratory limb carries the exchanged gas to the Pa Control Valve. This
valve allows two expiratory flow paths. One path is a variable restriction
controlled by the Pa Control Valve control line extending from the Pneumatic
Logic and Control Subsystem via a green Luer bulkhead fitting near the Patient
Circuit connection. The other flow path is a fixed orifice that requires a minimum
bias flow be maintained through the Patient Circuit to ensure a flow of fresh
Bias Gas regardless of the setting of the Pa Control Valve.
When the Pa Control Valve is changed, it adjusts the mean airway pressure at
the ET tube/patient connection after about five system time constants have
elapsed, but only if the set bias flow and oscillator characteristics remain
unchanged for the same time period. Five time constants will vary from about
one second to as long as 30 seconds. This time constant varies directly with Pa
and inversely with bias flow.
The individual elastic and dimensional characteristics of the Pa Control Valve
diaphragm interact with the valve control line pressure to determine the control
dial maximum setting. The Patient Circuit Calibration control provides a
screwdriver adjustment to set the maximum mean pressure that can be attained
with a particular Patient Circuit under specified conditions. This control is used
only when the Patient Circuit is replaced or the Pa control valve diaphragm of
the existing Patient Circuit is changed. Refer to Chapter 7, Maintenance and
Troubleshooting, for the complete setup procedure.
The Pressure Limit Valve limits the Pa. When an abnormal condition exists or
when the system mean pressure increases due to an inadvertent or deliberate
767164
0601G
___________________________________________________________________________________________________________________
30
Chapter 3 Description of System and Safety Features
E. Patient Circuit
___________________________________________________________________________________________________________________
control setting change, this valve acts to limit the mean proximal airway
pressure.
Both the Pa Control Valve and the Pressure Limit Valve are mushroom valves
that must be replaced periodically according to the procedures in Chapter 7,
Maintenance and Troubleshooting.
The Dump Valve is activated by the Electronic and Pneumatic Control
Subsystems only when the safety alarms are activated. The safety alarms are
the following:
1. Pa > 60 cmH2O
2. Pa < 5 cmH2O
The Dump Valve, when activated, will open the entire Patient Circuit to ambient
air. It allows the patient the opportunity to breathe spontaneously at normal
atmospheric pressure when the safety alarms have been activated. In an
emergency situation, the Dump Valve helps to prevent a decrease in cardiac
output due to sustained elevated Patient Circuit pressure or atelectasis due to a
negative Patient Circuit pressure.
The Dump Valve is a mushroom valve that must be replaced at intervals as
described in Chapter 7.
Two ports are provided for inserting the temperature probe of the External
Humidifier. One is near the patient “Y”; the other is near the Pressure Limit
Valve.
The inspiratory limb acts as the propagation means for the pressure oscillations
generated by the Oscillator Subsystem. A typical airway pressure oscillatory
waveform is illustrated in Figure 3.2.
767164
0601G
___________________________________________________________________________________________________________________
Chapter 3 Description of System and Safety Features
31
E.
Patient Circuit
___________________________________________________________________________________________________________________
Figure 3.2. Typical Oscillatory Proximal Airway Pressure Waveforms With Dump
Valve Activation.
This figure also illustrates the activation of the dump valve due to the Pa being
less than the <5 cmH2O limit or greater than the 60cmH2O limit.
To prevent accumulation of water from condensate within the Patient Circuit and
Oscillator Subsystems, a Water Trap drains them through the Oscillator
Compartment. Consult Chapter 7, Maintenance and Troubleshooting, for details
on use of Water Trap.
Precaution
The Water Trap must be drained at intervals as described in Chapter 7,
Maintenance and Troubleshooting.
The function of the controls discussed in the paragraphs above as well as the
function of the safety alarms are discussed further in Chapter 4, Location and
Function of Controls, Indicators, and Connections . The assembly of the Patient
767164
0601G
___________________________________________________________________________________________________________________
32
Chapter 3 Description of System and Safety Features
F. Oscillator Subsystem
___________________________________________________________________________________________________________________
Circuit onto its mounting arm and its connection to the rest of the HFOV system
is discussed in Chapter 5, Assembly and Installation.
F. Oscillator
Subsystem
The components of the Oscillator Subsystem are illustrated in Figure 3.3. The
design incorporates an electronic control circuit (square-wave driver) which
drives a linear motor which in turn drives a piston assembly. It is very similar to
a permanent magnet speaker.
Figure 3.3. Details of Oscillator Subsystems.
One of the major features of the design is that there is no physical contact
between the permanent magnet and the electrical coil which is suspended by
“spiders” within the permanent magnet. This results in a very efficient
frictionless oscillator system with an operational life of more than 2,000 hours.
767164
0601G
___________________________________________________________________________________________________________________
Chapter 3 Description of System and Safety Features
33
F.
Oscillator Subsystem
___________________________________________________________________________________________________________________
When the square-wave driver is of positive polarity, it drives the electrical coil
and the attached piston forward in the direction of the patient (inspiration).
When the polarity is negative, it drives the electrical coil and the attached piston
in the opposite direction (expiration).
The distance the piston is driven in each direction is determined by the
magnitude of the alternating polarity voltage applied to the electrical coil, the
Patient Circuit pressure encountered by the piston plate, the piston coil counterforce current, and the frequency of the square wave. The voltage of the squarewave driver output is controlled by the Power Control of the Electronic Control
and Alarm Subsystem.
There are two mechanical stops which determine the maximum piston
displacement in the full inspiration and full expiration directions. The maximum
stroke of the piston defined by these stops is approximately 365 milliliters.
The % inspiratory time is determined by another control on the Electronic
Control and Alarms Subsystem. This control sets the relative duration of the
successive positive and negative polarity voltages from the square-wave driver,
which is driving the electrical coil and piston. This control also establishes the
counter-force current to overcome the tendency of the mean airway pressure to
displace the piston off center.
As mentioned previously, the displacement of the electrical coil and piston is
determined by the magnitude of the voltage applied to the electrical coil. The
total transit time required for this displacement is only a matter of milliseconds.
Therefore, at the lower oscillation frequencies, the piston will remain stationery
at its full-travel position for the majority of that particular respiration phase
(inspiratory or expiratory).
As the oscillation frequency increases, the transit time of the electrical coil and
piston to its set full displacement will become a larger percentage of the total
respiratory phase duration. Although exactly determined by conditions within the
Patient Circuit, as frequency is increased the electrical coil and piston are
unable to complete full displacement before the square-wave driver switches
polarity requiring the travel direction to reverse. Thus, the displacement
amplitude of the oscillator piston will decrease as the oscillation frequency is
increased.
767164
0601G
___________________________________________________________________________________________________________________
34
Chapter 3 Description of System and Safety Features
G. Airway Pressure Monitor
___________________________________________________________________________________________________________________
Refer to Chapter 2, Specifications, for details on the range, resolution, and
accuracy of the various control functions affecting the Oscillator Subsystem.
Refer to Chapter 4, Location and Function of Controls, Indicators, and
Connections, for a full description of the use of these controls.
Because the major portion of the Oscillator Subsystem is a linear motor, some
type of cooling mechanism must be provided for the electrical coil. The cooling
source used in the Model 3100B is air flow obtained from a standard 50 psig
gas wall outlet. A regulator within the Oscillator Subsystem meters the airflow to
a Venturi-type air cooler at 25 LPM, which then entrains room air at
approximately 75 LPM, thus providing 100 LPM of cooling air around the
electrical coil.
A thermal cutout circuit has been incorporated into the oscillator to shut it down
in case of overheating caused by a cooling system failure. Such a failure, if
allowed to occur without oscillator shutdown, could result in the destruction of
the oscillator coil's support spiders. The thermal cutout system utilizes a
thermistor on the oscillator coil form to detect temperature rise. Thermal
shutdown will occur if coil temperature exceeds 175°C.
Prior to an oscillator thermal shutdown, the operator is given an indication that
the coil is overheating. A yellow caution LED on the front panel of the Control
Package lights when the coil temperature reaches approximately 150°C.
G. Airway Pressure
Monitor
The Airway Pressure Monitor is a very key subsystem within the Model 3100B
HFOV system. The majority of the safety and warning alarms rely upon the
mean airway pressure determinations of the Airway Pressure Monitor.
The Airway Pressure Monitor senses the pressure within the Patient Circuit
through 1/8" tubing running from the “Y” coupler of the Patient Circuit to the
airway pressure monitor transducer. A 500 ml/min trickle flow of dry gas from
the blender flows constantly from the 3100B to the patient “Y” to keep water
vapor from even partially obstructing this pressure sensing pathway.
Warning
Failure to comply with the recommended maintenance procedures for the
Airway Pressure Monitor as described in Chapter 7 could result in injury to the
patient or operator or could result in damage to the equipment.
767164
0601G
___________________________________________________________________________________________________________________
Chapter 3 Description of System and Safety Features
35
H.
Electronic Control and Alarm Subsystem
___________________________________________________________________________________________________________________
The Airway Pressure Monitor processes the instantaneous airway pressure
measurements of its pressure transducer to derive the following:
1. Mean airway pressure (Pa)
2. Oscillatory peak minus oscillatory trough pressure (∆P)
Mean Airway Pressure is essentially an arithmetic mean of the airway pressure
measurement. It is obtained by filtering the instantaneous pressure signal with a
DC to 0.5 Hz. low pass filter.
The ∆P reading is obtained by subtracting the oscillatory trough pressure from
the peak pressure.
A detailed list of specifications for the Airway Pressure Monitor is contained in
Chapter 2. A detailed description of the use of its control and display is
contained in Chapter 4.
H. Electronic Control
and Alarm
Subsystem
This subsystem contains the Oscillator Subsystem Controls and the alarm
functions. It consists of various electronic circuits and logic elements. It
integrates information received from the Airway Pressure Monitor to react in a
fashion safest for the patient. It utilizes this information to orchestrate the
activity of the Oscillator Subsystem and the Pneumatic Logic and Control
Subsystem.
The following are the Oscillator Subsystem controls which form a part of the
Electronic Control and Alarm Subsystem:
1. Power
2. % Inspiratory Time
3. Frequency–Hz
4. Start/Stop
The operation and use of these controls is described in detail in Chapter 4.
767164
0601G
___________________________________________________________________________________________________________________
36
Chapter 3 Description of System and Safety Features
I. Electrical Power Supply
___________________________________________________________________________________________________________________
The subsystem also contains the following indicators for reporting on the
Oscillator Subsystem status:
1. Start/Stop LED
2. ∆P digital meter
3. % Inspiratory Time digital meter
4. Frequency digital meter
The coordination of these indicators with the Oscillator Subsystem controls is
described in detail in Chapter 4.
The following alarm controls and indicators are part of this section:
1. Max Pa exceeded thumb wheel and LED
2. Min Pa exceeded thumb wheel and LED
3. Pa > 60 cmH2O LED
4. Pa < 5 cmH2O
5. 45-Sec Silence pushbutton and LED
6. Reset pushbutton
7. Battery Low LED
8. Source Gas Low LED
9. Oscillator Overheated LED
10. Oscillator Stopped LED
11. Power Failure LED
The range, resolution, and accuracy of these alarm functions are described in
Chapter 2. A detailed description of the use of these alarms, controls, and
indicators follows in Chapter 4.
The function of the alarms is influenced by inputs from the Airway Pressure
Monitor, Oscillator Subsystem, and Pneumatic Logic and Control Subsystem.
I. Electrical Power
Supply
The Electrical Power Supply converts the AC line voltage to the DC voltages
required to power the Electronic Control and Alarms Subsystem, the Airway
Pressure Monitor, and the Oscillator Subsystem.
Detailed specifications are listed in Chapter 2. Maintenance procedures are
covered in Chapter 7.
767164
0601G
___________________________________________________________________________________________________________________
Chapter 3 Description of System and Safety Features
37
J.
Safety Features
___________________________________________________________________________________________________________________
J. Safety Features
The Model 3100B HFOV system has been designed with numerous safety
features both to help avoid patient injury and to protect the equipment from
damage. These safety features are incorporated into the design of the various
subsystems:
1. Warning Alarms
2. Safety Alarms
3. Power Failure Alarm
4. Oscillator Stopped Alarm
5. Caution Alarms
6. Oscillator thermal cutout
7. Water trapping for condensate
8. Pressure relief valves to protect the equipment from over-pressure
damage
9. Oscillator startup logic to prevent application of excessively high or low
oscillatory pressures to patient
The Warning Alarms consist of the Max and Min Pa Exceeded settings and
indicators. In the event that the proximal pressure meets or exceeds the set
Max Pa alarm setting, an audible and visual alarm will occur, and the ventilator
will depressurize the Limit Valve seat pressure. Once the mean airway pressure
falls to a level of 12 (±3) cm H2O below the Set Max Pa setting, the Limit Valve
will re-pressurize to its normal operational state. Should the high mean airway
condition persist, the alarm will repeat until the condition is resolved. Once
corrected, the high Pa visual indicator will remain lit to notify the clinician that
the alarm was violated. Depress the Reset / Power Failure button to reset the
visual indicator. Should the proximal pressure meet or fall below the Min Pa
setting an audible and visual alarm will occur which will automatically reset after
correction of the alarm condition. No machine action is taken.
Operating the ventilator with low Bias Flow Rates (<15 Ipm) and Low
Mean
Airway Pressures (<15 cmH 0), with full power (Maximum
2
Amplitude) may result in a low-pressure dump upon activation of the Max
Pa Alarm.
The Safety Alarms consist of Pa > 60 cmH20 and < 5 cmH2O alarms. They are
indicated in the same manner as the Warning Alarms described above. If either
of these Pa alarms is activated, the oscillator is stopped (bias flow continues)
and the Dump Valve opens the Patient Circuit to atmospheric pressure. Either
767164
0601G
___________________________________________________________________________________________________________________
38
Chapter 3 Description of System and Safety Features
J. Safety Features
___________________________________________________________________________________________________________________
of these alarms can be reset by pressing the Reset Button once the cause of
the alarm condition has been corrected.
When the Power Failure Alarm is activated, no other machine actions are taken
other than the energizing of a red LED and a 3K-Hertz modulated tone. The
Power Failure Alarm is reset by pushing the Reset button whether or not the
alarm condition (removal of or inadequate power supply to the Electronic
Control and Alarms Subsystem) has been corrected. To restart the oscillator it
will then be necessary to press the Start/Stop Switch. It is normal for the Battery
Low LED to light when the reset button is pressed.
The Caution Alarms activate a yellow LED only; no audible alarm occurs. The
Caution Alarms are the following: Battery Low, Source Gas Low, Oscillator
Overheated and 45-Sec Silence. The Battery Low or Source Gas Low and the
Oscillator Overheated Caution Alarms are reset only by correction of the caution
condition by the user. The 45-Sec Silence caution indicator will be illuminated
for the duration of the 45-second alarm silence duration. During this 45-second
period, the audible alarm will be silenced regardless of the alarm condition. All
visual alarm indicators will operate normally.
The Oscillator Stopped Alarm will occur if ∆P is < 5 to 7 cmH2O. A red LED and
audible 3K-Hz. indication occurs. No action is taken by the machine and the
alarm resets automatically upon correction of the alarm condition. Note that the
oscillator may in fact be operating, but the resultant ∆P is below 5 to 7 cmH20. If
the oscillator is disabled by pushing the Start/Stop button, the Oscillator
Stopped alarm is disabled.
Warning
An audible alarm indicates the existence of a condition potentially harmful to the
patient and should not go unattended. Failure to respond to alarms could result
in injury (including death) to the patient and/or damage to the ventilator.
Precaution
When the ventilator is connected to a patient, it is imperative that someone be
in attendance at all times in order to react to any alarms and to detect other
indications of a problem.
767164
0601G
___________________________________________________________________________________________________________________
Chapter 3 Description of System and Safety Features
39
J.
Safety Features
___________________________________________________________________________________________________________________
A thermal cutout safety feature has been incorporated into the Oscillator
Subsystem. This feature shuts down the oscillator if overheating occurs. If the
oscillator were not shut down, such overheating could result in the destruction
of the oscillator coil's support spiders. The thermal cutout system utilizes a
thermistor on the oscillator coil form to detect temperature rise. Thermal
shutdown will occur if coil temperature exceeds 175°C.
Prior to an oscillator thermal shutdown, the operator is given an indication that
the coil is overheating. A yellow caution LED on the front panel of the Control
Package lights when the coil temperature reaches approximately 150°C.
A Water Trap is incorporated into the Oscillator subsystem, as described in a
previous section, to help eliminate condensate from the Patient Circuit. This is a
safety feature not seen in many conventional ventilators with a similar water
build-up potential. The Water Trap is easily emptied as described in Chapter 7,
Maintenance and Troubleshooting.
Precaution
The Water Trap must be drained at intervals as described in Chapter 7,
Maintenance and Troubleshooting. If the ventilator is operating, leave a small
amount of water at the bottom of the Water Trap container to act as a flow and
pressure seal between the ventilator and the output of the drain.
There are also mechanical pressure relief devices to protect the equipment from
damage. A 75 psig mechanical relief valve protects the “Inlet from Blender” and
the “Air Cooling Inlet” connections. The “Outlet to Humidifier” connection is
protected by a 5 psig mechanical relief valve. These devices function whether
the Model 3100B HFOV is electrically energized or not.
The oscillator will not start unless the controls are used in the proper sequence
and/or set to the proper range. The startup procedure is described in Chapter 6,
Operational Verification and Startup Procedures.
767164
0601G
___________________________________________________________________________________________________________________
Chapter 4 Location and Function of Controls, Indicators,
and Connections
41
A.
Introduction
___________________________________________________________________________________________________________________
A. Introduction
This chapter describes the location, function, and use of each control, indicator,
and connection on the Model 3100B HFOV. They are illustrated with reference
numbers on the illustrations contained within this chapter. Detailed
specifications of the resolution and accuracy of controls and indicators are
contained in Chapter 2. The theory of operation of the overall Model 3100B
system and each of its subsystems is explained in Chapter 3, Description of
System and Safety Features.
Precaution
Proper operation of the ventilator must be verified prior to each use. Refer to
Chapter 6, Operational Verification and Startup Procedures. The alarm
functions tested in this procedure verify the capability of the device to detect
and indicate conditions which could have a harmful effect on the patient.
767164
0601G
___________________________________________________________________________________________________________________
42
Chapter 4 Location and Function of Controls, Indicators,
and Connections
B. Front and Side Panel – Control Package
___________________________________________________________________________________________________________________
B. Front and Side Panel – Control Package
Figure 4.1. Front Panel Controls and Indicators.
The numbers shown on Figure 4.1 correspond to the numbers on the following
descriptions.
1. Bias Flow
Controls and indicates the rate of continuous flow of humidified blended gas
through the Patient Circuit. The control knob is a 15-turn pneumatic valve which
increases flow as it is turned counterclockwise.
The rate of flow is indicated by a ball float within a rotameter glass tube
graduated from 0 to 60 LPM in 5 LPM increments. The flow is read by aligning
the center of the ball float with the rotameter scale mark corresponding to the
767164
0601G
___________________________________________________________________________________________________________________
Chapter 4 Location and Function of Controls, Indicators,
and Connections
43
B.
Front and Side Panel – Control Package
___________________________________________________________________________________________________________________
adjusted flow. The maximum achievable rate of flow is internally limited to 60
LPM.
2. Mean Pressure Adjust
Adjusts the mean airway pressure (Pa) by controlling the resistance of the Pa
Control Valve. This control is a clockwise increasing 1-turn pneumatic valve.
The adjustment affected by this control is read on the Mean Pressure Monitor
(8).
Since this control is not a closed-loop control, Pa will change if the bias flow
setting is changed. Increasing the bias flow will increase the Pa. In addition,
since the oscillatory pressure waveform introduced by the Oscillator Subsystem
is nonsymmetrical, adjustment of the oscillator controls will also vary the Pa.
When adjusted, this control fixes the mean pressure at the ET tube/patient
connection after about five system time constants have elapsed but only if set
bias flow and oscillator characteristics remain unchanged for the same time
period. Five time constants will vary from about one second to as long as 30
seconds. This time constant varies inversely with both Pa Control Valve
resistance and bias flow setting.
Changes in the following oscillator controls may necessitate readjustment of the
mean pressure to maintain a constant Pa: Frequency, % Inspiratory Time,
Power (and resultant ∆P change).
Frequency affects the Pa adjustment slightly, but at higher frequencies the
amplitude of the oscillator piston movement may be attenuated due to slew rate
limiting. (The transit time of the piston is greater than the cycle time required by
the Frequency adjustment.)
Since the % Inspiratory Time adjustment affects the symmetry of the oscillatory
waveform, it will directly cause a change in the Pa when readjusted.
A change in the ∆P will cause a change in the percent of the Pa contributed by
any nonsymmetrical oscillatory waveform. Thus, Pa will change and will need to
be readjusted if an unchanged Pa is desired.
767164
0601G
___________________________________________________________________________________________________________________
44
Chapter 4 Location and Function of Controls, Indicators,
and Connections
B. Front and Side Panel – Control Package
___________________________________________________________________________________________________________________
With the oscillator off, the Mean Pressure Adjust control is capable of achieving
41 cmH2O Pa at a Bias Flow of 20 LPM with the patient circuit calibrated to the
system. Pa will generally increase moderately with the oscillator running.
Refer to Chapter 6, Operational Verification and Startup Procedures, for an
explanation of the Mean pressure setup procedure.
3. (Not used)
4. Power / ∆P
Determines the amount of power that is driving the oscillator piston to and fro.
The Power control is a 10-turn, electrical potentiometer covering the power
range of 0 to 100%. The knob scale is a 10-turn locking dial that is not
calibrated in % power but marked for purposes of establishing reference points.
The effect of this control is to change the displacement of the oscillator piston
and hence the oscillatory pressure ∆P.
The Power setting interacts with the Pa conditions existing within the Patient
Circuit to produce the resultant ∆P. The ∆P is numerically displayed on the
digital meter adjacent to the Power control. At extremely high amplitudes (power
settings greater than 6) the oscillatory pressure may significantly contribute to
the mean pressure. Changes to the amplitude will result in changes to the mean
airway pressure and should be compensated for to maintain an unchanged
mean airway pressure.
Refer to Chapter 6, Operational Verification and Startup Procedures, for a
description of the adjustment technique for setting the Power control.
5. % Inspiratory Time
Determines the percent of the oscillator cycle time that the piston is traveling
toward or is at its final inspiratory position. The control is a 10-turn electrical
potentiometer and covers the range of 30 to 50%. The setting is numerically
displayed on the digital meter adjacent to the control.
Changing the % Inspiratory Time control could have an effect on the position of
the oscillator piston. At higher frequencies, changing the % Inspiratory Time
from at or near 50% toward 30% may decrease the displacement. This is due to
the fact that the shorter inspiratory phase of the oscillation may not give the
piston enough time to travel to its full deflection.
767164
0601G
___________________________________________________________________________________________________________________
Chapter 4 Location and Function of Controls, Indicators,
and Connections
45
B.
Front and Side Panel – Control Package
___________________________________________________________________________________________________________________
Since this control affects the symmetry of the oscillatory waveform, it may affect
the Pa or the ∆P.
6. Frequency – Hz
Sets the oscillator frequency in Hertz. The control knob is a 10-turn, clockwise
increasing, electrical potentiometer covering the range of 3 to 15 Hertz. The set
frequency is displayed on the digital meter.
7. Start/Stop
Manually toggles the oscillator between enabled and disabled. If the green LED
on this pushbutton is lit, then the oscillator is enabled and pressing the
pushbutton will disable the oscillator. If the green LED is not lit, then the
oscillator is disabled and depressing the pushbutton will enable it to start
oscillating—assuming the start up procedure has been properly executed.
This start up procedure will be discussed in Chapter 6. If not done properly, the
system will not allow the oscillator to start. This prevents the patient from
experiencing too high or low a Pa.
8. Mean Airway Pressure
Displays the Pa on a digital meter in cmH2O.
9. Set Max Pa
Determines the level in cmH2O at which the Max Pa Exceeded Warning Alarm
will be indicated. The Maximum Pa level is set by means of a thumb-wheel
switch covering the range of 0 to 59 cmH2O. A mechanical stop has been
inserted in the tens column of the thumb-wheel switch to prevent the dial from
being turned past the numeral 5.
In the event that the proximal pressure meets or exceeds the set Max Pa alarm
setting, an audible and visual alarm will occur, and the ventilator will
depressurize the Limit Valve seat pressure. Once the mean airway pressure
falls to a level of 12 (±3) cm H2O below the Set Max Pa setting, the Limit Valve
will re-pressurize to its normal operational state. Should the high mean airway
condition persist, the alarm will repeat until the condition is resolved. Once
corrected the high Pa visual indicator will remain lit to notify the clinician that the
alarm was violated. Depress the Reset / Power Failure button to reset the visual
indicator.
767164
0601G
___________________________________________________________________________________________________________________
46
Chapter 4 Location and Function of Controls, Indicators,
and Connections
B. Front and Side Panel – Control Package
___________________________________________________________________________________________________________________
Operating the ventilator with low Bias Flow Rates (<15 Ipm) and Low
Mean
Airway Pressures (<15 cmH 0), with full power (Maximum
2
Amplitude) may result in a low-pressure dump upon activation of the Max
Pa Alarm.
10. Set Min Pa
Determines the level in cmH2O at which the Min Pa Exceeded Warning Alarm
will be indicated. The Minimum Pa level is set by means of a thumb-wheel
switch covering the range of 0 to 59 cmH2O. A mechanical stop has been
inserted in the tens column of the thumb-wheel switch to prevent the dial from
being turned past the numeral 5.
The activation of the alarm is indicated by a 3K-Hertz modulated tone and a red
LED which is adjacent to the thumb-wheel switch.
The alarm will reset automatically after correction of the condition. The audible
indicator can be silenced for 45 seconds by pushing the 45-Sec Silence
pushbutton.
This alarm does not initiate any machine response other than the activation of
the visual and audible indicators.
11. Pa > 60 cmH2O
The red LED indicates activation of this preset Safety Alarm. It is also indicated
by a 3K-Hertz modulated tone. The alarm is reset only by pushing the Reset
pushbutton after the alarm condition has been corrected. The 45-Sec Silence
pushbutton can be pushed to silence the audible indicator; however, the red
LED indicator will still function and the Dump Valve will remain open.
When this alarm occurs, the Model 3100B will automatically shut down the
oscillator, but bias flow will continue. The Dump Valve will be open and will hold
the airway pressure to near atmospheric. This protects the patient from the
elevated pressure and allows the patient to breathe spontaneously. (See the
Patient Circuit section in Chapter 3 for further explanation of this feature.)
Because of the Dump Valve activation, the Pa < 5 cmH2O Safety Alarm will
also be activated.
After the correction of the condition that triggered the Safety Alarm, the
oscillator startup procedure must be followed for reset. This is discussed in
Chapter 6.
767164
0601G
___________________________________________________________________________________________________________________
Chapter 4 Location and Function of Controls, Indicators,
and Connections
47
B.
Front and Side Panel – Control Package
___________________________________________________________________________________________________________________
12. Pa <5 cmH2O
The red LED indicates activation of this Safety Alarm. It is also indicated by a
3K-Hertz modulated tone. This alarm triggers at a Pa <5 cmH2O. The alarm will
reset after the alarm condition has been corrected.
The 45-Sec Silence pushbutton can be pushed to silence the audible indicator;
however, the red LED indicator will still function.
When this alarm occurs, the Model 3100B will automatically shut down the
oscillator, but bias flow will continue. The Dump Valve will be activated and will
hold the airway pressure to near atmospheric. This allows the patient to breathe
spontaneously. (See the Patient Circuit section in Chapter 3 for further
explanation of this feature.)
After the correction of the condition that triggered the Safety Alarm, the
oscillator startup procedure must be followed for reset. This is discussed in
Chapter 6.
13. Power Failure
The red LED indicates loss of electrical power or insufficient or inadequate
electrical power supply. It is accompanied by a 3K-Hertz modulated audible
tone. The following conditions will cause this alarm to trigger:
a. Tripping of Model 3100B System circuit breaker.
b. Turning off Power Switch (29).
c. Power plug being pulled from wall socket.
d. Loss of power to the hospital branch line to which the Model 3100B
System is connected.
e. A failure in the power supply internal to the Model 3100B System.
Once tripped, the alarm indicators (red LED and 3K-Hz modulated tone) can be
reset only by pushing the Reset button (14) even if the power failure condition
has been corrected. Then, the oscillator Start/Stop Switch must also be pressed
to restart the oscillator.
The Power Failure Alarm circuitry is powered by a battery (25) which will be
discussed further in the next section covering operation of controls, indicators,
and connections on the rear panel of the Control Package.
14. Reset Pushbutton
767164
0601G
This momentary pushbutton resets all Safety Alarms and the Power Failure
alarm.
___________________________________________________________________________________________________________________
48
Chapter 4 Location and Function of Controls, Indicators,
and Connections
B. Front and Side Panel – Control Package
___________________________________________________________________________________________________________________
The alarm conditions triggering the > 60 cmH2O and < 5 cmH2O Safety Alarms
(11 and 12) must first be corrected before resetting will occur. Since these
alarms cause the Dump Valve to open, Reset must be held in with the
Start/Stop enabled until the Dump Valve closes and airway pressure builds
above the 5 cmH2O Pa level.
The Power Failure alarm (13) will be reset regardless of whether the alarm
condition has been corrected or still exists.
It is normal for the Battery Low LED to light when the reset button is pressed.
15a. Battery Low
Indicates the Power Failure alarm battery (25) on the rear panel of the Control
Package must be changed as soon as possible to ensure continued proper
operation of the Power Failure alarm.
15b. Source Gas Low
Indicates the gas pressure at the “Inlet From Blender” or “Air Cooling”
connection has fallen below 30 psig.
Since the Battery Low and Source Gas Low are classified as caution alarms,
yellow LEDs are used, and there is no audible indicator. These alarms will reset
only after the battery has been replaced by a new one or the source gas
pressure increases above 30 psig, respectively.
The user should investigate the cause of the alarm. If the problem is a loss in
blender output pressure, the Warning or Safety Alarms will soon be activated. If
the problem is a loss of oscillator cooling air, the Oscillator Overheated alarm
will soon activate. This alarm can occur due to plugging of an Inlet Filter
Cartridge with dirt. Refer to the Operator Maintenance Procedures section of
Chapter 7 for instructions on changing the Inlet Filter Cartridges.
The battery will be discussed further in the next section covering the operation
and location of the rear panel controls, indicators, and connections.
767164
0601G
___________________________________________________________________________________________________________________
Chapter 4 Location and Function of Controls, Indicators,
and Connections
49
B.
Front and Side Panel – Control Package
___________________________________________________________________________________________________________________
16. Oscillator Overheated
Indicates that the oscillator coil is overheated and has reached approximately
150°C. Since this is a Caution Alarm, a yellow LED is used, and there is no
audible indicator. This alarm will reset only after the condition has been
corrected. The operator should determine if the problem is a loss of, or
decrease in, cooling gas pressure. This could be caused by low gas pressure at
its source, an occlusion (such as a kinked tube or plugged Inlet Filter Cartridge)
or a loose tube connection, internal or external. Refer to the Operator
Maintenance Procedures section of Chapter 7 for instructions on changing the
Inlet Filter Cartridges.
17. Oscillator Stopped
Indicates that the oscillator is enabled (Start/Stop pushbutton green LED
lighted) but ∆P < 5 to 7 cmH2O. A red LED indicator is accompanied by a 3KHertz modulated tone. No machine action is taken other than the indicators
which automatically reset when the condition is corrected.
18. 45-Sec Silence Pushbutton
Activates and indicates the inhibiting of the audible alarm, for a period of 45
seconds. This control is a lighted pushbutton and indicates a caution with its
yellow LED when pushed. Once activated, the 45-Sec Silence cannot be reset,
but must time out.
19. Patient Circuit Calibration
Adjusts the maximum mean pressure that can be obtained with a specific
Patient Circuit. This screwdriver adjustment is used to calibrate the maximum
mean pressure after the Patient Circuit is changed or the Pa Control diaphragm
is changed. A full setup procedure is detailed in Chapter 7, Maintenance and
Troubleshooting.
767164
0601G
___________________________________________________________________________________________________________________
50
Chapter 4 Location and Function of Controls, Indicators,
and Connections
C. Rear Panel – Control Package
___________________________________________________________________________________________________________________
C. Rear Panel – Control Package
24
28
Simpson
Blender/Cooling Gas
Filter Replacement Record
25
doodle
00 8 7 9
Elapsed Time
Filters should be replaced every
500 hours of operation
OUTLET TO
HUMIDIFIER
BREATING GAS
40-60 PSI
MAXIMU 60 LPM
POSITION LOCK
3100B OSCILLATORY VENTILATOR
*
Sensor
COOLING AIR
23
21
22
Driver Replacement Record
20
Drivers should be replaced every
2000 hours of operation
27
29
26
Figure 4.2. Rear Panel Controls, Indicators, and Connections.
The numbers shown on Figure 4.2 correspond to the numbers on the following
descriptions. Details concerning specific design characteristics are discussed in
Chapter 2.
767164
0601G
___________________________________________________________________________________________________________________
Chapter 4 Location and Function of Controls, Indicators,
and Connections
51
C.
Rear Panel – Control Package
___________________________________________________________________________________________________________________
20. Inlet From Blender
DISS oxygen fitting for connection to an inline Inlet Filter Cartridge and then to
the External Air/O2 Blender output. The nominal pressure of the blender output
gas should be 50 psig. The Source Gas Low yellow LED will light if the pressure
at the inlet drops below 30 psig ± 5%.
This input connection is protected from over-pressure by a 75 psig mechanical
relief valve. More details regarding this protection are listed in Chapter 2.
21. Outlet To Humidifier
Connector which provides bias flow to the inlet of the External Humidifier. This
is a 3/8" barbed fitting which is over-pressure protected by a 5 psig mechanical
relief valve. The Patient Circuit assembly procedures associated with this
connector are discussed in Chapter 5.
22. Pressure Transducer Zero
Adjustment
See Chapter 7.
23. Pressure Transducer Span
Adjustment
See Chapter 7.
24. Elapsed Time Meter
Indicates the total accumulated time in hours that power has been applied to the
Model 3100B. Detailed specifications of this meter are discussed in Chapter 2.
25. Power Failure Alarm
Battery And Battery
Compartment
A metal cover (fastened by 2 screws) behind which is a 9-volt alkaline battery.
Battery Low LED (15) on front panel indicates when this battery needs to be
changed. It can be replaced by any high quality 9-volt alkaline battery. Note:
remove the 9-volt battery if the instrument is not intended to be used for a
lengthy period.
26. Position Lock
Locks the Control Package in the rotational position selected by the user. When
this lock is rotated counterclockwise, it allows the rotation of the Control
Package over an arc of nearly 360°. This permits viewing of the Model 3100B
front panel from an angle independent of the Patient Circuit outlet orientation.
After the desired position has been selected, rotation of the knob in a clockwise
direction will lock the enclosure in the selected position.
767164
0601G
___________________________________________________________________________________________________________________
52
Chapter 4 Location and Function of Controls, Indicators,
and Connections
C. Rear Panel – Control Package
___________________________________________________________________________________________________________________
Rotation of the knob slightly counterclockwise from fully locked will apply friction
to prevent the enclosure from easily being rotated without actually fixing it in
place.
More on the subject of positioning of controls is discussed in Chapter 5,
Assembly.
27. Air Cooling Inlet
An Air DISS fitting for connection through an in-line Inlet Filter Cartridge to
hospital air supply which provides the oscillator with cooling gas. The nominal
pressure of the hospital air should be 50 psig at the required 25 LPM rate. The
Source Gas Low yellow LED will light if the pressure at the inlet drops below 30
psig ± 5%.
28. Blender/Cooling Gas Filter
Replacement Record
During normal maintenance as described in Chapter 7, record the reading on
the Elapsed Time Meter for quick reference.
29. Driver Replacement Record
During normal maintenance as described in Chapter 7, record the reading on
the Elapsed Time Meter for quick reference.
767164
0601G
___________________________________________________________________________________________________________________
Chapter 4 Location and Function of Controls, Indicators,
and Connections
53
D.
System Column and Patient Circuit
___________________________________________________________________________________________________________________
D. System Column and Patient Circuit
Figure 4.3. System Column and Patient Circuit Controls and Connections.
The numbers shown on Figure 4.3 correspond to the numbers on the following
descriptions.
767164
0601G
___________________________________________________________________________________________________________________
54
Chapter 4 Location and Function of Controls, Indicators,
and Connections
D. System Column and Patient Circuit
___________________________________________________________________________________________________________________
Precaution
Care should be taken not to crimp or perforate any of the control or sensing
lines (running to or from the Patient Circuit) during assembly or operation of the
ventilator as this will cause malfunction of the Safety Alarms, Warning Alarms,
Caution Alarms, and/or Pressure Limit controls.
30. Power Switch
Turns power to the Model 3100B System on and off. This power switch also
functions as a circuit breaker in case of a power overload. If the circuit breaker
trips, be sure to locate the problem causing the power overload before resetting
the breaker. This switch is a standard rocker switch which breaks both sides of
the power line as does the built-in circuit breaker.
31. Oscillator Compartment
(Bellows)
Attaches to 1 1/4" I.D. inspiratory limb of patient circuit and is held in place by
four quarter-turn fasteners.
32. Pa Control Valve Control
Green Luer bulkhead fitting for connection to green 1/16" I.D. tubing that runs to
the control input of the Pa Control Valve on the Patient Circuit. Consult
assembly procedure in Chapter 5 for details on attachment of this control line to
its valve. This line should be replaced periodically during scheduled preventive
maintenance of the HFOV.
33. Dump Valve Control
Red Luer bulkhead fitting for connection to red 1/16" I.D. tubing that runs to
control input of Dump Valve on Patient Circuit. Consult assembly procedure in
Chapter 5 for details on attachment of this control line to its valve. This line
should be replaced periodically during scheduled preventive maintenance of the
HFOV.
34. Pa Sense
White Luer bulkhead fitting for connection to clear 1/8" I.D. tubing that runs to
the Airway Pressure Port of the Patient Circuit for the purpose of transmitting
the Pa signal to the pressure transducer within the Control Package. Consult
assembly procedure in Chapter 5 for details on attachment.
35. Pa Limit Valve Control
Blue Luer bulkhead fitting for connection to blue 1/16" I.D. tubing that runs to
control input of Pa Limit Valve on Patient Circuit. Consult assembly procedure
767164
0601G
___________________________________________________________________________________________________________________
Chapter 4 Location and Function of Controls, Indicators,
and Connections
55
D.
System Column and Patient Circuit
___________________________________________________________________________________________________________________
in Chapter 5 for details on attachment of the control line to its valve. This line
should be replaced periodically during scheduled preventive maintenance of the
HFOV.
36. Water Trap
Condensate should drain into the water trap if the Patient Circuit is positioned
properly. There is a small (.025" diameter) hole at the top of the water trap to
allow air to escape as it fills.
37. Water Trap Drain Valve
Allows draining of water condensate. Water is drained from the bottom when the
stopcock is opened. The contents of the water trap can be drained while the
Model 3100B is still operating as long as the water seal between the ventilator
and the bottom drain is not broken. This can be accomplished by always leaving
a small amount of water at the bottom of water trap after draining. Follow the
instructions in Chapter 7 regarding cleaning and disinfecting the water trap and
valve mechanisms.
Precaution
Ensure that the stopcock is closed prior to performing a Patient Circuit
Calibration. If the Water Trap Stopcock is left open, Patient Circuit Calibration
(39–43 cmH20) may not be achievable, and the deliverable Pa will be reduced.
38. Bellows Fasteners
Four quarter-turn fasteners that hold the bellows (Oscillator Compartment) in
place in front of the oscillator piston.
39. Patient Circuit Cradle
For attachment of Patient Circuit. Refer to Chapter 5 for assembly and
adjustment instructions.
40. Humidifier Tubing
The external humidifier is connected between the “Outlet To Humidifier” on the
rear of the Control Package and the Bias Flow Inlet on the Patient Circuit. In
Figure 4.3, the humidifier tubing is shown connected to the patient circuit
without the humidifier inline.
Only the 3/8" tube supplied with the Patient Circuit should be used.
41. Bulkhead Luer Fittings
767164
0601G
___________________________________________________________________________________________________________________
56
Chapter 4 Location and Function of Controls, Indicators,
and Connections
D. System Column and Patient Circuit
___________________________________________________________________________________________________________________
There are four bulkhead luer fittings on the front of the oscillator compartment
for connection to the three valve caps and pressure sense port on the patient
circuit.
42. Hold Down Strap
Secures the patient circuit to the Patient Circuit Cradle. This keeps the circuit in
a stable position.
767164
0601G
___________________________________________________________________________________________________________________
Chapter 5 Assembly and Installation
57
A.
Introduction
___________________________________________________________________________________________________________________
A. Introduction
This chapter covers the unpacking, assembly, and installation of the Model
3100B HFOV prior to operational verification. The Control Package is shipped
already attached to the Column. The assembly of the Patient Circuit and its
attachment to the rest of the ventilator is illustrated in Figures 5.1 and 5.2.
B. Unpacking
The Model 3100B HFOV is shipped in one crate, containing the instrument (preassembled control package, column, and pedestal) and several smaller cartons
containing:
1. Patient Circuit support arm and cradle.
2. Two complete patient circuits, packaged one to a box.
3. Humidifier input and output hoses/adapters.
4. A box of ten spare Inlet Filter cartridges for blended gas and air inputs.
5. Operator's Manual.
6. Humidifier mounting bracket adapters.
C. Assembly
Precaution
Deviation from the assembly methods described here could damage the Model
3100B, render it mechanically unstable, or cause it to malfunction. If any
questions arise regarding the assembly procedure, please contact
SensorMedics Technical Support immediately before proceeding.
Place the pre-assembled Control Package, Column, and Pedestal on a level
floor and lock the locking wheels.
Assemble the Patient Circuit support arm prior to attempting to attach the
Patient Circuit. A flathead screwdriver will be necessary.
Precaution
When connecting the Patient Circuit, make certain that it is properly supported
by the support arm. Failure to do so could result in inadvertent Patient Circuit
disconnection due to oscillatory forces or could result in collection of humidifier
condensate in the patient airway.
767164
0601G
___________________________________________________________________________________________________________________
58
Chapter 5 Assembly and Installation
C. Assembly
___________________________________________________________________________________________________________________
Attach the vertically-adjustable rod to the end of the support arm so that it will
cradle, in its curved end, the main tube of the Patient Circuit. Tighten the
thumbscrew crosspiece to secure it at the height desired.
The angle of the Patient Circuit can also be controlled by loosening the
thumbscrew on the cradle rod and sliding it either up or down. Once again,
always be certain to retighten the thumbscrew.
Figure 5.1. Disassembled Patient Circuit.
767164
0601G
___________________________________________________________________________________________________________________
Chapter 5 Assembly and Installation
59
C.
Assembly
___________________________________________________________________________________________________________________
Figure 5.2. Details of Patient Circuit.
Assemble the Patient Circuit using Figures 5.1 and 5.2 as a guide. Connect the
Patient Circuit Body to the Bellows/Water Trap Assembly and snap the three
identical caps/diaphragm assemblies onto the three valve bodies located on the
Patient Circuit Body.
Next, attach this assembled Patient Circuit to the face of the Oscillator
Compartment using the four captive T-handle quarter-turn fasteners.
767164
0601G
___________________________________________________________________________________________________________________
60
Chapter 5 Assembly and Installation
C. Assembly
___________________________________________________________________________________________________________________
Precaution
The driver diaphragm of the 3100B has been coated with a special lubricant
during assembly. Please do not clean the driver diaphragm with cleaning
solvents as it may degrade the materials causing premature wear of the driver
diaphragm.
Attach the three color-coded tubes to their corresponding valve caps, using the
following color-coding scheme:
Color of Line
Patient Circuit Attachment Point
Blue
Green
Red
Clear
Limit Valve
Pa Control Valve
Dump Valve
Pa Sensing Port
Note that the differing lengths and color coding of the tubes and the physical
arrangement of the valves within the Patient Circuit minimize any crossconnection.
Precaution
Care should be taken not to crimp or perforate any of the control or sensing
lines (running to or from the Patient Circuit) during assembly or operation of the
ventilator, as this will cause malfunction of the Safety Alarms, Warning Alarms,
Caution Alarms, and/or Pressure Limit controls.
Next, attach the 1/8"-Tygon pressure-sense line (captive to the Patient Circuit
“Y”) to the bulkhead Luer fitting marked “Airway Pressure.” Finally, insert the
humidifier temperature probe in the tapered-opening near the patient “Y.” Note
that an identical such port with a removable plug in it is located at the opposite
end of the Patient Circuit. Always insert the plug in the unused port.
767164
0601G
___________________________________________________________________________________________________________________
Chapter 5 Assembly and Installation
61
C.
Assembly
___________________________________________________________________________________________________________________
Precaution
If the temperature probe is wiped with alcohol, allow the alcohol to evaporate
completely before inserting it into the circuit. A high residual of alcohol can
weaken the acrylic adapter and cause fracturing.
Always insert the provided plug into the unused temperature probe port. Failure
to do so will allow a leak of sufficient magnitude that the minimum Pa necessary
to allow the oscillator to start cannot be achieved.
Use the cradle rod adjustment already described to maintain the proper Patient
Circuit height and angle. The proper angle will allow condensate to run
downward into the Water Trap mounted on the Column.
The 3100B High Frequency Oscillating Ventilator is now ready for Operational
Verification and Start-Up (see Chapter 6).
Warning
Do not attempt to substitute a circuit configuration from any other instrument.
Use of a non-3100A or a non-3100B circuit can result in injury to the patient or
to the operator, and it may cause damage to the equipment. The Patient Circuit
described in this manual is specifically designed for patient use with the Model
3100B HFOV.
767164
0601G
___________________________________________________________________________________________________________________
62
Chapter 5 Assembly and Installation
C. Assembly
___________________________________________________________________________________________________________________
Obtain an External Air/O2 Blender and an External Humidifier for incorporation
into the system as described in Chapter 3. Attach these devices to the Patient
Circuit using the attachment accessories supplied and using Figures 5.1 and
5.2 as a guide. The following connections must be made:
Device
Input Connection(s) From
Output Connection To
Air/O2 Blender
(a) Hospital Air
DISS connection
(b) Hospital Oxygen
DISS connection
Control Package rear
panel “INLET FROM
BLENDER” DISS fitting
Humidifier
Control Package rear panel
“OUTLET TO HUMIDIFIER”
3/8" barbed fitting
Patient Circuit
Bias Flow Connection
3/8" nipple fitting
There is an additional connection from the Hospital AIR DISS connection to the
Column DISS Air fitting marked “AIR COOLING.”
Simpson
Blender/Cooling Gas
Filter Replacement Record
doodle
008 79
Elapsed Time
Filters should be replaced every
500 hours of operation
OUTLET TO
HUMIDIFIER
BREATING GAS
40-60 PSI
MAXIMU 60 LPM
POSITION LOCK
3100B OSCILLATORY VENTILATOR
*
Sensor
COOLING AIR
"Outlet to Humidifier"
3/8" Barbed Fitting
Driver Replacement Record
"Inlet From Blender"
DISS Fitting
"Cooling Air"
DISS Fitting
Drivers should be replaced every
2000 hours of operation
Figure 5.3. Rear Panel Connections.
767164
0601G
___________________________________________________________________________________________________________________
Chapter 5 Assembly and Installation
63
C.
Assembly
___________________________________________________________________________________________________________________
Warning
Do not shorten the 30" bias flow tube provided with the patient circuit, as this
may reduce the maximum ∆P by allowing the oscillatory pressures to be
attenuated by closer proximity to the volume of the humidifier canister.
Precaution
The inlet filter cartridges for the blended gas and the air inputs to the ventilator
must be replaced at least every 500 hours of operation as described in Chapter
7, Maintenance and Troubleshooting. Failure to replace a filter cartridge or
substitution of an unauthorized cartridge could result in injury to the patient
and/or damage to the equipment. Use only SensorMedics P/N 463110
cartridges (P/N 767163 box of 10).
Find a convenient power outlet for connection to the Model 3100B with a
minimum rating compatible with the HFOV power ratings described in Chapter
2.
The Model 3100B HFOV system is now ready for operational verification.
Warning
Do not attempt to defeat the proper connection of the ground wire. Improper
grounding may cause damage to the device or interconnected equipment and
could be injurious to the patient or to those associated with the device use. This
device is factory equipped with a hospital-grade AC power plug. Grounding
reliability can only be assured when connected to a tested receptacle labeled
“Hospital Grade.”
Precaution
Proper operation of the ventilator must be verified prior to each use. Refer to
Chapter 6, Operational Verification and Start-up Procedures.
767164
0601G
___________________________________________________________________________________________________________________
64
Chapter 5 Assembly and Installation
D. Pre-use Cleaning and Disinfection
___________________________________________________________________________________________________________________
Warning
Do not operate radio transmitters within 20 feet of this instrument. This may
result in erroneous pressure readings leading to false alarms and automatic
shut-down.
D. Pre-use Cleaning
and Disinfection
The 3100B requires no preliminary cleaning before initial use. The Patient
Breathing Circuit components, though clean, are not shipped sterile. If desired,
the circuit body may be disinfected before using according to the instructions in
the “Changing the Patient Circuit” section of Chapter 7, Maintenance and
Troubleshooting.
767164
0601G
___________________________________________________________________________________________________________________
Chapter 6 Operational Verification and Start-up Procedures
65
A.
Introduction
___________________________________________________________________________________________________________________
A. Introduction
This chapter covers the proper operational verification and ventilation start-up
methods for the Model 3100B HFOV.
Chapter 5 for instructions on unpacking, assembly, and installation
of See
the Model 3100B HFOV prior to operational start-up and verification.
Warning
The operational verification and start-up procedure must be followed before
ventilation of a patient commences. If at any time during the operational
verification and start-up procedure any abnormal function of the Model 3100B
HFOV is noted, do not proceed with patient ventilation as this could cause
patient injury or death; immediately contact SensorMedics Technical Support
before proceeding any further.
Precaution
Proper operation of the ventilator must be verified prior to each use. The alarm
functions tested in this procedure verify the capability of the device to detect
and indicate conditions which could have a harmful effect on the patient.
Precaution
Touch the outer metal cabinet of the instrument before touching any other
component to avoid possible instrument component damage from Electrostatic
Discharge.
Warning
Do not operate radio transmitters within 20 feet of this instrument. This may
result in erroneous pressure readings leading to false alarms and automatic
shut-down.
767164
0601G
___________________________________________________________________________________________________________________
66
Chapter 6 Operational Verification and Start-up Procedures
B. Start-up Procedures
___________________________________________________________________________________________________________________
B. Start-up Procedures
1. Connect the source gases to the Model 3100B HFOV System:
a. Oxygen line to the External Air/O2 Blender oxygen input fitting
b. Air line to the External Air/O2 Blender air input fitting and the oscillator “Air
Cooling” input connector.
c. External Air/O 2 Blender output to the Control Package rear panel oxygen
DISS fitting labeled “Inlet from Blender.”
2. Connect Patient Circuit and External Humidifier to the Model 3100B using the
assembly procedures described in Chapter 5.
Warning
Do not attempt to substitute a circuit configuration from any other instrument.
Use of a non-3100A or a non-3100B circuit can result in injury to the patient or
to the operator, and it may cause damage to the equipment. The Patient Circuit
described in this manual is specifically designed for patient use with the Model
3100B HFOV.
Precaution
When connecting the Patient Circuit, make certain that it is properly supported
by the support arm as described in Chapter 5, Assembly and Installation.
Failure to do so could result in inadvertent patient circuit disconnection due to
oscillatory forces or could result in collection of humidifier condensate in the
patient airway.
3. Connect all color-coded Patient Circuit Control Lines and the clear Pressure
Sense Line to their proper locations on the Patient Circuit as described in
Chapter 5.
Precaution
Care should be taken not to crimp or perforate any of the control or sense lines
(running to or from the Patient Circuit) during assembly or operation of the
ventilator as this will cause malfunction of the Safety Alarms, Warning Alarms,
Caution Alarms, and/or Pressure Limit controls.
767164
0601G
___________________________________________________________________________________________________________________
Chapter 6 Operational Verification and Start-up Procedures
67
B.
Start-up Procedures
___________________________________________________________________________________________________________________
4. Block off or obstruct the ET connection port on the Patient Circuit using the
#1 rubber stopper accessory provided.
5. Turn on the Main Power Switch (the green LED on the Start/Stop pushbutton
should be off). Some of the alarm LED's will be lit when power is first turned
on.
Warning
An audible alarm indicates the existence of a condition potentially harmful to the
patient and should not go unattended. Failure to respond to alarms could result
in injury, including death, to the patient and/or damage to the ventilator.
Precaution
Ensure that the stopcock is closed prior to performing a Patient Circuit
Calibration. If the Water Trap Stopcock is left open, Patient Circuit Calibration
(39–43 cmH20) may not be achievable, and the deliverable Pa will be reduced.
Warning
Ensure that the cooling fan at the rear of the driver enclosure is operational.
6. Calibrate the patient circuit to the system. (These instructions are also
located on a label on the side of the Control Package).
a. Turn on source gas pressure and establish Bias Flow at 20LPM. Be sure
to read the flow at the center of the ball, looking level at the flow meter.
b. Set Max Pa Alarm to 59 cmH2O.
c. Set Mean Pressure Adjust control to Max (full CW).
d. Push in and hold RESET while observing the Mean Pressure digital
readout. It is normal for the Battery Low LED to light when the reset
button is pressed.
e. Adjust the Patient Circuit Calibration on the right side of the control
package to achieve a Pa of 39 to 43 cm H2O. Do not overturn; if the
specified pressure can not be achieved, locate the leak.
767164
0601G
___________________________________________________________________________________________________________________
68
Chapter 6 Operational Verification and Start-up Procedures
B. Start-up Procedures
___________________________________________________________________________________________________________________
f. Release the RESET button; the Battery Low LED should turn off.
Precaution
Do not overturn the Patient Circuit Calibration as this may cause damage to the
device. When it is nearing its adjustment limit, it will reach a mechanical stop.
7. Perform the Ventilator Performance Check “Off Patient Only” section. (These
instructions are also located on a label on the top of the Control Package).
a. Insert stopper in Patient Circuit “Y” and turn on both gas sources.
b. Set BlAS FLOW for 30 LPM.
c. Set Max Pa Alarm to 35 cmH2O.
d. Pressurize system by pressing and holding RESET, and ADJUST for a
mean Pressure of 29-31 cmH2O.
e. Set FREQUENCY to 6, % I-Time to 33, and press START/STOP to start
the oscillator.
f. Set POWER to 6.0.
g. When a stable ∆P reading is obtained, verify that the ∆P and Pa
readings are within the range specified for your corresponding altitude
(see Figure 6.1).
8. Depress the START/STOP button to stop the oscillator.
9. With Mean Pressure Adjust and/or Bias Flow adjustment, achieve a mean
airway pressure within 2 cmH2O of the desired level. Ensure that the Bias
Flow is sufficient (see Chapter 8).
10. Verify the function of the thumb-wheel switches for “Set Max Pa” and “Set
Min Pa” alarms by setting the Max thumb wheel just below the established
Mean pressure, and by setting the Min thumb wheel just above the
established Mean pressure.
11. Set these thumb-wheel alarm switches to their desired settings. This is
generally 2–5 cmH20 above (Max thumb-wheel) and below (Min thumb
wheel) the established Mean pressure.
767164
0601G
___________________________________________________________________________________________________________________
Chapter 6 Operational Verification and Start-up Procedures
69
B.
Start-up Procedures
___________________________________________________________________________________________________________________
12. With fingers and thumb(s), squeeze closed the 1/8" clear Pressure Sense
tubing on the patient circuit to verify operation of the “Pa > 60 cmH2O”
alarm.
13. Depress the RESET button until the “Pa < 5 cmH2O” LED is extinguished
to reestablish the mean airway pressure.
14. Again, squeeze the pressure sense tubing on the patient circuit and observe
the pressure at which the Mean Pressure display limits.
15. Position the ventilator for connection to the patient. Loosen the Position
Lock control and adjust the angle of the Control Package for the best view
and access relative to the patient. Retighten the Position Lock.
16. Set the desired % oxygen, Mean Pressure, and ∆P for the patient. ∆P will
affect the Pa depending on ratio of Flow Rate/Pa. The lower the ratio, the
stronger the effect.
Precaution
Fractional concentration of inspired oxygen should be verified with an oxygen
monitor. Administration of excessive oxygen to a patient may be harmful. It is
imperative that the prescribed gas mixture is delivered by the blending system.
17. Remove the Patient Circuit stopper. Adjust the External Humidifier to
establish the desired gas temperature at the patient airway temperature
port. Connect the Patient Circuit to the patient ET tube.
Warning
Under no circumstances should proximal airway gas temperature of 41°C be
exceeded. This could result in injury to the patient's upper airway membranes.
767164
0601G
___________________________________________________________________________________________________________________
70
Chapter 6 Operational Verification and Start-up Procedures
B. Start-up Procedures
___________________________________________________________________________________________________________________
Warning
Do Not use the 3100B ventilator in environments where the ambient
temperature is at or above 84°F (28°C). Use of the ventilator in these
environments will result in extreme reduction in relative humidity in the patient’s
airway and possible desiccation of the patient airways.
Precaution
When the ventilator is connected to a patient, it is imperative that someone be
in attendance at all times in order to react to any alarms and to detect other
indications of a problem.
18. Push the Reset pushbutton until the “Pa < 5 cmH2O” LED is extinguished
to reestablish Mean Pressure.
19. Set the Power control for the desired ∆P (see Chapter 8).
20. Readjust the Frequency, % Inspiratory Time, Power, Mean Pressure, and
Bias Flow as needed during patient ventilation.
Warning
Under no circumstances should the ventilator be used in the presence of
flammable anesthetics due to the possibility of explosion.
Precaution
Do not place on the Control Package of the ventilator any fluid-containing
accessories, accessories that weigh more than 10 pounds, or accessories that
extend more than six inches above the ventilator electronics package or beyond
its sides. This could cause the ventilator to tip over, resulting in patient or user
injuries and/or damage to the equipment.
767164
0601G
___________________________________________________________________________________________________________________
Chapter 6 Operational Verification and Start-up Procedures
71
C.
Performance Verification
___________________________________________________________________________________________________________________
C. Performance Verification
Figure 6.1. Ventilator Performance Checks.
767164
0601G
___________________________________________________________________________________________________________________
72
Chapter 6 Operational Verification and Start-up Procedures
C. Performance Verification
___________________________________________________________________________________________________________________
The two graphs shown in Figure 6.1 are intended to guide the operator in
setting Power, Mean Pressure Adjust, and Bias Flow controls, and to help
ascertain that the 3100B is performing in a typical fashion without problems.
The left graph indicates the approximate setting of the Power control required to
achieve a specific ∆P pressure. The right graph illustrates the Bias Flow
required to achieve a range of Mean pressures with the single-turn Mean
Pressure Adjust control.
In establishing a specific Mean pressure, find the required Bias Flow that will
allow the Mean pressure to be adjusted above and below that desired. Set the
Mean Pressure Adjust control to approximately “twelve o'clock” and set the Bias
Flow as indicated on the graph, to a level which puts the desired Pa level in its
mid-range. When the system is operating, whether ON or OFF Patient, the
settings of the controls relative to the pressures being developed and displayed,
will quickly give an indication that the system performance is nominal.
767164
0601G
___________________________________________________________________________________________________________________
Chapter 7 Maintenance and Troubleshooting
73
A.
Introduction
___________________________________________________________________________________________________________________
A. Introduction
This chapter covers the Model 3100B maintenance and troubleshooting
procedures with which the operator and service technician should be
acquainted.
SensorMedics or its official representative will make available upon
request
such circuit diagrams, component part lists, descriptions,
calibration instructions or other information which will assist factoryqualified technical personnel to repair those parts of the equipment
which are classified as repairable. If you are interested in factory training,
please contact the SensorMedics Service Department for scheduling and
pricing of our biomedical training classes.
Warning
Failure to comply with the recommended maintenance procedures described in
this chapter could result in injury to the patient or operator or could result in
damage to the equipment.
B. Exterior Cleaning
When surface cleaning of the 3100B is desired, we recommend using a weak
disinfectant liquid to wipe down the exterior of the instrument. Do not spray
liquid cleaners directly on the exterior surface; spray the cleaning cloth and
wring it nearly dry before wiping. Do not allow liquids to drip into the instrument.
Do not use alcohol or sterilization liquids on the exterior surface of the
3100B.
Do not use abrasive cleaners or solvents on the exterior surface of the
3100B.
C. Operator
Maintenance
Procedures
767164
0601G
The operator maintenance procedures are the following:
Emptying the Water Trap.
Changing the Compressed-gas Inlet Filter Cartridge Elements.
Changing the Power Failure Alarm battery.
Cleaning the Column Lint Filter.
Changing the Patient Circuit.
___________________________________________________________________________________________________________________
74
Chapter 7 Maintenance and Troubleshooting
C. Operator Maintenance Procedures
___________________________________________________________________________________________________________________
Lubricating the driver diaphragm.
Emptying the Water Trap
The Water Trap must be emptied as described below.
Precaution
The Water Trap must be drained at intervals. If the ventilator is operating, leave
a small amount of water at the bottom of the Water Trap container to act as a
flow and pressure seal between the ventilator and the output of the drain.
Opening the stopcock on the bottom of the water trap will open the drain. The
contents of the water trap should be emptied into a disposable cup or a
container which can be subsequently disinfected.
When the Model 3100B is not operational, the Water Trap container can be
completely emptied.
Precaution
Ensure that the stopcock is closed prior to performing a Patient Circuit
Calibration. If the Water Trap Stopcock is left open, Patient Circuit Calibration
(39–43 cm H20) may not be achievable, and the deliverable Pa will be reduced.
Changing the Compressed-gas
Inlet Filter Cartridge Elements
The 0.1 micron Inlet Filter Cartridges are placed at the input of both the Inlet
From Blender DISS oxygen fitting and the Air Cooling Inlet DISS air fitting. Their
purpose is to capture any dirt particles or moisture before entry into the Model
3100B HFOV.
Precaution
The Inlet Filter Cartridges for the blended gas and the air inputs to the ventilator
must be replaced at least every 500 hours of operation as described in this
chapter. Failure to replace a Filter Cartridge or substitution of an unauthorized
cartridge could result in injury to the patient and/or damage to the equipment.
Use only SensorMedics cartridges (P/N 767163 box of 10).
767164
0601G
___________________________________________________________________________________________________________________
Chapter 7 Maintenance and Troubleshooting
75
C.
Operator Maintenance Procedures
___________________________________________________________________________________________________________________
The recommended minimum change interval is every 500 hours of operation.
However, the level of contaminants in the gas lines of your hospital may be
higher than normal. If the Model 3100B HFOV is used for the first time at a new
location within your hospital, Filter Cartridges should be checked for flow-limiting
contaminants after 100 hours of operation, and then after 300 hours of
operation, to determine whether or not a 500 hours of operation change interval
is appropriate.
A Filter Cartridge which has been allowed to accumulate flow limiting
contaminants will cause the gas supply pressure at the particular DISS fitting to
drop. Eventually, the Source Gas Low alarm will trigger. Refer to Chapter 4 for a
description of this alarm indication.
Cartridge Change Procedure
The procedure for changing a cartridge is as follows:
1. Turn off and disconnect both the air and oxygen source gas lines.
2. Unscrew body of inlet filter.
3. Remove old cartridge.
4. Install new cartridge. (A box of 10 spare cartridges, part number 767163, is
shipped with the Model 3100B as an accessory.)
5. Screw filter back together.
6. Record the Elapsed Time Meter reading on the rear of the 3100B.
Precaution
The filter cartridge body must be screwed back on securely. Cross-threaded or
loose installation will result in leaks and possible dislodging of the cartridge
body. If the cartridge body is dislodged, it will cause the ventilator to cease
functioning.
Changing the Power Failure
Alarm Battery
Cleaning the Column Lint Filter
767164
0601G
When the yellow Battery Low LED Caution Alarm on the front panel of the
Control Package is lighted, the problem is the Power Failure Alarm battery. It
should be changed as soon as possible. Access to this battery is gained
through the access door on the rear panel. A good quality 9 volt alkaline battery
should be used.
___________________________________________________________________________________________________________________
76
Chapter 7 Maintenance and Troubleshooting
C. Operator Maintenance Procedures
___________________________________________________________________________________________________________________
After each patient, inspect and clean the lint filter in the Column of the Model
3100B HFOV. Remove the filter element from its holder on the column rear.
Shake dirt out, wash it in warm sudsy water, dry it out and replace it in the
holder. Failure to perform this procedure will eventually cause a significant
restriction of air cooling flow to the oscillator square-wave driver. This could lead
to overheating of the driver and eventual malfunction of the oscillator.
Changing the Patient Circuit
Change the Patient Circuit with the same frequency as your institution's policy
requires for conventionally-ventilated patients. Dispose of the three snap-off
Cap/Diaphragms and the Bellows/Water Trap Assembly; these items
absolutely cannot be reused. The Patient Circuit Body is intended for singlepatient use.
Due to the high power settings which may be encountered, the cap diaphragms
of the patient circuit should be changed at least every three days. Failure to do
so may cause mean airway pressure instability.
Precaution
The driver diaphragm of the 3100B has been coated with a special lubricant
during assembly. Please do not clean the driver diaphragm with cleaning
solvents as it may degrade the materials causing premature wear of the driver
diaphragm.
Lubrication of the Driver
Diaphragm
Driver Lubrication Procedure
The oscillating mechanism of the 3100B ventilator consists of a linear motor
which drives a piston assembly. Due to the loads which can be placed on the
piston assembly, the driver diaphragm must be lubricated every 500 hours of
operation. This maintenance procedure will reduce wear on the driver
diaphragm and prolong its operational life.
1. Turn off the ventilator and remove the patient circuit.
767164
0601G
___________________________________________________________________________________________________________________
Chapter 7 Maintenance and Troubleshooting
77
C.
Operator Maintenance Procedures
___________________________________________________________________________________________________________________
2. Utilizing a lint free cloth or towel, wipe the surface of the driver diaphragm to
remove any contaminants and any residual lubricant.
3. Use a cotton tipped applicator or the finger of a gloved hand, to apply a thin
film of SensorMedics approved lubricant to the entire surface of the driver
diaphragm (Figure 7.1).
4. Record the Elapsed Time Meter reading on the rear of the 3100B.
Apply a thin film of lubricant
to the entire surface of the
driver diaphragm only.
Figure 7.1. Driver Diaphragm Lubrication.
Warning
Only SensorMedics approved lubricants should be used. Use of any other
lubricants could result in damage to the Driver Diaphragm or Bellows Water
Trap Membrane causing ventilator failure or patient injury.
767164
0601G
___________________________________________________________________________________________________________________
78
Chapter 7 Maintenance and Troubleshooting
D. Patient Circuit Calibration
___________________________________________________________________________________________________________________
Precaution
The Driver Diaphragm of the SensorMedics 3100B must be lubricated every
500 hours of use as described in this chapter. Failure to lubricate the Driver
Diaphragm may result in premature wear of the diaphragm, which could result in
failure of the driver mechanism.
D. Patient Circuit
Calibration
Before use on a patient, each patient circuit must be calibrated to the Model
3100B by following this procedure:
1. Insert the stopper in the Patient Circuit “Y” and turn on the Bias Flow gas.
2. Set Max Pa Alarm to 59 cmH2O.
3. Rotate the Mean Pressure ADJUST control to “Max.”
4. Adjust the Bias Flow to 20 LPM.
5. Depress and hold RESET (Oscillator OFF).
6. Observe the Mean Pressure display and adjust the Patient Circuit Calibration
screw for a reading of 39–43 cmH2O.
Precaution
Do not over adjust the Patient Circuit Calibration screw. Over adjustment may
cause damage to the device. The screw will reach a mechanical stop when it is
at the adjustment limit. DO NOT FORCE THE SCREW PAST THIS STOP!
E. Other Scheduled
Periodic Calibration
There are two other functions within the Model 3100B HFOV which require
periodic calibration:
1. Control Package DC Power Supply.
2. Airway Pressure Monitor Transducer Calibration.
Maintenance of accurate calibration of these functions is extremely important to
the proper function of the Model 3100B HFOV. If at any time, a calibration
discrepancy exists that cannot be solved by the normal calibration procedures
described below, do not attempt to treat a patient with the HFOV. Call
SensorMedics immediately for assistance.
767164
0601G
___________________________________________________________________________________________________________________
Chapter 7 Maintenance and Troubleshooting
79
E.
Other Scheduled Periodic Calibration
___________________________________________________________________________________________________________________
The calibration interval for these functions is tracked on the Elapsed Time Meter
(24) on the Rear Panel of the Control Package. A calibration must be performed
at least every 2,000 hours or when a discrepancy is noticed. An National
Bureau of Standards traceable digital voltmeter and a National Institute of
Standards and Technology traceable pressure measurement transducer are
required for proper calibration of the Power Supply and the Airway Pressure
Monitor.
To assure accurate setup, all periodic calibrations must be done with the Model
3100B HFOV at room temperature and prior to extensive operation of the
oscillator. If the oscillator is warm due to previous operation, allow a nonoperating cool-down interval of at least one hour before commencing
calibration.
Precaution
The cover enclosing the Control Package, Column, or any other portion of the
ventilator must not be removed by the user. To avoid electrical shock hazard,
please refer all service requiring cover removal to a qualified biomedical
equipment service technician.
Control Package DC Power
Supply
The calibration procedure for the Control Package DC Power Supply is as
follows:
1. Turn off Power to the 3100B HFOV and unplug unit from AC receptacle.
2. Remove the rear column cover.
3. Plug the 3100B HFOV back into receptacle and turn on Power.
4. Refer to Figure 7.2 to locate screwdriver potentiometer settings R9, R57, and
R82 for the DC Power Supply. It is located immediately below the oscillator
drive electronics.
767164
0601G
___________________________________________________________________________________________________________________
80
Chapter 7 Maintenance and Troubleshooting
E. Other Scheduled Periodic Calibration
___________________________________________________________________________________________________________________
Figure 7.2. Power Supply Adjustment Potentiometers.
5. Connect the negative lead of a digital voltmeter to the +5V Com terminal of
the DC Power Supply.
6. Connect the positive lead of the digital voltmeter to the +5V terminal of the
DC Power Supply.
If adjustments are necessary, remove the front column cover.
7. If necessary, adjust R9 for a reading of +5 volts ± 0.25 volts on the digital
voltmeter.
8. Connect the negative lead of the voltmeter to the ± 15V Com terminal.
9. Connect the positive lead of the voltmeter to the -15V terminal.
10. If necessary, adjust R57 for a reading of -15 volts ± 0.75 volts.
11. Connect the positive lead of the voltmeter to the +15V terminal.
12. If necessary, adjust R82 for a reading of +15 volts ± 0.75 volts.
13. When calibration has been completed, replace the column covers.
767164
0601G
___________________________________________________________________________________________________________________
Chapter 7 Maintenance and Troubleshooting
81
E.
Other Scheduled Periodic Calibration
___________________________________________________________________________________________________________________
Airway Pressure Monitor
Transducer
The calibration procedure for the Airway Pressure Monitor Transducer is as
follows:
1. Locate the pressure transducer ZERO and SPAN screwdriver adjustable
controls on the rear panel of the Control Package below the battery
compartment (see Figure 4.2). Have a suitably-small screwdriver available to
make any necessary adjustments.
2. Attach a digital readout type pressure transducer meter to the bottom “leg” of
a 1/8" “T” fitting. Attach one of the “arms” of the “T” fitting directly to the
pressure sense fitting of the patient “Y.” Attach the 3100B's 1/8" Tygon
pressure sense tubing directly to the other “arm” of the “T” fitting.
3. Plug the end of the patient circuit “T” with a #1 rubber stopper. Turn on the
bias-flow gas pressure, press reset until the Pa comes up, and create a
mean pressure of 40–45 cmH2O (as read on the transducer meter) by using
the Mean Pressure and Bias Flow controls (as explained in the Start Up
Procedures section of Chapter 6).
4. Remove the #1 stopper and adjust the ZERO control on the rear panel until
the Mean Pressure Monitor digital readout matches the pressure transducer
meter reading within ± 0.2 cmH2O. This reading is typically between 0.2 and
0.3 cmH2O.
5. Replace the #1 stopper, press reset until the Pa comes up, and re-establish
the 40–45 cmH2O mean pressure reading on the transducer meter as
explained in Step 3, above.
6. Adjust the rear-panel SPAN control until the Mean Pressure Monitor reading
matches the pressure transducer meter within ± 0.2 cmH2O.
7. If the SPAN control requires no adjustment, the calibration procedure is now
complete. But if the SPAN control required readjustment, steps 4,5, and 6
must be repeated (typically twice) until both the near-zero level and the 40–
45 cmH2O levels match within ± 0.2cmH2O.
8. The pressure transducer calibration procedure is now complete. It has been
adjusted finer than its “± 2% of reading or ± 2.0 cmH2O” specification to allow
for minor changes before the next required calibration in 2,000 operating
hours.
767164
0601G
___________________________________________________________________________________________________________________
82
Chapter 7 Maintenance and Troubleshooting
F. Scheduled Periodic Maintenance
___________________________________________________________________________________________________________________
F. Scheduled Periodic
Maintenance
There are two other scheduled maintenance intervals suggested by
SensorMedics, based on accelerated life testing data and clinical usage history.
These are:
1. Every 2,000 operating hours have the Oscillator Subassembly (“Driver”)
replaced with a new or rebuilt unit which has new diaphragms and support
spiders (the parts subject to flexure fatigue). This replacement must be done
by a factory trained technician.
2. Every 8,000 operating hours have the 3100B HFOV returned to a factory
authorized service location for a complete overhaul. This overhaul will include
the scheduled Oscillator Subassembly replacement plus the replacement of
all other parts subject to usage wear and aging (e.g., solenoid valves,
regulators, plastic tubing, and cooling fans).
G. Troubleshooting
This section is intended to assist the operator in identifying and correcting any
apparent malfunctions of the 3100B System. For assistance, the SensorMedics
Technical Support Department can be reached 24 hours a day, 7 days a week.
Special Environmental
Considerations
Excessive amounts of dust and lint in the area around the 3100B can cause
malfunctions due to blockage of the cooling fan input at the base of the
instrument. We recommend keeping the instrument environment as clean and
well-ventilated as possible, along with the normal maintenance of the cooling
fan filter as described earlier in this chapter.
Electrostatic Discharge
The 3100B is designed and tested to withstand normal to high amounts and
occurrences of Electrostatic Discharge (ESD). Under certain circumstances,
however, it is still possible for ESD to cause component damage to the 3100B.
ESD takes place when a person has built up enough static electricity on their
body and clothing that a “shock” occurs when they touch something conductive,
like metal or another person. This can damage instrument components if the
charge is of sufficient strength. To avoid this, especially during conditions of
extremely low humidity when the levels of ESD are generally high, touch the
outer metal cabinet of the instrument before touching any other component.
767164
0601G
___________________________________________________________________________________________________________________
Chapter 7 Maintenance and Troubleshooting
83
G.
Troubleshooting
___________________________________________________________________________________________________________________
Electromagnetic
Interference
The 3100B is also designed and tested to withstand normal amounts and
occurrences of Electromagnetic Interference (EMI). Under certain
circumstances, however, it is possible for EMI to effect the components of the
system. EMI consists of electromagnetic waves from one electronic device
interfering with the function of another electronic device. These waves can be
radiated through the air or conducted through electrical wiring. Likely causes of
troublesome EMI in the hospital setting include (but are not limited to) MRI
systems, lasers, diathermy equipment, cauterizers, transmitting computers, and
hand-held radio transmitters.
Operation of radio transmitters (e.g., walkie-talkies, cellular phones, etc.) within
20 feet of the instrument may cause erroneous pressure readings, which can
lead to false alarms and automatic shut-down. These erroneous pressure
readings are not due to fluctuations in the actual pressure but are the effect of
EMI on the components of the measurement circuits. Once the disturbance
stops, the reading returns to normal. If the condition of interference is strong
enough, and lasts long enough, the >60cmH2O or the <5 cmH2O alarms may
be triggered, which will cause the dump valve to open and the oscillator to stop.
Once the EMI disturbance has stopped or has been removed, press the reset
switch to restart the oscillator. The situation can generally be remedied by
locating the offending device and then distancing it at least 20 feet away.
In addition to the radiated EMI described above, conducted EMI can also
cause the same problems by disturbing the AC power line. Typical devices
which can exhibit this phenomenon are personal computers and other devices
that rely on high speed switching electronics. This sort of interference can be
difficult to locate if there are many such devices in the immediate vicinity.
Without expensive electronic detection equipment the only means available to
locate the offending device is to power down the surrounding systems one at a
time until the interference is removed.
It is important to note that radiated interference from hand-held radio
transmitters is the most common, and sources such as these should be isolated
first. The majority of devices used in a hospital environment have been checked
for conducted emissions and only through a malfunction of the device is there
likely to be an interference problem.
767164
0601G
___________________________________________________________________________________________________________________
84
Chapter 7 Maintenance and Troubleshooting
G. Troubleshooting
___________________________________________________________________________________________________________________
Troubleshooting Chart
The following chart should be used as a guide in correcting problems that may
arise in the use of the 3100B. For problems not covered by this list, or for any
questions or concerns, call the SensorMedics Technical Support Department.
Precaution
Troubleshooting with the 3100B should be done “OFF PATIENT” to avoid any
potentially dangerous situations such as abrupt changes in the Pa.
Visual / Audible Alarm Occurring
Condition
Displayed Pa > 60
cmH2O Alarm
Displayed Pa > Set
Max Pa Thumbwheel
Alarm
Possible Causes
Patient at high Pa and spontaneously
breathing.
Possible Remedies
Bias Flow rate possibly insufficient, readjust Pa using higher flow. Also, consider
clinical status of patient.
Obstruction in expiratory limb.
Replace patient circuit.
Obstruction in pressure sense line.
Replace patient circuit.
Interference from a radio transmitter.
Patient spontaneously breathing.
Remove source of interference.
Bias Flow rate possibly insufficient, readjust Pa using higher flow. Also, consider
clinical status of patient.
Improper setting of thumb-wheel switch.
Change setting.
Obstruction in expiratory limb.
Replace the patient circuit.
Obstruction in pressure sense line.
Replace the patient circuit.
Patient circuit temperature rise.
Check and correct circuit temperature.
Interference from a radio transmitter.
Remove the source of interference.
767164
0601G
___________________________________________________________________________________________________________________
Chapter 7 Maintenance and Troubleshooting
85
G.
Troubleshooting
___________________________________________________________________________________________________________________
Visual / Audible Alarm Occurring (cont.)
Condition
Displayed Pa < Set
Min Pa Thumbwheel
Alarm
Displayed Pa < 5
cmH2O Alarm
Possible Causes
Patient spontaneously breathing.
Possible Remedies
Bias Flow rate possibly insufficient, readjust Pa using higher flow. Also, consider
clinical status of patient.
Improper setting of thumb-wheel switch.
Change setting.
Improper setting of Pa adjust or flow
meter.
Change setting.
Patient circuit temperature drop.
Check and correct circuit temperature.
Leak in patient circuit or humidifier.
Eliminate leak or replace circuit.
Cap diaphragm leak.
Replace cap diaphragm.
Interference from a radio transmitter.
Improper setting of Pa adjust or flow
meter.
Remove source of interference.
Change setting.
Leak in humidifier or patient circuit,
including patient disconnect.
Eliminate leak or replace circuit.
Cap diaphragm leak.
Replace cap diaphragm.
Interference from a radio transmitter.
Remove source of interference.
Open Water Trap Stopcock
Oscillator Stopped with Power setting too low and ∆P is less than
no other alarm
or equal to 7 cm H2O.
occurring
Oscillator Failure.
767164
0601G
Close Water Trap Stopcock
Adjust setting for desired ∆P.
Call SensorMedics Service.
___________________________________________________________________________________________________________________
86
Chapter 7 Maintenance and Troubleshooting
G. Troubleshooting
___________________________________________________________________________________________________________________
Visual / Audible Alarm Occurring (cont.)
Condition
Source Gas Low
Alarm
Battery Low Alarm
Oscillator Overheated
Alarm
Possible Causes
Possible Remedies
Input pressure less than 30 psi, either from Check input gas lines.
blender or cooling air.
Input filter needs replacement.
Replace filters.
Flow restriction in gas supply lines.
Replace supply lines.
Internal leak.
Battery voltage less than optimal.
Call SensorMedics Service.
Replace battery.
Battery disconnected.
No cooling gas flow.
Properly reconnect battery.
Assure cooling gas supply hose is
attached.
Oscillator overheated due to poor cooling
gas flow.
Check cooling gas flow for blocked filter
element or restricted supply hose—replace
if necessary.
Oscillator overheated due to mechanical
failure of oscillator subsystem.
Call SensorMedics Service.
Failure During Checkout
Condition
Reset / Power Failure
Possible Causes
AC power removed from system or main
power interruption.
Possible Remedies
Check line cord. If okay, check other
equipment on same outlet. If other
equipment okay, possible internal fault.
Contact SensorMedics Service.
To start oscillator after correcting problem,
apply power to system, press and hold
“RESET” to establish Pa, and then press
Stop/Start switch.
Internal power supply failure.
Call SensorMedics Service.
767164
0601G
___________________________________________________________________________________________________________________
Chapter 7 Maintenance and Troubleshooting
87
G.
Troubleshooting
___________________________________________________________________________________________________________________
Failure During Checkout (cont.)
Condition
Possible Causes
Failure to meet Patient Leak in patient circuit or humidifier
Circuit Calibration
connections.
Improper flow meter setting.
Set flow meter to 20 LPM, sighting on
center of ball.
Open Water Trap Stopcock
Close Water Trap Stopcock
Internal leak or maladjustment.
Failure of Ventilator
Incorrect Patient Circuit Calibration.
Performance Check—
Pa out of range (LOW) Center of flow meter ball not used to make
20 LPM adjustment.
Failure of Ventilator
Performance Check—
Pa out of range
(HIGH)
767164
0601G
Possible Remedies
Eliminate leak or replace patient circuit.
Call SensorMedics Service.
Perform Patient Circuit Calibration.
Adjust flow to center of ball.
Incorrect altitude range being used.
Use appropriate altitude range for your
facility.
Internal Failure.
Incorrect Patient Circuit Calibration.
Call SensorMedics Service.
Perform Patient Circuit Calibration.
Center of flow meter ball not used to make
20 LPM adjustment.
Adjust flow to center of ball.
Incorrect altitude range being used.
Use appropriate altitude range for your
facility.
Internal Failure.
Call SensorMedics Service.
___________________________________________________________________________________________________________________
88
Chapter 7 Maintenance and Troubleshooting
G. Troubleshooting
___________________________________________________________________________________________________________________
Failure During Checkout (cont.)
Condition
Possible Causes
Possible Remedies
Failure of Ventilator
Use Bias Flow tubing supplied with circuit
Bias Flow tubing from humidifier to circuit
Performance Check— has been cut to less than 30", or tubing not and do not shorten.
∆P out of range (LOW) supplied with patient circuit being used.
Failure of Ventilator
Performance Check—
∆P out of range
(HIGH)
Power not set at 6.
Set Power to 6.
Compression characteristics of humidifier
allowing ∆P to drop.
Bypass humidifier for performance check,
then re-attach.
Internal Failure.
Oscillator not warmed up.
Call SensorMedics Service.
Allow Oscillator to warm up for 5 minutes.
Incorrect altitude range being used.
Use appropriate altitude range for your
facility.
Internal Failure.
Call SensorMedics Service.
Possible Causes
Drastic change in Pa due to overaggressive control change using the Pa
Adjust.
Possible Remedies
Re-establish Pa and make any small
adjustments to Pa using Flow-meter
Adjust. Note: see Clinical Guidelines
chapter for minimum flow requirements.
ET Tube has become disconnected.
Reconnect ET Tube.
Unexplained Operation
Condition
Oscillator shuts down
and Dump Valve
opens during
operation
Radio Frequency Interference.
Oscillator will not
To restart oscillator, Pa must first be >5
restart after temporary cmH2O, but in order to achieve Pa >5
disconnection (such as cmH2O, oscillator must be on.
for routine suctioning).
Locate and distance offending device.
Reduce power and increase Pa to target
level using flow meter and Pa Adjust
Control—then increase power while
keeping Pa on target by adjusting flow
meter or Pa control valve down.
767164
0601G
___________________________________________________________________________________________________________________
Chapter 7 Maintenance and Troubleshooting
89
H.
Supplies and Replacement Parts
___________________________________________________________________________________________________________________
Unexplained Operation (cont.)
Condition
Pa unstable—jumps
by 2–3 cmH2O
Humidifier not
operating properly
Pa jumping by > 5
cmH2O when trying to
adjust with Pa Adjust
Valve.
Oscillator making a
squeaking sound
Possible Causes
Water collecting at Pa Control Valve.
Possible Remedies
Adjust circuit height for better draining.
Patient spontaneously breathing.
Bias Flow rate possibly insufficient; readjust Pa using higher flow. Also, consider
clinical status of patient.
Worn or defective cap diaphragm.
Replace cap diaphragms.
Internal Failure.
Excessive heat from driver
Call SensorMedics Service.
Ensure cooling gas is connected. Try
different source connection for cooling gas.
Room temperature > 84°F
Worn or improperly seated cap diaphragm.
Decrease room temperature.
Replace cap diaphragms.
Internal Failure.
Call SensorMedics Service.
Cap diaphragm defective.
Replace cap diaphragm.
H. Supplies and
Replacement Parts
Parts and Supplies can be ordered by calling the SensorMedics Customer
Service Department. The Customer Service Representative can answer
questions concerning correct parts configurations and prices.
Part Number
Description
771384-102
3100B Patient Circuit Body (Flex Circuit with Heated Wire–Box of 4)
766895
3100A Patient Circuit Body (Box of 4)
766896
Cap/Diaphragm Set (Box of 4)
766897
Bellows/Watertrap (Box of 4)
767164
0601G
___________________________________________________________________________________________________________________
90
Chapter 7 Maintenance and Troubleshooting
H. Supplies and Replacement Parts
___________________________________________________________________________________________________________________
767163
Gas Filter Cartridge Element (Package of 10)
765734-104
Connecting Tube Assembly (8" length, blue)
765734-105
Connecting Tube Assembly (8" length, green)
765734-106
Connecting Tube Assembly (26" length, red)
765734-107
Connecting Tube Assembly (36" length, red, for use with 771384-102 patient
circuit)
766595
Humidifier Tubing
766798
Column Lint Filter Element
765742
Hold Down Strap, Patient Circuit
770566
Adjustable Cradle with Collar, Patient Circuit
768965
Mounting Bracket, Humidifier, 77mm (RCI ConchaTherm)
768968
Mounting Bracket, Humidifier, 30mm (Fisher and Paykel)
765298
Lubricant
Figure 7.3. Patient Circuit Parts.
767164
0601G
___________________________________________________________________________________________________________________
Chapter 8 Clinical Guidelines
91
A.
Treatment Strategies
___________________________________________________________________________________________________________________
A. Treatment Strategies
The clinical guidelines described below reflect the strategies and applications
developed during the course of the Multicenter Oscillatory ARDS Trial (MOAT II)
Prospective Randomized Control Trial.
A recently published trial by the National Institutes of Health ARDS network,
comparing a “lung protective” strategy of lower tidal volumes (< 6 ml/kg) and
plateau pressures (< 30 cm H2O) with a higher tidal volume strategy, reported
an absolute mortality reduction of 9%. High frequency oscillatory ventilation
(HFOV) is an alternative method of ventilation, which theoretically achieves the
goals of lung protective ventilation. HFOV achieves gas exchange by applying a
constant mean airway pressure, higher than that usually applied during
conventional ventilation. Thus, HFOV allows maintenance of alveolar
recruitment while potentially avoiding both the cyclic closing and opening of
alveolar units as well as the high peak airway pressures that occur with
conventional ventilation techniques.
Adjusting the 3100B's
Controls to Execute the
Treatment Strategies
The strategies are easy to implement because, for most clinical situations, only
two of the 3100B's five controls are employed: mean airway pressure and
oscillatory pressure amplitude (∆P). The other three, Bias Flow, Frequency and
% Inspiratory Time, are rarely changed during the course of treatment, as
explained below.
Bias Flow
A continuous flow of fresh, humidified gas from a standard humidifier and
Air/Oxygen blender is a fundamental requirement for replenishing oxygen and
removing carbon dioxide from the patient circuit. In most applications the flow
rate should be set at not less than 20 l/min. However, the effect of increasing
this control is relatively benign unless exceptionally high oscillatory amplitudes
are required. In these cases, bias flow should be higher to insure that the
patient circuit clearance flow is greater than the patient’s oscillatory flow. If the
bias flow is inadequate, the patient circuit's effective dead space will increase
and diminish the ventilation affect being sought by increasing the oscillatory
amplitude (∆P). Additionally, when operating the ventilator at high oscillatory
amplitudes it may be necessary to increase the flow to maintain mean airway
pressure. Although changes in Bias Flow will cause changes in Pa, in practice a
flow rate of 20–40 l/min is typical.
767164
0601G
___________________________________________________________________________________________________________________
92
Chapter 8 Clinical Guidelines
A. Treatment Strategies
___________________________________________________________________________________________________________________
If signs of carbon dioxide retention persist, increase the bias flow in increments
of 5 l/min as frequently as every 15 minutes. Remember that the Pa Adjust
control will have to be turned counterclockwise to compensate for the increased
flow, and maintain the desired Pa.
Frequency
For adult applications the typical starting frequency is 5Hz. In patients who
present with refractory hypercapnia with maximal oscillatory amplitude, the
frequency is then decreased incrementally to improve ventilation.
% Inspiratory Time
For most therapeutic situations, 33% has been found to be effective for most
patients. This control typically does not change during the course of treatment.
FIO 2
As for the adjustment of inspired oxygen concentration (FIO2), the basic
strategy employed with the 3100B is the same as in conventional ventilator
strategy—wean the concentration lower, as tolerated.
Mean Airway Pressure and
Oscillatory Pressure Amplitude
Having addressed these seldom-changed controls and the approach to FIO2
management, it is time to turn attention to the two controls at the heart of the
strategy for patient management with the 3100B: mean airway pressure and
oscillatory pressure amplitude (∆P).
Mean and Range of 3100B
Settings
The table below summarizes the ranges of control settings employed during the
MOAT II Clinical Trial.
Mean and Standard Deviation of 3100B Settings from MOAT II Clinical Trial
Mean (Standard Deviation)
Patient Weight (kg)
FiO 2
Mean Pa (cm H2O)
Frequency (Hz)
Amplitude (cm H2O)
78 (25)
24 hours
0.51 (0.15)
29 (6)
4.7 (0.7)
66 (14)
48 hours
0.52 (0.17)
28 (6)
4.7 (0.7)
65 (13)
72 hours
0.51 (0.15)
28 (6)
4.5 (0.9)
66 (17)
767164
0601G
___________________________________________________________________________________________________________________
Chapter 8 Clinical Guidelines
93
A.
Treatment Strategies
___________________________________________________________________________________________________________________
Mean Airway Pressure
Mean airway pressure changes are accomplished by a single-turn control that
varies the inflation of a mushroom valve which, in turn, increases the resistance
to the exit of the bias flow from the expiratory limb of the patient circuit. The
management of mean airway pressure is fundamental to controlling
oxygenation. Increases in mean airway pressure increase lung volume and
therefore alveolar surface area. At any given level of oscillatory pressure
amplitude (∆P), oxygenation is usually improved by increasing the mean airway
pressure, and vice versa. Disease-specific strategies for the manipulation of
mean airway pressure will be described below.
Pa will show small fluctuations with temperature and humidity changes. The
operator should be ready to make minor adjustments to Pa as the circuit
temperature rises and falls as it may, for instance, when a humidifier canister is
filled with fresh water.
Oscillatory Pressure Amplitude
Changes in the oscillatory pressure amplitude (∆P) are accomplished with the
ten-turn “Power” control, which adjusts the electrical current level applied to the
driving coil of the linear motor that displaces the diaphragm-sealed piston. As
the piston is displaced rapidly forward and backward in a nearly square-wave
pattern by the square-wave current in the driving coil, high-amplitude pressures
fluctuations are symmetrically superimposed on the level of mean airway
pressure previously established in the patient circuit as described above (at a
%Insp Time of 50%).
Although the 3100B is capable of generating oscillatory pressure higher than 90
cmH20 peak-to-peak at the proximal endotracheal tube attachment point of the
patient-circuit wye, no such pressures are developed in the trachea. This is
because the respiratory system impedance (of which the endotracheal tube is
the dominant element) greatly attenuates these high frequency pressure waves
and at the same time distorts their wave shape into a nearly triangular pattern.
For instance, at 3 Hz and a compliance of 19 ml/cmH2O, the losses are:
95%
91%
84%
767164
0601G
5.0 mm ET tube
7.0 mm ET tube
9.0 mm ET tube
___________________________________________________________________________________________________________________
94
Chapter 8 Clinical Guidelines
A. Treatment Strategies
___________________________________________________________________________________________________________________
Hence, in the clinical setting a larger ET tube will result in greater distal
pressure waveforms and a greater reduction in arterial PCO2.
To further clarify this oscillatory pressure amplitude phenomenon, consider the
following example. A patient with a compliance of 19 ml/cmH2O is attached to
the 3100B's patient circuit with a 5.0 mm ET tube. The 3100B is operating at 3
Hz, 33% Inspiratory Time, a mean airway pressure of 25 cmH2O and a ∆P of 90
cmH2O. Hence, the peak proximal airway pressure has a peak of 70 cmH2O
and a low of minus 20 cmH2O, while the tracheal airway pressure has a peak of
approximately 28 cmH2O and a low of 22 cmH2O because of the 95%
attenuation caused by this size ET tube at 3 Hz. With the 19 ml/cmH2O
compliance, this distal ∆P of 6 cmH2O creates a high-frequency tidal volume of
114 ml in a lung held at a nearly-constant, well-inflated level by the 25 cmH2O
mean airway pressure.
At a given mean airway pressure and frequency, the sole mechanism by which
ventilation (carbon dioxide removal) is achieved is the high-frequency tidal
volume created by the oscillatory pressure swings (∆P). Hence, as the “Power”
control is increased, the piston displacement increases, the ∆P increases, the
tidal volume increases, and ventilation increases.
Although the great majority of patients can be ventilated with this
straightforward method of adjusting ∆P upwards to counter a high PaCO 2 level,
there are some patients who require an even larger ∆P. When this is the case,
the strategy is to take advantage of the frequency-dependent nature of the
attenuation caused by the ET tube. As the frequency is reduced, the attenuation
diminishes and a larger distal ∆P occurs, resulting in an increase in delivered
tidal volume. Reducing the frequency in 1 Hz increments—is generally sufficient
to control persistently high PaCO2 levels. In some patients, the frequency may
have to be reduced to 3Hz.
767164
0601G
___________________________________________________________________________________________________________________
Chapter 8 Clinical Guidelines
95
A.
Treatment Strategies
___________________________________________________________________________________________________________________
Therapeutic Objectives
Assuming that peak alveolar pressure is the causative factor in airway rupture,
the principle advantage of HFOV over conventional ventilation is its ability to
maintain adequate ventilation and oxygenation at lower peak alveolar
pressures. Because ventilation is so readily achieved with relatively low
oscillatory pressure amplitudes, patients can be managed at higher mean
airway pressures while simultaneously operating at lower peak alveolar
pressures than conventional ventilators. This capability serves to improve
oxygenation by increasing alveolar recruitment and reinflation of atelectatic lung
spaces, and thereby improving ventilation/perfusion matching. Hence, the
therapeutic objectives in using the 3100B are to take maximum advantage of
these unique characteristics.
General Aspects of
Clinical Strategy
The strategy for the MOAT II clinical trial identified an oxygenation goal of a
SpO2 ≥ 88%, with maintenance of mean airway pressure until FiO2 could be
reduced to ≤ 0.60. The target PaCO2 expected was between 40-70 mm Hg,
although a higher PaCO 2 was tolerated providing the pH was > 7.15.
Special Considerations
Precaution
Patient size is an important guideline as to lung volume and anatomical dead
space, as well as the metabolic demand placed on ventilation. While the
maximum displacement of the 3100B is approximately 365 ml, the actual
volume delivered to the patient is dependent on power setting, frequency,
endotracheal tube size, and patient respiratory system compliance.
The performance charts in Section 2 of this manual can be used as a guide to
these relationships, but they may vary somewhat with individual patients and
instruments.
Oxygenation
767164
0601G
Mean airway pressure (Pa) was set 5 cm H2O greater than the Pa during
conventional ventilation (CMV) immediately prior to transition to HFOV. Target
oxygenation parameters were; pulse oximetry (SpO2) ≥ 88%, with fraction of
inspired oxygen (FiO2) ≤ 0.60. Once the patient was stabilized on HFOV, the
FiO 2 was reduced to ≤ 0.60 as long as SpO 2 was ≥ 88%.
___________________________________________________________________________________________________________________
96
Chapter 8 Clinical Guidelines
A. Treatment Strategies
___________________________________________________________________________________________________________________
An open lung strategy was used to optimize oxygenation on HFOV by
increasing mean airway pressure. If an FiO2 > 0.60 was required to maintain
SpO2 ≥ 88%, the Pa was increased in increments of 2 to 3 cm H2O every 20 to
30 minutes to a maximum of 45 cm H2O. As oxygenation improved, the FiO2
was reduced to maintain SpO2 ≥ 88%. Once FiO2 ≤ 0.50, Pa was decreased in
1 to 2 cm H2O decrements at 4 to 6 hour intervals, as long as SpO 2 remained
within the target range.
Ventilation
Initial oscillatory amplitude (∆P) was titrated to chest wall vibration. ∆P was
subsequently titrated to achieve a PaCO2 within the target range of 40 to 70 mm
Hg and maintain pH > 7.15. If the pH was < 7.15, the power setting was
increased up to a maximum of “10” in order to increase ∆P in increments of 10
cm H2O. If adequate ventilation could not be achieved at maximum pressure
amplitude, the following interventions were used in sequence:
1. Reduce respiratory frequency in 1 Hz steps to a minimum of 3 Hz.
2. Deflate the endotracheal tube cuff followed by restoration of the Pa by
adjusting the Pa controls or bias flow (if Pa was already at maximum
setting).
Weaning
Patients were weaned from HFOV back to CMV when FiO 2 ≤ 0.50 and Pa was
≤ 24 cm H2O with SpO2 ≥ 88%. For transition back to CMV, the conventional
ventilator was set in the pressure control mode with peak inspiratory pressure
adjusted to achieve a delivered tidal volume of 6 – 10 ml/kg of actual body
weight, PEEP 10 cm H2O, and 1:1 I:E ratio. These settings were designed to
achieve a Pa of close to 20 cmH2O (approximating the Pa on HFOV just prior
to changing to CMV).
767164
0601G
___________________________________________________________________________________________________________________
Chapter 8 Clinical Guidelines
97
A.
Treatment Strategies
___________________________________________________________________________________________________________________
Summary of MOAT II Clinical Management Strategies
Management Strategy
Target SpO2 ≥88
Target PaCO2 40-70 mm Hg
Initial Setting
Continued Management
Increase Pa to achieve the oxygenation goal (45 cm H2O maximum)
CMV Pa +5 cm H2O
Pa
Adjust
the amplitude to achieve the PCO2 goal.
Visible
chest
movement
Amplitude
Frequency
FiO2
Insp. Time %
If the amplitude is maximized, decrease the frequency by 1Hz
increments until the ventilation goal is reached.
If Frequency = 3 Hz, deflate ETT cuff
Maintain Pa until FiO 2 < 0.60 (SpO2>88%)
5 Hz
As Needed
33%
Summary of Weaning Strategy from MOAT II Clinical Trial
Weaning from HFOV
Transition to CMV when: FiO2< .50 and Pa < 24 cmH2O
Initial CMV Settings
767164
0601G
Tidal Volume
6-10 cc/Kg
I:E Ratio
1:1
PEEP
10 cmH2O
Mode
Pressure Control
___________________________________________________________________________________________________________________
98
Chapter 8 Clinical Guidelines
B. Disease-Specific Variations to General Clinical Strategies
___________________________________________________________________________________________________________________
B. Disease-Specific Variations to General Clinical Strategies
Homogeneous Lung Disease
Without Significant Air Leak
The primary pulmonary diagnoses which are associated with this pattern of lung
disease are: pneumonia and acute respiratory distress syndrome.
For these diagnoses, follow the general strategies outlined previously in this
chapter.
Non-Homogeneous Lung
Disease, Air Leak Syndromes,
and Airway Disease
The primary diagnoses in this group of illnesses are: pulmonary interstitial
emphysema (PIE), and severe recurrent pneumothoraces. The major
pathophysiologic processes are: persistent leak of gas from the airways and
alveoli into the interstitium of the lung or into the pleural space, and trapping of
gas within the lung.
For these diagnoses, also follow the general strategies outlined above, but with
the following important changes in emphasis and pressure levels:
1. When FIO 2 is above 0.6, place equal emphasis on weaning mean airway
pressure lower, even if it means accepting higher PaCO2 levels and lower
PaO2 levels, in order to further reduce the peak inflation pressure and, thus,
the risk of gas trapping and recurrent air leak.
2. Initiate therapy at a lower frequency to provide a longer expiratory time and,
thus, further reduce the risk of gas trapping.
3. Following resolution of air leak, revert to general strategies.
767164
0601G
___________________________________________________________________________________________________________________
Chapter 8 Clinical Guidelines
99
C.
Adverse Effects
___________________________________________________________________________________________________________________
C. Adverse Effects
High frequency ventilation, as with conventional positive pressure ventilation,
has inherent risks. These possible adverse effects include: under/over
ventilation, under/over humidification, chronic obstructive lung disease,
necrotizing tracheal bronchitis (NTB), atelectasis, hypotension, pneumothorax,
pneumopericardium, pneumomediastinum, pneumoperitoneum, and pulmonary
interstitial emphysema (PIE).
The table below summarizes the adverse events reported during the MOAT II
Clinical Trial and demonstrates that within this study there was no increase in
the occurrence of the listed adverse effects with HFOV when compared to
conventional mechanical ventilation.
Summary of reported adverse events during MOAT II Clinical Trial
HFOV
CMV
Number of patients
75
73
Intractable hypotension failure
0%
3%
Oxygenation failure
5%
8%
Respiratory acidosis failure
5%
8%
Air leak developed or worsened
9%
12%
Mucous plugged ET Tube
5%
4%
Precaution
Follow closely the recommendations contained in this Chapter regarding the
use of chest radiographs to monitor patient condition. During HFOV, as with all
ventilators, the relationship between improvement in lung compliance,
inadvertent increases in lung volume, increased pleural pressure, and
decreased venous return is a matter of concern, since it may result in
decreased cardiac output.
767164
0601G
___________________________________________________________________________________________________________________
100
Chapter 8 Clinical Guidelines
D. Recommended Monitoring Frequency
___________________________________________________________________________________________________________________
Precaution
The patient's tcPCO 2 and tcPO2 or SpO 2 should be monitored continuously to
insure that blood gases are at the proper level. It is important that an
unrestricted and unobstructed patient airway be maintained during HFOV. To
insure a patent airway, always maintain proper suctioning procedures as
described in the Suctioning Guidelines Section of Chapter 8, Clinical Guidelines.
Since only proximal airway pressure is monitored, no alarm will occur in the
event of an obstruction or restriction.
D. Recommended
Monitoring
Frequency
The recommended minimum frequency for monitoring the key pulmonary status
parameters is the following:
Arterial Blood Gases
1. 45–60 minutes after initiation of HFOV therapy to correlate to transcutaneous
values
2. Every 2 hours for 8 hours
3. Every 4 hours for 16 hours
4. Every 8–12 hours depending on institution policy during treatment
5. Within 1 hour after major setting change, or as clinically indicated
Non Invasive Gas Monitoring
(tcO2, tcCO 2, and SpO 2)
1. Continuously. This may alert the clinician to subtle changes in the patients
ventilatory status that may not be detectable by auscultation or physical
exam.
Chest X-Ray
1. Within 4 hours of start of use
2. Every 12 hours next 24 hours
3. Every 24 hours next 5 days
4. Every 48 hours next 8 days
5. Every week thereafter
6. Whenever lung over inflation is suspected
767164
0601G
___________________________________________________________________________________________________________________
Chapter 8 Clinical Guidelines
101
E.
Suctioning Guidelines
___________________________________________________________________________________________________________________
E. Suctioning
Guidelines
The need to suction during HFOV use should be determined based on
institution policy and clinical signs, just as with CV. The Multi-Center Studies
found no difference in the frequency of suctioning between the HFOV and CV
patients. However, some have observed that more frequent suctioning becomes
indicated during the treatment of the sickest patients, especially after they have
stabilized.
Precaution
Do not use extraneous ventilator circuit attachments (such as a suction port)
without a secondary external alarm capable of detecting ventilator
disconnection. Due to their inline pressure characteristics such attachments
could possibly keep the Pa alarm from detecting an accidental ventilator circuit
disconnection.
Disconnection and
Reconnection
The correct steps for disconnection and reconnection of the patient are as
follows:
1. Press the Alarm Silence. All the audio alarms will be inactive for 45 seconds.
Note the settings for Pa and Power setting.
2. Disconnect patient. This should allow the <5 cmH2O Pa alarm to open the
dump valve and stop the oscillator.
3. Perform suctioning using your institution’s standard technique.
4. Reconnect patient.
5. Press and hold RESET. Once the Pa rises above 5 cmH2O, the oscillator will
restart. Readjust Power and Mean Pressure until Pa and ∆P are at the levels
noted in step 1.
If the oscillator does not restart (or starts and then stops), first turn the power
down to a setting between 2 and 3; then, while holding the reset switch, adjust
the Pa to the desired level using the flow meter. Next, while monitoring the Pa,
turn the power up to achieve the desired amplitude and adjust the flow meter as
necessary to maintain the desired Pa.
767164
0601G
___________________________________________________________________________________________________________________
Index
103
Chyba! Pomocí karty Domů použijte u textu, který se má zde zobrazit, styl Index Heading.
— Chyba! Pomocí karty Domů použijte u textu, který se má zde zobrazit, styl Index
Heading.
___________________________________________________________________________________________________________________
Bulkhead Luer Fittings, 55
A
Adverse Effects, 1
Adverse Effects, Potential, 98
Air Cooling Inlet Fitting, 51
Air Leak Syndromes, 98
Airway Disease, 98
Airway Pressure Monitor, 34
Airway Pressure Monitor Transducer
Calibration, 80
Alarm, 15
Alarm Battery, Power Failure, 50
Alarm Subsystem, 35
Alarm, Battery Low, 85
Alarm, Oscillator Overheated, 85
Alarm, Pa < 5 cmH2O, 84
Alarm, Pa < Set Min Pa Thumbwheel, 84
Alarm, Pa > 60 cmH2O, 83
Alarm, Pa > Set Max Pa Thumbwheel, 83
Alarm, Source Gas Low, 85
Alarms, 16
Arterial blood gases, 95
Arterial Blood Gases, 99
Assembly, 56
atelectasis, 98
B
Battery Attachment Label, 12
Battery Compartment, 50
Battery Low Alarm, 85
Battery Low Indicator, 14, 47
Battery Specification Label, 12
Battery, Power Failure Alarm, Changing,
74
Bellows Fasteners, 54
Bias Flow, 90
Bias Flow Control, 13, 27
Blender, 61
Blender, External Air/O2, 25
Blender/Cooling Gas Filter Replacement
Record, 51
Blender/Cooling Gas Filter Replacement
Record Label, 9
blood gases, Arterial, 95
Blood Gases, Arterial, 99
767164
0601G
C
Calibration, Airway Pressure Monitor
Transducer, 80
calibration, patient circuit, 66
Calibration, Patient Circuit, 77
Calibration, Periodic, Scheduled, 77
Calibration, Power Supply, 78
Caution Alarms, 16, 38
Changing the Compressed-gas Inlet Filter
Cartridge Elements, 73
Changing the Patient Circuit, 75
Changing the Power Failure Alarm
Battery, 74
Chest X-Ray, 100
Children, Large, Adults Special
Considerations, 94
circuit breaker, 53
Circuit, Patient, 28
Cleaning and Disinfection, Pre-use, 63
Cleaning the Column Lint Filter, 75
Cleaning, Exterior, 72
Clinical Guidelines, 90
Clinical Strategy, General Aspects, 94
color-coded tubes, 59
Column Lint Filter, Cleaning, 75
Compartment, Battery, 50
Compressed-gas Inlet Filter Cartridge
Elements, Changing, 73
Connections, Gas, 18
Connections, Location and Function, 40
Connections, Rear Panel, 61
connections, tubing, 61
Contraindications, 1
Controls, 13
Controls, Location and Function, 40
Cradle, Patient Circuit, 54
D
Delta P, 35
Delta P Control, 43
Delta P Indicator, 15
Dimensions, 19
Disconnection and Reconnection during
Suctioning, 100
Disease-Specific Variations to General
Clinical Strategies, 98
Drain Valve, Water Trap, 54
Driver Diaphragm, Lubrication, 75
Driver Lubrication Record Label, 9
Driver Replacement Record, 51
Driver Replacement Record Label, 10
Dump Valve, 30
Dump Valve Control, 53
E
Effects, Adverse, 1
Elapsed Time Indicator, 15
Elapsed Time Meter, 50
Electrical Power Supply, 36
Electrical Specifications, 17
Electromagnetic Interference (EMI), 82
Electronic Control and Alarm Subsystem,
35
Electrostatic Discharge (ESD), 81
EMI (Electromagnetic Interference), 82
Emptying the Water Trap, 73
Environmental and Operational
Conditions, 19
Environmental Considerations, 81
Explanation of Symbols, 6
Exterior Cleaning, 72
F
Filter Cartridge Elements, Compressedgas Inlet, Changing, 73
FIO2, 91
Flow, Bias, 90
Forty-five Sec Silence Pushbutton, 48
Frequency, 91
Frequency Control, 13, 44
Frequency Indicator, 15
G
Gas Connections, 18
___________________________________________________________________________________________________________________
104
Index
Chyba! Pomocí karty Domů použijte u textu, který se má zde zobrazit, styl Index Heading.
— Chyba! Pomocí karty Domů použijte u textu, který se má zde zobrazit, styl Index
Heading.
___________________________________________________________________________________________________________________
General Clinical Strategies, DiseaseSpecific Variations, 98
Graphs, Performance, 20
H
Hold Down Strap, 55
Homogeneous Lung Disease, 98
Humidifier, 61
Humidifier Tubing, 54
Humidifier, External, 25
Humidity, 19
hypotension, 98
I
Indications for Use, 1
Indicators, 14
Indicators, Location and Function, 40
Inlet Fitting from Blender, 50
Inspiratory Time Control, 13
Inspiratory Time, Percent, 91
Installation, 56
Interference, Electromagnetic, 82
Introduction, 1
L
Labels, Exterior, 7
Leakage Current, 17
Lint Filter, Column, Cleaning, 75
Lubrication, Driver Diaphragm, 75
M
Maintenance, 72
Maintenance Procedures, Operator, 72
Maintenance, Periodic, Scheduled, 81
Mean Airway Pressure, 35, 92
Mean Airway Pressure Indicator, 44
Mean and Range of 3100A Settings, 96
Mean Pressure Adjust, 13, 27, 42
Mean Pressure Limit, 13
Mean Pressure Monitor, 15
mechanical relief valves, 39
Monitoring Frequency, Recommended,
99
Multi-Center Controlled Trials, 90
Multi-Center Studies, 100
N
Name Rating Label, 11
necrotizing tracheal bronchitis (NTB), 98
Non-Homogeneous Lung Disease, 98
O
Operational and Environmental
Conditions, 19
Operational Verification, 64
Operator Maintenance Procedures, 72
Oscillator Compartment (Bellows), 53
Oscillator Enabled Indicator, 14
Oscillator Overheated Alarm, 85
Oscillator Overheated Indicator, 14, 48
Oscillator Stopped Alarm, 38
Oscillator Stopped Indicator, 14, 48
Oscillator Subassembly Replacement, 81
Oscillator Subsystem, 32
Oscillatory Pressure Amplitude, 92
Outlet Fitting to Humidifier, 50
overhaul, complete, scheduled, 81
Overload Protection, 17
Oxygenation, Management, 95
P
Pa < 5 cmH2O Alarm, 84
Pa < 5 cmH2O Indicator, 46
Pa < Set Min Pa Thumbwheel Alarm, 84
Pa <20% of, 14
Pa > 60 cmH2O Alarm, 83
Pa > 60 cmH2O Indicator, 45
Pa > Set Max Pa Thumbwheel Alarm, 83
Pa >50 cmH2O Indicator, 14
Pa Control Valve, 29
Pa Control Valve Control, 53
Pa Limit Valve Control, 53
Pa Sense Fitting, 53
Parts, 88
Patient Circuit, 28, 52
patient circuit calibration, 66
Patient Circuit Calibration, 77
Patient Circuit Calibration Control, 14,
27, 48
Patient Circuit Calibration Failure, 86
Patient Circuit Calibration Procedure
Label, 7
Patient Circuit Cradle, 54
Patient Circuit, Changing, 75
Percent Inspiratory Time, 91
Percent Inspiratory Time Control, 43
Percent Inspiratory Time Indicator, 15
Performance Check, Ventilator, 67
Performance Graphs, 20
Performance Verification, 70
Periodic Calibration, Scheduled, 77
Periodic Maintenance, Scheduled, 81
Pneumatic Connections, 18
Pneumatic Logic and Control, 27
pneumomediastinum, 98
pneumonia, 98
pneumopericardium, 98
pneumoperitoneum, 98
pneumothoraces, severe recurrent, 98
pneumothorax, 98
Position Lock Control, 50
Potentiometers, Power Supply, 79
Power Control, 13, 43
Power Failure Alarm, 38
Power Failure Alarm Battery, 50
Power Failure Alarm Battery, Changing,
74
Power Failure Indicator, 14, 46
Power Indicator, 15
Power Requirements, 17
Power Supply, 36
Power Supply Calibration, 78
Power Switch, 53
Precautions, 3
Pressure Limit Valve, 29
Pressure Specifications, 15
Pressure Transducer Span Adjustment, 50
Pressure Transducer Zero Adjustment, 50
Pre-use Cleaning and Disinfection, 63
proximal airway pressure sensing line, 29
pulmonary interstitial emphysema (PIE),
98
R
Radio Frequency Interference (RFI)
Warning Label, 11
radio transmitters, 82
Rear Panel Connections, 61
Rear Panel, Control Package, 49
Reset / Power Failure, 85
Reset Button, 14
Reset Pushbutton, 47
respiratory distress syndrome, 98
767164
0601G
___________________________________________________________________________________________________________________
Index
105
Chyba! Pomocí karty Domů použijte u textu, který se má zde zobrazit, styl Index Heading.
— Chyba! Pomocí karty Domů použijte u textu, který se má zde zobrazit, styl Index
Heading.
___________________________________________________________________________________________________________________
S
safety alarms, 30
Safety Alarms, 16, 37
Safety and System Features, Description,
25
Safety Features, 37
Safety Standards, 17
Scheduled Periodic Calibration, 77
Scheduled Periodic Maintenance, 81
Set Max Pa Alarm Thumbwheel, 13
Set Max Pa Control, 44
Set Max Pa Exceeded Indicator, 14
Set Max Pa Thumbwheel, 15
Set Min Pa, 45
Set Min Pa Alarm Thumbwheel, 14
Set Min Pa Exceeded Indicator, 14
Set Min Pa Thumbwheel, 15
Silence Control, 45-Sec, 14
Silence Indicator, 45-SEC, 14
Source Gas Low Alarm, 85
Source Gas Low Indicator, 14, 47
Span Adjustment, Pressure Transducer,
80
Specifications, 13
square-wave driver, 32
Standards, Safety, 17
Start/Stop Control, 13, 44
Start-up Procedures, 64, 65
767164
0601G
Strap, Hold Down, 55
Strategies, Treatment, 90
Suctioning Guidelines, 100
Supplies, 88
System and Safety Features, Description,
25
System Column, 52
T
Technical Support Department, 81
Temperature, 19
Therapeutic Intervention and Rationale,
HFOV, Summary, 97
Therapeutic Objectives, 94
thermal cutout circuit, 34
thermal cutout safety system, 39
Treatment Strategies, 90
Troubleshooting, 72, 81
Troubleshooting Chart, 83
tubes, color-coded, 59
tubing connections, 61
Tubing, Humidifier, 54
U
Unpacking the Instrument, 56
V
Ventilation, Management, 94
Ventilator Performance Check, 67
Ventilator Performance Check Failure, 86
Ventilator Performance Checks Label, 8
Verification, Operational, 64
W
Warning Alarms, 16
Warnings, 1
Water Trap, 31, 39, 54
Water Trap Drain Valve, 54
Water Trap, Emptying, 73
Weaning, 95
Wilford Hall Medical Center, 90
X
X-Ray, Chest, 100
Z
Zero Adjustment, Pressure Transducer, 80


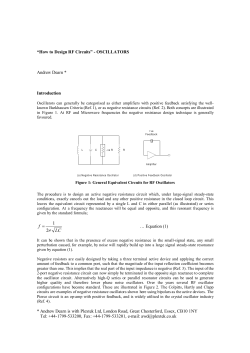


© Copyright 2026