
EcoDHOME WMTE-701 User Manual
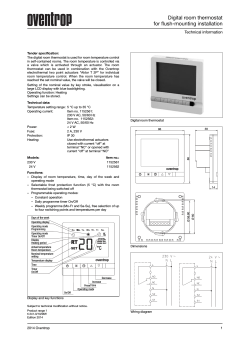
EcoDHOME
WMTE-701 User Manual
WH701/WH711 WW/RF Thermostat
This product has the following features:
1) Heating control
2) Programmable function for 24-hours per day and 7-day per week
3) 2 sets of permanent programs (factory setting program and self-setting program)
4) Large LCD display
5) Adjustable range around set temperature;
6) Allowable to calibrate the temperature display;
7) Adjustable selection of comfort temperature, economic temperature, and antifreeze temperature;
8) Suitable for energy saving control of wall mounted boilers, condensation boilers and heating system
valves within single and multi-zone systems;
9) A single receiver is able to control up to 4-off zones;
10) A single thermostat transmitter is able to control up to 7-off receivers;
11) Display adjustable between C and F.
12) 2 size AA 1.5V batteries for the power supply;.
13)Three transmission modes for selection, i.e. wired, wireless or multi-channel transmission.
14)Fast and Simple installation.
Applicable Standards:
EN60730-1 and its revisions
EN60730-2-7
EN60730-2-9
Compliant with the following EU directives:
EU B.T.73/23/EEC Directive
EU E.M.C.89/336/EEC Directive and 93/68/EEC Revision
Display screen symbols:
Fig.1
Present ambient temperature
Comfort temperature
Economic temperature
Antifreeze temperature
Present time
7 days display in a week, and the present day display is in the square frame
Program conditions
Running Symbol for the equipment
COPY
ADJUST
Battery charge
Celsius degree or Fahrenheit degree
+
Automatic operation mode
Customer program mode
Manual operation mode
Antifreeze mode
Program setting mode
Temperature setting mode
Date/Time setting mode
Operation Key:
Menu key/ Power key
Set key
Confirmation key
Increasing key
Decreasing key
Alarm Display:
00.0℃ Flash: Actual room tem perature lower than 0℃
45.0℃ Flash: Actual room tem perature hig her than 45℃
E0.1: Temperature probe(NTC) disconnected
Product Specifications:
Power: two LR6 1.5V alkaline batteries
Range of temperature adjustment: 5÷35℃/39÷95℉
Range of temperature display: 0÷40 0C/32÷104℉
Temperature test frequency: Every minute
Display accuracy: 0.1℃/1℉
Probe sensor: NTC(100K) 1%
Protection level: IP20
Output: Switch relay
Contact capacity: 8A/250V (WW model); 16A/250V (RF model); 5 A/250V(MRF model)
Insulating condition: Normal environment
Working environment temperature: -18÷50℃/0÷122℉
Running program: Set per 1 week as a cycle
Software level: A
Minimum allowable time for increase / decrease in program setting: 1 hour
Frequency: 433 MHz (RF/MRF)
Wireless transmission distance: Indoor 16 / 50 m; outdoor 200m (RF/MRF)
Size(mm): 77H*121W*21D
Installation: Wall mounted or on battery seat
Scope of Control Applications:
1. Control of wall-mounted boiler
2. Control of Thermal Actuator or electromagnetic valve
3. Control of water pump;
4. Ventilation control.
--------------------------------------Run Mode--------------------------------------1. Factory Preset Mode:
In this case, the icon displayed on working state column is
:
Factory preset program:
Monday to Friday:
00 : 00——06 : 00
Economic temperature
06 : 00——08 :00
Comfortable temperature
08 : 00——18 : 00
Antifreeze temperature
18 : 00——22 : 00
Comfortable temperature
22 : 00——24 : 00
Economic temperature
Saturday and Sunday:
00 : 00——06 : 00 Economic temperature
06 : 00——22 : 00 Comfortable temperature
22 : 00——24 : 00 Economic temperature
Display of Energy Consumption
on the lower right represents energy consumption that is controlled by the
The double ring
program in each time section. "Comfortable temperature" , economic temperature
antifreeze temperature are set in the temperature setting .
and the
2. User Defined Mode
In the user defined program, the icons displayed on the screen are
and
.
In the user defined program, the temperature for each time section is set by the user.
3. Manual Mode:
In this mode, the icon displayed on the screen is
.
The thermostat controls the temperature at a constant temperature setting, and the default
temperature is 20℃. The temperature can be adjusted with
key or
key .
4. Antifreeze Mode
In this mode, the icon displayed on the screen is
The thermostat controls the system to prevent the ambient temperature from dropping below the
pre-set antifreeze temperature, in order to keep the equipment and pipes free from freezing. This
temperature is set in the anti-freeze mode, and the default valve is 5℃.
5. Switch between Run Modes
Press the key
to turn on the thermostat.
After turnning on the thermostat, you may press menu key
to switch the run modes between:
factory preset mode, user defined mode, manual mode and antifreeze mode.
----------------------------------------Setting----------------------------------------During setting, the thermostat is temporarily inactive. When finishing the setting, press the
key to
confirm. If there is no operation of any key in 60 seconds, the thermostat will automatically turn into run
mode and then activate the control switch according to the pre-set program.
1.
Temperature Adjustment Setting
A) Press
key. The screen will display
B) Press
or
.
to set the calibration temperature value. The default value is 0 0C, the
adjustment range is -3 0C to +3 0C.
C) End of Temperature Adjustment Setting: Press
key to confirm and exit Temperature
adjustment setting, returning to the run mode.
2.
Date / Time Setting
Set the current date , hour and minute
A) When you finish the Temperature adjustment setting,
the Time setting, The screen will display
press
key again,
.
B) When the frame displaying the present date starts flashing, press
present weekday, and press
key to adjust the
key or
key to adjust the present
key to turn to next setting
D) Then the number representing the minute flashes, press
present minute, and press
D) End of Time Setting: Press
mode.
key or
key to turn to next setting
C) Then the number representing the hour flashes, press
hour, and press
then it will enter into
key or
key to adjust the
key to turn to next setting
key to confirm and exit the time setting, returning
to the run
3.
Temperature Setting
Set the Comfortable temperature, Economic temperature and Antifreeze temperature
The setting range of the comfortable temperature is 5÷35℃, the pre-set value is 20℃
The setting range of the economic temperature is 5÷35℃, the pre-set value is 18℃
The setting range of the antifreeze temperature is 5÷35℃, the pre-set value is 5℃
A) When you finish the Time setting, press
The screen will display
.
B) In this case, the temperature icon
will be displayed on the left side of temperature digit, while the
temperature digit will blink. Press
press
key again, then it will enter into the Temperature setting,
or
to set the value of comfortable temperature,
key to turn to next setting
C) In this case, the economic temperature icon
while the temperature digit will blink. Press
and press
will be displayed on the left side of temperature digit,
or
to set the value of economic temperature.
key to turn to next setting.
will be displayed, while the temperature digit will blink.
D) In this case, the low temperature icon
Press
and
or
to set the value of Antifreeze temperature, and press
key to turn to
Temperature adjustment setting setting.
E) End of Temperature Setting: Press
key to confirm and exit the time setting, returning to the run
mode.
4. User Defined Program Setting
Set the control temperature for 7 days and for each time interval
A) Press
key for 3 seconds, The screen will display
.
B) In this case, the icon and number indicating the weekday will blink. Press
day. Press
or
to adjust the
key to turn to next step, setting the temperature for each hour.
C) Then, the icons from 0:00 to 1:00 and the preset temperature icon (i.e. the icon on the left side of the
temperature digit) will start to blink. Press
or
to select the desired temperature and press
key to turn to next one hour setting.
D) Repeat the above steps until completing the temperature settings for 24 hours. Then, return to date
selection. During program setting, to return to the previous hour setting press and hold the
Or to return to the day selection press and hold the
key.
key. The temperature for any unset hours
remains the default or preset temperature.
E) The day icon will start to blink again, and repeat above process for each day.
key to confirm, exit settings and enter directly into user defined
F) End of Program Setting: press
run mode. In the screen display area, the icons
and
will be displayed.
Copy One-day Program
After entering a day program you can copy this into another day to save time when creating a weekly
program: For example, if you want to copy the program of Monday to Thursday, the methods are as
follows:
A)Select the program for Monday: in the user defined mode
frame for Monday flashes to select Monday and press
B. Copy to selected day: Press
copying and the icon
key or
, press
key, the icon
key or
key The outer
appears on the screen
key to select day, then press
key to finish the
disappears.
C. At this time the selected day cursor flashes, press
key to confirm.
D. Copying for other days, repeat steps A to B.
5.
Switch from Setting to Run Mode:
Under the Temperature Adjustment Setting, Time Setting or Temperature Setting modes, just press
key to enter into the Run Mode. If there is no operation of any key in 60 seconds, the thermostat will turn
into run mode and then activate the control switch according to the temperatures set.
Under the Program Setting, press
6.
key to enter into the User Defined Mode.
Temporary Change of Temperature
Both at
mode and at
and
mode,you can temporarily change the temperature at a
program period.
For example: You have set the program already for a comfort temperature of 20 0C between
8:00~12:00, but you want to lower the temperature to 18 0C at 10:40, then you set the temperature
to 18 0C . This setting will not exist forever, it will remain until 12:00 when the program period is
ended. At the program running mode, set the required temperature directly through
key, the number representing the temperature will flash, press
key or
key to confirm and stop
flashing. Without any adjustment in 5 seconds, the number representing the temperature will stop
flashing and continuously to display the present room temperature. The thermostat will recover to
automatic mode at the following program temperature change.
7.
Code Matching (Only used for RF /MRF model)
RF Model: Press the receiver key, so that the receiver indicator will blink. If the transmitter is
energized, turn off the transmitter LCD and then hold down▲ and ▼ keys simultaneously until the
indicator stops blinking. In this case, the code matching is finished. (Note: If no code matching
signal is received during 1 minute when the indicator keeps blinking, this indicator will turn dark and
the code matching will be stopped. Pressing the key again, the thermostat will again enter into code
matching state).
WH611 MRF Model: Press the receiver key, so that the indicator will blink in “one flash and one
stop”. The thermostat will enter into the 1st channel code matching state. The code matching
operation is same as RF model. After completing the code matching, press the key again to start the
2nd channel code matching, in which case the indicator will blink in “two flashes after one stop”. The
thermostat then enters into code matching state. After completing the code matching, press the key
again to start the 3rd channel code matching, in which case the indicator will blink in “three flashes
after one stop”. The code matching is then started. Likewise, press the key for the fourth time to start
the 4th channel code matching, in which case the indicator will blink in “four flashes and one stop”.
8.
Fault Display:
When the room temperature is lower than 0℃, the LCD will blink in 00.0℃. W hen the room
temperature is higher than 0℃, the LCD will resum e autom atically to norm al display.
When the room temperature is higher than ℃,
45 the LCD will blink in 45.0℃. W hen the room
temperature is lower than 45.0℃, the LCD will resum e autom atically to norm al display.
Upon disconnection of the temperature sensor, the display will blink in E0.1, in which case you shall
check and eliminate the fault.
9.
Engineering Setting
key for 5 seconds in OFF state, the place where the time is displayed will show the
Hold down
setting number, while the place where the temperature is displayed will show the set parameters.
Press
may press
or
to change the parameter setting, and press
key to enter into next setting. You
key to confirm and exit the setting of engineering parameters. If no operation of any
key within 60 seconds, it will save and exit, then return to OFF state.
Setting
Number
Notes on Adjustable Range
Numbering
Three-Digit
where
temperature
is
displayed(The value to be
set will blink )
Temperature
Temperature
00.2
difference
from stop to restart: 0.2 ℃
difference
from stop to
Temperature
restart
or
from stop to restart: 0.5℃
cycles
per
difference
Temperature
difference
00.5
01.0
from stop to restart: 1.0 ℃
hour
Temperature
from
stop
difference
to
01.5
restart:
1.5℃(Default Value)
Temperature
difference
02.0
from stop to restart: 2.0 ℃
Temperature
difference
02.5
from stop to restart: 2.5 ℃
Temperature
difference
03.0
from stop to restart: 3.0 ℃
Temperature
difference
03.5
from stop to restart: 3.5 ℃
Temperature
difference
04.0
from stop to restart: 4.0 ℃
Set the state
1 On/Off per hour
101
2 On/Off per hour
102
3 On/Off per hour
103
4 On/Off per hour
104
5 On/Off per hour
105
6 On/Off per hour
106
7 On/Off per hour
107
8 On/Off per hour
108
9 On/Off per hour
109
10 On/Off per hour
110
11 On/Off per hour
111
12 On/Off per hour
112
Disconnected (Default))
No display for the
first two digits
after turning
off
the
0
Connected
screen
No display for the
1
first two digits
Energy-saving State
No display for the
2
Remarks
first two digits
Switch
Display in ℃ (Default)
No display for the
between ℃
and ℉
0
first two digits
Display in ℉
No display for the
1
first two digits
Keypad
Keypad
not
activated
No display for the
(Default)
first two digits
Lock SET key
No display for the
0
1
first two digits
Lock all keys
No display for the
2
first two digits
Highest
10—35℃ (Adjustable by Display of setting temperature
temperature
0.1℃), Default Value 35℃
of heating
Selection of
Parameters set in factory
0
first two digits
engineering
parameters
No display for the
Parameters
set
customer (Default)
by
No display for the
1
first two digits
Fault Repair
Problem
Possible Cause
How to Repair
The thermostat does not work
1. Not connected to power
supply.
1.Battery seat: Check if the battery
contact is in good condition.
The heating system cannot be
started.
2. If the preset temperature is
higher than the temperature
currently on display.
2. Adjust
higher.
The mode switch doe not work.
3. Check if the keypad is
locked.
4. Check if the unit is stopped.
3.Enter engineering setting and
change the keypad lock mode of
number 4.
4.Start the unit.
The Up, Down or OK key does
not work.
5. Check if the keypad is
locked.
6. Check if the unit is stopped.
5.Enter engineering setting and
change the keypad lock mode of
number 4.
6.Start the unit.
The
room
temperature
displayed on the screen is not
compliant with the actual
temperature.
7. If the equipment is under
run state.
8. If set to temperature
calibration.
7. If the equipment is running,
indicating that the temperature is in the
process of heating / cooling. The two
temperatures will be equal when the
equipment finishs operation.
8.
Change
the
Adjustment
Temperature Setting
the
preset
temperature
Cautions on Installation and Use:
1. To prevent the thermostat display from a high fluctuation, special treatment has been made to the
program. Therefore, it is normal that the thermostat cannot immediately display the sudden change
of temperature.
2. The thermostat installed in standard 86 box shall be placed 1.5m above the ground.
3. For the thermostat installed in standard 86 box or wireless thermostat with battery seat, take care not
to install it to the wall corner, door / window side or behind the door or in such unheated area as
exterior wall. Avoid hot / cold air duct, radiator, flue or thermal pipe. Do not place in direct sunlight.
4. If the wireless thermostat with battery seat is placed at a position where the air ventilation is poor, the
temperature displayed on the thermostat might be inconsistent to the indoor average temperature.
5. Only the professional technicians are permitted to open the transmitting and receiving box of the
thermostat for installation. When installing the power supply, make sure that the power cable is well
insulated.
6. To install the receiving box, please install the base plate firstly and then connect the power and
signal wire correctly before installing the upper cover and fix it. The thermostat is unrepairable
product. The user shall not open the internal circuit board.
7. Before installing the thermostat, make sure that the system is disconnected. The maximum voltage
of the system shall meet the requirements specified in the Instruction Manual (Max. AC Voltage:
250V).
Dimensions WMTE-701 Thermostat
1、Wiring Terminals
Wiring Terminal
Remarks
N
AC Neutral
L
AC Live
1
NO (Normally-Open point)
2
COM (Public terminal of relay)
3
NC (Normally-Closed point)
2、Description of Terminals WMTE-701R4
Terminal
Description
N
Neutral
L
Live
1
Terminal 1 activated by thermostat connected to channel 1
2
Terminal 2 activated by thermostat connected to channel 2
3
Terminal 3 activated by thermostat connected to channel 3
4
Terminal 4 activated by thermostat connected to channel 4
5
Terminal Normally Open Contact (relay) activated from any channel
6
Terminal Normally Open Contact (relay) activated from any channel
3、Description Symbols
Symbol
Description
C
Boiler
E
Solenoid
T
Thermo-valve
Examples of Installation
Fig. 1 Mono-zone Configuration with Boiler
Fig. 2 Mono-zone Configuration with Solenoid
Fig. 3 Multi-zone Configuration with Thermal-actuators
Fig. 4 Mono-zone Configuration with Multi-point Splitter
www.ecodhome.co.uk


© Copyright 2026