
Polyethylene Piping Systems Field Manual for Municipal Water
Polyethylene Piping Systems
Field Manual
for
Municipal Water
Applications
M&I Division
2009 Edition
Page 1 of 88
Table of Contents
Table of Contents ....................................................................................2
PE Piping Systems Overview ..................................................................3
Sizes, Specifications, Pressure Ratings ................................... 4
Marking ................................................................................. 5
SAFETY! ..................................................................................................6
Flushing and Disinfecting ........................................................ 6
Contaminated Soils ................................................................ 6
General Precautions and Practices .......................................... 6
Handling Pipe and Fittings ...................................................... 7
Storing ...................................................................................................13
PE Water Service Lines ........................................................................15
Sizes, Pressures, and Specifications ..................................... 15
Burial ................................................................................... 17
Connections to Mains ........................................................... 18
Water Service Line Connections ............................................ 22
PE Water Distribution Piping .................................................................27
Sizes, Pressures, and Specifications ..................................... 27
Burial ................................................................................... 27
Fusion ................................................................................. 37
Electrofusion ........................................................................ 56
Transitions to Non-PE piping ................................................. 72
Quality Assurance and Field Testing ....................................................84
Leak Testing – Considerations for All Procedures ................... 84
Maintenance and Repair .......................................................................86
Electrofusion Repair ............................................................. 86
Flange Repair ...................................................................... 87
Mechanical Repair ................................................................ 87
Page 2 of 88
PE Piping Systems Overview
Since its discovery in 1933, polyethylene (PE) has grown to become one of the world’s
most widely used and recognized thermoplastic materials. Today’s modern PE resins are
highly engineered for rigorous applications such as pressure-rated gas, recycled water,
sanitary and drinking water systems, sustainable energy systems, landfill membranes,
automotive fuel tanks and other demanding applications.
Figure 1: Complete PE Water System
Some of the specific benefits of PE pipe are:
•
Life Cycle and Construction Cost Savings – For municipal applications, the life
cycle and construction cost of PE pipe can be significantly less than other pipe
materials.
•
Leak-Free, Fully Restrained Joints - PE heat fusion joining forms leak-free
joints that are as strong as, or stronger than, the pipe itself. For municipal
applications, fused joints eliminate the potential leak points.
•
Construction Advantages – PE pipe’s combination of light weight, flexibility and
leak-free, fully restrained joints permits unique and cost-effective installation
methods that are not practical with alternate materials.
•
Durability – PE pipe installations are cost-effective and have long-term cost
advantages due to the pipe’s physical properties, leak-free joints and
reduced maintenance costs.
Page 3 of 88
Sizes, Specifications, Pressure Ratings
Standard Diameters
PE pressure pipe is available in diameters from ½" through 65". Standard specifications
for PE pipe allow the pipe to be made to either controlled inside diameters or to controlled
outside diameters. The inside diameter system is used for small sizes that use insert type
fittings or with special mechanical compression fittings designed for SIDR 7 pipe. The
outside diameter systems are for use with fusion or with fittings that require a predictable
outside diameter.
There is one standard inside diameter sizing convention, SIDR, based on Schedule 40
series iron pipe sizes (IPS). There are four standard outside diameter sizing systems:
•
Iron Pipe Sized (IPS) pipe
•
Ductile Iron Pipe Sizes (DIPS)
•
Copper Tubing Sizes (CTS)
•
International Standards Organization (ISO 161/1) pipe
Standard Pressure Ratings for Water
TABLE 1
Standard Pressure Ratings for Water, at 73°F (23°C), for SDR-PR Pipes, psig
Standard Dimension Ratio
Standard Pressure Rating (psig) as a function of a Material’s
Hydrostatic Design Stress (HDS) for Water, at 73°F (23°C), psi *
SDR (In the Case
of Pipes Made to
Standard OD’s)
SIDR (In the Case
of Pipes Made to
Standard ID’s)
HDS = 630psi
HDS = 800psi
HDS = 1000psi
17.0
15.0
80
100
125
13.5
11.5
100
125
160
11.0
9.0
125
160
200
9.0
7.0
160
200
250
*Test pressures for short-term pressure leak tests can be 1.5 times the listed pressures.
Page 4 of 88
Marking
Pipe
ASTM, AWWA, NSF and CSA standards require that markings on pipe and tubing be
present at frequent intervals – generally not less than every 5 feet – and that they include
at least the following items of information:
•
•
•
•
•
•
•
The nominal pipe or tubing size (e.g., 1-inch);
The type of PE material from which the pipe is made (e.g., PE 4710);
The pipe or tubing dimension ratio or the pipe pressure rating or pressure class
for 73° F water, or both;
The standard against which the pipe has been made and tested;
The manufacturer’s name or trademark;
Production record coding the place and time of manufacture; and
The seal or mark of the certification agency that has determined the suitability
of the pipe for potable water service.
Figure 2: Typical Pipe Marking Configuration
Fittings
At a minimum, all fittings used for PE water service pipe should be clearly marked with
the manufacturer’s name or trademark and the nominal size of the pipe for which they are
designed. In addition, the seal or mark of the agency that has certified the conformance
of the fitting material to NSF-61 and its suitability for potable water service should be
visible.
Page 5 of 88
SAFETY!
Flushing and Disinfecting
Water piping should be flushed and disinfected in accordance with AWWA C651.
Chlorine disinfection, when conducted within the guidelines of AWWA C651, does not
have a significant adverse affect on the performance of PE pipe.
Contaminated Soils
When water pipelines are installed or repaired in ground known to be contaminated with
hydrocarbons, special considerations apply. The AWWA has addressed concerns
regarding hydrocarbon permeation by including a permeation statement in all of its pipe
standards including standards for PE (C901-07 and C906-07), PVC (C900-07 and C90597), steel (C200-05), ductile Iron (C110-03), and others.
Hydrocarbon contamination plumes are relatively compact and usually less than fifty feet
in length. If contaminated soils are encountered, do one of the following:
•
•
•
Surround the pipe with good clean soil of Class I or Class II materials to allow
the hydrocarbons that may have contacted the pipe’s wall to dissipate into the
atmosphere and in the envelope of the surrounding soil. The US EPA
guidelines prohibit the reuse of excavated hydrocarbon contaminated soil in the
envelope of bedding or backfill material.
Sleeve the pipe in areas where active hydrocarbon contamination is known to
exist.
Reroute the pipe around the contaminated plume.
Hydrocarbons do not degrade polyethylene but can diffuse through the wall of PE pipe in
areas of gross contamination. The exterior contact may affect sidewall fusions and or
butt fusions; thus, after PE pipes have been exposed to grossly contaminated soils,
mechanical connections may be preferred.
General Precautions and Practices
It is the responsibility of the user of this manual to know and follow safe practices. Obtain
and consult specific information from equipment suppliers, authorities with jurisdiction,
and applicable regulations and codes, as needed.
Page 6 of 88
Handling Pipe and Fittings
Receiving
The truck must be parked on level ground. The parking brake (hand brake) should be set
and the wheels chocked. It is preferred that the truck be shut off and left in gear. The
location of the driver should be known at all times.
Figure 3: Use Care in Unloading Pipe Bundles
General Handling Precautions
Stay Clear Of Trucks Being Unloaded
Only persons directly needed to unload pipe, such as the equipment operator, should be
allowed in the vicinity of a truck being unloaded. All others must stay well clear of the
unloading area.
Slippery When Wet
Polyethylene pipe is extremely slippery when wet. Use caution at all times, especially in
rainy or snowy weather.
Hot When Stored Outside
Black pipe exposed to sunlight may be hot! Always use caution before handling pipe that
has been exposed to direct sunlight.
Page 7 of 88
General Handling Recommendations
Power equipment is generally used to handle pipes greater than 8" in diameter. Power
lifting equipment includes forklifts, cherry pickers, backhoes, front-end loaders and
cranes. Excessive lengths, high weights or uneven site conditions can require the use of
multiple pieces of lifting equipment. Only experienced operators should be allowed to
utilize power equipment.
For lifting loose pipe off rail cars with side stakes, a minimum 15-foot lift is required. For
lifting pipe off trucks with side rails, a minimum 11-foot lift is required.
The staging area (operating space) must be clear of workers and obstacles and must
provide the operator with a clear line-of-sight. Mark off the staging area to alert other
workers that lifting equipment is being used.
Never exceed the rated lifting capacity of the equipment. All equipment specifically
designed for lifting will be marked with a safe lifting capacity.
Forklifts
The use of forklift trucks necessitates observing a number of OSHA standards. The
proper and safe use of forklifts is the responsibility of the operator. Special procedures for
handling PE pipe are:
•
•
•
•
•
•
Check the forks for jagged edges or burrs. If the forks are marred, cover them
with a suitable protective covering to prevent gouging of the pipe;
Use the forks in the widest possible position;
Always lift from the center of the pipe at the center of the forks;
Always slowly enter the forks underneath the pipe; never jerk or ram them in;
Tilt back the load only enough to stabilize the load; and
Operate as close to the ground as possible when moving pipe from one location
to another, but do not allow the pipe to drag or scrape along the ground.
Figure 4: Using a Forklift for Unloading Pipe Bundles
Page 8 of 88
Front End Loaders
When equipped with forks, front-end loaders can be operated as forklifts and the same
procedures must be followed as indicated above. Typically, front-end loaders are used to
lift and move large diameter pipe.
Mobile Cranes
When lifting pipe from overhead some additional requirements must be observed. Locate
overhead obstructions such as wires and trees and keep a minimum 10-foot clearance at
all times. Obstacles in the trench, meter pit or vault must also be avoided.
Inspect rigging for damage. Never swing a load of pipe or fittings over workers or in areas
that are used as pathways for traveling. Operate the crane at constant speed. Avoid
jerking and sudden movements.
Backhoes
Backhoes are often operated as cranes. The hook on the underside of the bucket is used
to lift and transport pipe. The use of backhoes is common since they are almost always
available on the job site. The same precautions used for cranes must be followed to
ensure their safe operation.
Pipe Handling Accessories
Chains, steel cables, wire ropes and hooks must not be used directly on polyethylene
pipe or fittings.
Slings
Wide band slings distribute the lifting load over a large area and prevent point loading or
pipe gouging. They can be used as chokers or with spreader bars. Chokers prevent the
pipe or fitting from slipping during lifting. Spreader bars are recommended for lifting long
lengths of fused pipe.
Nylon Rope
Thick nylon rope can also be used to lift pipe. It provides support similar to slings. Nylon
rope can be used as chokers or with spreader bars.
Tongs
Specially designed pipe tongs can be used to lift pipe. They provide lifting support as the
pipe weight increases. Do not exceed the design capacity.
Page 9 of 88
Ramps
Ramps can sometimes be used to lower smaller diameter pipe. Ramps require the
operator to stand to the side and slowly release the pipe down the ramp. Care must be
exercised to avoid losing control during the lowering procedure.
Lifting Requirements
The lifting capacity of a sling or rope is determined by several factors including the type of
sling or rope, the kind of hitch used, and how fittings are fastened to them. Typically,
accessories should be rated at a minimum of 1.5 times the weight of the heaviest load to
be lifted. The angle between each leg of the sling or rope should not exceed 45 degrees.
Avoid kinking or twisting any part of the lifting accessory.
Guidelines for Palletized and Non-palletized Coils
The trailer must be level before straps or bands are removed and the coils unloaded. Do
not push, pull or roll coils off of the truck. Never stand behind, under or around the load
as it is being unloaded. Do not remove straps until the sling is secured. If coils are in silos
do not push or pull the silo pack off the end of the truck with a lift truck.
Non-Palletized
Palletized
Page 10 of 88
Guidelines for Straight Lengths
Unloading Bundles from a Flat-Bed Trailer
Figure 5: Use Care in Unloading Bundled Fittings and Pipe
Check that the load has not shifted before removing the nylon straps securing the load to
the trailer. Use caution when straightening shifted loads before unloading.
Bundles should be unloaded with fork trucks or cranes equipped with spreader bars with
at least three wide web slings. If bundles are stacked and individually strapped to the
truck, unload the bulk packs one at a time from the top. Remove only the straps over the
pack being unloaded. Steel bands used on bundles should not be removed until the
bundles have been transported to the storage area and secured in a stable and safe
manner.
Never stand on a load of pipe. Do not roll or drop pipe off the truck. Do not use backhoes,
end loaders, or other material handling equipment to push or pull the load off the trailer.
Unloading Strip Loads from a Flat-bed Trailer
When unloading with a forklift, a second truck (or some other means) should be placed
on the opposite side to the unloading equipment to prevent pipe from being pushed from
the truck.
Page 11 of 88
Strip Loads Using Strip Packs
Check that all steel bands are in place before removing the nylon straps securing the
load to the trailer. Unload pipe with fork trucks, cranes equipped with wide web slings, or
cranes equipped with spreader bars with wide web slings.
If a fork truck is used, the forks should have sufficient length to safely support the strip
pack. The pack should be approached slowly at the midpoint of the pipe lengths. To
improve the pack stability during transportation, the forks should be as far apart as
possible.
If a crane with a single sling is used to unload the strip pack, the lengths should be
handled at their midpoints using wide web slings. If multiple slings or a spreader bar
equipped with wide web slings are used, the equipment manufacturer’s recommended
methods and procedures should be used. If the pipe is being unloaded in full rows, do not
cut the bands until the row is lowered to the ground; the bands prevent the pipe from
rolling.
If the pipe is being unloaded in less than full rows, the bands should be cut and removed
only from the length(s) being unloaded. Any loose pipe in the row should be secured with
suitable wedges. After each layer is off the trailer, remove dunnage from the top of pipe.
Strip Loads Using Chocks
Assure that all chocks are securely in place on both ends of the timbers. If they are not,
nail a chock or other suitable wedge into position. At no time should the chocks on
timbers be removed. The chocks prevent pipe from rolling. Check that all chocks are in
place before removing the nylon trucker straps securing the load to the trailer. Do not
remove “belly” straps until unloading is to take place on that layer. Use caution when
straightening shifted loads before unloading.
Pipe should be unloaded with fork trucks or cranes using at least three slings or end
hooks. When banded pipe is being unloaded in full or partial rows do not cut the band
until the pipe is lowered to the ground. After each layer is off the trailer, remove dunnage
from the top of pipe.
Page 12 of 88
Storing
Before pipe and/or fittings are placed into storage, they should be visually inspected for
scratches, gouges, discoloration and other defects. Damaged or questionable materials
should not be put into storage. Cuts and gouges that reduce the wall thickness by more
than 10% may impair long-term service life and should be discarded.
Off-Site Storage Guidelines
Store small pipe in racks according to the length and size of the pipe. Block or strap the
pipe to prevent it from rolling or falling off the rack. Pipe larger than two inches in
diameter should be stacked with spacing strips between each row. Arrange and block
each row of stacked pipe to prevent it from rolling off the pile. If pipe is stored outdoors,
make sure all blocks are made of material that won’t deteriorate as it weathers.
Material that cannot be stacked because of its size or shape should be stored on shelves
capable of supporting the combined weight of the materials.
Job Site Storage Guidelines
The storage area should have a relatively smooth, level surface free of stones, debris or
other materials that could damage the pipe or fittings. Where adequate ground conditions
do not exist or when a bed cannot be prepared, the pipe may be placed on planking
evenly spaced along the pipe length.
Figure 6: Storing PE Pipe
When pipes of variable wall thickness are received, it is recommended that the pipe be
segregated into piles, each pile containing a single size and pressure rating to minimize
confusion at a later date. The pile should be constructed in a pyramid, with each
successive layer having one less pipe than the layer below. The bottom layer should be
braced to prevent movement.
Page 13 of 88
The maximum allowable stacking heights for polyethylene pipe should not exceed those
in Table 2. Pipe coils should be stored upright on skids on a level surface.
TABLE 2: Suggested Loose Storage Stacking Heights in Rows for HDPE pipe
Nominal PE Pipe Size (in)
4
5
6
8
10
12
Suggested Stacking Height – Rows
Above DR 17
DR 17 & Below
15
12
12
10
10
8
8
6
6
5
5
4
Indoor/ Outdoor Storage
Expansion and contraction caused by uneven heating during storage in the sun may
cause the pipe to bow if not restrained by racks. This does not damage the pipe but may
be inconvenient when the pipe is taken out of storage for installation
Since black HDPE pipe generally contains greater than 2% carbon black, it will resist
damage from sunlight indefinitely. Colored products are compounded with antioxidants,
thermal stabilizers and UV stabilizers. Therefore, non-black products should remain in
unprotected outdoor storage for no more than two years (or longer only as recommended
by the pipe manufacturer). Black products with stripes are generally suitable for
unprotected outdoor storage and service.
.
Page 14 of 88
PE Water Service Lines
Sizes, Pressures, and Specifications
PE Water Service lines are typically ½" to 3" nominal diameter pipe or tubing in
accordance with AWWA C901, ASTM D2239, ASTM D3035, or ASTM D2737, with rated
pressure of 80 to 250 psig in accordance with Table 1. Water service lines may be joined
to themselves or to other types of pipe or fittings.
Options for joining depend on the pipe’s sizing convention:
IPS pipe produced per ASTM D3035:
• Heat Fusion
• Electrofusion
• O.D. Mechanical Compression fittings.
• O.D. Stab fittings
o Internal stiffeners are recommended on ½” – 2” stab and mechanical fittings
CTS pipe produced per ASTM D2737:
• Heat Fusion
• Electrofusion
• O.D. Mechanical Compression fittings.
• O.D. Stab fittings
o Internal stiffeners are recommended on ½” – 2” stab and mechanical fittings
SIDR pipe produced per ASTM D2239:
• Barbed insert fittings and clamps.
• Double clamping is recommended for pipes 1-1/4” and larger and on pressures
exceeding 160 psi.
• SIDR 7 pipe may be joined with O.D. Mechanical Compression fittings made
specifically for these pipe sizes.
Page 15 of 88
Figure 7: Typical PE Water Service Line Configuration
Figure 8: Typical All-PE Water Service Line Configuration
PE Main with Saddle
Fusion Tee
Curb Valve with
Mechanical Couplings
Meter with PE to Brass
Transitions
PE to Copper
Mechanical Fitting
Page 16 of 88
Burial
PE Water Service lines can usually be installed using basic simplified trenching and
backfill guidelines. Follow all instructions for placement and alignment of pipe and
fittings.
Trenching
Prepare trenches for PE Water Service lines in accordance with the Simplified
Installation Instructions of this Manual. A trench width of 12 inches is generally suitable
for a water service line.
Figure 9: Two PE Water Service Lines
Placement
Place the PE Water Service line in a prepared trench that is free of rocks and debris.
Place the pipe so that it is relaxed and “snakes” loosely in the trench. Do not bend the
pipe more than the minimum bend radius for the DR of the service line.
Figure 10: Proper vs. Improper Placement in Trench
Page 17 of 88
Compaction and Cover
Complete the compaction and cover of PE Water Service lines in accordance with the
Simplified Instructions of this Manual. Do not allow rocks or other hard objects in the
vicinity of the buried Water Service line.
Connections to Mains
There are many options available for hooking up a PE service line to a main. To help you
select the best option you should consider:
• Type of installation (new or existing);
• Type of main (PE, PVC, Ductile Iron, etc.);
• Type of fittings (mechanical vs. fusion);
• Type of tap (pressure or non pressure); and
• Type of PE service line you want to use (SIDR, CTS, and IPS).
If a new main is being installed, you have the option to install equal or smaller inline tees,
wyes or crosses. If the main is already installed, you may use service saddles, branch
saddles or tapping tees. Mechanical tapping saddles are available for larger diameter
pipe branches.
If the main is made of Ductile Iron, PVC or Concrete, you must use mechanical fittings. If
the main is made from PE, you may use either mechanical fittings or fusion. Fusion is the
preferred method of connecting to a main because, when done properly, fusion joints do
not leak.
If you are using mechanical saddles or fittings you need to ensure they are designed for
use with polyethylene pipe. The physical characteristics of PE pipe may contribute to
leaking joints when used with fittings that are designed for other materials. In addition,
mechanical fittings that use screws or bolts that tighten into the wall of the pipe can cause
point loading failures in PE pipe. Fittings that exhibit equal compressive stresses around
the wall of PE pipe work best. Consult the fitting manufacturer for recommendations.
Another consideration is whether you will be making a live tap or connecting to a nonpressurized line. When making live taps, Self Tapping tees are recommended. Service
saddles with corp. stops are also effective.
Transitioning to the service line is another consideration. You will need to transition from
the corp. stop or tapping tee outlet to your service pipe. There are many transition fittings
available that will allow you to transition from thread on a corp. stop to SIDR, CTS or IPS
pipe. Depending on the brand, the outlet on the self tapping tees may be stab, fusion or
compression. Consult the fitting manufacturer.
Page 18 of 88
Fusion to PE Main
The examples that follow illustrate connections to mains made at a vertical (90-degree)
angle, for clarity. Actual installation angles may vary in accordance with local
requirements or preferences.
Saddle Fusion to PE Main
Connections of PE Service Lines to PE Mains should be made by saddle fusion or saddle
electrofusion wherever possible.
Saddle and Saddle Electrofusion Self Tapping tees may be used to live tap PE pressure
mains. The main is prepared based on fusion procedures being followed. The Self
Tapping Tee is installed on the main. The cutter is threaded into the main then retracted,
retaining the coupon. The PE service pipe is installed on the outlet stub using
mechanical compression or stab fittings or with heat fusion.
PE service lines can be installed on pressure or non-pressure PE mains using saddle or
saddle electrofusion service saddles and corporation stops. Prior to installing the saddle,
prepare the main based on the fusion method you are following.
Prepare the main based on the fusion procedures being followed. Fuse the saddle on the
main and install the corp. stop. The tap is done with standard tapping tools and
procedures for either pressure or non pressure mains. The service tubing is installed on
the corp. stop outlet. Transition fittings are available to connect to the threaded outlet on
the corp. stop to PE service line.
Saddle or saddle electrofusion Tees can be installed on non pressure PE mains. The
main is prepared based on the fusion procedures you are following. The tee is installed.
A tap is manually made in the wall of the main. The PE service line is attached to the tee
using OD mechanical compression fittings or with fusion.
Figure 11: Saddle Fusion of PE Water Service Line to Main
Follow the procedures for Saddle Fusion given in this Manual to make connections of
Water Service lines to Mains with suitable saddle fusion fittings. Figure 11 shows a
typical saddle fusion tapping tee with a PE Water Service line stub.
Page 19 of 88
Saddle Electrofusion to PE Main
Figure 12: Saddle Electrofusion of PE Water Service Line to Main
Follow the procedures for Saddle Electrofusion Fusion given in this Manual to make
connections of Water Service lines to Mains with suitable saddle fusion fittings. Figure 12
shows a typical electrofusion tapping tee with a stab-type connector for the PE Water
Service Line.
Mechanical Connections Mains
Mechanical Connection to PE Mains
If fusion tools are not available, Mechanical Tapping tees can be used to tap live PE
pressure mains. The tee is securely installed on the main. The cutter is threaded into the
main and then retracted, retaining the coupon. The PE service pipe is installed on the
tapping tee outlet using stab, compression fittings or fusion depending on the fitting.
Figure 13: Mechanical Saddle Connection to PE Main
Page 20 of 88
PE service lines can be installed on pressure or non-pressure PE mains using
mechanical service saddles and corporation stops. Use of mechanical saddles and
sealing gaskets is recommended in areas with minimal temperature changes. Double
strapping of the service saddle and sealing gaskets is recommended. Prior to installing
the saddle, inspect the pipe for scratches or damage that might create a leak path.
Install the saddle and corp. stop on the main. The tap is done with standard tapping tools
and procedures for either pressure or non-pressure mains. The service tubing is installed
on the corp. stop outlet. Transition fittings are available to connect to the threaded outlet
on the corp. stop. Do not thread any component into the PE pipe wall itself.
Mechanical Connection to Non-PE Mains
Connections of PE Service Lines to non-PE Mains should be made using mechanical
fittings designed for the specific application and piping materials.
Install the mechanical service saddle that is designed for the pipe being tapped per the
fitting manufacturer’s instructions. Install the corporation stop. Make the tap. Transition
fittings are available to connect the threaded outlet on the corp. stop to the PE service
tubing.
Figure 14: Mechanical Saddle Connection of PE Water Service Line to PVC Main
Follow Manufacturer’s instructions to install suitable fittings to connect PE Water Service
lines to non-PE Mains, such as PVC or Ductile Iron. Use only fittings approved and
certified for this application.
Page 21 of 88
Water Service Line Connections
Fusion of PE Water Service Lines
Follow the general instruction in this Manual for making butt-fusion and electrofusion
connections in PE Water Service lines. Connection by fusion is the recommended
method of joining PE pipe wherever possible. Where mechanical connections are
required for transitions, terminations, or joining, use fittings and procedures in
accordance with the following section.
Mechanical Connection of PE Water Service Lines
Terminology
Mechanical coupling - a device for joining pipe or tubing that does not require heat
fusion or welding and utilizes a gripper ring for restraint and seal/gasket for a leak-free
connection. Types of mechanical couplings commonly used on HDPE service tubing
include Insertion (stab) and Compression.
Stiffener/Insert - a flanged cylinder of NSF approved material that is inserted into plastic
tubing to reinforce the gripping and sealing regions.
Seal/O-Ring/Gasket - a ring, usually made of an elastomer/rubber, that, when
compressed, creates a leak-tight seal on the HDPE tubing preventing leakage of water
from the fitting.
Gripper Ring - the plastic component of a coupling that grips or restrains the HDPE
tubing preventing pullout from the mechanical fitting.
Coupling Body - the pressure bearing vessel that can contain the stiffener, gripper ring
and seal/gasket into which the HDPE tubing is inserted.
Chamfer – A bevel or angle put onto the HDPE tubing (required in some coupling
products) that aids the insertion of the tubing into the coupling or fitting body.
Compression Coupling - a type of mechanical coupling that requires an outside force to
actuate the sealing and gripping mechanisms. This is often accomplished by tightening a
nut or retainer.
Insertion (stab) Coupling - a type of mechanical coupling in which the sealing and
gripping mechanisms are actuated when PE tubing is inserted
Page 22 of 88
General Considerations
Mechanical fittings are designed to seal and restrain (grip) HDPE service line
connections and joints using mechanical means.
When mechanical couplings are used to join HDPE pipes the coupling must provide full
restraint and seal on the HDPE tubing or pipe. Water flow thrust forces that develop at
bends or at end closures can push an unrestrained mechanical coupling off the pipe end.
HDPE pipes have exceptional resistance to surge pressures. Mechanical couplings must
also accommodate repeated surges.
Materials
For potable water piping, use only fittings that use materials listed to NSF-61, with the
certification mark visible on each fitting. Fittings not displaying these markings may not
be suitable for use on HDPE potable water piping.
Mechanical Fitting Types
There are multiple types of mechanical fittings commonly used on HDPE water pipe and
tubing. For this document, we will review the three primary mechanical fittings or
connections used. With all type of mechanical couplings, it is strongly recommended that
an insert or stiffener be used to support the inside diameter of the HDPE pipe to ensure
long-term seal and restraint.
Figure 15 – HDPE Insert Type Mechanical Coupling
These three different technologies can be classified by the method used for completion.
They are:
•
•
•
Stab or insert type;
Tightening of compression nut or compression type; and
Pack style or clamp ring.
Page 23 of 88
Stab or Insert Type Mechanical Couplings
The “stab” or insertion style coupling requires no tightening of a compression nut. With
stab type couplings, the seal and restraint are accomplished independent of each other.
Insert type couplings contain either single or multiple elastomeric o-rings that provide a
seal on the outside diameter of the HDPE tubing which has been inserted into the fitting.
The seal on the HDPE is accomplished because the inside diameter of the sealing o-ring
is smaller than that of the outside diameter of the polyethylene tubing. When the tubing
is inserted into the coupling or fitting body, the rubber o-ring is compressed or squeezed
onto the HDPE tubing surface, thus creating a watertight seal. Figure 16 reveals the
internal components of a typical HDPE stab or insert type coupling.
Figure 16 – HDPE Insert Type Mechanical Coupling
Compression Couplings
Compression style couplings require an outside force to seal. The outside force is
commonly a nut that is tightened down by the installer to a stop or predetermined torque
value. As the installer tightens the nut, the sealing gasket and/or internal gripping ring is
brought onto the HDPE pipe to provide seal and restraint (grip). The gas seal and
restraint (grip) are dependent upon the amount of tightness the operator applies to the
compression nut.
There are a variety of gripping mechanisms commonly used with compression couplings.
One version uses a reinforced gasket – as the nut is tightened, a metal grip ring inside
the gasket is driven onto the HDPE tubing as depicted in figure 17a. Another version, the
split clamp, contains separate sealing and gripping mechanisms.
The seal is
accomplished via a compression nut tightened down, while the grip is accomplished by a
set screw, as seen in figure 17c. In a third version, as the operator tightens down the
compression nut a sealing gasket and gripper ring are forced down upon the HDPE
tubing to provide seal and restraint on the pipe. Refer to figure 17d for a component
detail of this type of compression coupling.
Compression couplings were originally designed for metallic pipe connections. As such,
many designs do not include an ID insert stiffener, which may reduce the compression
fitting pull-out strength on PE tubing. Many manufacturers sell insert stiffeners separately.
When using a compression type coupling to join or connect to HDPE, it is recommended
that an insert stiffener be used to ensure long term restraint and water tight seal.
Page 24 of 88
Figure 17 – Compression Type Mechanical Couplings
17a – Compression
Fitting
17b – Reinforced Gasket
Style
17d – Compression Nut Style
17c – Split Clamp
Installation procedures for mechanical couplings
Installation procedures vary for mechanical couplings based upon the technology utilized.
It is suggested that only the manufacturer’s supplied installation instructions be used
when installing mechanical fittings on HDPE. Installation instructions should be included
with each fitting. If instructions are not included with the fitting or are not available, refrain
from installing the fitting. As mentioned previously in this document, it is suggested that a
stiffener or insert be used when installing a mechanical coupling. Figure 18 details an
example of typical insert type coupling installation instructions.
Figure 18 – Installation Instruction for Insert Type Mechanical Coupling
Page 25 of 88
Mechanical Connections to Meter boxes and Curb Stops
Connecting your HDPE service line to meter boxes and curb stops/valves can also be
easily accomplished using mechanical couplings. Please refer to Figures 19a-19d for
examples of such mechanical connections.
Figure 19 – Meter Box Connection Options
19a: Meter Box Mechanical
Coupling
19c: Insert Type Curb Stop
19b: Meter Box Connection Using Clamp
Ring Connection
19d: Compression End Curb Stop
Page 26 of 88
PE Water Distribution Piping
Sizes, Pressures, and Specifications
PE water distribution lines are typically 4" to 12" nominal diameter pipe in accordance
with AWWA C906, ASTM D3035, or ASTM F714, with rated pressure of 80 to 250 psig
in accordance with Table 1.
Burial
The materials enveloping a buried pipe are generally identified as shown by their function
or location (see Figure 20).
Figure 20 Pipe Trench
Trench Backfill
Embedment Envelope
Springline
Haunch
Sidewall
Clearance
Bedding
In-situ Soil
Installation Guidelines for PE Pipe
Install PE pressure pipe in accordance with ASTM D2774.
The engineer must evaluate the site conditions, the subsurface conditions, and the
application objectives to determine the extent of support the pipe may need from the
surrounding soil. Where the pipe burial depth is relatively deep, where subsurface soil
conditions are not supportive of pipe, where surface loads or live loads are present, or
where the pipe DR is high, the engineer will generally prepare a specific installation
specification. The specific engineered installation instructions should be followed.
Page 27 of 88
The following are general guidelines for the installation of 12” and smaller diameter PE
pipe with a minimum cover depth of 2 ft (3 ft under traffic loading; up to 5 feet for frost
protection) and a maximum depth of cover of 16 feet. For other depths consult the
engineer. Other satisfactory methods or specifications may be available. This information
should not be substituted for the judgment of a professional engineer in achieving specific
requirements.
Figure 21: Pipe Placement in Open Trench
Trench Construction
Principal considerations in trench construction are trench width, length, and depth; soil
stability; and groundwater accumulation in the trench. Unstable soils or wet conditions
should be controlled by sloping or bracing the trench walls, de-watering the trench bottom,
and/or other measures.
Trench Width
The trench width should allow sufficient room for joining the pipe, if required, snaking
small diameter from side to side along the bottom of trench for thermal affects, and filling
and compacting the side fills.Table 3 gives suggested minimum trench width values.
TABLE 3
Minimum Trench Width in Stable Ground vs. Pipe Size
Nominal Pipe Size (in.)
Minimum Trench Width (in.)
<3
12
3-12
Pipe OD + 12
Page 28 of 88
Trench Length
The length of open trench required for fused pipe sections should be such that bending
and lowering the pipe into the ditch does not exceed the manufacturer’s minimum
recommended bend radius and result in kinking. Table 4 lists the recommended lengths
of trench openings for placement of continuous lengths of fused pipe, assembled above
the trench. When the trench sidewalls are significantly sloped, somewhat shorter trench
openings may be used.
TABLE 4: Suggested Length of Minimum Trench Opening (Feet) for Installation of Joined Lengths of PE Pipe
Depth of Trench (feet)
Nominal Pipe
Size (inches)
3
5
7
9
11
13
½ to 3
15
20
25
30
35
40
4 to 8
25
30
35
40
45
50
10 to 12
35
40
45
50
55
60
Stability of Trench Walls
The embedment material must be placed from undisturbed trench sidewall to undisturbed
trench sidewall. Walls of trenches below the elevation of the crown of the pipe should be
maintained as vertical as possible. Sloping of trench walls in granular and cohesionless
soils should be provided whenever the walls are more than about four feet in depth or
otherwise required by state, local or federal regulations. For safety, if the walls are not
sloped, they should be stabilized by shoring or bracing. The slope should be approved by
the engineer.
Stable soils can be cut vertically or nearly vertically without significant sloughing. If trench
sidewalls readily slough off or the trench floor is soft and will not support workers or
compaction, it is unstable. The instability is usually a condition of the trench and not the
soil. Most often the cause is high groundwater. In unstable soils, the engineer should
determine the necessity for special procedures such as a “wide” trench or permanent
trench sheeting.
Wherever possible, temporary sheathing and bracing to protect workers should be
installed so that its bottom extends no lower than about one-quarter of the pipe diameter
below the pipe crown. Sheathing that is installed to project below the pipe springline
should be left in place unless, as with some thinner sheathing, it is designed to be pulled
and removed without disturbing the embedment next to the pipe. In this case, the trench
width should be increased by 12 to 24 inches, depending on the pipe diameter, to allow
for minor disturbance to the embedment near the sheathing. Do not use vibratory
placement or extraction of sheeting. This can cause severe disturbance to the bedding
and liquefaction of the surrounding soils.
Page 29 of 88
Portable Trench Shield
Portable trench shields or boxes can be used with PE pipe. All excavation of the trench
below the pipe crown elevation should be done from inside of the shield. The backhoe
operator should dig inside of the shield and force the shield down as soil is removed.
Where the bottom of the shield extends below the pipe crown, the shield must be
vertically raised after each lift is placed and embedment material shovelled under the
shield to fill the void created by the shield wall. Figure 22 illustrates the steps used with a
Portable Trench Shield.
If possible, use shields that are placed with no portion of their sides extending lower than
one-quarter of a pipe diameter below the pipe crown. This minimizes the amount of lifting
required and precludes the possibility for disturbing embedment materials. The minimum
inside clear width of the box or shield should allow for the minimum trench width
requirements for the pipe plus an additional 12 to 24 inches
Figure 22: Installing PE Pipe with a Portable Trench Shield
Page 30 of 88
Trench Floor Preparation
The trench floor must be stable in order to support the bedding material. Generally, if the
trench floor can be walked on without showing foot prints it is considered stable. Where
the trench floor is not stable, in many cases it can be stabilized by dewatering. Where
dewatering is not possible stabilization of the trench floor may be accomplished by
addition of crushed rock or by an alternate trench foundation.
Pressure pipe may be installed directly on the prepared trench floor as long as it is soil.
The trench bottom may undulate but must support the pipe smoothly and be free of
ridges, hollows, and lumps. The trench bottom should be relatively smooth and free of
rock. Rocks, boulders, or large stones that can cause point loading on the pipe must be
removed and the trench bottom padded with 4 to 6 inches of tamped bedding material.
Bedding should consist of free-flowing material such as gravel, sand, silty sand, or clayey
sand that is free of stones or hard particles larger than specified for the embedment size.
If you over-excavate the trench floor by more than 6 inches beyond grade, fill the overexcavation with acceptable material that is compacted to a density equal to that of the
embedment material.
De-watering
The groundwater in the trench should be kept below the pipe invert, using deep wells,
well points or sump pumps placed in the trench.
Placing Pipe in Trench
Place PE pressure pipe up to 8” in diameter in the trench by hand. Use equipment to lift,
move, and lower larger diameter pipe into the trench. Pipe must not be dumped, dropped,
pushed, or rolled into the trench.
Figure 23: Trench Wall Sloped for Safety
Page 31 of 88
Pipe Embedment
ASTM D2774 calls for embedment materials to be sufficiently granular for haunching
under the pipe and compacting. Typical soils include coarse grained soil, such as gravel
or sand, or coarse grained soil containing fines, such as silty sand or clayey sand.
Compactable native soil is acceptable where there is no traffic load. This includes lean
clays and silty sand. The particle size should not exceed the values in Table 5.
Where the embedment is angular, crushed stone may be placed around the pipe by
dumping and slicing with a shovel. Where the embedment is naturally occurring gravels,
sands and mixtures with fines, the embedment should be placed in lifts not exceeding 8
inches in thickness and then tamped. Tamping should be accomplished by using a
mechanical tamper. Compact to at least 85 percent Standard Proctor density as defined
in ASTM D698, Standard Test Methods for Laboratory Compaction Characteristics of Soil
Using Standard Effort, (12 400 ft-lbf/ft3 (600 kN-m/m3)). Under streets and roads, increase
compaction to at least 95 percent Standard Proctor density.
Table 5: Embedment Size vs. Diameter of Pipe
Pipe Diameter
<4”
6” & 8”
10” to 16”
>18”
Particle Size
<1/2”
<3/4”
<1”
<1-1/2”
Figure 24: Typical granular embedment
Page 32 of 88
Backfilling and Compaction
Backfilling should follow pipe placement and assembly as closely as possible to prevent
the pipe from being shifted out of line by cave-ins, protect the pipe from external damage,
eliminate pipe lifting due to flooding of open trench and lessen the possibility of backfill
material becoming frozen in cold weather.
Where the in-situ soil is fine grain, backfill material should be selected to prevent material
migration to or from the trench wall and other layers of embedment material.
Backfill under the pipe haunches to at least 6 inches above the pipe with the select
embedment soil. Shovel slice or compact in lifts not exceeding 8” as required. Place lifts
evenly on both sides of the pipe. Rock impingement may cause high contact stresses
and stress raisers in pipe wall. Keep large hard objects away from the pipe. See Figure
25.
If the final backfill material contains large rock (boulder or cobble size) or clumps, then 18
inches of cushion material should be provided between the pipe crown and the trench
backfill.
The final backfill may consist of the excavated material, provided it is free from unsuitable
matter such as large lumps of clay, organic material, boulders or stones larger than 8
inches, or construction debris. The final backfill may be placed in the trench by machines.
There should be at least one foot of cover over the pipe before compaction of the final
backfill by the use of self-powered compactors. Construction vehicles should not be
driven over the pipe until a three foot cover of properly compacted material is placed over
the pipe.
Where the pipe is located beneath a road, place the final backfill in lifts and compact to
95 percent Standard Proctor Density.
Page 33 of 88
Fig. 25: Avoid Rock Impingement when Placing Embedment
Unacceptable!
Sunlight Exposure During Installation
Placing pipe that has been in direct sunlight in a cooler trench will result in thermal
contraction of the pipe’s length. This contraction can generate force which could result in
pull-out at mechanical couplings or other buried structures. Allow pipe to cool before
making connections to an anchored joint, flange, or a fitting that requires protection
against excessive pull-out forces. Covering the pipe with embedment will facilitate cooling.
Deflection
Small diameter pressure pipes usually have adequate stiffness and are usually installed
in such shallow depths that it is unnecessary to make an internal inspection of the pipe
for deflection.
Page 34 of 88
Cold Bend Radius
Coiled lengths and long strings of PE fused pipe may be cold bent in the field. The
allowable bend ratio is determined by the pipe diameter (D) and the dimension ratio (DR).
See Figure 26 and Tables 6 and 7.
Figure 26: Bend Radius, R
TABLE 6: Minimum Bend Radius for PE Pipe Installed in Open Cut Trench
Dimension Ratio (DR)
Minimum Cold Bend Radius “R”
7 through 9
20 X Pipe Outside Diameter
11 through 13.5
25 X Pipe Outside Diameter
17 through 21
27 X Pipe Outside Diameter
Fitting or Flange in Bend, any DR
100 X Pipe Outside Diameter
TABLE 7: Minimum Bend Radius and Length to Make a 90-degree Bend Examples
DIPS DR 17
Minimum Bend Radius “R”
Length Needed for
Size
(feet)
Degree Bend (feet)
4
10
16
6
15
23
8
20
31
10
24
40
12
29
45
90-
Because fittings and flange connections are rigid compared to the pipe, the minimum
bend radius is 100 times the pipe’s outside diameter (OD) when a fitting or flange
connection is present in the bend. The bend radius should be limited to 100 x OD for a
distance of about 5 times the pipe diameter on either side of the fitting location
Page 35 of 88
Field bending involves excavating the trench to the desired bend radius, then sweeping
or pulling the pipe string into the required bend and placing it in the trench. Temporary
restraints may be required to bend the pipe and to maintain the bend while placing the
pipe in the trench and placing initial backfill. Temporary blocks or restraints must be
removed before installing final backfill, and any voids must be filled with compacted initial
backfill material. Considerable force may be required to field bend the pipe, and the pipe
may spring back forcibly if the restraints slip or are inadvertently released while bending.
Observe appropriate safety precautions during field bending.
Special Details for Valves and Hydrants
Figure 27: Typical Assembly and Support Arrangement for PE Pipe Connections
to Valves and Hydrants
Figure 27 shows a PE self-restrained mechanical joint (MJ) adapter being used to
connect to the valve. When large reducing tees or equal tees are used, MJ adapters,
flanges or electrofusion couplings should be fused to the reducing tees before it is placed
in the trench. The direct connection of long pipe sections or valves can create bending
loads on the leg of the reducing tee. The use of PE MJ adapters, flanges or electrofusion
couplings on the reducing leg of the tee makes installation of reducing tees easier and
safer while preventing stresses on the tee.
Page 36 of 88
Fusion
Generic Butt Fusion Joining Procedure
This procedure is intended for butt fusion joining of PE potable water, sewer and
industrial pipe manufactured in accordance with ASTM F714, ASTM D3035, AWWA
C901 and AWWA C906
To butt fuse PE pipe follow these simple steps to heat and fuse the ends of two pipes
together to form a leak free bond that is as strong or stronger than the pipe itself. After
the pipe ends are prepared by clamping and facing, the ends are put in contact with a
heater until a certain size bead is formed, as shown in Figure 28. The heater is removed
and pipe ends are brought together with a force specified to form the fusion bead, as
shown in Figure 29. This force must be maintained until the pipe joint has cooled.
Figure 28: Butt Fusion Bead Formation
Figure 29: Butt Fusion Proper Bead Appearance
Page 37 of 88
Machine and Operator Qualification
The selected fusion equipment and qualified operators shall be capable of meeting all
parameters of the job. The equipment shall have jaws or reducing inserts designed to
properly hold the size of the pipes being fused, and it shall have enough hydraulic force
to reach the required fusion pressure during all fusion conditions. The fusion operator
shall be thoroughly familiar with and trained on the equipment being used. See PPI TN42 Recommended Minimum Training Guidelines for PE Pipe Butt-Fusion Joining
Operators or Municipal and Industrial Projects (2009). Such training shall include at least
the following:
•
•
•
•
•
•
•
•
•
•
Safety;
Operator’s manual & checklist;
Basic maintenance and troubleshooting;
External power requirements;
Features;
Components and how they operate;
Hydraulic operation (if applicable);
Determining required fusion pressure and how to set on machine;
Heater operation and temperature requirements and adjustment; and
Data logging device (if applicable).
Job Set–up Guidelines
Weather Guidelines: Successful butt fusions can be accomplished in a broad range of
weather temperatures. Pipe ends and the fusion equipment must be dry and sheltered
from rain and wind.
PE pipe has very good impact resistance even in sub-freezing conditions; however, its
impact strength is reduced at low temperature. Do not drop pipe in sub-freezing
conditions. When temperatures are below -4ºF (-20ºC), butt fusion generally requires
portable shelters or trailers or other suitable protective measures with auxiliary heating.
Here are some general guidelines to address different weather conditions:
Cold Temperatures, Down to 32ºF (0ºC )
When butt fusing PE pipe under these conditions, set up a temporary wind barrier around
the operator and fusion equipment. Close the pipe ends off with end caps or other means
to prevent the flow of cold air.
Page 38 of 88
Figure 30: Extreme Weather Protection
Cold Ambient Temperatures Below 32ºF (0º C)
Pre-heat pipe ends using a heating blanket or warm air device. Alternatively, with pipe
mounted in the fusion machine, position the pipe ends within ¼ to ½ inch of the heater
plate face to allow the pipe ends to warm for 30 seconds to 2 minutes, depending on the
pipe size and wall thickness. Before starting pipe fusion, the operator needs to ensure
that the ID of the pipe is clear of moisture due to frost that is being melted.
The use of direct application open flame devices, such as torches, for heating PE pipe is
unacceptable due to the lack of adequate heating control and the possibility of oxidative
damage to the pipe ends and even ignition of the pipe. The warming temperature should
not exceed 120°F.
Warm (Hot) Environment (to 120º F)
Shade the operator and the equipment where ambient temperature is very high.
Wind
Wind striking the fusion heater plate and pipe can cause unacceptable temperature
variations and possible joint contamination during butt fusion. In windy conditions, use a
suitable shelter to protect the pipe and the fusion heater plate. High winds can also cause
flow through the pipe bore. Plug or cover pipe ends to prevent this.
Page 39 of 88
Additional Considerations
When PE pipe and fittings expand or contract with changes in temperature make
necessary adjustments.
Make sure pipes to be clamped in the fusion machine are dry, clean and free of ice, frost,
snow, dirt and other contamination.
When butt fusion is done in cold weather, DO NOT INCREASE THE HEATING TOOL
SURFACE TEMPERATURE. THE REQUIRED SURFACE TEMPERATURE MUST BE
BETWEEN 400 - 450°F. The optimum temperature is 425°F.
Some butt fusion equipment and supporting generators use motor and hydraulic oils.
Follow operator’s manuals to make necessary viscosity adjustments.
In cold conditions, it will take longer to develop the initial melt bead completely around the
pipe ends, especially on large diameter pipe. On larger pipe sizes, fusion pressure must
be maintained until a slight melt is observed around the entire circumference of the pipe
or fitting before releasing pressure to the heat soak cycle. DO NOT increase pressure
during the heat soak cycle. When proper melt has been obtained, the pipe and heater
shall be separated in a rapid, snap-like motion. The melted surfaces shall then be joined
immediately in one smooth motion so as to minimize cooling of the melted pipe ends.
Pipe Stands and Supports
Use pipe support stands when butt fusing lengths of pipe. Position pipe support stands
on either side of the fusion machine approximately 20’ from the pipe ends. Adjust the
height of the stands so that the pipes are level. The more stands that are used the more
freely the pipes move into and through the fusion machine. Other devices such as carts,
racks, etc. can be used to aid in supporting and feeding pipes.
Butt Fusion Parameters per ASTM F2620
Fusion Interface Pressure Range: 60 - 90 psi (4.14 - 6.21 bar)
Heater Surface Temperature Range: 400 - 450°F (204 - 232°C)
Page 40 of 88
Figure 31: Butt Fusion of Water Pipe
Butt Fusion Procedure
1.
2.
3.
4.
5.
6.
7.
Clean and securely fasten the components to be
joined.
Face the pipe ends.
Align the pipe profile.
Melt the pipe interfaces.
Join the two profiles together.
Hold under pressure until cool.
Visually inspect the joint.
Clean and Secure
Clean the inside and outside of the pipe to be joined by wiping with a clean lint-free cloth.
Remove all foreign matter. Extend enough pipe through the inner jaws to allow the facer
to cut and clean up the surface (see equipment manufacturer’s manual for
recommendations). Clamp the components in the machine. Check alignment of the ends
and adjust as needed.
Figure 32: Pipe Cleaned and Secured for Butt Fusion
Page 41 of 88
Face
The pipe ends must be faced to establish clean, parallel mating surfaces. Most
equipment manufacturers have incorporated a rotating planer block in their facers to
accomplish this goal. Install the facer in the fusion machine and move the pipe ends
against the facer. Facing is continued until a minimal distance exists between the fixed
and movable jaws of the machine and the facer is locked firmly and squarely between the
jaw bushings. Open the jaws and remove the facer. Remove any pipe chips from the
facing operation and any foreign matter with a clean, lint-free cotton cloth. Bring the pipe
ends together with minimal force and inspect the face off. A visual inspection of this
operation should verify that faces are square, perpendicular to the pipe centerline on
each pipe end and with no detectable gap.
Figure 33: Facing of Pipe
Align
The pipe profiles must be rounded
and aligned with each other to
minimize mismatch (high-low) of the
pipe walls. This can be accomplished
by tightening clamping jaws until the
outside diameters of the pipe ends
match. Always tighten the high side
down to achieve alignment. The jaws
must not be loosened or the pipe may
slip during fusion. Re-face the pipe
ends if excessive adjustment is
required and remove any chips from re-facing operation with a clean, lint-free cotton
cloth.
Figure 34: Aligning Pipe Ends for Fusion
Page 42 of 88
Melt
Heating tools that simultaneously heat both pipe ends are used to accomplish this
operation. These heating tools are normally furnished with thermometers to measure
internal heater temperature so the operator can monitor the temperature before each joint
is made. However, the thermometer can be used only as a general indicator because
there is some heat loss from internal to external surfaces, depending on factors such as
ambient temperatures and wind conditions. A pyrometer or other surface temperaturemeasuring device should be used before the first joint of the day is made and periodically
throughout the day to ensure proper temperature of the heating tool face that contacts
the pipe or fitting ends. Additionally, heating tools are usually equipped with suspension
and alignment guides that center them on the pipe ends.
The heater faces that come into contact with the pipe should be clean, oil-free and coated
with a nonstick coating or covered with a non-stick fabric as recommended by the fusion
equipment manufacturer to prevent molten plastic from sticking to the heater surfaces.
Remaining molten plastic can interfere with fusion quality and must be removed
according to the tool manufacturer’s instructions. Never use chemical cleaners or
solvents to clean heating tool surfaces.
Figure 35: Melting of Pipe for Fusion
The surface temperatures must be in the
temperature range 400 – 450°F (204 –
232°C). Install the heater in the butt
fusion machine and bring the pipe ends
into full contact with the heater at fusion
pressure to ensure that full and proper
contact is made between the pipe ends
and the heater.
After holding the
pressure very briefly, it should be
released without breaking contact. On
larger pipe sizes, fusion pressure must be
maintained until a slight melt is observed
around the circumference of the pipe before releasing pressure. Continue to hold the
components in contact with each other, without force, while a bead of molten
polyethylene develops between the heater and the pipe ends. When the proper bead size
is formed against the heater surfaces all around the pipe or fitting ends, remove the
heater. Melt bead size is dependent on pipe size. See Table 8 for approximate melt bead
sizes.
TABLE 8: Approximate Melt Bead Size
Pipe Size Approximate
1 ¼” and smaller (40mm and smaller)
Above 1 ¼” through 3” (above 40mm – 90mm)
Above 3” through 8” (above 90mm – 225mm)
Above 8” through 12” (above 225mm – 315mm)
Melt Bead Size
1/32” – 1/16” (1 – 2mm)
about 1/16” (2mm)
1/8” – 3/16” (3-5mm)
3/16” – 1/4” (5-6mm))
Page 43 of 88
Join
After the heater tool is removed, quickly inspect the pipe ends (NOTE: If a concave melt
surface is observed, unacceptable pressure during heating has occurred and the joint will
be low quality. Do not continue. Allow the component ends to cool completely, and restart
at the beginning. Except for a very brief time to seat the components fully against the
heater tool, do not apply pressure during heating), if acceptable, immediately bring the
molten pipe ends together with sufficient fusion force to form a double rollback bead
against the pipe wall. On hydraulic machines, apply the required fusion pressure as
calculated below.
For larger manual and hydraulic butt fusion machines, fusion force is determined by
multiplying the interfacial pressure, 60 – 90 psi (usually 75 psi), by the pipe area.
For manually operated fusion machines, a torque wrench may be used to apply the
proper force. For hydraulically operated fusion machines, the fusion force can be divided
by the total effective piston area of the carriage cylinders to give the theoretical fusion
pressure in psi. Internal and external drags need to be added to this figure to obtain the
actual fusion machine gauge pressure. The hydraulic gauge reading is dependent upon
pipe diameter, DR and machine design. Interfacial pressure and gauge reading are not
the same value.
Figure 36: Joining of Pipe by Butt Fusion
Hold
Hold the joint immobile under fusion force until the joint has cooled adequately to develop
strength. Allowing proper cooling times under fusion force prior to removal from the
clamps of the machine is important in achieving joint integrity. The fusion force should be
held between the pipe ends for approximately 30 – 90 seconds per inch of pipe diameter
or until the surface of the melt bead is cool to the touch. Use 90 seconds per inch of pipe
diameter for the cool time with pipes that have a wall thickness of 1 ½ inches or greater.
Remove the pipe from the fusion machine and avoid rough handling for an additional 30
minutes.
Page 44 of 88
Inspect
Visually inspect and compare the joint against the appearance guidelines that follow
(refer to figures 37-42). Visually, the width of butt fusion beads should be approximately 2
– 2 ½ times the bead height above the pipe; the beads should be rounded and uniformly
sized around the pipe circumference. The v-groove between the beads should not be
deeper than half the bead height above the pipe surface. When butt fusing to molded
fittings, the fitting-side bead may display shape irregularities such as minor indentations,
deflections and non-uniform bead rollover from molded part cooling and knit lines. In such
cases, visual evaluation is based mainly on the size and shape of the pipe-side bead.
(See Figure 37 for bead configuration). Visually unacceptable joints should be cut out and
re-fused using the correct procedure. (See manufacturer’s visual inspection guidelines.)
A datalogging device can be attached to the hydraulic fusion machines to record the
critical areas of the butt fusion process. This data can be reviewed before allowing the
joint to be buried to make sure the proper fusion procedure was followed by the operator.
This information can be downloaded to a PC as a permanent record of the joints on a job.
The datalogging of each joint on a job can be specified as a QA requirement.
Figure 37: Acceptable and Unacceptable Bead Cross-Sections
Figure 38: Unacceptable butt fusion joint due to incomplete facing operation
Page 45 of 88
Figure 39: Unacceptable butt fusion joint due to contamination captured in the joint
Figure 40: Acceptable butt fusion joint
Page 46 of 88
Figure 41: Unacceptable cupped surfaces after heat soak cycle
Cupped surfaces are unacceptable after the heat soak cycle. They are usually caused by
applying pressure during the heat soak cycle.
Figure 42: Visually unacceptable mitered joint
Visually mitered (angled, off-set) joints should be cut out and re-fused (straight or coiled
pipe).
Page 47 of 88
Coiled pipe is available in sizes through 6” IPS. Coiling may leave a bend in some pipe
sizes that must be addressed in the preparation of the butt fusion process. There are
several ways to address this situation:
•
Straighten and re-round coiled pipe before the butt fusion process.
•
If there is still curvature present, install the pipe ends in the machine in an “S”
configuration with print lines approximately 180° apart in order to help gain
proper alignment and help produce a straight joint. See Figure 8.
•
If there is still a curvature present, another option would be to install a straight
piece of pipe between the two coiled pipes.
•
Every effort should be made to make the joint perpendicular to the axis of the
pipe.
Figure 43: Alignment of Coiled Pipe Ends Through a Butt Fusion Machine
Page 48 of 88
Generic Saddle Fusion Joining Procedure of PE Pipe Mains 1 ¼”
IPS and Larger
Photographs describing the steps of this procedure along with photos of acceptable and
unacceptable fusions are included.
TABLE 9: Generic Saddle Fusion Parameters for Pressurized PE Water Pipes
Heater adapter surface temperature
500 ± 10°F
Initial interfacial pressure
60 ± 6 psi
Heat soak interfacial pressure
0 psi
Fusion interfacial pressure
30 ± 3 psi
Total heating time on main: 1¼" IPS
pressurized main
15 seconds maximum
Total heating time on main: 2" IPS
pressurized main
25 to 30 seconds maximum
Total heating time on main: all 3" and
larger mains and 1¼" and 2" IPS nonpressurized mains
Look for a 1/16" bead around the base of
the fitting
Look in the lower right hand corner of the fitting label for the forces required for that fitting
(Initial Heat Force / Heat Soak Force / Fusion Force) (example 180/0/90).
Terminology
Initial Heat (Bead-up) - The heating step used to develop an initial melt bead on the main
pipe.
Initial Heat Force (Bead-up force) – The force (pounds) applied to establish an initial melt
pattern on the main pipe. The Initial Heat Force is determined by multiplying the fitting
base area (sq. inches) by the initial interfacial pressure (pounds per square inch)
Heat Soak Force – The force (pounds) applied after an initial melt pattern is established
on the main pipe. The Heat Soak Force is the minimum force (essentially zero pounds)
that ensures that the fitting, heater and main stay in contact with each other.
Page 49 of 88
Fusion Force – The force (pounds) applied to establish the fusion bond between the
fitting and the pipe. The Fusion Force is determined by multiplying the fitting base area
(square inches) by the fusion interfacial pressure (pounds per square inch).
Total Heat Time – A time that starts when the heater is placed on the main pipe and initial
heat force is applied and ends when the heater is removed.
Cool Time – The time required to cool the joint to approximately 120°F (49°C). The fusion
force must be maintained for 5 minutes on 1¼” IPS or 10 minutes for all other main sizes,
after which the saddle fusion equipment can be removed. The joint must be allowed to
cool undisturbed for an additional 30 minutes before tapping the main or joining to the
branch outlet.
Interfacial Area for Rectangular Base Saddle Fittings
Area = (width of saddle base X length of saddle base) – hole area
Hole area = 3.14 X (hole diameter)2 / 4
Interfacial Area for Round Base Fittings
Area = saddle base area – hole area
Saddle base area = 3.14 X (saddle base diameter)2 / 4
Hole area = 3.14 X (hole diameter)2 / 4
Fitting Label – The initial heat force, heat soak force and the fusion force will be listed in
the lower right hand corner of the fitting label for all saddle fusion fittings; this will
eliminate the need to calculate the fusion forces in the field (e.g. 180/0/90).
Page 50 of 88
Generic Saddle Fusion Procedure
Figure 44: Fusion steps are illustrated with yellow pipe for better visibility; PE Water Pipe is
typically black
Page 51 of 88
Page 52 of 88
Note: All of the procedures in Figure 44 are based on tests conducted under controlled
ambient temperature. Environmental conditions on a job site could affect heating and
cooling times. Regardless of the jobsite conditions or ambient temperature, the
prescribed heating tool temperature is required. Do not increase or decrease the heating
tool temperature.
Page 53 of 88
Figure 45 : Acceptable Fusions
Page 54 of 88
Figure 46 : Unacceptable Fusions
Page 55 of 88
Electrofusion
Installation Guidelines for Electrofusion Couplings
Safety
Jobsite safety requirements should be fully understood and observed. Electrofusion
fittings and equipment are not intended to be, and are not, “Explosion Proof”. If used in
a volatile environment, additional ignition concerns may be present and are not
addressed in this document. When moisture at the fusion site is a safety concern,
connect the leads to the fitting before the control unit is powered up. Take safety
precautions to prevent exposure to electrical shock hazards.
Operator Experience
Electrofusion couplings should only be installed by persons that have received training
from an authorized electrofusion instructor, have a strong working knowledge of
polyethylene and heat fusion, and have qualified 14” and larger electrofusion joints
through destructive testing. This document is a guide only and should not be used in
place of training by an authorized electrofusion instructor. Failure to follow all preparation
steps can result in joint failure or leakage due to contamination or improper installation.
Destructive tests are described in ASTM F1055 and can be in the form of burst tests,
bend tests, peel tests and other methods useful in determining the quality of a fusion
joint.
Pre-installation Requirements
Pipe Diameter – In the absence of specific requirements from the fitting manufacturer
ensure that the pipe diameter is within the tolerances, at the specified temperature, of the
applicable pipe standard (ASTM F714, AWWA C906, etc.). Standard tolerances are
determined at 73°F. Measure pipe diameter with a Pi Tape at 2” and 6” from the pipe
end to determine diameter. Pipe toe-in or reduction in diameter is a condition that occurs
at the pipe end and should be checked to ensure that the pipe diameter is within
tolerance at 2” from the end. Severe toe-in may require the removal of up to one pipe
diameter or 12” from the pipe end.
Page 56 of 88
Figure 47: Measuring Diameter with a Pi Tape
Note: In preparing a pipe for electrofusion the pipe OD is reduced by at least .014” by
scraping the outside surface. This OD reduction should be taken into consideration when
accepting pipe extruded close to the above minimum tolerances.
Pipe Ovality – Determine if an ovality condition exists by measuring the pipe diameter to
determine the amount of out-of-roundness. If ovality exceeds 2%, re-rounding clamps
must be used.
Pipe ends should be squarely cut to 90° ± 5°. A 4” or wider sling or strap can be used as
a guide to mark the pipe for cutting. A level and protractor can be used to determine the
angle of the cut.
Pipe Alignment – Pipe alignment should be inspected to ensure that no stresses are
present in the assembly that might cause movement during fusion.
Power Source – An adequate power source is required. Ensure that power source is
capable of delivering power for entire coupling fusion time without interruption (check
generator for full fuel supply). Ensure that all connections are tight and clean. Loose
connections can result in arcing or blown fuses.
110 Volt – A minimum 5000 watt continuous supply generator capable of delivering 115
volts to 135 volts at 45 Hz to 66 Hz to the control box. Use a minimum 30 amp breaker
with “slow blow” or time delay fuse and a 30 amp twist-lock NENA L5 receptacle.
220 Volt – A minimum 5000 watt continuous supply generator capable of delivering 180
volts to 300 volts at 45 Hz to 65 Hz to the control box. Use a minimum 30 amp breaker
with “slow blow” or time delay fuses and a 15 amp twist-lock NEMA L6 receptacle.
Page 57 of 88
Note: Commercially available generators capable of meeting these requirements are
usually in excess of 7500 watt capacity and need to be in good working order.
Extension Cords – Typically, a single extension of up to 50’ is permitted between the
generator and the control box. The minimum wire gauge is 10/3 awg for extension
lengths up to 50’. Longer lengths may be allowed; consult the fitting and equipment
manufacturer for specific recommendations.
Control Box – A 24 digit barcode compatible control box conforming to ISO 12716 must
be used to deliver the required energy to the coupling. The control box must be capable
of delivering 80 amperes at 40 volts output. The control box must be capable of reading
the coupling barcode and applying the correct fusion parameters, including automatic
temperature compensation, to the fitting without operator intervention. The control box
must be capable of reading ambient temperatures at the fusion site.
Scraping Tools – PIPE PREPARATION IS VERY CRITICAL TO THE ELECTROFUSION
PROCESS. CAREFUL ATTENTION MUST BE GIVEN TO PROPER CLEANING AND
SCRAPING PROCEDURES TO REMOVE CONTAMINATION AND SURFACE
OXIDATION FROM THE PIPE SURFACE. Ensure that only mechanical type scraping
tools designed specifically for electrofusion preparation are used to prepare the pipe
surface. Do not use abrasives such as grinders, emery cloth, or sandpaper.
Markers – Ensure that insertion depth and pipe scrape area markings are made with a
non-greasy, non-petroleum based, fast-drying, permanent marker or paint pen.
Cleaning Agent / Wiping Cloth – A clean, dry, non-dyed, lint free cloth is used to clean
pipe surfaces. 96% or higher Isopropyl alcohol without additive, except water, is
recommended as a cleaning agent. Pre-impregnated wipes without additives may also be
suitable. Denatured alcohol may contain other impurities and is not suitable for use with
electrofusion. Under no circumstances should a coupling fusion be made with any liquid
(water, oil, sewage, etc.) flowing through the pipe or fusion area; fusion joint failure and
possible electrical hazards could occur. The fusion zone must be clean and dry before
and during fusion.
Weather Conditions – Observe manufacturer’s recommended minimum and maximum
installation temperatures for electrofusion fittings.
The typical installation temperature range is -4°F to 120°F (-20ºC to 49ºC), but can vary
above and below that range depending on the manufacturer. If ambient temperatures
are outside this range, consult the equipment and fitting manufacturer for a specific
recommendation. Large diameter couplings may use a temperature specific fusion time
or a pre-heat cycle prior to fusion. Protect the fusion site in case of inclement weather
such as rain or snow.
Page 58 of 88
Figure 48: Electrofusion Preparation: Keep Pipe Warm and Protected
Installation Procedure
1. Clean pipe ends to remove dirt, mud, and other debris from pipe ends. Clean water
can be used for initial cleaning prior to scraping; however, the pipe surface must be clean
and dry before scraping. Check pipe surface and remove any embedded debris that may
cause damage to scraping tools. PIPE PREPARATION IS VERY CRITICAL TO THE
ELECTROFUSION PROCESS. CAREFUL ATTENTION MUST BE GIVEN TO PROPER
CLEANING AND SCRAPING PROCEDURES TO REMOVE CONTAMINATION AND
SURFACE OXIDATION FROM THE PIPE SURFACE.
Figure 49: Clean Pipe Ends Thoroughly
Page 59 of 88
2. Ensure that the pipe end has a square and even cut as close to 90° as possible. A
sling or strap can be used as a guide for marking pipe ends for straight cutting.
Figure 50: Cut Pipe Ends Square
3. Measure the total length of the coupler to be installed. Make a mark (with
recommended marker) from the pipe end that is half the total length of the coupler. This
mark is for stab depth purposes and will ensure that the pipe end is inserted into the
center of the coupler.
Figure 51: Mark Insertion Depth on the Pipe
Page 60 of 88
4. Measure the pipe ovality. The High/Low diameter difference should not exceed 2%. If
required, place a re-round clamp immediately outside the stab depth mark. Do not
scrape to remove high sides of oval pipe in order to relieve ovality.
Figure 52: Cut Pipe Ends Square
Measure for highest and lowest diameter points; use re-round clamps if necessary. Use
either a commercially available re-rounding device (Figure 53), or substitute fullencirclement-type metal rings (Figure 54).
Figure 53: Commercial Re-Rounding Device
Figure 54: Re-Rounding with Full-Encirclement Ring
Page 61 of 88
5. Scrape the outside of the pipe surface to remove oxidation and other contaminants.
Use a mechanical type scraping tool designed specifically for electrofusion preparation to
remove at least .014” (0.36 mm) from the pipe OD. Scrape the pipe surface until an outer
layer or “skin” has been removed to expose clean, virgin pipe material. Inspect the entire
circumference of the scraped area to ensure total scraping coverage. Do not touch the
scraped surface with your hands because it may introduce surface contamination.
Scraped pipe should conform to the dimensional recommendations of the fitting
manufacturer. Do not use abrasives such as grinders, emery cloth, or sandpaper.
Figure 55: Scraping
6. Do not touch the scraped pipe surface or the inside of the coupler as body oils and
other contaminates will compromise fusion joint performance. If the surfaces become
contaminated, clean thoroughly with a clean lint-free towel and 96% isopropyl alcohol and
allow to dry before assembling. Do not use alcohol with any additives other than water.
CAUTION: TO AVOID ALL POSSIBLE RECONTAMINATION OF THE COUPLING AND
PREPARED PIPE SURFACES DO NOT TOUCH THE FUSION SURFACES.
7. If coupler is to be pushed completely over one pipe end, scrape the pipe end for the
entire length of the coupler to prevent contamination of the coupler by sliding over unscraped pipe.
8. Install coupler onto the pipe ends so that the stab depth marks are aligned at the outer
edges of the coupler. The pipe ends may be beveled to allow for easier insertion into the
coupling. If necessary, use a rubber mallet (or metal hammer and wood blocks) to move
coupler onto pipe. Re-round clamps can be used as anchors for pulling couplers onto
pipe with mechanical assist devices such as a hand winch. Use care not to damage
internal wire or terminal pins. Leave plastic bag over coupler to prevent contamination
and debris from entering the open end.
Page 62 of 88
Figure 56: Installing Coupler on Pipe
9. Check pipe end alignment to ensure that there is no bind or stress exerted on the
coupling before or during fusion and until cooling time has elapsed. Support for the pipe
and coupling may be necessary to prevent stresses or sagging that may develop as heat
is applied during fusion.
10. Make sure the generator is operating normally before powering the control box.
Connect the control box leads to the coupler. Make sure that all connections and lead
adapter tips are properly sized and secure.
11. Scan the barcode to set the fusion time. Ensure that label information conforms to
scanned data. Observe the manufacturer’s procedure for pre-heating or temperature
specific fusion time. Start the fusion process. Do not leave unattended. Depending on
the coupling manufacturer, some couplings have multiple barcodes that correspond to
the ambient temperature or a separate pre-heat barcode that is used prior to fusing the
coupling. Follow the manufacturer’s recommendation for scanning the proper barcode.
Under no circumstances should a coupling fusion be made with any substance flowing
through the pipe or fusion area; fusion joint failure and possible electrical hazards could
occur. The fusion zone should be clean and dry before and during fusion.
Figure 57: Scanning the Bar Code
Page 63 of 88
12. After the fusion cycle is complete, verify fusion cycle completion is normal. Check
melt indicators if the coupling is so equipped. Note the cooling time and mark the time
when the clamping time has elapsed on the pipe. Additional information such as fusion
record ID number, control box serial number, etc. should also be recorded if required.
For couplers with dual fusion zones, repeat for both ends of the coupler.
Figure 58: Recording the Electrofusion Information
If a fusion cycle fault occurs, note the error code displayed by the control box and
proceed according to the manufacturer’s recommendation. In case of power interruption
(i.e. generator runs out of gas, leads are disconnected or any other power interruption
failure) consult the manufacturer’s instructions for re-fusion. Faults caused by any other
circumstances should not be re-fused.
13. Backfill and handling can be completed after the recommended minimum cooling time
has elapsed. The recommended cooling time is displayed by the control box after the
fusion cycle completes or can be found on the coupler label. Pressure leak testing can
be conducted after the recommended cooling time plus one hour has elapsed.
Page 64 of 88
Examination
The following are illustrations of acceptable and unacceptable electrofusion joints:
Figure 59: Good Fusion Joint – Fully Acceptable
Figure 60: Melt Out Unacceptable – Possible Causes: Pipe Ovality, Flat Spots, Undersized Pipe
and Binding
Page 65 of 88
Figure 61: Exposed Wire Unacceptable – Possible Causes: Pipe Ovality, Flat Spots, Undersized
Pipe and Binding
Figure 62: Short Stab Unacceptable – Possible Cause: Failure to Mark and Monitor Stab Depth
Page 66 of 88
Figure 63: Mis-Stab Unacceptable – Possible Cause: Failure to Mark and Monitor Stab Depth
Figure 64: Misalignment Unacceptable – Possible Cause: Inadequate Clamping or Restraint
during Fusion
Page 67 of 88
Figure 65: Mis-cut Unacceptable – Possible Cause: Failure to cut Pipe End Perpendicular to the
Axis of the Pipe
Figure 66: Gouges and Scratched Unacceptable – Possible Cause: Damage during
Transportation or Handling of the Pipe
Page 68 of 88
Figure 67: Poor Scrape Unacceptable – Possible Causes: Incorrect Scraper, Poorly Maintained
Scraper, Inadequate Number of Passes with Scraper and Ineffective Evaluation of Scraping
Figure 68: Poor Scrape Unacceptable – Possible Causes: Incorrect Scraper, Poorly Maintained
Scraper, Inadequate Number of Passes with Scraper and Ineffective Evaluation of Scraping
Page 69 of 88
Figure 69: Over Scrape Unacceptable – Possible Causes: Incorrect Scraper, Poorly Maintained
Scraper, Excessive Number of Passes with Scraper and Ineffective Evaluation of Scraping
Figure 70: Pipe Flat Spots Unacceptable – Possible Cause: Damage during Transportation or
Handling of the Pipe.
Page 70 of 88
Figure 71: Pipe Flat Spots Unacceptable – Possible Cause: Damage during Transportation or
Handling of the Pipe.
Figure 72: Pipe Out of Round Unacceptable - Possible Causes: Transportation or Storage
Damage.
See PPI Publication TN-34 for detailed instructions for:
•
•
•
•
Measuring Diameter with a Pi-Tape
Reading a Pi-Tape
Marking Pipe Ends for Square Cuts
Cutting Pipe Ends
Page 71 of 88
Transitions to Non-PE piping
Refer to PPI TN-36 Connecting HDPE Water Pipe to DI and PVC Piping Systems (2006)
for additional details.
MJ Adapter Connections to DI Fittings
MJ (mechanical joint) Adapters are manufactured in standard IPS and DIPS sizes for
connecting IPS sized or DIPS sized polyethylene pipe to mechanical joint fittings and
appurtenances that meet AWWA C111/ANSI A21.11. When connected, they seal against
leakage and restrain against pullout. No additional external clamps or tie rod devices are
required unless connected to an existing piping system.
In water systems that use ductile iron pipe (DIP), many valves are connected to pipe
using MJ Adapters. A typical MJ Adapter Kit is shown below in Figures 73 through 75.
Figure 73 : HDPE MJ Adapter Kit
Figure 74: MJ connection to typical gate valve with MJ ends
Figure 75: MJ Connection to DI fitting
Page 72 of 88
Refer to the fitting manufacturer’s installation instructions for joining MJ Adapters to DI
Fittings. In general, the procedure is to first attach the HDPE MJ Adapter to the HDPE
pipe line. Slip the Gland Ring over the pipe end and then butt fuse the HDPE MJ Adapter
to the end of the pipe using the Generic Butt Fusion Joining Procedure. Install the Gasket
over the MJ Adapter and align the fitting with the socket hub of the ductile iron fitting.
Lubricate the gasket, the end of the MJ adapter, and the inside of the socket hub with an
approved pipe lubricant meeting AWWA C111. Do not use soapy water. Insert the MJ
Adapter into the socket hub. Make sure it is evenly and completely seated in the socket
hub. The MJ Adapter and the socket hub must be aligned straight into each other. Insert
the gland bolts and run the nuts up finger-tight. Tighten the gland bolts evenly to the
fitting manufacturer’s recommended procedures. This connection is used with a large
number of DI fittings, some of which are shown in Figure 76.
Figure 76: Ductile Iron MJ Fittings
When connecting to a valve with an MJ connection, longer T-Bolts may be required. If
the T-Bolts that come with the kit are not long enough for the assembly, use a coupling
nut and Grade 5 all thread to make up the length required (Figure 77)
Figure 77 T-Bolt Extension
Page 73 of 88
Flanged Connection to DI Fittings
Use a flanged connection to join HDPE pipe to HDPE pipe in a close quarter tie-in or
when a piping section will require removal in the future. Flanged joints are also used to
attach HDPE pipe to valves or DI fittings. The parts for a flange connection are the HDPE
Flange Adapter, Back-Up Ring, Gaskets and Bolts, Nuts and Washers.
Flange Connections
Bolted Flange Joint Assemblies (BFJA) are used to connect PE flange adapters to PE
flange adapters, PE flange adapters to metal or plastic pipe flange connections, or PE
flange adapters to valves. The PE flange adapters are attached to PE pipe or PE fittings
using butt fusion or electrofusion. The components of the PE Bolted Flange Joint
Assembly are shown in Figure 78.
Figure 78 : Fange Connection Components
Align the flanges and back-up rings as shown above. The service pressure rating for the
back-up ring should meet or exceed the pressure service of the pipe.
See PPI TN-38 for more details on BFJA, including bolt-tightening patterns,
recommended bolt torques, and a Flange Checklist.
Gaskets are not normally required to seal PE to PE flange connections. When connecting
PE flanges to other materials, gaskets are often used. The gasket must be soft enough to
compress into small scratches in the flange surface but be internally reinforced to provide
sufficient resistance against radial extrusion to handle the pressure rating of the service.
Black and red rubber gaskets are satisfactory for applications of less than 100 psi. If
optional gaskets are used, consult with the gasket manufacturer about the proper type of
Page 74 of 88
gasket to use with PE flanges based on service conditions, chemicals exposure, pressure,
and the bolt torque required to seat and seal the soft gasket surface.
A flange connection is a “fully restrained joint”. No external restraint devices are needed.
Figure 79: Ductile Iron Tee with Flanged Outlet
Solid DI Sleeve Connections to HDPE pipe
Solid Sleeves are ductile iron fittings designed to connect DI / PVC pipe to other piping
materials including HDPE pipe. Most solid sleeves have a flange or MJ hub to attach to
the HDPE pipe. On the ductile iron pipe side, a Megalug flange is attached to the pipe
and a gasket is installed over the pipe and into the sleeve before bolting the Megalug to
the Sleeve flange. A standard HDPE MJ Adapter kit is used on the HDPE pipe side to
complete the assembly. Be sure to use the manufacturer’s recommended bolting
procedures for this assembly. (See Figure 80)
Figure 80: Solid DI Sleeve Connections to HDPE pipe
Page 75 of 88
HDPE Bell Adapters to DI or PVC Pipe End
There are HDPE Bell Adapters available, up to 24” IPS, that are machined to the
standard MJ Adapter internal configurations and have an external stainless steel backup
ring installed to ensure positive seal contact. This connection incorporates a back-up
flange behind the HDPE Adapter and a Mega-Lug flange on the PVC or DI pipe.
Standard MJ seals and bolts are used to connect the assembly.
Figure 81: HDPE Bell Adapter to DI or PVC Pipe End
Dismantling Joint
Dismantling Joints simplify installations and replacement of flanged fittings in retrofitting
applications. Dismantling Joints provide the solution for adding, repairing or replacing
flanged fittings within a flanged pipe system. In all applications, a restrained dismantling
joint is required unless otherwise specified.
Adjustable, slip joint design accommodates either wide gaps or close quarter installations
and eliminates the need for precise measurements between flange connections.
Available in sizes 2” and larger, for ductile iron or flanged HDPE piping systems,
Standard flanges AWWA C207 Class D Flange. Other flanges are available upon
request.
Figure 82: Dismantling Joint
Page 76 of 88
Mechanical Connection – HPDE to PVC
This coupling provides the convenience of bolted mechanical assembly of plain-end PVC
pipe to plain-end high density polyethylene (HDPE) pipe without special adapters.
Integral rows of teeth on the HDPE side grip the pipe, and diamond-shaped teeth safely
grip the PVC pipe as you tighten the bolts to achieve metal-to-metal contact at the pads.
This coupling is available in IPS pipe sizes up to 8” IPS. When connecting HDPE pipe to
a mechanical coupling, restrain the fitting unless otherwise stated by the coupling
manufacturer.
Figure 83: Mechanical Connection – HPDE to PVC
Figure 84: Mechanical Connection – HPDE to PVC
Stiffener Installation Guidelines
When connecting HDPE pipe to the bell end of a ductile iron or PVC pipe, it is
recommended that a stiffener be added to the ID of the pipe to ensure a good connection
between the seal in the bell and the pipe. Check the pipe for toe-in. If it is severe, cut the
pipe back to remove it. If possible, have some means to press the stiffener into place.
Lubricant will minimize the insertion effort required. A detergent or silicone grease is
recommended.
There are two types of stiffeners available on the market. One type is a fixed diameter
stiffener that matches the ID of the pipe being repaired (see Figure 85). Caution should
be used when using fixed diameter stiffeners to be sure they are sized properly to obtain
Page 77 of 88
the proper press fit in the HDPE pipe. These are mainly used with smaller diameter
service lines.
Figure 85: Fixed Diameter Stiffener for HDPE pipe
The other type of stiffener is a split ring stiffener (see Figure 86). These are normally
made of stainless steel and provide a thin yet strong pipe wall reinforcement without
disturbing the flow characteristic of the pipe.
Figure 86: Split Ring Stiffener for HDPE pipe
Figure 87: Install Split Ring Stiffener in HDPE pipe
Page 78 of 88
Transition from PE Pressure Pipe to Gasket Jointed Pipe:
Restraint Methods
A heat-fused PE piping system creates a monolithic structure which does not require
thrust blocks to keep heat-fused PE fittings from separating from the PE pipe. When the
pipe is pressurized two significant internal forces are present in the pipe; end thrust from
bends or end caps is transmitted through the pipe as a longitudinal force and hoop stress
(hoop thrust) occurs due to the internal pressure. Bell and spigot piping systems must
have thrust blocks or restrained joints to prevent separation of pipe from fittings when
there is a change of direction and where connected to fused PE pipe.
The longitudinal force tends to grow the pipe length while the hoop thrust expands the
diameter (ever so slightly) and tends to contract the pipe length in proportion to Poisson’s
Ratio. In an all-PE pipe system the length effects from these two forces tend to cancel
each other out. As a result, buried PE pipes are self-restrained and require no thrust
blocking. A different situation occurs when PE pipe transitions to a type of pipe material
that is joined by non-restrained gasket joints. The longitudinal force may no longer be
present. The result is that hoop expansion is unbalanced and will cause contraction of the
PE pipe. This contraction can result in pulling apart of gasket joints in line with the PE
pipe.
Generally, it is necessary to anchor the ends of a PE pipeline that transitions into an
unrestrained gasket jointed pipe system. If the gasket joints are restrained, anchoring is
unnecessary. Restrained joints include butt fusions, electrofusions, socket fusions, bolted
flange connections, MJ Adapter connections or other restrained mechanical connections.
If an unrestrained bell and spigot or mechanical sleeve joint is in-line with the restrained
section, the cumulative Poisson effect shortening and possible thermal expansion /
contraction effect may cause in-line unrestrained joints or connections to be pulled apart.
Therefore, unrestrained joints or mechanical connections that are in-line with fully
restrained HDPE pipe must be restrained or otherwise protected against pullout disjoining.
The transition of PE pipe to DI and PVC pipe is discussed in this manual and in TN-36,
General Guidelines for Connecting PE Potable Water Pressure Pipes to DI and PVC
Piping Systems.
Restraint Methods
Wall Anchor
A typical pullout prevention technique is to restrain the transition connection by butt
fusing a Wall Anchor in the HDPE pipeline close to the connection and pouring a
concrete anchor around it as shown in Figure 88. Refer to the recommendations in Table
10 on anchor size and pull out loads.
Page 79 of 88
Figure 88: Wall Anchor Diagram
Mechanical Restraint Anchor
A typical pullout prevention technique is to restrain the transition connection and several
non-PE bell and spigot joints down line from the transition connection as shown in Figure
89.
Figure 89: Mechanical Restraint of existing pipeline when attaching to HDPE pipe
Buried Poly Anchor
This product is designed to be buried in the soil and resist any linear movement that
might occur with polyethylene pipe without pouring a concrete anchor around it. In order
to mobilize its buried anchoring restraint action, the Poly Anchor simply requires at least
85% standard Proctor Density soil compaction in-situ to the top of the plate. Consult with
the fitting manufacturer to ensure that the anchor size is adequate for the bearing
capacity of the soil.
Page 80 of 88
Figure 90: Buried Poly Anchor
Design of Anchors and Thrust Blocks
Thrust blocks are not required at restrained connections. Butt fusion welds, electrofusion
welds, side wall fusion welds, mechanical joint connections and flanged connections are
considered restrained connections.
Thrust blocks shall be used to support fire hydrants. Concrete pads shall be used under
metal valves to reduce settlement.
Anchor blocks shall be used when PE pipe connects to other pipe materials that use bell
and spigot connections unless these connections are restrained for a sufficient number of
joints to prevent pullout. See Figure 27 for typical connection.
Table 10: Approximate Soil Bearing Strengths
Soil Type
lbs/sq ft
Muck
Wet Clay/soft clay
Hard Clay
Sand
Sand and Gravel
Sand and gravel compacted
Crushed Stone
Hard Pan
0
500
1,500
1,000
1,500
2,000
2,000
4,000
For additional presumptive bearing capacities, see the Uniform Building Code. Caution!
Soil support strength varies greatly. Actual geotechnical measurements are needed to
determine actual support strength.
Page 81 of 88
The design of an anchor is based on the force at the end of the PE pipe. The force can
be caused by changes in temperature, soil movement or Poisson Effect. The Poisson
Effect occurs when the pipeline is pressurized and causes the PE pipe to contract in
length. Restraining the pipe with an anchor causes a thrust force to occur on the anchor.
The table below gives the thrust force when the pipe is pressurized to 1.5 times its rated
pressure. The 1.5 overpressure could occur due to surge or pressure testing. See
Chapter 7, Appendix 3 of the PPI Handbook of Polyethylene Pipe for more discussion on
the Poisson Effect.
When a pipeline is properly installed, soil movement is usually a minor force and can be
ignored. The temperature of water in most pipelines changes seasonally and the resulting
force is low. For example, most pipelines see a maximum temperature change of less
than 20 degrees in a month. This will result in a thrust force of less than 25% of the value
for any given pipe/DR in Table 10. In fact, for small thermal changes the soil is often
sufficient to restrain contraction.
Table 11: Longitudinal Thrust Forces Caused by Poisson Effect for Pipe Pressurized to 1.5
times its Pressure Class
Nominal
Size,
inches
Actual
DIPS Size,
inches
DR 17
PC100
lbs
DR 13.5
PC130
lbs
DR 11
PC160
lbs
4
6
8
10
12
4.80
6.90
9.05
11.10
13.20
1,463
3,173
5,378
8,355
11,753
1,835
3,977
6,741
10,472
14,731
2,208
4,786
8,112
12,602
17,727
Note: Poisson force based on a pressure test or surge pressure to 1.5 times the pipe
pressure rating
An anchor block stops the movement of the pipe end by transferring the force from the
PE pipe to the soil. To determine the size of an anchor block, first determine the soil
bearing strength. From the table “Approximate Soil Bearing Strengths”, assume that the
sand on the project has a bearing strength of 1,000 per square foot.
If we are working with a 12” DIPS DR 11 pipe and will be hydrotesting the pipe at 240 psi,
then the Poisson Effect force is calculated to be 17,727 lbs. The calculation of block size
is:
17,727 lbs/1000 lbs/sq foot = 17.7 sq feet of area in contact with the soil.
Apply a safety factor of 1.5 to the block, 17.7 x 1.5 = 26.6 sq ft of contact area required.
The safety factor accounts for variations in the presumptive soil values, construction, and
temperature forces.
Page 82 of 88
To size the block, the area of the pipe must be subtracted from the from the block size. If
a 5.5 ft by 5.5 ft block is used, the area is 30.25 sq ft. The area of the pipe is 0.95 sq ft.
The effective area of the block less the area of the pipe is:
30.25 - 0.95 = 29.3 sq ft.
This is more than the 26.6 sq feet needed and is acceptable. The block size has a safety
factor of 1.5 as indicated. A drawing of a typical anchor block is shown in Figure 91.
Figure 91: Reinforced Anchor Configuration
Page 83 of 88
Quality Assurance and Field Testing
Leak Testing – Considerations for All Procedures
The intent of leak testing is to find unacceptable joint leakage in pressure piping systems.
If leaks exist, they may manifest themselves by leakage or rupture. Leak tests of
pressure systems generally involve filling the system or a section of the system with a
liquid or gaseous fluid and applying internal pressure to determine resistance to leakage.
Safety is of paramount importance when conducting pressurized internal fluid leak tests.
Although routinely performed, leak tests may be the very first time a newly installed
system or repair will be subjected to stress.
•
•
•
•
•
•
•
•
Even at relatively low internal pressures, leak testing with a pressurized
internal fluid can generate very high forces that can be dangerous or even fatal
if suddenly released by the failure of a joint or system component or a testing
component.
Always take safety precautions when conducting pressurized fluid leak tests.
Restrain pipe, components and test equipment against movement in the event
of failure. Joints may be exposed for leakage inspection provided that restraint
is maintained.
Keep persons not involved in testing a safe distance away while testing is
being conducted.
Liquids such as water are preferred as test fluids because less energy is
released if something in the test section fails catastrophically. During a
pressure leak test, energy (internal pressure) is applied to stress the test
section. If the test fluid is an incompressible liquid such as water, the energy
applied to pressurize the liquid transfers primarily to the pipe and components
in the test section. However, if the test fluid is a compressible gas, energy is
applied to compress the gas as well as to stress the piping section. If a
catastrophic failure occurs during a pressurized liquid leak test, the overall
applied energy is much lower and energy dissipation is rapid.
However, if catastrophic failure occurs during a pressurized gas test, energy
release is many times greater, much more forceful and longer duration.
Where hydrostatic testing is specified, never substitute compressed gas
(pneumatic) for liquid (hydrostatic) testing.
Maximum leak test pressure is temperature dependent. If possible, test fluid
and test section temperatures should be less than 80°F (27°C). At
temperatures above 80°F (27°C), reduced test pressure is required. Contact
the pipe manufacturer for technical assistance with elevated temperature
pressure reduction. Sunlight heating of exposed PE pipe, especially black PE
pipe, can result in high pipe temperature.
Page 84 of 88
•
•
Before applying test pressure, allow time for the test fluid and the test section
to temperature equalize. Hydrostatic leak tests typically use cooler liquids so
the liquid-filled test section will tend to equalize to a lower temperature near
test liquid temperature. Compressed gases used in pneumatic leak tests do not
have similar temperature lowering effects, so it is more likely that test
pressures will have to be reduced due to elevated temperature effects when
conducting pneumatic leak tests. Bursting can result if test pressure is not
reduced for elevated test section temperature.
Leak Test Pressure and Duration – The maximum allowable leak test pressure
and leak test time including initial expansion, and time at leak test pressure
should be in accordance with the following equation and Tables 12 and 13.
P(T ) =
2 × HDS × Ft × HT
(DR − 1)
Where:
P (T) = Leak Test Pressure, psig, for Leak Test Time, T (from Table 11)
T = Leak Test Time, hours
HDS = PE material hydrostatic design stress for water at 73°F (23°C), psi
F t = PE material elevated temperature reduction factor
H T = Leak test duration factor for leak test time, T
DR = Pipe dimension ratio
Table 12: Leak Test Duration Factor, H T
Leak Test Pressure P (T)
(psig)
P (8)
P (48)
P (120)
Leak Test Time
T (hours)
≤8
≤ 48
≤ 120
Leak Duration Factor H T
1.5
1.25
1.00
Table 13: PE Material Hydrostatic Design Stress (HDS)
PE Material Designation Code
PE2708
PE3608
PE3710
PE4710
HDS for Water at 73°F (psi)
800
800
1000
1000
Page 85 of 88
Maintenance and Repair
Refer to PPI TN-35 Repairing Buried HDPE Potable Water Pressure Pipe (2006) for
additional repair options.
Electrofusion Repair
Figure 92: Electrofusion Repair Schematic
Figure 93: Electrofusion Field Repair
Page 86 of 88
Flange Repair
Figure 94: Flange Repair Schematic
Mechanical Repair
Figure 95: Mechanical Repair Sleeve
Page 87 of 88
Repairing HDPE Water Service Lines with Mechanical
Couplings
Mechanical couplings provide a quick and easy solution for the repair of HDPE service
lines. To repair a section of damaged service line tubing, first,shut off the flow of water
via control valve (i.e. curb stop, meter yoke valve, etc.) or by squeezing off the HDPE
service tubing using your company’s approved squeeze-off procedure. Then simply cut
out the section of damaged tubing and replace it with a new HDPE section between two
mechanical couplings. Also, there are mechanical couplings available that offer different
prefabricated repair lengths, allowing you to remove the damaged HDPE and replace it
with a single longer mechanical coupling. Figure 96 depicts an insert type repair coupling.
Figure 96 – Repair Coupling
Page 88 of 88
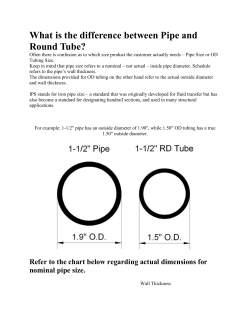

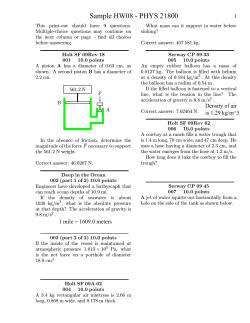


© Copyright 2026