
Document 308383
St. Elizabeth Catholic School - Kindergarten Addition Baird Sampson Neuert Project No. 1307 Project Manual Title Page Section 00 01 01 Page 1 March 4, 2014 A PROJECT MANUAL Mechanical and Electrical Specifications Issued for Tender St. Elizabeth Catholic School Kindergarten Addition 5 Redcar Avenue, Etobicoke, Ontario Project No. 1307 Tender No. P-025-14 March 4, 2014 St. Elizabeth Catholic School - Kindergarten Addition Baird Sampson Neuert Project No. 1307 Table of Contents Section 00 01 05 Page 1 March 4, 2014 DR - indicates entity responsible for preparation of listed documents (see Section 00 01 10) Document Identification DR Pgs Issued PROJECT MANUAL - VOLUME 1 DIVISION 00 - PROCUREMENT AND CONTRACTING REQUIREMENTS INTRODUCTORY INFORMATION 00 01 01 Project Manual Title Page ................................................ A 00 01 05 Table of Contents ............................................................ A 00 01 10 Document Responsibility and Project Directory................ A 1 4 3 PROCUREMENT REQUIREMENTS 00 21 13 Instructions to Bidders .................................................... O 15 00 31 00 Information Available for Review...................................... A 1 00 41 13 Base Bid Form ................................................................ O 3 00 43 36 Supplementary Bid Form – List of Subcontractors .......... O 1 Amendments to CCDC2-2008 Supplementary Conditions....................................................................... O 33 March 4, 2014 March 4, 2014 March 4, 2014 March 4, 2014 March 4, 2014 March 4, 2014 March 4, 2014 June 2009 DIVISION 01 - GENERAL REQUIREMENTS 01 10 00 01 21 00 01 25 00 01 26 00 01 31 13 01 31 19 01 32 16 01 32 33 01 33 00 01 35 13 01 45 00 01 50 00 01 56 23 01 60 00 01 73 00 01 73 29 01 74 13 01 77 00 01 78 36 General Instructions......................................................... A Allowances ...................................................................... A Product Substitution Procedures ..................................... A Requests for Interpretation............................................... A RFI Form ......................................................................... A Coordination ................................................................... A Project Meetings .............................................................. A Construction Progress Documentation............................. A Photographic Documentation........................................... A Submittals........................................................................ A Special Procedures for Work in Occupied Buildings......... A Quality Control ................................................................. A Temporary Facilities and Controls ................................... A Hoarding ......................................................................... A Products and Workmanship ............................................ A Site Layout....................................................................... L Cutting and Patching ....................................................... A Progressive Cleaning ...................................................... A Contract Closeout Procedures and Submittals ................ A Warranties ....................................................................... A 8 2 2 2 1 2 5 2 1 8 7 4 7 2 6 2 2 2 8 1 March 4, 2014 March 4, 2014 March 4, 2014 March 4, 2014 not dated March 4, 2014 March 4, 2014 March 4, 2014 March 4, 2014 March 4, 2014 March 4, 2014 March 4, 2014 March 4, 2014 March 4, 2014 March 4, 2014 not dated March 4, 2014 March 4, 2014 March 4, 2014 March 4, 2014 5 2 March 4, 2014 October 5, 2013 DIVISION 02 - EXISTING CONDITIONS 02 41 16 02 41 19 Demolition........................................................................ A Structural Alterations........................................................ S St. Elizabeth Catholic School - Kindergarten Addition Baird Sampson Neuert Project No. 1307 Table of Contents Section 00 01 05 Page 2 March 4, 2014 DR - indicates entity responsible for preparation of listed documents (see Section 00 01 10) Document Identification 02 41 20 02 41 21 DR Pgs Shrub and Tree Preservation ........................................... L Site Demolition and Removals ......................................... L Issued 1 2 not dated not dated Concrete Formwork ......................................................... S 6 Concrete Reinforcement .................................................. S 6 Cast-in-Place Concrete.................................................... S 11 Concrete Floor Finishing ................................................. A 4 Precast Concrete Slabs ................................................... S 7 Architectural Precast Concrete Fabrications .................... A 4 October 5, 2013 October 5, 2013 October 5, 2013 March 4, 2014 October 5, 2013 March 4, 2014 DIVISION 03 - CONCRETE 03 10 00 03 20 00 03 30 00 03 35 00 03 41 00 03 48 00 DIVISION 04 - MASONRY 04 05 00 04 05 13 04 05 19 04 05 23 04 21 00 04 22 00 04 43 24 Masonry Procedures ....................................................... A Mortar and Grout for Masonry ......................................... A Masonry Reinforcement and Connectors ........................ A Masonry Accessories ...................................................... A Brick Masonry Units ........................................................ A Concrete Masonry Units ................................................. A Stone Work...................................................................... L 9 3 3 4 1 2 1 March 4, 2014 March 4, 2014 March 4, 2014 March 4, 2014 March 4, 2014 March 4, 2014 not dated 9 5 7 1 October 5, 2013 March 4, 2014 March 4, 2014 not dated 3 2 9 March 4, 2014 not dated March 4, 2014 Thermal Insulation .......................................................... A 4 Sprayed-Applied Foamed-in-Place Air Barrier Insulation . A 5 Below-Grade Vapour Barrier............................................ A 3 Air Barrier Systems.......................................................... A 4 Glass Fibre Concrete Panel Cladding ............................. A 6 Built-Up Asphalt Roofing.................................................. A 13 Metal Flashing ................................................................ A 6 Firestopping and Smoke Seals ....................................... A 6 Joint Sealants ................................................................. A 8 March 4, 2014 March 4, 2014 March 4, 2014 March 4, 2014 March 4, 2014 March 4, 2014 March 4, 2014 March 4, 2014 March 4, 2014 DIVISION 05 - METALS 05 12 00 05 41 13 05 50 00 05 52 14 Structural Steel ................................................................ S Wind Load-Bearing Metal Studs ...................................... A Metal Fabrications ........................................................... A Steel Bollard .................................................................... L DIVISION 06 - WOOD, PLASTICS, AND COMPOSITES 06 10 53 06 10 63 06 40 00 Rough Carpentry ............................................................ A Timber and Wood Work ................................................... L Architectural Woodwork .................................................. A DIVISION 07 - THERMAL AND MOISTURE PROTECTION 07 21 00 07 21 29 07 26 16 07 27 00 07 46 46 07 51 13 07 62 00 07 84 00 07 92 00 St. Elizabeth Catholic School - Kindergarten Addition Baird Sampson Neuert Project No. 1307 Table of Contents Section 00 01 05 Page 3 March 4, 2014 DR - indicates entity responsible for preparation of listed documents (see Section 00 01 10) Document Identification DR Pgs Issued DIVISION 08 - OPENINGS 08 11 13 08 14 00 08 46 00 08 71 00 08 80 00 Steel Doors and Frames .................................................. A Flush Wood Doors ........................................................... A Aluminum Window-Wall and Window Systems ................ A Door Hardware ................................................................H Schedule of Finishing Hardware ......................................H Hardware Product Data Sheets........................................H Glass and Glazing .......................................................... A 11 5 16 10 11 38 10 March 4, 2014 March 4, 2014 March 4, 2014 not dated December 2, 2013 not dated March 4, 2014 Metal Supports for Gypsum and Cement Board............... A 7 Gypsum Board................................................................. A 12 Tiling ............................................................................... A 8 Acoustical Tile Ceiling Systems ....................................... A 5 Specialty Acoustic Components....................................... A 3 Resilient Base.................................................................. A 3 Linoleum Tile Flooring ..................................................... A 5 Epoxy Floor Coating ........................................................ A 7 Painting............................................................................ A 8 March 4, 2014 March 4, 2014 March 4, 2014 March 4, 2014 March 4, 2014 March 4, 2014 March 4, 2014 March 4, 2014 March 4, 2014 DIVISION 09 - FINISHES 09 22 00 09 29 00 09 31 00 09 51 23 09 54 40 09 65 13 09 65 16 09 67 00 09 91 00 DIVISION 10 - SPECIALTIES 10 11 00 10 14 24 10 28 00 Visual Display Surfaces .................................................. A Chalkboard Art Wall ......................................................... L Washroom Accessories .................................................. A 4 1 3 March 4, 2014 not dated March 4, 2014 4 March 4, 2014 Preparation of Subgrade..................................................C 9 Site Grading.....................................................................C 6 Excavation and Backfill .................................................... A 4 Shoring and Timbering.....................................................C 2 Excavation, Trenching and Backfilling..............................C 12 not dated not dated March 4, 2014 not dated not dated DIVISION 12 - FURNISHINGS 12 24 13 Roller Window Shades..................................................... A DIVISION 31 - EARTHWORK 31 13 10 31 22 13 31 23 00 31 23 31 31 23 33 DIVISION 32 - EXTERIOR IMPROVEMENTS 32 12 16 32 13 13 32 31 13 32 91 13 32 91 21 32 92 23 32 93 00 Asphalt Paving................................................................. L Exterior Concrete............................................................. L Chain Link Fencing .......................................................... L Soil Preparation for Planting Areas .................................. L Topsoil and Finish Grading .............................................. L Sodding ........................................................................... L Trees, Shrubs and Grasses ............................................. L 4 2 2 1 2 2 4 not dated not dated not dated not dated not dated not dated not dated St. Elizabeth Catholic School - Kindergarten Addition Baird Sampson Neuert Project No. 1307 Table of Contents Section 00 01 05 Page 4 March 4, 2014 DR - indicates entity responsible for preparation of listed documents (see Section 00 01 10) Document Identification DR Pgs Issued DIVISION 33 - UTILITIES 33 05 14 33 31 13 33 46 00 33 46 13 Manholes and Catchbasins..............................................C Pipe Sewers ....................................................................C Sub-Drainage................................................................... L Foundation Drainage ...................................................... A 2 4 2 3 not dated not dated not dated March 4, 2014 Schedule A – Scope of Work Selected Asbestos Abatement .......... AC 5 Asbestos Abatement Type 1 – Minimum Precautions ... AC 7 Asbestos Abatement Type 2 – Intermediate Precautions................................................................... AC 11 Asbestos Abatement Type 3 – Maximum Precautions .. AC 14 October 2013 October 2013 ATTACHMENTS October 2013 October 2013 PROJECT MANUAL - VOLUME 2 DIVISION 00 - PROCUREMENT AND CONTRACTING REQUIREMENTS INTRODUCTORY INFORMATION 00 01 01 Project Manual Title Page ................................................ A 00 01 05 Table of Contents ............................................................ A 00 01 10 Document Responsibility and Project Directory................ A 1 4 2 March 4, 2014 March 4, 2014 March 4, 2014 Refer to Mechanical Specification for Index ...................................... M299 March 3, 2014 DIVISIONS 21, 22, AND 23 FIRE SUPPRESSION, PLUMBING AND HVAC DIVISIONS 26, 27, AND 28 – ELECTRICAL, COMMUNICATIONS, AND ELECTRONIC SAFETY AND SECURITY Refer to Electrical Specification for Index ........................................... E204 END OF SECTION March 3, 2014 St. Elizabeth Catholic School - Kindergarten Addition Baird Sampson Neuert Project No. 1307 Document Responsibility and Project Directory 1.1 .1 .2 Document Responsibility Refer to Project Manual, Section 00 01 05 - Table of Contents, for indication of document responsibility (DR). Abbreviations for entity responsible for document preparation are as follows: .1 A - Denotes documents prepared by Architect. .2 AC - Denotes documents prepared by Abatement Consultant .3 E - Denotes documents prepared by Electrical Engineer. .4 H - Denotes documents prepared by Architectural Hardware Consultant. .5 L - Denotes documents prepared by Landscape/Civil Architect. .6 M - Denotes documents prepared by Mechanical Engineer. .7 O - Denotes documents prepared by Owner. .8 S - Denotes documents prepared by Structural Engineer. Professional seals if applied next to company names in the project directory (below) govern only those specification sections and schedules identified by the corresponding document responsibility (DR) abbreviation in Section 00 01 10. .1 1.2 .1 With regard to Section 00 31 00: The architect’s seal governs only Section 00 31 00 proper, and not the documents listed therein. Project Directory Owner: Toronto Catholic District School Board 80 Sheppard Avenue East Toronto, Ontario M2N 6E8 Tel: 416-222-8282 ext. 2476 .2 Section 00 01 10 Page 1 March 4, 2014 Architect (the Consultant): Baird Sampson Neuert Architects 317 Adelaide Street West, Suite 1004 Toronto, Ontario M5V 1P9 Tel: 416-363-8877 Fax: 416-363-4029 St. Elizabeth Catholic School - Kindergarten Addition Baird Sampson Neuert Project No. 1307 Document Responsibility and Project Directory 1.3 .1 Project Directory – Sub Consultant’s Employed by Architect (the Consultant): Structural Engineer: Blackwell Bowick Partnership Limited 19 Duncan Street, Suite 405 Toronto, Ontario M5H 3H1 Tel: 416-593-5300 Fax: 416-593-4840 .2 Mechanical Engineer: Enso Systems Inc. 5700 Yonge Street, Suite 200 Toronto, Ontario M2M 4K2 Tel: 416-410-9865 .3 Electrical Engineer: Enso Systems Inc. 5700 Yonge Street, Suite 200 Toronto, Ontario M2M 4K2 Tel: 416-410-9865 .4 Landscape/Civil Architect: JSW+ Associates 20 Mural Street, Unit 10 Richmond Hill, Ontario L4B 1K3 .5 Section 00 01 10 Page 2 March 4, 2014 Tel: 905-889-8100 ext. 237 Architectural Hardware Consultant: Trillium Architectural Products Ltd. 52 Prince Andrew Place Toronto, Ontario M3C 2H4 Tel: 647-529-1288 Fax: 416-391-5065 M: 416-200-6643 [email protected] St. Elizabeth Catholic School - Kindergarten Addition Baird Sampson Neuert Project No. 1307 Document Responsibility and Project Directory 1.4 .1 Project Directory – Sub Consultant’s Employed by Owner: Abatement Consultant: Golder Associates Ltd. 6925 Century Avenue Mississauga, Ontario L5N 7K2 Tel: 1-905-567-4444 END OF SECTION Section 00 01 10 Page 3 March 4, 2014 Mechanical Specifications for Addition to St. Elizabeth Catholic School 5 Redcar Avenue, Toronto, Ontario ENSO Systems Inc. 5700 Yonge Street, Suite 200 Toronto, Ontario, M2M 4K2 Tel/Fax: (416) 410-9865 Email: [email protected] March 3, 2014 Project: 865 ENSO Systems Inc. #865 St Elizabeth C.S. – Full Day Kindergarten Addition Fire Protection Specifications Page 1 INDEX FOR DIVISION 21 Section Title 210000 210001 083113 104413 104416 210513 210517 210518 210523 210529 220548 Index General Conditions Access Door and Frames Fire Protection Cabinets Fire Extinguishers Common Motor Requirements for Fire Pumps Sleeves and Sleeve Seals for Fire Protection Piping Escutcheons for Fire Protection Piping General-Duty Valves for Water-based Fire-Suppression Piping Hangers and Supports for Fire Protection Piping & Equipment Vibration and Seismic Controls for Fire Protection Piping & Equipment Identification for Fire Protection Piping & Equipment Fire Department Connections Fire-Suppression Standpipes Fire-Suppression Hoses and Nozzles Wet-Pipe Sprinkler Systems 210553 211119 211200 211213 211313 Page END OF INDEX March 3, 2014 ESI# 865 1 2 2 6 7 8 9 12 13 16 22 32 34 34 41 42 ENSO Systems Inc. #865 St Elizabeth C.S. – Full Day Kindergarten Addition Fire Protection Specifications Page 2 SECTION 210001 – GENERAL CONDITIONS General 1.1 1.2 Comply with the drawings, all specification sections including Division 00, 01, 02, 21, 22, 23 and 26, and all documents referred to therein. The Mechanical work is divided into Divisions and Subsections as follows: 1.3 1.4 Division 22 – Plumbing Systems, and Division 23 – HVAC Systems. Subsections are in order, but may not be numbered consecutively. Refer to the Index at each Division and page numbers. Refer specifically to Division 22, Section 220001 for General Conditions applying to this Division. SECTION 083113 - ACCESS DOORS AND FRAMES PART 1 - GENERAL 1.1 A. 1.2 A. SUMMARY Section Includes: 1. Access doors and frames for walls and ceilings. 2. Floor access doors and frames. ACTION SUBMITTALS Product Data: For each type of product. 1. B. Shop Drawings: 1. 2. C. D. Include construction details, fire ratings, materials, individual components and profiles, and finishes. Include plans, elevations, sections, details, and attachments to other work. Detail fabrication and installation of access doors and frames for each type of substrate. Samples: For each door face material, at least 75x125mm (3x5’’) in size, in specified finish, when requested. Product Schedule: Provide complete access door and frame schedule, including types, locations, sizes, latching or locking provisions, and other data pertinent to installation. PART 2 - PRODUCTS 2.1 A. 2.2 A. B. PERFORMANCE REQUIREMENTS Fire-Rated Access Doors and Frames: Units complying with CAN/ULC S101, OBC specified edition, that are identical to access door and frame assemblies tested for firetest-response characteristics according to the following test method and that are listed and labeled by ULC or another testing and inspecting agency acceptable to authorities having jurisdiction. ACCESS DOORS AND FRAMES FOR WALLS AND CEILINGS Source Limitations: Obtain each type of access door and frame from single source from single manufacturer. Flush Access Doors with Concealed Flanges: ENSO Systems Inc. #865 St Elizabeth C.S. – Full Day Kindergarten Addition 1. 2. 3. 4. Assembly Description: Fabricate door to fit flush to frame. Provide frame with gypsum board beads for concealed flange installation. Locations: Wall and ceiling. Door Size: minimum 300x300 (12x12’’) to 900x900mm (24x24’’) to suit application. Metallic-Coated Steel Sheet for Door: Nominal 0.064 inch (1.63 mm), 16 gage. a. 5. C. 2. 3. 4. 5. 6. Frame Material: Same material, thickness, and finish as door. Hinges: Continuous for entire length of door. Hardware: Latch unless noted to be lockable on the drawings. Assembly Description: Fabricate door to fit flush to frame, with a core of mineralfiber insulation enclosed in sheet metal. Provide self-latching door with automatic closer and interior latch release. Provide frame with gypsum board beads for concealed flange installation in ceilings and exposed flange for drywall partitions unless concealed flanges are requested by the Architect. Locations: Wall and ceiling. Door Size: minimum 300x300 (12x12’’) to 900x900mm (24x24’’) to suit application. Fire-Resistance Rating: Not less than that of construction assembly into which the door is being inserted to a minimum of 2 hours. Temperature-Rise Rating: 450OF (250OC) at the end of 30 minutes. Metallic-Coated Steel Sheet for Door: Nominal 0.064 inch (1.63 mm), 16 gage. a. 7. 8. 9. 10. Finish: No. 2b. Frame Material: Same material, thickness, and finish as door. Hinges: Continuous for entire length of door. Hardware: Latch unless noted to be lockable on the drawings. Hardware: 1. 2. A. B. Finish: factory prime where surface is to be painted by General Trades or factory finish enameled white, subject to Architect’s approval, for areas that will not be painted by General Trades. Stainless-Steel Sheet for Door: Nominal 0.062 inch (1.59 mm), 16 gage. a. 2.3 Finish: No. 2b. Fire-Rated, Flush Access Doors with Concealed Flanges FAP: 1. D. Finish: factory prime where surface is to be painted by General Trades or factory finish enameled white, subject to Architect’s approval, for areas that will not be painted by General Trades. Stainless-Steel Sheet for Door: Nominal 0.062 inch (1.59 mm), 16 gage. a. 6. 7. 8. Fire Protection Specifications Page 3 Latch: Cam latch operated by screwdriver. Lock: Mortise cylinder. MATERIALS Steel Plates, Shapes, and Bars: ASTM A 36/A 36M. Rolled-Steel Floor Plate: ASTM A 786/A 786M, rolled from plate complying with ASTM A 36/A 36M or ASTM A 283/A 283M, Grade C or D. ENSO Systems Inc. #865 St Elizabeth C.S. – Full Day Kindergarten Addition C. D. E. F. G. H. 2.4 A. B. C. Steel Sheet: Uncoated or electrolytic zinc coated, ASTM A 879/A 879M, with coldrolled steel sheet substrate complying with ASTM A 1008/A 1008M, Commercial Steel (CS), exposed. Metallic-Coated Steel Sheet: ASTM A 653/A 653M, Commercial Steel (CS), Type B; with minimum G60 (Z180) or A60 (ZF180) metallic coating. Rolled-Stainless-Steel Floor Plate: ASTM A 793, manufacturer's standard finish. Stainless-Steel Sheet, Strip, Plate, and Flat Bars: ASTM A 666, Type 316. Remove tool and die marks and stretch lines or blend into finish. Frame Anchors: Same type as door face. Inserts, Bolts, and Anchor Fasteners: Hot-dip galvanized steel according to ASTM A 153/A 153M or ASTM F 2329. FABRICATION General: Provide access door and frame assemblies manufactured as integral units ready for installation. Metal Surfaces: For metal surfaces exposed to view in the completed Work, provide materials with smooth, flat surfaces without blemishes. Do not use materials with exposed pitting, seam marks, roller marks, rolled trade names, or roughness. Doors and Frames: Grind exposed welds smooth and flush with adjacent surfaces. Furnish attachment devices and fasteners of type required to secure access doors to types of supports indicated. 1. 2. 3. 4. D. 2.5 A. B. For recessed doors with plaster infill, provide self-furring expanded metal lath attached to door panel. Latching Mechanisms: Furnish number required to hold doors in flush, smooth plane when closed. 1. 2. F. For concealed flanges with drywall bead, provide edge trim for gypsum board or gypsum base securely attached to perimeter of frames. For concealed flanges with plaster bead for full-bed plaster applications, provide zinc-coated expanded metal lath and exposed casing bead welded to perimeter of frames. Provide mounting holes in frames for attachment of units to metal or wood framing. Provide mounting holes in frame for attachment of masonry anchors. Recessed Access Doors: Form face of panel to provide recess for application of applied finish. Reinforce panel as required to prevent buckling. 1. E. Fire Protection Specifications Page 4 For cylinder locks, furnish two keys per lock and key all locks alike. For recessed panel doors, provide access sleeves for each locking device. Furnish plastic grommets and install in holes cut through finish. Extruded Aluminum: After fabrication, apply manufacturer's standard protective coating on aluminum that will come in contact with concrete. FINISHES Comply with NAAMM's "Metal Finishes Manual for Architectural and Metal Products" for recommendations for applying and designating finishes. Protect mechanical finishes on exposed surfaces from damage by applying a strippable, temporary protective covering before shipping. ENSO Systems Inc. #865 St Elizabeth C.S. – Full Day Kindergarten Addition C. D. Appearance of Finished Work: Noticeable variations in same piece are not acceptable. Variations in appearance of adjoining components are acceptable if they are within the range of approved Samples and are assembled or installed to minimize contrast. Steel and Metallic-Coated-Steel Finishes: 1. 2. E. Fire Protection Specifications Page 5 Factory Prime: Apply manufacturer's standard, fast-curing, lead- and chromatefree, universal primer immediately after surface preparation and pretreatment. Factory Finish: Immediately after cleaning and pretreating, apply manufacturer's standard two-coat, baked-on enamel finish consisting of prime coat and thermosetting topcoat, with a minimum dry-film thickness of 1 mil (0.025 mm) for topcoat. Stainless-Steel Finishes: 1. 2. Surface Preparation: Remove tool and die marks and stretch lines, or blend into finish. Polished Finishes: Grind and polish surfaces to produce uniform finish, free of cross scratches. a. b. c. 3. Run grain of directional finishes with long dimension of each piece. When polishing is completed, passivate and rinse surfaces. Remove embedded foreign matter and leave surfaces chemically clean. Directional Satin Finish: No. 4. Bright, Cold-Rolled, Unpolished Finish: No. 2B. PART 3 - EXECUTION 3.1 A. B. 3.2 A. B. C. D. E. 3.3 A. B. EXAMINATION Examine substrates for compliance with requirements for installation tolerances and other conditions affecting performance of the Work. Proceed with installation only after unsatisfactory conditions have been corrected. INSTALLATION Supply architectural style recessed frame and flange type access panels for locations where mechanical equipment or any other device requiring maintenance or adjustment is "built-in"; such as valves, junction boxes, relays, etc. Include cost of installation by qualified tradesmen. Comply with manufacturer's written instructions for installing access doors and frames. Install doors flush with adjacent finish surfaces or recessed to receive finish material. Do not provide access panels in removable panel type ceilings. Indicate location of equipment with acceptable markers. Size and locate access panels in applied tile, or in glazed or unglazed structural tile to suit block patterns. ADJUSTING Adjust doors and hardware, after installation, for proper operation. Remove and replace doors and frames that are warped, bowed, or otherwise damaged. END OF SECTION 083113 ENSO Systems Inc. #865 St Elizabeth C.S. – Full Day Kindergarten Addition Fire Protection Specifications Page 6 SECTION 104413 - FIRE PROTECTION CABINETS PART 1 - GENERAL 1.1 A. SUMMARY Section Includes: 1. Fire-protection cabinets for the following: a. b. c. 1.2 A. 1.3 A. B. Portable fire extinguishers. Fire hose valves. Fire hoses and racks. ACTION SUBMITTALS Product Data: For each type of product. Show door hardware, cabinet type, trim style, and panel style. Include roughing-in dimensions and details showing recessed, semirecessed, or surface-mounting method and relationships of box and trim to surrounding construction. COORDINATION Coordinate size of fire-protection cabinets to ensure that type and capacity of fire extinguishers, fire hoses, hose valves, and hose racks indicated are accommodated. Coordinate sizes and locations of fire-protection cabinets with wall depths. PART 2 - PRODUCTS 2.1 A. 2.2 A. PERFORMANCE REQUIREMENTS Fire-Rated Fire-Protection Cabinets: Listed and labeled to comply with requirements in ASTM E 814 for fire-resistance rating of walls where they are installed. FIRE-PROTECTION CABINETS Cabinet Type: (Drawing Symbol FHC), for hose, rack, valve, and fire extinguisher. 1. B. Standard of Acceptance: CEB, National Fire Equipment, Wilson & Cousins 2. Fully recessed Cabinet: 750 x 750 x 200 (30" x 30" x 8") deep, for two valves, the hose and 2.27kg fire extinguisher.18gauge baked white enamel corrosion protected steel tubs. Full 14 gauge stainless steel door (no glass) and door latch. Front section to have 51mm adjustment to wall surface and complete with 13mm turn back frame. Provide sign with lettering “FIRE HOSE & FIRE EXTINGUISHER” as required by governing authorities. Cabinet Type: (Drawing Symbol FEC) for portable extinguishers. 1. Standard of Acceptance: CEB, National Fire Equipment, Wilson & Cousins 2. Recessed cabinet: Tub 18 gauge steel construction with black enamel interior. Front to be adjustable with black enamel trim and 18 gauge 304 stainless steel door, as manufactured by Wilson and Cousins model IE-100, National Fire Protection model CTE-300. C. Accessories: 1. Identification: Lettering complying with authorities having jurisdiction for letter style, size, spacing, and location. ENSO Systems Inc. #865 St Elizabeth C.S. – Full Day Kindergarten Addition Fire Protection Specifications Page 7 PART 3 - EXECUTION 3.1 A. 3.2 A. B. EXAMINATION Examine walls and partitions for suitable framing depth. INSTALLATION General: Install fire-protection cabinets in locations and at mounting heights acceptable to authorities having jurisdiction. Fire-Protection Cabinets: Fasten cabinets to structure, square and plumb. 1. 2. Unless otherwise indicated, provide recessed fire-protection cabinets. If wall thickness is inadequate for recessed cabinets, provide semi-recessed fireprotection cabinets. Provide inside latch and lock for break-glass panels. END OF SECTION 104413 SECTION 104416 - FIRE EXTINGUISHERS PART 1 - GENERAL 1.1 A. B. 1.2 A. 1.3 A. 1.4 A. SUMMARY Section includes portable, hand-carried fire extinguishers and mounting brackets for fire extinguishers. Owner-Furnished Material: None. ACTION SUBMITTALS Product Data: For each type of product. Include rating and classification, material descriptions, dimensions of individual components and profiles, and finishes for fire extinguisher. CLOSEOUT SUBMITTALS Operation and Maintenance Data: For fire extinguishers to include in maintenance manuals. COORDINATION Coordinate type and capacity of fire extinguishers with fire-protection cabinets to ensure fit and function. PART 2 - PRODUCTS 2.1 A. B. 2.2 A. PERFORMANCE REQUIREMENTS NFPA Compliance: Fabricate and label fire extinguishers to comply with NFPA 10, "Portable Fire Extinguishers." Fire Extinguishers: Listed and labeled for type, rating, and classification by an independent testing agency acceptable to authorities having jurisdiction. PORTABLE, HAND-CARRIED FIRE EXTINGUISHERS Fire Extinguishers: (Drawing Symbol FE) mounted on acceptable wall bracket. Dry Chemical Type, capacity 2.27 kg with a 3A10BC ULC rating with discharge hose. Standard of Acceptance: National Fire Protection model Diamond or equal Wilson and Cousins. ENSO Systems Inc. #865 St Elizabeth C.S. – Full Day Kindergarten Addition B. Fire Protection Specifications Page 8 Fire Extinguishers: (Drawing Symbol FEC) mounted in an acceptable recessed wall cabinet. Dry Chemical Type, capacity 2.27 kg with a 3A10BC ULC rating with discharge hose. Standard of Acceptance: National Fire Protection model Diamond or equal Wilson and Cousins. 2.3 A. B. MOUNTING BRACKETS Mounting Brackets: Manufacturer's standard steel, designed to secure fire extinguisher to wall or structure, of sizes required for types and capacities of fire extinguishers indicated, with plated baked-enamel finish. Identification: Lettering complying with authorities having jurisdiction for letter style, size, spacing, and location. Locate as indicated by Architect. 1. Identify bracket-mounted fire extinguishers with the words EXTINGUISHER" in red letter decals applied to mounting surface. a. "FIRE Orientation: Horizontal. PART 3 - EXECUTION 3.1 A. INSTALLATION General: Install fire extinguishers and mounting brackets in locations indicated and in compliance with requirements of authorities having jurisdiction. 1. B. Mounting Brackets: 54 inches (1372 mm) above finished floor to top of fire extinguisher. Mounting Brackets: Fasten mounting brackets to surfaces, square and plumb, at locations indicated. END OF SECTION 104416 SECTION 210513 – COMMON MOTOR REQUIREMENTS FOR FIRE PROTECTION PUMPS PART 1 - GENERAL 1.1 A. 1.2 A. SUMMARY Section includes general requirements for single-phase and polyphase, generalpurpose, horizontal, small and medium, squirrel-cage induction motors for use on ac power systems up to 600 V and installed at equipment manufacturer's factory or shipped separately by equipment manufacturer for field installation. COORDINATION Coordinate features of motors, installed units, and accessory devices to be compatible with the following: 1. 2. 3. Motor controllers. Torque, speed, and horsepower requirements of the load. Ratings and characteristics of supply circuit and required control sequence. PART 2 - PRODUCTS 2.1 A. GENERAL MOTOR REQUIREMENTS CSA or ULC Listed and marked for intended location and application. ENSO Systems Inc. #865 St Elizabeth C.S. – Full Day Kindergarten Addition B. 2.2 A. B. C. D. Fire Protection Specifications Page 9 Efficiency: Energy efficient in Compliance with ASHRAE 90.1-2010. MOTOR CHARACTERISTICS Duty: Continuous duty at ambient temperature of 40OC and at altitude of 3300 feet (1000 m) above sea level. Capacity and Torque Characteristics: Sufficient to start, accelerate, and operate connected loads at designated speeds, at installed altitude and environment, with indicated operating sequence, and without exceeding nameplate ratings or considering service factor. Bearings: Pre-lubricated, antifriction ball bearings or sleeve bearings suitable for radial and thrust loading. Thermal Protection: Internal protection to automatically open power supply circuit to motor when winding temperature exceeds a safe value calibrated to temperature rating of motor insulation. Thermal-protection device shall automatically reset when motor temperature returns to normal range. PART 3 - EXECUTION A. Not Applicable. END OF SECTION 210513 SECTION 210517 – SLEEVES AND SLEEVE SEALS FOR FIRE PROTECTION PIPING PART 1 - GENERAL 1.1 A. SUMMARY Section Includes: 1. 2. 3. 4. 5. 1.2 A. Sleeves. Stack-sleeve fittings. Sleeve-seal systems. Sleeve-seal fittings. Grout. ACTION SUBMITTALS Product Data: For each type of product indicated. PART 2 - PRODUCTS 2.1 A. B. C. D. 2.2 A. SLEEVES Cast-Iron Wall Pipes: Cast or fabricated of cast or ductile iron and equivalent to ductileiron pressure pipe, with plain ends and integral waterstop unless otherwise indicated. Galvanized-Steel Wall Pipes: ASTM A 53/A 53M, Schedule 40, with plain ends and welded steel collar; zinc coated. Galvanized-Steel-Pipe Sleeves: ASTM A 53/A 53M, Type E, Grade B, Schedule 40, zinc coated, with plain ends. Galvanized-Steel-Sheet Sleeves: 0.0239-inch (0.6-mm) minimum thickness; round tube closed with welded longitudinal joint. STACK-SLEEVE FITTINGS Description: Manufactured, cast-iron sleeve with integral clamping flange. Include clamping ring, bolts, and nuts for membrane flashing. ENSO Systems Inc. #865 St Elizabeth C.S. – Full Day Kindergarten Addition 1. 2.3 A. Description: Modular sealing-element unit, designed for field assembly, for filling annular space between piping and sleeve. 2. 3. A. 2.5 A. B. C. D. Underdeck Clamp: Clamping ring with setscrews. SLEEVE-SEAL SYSTEMS 1. 2.4 Fire Protection Specifications Page 10 Sealing Elements: EPDM-rubber interlocking links shaped to fit surface of pipe. Include type and number required for pipe material and size of pipe. Pressure Plates: Carbon steel. Connecting Bolts and Nuts: Carbon steel, with corrosion-resistant coating of length required to secure pressure plates to sealing elements. SLEEVE-SEAL FITTINGS Description: Manufactured plastic, sleeve-type, waterstop assembly made for imbedding in concrete slab or wall. Unit has plastic or rubber waterstop collar with center opening to match piping OD. GROUT Standard: ASTM C 1107/C 1107M, Grade B, post-hardening and volume-adjusting, dry, hydraulic-cement grout. Characteristics: Nonshrink; recommended for interior and exterior applications. Design Mix: 5000-psi (34.5-MPa), 28-day compressive strength. Packaging: Premixed and factory packaged. PART 3 - EXECUTION 3.1 A. B. SLEEVE INSTALLATION Install sleeves for piping passing through penetrations in floors, partitions, roofs, and walls. For sleeves that will have sleeve-seal system installed, select sleeves of size large enough to provide 1-inch (25-mm)] annular clear space between piping and concrete slabs and walls. 1. C. Sleeves are not required for core-drilled holes except holes in mechanical service space floors. Install sleeves in concrete floors, concrete roof slabs, and concrete walls as new slabs and walls are constructed. 1. Cut sleeves to length for mounting flush with both surfaces. a. 2. D. Exception: Extend sleeves installed in floors of mechanical equipment areas or other wet areas 2 inches (50 mm) above finished floor level. Using grout, seal the space outside of sleeves in slabs and walls without sleeveseal system. Install sleeves for pipes passing through interior partitions. 1. 2. Cut sleeves to length for mounting flush with both surfaces. Install sleeves that are large enough to provide 1/4-inch (6.4-mm) annular clear space between sleeve and pipe or pipe insulation. ENSO Systems Inc. #865 St Elizabeth C.S. – Full Day Kindergarten Addition 3. E. 3.2 A. STACK-SLEEVE-FITTING INSTALLATION Install stack-sleeve fittings in new slabs as slabs are constructed. 2. 3. 4. 5. 3.3 A. B. 3.4 A. B. C. D. 3.5 A. Seal annular space between sleeve and piping or piping insulation; use joint sealants appropriate for size, depth, and location of joint. Comply with requirements for sealants specified in Section 079200 "Joint Sealants." Fire-Barrier Penetrations: Maintain indicated fire rating of walls, partitions, ceilings, and floors at pipe penetrations. Seal pipe penetrations with firestop materials. Comply with requirements for firestopping specified in Section 078413 "Penetration Firestopping." 1. B. Fire Protection Specifications Page 11 Install fittings that are large enough to provide 1/4-inch (6.4-mm) annular clear space between sleeve and pipe or pipe insulation. Secure flashing between clamping flanges for pipes penetrating floors with membrane waterproofing. Comply with requirements for flashing specified in Section 076200 "Sheet Metal Flashing and Trim." Install section of cast-iron soil pipe to extend sleeve to 2 inches (50 mm) above finished floor level. Extend cast-iron sleeve fittings below floor slab as required to secure clamping ring if ring is specified. Using grout, seal the space around outside of stack-sleeve fittings. Fire-Barrier Penetrations: Maintain indicated fire rating of floors at pipe penetrations. Seal pipe penetrations with firestop materials. Comply with requirements for firestopping specified in Section 078413 "Penetration Firestopping." SLEEVE-SEAL-SYSTEM INSTALLATION Install sleeve-seal systems in sleeves in exterior concrete walls and slabs-on-grade at service piping entries into building. Select type, size, and number of sealing elements required for piping material and size and for sleeve ID or hole size. Position piping in center of sleeve. Center piping in penetration, assemble sleeve-seal system components, and install in annular space between piping and sleeve. Tighten bolts against pressure plates that cause sealing elements to expand and make a watertight seal. SLEEVE-SEAL-FITTING INSTALLATION Install sleeve-seal fittings in new walls and slabs as they are constructed. Assemble fitting components of length to be flush with both surfaces of concrete slabs and walls. Position water stop flange to be centered in concrete slab or wall. Secure nailing flanges to concrete forms. Using grout, seal the space around outside of sleeve-seal fittings. SLEEVE AND SLEEVE-SEAL SCHEDULE Use sleeves and sleeve seals for the following piping-penetration applications: 1. Exterior Concrete Walls above Grade: a. 2. Piping: Cast-iron wall sleeves or Galvanized-steel-pipe sleeves. Exterior Concrete Walls below Grade: a. Piping: Cast-iron wall sleeves with sleeve-seal system or Galvanized-steelpipe sleeves with sleeve-seal system. ENSO Systems Inc. #865 St Elizabeth C.S. – Full Day Kindergarten Addition 1) 3. Piping: Cast-iron wall sleeves with sleeve-seal system or Galvanized-steelpipe sleeves with sleeve-seal system. 1) Select sleeve size to allow for 1-inch (25-mm) annular clear space between piping and sleeve for installing sleeve-seal system. Concrete Slabs above Grade: a. 5. Select sleeve size to allow for 1-inch (25-mm) annular clear space between piping and sleeve for installing sleeve-seal system. Concrete Slabs-on-Grade: a. 4. Fire Protection Specifications Page 12 Piping: Galvanized-steel-pipe sleeves, Stack-sleeve fittings Interior Partitions: a. Piping: Galvanized-steel-pipe sleeves. END OF SECTION 210517 SECTION 210518 – ESCUTCHEONS FOR FIRE PROTECTION PIPING PART 1 - GENERAL 1.1 A. SUMMARY Section Includes: 1. 2. 1.2 A. Escutcheons. Floor plates. ACTION SUBMITTALS Product Data: For each type of product indicated. PART 2 - PRODUCTS 2.1 A. B. C. D. E. 2.2 A. B. ESCUTCHEONS One-Piece, Cast-Brass Type: With polished, chrome-plated and finish and setscrew fastener. One-Piece, Deep-Pattern Type: Deep-drawn, box-shaped brass with chrome-plated finish and spring-clip fasteners. One-Piece, Stamped-Steel Type: With chrome-plated finish and spring-clip fasteners. Split-Casting Brass Type: With polished, chrome-plated and finish and with concealed hinge and setscrew. Split-Plate, Stamped-Steel Type: With chrome-plated finish, concealed hinge, and spring-clip fasteners. FLOOR PLATES One-Piece Floor Plates: Cast-iron flange with holes for fasteners. Split-Casting Floor Plates: Cast brass with concealed hinge. PART 3 - EXECUTION 3.1 A. INSTALLATION Install escutcheons for piping penetrations of walls, ceilings, and finished floors. ENSO Systems Inc. #865 St Elizabeth C.S. – Full Day Kindergarten Addition B. Install escutcheons with ID to closely fit around pipe, tube, and insulation of insulated piping and with OD that completely covers opening. 1. Escutcheons for Piping: a. b. c. d. e. f. g. h. i. j. C. D. Fire Protection Specifications Page 13 Piping with Fitting or Sleeve Protruding from Wall: One-piece, deep-pattern type. Chrome-Plated Piping: One-piece, cast-brass or split-casting brass type with polished, chrome-plated finish. Insulated Piping: One-piece, stamped-steel type or split-plate, stampedsteel type, chrome plated finish with concealed hinge. Bare Piping at Wall and Floor Penetrations in Finished Spaces: One-piece, cast-brass or split-casting brass type with polished, chrome-plated finish. Bare Piping at Wall and Floor Penetrations in Finished Spaces: One-piece, stamped-steel type or split-plate, stamped-steel type, chrome plated finish with concealed hinge. Bare Piping at Ceiling Penetrations in Finished Spaces: One-piece, castbrass or split-casting brass type with polished, chrome-plated finish. Bare Piping at Ceiling Penetrations in Finished Spaces: One-piece, stamped-steel type or split-plate, stamped-steel type, chrome plated finish with concealed hinge. Bare Piping in Unfinished Service Spaces: One-piece, cast-brass or splitcasting brass type, rough-brass finish. Bare Piping in Unfinished Service Spaces: One-piece, stamped-steel type or split-plate, stamped-steel type, chrome plated with concealed hinge or split-plate, stamped-steel type, chrome plated with exposed-rivet hinge. Bare Piping in Equipment Rooms: One-piece, stamped-steel type or splitplate, stamped-steel type with concealed hinge or split-plate, stamped-steel type, chrome plated with exposed-rivet hinge. Install floor plates for piping penetrations of equipment-room floors. Install floor plates with ID to closely fit around pipe, tube, and insulation of piping and with OD that completely covers opening. 1. 2. New Piping: One-piece, floor-plate type. Existing Piping: Split-casting, floor-plate type. END OF SECTION 210518 SECTION 210523 - GENERAL DUTY VALVES FOR WATER-BASED FIRE-SUPPRESSION PIPING PART 1 - GENERAL 1.1 A. SUMMARY Section Includes: 1. 2. 3. 4. 1.2 A. Supervised valves. Wet sprinkler alarm check valves. Valve accessories. Trim and drain valves. DEFINITIONS NBR: Acrylonitrile-butadiene, Buna-N, or nitrile rubber. ENSO Systems Inc. #865 St Elizabeth C.S. – Full Day Kindergarten Addition B. C. D. 1.3 A. 1.4 A. NRS: Non-rising stem. OS&Y: Outside screw and yoke. SBR: Styrene-butadiene rubber. ACTION SUBMITTALS Product Data: For each type of valve. DELIVERY, STORAGE, AND HANDLING Prepare valves for shipping as follows: 1. 2. 3. B. Protect internal parts against rust and corrosion. Protect threads, flange faces, and weld ends. Set valves open to minimize exposure of functional surfaces. Use the following precautions during storage: 1. 2. C. Fire Protection Specifications Page 14 Maintain valve end protection. Store valves indoors and maintain at higher than ambient dew point temperature. If outdoor storage is necessary, store valves off the ground in watertight enclosures. Use sling to handle large valves; rig sling to avoid damage to exposed parts. Do not use operating handles or stems as lifting or rigging points. PART 2 - PRODUCTS 2.1 A. GENERAL REQUIREMENTS FOR VALVES Valves and Accessories UL and ULC Listed and FM approved. 1. Supervised Valves: a. b. c. 2. Wet Sprinkler Alarm Check Valves: a. b. c. 3. Standard of Acceptance: Tyco model BFV-N with internally supervised devices. Wafer style butterfly. Maximum working pressure 250 psi (17.2 bar) Material of Construction: Body: ductile iron conforming to ASTM A-536. Disc: Ductile iron conforming to ASTM A-395, nickel plated. Seat material grade EPDM “E” rubber conforming to ASTM D-2000. Upper stem type 416 stainless steel conforming to ASTM 582. Operator: Gear operator with iron housing. Standard of Acceptance: Tyco model AV-1 300. Working pressure range: 20 to 300 psi (1.4 to 20.7 bar). Material of Construction: Body: ductile iron; handhole cover: ductile iron or cast iron; seat ring: bronze. Clapper for 21/2” (DN65) or smaller valve size: stainless steel, for larger sizes cast or ductile iron. All valve sizes to have EPDM clapper facing. Valve Accessories a. Water Flow Detector: Dedicated UL and ULC listed and FM approved containing two sets of SPDT (Form C) contacts, with an electrical rating of 10A @125/250 VAC/2.5 A @ 24 VDC. Standard of Acceptance: Tyco, Reliable. ENSO Systems Inc. #865 St Elizabeth C.S. – Full Day Kindergarten Addition b. Fire Protection Specifications Page 15 Pressure Loss Detector: Pressure type water flow switch installed downstream of the sprinkler check valve and/or sprinkler supervised valve. Switch to be bellows activated type. Maximum service pressure rating of 250 psi adjustable from 10 to 200 psi. One or two SPDT contacts rated at 10A @125/250 VAC and 2.5A @ 6/12/24 VDC. Standard of Acceptance: Tyco, Systems Sensor EPS series. B. C. D. Source Limitations for Valves: Obtain valves for each valve type from single manufacturer. ASME Compliance: 1. 2. E. F. G. H. I. AWWA Compliance: Comply with AWWA C606 for grooved-end connections. NFPA Compliance: Comply with NFPA 24 for valves. Valve Pressure Ratings: Not less than the minimum pressure rating indicated or higher as required by system pressures. Valve Sizes: Same as upstream piping unless otherwise indicated. Valve Actuator Types: 1. 2. 3. 2.2 A. ASME B16.1 for flanges on iron valves. ASME B1.20.1 for threads for threaded-end valves. Worm-gear actuator with handwheel for quarter-turn valves, except for trim and drain valves. Handwheel: For other than quarter-turn trim and drain valves. Handlever: For quarter-turn trim and drain valves NPS 2 (DN 50) and smaller. TRIM AND DRAIN VALVES Ball Valves: 1. Description: a. b. c. d. e. f. g. h. i. j. Pressure Rating: 175 psig (1200 kPa). Body Design: Two piece. Body Material: Forged brass or bronze. Port size: Full or standard. Seats: PTFE. Stem: Bronze or stainless steel. Ball: Chrome-plated brass. Actuator: Handlever. End Connections for Valves NPS 1 (DN 25) through NPS 2-1/2 (DN 65): Threaded ends. End Connections for Valves NPS 1-1/4 and NPS 2-1/2 (DN 32 and DN 65): Grooved ends. PART 3 - EXECUTION 3.1 A. B. GENERAL REQUIREMENTS FOR VALVE INSTALLATION Comply with requirements in the following Sections for specific valve installation requirements and applications: Install listed fire-protection shutoff valves supervised-open, located to control sources of water supply except from fire-department connections. Install permanent identification signs indicating portion of system controlled by each valve. ENSO Systems Inc. #865 St Elizabeth C.S. – Full Day Kindergarten Addition C. D. E. F. G. Fire Protection Specifications Page 16 Install check valve in each water-supply connection. Install backflow preventers instead of check valves in potable-water-supply sources. Install valves having threaded connections with unions at each piece of equipment arranged to allow easy access, service, maintenance, and equipment removal without system shutdown. Provide separate support where necessary. Install valves in horizontal piping with stem at or above the pipe center. Install valves in position to allow full stem movement. Install valve tags. Comply with requirements in Section 210553 "Identification for FireSuppression Piping and Equipment" for valve tags and schedules and signs on surfaces concealing valves; and the NFPA standard applying to the piping system in which valves are installed. Install permanent identification signs indicating the portion of system controlled by each valve. END OF SECTION 210523 SECTION 210529 – HANGERS AND SUPPORTS FOR FIRE PROTECTION PIPING AND EQUIPMENT PART 1 - GENERAL 1.1 A. SUMMARY Section Includes: 1. 2. 3. 4. 5. B. Related Sections 1. 1.2 A. Metal pipe hangers and supports. Thermal-hanger shield inserts. Fastener systems. Pipe positioning systems. Equipment supports. Section 210548.13 "Vibration Controls for Fire Protection Piping and Equipment" for vibration isolation devices. DEFINITIONS MSS: Manufacturers Standardization Society of The Valve and Fittings Industry Inc. PART 2 - PRODUCTS 2.1 A. METAL PIPE HANGERS AND SUPPORTS Carbon-Steel Pipe Hangers and Supports: 1. 2. 3. 4. 5. B. Description: MSS SP-58, Types 1 through 58, factory-fabricated components. Galvanized Metallic Coatings: Pregalvanized or hot dipped. Nonmetallic Coatings: Plastic coating, jacket, or liner. Padded Hangers: Hanger with fiberglass or other pipe insulation pad or cushion to support bearing surface of piping. Hanger Rods: Continuous-thread rod, nuts, and washer made of carbon steel. Copper Pipe Hangers: 1. Description: MSS SP-58, Types 1 through 58, copper-coated-steel, factoryfabricated components. ENSO Systems Inc. #865 St Elizabeth C.S. – Full Day Kindergarten Addition 2. 2.2 A. B. C. D. E. 2.3 A. B. 2.4 A. B. Fire Protection Specifications Page 17 Hanger Rods: Continuous-thread rod, nuts, and washer made of copper-coated steel. THERMAL-HANGER SHIELD INSERTS Insulation-Insert Material for Cold Piping: ASTM C 552, Type II cellular glass with 100psig (688-kPa) or ASTM C 591, Type VI, Grade 1 polyisocyanurate with 125-psig (862kPa) minimum compressive strength and vapor barrier. Insulation-Insert Material for Hot Piping: Water-repellent treated, ASTM C 533, Type I calcium silicate with 100-psig (688-kPa) ASTM C 552, Type II cellular glass with 100psig (688-kPa) or ASTM C 591, Type VI, Grade 1 polyisocyanurate with 125-psig (862kPa) minimum compressive strength. For Trapeze or Clamped Systems: Insert and shield shall cover entire circumference of pipe. For Clevis or Band Hangers: Insert and shield shall cover lower 180 degrees of pipe. Insert Length: Extend 2 inches (50 mm) beyond sheet metal shield for piping operating below ambient air temperature. FASTENER SYSTEMS Powder-Actuated Fasteners: Threaded-steel stud, for use in hardened portland cement concrete with pull-out, tension, and shear capacities appropriate for supported loads and building materials where used. Mechanical-Expansion Anchors: Insert-wedge-type, zinc-coated steel anchors, for use in hardened portland cement concrete; with pull-out, tension, and shear capacities appropriate for supported loads and building materials where used. MISCELLANEOUS MATERIALS Structural Steel: ASTM A 36/A 36M, carbon-steel plates, shapes, and bars; black and galvanized. Grout: ASTM C 1107, factory-mixed and -packaged, dry, hydraulic-cement, nonshrink and nonmetallic grout; suitable for interior and exterior applications. 1. 2. Properties: Nonstaining, noncorrosive, and nongaseous. Design Mix: 5000-psi (34.5-MPa), 28-day compressive strength. PART 3 - EXECUTION 3.1 A. B. HANGER AND SUPPORT INSTALLATION Metal Pipe-Hanger Installation: Comply with MSS SP-69 and MSS SP-89. Install hangers, supports, clamps, and attachments as required to properly support piping from the building structure. Metal Trapeze Pipe-Hanger Installation: Comply with MSS SP-69 and MSS SP-89. Arrange for grouping of parallel runs of horizontal piping, and support together on fieldfabricated trapeze pipe hangers. 1. 2. C. D. Pipes of Various Sizes: Support together and space trapezes for smallest pipe size or install intermediate supports for smaller diameter pipes as specified for individual pipe hangers. Field fabricate from ASTM A 36/A 36M, carbon-steel shapes selected for loads being supported. Weld steel according to AWS D1.1/D1.1M. Thermal-Hanger Shield Installation: Install in pipe hanger or shield for insulated piping. Fastener System Installation: ENSO Systems Inc. #865 St Elizabeth C.S. – Full Day Kindergarten Addition 1. 2. E. F. G. H. I. J. K. L. Fire Protection Specifications Page 18 Install powder-actuated fasteners for use in lightweight concrete or concrete slabs less than 4 inches (100 mm) thick in concrete after concrete is placed and completely cured. Use operators that are licensed by powder-actuated tool manufacturer. Install fasteners according to powder-actuated tool manufacturer's operating manual. Install mechanical-expansion anchors in concrete after concrete is placed and completely cured. Install fasteners according to manufacturer's written instructions. Pipe Positioning-System Installation: Install support devices to make rigid supply and waste piping connections to each plumbing fixture. Install hangers and supports complete with necessary attachments, inserts, bolts, rods, nuts, washers, and other accessories. Install hangers and supports to allow controlled thermal and seismic movement of piping systems, to permit freedom of movement between pipe anchors, and to facilitate action of expansion joints, expansion loops, expansion bends, and similar units. Install lateral bracing with pipe hangers and supports to prevent swaying. Install building attachments within concrete slabs or attach to structural steel. Install additional attachments at concentrated loads, including valves, flanges, and strainers, NPS 2-1/2 (DN 65) and larger and at changes in direction of piping. Install concrete inserts before concrete is placed; fasten inserts to forms and install reinforcing bars through openings at top of inserts. Load Distribution: Install hangers and supports so that piping live and dead loads and stresses from movement will not be transmitted to connected equipment. Pipe Slopes: Install hangers and supports to provide indicated pipe slopes and to not exceed maximum pipe deflections allowed by ASME B31.9 for building services piping. Insulated Piping: 1. Attach clamps and spacers to piping. a. b. c. 2. Install MSS SP-58, Type 39, protection saddles if insulation without vapor barrier is indicated. Fill interior voids with insulation that matches adjoining insulation. a. 3. Option: Thermal-hanger shield inserts may be used. Include steel weightdistribution plate for pipe NPS 4 (DN 100) and larger if pipe is installed on rollers. Install MSS SP-58, Type 40, protective shields on cold piping with vapor barrier. Shields shall span an arc of 180 degrees. a. 4. Piping Operating above Ambient Air Temperature: Clamp may project through insulation. Piping Operating below Ambient Air Temperature: Use thermal-hanger shield insert with clamp sized to match OD of insert. Do not exceed pipe stress limits allowed by ASME B31.9 for building services piping. Option: Thermal-hanger shield inserts may be used. Include steel weightdistribution plate for pipe NPS 4 (DN 100) and larger if pipe is installed on rollers. Shield Dimensions for Pipe: Not less than the following: ENSO Systems Inc. #865 St Elizabeth C.S. – Full Day Kindergarten Addition a. b. c. d. e. 5. 6. 3.2 A. B. C. 3.3 A. B. C. B. 3.5 A. B. Pipes NPS 8 (DN 200) and Larger: Include wood or reinforced calcium-silicateinsulation inserts of length at least as long as protective shield. Thermal-Hanger Shields: Install with insulation same thickness as piping insulation. Fabricate structural-steel stands to suspend equipment from structure overhead or to support equipment above floor. Grouting: Place grout under supports for equipment and make bearing surface smooth. Provide lateral bracing, to prevent swaying, for equipment supports. METAL FABRICATIONS Cut, drill, and fit miscellaneous metal fabrications for trapeze pipe hangers and equipment supports. Fit exposed connections together to form hairline joints. Field weld connections that cannot be shop welded because of shipping size limitations. Field Welding: Comply with AWS D1.1/D1.1M procedures for shielded, metal arc welding; appearance and quality of welds; and methods used in correcting welding work; and with the following: 2. 3. 4. A. NPS 1/4 to NPS 3-1/2 (DN 8 to DN 90): 12 inches (305 mm) long and 0.048 inch (1.22 mm) thick. NPS 4 (DN 100): 12 inches (305 mm) long and 0.06 inch (1.52 mm) thick. NPS 5 and NPS 6 (DN 125 and DN 150): 18 inches (457 mm) long and 0.06 inch (1.52 mm) thick. NPS 8 to NPS 14 (DN 200 to DN 350): 24 inches (610 mm) long and 0.075 inch (1.91 mm) thick. NPS 16 to NPS 24 (DN 400 to DN 600): 24 inches (610 mm) long and 0.105 inch (2.67 mm) thick. EQUIPMENT SUPPORTS 1. 3.4 Fire Protection Specifications Page 19 Use materials and methods that minimize distortion and develop strength and corrosion resistance of base metals. Obtain fusion without undercut or overlap. Remove welding flux immediately. Finish welds at exposed connections so no roughness shows after finishing and so contours of welded surfaces match adjacent contours. ADJUSTING Hanger Adjustments: Adjust hangers to distribute loads equally on attachments and to achieve indicated slope of pipe. Trim excess length of continuous-thread hanger and support rods to 1-1/2 inches (40 mm). PAINTING Touchup: Cleaning and touchup painting of field welds, bolted connections, and abraded areas of shop paint on miscellaneous metal are specified in Section 099123 "Interior Painting." Galvanized Surfaces: Clean welds, bolted connections, and abraded areas and apply galvanizing-repair paint to comply with ASTM A 780. ENSO Systems Inc. #865 St Elizabeth C.S. – Full Day Kindergarten Addition 3.6 A. B. C. D. E. F. G. H. I. HANGER AND SUPPORT SCHEDULE Specific hanger and support requirements are in Sections specifying piping systems and equipment. Comply with MSS SP-69 for pipe-hanger selections and applications that are not specified in piping system Sections. Use hangers and supports with galvanized metallic coatings for piping and equipment that will not have field-applied finish. Use nonmetallic coatings on attachments for electrolytic protection where attachments are in direct contact with copper tubing. Use carbon-steel pipe hangers and supports metal trapeze pipe hangers and metal framing systems and attachments for general service applications. Use copper-plated pipe hangers and copper or stainless-steel attachments for copper piping and tubing. Use padded hangers for piping that is subject to scratching. Use thermal-hanger shield inserts for insulated piping and tubing. Horizontal-Piping Hangers and Supports: Unless otherwise indicated and except as specified in piping system Sections, install the following types: 1. 2. 3. 4. J. Adjustable, Steel Clevis Hangers (MSS Type 1): For suspension of noninsulated or insulated, stationary pipes NPS 1/2 to NPS 30 (DN 15 to DN 750). Single-Pipe Rolls (MSS Type 41): For suspension of pipes NPS 1 to NPS 30 (DN 25 to DN 750), from two rods if longitudinal movement caused by expansion and contraction might occur. Adjustable Roller Hangers (MSS Type 43): For suspension of pipes NPS 2-1/2 to NPS 24 (DN 65 to DN 600), from single rod if horizontal movement caused by expansion and contraction might occur. Complete Pipe Rolls (MSS Type 44): For support of pipes NPS 2 to NPS 42 (DN 50 to DN 1050) if longitudinal movement caused by expansion and contraction might occur but vertical adjustment is not necessary. Vertical-Piping Clamps: Unless otherwise indicated and except as specified in piping system Sections, install the following types: 1. 2. K. Fire Protection Specifications Page 20 Extension Pipe or Riser Clamps (MSS Type 8): For support of pipe risers NPS 3/4 to NPS 24 (DN 24 to DN 600). Carbon- or Alloy-Steel Riser Clamps (MSS Type 42): For support of pipe risers NPS 3/4 to NPS 24 (DN 20 to DN 600) if longer ends are required for riser clamps. Hanger-Rod Attachments: Unless otherwise indicated and except as specified in piping system Sections, install the following types: 1. Steel Turnbuckles (MSS Type 13): For adjustment up to 6 inches (150 mm) for heavy loads. 2. Steel Clevises (MSS Type 14): For 120 to 450 deg F (49 to 232 deg C) piping installations. 3. Swivel Turnbuckles (MSS Type 15): For use with MSS Type 11, split pipe rings. 4. Malleable-Iron Sockets (MSS Type 16): For attaching hanger rods to various types of building attachments. 5. Steel Weldless Eye Nuts (MSS Type 17): For 120 to 450 deg F (49 to 232 deg C) piping installations. ENSO Systems Inc. #865 St Elizabeth C.S. – Full Day Kindergarten Addition L. Building Attachments: Unless otherwise indicated and except as specified in piping system Sections, install the following types: 1. 2. 3. 4. 5. 6. 7. 8. 9. 10. 11. 12. Steel or Malleable Concrete Inserts (MSS Type 18): For upper attachment to suspend pipe hangers from concrete ceiling. Top-Beam C-Clamps (MSS Type 19): For use under roof installations with barjoist construction, to attach to top flange of structural shape. Side-Beam or Channel Clamps (MSS Type 20): For attaching to bottom flange of beams, channels, or angles. Center-Beam Clamps (MSS Type 21): For attaching to center of bottom flange of beams. Welded Beam Attachments (MSS Type 22): For attaching to bottom of beams if loads are considerable and rod sizes are large. C-Clamps (MSS Type 23): For structural shapes. Top-Beam Clamps (MSS Type 25): For top of beams if hanger rod is required tangent to flange edge. Side-Beam Clamps (MSS Type 27): For bottom of steel I-beams. Steel-Beam Clamps with Eye Nuts (MSS Type 28): For attaching to bottom of steel I-beams for heavy loads. Linked-Steel Clamps with Eye Nuts (MSS Type 29): For attaching to bottom of steel I-beams for heavy loads, with link extensions. Malleable-Beam Clamps with Extension Pieces (MSS Type 30): For attaching to structural steel. Welded-Steel Brackets: For support of pipes from below or for suspending from above by using clip and rod. Use one of the following for indicated loads: a. b. c. 13. 14. 15. M. Light (MSS Type 31): 750 lb (340 kg). Medium (MSS Type 32): 1500 lb (680 kg). Heavy (MSS Type 33): 3000 lb (1360 kg). Side-Beam Brackets (MSS Type 34): For sides of steel or wooden beams. Plate Lugs (MSS Type 57): For attaching to steel beams if flexibility at beam is required. Horizontal Travelers (MSS Type 58): For supporting piping systems subject to linear horizontal movement where headroom is limited. Saddles and Shields: Unless otherwise indicated and except as specified in piping system Sections, install the following types: 1. 2. 3. N. Fire Protection Specifications Page 21 Steel-Pipe-Covering Protection Saddles (MSS Type 39): To fill interior voids with insulation that matches adjoining insulation. Protection Shields (MSS Type 40): Of length recommended in writing by manufacturer to prevent crushing insulation. Thermal-Hanger Shield Inserts: For supporting insulated pipe. Spring Hangers and Supports: Unless otherwise indicated and except as specified in piping system Sections, install the following types: 1. 2. Restraint-Control Devices (MSS Type 47): Where indicated to control piping movement. Spring Cushions (MSS Type 48): For light loads if vertical movement does not exceed 1-1/4 inches (32 mm). ENSO Systems Inc. #865 St Elizabeth C.S. – Full Day Kindergarten Addition 3. 4. O. P. Q. R. Fire Protection Specifications Page 22 Spring-Cushion Roll Hangers (MSS Type 49): For equipping Type 41, roll hanger with springs. Spring Sway Braces (MSS Type 50): To retard sway, shock, vibration, or thermal expansion in piping systems. Comply with MSS SP-69 for trapeze pipe-hanger selections and applications not specified in piping system Sections. Comply with MFMA-103 for metal framing system selections and applications not specified in piping system Sections. Use powder-actuated fasteners or mechanical-expansion anchors instead of attachments where required in concrete construction. Use pipe positioning systems in pipe spaces behind plumbing fixtures to supply and waste piping for plumbing fixtures. that are that are building support END OF SECTION 210529 SECTION 220548 - VIBRATION AND SEISMIC CONTROLS FOR FIRE PROTECTION PIPING AND EQUIPMENT PART 1 - GENERAL 1.1 A. SUMMARY Section Includes: 1. 2. 3. 4. 5. 6. 7. 8. 9. 10. 11. 12. 13. B. Related Requirements: 1. C. Elastomeric isolation pads. Elastomeric isolation mounts. Restrained elastomeric isolation mounts. Open-spring isolators. Restrained-spring isolators. Elastomeric hangers. Spring hangers. Snubbers. Restraint channel bracings. Restraint cables. Seismic-restraint accessories. Mechanical anchor bolts. Adhesive anchor bolts. Section 220548 "Vibration and Seismic Controls for Plumbing Systems" for devices for HVAC equipment and systems. Product Data: For each type of product. 1. Illustrate and indicate style, material, strength, fastening provision, and finish for each type and size of seismic-restraint component used. a. b. D. Tabulate types and sizes of seismic restraints, complete with report numbers and rated strength in tension and shear as evaluated by an agency acceptable to authorities having jurisdiction. Annotate to indicate application of each product submitted and compliance with requirements. Delegated-Design Submittal: For each seismic-restraint device. ENSO Systems Inc. #865 St Elizabeth C.S. – Full Day Kindergarten Addition 1. 2. Include design calculations and details for selecting seismic restraints complying with performance requirements, design criteria, and analysis data signed and sealed by the qualified professional engineer responsible for their preparation. Contact Mr. Sean Cochrane at HTS Engineering (representing Kinetics Noise Control), tel. (416) 661-3400 for information. Design Calculations: Calculate static and dynamic loading caused by equipment weight, operation, and seismic forces required to select seismic restraints and for designing vibration isolation bases. a. 3. b. c. d. A. B. C. D. 1.3 A. B. C. Coordinate design calculations with wind load calculations required for equipment mounted outdoors. Comply with requirements in other Sections for equipment mounted outdoors. Seismic Restraint Details: a. 1.2 Fire Protection Specifications Page 23 Design Analysis: To support selection and arrangement of seismic restraints. Include calculations of combined tensile and shear loads. Details: Indicate fabrication and arrangement. Detail attachments of restraints to the restrained items and to the structure. Show attachment locations, methods, and spacings. Identify components, list their strengths, and indicate directions and values of forces transmitted to the structure during seismic events. Indicate association with vibration isolation devices. Coordinate seismic-restraint and vibration isolation details with windrestraint details required for equipment mounted outdoors. Comply with requirements in other Sections for equipment mounted outdoors. Preapproval and Evaluation Documentation: Submit for review to an agency acceptable to authorities having jurisdiction, showing maximum ratings of restraint items and the basis for approval (tests or calculations). INFORMATIONAL SUBMITTALS Coordination Drawings: Show coordination of seismic bracing for electrical components with other systems and equipment in the vicinity, including other supports and seismic restraints. Welding certificates when requested. Air-Mounting System Performance Certification: Include natural frequency, load, and damping test data Field quality-control reports. QUALITY ASSURANCE Comply with seismic-restraint requirements in the OBC unless requirements in this Section are more stringent. Welding Qualifications: Qualify procedures and personnel according to AWS D1.1/D1.1M, "Structural Welding Code - Steel." Seismic-restraint devices shall have horizontal and vertical load testing and analysis. They shall bear anchorage preapproval from OSHPD in addition to preapproval, showing maximum seismic-restraint ratings, by ICC-ES or another agency acceptable to authorities having jurisdiction. Ratings based on independent testing are preferred to ratings based on calculations. If preapproved ratings are not available, submittals based on independent testing are preferred. Calculations (including combining shear ENSO Systems Inc. #865 St Elizabeth C.S. – Full Day Kindergarten Addition Fire Protection Specifications Page 24 and tensile loads) that support seismic-restraint designs must be signed and sealed by a qualified professional engineer. PART 2 - GENERAL 2.1 A. PERFORMANCE REQUIREMENTS Seismic-Restraint Loading: 1. 2. 3. Site Class as Defined in the OBC: D. Building Classification Category: High - for Schools and Normal for Offices. Building Importance factor (IE) Assigned Seismic Use Group or Building Category as Defined in the OBC: ULS=1.3 for schools and 1.0 for Offices. a. b. c. d. e. 4. 5. 2.2 A. Design Spectral Response Acceleration at Short Periods (0.2 Second): 0.24 (Toronto). Design Spectral Response Acceleration at 1.0-Second Period: 0.056 (Toronto). PERFORMANCE REQUIREMENTS Elastomeric Isolation Pads: 1. 2. 3. 4. 5. 6. 7. Fabrication: Single or multiple layers of sufficient durometer stiffness for uniform loading over pad area. Size: Factory or field cut to match requirements of supported equipment. Pad Material: Oil and water resistant with elastomeric properties. Surface Pattern: Ribbed pattern. Infused nonwoven cotton or synthetic fibers. Load-bearing metal plates adhered to pads. Sandwich-Core Material: Resilient and elastomeric. a. b. 2.3 A. Double-Deflection, Elastomeric Isolation Mounts: Mounting Plates: a. b. 2. A. Surface Pattern: Ribbed pattern. Infused nonwoven cotton or synthetic fibers. ELASTOMERIC ISOLATION MOUNTS 1. 2.4 Importance factor (IE) Assigned Seismic Use Group or Building Category as Defined in the OBC: ULS=1.3 for schools and 1.0 for Offices. Component Factor: 1.0 Component Response Modification Factor: 5.0. Component Amplification Factor: 2.5. Peak Ground Acceleration: 0.150 for Toronto. Top Plate: Encapsulated steel load transfer top plates, factory drilled and threaded with threaded studs or bolts. Baseplate: Encapsulated steel bottom plates with holes provided for anchoring to support structure. Elastomeric Material: Molded, oil-resistant rubber, neoprene, or other elastomeric material. RESTRAINED ELASTOMERIC ISOLATION MOUNTS Restrained Elastomeric Isolation Mounts: ENSO Systems Inc. #865 St Elizabeth C.S. – Full Day Kindergarten Addition 1. Description: All-directional isolator with restraints containing two separate and opposing elastomeric elements that prevent central threaded element and attachment hardware from contacting the housing during normal operation. a. b. 2.5 A. Freestanding, Laterally Stable, Open-Spring Isolators: 2. 3. 4. 5. 6. A. Outside Spring Diameter: Not less than 80 percent of the compressed height of the spring at rated load. Minimum Additional Travel: 50 percent of the required deflection at rated load. Lateral Stiffness: More than 80 percent of rated vertical stiffness. Overload Capacity: Support 200 percent of rated load, fully compressed, without deformation or failure. Baseplates: Factory-drilled steel plate for bolting to structure with an elastomeric isolator pad attached to the underside. Baseplates shall limit floor load to 500 psig (3447 kPa). Top Plate and Adjustment Bolt: Threaded top plate with adjustment bolt and cap screw to fasten and level equipment. RESTRAINED-SPRING ISOLATORS Freestanding, Laterally Stable, Open-Spring Isolators with Vertical-Limit Stop Restraint: 1. Housing: Steel housing with vertical-limit stops to prevent spring extension due to weight being removed. a. b. c. 2. 3. 4. 5. 6. 2.7 A. Housing: Cast-ductile iron or welded steel. Elastomeric Material: Molded, oil-resistant rubber, neoprene, or other elastomeric material. OPEN-SPRING ISOLATORS 1. 2.6 Fire Protection Specifications Page 25 Base with holes for bolting to structure with an elastomeric isolator pad attached to the underside. Bases shall limit floor load to 500 psig (3447 kPa). Top plate with threaded mounting holes Internal leveling bolt that acts as blocking during installation. Restraint: Limit stop as required for equipment and authorities having jurisdiction. Outside Spring Diameter: Not less than 80 percent of the compressed height of the spring at rated load. Minimum Additional Travel: 50 percent of the required deflection at rated load. Lateral Stiffness: More than 80 percent of rated vertical stiffness. Overload Capacity: Support 200 percent of rated load, fully compressed, without deformation or failure. ELASTOMERIC HANGERS Elastomeric Mount in a Steel Frame with Upper and Lower Steel Hanger Rods: 1. 2. Frame: Steel, fabricated with a connection for an upper threaded hanger rod and an opening on the underside to allow for a maximum of 30 degrees of angular lower hanger-rod misalignment without binding or reducing isolation efficiency. Dampening Element: Molded, oil-resistant rubber, neoprene, or other elastomeric material with a projecting bushing for the underside opening preventing steel to steel contact. ENSO Systems Inc. #865 St Elizabeth C.S. – Full Day Kindergarten Addition 2.8 A. SPRING HANGERS Combination Coil-Spring and Elastomeric-Insert Hanger with Spring and Insert in Compression: 1. 2. 3. 4. 5. 6. 7. 8. 2.9 A. Description: Factory fabricated using welded structural-steel shapes and plates, anchor bolts, and replaceable resilient isolation washers and bushings. 2. 3. A. 2.11 A. 2.12 A. B. C. Frame: Steel, fabricated for connection to threaded hanger rods and to allow for a maximum of 30 degrees of angular hanger-rod misalignment without binding or reducing isolation efficiency. Outside Spring Diameter: Not less than 80 percent of the compressed height of the spring at rated load. Minimum Additional Travel: 50 percent of the required deflection at rated load. Lateral Stiffness: More than 80 percent of rated vertical stiffness. Overload Capacity: Support 200 percent of rated load, fully compressed, without deformation or failure. Elastomeric Element: Molded, oil-resistant rubber or neoprene. Steel-washerreinforced cup to support spring and bushing projecting through bottom of frame. Adjustable Vertical Stop: Steel washer with neoprene washer "up-stop" on lower threaded rod. Self-centering hanger rod cap to ensure concentricity between hanger rod and support spring coil. SNUBBERS 1. 2.10 Fire Protection Specifications Page 26 Anchor bolts for attaching to concrete shall be seismic-rated, drill-in, and studwedge or female-wedge type. Resilient Isolation Washers and Bushings: Oil- and water-resistant neoprene. Maximum 1/4-inch (6-mm) air gap, and minimum 1/4-inch- (6-mm-) thick resilient cushion. RESTRAINT CHANNEL BRACINGS Description: MFMA-4, shop- or field-fabricated bracing assembly made of slotted steel channels with accessories for attachment to braced component at one end and to building structure at the other end and other matching components and with corrosionresistant coating; rated in tension, compression, and torsion forces. RESTRAINT CABLES Restraint Cables: ASTM A 603 galvanized (or ASTM A 492 stainless where noted in this document or on the drawings) -steel cables. End connections made of steel assemblies with thimbles, brackets, swivel, and bolts designed for restraining cable service; with a minimum of two clamping bolts for cable engagement. SEISMIC-RESTRAINT ACCESSORIES Hanger-Rod Stiffener: Reinforcing steel angle clamped to hanger rod. Hinged and Swivel Brace Attachments: Multifunctional steel connectors for attaching hangers to rigid channel bracings and restraint cables. Bushings for Floor-Mounted Equipment Anchor Bolts: Neoprene bushings designed for rigid equipment mountings, and matched to type and size of anchor bolts and studs. ENSO Systems Inc. #865 St Elizabeth C.S. – Full Day Kindergarten Addition D. E. 2.13 A. 2.14 A. Fire Protection Specifications Page 27 Bushing Assemblies for Wall-Mounted Equipment Anchorage: Assemblies of neoprene elements and steel sleeves designed for rigid equipment mountings, and matched to type and size of attachment devices used. Resilient Isolation Washers and Bushings: One-piece, molded, oil- and water-resistant neoprene, with a flat washer face. MECHANICAL ANCHOR BOLTS Mechanical Anchor Bolts: Drilled-in and stud-wedge or female-wedge type in zinccoated steel for interior applications and stainless steel for exterior applications. Select anchor bolts with strength required for anchor and as tested according to ASTM E 488. ADHESIVE ANCHOR BOLTS Adhesive Anchor Bolts: Drilled-in and capsule anchor system containing PVC or urethane methacrylate-based resin and accelerator, or injected polymer or hybrid mortar adhesive. Provide anchor bolts and hardware with zinc-coated steel for interior applications and stainless steel for exterior applications. Select anchor bolts with strength required for anchor and as tested according to ASTM E 488. PART 3 - GENERAL 3.1 A. B. C. 3.2 A. B. C. D. E. EXAMINATION Examine areas and equipment to receive vibration isolation and seismic-control devices for compliance with requirements for installation tolerances and other conditions affecting performance of the Work. Examine roughing-in for reinforcement and cast-in-place anchors to verify actual locations before installation. Proceed with installation only after unsatisfactory conditions have been corrected. COORDINATION AND EXECUTION Coordinate size, shape, reinforcement and attachment of all housekeeping pads supporting vibration/seismically rated equipment. Concrete shall have a minimum compressive strength of 3,000 psi or as specified by the project engineer. Coordinate size, thickness, doweling, and reinforcing of concrete equipment housekeeping pads and piers with vibration isolation and seismic restraint device manufacturer to ensure adequate space, embedment and prevent edge breakout failures. Pads and piers must be adequately doweled in to structural slab. Housekeeping Pads must be adequately reinforced and adequately sized for proper installation of equipment anchors. Refer seismic restraint manufacturer’s written instructions. Coordinate with vibration/seismic restraint manufacturer and the structural engineer of record to locate and size structural supports underneath vibration/seismically restrained equipment. Installation of all seismic restraint materials specified in this section shall be accomplished as per the manufacturer’s written instructions. Adjust isolators and restraints after piping or wiring systems have been filled and equipment is at its operating weight, following the manufacturer’s written instructions. Attach piping to the trapeze per seismic restraint manufacturer’s design. Install cables so they do not bend across sharp edges of adjacent equipment or building structures. Do not brace or support equipment to separate portions of the structure that may act differently in response to an earthquake. For example, do not connect a Transverse restraint to a wall and then a Longitudinal restraint to either a floor/ceiling/roof at the same braced location. ENSO Systems Inc. #865 St Elizabeth C.S. – Full Day Kindergarten Addition F. 3.3 A. Install vertical braces to stiffen hanger rods and prevent buckling per seismic restraint manufacturer’s design. Clamp vertical brace to hanger rods. Requirements apply equally to hanging equipment. Do not weld vertical braces to hanger rods. SEISMIC RESTRAINTS APPLICATION General: 1. 2. 3. 4. 5. B. All equipment and piping shall be restrained to resist seismic forces per the applicable Building Code(s) as a minimum; listed herein. Additional requirements specified herein are included specifically for this project; as needed basis. Install seismic restraint devices per the manufacturer’s submittals. Any deviation from the manufacturer’s instructions shall be reviewed and approved by the manufacturer. Attachment to structure for suspended equipment and pipe: If specific attachment is not indicated, anchor bracing to structure at flanges of beams, at upper truss chords of bar joists, or at concrete members. Provide hanger rod stiffeners where indicated or as required to prevent buckling of rods due to seismic forces. Where rigid restraints are used on equipment or piping, the support rods for the equipment or piping at restraint locations must be supported by anchors rated for seismic use. Post-installed concrete anchors must be in accordance with ACI 355.2. Concrete Anchor Bolts: 1. 2. 3. 4. 5. C. Fire Protection Specifications Page 28 Identify position of reinforcing steel and other embedded items prior to drilling holes for anchors. Do not damage existing reinforcing or embedded items during coring or drilling. Notify the structural engineer if reinforcing steel or other embedded items are encountered during drilling. Locate and avoid pre- or posttensioned tendons, electrical and telecommunications conduit, and gas lines. Do not drill holes in concrete or masonry until concrete, mortar, or grout has achieved full design strength. Mechanical Anchors: Protect threads from damage during anchor installation. Adhesive Anchors: Clean holes to remove loose material and drilling dust per manufactures instructions prior to installation of adhesive. Place adhesive in holes proceeding from the bottom of the hole and progressing toward the surface in such a manner as to avoid introduction of air pockets in the adhesive. Set anchors to manufacturer's recommended torque, using a torque wrench. Equipment Restraints: 1. 2. 3. Seismically restrain the following equipment: fire pumps. Install fasteners, straps and brackets as required to secure the equipment. Install neoprene grommet washers or fill the gap with epoxy on equipment anchor bolts where clearance between anchor and equipment support hole exceeds 3.2 mm (0.125 inch). Suspended Equipment: All suspended equipment that meets any of the following conditions requires seismic restraints as specified by the supplier: a. b. Rigidly attached to pipe that is 75 lbs. and greater, Items hung independently or with flexible connections greater than 20 lbs.. For importance factors greater than 1.0 all suspended equipment requires seismic restraints regardless of the above notes. ENSO Systems Inc. #865 St Elizabeth C.S. – Full Day Kindergarten Addition c. d. 4. b. Anchor floor and wall mounted equipment to the structure as per the stamped seismic certifications / drawings. Suspended equipment shall be restrained using seismic cable restraints, or struts, and hanger rods as per the stamped seismic certifications / drawings. Vibration Isolated Equipment: a. b. D. Wall mounted equipment weighing more than 20 lbs. with an importance factor of 1.0. The 300mm (12”) rule does not apply to suspended equipment. Rigid Mounted Equipment: a. 5. Fire Protection Specifications Page 29 Seismic control shall not compromise the performance of noise control, vibration isolation or fire stopping systems. Equipment supported by vibration-isolation hangers shall be detailed and installed with approximately a 1/8” gap between the isolation hangers and the structure. Isolators at restraint locations must be fitted with uplift limit stops. Piping Systems: Provide seismic control measures with spacing and anchorage engineered for the specific project. 1. All piping is to be restrained to meet code requirements. a. b. c. d. 2. Restraint Spacing For Piping: a. b. c. d. e. 3. All piping associated with “Life Safety Systems” shall always have an importance factor of 1.5. Seismic restraint requirements / exemptions vary with code and seismic acceleration – see specific code and comply with applicable restraint requirements. Seismically restrain / brace all pipes 65 mm (2 ½”) in nominal diameter and larger. Seismically restrain / brace all piping in boiler rooms, mechanical rooms and refrigeration mechanical rooms 32 mm (1 ¼”) in nominal diameter and larger. Branch lines may not be used to brace main lines. For ductile piping: Transverse supports a maximum of 12 m (40’) o.c. For ductile piping: Longitudinal supports a maximum of 24 m (80’) o.c. For non-ductile piping (e.g., cast iron, PVC) space Transverse supports a maximum of 6 m (20’) o.c., and Longitudinal supports a maximum of 12 m (40’) o.c. Differential spacing can be designed depending upon pipe size and length(s) of run (design will be indicated on drawings of approved method). For piping with hazardous material inside (e.g., natural gas, medical gas) space Transverse supports a maximum of 6 m (20’) o.c., and Longitudinal supports a maximum of 12 m (40’) o.c. For pipe risers, restrain the piping at floor penetrations using the same spacing requirements as above. Brace a change of direction longer than 3.7 m (12’). ENSO Systems Inc. #865 St Elizabeth C.S. – Full Day Kindergarten Addition 4. 5. 6. 7. 8. 9. 10. 11. 12. 13. 14. 15. 16. 17. 18. 19. 20. 21. 22. 3.4 A. Fire Protection Specifications Page 30 This specification does not allow the use of the 300mm (12’’) rule where the piping may be exempted from seismic restraint based on the length of the support rods provided that the rods are not subjected to bending moments. Install restraint cables so they do not bend across edges of adjacent equipment or building structure. Tie back to structure at 45 degrees to the structure. Longitudinal restraints for single pipe supports shall be attached rigidly to the pipe, not to the pipe hanger. For supports with multiple pipes (trapezes), secure pipes to trapeze member with clamps approved for application. Install flexible metal hose loops in piping which crosses building seismic joints, sized for the anticipated amount of movement. Install flexible piping connectors where adjacent sections or branches are supported by different structural elements, and where the connections terminate with connection to equipment that is anchored to a different structural element from the one supporting the connections as they approach equipment. Where pipe sizes reduce below required dimensions noted above in Section 3.2.E, the final restraint shall be installed at the transition location. Longitudinal restraints for single conduit supports shall be attached rigidly to the pipe, not to the pipe/conduit hanger. For supports with multiple conduits (trapezes), secure conduit to trapeze member with clamps approved for application. Where conduits reduce below required dimensions noted above in Section 3.2.F, the final restraint shall be installed at the transition location. Rod Stiffener Clamps are required where the hanger rod exceeds the maximum length shown in the seismic calculation sheets. They are only required at restraint locations. Seismically Rated Beam Clamps are required where welding to or penetrations to steel beams are not approved. Adjust restraint cables so that they are not visibly slack. Cable not to support weight during normal operation. Seismic systems are to be compatible with requirements for anchoring and guiding of systems. Drilled or power driven anchors or fasteners shall not be permitted for use with seismic control measures. Friction due to gravity does not constitute a seismic attachment. Seismic restraint connections are not to be connected to the bottom chord of steel joists or the bottom flange of steel beams. Standard beam clamps can be used to support restrained components; they cannot be used to connect the seismic restraint to the structure – only for the hanger rods. Brace remaining piping, ductwork, electrical components to code requirements (OBC & NBCC or TI-809-04)) or in conformance with SMACNA (Sheet Metal and Air Conditioning Contractors National Association, Inc.) “Seismic Restraint Manual Guidelines for Mechanical Systems”, 2ND edition or 3RD edition depending on Code or EOR. ACCOMMODATION OF DIFFERENTIAL SEISMIC MOTION Install flexible connections in piping where they cross seismic joints, where adjacent sections or branches are supported by different structural elements, and where the connections terminate with connection to equipment that is anchored to a different structural element from the one supporting the connections as they approach ENSO Systems Inc. #865 St Elizabeth C.S. – Full Day Kindergarten Addition Fire Protection Specifications Page 31 equipment. Comply with requirements in Section 221116 "Domestic Water Piping" for piping flexible connections. 3.5 A. B. C. D. E. INSPECTION AND CERTIFICATION The contractor shall notify the local representative of the seismic restraint materials manufacturer prior to installing any seismic restraint devices. The contractor shall seek the representative’s guidance in any installation procedures with which he/she is unfamiliar. The contractor shall notify the local representative of the seismic restraint materials manufacturer mid-way through the listed project for an inspection all vibration and seismic restraint devices already installed. A written report of any installation errors, improperly selected devices, or other fault in the system which could affect the performance of the system shall be documented and the contractor shall perform all steps that are required from this written report to properly complete the vibration and seismic restraint work as per the specifications. Upon completion of the installation, arrange for the design Engineer to visit the site to verify the proper installation of all seismic restraint devices herein specified. A written report citing any installation errors, improperly selected devices, or other fault in the system which could affect the performance of the system should be generated by the Engineer. The Engineer shall verify that isolators are adjusted, with spring’s perpendicular to bases or housing, adjustment bolts are tightened up on equipment mountings, and hangers are not cocked. Upon completion of the Work, the Engineer shall provide a sealed letter addressed to the local authorities having jurisdiction confirming that the Seismic Design and Installation is in general conformance with the design documents and the Ontario and National Building Codes. The installing contractor shall take all steps required to properly complete the seismic restraint work as per the specifications. Perform the following tests: 1. 2. 3. 4. 5. 3.6 A. Provide evidence of recent calibration of test equipment by a testing agency acceptable to authorities having jurisdiction. Schedule test with Owner, through Consultant, before connecting anchorage device to restrained component (unless post connection testing has been approved), and with at least seven days' advance notice. Obtain Consultant's approval before transmitting test loads to structure. Provide temporary load-spreading members. Test at least four of each type and size of installed anchors and fasteners selected by Consultant. Test to 90 percent of rated proof load of device. ADJUSTING Adjust restraints to permit free movement of equipment within normal mode of operation. END OF SECTION 210548 ENSO Systems Inc. #865 St Elizabeth C.S. – Full Day Kindergarten Addition Fire Protection Specifications Page 32 SECTION 210553 – IDENTIFICATION FOR FIRE PROTECTION PIPING AND EQUIPMENT PART 1 - GENERAL 1.1 A. SUMMARY Section Includes: 1. 2. 3. 1.2 A. B. C. D. Pipe labels. Valve tags. Pump and cabinet lamacoids ACTION SUBMITTALS Product Data: For each type of product indicated. Equipment Label Schedule: Include a listing of all equipment to be labeled with the proposed content for each label. Valve numbering scheme. Valve Schedules: For each piping system to include in maintenance manuals. PART 2 - PRODUCTS 2.1 A. B. C. D. PIPE LABELS General Requirements for Manufactured Pipe Labels: Preprinted, color-coded, with lettering indicating service, and showing flow direction. Pre-tensioned Pipe Labels: Pre-coiled, semi-rigid plastic formed to partially cover circumference of pipe and to attach to pipe without fasteners or adhesive. Self-Adhesive Pipe Labels: Printed plastic with contact-type, permanent-adhesive backing. Pipe Label Contents: Include identification of piping service using same designations or abbreviations as used on Drawings; also include pipe size and an arrow indicating flow direction. 1. 2. 2.2 A. VALVE TAGS Valve Tags: Stamped or engraved with 1/4-inch (6.4-mm) letters for piping system abbreviation and 1/2-inch (13-mm) numbers. 1. 2. B. Flow-Direction Arrows: Integral with piping-system service lettering to accommodate both directions or as separate unit on each pipe label to indicate flow direction. Lettering Size: Size letters according to ASME A13.1 for piping At least 1/2 inch (13 mm) for viewing distances up to 72 inches (1830 mm) and proportionately larger lettering for greater viewing distances]. Tag Material: Brass, 0.032-inch (0.8-mm) minimum thickness, and having predrilled or stamped holes for attachment hardware. Fasteners: Brass wire-link chain or beaded chain or S-hook. Valve Schedules: For each piping system, on 8-1/2-by-11-inch (A4) bond paper. Tabulate valve number, piping system, system abbreviation (as shown on valve tag), location of valve (room or space), normal-operating position (open, closed, or modulating), and variations for identification. Mark valves for emergency shutoff and similar special uses. 1. Valve-tag schedule shall be included in operation and maintenance data. ENSO Systems Inc. #865 St Elizabeth C.S. – Full Day Kindergarten Addition 2.3 A. Fire Protection Specifications Page 33 LAMACOID LABELS FOR PUMPS AND CABINETS Engraved Lamacoid Label: Punched or drilled for screw mounting. Black letters on a white background. Minimum thickness 3mm (0.12’’) and letter height shall be 10mm (3/8’’). PART 3 - EXECUTION 3.1 A. 3.2 A. B. C. 3.3 A. PREPARATION Clean piping and equipment surfaces of substances that could impair bond of identification devices, including dirt, oil, grease, release agents, and incompatible primers, paints, and encapsulants. GENERAL INSTALLATION REQUIREMENTS Coordinate installation of identifying devices with completion of covering and painting of surfaces where devices are to be applied. Coordinate installation of identifying devices with locations of access panels and doors. Install identifying devices before installing acoustical ceilings and similar concealment. PIPE LABEL INSTALLATION Pipe Label Locations: Locate pipe labels where piping is exposed or above accessible ceilings in finished spaces; machine rooms; accessible maintenance spaces such as shafts, tunnels, and plenums; and exterior exposed locations as follows: 1. 2. 3. 4. 5. 6. 7. B. 3.4 A. Near each valve and control device. Near each branch connection, excluding short takeoffs for fixtures and terminal units. Where flow pattern is not obvious, mark each pipe at branch. Near penetrations through walls, floors, ceilings, and inaccessible enclosures. At access doors, manholes, and similar access points that permit view of concealed piping. Near major equipment items and other points of origination and termination. Spaced at maximum intervals of 50 feet (15 m) along each run. Reduce intervals to 25 feet (7.6 m) in areas of congested piping and equipment. On piping above removable acoustical ceilings. Omit intermediately spaced labels. Directional Flow Arrows: Arrows shall be used to indicate direction of flow in pipes, including pipes where flow is allowed in both directions. EQUIPMENT LAMACOID LABELS Install lamacoid labels on all pumps, cabinets or equipment. Mechanically fasten lamacoid labels to equipment where possible (avoid adhesives) or strap with stainless steel bands. END OF SECTION 210553 ENSO Systems Inc. #865 St Elizabeth C.S. – Full Day Kindergarten Addition Fire Protection Specifications Page 34 SECTION 211119 - FIRE-DEPARTMENT CONNECTIONS PART 1 - GENERAL 1.1 A. SUMMARY Section Includes: 1. 1.2 A. Exposed-type fire-department connections. ACTION SUBMITTALS Product Data: For each type of product. 1. Include construction details, material descriptions, dimensions of individual components and profiles, and finishes for each fire-department connection. PART 2 - PRODUCTS 2.1 A. B. C. D. E. F. G. H. I. J. K. L. EXPOSED-TYPE FIRE-DEPARTMENT CONNECTION Standard: ULC. Type: Exposed, projecting, for wall mounting. Pressure Rating: 175 psig (1200 kPa) minimum. Body Material: Corrosion-resistant metal. Inlets: Brass with threads according to NFPA 1963 and matching local fire-department sizes and threads. Include extension pipe nipples, brass lugged swivel connections, and check devices or clappers. Caps: Brass, lugged type, with gasket and chain. Escutcheon Plate: Round, brass, wall type. Outlet: Back, with pipe threads. Number of Inlets: To fire department standard. Escutcheon Plate Marking: Similar to "AUTO SPKR." Finish: Polished chrome plated. Outlet Size: NPS 4 (DN 100) or fire department standard. PART 3 - EXECUTION 3.1 A. B. INSTALLATION Install wall-type fire-department connections. Install automatic (ball-drip) drain valve at each check valve for fire-department connection. END OF SECTION 211119 SECTION 211200 - FIRE-SUPPRESSION STANDPIPES PART 1 - GENERAL 1.1 A. SUMMARY Section Includes: 1. 2. 3. 4. 5. Pipes, fittings, and specialties. Fire-protection specialty valves. Hose connections. Alarm devices. Pressure gages. ENSO Systems Inc. #865 St Elizabeth C.S. – Full Day Kindergarten Addition 1.2 A. 1.3 A. B. Fire Protection Specifications Page 35 DEFINITIONS Standard-Pressure Standpipe Piping: Fire-suppression standpipe piping designed to operate at working pressure 175 psig (1200 kPa) maximum. ACTION SUBMITTALS Product Data: For each type of product. Include rated capacities, operating characteristics, electrical characteristics, and furnished specialties and accessories. Delegated-Design Submittal: 1. The drawings indicate the general arrangement of piping and design criteria. Ensure that pipes are adequately sized so that a fire pump is not necessary. 2. Successful tenderer will be required to produce shop drawings complete with all necessary hydraulic pipe sizing and system design calculations where required by the local authorities. Submit these drawings and calculation as specified. 3. System design and calculation procedures shall be in accordance with the requirements of governing codes and authorities. The design and drawings must be certified by a Professional Engineer. C. D. 1.4 A. 1.5 A. Approved Standpipe Drawings: Working plans, prepared according to NFPA 14, that have been approved by authorities having jurisdiction, including hydraulic calculations if applicable. Fire-hydrant flow test report. CLOSEOUT SUBMITTALS Operation and Maintenance Data: For fire-suppression standpipes specialties to include in emergency, operation, and maintenance manuals. QUALITY ASSURANCE Installer Qualifications: 1. Installer's responsibilities include designing, fabricating, and installing firesuppression standpipes and providing professional engineering services needed to assume engineering responsibility. Base calculations on results of fire-hydrant flow test. a. B. C. D. 1.6 A. Engineering Responsibility: Preparation of working plans, calculations, and field test reports by a qualified professional engineer. Welding Qualifications: Qualify procedures and operators according to ASME Boiler and Pressure Vessel Code. Electrical Components, Devices, and Accessories: Listed and labeled as defined in NFPA 70, by a qualified testing agency, and marked for intended location and application. NFPA Standards: Fire-suppression standpipe equipment, specialties, accessories, installation, and testing shall comply with NFPA 14. PROJECT CONDITIONS Interruption of Existing Fire-Suppression Standpipe Service: Do not interrupt firesuppression standpipe service to facilities occupied by Owner or others unless permitted under the following conditions and then only after arranging to provide temporary fire-suppression standpipe service according to requirements indicated: ENSO Systems Inc. #865 St Elizabeth C.S. – Full Day Kindergarten Addition 1. 2. Fire Protection Specifications Page 36 Notify Architect no fewer than two days in advance of proposed interruption of fire-suppression standpipe service. Do not proceed with interruption of fire-suppression standpipe service without Architect's written permission. PART 2 - PRODUCTS 2.1 A. B. C. 2.2 A. B. SYSTEM DESCRIPTIONS Automatic Wet-Type, Class I Standpipe System: Includes NPS 2-1/2 (DN 65) hose connections. Has open water-supply valve with pressure maintained and is capable of supplying water demand. Automatic Wet-Type, Class II Standpipe System: Includes NPS 1-1/2 (DN 40) hose stations. Has open water-supply valve with pressure maintained and is capable of supplying water demand. Automatic Wet-Type, Class III Standpipe System: Includes NPS 1-1/2 (DN 40) hose stations and NPS 2-1/2 (DN 65) hose connections. Has open water-supply valve with pressure maintained and is capable of supplying water demand. PERFORMANCE REQUIREMENTS Standard-Pressure, Fire-Suppression Standpipe System Component: Listed for 175psig (1200-kPa) minimum working pressure. Fire-suppression standpipe design shall be approved by authorities having jurisdiction. 1. Minimum residual pressure at each hose-connection outlet is as follows: As per NFPA 14. 2.3 A. 2.4 A. B. C. D. E. F. G. H. I. PIPING MATERIALS Comply with requirements in "Piping Schedule" Article for applications of pipe, tube, and fitting materials and for joining methods for specific services, service locations, and pipe sizes. BLACK STEEL PIPE AND ASSOCIATED FITTINGS Schedule 40: ASTM A 135/A 135M, Grade A; with factory- or field-formed ends to accommodate joining method. Schedule 40: ASTM A 795/A 795M, Type E, Grade A; with factory- or field-formed ends to accommodate joining method. Schedule 10: ASTM A 135/A 135M or ASTM A 795/A 795M, Schedule 10 in NPS 5 (DN 125) and smaller; and NFPA 13-specified wall thickness in NPS 6 to NPS 10 (DN 150 to DN 250), plain end. Uncoated, Steel Couplings: ASTM A 865/A 865M, threaded. Uncoated, Gray-Iron Threaded Fittings: ASME B16.4, Class 125, standard pattern. Malleable- or Ductile-Iron Unions: UL 860. Steel Flanges and Flanged Fittings: ASME B16.5, Class 150. Steel Welding Fittings: ASTM A 234/A 234M and ASME B16.9. Grooved-Joint, Steel-Pipe Appurtenances: 1. 2. Pressure Rating: 175 psig (1200 kPa) minimum. Grooved-End Fittings for Steel Piping: ASTM A 47/A 47M, malleable-iron casting or ASTM A 536, ductile-iron casting; with dimensions matching steel pipe. ENSO Systems Inc. #865 St Elizabeth C.S. – Full Day Kindergarten Addition 3. 2.5 A. Grooved-End-Pipe Couplings for Steel Piping: AWWA C606 and UL 213, rigid pattern, unless otherwise indicated, for steel-pipe dimensions. Include ferrous housing sections, EPDM-rubber gasket, and bolts and nuts. SPECIALTY VALVES General Requirements: 1. 2. Standard: ULC's "Fire Protection Equipment Directory" listing or FM Global's "Approval Guide." Pressure Rating: a. 3. 4. 5. B. A. Body Material: Cast or ductile iron. Size: Same as connected piping. End Connections: Flanged or grooved. Standard: ULC. Pressure Rating: 175 psig (1200 kPa) minimum. Type: Automatic draining, ball check. Size: NPS 3/4 (DN 20). End Connections: Threaded. HOSE CONNECTIONS Valve Hose Connections: 1. 2. 3. 4. 5. 6. 7. 8. 9. 10. B. Standard-Pressure Piping Specialty Valves: 175 psig (1200 kPa) minimum. Automatic (Ball Drip) Drain Valves: 1. 2. 3. 4. 5. 2.6 Fire Protection Specifications Page 37 Standard: ULC hose valve, with integral UL 1468 reducing or restricting pressure-control device, for connecting fire hose. Pressure Rating: 300 psig (2070 kPa) minimum. Material: Brass or bronze. Size: NPS 1-1/2 or NPS 2-1/2 (DN 40 or DN 65), as indicated. Inlet: Female pipe threads. Outlet: Male hose threads with lugged cap, gasket, and chain. Include hose valve threads according to NFPA 1963 and matching local fire-department threads. Pattern: To suit installation. Pressure-Control Device Type: As required. Design Outlet Pressure Setting: As per NFPA 14. Finish: Polished chrome-plated in cabinets with glass window installed in finished areas, rough brass or bronze in cabinets without glass window and mechanical service spaces. Water-Flow Indicators: 1. 2. 3. 4. 5. 6. Standard: ULC. Water-Flow Detector: Electrically supervised. Components: Two single-pole, double-throw circuit switches for isolated alarm and auxiliary contacts, 7 A, 125-V ac and 0.25 A, 24-V dc; complete with factoryset, field-adjustable retard element to prevent false signals and tamperproof cover that sends signal if removed. Type: Paddle operated. Pressure Rating: 250 psig (1725 kPa). Design Installation: Horizontal or vertical. ENSO Systems Inc. #865 St Elizabeth C.S. – Full Day Kindergarten Addition 2.7 A. B. C. D. Fire Protection Specifications Page 38 PRESSURE GAGES Standard: UL 393. Dial Size: 3-1/2- to 4-1/2-inch (90- to 115-mm) diameter. Pressure Gage Range: Zero to 250 psig (Zero to 1725 kPa) minimum. Water System Piping Gage: Include "WATER" on dial face. PART 3 - EXECUTION 3.1 A. B. 3.2 A. 3.3 A. B. 3.4 A. PREPARATION Perform fire-hydrant flow test according to NFPA 14 and NFPA 291. Use results for system design calculations required in "Quality Assurance" Article. Report test results promptly and in writing. EXAMINATION Examine walls and partitions for suitable thickness, fire- and smoke-rated construction, framing for hose-station cabinets, and other conditions where hose connections and stations are to be installed. WATER-SUPPLY CONNECTIONS Connect fire-suppression standpipe piping to building's interior water-distribution piping. Install shutoff valve, pressure gage, drain, and other accessories at connection to water-distribution piping. Install shutoff valve, check valve, pressure gage, and drain at connection to water supply. PIPING INSTALLATION Locations and Arrangements: Drawing plans, schematics, and diagrams indicate general location and arrangement of piping. Install piping as indicated, as far as practical. 1. B. C. D. E. F. G. H. I. J. Deviations from approved working plans for piping require written approval from authorities having jurisdiction. File written approval with Consultant before deviating from approved working plans. Piping Standard: Comply with requirements in NFPA 14 for installation of firesuppression standpipe piping. Install listed fittings to make changes in direction, branch takeoffs from mains, and reductions in pipe sizes. Install drain valves on standpipes. Extend drain piping to outside of building or as shown on plans. Install automatic (ball drip) drain valves to drain piping between fire-department connections and check valves. Drain to floor drain or outside building. Install alarm devices in piping systems. Install hangers and supports for standpipe system piping according to NFPA 14. Comply with requirements in NFPA 13 for hanger materials. Install pressure gages on riser or feed main and at top of each standpipe. Include pressure gages with connection not less than NPS 1/4 (DN 8) and with soft-metal seated globe valve, arranged for draining pipe between gage and valve. Install gages to permit removal, and install where they are not subject to freezing. Install sleeves for piping penetrations of walls, ceilings, and floors. Install sleeve seals for piping penetrations of concrete walls and slabs. ENSO Systems Inc. #865 St Elizabeth C.S. – Full Day Kindergarten Addition K. 3.5 A. B. C. D. E. F. G. Install escutcheons for piping penetrations of walls, ceilings, and floors. JOINT CONSTRUCTION Install couplings, flanges, flanged fittings, unions, nipples, and transition and special fittings that have finish and pressure ratings same as or higher than system's pressure rating for aboveground applications unless otherwise indicated. Install unions adjacent to each valve in pipes NPS 2 (DN 50) and smaller. Install flanges, flange adapters, or couplings for grooved-end piping on valves, apparatus, and equipment having NPS 2-1/2 (DN 65) and larger end connections. Ream ends of pipes and tubes, and remove burrs. Bevel plain ends of steel pipe. Remove scale, slag, dirt, and debris from inside and outside of pipes, tubes, and fittings before assembly. Flanged Joints: Select appropriate gasket material in size, type, and thickness suitable for water service. Join flanges with gasket and bolts according to ASME B31.9. Threaded Joints: Thread pipe with tapered pipe threads according to ASME B1.20.1. Cut threads full and clean using sharp dies. Ream threaded pipe ends to remove burrs and restore full ID. Join pipe fittings and valves as follows: 1. 2. H. I. J. 3.6 A. B. C. A. B. C. Shop weld pipe joints where welded piping is indicated. Do not use welded joints for galvanized-steel pipe. Dissimilar-Material Piping Joints: Make joints using adapters compatible with materials of both piping systems. VALVE AND SPECIALTIES INSTALLATION Install listed fire-protection valves, trim and drain valves, specialty valves and trim, controls, and specialties according to NFPA 14 and authorities having jurisdiction. Install check valve in each water-supply connection. Install backflow preventers instead of check valves in potable-water-supply sources. Specialty Valves: 1. 3.7 Apply appropriate tape or thread compound to external pipe threads. Damaged Threads: Do not use pipe or pipe fittings with threads that are corroded or damaged. Steel-Piping, Cut-Grooved Joints: Cut square-edge groove in end of pipe according to AWWA C606. Assemble coupling with housing, gasket, lubricant, and bolts. Join steel pipe and grooved-end fittings according to AWWA C606 for steel-pipe joints. Steel-Piping, Roll-Grooved Joints: Roll rounded-edge groove in end of pipe according to AWWA C606. Assemble coupling with housing, gasket, lubricant, and bolts. Join steel pipe and grooved-end fittings according to AWWA C606 for steel-pipe grooved joints. Welded Joints: Construct joints according to AWS D10.12/D10.12M, using qualified processes and welding operators according to "Quality Assurance" Article. 1. K. Fire Protection Specifications Page 39 General Requirements: Install in vertical position for proper direction of flow, in main supply to system. HOSE-CONNECTION INSTALLATION Install hose connections adjacent to standpipes. Install freestanding hose connections for access and minimum passage restriction. Install NPS 1-1/2 (DN 40) hose-connection valves with flow-restricting device. ENSO Systems Inc. #865 St Elizabeth C.S. – Full Day Kindergarten Addition D. E. 3.8 A. B. C. D. 3.9 A. B. 3.10 A. 3.11 A. Install NPS 2-1/2 (DN 65) hose connections with quick-disconnect NPS 2-1/2 by NPS 1-1/2 (DN 65 by DN 40) reducer adapter and flow-restricting device. Install wall-mounted-type hose connections in cabinets. Include pipe escutcheons, with finish matching valves, inside cabinet where water-supply piping penetrates cabinet. Install valves at angle required for connection of fire hose. Comply with requirements for cabinets in Section 104413 "Fire Protection Cabinets." HOSE-STATION INSTALLATION Install NPS 1-1/2 (DN 40) hose-station valves with flow-restricting device unless otherwise indicated. Install NPS 2-1/2 (DN 65) hose connections with quick-disconnect NPS 2-1/2 by NPS 1-1/2 (DN 65 by DN 40) reducer adapter and flow-restricting device unless otherwise indicated. Install wall-mounted, rack hose stations in cabinets. Include pipe escutcheons, with finish matching valves, inside cabinet where water-supply piping penetrates cabinet. Install valves at angle required for connection of fire hose. Comply with requirements for cabinets in Section 104413 "Fire Protection Cabinets." Install hose-reel hose stations on wall with bracket. FIRE-DEPARTMENT CONNECTION INSTALLATION Reconnect to existing wall-type fire-department connection. Install automatic (ball drip) drain valve at each check valve for fire-department connection. IDENTIFICATION Install labeling and pipe markers on equipment and piping according to requirements in NFPA 14. FIELD QUALITY CONTROL Tests and Inspections: 1. 2. B. 3.12 A. B. Leak Test: After installation, charge systems and test for leaks. Repair leaks and retest until no leaks exist. Flush, test, and inspect standpipe systems according to NFPA 14, "System Acceptance" Chapter. Prepare test and inspection reports. PIPING SCHEDULE Piping between Fire-Department Connections and Check Valves: Galvanized, standard-weight steel pipe with cast-iron threaded fittings or grooved joints. Standard-pressure, wet-type fire-suppression standpipe piping, NPS 3 (DN 75) and smaller, shall be the following: 1. C. Fire Protection Specifications Page 40 Schedule 10 black steel, joined with ULC listed combination of grooved fittings, gaskets, and grooves conforming to NFPA-13 & 14 requirements. Grooves cut or rolled on pipe shall be dimensionally compatible with fittings. Standard-pressure, wet-type fire-suppression standpipe piping, NPS 4 (DN 100) and larger, shall be the following: 1. Schedule 40, black-steel pipe CSA B63, Grade A black steel, joined by welding. ENSO Systems Inc. #865 St Elizabeth C.S. – Full Day Kindergarten Addition 3.13 A. B. Fire Protection Specifications Page 41 TEST AND CERTIFICATES Upon completion furnish and pay for a certificates of approval certifying compliance with the rules and regulations of governing authorities. Include pressure test results, material test sheets, etc., as required by the authorities having jurisdiction, OBC and NFPA. Submit sealed final review letter from design Engineer certifying that all work has been designed and installed in accordance with the OBC, NFPA 14 and the detailed design documents. END OF SECTION 211200 SECTION 211213 - FIRE-SUPPRESSION HOSES AND NOZZLES PART 1 - GENERAL 1.1 A. SUMMARY Section Includes: 1. 2. 1.2 A. ACTION SUBMITTALS Product Data: For each type of product. 1. B. A. Include construction details, material descriptions, dimensions of individual components and profiles, and finishes. Shop Drawings: 1. 1.3 NPS 1-1/2 (DN 40) rack-type hose stations. NPS 1-1/2 by NPS 2-1/2 (DN 40 by DN 65) rack-type hose stations. Include plans, elevations, sections, and mounting and attachment details. CLOSEOUT SUBMITTALS Operation and Maintenance Data: For each product type to include in operation and maintenance manuals. PART 2 - PRODUCTS 2.1 A. B. RACK-TYPE HOSE STATIONS Standard of Acceptance: National Fire Protection, Wilson and Cousins Hose Stations (Drawing Symbol FHC); Standpipe Valves, Accessories: Hoses and 1. ULC listed semi-automatic hose rack, chromed moving parts, positive water stop, as manufactured by Wilson and Cousins model IE-75 CP or National Fire Protection model HR. 2. 40mm all purpose single jacket hose, 23m length, abrasion resistant polyester filament jacket with polyurethane lining as manufactured by National Fire Protection model paragon. C. D. E. Chrome plate exposed parts (valves, couplings, hose rack, etc.) Fire hose cabinets, hose racks, hose and fittings shall be by one supplier Provide fire extinguisher in fire hose cabinet. The following identification symbols indicate specific requirements for the hose cabinets: ENSO Systems Inc. #865 St Elizabeth C.S. – Full Day Kindergarten Addition 1. 2. Fire Protection Specifications Page 42 FHC: Surface or recessed mounted as shown on the drawings with 40mm/65mm valves and hose rack assembly to Building Standard. Provide Owner with one set of hose wrenches. PART 3 - EXECUTION 3.1 A. 3.2 A. B. C. EXAMINATION Examine substrates, areas, and conditions, with Installer present, for compliance with requirements for installation tolerances and other conditions affecting performance of fire hoses, reels, racks, and monitors. HOSE-STATION INSTALLATION Install NPS 1-1/2 (DN 40) hose-station valves with flow-restricting device unless otherwise indicated. Install NPS 2-1/2 (DN 65) hose connections with quick-disconnect NPS 2-1/2 by NPS 1-1/2 (DN 65 by DN 40) reducer adapter and flow-restricting device unless otherwise indicated. Install wall-mounted, rack hose stations in cabinets. Include pipe escutcheons, with finish matching valves, inside cabinet where water-supply piping penetrates cabinet. Install valves at angle required for connection of fire hose. Install hose-reel hose stations on wall with bracket. END OF SECTION 211213 SECTION 211313 - WET-PIPE SPRINKLER SYSTEMS PART 1 - GENERAL 1.1 A. SUMMARY Section Includes: 1. 2. 3. 1.2 A. 1.3 A. B. Pipes, fittings, and specialties. Sprinklers. Excess Pressure Pump and Pressure gages. DEFINITIONS Standard-Pressure Sprinkler Piping: Wet-pipe sprinkler system piping designed to operate at working pressure of 175 psig (1200 kPa) maximum. PERFORMANCE REQUIREMENTS Standard-Pressure Piping System Component: Listed for 175-psig (1200-kPa) minimum working pressure. Delegated-Design Submittal: 1. The drawings indicate the general arrangement of piping and design criteria. Ensure that pipes are adequately sized so that a fire pump is not necessary. 2. Successful tenderer will be required to produce shop drawings complete with all necessary hydraulic pipe sizing and system design calculations where required by the local authorities. Submit these drawings and calculation as specified. 3. System design and calculation procedures shall be in accordance with the requirements of governing codes and authorities. The design and drawings must be sealed by a Professional Engineer. ENSO Systems Inc. #865 St Elizabeth C.S. – Full Day Kindergarten Addition C. D. E. Approved Sprinkler Drawings: Working plans, prepared according to NFPA 13, that have been approved by authorities having jurisdiction, including hydraulic calculations if applicable. Fire-hydrant flow test report. Sprinkler system design shall be approved by authorities having jurisdiction. 1. Sprinkler Occupancy Hazard Classifications: a. 1.4 A. B. 1.5 A. Product Data: For each type of product indicated. Include rated capacities, operating characteristics, electrical characteristics, and furnished specialties and accessories. Operation and Maintenance Data: For sprinkler specialties to include in emergency, operation, and maintenance manuals. QUALITY ASSURANCE Installer Qualifications: Installer's responsibilities include designing, fabricating, and installing sprinkler systems and providing professional engineering services needed to assume engineering responsibility. Base calculations on results of fire-hydrant flow test where require. a. C. 1.6 A. 1.7 A. In accordance with NFPA 13. SUBMITTALS 1. B. Fire Protection Specifications Page 43 Engineering Responsibility: Preparation of working plans, calculations, and field test reports by a qualified professional engineer. Welding Qualifications: Qualify procedures and operators according to ASME Boiler and Pressure Vessel Code. Electrical Components, Devices, and Accessories: ULC listed where required by Code and labeled as defined in NFPA 70, by a qualified testing agency, and marked for intended location and application. COORDINATION Coordinate layout and installation of sprinklers with other construction that penetrates ceilings, including light fixtures, HVAC equipment, and partition assemblies. EXTRA MATERIALS Furnish extra materials that match products installed and that are packaged with protective covering for storage and identified with labels describing contents. 1. Sprinkler Cabinets: Finished, wall-mounted, steel cabinet with hinged cover, and with space for spare sprinklers of each type of sprinklers used on the project plus sprinkler wrench. Include number of sprinklers required by NFPA 13.. PART 2 - PRODUCTS 2.1 A. PIPING MATERIALS Comply with requirements in "Piping Schedule" Article for applications of pipe, tube, and fitting materials, and for joining methods for specific services, service locations, and pipe sizes. ENSO Systems Inc. #865 St Elizabeth C.S. – Full Day Kindergarten Addition 2.2 A. B. C. D. E. F. STEEL PIPE AND FITTINGS Standard Weight, Black - Steel Pipe: ASTM A 53/A 53M,. Pipe ends may be factory or field formed to match joining method. Schedule 10, Black-Steel Pipe: ASTM A 135 or ASTM A 795/A 795M, Schedule 10 in NPS 5 (DN 125) and smaller; and NFPA 13-specified wall thickness in NPS 6 to NPS 10 (DN 150 to DN 250), plain end. Malleable- or Ductile-Iron Unions: UL 860. Steel Flanges and Flanged Fittings: ASME B16.5, Class 150. Steel Welding Fittings: ASTM A 234/A 234M and ASME B16.9. Grooved-Joint, Steel-Pipe Appurtenances: 1. 2. 2.3 A. B. C. 2.4 A. A. B. Pipe-Flange Gasket Materials: AWWA C110, rubber, flat face, 1/8 inch (3.2 mm) thick or ASME B16.21, nonmetallic and asbestos free. Metal, Pipe-Flange Bolts and Nuts: ASME B18.2.1, carbon steel unless otherwise indicated. Welding Filler Metals: Comply with AWS D10.12M/D10.12 for welding materials appropriate for wall thickness and chemical analysis of steel pipe being welded. SPRINKLER SPECIALTY PIPE FITTINGS Sprinkler Guards: Alarm-device types shall match piping and equipment connections. Water-Motor-Operated Alarm: A. Standard: ULC. Type: Mechanically operated, with Pelton wheel. Alarm Gong: Cast aluminum with red-enamel factory finish. Size: 10-inch (250-mm) diameter. Components: Shaft length, bearings, and sleeve to suit wall construction. Inlet: NPS 3/4 (DN 20). Outlet: NPS 1 (DN 25) drain connection. Electrically Operated Alarm Bell: 1. 2. 3. 4. 2.6 Standard: ULC. Type: Wire cage with fastening device for attaching to sprinkler. ALARM DEVICES 1. 2. 3. 4. 5. 6. 7. C. Pressure Rating: 175 psig (1200 kPa) minimum. Grooved-End-Pipe Couplings for Steel Piping: AWWA C606 and UL 213, rigid pattern, unless otherwise indicated, for steel-pipe dimensions. Include ferrous housing sections, EPDM-rubber gasket, and bolts and nuts. PIPING JOINING MATERIALS 1. 2. 2.5 Fire Protection Specifications Page 44 Standard: ULC. Type: Vibrating, metal alarm bell. Size: 6-inch (150-mm) minimum- diameter. Finish: Red-enamel factory finish, suitable for outdoor use. PRESSURE GAGES AND EXCESS PRESSURE PUMP Gauges: ENSO Systems Inc. #865 St Elizabeth C.S. – Full Day Kindergarten Addition 1. 2. 3. B. Fire Protection Specifications Page 45 Standard: ULC Dial Size: 3-1/2- to 4-1/2-inch (90- to 115-mm) diameter. Pressure Gage Range: 0 to 250 psig (0 to 1725 kPa) minimum. Excess Pressure Pump. 1. Provide an excess pressure pump with automatic control for each wet sprinkler system including all necessary piping, starter, controls and wiring from designated circuit as shown on the Electrical Drawings to maintain system pressure. Electric supply: 120 volts, 1 phase, 60 cycle. PART 3 - EXECUTION 3.1 A. PIPING INSTALLATION Locations and Arrangements: Drawing plans, schematics, and diagrams indicate general location and arrangement of piping. Install piping as indicated, as far as practical. 1. B. C. D. E. F. G. H. I. J. K. L. M. 3.2 A. B. C. D. Deviations from approved working plans for piping require written approval from authorities having jurisdiction. File written approval with Architect before deviating from approved working plans. Use listed fittings to make changes in direction, branch takeoffs from mains, and reductions in pipe sizes. Install unions adjacent to each valve in pipes NPS 2 (DN 50) and smaller. Install flanges, flange adapters, or couplings for grooved-end piping on valves, apparatus, and equipment having NPS 2-1/2 (DN 65) and larger end connections. Install "Inspector's Test Connections" in sprinkler system piping, complete with shutoff valve, and sized and located according to NFPA 13. Install sprinkler piping with drains for complete system drainage. Install automatic (ball drip) drain valve at each check valve for fire-department connection, to drain piping between fire-department connection and check valve. Install drain piping to and spill over floor drain or to outside building. Install alarm devices in piping systems. Install hangers and supports for sprinkler system piping according to NFPA 13. Comply with requirements for hanger materials in NFPA 13. Install pressure gages on riser or feed main, at each sprinkler test connection. Include pressure gages with connection not less than NPS 1/4 (DN 8) and with soft metal seated globe valve, arranged for draining pipe between gage and valve. Install gages to permit removal, and install where they will not be subject to freezing. Install sleeves for piping penetrations of walls, ceilings, and floors. Install sleeve seals for piping penetrations of concrete walls and slabs. Install escutcheons for piping penetrations of walls, ceilings, and floors. JOINT CONSTRUCTION Install couplings, flanges, flanged fittings, unions, nipples, and transition and special fittings that have finish and pressure ratings same as or higher than system's pressure rating for aboveground applications unless otherwise indicated. Install unions adjacent to each valve in pipes NPS 2 (DN 50) and smaller. Install flanges, flange adapters, or couplings for grooved-end piping on valves, apparatus, and equipment having NPS 2-1/2 (DN 65) and larger end connections. Ream ends of pipes and tubes and remove burrs. Bevel plain ends of steel pipe. ENSO Systems Inc. #865 St Elizabeth C.S. – Full Day Kindergarten Addition E. F. G. Remove scale, slag, dirt, and debris from inside and outside of pipes, tubes, and fittings before assembly. Flanged Joints: Select appropriate gasket material in size, type, and thickness suitable for water service. Join flanges with gasket and bolts according to ASME B31.9. Threaded Joints: Thread pipe with tapered pipe threads according to ASME B1.20.1. Cut threads full and clean using sharp dies. Ream threaded pipe ends to remove burrs and restore full ID. Join pipe fittings and valves as follows: 1. 2. H. I. J. L. M. N. 3.3 A. B. C. D. VALVE AND SPECIALTIES INSTALLATION Install listed fire-protection valves, trim and drain valves, specialty valves and trim, controls, and specialties according to NFPA 13 and authorities having jurisdiction. Install listed fire-protection shutoff valves supervised open, located to control sources of water supply except from fire-department connections. Install permanent identification signs indicating portion of system controlled by each valve. Install check valve in each water-supply connection. Install backflow preventers instead of check valves in potable-water-supply sources. Specialty Valves: 2. A. Shop weld pipe joints where welded piping is indicated. Do not use welded joints for galvanized-steel pipe. Steel-Piping, Cut-Grooved Joints: Cut square-edge groove in end of pipe according to AWWA C606. Assemble coupling with housing, gasket, lubricant, and bolts. Join steel pipe and grooved-end fittings according to AWWA C606 for steel-pipe joints. Steel-Piping, Roll-Grooved Joints: Roll rounded-edge groove in end of pipe according to AWWA C606. Assemble coupling with housing, gasket, lubricant, and bolts. Join steel pipe and grooved-end fittings according to AWWA C606 for steel-pipe grooved joints. Steel-Piping, Pressure-Sealed Joints: Join Schedule 5 steel pipe and steel pressureseal fittings with tools recommended by fitting manufacturer. Dissimilar-Material Piping Joints: Make joints using adapters compatible with materials of both piping systems. 1. 3.4 Apply appropriate tape or thread compound to external pipe threads. Damaged Threads: Do not use pipe or pipe fittings with threads that are corroded or damaged. Twist-Locked Joints: Insert plain end of steel pipe into plain-end-pipe fitting. Rotate retainer lugs one-quarter turn or tighten retainer pin. Steel-Piping, Pressure-Sealed Joints: Join lightwall steel pipe and steel pressure-seal fittings with tools recommended by fitting manufacturer. Welded Joints: Construct joints according to AWS D10.12M/D10.12, using qualified processes and welding operators according to "Quality Assurance" Article. 1. K. Fire Protection Specifications Page 46 General Requirements: Install in vertical position for proper direction of flow, in main supply to system. Alarm Valves: Include bypass check valve and retarding chamber drain-line connection. SPRINKLER INSTALLATION Install sprinklers in suspended ceilings in center of narrow dimension of acoustical ceiling panels. ENSO Systems Inc. #865 St Elizabeth C.S. – Full Day Kindergarten Addition B. 3.5 A. 3.6 A. B. Install dry-type sprinklers with water supply from heated space. Do not install pendent or sidewall, wet-type sprinklers in areas subject to freezing. IDENTIFICATION Install labeling and pipe markers on equipment and piping according to requirements in NFPA 13. FIELD QUALITY CONTROL Perform tests and inspections. Tests and Inspections: 1. 2. 3. 4. C. 3.7 A. B. 3.8 A. B. C. Fire Protection Specifications Page 47 Leak Test: After installation, charge systems and test for leaks. Repair leaks and retest until no leaks exist. Flush, test, and inspect sprinkler systems according to NFPA 13, "Systems Acceptance" Chapter. Coordinate with fire-alarm tests. Operate as required. Coordinate with fire-pump tests. Operate as required. Prepare test and inspection reports. CLEANING Clean dirt and debris from sprinklers. Remove and replace sprinklers with paint other than factory finish. PIPING SCHEDULE Piping between Fire-Department Connections and Check Valves: Galvanized, standard-weight steel pipe with threaded ends; cast-iron threaded fittings; and threaded joints. Sprinkler specialty fittings may be used, downstream of control valves, instead of specified fittings. Standard-pressure, wet-pipe sprinkler system, NPS 3 (DN 75) and smaller shall be the following: 1. Schedule 10, black-steel pipe joined with ULC listed combination of grooved fittings, gaskets and grooves. Grooves cut or rolled on pipe shall be dimensionally compatible with the fittings. Standard of Acceptance: Victaulic D. Standard-pressure, wet-pipe sprinkler system, NPS 4 (DN 100) and larger shall be the following: 1. 3.9 A. Schedule 40, black-steel joined by welding. Welding methods shall comply with all of the requirements of AWSI D10.9 Specification for Qualification of Welding Procedures and Welders for Piping and Tubing Level AR3. SPRINKLER SCHEDULE Use sprinkler types in subparagraphs below for the following applications: 1. Rooms without Ceilings: Upright sprinklers or pendent type as required. Regular brass finish. ENSO Systems Inc. #865 St Elizabeth C.S. – Full Day Kindergarten Addition 2. 3. 4. 3.10 A. B. Fire Protection Specifications Page 48 Rooms with Suspended T-bar and Drywall Ceilings and Bulkheads: Pendent semi-recessed type with chrome plated finish and one piece chrome plated escutcheon with centre hole diameters to suit sprinkler head. Side-wall type, chrome plated with escutcheon and deflector to give necessary area coverage in all areas required by NFPA-13 (around large skylight openings, along mezzanine perimeters, etc. Concealed type in all areas where shown on the drawings. Finish to Architect’s approval and subject to shop drawing review. TEST AND CERTIFICATES Upon completion furnish and pay for a certificates of approval certifying compliance with the rules and regulations of governing authorities. Include pressure test results, material test sheets, etc., as required by the authorities having jurisdiction, OBC and NFPA. Submit sealed final review letter from design Engineer certifying that all work has been designed and installed in accordance with the OBC, NFPA 13 and the detailed design documents. END OF SECTION 211313 End of Division 21 ENSO Systems Inc. #865 St. Elizabeth C.S. – Full Day Kindergarten Addition Division 22 Plumbing Specifications Page 1 INDEX FOR DIVISION 22 Section Title 220000 220001 083113 220516 220517 220518 220523.12 220523.14 220529 Index General Conditions Access Door and Frames Expansion Fittings and Loops for Pluming Piping Sleeves and Sleeve Seals for Plumbing Piping Escutcheons for Plumbing Piping Ball Valves for Plumbing Piping Check Valves for Plumbing Piping Hangers and Supports for Plumbing Piping & Equipment Vibration and Seismic Controls for Plumbing Piping & Equipment Identification for Plumbing Piping & Equipment Plumbing Piping Insulation Domestic Water Piping Domestic Water Piping Specialties Sanitary and Vent Piping Sanitary Waste Piping Specialties Facility Storm Drainage Piping Storm Drainage Piping Specialties Commercial Water Closets Commercial Lavatories Commercial Sinks Drinking Fountain Earth Moving 220548 220553 220719 221116 221119 221316 221319 221413 221423 224213.13 224216.13 224216.16 224216.17 312000 Page END OF INDEX March 3, 2014 ESI# 865 1 2 12 15 17 20 21 23 26 32 42 44 48 54 61 72 75 82 85 87 88 91 92 ENSO Systems Inc. #865 St. Elizabeth C.S. – Full Day Kindergarten Addition Division 22 Plumbing Specifications Page 2 SECTION 220001 – GENERAL CONDITIONS 1 General 1.1 Comply with the drawings, all specification sections including Division 00, 01, 02, 21, 22, 23 and 26, and all documents referred to therein. The work of these Divisions – Plumbing and Heating, Ventilating and Air Conditioning (HVAC) is divided into Divisions and Subsections. 1.2 Division 22 – Plumbing Systems, and Division 23 – HVAC Systems. 1.3 Subsections are in order, but may not be numbered consecutively. Refer to the Index at each Division and page numbers. 2 Definitions and Interpretations 2.1 The term "provide" shall be understood to include labour, materials, and services necessary to supply and install item or work referred to. The term "approved", "approval", etc., shall be understood to mean approved by authorities having jurisdiction as conforming to Codes, Standards, By-laws, etc. The term “accessible” shall be understood to mean readily accessible by a person using necessary tools but without cutting or breaking out material. The term “exposed” shall be understood to mean within the line of sight of any person standing, sitting in or using the occupied space, unless defined otherwise in the Sections of Division 22 and 23. The term “listed” shall be understood to mean that the materials or equipment have been tested in accordance with applicable standards, and have been approved and listed for their intended use by a testing company approved by the Authorities having jurisdiction. The term “subject to review” shall be understood to mean work or materials shall be laid out for review. No work shall proceed until instructions have been obtained. Submit further information, shop drawings, samples, etc., as specified and as may be reasonably requested. 2.2 2.3 2.4 2.5 2.6 3 Laws and Regulations Work provided under this Division shall conform to Section 014200, the standards and codes, current by-laws and regulations of authorities having jurisdiction. In case of conflict, the codes, by-laws and regulations take precedence over the Contract Documents. Do not reduce the standard established by the drawings and specifications by applying codes, by-laws and regulations. 4 Permits and Fees Give notices, obtain and pay for permits including Electrical Safety Authority Inspection and pay all fees necessary to complete the work of this Division. Include for all testing and demonstration to authorities having jurisdiction required to obtain final approvals. 5 Drawings The drawings are diagrammatic, intended to convey the scope of work and indicate general arrangement and approximate location of equipment, fixtures, piping and ductwork runs. Take information involving accurate dimensions of the building by site measurements. ENSO Systems Inc. #865 St. Elizabeth C.S. – Full Day Kindergarten Addition Division 22 Plumbing Specifications Page 3 6 Examination 6.1 6.2 Refer to Section 017123. Examine existing buildings, building site and local conditions affecting the work together with drawings and specifications of other Divisions forming part of the Tender Documents, before Tendering. Submit notice of omissions, discrepancies, defects or interferences affecting the work before submitting Tender. 7 Co-ordination 7.1 7.2 Refer to Section 013100. Lay out work so that it does not conflict with work of other Trades. Prepare field drawings showing size and location of equipment bases, sleepers, inserts, sleeves and openings required for passage of ducts, pipes, conduits, cables, etc., through walls, partitions, roofs, ceilings, floors and structural members. Submit field drawings as specified under Shop Drawings. No extra cost or credit shall be incurred for any change in location of equipment, providing distance does not exceed 3 m (10') and information is given before installation of said equipment. Coordinate work with all other trades and notify consultant of any conflicts or discrepancies prior to rough-in. 7.3 7.4 8 Standard of Materials and Equipment 8.1 8.2 Refer also to Section 014000 and 016000. Material required for performance of work shall be new and of uniform pattern throughout work. Identical units or equipment shall be of same manufacture. All material and equipment shall be of the type subject to Factory Mutual, Underwriters' Laboratories of Canada or Canadian Standards Association inspection and approval and shall bear ULC or CSA labels. 8.3 9 Protection of Work and Materials Protect materials and equipment from damage, inclement weather and/or extreme temperatures. Provide enclosures, tarpaulins, or special protection as required under the circumstances. Be responsible for the protection and maintenance of the work of this Division until the work has been completed and accepted. 10 Warranty 10.1 Warrant equipment and work against defects, deficiencies in design and workmanship for a period of one year after date of substantial completion. Provide extended warranties where called for. Submit (1) copy of warranty certificates with Operating and Maintenance manuals. 10.2 11 Trial Usage Allow for use of electrical systems to be thoroughly tested before final completion and acceptance of the work. Supply labour and equipment for such tests. 12 Superintendence Maintain at the job site for the full duration of the project, qualified personnel with proven experience in erecting, supervising, testing and adjusting projects of comparable nature and complexity. ENSO Systems Inc. #865 St. Elizabeth C.S. – Full Day Kindergarten Addition Division 22 Plumbing Specifications Page 4 13 Data Books, Operating and Maintenance Instructions 13.1 13.2 Refer to Section 017823. Submit three copies of final reviewed shop drawings and manufacturer's maintenance and operating instruction for each piece of major equipment and system. Include the names and addresses of spare parts suppliers and service organizations. Compile copies in sets in hard cover three-ring data books, with index page and indexing tabs. Provide the services of qualified personnel to instruct and familiarize the Owner's operating and maintenance staff with the correct procedures of operating and maintaining systems and equipment. 13.3 13.4 14 Base Bid and Supplementary Mechanical Tender Form 14.1 Products names and/or model numbers shown are for the purpose of establishing a standard of quality, performance, serviceability, appearance and capacity. Base tenders on the materials, equipment and methods specifically named in the specifications or indicated on the drawings. Submit proposed substitutions or alternatives in accordance with the following procedures: .1 .2 14.2 Where products, materials, methods and services are specifically named or identified as "Base Bid" items, submit proposed substitutions and/or alternatives as required by the Supplementary or Mechanical Tender Form. Where products, materials and methods are not specifically named or identified as "Base Bid" items, include one of the listed acceptable equipment manufacturers, methods and/or services (where applicable) in the tender and show the product and/or service on which the tender is based as required by the Supplementary or Mechanical Tender Form. 14.3 The tenderer is encouraged to offer products and materials by manufacturers not included in the specification. Do not include these items in the tender sum, but show items separately as substitutes complete with changes in price. Ensure that offered substitutions and/or alternatives meet space, weight, connection, power and wiring requirements, etc. All costs incurred for additional components, changes to services, structural or space requirements, layouts and plans, etc., necessary to accommodate the alternative or substitute items shall be borne by this Division. 15 Shop Drawings and Samples 15.1 Submit shop drawings for review in accordance with the requirements of Section 013300 and furnish shop drawings to authorities having jurisdiction for review where applicable. Submit shop drawings showing details of construction, weights, accurate dimensions, capacities, performances and wiring diagrams for each piece of major equipment and for each piece of equipment listed under "Submittals" article in the Sub-Sections of Division 22 and 23. Indicate the following information: 15.2 15.3 Manufacturer's and Supplier's name, catalogue model number Name of trade supplying item, project numbers Number identifying item in the contract documents such as equipment, fan and pump numbers, diffuser & grille identification symbols, etc. 15.4 Check for pertinent information such as physical dimensions, make, performance, electrical characteristics before submittal. Be responsible for accuracy of equipment ENSO Systems Inc. #865 St. Elizabeth C.S. – Full Day Kindergarten Addition 15.5 15.6 15.7 15.8 Division 22 Plumbing Specifications Page 5 dimensions related to available space, accessibility for maintenance and compliance with Codes and Regulations. Review of the drawings shall be construed to apply to general arrangement only and shall not relieve the Contractor from responsibility for deviations from the drawings and specifications, unless he has submitted written notice of such deviations at the time of submission of drawings and samples. Furnish prints of the reviewed shop drawing details to other parties for co-ordination. Submit samples of material and equipment where specified or as instructed for review before ordering same. Samples may be retained until the completion of the contract. Complete all work in accordance with reviewed shop drawings. All materials and workmanship shall be equal to reviewed samples. 16 Record Drawings and Demonstration 16.1 16.2 Refer to Section 017839. Obtain and pay for one set of black line record drawings relating to the work of this Division and keep at the job site. Note clearly, accurately and promptly revisions to the work and deviations from the Contract Documents. Dimension the location, depth, size and type of underground services from convenient reference points. Submit three sets of prints and one disk with record drawings (in AutoCAD 2004) upon completion of work. Construction drawing files will be made available for contractor’s use. 16.3 17 Accessibility Install work so as to be readily accessible for operation, maintenance and repairs by access panels or other acceptable means. 18 Concealment 18.1 Conceal piping, ductwork, conduit and cables except in unfinished areas such as service rooms or as noted on the drawings, in partitions, walls, between floors and ceilings etc. Install services that are to be concealed as close to the building structure as possible so that furrings, ceiling spaces and other enclosures can be of minimum size. Run exposed services parallel to building lines. Identify locations and submit notice where installation of work interferes with interior treatment and use of space. Await instructions before proceeding with the work 18.2 18.3 19 Final Inspection 19.1 Submit a written request to arrange for a final inspection of all electrical systems when: .1 .2 .3 .4 .5 Deficiencies noted during job inspections have been corrected. Systems have been tested and reports submitted. Obtain and submit unconditional final inspection certificate to Owner upon completion of work. Operating and maintenance manuals have been submitted. Tags are in place and equipment identified. Owner's operating personnel have been given operating and maintenance instructions. 19.2 Obtain and submit unconditional final inspection certificate from local Authorities having jurisdiction to Owner upon completion of work. 20 Cutting, Patching and Firestopping 20.1 20.2 Refer to Sections 017329, 078500 and 079200. Advise other Trades of the location of openings required for the installation of this Division's work. Provide and set sleeves, inserts, anchors, etc., when requested in ENSO Systems Inc. #865 St. Elizabeth C.S. – Full Day Kindergarten Addition 20.4 20.5 20.6 20.7 21 Division 22 Plumbing Specifications Page 6 advance of concrete pouring or similar work. Pay for and employ the Trades whose work is involved for cutting and patching of completed work. Lay out such work for review. Do not cut reinforcing steel without written instructions. Unless noted otherwise, perform and pay for cutting and patching in existing construction required for installation of work under this Division. Sleeve as specified elsewhere in this Specification. Do not cut reinforcing steel without written instructions. Provide fire stopping and smoke sealant where required for work by this Division. Refer to general sections for material specifications. Make good openings in walls and floors where demolished equipment, conduit, etc., are removed. Site Visit Site visits are strongly suggested to all bidders in order to review existing conditions that may affect the work. Advise the Owner’s representative 72 hours in advance of planned site visit and make all necessary arrangements to gain access to the areas affected by the work of the Contract. 22 Applicable Codes, Standards and Authorities 22.1 Codes, standards and authorities governing the work of this Division shall include but not be limited to the following and as noted in Section 014200: 22.1.1 Ontario Building Code and all Regulations referred to therein. 22.1.2 National Building Code and all Regulations referred to therein. 22.1.3 Ontario Electrical Safety Code 22.1.4 Ontario Gas Utilization Code 22.1.5 National Fire Protection Association (NFPA) No. 10 - Portable Fire Extinguishers. 22.1.6 NFPA No. 13 - Installation of Sprinkler Systems. 22.1.7 NFPA No. 14 – Installation of Standpipe Systems 22.1.8 Fire Protection: Insurance Underwriters (Agency). 22.1.9 Department of Labour Regulations. 22.1.10 Department of Consumer and Commercial Affairs - Pressure Vessel and Pressure Piping Regulations. 22.2 Authorities: .1 .2 .3 .4 .5 .6 Municipal Building Department Municipal Fire Prevention Authorities Ontario Ministry of Health and Longterm Care Electrical Safety Authority Ontario Ministry of Energy and Environment Ontario Fire Marshal’s Office 23 Abbreviations 23.1 Abbreviations used in these documents shall be as shown in the Table 1 at the end of this section. Other abbreviations may be used and shall be interpreted as referred to in the ASHRAE Guide and Data Books. 23.2 24 English/Metric Conversion Metric Units of measurement used in this specification are based on the International System of Units (SI) contained in "The Canadian Metric Practice Guide" prepared by the ENSO Systems Inc. #865 St. Elizabeth C.S. – Full Day Kindergarten Addition Division 22 Plumbing Specifications Page 7 Canadian Standards Association, Publication Number CAN3-Z234.1. Motor and pipe size conversions used are as in Table 2 at the end of this section. 25 List of Base Bid and Acceptable Equipment Manufacturers, Methods and Services See a complete list at the end of this section in Table 3. 26 Hoisting Apparatus 26.1 Unless noted otherwise, provide all apparatus necessary for the hoisting and placing of materials or equipment forming part of this Division. Ensure that all equipment and materials can be hoisted and set in place. Include for the cost of dismantling and reassembling equipment where required. 26.2 27 Work In Existing Building 27.1 General 27.1.1 Refer to 015000 and 017400. 27.1.2 Route new services to avoid interference with existing construction. 27.1.3 Cut back and terminate existing services to present a neat appearance. 27.1.4 Remove and dispose of existing abandoned piping, ductwork, conduit, wiring, devices, equipment, fixtures, hangers and supports. All wiring and cable to be removed to source panel. All unused outlet boxes (where it is not practical to remove same) shall be blanked with coverplates. 27.1.5 Hand over to the Owner existing devices and equipment to be removed such as thermostats, pneumatic control valves, etc., when requested by the Owner. 27.1.6 Refer also to Demolition Section in the Contract Documents. 27.1.7 Conceal all piping, ductwork and conduit except in unfinished areas such as service rooms or as noted on the drawings. Walls shall be chased where necessary. 27.1.8 It shall be the responsibility of any contractor, who while working on this project may disturb the wiring or produce heat, smoke, or dust that may activate the fire alarm system, to arrange to have the fire detectors in the area isolated before commencing such work. Failure to comply may result in false alarms. Subsequent charges and fines by the local municipality for attending to a false alarm shall be borne by this contractor. 27.1.9 All water and gas supply interruptions (including system shut down, drain & refill water system for all new connections to existing services) shall be arranged with the Owner’s representative at least 10 working days in advance and performed after hours as directed by the Owner’s representative. Obtain written approval 48 hours prior to each shut down. 27.2 Work Schedule Carry out Owner/user disturbing work after hours or on weekends. For further details refer to Instructions to Bidders and Section 013213. 27.3 X-ray and Scanning Before core drilling any concrete floors or walls, x-ray and/or scan the area in question. Include for premium time to perform this work. 28 Continuity of Existing Services Keep time for interruption of existing services to a minimum and arrange shut down periods with the Owner's authorized representative. Obtain written approval 72 hours prior to each shut down. Include in tender price for overtime work that may be required to tie-in services and wiring at night or weekends. ENSO Systems Inc. #865 St. Elizabeth C.S. – Full Day Kindergarten Addition 29 Division 22 Plumbing Specifications Page 8 Testing Perform tests on each system and submit test results for approval prior to the final acceptance of the work. Repair or correct deficiencies and re-test system as directed. Table 1 - Abbreviations Abbreviation: Long Form: AFF or A.F.F. Above Finished Floor AFG or A.F.G. Above Finished Grade AMCA Air Moving and Conditioning Assoc. Inc. ANSI or A.N.S.I. American National Safety Institute ARI or A.R.I. American Refrigeration Institute ASA or A.S.A. American Standards Association ASHRAE - American Society of Heating, Refrigerating & Air Conditioning ASTM - American Society For Testing Materials BOD or B.O.D. By Other Division CGA Canadian Gas Association CGSB Canadian Government Specification Board CSA Canadian Standards Association CUA Canadian Underwriter’s Association CI or C.I. Cast Iron CO or C.O. Clean-out C/W or c/w Complete With CW or C.W. Domestic Cold Water CBM/S or cbm/s or m3/s Cubic Meters Per Second DBT or D.B.T. Dry Bulb Temperature EEMAC or E.E.M.A.C. Electrical and Electronic Manufacturer’s Association Of Canada EDR Equivalent Direct Radiation ESA Electrical Safety Authority FA(P) or FAAP Fire Alarm (Panel) or Fire Alarm Annunciator Panel HP or hp High Pressure Or Horsepower ENSO Systems Inc. #865 St. Elizabeth C.S. – Full Day Kindergarten Addition Division 22 Plumbing Specifications Page 9 Table 1 – Abbreviations Continued Abbreviation: Long Form: KG or kg Kilograms KPA or kpa Kilopascals KW or kw Kilowatts L or l Litres L/S or l/s Litres Per Second LV or lv Low voltage M or m Meters MM or mm Millimeters M/S or m/s Meters Per Second MG or mg Milligrams NFPA National Fire Protection Association NC, NO or nc, no NormallyOpen,NormallyClosed Position When Power Is Off or Control Signal Output Is Zero NRCC or N.R.C.C. National Research Council Of Canada NTS or N.T.S. Not To Scale PDI or P.D.I. Plumbers Design Institute RH or R.H. Relative Humidity PPM or ppm Parts Per Million RPM or rpm Revolutions Per Minute SMACNA SheetMetal And AirConditioning Contractors National Association Inc. SS or S.S. Stainless Steel SP or S.P. Static Pressure TSSA Technical Standards and Safety Authority ULC Underwriter's Laboratory of Canada WBT or W.B.T. Wet Bulb Temperature WP or wp Working Pressure WG or wg Water Gauge WOG or wog Water Oil And Gas ENSO Systems Inc. #865 St. Elizabeth C.S. – Full Day Kindergarten Addition Division 22 Plumbing Specifications Page 10 Table 2 - Motor and Pipe Size Conversions English System Motor Size HP .5 Metric System Nominal Equivalent KW .37 English System Pipe Size Inches (“) 1/2 Metric System Nominal Equivalent MM 12 or 15 .75 .56 3/4 20 1 .75 1 25 1.5 1.1 1-1/4 32 2 1.5 1-1/2 40 3 2.2 2 50 5 3.7 2-1/2 65 7.5 5.5 3 75 10 7.5 3-1/2 90 15 10.5 4 100 20 15 5 125 25 19 6 150 30 22 8 200 40 30 10 250 Table 3 - List of Base Bid and Acceptable Equipment Manufacturers, Methods & Services The following is a list of acceptable equipment manufacturer, methods and services. Any deviation from the following list must be identified at the time of Tender closing on the Supplementary Tender Form. Item Base Bid Acceptable Alternatives Vibration Isolation Silencers - Vibro-Acoustics, Kinetics Noise Control Kinetics, Price, VibroAcoustics Mech’l Grooved Joints for Fire Protection System Only Gate, Globe & Butterfly Valves Victaulic - Crane, Jenkins, Toyo, Kitz Check Valves - Crane, Jenkins, Toyo, Kitz Ball Valves Balancing (CBV) Valves Unions Strainers - Crane, Jenkins, Watts, Kitz Armstrong, Bell and Gossett Crane, Grinell Braukmann,Crane, Morrison, Brass, McAvity, Sarco ENSO Systems Inc. #865 St. Elizabeth C.S. – Full Day Kindergarten Addition Division 22 Plumbing Specifications Page 11 Table 3 - List of Base Bid and Acceptable Equipment Manufacturers, Methods & Services continued Item Base Bid Acceptable Alternatives Automatic Air Vents - Amtrol, Sarco, S.A. Armstrong, Trerice Backflow Preventers - Watts Gauges, Thermometers - Weiss, Ashcroft, Trerice Thermal Insulation - Manson, Knauf Roof Drains & Vent Stack Floor Drains, Cleanouts, Drain Specialties Stainless Steel Sinks - J.R. Smith, Zurn, Watts, Thaler As specified Kindred, Franke Vitreous China Fixtures As specified American Standard, Kohler Faucets As Specified American Standard, Moen, Delta Flush Valves As specified Powers, Sloan Tempering Valves As specified Powers, Leonard, Watts, Zurn Pumps & Circulators (except as noted) Fire dampers & Smoke Dampers - ITT, Taco, Peerless, S.A. Armstrong, Worthington Air Balance, Canadian Advanced Air, Controlled Air, Ruskin, EH Price Hot Water Unit Heaters & Cabinet Heaters, Wallfin Washroom Exhaust Fans - Engineered Air, Rosemex - Broan, Nutone Air Intake/Relief Hoods - Greenheck, Cook Air Terminal Devices (Diffusers, Registers) Air handling unit McQuay EH Price, Nailor, Titus (Philip Air), Krueger, Metalaire Trane, Carrier, Johnson Controls - Refer to specification 239994 Automatic Temperature Control END OF SECTION 15010 - ENSO Systems Inc. #865 St. Elizabeth C.S. – Full Day Kindergarten Addition Division 22 Plumbing Specifications Page 12 SECTION 083113 - ACCESS DOORS AND FRAMES PART 1 - GENERAL 1.1 A. 1.2 A. SUMMARY Section Includes: 1. Access doors and frames for walls and ceilings. ACTION SUBMITTALS Product Data: For each type of product. 1. B. Shop Drawings: 1. 2. C. D. Include construction details, fire ratings, materials, individual components and profiles, and finishes. Include plans, elevations, sections, details, and attachments to other work. Detail fabrication and installation of access doors and frames for each type of substrate. Samples: For each door face material, at least 75x125mm (3”x5’’) in size, in specified finish, when requested. Product Schedule: Provide complete access door and frame schedule, including types, locations, sizes, latching or locking provisions, and other data pertinent to installation. PART 2 - PRODUCTS 2.1 A. 2.2 A. B. PERFORMANCE REQUIREMENTS Fire-Rated Access Doors and Frames: Units complying with CAN/ULC S101, OBC specified edition, that are identical to access door and frame assemblies tested for firetest-response characteristics according to the following test method and that are listed and labeled by ULC or another testing and inspecting agency acceptable to authorities having jurisdiction. ACCESS DOORS AND FRAMES FOR WALLS AND CEILINGS Source Limitations: Obtain each type of access door and frame from single source from single manufacturer. Flush Access Doors with Concealed Flanges: 1. 2. 3. 4. Assembly Description: Fabricate door to fit flush to frame. Provide frame with gypsum board beads for concealed flange installation. Locations: Wall and ceiling. Door Size: minimum 300x300 (12x12’’) to 900x900mm (24x24’’) to suit application. Metallic-Coated Steel Sheet for Door: Nominal 0.064 inch (1.63 mm), 16 gage. a. 5. Stainless-Steel Sheet for Door: Nominal 0.062 inch (1.59 mm), 16 gage. a. 6. Finish: factory prime where surface is to be painted by General Trades or factory finish enameled white, subject to Architect’s approval, for areas that will not be painted by General Trades. Finish: No. 2b. Frame Material: Same material, thickness, and finish as door. ENSO Systems Inc. #865 St. Elizabeth C.S. – Full Day Kindergarten Addition 7. 8. C. Hinges: Continuous for entire length of door. Hardware: Latch unless noted to be lockable on the drawings. Fire-Rated, Flush Access Doors with Concealed Flanges FAP: 1. 2. 3. 4. 5. 6. Assembly Description: Fabricate door to fit flush to frame, with a core of mineralfiber insulation enclosed in sheet metal. Provide self-latching door with automatic closer and interior latch release. Provide frame with gypsum board beads for concealed flange installation in ceilings and exposed flange for drywall partitions unless concealed flanges are requested by the Architect. Locations: Wall and ceiling. Door Size: minimum 300x300 (12x12’’) to 900x900mm (24x24’’) to suit application. Fire-Resistance Rating: Not less than that of construction assembly into which the door is being inserted to a minimum of 2 hours. Temperature-Rise Rating: 450OF (250OC) at the end of 30 minutes. Metallic-Coated Steel Sheet for Door: Nominal 0.064 inch (1.63 mm), 16 gage. a. 7. 8. 9. 10. A. B. C. D. E. F. G. H. 2.4 A. Finish: No. 2b. Frame Material: Same material, thickness, and finish as door. Hinges: Continuous for entire length of door. Hardware: Latch unless noted to be lockable on the drawings. Hardware: 1. 2. 2.3 Finish: factory prime where surface is to be painted by General Trades or factory finish enameled white, subject to Architect’s approval, for areas that will not be painted by General Trades. Stainless-Steel Sheet for Door: Nominal 0.062 inch (1.59 mm), 16 gage. a. D. Division 22 Plumbing Specifications Page 13 Latch: Cam latch operated by screwdriver. Lock: Mortise cylinder. MATERIALS Steel Plates, Shapes, and Bars: ASTM A 36/A 36M. Rolled-Steel Floor Plate: ASTM A 786/A 786M, rolled from plate complying with ASTM A 36/A 36M or ASTM A 283/A 283M, Grade C or D. Steel Sheet: Uncoated or electrolytic zinc coated, ASTM A 879/A 879M, with coldrolled steel sheet substrate complying with ASTM A 1008/A 1008M, Commercial Steel (CS), exposed. Metallic-Coated Steel Sheet: ASTM A 653/A 653M, Commercial Steel (CS), Type B; with minimum G60 (Z180) or A60 (ZF180) metallic coating. Rolled-Stainless-Steel Floor Plate: ASTM A 793, manufacturer's standard finish. Stainless-Steel Sheet, Strip, Plate, and Flat Bars: ASTM A 666, Type 316. Remove tool and die marks and stretch lines or blend into finish. Frame Anchors: Same type as door face. Inserts, Bolts, and Anchor Fasteners: Hot-dip galvanized steel according to ASTM A 153/A 153M or ASTM F 2329. FABRICATION General: Provide access door and frame assemblies manufactured as integral units ready for installation. ENSO Systems Inc. #865 St. Elizabeth C.S. – Full Day Kindergarten Addition B. C. Metal Surfaces: For metal surfaces exposed to view in the completed Work, provide materials with smooth, flat surfaces without blemishes. Do not use materials with exposed pitting, seam marks, roller marks, rolled trade names, or roughness. Doors and Frames: Grind exposed welds smooth and flush with adjacent surfaces. Furnish attachment devices and fasteners of type required to secure access doors to types of supports indicated. 1. 2. 3. 4. D. 2.5 A. B. C. D. For cylinder locks, furnish two keys per lock and key all locks alike. For recessed panel doors, provide access sleeves for each locking device. Furnish plastic grommets and install in holes cut through finish. Extruded Aluminum: After fabrication, apply manufacturer's standard protective coating on aluminum that will come in contact with concrete. FINISHES Comply with NAAMM's "Metal Finishes Manual for Architectural and Metal Products" for recommendations for applying and designating finishes. Protect mechanical finishes on exposed surfaces from damage by applying a strippable, temporary protective covering before shipping. Appearance of Finished Work: Noticeable variations in same piece are not acceptable. Variations in appearance of adjoining components are acceptable if they are within the range of approved Samples and are assembled or installed to minimize contrast. Steel and Metallic-Coated-Steel Finishes: 1. 2. E. For recessed doors with plaster infill, provide self-furring expanded metal lath attached to door panel. Latching Mechanisms: Furnish number required to hold doors in flush, smooth plane when closed. 1. 2. F. For concealed flanges with drywall bead, provide edge trim for gypsum board or gypsum base securely attached to perimeter of frames. For concealed flanges with plaster bead for full-bed plaster applications, provide zinc-coated expanded metal lath and exposed casing bead welded to perimeter of frames. Provide mounting holes in frames for attachment of units to metal or wood framing. Provide mounting holes in frame for attachment of masonry anchors. Recessed Access Doors: Form face of panel to provide recess for application of applied finish. Reinforce panel as required to prevent buckling. 1. E. Division 22 Plumbing Specifications Page 14 Factory Prime: Apply manufacturer's standard, fast-curing, lead- and chromatefree, universal primer immediately after surface preparation and pretreatment. Factory Finish: Immediately after cleaning and pretreating, apply manufacturer's standard two-coat, baked-on enamel finish consisting of prime coat and thermosetting topcoat, with a minimum dry-film thickness of 1 mil (0.025 mm) for topcoat. Stainless-Steel Finishes: 1. Surface Preparation: Remove tool and die marks and stretch lines, or blend into finish. ENSO Systems Inc. #865 St. Elizabeth C.S. – Full Day Kindergarten Addition 2. Polished Finishes: Grind and polish surfaces to produce uniform finish, free of cross scratches. a. b. c. 3. Division 22 Plumbing Specifications Page 15 Run grain of directional finishes with long dimension of each piece. When polishing is completed, passivate and rinse surfaces. Remove embedded foreign matter and leave surfaces chemically clean. Directional Satin Finish: No. 4. Bright, Cold-Rolled, Unpolished Finish: No. 2B. PART 3 - EXECUTION 3.1 A. B. 3.2 A. B. C. D. E. 3.3 A. B. EXAMINATION Examine substrates for compliance with requirements for installation tolerances and other conditions affecting performance of the Work. Proceed with installation only after unsatisfactory conditions have been corrected. INSTALLATION Supply architectural style recessed frame and flange type access panels for locations where mechanical equipment or any other device requiring maintenance or adjustment is "built-in"; such as valves, junction boxes, relays, etc. Include cost of installation by qualified tradesmen. Comply with manufacturer's written instructions for installing access doors and frames. Install doors flush with adjacent finish surfaces or recessed to receive finish material. Do not provide access panels in removable panel type ceilings. Indicate location of equipment with acceptable markers. Size and locate access panels in applied tile, or in glazed or unglazed structural tile to suit block patterns. ADJUSTING Adjust doors and hardware, after installation, for proper operation. Remove and replace doors and frames that are warped, bowed, or otherwise damaged. END OF SECTION 083113 SECTION 220516 – EXPANSION FITTINGS AND LOOPS FOR PLUMBING PIPING PART 1 - GENERAL 1.1 A. SUMMARY Section Includes: 1. 1.2 A. B. Pipe loops and swing connections. PERFORMANCE REQUIREMENTS Compatibility: Products shall be suitable for piping service fluids, materials, working pressures, and temperatures. Capability: Products to absorb 200 percent of maximum axial movement between anchors. ENSO Systems Inc. #865 St. Elizabeth C.S. – Full Day Kindergarten Addition Division 22 Plumbing Specifications Page 16 PART 2 - PRODUCTS 2.1 A. ALIGNMENT GUIDES AND ANCHORS Alignment Guides: 1. B. Description: Steel, factory-fabricated alignment guide, with bolted two-section outer cylinder and base for attaching to structure; with two-section guiding spider for bolting to pipe. Anchor Materials: 1. 2. 3. 4. Steel Shapes and Plates: ASTM A 36/A 36M. Bolts and Nuts: ASME B18.10 or ASTM A 183, steel hex head. Washers: ASTM F 844, steel, plain, flat washers. Mechanical Fasteners: Insert-wedge-type stud with expansion plug anchor for use in hardened portland cement concrete, with tension and shear capacities appropriate for application. PART 3 - EXECUTION 3.1 A. B. C. D. 3.2 A. B. C. D. E. PIPE LOOP AND SWING CONNECTION INSTALLATION Install pipe loops cold-sprung in tension or compression as required to partly absorb tension or compression produced during anticipated change in temperature. Connect risers and branch connections to mains with at least five pipe fittings including tee in main. Connect risers and branch connections to terminal units with at least four pipe fittings including tee in riser. Connect mains and branch connections to terminal units with at least four pipe fittings including tee in main. ALIGNMENT-GUIDE AND ANCHOR INSTALLATION Install alignment guides to guide expansion and to avoid end-loading and torsional stress. Install guide(s) on each side of pipe expansion fittings and loops. Install guides nearest to expansion joint not more than four pipe diameters from expansion joint. Attach guides to pipe and secure guides to building structure. Install anchors at locations to prevent stresses from exceeding those permitted by ASME B31.9 and to prevent transfer of loading and stresses to connected equipment. Anchor Attachments: 1. 2. 3. F. Anchor Attachment to Black-Steel Pipe: Attach by welding. Comply with ASME B31.9 and ASME Boiler and Pressure Vessel Code: Section IX, "Welding and Brazing Qualifications." Anchor Attachment to Galvanized-Steel Pipe: Attach with pipe hangers. Use MSS SP-69, Type 42, riser clamp welded to anchor. Anchor Attachment to Copper Tubing: Attach with pipe hangers. Use MSS SP69, Type 24, U-bolts bolted to anchor. Fabricate and install steel anchors by welding steel shapes, plates, and bars. Comply with ASME B31.9 and AWS D1.1/D1.1M. 1. Anchor Attachment to Steel Structural Members: Attach by welding. ENSO Systems Inc. #865 St. Elizabeth C.S. – Full Day Kindergarten Addition 2. G. Division 22 Plumbing Specifications Page 17 Anchor Attachment to Concrete Structural Members: Attach by fasteners. Follow fastener manufacturer's written instructions. Use grout to form flat bearing surfaces for guides and anchors attached to concrete. END OF SECTION 220516 SECTION 220517 – SLEEVES AND SLEEVE SEALS FOR PLUMBING PIPING PART 1 - GENERAL 1.1 A. SUMMARY Section Includes: 1. 2. 3. 4. 5. 1.2 A. Sleeves. Stack-sleeve fittings. Sleeve-seal systems. Sleeve-seal fittings. Grout. ACTION SUBMITTALS Product Data: For each type of product indicated. PART 2 - PRODUCTS 2.1 A. B. C. D. 2.2 A. SLEEVES Cast-Iron Wall Pipes: Cast or fabricated of cast or ductile iron and equivalent to ductileiron pressure pipe, with plain ends and integral waterstop unless otherwise indicated. Galvanized-Steel Wall Pipes: ASTM A 53/A 53M, Schedule 40, with plain ends and welded steel collar; zinc coated. Galvanized-Steel-Pipe Sleeves: ASTM A 53/A 53M, Type E, Grade B, Schedule 40, zinc coated, with plain ends. Galvanized-Steel-Sheet Sleeves: 0.0239-inch (0.6-mm) minimum thickness; round tube closed with welded longitudinal joint. STACK-SLEEVE FITTINGS Description: Manufactured, cast-iron sleeve with integral clamping flange. Include clamping ring, bolts, and nuts for membrane flashing. 1. 2.3 A. Underdeck Clamp: Clamping ring with setscrews. SLEEVE-SEAL SYSTEMS Description: Modular sealing-element unit, designed for field assembly, for filling annular space between piping and sleeve. 1. 2. 3. Sealing Elements: EPDM-rubber interlocking links shaped to fit surface of pipe. Include type and number required for pipe material and size of pipe. Pressure Plates: Carbon steel. Connecting Bolts and Nuts: Carbon steel, with corrosion-resistant coating of length required to secure pressure plates to sealing elements. ENSO Systems Inc. #865 St. Elizabeth C.S. – Full Day Kindergarten Addition 2.4 A. 2.5 A. B. C. D. Division 22 Plumbing Specifications Page 18 SLEEVE-SEAL FITTINGS Description: Manufactured plastic, sleeve-type, waterstop assembly made for imbedding in concrete slab or wall. Unit has plastic or rubber waterstop collar with center opening to match piping OD. GROUT Standard: ASTM C 1107/C 1107M, Grade B, post-hardening and volume-adjusting, dry, hydraulic-cement grout. Characteristics: Nonshrink; recommended for interior and exterior applications. Design Mix: 5000-psi (34.5-MPa), 28-day compressive strength. Packaging: Premixed and factory packaged. PART 3 - EXECUTION 3.1 A. B. SLEEVE INSTALLATION Install sleeves for piping passing through penetrations in floors, partitions, roofs, and walls. For sleeves that will have sleeve-seal system installed, select sleeves of size large enough to provide 1-inch (25-mm)] annular clear space between piping and concrete slabs and walls. 1. C. Sleeves are not required for core-drilled holes except holes in mechanical service space floors. Install sleeves in concrete floors, concrete roof slabs, and concrete walls as new slabs and walls are constructed. 1. Cut sleeves to length for mounting flush with both surfaces. a. 2. D. Install sleeves for pipes passing through interior partitions. 1. 2. 3. E. 3.2 A. Exception: Extend sleeves installed in floors of mechanical equipment areas or other wet areas 2 inches (50 mm) above finished floor level. Using grout, seal the space outside of sleeves in slabs and walls without sleeveseal system. Cut sleeves to length for mounting flush with both surfaces. Install sleeves that are large enough to provide 1/4-inch (6.4-mm) annular clear space between sleeve and pipe or pipe insulation. Seal annular space between sleeve and piping or piping insulation; use joint sealants appropriate for size, depth, and location of joint. Comply with requirements for sealants specified in Section 079200 "Joint Sealants." Fire-Barrier Penetrations: Maintain indicated fire rating of walls, partitions, ceilings, and floors at pipe penetrations. Seal pipe penetrations with firestop materials. Comply with requirements for firestopping specified in Section 078413 "Penetration Firestopping." STACK-SLEEVE-FITTING INSTALLATION Install stack-sleeve fittings in new slabs as slabs are constructed. 1. Install fittings that are large enough to provide 1/4-inch (6.4-mm) annular clear space between sleeve and pipe or pipe insulation. ENSO Systems Inc. #865 St. Elizabeth C.S. – Full Day Kindergarten Addition 2. 3. 4. 5. B. 3.3 A. B. 3.4 A. B. C. D. 3.5 A. Division 22 Plumbing Specifications Page 19 Secure flashing between clamping flanges for pipes penetrating floors with membrane waterproofing. Comply with requirements for flashing specified in Section 076200 "Sheet Metal Flashing and Trim." Install section of cast-iron soil pipe to extend sleeve to 2 inches (50 mm) above finished floor level. Extend cast-iron sleeve fittings below floor slab as required to secure clamping ring if ring is specified. Using grout, seal the space around outside of stack-sleeve fittings. Fire-Barrier Penetrations: Maintain indicated fire rating of floors at pipe penetrations. Seal pipe penetrations with firestop materials. Comply with requirements for firestopping specified in Section 078413 "Penetration Firestopping." SLEEVE-SEAL-SYSTEM INSTALLATION Install sleeve-seal systems in sleeves in exterior concrete walls and slabs-on-grade at service piping entries into building. Select type, size, and number of sealing elements required for piping material and size and for sleeve ID or hole size. Position piping in center of sleeve. Center piping in penetration, assemble sleeve-seal system components, and install in annular space between piping and sleeve. Tighten bolts against pressure plates that cause sealing elements to expand and make a watertight seal. SLEEVE-SEAL-FITTING INSTALLATION Install sleeve-seal fittings in new walls and slabs as they are constructed. Assemble fitting components of length to be flush with both surfaces of concrete slabs and walls. Position waterstop flange to be centered in concrete slab or wall. Secure nailing flanges to concrete forms. Using grout, seal the space around outside of sleeve-seal fittings. SLEEVE AND SLEEVE-SEAL SCHEDULE Use sleeves and sleeve seals for the following piping-penetration applications: 1. Exterior Concrete Walls above Grade: a. 2. Piping: Cast-iron wall sleeves or Galvanized-steel-pipe sleeves. Exterior Concrete Walls below Grade: a. Piping: Cast-iron wall sleeves with sleeve-seal system or Galvanized-steelpipe sleeves with sleeve-seal system. 1) 3. Concrete Slabs-on-Grade: a. Piping: Cast-iron wall sleeves with sleeve-seal system or Galvanized-steelpipe sleeves with sleeve-seal system. 1) 4. Select sleeve size to allow for 1-inch (25-mm) annular clear space between piping and sleeve for installing sleeve-seal system. Select sleeve size to allow for 1-inch (25-mm) annular clear space between piping and sleeve for installing sleeve-seal system. Concrete Slabs above Grade: a. Piping: Galvanized-steel-pipe sleeves, Stack-sleeve fittings ENSO Systems Inc. #865 St. Elizabeth C.S. – Full Day Kindergarten Addition 5. Division 22 Plumbing Specifications Page 20 Interior Partitions: a. Piping: Galvanized-steel-pipe sleeves. END OF SECTION 220517 SECTION 220518 – ESCUTCHEONS FOR PLUMBING PIPING PART 1 - GENERAL 1.1 A. SUMMARY Section Includes: 1. 2. 1.2 A. Escutcheons. Floor plates. ACTION SUBMITTALS Product Data: For each type of product indicated. PART 2 - PRODUCTS 2.1 A. B. C. D. E. 2.2 A. B. ESCUTCHEONS One-Piece, Cast-Brass Type: With polished, chrome-plated and finish and setscrew fastener. One-Piece, Deep-Pattern Type: Deep-drawn, box-shaped brass with chrome-plated finish and spring-clip fasteners. One-Piece, Stamped-Steel Type: With chrome-plated finish and spring-clip fasteners. Split-Casting Brass Type: With polished, chrome-plated and finish and with concealed hinge and setscrew. Split-Plate, Stamped-Steel Type: With chrome-plated finish, concealed hinge, and spring-clip fasteners. FLOOR PLATES One-Piece Floor Plates: Cast-iron flange with holes for fasteners. Split-Casting Floor Plates: Cast brass with concealed hinge. PART 3 - EXECUTION 3.1 A. B. INSTALLATION Install escutcheons for piping penetrations of walls, ceilings, and finished floors. Install escutcheons with ID to closely fit around pipe, tube, and insulation of insulated piping and with OD that completely covers opening. 1. Escutcheons for Piping: a. b. c. d. Piping with Fitting or Sleeve Protruding from Wall: One-piece, deep-pattern type. Chrome-Plated Piping: One-piece, cast-brass or split-casting brass type with polished, chrome-plated finish. Insulated Piping: One-piece, stamped-steel type or split-plate, stampedsteel type, chrome plated finish with concealed hinge. Bare Piping at Wall and Floor Penetrations in Finished Spaces: One-piece, cast-brass or split-casting brass type with polished, chrome-plated finish. ENSO Systems Inc. #865 St. Elizabeth C.S. – Full Day Kindergarten Addition e. f. g. h. i. j. C. D. Division 22 Plumbing Specifications Page 21 Bare Piping at Wall and Floor Penetrations in Finished Spaces: One-piece, stamped-steel type or split-plate, stamped-steel type, chrome plated finish with concealed hinge. Bare Piping at Ceiling Penetrations in Finished Spaces: One-piece, castbrass or split-casting brass type with polished, chrome-plated finish. Bare Piping at Ceiling Penetrations in Finished Spaces: One-piece, stamped-steel type or split-plate, stamped-steel type, chrome plated finish with concealed hinge. Bare Piping in Unfinished Service Spaces: One-piece, cast-brass or splitcasting brass type, rough-brass finish. Bare Piping in Unfinished Service Spaces: One-piece, stamped-steel type or split-plate, stamped-steel type, chrome plated with concealed hinge or split-plate, stamped-steel type, chrome plated with exposed-rivet hinge. Bare Piping in Equipment Rooms: One-piece, stamped-steel type or splitplate, stamped-steel type with concealed hinge or split-plate, stamped-steel type, chrome plated with exposed-rivet hinge. Install floor plates for piping penetrations of equipment-room floors. Install floor plates with ID to closely fit around pipe, tube, and insulation of piping and with OD that completely covers opening. 1. 2. New Piping: One-piece, floor-plate type. Existing Piping: Split-casting, floor-plate type. END OF SECTION 220518 SECTION 220523.12 – BALL VALVES FOR PLUMBING PIPING PART 1 - GENERAL 1.1 A. SUMMARY Section Includes: 1. 1.2 A. 1.3 A. DEFINITIONS CWP: Cold working pressure. ACTION SUBMITTALS Product Data: For each type of valve. 1. 1.4 A. Certification that products comply with NSF 61. DELIVERY, STORAGE, AND HANDLING Prepare valves for shipping as follows: 1. 2. 3. B. Ball valves. Protect internal parts against rust and corrosion. Protect threads, flange faces, and soldered ends. Set ball valves open to minimize exposure of functional surfaces. Use the following precautions during storage: 1. Maintain valve end protection. ENSO Systems Inc. #865 St. Elizabeth C.S. – Full Day Kindergarten Addition 2. C. Division 22 Plumbing Specifications Page 22 Store valves indoors and maintain at higher-than-ambient-dew-point temperature. If outdoor storage is necessary, store valves off the ground in watertight enclosures. Use sling to handle large valves; rig sling to avoid damage to exposed parts. Do not use operating handles or stems as lifting or rigging points. PART 2 - PRODUCTS 2.1 A. B. GENERAL REQUIREMENTS FOR VALVES Source Limitations for Valves: Obtain each type of valve from single source from single manufacturer. ASME Compliance: 1. 2. 3. 4. 5. 6. C. D. E. F. G. NSF Compliance: NSF 61and NSF 372 for valve materials for potable-water service. Bronze valves shall be made with dezincification-resistant materials. Bronze valves made with copper alloy (brass) containing more than 15 percent zinc are not permitted. Valve Pressure-Temperature Ratings: Not less than indicated and as required for system pressures and temperatures. Valve Sizes: Same as upstream piping unless otherwise indicated. Valve Actuator Types: 1. 2. H. 3. A. Gear Actuator: For quarter-turn valves NPS 200mm (8”) and larger. Handlever: For quarter-turn valves smaller than NPS 150mm (6”). Valves in Insulated Piping: 1. 2. 2.2 ASME B1.20.1 for threads for threaded end valves. ASME B16.1 for flanges on iron valves. ASME B16.5 for flanges on steel valves. ASME B16.10 and ASME B16.34 for ferrous valve dimensions and design criteria. ASME B16.18 for solder-joint connections. ASME B31.9 for building services piping valves. Include 2-inch (50-mm) stem extensions. Extended operating handles of nonthermal-conductive material and protective sleeves that allow operation of valves without breaking vapor seals or disturbing insulation. Memory stops that are fully adjustable after insulation is applied. ISOLATION VALVES – EXPOSED WATER PIPING 65mm (2.5”) and smaller. 1. 2. Standard of Acceptance: Jenkins, Crane, Toyo, Kitz Description: a. 2.3 A. Ball type, Mss SP-72, SP110, Type II, Class 125, Style 1, three-piece or double unioun end construction, full ported, full flow, with solder end connections, 2750 kpa (400 psi) WOG, MSS-SP-67. BALANCING VALVES - DHW RECIRCULATION 50mm (2”) diameter and less. ENSO Systems Inc. #865 St. Elizabeth C.S. – Full Day Kindergarten Addition 1. 2. Division 22 Plumbing Specifications Page 23 Standard of Acceptance: Jenkins, Crane, Toyo, Kitz. Description: a. Combination type, calibrated, bronze with bronze disc, equipped with readout valves with integral check valve, indexing position pointer and calibrated name plate, internal EPT O ring seals and factory moulded insulating enclosures. PART 3 - EXECUTION 3.1 A. B. C. D. 3.2 A. B. C. D. E. EXAMINATION Examine valve interior for cleanliness, freedom from foreign matter, and corrosion. Remove special packing materials, such as blocks, used to prevent disc movement during shipping and handling. Operate valves in positions from fully open to fully closed. Examine guides and seats made accessible by such operations. Examine mating flange faces for conditions that might cause leakage. Check bolting for proper size, length, and material. Verify that gasket is of proper size, that its material composition is suitable for service, and that it is free from defects and damage. Do not attempt to repair defective valves; replace with new valves. VALVE INSTALLATION Install valves with unions or flanges at each piece of equipment arranged to allow service, maintenance, and equipment removal without system shutdown. Locate valves for easy access and provide separate support where necessary. Install valves in horizontal piping with stem at or above center of pipe. Install valves in position to allow full stem movement. Install valve tags. Comply with requirements in Section 220553 "Identification for Plumbing Piping and Equipment" for valve tags and schedules. END OF SECTION 220523.12 SECTION 220523.14 – CHECK VALVES FOR PLUMBING PIPING PART 1 - GENERAL 1.1 A. SUMMARY Section Includes: 1. 2. 1.2 A. B. C. 1.3 A. Bronze lift check valves. Bronze swing check valves. DEFINITIONS CWP: Cold working pressure. EPDM: Ethylene propylene-diene terpolymer rubber. NBR: Acrylonitrile-butadiene, Buna-N, or nitrile rubber. ACTION SUBMITTALS Product Data: For each type of valve. 1. Certification that products comply with NSF 61. ENSO Systems Inc. #865 St. Elizabeth C.S. – Full Day Kindergarten Addition 1.4 A. DELIVERY, STORAGE, AND HANDLING Prepare valves for shipping as follows: 1. 2. 3. B. Protect internal parts against rust and corrosion. Protect threads, flange faces, grooves, and weld ends. Set check valves in either closed or open position. Use the following precautions during storage: 1. 2. C. Division 22 Plumbing Specifications Page 24 Maintain valve end protection. Store valves indoors and maintain at higher-than-ambient-dew-point temperature. If outdoor storage is necessary, store valves off the ground in watertight enclosures. Use sling to handle large valves; rig sling to avoid damage to exposed parts. Do not use handwheels or stems as lifting or rigging points. PART 2 - PRODUCTS 2.1 A. B. GENERAL REQUIREMENTS FOR VALVES Source Limitations for Valves: Obtain each type of valve from single source from single manufacturer. ASME Compliance: 1. 2. 3. 4. 5. C. D. E. F. G. H. 2.2 A. ASME B1.20.1 for threads for threaded end valves. ASME B16.1 for flanges on iron valves. ASME B16.10 and ASME B16.34 for ferrous valve dimensions and design criteria. ASME B16.18 for solder joint. ASME B31.9 for building services piping valves. AWWA Compliance: Comply with AWWA C606 for grooved-end connections. NSF Compliance: NSF 61 for valve materials for potable-water service. Bronze valves shall be made with dezincification-resistant materials. Bronze valves made with copper alloy (brass) containing more than 15 percent zinc are not permitted. Valve Pressure-Temperature Ratings: Not less than indicated and as required for system pressures and temperatures. Valve Sizes: Same as upstream piping unless otherwise indicated. Valve Bypass and Drain Connections: MSS SP-45. BRONZE LIFT CHECK VALVES Class 125, Lift Check Valves with Bronze Disc: 1. 2. Standard of Acceptance: Crane, Jenkins, Toyo, Kitz Description: a. b. c. d. e. f. Standard: MSS SP-80, Type 1. CWP Rating: 200 psig (1380 kPa). Body Design: Vertical flow. Body Material: ASTM B 61 or ASTM B 62, bronze. Ends: Threaded or soldered. See valve schedule articles. Disc: Bronze. ENSO Systems Inc. #865 St. Elizabeth C.S. – Full Day Kindergarten Addition 2.3 A. Division 22 Plumbing Specifications Page 25 BRONZE SWING CHECK VALVES Class 125, Bronze, Swing Check Valves with Bronze Disc: 1. 2. Standard of Acceptance: Crane, Jenkins, Toyo, Kitz Description: a. b. c. d. e. f. Standard: MSS SP-80, Type 3. CWP Rating: 200 psig (1380 kPa). Body Design: Horizontal flow. Body Material: ASTM B 62, bronze. Ends: Threaded or soldered. See valve schedule articles. Disc: Bronze. PART 3 - EXECUTION 3.1 A. B. C. D. E. 3.2 A. B. C. D. E. F. 3.3 A. 3.4 A. EXAMINATION Examine valve interior for cleanliness, freedom from foreign matter, and corrosion. Remove special packing materials, such as blocks, used to prevent disc movement during shipping and handling. Operate valves in positions from fully open to fully closed. Examine guides and seats made accessible by such operations. Examine threads on valve and mating pipe for form and cleanliness. Examine mating flange faces for conditions that might cause leakage. Check bolting for proper size, length, and material. Verify that gasket is of proper size, that its material composition is suitable for service, and that it is free from defects and damage. Do not attempt to repair defective valves; replace with new valves. VALVE INSTALLATION Install valves with unions or flanges at each piece of equipment arranged to allow service, maintenance, and equipment removal without system shutdown. Locate valves for easy access and provide separate support where necessary. Install valves in horizontal piping with stem at or above center of pipe. Install valves in position to allow full stem movement. Install check valves for proper direction of flow and as follows: 1. Swing Check Valves: In horizontal position with hinge pin level. 2. Lift Check Valves: With stem upright and plumb. Install valve tags. Comply with requirements in Section 220553 "Identification for Plumbing Piping and Equipment" for valve tags and schedules. ADJUSTING Adjust or replace valve packing after piping systems have been tested and put into service but before final adjusting and balancing. Replace valves if persistent leaking occurs. GENERAL REQUIREMENTS FOR VALVE APPLICATIONS If valve applications are not indicated, use the following: 1. Pump-Discharge Check Valves: a. NPS 2 (DN 50) and Smaller: Bronze swing check valves with bronze or nonmetallic disc. ENSO Systems Inc. #865 St. Elizabeth C.S. – Full Day Kindergarten Addition b. c. B. C. Division 22 Plumbing Specifications Page 26 NPS 2-1/2 (DN 65) and Larger for Domestic Water: Iron swing check valves with lever and weight or spring; or iron, center-guided, metal-seat or resilient-seat check valves. NPS 2-1/2 (DN 65) and Larger for Sanitary Waste and Storm Drainage: Iron swing check valves with lever and weight or spring. If valves with specified CWP ratings are unavailable, the same types of valves with higher CWP ratings may be substituted. End Connections: 1. 2. 3. 4. 5. 6. 7. For Copper Tubing, NPS 2 (DN 50) and Smaller: Threaded or soldered. For Copper Tubing, NPS 2-1/2 to NPS 4 (DN 65 to DN 100): Flanged or threaded. For Copper Tubing, NPS 5 (DN 125) and Larger: Flanged. For Steel Piping, NPS 2 (DN 50) and Smaller: Threaded. For Steel Piping, NPS 2-1/2 to NPS 4 (DN 65 to DN 100): Flanged or threaded. For Steel Piping, NPS 5 (DN 125) and Larger: Flanged. For Grooved-End Copper Tubing and Steel Piping: Grooved. END OF SECTION 220523.14 SECTION 220529 – HANGERS AND SUPPORTS FOR PLUMBING PIPING AND EQUIPMENT PART 1 - GENERAL 1.1 A. SUMMARY Section Includes: 1. 2. 3. 4. 5. B. Related Sections 1. 1.2 A. Metal pipe hangers and supports. Thermal-hanger shield inserts. Fastener systems. Pipe positioning systems. Equipment supports. Section 220548.13 "Vibration Controls for Plumbing Piping and Equipment" for vibration isolation devices. DEFINITIONS MSS: Manufacturers Standardization Society of The Valve and Fittings Industry Inc. PART 2 - PRODUCTS 2.1 A. METAL PIPE HANGERS AND SUPPORTS Carbon-Steel Pipe Hangers and Supports: 1. 2. 3. 4. 5. Description: MSS SP-58, Types 1 through 58, factory-fabricated components. Galvanized Metallic Coatings: Pre-galvanized or hot dipped. Nonmetallic Coatings: Plastic coating, jacket, or liner. Padded Hangers: Hanger with fiberglass or other pipe insulation pad or cushion to support bearing surface of piping. Hanger Rods: Continuous-thread rod, nuts, and washer made of carbon steel. ENSO Systems Inc. #865 St. Elizabeth C.S. – Full Day Kindergarten Addition B. Copper Pipe Hangers: 1. 2. 2.2 A. B. C. D. E. 2.3 A. B. 2.4 A. B. Division 22 Plumbing Specifications Page 27 Description: MSS SP-58, Types 1 through 58, copper-coated-steel, factoryfabricated components. Hanger Rods: Continuous-thread rod, nuts, and washer made of copper-coated steel. THERMAL-HANGER SHIELD INSERTS Insulation-Insert Material for Cold Piping: ASTM C 552, Type II cellular glass with 100psig (688-kPa) or ASTM C 591, Type VI, Grade 1 polyisocyanurate with 125-psig (862kPa) minimum compressive strength and vapor barrier. Insulation-Insert Material for Hot Piping: Water-repellent treated, ASTM C 533, Type I calcium silicate with 100-psig (688-kPa) ASTM C 552, Type II cellular glass with 100psig (688-kPa) or ASTM C 591, Type VI, Grade 1 polyisocyanurate with 125-psig (862kPa) minimum compressive strength. For Trapeze or Clamped Systems: Insert and shield shall cover entire circumference of pipe. For Clevis or Band Hangers: Insert and shield shall cover lower 180 degrees of pipe. Insert Length: Extend 2 inches (50 mm) beyond sheet metal shield for piping operating below ambient air temperature. FASTENER SYSTEMS Powder-Actuated Fasteners: Threaded-steel stud, for use in hardened portland cement concrete with pull-out, tension, and shear capacities appropriate for supported loads and building materials where used. Mechanical-Expansion Anchors: Insert-wedge-type, zinc-coated steel anchors, for use in hardened portland cement concrete; with pull-out, tension, and shear capacities appropriate for supported loads and building materials where used. MISCELLANEOUS MATERIALS Structural Steel: ASTM A 36/A 36M, carbon-steel plates, shapes, and bars; black and galvanized. Grout: ASTM C 1107, factory-mixed and -packaged, dry, hydraulic-cement, nonshrink and nonmetallic grout; suitable for interior and exterior applications. 1. 2. Properties: Non-staining, noncorrosive, and nongaseous. Design Mix: 5000-psi (34.5-MPa), 28-day compressive strength. PART 3 - EXECUTION 3.1 A. B. HANGER AND SUPPORT INSTALLATION Metal Pipe-Hanger Installation: Comply with MSS SP-69 and MSS SP-89. Install hangers, supports, clamps, and attachments as required to properly support piping from the building structure. Metal Trapeze Pipe-Hanger Installation: Comply with MSS SP-69 and MSS SP-89. Arrange for grouping of parallel runs of horizontal piping, and support together on fieldfabricated trapeze pipe hangers. 1. Pipes of Various Sizes: Support together and space trapezes for smallest pipe size or install intermediate supports for smaller diameter pipes as specified for individual pipe hangers. ENSO Systems Inc. #865 St. Elizabeth C.S. – Full Day Kindergarten Addition 2. C. D. 2. F. G. H. I. J. K. L. Field fabricate from ASTM A 36/A 36M, carbon-steel shapes selected for loads being supported. Weld steel according to AWS D1.1/D1.1M. Thermal-Hanger Shield Installation: Install in pipe hanger or shield for insulated piping. Fastener System Installation: 1. E. Division 22 Plumbing Specifications Page 28 Install powder-actuated fasteners for use in lightweight concrete or concrete slabs less than 4 inches (100 mm) thick in concrete after concrete is placed and completely cured. Use operators that are licensed by powder-actuated tool manufacturer. Install fasteners according to powder-actuated tool manufacturer's operating manual. Install mechanical-expansion anchors in concrete after concrete is placed and completely cured. Install fasteners according to manufacturer's written instructions. Pipe Positioning-System Installation: Install support devices to make rigid supply and waste piping connections to each plumbing fixture. Install hangers and supports complete with necessary attachments, inserts, bolts, rods, nuts, washers, and other accessories. Install hangers and supports to allow controlled thermal and seismic movement of piping systems, to permit freedom of movement between pipe anchors, and to facilitate action of expansion joints, expansion loops, expansion bends, and similar units. Install lateral bracing with pipe hangers and supports to prevent swaying. Install building attachments within concrete slabs or attach to structural steel. Install additional attachments at concentrated loads, including valves, flanges, and strainers, NPS 2-1/2 (DN 65) and larger and at changes in direction of piping. Install concrete inserts before concrete is placed; fasten inserts to forms and install reinforcing bars through openings at top of inserts. Load Distribution: Install hangers and supports so that piping live and dead loads and stresses from movement will not be transmitted to connected equipment. Pipe Slopes: Install hangers and supports to provide indicated pipe slopes and to not exceed maximum pipe deflections allowed by ASME B31.9 for building services piping. Insulated Piping: 1. Attach clamps and spacers to piping. a. b. c. 2. Install MSS SP-58, Type 39, protection saddles if insulation without vapor barrier is indicated. Fill interior voids with insulation that matches adjoining insulation. a. 3. Piping Operating above Ambient Air Temperature: Clamp may project through insulation. Piping Operating below Ambient Air Temperature: Use thermal-hanger shield insert with clamp sized to match OD of insert. Do not exceed pipe stress limits allowed by ASME B31.9 for building services piping. Option: Thermal-hanger shield inserts may be used. Include steel weightdistribution plate for pipe NPS 4 (DN 100) and larger if pipe is installed on rollers. Install MSS SP-58, Type 40, protective shields on cold piping with vapor barrier. Shields shall span an arc of 180 degrees. ENSO Systems Inc. #865 St. Elizabeth C.S. – Full Day Kindergarten Addition a. 4. b. c. d. e. 6. 3.2 A. B. C. 3.3 A. B. C. B. Pipes NPS 8 (DN 200) and Larger: Include wood or reinforced calcium-silicateinsulation inserts of length at least as long as protective shield. Thermal-Hanger Shields: Install with insulation same thickness as piping insulation. Fabricate structural-steel stands to suspend equipment from structure overhead or to support equipment above floor. Grouting: Place grout under supports for equipment and make bearing surface smooth. Provide lateral bracing, to prevent swaying, for equipment supports. METAL FABRICATIONS Cut, drill, and fit miscellaneous metal fabrications for trapeze pipe hangers and equipment supports. Fit exposed connections together to form hairline joints. Field weld connections that cannot be shop welded because of shipping size limitations. Field Welding: Comply with AWS D1.1/D1.1M procedures for shielded, metal arc welding; appearance and quality of welds; and methods used in correcting welding work; and with the following: 2. 3. 4. A. NPS 1/4 to NPS 3-1/2 (DN 8 to DN 90): 12 inches (305 mm) long and 0.048 inch (1.22 mm) thick. NPS 4 (DN 100): 12 inches (305 mm) long and 0.06 inch (1.52 mm) thick. NPS 5 and NPS 6 (DN 125 and DN 150): 18 inches (457 mm) long and 0.06 inch (1.52 mm) thick. NPS 8 to NPS 14 (DN 200 to DN 350): 24 inches (610 mm) long and 0.075 inch (1.91 mm) thick. NPS 16 to NPS 24 (DN 400 to DN 600): 24 inches (610 mm) long and 0.105 inch (2.67 mm) thick. EQUIPMENT SUPPORTS 1. 3.4 Option: Thermal-hanger shield inserts may be used. Include steel weightdistribution plate for pipe NPS 4 (DN 100) and larger if pipe is installed on rollers. Shield Dimensions for Pipe: Not less than the following: a. 5. Division 22 Plumbing Specifications Page 29 Use materials and methods that minimize distortion and develop strength and corrosion resistance of base metals. Obtain fusion without undercut or overlap. Remove welding flux immediately. Finish welds at exposed connections so no roughness shows after finishing and so contours of welded surfaces match adjacent contours. ADJUSTING Hanger Adjustments: Adjust hangers to distribute loads equally on attachments and to achieve indicated slope of pipe. Trim excess length of continuous-thread hanger and support rods to 1-1/2 inches (40 mm). ENSO Systems Inc. #865 St. Elizabeth C.S. – Full Day Kindergarten Addition 3.5 A. B. 3.6 A. B. C. D. E. F. G. H. I. PAINTING Touchup: Cleaning and touchup painting of field welds, bolted connections, and abraded areas of shop paint on miscellaneous metal are specified in Section 099123 "Interior Painting." Galvanized Surfaces: Clean welds, bolted connections, and abraded areas and apply galvanizing-repair paint to comply with ASTM A 780. HANGER AND SUPPORT SCHEDULE Specific hanger and support requirements are in Sections specifying piping systems and equipment. Comply with MSS SP-69 for pipe-hanger selections and applications that are not specified in piping system Sections. Use hangers and supports with galvanized metallic coatings for piping and equipment that will not have field-applied finish. Use nonmetallic coatings on attachments for electrolytic protection where attachments are in direct contact with copper tubing. Use carbon-steel pipe hangers and supports metal trapeze pipe hangers and metal framing systems and attachments for general service applications. Use copper-plated pipe hangers and copper or stainless-steel attachments for copper piping and tubing. Use padded hangers for piping that is subject to scratching. Use thermal-hanger shield inserts for insulated piping and tubing. Horizontal-Piping Hangers and Supports: Unless otherwise indicated and except as specified in piping system Sections, install the following types: 1. 2. 3. 4. J. Adjustable, Steel Clevis Hangers (MSS Type 1): For suspension of noninsulated or insulated, stationary pipes NPS 1/2 to NPS 30 (DN 15 to DN 750). Single-Pipe Rolls (MSS Type 41): For suspension of pipes NPS 1 to NPS 30 (DN 25 to DN 750), from two rods if longitudinal movement caused by expansion and contraction might occur. Adjustable Roller Hangers (MSS Type 43): For suspension of pipes NPS 2-1/2 to NPS 24 (DN 65 to DN 600), from single rod if horizontal movement caused by expansion and contraction might occur. Complete Pipe Rolls (MSS Type 44): For support of pipes NPS 2 to NPS 42 (DN 50 to DN 1050) if longitudinal movement caused by expansion and contraction might occur but vertical adjustment is not necessary. Vertical-Piping Clamps: Unless otherwise indicated and except as specified in piping system Sections, install the following types: 1. 2. K. Division 22 Plumbing Specifications Page 30 Extension Pipe or Riser Clamps (MSS Type 8): For support of pipe risers NPS 3/4 to NPS 24 (DN 24 to DN 600). Carbon- or Alloy-Steel Riser Clamps (MSS Type 42): For support of pipe risers NPS 3/4 to NPS 24 (DN 20 to DN 600) if longer ends are required for riser clamps. Hanger-Rod Attachments: Unless otherwise indicated and except as specified in piping system Sections, install the following types: 1. Steel Turnbuckles (MSS Type 13): For adjustment up to 6 inches (150 mm) for heavy loads. ENSO Systems Inc. #865 St. Elizabeth C.S. – Full Day Kindergarten Addition 2. 3. 4. 5. L. Steel Clevises (MSS Type 14): For 120 to 450 deg F (49 to 232 deg C) piping installations. Swivel Turnbuckles (MSS Type 15): For use with MSS Type 11, split pipe rings. Malleable-Iron Sockets (MSS Type 16): For attaching hanger rods to various types of building attachments. Steel Weldless Eye Nuts (MSS Type 17): For 120 to 450 deg F (49 to 232 deg C) piping installations. Building Attachments: Unless otherwise indicated and except as specified in piping system Sections, install the following types: 1. 2. 3. 4. 5. 6. 7. 8. 9. 10. 11. 12. Steel or Malleable Concrete Inserts (MSS Type 18): For upper attachment to suspend pipe hangers from concrete ceiling. Top-Beam C-Clamps (MSS Type 19): For use under roof installations with barjoist construction, to attach to top flange of structural shape. Side-Beam or Channel Clamps (MSS Type 20): For attaching to bottom flange of beams, channels, or angles. Center-Beam Clamps (MSS Type 21): For attaching to center of bottom flange of beams. Welded Beam Attachments (MSS Type 22): For attaching to bottom of beams if loads are considerable and rod sizes are large. C-Clamps (MSS Type 23): For structural shapes. Top-Beam Clamps (MSS Type 25): For top of beams if hanger rod is required tangent to flange edge. Side-Beam Clamps (MSS Type 27): For bottom of steel I-beams. Steel-Beam Clamps with Eye Nuts (MSS Type 28): For attaching to bottom of steel I-beams for heavy loads. Linked-Steel Clamps with Eye Nuts (MSS Type 29): For attaching to bottom of steel I-beams for heavy loads, with link extensions. Malleable-Beam Clamps with Extension Pieces (MSS Type 30): For attaching to structural steel. Welded-Steel Brackets: For support of pipes from below or for suspending from above by using clip and rod. Use one of the following for indicated loads: a. b. c. 13. 14. 15. M. Division 22 Plumbing Specifications Page 31 Light (MSS Type 31): 750 lb (340 kg). Medium (MSS Type 32): 1500 lb (680 kg). Heavy (MSS Type 33): 3000 lb (1360 kg). Side-Beam Brackets (MSS Type 34): For sides of steel or wooden beams. Plate Lugs (MSS Type 57): For attaching to steel beams if flexibility at beam is required. Horizontal Travelers (MSS Type 58): For supporting piping systems subject to linear horizontal movement where headroom is limited. Saddles and Shields: Unless otherwise indicated and except as specified in piping system Sections, install the following types: 1. 2. 3. Steel-Pipe-Covering Protection Saddles (MSS Type 39): To fill interior voids with insulation that matches adjoining insulation. Protection Shields (MSS Type 40): Of length recommended in writing by manufacturer to prevent crushing insulation. Thermal-Hanger Shield Inserts: For supporting insulated pipe. ENSO Systems Inc. #865 St. Elizabeth C.S. – Full Day Kindergarten Addition N. Spring Hangers and Supports: Unless otherwise indicated and except as specified in piping system Sections, install the following types: 1. 2. 3. 4. O. P. Q. R. Division 22 Plumbing Specifications Page 32 Restraint-Control Devices (MSS Type 47): Where indicated to control piping movement. Spring Cushions (MSS Type 48): For light loads if vertical movement does not exceed 1-1/4 inches (32 mm). Spring-Cushion Roll Hangers (MSS Type 49): For equipping Type 41, roll hanger with springs. Spring Sway Braces (MSS Type 50): To retard sway, shock, vibration, or thermal expansion in piping systems. Comply with MSS SP-69 for trapeze pipe-hanger selections and applications not specified in piping system Sections. Comply with MFMA-103 for metal framing system selections and applications not specified in piping system Sections. Use powder-actuated fasteners or mechanical-expansion anchors instead of attachments where required in concrete construction. Use pipe positioning systems in pipe spaces behind plumbing fixtures to supply and waste piping for plumbing fixtures. that are that are building support END OF SECTION 220529 SECTION 220548 - VIBRATION AND SEISMIC CONTROLS FOR PLUMBING PIPING AND EQUIPMENT PART 1 - GENERAL 1.1 A. SUMMARY Section Includes: 1. 2. 3. 4. 5. 6. 7. 8. 9. 10. 11. 12. 13. 14. 15. B. Elastomeric isolation pads. Elastomeric isolation mounts. Restrained elastomeric isolation mounts. Open-spring isolators. Housed-spring isolators. Restrained-spring isolators. Housed-restrained-spring isolators. Elastomeric hangers. Spring hangers. Snubbers. Restraint channel bracings. Restraint cables. Seismic-restraint accessories. Mechanical anchor bolts. Adhesive anchor bolts. Related Requirements: 1. Section 210548 "Vibration and Seismic Controls for Fire-Suppression Piping and Equipment" for devices for fire-suppression equipment and systems. ENSO Systems Inc. #865 St. Elizabeth C.S. – Full Day Kindergarten Addition 2. C. Section 230548 "Vibration and Seismic Controls for HVAC" for devices for HVAC equipment and systems. Product Data: For each type of product. 1. Illustrate and indicate style, material, strength, fastening provision, and finish for each type and size of seismic-restraint component used. a. b. D. 2. Include design calculations and details for selecting seismic restraints complying with performance requirements, design criteria, and analysis data signed and sealed by the qualified professional engineer responsible for their preparation. Contact Mr. Sean Cochrane at HTS Engineering (representing Kinetics Noise Control), tel. (416) 661-3400 for information. Design Calculations: Calculate static and dynamic loading caused by equipment weight, operation, and seismic forces required to select seismic restraints and for designing vibration isolation bases. a. 3. b. c. d. B. C. D. Coordinate design calculations with wind load calculations required for equipment mounted outdoors. Comply with requirements in other Sections for equipment mounted outdoors. Seismic Restraint Details: a. A. Tabulate types and sizes of seismic restraints, complete with report numbers and rated strength in tension and shear as evaluated by an agency acceptable to authorities having jurisdiction. Annotate to indicate application of each product submitted and compliance with requirements. Delegated-Design Submittal: For each seismic-restraint device. 1. 1.2 Division 22 Plumbing Specifications Page 33 Design Analysis: To support selection and arrangement of seismic restraints. Include calculations of combined tensile and shear loads. Details: Indicate fabrication and arrangement. Detail attachments of restraints to the restrained items and to the structure. Show attachment locations, methods, and spacings. Identify components, list their strengths, and indicate directions and values of forces transmitted to the structure during seismic events. Indicate association with vibration isolation devices. Coordinate seismic-restraint and vibration isolation details with windrestraint details required for equipment mounted outdoors. Comply with requirements in other Sections for equipment mounted outdoors. Preapproval and Evaluation Documentation: Submit for review to an agency acceptable to authorities having jurisdiction, showing maximum ratings of restraint items and the basis for approval (tests or calculations). INFORMATIONAL SUBMITTALS Coordination Drawings: Show coordination of seismic bracing for electrical components with other systems and equipment in the vicinity, including other supports and seismic restraints. Welding certificates when requested. Air-Mounting System Performance Certification: Include natural frequency, load, and damping test data Field quality-control reports. ENSO Systems Inc. #865 St. Elizabeth C.S. – Full Day Kindergarten Addition 1.3 A. B. C. Division 22 Plumbing Specifications Page 34 QUALITY ASSURANCE Comply with seismic-restraint requirements in the OBC unless requirements in this Section are more stringent. Welding Qualifications: Qualify procedures and personnel according to AWS D1.1/D1.1M, "Structural Welding Code - Steel." Seismic-restraint devices shall have horizontal and vertical load testing and analysis. They shall bear anchorage preapproval from OSHPD in addition to preapproval, showing maximum seismic-restraint ratings, by ICC-ES or another agency acceptable to authorities having jurisdiction. Ratings based on independent testing are preferred to ratings based on calculations. If preapproved ratings are not available, submittals based on independent testing are preferred. Calculations (including combining shear and tensile loads) that support seismic-restraint designs must be signed and sealed by a qualified professional engineer. PART 2 - GENERAL 2.1 A. PERFORMANCE REQUIREMENTS Wind-Restraint Loading: 1. 2. 3. B. Basic Wind Speed: 28.4m/s (0.52kPa). Building Classification Category: High - for Schools and Normal for Offices. Minimum 48.8 kg/sqm (10 lb/sqft.) multiplied by maximum area of HVAC component projected on vertical plane normal to wind direction and 45 degrees either side of normal. Seismic-Restraint Loading: 1. 2. 3. Site Class as Defined in the OBC: D. Building Classification Category: High - for Schools and Normal for Offices. Building Importance factor (IE) Assigned Seismic Use Group or Building Category as Defined in the OBC: ULS=1.3 for schools and 1.0 for Offices. a. b. c. d. e. 4. 5. 2.2 A. Importance factor (IE) Assigned Seismic Use Group or Building Category as Defined in the OBC: ULS=1.3 for schools and 1.0 for Offices. Component Factor: 1.0 Component Response Modification Factor: 5.0. Component Amplification Factor: 2.5. Peak Ground Acceleration: 0.150 for Toronto. Design Spectral Response Acceleration at Short Periods (0.2 Second): 0.24 (Toronto). Design Spectral Response Acceleration at 1.0-Second Period: 0.056 (Toronto). PERFORMANCE REQUIREMENTS Elastomeric Isolation Pads: 1. 2. 3. 4. 5. Fabrication: Single or multiple layers of sufficient durometer stiffness for uniform loading over pad area. Size: Factory or field cut to match requirements of supported equipment. Pad Material: Oil and water resistant with elastomeric properties. Surface Pattern: Ribbed pattern. Infused nonwoven cotton or synthetic fibers. ENSO Systems Inc. #865 St. Elizabeth C.S. – Full Day Kindergarten Addition 6. 7. Load-bearing metal plates adhered to pads. Sandwich-Core Material: Resilient and elastomeric. a. b. 2.3 A. Double-Deflection, Elastomeric Isolation Mounts: Mounting Plates: a. b. 2. A. Elastomeric Material: Molded, oil-resistant rubber, neoprene, or other elastomeric material. Restrained Elastomeric Isolation Mounts: Description: All-directional isolator with restraints containing two separate and opposing elastomeric elements that prevent central threaded element and attachment hardware from contacting the housing during normal operation. a. b. A. Freestanding, Laterally Stable, Open-Spring Isolators: 2. 3. 4. 5. 6. A. Housing: Cast-ductile iron or welded steel. Elastomeric Material: Molded, oil-resistant rubber, neoprene, or other elastomeric material. OPEN-SPRING ISOLATORS 1. 2.6 Top Plate: Encapsulated steel load transfer top plates, factory drilled and threaded with threaded studs or bolts. Baseplate: Encapsulated steel bottom plates with holes provided for anchoring to support structure. RESTRAINED ELASTOMERIC ISOLATION MOUNTS 1. 2.5 Surface Pattern: Ribbed pattern. Infused nonwoven cotton or synthetic fibers. ELASTOMERIC ISOLATION MOUNTS 1. 2.4 Division 22 Plumbing Specifications Page 35 Outside Spring Diameter: Not less than 80 percent of the compressed height of the spring at rated load. Minimum Additional Travel: 50 percent of the required deflection at rated load. Lateral Stiffness: More than 80 percent of rated vertical stiffness. Overload Capacity: Support 200 percent of rated load, fully compressed, without deformation or failure. Baseplates: Factory-drilled steel plate for bolting to structure with an elastomeric isolator pad attached to the underside. Baseplates shall limit floor load to 500 psig (3447 kPa). Top Plate and Adjustment Bolt: Threaded top plate with adjustment bolt and cap screw to fasten and level equipment. HOUSED-SPRING ISOLATORS Freestanding, Laterally Stable, Open-Spring Isolators in Two-Part Telescoping Housing: 1. 2. 3. Outside Spring Diameter: Not less than 80 percent of the compressed height of the spring at rated load. Minimum Additional Travel: 50 percent of the required deflection at rated load. Lateral Stiffness: More than 80 percent of rated vertical stiffness. ENSO Systems Inc. #865 St. Elizabeth C.S. – Full Day Kindergarten Addition 4. 5. Overload Capacity: Support 200 percent of rated load, fully compressed, without deformation or failure. Two-Part Telescoping Housing: A steel top and bottom frame separated by an elastomeric material and enclosing the spring isolators. a. b. 2.7 A. Freestanding, Laterally Stable, Open-Spring Isolators with Vertical-Limit Stop Restraint: Housing: Steel housing with vertical-limit stops to prevent spring extension due to weight being removed. a. b. c. 2. 3. 4. 5. 6. A. Restraint: Limit stop as required for equipment and authorities having jurisdiction. Outside Spring Diameter: Not less than 80 percent of the compressed height of the spring at rated load. Minimum Additional Travel: 50 percent of the required deflection at rated load. Lateral Stiffness: More than 80 percent of rated vertical stiffness. Overload Capacity: Support 200 percent of rated load, fully compressed, without deformation or failure. Freestanding, Laterally Stable, Open-Spring Isolators with Vertical-Limit Stop Restraint: Two-Part Telescoping Housing: A steel top and bottom frame separated by an elastomeric material and enclosing the spring isolators. Housings are equipped with adjustable snubbers to limit vertical movement. a. b. 2. 3. 4. 5. A. Base with holes for bolting to structure with an elastomeric isolator pad attached to the underside. Bases shall limit floor load to 500 psig (3447 kPa). Top plate with threaded mounting holes Internal leveling bolt that acts as blocking during installation. HOUSED-RESTRAINED-SPRING ISOLATORS 1. 2.9 Drilled base housing for bolting to structure with an elastomeric isolator pad attached to the underside. Bases shall limit floor load to 500 psig (3447 kPa). Top housing with threaded mounting holes and internal leveling device. RESTRAINED-SPRING ISOLATORS 1. 2.8 Division 22 Plumbing Specifications Page 36 Drilled base housing for bolting to structure with an elastomeric isolator pad attached to the underside. Bases shall limit floor load to 500 psig (3447 kPa). Threaded top housing with adjustment bolt and cap screw to fasten and level equipment. Outside Spring Diameter: Not less than 80 percent of the compressed height of the spring at rated load. Minimum Additional Travel: 50 percent of the required deflection at rated load. Lateral Stiffness: More than 80 percent of rated vertical stiffness. Overload Capacity: Support 200 percent of rated load, fully compressed, without deformation or failure. ELASTOMERIC HANGERS Elastomeric Mount in a Steel Frame with Upper and Lower Steel Hanger Rods: ENSO Systems Inc. #865 St. Elizabeth C.S. – Full Day Kindergarten Addition 1. 2. 2.10 A. Combination Coil-Spring and Elastomeric-Insert Hanger with Spring and Insert in Compression: 2. 3. 4. 5. 6. 7. 8. A. Description: Factory fabricated using welded structural-steel shapes and plates, anchor bolts, and replaceable resilient isolation washers and bushings. 2. 3. A. 2.13 A. Frame: Steel, fabricated for connection to threaded hanger rods and to allow for a maximum of 30 degrees of angular hanger-rod misalignment without binding or reducing isolation efficiency. Outside Spring Diameter: Not less than 80 percent of the compressed height of the spring at rated load. Minimum Additional Travel: 50 percent of the required deflection at rated load. Lateral Stiffness: More than 80 percent of rated vertical stiffness. Overload Capacity: Support 200 percent of rated load, fully compressed, without deformation or failure. Elastomeric Element: Molded, oil-resistant rubber or neoprene. Steel-washerreinforced cup to support spring and bushing projecting through bottom of frame. Adjustable Vertical Stop: Steel washer with neoprene washer "up-stop" on lower threaded rod. Self-centering hanger rod cap to ensure concentricity between hanger rod and support spring coil. SNUBBERS 1. 2.12 Frame: Steel, fabricated with a connection for an upper threaded hanger rod and an opening on the underside to allow for a maximum of 30 degrees of angular lower hanger-rod misalignment without binding or reducing isolation efficiency. Dampening Element: Molded, oil-resistant rubber, neoprene, or other elastomeric material with a projecting bushing for the underside opening preventing steel to steel contact. SPRING HANGERS 1. 2.11 Division 22 Plumbing Specifications Page 37 Anchor bolts for attaching to concrete shall be seismic-rated, drill-in, and studwedge or female-wedge type. Resilient Isolation Washers and Bushings: Oil- and water-resistant neoprene. Maximum 1/4-inch (6-mm) air gap, and minimum 1/4-inch- (6-mm-) thick resilient cushion. RESTRAINT CHANNEL BRACINGS Description: MFMA-4, shop- or field-fabricated bracing assembly made of slotted steel channels with accessories for attachment to braced component at one end and to building structure at the other end and other matching components and with corrosionresistant coating; rated in tension, compression, and torsion forces. RESTRAINT CABLES Restraint Cables: ASTM A 603 galvanized (or ASTM A 492 stainless where noted in this document or on the drawings) -steel cables. End connections made of steel assemblies with thimbles, brackets, swivel, and bolts designed for restraining cable service; with a minimum of two clamping bolts for cable engagement. ENSO Systems Inc. #865 St. Elizabeth C.S. – Full Day Kindergarten Addition 2.14 A. B. C. D. E. 2.15 A. 2.16 A. Division 22 Plumbing Specifications Page 38 SEISMIC-RESTRAINT ACCESSORIES Hanger-Rod Stiffener: Reinforcing steel angle clamped to hanger rod. Hinged and Swivel Brace Attachments: Multifunctional steel connectors for attaching hangers to rigid channel bracings and restraint cables. Bushings for Floor-Mounted Equipment Anchor Bolts: Neoprene bushings designed for rigid equipment mountings, and matched to type and size of anchor bolts and studs. Bushing Assemblies for Wall-Mounted Equipment Anchorage: Assemblies of neoprene elements and steel sleeves designed for rigid equipment mountings, and matched to type and size of attachment devices used. Resilient Isolation Washers and Bushings: One-piece, molded, oil- and water-resistant neoprene, with a flat washer face. MECHANICAL ANCHOR BOLTS Mechanical Anchor Bolts: Drilled-in and stud-wedge or female-wedge type in zinccoated steel for interior applications and stainless steel for exterior applications. Select anchor bolts with strength required for anchor and as tested according to ASTM E 488. ADHESIVE ANCHOR BOLTS Adhesive Anchor Bolts: Drilled-in and capsule anchor system containing PVC or urethane methacrylate-based resin and accelerator, or injected polymer or hybrid mortar adhesive. Provide anchor bolts and hardware with zinc-coated steel for interior applications and stainless steel for exterior applications. Select anchor bolts with strength required for anchor and as tested according to ASTM E 488. PART 3 - GENERAL 3.1 A. B. C. 3.2 A. B. C. EXAMINATION Examine areas and equipment to receive vibration isolation and seismic-control devices for compliance with requirements for installation tolerances and other conditions affecting performance of the Work. Examine roughing-in for reinforcement and cast-in-place anchors to verify actual locations before installation. Proceed with installation only after unsatisfactory conditions have been corrected. COORDINATION AND EXECUTION Coordinate size, shape, reinforcement and attachment of all housekeeping pads supporting vibration/seismically rated equipment. Concrete shall have a minimum compressive strength of 3,000 psi or as specified by the project engineer. Coordinate size, thickness, doweling, and reinforcing of concrete equipment housekeeping pads and piers with vibration isolation and seismic restraint device manufacturer to ensure adequate space, embedment and prevent edge breakout failures. Pads and piers must be adequately doweled in to structural slab. Housekeeping Pads must be adequately reinforced and adequately sized for proper installation of equipment anchors. Refer seismic restraint manufacturer’s written instructions. Coordinate with vibration/seismic restraint manufacturer and the structural engineer of record to locate and size structural supports underneath vibration/seismically restrained equipment. Installation of all seismic restraint materials specified in this section shall be accomplished as per the manufacturer’s written instructions. Adjust isolators and re- ENSO Systems Inc. #865 St. Elizabeth C.S. – Full Day Kindergarten Addition D. E. F. G. 3.3 A. straints after piping or wiring systems have been filled and equipment is at its operating weight, following the manufacturer’s written instructions. Isolated and restrained equipment, duct and piping located on roofs must be attached to the structure. Supports (e.g., sleepers) that are not attached to the structure will not be acceptable. Attach piping to the trapeze per seismic restraint manufacturer’s design. Install cables so they do not bend across sharp edges of adjacent equipment or building structures. Do not brace or support equipment to separate portions of the structure that may act differently in response to an earthquake. For example, do not connect a Transverse restraint to a wall and then a Longitudinal restraint to either a floor/ceiling/roof at the same braced location. Install vertical braces to stiffen hanger rods and prevent buckling per seismic restraint manufacturer’s design. Clamp vertical brace to hanger rods. Requirements apply equally to hanging equipment. Do not weld vertical braces to hanger rods. SEISMIC RESTRAINTS APPLICATION General: 1. 2. 3. 4. 5. 6. B. Division 22 Plumbing Specifications Page 39 All equipment and piping shall be restrained to resist seismic forces per the applicable Building Code(s) as a minimum; listed herein. Additional requirements specified herein are included specifically for this project; as needed basis. Install seismic restraint devices per the manufacturer’s submittals. Any deviation from the manufacturer’s instructions shall be reviewed and approved by the manufacturer. Attachment to structure for suspended equipment and pipe: If specific attachment is not indicated, anchor bracing to structure at flanges of beams, at upper truss chords of bar joists, or at concrete members. Provide hanger rod stiffeners where indicated or as required to prevent buckling of rods due to seismic forces. Where rigid restraints are used on equipment or piping, the support rods for the equipment or piping at restraint locations must be supported by anchors rated for seismic use. Post-installed concrete anchors must be in accordance with ACI 355.2. Ensure housekeeping pads have adequate space to mount equipment and seismic restraint devices and shall also be large enough and thick enough to ensure adequate edge distance and embedment depth for restraint anchor bolts to avoid housekeeping pad breakout failure. Concrete Anchor Bolts: 1. 2. 3. 4. Identify position of reinforcing steel and other embedded items prior to drilling holes for anchors. Do not damage existing reinforcing or embedded items during coring or drilling. Notify the structural engineer if reinforcing steel or other embedded items are encountered during drilling. Locate and avoid pre- or posttensioned tendons, electrical and telecommunications conduit, and gas lines. Do not drill holes in concrete or masonry until concrete, mortar, or grout has achieved full design strength. Mechanical Anchors: Protect threads from damage during anchor installation. Adhesive Anchors: Clean holes to remove loose material and drilling dust per manufactures instructions prior to installation of adhesive. Place adhesive in holes proceeding from the bottom of the hole and progressing toward the surface in such a manner as to avoid introduction of air pockets in the adhesive. ENSO Systems Inc. #865 St. Elizabeth C.S. – Full Day Kindergarten Addition 5. C. Division 22 Plumbing Specifications Page 40 Set anchors to manufacturer's recommended torque, using a torque wrench. Piping Systems: Provide seismic control measures with spacing and anchorage engineered for the specific project. 1. All piping is to be restrained to meet code requirements. a. b. c. d. 2. Restraint Spacing For Piping: a. b. c. d. e. 3. 4. 5. 6. 7. 8. 9. 10. 11. All piping associated with “Life Safety Systems” shall always have an importance factor of 1.5. Seismic restraint requirements / exemptions vary with code and seismic acceleration – see specific code and comply with applicable restraint requirements. Seismically restrain / brace all pipes 65 mm (2 ½”) in nominal diameter and larger. Seismically restrain / brace all piping in boiler rooms, mechanical rooms and refrigeration mechanical rooms 32 mm (1 ¼”) in nominal diameter and larger. Branch lines may not be used to brace main lines. For ductile piping: Transverse supports a maximum of 12 m (40’) o.c. For ductile piping: Longitudinal supports a maximum of 24 m (80’) o.c. For non-ductile piping (e.g., cast iron, PVC) space Transverse supports a maximum of 6 m (20’) o.c., and Longitudinal supports a maximum of 12 m (40’) o.c. Differential spacing can be designed depending upon pipe size and length(s) of run (design will be indicated on drawings of approved method). For piping with hazardous material inside (e.g., natural gas, medical gas) space Transverse supports a maximum of 6 m (20’) o.c., and Longitudinal supports a maximum of 12 m (40’) o.c. For pipe risers, restrain the piping at floor penetrations using the same spacing requirements as above. Brace a change of direction longer than 3.7 m (12’). This specification does not allow the use of the 300mm (12’’) rule where the piping may be exempted from seismic restraint based on the length of the support rods provided that the rods are not subjected to bending moments. Install restraint cables so they do not bend across edges of adjacent equipment or building structure. Tie back to structure at 45 degrees to the structure. Longitudinal restraints for single pipe supports shall be attached rigidly to the pipe, not to the pipe hanger. For supports with multiple pipes (trapezes), secure pipes to trapeze member with clamps approved for application. Install flexible metal hose loops in piping which crosses building seismic joints, sized for the anticipated amount of movement. Install flexible piping connectors where adjacent sections or branches are supported by different structural elements, and where the connections terminate with connection to equipment that is anchored to a different structural element from the one supporting the connections as they approach equipment. Where pipe sizes reduce below required dimensions noted above in Section 3.2.E, the final restraint shall be installed at the transition location. Longitudinal restraints for single conduit supports shall be attached rigidly to the pipe, not to the pipe/conduit hanger. ENSO Systems Inc. #865 St. Elizabeth C.S. – Full Day Kindergarten Addition 12. 13. 14. 15. 16. 17. 18. 19. 20. 21. 22. 3.4 A. 3.5 A. B. C. Division 22 Plumbing Specifications Page 41 For supports with multiple conduits (trapezes), secure conduit to trapeze member with clamps approved for application. Where conduits reduce below required dimensions noted above in Section 3.2.F, the final restraint shall be installed at the transition location. Rod Stiffener Clamps are required where the hanger rod exceeds the maximum length shown in the seismic calculation sheets. They are only required at restraint locations. Seismically Rated Beam Clamps are required where welding to or penetrations to steel beams are not approved. Adjust restraint cables so that they are not visibly slack. Cable not to support weight during normal operation. Seismic systems are to be compatible with requirements for anchoring and guiding of systems. Drilled or power driven anchors or fasteners shall not be permitted for use with seismic control measures. Friction due to gravity does not constitute a seismic attachment. Seismic restraint connections are not to be connected to the bottom chord of steel joists or the bottom flange of steel beams. Standard beam clamps can be used to support restrained components; they cannot be used to connect the seismic restraint to the structure – only for the hanger rods. Brace remaining piping, ductwork, electrical components to code requirements (OBC & NBCC or TI-809-04)) or in conformance with SMACNA (Sheet Metal and Air Conditioning Contractors National Association, Inc.) “Seismic Restraint Manual Guidelines for Mechanical Systems”, 2ND edition or 3RD edition depending on Code or EOR. ACCOMMODATION OF DIFFERENTIAL SEISMIC MOTION Install flexible connections in piping where they cross seismic joints, where adjacent sections or branches are supported by different structural elements, and where the connections terminate with connection to equipment that is anchored to a different structural element from the one supporting the connections as they approach equipment. Comply with requirements in Section 221116 "Domestic Water Piping" for piping flexible connections. INSPECTION AND CERTIFICATION The contractor shall notify the local representative of the seismic restraint materials manufacturer prior to installing any seismic restraint devices. The contractor shall seek the representative’s guidance in any installation procedures with which he/she is unfamiliar. The contractor shall notify the local representative of the seismic restraint materials manufacturer mid-way through the listed project for an inspection all vibration and seismic restraint devices already installed. A written report of any installation errors, improperly selected devices, or other fault in the system which could affect the performance of the system shall be documented and the contractor shall perform all steps that are required from this written report to properly complete the vibration and seismic restraint work as per the specifications. Upon completion of the installation, arrange for the design Engineer to visit the site to verify the proper installation of all seismic restraint devices herein specified. A written report citing any installation errors, improperly selected devices, or other fault in the ENSO Systems Inc. #865 St. Elizabeth C.S. – Full Day Kindergarten Addition D. E. system which could affect the performance of the system should be generated by the Engineer. The Engineer shall verify that isolators are adjusted, with spring’s perpendicular to bases or housing, adjustment bolts are tightened up on equipment mountings, and hangers are not cocked. Upon completion of the Work, the Engineer shall provide a sealed letter addressed to the local authorities having jurisdiction confirming that the Seismic Design and Installation is in general conformance with the design documents and the Ontario and National Building Codes. The installing contractor shall take all steps required to properly complete the seismic restraint work as per the specifications. Perform the following tests: 1. 2. 3. 4. 5. 3.6 A. Division 22 Plumbing Specifications Page 42 Provide evidence of recent calibration of test equipment by a testing agency acceptable to authorities having jurisdiction. Schedule test with Owner, through Architect, before connecting anchorage device to restrained component (unless post connection testing has been approved), and with at least seven days' advance notice. Obtain Architect's approval before transmitting test loads to structure. Provide temporary load-spreading members. Test at least four of each type and size of installed anchors and fasteners selected by Architect. Test to 90 percent of rated proof load of device. ADJUSTING Adjust restraints to permit free movement of equipment within normal mode of operation. END OF SECTION 220548 SECTION 220553 – IDENTIFICATION FOR PLUMBING PIPING AND EQUIPMENT PART 1 - GENERAL 1.1 A. SUMMARY Section Includes: 1. 2. 1.2 A. B. C. D. Pipe labels. Valve tags. ACTION SUBMITTALS Product Data: For each type of product indicated. Equipment Label Schedule: Include a listing of all equipment to be labeled with the proposed content for each label. Valve numbering scheme. Valve Schedules: For each piping system to include in maintenance manuals. PART 2 - PRODUCTS 2.1 A. B. PIPE LABELS General Requirements for Manufactured Pipe Labels: Preprinted, color-coded, with lettering indicating service, and showing flow direction. Pre-tensioned Pipe Labels: Pre-coiled, semi-rigid plastic formed to partially cover circumference of pipe and to attach to pipe without fasteners or adhesive. ENSO Systems Inc. #865 St. Elizabeth C.S. – Full Day Kindergarten Addition C. D. Self-Adhesive Pipe Labels: Printed plastic with contact-type, permanent-adhesive backing. Pipe Label Contents: Include identification of piping service using same designations or abbreviations as used on Drawings; also include pipe size and an arrow indicating flow direction. 1. 2. 2.2 A. Flow-Direction Arrows: Integral with piping-system service lettering to accommodate both directions or as separate unit on each pipe label to indicate flow direction. Lettering Size: Size letters according to ASME A13.1 for piping At least 1/2 inch (13 mm) for viewing distances up to 72 inches (1830 mm) and proportionately larger lettering for greater viewing distances]. VALVE TAGS Valve Tags: Stamped or engraved with 1/4-inch (6.4-mm) letters for piping system abbreviation and 1/2-inch (13-mm) numbers. 1. 2. B. Division 22 Plumbing Specifications Page 43 Tag Material: Brass, 0.032-inch (0.8-mm) minimum thickness, and having predrilled or stamped holes for attachment hardware. Fasteners: Brass wire-link chain or beaded chain or S-hook. Valve Schedules: For each piping system, on 8-1/2-by-11-inch (A4) bond paper. Tabulate valve number, piping system, system abbreviation (as shown on valve tag), location of valve (room or space), normal-operating position (open, closed, or modulating), and variations for identification. Mark valves for emergency shutoff and similar special uses. 1. Valve-tag schedule shall be included in operation and maintenance data. PART 3 - EXECUTION 3.1 A. 3.2 A. B. C. 3.3 A. PREPARATION Clean piping and equipment surfaces of substances that could impair bond of identification devices, including dirt, oil, grease, release agents, and incompatible primers, paints, and encapsulants. GENERAL INSTALLATION REQUIREMENTS Coordinate installation of identifying devices with completion of covering and painting of surfaces where devices are to be applied. Coordinate installation of identifying devices with locations of access panels and doors. Install identifying devices before installing acoustical ceilings and similar concealment. PIPE LABEL INSTALLATION Pipe Label Locations: Locate pipe labels where piping is exposed or above accessible ceilings in finished spaces; machine rooms; accessible maintenance spaces such as shafts, tunnels, and plenums; and exterior exposed locations as follows: 1. 2. 3. 4. Near each valve and control device. Near each branch connection, excluding short takeoffs for fixtures and terminal units. Where flow pattern is not obvious, mark each pipe at branch. Near penetrations through walls, floors, ceilings, and inaccessible enclosures. At access doors, manholes, and similar access points that permit view of concealed piping. ENSO Systems Inc. #865 St. Elizabeth C.S. – Full Day Kindergarten Addition 5. 6. 7. B. 3.4 A. Division 22 Plumbing Specifications Page 44 Near major equipment items and other points of origination and termination. Spaced at maximum intervals of 50 feet (15 m) along each run. Reduce intervals to 25 feet (7.6 m) in areas of congested piping and equipment. On piping above removable acoustical ceilings. Omit intermediately spaced labels. Directional Flow Arrows: Arrows shall be used to indicate direction of flow in pipes, including pipes where flow is allowed in both directions. VALVE-TAG INSTALLATION Install tags on valves and control devices in piping systems, except check valves, valves within factory-fabricated equipment units, shutoff valves, faucets, convenience and lawn-watering hose connections, and similar roughing-in connections of end-use fixtures and units. List tagged valves in a valve schedule. END OF SECTION 220553 SECTION 220719 – PLUMBING PIPING INSULATION PART 1 - GENERAL 1.1 A. GENERAL WORK INCLUDED 1. B. ACTION SUBMITTALS 1. C. Provide all labour, material, equipment and services required to complete the insulation work of the Piping Insulation in accordance with the specifications and/or drawings. Submit sample of insulating materials and a report from an approved testing laboratory confirming fire hazard ratings if requested Pipe labels. DEFINITIONS 1. Exposed piping and exposed pipe insulation includes all piping and pipe insulation installed in equipment rooms, service spaces and areas of building not provided with suspension type acoustic tile, drywall or plaster ceilings. PART 2 - PRODUCTS 2.1 A. B. GENERAL Thermal insulating materials shall be non-combustible. Adhesive shall be waterproof and flame resistant. Combustible wrappings or vapour barriers used in conjunction with thermal insulating materials shall be treated to reduce their combustibility so that flame spread classification of entire assembly, as determined according to Method of Fire Hazard Classification for Building Materials ASTM E-84-76a shall not exceed 25 and smoke developed number shall not exceed 50. Insulation thickness shall be as specified under the "Work Included Article" of this Section. 1. Pipework Insulation Types. a. Type ‘A’ ENSO Systems Inc. #865 St. Elizabeth C.S. – Full Day Kindergarten Addition .1 b. Preformed type mineral insulation of minimum 104 kg/m3 density with canvas or multi service jacket having longitudinal and traverse laps. Type ‘B’ .1 2. Division 22 Plumbing Specifications Page 45 Preformed type mineral insulation of minimum 104 kg/m3 density with factory applied vapour barrier jacket or glass fibre reinforced kraft or aluminum foil laminate having a maximum vapour transmission rate of .03 perms. Insulation Covering a. Close weave fire retarding canvas of the following weights: Exposed pipe and equipment insulation: 1.8 kg/m2. Exposed fitting, valve body, etc., insulation: 1.8 kg/m2. Except for steam piping, factory premoulded PVC fitting covers and jacketing approved by authorities having jurisdiction. For steam piping systems use canvas covering. 3. Insulation Accessories. a. b. c. (14 gauge) pins with 32mm (1.25") square plated type clips. Fibrous glass twine to local authorities approval. Unless noted wire used to secure insulation shall be minimum 16 gauge galvanized annealed wire. PART 3 - EXECUTION 3.1 A. B. C. D. E. F. G. H. I. J. K. EXECUTION This work shall be performed only by tradesmen experienced in insulation work. Install insulation material and adhesive in strict compliance with the manufacturer's recommendations. Provide covering material which is to be finish painted by other Division, in condition to receive the paint. Surfaces to be insulated shall be clean and dry. Do not apply insulation until leakage tests have been completed. Install insulation in a neat workmanlike manner with smooth and even surfaces. Locate longitudinal seams where least visible. Keep insulation clear of all instruments, controls, dampers, components, etc., so that it will not hinder or interfere with removal, setting, reading of, or access to same. Install insulation continuous through walls, floors and similar surfaces. Do not break continuity of insulation, vapour barrier and canvas finish by supports or rods. Remove supports and rods temporarily to facilitate installation of insulation, vapour barrier and canvas finish where required. Install 100mm long, 20 gauge polished aluminum pipe insulation protectors at all points, where exposed pipe insulation terminates at floor. Unless noted otherwise, do not insulate the following items: 1. 2. 3. Discharge from safety and relief valves, overflow and equipment drain pipes. Closed type hot water heating and chilled water expansion tanks. Exposed chrome plated piping. ENSO Systems Inc. #865 St. Elizabeth C.S. – Full Day Kindergarten Addition L. Insulation Types: 1. Pipework Insulation Type ‘A’ a. b. c. 2. b. Overlap vapour barrier jacket at least 50mm on longitudinal joints. Wrap butt joints with a minimum 100mm wide band of vapour barrier jacket. Seal laps and bands with pressure sensitive, vapour proof adhesive or vapour proof mastic applied to the complete surface of the laps. Insulate all fittings, screwed and flanged unions and valve bodies with segments of preformed pipe insulation or by wrapping with strips of fibrous glass blanket type insulation to the same thickness of the adjoining pipe insulation. Insulation shall be held in place with wire or fibrous glass twine. Coat the insulation with vapour proof mastic and wrap with glass fabric. Embed the glass fabric in the mastic and seal the fabric with vapour proof mastic. Finish insulation by applying a coat of vapour proof adhesive. Alternatively factory premoulded one piece PVC fitting covers and jacketing may be applied over insulation, in lieu of mastic and glass fabric. Install the covers to provide a complete vapour seal. Insulate expansion joints and flexible hose connectors to allow for movement and flexing of joints. Insulation Covering: 1. N. Secure insulation with approved type staples and/or cement laps down with adhesive. Insulate fittings, flanged unions and valve bodies with segments of preformed block or pipe insulation of by wrapping with strips of fibrous glass blanket type insulation to the same thickness of the adjoining pipe insulation. Insulation shall be held in place with wire of fibrous glass twine. Finish insulation with a coat of cement recovered with canvas or factory premoulded one piece PVC fitting covers and jacketing. Do not insulate screwed unions and piping inside air handling unit casing. Pipework Insulation Type ‘B’ a. M. Division 22 Plumbing Specifications Page 46 Unless noted cover exposed pipe and equipment insulation with canvas. PVC jacketing may be used for piping in mechanical rooms. Adhere canvas to insulation surfaces with full coating of lagging adhesive. Finish and seal canvas with a full brush coat of lagging adhesive. Install canvas over any vapour barrier jacket or coating specified. Hangers and Insulation Shields 1. Insulate and vapour seal hangers directly supporting insulated piping as part of adjoining pipe for the following services: a. Domestic Cold Water and Rain Water Piping .1 .2 .3 Insulate hanger rods to length of 4 times the pipe insulation thickness. Use curved metal insulation shields wherever pipe is supported by hanger of type which cannot effectively be insulated to prevent condensation, eg. roller hangers. Insulation shields shall consist of segment high density insulation and 12 gauge galvanized sheet steel protective shield complete with ENSO Systems Inc. #865 St. Elizabeth C.S. – Full Day Kindergarten Addition Division 22 Plumbing Specifications Page 47 vapour barrier, designed to suit adjacent insulation thickness and pipe weight. O. Hot Equipment 1. 2. 3. Insulate hot equipment with fibrous glass metal mesh blanket. Hold metal mesh blankets in place with 20mm metal bands on maximum 300mm centres. Lace metal edges butting together with wire. On large flat or irregular surfaces, impale metal mesh blankets over suitable welded fasteners on maximum 300mm centres. Alternatively hot equipment may be insulated with calcium silicate insulation blocks applied and secured as specified above. Finish the insulation with two coats of asbestos free cement, 6mm thick troweled smooth. Cover insulation with canvas. Insulation thickness shall be as follows: 4. 5. 6. Inspection and manholes on tanks and equipment. Cold Equipment 1. 2. 3. Q. Insulation Thickness 25 mm 40 mm 50 mm Insulation shall have maximum 'K' value of 0.068 W/M/oC at 150oC mean temperature. Hot equipment shall include all equipment as specified under the "Application Article" of this Section. Do not insulate the following: a. P. Equipment Temperature up to 95oC 96oC to 150oC 150oC and over Insulate cold surfaces of equipment as specified for pipework insulation Type 'B'. Cold equipment shall include all equipment as specified under the "Application Article" of this Section. Provide slip-on type insulated enclosures for flanges on strainers. Application 1. Domestic Cold Water Piping Systems: a. b. 2. Sanitary Drain Piping a. b. 3. Insulate with Type 'B' pipework insulation. Insulation thickness: 25mm. Insulate all concealed and exposed drain piping including fittings receiving flow from water closets, urinals, etc. up to the main vertical drain stacks and including the vertical portion of the stack fittings forming the first bend of horizontal take-offs with Type ‘B’ pipework insulation. Insulation thickness: 25mm. Rainwater Piping Systems a. b. Insulate all concealed and exposed piping including fittings with Type ‘B’ pipework insulation. Extend insulation on roof drains to cover the complete drain body with Type ‘D’ pipework insulation. Insulation thickness: 25mm. ENSO Systems Inc. #865 St. Elizabeth C.S. – Full Day Kindergarten Addition 4. Domestic Hot Water and Hot Water Recirculating Piping Systems a. b. 5. Insulate with Type 'A' pipework insulation. Insulation thickness: 25 mm for pipe size 25mm or larger; 12mm for pipe size 20mm or smaller. Hot Equipment a. Insulate as specified. Equipment includes the following: .1 6. Division 22 Plumbing Specifications Page 48 Equipment, pipes, etc., exposed to human contact having surface temperatures exceeding 70oC. Cold Equipment a. Insulate as specified. Equipment includes the following: .1 Bodies of strainers, water meters, valve body, back-flow preventer assemblies installed in piping systems and/or services to be insulated with type ‘B’ pipework insulation. END OF SECTION 220719 SECTION 221116 – DOMESTIC WATER PIPING PART 1 - GENERAL 1.1 A. SUMMARY Section Includes: 1. 1.2 A. Under-building-slab and aboveground domestic water pipes, tubes, and fittings inside buildings. FIELD CONDITIONS Interruption of Existing Water Service: Do not interrupt water service to facilities occupied by Owner or others unless permitted under the following conditions and then only after arranging to provide temporary water service according to requirements indicated: 1. 2. Notify Architect no fewer than seven days in advance of proposed interruption of water service. Do not interrupt water service without Architect's written permission. PART 2 - PRODUCTS 2.1 A. B. 2.2 A. PIPING MATERIALS Comply with requirements in "Piping Schedule" Article for applications of pipe, tube, fitting materials, and joining methods for specific services, service locations, and pipe sizes. Potable-water piping and components shall comply with NSF 14 and NSF 61. COPPER TUBE AND FITTINGS Hard Copper Tube: ASTM B 88, Type L (ASTM B 88M, Type B) water tube, drawn temper. ENSO Systems Inc. #865 St. Elizabeth C.S. – Full Day Kindergarten Addition B. C. D. E. F. Soft Copper Tube: ASTM B 88, Type K (ASTM B 88M, Type A) water tube, annealed temper. Cast-Copper, Solder-Joint Fittings: ASME B16.18, pressure fittings. Wrought-Copper, Solder-Joint Fittings: ASME B16.22, wrought-copper pressure fittings. Bronze Flanges: ASME B16.24, Class 150, with solder-joint ends. Copper Unions: 1. 2. 3. 4. 2.3 A. Pipe-Flange Gasket Materials: 2. C. D. E. 2.4 A. C. 2.5 A. B. TRANSITION FITTINGS General Requirements: Same size as pipes to be joined. Pressure rating at least equal to pipes to be joined. End connections compatible with pipes to be joined. Fitting-Type Transition Couplings: Manufactured piping coupling or specified piping system fitting. Sleeve-Type Transition Coupling: AWWA C219. DIELECTRIC FITTINGS General Requirements: Assembly of copper alloy and ferrous materials with separating nonconductive insulating material. Include end connections compatible with pipes to be joined. Dielectric Unions: 1. 2. 3. C. AWWA C110/A21.10, rubber, flat face, 1/8 inch (3.2 mm) thick or ASME B16.21, nonmetallic and asbestos free unless otherwise indicated. Full-face or ring type unless otherwise indicated. Metal, Pipe-Flange Bolts and Nuts: ASME B18.2.1, carbon steel unless otherwise indicated. Solder Filler Metals: ASTM B 32, lead-free alloys. Flux: ASTM B 813, water flushable. Brazing Filler Metals: AWS A5.8/A5.8M, BCuP Series, copper-phosphorus alloys for general-duty brazing unless otherwise indicated. 1. 2. 3. B. MSS SP-123. Cast-copper-alloy, hexagonal-stock body. Ball-and-socket, metal-to-metal seating surfaces. Solder-joint or threaded ends. PIPING JOINING MATERIALS 1. B. Division 22 Plumbing Specifications Page 49 Standard: ASSE 1079. Pressure Rating: 125 psig (860 kPa) minimum at 180OF (82OC). End Connections: Solder-joint copper alloy and threaded ferrous. Dielectric Flanges: 1. 2. 3. Standard: ASSE 1079. Factory-fabricated, bolted, companion-flange assembly. Pressure Rating: 125 psig (860 kPa) minimum at 180OF (82OC) ENSO Systems Inc. #865 St. Elizabeth C.S. – Full Day Kindergarten Addition 4. D. End Connections: Solder-joint copper alloy and threaded ferrous; threaded solder-joint copper alloy and threaded ferrous. Dielectric-Flange Insulating Kits: 1. 2. 3. 4. 5. E. Division 22 Plumbing Specifications Page 50 Non-conducting materials for field assembly of companion flanges. Pressure Rating: 150 psig (1035 kPa). Gasket: Neoprene or phenolic. Bolt Sleeves: Phenolic or polyethylene. Washers: Phenolic with steel backing washers. Dielectric Nipples: 1. 2. 3. 4. 5. Standard: IAPMO PS 66. Electroplated steel nipple complying with ASTM F 1545. Pressure Rating and Temperature: 300 psig (2070 kPa) at 225OF (107OC). End Connections: Male threaded or grooved. Lining: Inert and noncorrosive, propylene. PART 3 - EXECUTION 3.1 A. B. C. D. E. F. G. H. I. J. K. L. M. 3.2 A. B. PIPING INSTALLATION Drawing plans, schematics, and diagrams indicate general location and arrangement of domestic water piping. Indicated locations and arrangements are used to size pipe and calculate friction loss, expansion, and other design considerations. Install piping as indicated unless deviations to layout are approved on coordination drawings. Install copper tubing under building slab according to CDA's "Copper Tube Handbook." Install domestic water piping level with without pitch and plumb. Install piping concealed from view and protected from physical contact by building occupants unless otherwise indicated and except in equipment rooms and service areas. Install piping indicated to be exposed and piping in equipment rooms and service areas at right angles or parallel to building walls. Diagonal runs are prohibited unless specifically indicated otherwise. Install piping above accessible ceilings to allow sufficient space for ceiling panel removal, and coordinate with other services occupying that space. Install piping to permit valve servicing. Install nipples, unions, special fittings, and valves with pressure ratings the same as or higher than the system pressure rating used in applications below unless otherwise indicated. Install fittings for changes in direction and branch connections. Install unions in copper tubing at final connection to each piece of equipment, machine, and specialty. Install sleeves for piping penetrations of walls, ceilings, and floors. Install sleeve seals for piping penetrations of concrete walls and slabs. Install escutcheons for piping penetrations of walls, ceilings, and floors. JOINT CONSTRUCTION Ream ends of pipes and tubes and remove burrs. Bevel plain ends of steel pipe. Remove scale, slag, dirt, and debris from inside and outside of pipes, tubes, and fittings before assembly. ENSO Systems Inc. #865 St. Elizabeth C.S. – Full Day Kindergarten Addition C. Threaded Joints: Thread pipe with tapered pipe threads according to ASME B1.20.1. Cut threads full and clean using sharp dies. Ream threaded pipe ends to remove burrs and restore full ID. Join pipe fittings and valves as follows: 1. 2. D. E. 3.3 A. B. 3.4 A. B. 3.5 A. Apply appropriate tape or thread compound to external pipe threads. Damaged Threads: Do not use pipe or pipe fittings with threads that are corroded or damaged. Soldered Joints for Copper Tubing: Apply ASTM B 813, water-flushable flux to end of tube. Join copper tube and fittings according to ASTM B 828 or CDA's "Copper Tube Handbook." Joints for Dissimilar-Material Piping: Make joints using adapters compatible with materials of both piping systems. TRANSITION FITTING INSTALLATION Install transition couplings at joints of dissimilar piping. Transition Fittings in Underground Domestic Water Piping: 1. 2. C. Fittings for NPS 1-1/2 (DN 40) and Smaller: Fitting-type coupling. Fittings for NPS 2 (DN 50) and Larger: Sleeve-type coupling. Transition Fittings in Aboveground Domestic Water Piping NPS 2 (DN 50) and Smaller: Plastic-to-metal transition fittings or unions. DIELECTRIC FITTING INSTALLATION Install dielectric fittings in piping at connections of dissimilar metal piping and tubing. Dielectric Fittings for NPS 2 (DN 50) and Smaller: Use dielectric unions. HANGER AND SUPPORT INSTALLATION Comply with requirements for pipe hanger, support products, and installation in Section 220529 "Hangers and Supports for Plumbing Piping and Equipment." 1. 2. Vertical Piping: MSS Type 8 or 42, clamps. Individual, Straight, Horizontal Piping Runs: a. b. 3. 4. B. C. D. Division 22 Plumbing Specifications Page 51 100 Feet (30 m) and Less: MSS Type 1, adjustable, steel clevis hangers. Longer Than 100 Feet (30 m): MSS Type 43, adjustable roller hangers. Multiple, Straight, Horizontal Piping Runs 100 Feet (30 m) or Longer: MSS Type 44, pipe rolls. Support pipe rolls on trapeze. Base of Vertical Piping: MSS Type 52, spring hangers. Support vertical piping and tubing at base and at each floor. Rod diameter may be reduced one size for double-rod hangers, to a minimum of 3/8 inch (10 mm). Install hangers for copper tubing with the following maximum horizontal spacing and minimum rod diameters: 1. 2. 3. 4. NPS 3/4 (DN 20) and Smaller: 60 inches (1500 mm) with 3/8-inch (10-mm) rod. NPS 1 and NPS 1-1/4 (DN 25 and DN 32): 72 inches (1800 mm) with 3/8-inch (10-mm) rod. NPS 1-1/2 and NPS 2 (DN 40 and DN 50): 96 inches (2400 mm) with 3/8-inch (10-mm) rod. NPS 2-1/2 (DN 65): 108 inches (2700 mm) with 1/2-inch (13-mm) rod. ENSO Systems Inc. #865 St. Elizabeth C.S. – Full Day Kindergarten Addition 5. 6. E. F. 3.6 A. B. C. CONNECTIONS Drawings indicate general arrangement of piping, fittings, and specialties. When installing piping adjacent to equipment and machines, allow space for service and maintenance. Connect domestic water piping to water-service piping with shutoff valve; extend and connect to the following: 2. 3. A. 3.8 A. NPS 3 to NPS 5 (DN 80 to DN 125): 10 feet (3 m) with 1/2-inch (13-mm) rod. NPS 6 (DN 150): 10 feet (3 m) with 5/8-inch (16-mm) rod. Install supports for vertical copper tubing every 10 feet (3 m). Support piping and tubing not listed in this article according to MSS SP-69 and manufacturer's written instructions. 1. 3.7 Division 22 Plumbing Specifications Page 52 Water Heaters: Cold-water inlet and hot-water outlet piping in sizes indicated, but not smaller than sizes of water heater connections. Plumbing Fixtures: Cold- and hot-water-supply piping in sizes indicated, but not smaller than that required by plumbing code. Equipment: Cold- and hot-water-supply piping as indicated, but not smaller than equipment connections. Provide shutoff valve and union for each connection. Use flanges instead of unions for NPS 2-1/2 (DN 65) and larger. IDENTIFICATION Identify system components. Comply with requirements for identification materials and installation in Section 220553 "Identification for Plumbing Piping and Equipment." FIELD QUALITY CONTROL Perform the following tests and inspections: 1. Piping Inspections: a. b. Do not enclose, cover, or put piping into operation until it has been inspected and approved by authorities having jurisdiction. During installation, notify authorities having jurisdiction at least one day before inspection must be made. Perform tests specified below in presence of authorities having jurisdiction: 1) 2) c. 2. Roughing-in Inspection: Arrange for inspection of piping before concealing or closing in after roughing in and before setting fixtures. Final Inspection: Arrange for authorities having jurisdiction to observe tests specified in "Piping Tests" Subparagraph below and to ensure compliance with requirements. Re-inspection: If authorities having jurisdiction find that piping will not pass tests or inspections, make required corrections and arrange for reinspection. Piping Tests: a. b. Fill domestic water piping. Check components to determine that they are not air bound and that piping is full of water. Test for leaks and defects in new piping and parts of existing piping that have been altered, extended, or repaired. If testing is performed in ENSO Systems Inc. #865 St. Elizabeth C.S. – Full Day Kindergarten Addition c. d. e. 3.9 A. Perform the following adjustments before operation: Adjust balancing valves in hot-water-circulation return piping to provide adequate flow. a. b. 2. 3. A. segments, submit a separate report for each test, complete with diagram of portion of piping tested. Leave new, altered, extended, or replaced domestic water piping uncovered and unconcealed until it has been tested and approved. Expose work that was covered or concealed before it was tested. Cap and subject piping to static water pressure of 50 psig (345 kPa) above operating pressure, without exceeding pressure rating of piping system materials. Isolate test source and allow it to stand for four hours. Leaks and loss in test pressure constitute defects that must be repaired. Repair leaks and defects with new materials, and retest piping or portion thereof until satisfactory results are obtained. ADJUSTING 1. 3.10 Manually adjust ball-type balancing valves in hot-water-circulation return piping to provide hot-water flow in each branch. Adjust calibrated balancing valves to flows indicated. Remove and clean strainer screens. Check plumbing specialties and verify proper settings, adjustments, and operation. CLEANING Clean and disinfect potable domestic water piping as follows: 1. 2. Purge new piping and parts of existing piping that have been altered, extended, or repaired before using. Use purging and disinfecting procedures prescribed by authorities having jurisdiction; if methods are not prescribed, use procedures described in either AWWA C651 or AWWA C652 or follow procedures described below: a. b. Flush piping system with clean, potable water until dirty water does not appear at outlets. Fill and isolate system according to either of the following: 1) 2) c. d. 3.11 A. Division 22 Plumbing Specifications Page 53 Fill system or part thereof with water/chlorine solution with at least 50 ppm (50 mg/L) of chlorine. Isolate with valves and allow to stand for 24 hours. Fill system or part thereof with water/chlorine solution with at least 200 ppm (200 mg/L) of chlorine. Isolate and allow to stand for three hours. Flush system with clean, potable water until no chlorine is in water coming from system after the standing time. Repeat procedures if biological examination shows contamination. PIPING SCHEDULE Transition and special fittings with pressure ratings at least equal to piping rating may be used in applications below unless otherwise indicated. ENSO Systems Inc. #865 St. Elizabeth C.S. – Full Day Kindergarten Addition B. C. Flanges and unions may be used for aboveground piping joints unless otherwise indicated. Under-building-slab, domestic water piping, NPS 2 (DN 50) and smaller shall be the following: 1. D. A. Hard copper tube, ASTM B 88, Type L; cast or wrought-copper, solder-joint fittings. Aboveground domestic water piping, NPS 2-1/2 to NPS 4 (DN 65 to DN 100) , shall be the following: 1. 3.12 Soft copper tube, ASTM B 88, Type L; wrought-copper, solder-joint fittings; and brazed joints. Aboveground domestic water piping, NPS 2 (DN 50) and smaller , shall be following: 1. E. Division 22 Plumbing Specifications Page 54 Hard copper tube, ASTM B 88, Type L, cast- or wrought-copper, solder-joint fittings; soldered joints. VALVE SCHEDULE Drawings indicate valve types to be used. Where specific valve types are not indicated, the following requirements apply: 1. 2. 3. 4. Shutoff Duty: Use ball for piping NPS 2 (DN 50) and smaller. Use butterfly, ball, or gate valves with flanged ends for piping NPS 2-1/2 (DN 65) and larger. Throttling Duty: Use ball or globe valves for piping NPS 2 (DN 50) and smaller. Use butterfly or ball valves with flanged ends for piping NPS 2-1/2 (DN 65) and larger. Hot-Water Circulation Piping, Balancing Duty: Memory-stop balancing valves. Drain Duty: Hose-end drain valves. END OF SECTION 221116 SECTION 221119 - DOMESTIC WATER PIPING SPECIALTIES PART 1 - GENERAL 1.1 A. 1.2 A. RELATED DOCUMENTS Drawings and general provisions of the Contract, including General and Supplementary Conditions and Division 01 Specification Sections, apply to this Section. SUMMARY Section Includes: 1. 2. 3. 4. 5. 6. 7. 8. 9. Vacuum breakers. Backflow preventers. Temperature-actuated, water mixing valves. Strainers. Wall hydrants. Drain valves. Water-hammer arresters. Air vents. Trap-seal primer valves. ENSO Systems Inc. #865 St. Elizabeth C.S. – Full Day Kindergarten Addition 10. 1.3 A. B. A. Trap-seal primer systems. ACTION SUBMITTALS Product Data: For each type of product. Shop Drawings: For domestic water piping specialties. 1. 1.4 Division 22 Plumbing Specifications Page 55 Include diagrams for power, signal, and control wiring. CLOSEOUT SUBMITTALS Operation and Maintenance Data: For domestic water piping specialties to include in emergency, operation, and maintenance manuals. PART 2 - PRODUCTS 2.1 A. 2.2 A. 2.3 A. GENERAL REQUIREMENTS FOR PIPING SPECIALTIES Potable-water piping and components shall comply with NSF 61 PERFORMANCE REQUIREMENTS Minimum Working Pressure for Domestic Water Piping Specialties: 125 psig (860 kPa) unless otherwise indicated. VACUUM BREAKERS Hose-Connection Vacuum Breakers: 1. 2. 3. 4. 2.4 A. B. Standard: ASSE 1011. Body: Bronze, non-removable, with manual drain. Outlet Connection: Garden-hose threaded complying with ASME B1.20.7. Finish: Chrome or nickel plated. BACKFLOW PREVENTERS Standard of Acceptance: Zurn, Watts, Conbraco Reduced-Pressure-Principle Backflow Preventers. 1. 2. 3. 4. 5. 6. 7. Standard: ASSE 1013. Operation: Continuous-pressure applications. Pressure Loss: 12 psig (83 kPa) maximum, through middle third of flow range. Body: Bronze for NPS 2 (DN 50) and smaller; steel with interior lining that complies with AWWA C550 or that is FDA approved for NPS 2-1/2 (DN 65) and larger. End Connections: Threaded for NPS 2 (DN 50) and smaller; flanged type> for NPS 2-1/2 (DN 65) and larger. Configuration: Designed for horizontal, straight-through flow. Accessories: a. b. c. C. Valves NPS 2 (DN 50) and Smaller: Ball type with threaded ends on inlet and outlet. Valves NPS 2-1/2 (DN 65) and Larger: Outside-screw and yoke-gate type with flanged ends on inlet and outlet. Air-Gap Fitting: ASME A112.1.2, matching backflow-preventer connection. Double-Check, Backflow-Prevention Assemblies 1. Standard: ASSE 1015. ENSO Systems Inc. #865 St. Elizabeth C.S. – Full Day Kindergarten Addition 2. 3. 4. 5. 6. 7. 8. Operation: Continuous-pressure applications unless otherwise indicated. Pressure Loss: [5 psig (35 kPa)] maximum, through middle third of flow range. Size: See floor plans. Body: Bronze for NPS 2 (DN 50) and smaller; steel with interior lining that complies with AWWA C550 or that is FDA approved for NPS 2-1/2 (DN 65) and larger. End Connections: Threaded for NPS 2 (DN 50) and smaller; flanged for NPS 21/2 (DN 65) and larger. Configuration: To suit installation. Accessories: a. b. D. 6. 7. 8. Standard: ASSE 1047 and is FM Global approved or UL listed. Operation: Continuous-pressure applications. Pressure Loss: 12 psig (83 kPa) maximum, through middle third of flow range. Size: See plans.. Body: Cast iron or steel with interior lining that complies with AWWA C550 or that is FDA approved. End Connections: Flanged. Configuration: To suit installation. Accessories: a. b. Valves: Outside-screw and yoke-gate type with flanged ends on inlet and outlet. Air-Gap Fitting: ASME A112.1.2, matching backflow-preventer connection. Double-Check, Detector-Assembly Backflow Preventers: 1. 2. 3. 4. 5. 6. 7. 8. Standard: ASSE 1048 and is FM Global approved or UL listed. Operation: Continuous-pressure applications. Pressure Loss: 5 psig (35 kPa) maximum, through middle third of flow range. Size: See plans. Body: Cast iron or steel with interior lining that complies with AWWA C550 or that is FDA approved. End Connections: Flanged. Configuration: To suit installation. Accessories: a. b. F. ValvesNPS 2 (DN 50) and Smaller: Ball type with threaded ends on inlet and outlet. ValvesNPS 2-1/2 (DN 65) and Larger: Outside-screw and yoke-gate type with flanged ends on inlet and outlet. Reduced-Pressure-Detector, Fire-Protection, Backflow-Preventer Assemblies: 1. 2. 3. 4. 5. E. Division 22 Plumbing Specifications Page 56 Valves: Outside-screw and yoke-gate type with flanged ends on inlet and outlet. Bypass: With displacement-type water meter, shutoff valves, and reducedpressure backflow preventer. Hose-Connection Backflow Preventers: 1. 2. 3. Standard: ASSE 1052. Operation: Up to 10-foot head of water (30-kPa) back pressure. Inlet Size: NPS 1/2 or NPS 3/4 (DN 15 or DN 20). ENSO Systems Inc. #865 St. Elizabeth C.S. – Full Day Kindergarten Addition 4. 5. 2.5 A. Water-Temperature Limiting Devices: 7. 8. 4. 5. 6. 7. 8. 9. 10. A. Standard: ASSE 1017. Pressure Rating: 125 psig (860 kPa) minimum unless otherwise indicated. Type: Exposed-mounted or Cabinet-type as shown on plans, thermostatically controlled, water mixing valve. Material: Bronze body with corrosion-resistant interior components. Connections: Threaded or union inlets and outlet. Accessories: Manual temperature control, check stops on hot- and cold-water supplies, and adjustable, temperature-control handle. Tempered-Water Setting: As per Code. Valve Finish: Chrome plated if exposed, Rough bronze if concealed. Piping Finish: Chrome plated if exposed, Copper if concealed. Cabinet: Factory fabricated, stainless steel, for recessed or surface as shown on plans mounting and with hinged, stainless-steel door. Individual-Fixture, Water Tempering Valves: 1. 2. 3. 4. 5. 6. 7. 2.6 Standard: ASSE 1017. Pressure Rating: 125 psig (860 kPa). Type: Thermostatically controlled, water mixing valve. Material: Bronze body with corrosion-resistant interior components. Connections: Threaded or union inlets and outlet. Accessories: Check stops on hot- and cold-water supplies, and adjustable, temperature-control handle. Tempered-Water Setting: As per Code. Valve Finish: Chrome plated if exposed, Rough bronze if concealed. Primary, Thermostatic, Water Mixing Valves: 1. 2. 3. C. Outlet Size: Garden-hose thread complying with ASME B1.20.7. Capacity: At least 3-gpm (0.19-L/s) flow. TEMPERATURE-ACTUATED, WATER MIXING VALVES (NOTE: SPECIFIED UNDER EACH PLUMBING FIXTURE TYPE) 1. 2. 3. 4. 5. 6. B. Division 22 Plumbing Specifications Page 57 Standard: ASSE 1016, thermostatically controlled, water tempering valve. Pressure Rating: 125 psig (860 kPa) minimum unless otherwise indicated. Body: Bronze body with corrosion-resistant interior components. Temperature Control: Adjustable. Inlets and Outlet: Threaded. Finish: Rough or chrome-plated bronze. Tempered-Water Setting: As per Code. STRAINERS FOR DOMESTIC WATER PIPING Y-Pattern Strainers: 1. 2. 3. 4. Pressure Rating: 125 psig (860 kPa) minimum unless otherwise indicated. Body: Bronze for NPS 2 (DN 50) and smaller; cast iron with interior lining that complies with AWWA C550 or that is FDA approved, epoxy coated and for NPS 2-1/2 (DN 65) and larger. End Connections: Threaded for NPS 2 (DN 50) and smaller; flanged for NPS 21/2 (DN 65) and larger. Screen: Stainless steel with round perforations unless otherwise indicated. ENSO Systems Inc. #865 St. Elizabeth C.S. – Full Day Kindergarten Addition 2.7 A. 5. Perforation Size: a. Strainers NPS 2 (DN 50) and Smaller: 0.020 inch (0.51 mm). b. Strainers NPS 2-1/2 to NPS 4 (DN 65 to DN 100): 0.045 inch (1.14 mm). c. Strainers NPS 5 (DN 125) and Larger: 0.10 inch (2.54 mm). 6. Drain: Hose-end drain valve. WALL HYDRANTS Nonfreeze Wall Hydrant - Drawing Symbol WH1: 1. 2. 3. 4. 5. 6. 7. 8. 9. 10. 11. 2.8 A. A. Ball-Valve-Type, Hose-End Drain Valves: A. Standard: MSS SP-110 for standard-port, two-piece ball valves. Pressure Rating: 400-psig (2760-kPa) minimum CWP. Size: NPS 3/4 (DN 20). Body: Copper alloy. Ball: Chrome-plated brass. Seats and Seals: Replaceable. Handle: Vinyl-covered steel. Inlet: Threaded or solder joint. Outlet: Threaded, short nipple with garden-hose thread complying with ASME B1.20.7 and cap with brass chain. WATER-HAMMER ARRESTERS Water-Hammer Arresters: 1. 2. 3. 2.10 Standard: ASME A112.21.3M for concealed-outlet, self-draining wall hydrants. Pressure Rating: 125 psig (860 kPa). Operation: Loose key. Casing and Operating Rod: Of length required to match wall thickness. Include wall clamp. Inlet: NPS 3/4 or NPS 1 (DN 20 or DN 25). Outlet: Concealed, with integral vacuum breaker and garden-hose thread complying with ASME B1.20.7. Box: Deep, flush mounted with cover. Box and Cover Finish: Polished nickel bronze. Outlet: Exposed, with integral vacuum breaker and garden-hose thread complying with ASME B1.20.7. Nozzle and Wall-Plate Finish: Polished nickel bronze. Operating Keys(s): Two with each wall hydrant. DRAIN VALVES 1. 2. 3. 4. 5. 6. 7. 8. 9. 2.9 Division 22 Plumbing Specifications Page 58 Standard: ASSE 1010 or PDI-WH 201. Type: Metal bellows or Copper tube with piston. Size: ASSE 1010, Sizes AA and A through F, or PDI-WH 201, Sizes A through F. AIR VENTS Bolted-Construction Automatic Air Vents: 1. 2. Body: Bronze. Pressure Rating and Temperature: 125-psig (860-kPa) minimum pressure rating at 140 deg F (60 deg C). ENSO Systems Inc. #865 St. Elizabeth C.S. – Full Day Kindergarten Addition 3. 4. 5. 6. 2.11 A. Supply-Type, Trap-Seal Primer Device: 2. 3. A. Standard: ASSE 1018. Pressure Rating: 125 psig (860 kPa) minimum. Body: Bronze. Inlet and Outlet Connections: NPS 1/2 (DN 15) threaded, union, or solder joint. Gravity Drain Outlet Connection: NPS 1/2 (DN 15) threaded or solder joint. Finish: Chrome plated, or rough bronze for units used with pipe or tube that is not chrome finished. Drainage-Type, Trap-Seal Primer Device: 1. 2.12 Float: Replaceable, corrosion-resistant metal. Mechanism and Seat: Stainless steel. Size: NPS 3/8 (DN 10) minimum inlet. Inlet and Vent Outlet End Connections: Threaded. TRAP-SEAL PRIMER DEVICE 1. 2. 3. 4. 5. 6. B. Standard: ASSE 1044, lavatory P-trap with NPS 3/8 (DN 10) minimum, trap makeup connection. Size: NPS 1-1/4 (DN 32) minimum. Material: Chrome-plated, cast brass. TRAP-SEAL PRIMER SYSTEMS Trap-Seal Primer Systems: 1. 2. 3. 4. Standard: ASSE 1044. Piping: NPS 3/4, ASTM B 88, Type L (DN 20, ASTM B 88M, Type B); copper, water tubing. Cabinet: Recessed or surface mounted as shown on plans steel box with stainless-steel cover. Electric Controls: 24-hour timer, solenoid valve, and manual switch for 120-V ac power. a. 5. 6. 7. 2.13 A. Electrical Components, Devices, and Accessories: Listed and labeled as defined in NFPA 70, by a qualified testing agency, and marked for intended location and application. Vacuum Breaker: ASSE 1001. Number Outlets: As required. Size Outlets: NPS 1/2 (DN 15). FLEXIBLE CONNECTORS Bronze-Hose Flexible Connectors: Corrugated-bronze tubing with bronze wire-braid covering and ends brazed to inner tubing. 1. 2. 3. B. Division 22 Plumbing Specifications Page 59 Working-Pressure Rating: Minimum 200 psig (1380 kPa). End Connections NPS 2 (DN 50) and Smaller: Threaded copper pipe or plainend copper tube. End Connections NPS 2-1/2 (DN 65) and Larger: Flanged copper alloy. Stainless-Steel-Hose Flexible Connectors: Corrugated-stainless-steel tubing with stainless-steel wire-braid covering and ends welded to inner tubing. ENSO Systems Inc. #865 St. Elizabeth C.S. – Full Day Kindergarten Addition 1. 2. 3. Division 22 Plumbing Specifications Page 60 Working-Pressure Rating: Minimum 200 psig (1380 kPa). End Connections NPS 2 (DN 50) and Smaller: Threaded steel-pipe nipple. End Connections NPS 2-1/2 (DN 65) and Larger: Flanged steel nipple. PART 3 - EXECUTION 3.1 A. INSTALLATION Install backflow preventers in each water supply to mechanical equipment and systems and to other equipment and water systems that may be sources of contamination. Comply with authorities having jurisdiction. 1. 2. 3. B. C. D. Install water regulators with inlet and outlet shutoff valves. Install pressure gages on inlet and outlet. Install balancing valves in locations where they can easily be adjusted. Install temperature-actuated, water mixing valves with check stops or shutoff valves on inlets and with shutoff valve on outlet. 1. E. F. G. H. I. J. 3.2 A. Locate backflow preventers in same room as connected equipment or system. Install drain for backflow preventers with atmospheric-vent drain connection with air-gap fitting, fixed air-gap fitting, or equivalent positive pipe separation of at least two pipe diameters in drain piping and pipe-to-floor drain. Locate air-gap device attached to or under backflow preventer. Simple air breaks are unacceptable for this application. Do not install bypass piping around backflow preventers. Install cabinet-type units recessed in or surface mounted on wall as specified. Install Y-pattern strainers for water on supply side of each control valve, water pressure-reducing valve, and pump. Install water-hammer arresters in water piping according to PDI-WH 201. Install supply-type, trap-seal primer valves with outlet piping pitched down toward drain trap a minimum of 1 percent, and connect to floor-drain body, trap, or inlet fitting. Adjust valve for proper flow. Install drainage-type, trap-seal primer valves as lavatory trap with outlet piping pitched down toward drain trap a minimum of 1 percent, and connect to floor-drain body, trap, or inlet fitting. Install trap-seal primer systems with outlet piping pitched down toward drain trap a minimum of 1 percent, and connect to floor-drain body, trap, or inlet fitting. Adjust system for proper flow. This Division to include cost for Division 16 to provide power to electric primer tanks. LABELING AND IDENTIFYING Equipment Nameplates and Signs: Install engraved plastic-laminate equipment nameplate or sign on or near each of the following: 1. 2. 3. 4. 5. 6. 7. Backflow preventers. Water pressure-reducing valves. Calibrated balancing valves. Primary, thermostatic, water mixing valves. Primary water tempering valves. Supply-type, trap-seal primer valves. Trap-seal primer systems. ENSO Systems Inc. #865 St. Elizabeth C.S. – Full Day Kindergarten Addition 3.3 A. FIELD QUALITY CONTROL Perform the following tests and inspections: 1. 2. B. 3.4 A. B. C. Division 22 Plumbing Specifications Page 61 Test each vacuum breaker and backflow preventer according to authorities having jurisdiction and the device's reference standard. Prepare test and inspection reports. ADJUSTING Set field-adjustable pressure set points of water pressure-reducing valves. Set field-adjustable flow set points of balancing valves. Set field-adjustable temperature set points of temperature-actuated, water mixing valves. END OF SECTION 221119 SECTION 221316 – SANITARY WASTE AND VENT PIPING PART 1 - GENERAL 1.1 A. SUMMARY Section Includes: 1. 2. 1.2 A. PERFORMANCE REQUIREMENTS Components and installation shall be capable of withstanding the following minimum working pressure unless otherwise indicated: 1. B. 1.3 A. 1.4 A. B. 1.5 A. Pipe, tube, and fittings. Specialty pipe fittings. Soil, Waste, and Vent Piping: 10-foot head of water (30 kPa). Seismic Performance: Soil, waste, and vent piping and support and installation shall withstand the effects of earthquake motions determined according to OBC. ACTION SUBMITTALS Product Data: For each type of product indicated. QUALITY ASSURANCE Piping materials shall bear label, stamp, or other markings of specified testing agency. Comply with NSF/ANSI 14, "Plastics Piping Systems Components and Related Materials," for plastic piping components. Include marking with "NSF-dwv" for plastic drain, waste, and vent piping and "NSF-sewer" for plastic sewer piping. PROJECT CONDITIONS Interruption of Existing Sanitary Waste Service: Do not interrupt service to facilities occupied by Owner or others unless permitted under the following conditions and then only after arranging to provide temporary service according to requirements indicated: 1. Notify Architect no fewer than two days in advance of proposed interruption of sanitary waste service. ENSO Systems Inc. #865 St. Elizabeth C.S. – Full Day Kindergarten Addition 2. Division 22 Plumbing Specifications Page 62 Do not proceed with interruption of sanitary waste service without Architect's written permission. PART 2 - PRODUCTS 2.1 A. 2.2 A. B. C. PIPING MATERIALS Comply with requirements in "Piping Schedule" Article for applications of pipe, tube, fitting materials, and joining methods for specific services, service locations, and pipe sizes. HUBLESS, CAST-IRON SOIL PIPE AND FITTINGS Pipe and Fittings: ASTM A 888 or CISPI 301. Solvent Stack Fittings: ASME B16.45 or ASSE 1043, hubless, cast-iron aerator and deaerator drainage fittings. CISPI, Hubless-Piping Couplings: 1. 2. D. Cast-Iron, Hubless-Piping Couplings: 1. 2. 2.3 A. B. C. D. E. Copper DWV Tube: ASTM B 306, drainage tube, drawn temper. Copper Drainage Fittings: ASME B16.23, cast copper or ASME B16.29, wrought copper, solder-joint fittings. Hard Copper Tube: ASTM B 88, Type L and Type M (ASTM B 88M, Type B and Type C), water tube, drawn temper. Soft Copper Tube: ASTM B 88, Type L (ASTM B 88M, Type B), water tube, annealed temper. Copper Pressure Fittings: 2. 2. 2.4 A. Copper Fittings: ASME B16.18, cast-copper-alloy or ASME B16.22, wroughtcopper, solder-joint fittings. Furnish wrought-copper fittings if indicated. Copper Unions: MSS SP-123, copper-alloy, hexagonal-stock body with ball-andsocket, metal-to-metal seating surfaces, and solder-joint or threaded ends. Copper Flanges: ASME B16.24, Class 150, cast copper with solder-joint end. 1. G. Standard: ASTM C 1277. Description: Two-piece ASTM A 48/A 48M, cast-iron housing; stainless-steel bolts and nuts; and ASTM C 564, rubber sleeve with integral, center pipe stop. COPPER TUBE AND FITTINGS 1. F. Standards: ASTM C 1277 and CISPI 310. Description: Stainless-steel corrugated shield with stainless-steel bands and tightening devices; and ASTM C 564, rubber sleeve with integral, center pipe stop. Flange Gasket Materials: ASME B16.21, full-face, flat, nonmetallic, asbestosfree, 1/8-inch (3.2-mm) maximum thickness unless thickness or specific material is indicated. Flange Bolts and Nuts: ASME B18.2.1, carbon steel unless otherwise indicated. Solder: ASTM B 32, lead free with ASTM B 813, water-flushable flux. PVC PIPE AND FITTINGS Solid-Wall PVC Pipe: ASTM D 2665, drain, waste, and vent. ENSO Systems Inc. #865 St. Elizabeth C.S. – Full Day Kindergarten Addition B. C. 2.5 A. Division 22 Plumbing Specifications Page 63 PVC Socket Fittings: ASTM D 2665, made to ASTM D 3311, drain, waste, and vent patterns and to fit Schedule 40 pipe. Adhesive Primer: ASTM F 656. SPECIALTY PIPE FITTINGS Dielectric Fittings: 1. 2. General Requirements: Assembly of copper alloy and ferrous materials with separating nonconductive insulating material. Include end connections compatible with pipes to be joined. Dielectric Unions: a. Description: 1) 2) 3) 3. Dielectric Flanges: a. Description: 1) 2) 3) 4) 4. Standard: ASSE 1079. Pressure Rating: 125 psig (860 kPa) minimum at 180 deg F (82 deg C). End Connections: Solder-joint copper alloy and threaded ferrous. Standard: ASSE 1079. Factory-fabricated, bolted, companion-flange assembly. Pressure Rating: 125 psig (860 kPa) minimum at 180 deg F (82 deg C). End Connections: Solder-joint copper alloy and threaded ferrous; threaded solder-joint copper alloy and threaded ferrous. Dielectric Nipples: a. Description: 1) 2) 3) 4) 5) Standard: IAPMO PS 66 Electroplated steel nipple. Pressure Rating: 300 psig (2070 kPa) at 225 deg F (107 deg C). End Connections: Male threaded or grooved. Lining: Inert and noncorrosive, propylene. PART 3 - EXECUTION 3.1 A. 3.2 A. B. EARTH MOVING Comply with requirements for excavating, trenching, and backfilling specified in Section 312000 "Earth Moving." PIPING INSTALLATION Drawing plans, schematics, and diagrams indicate general location and arrangement of piping systems. Indicated locations and arrangements were used to size pipe and calculate friction loss, expansion, pump sizing, and other design considerations. Install piping as indicated unless deviations to layout are approved on coordination drawings. Install piping in concealed locations unless otherwise indicated and except in equipment rooms and service areas. ENSO Systems Inc. #865 St. Elizabeth C.S. – Full Day Kindergarten Addition C. D. E. F. G. H. I. J. K. L. Install piping indicated to be exposed and piping in equipment rooms and service areas at right angles or parallel to building walls. Diagonal runs are prohibited unless specifically indicated otherwise. Install piping above accessible ceilings to allow sufficient space for ceiling panel removal. Install piping to permit valve servicing. Install piping at indicated slopes. Install piping free of sags and bends. Install fittings for changes in direction and branch connections. Install piping to allow application of insulation. Make changes in direction for soil and waste drainage and vent piping using appropriate branches, bends, and long-sweep bends. Sanitary tees and short-sweep 1/4 bends may be used on vertical stacks if change in direction of flow is from horizontal to vertical. Use long-turn, double Y-branch and 1/8-bend fittings if two fixtures are installed back to back or side by side with common drain pipe. Straight tees, elbows, and crosses may be used on vent lines. Do not change direction of flow more than 90 degrees. Use proper size of standard increasers and reducers if pipes of different sizes are connected. Reducing size of drainage piping in direction of flow is prohibited. Lay buried building drainage piping beginning at low point of each system. Install true to grades and alignment indicated, with unbroken continuity of invert. Place hub ends of piping upstream. Install required gaskets according to manufacturer's written instructions for use of lubricants, cements, and other installation requirements. Maintain swab in piping and pull past each joint as completed. Install soil and waste drainage and vent piping at the following minimum slopes unless otherwise indicated: 1. 2. 3. M. N. O. P. 2. R. S. Building Sanitary Drain: As per Code. Horizontal Sanitary Drainage Piping: As per COde Vent Piping: As per Code, down toward vertical fixture vent or toward vent stack. Install cast-iron soil piping according to CISPI's "Cast Iron Soil Pipe and Fittings Handbook," Chapter IV, "Installation of Cast Iron Soil Pipe and Fittings." Install aboveground copper tubing according to CDA's "Copper Tube Handbook." Install underground PVC piping according to ASTM D 2321. Install engineered soil and waste drainage and vent piping systems as follows: 1. Q. Division 22 Plumbing Specifications Page 64 Combination Waste and Vent: Comply with standards of authorities having jurisdiction. Reduced-Size Venting: Comply with standards of authorities having jurisdiction. Install buried piping inside building between wall and floor penetrations and connection to sanitary sewer piping outside building with restrained joints. Anchor pipe to wall or floor. Install thrust-block supports at vertical and horizontal offsets. Install underground, copper, force-main tubing according to CDA's "Copper Tube Handbook." Plumbing Specialties: 1. 2. Install backwater valves in sanitary waste, gravity-flow piping where shown on the drawings. Install cleanouts at grade and extend to where building sanitary drains connect to building sanitary sewers in sanitary drainage gravity-flow piping. Install cleanout ENSO Systems Inc. #865 St. Elizabeth C.S. – Full Day Kindergarten Addition 3. T. U. V. W. 3.3 A. B. JOINT CONSTRUCTION Join hubless, cast-iron soil piping according to CISPI 310 and CISPI's "Cast Iron Soil Pipe and Fittings Handbook" for hubless-piping coupling joints. Threaded Joints: Thread pipe with tapered pipe threads according to ASME B1.20.1. Cut threads full and clean using sharp dies. Ream threaded pipe ends to remove burrs and restore full ID. Join pipe fittings and valves as follows: 2. D. E. 2. A. Apply appropriate tape or thread compound to external pipe threads unless dry seal threading is specified. Damaged Threads: Do not use pipe or pipe fittings with threads that are corroded or damaged. Do not use pipe sections that have cracked or open welds. Join copper tube and fittings with soldered joints according to ASTM B 828. Use ASTM B 813, water-flushable, lead-free flux and ASTM B 32, lead-free-alloy solder. Flanged Joints: Align bolt holes. Select appropriate gasket material, size, type, and thickness. Install gasket concentrically positioned. Use suitable lubricants on bolt threads. Torque bolts in cross pattern. Plastic, Nonpressure-Piping, Solvent-Cement Joints: Clean and dry joining surfaces. Join pipe and fittings according to the following: 1. 3.4 fitting with closure plug inside the building in sanitary drainage force-main piping. Comply with requirements for cleanouts specified in Section 221319 "Sanitary Waste Piping Specialties." Install drains in sanitary drainage gravity-flow piping. Do not enclose, cover, or put piping into operation until it is inspected and approved by authorities having jurisdiction. Install sleeves for piping penetrations of walls, ceilings, and floors. Comply with requirements for sleeves specified in Section 220517 "Sleeves and Sleeve Seals for Plumbing Piping." Install sleeve seals for piping penetrations of concrete walls and slabs. Comply with requirements for sleeve seals specified in Section 220517 "Sleeves and Sleeve Seals for Plumbing Piping." Install escutcheons for piping penetrations of walls, ceilings, and floors. Comply with requirements for escutcheons specified in Section 220518 "Escutcheons for Plumbing Piping." 1. C. Comply with ASTM F 402 for safe-handling practice of cleaners, primers, and solvent cements. PVC Piping: Join according to ASTM D 2855 and ASTM D 2665 Appendixes. SPECIALTY PIPE FITTING INSTALLATION Transition Couplings: 1. Install transition couplings at joints of piping with small differences in OD's. a. b. B. Division 22 Plumbing Specifications Page 65 NPS 1-1/2 (DN 40) and Smaller: Fitting-type transition couplings. NPS 2 (DN 50) and Larger: Pressure transition couplings. Dielectric Fittings: 1. 2. Install dielectric fittings in piping at connections of dissimilar metal piping and tubing. Dielectric Fittings for NPS 2 (DN 50) and Smaller: Use dielectric unions. ENSO Systems Inc. #865 St. Elizabeth C.S. – Full Day Kindergarten Addition 3. 4. 3.5 A. B. D. General valve installation requirements are specified in Section 220523.12 "Ball Valves for Plumbing Piping," Section 220523.13 "Butterfly Valves for Plumbing Piping," Section 220523.14 "Check Valves for Plumbing Piping," and Section 220523.15 "Gate Valves for Plumbing Piping." Shutoff Valves: 2. 3. A. Install shutoff valve on each sewage pump discharge. Install full-port ball valve for piping NPS 2 (DN 50) and smaller. Install gate valve for piping NPS 2-1/2 (DN 65) and larger. Check Valves: Install swing check valve, between pump and shutoff valve, on each sewage pump discharge. Backwater Valves: Install backwater valves in piping where shown on the drawings. 1. 3.6 Dielectric Fittings for NPS 2-1/2 to NPS 4 (DN 65 to DN 100): Use dielectric flanges. Dielectric Fittings for NPS 5 (DN 125) and Larger: Use dielectric flange kits. VALVE INSTALLATION 1. 2. 3. C. Horizontal Piping: Horizontal backwater valves. Use normally closed type unless otherwise indicated. Floor Drains: Drain outlet backwater valves unless drain has integral backwater valve. Install backwater valves in accessible locations. HANGER AND SUPPORT INSTALLATION Comply with requirements for pipe hanger and support devices and installation specified in Section 220529 "Hangers and Supports for Plumbing Piping and Equipment." 1. 2. 3. 4. Install carbon-steel pipe hangers for horizontal piping in noncorrosive environments. Install carbon-steel pipe support clamps for vertical piping in noncorrosive environments. Vertical Piping: MSS Type 8 or Type 42, clamps. Install individual, straight, horizontal piping runs: a. b. 5. 6. B. C. D. E. Division 22 Plumbing Specifications Page 66 100 Feet (30 m) and Less: MSS Type 1, adjustable, steel clevis hangers. Longer Than 100 Feet (30 m): MSS Type 43, adjustable roller hangers. Multiple, Straight, Horizontal Piping Runs 100 Feet (30 m) or Longer: MSS Type 44, pipe rolls. Support pipe rolls on trapeze. Base of Vertical Piping: MSS Type 52, spring hangers. Support horizontal piping and tubing within 12 inches (300 mm) of each fitting[, valve,] and coupling. Support vertical piping and tubing at base and at each floor. Rod diameter may be reduced one size for double-rod hangers, with 3/8-inch (10-mm) minimum rods. Install hangers for cast-iron soil piping with the following maximum horizontal spacing and minimum rod diameters: 1. NPS 1-1/2 and NPS 2 (DN 40 and DN 50): 60 inches (1500 mm) with 3/8-inch (10-mm) rod. ENSO Systems Inc. #865 St. Elizabeth C.S. – Full Day Kindergarten Addition 2. 3. 4. F. G. 3. 4. 3.7 A. B. C. CONNECTIONS Drawings indicate general arrangement of piping, fittings, and specialties. Connect soil and waste piping to exterior sanitary sewerage piping. Use transition fitting to join dissimilar piping materials. Connect drainage and vent piping to the following: 2. 3. 4. 5. 6. E. 2. A. Plumbing Fixtures: Connect drainage piping in sizes indicated, but not smaller than required by plumbing code. Plumbing Fixtures and Equipment: Connect atmospheric vent piping in sizes indicated, but not smaller than required by authorities having jurisdiction. Plumbing Specialties: Connect drainage and vent piping in sizes indicated, but not smaller than required by plumbing code. Install test tees (wall cleanouts) in conductors near floor and floor cleanouts with cover flush with floor. Install horizontal backwater valves with cleanout cover flush with floor. Equipment: Connect drainage piping as indicated. Provide shutoff valve if indicated and union for each connection. Use flanges instead of unions for connections NPS 2-1/2 (DN 65) and larger. Where installing piping adjacent to equipment, allow space for service and maintenance of equipment. Make connections according to the following unless otherwise indicated: 1. 3.8 NPS 1-1/4 (DN 32): 72 inches (1800 mm) with 3/8-inch (10-mm) rod. NPS 1-1/2 and NPS 2 (DN 40 and DN 50): 96 inches (2400 mm) with 3/8-inch (10-mm) rod. NPS 2-1/2 (DN 65): 108 inches (2700 mm) with 1/2-inch (13-mm) rod. NPS 3 and NPS 5 (DN 80 and DN 125): 10 feet (3 m) with 1/2-inch (13-mm) rod. Install supports for vertical copper tubing every 10 feet (3 m). Support piping and tubing not listed above according to MSS SP-69 and manufacturer's written instructions. 1. D. NPS 3 (DN 80): 60 inches (1500 mm) with 1/2-inch (13-mm) rod. NPS 4 and NPS 5 (DN 100 and DN 125): 60 inches (1500 mm) with 5/8-inch (16mm) rod. NPS 6 and NPS 8 (DN 150 and DN 200): 60 inches (1500 mm) with 3/4-inch (19mm) rod. Install supports for vertical cast-iron soil piping every 15 feet (4.5 m). Install hangers for copper tubing with the following maximum horizontal spacing and minimum rod diameters: 1. 2. H. I. Division 22 Plumbing Specifications Page 67 Install unions, in piping NPS 2 (DN 50) and smaller, adjacent to each valve and at final connection to each piece of equipment. Install flanges, in piping NPS 2-1/2 (DN 65) and larger, adjacent to flanged valves and at final connection to each piece of equipment. IDENTIFICATION Identify exposed sanitary waste and vent piping. Comply with requirements for identification specified in Section 220553 "Identification for Plumbing Piping and Equipment." ENSO Systems Inc. #865 St. Elizabeth C.S. – Full Day Kindergarten Addition 3.9 A. FIELD QUALITY CONTROL During installation, notify authorities having jurisdiction at least 24 hours before inspection must be made. Perform tests specified below in presence of authorities having jurisdiction. 1. 2. B. C. Roughing-in Inspection: Arrange for inspection of piping before concealing or closing-in after roughing-in and before setting fixtures. Final Inspection: Arrange for final inspection by authorities having jurisdiction to observe tests specified below and to ensure compliance with requirements. Reinspection: If authorities having jurisdiction find that piping will not pass test or inspection, make required corrections and arrange for reinspection. Test sanitary drainage and vent piping according to procedures of authorities having jurisdiction or, in absence of published procedures, as follows: 1. 2. 3. 4. 5. D. Division 22 Plumbing Specifications Page 68 Test for leaks and defects in new piping and parts of existing piping that have been altered, extended, or repaired. If testing is performed in segments, submit separate report for each test, complete with diagram of portion of piping tested. Leave uncovered and unconcealed new, altered, extended, or replaced drainage and vent piping until it has been tested and approved. Expose work that was covered or concealed before it was tested. Roughing-in Plumbing Test Procedure: Test drainage and vent piping except outside leaders on completion of roughing-in. Close openings in piping system and fill with water to point of overflow, but not less than 10-foot head of water (30 kPa). From 15 minutes before inspection starts to completion of inspection, water level must not drop. Inspect joints for leaks. Finished Plumbing Test Procedure: After plumbing fixtures have been set and traps filled with water, test connections and prove they are gastight and watertight. Plug vent-stack openings on roof and building drains where they leave building. Introduce air into piping system equal to pressure of 1-inch wg (250 Pa). Use U-tube or manometer inserted in trap of water closet to measure this pressure. Air pressure must remain constant without introducing additional air throughout period of inspection. Inspect plumbing fixture connections for gas and water leaks. Repair leaks and defects with new materials and retest piping, or portion thereof, until satisfactory results are obtained. Test force-main piping according to procedures of authorities having jurisdiction or, in absence of published procedures, as follows: 1. 2. 3. 4. Leave uncovered and unconcealed new, altered, extended, or replaced forcemain piping until it has been tested and approved. Expose work that was covered or concealed before it was tested. Cap and subject piping to static-water pressure of 50 psig (345 kPa) above operating pressure, without exceeding pressure rating of piping system materials. Isolate test source and allow to stand for four hours. Leaks and loss in test pressure constitute defects that must be repaired. Repair leaks and defects with new materials and retest piping, or portion thereof, until satisfactory results are obtained. Prepare reports for tests and required corrective action. ENSO Systems Inc. #865 St. Elizabeth C.S. – Full Day Kindergarten Addition 3.10 A. B. C. 3.11 A. B. CLEANING AND PROTECTION Clean interior of piping. Remove dirt and debris as work progresses. Protect drains during remainder of construction period to avoid clogging with dirt and debris and to prevent damage from traffic and construction work. Place plugs in ends of uncompleted piping at end of day and when work stops. PIPING SCHEDULE Flanges and unions may be used on aboveground pressure piping unless otherwise indicated. Aboveground, Sanitary Waste and Vent Piping NPS 21/2” (DN 65) and smaller shall be any of the following unless noted on the drawings: 1. Type DWV to: C. Service class, hubless cast-iron soil pipe and fittings to: Minimum NPS 3. CAN/CSA B70 – Latest edition. Mechanical joints: Neoprene or butyl rubber compression gaskets to ASTM C564-70 (latest edition), stainless steel clamps. Underground, Sanitary Waste and Vent Piping within Foundation Walls shall be the following: 1. Solid wall PVC pipe, PVC socket fittings, and solvent-cemented joints to: E. ASTM B30- latest addition for copper tube ASME B16.23 – Latest edition for cast copper alloy joint drainage fittings – DWV. ANSI B16.29 – Latest edition for wrought copper fittings – DWV. Solder: Lead-free copper alloy SXR9999. Aboveground, Sanitary Waste and Vent Piping NPS 3” (DN 75) and larger shall be any of the following: 1. D. Division 22 Plumbing Specifications Page 69 CAN/CSA B181.2 – Latest edition for PVC DWV. Joints: Solvent weld for PVC to ASTM D2564 – latest edition. Conversion from cast iron/copper (above ground) to buried PVC shall be downstream of where cast iron/copper drain penetrates concrete slab. Underground, Sanitary Waste Piping outside of Foundation Walls shall be the following: 1. PVC pipe, DR28 STM-3034 with integral bell and spigot utilizing flexible elastomeric seals. Where connecting to piping provided by the site services contractor match material specified under site services contract. END OF SECTION 221316 ENSO Systems Inc. #865 St. Elizabeth C.S. – Full Day Kindergarten Addition Division 22 Plumbing Specifications Page 70 SECTION 22319 – SANITARY WASTE PIPING SPECIALTIES PART 1 - GENERAL 1.1 A. 1.2 A. RELATED DOCUMENTS Drawings and general provisions of the Contract, including General and Supplementary Conditions and Division 01 Specification Sections, apply to this Section. SUMMARY Section Includes: 1. 2. 3. 4. 5. 6. 7. 8. 1.3 A. B. C. 1.4 A. B. 1.5 A. B. Backwater valves. Cleanouts. Floor drains. Air-admittance valves. Roof flashing assemblies. Through-penetration firestop assemblies. Miscellaneous sanitary drainage piping specialties. Flashing materials. DEFINITIONS HDPE: High-density polyethylene plastic. PE: Polyethylene plastic. PVC: Polyvinyl chloride plastic. QUALITY ASSURANCE Drainage piping specialties shall bear label, stamp, or other markings of specified testing agency. Comply with NSF 14, "Plastics Piping Components and Related Materials," for plastic sanitary piping specialty components. COORDINATION Coordinate size and location of concrete bases. Cast anchor-bolt inserts into bases. Concrete, reinforcement, and formwork requirements. Coordinate size and location of roof penetrations. PART 2 - PRODUCTS 2.1 A. BACKWATER VALVES Horizontal, Cast-Iron Backwater Valves: 1. 2. 3. 4. 5. 6. Standard: ASME A112.14.1. Size: Same as connected piping. Body: Cast iron. Cover: Cast iron with bolted or threaded access check valve. End Connections: hubless. Type Check Valve: Removable, bronze, swing check, factory assembled or field modified to hang to authorities approval. Extension: ASTM A 74, Service class; full-size, cast-iron, soil-pipe extension to field-installed cleanout at floor; replaces backwater valve cover. ENSO Systems Inc. #865 St. Elizabeth C.S. – Full Day Kindergarten Addition 2.2 A. CLEANOUTS Exposed Metal Cleanouts: 1. 2. 3. 4. 5. 6. 7. 8. 9. 10. 11. 12. 13. 14. 15. 16. 17. 18. 19. 2.3 A. Division 22 Plumbing Specifications Page 71 ASME A112.36.2M, Cast-Iron Cleanouts: Standard: ASME A112.36.2M for cast iron for cleanout test tee. Size: Same as connected drainage piping Body Material: Hubless, cast-iron soil pipe test tee cleanout as required to match connected piping. Closure: Countersunk, brass plug. Closure Plug Size: Same as or not more than one size smaller than cleanout size. Standard: ASME A112.36.2M for adjustable housing cast-iron soil pipe with castiron ferrule threaded, adjustable housing cleanout. Size: Same as connected branch. Body or Ferrule: Cast iron. Outlet Connection: Spigot or Threaded. Closure: Brass plug with straight threads and gasket. Frame and Cover Material and Finish: Nickel-bronze or Polished bronze. Frame and Cover Shape: Round. Top Loading Classification: Extra Heavy, Heavy, Light, Medium Duty as required for application. Riser: ASTM A 74, class, cast-iron drainage pipe fitting and riser to cleanout. Standard: ASME A112.36.2M. Include wall access. Size: Same as connected drainage piping. Wall Access: Flat, stainless-steel cover plate with screw. Drywall Wall Access: Square, stainless-steel wall-installation frame and cover. FLOOR DRAINS Cast-Iron Floor Drains Drawing Symbols: 1. 2. 3. 4. 5. 6. 7. 8. 9. 10. 11. 12. 13. 14. 15. 16. 17. 18. Standard: ASME A112.6.3. Pattern: Area, (AD1); Floor, (FD1); Funnel floor, (FFD1) sanitary drain. Body Material: Gray iron. Seepage Flange: As required for application. Anchor Flange: As required for application. Clamping Device: As required for application. Outlet: Bottom or Side. Backwater Valve: Integral, ASME A112.14.1, swing-check type where shown on the drawings. Coating on Interior and Exposed Exterior Surfaces: Not required. Sediment Bucket: Where called for on the drawings. Top or Strainer Material: Nickel bronze (FD1 and FD2). Top of Body and Strainer Finish: Nickel bronze. Top Shape: Round. Dimensions of Top or Strainer: 12mm. Top Loading Classification: Light Duty (FD1), Heavy Duty (FD2). Funnel: 75mm x 225mm required for FFD1 (cast iron funnel strainer) and FFD2 (nickel bronze funnel strainer). Inlet Fitting: As required for the application, trap-seal primer valve connection. Trap Material: Cast iron. ENSO Systems Inc. #865 St. Elizabeth C.S. – Full Day Kindergarten Addition 19. 2.4 A. Trap Pattern: Standard P-trap. ROOF FLASHING ASSEMBLIES Roof Flashing Assemblies: 1. Description: Manufactured assembly made of 4.0-lb/sq. ft. (20-kg/sq. m), 0.0625inch- (1.6-mm-) thick, lead flashing collar and skirt extending at least 6 inches (150 mm) from pipe, with galvanized-steel boot reinforcement and counterflashing fitting. a. 2.5 A. Through-Penetration Firestop Assemblies: 4. A. Floor-Drain, Trap-Seal Primer Fittings: 2. 2. 3. 4. 5. 2. Description: Manufactured, cast-iron fitting, with clamping device, that forms sleeve for pipe floor penetrations of floor membrane. Include galvanized-steel pipe extension in top of fitting that will extend 1 inch (25 mm) above finished floor and galvanized-steel pipe extension in bottom of fitting that will extend through floor slab. Size: As required for close fit to riser or stack piping. Stack Flashing Fittings: 1. 2. E. Standard: ASME A112.1.2, for fitting designed to ensure fixed, positive air gap between installed inlet and outlet piping. Body: Bronze or cast iron. Inlet: Opening in top of body. Outlet: Larger than inlet. Size: Same as connected waste piping and with inlet large enough for associated indirect waste piping. Sleeve Flashing Device: 1. D. Description: Cast iron, with threaded inlet and threaded or spigot outlet, and trapseal primer valve connection. Size: Same as floor drain outlet with NPS 1/2 (DN 15) side inlet. Air-Gap Fittings: 1. C. Standard: UL 1479 assembly of sleeve and stack fitting with firestopping plug. Size: Same as connected soil, waste, or vent stack. Stack Fitting: ASTM A 48/A 48M, gray-iron, hubless-pattern, wye branch with neoprene O-ring at base and gray-iron plug in thermal-release harness. Include PVC protective cap for plug. Special Coating: Corrosion resistant on interior of fittings. MISCELLANEOUS SANITARY DRAINAGE PIPING SPECIALTIES 1. B. Open-Top Vent Cap: Without cap. THROUGH-PENETRATION FIRESTOP ASSEMBLIES 1. 2. 3. 2.6 Division 22 Plumbing Specifications Page 72 Description: Counter-flashing-type, cast-iron fitting, with bottom recess for terminating roof membrane, and with threaded or hub top for extending vent pipe. Size: Same as connected stack vent or vent stack. Vent Caps: ENSO Systems Inc. #865 St. Elizabeth C.S. – Full Day Kindergarten Addition 1. 2. F. A. Lead Sheet: ASTM B 749, Type L51121, copper bearing, with the following minimum weights and thicknesses, unless otherwise indicated: D. E. F. G. H. General Use: 4.0-lb/sq. ft. (20-kg/sq. m), 0.0625-inch (1.6-mm) thickness. Vent Pipe Flashing: 3.0-lb/sq. ft. (15-kg/sq. m), 0.0469-inch (1.2-mm) thickness. Burning: 6-lb/sq. ft. (30-kg/sq. m), 0.0938-inch (2.4-mm) thickness. Copper Sheet: ASTM B 152/B 152M, of the following minimum weights and thicknesses, unless otherwise indicated: 1. 2. C. Standard: ASME A112.21.2M. Body: Cast iron with bronze sleeve, packing, and gland. End Connections: Matching connected piping. Size: Same as connected soil, waste, or vent piping. FLASHING MATERIALS 1. 2. 3. B. Description: Cast-iron body with threaded or hub inlet and vandal-proof design. Include vented hood and setscrews to secure to vent pipe. Size: Same as connected stack vent or vent stack. Expansion Joints: 1. 2. 3. 4. 2.7 Division 22 Plumbing Specifications Page 73 General Applications: 12 oz./sq. ft. (3.7 kg/sq. m or 0.41-mm thickness). Vent Pipe Flashing: 8 oz./sq. ft. (2.5 kg/sq. m or 0.27-mm thickness). Zinc-Coated Steel Sheet: ASTM A 653/A 653M, with 0.20 percent copper content and 0.04-inch (1.01-mm) minimum thickness, unless otherwise indicated. Include G90 (Z275) hot-dip galvanized, mill-phosphatized finish for painting if indicated. Elastic Membrane Sheet: ASTM D 4068, flexible, chlorinated polyethylene, 40-mil (1.01-mm) minimum thickness. Fasteners: Metal compatible with material and substrate being fastened. Metal Accessories: Sheet metal strips, clamps, anchoring devices, and similar accessory units required for installation; matching or compatible with material being installed. Solder: ASTM B 32, lead-free alloy. Bituminous Coating: SSPC-Paint 12, solvent-type, bituminous mastic. PART 3 - EXECUTION 3.1 A. B. INSTALLATION Install backwater valves in building drain piping. For interior installation, provide cleanout deck plate flush with floor and centered over backwater valve cover, and of adequate size to remove valve cover for servicing. Install cleanouts in aboveground piping and building drain piping according to the following, unless otherwise indicated: 1. 2. 3. 4. Size same as drainage piping up to NPS 4 (DN 100). Use NPS 4 (DN 100) for larger drainage piping unless larger cleanout is indicated. Locate at each change in direction of piping greater than 45 degrees. Locate at minimum intervals of 50 feet (15 m) for piping NPS 4 (DN 100) and smaller and 100 feet (30 m) for larger piping. Locate at base of each vertical soil and waste stack. ENSO Systems Inc. #865 St. Elizabeth C.S. – Full Day Kindergarten Addition C. D. E. For floor cleanouts for piping below floors, install cleanout deck plates with top flush with finished floor. For cleanouts located in concealed piping, install cleanout wall access covers, of types indicated, with frame and cover flush with finished wall. Install floor drains at low points of surface areas to be drained. Set grates of drains flush with finished floor, unless otherwise indicated. 1. 2. Position floor drains for easy access and maintenance. Set floor drains below elevation of surrounding finished floor to allow floor drainage. Set with grates depressed according to the following drainage area radii: a. b. c. 3. 4. F. G. H. I. K. L. M. 3.2 A. 3.3 A. Radius, 30 Inches (750 mm) or Less: Equivalent to 1 percent slope, but not less than 1/4-inch (6.35-mm) total depression. Radius, 30 to 60 Inches (750 to 1500 mm): Equivalent to 1 percent slope. Radius, 60 Inches (1500 mm) or Larger: Equivalent to 1 percent slope, but not greater than 1-inch (25-mm) total depression. Install floor-drain flashing collar or flange so no leakage occurs between drain and adjoining flooring. Maintain integrity of waterproof membranes where penetrated. Install individual traps for floor drains connected to sanitary building drain, unless otherwise indicated. Install roof flashing assemblies on sanitary stack vents and vent stacks that extend through roof. Install flashing fittings on sanitary stack vents and vent stacks that extend through roof. Install deep-seal traps on floor drains and other waste outlets, if indicated. Install floor-drain, trap-seal primer fittings on inlet to floor drains that require trap-seal primer connection. 1. 2. J. Division 22 Plumbing Specifications Page 74 Exception: Fitting may be omitted if trap has trap-seal primer connection. Size: Same as floor drain inlet. Install air-gap fittings on draining-type backflow preventers and on indirect-waste piping discharge into sanitary drainage system. Install sleeve flashing device with each riser and stack passing through floors with waterproof membrane. Install vent caps on each vent pipe passing through roof. Install expansion joints on vertical stacks and conductors. Position expansion joints for easy access and maintenance. CONNECTIONS Install piping adjacent to equipment to allow service and maintenance. FLASHING INSTALLATION Fabricate flashing from single piece unless large pans, sumps, or other drainage shapes are required. Join flashing according to the following if required: 1. 2. Lead Sheets: Burn joints of lead sheets 6.0-lb/sq. ft. (30-kg/sq. m), 0.0938-inch (2.4-mm) thickness or thicker. Solder joints of lead sheets 4.0-lb/sq. ft. (20kg/sq. m), 0.0625-inch (1.6-mm) thickness or thinner. Copper Sheets: Solder joints of copper sheets. ENSO Systems Inc. #865 St. Elizabeth C.S. – Full Day Kindergarten Addition B. Install sheet flashing on pipes, sleeves, and specialties passing through or embedded in floors and roofs with waterproof membrane. 1. 2. 3. C. D. E. F. 3.4 A. B. Division 22 Plumbing Specifications Page 75 Pipe Flashing: Sleeve type, matching pipe size, with minimum length of 10 inches (250 mm), and skirt or flange extending at least 8 inches (200 mm) around pipe. Sleeve Flashing: Flat sheet, with skirt or flange extending at least 8 inches (200 mm) around sleeve. Embedded Specialty Flashing: Flat sheet, with skirt or flange extending at least 8 inches (200 mm) around specialty. Set flashing on floors and roofs in solid coating of bituminous cement. Secure flashing into sleeve and specialty clamping ring or device. Install flashing for piping passing through roofs with counterflashing or commercially made flashing fittings. Extend flashing up vent pipe passing through roofs and turn down into pipe, or secure flashing into cast-iron sleeve having calking recess. PROTECTION Protect drains during remainder of construction period to avoid clogging with dirt or debris and to prevent damage from traffic or construction work. Place plugs in ends of uncompleted piping at end of each day or when work stops. END OF SECTION 221319 SECTION 221413 - FACILITY STORM DRAINAGE PIPING PART 1 - GENERAL 1.1 A. SUMMARY Section Includes: 1. 2. 1.2 A. PERFORMANCE REQUIREMENTS Components and installation shall be capable of withstanding the following minimum working pressure unless otherwise indicated: 1. B. 1.3 A. B. Pipe, tube, and fittings. Specialty pipe fittings. Storm Drainage Piping: 10-foot head of water (30 kPa). Seismic Performance: Soil, waste, and vent piping and support and installation shall withstand the effects of earthquake motions determined according to OBC. QUALITY ASSURANCE Piping materials shall bear label, stamp, or other markings of specified testing agency. Comply with NSF/ANSI 14, "Plastics Piping System Components and Related Materials," for plastic piping components. Include marking with "NSF-drain" for plastic drain piping and "NSF-sewer" for plastic sewer piping. ENSO Systems Inc. #865 St. Elizabeth C.S. – Full Day Kindergarten Addition 1.4 A. Division 22 Plumbing Specifications Page 76 PROJECT CONDITIONS Interruption of Existing Storm-Drainage Service: Do not interrupt service to facilities occupied by Owner or others unless permitted under the following conditions and then only after arranging to provide temporary service according to requirements indicated: 1. 2. Notify Architect no fewer than two days in advance of proposed interruption of storm-drainage service. Do not proceed with interruption of storm-drainage service without Architect's written permission. PART 2 - PRODUCTS 2.1 A. 2.2 A. B. PIPING MATERIALS Comply with requirements in "Piping Schedule" Article for applications of pipe, tube, fitting materials, and joining methods for specific services, service locations, and pipe sizes. HUBLESS, CAST-IRON SOIL PIPE AND FITTINGS Pipe and Fittings: ASTM A 888 or CISPI 301. CISPI, Hubless-Piping Couplings: 1. 2. C. Cast-Iron, Hubless-Piping Couplings: 1. 2.3 A. B. C. D. E. Copper DWV Tube: ASTM B 306, drainage tube, drawn temper. Copper Drainage Fittings: ASME B16.23, cast-copper fittings or ASME B16.29, wrought-copper, solder-joint fittings. Hard Copper Tube: ASTM B 88, Type L (ASTM B 88M, Type B), water tube, drawn temper. Soft Copper Tube: ASTM B 88, Type L (ASTM B 88M, Type B), water tube, annealed temper. Copper Pressure Fittings: 2. Copper Fittings: ASME B16.18, cast-copper-alloy fittings or ASME B16.22, wrought-copper, solder-joint fittings. Furnish wrought-copper fittings if indicated. Copper Unions: MSS SP-123, copper-alloy, hexagonal-stock body with ball-andsocket, metal-to-metal seating surfaces, and solder-joint or threaded ends. Copper Flanges: ASME B16.24, Class 150, cast copper with solder-joint end. 1. 2. G. Standard: ASTM C 1277. COPPER TUBE AND FITTINGS 1. F. Standards: ASTM C 1277 and CISPI 310. Description: Stainless-steel corrugated shield with stainless-steel bands and tightening devices; and ASTM C 564, rubber sleeve with integral, center pipe stop. Flange Gasket Materials: ASME B16.21, full-face, flat, nonmetallic, asbestosfree, 1/8-inch (3.2-mm) maximum thickness unless thickness or specific material is indicated. Flange Bolts and Nuts: ASME B18.2.1, carbon steel unless otherwise indicated. Solder: ASTM B 32, lead free with ASTM B 813, water-flushable flux. ENSO Systems Inc. #865 St. Elizabeth C.S. – Full Day Kindergarten Addition 2.4 A. B. C. PVC PIPE AND FITTINGS Solid-Wall PVC Pipe: ASTM D 2665, drain, waste, and vent. PVC Socket Fittings: ASTM D 2665, made to ASTM D 3311, drain, waste, and vent patterns and to fit Schedule 40 pipe. Adhesive Primer: ASTM F 656. 1. D. A. Adhesive primer shall have a VOC content of 550 g/L or less when calculated according to 40 CFR 59, Subpart D (EPA Method 24). Solvent Cement: ASTM D 2564. 1. 2.5 Division 22 Plumbing Specifications Page 77 PVC solvent cement shall have a VOC content of 510 g/L or less when calculated according to 40 CFR 59, Subpart D (EPA Method 24). SPECIALTY PIPE FITTINGS Transition Couplings: 1. B. General Requirements: Fitting or device for joining piping with small differences in OD's or of different materials. Include end connections same size as and compatible with pipes to be joined. 2. Fitting-Type Transition Couplings: Manufactured piping coupling or specifiedpiping-system fitting. 3. Unshielded, Non-pressure Transition Couplings: a. Standard: ASTM C 1173. b. Description: Elastomeric, sleeve-type, reducing or transition pattern. Include shear ring and corrosion-resistant-metal tension band and tightening mechanism on each end. c. Sleeve Materials: 1) For Cast-Iron Soil Pipes: ASTM C 564, rubber. Dielectric Fittings: 1. General Requirements: Assembly of copper alloy and ferrous materials with separating nonconductive insulating material. Include end connections compatible with pipes to be joined. 2. Dielectric Unions: a. Description: 1) 2) 3) 3. Dielectric Flanges: a. Description: 1) 2) 3) 4) C. Standard: ASSE 1079. Pressure Rating: 150 psig (1035 kPa) at 180OF (82OC). End Connections: Solder-joint copper alloy and threaded ferrous. Standard: ASSE 1079. Factory-fabricated, bolted, companion-flange assembly. Pressure Rating: 150 psig (1035 kPa). End Connections: Solder-joint copper alloy and threaded ferrous; threaded solder-joint copper alloy and threaded ferrous. ENSO Systems Inc. #865 St. Elizabeth C.S. – Full Day Kindergarten Addition 1. Division 22 Plumbing Specifications Page 78 Dielectric-Flange Insulating Kits: a. Description: 1) 2) 3) 4) 5) Nonconducting materials for field assembly of companion flanges. Pressure Rating: 150 psig (1035 kPa). Gasket: Neoprene or phenolic. Bolt Sleeves: Phenolic or polyethylene. Washers: Phenolic with steel-backing washers. PART 3 - EXECUTION 3.1 A. 3.2 A. B. C. D. E. F. G. H. I. J. K. EARTH MOVING Comply with requirements for excavating, trenching, and backfilling specified in Section 312000 "Earth Moving." PIPING INSTALLATION Drawing plans, schematics, and diagrams indicate general location and arrangement of piping systems. Indicated locations and arrangements were used to size pipe and calculate friction loss, expansion, pump sizing, and other design considerations. Install piping as indicated unless deviations from layout are approved on coordination drawings. Install piping in concealed locations unless otherwise indicated and except in equipment rooms and service areas. Install piping indicated to be exposed and piping in equipment rooms and service areas at right angles or parallel to building walls. Diagonal runs are prohibited unless specifically indicated otherwise. Install piping above accessible ceilings to allow sufficient space for ceiling panel removal. Install piping at indicated slopes. Install piping free of sags and bends. Install fittings for changes in direction and branch connections. Install piping to allow application of insulation. Make changes in direction for storm drainage piping using appropriate branches, bends, and long-sweep bends. Do not change direction of flow more than 90 degrees. Use proper size of standard increasers and reducers if pipes of different sizes are connected. Reducing size of drainage piping in direction of flow is prohibited. Lay buried building storm drainage piping beginning at low point of each system. Install true to grades and alignment indicated, with unbroken continuity of invert. Place hub ends of piping upstream. Install required gaskets according to manufacturer's written instructions for use of lubricants, cements, and other installation requirements. Maintain swab in piping and pull past each joint as completed. Install storm drainage piping at the following minimum slopes unless otherwise indicated: 1. 2. L. Building Storm Drain: 1 percent downward in direction of flow for piping NPS 3 (DN 80) and smaller; 1 percent downward in direction of flow for piping NPS 4 (DN 100) and larger. Horizontal Storm-Drainage Piping: As per Code downward in direction of flow. Install cast-iron soil piping according to CISPI's "Cast Iron Soil Pipe and Fittings Handbook," Chapter IV, "Installation of Cast Iron Soil Pipe and Fittings." ENSO Systems Inc. #865 St. Elizabeth C.S. – Full Day Kindergarten Addition M. N. O. Install aboveground copper tubing according to CDA's "Copper Tube Handbook." Install underground PVC piping according to ASTM D 2321. Plumbing Specialties: 1. 2. P. Q. R. S. 3.3 A. B. D. E. JOINT CONSTRUCTION Hubless, Cast-Iron Soil Piping Coupled Joints: Join according to CISPI 310 and CISPI's "Cast Iron Soil Pipe and Fittings Handbook" for hubless-piping coupling joints. Threaded Joints: Thread pipe with tapered pipe threads according to ASME B1.20.1. Cut threads full and clean using sharp dies. Ream threaded pipe ends to remove burrs and restore full ID. Join pipe fittings and valves as follows: 2. A. Apply appropriate tape or thread compound to external pipe threads unless dry seal threading is specified. Join copper tube and fittings with soldered joints according to ASTM B 828 procedure. Use ASTM B 813, water-flushable, lead-free flux and ASTM B 32, lead-free-alloy solder. Flanged Joints: Align bolt holes. Select appropriate gasket material, size, type, and thickness. Install gasket concentrically positioned. Use suitable lubricants on bolt threads. Torque bolts in cross pattern. Plastic, Non-pressure-Piping, Solvent-Cemented Joints: Clean and dry joining surfaces. Join pipe and fittings according to the following: 1. 3.4 Install backwater valves in storm drainage gravity-flow piping. Install cleanouts at grade and extend to where building storm drains connect to building storm sewers in storm drainage gravity-flow piping. Install cleanout fitting with closure plug inside the building in storm drainage force-main piping. Do not enclose, cover, or put piping into operation until it is inspected and approved by authorities having jurisdiction. Install sleeves for piping penetrations of walls, ceilings, and floors. Comply with requirements for sleeves specified in Section 220517 "Sleeves and Sleeve Seals for Plumbing Piping." Install sleeve seals for piping penetrations of concrete walls and slabs. Comply with requirements for sleeve seals specified in Section 220517 "Sleeves and Sleeve Seals for Plumbing Piping." Install escutcheons for piping penetrations of walls, ceilings, and floors. Comply with requirements for escutcheons specified in Section 220518 "Escutcheons for Plumbing Piping." 1. C. Division 22 Plumbing Specifications Page 79 Comply with ASTM F 402 for safe-handling practice of cleaners, primers, and solvent cements. PVC Piping: Join according to ASTM D 2855 and ASTM D 2665 Appendixes. SPECIALTY PIPE FITTING INSTALLATION Transition Couplings: 1. 2. 3. 4. Install transition couplings at joints of piping with small differences in OD's. In Drainage Piping: Unshielded, non-pressure transition couplings. In Aboveground Force-Main Piping: Fitting-type transition couplings. In Underground Force-Main Piping: a. NPS 1-1/2 (DN 40) and Smaller: Fitting-type transition couplings. ENSO Systems Inc. #865 St. Elizabeth C.S. – Full Day Kindergarten Addition b. B. 2. 3. 4. A. Backwater Valves: Install backwater valves in piping subject to backflow where shown on the drawings. 2. A. Install dielectric fittings in piping at connections of dissimilar metal piping and tubing. Dielectric Fittings for NPS 2 (DN 50) and Smaller: Use dielectric unions. Dielectric Fittings for NPS 2-1/2 to NPS 4 (DN 65 to DN 100): Use dielectric flanges or flange kits. Dielectric Fittings for NPS 5 (DN 125) and Larger: Use dielectric flange kits. VALVE INSTALLATION 1. 3.6 Horizontal Piping: Horizontal backwater valves. Use normally closed type unless otherwise indicated. Install backwater valves in accessible locations. HANGER AND SUPPORT INSTALLATION Comply with requirements for pipe hanger and support devices and installation specified in Section 220529 "Hangers and Supports for Plumbing Piping and Equipment." 1. 2. 3. 4. Install carbon-steel pipe hangers for horizontal piping in noncorrosive environments. Install carbon-steel pipe support clamps for vertical piping in noncorrosive environments. Vertical Piping: MSS Type 8 or Type 42, clamps. Individual, Straight, Horizontal Piping Runs: a. b. 5. 6. B. C. D. E. NPS 2 (DN 50) and Larger: Pressure transition couplings. Dielectric Fittings: 1. 3.5 Division 22 Plumbing Specifications Page 80 100 Feet (30 m) and Less: MSS Type 1, adjustable, steel clevis hangers. Longer Than 100 Feet (30 m): MSS Type 43, adjustable roller hangers. Multiple, Straight, Horizontal Piping Runs 100 Feet (30 m) or Longer: MSS Type 44, pipe rolls. Support pipe rolls on trapeze. Base of Vertical Piping: MSS Type 52, spring hangers. Support horizontal piping and tubing within 12 inches (300 mm) of each fitting, valve, and coupling. Support vertical piping and tubing at base and at each floor. Rod diameter may be reduced one size for double-rod hangers, with 3/8-inch (10-mm) minimum rods. Install hangers for cast-iron storm piping with the following maximum horizontal spacing and minimum rod diameters: 1. 2. 3. 4. NPS 1-1/2 and NPS 2 (DN 40 and DN 50): 60 inches (1500 mm) with 3/8-inch (10-mm) rod. NPS 3 (DN 80): 60 inches (1500 mm) with 1/2-inch (13-mm) rod. NPS 4 and NPS 5 (DN 100 and DN 125): 60 inches (1500 mm) with 5/8-inch (16mm) rod. NPS 6 and NPS 8 (DN 150 and DN 200): 60 inches (1500 mm) with 3/4-inch (19mm) rod. ENSO Systems Inc. #865 St. Elizabeth C.S. – Full Day Kindergarten Addition F. G. 3.7 A. B. C. Install supports for vertical cast-iron storm piping every 15 feet (4.5 m). Support piping and tubing not listed above according to MSS SP-69 and manufacturer's written instructions. CONNECTIONS Drawings indicate general arrangement of piping, fittings, and specialties. Connect interior storm drainage piping to exterior storm drainage piping. Use transition fitting to join dissimilar piping materials. Connect storm drainage piping to roof drains and storm drainage specialties. 1. D. F. 2. A. 3.9 A. Install unions, in piping NPS 2 (DN 50) and smaller, adjacent to each valve and at final connection to each piece of equipment. Install flanges, in piping NPS 2-1/2 (DN 65) and larger, adjacent to flanged valves and at final connection to each piece of equipment. IDENTIFICATION Identify exposed storm drainage piping. Comply with requirements for identification specified in Section 220553 "Identification for Plumbing Piping and Equipment." FIELD QUALITY CONTROL During installation, notify authorities having jurisdiction at least 24 hours before inspection must be made. Perform tests specified below in presence of authorities having jurisdiction. 1. 2. B. Storm Sewer: As shown on the drawings. Sump Pumps: To sump pump discharge. Where installing piping adjacent to equipment, allow space for service and maintenance of equipment. Make connections according to the following unless otherwise indicated: 1. 3.8 Install horizontal backwater valves with cleanout cover flush with floor where shown on the drawings. Connect force-main piping to the following: 1. 2. E. Division 22 Plumbing Specifications Page 81 Roughing-in Inspection: Arrange for inspection of piping before concealing or closing-in after roughing-in. Final Inspection: Arrange for final inspection by authorities having jurisdiction to observe tests specified below and to ensure compliance with requirements. Test storm drainage piping according to procedures of authorities having jurisdiction or, in absence of published procedures, as follows: 1. 2. 3. Test for leaks and defects in new piping and parts of existing piping that have been altered, extended, or repaired. If testing is performed in segments, submit separate report for each test, complete with diagram of portion of piping tested. Leave uncovered and unconcealed new, altered, extended, or replaced storm drainage piping until it has been tested and approved. Expose work that was covered or concealed before it was tested. Test Procedure: Test storm drainage piping, except outside leaders, on completion of roughing-in. Close openings in piping system and fill with water to point of overflow, but not less than 10-foot head of water (30 kPa). From 15 ENSO Systems Inc. #865 St. Elizabeth C.S. – Full Day Kindergarten Addition 4. 3.10 A. B. C. 3.11 A. B. minutes before inspection starts until completion of inspection, water level must not drop. Inspect joints for leaks. Repair leaks and defects with new materials and retest piping, or portion thereof, until satisfactory results are obtained. CLEANING Clean interior of piping. Remove dirt and debris as work progresses. Protect drains during remainder of construction period to avoid clogging with dirt and debris and to prevent damage from traffic and construction work. Place plugs in ends of uncompleted piping at end of day and when work stops. PIPING SCHEDULE Flanges and unions may be used on aboveground pressure piping unless otherwise indicated. Aboveground, Storm Drainage Piping NPS 3” (DN 75) and larger shall be of the following: 1. Service class, hubless cast-iron soil pipe and fittings to: C. Minimum NPS 3. CAN/CSA B70 – Latest edition. Mechanical joints: Neoprene or butyl rubber compression gaskets to ASTM C564-70 (latest edition), stainless steel clamps. Underground, Storm Drainage Piping within Foundation Walls shall be the following: 1. Solid wall PVC pipe, PVC socket fittings, and solvent-cemented joints to: D. Division 22 Plumbing Specifications Page 82 CAN/CSA B181.2 – Latest edition for PVC DWV. Joints: Solvent weld for PVC to ASTM D2564 – latest edition. Conversion from cast iron/copper (above ground) to buried PVC shall be downstream of where cast iron/copper drain penetrates concrete slab. Underground, Storm Drainage Piping outside of Foundation Walls shall be the following: 1. PVC pipe, DR28 STM-3034 with integral bell and spigot utilizing flexible elastomeric seals. Where connecting to piping provided by the site services contractor match material specified under site services contract. END OF SECTION 221413 SECTION 221423 - STORM DRAINAGE PIPING SPECIALTIES PART 1 - PRODUCTS 1.1 A. SUMMARY Section Includes: 1. 2. 3. 4. Roof drains. Miscellaneous storm drainage piping specialties. Cleanouts. Backwater valves. ENSO Systems Inc. #865 St. Elizabeth C.S. – Full Day Kindergarten Addition 5. 1.2 A. 1.3 A. Division 22 Plumbing Specifications Page 83 Flashing materials. ACTION SUBMITTALS Product Data: For each type of product indicated. QUALITY ASSURANCE Drainage piping specialties shall bear label, stamp, or other markings of specified testing agency. PART 2 - PRODUCTS 2.1 A. METAL ROOF DRAINS Cast-Iron, General-Purpose Roof Drains (Conventional Roof): (Drawing Symbol RD1) 1. 2. 3. 4. 5. 6. 7. 8. 9. 10. 2.2 Standard of Acceptance: Thaler RD Series (No Substitutions) Standard: ASME A112.6.4, for general-purpose roof drains. Body Material: Duco Cast iron. Dimension of Body: Minimum 12-inch (300-mm) diameter. Combination Flashing Ring and Gravel Stop. Flow-Control Weirs: Required for controlled flow type (Drawing Symbol RD2). Sediment collar; Outlet: Bottom, MJ connection. Adjustable extension sleeve, reversible collar. Underdeck Clamp: Cast aluminum. Dome: Vandal proof, cast aluminum dome with hinged access lid. Perforated Gravel Guard: Stainless steel. CLEANOUTS A. Stack Cleanouts in base of cast iron stacks shall be cast iron body with gasketed screwed cover. B. Line cleanouts in cast iron pipe shall be with gasketed cover screwed to body. Line cleanouts in copper pipes shall be cast bronze tube with wedge type gasket and bronze plug secured to body by bronze cap screws. C. Floor cleanouts in unfinished and outside areas shall be with gasket bonded to plug, and scoriated cast iron cover secured with stainless steel screws and adjustable top. D. Floor cleanouts in tiled, finished concrete, terrazzo and carpeted areas shall be with gasket bonded to plug with nickel bronze cover and appropriate recess for the application. 2.3 A. BACKWATER VALVES Cast-Iron, Horizontal Backwater Valves: 1. 2. 3. 4. 5. 6. 7. Standard: ASME A112.14.1, for backwater valves. Size: Same as connected piping. Body Material: Cast iron. Cover: Cast iron with bolted access check valve. End Connections: hubless. Check Valve: Removable, bronze, swing check, factory assembled or field modified to hang open for airflow unless subject to backflow condition. Extension: ASTM A 74, Service class; full-size, cast-iron soil-pipe extension to field-installed cleanout at floor; replaces backwater valve cover. ENSO Systems Inc. #865 St. Elizabeth C.S. – Full Day Kindergarten Addition 2.4 A. B. C. D. E. Division 22 Plumbing Specifications Page 84 FLASHING MATERIALS Copper Sheet: ASTM B 152/B 152M,12 oz./sq. ft. (3.7 kg/sq. m or 0.41-mm thickness). Elastic Membrane Sheet: ASTM D 4068, flexible, chlorinated polyethylene, 40-mil (1.01-mm) minimum thickness. Fasteners: Metal compatible with material and substrate being fastened. Metal Accessories: Sheet metal strips, clamps, anchoring devices, and similar accessory units required for installation; matching or compatible with material being installed. Solder: ASTM B 32, lead-free alloy. PART 3 - EXECUTION 3.1 A. INSTALLATION Install roof drains at low points of roof areas according to roof membrane manufacturer's written installation instructions. 1. 2. 3. B. Install cleanouts in aboveground piping and building drain piping according to the following instructions unless otherwise indicated: 1. 2. 3. 4. C. D. E. F. G. 3.2 A. Install flashing collar or flange of roof drain to prevent leakage between drain and adjoining roofing. Maintain integrity of waterproof membranes where penetrated. Install expansion joints, if indicated, in roof drain outlets. Position roof drains for easy access and maintenance. Use cleanouts the same size as drainage piping up to NPS 4 (DN 100). Use NPS 4 (DN 100) for larger drainage piping unless larger cleanout is indicated. Locate cleanouts at each change in direction of piping greater than 45 degrees. Locate cleanouts at minimum intervals of 50 feet (15 m) for piping NPS 4 (DN 100) and smaller and 100 feet (30 m) for larger piping or as required by Code. Locate cleanouts at base of each vertical soil and waste stack. For floor cleanouts for piping below floors, install cleanout deck plates with top flush with finished floor. For cleanouts located in concealed piping, install cleanout wall access covers, of types indicated, with frame and cover flush with finished wall. Install horizontal backwater valves in floor with cover flush with floor. Install trench drains at low points of surface areas to be drained. Set grates of drains flush with finished surface unless otherwise indicated. Install sleeve flashing device with each conductor passing through floors with waterproof membrane. FLASHING INSTALLATION Fabricate flashing from single piece of metal unless large pans, sumps, or other drainage shapes are required. Join flashing according to the following if required: 1. 2. Lead Sheets: Burn joints of 6.0-lb/sq. ft. (30-kg/sq. m) lead sheets, 0.0938-inch (2.4-mm) thickness or thicker. Solder joints of 4.0-lb/sq. ft. (20-kg/sq. m) lead sheets, 0.0625-inch (1.6-mm) thickness or thinner. Copper Sheets: Solder joints of copper sheets. ENSO Systems Inc. #865 St. Elizabeth C.S. – Full Day Kindergarten Addition B. Install sheet flashing on pipes, sleeves, and specialties passing through or embedded in floors and roofs with waterproof membrane. 1. 2. 3. C. D. 3.3 A. Division 22 Plumbing Specifications Page 85 Pipe Flashing: Sleeve type, matching the pipe size, with a minimum length of 10 inches (250 mm) and with skirt or flange extending at least 8 inches (200 mm) around pipe. Sleeve Flashing: Flat sheet, with skirt or flange extending at least 8 inches (200 mm) around sleeve. Embedded Specialty Flashing: Flat sheet, with skirt or flange extending at least 8 inches (200 mm) around specialty. Set flashing on floors and roofs in solid coating of bituminous cement. Secure flashing into sleeve and specialty clamping ring or device. PROTECTION Protect drains during remainder of construction period to avoid clogging with dirt or debris and to prevent damage from traffic or construction work. END OF SECTION 221423 SECTION 224213.13 - COMMERCIAL WATER CLOSETS PART 1 - GENERAL 1.1 A. SUMMARY Section Includes: 1. 2. 3. 1.2 A. ACTION SUBMITTALS Product Data: For each type of product. 1. 2. 1.3 A. Water closets. Flushometer valves. Toilet seats. Include construction details, material descriptions, dimensions of individual components and profiles, and finishes for water closets. Include rated capacities, operating characteristics, electrical characteristics, and furnished specialties and accessories. CLOSEOUT SUBMITTALS Operation and Maintenance Data: For flushometer valves and electronic sensors to include in operation and maintenance manuals. PART 2 - PRODUCTS 2.1 WALL-MOUNTED WATER CLOSETS (Drawing Symbol W1, barrier free design W1H). 1. 2. Closet: Toto CT708E, 17.5’’ high, vitreous china, wall hung, 6Lpf, high efficiency, powerful direct-fed siphon jet closet bowl with elongated rim, and 40mm (1 1/2") top spud. Seat (for W1): Toto #SC534 elongated heavy duty solid white plastic open front toilet seat less cover with check hinges and stainless steel posts, washers and nuts. Seat for W1H: Toto #SC134 elongated heavy duty solid white plastic open ENSO Systems Inc. #865 St. Elizabeth C.S. – Full Day Kindergarten Addition 3. 4. 5. Division 22 Plumbing Specifications Page 86 front toilet seat with cover with check hinges and stainless steel posts, washers and nuts. Flush Valve: "Sloan” Royal model 111-YO quiet, 6Lpf, exposed, diaphragm type, chrome plate closet flush valve complete with following features: van dal Resistant stop cap, adjustable tailpiece, 25mm (1") I.P.S screwdriver Bak-Chek angle stop, spud coupling and spud flange for 49mm top spud, seat solder adapter with cover tube and cast wall flange, high copper, low zinc brass casting for dezincification resistance , non-hold-open handle and no external volume adjustment to ensure water conservation, handle packing, stop seat and vacuum breaker molded form PERMEXTM rubber compound for chloramine resistance. Carrier: To suit the application Mount height to suit barrier free or regular application. PART 3 - EXECUTION 3.1 A. INSTALLATION Water-Closet Installation: 1. 2. 3. B. Support Installation: 1. 2. 3. 4. C. 2. 3. 4. 5. Install flushometer-valve, water-supply fitting on each supply to each water closet. Attach supply piping to supports or substrate within pipe spaces behind fixtures. Install lever-handle flushometer valves for accessible water closets with handle mounted on open side of water closet. Install actuators in locations that are easy for people with disabilities to reach. Install fresh batteries in battery-powered, electronic-sensor mechanisms. Install toilet seats on water closets. Wall Flange and Escutcheon Installation: 1. 2. F. Install supports, affixed to building substrate, for floor-mounted, back-outlet water closets. Use carrier supports with waste-fitting assembly and seal. Install floor-mounted, back-outlet water closets attached to building floor substrate, onto waste-fitting seals; and attach to support. Install wall-mounted, back-outlet water-closet supports with waste-fitting assembly and waste-fitting seals; and affix to building substrate. Flushometer-Valve Installation: 1. D. E. Install level and plumb according to roughing-in drawings. Install floor-mounted water closets on bowl-to-drain connecting fitting attachments to piping or building substrate. Install accessible, wall-mounted water closets at mounting height for handicapped/elderly, according to ICC/ANSI A117.1. Install wall flanges or escutcheons at piping wall penetrations in exposed, finished locations and within cabinets and millwork. Install deep-pattern escutcheons if required to conceal protruding fittings. Joint Sealing: 1. Match sealant color to water-closet color. ENSO Systems Inc. #865 St. Elizabeth C.S. – Full Day Kindergarten Addition 2. 3.2 A. 3.3 A. Division 22 Plumbing Specifications Page 87 Seal joints between water closets and walls and floors using sanitary-type, onepart, mildew-resistant silicone sealant. ADJUSTING Adjust water pressure at flushometer valves to produce proper flow. CLEANING AND PROTECTION Clean water closets and fittings with manufacturers' recommended cleaning methods and materials. END OF SECTION 224213.13 SECTION 224216.13 - COMMERCIAL LAVATORIES PART 1 - GENERAL 1.1 A. 1.2 A. SUMMARY Section Includes: 1. Lavatories. 2. Faucets. ACTION SUBMITTALS Product Data: For each type of product. 1. 2. Include construction details, material descriptions, dimensions of individual components and profiles, and finishes for lavatories. Include rated capacities, operating characteristics, electrical characteristics, and furnished specialties and accessories. B. Shop Drawings: Include diagrams for power, signal, and control wiring of automatic faucets. 1.3 A. CLOSEOUT SUBMITTALS Operation and Maintenance Data: For lavatories and faucets to include in operation and maintenance manuals. PART 2 - PRODUCTS 2.1 A. VITREOUS-CHINA, WALL-MOUNTED LAVATORIES Lavatory: Vitreous china, wall mounted (Drawing Symbol L1, barrier free design L1H). 1. Lavatory: American Standard, Murro wall-hung lavatory, 0958.000, (203mm) centres, 21.25" x 22" (559 x 540mm) vitreous china basin, rear overflow, faucet ledge, barrier-free complete with 0059.020 semi-china pedestal to cover exposed piping. 2. Carrier: Jay R Smith 0700-Z-M to suit concealed arms support application. 3. Faucet: American Standard faucet, Monterrey, 6530.170.002, C.P. 8’’ (203mm) C.C., cast brass lead-free body, washerless, ¼ turn ceramic drip-free disc valve brass cartridges, 10-5/8’’(270mm) high x 5’’ (127mm) reach rigid gooseneck spout with tamper-resistant 5.7LPM (1.5 gpm) flow aerator outlet and V.R. red and blue indexed cast brass 4’’ (102mm) blade handles. 4. Mixing valve: Powers model Hydroguard E480 on hot water supply ENSO Systems Inc. #865 St. Elizabeth C.S. – Full Day Kindergarten Addition Division 22 Plumbing Specifications Page 88 5. Waste: McGuire 155A Basin drain, chrome plated cast brass, one piece open grid strainer with 17ga. With 32mm tailpiece. 6. Supply: McGuire H165LKN3RB chrome plated rigid brass horizontal supplies with angle stops and stainless steel braided flexible risers. 7. Trap: McGuire 8872C, 40 mm cast brass chrome plated offset adjustable ‘P’ trap with cleanout. PART 3 - EXECUTION 3.1 A. B. C. D. E. F. 3.2 A. 3.3 A. 3.4 A. INSTALLATION Install lavatories level and plumb according to roughing-in drawings. Install supports, affixed to building substrate, for wall-mounted lavatories. Install accessible wall-mounted lavatories at handicapped/elderly mounting height for people with disabilities or the elderly, according to ICC/ANSI A117.1. Install wall flanges or escutcheons at piping wall penetrations in exposed, finished locations. Use deep-pattern escutcheons if required to conceal protruding fittings. Comply with escutcheon requirements specified in Section 220518 "Escutcheons for Plumbing Piping." Seal joints between lavatories, counters, and walls using sanitary-type, one-part, mildew-resistant silicone sealant. Match sealant color to fixture color. Comply with sealant requirements specified in Section 079200 "Joint Sealants." Install protective shielding pipe covers and enclosures on exposed supplies and waste piping of accessible lavatories. CONNECTIONS Connect fixtures with water supplies, stops, and risers, and with traps, soil, waste, and vent piping. Use size fittings required to match fixtures. ADJUSTING Adjust water pressure at faucets to produce proper flow. CLEANING AND PROTECTION Clean lavatories, faucets, and other fittings with manufacturers' recommended cleaning methods and materials. END OF SECTION 224216.13 SECTION 224216.16 - COMMERCIAL SINKS PART 1 - GENERAL 1.1 A. SUMMARY Section Includes: 1. 2. 3. 4. 5. Stainless Steel Single Bowl, Drop-in Sink. Stainless Steel Single Bowl, Drop-in Sink (Barrier free). Sink faucets. Supply fittings. Waste fittings. ENSO Systems Inc. #865 St. Elizabeth C.S. – Full Day Kindergarten Addition 1.2 A. ACTION SUBMITTALS Product Data: For each type of product. 1. 2. 1.3 A. Division 22 Plumbing Specifications Page 89 Include construction details, material descriptions, dimensions of individual components and profiles, and finishes for sinks. Include rated capacities, operating characteristics and furnished specialties and accessories. CLOSEOUT SUBMITTALS Maintenance Data: For sinks in maintenance manuals. PART 2 - PRODUCTS 2.1 A. STAINLESS STEEL SINKS Stainless Steel Single Bowl, Drop-in Sink (Drawing Symbol S1, for Teacher) 1. 2. 3. 4. 5. B. Sink: Kindred model LBS6808, 20cm deep, single compartment self rimming dropin sink with faucet ledge, 20 gauge type 302 18-8 stainless steel, undercoated, waste fitting, factory applied rim seal, cutout template, and universal installation system hardware. Centre back waste location, includes 89mm crumb cup strainer with 38mm brass tail piece. Cut hole to suit faucet installation, refer to architectural drawing for exact location (side mount or back mount faucet). Faucet: American Standard, Heritage model 6830.372H.002, 5’’ (127mm) reach swing gooseneck spout with 5.7LPM(1.5GPM) flow pressure compensating aerator outlet and red and blue indexed cast brass 4’’ (102mm) blade handles, vandal resistant, 8’’ (203mm) centres, durable cast brass lead-free construction, ¼ turn washerless ceramic disc valve cartridges, all operating parts must be replaceable from above the deck, threaded male inlet shank. Mixing valve: Powers model Hydroguard E480 on hot water supply. Supply: McGuire H165N5 rigid polished brass horizontal supplies with wheel handle angle stops and flexible copper risers. Trap: McGuire 8912CB 40 mm polished cast brass ‘P’ trap with cleanout. Stainless Steel Single Bowl, Drop-in Sink (Drawing Symbol S2, for Children) 1. 2. 3. 4. 5. Sink: Kindred model LBS6808, 20cm deep, single compartment self rimming dropin sink with faucet ledge, 20 gauge type 302 18-8 stainless steel, undercoated, waste fitting, factory applied rim seal, cutout template, and universal installation system hardware. Centre back waste location, includes 89mm crumb cup strainer with 38mm brass tail piece. Cut hole to suit faucet installation, refer to architectural drawing for exact location (side mount or back mount faucet). Faucet: American Standard, Heritage model 6830.372H.002, 5’’ (127mm) reach rigid gooseneck spout with 5.7LPM(1.5GPM) flow pressure compensating aerator outlet and red and blue indexed cast brass 4’’ (102mm) blade handles, vandal resistant, 8’’ (203mm) centres, durable cast brass lead-free construction, ¼ turn washerless ceramic disc valve cartridges, all operating parts must be replaceable from above the deck, threaded male inlet shank. Mixing valve: Powers model Hydroguard E480 on hot water supply. Supply: McGuire H165N5 rigid polished brass horizontal supplies with wheel handle angle stops and flexible copper risers. Trap: McGuire 8912CB 40 mm polished cast brass ‘P’ trap with cleanout ENSO Systems Inc. #865 St. Elizabeth C.S. – Full Day Kindergarten Addition Division 22 Plumbing Specifications Page 90 PART 3 - EXECUTION 3.1 A. B. C. 3.2 A. B. C. D. E. EXAMINATION Examine roughing-in of water supply and sanitary drainage and vent piping systems to verify actual locations of piping connections before sink installation. Examine walls, floors, and counters for suitable conditions where sinks will be installed. Proceed with installation only after unsatisfactory conditions have been corrected. INSTALLATION Install sinks level and plumb according to roughing-in drawings. Install supports, affixed to building substrate, for wall-hung sinks. Install accessible wall-mounted sinks at handicapped/elderly mounting height according to ICC/ANSI A117.1. Set floor-mounted sinks in leveling bed of cement grout. Install water-supply piping with stop on each supply to each sink faucet. 1. 2. F. G. H. 3.3 A. B. C. 3.4 A. B. 3.5 A. B. C. Exception: Use ball or gate valves if supply stops are not specified with sink. Comply with valve requirements specified in Section 220523.12 "Ball Valves for Plumbing Piping" and Section 220523.15 "Gate Valves for Plumbing Piping." Install stops in locations where they can be easily reached for operation. Install wall flanges or escutcheons at piping wall penetrations in exposed, finished locations. Use deep-pattern escutcheons if required to conceal protruding fittings. Comply with escutcheon requirements specified in Section 220518 "Escutcheons for Plumbing Piping." Seal joints between sinks and counters, floors, and walls using sanitary-type, one-part, mildew-resistant silicone sealant. Match sealant color to fixture color. Comply with sealant requirements specified in Section 079200 "Joint Sealants." Install protective shielding pipe covers and enclosures on exposed supplies and waste piping of accessible sinks. Comply with requirements in Section 220719 "Plumbing Piping Insulation." CONNECTIONS Connect sinks with water supplies, stops, and risers, and with traps, soil, waste, and vent piping. Use size fittings required to match fixtures. Comply with water piping requirements specified in Section 221116 "Domestic Water Piping." Comply with soil and waste piping requirements specified in Section 221316 "Sanitary Waste and Vent Piping." ADJUSTING Operate and adjust sinks and controls. Replace damaged and malfunctioning sinks, fittings, and controls. Adjust water pressure at faucets to produce proper flow. CLEANING AND PROTECTION After completing installation of sinks, inspect and repair damaged finishes. Clean sinks, faucets, and other fittings with manufacturers' recommended cleaning methods and materials. Provide protective covering for installed sinks and fittings. ENSO Systems Inc. #865 St. Elizabeth C.S. – Full Day Kindergarten Addition D. Division 22 Plumbing Specifications Page 91 Do not allow use of sinks for temporary facilities unless approved in writing by Owner. END OF SECTION 224216.16 SECTION 224216.17 – DRINKING FOUNTAINS PART 1 - GENERAL 1.1 A. SUMMARY Section Includes: 1. 2. 3. 4. 1.2 A. ACTION SUBMITTALS Product Data: For each type of product. 1. 2. 1.3 A. Stainless Steel Drinking Fountain. Stainless Steel Drinking Fountain (Barrier free). Supply fittings. Waste fittings. Include construction details, material descriptions, dimensions of individual components and profiles, and finishes for sinks. Include rated capacities, operating characteristics and furnished specialties and accessories. CLOSEOUT SUBMITTALS Maintenance Data: For drinking fountain in maintenance manuals. PART 2 - PRODUCTS 2.1 A. STAINLESS STEEL DRINKING FOUNTAINS Stainless Steel Single Bowl, Barrier-free Drinking Fountain (Drawing Symbol DF) 1. 2. 3. 4. 5. Standard of Acceptance: Haws. Drinking Fountain: Haws #1109 wall hung fountain with #6700 concealed mounting plate, lead-free, stainless steel, 18 gauge (1.2mm) with #4 satin finish, round front, 18’’ (457mm) receptor, forged brass bubbler head, self-closing push button, automatic volume regulator, 250 micron (60 mesh) in-line filter, vandal resistant open grid strainer, tailpiece. Carrier: Jay R Smith fountain carrier, with steel pipe legs, block base feed support and plate (space required 102mm finished wall to back of pipe space). Supply: McGuire #HST11BV polished brass straight ¼ turn all brass ball valve stop with VP loose key handle. Trap: McGuire #8872C-17T, 32 mm, CP, 17 gauge (1.5mm) brass adjustable body, and escutcheon. PART 3 - EXECUTION 3.1 A. B. C. EXAMINATION Examine roughing-in of water supply and sanitary drainage and vent piping systems to verify actual locations of piping connections before sink installation. Examine walls, floors, and counters for suitable conditions where sinks will be installed. Proceed with installation only after unsatisfactory conditions have been corrected. ENSO Systems Inc. #865 St. Elizabeth C.S. – Full Day Kindergarten Addition 3.2 A. B. C. D. INSTALLATION Install drinking fountains level and plumb according to roughing-in drawings. Install supports, affixed to building substrate, for wall-hung drinking fountains. Install accessible wall-mounted drinking fountains at handicapped mounting height according to ADA. Install water-supply piping with ball valve on supply to each drinking fountain. 1. E. 3.3 A. B. C. 3.4 A. B. 3.5 A. B. Division 22 Plumbing Specifications Page 92 Install valve in locations where they can be easily reached for operation. Seal joints between drinking fountain and walls using sanitary-type, one-part, mildewresistant silicone sealant. Match sealant color to fixture color. Comply with sealant requirements specified in Section 079200 "Joint Sealants." CONNECTIONS Connect drinking fountains with water supply, stops, and risers, and with traps, soil, waste, and vent piping. Use size fittings required to match fixtures. Comply with water piping requirements specified in Section 221116 "Domestic Water Piping." Comply with soil and waste piping requirements specified in Section 221316 "Sanitary Waste and Vent Piping." ADJUSTING Operate and adjust drinking fountains and controls. Replace damaged and malfunctioning drinking fountains, fittings, and controls. Adjust water pressure at supply to produce proper flow. CLEANING AND PROTECTION After completing installation of drinking fourntain, inspect and repair damaged finishes. Clean drinking fountains and other fittings with manufacturers' recommended cleaning methods and materials. END OF SECTION 224216.16 SECTION 312000 - EARTH MOVING PART 1 - GENERAL 1.1 A. B. 1.2 A. WORK SUMMARY Excavating and backfilling as required for mechanical services under building within foundation walls. Concrete backfill and pipe supporting pads as specified WORK SUMMARY Excavation outside of building, paving, sodding. 1. Excavating and backfilling by Division 2, Site Work except for work provided by the Mechanical Division as specified under 1.1 and 1.2 above. PART 2 - PRODUCTS A. Not applicable. ENSO Systems Inc. #865 St. Elizabeth C.S. – Full Day Kindergarten Addition Division 22 Plumbing Specifications Page 93 PART 3 - EXECUTION A. B. C. D. E. F. G. H. I. J. K. L. M. Carry out trench excavation in strict conformity with the Construction Safety Act. Keep excavation dry at all times. Excavate and prepare for underground services, so that no portion of any pipe bears directly against rock or hard surface. Grade and shape bottoms of excavations for pipes, as required, to fit the lower one-third segment of pipes and sockets. Keep sides and bottoms of excavation from freezing and protect as required to prevent damage to any part of the work by weather or other conditions. Execute excavating, pipe laying, testing and backfilling in limited length to enable protective and heating measures to function efficiently. Break up rocks and boulders removed from excavation as required, to permit handling. Remove rock encountered by drilling and wedging. Blasting will not be permitted unless prior written instructions are obtained. Form bottoms of trenches in earth inside building so that pipes are supported on a solid bed of undisturbed earth. Lay pipe to relieve hubs or conduits of undue strain. Backfill excavation required in proximity to and below footing levels with 10 MPa concrete to the level of the top of adjacent footing. Support piping inside building installed in unstable or filled ground as defined by jurisdictional authorities on a reinforced 17.5 MPa concrete pad or piers. Shape concrete support to provide a minimum bearing for the lower one-third of circumference of pipe. Support outside piping passing through building foundation walls with reinforced 17.5 MPa concrete pads. Key concrete pads into the outside wall and extend in length sufficiently to obtain a minimum bearing of .6m on undisturbed ground. Extend and wire the reinforcing steel of the support pads to the reinforcing steel of the outside walls, to prevent failure at the junction of the two elements. Replace excavation carried to greater depth than shown or authorized through negligence or error, with well compacted acceptable sand fill or concrete, at no change to Contract Price to give a bearing value equal to that of adjacent soil. Do not commence backfilling until written instruction to do so have been obtained. Backfill carefully to avoid injury to work and undue subsequent settlement. Backfill pipe trenches under building floors with sand placed in 150mm layers compacted to 98% standard Proctor. Manually compact fill up to 450mm above pipes. Include for cutting and making good of concrete floors inside building to accommodate new services. Final floor finish to be provided by General Trades where noted on the Architectural drawings. Store materials excavated in locations as instructed and in such a manner as to produce a minimum of damage or disfigurement of existing ground. Remove and dispose of excess excavated materials. Leave site clear and unencumbered. END OF SECTION 312000 End of Division 22 ENSO Systems Inc. #865 St. Elizabeth C.S. – Full Day Kindergarten Addition Division 23 HVAC Specifications Page 1 INDEX FOR DIVISION 23 Section Title Page 230000 230001 083113 230513 230516 230517 230518 230519 230523.12 230523.14 230529 230548 230553 230593 230713 230719 232113 232116 232123 232513 233113 233300 233713 233723 237313 238236 238239.13 239993.11 239994 Index General Conditions Access Door and Frames Common Motor Requirements for HVAC Equipment Expansion Fittings and Loops for HVAC Piping Sleeves and Sleeve Seals for HVAC Piping Escutcheons for HVAC Piping Meters and Gauges for HVAC Ball Valves for HVAC Piping Check Valves for HVAC Piping Hangers and Supports for HVAC Piping & Equipment Vibration and Seismic Controls for HVAC Piping & Eqpt Identification for HVAC Piping & Equipment Testing, Adjusting and Balancing for HVAC Duct Insulation HVAC Piping Insulation Hydronic Piping Hydronic Piping Specialties Hydronic Pumps Water Treatment for Closed-Loop Hydronic Systems Metal Ducts Air Duct Accessories Diffusers, Registers and Grilles HVAC Gravity Ventilators, Louvres & Curbs Modular Indoor Central-Station Air-Handling Units Finned-Tube Radiation Heaters Cabinet Unit Heaters Sequence of Operations for HVAC DDC Building Automation System END OF INDEX March 3, 2014 ESI# 865 1 2 2 6 7 9 12 14 16 18 21 28 40 43 54 57 61 66 70 72 74 82 87 90 93 96 98 99 51 pages ENSO Systems Inc. #865 St. Elizabeth C.S. – Full Day Kindergarten Addition Division 23 HVAC Specifications Page 2 SECTION 230001 – GENERAL CONDITIONS General 1.1 1.2 Comply with the drawings, all specification sections including Division 00, 01, 02, 21, 22, 23 and 26, and all documents referred to therein. The Mechanical work is divided into Divisions and Subsections as follows: 1.3 1.4 Division 22 – Plumbing Systems, and Division 21 – Fire Suppression Division 23 – HVAC Systems. Subsections are in order, but may not be numbered consecutively. Refer to the Index at each Division and page numbers. Refer specifically to Division 22, Section 220001 for General Conditions applying to this Division. SECTION 083113 - ACCESS DOORS AND FRAMES PART 1 - GENERAL 1.1 A. 1.2 A. SUMMARY Section Includes: 1. Access doors and frames for walls and ceilings. 2. Floor access doors and frames. ACTION SUBMITTALS Product Data: For each type of product. 1. B. Shop Drawings: 1. 2. C. D. Include construction details, fire ratings, materials, individual components and profiles, and finishes. Include plans, elevations, sections, details, and attachments to other work. Detail fabrication and installation of access doors and frames for each type of substrate. Samples: For each door face material, at least 75x125mm (3x5’’) in size, in specified finish, when requested. Product Schedule: Provide complete access door and frame schedule, including types, locations, sizes, latching or locking provisions, and other data pertinent to installation. PART 2 - PRODUCTS 2.1 A. 2.2 A. PERFORMANCE REQUIREMENTS Fire-Rated Access Doors and Frames: Units complying with CAN/ULC S101, OBC specified edition, that are identical to access door and frame assemblies tested for firetest-response characteristics according to the following test method and that are listed and labeled by ULC or another testing and inspecting agency acceptable to authorities having jurisdiction. ACCESS DOORS AND FRAMES FOR WALLS AND CEILINGS Source Limitations: Obtain each type of access door and frame from single source from single manufacturer. ENSO Systems Inc. #865 St. Elizabeth C.S. – Full Day Kindergarten Addition B. Flush Access Doors with Concealed Flanges: 1. 2. 3. 4. Assembly Description: Fabricate door to fit flush to frame. Provide frame with gypsum board beads for concealed flange installation. Locations: Wall and ceiling. Door Size: minimum 300x300 (12x12’’) to 900x900mm (24x24’’) to suit application. Metallic-Coated Steel Sheet for Door: Nominal 0.064 inch (1.63 mm), 16 gage. a. 5. 6. 7. 8. 2. 3. 4. 5. 6. Frame Material: Same material, thickness, and finish as door. Hinges: Continuous for entire length of door. Hardware: Latch unless noted to be lockable on the drawings. Assembly Description: Fabricate door to fit flush to frame, with a core of mineralfiber insulation enclosed in sheet metal. Provide self-latching door with automatic closer and interior latch release. Provide frame with gypsum board beads for concealed flange installation in ceilings and exposed flange for drywall partitions unless concealed flanges are requested by the Architect. Locations: Wall and ceiling. Door Size: minimum 300x300 (12x12’’) to 900x900mm (24x24’’) to suit application. Fire-Resistance Rating: Not less than that of construction assembly into which the door is being inserted to a minimum of 2 hours. Temperature-Rise Rating: 450OF (250OC) at the end of 30 minutes. Metallic-Coated Steel Sheet for Door: Nominal 0.064 inch (1.63 mm), 16 gage. a. 7. 8. 9. 10. Finish: No. 2b. Frame Material: Same material, thickness, and finish as door. Hinges: Continuous for entire length of door. Hardware: Latch unless noted to be lockable on the drawings. Hardware: 1. 2. A. B. Finish: factory prime where surface is to be painted by General Trades or factory finish enameled white, subject to Architect’s approval, for areas that will not be painted by General Trades. Stainless-Steel Sheet for Door: Nominal 0.062 inch (1.59 mm), 16 gage. a. 2.3 Finish: No. 2b. Fire-Rated, Flush Access Doors with Concealed Flanges FAP: 1. D. Finish: factory prime where surface is to be painted by General Trades or factory finish enameled white, subject to Architect’s approval, for areas that will not be painted by General Trades. Stainless-Steel Sheet for Door: Nominal 0.062 inch (1.59 mm), 16 gage. a. C. Division 23 HVAC Specifications Page 3 Latch: Cam latch operated by screwdriver. Lock: Mortise cylinder. MATERIALS Steel Plates, Shapes, and Bars: ASTM A 36/A 36M. Rolled-Steel Floor Plate: ASTM A 786/A 786M, rolled from plate complying with ASTM A 36/A 36M or ASTM A 283/A 283M, Grade C or D. ENSO Systems Inc. #865 St. Elizabeth C.S. – Full Day Kindergarten Addition C. D. E. F. G. H. 2.4 A. B. C. Steel Sheet: Uncoated or electrolytic zinc coated, ASTM A 879/A 879M, with coldrolled steel sheet substrate complying with ASTM A 1008/A 1008M, Commercial Steel (CS), exposed. Metallic-Coated Steel Sheet: ASTM A 653/A 653M, Commercial Steel (CS), Type B; with minimum G60 (Z180) or A60 (ZF180) metallic coating. Rolled-Stainless-Steel Floor Plate: ASTM A 793, manufacturer's standard finish. Stainless-Steel Sheet, Strip, Plate, and Flat Bars: ASTM A 666, Type 316. Remove tool and die marks and stretch lines or blend into finish. Frame Anchors: Same type as door face. Inserts, Bolts, and Anchor Fasteners: Hot-dip galvanized steel according to ASTM A 153/A 153M or ASTM F 2329. FABRICATION General: Provide access door and frame assemblies manufactured as integral units ready for installation. Metal Surfaces: For metal surfaces exposed to view in the completed Work, provide materials with smooth, flat surfaces without blemishes. Do not use materials with exposed pitting, seam marks, roller marks, rolled trade names, or roughness. Doors and Frames: Grind exposed welds smooth and flush with adjacent surfaces. Furnish attachment devices and fasteners of type required to secure access doors to types of supports indicated. 1. 2. 3. 4. D. 2.5 A. B. For recessed doors with plaster infill, provide self-furring expanded metal lath attached to door panel. Latching Mechanisms: Furnish number required to hold doors in flush, smooth plane when closed. 1. 2. F. For concealed flanges with drywall bead, provide edge trim for gypsum board or gypsum base securely attached to perimeter of frames. For concealed flanges with plaster bead for full-bed plaster applications, provide zinc-coated expanded metal lath and exposed casing bead welded to perimeter of frames. Provide mounting holes in frames for attachment of units to metal or wood framing. Provide mounting holes in frame for attachment of masonry anchors. Recessed Access Doors: Form face of panel to provide recess for application of applied finish. Reinforce panel as required to prevent buckling. 1. E. Division 23 HVAC Specifications Page 4 For cylinder locks, furnish two keys per lock and key all locks alike. For recessed panel doors, provide access sleeves for each locking device. Furnish plastic grommets and install in holes cut through finish. Extruded Aluminum: After fabrication, apply manufacturer's standard protective coating on aluminum that will come in contact with concrete. FINISHES Comply with NAAMM's "Metal Finishes Manual for Architectural and Metal Products" for recommendations for applying and designating finishes. Protect mechanical finishes on exposed surfaces from damage by applying a strippable, temporary protective covering before shipping. ENSO Systems Inc. #865 St. Elizabeth C.S. – Full Day Kindergarten Addition C. D. Appearance of Finished Work: Noticeable variations in same piece are not acceptable. Variations in appearance of adjoining components are acceptable if they are within the range of approved Samples and are assembled or installed to minimize contrast. Steel and Metallic-Coated-Steel Finishes: 1. 2. E. Division 23 HVAC Specifications Page 5 Factory Prime: Apply manufacturer's standard, fast-curing, lead- and chromatefree, universal primer immediately after surface preparation and pretreatment. Factory Finish: Immediately after cleaning and pretreating, apply manufacturer's standard two-coat, baked-on enamel finish consisting of prime coat and thermosetting topcoat, with a minimum dry-film thickness of 1 mil (0.025 mm) for topcoat. Stainless-Steel Finishes: 1. 2. Surface Preparation: Remove tool and die marks and stretch lines, or blend into finish. Polished Finishes: Grind and polish surfaces to produce uniform finish, free of cross scratches. a. b. c. 3. Run grain of directional finishes with long dimension of each piece. When polishing is completed, passivate and rinse surfaces. Remove embedded foreign matter and leave surfaces chemically clean. Directional Satin Finish: No. 4. Bright, Cold-Rolled, Unpolished Finish: No. 2B. PART 3 - EXECUTION 3.1 A. B. 3.2 A. B. C. D. E. 3.3 A. B. EXAMINATION Examine substrates for compliance with requirements for installation tolerances and other conditions affecting performance of the Work. Proceed with installation only after unsatisfactory conditions have been corrected. INSTALLATION Supply architectural style recessed frame and flange type access panels for locations where mechanical equipment or any other device requiring maintenance or adjustment is "built-in"; such as valves, junction boxes, relays, etc. Include cost of installation by qualified tradesmen. Comply with manufacturer's written instructions for installing access doors and frames. Install doors flush with adjacent finish surfaces or recessed to receive finish material. Do not provide access panels in removable panel type ceilings. Indicate location of equipment with acceptable markers. Size and locate access panels in applied tile, or in glazed or unglazed structural tile to suit block patterns. ADJUSTING Adjust doors and hardware, after installation, for proper operation. Remove and replace doors and frames that are warped, bowed, or otherwise damaged. END OF SECTION 083113 ENSO Systems Inc. #865 St. Elizabeth C.S. – Full Day Kindergarten Addition Division 23 HVAC Specifications Page 6 SECTION 230513 – COMMON MOTOR REQUIREMENTS FOR HVAC EQUIPMENT PART 1 - GENERAL 1.1 A. 1.2 A. SUMMARY Section includes general requirements for single-phase and polyphase, generalpurpose, horizontal, small and medium, squirrel-cage induction motors for use on ac power systems up to 600 V and installed at equipment manufacturer's factory or shipped separately by equipment manufacturer for field installation. COORDINATION Coordinate features of motors, installed units, and accessory devices to be compatible with the following: 1. 2. 3. Motor controllers. Torque, speed, and horsepower requirements of the load. Ratings and characteristics of supply circuit and required control sequence. PART 2 - PRODUCTS 2.1 A. B. 2.2 A. B. 2.3 A. B. C. D. E. F. G. H. GENERAL MOTOR REQUIREMENTS CSA Listed and marked for intended location and application. Efficiency: Energy efficient in Compliance with ASHRAE 90.1-2010. MOTOR CHARACTERISTICS Duty: Continuous duty at ambient temperature of 40OC and at altitude of 3300 feet (1000 m) above sea level. Capacity and Torque Characteristics: Sufficient to start, accelerate, and operate connected loads at designated speeds, at installed altitude and environment, with indicated operating sequence, and without exceeding nameplate ratings or considering service factor. POLYPHASE MOTORS Description: NEMA MG 1, Design B, medium induction motor. Service Factor: 1.15. Multispeed Motors: Separate winding for each speed. Rotor: Random-wound, squirrel cage. Bearings: Regreasable, shielded, antifriction ball bearings suitable for radial and thrust loading. Temperature Rise: Match insulation rating. Insulation: Class F with Class B temperature rise unless noted. Code Letter Designation: 1. 2. I. Motors 15HP and Larger: NEMA starting Code F or Code G. Motors Smaller than 15HP: Manufacturer's standard starting characteristic. Enclosure Material: Cast iron for motor frame sizes 324T and larger; rolled steel for motor frame sizes smaller than 324T . ENSO Systems Inc. #865 St. Elizabeth C.S. – Full Day Kindergarten Addition 2.4 A. B. POLYPHASE MOTORS WITH ADDITIONAL REQUIREMENTS Motors Used with Reduced-Voltage and Multispeed Controllers: Match wiring connection requirements for controller with required motor leads. Provide terminals in motor terminal box, suited to control method. Motors Used with Variable Frequency Controllers: 1. 2. 3. 4. 2.5 A. D. E. Windings: Copper magnet wire with moisture-resistant insulation varnish, designed and tested to resist transient spikes, high frequencies, and short time rise pulses produced by pulse-width modulated inverters. Energy- and Premium-Efficient Motors: Class B temperature rise; Class F insulation. Inverter-Duty Motors: Class F temperature rise; Class H insulation. Thermal Protection: Comply with OESC, CSA and NEMA MG 1 requirements for thermally protected motors. SINGLE-PHASE MOTORS Motors larger than 1/20hp and smaller than 1/2hp shall be suit starting torque and requirements of specific motor application: 1. B. C. Division 23 HVAC Specifications Page 7 Capacitor start, inductor run. Multispeed Motors: Variable-torque, permanent-split-capacitor type. Bearings: Pre-lubricated, antifriction ball bearings or sleeve bearings suitable for radial and thrust loading. Motors 1/20 HP and Smaller: Shaded-pole type. Thermal Protection: Internal protection to automatically open power supply circuit to motor when winding temperature exceeds a safe value calibrated to temperature rating of motor insulation. Thermal-protection device shall automatically reset when motor temperature returns to normal range. PART 3 - EXECUTION A. Not Applicable. END OF SECTION 230513 SECTION 230516 – EXPANSION FITTINGS AND LOOPS FOR HVAC PIPING PART 1 - GENERAL A. 1.2 A. B. Section Includes: 1. Expansion compensators-slip type. 2. Expansion compensators- bellows type. 3. Pipe loops and swing connections. 4. Alignment guides and anchors. PERFORMANCE REQUIREMENTS Compatibility: Products shall be suitable for piping service fluids, materials, working pressures, and temperatures. Capability: Products to absorb 200 percent of maximum axial movement between anchors. ENSO Systems Inc. #865 St. Elizabeth C.S. – Full Day Kindergarten Addition 1.3 A. Division 23 HVAC Specifications Page 8 ACTION SUBMITTALS Product Data: For each type of product indicated. PART 2 - PRODUCTS 2.1 A. EXPANSION JOINTS Expansion Compensator-Slip Type: 1. 2. 3. B. Expansion Compensator-Bellows Type: 1. 2. 3. 2.2 A. Minimum Pressure Rating: 150 psig (1035 kPa) unless otherwise indicated. For axial lateral or angular movements with stainless steel bellows, guides control rings and travel stops. Standard of Acceptance: Flexonics, Garlock, Badger, Tube Turn. ALIGNMENT GUIDES AND ANCHORS Alignment Guides: 1. B. Minimum Pressure Rating: 150 psig (1035 kPa) unless otherwise indicated. For axial pipe movement: complete with packing chamber, limit stops, lubrication fittings or lubricant impregnated packing rings. Packing material: as recommended by the manufacturer with adjustable packing gland. Slip pipe: hard chrome plated to ASTM A53-82, carbon steel. Standard of Acceptance: Rockwell, Tube Turns, Flexonics Description: Steel, factory-fabricated alignment guide, with bolted two-section outer cylinder and base for attaching to structure; with two-section guiding spider for bolting to pipe. Anchor Materials: 1. 2. 3. 4. Steel Shapes and Plates: ASTM A 36/A 36M. Bolts and Nuts: ASME B18.10 or ASTM A 183, steel hex head. Washers: ASTM F 844, steel, plain, flat washers. Mechanical Fasteners: Insert-wedge-type stud with expansion plug anchor for use in hardened portland cement concrete, with tension and shear capacities appropriate for application. a. b. c. 5. Stud: Threaded, zinc-coated carbon steel. Expansion Plug: Zinc-coated steel. Washer and Nut: Zinc-coated steel. Chemical Fasteners: Insert-type-stud, bonding-system anchor for use with hardened portland cement concrete, with tension and shear capacities appropriate for application. a. b. c. Bonding Material: ASTM C 881/C 881M, Type IV, Grade 3, two-component epoxy resin suitable for surface temperature of hardened concrete where fastener is to be installed. Stud: ASTM A 307, zinc-coated carbon steel with continuous thread on stud unless otherwise indicated. Washer and Nut: Zinc-coated steel. ENSO Systems Inc. #865 St. Elizabeth C.S. – Full Day Kindergarten Addition Division 23 HVAC Specifications Page 9 PART 3 - EXECUTION 3.1 A. B. 3.2 A. B. C. D. 3.3 A. B. C. D. E. EXPANSION-JOINT INSTALLATION Install expansion joints of sizes matching sizes of piping in which they are installed. Install metal-bellows expansion joints according to EJMA's "Standards of the Expansion Joint Manufacturers Association, Inc." PIPE LOOP AND SWING CONNECTION INSTALLATION Install pipe loops cold-sprung in tension or compression as required to partly absorb tension or compression produced during anticipated change in temperature. Connect risers and branch connections to mains with at least five pipe fittings including tee in main. Connect risers and branch connections to terminal units with at least four pipe fittings including tee in riser. Connect mains and branch connections to terminal units with at least four pipe fittings including tee in main. ALIGNMENT-GUIDE AND ANCHOR INSTALLATION Install alignment guides to guide expansion and to avoid end-loading and torsional stress. Install two guides on each side of pipe expansion fittings and loops. Install guides nearest to expansion joint not more than four pipe diameters from expansion joint. Attach guides to pipe and secure guides to building structure. Install anchors at locations to prevent stresses from exceeding those permitted by ASME B31.9 and to prevent transfer of loading and stresses to connected equipment. Anchor Attachments: 1. 2. F. Fabricate and install steel anchors by welding steel shapes, plates, and bars. Comply with ASME B31.9 and AWS D1.1/D1.1M. 1. 2. G. Anchor Attachment to Steel Pipe: Attach by welding. Comply with ASME B31.9 and ASME Boiler and Pressure Vessel Code: Section IX, "Welding and Brazing Qualifications." Anchor Attachment to Copper Tubing: Attach with pipe hangers. Use MSS SP69, Type 24, U-bolts bolted to anchor. Anchor Attachment to Steel Structural Members: Attach by welding. Anchor Attachment to Concrete Structural Members: Attach by fasteners. Follow fastener manufacturer's written instructions. Use grout to form flat bearing surfaces for guides and anchors attached to concrete. END OF SECTION 230516 SECTION 230517 – SLEEVES AND SLEEVE SEALS FOR HVAC PIPING PART 1 - GENERAL 1.1 A. SUMMARY Section Includes: 1. 2. Sleeves. Stack-sleeve fittings. ENSO Systems Inc. #865 St. Elizabeth C.S. – Full Day Kindergarten Addition 3. 4. 5. 1.2 A. Division 23 HVAC Specifications Page 10 Sleeve-seal systems. Sleeve-seal fittings. Grout. ACTION SUBMITTALS Product Data: For each type of product indicated. PART 2 - PRODUCTS 2.1 A. B. C. D. 2.2 A. SLEEVES Cast-Iron Wall Pipes: Cast or fabricated of cast or ductile iron and equivalent to ductileiron pressure pipe, with plain ends and integral waterstop unless otherwise indicated. Galvanized-Steel Wall Pipes: ASTM A 53/A 53M, Schedule 40, with plain ends and welded steel collar; zinc coated. Galvanized-Steel-Pipe Sleeves: ASTM A 53/A 53M, Type E, Grade B, Schedule 40, zinc coated, with plain ends. Galvanized-Steel-Sheet Sleeves: 0.0239-inch (0.6-mm) minimum thickness; round tube closed with welded longitudinal joint. STACK-SLEEVE FITTINGS Description: Manufactured, cast-iron sleeve with integral clamping flange. Include clamping ring, bolts, and nuts for membrane flashing. 1. 2.3 A. SLEEVE-SEAL SYSTEMS Description: Modular sealing-element unit, designed for field assembly, for filling annular space between piping and sleeve. 1. 2. 3. 2.4 A. 2.5 A. B. C. D. Underdeck Clamp: Clamping ring with setscrews. Sealing Elements: EPDM-rubber interlocking links shaped to fit surface of pipe. Include type and number required for pipe material and size of pipe. Pressure Plates: Carbon steel. Connecting Bolts and Nuts: Carbon steel, with corrosion-resistant coating, of length required to secure pressure plates to sealing elements. SLEEVE-SEAL FITTINGS Description: Manufactured plastic, sleeve-type, waterstop assembly made for imbedding in concrete slab or wall. Unit has plastic or rubber waterstop collar with center opening to match piping OD. GROUT Standard: ASTM C 1107/C 1107M, Grade B, post-hardening and volume-adjusting, dry, hydraulic-cement grout. Characteristics: Nonshrink; recommended for interior and exterior applications. Design Mix: 5000-psi (34.5-MPa), 28-day compressive strength. Packaging: Premixed and factory packaged. PART 3 - EXECUTION 3.1 A. SLEEVE INSTALLATION Install sleeves for piping passing through penetrations in floors, partitions, roofs, and walls. ENSO Systems Inc. #865 St. Elizabeth C.S. – Full Day Kindergarten Addition B. For sleeves that will have sleeve-seal system installed, select sleeves of size large enough to provide 1-inch (25-mm) annular clear space between piping and concrete slabs and walls. 1. C. Sleeves are not required for core-drilled holes. Install sleeves in concrete floors, concrete roof slabs, and concrete walls as new slabs and walls are constructed. 1. 2. Permanent sleeves are not required for holes in slabs formed by molded-PE or PP sleeves. Cut sleeves to length for mounting flush with both surfaces. a. 3. D. 3. 3.2 A. Exception: Extend sleeves installed in floors of mechanical equipment areas or other wet areas 2 inches (50 mm) above finished floor level. Using grout, seal the space outside of sleeves in slabs and walls without sleeveseal system. Install sleeves for pipes passing through interior partitions. 1. 2. E. Division 23 HVAC Specifications Page 11 Cut sleeves to length for mounting flush with both surfaces. Install sleeves that are large enough to provide 1/4-inch (6.4-mm) annular clear space between sleeve and pipe or pipe insulation. Seal annular space between sleeve and piping or piping insulation; use joint sealants appropriate for size, depth, and location of joint. Comply with requirements for sealants specified in Section 079200 "Joint Sealants." Fire-Barrier Penetrations: Maintain indicated fire rating of walls, partitions, ceilings, and floors at pipe penetrations. Seal pipe penetrations with firestop materials. Comply with requirements for firestopping specified in Section 078413 "Penetration Firestopping." STACK-SLEEVE-FITTING INSTALLATION Install stack-sleeve fittings in new slabs as slabs are constructed. 1. B. 3.3 A. B. Install fittings that are large enough to provide 1/4-inch (6.4-mm) annular clear space between sleeve and pipe or pipe insulation. 2. Secure flashing between clamping flanges for pipes penetrating floors with membrane waterproofing. Comply with requirements for flashing specified in Section 076200 "Sheet Metal Flashing and Trim." 3. Install section of cast-iron soil pipe to extend sleeve to 2 inches (50 mm) above finished floor level. 4. Extend cast-iron sleeve fittings below floor slab as required to secure clamping ring if ring is specified. 5. Using grout, seal the space around outside of stack-sleeve fittings. Fire-Barrier Penetrations: Maintain indicated fire rating of floors at pipe penetrations. Seal pipe penetrations with firestop materials. Comply with requirements for firestopping specified in Section 078413 "Penetration Firestopping." SLEEVE-SEAL-SYSTEM INSTALLATION Install sleeve-seal systems in sleeves in exterior concrete walls and slabs-on-grade at service piping entries into building. Select type, size, and number of sealing elements required for piping material and size and for sleeve ID or hole size. Position piping in center of sleeve. Center piping in penetration, assemble sleeve-seal system components, and install in annular space ENSO Systems Inc. #865 St. Elizabeth C.S. – Full Day Kindergarten Addition Division 23 HVAC Specifications Page 12 between piping and sleeve. Tighten bolts against pressure plates that cause sealing elements to expand and make a watertight seal. 3.4 A. B. C. D. 3.5 A. SLEEVE-SEAL-FITTING INSTALLATION Install sleeve-seal fittings in new walls and slabs as they are constructed. Assemble fitting components of length to be flush with both surfaces of concrete slabs and walls. Position waterstop flange to be centered in concrete slab or wall. Secure nailing flanges to concrete forms. Using grout, seal the space around outside of sleeve-seal fittings. SLEEVE AND SLEEVE-SEAL SCHEDULE Use sleeves and sleeve seals for the following piping-penetration applications: 1. Exterior Concrete Walls above Grade: a. b. 2. Piping Smaller Than NPS 6 (DN 150): Galvanized-steel-pipe sleeves. Piping NPS 6 (DN 150) and Larger: Galvanized-steel-pipe sleeves. Exterior Concrete Walls below Grade: a. Piping Smaller Than NPS 6 (DN 150): Cast-iron wall sleeves with sleeveseal system or Galvanized-steel-pipe sleeves with sleeve-seal system. 1) b. Piping NPS 6 (DN 150) and Larger: Cast-iron wall sleeves with sleeve-seal system or Galvanized-steel-pipe sleeves with sleeve-seal system. 1) 3. Galvanized-steel-pipe sleeves with sleeve-seal system. 1) Select sleeve size to allow for 1-inch (25-mm) annular clear space between piping and sleeve for installing sleeve-seal system. Concrete Slabs above Grade: a. 5. Select sleeve size to allow for 1-inch (25-mm) annular clear space between piping and sleeve for installing sleeve-seal system. Concrete Slabs-on-Grade: a. 4. Select sleeve size to allow for 1-inch (25-mm) annular clear space between piping and sleeve for installing sleeve-seal system. Galvanized-steel-pipe sleeves Interior Partitions: a. Galvanized-steel-pipe sleeves END OF SECTION 230517 SECTION 230518 – ESCUTCHEONS FOR HVAC PIPING PART 1 - GENERAL 1.1 A. RELATED DOCUMENTS Drawings and general provisions of the Contract, including General and Supplementary Conditions and Division 01 Specification Sections, apply to this Section. ENSO Systems Inc. #865 St. Elizabeth C.S. – Full Day Kindergarten Addition 1.2 A. SUMMARY Section Includes: 1. 2. 1.3 A. Division 23 HVAC Specifications Page 13 Escutcheons. Floor plates. ACTION SUBMITTALS Product Data: For each type of product indicated. PART 2 - PRODUCTS 2.1 A. B. C. D. 2.2 A. B. ESCUTCHEONS One-Piece, Cast-Brass Type: With polished, chrome-plated finish and setscrew fastener. One-Piece, Deep-Pattern Type: Deep-drawn, box-shaped brass with chrome-plated finish and spring-clip fasteners. One-Piece, Stamped-Steel Type: With chrome-plated finish and spring-clip fasteners. Split-Casting Brass Type: With polished, chrome-plated finish and with concealed hinge and setscrew. FLOOR PLATES One-Piece Floor Plates: Cast-iron flange with holes for fasteners. Split-Casting Floor Plates: Cast brass with concealed hinge. PART 3 - EXECUTION 3.1 A. B. INSTALLATION Install escutcheons for piping penetrations of walls, ceilings, and finished floors. Install escutcheons with ID to closely fit around pipe, tube, and insulation of piping and with OD that completely covers opening. 1. Escutcheons for New Piping: a. b. c. d. e. f. g. h. Piping with Fitting or Sleeve Protruding from Wall: One-piece, deep-pattern type. Chrome-Plated Piping: One-piece, cast-brass or split-casting brass type with polished, chrome-plated finish. Insulated Piping: One-piece, stamped-steel type or split-plate, stampedsteel type with concealed hinge]. Bare Piping at Wall and Floor Penetrations in Finished Spaces: One-piece, cast-brass or split-casting brass type with polished, chrome-plated finish. Bare Piping at Wall and Floor Penetrations in Finished Spaces: One-piece, stamped-steel type or split-plate, stamped-steel type with concealed hinge with chrome plated finish Bare Piping at Ceiling Penetrations in Finished Spaces: One-piece, castbrass or split-casting brass] type with polished, chrome-plated finish. Bare Piping at Ceiling Penetrations in Finished Spaces: One-piece, stamped-steel type[ or split-plate, stamped-steel type with concealed hinge with chrome plated finish. Bare Piping in Unfinished Service Spaces and equipment rooms: Onepiece, cast-brass or split-casting brass type with rough-brass finish. ENSO Systems Inc. #865 St. Elizabeth C.S. – Full Day Kindergarten Addition i. 2. b. c. d. e. f. A. Chrome-Plated Piping: Split-casting brass type with polished, chromeplated finish. Insulated Piping: Split-plate, stamped-steel type with concealed hinge. Bare Piping at Wall and Floor Penetrations in Finished Spaces: Splitcasting brass type with polished, chrome-plated finish. Bare Piping at Wall and Floor Penetrations in Finished Spaces: Split-plate, stamped-steel type with concealed hinge. Bare Piping at Ceiling Penetrations in Finished Spaces: Split-casting brass type with polished, chrome-plated finish. Bare Piping at Ceiling Penetrations in Finished Spaces: Split-plate, stamped-steel type with concealed hinge. Install floor plates for piping penetrations of equipment-room floors. Install floor plates with ID to closely fit around pipe, tube, and insulation of piping and with OD that completely covers opening. 1. 2. 3.2 Bare Piping in Unfinished Service Spaces: One-piece, stamped-steel type or split-plate, stamped-steel type with concealed hinge or split-plate, stamped-steel type with exposed-rivet hinge. Escutcheons for Existing Piping: a. C. D. Division 23 HVAC Specifications Page 14 New Piping: One-piece, floor-plate type. Existing Piping: Split-casting, floor-plate type. FIELD QUALITY CONTROL Replace broken and damaged escutcheons and floor plates using new materials. END OF SECTION 230518 SECTION 230519 – METERS AND GAGES FOR HVAC PIPING PART 1 - GENERAL 1.1 A. SUMMARY Section Includes: 1. 2. 3. 4. 1.2 A. 1.3 A. Thermometers. Thermowells. Dial-type pressure gages. Test plugs. ACTION SUBMITTALS Product Data: For each type of product indicated. CLOSEOUT SUBMITTALS Operation and Maintenance Data: For meters and gages to include in operation and maintenance manuals. PART 2 - PRODUCTS 2.1 A. THERMOMETERS Industrial, 228 mm adjustable angle cast aluminum case, CGSB standard CAN/CGSB14.4-M88 red reading mercury, lens front tube, white scale black embossed figures, ENSO Systems Inc. #865 St. Elizabeth C.S. – Full Day Kindergarten Addition Division 23 HVAC Specifications Page 15 clear glass or acrylic window, tapered aluminum stem. Scale suitable for 2 times the temperature range of service. Scale shall be combined Celsius and Fahrenheit. 1. 2.2 A. Standard of Acceptance: Weiss, Ashcroft, Trerice. THERMOWELLS Thermowells: 1. 2. B. 2.3 A. Standard: ASME B40.200. Description: Pressure-tight, socket-type fitting made for insertion into piping tee fitting. 3. Material for Use with Copper Tubing: CNR or CUNI. 4. Material for Use with Steel Piping: CSA. 5. Type: Stepped shank unless straight or tapered shank is indicated. 6. External Threads: NPS 1/2, NPS 3/4, or NPS 1, (DN 15, DN 20, or NPS 25,) ASME B1.20.1 pipe threads. 7. Internal Threads: 1/2, 3/4, and 1 inch (13, 19, and 25 mm), with ASME B1.1 screw threads. 8. Bore: Diameter required to match thermometer bulb or stem. 9. Insertion Length: Length required to match thermometer bulb or stem. 10. Lagging Extension: Include on thermowells for insulated piping and tubing. 11. Bushings: For converting size of thermowell's internal screw thread to size of thermometer connection. Heat-Transfer Medium: Mixture of graphite and glycerin. PRESSURE GAGES 115 mm dial, solid front blow out back, fiberglass reinforced polypropylene case, phosphor bronze bourdon tube and brass 1/4” N.P.T. socket, bottom connection, stainless steel rotary type movement, gauge to be registered with the Provincial Boiler and Pressure Safety Branch with a registration number and conform to ANSI B40.1. Accuracy to be grade “A”. On pumps liquid filled gauges shall be used. Gauges shall have combined kilopascal and psi scales. 1. 2. 2.4 A. B. C. D. E. Standard of Acceptance: Weiss, Ashcroft, Trerice Provide bronze stop cock, bronze bar stock 1/4“ N.P.T. bronze porous core pressure snubber for pulsating operation and diaphragm for corrosive services. TEST PLUGS Description: Test-station fitting made for insertion into piping tee fitting. Body: Brass or stainless steel with core inserts and gasketed and threaded cap. Include extended stem on units to be installed in insulated piping. Thread Size: NPS 1/4 (DN 8), ASME B1.20.1 pipe thread. Minimum Pressure and Temperature Rating: 200 psig at 200OF (1380 kPa at 93OC). Core Inserts: Chlorosulfonated polyethylene synthetic and EPDM self-sealing rubber. PART 3 - EXECUTION 3.1 A. B. INSTALLATION Install thermowells with socket extending a minimum of one-third of pipe diameter and in vertical position in piping tees. Install thermowells of sizes required to match thermometer connectors. Include bushings if required to match sizes. ENSO Systems Inc. #865 St. Elizabeth C.S. – Full Day Kindergarten Addition C. D. E. F. G. H. I. J. K. Install thermowells with extension on insulated piping. Fill thermowells with heat-transfer medium. Install direct-mounted thermometers in thermowells and adjust vertical and tilted positions. Install direct-mounted pressure gages in piping tees with pressure gage located on pipe at the most readable position. Install valve and snubber in piping for each pressure gage for fluids. Provide valved gauge connections on the discharge and suction side of all pumps and all other locations shown on the drawings or called for in the specifications. Terminate connections with 1/8” diameter female threads. Provide gauges with suitably sized dampening devices. Install gauges on steam services with steel syphon. Locate engraved lamacoid nameplate, identifying medium adjacent to thermometers and gauges. Install pressure gages in the following locations: 1. 2. 3. 3.2 A. 3.3 A. Division 23 HVAC Specifications Page 16 Building water service entrance into building. Inlet and outlet of each pressure-reducing valve. Where shown on the drawings. CONNECTIONS Install gages adjacent to machines and equipment to allow service and maintenance of meters, gages, machines, and equipment. ADJUSTING Adjust faces of meters and gages to proper angle for best visibility. END OF SECTION 230519 SECTION 230523.1- BALL AND BALANCING VALVES FOR HVAC PIPING PART 1 - GENERAL 1.1 A. SUMMARY Section Includes: 1. 2. 1.2 A. B. 1.3 A. 1.4 A. Ball valves. Balancing Valves. DEFINITIONS CWP: Cold working pressure. SWP: Steam working pressure. ACTION SUBMITTALS Product Data: For each type of valve. DELIVERY, STORAGE, AND HANDLING Prepare valves for shipping as follows: 1. 2. 3. Protect internal parts against rust and corrosion. Protect threads, flange faces, and weld ends. Set ball valves open to minimize exposure of functional surfaces. ENSO Systems Inc. #865 St. Elizabeth C.S. – Full Day Kindergarten Addition B. Use the following precautions during storage: 1. 2. C. Division 23 HVAC Specifications Page 17 Maintain valve end protection. Store valves indoors and maintain at higher-than-ambient-dew-point temperature. If outdoor storage is necessary, store valves off the ground in watertight enclosures. Use sling to handle large valves; rig sling to avoid damage to exposed parts. Do not use operating handles or stems as lifting or rigging points. PART 2 - PRODUCTS 2.1 A. B. GENERAL REQUIREMENTS FOR VALVES Source Limitations for Valves: Obtain each type of valve from single source from single manufacturer. ASME Compliance: 1. 2. 3. C. D. E. F. G. Bronze valves shall be made with dezincification-resistant materials. Bronze valves made with copper alloy (brass) containing more than 15 percent zinc are not permitted. Refer to HVAC valve schedule articles for applications of valves. Valve Pressure-Temperature Ratings: Not less than indicated and as required for system pressures and temperatures. Valve Sizes: Same as upstream piping unless otherwise indicated. Valve Actuator Types: 1. H. 3. 2.2 A. Handlever: For quarter-turn valves smaller than [NPS 2.5” (DN 100)]. Valves in Insulated Piping: 1. 2. I. ASME B1.20.1 for threads for threaded-end valves. ASME B16.18 for solder-joint connections. ASME B31.9 for building services piping valves. Include 2-inch (50-mm) stem extensions. Extended operating handle of nonthermal-conductive material, and protective sleeves that allow operation of valves without breaking the vapor seals or disturbing insulation. Memory stops that are fully adjustable after insulation is applied. Valve Bypass and Drain Connections: MSS SP-45. BALL VALVES Ball Valves 21/2” and smaller, screwed of soldered: 1. 2. Standard of Acceptance: Crane, Jenkins, Toyo, Kitz, Apollo Description: a. b. c. B. Rated for 600 WOG, bronze body, bronze ball, with Teflon seal. Ball valves shall have 111 port opening. With lockable handle where specified. Soldered ends acceptable only for 3/4” valves installed in copper piping. Balancing Valves: 1. 2. Standard of Acceptance: Bell and Gosset, Armstrong Description: ENSO Systems Inc. #865 St. Elizabeth C.S. – Full Day Kindergarten Addition a. b. Division 23 HVAC Specifications Page 18 Globe style, of nonferrous copper alloy or bronze construction, capable of positive shut-off, circuit drain connection with lockable memory and precise full measurement. Valves installed on cold (chilled water) services shall be provided with factory supplied preformed, removable PVC insulation jacket. PART 3 - EXECUTION 3.1 A. 3.2 A. B. C. D. E. 3.3 A. B. EXAMINATION Operate valves in positions from fully open to fully closed. Examine guides and seats made accessible by such operations. VALVE INSTALLATION Install valves with unions or flanges at each piece of equipment arranged to allow service, maintenance, and equipment removal without system shutdown. Locate valves for easy access and provide separate support where necessary. Install valves in horizontal piping with stem at or above center of pipe. Install valves in position to allow full stem movement. Install valve tags. Comply with requirements in Section 230553 "Identification for HVAC Piping and Equipment" for valve tags and schedules. GENERAL REQUIREMENTS FOR VALVE APPLICATIONS If valves with specified SWP classes or CWP ratings are unavailable, the same types of valves with higher SWP classes or CWP ratings may be substituted. Select valves with the following end connections: 1. For Copper Tubing, NPS 2 (DN 50) and Smaller: Threaded ends except where solder-joint valve-end option is specified. 2. For Copper Tubing, NPS 2-1/2 to NPS 4 (DN 65 to DN 100): Flanged ends or threaded valve-end. 3. For Steel Piping, NPS 2 (DN 50) and Smaller: Threaded ends. 4. For Steel Piping, NPS 2-1/2 to NPS 4 (DN 65 to DN 100): Flanged ends or threaded ends. END OF SECTION 230523.12 SECTION 230523.14 – CHECK VALVES FOR HVAC PIPING PART 1 - GENERAL 1.1 A. SUMMARY Section Includes: 1. 2. 3. 4. 1.2 A. B. C. Swing check valves 65mm diameter and smaller. Swing check valves 75mm diameter and larger. Silent check valves, 65 diameter and smaller, screwed. Silent check valves, 75mm diameter and larger, flanged. DEFINITIONS CWP: Cold working pressure. EPDM: Ethylene propylene copolymer rubber. NBR: Acrylonitrile-butadiene, Buna-N, or nitrile rubber. ENSO Systems Inc. #865 St. Elizabeth C.S. – Full Day Kindergarten Addition D. 1.3 A. 1.4 A. SWP: Steam working pressure. ACTION SUBMITTALS Product Data: For each type of valve. DELIVERY, STORAGE, AND HANDLING Prepare valves for shipping as follows: 1. 2. 3. B. Protect internal parts against rust and corrosion. Protect threads, flange faces, grooves, and weld ends. Block check valves in either closed or open position. Use the following precautions during storage: 1. 2. C. Division 23 HVAC Specifications Page 19 Maintain valve end protection. Store valves indoors and maintain at higher than ambient dew point temperature. If outdoor storage is necessary, store valves off the ground in watertight enclosures. Use sling to handle large valves; rig sling to avoid damage to exposed parts. Do not use hand wheels or stems as lifting or rigging points. PART 2 - PRODUCTS 2.1 A. B. GENERAL REQUIREMENTS FOR VALVES Source Limitations for Valves: Obtain each type of valve from single source from single manufacturer. ASME Compliance: 1. 2. 3. 4. 5. C. D. E. F. 2.2 A. ASME B1.20.1 for threads for threaded-end valves. ASME B16.1 for flanges on iron valves. ASME B16.10 and ASME B16.34 for ferrous valve dimensions and design criteria. ASME B16.18 for solder joint. ASME B31.9 for building services piping valves. Bronze valves shall be made with dezincification-resistant materials. Bronze valves made with copper alloy (brass) containing more than 15 percent zinc are not permitted. Valve Pressure-Temperature Ratings: Not less than indicated and as required for system pressures and temperatures. Valve Sizes: Same as upstream piping unless otherwise indicated. Valve Bypass and Drain Connections: MSS SP-45. CHECK VALVES Swing check valves 65mm (2.5”) and smaller, screwed: 1. 2. Standard of Acceptance: Crane, Jenkins, Toyo, Kitz Description: a. B. To MSS SP-80, class 125, 860 kpa, bronze body, bronze swing disc, screw in cap, regrindable seat. Swing check valves 75mm (3”) and larger, flanged: 1. Standard of Acceptance: Crane, Jenkins, Toyo, Kitz. ENSO Systems Inc. #865 St. Elizabeth C.S. – Full Day Kindergarten Addition 2. Description: a. C. To MSS SP-70, class 125, 860 kpa, cast iron body, bronze disc, bolted cap, regrind renewable seat. Silent check valves, 65mm (2.5”) diameter and smaller, screwed: 1. 2. Standard of Acceptance: Crane, Kitz, Nibco. Description a. D. Division 23 HVAC Specifications Page 20 To ASTM B62-82a, Class 125, 860 kpa, cast steel, wafer style, brass seat rings, brass inner valve, stainless steel spring (heavy duty spring in vertical down flow application) Silent check valves, 3” diameter and larger, flanged: 1. 2. Standard of Acceptance: Crane, Kitz, Nibco. Description a. Class 125, 860 kpa, iron body, fluid to 200OF, bronze or stainless steel disc, renewable seats and disc, stainless steel spring actuated. PART 3 - EXECUTION 3.1 A. B. C. D. 3.2 A. B. C. EXAMINATION Examine valve interior for cleanliness, freedom from foreign matter, and corrosion. Remove special packing materials, such as blocks, used to prevent disc movement during shipping and handling. Examine threads on valve and mating pipe for form and cleanliness. Examine mating flange faces for conditions that might cause leakage. Check bolting for proper size, length, and material. Verify that gasket is of proper size, that its material composition is suitable for service, and that it is free from defects and damage. Do not attempt to repair defective valves; replace with new valves. VALVE INSTALLATION Install valves with unions or flanges at each piece of equipment arranged to allow service, maintenance, and equipment removal without system shutdown. Locate valves for easy access and provide separate support where necessary. Install check valves for proper direction of flow and as follows: 1. 2. D. 3.3 A. 3.4 A. Swing Check Valves: In horizontal position with hinge pin level. Lift Check Valves: With stem upright and plumb. Install valve tags. Comply with requirements for valve tags and schedules in Section 230553 "Identification for HVAC Piping and Equipment." ADJUSTING Adjust or replace valve packing after piping systems have been tested and put into service but before final adjusting and balancing. Replace valves if persistent leaking occurs. GENERAL REQUIREMENTS FOR VALVE APPLICATIONS If valve applications are not indicated, use the following: 1. Pump-Discharge Check Valves: ENSO Systems Inc. #865 St. Elizabeth C.S. – Full Day Kindergarten Addition a. B. 3.5 A. Division 23 HVAC Specifications Page 21 Silent check valves. If valves with specified SWP classes or CWP ratings are unavailable, the same types of valves with higher SWP classes or CWP ratings may be substituted. HEATING-WATER VALVE SCHEDULE Swing check valves END OF SECTION 230523.14 SECTION 230529 – HANGERS AND SUPPORTS FOR HVAC PIPING AND EQUIPMENT PART 1 - GENERAL 1.1 A. SUMMARY Section Includes: 1. 2. 3. 4. 5. 6. B. Related Sections: 1. 2. 3. 1.2 A. 1.3 A. B. MSS: Manufacturers Standardization Society of The Valve and Fittings Industry Inc. PERFORMANCE REQUIREMENTS Delegated Design: Design trapeze pipe hangers and equipment supports, including comprehensive engineering analysis by a qualified professional engineer, using performance requirements and design criteria indicated. Structural Performance: Hangers and supports for HVAC piping and equipment shall withstand the effects of gravity loads and stresses within limits and under conditions indicated according to ASCE/SEI 7. 2. 3. A. B. Section 230516 "Expansion Fittings and Loops for HVAC Piping" for pipe guides and anchors. Section 233113 "Metal Ducts" for duct hangers and supports. Section 230548 "Vibration and Seismic Controls for HVAC" for vibration isolation devices. DEFINITIONS 1. 1.4 Metal pipe hangers and supports. Trapeze pipe hangers. Thermal-hanger shield inserts. Fastener systems. Pipe stands. Equipment supports. Design supports for multiple pipes, including pipe stands, capable of supporting combined weight of supported systems, system contents, and test water. Design equipment supports capable of supporting combined operating weight of supported equipment and connected systems and components. Design seismic-restraint hangers and supports for piping and equipment and obtain approval from authorities having jurisdiction. ACTION SUBMITTALS Product Data: For each type of product indicated. Shop Drawings: ENSO Systems Inc. #865 St. Elizabeth C.S. – Full Day Kindergarten Addition 1. 2. Division 23 HVAC Specifications Page 22 Trapeze pipe hangers. Equipment supports. PART 2 - PRODUCTS 2.1 A. METAL PIPE HANGERS AND SUPPORTS Carbon-Steel Pipe Hangers and Supports: 1. 2. 3. 4. 5. 2.2 A. TRAPEZE PIPE HANGERS Description: MSS SP-69, Type 59, shop- or field-fabricated pipe-support assembly made from structural carbon-steel shapes with MSS SP-58 carbon-steel hanger rods, nuts, saddles, and U-bolts. 1. 2.3 A. Non-MFMA Manufacturer Metal Framing Systems: 2. 3. 4. 5. 6. A. B. C. D. E. Steel. METAL FRAMING SYSTEMS 1. 2.4 Description: MSS SP-58, Types 1 through 58, factory-fabricated components. Galvanized Metallic Coatings: Pre-galvanized or hot dipped. Nonmetallic Coatings: Plastic coating, jacket, or liner. Padded Hangers: Hanger with fiberglass or other pipe insulation pad or cushion to support bearing surface of piping. Hanger Rods: Continuous-thread rod, nuts, and washer made of carbon steel. Description: Shop- or field-fabricated pipe-support assembly made of steel channels, accessories, fittings, and other components for supporting multiple parallel pipes. Standard: Comply with MFMA-4. Channels: Continuous slotted steel channel with inturned lips. Channel Nuts: Formed or stamped steel nuts or other devices designed to fit into channel slot and, when tightened, prevent slipping along channel. Hanger Rods: Continuous-thread rod, nuts, and washer made of carbon steel. Coating: Zinc. THERMAL-HANGER SHIELD INSERTS Insulation-Insert Material for Cold Piping: ASTM C 552, Type II cellular glass with 100psig (688-kPa) or ASTM C 591, Type VI, Grade 1 polyisocyanurate with 125-psig (862kPa) minimum compressive strength and vapor barrier. Insulation-Insert Material for Hot Piping: Water-repellent treated, ASTM C 533, Type I calcium silicate with 100-psig (688-kPa) ASTM C 552, Type II cellular glass with 100psig (688-kPa) or ASTM C 591, Type VI, Grade 1 polyisocyanurate with 125-psig (862kPa) minimum compressive strength. For Trapeze or Clamped Systems: Insert and shield shall cover entire circumference of pipe. For Clevis or Band Hangers: Insert and shield shall cover lower 180 degrees of pipe. Insert Length: Extend 2 inches (50 mm) beyond sheet metal shield for piping operating below ambient air temperature. ENSO Systems Inc. #865 St. Elizabeth C.S. – Full Day Kindergarten Addition 2.5 A. B. 2.6 A. 2.7 A. B. Division 23 HVAC Specifications Page 23 FASTENER SYSTEMS Powder-Actuated Fasteners: Threaded-steel stud, for use in hardened portland cement concrete with pull-out, tension, and shear capacities appropriate for supported loads and building materials where used. Mechanical-Expansion Anchors: Insert-wedge-type, zinc-coated steel anchors, for use in hardened portland cement concrete; with pull-out, tension, and shear capacities appropriate for supported loads and building materials where used. EQUIPMENT SUPPORTS Description: Welded, shop- or field-fabricated equipment support made from structural carbon-steel shapes. MISCELLANEOUS MATERIALS Structural Steel: ASTM A 36/A 36M, carbon-steel plates, shapes, and bars; black and galvanized. Grout: ASTM C 1107, factory-mixed and -packaged, dry, hydraulic-cement, nonshrink and nonmetallic grout; suitable for interior and exterior applications. 1. 2. Properties: Non-staining, noncorrosive, and nongaseous. Design Mix: 5000-psi (34.5-MPa), 28-day compressive strength. PART 3 - EXECUTION 3.1 A. B. HANGER AND SUPPORT INSTALLATION Metal Pipe-Hanger Installation: Comply with MSS SP-69 and MSS SP-89. Install hangers, supports, clamps, and attachments as required to properly support piping from the building structure. Metal Trapeze Pipe-Hanger Installation: Comply with MSS SP-69 and MSS SP-89. Arrange for grouping of parallel runs of horizontal piping, and support together on fieldfabricated trapeze pipe hangers. 1. 2. C. D. E. Metal Framing System Installation: Arrange for grouping of parallel runs of piping, and support together on field-assembled metal framing systems. Thermal-Hanger Shield Installation: Install in pipe hanger or shield for insulated piping. Fastener System Installation: 1. 2. F. Pipes of Various Sizes: Support together and space trapezes for smallest pipe size or install intermediate supports for smaller diameter pipes as specified for individual pipe hangers. Field fabricate from ASTM A 36/A 36M, carbon-steel shapes selected for loads being supported. Weld steel according to AWS D1.1/D1.1M. Install powder-actuated fasteners for use in lightweight concrete or concrete slabs less than 4 inches (100 mm) thick in concrete after concrete is placed and completely cured. Use operators that are licensed by powder-actuated tool manufacturer. Install fasteners according to powder-actuated tool manufacturer's operating manual. Install mechanical-expansion anchors in concrete after concrete is placed and completely cured. Install fasteners according to manufacturer's written instructions. Pipe Stand Installation: ENSO Systems Inc. #865 St. Elizabeth C.S. – Full Day Kindergarten Addition 1. 2. G. H. I. J. K. L. M. N. Division 23 HVAC Specifications Page 24 Pipe Stand Types except Curb-Mounted Type: Assemble components and mount on smooth roof surface. Do not penetrate roof membrane. Curb-Mounted-Type Pipe Stands: Assemble components or fabricate pipe stand and mount on permanent, stationary roof curb. Install hangers and supports complete with necessary attachments, inserts, bolts, rods, nuts, washers, and other accessories. Equipment Support Installation: Fabricate from welded-structural-steel shapes. Install hangers and supports to allow controlled thermal and seismic movement of piping systems, to permit freedom of movement between pipe anchors, and to facilitate action of expansion joints, expansion loops, expansion bends, and similar units. Install lateral bracing with pipe hangers and supports to prevent swaying. Install building attachments within concrete slabs or attach to structural steel. Install additional attachments at concentrated loads, including valves, flanges, and strainers, NPS 2-1/2 (DN 65) and larger and at changes in direction of piping. Install concrete inserts before concrete is placed; fasten inserts to forms and install reinforcing bars through openings at top of inserts. Load Distribution: Install hangers and supports so that piping live and dead loads and stresses from movement will not be transmitted to connected equipment. Pipe Slopes: Install hangers and supports to provide indicated pipe slopes and to not exceed maximum pipe deflections allowed by ASME B31.9 for building services piping. Insulated Piping: 1. Attach clamps and spacers to piping. a. b. c. 2. Install MSS SP-58, Type 39, protection saddles if insulation without vapor barrier is indicated. Fill interior voids with insulation that matches adjoining insulation. a. 3. 6. Option: Thermal-hanger shield inserts may be used. Include steel weightdistribution plate for pipe NPS 4 (DN 100) and larger if pipe is installed on rollers. Shield Dimensions for Pipe: Not less than the following: a. 5. Option: Thermal-hanger shield inserts may be used. Include steel weightdistribution plate for pipe NPS 4 (DN 100) and larger if pipe is installed on rollers. Install MSS SP-58, Type 40, protective shields on cold piping with vapor barrier. Shields shall span an arc of 180 degrees. a. 4. Piping Operating above Ambient Air Temperature: Clamp may project through insulation. Piping Operating below Ambient Air Temperature: Use thermal-hanger shield insert with clamp sized to match OD of insert. Do not exceed pipe stress limits allowed by ASME B31.9 for building services piping. NPS 1/4 to NPS 3-1/2 (DN 8 to DN 90): 12 inches (305 mm) long and 0.048 inch (1.22 mm) thick. Pipes NPS 8 (DN 200) and Larger: Include wood or reinforced calcium-silicateinsulation inserts of length at least as long as protective shield. Thermal-Hanger Shields: Install with insulation same thickness as piping insulation. ENSO Systems Inc. #865 St. Elizabeth C.S. – Full Day Kindergarten Addition 3.2 A. B. C. 3.3 A. B. C. EQUIPMENT SUPPORTS Fabricate structural-steel stands to suspend equipment from structure overhead or to support equipment above floor. Grouting: Place grout under supports for equipment and make bearing surface smooth. Provide lateral bracing, to prevent swaying, for equipment supports. METAL FABRICATIONS Cut, drill, and fit miscellaneous metal fabrications for trapeze pipe hangers and equipment supports. Fit exposed connections together to form hairline joints. Field weld connections that cannot be shop welded because of shipping size limitations. Field Welding: Comply with AWS D1.1/D1.1M procedures for shielded, metal arc welding; appearance and quality of welds; and methods used in correcting welding work; and with the following: 1. 2. 3. 4. 3.4 A. B. 3.5 A. 3.6 A. B. C. D. E. F. Use materials and methods that minimize distortion and develop strength and corrosion resistance of base metals. Obtain fusion without undercut or overlap. Remove welding flux immediately. Finish welds at exposed connections so no roughness shows after finishing and so contours of welded surfaces match adjacent contours. ADJUSTING Hanger Adjustments: Adjust hangers to distribute loads equally on attachments and to achieve indicated slope of pipe. Trim excess length of continuous-thread hanger and support rods to 1-1/2 inches (40 mm). PAINTING Touchup: Clean field welds and abraded areas of shop paint. Paint exposed areas immediately after erecting hangers and supports. Use same materials as used for shop painting. Comply with SSPC-PA 1 requirements for touching up field-painted surfaces. 1. B. Division 23 HVAC Specifications Page 25 Apply paint by brush or spray to provide a minimum dry film thickness of 2.0 mils (0.05 mm). Galvanized Surfaces: Clean welds, bolted connections, and abraded areas and apply galvanizing-repair paint to comply with ASTM A 780. HANGER AND SUPPORT SCHEDULE Specific hanger and support requirements are in Sections specifying piping systems and equipment. Comply with MSS SP-69 for pipe-hanger selections and applications that are not specified in piping system Sections. Use hangers and supports with galvanized metallic coatings for piping and equipment that will not have field-applied finish. Use nonmetallic coatings on attachments for electrolytic protection where attachments are in direct contact with copper tubing. Use carbon-steel pipe hangers and supports, metal trapeze pipe hangers and metal framing systems and attachments for general service applications. Use copper-plated pipe hangers and attachments for copper piping and tubing. ENSO Systems Inc. #865 St. Elizabeth C.S. – Full Day Kindergarten Addition G. H. I. Use padded hangers for piping that is subject to scratching. Use thermal-hanger shield inserts for insulated piping and tubing. Horizontal-Piping Hangers and Supports: Unless otherwise indicated and except as specified in piping system Sections, install the following types: 1. 2. 3. 4. 5. 6. 7. 8. J. 2. Extension Pipe or Riser Clamps (MSS Type 8): For support of pipe risers NPS 3/4 to NPS 24 (DN 24 to DN 600). Carbon- or Alloy-Steel Riser Clamps (MSS Type 42): For support of pipe risers NPS 3/4 to NPS 24 (DN 20 to DN 600) if longer ends are required for riser clamps. Hanger-Rod Attachments: Unless otherwise indicated and except as specified in piping system Sections, install the following types: 1. 2. 3. 4. 5. L. Adjustable, Steel Clevis Hangers (MSS Type 1): For suspension of non-insulated or insulated, stationary pipes NPS 1/2 to NPS 30 (DN 15 to DN 750). Pipe Stanchion Saddles (MSS Type 37): For support of pipes NPS 4 to NPS 36 (DN 100 to DN 900), with steel-pipe base stanchion support and cast-iron floor flange or carbon-steel plate, and with U-bolt to retain pipe. Adjustable Pipe Saddle Supports (MSS Type 38): For stanchion-type support for pipes NPS 2-1/2 to NPS 36 (DN 65 to DN 900) if vertical adjustment is required, with steel-pipe base stanchion support and cast-iron floor flange. Single-Pipe Rolls (MSS Type 41): For suspension of pipes NPS 1 to NPS 30 (DN 25 to DN 750), from two rods if longitudinal movement caused by expansion and contraction might occur. Adjustable Roller Hangers (MSS Type 43): For suspension of pipes NPS 2-1/2 to NPS 24 (DN 65 to DN 600), from single rod if horizontal movement caused by expansion and contraction might occur. Complete Pipe Rolls (MSS Type 44): For support of pipes NPS 2 to NPS 42 (DN 50 to DN 1050) if longitudinal movement caused by expansion and contraction might occur but vertical adjustment is not necessary. Pipe Roll and Plate Units (MSS Type 45): For support of pipes NPS 2 to NPS 24 (DN 50 to DN 600) if small horizontal movement caused by expansion and contraction might occur and vertical adjustment is not necessary. Adjustable Pipe Roll and Base Units (MSS Type 46): For support of pipes NPS 2 to NPS 30 (DN 50 to DN 750) if vertical and lateral adjustment during installation might be required in addition to expansion and contraction. Vertical-Piping Clamps: Unless otherwise indicated and except as specified in piping system Sections, install the following types: 1. K. Division 23 HVAC Specifications Page 26 Steel Turnbuckles (MSS Type 13): For adjustment up to 6 inches (150 mm) for heavy loads. Steel Clevises (MSS Type 14): For 120 to 450OF (49 to 232OC) piping installations. Swivel Turnbuckles (MSS Type 15): For use with MSS Type 11, split pipe rings. Malleable-Iron Sockets (MSS Type 16): For attaching hanger rods to various types of building attachments. Steel Weld-less Eye Nuts (MSS Type 17): For 120 to 450OF (49 to 232OC) piping installations. Building Attachments: Unless otherwise indicated and except as specified in piping system Sections, install the following types: ENSO Systems Inc. #865 St. Elizabeth C.S. – Full Day Kindergarten Addition 1. 2. 3. 4. 5. 6. 7. 8. 9. 10. 11. 12. Steel or Malleable Concrete Inserts (MSS Type 18): For upper attachment to suspend pipe hangers from concrete ceiling. Top-Beam C-Clamps (MSS Type 19): For use under roof installations with barjoist construction, to attach to top flange of structural shape. Side-Beam or Channel Clamps (MSS Type 20): For attaching to bottom flange of beams, channels, or angles. Center-Beam Clamps (MSS Type 21): For attaching to center of bottom flange of beams. Welded Beam Attachments (MSS Type 22): For attaching to bottom of beams if loads are considerable and rod sizes are large. C-Clamps (MSS Type 23): For structural shapes. Top-Beam Clamps (MSS Type 25): For top of beams if hanger rod is required tangent to flange edge. Side-Beam Clamps (MSS Type 27): For bottom of steel I-beams. Steel-Beam Clamps with Eye Nuts (MSS Type 28): For attaching to bottom of steel I-beams for heavy loads. Linked-Steel Clamps with Eye Nuts (MSS Type 29): For attaching to bottom of steel I-beams for heavy loads, with link extensions. Malleable-Beam Clamps with Extension Pieces (MSS Type 30): For attaching to structural steel. Welded-Steel Brackets: For support of pipes from below or for suspending from above by using clip and rod. Use one of the following for indicated loads: a. b. c. 13. 14. 15. M. Light (MSS Type 31): 750 lb (340 kg). Medium (MSS Type 32): 1500 lb (680 kg). Heavy (MSS Type 33): 3000 lb (1360 kg). Side-Beam Brackets (MSS Type 34): For sides of steel or wooden beams. Plate Lugs (MSS Type 57): For attaching to steel beams if flexibility at beam is required. Horizontal Travelers (MSS Type 58): For supporting piping systems subject to linear horizontal movement where headroom is limited. Saddles and Shields: Unless otherwise indicated and except as specified in piping system Sections, install the following types: 1. 2. 3. N. Division 23 HVAC Specifications Page 27 Steel-Pipe-Covering Protection Saddles (MSS Type 39): To fill interior voids with insulation that matches adjoining insulation. Protection Shields (MSS Type 40): Of length recommended in writing by manufacturer to prevent crushing insulation. Thermal-Hanger Shield Inserts: For supporting insulated pipe. Spring Hangers and Supports: Unless otherwise indicated and except as specified in piping system Sections, install the following types: 1. 2. 3. 4. Restraint-Control Devices (MSS Type 47): Where indicated to control piping movement. Spring Cushions (MSS Type 48): For light loads if vertical movement does not exceed 1-1/4 inches (32 mm). Spring-Cushion Roll Hangers (MSS Type 49): For equipping Type 41, roll hanger with springs. Spring Sway Braces (MSS Type 50): To retard sway, shock, vibration, or thermal expansion in piping systems. ENSO Systems Inc. #865 St. Elizabeth C.S. – Full Day Kindergarten Addition O. P. Q. Division 23 HVAC Specifications Page 28 Comply with MSS SP-69 for trapeze pipe-hanger selections and applications that are not specified in piping system Sections. Comply with MFMA-103 for metal framing system selections and applications that are not specified in piping system Sections. Use mechanical-expansion anchors instead of building attachments where required in concrete construction. END OF SECTION 230529 SECTION 230548 – VIBRATION AND SEISMIC CONTROLS FOR HVAC PIPING & EQUIPMENT PART 1 - GENERAL 1.1 A. SUMMARY Section Includes: 1. 2. 3. 4. 5. 6. 7. 8. 9. 10. 11. 12. 13. 14. 15. 16. 17. 18. 19. 20. B. Related Requirements: 1. 2. C. Elastomeric isolation pads. Elastomeric isolation mounts. Restrained elastomeric isolation mounts. Open-spring isolators. Housed-spring isolators. Restrained-spring isolators. Housed-restrained-spring isolators. Resilient pipe guides. Air-spring isolators. Restrained-air-spring isolators. Elastomeric hangers. Spring hangers. Snubbers. Restraint channel bracings. Restraint cables. Seismic-restraint accessories. Mechanical anchor bolts. Adhesive anchor bolts. Vibration isolation equipment bases. Restrained isolation roof-curb rails. Section 210548 "Vibration and Seismic Controls for Fire Suppression" for devices for fire-suppression equipment and systems. Section 220548 "Vibration and Seismic Controls for Plumbing" for devices for plumbing equipment and systems. Product Data: For each type of product. 1. Illustrate and indicate style, material, strength, fastening provision, and finish for each type and size of seismic-restraint component used. a. Tabulate types and sizes of seismic restraints, complete with report numbers and rated strength in tension and shear as evaluated by an agency acceptable to authorities having jurisdiction. ENSO Systems Inc. #865 St. Elizabeth C.S. – Full Day Kindergarten Addition b. D. 2. Include design calculations and details for selecting seismic restraints complying with performance requirements, design criteria, and analysis data signed and sealed by the qualified professional engineer responsible for their preparation. Contact Mr. Sean Cochrane at HTS Engineering (representing Kinetics Noise Control), tel. (416) 661-3400 for information. Design Calculations: Calculate static and dynamic loading caused by equipment weight, operation, and seismic forces required to select seismic restraints and for designing vibration isolation bases. a. 3. b. c. d. B. C. D. 1.3 A. B. C. Coordinate design calculations with wind load calculations required for equipment mounted outdoors. Comply with requirements in other Sections for equipment mounted outdoors. Seismic Restraint Details: a. A. Annotate to indicate application of each product submitted and compliance with requirements. Delegated-Design Submittal: For each seismic-restraint device. 1. 1.2 Division 23 HVAC Specifications Page 29 Design Analysis: To support selection and arrangement of seismic restraints. Include calculations of combined tensile and shear loads. Details: Indicate fabrication and arrangement. Detail attachments of restraints to the restrained items and to the structure. Show attachment locations, methods, and spacings. Identify components, list their strengths, and indicate directions and values of forces transmitted to the structure during seismic events. Indicate association with vibration isolation devices. Coordinate seismic-restraint and vibration isolation details with windrestraint details required for equipment mounted outdoors. Comply with requirements in other Sections for equipment mounted outdoors. Preapproval and Evaluation Documentation: Submit for review to an agency acceptable to authorities having jurisdiction, showing maximum ratings of restraint items and the basis for approval (tests or calculations). INFORMATIONAL SUBMITTALS Coordination Drawings: Show coordination of seismic bracing for electrical components with other systems and equipment in the vicinity, including other supports and seismic restraints. Welding certificates when requested. Air-Mounting System Performance Certification: Include natural frequency, load, and damping test data Field quality-control reports. QUALITY ASSURANCE Comply with seismic-restraint requirements in the OBC unless requirements in this Section are more stringent. Welding Qualifications: Qualify procedures and personnel according to AWS D1.1/D1.1M, "Structural Welding Code - Steel." Seismic-restraint devices shall have horizontal and vertical load testing and analysis. They shall bear anchorage preapproval from OSHPD in addition to preapproval, showing maximum seismic-restraint ratings, by ICC-ES or another agency acceptable to authorities having jurisdiction. Ratings based on independent testing are preferred to ENSO Systems Inc. #865 St. Elizabeth C.S. – Full Day Kindergarten Addition Division 23 HVAC Specifications Page 30 ratings based on calculations. If preapproved ratings are not available, submittals based on independent testing are preferred. Calculations (including combining shear and tensile loads) that support seismic-restraint designs must be signed and sealed by a qualified professional engineer. PART 2 - PRODUCTS 2.1 A. PERFORMANCE REQUIREMENTS Seismic-Restraint Loading: 1. 2. 3. Site Class as Defined in the OBC: D. Building Classification Category: High - for Schools and Normal for Offices. Building Importance factor (IE) Assigned Seismic Use Group or Building Category as Defined in the OBC: ULS=1.3 for schools and 1.0 for Offices. a. b. c. d. e. 4. 5. 2.2 A. Design Spectral Response Acceleration at Short Periods (0.2 Second): 0.24 (Toronto). Design Spectral Response Acceleration at 1.0-Second Period: 0.056 (Toronto). PERFORMANCE REQUIREMENTS Elastomeric Isolation Pads: 1. 2. 3. 4. 5. 6. 7. Fabrication: Single or multiple layers of sufficient durometer stiffness for uniform loading over pad area. Size: Factory or field cut to match requirements of supported equipment. Pad Material: Oil and water resistant with elastomeric properties. Surface Pattern: Ribbed pattern. Infused nonwoven cotton or synthetic fibers. Load-bearing metal plates adhered to pads. Sandwich-Core Material: Resilient and elastomeric. a. b. 2.3 A. Importance factor (IE) Assigned Seismic Use Group or Building Category as Defined in the OBC: ULS=1.3 for schools and 1.0 for Offices. Component Factor: 1.0 Component Response Modification Factor: 5.0. Component Amplification Factor: 2.5. Peak Ground Acceleration: 0.150 for Toronto. Surface Pattern: Ribbed pattern. Infused nonwoven cotton or synthetic fibers. ELASTOMERIC ISOLATION MOUNTS Double-Deflection, Elastomeric Isolation Mounts: 1. Mounting Plates: a. b. 2. Top Plate: Encapsulated steel load transfer top plates, factory drilled and threaded with threaded studs or bolts. Baseplate: Encapsulated steel bottom plates with holes provided for anchoring to support structure. Elastomeric Material: Molded, oil-resistant rubber, neoprene, or other elastomeric material. ENSO Systems Inc. #865 St. Elizabeth C.S. – Full Day Kindergarten Addition 2.4 A. RESTRAINED ELASTOMERIC ISOLATION MOUNTS Restrained Elastomeric Isolation Mounts: 1. Description: All-directional isolator with restraints containing two separate and opposing elastomeric elements that prevent central threaded element and attachment hardware from contacting the housing during normal operation. a. b. 2.5 A. Freestanding, Laterally Stable, Open-Spring Isolators: 2. 3. 4. 5. 6. A. Outside Spring Diameter: Not less than 80 percent of the compressed height of the spring at rated load. Minimum Additional Travel: 50 percent of the required deflection at rated load. Lateral Stiffness: More than 80 percent of rated vertical stiffness. Overload Capacity: Support 200 percent of rated load, fully compressed, without deformation or failure. Baseplates: Factory-drilled steel plate for bolting to structure with an elastomeric isolator pad attached to the underside. Baseplates shall limit floor load to 500 psig (3447 kPa). Top Plate and Adjustment Bolt: Threaded top plate with adjustment bolt and cap screw to fasten and level equipment. HOUSED-SPRING ISOLATORS Freestanding, Laterally Stable, Open-Spring Isolators in Two-Part Telescoping Housing: 1. 2. 3. 4. 5. Outside Spring Diameter: Not less than 80 percent of the compressed height of the spring at rated load. Minimum Additional Travel: 50 percent of the required deflection at rated load. Lateral Stiffness: More than 80 percent of rated vertical stiffness. Overload Capacity: Support 200 percent of rated load, fully compressed, without deformation or failure. Two-Part Telescoping Housing: A steel top and bottom frame separated by an elastomeric material and enclosing the spring isolators. a. b. 2.7 A. Housing: Cast-ductile iron or welded steel. Elastomeric Material: Molded, oil-resistant rubber, neoprene, or other elastomeric material. OPEN-SPRING ISOLATORS 1. 2.6 Division 23 HVAC Specifications Page 31 Drilled base housing for bolting to structure with an elastomeric isolator pad attached to the underside. Bases shall limit floor load to 500 psig (3447 kPa). Top housing with threaded mounting holes and internal leveling device. RESTRAINED-SPRING ISOLATORS Freestanding, Laterally Stable, Open-Spring Isolators with Vertical-Limit Stop Restraint: 1. Housing: Steel housing with vertical-limit stops to prevent spring extension due to weight being removed. a. Base with holes for bolting to structure with an elastomeric isolator pad attached to the underside. Bases shall limit floor load to 500 psig (3447 kPa). ENSO Systems Inc. #865 St. Elizabeth C.S. – Full Day Kindergarten Addition b. c. 2. 3. 4. 5. 6. 2.8 A. Restraint: Limit stop as required for equipment and authorities having jurisdiction. Outside Spring Diameter: Not less than 80 percent of the compressed height of the spring at rated load. Minimum Additional Travel: 50 percent of the required deflection at rated load. Lateral Stiffness: More than 80 percent of rated vertical stiffness. Overload Capacity: Support 200 percent of rated load, fully compressed, without deformation or failure. Freestanding, Laterally Stable, Open-Spring Isolators with Vertical-Limit Stop Restraint: Two-Part Telescoping Housing: A steel top and bottom frame separated by an elastomeric material and enclosing the spring isolators. Housings are equipped with adjustable snubbers to limit vertical movement. a. b. 2. 3. 4. 5. A. B. A. Factory-Set Height Guide with Shear Pin: Shear pin shall be removable and reinsertable to allow for selection of pipe movement. Guides shall be capable of motion to meet location requirements. ELASTOMERIC HANGERS Elastomeric Mount in a Steel Frame with Upper and Lower Steel Hanger Rods: 2. A. Outside Spring Diameter: Not less than 80 percent of the compressed height of the spring at rated load. Minimum Additional Travel: 50 percent of the required deflection at rated load. Lateral Stiffness: More than 80 percent of rated vertical stiffness. Overload Capacity: Support 200 percent of rated load, fully compressed, without deformation or failure. Description: Telescopic arrangement of two steel tubes or post and sleeve arrangement separated by a minimum 1/2-inch- (13-mm-) thick neoprene 1. 2.11 Drilled base housing for bolting to structure with an elastomeric isolator pad attached to the underside. Bases shall limit floor load to 500 psig (3447 kPa). Threaded top housing with adjustment bolt and cap screw to fasten and level equipment. RESILIENT PIPE GUIDES 1. 2.10 Top plate with threaded mounting holes Internal leveling bolt that acts as blocking during installation. HOUSED-RESTRAINED-SPRING ISOLATORS 1. 2.9 Division 23 HVAC Specifications Page 32 Frame: Steel, fabricated with a connection for an upper threaded hanger rod and an opening on the underside to allow for a maximum of 30 degrees of angular lower hanger-rod misalignment without binding or reducing isolation efficiency. Dampening Element: Molded, oil-resistant rubber, neoprene, or other elastomeric material with a projecting bushing for the underside opening preventing steel to steel contact. SPRING HANGERS Combination Coil-Spring and Elastomeric-Insert Hanger with Spring and Insert in Compression: ENSO Systems Inc. #865 St. Elizabeth C.S. – Full Day Kindergarten Addition 1. 2. 3. 4. 5. 6. 7. 8. 2.12 A. Description: Factory fabricated using welded structural-steel shapes and plates, anchor bolts, and replaceable resilient isolation washers and bushings. 2. 3. A. 2.14 A. 2.15 A. B. C. D. E. Frame: Steel, fabricated for connection to threaded hanger rods and to allow for a maximum of 30 degrees of angular hanger-rod misalignment without binding or reducing isolation efficiency. Outside Spring Diameter: Not less than 80 percent of the compressed height of the spring at rated load. Minimum Additional Travel: 50 percent of the required deflection at rated load. Lateral Stiffness: More than 80 percent of rated vertical stiffness. Overload Capacity: Support 200 percent of rated load, fully compressed, without deformation or failure. Elastomeric Element: Molded, oil-resistant rubber or neoprene. Steel-washerreinforced cup to support spring and bushing projecting through bottom of frame. Adjustable Vertical Stop: Steel washer with neoprene washer "up-stop" on lower threaded rod. Self-centering hanger rod cap to ensure concentricity between hanger rod and support spring coil. SNUBBERS 1. 2.13 Division 23 HVAC Specifications Page 33 Anchor bolts for attaching to concrete shall be seismic-rated, drill-in, and studwedge or female-wedge type. Resilient Isolation Washers and Bushings: Oil- and water-resistant neoprene. Maximum 1/4-inch (6-mm) air gap, and minimum 1/4-inch- (6-mm-) thick resilient cushion. RESTRAINT CHANNEL BRACINGS Description: MFMA-4, shop- or field-fabricated bracing assembly made of slotted steel channels with accessories for attachment to braced component at one end and to building structure at the other end and other matching components and with corrosionresistant coating; rated in tension, compression, and torsion forces. RESTRAINT CABLES Restraint Cables: ASTM A 603 galvanized (or ASTM A 492 stainless where noted in this document or on the drawings) -steel cables. End connections made of steel assemblies with thimbles, brackets, swivel, and bolts designed for restraining cable service; with a minimum of two clamping bolts for cable engagement. SEISMIC-RESTRAINT ACCESSORIES Hanger-Rod Stiffener: Reinforcing steel angle clamped to hanger rod. Hinged and Swivel Brace Attachments: Multifunctional steel connectors for attaching hangers to rigid channel bracings and restraint cables. Bushings for Floor-Mounted Equipment Anchor Bolts: Neoprene bushings designed for rigid equipment mountings, and matched to type and size of anchor bolts and studs. Bushing Assemblies for Wall-Mounted Equipment Anchorage: Assemblies of neoprene elements and steel sleeves designed for rigid equipment mountings, and matched to type and size of attachment devices used. Resilient Isolation Washers and Bushings: One-piece, molded, oil- and water-resistant neoprene, with a flat washer face. ENSO Systems Inc. #865 St. Elizabeth C.S. – Full Day Kindergarten Addition 2.16 A. 2.17 A. Division 23 HVAC Specifications Page 34 MECHANICAL ANCHOR BOLTS Mechanical Anchor Bolts: Drilled-in and stud-wedge or female-wedge type in zinccoated steel for interior applications and stainless steel for exterior applications. Select anchor bolts with strength required for anchor and as tested according to ASTM E 488. ADHESIVE ANCHOR BOLTS Adhesive Anchor Bolts: Drilled-in and capsule anchor system containing PVC or urethane methacrylate-based resin and accelerator, or injected polymer or hybrid mortar adhesive. Provide anchor bolts and hardware with zinc-coated steel for interior applications and stainless steel for exterior applications. Select anchor bolts with strength required for anchor and as tested according to ASTM E 488. PART 3 - EXECUTION 3.1 A. B. C. 3.2 A. B. C. D. E. F. EXAMINATION Examine areas and equipment to receive vibration isolation and seismic-control devices for compliance with requirements for installation tolerances and other conditions affecting performance of the Work. Examine roughing-in for reinforcement and cast-in-place anchors to verify actual locations before installation. Proceed with installation only after unsatisfactory conditions have been corrected. COORDINATION AND EXECUTION Coordinate size, shape, reinforcement and attachment of all housekeeping pads supporting vibration/seismically rated equipment. Concrete shall have a minimum compressive strength of 3,000 psi or as specified by the project engineer. Coordinate size, thickness, doweling, and reinforcing of concrete equipment housekeeping pads and piers with vibration isolation and seismic restraint device manufacturer to ensure adequate space, embedment and prevent edge breakout failures. Pads and piers must be adequately doweled in to structural slab. Housekeeping Pads must be adequately reinforced and adequately sized for proper installation of equipment anchors. Refer seismic restraint manufacturer’s written instructions. Coordinate with vibration/seismic restraint manufacturer and the structural engineer of record to locate and size structural supports underneath vibration/seismically restrained equipment (e.g. roof curbs, cooling towers and other similar equipment). Installation of all seismic restraint materials specified in this section shall be accomplished as per the manufacturer’s written instructions. Adjust isolators and restraints after piping or wiring systems have been filled and equipment is at its operating weight, following the manufacturer’s written instructions. Isolated and restrained equipment, duct and piping located on roofs must be attached to the structure. Supports (e.g., sleepers) that are not attached to the structure will not be acceptable. Attach piping to the trapeze per seismic restraint manufacturer’s design. Install cables so they do not bend across sharp edges of adjacent equipment or building structures. Do not brace or support equipment to separate portions of the structure that may act differently in response to an earthquake. For example, do not connect a Transverse restraint to a wall and then a Longitudinal restraint to either a floor/ceiling/roof at the same braced location. ENSO Systems Inc. #865 St. Elizabeth C.S. – Full Day Kindergarten Addition G. 3.3 A. Install vertical braces to stiffen hanger rods and prevent buckling per seismic restraint manufacturer’s design. Clamp vertical brace to hanger rods. Requirements apply equally to hanging equipment. Do not weld vertical braces to hanger rods. SEISMIC RESTRAINTS APPLICATION General: 1. 2. 3. 4. 5. 6. B. All equipment, piping and ductwork shall be restrained to resist seismic forces per the applicable Building Code(s) as a minimum; listed herein. Additional requirements specified herein are included specifically for this project; as needed basis. Install seismic restraint devices per the manufacturer’s submittals. Any deviation from the manufacturer’s instructions shall be reviewed and approved by the manufacturer. Attachment to structure for suspended equipment, pipe and duct: If specific attachment is not indicated, anchor bracing to structure at flanges of beams, at upper truss chords of bar joists, or at concrete members. Provide hanger rod stiffeners where indicated or as required to prevent buckling of rods due to seismic forces. Where rigid restraints are used on equipment, ductwork or piping, the support rods for the equipment, ductwork or piping at restraint locations must be supported by anchors rated for seismic use. Post-installed concrete anchors must be in accordance with ACI 355.2. Ensure housekeeping pads have adequate space to mount equipment and seismic restraint devices and shall also be large enough and thick enough to ensure adequate edge distance and embedment depth for restraint anchor bolts to avoid housekeeping pad breakout failure. Concrete Anchor Bolts: 1. 2. 3. 4. 5. C. Division 23 HVAC Specifications Page 35 Identify position of reinforcing steel and other embedded items prior to drilling holes for anchors. Do not damage existing reinforcing or embedded items during coring or drilling. Notify the structural engineer if reinforcing steel or other embedded items are encountered during drilling. Locate and avoid pre- or posttensioned tendons, electrical and telecommunications conduit, and gas lines. Do not drill holes in concrete or masonry until concrete, mortar, or grout has achieved full design strength. Mechanical Anchors: Protect threads from damage during anchor installation. Adhesive Anchors: Clean holes to remove loose material and drilling dust per manufactures instructions prior to installation of adhesive. Place adhesive in holes proceeding from the bottom of the hole and progressing toward the surface in such a manner as to avoid introduction of air pockets in the adhesive. Set anchors to manufacturer's recommended torque, using a torque wrench. Equipment Restraints: 1. 2. Seismically restrain the following equipment: air handling unit, boilers and control panels. Install fasteners, straps and brackets as required to secure the equipment. Install seismic snubbers on HVAC equipment supported by floor-mounted, nonseismic vibration isolators. Position snubbers as necessary and attach to equipment base and supporting structure as required. ENSO Systems Inc. #865 St. Elizabeth C.S. – Full Day Kindergarten Addition 3. 4. Install neoprene grommet washers or fill the gap with epoxy on equipment anchor bolts where clearance between anchor and equipment support hole exceeds 3.2 mm (0.125 inch). Suspended Equipment: All suspended equipment that meets any of the following conditions requires seismic restraints as specified by the supplier: a. b. c. d. 5. b. Anchor floor and wall mounted equipment to the structure as per the stamped seismic certifications / drawings. Suspended equipment shall be restrained using seismic cable restraints, or struts, and hanger rods as per the stamped seismic certifications / drawings. Vibration Isolated Equipment: a. b. D. Rigidly attached to pipe or duct that is 75 lbs. and greater, Items hung independently or with flexible connections greater than 20 lbs.. For importance factors greater than 1.0 all suspended equipment requires seismic restraints regardless of the above notes. Wall mounted equipment weighing more than 20 lbs. with an importance factor of 1.0. The 300mm (12”) rule does not apply to suspended equipment. Rigid Mounted Equipment: a. 6. Division 23 HVAC Specifications Page 36 Seismic control shall not compromise the performance of noise control, vibration isolation or fire stopping systems. Equipment supported by vibration-isolation hangers shall be detailed and installed with approximately a 1/8” gap between the isolation hangers and the structure. Isolators at restraint locations must be fitted with uplift limit stops. Piping, Duct and Electrical Systems: Provide seismic control measures with spacing and anchorage engineered for the specific project. 1. All piping, duct and conduit systems are to be restrained to meet code requirements. a. b. c. d. e. 2. All piping associated with “Life Safety Systems” shall always have an importance factor of 1.5. Seismic restraint requirements / exemptions vary with code and seismic acceleration – see specific code and comply with applicable restraint requirements. Seismically restrain / brace all pipes 65 mm (2 ½”) in nominal diameter and larger. Seismically restrain / brace all piping in boiler rooms, mechanical rooms and refrigeration mechanical rooms 32 mm (1 ¼”) in nominal diameter and larger. Seismically restrain / brace all Gas (ie: natural gas, medical gas, vacuum, petroleum based liquid, compressed air, etc.) piping 25 mm (1”) in nominal diameter and larger. Branch lines may not be used to brace main lines. Restraint Spacing For Piping: a. b. For ductile piping: Transverse supports a maximum of 12 m (40’) o.c. For ductile piping: Longitudinal supports a maximum of 24 m (80’) o.c. ENSO Systems Inc. #865 St. Elizabeth C.S. – Full Day Kindergarten Addition c. d. e. 3. d. b. Seismically restrain all conduit 65 mm (2 ½”) in nominal diameter and larger. Single supported conduit is restrained in the same fashion as single clevis supported pipe. Seismically restrain all conduit or cable trays that are supported on trapeze bars, that have been assigned a Component Importance Factor equal to 1.5, and that have a total weight greater than 10 lb/ft (146 N/m). This total weight includes not only the conduit or cable trays, but also includes the trapeze bars as well. Single supported conduit and trapeze supported conduit, bus duct, and cable trays to be seismically restrained in a manner similar to pipe and duct. a. b. 7. Transverse supports a maximum of 9 m (30’) o.c. Longitudinal supports a maximum of 18 m (60’) o.c. Seismically restrain per specific code requirements all Electrical components listed below (unless otherwise indicated on the drawings), using seismic cable restraints: a. 6. All ducts with cross sectional area equal to or greater than 0.55 m2 (6 ft2). All round ducts with diameters equal to or greater than 28” (710 mm). Any ductwork, pipe or equipment, which if it were to fail would result in damage to a piece of equipment or building function that has a component importance factor of 1.5. All ductwork weighing more than 25 kg/m (17 lb/ft). Restraint Spacing For Ductwork: a. b. 5. For non-ductile piping (e.g., cast iron, PVC) space Transverse supports a maximum of 6 m (20’) o.c., and Longitudinal supports a maximum of 12 m (40’) o.c. Differential spacing can be designed depending upon pipe size and length(s) of run (design will be indicated on drawings of approved method). For piping with hazardous material inside (e.g., natural gas, medical gas) space Transverse supports a maximum of 6 m (20’) o.c., and Longitudinal supports a maximum of 12 m (40’) o.c. For pipe risers, restrain the piping at floor penetrations using the same spacing requirements as above. Seismically restrain per specific code requirements, all ductwork listed below (unless otherwise indicated on the drawings), using seismic cable restraints: (Ductwork not meeting listed below criteria is to be “Exempt”) a. b. c. 4. Division 23 HVAC Specifications Page 37 Conduit: Follow piping spacing requirements and required criteria as listed in Section 3.2.E.2 Bus Ducts and Cable Trays: Follow duct spacing requirements and required criteria as listed in section 3.2.D.2 The seismic restraint components provided by Kinetics Noise Control, Inc. are intended to be used with suspended single supported conduit and trapeze supported conduit, cable trays, and bus ducts. Components intended to both support and restrain distribution systems such as wall mounted conduit, cable trays, and bus ducts will need to be designed and evaluated for both the dead weight load and the design horizontal seismic load. ENSO Systems Inc. #865 St. Elizabeth C.S. – Full Day Kindergarten Addition 8. 9. 10. 11. 12. 13. 14. 15. 16. 17. 18. 19. 20. 21. 22. 23. 24. 25. 26. 27. 28. Division 23 HVAC Specifications Page 38 To ensure that the seismic forces are transferred properly to the restraint points, the cables should be strapped either individually or in bundles to the cable tray at regular intervals. It is necessary for the conduit, bus ducts, and cable trays to be attached to the trapeze bars sufficiently to resist the design horizontal seismic forces, both transverse (T) and longitudinal (L). Brace a change of direction longer than 3.7 m (12’). This specification does not allow the use of the 300mm (12’’) rule where the piping, duct and electrical may be exempted from seismic restraint based on the length of the support rods provided that the rods are not subjected to bending moments. Install restraint cables so they do not bend across edges of adjacent equipment or building structure. Tie back to structure at 45 degrees to the structure. Longitudinal restraints for single pipe supports shall be attached rigidly to the pipe, not to the pipe hanger. For supports with multiple pipes (trapezes), secure pipes to trapeze member with clamps approved for application. Install flexible metal hose loops in piping which crosses building seismic joints, sized for the anticipated amount of movement. Install flexible piping connectors where adjacent sections or branches are supported by different structural elements, and where the connections terminate with connection to equipment that is anchored to a different structural element from the one supporting the connections as they approach equipment. Where pipe sizes reduce below required dimensions noted above in Section 3.2.E, the final restraint shall be installed at the transition location. Roof mounted duct is to be installed on sleepers or frames mechanically connected to the building structure. Roof anchors and seismic cables or frames shall be used to resist seismic and wind loading. Wind loading factors shall be determined by the registered design professional. Where duct sizes reduce below required dimensions noted above in Section 3.2.D, the final restraint shall be installed at the transition location. Longitudinal restraints for single conduit supports shall be attached rigidly to the pipe, not to the pipe/conduit hanger. For supports with multiple conduits (trapezes), secure conduit to trapeze member with clamps approved for application. Where conduit, bus ducts, cable trays sizes reduce below required dimensions noted above in Section 3.2.F, the final restraint shall be installed at the transition location. Rod Stiffener Clamps are required where the hanger rod exceeds the maximum length shown in the seismic calculation sheets. They are only required at restraint locations. Seismically Rated Beam Clamps are required where welding to or penetrations to steel beams are not approved. Adjust restraint cables so that they are not visibly slack. Cable not to support weight during normal operation. Seismic systems are to be compatible with requirements for anchoring and guiding of systems. Drilled or power driven anchors or fasteners shall not be permitted for use with seismic control measures. Friction due to gravity does not constitute a seismic attachment. Seismic restraint connections are not to be connected to the bottom chord of steel joists or the bottom flange of steel beams. ENSO Systems Inc. #865 St. Elizabeth C.S. – Full Day Kindergarten Addition 29. 30. 3.4 A. 3.5 A. B. C. D. E. Division 23 HVAC Specifications Page 39 Standard beam clamps can be used to support restrained components; they cannot be used to connect the seismic restraint to the structure – only for the hanger rods. Brace remaining piping, ductwork, electrical components to code requirements (OBC & NBC or TI-809-04)) or in conformance with SMACNA (Sheet Metal and Air Conditioning Contractors National Association, Inc.) “Seismic Restraint Manual Guidelines for Mechanical Systems”, 2ND edition or 3RD edition depending on Code or EOR. ACCOMMODATION OF DIFFERENTIAL SEISMIC MOTION Install flexible connections in piping where they cross seismic joints, where adjacent sections or branches are supported by different structural elements, and where the connections terminate with connection to equipment that is anchored to a different structural element from the one supporting the connections as they approach equipment. Comply with requirements in Section 221116 "Domestic Water Piping" for piping flexible connections. INSPECTION AND CERTIFICATION The contractor shall notify the local representative of the seismic restraint materials manufacturer prior to installing any seismic restraint devices. The contractor shall seek the representative’s guidance in any installation procedures with which he/she is unfamiliar. The contractor shall notify the local representative of the seismic restraint materials manufacturer mid-way through the listed project for an inspection all vibration and seismic restraint devices already installed. A written report of any installation errors, improperly selected devices, or other fault in the system which could affect the performance of the system shall be documented and the contractor shall perform all steps that are required from this written report to properly complete the vibration and seismic restraint work as per the specifications. Upon completion of the installation, arrange for the design Engineer to visit the site to verify the proper installation of all seismic restraint devices herein specified. A written report citing any installation errors, improperly selected devices, or other fault in the system which could affect the performance of the system should be generated by the Engineer. The Engineer shall verify that isolators are adjusted, with spring’s perpendicular to bases or housing, adjustment bolts are tightened up on equipment mountings, and hangers are not cocked. Upon completion of the Work, the Engineer shall provide a sealed letter addressed to the local authorities having jurisdiction confirming that the Seismic Design and Installation is in general conformance with the design documents and the Ontario and National Building Codes. The installing contractor shall take all steps required to properly complete the seismic restraint work as per the specifications. Perform the following tests: 1. 2. 3. Provide evidence of recent calibration of test equipment by a testing agency acceptable to authorities having jurisdiction. Schedule test with Owner, through Architect, before connecting anchorage device to restrained component (unless post connection testing has been approved), and with at least seven days' advance notice. Obtain Architect's approval before transmitting test loads to structure. Provide temporary load-spreading members. ENSO Systems Inc. #865 St. Elizabeth C.S. – Full Day Kindergarten Addition 4. 5. 3.6 A. Division 23 HVAC Specifications Page 40 Test at least four of each type and size of installed anchors and fasteners selected by Architect. Test to 90 percent of rated proof load of device. ADJUSTING Adjust restraints to permit free movement of equipment within normal mode of operation. END OF SECTION 230548 SECTION 230553 – IDENTIFICATION FOR HVAC PIPING AND EQUIPMENT PART 1 - GENERAL 1.1 A. SUMMARY Section Includes: 1. 2. 3. 4. 1.2 A. B. C. D. Equipment labels. Warning signs and labels. Pipe labels. Valve tags. ACTION SUBMITTALS Product Data: For each type of product. Equipment Label Schedule: Include a listing of all equipment to be labeled with the proposed content for each label. Valve numbering scheme. Valve Schedules: For each piping system to include in maintenance manuals. PART 2 - PRODUCTS 2.1 A. EQUIPMENT LABELS Metal Labels for Equipment: 1. 2. 3. 4. 5. 6. 7. Material and Thickness: Brass, 0.032-inch (0.8-mm) or stainless steel, 0.025-inch (0.64-mm) or aluminum, 0.032-inch (0.8-mm) or anodized aluminum, 0.032-inch (0.8-mm) minimum thickness, and having predrilled or stamped holes for attachment hardware. Letter Color: Black. Background Color: White. Minimum Label Size: Length and width vary for required label content, but not less than 2-1/2 by 3/4 inch (64 by 19 mm). Minimum Letter Size: 1/4 inch (6.4 mm) for name of units if viewing distance is less than 24 inches (600 mm), 1/2 inch (13 mm) for viewing distances up to 72 inches (1830 mm), and proportionately larger lettering for greater viewing distances. Include secondary lettering two-thirds to three-quarters the size of principal lettering. Fasteners: Stainless-steel rivets or self-tapping screws. Adhesive: Contact-type permanent adhesive, compatible with label and with substrate. ENSO Systems Inc. #865 St. Elizabeth C.S. – Full Day Kindergarten Addition B. Plastic Labels for Equipment: 1. 2. 3. 4. 5. 6. 7. 8. C. 2.2 A. B. C. D. E. F. G. H. 2.3 A. B. C. D. Division 23 HVAC Specifications Page 41 Material and Thickness: Multilayer, multicolor, plastic labels for mechanical engraving, [1/16 inch (1.6 mm)] thick, and having predrilled holes for attachment hardware. Letter Color: Black. Background Color: White. Maximum Temperature: Able to withstand temperatures up to 160OF (71OC). Minimum Label Size: Length and width vary for required label content, but not less than 2-1/2 by 3/4 inch (64 by 19 mm). Minimum Letter Size: 1/4 inch (6.4 mm) for name of units if viewing distance is less than 24 inches (600 mm), 1/2 inch (13 mm) for viewing distances up to 72 inches (1830 mm), and proportionately larger lettering for greater viewing distances. Include secondary lettering two-thirds to three-quarters the size of principal lettering. Fasteners: Stainless-steel rivets or self-tapping screws. Adhesive: Contact-type permanent adhesive, compatible with label and with substrate. Label Content: Include equipment's Drawing designation or unique equipment number, Drawing numbers where equipment is indicated (plans, details, and schedules), and the Specification Section number and title where equipment is specified. WARNING SIGNS AND LABELS Material and Thickness: Multilayer, multicolor, plastic labels for mechanical engraving, 1/16 inch (1.6 mm) or 1/8 inch (3.2 mm) thick, and having predrilled holes for attachment hardware. Letter Color: Red. Background Color: White. Maximum Temperature: Able to withstand temperatures up to 160OF (71OC). Minimum Label Size: Length and width vary for required label content, but not less than 2-1/2 by 3/4 inch (64 by 19 mm). Minimum Letter Size: 1/4 inch (6.4 mm) for name of units if viewing distance is less than 24 inches (600 mm), 1/2 inch (13 mm) for viewing distances up to 72 inches (1830 mm), and proportionately larger lettering for greater viewing distances. Include secondary lettering two-thirds to three-quarters the size of principal lettering. Fasteners: Stainless-steel rivets or self-tapping screws. Adhesive: Contact-type permanent adhesive, compatible with label and with substrate. PIPE LABELS General Requirements for Manufactured Pipe Labels: Preprinted, color-coded, with lettering indicating service, and showing flow direction according to ASME A13.1. Pretensioned Pipe Labels: Precoiled, semirigid plastic formed to partially cover circumference of pipe and to attach to pipe without fasteners or adhesive. Self-Adhesive Pipe Labels: Printed plastic with contact-type, permanent-adhesive backing. Pipe Label Contents: Include identification of piping service using same designations or abbreviations as used on Drawings; also include pipe size and an arrow indicating flow direction. ENSO Systems Inc. #865 St. Elizabeth C.S. – Full Day Kindergarten Addition 1. 2. 2.4 A. Flow-Direction Arrows: Integral with piping system service lettering to accommodate both directions or as separate unit on each pipe label to indicate flow direction. Lettering Size: [Size letters according to ASME A13.1 for piping] [At least 1/2 inch (13 mm) for viewing distances up to 72 inches (1830 mm) and proportionately larger lettering for greater viewing distances]. VALVE TAGS Description: Stamped or engraved with 1/4-inch (6.4-mm) letters for piping system abbreviation and 1/2-inch (13-mm) numbers. 1. 2. B. Division 23 HVAC Specifications Page 42 Tag Material: Brass, 0.032-inch (0.8-mm) or stainless steel, 0.025-inch (0.64mm) minimum thickness, and having predrilled or stamped holes for attachment hardware. Fasteners: Brass wire-link chain or beaded chain or S-hook. Valve Schedules: For each piping system, on 8-1/2-by-11-inch (A4) bond paper. Tabulate valve number, piping system, system abbreviation (as shown on valve tag), location of valve (room or space), normal-operating position (open, closed, or modulating), and variations for identification. Mark valves for emergency shutoff and similar special uses. 1. Valve-tag schedule shall be included in operation and maintenance data. PART 3 - EXECUTION 3.1 A. 3.2 A. B. C. 3.3 A. B. 3.4 A. PREPARATION Clean piping and equipment surfaces of substances that could impair bond of identification devices, including dirt, oil, grease, release agents, and incompatible primers, paints, and encapsulants. GENERAL INSTALLATION REQUIREMENTS Coordinate installation of identifying devices with completion of covering and painting of surfaces where devices are to be applied. Coordinate installation of identifying devices with locations of access panels and doors. Install identifying devices before installing acoustical ceilings and similar concealment. EQUIPMENT LABEL INSTALLATION Install or permanently fasten labels on each major item of mechanical equipment. Locate equipment labels where accessible and visible. PIPE LABEL INSTALLATION Pipe Label Locations: Locate pipe labels where piping is exposed or above accessible ceilings in finished spaces; machine rooms; accessible maintenance spaces such as shafts, tunnels, and plenums; and exterior exposed locations as follows: 1. 2. 3. 4. Near each valve and control device. Near each branch connection, excluding short takeoffs for fixtures and terminal units. Where flow pattern is not obvious, mark each pipe at branch. Near penetrations and on both sides of through walls, floors, ceilings, and inaccessible enclosures. At access doors, manholes, and similar access points that permit view of concealed piping. ENSO Systems Inc. #865 St. Elizabeth C.S. – Full Day Kindergarten Addition 5. 6. 7. B. C. A. B. Near major equipment items and other points of origination and termination. Spaced at maximum intervals of 50 feet (15 m) along each run. Reduce intervals to 25 feet (7.6 m) in areas of congested piping and equipment. On piping above removable acoustical ceilings. Omit intermediately spaced labels. Directional Flow Arrows: Arrows shall be used to indicate direction of flow in pipes, including pipes where flow is allowed in both directions. Pipe Label Color Schedule: 1. 3.5 Heating Water Piping: White letters on a safety-green background. VALVE-TAG INSTALLATION Install tags on valves and control devices in piping systems, except check valves, valves within factory-fabricated equipment units, shutoff valves, faucets, convenience and lawn-watering hose connections, and HVAC terminal devices and similar roughingin connections of end-use fixtures and units. List tagged valves in a valve schedule. Valve-Tag Application Schedule: Tag valves according to size, shape, and color scheme and with captions similar to those indicated in the following subparagraphs: 1. Valve-Tag Size and Shape: a. 2. A. 1-1/2 inches (38 mm) round or square. Valve-Tag Colors: a. b. c. d. e. 3.6 Division 23 HVAC Specifications Page 43 Toxic and Corrosive Fluids: Black letters on a safety-orange background. Flammable Fluids: Black letters on a safety-yellow background. Combustible Fluids: White letters on a safety-brown background. Potable and Other Water: White letters on a safety-green background. Defined by User: White letters on a safety-purple background, black letters on a safety-white background, white letters on a safety-gray background, and white letters on a safety-black background WARNING-TAG INSTALLATION Write required message on, and attach warning tags to, equipment and other items where required. END OF SECTION 230553 SECTION 230593 – TESTING, ADJUSTING, AND BALANCING FOR HVAC PART 1 - GENERAL 1.1 A. 1.2 A. RELATED DOCUMENTS Drawings and general provisions of the Contract, including General and Supplementary Conditions and Division 01 Specification Sections, apply to this Section. SUMMARY Section Includes: 1. Balancing Air Systems: a. Constant-volume air systems. ENSO Systems Inc. #865 St. Elizabeth C.S. – Full Day Kindergarten Addition 2. Balancing Hydronic Piping Systems: a. 1.3 A. B. C. D. E. 1.4 A. 1.5 A. B. 1.6 A. B. 1.7 A. Division 23 HVAC Specifications Page 44 Constant-flow hydronic systems. DEFINITIONS AABC: Associated Air Balance Council. NEBB: National Environmental Balancing Bureau. TAB: Testing, adjusting, and balancing. TABB: Testing, Adjusting, and Balancing Bureau. TAB Specialist: An entity engaged to perform TAB Work. INFORMATIONAL SUBMITTALS Certified TAB reports. QUALITY ASSURANCE TAB Contractor Qualifications: Engage a TAB entity certified by AABC, NEBB or TABB. Instrumentation Type, Quantity, Accuracy, and Calibration: As described in ASHRAE 111, Section 5, "Instrumentation." PROJECT CONDITIONS Full Owner Occupancy: Owner will occupy the site and existing building during entire TAB period. Cooperate with Owner during TAB operations to minimize conflicts with Owner's operations. Partial Owner Occupancy: Owner may occupy completed areas of building before Substantial Completion. Cooperate with Owner during TAB operations to minimize conflicts with Owner's operations. COORDINATION Perform TAB after leakage and pressure tests on distribution systems have been satisfactorily completed. PART 2 - PRODUCTS (Not Applicable) PART 3 - EXECUTION 3.1 A. TAB SPECIALISTS Subject to compliance with requirements, engage one of the following available TAB contractors: 1. 3.2 A. B. C. Approved by the TCDSB. EXAMINATION Examine the Contract Documents to become familiar with Project requirements and to discover conditions in systems' designs that may preclude proper TAB of systems and equipment. Examine systems for installed balancing devices, such as test ports, gage cocks, thermometer wells, flow-control devices, balancing valves and fittings, and manual volume dampers. Verify that locations of these balancing devices are accessible. Examine the approved submittals for HVAC systems and equipment. ENSO Systems Inc. #865 St. Elizabeth C.S. – Full Day Kindergarten Addition D. E. F. Examine design data including HVAC system descriptions, statements of design assumptions for environmental conditions and systems' output, and statements of philosophies and assumptions about HVAC system and equipment controls. Examine ceiling plenums and underfloor air plenums used for supply, return, or relief air to verify that they meet the leakage class of connected ducts as and are properly separated from adjacent areas. Verify that penetrations in plenum walls are sealed and fire-stopped if required. Examine equipment performance data including fan and pump curves. 1. 2. G. H. I. J. K. L. M. N. O. 3.3 A. B. Division 23 HVAC Specifications Page 45 Relate performance data to Project conditions and requirements, including system effects that can create undesired or unpredicted conditions that cause reduced capacities in all or part of a system. Calculate system-effect factors to reduce performance ratings of HVAC equipment when installed under conditions different from the conditions used to rate equipment performance. To calculate system effects for air systems, use tables and charts found in AMCA 201, "Fans and Systems," or in SMACNA's "HVAC Systems - Duct Design." Compare results with the design data and installed conditions. Examine system and equipment installations and verify that field quality-control testing, cleaning, and adjusting specified in individual Sections have been performed. Examine HVAC equipment and filters and verify that bearings are greased, belts are aligned and tight, and equipment with functioning controls is ready for operation. Examine terminal units, such as variable-air-volume boxes, and verify that they are accessible and their controls are connected and functioning. Examine strainers. Verify that startup screens are replaced by permanent screens with indicated perforations. Examine three-way valves for proper installation for their intended function of diverting or mixing fluid flows. Examine heat-transfer coils for correct piping connections and for clean and straight fins. Examine system pumps to ensure absence of entrained air in the suction piping. Examine operating safety interlocks and controls on HVAC equipment. Report deficiencies discovered before and during performance of TAB procedures. Observe and record system reactions to changes in conditions. Record default set points if different from indicated values. PREPARATION Prepare a TAB plan that includes strategies and step-by-step procedures. Complete system-readiness checks and prepare reports. Verify the following: 1. 2. 3. 4. 5. 6. 7. 8. Permanent electrical-power wiring is complete. Hydronic systems are filled, clean, and free of air. Automatic temperature-control systems are operational. Equipment and duct access doors are securely closed. Balance, smoke, and fire dampers are open. Isolating and balancing valves are open and control valves are operational. Ceilings are installed in critical areas where air-pattern adjustments are required and access to balancing devices is provided. Windows and doors can be closed so indicated conditions for system operations can be met. ENSO Systems Inc. #865 St. Elizabeth C.S. – Full Day Kindergarten Addition 3.4 A. B. GENERAL PROCEDURES FOR TESTING AND BALANCING Perform testing and balancing procedures on each system according to the procedures contained in AABC's "National Standards for Total System Balance", ASHRAE 111, NEBB's "Procedural Standards for Testing, Adjusting, and Balancing of Environmental Systems", SMACNA's "HVAC Systems - Testing, Adjusting, and Balancing" and in this Section. Cut insulation, ducts, pipes, and equipment cabinets for installation of test probes to the minimum extent necessary for TAB procedures. 1. 2. C. D. 3.5 A. B. C. D. E. F. G. H. I. J. K. 3.6 A. Division 23 HVAC Specifications Page 46 After testing and balancing, patch probe holes in ducts with same material and thickness as used to construct ducts. After testing and balancing, install test ports that comply with requirements in Section 233300 "Air Duct Accessories." Mark equipment and balancing devices, including damper-control positions, valve position indicators, fan-speed-control levers, and similar controls and devices, with paint or other suitable, permanent identification material to show final settings. Take and report testing and balancing measurements in inch-pound (IP) or metric (SI) units to match measurements shown in the contract documents. GENERAL PROCEDURES FOR BALANCING AIR SYSTEMS Prepare test reports for both fans and outlets. Obtain manufacturer's outlet factors and recommended testing procedures. Crosscheck the summation of required outlet volumes with required fan volumes. Prepare schematic diagrams of systems' "as-built" duct layouts. For variable-air-volume systems, develop a plan to simulate diversity. Determine the best locations in main and branch ducts for accurate duct-airflow measurements. Check airflow patterns from the outdoor-air louvers and dampers and the return- and exhaust-air dampers through the supply-fan discharge and mixing dampers. Locate start-stop and disconnect switches, electrical interlocks, and motor starters. Verify that motor starters are equipped with properly sized thermal protection. Check dampers for proper position to achieve desired airflow path. Check condensate drains for proper connections and functioning. Check for proper sealing of air-handling-unit components. Verify that air duct system is sealed as specified in Section 233113 "Metal Ducts." PROCEDURES FOR CONSTANT-VOLUME AIR SYSTEMS Adjust fans to deliver total indicated airflows within the maximum allowable fan speed listed by fan manufacturer. 1. Measure total airflow. a. 2. Where sufficient space in ducts is unavailable for Pitot-tube traverse measurements, measure airflow at terminal outlets and inlets and calculate the total airflow. Measure fan static pressures as follows to determine actual static pressure: a. b. Measure outlet static pressure as far downstream from the fan as practical and upstream from restrictions in ducts such as elbows and transitions. Measure static pressure directly at the fan outlet or through the flexible connection. ENSO Systems Inc. #865 St. Elizabeth C.S. – Full Day Kindergarten Addition c. d. 3. 5. 6. 7. B. Report the cleanliness status of filters and the time static pressures are measured. Measure static pressures entering and leaving other devices, such as sound traps, heat-recovery equipment, under final balanced conditions. Review Record Documents to determine variations in design static pressures versus actual static pressures. Calculate actual system-effect factors. Recommend adjustments to accommodate actual conditions. Obtain approval from Architect for adjustment of fan speed higher or lower than indicated speed. Comply with requirements in HVAC Sections for air-handling units for adjustment of fans, belts, and pulley sizes to achieve indicated airhandling-unit performance. Do not make fan-speed adjustments that result in motor overload. Consult equipment manufacturers about fan-speed safety factors. Modulate dampers and measure fan-motor amperage to ensure that no overload will occur. Measure amperage in full-cooling, full-heating, economizer, and any other operating mode to determine the maximum required brake horsepower. Adjust volume dampers for main duct, submain ducts, and major branch ducts to indicated airflows within specified tolerances. 1. Measure airflow of submain and branch ducts. a. 2. 3. C. Measure inlet static pressure of single-inlet fans in the inlet duct as near the fan as possible, upstream from the flexible connection, and downstream from duct restrictions. Measure inlet static pressure of double-inlet fans through the wall of the plenum that houses the fan. Measure static pressure across each component that makes up an air-handling unit, rooftop unit, and other air-handling and -treating equipment. a. 4. Division 23 HVAC Specifications Page 47 Where sufficient space in submain and branch ducts is unavailable for Pitot-tube traverse measurements, measure airflow at terminal outlets and inlets and calculate the total airflow for that zone. Measure static pressure at a point downstream from the balancing damper, and adjust volume dampers until the proper static pressure is achieved. Remeasure each submain and branch duct after all have been adjusted. Continue to adjust submain and branch ducts to indicated airflows within specified tolerances. Measure air outlets and inlets without making adjustments. 1. D. Measure terminal outlets using a direct-reading hood or outlet manufacturer's written instructions and calculating factors. Adjust air outlets and inlets for each space to indicated airflows within specified tolerances of indicated values. Make adjustments using branch volume dampers rather than extractors and the dampers at air terminals. 1. 2. Adjust each outlet in same room or space to within specified tolerances of indicated quantities without generating noise levels above the limitations prescribed by the Contract Documents. Adjust patterns of adjustable outlets for proper distribution without drafts. ENSO Systems Inc. #865 St. Elizabeth C.S. – Full Day Kindergarten Addition 3.7 A. B. C. GENERAL PROCEDURES FOR HYDRONIC SYSTEMS Prepare test reports with pertinent design data, and number in sequence starting at pump to end of system. Check the sum of branch-circuit flows against the approved pump flow rate. Correct variations that exceed plus or minus 5 percent. Prepare schematic diagrams of systems' "as-built" piping layouts. Prepare hydronic systems for testing and balancing according to the following, in addition to the general preparation procedures specified above: 1. 2. 3. 4. 5. 6. 7. 8. 3.8 A. Open all manual valves for maximum flow. Check liquid level in expansion tank. Check makeup water-station pressure gage for adequate pressure for highest vent. Check flow-control valves for specified sequence of operation, and set at indicated flow. Set differential-pressure control valves at the specified differential pressure. Do not set at fully closed position when pump is positive-displacement type unless several terminal valves are kept open. Set system controls so automatic valves are wide open to heat exchangers. Check pump-motor load. If motor is overloaded, throttle main flow-balancing device so motor nameplate rating is not exceeded. Check air vents for a forceful liquid flow exiting from vents when manually operated. PROCEDURES FOR CONSTANT-FLOW HYDRONIC SYSTEMS Measure water flow at pumps. Use the following procedures except for positivedisplacement pumps: 1. Verify impeller size by operating the pump with the discharge valve closed. Read pressure differential across the pump. Convert pressure to head and correct for differences in gage heights. Note the point on manufacturer's pump curve at zero flow and verify that the pump has the intended impeller size. a. 2. 3. 4. C. If impeller sizes must be adjusted to achieve pump performance, obtain approval from Architect and comply with requirements in Section 232123 "Hydronic Pumps." Check system resistance. With all valves open, read pressure differential across the pump and mark pump manufacturer's head-capacity curve. Adjust pump discharge valve until indicated water flow is achieved. a. B. Division 23 HVAC Specifications Page 48 Monitor motor performance during procedures and do not operate motors in overload conditions. Verify pump-motor brake horsepower. Calculate the intended brake horsepower for the system based on pump manufacturer's performance data. Compare calculated brake horsepower with nameplate data on the pump motor. Report conditions where actual amperage exceeds motor nameplate amperage. Report flow rates that are not within plus or minus 10 percent of design. Measure flow at all automatic flow control valves to verify that valves are functioning as designed. Measure flow at all pressure-independent characterized control valves, with valves in fully open position, to verify that valves are functioning as designed. ENSO Systems Inc. #865 St. Elizabeth C.S. – Full Day Kindergarten Addition D. E. Set calibrated balancing valves, if installed, at calculated presettings. Measure flow at all stations and adjust, where necessary, to obtain first balance. 1. F. G. 3. I. J. 3.9 A. B. 3.10 A. A. Determine the balancing station with the highest percentage over indicated flow. Adjust each station in turn, beginning with the station with the highest percentage over indicated flow and proceeding to the station with the lowest percentage over indicated flow. Record settings and mark balancing devices. Measure pump flow rate and make final measurements of pump amperage, voltage, rpm, pump heads, and systems' pressures and temperatures including outdoor-air temperature. Measure the differential-pressure-control-valve settings existing at the conclusion of balancing. Check settings and operation of each safety valve. Record settings. PROCEDURES FOR MOTORS Motors, 1/2 HP and Larger: Test at final balanced conditions and record the following data: 1. Manufacturer's name, model number, and serial number. 2. Motor horsepower rating. 3. Motor rpm. 4. Efficiency rating. 5. Nameplate and measured voltage, each phase. 6. Nameplate and measured amperage, each phase. 7. Starter thermal-protection-element rating. Motors Driven by Variable-Frequency Controllers: Test for proper operation at speeds varying from minimum to maximum. Test the manual bypass of the controller to prove proper operation. Record observations including name of controller manufacturer, model number, serial number, and nameplate data. PROCEDURES FOR HEAT-TRANSFER COILS Measure, adjust, and record the following data for each water coil: 1. 2. 3. 4. 5. 6. 7. 3.11 System components that have Cv rating or an accurately cataloged flowpressure-drop relationship may be used as a flow-indicating device. Measure flow at main balancing station and set main balancing device to achieve flow that is 5 percent greater than indicated flow. Adjust balancing stations to within specified tolerances of indicated flow rate as follows: 1. 2. H. Division 23 HVAC Specifications Page 49 Entering- and leaving-water temperature. Water flow rate. Water pressure drop. Dry-bulb temperature of entering and leaving air. Wet-bulb temperature of entering and leaving air for cooling coils. Airflow. Air pressure drop. TOLERANCES Set HVAC system's air flow rates and water flow rates within the following tolerances: ENSO Systems Inc. #865 St. Elizabeth C.S. – Full Day Kindergarten Addition 1. 2. 3. 3.12 A. Supply, Return, and Exhaust Fans and Equipment with Fans: Plus or minus 10 percent. Air Outlets and Inlets: Plus or minus 10 percent. Heating-Water Flow Rate: Plus or minus 10 percent. FINAL REPORT General: Prepare a certified written report; tabulate and divide the report into separate sections for tested systems and balanced systems. 1. 2. B. Include a certification sheet at the front of the report's binder, signed and sealed by the certified testing and balancing engineer. Include a list of instruments used for procedures, along with proof of calibration. General Report Data: In addition to form titles and entries, include the following data: 1. 2. 3. 4. 5. 6. 7. 8. 9. 10. 11. Title page. Name and address of the TAB contractor. Project name. Project location. Architect's name and address. Engineer's name and address. Contractor's name and address. Report date. Signature of TAB supervisor who certifies the report. Table of Contents with the total number of pages defined for each section of the report. Number each page in the report. Summary of contents including the following: a. b. c. 12. 13. 14. 15. Indicated versus final performance. Notable characteristics of systems. Description of system operation sequence if it varies from the Contract Documents. Nomenclature sheets for each item of equipment. Data for terminal units, including manufacturer's name, type, size, and fittings. Notes to explain why certain final data in the body of reports vary from indicated values. Test conditions for fans and pump performance forms including the following: a. b. c. d. C. Division 23 HVAC Specifications Page 50 Settings for outdoor-, return-, and exhaust-air dampers. Conditions of filters. Fan drive settings including settings and percentage of maximum pitch diameter. Other system operating conditions that affect performance. System Diagrams: Include schematic layouts of air and hydronic distribution systems. Present each system with single-line diagram and include the following: 1. 2. 3. 4. 5. 6. Quantities of outdoor, supply, return, and exhaust airflows. Water and steam flow rates. Duct, outlet, and inlet sizes. Pipe and valve sizes and locations. Terminal units. Balancing stations. ENSO Systems Inc. #865 St. Elizabeth C.S. – Full Day Kindergarten Addition 7. D. Position of balancing devices. Air-Handling-Unit Test Reports: For air-handling units with coils, include the following: 1. Unit Data: a. b. c. d. e. f. g. h. i. j. k. 2. 3. Unit identification. Location. Make and type. Model number and unit size. Manufacturer's serial number. Unit arrangement and class. Discharge arrangement. Sheave make, size in mm (inches), and bore. Center-to-center dimensions of sheave, and amount of adjustments in mm (inches). Number, make, and size of belts. Number, type, and size of filters. Motor Data: a. b. c. d. e. f. Motor make, and frame type and size. Horsepower and rpm. Volts, phase, and hertz. Full-load amperage and service factor. Sheave make, size in mm (inches), and bore. Center-to-center dimensions of sheave, and amount of adjustments in mm (inches). Test Data (Indicated and Actual Values): a. b. c. d. e. f. g. h. i. j. E. Division 23 HVAC Specifications Page 51 Total air flow rate in L/s (cfm). Total system static pressure in Pa (inches wg). Fan rpm. Discharge static pressure in Pa (inches wg). Filter static-pressure differential in Pa (inches wg) Heating-coil static-pressure differential in Pa (inches wg) Outdoor airflow in L/s (cfm). Return airflow in L/s (cfm). Outdoor-air damper position. Return-air damper position. Apparatus-Coil Test Reports: 1. Test Data (Indicated and Actual Values): a. b. c. d. e. f. g. h. i. Air flow rate in L/s (cfm). Average face velocity in m/s (fpm). Air pressure drop in Pa (inches wg) Outdoor-air, wet- and dry-bulb temperatures in OC (OF). Return-air, wet- and dry-bulb temperatures in OC (OF). Entering-air, wet- and dry-bulb temperatures in OC (OF).. Leaving-air, wet- and dry-bulb temperatures in OC (OF). Water flow rate in L/s (gpm). Water pressure differential in feet of head or kPa (psig). ENSO Systems Inc. #865 St. Elizabeth C.S. – Full Day Kindergarten Addition j. k. F. Entering-water temperature in OC (OF). Leaving-water temperature in OC (OF).). Fan Test Reports: For supply, return, and exhaust fans, include the following: 1. Fan Data: a. b. c. d. e. f. g. h. 2. g. 3. System identification. Location. Make and type. Model number and size. Manufacturer's serial number. Arrangement and class. Sheave make, size in mm (inches), and bore. Center-to-center dimensions of sheave, and amount of adjustments in mm (inches). Motor Data: a. b. c. d. e. f. Motor make, and frame type and size. Horsepower and rpm. Volts, phase, and hertz. Full-load amperage and service factor. Sheave make, size in mm (inches), and bore. Center-to-center dimensions of sheave, and amount of adjustments in mm (inches). Number, make, and size of belts. Test Data (Indicated and Actual Values): a. b. c. d. e. G. Division 23 HVAC Specifications Page 52 Total airflow rate in L/s (cfm). Total system static pressure in Pa (inches wg). Fan rpm. Discharge static pressure in Pa (inches wg). Suction static pressure in Pa (inches wg). Pump Test Reports: Calculate impeller size by plotting the shutoff head on pump curves and include the following: 1. Unit Data: a. b. c. d. e. f. g. h. i. j. k. l. m. Unit identification. Location. Service. Make and size. Model number and serial number. Water flow rate in L/s (gpm). Water pressure differential in feet of head or kPa (psig). Required net positive suction head in feet of head or kPa (psig). Pump rpm. Impeller diameter in mm (inches). Motor make and frame size. Motor horsepower and rpm. Voltage at each connection. ENSO Systems Inc. #865 St. Elizabeth C.S. – Full Day Kindergarten Addition n. o. p. 2. Report Data: a. b. c. d. e. A. Initial Inspection: 2. After testing and balancing are complete, operate each system and randomly check measurements to verify that the system is operating according to the final test and balance readings documented in the final report. Check the following for each system: a. b. c. d. e. A. Measure airflow of at least 10 percent of air outlets. Measure water flow of at least 5 percent of terminals. Measure room temperature at each thermostat/temperature sensor. Compare the reading to the set point. Verify that balancing devices are marked with final balance position. Note deviations from the Contract Documents in the final report. Final Inspection: 1. 3.14 Instrument type and make. Serial number. Application. Dates of use. Dates of calibration. INSPECTIONS 1. B. Static head in feet of head or kPa (psig). Pump shutoff pressure in kPa (psig). Actual impeller size in mm (inches) Full-open flow rate in L/s (gpm). Full-open pressure in feet of head or kPa (psig).. Final discharge pressure in kPa (psig).). Final suction pressure in kPa (psig). Final total pressure in kPa (psig). Final water flow rate in L/s (gpm). Voltage at each connection. Amperage for each phase. Instrument Calibration Reports: 1. 3.13 Amperage for each phase. Full-load amperage and service factor. Seal type. Test Data (Indicated and Actual Values): a. b. c. d. e. f. g. h. i. j. k. H. Division 23 HVAC Specifications Page 53 After initial inspection is complete and documentation by random checks verifies that testing and balancing are complete and accurately documented in the final report submit final report for review. ADDITIONAL TESTS Seasonal Periods: If initial TAB procedures were not performed during near-peak summer and winter conditions, perform additional TAB during near-peak summer and winter conditions. END OF SECTION 230593 ENSO Systems Inc. #865 St. Elizabeth C.S. – Full Day Kindergarten Addition Division 23 HVAC Specifications Page 54 SECTION 230713 – DUCT INSULATION PART 1 - GENERAL 1.1 A. GENERAL WORK INCLUDED 1. B. RELATED WORK NOT INCLUDED 1. C. Acoustic duct insulation and flexible duct insulation unless specifically noted otherwise. Refer to the drawings and specifications for specific requirements and extent of flexible ductwork and internal acoustic lining. SUBMITTALS 1. D. Provide all labour, material, equipment and services required to complete the insulation work of the Duct Insulation in accordance with the specifications and/or drawings. Submit sample of insulating materials and a report from an approved testing laboratory confirming fire hazard ratings if requested. DEFINITIONS 1. Exposed casings or ductwork and exposed casings or duct insulation includes all casings and ductwork and casings and ductwork insulation installed in equipment rooms, service spaces and areas of the building not provided with suspension type acoustic tile, drywall or plaster ceilings. PART 2 - PRODUCTS 2.1 A. B. GENERAL Thermal insulating materials shall be non-combustible. Adhesive shall be waterproof and Thermal insulating materials shall be non-combustible. Adhesive shall be waterproof and flame resistant. Combustible wrappings or vapour barriers used in conjunction with thermal insulating materials shall be treated to reduce their combustibility so that flame spread classification of entire assembly, as determined according to Method of Fire Hazard Classification for Building Materials ASTM E-84-76a shall not exceed 25 and smoke developed number shall not exceed 50. Insulation thickness shall be as specified under the "Work Included Article" of this Section. 1. Ductwork and Casing Insulation Types a. Type ‘A’ .1 .2 .3 .4 Exposed and concealed rectangular ductwork and casings: 25mm thick rigid fibrous glass duct insulation of minimum 86 kg/m3density Exposed round ductwork 250mm diameter and over: 25mm thick Fiberglas FLEX-WRAP of 56 kg/m3 (3.5 lbs/ft3) or 25mm thick preformed fibrous glass sleeving. Concealed round ductwork: 25mm thick flexible fibrous glass duct insulation of minimum 28 kg/m3 density. Insulation to be supplied with factory applied vapour barrier jacket of glass fibre reinforced kraft or aluminum foil laminate having a maximum vapour transmission rate of .03 perms. ENSO Systems Inc. #865 St. Elizabeth C.S. – Full Day Kindergarten Addition b. Type ‘B’ (Ducts/plenums handling outdoor air located inside the building) .1 .2 .3 .4 2. Division 23 HVAC Specifications Page 55 Exposed and concealed rectangular ductwork and casings: 50mm thick rigid fibrous glass duct insulation of minimum 86 kg/m3. density. Exposed round ductwork 250mm diameter and over: 50mm thick Fiberglas FLEX-WRAP of 56 kg/m3 (3.5 lbs/ft3) or 50mm thick preformed fibrous glass sleeving. Concealed round ductwork: 50mm thick flexible fibrous glass duct insulation of minimum 28 kg/m3. Density. Insulation to be supplied with factory applied vapour barrier jacket of glass fibre reinforced kraft or aluminum foil laminate having a maximum vapour transmission rate of .03 perms. Insulation Covering a. Close weave fire retarding canvas of the following weights: Exposed pipe and equipment insulation: 1.8 kg/m2. 3. Insulation Accessories. a. b. c. (14 gauge) pins with 32mm (1.25") square plated type clips. Fibrous glass twine to local authorities approval. Unless noted wire used to secure insulation shall be minimum 16 gauge galvanized annealed wire. PART 3 - EXECUTION 3.1 A. B. C. D. E. F. G. H. I. J. K. L. EXECUTION This work shall be performed only by tradesmen experienced in insulation work. Install insulation material and adhesive in strict compliance with the manufacturer's recommendations. Provide covering material which is to be finish painted by other Division, in condition to receive the paint. Surfaces to be insulated shall be clean and dry. Do not apply insulation until leakage tests have been completed. Install insulation in a neat workmanlike manner with smooth and even surfaces. Locate longitudinal seams where least visible. Keep insulation clear of all instruments, controls, dampers, components, etc., so that it will not hinder or interfere with removal, setting, reading of, or access to same. Install insulation continuous through walls, floors and similar surfaces. Seal all welded pin penetrations of vapour barriers with a 100mm x 100mm patch of aluminum foil tape or pressure sensitive vapour barrier tape. Do not break continuity of insulation, vapour barrier and canvas finish by supports or rods. Remove supports and rods temporarily to facilitate installation of insulation, vapour barrier and canvas finish where required. Unless otherwise noted, further insulation will not be required on ductwork provided with internal acoustic lining. Exposed flexible ductwork insulation shall be canvas covered by this Section. Install incompressible insulation material of the same thickness as adjacent ductwork insulation between casing or duct and support for externally insulated exposed ENSO Systems Inc. #865 St. Elizabeth C.S. – Full Day Kindergarten Addition M. N. rectangular or square casings or ductwork, except for ductwork supported by steel bands. Ensure correct installation of plugs for pitot tube openings in externally insulated casings and ductwork. Finish insulation flush with test plugs so that test openings may be used without damage to insulation. Unless noted otherwise, do not insulate the following items: 1. 2. 3. O. Discharge from safety and relief valves, overflow and equipment drain pipes. Closed type hot water heating and chilled water expansion tanks. Exposed chrome plated piping. Insulation Types: 1. Ductwork and Casing Insulation Type ‘A’ a. Secure flexible insulation for ducts up to 0.6 meter wide to duct surface using pressure sensitive tapes a minimum of 100mm wide and applied with moving pressure using an appropriate sealing tool. Outward clinch insulation with staples placed 150 mm on center. Refer to manufacturer’s diagram for staple stitching and butt-joint method. Closure systems should have a 25/50 F.H.C. per UL723.Secure with wire at 300mm centres on runs of ductwork and 150mm centres on fittings. Do not compress insulation to more than 25% of specified thickness. Adhere rigid insulation and flexible insulation for ducts and casings over 0.6 meter wide to duct surface with insulation adhesive and welding pins. Apply adhesive in 150mm wide strips at 450mm maximum spacing. Locate welded pins at 450mm maximum spacing and secure pins to duct with welding gun. Use a minimum of two rows of fasteners per side. Pin sizes shall be as recommended by the insulation manufacturer for the type and thickness of insulation. Impale insulation over pins and secure with suitable speed washers or clips. Remove protruding ends of pins. Butt insulation tightly against standing seams or flanged joints. Seal joints between perimeter of insulation and flange with vapour proof mastic. Fill joints, seams, chipped edges, etc., on exposed ductwork and casing insulation with a vapour barrier bedding compound or mastic to leave a smooth and even surface. Provide 50mm x 50mm x 0.4mm protective aluminum corners secured with tape until canvas covered. b. c. d. 2. Ductwork and Casing Type ‘B’ a. Apply insulation as specified for Type 'A' insulation except as follows: P. Division 23 HVAC Specifications Page 56 At standing seams and flanged joints, cover the projecting portion of the seam or flange with 75mm wide strips of the duct insulation grooved to accommodate seam or flange and provide a minimum of 12mm cover over the perimeter edges of seam or flange. Adhere strips to insulation on duct with adhesive. Over all coverings, strips at standing seams and flanges, apply a layer of vapour-proof mastic, embed an open mesh glass fabric, 20 x 20 in the mastic and apply a second coat of mastic over the insulation on the duct or casing for a minimum 50 mm. Insulation Covering: a. Unless noted cover exposed ductwork and casing insulation with canvas. Adhere canvas to insulation surfaces with full coating of lagging adhesive. ENSO Systems Inc. #865 St. Elizabeth C.S. – Full Day Kindergarten Addition Division 23 HVAC Specifications Page 57 Finish and seal canvas with a full brush coat of lagging adhesive. Install canvas over any vapour barrier jacket or coating specified. Where insulation is butted against standing seams or flanged joints, canvas cover the projecting leg of the seam or joint by placing a strip of canvas tight around the projecting seam or joint extending 75mm on each side. Lapp all seams at least 50 mm. Q. Application – Ductwork Insulation 1. Exhaust Air Duct/Plenum a. 2. Outdoor Air Intake Duct/Mixing Plenum (AHU1 and AHU2) a. 3. Insulate with with type ‘B’ ductwork insulation. Air Handling Unit Supply Air Ductwork (AHU1 and AHU2) a. 4. Insulate exhaust air duct serving washroom exhaust fans from roof by minimum 3m with type ‘A’ ductwork insulation. Insulate all concealed supply air ductwork with type ‘A’ ductwork insulation. Refer to architectural ceiling and room finishing schedules to determine the extent of concealed ductwork. Flexible ducts to be factory insulated.. Miscellaneous a. Insulate various parts of ductwork, plenums, etc., as shown on the drawings. END OF SECTION 230713 SECTION 220719 – HVAC PIPING INSULATION PART 1 - GENERAL 1.1 A. GENERAL WORK INCLUDED 1. B. ACTION SUBMITTALS 1. C. Provide all labour, material, equipment and services required to complete the insulation work of the HVAC Piping Insulation in accordance with the specifications and/or drawings. Submit sample of insulating materials and a report from an approved testing laboratory confirming fire hazard ratings if requested Pipe labels. DEFINITIONS 1. Exposed piping and exposed pipe insulation includes all piping and pipe insulation installed in equipment rooms, service spaces and areas of building not provided with suspension type acoustic tile, drywall or plaster ceilings. ENSO Systems Inc. #865 St. Elizabeth C.S. – Full Day Kindergarten Addition Division 23 HVAC Specifications Page 58 PART 2 - PRODUCTS 2.1 A. B. GENERAL Thermal insulating materials shall be non-combustible. Adhesive shall be waterproof and flame resistant. Combustible wrappings or vapour barriers used in conjunction with thermal insulating materials shall be treated to reduce their combustibility so that flame spread classification of entire assembly, as determined according to Method of Fire Hazard Classification for Building Materials ASTM E-84-76a shall not exceed 25 and smoke developed number shall not exceed 50. Insulation thickness shall be as specified under the "Work Included Article" of this Section. 1. Pipework Insulation Types. a. Type ‘A’ .1 b. Type ‘B’ .1 2. Preformed type mineral insulation of minimum 104 kg/m3 density with canvas or multi service jacket having longitudinal and traverse laps. Preformed type mineral insulation of minimum 104 kg/m3 density with factory applied vapour barrier jacket or glass fibre reinforced kraft or aluminum foil laminate having a maximum vapour transmission rate of .03 perms. Insulation Covering a. Close weave fire retarding canvas of the following weights: Exposed pipe and equipment insulation: 1.8 kg/m2. Exposed fitting, valve body, etc., insulation: 1.8 kg/m2. Except for steam piping, factory premoulded PVC fitting covers and jacketing approved by authorities having jurisdiction. For steam piping systems use canvas covering. 3. Insulation Accessories. a. b. c. (14 gauge) pins with 32mm (1.25") square plated type clips. Fibrous glass twine to local authorities approval. Unless noted wire used to secure insulation shall be minimum 16 gauge galvanized annealed wire. PART 3 - EXECUTION 3.1 A. B. C. D. E. EXECUTION This work shall be performed only by tradesmen experienced in insulation work. Install insulation material and adhesive in strict compliance with the manufacturer's recommendations. Provide covering material which is to be finish painted by other Division, in condition to receive the paint. Surfaces to be insulated shall be clean and dry. Do not apply insulation until leakage tests have been completed. ENSO Systems Inc. #865 St. Elizabeth C.S. – Full Day Kindergarten Addition F. G. H. I. J. K. Install insulation in a neat workmanlike manner with smooth and even surfaces. Locate longitudinal seams where least visible. Keep insulation clear of all instruments, controls, dampers, components, etc., so that it will not hinder or interfere with removal, setting, reading of, or access to same. Install insulation continuous through walls, floors and similar surfaces. Do not break continuity of insulation, vapour barrier and canvas finish by supports or rods. Remove supports and rods temporarily to facilitate installation of insulation, vapour barrier and canvas finish where required. Install 100mm long, 20 gauge polished aluminum pipe insulation protectors at all points, where exposed pipe insulation terminates at floor. Unless noted otherwise, do not insulate the following items: 1. 2. 3. L. Discharge from safety and relief valves, overflow and equipment drain pipes. Closed type hot water heating and chilled water expansion tanks. Exposed chrome plated piping. Insulation Types: 1. Pipework Insulation Type ‘A’ a. b. c. 2. Secure insulation with approved type staples and/or cement laps down with adhesive. Insulate fittings, flanged unions and valve bodies with segments of preformed block or pipe insulation of by wrapping with strips of fibrous glass blanket type insulation to the same thickness of the adjoining pipe insulation. Insulation shall be held in place with wire of fibrous glass twine. Finish insulation with a coat of cement recovered with canvas or factory premoulded one piece PVC fitting covers and jacketing. Do not insulate screwed unions and piping inside air handling unit casing. Pipework Insulation Type ‘B’ a. b. M. Division 23 HVAC Specifications Page 59 Overlap vapour barrier jacket at least 50mm on longitudinal joints. Wrap butt joints with a minimum 100mm wide band of vapour barrier jacket. Seal laps and bands with pressure sensitive, vapour proof adhesive or vapour proof mastic applied to the complete surface of the laps. Insulate all fittings, screwed and flanged unions and valve bodies with segments of preformed pipe insulation or by wrapping with strips of fibrous glass blanket type insulation to the same thickness of the adjoining pipe insulation. Insulation shall be held in place with wire or fibrous glass twine. Coat the insulation with vapour proof mastic and wrap with glass fabric. Embed the glass fabric in the mastic and seal the fabric with vapour proof mastic. Finish insulation by applying a coat of vapour proof adhesive. Alternatively factory premoulded one piece PVC fitting covers and jacketing may be applied over insulation, in lieu of mastic and glass fabric. Install the covers to provide a complete vapour seal. Insulate expansion joints and flexible hose connectors to allow for movement and flexing of joints. Insulation Covering: 1. Unless noted cover exposed pipe and equipment insulation and exposed ductwork and casing insulation with canvas. PVC jacketing may be used for piping in mechanical rooms. Adhere canvas to insulation surfaces with full coating of lagging adhesive. Finish and seal canvas with a full brush coat of lagging adhesive. Install ENSO Systems Inc. #865 St. Elizabeth C.S. – Full Day Kindergarten Addition Division 23 HVAC Specifications Page 60 canvas over any vapour barrier jacket or coating specified. Where insulation is butted against standing seams or flanged joints, canvas cover the projecting leg of the seam or joint by placing a strip of canvas tight around the projecting seam or joint extending 75mm on each side. Lapp all seams at least 50 mm. N. Hangers and Insulation Shields 1. Insulate and vapour seal hangers directly supporting insulated piping as part of adjoining pipe for the following services: a. Chilled Water Piping Insulate hanger rods to length of 4 times the pipe insulation thickness. Use curved metal insulation shields wherever pipe is supported by hanger of type which cannot effectively be insulated to prevent condensation, eg. roller hangers. Insulation shields shall consist of segment high density insulation and 12 gauge galvanized sheet steel protective shield complete with vapour barrier, designed to suit adjacent insulation thickness and pipe weight. .1 .2 .3 O. Hot Equipment 1. 2. 3. Insulate hot equipment with fibrous glass metal mesh blanket. Hold metal mesh blankets in place with 20mm metal bands on maximum 300mm centres. Lace metal edges butting together with wire. On large flat or irregular surfaces, impale metal mesh blankets over suitable welded fasteners on maximum 300mm centres. Alternatively hot equipment may be insulated with calcium silicate insulation blocks applied and secured as specified above. Finish the insulation with two coats of asbestos free cement, 6mm thick troweled smooth. Cover insulation with canvas. Insulation thickness shall be as follows: 4. 5. 6. Insulation Thickness 25 mm 40 mm 50 mm Insulation shall have maximum 'K' value of 0.068 W/M/oC at 150oC mean temperature. Hot equipment shall include all equipment as specified under the "Application Article" of this Section. Do not insulate the following: a. P. Equipment Temperature up to 95oC 96oC to 150oC 150oC and over Inspection and manholes on tanks and equipment, chemical by-pass feeders, flanges on strainers and suction guides requiring removal for access to strainer. Cold Equipment 1. 2. 3. Insulate cold surfaces of equipment as specified for pipework insulation Type 'B'. Cold equipment shall include all equipment as specified under the "Application Article" of this Section. Provide slip-on type insulated enclosures for flanges on strainers. ENSO Systems Inc. #865 St. Elizabeth C.S. – Full Day Kindergarten Addition Q. Division 23 HVAC Specifications Page 61 Application 1. Hot Water Heating Piping Systems a. b. c. 2. Insulate with Type 'A' pipework insulation. Insulation thickness: 25 mm for pipe size 25mm or larger; 12mm for pipe size 20mm or smaller. Do not insulate piping inside finned tube units. Hot Equipment a. Insulate as specified. Equipment includes the following: .1 .2 Equipment, pipes, etc., exposed to human contact having surface temperatures exceeding 70oC. Bodies of strainers, suction guides and vertical in-line pumps (pump types B and C where applicable) installed in piping systems and/or services to be insulated with type 'A' pipework insulation END OF SECTION 230719 SECTION 232113 – HYDRONIC PIPING PART 1 - GENERAL 1.1 A. SUMMARY Section includes pipe and fitting materials and joining methods for the following: 1. 2. 3. 4. 5. 1.2 A. Hot-water heating piping. Makeup-water piping. Condensate/drain piping. Air-vent piping. Safety-valve-inlet and -outlet piping. ACTION SUBMITTALS Product Data: For each type of the following: 1. Chemical treatment. PART 2 - PRODUCTS 2.1 A. PERFORMANCE REQUIREMENTS Hydronic piping components and installation shall be capable of withstanding the following minimum working pressure and temperature unless otherwise indicated: 1. 2. 2.2 A. Hot-Water Heating Piping: 125 psig (860 kPa)> at [200 deg F (93 deg C)]. Safety-Valve-Inlet and -Outlet Piping: Equal to the pressure of the piping system to which it is attached. COPPER TUBE AND FITTINGS Drawn-Temper Copper Tubing: [ASTM B 88, Type L (ASTM B 88M, Type B)]. ENSO Systems Inc. #865 St. Elizabeth C.S. – Full Day Kindergarten Addition 2.3 A. B. C. D. E. F. G. STEEL PIPE AND FITTINGS Steel Pipe: ASTM A 53/A 53M, black steel with plain ends; welded and seamless, Grade B, and wall thickness as indicated in "Piping Applications" Article. Cast-Iron Threaded Fittings: ASME B16.4; Classes 125 and 250 as indicated in "Piping Applications" Article. Malleable-Iron Threaded Fittings: ASME B16.3, Classes 150 and 300 as indicated in "Piping Applications" Article. Malleable-Iron Unions: ASME B16.39; Classes 150, 250, and 300 as indicated in "Piping Applications" Article. Cast-Iron Pipe Flanges and Flanged Fittings: ASME B16.1, Classes 25, 125, and 250; raised ground face, and bolt holes spot faced as indicated in "Piping Applications" Article. Wrought-Steel Fittings: ASTM A 234/A 234M, wall thickness to match adjoining pipe. Wrought Cast- and Forged-Steel Flanges and Flanged Fittings: ASME B16.5, including bolts, nuts, and gaskets of the following material group, end connections, and facings: 1. 2. 3. 2.4 A. Material Group: 1.1. End Connections: Butt welding. Facings: Raised face. JOINING MATERIALS Pipe-Flange Gasket Materials: Suitable for chemical and thermal conditions of piping system contents. 1. ASME B16.21, nonmetallic, flat, asbestos free, 1/8-inch (3.2-mm) maximum thickness unless otherwise indicated. a. b. B. 2.5 A. B. Full-Face Type: For flat-face, Class 125, cast-iron and cast-bronze flanges. Narrow-Face Type: For raised-face, Class 250, cast-iron and steel flanges. Flange Bolts and Nuts: ASME B18.2.1, carbon steel, unless otherwise indicated. DIELECTRIC FITTINGS General Requirements: Assembly of copper alloy and ferrous materials with separating nonconductive insulating material. Include end connections compatible with pipes to be joined. Dielectric Unions: 1. Description: a. b. c. C. Division 23 HVAC Specifications Page 62 Standard: ASSE 1079. Pressure Rating: 125 psig (860 kPa) minimum at 180 deg F (82 deg C). End Connections: Solder-joint copper alloy and threaded ferrous. Dielectric Flanges: 1. Description: a. b. c. d. Standard: ASSE 1079. Factory-fabricated, bolted, companion-flange assembly. Pressure Rating: 125 psig (860 kPa) minimum at 180 deg F (82 deg C). End Connections: Solder-joint copper alloy and threaded ferrous; threaded solder-joint copper alloy and threaded ferrous. ENSO Systems Inc. #865 St. Elizabeth C.S. – Full Day Kindergarten Addition D. Division 23 HVAC Specifications Page 63 Dielectric-Flange Insulating Kits: 1. Description: a. b. c. d. e. Nonconducting materials for field assembly of companion flanges. Pressure Rating: 150 psig (1035 kPa). Gasket: Neoprene or phenolic. Bolt Sleeves: Phenolic or polyethylene. Washers: Phenolic with steel backing washers. PART 3 - EXECUTION 3.1 A. PIPING APPLICATIONS Hot-water heating piping, aboveground, NPS 21/2” (DN 65) and smaller shall be any of the following: 1. 2. B. Hot-water heating piping, aboveground, NPS 3 (DN 75) and larger, shall be of the following: 1. C. Schedule 40 steel, continuous weld or electric resistance welded black carbon steel conforming to ASTM A53-84a Grade B with beveled ends. Hot-water heating piping installed below ground shall be the following: 1. D. Type L hard drawn copper tubing conforming to ASTM B-88, soft annealed copper tubing may be used within convector enclosures only. Schedule 40 steel, continuous weld or electric resistance welded black carbon steel conforming to ASTM A53-84a Grade B with threaded ends. Class 150, malleable-iron fittings; cast-iron flanges and flange fittings; and threaded joints. Type K (Type A), annealed-temper copper tubing, wrought-copper fittings, and brazed joints. Use the fewest possible joints. Makeup-water piping installed aboveground shall be of the following: 1. Type L (Type B) Type M (Type C), drawn-temper copper tubing, wrought-copper fittings, and soldered joints. E. Condensate-Drain Piping: Type M (Type C) or Type DWV, drawn-temper copper tubing, wrought-copper fittings, and soldered joints. F. Air-Vent Piping: 1. 2. 3.2 A. B. C. Inlet: Same as service where installed. Outlet: Type K (Type A), annealed-temper copper tubing with soldered or flared joints. PIPING INSTALLATIONS Drawing plans, schematics, and diagrams indicate general location and arrangement of piping systems. Install piping as indicated unless deviations to layout are approved on Coordination Drawings. Install piping in concealed locations unless otherwise indicated and except in equipment rooms and service areas. Install piping indicated to be exposed and piping in equipment rooms and service areas at right angles or parallel to building walls. Diagonal runs are prohibited unless specifically indicated otherwise. ENSO Systems Inc. #865 St. Elizabeth C.S. – Full Day Kindergarten Addition D. E. F. G. H. I. J. K. L. M. N. O. P. Q. R. 3.3 A. B. C. D. 3.4 A. B. Install piping above accessible ceilings to allow sufficient space for ceiling panel removal. Install piping to permit valve servicing. Install piping at indicated slopes. Install piping free of sags and bends. Install fittings for changes in direction and branch connections. Install piping to allow application of insulation. Select system components with pressure rating equal to or greater than system operating pressure. Install groups of pipes parallel to each other, spaced to permit applying insulation and servicing of valves. Install drains, consisting of a tee fitting, NPS 3/4 (DN 20) ball valve, and short NPS 3/4 (DN 20) threaded nipple with cap, at low points in piping system mains and elsewhere as required for system drainage. Install piping at a uniform grade of 0.2 percent upward in direction of flow. Reduce pipe sizes using eccentric reducer fitting installed with level side up. Install branch connections to mains using tee fittings in main pipe, with the branch connected to the bottom of the main pipe. For up-feed risers, connect the branch to the top of the main pipe. Install unions in piping, NPS 2 (DN 50) and smaller, adjacent to valves, at final connections of equipment, and elsewhere as indicated. Install flanges in piping, NPS 2-1/2 (DN 65) and larger, at final connections of equipment and elsewhere as indicated. Install shutoff valve immediately upstream of each dielectric fitting. DIELECTRIC FITTING INSTALLATION Install dielectric fittings in piping at connections of dissimilar metal piping and tubing. Dielectric Fittings for NPS 2 (DN 50) and Smaller: Use dielectric unions. Dielectric Fittings for NPS 2-1/2 to NPS 4 (DN 65 to DN 100): Use dielectric flanges. Dielectric Fittings for NPS 5 (DN 125) and Larger: Use dielectric flange kits. HANGERS AND SUPPORTS Comply with requirements in Section 230529 "Hangers and Supports for HVAC Piping and Equipment" for hanger, support, and anchor devices. Comply with the following requirements for maximum spacing of supports. Install the following pipe attachments: 1. 2. 3. 4. 5. C. Division 23 HVAC Specifications Page 64 Adjustable steel clevis hangers for individual horizontal piping less than 20 feet (6 m) long. Adjustable roller hangers and spring hangers for individual horizontal piping 20 feet (6 m) or longer. Pipe Roller: MSS SP-58, Type 44 for multiple horizontal piping 20 feet (6 m) or longer, supported on a trapeze. Spring hangers to support vertical runs. Provide copper-clad hangers and supports for hangers and supports in direct contact with copper pipe. Install hangers for steel piping with the following maximum spacing and minimum rod sizes: 1. 2. NPS 3/4 (DN 20): Maximum span, 7 feet (2.1 m). NPS 1 (DN 25): Maximum span, 7 feet (2.1 m). ENSO Systems Inc. #865 St. Elizabeth C.S. – Full Day Kindergarten Addition 3. 4. 5. 6. D. 3.5 A. B. C. D. E. PIPE JOINT CONSTRUCTION Ream ends of pipes and tubes and remove burrs. Bevel plain ends of steel pipe. Remove scale, slag, dirt, and debris from inside and outside of pipe and fittings before assembly. Soldered Joints: Apply ASTM B 813, water-flushable flux, unless otherwise indicated, to tube end. Construct joints according to ASTM B 828 or CDA's "Copper Tube Handbook," using lead-free solder alloy complying with ASTM B 32. Brazed Joints: Construct joints according to AWS's "Brazing Handbook," "Pipe and Tube" Chapter, using copper-phosphorus brazing filler metal complying with AWS A5.8/A5.8M. Threaded Joints: Thread pipe with tapered pipe threads according to ASME B1.20.1. Cut threads full and clean using sharp dies. Ream threaded pipe ends to remove burrs and restore full ID. Join pipe fittings and valves as follows: 2. G. 3.6 A. B. C. 3.7 A. NPS 3/4 (DN 20): Maximum span, 5 feet (1.5 m); minimum rod size, 1/4 inch (6.4 mm). Support vertical runs at each floor, and at 10-foot (3-m) intervals between floors. 1. F. NPS 1-1/2 (DN 40): Maximum span, 9 feet (2.7 m). NPS 2 (DN 50): Maximum span, 10 feet (3 m). NPS 2-1/2 (DN 65): Maximum span, 11 feet (3.4 m). NPS 3 (DN 80) and Larger: Maximum span, 12 feet (3.7 m). Install hangers for drawn-temper copper piping with the following maximum spacing and minimum rod sizes: 1. E. Division 23 HVAC Specifications Page 65 Apply appropriate tape or thread compound to external pipe threads unless dry seal threading is specified. Damaged Threads: Do not use pipe or pipe fittings with threads that are corroded or damaged. Do not use pipe sections that have cracked or open welds. Welded Joints: Construct joints according to AWS D10.12M/D10.12, using qualified processes and welding operators according to "Quality Assurance" Article. Flanged Joints: Select appropriate gasket material, size, type, and thickness for service application. Install gasket concentrically positioned. Use suitable lubricants on bolt threads. TERMINAL EQUIPMENT CONNECTIONS Sizes for supply and return piping connections shall be the same as or larger than equipment connections. Install control valves in accessible locations close to connected equipment. Install ports for pressure gages and thermometers at coil inlet and outlet connections where shown on the drawings. FIELD QUALITY CONTROL Prepare hydronic piping according to ASME B31.9 and as follows: 1. 2. Leave joints, including welds, uninsulated and exposed for examination during test. Provide temporary restraints for expansion joints that cannot sustain reactions due to test pressure. If temporary restraints are impractical, isolate expansion joints from testing. ENSO Systems Inc. #865 St. Elizabeth C.S. – Full Day Kindergarten Addition 3. 4. 5. B. Flush hydronic piping systems with clean water; then remove and clean or replace strainer screens. Isolate equipment from piping. If a valve is used to isolate equipment, its closure shall be capable of sealing against test pressure without damage to valve. Install blinds in flanged joints to isolate equipment. Install safety valve, set at a pressure no more than one-third higher than test pressure, to protect against damage by expanding liquid or other source of overpressure during test. Perform the following tests on hydronic piping: 1. 2. 3. C. Division 23 HVAC Specifications Page 66 Use ambient temperature water as a testing medium unless there is risk of damage due to freezing. While filling system, use vents installed at high points of system to release air. Subject piping system to hydrostatic test pressure that is not less than 1.5 times the system's working pressure. Test pressure shall not exceed maximum pressure for any vessel, pump, valve, or other component in system under test. After hydrostatic test pressure has been applied for at least 10 minutes, examine piping, joints, and connections for leakage. Eliminate leaks by tightening, repairing, or replacing components, and repeat hydrostatic test until there are no leaks. Perform the following before operating the system: 1. 2. 3. 4. 5. 6. 7. Open manual valves fully. Inspect pumps for proper rotation. Set makeup pressure-reducing valves for required system pressure. Inspect air vents at high points of system and determine if all are installed and operating freely (automatic type), or bleed air completely (manual type). Set temperature controls so all coils are calling for full flow. Inspect and set operating temperatures of hydronic equipment, such as boilers Verify lubrication of motors and bearings. END OF SECTION 232113 SECTION 232116 – HYDRONIC PIPING SPECIALTIES PART 1 - GENERAL 1.1 A. SUMMARY Section includes special-duty valves and specialties for the following: 1. Air Control Devices a. b. c. d. 2. Hydronic Specialties a. b. 3. 4. Manual air vents Automatic air vents Tangential air separators Membrane expansion tanks Strainers and suction guides Triple duty valves Air-vent piping. Safety-valve-inlet and -outlet piping. ENSO Systems Inc. #865 St. Elizabeth C.S. – Full Day Kindergarten Addition 1.2 A. ACTION SUBMITTALS Product Data: For each type of the following: 1. 2. 3. 1.3 A. Division 23 HVAC Specifications Page 67 Valves: Include flow and pressure drop curves based on manufacturer's testing for calibrated-orifice balancing valves and automatic flow-control valves. Air-control devices. Hydronic specialties. QUALITY ASSURANCE Pipe Welding: Qualify procedures and operators according to ASME Boiler and Pressure Vessel Code: Section IX. 1. Safety valves and pressure vessels shall bear the appropriate ASME label. Fabricate and stamp air separators and expansion tanks to comply with ASME Boiler and Pressure Vessel Code: Section VIII, Division 1. PART 2 - PRODUCTS 2.1 A. PERFORMANCE REQUIREMENTS Hydronic piping components and installation shall be capable of withstanding the following minimum working pressure and temperature unless otherwise indicated: 1. 2. 2.2 A. AIR-CONTROL DEVICES Manual Air Vents: 1. 2. 3. 4. 5. 6. 7. 8. B. Standard of Acceptance: Amtrol, Sarco, SA Armstrong, Trerice Body: Bronze. Internal Parts: Nonferrous. Operator: Screwdriver or thumbscrew. Inlet Connection: NPS 1/2 (DN 15). Discharge Connection: NPS 1/8 (DN 6). CWP Rating: 150 psig (1035 kPa). Maximum Operating Temperature: 225OF (107OC). Automatic Air Vents: 1. 2. 3. 4. 5. 6. 7. C. Hot-Water Heating Piping: 125 psig (860 kPa)> at 200 deg F (93 deg C). Safety-Valve-Inlet and -Outlet Piping: Equal to the pressure of the piping system to which it is attached. Standard of Acceptance: Amtrol, Sarco, SA Armstrong, Trerice Body: Bronze or cast iron. Internal Parts: Nonferrous. Operator: Noncorrosive metal float. Inlet Connection: NPS 1/2 (DN 15). Discharge Connection: NPS 1/4 (DN 8). CWP Rating: 150 psig (1035 kPa), Maximum Operating Temperature: 240OF (116OC). Tangential-Type Air Separators: 1. Standard of Acceptance: SA Armstrong Model VAS, Sarco, Amtrol ENSO Systems Inc. #865 St. Elizabeth C.S. – Full Day Kindergarten Addition 2. 3. 4. 5. 6. D. 3. 4. A. Y-Pattern Strainers: 3. 4. 5. 6. Standard of Acceptance: Braukmann, Crane, Morrison, Brass, McAvity, Sarco, Body: ASTM A 126, Class B, cast iron with bolted cover and bottom drain connection. End Connections: Threaded ends for NPS 2 (DN 50) and smaller; flanged ends for NPS 2-1/2 (DN 65) and larger. Strainer Screens - Closed Water Systems: 1.6mm perforated stainless-steel basket for sizes up to 75mm (3”), 3mm for sizes 100mm (4”) and larger. Strainer Screens - Open Water Systems: 3 mm perforations, Free screen area shall not be less than double the internal area of the pipe. CWP Rating: 125 psig (860 kPa). Basket Strainers: 1. 2. 3. 4. 5. C. Standard of Acceptance: SA Armstrong, Extrol, Expanflex Tank: Welded steel, rated for 125-psig (860-kPa) working pressure and 375OF (191OC) maximum operating temperature. Factory test after taps are fabricated and supports installed and are labeled according to ASME Boiler and Pressure Vessel Code: Section VIII, Division 1. Diaphragm: Securely sealed into tank to separate air charge from system water to maintain required expansion capacity. Air-Charge Fittings: Schrader valve, stainless steel with EPDM seats. HYDRONIC PIPING SPECIALTIES 1. 2. B. Tank: Welded steel; ASME constructed and labeled for 125-psig (860-kPa) minimum working pressure and 375OF (191OC) maximum operating temperature. Air Collector Tube: Perforated stainless steel, constructed to direct released air into expansion tank. Tangential Inlet and Outlet Connections: Threaded for NPS 2 (DN 50) and smaller; flanged connections for NPS 2-1/2 (DN 65) and larger. Blowdown Connection: Threaded. Size: Match system flow capacity. Diaphragm-Type Expansion Tanks: 1. 2. 2.3 Division 23 HVAC Specifications Page 68 Standard of Acceptance: Braukmann, Crane, Morrison, Brass, McAvity, Sarco. Body: ASTM A 126, Class B, high-tensile cast iron with bolted cover and bottom drain connection. End Connections: Threaded ends for NPS 2 (DN 50) and smaller; flanged ends for NPS 2-1/2 (DN 65) and larger. Strainer Screen: 40 -mesh startup strainer, and perforated stainless-steel basket with 50 percent free area. CWP Rating: 125 psig (860 kPa). Suction Guides: 1. Standard of Acceptance: SA Armstrong, Bell & Gossett 2. Suction guides may be used in lieu of strainers at pump inlets. 3. Body: Cast iron with steel guide vanes. 4. End Connections: Flanged. 5. Strainer Screen: Fine mesh brass startup strainer, stainless steel strainer with perforations as specified for strainers. Start-up strainer to be removed after cleaning and flushing of systems. ENSO Systems Inc. #865 St. Elizabeth C.S. – Full Day Kindergarten Addition 6. D. Division 23 HVAC Specifications Page 69 CWP Rating: 125 psig (860 kPa). Stainless-Steel Bellow, Flexible Connectors: 1. 2. 3. 4. 5. Body: Stainless-steel bellows with woven, flexible, bronze, wire-reinforcing protective jacket. End Connections: Threaded or flanged to match equipment connected. Performance: Capable of 3/4-inch (20-mm) misalignment. CWP Rating: 150 psig (1035 kPa). Maximum Operating Temperature: 250OF (121OC). PART 3 - EXECUTION 3.1 A. B. C. D. E. F. 3.2 A. B. C. D. E. VALVE APPLICATIONS Install shutoff-duty valves at each branch connection to supply mains and at supply connection to each piece of equipment. Install calibrated-orifice, balancing valves where shown on the drawings. Install calibrated-orifice, balancing valves in the return pipe of each heating or cooling terminal. Install check valves at each pump discharge and elsewhere as required to control flow direction. Install safety valves at hot-water generators and elsewhere as required by ASME Boiler and Pressure Vessel Code. Install drip-pan elbow on safety-valve outlet and pipe without valves to the outdoors; pipe drain to nearest floor drain or as indicated on Drawings. Comply with ASME Boiler and Pressure Vessel Code: Section VIII, Division 1, for installation requirements. Install pressure-reducing valves at makeup-water connection to regulate system fill pressure. HYDRONIC SPECIALTIES INSTALLATION Install manual air vents at high points in piping, at heat-transfer coils, and elsewhere as required for system air venting. Install automatic air vents at high points of system piping in mechanical equipment rooms only. Install manual vents at heat-transfer coils and elsewhere as required for air venting. Install piping from boiler air outlet, air separator, or air purger to expansion tank with a 2 percent upward slope toward tank. Install tangential air separator in pump suction. Install blowdown piping with gate or fullport ball valve; extend full size to nearest floor drain. Install expansion tanks above the air separator. Install tank fitting in tank bottom and charge tank. Use manual vent for initial fill to establish proper water level in tank. 1. 2. F. Install tank fittings that are shipped loose. Support tank from floor or structure above with sufficient strength to carry weight of tank, piping connections, fittings, plus tank full of water. Do not overload building components and structural members. Vent and purge air from hydronic system, and ensure that tank is properly charged with air to suit system Project requirements. END OF SECTION 232116 ENSO Systems Inc. #865 St. Elizabeth C.S. – Full Day Kindergarten Addition Division 23 HVAC Specifications Page 70 SECTION 232123 - HYDRONIC PUMPS PART 1 - GENERAL 1.1 A. SUMMARY Section Includes: 1. 2. 1.2 A. B. 1.3 Three-piece in-line design centrifugal pumps (Pump Type “A”). Fluid lubricated (Wet-rotor) pumps (Pump Type “C”). DEFINITIONS Buna-N: Nitrile rubber. EPT: Ethylene propylene diene terpolymer. ACTION SUBMITTALS A. Product Data: For each type of pump. Include certified performance curves and rated capacities, operating characteristics, furnished specialties, final impeller dimensions, and accessories for each type of product indicated. Indicate pump's operating point on curves. B. Shop Drawings: For each pump. 1. 1.4 A. Show pump layout and connections. CLOSEOUT SUBMITTALS Operation and Maintenance Data: For pumps to include operation, and maintenance manuals. PART 2 - PRODUCTS 2.1 A. Three-Piece In-Line Design Centrifugal Pumps (Pump Type “A”) Standard of Acceptance: SA Armstrong Series S and H, Bell & Gosset .1 .2 2.2 A. Fluid Lubricated (Wet Rotor) Pumps (Pump Type “C”) Standard of Acceptance: SA Armstrong Series Astro, Bell & Gosset .1 .2 2.3 A. Horizontal in-line three-piece centrifugal design with resiliently mounted motor, oil lubricated bronze sleeve bearings and mechanical seal suitable for 125psi (860kpa) working pressure. Iron body, bronze-fitted construction for standard applications, all bronze construction for domestic hot water systems. Capacities and application as scheduled on the drawings. Cast iron body with replaceable stainless steel cartridge impeller assembly. No mechanical seal, suitable for 125psi (860kpa) working pressure. Iron bodyconstruction for standard applications. Capacities and application as scheduled on the drawings. PUMP SPECIALTY FITTINGS Suction Diffuser or Guide: 1. 2. Standard of Acceptance: SA Armstrong, Bell & Gosset Angle pattern. ENSO Systems Inc. #865 St. Elizabeth C.S. – Full Day Kindergarten Addition 3. 4. 5. 6. B. Division 23 HVAC Specifications Page 71 175-psig (1204-kPa) pressure rating, cast or ductile iron body and end cap, pump-inlet fitting. Bronze startup and bronze or stainless-steel permanent strainers. Bronze or stainless-steel straightening vanes. Drain plug. Triple-Duty Valve: 1. 2. 3. 4. 5. Standard of Acceptance: SA Armstrong, Bell & Gosset Angle or straight pattern. 175-psig (1204-kPa) pressure rating, cast or ductile iron body, pump-discharge fitting. Drain plug and bronze-fitted shutoff, balancing, and check valve features. Brass gage ports with integral check valve and orifice for flow measurement. PART 3 - EXECUTION 3.1 A. 3.2 A. B. C. EXAMINATION Examine roughing-in for piping systems to verify actual locations of piping connections before pump installation. PUMP INSTALLATION Install pumps to provide access for periodic maintenance including removing motors, impellers, couplings, and accessories. Independently support pumps and piping so weight of piping is not supported by pumps and weight of pumps is not supported by piping. Equipment Mounting: 1. D. 3.3 A. B. 3.4 Comply with requirements for vibration isolation and seismic control devices specified in Section 230548 "Vibration and Seismic Controls for HVAC." Equipment Mounting: Install in-line pumps with continuous-thread hanger rods and spring hangers with vertical-limit stop of size required to support weight of in-line pumps. CONNECTIONS Install suction and discharge pipe sizes equal to or greater than diameter of pump nozzles. Install pressure gages on pump suction and discharge or at integral pressure-gage tapping, or install single gage with multiple-input selector valve. STARTUP SERVICE 1. 2. 3. 4. 5. Complete installation and startup checks according to manufacturer's written instructions. Clean strainers on suction piping. Remove start-up strainers on suction guides after cleaning and flushing operation. Perform the following startup checks for each pump before starting: a. Verify bearing lubrication. b. Verify that pump is rotating in the correct direction. Prime pump by opening suction valves and closing drains, and prepare pump for operation. ENSO Systems Inc. #865 St. Elizabeth C.S. – Full Day Kindergarten Addition 6. Division 23 HVAC Specifications Page 72 Open discharge valve slowly. END OF SECTION 232123 SECTION 232513 - WATER TREATMENT FOR CLOSED LOOP HYDRONIC SYSTEMS PART 1 - GENERAL 1.1 A. SUMMARY Section includes the following HVAC water-treatment systems: 1. 2. 3. 4. 1.2 A. 1.3 A. DEFINITIONS TSS: Total suspended solids are solid materials, including organic and inorganic, that are suspended in the water. These solids may include silt, plankton, and industrial wastes. ACTION SUBMITTALS Product Data: Include rated capacities, operating characteristics, and furnished specialties and accessories for the following products: 1. B. 1.4 A. A. Bypass feeders. Shop Drawings: Treatment equipment showing tanks and piping connections to HVAC systems. Include diagrams for power and control wiring. INFORMATIONAL SUBMITTALS Field quality-control reports. 1. 1.5 Cleaning and Flushing Chemical By-pass Feeders Chemical treatment test equipment. Chemicals. Water Analysis: Iron content after cleaning procedures. CLOSEOUT SUBMITTALS Operation and Maintenance Data: For equipment installed to be included in operation, and maintenance manuals. PART 2 - PRODUCTS 2.1 A. 2.2 A. B. MANUFACTURERS, SERVICE PROVIDERS Standard of Acceptance: GE Betz, Dearborn PERFORMANCE REQUIREMENTS Water quality for HVAC systems shall minimize corrosion, scale buildup, and biological growth for optimum efficiency of HVAC equipment without creating a hazard to operating personnel or to the environment. Base HVAC water treatment on quality of water available at Project site, HVAC system equipment material characteristics and functional performance characteristics, operating personnel capabilities, and requirements and guidelines of authorities having jurisdiction. ENSO Systems Inc. #865 St. Elizabeth C.S. – Full Day Kindergarten Addition C. Closed hydronic systems, including hot-water (glycol) heating shall have the following water qualities: 1. 2. 3. 2.3 A. Division 23 HVAC Specifications Page 73 To prevent corrosion. pH: Maintain a value within 9.0 to 10.5. "P" Alkalinity: Maintain a value within 100 to 500 ppm. CLEANING AND FLUSHING Closed Hot Water (Glycol) Heating System (New piping loop connecting to existing system): 1. Before commencing work, test existing water system and document water quality. 2. Clean and flush the new piping system as specified. 3. Cleaning Compound: Acceptable non-foaming and phosphate free detergent cleaning compound as recommended by the water treatment specialist. 4. After satisfactory leak testing, and prior to any system service or start-up, completely flush and drain the systems and equipment. Clean all strainers. 5. Introduce cleaning compound and circulate solution as recommended by the water treatment specialist. 6. Provide valved pipe connections at new piping loop and temporary circulating pump as required for circulating cleaning solution in new piping loop. 7. Test samples of water from the new piping loop for iron content. If total iron content of water exceeds one p.p.m. repeat cleaning procedure. Submit results for review. B. 2.4 A. After cleaning and flushing operation, use existing by-pass feeder and add chemicals compatible with existing system to maintain recommended water quality. MANUAL CHEMICAL-FEED EQUIPMENT Bypass Feeders: Steel, with corrosion-resistant exterior coating, minimum 3-1/2-inch (89-mm) fill opening in the top, and NPS 3/4 (DN 20) bottom inlet and top side outlet. Quarter turn or threaded fill cap with gasket seal and diaphragm to lock the top on the feeder when exposed to system pressure in the vessel. 1. B. 2.5 A. 2.6 A. Capacity: 2 gal. (7.6 L). Minimum Working Pressure: 125 psig (860 kPa CHEMICAL TREATMENT TEST EQUIPMENT Test Kit: Manufacturer-recommended equipment and chemicals in a wall-mounting cabinet. CHEMICALS Chemicals shall be as recommended by water-treatment system manufacturer that are compatible with piping system components and connected equipment and that can attain water quality specified in "Performance Requirements" Article. PART 3 - EXECUTION 3.1 A. WATER ANALYSIS Perform an analysis of supply water to determine quality of water available at Project site. ENSO Systems Inc. #865 St. Elizabeth C.S. – Full Day Kindergarten Addition 3.2 A. INSTALLATION Bypass Feeders: Install in closed hydronic systems equipped with the following: 1. 2. 3.3 Division 23 HVAC Specifications Page 74 Install bypass feeder in a bypass circuit around circulating pumps unless otherwise indicated on Drawings. Install a full-port ball isolation valves on inlet, outlet, and drain below feeder inlet. FIELD QUALITY CONTROL A. Manufacturer's Field Service: Engage a factory-authorized service representative to test and inspect components, assemblies, and equipment installations, including connections. B. Perform the following tests and inspections: 1. C. 3.4 A. Prepare test and inspection reports. MAINTENANCE SERVICE Scope of Maintenance Service: Provide chemicals and service program to maintain water conditions required above to inhibit corrosion, scale formation, and biological growth for the heating, hot-water (glycol) piping. Services and chemicals shall be provided for a period of one year from date of Substantial Completion and shall include the following: 1. 2. 3.5 A. Inspect piping and equipment to determine that systems and equipment have been cleaned, flushed, and filled with water, and are fully operational before introducing chemicals for water-treatment system. Initial water analysis and HVAC water-treatment recommendations. Startup assistance for Contractor to flush the systems, clean with detergents, and initially fill systems with required chemical treatment prior to operation. DEMONSTRATION Train Owner's maintenance personnel to adjust, operate, and maintain HVAC watertreatment systems and equipment. END OF SECTION 232513 SECTION 233113 – METAL DUCTS PART 1 - GENERAL 1.1 A. SUMMARY Section Includes: 1. 2. 3. 4. 5. 6. Single-wall rectangular ducts and fittings. Single-wall round and flat-oval ducts and fittings. Sheet metal materials. Duct liner. Sealants and gaskets. Hangers and supports. ENSO Systems Inc. #865 St. Elizabeth C.S. – Full Day Kindergarten Addition 1.2 A. B. PERFORMANCE REQUIREMENTS Delegated Duct Design: Duct construction, including sheet metal thicknesses, seam and joint construction, reinforcements, and hangers and supports, shall comply with SMACNA's "HVAC Duct Construction Standards - Metal and Flexible" and performance requirements and design criteria indicated in "Duct Schedule" Article. Structural Performance: Duct hangers and supports shall withstand the effects of gravity and seismic loads and stresses within limits and under conditions described in SMACNA's "HVAC Duct Construction Standards - Metal and Flexible "Guidelines for Mechanical Systems", OBC and SMACNA's "Seismic Restraint Manual: Guidelines for Mechanical Systems." 1. 2. 3. C. A. Low velocity, low pressure ductwork is classified as ductwork with mean velocities less velocities less than 10.2 m/s and static pressure 50mm water gauge or less. ACTION SUBMITTALS Product Data: When requested, for each type of the following products: 1. 2. 3. B. Seismic Hazard Level A or Low: Seismic force to weight ratio, 0.48. Seismic Hazard Level B or Normal: Seismic force to weight ratio, 0.30. Seismic Hazard Level C or High: Seismic force to weight ratio, 0.15. Ductwork Pressure Class a. 1.3 Division 23 HVAC Specifications Page 75 Liners and adhesives. Sealants and gaskets. Seismic-restraint devices. Delegated-Design Submittal: 1. 2. 3. 4. 5. Sheet metal thicknesses. Joint and seam construction and sealing. Reinforcement details and spacing. Materials, fabrication, assembly, and spacing of hangers and supports. Design Calculations: Calculations, including analysis data signed and sealed by the qualified professional engineer responsible for their preparation for selecting hangers and supports and seismic restraints. PART 2 - PRODUCTS 2.1 A. B. C. SINGLE-WALL RECTANGULAR DUCTS AND FITTINGS General Fabrication Requirements: Comply with SMACNA's "HVAC Duct Construction Standards - Metal and Flexible" based on indicated static-pressure class unless otherwise indicated. Transverse Joints: Select joint types and fabricate according to SMACNA's "HVAC Duct Construction Standards - Metal and Flexible," Figure 2-1, "Rectangular Duct/Transverse Joints," for static-pressure class, applicable sealing requirements, materials involved, duct-support intervals, and other provisions in SMACNA's "HVAC Duct Construction Standards - Metal and Flexible." Longitudinal Seams: Select seam types and fabricate according to SMACNA's "HVAC Duct Construction Standards - Metal and Flexible," Figure 2-2, "Rectangular Duct/Longitudinal Seams," for static-pressure class, applicable sealing requirements, ENSO Systems Inc. #865 St. Elizabeth C.S. – Full Day Kindergarten Addition D. 2.2 A. B. materials involved, duct-support intervals, and other provisions in SMACNA's "HVAC Duct Construction Standards - Metal and Flexible." Elbows, Transitions, Offsets, Branch Connections, and Other Duct Construction: Select types and fabricate according to SMACNA's "HVAC Duct Construction Standards Metal and Flexible," Chapter 4, "Fittings and Other Construction," for static-pressure class, applicable sealing requirements, materials involved, duct-support intervals, and other provisions in SMACNA's "HVAC Duct Construction Standards - Metal and Flexible." SHEET METAL MATERIALS General Material Requirements: Comply with SMACNA's "HVAC Duct Construction Standards - Metal and Flexible" for acceptable materials, material thicknesses, and duct construction methods unless otherwise indicated. Sheet metal materials shall be free of pitting, seam marks, roller marks, stains, discolorations, and other imperfections. Galvanized Sheet Steel: Comply with ASTM A 653/A 653M. 1. 2. C. Division 23 HVAC Specifications Page 76 Galvanized Coating Designation: [G60 (Z180)] [G90 (Z275)]. Finishes for Surfaces Exposed to View: Mill phosphatized. Reinforcement Shapes and Plates: ASTM A 36/A 36M, steel plates, shapes, and bars; black and galvanized. 1. D. 2.3 A. Where black- and galvanized-steel shapes and plates are used to reinforce aluminum ducts, isolate the different metals with butyl rubber, neoprene, or EPDM gasket materials. Tie Rods: Galvanized steel, 1/4-inch (6-mm) minimum diameter for lengths 36 inches (900 mm) or less; 3/8-inch (10-mm) minimum diameter for lengths longer than 36 inches (900 mm). DUCT LINER Fibrous-Glass Duct Liner: Comply with ASTM C 1071, NFPA 90A, or NFPA 90B; and with NAIMA AH124, "Fibrous Glass Duct Liner Standard." Liner inner surface to be neoprene coated. a. Liner to be 25mm (1”) thick, Maximum Thermal Conductivity: 1) B. Insulation Pins and Washers: 1. 2. C. Type II, Rigid: [0.23 Btu x in./h x sq. ft. x OF (0.033 W/m x K)] at 75OF (24OC) mean temperature. Cupped-Head, Capacitor-Discharge-Weld Pins: Copper- or zinc-coated steel pin, fully annealed for capacitor-discharge welding, [0.106-inch- (2.6-mm-)] [0.135inch- (3.5-mm-)] diameter shank, length to suit depth of insulation indicated with integral 1-1/2-inch (38-mm) galvanized carbon-steel washer. Insulation-Retaining Washers: Self-locking washers formed from 0.016-inch(0.41-mm-) thick aluminum; with beveled edge sized as required to hold insulation securely in place but not less than 1-1/2 inches (38 mm) in diameter. Shop Application of Duct Liner: Comply with SMACNA's "HVAC Duct Construction Standards - Metal and Flexible," Figure 7-11, "Flexible Duct Liner Installation." ENSO Systems Inc. #865 St. Elizabeth C.S. – Full Day Kindergarten Addition 1. 2. 3. 4. 5. 6. 7. Adhere a single layer of indicated thickness of duct liner with at least 90 percent adhesive coverage at liner contact surface area. Attaining indicated thickness with multiple layers of duct liner is prohibited. Apply adhesive to transverse edges of liner facing upstream that do not receive metal nosing. Butt transverse joints without gaps, and coat joint with adhesive. Fold and compress liner in corners of rectangular ducts or cut and fit to ensure butted-edge overlapping. Do not apply liner in rectangular ducts with longitudinal joints, except at corners of ducts, unless duct size and dimensions of standard liner make longitudinal joints necessary. Secure liner with mechanical fasteners 4 inches (100 mm) from corners and at intervals not exceeding 12 inches (300 mm) transversely; at 3 inches (75 mm) from transverse joints and at intervals not exceeding 18 inches (450 mm) longitudinally. Secure transversely oriented liner edges facing the airstream with metal nosings that have either channel or "Z" profiles or are integrally formed from duct wall. Fabricate edge facings at the following locations: a. b. 2.4 Division 23 HVAC Specifications Page 77 Fan discharges. Intervals of lined duct preceding unlined duct. SEALANT AND GASKETS A. General Sealant and Gasket Requirements: Surface-burning characteristics for sealants and gaskets shall be a maximum flame-spread index of 25 and a maximum smoke-developed index of 50 when tested according to UL 723; certified by an NRTL. B. Water-Based Joint and Seam Sealant: 1. 2. 3. 4. 5. 6. 7. 8. 9. C. Flanged Joint Sealant: Comply with ASTM C 920. 1. 2. 3. 4. 5. 6. D. Application Method: Brush on. Solids Content: Minimum 65 percent. Shore A Hardness: Minimum 20. Water resistant. Mold and mildew resistant. VOC: Maximum 75 g/L (less water). Maximum Static-Pressure Class: 10-inch wg (2500 Pa), positive and negative. Service: Indoor or outdoor. Substrate: Compatible with galvanized sheet steel (both PVC coated and bare), stainless steel, or aluminum sheets. General: Single-component, acid-curing, silicone, elastomeric. Type: S. Grade: NS. Class: 25. Use: O. For indoor applications, sealant shall have a VOC content of 250 g/L or less when calculated according to 40 CFR 59, Subpart D (EPA Method 24). Flange Gaskets: Butyl rubber, neoprene, or EPDM polymer with polyisobutylene plasticizer. ENSO Systems Inc. #865 St. Elizabeth C.S. – Full Day Kindergarten Addition 2.5 A. B. C. D. E. F. Division 23 HVAC Specifications Page 78 HANGERS AND SUPPORTS Hanger Rods for Noncorrosive Environments: Cadmium-plated steel rods and nuts. Hanger Rods for Corrosive Environments: Electrogalvanized, all-thread rods or galvanized rods with threads painted with zinc-chromate primer after installation. Strap and Rod Sizes: Comply with SMACNA's "HVAC Duct Construction Standards Metal and Flexible," Table 5-1 (Table 5-1M), "Rectangular Duct Hangers Minimum Size," and Table 5-2, "Minimum Hanger Sizes for Round Duct." Steel Cables for Stainless-Steel Ducts: Stainless steel complying with ASTM A 492. Duct Attachments: Sheet metal screws, blind rivets, or self-tapping metal screws; compatible with duct materials. Trapeze and Riser Supports: 1. 2. 3. Supports for Galvanized-Steel Ducts: Galvanized-steel shapes and plates. Supports for Stainless-Steel Ducts: Stainless-steel shapes and plates. Supports for Aluminum Ducts: Aluminum or galvanized steel coated with zinc chromate. PART 3 - EXECUTION 3.1 A. B. C. D. E. F. G. H. I. J. K. 3.2 A. DUCT INSTALLATION Drawing plans, schematics, and diagrams indicate general location and arrangement of duct system. Indicated duct locations, configurations, and arrangements were used to size ducts and calculate friction loss for air-handling equipment sizing and for other design considerations. Install duct systems as indicated unless deviations to layout are approved on Shop Drawings and Coordination Drawings. Install ducts according to SMACNA's "HVAC Duct Construction Standards - Metal and Flexible" unless otherwise indicated. Install round and flat-oval ducts in maximum practical lengths. Install ducts with fewest possible joints. Install factory- or shop-fabricated fittings for changes in direction, size, and shape and for branch connections. Unless otherwise indicated, install ducts vertically and horizontally, and parallel and perpendicular to building lines. Install ducts close to walls, overhead construction, columns, and other structural and permanent enclosure elements of building. Install ducts with a clearance of 1 inch (25 mm), plus allowance for insulation thickness. Where ducts pass through non-fire-rated interior partitions and exterior walls and are exposed to view, cover the opening between the partition and duct or duct insulation with sheet metal flanges of same metal thickness as the duct. Overlap openings on four sides by at least 1-1/2 inches (38 mm). Where ducts pass through fire-rated interior partitions and exterior walls, install fire dampers. Comply with requirements in Section 233300 "Air Duct Accessories" for fire and smoke dampers. Protect duct interiors from moisture, construction debris and dust, and other foreign materials.[ Comply with SMACNA's "IAQ Guidelines for Occupied Buildings Under Construction," Appendix G, "Duct Cleanliness for New Construction Guidelines."] INSTALLATION OF EXPOSED DUCTWORK Protect ducts exposed in finished spaces from being dented, scratched, or damaged. ENSO Systems Inc. #865 St. Elizabeth C.S. – Full Day Kindergarten Addition B. C. D. 3.3 A. B. Trim duct sealants flush with metal. Create a smooth and uniform exposed bead. Grind welds to provide smooth surface free of burrs, sharp edges, and weld splatter. When welding stainless steel with a No. 3 or 4 finish, grind the welds flush, polish the exposed welds, and treat the welds to remove discoloration caused by welding. Maintain consistency, symmetry, and uniformity in the arrangement and fabrication of fittings, hangers and supports, duct accessories, and air outlets. DUCT SEALING Seal ducts for duct static-pressure, seal classes, and leakage classes specified in "Duct Schedule" Article according to SMACNA's "HVAC Duct Construction Standards Metal and Flexible." Seal ducts to the following seal classes according to SMACNA's "HVAC Duct Construction Standards - Metal and Flexible": 1. 2. 3. 4. 5. 6. 7. 8. 9. 10. 3.4 A. B. Comply with SMACNA's "HVAC Duct Construction Standards - Metal and Flexible," Chapter 5, "Hangers and Supports." Building Attachments: Concrete inserts, powder-actuated fasteners, or structural-steel fasteners appropriate for construction materials to which hangers are being attached. 3. 4. 5. D. E. Comply with SMACNA's "HVAC Duct Construction Standards - Metal and Flexible." Outdoor, Supply-Air Ducts: Seal Class A. Outdoor, Exhaust Ducts: Seal Class C. Outdoor, Return-Air Ducts: Seal Class C. Unconditioned Space, Supply-Air Ducts in Pressure Classes 2-Inch wg (500 Pa) and Lower: Seal Class B. Unconditioned Space, Exhaust Ducts: Seal Class C. Unconditioned Space, Return-Air Ducts: Seal Class B. Conditioned Space, Supply-Air Ducts in Pressure Classes 2-Inch wg (500 Pa) and Lower: Seal Class C. Conditioned Space, Exhaust Ducts: Seal Class B. Conditioned Space, Return-Air Ducts: Seal Class C. HANGER AND SUPPORT INSTALLATION 1. 2. C. Division 23 HVAC Specifications Page 79 Where practical, install concrete inserts before placing concrete. Install powder-actuated concrete fasteners after concrete is placed and completely cured. Use powder-actuated concrete fasteners for standard-weight aggregate concretes or for slabs more than 4 inches (100 mm) thick. Do not use powder-actuated concrete fasteners for lightweight-aggregate concretes or for slabs less than 4 inches (100 mm) thick. Do not use powder-actuated concrete fasteners for seismic restraints. Hanger Spacing: Comply with SMACNA's "HVAC Duct Construction Standards - Metal and Flexible," Table 5-1 (Table 5-1M), "Rectangular Duct Hangers Minimum Size," and Table 5-2, "Minimum Hanger Sizes for Round Duct," for maximum hanger spacing; install hangers and supports within 24 inches (610 mm) of each elbow and within 48 inches (1200 mm) of each branch intersection. Hangers Exposed to View: Threaded rod and angle or channel supports. Support vertical ducts with steel angles or channel secured to the sides of the duct with welds, bolts, sheet metal screws, or blind rivets; support at each floor and at a maximum intervals of 16 feet (5 m). ENSO Systems Inc. #865 St. Elizabeth C.S. – Full Day Kindergarten Addition F. G. Install upper attachments to structures. Select and size upper attachments with pullout, tension, and shear capacities appropriate for supported loads and building materials where used. Drilling for and Setting Anchors: 1. 2. 3. 4. 5. 3.5 A. B. 3.6 A. 3.7 A. B. Division 23 HVAC Specifications Page 80 Identify position of reinforcing steel and other embedded items prior to drilling holes for anchors. Do not damage existing reinforcement or embedded items during drilling. Notify the Architect if reinforcing steel or other embedded items are encountered during drilling. Locate and avoid pre-stressed tendons, electrical and telecommunications conduit, and gas lines. Do not drill holes in concrete or masonry until concrete, mortar, or grout has achieved full design strength. Wedge Anchors: Protect threads from damage during anchor installation. Heavyduty sleeve anchors shall be installed with sleeve fully engaged in the structural element to which anchor is to be fastened. Set anchors to manufacturer's recommended torque, using a torque wrench. Install zinc-coated steel anchors for interior applications and stainless-steel anchors for applications exposed to weather. CONNECTIONS Make connections to equipment with flexible connectors complying with Section 233300 "Air Duct Accessories." Comply with SMACNA's "HVAC Duct Construction Standards - Metal and Flexible" for branch, outlet and inlet, and terminal unit connections. PAINTING Paint interior of metal ducts that are visible through registers and grilles and that do not have duct liner. Apply one coat of flat, black, latex paint over a compatible galvanizedsteel primer. Paint materials and application of duct exterior is specified under Painting Divisions. FIELD QUALITY CONTROL Perform tests and inspections. Leakage Tests: 1. 2. Comply with SMACNA's "HVAC Air Duct Leakage Test Manual." Submit a test report for each test. Test the following systems: a. Construction of low pressure ductwork shall be inherently airtight, and leakage shall be of sufficiently low magnitude as to be inaudible in quiet ambient and not detectable by sense of feel. 3.8 A. B. DUCT SCHEDULE Fabricate ducts with galvanized sheet steel except. Elbow Configuration: 1. Rectangular Duct: Comply with SMACNA's "HVAC Duct Construction Standards - Metal and Flexible," Figure 4-2, "Rectangular Elbows." a. Velocity 1000 fpm (5 m/s) or Lower: 1) Radius Type RE 1 with minimum 0.5 radius-to-diameter ratio. ENSO Systems Inc. #865 St. Elizabeth C.S. – Full Day Kindergarten Addition 2) b. 3) 3) Radius Type RE 1 with minimum 1.5 radius-to-diameter ratio. Radius Type RE 3 with minimum 1.0 radius-to-diameter ratio and two vanes. Mitered Type RE 2 with vanes complying with SMACNA's "HVAC Duct Construction Standards - Metal and Flexible," Figure 4-3, "Vanes and Vane Runners," and Figure 4-4, "Vane Support in Elbows." Rectangular Duct: Comply with SMACNA's "HVAC Duct Construction Standards - Metal and Flexible," Figure 4-2, "Rectangular Elbows." a. b. c. 3. Radius Type RE 1 with minimum 1.0 radius-to-diameter ratio. Radius Type RE 3 with minimum 0.5 radius-to-diameter ratio and two vanes. Mitered Type RE 2 with vanes complying with SMACNA's "HVAC Duct Construction Standards - Metal and Flexible," Figure 4-3, "Vanes and Vane Runners," and Figure 4-4, "Vane Support in Elbows." Velocity 1500 fpm (7.6 m/s) or Higher: 1) 2) 2. Mitered Type RE 4 without vanes. Velocity 1000 to 1500 fpm (5 to 7.6 m/s): 1) 2) c. Division 23 HVAC Specifications Page 81 Radius Type RE 1 with minimum 1.5 radius-to-diameter ratio. Radius Type RE 3 with minimum 1.0 radius-to-diameter ratio and two vanes. Mitered Type RE 2 with vanes complying with SMACNA's "HVAC Duct Construction Standards - Metal and Flexible," Figure 4-3, "Vanes and Vane Runners," and Figure 4-4, "Vane Support in Elbows." Round Duct: Comply with SMACNA's "HVAC Duct Construction Standards Metal and Flexible," Figure 3-4, "Round Duct Elbows." a. Minimum Radius-to-Diameter Ratio and Elbow Segments: Comply with SMACNA's "HVAC Duct Construction Standards - Metal and Flexible," Table 3-1, "Mitered Elbows." Elbows with less than 90-degree change of direction have proportionately fewer segments. 1) 2) 3) 4) Velocity 1000 fpm (5 m/s) or Lower: 0.5 radius-to-diameter ratio and three segments for 90-degree elbow. Velocity 1000 to 1500 fpm (5 to 7.6 m/s): 1.0 radius-to-diameter ratio and four segments for 90-degree elbow. Velocity 1500 fpm (7.6 m/s) or Higher: 1.5 radius-to-diameter ratio and five segments for 90-degree elbow. Radius-to Diameter Ratio: 1.5. b. C. Round Elbows, 12 Inches (305 mm) and Smaller in Diameter: Stamped or pleated. c. Round Elbows, 14 Inches (356 mm) and Larger in Diameter: Standing seam. Branch Configuration: 1. Rectangular Duct: Comply with SMACNA's "HVAC Duct Construction Standards - Metal and Flexible," Figure 4-6, "Branch Connection." ENSO Systems Inc. #865 St. Elizabeth C.S. – Full Day Kindergarten Addition a. b. 2. Division 23 HVAC Specifications Page 82 Rectangular Main to Rectangular Branch: 45-degree entry. Rectangular Main to Round Branch: Spin in. Round and Flat Oval: Comply with SMACNA's "HVAC Duct Construction Standards - Metal and Flexible," Figure 3-5, "90 Degree Tees and Laterals," and Figure 3-6, "Conical Tees." Saddle taps are permitted in existing duct. a. b. c. Velocity 1000 fpm (5 m/s) or Lower: 90-degree tap. Velocity 1000 to 1500 fpm (5 to 7.6 m/s): Conical tap. Velocity 1500 fpm (7.6 m/s) or Higher: 45-degree lateral. END OF SECTION 233113 SECTION 233300 – AIR DUCT ACCESSORIES PART 1 - GENERAL 1.1 A. SUMMARY Section Includes: 1. 2. 3. 4. 5. 6. 7. 8. 9. 10. 11. 1.2 A. Backdraft and pressure relief dampers. Barometric relief dampers. Manual volume dampers. Control dampers. Fire dampers. Duct silencers. Turning vanes. Duct-mounted access doors. Flexible connectors. Flexible ducts. Duct accessory hardware. ACTION SUBMITTALS Product Data: For each type of product. 1. For duct silencers, include pressure drop and dynamic insertion loss data. Include breakout noise calculations for high transmission loss casings. PART 2 - PRODUCTS 2.1 A. B. 2.2 A. ASSEMBLY DESCRIPTION Comply with NFPA 90A, "Installation of Air Conditioning and Ventilating Systems," and with NFPA 90B, "Installation of Warm Air Heating and Air Conditioning Systems." Comply with SMACNA's "HVAC Duct Construction Standards - Metal and Flexible" for acceptable materials, material thicknesses, and duct construction methods unless otherwise indicated. Sheet metal materials shall be free of pitting, seam marks, roller marks, stains, discolorations, and other imperfections. MATERIALS Galvanized Sheet Steel: Comply with ASTM A 653/A 653M. 1. 2. Galvanized Coating Designation: G60 (Z180). Exposed-Surface Finish: Mill phosphatized. ENSO Systems Inc. #865 St. Elizabeth C.S. – Full Day Kindergarten Addition B. C. D. E. F. 2.3 Division 23 HVAC Specifications Page 83 Stainless-Steel Sheets: Comply with ASTM A 480/A 480M, Type 304, and having a No. 2 finish for concealed ducts and No.4 finish for exposed ducts. Aluminum Sheets: Comply with ASTM B 209 (ASTM B 209M), Alloy 3003, Temper H14; with mill finish for concealed ducts and standard, 1-side bright finish for exposed ducts. Extruded Aluminum: Comply with ASTM B 221 (ASTM B 221M), Alloy 6063, Temper T6. Reinforcement Shapes and Plates: Galvanized-steel reinforcement where installed on galvanized sheet metal ducts; compatible materials for aluminum and stainless-steel ducts. Tie Rods: Galvanized steel, 1/4-inch (6-mm) minimum diameter for lengths 36 inches (900 mm) or less; 3/8-inch (10-mm) minimum diameter for lengths longer than 36 inches (900 mm). BACKDRAFT AND PRESSURE RELIEF DAMPERS (Drawing Symbol B/D) A. Construct dampers of aluminum. Join blades with a tie bar and mount shafts in bronze bushings. Felt edges of blades for quiet operation. B. Counterbalanced dampers shall be complete with ball bearings suitable for horizontal or vertical mounting. 2.4 MANUAL VOLUME DAMPERS (Drawing Symbol V/D) A. Single blade volume dampers for ducts up to maximum depth of 200mm and maximum width of 1200mm. B. Opposed multi-blade volume dampers for ducts, with maximum depth over 300mm or width greater than 1,200mm , and ducts over 300mm diameter. C. Material: Same as ductwork. Gauge: Minimum 18 gauge or 4 standard sizes heavier than the duct metal gauge in which damper is installed. Fit dampers snugly into the duct to provide shut-off. Bent edges at right angles to the shaft 90 degrees, bead blade or brace as necessary to provide rigidity. Fit each damper with a locking type quadrant of acceptable type and size. D. Handle shall point in the direction of air flow with damper open, at right angles with the damper closed. Where dampers are installed on insulated ducts, built out quadrant to insulation thickness. 2.5 MOTORIZED CONTROL DAMPERS (Drawing Symbol M/D). A. 2.6 By Controls and Instrumentation Section FIRE DAMPERS (Drawing Symbol F/D) A. Dampers shall be listed and labeled. B. Dampers installed in membrane forming part of a rated ceiling assembly shall be fire stop flap design meeting code requirements. C. Fire dampers shall be single blade, multi-blade or accordion type spring tension blade design, rated for fire separation. Accordion type fire dampers shall maintain 100% free duct area in ducts with air velocities of 6.0 m/s and over. D. Provide 71oC fusible link conforming to ULC S505, chain and spring catch, for control of dampers. E. Dampers shall be of galvanized steel construction, except those installed in stainless steel ductwork which shall be constructed of stainless steel. ENSO Systems Inc. #865 St. Elizabeth C.S. – Full Day Kindergarten Addition 2.7 Division 23 HVAC Specifications Page 84 DUCT SILENCERS A. Standard of Acceptance: Vibro Acoustics, Kinetics Noise Control B. General Requirements: 1. Provide factory fabricated silencers as scheduled and specified. 2. Acoustical attenuation and air flow versus pressure drop performance shall be substantiated by tests performed on silencers at an independent testing laboratory. Supply performance data for all attenuators. 3. Cross-talk silencers shall be designed for installation in walls with a sound transmission class rating of STC 50. 4. Provide all silencers with appropriate liners to minimize erosion of media. C. Design and Performance: 1. Silencers shall be duct or elbow type designed to attenuate equipment and fan generated sound to maintain specified RC levels. 2. All parts of the silencers applied on supply air ductwork shall be internally insulated to prevent excessive heat loss/gain or condensation. 3. Design and select silencer to suit available space. Submit shop drawings and design data for review. D. Cross-talk, Duct and/or Casing Mounted Silencers 1. Unless noted otherwise, all metal parts shall be zinc coated. Outer casings of attenuators shall be of galvanized sheet metal. Casing for rectangular units shall be not lighter than 22 gauge. Seams of outer casings shall be lock formed and filled with duct sealer, or continuously welded. Design interior partitions and baffles to minimize aero-dynamic losses and shall be not lighter than 22 gauge galvanized sheet steel. Perforations in the sheet metal forming cells and baffles shall not exceed 3 mm diameter. Provide glass cloth backing between packing material and perforated sheet metal to prevent erosion. 2. Construction of units, including those consisting of assemblies of modular units shall be inherently airtight. Leak test at not less than 150 mm WG. 3. Acoustic media shall be “MoldBlock” media or approved equal containing 100% natural cotton fibres treated with an EPA registered, non-toxic borate solution, flash dried to provide resistance to mold, mildew and fungi. Media shall comply with UL181 and NFPA90A. 4. Media, adhesives, sealers, and other accessory materials shall have fire ratings not exceeding 25 for flame spread and 5O for smoked developed as determined in accordance with ASTM E84. 5. Sound attenuators comprised of multiple modular units shall be free from air and acoustic leaks. The assembly shall be rigid structure with girth angles to prevent distortion of assembly in shipment. Edges of units shall not be field cut, formed, or otherwise modified except for forming holes for fastenings. Connections between attenuators and connecting ducts shall consist of companion angles, sealed to prevent leakage. Modular units as shipped from the factory shall include all angles, studs, and other attachments to connecting ducts. Silencers shall be so constructed and installed that they will not vibrate, rattle, or otherwise react to system pressure variations. Mechanical fastenings which may loosen, such as nuts and bolts and sheet metal screws, shall not be used in unit assemblies. Media, adhesives, sealers, ENSO Systems Inc. #865 St. Elizabeth C.S. – Full Day Kindergarten Addition Division 23 HVAC Specifications Page 85 and other accessory materials shall have fire ratings not exceeding 25 for flame spread and 5O for smoked developed as determined in accordance with ASTM E84. 6. Provide galvanized sheet metal guide vanes in duct and/or casings upstream and downstream of silencers in location of excessive air turbulence and as required to achieve design air pressure drop across silencers and minimize system effects. 2.8 A. B. C. 2.9 A. TURNING VANES Manufactured Turning Vanes for Metal Ducts: Curved blades of galvanized sheet steel; support with bars perpendicular to blades set; set into vane runners suitable for duct mounting. General Requirements: Comply with SMACNA's "HVAC Duct Construction Standards Metal and Flexible"; Figures 4-3, "Vanes and Vane Runners," and 4-4, "Vane Support in Elbows." Vane Construction: Single wall for ducts up to 48 inches (1200 mm) wide and double wall for larger dimensions. DUCT-MOUNTED ACCESS DOORS Duct-Mounted Access Doors: Fabricate access panels according to SMACNA's "HVAC Duct Construction Standards - Metal and Flexible"; Figures 7-2 (7-2M), "Duct Access Doors and Panels," and 7-3, "Access Doors - Round Duct." 1. Door: a. b. c. d. 2. 3. Frame: Galvanized sheet steel, with bend-over tabs and foam gaskets. Number of Hinges and Locks: a. b. c. 2.10 A. B. C. Materials: Flame-retardant or noncombustible fabrics. Coatings and Adhesives: Comply with UL 181, Class 1. Flexible Connector Fabric: Glass fabric double coated with neoprene. 3. A. Access Doors Less Than 12 Inches (300 mm) Square: No hinges and two sash locks. Access Doors up to [18 Inches (460 mm)] Square: Two hinges and two sash locks. Access Doors up to 24 by 48 Inches (600 by 1200 mm): Continuous hinges and two compression latches with outside and inside handles. FLEXIBLE CONNECTORS 1. 2. 2.11 Double wall, rectangular. Galvanized sheet metal with insulation fill and thickness as indicated for duct pressure class. Hinges and Latches: 1-by-1-inch (25-by-25-mm) butt or piano hinge and cam latches. Fabricate doors airtight and suitable for duct pressure class. Minimum Weight: 26 oz./sq. yd. (880 g/sq. m). Tensile Strength: 480 lbf/inch (84 N/mm) in the warp and 360 lbf/inch (63 N/mm) in the filling. Service Temperature: Minus 40 to plus 200OF (Minus 40 to plus 93OC). FLEXIBLE DUCTS Non-insulated, Flexible Duct: UL 181, Class 1, multiple layers of aluminum laminate supported by helically wound, spring-steel wire. ENSO Systems Inc. #865 St. Elizabeth C.S. – Full Day Kindergarten Addition 1. 2. 3. B. 2. 3. 4. A. B. Pressure Rating: 10-inch wg (2500 Pa) positive and 1.0-inch wg (250 Pa) negative. Maximum Air Velocity: 4000 fpm (20 m/s). Temperature Range: Minus 10 to plus 160OF (Minus 23 to plus 71OC). Use acoustic type flexible ducts where called for on the drawings Flexible Duct Connectors: 1. 2.12 Pressure Rating: 10-inch wg (2500 Pa) positive and 1.0-inch wg (250 Pa) negative. Maximum Air Velocity: 4000 fpm (20 m/s). Temperature Range: Minus 20 to plus 210OF (Minus 29 to plus 99OC). Insulated, Flexible Duct: UL 181, Class 1, 2-ply vinyl film supported by helically wound, spring-steel wire; fibrous-glass insulation; polethylene vapor-barrier film. 1. C. Division 23 HVAC Specifications Page 86 Non-Clamp Connectors: Adhesive plus sheet metal screws. DUCT ACCESSORY HARDWARE Instrument Test Holes: Cast iron or cast aluminum to suit duct material, including screw cap and gasket. Size to allow insertion of pitot tube and other testing instruments and of length to suit duct-insulation thickness. Adhesives: High strength, quick setting, neoprene based, waterproof, and resistant to gasoline and grease. PART 3 - EXECUTION 3.1 A. B. C. D. INSTALLATION Install duct accessories according to applicable details in SMACNA's "HVAC Duct Construction Standards - Metal and Flexible" for metal ducts and in NAIMA AH116, "Fibrous Glass Duct Construction Standards," for fibrous-glass ducts. Install duct accessories of materials suited to duct materials; use galvanized-steel accessories in galvanized-steel, stainless-steel accessories in stainless-steel ducts, and aluminum accessories in aluminum ducts. Install backdraft dampers at inlet of exhaust fans or exhaust ducts as close as possible to exhaust fan unless otherwise indicated. Install volume dampers at points on supply, return, and exhaust systems where branches extend from larger ducts. Where dampers are installed in ducts having duct liner, install dampers with hat channels of same depth as liner, and terminate liner with nosing at hat channel. 1. 2. E. F. G. H. I. Install galvanized steel volume dampers in galvanized steel ducts. Install aluminum volume dampers in aluminum ducts. Set dampers to fully open position before testing, adjusting, and balancing. Install test holes at fan inlets and outlets and elsewhere as indicated. Install fire dampers according to ULC listing. Connect ducts to duct silencers rigidly. Install duct access doors on sides of ducts to allow for inspecting, adjusting, and maintaining accessories and equipment at the following locations: 1. 2. Upstream of duct coils. Upstream from duct filters. ENSO Systems Inc. #865 St. Elizabeth C.S. – Full Day Kindergarten Addition 3. 4. 5. J. K. Adjacent to and close enough to fire to reset or reinstall fusible links. Access doors for access to fire or smoke dampers having fusible links shall be pressure relief access doors and shall be outward operation for access doors installed upstream from dampers and inward operation for access doors installed downstream from dampers. Control devices requiring inspection. Elsewhere as indicated. Install access doors with swing against duct static pressure. Access Door Sizes: 1. 2. 3. 4. 5. 6. L. M. N. Division 23 HVAC Specifications Page 87 One-Hand or Inspection Access: 8 by 5 inches (200 by 125 mm). Two-Hand Access: 12 by 6 inches (300 by 150 mm). Head and Hand Access: 18 by 10 inches (460 by 250 mm). Head and Shoulders Access: 21 by 14 inches (530 by 355 mm). Body Access: 25 by 14 inches (635 by 355 mm). Body plus Ladder Access: 25 by 17 inches (635 by 430 mm). Connect flexible ducts to metal ducts with adhesive plus sheet metal screws. Install flexible connectors to connect ducts to equipment. Install duct test holes where required for testing and balancing purposes. END OF SECTION 233300 SECTION 233713 – DIFFUSERS, REGISTERS AND GRILLES PART 1 - GENERAL 1.1 A. SUMMARY Section Includes: 1. 2. 1.2 A. Diffusers. Registers and Grilles ACTION SUBMITTALS Product Data: For each type of product indicated, include the following: 1. 2. Data Sheet: Indicate materials of construction, finish, and mounting details; and performance data including throw and drop, static-pressure drop, and noise ratings. Diffuser, Register, and Grille Schedule: Indicate drawing designation, room location, quantity, model number, size, and accessories furnished. PART 2 - PRODUCTS 2.1 2.2 A. Standard of Acceptance: Bird Archer, Culligan, Finnan, GE Betz, Specialty Chemical. Diffusers and Grilles General 1. 2. Unless specified otherwise, finish all internal parts of grilles, registers and diffusers with flat black paint. Counter-sink screw holes at face of grilles, registers or diffusers to accept recessed type screws. ENSO Systems Inc. #865 St. Elizabeth C.S. – Full Day Kindergarten Addition B. Diffuser Identification 1. 2. 3. The following abbreviations are used hereinafter and on the drawings to identify diffusers as to service involved and to indicate specific requirements for frames: Diffusers shall distribute air in a throw pattern as shown on the drawings. Blank-off active section of diffusers where shown on the drawings and as required to accommodate obstructions affecting air distribution. Diffusers of linear design shall be of length shown on the drawings. Take field measurements as required before ordering. Where sectional installation is required provide alignment devices without devices being visibly apparent. a. b. C. SD Supply air diffuser. SDD Supply air diffuser with 100mm drop type frame. Diffuser Types 1. Type SD1 a. b. c. D. Division 23 HVAC Specifications Page 88 Diffusers shall be of square face or round neck design with a minimum of four louvred vane assemblies and adjustable air pattern. The inner vane assemblies shall be removable without the use of tools for access to accessories above. Diffusers shall be of aluminum construction. EH price model ASCDA or equal. Unless noted otherwise, diffusers used on inverted T-bar ceilings shall be provided with a flat border frame so that the diffuser will neatly rest on the inverted T-bar. Unless noted otherwise, provide diffusers for other than lay-in ceiling tile, inverted T-bar applications with extended frame designed for flush mounting and to overlap ceiling opening. Unless noted otherwise, provide each diffuser with one multi-blade variable position deflecting and equalizing grid. Install grid in diffuser neck with blades positioned to provide optimal draft free air distribution at occupant positions. Grilles and Registers Identification 1. The following abbreviations are used hereinafter and on the drawing to identify grilles and registers as to service involved. a. b. c. d. e. f. g. h. 2. SG Supply air. RG Return air grille. EG Exhaust air grille. TG Transfer air grille. DG Door grille SR Supply air register. RR Return air register. ER Exhaust air register. Unless noted otherwise, provide grilles and registers used in inverted T-bar ceilings with a flat border so that the grille or register will neatly rest on the inverted T-bars. Provide grilles and registers for other than lay-in ceiling tile, inverted T-bar applications with extended frame designed for flush mounting and to overlap ceiling, floor or wall opening, except where abbreviations above are followed by an R. These grilles and registers shall be provided with an extended mounting frame designed to allow removal of the grille or register core without destroying the panel seal and paint finish; e.g. SRG denotes supply grille with removable core type ENSO Systems Inc. #865 St. Elizabeth C.S. – Full Day Kindergarten Addition Division 23 HVAC Specifications Page 89 extended mounted frame. Extended mounting frame shall be of material specified for grille or register. E. Grille and Register Types 1. Type SG1/SR1 a. Grilles and registers shall be of steel construction with double deflection horizontal face blades and vertical rear blades. Deflection blades shall be of stream line shape and individually adjustable. Blade depth shall equal or exceed blade spacing. Blade spacing shall not exceed 20mm. 2. Type RG1, RR1, RG2, RR2 a. 3. Type TG3 a. 4. Grilles shall be of extruded aluminum heavy duty pressed core construction, c/w heavy duty extruded aluminum border with reinforcing support bars, precision mitered corners, core is removable and supplied with core clips, 12 mm wide spacing, and narrow face border. Base of design: EH Price LBPH-15B c/w 125 narrow face border, 100mm width (unless noted on drawings otherwise). Type DG a. b. c. F. Grilles shall be of extruded aluminum heavy duty pressed core construction, c/w heavy duty extruded aluminum border with reinforcing support bars, precision mitered corners, core is removable and supplied with core clips, pencil proof spacing, and minimum 19mm flanged border. Base of design: EH Price LBPH-25C c/w 750 flange border, 100mm width (unless noted on drawingS otherwise). Type TG4 a. 5. Grilles and registers shall be of aluminum construction with 12mm x 12mm x 12mm grid core dimensions providing minimum 90% free area. Grilles used on non-ducted return air ceiling applications with inverted T-bar ceilings may be without border frame specified elsewhere. T-bar to support grid core shall be provided by other Division. Coordinate with general trades and provide door grilles as shown on the drawings equal to EH Price, STG series. Employ qualified tradesman for door cutting and grille installation. Width and height of door grilles shall be subject to Shop Drawing review. Provide fire-rated door grille where noted with FD on drawings; door grille to be equal to Nailor 61 DGD-FR. Accessories 1. 2. Provide accessories in conjunction with supply air diffusers, supply, return and exhaust air grilles and registers as specified and/or on the drawings. Integral opposed blade volume control dampers shall be key and gang- operated type adjustable from register or diffuser face with removable key. Dampers shall have spring tension or other positioning device to maintain positive blade setting under all operating conditions. Opposed blade volume control dampers shall be ENSO Systems Inc. #865 St. Elizabeth C.S. – Full Day Kindergarten Addition 3. 4. 5. Division 23 HVAC Specifications Page 90 aluminum or steel and aluminum construction. Unless specified otherwise, finish shall be matte black paint. Where shown on drawings, provide multi- vane air deflecting devices at branch duct take-offs serving registers and grilles. Each unit shall consist of a bank of curved blades, secured to four heavy side rails, two top and two bottom, which in turn are pivoted to the mounting frame. Air deflecting devices shall be rotary operated by lever arm with lever arm and locking quadrant external to duct. Unless specified otherwise, finish shall be matte black paint. Multi-blade variable position deflecting and equalizing grids shall be of steel construction. Unless specified otherwise, finish shall be matte black paint. Where shown on drawings (hatch in diffuser), provide sectorizing baffle to create required air pattern (block off hatched direction). PART 3 - EXECUTION 3.1 A. B. C. 3.2 A. INSTALLATION Install grilles, registers and diffusers in such a manner as to facilitate repeated removals of same without damaging ceiling or wall construction and finish. Apply opposed blade volume dampers integral with grilles to comprise registers. Joints between each grille, register or diffuser and its components, connecting duct or mounting surface shall be essentially airtight, using gasket or equivalent as required, to prevent leakage of supply air return air plenums and to prevent air bypassing grille, register or diffuser. ADJUSTING After installation, adjust diffusers, registers, and grilles to air patterns indicated, or as directed, before starting air balancing. END OF SECTION 233713 SECTION 233723 - HVAC GRAVITY VENTILATORS, LOUVRES AND CURBS PART 1 - GENERAL 1.1 A. SUMMARY Section Includes: 1. 2. 3. 4. 1.2 A. B. C. Roof hoods for Air Intake and Exhaust/Relief Outlets. Goosenecks. Louvres Roof Curbs PERFORMANCE REQUIREMENTS Structural Performance: Ventilators shall withstand the effects of gravity loads and the following loads and stresses within limits and under conditions indicated without permanent deformation of ventilator components, noise or metal fatigue caused by ventilator blade rattle or flutter, or permanent damage to fasteners and anchors. Wind pressures shall be considered to act normal to the face of the building. Seismic Performance: Ventilators to Water Entrainment: Limit water penetration through unit to comply with ASHRAE 62.1. ENSO Systems Inc. #865 St. Elizabeth C.S. – Full Day Kindergarten Addition 1.3 A. ACTION SUBMITTALS Shop Drawings: For gravity ventilators, roof . Include plans, elevations, sections, details, ventilator attachments to curbs, and curb attachments to roof structure. 1. 1.4 A. 1.5 A. Show weep paths, gaskets, flashing, sealant, and other means of preventing water intrusion. INFORMATIONAL SUBMITTALS Coordination Drawings: Roof framing plans and other details, drawn to scale, on which the following items are shown and coordinated with each other, based on input from installers of the items involved: 1. 2. B. Division 23 HVAC Specifications Page 91 Structural members to which roof curbs and ventilators will be attached. Sizes and locations of roof openings. Seismic Qualification Certificates: For ventilators, accessories, and components, from manufacturer. COORDINATION Coordinate sizes and locations of roof curbs, equipment supports, and roof penetrations with actual equipment provided. PART 2 - PRODUCTS 2.1 A. B. C. D. 2.2 A. B. 2.3 A. B. C. D. MATERIALS Aluminum Extrusions: ASTM B 221 (ASTM B 221M), Alloy 6063-T5 or T-52. Aluminum Sheet: ASTM B 209 (ASTM B 209M), Alloy 3003 or 5005 with temper as required for forming or as otherwise recommended by metal producer for required finish. Stainless-Steel Sheet: ASTM A 666, Type 304, with No. 4 finish. Fasteners: Same basic metal and alloy as fastened metal or 300 Series stainless steel unless otherwise indicated. Do not use metals that are incompatible with joined materials. FABRICATION, GENERAL Factory or shop fabricate gravity ventilators to minimize field splicing and assembly. Disassemble units to the minimum extent as necessary for shipping and handling. Clearly mark units for reassembly and coordinated installation. Fabricate frames, including integral bases, to fit in openings of sizes indicated, with allowances made for fabrication and installation tolerances, adjoining material tolerances, and perimeter sealant joints. ROOF HOODS Standard of Acceptance: Low profile construction, Greenheck Model Fabra Hood or approved equal. Provide air intakes with 25 mm thick disposable glassfibre filters in readily accessible mounting frames arranged to be removable without lifting the hood assembly Provide interior surfaces of exhaust/relief hoods with 25 mm thick neoprene coated insulation to prevent condensation Factory fabricate according to SMACNA's "HVAC Duct Construction Standards - Metal and Flexible," Figures 6-6 and 6-7. ENSO Systems Inc. #865 St. Elizabeth C.S. – Full Day Kindergarten Addition E. F. G. 2.4 A. B. Materials: Aluminum sheet, minimum 0.063’’ (1.6mm) thick base and 0.050’’ (1.27mm) thick hood; suitably reinforced. Bird Screening: Aluminum, ½-inch (12.7mm) square mesh, 0.063’’ (1.6mm) wire. Capacities and Characteristics: As scheduled on the drawings. GOOSENECKS Factory or shop fabricate according to SMACNA's "HVAC Duct Construction Standards - Metal and Flexible," Figure 6-5; with a minimum of 0.052’’ (1.3mm) thick, galvanizedsteel sheet. Bird Screening: Aluminum, 1/2-inch (12.7mm) square mesh, 0.063’’ (1.6mm) wire. Galvanized-Steel Sheet Finish: 1. 2. 3. Surface Preparation: Clean surfaces of dirt, grease, and other contaminants. Clean welds, mechanical connections, and abraded areas and repair galvanizing according to ASTM A 780. Apply a conversion coating suited to the organic coating to be applied over it. Factory Priming for Field-Painted Finish: Where field painting after installation is indicated, apply an air-dried primer immediately after cleaning and pretreating. Baked-Enamel Finish: Immediately after cleaning and pretreating, apply manufacturer's standard finish consisting of prime coat and thermosetting topcoat, with a minimum dry film thickness of 1 mil (0.025 mm) for topcoat and an overall minimum dry film thickness of 2 mils (0.05 mm). a. C. 2.5 A. B. 2.6 A. B. C. Division 23 HVAC Specifications Page 92 Color and Gloss: To Architect’s approval. Capacities and Characteristics: As shown on the drawings. LOUVRES Standard of Acceptance: EH Price, Nailor, Titus, Ventex. Louvres shall be of aluminum construction, weatherproof, fixed blade design with minimum 45% free area. Provide louvres with aluminum birdscreens 12 mm x 12 mm mesh, frames, head and sill to suit the application. Finish of louvres shall be subject to review and acceptance. Provide galvanized steel blank-off panels of double skin construction with 50mm rigid fibre glass insulation sandwiched in between for unused portions of louvres ROOF CURBS Standard of Acceptance: Thaler or TCDSB roofer approved. Factory fabricated curbs: to be of same material as specified for air intakes and outlets. Provide curbs with rigid fiberglass insulation, cant strips, nailing strips held in place by metal wraps-around and select curb design to suit roof construction. Provide extended base type curbs where required to meet clearances indicated. Minimum clearance for air intake hoods measured from finished roof to intake shall be 450mm. PART 3 - EXECUTION 3.1 A. B. C. INSTALLATION Install gravity ventilators level, plumb, and at indicated alignment with adjacent work. Install goosenecks on curb base where throat size exceeds 9 by 9 inches (230 by 230 mm). Install gravity ventilators with clearances for service and maintenance. ENSO Systems Inc. #865 St. Elizabeth C.S. – Full Day Kindergarten Addition D. E. Division 23 HVAC Specifications Page 93 Label gravity ventilators according to requirements specified in Section 230553 "Identification for HVAC Piping and Equipment." Repair finishes damaged by cutting, welding, soldering, and grinding. Restore finishes so no evidence remains of corrective work. Return items that cannot be refinished in the field to the factory, make required alterations, and refinish entire unit or provide new units. END OF SECTION 233723 SECTION 237313 - MODULAR INDOOR CENTRAL-STATION AIR-HANDLING UNITS PART 1 - GENERAL 1.1 A. SUMMARY Section Includes: 1. 1.2 A. 1.3 A. Constant-air-volume, single-zone air-handling units. PERFORMANCE REQUIREMENTS Seismic Performance: Air-handling units shall withstand the effects of earthquake motions. ACTION SUBMITTALS Product Data: For each air-handling unit indicated. 1. 2. 3. Unit dimensions and weight. Cabinet material, metal thickness, finishes, insulation, and accessories. Fans: a. b. c. d. 4. 5. 1.4 A. Seismic Qualification Certificates: For air-handling units, accessories, and components, from manufacturer. 2. A. B. 1.6 Certified coil-performance ratings with system operating conditions indicated. Filters with performance characteristics. INFORMATIONAL SUBMITTALS 1. 1.5 Certified fan-performance curves with system operating conditions indicated. Certified fan-sound power ratings. Fan construction and accessories. Motor ratings, electrical characteristics, and motor accessories. Dimensioned Outline Drawings of Equipment Unit: Identify center of gravity and locate and describe mounting and anchorage provisions. Detailed description of equipment anchorage devices on which the certification is based and their installation requirements. CLOSEOUT SUBMITTALS Operation and Maintenance Data: For air-handling units to include in emergency, operation, and maintenance manuals. QUALITY ASSURANCE ENSO Systems Inc. #865 St. Elizabeth C.S. – Full Day Kindergarten Addition A. B. 1.7 A. B. Division 23 HVAC Specifications Page 94 ASHRAE Compliance: Applicable requirements in ASHRAE 62.1, Section 5 - "Systems and Equipment" and Section 7 - "Construction and Startup." ASHRAE/IESNA 90.1 Compliance: Applicable requirements in ASHRAE/IESNA 90.1, Section 6 - "Heating, Ventilating, and Air-Conditioning." COORDINATION Coordinate sizes and locations of concrete bases with actual equipment provided. Coordinate sizes and locations of structural-steel support members, if any, with actual equipment provided. PART 2 - PRODUCTS 2.1 A. 2.2 A. MANUFACTURERS Standard of Acceptance: As scheduled on the drawing, contact Mr. Alex Forsea (HTS) @ (416) 661-3400. UNIT CASINGS General Fabrication Requirements for Casings: 1. 2. 3. 4. B. Forming: Form walls, roofs, and floors with at least two breaks at each joint. Casing Joints: Sheet metal screws or pop rivets. Sealing: Seal all joints with water-resistant sealant. Airstream Surfaces: Surfaces in contact with the airstream shall comply with requirements in ASHRAE 62.1. Casing Insulation and Adhesive: 1. Location and Application: Factory applied with adhesive and mechanical fasteners to the internal surface of section panels downstream from, and including, the cooling-coil section. a. b. c. 2. C. Liner Adhesive: Comply with ASTM C 916, Type I. Mechanical Fasteners: Galvanized steel, suitable for adhesive attachment, mechanical attachment, or welding attachment to duct without damaging liner when applied as recommended by manufacturer and without causing leakage in cabinet. Liner materials applied in this location shall have air-stream surface coated with a temperature-resistant coating or faced with a plain or coated fibrous mat or fabric depending on service-air velocity. Location and Application: Encased between outside and inside casing. Inspection and Access Panels and Access Doors: 1. 2. Panel and Door Fabrication: Formed and reinforced, single- or double-wall and insulated panels of same materials and thicknesses as casing. Inspection and Access Panels: a. b. c. Fasteners: Two or more camlock type for panel lift-out operation. Arrangement shall allow panels to be opened against air-pressure differential. Gasket: Neoprene, applied around entire perimeters of panel frames. Size: Large enough to allow inspection and maintenance of air-handling unit's internal components. ENSO Systems Inc. #865 St. Elizabeth C.S. – Full Day Kindergarten Addition 3. Access Doors: a. b. 4. A. A. General Requirements for Coil Section: General Requirements for Air Filtration Section: 3. A. B. As scheduled on the drawings. Filter Gage: 1. 2. 2.5 Comply with NFPA 90A. Provide minimum arrestance according to ASHRAE 52.1, and a minimum efficiency reporting value (MERV) according to ASHRAE 52.2. Provide filter holding frames arranged for flat or angular orientation, with access doors on both sides of unit. Filters shall be removable from one side or lifted out from access plenum. Disposable Panel Filters: 1. C. Comply with ARI 410. Fabricate coil section to allow removal and replacement of coil for maintenance and to allow in-place access for service and maintenance of coil(s). AIR FILTRATION SECTION 1. 2. B. As shown on the drawings. COIL SECTION 1. 2. 2.4 Hinges: A minimum of two ball-bearing hinges or stainless-steel piano hinge and two wedge-lever-type latches, operable from inside and outside. Arrange doors to be opened against air-pressure differential. Gasket: Neoprene, applied around entire perimeters of panel frames. Locations and Applications: a. 2.3 Division 23 HVAC Specifications Page 95 3-1/2’’ (90mm) diameter, diaphragm-actuated dial in metal case. Range: 0 to 0.5-inch wg (0 to 125 Pa) Accessories: Static-pressure tips with integral compression fittings, 1/4-inch (6mm) plastic tubing, and 2- or 3-way vent valves. CAPACITIES AND CHARACTERISTICS As scheduled on the drawings: Heating Coil: 1. 2. 3. 4. 5. Piping Connections: Threaded, same end of coil. Tube Material: Copper. Fin Type: Plate or Spiral. Fin Material: Aluminum Headers: a. Seamless copper tube with brazed joints, prime coated. b. Fabricated steel, with brazed joints, prime coated. 6. 7. Frames: Channel frame, galvanized steel Number of Rows: As scheduled on the drawings. ENSO Systems Inc. #865 St. Elizabeth C.S. – Full Day Kindergarten Addition 2.6 A. B. C. Division 23 HVAC Specifications Page 96 SOURCE QUALITY CONTROL Fan Sound-Power Level Ratings: Comply with AMCA 301, "Methods for Calculating Fan Sound Ratings from Laboratory Test Data." Test fans according to AMCA 300, "Reverberant Room Method for Sound Testing of Fans." Fans shall bear AMCAcertified sound ratings seal. Fan Performance Rating: Factory test fan performance for airflow, pressure, power, air density, rotation speed, and efficiency. Rate performance according to AMCA 210, "Laboratory Methods of Testing Fans for Aerodynamic Performance Rating." Water Coils: Factory tested to 300 psig (2070 kPa) according to ARI 410 and ASHRAE 33. PART 3 - EXECUTION 3.1 A. INSTALLATION Equipment Mounting: 1. 2. B. C. D. 3.2 A. B. 3.3 A. Install air-handling units as shown on the drawings. Comply with requirements for vibration isolation and seismic control devices specified in Section 230548 "Vibration and Seismic Controls for HVAC." Suspended Units: Suspend and brace units from structural-steel support frame using threaded steel rods and spring hangers. Arrange installation of units to provide access space around air-handling units for service and maintenance. Install filter-gage, static-pressure taps upstream and downstream of filters. Mount filter gages on outside of filter housing or filter plenum in accessible position. Provide filter gages on filter banks, installed with separate static-pressure taps upstream and downstream of filters. CONNECTIONS Install piping adjacent to air-handling unit to allow service and maintenance. Connect piping to air-handling units mounted on vibration isolators with flexible connectors. STARTUP SERVICE Starting procedures for air-handling units include the following: 1. 2. 3. Energize motor; verify proper operation of motor, drive system, and fan wheel. Adjust fan to indicated rpm. Replace fan and motor pulleys as required to achieve design conditions. Measure and record motor electrical values for voltage and amperage. Submit manufacturer approved start-up report for review upon completion. END OF SECTION 237313 SECTION 238236 – FINNED-TUBE RADIATION HEATERS PART 1 - GENERAL 1.1 A. SUMMARY Section includes hydronic convectors and finned-tube radiation heaters. ENSO Systems Inc. #865 St. Elizabeth C.S. – Full Day Kindergarten Addition 1.2 A. Division 23 HVAC Specifications Page 97 ACTION SUBMITTALS Product Data: For each type of product. 1. Include rated capacities, operating characteristics, furnished specialties, and accessories. PART 2 - PRODUCTS 2.1 A. B. C. D. HOT-WATER FINNED-TUBE RADIATION HEATERS Standard of Acceptance: Engineered Air, Rosemex Performance Ratings: Rate finned-tube radiation heaters according to Hydronics Institute's "IBR Testing and Rating Standard for Finned-Tube (Commercial) Radiation." Capacity and Performance Characteristics: As scheduled on the drawings. General 1. For unit valves which are not accessible for servicing, provide readily removable sections of enclosure panels for access to valves. 2. Metal surfaces of enclosures or cabinets shall have factory applied baked enamel finish coat. Colour to architect’s approval. Submit colour sample with shop drawings. 3. Unless noted otherwise, capacities shown on the Drawings are based on 18oC entering air temperature and 82oC/71oC entering and leaving water temperature. E. Finned Tube Units (Drawing Symbol Type “A”) 1. 2. 3. 4. 5. 6. F. Heating Elements: Copper tube/aluminum fin. Element Hangers - quiet operation, ball bearings, cradle type providing unrestricted longitudinal movement during expansion and contraction. Enclosure brackets shall support hangers on four centres maximum with element evenly spaced. Provide expansion compensators as recommended by the unit manufacturer to absorb expansion. Enclosures for tube fins shall be wall to wall and of type as shown on the drawings complete with end boxes, trim strips inside and outside where required. Enclosure construction minimum 16 gauge. Heating elements shall be single row unless required otherwise by available space. Pipe double row elements in series. Increase enclosure heights if required to obtain specified capacity. Finned Tube Units (Drawing Symbol Type “B”) 1. Heating Elements: Copper tube/aluminum fin. 2. Element Hangers - quiet operation, ball bearings, cradle type providing unrestricted longitudinal movement during expansion and contraction. Provide expansion compensators as recommended by the unit manufacturer to absorb expansion. 3. Heating elements to be installed behind book shelves or benches as per drawings (millwork by general trades). PART 3 - EXECUTION 3.1 A. B. C. D. FINNED-TUBE RADIATION HEATER INSTALLATION Install enclosure continuously around corners, using outside and inside corner fittings. Join sections with splice plates and filler pieces to provide continuous enclosure. Install access doors for access to valves. Install enclosure continuously from wall to wall. Unit manufacturer shall take field dimensions as required to ensure proper installation. ENSO Systems Inc. #865 St. Elizabeth C.S. – Full Day Kindergarten Addition E. F. G. H. I. J. K. Division 23 HVAC Specifications Page 98 Terminate enclosures with manufacturer's end caps except where enclosures are indicated to extend to adjoining walls. Install valves within reach of access door provided in enclosure. Install air-seal gasket between wall and recessed flanges or front cover of fully recessed unit. Install piping within pedestals for freestanding units. Install two valves on each radiator and convector on hot water heating systems. One valve shall be a hand operated ball valve and the other a ball valve with memory stop. For units located in public areas, remove valve operator. Unless shown otherwise, provide each unit, which is supplied by upfeed runouts with easily accessible air vent. Where air vent is not easily accessible, extend vent through enclosure cabinet for screw driver operation. Provide units located below mains with air vents and drain valves. Pitch units to allow air to vent to the air vent. END OF SECTION 238236 SECTION 238239.13 – CABINET UNIT HEATERS PART 1 - GENERAL 1.1 A. 1.2 A. SUMMARY Section includes cabinet unit heaters with centrifugal fans and hot-water coils. ACTION SUBMITTALS Product Data: For each type of product. 1. 1.3 A. Include rated capacities, operating characteristics, furnished specialties, and accessories. CLOSEOUT SUBMITTALS Operation and Maintenance Data: For cabinet unit heaters to include in emergency, operation, and maintenance manuals. PART 2 - PRODUCTS 2.1 A. 2.2 A. MANUFACTURERS Standard of Acceptance: Engineered Air, Rosemex CAPACITIES AND CHARACTERISTICS Capacity: As scheduled on the drawings a. Elements shall be of 15mm copper tubes with aluminum plate type fins and with headers. Each element shall be provided with a screwdriver operated air vent valve. b. Cabinets shall be designed for recessed, wall or ceiling mounting as shown on the drawings and shall be constructed of 16 gauge steel with zinc chromate finish with inlet and outlet grille. Cabinet shall be provided with a prime coat of paint inside and outside. c. Unit shall be complete with motor, overload protection, minimum 2-speed controller and centrifugal fans. Speed controller shall be mounted within the cabinet and be easily accessible through an access panel in the front panel. d. Concealed mounted units shall have removable front panel to allow full access to motor, fans and controls. ENSO Systems Inc. #865 St. Elizabeth C.S. – Full Day Kindergarten Addition Division 23 HVAC Specifications Page 99 e. Indicated unit capacities shall be met on low speed operation. f. Unless noted on drawings, capacities scheduled on the drawings are based on 15.5OC EAT, 80OC EWT, 20OC differential temperature, low speed operation. Max. WPD not to exceed 12 kPa at rated capacity. g. Electric supply: 120/1/60 PART 3 - EXECUTION 3.1 A. 3.2 A. INSTALLATION Install cabinet unit heaters to comply with NFPA 90A. ELECTRIAL WIRING This Division (controls) shall provide temperature controls, starters and electrical wiring including power wiring from power supply termination points (junction boxes) as shown on the electrical drawings. END OF SECTION 238239.13 SECTION 230993.11 SEQUENCE OF OPERATIONS FOR HVAC DDC 1 Part One: General .1 References .1 .2 Work Included .1 .2 .3 Submit shop drawings for the following: .1 Control diagram complete with all wiring layouts. Wiring diagrams shall identify interface wiring connections. .2 Motorized damper. .3 Control valves. .4 As outlined in the Building Automation System (BAS) section. Part Two: Products .1 3 Provide all labour, material, equipment and services required to complete the Controls and Instrumentation work of the Mechanical Division in accordance with the specifications and/or drawings. Electrical wiring required in conjunction with the building automation and energy management system as specified. Submittals .1 2 Comply with the Electrical Division specifications, and the Toronto Catholic School Board Control Specification 239994. Refer to appropriate sections. Part Three: Execution A. Installation and Responsibility .1 All equipment shall be supplied and installed by a single contractor (refer to Section 239994, item 1.5) who shall be responsible for the operation of the whole system. ENSO Systems Inc. #865 St. Elizabeth C.S. – Full Day Kindergarten Addition Division 23 HVAC Specifications Page 100 B. Electrical Wiring .1 .2 .3 Except as otherwise specified or shown herein, this Section shall provide all electrical wiring, transformer, relays and control components in conjunction with thermostats including interface wiring into motor starter circuits. Provide all work specified under the BAS section. Provide electrical work specified under the following articles: .1 .2 Cabinet Unit Heaters (section 238239.13) Air handling units (section 237313) C. Termination .1 .2 Electrical Division will make provision for and/or terminate power wiring for equipment to be wired by this Section in suitable receptacle, outlet box, disconnect switch etc. as shown and/or specified in the electrical documents. This Section shall provide breakers and/or control components including control voltage transformers including all wiring as required to complete the system(s). Run wiring in approved Wiremold where existing walls are block construction. D. Interlocking .1 .2 E. This section shall interwire fans, pumps, equipment, components, etc,. to provide sequences and operation specified and/or shown. This Section shall arrange and pay for all necessary changes from capacities and sizes of control transformers specified and/or shown on Division 16 drawings. Building Automation System (BAS) .1 General .1 .2 Refer to Specification 239994 Part 1, General. Building Automation System (BAS) Contractor shall provide: .3 A fully integrated new building automation system to Toronto Catholic District School Board (TCDSB) standards as per specified and specification . All electrical wiring to each stand-alone Application Specific Controller and DDC Controller. Pick up power from termination points provided by Electrical Division as shown on the electrical drawings. Include for breakers. Incorporate surge transient protection in the design of system to protect electrical components in all DDC Controllers, Application Specific Controllers and operator's workstations. All wiring, conduit, piping, installation, materials, supervision and labor including calibration, commissioning software programming and data base generation, dynamic graphic generation and additional work necessary to provide a complete and fully operating system to the approval of the Consultant. The mechanical contractor shall provide: Install wells and openings for water monitoring devices, flow switches and alarms furnished by BAS Contractor. ENSO Systems Inc. #865 St. Elizabeth C.S. – Full Day Kindergarten Addition F. Division 23 HVAC Specifications Page 101 Install control devices, alarms, monitoring devices, control valves and motorized dampers furnished by the BAS Contractor. Control Sequence Description 1. General a. Unless otherwise specified, dampers and valves shall return to the "NO" or "NC" positions as specified, when respective system supply fans or pumps are stopped. b. Supply and install all step-down transformers from line voltage to 24 V as required. c. Sensors which are shown wall mounted shall have wiring concealed in wall construction. d. Where practical, sensors mounted on columns or poured concrete construction shall have wiring or tubing concealed up to ceiling above. e. Sensors shall be mounted 1500 mm from floor to centre unless shown otherwise. f. Duct mounted devices shall be mounted on panels with bases plumb and level. Duct panels shall be dampened to eliminate detrimental vibration. g. Local control panels shall be mounted in accessible convenient wall locations within Mechanical Rooms. h. Co-operate with the Air Balancing and Testing Specialist and make all necessary adjustments to controls requested by him to provide performance specified with regard to system balance, verification of air flows at air volume control terminals. i. Provide status indication of equipment to TCDSB Standards. j. Provide user temperature adjustment and occupied override features at space temperature sensors to TCDSB standard. k. Schedule equipment operation as directed by the Owner. Provide occupied/unoccupied and setback controls according to the TCDSB’s energy conservation standards. 2. Constant Volume Single Zone System with Supplementary Hot Water Heating Convectors. Typical for AHU1 and AHU2 (Refer to Control Schematics on Drawing M4) a. The unit shall be started and stopped by the BAS based on a time of day schedule as directed by the TCDSB. b. Heating during unoccupied periods is provided by the hot water convectors. To conserve energy, the ventilation system should operate only during occupancy or warm-up periods. c. A room temperature sensor shall via DDC loop control sequentially modulate the 2-way valves at the hot water heating radiation and reset the supply air temperature of the air handling unit to maintain setpoint. d. The supply air temperature sensor shall via DDC loop control sequentially modulate the free cooling dampers with the 3-way hot water heating coil valve to maintain a setpoint of 22 degC (for optimum energy efficiency the supply air setpoint should match the space temperature setpoint). e. A low limit mixed air temperature sensor via DDC loop control shall prevent the temperature at the point of sensing from falling below 6 degC and maintain a plenum temperature of 20 degC by modulating the heating coil when the unit is shutdown. f. Set minimum outdoor air ventilation position at free cooling dampers so that 40% of outdoor air is introduced during occupancy. Note that excessive space pressurization is prevented by a gravity relief hood with counter balanced backdraft dampers. ENSO Systems Inc. #865 St. Elizabeth C.S. – Full Day Kindergarten Addition Division 23 HVAC Specifications Page 102 g. Provide a freeze protection thermostat in the fan discharge air to shut down the system when the temperature is below 2 degC. Provide a remote freezestat reset function via BAS. h. When the ambient temperature is below 0 degC, a water temperature sensor sensing on the leaving heating coil side shall shut down the system and alarm at the operator’s console if the temperature falls below 10 degC with the coil circulating pump operating. i. When the ambient temperature is below 2 degC and the system is scheduled ON, the heating coil circulating pump shall operate to maintain full flow through the coil for freeze protection. Pump failure shall alarm at the operator’s console. j. When the room is occupied, set minimum outdoor air ventilation at 10%. A CO2 sensor sensing in the return air shall signal the ac-unit controller to increase outdoor air ventilation to maintain a CO2 level of 700 ppm maximum. The signal shall be overridden when the supply air temperature drops below 8OC and when the unit operates in enthalpy mode k. Monitor air filter pressure drop. l. Provide humidity sensors to monitor indoor and outdoor humidity level. m. Warm-up Mode .1 Use OFF Hour temperature setback controls and morning warm up to TCDSB standards by operating the system in recirculating mode with the convectors at maximum output and the supply air temperature at an operator adjustable 40 degC. During warm-up operation, the outdoor air damper shall be closed. n. System Point Summary .1 .2 .3 .4 .5 .6 .7 .8 .9 .10 .11 .12 .13 .14 .15 .16 .17 .18 .19 3. Outdoor air temperature Space temperature Supply air dry bulb temperature Low limit mixed air temperature Leaving heating coil water temperature Freeze stat reset control Air filter pressure drop alarm Minimum outdoor air ventilation setting Stop/start supply fan Supply fan status Coil circulating pump start/stop Coil circulating pump status Feedback for each damper Feedback for control valve Return air temperature Return air CO2 Return air Humidity Outdoor humidity Outdoor air enthalpy Point Type AI AI AI AI AI BO BI AO BO AI BO AI AI AI AI AI AI AI AI Typical Cabinet Unit Heater Control a. Space temperature sensor via DDC control loop shall modulate the 2-way valve and cycle the fan to maintain set point. b. System Point Summary Point Type Room temperature AI ENSO Systems Inc. #865 St. Elizabeth C.S. – Full Day Kindergarten Addition 4. Control valve Unit fan start/stop Unit fan status (current sensor) Division 23 HVAC Specifications Page 103 AO BO AI Washrooms Exhaust Fan (EF1-4) a. Exhaust fan runs on a time-of-day schedule defined by the Operator. b. System Point Summary Point Type Fan start/stop BO Fan status (current sensor) AI 5. Occupancy Control a. Building Automation Contractor to wire to 24V AC signal from power pack (complete with built-in SPDT relay) serving motion sensor in each of two control zones (Kindergartens 108 and 109); the sensor and power pack will be supplied and installed by Division 16 and located on the room ceiling as per the electrical drawings. Building Automation Contractor to wire to each sensor for control of each air handling unit (AHU) during ‘UNOCCUPIED’ initiated by motion sensors while the air handling unit is scheduled ON, times as follows: 6. Maintain space temperature setpoint during the heating season. Lighting control a. Provide lighting control for the outdoor lighting zone c/w one AI/DO for this zone. b. 120V photocell will be provided by Electrical Division plus contactor adjacent to panel PP’D’ in Storage 132. Building Automation Contractor to wire to contactor and photocell (provide relay if required) as required to control exterior lighting circuit. c. Schedule lighting control as directed by the TDCSB including security alarm conditions. d. Connect common signal to multiple sensors and relays as shown on the electrical drawings; coordinate with electrical contractor. End of Section 230993.11 End of Division 23 TORONTO CATHOLIC DISTRICT SCHOOL BOARD St. Elizabeth Catholic School SECTION 239994 DIGITAL CONTROLS PART 1 GENERAL 1.0 Section Includes 1.1 General 1.2 Approved Control Systems 1.3 Description 1.4 Demolition Work and General Intent 1.5 Quality Assurance 1.6 Codes and Standards 1.7 System Performance 1.8 Submittals 1.9 Project Record Documents 1.10 Warranty 1.11 Ownership of Proprietary Material 1.12 Definitions 1 Rev 5, July 12,2013 TORONTO CATHOLIC DISTRICT SCHOOL BOARD St. Elizabeth Catholic School SECTION 239994 DIGITAL CONTROLS 1.1 1.2 GENERAL .1 This section of the specification shall be read in conjunction with and shall be governed by the requirements outlined in Section 15010 of the specification. APPROVED CONTROL SYSTEMS .1 The following are approved control system suppliers, manufacturers, and product lines: Manufacturer Software Front-End Controller Field Controllers Automated Logic Control WebCTRL WebCTRL ME, M, SE and ZN lines Distech Tridium Niagara EC-BOS 7 ECB Series Honeywell Tridium Niagara WEBax 700 Spyder Johnson Controls Tridium Niagara FX70 FX Series Johnson Controls Johnson Controls NAE45/55 FEC Series .2 1.3 1.4 The above list is alphabetical and does not indicate preference. Inclusion on this list does not guarantee acceptance of products or installation. Control systems shall comply with the terms of this specification .3 The Contractor shall use only operator workstation software, controller software, custom application programming language, and controllers from the corresponding manufacturer and product line unless Owner approves use of multiple manufacturers. DESCRIPTION .1 General: The control system shall consist of a high-speed, peer-to-peer network of DDC controllers, a control system server and an operator workstation. .2 Furnish and install a personal computer (PC) operator workstation able to access the system through a conventional web browser connected to the network. The operator workstation shall be as described in section 2.3.4. The PC shall allow operators to interface with system via dynamic color graphics, depict each mechanical system and building floor plan by a point-and-click graphic. .3 The system shall directly control HVAC equipment as detailed on the drawings including the Sequence of Control and Points List. Each zone controller shall provide occupied and unoccupied modes of operation by individual zone. Furnish energy conservation features such as optimal start and stop, night setback, request-based logic, and demand level adjustment of setpoints as specified in Appendix A. .4 Provide for future system expansion to include monitoring of occupant card access, fire alarm, and lighting control systems. .5 System shall use the BACnet protocol for communication to the operator workstation or web server and for communication between control modules. Schedules, setpoints, trends, and alarms specified in Section 239994 Appendix A (Sequences of Operation) shall be BACnet objects. DEMOLITION WORK AND GENERAL INTENT .1 Refer to drawings and specifications. .2 Include all computer hardware and software, operator input/output communication devices, standalone digital system controllers, communication interface to digital system controllers and field sensors and control devices required to meet specified performance. 2 Rev 5, July 12,2013 TORONTO CATHOLIC DISTRICT SCHOOL BOARD St. Elizabeth Catholic School SECTION 239994 DIGITAL CONTROLS .3 1.5 1.6 1.7 Include all wiring, conduit, piping, installation, materials, supervision and labor including calibration, commissioning software programming and data base generation, dynamic graphic generation and additional work necessary to provide a complete and fully operating system to the approval of the Consultant. .4 Controls sub-contractor shall coordinate with the electrical sub-contractor the location of junction boxes from which power to the controls equipment will be provided. The over-all responsibility for providing and coordinating power supply to the controls equipment rests with the mechanical contractor in his capacity as general contractor. .5 The control system shall be installed by the control subcontractor but as an integral part of the mechanical sub-contract. The systems shall be installed by competent control mechanics and electricians regularly employed by the control sub-contractor QUALITY ASSURANCE .1 Installer and Manufacturer Qualifications .1 Installer shall have an established working relationship with Control System Manufacturer. .2 Installer shall have successfully completed Control System Manufacturer's control system training. Upon request, Installer shall present record of completed training including course outlines. CODES AND STANDARDS .1 Work, materials, and equipment shall comply with the most restrictive of local, state, and federal authorities' codes and ordinances or these plans and specifications. As a minimum, the installation shall comply with current editions in effect 30 days prior to receipt of bids of the following codes: .1 National Electric Code (NEC) .2 International Building Code (IBC) Section 719 Ducts and Air Transfer Openings Section 907 Fire Alarm and Detection Systems Section 909 Smoke Control Systems .3 Division 15 Mechanical .4 International Mechanical Code (IMC) .5 ANSI/ASHRAE 135-2004: Data Communication Protocol for Building Automation and Control Systems (BACNET) SYSTEM PERFORMANCE .1 Performance Standards. System shall conform to the following minimum standards over network connections. Systems shall be tested using manufacturer's recommended hardware and software for operator workstation (server and browser for web-based systems). .1 Graphic Display. A graphic with 20 dynamic points shall display with current data within 10 sec. .2 Graphic Refresh. A graphic with 20 dynamic points shall update with current data within 8 sec. and shall automatically refresh every 15 sec. .3 Configuration and Tuning Screens. Screens used for configuring, calibrating, or tuning points, PID loops, and similar control logic shall automatically refresh within 6 sec. .4 Object Command. Devices shall react to command of a binary object within 2 sec. Devices shall begin reacting to command of an analog object within 2 sec. 3 Rev 5, July 12,2013 TORONTO CATHOLIC DISTRICT SCHOOL BOARD St. Elizabeth Catholic School SECTION 239994 DIGITAL CONTROLS .5 Alarm Response Time. An object that goes into alarm shall be annunciated at the workstation within 15 sec. .6 Program Execution Frequency. Custom and standard applications shall be capable of running as often as once every 5 sec. Select execution times consistent with the mechanical process under control. .7 Performance. Programmable controllers shall be able to completely execute DDC PID control loops at a frequency adjustable down to once per sec. Select execution times consistent with the mechanical process under control. .8 Multiple Alarm Annunciation. Each workstation on the network shall receive alarms within 5 sec of other workstations. .9 Reporting Accuracy. System shall report values with minimum end-to-end accuracy listed in Table 1. .10 Control Stability and Accuracy. Control loops shall maintain measured variable at setpoint within tolerances listed in Table 2. Table 1 - Reporting Accuracy Measured Variable Reported Accuracy Space Temperature ±0.5ºC (±1ºF) Ducted Air ±0.5ºC (±1ºF) Outside Air ±1.0ºC (±2ºF) Dew Point ±1.5ºC (±3ºF) Water Temperature ±0.5ºC (±1ºF) Delta-T ±0.15ºC (±0.25ºF) Relative Humidity ±5% RH Water Flow ±2% of full scale Airflow (terminal) ±10% of full scale (see Note 1) Airflow (measuring stations) ±5% of full scale Airflow (pressurized spaces) ±3% of full scale Air Pressure (ducts) ±25 Pa (±0.1 in. w.g.) Air Pressure (space) ±3 Pa (±0.01 in. w.g.) Water Pressure ±2% of full scale (see Note 2) Electrical (A, V, W, Power Factor) ±1% of reading (see Note 3) Carbon Monoxide (CO) ±5% of reading Carbon Dioxide (CO2) ±50 ppm Note 1: Accuracy applies to 10% - 100% of scale Note 2: For both absolute and differential pressure Note 3: Not including utility-supplied meters Table 2 - Control Stability and Accuracy Controlled Variable Control Accuracy Range of Medium ±50 Pa (±0.2 in. w.g.) 0-1.5 kPa (0-6 in. w.g.) Air Pressure ±3 Pa (±0.01 in. w.g.) -25 to 25 Pa (-0.1 to 0.1 in. w.g.) Airflow ±10% of full scale Space Temperature ±1.0ºC (±2.0ºF) Duct Temperature ±1.0ºC (±2ºF) 4 Rev 5, July 12,2013 TORONTO CATHOLIC DISTRICT SCHOOL BOARD St. Elizabeth Catholic School SECTION 239994 DIGITAL CONTROLS Humidity Fluid Pressure 1.8 ±5% RH ±7 kPa (±1.0 psi) ±50 Pa (±0.2 in. w.g.) MPa (1-150 psi) 0-12.5 kPa (0-50 in. w.g.) differential SUBMITTALS .1 Provide three copies of shop drawings and other submittals on hardware, software, and equipment to be installed or furnished. Drawings should be 11” x 17” prints. .2 Provide submittals within 6 weeks of contract award .3 Begin no work until submittals have been approved for conformity with design intent. .4 Provide drawings using AutoCAD 2006 (or newer) in following formats: original, pdf and print. .5 Submittal approval does not relieve Contractor of responsibility to supply sufficient quantities to complete work. .6 Provide submittals on the following: .1 Product Submittals. Clearly indicate applicable data on manufacturer's cutsheets by highlighting or by other means. General catalogs shall not be accepted as cut sheets to fulfill submittal requirements. Select and show submittal quantities appropriate to scope of work. .2 Network Architecture. Riser diagrams showing control network layout, connections to all network devices, communication protocols, network speeds and wire types. Include schematic diagrams of control, communication, and power wiring for central system installation. Show interface wiring to control system. .3 Schematics. Schematic diagram of each controlled system. Label all control points with point names. Graphically show locations of control elements. .4 Floor plan schematic diagrams indicating field sensor and controller locations. .5 Valve Schedule. Indicate system and device designation, product name, manufacturer, and model numbers (both valve and actuator), quantities, sizes, Cv (design and actual), pressure drop, close-off pressure, configuration, ports, and line sizes of each supplied valve and existing control valve. .6 Damper Schedule. Indicate system and device designation, product name, manufacturer, size, and model numbers (both damper and actuator) of each supplied damper/actuator and existing control damper/actuator. .7 Room and Equipment Schedules. Indicate controller type, address, model number, object names, setpoints, and room location. .8 Instrumentation list (Bill of Materials) for each controlled system. List each control system element in a table. Show element name, type of device, manufacturer, model number, and product data sheet number. .9 Manufacturer's description and technical data such as performance curves, product specifications, and installation and maintenance instructions for items listed below and for relevant items not listed below: Direct digital controllers (controller panels) Transducers and transmitters Sensors (include accuracy data) Actuators Valves Relays and switches 5 Rev 5, July 12,2013 TORONTO CATHOLIC DISTRICT SCHOOL BOARD St. Elizabeth Catholic School SECTION 239994 DIGITAL CONTROLS 1.8 Control panels Power supplies Batteries Operator interface equipment Wiring .10 Complete description of control system operation including sequences of operation and points-lists for each control system. Include and reference schematic diagram of controlled system. List I/O points and software points specified in Section 239994. Indicate alarmed and trended points. .11 Wiring diagrams and layouts for each control panel. Show termination numbers. .12 Schematic wiring diagram of each controlled system. Label control elements and terminals. Where a control element is also shown on control system schematic, use the same name. .13 Description of process, report formats, and checklists to be used in Section 239994 Article 3.17 (Control System Demonstration and Acceptance). .14 BACnet Protocol Implementation Conformance Statement (PICS) for each submitted type of controller and operator interface. .7 Schedules .1 Construction Schedule of work provided within one month of contract award, indicating: Intended sequence of work items Start date of each work item Duration of each work item Planned delivery dates for ordered material and equipment and expected lead times Milestones indicating possible restraints on work by other trades or situations .2 Monthly written status reports indicating work completed and revisions to expected delivery dates. Include updated schedule of work. PROJECT RECORD DOCUMENTS. .1 Submit three copies of record (as-built) documents upon completion of installation for approval prior to final completion. Submittal shall consist of: .1 As-built versions of submittal shop drawings should be 11” x 17” prints. Provide drawings using AutoCAD 2006 (or newer) in following formats: original, pdf and print. .2 Testing and Commissioning Reports and Checklists. Completed versions of reports, checklists, and trend logs used to meet requirements of Section 239994 Article 3.17 (Control System Demonstration and Acceptance). .3 Operation and Maintenance (O&M) Manual. Printed, electronic, or online help documentation of the following: As-built versions of submittal product data. Names, addresses, and telephone numbers of installing contractors and service representatives for equipment and control systems. Operator's manual with procedures for operating control systems: logging on and off, handling alarms, producing point reports, 6 Rev 5, July 12,2013 TORONTO CATHOLIC DISTRICT SCHOOL BOARD St. Elizabeth Catholic School SECTION 239994 DIGITAL CONTROLS .4 1.10 trending data, overriding computer control, and changing setpoints and variables. Programming manual or set of manuals with description of programming language and syntax, of statements for algorithms and calculations used, of point database creation and modification, of program creation and modification, and of editor use. Engineering, installation, and maintenance manual or set of manuals that explains how to design and install new points, panels, and other hardware; how to perform preventive maintenance and calibration; how to debug hardware problems; and how to repair or replace hardware. Documentation of programs created using custom programming language including setpoints, tuning parameters, and object database. Electronic copies of programs shall meet this requirement if control logic, setpoints, tuning parameters, and objects can be viewed using furnished programming tools. Graphic files, programs, and database on magnetic or optical media. List of recommended spare parts with part numbers and suppliers. Complete original-issue documentation, installation, and maintenance information for furnished third-party hardware including computer equipment and sensors. Complete original-issue copies of furnished software, including operating systems, custom programming language, operator workstation or web server software, and graphics software. Licenses, guarantees, and warranty documents for equipment and systems. Recommended preventive maintenance procedures for system components, including schedule of tasks such as inspection, cleaning, and calibration; time between tasks; and task descriptions. Training Materials: Provide course outline and materials for each class at least six weeks before first class. Training shall be furnished via instructor-led sessions, computerbased training, or web-based training. Consultant will modify course outlines and materials if necessary to meet Owner's needs. Consultant will review and approve course outlines and materials at least three weeks before first class. Training shall be provided on an on-going basis at the request of the Owner with a maximum of two 8 hour sessions per year. WARRANTY Warrant work as follows: .1 Warrant labor and materials for specified control system free from defects for a period of 24 months after final acceptance. Control system failures during warranty period shall be adjusted, repaired, or replaced at no additional cost or reduction in service to 7 Rev 5, July 12,2013 TORONTO CATHOLIC DISTRICT SCHOOL BOARD St. Elizabeth Catholic School SECTION 239994 DIGITAL CONTROLS 1.11 1.12 Owner. Respond during normal business hours within 24 hours of Owner's warranty service request. .2 Work shall have a single warranty date, even if Owner receives beneficial use due to early system start-up. If specified work is split into multiple contracts or a multi-phase contract, each contract or phase shall have a separate warranty start date and period. .3 If Consultant determines that equipment and systems operate satisfactorily at the end of final start-up, testing, and commissioning phase, Consultant will certify in writing that control system operation has been tested and accepted in accordance with the terms of this specification. Date of acceptance shall begin warranty period. .4 Provide updates to operator workstation software, project-specific software, graphic software, database software, and firmware that resolve software deficiencies at no charge for a period of five years from acceptance date. Do not install updates or upgrades without Owner's written authorization. .5 Reprograming and recommissioning of controllers & programs as required when advised by board staff (including reprogramming due to revisions and complete rewrites of sequence of operations). .6 Exception: Contractor shall not be required to warrant reused devices except those that have been rebuilt or repaired. Installation labor and materials shall be warranted. Demonstrate operable condition of reused devices at time of Engineer's acceptance. OWNERSHIP OF PROPRIETARY MATERIAL Project-specific software and documentation shall become Owner's property. This includes, but is not limited to: .1 Graphics .2 Record drawings / Documentation .3 Database .4 Application programming code (Two copies and two licenses of Engineering (Program) Tool) .5 Licensed copy of Web supervisor software for main server .6 Limitless quantity of authenticated users and limitless quantity of authenticated simultaneous users. DEFINITIONS Term BACnet Interoperability Building Blocks (BIBB) Definition A BIBB defines a small portion of BACnet functionality that is needed to perform a particular task. BIBBS are combined to build the BACnet functional requirements for a device in a specification. BACnet/BACnet Standard BACnet communication requirements as defined by the latest version of ASHRAE/ANSI 135 and approved addenda. Control Systems Server A computer(s) that maintain(s) the systems configuration and programming database. Controller Intelligent stand-alone control device. Controller is a generic reference to building controllers, custom application controllers, and application specific controllers. Direct Digital Control Microprocessor-based control including Analog/Digital conversion and program logic. 8 Rev 5, July 12,2013 TORONTO CATHOLIC DISTRICT SCHOOL BOARD St. Elizabeth Catholic School SECTION 239994 DIGITAL CONTROLS Term Gateway Definition Bi-directional protocol translator connecting control systems that use different communication protocols. Local Area Network Computer or control system communications network limited to local building or campus. Master-Slave/Token Passing Point-to-Point Primary Controlling LAN Data link protocol as defined by the BACnet standard. Serial communication as defined in the BACnet standard. High speed, peer-to-peer controller LAN connecting BCs and optionally AACs and ASCs. Refer to System Architecture below. Protocol Implementation Conformance Statement A written document that identifies the particular options specified by BACnet that are implemented in a device. Router Wiring A device that connects two or more networks at the network layer. Raceway, fittings, wire, boxes and related items. 9 Rev 5, July 12,2013 TORONTO CATHOLIC DISTRICT SCHOOL BOARD St. Elizabeth Catholic School SECTION 239994 DIGITAL CONTROLS PART 2 PRODUCTS 2.0 Section Includes 2.1 Materials . 2.2 Communication. 2.3 Operator Interface . 2.4 Connection to the TCDSB Wide Area Network (WAN). 2.5 TCDSB Central Server. 2.6 Heating Plant Low Temperature Alarm 2.7 Local Service Ports 2.8 Controller Software. 2.9 Controllers 2.10 Power Supplies and Line Filtering 2.11 Auxiliary Control Devices 2.12 Fiber Optic Cable System 2.13 Wiring and Raceways 10 Rev 5, July 12,2013 TORONTO CATHOLIC DISTRICT SCHOOL BOARD St. Elizabeth Catholic School SECTION 239994 DIGITAL CONTROLS 2.1 2.2 2.3 MATERIALS .1 Use new products the manufacturer is currently manufacturing and selling for use in new installations. Do not use this installation as a product test site unless explicitly approved in writing by Owner. Spare parts shall be available for at least five years after completion of this contract. COMMUNICATION .1 Control products, communication media, connectors, repeaters, hubs, and routers shall comprise a BACnet internetwork. Controller and operator interface communication shall conform to ANSI/ASHRAE Standard 135-2004, BACnet. .2 Install new wiring and network devices as required to provide a complete and workable control network. .3 Each controller shall have a communication port for temporary connection to a laptop computer or other operator interface. Connection shall support memory downloads and other commissioning and troubleshooting operations. .4 Internetwork operator interface and value passing shall be transparent to internetwork architecture. .1 An operator interface connected to a controller shall allow the operator to interface with each internetwork controller as if directly connected. Controller information such as data, status, and control algorithms shall be viewable and editable from each internetwork controller. .2 Inputs, outputs, and control variables used to integrate control strategies across multiple controllers shall be readable by each controller on the internetwork. Program and test all cross-controller links required to execute control strategies specified in Section 239994 Appendix A. An authorized operator shall be able to edit cross-controller links by typing a standard object address or by using a point-and-click interface. .5 Controllers with real-time clocks shall use the BACnet Time Synchronization service. System shall automatically synchronize system clocks daily from an operatordesignated controller via the internetwork. If applicable, system shall automatically adjust for daylight saving and standard time. .6 System shall be expandable to at least twice the required input and output objects with additional controllers, associated devices, and wiring. OPERATOR INTERFACE .1 Operator Interface. Workstation shall reside on high-speed network with building controllers. Each workstation shall be able to access all system information. .2 Communication. workstation and controllers shall communicate using BACnet protocol. Workstation and control network backbone shall communicate using ISO 8802-3 (Ethernet) Data Link/Physical layer protocol and BACnet/IP addressing as specified in ANSI/ASHRAE 135-2004, BACnet Annex J. .3 Portable Operator's Terminal. Provide all necessary software, licenses and hardware (e.g. bluetooth dongle) to configure a PC laptop computer for use as a Portable Operator's Terminal. Operator shall be able to connect configured Terminal to the system network or directly to each controller for programming, setting up, and troubleshooting. Physical laptop need not be provided. Licenses should be valid for at least the duration of the warranty period. .4 BACnet. Web server or workstation shall have demonstrated interoperability during at least one BMA Interoperability Workshop and shall substantially conform to BACnet 11 Rev 5, July 12,2013 TORONTO CATHOLIC DISTRICT SCHOOL BOARD St. Elizabeth Catholic School SECTION 239994 DIGITAL CONTROLS .5 .6 12 Operator Workstation (B-OWS) device profile as specified in ASHRAE/ANSI 135-2001, BACnet Annex L. Operator Workstation .1 Hardware. Each workstation shall consist of the following: Computer. Industry-standard hardware shall meet or exceed DDC system manufacturer's recommended specifications and shall meet response times specified in Section 239994 Paragraph 1.9. Hard disk shall have sufficient memory to store system software, one year of data for trended points specified in Appendix A, and a system database at least twice the size of the existing database at system acceptance. Configure computers and network connections if multiple computers are required to meet specified memory and performance. Web server or workstations shall be Dell (TCDSB Standard) PCs with a minimum of: Dual or Quad Core Processor 4 GB RAM 500 GB hard disk providing data at 3.0 Gb/sec 16x DVD-RW drive Wireless Keyboard & Mouse 24-inch 24-bit color LCD monitor with at least 1680 x 1050 resolution Serial, parallel, and network communication ports and cables required for proper system operation .2 Software Operating System. Workstation shall have an industry-standard professional-grade operating system. Acceptable systems include Windows 7. Graphics .1 System Graphics. Operator interface shall be graphically based and shall include at least one graphic per piece of equipment or occupied zone, graphics for each chilled water and hot water system, and graphics that summarize conditions on each floor of each building included in this contract. Functionality. Graphics shall allow operator to monitor system status, to view a summary of the most important data for each controlled zone or piece of equipment, to use point-and-click navigation between zones or equipment, and to edit setpoints and other specified parameters. Animation. Graphics shall be able to animate by displaying different image files for changed object status. Alarm Indication. Indicate areas or equipment in an alarm condition using color or other visual indicator. Format. Graphics shall be saved in an industry-standard format such as BMP, JPEG, PNG, or GIF. Web-based system graphics shall be viewable on browsers compatible with World Wide Web Consortium browser standards. Web graphic format shall require no plug-in Rev 5, July 12,2013 TORONTO CATHOLIC DISTRICT SCHOOL BOARD St. Elizabeth Catholic School SECTION 239994 DIGITAL CONTROLS .7 13 (such as HTML and JavaScript) or shall only require widely available no-cost plug-ins (such as Active-X and Macromedia Flash). System Tools. System shall provide the following functionality to authorized operators as an integral part of the operator interface or as stand-alone software programs. If furnished as part of the interface, the tool shall be available from each workstation interface. If furnished as a stand-alone program, software shall be installable on standard workstation PCs with no limit on the number of copies that can be installed under the system license. .1 Automatic System Database Configuration. Each workstation shall store on its hard disk a copy of the current system database, including controller firmware and software. Stored database shall be automatically updated with each system configuration or controller firmware or software change. .2 Controller Memory Download. Operators shall be able to download memory from the system database to each controller. .3 System Configuration. Operators shall be able to configure the system. .4 Online Help. Context-sensitive online help for each tool shall assist operators in operating and editing the system. .5 Security. System shall require a user name and password to view, edit, add, or delete data. Operator Access. Each user name and password combination shall define accessible viewing, editing, adding, and deleting functions in each system application, editor, and object. Automatic Log Out. Automatically log out each operator if no keyboard or mouse activity is detected. Operators shall be able to adjust automatic log out delay. Encrypted Security Data. Store system security data including operator passwords in an encrypted format. System shall not display operator passwords. .6 System Diagnostics. System shall automatically monitor controller and I/O point operation. System shall annunciate controller failure and I/O point locking (manual overriding to a fixed value). .7 Alarms Alarm Processing. System input and status objects shall be configurable to alarm on departing from and on returning to normal state. Operator shall be able to enable or disable each alarm and to configure alarm limits, alarm limit differentials, alarm states, and alarm reactions for each system object. Configure and enable alarm points as specified in Section 239994 Appendix A (Sequences of Operation). Alarms shall be BACnet alarm objects and shall use BACnet alarm services. Alarm Messages. Alarm messages shall use an English language descriptor without acronyms or mnemonics to describe alarm source, location, and nature. Alarm Reactions. Operator shall be able to configure (by object) actions workstation or web server shall initiate on receipt of each alarm. As a minimum, workstation or web server shall be able to log, Rev 5, July 12,2013 TORONTO CATHOLIC DISTRICT SCHOOL BOARD St. Elizabeth Catholic School SECTION 239994 DIGITAL CONTROLS .8 .9 .10 .11 14 print, start programs, display messages, send e-mail, send page, and audibly annunciate. Alarm Maintenance. Operators shall be able to view system alarms and changes of state chronologically, to acknowledge and delete alarms, and to archive closed alarms to the workstation or web server hard disk from each workstation or web browser interface. Object and Property Status and Control. Operator shall be able to view, and to edit if applicable, the status of each system object and property by menu, on graphics, or through custom programs. Reports and Logs. Operator shall be able to select, to modify, to create, and to print reports and logs. Operator shall be able to store report data in a format accessible by standard spreadsheet and word processing programs. Standard Reports. Furnish the following standard system reports: Objects. System objects and current values filtered by object type, by status (in alarm, locked, normal), by equipment, by geographic location, or by combination of filter criteria. Alarm Summary. Current alarms and closed alarms. System shall retain closed alarms for an adjustable period. Logs. System shall log the following to a database or text file and shall retain data for an adjustable period: Alarm History. Trend Data. Operator shall be able to select trends to be logged. Operator Activity. At a minimum, system shall log operator log in and log out, control parameter changes, schedule changes, and alarm acknowledgment and deletion. System shall date and time stamp logged activity. Graphics Graphics Generation. Graphically based tools and documentation shall allow Operator to edit system graphics, to create graphics, and to integrate graphics into the system. Operator shall be able to add analog and binary values, dynamic text, static text, and animation files to a background graphic using a mouse. Graphics Library. Complete library of standard HVAC equipment graphics shall include equipment such as chillers, boilers, air handlers, terminals, fan coils, and unit ventilators. Library shall include standard symbols for other equipment including fans, pumps, coils, valves, piping, dampers, and ductwork. Library graphic file format shall be compatible with graphics generation tools. Custom Application Programming. Operator shall be able to create, edit, debug, and download custom programs. System shall be fully operable while custom programs are edited, compiled, and downloaded. Programming language shall have the following features: Language. Language shall be graphically based and shall use function blocks arranged in a logic diagram that clearly shows control logic flow. Function blocks shall directly provide functions Rev 5, July 12,2013 TORONTO CATHOLIC DISTRICT SCHOOL BOARD St. Elizabeth Catholic School SECTION 239994 DIGITAL CONTROLS .8 15 listed below, and operators shall be able to create custom or compound function blocks. Programming Environment. Tool shall provide a full-screen, cursorand-mouse-driven programming environment that incorporates word processing features such as cut and paste. Operators shall be able to insert, add, modify, and delete custom programming code, and to copy blocks of code to a file library for reuse in other control programs. Independent Program Modules. Operator shall be able to develop independently executing program modules that can disable, enable and exchange data with other program modules. Debugging and Simulation. Operator shall be able to step through the program observing intermediate values and results. Operator shall be able to adjust input variables to simulate actual operating conditions. Operator shall be able to adjust each step's time increment to observe operation of delays, integrators, and other time-sensitive control logic. Debugger shall provide error messages for syntax and for execution errors. Conditional Statements. Operator shall be able to program conditional logic using compound Boolean (AND, OR, and NOT) and relational (EQUAL, LESS THAN, GREATER THAN, NOT EQUAL) comparisons. Mathematical Functions. Language shall support floating-point addition, subtraction, multiplication, division, and square root operations, as well as absolute value calculation and programmatic selection of minimum and maximum values from a list of values. Variables: Operator shall be able to use variable values in program conditional statements and mathematical functions. Time Variables. Operator shall be able to use predefined variables to represent time of day, day of the week, month of the year, and date. Other predefined variables or simple control logic shall provide elapsed time in seconds, minutes, hours, and days. Operator shall be able to start, stop, and reset elapsed time variables using the program language. System Variables. Operator shall be able to use predefined variables to represent status and results of Controller Software and shall be able to enable, disable, and change setpoints of Controller Software as described in Controller Software section Operator Functions. Operator interface shall allow each authorized operator to execute the following functions as a minimum: .1 Point-and-click Navigation. Operator interface shall be graphically based and shall allow operators to access graphics for equipment and geographic areas using point-and-click navigation. .2 View and Configure Trends. Operators shall be able to view a trend graph of each trended point and to edit graph configuration to display a specific time Rev 5, July 12,2013 TORONTO CATHOLIC DISTRICT SCHOOL BOARD St. Elizabeth Catholic School SECTION 239994 DIGITAL CONTROLS 2.4 2.5 2.6 2.7 period or data range. Operator shall be able to create custom trend graphs to display on the same page data from multiple trended points. CONNECTION TO THE TCDSB WIDE AREA NETWORK (WAN) .1 Advise the TCDSB representative of the proposed location of the system router/gateway panel within the facility The controls vendor shall Provide a communication cable (RJ45) between the BAS Controller and the schools HUB under the TCDSB supervision and comply with the Board standard and he shall connect the BAS to the TCDSB server and WAN and confirm that network access to the BAS has been established. .2 Submit the proposed site-specific BAS network wiring diagram to the Consultant for approval. The use of field installed hubs/switches is not allowed under any circumstances. TCDSB CENTRAL SERVER .1 New site databases and graphics files shall be installed on and integrated to the designated central TCDSB central server located at 80 Sheppard Ave. East, Toronto. .2 Provide written notification to the TCDSB representative prior to installing new site databases to the TCDSB server. Do not install software or make any changes to the server without the written consent of the TCDSB representative. .3 Set up and configure the server software and area routers (where required) to allow for seamless access to the site BAS via the TCDSB WAN. .4 Coordinate all activities related to the central server with the TCDSB representatives. Provide the TCDSB with detailed documentation related to any changes made to the server software, settings or protocols. .5 Supply and install on the TCDSB central server, the latest version of server software available from the manufacturer. Ensure server license is valid for at least the duration of the warranty period. .6 Provide all services required to fully integrate the new installation at the school with the TCDSB central server. HEATING PLANT LOW TEMPATURE ALARM .1 Provide separate digital output (DO) for alarm annunciation via dry contact on relay to security panel for each primary heating plant on heating failure .1 Provide wiring from relay (terminated at relay) to security panel (un-terminated at security panel) .2 TCDSB staff to terminate wiring in security panel .2 Alarm contact to make only when all 4 of the following conditions are met (programming and set-points to be adjustable): .1 Outside temperature is below 5 degrees C .2 Heating Season is active (between October 1 and April 1) .3 All boilers in heating plant are in flame failure .4 Primary Return Temperature is below 30 degrees C LOCAL SERVICE PORTS .1 Every DDC panel shall be provided with a local network access port to connect to laptop computer. A user connected to the local access port shall have the same level of system access and functionality as being connected to the site workstation PC. .2 Where BAS points (4 or more) are located in a mechanical room that does not have a local BAS panel installed, a remote network access port shall be provided. The access 16 Rev 5, July 12,2013 TORONTO CATHOLIC DISTRICT SCHOOL BOARD St. Elizabeth Catholic School SECTION 239994 DIGITAL CONTROLS 2.8 port shall be installed in a hinged metal enclosure with key-lock set and lamicoid ID label. .3 Main Server LAN connection. Provide LAN connection for Main server and for primary user interface/workstation (if not in same room) in the Maintenance Office. Include outlets, cabling (CAT-5E or to match existing) and conduit and route back to main LAN room. .4 Additional LAN connections. Provide one LAN connection in each mechanical room and boiler room to allow connection for a Portable Operator Terminal. Include outlets, cabling (CAT-5E or to match existing) and conduit and route back to main LAN room. CONTROLLER SOFTWARE .1 Building and energy management application software shall reside and operate in system controllers. Applications shall be editable through operator workstation, web browser interface, or engineering workstation. .2 Scheduling. See (View and Adjust Operating Schedules Paragraph). System shall provide the following schedule options as a minimum: .1 Weekly. Provide separate schedules for each day of the week. Each schedule shall be able to include up to 5 occupied periods (5 start-stop pairs or 10 events). .2 Exception. Operator shall be able to designate an exception schedule for each of the next 365 days. After an exception schedule has executed, system shall discard and replace exception schedule with standard schedule for that day of the week. .3 Holiday. Operator shall be able to define 24 special or holiday schedules of varying length on a scheduling calendar that repeats each year. .3 System Coordination. Operator shall be able to group related equipment based on function and location and to use these groups for scheduling and other applications. .4 Remote Communication. System shall automatically contact operator workstation or server on receipt of critical alarms. If no network connection is available, system shall use a modem connection. .5 PID Control. System shall provide direct- and reverse-acting PID (proportional-integralderivative) algorithms. Each algorithm shall have anti-windup and selectable controlled variable, setpoint, and PID gains. Each algorithm shall calculate a time-varying analog value that can be used to position an output or to stage a series of outputs. .6 Staggered Start. System shall stagger controlled equipment restart after power outage. Operator shall be able to adjust equipment restart order and time delay between equipment restarts. .7 Demand Limiting. .1 The demand-limiting program shall monitor building power consumption from a building power meter (provided by others) which generates pulse signals or a BACnet communications interface. An acceptable alternative is for the system to monitor a watt transducer or current transformer attached to the building feeder lines. .2 When power consumption exceeds adjustable levels, system shall automatically adjust setpoints, de-energize low-priority equipment, and take other programmatic actions to reduce demand as specified in Section 23 09 93 (Sequences of Operation). When demand drops below adjustable levels, system shall restore loads as specified. 17 Rev 5, July 12,2013 TORONTO CATHOLIC DISTRICT SCHOOL BOARD St. Elizabeth Catholic School SECTION 239994 DIGITAL CONTROLS .8 2.9 Energy Calculations .1 System shall accumulate and convert instantaneous power (kW) or flow rates (L/s [gpm]) to energy usage data. .2 System shall calculate a sliding-window average (rolling average). Operator shall be able to adjust window interval to 15 minutes, 30 minutes, or 60 minutes. .9 Anti-Short Cycling. Binary output objects shall be protected from short cycling by means of adjustable minimum on-time and off-time settings. .10 On and Off Control with Differential. System shall provide direct- and reverse-acting on and off algorithms with adjustable differential to cycle a binary output based on a controlled variable and setpoint. .11 Runtime Totalization. System shall provide an algorithm that can totalize runtime for each binary input and output. Operator shall be able to enable runtime alarm based on exceeded adjustable runtime limit. Configure and enable runtime tantalization and alarms as specified in Appendix A (Sequence of Operations). .12 Environmental Index. System shall monitor all occupied zones and compile an index that provides a numerical indication of the environmental comfort within the zone. As a minimum, this indication shall be based upon the deviation of the zone temperature from the heating or cooling setpoint. If humidity is being measured within the zone then the environmental index shall be adjusted to reflect a lower comfort level for high or low humidity levels. Similarly, if carbon dioxide levels are being measured as an indication of ventilation effectiveness then the environmental index shall be adjusted to indicate degraded comfort at high carbon dioxide levels. Other adjustments may be made to the environmental index based upon additional measurements. The system shall maintain a trend of the environmental index for each zone in the trend log. The system shall also compute an average comfort index for every building included in this contract and maintain trendlogs of these building environmental indices. Similarly, the system shall compute the percentage of occupied time that comfortable conditions were maintained within the zones. Through the UI the user shall be able to add a weighting factor to adjust the contribution of each zone to the average index based upon the floor area of the zone, importance of the zone, or other static criteria. CONTROLLERS .1 General. Provide Building Controllers (BC), Advanced Application Controllers (AAC), Application Specific Controllers (ASC), Smart Actuators (SA), and Smart Sensors (SS) as required to achieve performance specified in Section 239994 Article 1.9 (System Performance). Every device in the system which executes control logic and directly controls HVAC equipment must conform to a standard BACnet Device profile as specified in ANSI/ASHRAE 135-2004, BACnet Annex L. Unless otherwise specified, hardwired actuators and sensors may be used in lieu of BACnet Smart Actuators and Smart Sensors. .2 BACNET. .1 Building Controllers (BCs). Each BC shall conform to BACnet Building Controller (B-BC) device profile as specified in ANSI/ASHRAE 135-2004, BACnet Annex L and shall be listed as a certified B-BC in the BACnet Testing Laboratories (BTL) Product Listing. .2 Advanced Application Controllers (AACs). Each AAC shall conform to BACnet Advanced Application Controller (B-AAC) device profile as specified in 18 Rev 5, July 12,2013 TORONTO CATHOLIC DISTRICT SCHOOL BOARD St. Elizabeth Catholic School SECTION 239994 DIGITAL CONTROLS .3 19 ANSI/ASHRAE 135-2004, BACnet Annex L and shall be listed as a certified BAAC in the BACnet Testing Laboratories (BTL) Product Listing. .3 Application Specific Controllers (ASCs). Each ASC shall conform to BACnet Application Specific Controller (B-ASC) device profile as specified in ANSI/ASHRAE 135-2004, BACnet Annex L and shall be listed as a certified BASC in the BACnet Testing Laboratories (BTL) Product Listing. .4 Smart Actuators (SAs). Each SA shall conform to BACnet Smart Actuator (BSA) device profile as specified in ANSI/ASHRAE 135-2004, BACnet Annex L and shall be listed as a certified B-SA in the BACnet Testing Laboratories (BTL) Product Listing. .5 Smart Sensors (SSs). Each SS shall conform to BACnet Smart Sensor (B-SS) device profile as specified in ANSI/ASHRAE 135-2004, BACnet Annex L and shall be listed as a certified B-SS in the BACnet Testing Laboratories (BTL) Product Listing. .6 BACnet Communication. Each BC shall reside on or be connected to a BACnet network using ISO 8802-3 (Ethernet) Data Link/Physical layer protocol and BACnet/IP addressing. BACnet routing shall be performed by BCs or other BACnet device routers as necessary to connect BCs to networks of AACs and ASCs. Each AAC shall reside on a BACnet network using ISO 8802-3 (Ethernet) Data Link/Physical layer protocol with BACnet/IP addressing, or it shall reside on a BACnet network using the ARCNET or MS/TP Data Link/Physical layer protocol. Each ASC shall reside on a BACnet network using the ARCNET or MS/TP Data Link/Physical layer protocol. Each SA shall reside on a BACnet network using the ARCNET or MS/TP Data Link/Physical layer protocol. Each SS shall reside on a BACnet network using ISO 8802-3 (Ethernet) Data Link/Physical layer protocol with BACnet/IP addressing, or it shall reside on a BACnet network using ARCNET or MS/TP Data Link/Physical layer protocol COMMUNICATION. .1 Service Port. Each controller shall provide a service communication port for connection to a Portable Operator's Terminal. Connection shall be extended to space temperature sensor ports where shown on drawings. .2 Signal Management. BC and ASC operating systems shall manage input and output communication signals to allow distributed controllers to share real and virtual object information and to allow for central monitoring and alarms. .3 Data Sharing. Each BC and AAC shall share data as required with each networked BC and AAC. .4 Stand-Alone Operation. Each piece of equipment specified in Section 239994 Appendix A shall be controlled by a single controller to provide stand-alone control in the event of communication failure. All I/O points specified for a piece of equipment shall be integral to its controller. Provide stable and reliable stand- Rev 5, July 12,2013 TORONTO CATHOLIC DISTRICT SCHOOL BOARD St. Elizabeth Catholic School SECTION 239994 DIGITAL CONTROLS .4 .5 .6 .7 .8 .9 .10 .11 20 alone control using default values or other method for values normally read over the network. Environment. Controller hardware shall be suitable for anticipated ambient conditions. .1 Controllers used outdoors or in wet ambient conditions shall be mounted in waterproof enclosures and shall be rated for operation at -29°C to 60°C (-20°F to 140°F). .2 Controllers used in conditioned space shall be mounted in dust-protective enclosures and shall be rated for operation at 0°C to 50°C (32°F to 120°F). Keypad. Provide a local keypad and display for each BC and AAC. Operator shall be able to use keypad to view and edit data. Keypad and display shall require password to prevent unauthorized use. If the manufacturer does not normally provide a keypad and display for each BC and AAC, provide the software and any interface cabling needed to use a laptop computer as a Portable Operator's Terminal for the system. Real-Time Clock. Controllers that perform scheduling shall have a real-time clock Serviceability. .1 Controllers shall have diagnostic LEDs for power, communication, and processor. .2 Wires shall be connected to a field-removable modular terminal strip or to a termination card connected by a ribbon cable. .3 Each BC and AAC shall continually check its processor and memory circuit status and shall generate an alarm on abnormal operation. System shall continuously check controller network and generate alarm for each controller that fails to respond. Memory. .1 Controller memory shall support operating system, database, and programming requirements. .2 Each BC and AAC shall retain BIOS and application programming for at least 72 hours in the event of power loss. .3 Each ASC and SA shall use nonvolatile memory and shall retain BIOS and application programming in the event of power loss. System shall automatically download dynamic control parameters following power loss. .4 Each controller shall have a min. 25% spare memory to allow for future expansion. Immunity to Power and Noise. Controllers shall be able to operate at 90% to 110% of nominal voltage rating and shall perform an orderly shutdown below 80% nominal voltage. Operation shall be protected against electrical noise of 5 to 120 Hz and from keyed radios up to 5 W at 1 m (3 ft). Transformer. ASC power supply shall be fused or current limiting and shall be rated at a minimum of 125% of ASC power consumption. INPUT AND OUTPUT INTERFACE .1 General. Hard-wire input and output points to BCs, AACs, ASCs, or SAs. .2 Protection. Shorting an input or output point to itself, to another point, or to ground shall cause no controller damage. Input or output point contact with up to 24 V for any duration shall cause no controller damage. .3 Binary Inputs. Binary inputs shall monitor the on and off signal from a remote device. Binary inputs shall provide a wetting current of at least 12 mA and shall Rev 5, July 12,2013 TORONTO CATHOLIC DISTRICT SCHOOL BOARD St. Elizabeth Catholic School SECTION 239994 DIGITAL CONTROLS 2.10 2.11 be protected against contact bounce and noise. Binary inputs shall sense dry contact closure without application of power external to the controller. .4 Pulse Accumulation Inputs. Pulse accumulation inputs shall conform to binary input requirements and shall accumulate up to 10 pulses per second. .5 Analog Inputs. Analog inputs shall monitor low-voltage (0-10 Vdc), current (4-20 mA), or resistance (thermistor or RTD) signals. Analog inputs shall be compatible with and field configurable to commonly available sensing devices. .6 Binary Outputs. Binary outputs shall send an on-or-off signal for on and off control. Building Controller binary outputs shall have three-position (on-off-auto) override switches and status lights. Outputs shall be selectable for normally open or normally closed operation. .7 Analog Outputs. Analog outputs shall send a modulating 0-10 Vdc or 4-20 mA signal as required to properly control output devices. Each Building Controller analog output shall have a two-position (auto-manual) switch, a manually adjustable potentiometer, and status lights. Analog outputs shall not drift more than 0.4% of range annually .8 Tri-State Outputs. Control three-point floating electronic actuators without feedback with tri-state outputs (two coordinated binary outputs). Tri-State outputs may be used to provide analog output control in zone control and terminal unit control applications such as VAV terminal units, duct-mounted heating coils, and zone dampers. .9 Universal Inputs and Outputs. Inputs and outputs that can be designated as either binary or analog in software shall conform to the provisions of this section that are appropriate for their designated use. POWER SUPPLIES AND LINE FILTERING. .1 Power Supplies. Control transformers shall be UL listed. Furnish Class 2 currentlimiting type or furnish over-current protection in primary and secondary circuits for Class 2 service in accordance with NEC requirements. Limit connected loads to 80% of rated capacity. .1 DC power supply output shall match output current and voltage requirements. Unit shall be full-wave rectifier type with output ripple of 5.0 mV maximum peakto-peak. Regulation shall be 1.0% line and load combined, with 100microsecond response time for 50% load changes. Unit shall have built-in overvoltage and over-current protection and shall be able to withstand 150% current overload for at least three seconds without trip-out or failure. Unit shall operate between 0°C and 50°C (32°F and 120°F). EM/RF shall meet FCC Class B and VDE 0871 for Class B and MILSTD 810C for shock and vibration. Line voltage units shall be UL recognized and CSA listed. .2 Power Line Filtering. .1 Provide internal or external transient voltage and surge suppression for workstations and controllers. Surge protection shall have: .2 Dielectric strength of 1000 V minimum .3 Response time of 10 nanoseconds or less .4 Transverse mode noise attenuation of 65 dB or greater .5 Common mode noise attenuation of 150 dB or greater at 40-100 Hz AUXILIARY CONTROL DEVICES 21 Rev 5, July 12,2013 TORONTO CATHOLIC DISTRICT SCHOOL BOARD St. Elizabeth Catholic School SECTION 239994 DIGITAL CONTROLS .1 .2 22 Motorized Control Dampers. .1 Type. Control dampers shall have linear flow characteristics and shall be parallel- or opposed-blade type as specified below or as scheduled on drawings. Outdoor and return air mixing dampers and face-and-bypass dampers shall be parallel-blade and shall direct airstreams toward each other. Other modulating dampers shall be opposed-blade. Two-position shutoff dampers shall be parallel- or opposed-blade with blade and side seals. .2 Frame. Damper frames shall be 2.38 mm (13 gauge) galvanized steel channel or 3.175 mm (1/8 in.) extruded aluminum with reinforced corner bracing. .3 Blades. Damper blades shall not exceed 20 cm (8 in.) in width or 125 cm (48 in.) in length. Blades shall be suitable for medium velocity (10 m/s [2000 fpm]) performance. Blades shall be not less than 1.5875 mm (16 gauge). .4 Shaft Bearings. Damper shaft bearings shall be as recommended by manufacturer for application, oil impregnated sintered bronze, or better. .5 Seals. Blade edges and frame top and bottom shall have replaceable seals of butyl rubber or neoprene. Side seals shall be spring-loaded stainless steel. Blade seals shall leak no more than 50 L/s·m2 (10 cfm per ft2) at 1000 Pa (4 in. w.g.) differential pressure. Blades shall be airfoil type suitable for wide-open face velocity of 7.5 m/s (1500 fpm). .6 Sections. Damper sections shall not exceed 125 cm - 150 cm (48 in. - 60 in.). Each section shall have at least one damper actuator. .7 Linkages. Dampers shall have exposed linkages. .8 Standard of Acceptance: .9 TAMCO ultra-low leakage insulated dampers for all fresh air and exhaust dampers. .10 TAMCO uninsulated dampers for return air dampers. Automatic Control Valves .1 Automatic control valves, shall be globe type valves. Valves and actuators shall be ordered as one factory-assembled and tested unit. Control ball valves will not be accepted. .2 Submit to the Consultant for review the following information for each valve: Valve type and size Connection type Line size Valve manufacturer and model number Valve flow coefficient Design flow Pressure drop across valve Maximum close-off pressure Actuator manufacturer and model number Actuator maximum torque .3 Valves 2” (50mm) and smaller shall be constructed of bronze. Valves 2 ½ ” (65mm) and larger shall have iron bodies and bronze mountings. Rev 5, July 12,2013 TORONTO CATHOLIC DISTRICT SCHOOL BOARD St. Elizabeth Catholic School SECTION 239994 DIGITAL CONTROLS .4 .5 .6 .7 .8 .9 .10 .11 .12 .13 .14 .15 .16 .17 .18 .19 .20 23 All control valves shall have stainless steel stems. The bronze in bodies and bonnets of all bronze valves shall conform to ASTM B62 for valves rated up to 150psig (1035 Kpa) working pressure and to ASTM B61 for valves rated at 200 psig (1380 Kpa) working pressure. The bodies and bonnets of iron body valves shall conform to ASTM A126, Class B. Control valve discs and seats shall be of bronze for 100 °C or less fluid temperature and of stainless steel for fluid temperatures above 100 °C. The control valves shall have tight shut-off. Flat disk valves are not acceptable. Control valves 2” (50mm) and smaller shall be complete with screwed ends type, except for bronze valves installed in soldered copper piping which shall be complete with soldering ends. Control valves larger than 2” (50mm) shall be complete with flanged end type and proper flanged adapters to copper shall be provided where flanged valves are installed in copper piping. The water control valves shall be sized for a pressure drop of 6 ft. water column or as indicated on mechanical drawings. Each automatic control valve must provide the design output and flow rates at pressure drops compatible with equipment selected. Each automatic control valve must be suitable for the particular system working pressure. Each automatic control valve shall be fitted with a position indicator. All the same type control valves shall be the products of a single manufacturer and have the manufacturer’s name, pressure rating and size clearly marked on the outside of the body. All heating valves: default position shall be fully open to the coil. Valves providing two-position service shall be quick opening. Two-way valves shall have replaceable disc or ball. Close-off (Differential) Pressure Rating. Valve actuator and trim shall provide the following minimum close-off pressure ratings. Two-way: 150% of total system (pump) head. Three-way: 300% of pressure differential between ports A and B at design flow or 100% of total system (pump) head. Ports. Valves providing modulating service shall have equal percentage ports. Sizing. Two-position service: line size. Two-way modulating service: select pressure drop equal to the greatest of twice the pressure drop through heat exchanger (load), 50% of the pressure difference between supply and return mains, or 35 kPa (5 psi). Three-way modulating service: select pressure drop equal to the smaller of twice the pressure drop through the coil exchanger (load) or 35 kPa (5 psi). Fail Position. Water valves shall fail normally open or closed as follows unless otherwise specified. Water zone valves: normally open. Heating coils in air handlers: normally open to the coils. Chilled water control valves: normally closed to the coils. Rev 5, July 12,2013 TORONTO CATHOLIC DISTRICT SCHOOL BOARD St. Elizabeth Catholic School SECTION 239994 DIGITAL CONTROLS .3 .4 .5 24 Other applications: as scheduled or as required by sequences of operation. .21 Standard of Acceptance: Belimo Electric Damper and Valve Actuators. .1 Stall Protection. Mechanical or electronic stall protection shall prevent actuator damage throughout the actuator's rotation. .2 Spring-return Mechanism. Actuators used for power-failure, heating and safety applications shall have an internal mechanical spring-return mechanism or an uninterruptible power supply (UPS), unless otherwise specified .3 Signal and Range. Proportional actuators shall accept a 0-10 Vdc or a 0-20 mA control signal and shall have a 2-10 Vdc or 4-20 mA operating range. (Floating motor actuators may be substituted for proportional actuators in terminal unit applications as described in paragraph 2.6H.) .4 Wiring. 24 Vac and 24 Vdc actuators shall operate on Class 2 wiring. .5 Manual Positioning. Operators shall be able to manually position each actuator when the actuator is not powered. Non-spring-return actuators shall have an external manual gear release. Spring-return actuators with more than 7 N·m (60 in.-lb) torque capacity shall have a manual crank. .6 Standard of Acceptance: Belimo Binary Temperature Devices (low limit, high limit devices). .1 Low-Voltage Space Thermostats. Low-voltage space thermostats shall be 24 V, bimetal-operated, mercury-switch type, with adjustable or fixed anticipation heater, concealed setpoint adjustment, 13°C-30°C (55°F-85°F) setpoint range, 1°C (2°F) maximum differential, and vented ABS plastic cover. .2 Line-Voltage Space Thermostats. Line-voltage space thermostats shall be bimetal-actuated, open-contact type or bellows-actuated, enclosed, snap-switch type or equivalent solid-state type, with heat anticipator, UL listing for electrical rating, concealed setpoint adjustment, 13°C-30°C (55°F-85°F) setpoint range, 1°C (2°F) maximum differential, and vented ABS plastic cover. .3 Low-Limit Thermostats. Low-limit airstream thermostats shall be UL listed, vapor pressure type. Element shall be at least 6 m (20 ft) long. Element shall sense temperature in each 30 cm (1 ft) section and shall respond to lowest sensed temperature. Low-limit thermostat shall be manual reset only. Temperature Sensors. .1 Type. Temperature sensors shall be Resistance Temperature Device (RTD) or thermistor. .2 Duct Sensors. Duct sensors shall be single point or averaging as shown. Averaging sensors shall be a minimum of 1.5 m (5 ft) in length per 1 m2 (10 ft2) of duct cross-section. Standard of Acceptance: Greystone .3 Immersion Sensors. Provide immersion sensors with a separable stainless steel well. Well pressure rating shall be consistent with system pressure it will be immersed in. Well shall withstand pipe design flow velocities. Use immersion temperature sensors with thermwells for all applications where a temperature of a fluid in a pipe is being sensed. Rev 5, July 12,2013 TORONTO CATHOLIC DISTRICT SCHOOL BOARD St. Elizabeth Catholic School SECTION 239994 DIGITAL CONTROLS .6 .7 25 The sensors shall be complete with brass thermowell. Provide a stainless steel thermowell where exposed to corrosive liquids. Use conductive gel when mounting the sensor in the thermowell. The sensors to be mounted on insulated piping shall be installed clear of the insulation. Standard of Acceptance: Greystone .4 Space Sensors Mount sensors at a height of 5’-6’’ above the finished floor. Unless indicated otherwise, mount new sensors adjacent to the existing thermostat in the space. Provide a heavy-duty metal guard for all sensors or thermostats mounted in public areas such as stairways, vestibules, lobbies, gyms. On the approval of the Consultant, a, stainless steel, ventilated plate-type sensor may be used in lieu of guard or cage. Do not mount sensors on outside walls or other locations influenced by external thermal sources (e.g. computers, boiler rooms ). Standard of acceptance: Greystone .5 Duct Averaging Sensors Provide plenum mounted mixed air temperature averaging type sensors with the following minimum characteristics: Mount in a zigzag manner to provide continuous coverage of the entire duct cross-sectional area. The use of thermistor type sensors is acceptable. Standard of Acceptance: Greystone .6 Outdoor Temperature Sensors Provide outdoor air temperature sensors with the following minimum characteristics: Each sensor shall be a 6”, 10K thermistor probe Minimum two sensors shall be installed for each site. Both sensors shall be mounted inside a heavy-duty (blow-proof) solar shield. Standard of Acceptance: Greystone Humidity Sensors. .1 Duct and room sensors shall have a sensing range of 20%–80%. .2 Duct sensors shall have a sampling chamber. .3 Outdoor air humidity sensors shall have a sensing range of 20%–95% RH and shall be suitable for ambient conditions of -40°C–75°C (-40°F–170°F). .4 Humidity sensors shall not drift more than 1% of full scale annually. Flow Switches. .1 Flow-proving switches shall be paddle (water service only) or differential pressure type (air or water service) as shown. Switches shall be UL listed, SPDT snap-acting, and pilot duty rated (125 VA minimum). .2 Paddle switches shall have adjustable sensitivity and NEMA 1 enclosure unless otherwise specified. .3 Differential pressure switches shall have scale range and differential suitable for intended application and NEMA 1 enclosure unless otherwise specified Rev 5, July 12,2013 TORONTO CATHOLIC DISTRICT SCHOOL BOARD St. Elizabeth Catholic School SECTION 239994 DIGITAL CONTROLS .8 .9 .10 .11 .12 26 .4 Standard of Acceptance: Greystone CO2 Sensors .1 Provide CO2 sensors for either wall or duct mounting applications as specified. Provide a heavy duty metal guard to protect the sensor when mounted on walls. Provide the factory-supplied duct mounting kit for all duct mount applications. .2 The sensor shall be microprocessor controlled, fully digital, non-dispersive dual wavelength infrared technology with temperature compensation. The device output shall be 4 to 20mA. .3 The sensor shall have a measurement range of 0 to 3000ppm with an accuracy of +/-25ppm in the 15-30C range. Long term stability shall be no greater than 20 ppm per year. The user selectable range shall be 0 to 1500ppm. .4 Install the sensor in accordance with all manufacturer’s instructions. Wall mounted sensors shall be installed at a minimum height of 72” above the finished floor. Sensors shall not be mounted on an outside wall, close to a window, door or in draft areas with direct airflow. .5 The standard of acceptance shall be Greystone Relays. .1 Control Relays. Control relays shall be plug-in type, UL listed, and shall have dust cover and LED "energized" indicator. Contact rating, configuration, and coil voltage shall be suitable for application. .2 Time Delay Relays. Time delay relays shall be solid-state plug-in type, UL listed, and shall have adjustable time delay. Delay shall be adjustable ±100% from setpoint shown. Contact rating, configuration, and coil voltage shall be suitable for application. Provide NEMA 1 enclosure for relays not installed in local control panel. .3 Standard of Acceptance: Enercorp Override Timers. .1 Unless implemented in control software, override timers shall be spring-wound line voltage, UL Listed, with contact rating and configuration required by application. Provide 0-6 hour calibrated dial unless otherwise specified. Flush mount timer on local control panel face or where shown. Current Transmitters .1 AC current transmitters shall be self-powered, combination split-core current transformer type with built-in rectifier and high-gain servo amplifier with 4-20 mA two-wire output. Full-scale unit ranges shall be 10 A, 20 A, 50 A, 100 A, 150 A, and 200 A, with internal zero and span adjustment. Unit accuracy shall be ±1% full-scale at 500 ohm maximum burden. .2 Transmitter shall meet or exceed ANSI/ISA S50.1 requirements and shall be UL/CSA recognized. .3 Unit shall be split-core type for clamp-on installation on existing wiring. Current Transformers .1 AC current transformers shall be UL/CSA recognized and shall be completely encased (except for terminals) in approved plastic material. .2 Transformers shall be available in various current ratios and shall be selected for ±1% accuracy at 5 A full-scale output. .3 Use fixed-core transformers for new wiring installation and split-core transformers for existing wiring installation. Rev 5, July 12,2013 TORONTO CATHOLIC DISTRICT SCHOOL BOARD St. Elizabeth Catholic School SECTION 239994 DIGITAL CONTROLS .13 .14 .15 .16 .17 .18 .19 27 Voltage Transmitters .1 AC voltage transmitters shall be self-powered single-loop (two-wire) type, 4-20 mA output with zero and span adjustment. .2 Adjustable full-scale unit ranges shall be 100-130 Vac, 200-250 Vac, 250-330 Vac, and 400-600 Vac. Unit accuracy shall be ±1% full-scale at 500 ohm maximum burden. .3 Transmitters shall meet or exceed ANSI/ISA S50.1 requirements and shall be UL/CSA recognized at 600 Vac rating. Power Monitors. .1 Power monitors shall be three-phase type and shall have three-phase disconnect and shorting switch assembly, UL listed voltage transformers, and UL listed split-core current transformers. .2 Power monitors shall provide selectable output: rate pulse for kWh reading or 420 mA for kW reading. Power monitors shall operate with 5 A current inputs and maximum error of ±2% at 1.0 power factor or ±2.5% at 0.5 power factor. Current Switches .1 Current-operated switches shall be self-powered, solid-state with adjustable trip current. Select switches to match application current and DDC system output requirements. Status Relays (Solid State) .1 The status relays shall be mounted inside newly provided enclosures mounted near the respective equipment starter cabinets. .2 Standard of Acceptance: Omron Pressure Transducers. .1 Transducers shall have linear output signal and field-adjustable zero and span. .2 Continuous operating conditions of positive or negative pressure 50% greater than calibrated span shall not damage transducer sensing elements. .3 Water pressure transducer diaphragm shall be stainless steel with minimum proof pressure of 1000 kPa (150 psi). Transducer shall have 4-20 mA output, suitable mounting provisions, and block and bleed valves. .4 Water differential pressure transducer diaphragm shall be stainless steel with minimum proof pressure of 1000 kPa (150 psi). Over-range limit (differential pressure) and maximum static pressure shall be 2000 kPa (300 psi.) Transducer shall have 4-20 mA output, suitable mounting provisions, and 5valve manifold. .5 Standard of Acceptance: Greystone Differential Pressure Switches. .1 Differential pressure switches (air or water service) shall be UL listed, SPDT snap-acting, pilot duty rated (125 VA minimum) and shall have scale range and differential suitable for intended application and NEMA 1 enclosure unless otherwise specified. Pressure-Electric (PE) Switches. .1 PE switches shall be UL listed, pilot duty rated (125 VA minimum) or motor control rated, metal or neoprene diaphragm actuated, operating pressure rated for 0-175 kPa (0-25 psig), with calibrated scale minimum setpoint range of 14125 kPa (2-18 psig). Rev 5, July 12,2013 TORONTO CATHOLIC DISTRICT SCHOOL BOARD St. Elizabeth Catholic School SECTION 239994 DIGITAL CONTROLS .2 .20 .21 .22 28 Provide one- or two-stage switch action (SPDT, DPST, or DPDT) as required by application. .3 Switches shall be open type (panel-mounted). Exception: Switches shall be enclosed type for remote installation. Enclosed type shall be NEMA 1 unless otherwise specified. .4 Each pneumatic signal line to PE switches shall have permanent indicating gauge. Variable Speed Drives .1 The VFD serial communication: The BACnet connection shall be an RS485, MS/TP interface operating at 9.6, 19.2, 38.4, or 76.8 Kbps. The connection shall be tested by the BACnet Testing Labs (BTL) and be BTL Listed. The BACnet interface shall conform to the BACnet standard device type of an Applications Specific Controller (BASC). The use of third party gateways and multiplexers is not acceptable. If additional hardware is required to obtain the BACnet interface, the VFD manufacturer shall supply one BACnet gateway per drive. Multiple VFDs sharing one gateway shall not be acceptable. Capabilities shall include, but not be limited to; run/stop control, speed set adjustment, PID control adjustments, current limit, acceleration/deceleration time adjustments, and lock and unlock the keypad. The drive shall have the capability of allowing the DDC to monitor feedback such as process variable feedback, output speed / frequency, current (in amps), % torque, power (kW), kilowatt hours (resettable), operating hours (re-settable), and drive temperature. The VFD shall allow the DDC to control the drive’s digital and analog outputs via the serial interface, independent of any VFD function and monitor all of the drive’s digital and analog inputs. All diagnostic warning and fault information shall be transmitted over the serial communications bus. Remote VFD fault reset shall be possible. The following additional status indications and settings shall be transmitted over the serial communications bus – keypad “Hand” or “Auto” selected and bypass selected. The DDC system shall also be able to monitor if the motor is running in the VFD mode or bypass mode. Occupancy Sensors. Occupancy sensors shall utilize Passive Infrared (PIR) and/or Microphonic Passive technology to detect the presence of people within a room. Sensors shall be mounted as indicated on the approved drawings. The sensor output shall be accessible by any lighting and/or HVAC controller in the system. Occupancy sensors shall be capable of being powered from the lighting or HVAC control panel, as shown on the drawings. Occupancy sensor delay shall be software adjustable through the user interface and shall not require manual adjustment at the sensor. Fire stopping and Smoke Seal Materials .1 Asbestos-free elastomeric materials tested, listed and labelled by ULC in accordance with CAN4-S115-M85, for installation in U.L.C. designated firestopping and smoke seal Systems. These Systems shall provide a positive fire, water and smoke seal and a fire- resistance rating (flame, smoke hose Rev 5, July 12,2013 TORONTO CATHOLIC DISTRICT SCHOOL BOARD St. Elizabeth Catholic School SECTION 239994 DIGITAL CONTROLS .23 .24 .25 .26 29 stream and temperature) not less than the fire resistance rating of surrounding construction. .2 Materials shall form ULC listed or UL classified assemblies and be compatible with abutting dissimilar materials and finishes. .3 Standard of Acceptance: 3M Canada Limited A/D Fire Protection System Ltd. Fire Stop System Wall Opening Covering Plates .1 All hole covering plates used on this project shall be stainless steel 18-8 chrome metal alloy, type 302, non-magnetic type for finished areas and pressed steel for unfinished areas. Finish brush marks shall be run in a vertical direction. Access Doors .1 Access doors installed in unfinished areas shall be constructed of 12 ga prime coated steel and of stainless steel for all areas finished with tile or marble surfaces. .2 Access doors shall be complete with 180? opening door, round safety corners, concealed hinges, screwdriver latches, plaster lock and anchor straps. .3 Access doors shall be 24’x 24’ or 12’x 18’ as per site condition. .4 Access doors in fire rated construction shall be ULC listed and labeled and of a rating to maintain the fire separation integrity. .5 Standard of Acceptance: Zurn Industries Canada Limited LeHage Industries Limited Acudor Acorn Limited. Local Control Panels. .1 Indoor control panels shall be fully enclosed NEMA 1 construction with hinged door key-lock latch and removable sub-panels. A common key shall open each control panel and sub-panel. .2 Prewire internal and face-mounted device connections with color-coded stranded conductors tie-wrapped or neatly installed in plastic troughs. Field connection terminals shall be UL listed for 600 V service, individually identified per control and interlock drawings, with adequate clearance for field wiring. .3 Each local panel shall have a control power source power switch (on-off) with over current protection. LAN CABLING .1 All LAN cabling shall be Category V as defined by EIA/TIA 568A. The contractor shall test all cabling to verify that 100Mb bandwidth is supported. See commissioning requirements. .2 Cabling shall be 4 pair, 100 ohm UTP, #24 AWG solid copper conductor PVC insulated, with blue or grey colour coded jacket. FT6 rated cable shall be used unless otherwise required to meet building codes or by-laws. .3 Data outlets shall be RJ45, 8 pin connectors, with 50 microns of hard gold over nickel, minimum durability of 750 mating cycles and contact pressure of 100 grams per contact. Transmission characteristics shall meet TSB-40 Category V. .4 Provide one RJ45 data outlet adjacent to each device to be terminated (e.g. workstation PC, DDC panel, hub, etc.) Use a flexible patch cable to connect Rev 5, July 12,2013 TORONTO CATHOLIC DISTRICT SCHOOL BOARD St. Elizabeth Catholic School SECTION 239994 DIGITAL CONTROLS 2.12 2.13 from the data outlet to the end device. For Delta Controls installations, provide a duplex data outlet at the workstation PC to accommodate the remote security key wiring. LAN cabling shall not be directly terminated to any device. .5 Provide protection from EMI sources in accordance with CSA-T530 article 4 .6 The contractor shall test all cabling to verify conformance with TIA /EIA TSB-67 - Basic Link Test using a Level 2, bi-directional tester. See commissioning requirements. .7 Where there are more than 2-90 degree in a conduit run, provide a pull box between sections so that there are two bends or less in any one section. .8 Where a conduit run requires a reverse bend, between 100 degrees and 180 degrees, insert a pull box at each bend having an angle from 100 degrees to 180 degrees. .9 Ream all conduit ends and install insulated bushings on each end. .10 Terminate all conduits that protrude through the structural floor 2” above the concrete base. .11 Do not use a pull box in lieu of a conduit bend. Align conduits that enter a pull box from opposite ends with each other. FIBER OPTIC CABLE SYSTEM .1 Optical Cable. Optical cables shall be duplex 900 mm tight-buffer construction designed for intra-building environments. Sheath shall be UL listed OFNP in accordance with NEC Article 770. Optical fiber shall meet the requirements of FDDI, ANSI X3T9.5 PMD for 62.5/125mm. .2 Connectors. Field terminate optical fibers with ST type connectors. Connectors shall have ceramic ferrules and metal bayonet latching bodies. WIRING AND RACEWAYS .1 General. Provide copper wiring, plenum cable, and raceways as specified in applicable sections of Division 16. .2 Insulated wire shall use copper conductors and shall be UL listed for 90°C (200°F) minimum service. 30 Rev 5, July 12,2013 TORONTO CATHOLIC DISTRICT SCHOOL BOARD St. Elizabeth Catholic School SECTION 239994 DIGITAL CONTROLS PART 3: EXECUTION 3.1 Examination 3.2 Protection 3.3 Coordination 3.4 General Workmanship 3.5 Field Quality Control 3.6 Existing Equipment 3.7 Wiring 3.8 Communication Wiring 3.9 Fiber Optic Cable 3.10 Installation of Sensors 3.11 Flow Switch Installation 3.12 Actuators 3.13 Warning Labels 3.14 Identification of Hardware and Wiring 3.15 Programming. 3.16 Equipment Enclosures And Locations 3.17 Identification and Labeling Of Control Equipment 3.18 Systems Hardware Commissioning. 3.19 Substantial Completion Inspection 3.20 Control System Demonstration And Acceptance 3.21 Cleaning 3.22 Training 31 Rev 5, July 12,2013 TORONTO CATHOLIC DISTRICT SCHOOL BOARD St. Elizabeth Catholic School SECTION 239994 DIGITAL CONTROLS 3.1 3.2 3.3 EXAMINATION .1 Thoroughly examine project plans for control device and equipment locations. Report discrepancies, conflicts, or omissions to Consultant for resolution before starting roughin work. .2 Inspect site to verify that equipment can be installed as shown. Report discrepancies, conflicts, or omissions to Consultant for resolution before starting rough-in work. .3 Examine drawings and specifications for work of others. Report inadequate headroom or space conditions or other discrepancies to Consultant and obtain written instructions for changes necessary to accommodate Section 239994 work with work of others. Controls Contractor shall perform at his expense necessary changes in specified work caused by failure or neglect to report discrepancies. PROTECTION .1 Controls Contractor shall protect against and be liable for damage to work and to material caused by Contractor's work or employees. .2 Controls Contractor shall be responsible for work and equipment until inspected, tested, and accepted. Protect material not immediately installed. Close open ends of work with temporary covers or plugs during storage and construction to prevent entry of foreign objects. COORDINATION .1 Site. .1 Assist in coordinating space conditions to accommodate the work of each trade where work will be installed near or will interfere with work of other trades. If installation without coordination causes interference with work of other trades, Contractor shall correct conditions without extra charge. .2 Coordinate and schedule work with other work in the same area and with work dependent upon other work to facilitate mutual progress. .2 Test and Balance. .1 Provide Test and Balance Contractor a single set of necessary tools to interface to control system for testing and balancing. .2 Train Test and Balance Contractor to use control system interface tools. This training will be planned for a minimum of 4 hours. .3 Provide a qualified technician to assist with testing and balancing the first 20 terminal units. .4 Test and Balance Contractor shall return tools undamaged and in working condition at completion of testing and balancing. .5 Also refer to section 15015 for location of measurements, tolerances, checking and calibration of BAS devices. .3 Life Safety. .1 Duct smoke detectors required for air handler shutdown are provided under Division 16 and/or are existing. Interlock smoke detectors to air handlers for shutdown as specified in Section 239994 Appendix A (Sequences of Operation). .2 Smoke dampers and actuators required for duct smoke isolation are provided under Division 15 and/or are existing. Interlock smoke dampers to air handlers as specified in Section 239994 Appendix A (Sequences of Operation). .4 Coordination with Other Controls. Integrate with and coordinate controls and control devices furnished or installed by others as follows. 32 Rev 5, July 12,2013 TORONTO CATHOLIC DISTRICT SCHOOL BOARD St. Elizabeth Catholic School SECTION 239994 DIGITAL CONTROLS .1 .2 3.4 3.5 3.6 Communication media and equipment shall be provided as specified herein Each supplier of a controls product shall configure, program, start up, and test that product to meet the sequences of operation described herein regardless of where within the contract documents those products are described. .3 Coordinate and resolve incompatibility issues that arise between control products provided under this section and those provided under other sections or divisions of this specification. .4 The contractor is responsible for providing all controls described in the contract documents regardless of where within the contract documents these controls are described. .5 Controls Contractor shall be responsible for integration of control products provided by multiple suppliers regardless of where integration is described within the contract documents. GENERAL WORKMANSHIP .1 Install equipment, piping, and wiring or raceway horizontally, vertically, and parallel to walls wherever possible. .2 Provide sufficient slack and flexible connections to allow for piping and equipment vibration isolation. .3 Install equipment in readily accessible locations as defined by National Electrical Code (NEC) Chapter 1 Article 100 Part A. .4 Verify wiring integrity to ensure continuity and freedom from shorts and ground faults. .5 Equipment, installation, and wiring shall comply with industry specifications and standards and local codes for performance, reliability, and compatibility. FIELD QUALITY CONTROL .1 Work, materials, and equipment shall comply with rules and regulations of applicable local, state, and federal codes and ordinances as identified in Section 239994 Article 1.8 (Codes and Standards). .2 Continually monitor field installation for code compliance and workmanship quality. .3 Contractor shall arrange for work inspection by local or state authorities having jurisdiction over the work. EXISTING EQUIPMENT .1 Wiring. Interconnecting control wiring shall be removed and shall become Contractor's property unless specifically noted or shown to be reused. .2 Local Control Panels. Remove and deliver existing control panels to Owner. .3 Repair. Unless otherwise directed, Contractor is not responsible for repair or replacement of existing energy equipment and systems, valves, dampers, or actuators. Notify Consultant in writing immediately of existing equipment that requires maintenance. .4 Indicator Gauges. Ensure operation of and recalibrate for reasonable accuracy or replace existing gauges. .5 Room Thermostats. Remove and deliver existing room thermostats to Owner unless otherwise noted. Patch and finish holes and marks left by removal to match existing walls. .6 Electronic Sensors and Transmitters. Remove and deliver existing sensors and transmitters to Owner. .7 Controllers and Auxiliary Electronic Devices. Remove and deliver existing controllers and auxiliary electronic devices to Owner. 33 Rev 5, July 12,2013 TORONTO CATHOLIC DISTRICT SCHOOL BOARD St. Elizabeth Catholic School SECTION 239994 DIGITAL CONTROLS .8 3.7 Damper Actuators, Linkages, and Appurtenances: Remove and deliver existing damper actuators, linkages and appurtenances to Owner. .9 Control Valves. Replace existing control valves with new. Deliver removed control valves to Owner. .10 Existing System Operating Schedule. Existing mechanical system may be disabled during this work. .11 Maintain fan scheduling using existing or temporary time clocks or control systems throughout the control system installation. .12 Modify existing starter control circuits if necessary to provide hand-off-auto control of each controlled starter. Furnish new starters or starter control packages as required. .13 Patch holes and finish to match existing walls. .14 At Owner's request, items to be delivered to Owner shall instead be properly disposed of. Hazardous materials shall be disposed in accordance with current regulations and applicable by-laws. WIRING .1 Control and interlock wiring and installation shall comply with national and local electrical codes, and manufacturer's recommendations. .2 NEC Class 1 (line voltage) wiring shall be UL listed in approved raceway as specified by NEC. .3 All wiring shall be installed in EMT conduit unless specified otherwise. Exposed wiring in finished areas (e.g. corridors, classrooms, gymnasiums, etc.) shall be installed in wiremold (colour to match surrounding area) .4 Wiring from DDC controllers to sensors and actuators and control system network and low voltage wiring running in accessible ceilings may be installed using LVT cable. Where the ceiling is used as a return air plenum, plenum rated cable shall be used in lieu of LVT cable. .5 Install EMT and cable at right angles to building lines, securely fastened, and in accordance with current electrical codes and standards. .6 Power and control wiring shall be copper conductor (RW90). For power wiring, provide #12 AWG (minimum) with a 3% maximum voltage drop in accordance with CEC requirements. Control wiring shall be a minimum of #14 AWG, unless otherwise specified. .7 The wires smaller than 18 gauge shall not be used and will not be accepted on the project except for: wiring between terminal computer devices, wire in standard communication cables, such as printers and short haul modems, wire used in communication networks, i.e. any cable transferring digital data, using twisted shielded pairs. .8 The wiring from panels to devices shall be installed without splices. The use of crimp connectors is not allowed when connecting field wiring to sensor or device leads. The use of wire nuts is acceptable in this application. .9 Power for control system shall not be obtained by tapping into miscellaneous circuits that could be inadvertently switched off. Only dedicated circuit(s) shall power the control system. Provide additional breakers or electrical panels as required. .10 Mount transformers and other peripheral equipment in panels located in serviceable areas. Provide line-side breakers/fuses for each transformer. 34 Rev 5, July 12,2013 TORONTO CATHOLIC DISTRICT SCHOOL BOARD St. Elizabeth Catholic School SECTION 239994 DIGITAL CONTROLS .11 3.8 3.9 All 120 VAC power for any controls equipment shall be from dedicated circuits. Provide a breaker lock for each breaker used to supply the control system. Update the panel circuit directory. .12 A dedicated power circuit may be used to power DDC panels and equipment within the same or adjoining mechanical rooms. The use of one power circuit to power DDC panels distributed throughout the building is not acceptable. .13 The controller may be powered from the equipment that it is directly controlling (i.e. heat pump, rooftop unit) only if the controller controls no other equipment and the power supply to the controller remains energized independently of unit operation or status. .14 Provide all required code gauge boxes, connectors and other wiring accessories. .15 For all DC wiring, positive conductors shall be WHITE or RED in colour while negative conductors shall be BLACK in colour. COMMUNICATION WIRING .1 Communication wiring shall be low-voltage Class 2 wiring and shall comply with Article 3.7 (Wiring). .2 Install communication wiring in separate raceways and enclosures from other Class 2 wiring. .3 During installation do not exceed maximum cable pulling, tension, or bend radius specified by the cable manufacturer. .4 Verify entire network's integrity following cable installation using appropriate tests for each cable. .5 Install lightning arrestor according to manufacturer's recommendations between cable and ground where a cable enters or exits a building. .6 Each run of communication wiring shall be a continuous length without splices when that length is commercially available. Runs longer than commercially available lengths shall have as few splices as possible using commercially available lengths. .7 Label communication wiring to indicate origination and destination. .8 Ground coaxial cable according to NEC regulations article on "Communications Circuits, Cable, and Protector Grounding." .9 BACnet MS/TP communications wiring shall be installed in accordance with ASHRAE/ANSI Standard 135. This includes but is not limited to: .1 The network shall use shielded, twisted-pair cable with characteristic impedance between 100 and 120 ohms. Distributed capacitance between conductors shall be less than 100 pF per meter (30 pF per foot.) .2 The maximum length of an MS/TP segment is 1200 meters (4000 ft) with AWG 18 cable. The use of greater distances and/or different wire gauges shall comply with the electrical specifications of EIA-485. .3 The maximum number of nodes per segment shall be 32, as specified in the EIA 485 standard. Additional nodes may be accommodated by the use of repeaters. .4 An MS/TP EIA-485 network shall have no T connections. FIBER OPTIC CABLE .1 During installation do not exceed maximum pulling tensions specified by cable manufacturer. Post-installation residual cable tension shall be within cable manufacturer's specifications. 35 Rev 5, July 12,2013 TORONTO CATHOLIC DISTRICT SCHOOL BOARD St. Elizabeth Catholic School SECTION 239994 DIGITAL CONTROLS .2 3.10 3.11 3.12 Install cabling and associated components according to manufacturers' instructions. Do not exceed minimum cable and unjacketed fiber bend radii specified by cable manufacturer. INSTALLATION OF SENSORS .1 Install sensors according to manufacturer's recommendations. .2 Mount sensors rigidly and adequately for operating environment. .3 Install room temperature sensors on concealed junction boxes properly supported by wall framing. .4 Air seal wires attached to sensors in their raceways or in the wall to prevent sensor readings from being affected by air transmitted from other areas. .5 Use averaging sensors in mixing plenums and hot and cold decks. Install averaging sensors in a serpentine manner vertically across duct. Support each bend with a capillary clip. .6 Install mixing plenum low-limit sensors in a serpentine manner horizontally across duct. Support each bend with a capillary clip. Provide 3 m (1 ft) of sensing element for each 1 m2 (1 ft2) of coil area. .7 Install pipe-mounted temperature sensors in wells. Install liquid temperature sensors with heat-conducting fluid in thermal wells. .8 Install outdoor air temperature sensors on north wall at designated location with sun shield complete with metal cover cage. .9 Differential Air Static Pressure. .1 Supply Duct Static Pressure. Pipe high-pressure tap to duct using a pitot tube. Make pressure tap connections according to manufacturer's recommendations. .2 Return Duct Static Pressure. Pipe high-pressure tap to duct using a pitot tube. Make pressure tap connections according to manufacturer's recommendations. .3 Building Static Pressure. Pipe pressure sensor's low-pressure port to the static pressure port located on the outside of the building through a high-volume accumulator. Pipe high-pressure port to a location behind a thermostat cover. .4 Piping to pressure transducer pressure ports shall contain a capped test port adjacent to transducer. .5 Pressure transducers, except those controlling VAV boxes, shall be located in control panels, not on monitored equipment or on ductwork. Mount transducers in a vibration-free location accessible for service without use of ladders or special equipment. .6 Mount gauge tees adjacent to air and water differential pressure taps. Install shut-off valves before tee for water gauges. .10 Smoke detectors, freezestats, high-pressure cut-offs, and other safety switches shall be hard-wired to de-energize equipment as described in the sequence of operation. Switches shall require manual reset. Provide contacts that allow DDC software to monitor safety switch status. .11 Install humidity sensors for duct mounted humidifiers at least 3 m (10 ft) downstream of the humidifier. Do not install filters between the humidifier and the sensor. FLOW SWITCH INSTALLATION .1 Use correct paddle for pipe diameter. .2 Adjust flow switch according to manufacturer's instructions. ACTUATORS .1 General. Mount actuators and adapters according to manufacturer's recommendations. 36 Rev 5, July 12,2013 TORONTO CATHOLIC DISTRICT SCHOOL BOARD St. Elizabeth Catholic School SECTION 239994 DIGITAL CONTROLS .2 3.13 Electric and Electronic .1 Damper Actuators. Mount actuators directly on damper shaft or jackshaft unless shown as a linkage installation. Link actuators according to manufacturer's recommendations. For low-leakage dampers with seals, mount actuator with a minimum 5° travel available for damper seal tightening. To compress seals when spring-return actuators are used on normally closed dampers, power actuator to approximately 5° open position, manually close the damper, then tighten linkage. Check operation of damper-actuator combination to confirm that actuator modulates damper smoothly throughout stroke to both open and closed positions. Provide necessary mounting hardware and linkages for actuator installation. .2 Valve Actuators. Connect actuators to valves with adapters approved by actuator manufacturer. Actuators and adapters shall be mounted following the actuator manufacturer's recommendations. WARNING LABELS .1 Affix permanent warning labels to equipment that can be automatically started by the control system. .1 Labels shall use white lettering (12-point type or larger) on a red background. .2 Warning labels shall read as follows. CAUTION This equipment is operating under automatic control and may start or stop at any time without warning. Switch disconnect to "Off" position before servicing. .2 Affix permanent warning labels to motor starters and control panels that are connected to multiple power sources utilizing separate disconnects. .1 Labels shall use white lettering (12-point type or larger) on a red background. .2 Warning labels shall read as follows. CAUTION This equipment is fed from more than one power source with separate disconnects. Disconnect all power sources before servicing. 3.14 IDENTIFICATION OF HARDWARE AND WIRING .1 Label wiring and cabling, including that within factory-fabricated panels, with control system address or termination number at each end within 5 cm (2 in.) of termination. .2 Label pneumatic tubing at each end within 5 cm (2 in.) of termination with a descriptive identifier. .3 Permanently label or code each point of field terminal strips to show instrument or item served. .4 Label control panels with minimum 1 cm (½ in.) letters on laminated plastic nameplates. .5 Label each control component with a permanent label. Label plug-in components such that label remains stationary during component replacement. .6 Label room sensors related to terminal boxes or valves with nameplates. 37 Rev 5, July 12,2013 TORONTO CATHOLIC DISTRICT SCHOOL BOARD St. Elizabeth Catholic School SECTION 239994 DIGITAL CONTROLS .7 .8 3.15 Manufacturers' nameplates and UL or CSA labels shall be visible and legible after equipment is installed. Label identifiers shall match record documents. Controllers .1 3.16 3.17 Provide a separate controller for each AHU or other HVAC system. A DDC controller may control more than one system provided that all points associated with the system are assigned to the same DDC controller. Points used for control loop reset, such as outside air or space temperature, are exempt from this requirement. .2 Building Controllers and Custom Application Controllers shall be selected to provide the required I/O point capacity required to monitor all of the hardware points listed in Appendix A (Sequences of Operation). PROGRAMMING .1 Point Naming. Name points as shown on the equipment points list provided with each sequence of operation. See Section 239994 Appendix A (Sequences of Operation). If character limitations or space restrictions make it advisable to shorten the name, the abbreviations given in Appendix C may be used. Where multiple points with the same name reside in the same controller, each point name may be customized with its associated Program Object number. For example, "Zone Temp 1" for Zone 1, "Zone Temp 2" for Zone 2. .2 Software Programming. Programming shall provide actions for each possible situation. Graphic- or parameter-based programs shall be documented. Text-based programs shall be modular, structured, and commented to clearly describe each section of the program. .1 Application Programming. Provide application programming that adheres to sequences of operation specified in Section 239994 Appendix A. Program documentation or comment statements shall reflect language used in sequences of operation. .2 System Programming. Provide system programming necessary for system operation. .3 Operator Interface. .1 Standard Graphics. Provide graphics as specified in Section 239994 Article 2.3 Paragraph E.2 (System Graphics). Show on each equipment graphic input and output points and relevant calculated points such as indicated on the applicable Points List in Section 239994 Appendix A. Point information on graphics shall dynamically update. .2 Install, initialize, start up, and troubleshoot operator interface software and functions (including operating system software, operator interface database, and third-party software installation and integration required for successful operator interface operation) as described in Section 239994. EQUIPMENT ENCLOSURES AND LOCATIONS .1 Provide new enclosures for all field equipment (e.g. DDC panels, transducers, relays, etc.). Enclosures shall be equipped with a hinged door and latch. Provide a OWNERstandard key/lock set for each enclosure. .2 Mount all enclosures in serviceable areas of mechanical rooms, storage rooms or janitor closets. Obtain written approval of the Consultant prior to mounting any enclosure in ceiling spaces or more than 5’-6” above the finished floor. 38 Rev 5, July 12,2013 TORONTO CATHOLIC DISTRICT SCHOOL BOARD St. Elizabeth Catholic School SECTION 239994 DIGITAL CONTROLS .3 3.18 All transformers and power supplies for control equipment shall be installed in new dedicated metal cabinets with hinged, lockable covers located in the proximity of their dedicated controller cabinets. .4 Include within a DDC panel enclosure one 120 VAC duplex receptacle for portable PC power, if the controller cabinet is located further than 5’-0” from the nearest wall receptacle. .5 Ensure that enclosures are sized to allow for ease of servicing of all equipment contained within. Enclosures containing DDC panels shall be sized to allow for the installation of the maximum allowable number of expansion panels/boards. Do not mount other equipment in a manner that may interfere with the future installation of expansion panels/boards. .6 For enclosures containing pneumatic transducers or devices, provide one pressure gauge (1½” dial, 0-30psi) for the main air line supply. IDENTIFICATION AND LABELING OF CONTROL EQUIPMENT .1 All panels must have a lamicoid tag (min. 3”x1”) affixed to the front face indicating panel designation and function (i.e. “BAS Panel 1” or “Relay Panel 3”). .2 All field sensors or devices must have a lamicoid tag (min. 3”x1”) attached with tie-wrap or adhesive indicating the point software name and hardware address (i.e. AHU1-MAT, 2.IP4). Tags must be secured by screws where mounted outside of the building, in unheated spaces, in high humidity areas or where subject to vibration. .3 Room sensors or other sensors in finished areas must have a lamicoid tag affixed to the front cover. This tag shall be minimum 1”x ½” and indicate the point software name and hardware address. .4 All devices within a field enclosure shall be identified via a label or tag. .5 All BAS panel power sources must be identified by a label (min. 3”x1”) indicating the source power panel designation and circuit number (i.e. “120vac fed from LP-2A cct #1). .6 All field control equipment panels fed from more than one power source must have a warning label on the front cover. .7 All wires shall be identified with the hardware address with a band-type self-adhesive strips or clip-on plastic wire markers at both ends. .8 All rotating equipment controlled by the BAS shall have a tag or label affixed indicating that the equipment may start without warning. .9 The location of the phone line manager shall be indicated via a label affixed to the inside cover of the modem enclosure or BAS panel. .10 All BAS panels will be supplied with a point’s list sheet (within a plastic sleeve) attached to the inside door. .11 The points list shall identify the following for each point: Panel number. Panel location. Hardware address. Software name. Point description. Field device type. Point type (i.e. AI or DO). Device fail position. 39 Rev 5, July 12,2013 TORONTO CATHOLIC DISTRICT SCHOOL BOARD St. Elizabeth Catholic School SECTION 239994 DIGITAL CONTROLS 3.19 Device manufacturer. Model number or reference. Wire tag reference. .12 Provide laminated wiring diagrams for all field mounted relay enclosures. Securely attach to the inside door. Identify power panels and circuit numbers of the equipment being controlled. .13 Provide laminated wiring diagrams or modify existing equipment wiring diagrams wherever the BAS interfaces to other equipment. (e.g. boilers, chillers, etc.). Securely attach to the inside of the respective control cabinet. .14 Provide lamacoid labels indicating the required operating sequences, on the boilers and valves, where the boiler plants have manual or automatic isolating valves. Submit actual wording to the Consultant for approval prior to fabrication and installation. .15 Provide lamicoid or machine labels (as outlined above) for all interposing relays or contactors used in control circuits. The labels shall include the related point software name and hardware address .16 Provide a lamicoid label to identify the location of concealed devices above the ceiling space. Mount the label on the ceiling grid t-bar or a permanent surface adjacent to the devices. The label shall contain the wording “BAS Devices Above”. .17 Provide lamicoid labels for all auxiliary HVAC equipment (e.g. force flow cabinets, unit ventilators, unit heater, window AC units, etc.) controlled by the BAS. Mount the labels in the vicinity of the existing thermostat or power switch for the unit. The label shall contain the wording “Under BAS Control”. .18 Where directed by the Consultant, provide any and all additional labelling, diagrams. schematics or instructions as may be required to facilitate the correct operation and maintenance of controlled building systems. SYSTEM HARDWARE COMMISSIONING .1 This contractor shall be responsible for the “end to end” commissioning, testing, verification and start-up of the complete control system hardware including panels, sensors, transducers, end devices, relays and wiring. Where applicable, this shall include any points from an existing and/or re-used automation system in the building. .2 The contractor shall conduct the hardware commissioning at the facility. .3 When the site hardware installation is 100% completed (including all labeling and documentation), the contractor shall provide written notification to the Owner to schedule the hardware commissioning dates for each facility. .4 Owner reserves the right, at it’s sole discretion, to discontinue site commissioning at any time if any part of the site hardware installation is found to be incomplete on the date of commissioning. If this occurs, the Contractor shall assume responsibility for any additional costs related to rescheduling of the site commissioning. .5 The Contractor shall prepare a hardware commissioning report containing the following information and test results: .1 Analog inputs (i.e. temperatures, pressure, etc.) shall be verified with an approved calibration device. All actual temperature readings should be with +/1C of the readings observed at the workstation. Record calibration adjustments and settings. .2 Analog outputs shall be verified by manually commanding the output channel from the operator workstation to two or more positions within the 0-100% range and verifying the actual position of the actuator or device. All devices shall 40 Rev 5, July 12,2013 TORONTO CATHOLIC DISTRICT SCHOOL BOARD St. Elizabeth Catholic School SECTION 239994 DIGITAL CONTROLS 3.20 operate over their entire 0-100% range from a minimum control range of 1090%. Record the actual output scale range (channel output voltage versus controller command) for each analogue end device .3 Digital outputs shall be verified by witnessing the actual start/stop operation of the equipment under control. .4 Digital inputs shall be verified by witnessing the status of the input point as the equipment is manually cycled on and off. .5 Identify any existing equipment (valves, dampers, fan starters, etc..) that are inoperative or require maintenance or repair. .6 The BAS field panel power source shall be toggled on and off to ensure reboot functionality and power down memory retention of all parameters. During the power down test, all controlled system outputs shall go to their fail-safe position. .7 The hardware commissioning report must be signed and dated by the Contractor’s technician performing the tests and participating Owner representative. .8 Include with the hardware commissioning report a site floor plan indicating the location of all equipment installed in concealed or recessed locations (e.g. interposing relays in ceiling spaces). .9 Provide testing of all LAN cabling to ensure that 100Mb bandwidth is supported. .10 Verify conformance with TIA /EIA TSB-67 - Basic Link Test using a Level 2, bidirectional tester. Provide all equipment necessary to carry out the required tests. .6 The Contractor shall prepare a software commissioning report containing the following information and test results: .1 Alarms and Interlocks. Check each alarm with an appropriate signal at a value that will trip the alarm. Trip interlocks using field contacts to check logic and to ensure that actuators fail in the proper direction. Tests interlock actions by simulating alarm conditions to check initiating value of variable and interlock action. .2 Record all out-of-season or unverified points in the commissioning report as “non-commissioned”. .3 Verify PID loop tuning parameters by applying a step change to the current setpoint and observing the response of the controlled device. Setpoint should be reached in an acceptable period of time without excessive cycling or hunting of the controlled device. Provide a graph of the trend response to setpoint change for important controlled devices (e.g. valves 1-inch or larger, dampers on major air handlers, etc.) .4 Provide confirmation that a series of test alarms has been successfully received at a designated remote monitoring workstations. .5 The software commissioning report must be signed and dated by the Contractor’s technician performing the tests and participating Owner representative. .7 At the completion of site commissioning, submit four (4) copies of each the hardware and software commissioning reports to the Owner. SUBSTANTIAL COMPLETION INSPECTION 41 Rev 5, July 12,2013 TORONTO CATHOLIC DISTRICT SCHOOL BOARD St. Elizabeth Catholic School SECTION 239994 DIGITAL CONTROLS .1 3.21 At the completion of the site hardware inspection, the Contractor shall test and verify that the system programming, graphics and alarm software is operating correctly and is in compliance all requirements of the specifications. .2 The Contractor shall provide written notification to the Owner that the site is ready for the Substantial Completion Inspection by the Consultant. .3 At the conclusion of the Substantial Completion Inspection, the Consultant shall issue a comprehensive site deficiency report to the Contractor for his immediate action. .4 The Contractor shall correct all items noted in the site deficiency report within ten (10) business days of receipt. .5 The Contractor shall provide written notification to the Owner that all items on the Consultant’s site deficiency report have been corrected. CONTROL SYSTEM DEMONSTRATION AND ACCEPTANCE .1 Demonstration. Prior to acceptance, perform the following performance tests to demonstrate system operation and compliance with specification after and in addition to tests specified above. Provide Consultant with log documenting completion of Substantial Completion Inspection. .1 Consultant and Board Representative will be present to observe and review system demonstration. Notify Consultant and Board Representative at least 10 days before system demonstration begins. .2 Demonstration shall follow process submitted and approved. Complete approved checklists and forms for each system as part of system demonstration. .3 Demonstrate actual field operation of each sequence of operation as specified herein. Provide at least two persons equipped with two-way communication. Demonstrate calibration and response of any input and output points requested by Consultant. Provide and operate test equipment required to prove proper system operation. .4 Demonstrate compliance with sequences of operation through each operational mode. .5 Demonstrate complete operation of operator interface. .6 Demonstrate each of the following. DDC loop response. Supply graphical trend data output showing each DDC loop's response to a setpoint change representing an actuator position change of at least 25% of full range. Trend sampling rate shall be from 10 seconds to 3 minutes, depending on loop speed. Each sample's trend data shall show setpoint, actuator position, and controlled variable values. Consultant will require further tuning of each loop that displays unreasonably under- or over-damped control. Building fire alarm system interface. Trend logs for each system. Trend data shall indicate setpoints, operating points, valve positions, and other data as specified in the points list provided with each sequence of operation. Each log shall cover three 48-hour periods and shall have a sample frequency not less than 10 minutes or as specified on its points list. Logs shall be accessible through system's operator interface and shall be retrievable for use in other software programs. 42 Rev 5, July 12,2013 TORONTO CATHOLIC DISTRICT SCHOOL BOARD St. Elizabeth Catholic School SECTION 239994 DIGITAL CONTROLS .7 3.22 3.23 Tests that fail to demonstrate proper system operation shall be repeated after Contractor makes necessary repairs or revisions to hardware or software to successfully complete each test. .2 Acceptance. .1 After tests described in this specification are performed to the satisfaction of both Consultant and Owner, Consultant will accept control system as meeting completion requirements. Consultant may exempt tests from completion requirements that cannot be performed due to circumstances beyond Contractor's control. Consultant will provide written statement of each exempted test. Exempted tests shall be performed as part of warranty. .2 System shall not be accepted until completed demonstration forms and checklists are submitted and approved as required. CLEANING .1 Each day clean up debris resulting from work. Remove packaging material as soon as its contents have been removed. Collect waste and place in designated location. .2 On completion of work in each area, clean work debris and equipment. Keep areas free from dust, dirt, and debris. .3 On completion of work, check equipment furnished under this section for paint damage. Repair damaged factory-finished paint to match adjacent areas. Replace deformed cabinets and enclosures with new material and repaint to match adjacent areas. TRAINING .1 Provide training for a designated staff of Owner's representatives. Training shall be provided via self-paced training, web-based or computer-based training, classroom training, or a combination of training methods. .2 Training shall enable students to accomplish the following objectives. .1 Proficiently operate system .2 Understand control system architecture and configuration .3 Understand DDC system components .4 Understand system operation, including DDC system control and optimizing routines (algorithms) .5 Operate workstation and peripherals .6 Log on and off system .7 Access graphics, point reports, and logs .8 Adjust and change system set-points, time schedules, and holiday schedules .9 Recognize common HVAC system malfunctions by observing system graphics, trend graphs, and other system tools .10 Understand system drawings and Operation and Maintenance manual .11 Understand job layout and location of control components .12 Access data from DDC controllers .13 Operate portable operator's terminals .14 Create and change system graphics .15 Create, delete, and modify alarms, including configuring alarm reactions .16 Create, delete, and modify point trend logs (graphs) and multi-point trend graphs .17 Configure and run reports 43 Rev 5, July 12,2013 TORONTO CATHOLIC DISTRICT SCHOOL BOARD St. Elizabeth Catholic School SECTION 239994 DIGITAL CONTROLS .3 .4 .5 .6 44 .18 Add, remove, and modify system's physical points .19 Create, modify, and delete application programming .20 Add operator interface stations .21 Add a new controller to system .22 Download firmware and advanced applications programming to a controller .23 Configure and calibrate I/O points .24 Maintain software and prepare backups .25 Interface with job-specific, third-party operator software .26 Add new users and understand password security procedures Divide presentation of objectives into three sessions (1-13, 14-23, and 24-26). Participants will attend one or more of sessions, depending on knowledge level required. .1 Day-to-day Operators (objectives 1-13) .2 Advanced Operators (objectives 1-13 and 14-23) .3 System Managers and Administrators (objectives 1-13 and 14-26) Provide course outline and materials Provide one copy of training material per student. Instructors shall be factory-trained and experienced in presenting this material. Perform classroom training using a network of working controllers representative of installed hardware. Rev 5, July 12,2013 TORONTO CATHOLIC DISTRICT SCHOOL BOARD St. Elizabeth Catholic School SECTION 239994 DIGITAL CONTROLS APPENDIX A - Sequences of Operation Refer to section 230993.11 and the mechanical drawings for the Sequences of Operation and Points List. 45 Rev 5, July 12,2013 TORONTO CATHOLIC DISTRICT SCHOOL BOARD St. Elizabeth Catholic School SECTION 239994 DIGITAL CONTROLS APPENDIX B - Glossary of Terms Terms used within the Specification Text: Advanced Application Controller (AAC): A fully programmable control module. This control module may be capable of some of the advanced features found in Building Controllers (storing trends, initiating read and write requests, etc.) but it does not serve as a master controller. Advanced Application Controllers may reside on either the Ethernet/IP backbone or on a subnet. Application Specific Controller (ASC): A pre-programmed control module which is intended for use in a specific application. ASCs may be configurable, in that the user can choose between various pre-programmed options, but it does not support full custom programming. ASCs are often used on terminal equipment such as VAV boxes or fan coil units. In many vendors' architectures ASCs do not store trends or schedules but instead rely upon a Building Controller to provide those functions. BACnet/IP: An approved BACnet network type which uses an Ethernet carrier and IP addressing. BACnet MS/TP: An approved BACnet network type which uses a Master-Slave Token Passing configuration. MS/TP networks are unique to BACnet and utilize EIA485 twisted pair topology running at 9600 to 76,800 bps. BACnet over ARCNET: An approved BACnet network type which uses an ARCNET (attached resource computer network) carrier. ARCNET is an industry standard that can utilize several speeds and wiring standards. The most common configuration used by BACnet controllers is an EIA485 twisted pair topology running at 156,000 bps. Building Controller (BC): A fully programmable control module which is capable of storing trends and schedules, serving as a router to devices on a subnet, and initiating read and write requests to other controllers. Typically this controller is located on the Ethernet/IP backbone of the BAS. In many vendors' architectures a Building Controller will serve as a master controller, storing schedules and trends for controllers on a subnet underneath the Building Controller. Direct Digital Control (DDC): A control system in which a digital computer or microprocessor is directly connected to the valves, dampers, and other actuators which control the system, as opposed to indirectly controlling a system by resetting setpoints on an analog pneumatic or electronic controller. PICS - Protocol Implementation Conformance Statement: A written document, created by the manufacturer of a device, which identifies the particular options specified by BACnet that are implemented in the device. Smart Actuator (SA): An actuator which is controlled by a network connection rather than a binary or analog signal. (0-10v, 4-20mA, relay, etc.) Smart Sensor (SS): A sensor which provides information to the BAS via network connection rather than a binary or analog signal. (0-10000 ohm, 4-20mA, dry contact, etc.) Web services: Web services are a standard method of exchanging data between computer systems using the XML (extensible markup language) and SOAP (simple object access protocol) standards. Web 46 Rev 5, July 12,2013 TORONTO CATHOLIC DISTRICT SCHOOL BOARD St. Elizabeth Catholic School SECTION 239994 DIGITAL CONTROLS services can be used at any level within a Building Automation System (BAS), but most commonly they are used to transfer data between BAS using different protocols or between a BAS and a non-BAS system such as a tenant billing system or a utility management system. Terms used within the Sequences of Operation: adj. Adjustable by the end user, through the supplied user interface. AI, AO, etc. (Column Headings on Points List) AI = Analog Input. A physical input to the control module. AO = Analog Output. A physical output from the control module. AV = Analog Value. An intermediate (software) point that may be editable or read-only. Editable AVs are typically used to allow the user to set a fixed control parameter, such as a setpoint. Read Only AVs are typically used to display the status of a control operation. BI = Binary Input. A physical input to the control module. BO = Binary Output. A physical output from the control module. BV = Binary Value. An intermediate (software) point that may be editable or read-only. Editable BVs are typically used to allow the user to set a fixed control parameter, such as a setpoint. Read Only BVs are typically used to display the status of a control operation. Sched = Schedule. The control algorithm for this equipment shall include a user editable schedule. Loop = A control loop. Most commonly a PID control loop. Typically a control loop will include a setpoint, an input which is compared to the setpoint, and an output which controls some action based upon the difference between the input and the setpoint. A PID control loop will also include gains for the proportional, integral, and derivative response as well as an interval which controls how frequently the control loop updates its output. These gains may be adjustable by the end user for control loop "tuning," but in self-tuning control loops or loops which have been optimized for a specific application the gains may not be adjustable. Trend. The control system shall be configured to collect and display a trend log of this object. The trending interval shall be no less than one sample every 5 minutes. (Change of Value trending, where a sample is taken every time the value changes by more than a user-defined minimum, is an acceptable alternative.) Alarm. The control system shall be configured to generate an alarm when this object exceeds user definable limits, as described in the Sequence of Controls. Note: If the specifications require use of the BACnet protocol, all of the above shall be provided as BACnet objects. KW Demand Limiting: * An energy management strategy that reduces energy consumption when a system's electric power meter exceeds an operator-defined threshold. When power consumption exceeds defined levels, the system automatically adjust setpoints, de-energizes low priority equipment, and takes other pre-programmed actions to avoid peak demand charges. As the demand drops, the system restores loads in a predetermined manner. Occupant Override Switch, or Timed Local Override: A control option that allows building occupants to override the programmed HVAC schedule for a limited period of time. When the override time expires, the zone returns to its unoccupied state. Occupant Setpoint Adjustment: 47 Rev 5, July 12,2013 TORONTO CATHOLIC DISTRICT SCHOOL BOARD St. Elizabeth Catholic School SECTION 239994 DIGITAL CONTROLS A control option that allows building occupants to adjust - within limits set by the HVAC control system - the heating and cooling setpoints of selected zones. Typically the user interface for this function is built into the zone sensor. Optimal Start-Up: * A control strategy that automatically starts an HVAC system at the latest possible time yet ensures comfort conditions by the time the building becomes occupied. In a typical implementation, a controller measures the temperature of the zone and the outside air. Then, using design heating or cooling capacity at the design outside air temperature, the system computes how long a unit must run at maximum capacity to bring the zone temperature to its occupied setpoint. The optimal start algorithm often includes a self-learning feature to adjust for variations from design capacity. A distributed system must use Run on Request with Optimal Start. (See below.) Requested, or Run on Request: * A control strategy that optimizes the runtime of a source piece of equipment that supplies one or more receiving units - such as an air handler unit supplying zone terminal units with heating, cooling, ventilation, or similar service. Source equipment runs only when needed, not on a fixed schedule. The source equipment runs when one or more receiving units request its services. An operator determines how many requests are required to start the source equipment. For example, if all the zones in a building are unoccupied and the zone terminal units do not need heating or cooling, the AHU will shut down. However, if a zone becomes occupied or needs cooling, the terminal unit will send a run request to the AHU to initiate the start-up sequence. If this AHU depends on a central chiller, it can send a run request to the chiller. The run on request algorithm also allows an operator to schedule occupancy for individual zones based on the needs of the occupants without having to adjust the schedules of related AHUs and chillers. Trim and Respond, or Setpoint Optimization: * A control strategy that optimizes the setpoint of a source piece of equipment that supplies one or more receiving units - such as an air handler unit supplying zone terminal units with heating, cooling, ventilation, or similar service. The source unit communicates with receiving units to determine heating, cooling, and other requirements, and then adjusts its setpoint. For example, if all zones are comfortable and do not request cooling, the AHU will gradually increase (trim) its supply air setpoint. When a zone requests cooling, the AHU responds by dropping its setpoint. The more zones that request cooling, the more it drops the setpoint. The AHU repeats this process throughout the day to keep zones cool, but with a supply air setpoint that is no cooler than necessary. Contracting Terms: Furnished or Provided: The act of supplying a device or piece of equipment as required meeting the scope of work specified and making that device or equipment operational. All costs required to furnish the specified device or equipment and make it operational are borne by the division specified to be responsible for providing the device or equipment. Install or Installed: 48 Rev 5, July 12,2013 TORONTO CATHOLIC DISTRICT SCHOOL BOARD St. Elizabeth Catholic School SECTION 239994 DIGITAL CONTROLS The physical act of mounting, piping or wiring a device or piece of equipment in accordance with the manufacturer's instructions and the scope of work as specified. All costs required to complete the installation are borne by the division specified to include labor and any ancillary materials. Interface: The physical device required to provide integration capabilities from an equipment vendor's product to the control system. The equipment vendor most normally furnishes the interface device. An example of an interface is the chilled water temperature reset interface card provided by the chiller manufacturer in order to allow the control system to integrate the chilled water temperature reset function into the control system. Integrate: The physical connections from a control system to all specified equipment through an interface as required to allow the specified control and monitoring functions of the equipment to be performed via the control system. 49 Rev 5, July 12,2013 TORONTO CATHOLIC DISTRICT SCHOOL BOARD St. Elizabeth Catholic School SECTION 239994 DIGITAL CONTROLS APPENDIX C - Abbreviations The following abbreviations may be used in graphics, schematics, point names, and other UI applications where space is at a premium. AC - Air Conditioning AHU - Air Handling Unit AI - Analog Input AO - Analog Output AUTO - Automatic AUX - Auxiliary BI -Binary Input BO -Binary Output C -Common CHW - Chilled Water CHWP - Chilled Water Pump CHWR - Chilled Water Return CHWS - Chilled Water Supply COND - Condenser CW - Condenser Water CWP - Condenser Water Pump CWR - Condenser Water Return CWS - Condenser Water Supply DA - Discharge Air EA - Exhaust Air EF - Exhaust Fan FCU - Fan Coil Unit HOA - Hand / Off / Auto HP - Heat Pump HRU - Heat Recovery Unit HEX - Heat Exchanger HW - Hot Water HWP - Hot Water Pump HWR - Hot Water Return HWS - Hot Water Supply MAX - Maximum MIN - Minimum MISC - Miscellaneous NC - Normally Closed NO - Normally Open OA - Outdoor Air RA - Return Air RF - Return Fan RH - Relative Humidity RTU - Roof-top Unit SA - Supply Air SF - Supply Fan SP - Static Pressure TEMP - Temperature 50 Rev 5, July 12,2013 TORONTO CATHOLIC DISTRICT SCHOOL BOARD St. Elizabeth Catholic School SECTION 239994 DIGITAL CONTROLS UH - Unit Heater UV - Unit Ventilator VAV - Variable Air Volume W/ - with W/O - without 51 Rev 5, July 12,2013 Electrical & Communications Specifications for Addition to St. Elizabeth Catholic School 5 Redcar Avenue, Toronto, Ontario ENSO Systems Inc. 5700 Yonge Street, Suite 200 Toronto, Ontario, M2M 4K2 Tel/Fax: (416) 410-9865 Email: [email protected] March 3, 2014 Project: 865 ENSO Systems Inc. #865 St Elizabeth C.S. – Full Day Kindergarten Addition Electrical Specifications Page 1 INDEX FOR DIVISION 26 Section Title 260000 260001 083113 260519 Index General Conditions Access Door and Frames Low Voltage Electrical Power Conductors And Cables Grounding and Bonding for Electrical Systems Hangers and Supports for Electrical Systems Raceways and Boxes for Electrical Systems Sleeves and Sleeve Seals for Electrical Raceways And Cabling Seismic Controls for Electrical Systems Identification for Electrical Systems Lighting Control Devices Panelboards Wiring Devices Fuses Enclosed Switches and Circuit Breakers Enclosed Controllers Interior Lighting Exterior Lighting 260526 260529 260533 260544 260548.16 260553 260923 262416 262726 262813 262816 262913 265100 265600 Page END OF INDEX March 3, 2014 ESI# 865 1 2 11 15 18 23 27 34 37 43 50 55 63 67 70 75 81 90 ENSO Systems Inc. #865 St Elizabeth C.S. – Full Day Kindergarten Addition Electrical Specifications Page 2 SECTION 260001 – GENERAL CONDITIONS 1 General 1.1 Comply with the drawings, all specification sections including Division 00, 01, 02, 26, 27 and 28, and all documents referred to therein. The work of these Divisions - Electrical and Communications is divided into Divisions and Subsections. 1.2 Division 26 – Electrical Systems Division 27 – Communications Systems, and Division 28 – Electrical Safety & Security. 1.3 Subsections are in order, but may not be numbered consecutively. Refer to the Index at each Division and page numbers. 2 Definitions and Interpretations 2.1 The term "provide" shall be understood to include labour, materials, and services necessary to supply and install item or work referred to. The term "approved", "approval", etc., shall be understood to mean approved by authorities having jurisdiction as conforming to Codes, Standards, By-laws, etc. The term “accessible” shall be understood to mean readily accessible by a person using necessary tools but without cutting or breaking out material. The term “exposed” shall be understood to mean within the line of sight of any person standing, sitting in or using the occupied space, unless defined otherwise in the Sections of Division 16. The term “listed” shall be understood to mean that the materials or equipment have been tested in accordance with applicable standards, and have been approved and listed for their intended use by a testing company approved by the Authorities having jurisdiction. The term “subject to review” shall be understood to mean work or materials shall be laid out for review. No work shall proceed until instructions have been obtained. Submit further information, shop drawings, samples, etc., as specified and as may be reasonably requested. 2.2 2.3 2.4 2.5 2.6 3 Laws and Regulations Work provided under this Division shall conform to the standards and codes, current by-laws and regulations of authorities having jurisdiction. In case of conflict, the codes, by-laws and regulations take precedence over the Contract Documents. Do not reduce the standard established by the drawings and specifications by applying codes, by-laws and regulations. 4 Permits and Fees Give notices, obtain and pay for permits including Electrical Safety Authority Inspection and pay all fees necessary to complete the work of this Division. Include for all testing and demonstration to authorities having jurisdiction required to obtain final approvals. 5 Drawings The drawings are diagrammatic, intended to convey the scope of work and indicate general arrangement and approximate location of equipment, fixtures, conduit and cable runs. Take information involving accurate dimensions of the building by site measurements. ENSO Systems Inc. #865 St Elizabeth C.S. – Full Day Kindergarten Addition Electrical Specifications Page 3 6 Examination 6.1 Examine existing buildings, building site and local conditions affecting the work together with drawings and specifications of other Divisions forming part of the Tender Documents, before Tendering. Submit notice of omissions, discrepancies, defects or interferences affecting the work before submitting Tender. 6 Co-ordination 6.1 Lay out work so that it does not conflict with work of other Trades. Prepare field drawings showing size and location of equipment bases, sleepers, inserts, sleeves and openings required for passage of bus ducts, conduits, cables, etc., through walls, partitions, roofs, ceilings, floors and structural members. Submit field drawings as specified under Shop Drawings. No extra cost or credit shall be incurred for any change in location of equipment, providing distance does not exceed 3 m (10') and information is given before installation of said equipment. Coordinate work with all other trades and notify consultant of any conflicts or discrepancies prior to rough-in. 6.2 6.3 7 Standard of Materials and Equipment 7.1 7.2 Material required for performance of work shall be new and of uniform pattern throughout work. Identical units or equipment shall be of same manufacture. All material and equipment shall be of the type subject to Factory Mutual, Underwriters' Laboratories of Canada or Canadian Standards Association inspection and approval and shall bear ULC or CSA labels. 8 Protection of Work and Materials Protect materials and equipment from damage, inclement weather and/or extreme temperatures. Provide enclosures, tarpaulins, or special protection as required under the circumstances. Be responsible for the protection and maintenance of the work of this Division until the work has been completed and accepted. 9 Warranty 9.1 Warrant equipment and work against defects, deficiencies in design and workmanship for a period of one year after acceptance. Provide extended warranties where called for. Submit (1) copy of warranty certificates with Data Book. 9.2 10 Trial Usage Allow for use of electrical systems to be thoroughly tested before final completion and acceptance of the work. Supply labour and equipment for such tests. 11 Superintendence Maintain at the job site for the full duration of the project, qualified personnel with proven experience in erecting, supervising, testing and adjusting projects of comparable nature and complexity. 12 Data Books, Operating and Maintenance Instructions 13.1 Submit three copies of final reviewed shop drawings and manufacturer's maintenance and operating instruction for each piece of major equipment and system. Include the names and addresses of spare parts suppliers and service organizations. ENSO Systems Inc. #865 St Elizabeth C.S. – Full Day Kindergarten Addition 13.2 Electrical Specifications Page 4 13.3 Compile copies in sets in hard cover three-ring data books, with index page and indexing tabs. Provide the services of qualified personnel to instruct and familiarize the Owner's operating and maintenance staff with the correct procedures of operating and maintaining systems and equipment. 13 Base Bid and Supplementary Electrical Tender Form 13.1 Products names and/or model numbers shown are for the purpose of establishing a standard of quality, performance, serviceability, appearance and capacity. Base tenders on the materials, equipment and methods specifically named in the specifications or indicated on the drawings. Submit proposed substitutions or alternatives in accordance with the following procedures: 14.1.1 Where products, materials, methods and services are specifically named or identified as "Base Bid" items, submit proposed substitutions and/or alternatives as required by the Supplementary or Electrical Tender Form. 14.1.2 Where products, materials and methods are not specifically named or identified as "Base Bid" items, include one of the listed acceptable equipment manufacturers, methods and/or services (where applicable) in the tender and show the product and/or service on which the tender is based as required by the Supplementary or Electrical Tender Form. 14.2 14.3 15 15.1 15.2 15.3 The tenderer is encouraged to offer products and materials by manufacturers not included in the specification. Do not include these items in the tender sum, but show items separately as substitutes complete with changes in price. Ensure that offered substitutions and/or alternatives meet space, weight, connection, power and wiring requirements, etc. All costs incurred for additional components, changes to services, structural or space requirements, layouts and plans, etc., necessary to accommodate the alternative or substitute items shall be borne by this Division. Shop Drawings and Samples Submit shop drawings for review in accordance with the requirements of Division 1 and furnish shop drawings to authorities having jurisdiction for review where applicable. Submit shop drawings showing details of construction, weights, accurate dimensions, capacities, performances and wiring diagrams for each piece of major equipment and for each piece of equipment listed under "Shop Drawings" article in the Trade Section. Include shop drawings for distribution equipment, transformers, luminaires, switches (disconnect, safety, transfer), generators, emergency lighting and battery system, fire alarm system, lighting control equipment, cable trays and modular wireways, fuses, heating, low voltage wiring systems, wiring devices, and other special equipment as requested by the Consultant. Indicate the following information: 15.4 Manufacturer's and Supplier's name, catalogue model number Name of trade supplying item, project numbers Number identifying item in the contract documents such as splitter, transformer and panel numbers, luminaire identification symbols, etc. Check for pertinent information such as physical dimensions, make, performance, electrical characteristics before submittal. Be responsible for accuracy of equipment dimensions related to available space, accessibility for maintenance and compliance with Codes and Regulations. ENSO Systems Inc. #865 St Elizabeth C.S. – Full Day Kindergarten Addition 15.5 15.6 15.7 15.8 16 16.1 16.2 17 Electrical Specifications Page 5 Review of the drawings shall be construed to apply to general arrangement only and shall not relieve the Contractor from responsibility for deviations from the drawings and specifications, unless he has submitted written notice of such deviations at the time of submission of drawings and samples. Furnish prints of the reviewed shop drawing details to other parties for co-ordination. Submit samples of material and equipment where specified or as instructed for review before ordering same. Samples may be retained until the completion of the contract. Complete all work in accordance with reviewed shop drawings. All materials and workmanship shall be equal to reviewed samples. Record Drawings and Demonstration Obtain and pay for one set of black line record drawings relating to the work of this Division and keep at the job site. Note clearly, accurately and promptly revisions to the work and deviations from the Contract Documents. Dimension the location, depth, size and type of underground services from convenient reference points. Submit three sets of prints and one disk with record drawings (in AutoCAD 2010) upon completion of work. Construction drawing files will be made available for contractor’s use. Accessibility Install work so as to be readily accessible for operation, maintenance and repairs by access panels or other acceptable means. 18 18.1 18.2 18.3 19 19.1 Concealment Conceal conduit and cables except in unfinished areas such as service rooms or as noted on the drawings where conduits shall be surface mounted. Chase walls were necessary to conceal conduit and boxes. Install services that are to be concealed as close to the building structure as possible so that furrings, ceiling spaces and other enclosures can be of minimum size. Run exposed services parallel to building lines. Identify locations and submit notice where installation of work interferes with interior treatment and use of space. Await instructions before proceeding with the work. Final Inspection Submit a written request to arrange for a final inspection of all electrical systems when: 19.1.1 Deficiencies noted during job inspections have been corrected. 19.1.2 Systems have been tested and reports submitted. Obtain and submit unconditional final inspection certificate to Owner upon completion of work. 19.1.3 Operating and maintenance manuals have been submitted. 19.1.4 Tags are in place and equipment identified. 19.1.5 Owner's operating personnel have been given operating and maintenance instructions. 19.2 20 20.1 Obtain and submit unconditional final inspection certificate from local Authorities having jurisdiction to Owner upon completion of work. Cutting, Patching and Firestopping Advise other Trades of the location of openings required for the installation of this Division's work. Provide and set sleeves, inserts, anchors, etc., when requested in advance of concrete pouring or similar work. Pay for and employ the Trades whose work is involved for cutting and patching of completed work. Lay out such work for review. Do not cut reinforcing steel without written instructions. ENSO Systems Inc. #865 St Elizabeth C.S. – Full Day Kindergarten Addition 20.2 20.3 20.4 20.5 21 Electrical Specifications Page 6 Unless noted otherwise, perform and pay for cutting and patching in existing construction required for installation of work under the Electrical Division. Sleeve as specified elsewhere in this Specification. Do not cut reinforcing steel without written instructions. Provide fire stopping and smoke sealant where required for work by this Division. Refer to general sections for material specifications. Make good openings in walls and floors where demolished equipment, conduit, etc., are removed. Site Visit Site visits are strongly suggested to all bidders in order to review existing conditions that may affect the work. Advise the Owner’s representative 72 hours in advance of planned site visit and make all necessary arrangements to gain access to the areas affected by the work of the Contract. 22 22.1 Applicable Codes, Standards and Authorities Codes, standards and authorities governing the work of this Division shall include but not be limited to the following: 22.1.1 22.1.2 22.1.3 22.1.4 22.1.5 22.1.6 22.2 Authorities: 22.2.1 22.2.2 22.2.3 22.2.4 22.2.5 23 23.1 23.2 24 Ontario Building Code, current edition, and all Ontario Regulations. National Building Code of Canada, current edition. Fire Protection: Insurance Underwriters (Agency). Department of Labour Regulations. Ontario Electrical Safety Code Elevating Devices Act & Elevator Code Municipal Building Department Municipal Fire Prevention Authorities Electrical Safety Authority Ontario Ministry of Energy and Environment Ontario Fire Marshal’s Office Abbreviations Abbreviations used in these documents shall be as shown in the Table 1 at the end of this section. Other abbreviations may be used and shall be interpreted as referred to in the Ontario Building Code and Electrical Safety Code. English/Metric Conversion Metric Units of measurement used in this specification are based on the International System of Units (SI) contained in "The Canadian Metric Practice Guide" prepared by the Canadian Standards Association, Publication Number CAN3-Z234.1-76. Motor and pipe size conversions used are as in Table 2 at the end of this section. 25 List of Base Bid and Acceptable Equipment Manufacturers, Methods and Services See Table 3 at end of section and Luminaire schedule on the drawings. 26 26.1 Hoisting Apparatus Unless noted otherwise, provide all apparatus necessary for the hoisting and placing of materials or equipment forming part of this Division. ENSO Systems Inc. #865 St Elizabeth C.S. – Full Day Kindergarten Addition 26.2 27 27.1 Electrical Specifications Page 7 Ensure that all equipment and materials can be hoisted and set in place. Include for the cost of dismantling and reassembling equipment where required. Work in Existing Building General 27.1.1 Route new services to avoid interference with existing construction. 27.1.2 Cut back and terminate existing services to present a neat appearance. 27.1.3 Remove and dispose of existing abandoned conduit, wiring, cables, devices, equipment, fixtures, hangers and supports. All wiring and cable to be removed to source panel. All unused outlet boxes (where it is not practical to remove same) shall be blanked with coverplates. 27.1.4 Hand over to the Owner existing equipment to be removed such as panels, transformers, splitters, etc., when requested by the Owner. 27.1.5 Refer also to Demolition Section in the Contract Documents. 27.1.6 Conceal all conduit and boxes except in unfinished areas such as service rooms or as noted on the drawings where conduits shall be surface mounted. Walls shall be chased where necessary. 27.1.7 It shall be the responsibility of any contractor, who while working on this project may disturb the wiring or produce heat, smoke, or dust that may activate the fire alarm system, to arrange to have the fire detectors in the area isolated before commencing such work. Failure to comply may result in false alarms. Subsequent charges and fines by the local municipality for attending to a false alarm shall be borne by this contractor 27.2 Work Schedule Carry out Owner/user disturbing work after hours or on weekends. For further details refer to Instructions to Bidders. 27.3 X-ray and Scanning 27.3.1 Before core drilling any concrete floors or walls, x-ray and/or scan the area in question. Include for premium time to perform this work. 28 Continuity of Existing Services 28.1 Include in tender price for overtime work that may be required to tie-in services and wiring at night or weekends. 29 Testing 29.1 Perform tests on each system and submit test results for approval prior to the final acceptance of the work. Repair or correct deficiencies and re-test system as directed. 29.2 Balance panels within 5%. 29.3 Grounding shall be as required by the Ontario Electrical Safety Code. 29.4 Test all system grounding conductors for phase to ground loads; ammeter shall read less than one ampere. ENSO Systems Inc. #865 St Elizabeth C.S. – Full Day Kindergarten Addition Electrical Specifications Page 8 Table 1 - Abbreviations Abbreviation: Long Form: AFF or A.F.F. Above Finished Floor AFG or A.F.G. Above Finished Grade ANSI or A.N.S.I. American National Safety Institute ASA or A.S.A. American Standards Association ASHRAE - American Society of Heating, Refrigerating & Air Conditioning ASTM - American Society For Testing Materials BB Plywood backboard (FR indicates fire-rated) BOD or B.O.D. By Other Division CGA Canadian Gas Association CGSB Canadian Government Specification Board CSA Canadian Standards Association CUA Canadian Underwriter's Association C Conduit C/W or c/w Complete With EEMAC or E.E.M.A.C. Electrical and Electronic Manufacturer's Association Of Canada ESA Electrical Safety Authority FA(P) or FAAP Fire Alarm (Panel) or Fire Alarm Annunciator Panel FR or FR BB Fire-rated or fire-rated backboard HP or hp High Pressure Or Horsepower JB Junction Box KG or kg Kilograms KW or kw Kilowatts LP or PP or RP Lighting Panel, Power Panel, Receptacle Panel LV Low voltage M or m Meters MM or mm Millimeters NFPA National Fire Protection Association NC, NO or nc, no Normally Open, Normally Closed. Position When Power Is Off or Control Signal Output Is Zero OBC Ontario Building Code, current version OESC Ontario Electrical Safety Code, current version ENSO Systems Inc. #865 St Elizabeth C.S. – Full Day Kindergarten Addition Electrical Specifications Page 9 Table 1 - Abbreviations continued Abbreviation: Long Form: PP Power Pole RPM or rpm Revolutions Per Minute SB Switchboard SP Splitter SS or S.S. Stainless Steel TSSA Technical Standards and Safety Authority TX or tx Transformer ULC Underwriter's Laboratory of Canada WM Wiremold Table 2 - Motor and Conduit Size Conversions English System Motor Size HP .5 Metric System Nominal Equivalent kW .37 English System Conduit Size Inches (“) 1/2 Metric System Nominal Equivalent MM 12 or 15 .75 .56 3/4 20 1 .75 1 25 1.5 1.1 1-1/4 32 2 1.5 1-1/2 40 3 2.2 2 50 5 3.7 2-1/2 65 7.5 5.5 3 75 10 7.5 3-1/2 90 15 10.5 4 100 20 15 5 125 25 19 6 150 30 22 8 200 40 30 10 250 50 37 12 300 60 45 14 350 75 56 16 400 100 75 18 450 ENSO Systems Inc. #865 St Elizabeth C.S. – Full Day Kindergarten Addition Electrical Specifications Page 10 Table 3 - List of Base Bid and Acceptable Equipment Manufacturers, Methods & Services The following is a list of acceptable equipment manufacturer, methods and services. Any deviation from the following list must be identified at the time of Tender closing on the Supplementary Tender Form. Component Acceptable Product Safety Switches & Panelboards Square D (Schneider Electric) Siemens Cutler Hammer (Eaton) Contactors & Starters Square D Siemens Cutler Hammer Allen-Bradley Wiring Devices Pass & Seymour Leviton Hubbell Arrow Hart Exit Lights and Battery Packs Lumacell Emergi-Lite Beghelli Fluorescent Ballast And Lamps Phillips Osram-Sylvania Fluorescent Fixtures Visioneering CFI Metalux Lithonia Compact Fluorescent Fixtures Calculite Halo Lithonia Fixture Type: M1, M2 McGraw Edison Keene Fire Alarm Simplex Grinnell Time Clocks Paragon Pass & Seymour Intermatic Motion sensors/ Photocells Wattstopper Lutron Leviton Pass & Seymour End of Section 260001 ENSO Systems Inc. #865 St Elizabeth C.S. – Full Day Kindergarten Addition Electrical Specifications Page 11 SECTION 083113 - ACCESS DOORS AND FRAMES PART 1 - GENERAL 1.1 A. 1.2 A. SUMMARY Section Includes: 1. Access doors and frames for walls and ceilings. 2. Floor access doors and frames. ACTION SUBMITTALS Product Data: For each type of product. 1. B. Shop Drawings: 1. 2. C. D. Include construction details, fire ratings, materials, individual components and profiles, and finishes. Include plans, elevations, sections, details, and attachments to other work. Detail fabrication and installation of access doors and frames for each type of substrate. Samples: For each door face material, at least 75x125mm (3x5’’) in size, in specified finish, when requested. Product Schedule: Provide complete access door and frame schedule, including types, locations, sizes, latching or locking provisions, and other data pertinent to installation. PART 2 - PRODUCTS 2.1 A. 2.2 A. B. PERFORMANCE REQUIREMENTS Fire-Rated Access Doors and Frames: Units complying with CAN/ULC S101, OBC specified edition, that are identical to access door and frame assemblies tested for firetest-response characteristics according to the following test method and that are listed and labeled by ULC or another testing and inspecting agency acceptable to authorities having jurisdiction. ACCESS DOORS AND FRAMES FOR WALLS AND CEILINGS Source Limitations: Obtain each type of access door and frame from single source from single manufacturer. Flush Access Doors with Exposed Flanges: 1. 2. 3. 4. Assembly Description: Fabricate door to fit flush to frame. Provide manufacturer's standard-width exposed flange, proportional to door size. Locations: Wall and ceiling. Door Size: minimum 300x300 (12x12’’) to 900x900mm (24x24’’) to suit application. Metallic-Coated Steel Sheet for Door: Nominal 0.064 inch (1.63 mm), 16 gage. a. 5. Finish: factory prime where surface is to be painted by General Trades or factory finish enameled white, subject to Architect’s approval, for areas that will not be painted by General Trades. Stainless-Steel Sheet for Door: Nominal 0.062 inch (1.59 mm), 16 gage. a. Finish: No. 2b. ENSO Systems Inc. #865 St Elizabeth C.S. – Full Day Kindergarten Addition 6. 7. 8. C. Frame Material: Same material, thickness, and finish as door. Hinges: Continuous for entire length of door. Hardware: Latch unless noted to be lockable on the drawings. Flush Access Doors with Concealed Flanges: 1. 2. 3. 4. Assembly Description: Fabricate door to fit flush to frame. Provide frame with gypsum board beads for concealed flange installation. Locations: Wall and ceiling. Door Size: minimum 300x300 (12x12’’) to 900x900mm (24x24’’) to suit application. Metallic-Coated Steel Sheet for Door: Nominal 0.064 inch (1.63 mm), 16 gage. a. 5. 6. 7. 8. Finish: factory prime where surface is to be painted by General Trades or factory finish enameled white, subject to Architect’s approval, for areas that will not be painted by General Trades. Stainless-Steel Sheet for Door: Nominal 0.062 inch (1.59 mm), 16 gage. a. D. Electrical Specifications Page 12 Finish: No. 2b. Frame Material: Same material, thickness, and finish as door. Hinges: Continuous for entire length of door. Hardware: Latch unless noted to be lockable on the drawings. Recessed Access Doors: 1. 2. 3. 4. Assembly Description: Fabricate door in the form of a pan recessed 1/2 inch (13 mm), 5/8 inch (16 mm), or 1 inch (25 mm), sized to suit infill material (drywall, tile, etc.) Provide frame with gypsum board bead for concealed flange installation. Locations: Wall and ceiling. Door Size: minimum 300x300 (12x12’’) to 900x900mm (24x24’’) to suit application. Uncoated Steel Sheet for Door: Nominal 0.060 inch (1.52 mm), 16 gage. Finish: Factory prime. 5. Metallic-Coated Steel Sheet for Door: Nominal 0.064 inch (1.63 mm), 16 gage. a. 6. Stainless-Steel Sheet for Door: Nominal 0.062 inch (1.59 mm), 16 gage. a. 7. 8. 9. E. Finish: factory prime where surface is to be painted by General Trades or factory finish enameled white, subject to Architect’s approval, for areas that will not be painted by General Trades. Finish: No. 2b. Frame Material: Same material, thickness, and finish as door. Hinges: Continuous for entire length of door. Hardware: Latch unless noted to be lockable on the drawings. Fire-Rated, Flush Access Doors with Concealed Flanges FAP: 1. Assembly Description: Fabricate door to fit flush to frame, with a core of mineralfiber insulation enclosed in sheet metal. Provide self-latching door with automatic closer and interior latch release. Provide frame with gypsum board beads for concealed flange installation in ceilings and exposed flange for drywall partitions unless concealed flanges are requested by the Architect. ENSO Systems Inc. #865 St Elizabeth C.S. – Full Day Kindergarten Addition 2. 3. 4. 5. 6. Locations: Wall and ceiling. Door Size: minimum 300x300 (12x12’’) to 900x900mm (24x24’’) to suit application. Fire-Resistance Rating: Not less than that of construction assembly into which the door is being inserted to a minimum of 2 hours. Temperature-Rise Rating: 450OF (250OC) at the end of 30 minutes. Metallic-Coated Steel Sheet for Door: Nominal 0.064 inch (1.63 mm), 16 gage. a. 7. F. A. B. C. Latch: Cam latch operated by screwdriver. Lock: Mortise cylinder. General: Provide access door and frame assemblies manufactured as integral units ready for installation. Metal Surfaces: For metal surfaces exposed to view in the completed Work, provide materials with smooth, flat surfaces without blemishes. Do not use materials with exposed pitting, seam marks, roller marks, rolled trade names, or roughness. Doors and Frames: Grind exposed welds smooth and flush with adjacent surfaces. Furnish attachment devices and fasteners of type required to secure access doors to types of supports indicated. 2. 3. 4. For concealed flanges with drywall bead, provide edge trim for gypsum board or gypsum base securely attached to perimeter of frames. For concealed flanges with plaster bead for full-bed plaster applications, provide zinc-coated expanded metal lath and exposed casing bead welded to perimeter of frames. Provide mounting holes in frames for attachment of units to metal or wood framing. Provide mounting holes in frame for attachment of masonry anchors. Recessed Access Doors: Form face of panel to provide recess for application of applied finish. Reinforce panel as required to prevent buckling. 1. E. Frame Material: Same material, thickness, and finish as door. Hinges: Continuous for entire length of door. Hardware: Latch unless noted to be lockable on the drawings. FABRICATION 1. D. Finish: No. 2b. Hardware: 1. 2. 2.3 Finish: factory prime where surface is to be painted by General Trades or factory finish enameled white, subject to Architect’s approval, for areas that will not be painted by General Trades. Stainless-Steel Sheet for Door: Nominal 0.062 inch (1.59 mm), 16 gage. a. 8. 9. 10. Electrical Specifications Page 13 For recessed doors with plaster infill, provide self-furring expanded metal lath attached to door panel. Latching Mechanisms: Furnish number required to hold doors in flush, smooth plane when closed. 1. 2. For cylinder locks, furnish two keys per lock and key all locks alike. For recessed panel doors, provide access sleeves for each locking device. Furnish plastic grommets and install in holes cut through finish. ENSO Systems Inc. #865 St Elizabeth C.S. – Full Day Kindergarten Addition F. 2.4 A. B. C. D. Extruded Aluminum: After fabrication, apply manufacturer's standard protective coating on aluminum that will come in contact with concrete. FINISHES Comply with NAAMM's "Metal Finishes Manual for Architectural and Metal Products" for recommendations for applying and designating finishes. Protect mechanical finishes on exposed surfaces from damage by applying a strippable, temporary protective covering before shipping. Appearance of Finished Work: Noticeable variations in same piece are not acceptable. Variations in appearance of adjoining components are acceptable if they are within the range of approved Samples and are assembled or installed to minimize contrast. Steel and Metallic-Coated-Steel Finishes: 1. 2. E. Electrical Specifications Page 14 Factory Prime: Apply manufacturer's standard, fast-curing, lead- and chromatefree, universal primer immediately after surface preparation and pretreatment. Factory Finish: Immediately after cleaning and pretreating, apply manufacturer's standard two-coat, baked-on enamel finish consisting of prime coat and thermosetting topcoat, with a minimum dry-film thickness of 1 mil (0.025 mm) for topcoat. Stainless-Steel Finishes: 1. 2. Surface Preparation: Remove tool and die marks and stretch lines, or blend into finish. Polished Finishes: Grind and polish surfaces to produce uniform finish, free of cross scratches. a. b. c. 3. Run grain of directional finishes with long dimension of each piece. When polishing is completed, passivate and rinse surfaces. Remove embedded foreign matter and leave surfaces chemically clean. Directional Satin Finish: No. 4. Bright, Cold-Rolled, Unpolished Finish: No. 2B. PART 3 - EXECUTION 3.1 A. B. 3.2 A. B. C. D. E. EXAMINATION Examine substrates for compliance with requirements for installation tolerances and other conditions affecting performance of the Work. Proceed with installation only after unsatisfactory conditions have been corrected. INSTALLATION Supply architectural style recessed frame and flange type access panels for locations where electrical equipment or any other device requiring maintenance or adjustment is "built-in"; such as junction boxes, relays, etc. Include cost of installation by qualified tradesmen. Comply with manufacturer's written instructions for installing access doors and frames. Install doors flush with adjacent finish surfaces or recessed to receive finish material. Do not provide access panels in removable panel type ceilings. Indicate location of equipment with acceptable markers. Size and locate access panels in applied tile, or in glazed or unglazed structural tile to suit block patterns. ENSO Systems Inc. #865 St Elizabeth C.S. – Full Day Kindergarten Addition 3.3 A. B. Electrical Specifications Page 15 ADJUSTING Adjust doors and hardware, after installation, for proper operation. Remove and replace doors and frames that are warped, bowed, or otherwise damaged. END OF SECTION 083113 SECTION 260519 - LOW-VOLTAGE ELECTRICAL POWER CONDUCTORS AND CABLES PART 1 - GENERAL 1.1 A. SUMMARY Section Includes: 1. 2. 1.2 A. Building wires and cables rated 600 V and less. Connectors, splices, and terminations rated 600 V and less. QUALITY ASSURANCE Testing Agency Qualifications: an NRTL plus OESC and OBC approved. PART 2 - PRODUCTS 2.1 A. B. 2.2 A. B. CONDUCTORS AND CABLES Copper Conductors and Insulation: shall comply with the OESC and be CSA listed, by a qualified testing agency, and marked for intended location and application. Multiconductor Cable: shall comply with the OESC and be CSA listed, by a qualified testing agency, and marked for intended location and application. CONDUCTOR INSULATION AND MULTICONDUCTOR CABLE APPLICATIONS AND WIRING METHODS Feeders Concealed in Raceway: Type RW90 (90OC) for indoors or RWU-90, X-Link (40OC) for outdoors, as dictated by Code, single conductors. Exposed Feeders: TECK, multiple conductor with annealed, Class B, stranded copper conductors and cross-linked polyethylene, RW90 insulation, 1000 volt rating for #8 AWG and larger. Grounding to be un-insulated tinned stranded copper with non-hygroscopic filter material to maintain circular cross-section. Inner and outer jackets to be PVC ‘Flamenol’ suitable for –40OC with mylar tape separator and aluminum strip, armour helically wound and interlocked. 2.3 A. B. C. D. CONNECTORS AND SPLICES Description: Factory-fabricated connectors and splices of size, ampacity rating, material, type, and class for application and service indicated. Building wire connectors to be Ideal ‘Wing Nut’ or equal for wire sizes up to #6 AWG and Burndy QQA (CU/AL) at studs and bus bars and Burndy Q2A or A3Q (CU/AL) for wire sizes #4 and larger. Cable connectors to be watertight with open compounded head, T&B series ‘Spin-on 2’ with corrosion resistant boot for armoured TECK cables, T&B ‘Tite-Bite’ with nylon insulated throat for armoured cables steel type. Install connectors and tighten as recommended by manufacturer. ENSO Systems Inc. #865 St Elizabeth C.S. – Full Day Kindergarten Addition 2.4 A. Electrical Specifications Page 16 SYSTEM DESCRIPTION Electrical Components, Devices, and Accessories shall comply with the OESC and be CSA listed, by a qualified testing agency, and marked for intended location and application. PART 3 - EXECUTION 3.1 A. B. CONDUCTOR MATERIAL APPLICATIONS Feeders and Branch Circuits: Copper. Solid for No. 10 AWG and smaller; stranded for No. 8 AWG and larger. Branch Circuits Concealed in Ceilings, Walls, and Partitions: Type RW90 (90OC) for indoors or RWU-90, X-Link (-40OC) for outdoors, as dictated by Code, single conductors in raceway. AC90, multi-conductor, with solid annealed commercial grade 98% conductivity tinned copper conductors and cross-linked polyethylene with R90 insulation, 600 volt rating on #10 and #12 size. Grounding to be un-insulated, solid copper with impregnated paper separator. Throat connectors and anti-short sleeves are required at all dressed ends. C. D. E. F. G. H. I. 3.2 A. B. C. Low voltage (24 volts or less) control circuit conductors for thermostats (excludes fire alarm and lighting controls): equivalent to branch circuit wire above or stranded copper power-limited plenum rated (FT6) cable rated for 48 volts or higher concealed in ceilings, walls and partitions. Wiring in channel back of fluorescent luminaires shall be GTF or TEW type. Aluminum wiring shall NOT be used unless specifically identified on the drawings. Wires and cables shall be rated at 1000V for 347/600V circuits, 600 volts for 120/208V circuits, 300 volts for low voltage control, security or fire alarm circuits. All wires shall be new and delivered to the site of the project in their original packing. Wires shall be factory identified, showing size, voltage rating and insulation type. The minimum permissible size for branch circuit wiring shall be #12 AWG. INSTALLATION OF CONDUCTORS AND CABLES Use only Code approved wire for final fixture or appliance connections. All wiring for feeders, branches, drops, devices, etc., to be in EMT conduit unless otherwise noted. Use of Teck and Corflex cables will specifically noted on the drawings. Armoured cable (BX) AC90 may only be used for: final lighting connections to a maximum of 1.5m (5’); note that final connections to lighting fixtures shall originate from an outlet box; connections of fixture body to fixture body are not acceptable, continuous rows of recessed pot lights in drywall or plaster ceilings, final connection to a power pole to a maximum of 3m (10’), final connection to a receptacle concealed in drywall partitions (must originate from a junction box in the ceiling within 0.3m (12’’) of the wall entry point. DO NOT use armoured cable anywhere else without written permission. D. E. The minimum permissible size for branch circuit wiring shall be #12 AWG. Neutral conductor shall be white throughout, three phase wires shall be: one red, one black and one blue or 3 black with coloured tape on each termination. ENSO Systems Inc. #865 St Elizabeth C.S. – Full Day Kindergarten Addition F. G. H. I. J. K. L. M. N. O. P. Q. R. S. 3.3 A. B. Where common neutrals are used ensure that circuits are from different phases with a minimum neutral size to be #10 AWG. Provide a separate neutral for all separate circuits. No splices are permitted for low voltage armoured cables. Size wires for a maximum 2% voltage drop to farthest outlet on loaded circuit. For 120V branch wiring exceeding 23m (75’) to the farthest outlet on a loaded circuit shall be #10 AWG Conceal cables in finished walls, ceilings, and floors unless otherwise indicated. Do not pull or install bruised, kinked, scored, deformed, or abraded cable. Secure and support low voltage (thermostat) cables in ceiling plenums with j-hooks at intervals not to exceed 1200mm (4’) or tie wrap to open web steel joists; do not allow cables to lay on removable ceiling tiles. Fasten securely in place with hardware specifically designed and installed as per manufacturer’s recommendations so as to not damage cables. Complete raceway installation between conductor and cable termination points according to Section 260533 "Raceways and Boxes for Electrical Systems" prior to pulling conductors and cables. Use manufacturer-approved pulling compound or lubricant where necessary; compound used must not deteriorate conductor or insulation. Do not exceed manufacturer's recommended maximum pulling tensions and sidewall pressure values. Use pulling means, including fish tape, cable, rope, and basket-weave wire/cable grips, that will not damage cables or raceway. Install exposed cables parallel and perpendicular to surfaces of exposed structural members, and follow surface contours where possible. Provide flexible connections at all conduit and conductor terminations and supports to eliminate sound and vibration transmission to the building structure. Support cables according to Section 260529 "Hangers and Supports for Electrical Systems." CONNECTIONS Tighten electrical connectors and terminals according to manufacturer's published torque-tightening values. Make splices, terminations, and taps that are compatible with conductor material and that possess equivalent or better mechanical strength and insulation ratings than unspliced conductors. 1. C. D. E. 3.4 A. B. Electrical Specifications Page 17 Use oxide inhibitor in each splice, termination, and tap for aluminum conductors where aluminum conductors are specifically specified. Wiring at Outlets: Install conductor at each outlet, with at least 300 mm (12 inches) of slack. Do NOT splice low voltage (thermostat) cables. Termination lugs for feeders shall be compression type. IDENTIFICATION Identify and color-code conductors and cables according to Section 260553 "Identification for Electrical Systems." Identify each spare conductor at each end with identity number and location of other end of conductor, and identify as spare conductor. ENSO Systems Inc. #865 St Elizabeth C.S. – Full Day Kindergarten Addition 3.5 A. 3.6 A. Electrical Specifications Page 18 SLEEVE AND SLEEVE-SEAL INSTALLATION FOR ELECTRICAL PENETRATIONS Install sleeves and sleeve seals at penetrations of exterior floor and wall assemblies. Comply with requirements in Section 260544 "Sleeves and Sleeve Seals for Electrical Raceways and Cabling." FIRESTOPPING Apply firestopping to electrical penetrations of fire-rated floor and wall assemblies to restore original fire-resistance rating of assembly according to Section 078413 "Penetration Firestopping." END OF SECTION 260519 SECTION 260526 - GROUNDING AND BONDING FOR ELECTRICAL SYSTEMS PART 1 - GENERAL 1.1 A. 1.2 A. B. RELATED DOCUMENTS Drawings and general provisions of the Contract, including General and Supplementary Conditions and Division 01 Specification Sections, apply to this Section. SUMMARY Section includes grounding and bonding systems and equipment. Section includes grounding and bonding systems and equipment, plus the following special applications: 1. 2. 3. 1.3 A. INFORMATIONAL SUBMITTALS As-Built Data: Plans showing dimensioned as-built locations of grounding features specified in "Field Quality Control" Article, including the following: 1. 2. 1.4 A. B. 1.5 A. B. Underground distribution grounding. Ground bonding common with lightning protection system. Foundation steel electrodes. Ground rods. Grounding arrangements and connections for separately derived systems. QUALITY ASSURANCE Electrical Components, Devices, and Accessories shall comply with the OESC and be CSA listed, by a qualified testing agency, and marked for intended location and application.. Comply with latest version of Electrical Safety Code for grounding and bonding materials and equipment. Acceptable Manufacturers: Burndy or Thomas and Betts ENSO Systems Inc. #865 St Elizabeth C.S. – Full Day Kindergarten Addition Electrical Specifications Page 19 PART 2 - PRODUCTS 2.1 A. B. CONDUCTORS Insulated Conductors: Copper wire or cable insulated for 600 V unless otherwise required by the OESC or by the Authorities having jurisdiction. Bare Copper Conductors: 1. 2. 3. 4. C. 2.2 A. B. C. 2.3 A. B. Solid Conductors: ASTM B 3. Stranded Conductors: ASTM B 8. Bonding Conductor: No. 4 or No. 6 AWG, stranded conductor as required by latest version of OESC. Bonding Jumper: Copper tape, braided conductors terminated with copper ferrules; minimum size as permitted by the OESC and by the Authorities having jurisdiction. Grounding Bus: Predrilled rectangular bars of annealed copper, 6.3 by 100 mm (1/4 by 4 inches) by length (noted on plans or 600mm (24’’) where not noted) in cross section, with 7.14-mm (9/32-inch) holes spaced 28mm (1-1/8 inches) apart. Stand-off insulators for mounting shall comply with UL 891 and the Electrical Safety Code for use in switchboards, 600 V and shall be Lexan or PVC, impulse tested at 5000 V. CONNECTORS Shall comply with the OESC and be CSA listed, by a qualified testing agency, and marked for intended location and for applications in which used and for specific types, sizes, and combinations of conductors and other items connected. Bolted Connectors for Conductors and Pipes: Copper or copper alloy. Bus-Bar Connectors: Mechanical type, cast silicon bronze, solderless compression or exothermic type wire terminals, and long-barrel, two-bolt connection to ground bus bar. GROUNDING ELECTRODES Ground Rods: size and spacing as required by the OESC. Chemical-Enhanced Grounding Electrodes: Copper tube, straight or L-shaped, charged with nonhazardous electrolytic chemical salts where specifically noted as being required on the drawings. 1. 2. Termination: Factory-attached No. 4/0 AWG bare conductor at least 1200mm (48 inches) long or minimum size permitted by the Electrical Safety Code. Backfill Material: Electrode manufacturer's recommended material. PART 3 - EXECUTION 3.1 A. B. C. APPLICATIONS Install grounding connections to typical equipment included in, but not necessarily limited to following list: service equipment, transformers, switchgear, duct systems, frames of motors, starters, control panels, building steel and metal cladding work, generators, elevator rails, communication systems, distribution panels and outdoor lighting. Conductors: Install solid conductor for #8 AWG and smaller, and stranded conductors for #6 AWG and larger unless otherwise indicated. Underground Grounding Conductors: Size and install (bury at depth) as required by the OESC. ENSO Systems Inc. #865 St Elizabeth C.S. – Full Day Kindergarten Addition D. E. Isolated Grounding Conductors: Green-colored insulation with continuous yellow stripe. On feeders with isolated ground, identify grounding conductor where visible to normal inspection, with alternating bands of green and yellow tape, with at least three bands of green and two bands of yellow. Conductor Terminations and Connections: 1. 2. 3. 4. 3.2 A. 3.3 A. C. 3.4 A. B. C. Pipe and Equipment Grounding Conductor Terminations: Bolted connectors. Underground Connections: Welded connectors except at test wells and as otherwise indicated. Connections to Ground Rods at Test Wells: Bolted connectors. Connections to Structural Steel: Welded connectors. GROUNDING AT THE SERVICE Equipment grounding conductors and grounding electrode conductors shall be connected to the ground bus. Install a main bonding jumper between the neutral and ground buses. EQUIPMENT GROUNDING Install insulated equipment grounding conductors with all feeders, branch circuits and the following items (not an all inclusive list). 1. 2. 3. 4. 5. 6. 7. 8. B. Electrical Specifications Page 20 Feeders and branch circuits. Lighting circuits. Receptacle circuits. Single-phase motor and appliance branch circuits. Three-phase motor and appliance branch circuits. Flexible raceway runs. Armored and metal-clad cable runs. Busway Supply Circuits: Install insulated equipment grounding conductor from grounding bus in the switchgear, switchboard, or distribution panel to equipment grounding bar terminal on busway. Isolated Grounding Receptacle Circuits: Install an insulated equipment grounding conductor connected to the receptacle grounding terminal. Isolate conductor from raceway and from panelboard grounding terminals. Terminate at equipment grounding conductor terminal of the applicable derived system or service unless otherwise indicated. Isolated Equipment Enclosure Circuits: For designated equipment supplied by a branch circuit or feeder, isolate equipment enclosure from supply circuit raceway with a nonmetallic raceway fitting listed for the purpose. Install fitting where raceway enters enclosure, and install a separate insulated equipment grounding conductor. Isolate conductor from raceway and from panelboard grounding terminals. Terminate at equipment grounding conductor terminal of the applicable derived system or service unless otherwise indicated. INSTALLATION Install complete permanent, continuous, system and circuit, equipment, grounding systems including electrodes, conductors, connectors, accessories, as indicated, to conform to requirements of local Hydro Authority and the OESC. Install connectors in accordance with manufacturer's instruction. Protect exposed grounding conductors from mechanical injury. ENSO Systems Inc. #865 St Elizabeth C.S. – Full Day Kindergarten Addition D. E. F. G. H. I. J. K. L. M. N. Use mechanical connectors for grounding connections to equipment provided with lugs. Soldered joints not permitted. Install bonding wire for flexible conduit, connected at one end to grounding bushing, soldieries lug, clamp or cup washer and screw. Neatly cleat bonding wire to exterior of flexible conduit. Install separate ground wire in each conduit and bond to box. DO NOT USE CONDUIT AS GROUND. Connect building structural steel to ground by welding copper to steel. Make buried connections, and connections to conductive water main and electrodes, using copper welding by thermit process. Make grounding connections in radial configuration only, with connections terminating at single grounding point and connecting to incoming metal water pipe. Avoid loop connections. Bond single conductor, metallic armoured cables to cabinet at supply end, and provide non-metallic entry plate at lead end. Grounding Conductors: Route along shortest and straightest paths possible unless otherwise indicated or required by the OESC. Avoid obstructing access or placing conductors where they may be subjected to strain, impact, or damage. Ground Bonding Common with Lightning Protection System: shall comply with the OESC and be CSA listed, by a qualified testing agency, and marked for intended location and application. Bond electrical power system ground directly to lightning protection system grounding conductor at closest point to electrical service grounding electrode. Use bonding conductor sized same as system grounding electrode conductor, and install in conduit. Ground Rods: Drive rods until tops are 2 inches (50 mm) below finished floor or final grade unless otherwise indicated. 1. 2. O. Interconnect ground rods with grounding electrode conductor below grade and as otherwise indicated. Make connections without exposing steel or damaging coating if any. For grounding electrode system, install multiple ground rods spaced at least onerod length from each other and located at least the same distance from other grounding electrodes, and connect to the service grounding electrode conductor as required by the OESC and Authorities having jurisdiction. Test Wells: Ground rod driven through drilled hole in bottom of handhole. Handholes are specified in Section 260543 "Underground Ducts and Raceways for Electrical Systems," and shall be at least 12 inches (300 mm) deep, with cover. 1. P. Electrical Specifications Page 21 Test Wells: Install at least one test well for each service unless otherwise indicated. Install at the ground rod electrically closest to service entrance. Set top of test well flush with finished grade or floor. Bonding Straps and Jumpers: Install in locations accessible for inspection and maintenance except where routed through short lengths of conduit. 1. 2. 3. Bonding to Structure: Bond straps directly to basic structure, taking care not to penetrate any adjacent parts. Bonding to Equipment Mounted on Vibration Isolation Hangers and Supports: Install bonding so vibration is not transmitted to rigidly mounted equipment. Use exothermic-welded connectors for outdoor locations; if a disconnect-type connection is required, use a bolted clamp. ENSO Systems Inc. #865 St Elizabeth C.S. – Full Day Kindergarten Addition Q. Grounding and Bonding for Piping: 1. 2. 3. 4. R. S. T. 2. 3. 4. 5. 6. A. B. Metal Water Service Pipe (water, sanitary and storm piping): Install insulated copper grounding conductors, in conduit, from building's main service equipment, or grounding bus, to main metal water service entrances to building. Connect grounding conductors to main metal water service pipes; use a bolted clamp connector or bolt a lug-type connector to a pipe flange by using one of the lug bolts of the flange. Where a dielectric main water fitting is installed, connect grounding conductor on street side of fitting. Bond metal grounding conductor conduit or sleeve to conductor at each end. Water Meter Piping: Use braided-type bonding jumpers to electrically bypass water meters. Connect to pipe with a bolted connector. Bond each aboveground portion of gas piping system on customer side of gas meter downstream from equipment shutoff valve. Minimum wire size #6 AWG or as approved by local Authority having jurisdiction. Bonding Interior Metal Ducts: Bond metal air ducts to equipment grounding conductors of associated fans, blowers, electric heaters, and air cleaners. Install bonding jumper to bond across flexible duct connections to achieve continuity. Grounding for Steel Building Structure: Install a driven ground rod at base of each corner column and at intermediate exterior columns at distances in accordance with the Electrical Safety Code and as approved by the local Authority having jurisdiction. Concrete-Encased Grounding Electrode: install in building foundation footings with terminal and fabricate according to OESC; use copper conductor not smaller than #4/0 AWG. 1. 3.5 Electrical Specifications Page 22 Bond grounding conductor to reinforcing steel in at least four locations and to anchor bolts. Extend grounding conductor below grade and connect to building's grounding grid or to grounding electrode external to concrete. If reinforcing is in multiple pieces, connect together by the usual steel tie wires or exothermic welding to create the required length. Bond separate and multiple electrodes together. Use size 4/0 AWG copper conductors for connections to electrodes. Make special provision for installing electrodes that will give acceptable resistance to ground value where rock or sand terrain prevails. Minimum length to be 6m (20’ long) unless otherwise approved by the Authorities having jurisdiction. FIELD QUALITY CONTROL Testing Agency: Owner will engage a qualified testing agency to perform tests and inspections when specifically noted. Tests and Inspections: 1. 2. 3. 4. After installing grounding system but before permanent electrical circuits have been energized, test for compliance with requirements. Disconnect ground fault devices during tests. Inspect physical and mechanical condition. Verify tightness of accessible, bolted, electrical connections with a calibrated torque wrench according to manufacturer's written instructions. Test completed grounding system at each location where a maximum groundresistance level is specified, at service disconnect enclosure grounding terminal ENSO Systems Inc. #865 St Elizabeth C.S. – Full Day Kindergarten Addition Electrical Specifications Page 23 and at individual ground rods. Make tests at ground rods before any conductors are connected. a. b. 5. C. D. E. Measure ground resistance no fewer than two full days after last trace of precipitation and without soil being moistened by any means other than natural drainage or seepage and without chemical treatment or other artificial means of reducing natural ground resistance. Perform ground continuity and resistance test using method appropriate to site conditions and to approval of local Authority having jurisdiction. Prepare dimensioned Drawings locating each test well, ground rod and groundrod assembly, and other grounding electrodes. Identify each by letter in alphabetical order, and key to the record of tests and observations. Include the number of rods driven and their depth at each location, and include observations of weather and other phenomena that may affect test results. Describe measures taken to improve test results. Submit test and inspection reports for review. Grounding system will be considered defective if it does not pass tests and inspections. Excessive Ground Resistance: if resistance to ground exceeds acceptable values, notify Consultant promptly and include recommendations to reduce ground resistance. END OF SECTION 260526 SECTION 260529 - HANGERS AND SUPPORTS FOR ELECTRICAL SYSTEMS PART 1 - GENERAL 1.1 A. 1.2 A. RELATED DOCUMENTS Drawings and general provisions of the Contract, including General and Supplementary Conditions and Division 01 Specification Sections, apply to this Section. SUMMARY This Section includes the following: 1. 2. B. Related Sections include the following: 1. 1.3 A. B. C. 1.4 A. Hangers and supports for electrical equipment and systems. Construction requirements for concrete bases. Section 260548.16 "Seismic Controls for Electrical Systems" for products and installation requirements necessary for compliance with seismic criteria. DEFINITIONS EMT: Electrical metallic tubing. IMC: Intermediate metal conduit. RMC: Rigid metal conduit. PERFORMANCE REQUIREMENTS Delegated Design: Design supports for multiple raceways, including comprehensive engineering analysis by a qualified professional engineer, using performance requirements and design criteria indicated. Maintain minimum criteria permitted by the OESC. ENSO Systems Inc. #865 St Elizabeth C.S. – Full Day Kindergarten Addition B. C. D. 1.5 A. Design supports for multiple raceways capable of supporting combined weight of supported systems and its contents. Design equipment supports capable of supporting combined operating weight of supported equipment and connected systems and components. Rated Strength: Adequate in tension, shear, and pullout force to resist maximum loads calculated or imposed for this Project, with a minimum structural safety factor of five times the applied force. SUBMITTALS Shop Drawings: signed and sealed by a qualified professional engineer if requested. Show fabrication and installation details and include calculations for the following: 1. 2. 3. 4. 1.6 A. B. Electrical Specifications Page 24 Trapeze hangers. Include Product Data for components. Steel slotted channel systems. Include Product Data for components. Nonmetallic slotted channel systems. Include Product Data for components. Equipment supports. COORDINATION Coordinate size and location of concrete bases. Cast anchor-bolt inserts into bases. Concrete, reinforcement, and formwork requirements are specified together with concrete Specifications. Coordinate installation of roof curbs, equipment supports, and roof penetrations. These items are specified in Section 077200 "Roof Accessories." PART 2 - PRODUCTS 2.1 A. SUPPORT, ANCHORAGE, AND ATTACHMENT COMPONENTS Steel Slotted Support Systems: Comply with MFMA-4, factory-fabricated components for field assembly. 1. 2. 3. 4. B. C. D. E. F. Metallic Coatings: Hot-dip galvanized after fabrication and applied according to MFMA-4. Nonmetallic Coatings: Manufacturer's standard PVC, polyurethane, or polyester coating applied according to MFMA-4. Painted Coatings: Manufacturer's standard painted coating applied according to MFMA-4. Channel Dimensions: Selected for applicable load criteria. Raceway and Cable Supports: As described in OESC or hereafter if stricter. Conduit and Cable Support Devices: Steel hangers, straps, clamps, and associated fittings, designed for types and sizes of raceway or cable to be supported. Support for Conductors in Vertical Conduit: Factory-fabricated assembly consisting of threaded body and insulating wedging plug or plugs for non-armored electrical conductors or cables in riser conduits. Plugs shall have number, size, and shape of conductor gripping pieces as required to suit individual conductors or cables supported. Body shall be malleable iron. Structural Steel for Fabricated Supports and Restraints: steel plates, shapes, and bars; galvanized. Mounting, Anchoring, and Attachment Components: Items for fastening electrical items or their supports to building surfaces include the following: ENSO Systems Inc. #865 St Elizabeth C.S. – Full Day Kindergarten Addition 1. 2. 3. 4. 5. 6. 2.2 A. B. 2.3 A. Electrical Specifications Page 25 Mechanical-Expansion Anchors: Insert-wedge-type, zinc-coated steel, for use in hardened portland cement concrete with tension, shear, and pullout capacities appropriate for supported loads and building materials in which used. Concrete Inserts: Steel, slotted support system units similar to MSS Type 18; complying with MFMA-4 or MSS SP-58. Clamps for Attachment to Steel Structural Elements: type suitable for attached structural element. Through Bolts: Structural type, hex head, and high strength. Toggle Bolts: All-steel springhead type. Hanger Rods: Threaded steel. FABRICATED METAL EQUIPMENT SUPPORT ASSEMBLIES Description: Welded or bolted, structural-steel shapes, shop or field fabricated to fit dimensions of supported equipment. Materials: Comply with requirements in Section 055000 "Metal Fabrications" for steel shapes and plates. PLYWOOD BACKBOARDS Description: 1200mm wide x 2400mm high x 19mm thick fire-retardant plywood backboard. PART 3 - EXECUTION 3.1 A. B. C. D. E. F. G. H. I. J. APPLICATION Provide supports for all conduits, luminaires, equipment, etc. installed by this Division. Install fastenings and supports as required for each type of conduit, cable and equipment in accordance with authorities having jurisdiction and manufacturer’s installation recommendations. Conduit Anchors: rigidly anchor all conduits to structural bearings where required to control the direction of expansion and to prevent undue stress on branch connections and structure or crushing of insulation in sleeves. Pay particular attention to all building expansion joists. Dissimilar metals shall not come in direct contact with each other. Comply with OESC for application of hangers and supports for electrical equipment and systems except if requirements in this Section are stricter. Space hangers to prevent sagging and to prevent conduit joints from carrying the weight of the conduit and contents. Support ceiling mounted equipment from the ceiling support system provided it is adequate to carry weight of equipment specified. Provide Consultant and Electrical Safety Authority with a sealed/stamped letter of approval from ceiling manufacturer or Structural Engineer. Support vertical conduits at each floor and/or at each length of conduit. Provide metal brackets, frames, hangers, clamps and related type of support structure where indicated or required to support conduit runs, cable runs and raceways. Ensure adequate vertical support where there is no wall support. Support conduit with one hole steel straps to secure surface conduits and cables 50mm (2’’) and smaller and two-hole steel straps for conduits and cables larger than 50mm. Spring-steel clamps designed for supporting single conduits without bolts may be used for 38mm (1-1/2-inch) and smaller raceways serving branch circuits and ENSO Systems Inc. #865 St Elizabeth C.S. – Full Day Kindergarten Addition K. L. M. N. O. P. 3.2 A. B. C. D. communication systems above suspended ceilings and for fastening raceways to trapeze supports. Support individual cable or conduit runs with or without channels from 6mm (1/4’’) diameter threaded rods and spring clips. Maximum Support Spacing and Minimum Hanger Rod Size for Raceway: Space supports for EMT and RMC as required by the OESC. Minimum rod size shall be 6mm (1/4 inch) in diameter. Multiple Raceways or Cables: Install trapeze-type supports fabricated with U shape pre-galvanized steel, 41mm x 41mm x 22mm support system, sized so capacity can be increased by at least 50% in future without exceeding specified design load limits. Provide backboards for mounting of panelboards, cabinets, contactors, communications equipment, fire alarm control equipment, or any other equipment where required by Code, local authorities, or designated on plans. Hangers shall only be suspended from structural bearings such as beams, or joists. Where such bearings do not exist use bridging steel. Do not weld hangers to structural steel. Do NOT use powder-actuated fasteners or wire lashing or perforated strap to support or secure conduits, cables or raceways. SUPPORT INSTALLATION Comply with OESC for installation requirements except as specified in this Article. Raceway Support Methods: In addition to methods described herein, conduits may be supported by openings through structure members, as permitted in OESC. Strength of Support Assemblies: Where not indicated, select sizes of components so strength will be adequate to carry present and future static loads within specified loading limits. Minimum static design load used for strength determination shall be weight of supported components plus 90 kg (200 lb). Mounting and Anchorage of Surface-Mounted Equipment and Components: Anchor and fasten electrical items and their supports to building structural elements by the following methods unless otherwise indicated by code: 1. 2. 3. 4. 5. 6. 7. E. 3.3 A. Electrical Specifications Page 26 To Wood: Fasten with lag screws or through bolts. To New Concrete: Bolt to self-drilling expandable concrete inserts. To Masonry or tile: Approved toggle-type bolts on hollow masonry units and expansion anchor fasteners on solid masonry units. To Existing Concrete: Expansion anchor fasteners. To Steel: Welded threaded studs, lock washers and nuts, beam clamps or spring-tension clamps. To Light Steel: Sheet metal screws. Items Mounted on Hollow Walls and Nonstructural Building Surfaces: Mount cabinets, panelboards, disconnect switches, control enclosures, pull and junction boxes, transformers, and other devices on slotted-channel racks attached to substrate by means that meet seismic-restraint strength and anchorage requirements. Drill holes for expansion anchors in concrete at locations and to depths that avoid reinforcing bars. INSTALLATION OF FABRICATED METAL SUPPORTS Comply with installation requirements in Section 055000 "Metal Fabrications" for sitefabricated metal supports. ENSO Systems Inc. #865 St Elizabeth C.S. – Full Day Kindergarten Addition B. 3.4 A. B. C. Electrical Specifications Page 27 Cut, fit, and place miscellaneous metal supports accurately in location, alignment, and elevation to support and anchor electrical materials and equipment. PAINTING Touchup: Comply with sections for Exterior and Interior Painting for cleaning and touchup painting of field welds, bolted connections, and abraded areas of shop paint on miscellaneous metal. Touchup: Clean field welds and abraded areas of shop paint. Paint exposed areas immediately after erecting hangers and supports. Use same materials as used for shop painting and apply paint by brush or spray to provide minimum dry film thickness of .05mm (2.0 mils). Galvanized Surfaces: Clean welds, bolted connections, and abraded areas and apply galvanizing-repair paint. END OF SECTION 260529 SECTION 260533 – RACEWAYS, SPLITTERS, CABINETS, JUNCTION, PULL & OUTLET BOXES PART 1 - GENERAL 1.1 A. 1.2 A. RELATED DOCUMENTS Drawings and general provisions of the Contract, including General and Supplementary Conditions and Division 01 Specification Sections, apply to this Section. SUMMARY Related Requirements: 1. 2. 1.3 A. B. C. D. E. 1.4 A. B. Section 270528 "Pathways for Communications Systems" for conduits, wireways, surface pathways, innerduct, boxes, faceplate adapters, enclosures, cabinets, and handholes serving communications systems. Section 280528 "Pathways for Electronic Safety and Security" for conduits, surface pathways, innerduct, boxes, and faceplate adapters serving electronic safety and security. DEFINITIONS GRC: heavy wall, galvanized steel, rigid threaded conduit. IMC: Intermediate metal conduit. EMT: Electrical metallic tubing. FMC: flexible metal conduit. LFC: liquid (seal) tight flexible conduit. ACTION SUBMITTALS Product Data: For surface raceways, wireways and fittings, floor boxes, hinged-cover enclosures, and cabinets. Samples: For exposed wireways and for each color and texture specified where requested by the Consultant. ENSO Systems Inc. #865 St Elizabeth C.S. – Full Day Kindergarten Addition 1.5 A. Electrical Specifications Page 28 INFORMATIONAL SUBMITTALS Coordination Drawings: Conduit routing plans, drawn to scale, on which the following items are shown and coordinated with each other, using input from installers of items involved: 1. 2. 3. 4. Structural members in paths of conduit groups with common supports. HVAC and plumbing items and architectural features in paths of conduit groups with common supports. Detailed description of equipment anchorage devices on which the certification is based and their installation requirements. Detailed description of conduit support devices and interconnections on which the certification is based and their installation requirements. PART 2 - PRODUCTS 2.1 A. B. C. D. E. F. METAL CONDUITS, TUBING, AND FITTINGS Listing and Labeling: Metal conduits, tubing, and fittings shall comply with the OESC and be CSA listed, by a qualified testing agency, and marked for intended location and application. GRC: Comply with OESC. EMT: Comply with OESC. FMC: Comply with OESC; zinc-coated steel. LFMC: Flexible steel conduit with PVC jacket and complying with OESC. Fittings for Metal Conduit: Comply with OESC. 1. 2. Conduit Fittings for Hazardous (Classified) Locations: Comply with OESC. Fittings for EMT: a. b. 3. 4. G. H. 2.2 A. Material: Steel. Type: Setscrew. Expansion Fittings: PVC or steel to match conduit type, complying with OESC, rated for environmental conditions where installed, and including flexible external bonding jumper. Coating for Fittings for PVC-Coated Conduit: Minimum thickness of 1mm (0.040 inch) with overlapping sleeves protecting threaded joints. Joint Compound for GRC: Approved, as defined in OESC, by authorities having jurisdiction for use in conduit assemblies, and compounded for use to lubricate and protect threaded conduit joints from corrosion and to enhance their conductivity. Do not use running threads. Use Ericson coupling where required. METAL WIREWAYS AND AUXILIARY GUTTERS Description: Sheet metal, complying with OESC and NEMA 250, Type 2 (typical indoor use) Type 3R (service rooms), Type 4 (for exterior applications) or Type 12 (hazardous locations) unless otherwise indicated, and sized according to NFPA 70. 1. Metal wireways installed outdoors shall comply with the OESC and be CSA listed, by a qualified testing agency, and marked for intended location and application. ENSO Systems Inc. #865 St Elizabeth C.S. – Full Day Kindergarten Addition B. C. D. 2.3 A. B. Fittings and Accessories: Include covers, couplings, offsets, elbows, expansion joints, adapters, hold-down straps, end caps, and other fittings to match and mate with wireways as required for complete system. Wireway Covers: Screw-cover type typical and flanged-and-gasketed type where specifically noted on the drawings. Finish: Manufacturer's standard enamel finish. SURFACE RACEWAYS Listing and Labeling: Surface raceways and tele-power poles shall comply with the OESC and be CSA listed, by a qualified testing agency, and marked for intended location and application. Surface Metal Raceways shall comply with the OESC and be CSA listed, by a qualified testing agency, and marked for intended location and application. Refer to drawing legend for specification. 1. 2.4 A. B. C. D. E. F. G. H. I. J. Electrical Specifications Page 29 Fittings and Accessories: Dividers, end caps, covers, cutouts, wiring harnesses, devices, mounting materials, and other fittings shall match and mate with raceway, boxes and devices as required for complete system. BOXES, ENCLOSURES, AND CABINETS General Requirements for Boxes, Enclosures, and Cabinets: comply with the OESC and be CSA listed, by a qualified testing agency, and marked for intended location and application. Boxes, enclosures, and cabinets installed in wet locations shall be listed for use in wet locations. Sheet Metal Outlet and Device Boxes: OESC gauge, welded construction and screwon flat covers. Provide covers with 25mm (1’’) minimum extension all the way around for flush-mounted boxes. Cast-Metal Outlet and Device Boxes: OESC gauge, ferrous alloy, type FS or FD, with factory threaded hubs and mounting feet for surface mounted rigid conduit complete with gasketed cover. Masonry boxes: OESC gauge, electro-galvanized steel masonry single and multi-gang MBD boxes for masonry walls and electro-galvanized sheet steel concrete boxes with matching extension and plaster rings for concrete walls and electro-galvanized steel sectional screw gang type boxes with two double clamps for non-metallic sheathed cable Luminaire Outlet Boxes: Nonadjustable, designed for attachment of luminaire including weight of fixture, lamp, ballast, etc. Outlet boxes designed for attachment of luminaires weighing more than 23 kg (50 lb) shall be listed and marked for the maximum allowable weight. Small Sheet Metal Pull and Junction Boxes: OESC gauge, welded construction and screw-on flat covers. Provide covers with 25mm (1’’) minimum extension all the way around for flush-mounted boxes. Box extensions used to accommodate new building finishes shall be of same material as recessed box. Device Box Dimensions: 100 mm square by 60 mm deep (4 inches square by 2-1/8 inches deep) and 100 mm by 60 mm by 60 mm deep (4 inches by 2-1/8 inches by 21/8 inches deep). Utility boxes for connection to surface mounted EMT conduit shall be minimum 100mm x 54mm x48mm (4’’x2.125’’x1.875’’). ENSO Systems Inc. #865 St Elizabeth C.S. – Full Day Kindergarten Addition K. L. M. N. O. P. Square or octagonal boxes for lighting shall be minimum 100mm (4’’). Boxes for flush mounting devices in finished plaster or tile wall shall be minimum of 100mm (4’’). Use 100mm (4’’) square boxes where more than one conduit enters one side with extension and plaster rings as required. Use 100mm (4’’) square boxes where more than one conduit enters one side with extension and plaster rings as required. Gangable boxes are allowed unless noted in the drawing details. Hinged-Cover Enclosures: Comply with OESC and NEMA 250, Type 2, 3R, 4 and 12 (to match box) with continuous-hinge cover with flush latch unless otherwise indicated. 1. 2. 2.5 A. Electrical Specifications Page 30 Metal Enclosures: Steel, finished inside and out with manufacturer's standard enamel. Interior Panels: Steel; all sides finished with manufacturer's standard enamel. CONNECTORS FOR WIRES AND BOXES Building wire connectors to be Ideal ‘Wing Nut’ or equal for wire sizes up to #6 AWG and Burndy QQA (CU/AL) at studs and bus bars and Burndy Q2A or A3Q (CU/AL) for wire sizes #4 and larger. PART 3 - EXECUTION 3.1 A. B. RACEWAY APPLICATION Aluminum conduit shall NOT be used unless specifically noted. Outdoors: Apply raceway products as specified below unless otherwise indicated: 1. 2. 3. 4. C. Exposed Conduit: GRC. Concealed Conduit, Aboveground: GRC. Connection to Vibrating Equipment (Including Transformers and Hydraulic, Pneumatic, Electric Solenoid, or Motor-Driven Equipment): liquid seal tight flexible conduit, armoured cable or Corflex. Boxes and Enclosures, Aboveground: NEMA type 4. Indoors: Apply raceway products as specified below unless otherwise indicated: 1. 2. 3. Unless otherwise noted, conduits inside the building for panel feeders, lighting, fire alarm, branch circuit wiring, drops, devices, etc., shall be EMT. Steel fittings shall be used with EMT; cast fittings are not acceptable. Connectors to be steel, set screw type, nylon insulated. Conduit straps shall be single or double hole steel Exposed, Not Subject to Physical Damage: EMT or Wiremold Raceway. Exposed and Subject to Mechanical/Physical Damage or in Hazardous locations: GRC Connectors to be steel, threaded type. Conduit straps shall be single or double hole steel. Raceway locations include the following: a. b. c. d. 4. Loading dock. Corridors used for traffic of mechanized carts, forklifts, and pallet-handling units. Mechanical rooms. Gymnasiums. Concealed in Ceilings and Interior Walls and Partitions: EMT unless armoured cable is permitted. ENSO Systems Inc. #865 St Elizabeth C.S. – Full Day Kindergarten Addition 5. 6. 7. D. E. 2. 3. G. 3.2 A. B. C. D. E. F. G. H. I. J. K. Connection to Vibrating Equipment (Including Transformers and Hydraulic, Pneumatic, Electric Solenoid, or Motor-Driven Equipment): maximum 1m (3’) FMC, except use LFMC in damp, wet or potentially wet locations. Connect FMC to rigid conduit drop ahead of actual bend and have two additional clips over normal requirements. Damp or Wet Locations: GRC. Boxes and Enclosures: NEMA 250, Type 1, except use NEMA 250, Type 4 stainless steel in institutional and commercial kitchens and damp or wet locations. Minimum Raceway Size: 21mm (3/4-inch) trade size. Raceway Fittings: Compatible with raceways and suitable for use and location. 1. F. Electrical Specifications Page 31 Rigid Steel Conduit: Use threaded rigid steel conduit fittings unless otherwise indicated. EMT: Use steel, setscrew type nylon insulated fittings; cast fittings are NOT acceptable. Flexible Conduit: Use only fittings listed for use with flexible conduit. Install nonferrous conduit or tubing for circuits operating above 60 Hz. Where aluminum raceways are installed for such circuits and pass through concrete, install in nonmetallic sleeve. Install surface raceways only where indicated on Drawings. INSTALLATION Comply with the OESC for installation requirements except where requirements on drawings or specification are stricter. Conduit sizes shall be as indicated on the drawings and shall not be reduced in size without authorization. Conduit in finished area shall be concealed. All conduits shall be installed parallel to building lines. Keep raceways at least 150mm (6’’) away from parallel runs of flues and steam or hotwater pipes. Install horizontal raceway runs above water and steam piping. Complete raceway installation before starting conductor installation. Comply with requirements in Section 260529 "Hangers and Supports for Electrical Systems" for hangers and supports. Arrange stub-ups so curved portions of bends are not visible above finished slab. Install no more than the equivalent of three 90-degree bends in any conduit run except for control wiring conduits, for which fewer bends are allowed. Support within 300mm (12’’) of changes in direction. Conceal conduit and EMT within finished walls, ceilings, and floors unless otherwise indicated. Install conduits parallel or perpendicular to building lines. Support conduit within 300mm (12’’) of enclosures to which attached. Expansion Joints: where conduits cross expansion joints of building, as shown on Architectural Drawings, provide approved type expansion joints complete with grounding straps and clamps Stub-ups to Above Recessed Ceilings: 1. 2. Use EMT for raceways. Use a conduit bushing or insulated fitting to terminate stub-ups not terminated in hubs or in an enclosure. ENSO Systems Inc. #865 St Elizabeth C.S. – Full Day Kindergarten Addition L. M. N. O. P. Q. R. S. T. Threaded Conduit Joints, Exposed to Wet, Damp, Corrosive, or Outdoor Conditions: Apply listed compound to threads of raceway and fittings before making up joints. Follow compound manufacturer's written instructions. Coat field-cut threads on PVC-coated raceway with a corrosion-preventing conductive compound prior to assembly. Raceway Terminations at Locations Subject to Moisture or Vibration: Use insulating bushings to protect conductors including conductors smaller than No. 4 AWG. Terminate threaded conduits into threaded hubs or with locknuts on inside and outside of boxes or cabinets. Install bushings on conduits up to 35mm (1.25’’) trade size and insulated throat metal bushings on 41mm (1.5’’) trade size and larger conduits terminated with locknuts. Install insulated throat metal grounding bushings on service conduits. Install raceways square to the enclosure and terminate at enclosures with locknuts. Install locknuts hand tight plus 1/4 turn more. Do not rely on locknuts to penetrate nonconductive coatings on enclosures. Remove coatings in the locknut area prior to assembling conduit to enclosure to assure a continuous ground path. Cut conduit perpendicular to the length. For conduits 53mm (2’’) trade size and larger, use roll cutter or a guide to make cut straight and perpendicular to the length. Install pull wires in empty raceways. Use polypropylene or monofilament plastic line with not less than 90kg (200-lb) tensile strength. Leave at least 1.2m (4’) of slack at each end of pull wire. Cap underground raceways designated as spare above grade alongside raceways in use. Surface Raceways: 1. 2. U. V. Install surface raceway with a minimum 50mm (2’’) radius control at bend points. Secure surface raceway with screws or other anchor-type devices at intervals not exceeding 1.2m (4’) with no less than two supports per straight raceway section. Support surface raceway according to manufacturer's written instructions. Tape and glue are not acceptable support methods. Install raceway sealing fittings at accessible locations according to NFPA 70 and fill them with listed sealing compound. For concealed raceways, install each fitting in a flush steel box with a blank cover plate having a finish similar to that of adjacent plates or surfaces. Install raceway sealing fittings according to NFPA 70. Install devices to seal raceway interiors at accessible locations. Locate seals so no fittings or boxes are between the seal and the following changes of environments. Seal the interior of all raceways at the following points: 1. 2. 3. W. X. Electrical Specifications Page 32 Where conduits pass from warm to cold locations, such as boundaries of refrigerated spaces. Where an underground service raceway enters a building or structure. Where otherwise required by NFPA 70. Comply with manufacturer's written instructions for solvent welding RNC and fittings. Expansion-Joint Fittings: 1. Install in each run of aboveground RNC that is located where environmental temperature change may exceed 17OC (30OF) and that has straight-run length that exceeds 7.6m (25’). Install in each run of aboveground EMT conduit that is located where environmental temperature change may exceed 55OC (100OF) and that has straight-run length that exceeds 30m (100’). ENSO Systems Inc. #865 St Elizabeth C.S. – Full Day Kindergarten Addition 2. 3. 4. Y. AA. BB. CC. DD. EE. FF. GG. HH. II. JJ. KK. LL. MM. NN. OO. PP. Install fitting(s) that provide expansion and contraction for at least 0.00041 inch per foot of length of straight run per OF (0.06 mm per meter of length of straight run per OC) of temperature change for PVC conduits. Install fitting(s) that provide expansion and contraction for at least 0.000078 inch per foot of length of straight run per OF (0.0115 mm per meter of length of straight run per OC) of temperature change for metal conduits. Install expansion fittings at all locations where conduits cross building or structure expansion joints. Install each expansion-joint fitting with position, mounting, and piston setting selected according to manufacturer's written instructions for conditions at specific location at time of installation. Install conduit supports to allow for expansion movement. Flexible Conduit Connections: Comply with NEMA RV 3. Use a maximum of 1.8m (6’) of flexible conduit for recessed and semi-recessed luminaires, equipment subject to vibration, noise transmission, or movement; and for transformers and motors. 1. 2. Z. Electrical Specifications Page 33 Use LFMC in damp or wet locations subject to severe physical damage. Use LFMC or LFNC in damp or wet locations not subject to severe physical damage. Only main pull and junction boxes are indicated on drawings. Install pull boxes so as not to exceed 30m (100’) of conduit between boxes and after every two 90 degree bends Install boxes in inconspicuous but accessible locations Fittings for boxes to have bushings and connectors with nylon insulated throats, knockout fillers, double lock nuts and insulated bushing on sheet metal boxes. Use conduit outlet bodies for conduit up to 32mm (1.25’’) and pull boxes for conduits of 50mm (1.5’’) or larger. Gang boxes where wiring devices are grouped. Provide matching blank coverplates for boxes without wiring devices. Recess outlet boxes in plaster, masonry, or concrete walls where possible. Surface mount outlet boxes only on existing masonry or concrete walls or in service rooms. Separate communications outlets from power outlets by 100mm (4’’). Mount boxes at heights indicated on Drawings. If mounting heights of boxes are not individually indicated, give priority to ADA requirements. Install boxes with height measured to top of box unless otherwise indicated. Recessed Boxes in Masonry Walls: Saw-cut opening for box in center of cell of masonry block, and install box flush with surface of wall. Prepare block surfaces to provide a flat surface for a raintight connection between box and cover plate or supported equipment and box. Horizontally separate boxes mounted on opposite sides of walls by 150mm (6’’) so they are not in the same vertical channel. Do not mount back to back. Locate boxes so that cover or plate will not span different building finishes. Support boxes of three gangs or more from more than one side by spanning two framing members or mounting on brackets specifically designed for the purpose. Fasten junction and pull boxes to or support from building structure. Do not support boxes by conduits. Set metal floor boxes level and flush with finished floor surface. Set nonmetallic floor boxes level. Trim after installation to fit flush with finished floor surface. Provide barriers in boxes and approved signage where different voltages are used. ENSO Systems Inc. #865 St Elizabeth C.S. – Full Day Kindergarten Addition 3.3 A. 3.4 A. 3.5 A. Electrical Specifications Page 34 SLEEVE AND SLEEVE-SEAL INSTALLATION FOR ELECTRICAL PENETRATIONS Install sleeves and sleeve seals at penetrations of exterior floor and wall assemblies. Comply with requirements in Section 260544 "Sleeves and Sleeve Seals for Electrical Raceways and Cabling." FIRESTOPPING Install firestopping at penetrations of fire-rated floor and wall assemblies. Comply with requirements in Section 078413 "Penetration Firestopping." PROTECTION Protect coatings, finishes, and cabinets from damage and deterioration. 1. 2. Repair damage to galvanized finishes with zinc-rich paint recommended by manufacturer. Repair damage to PVC coatings or paint finishes with matching touchup coating recommended by manufacturer. END OF SECTION 260533 SECTION 260544 - SLEEVES AND SLEEVE SEALS FOR ELECTRICAL RACEWAYS AND CABLING PART 1 - GENERAL 1.1 A. 1.2 A. RELATED DOCUMENTS Drawings and general provisions of the Contract, including General and Supplementary Conditions and Division 01 Specification Sections, apply to this Section. SUMMARY Section Includes: 1. 2. 3. 4. 5. Sleeves for raceway and cable penetration of non-fire-rated construction walls and floors. Sleeve-seal systems. Sleeve-seal fittings. Grout. Silicone sealants. PART 2 - PRODUCTS 2.1 A. SLEEVES Wall Sleeves: 1. 2. B. C. Steel Pipe Sleeves: Type E, Grade B, Schedule 40, zinc coated, plain ends. Cast-Iron Pipe Sleeves: Cast or fabricated "wall pipe," equivalent to ductile-iron pressure pipe, with plain ends and integral water-stop unless otherwise indicated. Sleeves for Conduits Penetrating Non-Fire-Rated Gypsum Board Assemblies: Galvanized-steel sheet; 0.6mm (0.0239’’) minimum thickness; round tube closed with welded longitudinal joint, with tabs for screw-fastening the sleeve to the board. Sleeves for Rectangular Openings: ENSO Systems Inc. #865 St Elizabeth C.S. – Full Day Kindergarten Addition 1. 2. Material: Galvanized sheet steel. Minimum Metal Thickness: a. b. 2.2 A. Description: Modular sealing device, designed for field assembly, to fill annular space between sleeve and raceway or cable. 2. 3. A. 2.4 A. B. C. D. 2.5 A. Sealing Elements: EPDM (flame spread rating less than 25 and smoke developed rating of 50 or less) rubber interlocking links shaped to fit surface of pipe. Include type and number required for pipe material and size of pipe. Pressure Plates: Zinc coated carbon steel or stainless steel. Connecting Bolts and Nuts: Stainless steel of length required to secure pressure plates to sealing elements. SLEEVE-SEAL FITTINGS Description: Manufactured plastic, sleeve-type, water-stop assembly made for embedding in concrete slab or wall. Unit shall have plastic or rubber water-stop collar with center opening to match piping OD. GROUT Description: Non-shrink; recommended for interior and exterior sealing openings in non-fire-rated walls or floors. Standard: ASTM C 1107/C 1107M, Grade B, post-hardening and volume-adjusting, dry, hydraulic-cement grout. Design Mix: 34.5 MPa (5000-psi), 28-day compressive strength. Packaging: Premixed and factory packaged. SILICONE SEALANTS Silicone Sealants: Single-component, silicone-based, neutral-curing elastomeric sealants of grade indicated below. 1. 2. 3. B. For sleeve cross-section rectangle perimeter less than 1.27m (50’’) and with no side larger than 400mm (16’’), thickness shall be 1.3mm (0.052’’). For sleeve cross-section rectangle perimeter 1.27m (50’’) or more and one or more sides larger than 400mm (16’’), thickness shall be 3.5mm (0.138’’). SLEEVE-SEAL SYSTEMS 1. 2.3 Electrical Specifications Page 35 Grade: Pourable (self-leveling) formulation for openings in floors and other horizontal surfaces that are not fire rated. Sealant shall have VOC content of 250 g/L or less when calculated according to 40 CFR 59, Subpart D (EPA Method 24). Sealant shall comply with the testing and product requirements of the California Department of Health Services' "Standard Practice for the Testing of Volatile Organic Emissions from Various Sources Using Small-Scale Environmental Chambers." Silicone Foams: Multicomponent, silicone-based liquid elastomers that, when mixed, expand and cure in place to produce a flexible, non-shrinking foam. PART 3 - EXECUTION 3.1 A. SLEEVE INSTALLATION FOR NON-FIRE-RATED ELECTRICAL PENETRATIONS Comply with ULC required ratings. ENSO Systems Inc. #865 St Elizabeth C.S. – Full Day Kindergarten Addition B. C. Comply with ULC and NEMA VE 2 for cable tray and cable penetrations. Sleeves for Conduits Penetrating Above-Grade Non-Fire-Rated Concrete and Masonry-Unit Floors and Walls: 1. Interior Penetrations of Non-Fire-Rated Walls and Floors: a. b. 2. 3. 4. 5. D. 2. F. G. 3.2 A. B. 3.3 A. B. Seal annular space between sleeve and raceway or cable, using joint sealant appropriate for size, depth, and location of joint. Comply with requirements in Section 079200 "Joint Sealants." Seal space outside of sleeves with mortar or grout. Pack sealing material solidly between sleeve and wall so no voids remain. Tool exposed surfaces smooth; protect material while curing. Use pipe sleeves unless penetration arrangement requires rectangular sleeved opening. Size pipe sleeves to provide 6.4mm (0.25’’) annular clear space between sleeve and raceway or cable unless sleeve seal is to be installed or clearance as outlined by seismic criteria. Install sleeves for wall penetrations unless core-drilled holes or formed openings are used. Install sleeves during erection of walls. Cut sleeves to length for mounting flush with both surfaces of walls. Deburr after cutting. Install sleeves for floor penetrations. Extend sleeves installed in floors 50mm (2’’) above finished floor level. Install sleeves during erection of floors. Sleeves for Conduits Penetrating Non-Fire-Rated Gypsum Board Assemblies: 1. E. Electrical Specifications Page 36 Use circular metal sleeves unless penetration arrangement requires rectangular sleeved opening. Seal space outside of sleeves with approved joint compound for gypsum board assemblies. Roof-Penetration Sleeves: Seal penetration of individual raceways and cables with flexible boot-type flashing units applied in coordination with roofing work. Aboveground, Exterior-Wall Penetrations: Seal penetrations using cast-iron pipe sleeves and mechanical sleeve seals. Select sleeve size to allow for 25mm (1’’) annular clear space between pipe and sleeve for installing mechanical sleeve seals. Underground, Exterior-Wall and Floor Penetrations: Install cast-iron pipe sleeves. Size sleeves to allow for 25mm (1’’) annular clear space between raceway or cable and sleeve for installing sleeve-seal system. SLEEVE-SEAL-SYSTEM INSTALLATION Install sleeve-seal systems in sleeves in exterior concrete walls and slabs-on-grade at raceway entries into building. Install type and number of sealing elements recommended by manufacturer for raceway or cable material and size. Position raceway or cable in center of sleeve. Assemble mechanical sleeve seals and install in annular space between raceway or cable and sleeve. Tighten bolts against pressure plates that cause sealing elements to expand and make watertight seal. SLEEVE-SEAL-FITTING INSTALLATION Install sleeve-seal fittings in new walls and slabs as they are constructed. Assemble fitting components of length to be flush with both surfaces of concrete slabs and walls. Position water-stop flange to be centered in concrete slab or wall. ENSO Systems Inc. #865 St Elizabeth C.S. – Full Day Kindergarten Addition C. D. Electrical Specifications Page 37 Secure nailing flanges to concrete forms. Using grout, seal the space around outside of sleeve-seal fittings. END OF SECTION 260544 SECTION 260548.16 - SEISMIC CONTROLS FOR ELECTRICAL SYSTEMS PART 1 - GENERAL 1.1 A. 1.2 A. RELATED DOCUMENTS Drawings and general provisions of the Contract, including General and Supplementary Conditions and Division 01 Specification Sections, apply to this Section. SUMMARY Section Includes: 1. 2. 3. 4. 5. B. Related Requirements: 1. 1.3 A. Restraint channel bracings. Restraint cables. Seismic-restraint accessories. Mechanical anchor bolts. Adhesive anchor bolts. Section 260529 "Hangers and Supports for Electrical Systems" for commonly used electrical supports and installation requirements. ACTION SUBMITTALS Product Data: For each type of product. 1. Illustrate and indicate style, material, strength, fastening provision, and finish for each type and size of seismic-restraint component used. a. b. B. Tabulate types and sizes of seismic restraints, complete with report numbers and rated strength in tension and shear as evaluated by an agency acceptable to authorities having jurisdiction. Annotate to indicate application of each product submitted and compliance with requirements. Delegated-Design Submittal: For each seismic-restraint device. 1. 2. Include design calculations and details for selecting seismic restraints complying with performance requirements, design criteria, and analysis data signed and sealed by the qualified professional engineer responsible for their preparation. Contact Mr. Sean Cochrane at HTS Engineering (representing Kinetics Noise Control), tel. (416) 661-3400 for information. Design Calculations: Calculate static and dynamic loading caused by equipment weight, operation, and seismic forces required to select seismic restraints and for designing vibration isolation bases. a. Coordinate design calculations with wind load calculations required for equipment mounted outdoors. Comply with requirements in other Sections for equipment mounted outdoors. ENSO Systems Inc. #865 St Elizabeth C.S. – Full Day Kindergarten Addition 3. Seismic Restraint Details: a. b. c. d. 1.4 A. B. C. D. 1.5 A. B. C. D. Electrical Specifications Page 38 Design Analysis: To support selection and arrangement of seismic restraints. Include calculations of combined tensile and shear loads. Details: Indicate fabrication and arrangement. Detail attachments of restraints to the restrained items and to the structure. Show attachment locations, methods, and spacings. Identify components, list their strengths, and indicate directions and values of forces transmitted to the structure during seismic events. Indicate association with vibration isolation devices. Coordinate seismic-restraint and vibration isolation details with windrestraint details required for equipment mounted outdoors. Comply with requirements in other Sections for equipment mounted outdoors. Preapproval and Evaluation Documentation: By an agency acceptable to authorities having jurisdiction, showing maximum ratings of restraint items and the basis for approval (tests or calculations). INFORMATIONAL SUBMITTALS Coordination Drawings: Show coordination of seismic bracing for electrical components with other systems and equipment in the vicinity, including other supports and seismic restraints. Qualification Data: For professional engineer and testing agency. Welding certificates. Field quality-control reports. QUALITY ASSURANCE Testing Agency Qualifications: An independent agency, with the experience and capability to conduct the testing indicated, that is a nationally recognized testing laboratory and that is acceptable to authorities having jurisdiction. Comply with seismic-restraint requirements in the OBC unless requirements in this Section are more stringent. Welding Qualifications: Qualify procedures and personnel according to AWS D1.1/D1.1M, "Structural Welding Code - Steel." Seismic-restraint devices shall have horizontal and vertical load testing and analysis. They shall bear anchorage preapproval from OSHPD in addition to preapproval, showing maximum seismic-restraint ratings, by ICC-ES or another agency acceptable to authorities having jurisdiction. Ratings based on independent testing are preferred to ratings based on calculations. If preapproved ratings are not available, submittals based on independent testing are preferred. Calculations (including combining shear and tensile loads) that support seismic-restraint designs must be signed and sealed by a qualified professional engineer. PART 2 - PRODUCTS 2.1 A. PERFORMANCE REQUIREMENTS Seismic-Restraint Loading: 1. 2. 3. Site Class as Defined in the OBC: D. Building Classification Category: High - for Schools and Normal for Offices. Building Importance factor (IE) Assigned Seismic Use Group or Building Category as Defined in the OBC: ULS=1.3 for schools and 1.0 for Offices. ENSO Systems Inc. #865 St Elizabeth C.S. – Full Day Kindergarten Addition a. b. c. d. e. 4. 5. 2.2 A. 2.3 A. 2.4 A. B. C. D. E. 2.5 A. 2.6 A. Electrical Specifications Page 39 Importance factor (IE) Assigned Seismic Use Group or Building Category as Defined in the OBC: ULS=1.3 for schools and 1.0 for Offices. Component Factor: 1.0 Component Response Modification Factor: 5.0. Component Amplification Factor: 2.5. Peak Ground Acceleration: 0.150 for Toronto. Design Spectral Response Acceleration at Short Periods (0.2 Second): 0.24 (Toronto). Design Spectral Response Acceleration at 1.0-Second Period: 0.056 (Toronto). RESTRAINT CHANNEL BRACINGS Description: MFMA-4, shop- or field-fabricated bracing assembly made of slotted steel channels with accessories for attachment to braced component at one end and to building structure at the other end, with other matching components, and with corrosion-resistant coating; rated in tension, compression, and torsion forces. RESTRAINT CABLES Restraint Cables: ASTM A 603 galvanized steel cables. End connections made of steel assemblies with thimbles, brackets, swivel, and bolts designed for restraining cable service; with a minimum of two clamping bolts for cable engagement. SEISMIC-RESTRAINT ACCESSORIES Hanger-Rod Stiffener: Steel tube or reinforcing steel angle clamped to hanger rod. Hinged and Swivel Brace Attachments: Multifunctional steel connectors for attaching hangers to rigid channel bracings or restraint cables. Bushings for Floor-Mounted Equipment Anchor Bolts: Neoprene bushings designed for rigid equipment mountings and matched to type and size of anchor bolts and studs. Bushing Assemblies for Wall-Mounted Equipment Anchorage: Assemblies of neoprene elements and steel sleeves designed for rigid equipment mountings and matched to type and size of attachment devices used. Resilient Isolation Washers and Bushings: One-piece, molded, oil- and water-resistant neoprene, with a flat washer face. MECHANICAL ANCHOR BOLTS Mechanical Anchor Bolts: Drilled-in and stud-wedge or female-wedge type in zinccoated steel for interior applications and stainless steel for exterior applications. Select anchor bolts with strength required for anchor and as tested according to ASTM E 488. ADHESIVE ANCHOR BOLTS Adhesive Anchor Bolts: Drilled-in and capsule anchor system containing PVC or urethane methacrylate-based resin and accelerator, or injected polymer or hybrid mortar adhesive. Provide anchor bolts and hardware with zinc-coated steel for interior applications and stainless steel for exterior applications. Select anchor bolts with strength required for anchor and as tested according to ASTM E 488. ENSO Systems Inc. #865 St Elizabeth C.S. – Full Day Kindergarten Addition Electrical Specifications Page 40 PART 3 - EXECUTION 3.1 A. B. C. 3.2 A. B. C. 3.3 A. EXAMINATION Examine areas and equipment to receive vibration isolation and seismic-control devices for compliance with requirements for installation tolerances and other conditions affecting performance of the Work. Examine roughing-in for reinforcement and cast-in-place anchors to verify actual locations before installation. Proceed with installation only after unsatisfactory conditions have been corrected. COORDINATION AND EXECUTION Attach conduit to the trapeze per seismic restraint manufacturer’s design. Install cables so they do not bend across sharp edges of adjacent equipment or building structures. Do not brace or support equipment to separate portions of the structure that may act differently in response to an earthquake. For example, do not connect a Transverse restraint to a wall and then a Longitudinal restraint to either a floor/ceiling/roof at the same braced location. Install vertical braces to stiffen hanger rods and prevent buckling per seismic restraint manufacturer’s design. Clamp vertical brace to hanger rods. Requirements apply equally to hanging equipment. Do not weld vertical braces to hanger rods. SEISMIC RESTRAINTS APPLICATION General: 1. 2. 3. 4. 5. B. All equipment and conduit shall be restrained to resist seismic forces per the applicable Building Code(s) as a minimum; listed herein. Additional requirements specified herein are included specifically for this project; as needed basis. Install seismic restraint devices per the manufacturer’s submittals. Any deviation from the manufacturer’s instructions shall be reviewed and approved by the manufacturer. Attachment to structure for suspended equipment and conduit: If specific attachment is not indicated, anchor bracing to structure at flanges of beams, at upper truss chords of bar joists, or at concrete members. Provide hanger rod stiffeners where indicated or as required to prevent buckling of rods due to seismic forces. Where rigid restraints are used on equipment or conduit, the support rods for the equipment, ductwork or piping at restraint locations must be supported by anchors rated for seismic use. Post-installed concrete anchors must be in accordance with ACI 355.2. Concrete Anchor Bolts: 1. 2. 3. Identify position of reinforcing steel and other embedded items prior to drilling holes for anchors. Do not damage existing reinforcing or embedded items during coring or drilling. Notify the structural engineer if reinforcing steel or other embedded items are encountered during drilling. Locate and avoid pre- or posttensioned tendons, electrical and telecommunications conduit, and gas lines. Do not drill holes in concrete or masonry until concrete, mortar, or grout has achieved full design strength. Mechanical Anchors: Protect threads from damage during anchor installation. ENSO Systems Inc. #865 St Elizabeth C.S. – Full Day Kindergarten Addition 4. 5. C. Adhesive Anchors: Clean holes to remove loose material and drilling dust per manufactures instructions prior to installation of adhesive. Place adhesive in holes proceeding from the bottom of the hole and progressing toward the surface in such a manner as to avoid introduction of air pockets in the adhesive. Set anchors to manufacturer's recommended torque, using a torque wrench. Equipment Restraints: 1. 2. 3. Seismically restrain panels. Install fasteners, straps and brackets as required to secure the equipment. Install neoprene grommet washers or fill the gap with epoxy on equipment anchor bolts where clearance between anchor and equipment support hole exceeds 3.2 mm (0.125 inch). Rigid Mounted Equipment: a. b. 4. Anchor floor and wall mounted equipment to the structure as per the stamped seismic certifications / drawings. Suspended equipment shall be restrained using seismic cable restraints, or struts, and hanger rods as per the stamped seismic certifications / drawings. Vibration Isolated Equipment: a. b. D. Electrical Specifications Page 41 Seismic control shall not compromise the performance of noise control, vibration isolation or fire stopping systems. Equipment supported by vibration-isolation hangers shall be detailed and installed with approximately a 1/8” gap between the isolation hangers and the structure. Isolators at restraint locations must be fitted with uplift limit stops. Electrical Systems: Provide seismic control measures with spacing and anchorage engineered for the specific project. 1. Seismically restrain per specific code requirements all Electrical components listed below (unless otherwise indicated on the drawings), using seismic cable restraints: a. b. 2. 3. Seismically restrain all conduit 65 mm (2 ½”) in nominal diameter and larger. Single supported conduit is restrained in the same fashion as single clevis supported pipe. Seismically restrain all conduit, bus ducts, or cable trays that are supported on trapeze bars, that have been assigned a Component Importance Factor equal to 1.5, and that have a total weight greater than 10 lb/ft (146 N/m). This total weight includes not only the conduit, bus duct, or cable trays, but also includes the trapeze bars as well. The electrical contractor is to provide the weight per unit length for cable trays and bus duct. Single supported conduit and trapeze supported conduit, bus duct, and cable trays to be seismically restrained in a manner similar to pipe and duct. a. b. Conduit: Follow piping spacing requirements and required criteria as listed in Section 3.2.E.2 Bus Ducts and Cable Trays: Follow duct spacing requirements and required criteria as listed in section 3.2.D.2 ENSO Systems Inc. #865 St Elizabeth C.S. – Full Day Kindergarten Addition 4. 5. 6. 7. 8. 9. 10. 11. 12. 13. 14. 15. 16. 17. 18. 19. 20. 3.4 A. B. Electrical Specifications Page 42 The seismic restraint components provided by Kinetics Noise Control, Inc. are intended to be used with suspended single supported conduit and trapeze supported conduit, cable trays, and bus ducts. Components intended to both support and restrain distribution systems such as wall mounted conduit, cable trays, and bus ducts will need to be designed and evaluated for both the dead weight load and the design horizontal seismic load. To ensure that the seismic forces are transferred properly to the restraint points, the cables should be strapped either individually or in bundles to the cable tray at regular intervals. It is necessary for the conduit, bus ducts, and cable trays to be attached to the trapeze bars sufficiently to resist the design horizontal seismic forces, both transverse (T) and longitudinal (L). Brace a change of direction longer than 3.7 m (12’). This specification does not allow the use of the 300,, (12’’) rule where the conduit and electrical may be exempted from seismic restraint based on the length of the support rods provided that the rods are not subjected to bending moments. Install restraint cables so they do not bend across edges of adjacent equipment or building structure. Tie back to structure at 45 degrees to the structure. Longitudinal restraints for single conduit supports shall be attached rigidly to the pipe, not to the pipe/conduit hanger. For supports with multiple conduits (trapezes), secure conduit to trapeze member with clamps approved for application. Where conduit, bus ducts, cable trays sizes reduce below required dimensions noted above in Section 3.2.F, the final restraint shall be installed at the transition location. Rod Stiffener Clamps are required where the hanger rod exceeds the maximum length shown in the seismic calculation sheets. They are only required at restraint locations. Seismically Rated Beam Clamps are required where welding to or penetrations to steel beams are not approved. Adjust restraint cables so that they are not visibly slack. Cable not to support weight during normal operation. Seismic systems are to be compatible with requirements for anchoring and guiding of systems. Drilled or power driven anchors or fasteners shall not be permitted for use with seismic control measures. Friction due to gravity does not constitute a seismic attachment. Seismic restraint connections are not to be connected to the bottom chord of steel joists or the bottom flange of steel beams. Standard beam clamps can be used to support restrained components; they cannot be used to connect the seismic restraint to the structure – only for the hanger rods. Brace remaining electrical components to code requirements (OBC & NBC or TI809-04). INSPECTION AND CERTIFICATION Notify the local representative of the seismic restraint materials manufacturer prior to installing any seismic restraint devices. The contractor shall seek the representative’s guidance in any installation procedures with which he/she is unfamiliar. The contractor shall notify the local representative of the seismic restraint materials manufacturer mid-way through the listed project for an inspection all vibration and seismic restraint devices already installed. A written report of any installation errors, ENSO Systems Inc. #865 St Elizabeth C.S. – Full Day Kindergarten Addition C. D. E. improperly selected devices, or other fault in the system which could affect the performance of the system shall be documented and the contractor shall perform all steps that are required from this written report to properly complete the vibration and seismic restraint work as per the specifications. Upon completion of the installation, arrange for the seismic design Engineer to visit the site to verify the proper installation of all seismic restraint devices herein specified. A written report citing any installation errors, improperly selected devices, or other fault in the system which could affect the performance of the system should be generated by the Engineer. The Engineer shall verify that isolators are adjusted, with spring’s perpendicular to bases or housing, adjustment bolts are tightened up on equipment mountings, and hangers are not cocked. Upon completion of the Work, the Engineer shall provide a sealed letter addressed to the local authorities having jurisdiction confirming that the Seismic Design and Installation is in general conformance with the design documents and the Ontario and National Building Codes. The installing contractor shall take all steps required to properly complete the seismic restraint work as per the specifications. Perform the following tests: 1. 2. 3. 4. 5. 3.5 A. Electrical Specifications Page 43 Provide evidence of recent calibration of test equipment by a testing agency acceptable to authorities having jurisdiction. Schedule test with Owner, through Architect, before connecting anchorage device to restrained component (unless post connection testing has been approved), and with at least seven days' advance notice. Obtain Architect's approval before transmitting test loads to structure. Provide temporary load-spreading members. Test at least four of each type and size of installed anchors and fasteners selected by seismic Engineer. Test to 90 percent of rated proof load of device. ADJUSTING Adjust restraints to permit free movement of equipment within normal mode of operation. END OF SECTION 260548.16 SECTION 260553 - IDENTIFICATION FOR ELECTRICAL SYSTEMS PART 1 - GENERAL 1.1 A. 1.2 A. RELATED DOCUMENTS Drawings and general provisions of the Contract, including General and Supplementary Conditions and Division 01 Specification Sections, apply to this Section. SUMMARY Section Includes: 1. 2. 3. 4. 5. Identification for raceways. Identification of power and control cables. Identification for conductors. Underground-line warning tape and powders. Warning labels and signs. ENSO Systems Inc. #865 St Elizabeth C.S. – Full Day Kindergarten Addition 6. 7. 8. 1.3 A. B. C. 1.4 A. B. C. D. Electrical Specifications Page 44 Instruction signs. Equipment identification labels. Miscellaneous identification products. ACTION SUBMITTALS Product Data: For each electrical identification product indicated. Samples: For each type of label and sign to illustrate size, colors, lettering style, mounting provisions, and graphic features of identification products. Identification Schedule: An index of nomenclature of electrical equipment and system components used in identification signs and labels. COORDINATION Coordinate identification names, abbreviations, colors, and other features with requirements in other Sections requiring identification applications, Drawings, Shop Drawings, manufacturer's wiring diagrams, and the Operation and Maintenance Manual. Use consistent designations throughout Project. Coordinate installation of identifying devices with completion of covering and painting of surfaces where devices are to be applied. Coordinate installation of identifying devices with location of access panels and doors. Install identifying devices before installing acoustical ceilings and similar concealment. PART 2 - PRODUCTS 2.1 POWER & CONTROL RACEWAY, ARMOURED & METAL CLAD IDENTIFICATION MATERIALS A. Minimum size of letters for legend and for minimum length of color field for each raceway size. B. Colors for Raceways Carrying Circuits at 600 V or Less: 1. 2. C. Colors for Raceways Carrying Circuits at More Than 600 V: 1. 2. D. E. F. G. H. Black letters on an orange field. Legend: Indicate voltage and service type (lighting, equipment feed, etc.) Black letters on an orange field. Legend: "DANGER CONCEALED HIGH VOLTAGE WIRING." Vinyl Labels for Raceways Carrying 600 V or Less: Preprinted, flexible label laminated with a clear, weather- and chemical-resistant coating and matching wraparound clear adhesive tape for securing ends of legend label. Snap-Around Labels for Raceways Carrying Circuits at 600 V or Less: Slit, pretensioned, flexible, preprinted, color-coded acrylic sleeve, with diameter sized to suit diameter of raceway or cable it identifies and to stay in place by gripping action. Snap-Around, Color-Coding Bands for Raceways Carrying Circuits at 600 V or Less: Slit, pre-tensioned, flexible, solid-colored acrylic sleeve, 50mm (2’’) long, with diameter sized to suit diameter of raceway or cable it identifies and to stay in place by gripping action. Tape and Stencil for Raceways Carrying Circuits More Than 600 V: 100mm (4’’) wide black stripes on 900mm (3’) centers diagonally over orange background that extends full length of raceway or duct and is 300mm (12’’) wide. Stop stripes at legends. Self-Adhesive Vinyl Tape for Armoured and Metal Clad Cables: Colored, heavy duty, waterproof, fade resistant; 2 inches (50 mm) wide; compounded for outdoor use. ENSO Systems Inc. #865 St Elizabeth C.S. – Full Day Kindergarten Addition I. J. K. Self-Adhesive, Self-Laminating Polyester Labels for Armoured and Metal Clad Cables: Preprinted, 0.08mm (3-mil) thick flexible label with acrylic pressure-sensitive adhesive that provides a clear, weather- and chemical-resistant, self-laminating, protective shield over the legend. Labels sized to fit the cable diameter such that the clear shield overlaps the entire printed legend. Metal Tags: Brass or aluminum, 50 by 50 by 1.3 mm (2 by 2 by 0.05’’) with stamped legend, punched for use with self-locking cable tie fastener. Write-On Tags: Polyester tag, 0.38mm (0.015’’) thick, with corrosion-resistant grommet and cable tie for attachment to conductor or cable. 1. 2. 2.2 A. B. 2.3 A. B. C. Color-Coding Conductor Tape: Colored, self-adhesive vinyl tape not less than 0.08mm (3-mil) thick by 25 to 50mm (1 to 2’’) wide. Self-Adhesive, Self-Laminating Polyester Labels: Preprinted 0.08mm (3-mil) thick flexible label with acrylic pressure-sensitive adhesive that provides a clear, weatherand chemical-resistant, self-laminating, protective shield over the legend. Labels sized to fit the conductor diameter such that the clear shield overlaps the entire printed legend. WARNING LABELS AND SIGNS Comply with OESC. Self-Adhesive Warning Labels: Factory-printed, multicolor, pressure-sensitive adhesive labels, configured for display on front cover, door, or other access to equipment unless otherwise indicated. Baked-Enamel Warning Signs: 2. 3. 2. A. Preprinted aluminum signs, punched or drilled for fasteners, with colors, legend, and size required for application. 6.4mm (1/4’’) grommets in corners for mounting. Nominal size, 180 by 250 mm (7 by 10’’). Warning label and sign shall include, but are not limited to, the following legends: 1. 2.4 Marker for Tags: Permanent, waterproof, black ink marker recommended by tag manufacturer. Marker for Tags: Machine-printed, permanent, waterproof, black ink marker recommended by printer manufacturer. CONDUCTOR IDENTIFICATION MATERIALS 1. D. Electrical Specifications Page 45 Multiple Power Source Warning: "DANGER - ELECTRICAL SHOCK HAZARD EQUIPMENT HAS MULTIPLE POWER SOURCES." Workspace Clearance Warning: "WARNING – AREA IN FRONT OF ELECTRICAL EQUIPMENT MUST BE KEPT CLEAR FOR 1m (40’’)” INSTRUCTION SIGNS Engraved, laminated acrylic or melamine plastic, minimum 1.6mm (1/16’’) thick for signs up to 129 sq. cm (20 sq. inches) and 3.2 mm (1/8’’) for larger sizes. 1. 2. 3. Engraved legend with black letters on white face. Punched or drilled for mechanical fasteners. Framed with mitered acrylic molding and arranged for attachment at applicable equipment. ENSO Systems Inc. #865 St Elizabeth C.S. – Full Day Kindergarten Addition B. C. 2.5 A. B. C. D. 2.6 A. Adhesive Film Label: Machine printed, in black, by thermal transfer or equivalent process. Minimum letter height shall be 10mm (3/8’’). Adhesive Film Label with Clear Protective Overlay: Machine printed, in black, by thermal transfer or equivalent process. Minimum letter height shall be 10mm (3/8’’). Overlay shall provide a weatherproof and UV-resistant seal for label. EQUIPMENT IDENTIFICATION LABELS Adhesive Film Label: Machine printed, in black, by thermal transfer or equivalent process. Minimum letter height shall be 10mm (3/8’’). Adhesive Film Label with Clear Protective Overlay: Machine printed, in black, by thermal transfer or equivalent process. Minimum letter height shall be 10mm (3/8’’). Overlay shall provide a weatherproof and UV-resistant seal for label. Engraved Lamacoid Label: Punched or drilled for screw mounting. Black letters on a white background. Minimum thickness 3mm (0.12’’) and letter height shall be 10mm (3/8’’) . Stenciled Legend: In nonfading, waterproof, black ink or paint. Minimum letter height shall be 25mm (1’’). CABLE TIES UV-Stabilized Cable Ties: Fungus inert, designed for continuous exposure to exterior sunlight, self-extinguishing, one piece, self-locking, Type 6/6 nylon. 1. 2. 3. 4. B. A. B. Minimum Width: 5mm (3/16’’) Tensile Strength at 23OC (73OF): 82.7 MPa (12,000 psi). Temperature Range: -40 to + 85OC (-40 to +185OF) Color: Black. Plenum-Rated Cable Ties: Self-extinguishing, UV stabilized, one piece, self-locking. 1. 2. 3. 4. 5. 2.7 Electrical Specifications Page 46 Minimum Width: 5mm (3/16’’) Tensile Strength at 23OC (73OF): 48.2 MPa (7,000 psi). UL 94 Flame Rating: 94V-0. Temperature Range: -46 to + 140OC (-50 to +284OF) Color: Black. MISCELLANEOUS IDENTIFICATION PRODUCTS Paint: Comply with requirements in painting Sections for paint materials and application requirements. Select paint system applicable for surface material and location (exterior or interior). Fasteners for Labels and Signs: Self-tapping, stainless-steel screws or stainless-steel machine screws with nuts and flat and lock washers. PART 3 - EXECUTION 3.1 A. B. C. D. INSTALLATION Verify identity of each item before installing identification products. Location: Install identification materials and devices at locations for most convenient viewing without interference with operation and maintenance of equipment. Apply identification devices to surfaces that require finish after completing finish work. Self-Adhesive Identification Products: Clean surfaces before application, using materials and methods recommended by manufacturer of identification device. ENSO Systems Inc. #865 St Elizabeth C.S. – Full Day Kindergarten Addition E. F. G. H. Attach signs and plastic labels that are not self-adhesive type with mechanical fasteners appropriate to the location and substrate. Attach plastic raceway and cable labels that are not self-adhesive type with clear vinyl tape with adhesive appropriate to the location and substrate. System Identification Color-Coding Bands for Raceways and Cables: Each colorcoding band shall completely encircle cable or conduit. Place adjacent bands of twocolor markings in contact, side by side. Locate bands at changes in direction, at penetrations of walls and floors, at 15m (50’) maximum intervals in straight runs, and at 7.6M (25’) maximum intervals in congested areas. Cable Ties: For attaching tags. Use general-purpose type, except as listed below: 1. 2. I. J. 3.2 A. IDENTIFICATION SCHEDULE Concealed Raceways, Duct Banks, More Than 600 V, within Buildings: Tape and stencil 100mm (4’’) wide black stripes on minimum 900mm (36’’) centers over orange background that extends full length of raceway or duct and is 300mm (12’’) wide or as directed by authorities having jurisdiction. Stencil legend "DANGER CONCEALED HIGH VOLTAGE WIRING" with 75mm (3’’) high black letters on 900mm (36’’) centers. Stop stripes at legends. Apply to the following finished surfaces: 2. 3. C. D. Outdoors: UV-stabilized nylon. In Spaces Handling Environmental Air: Plenum rated. Underground-Line Warning Tape and/or Powder: During backfilling of trenches install continuous underground-line warning tape and powders as required by OESC. Use multiple tapes where width of multiple lines installed in a common trench or concrete envelope exceeds 400mm (16’’) overall. Painted Identification: Comply with requirements in painting Sections for surface preparation and paint application. 1. B. Electrical Specifications Page 47 Floor surface directly above conduits running beneath and within 300mm (12’’) of a floor that is in contact with earth or is framed above unexcavated space. Wall surfaces directly external to raceways concealed within wall. Accessible surfaces of concrete envelope around raceways in vertical shafts, exposed in the building, or concealed above suspended ceilings. Accessible Raceways, Armored and Metal-Clad Cables, More Than 600 V: Selfadhesive vinyl or Snap-around labels. Install labels at 15m (30’) maximum intervals. Accessible Raceways and Metal-Clad Cables, 600 V or Less, for Service, Feeder, and Branch Circuits More Than 30V to ground: Identify with self-adhesive vinyl tape applied in bands. Install labels 10m (30’) maximum intervals. Accessible Raceways and Cables within Buildings: Identify the covers of each junction and pull box of the following systems with self-adhesive vinyl labels with the wiring system legend and system voltage. System legends and colour coding shall be as follows: 1. 2. 3. 4. 5. 6. 7. 8. Emergency Power – use orange background and white lettering. Power – prime. Lighting - black. Fire Alarm –red. Public Address – white. Security Systems – brown. Building Automation Systems – green. Building Control Systems – blue. ENSO Systems Inc. #865 St Elizabeth C.S. – Full Day Kindergarten Addition 9. 10. E. Exit and Emergency Lighting – orange. UPS - yellow. Power-Circuit Conductor Identification, 600 V or Less: For conductors in vaults, pull and junction boxes, manholes, and handholes, use color-coding conductor tape to identify the phase. 1. Color-Coding for Phase and Voltage Level Identification, 600 V or Less: Use colors listed below for ungrounded service, feeder and branch-circuit conductors. a. b. Color shall be factory applied. Colors for 208/120-V Circuits: 1) 2) 3) c. d. e. f. G. H. I. J. K. Phase A: Brown. Phase B: Orange. Phase C: Yellow. Neutrals: White. Ground/Bonding wires: Green Field-Applied, Color-Coding Conductor Tape: Apply in half-lapped turns for a minimum distance of 150mm (6’’) from terminal points and in boxes where splices or taps are made. Apply last two turns of tape with no tension to prevent possible unwinding. Locate bands to avoid obscuring factory cable markings. Power-Circuit Conductor Identification, More than 600 V: For conductors in vaults, pull and junction boxes, manholes, and handholes, use nonmetallic plastic tag holder with adhesive-backed phase tags and a separate tag with the circuit designation. Install instructional sign including the color-code for grounded and ungrounded conductors using adhesive-film-type labels. Control-Circuit Conductor Identification: For conductors and cables in pull and junction boxes, manholes, and handholes, use self-adhesive vinyl labels with the conductor or cable designation, origin, and destination. Control-Circuit Conductor Termination Identification: For identification at terminations provide self-adhesive vinyl labels with the conductor designation. Conductors to Be Extended in the Future: Attach marker tape to conductors and list source. Auxiliary Electrical Systems Conductor Identification: Identify field-installed alarm, control, and signal connections. 1. 2. 3. L. Phase A: Black. Phase B: Red. Phase C: Blue. Colors for 600/347V Circuits: 1) 2) 3) F. Electrical Specifications Page 48 Identify conductors, cables, and terminals in enclosures and at junctions, terminals, and pull points. Identify by system and circuit designation. Use system of marker tape designations that is uniform and consistent with system used by manufacturer for factory-installed connections. Coordinate identification with Project Drawings, manufacturer's wiring diagrams, and the Operation and Maintenance Manual. Locations of Underground Lines: Identify with underground-line warning tape and powder for power, lighting, communication, and control wiring and optical fiber cable. ENSO Systems Inc. #865 St Elizabeth C.S. – Full Day Kindergarten Addition 1. M. N. Install underground-line warning tape and powders for both direct-buried cables and cables in raceway. Workspace Indication: Install floor marking tape to show working clearances in the direction of access to live parts. Workspace shall be as required by OESC unless otherwise indicated. Do not install at flush-mounted panelboards and similar equipment in finished spaces. Warning Labels for Indoor Cabinets, Boxes, and Enclosures for Power and Lighting: Baked-enamel warning signs 1. 2. 3. 4. Comply with OESC. Identify system voltage with black letters on an orange background. Apply to exterior of door, cover, or other access. For equipment with multiple power or control sources, apply to door or cover of equipment including, but not limited to, the following: a. b. O. P. Q. Electrical Specifications Page 49 Power transfer switches. Controls with external control power connections. Operating Instruction Signs: Install instruction signs to facilitate proper operation and maintenance of electrical systems and items to which they connect. Install instruction signs with approved legend where instructions are needed for system or equipment operation. Emergency Operating Instruction Signs: Install instruction signs with white legend on a red background with minimum 10mm (3/8’’) high letters for emergency instructions at equipment used for power transfer, load shedding, etc. Equipment Identification Labels: On each unit of equipment, install unique designation label that is consistent with wiring diagrams, schedules, and the Operation and Maintenance Manual. Apply labels to disconnect switches and protection equipment, central or master units, control panels, control stations, terminal cabinets, and racks of each system. Systems include power, lighting, control, communication, signal, monitoring, and alarm systems unless equipment is provided with its own identification. 1. Labeling Instructions: a. b. c. d. e. 2. Indoor Equipment: Engraved, laminated lamacoid label unless otherwise indicated, provide a single line of text with 13mm (1/2’’) high letters on 38mm (1.5’’) high label; where two lines of text are required, use labels 50mm (2’’) high. Outdoor Equipment: Engraved, laminated lamacoid label 100mm (4’’) high. Elevated Components: Increase sizes of labels and letters to those appropriate for viewing from the floor. Unless provided with self-adhesive means of attachment, fasten labels with appropriate mechanical fasteners that do not change the NEMA rating of the enclosure. Label in English. Equipment to Be Labeled with Lamacoid Nameplates: a. b. c. Panelboards: Typewritten directory of circuits in the location provided by panelboard manufacturer. Panelboard identification shall be [self-adhesive, engraved] [engraved], laminated acrylic or melamine label. Enclosures and electrical cabinets. Access doors and panels for concealed electrical items. ENSO Systems Inc. #865 St Elizabeth C.S. – Full Day Kindergarten Addition d. e. f. g. h. i. j. k. l. Electrical Specifications Page 50 Emergency system boxes and enclosures. Motor-control centers. Enclosed switches. Enclosed circuit breakers. Enclosed controllers. Push-button stations. Contactors. Battery packs. Monitoring and control equipment. END OF SECTION 260553 SECTION 260923 - LIGHTING CONTROL DEVICES PART 1 - GENERAL 1.1 A. SUMMARY Section Includes: 1. 2. 3. 4. 5. 6. 7. B. Related Requirements: 1. 1.2 A. B. Time switches. Photoelectric switches. Standalone daylight-harvesting switching controls. Indoor occupancy sensors. Outdoor motion sensors. Lighting contactors. Emergency shunt relays. Section 262726 "Wiring Devices" for wall-box dimmers, wall-switch occupancy sensors, and manual light switches. ACTION SUBMITTALS Product Data: For each type of product. Shop Drawings: Show installation details for occupancy and light-level sensors. 1. 2. Interconnection diagrams showing field-installed wiring. Include diagrams for power, signal, and control wiring. PART 2 - PRODUCTS 2.1 A. TIME SWITCHES Electronic Time Switches: Solid state, programmable, with alphanumeric display; complying with CSA C22.2. 1. 2. 3. 4. 5. 6. Contact Configuration: SPST, DPST, DPDT as noted on drawings. Contact Rating: refer to drawings. Programs: Two on-off set points per day on a 7 day, 24-hour schedule, allowing different set points for each day of the week and an annual holiday schedule that overrides the weekly operation on holidays. Circuitry: Allow connection of a photoelectric relay as substitute for on-off function of a program on selected channels where noted on drawings. Astronomic Time: All channels. Automatic daylight savings time changeover. ENSO Systems Inc. #865 St Elizabeth C.S. – Full Day Kindergarten Addition 7. B. 4. 5. 6. 7. A. Description: Solid state, with SPST or DPST as per drawings, dry contacts rated for load as per drawings to operate connected load, relay, contactor coils, or microprocessor input; complying with CSA C22.2. 3. 4. 5. 6. A. B. Contact Configuration: SPST, DPST, DPDT as noted on drawings. Contact Rating: refer to drawings. Circuitry: Allows connection of a photoelectric relay as a substitute for the on-off function of a program. Astronomic time dial. Eight-Day Program: Uniquely programmable for each weekday and holidays. Skip-a-day mode. Wound-spring reserve carryover mechanism to keep time during power failures, minimum of 24 hours. OUTDOOR PHOTOELECTRIC SWITCHES 1. 2. 2.3 Battery Backup: Not less than seven days reserve, to maintain schedules and time clock. Electromechanical-Dial Time Switches: Comply with CSA C22.2. 1. 2. 3. 2.2 Electrical Specifications Page 51 CSA Listed and marked for intended location and application. Light-Level Monitoring Range: 1.5 to 10 fc (16 to 108 lux), with an adjustment for turn-on and turn-off levels within that range[, and a directional lens in front of the photocell to prevent fixed light sources from causing turn-off]. Time Delay: 30 second minimum, to prevent false operation. Surge Protection: Metal-oxide varistor. Lightning Arrester: Air-gap type. Mounting: Twist lock complies with NEMA C136.10, with base-and-stem mounting or stem-and-swivel mounting accessories as required to direct sensor to the north sky exposure. DAYLIGHT-HARVESTING SWITCHING CONTROLS Ceiling-Mounted Switching Controls: Solid-state, light-level sensor unit, with separate power pack mounted on luminaire or ceiling as noted on the drawings, to detect changes in indoor lighting levels that are perceived by the eye. Electrical Components, Devices, and Accessories: 1. 2. 3. 4. 5. 6. 7. 8. 9. CSA Listed and marked for intended location and application. Operating Ambient Conditions: Dry interior conditions, 0 to 49OC (32 to 120OF). Sensor and power pack specification – see drawing legend. General Space Sensors Light-Level Monitoring Range: 10 to 200 fc (108 to 2152 lux), with an adjustment for turn-on and turn-off levels within that range. Time Delay: Adjustable from 5 to 300 seconds to prevent cycling. Set-Point Adjustment: Equip with deadband adjustment of 25, 50, and 75 percent above the "on" set point, or provide with separate adjustable "on" and "off" set points. Test Mode: User selectable, overriding programmed time delay to allow settings check. Control Load Status: User selectable to confirm that load wiring is correct. Indicator: Two digital displays to indicate the beginning of on-off cycles. ENSO Systems Inc. #865 St Elizabeth C.S. – Full Day Kindergarten Addition 2.4 A. DAYLIGHT-HARVESTING DIMMING CONTROLS System Description: Sensing daylight and electrical lighting levels, the system adjusts the indoor electrical lighting levels. As daylight increases, the lights are dimmed. 1. Lighting control set point is based on two lighting conditions: a. b. 2. 3. 4. A. CSA Listed and marked for intended location and application. Sensor Output: 0- to 10-V dc to operate electronic dimming ballasts. Sensor is powered by controller unit. Power Pack: Sensor has 24-V dc, 120 or 347V power source as noted on drawings. Light-Level Sensor Set-Point Adjustment Range: 20 to 60 fc (120 to 640 lux). INDOOR OCCUPANCY SENSORS General Requirements for Sensors: Wall or ceiling-mounted, solid-state indoor occupancy sensors with a separate power pack. 1. 2. 3. 4. 5. 6. CSA Listed and marked for intended location and application. Operating Ambient Conditions: Dry interior conditions, 0 to 49OC (32 to 120OF). Operation: Unless otherwise indicated, turn lights on when coverage area is occupied, and turn them off when unoccupied; with a time delay for turning lights off, adjustable over a minimum range of 1 to 15 minutes. Sensor Output: Contacts rated to operate the connected relay. Sensor is powered from the power pack. Power Pack: Dry contacts rated for 20-A ballast load at 120 or 347V ac as noted on the drawings. Sensor has 24-V dc power source. Mounting: a. b. c. 7. 8. 9. B. Initial setup tool. Tool for occupants to adjust the target levels by increasing the set point up to 25 percent, or by minimizing the electric lighting level. Ceiling-Mounted Dimming Controls: Solid-state, light-level sensor unit, with separate controller unit, to detect changes in lighting levels that are perceived by the eye. 1. 2. 2.5 When no daylight is present (target level). When significant daylight is present. System programming is done with two hand-held, remote-control tools. a. b. B. Electrical Specifications Page 52 Sensor: Suitable for mounting in any position on a standard outlet box. Relay: Externally mounted through a 13mm (0.5’’) knockout in a standard electrical enclosure. Time-Delay and Sensitivity Adjustments: Recessed and concealed behind hinged door. Indicator: Digital display, to show when motion is detected during testing and normal operation of sensor. Bypass Switch: Override the "on" function in case of sensor failure. Automatic Light-Level Sensor: Adjustable from 2 to 200 fc (21.5 to 2152 lux); turn lights off when selected lighting level is present. PIR Type: Ceiling mounted; detect occupants in coverage area by their heat and movement. ENSO Systems Inc. #865 St Elizabeth C.S. – Full Day Kindergarten Addition 1. 2. 3. 4. 2.6 A. A. General Requirements for Sensors: Automatic-wall-switch occupancy sensor, suitable for mounting in a single gang switchbox. General Description: Solid-state unit. The unit is designed to operate with the lamp and ballasts indicated. 3. 4. 5. 6. 7. 8. C. 2.8 A. B. C. CSA Listed and marked for intended location and application. Operating Ambient Conditions: Dry interior conditions, 0 to 49OC (32 to 120OF). Switch Rating and Type: Refer to drawings for specification. HIGH-BAY OCCUPANCY SENSORS 1. 2. B. Detector Sensitivity: Detect occurrences of 150mm (6’’) minimum movement of any portion of a human body that presents a target of not less than 232 sq. cm. (36 sq. in). Detection Coverage (Room): Detect occupancy anywhere in a circular area of 93 sqm (1000 sqft) when mounted on a 2.44m (8’) high ceiling. Detection Coverage (Corridor): Detect occupancy within 27.4m (90’) when mounted on a 3m (10’) high ceiling. See drawing for specification type. SWITCHBOX-MOUNTED OCCUPANCY SENSORS 1. 2. 3. 2.7 Electrical Specifications Page 53 CSA Listed and marked for intended location and application. Operation: Turn lights on when coverage area is occupied, and to half-power when unoccupied; with a time delay for turning lights to half-power that is adjustable over a minimum range of 1 to 16 minutes. Continuous Lamp Monitoring: When lamps are dimmed continuously for 24 hours, automatically turn lamps on to full power for 15 minutes for every 24 hours of continuous dimming. Operating Ambient Conditions: interior conditions, 0 to 65OC (32 to 149OF). Mounting: Threaded pipe. Time-Delay and Sensitivity Adjustments: Recessed and concealed behind hinged door. Detector Technology: PIR. Power and dimming control from the lighting fixture ballast that has been modified to include the dimming capacitor and MyzerPORT option. Detector Coverage: User selectable by interchangeable PIR lenses, suitable for mounting heights from 3.7 to 15.2 m (12 to 50 feet). Accessories: Obtain manufacturer's installation and maintenance kit with laser alignment tool for sensor positioning and power port connectors. CONDUCTORS AND CABLES Power Wiring to Supply Side of Remote-Control Power Sources: Not smaller than No. 12 AWG. Comply with requirements in Section 260519 "Low-Voltage Electrical Power Conductors and Cables." Classes 2 and 3 Control Cable: Multiconductor cable with stranded-copper conductors not smaller than No. 18 AWG. Comply with requirements in Section 260519 "LowVoltage Electrical Power Conductors and Cables." Class 1 Control Cable: Multiconductor cable with stranded-copper conductors not smaller than No. 14 AWG. Comply with requirements in Section 260519 "Low-Voltage Electrical Power Conductors and Cables." ENSO Systems Inc. #865 St Elizabeth C.S. – Full Day Kindergarten Addition Electrical Specifications Page 54 PART 3 - EXECUTION 3.1 A. B. 3.2 A. B. C. D. 3.3 A. SENSOR INSTALLATION Coordinate layout and installation of ceiling-mounted devices with other construction that penetrates ceilings or is supported by them, including light fixtures, HVAC equipment, smoke detectors, fire-suppression systems, and partition assemblies. Install and aim sensors in locations to achieve not less than 90 percent coverage of areas indicated. Do not exceed coverage limits specified in manufacturer's written instructions. WIRING INSTALLATION Wiring Method: Comply with Section 260519 "Low-Voltage Electrical Power Conductors and Cables." Minimum conduit size is 16mm (0.5’’). Wiring within Enclosures: Comply with NECA 1. Separate power-limited and nonpower-limited conductors according to conductor manufacturer's written instructions. Size conductors according to lighting control device manufacturer's written instructions unless otherwise indicated. Splices, Taps, and Terminations: Make connections only on numbered terminal strips in junction, pull, and outlet boxes; terminal cabinets; and equipment enclosures. IDENTIFICATION Identify components and power and control wiring according to Section 260553 "Identification for Electrical Systems." 1. 2. B. 3.4 A. B. C. Label time switches and contactors with a unique designation. FIELD QUALITY CONTROL Testing Agency: Engage a qualified testing agency to evaluate lighting control devices and perform tests and inspections. Manufacturer's Field Service: Engage a factory-authorized service representative to test and inspect components, assemblies, and equipment installations, including connections. Perform the following tests and inspections with the assistance of a factory-authorized service representative where required: 1. 2. D. E. 3.5 A. Identify controlled circuits in lighting contactors. Identify circuits or luminaires controlled by photoelectric and occupancy sensors at each sensor. Operational Test: After installing time switches and sensors, and after electrical circuitry has been energized, start units to confirm proper unit operation. Test and adjust controls and safeties. Replace damaged and malfunctioning controls and equipment. Lighting control devices will be considered defective if they do not pass tests and inspections. Prepare test and inspection reports. ADJUSTING Occupancy Adjustments: When requested within 12 months from date of Substantial Completion, provide on-site assistance in adjusting sensors to suit actual occupied ENSO Systems Inc. #865 St Elizabeth C.S. – Full Day Kindergarten Addition Electrical Specifications Page 55 conditions. Provide up to two visits to Project during other-than-normal occupancy hours for this purpose. 1. 2. 3. 3.6 A. B. For occupancy and motion sensors, verify operation at outer limits of detector range. Set time delay to suit Owner's operations. For daylighting controls, adjust set points and deadband controls to suit Owner's operations. Align high-bay occupancy sensors using manufacturer's laser aiming tool. DEMONSTRATION Coordinate demonstration of products specified in this Section with demonstration requirements for low-voltage, programmable lighting control systems specified in Section 260943.13 "Addressable-Fixture Lighting Controls" and Section 260943.23 "Relay-Based Lighting Controls." Train Owner's maintenance personnel to adjust, operate, and maintain lighting control devices. END OF SECTION 260923 SECTION 262416 - PANELBOARDS PART 1 - GENERAL 1.1 A. 1.2 A. RELATED DOCUMENTS Drawings and general provisions of the Contract, including General and Supplementary Conditions and Division 01 Specification Sections, apply to this Section. SUMMARY Section Includes: 1. 2. 3. 4. 1.3 A. B. 1.4 A. B. Distribution panelboards. Lighting and appliance branch-circuit panelboards. Load centers. Electronic-grade panelboards. DEFINITIONS SVR: Suppressed voltage rating. TVSS: Transient voltage surge suppressor. ACTION SUBMITTALS Product Data: For each type of panelboard, switching and overcurrent protective device, transient voltage suppression device, accessory, and component indicated. Include dimensions and manufacturers' technical data on features, performance, electrical characteristics, ratings, and finishes. Shop Drawings: For each panelboard and related equipment. 1. 2. 3. 4. 5. Include dimensioned plans, elevations, sections, and details. Show tabulations of installed devices, equipment features, and ratings. Detail enclosure types and details for types other than NEMA 250, Type 1. Detail bus configuration, current, and voltage ratings. Short-circuit current rating of panelboards and overcurrent protective devices. Include evidence of NRTL listing for series rating of installed devices. ENSO Systems Inc. #865 St Elizabeth C.S. – Full Day Kindergarten Addition 6. 7. 8. 1.5 A. Seismic Qualification Certificates: Submit certification that panelboards, overcurrent protective devices, accessories, and components will withstand seismic forces defined in Section 260548.16 "Seismic Controls for Electrical Systems." Include the following: 2. 3. 1.6 A. CLOSEOUT SUBMITTALS Operation and Maintenance Data: For panelboards and components to include in emergency, operation, and maintenance manuals. In addition to items specified in Section 017823 "Operation and Maintenance Data," include the following: 2. A. B. 1.8 A. Basis for Certification: Indicate whether withstand certification is based on actual test of assembled components or on calculation. Dimensioned Outline Drawings of Equipment Unit: Identify center of gravity and locate and describe mounting and anchorage provisions. Detailed description of equipment anchorage devices on which the certification is based and their installation requirements. Panelboard Schedules: install in panelboards after load balancing. 1. 1.7 Detail features, characteristics, ratings, and factory settings of individual overcurrent protective devices and auxiliary components. Include wiring diagrams for power, signal, and control wiring. Include time-current coordination curves for each type and rating of overcurrent protective device included in panelboards. Submit on translucent log-log graft paper; include selectable ranges for each type of overcurrent protective device. INFORMATIONAL SUBMITTALS 1. B. Manufacturer's written instructions for testing and adjusting overcurrent protective devices. Time-current curves, including selectable ranges for each type of overcurrent protective device that allows adjustments. DELIVERY, STORAGE, AND HANDLING Remove loose packing and flammable materials from inside panelboards; install temporary electric heating (250 W per panelboard) to prevent condensation. Handle and prepare panelboards for installation according to OESC. PROJECT CONDITIONS Environmental Limitations: 1. 2. Do not deliver or install panelboards until spaces are enclosed and weathertight, wet work in spaces is complete and dry, work above panelboards is complete, and temporary HVAC system is operating and maintaining ambient temperature and humidity conditions at occupancy levels during the remainder of the construction period. Rate equipment for continuous operation under the following conditions unless otherwise indicated: a. b. B. Electrical Specifications Page 56 Ambient Temperature: Not exceeding -5OC (23OF) to +40OC (104OF) Altitude: Not exceeding 2000m (6000’). Interruption of Existing Electric Service: Do not interrupt electric service to facilities occupied by Owner or others unless permitted under the following conditions and then ENSO Systems Inc. #865 St Elizabeth C.S. – Full Day Kindergarten Addition Electrical Specifications Page 57 only after arranging to provide temporary electric service according to requirements indicated: 1. 2. 1.9 A. B. Notify Project Manager and Owner no fewer than 72 hours in advance of proposed interruption of electric service. Do not proceed with interruption of electric service without Project Manager/Owner’s written permission. COORDINATION Coordinate layout and installation of panelboards and components with other construction that penetrates walls or is supported by them, including electrical and other types of equipment, raceways, piping, encumbrances to workspace clearance requirements, and adjacent surfaces. Maintain required workspace clearances and required clearances for equipment access doors and panels. Coordinate sizes and locations of concrete bases with actual equipment provided. Cast anchor-bolt inserts into bases. Concrete, reinforcement, and formwork requirements are specified with concrete. PART 2 - PRODUCTS 2.1 A. B. GENERAL REQUIREMENTS FOR PANELBOARDS Fabricate and test panelboards to withstand seismic forces defined in Section 260548.16 "Seismic Controls for Electrical Systems." Enclosures: Flush or surface mounted cabinets as noted in panel schedules on drawings. 1. Sprinkler-proof and rated for environmental conditions at installed location. a. b. c. d. e. 2. 3. 4. 5. 6. Front: Secured to box with concealed trim clamps. For surface-mounted fronts, match box dimensions; for flush-mounted fronts, overlap box. Hinged Front Cover: Entire front trim hinged to box and with standard door within hinged trim cover. Skirt for Surface-Mounted Panelboards: Same gage and finish as panelboard front with flanges for attachment to panelboard, wall, and ceiling or floor. Gutter Extension and Barrier: Same gage and finish as panelboard enclosure; integral with enclosure body. Arrange to isolate individual panel sections. Finishes: a. b. c. 7. Indoor Dry and Clean Locations: NEMA 250, Type 2. Outdoor Locations: NEMA 250, Type 3R. Kitchen or Wash-Down Areas: NEMA 250, Type 4X, stainless steel. Other Wet or Damp Indoor Locations: NEMA 250, Type 4 Indoor Locations Subject to Dust, Falling Dirt, and Dripping Noncorrosive Liquids: NEMA 250, Type 12. Panels and Trim: Steel and galvanized steel, factory finished immediately after cleaning and pretreating with manufacturer's standard two-coat, baked-on finish consisting of prime coat and thermosetting topcoat. Back Boxes: Galvanized steel with same finish as panels and trim. Trim and Door: baked enamel gray finish (2 coats of primer and finish coats). Directory Card: Inside panelboard door, mounted in metal frame with transparent protective cover]. ENSO Systems Inc. #865 St Elizabeth C.S. – Full Day Kindergarten Addition C. D. Incoming Mains Location: refer to drawings. Phase, Neutral, and Ground Buses: 1. 2. 3. 4. 5. 6. E. 5. 6. 7. G. H. I. J. K. L. 2.2 A. Material: Tin-plated hard-drawn copper, 98 percent conductivity. Main Bus: rated for 50,000 A withstand capacity running full length of panelboard Equipment Ground Bus: Copper and adequate for feeder and branch-circuit equipment grounding conductors; bonded to box. Isolated Ground Bus: Adequate for branch-circuit isolated ground conductors; insulated from box. Extra-Capacity Neutral Bus: Neutral bus rated 200 percent of phase bus and ULC listed as suitable for nonlinear loads. Split Bus: Vertical buses divided into individual vertical sections. Conductor Connectors: Suitable for use with conductor material and sizes. 1. 2. 3. 4. F. Electrical Specifications Page 58 Material: Tin-plated hard-drawn copper, 98 percent conductivity. Main and Neutral Lugs: Mechanical type. Ground Lugs and Bus-Configured Terminators: Mechanical type. Feed-Through Lugs: Mechanical type, suitable for use with conductor material. Locate at opposite end of bus from incoming lugs or main device. Subfeed (Double) Lugs: Mechanical type suitable for use with conductor material. Locate at same end of bus as incoming lugs or main device. Gutter-Tap Lugs: Mechanical type suitable for use with conductor material. Locate at same end of bus as incoming lugs or main device. Extra-Capacity Neutral Lugs: Rated 200 percent of phase lugs mounted on extracapacity neutral bus. Service Equipment Label: NRTL labeled for use as service equipment for panelboards or load centers with one or more main service disconnecting and overcurrent protective devices. Future Devices: Mounting brackets, bus connections, filler plates, and necessary appurtenances required for future installation of devices. Sequence phase bussing with odd numbered breakers on left and even on right, with each breaker identified by permanent number identification as to circuit number and phase. Mains, number of circuits, and number and size of branch circuit breakers as per panel schedules Panelboard Short-Circuit Current Rating: Rated for series-connected system with integral or remote upstream overcurrent protective devices and labeled by an NRTL. Include size and type of allowable upstream and branch devices, listed and labeled for series-connected short-circuit rating by an NRTL. Fully rated to interrupt symmetrical short-circuit current available at terminals and as noted in panel schedule. Provide non-ferrous plates for metal sheathed cables, contactors, shunt-trip and feed through lugs as required. Breakers: to Section 262416. PERFORMANCE REQUIREMENTS Seismic Performance: Panelboards shall withstand the effects of earthquake motions determined according to Specification Section 260548 Seismic Controls for Electrical Systems. ENSO Systems Inc. #865 St Elizabeth C.S. – Full Day Kindergarten Addition 1. B. 2.3 A. B. C. D. LIGHTING AND APPLIANCE BRANCH-CIRCUIT PANELBOARDS Panelboards: NEMA PB 1, lighting and appliance branch-circuit type. Mains: Circuit breaker or lugs only as per panel schedule. Branch Overcurrent Protective Devices: Bolt-on circuit breakers, replaceable without disturbing adjacent units. Contactors in Main Bus: NEMA ICS 2, Class A, mechanically held, general-purpose controller, with same short-circuit interrupting rating as panelboard. 2. 2.4 A. The term "withstand" means "the unit will remain in place without separation of any parts from the device when subjected to the seismic forces specified and the unit will be fully operational after the seismic event.” Surge Suppression: Factory installed as an integral part of indicated panelboards, complying with CSA and UL 1449 SPD Type 1 or Type 2 as noted in panel schedule. 1. E. F. Electrical Specifications Page 59 Internal Control-Power Source: Control-power transformer, with fused primary and secondary terminals, connected to main bus ahead of contactor connection. External Control-Power Source: 120V branch circuit or 24V control circuit as noted on drawings. Doors: Concealed hinges; secured with flush latch with tumbler lock; keyed alike. 250V: NBLP type with breakers rated for 22kAIC unless noted otherwise in the panel schedule. A symmetrical interrupting capacity at 120/240V unless otherwise noted on drawings DISCONNECTING AND OVERCURRENT PROTECTIVE DEVICES Molded-Case Circuit Breaker (MCCB): Comply with UL 489, with interrupting capacity to meet available fault currents. 1. 2. 3. Thermal-Magnetic Circuit Breakers: Inverse time-current element for low-level overloads, and instantaneous magnetic trip element for short circuits. Adjustable magnetic trip setting for circuit-breaker frame sizes 250 A and larger. Adjustable Instantaneous-Trip Circuit Breakers: Magnetic trip element with frontmounted, field-adjustable trip setting. Electronic trip circuit breakers with rms sensing; field-replaceable rating plug or field-replicable electronic trip; and the following field-adjustable settings: a. b. c. d. 4. 5. 6. 7. 8. Instantaneous trip. Long- and short-time pickup levels. Long- and short-time time adjustments. Ground-fault pickup level, time delay, and I squared x t response. Current-Limiting Circuit Breakers: Frame sizes 400 A and smaller; let-through ratings less than NEMA FU 1, RK-5. GFCI Circuit Breakers: Single- and two-pole configurations with Class A groundfault protection (6-mA trip). Ground-Fault Equipment Protection (GFEP) Circuit Breakers: Class B groundfault protection (30-mA trip). Arc-Fault Circuit Interrupter (AFCI) Circuit Breakers: Comply with UL 1699; 120/240-V, single-pole configuration. Molded-Case Circuit-Breaker (MCCB) Features and Accessories: a. Standard frame sizes, trip ratings, and number of poles. ENSO Systems Inc. #865 St Elizabeth C.S. – Full Day Kindergarten Addition b. c. d. e. f. g. h. i. j. k. l. m. n. 2.5 A. B. Electrical Specifications Page 60 Lugs: Mechanical style, suitable for number, size, trip ratings, and conductor materials. Application Listing: Appropriate for application; Type SWD for switching fluorescent lighting loads; Type HID for feeding fluorescent and highintensity discharge (HID) lighting circuits. Ground-Fault Protection: Integrally mounted or Remote-mounted relay and trip unit with adjustable pickup and time-delay settings, push-to-test feature, and ground-fault indicator. Communication Capability: Circuit-breaker-mounted, Universal mounted or Integral communication module with functions and features compatible with power monitoring and control system specified in Section 260913 "Electrical Power Monitoring and Control." Shunt Trip: 120 or 24V, as per drawing, trip coil energized from separate circuit, set to trip at [55] [75] percent of rated voltage. Undervoltage Trip: Set to operate at 35 to 75 percent of rated voltage with field-adjustable 0.1- to 0.6-second time delay. Auxiliary Contacts: One or two SPDT switches where noted on the drawings with "a" and "b" contacts; "a" contacts mimic circuit-breaker contacts and "b" contacts operate in reverse of circuit-breaker contacts. Alarm Switch: Single-pole, normally open contact that actuates only when circuit breaker trips. Key Interlock Kit: Externally mounted to prohibit circuit-breaker operation; key shall be removable only when circuit breaker is in off position. Zone-Selective Interlocking: Integral with electronic trip unit; for interlocking ground-fault protection function with other upstream or downstream devices. Multipole units enclosed in a single housing or factory assembled to operate as a single unit. Handle Padlocking Device: Fixed attachment, for locking circuit-breaker handle in on or off position. Handle Clamp: Loose attachment, for holding circuit-breaker handle in on position. ACCESSORY COMPONENTS AND FEATURES Accessory Set: Include tools and miscellaneous items required for overcurrent protective device test, inspection, maintenance, and operation. Portable Test Set: For testing functions of solid-state trip devices without removing from panelboard. Include relay and meter test plugs suitable for testing panelboard meters and switchboard class relays. PART 3 - EXECUTION 3.1 A. B. C. EXAMINATION Examine panelboards before installation. Reject panelboards that are damaged or rusted or have been subjected to water saturation. Examine elements and surfaces to receive panelboards for compliance with installation tolerances and other conditions affecting performance of the Work. Proceed with installation only after unsatisfactory conditions have been corrected. ENSO Systems Inc. #865 St Elizabeth C.S. – Full Day Kindergarten Addition 3.2 A. INSTALLATION Equipment Mounting: Install panelboards on concrete bases, 100mm (4’’) nominal thickness. Comply with requirements for concrete base specified in Section 033000 "Cast-in-Place Concrete." or Section 033053 "Miscellaneous Cast-in-Place Concrete." 1. 2. 3. 4. 5. B. C. D. E. F. I. J. K. L. M. N. 3.3 A. B. C. Install dowel rods to connect concrete base to concrete floor. Unless otherwise indicated, install dowel rods on 450mm (18’’) centers around full perimeter of base. For panelboards, install epoxy-coated anchor bolts that extend through concrete base and anchor into structural concrete floor. Place and secure anchorage devices. Use setting drawings, templates, diagrams, instructions, and directions furnished with items to be embedded. Install anchor bolts to elevations required for proper attachment to panelboards. Attach panelboard to the vertical finished or structural surface behind the panelboard. Temporary Lifting Provisions: Remove temporary lifting eyes, channels, and brackets and temporary blocking of moving parts from panelboards. Comply with mounting and anchoring requirements specified in Section 260548.16 "Seismic Controls for Electrical Systems." Mount top of trim 2m (6.5’) above finished floor unless otherwise indicated. Mount panelboard cabinet plumb and rigid without distortion of box. Mount recessed panelboards with fronts uniformly flush with wall finish and mating with back box. Install overcurrent protective devices and controllers not already factory installed. 1. G. H. Electrical Specifications Page 61 Set field-adjustable, circuit-breaker trip ranges. Install filler plates in unused spaces. Stub four 27mm (1’’) empty conduits from panelboard into accessible ceiling space, space designated to be ceiling space in the future or raised floor space or below slab not on grade. Arrange conductors in gutters into groups and bundle and wrap with wire ties after completing load balancing. Install surface mounted panelboards on fire-rated plywood backboards. Where practical, group panelboards on common backboard. Connect loads to circuits as indicated. Connect panelboard feeder contactor remote emergency shut-off push buttons as indicated on plans. Connect neutral conductors to common neutral bus with respective neutral identified. Provide surge suppression where indicated on panel schedule. IDENTIFICATION Identify field-installed conductors, interconnecting wiring, and components; provide warning signs complying with Section 260553 "Identification for Electrical Systems." Create a directory to indicate installed circuit loads after balancing panelboard loads; incorporate Owner's final room designations. Obtain approval before installing. Use a computer or typewriter to create directory; handwritten directories are not acceptable. Panelboard Nameplates: Label each panelboard with a nameplate complying with requirements for identification specified in Section 260553 "Identification for Electrical Systems." ENSO Systems Inc. #865 St Elizabeth C.S. – Full Day Kindergarten Addition D. 3.4 A. Device Nameplates: Label each branch circuit device in distribution panelboards with a nameplate complying with requirements for identification specified in Section 260553 "Identification for Electrical Systems." FIELD QUALITY CONTROL Acceptance Testing Preparation: 1. 2. B. 2. 3.5 A. B. C. ADJUSTING Adjust moving parts and operable component to function smoothly, and lubricate as recommended by manufacturer. Set field-adjustable circuit-breaker trip ranges as indicated (or as specified in Section 260573 "Overcurrent Protective Device Coordination Study” when included in specification. Load Balancing: After Substantial Completion, but not more than 60 days after Final Acceptance, measure load balancing and make circuit changes. 3. 4. A. Perform each visual and mechanical inspection and electrical test stated in NETA Acceptance Testing Specification. Certify compliance with test parameters. Correct malfunctioning units on-site, where possible, and retest to demonstrate compliance; otherwise, replace with new units and retest. Panelboards will be considered defective if they do not pass tests and inspections. Prepare test and inspection reports, including a certified report that identifies panelboards included and that describes scanning results. Include notation of deficiencies detected, remedial action taken, and observations after remedial action. 1. 2. 3.6 Test insulation resistance for each panelboard bus, component, connecting supply, feeder, and control circuit. Test continuity of each circuit. Tests and Inspections: 1. C. D. Electrical Specifications Page 62 Measure as directed during period of normal system loading. Perform load-balancing circuit changes outside normal occupancy/working schedule of the facility and at time directed. Avoid disrupting critical 24-hour services such as fax machines and on-line data processing, computing, transmitting, and receiving equipment. After circuit changes, recheck loads during normal load period. Record all load readings before and after changes and submit test records. Tolerance: Difference exceeding 20 percent between phase loads, within a panelboard, is not acceptable. Rebalance and recheck as necessary to meet this minimum requirement. PROTECTION Temporary Heating: Apply temporary heat to maintain temperature according to manufacturer's written instructions. END OF SECTION 262416 ENSO Systems Inc. #865 St Elizabeth C.S. – Full Day Kindergarten Addition Electrical Specifications Page 63 SECTION 262726 - WIRING DEVICES PART 1 - GENERAL 1.1 A. SUMMARY Section Includes: 1. 2. 3. 4. 5. 1.2 A. B. C. D. E. F. 1.3 A. DEFINITIONS EMI: Electromagnetic interference. GFCI: Ground-fault circuit interrupter. Pigtail: Short lead used to connect a device to a branch-circuit conductor. RFI: Radio-frequency interference. TVSS: Transient voltage surge suppressor. UTP: Unshielded twisted pair. ADMINISTRATIVE REQUIREMENTS Coordination: 1. 2. 1.4 A. B. Receptacles, receptacles with integral GFCI, and associated device plates. Isolated-ground receptacles. Tamper-resistant receptacles. Weather-resistant receptacles. Switches and wall-box dimmers. Receptacles for Owner-Furnished Equipment: Match plug configurations. Cord and Plug Sets: Match equipment requirements. ACTION SUBMITTALS Product Data: For each type of product when requested. Samples: One for each type of device and wall plate specified when requested. PART 2 - PRODUCTS 2.1 A. 2.2 A. B. GENERAL WIRING-DEVICE REQUIREMENTS Wiring Devices, Components, and Accessories: CSA listed and marked for intended location and application. STRAIGHT-BLADE RECEPTACLES Convenience Receptacles, 125 V, 15 or 20A: 15A or 20 duplex receptacles shall be as specified on drawings, grounding type rated for 125 Volt, CSA Type 5-15R or 5-20R (Hubbell Cat. #DR150W for #DR200W), white finish, unless otherwise specified on drawings. These shall have break-off line to allow for split wiring or 2 circuits. Isolated-Ground, Duplex Convenience Receptacles, 125 V, 15 or 20 A: 15A or 20 duplex receptacles shall be as specified on drawings, grounding type rated for 125 Volt, CSA Type 5-15R or 5-20R (Hubbell Cat. #IG2152 or #IG2162), white finish with orange triangle, unless otherwise specified on drawings.. 1. Description: Straight blade; equipment grounding contacts shall be connected only to the green grounding screw terminal of the device and with inherent electrical isolation from mounting strap. Isolation shall be integral to receptacle construction and not dependent on removable parts. ENSO Systems Inc. #865 St Elizabeth C.S. – Full Day Kindergarten Addition C. D. 2.3 A. Tamper-Resistant Convenience Receptacles, 125 V, 15 or 20 A: 15A or 20 duplex receptacles shall be as specified on drawings, grounding type rated for 125 Volt, CSA Type 5-15R or 5-20R (Hubbell Cat. #DR15WHIWRTR and #DR20WHIWRTR), white finish, unless otherwise specified on drawings. These shall have break-off line to allow for split wiring or 2 circuits . Hospital Grade: Same as above Hubbell IG2182WA series. GFCI RECEPTACLES General Description: 1. 2. 3. B. C. 2.4 A. B. TOGGLE SWITCHES Light switches single pole, 3-way and 4-way shall be voltage as specified on drawings, premium specification grade, toggle type, equal to Hubbell #DS120OW, 20A, white finish, unless otherwise specified on drawings. Use illuminated switches for mechanical and electrical service rooms Hubbell DS120ILW. Corridor switches to be key-operated unless noted otherwise on the drawings: Pilot-Light Switches, 20 A: E. 2.5 A. B. 2.6 A. Description: Single pole, with neon-lighted handle, illuminated when switch is "off." Key-Operated Switches, 120/347 V, 20 A: 1. D. Straight blade, non-feed through type. Comply with NEMA WD 1, NEMA WD 6, UL 498, UL 943 Class A, and FS W-C596. Include indicator light that shows when the GFCI has malfunctioned and no longer provides proper GFCI protection. Duplex GFCI Convenience Receptacles, 125 V, 15 or 20 A: Ground fault receptacles shall be as specified on drawings, grounding type rated for 15A or 20A, 125 Volt, CSA Type 5-15R & 5-20R (Hubbell #GF15OWL and #GF20OWL), white finish, unless otherwise specified on drawings. These shall have double wipe contacts and be suitable for #8 AWG wiring. Hospital Grade: Same as above, Hubbel GFR8200HOWL and GFR8300HOWL. 1. C. Electrical Specifications Page 64 Description: Single pole, with factory-supplied key in lieu of switch handle. Single-Pole, Double-Throw, Momentary-Contact, Center-off Switches: 120/347 V, 20 A; for use with mechanically held lighting contactors. Key-Operated, Single-Pole, Double-Throw, Momentary-Contact, Center-off Switches: 120/347 V, 20 A; for use with mechanically held lighting contactors, with factorysupplied key in lieu of switch handle. WALL-BOX DIMMERS Dimmer Switches: Modular, full-wave, solid-state units with integral, quiet on-off switches, with audible frequency and EMI/RFI suppression filters. Control: Refer to drawing for specifications. WALL PLATES Single and combination types shall match corresponding wiring devices. 1. Plate-Securing Screws: Metal with head color to match plate finish. ENSO Systems Inc. #865 St Elizabeth C.S. – Full Day Kindergarten Addition 2. 3. 4. B. 2.7 A. Material for Finished Spaces: stainless steel unless specified as nylon on the drawings. Material for Unfinished Spaces: Galvanized steel. Material for Damp Locations: Stainless steel with spring-loaded lift cover, and listed and labeled for use in wet and damp locations. Wet-Location, Weatherproof Cover Plates: NEMA 250, complying with Type 3R, weather-resistant, thermoplastic with lockable cover. FINISHES Device Color: 1. 2. 3. 4. B. Electrical Specifications Page 65 Wiring Devices Connected to Normal Power System: White unless otherwise indicated on drawings. Wiring Devices Connected to Emergency Power System: Red. TVSS Devices: Blue. Isolated-Ground Receptacles: Orange or as specified above with orange triangle on face. Wall Plate Color: For plastic covers, match device color. PART 3 - EXECUTION 3.1 A. B. INSTALLATION The drawings show approximate location of outlets, exact location shall be co-ordinated on the site with other trades, architectural drawings, etc. Outlets inaccurately located shall be re-adjusted or relocated at the Contractor's expense. Mount devices as follows: 1. 2. 3. 4. C. Coordination with Other Trades: 1. 2. 3. 4. D. Receptacles, telephone and alarm outlets 12" (305 mm) above finished floor, or above raised floor unless otherwise noted. Outlets over counter 42" (890 mm) above finished floor or as per architectural drawings (co-ordinate on job with millwork. Outlets in mechanical, electrical and telephone rooms 48" (1220 mm) above floor. Light switches 47" (1200 mm) above finished floor to top of device to barrier-free standards. Protect installed devices and their boxes. Do not place wall finish materials over device boxes and do not cut holes for boxes with routers that are guided by riding against outside of boxes. Keep outlet boxes free of plaster, drywall joint compound, mortar, cement, concrete, dust, paint, and other material that may contaminate the raceway system, conductors, and cables. Install device boxes in brick or block walls so that the cover plate does not cross a joint unless the joint is troweled flush with the face of the wall. Install wiring devices after all wall preparation, including painting, is complete. Conductors: 1. Do not strip insulation from conductors until right before they are spliced or terminated on devices. ENSO Systems Inc. #865 St Elizabeth C.S. – Full Day Kindergarten Addition 2. 3. 4. Strip insulation evenly around the conductor using tools designed for the purpose. Avoid scoring or nicking of solid wire or cutting strands from stranded wire. The length of free conductors at outlets for devices shall meet provisions of OESC without pigtails. Existing Conductors: a. b. c. E. 2. 3. 4. 5. 6. 7. 8. 9. 2. H. I. 3.2 A. Replace devices that have been in temporary use during construction and that were installed before building finishing operations were complete. Keep each wiring device in its package or otherwise protected until it is time to connect conductors. Do not remove surface protection, such as plastic film and smudge covers, until the last possible moment. Connect devices to branch circuits using pigtails that are not less than 150mm (6’’) in length. When there is a choice, use side wiring with binding-head screw terminals. Wrap solid conductor tightly clockwise, two-thirds to three-fourths of the way around terminal screw. Use a torque screwdriver when a torque is recommended or required by manufacturer. When conductors larger than No. 12 AWG are installed on 15- or 20-A circuits, splice No. 12 AWG pigtails for device connections. Tighten unused terminal screws on the device. When mounting into metal boxes, remove the fiber or plastic washers used to hold device-mounting screws in yokes, allowing metal-to-metal contact. Receptacle Orientation: 1. G. Cut back and pigtail, or replace all damaged conductors. Straighten conductors that remain and remove corrosion and foreign matter. Pig-tailing existing conductors is permitted, provided the outlet box is large enough. Device Installation: 1. F. Electrical Specifications Page 66 Install ground pin of vertically mounted receptacles up, and on horizontally mounted receptacles to the left. Install hospital-grade receptacles in patient-care areas with the ground pin or neutral blade at the top. Device Plates: Do not use oversized or extra-deep plates. Repair wall finishes and remount outlet boxes when standard device plates do not fit flush or do not cover rough wall opening. Arrangement of Devices: Unless otherwise indicated, mount flush, with long dimension vertical and with grounding terminal of receptacles on top. Group adjacent switches under single, multi-gang wall plates. Adjust locations of floor service outlets and service poles to suit arrangement of partitions and furnishings. GFCI RECEPTACLES Install non-feed-through-type GFCI receptacles where protection of downstream receptacles is not required. ENSO Systems Inc. #865 St Elizabeth C.S. – Full Day Kindergarten Addition 3.3 A. B. 3.4 A. IDENTIFICATION Comply with Section 260553 "Identification for Electrical Systems." Identify each receptacle with panelboard identification and circuit number. Use hot, stamped, or engraved machine printing with black filled lettering on face of plate, and durable wire markers or tags inside outlet boxes. FIELD QUALITY CONTROL Tests for Convenience Receptacles: 1. 2. 3. 4. 5. 6. B. Electrical Specifications Page 67 Line Voltage: Acceptable range is 105 to 132 V. Percent Voltage Drop under 15A Load: A value of 6 percent or higher is unacceptable. Ground Impedance: Values of up to 2 ohms are acceptable. GFCI Trip: Test for tripping values specified in UL 1436 and UL 943. Using the test plug, verify that the device and its outlet box are securely mounted. Tests shall be diagnostic, indicating damaged conductors, high resistance at the circuit breaker, poor connections, inadequate fault current path, defective devices, or similar problems. Correct circuit conditions, remove malfunctioning units and replace with new ones, and retest as specified above. Wiring device will be considered defective if it does not pass tests and inspections. END OF SECTION 262726 SECTION 262813 - FUSES PART 1 - GENERAL 1.1 A. 1.2 A. RELATED DOCUMENTS Drawings and general provisions of the Contract, including General and Supplementary Conditions and Division 01 Specification Sections, apply to this Section. SUMMARY Section Includes: 1. Cartridge fuses rated 600 V ac and less for use in the following: a. b. c. d. e. f. 2. 1.3 A. Control circuits. Motor-control centers. Panelboards. Switchboards. Enclosed controllers. Enclosed switches. Spare-fuse cabinets. ACTION SUBMITTALS Product Data: For each type of product. Include construction details, material descriptions, dimensions of individual components and profiles, and finishes for sparefuse cabinets. Include the following for each fuse type indicated: ENSO Systems Inc. #865 St Elizabeth C.S. – Full Day Kindergarten Addition 1. Ambient Temperature Adjustment Information: If ratings of fuses have been adjusted to accommodate ambient temperatures, provide list of fuses with adjusted ratings. a. b. 2. 3. 4. 5. 6. 1.4 A. A. For each fuse having adjusted ratings, include location of fuse, original fuse rating, local ambient temperature, and adjusted fuse rating. Provide manufacturer's technical data on which ambient temperature adjustment calculations are based. Dimensions and manufacturer's technical data on features, performance, electrical characteristics, and ratings. Current-limitation curves for fuses with current-limiting characteristics. Time-current coordination curves (average melt) and current-limitation curves (instantaneous peak let-through current) for each type and rating of fuse. Submit in PDF format. Coordination charts and tables and related data. Fuse sizes for elevator feeders and elevator disconnect switches. MAINTENANCE MATERIAL SUBMITTALS Furnish extra materials that match products installed and that are packaged with protective covering for storage and identified with labels describing contents. 1. 1.5 Electrical Specifications Page 68 Fuses: Equal to 10 percent of quantity installed for each size and type, but no fewer than three of each size and type. FIELD CONDITIONS Where ambient temperature to which fuses are directly exposed is less than 5OC (40OF or more than 38OC (100OF) apply manufacturer's ambient temperature adjustment factors to fuse ratings. PART 2 - PRODUCTS 2.1 A. 2.2 A. B. MANUFACTURERS Source Limitations: Obtain fuses, for use within a specific product or circuit, from single source from single manufacturer. CARTRIDGE FUSES Characteristics: NEMA FU 1, current-limiting, nonrenewable cartridge fuses with voltage ratings consistent with circuit voltages. Refer to single line drawings for type or use the following where no specification on the drawing is provided: 1. 2. 3. 4. 600A and lower: fuses shall be CSA approved HRC type, voltage as required, Form 1 Class "J" non-renewable for lighting and general loads without inrush. Above 600A: fuses shall be CSA approved HRC type, voltage as required, Form 1 Class "L" non-renewable for lighting and general loads without inrush. 600A and lower: fuses shall be CSA approved HRC type, voltage as required, Form 1 Class "J" non-renewable for time delay for motors, transformers and loads with inrush. Above 600A: fuses shall be CSA approved HRC type, voltage as required, Form 1 Class "L" non-renewable for time delay for motors, transformers and loads with inrush. ENSO Systems Inc. #865 St Elizabeth C.S. – Full Day Kindergarten Addition 5. 6. C. D. E. F. Electrical Specifications Page 69 Other types as rated and noted on the drawings. Fuses to be manufactured by English Electric Limited or Gould Schawmet. Electrical Components, Devices, and Accessories: CSA Listed, by a qualified testing agency, and marked for intended location and application. Comply with OESC and CAN/CSA 1422-02. Comply with NEMA FU 1 for cartridge fuses. Coordinate fuse ratings with utilization equipment nameplate limitations of maximum fuse size and with system short-circuit current levels. PART 3 - EXECUTION 3.1 A. B. C. D. E. 3.2 A. B. C. EXAMINATION Examine fuses before installation. Reject fuses that are moisture damaged or physically damaged. Examine holders to receive fuses for compliance with installation tolerances and other conditions affecting performance, such as rejection features. Examine utilization equipment nameplates and installation instructions. Install fuses of sizes and with characteristics appropriate for each piece of equipment. Evaluate ambient temperatures to determine if fuse rating adjustment factors must be applied to fuse ratings. Proceed with installation only after unsatisfactory conditions have been corrected. FUSE APPLICATIONS Provide switches with fuses where required and shown on the drawings. Confirm fuse size with equipment shop drawings Cartridge Fuses: 1. 2. 3. 4. 3.3 A. B. 3.4 A. Motor Branch Circuits: time delay. Other Branch Circuits: time delay or fast acting as noted on the drawings. Control Transformer Circuits: time delay, control transformer duty. Provide open-fuse indicator fuses or fuse covers with open fuse indication. INSTALLATION Install fuses in fusible devices. Arrange fuses so rating information is readable without removing fuse. Install spare-fuse cabinet(s) in location shown on the Drawings or as indicated in the field by Consultant or Owner. IDENTIFICATION Install labels complying with requirements for identification specified in Section 260553 "Identification for Electrical Systems" and indicating fuse replacement information inside of door of each fused switch and adjacent to each fuse block, socket, and holder. END OF SECTION 262813 ENSO Systems Inc. #865 St Elizabeth C.S. – Full Day Kindergarten Addition Electrical Specifications Page 70 SECTION 262816 - ENCLOSED SWITCHES AND CIRCUIT BREAKERS PART 1 - GENERAL 1.1 A. SUMMARY Section Includes: 1. 2. 3. 4. 5. 6. 7. 1.2 A. B. C. 1.3 A. DEFINITIONS NC: Normally closed. NO: Normally open. SPDT: Single pole, double throw. ACTION SUBMITTALS Product Data: For each type of enclosed switch, circuit breaker, accessory, and component indicated. Include dimensioned elevations, sections, weights, and manufacturers' technical data on features, performance, electrical characteristics, ratings, accessories, and finishes. 1. 2. 3. 4. 5. B. A. Operation and Maintenance Data: For enclosed switches and circuit breakers to include in emergency, operation, and maintenance manuals. In addition to items specified in Section 017823 "Operation and Maintenance Data," include the following: 2. A. Wiring Diagrams: For power, signal, and control wiring. CLOSEOUT SUBMITTALS 1. 1.5 Enclosure types and details for types other than NEMA 250, Type 1. Current and voltage ratings. Short-circuit current ratings (interrupting and withstand, as appropriate). Include evidence of NRTL listing for series rating of installed devices. Detail features, characteristics, ratings, and factory settings of individual overcurrent protective devices, accessories, and auxiliary components. Shop Drawings: For enclosed switches and circuit breakers. Include plans, elevations, sections, details, and attachments to other work. 1. 1.4 Fusible switches. Non-fusible switches. Receptacle switches. Shunt trip switches. Molded-case circuit breakers (MCCBs). Molded-case switches. Enclosures. Manufacturer's written instructions for testing and adjusting enclosed switches and circuit breakers. Time-current coordination curves (average melt) for each type and rating of overcurrent protective device; include selectable ranges for each type of overcurrent protective device. MAINTENANCE MATERIAL SUBMITTALS Furnish extra materials that match products installed and that are packaged with protective covering for storage and identified with labels describing contents. ENSO Systems Inc. #865 St Elizabeth C.S. – Full Day Kindergarten Addition 1. 2. 1.6 A. B. C. D. E. 1.7 A. Fuses: Equal to 10 percent of quantity installed for each size and type, but no fewer than three of each size and type. Fuse Pullers: Two for each size and type. QUALITY ASSURANCE Testing Agency Qualifications: Member company of a NRTL. Source Limitations: Obtain enclosed switches and circuit breakers, overcurrent protective devices, components, and accessories, within same product category, from single source from single manufacturer. Product Selection for Restricted Space: Drawings indicate maximum dimensions for enclosed switches and circuit breakers, including clearances between enclosures, and adjacent surfaces and other items. Comply with indicated maximum dimensions. Electrical Components, Devices, and Accessories: CSA Listed and marked for intended location and application. Comply with OESC. PROJECT CONDITIONS Environmental Limitations: 1. 2. Do not deliver or install panelboards until spaces are enclosed and weathertight, wet work in spaces is complete and dry, work above panelboards is complete, and temporary HVAC system is operating and maintaining ambient temperature and humidity conditions at occupancy levels during the remainder of the construction period. Rate equipment for continuous operation under the following conditions unless otherwise indicated: a. b. B. 2. A. Ambient Temperature: Not exceeding -5OC (23OF) to +40OC (104OF) Altitude: Not exceeding 2000m (6000’). Interruption of Existing Electric Service: Do not interrupt electric service to facilities occupied by Owner or others unless permitted under the following conditions and then only after arranging to provide temporary electric service according to requirements indicated: 1. 1.8 Electrical Specifications Page 71 Notify Project Manager and Owner no fewer than 72 hours in advance of proposed interruption of electric service. Do not proceed with interruption of electric service without Project Manager/Owner’s written permission. COORDINATION Coordinate layout and installation of switches, circuit breakers, and components with equipment served and adjacent surfaces. Maintain required workspace clearances and required clearances for equipment access doors and panels. PART 2 - PRODUCTS 2.1 A. FUSIBLE SWITCHES Type HD, Heavy Duty, 240 or 600V ac: CSA, horsepower rated, with bolt pads to accommodate specified fuses, with neutral bar where required, lockable handle in “OFF” position with capability to accept three padlocks, and interlocked with cover in closed position. ENSO Systems Inc. #865 St Elizabeth C.S. – Full Day Kindergarten Addition B. C. D. E. F. G. H. Fuse holders shall be required to suit rating and type of fuses specified without adaptors. Withstand rating 6 times continuous current break at rated voltage. Enclosure shall be CEMA 1 with drip shields except where weatherproof switches are required, these shall be CEMA 3. ON-OFF switch position indication on cover. All switches shall be of the same manufacturer. Mechanically interlocked door to prevent opening when handle in ON position. Sprinkler-proof. Accessories: 1. 2. 3. 4. 5. 6. 2.2 A. B. Type HD, Heavy Duty, 240 or 600V ac: CSA, horsepower rated with neutral bar where required, lockable handle in “OFF” position with capability to accept three padlocks, and interlocked with cover in closed position. Accessories: 2. 3. 4. A. B. C. D. Equipment Ground Kit: Internally mounted and labeled for copper and aluminum ground conductors. Neutral Kit: Internally mounted; insulated, capable of being grounded and bonded; labeled for copper and aluminum neutral conductors. Isolated Ground Kit: Internally mounted; insulated, capable of being grounded and bonded; labeled for copper and aluminum neutral conductors. Class R Fuse Kit: Provides rejection of other fuse types when Class R fuses are specified. Lugs: Mechanical type, suitable for number, size, and conductor material. Service-Rated Switches: Labeled for use as service equipment. NONFUSIBLE SWITCHES 1. 2.3 Electrical Specifications Page 72 Equipment Ground Kit: Internally mounted and labeled for copper and aluminum ground conductors. Neutral Kit: Internally mounted; insulated, capable of being grounded and bonded; labeled for copper and aluminum neutral conductors. Isolated Ground Kit: Internally mounted; insulated, capable of being grounded and bonded; labeled for copper and aluminum neutral conductors. Lugs: Mechanical type, suitable for number, size, and conductor material. MOLDED-CASE CIRCUIT BREAKERS General Requirements: Comply with CSA, UL 489, NEMA AB 1, and NEMA AB 3, with interrupting capacity to comply with available fault currents. Thermal-Magnetic Circuit Breakers: Inverse time-current element for low-level overloads and instantaneous magnetic trip element for short circuits. Adjustable magnetic trip setting for circuit-breaker frame sizes 250 A and larger. Adjustable, Instantaneous-Trip Circuit Breakers: Magnetic trip element with frontmounted, field-adjustable trip setting. Electronic Trip Circuit Breakers: Field-replaceable rating plug, rms sensing, with the following field-adjustable settings: 1. 2. 3. 4. Instantaneous trip. Long- and short-time pickup levels. Long- and short-time time adjustments. Ground-fault pickup level, time delay, and I2t response. ENSO Systems Inc. #865 St Elizabeth C.S. – Full Day Kindergarten Addition E. F. G. H. I. Current-Limiting Circuit Breakers: Frame sizes 400 A and smaller, and let-through ratings less than NEMA FU 1, RK-5. Integrally Fused Circuit Breakers: Thermal-magnetic trip element with integral limiterstyle fuse listed for use with circuit breaker and trip activation on fuse opening or on opening of fuse compartment door. Ground-Fault, Circuit-Interrupter (GFCI) Circuit Breakers: Single- and two-pole configurations with Class A ground-fault protection (6-mA trip). Ground-Fault, Equipment-Protection (GFEP) Circuit Breakers: With Class B groundfault protection (30-mA trip). Features and Accessories: 1. 2. 3. 4. 5. 6. 7. 8. 9. 10. 11. 12. 2.4 A. Electrical Specifications Page 73 Standard frame sizes, trip ratings, and number of poles. Lugs: Mechanical type, suitable for number, size, trip ratings, and conductor material. Application Listing: Appropriate for application; Type SWD for switching fluorescent lighting loads; Type HID for feeding fluorescent and high-intensity discharge lighting circuits. Ground-Fault Protection: Comply with UL 1053; integrally mounted, self-powered type with mechanical ground-fault indicator; relay with adjustable pickup and time-delay settings, push-to-test feature, internal memory, and shunt trip unit; and three-phase, zero-sequence current transformer/sensor. Communication Capability: Circuit-breaker-mounted communication module with functions and features compatible with power monitoring and control system, specified in Section 260913 "Electrical Power Monitoring and Control." Shunt Trip: Trip coil energized from separate circuit, with coil-clearing contact. Undervoltage Trip: Set to operate at 35 to 75 percent of rated voltage without intentional time delay. Auxiliary Contacts: Two SPDT switches with "a" and "b" contacts; "a" contacts mimic circuit-breaker contacts, "b" contacts operate in reverse of circuit-breaker contacts. Alarm Switch: One NO and NC contact that operates only when circuit breaker has tripped. Key Interlock Kit: Externally mounted to prohibit circuit-breaker operation; key shall be removable only when circuit breaker is in off position. Zone-Selective Interlocking: Integral with electronic ground-fault trip unit; for interlocking ground-fault protection function. Electrical Operator: Provide remote control for on, off, and reset operations. ENCLOSURES Enclosed Switches and Circuit Breakers: CSA, NEMA AB 1, NEMA KS 1, NEMA 250, and UL 50, to comply with environmental conditions at installed location. 1. 2. 3. 4. 5. 6. Indoor, Dry and Clean Locations: NEMA 250, [Type 1] <Insert type>. Outdoor Locations: NEMA 250, Type 3R. Kitchen or Wash-Down Areas: NEMA 250, Type 4X stainless steel. Other Wet or Damp, Indoor Locations: NEMA 250, Type 4. Indoor Locations Subject to Dust, Falling Dirt, and Dripping Noncorrosive Liquids: NEMA 250, Type 12. Hazardous Areas Indicated on Drawings: NEMA 250, Type 9. ENSO Systems Inc. #865 St Elizabeth C.S. – Full Day Kindergarten Addition Electrical Specifications Page 74 PART 3 - EXECUTION 3.1 A. B. C. D. E. 3.2 A. INSTALLATION Install individual wall-mounted switches and circuit breakers with tops at uniform height unless otherwise indicated. Comply with mounting and anchoring requirements specified in Section 260548.16 "Seismic Controls for Electrical Systems." Temporary Lifting Provisions: Remove temporary lifting eyes, channels, and brackets and temporary blocking of moving parts from enclosures and components. Install fuses in fusible devices. Comply with CSA and NECA 1. IDENTIFICATION Comply with requirements in Section 260553 "Identification for Electrical Systems." 1. 2. 3.3 A. FIELD QUALITY CONTROL Acceptance Testing Preparation: 1. 2. B. 2. 3. D. 3.4 A. B. Test insulation resistance for each panelboard bus, component, connecting supply, feeder, and control circuit. Test continuity of each circuit. Tests and Inspections: 1. C. Identify field-installed conductors, interconnecting wiring, and components; provide warning signs. Label each enclosure with engraved metal or laminated-plastic nameplate. Perform each visual and mechanical inspection and electrical test stated in NETA Acceptance Testing Specification. Certify compliance with test parameters. Correct malfunctioning units on-site, where possible, and retest to demonstrate compliance; otherwise, replace with new units and retest. Test and adjust controls, remote monitoring, and safeties. Replace damaged and malfunctioning controls and equipment. Enclosed switches and circuit breakers will be considered defective if they do not pass tests and inspections. Prepare test and inspection reports, including a certified report that identifies enclosed switches and circuit breakers and that describes scanning results. Include notation of deficiencies detected, remedial action taken, and observations after remedial action. ADJUSTING Adjust moving parts and operable components to function smoothly, and lubricate as recommended by manufacturer. Set field-adjustable circuit-breaker trip ranges. END OF SECTION 262816 ENSO Systems Inc. #865 St Elizabeth C.S. – Full Day Kindergarten Addition Electrical Specifications Page 75 SECTION 262913 - ENCLOSED CONTROLLERS PART 1 - GENERAL 1.1 A. SUMMARY Section includes the following enclosed controllers rated 600 V and less: 1. 2. 3. 4. B. Related Section: 1. 1.2 A. B. C. D. E. F. G. 1.3 A. B. Full-voltage manual. Full-voltage magnetic. Reduced-voltage magnetic. Multi-speed. Section 262923 "Variable-Frequency Motor Controllers" for general-purpose, ac, adjustable-frequency, pulse-width-modulated controllers for use on variable torque loads in ranges up to 200 hp. DEFINITIONS CPT: Control power transformer. MCCB: Molded-case circuit breaker. MCP: Motor circuit protector. N.C.: Normally closed. N.O.: Normally open. OCPD: Overcurrent protective device. SCR: Silicon-controlled rectifier. ACTION SUBMITTALS Product Data: For each type of enclosed controller. Include manufacturer's technical data on features, performance, electrical characteristics, ratings, and enclosure types and finishes. Shop Drawings: For each enclosed controller. Include dimensioned plans, elevations, sections, details, and required clearances and service spaces around controller enclosures. 1. Show tabulations of the following: a. b. c. d. e. 2. 1.4 A. Each installed unit's type and details. Factory-installed devices. Short-circuit current rating of integrated unit. Listed and labeled for integrated short-circuit current (withstand) rating of OCPDs in combination controllers by a NRTL acceptable to authorities having jurisdiction. Features, characteristics, ratings, and factory settings of individual OCPDs in combination controllers. Wiring Diagrams: For power, signal, and control wiring. INFORMATIONAL SUBMITTALS Load-Current and Overload-Relay Heater List: Compile after motors have been installed, and arrange to demonstrate that selection of heaters suits actual motor nameplate full-load currents. ENSO Systems Inc. #865 St Elizabeth C.S. – Full Day Kindergarten Addition B. 1.5 A. Load-Current and List of Settings of Adjustable Overload Relays: Compile after motors have been installed, and arrange to demonstrate that switch settings for motor running overload protection suit actual motors to be protected. CLOSEOUT SUBMITTALS Operation and Maintenance Data: For enclosed controllers to include in emergency, operation, and maintenance manuals. In addition to items specified in Section 017823 "Operation and Maintenance Data," include the following: 1. 2. 3. 4. 1.6 A. Furnish extra materials that match products installed and that are packaged with protective covering for storage and identified with labels describing contents. 2. 3. 4. 5. A. Environmental Limitations: Rate equipment for continuous operation under the following conditions unless otherwise indicated: 2. A. Ambient Temperature: Not less than -30OC (-22OF) to +40OC (104OF). Altitude: Not exceeding 2000m (6000’). Interruption of Existing Electric Service: Do not interrupt electric service to facilities occupied by Owner or others unless permitted under the following conditions and then only after arranging to provide temporary electric service according to requirements indicated: 1. 1.8 Fuses: Equal to 10 percent of quantity installed for each size and type, but no fewer than three of each size and type. Control Power Fuses: Equal to 10 percent of quantity installed for each size and type, but no fewer than three of each size and type. Indicating Lights: Two of each type and color installed. Auxiliary Contacts: Furnish one spare(s) for each size and type of magnetic controller installed. Power Contacts: Furnish three spares for each size and type of magnetic contactor installed. PROJECT CONDITIONS 1. 2. B. Routine maintenance requirements for enclosed controllers and installed components. Manufacturer's written instructions for testing and adjusting circuit breaker and MCP trip settings. Manufacturer's written instructions for setting field-adjustable overload relays. Manufacturer's written instructions for testing, adjusting, and reprogramming reduced-voltage solid-state controllers. MATERIALS MAINTENANCE SUBMITTALS 1. 1.7 Electrical Specifications Page 76 Notify Project Manager and Owner no fewer than 72 hours in advance of proposed interruption of electric service. Do not proceed with interruption of electric service without Project Manager/Owner’s written permission. COORDINATION Coordinate layout and installation of switches, circuit breakers, and components with equipment served and adjacent surfaces. Maintain required workspace clearances and required clearances for equipment access doors and panels. ENSO Systems Inc. #865 St Elizabeth C.S. – Full Day Kindergarten Addition B. C. Electrical Specifications Page 77 Coordinate sizes and locations of concrete bases with actual equipment provided. Cast anchor-bolt inserts into bases. Concrete, reinforcement, and formwork requirements are specified with concrete. Coordinate installation of roof curbs, equipment supports, and roof penetrations. PART 2 - PRODUCTS 2.1 A. B. C. D. E. F. G. H. I. J. 2.2 A. GENERAL Starters: CSA C22.2 No. 14, EEMAC E14-2, in CSA type enclosure and with components, as specified herein or as indicated on Drawings. All equipment to be sprinklerproof. Surface mount unless noted otherwise. “Start-Stop” pushbuttons. Green Pilot light for “ON”. Single or three phase to suit motor. Trip indicating handle. Manual reset from outside of the enclosure. Configuration: Non-reversing, Reversing or Two speed to match motor. Nameplates: to indicate configuration. FULL-VOLTAGE CONTROLLERS Fractional Horsepower Manual Controllers: push-button action; marked to show whether unit is off, on, or tripped. 1. Manufacturer’s model numbers: C.G.E. CR1061 series Square D Class 2510 2. 3. B. Overload heater. Overload Relays: Inverse-time-current characteristics; tripping characteristics; heaters matched to nameplate full-load current of actual protected motor; external reset push button. Magnetic Controllers: Full voltage, across the line, electrically held. 1. Manufacturer’s model numbers: C.G.E. CR-206 series Square D Class 8536 2. 3. Hand/Off/Auto selector switch and reset button. Solenoid operated contactor: Pressure-encapsulated type with coil transient suppressors. a. 4. 5. Operating Voltage: Depending on contactor NEMA size and line-voltage rating, manufacturer's standard matching control power or line voltage. Power Contacts: Totally enclosed, double-break, silver-cadmium oxide; assembled to allow inspection and replacement without disturbing line or load wiring. Control Circuits: 24 or 120V ac (as selected by the Controls Contractor); obtained from integral CPT, with primary and secondary fuses] of sufficient capacity to operate integral devices and remotely located pilot, indicating, and control devices. ENSO Systems Inc. #865 St Elizabeth C.S. – Full Day Kindergarten Addition a. 6. CPT Spare Capacity: 100 VA. Melting Alloy Overload Relays: a. b. c. 7. Inverse-time-current characteristic. Class 20 (Class 10 for submersible pumps) (Class 30 for high inertia loads) tripping characteristic. Heaters in each phase matched to nameplate full-load current of actual protected motor and with appropriate adjustment for duty cycle. Ambient Compensated Bimetallic Overload Relays: a. b. c. d. e. 8. Inverse-time-current characteristic. Class 20/Class 30 tripping characteristic. Heaters in each phase matched to nameplate full-load current of actual protected motor and with appropriate adjustment for duty cycle. Ambient compensated. Automatic resetting. Solid-State Overload Relay: a. b. c. d. e. 9. 10. C. Electrical Specifications Page 78 Switch or dial selectable for motor running overload protection. Sensors in each phase. Class 10/20 selectable tripping characteristic selected to protect motor against voltage and current unbalance and single phasing. Class II ground-fault protection, with start and run delays to prevent nuisance trip on starting. Analog communication module. Minimum one N.C. and N.O., isolated overload alarm contact. External overload reset push button. Combination Magnetic Controller: Factory-assembled combination of magnetic controller, OCPD, and disconnecting means. 1. Manufacturer’s model numbers: C.G.E. CR-207 series Square D Class 8539 2. 3. 4. Hand/Off/Auto selector switch and reset button. For motors with thermistors, provide pre-wired control relay complete with pilot light indicating sensing device is operating and a separately identified reset button Solenoid operated contactor: Pressure-encapsulated type with coil transient suppressors. a. 5. 6. 7. Operating Voltage: Depending on contactor NEMA size and line-voltage rating, manufacturer's standard matching control power or line voltage. Fusible Disconnecting Means to Specification 262816 Enclosed Switches and Circuit Breakers. Auxiliary Contacts: Two N.O./N.C. arranged to activate before switch blades open. Non-fusible Disconnecting Means to Specification 262816 Enclosed Switches and Circuit Breakers. ENSO Systems Inc. #865 St Elizabeth C.S. – Full Day Kindergarten Addition 2.3 A. ENCLOSURES Enclosed Controllers: CSA, to comply with environmental conditions at installed location. 1. 2. 3. 4. 5. 6. 2.4 A. Dry and Clean Indoor Locations: Type 1. Outdoor Locations: Type 4X. Kitchen and Wash-Down Areas: Type 4X, stainless steel. Other Wet or Damp Indoor Locations: Type 4. Indoor Locations Subject to Dust, Falling Dirt, and Dripping Noncorrosive Liquids: Type 12. Hazardous Areas Indicated on Drawings: Type 7 or Type 9. ACCESSORIES General Requirements for Control Circuit and Pilot Devices: NEMA ICS 5; factory installed in controller enclosure cover unless otherwise indicated. 1. Push Buttons, Pilot Lights, and Selector Switches: Heavy-duty, oil-tight type. a. b. 2. 3. B. C. D. E. F. G. H. I. J. Electrical Specifications Page 79 Pilot Lights: LED types; colors as indicated; push to test. Selector Switches: Rotary. Elapsed Time Meters: Heavy duty with digital readout in hours resettable. Meters: Panel type, 65mm (2.5’’) minimum size with 90 or 120 degree scale and plus or minus two percent accuracy. Where indicated, provide selector switches with an off position. N.C., N.O. and/or Reversible N.C./N.O. auxiliary contact(s). Control Relays: Auxiliary and adjustable solid-state time-delay relays. Phase-Failure, Phase-Reversal, and Undervoltage and Overvoltage Relays: Solid-state sensing circuit with isolated output contacts for hard-wired connections. Provide adjustable undervoltage, overvoltage, and time-delay settings. Breather and drain assemblies, to maintain interior pressure and release condensation in Type 4 or Type 4X enclosures installed outdoors or in unconditioned interior spaces subject to humidity and temperature swings. Space heaters, with N.C. auxiliary contacts, to mitigate condensation in Type 3R (Type 4X or Type 12 where noted on the drawing) enclosures installed outdoors or in unconditioned interior spaces subject to humidity and temperature swings. Sun shields installed on fronts, sides, and tops of enclosures installed outdoors and subject to direct and extended sun exposure. Cover gaskets for Type 1 enclosures. Terminals for connecting power factor correction capacitors to the line or load side of overload relays as directed. Spare control wiring terminal blocks, quantity as indicated. PART 3 - EXECUTION 3.1 A. B. C. EXAMINATION Examine areas and surfaces to receive enclosed controllers, with Installer present, for compliance with requirements and other conditions affecting performance of the Work. Examine enclosed controllers before installation. Reject enclosed controllers that are wet, moisture damaged, or mold damaged. Proceed with installation only after unsatisfactory conditions have been corrected. ENSO Systems Inc. #865 St Elizabeth C.S. – Full Day Kindergarten Addition 3.2 A. B. C. D. E. F. G. H. I. J. K. L. 3.3 A. INSTALLATION Where starter and disconnect are grouped, utilize combination type starter. Ensure correct fuses and overload devices elements installed. Co-ordinate with Division 15 to ensure proper size starters. Co-ordinate with Division 15 and Owner designated control contractor for control wiring. Wall-Mounted Controllers: Install enclosed controllers on walls with tops at uniform height unless otherwise indicated, and by bolting units to wall or mounting on lightweight structural-steel channels bolted to wall. For controllers not at walls, provide freestanding racks complying with Section 260529 "Hangers and Supports for Electrical Systems." Temporary Lifting Provisions: Remove temporary lifting eyes, channels, and brackets and temporary blocking of moving parts from enclosures and components. Install fuses in each fusible-switch enclosed controller. Install fuses in control circuits if not factory installed. Comply with requirements in Section 262813 "Fuses." Install heaters in thermal overload relays. Select heaters based on actual nameplate full-load amperes after motors have been installed. Install, connect, and fuse thermal-protector monitoring relays furnished with motordriven equipment. Install power factor correction capacitors. Connect to the line or load side of overload relays. If connected to the load side of overload relays, adjust overload heater sizes to accommodate the reduced motor full-load currents. Comply with NECA 1. IDENTIFICATION Identify enclosed controllers, components, and control wiring. Comply with requirements for identification specified in Section 260553 "Identification for Electrical Systems." 1. 2. 3. 3.4 A. B. C. Identify field-installed conductors, interconnecting wiring, and components; provide warning signs. Label each enclosure with engraved nameplate. Label each enclosure-mounted control and pilot device. CONTROL WIRING INSTALLATION Install wiring between enclosed controllers and remote devices. Comply with requirements in Section 260523 "Control-Voltage Electrical Power Cables." Bundle, train, and support wiring in enclosures. Connect selector switches and other automatic-control selection devices where applicable. 1. 2. 3.5 Electrical Specifications Page 80 Connect selector switches to bypass only those manual- and automatic-control devices that have no safety functions when switch is in manual-control position. Connect selector switches with enclosed-controller circuit in both manual and automatic positions for safety-type control devices such as low- and highpressure cutouts, high-temperature cutouts, and motor overload protectors. FIELD QUALITY CONTROL 1. Inspect and test starter operation as per starter manufacturer's instructions. ENSO Systems Inc. #865 St Elizabeth C.S. – Full Day Kindergarten Addition 2. 3. 4. 5. 6. 7. 8. 9. 10. B. C. 3.6 A. B. C. D. 3.7 A. B. Inspect controllers, wiring, components, connections, and equipment installation. Test and adjust controllers, components, and equipment. Test insulation resistance for each enclosed-controller element, component, connecting motor supply, feeder, and control circuits. Test continuity of each circuit. Verify that voltages at controller locations are within plus or minus 10 percent of motor nameplate rated voltages. If outside this range for any motor, notify Consultant before starting the motor(s). Check that sequence controls, interlocking with other separate related starters, equipment, control devices, operate as indicated. Test each motor for proper phase rotation. Perform each electrical test and visual and mechanical inspection stated in NETA Acceptance Testing Specification. Certify compliance with test parameters. Correct malfunctioning units on-site, where possible, and retest to demonstrate compliance; otherwise, replace with new units and retest. Test and adjust controls, remote monitoring, and safeties. Replace damaged and malfunctioning controls and equipment. Enclosed controllers will be considered defective if they do not pass tests and inspections. Prepare test and inspection reports including a certified report that identifies enclosed controllers and that describes scanning results. Include notation of deficiencies detected, remedial action taken, and observations after remedial action. ADJUSTING Set field-adjustable switches, auxiliary relays, time-delay relays, timers, and overloadrelay pickup and trip ranges. Adjust overload-relay heaters or settings if power factor correction capacitors are connected to the load side of the overload relays. Set field-adjustable switches and program microprocessors for required start and stop sequences in reduced-voltage solid-state controllers. Set field-adjustable circuit-breaker trip ranges. PROTECTION Temporary Heating: Apply temporary heat to maintain temperature according to manufacturer's written instructions until enclosed controllers are ready to be energized and placed into service. Replace controllers whose interiors have been exposed to water or other liquids prior to Substantial Completion. END OF SECTION 262913 SECTION 265100 - INTERIOR LIGHTING PART 1 - GENERAL 1.1 A. Electrical Specifications Page 81 SUMMARY Section Includes: 1. 2. Interior lighting fixtures, lamps, and ballasts. Emergency lighting units. ENSO Systems Inc. #865 St Elizabeth C.S. – Full Day Kindergarten Addition 3. 4. B. A. B. C. D. E. F. G. 1.3 A. BF: Ballast factor. CCT: Correlated color temperature. CRI: Color-rendering index. HID: High-intensity discharge. LER: Luminaire efficacy rating. Lumen: Measured output of lamp and luminaire, or both. Luminaire: Complete lighting fixture, including ballast housing if provided. ACTION SUBMITTALS Product Data: For each type of lighting fixture, arranged in order of fixture designation. Include data on features, accessories, finishes, and the following: 1.4 A. Physical description of lighting fixture including dimensions. Emergency lighting units including battery and charger. Ballast, including BF. Energy-efficiency data. Life, output (lumens, CCT, and CRI), and energy-efficiency data for lamps. Samples: For each lighting fixture indicated in the Interior Lighting Fixture Schedule when requested. Each Sample shall include the following: 1. 2. 3. C. D. Section 260923 "Lighting Control Devices" for automatic control of lighting, including time switches, photoelectric relays, occupancy sensors, and multi-pole lighting relays and contactors. DEFINITIONS 1. 2. 3. 4. 5. B. Exit signs. Lighting fixture supports. Related Sections: 1. 1.2 Electrical Specifications Page 82 Lamps and ballasts, installed. Cords and plugs. Pendant support system. Installation instructions. Verify catalogue reference numbers with the description and co-ordinate with the installation conditions, with particular regard to ceiling construction details, type and finish, before ordering luminaires. INFORMATIONAL SUBMITTALS Coordination Drawings: Reflected ceiling plan(s) and other details, drawn to scale, on which the following items are shown and coordinated with each other, using input from installers of the items involved: 1. 2. 3. 4. 5. 6. Lighting fixtures. Suspended ceiling components. Partitions and millwork that penetrate the ceiling or extends to within 30mm (12’’) of the plane of the luminaires. Ceiling-mounted projectors. Structural members to which suspension systems for lighting fixtures will be attached. Other items in finished ceiling including the following: ENSO Systems Inc. #865 St Elizabeth C.S. – Full Day Kindergarten Addition a. b. c. d. e. f. B. C. 1.5 A. A. CLOSEOUT SUBMITTALS Operation and Maintenance Data: For lighting equipment and fixtures to include in emergency, operation, and maintenance manuals. A. Furnish extra materials that match products installed and that are packaged with protective covering for storage and identified with labels describing contents. Mockups: Provide interior lighting fixtures for room or module mockups, complete with power and control connections when requested. 3. A. 1.9 A. Lamps: 10 percent of each type and rating installed. Furnish at least one of each type. QUALITY ASSURANCE 1. 2. 1.8 Provide a list of all lamp types used on Project; use ANSI and manufacturers' codes. MAINTENANCE MATERIAL SUBMITTALS 1. 1.7 Air outlets and inlets. Speakers. Sprinklers. Smoke and fire detectors. Occupancy sensors. Access panels. Qualification Data: For qualified agencies providing photometric data for lighting fixtures. Product Certificates: For each type of ballast for bi-level and dimmer-controlled fixtures, from manufacturer. 1. 1.6 Electrical Specifications Page 83 Obtain Architect's approval of fixtures for mockups before starting installations. Maintain mockups during construction in an undisturbed condition as a standard for judging the completed Work. Approved fixtures in mockups may become part of the completed Work if undisturbed at time of Substantial Completion. COORDINATION Coordinate layout and installation of lighting fixtures and suspension system with other construction that penetrates ceilings or is supported by them, including HVAC equipment, fire-suppression system, and partition assemblies. WARRANTY Special Warranty for Emergency Lighting Batteries: Manufacturer's standard form in which manufacturer of battery-powered emergency lighting unit agrees to repair or replace components of rechargeable batteries that fail in materials or workmanship within specified warranty period. 1. 2. Warranty Period for Emergency Lighting Unit Batteries: 10 years from date of Substantial Completion. Full warranty shall apply for first year, and prorated warranty for the remaining nine years. Warranty Period for Fluorescent Lamps and Ballasts: 5 years as per manufacturer’s warranty for certain combined lamps and ballasts. ENSO Systems Inc. #865 St Elizabeth C.S. – Full Day Kindergarten Addition Electrical Specifications Page 84 PART 2 - PRODUCTS 2.1 A. B. 2.2 A. B. C. D. MANUFACTURERS Contractor shall include in his Tender the fixture(s) that are specified. If an alternate manufacturer is named, it is mandatory that the fixture be equivalent in all respects, i.e. same lens, equivalent frame, performance, paint finish, ballast, construction quality, etc. Alternate manufacturers or alternate fixtures types must be offered as an alternate only to the base bid, with a Separate Price stated in the Tender. Low bidder will be determined on the basis of the specified items not on "alternate savings". Fixture manufacturer shall be responsible for obtaining CSA approval prior to installation of fixtures and shall bare all associated costs. GENERAL REQUIREMENTS FOR LIGHTING FIXTURES AND COMPONENTS Metal Parts: Free of burrs and sharp corners and edges. Sheet Metal Components: Steel unless otherwise indicated. Form and support to prevent warping and sagging. Doors, Frames, and Other Internal Access: Smooth operating, free of light leakage under operating conditions, and designed to permit re-lamping without use of tools. Designed to prevent doors, frames, lenses, diffusers, and other components from falling accidentally during re-lamping and when secured in operating position. Diffusers and Globes: 1. Acrylic Lighting Diffusers: 100 percent virgin acrylic plastic. High resistance to yellowing and other changes due to aging, exposure to heat, and UV radiation. a. b. 2. E. Glass: Annealed crystal glass unless otherwise indicated. Factory-Applied Labels: Comply with CSA and OESC. Include recommended lamps and ballasts. Labels shall be located where they will be readily visible to service personnel, but not seen from normal viewing angles when lamps are in place. 1. Label shall include the following lamp and ballast characteristics: a. b. c. d. e. f. F. G. Lens Thickness: At least 0.125 inch (3.175 mm) minimum unless otherwise indicated. UV stabilized. "USE ONLY" and include specific lamp type. Lamp diameter code (T-4, T-5, T-8, etc.), tube configuration (twin, quad, triple, etc.), base type, and nominal wattage for fluorescent and compact fluorescent luminaires. Lamp type, wattage, bulb type (ED17, BD56, etc.) and coating (clear or coated) for HID luminaires. Start type (preheat, rapid start, instant start, etc.) for fluorescent and compact fluorescent luminaires. ANSI ballast type (M98, M57, etc.) for HID luminaires. CCT and CRI for all luminaires. Verify catalogue reference numbers with the description and co-ordinate with the installation conditions, with particular regard to ceiling construction details, type and finish, before ordering luminaires. Provide fixtures and lamps as indicated on the fixture schedule and/or as specified under this section. These must and shall be complete with all necessary plaster ENSO Systems Inc. #865 St Elizabeth C.S. – Full Day Kindergarten Addition Electrical Specifications Page 85 frames, hangers, lamps, louvres, diffusers, canopies, supports, etc. Provide lens supports on all four sides. 2.3 A. BALLASTS FOR LINEAR FLUORESCENT LAMPS General Requirements for Electronic Ballasts: 1. 2. 3. 4. 5. 6. 7. 8. 9. 10. 11. 12. 13. B. C. Luminaires controlled by occupancy sensors shall have programmed-start ballasts. Electronic Programmed-Start Ballasts for T5, T5HO & T8 Lamps: Comply with ANSI C82.11 and the following: 1. 2. 3. D. E. Lamp end-of-life detection and shutdown circuit for T5 diameter lamps. Automatic lamp starting after lamp replacement. Sylvania Quicktronic High Efficiency 28W T8, universal voltage, PROStart Parallel Operation model QHE 2x32T8/UNV PSN, 0.88 Ballast Factor, Power Factor >0.98. Single Ballasts for Multiple Lighting Fixtures: Factory wired with ballast arrangements and bundled extension wiring to suit final installation conditions without modification or rewiring in the field. Ballasts for Low-Temperature Environments: 1. F. Comply with CSA, UL 935 and with ANSI C82.11. Designed for type and quantity of lamps served. Ballasts shall be designed for full light output unless another BF, dimmer, or bilevel control is indicated. Sound Rating: Class A. Internal thermal protection. Non-PCB type. Total Harmonic Distortion Rating: Less than 10 percent. Transient Voltage Protection: IEEE C62.41.1 and IEEE C62.41.2, Category A or better. Operating Frequency: 42 kHz or higher. Lamp Current Crest Factor: 1.7 or less. BF: 0.88 or higher. Power Factor: 0.98 or higher. Parallel Lamp Circuits: Multiple lamp ballasts shall comply with ANSI C82.11 and shall be connected to maintain full light output on surviving lamps if one or more lamps fail. Temperatures -20OF (-29OC) and Higher: Electromagnetic type designed for use with indicated lamp types. Ballasts for Dimmer-Controlled Lighting Fixtures (connected to PC2): Electronic type. 1. 2. 3. 4. 5. Dimming Range: 100 to 5 percent of rated lamp lumens. Ballast Input Watts: Can be reduced to 20 percent of normal. Compatibility: Certified by manufacturer for use with specific dimming control system and lamp type indicated. Control: Coordinate wiring from ballast to control device to ensure that the ballast, controller, and connecting wiring are compatible. Quicktronic High Efficiency Prosense model QTP 2x32T8/UNV DIM-TC, 120277volts. ENSO Systems Inc. #865 St Elizabeth C.S. – Full Day Kindergarten Addition 2.4 A. BALLASTS FOR COMPACT FLUORESCENT LAMPS Description: Electronic-programmed rapid-start type, complying with CSA, UL 935 and with ANSI C 82.11, designed for type and quantity of lamps indicated. Ballast shall be designed for full light output unless dimmer or bi-level control is indicated: 1. 2. 3. 4. 5. 6. 7. 8. 9. 10. 2.5 A. Electronic Ballast for Metal-Halide Lamps: Include the following features unless otherwise indicated: 9. 10. 11. 12. A. B. Lamp end-of-life detection and shutdown circuit. Automatic lamp starting after lamp replacement. Sound Rating: Class A. Total Harmonic Distortion Rating: Less than 20 percent. Transient Voltage Protection: IEEE C62.41.1 and IEEE C62.41.2, Category A or better. Operating Frequency: 20 kHz or higher. Lamp Current Crest Factor: 1.7 or less. BF: 0.95 or higher unless otherwise indicated. Power Factor: 0.98 or higher. Interference: Comply with 47 CFR 18, Ch. 1, Subpart C, for limitations on electromagnetic and radio-frequency interference for non-consumer equipment. BALLASTS FOR HID LAMPS 1. 2. 3. 4. 5. 6. 7. 8. 2.6 Electrical Specifications Page 86 Integral with luminaire unless otherwise noted. Pulse Start type. Minimum Starting Temperature: -30OC (-20OF) for single-lamp ballasts. Rated Ambient Operating Temperature: 54OC (130OF). Lamp end-of-life detection and shutdown circuit. Sound Rating: Class A. Total Harmonic Distortion Rating: Less than 20 percent. Transient Voltage Protection: IEEE C62.41.1 and IEEE C62.41.2, Category A or better. Lamp Current Crest Factor: 1.5 or less. Power Factor: 0.90 or higher. Interference: Comply with 47 CFR 18, Ch. 1, Subpart C, for limitations on electromagnetic and radio-frequency interference for non-consumer equipment. Protection: Class P thermal cutout. EXIT SIGNS General Requirements for Exit Signs: Comply with OBC and CSA for sign colors, visibility, luminance, and lettering size, comply with authorities having jurisdiction. Internally Lighted Signs: 1. 2. 3. 4. 5. 6. Power source: 120VAC, 240VAC or 347VAC, and 12 or 24 VDC (from battery pack) as noted in luminaire schedule Power supply assembly to be low loss, low noise high power factor transformer type encapsulated ballast for 347V units. Lamps for AC or DC Operation: LEDs, 100,000 hours minimum rated lamp life. Power consumption: 1 watt per face. Housing: extruded aluminum minimum 1.3 mm thick with satin white enamel finish unless otherwise noted in luminaire schedule. Face and back plates: extruded aluminum 2mm (.78’’). ENSO Systems Inc. #865 St Elizabeth C.S. – Full Day Kindergarten Addition 7. 8. 9. 10. 2.7 A. Electrical Specifications Page 87 Running man: height as per Code requirements on one common face plate. Face plate to remain captive for re-lamping. Wall, end to wall and ceiling mounting as indicated. Single and double face with arrows indicating exit directions as indicated. EMERGENCY LIGHTING UNITS General Requirements for Emerge ncy Lighting Units: Self-contained u nits complying with CAN/CSA C22.1. 1. 2. 3. 4. 5. 6. 7. 8. 9. 10. 11. 12. 13. 14. 15. 16. 17. Supply voltage: 120V AC, 240V AC or 347V AC as noted in luminaire schedule. Operating life: 30 or 120 minutes as noted in luminaire schedule. Output voltage: 12 or 24V DC as noted in luminaire schedule. Charger: Fully automatic, solid- state type with sealed transfer relay, multi-rate, voltage/current regulated, inverse temperature compensated, shor t circuit protected, modular construction. Operation: Relay automatically turns lamp on when power-supply circuit voltage drops to 80 percent of nominal voltage or below. Lamp automatically disconnects from battery when voltage approaches deep -discharge level. When normal voltage is restored, relay disconn ects lamps from batt ery, and b attery is automatically recharged and floated on charger. Low voltage disconnect: solid state, modular, o perates at 80% battery output voltage. Test Push Button: Push-to-test type, in unit h ousing, simulates loss of normal power and demonstrates unit operability. LED Indicator Light: Indicates nor mal power on. Normal glow indicates trickle charge; bright glow indicates charg ing at end of discharge cycle, solid state, life expectancy 100,000 hours minimum, for ‘AC Power ON’ and ‘High Charge’ Wire Guard: Heavy-chrome-plated wire guard protects la mp heads or fixture s when specified in the luminaire schedule. Integral Time-Delay Rel ay: Holds u nit on for fixed interval of 5 minutes when power is restored after an outage. Remote Test: Switch in hand-held remote device aimed in direction of tested unit initiates coded infrared signal. Signal reception by fact ory-installed infrared receiver in tested unit triggers simulation of lo ss of its no rmal power supply, providing visual confirmation of either proper or failed emergency response. Integral Self-Test: Factory-installed electronic device automatically initiates coderequired test of unit emergency operation at r equired intervals. Test f ailure is annunciated by an integral audible alarm and a flashing red LED. Lamp heads: integra l on unit and remote adjustable mounting, swiv el type, adjustable lens, c/w h igh intensity quartz-halog en, 12W, 2 0W, 55W or 75W as per luminaire schedule. Cabinet: suitable for direct or shelf mounting to wall and complete with knockouts for conduit. Finish: white baked enamel. Warranty: 10 year for battery. Auxiliary equipment: 18. 19. 20. 21. 3 minute time delay relay. AC input and DC output terminal blocks inside cabinet. Hardwired connection for AC. Self-diagnostic and testing circuitry additional remote alarm contacts. ENSO Systems Inc. #865 St Elizabeth C.S. – Full Day Kindergarten Addition 2.8 A. B. FLUORESCENT LAMPS Fluorescent lamps shall be 32 Wa tt, T8, 4100 OK CCT, 85 CRI, 60,000 hour, Octron 800XP XL SS Ecologic 3 extended performance by Osram-Sylvania. Compact Fluorescent L amps: 4-Pin, CRI 80 (minimum), color temperature 4100K, average rated life of 10,000 hours at three hours operation per start u nless otherwise indicated. 1. 2. 3. 2.9 A. B. C. D. E. F. Electrical Specifications Page 88 18 W: T4, double or triple tube, rated 1200 initial lumens (minimum). 26 W: T4, double or triple tube, rated 1800 initial lumens (minimum). 32 W: T4, triple tube, rated 2400 initial lumens (minimum). LIGHTING FIXTURE SUPPORT COMPONENTS Comply with Section 260529 "Hangers and Supports for Electrical Systems" for channel- and angle-iron supports and nonmetallic channel and angle supports. Single-Stem Hangers: 13mm (0.5’’) steel tubing with swi vel ball fittings and ceilin g canopy. Finish same as fixture. Twin-Stem Hangers: Two, 13mm (0.5’’) steel tubes with single canopy designed to mount a single fixture. Finish same as fixture. Wires: ASTM A 641/A 641M, Class 3, soft temper, zinc-co ated steel, 12 gage (2.68 mm). Wires for H umid Spaces: ASTM A 580/A 580M, Composition 302 or 3 04, annealed stainless steel, 12 gage (2.68 mm). Rod Hangers: 5-mm (3/16’’) minimum diameter, cadmium-plated, threaded steel rod. PART 3 - EXECUTION 3.1 A. B. INSTALLATION Refer to Architectural Reflected Ceiling Plans for exact location of luminaires. Lighting fixtures: 1. 2. C. D. E. F. Set level, plumb, and square with ceilings and walls unless otherwise indicated. Install lamps in each luminaire. Temporary Lighting: If it is nece ssary, and approved by General Contractor and Consultant, to use permanent luminaires for temporary lighting, install and energize the minimum number of luminaires necessary. When construction is sufficiently compl ete, remove the temporary luminaires, disassemble, clean thoroughly, install new lamps, and reinstall. Co-ordinate the mounting and location of luminaires with other trades to avoid conflicts. Junction boxes in suspended ceiling space shall be accessible through the fixtures or by removable ceiling. Lay-in Ceiling Lighting Fixtures Supports: Use grid as a support element. 1. 2. 3. Install ceiling support system rods or wires, independent of the ceilin g suspension devices, for each f ixture. Locate n ot more than 150mm (6’’) from lighting fixture corners. Support Clips: Fasten t o lighting fixtures and to ceiling grid members a t or near each fixture corner with clips that are UL listed for the application. Fixtures of Sizes Less Than Ceiling Grid: Install as indicated on reflected ceiling plans or ce nter in acou stical panel, and support fixtures independently with at least two 20mm (3/4’’) metal channels spanning and secured to ceiling tees. ENSO Systems Inc. #865 St Elizabeth C.S. – Full Day Kindergarten Addition 4. G. 4. 3. 4. 5. 6. L. 3.2 A. B. C. 3.3 A. B. Install emergency lighting in accordance with CSA C22.1, latest edition. Size wire as required to maintain allowable voltage drop. Direct remote heads down towards floor in direction of exit pathway. Provide 20A,1P “lock-on” type breaker feeding b attery unit and exit sign s with a separate circuit. Exit Signs: 1. 2. J. K. Pendants and Rods: Where longer than 1.2m (4’), brace to limit swinging. Stem-Mounted, Single-Unit Fixtures: Suspend with twin-stem hangers. Continuous Rows: Use tubing or stem for wiring at one point and tubing or rod for suspension for each unit length of fixture chassis, including one at each end. Do not use grid as support for pendant luminaires. Connect support wires or rods to building structure. Emergency Lighting Systems: 1. 2. 3. 4. I. Install at lea st one inde pendent support rod or weldless ‘single jack’ br ight zinc plated steely safety chain from stru cture to a tab on lighting fixture. Chain or rod shall have breaking strength of the weight of fixture at a safety factor of 3. Suspended Lighting Fixture Support: 1. 2. 3. H. Electrical Specifications Page 89 Install exit lights as indicated, to requirements of OBC latest amendments. Mount exit luminaire independent of T-bar ceiling. Caddy clips and wood bracing not acceptable. Exit lighting wiring to be in separate conduit system. Size wire as required to maintain allowable voltage drop. Connect emergency lamp sockets to emergency circuits from emergency lighting battery unit is indicated. Permanently tag each fixture box with circuit numbers (commercial power and emergency power circuits). Connect strip lights under cabinets after installation of cabinets . Connect wiring according to Section 260519 "Low-Voltage Electrical Power Conductors and Cables." Dispose of existing fixtures as show n on drawings. Include for disposal of PCB containing ballasts to approval of authorities having jurisdiction. IDENTIFICATION Install labels with pane l and circuit numbers on concea led junction and outlet boxe s. Comply with requirements for identif ication specified in Sect ion 260553 "Identification for Electrical Systems." Permanently tag each fixture box with circuit number. Permanently tag from battery number each remote and exit within outlet box. FIELD QUALITY CONTROL Test for Emergency Lighting: Interr upt power supply to demonstrate proper operation. Verify transfer from normal power to battery and retransfer to normal. Remote Emergency Fixtures: 1. Run diagnostic circuitry and test all remote lamps. ENSO Systems Inc. #865 St Elizabeth C.S. – Full Day Kindergarten Addition 2. C. 3.4 A. 3.5 A. Electrical Specifications Page 90 After all remote lamps are connected, test battery unit for full 30 or 1 20 minute operating life (noted in luminaire schedule) and provide test report confirming that battery charge was sufficient for full lamp load for duration of noted operating life. Verify that self-luminous exit signs are installed accordin requirements of OBC and CSA. g to their listing and the STARTUP SERVICE Burn-in all lamps that require specific aging period to o perate properly, prior t o occupancy by Owner. Burn-in fluorescent and compact fluorescent lamps intended to be dimmed, for at least 100 hours at full voltage. ADJUSTING Occupancy Adjustments: When req uested within 12 month s of da te of Substantial Completion, provide on -site assistance in adju sting aimable luminaires to suit act ual occupied conditions. Provide up to 2 visits to Project during other-than-normal occupancy hours for this purpose. Some of this work may be required after dark. 1. Adjust aimable luminaires in the presence of Consultant. END OF SECTION 265100 SECTION 265600 - EXTERIOR LIGHTING PART 1 - GENERAL 1.1 A. SUMMARY Section Includes: 1. B. Related Sections: 1. 1.2 A. B. C. D. 1.3 A. Exterior luminaires with lamps and ballasts. Section 265100 "Interior Lighting" f or exterior luminaires normally mo unted on exterior surfaces of buildings. DEFINITIONS CCT: Correlated color temperature. CRI: Color-rendering index. HID: High-intensity discharge. Luminaire: Complete lighting fixture, including ballast housing if provided. ACTION SUBMITTALS Product Data: For each luminaire, pole, and support component, arranged in order of lighting unit designation. Include data on fe atures, accessories, finishes, a nd the following: 1. 2. 3. 4. 5. Physical description of luminaire, including materials, dimensions, effective projected area, and verification of indicated parameters. Details of attaching luminaires and accessories. Photometric data based on laboratory tests of ea ch luminaire type, complete with indicated lamps, ballasts, and accessories. Ballasts, including energy-efficiency data. Lamps, including life, output, CCT, CRI, lumens, and energy-efficiency data. ENSO Systems Inc. #865 St Elizabeth C.S. – Full Day Kindergarten Addition 6. 1.4 A. Electrical Specifications Page 91 Means of a ttaching luminaires to supports, and indication that attachment is suitable for components involved. CLOSEOUT SUBMITTALS Operation and Maintenance Data: For luminaires to include in operation and maintenance manuals. PART 2 - PRODUCTS 2.1 A. B. 2.2 A. GENERAL REQUIREMENTS FOR LUMINAIRES Luminaires shall be CSA listed and labeled for installation in wet locations and out door applications by an NRTL acceptable to authorities having jurisdiction. Luminaire Finish: Manu facturer's standard paint applied to factory-assembled and tested luminaire before shipping. BALLASTS FOR HID LAMPS Comply with ANSI C82.4 and UL 1029 and capable of open-circuit o peration without reduction of average lamp life. Include the following features unless otherwise indicated: 1. 2. 3. 4. 2.3 A. Ballast Circuit: Constant-wattage autotransformer or regulating high-power-factor type, pulse start. Minimum Starting Temperature: -22OF (-30OC). Normal Ambient Operating Temperature: 104OF (40OC). Ballast Fuses: One in each ungrounded power supply conductor. Voltage and current ratings as recommended by ballast manufacturer. HID LAMPS Pulse-Start, Metal-Halide Lamps: Minimum CRI 65, and CCT color temperature 4000K. PART 3 - EXECUTION 3.1 A. B. LUMINAIRE INSTALLATION Install lamps in each luminaire. Fasten luminaire to indicated structural supports. 1. 3.2 A. 3.3 A. B. Use fastening methods and materials selected to resist seismic forces defined for the application and approved by manufacturer. CORROSION PREVENTION Steel Conduits: Comply with Sect ion 260533 "Raceways and Boxes for Electrical Systems." In concrete f oundations, wrap conduit with 0.2 54mm (0.010’’) thick, pipewrapping plastic tape applied with a 50 percent overlap. FIELD QUALITY CONTROL Inspect each installed fixture for damage. Replace damaged fixtures and components. Illumination Observations: Verify normal operation of lig hting units after installing luminaires and energizing circuits with normal power source. 1. Verify operation of photoelectric controls. END OF SECTION 265600 End of Division 26 ENSO Systems Inc. #865 St. Elizabeth C.S. – Full Day Kindergarten Addition Communications Specifications Page 1 INDEX FOR DIVISION 27 Section 270000 270001 270528 271500 275116 275313 Title Page Index 1 General Provisions 2 Pathways for Communication Systems Communications Horizontal Cabling Public Address Systems 7 Clock Systems 12 Appendix Toronto District Catholic School Board Structured Cabling System Guidelines END OF INDEX March 3, 2014 ESI# 865 2 6 81 Pages ENSO Systems Inc. #865 St. Elizabeth C.S. – Full Day Kindergarten Addition Communications Specifications Page 2 SECTION 270001 – GENERAL CONDITIONS General 1.1 1.2 Comply with the drawings, all s pecification sections including Division 00, 01, 02, 26, 27 and 28, and all documents referred to therein. The work of these Divisions - Electrical and Communications is divided into Divisions and Subsections. 1.3 1.4 Division 26 – Electrical Systems Division 27 – Communications Systems, and Division 28 – Electrical Safety & Security. Subsections are in order, but may not be numbered consecutively. Refer to the Index at each Division and page numbers. Refer specifically to Division 26, Section 260001 for General Conditions applying to this Division. End of Section 270001 SECTION 270528 - PATHWAYS FOR COMMUNICATIONS SYSTEMS PART 1 - GENERAL 1.1 A. SUMMARY Section Includes: 1. 2. 3. 4. B. Related Requirements: 1. 1.2 A. Section 260533 "Raceways and Boxes for Electrical Systems" for conduits, wireways, surface raceways, boxes, enclosu res, cabinets, handholes, and faceplate adapters serving electrical systems. INFORMATIONAL SUBMITTALS Coordination Drawings: Pathway routing plan s, drawn to scale, on which the following items are shown and coordinated with each other , using input from in stallers of items involved: 1. 2. B. Metal conduits and fittings. Nonmetallic conduits and fittings. Surface pathways. Boxes, enclosures, and cabinets. Structural members in paths of pathway groups with common supports. HVAC and plumbing items and architectural fe atures in paths of conduit groups with common supports. Qualification Data: For professional engineer. PART 2 - PRODUCTS 2.1 Refer to Section 260533 "Raceways and Boxes for Electrical Systems". PART 3 - EXECUTION 3.1 A. PATHWAY APPLICATION Indoors: Apply pathway products as specified below unless otherwise indicated: ENSO Systems Inc. #865 St. Elizabeth C.S. – Full Day Kindergarten Addition 1. 2. 3. Exposed, Not Subject to Physical Damage: EMT. Exposed, Not Subject to Severe Physical Damage: GRC. Exposed and Subject t o Severe Physical Da mage: GRC. Pathway locations include the following: a. b. c. d. 4. 5. 6. 7. B. C. 2. 3.2 A. B. C. D. E. F. G. H. I. Loading dock. Corridors used for traffic of mechanized carts, f orklifts, and pallet-handling units. Mechanical rooms. Gymnasiums Concealed in Ceilings: EMT or cables supported with j-hooks as noted hereafter. Concealed in Interior Walls and Partitions: EMT. Damp or Wet Locations: GRC. Boxes and Enclosure s: NEMA 250 Type 1, except use NEMA 250 Type 4 stainless steel in institutional an d commercial kitchens and damp or wet locations. Minimum Pathway Size: 21mm (3/4’’) trade size. Pathway Fittings: Compatible with pathways and suitable for use and location. 1. D. E. Communications Specifications Page 3 Rigid and Intermediate Steel Con duit: Use threaded rigid steel cond uit fittings unless otherwise indicated. Comply with NEMA FB 2.10. EMT: Use setscrew, steel fittings. Comply with NEMA FB 2.10. Do not install aluminum conduits, boxes, or fittings unless specifically noted. Install surface pathways only in service rooms or where indicated on Drawings. INSTALLATION Comply with NECA 1, NECA 101, and TIA-569-B for inst allation requirements except where requirements on Drawings or in this article are stricte r. Comply with NECA 102 for aluminum pathwa ys. Comply with NFPA 70 limitations for types of pathways allowed in specific occupancies and number of floors. Keep pathways at least 150mm (6’’) away from parallel runs of flues and steam or hotwater pipes. Install horizontal pathway runs above water and steam piping. Complete pathway installation before starting conductor installation. Comply with requirements in Section 260529 "Hangers and Supports for Electr ical Systems" for hangers and supports. Arrange stub-ups so curved portions of bends are not visible above finished slab. Install no more than the equivalent of two 90-degree bends in any pathway run. Support within 300mm (12’’) of changes in direction. Utilize long ra dius ells for all optical-fiber cables. Conceal conduit and E MT within finished walls, ceilings, a nd floors un less otherwise indicated. Install conduits parallel or perpendicular to building lines. Support conduit within 300mm (12’’) of enclosures to which attached. Stub-ups to Above Recessed Ceilings: 1. 2. Use EMT or GRC for pathways. Use a nylo n conduit bushing or insulated f itting to terminate stub-ups not terminated in hubs or in an enclosure. ENSO Systems Inc. #865 St. Elizabeth C.S. – Full Day Kindergarten Addition J. K. L. M. N. O. P. Q. Threaded Conduit Joint s, Exposed to Wet, Da mp, Corrosive, or Outdoor Conditions: Apply listed compound to threads of pathway and fittings before ma king up join ts. Follow compound manufacturer's written instructions. Coat field-cut threads on PVC-coat ed pathway with a corrosion-preventing conductive compound prior to assembly. Terminate threaded conduits into threaded hubs or with lo cknuts on inside and outside of boxes or cabinets. Install insulated bushings on conduits terminated with locknuts. Install pathways square to the enclosure and terminate at enclosures with locknuts. Install locknuts hand tight plus 1/4 turn more. Do not rely on locknut s to penetrate nonconductive coatings on enclosu res. Remove coatings in the locknut area prior to assembling conduit to enclosu re to assur e a continuous ground path. Cut conduit perpendicu lar to the length. For conduits of 50mm (2’’) trade size and larger, use roll cutter o r a guide t o ensure cut is straigh t and perpe ndicular to the length. Install pull wires in empty pathwa ys. Use polypropylene o r monofilament plastic line with not less than 90kg (200-lb) tensile strength . Leave at l east 600mm (24’’) of slack at each end of pull wire. Cap underground pathways designated as spare above grade alongside pathways in use. Surface Pathways: 1. 2. 3. R. 2. 3. T. Install surface pathway for surface t elecommunications outlet boxes only where indicated on Drawings. Install surface pathway with a minimum 50mm (2’’) radius control at bend points. Secure surface pathway with screws or other anchor-type devices at intervals not exceeding 1.2m (4’) a nd with no less than t wo supports per straight pathway section. Support surface pathway according to ma nufacturer's written instructions. Tape and glue are not acceptable support methods. Pathways for Communications Cable: Install pathways, metal, rigid and flexibl e, as follows: 1. S. Communications Specifications Page 4 21mm (3/4’’) Trade Size and Smal ler: Install p athways in maximum lengths of 15m (50’). 27mm (1’’) Trade Size and Larger: Install path ways in maximum lengths of 23m (75’). Install with a ma ximum of two 90-d egree bends or equivalent for each length of pathway unless Drawings show stricter requirements. Separate lengths with pull or junction boxes or terminations at distribu tion frames or cabinet s where necessary to comply with these requirements. Install pathway sealing fittings at a ccessible locations and fill them with listed sea ling compound. For concealed pathways, install each fitting in a flush steel box with a blank cover plate having a finish similar to that of adjacent plates or surfaces. Install pathway sealing fittings according to manufacturer’s recommendation. Install devices to seal pathway interiors at accessib le locations. Loca te seals so no fittings or boxes are between the seal and the following changes of environments. Seal the interior of all pathways at the following points: 1. 2. Where conduits pass from warm to cold locations, su ch as boundaries of refrigerated spaces. Where an underground service pathway enters a building or structure. ENSO Systems Inc. #865 St. Elizabeth C.S. – Full Day Kindergarten Addition U. V. Comply with manufacturer's writte n instructions for solven t welding P VC conduit and fittings. Expansion-Joint Fittings: 1. 2. Install in ea ch run of aboveground RNC that i s located where enviro nmental temperature change may exceed 3 0OF (17OC), and that has straight-r un length that exceeds 25 feet (7.6 m). Install in each run of abovegro und RMC[ and EMT] conduit that is located where environmental temperature change may exceed 100OF (55OC) and that has straight-run length that exceeds 100 feet (30 m). Install type and quantity of fitting s that accommodate temperature cha nge listed for each of the following locations: a. b. c. d. 3. 4. 5. W. Communications Specifications Page 5 Outdoor Locations N ot Exposed to Direct Sunlight: 125OF (70OC) temperature change. Outdoor Locations Exposed to Direct Sunlight : 155OF (86OC) temperature change. Indoor Spaces Connected with Outdoors without Physical Separation: 125OF (70OC) temperature change. Attics: 135OF (75OC) temperature change. Install fitting(s) that provide expansion and cont raction for at least 0.00041 inch per foot of length of straight run per OF (0.06 mm per met er of length of straight run per OC) of temperature change for PVC conduits. Install fitting(s) that provide expansion and contraction for at least 0.000078 inch per foot of length of straight run per OF (0.0115 mm per meter of length of straight run per OC) of temperature change for metal conduits. Install expansion fittings at all locations where conduits cross building or structure expansion joints. Install each expansion-joint fitting with position, mounting, and piston setting selected according to manufacturer's written instructions for conditions at specific location at t ime of installation. Insta ll conduit supports to allow for expansion movement. Mount boxes at heights indicated o n Drawings. If mounting heights of boxes are not individually indicated, give priority to barrier-free requirements. Install boxes with height measured to top of box unless otherwise indicated such as over counter – verify height with millwork. X. Recessed Boxes in Masonry Walls: Saw-cut opening for box in center of cell of masonry block, and in stall box flush with surface of wall. Prepare block surface to provide a flat surface f or a rain-tight connect ion between box and cover plate or supported equipment and box. Y. Horizontally separate boxes mounted on opposit e sides of w alls so they are not in the same vertical channel. Z. Support boxes of thre e gangs or more fro m more than one side by spanning two framing members or mounting on brackets specifically designed for the purpose. AA. Fasten junction and pull boxes to or support from building structure. Do not support boxes by conduits. BB. Set metal floor boxes level and flush with finished floor surface. CC. Set nonmetallic floor b oxes level. Trim after installation to fit flush with finished floor surface. ENSO Systems Inc. #865 St. Elizabeth C.S. – Full Day Kindergarten Addition 3.3 A. 3.4 A. 3.5 A. SLEEVE AND PENETRATIONS SLEEVE-SEAL Communications Specifications Page 6 INSTALLATION FOR COMMUNICATIONS Install sleeves and slee ve seals at penetrations of exterior floor and wall assemblies. Comply with requirements in Section 260544 "Sleeves and Slee ve Seals f or Communications Pathways and Cabling." FIRESTOPPING Install firestopping at penetrations of fire-rated floor and wall assemblies. Comply with requirements in Section 078413 "Penetration Firestopping." PROTECTION Protect coatings, finishes, and cabinets from damage or deterioration. 1. 2. Repair damage to galvanized finishes with zinc-rich pain t recommended by manufacturer. Repair damage to PVC coating s or paint finishes with matching tou chup coating recommended by manufacturer. END OF SECTION 270528 SECTION 271500 - COMMUNICATIONS HORIZONTAL CABLING PART 1 - GENERAL 1.1 A. SUMMARY Related Requirements: 1. 2. 3. 1.2 A. PROJECT SUMMARY The Toronto Catholic District Sch ool Board i s in the pro cess of making an addition comprised of two kindergarten rooms, corridors, washrooms and storage areas. The objective of this Division is to provid e data and telephone communication services to service the addition including: 1. 2. 3. 4. B. Section 270528 "Raceways and Boxes for Electrical Systems" for conduits, wireways, surface raceways, bo xes, enclosures, cabinets, and faceplat e adapters serving electrical systems. Section 270528 "Pathways for Communications Systems" for conduits, wireways, surface raceways, boxes, enclo sures, cabinets, and faceplate adapters serving communications systems. Toronto District Catholic School Board “Structured Cabling System Guidelines”, Version 2.33 for data and telephone systems. UTP cabling. Multiuser telecommunications outlet assemblies. Telecommunications outlet/connectors. Cabling system identification products. General Requirements: 1. This Division shall pro vide all req uired equipment to terminate cabling from outlets in a ddition to e xisting rack. Quantity of new data outlets is 1 5 plus 2 wireless access points as noted on the plans. ENSO Systems Inc. #865 St. Elizabeth C.S. – Full Day Kindergarten Addition 2. 3. Communications Specifications Page 7 Provide patch cords, j acks, faceplates, etc., and all testing and certification required to make an operating system as outlined in TCDSB Cabling Guidelines V2.33. Provide patch panel in existing rack to accommodate additional data outlets. END OF SECTION 271500 SECTION 275116 - PUBLIC ADDRESS SYSTEMS PART 1 - GENERAL 1.1 A. SUMMARY Section Includes: 1. 2. 3. 1.2 A. B. 1.3 A. B. DEFINITIONS Channels: Separate parallel signal paths, from sources to loudspeakers or loudspeaker zones, with separate amplification and switching that permit selectio n between paths for speaker alternative program signals. Zone: Separate group of loudspeakers and a ssociated supply wiring that may be arranged for selective switching between different channels. ACTION SUBMITTALS Product Data: For each type of product. Shop Drawings: Power, signal, and control wiring. 1. 1.4 A. 1.5 A. Power amplifiers. Loudspeakers. In-house Telephone Handsets Devices. INFORMATIONAL SUBMITTALS Coordination Drawings: Reflected ceiling plans, drawn to scale, on which ceilingmounted items including lighting fixtures, diffusers, grilles, speakers, sprinklers, access panels, and special moldings are shown and coordinated with each other, using input from installers of the items involved. CLOSEOUT SUBMITTALS Operation and Maintenance Data: submit device shop drawings. PART 2 - PRODUCTS 2.1 A. B. 2.2 A. MANUFACTURERS Source Limitations: Ob tain public address system from single source from sin gle manufacturer. Electrical Components, Devices, and Accessories: CSA listed and marked for intended location and application. FUNCTIONAL DESCRIPTION OF SYSTEM System Functions: 1. Selectively connect any zone to any available signal channel. ENSO Systems Inc. #865 St. Elizabeth C.S. – Full Day Kindergarten Addition 2. 3. 4. 5. 2.3 A. B. C. 2.4 A. B. C. D. E. F. G. H. 2.5 A. B. Compatibility of Compo nents: Coordinate component feat ures to for m an integrated system. Match components and interconnections for optimum performance of specified functions. Equipment shall be modular, using so lid-state components, and fully rated for continuous duty unless otherwise indicated. Select equipment for normal operation on input power usually supplied at 110 to 130 V, 60 Hz. Weather-Resistant Equipment: Listed and labeled by a qualified testing agency for duty outdoors or in damp locations. POWER AMPLIFIERS Mounting: rack mounted to suit specified enclosure. Output Power: 70-V ba lanced line. 80 percent of the sum of watta ge settings of connected for each station and speaker connected in all-call mode of operation, plus a 25 percent allowance for future stations. Total Harmonic Distortion: Less th an 3 percent at rated power output from 5 0 to 12,000 Hz. Minimum Signal-to-Noise Ratio: 80 dB, at rated output. Frequency Response: Within plus or minus 3 dB from 20 to 12,000 Hz. Output Regulation: Less than 2 dB from full to no load. Controls: On-off, input levels, and low-cut filter. Input Sensitivity: Matched to prea mplifier and to provide full-rated ou tput with so undpressure level of less than 10 dynes/sq. cm impinging on speaker microphone o r handset transmitter. IN-HOUSE PHONE HANDSET In-house telephone systems: to mat ch existing Nortel Norstar Meridian M7208 (Pho ne NT8B30) or approved equal, ivory finish . Provide module in existing rack to accommodate new zones. Adapters shall accept voice sign als from telephone extension dia ling access and automatically provide amplifier input and program override for preselected zones. 3. A. "All-call" feature shall connect the all-call sou nd signal simultaneously to all zones regardless of zone or channel switch settings. Telephone paging adapter shall allow paging by dialing a n extension from any local telephone instrument and speaking into the telephone. Produce a program-signal tone that is amplified and sounded over all s peakers, overriding signals currently being distributed. Reproduce high-quality sound th at is free of noise and distortion at all loudspeakers at all times during e quipment operation including stan dby mode with inputs off; output free of non-uniform coverage of amplified sound. SYSTEM DESCRIPTION 1. 2. 2.6 Communications Specifications Page 8 Minimum Frequency Response: Flat, 200 to 2500 Hz. Impedance Matching: Adapter matches telephone line to pub lic address equipment input. Rack or cabinet mounted as specified. LOUDSPEAKERS Speakers: McBride series 8224 (recess mounted wall type for new classrooms, surface mounted where show on existing walls, and recessed ceiling mounted type for corridors), pre-assembled “call-in” speaker complete with 8’’ dual cone speaker with ENSO Systems Inc. #865 St. Elizabeth C.S. – Full Day Kindergarten Addition Communications Specifications Page 9 magnet, 12.5’’ square steel baffle ( MC25A), 24 or 70 Volt to match existing, 4 Wa transformer and suitable back box or Rauland or GE Edwards equivalent. 2.7 A. CONDUCTORS AND CABLES Return air plenum rated, jacketed, twisted pair and twisted multi-pair, un-tinned solid copper. 1. 2. 3. 2.8 A. tt Insulation for Wire in Conduit: Thermoplastic, not less than 0.8mm (1/32’’) thick. Microphone Cables: Neoprene jacketed, not le ss than 08mm (1/32’’) thick, over shield with filled inter stices. Shield No. 34 AWG, tinned, soft-coppe r strands formed into a braid or approved equivalent foil. Shielding coverage on conductors is not less than 60 percent. Plenum Cable: Listed and labeled for plenum installation. PATHWAYS Conduit and Boxes: Comply with Section 270528 "Pathways for Communications Systems. Flexible metal conduit shall not be used. 1. Outlet boxes shall be not less than 50mm (2’’) wide, 75mm (3’’) high, and 65mm (2.5’’) deep. PART 3 - EXECUTION 3.1 A. 3.2 A. INSTALLATION Mount system components with fastening methods and devices designe d to resist t he seismic forces indicated in Section 260548.16 "Seismic Controls for Electrical Systems." WIRING METHODS Wiring Method: Install cables in raceways in wa lls, unfinished spaces and inaccessible ceilings. Plenum rated cables may be installe d in ceiling plenums supported with JHooks on 1.5m (5’) centres. Install, size, and space J-Hooks to comply with TIA/EIA568-B. 1. 3.3 A. B. C. D. E. 3.4 A. B. Comply with requirements for raceways and boxes specifie d in Section 260533 "Raceway and Boxes for Electrical Systems." INSTALLATION OF PATHWAYS Comply with requirements in Section 270528 "Pathways for Communications Systems." for installation of conduits and wireways. Provide pull box es at a m aximum of 30m (100’) of conduit and a m aximum of 180 degrees worth of bends between pull boxes. Pull boxes to be 8 time s the size of inside dia meter size of conduit entering it and be complete with screw type cover (not hinged).. Conduit system shall contain no LB’s (only pull boxes permitted as intermediate pull points). Only sweep or 90 degree elbows may be utilise d. The mini mum radius of curvature shall be 10 times the conduit internal diameter. Install manufactured conduit sweeps and long-radius elbows whenever possible. INSTALLATION OF CABLES Comply with NECA 1. General Cable Installation Requirements: ENSO Systems Inc. #865 St. Elizabeth C.S. – Full Day Kindergarten Addition 1. 2. 3. 4. 5. 6. C. 2. 3. 3.5 A. B. C. D. Terminate conductors; no cable shall contain un-terminated elements. Make terminations only at outlets and terminals. Splices, Taps, and T erminations: Arrange on numbered terminal strips in junction, pull, and outle t boxes; terminal cabin ets; and eq uipment enclosures. Cables may not be spliced. Secure and support cables at intervals not exceeding 760mm (30’’) and not more than 150mm (6’’) from cabinets, boxes, fitti ngs, outlets, racks, frames, and terminals. Bundle, lace, and train conducto rs to terminal points without e xceeding manufacturer's limitations on bending radii. In stall lacing bars and distributio n spools. Do not install bruised, kinked, score d, deformed, or abraded cable. Do not splice cable between termination, tap, or junction poin ts. Remove and discard cable if damaged during installation and replace it with new cable. Cold-Weather Installation: Bring cable to roo m temperature before dereeling. Heat lamps shall not be used. Open-Cable Installation: 1. D. Communications Specifications Page 10 Install cabling with horizontal and vertical cable guides in telecommunications spaces with terminating hardware and interconnection equipment. Suspend speaker cable not in a wireway or pat hway a minimum of 200mm (8’’) above ceiling by cable supports not more than 1.5m (5’) apart. Cable shall not be run through structural members or be in contact with pipes, ducts, or other potentially damaging items. Separation of Wires: Separate speaker-microphone, lin e-level, speaker-level, and power wiring runs. In stall in separate pathways or, where exposed or in same enclosure, separate con ductors at least 300mm (12’’) apart for speaker microphones and adjacent parallel power and telephone wiring. Separate other communication equipment conductors as recommended by equipment manufacturer. INSTALLATION OF SYSTEM Coordinate layout and installation of system components and sus pension system with other construction that penetrates ceilings or i s supported by them, i ncluding light fixtures, HVAC equipment, fire-suppression system, and partition assemblies. Match input and output impedances and signa l levels at signal interf aces. Provide matching networks where required. Identification of Condu ctors and Cables: Color-code cond uctors and apply wire and cable marking tape to designat e wires and cables so they identify media in coordination with system wiring diagrams. Equipment Cabinets and Racks: 1. 2. 3. Group items of same function tog ether, either vertically or side by side, and arrange controls symmetrically. Mount monitor panel above the amplifiers. Arrange all inputs, ou tputs, interconnections, and test points so they are accessible at rear of rack for maintenance and testing, with each item removable from rack without disturbing other items or connections. Blank Panels: Cover empty space in equipment racks so entire front of rack is occupied by panels. ENSO Systems Inc. #865 St. Elizabeth C.S. – Full Day Kindergarten Addition E. F. G. H. I. J. 3.6 A. B. C. 3.7 A. B. Volume Limiter/Compressor: Equip each zone with a volume limiter/compressor. Install in central equipment cabinet. Arrange to provide a constant input to power amplifiers. Wall-Mounted Outlets: Flush mounted. Conductor Sizing: Unless otherwise indicat ed, size speaker circuit conductors from racks to loudspeaker outlets not smaller than No. 18 AWG and conductors from microphone receptacles to amplifiers not smaller than No. 22 AWG. Speaker-Line Matching Transformer Connection s: Make init ial connections using t ap settings indicated on Drawings. Install all devices in control panel as per detail on drawing where shown in classrooms. Connect wiring according to Section 271500 "Communications Horizontal Cabling" and Section 280513 "Conductors and Cables for Electronic Safety and Security." GROUNDING Ground cable shields and equipment to eliminate shock hazard and to minimize ground loops, common-mode returns, noise pickup, cross talk, and other impairments. Signal Ground Terminal: Locate at main equipment cabinet. Isolate from power system and equipment grounding. Install grounding electrodes as specified in Section 270526 "Grounding and Bon ding for Communications Systems." FIELD QUALITY CONTROL Engage manufacturer to start-up, inspect, test, and adjust component s, assemblies, and equipment installations, including connections. Tests and Inspections: 1. 2. 3. C. D. 3.8 A. 3.9 A. Communications Specifications Page 11 Schedule tests with at least seven days' advance notice of test performance. After installing public a ddress system and after electrical circu itry has been energized, test for compliance with requirements. Operational Test: Perf orm tests t hat include originating program and page messages at microphone outlets, preamplifier program inputs, and othe r inputs. Verify proper routing a nd volume levels and t hat system is free of n oise and distortion. Inspection: Verify that units and controls are properly labeled and interconnecting wires and terminals are identified. Prepare a list of final tap settings of paging speaker- line matching transformers. Public address system will be considered defective if it does not pass tests a nd inspections. ADJUSTING Occupancy Adjustments: When req uested within 12 month s of da te of Substantial Completion, provide on -site assistance in adjusting system to suit actual occupied conditions. Provide up to two visit s to Proje ct during oth er-than-normal occupancy hours for this purpose. DEMONSTRATION Train Owner's maintenance perso nnel to adjust, operate , and maint ain the public address system and eq uipment; allow for a minimum of 4 hours training over two separate site visits. Refer to Section 017900 "Demonstration and Training." END OF SECTION 275116 ENSO Systems Inc. #865 St. Elizabeth C.S. – Full Day Kindergarten Addition Communications Specifications Page 12 SECTION 275313 - CLOCK SYSTEMS PART 1 - GENERAL 1.1 A. SUMMARY Section Includes: 1. 2. 1.2 A. B. C. 1.3 A. Secondary indicating clocks. System wire and cable. DEFINITIONS NIST: The National Institute of Science and Technology. PC: Personal computer. UTC: Universal time coordinated. The precisely measured time at zero degr longitude; a worldwide standard for time synchronization. ees ACTION SUBMITTALS Product Data: For each type of prod uct indicated. Include construction details, material descriptions, dimensions of individual components and prof iles, and finishes (including available colors) for e ach product indicated and describe features and operating sequences, both automatic and manual, for the following: 1. 2. Indicating clocks. Equipment enclosures and back boxes. PART 2 - PRODUCTS 2.1 A. SECONDARY INDICATING CLOCKS Analog Clock: Equipped with a sweep second h and. Movement shall be driven by selfstarting, permanently lubricated, sealed synchronous motor equipped with a correcting solenoid actuator, or be a microprocessor-based, second impulse unit, compatible with the master clock. Refer to electrical drawing legend for clock type (wired or battery). 1. 2. Wired Clock: Rauland Analog Clock, model TCCKAN12, 300mm (12’’) diameter, CSA certified, black ca se, semi-recess mounted, 12 or 2 4V power (t o match existing system – verify on site) co mplete with control con nection from existing Master Clock system or Dukane or GE equivalent. Clock to automatically sense correction codes sent by Master Clock. Connections for Power and Correction: a. Wired synchronous connection to power and correction. 1) b. c. 3. the maste r clock for both operating Time-Base Backup: Internal capacitor shall back up internal time base to ma intain timekeeping during power o utages of up to 12 hours' duration. Correction by RS485, Ethernet, or similar data line with operating power supplied over a separate connection. Power Connection for Secondary Indicating Clocks: Plug connector. Display Visibility: Hour and minute numerals r eadable at 10m (30’) i n normal ambient light. ENSO Systems Inc. #865 St. Elizabeth C.S. – Full Day Kindergarten Addition B. C. Provision for Modular Panel Installa tion: Equip designated clock for pa nel mounting. Mount semi-recessed with arrangement and trim as in dicated on electrical detail drawings. Coordinate wiring with other modular panel components. Secondary Indicating Clock Characteristics: 1. 2. 3. 4. 5. 6. 7. 8. 9. 10. 2.2 A. C. D. 2.3 A. 2.4 A. 2.5 A. Low voltage connected to central system or battery p owered only as per electrical drawings. Clock Type: Analog. Face Configuration: Single. Mounting: Surface or semi-recessed within classroom control panel for new walls. Nominal Dimensions: 300mm (12’’) diameter. Casing Finish: Black. Dial Face Color: Black. Analog Clock Crystal: Clear acrylic. Face Color: White. Seconds Display: Yes. PROGRAM SIGNAL DEVICES Bells: Heavy-duty, mod ular, vibrating type with the follo measured at 3m (10’): 1. 2. B. Communications Specifications Page 13 wing sound-output ratings 150mm (6’’) Bell: 90 dB at 1m. Edwards Adaptabel, 33 2 series (AC power) or 333 serie s (DC power), 100mm (4’’) diameter single stroke bell, voltage to mat ch existing (verify on site), grey finish complete with recessed back box for new walls and surface mounted back box where mounted to existing concrete block walls Mounting Arrangement for Signal Devices: Designed for attachment with screws on the mounting plate of a flush-mounted back box unless otherwise indicated. Enclosures for Flush-Mounting Bells and Horns: Enclosur e, mounting plate, and grille assembly shall be furnished by device manufac turer to match features of the device to be mounted. Enclosure shall be recessed in wall, completely enclosing the device, with grille mounting over the open side of the enclosure and flush with the wall. Connection Provision for Signal-Indicating Devices: Plug connector. CLOCK CIRCUIT POWER BOOSTER Description: Transformer power supply, mounted in steel cabinet with hinged door, and having fuse-protected input and output circuits. BACK BOXES FOR SECONDARY INDICATING CLOCKS AND PROGRAM DEVICES Description: Box and cover-plate assembly shall be furnish ed by device manufacturer and be suitable for device to be mounted. Back boxes shall be equipped with knockouts and hanger straps or mounting ada pters arranged for flush mounting the device unless otherwise indicated. CONDUCTORS AND CABLES Conductors: Jacketed, plenum-rated, twisted pair and twisted multi-pair, un-tinned solid copper. Sizes as recommended by system manufacturer, but not smaller than No. 22 AWG. Voltage drop for signal, control, and clock correction circuits shall not exceed 10 percent under peak load conditions. ENSO Systems Inc. #865 St. Elizabeth C.S. – Full Day Kindergarten Addition B. C. D. E. F. G. H. 120V AC and Class 1 Signal and Co ntrol Circuits: Stranded, single conductors of size and type recommended by system manufacturer. Materials and install ation requirements are specified in Section 260519 "Low-Voltage Electrical Po wer Conductors and Cables." Class 2 and Class 3 Signal and Control Circuits: Single conductor or twisted-pair cable, unshielded, unless manufacturer recommends shielded cable. Data Circuits: Category 6 minimum, unshielded, twisted-pair cable, unless manufacturer recommends shielded cable. Insulation: Thermoplastic, not less than 0.8mm (1/32’’) thick. Plenum Cable: CSA listed and labeled for plenum installation. Conductor Color-Coding: Uniformly identified and coordinated with wiring diagrams. Shielding: For speaker-microphone leads and at other lo cations recommended by manufacturer; No. 34 AWG tinned, soft-copper strands formed in to a braid or equivalent foil. 1. 2.6 A. B. Communications Specifications Page 14 Minimum Shielding Coverage on Conductors: 60 percent. PATHWAYS Intercommunication and Program System Raceways and Boxes: Same as required for electrical branch circu its specified in Section 260533 "Raceway and Boxes for Electrical Systems." Outlet boxes shall be no smaller than 50W x 75H x 2.5D mm (2x3x2.5’’). PART 3 - EXECUTION 3.1 A. B. 3.2 A. INSTALLATION Mount system components with fastening methods and devices designe d to resist t he seismic forces indicated in Section 260548.16 "Seismic Controls for Electrical Systems." Install all devices in control panel as per detail on drawing where shown in classrooms. WIRING METHODS Wiring Method: Install cables in raceways in wa lls, unfinished spaces and inaccessible ceilings. Plenum rated cables may be installe d in ceiling plenums supported with JHooks on 1.5m (5’) centres. Install, size, and space J-Hooks to comply with TIA/EIA568-B. 1. 3.3 A. B. C. 3.4 A. Comply with requirements for raceways and boxes specifie d in Section 260533 "Raceway and Boxes for Electrical Systems." ELECTRICAL CONNECTIONS Make splices, taps, and terminations on numbered terminal strips in junction, pull, and outlet boxes; terminal cabinets; and equipment enclosures. Use plug connectors for connections to clocks and signal devices. Ground clocks, programming equipment, and conductor an d cable shields to eliminate shock hazard and to minimize ground loops, common-mode returns, noise pickup, cross talk, and other impairments. IDENTIFICATION Comply with Section 260553 "Identification for Electrical Systems." ENSO Systems Inc. #865 St. Elizabeth C.S. – Full Day Kindergarten Addition B. 3.5 A. Color-code wires, and apply wire and cable marking tape to design ate wires and cables so they are uniformly identified and coordinated with wiring diagrams throughout the system. FIELD QUALITY CONTROL Tests and Inspections: 1. 2. 3.6 A. 3.7 A. Communications Specifications Page 15 Perform operational-system tests to verify compliance with the Specifications and make adjustments to b ring system into compliance. Include operation of all modes of clock correction and all programming and manually programmed signal and relay operating functions. Verify that units and controls are properly labeled and interconnecting wires and terminals are identified. ADJUSTING Occupancy Adjustments: When req uested within 12 month s of da te of Substantial Completion, provide on -site assistance in adjusting system to suit actual occupied conditions. Provide up to two visit s to Proje ct during oth er-than-normal occupancy hours for this purpose. DEMONSTRATION Train Owner's maintenance perso nnel to adjust, operate, and maint program-control system components. END OF SECTION 275313 End of Division 27 ain clock-and- STRUCTURED CABLING SYSTEM GUIDELINES For Toronto Catholic District School Board 80 Sheppard Avenue East Toronto, Ontario Document Version 2.33 Issued –13 June 2011 Toronto Catholic District School Board This document has been developed to create cabling infrastructure management standards for the design of voice, wireless, and data systems for the Toronto Catholic District School Board. This document is to be used in conjunction with industry standards. The ANSI/TIA/EIA standards as reflected by the BICSI Manuals (specified later in this document) are to be followed by the design engineer and installation contractors. The goal of this document is to adapt the industry standards to meet the needs of the Toronto Catholic District School Board technology requirements. This document can be used by engineers when designing Structured Cabling Systems for the Toronto Catholic District School Board. 1 Toronto Catholic District School Board Table of Contents Confidentiality Statement ............................................................................................. 6 1.0 1.01 Intent ........................................................................................................................... 6 1.02 Definitions.................................................................................................................... 6 1.03 General Definitions ...................................................................................................... 6 1.04 Codes and Standards .................................................................................................. 8 1.05 Installation Standards ................................................................................................ 10 1.06 Labour ....................................................................................................................... 10 2.0 Overview ............................................................................................................................. 12 2.01 Project Design Overview ............................................................................................ 12 2.02 Design Considerations .............................................................................................. 13 2.03 MTR/TR Location....................................................................................................... 13 2.04 Main Telecommunications Room (MTR) – ................................................................. 13 2.05 Telecommunications Room (TR) ............................................................................... 14 2.06 Distribution Panels ..................................................................................................... 15 2.07 Distribution Pathway System - ................................................................................... 15 2.08 Cabling Distribution Design Requirements................................................................. 15 2.09 Workstation Outlets Locations ................................................................................... 15 2.10 Basic Wireless Access Point Design Guidelines ........................................................ 16 2.11 Provisions for Portable Classrooms............................................................................ 16 2.12 Design Drawings........................................................................................................ 16 2.13 System Documentation ............................................................................................... 17 3.0 ELECTRICAL SYSTEM PRODUCTS ............................................................................ 19 3.01 Cable Trays General .................................................................................................. 19 3.02 Cable Tray Types....................................................................................................... 19 3.03 Surface Raceway (Retrofit Only, All systems) ............................................................ 19 3.04 Outlet Boxes .............................................................................................................. 20 3.05 Utility Poles (Retrofit Only) ........................................................................................ 20 4.0 ELECTRICAL INSTALLATION....................................................................................... 22 4.01 Pathways / Raceways ................................................................................................ 22 4.02 Cable Tray ................................................................................................................ 23 4.03 Outlet Boxes .............................................................................................................. 23 4.04 Utility Poles (Retrofit Only) ......................................................................................... 24 4.05 Electrical Penetrations ............................................................................................... 24 4.06 Cutting, Patching, and Painting .................................................................................. 24 4.07 Firestopping ............................................................................................................... 24 4.08 Surface Raceway....................................................................................................... 24 5.0 COMMUNICATIONS SYSTEM PRODUCTS.................................................................. 26 5.01 5.02 5.03 5.04 5.05 Racks and Cabinets ................................................................................................... 26 Vertical Cable Management ....................................................................................... 26 Cabinet Vertical Cable Management .......................................................................... 26 Vertical Power Bar ..................................................................................................... 27 Fibre Optic Cross Connect Panels ............................................................................. 27 2 Toronto Catholic District School Board 5.06 Fibre Optic Connectors .............................................................................................. 27 5.07 Fibre Optic Cables ..................................................................................................... 27 5.08 Telephone Backbone Cable and Terminations ........................................................... 28 5.09 Modular Patch Panels and Wire Management ............................................................ 28 5.10 Horizontal Cables ...................................................................................................... 28 5.11 Workstation Outlets ................................................................................................... 28 5.12 Patch and Workstation Cables ................................................................................... 28 6.0 COMMUNICATIONS SYSTEM INSTALLATION ............................................................ 30 6.01 Conduit and Cable Distribution System ..................................................................... 31 6.02 Backboards, Rack, and Cabinets ............................................................................... 32 6.03 Rack/Cabinet Entry .................................................................................................... 33 6.04 Telephone Backbone Cable and Terminations ........................................................... 33 6.05 Patch Panels............................................................................................................. 33 6.06 Connectors and Terminations ................................................................................... 33 6.07 Telecommunications Outlets ...................................................................................... 34 6.08 Wireless Access Points .............................................................................................. 34 6.09 Portables .................................................................................................................. 35 7.0 Grounding and Bonding System .................................................................................... 37 7.01 General ..................................................................................................................... 37 7.02 TBB Sizing ................................................................................................................. 38 7.03 Copper Code Cable Sizes .......................................................................................... 38 7.04 Installation ................................................................................................................. 38 7.05 Special Instructions .................................................................................................... 39 8.0 Identification .................................................................................................................. 41 8.01 Labelling .................................................................................................................... 41 8.02 Identification .............................................................................................................. 41 9.0 Documentation and Testing Requirements..................................................................... 44 9.01 Acceptable Field Test Equipment (Tester).................................................................. 44 9.02 Copper Cabling Testing Procedures........................................................................... 44 9.03 Fibre Optic Testing Procedures: ................................................................................. 45 9.04 Test Result Documentation ........................................................................................ 46 9.05 As-Built Documentation ............................................................................................. 46 10.0 Acceptance .................................................................................................................. 48 10.01 10.02 10.03 10.04 10.05 11.0 On-Site Field Observations ........................................................................................ 48 Above the Ceiling Pathway Inspection ....................................................................... 48 Testing Verification .................................................................................................... 48 Substantial Completion .............................................................................................. 48 Final Acceptance ...................................................................................................... 48 Appendices................................................................................................................ 50 11.01 11.02 11.03 11.04 11.05 Appendix A – Drawing List ......................................................................................... 50 Appendix B –Forms ................................................................................................... 73 Appendix C – Elementary School Design Standards for Rooms Data Sheet ............... 75 Appendix D – Secondary School Design Standards for Rooms Data Sheet ................ 76 Appendix E – Portable Design Standards ................................................................... 77 3 Toronto Catholic District School Board Revision History Date 13 July, 2010 Author David Klein 21 September, 2010 David Klein 14 June 2011 Bill Vanderlans 4 Description Section 11.01 – Appendix A – Network Diagrams. • Updated versions of diagrams Section 8.0 – Identification • Clarification of wireless identification for sites with existing identification systems Section 8.02 – Identification • Clarification regarding labelling convention identifying hub room. Section 11.05 – Appendix E Portable Design Standards. • Appendix E added Section 6.09 – Portables • added .5 Section 11.01 – Appendix A – Network Diagrams. • Added Drawing Numbers T-20 and T21 Toronto Catholic District School Board Section I – General 5 Toronto Catholic District School Board 1.0 .1 .2 1.01 .1 .2 .3 1.02 .1 Confidentiality Statement The material provided here is proprietary to the Toronto Catholic District School Board (herein after referred to as the Owner or TCDSB and their agents. The documents shall remain property of the Owner. The document shall not be reproduced in whole or in part without the written consent of the Owner. The Owner shall not be held responsible or liable for any use of these documents without permission. Intent The TCDSB will establish guidelines for a structured cabling system for each facility owned by the TCDSB, including elementary schools, secondary schools and administrative offices. The schools are broken down into three categories, new builds, expansions and retrofits The guidelines will establish best practices for the installation of data, voice, and wireless access point (WAP) cabling. Definitions The components of a telecommunications system shall be defined as follows: Horizontal Cabling Backbone Cabling Entrance Facilities (EF) Main Telecommunications Room (MTR) Telecommunications Rooms (TR) Work Area (WA) Telecommunications outlet (TO) Wireless Access Point (WAP) Administration 1.03 The cabling between the Telecommunications Room and the Work Area The cabling between the Telecommunications Room and the Equipment Room An entrance to the building for both public and private network service cables. An environmentally controlled centralized space for telecommunications equipment. Also referred to as the Equipment room. An enclosed space where the horizontal cable terminates and crossconnects to the equipment or backbone cabling. Location of the telecommunications outlet End point of the structured cabling system where the horizontal cable terminates. A wireless access point (WAP) is a device that allows wireless communication devices to connect to a wireless network using 802.11x standards. The WAP usually connects to a router, and can relay data between the wireless devices (such as computers or printers) and wired devices on the network. The method of Labelling, identification and documentation of the structured cabling system. General Definitions Administration The method for labelling, documentation and usage needed to implement moves, additions and changes of the Communications infrastructure. Backboard A wood panel used for mounting connecting hardware and equipment. The radius that cable can bend before the risk of damage or decrease in transmission performance. Bend Radius 6 Toronto Catholic District School Board Bonding The permanent joining of metallic parts to form an electrically conductive path that will assure electrical continuity, the capacity to conduct safely any current likely to be imposed. Cable Tray A ladder, trough, spline, basket style, solid bottom or channel raceway system intended for the support of Communications cable. The buildings and grounds of a complex, such as a College. Campus Conduit Cross-Connection A rigid or flexible metallic or non-metallic raceway of circular cross-section through which cables can be pulled. A connection scheme between cabling runs, subsystems, and equipment using patch cords or jumpers that attach to connecting hardware on each end. Earth Ground An electrical connection to earth obtained by a grounding electrode system. Electromagnetic Interference Fire-stop The interference in signal transmission or reception resulting from the coupling of electrical or magnetic fields. A material, device, or assembly of parts in a fire rated wall or floor, to prevent passage of flame, smoke or gases through the rated barrier. A conducting connection, intentional or accidental, between a circuit (or equipment) and the earth (or to come conducting body that acts in place of the earth). Consists of cabling that extends between and includes the horizontal cross-connect and the Communications outlet. A cross-connect of horizontal cabling to other cabling, e.g., horizontal, backbone, equipment. Ground Horizontal Cabling Horizontal Crossconnect Innerduct A corrugate plastic tube installed within an metallic conduit or used to protect cabling within the Telecommunications Room Intermediate Cross- Across-connect between the main cross-connect and the connect horizontal cross-connect in backbone cabling. TO The telecommunications outlet in the work area. Open Office Cabling The cabling that distributes from the Communications room to the open office area utilizing a consolidation point or multiuser Communications outlet. Pathway A facility for the placement of Communications cable. Penetration Opening made in fire-rated barrier (architectural structures or assemblies). Pull Strength The maximum pulling force that can be safely applied to a cable without incurring damage. .1 .2 Raceway Any enclosed channel designed expressly for holding wires or cables. UTP Work Area Unshielded Twisted Pair A building space where the occupants interact with Communications terminal equipment. Wherever the terms “documents “are used it shall mean the guidelines and drawings that form part of this document. Wherever the term is used “install” or variations of the term “install” are used in the 7 Toronto Catholic District School Board .3 .4 1.04 .1 documentation it shall mean to install and connect complete. Wherever the term is used “supply” or variations of the term “Supply” are used in this documentation it shall mean to supply only. Wherever the term “work” is used in the documentation it shall mean necessary equipment, materials and labour to provide a complete and functioning structured cabling system as detailed in this guideline documentation. Codes and Standards The equipment, material and installation shall conform to the following version of the applicable Codes, Standards (including technical service bulletins and addenda) and regulations of authorities having jurisdiction. ANSI/EIA/TIA-568-B.1 Commercial Building Telecommunications Standard Part 1: General Requirements ANSI/EIA/TIA-568-B.2 Commercial Building Telecommunications Cabling Standard Part 2: Balanced Twisted-Pair Cabling Components ANSI/EIA/TIA-568-B.2-1 Addendum 1 – Transmission Performance Specifications for 4-pair 100Ω Category 6 Cabling ANSI/EIA/TIA-568-B.3 Optical Fibre Cabling Components Standard ANSI/EIA/TIA-568-B.3-1 Optical Fibre Cabling Components Standard – Addendum 1 Additional Transmission Performance requirements for 50/125 µm Optical Fibre Cables TIA/EIA 569-A Commercial Building Standard For Telecommunications Pathways And Spaces. ANSI/EIA/TIA-606-A Administration Standard For The Telecommunications Infrastructure Of Commercial Buildings ANSI/TIA/EIA—J-STD-607 Commercial Building Grounding (Earthing) And Bonding Requirements For Telecommunications. CSA C22.1 Canadian Electric Code Part 1 Ontario Hydro Electrical Safety Code CSA C22.2 No. 214 Communications Cables. ISO/IEC IS 11801A Generic Cabling For Customer Premises. CENELEC EN 50173 Performance Schemes. IEC 603-7, PART 7 Detailed Specification For Connectors, 8-Way, Including Fixed And Free Connectors With Common Mating Features. FIPS PUB 174 Commercial 8 Requirements Building For Generic Telecommunications Cabling Cabling Wiring Toronto Catholic District School Board Standard. Federal Information Standard Publication. UL 444 and 13 Adopted Test And Follow-Up Service Requirements For the Optional Qualification Of 100 Ω Twisted-Pair (Cables). IEC 807-8 Rectangular Connectors For Frequencies Below 3 MHz, Part 8: Detailed Specification For Connectors, FourSignal Contacts And Earthing Contacts For Cable Screens, First Edition. NEMA WC 63 Performance Standard For Field Testing Of Unshielded Twisted-Pair Cabling System. CSA C22.2 No. 232-M Fibre optic Cables. ANSI/EIA/TIA-492BAAA Detail Specifications For Class Iva Dispersion-Unshifted Singlemode Optical Waveguide Fibres Used In Communication Systems. ANSI/EIA/TIA-455 Test Procedures For Fibre optics, Cables And Transistors. ANSI/EIA/TIA-598 Colour Coding Of Fibre optic Cables. ANSI/EIA/TIA-604-3 FOCIS 3 Fibre optic Connector Intermateability Standard. ANSI/ICEA S-83-596 Fibre optic Premises Distribution Cable. ANSI/ICEA S-83-640 Fibre optic Outside Plant Communications Cable. ANSI Z136.2 American Standards For The Safe Operation Of Fibre optic Communication Systems Utilizing Laser Diode And LED Sources. ANSI/EIA/TIA-492AAAA Detailed Specification For 62.5µm Core Diameter / 125µm Cladding Diameter Class 1a Multimode, GradedIndex Optical Waveguide fibres. ANSI X3.230 Information Technology – Fibre Channel – Physical and signalling Interface. IEEE 802.3z (Gigabit Ethernet) Media Access Control Parameters, Physical Layer, Repeater and Management Parameters for 1000 Mb/s Operation IEEE 802.ae (10 Gigabit Ethernet) Media Access Control Parameters, Physical Layer, Repeater and Management Parameters for 10 Gb/s Operation ISO/IEC 11801 2nd Edition Generic Cabling for Customer Premises 9 Toronto Catholic District School Board 1.05 .1 1.06 .1 .2 .3 .4 .5 Installation Standards Install cabling in accordance with the most recent edition of BICSI publications: BICSI Telecommunications Distribution Methods Manual BICSI Cabling Installation Manual Labour The Telecommunications Cabling Contractor shall use only tradesmen who are fully trained, qualified and experienced on the installation, termination and testing of a Certified Communications Cabling system. The installer must be a certified and approved installer of the specified cabling system. The Project Manager and Project Forman who start the project must remain on the project until its completion. Changes to the contractors’ project team may only occur with the prior consent of owner. At least one member of the contractors project team must hold a current RCDD accreditation, or be a BICSI registered installation technician, and will be responsible for quality control during the course of the project A copy of the RCDD or BICSI accreditation shall be submitted with the project manual for the project records. The Telecommunications Cabling Contractor may not assign or sub-contract any work without the prior written consent of the Owner or his designated representative. A list of sub-contractors must be submitted with the tender response. 10 Toronto Catholic District School Board Section 2 - Project Design 11 Toronto Catholic District School Board 2.0 Overview 2.01 .1 .2 .3 .4 .5 .6 .7 .8 .9 .10 .11 .12 .13 .14 Project Design Overview This standard is drawn from the ANSI/TIA/EIA Structured Wiring Standards and designed to support the standards of the Toronto Catholic District School Board. Projects will vary depending on whether the project is new or retrofit design and construction. The base facilities required are to include communications equipment rooms (ER), Telecommunications Rooms (TR) and Pathways for the distribution of the Structured Cabling System (SCS). Designated locations for workstation outlets should accommodate room rearrangements and future alternate uses whenever possible. The workstation outlets should be located so that they are far away from the main teaching boards, windows, egress and water sources (including condensation from louvers and equipment. Every teaching area shall receive sufficient workstation outlets to allow for a minimum of four cables all other areas shall be provided with a minimum of two cables per location. Offices require multiple locations to allow for multiple furniture arrangements (2 locations minimum). Unless fully enclosed in conduit, all communications wire shall be PLENUM rated Category 6 UTP #24 AWG, or better. All workstation outlets and patch panels shall use ANSI/TIA/EIA T568A 8-pin modular jacks (RJ45) and be generic in design. All cabling shall be installed in a star topology, originating in the TR and terminating at the workstation outlet. All conductors shall be terminated at both ends. Electrical wiring shall not be bundled in the same pathway as the communications wiring unless the pathway contains partitions for power and communications wiring approved for this purpose. Combination power and data outlet boxes (typically used in floor installations) shall contain no cross over wiring. Fibre optic cabling is to be used between buildings for Data distribution due to its transmission


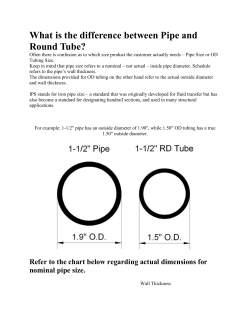


© Copyright 2026