
PROJECT MANUAL PROPOSAL PACKAGE #4 Nederland I.S.D. 2012 Bond Projects
PROJECT MANUAL
PROPOSAL PACKAGE #4
Nederland I.S.D.
Nederland High School
2012 Bond Projects
High School Renovations
Board President
Board Vice President
Board Secretary
Board Member
Board Member
Board Member
Board Member
Nicholas Phillips
Kay DeCuir
Marty Byrd
Reed Richard
Susan Isom
Ron Burkhalter
Jesse Branick
Superintendent
Assistant Superintendent
Assistant Superintendent
Business Manager
Maintenance Director
Robert Madding
Michael Laird
Dr. Stuart Kieschnick
Melissa Wong
Ronnie Trahan
GALEWSKY & JOHNSTON
CONSULTING ENGINEERS, INC.
12010 - NEDERLAND I.S.D. - HIGH SCHOOL
DATE: SEPTEMBER 2014
PAGE: 1
SECTION 01660 - TESTING,
SYSTEMS
ADJUSTING
SECTION 15010 - BASIC MECHANICAL
AND BALANCING
(TAB) OF ENVIRONMENTAL
REQUIREMENTS
SECTION 15011 - SUPPORTS AND ANCHORS
SECTION 15012 - VALVES
SECTION 15013 - PIPE AND PIPE FITTINGS
SECTION 15014 - TRENCHING AND BACKFILL
SECTION 15015 - MECHANICAL ALTERATION
PROJECT PROCEDURES
SECTION 15020 - ACCESS DOORS
SECTION 15021 - CORRECTIONS
DURING THE WARRANTY PERIOD
SECTION 15022 - ROUTINE MAINTENANCE
SECTION 15024 - INSTRUCTION
DURING THE WARRANTY PERIOD
OF OWNER'S PERSONNEL
SECTION 15025 - OPERATION AND MAINTENANCE
MANUALS
SECTION 15026 - CONTRACT QUALITY CONTROL
SECTION 15027 -IDENTIFICATION
SECTION 15028 - PAINTING MECHANICAL
SYSTEMS
SECTION 15029 - WARRANTIES
SECTION 15030 - COMMISSIONING
AND BALANCING
SECTION 15031 - TESTING,
SYSTEMS
OF HVAC SYSTEM AND COORDINATION
ADJUSTING
AND BALANCING
SECTION 15040 - SHOP DRAWINGS, COORDINATION
"'--••.••..._---_./
OF TESTING
(TAB) OF ENVIRONMENTAL
DRAWINGS & PRODUCT DATA
12010 - NEDERLAND I.S.D. - HIGH SCHOOL
DATE: SEPTEMBER 2014
PAGE: 2
SECTION 15041 - PROJECT RECORD DOCUMENTS
SECTION 15050 - CIRCULATING
WATER PIPING SYSTEM
SECTION 15052 - CONDENSATE
DRAIN PIPING SYSTEM
SECTION 15054 - CIRCULATING
WATER SYSTEM SPECIALTIES
SECTION 15060 - REFRIGERANT
PIPING SYSTEM
SECTION 15070 - PIPE EXPANSION COMPENSATION
SECTION 15080 - PRESSURE AND TEMPERATURE
INSTRUMENTS
SECTION 15085 - WATER FLOW MEASURING SYSTEMS
SECTION 15110 - VARIABLE FREQUENCY MOTOR SPEED CONTROL (PUMP & AHU'S)
SECTION 15115 -AIR HANDLING UNITS
SECTION 15116 - FAN COIL UNITS
SECTION 15120 - HVAC PUMPS
SECTION 15125 - HEATING AND COOLING COILS
SECTION 15135 - PACKAGED AIR-COOLED
LIQUID CHILLING UNIT (80-500 TONS)
SECTION 15157 - FIRE TUBE HOT WATER BOILER
SECTION 15200 - SOUND AND VIBRATION CONTROL
SECTION 15250 - MECHANICAL
PIPING INSULATION
SECTION 15255 - DOMESTIC WATER AND MISCELLANEOUS
PIPING INSULATION
SECTION 15260 - DUCTWORK INSULATION
SECTION 15270 - EQUIPMENT INSULATION
SECTION 15350 - NATURAL GAS PIPING SYSTEM
----------------------------~--~----------~--~-------------------2Q
-
"------_./
12010 - NEDERLAND I.S.D. - HIGH SCHOOL
DATE: SEPTEMBER 2014
PAGE: 3
SECTION 15408 - SYSTEM OF SANITARY SOIL, WASTE AND VENT PIPING
SECTION 15410 - SYSTEM OF DOMESTIC WATER PIPING
SECTION 15420 - PLUMBING EQUIPMENT
SECTION 15430 - PLUMBING FIXTURES AND TRIM
SECTION 15705 - CIRCULATING
WATER SYSTEM TREATMENT
SECTION 15762 - ELECTRIC WALL HEATER
SECTION 15763 - HOT WATER UNIT HEATERS
SECTION 15772 - AIR COOLED GAS HEAT PACKAGED AIR CONDITIONING
SECTION 15774 - AIR-COOLED
CONDENSING
UNIT
UNITS
SECTION 15776 - ROOF-TOP PACKAGED AIR CONDITIONING
UNITS
UNIT & GRADE MOUNTED
SECTION 15778 - OUTSIDE WALL MOUNTED PACKAGED HEAT PUMP UNITS
SECTION 15781 - DUCTLESS AIR CONDITIONING
SECTION 15800 - AIR DISTRIBUTION
SYSTEM
SYSTEM
SECTION 15801 - WALL LOUVERS
SECTION 15802 - AIR OUTLETS
SECTION 15803 - AIR CONTROL DAMPERS
SECTION 15805 - GAS-FIRED EQUIPMENT VENTS
SECTION 15806 - FAN POWERED TERMINAL UNITS
SECTION 15813 - LOW PRESSURE ROUND DUCT SYSTEM
SECTION 15814 - DOUBLE WALL ACOUSTICAL
SECTION 15841 - VENTILATION
DUCT SYSTEM
AND EXHAUST SYSTEMS
pa
12010 - NEDERLAND I.S.D. - HIGH SCHOOL
DATE: SEPTEMBER 2014
PAGE: 4
SECTION 15857 - KITCHEN HOOD DUCTWORK
SECTION 15860 - FIRE DAMPERS
SECTION 15880 - AIR FILTERS
SECTION 15900 - AUTOMATION SYSTEMS
DIGITAL CONTROL SYSTEM FOR HVAC
GENERAL
REQUIREMENTS
AND DIRECT-
SECTION 16010 - BASIC ELECTRICAL REQUIREMENTS
SECTION 16011 - SUPPORTS AND FASTENERS
SECTION 16014 - TRENCHING AND BACKFILL
SECTION 16015 - ELECTRICAL ALTERATION
PROJECT PROCEDURES
SECTION 16021 - IDENTIFICATION
SECTION 16022 - CORRECTIONS
DURING THE WARRANTY PERIOD
SECTION 16023 - ROUTINE MAINTENANCE
SECTION 16024 - INSTRUCTION
DURING THE WARRANTY PERIOD
OF OWNER'S PERSONNEL
SECTION 16025 - OPERATION AND MAINTENANCE
MANUALS
SECTION 16026 - CONTRACT QUALITY CONTROL
SECTION 16028 - CLEANING
SECTION 16030 - TESTING OF ELECTRICAL SYSTEM
SECTION 16040 - SHOP DRAWINGS, COORDINATION
DRAWINGS & PRODUCT DATA
SECTION 16041 - PROJECT RECORD DOCUMENTS
SECTION 16090 - CONDUCTOR
SYSTEMS - 600 VOLT RATING
SECTION 16100 - CONDUIT SYSTEMS
SECTION 16103 - GROUNDING
'------_/
12010 - NEDERLAND I.S.D. - HIGH SCHOOL
DATE: SEPTEMBER 2014
PAGE: 5
SECTION 16131 - PULL AND JUNCTION BOXES
SECTION 16140 - WIRING DEVICES
SECTION 16151 - SAFETY SWITCH
SECTION 16422 - MOTOR CONTROL CENTER
SECTION 16435 - CIRCUIT BREAKER DISTRIBUTION
PANELBOARD
SECTION 16460 - DRY TYPE TRANSFORMERS
SECTION 16475 - FUSES - 600 VOLTS AND BELOW
SECTION 16480 - MOTOR STARTERS - MAGNETIC AND MANUAL
SECTION 16510 - LUMINAIRES
SECTION 16625 - EMERGENCY
BATTERY POWERED LIGHTING
SECTION 16720 - FIRE ALARM AND DETECTION SYSTEM
•
12010 - NISD - High School
SECTION 01660
TESTING, ADJUSTING AND BALANCING (TAB) OF ENVIRONMENTAL SYSTEMS
1.1
RELATED WORK
A.
1.2
Section 15031 - "Commissioning of HVAC System and Coordination of Testing
and Balancing.
GENERAL
A.
The organization performing the work shall be:
1.
B.
C.
D.
1.3
Certified member of the AABC.
The organization shall provide the services of a supervisor with extensive
knowledge of the work involved and at least two years experience conducting
tests of the type specified.
1.
All work shall be conducted under the direct supervision of the
supervisor.
2.
Technicians shall be trained and experienced in the work they conduct.
The organization shall utilize comprehensive report forms to document results.
1.
If requested, submit sample forms for review prior to commencing work.
2.
Upon completion of the TAB work, the report forms shall be signed by the
supervising engineer and (1) copy submitted to the ENGINEER OF
RECORD for his review and comments.
3.
SUBMIT THREE COPIES OF THE FINAL REPORT TO DIVISION 15
FOR HIS INCLUSION IN THE O & M MANUALS SPECIFIED IN 15025.
Refer to Architect’s work sequence plan/schedule/notes to understand various
systems will be made operational during the course of project construction. This
section will be required to complete the specified requirements as each system is
substantially completed.
ACCEPTABLE TAB FIRMS
A.
Coastal Air Balance (504) 834-4537
B.
Engineered Air Balance (713) 784-4825.
01660 - 1 of 7
12010 - NISD - High School
1.4
TAB FIRM QUALIFICATIONS
A.
An approved organization for the work under this section:
1.
B.
1.5
A specialist in this field and have the personnel, experience, training, skill
and the organization to perform the work.
To support the evidence of qualification, provide the following information (does
not apply to firms listed in 1.3):
1.
History of the TAB organization.
2.
Agency certification.
3.
Personnel qualifications.
4.
TAB data forms.
5.
Instrumentation list.
6.
Name of the project supervisor.
7.
Name and address and contact person of five successfully completed
projects of similar size and scope.
SCOPE
A.
B.
Test, adjust and balance:
1.
The air distribution systems.
2.
The exhaust and supply systems.
3.
The chilled water and hot water hydronic systems.
Perform periodic inspections of the project during construction.
1.
C.
Notify the Architect/Engineer in writing or discussion of any
deviations from the Contract Documents relating to the testing,
adjusting and balancing work.
Continue the inspections up to completion of project.
1.
As necessary, in the succeeding report, list corrections made from
previous report.
01660 - 2 of 7
12010 - NISD - High School
1.6
1.7
EXTENDED WARRANTY
A.
Include an extended warranty of 180 days after completion of test and balance
work, during which time the Architect/Engineer may request a re-test or
re-setting of any outlet or other item as listed in the test report.
B.
Provide technicians and instruments to assist the Architect/Engineer in making
any tests he may require during this period.
TESTING INSTRUMENTS
A.
B.
1.8
If requested by the Engineer, submit a list of all instruments to be used for the
test and balance procedures.
1.
Catalog sheets.
2.
Certificate of last calibration.
Testing equipment shall be in good working order and tested for accuracy prior
to start of work.
RELATED WORK
A.
Refer to Sections 15030 and 15900 for coordination of work specified in that
section.
B.
Review the related duct work shop drawings and piping shop drawings.
1.
Make recommendations concerning suitability with respect to the testing,
adjusting and balancing work.
C.
Measure building static pressure and adjust supply, return and exhaust air
systems to provide required relationship between each to maintain approximately
0.05 inches positive static pressure near the building entries.
D.
In cooperation with the work specified in Section 15900 and related sections, set
and adjust automatically operated dampers and valves.
1.
E.
Verify correct operation of all sequences.
Upon completion of the testing and balancing, submit (3) days prior notice that
the systems are ready for a running test.
1.
A qualified representative of the test and balance organization shall be
present.
01660 - 3 of 7
12010 - NISD - High School
1.9
INSTRUMENT TEST HOLES
A.
1.10
When it is required to make holes in the field, to measure temperature, static
pressure or velocity in the ducts:
1.
Drill holes.
2.
Provide plastic plugs.
TESTING THE CONSTANT VOLUME AIR DISTRIBUTION SYSTEMS
A.
Record preliminary air handler data including fan RPM and static pressures
across filter, fans and coils.
B.
Perform a velocity traverse of the main supply ducts using a pitot tube and
inclined manometer or electronic instrument to establish initial air delivery.
C.
Determine percentage of outside air and return air using velocity traverse or
temperature relationship.
1.
1.11
D.
Make adjustments in fan RPM and damper settings as required to obtain design
supply air, return air and outside air.
E.
Measure and adjust all supply and return branches to design air delivery.
F.
Measure and adjust all diffusers to design air delivery to +/- 5% of design
requirements.
G.
Make a set of recordings showing final system conditions.
TESTING THE EXHAUST AND VENTILATION SYSTEMS
A.
1.12
Measure at minimum and maximum outside air settings.
Test and balance the exhaust and ventilation systems using the methods
specified for constant volume air distribution systems.
TESTING THE VARIABLE VOLUME AIR DISTRIBUTION SYSTEMS
A.
Measure and adjust all fan powered terminal units to design air delivery.
B.
Set the supply air static pressure control network to produce maximum supply
duct pressures.
C.
Measure and adjust the design air delivery at the inlet of each fan powered
terminal unit.
01660 - 4 of 7
12010 - NISD - High School
D.
E.
Measure and record the air quantity from each fan powered terminal unit at its
maximum flow.
1.
Manipulate the controlling temperature sensor/DDC controller to achieve
maximum flow.
2.
Simultaneously record both the inlet static pressure at each terminal unit
and the DDC controller signal to the terminal unit.
Reset each terminal unit through the DDC controller to yield minimum flow.
1.
F.
Simultaneously record the inlet static pressure to each terminal unit and
the DDC controller signal to the terminal unit.
If the terminal unit is operating with inlet static pressure in excess of the
minimum cataloged pressure specified by the manufacturer; and is not producing
rated air quantity; field adjust the terminal unit to produce rated air quantity.
1.
Re-test until approved results are obtained.
G.
Position the fan powered terminal units to the proportion of maximum fan air
volume to total installed terminal unit maximum volume.
H.
Set the fan to operate at approximate design speed.
I.
Make a total air traverse.
J.
Make a speed increase if either or both static and volume are low.
1.
If the volume is correct, but the static is high, reduce the speed.
2.
If the static is high or correct, but the volume is low, adjust all of the
terminal units to the proper volume.
K.
Set the terminal units to minimum, adjust the variable frequence fan speed
controller until minimum static and volume are obtained.
L.
Coordinate with the work specified in Section 15910 on the final location of the
sensors for the static pressure controller.
1.
Locate in the supply duct far enough from the fan discharge to be truly
representative of the average static pressure in the system.
M.
Adjust the variable frequency fan speed controller as required to coordinate with
the static pressure sensing network.
N.
Make a set of recordings showing final system conditions.
01660 - 5 of 7
12010 - NISD - High School
1.13
System duct static pressures.
2.
Control system signal pressures.
TESTING THE HYDRONIC SYSTEMS
A.
1.14
1.
Record preliminary pump data.
1.
Pump RPM.
2.
Pump shut-off differential head.
3.
Pump operating differential head.
B.
Adjust balancing valves in the pump discharge lines to obtain design GPM as
read from the manufacturer's pump curve and from a flow meter.
C.
Balance flow thru:
1.
Chillers.
2.
Boilers
3.
Coils.
D.
Use flow meters, differential pressures or temperature relationships as required.
E.
Balance by-pass lines to obtain the same pressure drop with systems on
by-pass.
F.
Repeat steps as required to obtain a final systems balance and make a set of
recordings showing final systems conditions.
EQUIPMENT TESTS
A.
B.
Record the following hot water coil performance data:
1.
Air entering/leaving; dry bulb temperatures.
2.
Water entering/leaving temperature (where applicable).
Record the following chilled water coil performance data:
1.
Air entering/leaving; wet and dry bulb temperatures.
2.
Water entering/leaving temperatures.
01660 - 6 of 7
12010 - NISD - High School
C.
D.
E.
Record the following hot water boiler performance data:
1.
Water entering/leaving temperature.
2.
Stack temperature.
Record the following condensing unit performance data:
1.
Suction pressure.
2.
Condensing pressures.
3.
Suction pressure.
4.
Air entering/leaving; condenser; dry bulb temperature.
5.
Outdoor ambient dry bulb temperature.
Record the following DX coil performance data:
1.
1.15
Air entering/leaving; wet and dry bulb temperatures.
EQUIPMENT POWER READINGS
A.
Record the following information for each motor.
1.
Equipment designation.
2.
Manufacturer.
3.
Unit model number and serial number.
4.
Motor nameplate horsepower; nameplate voltage; phase and full load
amperes.
5.
Heater coil in starter.
a.
Rating in amperes.
b.
Manufacturer's recommendation.
6.
Motor rpm/driven equipment rpm.
7.
Power reading (voltage, amperes of all legs at motor terminals).
01660 - 7 of 7
12010 - NISD - High School
SECTION 15010
BASIC MECHANICAL REQUIREMENTS
1.1
SECTION INCLUDES
A.
1.2
CONTRACTOR'S QUALIFICATIONS
A.
1.3
Basic Mechanical Requirements are specifically applicable to all Division 15
Sections, in addition to Division 1 - General Requirements.
An approved contractor for the work under this division:
1.
A specialist in this field and have the personnel, experience, training, skill
and the organization to provide a practical working system.
2.
Be able to furnish evidence of having contracted for and installed not less
than (3) systems of comparable size and type to this one that have
served their Owners satisfactorily for not less than (3) years.
RELATION WITH OTHER TRADES
A.
Carefully study all matters and conditions concerning the project and
conscientiously study the relation and cooperate as necessary to accomplish the
full intent of the documents. Submit notification of conflict in ample time to
prevent unwarranted changes in any work. Review other divisions of these
specifications to determine their requirements. Extend mechanical services and
final connections to all items requiring same.
B.
Provide sleeves and inserts in forms as required for the work. Stub up and
protect open ends of pipe before any concrete is placed. Furnish sizes of
required equipment pads. Furnish and locate all bolts and fittings required to be
cast in them.
C.
Locate and size openings required for installation of work specified in this
division in sufficient time to prevent delay in the work.
D.
Refer to other divisions of the specifications for the scope of required
connections to equipment furnished under that division. Determine from the
contractors for the various trades, the Owner and by direction from the
Architect/Engineer the exact location of all items. The contractors involved will
furnish all roughing-in drawings required for proper installation of the mechanical
work.
15010 - 1 of 6
12010 - NISD - High School
1.4
E.
Request all shop drawings required in ample time to permit proper installation of
equipment and appurtenances.
F.
Extend services as indicated to the various items of equipment furnished by
other. Rough-in for the various items and make final connections ready for
operation upon placing of the equipment.
MATERIALS AND EQUIPMENT
A.
B.
1.5
All materials or equipment furnished for this work:
1.
New and delivered in undamaged original crates.
2.
Plainly marked for identification.
3.
Quality as specified.
Do not paint or in any way cover any material or equipment until approved on
location.
STORAGE AND HANDLING OF EQUIPMENT AT JOB SITE
A.
Indoor and outdoor air moving equipment.
1.
Factory seals and covers maintained.
a.
2.
B.
1.6
Store in clean and dry environment.
At all other equipment such as VAV boxes, grilles (but not necessarily limited to
this list).
1.
C.
Seal air inlets and outlets with plastic sheeting if not factory
provided.
Shall be adequately protected from weather, vandalism and construction
processes.
Reference Section 15800 for duct system’s storage and handling.
FACTORY FINISH
A.
Factory assembled equipment except plumbing fixtures, nonferrous or
galvanized items and other items specified or scheduled to have a specific finish:
1.
Delivered with a factory applied finish such as baked on machinery
15010 - 2 of 6
12010 - NISD - High School
enamel which does not require additional field painting.
1.7
B.
Protect equipment from damage and defacement.
C.
Factory finish that becomes marred, stained or otherwise damaged: fully and
satisfactorily restored.
D.
Should any of the special factory applied coatings be damaged during handling,
storage or installation, the damage areas shall be recoated in the field using the
same surface preparation and coating system originally applied by the
manufacturer.
UTILITIES, LOCATIONS AND ELEVATIONS
A.
Locations and elevations of the various utilities included within the scope of this
work:
1.
B.
1.8
Are offered separate from the Contract Documents as a general guide
only, without guarantee as to accuracy.
Examine the site and verify the location and elevation of all utilities and of their
relation to the work.
DRAWINGS AND SPECIFICATIONS
A.
The mechanical drawings:
1.
Are diagrammatic and shall be followed as closely as the actual
construction will permit.
2.
Are not intended to show complete and accurate location of air outlets,
thermostats, control devices, apparatus and appurtenances.
B.
Should any changes be required to make work specified in this division conform
to the project as it is constructed or to make it conform with the rules of city and
municipal bodies having jurisdiction, submit request for direction before
proceeding with the work. All changes due to poor coordination made without
additional expense to the Owner.
C.
Exact locations of equipment and accessories in finished spaces:
1.
Determined by reference to specific details. When not specifically
shown, locations of items to be approved prior to installation. Relocation
before installation of up to (3) feet both vertically and horizontally from the
position indicated on the drawings may be directed without additional
cost.
15010 - 3 of 6
12010 - NISD - High School
1.9
1.10
2.
From architectural drawings.
3.
From other drawing series.
4.
From other divisions of the specifications.
PERMITS AND REGULATIONS
A.
Obtain all work permits required.
B.
Conform to applicable federal, state and local ordinances and codes.
C.
Mechanical work shall comply with applicable inspection services:
1.
Underwriter's Laboratories.
2.
National Fire Protection Association.
3.
State Health Department.
4.
Local Municipal Building Inspection Department.
D.
Where laws, codes or ordinances conflict with the specifications, then the laws,
codes or ordinances govern.
E.
In cases where the specifications exceed in quantity or quality of material or
labor, specifications shall be followed.
F.
In cases of conflict, submit request for direction before proceeding.
UTILITY SERVICE
A.
Provide all connections, piping, valves, meters and fittings for temporary water,
gas and drainage service required during construction of the project.
B.
Remove temporary utilities, equipment, facilities and materials prior to
Substantial Completion.
1.
C.
1.11
Clean and repair damage caused by installation or use of temporary
work.
Make arrangements with the utility sources and pay costs for the connections
and changeovers
AVAILABLE SPACE
15010 - 4 of 6
12010 - NISD - High School
1.12
A.
Size and shape of physical spaces for equipment shown on drawings has been
designed in accordance with the general practice for equipment of the type
indicated and specified.
B.
Equipment shall:
Be selected to fit properly into such spaces.
2.
Be arranged and positioned to permit access as required for
maintenance, servicing, removal or replacement of parts and/or whole
pieces of equipment.
FLASHING AND ISOLATION
A.
1.13
1.
Provide continuous neoprene strip to separate dissimilar metals that could come
into contact.
ELECTRICAL REQUIREMENTS
A.
Provide motors for all equipment requiring same and specified in this division.
1.
B.
Coordinate voltage and phase requirements with the work specified in
Division 16.
Motors furnished with the various pieces of apparatus:
1.
Shall have suitable starting and running characteristics to drive the loads.
C.
Confirm that proper running overcurrent protection is installed in each motor
starter.
D.
Motor starting equipment that is not factory installed is specified in Division 16.
E.
Provide a motor starter schedule of the actual equipment being furnished.
Coordinate with the shop drawings specified in Division 16.
F.
1.
Motor size.
2.
Starter size.
3.
Heater element size.
4.
Auxiliary contacts required.
If motors actually furnished for work specified in this division have requirements
15010 - 5 of 6
12010 - NISD - High School
differing from that shown on the drawings or in the specifications and require
changes in the work involving extra cost, responsibility for the extra cost is
specified in this division.
1.14
CONCRETE STRUCTURES AND SLABS
A.
Provide equipment "housekeeping" pads and other structures as shown on the
drawings.
B.
Form work as specified in Division 3.
C.
Excavation as specified in Division 2 and Division 3.
D.
Concrete work as specified in Division 3.
1.
E.
1.15
3000 PSI.
Concrete pads:
1.
4" thick; or as shown on the drawings.
2.
Chamfer strips at edges and corners of forms.
3.
Smooth steel trowel finish.
4.
Reinforcing as shown on the drawings (minimum is #3 bars, 10" o.c. if not
noted).
VANDAL RESISTANT DEVICES
A.
Provide a handle for each loose key operated valve and hose bibb on the
project.
15010 - 6 of 6
12010 - NISD - High School
SECTION 15011
SUPPORTS AND ANCHORS
1.1
1.2
WORK INCLUDED
A.
Pipe, equipment hangers, supports and associated anchors.
B.
Sleeves and seals.
QUALITY ASSURANCE
A.
1.3
WORK FURNISHED BUT INSTALLED UNDER OTHER SECTIONS
A.
1.4
Support systems shall be adequate for weight of equipment, pipe insulation and
the fluids which they carry.
Furnish hangers, supports and sleeves for placement into formwork.
GENERAL REQUIREMENTS
A.
Adhere to the general routing of piping systems as shown on the drawings.
B.
Install all lines in the most direct, neat and workmanlike manner employing only
skilled mechanics.
1.
Install piping to conserve building space and not interfere with use of
space.
C.
Lines which require a definite grade for drainage have precedence in routing
over all other lines.
D.
Hold horizontal and vertical lines as close as possible to walls, ceilings, struts
and members as to occupy the minimum space consistent with the proper
requirements for insulation, expansion, removal of pipe and access to valves and
dampers.
E.
Concealed work shall finish off within the limits permitted by the chases.
F.
Make connections to rotating equipment in such a manner as to prevent
transmission of vibration.
G.
Install piping to allow for expansion and contraction without stressing pipe, joints
or connected equipment.
1.
See drawings for indicated expansion loops.
15011 - 1 of 5
12010 - NISD - High School
1.5
SUBMITTALS
A.
Submit shop drawings and product data as specified.
1.
1.6
Indicate hanger and support framing and attachment methods.
B.
Submit shop drawings of custom fabricated supports.
C.
Submit shop drawings of expansion loops and related supports.
PIPE HANGERS AND SUPPORTS
A.
Hangers for pipe sizes 1/2" to 1-1/2" malleable iron or carbon steel, adjustable
swivel, split ring.
B.
Hangers for pipe sizes 2" to 8": carbon steel, adjustable, clevis.
C.
Multiple or trapeze hangers: steel channels with welded spacers and hanger
rods.
D.
Wall support: welded steel bracket and steel clamp.
E.
Vertical support: steel riser clamp. See drawing detail.
F.
Floor support for pipe sizes to 8": steel adjustable pipe saddle, locknut nipple,
floor flange and concrete pier or steel support. See drawing detail.
G.
Copper pipe hangers: carbon steel ring, adjustable, copper plated, sized for
copper tubing.
1.
At the contractor's option, provide sheet lead packing between hanger or
support and piping.
H.
Shields for insulated piping are specified in Section 15250.
I.
Install hangers to provide minimum 1/2" space between finished covering and
adjacent work.
J.
Place a hanger within 12" of each horizontal elbow.
K.
Use hangers with 1-1/2" minimum vertical adjustment.
L.
Support horizontal cast iron pipe adjacent to each hub with 5 feet maximum
spacing between hangers on five foot pipe lengths and 10 feet maximum
spacing between hangers on 10 foot pipe lengths.
15011 - 2 of 5
12010 - NISD - High School
1.7
M.
Support vertical piping at every floor. Support vertical cast iron pipe at each
floor.
N.
Where several pipes can be installed in parallel and at same elevation, provide
multiple or trapeze hangers.
O.
Support riser piping independently of connected horizontal piping.
PIPE SLEEVES AND ESCUTCHEONS
A.
Provide sleeves:
1.
Wherever pipe passes through concrete or masonry construction.
2.
Wherever vibration, expansion or contraction would affect finished
surfaces penetrated by pipe.
3.
Where required to permit installation of piping after completion of other
work.
B.
Sleeves in floor slabs shall project at least 2" above finished floor. Caulk sleeves
full depth.
C.
Size sleeves large enough to allow for movement due to expansion and
contraction.
D.
Sleeves for insulated pipe shall be large enough to permit application of pipe
insulation continuous through the sleeve.
E.
Do not permit pipe to touch wall of sleeve.
F.
Provide exposed pipes in occupied spaces passing through floors, ceilings or
walls with approved cast brass or formed stainless steel escutcheon plates.
G.
H.
1.
Provide with tamperproof set screws to secure escutcheon to pipe.
2.
Escutcheons in finished spaces shall be nickel or chrome plated.
Sleeves for pipe through exterior walls and floors: form with Schedule 40 PVC
pipe.
1.
Seal with butyl rubber sealant of quality specified.
2.
Refer to drawing details/notes.
DO NOT USE PVC PIPE SLEEVES IN RETURN AIR PLENUMS.
15011 - 3 of 5
12010 - NISD - High School
I.
J.
Sleeves for pipes through nonfire rated beams, walls, footings and potentially
wet floors: form with Schedule 40 galvanized steel pipe.
1.
Seal with butyl rubber sealant of quality specified.
2.
Refer to drawing details/notes.
Sleeves for pipes through fire rated and fire resistive floors, walls and
fireproofing: prefabricated fire rated sleeves.
1.
1.8
Seal with Underwriter's Laboratories classified fire stop sealant system,
either one or two component.
SECURING AND SUPPORTING OF PIPE
A.
Support pipe from building structures:
1.
By approved hangers and supports installed in a manner to prevent
excessive stress and vibration in supporting force.
2.
To provide and maintain required grade and pitch.
3.
To provide for expansion and contraction.
B.
Refer to the schedule on the drawings for hanger spacing.
C.
Where grooved mechanical piping systems are used, adjust the hanger spacing
to the manufacturer's recommendation.
1.
Install a support at each fitting.
D.
Special types of hangers may be employed to suit particular conditions. Hangers
shall be approved by the Architect/Engineer.
E.
Perforated strap is not approved as hanger material.
F.
Use electro-galvanized or cadmium plated threaded rods, nuts and hangers.
G.
Hanger rods:
1.
Fastened to structural steel members with beam clamps suitable for
structural members and conditions.
2.
Fastened to galvanized concrete inserts set flush with surface.
3.
Refer to the schedule on the drawings for hanger rod sizes.
15011 - 4 of 5
12010 - NISD - High School
H.
Coat all field cut ends with cold galvanizing material.
I.
Construct supports of structural steel members. Brace and fasten with flanges
bolted to structure.
J.
Where pipe support members are welded to structural building framing, scrape,
brush clean and apply one coat of zinc rich primer to welding.
K.
Provide rigid anchors for pipes after vibration isolation components are installed.
L.
Prime coat steel hangers and supports indoors and above suspended ceiling
spaces.
M.
At outdoor locations, all supports, brackets and structural members shall be
hot-dipped galvanized unless noted otherwise on the drawings.
15011 - 5 of 5
12010 - NISD - High School
SECTION 15012
VALVES
1.1
1.2
1.3
GENERAL
A.
Refer to the drawings for the schedule of valves. Submit on all proposed valves.
B.
Provide valves of same manufacturer throughout where possible.
C.
Provide valves with manufacturer's name, duty and pressure rating clearly
marked on outside of body.
D.
Where valves are installed in insulated piping, provide with extended neck so
valve operator and stop plate clear the full thickness insulation.
E.
All valve materials shall be suitable for the intended service.
PRESSURE RATINGS
A.
Unless otherwise indicated, use valves suitable for 125 minimum PSIG WSP and
450 degrees F and maximum 200 PSIG and 250 degrees F.
B.
The pressure-temperature rating of valves shall be not less than the design
criteria applicable to all components of the system.
GATE AND GLOBE VALVES
A.
Gate and globe valves shall be designed for repacking under pressure when fully
opened.
1.
1.4
Equipped with packing suitable for the intended service.
B.
When the valve is fully opened, the back seat shall protect the packing and the
stem threads from the fluid.
C.
All gate and globe valves shall have a gland follower.
D.
Gate valves shall be of the solid wedge type designed and manufactured in such
a way that seating surfaces are prevented from contacting until near the point of
closure.
BUTTERFLY VALVES
A.
Butterfly valves shall conform to MSS-SP-67.
B.
Liners, inserts and discs shall be suitable for the intended service.
15012 - 1 of 3
12010 - NISD - High School
C.
1.5
Valves shall have full lug type body designed for installation between ANSI
standard flanges.
BALL VALVES
A.
Provide ball valves with:
1.
Blowout proof stainless steel stem.
2.
Full size port, ASTM 272 stainless steel Type 316 ball.
3.
Cast bronze body.
a.
1.6
1.7
Maximum 15% zinc composition.
4.
Threaded ends.
5.
Where used for balancing, provide with memory stop.
B.
Seat, seals, thrust washers and packing shall be suitable for the intended
service.
C.
Service rating:
1.
150 PSI saturated steam.
2.
400 PSI WOG.
VALVE CONNECTIONS
A.
Provide valves suitable to connect to adjoining piping as specified for pipe joints.
Use pipe size valves.
B.
Thread pipe sizes 2" and smaller.
C.
Flange pipe sizes 2-1/2" and larger.
D.
Solder or screw to solder adapters for copper tubing.
VALVE OPERATORS
A.
Provide suitable handwheels for gate, globe, angle or drain valves and inside
hose bibbs.
B.
For butterfly valves, provide handles and operators as scheduled and shown on
the drawings.
1.
Lever lock handle with toothed plate for shut-off service only.
15012 - 2 of 3
12010 - NISD - High School
2.
1.8
Gear operators or infinitely adjustable handle with lock nut and memory
stop for throttling service.
INSTALLATION
A.
Install valves with stems upright or horizontal, not inverted.
B.
Install gate, butterfly or ball valves for shut-off and isolating service to isolate
equipment, part of systems or vertical risers.
C.
Install globe, ball or butterfly valves for throttling service and control device or
by-pass.
D.
Use butterfly valves and ball valves in hot water and chilled water systems
interchangeably in place of gate and globe valves.
E.
Use butterfly valves and ball valves in circulating water systems for balancing
duty.
F.
Provide drain valves at main shut-off valves and low points of piping and
apparatus so the systems can be entirely drained.
1.
2 inch valve for pipes 2 inches and larger.
2.
Line size valve for pipes smaller than 2 inches.
3.
Terminate with adapter and hose thread end.
15012 - 3 of 3
12010 - NISD - High School
SECTION 15013
PIPE AND PIPE FITTINGS
1.1
WORK INCLUDED
A.
1.2
1.3
Pipe, fittings and connections.
RELATED WORK
A.
Section 15011 - "Supports and Anchors".
B.
Section 15012 - "Valves".
C.
Section 15070 - "Pipe Expansion Compensation".
D.
Section 15200 - "Sound and Vibration Control".
REFERENCE STANDARDS
A.
ANSI/ASME B16.3 - "Malleable-iron threaded fittings".
B.
ANSI/ASME B16.22 - "Wrought copper and bronze solder-joint pressure fittings".
C.
ANSI/ASME B16.29 - "Wrought copper and wrought copper alloy solder-joint
drainage fittings - DWV".
D.
ANSI/ASTM A53 - "Pipe, steel, black and hot-dipped zinc-coated, welded and
seamless".
E.
ANSI/ASTM A120 - "Pipe, steel, black and galvanized, welded and seamless for
ordinary uses".
F.
ANSI/ASTM A126 - "Gray iron castings for valves, flanges and pipe fittings".
G.
ANSI/ASTM B43 - "Seamless red brass pipe, standard sizes".
H.
ANSI/ASTM D1784 - "Rigid polyvinyl chloride (PVC) compounds and chlorinated
polyvinyl chloride (CPVC) compounds".
I.
ANSI/AWS D.1.1 - "Structural Welding Code".
J.
ANSI/AWWA C606 - "Grooved and shouldered type joints".
15013 - 1 of 6
12010 - NISD - High School
1.4
1.5
1.6
1.7
K.
ASTM D2855 - "Practice for making solvent-cemented joints with PVC pipe and
fittings".
L.
FS WW-P-521 - "Pipe fittings, flange fittings and flanges: steel and malleable
iron threaded and butt welding class 150".
QUALITY ASSURANCE
A.
Use welding materials and procedures that conform to ASME code.
B.
Employ certified welders in accordance with ASME code.
PIPE AND TUBE
A.
Steel pipe: ANSI/ASTM A53, A120, weight as scheduled.
B.
Copper water tube: ASTM B88, Type "K", "L", "M" and "DWV", type and temper
as scheduled, seamless.
C.
Brass pipe: ANSI/ASTM B43, IPS 85 red brass.
D.
PVC plastic pipe: ANSI/ASTM D1784, schedule as specified.
PIPE AND TUBE JOINTS AND FITTINGS
A.
Steel pipe fittings: ANSI/ASME B16.3, ANSI/ASTM A126, FS WW-P-521.
B.
Copper and brass pipe fittings: ANSI/ASME B16.22, pressure fittings.
C.
PVC pipe fittings: ANSI/ASTM D2729.
UNIONS, COUPLINGS AND FLANGES
A.
Pipe size 2" and under: 150 PSI malleable iron for threaded ferrous piping;
bronze for copper or brass pipe soldered joints.
B.
Pipe size over 2": 150 PSI forged steel slip-on flanges for ferrous piping; bronze
flanges for copper or brass piping.
1.
1.8
Where shown on the drawings, or otherwise required for installation of
gauge cocks and other instrumentation, provide with 1/2" threaded pipe
taps.
PREPARATION
A.
Ream pipe and tube ends. Remove burrs. Bevel plain end ferrous pipe.
B.
Remove scale and dirt, inside and out, before assembly.
15013 - 2 of 6
12010 - NISD - High School
C.
1.9
STEEL PIPE CONNECTIONS
A.
1.10
1.11
Remove welding slag or foreign material from pipe and fitting materials.
Screw joint steel piping up to and including 1-1/2". Weld piping 2-1/2" and
larger, including branch connections. Screw or weld 2" piping.
SCREWED PIPE ASSEMBLY
A.
Die cut screwed joints with full cut standard taper pipe threads.
B.
Make joints with graphite and oil, graphite compound or teflon. Apply compound
to male threads only.
C.
Caulking of threaded joints to stop leaks is not approved.
FLANGED SYSTEMS INSTALLATION
A.
Prior to installation of bolts, accurately center and align flanged joints to prevent
mechanical stressing of flanges, pipe and equipment. Align bolt holes to
straddle the vertical, horizontal or north-south centerline.
1.
Do not exceed 3/64 inch per foot inclination of the flange face from true
alignment.
B.
Use flat face companion flanges only with flat faced fittings, valves or equipment.
Otherwise, use raised face flanges.
C.
Install proper gaskets suitable for intended service and factory cut to proper
dimensions. Secure with a suitable gasket cement.
D.
Use ANSI nuts and bolts, galvanized or black to match flange material.
E.
F.
1.
Use ANSI 316 stainless steel nuts and bolts underground.
2.
Tighten bolts progressively to prevent unbalanced stress. Draw bolts
tight to ensure proper seating of gaskets.
Install 1/2" Schedule 80 black iron pipe nipple in threaded pipe tap for gauge
cocks and other instrumentation.
1.
Outdoors, use equivalent stainless steel pipe nipples.
2.
Plug unused openings.
Where PVC flanges are employed, tighten the flange bolts with a torque wrench
to the pipe manufacturer's recommended bolt torque.
1.
Use U.S. Standard round washers on both flanges.
15013 - 3 of 6
12010 - NISD - High School
1.12
GASKETS
A.
B.
1.13
For piping systems 220 degrees F and below, provide ring rubber gaskets.
1.
Use 1/16 inch thick gaskets for pipe smaller than 6 inches.
2.
Use 1/8 inch thick gaskets for pipe 6 inches and larger.
Where PVC flanges are employed, use soft, full face, 1/8" thick gaskets.
WELDED PIPE ASSEMBLY
A.
Welding in accordance with:
1.
American Welding Society.
2.
ASME Code for Pressure Piping.
B.
All welding shall be done by welders having at least six months experience with
the type of work required for this job.
C.
Ensure complete penetration of deposited metal with base metal. Provide filler
metal suitable for use with base metal. Keep inside of fittings free from globules
of weld metal.
D.
Align piping and equipment so that no part is offset more than 1/16 inch. Set all
fittings and joints square and true. Preserve alignment during welding operation.
E.
Butt weld joints in straight pipe.
F.
Weld slip on flanges on both the inside and outside of flanges.
G.
Changes in direction and at intersection of piping:
H.
1.
Made with factory made welding fittings.
2.
Long radius fittings.
3.
Eccentric reducing fittings on horizontal pipe.
4.
Straight tee connections with welding tees.
5.
Branch connections with reducing tee or weld-o-let or thread-o-let.
Taps for installation of thermowells, test wells, cocks and insertion instruments:
1.
Thread-o-lets.
15013 - 4 of 6
12010 - NISD - High School
2.
I.
1.14
Mitered joints are not approved.
GROOVED MECHANICAL PIPING SYSTEM ASSEMBLY
A.
Pipe, fittings and valves shall be with grooved ends.
B.
All fittings and valve products shall be provided by the same manufacturer.
1.
C.
Valve construction shall be as specified and as shown in the schedule on
the drawings.
Use grooved pipe couplings to provide a rigid pipe joint.
1.
Two or more ductile iron (ASTM A-536 Grade 65-45-12) housings.
2.
Angle bolt pad.
3.
C-shaped synthetic rubber gasket.
4.
Steel bolts and nuts.
D.
Use flexible couplings for expansion, contraction, deflection and vibration
attenuation.
E.
Use grooved mechanical couplings and fasteners only in accessible locations.
1.
1.15
3000 lb. forged steel coupling unless indicated otherwise on the
drawings.
For use only above grade.
F.
Install the system according to the manufacturer's installation instructions.
G.
Acceptable manufacturers:
1.
Victaulic.
2.
Gustin Bacon.
3.
Grinnell.
PLASTIC PIPE CONNECTIONS
A.
Form solvent joints in PVC pipe and fittings to ANSI/ASTM D2855 and
manufacturer's recommendations.
B.
Make connections to equipment and branch mains with unions or flanges.
15013 - 5 of 6
12010 - NISD - High School
1.16
COPPER TUBING CONNECTIONS
A.
Form soldered or brazed joints in copper, brass or bronze fittings in accordance
with the Copper Development Association Copper Tube Handbook.
B.
Make copper tubing joints with long radius wrought copper fittings:
C.
1.17
Tubing cut square and burrs removed.
2.
Inside of fittings and outside of tubing cleaned with sand cloth before
sweating.
Make connections to equipment and branch mains with unions or flanges.
DIELECTRIC ISOLATION
A.
1.18
1.
Provide a dielectric isolating flange, coupling or union:
1.
At each juncture of dissimilar metals.
2.
At each gas pipe connection to equipment.
3.
At each gas pipe entrance to buildings.
PIPE AND TUBING ASSEMBLY, GENERAL
A.
In general, use the specified materials in fabricating the various piping systems.
B.
Methods of assembly shall be varied only to meet special conditions where it is
impossible to comply with the specified methods of joining piping.
C.
Where special classes of piping are involved and are not listed, request exact
instructions from the Engineer as to the class of material involved and the
method of fabricating it before ordering the material.
15013 - 6 of 6
12010 - NISD - High School
SECTION 15014
TRENCHING AND BACKFILL
1.1
1.2
1.3
GENERAL
A.
Stake out routing of the excavation by actual field measurements. Obtain
approval of the Architect/Engineer before beginning trenching.
B.
Set required lines and levels.
C.
Maintain bench marks, monuments and other reference points.
D.
The drawings indicate all known information pertaining to surface and
subsurface obstructions. This information is not guaranteed.
UTILITIES
A.
Before starting excavation, establish location, size and extent of any existing
underground utilities occurring in work area.
B.
Notify the related utility companies to remove and relocate lines which are in the
way of excavation.
C.
Maintain, reroute or extend as required existing utility lines which are to remain
and pass through work area.
D.
Protect utility services uncovered by excavation.
E.
Remove abandoned utility service lines from areas of excavation. Cap, plug or
seal such lines and identify at grade.
F.
Accurately locate and record abandoned and active utility lines rerouted or
extended on project record documents.
PROTECTION
A.
Protect excavations as required to prevent cave-in or loose soil from falling into
excavation.
B.
Notify Architect/Engineer of unexpected subsurface conditions and discontinue
work in affected area until notification to resume work.
C.
Grade excavation top perimeter to prevent surface water run-off into excavation.
15014 - 1 of 3
12010 - NISD - High School
1.4
1.5
1.6
1.7
D.
Keep surface materials approved for reuse separate from general excavation
material.
E.
Keep excavated material piled so that it will not endanger work or obstruct roads
and driveways. Keep drainage channels clear or provide other satisfactory
means for drainage.
INSPECTION
A.
Verify stockpiled fill to be reused is approved.
B.
Verify areas to be backfilled are free of debris or water.
PREPARATION
A.
Identify required lines, levels, contours and datum.
B.
When necessary, compact subgrade surfaces to density requirements for backfill
material.
EXCAVATION
A.
Cut trenches sufficiently wide to enable installation of the work and allow
inspection.
B.
Remove lumped subsoil and rock.
C.
Correct unauthorized excavation at no cost to Owner.
D.
Fill over-excavated areas under pipe bearing surfaces in accordance with
directions by Architect/Engineer.
PLUGGING ENDS
A.
1.8
Before leaving the work for the night or at any time, the end of the pipe shall be
securely closed with a tight fitting plug or other method to prevent stoppage by
dirt.
BACKFILLING
A.
Backfill trench as soon as practical after completion of inspection and testing.
B.
Backfill systematically as early as possible to allow maximum time for natural
settlement. Do not backfill over porous, wet or spongy subgrade surfaces.
C.
Deposit select backfill of sand or dry friable soil in the trench simultaneously on
both sides of pipe for full width of the trench.
1.
In continuous layers not exceeding 6" loose depth.
15014 - 2 of 3
12010 - NISD - High School
1.9
To an elevation of 12" above top of pipe.
3.
Thoroughly compact under and on each side of pipe to provide solid
backing against external surface of pipe.
4.
Compact fill to density of undisturbed trench side.
5.
Add backfill and continue to compact to maintain the 12" elevation.
D.
Place and compact common fill material in continuous layers not exceeding 8".
E.
Maintain optimum moisture content of backfill materials to attain required
compaction density.
F.
Remove surplus backfill materials from site.
G.
Leave stockpile areas completely free of excess fill materials.
H.
Provide any deficiency in quantity of material for backfilling trenches or for filling
depressions caused by settlement.
UNSUITABLE CONDITIONS FOR PIPE LAYING
A.
1.10
2.
Lay no work in water or when trench conditions or weather are unsuitable for
such work.
SPECIAL CONDITIONS
A.
Refer to other sections of the specifications for special backfill and bedding
requirements.
B.
Install backfill under building slab and paved areas as specified in Division 2.
15014 - 3 of 3
12010 - NISD - High School
SECTION 15015
MECHANICAL ALTERATION PROJECT PROCEDURES
1.1
EXISTING MATERIAL AND EQUIPMENT
A.
All existing material and equipment indicated on the drawings or in the
specifications to be reused shall be thoroughly cleaned and reconditioned before
installation and reuse in the modified systems.
B.
All material or equipment removed which is not to be salvaged for Owner's use
or for reuse on the project shall:
C.
1.
Become the property of the contractor.
2.
Be promptly removed from the site.
Material or equipment salvaged for Owner's use shall be carefully handled and
stored where directed by the Owner.
1.
D.
All material and equipment not indicated to be removed shall be reconnected to
the systems.
E.
During the process of demolition and removal of existing refrigeration equipment
containing refrigerant, service and handle the refrigerant in accordance with the
requirements of the Environmental Protection Agency and the Clean Air Act.
1.
1.2
See drawings for notes regarding preparation and storage.
Free venting of refrigerant and release to the atmosphere is not
approved.
PROJECT/SITE CONDITIONS
A.
Install the work as shown on the drawings, unless prevented by project
conditions.
B.
Prepare drawings showing proposed rearrangement of the work to meet project
conditions, including changes to work specified in other sections.
1.
Obtain permission of the Architect/Engineer before proceeding.
15015 - 1 of 4
12010 - NISD - High School
1.3
REFRIGERANT PIPING SYSTEMS
A.
Relocate, modify and extend the refrigerant piping systems as required to
accommodate the work.
B.
If the existing refrigeration system is provided with valves and an adequate
containment vessel, pump the system down and store the refrigerant in the
vessel.
C.
If the existing refrigeration system is not provided with sufficient valves and an
adequate containment vessel:
D.
1.
Provide a recycling machine to remove the refrigerant from the system.
2.
Process the refrigerant by oil separation and circulation through a filter
drier media.
3.
At the completion of the new refrigerant piping system, return the
refrigerant to the same piece of equipment from which it was removed.
4.
The refrigerant piping system and the refrigerant that is reused in the
modified system is subject to the Warranty and Guarantee provisions of
the project, as if furnished new.
Service, handle and recycle refrigerants in accordance with the requirements of
the Environmental Protection Agency and the Clean Air Act.
1.
1.4
Free venting of refrigerant and release to the atmosphere is not
approved.
SEQUENCE AND SCHEDULING
A.
Refer to other drawings series for work in remodeled areas.
1.
Where facilities in these areas are required to remain in service, any
related work required to keep these facilities in operation is specified in
this division.
B.
Remove and replace existing piping, grilles, duct work and boxes coincident with
the construction.
C.
Remove or relocate existing piping, grilles, duct work and boxes as occasioned
by new or remodeled construction.
1.
Cap unused pipe and duct beyond the new finish line.
15015 - 2 of 4
12010 - NISD - High School
2.
D.
1.5
1.6
Relocate all piping, grilles, duct work and boxes as required to accommodate
new work requiring precedence.
PROTECTION OF THE WORK
A.
Provide adequate temporary support and auxiliary structure as necessary to
assure structural value or integrity of affected portion of work.
B.
Provide devices and methods to protect other portions of project from damage.
C.
Execute fitting and adjustment of products to provide a finished installation to
comply with specified products, functions, tolerances and finishes.
BUILDING AUTOMATION SYSTEM
A.
Maintain the existing building automation system in service until an appropriate
transition can be made to the new work.
1.
B.
1.7
Make temporary connections to maintain service in areas adjacent to the
work area.
Refer to Section 15900 for additional information on this subject.
MATCHING EXISTING ELEMENTS
A.
All materials, equipment and components of the new work in the same area with
existing work and exposed to common view with the existing work shall exactly
match in appearance the existing materials, equipment and components.
B.
Discrepancies between drawings and specification references for the new work
and the actual existing materials, equipment and components shall be resolved
prior to the submission of shop drawings.
C.
If the proposed material, equipment or component for the new work is not an
exact match, a full size sample may be required for approval.
1.
1.8
Do not terminate active piping in concealed inaccessible construction.
Submit requests for additional directions on this subject from the
Architect/Engineer.
SITE SURVEY AND SYSTEM VERIFICATION
A.
Make a field survey of the existing mechanical and electrical systems and
general construction in the area of the work. Verify:
15015 - 3 of 4
12010 - NISD - High School
B.
1.
Duct clearances with respect to existing general construction, electrical
conduit and piped services.
2.
Existing duct work that is to remain in service.
3.
Other information required to construct the project.
Coordinate installation of duct work and equipment with other trades, prior to
installation, to prevent construction conflicts.
1.
Relocation of conflicting mechanical and electrical elements, in the area
of the work, is specified to be provided in the related section of the work.
C.
Resize duct work in areas of conflict requiring precedence.
D.
Relocate piping in the area of the work for other systems requiring precedence.
E.
Use this information to prepare shop drawings.
15015 - 4 of 4
12010 - NISD - High School
SECTION 15020
ACCESS DOORS
1.1
GENERAL
A.
Furnish doors necessary to provide access to equipment and appurtenances and
where shown on the drawings.
B.
Locate access doors so that they have an orderly and approved relation to the
construction.
C.
Access doors in acoustical ceilings:
1.
D.
Access doors in walls and ceilings:
1.
E.
1.3
Of construction as required by the surface in which installed.
When access doors are installed in fire rated building construction, provide fire
rated access doors and frames to conform to UL requirements.
1.
1.2
Relate to the pattern of acoustic material.
Provide with labels indicating rating conformance.
SUBMITTALS
A.
Submit product data as specified.
B.
Include sizes, type finishes, scheduled locations and details of adjoining work.
C.
Submit manufacturer's installation instructions.
FABRICATION
A.
Weld, fill and grind joints to assure flush and square unit.
B.
Hardware
C.
1.
175 degree steel hinges with removable pin.
2.
Screw driver slot, quarter turn cam lock.
See detail on drawings for fabrication of other access doors.
15020 - 1 of 2
12010 - NISD - High School
1.4
FINISH
A.
Use galvanized units where located outdoors.
B.
Use prime coat units with baked on primer for indoor locations.
1.
1.5
Where scheduled, finish units with baked enamel color.
INSTALLATION
A.
Verify rough openings for door and frame are correctly sized and located.
B.
Install frame plumb and level in wall and ceiling openings.
C.
Position to provide convenient access to concealed work requiring access.
D.
Secure rigidly in place in accordance with manufacturer's instructions.
15020 - 2 of 2
12010 - NISD - High School
SECTION 15021
CORRECTIONS DURING THE WARRANTY PERIOD
1.1
GENERAL
A.
The guarantee and warranty period is for (12) months after Substantial
Completion of the project.
1.
B.
The Owner will notify the contractor of any failure or observed defects in the
system during this period.
C.
Corrections to the work during this period and during regular working hours shall
be at no cost to the Owner.
1.
1.2
Refer to the related sections for extended warranty and guarantee
periods.
1. Response time shall be no longer than the day following the call from
the Owner.
D.
Emergency service shall be available to the Owner on a (24) hour every day
basis during this period.
E.
Overtime work, if requested by the Owner, will be reimbursed at the difference
between regular and premium labor at the contractor's current standard hourly
billing rate for contract customers.
PROCEDURES
A.
Prior to commencing corrections during the warranty period, determine from the
Owner any special requirements required to conform to his established policy for
work on his premises.
B.
When the service technician arrives at the project to perform the corrective work,
notify the Owner's authorized representative.
C.
Upon completion of the corrective work, file a signed copy of the service report
with:
1.
D.
The Owner's authorized representative.
If the corrective work requires more than one day to complete, notify the Owner
and give an estimate of the completion date.
15021 - 1 of 1
12010 - NISD - High School
SECTION 15022
ROUTINE MAINTENANCE DURING THE WARRANTY PERIOD
1.1
GENERAL
A.
During the warranty period, provide normal maintenance service as
recommended by the manufacturer.
1.
B.
C.
Maintenance shall include but is not limited to:
1.
Belt adjustment and replacement of damaged belts.
2.
Lubrication.
3.
Verification that UVC lights are operational (replace lights not operating).
Make inspections not less than once each (2) months:
1.
1.2
1.3
At no additional cost to the Owner.
File a copy of each inspection report with the Owner.
FILTER MAINTENANCE
A.
Replace filters as required in all equipment, prior to Substantial Completion of
the project and monthly thereafter, at no charge, until expiration of (90) days
after Substantial Completion of the project.
B.
Filter changes will be the responsibility of the Owner thereafter.
C.
Deliver to the Owner a formal notice of the date on which his routine filter
maintenance will expire.
1.
Send a copy of this notice, signed by the Owner, to the Architect.
2.
Filter maintenance will remain the responsibility of the contractor until the
signed notice is obtained from the Owner.
PROCEDURES
A.
Refer to Section 15021 for routine procedures concerning service technician's
visits to the project during the warranty period.
15022 - 1 of 1
12010 - NISD - High School
SECTION 15024
INSTRUCTION OF OWNER'S PERSONNEL
1.1
1.2
GENERAL
A.
Before final inspection, conduct an on-site training program to instruct the
Owner's operating personnel in the operation and maintenance of the
mechanical systems.
B.
Provide the training during the Owner's regular working day.
C.
The instructors shall be experienced in their phase of operation and maintenance
of the building mechanical systems and with the project.
D.
The Owner will provide a list of personnel to receive instructions and will
coordinate their attendance at the agreed upon times.
E.
Use the Operation and Maintenance Manuals as the basis of instruction. Review
contents of manual with personnel in detail to explain all aspects of operation
and maintenance.
F.
Demonstrate start-up, operation, control, adjustment, trouble-shooting, servicing,
maintenance and shutdown of each item of equipment.
G.
Demonstrate equipment functions (both individually and as part of the total
integrated system).
H.
Prepare and insert additional data in Operation and Maintenance Manuals when
need for additional data becomes apparent during instructions.
I.
For equipment or systems requiring specific seasonal operation, perform
instructions for other seasons within six months.
PROGRAM SYLLABUS
A.
Submit the proposed program syllabus for each system or systems that receive
Substantial Completion status and approval 30 days prior to the requested date
to commence training.
1.
Time and dates for each session.
2.
Subjects.
3.
Instructors.
15024 - 1 of 2
12010 - NISD - High School
4.
B.
1.3
As a minimum, allocate (24) hours of dedicated instructor time for the HVAC
systems and (8) hours of dedicated instructor time for the plumbing systems.
Choose from the time allotments that best represent system complexity.
1.
(2) hours total on (1) day.
2.
(4) hours total on (1) day.
3.
(6) hours across each of (2) days.
4.
(10) hours total across each of (2) days.
5.
(12) hours total across each of (2) days.
6.
(16) hours total across each of (3) days.
RELATED SECTIONS
A.
1.5
Submit one copy to the Owner and one copy to the Architect/Engineer for review
and approval.
MINIMUM INSTRUCTIONAL TIME
A.
1.4
Other pertinent information.
Refer to other sections of the specifications for additional training and
instructional periods specified there.
CERTIFICATES AND REPORTS
A.
B.
At the conclusion of the on-site training program, have the person designated by
the Owner sign a certificate to verify:
1.
He has a proper understanding of the system.
2.
The demonstrations and instructions have satisfactorily completed.
3.
The scope and content of the Operation and Maintenance Manuals used
for the training program are satisfactory.
Include the certificate in an appropriately tabbed section of each manual.
1.
A composite manual is required with each system's certificates as they
are accepted for Substantial Completion.
15024 - 2 of 2
12010 - NISD - High School
SECTION 15025
OPERATION AND MAINTENANCE MANUALS
1.1
REQUIREMENTS INCLUDED
A.
Compile product data and related information appropriate for Owner's
maintenance and operation of products and systems furnished under Contract.
1.
B.
1.2
Deliver (3) copies of complete manual in final form.
FORM FOR MANUALS
A.
1.3
Prepare operation and maintenance data as specified in this section and
as referenced in other pertinent sections of specifications.
Prepare data in form of an instructional manual for use by Owner's personnel.
FORMAT FOR MANUALS
A.
Size: 8-1/2 in. x 11 in.
B.
Text: manufacturer's printed data or neatly typewritten.
C.
Drawings:
D.
1.
Provide reinforced punched binder tab and bind in text.
2.
Fold larger drawings to size of text pages.
Internally subdivide the manual contents with permanent page dividers, logically
organized.
1.
Index tab titling clearly printed under reinforced laminated plastic tabs.
2.
Indexed tabs for each separate product or each piece of operating
equipment or each operating system.
E.
Provide typed description of products and major component parts of equipment.
F.
Where appropriate, submit documentation for large sub-systems and reports in
an individual binder.
1.
Annotated and internally subdivided as specified.
15025 - 1 of 6
12010 - NISD - High School
1.4
1.5
BINDERS
A.
Commercial quality "D-ring" binders (three rings) "ONLY" with hard back and
cleanable plastic covers.
B.
Minimum ring size: 3 inch.
C.
When multiple binders are used, correlate the data into related consistent
groupings.
COVER
A.
B.
1.6
Identify each volume with typed or printed title "OPERATION AND
MAINTENANCE INSTRUCTIONS".
1.
Title of Project, name of Architect/Engineer.
2.
Identify separate structures as applicable.
3.
Identify subject matter covered in each manual, when multiple binders
are required.
Print identifying information on the front cover and spine and secure with
adhesive.
CONTENT OF MANUALS
A.
All reviewed product submittals and shop drawings for the project will form the
basis of the Table of Contents and the tabbed sections for the Operation and
Maintenance Manuals.
1.
List names, addresses and telephone numbers of contractor and
subcontractor with name, address and telephone number of responsible
parties.
B.
ALL warranties, reports, certificates, forms and other texts and documents
required prior to Substantial Completion shall be included in the Operation and
Maintenance Manuals.
C.
Provide a Table of Contents for each volume arranged in systematic order.
D.
Product data:
1.
Include only those sheets which are pertinent to the specific product.
2.
Delete references to inapplicable information.
15025 - 2 of 6
12010 - NISD - High School
E.
1.7
Drawings:
1.
Supplement product data to illustrate relations of component parts of
equipment and systems to show controls and flow diagrams.
2.
Coordinate drawings with information in the Project Record Documents to
assure correct illustration of completed installation.
3.
Do not use Project Record Documents as maintenance drawings.
F.
Type text as required to supplement product data. Provide logical sequence of
instructions for each procedure, incorporating manufacturer's instructions.
G.
Warranties, reports, certificates, forms and other documents.
1.
Original copy of each equipment warranty.
2.
Copy of Testing and Acceptance Procedures and Reports of the Building
Automation System.
3.
Copy of tests and reports specified in the related individual specification
section.
4.
Original copy of each certificate, report and receipt bearing signatures
and Notary Seal as appropriate.
5.
Copy of Test and Balance Report.
MANUAL FOR EQUIPMENT AND SYSTEMS
A.
Content for each unit of equipment and system as appropriate:
1.
2.
Description of unit and component parts.
a.
Function, normal operating characteristics and limiting conditions.
b.
Performance curves, engineering data and tests.
c.
Complete nomenclature and commercial number of replaceable
parts.
Operating procedures:
a.
Start up, break-in, routine and normal operating instructions.
b.
Regulation, control, stopping, shut down and emergency
15025 - 3 of 6
12010 - NISD - High School
instructions.
3.
B.
c.
Summer and winter operating instructions.
d.
Special operating instructions.
Maintenance procedures:
a.
Routine operations.
b.
Guide to "trouble-shooting".
c.
Disassembly, repair and reassembly.
d.
Alignment, adjusting and checking.
e.
Routine service based on operating hours.
4.
Servicing schedules.
5.
Manufacturer's printed operating and maintenance instructions.
6.
Description of sequence of operation by control manufacturer.
7.
Manufacturer's parts list, illustrations, assembly drawings and diagrams
required for maintenance.
a.
Predicted life of parts subject to wear.
b.
Items recommended to be stocked as spare parts.
8.
As installed Building Automation System (BAS) diagrams by (BAS)
manufacturer/contractor.
9.
Complete equipment internal wiring diagrams.
10.
Schedule for each air handling unit, the number and size of filters, the
number and type of UVC lamps.
11.
Schedule of each air handling unit belt size.
12.
"As installed" color coded piping diagrams.
13.
Other data as required under pertinent sections of the specifications.
Prepare and include additional data when the need for such data becomes
15025 - 4 of 6
12010 - NISD - High School
apparent during instruction of Owner's personnel.
1.8
OPERATING AND MAINTENANCE MANUAL SUBMISSION SCHEDULE
A.
At least [ 30 ] days prior to the date of Substantial Completion, submit one copy
of the Operation and Maintenance Manual to the Architect/Engineer. The copy
shall be essentially complete.
B.
Minimum documentation for this submission:
C.
1.
Table of contents for each binder.
2.
Contractor information.
3.
All parts and maintenance manuals for items of equipment.
4.
Warranties (without starting dates).
5.
Certifications that have been completed. Submit forms and outlines of
certifications that have not been completed.
6.
Operating and maintenance procedures.
7.
Form of Owner's Training Program Syllabus.
8.
Control operations/equipment wiring diagrams.
9.
Coordination drawings.
10.
Schedules of operating, maintenance and repair parts and components.
11.
Other required operation and maintenance submittals that are complete.
Include in this initial submittal, all shop drawings, coordination drawings and
product data required for the project under Division 15.
1.
Bear the contractor's stamp of approval.
2.
If reviewed by the Architect/Engineer, bear the Architect/Engineer's
stamp, with an appropriate level of approval annotated thereon.
D.
Written response will be provided to the contractor with comments for the
required corrections.
E.
The contractor will be notified of missing, omitted or incomplete materials. The
manuals shall be reworked by the contractor, as required.
15025 - 5 of 6
12010 - NISD - High School
F.
Deliver (2) finally complete manuals to the Architect/Engineer for delivery to the
Owner.
G.
Deliver (1) finally complete manual to the Engineer.
15025 - 6 of 6
12010 - NISD - High School
SECTION 15026
CONTRACT QUALITY CONTROL
1.1
1.2
REQUIREMENTS INCLUDED
A.
General quality control.
B.
Workmanship.
C.
Manufacturer's instructions.
D.
Manufacturer's certificates.
E.
Manufacturer's field services.
F.
Mockups.
QUALITY CONTROL PROGRAM
A.
1.3
1.4
1.5
Maintain quality control over supervision, subcontractors, suppliers,
manufacturers, products, services, site conditions and workmanship to produce
work in accordance with the Contract Documents.
WORKMANSHIP
A.
Comply with industry standards except when more restrictive tolerances or
specified requirements indicate more rigid standards or more precise
workmanship.
B.
Perform work by persons qualified to produce workmanship of specified quality.
C.
Secure products in place with positive anchorage devices designed and sized to
withstand stresses, vibration and racking.
D.
Provide finishes to match approved samples.
MANUFACTURER'S INSTRUCTIONS
A.
Comply with instructions in full detail including each step in sequence.
B.
Should instruction conflict with Contract Documents, request clarification from
Architect/Engineer before proceeding.
MANUFACTURER'S CERTIFICATES
15026 - 1 of 5
12010 - NISD - High School
A.
1.6
1.7
1.8
When required in individual specification sections, submit manufacturer's
certificate, in duplicate, certifying that products meet or exceed specified
requirements, executed by responsible officer.
MANUFACTURER'S FIELD SERVICES
A.
When required in individual specification sections, require manufacturer to
provide qualified personnel to observe field conditions; condition of installation;
quality of workmanship; start-up of equipment; test, adjust and balance of
equipment.
B.
Representative shall make written report of observations and recommendations
to Architect/Engineer.
MOCK UPS
A.
Assemble and erect the specified equipment and products complete, with
specified anchorage and support devices, seals and finishes.
B.
Do not proceed with any work involving a mock up until the related mock up has
been approved in writing.
C.
Submit color photographs of each approved mock up in each phase.
1.
Minimum four views.
2.
Minimum size 3 x 5 inch.
D.
Acceptable mock ups in place may be retained in the completed work.
E.
Perform tests and submit results as specified.
SCHEDULING OF MOCK UPS
A.
Schedule demonstration and observation of mock ups, in phases, with
Architect/Engineer.
1.
Rough-in.
2.
Finish with all appurtenances in place.
3.
Insulation installed.
4.
Demonstrations.
15026 - 2 of 5
12010 - NISD - High School
1.9
FAN POWERED TERMINAL UNIT
A.
B.
Mock up a fan powered terminal unit, completely installed, including:
1.
Suspension system.
2.
Vibration isolation.
3.
Inlet duct back to the primary duct.
4.
Outlet duct to at least one diffuser.
5.
Heater piping connection.
6.
Duct insulation.
7.
Pipe insulation.
8.
Electrical and electronic connections.
9.
Valve tags and pipe identification.
Tests:
1.
C.
1.10
Air flow control throughout the range.
Demonstrate:
1.
Fan operation interlock.
2.
Accessibility to internal components for service.
3.
Control sequence.
AIR HANDLING UNIT
A.
Mock up an air handling unit, completely installed, including:
1.
Piping connections including thermowells, test stations and test wells.
2.
Pipe vibration isolation.
3.
Pipe insulation.
4.
Condensate drain piping.
5.
Electrical connections.
15026 - 3 of 5
12010 - NISD - High School
B.
6.
Ductwork beyond the first transition.
7.
Control valves and bypass.
8.
Cabinet vibration isolation.
9.
Block valves and balancing valves.
10.
Duct insulation.
11.
Instrumentation.
Tests:
1.
C.
1.11
Air flow at scheduled static pressure.
Demonstrate:
1.
Filter accessibility.
2.
Accessibility to drain and components for service.
3.
Controls sequence.
FAN/COIL UNIT
A.
Mock up one of each style of fan/coil unit (vertical up, down discharge and
horizontal) completely installed including:
1.
Primary, secondary and auxiliary drain pans.
2.
Piping connections including thermowells, test stations and test wells.
3.
Pipe insulation.
4.
Condensate drain piping.
5.
Electrical connections.
6.
Duct connection.
7.
Valve package.
8.
Cabinet vibration isolation.
9.
Suspension system.
15026 - 4 of 5
12010 - NISD - High School
B.
10.
Duct insulation.
11.
Valve tags and pipe identification.
Tests:
1.
C.
1.12
Air flow at scheduled static pressure.
Demonstrate:
1.
Filter accessibility.
2.
Accessibility to components for service.
3.
Controls sequence.
HOT AND CHILLED WATER CIRCULATING PUMPS
A.
Mock up one each hot and chilled water pump, completely installed, including:
1.
Pump mounted on housekeeping pad.
2.
Auxiliary drain pan (where applicable).
3.
Piping to a point beyond the complete valve and instrumentation
assemblies (gauge cocks, drains, thermowells and instrument wells).
4.
Strainers with blowdown.
5.
Flexible piping connections.
6.
Pipe supports.
7.
Pipe insulation.
8.
Pump painting.
9.
Electrical connections.
15026 - 5 of 5
12010 - NISD - High School
SECTION 15027
IDENTIFICATION
1.1
GENERAL
A.
1.2
PIPE LINES IDENTIFICATION
A.
B.
C.
1.3
Provide nameplates and tags that correspond to the identification shown on the
operating instructions, automatic temperature control drawings, project record
documents and other project related material.
Identify all piping that is accessible for maintenance operations.
1.
Do not use on piping in finished spaces.
2.
Use printed PVC snap-on bands.
Locate pipe identification markers as follows:
1.
Adjacent to each valve and fitting.
2.
At each branch and riser take-off.
3.
At each pipe passage through wall, floor and ceiling construction.
4.
On all accessible horizontal pipe runs - marked every 25 feet.
Conform to ANSI standard A13.1 current edition "Scheme for the Identification of
Piping Systems". Each marker shall show:
1.
Approved color-coded background.
2.
Proper color of legend in relation to background color.
3.
Approved legend letter size.
4.
Approved marker length.
D.
Show direction of flow with arrows.
E.
At the Contractor's option, a PVC band held in position with plastic locking straps
may be employed.
MANUFACTURER'S LABELS
A.
Fabricated of engraved laminated plastic or etched metal plate.
15027 - 1 of 3
12010 - NISD - High School
1.
1.4
1.5
Secured to equipment with escutcheon pins, self-tapping or machine
screws.
B.
Plate shall identify each item of equipment.
C.
Plate shall bear the manufacturer's name and address and the item's catalog
number affixed to the equipment in a conspicuous place.
EQUIPMENT LABELS
A.
Provide a laminated engraved plastic nameplate on each piece of equipment and
starter using a designation approved by the Engineer.
B.
Submit a schedule according to the shop drawing procedure.
C.
Provide nameplates with 1/4" high letters and fastened with epoxy or screws.
VALVE IDENTIFICATION
A.
Provide identification for all valves in the form of engraved plastic tags.
1.
Minimum of 3/4" x 2-1/2", large enough to accommodate required
wording and engraved characters 1/4" high.
2.
Wording to show the function of the valve.
3.
Consecutively numbered.
4.
Attached to the valve with a stainless steel chain or meter seal with 4 ply
.018 copper wire.
B.
Where valves are within 48" of the equipment served, in plain view, and their
duty is obvious, a valve identification tag is not required.
C.
Furnish charts of all valves in triplicate. Charts shall include the following:
D.
1.
Valve Identification Number.
2.
Location.
3.
Purpose.
Laminate each chart between .015" thick plastic sheets with edges sealed.
1.
Enclose two charts in aluminum frames and hang where directed.
2.
Deliver one laminated chart to the Owner.
15027 - 2 of 3
12010 - NISD - High School
E.
1.6
Insert a copy of the valve chart in the Owner's Manuals.
INSTALLATION
A.
Give attention to visibility with reference to pipe markings and labels. Where
pipe lines are located above or below the normal line of vision, the lettering shall
be placed below or above the horizontal centerline of the pipe.
B.
For identification of piping systems of less than 3/4" in diameter, use a
permanently legible tag as specified for valve identification.
C.
When the piping layout creates or occurs in a limited area of inaccessibility or of
extreme complexity, such segments of layouts may require substitute techniques
to achieve positive identification. Use of substitute techniques shall be limited to
such segments and shall be approved prior to installation.
15027 - 3 of 3
12010 - NISD - High School
SECTION 15028
PAINTING MECHANICAL SYSTEMS
1.1
1.2
1.3
1.4
WORK INCLUDED
A.
Surface preparation.
B.
Surface finish schedule.
C.
Colors shall be as selected by the Architect/Engineer. All paint colors will be
selected from the paint manufacturer's standard color chart.
QUALITY ASSURANCE
A.
Product manufacturer: company specializing in manufacturing quality paint and
finish products with three years experience.
B.
Applicator: company specializing in commercial painting and finishing with five
years experience.
REGULATORY REQUIREMENTS
A.
Conform to code for flame/fuel/smoke rating requirements for finishes.
B.
Adhere to all safety rules and regulations of the Owner, applicable municipal,
state and federal laws and Insurance Underwriter Regulations in the storing,
handling, use and application of paints and paint materials.
C.
Adhere to all applicable subparts of Part 1910 of the "Occupational Safety and
Health Standards" in the execution of all work.
DELIVERY, STORAGE AND HANDLING
A.
Deliver products to site in sealed and labeled containers; inspect to verify
acceptance.
B.
Container labeling to include manufacturer's name, type of paint, brand name,
brand code, coverage, surface preparation, drying time, cleanup, color
designation and instructions for mixing and reducing.
C.
Store paint materials in well ventilated area according to manufacturer's
instructions.
D.
Take precautionary measures to prevent fire hazards and spontaneous
combustion.
15028 - 1 of 4
12010 - NISD - High School
1.5
1.6
1.7
ACCEPTABLE MANUFACTURERS
A.
Pittsburgh.
B.
Pratt and Lambert.
C.
Sherwin-Williams.
D.
Rustoleum.
E.
Glidden.
MATERIALS
A.
Coatings: good flow and brushing properties; capable of drying or curing free of
streaks or sags.
B.
Accessory materials: turpentine, paint thinners and other materials not
specifically indicated, but required to achieve the finishes specified of
commercial quality.
INSPECTION
A.
Verify that surfaces are ready to receive work as instructed by the product
manufacturer.
B.
Examine surfaces scheduled to be finished prior to commencement of work.
Report any condition that may potentially affect proper application.
1.
1.8
Beginning of painting application means contractor acceptance of existing
surfaces.
PREPARATION
A.
Remove hardware, trim and fittings prior to preparing surfaces for finishing.
B.
Correct minor defects and clean surfaces which affect work of this section.
C.
Impervious surfaces: remove mildew by scrubbing with solution of tri-sodium
phosphate and bleach. Rinse with clean water and allow surface to dry.
D.
Galvanized surfaces: remove surface contamination and oils and wash with
solvent. Apply coat of etching primer.
E.
Uncoated steel and iron surfaces: remove grease, scale, dirt and rust. Where
heavy coatings of scale are evident, remove by wire brushing or sandblasting;
clean by washing with solvent. Spot prime paint after repairs.
15028 - 2 of 4
12010 - NISD - High School
F.
1.9
1.10
1.11
1.12
Shop primed steel surfaces: sand and scrape to remove loose primer and rust.
Feather edges to make touch-up patches inconspicuous. Clean surfaces with
solvent. Prime bare steel surfaces.
PROTECTION
A.
Protect elements surrounding the work of this section from damage or
disfiguration.
B.
Repair damage to other surfaces caused by work of this section.
C.
Furnish drop cloths, shields and protective methods to prevent spray or
droppings from disfiguring other surfaces.
D.
Remove empty paint containers from site.
APPLICATION
A.
Apply products in accordance with manufacturer's instructions.
B.
Do not apply finishes to surfaces that are not dry.
C.
Apply each coat to uniform finish.
D.
Allow applied coat to dry before next coat is applied.
CLEANING
A.
As work proceeds, promptly remove paint where spilled, splashed or spattered.
B.
During progress of work maintain premises free of unnecessary accumulation of
tools, equipment, surplus materials and debris.
C.
Collect cloths and material which may constitute a fire hazard, place in closed
metal containers and remove daily from site.
SCHEDULE
A.
B.
Steel - unprimed.
1.
Prime coat Sherwin Williams KEM KROMIK B50.
2.
Two coats Sherwin Williams B42 Series Metalatex Semi-gloss Industrial
coating.
Steel - primed.
1.
Touch-up with original primer.
15028 - 3 of 4
12010 - NISD - High School
2.
C.
D.
1.13
1.14
Two coats Sherwin Williams B42 Series Metalatex Semi-gloss Industrial
coating.
Steel - galvanized.
1.
Prime coat Sherwin Williams Galvite B50W3.
2.
Two coats Sherwin Williams B42 Series Metalatex Semi-gloss Industrial
coating.
Previously painted steel.
1.
Touch-up scratched and abraded areas with original primer.
2.
Two coats Sherwin Williams B42 Series Metalatex Semi-gloss Industrial
coating.
UNPAINTED SURFACES
A.
Do not paint nameplates or polished surfaces.
B.
Do not paint valve stem, valve stem threads, packing, packing nuts and bolts
and other items which in normal operation are subject to frequent usage.
COMPONENT PAINTING SCHEDULE
A.
Exposed gas piping (interior).
B.
Pipe hangers and supports (non-galvanized).
C.
Access doors (only if exposed in occupied areas).
D.
Exposed steel piping in mechanical rooms.
1.
Verify color with Engineer.
E.
All exposed uninsulated ducts outside.
F.
Other exposed ducts inside where noted.
G.
Chilled and hot water pump assemblies.
H.
Uninsulated expansion tanks.
15028 - 4 of 4
12010 - NISD - High School
SECTION 15029
WARRANTIES
1.1
1.2
1.3
GENERAL
A.
Compile specified warranty and guarantee documents for inclusion in each of the
Operation and Maintenance Manuals specified in Section 15025.
B.
Execute and assemble original documents from subcontractors, suppliers and
manufacturers.
C.
Verify that documents are in proper form and contain full information.
D.
Co-execute documents when required.
E.
Signatures and notary public seals (if applicable) shall be original on each form.
RELATED SECTIONS
A.
Section 15025 - Operation and Maintenance Manuals.
B.
Individual specification sections: warranties required for specific products or
work.
PREPARATION OF SUBMITTALS
A.
Except for items put into early use with Owner's permission, date of beginning of
time of warranty is the date of Substantial Completion.
B.
For elements of work delayed beyond date of Substantial Completion, provide
updated submittal within ten days after acceptance, listing date of acceptance as
start of warranty period.
C.
Execute each warranty document with:
D.
1.
Date of beginning of warranty.
2.
Duration and date of ending of warranty.
3.
Serial number, model number and other appropriate identification of
covered equipment.
Write project specific warranty documents, exactly paraphrasing the Contract
Documents.
15029 - 1 of 2
12010 - NISD - High School
1.
Exceptions or deviations from the Contract Documents are not approved.
15029 - 2 of 2
12010 - NISD - High School
SECTION 15030
COMMISSIONING OF HVAC SYSTEM AND COORDINATION
OF TESTING AND BALANCING
1.1
DIVISION 15 WORK AND COORDINATION
A.
Bring the work to a state of readiness for testing, balancing, and adjusting as
specified in this section
1.
Install air terminal devices.
2.
Provide specified filters in air handling equipment. Install clean filters just
prior to the start of the test and balance work.
3.
Verify lubrication of equipment.
4.
Install permanent instrumentation.
5.
Ensure that the piping systems are clean and filled with treated water.
6.
Complete "start-up" of equipment.
7.
Check rotation and alignment of rotating equipment and tension of belted
drives.
8.
Verify ratings of overload heaters in motor starters. Install correct
heaters.
9.
Verify that safety and operating control set points are as designed and
automatic control sequences have been checked.
10.
Provide control diagrams and sequence of operation.
11.
Collect material for maintenance manuals and prepare one manual
especially for use in testing and balancing.
12.
Verify that graphic operational data such as start/stop instructions, valve
tag schedules, and piping identification schedules have been provided
where needed.
13.
Verify that equipment and piping identification work has been completed
with valve tags, schedules, and piping identification system.
14.
Comb out fins on extended surface heat transfer coils where damaged.
15030 - 1 of 10
12010 - NISD - High School
1.2
1.3
FAN SPEED ADJUSTMENTS
A.
Change the pulleys and belts as required to effect the correct speed ratio.
B.
Provide an adjustable pitch sheave to serve during system commissioning and
test and balance to determine the final fan speed.
C.
Once the correct fan speed has been determined:
Replace the adjustable pitch sheave (7-1/2 HP and larger) with a fixed
pitch sheave of the correct pitch diameter.
2.
Provide new matched belts of the correct size. If a change is required.
SYSTEM CERTIFICATION
A.
B.
1.4
1.
Submit a letter stating:
1.
The specified pieces of equipment have been checked, started, and
adjusted by Division 15.
2.
Other equipment has been checked and started.
3.
The systems have been operated for the specified period of time.
4.
The automatic controls system has been adjusted, calibrated, and
checked, and is operating as specified.
5.
The Building Automation System tests have been completed.
Certify that the systems are ready for balancing and adjusting.
TESTING, ADJUSTING AND BALANCING
A.
Testing, adjusting and balancing (T.A.B.) of the environmental systems is
specified in Section 01660.
B.
Installation of automatic temperature controls (A.T.C.) is specified in Section
15900.
C.
Commissioning of the work and coordination of T.A.B. and A.T.C. is specified in
this section.
D.
Substantial Completion for the HVAC work will not be recommended until
Sections 15030, 01660 and 15900 are 100% complete and the HVAC running
demonstration has been successfully completed.
15030 - 2 of 10
12010 - NISD - High School
1.5
SYSTEM COMMISSIONING AND COORDINATION
A.
Bring the work to a state of readiness for testing, adjusting and balancing.
1.
2.
Circulating chilled and hot water systems:
a.
Cleaned and flushed.
b.
Water program manager certificate provided.
c.
Water treatment in place.
d.
Verify flow meters are correctly placed for accurate read out.
e.
Prior to chiller start ups, confirm all insulation vapor barrier
systems are in place. Do not sweat any appurtenances or vessels
in the piping system.
f.
Provide an initial balance at pumps, boilers, chillers, fan-coil units
and air handling units.
Check circulating water systems:
a.
Required block valves.
b.
Required balancing valves with infinite positioning levers.
c.
Required drain valves with hose adapters.
d.
All balancing valves set for 45 degrees for initial balance and
system start up.
3.
Water treatment chemical feeders are operational with valves, drains,
sight glasses and insulation with removable insulation cap.
4.
Chilled and hot water circulating water system pumps:
a.
Operational, correct rotation and on local control.
b.
All necessary pressure taps and test wells installed.
c.
Start up strainers removed. Provide clean running strainers in
place.
d.
Initial throttling by pump curve and pressure drop across pump.
15030 - 3 of 10
12010 - NISD - High School
5.
6.
Water chilling machines:
a.
Operational, on local control.
b.
Initial setting of pressure drop across chiller barrel by throttling.
c.
All necessary pressure taps and test wells installed.
Chilled and hot systems makeup water:
a.
Provide water meter (see Section 15705).
b.
Provide makeup water piping PRV (set to proper system
pressure) and relief valve.
c.
High (circulating water piping) point manual air vents installed with
copper bleed off tubing run to drain.
7.
All motor over current protection devices installed and sized for motor
overcurrent protection. All motors operating within name plate. Not in
service factor.
8.
At all air handling and fan-coil units:
9.
a.
Verify correct chilled and hot water piping arrangement.
b.
Operational and on local control.
c.
No air locked coils.
d.
Clean coils, surfaces and clean filters.
e.
Correct fan rotation, speed and amps utilizing submitted fan
curves.
f.
Proper condensate removal.
g.
No vibration or operating noises. Unit vibration isolation adjusted
and set.
h.
Check all drives and variable speed drives. No vibration or noise.
i.
Align and tension all belts.
All motorized dampers:
a.
Installed.
15030 - 4 of 10
12010 - NISD - High School
10.
11.
12.
b.
Interlocked/controlled.
c.
Tested for interlock or control and exercised.
Exhaust and supply fans:
a.
Operating with correct running load amps and rotation.
b.
Backdraft dampers installed and operational.
c.
Interlocks in place and operational.
d.
No noise or vibration.
Supply, return and exhaust duct work installed with:
a.
All required manual and motorized volume dampers.
b.
Completed insulation with vapor barriers.
c.
All supply, exhaust and return grilles.
d.
All return air pathways are open.
e.
At return air plenums, ensure building return air/air plenum is
sealed air tight.
Review, record, report any observed or discovered equipment
deficiencies:
a.
AHU units and fan-coil units.
b.
Water treatment.
c.
Pumps.
d.
Chillers.
e.
Exhaust and supply fans.
f.
A.T.C. control elements.
g.
All coils in correct position, i.e., reheat, pretreat piped to the
correct water supply/return system.
15030 - 5 of 10
12010 - NISD - High School
13.
B.
Automatic temperature control system:
a.
Establish automation system local control for all air handling units,
VAV boxes and exhaust fans.
b.
Establish local automation system control for the chilled water
plant and pumps during interim operations.
c.
Complete automation network of local controlled systems and the
building automation system.
d.
Provide proof of automation control point testing and provide
coordination for the required HVAC system demonstration.
e.
Verify all safety interlocks are in place along with automated
control sequences.
f.
Provide copies of control diagrams and sequences for system
commissioning.
General items.
1.
Verify that equipment and piping identification is completed with valve
tags, schedules and piping identification system.
2.
Verify in writing to the Engineer when system commissioning operations,
final test and balance, along with automation system network will be
completed and HVAC system running demonstration can be scheduled.
3.
Prior to test and run demonstration, meet with Engineer to establish all
data required is available for the test and run demonstration and project
completion date.
a.
1.6
Notify the Engineer and Owner of projected date for test and run
demonstration.
4.
Provide copies of equipment factory start up certificates (reports) to the
Engineer for specified equipment.
5.
Refer to applicable sections of Division 15 and Division 16 for specific
requirements for items of equipment, materials, services and systems
referenced to in this section.
CONDUCT FOR THE ENGINEER AND OWNER AN HVAC SYSTEM RUNNING
DEMONSTRATION
A.
Schedule for (1) day, commencing time to be established.
15030 - 6 of 10
12010 - NISD - High School
B.
Provide listed documents for the demonstration:
1.
Copy of Owner's Operation and Maintenance Manuals.
2.
Copy of notification to Owner's operating and maintenance personnel.
3.
Certificates for factory start ups.
4.
Copy of Testing and Balancing Report and site visit reports.
5.
Any required test instruments/devices required for the demonstration
(with proof of calibration).
C.
Exercise motorized dampers, prove interlocks.
D.
Exercise and prove interlocks for exhaust and supply systems.
E.
Exercise and prove control functions for each space:
F.
G.
1.
Space temperature and humidity control set point being maintained for
cooling.
2.
Space temperature control set point being maintained for heating.
For circulating water pumps, demonstrate:
1.
Balance and flow on pump curve.
2.
Rate of flow through flow meter.
3.
Head in feet across pumps.
4.
Compare to manufacturer's pressure drop across the vessel served.
5.
Pump current draw each phase.
For hot water boilers:
1.
Operational, on local control.
2.
Factory Pre-Start and Safety check lists completed along with local
control set up.
3.
Water temperature set as scheduled.
4.
Initial throttling by pressure drop across boiler set.
15030 - 7 of 10
12010 - NISD - High School
H.
I.
J.
5.
All pressure taps and test wells installed.
6.
Relief valves piped/supported to floor drains.
For air-cooled water chilling machines, demonstrate:
1.
Delta pressure drop across chiller barrel plotted on the manufacturer's
Delta P versus GPM chart.
2.
Temperature set point.
3.
Entering CHW temperature.
4.
Leaving CHW temperature.
5.
Condenser air entering temperature.
6.
Condenser air leaving temperature.
7.
Head pressure.
8.
Suction pressure.
9.
Current draw.
10.
Ambient air temperature.
Air handling units and fan-coil systems, demonstrate:
1.
Supply air quantity.
2.
Return air quantity.
3.
O.A. quantity.
4.
Fan speed/RPM.
5.
Amp draw.
6.
Entering air temperature DB/WB.
7.
Leaving air temperature DB/WB.
For each new exhaust (or supply) system, demonstrate:
1.
Air quantity.
15030 - 8 of 10
12010 - NISD - High School
2.
K.
1.7
For building, demonstrate pressurization:
1.
Building external static measured to building internal static at each
building exposure.
2.
Measure/record wind velocity.
EXTENDED WARRANTY
A.
1.8
Reference to Section 01660, Article 1.06 for extended testing and balancing
warranty. The Division 15 Contractor shall provide the services of a technician to
coordinate with the representatives of the TAB firm during the specified extended
warranty period which occurs for 180 days after Owner occupancy of the
building.
COMPLAINT LOG
A.
Prepare a log book for use at the site by the Owner’s personnel, after occupancy
of the building.
1.
B.
1.9
Amp draw.
Submit the forms to the Architect/Engineer for approval prior to use.
Format shall allow adequate columns and lines for:
1.
Location by room number.
2.
Complaint.
3.
Name of person reporting the complaint.
4.
Other remarks.
C.
Deliver the log to the Owner at the site in a three ring binder, with an appropriate
title on the cover.
D.
Provide sufficient blank forms for three months activity.
CONTINUING SERVICES
A.
Make a project inspection once each month for the three months after Owner
occupancy of the building commences.
1.
Verify that design conditions are being met throughout the project.
15030 - 9 of 10
12010 - NISD - High School
2.
B.
Review the complaint log maintained at the project, by the Owner.
1.
C.
Notify TAB (01660) if his services are required.
Make all necessary adjustments.
Submit a log of all activity of corrections and adjustments made during each visit.
15030 - 10 of 10
12010 - NISD - High School
SECTION 15031
TESTING, ADJUSTING AND BALANCING (TAB) OF ENVIRONMENTAL SYSTEMS
1.1
RELATED WORK
A.
1.2
Section 15030 - "Commissioning of HVAC System and Coordination of Testing
and Balancing.
GENERAL
A.
The organization performing the work shall be:
1.
B.
C.
D.
1.3
Certified member of the AABC.
The organization shall provide the services of a supervisor with extensive
knowledge of the work involved and at least two years experience conducting
tests of the type specified.
1.
All work shall be conducted under the direct supervision of the
supervisor.
2.
Technicians shall be trained and experienced in the work they conduct.
The organization shall utilize comprehensive report forms to document results.
1.
Upon completion of the TAB work, the report forms shall be signed by the
supervising engineer and included in the final report and Owner's Manual.
2.
SUBMIT THREE COPIES OF THE FINAL REPORT TO THE
ENGINEER.
Refer to specification work sequence notes/plan notes to understand various
systems will be made operational during the course of project construction. This
section will be required to complete the specified requirements as each system is
substantially completed.
ACCEPTABLE TAB FIRMS
A.
Coastal Air Balance (409) 291-2524
B.
Engineered Air Balance (713) 784-4825.
15031 - 1 of 8
12010 - NISD - High School
1.4
TAB FIRM QUALIFICATIONS
A.
An approved organization for the work under this section:
1.
B.
1.5
A specialist in this field and have the personnel, experience, training, skill
and the organization to perform the work.
To support the evidence of qualification, provide the following information (does
not apply to firms listed in 1.3):
1.
History of the TAB organization.
2.
Agency certification.
3.
Personnel qualifications.
4.
TAB data forms.
5.
Instrumentation list.
6.
Name of the project supervisor.
7.
Name and address and contact person of five successfully completed
projects of similar size and scope.
SCOPE
A.
B.
Test, adjust and balance:
1.
The air distribution systems.
2.
The exhaust systems.
3.
The hydronic system.
PERFORM TWO PERIODIC INSPECTIONS OF THE PROJECT DURING
CONSTRUCTION.
1.
Notify the Engineer in writing of these inspections along with any
deviations from the Contract Documents relating to the testing, adjusting
and balancing work.
2.
In the succeeding report, list corrections made from previous report.
15031 - 2 of 8
12010 - NISD - High School
1.6
1.7
EXTENDED WARRANTY
A.
Include an extended warranty of 180 days after completion of test and balance
work, during which time the Engineer may request a re-test or re-setting of any
outlet or other item as listed in the test report.
B.
Provide technicians and instruments to assist the Architect/Engineer in making
any tests he may require during this period.
TESTING INSTRUMENTS
A.
B.
1.8
Submit a list of all instruments to be used for the test and balance procedures.
1.
Catalog sheets.
2.
Certificate of last calibration.
Testing equipment shall be in good working order and tested for accuracy prior
to start of work.
RELATED WORK
A.
Refer to Section 15030 for coordination specified there.
B.
Review the related duct work shop drawings and piping shop drawings.
1.
C.
Measure building static pressure and adjust supply, return and exhaust air
systems to provide required relationship between each to maintain approximately
0.05 inches positive static pressure near the building entries.
D.
In cooperation with the work specified in Section 15900 and related sections, set
and adjust automatically operated dampers and valves.
1.
E.
Verify correct operation of all sequences.
Upon completion of the testing and balancing, submit (3) days prior notice that
the systems are ready for a running test.
1.
1.9
Make recommendations concerning suitability with respect to the testing,
adjusting and balancing work.
A qualified representative of the test and balance organization shall be
present.
INSTRUMENT TEST HOLES
A.
When it is required to make holes in the field, to measure temperature, static
15031 - 3 of 8
12010 - NISD - High School
pressure or velocity in the ducts:
1.10
1.
Drill holes.
2.
Provide plastic plugs.
TESTING THE CONSTANT VOLUME AIR DISTRIBUTION SYSTEMS
A.
Record preliminary air handler data including fan RPM and static pressures
across filter, fans and coils.
B.
Perform a velocity traverse of the main supply ducts using a pitot tube and
inclined manometer or electronic instruments to establish initial air delivery.
C.
Determine percentage of outside air and return air using velocity traverse or
temperature relationship.
1.
1.11
Measure at minimum and maximum outside air settings where applicable.
D.
Make adjustments in fan RPM and damper settings as required to obtain design
supply air, return air and outside air.
E.
Measure and adjust all supply and return branches to design air delivery.
F.
Measure and adjust all diffusers to design air delivery to +/- 5-10% of design
requirements.
G.
Make a set of recordings showing final system conditions.
TESTING THE VARIABLE VOLUME AIR DISTRIBUTION SYSTEMS
A.
Measure and adjust all fan powered terminal units to design air delivery.
B.
Set the supply air static pressure control network to produce maximum supply
duct pressures.
C.
Measure and adjust the design air delivery at the inlet of each fan powered
terminal unit.
D.
Measure and record the air quantity from each fan powered terminal unit at its
maximum flow.
1.
Manipulate the controlling temperature sensor/DDC controller to achieve
maximum flow.
2.
Simultaneously record both the inlet static pressure at each terminal unit
and the DDC controller signal to the terminal unit.
15031 - 4 of 8
12010 - NISD - High School
E.
Reset each terminal unit through the DDC controller to yield minimum flow.
1.
F.
If the terminal unit is operating with inlet static pressure in excess of the
minimum cataloged pressure specified by the manufacturer; and is not producing
rated air quantity; field adjust the terminal unit to produce rated air quantity.
1.
Re-test until approved results are obtained.
G.
Position the fan powered terminal units to the proportion of maximum fan air
volume to total installed terminal unit maximum volume.
H.
Set the fan to operate at approximate design speed.
I.
Make a total air traverse.
J.
Make a speed increase if either or both static and volume are low.
1.
If the volume is correct, but the static is high, reduce the speed.
2.
If the static is high or correct, but the volume is low, adjust all of the
terminal units to the proper volume.
K.
Set the terminal units to minimum, adjust the variable frequence fan speed
controller until minimum static and volume are obtained.
L.
Coordinate with the work specified in Section 15910 on the final location of the
sensors for the static pressure controller.
1.
1.12
Simultaneously record the inlet static pressure to each terminal unit and
the DDC controller signal to the terminal unit.
Locate in the supply duct far enough from the fan discharge to be truly
representative of the average static pressure in the system.
M.
Adjust the variable frequency fan speed controller as required to coordinate with
the static pressure sensing network.
N.
Make a set of recordings showing final system conditions.
1.
System duct static pressures.
2.
Control system signal pressures.
TESTING THE EXHAUST AND VENTILATION SYSTEMS
A.
Test and balance the exhaust and ventilation systems using the methods
15031 - 5 of 8
12010 - NISD - High School
specified for constant volume air distribution systems.
1.13
TESTING THE HYDRONIC SYSTEMS
A.
1.14
1.
Pump RPM.
2.
Pump shut-off differential head.
3.
Pump operating differential head.
B.
Adjust balancing valves in the pump discharge lines to obtain design GPM as
read from the manufacturer's pump curve and from a flow meter.
C.
Balance flow thru:
1.
Chillers.
2.
Chilled water coils.
D.
Use flow meters, differential pressures or temperature relationships as required.
E.
Balance by-pass lines to obtain the same pressure drop with systems on
by-pass.
F.
Repeat steps as required to obtain a final systems balance and make a set of
recordings showing final systems conditions.
EQUIPMENT TESTS
A.
1.15
Record preliminary pump data (each pump).
Record the following chilled water coil performance data:
1.
Air entering/leaving; wet and dry bulb temperatures.
2.
Water entering/leaving temperatures.
EQUIPMENT POWER READINGS
A.
Record the following information for each motor.
1.
Equipment designation.
2.
Manufacturer.
3.
Unit model number and serial number.
15031 - 6 of 8
12010 - NISD - High School
B.
4.
Motor nameplate horsepower; nameplate voltage; phase and full load
amperes.
5.
Heater coil in starter.
Rating in amperes.
b.
Manufacturer's recommendation.
6.
Motor rpm/driven equipment rpm.
7.
Power reading (voltage, amperes of all legs at motor terminals).
Record the following information for each electric heater.
1.
Equipment designation.
2.
Manufacturer.
3.
Unit model number and serial number.
4.
Heater nameplate KW; nameplate voltage, phase and full load amperes.
5.
Overcurrent protection.
6.
1.16
a.
a.
Rating in amperes.
b.
Manufacturer’s recommendation.
Power reading (voltage, amperes of all legs at electric heater terminals).
COMPLAINT LOG
A.
Prepare a log book for use at the site by the Owner’s personnel, after occupancy
of the building.
1.
B.
Submit the forms to the Architect/Engineer for approval prior to use.
Format shall allow adequate columns and lines for:
1.
Location by room number.
2.
Complaint.
3.
Name of person reporting the complaint.
4.
Other remarks.
15031 - 7 of 8
12010 - NISD - High School
1.17
1.18
C.
Deliver the log to the Owner at the site in a hard bound three ring binder, with an
appropriate title on the cover.
D.
Provide sufficient blank forms for three months activity.
EXTENDED WARRANTY
A.
Include an extended warranty of 180 days after Owner occupancy of the
building. During which time the Architect/Engineer may request a re-test or
re-setting of any outlet or other item as listed in the test report.
B.
Provide technicians and instruments to make tests and adjustments the project
requires during this period.
CONTINUING SERVICES
A.
Make a project inspection once each month for the three months after Owner
occupancy of the building commences.
1.
B.
Review the complaint log maintained at the project, by the Owner.
1.
C.
1.19
Verify that design conditions are being met throughout the project.
Make all necessary adjustments.
Submit a log of all activity of corrections and adjustments made during each visit.
THE EXISTING SYSTEM
A.
Test, balance, adjust and record all elements of the existing hydronic system as
well as the new work specified.
B.
Deliver the data to the Architect/Engineer for later use in the final testing and
balancing of the project.
C.
Take all measurements prior to demolition or modification to the systems.
D.
Take measurements and record data as specified for testing of the new work.
E.
A set of the original mechanical drawings will be available for design air quantity.
15031 - 8 of 8
12010 - NISD - High School
SECTION 15040
SHOP DRAWINGS, COORDINATION DRAWINGS & PRODUCT DATA
1.1
1.2
GENERAL
A.
Prepare shop drawings, coordination drawings and product data as required by
the contract documents.
B.
Submittals shall be prepared and produced for:
1.
Distribution as specified.
2.
Inclusion in the Operating and Maintenance Manual, as specified, in the
related section.
SHOP DRAWINGS
A.
Present drawings in a clear and thorough manner.
1.
1.3
Identify details by reference to sheet and detail, schedule, or room
numbers shown on Contract Drawings.
B.
Show all dimensions of each item of equipment on a single composite Shop
Drawing. Do not submit a series of drawings of components.
C.
Identify field dimensions; show relation to adjacent or critical features or work or
products.
COORDINATION DRAWINGS
A.
Present in a clear and thorough manner. Title each drawing with project name.
Identify each element of drawings by reference to sheet number and detail, or
room number of contract documents.
1.
B.
Prepare coordination drawings to coordinate installations for efficient use of
available space, for proper sequence of installation, and to resolve conflicts.
1.
C.
Minimum drawing scale: 1/4"=1'-0".
Coordinate with work specified in other sections and other divisions of the
specifications.
For each mechanical room submit plan and elevation drawings. Show:
1.
Actual mechanical equipment and components to be furnished.
15040 - 1 of 6
12010 - NISD - High School
D.
1.4
1.5
Service clearance.
3.
Relationship to other equipment and components.
Identify field dimensions. Show relation to adjacent or critical features of work or
products.
PRODUCT DATA
A.
Submit only pages which are pertinent.
B.
Mark each copy of standard printed data to identify pertinent products,
referenced to specifications section and article number.
C.
Show reference standards, performance characteristics and capacities; wiring
and piping diagrams and controls; component parts; finishes; dimensions and
required clearances.
D.
Modify manufacturer's standard schematic drawings and diagrams to
supplement standard information and to provide information specifically
applicable to the work. Delete information not applicable.
MANUFACTURER'S INSTRUCTIONS
A.
1.6
2.
Submit Manufacturer's instructions for storage, preparation, assembly,
installation, start-up, adjusting, calibrating, balancing and finishing.
CONTRACTOR RESPONSIBILITIES
A.
Review Submittals prior to transmittal.
B.
Determine and verify:
1.
Field measurements.
2.
Field construction criteria.
3.
Manufacturer's Catalog numbers.
4.
Conformance with requirements of Contract Documents.
C.
Coordinate submittals with requirements of the Work and of the Contract
Documents.
D.
Notify the Architect/Engineer in writing at time of submission of any deviations in
the submittals from requirements of the Contract Documents.
E.
Do not fabricate products, or begin work for which submittals are specified, until
such submittals have been produced and bear Contractor's stamp.
15040 - 2 of 6
12010 - NISD - High School
1.
F.
Contractor's responsibility for deviations in submittals from requirements of
Contract Documents is not relieved whether Architect/Engineer reviews
submittals or not, unless Architect/Engineer gives written acceptance of the
specific deviations on reviewed documents.
G.
Submittals shall show sufficient data to indicate complete compliance with
Contract Documents:
H.
1.7
Do not fabricate products or begin work scheduled to have submittals
reviewed, until return of reviewed submittals with Architect/Engineer's
acceptance.
1.
Proper sizes and capacities.
2.
That the item will fit in the available space in a manner that will allow
proper service.
3.
Where located outdoors, will not infringe upon sight lines.
4.
Construction methods, materials and finishes.
Schedule submissions at least 15 days before date reviewed submittals will be
needed.
SUBMISSION REQUIREMENTS
A.
Make submittals promptly in accordance with approved schedule, and in such
sequence as to cause no delay in the Work or in the work of any other
Contractor.
B.
Number of submittals required:
C.
1.
Shop Drawings and Coordination Drawings: Submit one reproducible
transparency and one opaque reproduction.
2.
Product Data: Submit the number of copies which the contractor
requires, plus three which will be retained by the Architect/Engineer.
Accompany submittals with transmittal letter, in duplicate, containing:
1.
Date.
2.
Project title and number.
3.
Contractor's name and address.
4.
The number of each Shop Drawing, Project Datum and Sample
submitted.
15040 - 3 of 6
12010 - NISD - High School
5.
D.
E.
1.8
Other pertinent data.
Submittals shall include:
1.
The date of submission.
2.
The project title and number.
3.
Contract identification.
4.
The names of:
a.
Contractor.
b.
Subcontractor.
c.
Supplier.
d.
Manufacturer.
5.
Identification of the product.
6.
Field dimensions, clearly identified as such.
7.
Relation to adjacent or critical features of the work or materials.
8.
Applicable standards, such as ASTM or federal specifications numbers.
9.
Identification of deviations from contract documents.
10.
Suitable blank space for Contractor and Architect/Engineer stamps.
11.
Contractor's signed and dated Stamp of Approval.
Coordinate submittals into logical groupings to facilitate interrelation of the
several items.
1.
Finishes which involve Architect/Engineer selection of colors, textures or
patterns.
2.
Associated items which require correlation for efficient function or for
installation.
SUBMITTAL SPECIFICATION INFORMATION
A.
Every submittal document whether identified to be reviewed by the
Architect/Engineer or not, shall bear the following information as used in the
project manual:
15040 - 4 of 6
12010 - NISD - High School
1.9
The related specification section number.
2.
The exact specification section title.
RESUBMISSION REQUIREMENTS
A.
B.
1.10
1.
Make resubmittals under procedures specified for initial submittals.
1.
Indicate that the document is a resubmittal.
2.
Identify changes made since previous submittals.
Indicate any changes which have been made other than those requested by the
Architect/Engineer.
CONTRACTOR'S STAMP OF APPROVAL
A.
Contractor shall stamp and sign each document certifying to the review of
products, field measurements and field construction criteria, and coordination of
the information within the submittal with requirements of the work and of
Contract Documents.
B.
Contractor's stamp of approval on any submittal shall constitute a representation
to Owner and Architect/Engineer that Contractor has either determined and
verified all quantities, dimensions, field construction criteria, materials, catalog
numbers, and similar data or assumes full responsibility for doing so, and that
Contractor has reviewed or coordinated each submittal with the requirements of
the work and the Contract Documents.
C.
Do not deliver any submittals to the Architect/Engineer that do not bear the
Contractor's stamp of approval and signature.
D.
Submittals delivered to the Architect/Engineer without Contractor's stamp of
approval and signature will not be processed.
1.
1.11
The Contractor shall bear the risk of all delays, as if no submittal had
been delivered.
ARCHITECT/ENGINEER REVIEW OF IDENTIFIED SUBMITTALS
A.
The Architect/Engineer will:
1.
Review identified submittals with reasonable promptness and in
accordance with schedule.
2.
Affix stamp and initials or signature, and indicate requirements for
resubmittal or approval of submittal.
15040 - 5 of 6
12010 - NISD - High School
3.
B.
Review and approval of submittals will not extend to design data reflected in
submittals which is peculiarly within the special expertise of the Contractor or any
party dealing directly with the Contractor.
C.
Architect/Engineer's review and approval is only for conformance with the design
concept of the project and for compliance with the information given in the
contract.
D.
1.12
Return submittals to Contractor for distribution or for resubmission.
1.
The Review shall not extend to means, methods, sequences, techniques
or procedures of construction or to safety precautions or programs
incident thereto.
2.
The Review shall not extend to review of quantities, dimensions, weights
or gauges, fabrication processes or coordination with the work of other
trades.
The review and approval of a separate item as such will not indicate approval of
the assembly in which the item functions.
SUBSTITUTIONS
A.
Do not make requests for substitution employing the procedures of this Section.
B.
The procedure for making a formal request for substitution is specified in Section
01630.
C.
The procedure for making a formal request for substitution is specified in the
Conditions of the Contract.
15040 - 6 of 6
12010 - NISD - High School
SECTION 15041
PROJECT RECORD DOCUMENTS
1.1
GENERAL
A.
1.2
REQUIREMENTS INCLUDED
A.
1.3
Provide record documents as specified in General Conditions.
Maintain at the site for review by the Architect/Engineer and the Owner one
record copy of:
1.
Drawings.
2.
Specifications.
3.
Addenda.
4.
Change orders and other modifications to the contract.
5.
Field orders or written instructions.
6.
Approved shop drawings and product data.
7.
Field test records.
MAINTENANCE OF DOCUMENTS
A.
Store documents apart from documents used for construction.
B.
Maintain documents in a clean, dry, legible condition and in good order.
1.
C.
1.4
Make documents available at all times for inspection by Architect/Engineer.
MARKING DEVICES
A.
1.5
Do not use record documents for construction purposes.
Provide red felt tip marking pens for recording information.
RECORDING
A.
Label each document "Project Record" in neat, large printed letters.
B.
Record information concurrently with construction progress.
15041 - 1 of 3
12010 - NISD - High School
1.
C.
D.
1.6
1.7
Do not conceal any work until required information is recorded.
Legibly mark Record Drawings to record actual construction:
1.
Depths of various buried elements in relation to finish first floor datum.
2.
Horizontal and vertical locations of underground utilities and
appurtenances, referenced to permanent surface improvements.
3.
Location of internal utilities and appurtenances concealed in the
construction, referenced to visible and accessible features of the
structure.
4.
Field changes of dimension and detail.
5.
Changes made by field order or by change order.
6.
Details not on original contract drawings.
7.
Identify locations by at least two dimensions to permanent structures.
Legibly mark and record at each product specification section, details of the
actual products installed.
1.
Manufacturer's name and product model and number.
2.
Product substitutions or alternates utilized.
3.
Changes made by Addenda and Modifications.
4.
Changes made by field order or by change order.
5.
Other matters not originally specified.
REPRODUCIBLE RECORD DRAWINGS
A.
Transfer all recorded information from the original record drawings to one set of
reproducible mylar films and deliver to the Architect/Engineer.
B.
Identify all record drawing information.
C.
Delete Architect/Engineer seals and ownership information from the documents.
SUBMITTALS
A.
Submit record documents to Architect/Engineer with final Application for
Payment.
B.
Accompany submittal with transmittal letter in duplicate containing:
15041 - 2 of 3
12010 - NISD - High School
1.
Date.
2.
Project title and number.
3.
Contractor's name and address.
4.
Title and number of each record document.
5.
Signature of an officer of the contracting firm.
15041 - 3 of 3
12010 - NISD - High School
SECTION 15050
CIRCULATING WATER PIPING SYSTEM
1.1
1.2
RELATED WORK
A.
Section 15011 - "Supports and Anchors".
B.
Section 15012 - "Valves".
C.
Section 15013 - "Pipe and Pipe Fittings".
D.
Section 15054 - "Circulating Water System Specialties".
E.
Section 15200 - "Sound and Vibration Control".
F.
Section 15705 - "Circulating Water System Treatment".
PIPE MATERIAL
A.
1.3
Chilled water piping - black steel Schedule 40.
1.
Pipe size 2-1/2" and larger - join with Schedule 40 welding or flanged
fittings.
2.
Pipe size 2" and smaller - join with 150# malleable iron screwed fittings.
3.
Nipples 1" and smaller - Schedule 80.
4.
Fittings 1" and smaller - 300# malleable iron.
MECHANICAL PIPE COUPLINGS AND FITTINGS
A.
At the Contractor's option, mechanical pipe couplings and fittings may be
employed to join:
1.
B.
Use only in accessible locations.
1.
1.4
Schedule 40 black iron (zero flex in mechanical rooms).
For use only above grade.
CLEANING OF PIPING SYSTEMS
A.
Remove scale and dirt inside and out before assembly.
B.
Remove welding slag and foreign material from pipe and fitting materials.
15050 - 1 of 3
12010 - NISD - High School
C.
Circulate a noncorrosive industrial system cleaner throughout all new circulating
water piping systems and related equipment.
D.
Clean the system strainers as often as required during the cleaning process.
E.
Use only chemicals formulated for piping system pre-cleaning.
1.
F.
The products used shall inhibit corrosion of the various metals in the system.
G.
Use the circulated system cleaner in accordance with the manufacturer's
recommendations. Circulate for such length of time as required to ensure:
H.
I.
1.5
Remove all rust, mill scale, oil, grease and other contaminants deposited
during construction.
1.
A clean piping system.
2.
The effectiveness of the water treatment chemicals.
After completion of the cleaning process:
1.
Drain the system.
2.
Clean all system strainers.
3.
Fill and flush as often as required.
4.
Refill with clean water.
After completion of the cleaning procedure, install the water treatment as
specified in Section 15705.
TESTING OF PIPING SYSTEMS
A.
All new piping systems shall be:
1.
Thoroughly tested for leaks.
2.
Approved by local authorities having jurisdiction:
a.
B.
Proof of such approval submitted before any such work is
concealed.
Local codes and regulations govern the extent of the test of each system;
however, the following minimum tests shall be made:
1.
Circulating water lines: tested at hydrostatic pressure of 100 PSI
maintained for 6 hours.
15050 - 2 of 3
12010 - NISD - High School
C.
Any leaks or other defects:
1.
Corrected at once.
2.
Remove all defective material.
3.
Replace with sound material.
4.
Repeat test until all leaks are eliminated.
15050 - 3 of 3
12010 - NISD - High School
SECTION 15052
CONDENSATE DRAIN PIPING SYSTEM
1.1
GENERAL
A.
Provide all piping (either inside or outside) from cooling coil drain pans and main
drain piping to the building drain system.
B.
Pipe material:
C.
1.
Schedule 40 PVC.
2.
Fittings: PVC drainage pattern fitting.
Size piping as shown on the drawings.
1.
1.2
Do not install piping sized smaller than the drain pan connection size.
INSTALLATION
A.
B.
Install the system to facilitate easy removal.
1.
Use threaded plugged tee at each change of direction to permit cleaning.
2.
Maintain a positive slope on all piping.
3.
Provide sufficient supports to prevent sagging.
Install a water seal trap in each individual drain line from the drain pan.
1.
C.
Size the length of the trap leg based on the fan pressure.
Install traps and cleanout as shown in the drawing details.
1.
Confirm requirements with manufacturer's installation instructions.
15052 - 1 of 1
12010 - NISD - High School
SECTION 15054
CIRCULATING WATER SYSTEM SPECIALTIES
1.1
1.2
RELATED WORK
A.
Section 15050 "Circulating Water Piping System".
B.
Section 15705 "Circulating Water System Treatment".
REGULATORY REQUIREMENTS
A.
1.3
Conform to ANSI/ASME Boilers and Pressure Vessels Code Section 8D for
manufacturer of tanks.
RELIEF VALVES
A.
ASME rated.
B.
Select system relief valve capacity so that it is greater than make-up pressure
reducing valve capacity.
C.
Select equipment relief valve capacity to exceed rating of connected equipment.
D.
Pipe relief valve outlet to nearest floor drain.
1.
E.
1.4
Or as shown on the drawing.
Where one line vents several relief valves, make cross sectional area equal to
sum of individual vent areas.
AUTOMATIC COLD WATER FILL ASSEMBLY
A.
Pressure reducing valve.
B.
Reduced pressure double check back flow preventer.
C.
Test cocks.
D.
Strainer.
E.
Vacuum breaker.
F.
Valved by-pass.
15054 - 1 of 4
12010 - NISD - High School
1.5
1.6
PRE-PRESSURIZED DIAPHRAGM TYPE EXPANSION TANK
A.
Closed type with flexible diaphragm sealed in tank to separate air and water.
B.
Welded construction.
C.
Fitted with pressure gauge, inlet connection and air charging fitting.
D.
ASME tested and stamped; and supplied with National Board Form U-1.
E.
Rated at 125 PSI working pressure at 240 degrees F.
F.
Air and water tight at 100 PSI.
G.
Provided with steel legs or saddle, to suit the installation.
PIPE SYSTEMS STRAINERS
A.
Body:
1.
"Y" pattern or basket.
2.
Line sized.
3.
ASTM A-126 Class B cast iron.
B.
Provide valved drain and hose connection on strainer blow down connection.
C.
Fabricate screens of monel or type 304 stainless steel:
1.
D.
1.7
20 mesh woven wire.
Construction:
1.
2" size and smaller with screw connections rated 400 PSI WOG.
2.
Over 2" size with flanged connections, rated 125 PSI WOG.
AIR SEPARATOR
A.
Tested and stamped in accordance with Section 8D of ANSI/ASME Code, for
125 PSIG operating pressure.
B.
Tangential inlet and outlet connections.
C.
Internal stainless steel air collector tube.
15054 - 2 of 4
12010 - NISD - High School
1.8
AIR ELIMINATOR
A.
1.9
Float type air vent.
1.
Cast iron body.
2.
Stainless steel float and operating mechanism.
3.
Rated for 125 PSIG operating pressure.
4.
Vent free air from the system.
SUCTION DIFFUSER
A.
For each pump as shown on the drawing, provide an angle type suction diffuser.
1.
B.
C.
Components:
1.
Inlet straightening vanes.
2.
Removable end cap with steel cap screws. Provide stainless steel cap
screws on chilled water suction diffuser only.
3.
Gauge port.
4.
Threaded strainer blowdown port.
5.
Adjustable support foot.
6.
Removable magnetic insert.
Provide screen fabricated of monel or Type 304 stainless steel.
1.
D.
.125 perforations for hot water system and chilled water system.
Provide an additional fine mesh disposable strainer for use during start-up
operations.
1.
1.10
Body to fit both the pump inlet and suction pipe size.
Remove after 30 days operation.
MANUAL AIR VENTS
A.
Where required to prevent air traps.
1.
At high points in the piping system.
15054 - 3 of 4
12010 - NISD - High School
B.
With copper drain tube connector extended to the nearest drain.
C.
600 PSI WOG working pressure brass body ball valve with stainless steel ball,
stem and lever handle.
1.
D.
1.11
Chrome plated bronze ball.
Do not use automatic air vents.
INSTALLATION AND APPLICATION
A.
Install specialties in accordance with manufacturer's instructions to permit
intended performance.
B.
Where large air quantities can accumulate, provide enlarged air collection
standpipes.
15054 - 4 of 4
12010 - NISD - High School
SECTION 15060
REFRIGERANT PIPING SYSTEM
1.1
1.2
REFERENCES
A.
ANSI/ASME B16.22 - Wrought Copper and Copper Alloy Solder Joint Pressure
Fittings.
B.
ANSI/ASME B16.26 - Cast Copper Alloy Fittings for Flared Copper Tubes.
C.
ANSI/ASME B31.5 - Refrigeration Piping.
D.
ANSI/AWS A5.8 - BCuP Silver Brazing Alloy.
E.
ARI 750 - Thermostatic Refrigerant Expansion Valves.
F.
ASTM B280 - Seamless Copper Tube for Air Conditioning and Refrigeration
Field Service.
PIPE ASSEMBLY
A.
All copper tubing joints shall be made with wrought copper fittings.
1.
Cut tubing square and remove burrs.
B.
Polish the inside of fittings and outside of tubing with sand cloth before joining.
C.
Make connections with high silver content brazing alloy.
1.
Do not use flux.
D.
Flow dry nitrogen through the joint being heated to prevent oxidation.
E.
Provide access to concealed valves and fittings.
F.
Provide clearance for installation of insulation and access to valves and fittings.
G.
Systems 5 tons and smaller - flared connections (contractor's option).
H.
Changes in direction with soft tubing may be made with tubing benders in lieu of
fittings.
1.
Only 90 degree or 45 degree long radius sweeps approved.
15060 - 1 of 4
12010 - NISD - High School
1.3
PIPE MATERIAL
A.
1.4
1.5
1.6
TESTING AND EVACUATION OF REFRIGERANT PIPING
A.
Test all refrigerant lines and connections to not less than 250 psi pressure using
an inert non-polluting gas.
B.
When all connections are found to be free of leaks, release the pressure from
the system.
1.
Connect the system to a high capacity vacuum pump.
2.
Evacuate until a wet bulb indicator registers a temperature of 35 degrees
F.
C.
After the initial pull-down, introduce sufficient inert non-polluting gas into the
system to bring it to atmospheric pressure.
D.
Evacuate the systems again until the wet bulb indicator registers 35 degrees F.
E.
Upon completion of the evacuation procedure, introduce the proper charge of
refrigerant into the system using the manufacturer's charging chart.
F.
Testing and evacuation shall not be completed until the ambient air temperature
is 70 degrees F. or above.
REFRIGERANT AND OIL
A.
Provide the initial charge of refrigerant and oil necessary for the proper testing
and operation of the refrigeration unit. The oil shall be of the viscosity and have
other characteristics as recommended by the manufacturer of the unit.
B.
Provide additional refrigerant and oil required during the first year's operation.
REFRIGERANT PIPE SIZING
A.
1.7
ACR hard-drawn copper tubing with long radius fittings.
Confirm refrigerant pipe sizes with the condensing unit manufacturer's sizing
charts prior to fabrication and installation.
REFRIGERANT SYSTEM SPECIALTIES
A.
Install a liquid line filter-dryer.
B.
Provide a moisture and liquid indicator.
15060 - 2 of 4
12010 - NISD - High School
1.8
1.9
C.
Provide refrigerant line valves where shown on the drawings to permit
containment of the refrigerant during servicing the equipment.
D.
Provide refrigerant charging valve connections in liquid line.
E.
Provide expansion valves, solenoid valves, and other specialties as called for in
the manufacturer's instructions and as shown on the drawings.
F.
Acceptable Manufacturers
Alco
2.
Sporlan
3.
Henry (Refrigerant Valves)
REGULATIONS
A.
Handle refrigerants in accordance with the requirements of the Environmental
Protection Agency and the Clean Air Act.
B.
Free venting of refrigerant and release to the atmosphere is not approved.
CERTIFICATION
A.
B.
1.10
1.
Prepare a certificate for each unit stating:
1.
Serial number.
2.
If nitrogen was used during the brazing of joints.
3.
Pressure used for test, test procedure and test results.
Insert copy of the certificate in the Owner's Manual.
SUBMITTALS
A.
Submit shop drawings and product data as specified in Section 15040.
B.
Prior to fabrication of the refrigerant piping systems:
1.
C.
Review coordination of pipe routing with all trades.
Submit equipment manufacturer's pipe sizing charts with selections plotted
thereon.
15060 - 3 of 4
12010 - NISD - High School
D.
Submit equipment manufacturer's instructions for testing, evacuating and
charging the refrigerant piping system.
1.
If these instructions are different than the specifications, do not proceed
without a clear resolution of the discrepancies.
15060 - 4 of 4
12010 - NISD - High School
SECTION 15070
PIPE EXPANSION COMPENSATION
1.1
GENERAL
A.
1.2
1.
Flexible pipe connections.
2.
Expansion joints and compensators.
3.
Pipe loops, offsets and swing joints.
DESIGN CRITERIA
A.
B.
1.3
Provide:
Base expansion calculations on:
1.
50 degrees F. installation temperature to 210 degrees F. for hot water
heating.
2.
140 degrees F. for domestic hot water, plus 30% safety factor.
Conform to Standards of Expansion Joint Manufacturer's Association.
SUBMITTALS
A.
Submit shop drawings as specified.
B.
Submit manufacturer's product literature.
C.
Expansion joint shop drawings to include maximum allowable temperature and
pressure rating, and maximum expansion compensation.
1.
1.4
Compare to calculated compensation requirements.
D.
Submit manufacturer's installation instructions.
E.
Where expansion loops are proposed, submit calculations and shop drawings
showing size/location of loops.
EXPANSION JOINTS
A.
As shown on the drawings or as determined by the contractor during
construction.
B.
Steel piping 3 inches and under: stainless steel bellows type with anti-torque
15070 - 1 of 2
12010 - NISD - High School
device, limit stops and internal guide.
1.5
1.6
C.
Steel piping over 3 inches: external ring controlled type with hydraulically formed
stainless steel bellows.
D.
Manufactured by ADSCO.
PIPE ALIGNMENT GUIDES
A.
Provide pipe guides so that movement takes place along axis of pipe only.
B.
Guide expansion joint by 2 guides on the side opposite the anchor.
C.
Cold piping supported by Unistrut supports guided by a duplicate set of pipe rolls
installed on top of pipe.
D.
Guide hot piping and pipe in vertical chases with cast semi steel guiding cylinder
and spider.
E.
Maximum guide spacing 15'-0".
INSTALLATION
A.
Accomplish structural work and provide equipment required to control expansion
and contraction of piping, loops, pipe offsets, and swing joints.
B.
Rigidly anchor pipe to building structure where necessary.
C.
Install according to manufacturer's instructions.
15070 - 2 of 2
12010 - NISD - High School
SECTION 15080
PRESSURE AND TEMPERATURE INSTRUMENTS
1.1
GAUGES AND COCKS
A.
B.
Cast aluminum case, gauges, black finished, bottom outlet flangeless.
1.
Without flange for pipe mounting.
2.
With flange for wall mounting.
Brass or bronze bushed, rotary type movement.
1.
Phosphor bronze bourdon tube silver brazed to socket and tip.
2.
Forged brass socket.
C.
For pulsating service, provide impulse dampeners.
D.
Provide a brass ball valve with stainless steel ball, stem and lever handle with
each gauge for service or as otherwise shown on the drawing details.
1.
E.
Gauge accuracy: +/- 1% over operating range.
F.
Locate to be easily readable from the floor at a 5'-6" eye level.
1.
1.2
Adjust pipe nipples as required.
THERMOMETER WELLS
A.
Brass or Type 300 stainless steel.
1.
1.3
600 PSI WOG working pressure.
Machined bar stock, one piece construction.
B.
Where installed in insulated piping or vessels, provide with extension neck.
C.
Provide metal to metal contact with bulb chamber for maximum sensitivity.
THERMOMETERS IN PIPING SYSTEMS OR VESSELS
A.
Extruded aluminum case with baked epoxy finish.
B.
9 inch scale length.
15080 - 1 of 3
12010 - NISD - High School
C.
Brass stem, length to match well.
D.
Red reading mercury column.
E.
Accuracy: +/- 1% of scale range.
F.
Range:
G.
1.
Hot water lines: 60 degrees F to 240 degrees F.
2.
Chilled water lines: 30 degrees F to 130 degrees F.
Locate to be easily readable from the floor at a 5'-6" eye level.
1.
1.4
DUCT THERMOMETERS
A.
Extruded aluminum case with baked epoxy finish.
B.
9 inch scale length.
C.
Red reading mercury column.
D.
Slotted bulb guard.
E.
Stem length as required for good sampling.
F.
3" duct flange.
G.
Range:
1.
30 degrees F to 180 degrees F.
H.
Accuracy: +/- 1% of scale range.
I.
Locate to be easily readable from the floor at a 5'-6" eye level.
1.
1.5
Use adjustable angle or rigid stem as required.
Use adjustable angle or rigid stem as required.
PRESSURE AND TEMPERATURE TEST STATIONS
A.
"Pete's Plug" fitting to receive either a temperature or pressure probe. Fitting
shall be solid brass with valve core of nordel.
1.
B.
Fitted with a color coded and marked cap with gasket.
Provide to the Owner a fitted case with:
15080 - 2 of 3
12010 - NISD - High School
1.6
1.
Two pressure gauge adapters with 1/8" OD probe.
2.
Four five inch stem pocket testing thermometers.
Two with range 30 degrees F to 130 degrees F for chilled water
and condenser water.
b.
Two with range 60 degrees F to 240 degrees F for hot water.
TEST WELLS
A.
Brass or Type 300 stainless steel.
1.
1.7
a.
Machined bar stock, one piece construction.
B.
Where installed in insulated piping, provide with extension necks.
C.
I. D. sized to accommodate serviceman's etched stem glass thermometer.
D.
Furnish with brass or stainless steel chain and threaded plug.
E.
Leave each test well filled with an approved heat transfer compound.
ACCEPTABLE MANUFACTURERS
A.
Trerice.
B.
Taylor.
C.
Marsh.
D.
Weksler.
E.
Marshaltown.
F.
Weiss.
15080 - 3 of 3
12010 - NISD - High School
SECTION 15085
WATER FLOW MEASURING SYSTEMS
1.1
WATER FLOW MEASURING STATIONS (OPTIONS)
A.
1.2
FLOW MEASURING STATIONS COMPONENTS
A.
Read out valves with integral safety check valves.
B.
Permanent metal tag showing:
C.
1.3
1.4
Venturi design, flow measure station sized to produce permanent pressure loss
of not more than 25% of indicated flow rate differential, at full flow.
1.
Design flow rate.
2.
Flow range through a range of differential pressures.
3.
Metered fluid line size.
4.
Station or location number.
Construction:
1.
Of corrosion resistant material.
2.
Mounting means provided as a part of the element.
INSTALLATION
A.
Flow meters shall be selected and installed in accordance with ASME "Fluid
Meters, Their Theory and Application."
B.
Observe the manufacturer's recommended upstream and downstream straight
pipe requirements.
C.
Install flow measuring stations in accordance with the manufacturer's
recommendations.
SUBMITTALS
A.
Submit manufacturer's product data sheets as specified.
1.
B.
Armstrong Venturis Model APV, or equal.
Submit manufacturer's accuracy and certification selection chart.
15085 - Page 1 of 2
12010 - NISD - High School
C.
Submit manufacturer's installation instructions.
D.
Submit manufacturer's calibration certificate.
15085 - 2 of 2
12010 - NISD - High School
SECTION 15110
VARIABLE FREQUENCY MOTOR SPEED CONTROL (PUMP AND AHU’S)
1.1
GENERAL
A.
At the location shown on the drawings, provide a complete microprocessor
controlled variable frequency pump speed control system.
1.
1.2
UL listed.
B.
Rated for the listed circuit voltage and scheduled motor horsepower.
C.
Capable of controlling the speed of any NEMA design B motor within the system
ratings.
D.
95% or greater power factor at all loads.
E.
Contained in a NEMA 1 cabinet.
F.
Accept specified (4-20 mA) control signal.
G.
Pulse width modulated (PWM) design.
H.
Alphanumeric display and keypad control for adjustments and configuration
programming.
I.
Meets NEC/IEEE 519-1992 for AC line transients.
J.
5% or less total harmonic distortion (THD).
K.
Automatic restart.
L.
2-Year parts and labor on-site warranty.
SPEED CONTROL SYSTEM
A.
Solid state converter and inverter sections.
1.
Converter - Divide bridge.
2.
Inverter - transistor.
15110 - 1 of 4
12010 - NISD - High School
B.
Control signal:
1.
1.3
INTERFERENCE WITH OTHER SYSTEMS
A.
1.4
The system shall not produce interference on the incoming phase and ground
conductors per ANSI/IEEE 519.
PROTECTIVE CIRCUITS
A.
1.5
4 to 20 MA 10VDC signal.
Provide the following protection:
1.
A/C line transients.
2.
Overcurrent - instantaneous trip.
3.
Internal overcurrent protection of solid state devices.
4.
Output overvoltage.
5.
Input undervoltage.
6.
Phase loss protection.
7.
Overload - inverse time curve trip.
8.
Ground fault protection.
9.
Output short circuit protection.
DIAGNOSTIC FAULT INDICATORS
A.
Provide an internal digital display to indicate the following trip conditions.
1.
Ground fault on startup.
2.
Phase loss.
3.
Overcurrent.
4.
Undervoltage/overvoltage.
5.
Overload.
6.
Output short circuit.
15110 - 2 of 4
12010 - NISD - High School
1.6
MANUAL BYPASS
A.
1.7
1.
Three position switch to transfer motor from adjustable speed drive to the
power line, or from the line to drive at zero speed.
2.
Main power circuit breaker protection for both the bypass circuitry and the
drive.
3.
Manual switch capable of starting the motor in the bypass mode.
4.
Motor protection and safety devices shall operate in either bypass or
drive mode.
5.
Bypass package shall be mounted in the cabinet.
FIELD ADJUSTMENTS
A.
1.8
Provide components and circuitry necessary for a complete manual bypass.
The following shall be adjustable in the field over the ranges specified.
1.
Instantaneous overcurrent trip: 180% to 220%.
2.
Minimum speed: 0% to 50%.
3.
Maximum speed: 50% to 110%.
4.
Volts/hertz: +15% from 7.67v/hz.
5.
Adjustable acceleration/deceleration rates: 30 to 300 sec.
6.
Voltage boost: 0 to 20V.
7.
Maximum speed: 0-100% adjustable.
8.
Minimum speed: 0-100% adjustable.
SUBMITTAL
A.
Submit manufacturer's information and shop drawings as specified.
1.
Complete technical details.
2.
Dimensions and manufacturer's installation manual.
3.
Schematic diagrams of the circuitry and field connections.
15110 - 3 of 4
12010 - NISD - High School
4.
1.9
1.10
Manufacturer's start-up manual.
START-UP, TESTING AND INSTRUCTION
A.
Provide the services of a factory trained field technician to start up, test and
adjust the variable fan speed control system.
B.
Coordinate with the test and balance phase of the project as specified in Section
15031.
C.
Utilize comprehensive report forms to document appraisal and test results on the
system. Upon completion of the work, the report forms shall be signed by the
supervising technical representative and included in the final report.
D.
Testing shall be done in accordance with the manufacturer's start up manual.
E.
Instruct Owner's personnel in operation and maintenance of the controller.
ACCEPTABLE MANUFACTURERS
A.
Toshiba.
B.
Magnetek.
C.
ABB
15110 - 4 of 4
12010 - NISD - High School
SECTION 15115
AIR HANDLING UNITS
1.1
INDOOR AND WEATHER TIGHT DRAW THROUGH AIR HANDLING UNITS
A.
Casing:
1.
Unit shall be constructed of a complete frame with easily removable
panels. Removal of any panel shall not affect the structural integrity of
the unit. Single height coil sections shall have removable frame sections
to facilitate vertical coil extraction.
2.
All units shall be supplied with 16-gage, G-90 galvanized steel base rails
with perimeter lifting lugs provided on each section.
3.
Unit shall be thermally broken to minimize the conduction path from the
inside of the casing to the outside.
4.
Casing panels (top, sides, and bottom) shall be constructed of galvanized
steel. Outdoor units shall have the following exterior finish:
a.
Pre-painted with a baked enamel finish passing 500-hour salt
spray test (ASTM B-117).
5.
Casing panels (top, sides, and bottom) shall have no exterior exposed
raw edges that could lead to rust formation.
6.
Casing panels (top, sides, and bottom) shall be solid double-wall
construction with 2" injected foam insulation between the inner and outer
panels. Panel assemblies shall not carry an R-value of less than 13.
Insulation exposed to air stream with flame spread not higher than 25 and
smoke developed rating not higher than 50.
7.
Casing deflection shall not exceed a 1:200 ratio when subject to an
internal pressure of ±5-in. wg.
8.
Unit side panels shall be easily removable for access and shall seal
against a full perimeter automotive style gasket to ensure a tight seal.
9.
The panel retention system shall comply with UL 1995 which states all
moving parts (for example, fan blades, blower wheels, pulleys, and belts)
that, if accidentally contacted, could cause bodily injury, shall be guarded
against accidental contact by an enclosure requiring tools for removal.
10.
Accessibility shall be a hinged double-wall access door on either side with
removable access panel(s) on the other side.
15115 - 1 of 5
12010 - NISD - High School
B.
11.
Fan supports, structural members, panels, or flooring shall not be welded,
unless aluminum, stainless steel, or other corrosion-resistant material is
used. Painted welds on unit exterior steel or galvanized steel are not
acceptable.
12.
All coil sections shall be double wall construction with insulation sealed
between the inner and outer panels. Panel assemblies shall not carry an
R-value of less than 13. Single height coil sections shall have removable
frame sections to facilitate vertical coil extraction.
13.
Condensation on the exterior of the air handling units is not approved.
Access doors:
1.
C.
Drain pan:
1.
D.
E.
Access doors shall be solid double wall construction with insulation
sealed between the inner and outer panels. Panel assemblies shall not
carry an R-value of less than 13. Latches shall be non-removable and
operated with a simple tool.
Provide a sloped stainless steel double wall condensate drain pan with 1"
thick fiberglass insulation and 1-1/2" MPT connection for condensate
drain.
a.
Standing water in drain pan after unit shut down is not acceptable.
b.
If unit is internally isolated, mount unit on factory galvanized legs
or channel supports to provide adequate mounting clearance for
condensate drain line and trap.
Supply fans shall be:
1.
Forward-curved fans with double-width double-inlet (DWDI) and scroll.
They shall be constructed of galvanized steel with baked enamel finish.
2.
They shall be designed for continuous operation at the maximum rated
fan speed and motor horsepower.
3.
Fans shall have an AMCA class rating corresponding.
4.
V-belt drive assembly and motor with totally enclosed belt guard.
5.
Insulated sheet metal cabinet with removable panels for access to the
interior. Insulation to meet NFPA 90A for flame spread and smoke
generation.
Drive assembly:
15115 - 2 of 5
12010 - NISD - High School
F.
1.
Sized for 50% overload.
2.
Matched belts.
Select proper fan drives from an assortment of fixed pitch cast iron pulleys and
matched belts.
1.
Pulleys keyed to the shaft.
G.
Motor so selected that the brake horsepower required to deliver the design air
quantity at the system static pressure will not exceed the motor nameplate
rating.
H.
Motor shall be:
I.
J.
1.
Open drip proof, 1750 RPM.
2.
90% Efficient at loads of 70% - 100%.
Submit fan performance curve for each unit:
1.
Plot fan volume against static pressure, horsepower and efficiency.
2.
Show point of rating based on static requirements of the system.
3.
Chart of specific sound power level at each octave band center
frequency.
4.
For variable volume units plot fan volume over entire range.
Supply fans shall be:
1.
K.
Double width, double inlet, non-overloading, double thickness air foil
blade centrifugal fan.
Fans shall be:
1.
Statically and dynamically balanced.
2.
Tested after being installed in the fan sections.
3.
Selected for the design air quantities and pressure of the system.
4.
Mounted on a common shaft if multiple wheels.
5.
Fan and motor to have internal factory installed vibration isolation.
a.
Vibration isolation shall be spring isolators.
15115 - 3 of 5
12010 - NISD - High School
L.
Select fan to operate at or near its maximum efficiency point when handling the
required air quantity and static pressure.
M.
Provide a sloped stainless steel double wall condensate drain pan with 1" thick
fiberglass insulation.
1.
Standing water in drain pan after unit shut down is not acceptable.
2.
If unit is internally isolated, mount unit on factory galvanized legs or
channel supports to provide adequate mounting clearance for
condensate drain line and trap.
N.
Provide an access panel of double wall construction with quick release latching
device adjacent to the condensate drain for inspection.
O.
Fan bearings:
P.
1.
Remote grease fittings grouped on the coil connection side of the unit.
2.
Self-aligning.
3.
Selected for an average life of 200,000 hours.
All of the insulation, vapor barriers, facings and adhesives shall have:
1.
Flame spread not higher than 25.
2.
Smoke developed rating not higher than 50.
Q.
Condensation on the exterior of the air handling units not approved.
R.
Filter section:
1.
Constructed with substantial hinges.
2.
Neoprene gasketing.
3.
Permanent quick release latching devices.
4.
Arranged to accommodate 2" thick filters as specified.
S.
Cooling coils as specified.
T.
Equipment capacities as scheduled.
U.
Acceptable manufacturers:
15115 - 4 of 5
12010 - NISD - High School
1.2
1.
Daikin.
2.
Trane.
3.
Thermal.
4.
York.
SUBMITTALS
A.
Submit manufacturer's dimensioned product data sheets.
1.
B.
Submit manufacturer's "Installation, Start Up and Service Instructions".
C.
Submit fan performance curve for each unit:
1.
Plot fan volume against static pressure, horsepower and efficiency.
2.
Show point of rating based on static requirements of the system.
D.
Submit manufacturer's certified cooling coil capacity data.
E.
Submit a schedule of belts with replacement commercial part number.
1.
F.
Include the schedule in the Operation and Maintenance Manual.
Submit a schedule of filters indexed to each unit with replacement commercial
part number.
1.
1.3
Show limiting construction dimensions where scheduled.
Include the schedule in the Operation and Maintenance Manual.
INSTALLATION
A.
Install the systems in accordance with the manufacturer's "Installation, Start Up
and Service Instructions".
15115 - 5 of 5
12010 - NISD - High School
SECTION 15116
FAN COIL UNITS
1.1
GENERAL
A.
Provide the vertical and horizontal fan coil units as shown on the drawings and
scheduled.
1.
1.2
B.
Equipment capacity and features as scheduled.
C.
Construct the unit to provide sufficient clearance between the coil connections to
permit installation of the field applied pipe insulation.
REFERENCE STANDARDS
A.
1.3
Vertical units are either up-flow or down-flow as scheduled.
ANSI/NFPA 70 - National Electrical Code.
FAN AND DRIVE SECTION (DIRECT AND BELT DRIVE)
A.
Locate the motor and drive assembly inside the cabinet, designed for service
removal.
1.
B.
Sheaves to be variable pitch single groove.
Provide a belt drive fan motor with built-in motor protection.
1.
Factory wired to a junction box.
2.
Resiliently mounted.
C.
Select the unit to meet the scheduled sensible and latent cooling capacity and
the scheduled heating capacity at the scheduled CFM rating.
D.
Supply fans:
1.
Double width, double inlet, forward curved blades.
2.
Statically and dynamically balanced.
3.
Tested after being installed in the fan section.
4.
Selected for the design air quantities and pressure of the system.
15116 - 1 of 5
12010 - NISD - High School
1.4
E.
Select fan to operate at or near its maximum efficiency point when handling the
required maximum air quantity and static pressure.
F.
Select the fan motor so the brake horsepower required to deliver the design air
quantity at the system static pressure will not exceed the motor nameplate
rating.
G.
Fan bearings:
1.
Permanently lubricated ball bearings.
2.
Self-aligning.
H.
Direct drive units shall be equipped with 4-speed direct drive motors. Motors
shall be permanent split capacitor type with resilient mount, sleeve bearings with
oilers and built-in thermal overload protection with automatic reset.
I.
The fan shall be designed to be easily removable with the removal of four screws
and the disconnection of the electrical service with a quick disconnect. The fan
shall be removable thru the bottom access opening. This shall provide coil
access for cleaning.
UNIT HOUSING
A.
Construct the unit of steel sheets and formed members.
1.
Provide structure to brace the assembly for the pressure of the system.
2.
Continuous galvanized steel.
B.
Bolt housing components together with neoprene gasketed airtight joints.
C.
Internally insulate the entire unit with 1" neoprene coated, minimum 1-1/2 pound
density glass fiber insulation, applied to internal surfaces with adhesive and weld
pins. Coat exposed edges of insulation with adhesive.
D.
All of the insulation, vapor barriers, facings and adhesives:
1.
Flame spread not higher than 25.
2.
Smoke developed rating not higher than 50.
E.
Condensation on the exterior of the unit is not approved.
F.
If indicated with supply air duct on the drawings, provide a duct flange on all four
sides of the supply air outlet of the unit.
1.
Sized to permit connection of the flexible connection to the ductwork.
15116 - 2 of 5
12010 - NISD - High School
2.
G.
If indicated with return air duct on the drawings, provide a duct flange on all four
sides of the return air inlet of the unit similar to supply air.
H.
Provide insulated, removable panels for access to the interior.
I.
1.5
1.
Plated captive screws and nuts.
2.
Neoprene gaskets.
The bottom panel shall be designed to be easily removable and provide for
complete access to the fan.
CONDENSATE DRAIN PAN
A.
B.
Construct drain pan from stainless steel with welded corners.
1.
Pitch to drain connection. Standing water in drain pan after unit shut
down is not acceptable.
2.
See schedule on the drawings for additional items.
Provide the primary drain pan with minimum 3/4" IPS main condensate drain
connection.
1.
C.
Coat and seal the insulation in place with waterproof mastic.
CHILLED AND HOT WATER COILS
A.
1.7
Provide a minimum 1/2" IPS overflow drain connection above the main
condensate drain connection.
Line the primary condensate drain pan with a minimum of 1/2" closed cell
insulation.
1.
1.6
Extend beyond the primary drain pan.
Provide water coils as specified in Section 15125.
FACTORY VALUE PACKAGE
A.
Provide ready-to-install factory assembled and provided value package to
include three-way control valves, 20 mesh stainless steel strainer with blow down
valve, pressure/temperature ports, isolation valves, manual circuit setter and one
half of unions with other half permanently attached to coil tubing for easy field
installation of value package.
15116 - 3 of 5
12010 - NISD - High School
1.8
UVC LAMPS
A.
1.9
1.
Provide with factory “on-off” switch mounted on the unit.
2.
Label switch as to duty.
AIR FILTERS
A.
1.10
See note in schedule on the drawings.
Provide 2" thick air filters as specified in Section 15880.
FILTER SECTION
A.
B.
Locate behind access doors.
1.
Constructed with substantial hinges.
2.
Neoprene gasketing.
3.
Permanent quick-release latching devices.
Arranged to accommodate the 2" thick filters as specified.
1.
1.11
1.12
Single section filter.
C.
Provide full length tracks to support the filter.
D.
Side access as required to suit the location.
ELECTRICAL REQUIREMENTS
A.
See note in schedule on the drawings.
B.
A 3-speed motor control switch with “off” position shall be furnished for field
wiring to any three of four motor speeds. The speed switch shall be suitable for
field installation in a 2" x 4" electrical box.
C.
An electrical quick disconnect shall provide for easy fan/motor removal.
ACCEPTABLE MANUFACTURERS
A.
Magic Aire.
B.
Daikin.
C.
York.
15116 - 4 of 5
12010 - NISD - High School
D.
1.13
Trane International.
SUBMITTALS
A.
Submit manufacturer's dimensioned product data sheets.
1.
1.14
Show location of filter access doors.
B.
Submit manufacturer's "Installation, Start Up and Service Instructions".
C.
Submit fan performance curve for each unit:
1.
Plot fan volume against static pressure, horsepower and efficiency.
2.
Show point of rating based on static requirements of the system.
D.
Submit manufacturer's certified cooling coil capacity data and electric heater
capacity.
E.
Submit manufacturer's data on housing insulation material.
INSTALLATION
A.
Install the systems in accordance with the manufacturer's "Installation, Start Up
and Service Instructions".
15116 - 5 of 5
12010 - NISD - High School
SECTION 15120
HVAC PUMPS
1.1
1.2
REFERENCES
A.
UL 778 - Motor Operated Water Pumps.
B.
NFPA 70 - National Electrical Code.
PERFORMANCE REQUIREMENTS
A.
B.
1.3
Ensure pumps:
1.
Operate without vapor binding and cavitation.
2.
Are non-overloading at any point on the pump curve in parallel or
individual operation.
3.
Operate within 25 percent of midpoint of published maximum efficiency
curve.
The schedule on the drawing sets forth the type of pump, GPM, head capacities
and horsepower required.
DATA PLATES
A.
B.
Provide a data plate for each pump.
1.
Corrosion resistant material.
2.
Permanently imprinted.
3.
Suitably attached to the pump.
Data plates shall contain:
1.
The manufacturer's name.
2.
Pump size and type.
3.
Serial number.
4.
Speed.
5.
Impeller diameter.
15120 - 1 of 6
12010 - NISD - High School
C.
1.4
6.
Capacity.
7.
Head rating.
8.
Other pertinent data.
If the pump is field modified to meet the project conditions, provide a new
nameplate with the correct information.
HORIZONTAL BASE MOUNTED PUMPS
A.
B.
C.
Casing.
1.
Vertical split case.
2.
Cast iron.
3.
175 PSI working pressure.
4.
Replaceable bronze case wear rings.
5.
End suction arranged back pull-out design.
6.
Suction and discharge gauge ports.
Impeller.
1.
Bronze.
2.
Fully enclosed.
3.
Keyed to the shaft.
Shaft.
1.
D.
E.
Alloy steel.
Drive.
1.
Woods flexible coupling.
2.
Totally enclosed OSHA approved coupling guard.
Bearings.
1.
Conform to Anti-Friction Bearing Manufacturers Association (AFBMA)
Standards.
2.
Ball or roller bearing pillow block type.
15120 - 2 of 6
12010 - NISD - High School
F.
G.
3.
Self-aligning.
4.
AFBMA L10 rating of 20,000 hours.
Mechanical seal.
1.
Carbon-ceramic faces.
2.
Seal materials suitable for the pumped liquid.
3.
Replaceable bronze shaft sleeve.
Baseplate:
1.
H.
1.5
Galvanized structural steel channel base.
Pump motor:
1.
Hydraulic Institute - NEMA Standard.
2.
Re-greasable ball bearings.
3.
Open drip proof where located indoors. TEFC where located outdoors.
4.
90% efficiency at load of 75%-100%.
5.
So sized with relation to the pump impeller that the brake horsepower
requirements will not overload the motor at any point on the pump curve.
IN-LINE HOT WATER CIRCULATOR PUMPS
A.
B.
Casing.
1.
Vertical split case.
2.
Cast iron.
3.
175 PSI working pressure.
4.
Replaceable bronze case wear rings.
5.
Back pull-out design.
6.
Suction and discharge gauge ports.
Impeller.
1.
Bronze.
15120 - 3 of 6
12010 - NISD - High School
C.
D.
2.
Fully enclosed.
3.
Keyed to the motor shaft.
Shaft.
1.
Alloy steel.
2.
Or stainless steel.
Bearings.
1.
E.
F.
1.6
Oil lubricated bronze journal bearings.
Mechanical seal.
1.
Carbon-ceramic faces.
2.
Seal materials suitable for the pumped liquid.
3.
Bronze shaft sleeve.
Motor and drive.
1.
Flexible coupling.
2.
Hydraulic Institute - NEMA Standard.
3.
Open drip proof.
4.
So sized with relation to the pump impeller that the brake horsepower
requirements will not overload the motor at any point on the pump curve.
ACCEPTABLE MANUFACTURERS
A.
Paco.
B.
Bell & Gossett.
C.
Armstrong.
D.
Aurora.
E.
Weinman.
F.
Taco.
G.
Peerless.
15120 - 4 of 6
12010 - NISD - High School
1.7
SUBMITTALS
A.
Submit shop drawings and product data as specified.
B.
Select pump near the mid-point of its performance curve.
C.
Submit manufacturer's certified curve with selections plotted thereon.
D.
Submit manufacturer's installation instructions.
E.
Submit schedule of bearings with replacement commercial part number.
1.
F.
Submit schedule of mechanical seal with replacement commerical part number.
1.
G.
1.9
Include the schedule in the Operation and Maintenance Manual.
Submit schedule of lubricants with recommended lubrication schedule.
1.
1.8
Include the schedule in the Operation and Maintenance Manual.
Include the schedule in the Operation and Maintenance Manual.
INSTALLATION
A.
Install each pump in accordance with the manufacturer's "Installation, Start-Up
and Service Instructions".
B.
Provide access space around pumps for service. Provide no less than minimum
as recommended by manufacturer.
C.
Install pumps on concrete housekeeping base with anchor bolts.
1.
Set and level.
2.
Grout in place.
D.
Provide air cock and drain connection on horizontal pump casings.
E.
Provide drains for bases and seals, piped to and discharging into floor drains.
F.
Lubricate pumps before start-up.
G.
Paint entire unit with two coats of machinery enamel after completion of
installation.
SYSTEM START-UP
A.
Before starting pumps but after connecting piping:
15120 - 5 of 6
12010 - NISD - High School
1.10
1.
Align shafts and coupling with a precision laser optical alignment
instrument to the minimum tolerances recommended by the
manufacturer.
2.
Tabulate the actual pump alignment reading with manufacturer's
minimum tolerances.
B.
Submit readings for approval.
C.
Include the approved readings in the Owner's Maintenance Manual.
FINAL PUMP FLOW CALIBRATION
A.
B.
Based on the results of the final phases of the test and balance sequences, if the
flow of the un-throttled pump is more than 10% above the scheduled values:
1.
Request detailed instructions from the pump manufacturer for the correct
impeller diameter.
2.
Trim the impeller to the diameter recommended by the manufacturer
employing precision machinery.
Enter the information on the final configuration of the pump in the Owner's
Manual.
1.
1.11
Modify the pump nameplate to reflect the correct head and flow data and
the impeller diameter.
SPARE PARTS
A.
Provide the following spare parts and material to the Owner for his use after the
warranty period.
1.
A mechanical seal for each pump.
2.
A set of bearings for each pump.
15120 - 6 of 6
12010 - NISD - High School
SECTION 15125
HEATING AND COOLING COILS
1.1
DIRECT EXPANSION COOLING COILS
A.
B.
DX cooling coils:
1.
Constructed of copper tubes and aluminum fins.
2.
Designed and circuited for use with direct expansion refrigeration.
Cooling coil face velocity.
1.
C.
1.2
Not be of such magnitude as to cause moisture to be carried off the coil.
Coils shall be constructed in casings as required for installation.
HOT WATER COILS
A.
Hot water coils
1.
Constructed of copper tubes and aluminum fins.
2.
Designed and circuited for hot water.
a.
Maximum temperature 200 degrees F.
B.
Where coils are duct mounted and the incoming air is not filtered, the maximum
approved fin spacing is 8 fins per inch.
C.
Non-trapping circuit design.
D.
1.
Working pressure 200 psi.
2.
Tappings for drain and air vent.
Provide a Schraeder valve on the inlet and outlet of each coil.
1.
E.
Positioned to permit accurate pressure readings.
Coils shall be constructed in casings as required for installation.
15125 - 1 of 3
12010 - NISD - High School
1.3
CHILLED WATER COILS
A.
B.
C.
Chilled water coils:
1.
Constructed of copper tubes and aluminum fins.
2.
Designed and circuited for chilled water.
Non-trapping circuit design.
1.
Working pressure 200 psi.
2.
Tappings for drain and air vent.
Provide a Schraeder valve on the inlet and outlet of each coil.
1.
1.4
Positioned to permit accurate pressure readings.
D.
Coils shall be constructed in casings as required for installation.
E.
Where coils are stacked, provide intermediate drain pans with drop tubes to
drain condensate to the main drain pan without flooding the lower coil.
ELECTRIC DUCT HEATERS
A.
Each heater shall bear the UL label.
1.
B.
Construct each heater of corrosion resistant materials.
1.
C.
Capacity and stages as scheduled.
Construct the heating coil of 80-20 nickel-chrome wire.
Components:
1.
Prewired fuses or breakers for each circuit or stage as required by the
National Electrical Code.
2.
Contactors in accordance with the staging requirements.
D.
Provide an unfused disconnect switch with door interlock at the incoming feeder
terminal.
E.
Safety Controls
1.
A primary and secondary thermal cut off to de-energize each circuit.
15125 - 2 of 3
12010 - NISD - High School
2.
A differential pressure air flow switch to de-energize the heater in the
absence of flow.
a.
F.
G.
1.5
Terminal Box.
1.
Factory insulated to prevent condensation.
2.
Dust tight for installation in return air plenum.
Voltage requirements of the heater controls shall be compatible with temperature
control system.
SUBMITTALS
A.
Submit manufacturer's product data sheets and unit capacity information as
specified.
B.
Submit manufacturer's "Installation, Start Up and Service Instructions."
C.
Submit internal wiring diagram.
1.
1.6
Air Flow Switch specification is in Sections 15900 Series.
Electrical interlocks.
INSTALLATION
A.
Install the electric heaters in accordance with the manufacturer's "Installation,
Start Up and Service Instructions."
1.
Observe upstream and downstream relationships to fittings and
obstructions and fan outlet.
15125 - 3 of 3
12010 - NISD - High School
SECTION 15135
PACKAGED AIR-COOLED LIQUID CHILLING UNIT (80-500 TONS)
1.1
GENERAL
A.
Provide the packaged air-cooled liquid chilling unit.
1.
B.
See Alternate Bid.
Chilling machine shall consist of:
1.
Multiple semi-hermetic twin screw compressors.
a.
C.
1.2
R-134A HFC Refrigerant.
2.
Enclosed fully wired control center.
3.
Nonferrous condenser coils/aluminum fins with coating as scheduled.
Direct drive condenser fans and permanently lubricated motors.
4.
DX liquid cooler.
Chiller package shall deliver the scheduled cooling capacity.
INTERCONNECTING REFRIGERANT PIPING AND SPECIALTIES
A.
B.
All components shall be factory assembled, pressure tested, dehydrated and
supplied with refrigerant and oil.
1.
Liquid line shutoff valves and discharge service valves.;
2.
Electronic expansion valves;
3.
Replaceable core filter drier;
4.
Operating charge of refrigerant R-134A and operating compressor oil;
5.
Moisture indicating sight glass;
6.
Pressure relief valves.
Compressor suction service valve:
1.
Standard refrigerant discharge isolation and liquid valves enable service
personnel to store the refrigerant charge in the cooler or condenser
during servicing. This factory-installed option allows for further isolation
15135 - 1 of 10
12010 - NISD - High School
of the compressor from the cooler vessel.
1.3
HOUSING
A.
The entire assembly shall be painted galvanized steel in a weatherproof cabinet
for outdoor installation.
1.
B.
Provide with factory fabricated PVC coated steel wire safety condenser guards
and fan guards.
C.
Provide with factory security grilles to protect the compressors and cooler.
1.
D.
Provide factory direct drive, reinforced polymer construction for each condenser
fan to reduce sound levels.
1.
Vertical discharge.
2.
No effect on chiller capacity.
3.
Finish to match chiller housing.
STANDARDS
A.
1.6
Complete with support retainers and fasteners.
CONDENSER FANS
A.
1.5
Complete with support retainers and fasteners.
Unit to be furnished with field-installed condenser coil cover ends.
1.
1.4
Tested with 500-hour salt spray test per ASTM B-117 Standard.
Machine construction and safety devices shall conform to the current edition of
the following codes:
1.
National Electrical Code
2.
ASHRAE 15 Safety Code.
3.
ASME Code for Unfired Pressure Vessels.
4.
ARI Standards
MOTOR COMPRESSORS
A.
Semi-hermetic twin screw type motor compressors provided with:
1.
Direct drive, 3500 rpm, with motor temperature sensors.
15135 - 2 of 10
12010 - NISD - High School
2.
B.
1.7
Automatic capacity control utilizing infinitely modulating side valve from
100% to 15% full load.
Mount the motor compressor on vibration isolation.
LIQUID COOLER
A.
The cooler shall be direct expansion shell-and-tube heat exchanger.
1.
The heads shall be removable for servicing.
2.
Nonferrous baffles for maximum corrosion resistance.
3.
Fouling factor .00025.
4.
Construct the cooler and test in accordance with the latest ASME code
for Unfired Pressure Vessels.
a.
220 psig design pressure on the refrigerant side.
b.
300 psig design pressure on the water side.
c.
Cooler drain and vent.
B.
Provide with insertion well for freeze protection thermostat.
C.
Provide suitable tappings in the nozzles for sensing bulbs and gauges.
D.
Provide with an isolated refrigeration circuit for each condensing unit.
E.
Provide an electric heater cable along the shell beneath the insulation:
F.
G.
1.
Actuated by a thermostat with its sensing element in the outside air.
2.
Afford protection against freezing down to 0 degrees F.
Cover the chiller with 3/4" thick, closed cell, PVC foam flexible sheet insulation
with a maximum K factor of .28.
1.
Adhere with water proof cement.
2.
Vapor seal joints to preclude condensation.
3.
Finish with two coats of insulation paint.
Provide weather protection as required.
15135 - 3 of 10
12010 - NISD - High School
1.8
CONTROLS, SAFETIES AND DIAGNOSTICS
A.
The control center includes:
1.
Microprocessor with non-volatile memory. Battery backup system shall
not be accepted.
2.
Separate terminal block for power and controls.
3.
Separate 115V power supply to serve all controllers, relays and control
components.
4.
On/Off control switch.
5.
Replaceable solid-state controllers.
6.
Pressure sensors installed to measure suction, oil, economizer, and
discharge pressure. Thermistors installed to measure cooler entering
and leaving fluid temperatures and outside air temperature.
B.
Automatic circuit lead/lag.
C.
Capacity control based on leaving chilled fluid temperature and compensated by
rate of change of return-fluid temperature with temperature set point accuracy to
0.1E F (0.05E C).
D.
Limiting the chilled fluid temperature pull-down rate at start-up to an adjustable
range of 0.2E F to 2E F (0.1 to 1.1E C) per minute to prevent excessive demand
spikes at start-up.
E.
Seven-day time schedule.
F.
Leaving chilled fluid temperature reset from return fluid and outside air
temperature.
G.
Chilled water pump start/stop control.
H.
Chiller control for parallel chiller applications without addition of hardware
modules and control panels (requires thermistors).
I.
Timed maintenance scheduling to signal maintenance activities for strainer
maintenance and user-defined maintenance activities.
J.
Low ambient protection to energize cooler heaters.
K.
Single step demand limit control activated by remote contact closure.
L.
Diagnostics include:
15135 - 4 of 10
12010 - NISD - High School
M.
1.
Touch screen display consisting of 1/4 VGA LCD (liquid crystal display)
with adjustable contrast and back lighting.
2.
Display shall allow a user to navigate through menus, select desired
options and modify data.
Features include:
1.
Display shall allow access to configuration, maintenance, service, set
points time schedules, alarm history and status data.
2.
Display shall have one button for chiller on/off.
3.
Display shall include three levels of password protection against
unauthorized access to configuration and maintenance information and
display set up parameters.
4.
Display shall allow for easy connection of a portable hand held technician
tool to access information and upload and/or download chiller settings.
5.
Display alarms and parameters shall be capable of being displayed in full
text.
6.
Display shall be capable of displaying the last 50 alarms and will store a
snapshot of a minimum of 20 status data parameters for each alarm.
7.
Compressor run hours.
8.
Compressor number of starts.
9.
Compressor current.
10.
Time of day:
a.
Display module, in conjunction with the microprocessor, must also
be capable of displaying the output (results) of a service test.
Service test shall verify operation of every switch, thermistor, fan
and compressor before chiller is started.
b.
Diagnostics includes the ability to review a list of the 30 most
recent alarms with clear language descriptions of the alarm event.
Display of alarm codes without the ability for clear language
descriptions shall be prohibited.
c.
An alarm history buffer shall allow the user to store no less than
30 alarm events with clear language descriptions, time and date
stamp event entry.
d.
The chiller controller shall include multiple connection ports for
15135 - 5 of 10
12010 - NISD - High School
communicating with the local equipment network.
e.
N.
Safeties included:
1.
2.
O.
1.9
The control system shall allow software upgrade without the need
for new hardware modules.
Unit shall be equipped with thermistors and all necessary components in
conjunction with the control system to provide the unit with the following
protections:
a.
Loss of refrigerant charge.
b.
Reverse rotation.
c.
Low chilled fluid temperature.
d.
Motor overtemperature.
e.
High pressure.
f.
Electrical overload.
g.
Loss of phase.
h.
Loss of chilled water flow.
Condenser fan motors shall have internal overcurrent protection.
Solid state starter.
MOTOR CONTROL EQUIPMENT
A.
Each compressor motor shall be operated and protected against electrical
overload by means of definite-purpose contactors and calibrated,
ambient-compensated, magnetic-trip circuit breakers.
B.
Provide protective devices to open all 3 phases in the event of:
1.
Overload in any one phase.
2.
Single phase condition.
3.
Phase reversal.
C.
Provide ground fault protection for each compressor.
D.
Provide for manual reset.
15135 - 6 of 10
12010 - NISD - High School
E.
1.10
Provide pilot light or digital display to indicate malfunction.
REMOTE ENHANCED DISPLAY
A.
Touch Pilot display:
1.
B.
Temperature reset:
1.
1.11
1.13
Shall include leaving chilled fluid temperature reset from space
temperature (requires additional sensor) or 4 to 20 mA input (requires
Energy Management Control Module).
CORROSION PROTECTION
A.
1.12
Unit shall be supplied with a remote mount touch screen display for
network attachment to the chiller.
E-Coated aluminum fin condenser coils.
1.
Epoxy coating.
2.
Factory applied.
INSTALLATION
A.
Align chiller on concrete foundation and sub-bases; level and grout.
B.
Arrange piping for easy dismantling to permit tube cleaning and service.
C.
Install the system in accordance with the manufacturer's "Installation, Start-Up
and Service Instructions."
D.
Observe the manufacturer's recommended clearance dimensions for proper air
flow and service.
CHILLER MANUFACTURER START UP SERVICE
A.
Provide the services of a factory trained service supervisor employed by the
chiller manufacturer to start up the system.
1.
Technicians, as required, shall be trained and experienced in the work
they perform.
B.
The supervisor shall utilize comprehensive report forms to document results.
C.
Upon completion of the work, the report forms shall be signed by the supervisor
and included in the Owner's Manual.
D.
Verify that the volume of water in the system is above the manufacturers
15135 - 7 of 10
12010 - NISD - High School
recommended minimum.
E.
F.
Follow the manufacturer's start up procedures.
1.
Verify interlocks.
2.
Test and verify operation of safety controls.
3.
Calibrate controls.
4.
Verify microprocessor based control operation.
5.
Test, calibrate, and set the chilled water temperature controls.
6.
Verify operation of the integrated control panel.
Measure and record the following data:
1.
Chilled water entering/leaving temperature.
2.
Chilled water flow through the chiller.
3.
Suction pressure/condensing pressure.
4.
Air entering/leaving condenser; dry bulb temperature.
5.
Outdoor ambient; dry bulb.
6.
Motor nameplate voltage; phase and full load amperes.
7.
Heater coil in starter (as applicable).
8.
1.14
a.
Rating in amperes.
b.
Manufacturer's recommendation.
Power reading (voltage and amperes of all legs at motor terminals).
EXTENDED WARRANTY
A.
Provide each refrigeration compressor with a warranty against failure for a period
of 5 years.
1.
The warranty shall indicate model, serial number of the unit and
commencing date.
2.
The warranted compressor assembly consists of the stator, rotor,
eccentric shaft, eccentric rods, pistons, wrist pins, suction valves,
discharge valves, unloading mechanisms, oil pump, and the housing in
15135 - 8 of 10
12010 - NISD - High School
which these parts are enclosed.
B.
In the event of failure, provide to the owner a completely new motor
compressor.
1.
1.15
SUBMITTALS
A.
Submit shop drawings and product data as specified in Section 15040.
B.
Submit manufacturer's certified capacity data.
C.
Submit manufacturer's "Installation, Start Up and Service" instructions.
1.
Recommended conductors size, overcurrent protection, and disconnect
size.
2.
Electrical interlocks.
D.
Submit recommended clearance dimensions for air flow and service.
E.
Submit coordination drawings as specified in Section 15040.
1.
1.16
Give consideration to adjacent structures as they effect air flow patterns.
F.
Submit internal wiring diagram of control center.
G.
Submit sequence of operation in narrative form.
H.
Submit the recommended minimum volume of water in the system. Compare to
the actual calculated volume.
I.
Submit the design and operating parameters input to the dual sequence
controller.
ADDITIONAL FEATURES
A.
1.17
At the owner's option, provide new warranted parts.
Refer to the drawings schedule of PACKAGED AIR-COOLED CHILLER “Notes”
for features not specifically mentioned in the specifications.
OWNER’S FACTORY TRAINING
A.
Include factory training for two Owner Maintenance representatives for a total
period of (5) days.
1.
Training to be on this model chiller and specifically cover maintenance
and operational requirements.
15135 - 9 of 10
12010 - NISD - High School
B.
1.18
2.
Diagnostics and trouble shooting.
3.
Use of Navigator hand held display.
Include all costs (travel, lodging, meals, etc.) for this training.
ACCEPTABLE MANUFACTURERS
A.
Daikin.
B.
Trane
C.
York.
15135 - 10 of 10
12010 - NISD - High School
SECTION 15157
FIRE TUBE HOT WATER BOILER
1.1
1.2
GENERAL
A.
Provide the horizontal gas-fired fire tube hot water boilers as shown on the
drawing.
B.
Boiler capacity shall be as scheduled.
QUALITY ASSURANCE
A.
Construct the boiler shell in accordance with the ASME Code for 150 PSI
working pressure. The boilers shall be inspected by an authorized inspector
during construction.
B.
Each boiler shall be hydrostatically tested and registered with the "National
Board of Boiler and Pressure Vessel Inspectors".
1.
C.
Each boiler shall be approved as a unit by the Underwriter's Laboratory and bear
the U.L. seal.
D.
The burner, gas train and controls shall conform to the requirements of I.R.I. and
its NOx emissions will not exceed 30 ppm, reference @ 3% O2
E.
The boiler and installation shall conform to the Boiler Law Rules and Regulations
of the Boiler Division of the Texas Department of Labor and Standards.
F.
Provide factory tests to check construction, controls and operation of unit.
G.
1.3
Furnish 6 copies of the "Manufacturers' Data Report" for each boiler.
1.
Each boiler shall be completely assembled, wired, fire tested and preset
to fire at its rating before leaving the factory.
2.
Provide a certificate of the factory fire test.
The system control sequence is such that the boiler is required to maintain
temperature without the system pumps operating. If forced internal thermal
circulation is required, it shall be provided as a factory component, piped and
wired into the burner circuit.
BOILER CONSTRUCTION
A.
The front and rear tube sheets and all flues shall be fully accessible for
inspection and cleaning when doors are swung open.
15157 - 1 of 5
12010 - NISD - High School
1.4
1.5
1.6
B.
Furnish the shells with adequate manholes to facilitate boiler inspection and
cleaning.
C.
Provide an observation port through the front door for inspecting the flame.
D.
Mount each boiler on a welded structural steel skid base.
E.
Provide a 5" diameter stack thermometer.
BOILER SHELL
A.
Provide two lifting eyes on top of boiler.
B.
Insulate each boiler with two inch thick fiberglass blanket, under a sectional
sheetmetal lagging.
C.
The entire boiler; base; frame; and other components shall be factory painted
before shipment, using a hard finished enamel.
1.
Provide two quarts of the factory paint for touch up of the boiler finish.
2.
Deliver paint to the Owner.
COMBUSTION ASSEMBLY
A.
The combustion assembly shall be hinge mounted to swing out for easy
inspection.
B.
Components
1.
Motor driven blower.
2.
Air/gas mixer.
3.
Air switch.
4.
Burner assembly.
5.
Runner pilot assembly.
6.
Spark ignition and flame rods.
CONTROL PANEL
A.
The boiler control panel shall contain:
1.
Magnetic starter with three phase protection.
15157 - 2 of 5
12010 - NISD - High School
1.7
Honeywell microprocessor based combustion safeguard.
3.
Ignition transformer.
4.
Prepurge and postpurge time delay relays.
5.
Provide factory disconnect.
6.
Other electrical components.
THE GAS PIPING MANIFOLD
A.
B.
1.8
2.
Pilot assembly:
1.
Gas pressure regulator valve.
2.
Manual shutoff cock.
3.
Electrically operated gas valve.
Main burner gas manifold assembly:
1.
Gas pressure regulator valve.
2.
Manual shutoff cock.
3.
Electrically operated gas valves.
4.
Gas input adjustment device independent of the pressure regulator valve.
HOT WATER TRIM
A.
Low water cutoff with manual reset mounted in accordance with State of Texas
requirements.
B.
Combination pressure and altitude gauge.
C.
4" dial thermometers (1 each for boiler supply and return by contractor).
D.
Water relief valve of type and size to comply with ASME code.
E.
Operating and high limit temperature controls.
F.
Dip tube and air vent tapping.
15157 - 3 of 5
12010 - NISD - High School
1.9
EXTENDED WARRANTY
A.
1.10
Furnish a printed manufacturer's guarantee to supply all materials and labor for
periods described below covering the following conditions:
1.
Repair and replacement of boiler parts and refractory damaged by fuel
explosion - 20 years.
2.
Repair of crown sheet (and replacement of tubes) due to cracked
ligaments or segments between tubes - 20 years.
3.
Repair of damage and/or replacement of tubes loosened by "heat shock"
(welding of tubes in place during repairs not permitted) - 20 years.
4.
Repair of burner assemble material manufactured by Sellers - 5 years.
BOILER MANUFACTURER STARTUP SERVICE
A.
B.
C.
Provide the services of factory trained service supervisor employed by the boiler
manufacturer to start up the system.
1.
Set the boiler operating controls.
2.
Set the boiler safety controls.
Perform a flue gas analysis at the boiler outlet. Record the following results of
the flue gas analysis.
1.
Carbon dioxide % vol.
2.
Oxygen % vol.
3.
Stack temperature.
4.
Calculated combustion efficiency.
5.
Comparison with manufacturer's specifications and recommendations.
The supervisor shall utilize comprehensive report forms to document results.
1.
Upon completion of the work, the report forms shall be signed by the
supervisor and included in the Owner's Manual.
2.
Submit four copies of the final report to the Engineer.
3.
Sample forms shall be submitted for review prior to commencing work.
15157 - 4 of 5
12010 - NISD - High School
D.
1.11
1.12
1.13
Do not operate the boilers for any reason until the factory start up service has
been completed.
ACCEPTABLE MANUFACTURERS:
A.
Sellers
B.
Cleaver-Brooks
SUBMITTALS
A.
Submit manufacturer's product data sheets and unit capacity information as
specified.
B.
Submit manufacturer's "Installation, Start up and Service Instructions".
C.
Submit power wiring and control diagrams.
D.
Submit shop drawings of boiler vent and cap, sized in accordance with
manufacturers recommendations.
E.
Submit shop drawings of the gas relief vent piping, including outdoor terminal.
INSTALLATION
A.
Install the boilers, piping, and accessories in accordance with the manufacturer's
installation instructions.
B.
Pipe each gas relief vent to the outdoors, in accordance with the manufacturers
recommendations.
1.
Where there is more than one gas relief vent in the piping train, each vent
shall be separately piped to the outdoors.
2.
Each gas relief vent shall be piped full line sized.
3.
Install gas relief vent piping as shown in the detail on the drawings.
4.
Terminate each gas relief vent to prohibit the entrance of rain water.
15157 - 5 of 5
12010 - NISD - High School
SECTION 15200
SOUND AND VIBRATION CONTROL
1.1
GENERAL
A.
1.
All drive belts shall be matched sets.
2.
Drives shall be statically and dynamically balanced.
3.
Cast iron pulleys keyed to the shaft.
B.
Provide stops on spring isolation to limit travel to not exceed pipe isolation
flexibility.
C.
All isolators supporting a given piece of equipment shall be selected for
approximately equal spring deflection.
D.
All vibration isolation equipment including mountings, hangers and flexible pipe
connectors shall be furnished by a single approved manufacturer of vibration
isolation equipment.
E.
The isolation supplier shall be capable of dealing effectively with vibration and
noise characteristics effects and criteria.
F.
1.2
For all belt connected equipment:
1.
Qualified to select specific vibration and noise control devices as
specified.
2.
Provide facilities and experienced technical personnel for measuring and
evaluating the transmission of perceptual vibration or noise into the
occupied space, if required.
The noise and vibration control apparatus manufacturer shall supervise, inspect,
test and approve the installation.
SCOPE
A.
Prevent transmission of perceptual vibration or noise into the occupied space.
B.
All mechanical equipment and piping shall be mounted on or suspended from
approved and specified foundations or supports.
C.
All vibration isolation systems shall be guaranteed to have the static deflections
as required.
15200 - 1 of 6
12010 - NISD - High School
1.3
D.
Install the vibration isolation system in accordance with the manufacturer's
instructions.
E.
Weatherproof all vibration isolation outdoors.
1.
Hot dipped galvanize steel parts.
2.
Cadmium plate bolts.
3.
Cadmium plate and neoprene coat all springs.
ACOUSTICAL REQUIREMENTS
A.
Maximum noise levels shall conform to "Recommended Indoor Design Goals for
Air Conditioning System Sound Control" as set forth in the chapter on "Sound
and Vibration Control" in the current edition of the ASHRAE "System" handbook.
1.
B.
The acoustical requirements of the project are mandatory. Mechanical systems
designs and equipment selections have been made to provide the required
acoustical performance.
C.
It is the Contractor's responsibility to make the installation; equipment placement;
isolation; duct insulation; and vibration isolation as required to maintain airborne
and structure-borne noise and vibration levels at or below a Noise Criterion of:
D.
1.
NC-25 in the Hearing-Vision Testing Room.
2.
NC-35 in all occupied spaces.
Measure noise levels with all equipment at its normal operating configuration and
the space unoccupied.
1.
1.4
The mid-point of the range of NC criteria shall apply.
Take measurements at 4'-0" above the floor after ceiling and floor
covering is installed.
EQUIPMENT ISOLATOR TYPES
A.
Type 1 - not used.
B.
Type 2 - aluminum-housed, or cast iron housed, adjustable, spring mounting
having telescoping top and bottom sections separated by resilient inserts of
neoprene or other suitable material to limit horizontal motion. The inserts shall
be permanently lubricated to minimize vertical friction. Provide housing with
vertical limit stop. Steel or cast iron housings may be used if they are hot-dip
galvanized after fabrication. Bond a 1/4" thick neoprene pad to the baseplate.
15200 - 2 of 6
12010 - NISD - High School
1.5
1.6
C.
Type 3 - 1/4" thick molded neoprene isolation pad with non-skid surface. Use
double layers, bonded to middle layer of 1/2" composition cork. Bond a 10
gauge galvanized steel bearing plate to the top of pad.
D.
Type 4 - a spring hanger consisting of a rectangular steel box, containing a steel
coil spring, and a neoprene element in series. The neoprene element shall be
molded with a rod isolation bushing that passes through the hanger box. Provide
an elastomeric element at the top of the box for acoustic isolation. The design
shall prevent metal-to-metal contact between the hanger rod and the hanger box
through a 30 degree arc. The hanger box shall be capable of supporting a load
of 200% of rated load without deformation or failure. Springs shall have a
minimum additional travel to solid equal to 50% of the rated deflection.
E.
Type 5 - a hanger consisting of a rectangular steel box containing a neoprene
element. The neoprene element shall be molded with a rod isolation bushing
that passes through the hanger box. Provide an elastomeric element at the top
of the box for acoustic isolation. The design shall prevent metal-to-metal contact
between the hanger rod and the hanger box through a 30 degree arc. The
hanger box shall be capable of supporting a load of 200% of rated load without
deformation or failure.
EQUIPMENT BASE TYPES
A.
Type B-1 - not used.
B.
Type B-2 - a concrete inertia base, consisting of a perimeter steel pouring form,
reinforcing bars welded in place, bolting templates and height-saving brackets
for side mounting of the isolators.
1.
The perimeter steel members shall be structural channels having a
minimum depth of 1/12 of the longest span, but not less than 6" deep.
2.
Be at least equal in weight to the pump with its driving motor and sized
for a minimum overlap of 4" around the base of the equipment.
3.
Sized to support the suction elbow of end suction pumps and both the
suction and discharge elbows of horizontal split-case pumps.
4.
T-shaped where necessary to conserve space.
SCHEDULE OF ISOLATED EQUIPMENT
EQUIPMENT
ISOLATOR
TYPE/BASE
Air Handling Units (Floor Mounted and in
Mech. Mezzanine Rooms)
Supply and Exhaust Fans (Suspended)
Fan Coil Units (Suspended)
2
4
4
15200 - 3 of 6
MINIMUM
DEFLECTION
2.0
1.0
1.0
12010 - NISD - High School
Fan Coil Units (Floor Mounted)
Utility Vent Set (Base Mounted)
Fan Powered VAV Boxes (Suspended)
Chilled Water Pump (Interior)
Hot Water Pump (Interior)
Condensing Units on Roof
A.
1.7
1.8
3
2
5
B-2
B-2
3
Any equipment or system that may be altered or added or that is not specifically
considered herein shall be treated in a manner that is set out for similar
equipment system.
PIPING ISOLATOR TYPES
A.
Type P-1: Monel wire reinforced molded TFE teflon bellows; multiple arch;
flexible pipe connector; limit bolts; ASA standard ductile iron flanges; integral
molded gaskets; minimum working pressure: 100 PSI at 250 degrees F.
B.
Type P-2: Type 316 stainless steel corrugated metal flexible pipe connector;
Type 321 stainless steel single braid; Schedule 40 NPT, male nipple with hex
boss each end; minimum working pressure: 250 PSI at 500 degrees F.
C.
Type P-3: Not used.
D.
Type P-4: Not used.
SCHEDULE OF PIPING ISOLATORS
EQUIPMENT
ISOLATOR TYPE
Chilled Water Pumps
Hot Water Pumps
Hot Water Coils (Air Handling Units)
Chilled Water Coils (Air Handling Units)
1.9
Min.
1.0
Min.
1.0
1.0
Min.
P-1
P-1
P-2
P-2
PIPING ISOLATION
A.
Provide isolation in two planes where required.
B.
Isolate all pumped water piping 1-1/2" and larger in mechanical rooms with Type
4 spring isolators providing a minimum of 1" static deflection.
C.
The supports for all piping, including drains, within one hundred pipe diameters,
from any piece of equipment specified to be isolated shall be isolated with spring
type supports with not less than static deflection specified for the piece of
equipment.
D.
Isolate the first three supports outside mechanical rooms for pumped hot water
and chilled water piping 2" and larger with Type 4 spring type hangers providing
a minimum of 1" static deflection.
15200 - 4 of 6
12010 - NISD - High School
E.
At points where piping passes through walls or floors, provide sleeves with
sufficient resiliency to prevent transmission of vibration from wall to pipe or from
pipe to wall. Sleeves shall be Schedule 40 pipe with the isolation material
bonded to the sleeve.
F.
Floor mounted pipe supports shall have the same type of isolator or media as is
used for the nearest isolated equipment connected to the piping.
1.
1.10
G.
The pipe hanger system shall have provisions for all piping to be shimmed or
blocked in place until all connections are made and the system filled with water;
adjust the isolators to support the weights; remove the shim blocks.
H.
All isolation supporting piping shall be capable of an additional 50% deflection
without becoming solid.
SUBMITTAL DRAWINGS
A.
1.11
Static deflection equal to or greater than equipment support.
Submittal drawings shall include:
1.
Manufacturer's selection charts showing point of selection and efficiency
for each piece of isolation equipment.
2.
Static deflection, supported weight and disturbing frequency, for each
piece of actual equipment being isolated.
3.
Deflected spring height.
4.
Unloaded spring height.
5.
Isolator transmissibility.
6.
Detailed instructions for installing and adjusting the isolators and bases.
TESTING AND ADJUSTING
A.
Where perceptual transmitted noise or vibration is observed:
1.
Provide field instrumentation for testing and measurement.
2.
Determine the source, cause and path of any such disturbances.
B.
Adjust and modify the isolation equipment and machinery as required.
C.
Prepare a chart for each piece of isolated equipment to show:
1.
Tests made and results.
15200 - 5 of 6
12010 - NISD - High School
1.12
3.
Final test readings.
Prepare a written sound analysis of:
1.
Each 2nd floor mechanical equipment room.
2.
Each area below or adjacent to 2nd floor mechanical equipment rooms.
B.
The readings shall be taken when all furnishings are in place. Submit the
analysis on standard "NC" curve forms.
C.
Take the readings in the eight primary octave bands affected.
D.
Deliver the approved charts in the Owner's Manuals.
CERTIFICATION
A.
1.14
Modifications made.
SOUND SURVEY
A.
1.13
2.
After completion of the installation and prior to final inspection, submit a
certificate from the isolation manufacturer stating:
1.
The installation is in accordance with the manufacturer's instructions and
recommendations.
2.
All the equipment has been adequately isolated.
3.
Acceptable noise levels exist in the occupied spaces based upon
measurements made.
ACCEPTABLE MANUFACTURERS
A.
Amber/Booth.
B.
Mason.
C.
VMC.
D.
Kinetics.
15200 - 6 of 6
12010 - NISD - High School
SECTION 15250
MECHANICAL PIPING INSULATION
1.1
1.2
WORK INCLUDED
A.
Piping insulation.
B.
Jackets and accessories.
C.
Covering.
QUALITY ASSURANCE
A.
Insulation shall be installed in a workmanlike manner by skilled workmen
regularly engaged in piping insulation application.
1.
B.
1.3
Three years minimum experience.
Insulation products installed indoors shall have composite (insulation, jacket and
adhesive used to adhere jacket to the insulation) Fire and Smoke Hazard ratings
as tested under procedure ASTM E-84, NFPA 255 and UL 723, not exceeding:
1.
Flame spread - 25.
2.
Smoke developed - 50.
C.
Each container shall bear the UL label.
D.
Condensation on any insulated piping system is not approved.
HANGERS AND SUPPORTS FOR INSULATED PIPING SYSTEMS
A.
Install hangers for cold pipes outside of the insulation and vapor barrier jacket.
B.
Provide a galvanized steel sheet metal protection shield at each pipe hanger or
support.
1.
C.
See the schedule on the drawings for insulated pipe protection shields as
specified.
Provide 360 degree segment of incompressible, load bearing insulation with
matching vapor barrier jacket at each support point to prevent insulation from
sagging or crushing.
15250 - 1 of 7
12010 - NISD - High School
D.
1.4
1.
Of same thickness and contour as adjoining insulation.
2.
Extend the segment length 1" beyond the protection shield.
For Koolphen phenolic foam systems, provide 5 PCF density "K Blocks" with
integral galvanized shields.
HOT WATER HEATING PIPING INDOORS
A.
Cover with fiberglass, heavy density, dual temperature pipe insulation with a ASJ
vapor barrier jacket.
B.
Seal the vapor barrier jacket longitudinal seam with the factory applied pressure
sensitive tape lap sealing system.
C.
Seal the butt joint with a matching 3" wide tape with factory applied pressure
sensitive sealing system.
D.
Cover fittings and flanges with factory made molded fitting covers or field
fabricated segments of pipe insulation of a thickness equal to that of the
adjacent straight pipe covering. Adhere segments together with no voids with
vapor barrier mastic. Secure fitting insulation covers and segments in place with
16 gauge soft stainless wire.
1.
Apply skim coat of insulating cement to the insulated fitting to produce a
smooth surface.
2.
After the cement is dry, apply a tack coat of white vapor barrier mastic.
3.
Embed into the wet tack coat an open mesh glass fabric membrane.
Smooth the membrane to avoid wrinkles. Overlap all seams and joints at
least two inches.
4.
Apply a finish coat of the same white vapor barrier mastic on the still wet
tack coat.
5.
The fabric shall not be visible after completion of the finish coat.
6.
The application shall provide a minimum dry film thickness of 56 mils.
E.
Hot water piping insulation is not required to be vapor barrier proof. However,
mastics shall be used to provide a neat and finished system.
F.
Insulation thickness:
1.
1" thick on pipe sizes through 2".
15250 - 2 of 7
12010 - NISD - High School
G.
1.5
1-1/2" thick on pipe sizes 2-1/2" through 4".
3.
2" Thick on pipe sizes 6" and above.
See details on drawings for limited use of elastomeric thermal insulation.
CHILLED WATER PIPING INDOORS
A.
Cover with 3.75 lb./CF phenolic foam, dual temperature pipe insulation with a
ASJ vapor barrier jacket.
B.
Seal the vapor barrier jacket longitudinal seam with the factory applied pressure
sensitive tape lap sealing system.
C.
Seal the butt joint with a matching 3" wide tape with factory applied pressure
sensitive sealing system.
D.
Cover valves, fittings and flanges with factory made molded phenolic foam fitting
covers of a thickness equal to that of the adjacent straight pipe covering.
E.
Apply vapor barrier mastic at 1/16" thick to the butt joint of the insulation covering
at valves, fittings and flanges.
F.
G.
1.6
2.
1.
At 20 foot intervals on straight pipe, apply vapor barrier mastic at 1/16"
thick to the butt joint and onto the bore of the insulation for a minimum of
two inches.
2.
Position insulation carefully to ensure that an unbroken seal is obtained.
Insulation thickness:
1.
3/4" thick on sizes through 1-1/4".
2.
1" thick on pipe sizes through 2".
3.
1-1/2" thick on pipe sizes above 2".
See details on drawings for limited use of elastomeric thermal insulation.
INSULATED CHILLED WATER PIPING EXPOSED TO VIEW INDOORS
A.
Straight pipe.
1.
Apply a smooth flood coat of white lagging.
15250 - 3 of 7
12010 - NISD - High School
B.
Fittings.
1.
C.
1.7
Apply a flood coat of white lagging.
Install in accordance with manufacturer's instructions.
CHILLED WATER, HOT WATER AND CONDENSATE PIPING OUTDOORS ABOVE
GRADE
A.
Cover chilled and hot water piping with 1-1/2" thick Trymer 2000 rigid foam dual
temperature pipe insulation. Cover condensate piping with 1" thick Trymer.
1.
Insulation to be factory wrapped with IdealSeal 777 multi-layer laminate
embossed aluminum sheets vapor barrier jacket.
2.
Apply so jacket longitudinal seam tends to shed water.
B.
Seal the butt joints with a matching 4" wide IdealSeal 777 vapor barrier tape
wrap.
C.
Cover valves, fittings and flanges with factory made molded fitting covers or field
fabricated segments of pipe insulation of a thickness equal to that of the
adjacent straight pipe covering. Adhere segments together with no voids with
vapor barrier mastic. Secure fitting insulation covers and segments in place with
16 gauge soft stainless wire.
1.
Apply skim coat of insulating cement to the insulated fitting to produce a
smooth surface.
2.
After the cement is dry, field apply ½" lapped layers of IdealSeal 777
vapor barrier sheets and tape to make a complete vapor barrier covering.
a.
D.
1.8
Position lap joints and seams to shed water.
No other jackets or aluminum coverings are necessary.
ALL INDOOR ABOVE GRADE CONCEALED CONDENSATE DRAIN PIPING AND
TRAPS, ROOF DRAIN SUMPS, RELATED HORIZONTAL AND VERTICAL ROOF OR
FLOOR DRAIN LINES WHICH RECEIVE COLD CONDENSATE
A.
Cover with tubular or sheet flexible, elastomeric thermal insulation.
B.
Fabricate fitting covers of mitered sections of the pipe insulation material.
C.
Seal butt joints with manufacturer's approved adhesive.
D.
Apply insulation in accordance with manufacturer's recommendations.
15250 - 4 of 7
12010 - NISD - High School
E.
Slip the pipe insulation onto the pipe before it is in place where possible.
1.
F.
Insulate horizontal roof drain and floor drain lines receiving cold condensate for a
minimum horizontal distance of 10 feet out from device.
G.
Insulation thickness:
1.
1.9
A.
Cover as noted in Article 1.8.
B.
Insulation thickness:
C.
1/2" thick - indoors.
Finish the elastomeric insulation with two coats of Armstrong WB Armaflex white
finish.
1.
1.11
1/2" thick - indoors.
INSULATED CONDENSATE DRAIN PIPING AND TRAPS OR OTHER HORIZONTAL/
VERTICAL PIPING EXPOSED TO VIEW INDOORS
1.
1.10
Where insulation cannot be slipped on the pipe, use pre-slit insulation
with the longitudinal joint adhered with the manufacturer's approved
adhesive
Apply in accordance with the manufacturer's instructions.
SUBMITTALS
A.
Submit product data on each insulation type, jacket, adhesive and finish to be
used in the work.
B.
Include product description, list of materials and thickness for each service and
location.
C.
Submit manufacturer's installation instructions.
ACCEPTABLE MANUFACTURERS
A.
Phenolic foam pipe insulation: Maximum thermal conductivity .13 at 75 F; 3.75
PCF density white kraft vapor barrier jacket bonded to aluminum foil reinforced
with fiber glass yarn. Jacket water vapor permeance .02 perms max: Beach
puncture resistance 50 oz. in./in. tear min.
1.
Kooltherm Insulation Products, Koolphen K or Resolco Insulphen.
15250 - 5 of 7
12010 - NISD - High School
B.
Trymer 2000
1.
C.
D.
E.
Flexible, closed cell, foamed plastic insulation.
1.
Armstrong Armaflex II.
2.
Johns Manville Aerotube II.
Mastics and adhesives.
1.
Childers.
2.
Foster.
3.
Insul-Coustic.
4.
Vimasco.
Exterior jacketing and cladding.
1.
F.
1.12
Insulation Products with IdealSeal 777 jacket and cladding.
IdealSeal 777.
Monel staples.
1.
Bostich Monel.
2.
Duo-Fast Monel.
3.
Markwell Monel.
INSTALLATION
A.
Install materials in accordance with manufacturer's instructions.
1.
See drawing details for various conditions and treatment of insulation.
2.
During installation of the factory applied pressure sensitive jacket, tape
and lap sealing system, observe the manufacturer's requirements for a
clean, dry jacket surface.
B.
Install materials after piping has been tested and approved.
C.
Apply insulation on clean, dry surfaces only.
D.
Insulation shall be continuous through wall, floor, ceiling openings and sleeves.
15250 - 6 of 7
12010 - NISD - High School
E.
On cold surfaces, where vapor barrier jackets are used, apply insulation with a
continuous, unbroken vapor seal. Hangers, supports and anchors that are
secured directly to the cold surface shall be insulated and vapor sealed to
prevent condensation.
F.
On exposed piping, locate insulation and cover seams in least visible locations.
G.
On insulated cold piping with vapor barrier, insulate fittings, valves, unions,
flanges, strainers, flexible connections and expansion joints.
H.
Neatly finish insulation at supports, protrusions and interruptions.
I.
The use of staples in the fabrication and installation of the insulation system is
not approved, except where specified.
15250 - 7 of 7
12010 - NISD - High School
SECTION 15255
DOMESTIC WATER AND MISCELLANEOUS PIPING INSULATION
1.1
1.2
WORK INCLUDED
A.
Piping insulation.
B.
Jackets and accessories.
C.
Covering.
QUALITY ASSURANCE
A.
Insulation shall be installed in a workmanlike manner by skilled workmen
regularly engaged in piping insulation application.
1.
B.
1.3
Insulation products installed indoors shall have composite (insulation, jacket and
adhesive used to adhere to jacket to the insulation) Fire and Smoke Hazard
ratings as tested under procedure ASTM E-84, NFPA 255 and UL 723, not
exceeding:
1.
Flame spread - 25.
2.
Smoke developed - 50.
C.
Each container shall bear the UL label.
D.
Condensation on any insulated piping system is not approved.
HANGERS AND SUPPORTS FOR INSULATED PIPING SYSTEMS
A.
Install hangers for domestic water pipes outside of all insulation.
1.
1.4
Three years minimum experience.
Provide a galvanized sheet metal protection shield at each hanger.
DOMESTIC WATER PIPING
A.
Cover all domestic cold water, hot water, hot water return and tempered water
piping with fiberglass, one piece pipe insulation with a vapor barrier jacket.
B.
Seal the vapor barrier jacket longitudinal seam with the factory applied pressure
sensitive tape lap sealing system.
15255 - 1 of 5
12010 - NISD - High School
C.
Seal the butt joint with a matching 3" wide tape with factory applied pressure
sensitive sealing system.
D.
Cover valves, fittings and flanges with factory made molded fitting covers or field
fabricated segments of pipe insulation of a thickness equal to that of the
adjacent straight pipe covering. Adhere segments together with no voids with
vapor barrier mastic. Secure fitting insulation covers and segments in place with
16 gauge soft stainless wire.
E.
1.5
1.
Apply a skim coat of insulating cement to the insulated fitting to produce
a smooth surface.
2.
After the cement is dry, apply a tack coat of white vapor barrier mastic.
3.
Embed into the wet tack coat an open mesh glass fabric membrane.
Smooth the membrane to avoid wrinkles. Overlap all seams and joints at
least two inches.
4.
Apply a finish coat of the same white vapor barrier mastic on the still wet
tack coat.
5.
The fabric shall not be visible after completion of the finish coat.
6.
The application shall provide a minimum dry film thickness of 56 mils.
Apply vapor barrier mastic at 1/16" thick to the butt joint of the insulation covering
at valves, fittings and flanges.
1.
At 20 foot intervals on straight pipe, apply vapor barrier mastic at 1/16"
thick to the butt joint and onto the bore of the insulation for a minimum of
two inches.
2.
Position insulation carefully to ensure that an unbroken seal is obtained.
F.
Do not cover chrome plated supplies to plumbing fixtures (see drawing notes and
schedules for ADA requirements).
G.
Cover all domestic water piping inside chases and walls.
OPTIONAL FITTING JACKET FOR THE DOMESTIC WATER SYSTEM
A.
Cover valves and fittings in the domestic water system with Zeston 25/50 rated
PVC fitting covers.
B.
Apply the properly sized, factory precut insulation insert to fully insulate the valve
or fitting.
15255 - 2 of 5
12010 - NISD - High School
1.6
C.
Install in accordance with manufacturer's instructions.
D.
Apply 2" wide color-matched, pressure sensitive "Z-tape" over the circumferential
joint. Lap the tape over the adjacent pipe insulation jacket.
PLUMBING TRAP AND DRAIN PIPING
A.
1.7
Cover plumbing traps and horizontal plumbing drain lines, above grade,
receiving condensate from air handling equipment, as specified for domestic
HOT water piping. (1" MAXIMUM THICKNESS REQUIREMENT.)
PIPE INSULATION THICKNESS
A.
B.
Domestic hot water piping:
1.
1" Thick on pipe sizes 1-1/2" and smaller.
2.
1-1/2" Thick on pipe sizes 2" and larger.
Domestic cold and tepid water piping:
1.
1.8
INSULATED PIPING EXPOSED TO VIEW INDOORS
A.
Straight pipe.
1.
B.
C.
Apply a smooth flood coat of white lagging.
Fittings.
1.
1.9
1/2" Thick, all size piping.
Apply a flood coat of white lagging.
Install in accordance with manufacturer's instructions.
SUBMITTALS
A.
Submit product data on each insulation type, jacket, adhesive and finish to be
used in the work.
B.
Include product description, list of materials and thickness for each service and
location.
C.
Submit manufacturer's installation instructions.
15255 - 3 of 5
12010 - NISD - High School
1.10
ACCEPTABLE MANUFACTURERS
A.
B.
C.
D.
1.11
Glass fiber pipe insulation: Maximum thermal conductivity .23 at 75 F: High
density white kraft vapor barrier jacket bonded to aluminum foil reinforced with
fiber glass yarn, jacket water vapor permeance .02 perms max: Beach puncture
resistance 50 oz. in./in. tear min.
1.
Johns Manville Micro-Lok APT Plus.
2.
Owens-Corning ASJ/SSL.
3.
Knauf ASJ/SSL.
Preformed fitting insulation and PVC premolded, one piece covers.
1.
Johns Manville Zeston (Fire Hazard Classification 25/50).
2.
Knauf (Fire Hazard Classification 25/50).
Fiberglass reinforcing cloth mesh.
1.
Perma Glass Mesh.
2.
Alpha Glass Mesh.
3.
Childers Chil-Glas.
Mastics and adhesives.
1.
Childers.
2.
Foster.
3.
Insul-Coustic.
4.
Vimasco.
INSTALLATION
A.
Install materials in accordance with manufacturer's instructions.
B.
Install materials after piping has been tested and approved.
C.
Apply insulation on clean, dry surfaces only.
D.
Insulation shall be continuous through wall, floor, ceiling openings and sleeves.
15255 - 4 of 5
12010 - NISD - High School
E.
On cold surfaces, where vapor barrier jackets are used, apply insulation with a
continuous, unbroken vapor seal. Hangers, supports and anchors that are
secured directly to the cold surface shall be insulated and vapor sealed to
prevent condensation.
F.
On exposed piping, locate insulation and cover seams in least visible locations.
G.
On insulated cold piping with vapor barrier, insulate fittings, valves, unions,
flanges, strainers, flexible connections and expansion joints.
H.
On insulated hot piping, do not insulate flanges and unions at equipment.
1.
Bevel and seal ends of insulation at these locations.
I.
Neatly finish insulation at supports, protrusions and interruptions.
J.
The use of staples in the fabrication and installation of the insulation system is
not approved.
15255 - 5 of 5
12010 - NISD - High School
SECTION 15260
DUCTWORK INSULATION
1.1
1.2
WORK INCLUDED
A.
Ductwork insulation.
B.
Jackets and accessories.
C.
Exposed metal joints at fire dampers.
D.
Back of supply air diffusers and grilles.
E.
At any exposed metal parts in the ductwork system that do not come
preinsulated.
QUALITY ASSURANCE
A.
Insulation shall be installed in a workmanlike manner by skilled workmen
regularly engaged in ductwork insulation application.
1.
B.
1.3
Three years minimum experience.
Insulation products shall have composite (insulation, jacket and adhesive used
to adhere to jacket to the insulation) Fire and Smoke Hazard ratings as tested
under procedure ASTM E-84, NFPA 255 and UL 723, not exceeding:
1.
Flame spread - 25.
2.
Smoke developed - 50.
C.
Each container shall bear the UL label.
D.
Condensation on any insulated system is not approved.
DUCTWORK COVERING
A.
Cover ductwork as shown on drawing details/notes/schedules.
1.
1-1/2" thick, 1-1/2 pound minimum density glass fiber blanket duct
insulation with reinforced foil facing with a 2" tab one edge.
B.
Apply adhesive to the surface of the metal duct, in 4" widths at 8" intervals.
C.
Wrap insulation on ducts with facing overlapping joints at least 2".
15260 - 1 of 3
12010 - NISD - High School
1.
1.4
1.5
Hold in place with 1/2" outward clinching Monel staples on 4" centers.
D.
On ducts over 24" in width, further secure insulation on the underside with
mechanical fasteners spaced on not more than 18" centers.
E.
Cover end and longitudinal seams and sheet metal caps and screws with 1/8"
coating of fireproof vapor barrier mastic embedded with open mesh glass fabric
and finished with another 1/8" coat of mastic.
SUBMITTALS
A.
Submit product data on each insulation type, cement, jacket and finish to be
used in the work.
B.
Include product description, list of materials, accessories and thickness for each
service and location.
C.
Submit manufacturer's installation instructions.
ACCEPTABLE MANUFACTURERS
A.
B.
C.
Glass fiber blanket duct insulation: density 1.5 pcf; maximum thermal
conductivity .25 at 75 F; facing .35 mil foil reinforced with glass yarn mesh and
laminated to 40 lb. fire resistant kraft.
1.
Johns Manville Microlite FSKL.
2.
Owens-Corning ED75 or ED100 RKF.
3.
Certainteed Type 4 Duct Wrap FSK.
4.
Knauf .75 PCF FSK.
Monel staples.
1.
Bostich Monel.
2.
Duo-Fast Monel.
3.
Markwell Monel.
Fiberglass reinforcing cloth mesh.
1.
Perma Glass Mesh.
2.
Alpha Glass Mesh.
3.
Childers Chil-Glas.
15260 - 2 of 3
12010 - NISD - High School
D.
1.6
1.7
Mastics and adhesives.
1.
Childers.
2.
Foster.
3.
Insul-Coustic.
INSTALLATION
A.
Install materials in accordance with manufacturer's instructions.
B.
Apply insulation on clean, dry surfaces only.
C.
Continue insulation with vapor barrier through penetrations.
D.
Neatly finish insulation at supports, protrusions and interruptions.
DUCTWORK COVERING EXCEPTIONS
A.
Do not cover fiberglass ductboard systems.
B.
Do not cover factory insulated round flexible duct.
15260 - 3 of 3
12010 - NISD - High School
SECTION 15270
EQUIPMENT INSULATION
1.1
1.2
WORK INCLUDED
A.
Equipment and vessel insulation.
B.
Covering.
C.
Chiller nozzles and headers.
QUALITY ASSURANCE
A.
Insulation shall be installed in a workmanlike manner by skilled workmen
regularly engaged in equipment insulation application.
1.
B.
1.3
Three years minimum experience.
Insulation products shall have composite (insulation, jacket and adhesive used to
adhere to jacket to the insulation) Fire and Smoke Hazard ratings as tested
under procedure ASTM E-84, NFPA 255 and UL 723, not exceeding:
1.
Flame spread - 25.
2.
Smoke developed - 50.
C.
Each container shall bear the UL label.
D.
Condensation on any insulated system is not approved.
EQUIPMENT AND VESSELS COVERING (COLD AND HOT)
A.
B.
Cover all vessels in the chilled and hot water systems (both air separators and
the chilled water expansion tank) with 3/4" thick flexible elastomeric thermal
insulation. See exceptions this section.
1.
Cut or miter where necessary to fit the shape and contour of the
equipment.
2.
Seal all joints with manufacturer's approved adhesive.
Cover removable heads; data plates; and access points:
1.
In such a manner that it is readily removable without damage to the
insulation.
15270 - 1 of 3
12010 - NISD - High School
2.
C.
Have a vapor proof cover fabricated to allow it to be sealed to equipment
vapor barrier.
Finish (indoors):
1.
Finish the elastomeric insulation with two coats of Armstrong WB
Armaflex white finish.
a.
1.4
1.5
2.
WB finish to be compatible with any other manufactured elastomeric
insulation.
3.
Provide seal at all butt joints, transverse joints, valves and equipment to
assure water tight vapor seals.
SUBMITTALS
A.
Submit product data on each insulation type, cement, jacket and finish to be
used in the work.
B.
Include product description, list of materials, accessories and thickness for each
service and location.
C.
Submit manufacturer's installation instructions.
ACCEPTABLE MANUFACTURERS
A.
Flexible, closed cell, elastomeric insulation, maximum thermal conductivity .27 at
75 F.
1.
1.6
Elastomeric shall not be visible after second coat.
Armstrong AP Armaflex sheet and roll.
INSTALLATION
A.
Install materials in accordance with manufacturer's instructions.
B.
Apply insulation on clean, dry surfaces only.
C.
Do not insulate factory insulated equipment.
D.
Apply insulation as close as possible to equipment by grooving, scoring and
beveling insulation. Secure insulation to equipment with adhesives.
E.
Do not insulate over nameplate or ASME stamps on hot equipment. Bevel and
seal insulation around such.
15270 - 2 of 3
12010 - NISD - High School
1.7
F.
When equipment with insulation requires periodic opening for maintenance or
repair, install insulation in such a manner that it can be easily removed and
replaced without damage.
G.
Neatly finish insulation at supports, protrusions and interruptions.
INSULATION INSTALLATION EXCEPTIONS
A.
Do not insulate the hot water expansion tanks at indoor locations.
B.
Do not insulate the hot water or chilled water chemical feeders at indoor
locations.
C.
Do not insulate the chilled water or hot water pump suction diffusers.
D.
1.
Bevel the end of the insulation to the flange or union.
2.
Seal the insulation with vapor barrier cement.
3.
Expose the bolts and nuts.
Do not insulate the chilled water or hot water pump body.
15270 - 3 of 3
12010 - NISD - High School
SECTION 15350
NATURAL GAS PIPING SYSTEM
1.1
GENERAL
A.
1.2
1.3
1.
International Gas Code.
2.
The National Fuel Gas Code (NFPA 54).
3.
Applicable governing local code.
REFERENCES
A.
ANSI B31.2 - Fuel Gas Piping.
B.
ASTM A53 - Pipe, Steel, Black and Hot-Dipped Zinc Coated, (Galvanized)
Welded and Seamless.
C.
ASTM A120 - Pipe, Steel, Black and Hot-Dipped Zinc Coated (Galvanized),
Welded and Seamless, for Ordinary Uses.
D.
ASTM A234 - Pipe Fittings of Wrought Carbon Steel and Alloy Steel for
Moderate and Elevated Temperatures.
E.
ANSI B16.3 - Malleable Iron Threaded Fittings.
F.
ANSI/ASME B1.20.1 - Standard for Pipe Threads, General Purpose.
G.
ANSI/MSS SP-58 - Standard Practice for Pipe Hangers and Supports Materials, Design and Manufacture.
H.
ANSI B31.9 - Building Service Piping.
I.
NFPA 54 - National Fuel Gas Code.
QUALITY ASSURANCE
A.
1.4
Install all systems in accordance with:
Valves: manufacturer's name and pressure rating marked on valve body.
PIPING MATERIALS
A.
Piping indoors - Schedule 40 black steel pipe.
B.
Piping outside above grade - Schedule 40 galvanized steel pipe.
15350 - 1 of 3
12010 - NISD - High School
1.
C.
Piping below grade - Polyethylene, PE 2406 as classified by ASTM D 3350, SDR
11, manufactured in accordance with ASTM D 2513 minimum of 3,000 hours
typical performance when tested according to ASTM F 1473 and ASTM D 2239.
Provide with fittings manufactured in accordance with ASTM D 2513, heat fusion
welded joints, installed in accordance with ASTM D 2774.
1.
1.5
Provide annodeless gas piping riser with one-piece steel outer protective
pipe sleeve bent to form a 90E radius to route and fully contain the
polyethylene tubing above grade. Terminate riser with steel to plastic
adapter and threaded pipe connection. The owner had indicated the
desire to use annodeless gas risers. There seems to be a question
regarding the acceptance of the annodeless gas riser assemblies by the
City of Beaumont and/or the gas company. These riser assemblies are
acceptable by both entities.
WARNING TAPE
A.
Install a 2" wide yellow plastic warning tape in the ditch 12" below the ground
line, over the gas pipe line.
1.
Resistant to destructive chemical components likely to be encountered in
the soil.
B.
Continuous imprint: "CAUTION: BURIED GAS LINE BELOW."
C.
Tape used with thermoplastic pipe system:
1.
1.6
Coat exposed threads with cold galvanizing compound.
An inert, detectable, bonded layer plastic with a metallized foil core.
GAS PRESSURE REGULATOR
A.
B.
Provide a gas pressure regulator where indicated on the drawings.
1.
Regulator operating characteristics and capacity to suit its duty.
2.
Provide with valve on inlet and plugged gauge port downstream.
Where a regulator is located indoors, pipe a line sized, gas relief vent to the
outdoors.
1.
Where there is more than one regulator at a location, each regulator shall
have a separate gas relief vent to the outdoors.
2.
Terminate gas vent relief vent piping to prevent the entrance of rainwater.
15350 - 2 of 3
12010 - NISD - High School
1.7
INSTALLATION
A.
Arrange with the gas utility company for meter and service line extensions that
are required and pay all costs attendant thereto.
B.
Extend piping to all gas consuming devices, including all final connections.
C.
Install a gas valve for shut-off and to isolate equipment, part of systems
orvertical risers.
D.
Install a non-conductoring dielectric connection:
E.
1.8
1.
Where jointing dissimilar metals.
2.
At each gas consuming equipment connection.
Install gas piping to conserve building space and not interfere with use of space.
TESTING OF PIPING SYSTEMS
A.
All new piping systems shall be:
1.
Thoroughly tested for leaks.
2.
Approved by local authorities having jurisdiction.
a.
B.
C.
Proof of such approval submitted before any such work is
concealed.
Local codes and regulations govern the extent of the test of each system. Make
the following minimum tests.
1.
Test gas piping and connections with 50 pounds air pressure maintained
for 24 hours.
2.
Make final test on piping under pressure with soap solution.
Any leaks or other defects:
1.
Corrected at once.
2.
Remove all defective material.
3.
Replace with sound material.
4.
Repeat test until all leaks are eliminated.
15350 - 3 of 3
12010 - NISD - High School
SECTION 15408
SYSTEM OF SANITARY SOIL, WASTE AND VENT PIPING
1.1
1.2
1.3
1.4
RELATED WORK
A.
Section 15014 - Trenching and Backfill.
B.
Section 15255 - Domestic Water and Miscellaneous Piping Insulation.
C.
Section 15420 - Plumbing Equipment.
D.
Section 15430 - Plumbing Fixtures.
GENERAL
A.
Install all systems in accordance with the International Plumbing Code and
governing local codes.
B.
Extend and connect to serve fixtures located in the building and such items of
equipment as require same.
REFERENCES
A.
ASTM D1785 - PVC plastic pipe, Schedules 40, 80 and 120.
B.
ASTM D2855 - Making solvent-cemented joints with PVC pipe fittings.
C.
ANSI/ASTM D2466 - PVC plastic piping fittings, Schedule 40.
D.
ASTM F477 - Elastomeric seals gaskets for jointing plastic pipe.
SOIL, WASTE AND VENT PIPING
A.
Schedule 40 PVC pipe with drainage pattern fittings and solvent welded joints.
1.
1.5
Use factory made adapters to connect from one style of pipe to another.
FITTINGS
A.
Use only long sweep quarter and eighth bends for changes in direction.
1.
Short sweep fittings are not approved.
15408 - 1 of 3
12010 - NISD - High School
1.6
1.7
VENT FLASHING
A.
Provide a flashing for all plumbing stacks passing through the roof.
B.
Desilvered sheet lead free of oxidation.
1.
4 pounds per square foot weight.
2.
Flange built 4 inches into the roofing.
3.
Running up the pipe and completely turned over into the pipe cavity a
minimum of 1".
TESTING OF DRAINAGE AND VENT SYSTEMS
A.
Test new piping systems to ensure that they are leak free.
B.
All new piping systems tests shall be approved by the local administrative
authority having jurisdiction.
C.
1.
Local codes and regulations govern the extent of the test of each system.
2.
The specified testing shall be performed as a minimum.
Test the system by filling with water full to the top of the highest stack. Hold for
24 hours.
1.
Make tests after all rough-in is completed and before fixtures are
connected.
2.
Test pipe to the sewer.
D.
Open cleanouts to verify that the pressure has reached all parts of the system.
E.
Test the building sewer piping system by plugging the end of the building sewer
at the point of connection to the public sewer. Fill the building sewer with water
and test with not less than 10 foot head of water.
F.
Do not conceal piping systems until all tests are satisfactorily completed.
G.
If any leaks or other defects are observed, suspend the test and correct the
condition at once.
1.
Remove defective material.
2.
Replace with sound material.
15408 - 2 of 3
12010 - NISD - High School
3.
H.
1.8
1.9
Repeat the testing until all leaks are eliminated and the full test period is
achieved.
The satisfactory completion of any test or series of tests does not relieve the
Contractor of responsibility for ultimate proper and satisfactory operation of
piping systems and their accessories.
INSTALLATION
A.
Route piping in orderly manner and maintain gradient.
B.
Install piping to conserve building space and not interfere with use of space.
C.
Group piping whenever practical at common elevations.
D.
Before commencing work, establish invert elevations required for sewer
connections, confirm inverts and ensure that the system can be properly
connected with slope for drainage and cover.
E.
Provide excavation and backfilling for the proper installation of underground
piping and components for the work of this section.
PIPING SYSTEM CERTIFICATION
A.
After completion of all testing but prior to Substantial Completion, pass a
plumber's flexible mechanical cleaning rod through the entire new soil and waste
system.
1.
Verify that the system is free of debris and obstructions.
2.
Provide a certificate attesting to verification. Insert in the Owner's Manual.
15408 - 3 of 3
12010 - NISD - High School
SECTION 15410
SYSTEM OF DOMESTIC WATER PIPING
1.1
1.2
RELATED WORK
A.
Section 15010 - Special Mechanical Requirements.
B.
Section 15011 - Supports and Anchors.
C.
Section 15012 - Valves.
D.
Section 15014 - Trenching and Backfill.
E.
Section 15255 - Domestic Water and Miscellaneous Piping Insulation.
F.
Section 15420 - Plumbing Equipment.
G.
Section 15430 - Plumbing Fixtures.
GENERAL
A.
Install in accordance with International Plumbing Code and governing local
codes.
1.
B.
1.3
Applicable governing local codes.
Extend water lines to all water using devices including final connection.
REFERENCES
A.
ANSI/ASME Sec. 9 - Welding and brazing qualifications.
B.
ANSI/ASTM B32 - Solder metal.
C.
ASTM B88 - Seamless copper water tube.
D.
ANSI/ASTM B16.29 - Wrought copper fittings.
E.
AWS A5.8 BAG-7 - Brazing filler metal.
F.
AWWA C601 - Standard methods for the examination of water and waste water.
15410 - 1 of 6
12010 - NISD - High School
1.4
1.5
DOMESTIC WATER PIPING ABOVE GRADE
A.
Copper tubing: Type L hard drawn. Fittings: wrought copper. Joints: 95% tin /
5% antimony solder or 95.5% tin / 4% copper / 0.5% silver solder.
B.
At the Contractor's option, branch taps may be made, utilizing mechanical
formed tee connections ("T-Drill" System).
Make installation in accordance with the manufacturer's installation
instructions.
2.
Make joints with silver brazing filler metal.
COPPER PIPE CORROSION PROTECTION
A.
B.
1.6
1.
Corrosion protect all copper tube piping systems:
1.
In the building slab.
2.
Beneath the building slab.
3.
Buried.
Cover copper tubing piping system with:
1.
"Tapecoat" TC primer.
2.
"Tapecoat" CT cold applied coating tape.
C.
Install coating system as specified by the manufacturer.
D.
Extend the corrosion protection 2" above slab line.
TEST OF PIPE CORROSION PROTECTION SYSTEM
A.
Test the continuity of the pipe corrosion protection coating with an approved high
voltage tester adjusted to provide sufficient voltage to produce a spark through a
pinhole in the coating (at least 15 KV AC).
B.
Make repairs to small holidays in accordance with the manufacturer's
instructions.
C.
Retest the repairs with the high voltage tester.
D.
Furnish certificate of compliance with field testing in Owner's Manual.
15410 - 2 of 6
12010 - NISD - High School
1.7
TESTS OF DOMESTIC WATER PIPING SYSTEM
A.
Test new piping systems to ensure that they are leak free.
B.
All new piping systems tests shall be approved by the local administrative
authority having jurisdiction.
C.
1.
Submit a certificate of approval from the administrative authority,
certifying satisfactory completion of the testing procedure.
2.
Put a copy of the certificate in each Owner's Manual.
Local codes and regulations govern the extent of the test of each system.
1.
The specified testing shall be performed as a minimum.
D.
Test the new domestic water piping system at 125 PSI hydrostatic pressure,
maintained for 6 hours.
E.
Use only potable water for the test.
F.
Perform the test before fixtures, faucets, trim or final connections are made to
equipment.
G.
Do not insulate or conceal piping systems until all tests are satisfactorily
complete.
H.
If any leaks or other defects are observed, suspend the test and correct the
condition at once.
I.
1.
Remove defective material.
2.
Replace with sound material.
3.
Repeat the testing until all leaks are eliminated and the full test period is
achieved.
After the system has been completely installed, including fixtures, faucets, trim,
hose connections and final connections to all equipment, place the entire system
in operating condition and observe for leaks.
1.
J.
Operate and adjust all valves, faucets and trim.
The satisfactory completion of any test or series of tests does not relieve the
Contractor of responsibility for ultimate proper and satisfactory operation of
piping systems and their accessories.
15410 - 3 of 6
12010 - NISD - High School
1.8
DISINFECTION OF DOMESTIC WATER PIPING SYSTEM
A.
Prior to starting work, verify system is complete, flushed and clean.
B.
Inject disinfectant; free chlorine in liquid, powder, tablet or gas form; throughout
the system to obtain 50 to 80 MG/L residual.
C.
Bleed water from outlets to ensure distribution and test for disinfectant residual
at minimum 15 percent of outlets.
D.
Retain disinfectant in system for 24 hours. During the disinfection process,
operate all valves and accessories.
E.
If final disinfectant residual tests less than 25 MG/L, repeat treatment.
F.
Flush disinfectant from system until chemical and bacteriological tests prove
water quality equal to that of the permanent potable water supply.
G.
Take samples no sooner than 24 hours after flushing from 10 percent of the
outlets and from the water entry.
1.
Obtain a minimum of one water sample from each hot and cold water
branch.
2.
Take samples from faucets located at highest point in the building and
farthest point from the main water supply.
H.
Post warning signs at all outlets while disinfecting the system.
I.
After final flushing, remove aerators, clean and replace.
J.
Chemical and bacteriological tests shall be conducted by a state-certified
laboratory.
K.
The firm performing the disinfection shall have chemical laboratory experience.
Certification of performance shall indicate:
1.
Name and location of the project and date when disinfection was
performed.
2.
Material used for disinfection.
3.
Retention period of disinfectant in piping system.
4.
Mg/l chlorine during retention.
15410 - 4 of 6
12010 - NISD - High School
L.
5.
Mg/l chlorine after flushing.
6.
Statement that disinfection was performed as specified.
7.
Name and address of the person performing disinfection.
8.
Signature of an officer of the firm.
The laboratory report shall show the following information.
1.
Name and address of the approved laboratory, testing the samples.
2.
Name and location of the project and date the samples were obtained.
3.
Mg/l chlorine during retention.
4.
Mg/l chlorine after flushing.
5.
The coliform organism count. (An acceptable test shall show absence of
coliform organisms.)
M.
If analysis does not satisfy the specified minimum requirements, the disinfection
procedure shall be repeated.
N.
Submit for approval to the Architect/Engineer and the administrative authority
having jurisdiction, a copy each of the laboratory report and the certification of
performance.
1.
1.9
1.10
Put an approved copy of each document in the Owner's Manual.
APPLICATION
A.
Provide water supplies to each plumbing fixture, and to each item of equipment,
with shutoff or stop valve.
B.
Where required for connections to valves, fixtures and equipment, use copper to
I.P.S. adapters.
C.
Ferrous pipe is not approved in any domestic water piping system throughout the
project.
NOISE
A.
Eliminate abnormal noises, which are not considered by the Architect/Engineer
to be an inherent part of the system as designed. Rattling equipment and piping;
squeaks in equipment components are not acceptable.
15410 - 5 of 6
12010 - NISD - High School
1.11
1.12
FLANGES, UNIONS AND COUPLINGS
A.
Pipe size 2 inches and under: bronze unions with soldered joints.
B.
Pipe size over 2 inches: bronze flanges for brazed joints; neoprene gaskets.
C.
Dielectric connections: union with galvanized or plated steel threaded end,
copper solder end, water impervious isolation barrier.
DRAIN VALVES
A.
Install drain valves at all low points of the domestic water piping systems so that
these systems can be entirely drained.
1.
Install a 1-inch drain valve for 1-inch pipes and larger.
2.
Install a line size drain valve for pipes smaller than 1-inch.
B.
Use gate valves with hose thread adapter.
C.
Show location of each drain valve on record drawings.
1.
1.13
Identify as domestic water system drain valve.
INSTALLATION
A.
Install piping to conserve building space and not interfere with use of space.
B.
Group piping whenever practical at common elevations.
C.
Install piping to provide adequate access to equipment and controls. Install
piping to allow water to drain.
1.
Install valves at low points.
D.
Install brass male adapters each side of valves in piped system. Solder adapters
to pipe.
E.
Install valves in accessible locations and to make possible removal of bonnet
and complete servicing of each valve.
15410 - 6 of 6
12010 - NISD - High School
SECTION 15420
PLUMBING EQUIPMENT
1.1
CLEANOUTS
A.
1.2
Locate adjustable cleanouts:
1.
At base of stacks.
2.
At places where runs change direction.
3.
Wherever necessary to provide easy access for cleaning.
4.
No further than 75 feet apart in horizontal drainage lines within the
building.
5.
Installed to provide clearance for rodding.
B.
In piping over 4", cleanouts shall be 4".
C.
Cleanouts as scheduled on drawings.
D.
Where PVC piping is employed, PVC cleanout fitting and plug in lieu of
"Lekeromate" plug and lead seal is approved.
E.
Acceptable manufacturers:
1.
Zurn.
2.
Josam.
3.
Wade.
4.
Smith.
5.
Watts
HOSE BIBBS
A.
Hose bibbs as scheduled on the drawings.
B.
Acceptable manufacturers:
1.
Woodford.
15420 - 1 of 3
12010 - NISD - High School
1.3
1.4
FLOOR DRAINS
A.
Connect drains to deep seal trap except where shown otherwise.
B.
Where used in membrane floors, provide integrally cast flange with membrane
clamping device.
1.
Set in a 48" x 48" "Chloraloy" non-plasticized chlorinated polyethylene
waterproofing membrane. Weld with CPE solvent bonding liquid.
2.
Contractor's option 36" x 36" 4# lead flashing.
C.
Floor drains as scheduled on drawings.
D.
Acceptable manufacturers:
1.
Zurn.
2.
Josam.
3.
Wade.
4.
Smith.
5.
Watts
WATER HAMMER ARRESTORS
A.
Install permanently sealed water hammer arrestors on all hot and cold water
branches and headers to plumbing fixtures.
1.
Sized according to P.D.I. Standard WH 201.
2.
Or as shown on the drawings.
B.
Provide arrestors at all quick closing valves on equipment.
C.
The water hammer arrestors shall be installed according to manufacturer's
recommendation.
D.
12" long capped pipe air chambers may be installed on a single fixture (not in a
battery) furnished with manually controlled compression type faucets.
E.
Acceptable manufacturers:
1.
J. R. Smith.
15420 - 2 of 3
12010 - NISD - High School
1.5
2.
Wade.
3.
Watts.
4.
Precision.
5.
Sioux Chief
BACK FLOW PREVENTER
A.
Provide the reduced pressure back flow preventer where shown:
1.
B.
C.
Factory assembled components:
1.
Tight-closing isolating shutoff valves.
2.
Incoming strainer.
3.
Test cocks.
4.
A pressure differential relief valve located between two positive seating
check valves.
Acceptable manufacturer:
1.
1.6
1.7
Prevent the backflow of contaminated water into the potable water
supply.
Watts.
SUBMITTALS
A.
Submit manufacturer's product data sheets and unit capacity information as
specified.
B.
Submit manufacturer's certified capacity charts with selections plotted thereon.
C.
Submit manufacturer's "Installation, Start Up and Service Instructions".
INSTALLATION
A.
Install each piece of equipment in accordance with manufacturer's
recommendations.
B.
Start up each item of equipment in accordance with the manufacturer's
"Installation, Start Up and Service Instructions".
15420 - 3 of 3
12010 - NISD - High School
SECTION 15430
PLUMBING FIXTURES AND TRIM
1.1
GENERAL
A.
Connect all fixtures shown on the drawings to soil, waste, vent and water
supplies.
B.
Thoroughly clean and disinfect all fixtures upon completion of the installation.
C.
Plumbing fixtures and trim are scheduled on the drawings.
1.
1.2
INSTALLATION
A.
Mount wall hung fixtures according to the manufacturer's instructions.
B.
Fasten each wall hanger with through bolts and a back plate.
1.
1.3
The model numbers represent the style and level of quality of fixtures,
trim and supports.
Anchor the lower part of wall mounted fixtures with chrome plated
through bolts and a back plate.
C.
Provide chrome plated bolts to secure fixtures tightly upon their carriers.
D.
Use vandal resistant stainless steel machine screws to secure equipment and
appurtenances to back plates.
E.
Fasten carriers to the floor with expansion anchors and lag bolts.
F.
Refer to schedules and drawings for special mounting heights.
G.
Furnish all miscellaneous trim and appurtenances required for a complete
installation.
JOB CONDITIONS
A.
Review requirements of plumbing fixtures as to size and configuration prior to
submitting shop drawings.
B.
Check location of plumbing fixtures and make necessary adjustments in position
to conform with architectural features, symmetry and cabinet arrangement.
15430 - 1 of 3
12010 - NISD - High School
C.
Coordinate units mounted in cabinets with the construction in which they are to
be mounted.
D.
Check millwork shop drawings. Confirm location and size of fixtures and
openings before rough-in and installation.
1.
1.4
1.5
Resolve discrepancies between catalog references and the actual
construction into which they are to be installed at the time of submission
of shop drawings.
FIXTURE TO WALL JOINT SEALANT
A.
After installation of the wall hung fixtures is complete, seal the joint between the
wall surface and the fixture.
B.
Perform work in accordance with sealant manufacturer's requirements for
preparation of surfaces and material installation instructions.
C.
Remove loose materials and foreign matter which might impair adhesion of
sealant.
D.
Clean joints in accordance with manufacturer's instructions.
E.
Install sealant free of air pockets, foreign embedded matter, ridges and sags.
F.
Protect sealants until cured.
G.
Use white silicone sealant; single component, fungus resistant, non-sagging,
non-staining, non-bleeding.
H.
After completion of application of the sealant, clean the adjacent soiled surfaces.
ACCEPTABLE MANUFACTURERS
A.
B.
Stainless Steel Ware:
1.
Elkay.
2.
Just.
Sink faucets:
1.
Powers.
2.
Chicago.
15430 - 2 of 3
12010 - NISD - High School
3.
C.
D.
Supplies, stops and chrome plated tubular brass:
1.
McGuire.
2.
Kohler.
Emergency Eye/Face Wash & Shower:
1.
E.
Moen Commercial.
Bradley.
Emergency Safety Shower Heater:
1.
Keltech.
15430 - 3 of 3
12010 - NISD - High School
SECTION 15705
CIRCULATING WATER SYSTEM TREATMENT
1.1
GENERAL
A.
Provide all equipment, chemicals and materials for the complete water treatment
system.
B.
Determine which chemicals to use from the results of a water sample analysis
taken from the building domestic water supply.
C.
Provide all water treatment products, holding reservoirs, equipment and labor for
testing, cleaning, flushing and dispensing products to achieve the required water
quality for each system specified.
1.
1.2
The hot and chilled water closed circuit system.
SERVICE AND SUPPLIES
A.
B.
All work shall be performed by a qualified full-time water program manager.
1.
Specialist in the field of industrial water treatment.
2.
Facilities including water analysis laboratory, development facilities and
service department.
Provide a water management and service program for a period of one year
beginning at Substantial Completion.
1.
C.
Make routine visits bi-weekly during first two months of operation and
monthly during the remainder of the specified period.
Routine services.
1.
Check and adjust water treatment system operation.
2.
Instruct, train and advise operating personnel.
3.
Check efficiency of chemicals and chemical applications.
4.
Replenish chemicals and replace expendables.
D.
Chemically clean the piping system.
E.
Provide a complete laboratory analysis of water samples.
15705 - 1 of 5
12010 - NISD - High School
1.
1.3
F.
Provide review of report figures on the field water testing.
G.
Provide report charts and log sheets and recorder charts for maintenance of
water control tests.
H.
Establish the recommended maintenance schedule for analysis and
replenishment of the corrosion inhibitors.
QUALITY ASSURANCE
A.
B.
The Contractor for the work specified in this section shall have:
1.
Research and development facilities.
2.
Regional laboratories capable of making water analysis.
3.
A service department and qualified technical service representatives
located within a reasonable distance of the project site.
4.
Service representatives who are Registered Engineers or factory-certified
technicians with not less than 5 years of water treatment experience with
the water treatment system manufacturer.
Supply water treatment chemicals in metal drums, fiber drums with plastic liners
or plastic-lined "liqui-paks" as best suited to the materials. Paper bags or
unlined cardboard cartons are not approved.
1.
1.4
Insert in the Owner's Manuals.
Use only chemicals in domestic water systems, and all biocides
regardless of where used, which are registered with the U.S. Department
of Agriculture or the U.S. Environmental Protection Agency and which are
labeled as required by law.
C.
Provide electrical products which have been tested, listed and labeled by
Underwriters Laboratories and which comply with the National Electrical
Manufacturers' Association standards.
D.
Ensure that neither products, waste, blow-down nor other effluents violate local,
state or federal laws or regulations in effect.
HOT AND CHILLED WATER SYSTEMS
A.
By-pass filter feeders in the hot water and chilled water systems:
1.
Rated at 40 GPM capacity.
2.
Operating conditions: 200 PSIG and 200 degrees F.
15705 - 2 of 5
12010 - NISD - High School
B.
1.5
3.
Quick opening cap with a Buna N "O" ring seal; or 1-1/2" valve and
funnel.
4.
5 micron polypropylene filter bag mounted in a perforated stainless steel
holder.
5.
Fabricated with bolt plate on bottom.
6.
Feeder tank and cap to be constructed of type 304 stainless steel.
7.
Provide 3/4" water meter for each system makeup station. Water meter
to be bronze with 10 gallon per contact 24VAC Reed Smith capability.
Treatment chemicals:
1.
A corrosion inhibitor of the nitrite-borate type.
2.
Furnished as a concentrated liquid in 5 gallon drums.
3.
With an effective copper corrosion inhibitor.
4.
With maintained nitrate residual 600-800 PPM.
5.
The condensing boiler B-4 requires system water to be between 6 and
8.5 ph.
CLEANING OF PIPING SYSTEMS
A.
All work shall be performed by the Approved Water Program Manager.
B.
Fill system with fresh water and circulate, drain and flush to remove excess
debris prior to chemical cleaning. Repeat until water is visually clean. Open and
clean the system strainers as often as required during the cleaning process.
1.
C.
Clean the new system, including all coils and chillers.
Use only chemicals formulated for piping system pre-cleaning.
1.
Remove all rust, mill scale, oil, grease and other contaminants deposited
during construction.
D.
The products used shall inhibit corrosion of the various metals in the system.
E.
Inject twice the normal amount of system treatment chemical. Operate system
normally and check treatment level and filter once every two weeks for the first
month and monthly thereafter to ensure:
1.
A clean piping system.
15705 - 3 of 5
12010 - NISD - High School
2.
F.
When filters show little collection of debris, then a "Certificate of Completion of
Cleaning" will be issued for the system and normal water treatment program
implemented for the duration of the warranty period.
1.
1.6
1.7
Insert the Certificate of Completion of Cleaning in the Owner's Manual.
PERSONNEL TRAINING
A.
Train the Owner's designated personnel in use and operation of the water
treating systems.
B.
Include preparation of chemical solutions and charging of the chemical solution
reservoir.
C.
Provide a "Program Administration Manual" encompassing all systems as
installed.
EXTENDED SERVICE AGREEMENT
A.
Prior to the end of the Warranty Period, submit four copies of an "Agreement for
Continued Service".
B.
Offer terms and conditions for:
C.
1.8
The effectiveness of the water treatment chemicals.
1.
Furnishing chemicals;
2.
Providing continued testing and servicing;
3.
Replacement of materials and equipment.
The proposed agreement shall be structured to commence at the end of the
Warranty Period.
SUBMITTALS
A.
Submit shop drawings and product data as specified in Section 15040.
B.
Submit test reports of samples of each treated water system specified.
C.
1.
Comply with ASTM D 596 for reporting.
2.
Indicate the ASTM test methods used for each test.
Submit shop drawings for each water treatment system. Show piping and tubing
sizes, fittings, accessories, valves and connections.
15705 - 4 of 5
12010 - NISD - High School
1.9
1.10
ACCEPTABLE SUPPLIER/MANUFACTURERS
A.
Garratt-Callahan.
B.
Worth.
C.
Nalco.
COMPONENT PERFORMANCE
A.
The Owner may reject at any time during the warranty any or all items of
equipment which are not delivering their standard performance. Contractor shall
replace all such items at no cost to the Owner.
B.
During the warranty period, if any of the water systems become fouled, then
chemical cleaning of the system is specified in this section at no additional cost
to the Owner.
15705 - 5 of 5
12010 - NISD - High School
SECTION 15762
ELECTRIC WALL HEATER
1.1
ELECTRIC WALL HEATER
A.
Provide the wall mounted (or bracket mounted) heavy duty vandal resistant
forced air electric heater where shown on the drawings with enclosure sleeves.
1.
B.
See schedule and drawings.
Construction:
1.
Totally enclosed nonglowing element.
2.
High impact resistant louvered grille that is a combination supply and
return grille assembly.
3.
Vandal-resistant design.
C.
Finish enclosure with baked enamel in manufacturer's standard color.
D.
Motor:
E.
F.
1.
Protected from the heated air with motor shield.
2.
Permanently lubricated.
3.
Totally enclosed and impedance protected.
4.
Same voltage as the heater.
5.
Thermostat/disconnect switch.
Controls:
1.
Thermal overload protection by means of an automatic reset device to
disconnect the elements and the motor in the event normal operating
temperatures are exceeded.
2.
Provide integral factory mounted internal thermostat with adjustment
means.
Acceptable manufacturers:
1.
Markel
15762 - 1 of 2
12010 - NISD - High School
2.
Chromalox
3.
Berko
15762 - 2 of 2
12010 - NISD - High School
SECTION 15763
HOT WATER UNIT HEATERS
1.1
1.2
1.3
GENERAL
A.
Provide the hot water unit heaters (HWUH) as shown on the drawings.
B.
Equipment capacity and features as scheduled.
C.
Construct the unit to provide sufficient clearance between the coil connections to
permit installation of the field applied pipe insulation.
REFERENCE STANDARDS
A.
ANSI/ARI 410 - Forced-Circulation Air-Cooling and Air-Heating Coils.
B.
ANSI/ARI 440 - Room Fan-Coil Air Conditioners.
C.
ANSI/NFPA 70 - National Electrical Code.
D.
SMACNA - HVAC Duct Construction Standards, Metal and Flexible.
FAN AND DRIVE SECTION
A.
Locate the motor and drive assembly inside the cabinet.
B.
Provide multi-speed direct connected fan motor with built-in motor protection.
C.
D.
1.
Three-speed windings.
2.
Factory wired to a junction box.
3.
Mount the motor speed change controller on the junction box.
4.
Resiliently mounted.
Select the fan speed changes (based on the specified external static and
decreasing internal static) to provide air quantity at or near:
1.
100% scheduled CFM.
2.
70% scheduled CFM.
Select the unit to meet the scheduled heating capacity at either the 100%
scheduled CFM rating or 70% scheduled rating.
15763 - 1 of 6
12010 - NISD - High School
E.
1.4
Supply fans:
1.
Double width, double inlet, forward curved blades.
2.
Statically and dynamically balanced.
3.
Tested after being installed in the fan section.
4.
Selected for the design air quantities and pressure of the system.
5.
Mounted on a common shaft if multiple wheels.
F.
Select fan to operate at or near its maximum efficiency point when handling the
required maximum air quantity and static pressure.
G.
Select the fan motor so the brake horsepower required to deliver the design air
quantity at the system static pressure will not exceed the motor nameplate
rating.
H.
Fan bearings:
1.
Permanently lubricated.
2.
Self-aligning.
UNIT HOUSING
A.
Construct the unit of mill galvanized steel sheets and formed members.
1.
Provide structure to brace the assembly for the pressure of the system.
2.
Limit overall height to a maximum of 10-1/2".
B.
Connect housing components together with neoprene gasketed airtight joints.
C.
For sound control, internally insulate the entire unit with neoprene coated, 1-1/2
pound density glass fiber insulation, applied to internal surfaces with adhesive
and weld pins. Coat exposed edges of insulation with adhesive.
D.
All of the insulation, vapor barriers, facings and adhesives:
E.
1.
Flame spread not higher than 25.
2.
Smoke developed rating not higher than 50.
If indicated with supply air duct on the drawings, provide a duct flange on all four
sides of the supply air outlet of the unit.
1.
Where shown on the drawings, sized to permit connection of the flexible
15763 - 2 of 6
12010 - NISD - High School
connection to the duct work.
2.
F.
1.5
Provide insulated, removable panels for access to the interior.
1.
Plated captive screws and nuts.
2.
Neoprene gaskets.
DRAIN PAN
A.
Construct safety drain pan from Type 304 stainless steel with welded corners.
1.
1.7
Pitch to threaded 3/4" drain connection with removable drain plug located
outside casing.
B.
Size the drain pan to encompass the entire heating coil section.
C.
Line drain pan with a minimum of 1/2" closed cell insulation.
1.
1.6
If indicated with return air duct on the drawings, provide a duct flange on
all four sides of the return air inlet of the unit.
For leakage protection, coat and seal the insulation in place with
waterproof mastic.
HOT WATER COIL
A.
Tubes of copper with pressure bonded, aluminum fins.
B.
Coils rated at 150 PSI working pressure.
C.
Circuited as required for the service and capacity.
PIPING PACKAGE
A.
Provide as a component of the fan coil unit a factory fabricated piping package
and valve cluster for each coil.
1.
B.
Control valves.
1.
C.
Make connections with unions or flared fittings where required for service.
A three way pattern control valve for the heating coil (refer to controls
sections).
Balancing and service valves.
1.
A ball valve on the supply and return of coil.
15763 - 3 of 6
12010 - NISD - High School
2.
D.
Provide Schrader valves in bypass piping ahead of the ball valve and in the
return line after the control valve.
1.
1.8
Provide balancing and service valves as specified in Section 15012.
AIR FILTERS
A.
1.11
Provide the control valves as specified in Section 15900.
BALANCING AND SERVICE VALVES
A.
1.10
Provide air filters as specified in Section 15880.
FILTER SECTION
A.
B.
Locate behind access doors.
1.
Constructed with substantial hinges.
2.
Neoprene gasketing.
3.
Permanent quick-release latching devices.
Arranged to accommodate the 1" thick filters as specified.
1.
1.12
Position to take accurate pressure readings.
CONTROL VALVES
A.
1.9
A ball valve in the bypass piping of the three way valve cluster.
Single section filter.
C.
Provide full length tracks to support the filter.
D.
Side or bottom access as required to suit the location.
SPARE PARTS
A.
Provide the following spare parts and material to the Owner for his use after the
warranty period.
1.
One spare fan motor for each size of fan motor on the project.
2.
One spare control valve with operator for each size and type of valve on
the project.
15763 - 4 of 6
12010 - NISD - High School
1.13
ELECTRICAL REQUIREMENTS
A.
Provide a single point electrical connection for the entire unit.
1.
Electrical components shall be U.L. listed and installed in accordance
with the National Electrical Code.
a.
B.
2.
Mount all electrical (and electronic) components in a galvanized steel
control box with removable cover.
3.
Provide space in the control box for the direct digital control card.
4.
The DDC card is specified to be furnished in Section 15900 and shipped
to the terminal unit manufacturer for installation.
5.
Provide a 24 volt secondary control transformer connected into factory
controls.
6.
Coordination is specified in this section.
Bring all electrical connections to a common junction box.
1.
2.
Extend an eight foot long, rubber covered power cord from the junction
box.
a.
Three wire, 14 AWG insulated copper conductors.
b.
U.L. labeled.
c.
Terminate with three pole grounding 20 amp twist lock cap.
Provide factory wiring and instruments to interlock each control valve to
close to the coil when the fan is de-energized.
a.
1.14
1.15
Provide with disconnect switch (connected to factory wiring).
Provide an E/P switch wired into the fan control circuit.
ACCEPTABLE MANUFACTURERS
A.
Carrier.
B.
Trane.
C.
McQuay.
SUBMITTALS
A.
Submit manufacturer's dimensioned product data sheets.
15763 - 5 of 6
12010 - NISD - High School
B.
Submit manufacturer's "Installation, Start Up and Service Instructions."
C.
Submit fan performance curve.
1.
Plot fan volume against static pressure, horsepower and efficiency.
2.
Show point of rating based on static requirements of the system.
D.
Submit manufacturer's certified heating coil capacity data.
E.
Submit filter manufacturer's product data sheets and capacity information.
F.
Submit manufacturer's data on housing insulation material.
G.
Submit shop drawings of hanger assembly and method proposed for mounting.
15763 - 6 of 6
12010 - NISD - High School
SECTION 15772
AIR-COOLED GAS HEAT PACKAGED AIR CONDITIONING UNIT
1.1
GENERAL
A.
Provide the grade mounted packaged air-cooled air conditioning, cooling and
heating unit as shown on the drawings.
1.
Outdoor one piece air to air-cooling system.
2.
Gas heating section.
3.
Single point power location for unit.
4.
Factory curb mounted for grade installation.
5.
Vertical condenser discharge.
6.
Factory wiring, piping, controls and refrigerant charge contained within
the unit enclosure.
B.
System capacity and accessories as scheduled.
C.
All electrical components of the unit shall be completely factory wired to the load
side of the unit disconnect switch.
1.
D.
1.2
Non-fused disconnect switch factory installed.
All wiring shall be in compliance with the National Electric Code.
QUALITY ASSURANCE
A.
ASHRAE 90.1 Energy Standards and NFPA 90A - Installation of Air Conditioning
and Ventilation Systems.
B.
AHRI 210/240 and 340/360 - Unitary Air Conditioning Equipment.
C.
ASHRAE 15 and UL listed/tested in accordance with ANSI Z21.47.
D.
Unit casing capable of withstanding 500-hour salt spray test per ASTM B117.
E.
Bear the Underwriters Laboratories label.
F.
Unit shall be designed in accordance with ISO 9001, and shall be manufactured
in a facility registered to ISO 9001.
15772 - 1 of 7
12010 - NISD - High School
G.
Unit shall be subjected to a completely automated run testing on the assembly
line.
1.
1.3
1.4
UNIT CABINET
A.
Unit cabinet shall be constructed of galvanized steel, and shall be bonderized
and coated with a prepainted baked enamel finish on all externally exposed
surfaces. Cabinet panels shall be easily removable for servicing.
B.
Holes shall be provided in the base rails for rigging shackles to facilitate
maneuvering and overhead rigging.
C.
Unit shall have a factory-installed, sloped condensate drain pan made of a noncorrosive material, providing a common connection with a minimum 3/4" drain,
and shall comply with ASHRAE Standard 62.
D.
Unit shall have one factory-installed filter access panel to provide filter access
with tool-less removal.
1.
Accommodate 2" filters as specified in Section 15880.
2.
Access panel to be identified with name plate as “Filter Access”.
CABINET SECTION INSULATION
A.
Evaporator fan compartment interior cabinet surfaces shall be insulated with a
minimum ½" thick, 1-1/2 lb. density, flexible fiberglass insulation, neoprene
coated on the air side. Aluminum foil-faced fiberglass insulation shall be used in
the gas heating compartment.
1.
B.
1.5
Units to contain a factory-supplied printout indicating tested pressures,
amperages, data, and inspectors. This provides certification of the unit
status at the time of manufacture.
All of the insulation, vapor barrier, facings and adhesives:
a.
Flame spread not higher than 25.
b.
Smoke developed rating not higher than 50.
c.
Condensation on the exterior of the unit is not approved.
Unit shall have standard thru-the-bottom gas and power connection capability
(accessory kit is required).
EVAPORATOR FAN SECTION
A.
Drive Assembly:
15772 - 2 of 7
12010 - NISD - High School
2.
Matched belts.
3.
Adjustable pitch motor pulley.
4.
Provide built-in motor protection.
Motor so selected that the brake horsepower required to deliver the design air
quantity at the system static pressure will not exceed the motor nameplate
rating.
C.
Fans shall be:
1.
Double width, double inlet, forward curved.
2.
Statically and dynamically balanced.
3.
Tested after being installed in the fan sections.
4.
Selected for the design air quantities and pressure of the system.
5.
Mounted on a common shaft if multiple wheels.
Fan bearing shall be:
1.
Permanently lubricated ball-bearing type.
2.
Self-aligning.
CONDENSER FAN (EVAPORATOR SECTION)
A.
1.7
Size each V-belt drive for 50% overload.
B.
D.
1.6
1.
Fan shall be of the direct-driven propeller type and shall discharge air vertically.
1.
Totally enclosed motors.
2.
Permanently lubricated.
3.
Direct drive propeller type.
B.
Fan shall have aluminum blades riveted to corrosion-resistant steel spiders and
shall be dynamically balanced.
C.
Fan safety guards shall be PVC coated steel.
COMPRESSOR(S)
A.
Evaporator Section:
15772 - 3 of 7
12010 - NISD - High School
1.8
2.
Factory mounted on rubber grommets and internally spring mounted for
vibration isolation.
3.
Compressor cycle delay.
Evaporator Section:
1.
Standard evaporator and condenser coils shall have aluminum lanced
plate fins mechanically bonded to seamless internally grooved copper
tubes with all joints brazed.
2.
Dual compressor models shall have face-slit type evaporator coil (Circuit
No. 1 on bottom).
3.
Condenser coil to be E-coated.
REFRIGERANT COMPONENTS
A.
1.10
Fully hermetic type, internally protected scroll-type.
COILS
A.
1.9
1.
Evaporator Section Refrigerant Circuit Components shall include:
1.
Thermostatic expansion valve designed to allow changeout of power
element and bulb w/o removing the valve body.
2.
Refrigerant filter drier.
3.
Service gage connections on suction, discharge, and liquid lines.
GAS HEATING SECTION
A.
Induced-draft combustion type with energy saving direct-spark ignition system
and redundant main gas valve.
B.
Heat exchanger:
1.
The optional stainless steel heat exchanger shall be of the tubular-section
type, constructed of a minimum of 20-gauge type 409 stainless steel.
C.
Burners shall be of the in-shot type constructed of aluminum-coated steel.
D.
All gas piping shall enter the unit cabinet at a single location on side of unit
(horizontal plane).
E.
The integrated gas controller (IGC) board shall include gas heat operation fault
notification using an LED (light-emitting diode).
15772 - 4 of 7
12010 - NISD - High School
1.11
F.
Unit shall be equipped with anti-cycle protection with one short cycle on unit
flame rollout switch or 4 continuous short cycles on the high temperature limit
switch. Fault indication shall be made using an LED.
G.
The IGC board shall contain algorithms that modify evaporator-fan operation to
prevent future cycling on high temperature limit switch.
H.
The LED shall be visible without removal of control box access panel.
CONTROLS AND SAFETIES
A.
B.
Unit controls:
1.
Unit shall be complete with self-contained low-voltage control circuit
protected by a resettable circuit breaker on the 24-V transformer side.
2.
Unit shall have head pressure control to maintain condensing
temperature at outdoor ambient temperatures down to -20EF.
3.
Unit shall have two modes of dehumidification, one when both
temperature and humidity are not satisfied and the other when only
humidity is not satisfied (when scheduled on drawings).
4.
Unit shall have built in protocol for BACNET Direct Digital Controller.
Safeties:
1.
C.
Unit shall incorporate a solid-state compressor protector which provides
anti-cycle reset capability at the space thermostat, should any of the
following standard safety devices trip and shut off compressor.
a.
Compressor overtemperature, overcurrent.
b.
Loss of charge/low pressure switch.
c.
Freeze protection thermostat, evaporator coil.
d.
High pressure switch.
e.
Automatic reset motor thermal overload protector. The lockout
protection shall be easily disconnected at the control board, if
necessary.
Heating section shall be provided with the following minimum protections:
1.
High temperature limit switches.
2.
Induced draft motor speed sensor.
15772 - 5 of 7
12010 - NISD - High School
1.12
3.
Flame rollout switch.
4.
Flame proving controls.
EXTENDED WARRANTY
A.
Provide each refrigeration compressor with a warranty against failure for a period
of 5 years.
1.
1.13
1.14
ACCEPTABLE MANUFACTURERS
A.
Carrier.
B.
Trane.
C.
McQuay.
D.
York.
INSTALLATION
A.
Install and start up the system in accordance with the manufacturer's
"Installation, Start Up and Service Instructions."
1.
1.15
The warranty shall indicate model, serial number of the unit, and
commencing date.
See Section 15900 for controls.
SUBMITTALS
A.
Submit shop drawings and product data as specified.
B.
Submit manufacturer's certified capacity curve with selections plotted thereon.
C.
Submit manufacturer's "Installation, Start Up and Service Instructions."
D.
E.
1.
Recommended conductors, overcurrent protection, and disconnect size.
2.
Electrical interlocks.
Submit fan performance curve for each unit:
1.
Plot fan volume against static pressure, horsepower and efficiency.
2.
Show point of rating based on actual static requirements of the system.
Select fan to operate at or near its maximum efficiency point when handling the
required air quantity and static pressure.
15772 - 6 of 7
12010 - NISD - High School
F.
G.
Submit shop drawings of the required temperature control system interface.
1.
Field wiring.
2.
Connections to all devices.
3.
"Sequence of Operation."
4.
Color coding of all control conductors and trunk cables.
Submit product data on the space humidistat.
15772 - 7 of 7
12010 - NISD - High School
SECTION 15774
AIR-COOLED CONDENSING UNITS
1.1
GENERAL
A.
1.2
All the condensing units furnished shall be the product of a single manufacturer.
AIR-COOLED CONDENSING UNITS (THRU FIVE TONS)
A.
Each unit shall consist of:
1.
A scroll hermetic motor compressor.
a.
2.
Nonferrous condenser coils.
a.
3.
4.
B.
Puron refrigerant.
PVC coated condenser coil guard/hail guards.
Condenser fans and permanently lubricated ball bearing motors.
a.
PVC coated fan guard.
b.
Totally enclosed fan motor.
Minimum efficiency of 13 SEER.
Each compressor shall be supplied with:
1.
Service valves.
2.
Internal high pressure relief valve.
3.
Internal thermal overload.
4.
Vibration isolation.
C.
Provide brass service valves with fittings and gauge ports, located on the exterior
of the unit housing.
D.
Housing:
1.
Weatherproof case with baked enamel finish.
15774 - 1 of 4
12010 - NISD - High School
2.
E.
Suitable for outdoor installation.
Controls:
1.
Factory wired.
2.
Temperature and current sensitive compressor motor winding overload
devices to disconnect the compressor motor.
a.
3.
High and low pressure switch and restart time delay is approved in-lieu-of
temperature and current monitor.
F.
Provide a liquid line filter dryer with each compressor.
G.
Provide condensing head pressure controls as scheduled utilizing:
1.
H.
1.3
Restart time delay to prohibit short cycling.
Fan speed control.
Condensing unit operation:
1.
Capacity as set forth in the schedule.
2.
Based on 95 degree F. ambient.
3.
Capacity selection made with respect to the air handling/fan coil unit to
permit a 1 degree line loss.
AIR-COOLED CONDENSING UNITS (7-1/2 TONS AND LARGER)
A.
Each unit shall consist of:
1.
A hermetic motor compressor.
2.
Nonferrous plate fin condenser coils.
a.
3.
B.
PVC coated condenser coil guard.
Condenser fans and permanently lubricated ball bearing motors.
a.
PVC coated fan guard.
b.
Totally enclosed fan motor.
Each compressor shall be supplied with a crank case heater.
15774 - 2 of 4
12010 - NISD - High School
C.
D.
1.4
Housing:
1.
Weatherproof case with baked enamel finish.
2.
Suitable for outdoor installation.
Controls:
1.
Factory wired.
2.
High and low pressure switches.
3.
Oil failure switch.
4.
Compressor and condenser fan motor overload devices.
E.
All safety devices shall be monitored and interlocked to prohibit compressor
short cycling.
F.
Equip each condensing unit with controls arranged for winter start and
condensing head pressure control as scheduled on the drawings.
G.
Condensing unit operation:
1.
Capacity as set forth in the schedule.
2.
Based on 95 degree F. ambient.
3.
Capacity selection made with respect to the air handling/fan coil unit to
permit a 1 degree line loss.
EXTENDED WARRANTY
A.
Provide each refrigeration compressor with a warranty against failure for a period
of 5 years.
1.
1.5
The warranty shall indicate model, serial number of the unit and
commencing date.
ACCEPTABLE MANUFACTURERS
A.
Carrier.
B.
Trane.
C.
York.
15774 - 3 of 4
12010 - NISD - High School
1.6
INSTALLATION
A.
1.7
Install and start up the system in accordance with the manufacturer's
"Installation, Start Up and Service Instructions".
SUBMITTALS
A.
Submit shop drawings and product data as specified.
B.
Submit manufacturer's certified capacity charts with selections plotted thereon.
C.
Submit manufacturer's "Installation, Start Up and Service Instructions".
D.
1.
Recommended conductor, overcurrent protection and disconnect size.
2.
Electrical interlocks.
Submit manufacturer's refrigerant pipe sizing charts with recommended
selection.
1.
Based on system capacity requirements and length of run.
15774 - 4 of 4
12010 - NISD - High School
SECTION 15776
ROOF-TOP PACKAGED AIR CONDITIONING UNITS
AND GRADE MOUNTED UNITS
1.1
GENERAL
A.
Provide the roof-mounted packaged air conditioning units as shown on the
drawings.
1.
One piece air to air-cooling system.
2.
Gas-fired heating component.
B.
System capacity as scheduled. See notes for unit special coatings, feature
items and control.
C.
All electrical components of the unit shall be completely factory wired to the load
side of the unit disconnect switch.
1.
D.
1.2
1.3
Disconnect switch factory installed with properly sized overcurrent
protection.
All wiring shall be in compliance with the National Electric Code.
QUALITY ASSURANCE
A.
ANSI/NFPA 90A - Installation of Air Conditioning and Ventilation Systems.
B.
ARI 210 - Unitary Air Conditioning Equipment.
C.
ARI 270 - Sound Rating of Outdoor Unitary Equipment.
D.
Certified by the American Gas Association.
E.
Bear the Underwriters Laboratories label.
F.
National Roofing Contractors Association Standards for roof curbs.
HOUSING
A.
Insulated weatherproof casing bonderized and coated with baked enamel finish.
1.
Galvanized steel sheets.
2.
Sloped for drainage.
15776 - 1 of 9
12010 - NISD - High School
B.
The top panels shall be single continuous piece or joined with standing seams
and weather resistant sealant.
1.
C.
All interior support members shall be minimum 16 gauge steel.
D.
All access panels shall have locking or latching door handles and be easily
removable.
E.
Filter Section:
F.
1.4
Side panel seams shall be sealed neoprene gasket material or with
polyurethane foam.
1.
Constructed with substantial hinges.
2.
Neoprene gasketing.
3.
Permanent quick-release latching devices or tool-less filter access.
4.
Accommodate 2" thick filters as specified.
All of the insulation, vapor barrier, facings and adhesives:
1.
Flame spread not higher than 25.
2.
Smoke developed rating not higher than 50.
3.
Condensation on the exterior of the unit is not approved.
OUTSIDE AIR DAMPERS
A.
Provided with bird screen and rain hood.
B.
Constructed of 16 gauge galvanized formed steel blades.
1.
Or extruded aluminum blades.
C.
Blades not over 9" wide.
D.
Shafts and blades bolted through to prevent misalignment.
E.
Galvanized structural channel frame.
F.
Nonstick, noncorrodible bearings.
G.
Closed cell polyurethane edge seal at blade intermesh, and head and sides.
H.
Arrange dampers and linkage for motor operation from a single point.
15776 - 2 of 9
12010 - NISD - High School
I.
1.5
Electric actuator.
REFRIGERATION SYSTEM
A.
B.
Refrigeration components:
1.
Hermetic compressor.
2.
Evaporator fan section.
3.
All piping, strainer and valves factory installed.
Each compressor shall be scroll type where required by the manufacturer.
1.
1.6
1.7
OPERATING AND SAFETY CONTROLS
A.
Factory wired to the load side of the unit electrical terminals.
B.
Temperature and current sensitive compressor motor winding monitor.
1.
Disconnect the compressor motor.
2.
Prohibit short cycling.
C.
Fan motor overload devices.
D.
High and low pressure switch and restart time delay is approved in lieu of
temperature and current monitor.
E.
Arrange controls for winter start and condensing pressure control down to
ambient of 20 degrees.
F.
Arrange controls to prevent simultaneous start of compressors.
AUTOMATIC TEMPERATURE CONTROLS
A.
1.8
Service gauge connections on suction and liquid lines.
Temperature controls are specified in Section 15900.
EVAPORATOR FAN SECTION
A.
Drive Assembly:
1.
Size each V-Belt drive for 50% overload.
2.
Matched belts.
3.
Adjustable pitch motor pulley.
15776 - 3 of 9
12010 - NISD - High School
4.
B.
1.
Three-speed windings.
2.
Factory wired to a junction box and provisions for motor speed change
mounted on this box.
3.
Resiliently mounted.
Motor so selected that the brake horsepower required to deliver the design air
quantity at the system static pressure will not exceed the motor nameplate
rating.
D.
Fans shall be:
1.
Double width, double inlet, forward curved.
2.
Statically and dynamically balanced.
3.
Tested after being installed in the fan sections.
4.
Selected for the design air quantities and pressure of the system.
5.
Mounted on a common shaft if multiple wheels.
Fan bearings shall be:
1.
Permanently lubricated.
2.
Self-aligning.
CONDENSATE DRAIN PANS
A.
1.10
Provide multispeed direct connected fan motor with built-in motor protection.
C.
E.
1.9
Provide built-in motor protection.
Construct drain pans from aluminized steel with double wall construction, welded
corners and sloped so that water does not stand in the pan.
1.
Insulation sandwiched between the pans.
2.
Comply with ASHRAE Standard 62.
CONDENSER AND FAN SECTION
A.
Nonferrous finned condenser coils.
1.
PVC coated steel condenser coil guards.
15776 - 4 of 9
12010 - NISD - High School
2.
B.
Condenser fans totally enclosed outdoor rated with permanently lubricated
motors.
1.
1.11
1.12
Fan guard.
C.
Fan safety guards shall be PVC coated steel.
D.
Fans with permanently lubricated motors.
CONDENSER FANS
A.
Direct drive propeller type with vertical discharge air.
B.
Aluminum blades dynamically balanced.
C.
Fan safety guards shall be PVC coated steel.
D.
Fans with permanently lubricated motors.
COMPRESSOR VIBRATION ISOLATION
A.
1.13
Hail guards.
Factory mounted spring isolator.
DIRECT EXPANSION COOLING COILS
A.
B.
DX cooling coils:
1.
Constructed of copper tubes and aluminum fins.
2.
Designed and circuited for use with direct expansion refrigeration.
Cooling coil face velocity.
1.
Not to be of such magnitude as to cause moisture to be carried off the
coil.
2.
Maximum velocity as scheduled.
C.
Circuit cooling coil with interlaced tubes so the entire face is active under all
modes of unloading. Refer to the schedule on the drawings.
D.
Coils shall be constructed in casings as required for installation.
E.
Where coils are stacked, provide intermediate drain pans with drop tubes to
drain condensate to the main drain pan without flooding the lower coil.
15776 - 5 of 9
12010 - NISD - High School
1.14
CORROSION PROTECTION
A.
1.15
See equipment schedule.
GAS HEATING SECTION
A.
Unit shall be equipped with corrosion resistant burners and heat exchangers.
B.
Gas controls.
C.
D.
1.
Automatic gas valve and pressure regulator.
2.
Manual shut off valve.
3.
Pilot valve.
4.
Flame rollout limit switches.
5.
An adjustable fan control.
6.
Fixed high limit controls.
Unit shall be equipped with an electric spark pilot ignition system.
1.
Electronic flame detection.
2.
100% safety shut off.
Combustion air shall be induced by a positive pressure power venting fan.
1.
1.16
Pre-purge of combustion chamber.
DEHUMIDIFICATION (WHERE SCHEDULED)
A.
B.
Humidi-Mizer Adaptive Dehumidification System shall be factory installed.
1.
Subcooling Mode - dehumidification when both temperature and humidity
in the space are not satisfied.
2.
Hot gas reheat mode - dehumidification when only humidity in the space
is not satisfied.
Provide RTU Open Controller
1.
Built-in protocol for BACnet (MS/TP and PTP), Modbus, Johnson N2 and
Lon Works.
2.
Accept following inputs: space temperature, set point adjustment, fire
shutdown, humidity and remote occupancy.
15776 - 6 of 9
12010 - NISD - High School
C.
1.17
Coordinate with the requirements for control during emergency power operation.
ROOF CURB FOUNDATION
A.
Provide a factory fabricated roof mounting curb for each unit.
B.
Construction:
1.
All welded.
2.
Minimum 14 gauge formed galvanized steel.
3.
Treated wood nailer strip and exterior rigid insulation.
4.
Weatherproof isolating resilient seal.
5.
Acoustically and thermally lined with fire resistant insulation.
C.
Provide the base with a cant to receive the roofing materials.
D.
Construct the base with a 12" minimum curb height.
1.
E.
Construct the base with sufficient structural capacity to accommodate the
imposed load with a safety factor of 4.0.
1.
1.18
Construction approved by the National Roofing Contractors' Association.
EXTENDED WARRANTY
A.
1.19
Form the top to match the base of the unit.
Provide each refrigeration compressor with a warranty against failure for a period
of 5 years.
1.
The warranty shall indicate model, serial number of the unit, and
commencing date.
2.
The warranted compressor assembly consist of the stator, rotor,
eccentric shaft, eccentric rods, pistons, wrist pins, suction valves,
discharge valves, unloading mechanisms, oil pump, and the housing in
which these parts are enclosed.
ACCEPTABLE MANUFACTURERS
A.
Carrier
B.
Trane
15776 - 7 of 9
12010 - NISD - High School
1.20
C.
York
D.
McQuay
INSTALLATION
A.
1.21
Install and start up the system in accordance with the manufacturer's
"Installation, Start Up and Service Instructions."
SUBMITTALS
A.
Submit shop drawings and product data as specified.
B.
Submit manufacturer's certified capacity curve with selections plotted thereon.
C.
Submit manufacturer's "Installation, Start Up and Service Instructions."
D.
E.
1.
Recommended conductors, overcurrent protection, and disconnect size.
2.
Electrical interlocks.
Submit detailed calculations for fan static pressure requirements and motor
horsepower based on:
1.
Actual loss through the equipment to be furnished.
2.
The ductwork as shown in the shop drawings.
Submit fan performance curve for each unit:
1.
Plot fan volume against static pressure, horsepower and efficiency.
2.
Show point of rating based on actual static requirements of the system.
F.
Select fan to operate at or near its maximum efficiency point when handling the
required air quantity and static pressure.
G.
Submit shop drawings of the required temperature control system interface.
1.
Field wiring.
2.
Connections to all devices.
3.
"Sequence of Operation."
4.
Color coding of all control conductors and trunk cables.
5.
Submit shop drawings of the power and control wiring requirements as
the system is modified for operation on emergency power.
15776 - 8 of 9
12010 - NISD - High School
H.
Submit product data on the space temperature controller.
15776 - 9 of 9
12010 - NISD - High School
SECTION 15778
OUTSIDE WALL MOUNTED PACKAGED HEAT PUMP UNITS
1.1
1.2
1.3
GENERAL
A.
Provide the self-contained, vertical, energy efficient heat/cool outside wall
mounted, through the wall, packaged heat pump units as shown on the
drawings.
B.
System capacity as scheduled.
C.
Electric heating coils as specified.
D.
All electrical components of the unit including the electric heaters, shall be
completely factory wired to factory installed circuit breakers.
REFERENCE STANDARDS
A.
Underwriters Laboratories Listed - For Outdoor Installation.
B.
ASHRAE/ARI 390 - Single Package Vertical Units, Heat Pump Equipment.
C.
ASHRAE 90.1 - Efficiency requirements.
D.
ANSI/NFPA 90A - Installation of Air Conditioning and Ventilating Systems.
E.
ANSI/NFPA 70 - National Electrical Code.
F.
ANSI/ASHRAE Standard 62.1.
HOUSING
A.
B.
Insulated weatherproof slope top casing with baked-on textured exterior
polyester enamel finish.
1.
20 Gauge galvanized steel sheets.
2.
Unit base constructed of 16 gauge galvanized steel sheets.
Filter section to accommodate 2" filters MERV 6 as specified.
1.
C.
Arranged for ease of access.
All of the insulation, vapor barrier, facings, and adhesives:
1.
Flame spread not higher than 25.
15778 - 1 of 5
12010 - NISD - High School
D.
1.4
Smoke developed rating not higher than 50.
3.
Condensation on the exterior of the unit is not approved.
4.
1" Fiberglass high density foil faced insulation.
Factory installed ventilator to provide outside ventilation air thru adjustable
exhaust air damper. Ventilator to automatically adjust during Stage 1 and 2
operation to maintain scheduled outside air quantity.
ELECTRIC HEATING STRIPS
A.
1.5
2.
UL labeled, factory installed, and equipped with automatic thermal and current
overload devices.
1.
Constructed of corrosion resistant materials.
2.
Side out assembly.
B.
Control voltage requirements shall be compatible with temperature control
system.
C.
Heater capacity as scheduled.
AUTOMATIC TEMPERATURE CONTROLS
A.
Provide a wall mounted programmable combination thermostat/humidistat for
each wall-mount packaged air conditioning unit.
B.
Provide for individual heating and cooling set point adjustment.
1.
Automatic and manual heating-cooling change over. System "OFF"
position.
C.
Provide for individual humidity set point adjustment.
D.
Provide for occupancy control.
E.
Sub-base controls.
1.
Fan "ON-AUTO".
F.
Provide emergency heating capability for operation of the heaters.
G.
Bacnet capable monitoring and controlling of unit parameters over MS/TP
network.
H.
Bard Model CS9B-THO.
15778 - 2 of 5
12010 - NISD - High School
1.6
EVAPORATOR FAN SECTION
A.
1.7
Provide twin blowers, multi-speed direct connected fan motor with built-in motor
protection.
1.
Three-speed windings.
2.
Factory wired to a junction box and provisions for motor speed change,
mounted on the box.
3.
Resiliently mounted.
B.
Select the fan motor so that the brake horsepower required to deliver the design
air quantity at the system static pressure will not exceed the motor nameplate
rating.
C.
Fans shall be:
1.
Double width, double inlet, forward curved.
2.
Statically and dynamically balanced.
3.
Selected for the design air quantities and pressure of the system.
4.
Mounted on a common shaft if multiple wheels.
REFRIGERATION SYSTEM
A.
B.
Refrigeration components.
1.
High efficiency scroll 2-stage heat pump compressor with isolation and
sound blanket.
2.
High efficiency indoor fan section, variable speed/soft start, to provide
proper air flow for staged capacity. Fan speed shall maintain discharge
air temperatures during first stage cooling or heating mode.
3.
All piping and valves for automatic heat pump operation, factory installed.
4.
Condenser fans with permanently lubricated motors.
5.
R-410A refrigerant.
Provide each compressor with:
1.
Liquid line filter drier.
15778 - 3 of 5
12010 - NISD - High School
1.8
1.9
3.
Phase rotation monitor - 3 phase units.
A.
Factory wired to the load side of the unit electrical terminals.
B.
Factory installed temperature and current sensitive compressor motor winding
monitor.
1.
Disconnect the compressor motor.
2.
Prohibit short cycling.
C.
Fan motor overload devices.
D.
High and low pressure switch and restart time delay is approved in lieu of
temperature and current monitor.
E.
All equipment for true heat pump reverse cycle operation.
1.
Automatic defrost controls.
2.
Two step outdoor thermostats.
EXTENDED WARRANTY
Provide each refrigeration compressor with a warranty against failure for a period
of five years.
1.
The warranty shall indicate model, serial number of the unit, and
commencing date.
2.
The warranted compressor assembly consist of the stator, rotor,
eccentric shaft, eccentric rods, pistons, wrist pins, suction valves,
discharge valves, unloading mechanisms, oil pump, and the housing in
which these parts are enclosed.
INSTALLATION
A.
1.11
High-low pressure relief switches with auto-reset.
OPERATING AND SAFETY CONTROLS
A.
1.10
2.
Install and start-up the system in accordance with the manufacturer's
"Installation, Start-Up, and Service Instructions."
SUBMITTALS
A.
Submit Shop Drawings and product data as specified.
15778 - 4 of 5
12010 - NISD - High School
B.
Submit manufacturer's certified capacity.
C.
Submit manufacturer's "Installation, Start-Up, and Service Instructions."
D.
E.
1.
Recommended conductor, over current protection, and disconnect size.
2.
Electrical interlocks.
Submit fan performance curve for each different unit size:
1.
Plot fan volume against static pressure, horsepower, and efficiency.
2.
Show point of rating based on actual static requirements of the system.
Submit schedule of filters indexed to each unit with replacement commercial part
number.
1.
F.
Submit schedule of lubricants with recommended lubrication schedule.
1.
G.
Include the schedule in the Operation and Maintenance Manual.
Submit mounting and installation construction details.
1.
1.12
Include the schedule in the Operation and Maintenance Manual.
Load points; Recommended auxiliary supports; Attachment devices.
ACCEPTABLE MANUFACTURERS
A.
Bard.
B.
Marvair.
15778 - 5 of 5
12010 - NISD - High School
SECTION 15781
DUCTLESS AIR CONDITIONING SYSTEM
1.1
GENERAL
A.
B.
1.2
1.3
The system shall consist of:
1.
Indoor fan coil unit (cooling only).
2.
Outdoor air-cooled condensing unit.
3.
Microprocessor controls.
System capacity as scheduled on the drawings.
QUALITY ASSURANCE
A.
Units rated in accordance with ARI Standard 240 and bear the ARI label.
B.
Bear the UL label.
C.
All wiring in accordance with National Electrical Code.
INDOOR EXPOSED WALL MOUNTED FAN COIL UNIT
A.
Unit cabinet:
1.
Decorative high impact polystyrene construction with integral wall
mounting bracket and mounting hardware.
2.
Fully insulated with insulation having:
3.
B.
a.
Flame spread not higher than 25.
b.
Smoke developed rating not higher than 50.
Integral return air and supply air grilles.
Fan:
1.
Multi-speed direct drive motor with inherent overload protection.
2.
Statically and dynamically balanced.
3.
Permanently lubricated bearings.
15781 - 1 of 4
12010 - NISD - High School
4.
Adjustable guide vanes to change air flow horizontally and vertically.
5.
Motor driven air sweep for uniform air distribution.
C.
DX cooling coil as specified in Section 15125.
D.
Condensate drain pan under coil with a condensate pump.
1.
E.
1.4
A level sensor in the condensate pan shall signal to stop cooling upon
sensing a high water level.
Filter track with factory supplied washable filter.
OUTDOOR CONDENSING UNIT
A.
Housing:
1.
Galvanized steel construction with baked enamel finish.
2.
Corrosion resistant fan guard and condenser coil guard.
B.
Condenser fans with permanently lubricated motors with inherent overload
protection and resiliently mounted.
C.
Nonferrous condenser coils.
D.
Hermetic reciprocating or scroll type compressor.
1.
Internal overloads to protect compressor motor from overcurrent and over
temperature.
2.
Crank case heater.
3.
Vibration isolation.
E.
Provide brass service valves with fitting and gauge ports.
F.
Refrigerant accumulator.
G.
Controls and safeties:
1.
Factory wired.
2.
Restart time delay to prohibit short cycling.
3.
Automatic restart on power failure.
4.
High pressure and liquid line low pressure switches.
15781 - 2 of 4
12010 - NISD - High School
1.5
1.7
6.
Automatic outdoor fan motor protection.
7.
Low ambient head pressure control to allow unit operation down to 32
degrees F.
Wall mounted microprocessor based control system to control space
temperature with:
1.
Automatic restart after power failure with set points same as at failure.
2.
Indoor coil freeze protection.
3.
Fan "On-Auto".
4.
Fan speed control capable of being manually set or automatically
controlled.
5.
Diagnostics.
6.
Time delay to prevent compressor short cycling.
ACCEPTABLE MANUFACTURERS
A.
Carrier.
B.
Mitsubishi.
C.
EMI.
EXTENDED WARRANTY
A.
1.8
High pressure relief.
SPACE TEMPERATURE CONTROL
A.
1.6
5.
Provide each refrigeration compressor with a warranty against failure for a period
of 5 years.
1.
The warranty shall indicate model, serial number of the unit and
commencing date.
2.
The warranted compressor assembly consists of the stator, rotor,
eccentric shaft, eccentric rods, pistons, wrist pins, suction valves,
discharge valves, unloading mechanisms, oil pump and the housing in
which these parts are enclosed.
INSTALLATION
A.
Install and start up the system in accordance with the manufacturer's
15781 - 3 of 4
12010 - NISD - High School
"Installation, Start Up and Service Instructions".
1.9
SUBMITTALS
A.
Submit shop drawings and product data as specified.
B.
Submit manufacturer's certified capacity curve with selections plotted thereon.
C.
Submit manufacturer's "Installation, Start Up and Service Instructions".
D.
1.
Recommended conductor overcurrent protection and disconnect size.
2.
Electrical interlocks.
Submit manufacturer's refrigerant pipe sizing charts with recommended
selection.
15781 - 4 of 4
12010 - NISD - High School
SECTION 15800
AIR DISTRIBUTION SYSTEM
1.1
GENERAL
A.
1.2
1.3
DUCTWORK MATERIAL
A.
Prime galvanized, lock forming quality steel sheets.
B.
Lock forming quality aluminum duct sheet.
C.
Where duct work is indicated to be exposed to view in occupied spaces, provide
materials which are free from visual imperfections, pitting, seam marks, roller
marks, oil canning, stains, discolorations, shop markings and other
imperfections, including those which would impair painting.
REFERENCE STANDARDS
A.
1.4
See other specification sections for ductwork material as scheduled.
The installation, metal gauges, construction methods and support systems shall
conform to the current edition of the following standards:
1.
HVAC Duct Construction Standards, Sheet Metal and Air Conditioning
Contractors National Association (SMACNA).
2.
HVAC Duct System Design, Sheet Metal and Air Conditioning
Contractors National Association (SMACNA).
3.
Round Industrial Duct Construction Standards, Sheet Metal and Air
Conditioning Contractors National Association (SMACNA).
4.
Standard for the Installation of Air Conditioning and Ventilating Systems
(NFPA 90A).
FABRICATION AND INSTALLATION
A.
Install ducts to coordinate with structural and architectural elements.
1.
Where necessary to change the size or shape to conform to structural or
architectural conditions, consult Architect/Engineer for rerouting or
resizing.
B.
Workmanship shall be careful, accurate and neat.
C.
Strengthen uninsulated duct work by diamond crimping of the sheet or beading.
15800 - 1 of 8
12010 - NISD - High School
1.5
1.6
D.
Equip square elbows with turning vanes as shown on drawing details.
E.
Refer to the drawings and the SMACNA "HVAC Duct Construction Standards"
for Standard Duct Construction Details.
1.
The limited number of illustrations of fitting configurations is not intended
to preclude the use of other alternatives for which performance data is
published.
2.
Procedures for demonstrating equivalency of non-illustrated construction
detail by tests and/or analysis are shown in the Standards, Section VII.
F.
Duct joints and seams shall be selected, constructed and installed consistent
with the pressure classification and the specified leakage control measures.
G.
Where exposed ducts pass through partitions, conceal the space between the
construction opening and the duct or duct-plus-insulation with sheet metal
flanges of the same gauge as the duct. Overlap the opening on all sides by at
least 1-1/2". See related details on the drawings.
H.
Coordinate duct installation with installation of accessories, dampers, equipment,
controls and other associated work of the duct work system.
I.
Paint raw duct work visible behind air outlets flat black.
ACCESS DOORS IN DUCT WORK
A.
Fabricate rigid and close-fitting doors of galvanized steel with fireproof sealing
gaskets and quick fastening locking devices. For insulated duct work, install
matching thickness insulation with sheet metal cover.
B.
Provide two hinges and two sash locks for sizes up to 18 inch square; two hinges
and two compression latches with outside and inside handles for sizes up to 24
inch x 48 inch. Provide an additional hinge for larger sizes.
C.
Review location of doors prior to installation.
D.
Refer to Section 15860 for specifications for access doors at fire dampers.
MISCELLANEOUS DUCT WORK MATERIALS
A.
Provide miscellaneous materials and products of the types and sizes required to
comply with duct work system requirements including proper connection of duct
work and equipment.
B.
Seal all longitudinal and transverse joints in ducts with fireproof nonhardening,
nonmigrating mastic or liquid elastic sealant, compounded and recommended by
the manufacturer specifically for sealing joints and seams in duct work.
15800 - 2 of 8
12010 - NISD - High School
1.7
1.
Type applicable for the fabrication/installation detail.
2.
Seal all outdoor duct work at all joints.
C.
Except as otherwise indicated, provide hot-dipped galvanized steel fasteners,
anchors, rods, straps, trim and angles for support of duct work.
D.
Hardware used in duct fittings and accessories shall have had a previous record
of satisfactory use for the application or evidence of suitability shall be submitted
for approval.
FLEXIBLE CONNECTIONS
A.
Fabricate of flameproof glass fabric double coated with neoprene, approximately
4" wide, tightly crimped into galvanized iron edging strips on each side.
1.
B.
1.8
Attach to ducting and equipment by screws or bolts at 6" intervals.
Provide flexible connections immediately adjacent to equipment in ducts
associated with fans and equipment subject to forced vibration.
DELIVERY, STORAGE AND HANDLING
A.
B.
C.
Protect shop fabricated duct work, accessories and purchased products from
damage during shipping, storage and handling.
1.
Prevent end damage.
2.
Prevent dirt and moisture from entering ducts and fittings.
Storage of duct at the job site.
1.
Store on building slab under roof in a clean and dry environment.
2.
Palletize so as not to come in contact with the floor.
3.
Protect from all construction processes.
4.
Cover with plastic sheeting.
5.
Prevent end damage. Do not store lined sheet metal or fiberglass
duct on ends.
6.
If necessary to store outside, store above grade and enclosed with
waterproof wrapping.
Erected duct work.
15800 - 3 of 8
12010 - NISD - High School
1.
1.9
QUALITY ASSURANCE
A.
Leakage of the completed duct system, in excess of 5% of the total air flow, is
not approved.
B.
Leakage, if present, shall be uniform throughout the system.
1.
C.
1.10
All opened ends and duct taps shall be sealed with plastic sheeting
during construction.
Excessive leaks at a few joint connections is not approved.
Leakage at outdoor, insulated duct work is not approved.
FIBERGLASS DUCT WORK
A.
Where indicated and scheduled on drawings, fiberglass duct work shall be
fabricated of 1-1/2" thick Type 800 FSK faced fiberglass as scheduled. Duct
dimensions on the plans refer to inside dimensions. Fiberglass duct to receive no
further insulation.
1.
Internal duct air stream surface shall be finished with a factory applied
thermosetting acrylic polymer coating. Coating shall resist potential dust
incursion into the material substrate and shall contain an immobilized
EPA-approved anti-microbial agent to further inhibit potential microbial
growth. Results of mold, fungi and bacteria testing of UL181, ASTM C
1071, ASTM G-21 and G-22 shall show no growth. The coating shall be
resistant to fiber shed and damage during cleaning operations.
B.
Use only precision machinery to fabricate fibrous glass ducts and fittings. Make
only minor on-site manual adjustments.
C.
Fiberglass duct work fabricated and erected in accordance with:
D.
E.
1.
The SMACNA Duct Manual for Fibrous Glass Construction.
2.
The manufacturer's installation instructions.
Approved systems:
1.
Owens Corning "EnDuraCoat" with SMACNA labeled tape.
2.
Johns Manville "SuperDuct" with thermal actuated chemical bond tape, or
SMACNA labeled tape.
SMACNA tape installation:
1.
Wipe surface where tape is to be applied with a clean cloth. If surface
has grease or oil, wipe it clean with an alcohol saturated cloth.
15800 - 4 of 8
12010 - NISD - High School
1.11
2.
Rub tape firmly in place immediately after applying.
3.
Use a heat seal iron to ensure a good bond when installed below 50
degrees F.
F.
Repair punctures and tears with tape system as soon as they occur.
G.
Install ship lap joint according to manufacturer's instructions.
H.
Condensation on the surface is not approved.
DUCT LINER
A.
Fabricate and install all duct liner in accordance with SMACNA Installation
Standards for Rectangular Ducts using flexible liner.
B.
Line duct work as indicated and scheduled on the drawings for thickness and
density.
1.
(1-1/2 lb.and 2 lb.) per cubic foot fiberglass duct liner unless indicated
otherwise on drawings.
2.
Black flexible coating one side.
3.
Apply liner to the duct with sprayed side to air stream.
C.
Linings shall meet the requirements of the "Erosion Test Method" described in
UL Pub. No. 181 and "Duct Liner Materials Standard" of TIMA.
D.
Approved systems:
E.
1.
CertainTeed "ToughGard".
2.
Owens Corning "AeroFlex Plus".
3.
Johns Manville "Permacote Linacoustic".
Adhere the liner to the sheet metal with 100 percent coverage of adhesive.
1.
F.
Coat all exposed edges and joints with adhesive.
The liner shall be additionally secured with mechanical fasteners which shall
compress the duct liner sufficiently to hold it firmly in place.
1.
Conform to the "Mechanical Fastener Standard", MF-1 of the Duct Liner
Application Standard.
15800 - 5 of 8
12010 - NISD - High School
2.
G.
For all equipment installations:
1.
Install 24 gauge channel nosing on the leading edge of all raw insulation.
2.
Welded pins affixed at 6" intervals parallel to the nosing.
H.
Cut the liner accurately to assure overlapped and compressed longitudinal
corner joints and tightly butted transverse joints.
I.
Fabricate all duct liner with precision machinery.
1.
J.
K.
L.
Make only minor, on-site manual adjustments to liner.
Provide insulated "build-out" sections to maintain the continuity of the liner when
specialties, such as dampers and turning vanes, are secured to the sides of the
duct. Build-outs shall be secured to the duct with sheet metal screws, bolts or
welds.
1.
1.12
Fasteners shall start within 3" of the upstream transverse edges of the
liner and 3" from the longitudinal joints and shall be spaced at a
maximum of 6" o.c. around the perimeter of the duct, except that they
may be a maximum of 6" from a corner break. Elsewhere, they shall be a
maximum of 16" o.c., except that they shall be placed not more than 6"
from a longitudinal joint of the liner nor 12" from a corner break.
Use of a hat section for "build-out" is optional, and its use shall be
evaluated for each specialty. Liner shall be adequately protected from
damage or erosion, and friction loss through the section shall be
minimized.
Linings and adhesives:
1.
Flame spread classification of not more than 25.
2.
Smoke developed rating not more than 50.
3.
Materials UL listed.
4.
Each container or wrapper UL labeled.
Increase duct size over those shown on the drawings where it is to receive
internal insulation. Sizes on the drawing are inside clear dimensions.
SUBMITTALS
A.
Review coordination of duct work with all trades.
15800 - 6 of 8
12010 - NISD - High School
1.13
B.
Submit product data on fiberglass duct board, duct liner and flexible duct.
C.
Submit shop drawings of any element of the duct system (prior to fabrication)
where required to resolve conflicts.
D.
Where fiberglass duct is used, submit details of construction including turning
vanes, dampers, hangers, bracing taping system and outlet connections.
FLEXIBLE DUCT
A.
Location where shown on drawings.
B.
Installation:
C.
D.
E.
F.
1.
Stretched to smooth out internal corrugations (5' maximum length).
2.
Use long radius bends to 45 degrees.
3.
Bends over 45 degrees made with sheet metal elbows.
4.
According to the manufacturer's installation instructions.
Construction:
1.
Continuous galvanized spring steel wire helix with reinforced metalized
cover.
2.
UL 181 Class I air duct label.
3.
Reinforced metalized vapor barrier jacket.
4.
Rated for use at system pressure (6" w.c. positive) thru 12" diameter.
5.
Rated minimum velocity 4000 FPM.
Fire hazard classification:
1.
Flame spread rating 25 max.
2.
Smoke developed rating 50 max.
Thermal characteristics:
1.
R-value equal to R-6 minimum.
2.
1-1/4" wall thickness insulation with 1" overlap.
Acceptable manufacturers:
15800 - 7 of 8
12010 - NISD - High School
1.14
1.
Flexmaster.
2.
Thermaflex.
3.
ATCO.
INSTRUMENT TEST HOLES
A.
Provide Vent Fabric #699 instrument test holes where required to measure
temperature, static pressure and velocity in each supply, return, outside air and
exhaust duct.
B.
Test holes shall be factory fabricated, air tight flanged fittings with screw cap.
1.
Provide extended neck fittings to clear insulation.
15800 - 8 of 8
12010 - NISD - High School
SECTION 15801
WALL LOUVERS
I.01
GENERAL
A.
B.
I.02
I.05
Sill and frame to suit the application, as shown on the drawing details.
2.
Style and size as shown on the drawings.
Use screws and fasteners of nonmagnetic stainless steel or nonferrous metal.
Bear the AMCA seal indicating conformance with the certified ratings program.
1.
Air performance.
2.
Water penetration.
FINISH
A.
I.04
1.
STANDARDS
A.
I.03
Provide the extruded aluminum wall louvers where shown on the drawings and
scheduled.
Provide with finish and protective coatings as shown in the schedule.
ACCEPTABLE MANUFACTURERS:
A.
Ruskin.
B.
Louvers and Dampers Inc.
C.
Titus.
D.
Krueger.
E.
Arrow.
F.
Pottorff.
PREPARATION
A.
Take site dimensions affecting this work.
15801 - 1 of 2
12010 - NISD - High School
B.
I.06
I.07
Ensure openings affecting this work are properly prepared and that flashings are
correctly located to divert moisture to exterior.
INSTALLATION
A.
Install louvers in openings properly aligned and level.
B.
Secure louver rigid with fasteners of noncorrosive, non-magnetic metals to suit
materials as being encountered.
C.
Coordinate installation method with application of siding system and mechanical
work.
D.
Set and tie in to flashings to ensure diversion of moisture to exterior.
E.
Seal the louver to the adjacent surface to ensure a weatherproof installation.
1.
Clean and prepare the joint surface.
2.
Use silicone rubber base sealing compound.
3.
Install sealant in accordance with manufacturer's instructions.
4.
Replace sealants which fail because of loss of cohesion or adhesion, or
do not cure.
SUBMITTALS
A.
Submit shop drawings, samples and product data as specified.
B.
Submit manufacturer's certified capacity charts with selections plotted thereon.
C.
1.
Water penetration.
2.
Pressure drop.
Submit manufacturer's installation and construction details.
15801 - 2 of 2
12010 - NISD - High School
SECTION 15802
AIR OUTLETS
1.1
1.2
1.3
QUALITY ASSURANCE
A.
Certify compliance with air flow tests and sound level measurements in
accordance with applicable Air Diffusion Council (A.D.C.) equipment test codes
and ASHRAE standards.
B.
Manufacturer shall certify cataloged performance and ensure correct application
of air outlet types.
SUBMITTALS
A.
Submit in accordance with Sections 15040 and 15800.
B.
Submit product data and shop drawings covering each item together with
schedule of outlets.
JOB CONDITIONS
A.
Review requirements of outlets as to size and finish prior to submitting shop
drawings and schedules of outlets.
1.
B.
Check location of outlets and make necessary adjustments in position to
conform with architectural features, symmetry and lighting arrangement.
C.
Coordinate units mounted in the ceilings with the ceiling construction in which
they are to be mounted.
D.
1.4
Confirm air flow patterns from drawings and notes.
1.
Confirm ceiling construction details and architectural finish for each room.
2.
Resolve discrepancies between catalog references and the actual ceiling
construction into which they are to be installed at the time of submission
of shop drawings.
Provide and install items as listed in schedules.
ACCEPTABLE MANUFACTURERS
A.
Krueger.
B.
Titus
15802 - 1 of 2
12010 - NISD - High School
1.5
1.6
C.
Metal-Aire.
D.
Tuttle & Bailey.
E.
Carnes.
F.
Price.
G.
Anemostat.
H.
Nailor.
APPLICATION
A.
Rate units in accordance with ADC standards.
B.
Provide supply outlets with sponge rubber seal around edge.
C.
Provide baffles to direct air away from walls, columns or other obstructions within
radius of diffuser operation.
D.
Provide plaster frame for diffusers located in plaster surfaces.
CONSTRUCTION
A.
Provide grilles, registers and diffusers constructed of materials as scheduled.
B.
Provide steel outlets finished with factory baked enamel finish.
1.
C.
Provide aluminum outlets with satin finish.
1.
D.
1.7
Special colors as scheduled.
Special finish and color as scheduled.
Grilles and diffusers which have ceiling radiation or fire dampers mounted behind
them shall have removable core for access to resetting these devices.
INSTALLATION
A.
Install items in accordance with manufacturer's printed instructions.
15802 - 2 of 2
12010 - NISD - High School
SECTION 15803
AIR CONTROL DAMPERS
1.1
GENERAL
A.
Provide the factory fabricated control dampers where shown on the drawings.
1.
1.2
Shop fabrication of dampers is not approved.
LOW LEAKAGE DAMPERS
A.
Use at all locations where 100% close off is required.
B.
Construct of 16 gauge galvanized, formed steel blades.
1.
At the contractor's option, extruded aluminum blades are acceptable.
C.
Blades not over 9" wide.
D.
Shafts and blades bolted through to prevent misalignment.
E.
Galvanized structural channel frame.
F.
Stainless steel bearing pins (axle) and linkage.
G.
Oil impregnated bronze, nylon or molded synthetic bearings.
H.
Spring loaded stainless steel side seals.
I.
Closed cell fire-proof edge seal at blade intermesh.
J.
Opposed blade acting; or parallel blade acting.
1.
K.
All blade linkage hardware stainless steel.
1.
L.
Be readily accessible for maintenance after installation.
Arrange dampers and linkage for motor operation from a single point.
1.
M.
As scheduled.
Motors specified in another section.
Where shown on the drawings, divide the damper into minimum and maximum
sections.
15803 - 1 of 3
12010 - NISD - High School
1.
1.3
VOLUME CONTROL DAMPERS
A.
Fabricate in accordance with SMACNA Low Pressure Duct Construction
Standards.
B.
Shafts and blades bolted through to prevent misalignment.
C.
Galvanized structural channel frame.
D.
Electro-plated steel bearing pins (axle) and linkage.
E.
Provide oil-impregnated bronze, nylon or molded synthetic bearings.
F.
Opposed blade acting.
G.
Arrange dampers and linkage for motor operations from a single point.
1.
1.4
Arrange each section for individual motor operators.
Motors specified in another section.
H.
For manual operation, provide locking, indicating quadrant regulators. Where
rod lengths exceed 30", provide regulator at both ends.
I.
On insulated ducts, mount quadrant regulators on stand-off mounting brackets.
ACCEPTABLE MANUFACTURERS
A.
Vent Products.
B.
Ruskin.
C.
Air Balance.
D.
American Warming.
E.
Louvers and Dampers.
F.
Arrow.
G.
Nailor.
H.
Greenheck.
15803 - 2 of 3
12010 - NISD - High School
1.5
SUBMITTALS
A.
Submit in accordance with Sections 15040 and 15800.
B.
Submit shop drawings of factory fabricated assemblies.
C.
If requested during submittal review, submit a sample of the damper with all
construction features implemented prior to fabrication.
1.
D.
1.6
Submit a sample bearing.
Submit manufacturer's printed installation instructions.
QUALITY ASSURANCE
A.
Manufacturer shall certify cataloged performance and ensure correct application.
B.
The installed control damper assembly shall leak no more than .5% of flow at
1500 FPM face velocity, against a 4" WG pressure when closed.
15803 - 3 of 3
12010 - NISD - High School
SECTION 15805
GAS-FIRED EQUIPMENT VENTS
1.1
GENERAL
A.
1.2
1.3
1.4
Provide a flue gas vent system for each gas-fired heat producing appliance.
SECTION INCLUDES
A.
Fabricated breechings.
B.
Manufactured and shop fabrication vent caps.
C.
Manufactured double wall stacks.
REFERENCES
A.
ANSI Z223.1 (LATEST EDITION) - The National Fuel Gas Code.
B.
ASHRAE - Handbook, Equipment Volume, Chapter "Chimney, Gas, Vent, and
Fireplace Systems."
C.
SMACNA - HVAC Duct Construction Standards.
D.
UL 1738 - Standard for Safety Venting Systems for Gas Burning Appliances,
Categories II, III and IV.
E.
UL 441 - Standard for Gas Vents.
F.
UL 1738 or UL 103 - Standard for Low Temperature Venting Systems.
DEFINITIONS
A.
Breeching: Vent Connector.
B.
Smoke Pipe: Round single wall vent connector.
C.
Vent: That portion of a venting system designed to convey flue gases directly
outdoors from a vent connector or from an appliance when a vent connector is
not used.
D.
Vent Connector: That part of a venting system that conducts the flue gases from
the flue collar of an appliance to a vent, and may include a draft control device.
15805 - 1 of 4
12010 - NISD - High School
1.5
REGULATORY REQUIREMENTS
A.
1.6
TYPE B DOUBLE WALL GAS VENTS (BOILERS B-1, B-2 AND B-3)
A.
1.7
Conform to ANSI Z223.1 and Z21.13 codes for installation of gas burning
appliances and equipment.
Fabricate inner pipe of sheet aluminum, and outer pipe of galvanized sheet steel,
tested in compliance with ANSI Z21.13.
DOUBLE WALL METAL STACKS (BOILER B-4)
A.
Provide double wall metal stacks, UL listed, for use with building heating boiler
equipment, in compliance with NFPA 211.
B.
Fabricate with 1 inch minimum air space between walls.
C.
1.
Construct inner flue of Type 304 Stainless steel.
2.
Construct outer casing of aluminum coated steel.
3.
Protect all parts of the stack exposed above the roof with two coats of
heat resistant industrial enamel.
Provide accessories each bearing factory applied UL label.
1.
1.8
Ventilated Roof Thimble: Consists of roof penetration, vent flashing with
spacers and storm collar.
BREECHING
A.
Fabricate of ANSI/ASTM 167 Type 304 Stainless Steel.
1.
Minimum 12 Guage.
B.
Weld longitudinal seams. Fabricate joints by welding lapping and bolting, or with
companion flanges.
C.
Provide expansion joints to accommodate anticipated movement for each
specific installation.
D.
Provide openings as required for temperature sensors and other items being
furnished with appliance.
E.
Provide cleanout doors of same gage as breeching.
F.
Reinforce rectangular breeching with angle frames and round breeching with
flanged girth joints or angle frames. Refer to SMACNA HVAC Duct Construction
Standards.
15805 - 2 of 4
12010 - NISD - High School
1.9
ROOF CURBS
A.
1.10
1.11
1.
Sufficient structural capacity to accommodate the imposed load with a
safety factor of 4.0.
2.
Construction approved by the National Roofing Contractor's Association.
3.
Provide a minimum deck to lip clearance of 8".
4.
Constructed on the roof pitch.
FLUE GAS VENT CAP
A.
For Boilers B-1, B-2 and B-3, terminate on the roof with the base and cap as
shown on the drawings.
B.
For Boiler B-4, terminate on the roof or thru wall as shown on the drawings.
C.
Size the base and cap to accept the outside dimension of the double wall pipe.
INSTALLATION OF BASE
A.
1.12
Provide prefabricated curb of aluminum with all joints welded for each vent.
Install the base as shown on the drawing details (similar for wall).
INSTALLATION
A.
Install in accordance with manufacturer's instructions.
B.
Install in accordance with recommendations of ASHRAE-Handbook, Equipment
Volume, Chapter "Chimney, Gas, Vent, and Fireplace systems", and ANSI
Z223.1 (NFPA 54).
C.
Install breechings with minimum of joints. Align accurately at connections, with
internal surfaces smooth.
D.
Support breechings from building structure, rigidly with suitable ties, braces,
hangers and anchors to hold to shape and prevent buckling. Support vertical
breechings, chimneys, and stacks at 12 foot spacing, to adjacent structural
surfaces, or at floor penetrations. Refer to SMACNA HVAC duct construction
standards for equivalent duct support configuration and size.
E.
Pitch breechings with positive slope up from fuel-fired equipment to stack.
F.
For Type B double wall gas vents, maintain UL listed minimum clearances from
combustibles. Assemble pipe and accessories as required for complete
installation.
15805 - 3 of 4
12010 - NISD - High School
1.13
1.14
G.
Assemble and install stack sections in accordance with NFPA 82, industry
practices, and in compliance with UL listing. Join sections with acid-resistant joint
cement to ANSI/ASTM C105. Connect base section to foundation using anchor
lugs.
H.
Level and plumb stacks.
I.
Clean breechings, and stacks during installation, removing dust and debris.
J.
At appliances, provide slip joints permitting removal of appliances without
removal or dismantling of breechings, or stacks.
ACCEPTABLE MANUFACTURERS
A.
Metal-Fab, Inc.
B.
Schebler.
SUBMITTALS
A.
Submit size of vent as recommended by the manufacturer of the gas fired
equipment.
B.
Submit shop drawings indicating general construction, dimensions, weights,
support and layout of breechings, and vent.
1.
Submit layout drawings indicating plan view and elevations.
C.
Submit shop drawings of shop made vent cap and base.
D.
Submit product data on factory built double wall stacks and vents.
E.
Submit product data on factory built vent cap and base.
F.
Submit manufacturer's installation instructions.
15805 - 4 of 4
12010 - NISD - High School
SECTION 15806
FAN POWERED TERMINAL UNITS
1.1
1.2
QUALITY ASSURANCE
A.
Make air flow tests and sound level measurements in accordance with applicable
Air Diffusion Council (A.D.C.) equipment test codes and ASHRAE standards.
B.
Manufacturer shall certify cataloged performance and ensure correct application
of terminal units.
C.
Certified under the ARI Standard 880-94 Certification Program.
SUBMITTALS
A.
Submit in accordance with Sections 15040 and 15800.
B.
Submit product data and shop drawings covering each item together with
schedule of terminal units.
C.
Submit manufacturer's installation instructions.
D.
Submit certified sound power levels for both discharge sound and casing
radiated sound, tested in accordance with ASHRAE Standard 36-72.
1.
E.
1.3
1.4
The data shall include the second through sixth octave bands for each
unit size with inlet static pressures, and all attenuation factors defined.
Submit a graphic representation and narrative format of each box control
sequence.
INSTALLATION
A.
Install each unit in accordance with the manufacturer's printed installation
instructions.
B.
Suspend each unit from 1/4" threaded hanger rods.
1.
Supported from the building structure.
2.
Provide sub-structure where required.
BOX CONSTRUCTION
A.
Galvanized steel casing with suspension lugs.
B.
Lined with 1" thick 1-1/2 lb. density thermal and acoustical insulation.
15806 - 1 of 5
12010 - NISD - High School
1.5
1.
Flame spread not higher than 25.
2.
Smoke developed rating not higher than 50.
3.
Condensation on the box is not approved.
4.
Coat all cut edges with approved sealant.
C.
Provide a cam latched door for setting of controls; removal of fan; and servicing
of unit; without disturbing duct connections.
D.
All components shall be constructed of corrosion resistant materials.
E.
Bearings shall not require lubrication.
F.
Casing leakage shall not exceed 2.0% of scheduled design air flow at 3.0 inches
W.G. interior casing pressure.
G.
Seal all casing joints with approved adhesive if required to meet the maximum
casing leakage rate.
CONTROL MOTORS
A.
Provide the electronic control motors to modulate the primary air dampers.
1.
1.6
Control motor is specified to be provided and mounted in this section.
COMPONENTS (CONSTANT VOLUME FAN POWERED TERMINAL UNITS)
A.
The entire terminal unit, including the heating coil shall be designed and built as
a single unit.
B.
Provide each unit with a primary variable air volume damper that controls the air
quantity in response to a space sensor.
C.
Each unit shall contain:
1.
Fan and motor assembly.
2.
Heating coil.
3.
Backdraft damper.
D.
Locate the heating coil in the discharge of the blower section.
E.
Provide a filter track at the induction air intake.
1.
Track shall accommodate 1" thick filters as specified in Section 15880.
15806 - 2 of 5
12010 - NISD - High School
F.
Provide a single point electrical connection for the entire unit.
1.
Electrical components shall be U.L. listed and installed in accordance
with the National Electric Code.
a.
1.7
Provide with disconnect switch (connected to factory wiring).
2.
Mount all electrical (and electronic) components in a galvanized steel
control box, with removable cover.
3.
Provide space in the control box for the direct digital control card.
4.
The DDC card is specified to be furnished in Section 15900 and shipped
to the terminal unit manufacturer for installation.
5.
Coordination is specified in this section.
BLOWER FAN AND MOTOR (CONSTANT VOLUME FAN POWERED TERMINAL
UNITS)
A.
Blower fan:
1.
Constructed of steel.
2.
Forward curved centrifugal wheel.
3.
Dynamically balanced wheels.
4.
Direct drive motors.
B.
High efficiency motor.
C.
Motor current characteristics as scheduled.
1.
Thermal overload protection.
2.
Sleeve bearings.
3.
Permanent split capacitor.
D.
Provide anti-backward rotation device.
E.
Provide isolation between fan motor assembly and unit casing.
F.
Provide a manual speed control system which shall allow continuously adjustable
fan speed from maximum to minimum.
1.
Electronic speed control matched to operate with the motor.
15806 - 3 of 5
12010 - NISD - High School
G.
1.8
Speed controller shall incorporate a minimum voltage stop to insure motor
cannot operate in a stall mode.
PRIMARY DAMPER MOTOR (CONSTANT VOLUME FAN POWERED TERMINAL
UNIT)
A.
The electronic actuator shall vary primary air damper in response to the
electronic signal.
B.
Damper leakage at shutoff shall not exceed 2.0% at 1 inch W.G. pressure.
C.
Damper operation shall be demonstrated to be closed before heating is
energized.
1.
1.9
D.
Locate the damper inside the unit.
E.
Damper connection to the operating shaft shall be a positive mechanical
connection.
AIR FLOW CONTROL (CONSTANT VOLUME FAN POWERED TERMINAL UNIT)
A.
Provide a flow control device that will limit the maximum CFM of the unit to that
scheduled on the drawings.
1.
Air quantity shall be factory set.
B.
Control signal shall reset the flow control device to reduce primary air quantity to
match load requirements.
C.
Control of the fan powered unit shall be pressure independent.
D.
Each terminal shall incorporate a four quadrant center averaging flow sensor to
insure the following performance:
1.
E.
1.10
Overlap under any conditions is not approved.
Controller fidelity shall be +/- 5% of set volume with only (2) duct
diameters of straight duct at inlet and inlet static variation of 0.25 in. W.G.
to 6.0 in. W.G.
Provide flow measuring taps and a flow chart with each unit for field balancing air
flows.
CONSTANT AIR VOLUME FAN POWERED TERMINAL UNIT CONTROL
A.
Start the fan in the terminal unit when the central system starts.
B.
An individual space temperature sensor through the DDC controller shall
15806 - 4 of 5
12010 - NISD - High School
modulate the related damper motor on the primary air damper and modulate the
valve on the box hot water coil in sequence to maintain the required space
temperature.
1.11
C.
The space temperature sensor is specified to be provided in the 15900 series of
the specifications.
D.
The control valve on the hot water coil is specified to be provided in the 15900
series.
FLOW CONTROLLER
A.
1.12
Provide with adjustable reset span.
HOT WATER HEATING COILS
A.
Provide hot water heating coils sized as scheduled.
1.
B.
1.13
1.14
Hot water heating coil is specified to be provided and mounted in this
section.
Hot water heating coils specification is in Section 15125.
ACCEPTABLE MANUFACTURERS
A.
Titus.
B.
Krueger.
C.
Anemostat.
D.
Price.
SPARE PARTS
A.
Provide two spare motors for each size box.
B.
Provide extra sets of filter holding clips/holding bars. One extra set for each five
terminal units.
15806 - 5 of 5
12010 - NISD - High School
SECTION 15813
LOW PRESSURE ROUND DUCT SYSTEM
1.1
1.2
DUCTWORK MATERIAL
A.
Prime galvanized, lock forming quality steel sheets.
B.
Provide materials which are free from visual imperfections, pitting, seam marks,
roller marks, oil canning, stains, discolorations, shop markings and other
imperfections, including those which would impair painting.
REFERENCE STANDARDS
A.
1.3
1.
SMACNA Low Pressure Duct Construction Standards.
2.
Standard for the Installation of Air Conditioning and Ventilating Systems
(NFPA 90A).
3.
ASHRAE Handbook.
RELATED WORK
A.
1.4
The installation, metal gauges, construction methods and support systems shall
conform to the current edition of the following standards:
Section 15800 Air Distribution System.
FABRICATION AND INSTALLATION
A.
Install ducts to coordinate with structural and architectural elements.
1.
Where necessary to change the size or shape to conform to structural or
architectural conditions, consult Engineer for re-routing or re-sizing.
B.
Workmanship shall be careful, accurate and neat.
C.
Fabricate duct with lock type or welded spiral seam.
15813 - 1 of 1
12010 - NISD - High School
SECTION 15814
DOUBLE WALL ACOUSTICAL DUCT SYSTEM
1.1
RELATED WORK
A.
1.2
Refer to Section 15800 for related work specified there.
GENERAL
A.
Construct all duct work in the spaces designated on the drawings of round or flat
oval double wall, insulated acoustical duct.
1.
B.
1.3
All duct and fittings shall be provided by the approved manufacturer.
MATERIALS AND CONSTRUCTION
A.
All duct and fittings shall be galvanized sheet metal in accordance with
ASTM-A527 specifications.
B.
All duct diameters shown on drawings are nominal inner liner dimensions.
C.
Duct system shall be constructed of:
D.
1.
Perforated inner liner.
2.
A 1-inch layer of fiberglass insulation.
3.
An outer pressure shell.
Duct shall be provided in continuous lengths.
1.
E.
F.
Except when interrupted by fittings, duct sections shall not be less than
12 feet long.
Use double-wall insulated fittings at all locations.
1.
1.4
Spiral lockseam construction.
Constructed as specified for straight duct.
Perforations in the liner walls shall be 3/32 inch in diameter with an overall open
area of 23 percent.
THERMAL PROPERTIES
15814 - 1 of 3
12010 - NISD - High School
A.
1.5
1.6
INSTALLATION
A.
Assembly joints shall be sealed with a water-based duct sealant that is a vinyl
acrylic polymer formulated to withstand temperatures from -25 to +200 degrees
F.
B.
Sealant.
1.
Nonflammable and fire retardant.
2.
UL Classification markings with a flame spread of 5 and smoke
developed of 5.
C.
Provide insulation ends at all locations where double-wall duct connects to
single-wall duct. The insulation end shall terminate the insulation and reduce the
outer shell diameter to the normal single-wall size.
D.
Provide all system sections with both an inner liner coupling and an outer
pressure shell coupling.
E.
Install all duct work components in accordance with the manufacturer's
installation manual.
TESTING
A.
1.7
All double wall ducts shall have a maximum thermal conductivity (k) factor of
0.27 BTU/hr./sq. ft./ degree F./inch thickness at 75 degrees F. mean
temperature.
As the project progresses:
1.
Test the duct work in sections.
2.
Finally as a complete system.
B.
Maximum allowable leakage is 1/2 of 1% of the total air flow.
C.
Make test measurement pressure corresponding to the design static pressure of
the system.
D.
Test method as set forth in SMACNA "High Velocity Duct Construction
Standards".
ACCEPTABLE MANUFACTURER
A.
United McGill.
15814 - 2 of 3
12010 - NISD - High School
1.8
SUBMITTAL
A.
Submit shop drawings as specified in Section 15800.
B.
Submit product data for sealing materials.
C.
Submit sound attenuation data for the duct system.
15814 - 3 of 3
12010 - NISD - High School
SECTION 15841
VENTILATION AND EXHAUST SYSTEMS
1.1
GENERAL
A.
Provide the supply and exhaust systems of the size, arrangement, rotation and
discharge shown on the drawings.
B.
Select fans and vents:
C.
1.2
1.4
1.5
To operate at or near its maximum efficiency point when handling the
required air quantity and static pressure.
2.
For the design air quantities and pressure of the system.
System capacity as scheduled.
REFERENCE STANDARDS
A.
1.3
1.
Each unit shall be tested and rated in accordance with the AMCA certified ratings
program.
SELECTION AND BALANCING
A.
Provide fans capable of accommodating static pressure variations of plus or
minus 10%.
B.
Statically and dynamically balance fans to eliminate vibration or noise
transmission to occupied areas of the building.
VENTILATION AND EXHAUST FANS
A.
Provide the ventilation and exhaust fans shown on the drawings.
B.
Provide each fan out of sight of its controller with a safety switch.
C.
Provide each motor with internal overload protection.
D.
Provide each belt driven fan with approved, totally enclosed belt guard.
E.
Provide duct flanges where required for connections.
ROOFTOP VENTILATION AND EXHAUST SYSTEMS
A.
Provide the rooftop ventilation and exhaust systems shown on the drawings.
B.
Provide each fan out of sight of its controller with a safety switch.
15841 - 1 of 4
12010 - NISD - High School
1.6
1.7
C.
Provide each motor with internal overload protection.
D.
Components.
Aluminum, stainless steel or plastic coated steel bird guard.
2.
Screws and fasteners of stainless steel or nonferrous material.
3.
All aluminum construction unless indicated otherwise on fan schedule.
GRAVITY ROOFTOP INTAKE AND RELIEF VENTS
A.
Provide the rooftop intake and relief vent systems shown on the drawings.
B.
Provide with aluminum, stainless steel or plastic coated steel bird guard.
1.
Screws and fasteners of stainless steel or nonferrous material.
2.
All aluminum construction.
3.
Provide relief vents with gravity backdraft dampers where scheduled.
ROOF CURBS
A.
1.8
1.
Provide a prefabricated curb of aluminum with all joints welded for each roof
mounted fan and gravity relief/exhaust/intake vent. See Detail.
1.
Acoustically and thermally lined with fire resistant insulation.
2.
Provided with cant to receive the roofing materials.
3.
Sufficient structural capacity to accommodate the imposed load with a
safety factor of 4.0.
4.
Construction approved by the National Roofing Contractors Association.
5.
Provide a minimum deck to lip clearance of 8". See Fan Schedule for
kitchen curb height.
6.
Constructed on the roof pitch.
7.
Where interior is exposed to view, line with sheet metal.
DAMPERS
A.
Where automatic backdraft damper is scheduled:
1.
Multi-bladed.
15841 - 2 of 4
12010 - NISD - High School
1.9
1.12
3.
Roll formed aluminum blades.
4.
Nylon bearings.
5.
Neoprene weatherstrip on blade edge.
A.
Supply and install sheaves as necessary for final air balancing.
B.
Set roof mounted fans on curbs.
C.
Fasten fan to curb with stainless steel fasteners.
1.
12" on center per side.
2.
Minimum 2 per side.
Verify exact requirements of the kitchen equipment hoods specified in Division
11.
JOB CONDITIONS
A.
1.11
Heavy duty.
INSTALLATION
D.
1.10
2.
Do not operate fans for any purpose until duct work is clean, filters in place,
bearings lubricated and fan has been run under observation.
ACCEPTABLE MANUFACTURERS
A.
Acme.
B.
Jenn-Air.
C.
Cook.
D.
Greenheck.
SUBMITTALS
A.
Submit manufacturer's product data sheets and unit capacity information as
specified.
B.
Submit manufacturer's "Installation, Start Up and Service Instructions".
C.
Submit fan performance curve for each unit:
1.
Plot fan volume against static pressure, horsepower and efficiency.
15841 - 3 of 4
12010 - NISD - High School
D.
2.
Show point of rating based on static requirements of the system.
3.
Chart of sound power level.
Where special finishes are specified, submit actual samples.
15841 - 4 of 4
12010 - NISD - High School
SECTION 15857
KITCHEN HOOD DUCTWORK
1.1
GENERAL
A.
1.2
DUCTWORK
A.
1.3
Kitchen equipment hoods are specified to be furnished and installed in Division
11.
Ductwork from the hood is specified in this section.
1.
All seams and joints welded watertight.
2.
Slope back to the hood.
MATERIAL
A.
Where duct is exposed to view in occupied spaces: Type 316 stainless steel;
welded, ground and polished to match the hood.
B.
In concealed locations: 16 Ga. Black iron.
1.
1.4
INSPECTION DOORS
A.
1.5
Weld all seams and joints.
Provide inspection doors in duct as required in NFPA Standard 96.
REFERENCE STANDARDS
A.
The installation; metal gauges, construction methods and support systems shall
conform to the current edition of the following standards:
1.
SMACNA "Accepted Industry Practice for Industrial Duct Construction."
2.
SMACNA "Rectangular Industrial Duct Construction Standards".
3.
Current American Welding Society "Specification for Welding of
Sheetmetal" .
4.
Industrial Ventilation Manual.
15857 - 1 of 2
12010 - NISD - High School
5.
1.6
Standard for the Installation of Equipment for the Removal of Smoke and
Grease-Laden Vapors from Commercial Cooking Equipment. (NFPA 96).
SHOP DRAWINGS
A.
B.
Submit shop drawings of the entire hood exhaust duct system and components
prior to fabrication.
1.
Metal gauges.
2.
Hood and fan connection details.
Submit shop drawings on necessary structural supports.
15857 - 2 of 2
12010 - NISD - High School
SECTION 15860
FIRE DAMPERS
1.1
1.2
GENERAL
A.
Rated for 1-1/2 hour.
B.
Bear the UL label.
C.
Present a minimum of 90% free area.
D.
Provided with UL labeled 160 degrees fusible link.
INSTALLATION
A.
Install fire dampers in accordance with their conditions for approval. Install
retaining angles, frames and sleeves in accordance with SMACNA'S fire damper
manual.
B.
Where required for installation in high pressure or medium pressure duct
systems:
1.
1.3
Construct as required for the system pressure.
ACCESS DOORS
A.
B.
Provide each damper in duct work with access door.
1.
Size and location to provide adequate room for inspection and servicing
of the damper and replacement of fusible link with damper closed.
2.
Flange frame secured to the duct with screws.
3.
Single handle latch; butt hinges with loose pins.
Provide fire proof gasket between door and duct.
1.
Air tight installation.
C.
Conform to all recommendations and requirements of the National Fire
Protection Association.
D.
Stencil "Fire Damper Access" on each door.
E.
Door in insulated duct work shall be insulated.
15860 - 1 of 2
12010 - NISD - High School
F.
Provide access door in wall or ceiling for access to damper door where duct is
concealed and not accessible through lift out ceiling tile.
1.
1.4
TESTING
A.
B.
1.5
The door shall have a UL label to match the construction in which it is
installed.
Upon completion of the project but prior to final inspection, demonstrate the
operation of all fire dampers.
1.
Open all damper access doors.
2.
Disconnect each fusible link.
3.
Insert a wire in lieu of the fusible link to hold open the damper.
4.
Cut the wire to demonstrate operation of the fire damper.
5.
If the damper closes properly, reconnect the fusible link before going on
to the next damper test.
After successful completion of the testing of each damper on the project:
1.
Submit a certificate describing the testing method, that each damper was
demonstrated, and rating of each fusible link.
2.
Insert in the Owner's Manual.
SUBMITTALS
A.
Submit product data sheets on the dampers.
1.
Schedule of sizes and location.
B.
Submit schedule of fusible link ratings and location.
C.
Submit product data sheets on access doors.
15860 - 2 of 2
12010 - NISD - High School
SECTION 15880
AIR FILTERS
1.1
AIR FILTER GAUGES
A.
1.2
Install an air filter gauge as specified for each Air Handling Unit.
1.
Mount to take pressure differential across each filter bank.
2.
Locate so as to be easily read from 5'-6" eye level.
B.
Provide with range appropriate to the filter manufacturer's recommendation for
maximum pressure drop across the filter.
C.
Filter gauge shall be Dwyer Series 3000 Photohelic:
1.
Static pressure tips.
2.
Sensing tubing.
3.
Adjustable contacts for remote monitoring.
D.
Set alarm signal flag and auxiliary contacts as recommended for maximum
pressure drop "Dirty Filter" across the filter bank.
E.
Mount the filter gauge on a rigid structural bracket on the unit.
AIR FILTERS (FAN POWERED TERMINAL UNITS)
A.
The filter cells:
1.
Disposable media and frame 1" thick or as required by equipment.
2.
Coated with high flash point adhesive.
B.
Resistance to air flow of a clean filter not to exceed .12" W.G. at 300 FPM.
C.
UL listed Class II rated.
D.
Acceptable manufacturers:
1.
AAF.
2.
Farr.
3.
Continental.
15880 - 1 of 3
12010 - NISD - High School
1.3
MEDIUM EFFICIENCY AIR FILTERS (ALL AIR HANDLING UNITS)
A.
The filter cells:
1.
Pleated media.
2.
Disposable type.
3.
Contain not less than 4.6 square feet of filtering media per square foot of
face area.
4.
15 pleats per linear foot of filter
5.
Thickness:
a.
B.
Media of reinforced nonwoven cotton fabric treated with adhesive and
continuously laminated to a supporting steel wire grid conforming to the
configuration of the pleats.
1.
C.
Seal the media pack in a chipboard frame.
Rated average dust spot efficiency of not less than 36%.
1.
Average synthetic arrestance in excess of 93% when tested in
accordance with the ASHRAE 52-76 test standard.
D.
Filter capable of operating with variable face velocities up to 500 FPM without
impairing efficiency.
E.
Initial resistance to air flow:
1.
300 FPM - .08" W.G.
2.
500 FPM - .28" W.G.
F.
UL listed with Class II rating.
G.
Provide one spare set for Owner's use after the warranty period.
H.
Acceptable manufacturer:
1.
1.4
2" thick for units listed.
Farr 30/30.
SUBMITTALS
15880 - 2 of 3
12010 - NISD - High School
1.5
A.
Submit manufacturer's product data sheets and capacity information as
specified.
B.
Submit recommended "Dirty Filter" pressure drop.
INSTALLATION
A.
Install the filters and filter gauges in accordance with the manufacturer's
instructions.
15880 - 3 of 3
12010 - NISD - High School
SECTION 15900
AUTOMATION SYSTEMS GENERAL REQUIREMENTS AND
DIRECT-DIGITAL CONTROLS SYSTEM FOR HVAC
SECTION 15900 WILL BE ISSUED BY ADDENUM
15900 - 1 of 1
12010 - NISD - High School
SECTION 16010
BASIC ELECTRICAL REQUIREMENTS
1.1
CONTRACTOR'S QUALIFICATIONS
A.
B.
An approved contractor for the work under this division.
1.
A specialist in this field and have the personnel, experience, training, skill
and the organization to provide a practical working system.
2.
Be able to furnish evidence of having contracted for and installed not less
than three systems of comparable size and type to this one that have
served their Owners satisfactorily for not less than three years.
The Contractor shall employ a competent project superintendent for this work
with experience in installing not less than three such systems.
1.
1.2
1.3
The superintendent shall be in attendance at the project during the
performance of the work of this division.
RELATION WITH OTHER TRADES
A.
Carefully study all matters and conditions concerning the project. Submit
notification of conflict in ample time to prevent unwarranted changes in any work.
Review other divisions of these specifications to determine their requirements.
Extend electrical services and final connections to all items requiring same.
B.
Because of the complicated relationship of this work to the total project,
conscientiously study the relation and cooperate as necessary to accomplish the
full intent of the documents.
C.
Furnish sizes of required equipment pads. Furnish and locate bolts and fittings
required to be cast in them.
D.
Locate and size openings required for installation of work specified in this
division in sufficient time to prevent delay in the work.
E.
The responsibility for alignment of motor and driven equipment is specified in the
related division.
APPARATUS PROTECTION
A.
Take all precautions necessary to protect the work from damage during handling
and installation and until completion of construction. Failure to comply with the
above shall be sufficient cause for rejection of the work.
16010 - 1 of 5
12010 - NISD - High School
1.4
NOISE AND VIBRATION
A.
1.5
MATERIALS AND EQUIPMENT
A.
B.
1.6
Eliminate any abnormal noises which are not considered by the
Architect/Engineer to be an inherent part of the systems as designed. Abnormal
buzzing in equipment components will not be acceptable.
All materials or equipment furnished for this work:
1.
New and delivered in undamaged original crates.
2.
Plainly marked for identification.
3.
Quality as specified.
Do not paint or in any way cover any material or equipment until approved on
location.
FACTORY FINISH
A.
Factory assembled equipment except nonferrous or galvanized items and other
items specified or scheduled to have a specific finish:
1.
1.7
B.
Protect equipment from damage and defacement.
C.
Factory finish that becomes marred, stained or otherwise damaged: fully and
satisfactorily restored.
UTILITIES, LOCATIONS AND ELEVATIONS
A.
1.8
Delivered with a factory applied finish such as baked on machinery
enamel which does not require additional field painting.
Examine the site and verify the location and elevation of all utilities and of their
relation to the work.
DRAWINGS AND SPECIFICATIONS
A.
The electrical drawings:
1.
Are diagrammatic and shall be followed as closely as the actual
construction will permit.
2.
Are not intended to show complete and accurate location of switches,
outlets, panels, feeders, apparatus and appurtenances.
16010 - 2 of 5
12010 - NISD - High School
1.9
1.10
B.
Should any changes be required to make work specified in this division conform
to the project as it is constructed or to make it conform with the rules of the city
and municipal bodies having jurisdiction, submit request for directions before
proceeding with the work. All changes due to poor coordination made without
additional expense to the Owner.
C.
Exact locations of equipment and accessories in finished spaces:
1.
Determined by reference to specific details. When not specifically
shown, locations of items to be approved prior to installation. Relocation
before installation of up to 3 feet both vertically and horizontally from the
position indicated on the drawings may be directed without additional
cost.
2.
From architectural drawings.
3.
From other drawing series.
4.
From other divisions of the specifications.
PERMITS AND REGULATIONS
A.
Obtain all permits required.
B.
Conform to all federal, state and local ordinances and codes.
C.
Electrical work shall comply with applicable inspection services.
1.
Underwriter's Laboratories.
2.
National Fire Protection Association.
3.
Local Municipal Building Inspection Department.
D.
Where laws, codes or ordinances conflict with the specifications, then the laws,
codes or ordinances govern.
E.
In cases where the specifications exceed in quantity or quality of material or
labor, specifications shall be followed.
F.
In cases of conflict, submit request for direction before proceeding.
UTILITY SERVICE
A.
Provide all connections, wiring, outlets, sockets and lamps for temporary electric
power and lighting required during construction of the project.
16010 - 3 of 5
12010 - NISD - High School
B.
1.11
1.12
1.
Clean and repair damage caused by installation or use of temporary
work.
2.
Restore existing facilities used during construction to original condition.
Restore permanent facilities used during construction to specified
condition.
AVAILABLE SPACE
A.
Size and shape of physical spaces for equipment shown on drawings has been
designed in accordance with the types indicated and specified.
B.
Equipment shall:
1.
Be selected to fit properly into such spaces.
2.
Be arranged and positioned to permit access as required for
maintenance, servicing, removal or replacement of parts and/or whole
pieces of equipment.
3.
Be arranged and positioned to permit installation later of additional pieces
of equipment, of size and configuration similar to that installed in this
contract without rearrangement where construction documents indicate
requirement for such space for future items.
ELECTROLYSIS ISOLATION
A.
1.13
Remove temporary equipment, facilities and materials prior to Substantial
Completion.
Provide continuous neoprene strip to separate dissimilar metals that could come
into contact.
CONCRETE SLABS
A.
Provide equipment "housekeeping" pads and other structures as shown on the
drawings.
B.
Concrete pads:
1.
Minimum 4" thick.
2.
Chamfer strips at edges and corners of forms.
3.
Smooth steel trowel finish.
16010 - 4 of 5
12010 - NISD - High School
1.14
VANDAL RESISTANT DEVICES
A.
1.15
Where vandal resistant screws or bolts are employed on the project, deliver to
the Owner suitable tools for use with each type of fastener used.
MOTOR CONTROLS EXCEPTIONS
A.
Controllers for all motors are specified in this division.
B.
Exceptions:
1.
Motor controllers that are factory installed with the equipment are not
specified to be furnished in this division.
2.
Motor controllers that are specified in other divisions are not specified to
be furnished in this division.
16010 - 5 of 5
12010 - NISD - High School
SECTION 16011
SUPPORTS AND FASTENERS
1.1
1.2
GENERAL
A.
Use methods and devices recommended by the equipment manufacturer.
B.
Fasteners shall be compatible with the material into which they are applied.
C.
The supporting and attaching devices shall be approved by all applicable codes
and regulations.
QUALITY ASSURANCE
A.
1.3
Support systems shall be adequate for weight of equipment and conduit,
including wiring, which they carry.
SECURING AND SUPPORTING OF CONDUIT AND BOXES
A.
B.
C.
D.
Support conduit:
1.
At intervals not greater than 7 feet.
2.
Within three feet of bends, outlets and junction box.
3.
With channel support with conduit fittings on vertical runs.
Where a number of conduits are run exposed and parallel:
1.
Group and support by trapeze or unistrut hangers secured to structure.
2.
Fasten conduit to hanger with conduit clamps.
3.
Provide hanger with 25 percent spare capacity.
Hanger rods:
1.
Fastened to galvanized concrete inserts set flush with surface. Provide
reinforcing rod installed through opening in the concrete inserts.
2.
3/8" minimum diameter with machine threads.
Support outlet and junction boxes:
1.
Independently to surface on which conduit is run.
16011 - 1 of 3
12010 - NISD - High School
E.
1.4
2.
Rigidly to building structure.
3.
Conduit shall not be used for sole support of boxes.
Support individual conduit with approved anchor straps employing:
1.
Toggle bolts on hollow masonry.
2.
Expansion shields and machine screws or preset inserts on solid
masonry.
3.
Machine screws, bolts or welded studs on metal surfaces.
4.
Wood screws on a wood construction.
5.
Self-drilling anchors or power driven studs on concrete surfaces.
F.
Perforated strap is not approved as hanger material.
G.
For conduits exposed on the surface in damp locations, provide clamp backs
under each conduit clamp to prevent accumulation of moisture around conduits.
H.
Use electro-galvanized or cadmium plated steel bolts, threaded rods, nuts,
washers and screws.
SURFACE MOUNTED EQUIPMENT
A.
Install surface-mounted cabinets, boxes and panelboards with minimum of four
anchors.
1.
B.
1.5
Use fasteners suitable for the surface or structure and weight of device.
FLUSH MOUNTED EQUIPMENT
A.
1.6
Provide steel channel supports to stand cabinet one inch off wall.
Bridge studs top and bottom with channels to support flush-mounted cabinets
and panelboards in stud walls.
INSERTS
A.
Malleable iron case of galvanized steel shell and expander plug for threaded
connection with lateral adjustment, top slot for reinforcing rods, lugs for attaching
to forms. Size inserts to suit threaded hanger rods.
B.
Provide inserts for placement in concrete formwork.
16011 - 2 of 3
12010 - NISD - High School
1.7
C.
Provide inserts for suspending hangers from reinforced concrete slabs and sides
of reinforced concrete beams.
D.
Provide hooked rod to concrete reinforcement section for inserts carrying conduit
over 4".
E.
Where concrete slabs form finished ceiling, provide inserts to be flush with slab
surface.
F.
Where inserts are omitted, drill through concrete slab from below and provide
thru-bolt with recessed square steel plate and nut. Recess and grout flush with
slab.
SUPPORTS
A.
Construct supports of galvanized steel structural members.
1.
Cross section suitable for the load.
2.
Brace and fasten with flanges bolted to structure.
B.
Prime coat steel hangers and supports indoors; and supports located in crawl
spaces; pipe shafts; and suspended ceiling spaces.
C.
At outdoor locations, all supports, brackets and structural members shall be
hot-dipped galvanized.
16011 - 3 of 3
12010 - NISD - High School
SECTION 16014
TRENCHING AND BACKFILL
1.1
1.2
1.3
GENERAL
A.
Stake out routing of the excavation by actual field measurements. Obtain
approval of the Architect/Engineer/Owner before beginning trenching.
B.
Set required lines and levels.
C.
Maintain bench marks, monuments and other reference points.
D.
The drawings indicate all known information pertaining to surface and
subsurface obstructions. This information is not guaranteed.
UTILITIES
A.
Before starting excavation, establish location and extent of underground utilities
occurring in work area.
B.
Notify the related utility companies to remove and relocate lines which are in the
way of excavation.
C.
Maintain, reroute or extend as required existing utility lines which are to remain
and pass through work area.
D.
Protect utility services uncovered by excavation.
E.
Remove abandoned utility service lines from areas of excavation. Cap, plug or
seal such lines and identify at grade.
F.
Accurately locate and record abandoned and active utility lines rerouted or
extended on project record documents.
PROTECTION
A.
Protect excavations as required to prevent cave-in or loose soil from falling into
excavation.
B.
Notify Architect/Engineer of unexpected subsurface conditions and discontinue
work in affected area until notification to resume work.
C.
Grade excavation top perimeter to prevent surface water run-off into excavation.
16014 - 1 of 3
12010 - NISD - High School
1.4
1.5
1.6
1.7
D.
Keep surface materials approved for reuse separate from general excavation
material.
E.
Keep excavated material piled so that it will not endanger work or obstruct roads
and driveways. Keep drainage channels clear or provide other satisfactory
means for drainage.
F.
Prevent excavated soil from washing into adjacent storm drains, swales and
roads by installing barriers.
INSPECTION
A.
Verify stockpiled fill to be reused is approved.
B.
Verify areas to be backfilled are free of debris or water.
PREPARATION
A.
Identify required lines, levels, contours and datum.
B.
When necessary, compact subgrade surfaces to density requirements for backfill
material.
EXCAVATION
A.
Cut trenches sufficiently wide to enable installation of the work and allow
inspection.
B.
Remove lumped subsoil and rock.
C.
Correct unauthorized excavation at no cost to Owner.
D.
Fill over-excavated areas under conduit bearing surfaces in accordance with
directions by Architect/Engineer.
PLUGGING ENDS OF CONDUIT
A.
1.8
Before leaving the work for the night or at any time, the end of the conduit shall
be securely closed with a tight fitting plug.
BACKFILLING
A.
Backfill trench as soon as practical after completion of inspection and testing.
B.
Backfill systematically as early as possible to allow maximum time for natural
settlement. Do not backfill over porous, wet or spongy subgrade surfaces.
16014 - 2 of 3
12010 - NISD - High School
C.
1.9
Deposit select backfill of sand or dry friable soil in the trench simultaneously on
both sides of conduit for full width of the trench.
1.
In continuous layers not exceeding 6" loose depth.
2.
To an elevation of 12" above top of conduit.
3.
Thoroughly compact under and on each side of conduit to provide solid
backing against external surface of pipe.
4.
Compact fill to density of undisturbed trench side.
5.
Add backfill and continue to compact to maintain the 12" elevation.
D.
Place and compact common fill material in continuous layers not exceeding 8
inches.
E.
Maintain optimum moisture content of backfill materials to attain required
compaction density.
F.
Remove surplus backfill materials from site.
G.
Leave stockpile areas completely free of excess fill materials.
H.
Provide any deficiency in quantity of material for backfilling trenches or for filling
depressions caused by settlement.
UNSUITABLE CONDITIONS FOR CONDUIT OR DIRECT BURIAL CABLE LAYING
A.
Lay no work in water or when trench conditions or weather are unsuitable for
such work.
16014 - 3 of 3
12010 - NISD - High School
SECTION 16015
ELECTRICAL ALTERATION PROJECT PROCEDURES
1.1
1.2
EXISTING MATERIAL AND EQUIPMENT
A.
All existing material and equipment indicated on the drawings or in the
specifications to be reused shall be thoroughly cleaned and reconditioned before
installation and reuse in the modified system.
B.
All material or equipment removed which is not to be salvaged for Owner's use
or for reuse on the project shall:
1.
Become the property of the contractor.
2.
Be promptly removed from the site.
C.
Material or equipment salvaged for Owner's use shall be carefully handled and
stored where directed by the Owner.
D.
All material and equipment not indicated to be removed shall be re-connected to
the systems.
DEMOLITION AND EXTENSION OF EXISTING ELECTRICAL WORK
A.
Demolish and extend existing electrical work under provisions of this section.
B.
Provide temporary wiring and connections to maintain existing systems in service
during construction. When work must be performed on energized equipment or
circuits, use personnel experienced in such operations.
C.
Remove, relocate and extend existing installations to accommodate new
construction.
D.
Remove abandoned wiring to source of supply.
E.
Remove exposed abandoned conduit, including abandoned conduit above
accessible ceiling finishes.
F.
Disconnect abandoned outlets and remove devices.
1.
Remove abandoned outlets if conduit servicing them is abandoned and
removed.
2.
Provide blank cover for abandoned outlets which are not removed.
16015 - 1 of 4
12010 - NISD - High School
1.3
G.
Disconnect and remove abandoned panelboards and distribution equipment.
H.
Disconnect and remove electrical devices and equipment serving utilitization
equipment that has been removed.
I.
Disconnect and remove abandoned luminaires. Remove brackets, stems,
hangers and other accessories.
PROJECT/SITE CONDITIONS
A.
Install the work as shown on the drawings, unless prevented by project
conditions.
B.
Prepare drawings showing proposed rearrangement of the work to meet project
conditions, including changes to work specified in other sections.
1.
1.4
SEQUENCE AND SCHEDULING
A.
Refer to other drawings series for work in remodeled areas.
1.
Where facilities in these areas are required to remain in service, any
related work required to keep these facilities in operation is specified in
this division.
B.
Verify that abandoned wiring and equipment serve only abandoned facilities.
C.
Remove and/or relocate existing lights, switches and devices as occasioned by
new or remodeled construction.
1.
D.
E.
1.5
Obtain permission of the Architect/Engineer before proceeding.
Reestablish service to all lights, switches and devices that may be
interrupted by remodeled construction.
Where new/existing luminaires or devices are shown being connected to existing
circuits:
1.
Verify existing system voltage.
2.
Provide ballast/device to match system voltage.
Verify the loading of each circuit affected by remodeling work. The maximum
load of any branch circuit may not exceed 80% of its rating.
PROTECTION OF THE WORK
16015 - 2 of 4
12010 - NISD - High School
1.6
A.
Provide adequate temporary support and auxiliary structure as necessary to
assure structural value or integrity of affected portion of work.
B.
Provide devices and methods to protect other portions of the project from
damage.
C.
Execute fitting and adjustment of products to provide a finished installation to
comply with specified products, functions, tolerances and finishes.
D.
Maintain access to existing electrical installations which remain active. Modify
installation or provide access panel as appropriate.
LUMINAIRES
A.
1.7
Every luminaire that is taken down for the alteration procedure and then
reinstalled:
1.
Use mild detergent to clean all exterior and interior surfaces; rinse with
clean water and wipe dry.
2.
Provide new lamps and ballasts in all luminaires that are to be reused.
Replace broken or damaged parts.
3.
Touch up scratched or abraded areas with matching paint.
PANELBOARDS AND EQUIPMENT ENCLOSURES
A.
Check tightness of electrical connections.
1.
1.8
Provide closure plates for vacant positions.
B.
Provide typed circuit directory showing revised circuiting arrangement.
C.
Maintain access to existing electrical installations which remain active. Modify
installation or provide access panel as appropriate.
MATCHING EXISTING ELEMENTS
A.
All materials, equipment and components of the new work in the same area with
existing work; and exposed to common view with existing work; shall exactly
match in appearance the existing materials, equipment and components.
B.
Discrepancies between drawings and specification references for the new work
and the actual existing materials, equipment and components shall be resolved
prior to the submission of shop drawings.
16015 - 3 of 4
12010 - NISD - High School
C.
If the proposed material, equipment or component for the new work is not an
exact match, a full size sample may be required for approval.
1.
1.9
Submit requests for additional directions on this subject from the
Architect/Engineer.
SITE SURVEY AND SYSTEM VERIFICATION
A.
Make a field survey of the existing mechanical and electrical systems and
general construction in the area of the work. Verify:
1.
Conduit clearances with respect to existing general construction,
ductwork and piped services.
2.
Existing circuits that are to remain in service.
3.
Abandoned wiring and equipment serve only abandoned facilities.
4.
Other information required to construct the project.
B.
Demolition is based on casual field observation and existing documents. Report
discrepancies to Architect/Engineer before disturbing existing installation.
C.
Coordinate installation of electrical work and equipment with other trades, prior to
installation, to prevent construction conflicts.
1.
Relocation of conflicting electrical elements, in the area of the work, is
specified to be provided in the related section of the work.
D.
Relocate conduit in the area of the work, for other systems requiring precedence.
E.
Use this information to prepare shop drawings.
16015 - 4 of 4
12010 - NISD - High School
SECTION 16021
IDENTIFICATION
1.1
1.2
SECTION INCLUDES
A.
Nameplates and labels.
B.
Wire and cable markers.
C.
Conduit markers.
REFERENCES
A.
1.3
GENERAL
A.
1.4
ANSI/NFPA 70 - National Electrical Code.
Provide permanent identifying nameplates for all connected electrical equipment.
1.
Switches and starters identified by the load served.
2.
Transformers identified by the scheduled identification and the load
served.
3.
Switchboard and panels identified by the scheduled identification.
4.
Equipment cabinets identified by duty.
5.
Junction box covers identifying panel and circuit.
B.
Show voltage and phase for all equipment.
C.
Provide permanent identification of all wiring.
D.
Prepare the legend on all nameplates and tags to correspond to the identification
shown on the operating instructions, the record drawings and the panelboard
directory of circuits.
NAMEPLATES AND LABELS
A.
Fabricated of laminated engraved plastic, or etched, engraved corrosion
resistant metal.
B.
Secured to equipment with escutcheon pins, self-tapping or machine screws, or
approved adhesive that is removable only by mechanical means.
16021 - 1 of 3
12010 - NISD - High School
1.5
C.
Have primary lettering 1/4" high and secondary lettering 1/8" high.
D.
Secure nameplate to front panel on surface mounted equipment.
E.
Secure nameplate to inside of door on panelboard that is recessed in finished
locations.
WIRE AND CABLE MARKERS
A.
Fabricate of waterproof tape printed, wrap-around, self-adhesive or tubing type
wire markers.
1.
1.6
CONDUIT MARKERS
A.
Fabricate of wrap-around self-adhesive type conduit marker with printed legend.
1.
1.7
Mark circuit identification with indelible ink in dedicated space on marker.
SPECIFIED WIRE AND CABLE MARKERS
A.
B.
1.8
Protect printing by clear permanent overcoat.
Identify each wire and/or cable in conduit including pull wires:
1.
Where wires and/or cables are interrupted or pass through junction
boxes.
2.
Where wires and/or cables are terminated in panels, boxes, outlets,
equipment.
3.
In pull boxes.
Show circuit number and panel identification.
SPECIFIED CONDUIT MARKERS
A.
Identify each accessible conduit leaving a panelboard.
1.
B.
Identify circuit number.
Identify feeder conduit by voltage and panel designation.
1.
Spacing: 20 feet on centers.
2.
Location: mark each conduit longer than 10 feet.
3.
Provide markers on all accessible conduit.
16021 - 2 of 3
12010 - NISD - High School
C.
Identify auxiliary conduit systems and spare empty conduit systems by duty and
panel designation.
1.
Spacing: 20 feet on centers.
2.
Location: mark each conduit longer than 10 feet.
3.
Provide markers on all accessible conduit.
16021 - 3 of 3
12010 - NISD - High School
SECTION 16022
CORRECTIONS DURING THE WARRANTY PERIOD
1.1
GENERAL
A.
The guarantee and warranty period is for 12 months after Substantial
Completion of the project.
1.
B.
The Owner will notify the contractor of any failure or observed defects in the
system during this period.
C.
Corrections to the work during this period and during regular working hours shall
be at no cost to the Owner.
1.
1.2
Refer to the related sections for extended warranty and guarantee
periods.
Response time shall be no longer than the day following the call from the
Owner.
D.
Emergency service shall be available to the Owner on a 24 hour every day basis
during this period.
E.
Overtime work, if requested by the Owner, will be reimbursed at the difference
between regular and premium labor at the contractor's current standard hourly
billing rate for contract customers.
PROCEDURES
A.
Prior to commencing corrections during the warranty period, determine from the
Owner any special requirements required to conform to his established policy for
work on his premises.
B.
When the service technician arrives at the project to perform the corrective work,
notify the Owner's authorized representative.
C.
Upon completion of the corrective work, file a signed copy of the service report
with:
1.
The Owner's authorized representative.
2.
The Architect/Engineer.
3.
If the corrective work requires more than one day to complete, notify the
Owner and give an estimate of the completion date.
16022 - 1 of 2
12010 - NISD - High School
1.3
RECORDS
A.
Two weeks prior to the completion of the one year warranty period, deliver to the
Engineer a bound copy of all service reports generated during the period.
B.
Provide a narrative of any special events.
16022 - 2 of 2
12010 - NISD - High School
SECTION 16023
ROUTINE MAINTENANCE DURING THE WARRANTY PERIOD
1.1
GENERAL
A.
During the warranty period, provide normal maintenance service as
recommended by the manufacturer.
1.
B.
C.
Maintenance shall include but is not limited to:
1.
Replace defective lamps on a monthly basis.
2.
Replace defective ballasts on a monthly basis.
Make inspections not less than once each two months:
1.
1.2
At no additional cost to the Owner.
File a copy of each inspection report with the Owner.
PROCEDURES
A.
Refer to Section 16022 for routine procedures concerning service technician's
visits to the project during the warranty period.
16023 - 1 of 1
12010 - NISD - High School
SECTION 16024
INSTRUCTION OF OWNER'S PERSONNEL
1.1
1.2
GENERAL
A.
Before final inspection, conduct an on-site training program to instruct the
Owner's operating personnel in the operation and maintenance of the electrical
systems.
B.
Provide the training during the Owner's regular working day.
C.
The instructors shall be experienced in their phase of operation and maintenance
of the building electrical systems and with the project.
D.
The Owner will provide a list of personnel to receive instructions and will
coordinate their attendance at the agreed upon times.
E.
Use the Operation and Maintenance Manuals as the basis of instruction. Review
contents of manual with personnel in detail to explain all aspects of operation
and maintenance.
F.
Demonstrate start-up, operation, control, adjustment, trouble-shooting, servicing,
maintenance and shutdown of each item of equipment.
G.
Demonstrate equipment functions (both individually and as part of the total
integrated system).
H.
Prepare and insert additional data in Operation and Maintenance Manuals when
need for additional data becomes apparent during instructions.
I.
For equipment or systems requiring specific seasonal operation, perform
instructions for other seasons within six months.
PROGRAM SYLLABUS
A.
Submit the proposed program syllabus 30 days prior to the requested date to
commence training.
1.
Time and dates for each session.
2.
Subjects.
3.
Instructors.
4.
Other pertinent information.
16024 - 1 of 2
B.
1.3
MINIMUM INSTRUCTIONAL TIME
A.
1.4
As a minimum, allocate (8) total hours of dedicated instructor time.
RELATED SECTIONS
A.
1.5
Submit one copy to the Owner and one copy to the Architect/Engineer for review
and approval.
Refer to other sections of the specifications for additional training and
instructional periods specified there.
CERTIFICATES AND REPORTS
A.
B.
C.
Submit a report within one week after completion of the on-site training program
that instructions have been satisfactorily completed. Give time and date of each
demonstration.
1.
Hours devoted to the demonstration.
2.
List of persons present.
At the conclusion of the on-site training program, have the person designated by
the Owner sign a certificate to verify:
1.
He has a proper understanding of the system.
2.
The demonstrations and instructions have satisfactorily completed.
3.
The scope and content of the Operation and Maintenance Manuals used
for the training program are satisfactory.
Include the report and the certificate in an appropriately tabbed section of each
manual.
16024 - 2 of 2
12010 - NISD - High School
SECTION 16025
OPERATION AND MAINTENANCE MANUALS
1.1
REQUIREMENTS INCLUDED
A.
Compile product data and related information appropriate for Owner's
maintenance and operation of products and systems furnished under Contract.
1.
B.
1.2
Deliver three copies of complete manual in final form.
FORM FOR MANUALS
A.
1.3
Prepare operation and maintenance data as specified in this section and
as referenced in other pertinent sections of specifications.
Prepare data in form of an instructional manual for use by Owner's personnel.
FORMAT FOR MANUALS
A.
Size: 8-1/2 in. x 11 in.
B.
Paper: 20 pound minimum, white, for typed pages.
C.
Text: manufacturer's printed data or neatly typewritten.
D.
Drawings:
E.
1.
Provide reinforced punched binder tab and bind in text.
2.
Fold larger drawings to size of text pages.
Internally subdivide the manual contents with permanent page dividers, logically
organized.
1.
Index tab titling clearly printed under reinforced laminated plastic tabs.
2.
Indexed tabs for each separate product or each piece of operating
equipment or each operating system.
F.
Provide typed description of products and major component parts of equipment.
G.
Where appropriate, submit documentation for large sub-systems and reports in
an individual binder.
1.
Annotated and internally subdivided as specified.
16025 - 1 of 6
12010 - NISD - High School
1.4
1.5
BINDERS
A.
Commercial quality "D-ring" binders (three rings) with hard back and cleanable
plastic covers.
B.
Minimum ring size: 2 inch.
C.
When multiple binders are used, correlate the data into related consistent
groupings.
COVER
A.
B.
1.6
Identify each volume with typed or printed title "OPERATION AND
MAINTENANCE INSTRUCTIONS".
1.
Title of Project.
2.
Identify separate structures as applicable.
3.
Identify subject matter covered in each manual when multiple binders are
required.
Print identifying information on the front cover and spine.
CONTENT OF MANUALS
A.
Title sheet for each volume.
1.
Title of Project.
2.
Names, addresses and telephone numbers of Architect/Engineer;
subconsultants; Contractor and subcontractor with name, address and
telephone number of responsible parties.
B.
Table of Contents for each volume arranged in systematic order.
C.
For each product or system, list names, addresses and telephone numbers of
subcontractors and suppliers, including local source of supplies and replacement
parts.
D.
Product data:
1.
Include only those sheets which are pertinent to the specific product.
2.
Annotate each sheet to clearly identify specific project or part installed.
16025 - 2 of 6
12010 - NISD - High School
E.
1.7
3.
Identify each product by product name and other identifying symbols as
set forth in the Contract Documents.
4.
Delete references to inapplicable information.
Drawings:
1.
Supplement product data to illustrate relations of component parts of
equipment and systems, to show controls and flow diagrams.
2.
Coordinate drawings with information in Project Record Documents to
assure correct illustration of completed installation.
3.
Do not use Project Record Documents as maintenance drawings.
F.
Type text as required to supplement product data. Provide logical sequence of
instructions for each procedure, incorporating manufacturer's instructions.
G.
Warranties, reports, certificates, forms and other documents.
1.
Original copy of each warranty.
2.
Copy of the tests and reports specified in the related individual
specification section.
3.
Original copy of each certificate, report and receipt bearing signatures
and Notary Seal as appropriate.
MANUAL FOR EQUIPMENT AND SYSTEMS
A.
Content for each electric and electronic system as appropriate:
1.
2.
Description of system and component parts.
a.
Function, normal operating characteristics and limiting conditions.
b.
Performance curves, engineering data and tests.
c.
Complete nomenclature and commercial number of replaceable
parts.
Copies of typed circuit directories of panelboards reflecting load served
and room numbers and names.
a.
3.
Electrical service.
As-installed color coded wiring diagrams.
16025 - 3 of 6
12010 - NISD - High School
4.
5.
B.
Operating procedures:
a.
Routing and normal operating instructions.
b.
Sequences required.
c.
Special operating instructions.
Maintenance procedures:
a.
Routine operations.
b.
Guide to "trouble-shooting".
c.
Disassembly, repair and reassembly.
d.
Alignment, adjusting and checking.
e.
Routine service based on operating hours.
6.
Servicing schedules.
7.
Manufacturer's printed operating and maintenance instructions.
8.
Description of sequence of operation of systems by manufacturer.
9.
Original manufacturer's parts list, illustrations, assembly drawings and
diagrams required for maintenance.
a.
Predicated life of parts subject to wear.
b.
Items recommended to be stocked as spare parts.
10.
Complete equipment internal wiring diagrams.
11.
Warranties, reports, certificates, forms and other documents as issued in
the list published by the Architect/Engineer.
12.
Each Contractor's coordination drawings.
13.
Other data as required under pertinent sections of the specifications.
Prepare and include additional data when the need for such data becomes
apparent during instruction of Owner's personnel.
16025 - 4 of 6
12010 - NISD - High School
1.8
C.
Additional requirements for operation and maintenance data: respective
sections of specifications.
D.
Complete information for all products as issued in the list published by the
Architect/Engineer.
OPERATION AND MAINTENANCE MANUAL SUBMISSION SCHEDULE
A.
At least [30] days prior to the date of Substantial Completion, submit the
Operation and Maintenance Manuals to the Architect/Engineer. The copy shall
be complete.
B.
Minimum documentation for this submission:
C.
D.
1.
Table of contents for each binder.
2.
Contractor information.
3.
All parts and maintenance manuals for items of equipment.
4.
Warranties (without starting dates).
5.
Certifications that have been completed. Submit forms and outlines of
certifications that have not been completed.
6.
Operating and maintenance procedures.
7.
Form of Owner's Training Program Syllabus.
8.
Control operations/equipment wiring diagrams.
9.
Coordination drawings.
10.
Schedules of operating, maintenance and repair parts and components.
11.
Other required operation and maintenance submittals that are complete.
Include in this initial submittal, all shop drawings, coordination drawings and
product data required for the project under Division 16.
1.
Bear the Contractor's stamp of approval.
2.
If reviewed by the Architect/Engineer, bear the Architect/Engineer's
stamp with an appropriate level of approval annotated thereon.
Written response will be provided to the Contractor with comments for the
required corrections.
16025 - 5 of 6
12010 - NISD - High School
E.
The Contractor will be notified of missing, omitted or incomplete materials. The
Manuals shall be reworked by the Contractor, as required.
F.
Deliver two finally complete Manuals to the Architect/Engineer for delivery to the
Owner.
G.
Deliver one finally complete Manual to the Engineer.
16025 - 6 of 6
12010 - NISD - High School
SECTION 16026
CONTRACT QUALITY CONTROL
1.1
1.2
REQUIREMENTS INCLUDED
A.
General Quality Control.
B.
Workmanship.
C.
Manufacturer's Instructions.
D.
Manufacturer's Certificates.
E.
Manufacturer's Field Services.
F.
Mockups.
QUALITY CONTROL PROGRAM
A.
1.3
1.4
1.5
Maintain quality control over supervision, subcontractors, suppliers,
manufacturers, products, services, site conditions and workmanship to produce
work in accordance with the Contract Documents.
WORKMANSHIP
A.
Comply with industry standards except when more restrictive tolerances or
specified requirements indicate more rigid standards or more precise
workmanship.
B.
Perform work by persons qualified to produce workmanship of specified quality.
C.
Secure products in place with positive anchorage devices designed and sized to
withstand stresses, vibration and racking.
D.
Provide finishes to match approved samples.
MANUFACTURER'S INSTRUCTIONS
A.
Comply with instructions in full detail, including each step in sequence.
B.
Should instruction conflict with Contract Documents, request clarification from
Architect/Engineer before proceeding.
MANUFACTURER'S CERTIFICATES
16026 - 1 of 2
12010 - NISD - High School
A.
1.6
1.7
When required in individual specification sections, submit manufacturer's
certificate, in duplicate, certifying that products meet or exceed specified
requirements, executed by responsible officer.
MANUFACTURER'S FIELD SERVICES
A.
When required in individual specification sections, require manufacturer to
provide qualified personnel to observe field conditions; condition of installation;
quality of workmanship; start-up of equipment; test, adjust and balance of
equipment.
B.
Representative shall make written report of observations and recommendations
to Architect/Engineer.
MOCK UPS
A.
Assemble and erect the specified equipment and products complete, with
specified anchorage and support devices, seals and finishes.
B.
Do not proceed with any work involving a mock up until the related mock up has
been approved in writing.
C.
Submit color photographs of each approved mock up in each phase.
D.
1.
Minimum four views.
2.
Minimum size, 3 x 5 inch.
Acceptable mock ups in place may be retained in the completed work.
1.
E.
1.8
Refer to Section 15026 for mechanical items.
Perform tests and submit results as specified.
SCHEDULING OF MOCK UPS
A.
Schedule demonstration and observation of mock ups, in phases, with
Architect/Engineer.
1.
Rough-in.
2.
Finish with all appurtenances in place.
3.
Demonstrations.
16026 - 2 of 2
12010 - NISD - High School
SECTION 16028
CLEANING
1.1
1.2
1.3
1.4
GENERAL
A.
Execute cleaning during progress of the work and at completion of the work as
required by General Conditions.
B.
Conduct cleaning and disposal operations to comply with codes, ordinances,
regulations and anti-pollution laws.
MATERIALS
A.
Use only those cleaning materials which will not create hazards to health or
property and which will not damage surfaces.
B.
Use only those cleaning materials and methods suitable for or recommended by
the manufacturer of the surface material to be cleaned.
C.
Use cleaning materials only on surfaces recommended by cleaning material
manufacturer.
DURING CONSTRUCTION
A.
Execute periodic cleaning to keep the work, the site and adjacent properties free
from accumulations of waste materials, rubbish and windblown debris resulting
from construction operations.
B.
Provide on-site containers for the collection of waste materials, debris and
rubbish.
C.
Remove waste materials, debris and rubbish from the site periodically and
dispose of at legal disposal areas away from the site.
FINAL CLEANING
A.
Employ skilled workmen for final cleaning.
B.
Remove grease, mastic, adhesives, dust, dirt, stains, fingerprints, labels and
other foreign materials from sight-exposed surfaces of equipment and
luminaires.
C.
Touch up damage to painted surfaces using only manufacturer's supplied
touch-up paint.
16028 -1 of 1
12010 - NISD - High School
SECTION 16030
TESTING OF ELECTRICAL SYSTEM
1.1
GENERAL
A.
Provide an electrical testing technician to make tests and evaluations to
determine that the electrical system is installed and adjusted for successful
energization and operation.
B.
The testing technicians shall be trained and experienced in the testing they
conduct.
C.
Testing equipment shall be in good working order and comply with the
requirements of the applicable industry standards.
D.
The testing technician shall utilize comprehensive report forms to document
appraisal and test results.
E.
F.
1.2
1.
Upon completion of the work, the report forms shall be signed by the
technician and included in the final report.
2.
Report forms shall identify equipment by model number. Sample forms
shall be submitted for Architect/Engineer review prior to commencing
work.
Testing shall be done in accordance with:
1.
Manufacturer's printed testing procedures.
2.
ANSI Standards
3.
NEMA Standards.
Coordinate with special tests and equipment start up specified in the related
section.
TESTS
A.
Tests shall be complete and results approved before final inspection is begun.
B.
Each complete device connected shall test free from short circuits and grounds
and have an insulation resistance between conductors and ground, based on
maximum load, not less than required by the latest edition of the National
Electrical Code.
16030 - 1 of 2
12010 - NISD - High School
C.
Test the ground of the electrical neutral. Ground resistance shall not exceed 10
ohms.
D.
Test feeder cables 1/0 and larger with a 1000 volt dc megger. Insulation
resistance shall be not less than 25 megohms.
E.
Test the equipment grounds for each feeder. Ground resistance shall not
exceed 25 ohms.
F.
Test the ground for each transformer. Ground resistance shall not exceed 25
ohms.
G.
Test ground fault protection system.
H.
1.
Tests made by factory authorized technician.
2.
Document as specified in N.E.C.
Furnish record of inspections made and test data. List date, time, weather
conditions, field conditions, test data, instruments used and brief description of
all tests.
1.
I.
Indicate conformance with specifications.
Test reports shall be bound in the Operation and Maintenance Manuals.
16030 - 2 of 2
12010 - NISD - High School
SECTION 16040
SHOP DRAWINGS, COORDINATION DRAWINGS & PRODUCT DATA
1.1
GENERAL
A.
Prepare submittal as required by the Contract Documents.
B.
The term submittal, as used herein, refers to all:
C.
D.
1.2
1.
Shop drawings.
2.
Coordination drawings.
3.
Product data.
Submittals shall be prepared and produced for:
1.
Distribution as specified.
2.
Inclusion in the Operation and Maintenance Manuals, as specified, in the
related section.
Certain of the submittals will be identified as specified for review by the
Architect/Engineer.
SHOP DRAWINGS
A.
Present drawings in a clear and thorough manner.
1.
1.3
Identify details by reference to sheet and detail, schedule or room
numbers shown on Contract Drawings.
B.
Show all dimensions of each item of equipment on a single composite shop
drawing. Do not submit a series of drawings of components.
C.
Identify field dimensions; show relation to adjacent or critical features or work or
products.
MOTOR STARTER COORDINATION SUBMITTAL
A.
The motor starter schedule on the drawings is for bidding purposes only.
B.
Prepare and submit a motor starter schedule showing:
1.
Motor HP size, speed and winding type for each piece of equipment
16040 - 1 of 8
12010 - NISD - High School
actually being furnished. Coordinate with the work specified in the
related division.
C.
1.4
2.
Motor starter type, voltage, phase and size.
3.
Motor starter accessories.
4.
Running overcurrent protection size.
5.
Required conduit and conductor size and quantities.
6.
Method of operational control and divisional responsibility.
Use this information for:
1.
Switchgear, starters, motor control centers and other apparatus selection.
2.
Actual construction.
D.
Collect motor/starter coordination information from the divisional contractors for
the related equipment actually being furnished.
E.
Submit schedule prior to site rough-ins and ordering equipment.
ELECTRICAL CONNECTION SUBMITTAL
A.
Prepare and submit a schedule identifying all equipment requiring an electrical
connection.
B.
The schedule shall indicate electrical requirements for each piece of equipment
specified or shown on the drawings requiring an electrical connection.
C.
Minimum scheduled information shall be:
1.
Ampacity, voltage, phase for power and/or control circuits.
2.
Motor starter and/or disconnect size.
3.
Overcurrent protection type and size.
4.
Conduit/conductors type and size.
5.
Number of connection points for power and/or control circuits.
6.
Method of operational control and divisional responsibility.
16040 - 2 of 8
12010 - NISD - High School
1.5
D.
Collect electrical connection information from divisional contractor for the related
equipment actually being furnished.
E.
Submit schedule prior to sizing rough-ins and ordering equipment.
COORDINATION DRAWINGS
A.
Present in a clear and thorough manner. Title each drawing with project name.
Identify each element of drawings by reference to sheet number and detail or
room number of Contract Documents.
1.
B.
Prepare coordination drawings to coordinate installations for efficient use of
available space, for proper sequence of installation and to resolve conflicts.
1.
C.
Minimum drawing scale: 1/4"=1'-0".
Coordinate with work specified in other sections and other divisions of the
specifications.
For each room containing electrical switchgear and for each outside equipment
pad with electrical switchgear and equipment, submit plan and elevation
drawings. Show:
1.
Actual electrical switchgear, equipment and components to be furnished.
2.
Service clearance.
3.
Relationship to other equipment and components in the room.
D.
Identify field dimensions. Show relation to adjacent or critical features or work or
products.
E.
Verify location of wiring devices, telephone outlets and other work specified in
this division.
F.
1.
Coordinate with drawing details, site conditions and millwork shop
drawings prior to installation.
2.
Where required for clarification, submit shop drawings prior to rough-in
and fabrication.
Submit shop drawings in plan, elevation and sections, showing receptacles and
outlets, and other electrical devices in casework, cabinetwork and built in
furniture.
1.
Coordinate with millwork shop drawings.
16040 - 3 of 8
12010 - NISD - High School
G.
Related requirements:
1.
1.6
1.7
PRODUCT DATA
A.
Submit only pages which are pertinent.
B.
Mark each copy of standard printed data to identify pertinent products,
referenced to specification section and article number.
C.
Show reference standards, performance characteristics and capacities; wiring
diagrams and controls; component parts; finishes; dimensions and required
clearances.
D.
Modify manufacturer's standard schematic drawings and diagrams to
supplement standard information and to provide information specifically
applicable to the work. Delete information not applicable.
MANUFACTURER'S INSTRUCTIONS
A.
1.8
Coordination drawings specified in Division 15.
Submit manufacturer's instructions for storage, preparation, assembly,
installation, start-up, adjusting, calibrating and finishing.
CONTRACTOR RESPONSIBILITIES
A.
Review submittals prior to transmittal.
B.
Determine and verify:
1.
Field measurements.
2.
Field construction criteria.
3.
Manufacturer's catalog numbers.
4.
Conformance with requirements of Contract Documents.
C.
Coordinate submittals with requirements of the work and of the Contract
Documents.
D.
Notify the Architect/Engineer in writing at time of submission of any deviations in
the submittals from requirements of the Contract Documents.
E.
Do not fabricate products, or begin work for which submittals are specified, until
such submittals have been produced and bear Contractor's stamp.
16040 - 4 of 8
12010 - NISD - High School
1.
F.
Contractor's responsibility for errors and omissions in submittals is not relieved
whether Architect/Engineer reviews submittals or not.
G.
Contractor's responsibility for deviations in submittals from requirements of
Contract Documents is not relieved whether Architect/Engineer reviews
submittals or not, unless Architect/Engineer gives written acceptance of the
specific deviations on reviewed documents.
H.
Submittals shall show sufficient data to indicate complete compliance with
Contract Documents:
I.
1.9
Do not fabricate products or begin work scheduled to have submittals
reviewed, until return of reviewed submittals with Architect/Engineer's
acceptance.
1.
Proper sizes and capacities.
2.
That the item will fit in the available space in a manner that will allow
proper service.
3.
Where located outdoors, will not infringe upon sight lines.
4.
Construction methods, materials and finishes.
Schedule submissions at least 15 days before date reviewed submittals will be
needed.
SUBMISSION REQUIREMENTS
A.
Make submittals promptly in accordance with approved schedule and in such
sequence as to cause no delay in the work or in the work of any other
Contractor.
B.
Number of submittals required:
C.
1.
Shop drawings and coordination drawings: submit one reproducible
transparency and one opaque reproduction.
2.
Product data: submit the number of copies which the contractor requires,
plus two which will be retained by the Architect/Engineer.
Accompany submittals with transmittal letter, in duplicate, containing:
1.
Date.
2.
Project title and number.
16040 - 5 of 8
12010 - NISD - High School
D.
E.
3.
Contractor's name and address.
4.
The number of each shop drawing and project datum.
5.
Other pertinent data.
Submittals shall include:
1.
The date of submission.
2.
The project title and number.
3.
Contract identification.
4.
The names of:
a.
Contractor.
b.
Subcontractor.
c.
Supplier.
d.
Manufacturer.
5.
Identification of the product.
6.
Field dimensions, clearly identified as such.
7.
Relation to adjacent or critical features of the work or materials.
8.
Applicable standards, such as ASTM or federal specifications numbers.
9.
Identification of deviations from Contract Documents.
10.
Suitable blank space for Contractor and Engineer stamps.
11.
Contractor's signed and dated Stamp of Approval.
Coordinate submittals into logical groupings to facilitate interrelation of the
several items.
1.
Finishes which involve Architect/Engineer selection of colors, textures or
patterns.
2.
Associated items which require correlation for efficient function or for
installation.
16040 - 6 of 8
12010 - NISD - High School
1.10
SUBMITTAL SPECIFICATION INFORMATION
A.
B.
Every submittal document shall bear the following information as used in the
Project Manual:
1.
The related specification section number.
2.
The exact specification section title.
Submittals delivered to the Architect/Engineer without the specified information
will not be processed.
1.
1.11
RESUBMISSION REQUIREMENTS
A.
B.
1.12
The Contractor shall bear the risk of all delays, as if no submittal had
been delivered.
Make resubmittals under procedures specified for initial submittals.
1.
Indicate that the document or sample is a resubmittal.
2.
Identify changes made since previous submittals.
Indicate any changes which have been made other than those requested by the
Architect/Engineer.
CONTRACTOR'S STAMP OF APPROVAL
A.
Contractor shall stamp and sign each document certifying to the review of
products, field measurements and field construction criteria, and coordination of
the information within the submittal with requirements of the work and of
Contract Documents.
B.
Contractor's stamp of approval on any submittal shall constitute a representation
to Owner and Architect/Engineer that Contractor has either determined and
verified all quantities, dimensions, field construction criteria, materials, catalog
numbers and similar data or assumes full responsibility for doing so, and that
Contractor has reviewed or coordinated each submittal with the requirements of
the work and the Contract Documents.
C.
Do not deliver any submittals to the Architect/Engineer that do not bear the
Contractor's stamp of approval and signature.
D.
Submittals delivered to the Architect/Engineer without Contractor's stamp of
approval and signature will not be processed.
1.
The Contractor shall bear the risk of all delays, as if no submittal had
16040 - 7 of 8
12010 - NISD - High School
been delivered.
1.13
ARCHITECT/ENGINEER REVIEW OF IDENTIFIED SUBMITTALS
A.
1.
Review identified submittals with reasonable promptness and in
accordance with schedule.
2.
Affix stamp and initials or signature and indicate requirements for
resubmittal or approval of submittal.
3.
Return submittals to Contractor for distribution or for resubmission.
B.
Review and approval of submittals will not extend to design data reflected in
submittals which is peculiarly within the special expertise of the Contractor or any
party dealing directly with the Contractor.
C.
Architect/Engineer's review and approval is only for conformance with the design
concept of the project and for compliance with the information given in the
contract.
D.
1.14
The Architect/Engineer will:
1.
The review shall not extend to means, methods, sequences, techniques
or procedures of construction or to safety precautions or programs
incident thereto.
2.
The review shall not extend to review of quantities, dimensions, weights
or gauges, fabrication processes or coordination with the work of other
trades.
The review and approval of a separate item as such will not indicate approval of
the assembly in which the item functions.
SUBSTITUTIONS
A.
Do not make requests for substitution employing the procedures of this section.
B.
The procedure for making a formal request for substitution is specified in the
Conditions of the Contract.
16040 - 8 of 8
12010 - NISD - High School
SECTION 16041
PROJECT RECORD DOCUMENTS
1.1
REQUIREMENTS INCLUDED
A.
1.2
Maintain at the site for review by the Architect/Engineer and the Owner one
record copy of:
1.
Drawings.
2.
Specifications.
3.
Addenda.
4.
Change orders and other modifications to the contract.
5.
Field orders or written instructions.
6.
Approved shop drawings and product data.
7.
Field test records.
MAINTENANCE OF DOCUMENTS
A.
Store documents apart from documents used for construction.
B.
Maintain documents in a clean, dry, legible condition and in good order.
1.
C.
1.3
Make documents available at all times for inspection by Architect/Engineer.
MARKING DEVICES
A.
1.4
Do not use record documents for construction purposes.
Provide red felt tip marking pens for recording information.
RECORDING
A.
Label each document "Project Record" in neat, large printed letters.
B.
Record information concurrently with construction progress.
1.
C.
Do not conceal any work until required information is recorded.
Legibly mark record drawings to record actual construction:
16041 - 1 of 3
12010 - NISD - High School
D.
1.5
1.6
1.
Depths of various buried elements in relation to finish first floor datum.
2.
Horizontal and vertical locations of underground utilities and
appurtenances, referenced to permanent surface improvements.
3.
Location of internal utilities and appurtenances concealed in the
construction, referenced to visible and accessible features of the
structure.
4.
Field changes of dimension and detail.
5.
Changes made by field order or by change order.
6.
Details not on original contract drawings.
7.
Identify locations by at least two dimensions to permanent structures.
Legibly mark and record at each product specification section, details of the
actual products installed.
1.
Manufacturer's name and product model and number.
2.
Product substitutions or alternates utilized.
3.
Changes made by addenda and modifications.
4.
Changes made by field order or by change order.
5.
Other matters not originally specified.
REPRODUCIBLE RECORD DRAWINGS
A.
Transfer all recorded information from the original record drawings to one set of
reproducible mylar films and deliver to the Architect/Engineer.
B.
Identify all record drawing information.
C.
Delete Architect/Engineer seals and ownership information from the documents.
SUBMITTALS
A.
Submit record documents to Architect/Engineer with final Application for
Payment.
B.
Accompany submittal with transmittal letter in duplicate containing:
16041 - 2 of 3
12010 - NISD - High School
1.
Date.
2.
Project title and number.
3.
Contractor's name and address.
4.
Title and number of each record document.
5.
Signature of an officer of the contracting firm.
16041 - 3 of 3
12010 - NISD - High School
SECTION 16090
CONDUCTOR SYSTEMS - 600 VOLT RATING
1.1
GENERAL
A.
1.2
1.3
Conductors:
1.
Soft drawn annealed copper.
2.
Having a conductivity of not less than 98% of that of pure copper.
3.
Continuous without weld or splice throughout its length.
4.
Branch circuit conductors unless noted otherwise - code gauge type
"THW", "THHN", "THWN" or "XHHW", solid conductor.
5.
All service entrance conductors, all feeder and branch circuits No. 8 and
larger - code gauge type "THW", "THHN", "THWN" or "XHHW", stranded
conductor.
6.
Approved by NEC for the environment.
7.
Bear the UL label.
CIRCUITRY
A.
The intent of the drawings is to indicate schematically the circuitry required.
B.
Branch circuits may be grouped in a single raceway provided the work performed
in grouping conductors:
1.
Complies with all applicable articles in the National Electrical Code and
governing local codes.
2.
Includes but shall not be limited to ampacity derating of conductors.
3.
Observes maximum capacities of raceways.
C.
Adopt a standard connection system to lights and appliances uniform throughout
the system.
D.
Insure that branch circuits are so connected to the panels as to provide balanced
loading insofar as practical.
CONDUCTORS AND CONNECTIONS
16090 - 1 of 2
12010 - NISD - High School
A.
Install no branch circuit with wire smaller than No. 12.
1.
B.
Branch circuits shall be of such size that the drop in potential to the farthest point
on the circuit shall not exceed 2%.
C.
Connections for electrical and mechanical security:
D.
1.4
Control wiring may be No. 16 unless larger conductors are required to
offset voltage drop.
1.
No. 8 wire and larger made with forged copper pressure connectors.
2.
No. 10 wire and smaller made with indent type splice caps or electrical
spring connectors.
3.
Cover joints with sufficient plastic tape or caps to insure insulating value
equal to that of the conductor insulation itself.
4.
Pad sharp corners and voids to prevent damage.
5.
In junction boxes joining underground conduit or in wet location, make
connections waterproof with Scotch 2200 self-fusing rubber based
insulating compound laminated to PVC backing.
Conductors in continuous row fluorescent fixtures - code gauge type rated at 90
degrees C.
COLOR CODING
A.
All branch circuits and feeder conductors color coded as scheduled on the
drawings.
1.
Neutrals of different voltage systems must be of different color.
2.
All circuit conductors of the same color - connected to the same feeder
conductor throughout the installation.
3.
Conductors intended solely for equipment grounding purposes - green in
color.
B.
Wire No. 6 AWG or smaller - the color of the insulation covering.
C.
Wire larger than No. 6 AWG and other types of wire: self-adhesive, wrap around
wire markers of solid colors.
1.
Mark each wire at both beginning and termination points.
16090 - 2 of 2
12010 - NISD - High School
SECTION 16100
CONDUIT SYSTEMS
1.1
GENERAL
A.
Install conduit systems as scheduled or as shown on the drawings.
B.
Installation and all components of the system:
1.
UL labeled.
2.
Conform to:
a.
National Electrical Code.
b.
All local codes.
C.
Use fittings and methods of joining conduit as set forth in the National Electrical
Code.
D.
Conduit terminations at electrical equipment and boxes:
1.
Secured in place by locknuts inside and outside.
2.
Provided with approved bushings.
E.
Join rigid conduit with standard couplings according to the manufacturer's
recommendations.
F.
Adhere to the general routing of conduit systems as shown on the drawings.
G.
Install all conduit in the most direct, neat and workmanlike manner, employing
only skilled mechanics.
1.
Install conduit to conserve building space and not interfere with use of
space.
H.
Hold horizontal and vertical conduit as close as possible to walls, ceilings, struts
and members as to occupy the minimum space consistent with the proper
requirements for service of adjacent elements.
I.
Concealed work shall finish off within the limits permitted by the chases.
16100 - 1 of 6
12010 - NISD - High School
J.
1.2
Layout to maintain headroom, neat mechanical appearance and to support
equipment loads required.
CONDUIT
A.
Rigid steel conduit:
1.
UL labeled, Schedule 40.
2.
Steel pipe.
3.
Zinc coated inside and out.
B.
Fittings meet same requirements as for rigid steel conduits. UL labeled.
C.
Electrical metallic tubing (EMT).
D.
E.
F.
1.
Cold rolled steel tubing.
2.
Zinc coated inside and out.
3.
UL labeled standard weight.
Fittings meet same requirements as for EMT. UL labeled.
1.
Compression fittings.
2.
Cast metal not approved.
PVC conduit:
1.
UL labeled Type 40.
2.
PVC fittings and solvent welded joints.
Flexible conduit.
1.
Connections to motors and equipment:
a.
18 inches minimum length, 36" maximum length.
2.
Flexible metallic conduit for all connections located indoors where not
exposed to moisture.
3.
For all connections outdoors or in wet locations:
a.
3/4" - 2", Type CN nonmetallic with PVC watertight connectors.
16100 - 2 of 6
12010 - NISD - High School
b.
G.
H.
2-1/2" and above, Type UA with watertight connectors.
Use 1/2" Type AC flexible conduit only for light fixture whips. Provide sufficient
length of flexible conduit to avoid transmission of vibration.
1.
With equipment ground conductor.
2.
Length not to exceed 6'.
3.
Conductor size may be #14, except where required by local code to be
#12.
Rigid aluminum conduit:
1.
UL labeled Schedule 40.
2.
6063 aluminum alloy T3 temper.
I.
Fittings meet same requirements as for rigid aluminum conduit. UL labeled.
J.
All above grade indoors; services and panel feeders installed in:
K.
L.
1.
Rigid steel conduit.
2.
Rigid aluminum conduit.
3.
Electrical metallic tubing.
Conduit run exposed to the weather:
1.
Rigid steel conduit.
2.
Rigid aluminum conduit.
Conduit run underground or beneath the building slab:
1.
2.
Rigid steel or PVC.
a.
Where PVC is used, rigid steel elbows shall be used in each
change of direction.
b.
Where PVC is used, stub-ups through slabs or grade shall be
rigid steel. Provide .010 scotch wrap tape 2" above and below
concrete for stub-ups through slabs.
In a red dyed concrete envelope with 2" of encasement all around.
16100 - 3 of 6
12010 - NISD - High School
M.
1.3
3.
Concrete encasement not required beneath the building slab.
4.
Sealed watertight at each end.
Conduit concealed in furred ceilings or in walls.
1.
Electrical metallic tubing.
2.
Rigid steel conduit.
3.
Rigid aluminum conduit.
INSTALLATION
A.
In suspended ceilings, support conduit runs from structure, not ceiling system
construction.
B.
Where conduits pass through exterior concrete walls or fittings below grade,
entrance made watertight by means of a conduit entrance seal filled with potting
compound.
C.
Lay out and install all conduit runs to avoid proximity to hot pipes. Do not install
runs within 6" of hot pipes.
D.
Conduit concealed unless definitely shown otherwise.
E.
Cap or plug conduit ends upon completion of the run until the wire is pulled.
F.
Swab out conduit to remove moisture and debris before wires are pulled in.
G.
Completely install each conduit run prior to pulling conductors.
H.
Install expansion fittings and bonding jumpers where conduit crosses building
expansion joints.
I.
Route all exposed conduits parallel or perpendicular to building lines.
J.
Alter conduit routing to avoid structural obstructions, minimizing crossovers.
K.
For conduits routed on roofs:
1.
Provide Miro Industries #24R pillow block pipestand.
2.
Spacing for pipestands to be 6.66' on center.
16100 - 4 of 6
12010 - NISD - High School
L.
M.
1.4
3.
Where additional height of pipestands is required, stack pipestands
accordingly.
4.
Installation per manufacturer's recommendation.
For conduits routed to rooftop curb-mounted equipment:
1.
Route conduit within curb.
2.
Coordinate with Division 15 prior to rough-in for conduit location within
curb.
Sleeve penetrations as specified in this section.
CONDUIT SLEEVES AND ESCUTCHEONS
A.
Provide sleeves:
1.
Wherever vibration, expansion or contraction would affect finished
surfaces penetrated by conduit.
2.
Where required to permit installation of conduit after completion of other
work.
B.
Sleeves in floor slabs shall project at least 2" above finished floor. Caulk sleeves
full depth and provide floor plate.
C.
Size sleeves large enough to allow for movement due to expansion and
contraction.
D.
Do not permit conduit to touch wall of sleeve.
E.
Provide exposed conduit in occupied spaces; passing through floors; ceilings; or
walls; with approved, chrome plated or formed stainless steel escutcheon plates.
F.
Sleeves for conduit through exterior walls and floors: form with Schedule 40
galvanized steel pipe.
G.
1.
Seal with butyl rubber sealant of quality specified.
2.
Refer to drawing details.
Sleeves for conduit through nonfire rated beams, walls, footings and potentially
wet floors: form with Schedule 40 galvanized steel pipe.
1.
Seal with butyl rubber sealant of quality specified.
16100 - 5 of 6
12010 - NISD - High School
2.
H.
1.5
1.6
Sleeves for conduit through fire rated and fire resistive floors, walls and
fireproofing: form with Schedule 40 galvanized steel pipe.
1.
Seal with Underwriter's Laboratories classified fire stop sealant system;
either one or two component.
2.
Refer to drawing details.
MINIMUM CONDUIT SIZES
A.
All branch circuits (unless noted otherwise): 3/4".
B.
Switch leg: 1/2".
RACEWAY CONTINUITY
A.
Assure the electrical continuity of all metal conduit systems.
B.
Approved methods:
C.
1.7
Refer to drawing details.
1.
Threadless fittings made up tight, with conduit or metal clad cable.
2.
Two locknuts, one inside and one outside of boxes or cabinets.
3.
Threaded compression couplings and threaded bosses on enclosures:
make up joints wrench tight.
4.
Threadless compression coupling on rigid metal conduit and electrical
metallic tubing: make joints tight.
5.
Use bonding jumpers around knockouts which are formed to impair the
electrical grounding continuity.
Locknuts and bushings are not approved for electrical continuity.
TELEPHONE, DATA AND MISCELLANEOUS CONDUIT SYSTEMS
A.
Provide a system of empty conduit and junction boxes for reception of telephone
wiring.
1.
Stub-up empty conduit from recessed junction 12" into accessible ceiling
space.
2.
Provide blank coverplate for each unused junction box.
16100 - 6 of 6
12010 - NISD - High School
SECTION 16103
GROUNDING
1.1
GENERAL
A.
B.
1.2
1.3
Grounding shall conform to the requirements of:
1.
National Electrical Code.
2.
Governing local codes.
Ground effectively and permanently.
1.
Neutral conductor.
2.
All conduit systems.
3.
All electrical equipment.
REFERENCE STANDARDS
A.
ANSI/IEEE Standard 142 - "Recommended Practice for Grounding of Industrial
and Commercial Power Systems".
B.
ANSI/UL 467 - "Safety Standard for Grounding and Bonding Equipment".
LIGHTNING ARRESTORS:
A.
No. 2/0 ground conductor as short and direct as possible.
B.
Minimize number of right angle bends.
1.
C.
Connect as directly as possible to circuit to be protected.
D.
If run in conduit for protection:
1.
1.4
Minimum radius 8".
Nonmagnetic conduit.
GROUNDING ELECTRODE
A.
3/4" x 10'-0" copper clad grounding electrode.
1.
UL listed.
16103 - 1 of 3
12010 - NISD - High School
B.
Connections.
1.
UL listed grounding electrode connector.
2.
Approved thermal fusion methods.
C.
Driven with top of electrode at grade.
D.
The total ground resistance shall not exceed 10 ohms for service entrance
grounds and 25 ohms for equipment grounds.
1.
Where this condition cannot be obtained with one electrode, install a
longer electrode, deep-driven sectional electrodes or additional
electrodes until the required ground resistance is obtained.
2.
Not more than three grounding electrodes will be required.
a.
3.
E.
1.5
Fusion weld grounding electrode conductor between electrodes.
The minimum distance between electrodes shall be 10 feet.
Resistance of neutral ground shall be measured using a megger earth resistance
tester.
1.
Not less than 48 hours after last rainfall.
2.
Shall not exceed 10 ohms.
FOR SYSTEMS 600 VOLTS OR LESS
A.
In the service equipment, provide a ground bus separate from the neutral bar.
1.
B.
Connect the grounding electrode conductor between the ground bus and the
driven ground electrode.
1.
C.
Bond it with copper strap to the neutral bar.
In rigid steel conduit.
Install a green insulated equipment grounding conductor:
1.
In each section of nonmetallic conduit.
2.
To all weatherproof receptacles.
3.
With each panel feeder.
16103 - 2 of 3
12010 - NISD - High School
D.
4.
With each branch circuit with two or three pole breakers.
5.
With each single pole branch circuit exceeding 20 amps.
6.
In each surface metal raceway.
Install a green insulated/isolated equipment grounding conductor:
1.
To all isolated ground receptacles.
a.
Continue each conductor thru each successive panelboard
connecting to the ground bus at the service entrance switchgear
or the ground bus at the first panelboard of a separately derived
system.
E.
Provide all conduit terminating in electrical or mechanical equipment with
grounding bushings with ground wire extended to ground bus in equipment.
F.
With ground fault protection on the main switchboard, the neutral shall be
grounded in only one place.
1.
On source side of ground fault sensor CT.
16103 - 3 of 3
12010 - NISD - High School
SECTION 16131
PULL AND JUNCTION BOXES
1.1
1.2
1.3
1.4
WORK INCLUDED
A.
Pull boxes.
B.
Junction boxes.
GENERAL
A.
Provide where required for the installation and servicing of the conductors.
B.
Sized to conform with the National Electrical Code.
MATERIALS
A.
Galvanized steel, gauges conforming to NEC.
B.
If underground or at grade, cast iron or concrete with cast iron lid.
CONSTRUCTION
A.
Surface mounted pull boxes.
1.
B.
1.5
With screw-on or hinged cover.
Flush mounted pull boxes.
1.
With overlapping covers.
2.
With flush head cover retaining screws.
3.
Prime coated indoors.
4.
Galvanized outdoors with waterproof gasket.
INSTALLATION
A.
Locate pull and junction boxes above removable ceilings or in electrical rooms,
utility rooms or storage areas.
B.
Close unused openings in pull and junction boxes with a knockout closure.
16131 - 1 of 1
12010 - NISD - High School
SECTION 16140
WIRING DEVICES
1.1
WALL SWITCHES
A.
Hubbell Catalog Series 1221.
1.
Rated 20A 120-277V AC.
2.
Rated 1 HP @ 120V, 2 HP @ 240V.
B.
For control of remotely located lights and devices, provide with lighted toggle to
indicate "ON" position.
C.
For control of remotely located lights and devices on emergency circuit, provide
with lighted toggle to indicate "OFF" position.
D.
Where used outdoors: Hubbell Catalog Series 1281.
1.
E.
1.2
Provide Hubbell Catalog #1795 clear weatherproof bubble plate.
Key-operated switches: Hubbell Series 1221-L.
1.
Rated 20A 120-277V AC.
2.
Rated 1 HP @ 120V, 2 HP @ 240V.
RECEPTACLES
A.
General receptacle requirements:
1.
Devices shall be two-pole, three wire, grounding with screw type wiring
terminals suitable for No. 10 AWG.
a.
NEMA 5-15R; 15A, 125V rating.
b.
NEMA 5-20R; 20A, 125V rating.
2.
Mounting strap and ground contacts shall be one piece design
constructed of brass.
3.
Heavy-duty, wide body nylon base.
4.
High impact nylon face.
16140 - 1 of 4
12010 - NISD - High School
5.
B.
Duplex receptacles: Hubbell Series 5262 with grounding poles.
1.
C.
E.
F.
1.3
Rated 15A 125V AC.
Where duplex receptacle is used on an individual circuit: Hubbell Series 5362.
1.
D.
Automatic self grounding clip.
Rated 20A 125V AC.
Duplex receptacle with isolated ground: Hubbell IG5362.
1.
Rated 20A 125V AC.
2.
Provide orange wall plate to match device.
Special receptacle devices:
1.
As scheduled on the drawings.
2.
With stainless steel plates with engraved black identification with 1/4"
letters.
3.
Confirm exact receptacle requirements by comparing with cap on
equipment actually furnished.
Duplex receptacle with ground fault circuit interrupter - Hubbell Series GF5362.
1.
Provide U.L. Class A ground fault protection.
2.
Rated 20A, 120V AC.
3.
Tripping requirements: conform to UL Standard 943.
4.
Both outlets ground fault protected.
5.
Operational test means.
6.
Feed through terminals for downstream protection.
WALL PLATES
A.
Provide a plate for every receptacle, switch, telephone outlet and other wiring
device.
B.
Plates shall be nylon with Ivory finish.
16140 - 2 of 4
12010 - NISD - High School
C.
1.
Fasten wall plates with matching screws.
2.
Refer to drawings for special legends.
3.
Provide Ivory device and toggle handle to match plate.
Weatherproof receptacle plates - Hubbell HBL5206WO cast aluminum with lift
cover and stainless steel hinge.
1.
D.
Fasten all plates outdoors with Type 302 Allen head "non-tamperable" screws.
1.
E.
Furnish 25% spare screws.
Outlet boxes not covered by fixture canopies or other such equipment:
1.
Provided with blank nylon Ivory wall plates.
2.
Where exposed to the weather, provide blank gray fiberglass plate with
rubber gaskets.
F.
In areas indoors where conduit and boxes are exposed, device plates shall be
cadmium plated steel.
G.
Provide special width plates for installation in mullions and other special
dimension locations.
1.
1.4
Provide FS/FD junction box.
Refer to architectural drawing series.
INSTALLATION
A.
Switch and receptacle mounting heights are scheduled on the drawings.
B.
Mount switches in suitable boxes.
1.
Installed recessed 54" above the finished floor on the strike side of the
door, unless otherwise noted on drawings.
a.
2.
C.
Verify strike side of door with architectural drawings.
With switch handles down when the circuit is open (single pole).
Duplex, television, computer and telephone receptacles.
1.
Installed recessed 18" above the floor unless otherwise noted.
16140 - 3 of 4
12010 - NISD - High School
1.5
1.6
D.
Provide gang junction box and coverplate where more than one device or switch
is indicated at the same location.
E.
Provide multiple outlet support bracket where devices are adjacent to each other,
but located between wall studs.
F.
Provide box and conduit brackets suitable for mounting on wood or metal studs
as appropriate.
ACCEPTABLE MANUFACTURERS
A.
Hubbell.
B.
Leviton.
SUBMITTALS
A.
Submit shop drawings and product data as specified.
B.
Submit manufacturer's product data sheet for each device and wall plate on the
project.
C.
Submit drawings of plans, elevation and sections of receptacles and outlets in
casework, cabinetwork and built-in-place furniture.
1.
Coordinate dimensions with millwork shop drawings and related
architectural drawing series.
16140 - 4 of 4
12010 - NISD - High School
SECTION 16151
SAFETY SWITCH
1.1
1.2
GENERAL
A.
Provide where shown on the drawings and where required by NEC.
B.
Conform to NEMA and UL Standards for heavy duty switches.
RELATED SECTIONS
A.
1.3
Section 16475 - Fuses.
ENCLOSURE
A.
Where located indoors, NEMA 1.
B.
Where located outdoors, NEMA 3R.
C.
Verify with drawings for deviation from standard enclosure types shown above.
D.
Operating handle lockable "Off" with three pad locks.
E.
Door interlocks:
1.
F.
1.4
Defeatable, front accessible interlock.
a.
To prevent opening door when operating handle is in the "ON"
position.
b.
To prevent throwing switch to "ON" position when door is open.
Provide specified identification label.
SWITCH
A.
Horsepower rated at system voltage.
B.
Current rating as shown on the drawings.
C.
Two/three pole:
1.
Quick make, quick break action.
2.
Current carrying parts plated.
16151 - 1 of 2
12010 - NISD - High School
3.
Fuses as shown on the drawings.
a.
D.
E.
Neutral block:
1.
Where shown on the drawings.
2.
Current rating same as switch.
3.
Isolated.
Location:
1.
Below ceilings: where shown on drawings accessible from floor, unless
shown otherwise.
a.
2.
1.6
Coordinate with other divisions for work in vicinity.
Above ceilings: where shown on drawings accessible from ladder below
ceiling, unless shown otherwise.
a.
1.5
Provide rejection type fuse clips.
Coordinate with other divisions for work in vicinity.
SUBMITTALS
A.
Submit manufacturer's product data.
B.
Submit data for each type of disconnect shown on drawings using referenced
identification.
ACCEPTABLE MANUFACTURERS
A.
Square D.
B.
General Electric.
16151 - 2 of 2
12010 - NISD - High School
SECTION 16422
MOTOR CONTROL CENTER
1.1
GENERAL
A.
1.2
1.3
Provide the motor control centers shown on the drawings.
1.
Conform to latest published NEMA Standards.
2.
NEMA 1 Enclosure.
RELATED WORK
A.
Section 16040 - Shop Drawings, Product Data.
B.
Section 16480 - Motor Starters.
MOTOR CONTROL UNITS (CIRCUIT BREAKER)
A.
Motor control units shall be combination circuit breaker magnetic starter.
1.
B.
C.
1.4
Mount units front-of-board.
Over current protection:
1.
Adjustable instantaneous trip circuit breakers.
2.
Specifically designed for motor circuit protection.
Provide motor starters as specified.
CONSTRUCTION
A.
Select control units in accordance with NEMA Industrial Control Standards as
apply.
B.
Identify each unit with an engraved laminated plastic nameplate stating the load
it serves (1/4" high letters).
C.
Wiring shall be NEMA Class I, Type B.
1.
Provide pull-apart unit terminal block for control circuits in each starter.
a.
Provide four unwired terminal points for future Owner use.
16422 - 1 of 3
12010 - NISD - High School
2.
D.
Provide a separate control power circuit with fuse block for each starter.
1.
1.5
1.6
Provide an auxiliary contact to open starter control circuit.
ELECTRICAL BUS
A.
Tin plated copper bus.
B.
Of sufficient cross-sectional area to continuously conduct rated full load current
with a maximum temperature rise of 50 degrees C. above an ambient
temperature of 40 degrees C.
C.
All joints full lap; bolted with Belville washers.
D.
Full length ground bus sized at 25% of phase bus. Bond the ground bus to each
section.
E.
Full length neutral bus.
F.
Drill all busses for future extension.
G.
Horizontal bussing between sections shall be bus bar construction.
SHORT CIRCUIT RATING
A.
Each motor control center, as a complete unit, shall have a single withstand
short circuit current rating as shown on the drawings.
B.
The withstand short circuit current rating shall certify that all equipment is
capable of withstanding the stresses of a fault equal to the interrupting capacity
rating of the smallest over-current protective device.
1.
1.7
Provide main fuse and disconnect for incoming control power circuit.
Established by actual tests by the manufacturer on similar equipment.
SUBMITTALS
A.
Submit shop drawings as specified.
B.
Verify the electrical characteristics of all equipment. This information shall be
used in preparing shop drawings.
C.
Refer to Section 16040 for motor controls coordination.
16422 - 2 of 3
12010 - NISD - High School
1.8
ACCEPTABLE MANUFACTURERS
A.
General Electric.
B.
Square D.
16422 - 3 of 3
12010 - NISD - High School
SECTION 16435
CIRCUIT BREAKER DISTRIBUTION PANELBOARD
1.1
CIRCUIT BREAKER DISTRIBUTION PANELBOARDS
A.
B.
Panelboards:
1.
Provided with hinged locking door.
2.
Equipped with locks keyed alike throughout the building.
3.
Equipped with the number and size of circuit breakers scheduled.
4.
Provided with a typewritten directory of circuits reflecting load served and
actual room numbers and names and mount in a card holder on the
inside of the panel.
Breakers:
1.
Thermal magnetic.
2.
Trip indicating.
3.
Multipole breakers provided with:
4.
C.
Common trips on all poles.
b.
Single handles.
Location of breakers in panelboard to match panelboard details on
drawings.
Constructed in accordance with all applicable NEMA and UL Standards.
1.
D.
a.
Minimum panel width 20".
Panelboards bussing:
1.
Tin plated copper bus.
2.
Of sufficient cross section area to continuously conduct rated full load
current with a maximum temperature rise of 50 degrees C. above an
ambient temperature of 40 degrees C.
3.
Provide a grounding bus sized at 25% of the phase bus.
16435 - 1 of 2
12010 - NISD - High School
E.
4.
Provide an isolated grounding bus sized at 25% of phase bus.
5.
Provide a neutral bus sized at 100% of the phase bus.
Provide nameplate on cover of each panelboard.
1.
F.
1.2
Verify the electrical characteristics of all equipment for use in preparing shop
drawings for panelboards.
SHORT CIRCUIT RATING
A.
Each distribution panelboard as a complete unit shall have a single withstand
short circuit current rating as shown on the drawings.
B.
The withstand short circuit current rating shall certify that all equipment is
capable of withstanding the stresses of a fault equal to the interrupting capacity
rating of the smallest over-current protective device.
1.
1.3
1.4
Refer to specification Section 16021 - Identification.
Established by actual tests by the manufacturer on similar equipment.
SHOP DRAWINGS
A.
Submit shop drawings and manufacturer's product data as specified.
B.
Verify the electrical characteristics of all equipment. This information shall be
used in preparing shop drawings.
C.
Submit product data sheets of test data to withstand short circuit current rating.
ACCEPTABLE MANUFACTURERS
A.
General Electric.
B.
Square D.
16435 - 2 of 2
12010 - NISD - High School
SECTION 16460
DRY TYPE TRANSFORMERS
1.1
1.2
GENERAL
A.
Provide dry type transformers where shown on the drawings.
B.
Connect as shown on the drawings.
C.
Minimum overload capacity to comply with ASA standards.
D.
Provide in an enclosure suitable for its location.
E.
Electrical characteristics and capacity as scheduled on the drawings.
CONSTRUCTION
A.
Class 220 degrees C insulation.
B.
Constructed in accordance with NEMA standards and the NEC.
C.
Terminal compartment in an ambient temperature location.
1.
D.
Incorporate built in vibration dampening systems.
E.
Sound levels shall conform to the NEMA standards after installation.
F.
Transformer 3 through 25 KVA - with 4 taps.
1.
G.
1.3
Provide primary and secondary termination lugs. Size lugs to accept
related feeder conductors.
Transformer 30 KVA and above - with 6 taps.
Transformers 25 KVA and above - 80 degrees C rise above 40 degrees C
ambient.
TRANSFORMER VIBRATION ISOLATION
A.
Provide vibration isolating equipment to isolate each electrical transformer.
B.
Floor mounted transformer isolators.
1.
Amber-Booth Type SP-NRC Flex-Plate vibration isolator, Style D, with
tapped hole to permit securing transformer to the isolator pad.
16460 - 1 of 2
12010 - NISD - High School
2.
C.
All wiring to the vibration isolated unit shall be made flexible with a 90 degree
loop of flexible conduit to avoid restraining the equipment and short circuiting the
vibration isolators.
1.
1.4
1.5
1.6
Size for weight of the transformer.
Refer to detail on the drawing.
INSTALLATION
A.
Install each transformer according to the manufacturer's installation manual.
B.
Install the external vibration isolation as specified.
SUBMITTALS
A.
Submit product data as specified.
B.
Submit drawings showing exact placement with related work in the space.
C.
Submit product data sheets and shop drawings of the proposed vibration
isolation.
1.
Manufacturer's selection chart.
2.
Static deflection and supported weight.
3.
Deflected spring height.
4.
Detailed instructions for installing and adjusting the isolators.
ACCEPTABLE MANUFACTURERS
A.
General Electric.
B.
Square D.
16460 - 2 of 2
12010 - NISD - High School
SECTION 16475
FUSES - 600 VOLTS AND BELOW
1.1
1.2
1.3
GENERAL
A.
Provide fuses where shown on the drawings.
B.
Ampere ratings as shown on the drawings.
C.
Voltage rating equal to or greater than the voltage at their point of application.
D.
Interrupting rating of 200,000 ampere RMS symmetrical.
RELATED WORK
A.
Section 16151 - Safety Switch.
B.
Section 16422 - Motor Control Center.
C.
Section 16480 - Motor Starters.
FUSES RATED ABOVE 600 AMPERES
A.
1.4
U.L. Class L.
1.
Current limiting.
2.
Time delay.
3.
Hold 500% of rated current for 4 seconds.
4.
Clear 20 times rated current in .01 second.
FUSES RATED 600 AMPERES AND BELOW
A.
U.L. Class RKI.
1.
Current limiting.
2.
Dual element time delay.
3.
Hold 500% of rated current for 10 seconds.
4.
Clear 15 times rate current in .01 second.
16475 - 1 of 2
12010 - NISD - High School
1.5
1.6
SPARES
A.
Provide one spare set of three (3) of each size and type of fuses rated at more
than 600 amperes.
B.
Provide 10% of each size and type of fuses rated at 600 amp or less; in no case
less than one set of three, of each size and type.
SUBMITTALS
A.
Submit product data as specified.
B.
Submit manufacturer's curves showing coordination ratios between main and
branch fuses.
C.
Submit schedule of fuses with replacement commercial part number.
1.
1.7
Include the schedule in the Operation and Maintenance Manual.
ACCEPTABLE MANUFACTURERS
A.
Bussman.
B.
Shawmut.
C.
Littelfuse.
16475 - 2 of 2
12010 - NISD - High School
SECTION 16480
MOTOR STARTERS - MAGNETIC AND MANUAL
1.1
1.2
1.3
GENERAL
A.
Provide motor starters where scheduled or shown on the drawings.
B.
Rated at system voltage in accordance with applicable NEMA standards, sizes
and horsepower ratings.
C.
Provide in an enclosure suitable for the environment.
RELATED WORK
A.
Section 16040 - Shop Drawings, Product Data.
B.
Section 16422 - Motor Control Center.
C.
Section 16475 - Fuses.
MAGNETIC MOTOR STARTERS
A.
Magnetic motor starter:
1.
Across-the-line.
2.
Gravity dropout type.
3.
Double break silver alloy contacts.
a.
B.
C.
Replaceable without removing wiring or removing starter from
panel.
Solenoid coils of molded construction and replaceable from the front without
removing the starter from panel.
1.
Fused 120V control circuit, if located in motor control centers.
2.
At locations other than motor control centers, provide fused control
voltage transformer.
Overload relays of the solid state type.
1.
De-energize the motor starter if any of the following are sensed.
16480 - 1 of 3
12010 - NISD - High School
D.
Phase loss.
b.
Phase unbalance.
2.
Relay to be self powered and ambient/harmonic insensitive.
3.
Provide LED to indicate current flow.
Provide (1) normally open and (1) normally closed auxiliary contact.
1.
1.4
a.
Contacts rated at 10 amps.
E.
Three phase starters with three overload relays.
F.
Reset button located in the front cover to reset all overload relays.
G.
Provide H-O-A selector switch with pilot light in the cover where electrically
interlocked or remotely started.
PHASE MONITORING RELAY
A.
Monitor the line-to-line voltages of the incoming circuit to each motor starter.
1.
B.
SSAC Model #PLM.
De-energize the motor starter if any of the following are sensed.
1.
Loss of a single phase.
2.
Voltage unbalance.
3.
Phase reversal.
4.
Low voltage.
C.
When correct conditions are re-established, relay shall reset automatically.
D.
Provide pilot light to indicate normal operation.
E.
Trip delay to be fixed at 5 seconds.
F.
Voltage unbalance to be fixed at 4 percent.
G.
Provide fuse block and fuses for line voltage inputs.
1.
Fuse size per manufacturer's recommendation.
16480 - 2 of 3
12010 - NISD - High School
1.5
COMBINATION STARTERS
A.
Provide motor starters as specified.
B.
All control units shall be selected in accordance with NEMA industrial control
standards as apply.
C.
Circuit breaker type combination starters consist of a circuit breaker and a motor
starter.
1.
1.6
1.7
Circuit breakers shall be adjustable instantaneous trip breakers
specifically for motor circuit protection.
D.
Identify each unit with an engraved laminated plastic nameplate stating the load
it serves.
E.
Operation of disconnecting means shall open the control circuit.
SUBMITTALS
A.
Submit manufacturer's product data.
B.
Submit data for each type of motor starter shown on drawings using referenced
identification.
C.
Verify the electrical characteristics of all equipment. Use this information in
preparing shop drawings.
D.
Refer to Section 16040 and submit motor control coordination schedule.
ACCEPTABLE MANUFACTURERS
A.
General Electric.
B.
Square D.
16480 - 3 of 3
12010 - NISD - High School
SECTION 16510
LUMINAIRES
1.1
GENERAL
A.
Provide a luminaire for each luminaire symbol shown on the drawings.
B.
The descriptions and catalog numbers establish the quality, appearance and
performance of the specified luminaires.
C.
Verify all dimensions and electrical characteristics with actual project conditions.
D.
1.
If conditions do not permit the installation of any of the lighting details as
specified, request instructions prior to rough-in.
2.
Coordinate with work specified in other divisions to avoid conflicts
between luminaires and other building components.
All luminaires shall embody the highest standards of electrical and mechanical
design, materials and workmanship.
1.
1.2
Subject to approval.
E.
Install luminaires complete with lamps.
F.
Lighting fixtures recessed in ceiling cavities forming air plenums shall be
manufactured and wired to conform to the National Electrical Code.
1.
Approved for use in air plenums.
2.
Use approved branch circuit wiring.
G.
Luminaires for use in wet or damp locations shall be gasketed to prevent access
of moisture into electrical components, enclosing diffusers, lenses or globes.
H.
Where applicable, luminaires shall be UL listed to accommodate thru-branch
circuit wiring.
RECESSED LUMINAIRES
A.
Recessed fixtures shall coordinate properly with the ceiling construction in which
they are to be mounted.
1.
Confirm ceiling construction details and architectural finish for each room.
16510 - 1 of 6
12010 - NISD - High School
2.
1.3
Discrepancies between fixture catalog references appearing on the
drawings and the actual ceiling construction into which they are to be
installed shall be resolved at the time of submission of submittals by
Contractor.
B.
Faceplates of recessed luminaires which open for access to the interior of the
luminaire and which also serve as a ceiling trim shall be positively held to the
luminaire body by adjustable means which permit the faceplate to be drawn up to
the ceiling as tight as necessary to insure complete contact of faceplate with
ceiling surrounding the luminaire. Devices to accomplish this shall not be visible
from below.
C.
Housings for discharge lamp luminaires shall be so constructed that all electrical
components are easily accessible and replaceable without removing the fixture
body from its mountings.
D.
All lenses, diffusers or louvers contained in frames shall be removable, but
positively held within the frame, so that hinging or other motion of the frame will
not cause the diffusing element to drop out.
E.
Provide plaster frames for recessed fixtures in plaster ceiling.
FLUORESCENT LAMP LUMINAIRES
A.
Housings shall be constructed so that all electrical components are easily
accessible and replaceable without removing the fixture body from its mountings.
B.
Ballasts furnished with each fluorescent lamp luminaire:
1.
Electronic, less than 10% THD.
2.
High power factor, UL labeled, Class P.
3.
Meet applicable ASA and CBM Standards.
4.
Ballast factor.
5.
a.
Rapid start lamps - 92.5%.
b.
Rapid start, high output lamps - 95%.
c.
Rapid start, 34W lamps - 85%.
Meet the minimum efficiency standards of the National Appliance Energy
Conservation Amendments of 1988.
16510 - 2 of 6
12010 - NISD - High School
6.
Approved electronic manufacturers:
a.
7.
Suitable for connection to system voltage.
8.
Warranty by ballast manufacturer.
a.
C.
1.4
Replace fixtures which cannot be quieted by replacement of ballast.
Ballasts shall have the lowest sound rating available for the lamps specified and
shall clearly show their respective sound ratings.
1.
E.
Electronic - 5 years.
Housing shall be so constructed and ballast so mounted as to minimize sounding
board effect which amplifies normal ballast vibration.
1.
D.
Advance Centium.
Replace noisy ballasts at no cost to the Owner.
Fluorescent lamps shall be rapid start. All lamps shall be by the same
manufacturer to assure uniformity of color.
1.
Lamps as shown in the schedule.
2.
Lamps to match operating characteristics of ballast for optimum lumen
output.
F.
Where dimming ballasts are required, they shall be high power factor.
G.
Ballasts shall be rigidly mounted to the inside of the luminaire housing with
ballast surface and housing in complete contact for efficient conduction of ballast
heat. Ballast mounting screws shall be permanently affixed to the luminaire
housing and lock washers provided to secure attachment of the ballast.
H.
Use only single or two lamp fluorescent ballasts in one luminaire.
HIGH INTENSITY DISCHARGE LAMP LUMINAIRES
A.
Provide screw base sockets with:
1.
Porcelain body with nickel plated bronze screw shell.
2.
Suitably attached and adequately reinforced to prevent tearing or
distorting the shell when inserting or removing lamp.
16510 - 3 of 6
12010 - NISD - High School
B.
C.
1.5
Socket rating:
1.
660 watt, 600 volt for medium base.
2.
1500 watt, 600 volt for mogul base.
Ballasts and matched capacitors suitable for the electrical characteristics of the
supply circuits to which they are connected and for operating the specific lamps.
1.
Minimum power factor: 90%.
2.
UL labeled and CBM approved.
3.
Thermal protection for ballasts installed indoors.
4.
Rated suitable for installed operating temperatures.
5.
Capable of operating for extended periods at short circuit current.
D.
Do not exceed the normal line operating current during lamp starting or hot
relamping.
E.
Ballasts for metal halide lamps:
1.
Constant wattage design.
2.
Regulated so that plus or minus 10% variation in line voltage will not
cause more than plus or minus 5% variation in lamp watts for mercury
vapor or plus or minus 10% variation in lamp watts for metal halide.
3.
A reduction in line voltage of up to 40% shall not extinguish the lamp.
F.
Construct housings so that all electrical components are easily accessible and
replaceable without removing the fixture body from its mountings.
G.
Replace noisy ballasts at no cost to the Owner.
INSTALLATION
A.
All luminaires shall be installed complete with all equipment, materials, parts,
attachments, devices, hardware, hangers, cables, supports, channels, frames
and brackets necessary to make a safe, complete and fully operative installation.
Install luminaires in conformance with manufacturer's instructions.
B.
Luminaires shall be installed true and be free of light leaks, warps, dents or other
irregularities.
16510 - 4 of 6
12010 - NISD - High School
C.
All supports for luminaires shall be adequate for the weight of the luminaires. If
troffer fixtures are supported from structural members provided for the
suspended ceiling, verify the adequacy of such structural members including
attachment to building structure.
1.
D.
E.
Furnish all pendant stem hangers with suitable aligner canopies or outlet box
covers so that the luminaires hang vertical to the finished floor.
1.
When luminaires or hanger canopies are mounted flush to the ceiling or
wall, and where raceways and outlet boxes serving the luminaires are
surface mounted to the ceiling or wall, provide finishing rings to conceal
the outlet box.
2.
All visible hanging devices and appurtenances shall have the same finish
as the luminaire.
Rows of luminaires shall be installed accurately in straight lines.
1.
F.
Where necessary, provide extra supports from the building structure.
Provide fixtures adaptable to end-to-end installation.
Each luminaire shall be installed at the location shown on the drawings. Where
field conditions require deviation from the location shown, notify the
Architect/Engineer.
1.
Make the installation as directed by the Architect/Engineer.
G.
Pendant luminaires shall be installed at the mounting heights shown and as
detailed on the drawings or as directed. Pendant luminaires in the same room or
area shall be installed plumb and at uniform heights above the finished floor.
H.
After the installation of the lighting fixtures is completed, fixtures so requiring
(both interior and exterior units) shall be adjusted after dark with the
Architect/Engineer present.
1.
Provide manpower and tools for final focusing.
2.
Adjustment shall be made at no additional cost to the Owner.
I.
Prior to occupancy, clean all luminaires.
J.
In mechanical and electrical equipment rooms, the locations of fixtures and
outlets as shown on the drawings is essentially correct.
1.
Modify exact location at the time of installation in order to meet structural
conditions. Clear interferences and properly relate to equipment location.
16510 - 5 of 6
12010 - NISD - High School
K.
1.6
Provide ceiling access doors if required to service ballasts and fixture
components.
SHOP DRAWINGS
A.
Submit shop drawings and manufacturer's product data as specified.
B.
Original catalog sheets will be acceptable if the sheet represents the fixture type
exactly as specified without any modifications in construction or electrical
characteristics.
C.
Submit manufacturer’s installation instructions.
D.
Drawings shall indicate:
1.
Name of project.
2.
Fixture type.
3.
Complete details of fixtures.
4.
Metal gauges.
5.
Type of wiring.
6.
Color and texture of finishes.
E.
If scallop shields and wallwash reflectors are required, shop drawings shall
indicate their relative position to the wall or adjacent vertical surface.
F.
Identify those fixtures containing emergency battery powered lighting modules.
G.
Submit manufacturer's product data on ballasts and lamps.
1.
Fluorescent lamp color.
16510 - 6 of 6
12010 - NISD - High School
SECTION 16625
EMERGENCY BATTERY POWERED LIGHTING
1.1
EMERGENCY FLUORESCENT LIGHTING MODULE
A.
Provide in each emergency light fixture so designated on the drawing an
emergency lighting module.
B.
Components.
1.
Electronic circuitry required for fluorescent lamp operation.
2.
Battery recharging and derangement signal circuitry.
3.
Assembly of nickel-cadmium or lead battery cells.
C.
The emergency lighting module shall provide power to the fluorescent lamp
within the fixture upon failure of the normal supply to the fixture.
D.
Under normal mode, the electronic assembly shall provide energy to the battery
assembly to keep the batteries in a constant state of readiness. When the line
voltage drops to approximately 75%, the electronic module shall automatically
cause the inverter to draw current from the batteries and operate the fluorescent
lamp at 1000 lumen output for 1-1/2 hours minimum.
E.
Upon restoration of building power, the batteries shall be recharged to their full
capacity within 16 hours. The batteries shall be protected from excessive
discharge by an automatic low voltage battery cut-out circuit.
F.
The transfer from normal to emergency mode shall be accomplished with solid
state circuitry. The drop out and restrike voltage reference points shall be within
15 volts of each other so as not to create an excessive dead band in the event of
a power dim out.
G.
Provide a LED derangement signal. The glow shall be a positive indication that
the battery charger is functioning. It shall be positioned within the fixture in such
a manner that the fixture is identifiable as an emergency lighting unit. Provide an
adjacent push to test button.
H.
Provide internal wiring circuitry to permit.
1.
Local ON-OFF switching.
2.
Energize when in the OFF position and a failure of the normal power
supply occurs.
16625 - 1 of 2
12010 - NISD - High School
I.
The emergency lighting module shall be Underwriter's Laboratories listed.
1.
J.
1.2
Acceptable manufacturers:
1.
Bodine.
2.
Lightalarms.
3.
Dual-Light.
4.
Prescolite.
INSTALLATION
A.
1.3
Locate the module inside the ballast compartment.
Install the systems according to the manufacturer's installation instructions.
SUBMITTALS
A.
Submit shop drawings as specified.
B.
Submit wiring diagrams for switching circuits.
C.
Submit manufacturer's product data.
16625 - 2 of 2
12010 - NISD - High School
SECTION 16720
FIRE ALARM AND DETECTION SYSTEM
SECTION 16720 WILL BE ISSUED BY ADDENDUM
16625 - 1 of 1
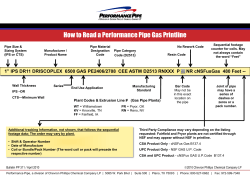

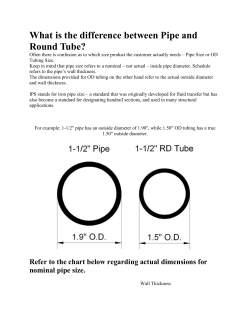


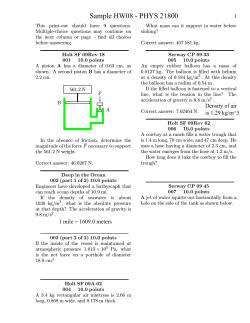
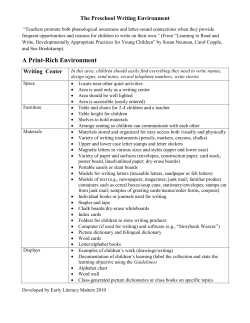
© Copyright 2026