
LABORATORY MANUAL FOR CHEMISTRY 101 Prepared by:
LABORATORY MANUAL FOR CHEMISTRY 101 Prepared by: Department of Chemistry and Physics Los Angeles Valley College This Lab Book Belongs To: ___________________________________________ Copyright © 2014 by the Department of Chemistry and Physics, Los Angeles Valley College. All rights reserved. No part of this publication may be reproduced or distributed in any form or by any means, electronic or otherwise, or stored in a database or retrieval system, without written permission of the copyright holder. 2 TABLE OF CONTENTS GRAPHS ............................................................................................................ 3 METATHESIS REACTIONS ...................................................................................... 15 LABORATORY SAFETY RULES ................................................................................. 23 NICKEL(II) SALT ................................................................................................ 26 BALANCING REDOX REACTIONS USING THE HALF-REACTION METHOD ................................ 31 DERIVING CHEMICAL EQUATIONS FROM BALANCED NET IONIC EQUATIONS .......................... 34 COPPER CHEMISTRY AND REDOX REACTIONS ............................................................. 36 DETERMINATION OF THE GAS CONSTANT .................................................................. 47 MOLAR MASS OF A VOLATILE LIQUID ....................................................................... 51 INTERNAL ENERGY PROBLEMS ............................................................................... 55 BOMB CALORIMETRY .......................................................................................... 61 HESS'S LAW OF HEAT SUMMATION .......................................................................... 69 ATOMIC EMISSION SPECTROSCOPY .......................................................................... 77 MOLECULAR MODELS .......................................................................................... 85 DETERMINATION OF PERCENT KHP AND ACID EQUIVALENT WEIGHT .................................. 91 UNIT CELL GEOMETRY ........................................................................................ 96 FREEZING POINT DEPRESSION .............................................................................. 101 APPENDIX ...................................................................................................... 111 3 GRAPHS INTRODUCTION Relationships between experimental quantities are often represented in the form of graphs. Straight line graphs are easier to construct and to interpret than curved ones. Data that initially result in a curve when graphed are sometimes mathematically rearranged to result in a straight line relationship. This can often be accomplished by taking the logarithms of the values for one or both of the quantities that were being plotted and then graphing these new log values. When data that has been graphed forms a straight line plot, the mathematical relationship between the quantities can be determined from the equation for a line. PROCEDURE A. Construction of a graph A number of rules must be followed when constructing graphs. Your score for this exercise will depend upon how well you follow these rules. 1. Select a good quality graph paper that is easy to use with the metric scale. Graph paper that has divisions marked in blocks with different shades of lines is easier to use (less counting) than paper that has uniform shading. Choose paper that is divided into five by five or ten by ten small squares within a larger grid. Avoid paper in which the large squares are divided into four by four or eight by eight blocks (this type of graph paper is for drafting classes that use English system units). 2. It is customary to plot the quantity that is varied (the independent variable) on the x (horizontal) axis and the quantity that is measured (the dependent variable) on the y (vertical) axis. In mathematical terms, the quantity on the y-axis is a function of the quantity on the x-axis. 3. Use a scale for each axis that will spread the data points to be plotted over the full page (or over the space assigned). Do not crowd the data into one corner. However, your scale should result in convenient units (such as 10, 20, 30, etc. or 2, 4, 6, 8, etc.) for each major division on the graph. A compromise may be necessary. 4. Use a constant scale (the same number of divisions/unit) along each axis. However, because different quantities are plotted on each axis you would not necessarily expect the scale on the x and y axes to be the same. 5. It is only necessary to mark (and label) the intervals at 4 to 6 places along an axis (more than that gets cluttered). For example, if you had mass readings ranging from 7 to 68 g, you might mark and label the axis at 0, 20, 40, 60, and 80 g. Do NOT mark your axes at the data points. The coordinates for the data plotted on the graph should be presented in a table on an unused section of the graph paper (away from the data points) or on a separate piece of paper. 6. The precision in the labels for the axes intervals should reflect the precision in the data being plotted. For example, if masses were determined to one place after the decimal (such as 9.1 g, 15.4 g, etc.) the intervals on the graph should be labeled 0.0, 20.0, 40.0 and so on. Note: The precision for measurements plotted on the y-axis may differ from those for the x axis. 7. If you do not have any data close to a zero value, you need not place “zero” in the lower left-hand corner of the graph. The graph origin can begin at any convenient value (provided it is labeled). However, if the graph is to be assessed to determine a “straight-line” relationship between data, and you wish to read the y-intercept directly from the graph, then you must use intervals and plot the data so that the y-intercept is NOT off the graph. 4 8. Label each axis with the appropriate label. 9. Title each graph. The title should reflect what quantities are being plotted. The title might simply be an equation that has been provided or it might be the description of experimental quantities. 10. After the data have been plotted, draw either a straight line or a smooth curve that best represents the data points. Do NOT connect the dots with individual straight lines. When data being plotted has been experimentally obtained, you should not expect the line to pass directly through every data point due to experimental errors. Construct a “best-fit” plot in which the points that do not fall on the line are randomly scattered. The sum of the distances between the line and the points above it should be the same as the sum of the distances between the line and the points below it. In addition, the line should be drawn so that these distances are minimized. B. Determination of a Mathematical Relationship from a Straight Line Graph. The straight line relationship between quantities x and y can be represented by: = y mx + b where y (the quantity plotted on the vertical axis) is a function of x (the quantity plotted on the horizontal axis). The “m” is the slope of the line and “b” is called the y-intercept. Linear regression analysis and substitution can be used to obtain the exact value for the slope and y-intercept, but in this exercise these values will be estimated by reading them directly from the graph. 1. Graph the data and draw a “best-fit” straight line (see Part A of the Procedure). 2. Determine the slope of the line. Choose two points on the line (not necessarily data points) that can be read accurately. To maximize precision, these two points should be fairly far apart. Read the coordinate values for each point. Point number one is the data point having an x value closest to the origin and the values for point one will be (x1, yl). The other point will have values of (x2, y2). The slope of the line is: y − y1 m= 2 x 2 − x1 3. The sign of the slope can be negative (indicating an inverse relationship between the quantities x and y). Note that the number of significant figures for the slope will be artificially reduced if the points on the line selected for slope determination are too close together. Be sure to include units (unit for y/unit for x) with the value for the slope. 4. To determine the y-intercept value from the graph, extrapolate (extend) the line until it reaches the y-axis (x = 0) and read the value for y at that point (include units). 5. Write the mathematical relationship for the quantities that have been graphed. Into the equation: y mx + b = substitute (each with its appropriate unit): for y – the quantity (what is being graphed) on the y axis for m – the value (number) for the slope for x – the quantity (what is being graphed) on the x axis for b – the value (number) for the y-intercept For example: g concentration = temperature 100 mL g ( C) × 23.1 100 mL ⋅ o o g + 5.3 C 100 mL 5 Constructing Scientific Graphs in Excel™ Excel™ makes constructing scientific graphs easy. You can plot points and find the line of best fit (linear or otherwise) and the equation for that line. You can also import scientific data (such as that from the Vernier™ LabQuest) and visually represent the data. Excel’s “Scatter Plot” chart function allows you to do both. Input the data One version of the scatter chart is used when you only have a few data points (5 to 15 or so). You will enter the independent variable (x-axis) in the first column, “A,” and the dependent variable (y-axis) in the second column, “B.” You can also add descriptions of the data in the first row if you like. For example: Once the data has been entered you can use the cursor to select all of the data, including the header row. Then you will click on the “Insert” tab. On the “Insert” tab you want to choose the icon under the “Charts” section that indicates a scatter chart “Insert Scatter (X, Y) or Bubble Chart” and click on it. After clicking the icon you will have a choice of what kind of scatter plot you want to make. Click on the first one which just shows the points. With this data set you will have something that looks like this. 6 y data Double-click here to change the title. 120 100 80 60 40 20 0 0 2 4 6 8 10 12 Presently, this is not that useful. We need to have the graph properly formatted with the axes labelled, the correct precision, and a descriptive title. We should also have more grid lines. In Excel 2013 clicking on the Scatter Chart icon will then bring up a two new toolbars at the top, one for the Design and one for the Format of the chart. We are mainly interested in the Design toolbar. The first part of the toolbar is labelled “Add Chart Element.” In Excel 2010, three new toolbars are created, “Design,” “Layout,” and “Format.” The Chart Elements are in the “Layout” toolbar in Excel 2010. With this we can add our axes labels and the minor gridlines and format them as we need. Click on “Add Chart Element” then click on “Axis Title” then on “Primary Horizontal.” In the formula bar just under the toolbar you can then put in the title for that axis. For instance, time in minutes (“Time (min)”) and press ENTER. We can do the same for the y-axis by clicking through to “Primary Vertical” and put in the label in the box. For instance, the distance in kilometers (“Distance (km)”) and press ENTER. If you double click on the chart title, where it currently says “y data,” you can change that to a descriptive title such as “Plot of distance vs. time for a road trip.” The graph should now look like this: Plot of distance vs. time for a road trip Distance (km) 120 100 80 60 40 20 0 0 2 4 6 8 10 12 Time (min) Going back to the “Add Chart Element” box we can add minor gridlines by clicking on “Gridlines” then either “Primary Minor Horizontal” or “Primary Minor Vertical.” You will want to change both of them but you can only change on at a time. Adding these with the default values gives this: 7 Plot of distance vs. time for a road trip 120 Distance (km) 100 80 60 40 20 0 0 2 4 6 8 10 12 Time (min) The values on the axes can also be modified to indicate values with appropriate precision by doubleclicking on the numbers on the axis. On the “Format” panel that opens on the right click on the icon with 3 vertical bars and the last option is “Number.” Clicking this and changing the option from “General” to “Number” allows you to specify the number of decimal places the values on that axis have. We can also make the data points smaller (the default is too big). On the right side of the program is the formatting options. Clicking on the drop down arrow where it says “AXIS OPTIONS” and then clicking on the “Series ‘y data’” option (the last one in the list), allows you to change the size, type and color of the data point markers. In the new panel that comes up click on the icon that looks like a paint can and then click on “MARKER” then on “MARKER OPTIONS.” Change it to “Built In” and reduce the size. The smallest you can make it is “2” which works well. 8 At this point we also want to add a trend line which will be the best-fit line for the data. We can do this with the “Add Chart Element” option under “Trendline.” I would suggest using the “More Trendline Options.” Here on the right side under the “Format…,” click on the icon that looks like three vertical bars. You can then select which kind of trend line you want and click on the option to display the equation on the chart. You can also choose to set the intercept to 0.0 (or any value that you know it should be). You can also format the line under the icon that looks like a paint can being poured out. Set the trend line to be a solid line and the thickness to be thin (0.5 pt). Our finished graph then looks like: Plot of distance vs. time for a road trip 120 Distance (km) 100 y = 8.2517x 80 60 40 20 0 0 2 4 6 8 10 12 Time (min) Clicking on a blank area of the chart and pressing “Ctrl-P” will allow you to print the chart. You will usually want to print only one graph on a page. 9 Smooth Line Scatter Chart Inputting the data In this case we will usually input data from another source so we won’t we typing it in by hand. The process for creating the chart will be essentially the same as above, we’ll select “Insert Scatter (X, Y) or Bubble Chart” and choose the option “Scatter with Smooth Lines.” Here we have spectrum data created with the Vernier™ SpectroVis Module from three different discharge lamps. There are 645 rows of data! Obviously, there’s far too much data to enter (or graph) by hand but Excel will handle it nicely. We need to select the data we want to plot. Here, we will just plot the first spectrum out of the three. To select the first spectrum we can just click on the column “A” label and drag over to the column “B” label. This gives us: As before, we then click on the “Insert” tab and click on the “Insert Scatter (X, Y) or Bubble Chart” option. Then we’ll click on the option that shows a smooth line. If we wanted to plot all three spectra on the same plot we would then hold down the Ctrl key and click on the other two intensity columns. This will create a chart that looks like this: 10 Intensity 1.2 1 0.8 0.6 0.4 0.2 0 0 200 400 600 800 1000 Again, we need to do some formatting here to make it useful as a scientific graph. First we need to set the x-axis correctly because we do not need to show the area from 0 to almost 400 nm and from about 900 nm to 1000 nm. To set the x-axis scale correctly we then click in the “Format” area on the right on the “Horizontal (Value) Axis.” Click on the icon that looks like three vertical bars and on “Axis Options.” The first section here is “Bounds.” Change the Minimum to 380 and the maximum to 900. Next we need to add the axis labels. This is done exactly as we did before. Click on “Add Chart Elements” then “Axis Titles” then “Primary Horizontal.” Type “Wavelength (nm)” in the box and press ENTER. Do the same for “Primary Vertical” and type “Intensity” in the box. This has no units so we don’t have to add anything else. We should also change the graph title to something more descriptive such as “Plot of Intensity vs. Wavelength for the Hydrogen lamp.” We can also add in the minor gridlines to make the graph easier to read by clicking “Add Chart Elements” then “Gridlines” then “Primary Minor Vertical.” Then in the “Format” section on the right click on “Vertical (Value) Axis” and click on the icon that looks like 3 bars. Click on “Axis Options” and change the value for the minor units to 0.02 (1/10th of the major unit). Then do the same thing for the Horizontal axis. We can change the precision of the labels on the axes in the same way we did before with the “Number” option at the bottom of the “Format Axis” panel (3 decimals for intensity and 1 for the wavelength). Finally, again the default value for the line is too thick. Click on “Series ‘Intensity’” and then on the paint bucket icon and change the line thickness to 0.5 pt. We then have a graph that looks like: 11 Plot of intensity of light vs. wavelength for the hydrogen lamp 1.200 1.000 Intensity 0.800 0.600 0.400 0.200 0.000 380.0 480.0 580.0 680.0 780.0 Wavelength (nm) At this point, you can click on a blank area of the graph and press Ctrl-P you can print it. 880.0 12 GRAPHING EXERCISES: Use a good quality graph paper in this exercise. (Several sheets of graph paper are available after Appendix B in this lab book. Make photocopies or purchase similar graph paper if you need more sheets.) Use one sheet of graph paper divided into 4 sections for Exercises 1a, 1b, 1c, and 2 (one-fourth of a sheet for each graph). Use a full sheet of graph paper for each graph in Exercises 3 and 4. Include a table of the data that was plotted for each graph (either on the graph or on a separate, labeled sheet of paper). If you choose to do this exercise with Excel™ or some other computer graphing program you can use 1 sheet per graph for the first four. 1. Construct graphs for each of the following functions. Select 6 values for x ranging from 0 to 10, and for each value of x calculate the value for y. Provide these values for x and y in a table. Plot y on the vertical axis and x on the horizontal axis. a. a. y = 5x b. = y 4 x + 25 c. y= 15 x 2. For each of the values you chose for x in Exercise 1c, calculate log x. For each of the values you calculated for y in Exercise 1c, calculate log y. Create a table containing the data for log x and log y. Plot these data with log x on the x (horizontal) axis and log y on the y (vertical) axis. How is the shape of the graph different than that for Exercise 1c? 3. a. Graph the solubility of Potassium Sulfate in water (y-axis) as a function of temperature (xaxis). The experimental data are: Temperature, °C solubility (g/100 g water) 20.0 9.9 40.0 14.0 60.0 18.0 80.0 21.9 100.0 26.0 b. Use the graph you have just prepared to determine a mathematical equation for solubility of this salt (y-axis) as a function of temperature (x-axis). 4. We can measure the concentration of a dissolved substance by measuring the fraction of a particular wavelength of light that passes through the solution. This fraction of light (known as transmittance) has the symbol I/Io. The following data were obtained for 525 nm light passing through 1.00 cm of solution (of varying concentrations) of Potassium Permanganate. (These concentrations are expressed in units of mg MnO4-/100 mL solution.) concentration I/Io 1.0 0.400 2.0 0.158 3.0 0.063 4.0 0.025 a. Prepare a graph of I/Io (y-axis) as a function of Permanganate concentration (x-axis). b. Calculate log I/Io. Construct a table with the original values for concentration and log I/Io. Plot the mg MnO4-/100 mL solution on the x-axis. Plot log I/Io on the y-axis. Note: Because the values for log I/Io (y-axis) are negative, you will be plotting in the lower right hand quadrant and the labels for the x-axis should be along the top of the graph. c. Determine the mathematical relationship for log I/Io as a function of concentration. Watch the sign on your values for slope and y-intercept. 13 REPORT BALANCE EXERCISE NAME _______________________________ SECTION ____________________________ BALANCE NUMBER: UNKNOWN CODE: MASS (TRIAL 1): MASS (TRIAL 2): MASS (TRIAL 3): AVERAGE MASS: UNKNOWN CODE: MASS (TRIAL 1): MASS (TRIAL 2): MASS (TRIAL 3): AVERAGE MASS: YOU MAY WISH TO MAKE NOTES REGARDING THE PROPER USE OF THE ANALYTICAL BALANCE IN THIS SPACE: LEVEL? ZEROED? 14 15 METATHESIS REACTIONS INTRODUCTION A metathesis (double-replacement) reaction is one that appears to involve the exchange of parts of the reactants. With careful observation, and consultation of solubility rules, it is often possible to determine the chemical reaction that occurs when two water soluble compounds react and a precipitate forms. In addition, if the volumes and molarities of the reactants are known, it is then possible to determine the limiting reactant and theoretical yields for the reaction. SOLUBILITY RULES: Salts that are soluble: o All salts containing Group IA ions are soluble. o All salts containing the ammonium ion are soluble. o All salts containing the following anions are soluble: nitrate, chlorate, perchlorate o All salts containing the acetate ion except with silver, lead(II) and mercury(I). Salts that are generally soluble, with some exceptions: o All chlorides, bromides, and iodides are soluble except those of silver, lead(II), and mercury(I). o All sulfates are soluble except those of calcium, strontium, barium, silver, lead(II), and mercury(I). Salts that are generally insoluble, with some exceptions: o All metal oxides are insoluble, except for those of Group IA, calcium, strontium, and barium. o All hydroxides are insoluble, except for those of Group IA, ammonium, calcium, strontium, and barium. o All carbonates, phosphates, sulfides, and sulfites are insoluble, except for those of Group IA and ammonium. PROCEDURE 1. Watch your professor's demonstration carefully. Aqueous solutions containing different chemicals will be combined. Record (on your report sheets): a. the color, volume, and molarity of each reagent used. b. your observations as to what occurs as the reagents are mixed (color of precipitate and any other observations). 2. The reactions you will observe are: a. silver nitrate with potassium chromate b. silver nitrate with sodium phosphate c. lead(II) nitrate with potassium chromate d. barium chloride with sodium sulfate 3. Consult the solubility rules provided in the introduction and determine the probable identity of the precipitate that has formed in each reaction. Note: The solubility rules provided are not complete. However, they provide sufficient information to determine, by process of elimination if necessary, the identity of each reaction's precipitate. 4. Write balanced chemical, ionic, and net ionic equations for each demonstrated reaction. Include phase labels or you will lose credit. 5. Calculate the theoretical yield (in grams) for the precipitate formed in each reaction and identify the limiting reactant. 16 17 REPORT FOR METATHESIS REACTIONS EXP. NAME __________________________ SECTION________________________ Reaction of silver nitrate with potassium chromate. silver nitrate Volume (mL) Molarity (M) Color of Solution Observations Chemical Reaction Ionic Equation Net Ionic Equation Theoretical Yield (g) Limiting Reactant SHOW CALCULATIONS: potassium chromate 18 REPORT FOR METATHESIS REACTIONS EXP. (cont.) NAME ____________________________________ Reaction of silver nitrate with sodium phosphate. silver nitrate Volume (mL) Molarity (M) Color of Solution Observations Chemical Reaction Ionic Equation Net Ionic Equation Theoretical Yield (g) Limiting Reactant SHOW CALCULATIONS: sodium phosphate 19 REPORT FOR METATHESIS REACTIONS EXP. (cont.) NAME __________________________________ Reaction of plumbous nitrate with potassium chromate. lead(II) nitrate Volume (mL) Molarity (M) Color of Solution Observations Chemical Reaction Ionic Equation Net Ionic Equation Theoretical Yield (g) Limiting Reactant SHOW CALCULATIONS: potassium chromate 20 REPORT FOR METATHESIS REACTIONS EXP. (cont.) NAME _______________________ Reaction of barium chloride with sodium sulfate. barium chloride Volume (mL) Molarity (M) Color of Solution Observations Chemical Reaction Ionic Equation Net Ionic Equation Theoretical Yield (g) Limiting Reactant SHOW CALCULATIONS: sodium sulfate 21 QUESTIONS FOR METATHESIS REACTION EXP. NAME __________________________ 1. When 2.0 mL of 1.50-M ammonium phosphate is mixed with 1.000 mL of 0.750-M ferrous acetate, a precipitate forms. a. Write balanced chemical and net ionic equations for the reaction, including phase labels. b. Calculate the theoretical yield (in grams) of the precipitate and identify the limiting reactant. c. Calculate the grams of the reactant in excess (left over) after the reaction is complete. 22 QUESTIONS FOR METATHESIS REACTION EXP. (cont.) NAME __________________________ 2. When 1.25 mL of 2.50-M copper(I) bromide is mixed with 2.0 mL of 1.50-M lithium carbonate, a precipitate forms. a. Write balanced chemical and net ionic equations for the reaction, including phase labels. b. Calculate the theoretical yield (in grams) of the precipitate and identify the limiting reactant. c. Calculate the grams of the reactant in excess (left over) after the reaction is complete. 23 LABORATORY SAFETY RULES Note: Failure to follow safety rules will result in expulsion from this course. 1. Wear approved safety goggles AT ALL TIMES in the laboratory. 2. It is not advisable to wear contact lenses during lab. 3. Tie back long hair and do not wear loose clothing to lab. They are fire hazards. 4. Wear closed shoes to lab. 5. Never put anything into your mouth while in the lab. 6. Immediately wash off any chemicals spilled on your skin or clothes. 7. Keep the lab neat. Return reagent containers and equipment to proper locations. Put any belongings not needed for experimental work on the shelves provided. 8. Clean up all chemical spills or broken glass immediately. 9. Think about how much chemical you will need before you take it from a stock (reagent) bottle. NEVER return unused chemicals to stock bottles. 10. Dispose of waste chemicals only as instructed. 11. Behave in a responsible manner. 12. Be aware of the location and use of laboratory safety equipment. 13. Immediately report accidents and injuries to your professor. 14. Do NOT perform unauthorized experiments 15. Thoroughly wash your hands any time you leave the lab. 16. No smoking on the Los Angeles Valley College campus except for designated areas. I have carefully read all of the safety precautions summarized above and recognize that it is my responsibility to observe them throughout this course. Chemistry 101 Date Section Number Printed Name Signature 24 25 LABORATORY SAFETY RULES Note: Failure to follow safety rules will result in expulsion from this course. 1. Wear approved safety goggles AT ALL TIMES in the laboratory. 2. It is not advisable to wear contact lenses during lab. 3. Tie back long hair and do not wear loose clothing to lab. They are fire hazards. 4. Wear closed shoes to lab. 5. Never put anything into your mouth while in the lab. 6. Immediately wash off any chemicals spilled on your skin or clothes. 7. Keep the lab neat. Return reagent containers and equipment to proper locations. Put any belongings not needed for experimental work on the shelves provided. 8. Clean up all chemical spills or broken glass immediately. 9. Think about how much chemical you will need before you take it from a stock (reagent) bottle. NEVER return unused chemicals to stock bottles. 10. Dispose of waste chemicals only as instructed. 11. Behave in a responsible manner. 12. Be aware of the location and use of laboratory safety equipment. 13. Immediately report accidents and injuries to your professor. 14. Do NOT perform unauthorized experiments 15. Thoroughly wash your hands any time you leave the lab. 16. No smoking on the Los Angeles Valley College campus except for designated areas. Come to lab prepared! Carefully read the experiment before coming to lab. 26 NICKEL(II) SALT INTRODUCTION A nickel(II) salt is put into aqueous solution. Alcoholic dimethylglyoxime is added to this solution and the nickel(II) ion is then quantitatively precipitated as the bis(dimethylglyoximato)nickel(II) coordination compound. The salt’s anion is a spectator in the reaction. H3C Ni2+ + 2 O H C N .. O CH3 H3C CH3 C C N N H C N .. O O Ni O H N N C C + 2 H+ O H H3C CH3 (the dotted lines are hydrogen bonds or coordinate covalent bonds) The solid red nickel(II) dimethylglyoxime coordination compound is collected using suction filtration techniques and dried. The mass and formula of the precipitate are used to calculate the mass of Nickel in the original unknown salt. All mass determinations require the use of the analytical balance. PROCEDURE DAY 1 1. Obtain a capped shell vial containing an unknown nickel(II) salt. Record your unknown’s number. 2. Place the vial of the nickel salt on the pan of the balance and then zero the balance with the vial on the pan. Carefully avoiding spills, the chemical is then transferred to the reaction vessel (for this experiment, use a clean 400 mL beaker which can be wet). The empty vial (which may have some chemical still clinging to its sides) is then returned to the balance pan (without re-zeroing). The negative mass displayed is the mass of nickel(II) salt transferred. 3. Record the mass of nickel(II) salt transferred in grams ±0.1 mg. 4. Add approximately 200 mL of distilled water to the unknown sample in the 400 mL beaker. Using a clean glass or plastic stirring rod, stir the solution until all solids have been dissolved. 5. On a hot plate, heat the solution to between 60°C and 80°C (use a thermometer). Do not overheat!! 6. Add 40 mL of a 1-percent alcoholic solution of dimethylglyoxime to the warm solution. Stir well. 7. Using the dropper bottle of 6-M ammonium hydroxide (available in the hood) make the solution slightly basic (pH 8-9) by adding the 6-M ammonium hydroxide one drop at a time using a clean dropper. After each drop, stir, and test the pH by touching the wet stir rod to a piece of pH paper. You should be able to do 4-6 tests on one piece of pH paper. Dispose of the used pH paper in the wastepaper basket, neither on the floor nor in the sink!! 8. Coagulate the precipitate into larger particles by maintaining the temperature at about 60°C (use a hot plate on a low setting (4-5) and check the temperature frequently). Heat for at least 45 minutes and (gently) stir occasionally. During the heating process, complete steps 9 through 11. Do not forget to watch the solution’s temperature! Do not leave your material unless you have turned off 27 your hot plate. 9. Obtain a filtration crucible. 10. Choose the smallest beaker on which you can write your name AND in which the crucible will stand upright. The crucible should rest on the bottom of the beaker. 11. Clean both the beaker and the crucible with tap water and then with deionized water. Do not use a brush to clean the crucible; it will damage the glass filter. Put your name and/or your locker number in pencil on the beaker, and place it in the oven on the shelf for your lab section. Leave them to dry until the next laboratory period. Tape will scorch in the drying ovens. Do not put it on glassware that is dried in an oven! 12. After your precipitate has been maintained at about 60°C for at least 45 minutes, carefully place the beaker containing the warm solution in your drawer. Cover it with a watch glass (curved side down) and store it until the next lab session. DAY 2 1. Remove your crucible and beaker from the oven (use your tongs and ceramic tile), place them in a desiccator, and allow them to cool to room temperature. Be careful--they will be very hot!! 2. Do not touch the beaker or crucible until after they are weighed. After cooling, determine the combined weight of crucible and beaker on the analytical balance. Note that in this weighing procedure you will zero the balance before placing the crucible and beaker on the pan. The mass will then be read directly. After the mass of the beaker and crucible have been determined, they can be touched with your fingers. Never attempt to weigh an object that is warmer than room temperature. 3. Review your professor’s discussion of the use of the suction filtration apparatus. Clean the filter flask of the suction filtration apparatus before using it. Filter the solution and precipitate prepared on DAY 1 through the crucible. If some precipitate passes through the filter, return it to the original beaker and re-filter it through the same crucible. Rinse all of the precipitate into the crucible using distilled water. Continue to filter and carefully wash your precipitate in the crucible with a stream of distilled water from your wash bottle. Use a total of about 250 ml of water. (Which chemicals and spectator ions are you washing away? You will need to think about this to answer the first question in your report.) 4. Place your crucible in the same beaker in which you originally weighed it. Be certain that your name is still on the beaker (no marking tape, it will burn) and leave it in the 110°C oven on the shelf designated for your lab section until the next laboratory session. 28 DAY 3 1. Carefully remove your hot beaker and crucible from the oven and place them in a desiccator. Allow them to cool to room temperature. After cooling, and without touching them with your fingers, weigh both the crucible and the beaker on the analytical balance. The mass of your NiC8H14O4N4 (molar mass = 288.917 g mol-1) precipitate is determined by difference. Note: there is one atom of nickel in each molecule of precipitate. 2. Do not use a brush to clean the crucible; it will damage the glass filter. Just rinse out the large chunks of the precipitate with a stream of tap water and return the crucible to the stockroom. The crucible will still be pink when you return it. 3. Calculate the percent by mass of nickel in the unknown salt. 29 REPORT NAME __________________________ NICKEL(II) SALT EXP. SECTION _______________________ UNKNOWN # Mass of unknown, (g) Mass of crucible + beaker + precipitate, (g) Mass of crucible + beaker, (g) Mass of known precipitate, (g) Percent nickel(II) in the unknown salt, (%) SAMPLE CALCULATIONS (use separate sheets if necessary) 30 QUESTIONS FOR NICKEL(II) SALT EXP. NAME __________________________ 1. When the sample is placed in the oven, the alcohol and water evaporate. List all other chemicals, including spectator ions that must be washed from the sample before it is dried. 2. A 0.2084 g sample of an unknown Ni(II) salt was put into solution and properly treated to form the solid nickel(II) dimethylglyoxime complex (molar mass = 288.917 g mol-1). When the precipitate was rinsed, dried, and cooled, it was determined to have a mass of 0.1923 g. Calculate the mass of nickel in the precipitate and the percent (by mass) of nickel in the original (unknown) salt sample. 3. When a solution containing silver ions is mixed with another solution containing chloride ions, a precipitate of silver chloride forms. When 45.00 ml of a silver nitrate solution is mixed with an excess of a sodium chloride solution, all of the silver ion is precipitated as silver chloride. The solid is collected, washed, dried, and found to have a mass of 2.928 g. Calculate the molarity of the original silver nitrate solution. 31 BALANCING REDOX REACTIONS USING THE HALF-REACTION METHOD There are many methods that can be used when balancing chemical reactions that involve oxidationreduction. The following steps are used in a “half-reaction” method: 1. The initial “skeleton” reaction to be balanced for an oxidation-reduction reaction occurring in aqueous solution often does not include the H2O, H+(in acid), or OH- (in base) that will be added later as the reaction is balanced. Sometimes spectator ions are not included either. Write the skeleton reaction and assign oxidation numbers to each element. 2. Split the reaction into two half-reactions, one containing everything being oxidized and one containing everything being reduced. (Note: In some reactions, more than one element is oxidized or more than one is reduced. Sometimes the mole to mole relationships between these elements can be determined from the formulas of the chemicals involved in the reaction. However, in some cases, experimental data is needed to help determine the correctly balanced equation.) 3. For each half-reaction, balance of all the elements present except oxygen and hydrogen. 4. Balance oxygen by adding H2O to the side of the half-reaction needing oxygen. 5. The method for balancing hydrogen in each half-reaction depends on whether the reaction is taking place in acidic or basic solution. a. in acid, add H+ to the side of the reaction needing more hydrogen. b. in base, count the number of hydrogen atoms that are needed. Add one H2O for every hydrogen atom needed to the side with insufficient hydrogen and simultaneously add the same number of OHions to the opposite side Note: # of H needed = # of H2O added to the side with insufficient H = # of OH- added to opposite side 6. Balance overall charge by adding electrons (e-) to the more positive side of the half-reaction. 7. Multiply each half-reaction by the factors needed to make the electrons in each half-reaction equal. 8. Add the half-reactions (combining any like terms) and cancel species that appear on both sides of the equation (electrons must cancel). 9. If needed, divide by the largest common factor to reduce the coefficients to the lowest whole number ratio. 10. CHECK to make certain that the number of atoms of each element and overall charge are balanced. 32 This method of balancing redox reactions will now be applied to a problem. The numbers shown to the left of each step in the process correspond to the numbers for the steps in the instructions given on the previous page. Balance the following redox reaction: 1. 2 3. 4. N2H4 + Pu2O3 → N2O + Pu(OH)2 (in base) N2H4 + Pu2O3 → N2O + Pu(OH)2 (in OH- and H2O) -2 +1 +3 -2 +1 -2 N2H4 → N2O Nitrogen is balanced N2H4 → N2O +2 -2 +1 +1 -2 Pu2O3 → Pu(OH)2 Pu needs to be balanced Pu2O3 → 2 Pu(OH)2 one oxygen needed on the reactant side, add one H2O to the reactant side H2O + N2H4 → N2O -2 +1 one oxygen needed on the reactant side, add one H2O to the reactant side H2O + Pu2O3 → 2 Pu(OH)2 5. (in base) 6 H needed on the product side, add 6 H2O to 2H needed on the reactant side, add 2 H2O to the product side and 6 OH- to the reactant side reactant side and 2 OH- to the product side 6OH- + H2O + N2H4 → N2O + 6 H2O 2 H2O + H2O + Pu2O3 → 2 Pu(OH)2 + 2 OH(H2O on the reactant side could be combined) | 3 H2O + Pu2O3 → 2 Pu(OH)2 + 2 OHNote: It does not matter that there is H2O on both sides of the nitrogen equation at this point. They will be canceled later. Hydrogen and oxygen are balanced in each half reaction. 6. add 6 e- to the product side add 2 e- to the reactant side 6 OH- + H2O + N2H4 → N2O + 6 H2O + 6e- 2 e- + 3 H2O + Pu2O3 → 2 Pu(OH)2 + 2 OH7. Multiply equation above by 1 Multiply the equation above by 3 6 OH- + H2O + N2H4 → N2O + 6 H2O + 6e6 e- + 9 H2O + 3 Pu2O3 → 6 Pu(OH)2 + 6 OH(add equations and combine like terms) 8. 6 e- + 6 OH- + 10 H2O + N2H4 + 3 Pu2O3 → N2O + 6 H2O + 6 Pu(OH)2 + 6 OH- + 6e(cancel 6 e-, 6 OH-, and 6 H2O from each side of the reaction) 4 H2O + N2H4 + 3 Pu2O3 → N2O + 6 Pu(OH)2 9. Because the coefficients are in the lowest whole number ratio, the equation is complete. 10. Check to make sure the number of atoms and overall charge are balanced in the completed equation. 33 Apply the method outlined for the half-reaction method to balance the following redox reactions. 1. NO3- + Zn → Zn2+ + N2 (in acid) (in base) 2. O2 + I- → I2 Hint: one of the half-reactions has nothing on the product side. 3. CrO2- + ClO- → Cl- + CrO42- (in base) (in acid) 4. HNO3 + Bi2S3 → Bi(NO3)3 + NO + S Hint: remember that most metal sulfides are insoluble. 5. S2O32- + I2 → S4O62- + I- (in base) 6. Cr2O72- + Sn2+ → Sn4+ + Cr3+ (in acid) 7. SCN- + H2O2 → NH4+ + HCO3- + HSO4Hint: same as in number 2. (in acid) 34 DERIVING CHEMICAL EQUATIONS FROM BALANCED NET IONIC EQUATIONS For oxidation-reduction reactions, often it is easier to balance the net ionic form of the equation first and then to derive the chemical equation from the net ionic equation. The following is a method for this procedure: 1. Write the skeleton equation from the information given for the reactants and products. 2. Assign oxidation numbers to every element (including the elements of any acids and bases). 3. The elements that are spectator ions do not change oxidation numbers. However, sometimes an ion can be involved as both a spectator ion and in oxidation-reduction. An example of this will be the nitrate ion in the copper chemistry experiment. 4. Balance the net ionic equation following the rules given in the previous section. Remember to add in the spectator ions on the side needing them when you balance the atoms other than oxygen and hydrogen. 5. If needed, divide to reduce the coefficients to the lowest whole-number ratio. At this point you will need to add in the counter ion for the acid or base used. Add one counter ion for each H+ (for sulfuric acid you will add HSO4-) or OH- in the equation to each side. The result of this step is the ionic equation. Check to make sure that the total charge on each side of the reaction is zero. 6. Combine anions and cations to create the balanced chemical equation. No uncombined ions should remain. Check to make sure the number of atoms is still balanced and that the coefficients are in the lowest whole-number ratio. An example of this method of deriving a chemical equation from the balanced net ionic form of an equation for a redox reaction will now be shown. Practice problems will be found in the Copper Chemistry laboratory experiment and questions. Potassium permanganate reacts with chromium(III) chloride to produce manganese(IV) oxide and the chromate ion in potassium hydroxide. KMnO4 + CrCl3 MnO2 + CrO42- +1 +7 -2 +3 -1 +4 -2 +6 -2 3 e- + 4 H2O + KMnO4 MnO2 + K+ + 2 H2O +4 OH8OH- + 4 H2O + CrCl3 CrO42- + 3 Cl- + 8 H2O + 3 e— 4 OH- + KMnO4 + CrCl3 MnO2 + CrO42- + 3 Cl- + K+ + 2 H2O +4 K+ +4 K+ 4 KOH + KMnO4 + CrCl3 MnO2 + K2CrO4 + 3 KCl + 2 H2O Balance atom other than H or O. Balance O by adding water. Balance H by adding H+. Balance charge by adding e-. Add in counter ion to acid or base. 35 MORE PRACTICE REDOX PROBLEMS 1. NaCl + MnO2 → Mn2+ + Cl2 (in H2SO4) 2. K4Fe(CN)6 + CeCl4 → Ce(OH)3 + Fe(OH)3 + CO32- + NO (in KOH) 3. NaNO2 + Al → NH3 + AlO2- (in NaOH) 4. NaIO3 + NaI → NaI3 (in HI) 5. Fe + HCl → HFeCl4 + H2 6. Fe(OH)2 + H2O2 → Fe(OH)3 (in KOH) 7. Na2S2O8 + CrCl3 → Cr2O72- + SO42- (in HCl) 8. KCN + KMnO4 → CNO- + MnO2 (in KOH) 9. CrI3 + Cl2 → CrO42- + IO4- + Cl- (in NaOH) 10. Potassium permanganate and nitrous acid react in sulfuric acid. Two of the products of this reaction are manganese(II) bisulfate and nitric acid. 36 COPPER CHEMISTRY AND REDOX REACTIONS INTRODUCTION This laboratory exercise will examine several oxidation-reduction reactions (reactions which involve the transfer of electrons from one substance to another). In the past, the first experimental procedure was performed using pure copper pennies. However, modern pennies are not pure copper, but instead have zinc centers with copper plated only on the outer surfaces. Therefore, this experiment will use pieces of pure copper metal. The reactions that will be used to dissolve the copper metal and then recover it are outlined below: HNO3 NaOH ∆ H2SO4 Zn Cu → Cu2+ → Cu(OH)2 → CuO → Cu2+ → Cu The first reaction in this experiment generates nitrogen dioxide, a poisonous gas. Breathing only a small amount of this gas can result in inflammation of the lungs. In larger amounts, this gas can be fatal. In addition, later experimental procedures will generate flammable hydrogen gas. All of these potentially hazardous procedures must be performed in the fume hood. Several reactions in this experiment require the use of concentrated acids. Use these acids in the fume hoods. Do not remove the bottles from the hoods. Immediately clean up any spills using sodium bicarbonate to neutralize the acid and then wipe up the moist neutralized salts. In this laboratory exercise, if the reaction is a metathesis (or other reaction in which there is no oxidation-reduction reactions), only the chemical (molecular) equation will be written and balanced. For each step of the copper chemistry experiment in which a chemical reaction occurs, and also for each of the four redox demonstration reactions, it will be necessary to write balanced net ionic, ionic, and chemical equations. 37 PROCEDURE DAY 1 – A. Copper Chemistry 1. Work in groups of 3 to 4 people. Obtain a pair of beaker tongs and a piece of copper wire. Determine the mass of the copper wire to the nearest 0.0001 g. (It can be weighed directly on the balance pan.) Now place the copper wire in a clean 400 mL beaker. Record your observations for each step in which a chemical reaction occurs. 2. Make sure the hood fans are on. In the hood, add 5.0 mL of concentrated nitric acid (not 6-M) to the copper in the beaker. Two of the products from the oxidation-reduction reaction that occurs are nitrogen dioxide and copper(II) ion in aqueous solution. 3. Keep the beaker at the back of the hood. Avoid unnecessary exposure to nitrogen dioxide by keeping your head out of the hood and the glass shield pulled down in front of your face. Tip and swirl the beaker occasionally to make sure the copper reacts completely. As long as the solution is green, nitrogen dioxide gas is still being formed. When the copper has completely dissolved and no more nitrogen dioxide gas is being produced, the solution will be completely blue (not green). Make sure that all of the copper wire has dissolved. Now add approximately 100 ml of cold, deionized water to the beaker, then take the beaker out of the hood and return to your bench space. The blue color of your solution is due to the aqueous copper(II) cation. 4. Add 20 mL of 6-M NaOH (stored in the hood) to your solution. The hydroxide ion will react with the copper(II) ion to form a gelatinous white copper(II) hydroxide precipitate. The precipitate appears blue because some of the copper(II) ion remains in hydrated. Of course, NaOH also neutralizes the excess nitric acid (from step 2) according to the balanced molecular equation: NaOH + HNO3 → NaNO3 + H2O 5. Obtain one large piece of broken crucible. Rinse it well and add it to your beaker containing the precipitate. It will act as a boiling chip to prevent "bumping" and splattering during heating in the next step. 6. With gentle stirring, carefully heat your precipitate mixture to just boiling (use a hot plate on a low setting). The heat will cause all of the copper ions to react and will convert the copper(II) hydroxide into black copper(II) oxide solid (water is expelled in the process). Heat until all of the blue color is gone and the solids are completely black. Use beaker tongs to transfer the hot beaker to a ceramic tile and allow the black solid to settle. 7. While the precipitate is settling, heat a large beaker of about 300 mL of deionized water to boiling. 8. Wash your evaporating dish and store it in your drawer. It needs to be clean and dry for DAY 2. It is difficult to precipitate out copper metal while NO3- is present. Step 9 removes most of the nitrate. 9. After your precipitate has settled, decant the clear solution (supernatant) into a separate beaker. Try not to lose any precipitate. Using beaker tongs to handle the hot beaker, wash the precipitate with about 100 mL of hot water. Allow the precipitate to settle. Decant the supernatant and repeat the wash procedure two more times. Be sure to keep the deionized water hot. Decant as completely as possible after the last wash. 10. Add 20 mL of 6.0-M H2SO4 to the black precipitate. Make sure all of the precipitate dissolves. If all of the precipitate does not dissolve, add more sulfuric acid 1-2 mL at a time until it does. Decant your solution into a second clean 250 mL beaker leaving the boiling chip in the original beaker. Rinse the original beaker containing the boiling chip with deionized water and add this rinse water to your solution in the second beaker (you are trying not to lose any copper ions). 11. Return the piece of broken crucible to the container provided. 38 12. Cover the solution with a watch glass (curved side down) and store it in your drawer until the next lab period. Return the beaker tongs to the stockroom. DAY 2 - A. Copper Chemistry (cont.) 13. In the hood, add approximately 2 grams of 30-mesh zinc to your solution (a small amount at a time) with gentle stirring. Two different reactions are occurring. Zinc metal is donating electrons to the copper(II) ion, precipitating copper metal and forming zinc ion in solution. In addition, zinc metal is reacting with the excess hydrogen ion from step 10 on day 1 to produce zinc ion and hydrogen gas (which is flammable). 14. Continue to stir the mixture. Every few minutes, stop stirring and look for hydrogen gas formation. After the gas production has slowed down, look at the supernatant. It should be colorless (or have a slightly gray color). If it is still blue, add more zinc, a small amount (0.1 to 0.2 g) at a time until the blue color is gone. Do not add too much zinc. Note: it is now necessary to dissolve any excess zinc metal that may be present. Zinc will react with hydrochloric acid and dissolve but copper metal will not react. 15. When you no longer see gas formation in the beaker and the copper precipitate has settled, carefully decant and discard the supernatant. While still in the hood, first add 5.0 ml of distilled water and then 10.0 ml of concentrated (12-M) hydrochloric acid to the precipitate. Rinse your graduated cylinder immediately. When gas evolution in the beaker has stopped, remove the beaker from the hood. 16. Allow the copper to settle while you weigh the evaporating dish (which was cleaned on DAY 1) to the nearest 0.0001 g. (The dish must be clean and dry.) 17. Decant the supernatant, add sodium bicarbonate until it stops fizzing and discard it carefully down the sink and flush with plenty of water. Transfer the copper to the weighed evaporating dish. Use your wash bottle to rinse any solid remaining in the beaker into the evaporating dish. Wash the copper in the dish three times with about 30 mL of deionized water each time. Drain as completely as possible after each washing. 18. In the hood, wash the copper (still in the dish) with 10 ml of methanol. Decant the methanol into a beaker and discard the used methanol in the waste methanol container. Repeat with a second 10 mL sample of Methanol. 19. In the hood, wash the copper with 10 ml of acetone, decant, and discard the used acetone in the waste acetone container. Repeat with a second 10 mL sample of acetone. 20. Gently warm the copper in the evaporating dish on a hot water bath. Stir gently until the copper is dry and granular. Do not overheat or the copper will oxidize (react with the oxygen in the air). Note: Do not put your copper away wet. It will oxidize!! 21. Store the evaporating dish containing the copper uncovered in your drawer until the next laboratory period. DAY 3 – A. Copper Chemistry (cont.) 22. Weigh your copper and evaporating dish. Determine your percent recovery. Percent Recovery = 23. Discard copper in the container provided. g of recovered Copper × 100 g of original Copper 39 24. For each step of the Copper Chemistry experiment in which a chemical reaction occurred, write a chemical equation. B. Additional Oxidation - Reduction Reactions. 1. Observe your professor's demonstration of four oxidation-reduction reactions. 2. Record your observations (color changes, phase changes, appearance of reactants and products). 3. Follow the procedure outlined in the previous sections and write a balanced net ionic equation for each reaction. Derive the balanced ionic and chemical equations for each reaction. The reactions are: a. Potassium permanganate reacts with iron(II) chloride in hydrochloric acid solution. Two of the products of the reaction are manganese(II) ion and iron(III) ion. b. Sodium dichromate reacts with potassium iodide in sulfuric acid solution. Two of the products of the reaction are chromium(III) ion and molecular iodine. c. Nickel(II) nitrate reacts with potassium persulfate, K2S2O8, in sodium hydroxide solution. Two of the products of the reaction are nickel(IV) oxide (a black precipitate) and sulfate ion. d. Aluminum metal reacts with sodium bromate, NaBrO3, in sodium hydroxide solution. Three of the products of the reaction are bromide ion, hydrogen gas, and the Al(OH)4- ion. In this reaction there are two reductions and they can be combined in the same half-reaction. However, the ratio of bromide to hydrogen must be determined experimentally. It has been found that one mole of hydrogen gas is produced for every mole of bromide ion produced. 40 REPORT FOR COPPER CHEMISTRY AND REDOX EXPERIMENT NAME __________________________________ A. Copper Chemistry SECTION ________________________________ 41 Orignal Mass of Copper, (g) Mass of Evaporating dish + recovered Copper, (g) Mass of Evaporating dish, (g) Mass of Recovered Copper, (g) Percent Recovery, (%) For each step of the procedure in which a chemical reaction occurred, record your observations. Did a gas or precipitate form? Was there a color change? For each step involving a redox reaction, write a net ionic equation that has been balanced using the ½ reaction method. Then write the ionic equation and chemical equation. Show your work on a separate sheet. For each step with a chemical reaction that does not involve redox, write a balanced chemical (molecular form) equation. For all of the equations, include symbols for physical states or you will lose credit! Step 2 Observation Chemical Equation Ionic Equation Net Ionic Equation Step 4 (NOT the neutralization reaction that was provided) Observation Chemical Equation REPORT FOR COPPER CHEMISTRY AND REDOX EXP. (cont). NAME ____________________________________________ Step 6 Observation Chemical Equation Step 10 Observation Chemical Equation Step 13 (Note: Two different chemical reactions occurred in this step; give the equations for both. Only one reaction involved copper.) Observation Chemical Equation A Ionic Equation A Net Ionic Equation A Chemical Equation B Ionic Equation B Net Ionic Equation B 42 REPORT FOR COPPER CHEMISTRY AND REDOX EXP. (cont). NAME ____________________________________________ Step 15 (Note: This reaction does not involve copper!) Observation Chemical Equation Ionic Equation Net Ionic Equation B. Additional Oxidation - Reduction Reactions—show work on separate sheets – see lab manual procedure for products Reaction of potassium permanganate with iron(II) chloride in hydrochloric acid solution Observations Chemical Equation Ionic Equation Net Ionic Equation 43 44 REPORT FOR COPPER CHEMISTRY AND REDOX EXP. (cont.) NAME _______________________________ Reaction of sodium dichromate with potassium iodide in sulfuric acid solution Observations Chemical Equation Ionic Equation Net Ionic Equation Reaction of nickel(II) nitrate with potassium persulfate in sodium hydroxide solution Observations Chemical Equation Ionic Equation Net Ionic Equation Reaction of aluminum with sodium bromate in sodium hydroxide solution Observations Chemical Equation Ionic Equation Net Ionic Equation 45 QUESTIONS FOR COPPER CHEMISTRY AND REDOX EXP. NAME __________________________ 1. What are the greatest sources of error in copper recovery in this experiment and what can be done to minimize these errors? 2. Why are CuSO4 and Cu(NO3)2 the same color? 3. From the following data, compute the percent recovery of copper. Assuming that the masses given are correct (no weighing errors), give a possible explanation for the fact that the percent recovery is greater than 100%. Initial mass of copper Mass of recovered copper + dish Mass of evaporating dish 3.1534 g 185.3109 g 182.1051 g Mass of recovered copper ________g Percent Recovery ________% 46 47 DETERMINATION OF THE GAS CONSTANT INTRODUCTION The ideal gas law, PV = nRT, will be used in this experiment to determine the value for R, the gas constant. Magnesium metal will react with a hydrochloric acid solution to produce hydrogen gas: Mg + 2 HCl → MgCl2 + H2 From the mass of magnesium used and the stoichiometry of the reaction, the moles of hydrogen gas that are produced by the above reaction can be calculated. The volume, temperature, and pressure of the gas will be measured, and the value of R can then be calculated. Because the hydrogen gas from this reaction is collected in a eudiometer tube over water, the gas in the tube is a mixture of H2 and H2O. The pressure of H2 will be calculated by: = PH2 Pgas mixture − VPH2O (1) Your textbook has a table of the vapor pressure for water at various temperatures. You will have to interpolate to get the vapor pressure at the precise temperature that is in the experiment. If the solution levels inside and outside the eudiometer tube cannot be equalized after the reaction is complete, the pressure of the gas mixture in the tube will not equal atmospheric pressure. In this case, a correction for the differences in height must be made. Measure the difference in heights in millimeters (not centimeters). This difference in height of solutions, which represents the difference in pressures, must be converted into mm Hg units by solving the following: Pheight difference (mmHg) = height difference (mm sol'n) density of soluton density of Hg The density of the solution is 1.01 g/mL and the density of mercury is 13.534 g/mL. Thus, Pgas mixture = Patm − Pheight difference and then, substituting equation (2) into equation (1) yields: PH2 = Patm − Pheight difference − VPH2O (2) 48 PROCEDURE 1. Work in group of 3 to 4 people. Calculate the mass of magnesium necessary to evolve about 40 mL of hydrogen gas when measured at STP. Obtain two pieces of Mg ribbon and make sure each does not weigh more than the calculated mass. If it is too large, break off a small piece (disposing of the excess in the wastepaper basket) and weigh the remainder. Determine the mass of each piece of Mg ribbon to the nearest 0.0001 g. Do not confuse which piece has which mass. 2. Add 15 mL of 6-M HCl to the eudiometer tube. With your wash bottle, carefully wash down any acid that might have adhered to the sides of the tube. 3. Coil one of the strips of Mg so that it will fit into the eudiometer tube (but not too tight or it reacts too slowly). Slip a piece of copper wire through the coil and secure it. Lower the Mg coil into the eudiometer tube until it is about 8-10 cm below the top of the tube. Secure the wire to the outside of the tube to keep the Mg coil in place. 4. Carefully fill the eudiometer tube to the top with water (layer the water on top of the acid without mixing). Fill your largest beaker about 3/4 full with tap water. Put your thumb over the opening of the eudiometer tube (without trapping air bubbles) and invert the eudiometer tube into the beaker. With the open end below water level, remove your thumb and secure the upright tube in a buret clamp. 5. The HCl will diffuse down through the water to the Mg and react with it. As soon as the reaction has stopped, complete the following steps as rapidly as possible. a. Try to adjust the tube so that the levels of liquid inside and outside match. If it can't be done, you must measure the height difference in millimeters. Do not allow the end of the tube to come out of the liquid in your beaker or you will lose your H2 gas. b. Measure the volume of gas (±0.01 mL) in the eudiometer tube and convert it to liters. c. Measure the solution’s temperature (±0.1C) and convert it to Kelvin. Use this value for the H2 gas temperature. 6. Rinse out your tube and repeat steps 2-5 using your second piece of Mg ribbon. 7. Record the current atmospheric pressure in units of mmHg. 8. Straighten the copper wire and return it and the eudiometer. 9. Exchange data with another group and calculate R (in units of mmHg L mol-1 K-1) using four sets of data. 10. Calculate the percent relative average deviation for the four trials (see Appendix A at the end of this lab manual). 11. Using your average R value and the accepted value for R which is 62.364 L mmHg mol-1 K-1, calculate the percent error (see Appendix A at the end of this lab manual). 49 REPORT GAS CONSTANT EXP. NAME _________________________ SECTION _______________________ Patm, (mmHg) Your group’s data Trial 1 Trial 2 Mass of Mg, (g) Moles of H2, (mol) Volume of H2, (L) Temperature of H2, (K) Height difference, (mm sol'n) Pheight difference, (mmHg) VP water, (mmHg) Phydrogen, (mmHg) R, (L mmHg mol-1 K-1) Average R Percent Relative Average Deviation, (%) Percent Error, (%) SAMPLE CALCULATIONS (use separate sheets if necessary) Data from another group Trial 3 Trial 4 50 QUESTIONS FOR GAS CONSTANT EXP. NAME _________________________ 1. There are several sources of error in this experiment that are unavoidable using the available equipment. What are these errors and what can be done to keep them as small as possible? 2. What must be done if the amount of Mg is miscalculated and is so large that the gas generated overflows the tube? 3. A student used 0.0820 g of Mg and collected 85.2 mL of H2 gas (their eudiometer tube is larger than the one we used) over water at 29.3°C on a day when the atmospheric pressure was 766.2 mmHg. The level of the solution in the tube was 18.4 mm above the level in the beaker when the reaction was complete. What was the experimental value for R in units of L mmHg mol1- K-1? How does this compare (calculate percent error) to the accepted value for R? 51 MOLAR MASS OF A VOLATILE LIQUID INTRODUCTION The molar mass of a gas can be determined from the following: Molar Mass = mRT PV where m is the mass of the gas sample, R is the gas constant, T is the temperature (in Kelvin), P is the pressure of the gas sample and V is the volume of the gas sample. In the following experimental procedure, an excess of a volatile liquid, ethanol, is vaporized in a previously weighed container. The excess vapor is allowed to escape and the remaining ethanol vapor is condensed back into a liquid and then weighed. Because the flask is open to the surroundings, the pressure of the volatized ethanol will be equal to the barometric pressure. The temperature of the boiling water used to heat the liquid ethanol sample will be measured and this will be used as the temperature of the ethanol gas. From these data, the molar mass of ethanol can be estimated. Even with the best possible laboratory techniques, the molar mass determination will be an estimate. Because ethanol is a volatile liquid, a few ethanol molecules will remain in the gas phase even after cooling and they will not be weighed. In addition, gas samples tend to deviate from ideal gas behavior when studied at temperatures near their condensation point. PROCEDURE: 1. Work in groups of 3 or 4 people. Check out a 125 mL flask and obtain a piece of aluminum foil. 2. Record the barometric pressure which your instructor has provided to you. 3. The inside of the 125 mL flask must be dry. If it is wet, return it to the stockroom and get a dry one. 4. In the fume hood on a hot plate, set up a water bath using the smallest beaker that will completely hold the experimental flask. Place a buret clamp on the neck of the flask. Using a freestanding ring stand secure the flask so that it is suspended in but not touching the bottom of the beaker. 5. Fill the beaker with water to a level that is 2-3 cm from the top. Do not allow any water to enter the flask! The flask should now be surrounded by water. Remove the flask and turn on the hot plate. Do not disturb the assembly of any other group that is using the same hot plate. 6. Dry the outside of the flask with paper towels. This will provide the same experimental conditions as the final weighing. 7. On the analytical balance, determine the combined mass of the towel-dried empty flask and aluminum foil to the nearest 0.0001 g. 8. Prepare an ice bath. Place about 200 mL of ice in your largest beaker and fill the beaker about half full of tap water. You will use this ice bath later. 52 9. Using a dry 10 mL graduated cylinder or a cylinder that has been rinsed with ethanol, obtain approximately 3 mL of ethanol and pour it into the flask. 10. Make a cap for the 125 mL flask from the weighed piece of aluminum foil. Seal the foil around the flask's neck as tightly as possible. Crimp the foil as high on the flask's neck as possible. The foil must not dip into the water bath in the next step! Using a pin, poke a tiny hole in the foil. Keep the hole as small as possible. 11. Return the capped flask containing the ethanol to the hot water bath and secure it with the clamp. Make sure the foil does not touch the water. As the temperature inside the flask starts to rise, vaporized ethanol will begin to flow out through the pin hole in the aluminum cap. Continue heating the flask in the water-bath until the water comes to a full boil. If necessary, adjust the hot plate so that the water is definitely boiling but not so vigorously that it splashes water up onto the foil cap. Continue to heat the flask for a full five minutes after the water in the beaker has started to boil. 12. Record the temperature of the boiling water. By this time, the entire ethanol sample should be in the gas phase and the excess, the amount that will not fit in the volume of the flask at atmospheric pressure and about 100°C, should have escaped through the pin hole. Check to make sure that there are no drops of liquid ethanol on the neck of the flask. Be careful to keep the foil cap on. 13. Without disturbing the foil cap, place your finger over the pinhole in the foil, remove the flask from the water. The clamp can be used as a handle to help carry the flask. Keeping your finger over the hole in the foil; put the flask into the ice bath. Do not allow the foil cap to touch the water or ice. 14. Keep your finger over the hole until the flask is feels cold to the touch. After the flask is cold, remove your finger from the hole to allow air to enter. The air will replace the ethanol vapor that has condensed to liquid phase. 15. Remove the flask from the tap water and using dry paper towels, wipe any water from the outside of the flask and foil. Determine the mass of the flask, foil, and condensed ethanol. This step must be done as quickly as possible because the ethanol will start to evaporate. 16. Calculate the mass of ethanol in the flask. 17. Determine the actual volume of the flask, the volume the gas occupied. To do this, fill the flask completely with water. Carefully pour the water into your 50 mL graduated cylinder to measure the volume of the water. If you spill any water you will need to start this entire step over. 18. Calculate the experimental molar mass of ethanol. 19. The actual value for the molar mass of ethanol is 46.0684 g/mole. Calculate the percent error. 53 REPORT FOR MOLAR MASS EXPERIMENT NAME _________________________ SECTION ______________________ Mass of ethanol, flask, and foil, (g) Mass of empty flask and foil, (g) Mass of ethanol, (g) Temperature, (K) Barometric pressure, (mm Hg) Volume of flask, (L) Experimental molar mass of ethanol Percent error, (%) SAMPLE CALCULATIONS (Use separate sheets if necessary) 54 QUESTIONS FOR MOLAR MASS EXPERIMENT NAME _________________________ 1. Why should the hole in the aluminum foil used as a cap in this experiment be as small as possible? Why should you place your finger over the hole while transferring the flask from the hot to cold water bath? 2. Diethyl ether (CH3CH2-O-CH2CH3) is very volatile, it boils at 34.5°C, and very flammable. An experiment was performed using a sample of diethyl ether in a flask heated to 40.0°C. After cooling, the combined mass of the flask, foil cap, and condensed ether was 95.9808 g. The empty flask and foil cap massed 95.2456 g and had a volume of 259.5 mL. The atmospheric pressure was 746.5 torr. Use these data to calculate the approximate molar mass of diethyl ether. 55 INTERNAL ENERGY PROBLEMS INTRODUCTION Energy can be broken down into two types: kinetic energy and potential energy. Kinetic energy is the energy of motion and potential energy is the energy of position. Electrons and nuclei which make up a substance have both potential energy (because of their relative positions), and kinetic energy (from motions within the system). The sum of the kinetic and potential energies for each of the particles that make up a substance is known as the internal energy, E, of the substance. The change in internal energy, E, that occurs as a result of a chemical reaction or during a phase change is something that can be measured experimentally. Another way to express an energy change of a system is by the change in enthalpy, H. The enthalpy change for a chemical reaction is the amount of heat that is transferred during the reaction at constant pressure. Heat flows from a region at higher temperature to a region at lower temperature. A more precise definition of enthalpy is: H= E + PV where P is the pressure of the system and V is the volume of the system. If we consider a reaction under constant pressure we can derive a new expression for H: ∆H =∆E + P∆V which can be rearranged to solve for E: ∆E =∆H − P∆V This equation is just another way of stating that for the reaction being studied, the change in internal energy is equal to heat plus pressure‐volume work. (At constant pressure, heat is H and ‒PV is work.) When a reaction occurs in a closed, expandable container (such as a piston and cylinder or in a balloon), the change in volume can be measured and the amount of work can be determined. However, in an open container, the change in volume cannot be measured and an alternate method of determining work must be used. To do this, we need the Ideal Gas Law. We need to remember that the temperature of the system remains constant. Therefore, the only value on the right‐hand side of the equation that can change is the number of moles of gas. Thus, work can be expressed as −P∆V = −∆n ( RT ) which makes the expression for E: ∆E = ∆H − ∆n ( RT ) When using this equation there are several things to remember. • The values for E and H are for the reaction as written and the units for E and H are J/mol rxn or kJ/mol rxn. • n is the change in number of moles of gas in the balanced chemical equation. The units are moles of gas / mole of reaction. R has the value of 8.314 J/mol K. • T is the standard thermodynamic temperature of 298.15 K. 56 Example: Hydrogen reacts with oxygen to produce water according to the following reaction: H2 + ½ O2 H2O H = –241.826 kJ/mol rxn What is the change in internal energy of this reaction? Solution: The change in number of moles of gas in this reaction is: 1 mol of gas final – 1.5 moles of gas initial = –0.5 mol gas /mol rxn We can now calculate the change in internal energy of the reaction. ∆E = ∆H − ∆n ( RT ) = = 1 kJ −241.826 kJ 0.5 mol gas 8.314 J − − (298.15 K ) 3 mol rxn mol rxn mol gas ⋅ K 10 J −240.587 kJ mol rxn 57 PROBLEMS (1 Latm = 101.325 J, 1 Lbar = 100.000 J) 1. In an exothermic process, the volume of a system expanded from 186 mL to 1997 mL against a constant pressure of 745 torr. During the process, 18.6 calories of heat energy were given off. What was the internal energy change for the system in joules? 2. Calculate the change in internal energy for the thermal decomposition of 1.000 g of potassium chlorate at a constant external pressure of 943.2 mmHg. The decomposition reaction is 2 KClO3 ∆ → 2KCl + 3 O2 MnO2 Potassium chlorate’s heat of formation is ‒391.20 kJ/mol, potassium chloride’s heat of formation is ‒435.87 kJ/mol, and oxygen has a density of 1.308 g/L at the reaction temperature. 58 3. (a) A gas at expands from 2.0 L to 6.0 L at a constant pressure of 912 mmHg. If qp was zero in the process, what would be the change in internal energy? (b) What would be the change in internal energy for the process described in 3 (a) if the expansion occurred when the external pressure was zero? 4. The oxidation of nitric oxide 2 NO + O2 2 NO2 ∆Hrxn = −113.1 kJ is a key step in the production of photochemical smog. Calculate the change in internal energy (in kJ) that occurs when 15.4 g of NO reacts with excess Oxygen at 35.0°C. 59 5. A gaseous mixture was enclosed in a piston and cylinder system having a volume of 1545 mL. When a chemical reaction occurred, the volume decreased to 375 mL and 321 calories of heat was absorbed. The external pressure was 753 mmHg. Calculate the change in enthalpy, work, and the change in internal energy for this system in kJ. 6. When 3.55 g of methane (CH4) gas, was burned in excess oxygen at 45C, the internal energy change was ‒196.3 kJ. Calculate the enthalpy change for the combustion of one mole of methane at 45°C. 60 61 BOMB CALORIMETRY INTRODUCTION The enthalpy of reaction involving gases can be conveniently determined using an apparatus called a "bomb" calorimeter (see the diagram above). A bomb calorimeter, a device in which volume, not pressure, is constant, is used to measure the change in internal energy (E) that occurs during a physical or chemical change. The enthalpy of the process can then be calculated. In a bomb calorimeter, the reaction takes place in a sealed, rigid, container (called the bomb) which is enclosed in an insulated water jacket. A spark from an electrical circuit is used to start the combustion reaction inside the bomb. The resulting temperature change of the water is measured and used to calculate the energy change. The bomb calorimeter must be calibrated to determine its heat capacity. A weighed sample of pure benzoic acid having a known enthalpy of combustion is burned and the water’s temperature change is then used to calculate the heat capacity of the calorimeter. The calorimeter is then set up in an identical manner for additional experiments involving various fuels. The video experiment demonstrates the use of a bomb calorimeter. You will use data obtained from the video to calculate the molar enthalpy of combustion for each of the compounds listed on the following page. 62 Straight Chain Alcohols 1‐Propanol (Propan‐1‐ol) Formula CH3(CH2)2OH M. W. 60.11 1‐Butanol (Butan‐1‐ol) CH3(CH2)3OH 74.12 1‐Pentanol (Pentan‐1‐ol) CH3(CH2)4OH 88.15 Six Carbon Cyclic Compounds Formula M. W. H2 C H2C CH2 Cyclohexane 84.16 H2C CH2 C H2 H2 C H2C CH Cyclohexene 82.15 H2C CH C H2 H2 C HC CH HC CH 1,4‐Cyclohexadiene 80.14 C H2 H C 1,3,5‐Cyclohexatriene (Benzene) HC CH HC CH C H 78.12 63 For these combustion reactions, a fuse wire and cotton ignition thread are used. It has been found that the length of fuse wire and ignition thread used to initiate the combustion does not contribute enough heat to make a significant difference in the total heat evolved when sample sizes are as large as those used in the video. The products for the combustion of hydrocarbons are carbon dioxide gas and liquid water (when the reactions occur under the conditions employed in the video). To make sure that the water generated by the reaction condenses to the liquid form, a few drops of water are added to the reaction chamber during assembly. This added water avoids supersaturation of water in the gas phase. PROCEDURE A. Determination of the Heat Capacity of the Bomb Calorimeter 1. Watch the video. Calculate the mass of benzoic acid (molecular formula: C6H5COOH; molecular weight: 122.13 g/mole) used. 2. Write a balanced equation for the combustion of one mole of benzoic acid. (Remember, the other reactant is oxygen gas and the products will be carbon dioxide gas and liquid water.) 3. The standard enthalpy of combustion (H) for benzoic acid is ‐3227 kJ/mol and standard temperature is 298.15 K. a. Determine the standard change in internal energy (E) for the combustion of one mole of benzoic acid. ∆E = ∆H − ∆nRT Where n = moles gaseous products ‐ moles gaseous reactants from the balanced equation for the combustion of one mole of benzoic acid. b. Calculate q for the moles of benzoic acid actually burned in this experiment (this is qexp used in step 4c). c. Remember that qcalorimeter = −qexp and because in this experiment volume (not pressure) was constant qcalorimeter = nrxn ∆Ecalorimeter = C calorimeter ∆T 4. Use the information/equations outlined in step 3 and the experimental data from the video, to calculate the heat capacity of the calorimeter. 64 B. Relationship between Enthalpy of Combustion and chain length in Straight Chain Alcohols 1. The masses of the sample plus crucible and the empty crucible are recorded on your data sheet. Calculate the mass of each compound used. Using the molecular weight given in the introduction, calculate the moles of each compound used. 2. Observe the video. The initial and final temperatures for the combustion of each compound are given in the data tables of the report pages. Calculate T for each. 3. Using the formulae shown in the introduction, write a balanced equation for the combustion of one mole of each compound. Calculate n for each reaction. 4. Calculate the standard molar enthalpy of combustion (enthalpy per mole of substance burned) for each compound (use the heat capacity for the calorimeter determined in Part A). Note that for all of these experiments the masses of reactants used are similar (± 0.1g). Because the chemicals involved in the reaction are all part of the calorimeter assembly that absorbs the heat given off during combustion, similar masses of reactants must be used in order for the heat capacity determined in Part A to be valid for all the experiments. Also note that the same equations presented in Part A apply to Parts B and C. 5. Answer the questions concerning the relationship between chain length of straight‐chain alcohols and their enthalpies of combustion. C. Relationship between Enthalpy of Combustion and number of double bonds in Cyclic Six‐ Carbon Compounds 1. Follow steps 1‐4 for Part B above. 2. Answer the question about Benzene concerning the relationship between carbon‐carbon double bonds and enthalpy of combustion. 65 REPORT NAME ________________________________ BOMB CALORIMETRY EXP. SECTION _____________________________ A. Determination of Heat Capacity Mass of benzoic acid + thread, (g) 0.7934 Mass of thread, (g) 0.0047 Mass of benzoic acid, (g) Final temperature, (°C) 17.107 Initial temperature, (°C) 15.070 T, (°C) Write the balanced equation for the combustion of one mole of Benzoic acid: n=________ Heat capacity of the calorimeter _____________________________ SAMPLE CALCULATIONS (use separate sheets if necessary) 66 REPORT FOR BOMB CALORIMETERY EXP. (cont.) NAME ________________________________ B. Straight Chain Alcohols Propanol Butanol Pentanol Mass of sample + crucible, (g) 11.6465 11.7158 11.7357 Mass of crucible, (g) 10.8902 10.8925 10.8997 Final temperature, (°C) 22.085 22.091 20.030 Initial temperature, (°C) 19.623 19.230 16.972 Mass of sample, (g) T, (°C) Molar enthalpy of combustion Write a balanced equation for the combustion of one mole of each compound. 1. n=__________ 2. n=__________ 3. n=__________ SAMPLE CALCULATIONS (use separate sheets if necessary) 67 REPORT FOR BOMB CALORIMETERY EXP. (cont.) NAME _________________________________ C. Cyclic compounds Cyclohexane Cyclohexene 1,4‐Cyclohexadiene Benzene Mass of sample + crucible, (g) 11.7403 11.7017 11.5666 11.6982 Mass of crucible, (g) 10.8978 10.8977 10.8990 10.8993 Final temperature, (°C) 20.987 21.369 23.778 20.879 Initial temperature, (°C) 17.203 17.825 20.891 17.661 Mass of sample, (g) T, (°C) Molar enthalpy of combustion Write a balanced equation for the combustion of one mole of each compound: 1. n=________ 2. n=________ 3. n=________ 4. n=________ SAMPLE CALCULATIONS (use separate sheets if necessary) 68 QUESTIONS FOR BOMB CALORIMETRY EXP. NAME ______________________ 1. What kind of changes in enthalpies of combustion did you observe as the chain length of the alcohols increased? What was the approximate change for each CH2 unit added? 2. Benzene does not follow the trend established by the enthalpy values obtained for the other compounds in Part C. What value would be predicted for the molar enthalpy of combustion for benzene from the observed trend obtained from cyclohexane, cyclohexene, and 1,4‐ cyclohexadiene? 3. Hexanol (C6H14O) is a liquid alcohol similar to the ones used in the experiment. In another bomb calorimetry experiment 0.8278 g of hexanol is burned and the temperature of the calorimeter increased from 16.834C to 19.203C. The heat capacity of the calorimeter is 13.52 kJ C-1. Calculate the enthalpy of formation of hexanol in kJ/mol C6H14O. Compare this to the accepted value of -377.5 kJ mol-1. 69 HESS'S LAW OF HEAT SUMMATION INTRODUCTION Hess's Law of Heat Summation states that if a chemical reaction can be written as the sum of two or more individual steps, then the enthalpy change for the overall reaction will be equal to the sum of the enthalpy changes for the individual steps. The validity of this law can be tested experimentally. In this experiment the following reactions and enthalpies of reaction will be considered: (1) Mg + 2 HCl → MgCl2 + H2 (∆Hl ) (The ∆H for this reaction will be determined experimentally) (2) MgCl2 + H2O → MgO + 2 HCl (∆H2) (The ∆H of the reverse reaction will be determined experimentally) (3) H2 + ½ O2 → H2O (∆H3) _________________________________________________ (4) Mg + ½ O2 → MgO (The ∆Hfo for H2O(l) will be obtained from tables in the book) (∆H4) Because equations (1), (2), and (3) add to give equation (4), ∆H1, ∆H2, and ∆H3 add to give ∆H4, which is the molar enthalpy of formation for solid magnesium oxide. The experiments that will be done in the laboratory are: • magnesium metal reacting with aqueous hydrogen ion to produce aqueous magnesium ion and hydrogen gas (equation (1) above) • solid magnesium oxide reacting with aqueous hydrogen ion to produce aqueous magnesium ion and liquid water (the reverse of equation (2) above) By using the experimentally determined enthalpies of reaction for two of the reactions and the accepted value for the standard enthalpy of formation of liquid water, the experimental ∆H for the formation reaction of magnesium oxide will be determined by summation and compared to the accepted value. PROCEDURE A. Enthalpy change (magnesium metal with hydrochloric acid) 1. Work in groups of 3 or 4 students. Obtain two Styrofoam® cups, a cardboard lid, and a timer. 2. Obtain two pieces of magnesium and determine their masses (to ±0.001 g, on the beam balances). To insure that the magnesium is the limiting reactant in this experiment, the mass of each piece should be less than 0.4 grams. If the mass of either piece of magnesium is greater than 0.4 gram, trim off a piece (discard the trimmings in the wastepaper basket) and determine the mass of the remainder. Record the masses (be sure to keep track of which piece has which mass). 70 3. Select one of the Styrofoam® cups to be the inner cup for all the parts of the experiment. Determine its mass (to ±0.001 g, on the beam balances). Do not lose track of which is the inner cup. 4. Rinse the inner cup with distilled water and drain it upside down on a paper towel. 5. Rinse the thermometer with distilled water and dry it with a paper towel. The same thermometer must be used throughout this experiment! 6. Label (with tape) two graduated cylinders, one HCl and one water. Note: The glassware used in this experiment should be clean and dry. If you do not have clean glassware, wash it, then rinse it out with 2 to 3 mL of the solution you will be putting into it. Discard any rinsing solutions. 7. To obtain additional insulation, set your weighed inner cup into a second cup. Add about 50 mL of distilled water to the inner cup. Now add about 50 mL 6-M hydrochloric acid to the distilled water in the cup. Measure the temperature of the resulting solution to a precision of 0.1°C. Wait 30 seconds and measure it again to be sure the temperature is stable. When the temperature is stable, record it as your initial temperature. 8. Add the magnesium metal to solution in the inner cup and cover the cups with the cardboard lid (with the thermometer through the hole in the lid). Immediately start stirring and timing. At 30 seconds interval record the temperature of the solution (to a tenth of a Celsius degree) until you get four consistent readings or the temperature starts to drop. Read the temperature without removing the tip of the thermometer from the solution. The highest temperature reached is your final temperature. 9. Carefully remove the thermometer and lid, and lift the inner cup and solution out of the outer cup. Determine the combined mass of the inner cup and the solution present at the end of the experiment. Calculate the mass of the solution. 10. Using the same graduated cylinders and inner cup, repeat steps 4-9 with the second piece of magnesium. 11. Exchange data with another group so that you have four (4) sets of data. Note: Steps12- 15 can be completed after all the data for Parts A and B have been collected. 12. Calculate q for the calorimeter. qcalorimeter = [Ccalorimeter + ssolutionmsolution ] ∆T The calorimeter assembly is both cups, the lid, and the thermometer. The heat capacity of the assembly must be determined experimentally. For the most accurate results, the heat capacity of each calorimeter assembly should be experimentally determined. However, in the interest of saving time, it can be assumed that the calorimeter assembly used in this experiment had a heat capacity of 2.1 J/°C. In each part of this experiment, assume that the solution’s specific heat is 4.17 J/g°C. 13. Calculate q for each reaction. Remember that qreaction will have the opposite sign of q for the calorimeter. 14. For each reaction, calculate the molar change in enthalpy (∆H) for one mole of magnesium metal. 71 15. Using the molar enthalpies from the four experiments, calculate the average molar enthalpy change for the reaction of one mole of magnesium metal with excess hydrochloric acid. B. Enthalpy Change (magnesium oxide with hydrochloric acid) 1. Obtain a vial containing 6-7 grams of magnesium oxide. This is enough magnesium oxide to do two trials and the mass is small enough to insure that the magnesium oxide will be the limiting reactant. 2. Label a clean dry beaker “A” and a second clean dry beaker “B.” Pour approximately onehalf the magnesium oxide from the vial into beaker “A” and the rest into beaker “B.” 3. Measure and record the total mass of each beaker containing magnesium oxide. 4. Do the experiment using the same procedure as Part A (steps 4 through 9) except use the magnesium oxide instead of magnesium metal. 5. Repeat the entire process again for the second magnesium oxide sample. Save the empty beakers. 6. Measure and record the mass of the empty beakers to the nearest 0.001 g (using the beam balances). 7. Exchange the data you have gathered with that from another group. 8. For each set of data, determine the experimental molar enthalpy for the reaction. 9. Determine the average molar enthalpy for the reaction between solid magnesium oxide and excess hydrochloric acid. C. Determination of the Experimental Molar Enthalpy of Formation for Magnesium Oxide. Calculate the experimental molar enthalpy of formation for magnesium oxide by summation using the data collected in Parts A and B and the ∆Hf° for H2O from your textbook. Remember that the chemical equation for the reaction done in Part B must be reversed to add correctly to the overall equation with a corresponding sign change for the experimental molar ∆H. 72 73 REPORT HESS'S LAW EXP. NAME _______________________ SECTION _____________________ A. Enthalpy Change (HCl-Mg) Your group’s data Trial 1 Trial 2 Mass of magnesium, (g) Mass of inner cup and solution, (g) Mass of empty inner cup, (g) Mass of solution, (g) Initial temperature of solution, (°C) Temperature (°C) after: 30 seconds 60 seconds 90 seconds 120 seconds 150 seconds 180 seconds Final temperature of solution, (°C) Molar enthalpy of reaction, (kJ mol-1) Average ∆H, (kJ mol-1) (Experimental ∆H for reaction 1 in the summation) SAMPLE CALCULATIONS (use separate sheets) Data from another group Trial 3 Trial 4 74 REPORT FOR HESS'S LAW EXP. (cont.) NAME _________________________ B. Enthalpy Change (HCl-MgO) Your group’s data Trial 1 Trial 2 Mass of beaker and MgO, (g) Mass of empty beaker, (g) Mass of magnesium oxide used, (g) Mass of inner cup and solution, (g) Mass of empty inner cup, (g) Mass of solution, (g) Initial temperature of solution, (°C) Temperature (°C) after: 30 seconds 60 seconds 90 seconds 120 seconds 150 seconds 180 seconds Final temperature of solution, (°C) Molar enthalpy of reaction, (kJ mol-1) Average ∆H, (kJ mol-1) Experimental ∆H for the reverse reaction (Eq. 2 in the summation) SAMPLE CALCULATIONS (use separate sheets) Data from another group Trial 3 Trial 4 75 REPORT FOR HESS'S LAW EXP. (cont.) C. NAME _________________________ Experimental Enthalpy of Formation of Magnesium Oxide by Summation Eq. Balanced Chemical Equations (see Introduction) 1 ∆Hrxn (kJ/mole) ∆H1 = (experimental) 2 ∆H2 = (experimental) 3 ∆H3 = (from text) 4 ∆H4 = (by summation) SAMPLE CALCULATIONS 76 QUESTIONS FOR HESS'S LAW EXP. NAME _________________________ 1. Calculate the percent error (see Appendix A of this lab manual) for your experimental enthalpy of formation for magnesium oxide obtained by summation. Use the accepted value given in your textbook. Comment on how close your experimentally obtained enthalpy of formation for magnesium oxide was to the accepted value. If your percent error is less than ± 15 % your results are very close to the accepted value. List some sources of error that could affect the results of this experiment. 2. Given : → 2 N2 + 6 H2O 4 NH3 + 3 O2 N2O + H2 → N2 + H2O H2 + ½ O2 → H2O Find the ∆H for: 2 NH3 + 3 N2O → 4 N2 + 3 H2O ∆H = -1531 kJ ∆H = -367.4 kJ ∆H = -286 kJ (Show your work) 77 ATOMIC EMISSION SPECTROSCOPY INTRODUCTION Identification of the composition of materials by spectroscopy is a technique that has been used extensively in astronomy and chemistry. Light from the material observed, whether it is from a distant star or a chemical in a laboratory is passed through a prism or a diffraction grating. The prism or grating separates the electromagnetic spectrum into its component wavelengths that can then be measured. The visible part of the spectrum is the portion of the electromagnetic spectrum observable by the human eye and provides enough data to be used as an identification technique for some elements. The spectrum is a manifestation of the difference in electronic energy levels in the particular substance being studied. The human eye is able to see the wavelengths of light given off by an excited hydrogen electron making a transition from an outer n level to n = 2. There are many other transitions (including transitions to the hydrogen electron ground state at n = 1) that the human eye is unable to detect. The difference in energy levels for the visible spectrum of a hydrogen atom can be represented as: 1 1 = ∆E RH 2 − 2 2 n (1) where RH is the Rydberg constant which, in energy units, has the value of 2.180 x 10⁻¹⁸ J. Because we measure the wavelengths of the transitions in the spectrum instead of the energy, and because hc ∆E = λ (2) equation (1) becomes: 1 R 1 1 = H 2 − 2 λ hc 2 n (3) where h is Planck’s constant and c is the speed of light. Because RH, h, and c are all constants we can combine them into one constant, RH′ . We can now write Equation (3) as 1 1 1 = RH′ 2 − 2 n λ 2 (4) In this form, the accepted value of the modified Rydberg constant, RH′ , is 1.097 x 10⁷ m-1. In this experiment a hand-held spectroscope, which utilizes a simple diffraction grating, will be used to separate the visible light into its components. The atomic spectral data from hydrogen will be used to determine the value of the Rydberg constant in units of m-1. You will also use the spectroscope to identify two elements by comparing the atomic spectra of unknowns to known spectra. 78 PROCEDURE A. Determination of the Rydberg constant. 1. Work in groups of 3 to 4 people. Obtain a hand-held spectrometer and an Emission Spectra sheet. 2. Observe your instructor’s demonstration of the use of the spectrometer. 3. Calibrate your spectrometer by measuring the wavelengths of spectral lines from the fluorescent lights using your spectrometer. The actual wavelength of the bright green line from the fluorescent lights is 546 nm. You will need the calibration factor to obtain the correct wavelengths for the remainder of this lab. The factor is calculated as: calibration factor = λactual − λobserved This value, which can be positive or negative, will be added to all of your measurements to obtain the corrected wavelengths. 4. Using the spectrometer, observe the light from the hydrogen lamp. Each member of the group should make the measurements of the spectrum. Make sure that all of your measurements agree. Do not touch the lamp. You could receive an electrical shock. After a bit of practice, you should be able to see the lines for the visible spectrum of hydrogen. The lines should appear sharp and fairly bright. You will see “artifacts” in the spectra from ambient light in the room. These lines will be fuzzy and less bright than the real lines. To determine which lines are artifacts, move the spectrometer slightly side-toside. The artifacts will remain while the real spectrum disappears. 5. Record the wavelengths and colors of the lines in hydrogen spectrum on the data sheet. Most people can see three lines easily. Some can see a fourth line. 6. Correct the value of each wavelength using the calibration factor from step 3. Convert the wavelengths to meters (put your answer in scientific notation). 7. Determine the initial (outer) n value for each wavelength. (Remember each visible wavelength of light for a transition from an outer n to n = 2.) The longest visible wavelength corresponds to a transition from n=3 to n=2. The next longest wavelength corresponds to n=4 to n=2 and so on. If you are able to see four lines in the hydrogen spectrum, the line with the shortest wavelength corresponds to the transition from n=6 to n=2. 8. Calculate the value of the modified Rydberg constant, RH′ (in units of m-1) (using equation (4) given in the introduction) for each of the corrected wavelengths you measured. Report the average value of this Rydberg constant from these calculations as the constant obtained by the mathematical method. 9. The value of the Rydberg constant can also be determined graphically. Calculate 1/λ for each line. Put these data into scientific notation (with the same exponent for each). Calculate 1/n2 (where n is the initial (outer) n value) for each line and put these data into decimal form (with four places after the decimal). 79 10. Plot 1/λ (y-axis, in m-1) vs. 1/n2 (x-axis, no units). Draw the best-fit straight line that Report this value of the Rydberg represents your data. The slope of this line is −RH′ . -1 constant, RH′ , in units of m , as the constant obtained by the graphical method. 11. Calculate your experimental Rydberg constant, RH′ , by averaging the two obtained using the mathematical method and the graphical method. RH′ values you 12. Calculate the percent error using the accepted value of the modified constant (in m-1) given in the introduction. B. Determination of unknowns by atomic spectroscopy. 1. Each person in the group should observe and record the lines in the spectrum of both unknowns. Again, the true spectra will be bright, sharp lines that disappear as you move the spectrometer from side-to-side. “Artifacts” from the ambient light will be less bright, fuzzy, and remain as the spectrometer is moved to the side. 2. Calculate and record the corrected wavelength for each line. 3. Each unknown is one of the elements on the sheet of Emission Spectra. Compare your data to the spectra on your sheet and try to determine the identity of each of the unknowns. 4. Report the identity of each unknown. 80 81 REPORT ATOMIC EMISSION SPECTROSCOPY NAME _____________________________ SECTION __________________________ A. Determination of the Rydberg constant. Actual wavelength of the bright green line from the fluorescent lights, (nm) Observed wavelength of the bright green line from the fluorescent lights, (nm) 546 Calibration factor, (nm) Color Observed Wavelength (nm) Corrected wavelength (nm) Hydrogen Corrected wavelength (m) Initial n value Value of Rydberg constant, RH′ (m-1) λ1 λ2 λ3 λ4 Average Rydberg constant, RH′ , (in m-1) obtained by mathematical method Data to be plotted for graphical method Inverse of wavelength (m-1) (in scientific notation with the same power of 10) λ1 λ2 λ3 λ4 RH′ (in m-1) from the slope of line plotted in the graphical method RH′ (in m-1). This will be an average of the average RH′ obtained by the mathematical method and the RH′ obtained by the Experimental value of graphical method. Percent error, (%) CALCULATIONS (use separate sheets to show your work) Inverse of initial n2 value (in decimal form) 82 REPORT FOR ATOMIC EMISSION EXP. (cont.) NAME ______________________ B. Determination of unknowns by atomic spectra (you may not need all of the rows provided) Color λ1 λ2 λ3 λ4 λ5 λ6 λ7 λ8 Identity Unknown A Observed Corrected wavelength wavelength (nm) (nm) Unknown B Color Observed wavelength (nm) Corrected wavelength (nm) 83 QUESTIONS FOR ATOMIC EMISSION EXP. NAME _______________________ 1. For each of the corrected wavelengths you collected for your hydrogen electron data, calculate the energy of the light in J. (Show a sample calculation) Corrected wavelength (m) Energy (J) λ1 λ2 λ3 λ4 As the wavelength of light emitted by the hydrogen atom increases, how does the energy change of the transitions vary? 2. The energy of an electron in a hydrogen atom is given by, R E n = − H2 n where RH is 2.180 × 10⁻¹⁸ J and n is the principle quantum number of the energy level. The energy of an electron that has been removed from the atom is 0 J. Calculate the amount of energy required to remove an electron from the n = 1 energy level of a hydrogen atom (energyfinal - energyinitial). 84 3. The red line in the hydrogen spectrum corresponds to a transition from the energy level n=3 to the energy n= 2. For species other than Hydrogen which contain one electron, (e.g. He+, Li2+), equation (4) must be modified slightly to yield correct wavelengths. The modified equation is: 1 1 1 = Z 2 RH′ 2 − 2 n 2 λ where Z is the species’ atomic number. Using the transition that results in the red line in the hydrogen spectrum (n=3 to n=2), calculate the wavelength of light emitted by an electron making the same transition in He+. 4. Deuterium is an isotope of hydrogen with 1 proton and 1 neutron in its nucleus (deuterium = 2 H). However, its atomic emission spectrum is identical to that of hydrogen. Explain why this is the case. 85 MOLECULAR MODELS INTRODUCTION The chemical and physical properties of a substance are influenced by the distribution of outer shell (valence) electrons and the three-dimensional arrangement of its nuclei. A variety of experimental methods are employed to map out the relative positions of the nuclei in a molecule or an ion. Many molecules and polyatomic ions have a central atom. You will determine the distribution of electrons and bonded atoms about the central atom. In so doing, you will be able to determine the probable hybridization of the central atom, electron group and molecular geometries, and polarity of the species in question. PROCEDURE Students may work individually or in small groups. Complete the following tables according to your professor's instructions. 86 87 REPORT MOLECULAR MODELS EXP. Compound Lewis Structure NAME __________________________ SECTION________________________ Central Atom Hybrid Electron Group Geometry Molecular Geometry Polarity 88 REPORT FOR MOLECULAR MODELS EXP. (cont.) NAME __________________________ Compound Lewis Structure Central Atom Hybrid Electron Group Geometry Molecular Geometry Polarity 89 REPORT FOR MOLECULAR MODELS EXP. (cont.) NAME __________________________ Compound Lewis Structure Central Atom Hybrid Electron Group Geometry Molecular Geometry Polarity 90 QUESTIONS FOR MOLECULAR MODELS EXP. NAME __________________________ 1. Answer each of the following for the nitrate ion (NO3-). a. Provide the Lewis structures (including resonance forms) for the nitrate ion. In one of the structures label the hybridization of the nitrogen and each of the oxygens. b. What are the electron group and molecular geometries? electron group ________________________________________ molecular ___________________________________________ c. Is this a polar or nonpolar ion? 2. The nitrite ion is slightly different than the nitrate ion. What are the electron group and molecular geometries for nitrite ion? What is its polarity? Include the Lewis structure for this ion in your response. 91 DETERMINATION OF PERCENT KHP AND ACID EQUIVALENT WEIGHT INTRODUCTION Titration is a process of mixing measured volumes of reacting solutions in such a manner that one can determine when chemically equivalent amounts of reactants are mixed. One of the purposes of the titration process is to determine the concentration of a solute in a solution. Additionally, the titration process will be used in the analyses of soluble solid unknown acids. The equivalence point of a titration is the point at which stoichiometric amounts of reactants have been mixed. A method must be used to show when the equivalence point has been reached. In acid-base titrations, phenolphthalein is often used as an indicator. Phenolphthalein is an organic molecule that is colorless in acidic solution and pink to red in the presence of base. If the indicator is placed in an acidic solution it will be colorless. As base is added to this solution, a pink color develops as the neutralization (equivalence) point is passed. In this experiment each student will work alone and: a. prepare an approximately 0.1-M NaOH solution. b. standardize (precisely determine the molarity, ±0.0001 M) the NaOH using the pure solid monoprotic acid standard, potassium hydrogen phthalate (KHP). c. determine the percent by mass of KHP in an impure sample. d. determine the mass of a solid acid unknown that neutralizes one mole of hydroxide ion. e. prepare a formal write-up of the experiment. H H C C C C C H O - O C O C C H O K+ H potassium hydrogen phthalate, (KHP) Note: You will need to prepare your own data tables for this experiment. These will be turned in as part of the formal lab report. These tables must be prepared before you come to lab to begin data collection. You need to make sure that all measurements made have a place in the data tables (i.e., initial buret reading, final buret reading, etc.) 92 PROCEDURE A. Preparation of an NaOH solution 1. Thoroughly clean your large screw cap bottle. Also clean its cap. 2. Review calculations for dilution and calculate the amount of 6-M NaOH needed to prepare 500 mL of approximately 0.1-M NaOH. 3. Using the 6-M NaOH in the hood, measure out the calculated amount of NaOH (use a graduated cylinder) and place it in the clean screw cap bottle. 4. Fill the bottle to the 500 mL line with distilled water (this is approximately 500 mL). 5. Cap the bottle and mix well by inversion (at least 20 inversions). 6. Put your name and/or locker number on the bottle of NaOH. B. Standardization of NaOH solution Note: The NaOH you have prepared is approximately 0.1-M. You must determine the precise molarity of your NaOH to at least 4 significant figures (keeping only the number of significant figures allowed). 1. Obtain and clean the buret assigned to your lab locker according to the signs posted in the lab. Rinse it 3 times with 2-3 mL of your NaOH solution prior to filling it. If you wish to use a beaker or funnel to help fill your buret you must clean them and then rinse them with your NaOH solution prior to their use. 2. Fill the buret with your NaOH solution, rinse solution through the buret tip to eliminate air bubbles, and note the initial buret reading to two decimal places. 3. Obtain a capped vial of pure potassium hydrogen phthalate (KHP), standard. Label this vial and keep it capped when it is not in use. 4. Clean a 250 mL Erlenmeyer flask (it does not have to be dry). 5. Calculate the mass of pure KHP (molar mass = 204.23 g mol-1) that will require about 20 - 25 mL of approximately 0.1-M sodium hydroxide solution for complete reaction. Remember that KHP is monoprotic. 6. Do one trial. Take the vial of pure KHP, your clean flask, and the data sheet to the analytical balance room and measure KHP into the flask. Use the approximate mass (+/- 0.05 g) calculated in step 5 as a guide. Record the precise mass of KHP dispensed into the flask to the nearest 0.0001 g. 7. Dissolve the KHP in the flask in about 50 mL of distilled water. 8. Add 2 to 3 drops of phenolphthalein and titrate the flask to a consistent very, very faint pink end point. Record the final buret reading and calculate the total volume of NaOH used for the titration. The contents of the flask can now be discarded. (Save your KHP for additional trials.) 93 Note: If your titration volume was at least 10.00 mL (4 significant figures) this titration can be included in your calculations. However, a larger titration volume (closer to 25 mL) will give better precision. On the other hand, an unnecessarily large titration volume (more than 25 mL) is time consuming. The volume of NaOH solution required is directly proportional to the mass of KHP titrated. If the volume for your first your titration was not between 20 and 25 mL, adjust the mass used for the rest of your trials. 9. Clean three 250 mL Erlenmeyer flasks (they do not have to be dry) and label them #1, #2, and #3. 10. Take the vial of KHP, your 3 flasks, and your data sheet to the analytical balance room and measure KHP into each of the 3 flasks using the first trial as a guide. Record the exact mass of KHP in each flask to the nearest 0.0001 g. Note: You should refill the buret for each titration. The NaOH solution remaining in your buret at the end of each lab session should be saved in a clean dry beaker and used for rinsing the buret at the next lab session. Never put unused solution back into your stock bottle. You risk contaminating your NaOH solution. 11. Follow steps 7 and 8 for each of your flasks. 12. Use the volume of NaOH solution and the mass of KHP in each flask to calculate the molarity of your NaOH. (You will need to average at least 3 values.) 13. Determine and record the average molarity of your NaOH. This solution will be used to determine the values for your unknowns. Take good care of it!! 14. Using at least three molarity values calculate your percent relative average deviation (see Appendix A at the end of this lab manual). Note: Percent relative average deviation is a measure of precision and at least 3 trials are required for the calculation to be meaningful. If your average deviation is less than 2%, it means that the data you have collected shows good precision and you have completed enough trials. If it is greater than 2%, then additional trials are needed. C. Determination of percent KHP in an impure sample 1. Clean, rinse, and fill the buret with your NaOH as you have done for previous titrations. 2. Obtain a clean, dry capped shell vial containing an impure KHP unknown. Record your unknown’s number and label the vial. Keep this vial in your locker until your graded lab report has been returned to you. Note: The shell vial of unknown contains enough sample for at least six trials. No additional unknown will be provided! Should an unknown be spilt, a different unknown will be obtained and you will start that unknown’s analysis from the beginning. 3. Do one trial titration with the unknown using about twice as much mass as was used for pure KHP. Record the precise mass of unknown (±0.0001 g) and volume of NaOH used (±0.01 mL). (Titration procedure is exactly the same as that used previously.) 4. You will need to do at least two more trials. If the total volume of NaOH used in your first titration was less than 20 mL use a little more unknown for your subsequent titrations. If your titration volume was greater than 25 mL use a little less unknown. (The mass of impure KHP and the volume of NaOH solution used in the titration are directly proportional). 94 5. Calculate the percent by mass of KHP in your impure sample for each trial. 6. Determine the percent relative average deviation using the calculated mass percents from all your trials. Do additional trials if your deviation is greater than 2%. 7. Report the average percent by mass of KHP for your unknown. D. Determination of the mass of an unknown acid required to neutralize one mole of Hydroxide ion. 1. Obtain a clean, dry capped shell vial containing an impure KHP unknown. Record your unknown’s number and label the vial. Keep this vial in your locker until your graded lab report has been returned to you. Note: the shell vial of unknown contains enough sample for at least six trials. No additional unknown will be provided! Should an unknown be spilt, a different unknown will be obtained and you will start that unknown’s analysis from the beginning. 2. Do one trial titration using between 0.1 to 0.4 g of the unknown acid. Be careful!! It is easy to dump in too much solid. Titrate as before. 3. If your initial titration volume is less than 20 mL use a little more unknown. If your titration volume was greater than 25 mL use a little less unknown. (The mass of acid and the volume of NaOH solution used in the titration are directly proportional.) Do at least two more trials. 4. For each trial, calculate the mass of your unknown acid required to neutralize one mole of hydroxide ion. 5. Using the calculated mass of acid/mole OH- values, determine the percent relative average deviation. Do additional trials if your deviation is greater than 2%. 6. Report the average grams acid/mole hydroxide neutralized for your unknown. E. Write a formal lab report. Carefully follow all of the instructions or you will lose points. 1. The report does not need to be typed, but must be legible, neat, and secured in a folder so that it does not fall out. 2. Use only one side of each piece of paper. 3. The report must contain the following labeled sections in this order: a) Title page: A page with only the identifying title of the experiment, your name, and the date the report is submitted. b) Introduction: a paragraph (be concise) describing what values you have been asked to determine in the experiment, (not how to do the experiment). Include the balanced chemical equation for the reactions used in parts B and C of this experiment. No numbers should be used in this part of your report. c) Procedure: Do not repeat the details of the procedure given in your lab book or you will lose credit. Instead, you should write several paragraphs summarizing the theory of the procedures you used in your experiment. Some of the topics these paragraphs should 95 cover are: What is a titration? What is a buret (maybe a sketch would be useful) and how is it used? What is the “equivalence point” in an acid/base titration? How do you know when you have reached the “equivalence point?” How is the “equivalence point” different from the “end point?” What is an indicator (in general) and what is phenolphthalein (the specific indicator used in this experiment)? No data should be presented in this part of your report. d) Data tables: Present all of your data in neat, table form. All measurements must be included. e) Sample calculations: Show at least one complete sample calculation for each type of calculation. f) Results: Report your unknowns’ numbers and the average values you obtained (not the relative average deviation) for each unknown. Put nothing else in this section. g) Error discussion: Your error discussion should first define systematic and random errors. Then it should give definitions of accuracy and precision. Now make sure your error discussion answers the following questions: Which type of error, systemic or random, affects accuracy (and the grade on your unknowns)? Which type of error affects precision (and your percent relative average deviation)? What are some possible systematic errors that could occur in this experiment? What are some possible random errors that could occur in this experiment? How would each of the possible errors in this experiment affect your results? What can be done to try to minimize each type of error? NOTE: The Introduction, Procedure, and Error discussion of this lab report should be in complete sentences, paragraph (not outline) format and will be graded for spelling and grammar as well as content. Be sure to reference any outside sources that you used to write your report. 96 UNIT CELL GEOMETRY INTRODUCTION Most solids form crystal lattices composed of repeating box-like units (unit cells). These cells are parallelepipeds whose shape is determined by the lengths of the edges of the parallelepipeds and by the angles between the edges. A cubic cell has 90° angles between all of its neighboring edges and all of its edge lengths are equal to each other. There are three possible arrangements of atoms within a cubic cell. In a simple cubic unit, there is an atom located at each corner of the cube (and each corner atom is shared by seven other cells). There are no other atoms present in a simple cubic unit cell. Corner atoms touch each other (except in the diagonal direction). In a body-centered cubic unit, there are corner atoms (as in the simple cube), but, in addition, there is a central atom completely within the body of the cube that is not shared with any other cell. In the body-centered cubic cell, none of the corner atoms touch each other but they all touch the central atom. In a face-centered cubic unit, there are, again, corner atoms shared with the surrounding cells. In addition, there is an atom centered on each of the six faces of the cell. Half of a face-centered atom belongs to this cell. The other half belongs to the cell adjacent to that face. Each facecentered atom touches its four corner atoms, but the corner atoms do not touch each other. PROCEDURE 1. The class should divide into eight groups and each group will check out a cubic cell model kit. Each kit should contain: 8 - 1/8 spheres; 6 - 1/2 spheres; 1 - whole sphere; metal connecting rods 2. Consult the diagrams in your textbook and build a simple cubic unit cell. Collaborate with the seven other groups of students and assemble a model of a portion of a solid formed from eight simple cubic unit cells. 3. Draw a diagram of a simple cubic unit cell and answer the questions on the report sheet for this cell type. 4. Repeat steps 2 and 3 for the body-centered and face-centered cubic units. 5. Observe your professor’s demonstration of a hexagonal unit cell and answer the questions on the report sheet. 97 REPORT UNIT CELL GEOMETRY EXP. NAME _________________________ SECTION _______________________ Simple Cubic Unit Cell Sketch the cell. Number of atoms/cell _____________ How many atoms does each individual atom touch when the unit cells are combined to form the crystal lattice? _____________ What is the relationship between cell length and radius of the atom? length = ________ r Body-centered Cubic Unit Cell Sketch the cell. Number of atoms/cell _____________ How many atoms does each individual atom touch when the unit cells are combined to form the crystal lattice? _____________ What is the relationship between cell length and radius of the atom? length = ___________ r 98 REPORT FOR UNIT CELL GEOMETRY EXP. (cont.) NAME ________________________ Face-centered Cubic Unit Cell Sketch the cell. Number of atoms/cell _____________ How many atoms does each individual atom touch when the unit cells are combined to form the crystal lattice? _____________ What is the relationship between cell length and radius of the atom? length = ___________ r Hexagonal Unit Cell Sketch the cell. Number of atoms/cell _____________ How many atoms does each individual atom touch in the crystal lattice? _____________ 99 QUESTIONS FOR UNIT CELL GEOMETRY EXP. NAME ________________________ 1. Calculating the packing fraction (the percent space occupied by atoms) for a hexagonal unit cell requires a bit more trigonometry than the same calculation for a cubic cell. However, based on your observations, which of the cubic cells would you expect to have the same packing fraction (percent of cell space occupied by atoms) as the hexagonal cell? Explain your reasoning. 2. In a face-centered cube, atoms touch each other on a diagonal across the face of the cell. Calculate the percent of the space (i.e., the packing fraction) in the cell occupied by atoms. Hint: Calculate the length of each cell in terms of the radii of the atoms using the Pythagorean Theorem which, for a right triangle, states: a2 + b2 = c2. 3. In a different universe, a certain very heavy element, "Q", forms a body-centered cubic solid having a density of 23.7 g/mL. The length of a unit cell is 3.256 Angstroms. Calculate the approximate atomic mass of "Q". 100 101 FREEZING POINT DEPRESSION INTRODUCTION The freezing point depression of a solution is a colligative property. Colligative properties of solutions depend only on the number of solute particles present per amount of solvent. They do not depend on the kind of solute dissolved. Other colligative properties include the boiling point elevation of a solution and depression of the vapor pressure above a solution. The freezing point of a solution is related to the molality of the solute in solution by the following equation: ∆Tf = −K f mi Where ∆Tf is the freezing point depression (in °C or K) that occurs due to the presence of the solute, Kf is a freezing point (cryoscopic) constant that is characteristic of the solvent (not solute), m is the molality of the solution, and i is the van't Hoff factor that compensates for the amount of dissociation of the solute. A non-dissociating solute has i = 1. The relationship between freezing point depression and molality can be used to determine the molar mass of an unknown substance. A measured mass of solvent, for which Kf has been determined, is combined with a known mass of solute. The freezing point of the solution is subtracted from the freezing point of the pure solvent which gives ∆Tf. If the value for i is known the equation shown above can be used to solve for the molality of the solute and the molar mass of the solute can be determined. PROCEDURE A. Determination of the Freezing Point of Pure Water 1. Work in small groups. Each group should check out a timer. 2. On the beam balances in the lab room, determine the mass of a clean dry 50 mL beaker (to ±0.001g). Use the same weighed 50 mL beaker for Parts A, B, and C of this experiment. The mass of the beaker will not be needed for Part A, but it will be needed for Parts B and C. 3. Put about 40 mL of deionized water into the 50 mL beaker. 4. In a 250 mL beaker, weigh out approximately 50 grams of rock salt. Add 80 mL of tap water to the salt and stir for 2-3 minutes using a clean stir rod. 5. Fill a different 250 mL beaker with ice. Transfer the salt solution (including the undissolved salt) to the 250 mL beaker containing the ice. Put the stir rod into the ice-salt-water bath and stir occasionally. 6. Clamp the 50 mL beaker containing the deionized water so it is Figure: Experimental Setup immersed in the ice-salt-water bath to a depth of about one inch (see figure to the right). Be careful that you do not allow the salt water to spill into the 50 mL beaker. Place a clean stir rod into the 50 mL beaker. 102 Hang a clean thermometer from a buret clamp so that its tip is immersed in the deionized water in the 50 mL beaker. Do not allow the tip of the thermometer to touch the bottom of the beaker. 7. Continuously stir the deionized water in the 50 mL beaker. Frequently scrape the bottom and the sides of the beaker with the stir rod. Do not hit the thermometer. Observe the temperature. When the temperature has dropped to about 2 or 3 degrees Celsius, begin recording the temperature (to the nearest tenth of a degree) at 15 second intervals. Use the other stir rod to stir the ice-salt-water bath at approximately one minute intervals. Continue to stir the deionized water while scraping the bottom and sides of the beaker and record the water’s temperature while watching for ice formation. In pure water, you may not see crystals. Instead, the ice may freeze as a sheet on the bottom of the beaker. Occasionally lift the beaker out of the ice bath and look at it from the side to see if there is ice. Quickly return the beaker to the ice bath. Take at least three more temperature readings after you are sure that ice has formed. 8. Save your ice-salt-water bath. Step 9 can be completed later. Collect the data for parts B and C first. 9. On a full sheet of graph paper or on the computer, plot the temperature of the water (y-axis) as a function of time (x-axis). Be sure to use a suitable scale and label your graph. Use a "best fit" straight line through the most horizontal (region of essentially constant) data points. Extrapolate (Note: supercooling is not always seen) this line back to the vertical axis to find the freezing point of pure water (See figure to the right). Figure. Cooling curve for pure water B. Freezing Point Constant for Water 1. Each group should obtain two clean dry shell vials. One will contain glucose, C6H12O6 (MM = 180.16 g mol-1, a non-electrolyte with i = 1), and the second will contain the unknown (to be used in Part C). 2. Clean the weighed 50 mL beaker used in Part A. Put about 40 mL of deionized water into the 50 mL beaker and determine the combined mass of the beaker and water. Calculate the mass of water. 3. There should be about 4 grams of glucose in the shell vial given to you. Determine the mass of the vial and glucose (combined) to the nearest 0.001 g using the beam balances in the lab. Transfer the glucose into the water in the weighed 50 mL beaker. Determine the mass of the empty shell vial and calculate the mass of glucose transferred. With a clean stir rod, stir to dissolve the glucose completely. The glucose must be completely dissolved before the solution’s freezing point can be determined. 4. Drain off about ½ of the solution from your ice-salt-water bath (leaving behind the remaining ice and salt). Add more ice to the bath. Stir well. 103 5. Clamp the 50 ml beaker containing the glucose solution in so it is immersed in the ice-saltwater bath to a depth of about one inch. Continue as described in steps 6 and 7 of part a. Remember to stir the ice-salt-water bath about once every minute. 6. Save your ice-salt-water bath. Steps 7 and 8 can be done later. Collect the data for Part C first. 7. On a full sheet of graph paper or on a computer, plot temperature versus time as described in Part A, step 9. Draw one "best fit" straight line through the more horizontal data points, the region in the graph where the temperatures are at a constant slope. (They may be almost constant.) Draw a "best fit" straight line that passes through the most vertical (region in the graph at the start of timing where temperatures are dropping rapidly) data points. The temperature reading at the intersection of these two straight lines is the freezing point of the solution. (See figure to the right. Note: supercooling is not always observed.) 8. Calculate the molality of the glucose solution. Calculate ∆Tf for the solution (use the freezing point of pure water from Part A). Calculate Kf for water. 104 C. Determination of the Molar Mass of an Unknown Solid 1. Discard the glucose solution from Part B and clean the weighed 50 mL beaker and thermometer. Fill the clean, weighed 50 mL beaker with about 40 mL of deionized water. Determine the mass of the beaker and water. Calculate the mass of the new sample of water. 2. The unknowns in this experiment are all non-electrolytes (i = 1). Determine the mass of the unknown and shell vial together to the nearest 0.001 g using the beam balances in the lab. Transfer the unknown substance to the beaker containing the new sample of water and using a clean stir rod, stir until the solid has completely dissolved. Determine the mass of the empty shell vial and calculate the mass of unknown transferred. 3. Drain off about ½ of the solution from your ice-salt-water bath (leaving behind the remaining ice and salt). Add more ice, and if necessary salt, to the bath. Stir well. Measure the freezing point of the unknown solution following the procedure described in Part B. Remember to stir your ice-salt-water bath. 4. On a full sheet of graph paper or on a computer, plot temperature versus time as described in Part A, step 9. Draw one "best fit" straight line through the more horizontal data points, the region in the graph where the temperatures are at a constant slope. (They may be almost constant.) Draw a "best fit" straight line that passes through the most vertical (region in the temperature reading at the intersection of these two straight lines is the freezing point of the solution (See Figure 3). 5. Using the freezing point of pure water from Part A, the experimental Kf for water from Part B, and the ∆Tf from this part of the experiment, calculate the molar of the unknown. 6. Include all graphs with your report. 105 REPORT FREEZING POINT EXP. A. NAME __________________________ SECTION _______________________ Determination of Freezing Point of Pure Water Mass of empty beaker, (g) Time, (s) Temperature, (°C) Freezing point of pure Water, (°C) Time, (s) (continued) Temperature, (°C) (continued) 106 REPORT FOR FREEZING POINT EXP. (cont.) B. NAME _______________________ Freezing Point Constant for Water Mass of beaker + water, (g) Mass of empty beaker, (g) (from Part A) Mass of water, (g) Mass of glucose + vial, (g) Mass of vial, (g) Mass of glucose, (g) Time, (s) Temperature, (°C) Time, (s) (continued) Temperature, (°C) (continued) 107 REPORT FOR FREEZING POINT EXP. (cont.) NAME __________________________ B. Freezing point constant for water (cont.) Freezing point of solution, (°C) ∆Tf for solution, (°C) Kf for water, (°C/m) SAMPLE CALCULATIONS (use separate sheets if necessary, include graphs) 108 REPORT FOR FREEZING POINT EXP. (cont.) NAME __________________________ C. Determination of the Molar Mass of an Unknown Solid UNKNOWN # Mass of beaker + water, (g) Mass of empty beaker, (g) (from Part A) Mass of water, (g) Mass of vial + unknown, (g) Mass of empty vial, (g) Mass of unknown, (g) Time, (s) Temperature, (°C) Time, (s) (continued) Temperature, (°C) (continued) 109 REPORT FOR FREEZING POINT EXP. (cont.) NAME _______________________ C. Determination of the Molar Mass of an Unknown Solid (cont.) Freezing point of solution, (°C) ∆Tf for solution, (°C) Molar mass of unknown, (g/mol) SAMPLE CALCULATIONS (use separate sheets if necessary, include graphs) 110 QUESTIONS FOR FREEZING POINT EXP. NAME _______________________________ Calculate the molar mass of an unknown non-electrolyte from its effect on the boiling point of ethanol. Mass of ethanol used Normal boiling point of ethanol Kb for ethanol Mass of unknown used Boiling point of solution 100.0 g 78.500 °C 1.20 °C/m 12.6 g 78.955 °C 111 APPENDIX Calculations Involving Precision and Accuracy Precision Precision is a measure of how well multiple (repeated) measurements agree with each other. It is an indication of consistency. One method of evaluating the precision of a set of data is to determine the percent relative average deviation. The procedure for this calculation is as follows: 1. Determine the average value for at least three experimental trials. 2. Subtract each individual value from the average value to get the deviation for each trial. 3. Add together the absolute values of the deviations and divide by the number of trials and the average value to get the relative average deviation. 4. Multiply by 100 to get percent relative average deviation. n average deviation %RAD= = × 100 average value x1 − x + x 2 − x + ... + x n − x nx × 100 = ∑x i =1 i −x nx × 100 where x is the average value, xi are the individual values and n is the number of measurements. Accuracy Accuracy is a measure of how close an experimental value (usually an average value) is to the accepted value. One method of evaluating the accuracy of an experimental result is to determine the percent error as follows: %error = experimental value - accepted value × 100 accepted value Do not use absolute values when calculating percent error. The sign simply indicates that the experimental value is higher than the accepted value when the percent error is a positive number, lower if negative. Free Multi-Width Graph Paper from http://incompetech.com/graphpaper/multiwidth/ Free Multi-Width Graph Paper from http://incompetech.com/graphpaper/multiwidth/ Free Multi-Width Graph Paper from http://incompetech.com/graphpaper/multiwidth/ Free Multi-Width Graph Paper from http://incompetech.com/graphpaper/multiwidth/ Free Multi-Width Graph Paper from http://incompetech.com/graphpaper/multiwidth/ Free Multi-Width Graph Paper from http://incompetech.com/graphpaper/multiwidth/
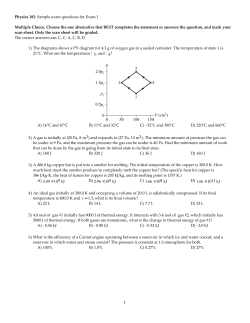


© Copyright 2026