
Construction of solar cookers and driers PRO-AGRO COLLECTION
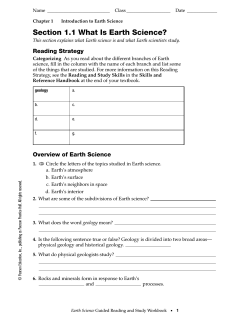
COLLECTION
PRO-AGRO
Construction of solar
cookers and driers
Christelle Souriau & David Amelin
COORDINATOR
E. Lionelle Ngo-Samnick
AUTHORS
Christelle Souriau and David Amelin
SERIES REVIEWER
Contributors
Rodger Obubo
2
REVIEWERS
Pascale Cognet, Jean-François Colmant and
Pascal Nondjock
Illustrations
Joseph Samuel Samnick and J.M. Christian Bengono
TRANSLATION
BLS
MISE EN PAGE
Stéphanie Leroy
The Pro-Agro Collection is a joint publication by Engineers Without Borders,
Cameroon (ISF Cameroun) and The Technical Centre for Agricultural and Rural
Cooperation (CTA).
CTA - P.O. Box 380 - 6700 AJ Wageningen - The Netherlands - www.cta.int
ISF Cameroun - P.O. Box 7105 - Douala-Bassa - Cameroon - www.isf-cameroun.org
© CTA and ISF 2014
Cover photo: © Hollandse Hoogte/Fred Hoogervorst
ISBN (CTA): 978-92-9081-567-9
Contents
1
2
3
Solar cookers
05
1.1
Types of solar cookers
1.2
Essential factors for solar cooking
1.3
Construction and use of the box cooker
1.4
Construction of the solar panel cooker
1.5
Use of solar cookers
1.6
Cost of solar cookers
.. . . . . . . . . . . . . . . . . . . . . . . . . . . . . . . . . . . . . . . . . . . . . . . . . . . . . . . . . . . . . . . . . . . . . ....................................... 05
06
.. . . . . . . . . . . . . . . . . . . . . . . . . . . 10
.............................. 14
.. . . . . . . . . . . . . . . . . . . . . . . . . . . . . . . . . . . . . . . . . . . . . . . . . . . . . . . . . . . . . . . . . . . . . . . . . . 17
......................................................................... 22
Solar driers
24
2.1
Different types of driers
2.2
Construction of a direct solar drier
2.3
Construction of an indirect solar drier
2.4
Use of solar driers
2.5
Cost of solar driers
.. . . . . . . . . . . . . . . . . . . . . . . . . . . . . . . . . . . . . . . . . . . . . . . . . . . . . . . . . . . . . . . . ...................................... 24
25
.............................. 27
............................................................................... 33
............................................................................. 34
Additional information
36
3.1Bibliography
36
3.2
............................................................................................ Useful contacts
...................................................................................... 37
General
information
Drying food using the sun and the air flow is an age-old practice that does not
always produce the best results. Cooking of food is traditionally done using wood,
oil, charcoal or gas, which requires a lot of attention and energy.
Although improved techniques for using solar energy are not that well-known,
they nevertheless provide better results in terms of economy, ecology, quality
and simple usage. Solar cookers and driers capture the sun’s rays to heat
and dry food.
This guide presents simple methods for construction and use of solar cookers and driers: a box cooker, a solar panel cooker, a direct solar drier and
an indirect solar drier. Easy to make and use independently, they provide an
economical way to meet the food processing needs of diverse populations.
The solar cooker saves time, money and energy at no risk for the environment.
It can be used to cook all types of food (vegetables, fruits, meat, cereals,
bread, etc.). Solar cooking is slower than traditional cooking methods and
consequently enables the production of healthier dishes, preserving both
taste and nutrients and making meat more tender. Vegetables, fruits and
meat cook perfectly without water, thereby accelerating the cooking process,
while cereals and starchy foods need less than a third of the amount of water
required for traditional cooking.
Compared to air-drying, solar driers allow better preservation of food quality.
With higher temperatures, solar drying is much more thorough. Food dries
2 to 5 times more quickly in a solar dryer than in open air. Furthermore,
it reduces health risks by eliminating contamination with mould, insects,
animals, dust and many other threats. A solar drier reduces the need for
handling as well as the drying time. It enables to obtain better quality products. As handling is reduced, the risk of food products crumbling or breaking
up is eliminated.
4
1
Solar cookers
This practical guide presents two main models: a “box cooker” and a
“solar panel cooker” that can reach temperatures of between 120
and 150 °C for cooking, roasting or boiling. It should be noted that
there are other types of solar cookers that can reach higher temperatures for frying or grilling food.
1.1 Types of solar cookers
There are three different types of solar cookers:
Also called “parabolic solar cookers”, curved concentrator solar cookers rapidly reach very high temperatures, but require frequent adjustments and
many safety precautions. With an estimated power
of 400 W, they are the most expensive. The parabola
enables all types of cooking, including frying.
Solar cooker with
parabolic reflector
Box cooker
Solid and efficient, the box cooker is composed of an
insulated wooden box containing a smaller box with a
black base and internal walls covered in aluminium.
A double-glazed glass top covers the assembly and
produces a greenhouse effect. It can be made using
local materials (wood, sheep’s wool, etc.) and can
easily reach a temperature of 120 to 150 °C. Easy
to make, the box cooker is the one most frequently
used.
Solar panel cooker
Solar panel cookers combine elements of the box
cooker and the parabolic cooker. Very easy to construct, the solar panel cooker has neither glass nor
an insulation system. Its reflective surfaces are safe
for the eyes. As the temperature is regular, it does
not require any adjustment during cooking. It can
simply be folded for storage purpose.
5
1.2 Essential factors for solar cooking
Location of the solar cooker
The solar cooker must be placed outdoors, in a sunny spot exposed to the
wind, but protected from very strong winds, storms, fog, dust and shade
from nearby trees or buildings, all of which reduce the amount of sunshine
and increase the cooking time.
The selected location must be at a distance from sites used for disposal
of human or animal waste and waste water. It is preferable to fence the
site to keep out domestic animals.
Optimum time to use the solar cooker
The solar cooker must be used when the size of the shadow on the ground
is shorter than the actual height of the cook. The sun must therefore be
quite high in the sky to enable cooking. Solar cooking is not possible early
in the morning or after sunset. The ideal time to cook is therefore between
09.00 am and 3.00 pm.
09 am – 12 pm
12 pm – 3 pm
Rapid cooking
Slow cooking
After 3 pm
No cooking
The best times for solar cooking
Types of container used for cooking food
It is preferable to use containers of a dark colour, as they absorb heat best,
while light colours reflect the sunlight.
6
Capture or
reflection of
sunlight
Capture
Reflection of sunlight
Cooking time
The amount of time required for solar cooking depends on the time of year,
the time of day, the degree of sunshine, the type of container used, the
dish to be cooked and the quantities of food prepared.
The essential factors for solar cooking are represented
in the following table
Rapid cooking
Slow cooking
Time of day
Sun intensity
Wind
Thickness of container
Amount and size of
food
Quantity of water
7
Solar cooking is not suitable for preparing dishes that require occasional
stirring. It is recommended to include all ingredients at the beginning of
the cooking process.
Temperatures for cooking food
In normal conditions, simple solar cookers can reach a temperature of
120 ° C. To avoid the proliferation of bacteria, it is necessary to cook food
at a temperature above 60 °C. Between 82 °C and 91 °C, food cooks
without boiling and does not lose its nutrients. The cooked food can remain
in the cooker without any risk until meal time.
22°C
Ambient
temperature
71°C
Pasteurisation of
food
22°C à 49°C
Presence of
bacteria in food
82°C
Cooking
60°C
Disappearance of
bacteria from food
100°C
Boiling point
of water
65°C
Pasteurisation
of water
100°C - 130°C
Simple solar
cooking
Solar cooking generally takes twice as long as traditional cooking. Approximate
solar cooking durations for 2 kilograms of food in sunny weather are shown
in the following table.
8
Approximate cooking times
1 – 2 hours
3 - 4 hours
5 – 8 hours
Eggs
Potatoes
Roast meat
Rice
Beans
Soup
Fruit
Cassava
Vegetables
Meat
Fish
Bread
Chicken
Cooking times vary according to the type of food. As in traditional cooking,
meat and soups should be cooked longer.
9
1.3 Construction and use of the
box cooker
Equipment and materials required
• 2 wooden boxes of different sizes, one slightly smaller than the other
and able to fit inside the other. The external box can be made of wood or
plywood, the internal box of metal (preferably aluminium).
• A question of choice and availability: polystyrene, blocks of insulating
foam, crumpled up balls of newspaper, sheep’s wool, dried plant fibres
(rice, banana leaves, coconut fibres, etc.), feathers or ashes to insulate
the space between the two boxes. (No polyvinyl and no glass wool or other
plastics that give off smoke at high temperature). Sheep’s wool and ashes
should be available in large quantities. Ashes, however, will increase the
weight of the cooker.
Materials required
• Some cardboard
• A very rigid cardboard box (for the
reflectors)
• Some aluminium foil
• A transparent pane of glass a little
larger than the smaller box (or a
sheet of plastic of this size, if glass
is not available)
Large box
Black cardboard
(to cover the base of
the small box)
10
Small box
Insulation I
(Foam for base of
large box)
Cardboard
(to be covered with
aluminium for the
reflectors)
•
•
•
•
•
•
Non-toxic glue
Sticky tape
Assorted pieces of wood
Scissors
A ruler
A whiteboard marker
Wooden
battens
Aluminium foil
(to stick on the inside
walls of the small box)
Insulation II
Glass + frame
Construction of the box cooker
The box cooker is composed of two wooden or cardboard boxes; one must
be three centimetres bigger than the other in all directions.
>>> Constructing the two boxes
Use the plans below to make the boxes from wood or cardboard.
* All measurements are in centimetres.
>>> Assembling the two boxes
• Fill the base of the larger box with insulation material up to 1 to 3 cm height.
• Place the second box inside the first. Fill the empty spaces between the
boxes with the same material used for the base without deforming the boxes,
while ensuring that they do not move.
11
• Insert pieces of foam on top of the insulation to fill the space between
the boxes completely.
• Close off the top gap between the boxes with four wooden battens so
that the edges fit snugly.
>>> Making of the reflectors for the interior of the box
• Cut pieces of cardboard to fit the inside walls of the smaller box. Cover
with aluminium foil. Stick the aluminium foil to the cardboard, making sure
that it is smooth and has no folds or air or glue bubbles.
• Staple the cardboard covered with aluminium foil onto the internal walls
of the oven. Cover the bottom of the inside box with black cardboard to
absorb the heat.
aluminium
black cardboard
>>> Generating the greenhouse effect
• To improve cooking, place the dish in a “heat trap”, i.e. under a pane of
glass or plastic.
• Construct two wooden frames to the measurements of the cooker. Select
a panel of the same size and place it on the first frame. Attach it with silicon
adhesive. Position the second panel and attach it in the same way.
glass
glass
silicone
glue
wooden batten
wood
12
• Attach the glass or plastic panel to the top of the cooker with two small
hinges. To ensure that the oven remains airtight when closed, place four
strips of foam on the top edges of the 4 walls (matching the frame of the
glass panel). The glass top will rest against the foam joint and prevent the
escape of hot air.
strips
of foam
>>> Making of the top reflector
For the reflector, use a very rigid piece of cardboard. Cover with a sheet
of aluminium foil . Use a hinge or a smaller piece of cardboard to attach
the reflector to the rear of the oven.
The reflector must be maintained in a vertical position above the box. The
reflector’s support will allow the angle between the reflector and the box
to be adjusted. This will make a number of positions available to ensure
optimum reflection of sunlight.
To make the support, attach a small piece of cardboard (5 cm x 2 cm)
onto the frame of the box and another onto the reflector. Take a stiff piece
of iron wire of 40 cm length and bend the ends to 90°. Insert each end
of the wire into the corrugations of the cardboard. A number of different
positions can be selected in this way to adjust the angle of the reflector.
13
1.4 Construction of the solar panel cooker
The solar panel cooker is made of cardboard covered with aluminium foil.
Folded around a food container, the cardboard reflects the sunlight. Simple
and easy to carry around, this cooker can be made in just one to two hours.
You can make it bigger if necessary.
Required materials
• Corrugated cardboard 0.9 m x 1.2 m
• Aluminium foil sheets
• Non-toxic glue
• Black paint
Construction
• In order to ensure that the angles are accurate, cut out a protractor
template using the pattern below.
2.9
Protractor template
to be cut out
cm
3.4
16.2 cm
14
cm
3.4 cm
• Place the cardboard on a flat surface and draw the outline of the cooker
using the plan below.
Slot
Slot
Plan of solar panel cooker
• To obtain the shapes of the cooker, carefully cut out the 2 slots, making
sure not to make them any larger. The width of the slots is crucial to the
stability of the structure.
• Mark the folding lines with a appropriate instrument (spoon handle, knife
handle, ruler). Fold the cardboard along the folding lines.
• To preserve the cooker and avoid humidity, paint the back of the cardboard
(non-reflective surfaces). Leave to dry.
• Stick a sheet of aluminium foil over the front surface of the cooker. Make
sure the folding areas adhere firmly. Leave to dry.
Glue diluted
with water
Binding the aluminium foil to the panel cooker
15
• Fold the cooker and assemble it. The
solar panel cooker is now finished.
• The cooker can be folded in two or
folded so as to measure only 33 cm2.
Folding the panel cooker
• Store the cooker away from humidity and animals. Wipe the reflective
surfaces with a dry cloth occasionally. If the cardboard panels get damp,
place them flat (shiny surface toward the sun) until they get dry. Take care
not to damage the shiny surface.
• The plastic bags can be used more
than ten times. If they get torn, you
can repair them with adhesive tape to
prolong their use.
16
1.5 Use of solar cookers
To avoid any food contamination while using solar cookers, it is essential to
observe the following rules of hygiene:
• wash your hands with soap before handling food
• wash and dry utensils before use
• clean food preparation surfaces
• consume the food soon after it has been cooked. The higher the temperature, the more difficult it is to preserve cooked food.
Using the box cooker
• Before you start cooking with the box cooker, adjust the reflector to the
best angle to reflect the sunlight onto the food. The ideal angle reflects
the maximum amount of sunlight onto the glass top, as shown in the
figure below.
Incorrect angle
Correct angle
Positioning the reflector for optimum sunlight
• Place the food in a dark-coloured container with a lid.
• Place the food container in the centre of the box cooker and leave the meal
to cook without stirring the food during the cooking time. Avoid opening the
cooker while it is cooking, as this causes heat loss.
• Position the solar cooker so that it is best placed to capture the sun’s
rays. Reposition it every hour to ensure maximum efficiency.
17
Using the solar panel cooker
• Place the food in a dark-coloured container with a lid.
Filling the cooking pot
• To increase the efficiency of solar panel cookers, place the pot in a transparent “heat trap” that allows the sun’s rays to pass through. Overturned
Pyrex bowls can be used, but in this case, you must provide a glass base
to place them on to avoid damaging the cooker.
Circulation
of air
Overturned
Pyrex bowl
Plastic bag
Making a heat-trap
Place the cooking pot on a raised support made from wire mesh or pebbles
to create a current of air around the pot without losing heat. Make sure to
use a stable support, i.e. wider than the container. The pot should rest on
the support at approximately 6 cm above the base. This support enables
the sun’s rays to be reflected onto the top and sides of the pot, as well as
underneath. Close the bag.
18
Pot on stones
Pot raised on a
wire-framed support
Setting up the cooking pot on a stable support
• Place the cooker in a sunny spot with no shade. There must be full and
continuous sunlight.
• Place the cooker so that its shadow is directly behind it and not on one
side. To speed up the cooking, adjust the position every two hours.
• Prepare the meal by cooking at around 9 - 10 a.m. so that it is ready
for lunch. Prepare the meal by cooking at around 1 - 2 p.m. so that it is
ready for the evening meal.
• If you want a dish to cook throughout the day, place the cooker in the
direction of the sun’s position at midday or early afternoon.
• If necessary, adjust the position of the cooker’s front panel.
Folding the cooker
Positioning the cooker in
relation to the sun
19
Position of the cooker’s front panel
The shadow of the front panel must always be small. The panel must be
raised when the sun is high in the sky and lowered when the sun is low in
the sky. The reflection of the sunlight must be as great as possible.
Placing the pot in the cooker
In case of strong wind, add stones or
bricks on each side of the cooker to stabilise it. Do not insert any stone inside the
cooker, as they could impede the reflected
sunlight.
Stabilising the cooker in windy conditions
• Leave the food to cook without stirring. Avoid opening the bag during
cooking to prevent loss of heat.
• When the cooking is finished, wear sunglasses to prevent the reflected
sunlight from damaging your eyes and use cooking gloves or tea towels
to avoid burns, as the pot will be very hot. Position yourself in front of the
cooker with your back to the sun, then remove the cooking pot. Avoid the
steam that will be released when you open the plastic bag, as it is very
hot and can cause burns.
20
Removing the pot
from the cooker
Using the box cooker or solar panel cooker to pasteurise food
In addition to cooking, solar cookers can also be used to pasteurise liquids
and food. To avoid food contamination, it is essential to observe the basic
hygiene rules described below.
In addition, it is essential to preserve pasteurised food and liquids in dry,
hermetically sealed containers.
It is not useful to
boil liquids if you
have a measuring
device showing that
pasteurisation has
been successful.
>>> Pasteurisation of liquids and food
Impure water is a serious health problem, as it leads to diseases such as
cholera, dysentery, typhoid, Guinea worm disease and hepatitis A. Pasteurisation kills germs by exposing them to heat. Solar cookers heat water
to high temperatures reducing the risk of microorganism contamination
(Escherichia coli, rotavirus, Giardia lambia, hepatitis A virus). Milk and food
products are pasteurised when they are heated to 71 °C.
>>> Checking the pasteurisation of water
To ensure that water has been correctly pasteurised, you
can use a WAPI (Water Pasteurisation Indicator). This
simple and reusable device contains a piece of wax that
melts when it reaches the pasteurisation temperature,
thus indicating that the water has reached the correct
temperature.
If you do not have
an indicator, boil the
water for 5 minutes
to ensure that all of
the bacteria have
been completely destroyed.
Pasteurisation does not purify the water
from dangerous chemical products such
as mercury or arsenic. To counter heatresistant fungi, it is essential to sterilise
water, liquids, food products and medical
instruments with special, very powerful
cookers that can reach high temperatures
(more than 150°C).
21
1.6 Cost of solar cookers
In Africa, wood, charcoal, gas and agricultural residue (palm nut husks, cow
dung, etc.) constitute the most popular source of domestic fuel. A household
consumes on average 5 kg of wood per day. Therefore a typical family needs
1,825 kg of wood per year. With the average price of wood at FCFA 80 per
kg, the annual expenditure on wood is approximately FCFA 146,000 (E 222.5)
per household. Gas consumption stands at an average of 12.5 kg per month
per household, which is 150 kg of gas per year. The price of a 12.5 kg gas
cylinder is approximately FCFA 6,000, so annual expenditure of gas is FCFA
72,000 (E 109.7) for each household.
Although solar cookers can only be used in sunny weather, they represent
interesting alternatives as far as energy source used being free and due to
their minimal impact on the environment (no air pollution, less deforestation).
The following table shows the cost of making a box cooker
Unit price
in FCFA
Total price
in FCFA
1
10,000
10,000
1 roll
5m
1
2,500
2,500
Sheet of glass or plastic 3 mm thick
measuring 43 cm x 37 cm
1 sheet
1
10,000
10,000
Blocks of foam, newspaper, sheep’s
wool, ashes or dried plant fibres
assorted
0,5 m2
2,000
2,000
1
1
2,000
2,000
1 pot 100
to 200 ml
1
5,000
5,000
1 box
5,000
5,000
2
5,000
5,000
10,000
20,000
Piece of wood measuring 1.5 m x
1.5 m (in the absence of wood, make
two cardboard boxes, one approximately 45 cm x 45 cm and the other
approximately 40 cm x 40 cm)
Household aluminium foil
Rigid cardboard box 1 m x 2 m
Glue
Screws, nails
Equipment (scissors, ruler)
Labour
TOTAL
22
Unit
Quantity
1
1
61,500
The total cost of a rigid box cooker is approximately FCFA 61,500 or
e 93.75.
The following table shows the cost of making a solar panel cooker
Unit
Quantity
Sheet of paper 1 m x 1.30 m
1
1
2,000
2,000
Rigid cardboard box 1 m x 1.30 m
1
1
3,000
3,000
1 pot
medium
size
1
5,000
5,000
1 roll
5m
1
2,500
2,500
5,000
5,000
10,000
10,000
Glue
Household aluminium foil
Equipment (scissors, ruler)
Labour
TOTAL
1
1
Unit price
in FCFA
Total price
in FCFA
27,500
The total cost of a solar panel cooker is approximately FCFA 27,500 or
e 41.90.
These investments are generally recouped in less than one year of use. The
profitability of these cookers depends on how frequently they are used
23
2
SOLAR DRIERS
2.1 Different types of driers
Food is traditionally dried in the open air, spread out in the sunlight. This
traditional method requires a lot of handling and leads to considerable loss
due to contamination by insects, sand and gravel. This guide demonstrates
improved drying techniques (direct solar drier or indirect solar drier)
that limit losses due to contamination, save time and achieve better quality results. It is therefore important to choose the drier best suited to the
needs and capacities of each household.
Traditional drying method
The direct solar drier technique is more efficient than the traditional
method, because food is protected behind glass, which allows to obtain
higher temperatures. Moreover, food is protected from possible contamination (dust, sand, etc.) thanks to the glass. The sun, amplified by the
glass, shines directly on the food and dries it. However, these rays also
destroy the vitamins and nutritional elements, eliminating food flavours and
colours. Furthermore, in case of inadequate ventilation, this can lead to
mould issues in humid conditions.
Direct solar
drier
24
The indirect solar drier technique takes longer to build and is more
expensive but it saves vitamins, nutritional elements and food colours. The
sun’s rays do not make direct contact with the food, but the sun’s ray hit a
transparent surface with a black base which acts as a solar collector. The
air heated in this way by the collector circulates toward the drier and dries
the food.The circulation of hot air provides good ventilation and eliminates
any humidity issues. The food does not lose its nutritional qualities.
Indirect solar
drier
2.2 Construction of a direct solar drier
The food is spread out on grids inside a box with a glass top to increase
the temperature and protect the food. Holes in the rear of the drier provide
a small amount of ventilation.
Direct solar
drier
For the solar drier to operate most efficiently, the glass top must be at an
angle of 45° to the sun, and the drier must be positioned to face south.
25
Required materials
• Several pieces of wood between
0.5 cm and 2 cm thick
• A sheet of plexiglas or glass
measuring 1 m x 60 cm
• Wooden battens of a total length
of 3.50 m
•
•
•
•
•
Hinges
Handles
Screws and nails
Silicon glue
A mosquito screen
Construction of the direct solar drier
• Cut the wood as indicated in the schematic representation below.
Side
Base
0.70 m
0.60 m
Side
0.30 m
0.30 m
Front
• Make some holes in the base and rear sections. These holes will provide
the drier with ventilation.
• Join the parts together: attach the sides to the base, then attach the
rear and the front.
• Make two wooden frames to the measurements of the box. Place the
glass top on the first frame, seal the joint with a silicon sealant, and then
attach the second frame to the other side of the glass top in the same way.
• Attach two hinges joining the frame of the glass top to the rear of the box.
• Bind the battens to the inside of the box as indicated below. These battens
will support the grids.
26
• Make the grids with the battens. Make wooden frames measuring 95 cm
x 55 cm and attach the mosquito screen to it.
• Fix the mosquito screen over all of the ventilation holes, as well as under
and to the rear of the drier.
• Bind two pieces of wood to each side of the box to raise it above the
ground, as shown in.
2.3 Construction of an indirect solar drier
The two most important factors for ensuring that the drier works efficiently
are its position in relation to the sun and ventilation. The drier should always
be positioned at an angle of 35° to 45° away from the south and also correctly ventilated.
All indirect solar driers are composed of two parts: the solar collector and
the drying chamber (see plan). This technical guide demonstrates the simple
and rapid construction of a vertical solar drier, which means that the solar
collector is located below the drying chamber. The plan below can be adapted
to construct driers of different sizes.
Air outlet
5
4
3
Sun’s rays
Solar
collector
Air inlet
2
Drying
chamber
1/ Air intake.
2/ The solar collector
is made from black
materials covered with a
glass top. The sun’s rays
strike the glass and heat
the air.
3/ Hot air circulates in
the drying chamber. The
food spread out on the
grids is dehydrated by the
circulation of hot air.
4/ Two lateral windows
can be opened to
regulate the temperature
inside the drying
chamber.
5/ Hot air is evacuated
through an opening
situated above door A.
1
The different parts of the solar drier
27
Ideally, the temperature inside the drier should be 45 to 50 °C. It can be
adjusted by opening or closing the windows on the sides. It is helpful to
check the temperature with a thermometer. If the temperature is too high,
it will cook the food and, if it is too low, the food will not dry and will decay.
Required materials
• Screws and nails
• 4 hinges
• 3 door latches
• Wire mesh or mosquito screen
for the air intakes and outlets
• Synthetic foam (optional)
• A thermometer (optional)
• Plywood or recycled wooden
boards or planks
• Galvanised sheet metal
• Wooden battens or slats
• Silicon insulation gasket
• A sheet of plastic (or glass if it is
impossible to obtain plastic)
• Black paint
Construction of the drying chamber
• Cut up wooden sections A, B, C, D and H using the measurements shown
on the representation. Section A will form the door. It will be located opposite the solar collector. The solar collector will be bound under section C.
Side
H
Side A
Side D
The different
sections of the
drying chamber
Side C
Side
D
28
Side B
Openings
Side C
Side B
The drying
chamber seen
from above
Solar
collector
Drying
chamber
Side D
Hinge
Side A (Door)
• Cut a 25 cm x 25 cm square to form Side B as shown above.
Openings
25 cm x 25 cm
Side B
Bottom
of drier
Base of drier
29
• Repeat the same with side D. These openings allow the temperature to
be regulated.
• Cut the drier base legs: 4 lengths of 10 cm wide and 70 cm long wood.
The thickness of these battens is important, as they will form the base
that will carry the drier assembly.
• Bind two pieces of wood to the outside of side B and two others to the
outside of side D, as shown above. Add a supporting batten between these
legs to ensure stability.
• Assemble sections B, C and D using the slats or battens on the internal
sections, as shown above.
Side D
Side B
D
B
Side C
Assembling the sides of the drying chamber
H
• Cut six 80 cm lengths
of wood. Bind them to the
inside of Sides B and D,
20 cm apart, as shown in
the plan. They will act as
supports for the grids.
B
Grid supports
30
• Bind section A, which will form the door, and leave a 10 cm opening
above the door. Attach two hinges and a latch. Place Side H between Sides
B and D above the opening for the air outlet.
Construction of the solar collector
• Cut up sections E, F and G using the measurements in the schematic
representation. Paint the internal surfaces of sections E, F and G with
black paint.
1m
F
G
2m
0.5 m
0.5 m
F
0.5 m
E
E
2m
1m
G
2m
• Assemble sections E, F and G using battens placed on the inside.
• Position the pane of glass on top of the solar collector, then bind it to
sides F and G with the silicon glue.
• Position the mosquito screen on the side, as shown above. The mosquito
screen will allow air to pass through while preventing insects from entering
the drier.
Transparent surface
Side E
Colle
silicone
Mosquito screen
Solar collector
31
Construction of the drying grids
• The 5 drying grids are 97 cm x 97 cm squares. They are built as wooden
frames. A fine wire mesh or mosquito screen is attached to each frame,
as shown above.
Assembling the solar collector and the drying chamber
• Attach the solar collector to the drying chamber with lengths of wood on
sides B and D, as shown in the plan. To position the solar collector correctly,
the angle between the collector and the drying chamber must be 45 °C.
Fixing board
Connecting the drying chamber to the
solar collector
• It is important to ensure that the joints between the solar collector and
the drying chamber are airtight in order to obtain good hot air circulation.
Seal any gaps with wood or silicon sealant.
Construction of the roof of the solar drier
• Cut a piece of sheet metal of 1.40 m x 1.40 and bind it to the top of
the drying chamber.
32
Finishing the solar drier
• Cut two pieces of wood measuring 27 cm x 27 cm to close the side
windows. Use hinges to attach these squares to the openings on sides B
and D. Attach latches. All of the openings on the drier must be closed to
prevent insects from entering the drier.
• Attach pieces of mosquito screen over the lateral windows.
• Attach a piece of mosquito screen over the hot air outlet.
• Check that the outlet is airtight. Attach pieces of wood or foam to seal
the openings if necessary.
2.4 Using solar driers
• Place the drier in a sunny spot facing south.
• Wash the food before drying it, remove any spoilt items.
• To facilitate the drying process, whenever possible cut the food into thin
strips or small pieces. Small portions of food can be dried as such.
• It takes 1 to 4 days to dry food in sunny conditions. In case of bad weather,
move the drier to a dry and sheltered spot. If bad weather persists, it is
possible to complete the heating in an oven at low temperature.
• Preserve the dried food in a clean, hermetically sealed container, preferably in a dry, cool place.
33
2.5 Cost of solar driers
The following table shows the cost of building a direct
solar drier (in FCFA)
Unit
Quantity
1
1
10,000
10,000
1m
10
1,000
10,000
1
1
10,000
10,000
Silicon glue
1 tube
1
5,000
5,000
Black paint
1 100 ml
tin
1
5,000
5,000
1 box
1
5,000
5,000
Hinges
1
5,000
10,000
1 m x 1 m mosquito screen
1
5,000
5,000
1
10,000
20,000
2.10 m x 1.60 m piece of wood
0.5 cm to 2 cm thick
Wooden battens or slats totalling
10 m in length
1 m x 0.70 m plastic sheet
(plexiglas) or pane of glass
Screws and nails
Labour
TOTAL
34
2
Unit price
in FCFA
Total price
in FCFA
80,000
The following table shows the cost of constructing an indirect
solar drier (in CFAF)
Unit
Pieces of wood 0.5 cm to 2 cm
thick with a total surface area of
2.20 m x 5 m
Quantity
Unit price
in CFAF
Total price
in CFAF
1
10,000
10,000
1 m x 2 m plastic sheet (plexiglas)
or pane of glass
1m
1
10,000
10,000
Wooden battens or slats measuring 2 cm x 2 cm, with a total
length of 24m
1m
10
1,000
10,000
10
1,000
10,000
Hinges
2
5,000
10,000
Handles door latch
1
15 000
15,000
Black paint
1
15,000
15,000
1.10 m x 1.10 m sheet of
corrugated iron
1
5,000
5,000
1 m x 1 m mosquito screen
1
3,600
3,600
10 cm x 10 cm wooden battens,
with a total length of 1.20 m
Screws and nails
1 box
1
5,000
5,000
Silicon glue
1 tube
1
5,000
5,000
6
1
10,000
60,000
Labour
TOTAL
163,600
The building cost of solar driers starts from FCFA 80,000 (e 121.95). The
drying capacity is 1 to 10 kg of fresh products per day. Their profitability
depends on how frequently they are used.
To reduce the cost of driers, use local and recycled materials as much as
possible. This investment becomes profitable very soon.
35
3
ADDITIONAL
INFORMATION
3.1 Bibliography
Benkhelfellah R., El Mokretar S., Miri R. and Belhamel M., 2005. Séchoirs
solaires. Études comparatives de la cinétique de séchage des produits
agroalimentaires dans des modèles de types direct et indirect (Solar driers.
Comparative studies of the kinetics of drying agrofood products in direct and
indirect models), 12èmes Journées Internationales de Thermique Maroc.
Berhinger R. and Götz M., 2009. Cuiseurs solaires : Autoconstruction et
recettes (Solar cookers: construction and recipes), Ed. La plage.
Dudez P., 1996. Le séchage solaire à petite échelle des fruits et légumes,
Expériences et procédés (Small-scale solar drying of fruits and vegetables.
Experiences and processes), (CIRAD) Ed. du GRET, Ministry of Cooperation
Lorenz-Ladener C. and Griesmar D., 2011. Séchoirs solaires : Construction
et utilisation (Solar driers: Construction and use), Ed. La Plage.
Miri R., Mokrani O., Siad F. and Belhamel M., 2002. Étude expérimentale
d’un Séchoir Solaire (Experimental Study of a Solar Drier), Rev. Energ. Ren.:
Zones Arides, p. 41-48.
Rioux A., 1995. Amélioration et diversification du séchage solaire domestique des fruits, des légumes et des feuilles (Improvement and diversification
of the domestic solar drying of fruit, vegetables and leaves), Documents
archive of the FAO.
36
3.2 Useful contacts
n Association Bolivia Inti
18, rue Gaëtan Rondeau
44 200 Nantes (France)
Tel.: (+33) 02 51 86 04 04
Email: [email protected]
www.boliviainti-sudsoleil.org
n Association Solemyo
Rue des Gares 15
1201 Genève (Switzerland)
Tel: (+41) 22 734 734 0
Email: [email protected], [email protected],
[email protected]
www.cuisinesolaire.com
37
38
In the same collection…
Improved plantain production
E. Lionelle Ngo-Samnick
Rearing grasscutters
E. Lionelle Ngo-Samnick
Rattan production and processing
E. Lionelle Ngo-Samnick
How to make a hand pump
Thomas Simb Simb
Maize production and processing
Maybelline Escalante-Ten Hoopen & Abdou Maïga
Improved technique for hand-crafted
soaps and detergents production
Martial Gervais Oden Bella
Raising geese
Irénée Modeste Bidima
Cocoa production and processing
Kokou Edoh Adabe & E. Lionelle Ngo-Samnick
39
Construction of solar
cookers and driers
Pro-Agro is a collection of practical, illustrated guides that are jointly published by CTA
and ISF Cameroun. They are an ideal source of information for farmers, rural communities and extension workers in tropical and subtropical regions.
This technical guide describes a number of simple methods for building and using
solar cookers and driers: a box cooker, a solar panel cooker, a direct solar drier and
an indirect solar drier. They meet the food processing needs of diverse populations
at low cost. They are economical, environmentally friendly, easy to make and can be
used independently.
• The Technical Centre for Agricultural and Rural Cooperation (CTA) is a joint
international institution of the African, Caribbean and Pacific (ACP) Group of States
and the European Union (EU). Its mission is to advance food and nutritional security, increase prosperity and encourage sound natural resource management in ACP
countries. It provides access to information and knowledge, facilitates policy dialogue
and strengthens the capacity of agricultural and rural development institutions and
communities. CTA operates under the framework of the Cotonou Agreement and is
funded by the EU.
• Engineers without Borders (ISF) is a network of professionals in more than
52 countries to promote human development through improved access to scientific and technical knowledge. In Cameroon, ISF works together with local people
to improve their livelihoods and strengthen their technical capacity by sharing and
diffusing information adapted to their needs.
ISBN 978-92-9081-567-9
9 789290 815679


© Copyright 2026