
NE SAFETY WARNINGS k i d s !
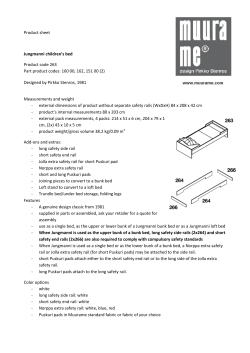
NE
kids
Assembly Instructions
STUDENT LOFT BED
Item No. X080
!
SAFETY WARNINGS
1. Follow the information on the warnings appearing on the upper bunk end structure and on the
carton. Do not remove warning label from bed.
SAFETY FIRST!
2. Always use the recommended size mattress or mattress support, or both, to help prevent
entrapment or falls.
All of NE kid’s Bunkbeds were
designed and manufactured with
your child’s safety as our top
priority.
3. Surface of mattress must be at least 5 inches (127 mm) below the upper edge of guardrails.
4. Do not allow children under 6 years of age to use the upper bunk.
5. Prohibit more than one person on the upper bunk.
Their unparalleled strength is a
bi-product of the safety design.
Our bunks meet all compliance
with ASTM F 1427-07 “Standard
Consumer Safety Specification
for Bunk Beds” and Code of
Federal Regulations (CFR) 1213
“Safety Standards for Entrapment
Hazards in Bunk Beds” and
(CFR) 1513 “Requirements for
Bunk Beds”.
6. Periodically, check and ensure that the guardrail, stairs, and other components are in their proper
position, free from damage, and that all connectors are tight.
7. Do not allow horseplay on or under the bed and prohibit jumping on the bed.
8. Always use the stairs for entering and leaving the upper bunk.
9. Do not use substitute parts. Contact the manufacturer or dealer for replacement parts.
10. Use of a nightlight may provide added safety precaution for a child using the upper bunk.
11. Always use guardrails on both long sides of the upper bunk. If bunk bed will be placed next to the
wall, the guardrail that runs the full length of the bed should be placed against the wall to prevent
entrapment between the bed and wall.
Safety is a cooperative effort
between us as the manufacturer,
and you as a guardian. Please
read and consider the
warnings listed on this page
when choosing a mattress and
discussing rules of use with your
child.
REPLACEMENT PARTS
Replacement parts, including
additional guardrails, may be
obtained from any of NE kids’
dealers.
Page 1 of 17
12. The use of water or sleep flotation mattresses is prohibited.
13. Keep these instructions for future reference.
!
STRANGULATION HAZARD
Never attach or hang items to any part of the bunk bed that are not designed for use with the bed;
including, but not limited to, hooks, belts and jump ropes
SIZE OF MATTRESS AND FOUNDATION
Use only mattress, foundation and deck combined which is 74-75 inches long and 37 ½-38 ½ inches wide
on upper bunk. Ensure thickness of mattress and foundation combined does not exceed 8 inches and the
mattress is at least 5 inches below upper edge of guardrails.
NE kids · 2300 Prospect Dr. Christiansburg, VA 24073 · www.ne-kids.com
NE
kids
Assembly Instructions
Page 2 of 17
STUDENT LOFT BED
Item No. X080
INTRODUCTION
Enclosed please find simple step-by-step
instructions to help you quickly assemble
your product. Before you begin we recommend
that you follow the steps below:
1. Please read the instructions thoroughly
2. Identify all parts and hardware
3. Gather the tool(s) necessary
4. 2 adults required for assembly
To protect your parts during assembly please
place them on a soft surface.To clean surface use
only water on a damp cloth. Do not use window
cleaners or cleaning abrasives as it will scratch
the surface and could damage the protective
coating.
CUSTOMER SUPPORT
If you are missing parts or need assistance with
your product, please contact the retailer from
whom you purchased the product. When you
call or email, please include the Product’s Item
Number and PO Number which is located on
the Production Tracking Sticker. This sticker can
be found on the bottom, inside or back of your
product.
Fully Assembled
Student Loft
NE kids · 2300 Prospect Dr. Christiansburg, VA 24073 · www.ne-kids.com
NE
kids
STUDENT LOFT BED - Assembly Instructions
PARTS LIST
A
100mm Bolts
B
60mm Bolts
C
40mm Bolts
D
45mm Screws
E
Barrel Nuts
F
8mm Wood Dowels
G
30mm Screws
H
20mm Screws
1
Bottom
3
6
X 16
X 23
7
Bookcase
Shelves
11
Desk Hutch Back Supports
X 1 (of each type)
X2
X4
X 24
4
X 12
8
Bookcase
Drawer Chest
X 26
X1
J
25mm Bolts
X4
Desk Hutch
Top Panel
Desk Top
X1
X1
X 12
10mm Wood Dowels
L
Top
X8
I
K
Page 3 of 17
Bookcase
Top Panel
2
X1
X2
T-Nuts
X2
9
10
5
Ladder Hooks
X2
Allen Wrench
X1
Bookcase
Side Panel
X1
Desk Cabinet
X1
Left & Right Desk Hutch Side Panels
X 1 ea.
NE kids · 2300 Prospect Dr. Christiansburg, VA 24073 · www.ne-kids.com
NE
kids
STUDENT LOFT BED - Assembly Instructions
Page 4 of 17
PARTS LIST (CONTINUED)
12
13
14
15
16
17
Front Guard Rail
X1
Head/Footboards
X2
Set of Slats
X1
Rails
X2
Ladder
X1
Rear Guard Rail
X1
Other Tools Required
(Not Included)
•Phillips Screwdriver
•Flathead Screwdriver
NE kids · 2300 Prospect Dr. Christiansburg, VA 24073 · www.ne-kids.com
NE
kids
STUDENT LOFT BED - Assembly Instructions
!
Page 5 of 17
NOTE: Before beginning assembly, decide exactly where the bed is to be placed
and on which ends you would like the the Desk/Ladder and Bookcase. Both the
Bookcase and Desk can be placed at either end and reversed. See below.
For left-hand Desk/Ladder
follow directions as indicated.
For right-hand Desk/Ladder
follow directions as indicated but
please note inset drawings.
NE kids · 2300 Prospect Dr. Christiansburg, VA 24073 · www.ne-kids.com
NE
kids
STUDENT LOFT BED - Assembly Instructions
STEP 1
Page 6 of 17
STEP 2
Remove drawers from chest.
Assemble Drawer Chest, Shelves
and Bookcase Side Panel
B
B
2
B
B
3
1
3
1
E X2
E X2
B
E X2
B
E X2
B
B
NE kids · 2300 Prospect Dr. Christiansburg, VA 24073 · www.ne-kids.com
NE
kids
STUDENT LOFT BED - Assembly Instructions
STEP 3
With two adults, lift the Bookcase into desired position
then replace the Drawers.
Page 7 of 17
STEP 4
Attach Head/Footboard to Bookcase Top Panel then attach Top Panel to Bookcase.
C
C
12
12
4
C
C
C
C
4
C
C
Left-hand Bookcase
(Right-hand Desk/Ladder)
NE kids · 2300 Prospect Dr. Christiansburg, VA 24073 · www.ne-kids.com
NE
kids
STUDENT LOFT BED - Assembly Instructions
Page 8 of 17
!
STEP 5
Loosely affix Desk Top to Right Desk Hutch Side Panel (do not completely tighten
bolts). Remove drawers from Desk Cabinet, then attach Right Desk Hutch Side
Panel to Desk Cabinet.
NOTE: Before continuing assembly, decide whether
you would like the Desk to be outside-facing or
inside-facing and follow instructions below. For use
of the Lower Bed with the Student Loft, Desk must be
outside-facing.
E
8
F
F
E
10
B
For outside-facing Desk assembly,
please continue with
Step 6 on Page 9.
B
10
5
5
C
X2
C
X2
For inside-facing Desk assembly,
please skip to
Step 6A on Page 11.
NE kids · 2300 Prospect Dr. Christiansburg, VA 24073 · www.ne-kids.com
NE
kids
STUDENT LOFT BED - Assembly Instructions
Page 9 of 17
Steps 6-8: Outside-facing Desk assembly
STEP 6
STEP 7
Fit Desk Hutch Back Supports, Desk Top, and
Left Desk Hutch Side Panel together using wood
dowels(12).
Secure Desk Hutch Side Panels and
Back Supports as shown and tighten
any bolts that were left loose.
FRONT VIEW
J
F
10
B
K
F
E
6
8
K
F
F
5
F
F
F
E
E
J
B
B
E
9
F
B
B
E
B
7
F
F
E
D
REAR VIEW
E
B
NE kids · 2300 Prospect Dr. Christiansburg, VA 24073 · www.ne-kids.com
NE
kids
STUDENT LOFT BED - Assembly Instructions
Page 10 of 17
STEP 8
Attach Desk Hutch Top Panel.
D
D
C
C
D
D
C
11
C
Skip to Step 9 on Page 12
NE kids · 2300 Prospect Dr. Christiansburg, VA 24073 · www.ne-kids.com
NE
kids
STUDENT LOFT BED - Assembly Instructions
Page 11 of 17
Steps 6A-8A: Inside-facing Desk assembly
STEP 6A
STEP 7A
Fit Desk Hutch Back Supports, Desk Top, and
Left Desk Hutch Side Panel together using wood
dowels(12).
STEP 8A
Secure Desk Hutch Side Panels and Back
Supports as shown and tighten any bolts that
were left loose.
Attach Desk Hutch Top Panel.
F
10
C
B
F
C
E
D
J
K
F
8
F
F
K
9
J
11
E
B
B
F
E
E
7
D
B
E
F
C
E
F
5
D
C
6
B
D
F
F
E
B
REAR VIEW
NE kids · 2300 Prospect Dr. Christiansburg, VA 24073 · www.ne-kids.com
NE
kids
STUDENT LOFT BED - Assembly Instructions
Page 12 of 17
STEP 9
STEP 10
With two adults, move the Desk Hutch into position
then replace the drawers.
Attach Headboard to the top of the Desk Hutch.
Steps 10-14: Upper Bed assembly
12
C
C
12
C
C
C
For outside-facing
Desk assembly
C
C
C
For inside-facing
Desk assembly
NE kids · 2300 Prospect Dr. Christiansburg, VA 24073 · www.ne-kids.com
NE
kids
STUDENT LOFT BED - Assembly Instructions
Page 13 of 17
STEP 11
A
Loosely attach Desk Hutch,
Bed Side Rails and Bookcase
(do not completely tighten
bolts until Step 13).
I
E
A
E
Detail for all four corners
13
I
I
13
E
A
E
I
A
NE kids · 2300 Prospect Dr. Christiansburg, VA 24073 · www.ne-kids.com
NE
kids
STUDENT LOFT BED - Assembly Instructions
Page 14 of 17
G
STEP 12
G
Attach Slats.
G
14
14
Lay slat roll between side rails and screw in slats to slat support as
indicated. Make sure rails are pulled into slats prior to screwing in place.
!
WARNING
To help prevent serious or fatal injuries SCREW BOTH SIDES
OF EACH SLAT TO THE SLAT SUPPORT. Failure to do so
could result in the collapse of the entire slat roll, and will void
your warranty.
NE kids · 2300 Prospect Dr. Christiansburg, VA 24073 · www.ne-kids.com
NE
kids
STUDENT LOFT BED - Assembly Instructions
Page 15 of 17
STEP 13
Position Guard Rails in place, tighten all Bed Side Rail bolts completely, then attach
Guard Rails as shown. Note: Ladder opening must be on the Desk end of the bed.
C
16
H
15
Detail for 3 corners
H
16
Inside detail
15
H
Right-hand Desk/Ladder
NE kids · 2300 Prospect Dr. Christiansburg, VA 24073 · www.ne-kids.com
NE
kids
STUDENT LOFT BED - Assembly Instructions
Page 16 of 17
STEP 14
Attach Ladder Hooks to Ladder, then attach Ladder to Upper Bed.
Note: Please ensure that
the bolts for Ladder rungs
are tight before using.
L
L
H
H
H
H
17
Inside detail
NE kids · 2300 Prospect Dr. Christiansburg, VA 24073 · www.ne-kids.com
NE
k i d s CARE INSTRUCTIONS
STUDENT LOFT BED - Assembly Instructions
Page 17 of 17
• A lacquer finish is used on this furniture to protect the wood. It is not waterproof, clean
spills immediately. Dust using a slightly damp cloth, making sure no standing water is
left on the furniture. DO NOT use any household cleaners, citrus-based polishes, wood
soaps, or oils; they can break down the natural lacquer finish.
• Do not place furniture in direct sunlight. Natural solid wood furniture will naturally
color as it ages, however, direct sunlight dramatically speeds up the process.
• In natural wood furniture, the variations in texture and grain will affect the finish,
making it impossible to guarantee an exact match between two pieces of wood even
though identical finishing processes are used. These differences in character are not
defects, but variations that make each piece of furniture unique and beautiful.
• Solid wood naturally expands and contracts. In high humidity you may find that
drawers can stick slightly. This will correct itself, and is not reason for concern.
• Do not place furniture over heating or cooling vents. Dramatic changes in
temperature can cause the wood to split.
• If you place objects such as lamps or plants on your case pieces make sure to move
them from time to time. There may be a slight discoloration where the object was.
However, by exposing it to light the color will catch up to the rest of the case.
• Plastic or foam footed items such as phones or clocks can damage this finish, use
trivets under such items.
NE kids · 2300 Prospect Dr. Christiansburg, VA 24073 · www.ne-kids.com


© Copyright 2026