
1Password for Windows
1Password for
Windows
Manual
version 4 — Last update: 2014/11/26
AgileBits
Table of Contents
Welcome to 1Password .............................................................................................................................. 2
Quick Start .................................................................................................................................................. 3
Requirements.......................................................................................................................................... 4
The first time you run 1Password ............................................................................................................ 5
Setting up browsers ................................................................................................................................ 9
Saving a Login ...................................................................................................................................... 10
Using a saved Login.............................................................................................................................. 11
Changing a saved password ................................................................................................................. 12
Adding an Identity and a Credit Card..................................................................................................... 14
Get started! ........................................................................................................................................... 15
Introducing 1Password ............................................................................................................................ 16
The main 1Password program............................................................................................................... 23
The browser extensions ........................................................................................................................ 27
The system tray icon ............................................................................................................................. 29
Configuring 1Password ........................................................................................................................... 30
1Password preferences......................................................................................................................... 31
General tab...................................................................................................................................... 32
Security tab ..................................................................................................................................... 34
Backup tab ...................................................................................................................................... 36
Browsers tab.................................................................................................................................... 38
Logins tab........................................................................................................................................ 40
Auto-save tab .................................................................................................................................. 44
Updates tab ..................................................................................................................................... 46
Network tab ..................................................................................................................................... 47
Warnings tab ................................................................................................................................... 48
View-menu toggles .......................................................................................................................... 49
Browser settings ................................................................................................................................... 51
Third-party security software ................................................................................................................. 55
Using 1Password...................................................................................................................................... 56
Registering 1Password ......................................................................................................................... 57
Upgrading to 1Password 4 .................................................................................................................... 58
Creating a strong password .................................................................................................................. 59
Syncing your 1Password data ............................................................................................................... 61
Setting up Dropbox sync .................................................................................................................. 63
Syncing over Wi-Fi........................................................................................................................... 65
Getting 1Password data from iOS .................................................................................................... 73
Importing data ....................................................................................................................................... 74
Exporting data....................................................................................................................................... 80
Using Identities and Credit Cards .......................................................................................................... 81
Using Logins in the main program ......................................................................................................... 82
Creating a multiple-page Login.............................................................................................................. 84
Creating an application Login ................................................................................................................ 85
Searching for items ............................................................................................................................... 86
Using auto-type..................................................................................................................................... 87
Working with attachments ..................................................................................................................... 89
Working with folders and tags ............................................................................................................... 90
Using the Security Audit items .............................................................................................................. 91
Using Secure Desktop........................................................................................................................... 92
Using custom icons ............................................................................................................................... 93
Using keyboard shortcuts ...................................................................................................................... 94
Creating a new vault ............................................................................................................................. 96
Using 1PasswordAnywhere................................................................................................................... 97
Sharing an item..................................................................................................................................... 98
Sharing a vault ...................................................................................................................................... 99
Learn more.............................................................................................................................................. 100
1Password Glossary .............................................................................................................................. 101
AgileBits
1Password for Windows - version 4
Welcome to 1Password
1Password creates unique and unguessable passwords for every site where you have an account,
remembers them all for you, and logs you in with a single key combination. It’s simply the safest and easiest
way to use the web. 1Password can store nearly anything you want kept safe, like credit card and identity
information, and help you use that information securely in online forms.
Everything in your 1Password vault is protected by a master password known only to you. Just remember
your master password—1Password will remember the rest.
Quick Start —>
Last update: 2014/11/26 19:30:06
Page 2 of 109
AgileBits
1Password for Windows - version 4
Quick Start
This section provides what we believe is the very least information with which you can be successful using
1Password 4 for Windows.
• Requirements
• The first time you run 1Password
• Registering 1Password
• Setting up browsers
• Saving a Login
• Using a saved Login
• Updating an existing password
• Adding a Credit Card
• Adding an Identity
Please see the rest of the user’s guide for even more useful information.
Requirements —>
Last update: 2014/11/26 19:30:06
Page 3 of 109
AgileBits
1Password for Windows - version 4
Requirements
Operating Systems
1Password for Windows is tested and supported in these operating systems:
• Windows 8.x
• Windows 7.x
Notes:
• The 1Password installer requires “admin” rights to complete the installation, and you may need to
restart Windows after installation is complete. (You don’t need to be logged into an account with
“admin” rights to use 1Password, though.)
• 1Password is a Desktop-mode program, not a Metro-mode app.
Web Browsers
The 1Password extensions are tested for compatibility with only the current “stable” (non-beta) versions of
these web browsers:
• Internet Explorer — see this important note
• Firefox
• Chrome
• Safari
• Opera
1Password may continue to work with older versions of these browsers, as well.
Next: The first time you run 1Password —>
Last update: 2014/11/26 19:30:06
Page 4 of 109
AgileBits
1Password for Windows - version 4
The first time you run 1Password
Downloading and running the installer
1. Log into Windows using an account that has administrator privileges.
1Password needs “admin rights” so it can create the necessary Registry entries.
2. In your favorite web browser, visit the download page.
3. Under “1Password 4 for Windows”, click the Download Now button.
4. When the download is complete, run the installer (1Password-4.x.x.exe).
5. At the prompt, leave Yes, restart the computer now enabled, and click the Finish button.
Note: You won’t need to restart the computer on future updates that you obtain through the Help menu or
through the automatic update mechanism.
Launching 1Password
Log into Windows using any account you like, and run 1Password.
If it finds one vault in your local Dropbox folder hierarchy, 1Password will open that vault. Use your master
password to unlock it.
If it finds multiple vaults in your local Dropbox folder hierarchy, 1Password will offer you a list. Choose the
vault you wish to open, and use your master password to unlock it.
If if finds no vaults in your local Dropbox folder hierarchy, or if you don’t have Dropbox installed, 1Password
will present three options.
Last update: 2014/11/26 19:30:06
Page 5 of 109
AgileBits
1Password for Windows - version 4
Which option should you choose?
• I am new to 1Password
• I have used 1Password before
• Restore 1Password vault from backup
I am new to 1Password
Choose this option to create a new 1Password vault.
By default, 1Password will name the vault 1Password.agilekeychain and store it in a new 1Password folder
it creates in your Documents folder. We recommend you accept this arrangement.
Note: Be sure the vault you create ends with the .agilekeychain extension; otherwise, 1Password won’t
recognize it as a valid vault.
Creating a master password
Last update: 2014/11/26 19:30:06
Page 6 of 109
AgileBits
1Password for Windows - version 4
Type in a master password that will be easy for you to remember, hard for anyone else to guess, and not
too difficult for you to type. The dialog box shows how well you’re doing, and it makes sure you type the
same master password both times. We want to make sure you remember it, but we advise you not to write it
down or save it to a file that someone else could find on your computer.
Caution: Your master password is stored only within your 1Password data. We have no way of resetting or
restoring it, because such a method would be a “back door” through which someone could get unauthorized
access to your 1Password data.
I have used 1Password before
Choose this option to open an existing 1Password vault.
Use the dialog box to locate and select the existing vault. It’ll have a name that ends with the .agilekeychain
extension.
Last update: 2014/11/26 19:30:06
Page 7 of 109
AgileBits
1Password for Windows - version 4
To unlock the selected vault, use its independent master password. (1Password for Windows does not yet
include the concept of “primary” and “secondary” vaults.)
Restore 1Password vault from Backup
Choose this option to restore 1Password data from a backup file you created using 1Password’s built-in
backup function.
Select the .agilekeychain_zip or .agilekeychain_backup file you want to restore from.
At the prompt, enter the same master password that was used to unlock the vault that the selected backup
was made from.
Next: Setting up browsers —>
Last update: 2014/11/26 19:30:06
Page 8 of 109
AgileBits
1Password for Windows - version 4
Setting up browsers
Internet Explorer
Because every Windows computer has Internet Explorer, the 1Password extension for IE is enabled by
default.
You can confirm that it’s enabled by choosing File > Preferences, selecting the Browsers tab, and seeing
the checkmark next to Internet Explorer.
Chrome, Firefox, Safari, Opera
1. In the main 1Password program, click the Preferences tool, select the Browsers tab, and click the
“install” button next to the browser in which you want to use 1Password.
Note: If you have multiple profiles in Chrome or Firefox, select the one in which you want to use
1Password, and click the OK button.
1Password launches that browser and displays the extension download page.
2. Optionally, click the Enable Betas link.
3. Click the Install button.
Once the extension is installed, you can see the version number on the “install” button (on the Browsers tab
of 1Password preferences), and you can click the button again to switch between the beta and stable
versions of the extension.
Tip: It’s a good idea to disable your browsers’ built-in password-save and form-fill features, so you’ll always
know it’s 1Password that’s protecting your data and making your Logins available across all your
1Password-enabled browsers and platforms.
Next: Saving a Login —>
Last update: 2014/11/26 19:30:06
Page 9 of 109
AgileBits
1Password for Windows - version 4
Saving a Login
The easiest way to save a Login item is to visit the web sites you already use, and let 1Password do the
work for you.
1. In your 1Password-enabled browser, visit the login page on a web site where you have an account.
2. Enter your username and password, and submit the form.
3. Accept 1Password’s offer to save a new Login item.
_____
Note: Some forms just refuse to cooperate. If you need to save a Login item by hand for some reason,
please see Saving a Login manually in the online knowledgebase.
Next: Using a saved Login —>
Last update: 2014/11/26 19:30:06
Page 10 of 109
AgileBits
1Password for Windows - version 4
Using a saved Login
The easiest way to use a saved Login item is through the “go and fill login” feature in the 1Password
browser extensions:
1. In your 1Password-enabled browser, click on the 1Password button on the browser’s toolbar (or press
Ctrl+\).
2. In the extension menu, choose Logins, and navigate the folders to find the Login for the site you want
to visit.
3. Click on the Login item for that site.
1Password directs the browser to the saved URL, enters the saved username and password, and
(optionally) submits the form.
Next: Changing a saved password —>
Last update: 2014/11/26 19:30:06
Page 11 of 109
AgileBits
1Password for Windows - version 4
Changing a saved password
One of the key benefits of using 1Password is to replace your old, re-used, easy-to-guess passwords with
new, strong, unguessable passwords.
Changing your password on a web site involves two steps: you have to tell the web site about the new
password, and you have to save the new password in 1Password. Don’t worry, though—1Password makes
it easier than that might sound.
1. Use your existing Login to log in to the web site.
2. Go to the site’s “change password” form (typically under My Account, Settings, or something similar).
3. If the “change password” form requires that you enter your current (old) password:
1. Click on the 1Password button on the browser’s toolbar.
2. Locate your existing Login item for the site.
3. Right-click on the Password field’s value to copy the current password to the clipboard.
4. Click in the “old password” field on the form, and press Ctrl+V.
4. Click on the 1Password button on the browser’s toolbar again, and choose Generate Password.
5. Use the controls (shown above) to create exactly the kind of password required by the site.
6. Click the Copy icon next to the strength indicators; then click the OK button.
1Password should enter the strong password in the “new password” and “confirm password” fields;
otherwise, you can paste it in yourself.
7. Submit the site’s “change password” form.
8. Accept 1Password’s offer to update the password field in your existing Login for that site.
Last update: 2014/11/26 19:30:06
Page 12 of 109
AgileBits
1Password for Windows - version 4
Next: Adding an Identity and a Credit Card —>
Last update: 2014/11/26 19:30:06
Page 13 of 109
AgileBits
1Password for Windows - version 4
Adding an Identity and a Credit Card
You’ll get even more out of 1Password by letting it do other repetitive tasks for you. Once you’ve created an
Identity item and a Credit Card item, you won’t have to type in your personal and financial details online
again—just click the 1Password button in your browser’s toolbar, and choose the item you want to use to fill
the form.
1. In the main 1Password program, click on the New Item tool.
2. Choose the type of item you want to create:
• Identity
• Wallet Item > Credit Card
3. Fill in as much information as you want to make available for 1Password to use online (or that you
want to have available as a record for your own use).
4. Give the item a name, such as “Personal”, “Office Address”, or “Debit Card”, that will make it easily
identifiable when you need it.
5. Save the new item to make it available in your 1Password-enabled browsers.
Get started! —>
Last update: 2014/11/26 19:30:06
Page 14 of 109
AgileBits
1Password for Windows - version 4
Get started!
Once you’ve completed the steps in this Quick Start section, you’re ready to use 1Password.
For more information, consider spending a few minutes looking at these other sections:
• Introducing 1Password
Read about the main program, the browser extensions, and the optional helper menu in the system
tray.
• Configuring 1Password
Read about Preference settings, the View toggles, and more.
• Using 1Password
Read about the many other useful features beyond those you’ve set up so far.
Last update: 2014/11/26 19:30:06
Page 15 of 109
AgileBits
1Password for Windows - version 4
Introducing 1Password
1Password gives you the security you need in today’s online world without slowing you down. 1Password
makes you more productive while simultaneously increasing your security with strong, unique passwords for
all your accounts.
Keeping you safe. 1Password has been protecting people for nearly a decade. 1Password 4 builds upon
this rich history to bring you the best possible security with unmatched productivity.
Security made beautiful. 1Password 4 has been re-written from pixel to bit to give you the best possible
experience, wrapped in an updated UI.
Saving you time. 1Password makes it simple to use strong unique passwords. Being secure with
1Password is easier than being at risk using passwords that are weak enough to remember and type
manually.
Strong Password Generator
Don’t expose your sensitive accounts and waste time with weak passwords. Let 1Password create and save
incredibly strong, unique passwords for every site, app, program, and service.
Every password a unique snowflake. A single click gives you a random, incredibly strong new password
you can save for a new account or use in a program like iTunes or Skype.
Last update: 2014/11/26 19:30:06
Page 16 of 109
AgileBits
1Password for Windows - version 4
Security made simple. All your beautiful snowflakes are saved within 1Password, ready to be automatically
filled when needed. It’s the simplest way to protect yourself from password reuse, data breaches, and PML
(Password Memory Loss).
Add your own password ingredients. Not all password requirements are created equal. The Password
Recipe allows you to generate fantastically long passwords customized to your heart’s content.
Browser Integration
A single click can open your browser, take you to a site, fill in your username and password, and log you in.
It’s the fastest way to work or play.
Fluent in browser-ese. 1Password extensions provide easy access to all your 1Password data directly
within your favorite web browser. Supports Safari, Chrome, Firefox, and, for the first time, Opera.
Go & fill & save your time. Launch your favorite sites, and automatically sign in with a single click. Save
even more time by having 1Password automatically submit for you. Save even more-er time by allowing
1Password to automatically save new Logins.
Type less, get more done. One click can automatically fill out long, tedious signup forms or shipping and
credit card details when you’re shopping online. 1Password will save you so much time, you’ll need a new
app to track it all.
Last update: 2014/11/26 19:30:06
Page 17 of 109
AgileBits
1Password for Windows - version 4
Synchronization
1Password can sync your data across all your devices automatically through Dropbox or manually over a
temporary Wi-Fi connection with 1Password on your mobile device, so your data is never out of your hands.
Dropbox. Sync between a wide variety of devices and platforms with your Dropbox account.
Wi-Fi. Sync Windows, iOS, and Android locally. Your data never leaves your network.
New Stronger Vault
Our expertise in security is combined with our commitment to make your life easier. With 1Password, the
easy way to behave is the secure way.
More secure. Privacy for modern times. 1Password is thoroughly encrypted to remain secure at all times.
Only you know what you do with 1Password, and only you know what data you have in your vault.
Exceeds security requirements:
Last update: 2014/11/26 19:30:06
Page 18 of 109
AgileBits
1Password for Windows - version 4
• Tamper-proof authenticated encryption
• AES-256 using Encrypt-then-MAC
• Openly published security design
• Decrypted data is never written to disk
• GPU resistant PBKDF2-HMAC-SHA512
Convenience is security. With 1Password, you can use strong, unique passwords everywhere—the way
passwords were meant to be.
Beyond Passwords
Like a 21st-century digital wallet, no paper required, 1Password provides a comprehensive set of beautiful,
simple tools help you go paperless and keep all your vital information secure and just a tap away.
Slim your wallet. 1Password’s vault has many tailored categories. Store your credit cards, reward
programs, membership cards, and more. Never leave home without your important information again.
Protect your identity. Store your entire life in 1Password. Add bank accounts, passports, wills,
investments, and more—your life, secured.
Secure your sticky notes. Stop using sticky notes for private information you don’t want others to see.
Secure Notes let you store this information in the privacy and security of 1Password’s vault.
Organize
1Password keeps your vault tidy on its own, but you can always go hands-on. Favorites, Folders, and Tags
help you focus on tasks and save time searching and scrolling.
Favorites. Mark your most important or frequently used items for quick access and sync this list between all
your devices.
Folders. Create as many folders as you want to hold your items, just like folders in a filing cabinet.
Tags. Add as many tags as you like to an item, giving you another dimension of organization.
1Password: Power to the System Tray!
Last update: 2014/11/26 19:30:06
Page 19 of 109
AgileBits
1Password for Windows - version 4
Small icon, big possibilities. With the “show in notification area” option enabled, you can click on the
1Password icon in the system tray (the notification area) to launch 1Password. Right-click the icon to switch
vaults, generate a strong password, or set options.
Multiple Vaults
Multiple vaults. Keep your information organized by creating multiple vaults to separate client work, archive
old logins, and keep personal information personal.
Easy, secure sharing. Create additional vaults and share them securely with your family or team members.
Automatic syncing keeps everyone up-to-date.
Endless opportunities to share:
• Business logins with your co-workers
• Personal information with your spouse
• Encryption keys with your dev team
• Estate planning with loved ones
Last update: 2014/11/26 19:30:06
Page 20 of 109
AgileBits
1Password for Windows - version 4
Speaking of Sharing
When sharing an entire vault is more than you need, you can share individual items.
Teamwork by E-mail. You can share any type of 1Password item with people you trust via e-mail. If your
recipient makes changes to the items and shares them back to you, 1Password will update your existing
copy.
Security Audit
Understand and improve your security.
Last update: 2014/11/26 19:30:06
Page 21 of 109
AgileBits
1Password for Windows - version 4
Security at a glance. 1Password can show all your items with weak and duplicated passwords, so you can
decide which ones to fortify and update.
Password Strength. Get a quick look at the strength of each Login password on-the-fly; then update them
as you see fit.
Eliminate duplicates. Nothing puts you at bigger risk than re-used passwords. Quickly find duplicate
passwords, and replace them with strong, unique ones.
Cope with Heartbleed. Find out what sites were affected, check their current status, and determine which
of your Logins need new passwords.
Works Everywhere
Speaks multiple platforms. 1Password for Windows has siblings for Mac, iPhone, iPad, Android, and
Windows Phone. We’ve got you covered.
1PasswordAnywhere. If your 1Password vault is in Dropbox or on a USB thumb drive, you can decrypt and
use it from any traditional computer in the world with a modern browser and an internet connection.
Fluent in browser-ese. 1Password supports Internet Explorer, Chrome, Firefox, Safari, and now Opera,
too.
Next: The main 1Password program —>
Last update: 2014/11/26 19:30:06
Page 22 of 109
AgileBits
1Password for Windows - version 4
The main 1Password program
Notes:
• The Category and Folder areas are collectively referred to as the sidebar.
• Display of the Favorites, Generated Passwords, and Security Audit items is toggled on the View
menu.
• The Folder area also includes the Trash and the built-in All and Unassigned folders.
• The built-in Unassigned folder contains any items you haven’t assigned to folders you’ve created.
• In the list area, click on a column heading to sort the listed items by the values in that column. Click
again to reverse the sort order.
Menu commands
File
Last update: 2014/11/26 19:30:06
Page 23 of 109
AgileBits
1Password for Windows - version 4
Note that the Reopen 1Password Vault command displays the same “recently used” list as the Open
1Password Vault tool at the far left end of the 1Password toolbar.
Edit
Note that the Copy and Paste commands work with selected text. To create a copy of a selected item, use
the Duplicate command.
Backup
Note that you can configure automatic periodic backups on the Backup tab of 1Password preferences.
Last update: 2014/11/26 19:30:06
Page 24 of 109
AgileBits
1Password for Windows - version 4
View
Toggle optional categories and Security Audit items in the sidebar. Toggle addition of a “Folder” column in
the list area when you select the built-in All folder.
Note that the Conceal Passwords command works differently than the other toggles in this menu. It’s a
“negative logic” control: You enable this toggle to hide passwords; you disable this toggle to see passwords.
Tip: When the Conceal Passwords toggle is enabled, you can press Ctrl+R to get a quick peek at a
password.
Help
Note that you can configure automatic periodic checks for new versions on the Updates tab of 1Password
preferences.
Last update: 2014/11/26 19:30:06
Page 25 of 109
AgileBits
1Password for Windows - version 4
Next: The browser extensions —>
Last update: 2014/11/26 19:30:06
Page 26 of 109
AgileBits
1Password for Windows - version 4
The browser extensions
Click on the 1Password button in your browser’s tool bar to display the extension menu.
Tip: In Internet Explorer, the Current Tab option may yield slightly better response time than the New Tab
option.
In Chrome, Firefox, Safari, and Opera, the “open in” submenu includes an additional option, New Window:
Last generated password
This command (disabled if you’ve never used the password generator) copies the last generated password
to the clipboard and, if a form is currently displayed in the browser, attempts to fill any password fields on
the form with that last generated password
URL matching
When you press Ctrl+\ in your 1Password-enabled browser:
Last update: 2014/11/26 19:30:06
Page 27 of 109
AgileBits
1Password for Windows - version 4
• If one Login matches the URL of the web page currently displayed, 1Password fills (and optionally
submits) the form.
• If multiple Logins match the URL of the web page currently displayed, 1Password displays a small
menu near the pointer, from which you select the Login you want to use.
• If no Logins match the URL of the web page currently displayed, the extension menu appears near
the system tray icon, instead.
Copying data
In the extension menu, right-click on a Login, Credit Card, or Identity item to see a menu of data fields you
can copy.
You can also mark (or unmark) the item as a “favorite” or open it in 1Password for editing or to copy a
different field.
Searching
If the System Tray option is enabled on the General tab of 1Password preferences, you can invoke the
extension and simply begin typing to search for Login items.
Next: The system tray icon —>
Last update: 2014/11/26 19:30:06
Page 28 of 109
AgileBits
1Password for Windows - version 4
The system tray icon
If the System Tray option is enabled on the General tab of 1Password preferences:
• Clicking the “X” button in the upper right corner of the 1Password window minimizes 1Password to the
system tray. To quit 1Password, choose File > Exit.
Note that 1Password, minimized when the System Tray option is enabled, does not appear on the
Windows task bar, only in the system tray.
• You can right-click on the 1Password icon in the system tray (a.k.a. the notification area) to get
access to some of 1Password’s features.
For example, the Last Generated Password command (disabled if you haven’t used the password
generator) copies the last generated password to the clipboard and, if a form is currently displayed in
a 1Password-enabled browser that has focus, attempts to fill any password fields on that form with the
last generated password.
• You can also click on the icon to reopen the 1Password window.
Last update: 2014/11/26 19:30:06
Page 29 of 109
AgileBits
1Password for Windows - version 4
Configuring 1Password
Click on the > icon next to this topic in the Table of Contents.
1Password preferences —>
Last update: 2014/11/26 19:30:06
Page 30 of 109
AgileBits
1Password for Windows - version 4
1Password preferences
In the main 1Password program, click on the Preferences tool (or press Ctrl+P) to see most options. Choose
View to toggle the visibility of various elements.
• General tab
• Security tab
• Backup tab
• Browsers tab
• Logins tab
• Auto-save tab
• Updates tab
• Network tab
• Warnings tab
• View-menu toggles
Last update: 2014/11/26 19:30:06
Page 31 of 109
AgileBits
1Password for Windows - version 4
General tab
1Password vault
This shows the location and name of your vault (the .agilekeychain or .opvault folder). You can also switch
to a different vault or move your vault under Dropbox sync control.
If the Move to Dropbox button is disabled, it means one of the following things:
• Your 1Password data is already stored somewhere in the Dropbox folder hierarchy.
• There’s already a vault in your local Dropbox folder hierarchy with the same folder name as the one
you’d be moving there.
• You don’t have Dropbox installed on this PC.
If scanning the Dropbox directory on launch takes 1Password more time than you want to wait, just disable
this option.
For related information, see Moving your vault in our knowledgebase.
Sounds
We think the sound 1Password makes when it locks and unlocks is charming. It also lets you know when
your data is protected. If it bothers you or your neighbor, though, you can silence it.
Last update: 2014/11/26 19:30:06
Page 32 of 109
AgileBits
1Password for Windows - version 4
System Tray
With this option enabled, you can right-click on the 1Password icon in the system tray (a.k.a. the notification
area) to get access to some of 1Password’s features. You can click on it to reopen the 1Password window.
Enabling this option also changes the effect of clicking the “close” icon (X) in the upper right corner of the
1Password window: it leaves 1Password running and accessible in the system tray; to quit 1Password,
you’ll need to choose File > Exit.
Note: The system tray icon represents the status of the 1Password helper, rather than the main program.
For that reason, you will in certain circumstances have to unlock the main program even if the system tray
icon shows the helper is unlocked and even if you’ve unlocked your data in one of the extensions, though
the helper does its best to keep the lock states in lock-step. For details, please see the data locking article
in our online knowledgebase.
Double-click
Normally, double-clicking a listed Login in 1Password opens the Login in an edit window; but you can
configure 1Password to open the Login’s URL in a preferred web browser, instead. To do so, set the
Double-click option to Open the Location in web browser.
Note: You’ll still need to press Ctrl+\ or click the 1Password button in the browser’s toolbar to fill and submit
the login form.
Last update: 2014/11/26 19:30:06
Page 33 of 109
AgileBits
1Password for Windows - version 4
Security tab
Auto-lock
By default, your 1Password vault is configured to lock itself automatically in certain circumstances, such as
when your PC is locked or after a specific period of system inactivity. This security feature protects your
data if you forget to lock 1Password manually before walking away from the computer, for example.
In some environments, though, having the vault lock so often is an annoyance. Fortunately, the vault-locking
preferences are highly configurable.
See Browsers tab for related settings.
Caution: The Lock when web browser is closed option normally locks only the helper and thus the
1Password browser extensions. If you also want the main program to lock when you close a web browser
window, you must also enable the Universal Unlock option on the Browsers tab.
Master password
Please see Choosing a master password in our knowledgebase.
Your new master password will be synced to your other devices running 1Password. If you sync the vault to
1Password for iOS, though, you can continue using the old master password to unlock it in 1Password for
Last update: 2014/11/26 19:30:06
Page 34 of 109
AgileBits
1Password for Windows - version 4
iOS, until the first time you use the new master password; after that, only the new master password will
unlock the vault in 1Password for iOS.
Clipboard
Copying a username or password to the clipboard is a convenient way of pasting it into web forms, should
that prove necessary. Leaving that information in the clipboard, though, could pose a security risk, so
1Password offers options to control whether and when the contents of the clipboard should be cleared.
You can also specify whether 1Password should get out of the way when you copy a username or
password. This can make it easier to get back to the window into which you want to paste the copied value.
Tip: You can’t enable both Minimize 1Password on Copy to the Clipboard and Clear the clipboard on
minimize; that would leave you with 1Password minimized and nothing on the clipboard.
Never locking your data
In earlier versions of 1Password for Mac, we provided an option to store your master password in the OS X
system keychain. We didn’t recommend using it, because it made your 1Password data accessible to
anyone who could unlock your Mac OS X account, but it was an option we made available. Windows has
never offered an equivalent to the OS X system keychain, though, so there’s still no secure way to store
your master password.
For that reason, 1Password for Windows has never included a “remember my master password” option.
There is no way to set the preferences so as to avoid locking altogether.
Last update: 2014/11/26 19:30:06
Page 35 of 109
AgileBits
1Password for Windows - version 4
Backup tab
Regular backups are important for all your data, but they’re critical for your Logins, Credit Cards, Secure
Notes, and other information stored in 1Password. When starting over after a catastrophe, having easy
access to your 1Password data on an up-to-date backup up will allow you to get up and running more
quickly.
It’s important to know, then, that backing up the 1Password program doesn’t back up your 1Password data,
which is stored separately from the program itself.
1Password automatically creates a backup of your 1Password data every day, keeping up to 50 backups at
a time in a folder under your Windows user account directory. You can change the frequency, location, and
number of backups retained.
Notes:
• The Number of backups to keep applies to each vault. If you have three vaults, for example,
1Password may retain up to 150 backups.
• Only the most-recently-selected vault is backed up. For example, if you have three vaults—one you
open daily, one you open weekly, and one you open monthly—that’s how often each of them will be
backed up, if you set Perform backup every to Day.
• 1Password cannot back up your data unless your computer is “awake” for some time during a given
day. If it sleeps or hibernates for the entire period selected, no backup will occur.
Last update: 2014/11/26 19:30:06
Page 36 of 109
AgileBits
1Password for Windows - version 4
• 1Password will back up your data regardless of whether anything has changed since the last backup.
• 1Password for Windows backup files are intended only for restoring your data to 1Password for
Windows.
You can also create a backup anytime you like by choosing Backup > Back Up 1Password Data.
In case of a complete drive failure or other catastrophe, you’ll want to have an external backup of your
1Password data and, ideally, these 1Password backups, too.
You can copy all the files to an external hard drive or a USB flash drive; you can put them under the
automatic control of an online backup or sync service. Note that the Dropbox sync solution includes
retention of your data for up to 30 days, in addition to the copies of your current 1Password data that exist
on other synced computers. This redundancy makes Dropbox even more useful.
Tip: We do not recommend keeping your automatic backup files in your Dropbox folder hierarchy, because
too many backups could quickly use up all your Dropbox space.
Last update: 2014/11/26 19:30:06
Page 37 of 109
AgileBits
1Password for Windows - version 4
Browsers tab
Internet Explorer is present on every Windows system, and the extension is enabled by default.
The other browsers found on your computer are listed next, each with a button you can click to install the
extension for that browser. Click the button (even if it says the extension is already installed) to get the
latest version of the extension that’s compatible with your version of 1Password for Windows.
If you’re feeling adventurous, click the “Enable Betas” link on the web page that appears. Then click the
Install button on that page, and follow the instructions in Setting up browsers.
Secure desktop
Windows offers the ability to enter your master password on what’s called a “secure desktop”, a decision
you might consider if you’re concerned about the possible presence of key-loggers on your system.
Note: Despite its location on the Browsers tab, this option applies to unlocking your data in the main
program as well as in the browser extensions.
Universal unlock
1Password, the helper, and your browsers run in separate processes, and the locked/unlocked status is
associated with individual processes. Closing 1Password for Windows or closing the last browser window
“kills” the associated process, which normally locks your 1Password data for access from that process;
Last update: 2014/11/26 19:30:06
Page 38 of 109
AgileBits
1Password for Windows - version 4
hence, restarting 1Password for Windows or using your 1Password data in one of the browser extensions
requires unlocking the 1Password data again.
If you enable the Universal Unlock option, though, the helper will almost always keep the lock status
matched. There is one exception: If the main program isn’t running when you unlock one of the extensions,
you’ll need to enter your master password again to unlock the main program. We hope that security
measure isn’t too frequent an inconvenience.
Here are some other important things to remember when enabling the Universal Unlock option:
• This is less secure than the default behavior. You may want to consider tightening up your “auto-lock”
settings on the Security tab of 1Password preferences.
• Enabling this option is not recommended on public or shared computers.
• Unlocking your 1Password data in the extension for one browser also unlocks your 1Password data in
the extensions for all the other 1Password-enabled browsers.
• Enabling this option is required if you want the Lock when web browser is closed option to lock the
main 1Password program, rather than locking only the helper (and thus the 1Password extensions).
See also Security tab.
The Universal Unlock option also affects the auto-lock timer:
• If this option is enabled, the helper monitors all activity and resets the auto-lock timer with each
keystroke or mouse click.
• If this option is disabled, the helper doesn’t unlock the main program, so the auto-lock timer is reset
only on interaction with the main 1Password program.
When the Universal Unlock option is disabled, the system tray icon reflects the lock state of the 1Password
browser extensions, rather than the lock state of the main program.
Last update: 2014/11/26 19:30:06
Page 39 of 109
AgileBits
1Password for Windows - version 4
Logins tab
Auto-submit
With this option enabled, 1Password will try to submit web forms after filling them. If you find that most of
the sites where you have accounts don’t accept automated submission (or if you have some other reason to
change the default behavior), you can disable this global option. You can still enable it for specific Logins, if
you like.
Likewise, you can leave this global option enabled and disable auto-submit for specific Login items that
don’t accept automated submission.
Show X more items
If your 1Password data contains no Login items with URLs that match the page currently displayed in your
browser, the 1Password extension displays this menu:
If your 1Password data contains multiple Login items with URLs that match the current page, the 1Password
extension displays the matching Login items at the top of the menu:
Last update: 2014/11/26 19:30:06
Page 40 of 109
AgileBits
1Password for Windows - version 4
With this option enabled, the list of matching Login items is limited to four; if there are more, you’ll see
“Show X more items” below the fourth name listed. (“X” is the number of items not shown.)
With the Show X more items option disabled, the list will include all matching Login items.
Lenient URL and domain matching
If you use a single set of login credentials (username and password) for multiple sites, you can add multiple
URLs to a Login item in the “edit” dialog box.
If the domains are the same except for subdomains (mail.google.com, maps.google.com, and
images.google.com, for example), 1Password will offer automatically to use the Login item at any of the
URLs. You don’t need to set up domain matching, though the Lenient URL matching option is required by
the .agilekeychain format.
If the domains are different (acme.com, acme.net, and acme-corp.biz, for example), you may be able to
use domain matching to tell 1Password to treat them as equivalent. (See the note, below, for details.)
Showing usernames
If you have two or more Login items with the same name (presumably for the same site), enabling this
option will cause 1Password to display the usernames (rather than the Login names) in the extension menu.
This would make it easier to select the right Login items to use for multiple gmail.com accounts, for
example. (Of course, you can simply give the Login item different names to make them more easily
recognizable.)
Defining matching domains
1. On the Logins tab of 1Password preferences, click the Domain Matching button.
Last update: 2014/11/26 19:30:06
Page 41 of 109
AgileBits
1Password for Windows - version 4
2. In the Domain Matching dialog box, click the upper Add button.
3. In the Domain Name dialog box, type the name of one of the sites; then click the OK button.
4. For each of the other domains:
1. In the Domain Matching dialog box, click the lower Add button.
2. In the Domain Name dialog box, type the domain name; then click the OK button.
5. When you finish setting up the matching for all the domains you want to equate, click the OK button to
close the Domain Matching dialog box.
Note: This “global” domain matching is a feature of the .agilekeychain format only; it is not included in the
.opvault format.
Downloading rich icons
1Password for Windows automatically downloads rich icons:
• When a new Login item is created in either the browser extension or the main 1Password program
• When you click on the Download Icon (or Update Icon) button while editing a Login item
• When you choose File > Download Icons in the main 1Password program
To minimize the size of your vault and improve sync times, rich icons are stored in a temporary local
location, separate from your 1Password data—they do not sync to other 1Password installations.
Viewing rich icons
Use the View > Show Rich Icons commands to control whether rich icons are displayed in the list view.
Disabling this option may provide an improvement in performance on slower machines by allowing generic
icons to be displayed instead.
Custom icons
Last update: 2014/11/26 19:30:06
Page 42 of 109
AgileBits
1Password for Windows - version 4
Please see Using custom icons.
Keyboard shortcut
The default shortcut for triggering the 1Password extension in your browser is Ctrl+\ (holding down the Ctrl
key as you press the backslash key).
If you prefer some other shortcut, define it here. See Using keyboard shortcuts for related information.
If you simply delete the shortcut here, leaving it set to None, 1Password will not install a low-level keyboard
“hook” to detect a shortcut in your browser. You will need to click the 1Password button in the browser
toolbar to invoke the 1Password extension.
Last update: 2014/11/26 19:30:06
Page 43 of 109
AgileBits
1Password for Windows - version 4
Auto-save tab
Auto-save new Logins
When you submit a login form at a web site for which you haven’t yet saved a Login item, or when you use a
different password at a site for which you have already saved a Login item, 1Password normally offers to
save a new Login item for you (or update an existing Login item, if you prefer).
You can prevent that behavior, if you like, by disabling this option.
Disable auto-save when vault is locked
When the Auto-save new Logins option is enabled, the 1Password browser extensions will prompt you to
save or update Login items in the circumstances described above. Of course, if your 1Password data is
locked, saving or updating a Login will require you to unlock it first. You can prevent that behavior by
enabling this option.
This is a “negative logic” option: You enable this option to disable the auto-save feature when your
1Password data is locked, and you disable this option to enable the auto-save feature when your
1Password data is locked.
Note: This option is available only when the Auto-save new Logins option is enabled.
Last update: 2014/11/26 19:30:06
Page 44 of 109
AgileBits
1Password for Windows - version 4
Avoid auto-save on these domains
You can define certain domains for which 1Password will never offer to save a Login item.
Note: The controls for this field are available only when the Auto-save new Logins option is enabled.
Last update: 2014/11/26 19:30:06
Page 45 of 109
AgileBits
1Password for Windows - version 4
Updates tab
You can always check from the Help menu, but it’s easier to let 1Password continue doing it for you
automatically.
Getting off the beta track
Beta builds always check for beta builds.
To get off the beta track with the next non-beta build:
• Disable the Include beta versions option.
Subsequent checks will offer an update only when a new non-beta build is available.
To get off the beta track immediately:
1. Disable the Include beta versions option.
2. Close the preferences window.
3. Choose Help > 1Password Release Notes.
4. On the page that appears, disable the Show betas option, and select the latest non-beta build.
Note: You’ll need to restart your computer after running an installer downloaded in this way.
Last update: 2014/11/26 19:30:06
Page 46 of 109
AgileBits
1Password for Windows - version 4
Network tab
If you connect to the Internet through a proxy server, you may need to enter the details here, typically at the
request of our support team.
Last update: 2014/11/26 19:30:06
Page 47 of 109
AgileBits
1Password for Windows - version 4
Warnings tab
This tab lists the various messages that can appear in 1Password, such as this one that appears when you
create a Login item in the main 1Password program:
Any such messages that you’ve opted not to see again will be available on the Warnings tab, where you can
specify that they be “reset” for display the next time the circumstances are right.
Last update: 2014/11/26 19:30:06
Page 48 of 109
AgileBits
1Password for Windows - version 4
View-menu toggles
To display the security audit groups and other optional elements in the sidebar, use the toggles on the View
menu.
Favorites. Enabling this adds the group to the sidebar.
Generated Passwords. Enabling this adds the group to the sidebar and adds Passwords to the New Item
tool.
Security Audit. Enabling each of these adds the corresponding group to the sidebar.
Last update: 2014/11/26 19:30:06
Page 49 of 109
AgileBits
1Password for Windows - version 4
• Weak Passwords lists Login items with passwords that are relatively weak.
• Duplicated Passwords lists Login items with passwords that are used in multiple Login items. Best
practice is to use unique passwords.
• Heartbleed lists Login items for URLs in the “Alexa Top 10,000 list”, the most visited web sites that
were vulnerable on April 8, 2014.
• Watchtower lists Login items for URLs for which our Watchtower tool suggests you take specific
actions.
Show Item Counts. Enabling this causes 1Password to append items counts in parentheses next to the
categories and group names in the sidebar.
Conceal Passwords. Enabling this causes 1Password to display passwords as a series of •••••••
characters. You can press Ctrl+R to get a quick peek at the password.
Show Password Strength. Enabling this adds the “Strength” column to the list area for Login items.
Last update: 2014/11/26 19:30:06
Page 50 of 109
AgileBits
1Password for Windows - version 4
Browser settings
Many modern web browsers provide rudimentary password management features that may actually conflict
with the richer feature set provided by 1Password. We strongly recommend disabling your browser’s
password management feature.
Note: You might not want to clear the list of saved passwords in your browser until you’ve created Logins in
1Password for the corresponding sites. Once you have, though, clearing the passwords saved in your
browser might plug a potential “hole” in your system’s security.
Internet Explorer
1. In Internet Explorer, choose Tools > Internet Options.
2. Select the Content tab.
3. Click the Settings button next to Auto-Complete.
4. Disable the Forms and User names and passwords on forms options.
5. Click the OK buttons to save your changes.
Chrome
1. In Chrome, click the Customize and control tool, and choose Settings.
2. Scroll down, and click Show advanced settings.
Last update: 2014/11/26 19:30:06
Page 51 of 109
AgileBits
1Password for Windows - version 4
3. Scroll down to Passwords and forms.
4. Disable the Enable Autofill to fill out web forms in a single click and Offer to save your web
passwords options.
5. Close the Extensions window to save your changes.
Firefox
1. In Firefox, click on the Settings tool.
2. Select the Security tab.
3. Disable the Remember passwords for sites and Use master password options.
4. Click the OK button to save your changes.
Opera
Last update: 2014/11/26 19:30:06
Page 52 of 109
AgileBits
1Password for Windows - version 4
1. In Opera, click Opera in the upper left corner; then choose Settings.
2. In the sidebar, select Privacy and security.
3. Disable the Offer to save passwords… and Enable auto-filling… options.
4. Close the settings tab to save your changes.
Safari
1. In Safari, click the “gear” tool, and choose Preferences.
2. Select the AutoFill tab.
3. Under “AutoFill web forms”, disable the Usernames and passwords and Other forms options.
Last update: 2014/11/26 19:30:06
Page 53 of 109
AgileBits
1Password for Windows - version 4
Tip: Because 1Password includes Identity items, you can also disable the Using info from my
Contacts card option.
4. Click the Close (X) button to save your changes.
Last update: 2014/11/26 19:30:06
Page 54 of 109
AgileBits
1Password for Windows - version 4
Third-party security software
Except for Kaspersky Internet Security and Sophos Endpoint Antivirus, the default settings of most major
antivirus, anti-malware, and firewall programs work just fine with 1Password 4 for Windows. If you’ve
updated to the latest version of your security software, though, and something is still preventing 1Password
from performing its safe and secure functions, please see Troubleshooting the browser extensions in our
knowledgebase for suggestions.
Last update: 2014/11/26 19:30:06
Page 55 of 109
AgileBits
1Password for Windows - version 4
Using 1Password
Click on the > icon next to this topic in the Table of Contents.
Last update: 2014/11/26 19:30:06
Page 56 of 109
AgileBits
1Password for Windows - version 4
Registering 1Password
You can run the full and unlimited version of the software in trial mode for 30 days, after which you’ll be
limited to 20 items.
When you’re ready, purchase a license from our online store, carefully copy the license key from the e-mail
message you receive, and follow these steps to register 1Password:
1. In the main 1Password program, choose Help > Enter License Key.
2. In the dialog box that appears, paste the full license key; click the OK button.
3. In the confirmation dialog box, click the OK button.
Last update: 2014/11/26 19:30:06
Page 57 of 109
AgileBits
1Password for Windows - version 4
Upgrading to 1Password 4
Please see Upgrading from 1Password 1 in our online Knowledgebase.
Last update: 2014/11/26 19:30:06
Page 58 of 109
AgileBits
1Password for Windows - version 4
Creating a strong password
Creating a new Login item
• Where you have an existing account:
Log in to the site, find the site’s “change password” page, enter your current password, generate a
strong password, fill in and submit the form, log out, visit the site’s login page again, fill in the
username field, use the last generated password to fill the password field, submit the login form, and
let 1Password create a Login that you can use from then on.
• Where you don’t yet have an account:
Find the site’s “new account”, “signup”, or “register” page, generate a strong password, fill in and
submit the form, visit the site’s login page, fill in the username field, use the last generated password
to fill the password field, submit the login form, and let 1Password create a Login that you can use
from then on.
Last update: 2014/11/26 19:30:06
Page 59 of 109
AgileBits
1Password for Windows - version 4
Updating an existing Login item
• Where you’ve already saved a Login item:
See Changing a saved password.
Invoking the password generator
• In the browser:
Click the 1Password button in the toolbar, and choose Password Generator.
• In the main 1Password program:
Make sure View > Generated Passwords is enabled; then click the New Item tool, and choose
Password.
Were you thinking of the master password?
Please see Choosing a master password in our online knowledgebase.
Last update: 2014/11/26 19:30:06
Page 60 of 109
AgileBits
1Password for Windows - version 4
Syncing your 1Password data
Here are the sync options available to users of 1Password on all the supported platforms.
• Dropbox syncing allows 1Password for Mac, 1Password for Windows, 1Password 4 or later for iOS,
and 1Password for Android to share and sync your 1Password data directly.
Mac ←→ Windows
Mac ←→ mobile
Windows ←→ mobile
Mac ←→ Mac
Windows ←→ Windows
mobile ←→ mobile
• Wi-Fi syncing (a manual process) allows 1Password 4 or later for Mac or 1Password 4 for Windows to
share and sync your 1Password data over a temporary Wi-Fi connection to the 1Password app on a
supported mobile device (currently iOS only). 1Password on the Mac and PC will not be syncing
directly.
Mac ←→ iOS
Windows ←→ iOS
• Folder-based syncing, available in 1Password 4 and later for Mac, allows 1Password 4 or later for
Mac and 1Password for Windows to share and sync your 1Password data directly, but the 1Password
apps for mobile devices do not yet support this option.
Mac ←→ Windows
Mac ←→ Mac
Windows ←→ Windows
• iCloud syncing, available in 1Password 4 and later for Mac, allows 1Password 4 or later for Mac and
1Password 4 or later for iOS to share and sync your 1Password data directly, but 1Password for
Windows and 1Password for non-iOS mobile devices do not yet support this option.
Mac ←→ iOS
Mac ←→ Mac
iOS ←→ iOS
• Combining folder-based syncing in 1Password 4 or later for Mac (to sync with 1Password for
Windows) with manual Wi-Fi syncing in either 1Password 4 or later for Mac or 1Password 4 for
Windows allows you to share and sync your 1Password data among your Mac, PC, and supported
mobile devices.
Last update: 2014/11/26 19:30:06
Page 61 of 109
AgileBits
1Password for Windows - version 4
Important: If your 1Password data is already on an iOS device, and you want to share and sync it with
1Password for Windows, see Getting 1Password data from iOS.
See also Setting up Dropbox sync and Syncing over Wi-Fi.
Last update: 2014/11/26 19:30:06
Page 62 of 109
AgileBits
1Password for Windows - version 4
Setting up Dropbox sync
You need Dropbox on your PC
You can sign up and download it from the Dropbox web site.
You have Dropbox on your PC
What’s your situation?
• You’ve saved Logins and other items in the 1Password app on your iOS device, and you want to start
by getting that data into 1Password for Windows.
See Getting 1Password data from iOS.
• You’ve saved Logins and other items in 1Password for Mac, and you want to start by getting that data
into 1Password for Windows.
◦ Be sure Dropbox is installed and running on your Mac and associated with the same Dropbox
account as on your PC.
◦ In 1Password for Mac, choose 1Password > Preferences.
◦ On the Sync tab, set up Dropbox syncing.
◦ Note the name and location of the sync point (typically, your-name > Dropbox > Apps >
1Password > 1Password.agilekeychain or your-name > Dropbox > 1Password >
1Password.agilekeychain, depending on which version of 1Password for Mac you’re using).
◦ Wait for Dropbox to finish copying your data up to your private dropbox.com web site.
◦ On your PC, wait for Dropbox to finish copying your data down from your private dropbox.com
web site.
◦ Launch 1Password for Windows to follow one of these possible steps:
• Accept its offer to use the .agilekeychain folder in your local Dropbox folder.
• Choose File > Open 1Password Vault, and select the .agilekeychain folder in your local
Dropbox folder.
• You’re ready to set up Dropbox so you can share and sync your 1Password data with other computers
and mobile devices.
Follow these steps to put your 1Password data under Dropbox sync control:
◦ Launch 1Password for Windows, and click on the Preferences tool.
Last update: 2014/11/26 19:30:06
Page 63 of 109
AgileBits
1Password for Windows - version 4
◦ On the General tab, click on the Move to Dropbox button.
◦ Wait for Dropbox to finish copying your data up to your private dropbox.com web site.
See also Sync options.
Last update: 2014/11/26 19:30:06
Page 64 of 109
AgileBits
1Password for Windows - version 4
Syncing over Wi-Fi
1. Start the temporary Wi-Fi sync server on your PC or Mac.
Important: Leave this window open until the sync is complete.
• In 1Password 4 for Windows, choose File > Wi-Fi Sync.
• In 1Password 5 for Mac, choose Window > Wi-Fi Sync, and enable the Use Wi-Fi to sync this
Mac with iOS devices option.
• In 1Password 4 for Mac, choose Window > Wi-Fi Sync.
Last update: 2014/11/26 19:30:06
Page 65 of 109
AgileBits
1Password for Windows - version 4
Remember: You need to leave the sync-server window open until the sync is complete.
2. In 1Password for iOS, tap Settings > Sync.
Last update: 2014/11/26 19:30:06
Page 66 of 109
AgileBits
1Password for Windows - version 4
3. Tap Sync using Wi-Fi.
4. If your computer is not listed…
…tap Refresh List.
Last update: 2014/11/26 19:30:06
Page 67 of 109
AgileBits
1Password for Windows - version 4
5. Tap on the computer’s name.
Last update: 2014/11/26 19:30:06
Page 68 of 109
AgileBits
1Password for Windows - version 4
6. Tap Secret, and type the “secret” still displayed on the Mac or PC.
Last update: 2014/11/26 19:30:06
Page 69 of 109
AgileBits
1Password for Windows - version 4
7. Tap Done.
Last update: 2014/11/26 19:30:06
Page 70 of 109
AgileBits
1Password for Windows - version 4
8. Tap Sync Now.
Last update: 2014/11/26 19:30:06
Page 71 of 109
AgileBits
1Password for Windows - version 4
9. When the message below the computer name changes from “Sync started” to “Sync finished”:
1. Exit Settings on your iOS device.
2. Close the Wi-Fi sync-server window on your Mac or PC.
Last update: 2014/11/26 19:30:06
Page 72 of 109
AgileBits
1Password for Windows - version 4
Getting 1Password data from iOS
If you have Logins and other items saved in 1Password 4.x on your iPhone or other iOS device, and you
want to start sharing and syncing that data with a new 1Password for Windows installation, follow these
steps:
1. In 1Password 4.x for iOS on your iPhone or other iOS device, tap Settings > Sync > Sync Service,
choose Dropbox, and follow the instructions to establish the connection to your Dropbox account.
1Password saves a copy of your 1Password data to your Dropbox folder, which is automatically
copied up to your private dropbox.com web site.
2. On your PC, wait for Dropbox to finish copying your data down from your private dropbox.com web
site.
3. Launch 1Password for Windows, choose File > Open 1Password Vault, and locate and select this
folder:
…\Dropbox\Apps\1Password\1Password.agilekeychain
See also Sync options.
Last update: 2014/11/26 19:30:06
Page 73 of 109
AgileBits
1Password for Windows - version 4
Importing data
The best way by far to share your 1Password data between your PCs and Macs is to use Dropbox to keep
them in sync. That way, your 1Password data is always automatically up to date and available on your PC,
Mac, and mobile devices, no matter where you modify it.
To import Logins formatted as delimited text or Roboform’s “print to HTML” output for Passcards, or to
import Logins and other item types exported from 1Password as 1Password Interchange Format (1PIF), just
choose File > Import, locate and select the import file, and follow the instructions.
Import formats
• 1Password Interchange Format
• Delimited text
Example: SplashID Web Logins
• Roboform Passcards
• Other formats
Other important information
• Cleaning up
• Watchtower and the “modified date”
• Alternatives to importing data
1Password Interchange Format
If the 1PIF file was created on a Mac:
1. In 1Password on the destination PC, choose File > Import.
2. Locate and open the .1pif folder copied from the source Mac.
3. Choose the data.1pif file contained within that .1pif folder.
If the 1PIF file was created on a PC:
1. In 1Password on the destination PC, choose File > Import.
2. Choose the .1pif file copied from the source PC.
Last update: 2014/11/26 19:30:06
Page 74 of 109
AgileBits
1Password for Windows - version 4
Delimited text
1Password for Windows includes the ability to import Login items from delimited-text files that use commas,
tabs, or semicolons to separate fields.
Delimited-text files have a few common characteristics:
• Each line of text represents a record—in this case, a Login you want to create in 1Password.
• Each string of characters between the delimiters represents a field—in this case, a name, URL,
username, password, or description—in that Login to be created.
• The fields may be enclosed in quotation marks:
"value";"value";"value value";...;"value"
• A field enclosed in quotation marks can include line breaks, as might be useful for long notes. It can
even include the delimiter character:
"value; value";"value";...;"value"
• The first line of text may contain field names; otherwise, the file contains only field values.
So, a properly formatted comma-delimited text (CSV) file might look something like this:
Name,Product,Serial Number,License Key,Company,Web Site,User Name,E-mail
Address,Password
Cogito Ergo Sum,Ergo Sum Self-Realization
5.0,CES-98765-43210,,,http://www.cogito.com/
ergo-sum,your-username,[email protected],your-password
Acme WidgetPro,WidgetPro
2010,,AC123-WP45-67890,Acme,www.acme.com,your-username,[email protected],your-passwo
If you open this properly formatted delimited-text file in a spreadsheet, all the names line up under the Name
heading, the usernames under the User Name heading, the passwords under the Password heading, and so
on.
If your plain-text file meets those criteria, 1Password should have no problem importing it and creating a
Login item for each record.
Last update: 2014/11/26 19:30:06
Page 75 of 109
AgileBits
1Password for Windows - version 4
Example: SplashID Web Logins
1. In SplashID, export to CSV any Web Logins you want to transfer to 1Password. The resulting file will
look something like this:
SplashID Export File,,,,,,,,,,,,
Web Logins,Cogito Ergo
Sum,your-username,your-password,http://www.cogito.com/
ergo-sum,,,,,,"August 05,2014",,Personal
Web Logins,Acme
WidgetPro,your-username,your-password,www.acme.com,,,,,,"August
05,2014",,Personal
2. To finish preparing the file, open it in a text editor (Notepad or something similar), and carefully
replace the first line with this:
ignore,title,username,password,url,,,,,,,,
Tip: To be sure you get all the commas, just copy that line above, and paste it into the file, in place of
the “SplashID Export File” line that’s there.
3. Save the file, making sure it’s still in plain-text format.
The file should look like this:
ignore,title,username,password,url,,,,,,,,
Web Logins,Cogito Ergo
Sum,your-username,your-password,http://www.cogito.com/
ergo-sum,,,,,,"August 05,2014",,Personal
Web Logins,Acme
WidgetPro,your-username,your-password,www.acme.com,,,,,,"August
05,2014",,Personal
4. In 1Password, choose File > Import, locate and select the file you just edited, and click the OK
button.
Last update: 2014/11/26 19:30:06
Page 76 of 109
AgileBits
1Password for Windows - version 4
5. In the Select Columns dialog box, match the Title, Username, Password, and URL fields in the dialog
with the corresponding columns in the import file, as shown below.
6. Click the OK button.
7. Click the No button, as shown above, to ignore the headings row that you edited above.
8. Click the Yes button for each remaining row, or (as shown above) click the Yes to All button to import
all the Web Logins in the import file at once.
Roboform Passcards
In RoboForm 6.9, use the “print list” feature for passcards, making sure you select the “full URLs” option, to
create an HTML file containing your Passcards. Import the resulting HTML file into 1Password for Windows.
Last update: 2014/11/26 19:30:06
Page 77 of 109
AgileBits
1Password for Windows - version 4
Note: Roboform 6.10 and later versions seem not to include the ability to export your complete Passcard
data. If you don’t select the “full URLs” option available in Roboform 6.9, your imported Logins might not
work as expected in 1Password for Windows.
Other formats
If you have data coming from other password management programs, you may be able to use one of the
converters described in our online knowledgebase.
Cleaning up
Caution:
• 1Password Interchange Format files are not encrypted. Your data in the .1pif file is stored in JSON,
a plain text format, so be sure to delete it securely on both the source and destination machines,
when you’ve completed the transfer. For your security, do not use an online JSON viewer to read a
.1pif file, because your private data would be transmitted in plain text.
• Delimited text files are not encrypted. Your data is saved in plain text, so be sure to delete the import
file securely on both the source and destination machines, when you’ve completed the transfer. For
your security, do not use a cloud-based service to read or transfer the file between machines,
because your private data would be transmitted in plain text.
• Roboform “print to HTML” files are not encrypted. HTML is saved in plain text, so be sure to delete
the import file securely on both the source and destination machines, when you’ve completed the
transfer. For your security, do not use a cloud-based service to read or transfer the file between
machines, because your private data would be transmitted in plain text.
An important note regarding Watchtower
The “modified date” of items imported as delimited text or from a Roboform export will be recorded as the
time and date they were imported. For that reason, 1Password’s Watchtower service will not be able to
accurately assess these items’ vulnerability. If you have not recently changed the passwords for your
imported items, we recommend visiting our Watchtower page and entering the URLs, one at a time, to
check for vulnerabilities.
Alternatives to importing data
Copying the 1Password vault
Last update: 2014/11/26 19:30:06
Page 78 of 109
AgileBits
1Password for Windows - version 4
If you just need to move your 1Password data once from one PC to another for some reason, you can
simply copy the .agilekeychain folder (by way of a removable drive, for example). Then launch 1Password,
choose File > Open 1Password Vault, and choose the .agilekeychain folder you just copied. (Select the
.agilekeychain folder itself, not some subfolder within it.)
Shared folders and shared drives
To protect data integrity, and improve performance:
• We do not recommend storing your 1Password data in a location that uses the “shared folders”
feature included in Parallels and VMware.
• We do not recommend storing your 1Password data folder on a network-share device.
Last update: 2014/11/26 19:30:06
Page 79 of 109
AgileBits
1Password for Windows - version 4
Exporting data
In 1Password, choose File > Export, select the appropriate format, select what to export, and follow the
instructions.
The format you choose depends on whether you want to export just Login items (delimited text) or all item
types (1Password Interchange Format).
See also Importing data.
1Password Interchange Format
The best way by far to share and sync your 1Password data is to use Dropbox (as described here). That
way, your 1Password data is up to date and available on your PC, Mac, iPhone, iPad, iPod touch, and
Android device, no matter where you modify it.
If you just need to move your 1Password data once from Windows to the Mac for some reason, though, you
can export it from 1Password for Windows, select 1Password Interchange Format, and import the
resulting .1pif file into 1Password for Mac.
Caution: 1Password Interchange Format files are not encrypted. Your data in the .1pif file is stored in
JSON, a plain text format, so be sure to delete it securely on both machines, when you’ve completed the
transfer. For your security, do not use an online JSON viewer to read a .1pif file, because your private data
would be transmitted in plain text.
Delimited text
1Password for Windows includes the ability to export Login items to delimited-text files that use commas or
tabs to separate fields.
The delimited-text file has the following characteristics:
• The first line of text contains the field names: title, notes, username, password, url.
• Each of the remaining lines of text represents a Login you had stored in 1Password.
• Each field value is enclosed in quotation marks ("value";"value";"value";"value";"value")
and may include the delimiter character (tabs or commas).
Last update: 2014/11/26 19:30:06
Page 80 of 109
AgileBits
1Password for Windows - version 4
Using Identities and Credit Cards
1Password Identities make it much easier to register new accounts or make a purchase online, and you can
create multiple Identities for any purpose. Identities can store personal details like your home or work
address, typical security question answers, or even your favorite forum username and signature, then
automatically fill all that information into registration forms. You can even use 1Password to securely store
and fill your credit card information.
You can add as many Identities as you want. Typically, you’ll give each a name or a theme, such as “Work”
and “Personal”. You could even create an “Alias” Identity with fake information that you use on sites you
don’t trust. Likewise, you could create Credit Card items for the credit and debit cards you use for yourself,
your business, and your kids’ Little League team.
1
Once your Identities and Credit Cards are created, 1Password can use them in your web browser to fill
registration forms, shopping cart check-out forms, shipping address forms, and weblog comment fields. Just
click on the 1Password button in the browser’s toolbar, and choose the item you want to use.
_____
1. The 1Password extension for Internet Explorer cannot yet fill forms with data from Credit Card and
Identity items. Instead, it opens the selected item in 1Password, where you can copy the values you
need. We apologize for the inconvenience.
Last update: 2014/11/26 19:30:06
Page 81 of 109
AgileBits
1Password for Windows - version 4
Using Logins in the main program
The easiest way to use a saved Login item is through the “go and fill login” feature in the 1Password
browser extensions.
If you already have 1Password open, though, it may be more convenient to “go and fill” directly from there:
1. In 1Password for Windows, select the Login for the site you want to visit.
2. In the details area (the bottom right quadrant of the 1Password window), click the URL:
1Password will open your default browser at that URL.
3. Press Ctrl+\, and 1Password will fill in the fields and (optionally) submit the form for you automatically.
Double-clicking a listed Login
Normally, double-clicking a listed Login in 1Password opens the Login in an edit window; but you can
configure 1Password to open the Login’s URL in a preferred web browser, instead. To do so, set the
Last update: 2014/11/26 19:30:06
Page 82 of 109
AgileBits
1Password for Windows - version 4
Double-click option to Open the URL in web browser on the General tab of 1Password preferences.
Note: You’ll still need to fill and submit the login form at that URL.
Last update: 2014/11/26 19:30:06
Page 83 of 109
AgileBits
1Password for Windows - version 4
Creating a multiple-page Login
Some web sites—especially banks, it seems—require you to enter your username and password on
separate pages, perhaps with a random “security question” of some kind in between. Generally speaking,
you’ll need to create a separate Login item for each page in the sequence, as in this example:
1. On the Auto-save tab of 1Password preferences, make sure the Auto-save new Logins option is
enabled.
2. Go to www.mybank.com/login.html, and fill in your username, but do not submit the form.
3. Click the 1Password button on the browser toolbar, and choose Settings > Save New Login; name
the new item MyBank - 1.
4. Back in the browser, submit the username page.
5. On the next page, answer the security question, repeat the steps above to save a new Login item,
and submit the form.
Depending on the number of possible security questions, you may decide not to save a Login for that
page. In that case, you’d simply enter the answer and submit the form by hand, each time you log in
to the bank’s site.
If you do save a Login for the security-question page, you’ll need to create one for each of the random
questions, something like this:
MyBank – 2 (mother’s maiden name)
MyBank – 2 (father’s birth year)
MyBank – 2 (favorite pet’s name)
Tip: When you set up your online bank account, you can use 1Password’s password generator to
create unguessable answers to these questions. There’s no reason to tell the bank the real answers,
because 1Password will always be there to provide whatever answers you tell the bank to expect.
6. On the next page, fill in your password, and submit the form. Because this page includes a password
page, 1Password will save a Login that you can name MyBank - 3.
_____
Tip: You may be able to edit one of your saved Logins to contain all the fieldname-value pairs stored above,
essentially creating a single Login item that works for all the pages in the sequence. You could also create a
Login in the main program, defining the username and password values by hand. This strategy often works
with sites that have only two pages in the login sequence, and there’s no harm in trying, if you’re interested
in reducing the number of Login items in your vault for some reason.
Last update: 2014/11/26 19:30:06
Page 84 of 109
AgileBits
1Password for Windows - version 4
Creating an application Login
You may be able to create a Login item for a program that is not browser-based.
1. Launch the program for which you want to create a Login item.
2. In 1Password, click the New Item tool, and choose Login.
3. In the Login dialog box, enter a name for the Login, enter your username and password for the
program, and click the OK button.
4. In the details area, click the Edit button.
5. Hold down the Ctrl key as you click on the Add URL button.
6. Select the application from the menu that appears.
7. Click the OK button to save your changes.
Using the application Login
Note: Not all programs accept login information transmitted in this way, but it’s worth a try.
• If you’ve stored both a username and password in the Login:
◦ Bring the application to the foreground.
◦ Click to put the insertion point in the username field.
◦ Press Ctrl+\.
1Password will send the saved username value, the Tab key, the saved password value, and
the Enter key.
• If you’ve stored only a password in the Login:
◦ Bring the application to the foreground.
◦ Click to put the insertion point in the password field.
◦ Press Ctrl+\.
1Password will send the saved password value, and the Enter key.
Last update: 2014/11/26 19:30:06
Page 85 of 109
AgileBits
1Password for Windows - version 4
Searching for items
In the main program
When you launch 1Password, the insertion point is in the search field, so you can just start typing. Filtering
is nearly instantaneous, so the displayed list narrows, as you type, to show only matching items. Clicking
the X next to the search field clears what you’ve typed.
When you click in the search field, the current category or folder stays selected.
When you press Ctrl+F, though, the All folder is selected automatically—you’re searching all item types. To
narrow the search to a specific item type, you can then select that category in the sidebar. Notice that the
search filter stays in effect, narrowing the list of items displayed, until you clear the search field.
You can click the triangle next to the search icon to control whether you want to search only item titles
(which is a little faster) or all fields.
Tip: If you’ve selected a category or folder and don’t see all the expected items, make sure the search field
is clear. When a search filter is in effect, the outline of the search field pulses to remind you.
Tags
When the insertion point is in the search field, you can press Alt+↓ to see a list of all the tags you’ve
defined.
You can also type tag: followed immediately by the tag name (like this: tag:Hobbies) to search for items
with that tag.
In the browser extensions
As soon as you invoke the 1Password extension, just start typing to filter the list to show Logins with
matching title, URL, or tag.
Last update: 2014/11/26 19:30:06
Page 86 of 109
AgileBits
1Password for Windows - version 4
Using auto-type
1Password for Windows includes an alternate method, called auto-type, for filling the occasional form in
which the standard fill method is blocked. (Do let us know when you find a site where the standard method
doesn’t work; we’re always looking for ways to improve our form-filling algorithms!)
Another nifty use of auto-type is with programs that aren’t web browsers. You just need to have a Login item
saved with the username and password.
Full-time auto-type
You can set up a Login item to always use auto-type:
1. In 1Password, edit the Login item.
2. Enable the Auto-type option, and save the item.
When you visit the site in your web browser, place the insertion point in the username field; then press
Ctrl+\ as usual. 1Password will fill in the username and password fields with the values saved in the
corresponding Login item.
Note: You must place the insertion point in the username field before invoking the 1Password extension;
otherwise, 1Password won’t fill in the fields.
One-click auto-type
You can use auto-type on an as-needed basis, typically with non-browser programs:
1. Display the login form in the program, and place the insertion point in the username field.
2. In the main 1Password program, select the Login item you want to use, and click the Auto-type button
in the 1Password toolbar.
Field-level auto-type
If the “one-click” auto-type method doesn’t fill in the form correctly, you can fill in the fields one at a time:
1. Display the login form in the browser or other program, and place the insertion point in the username
field
Last update: 2014/11/26 19:30:06
Page 87 of 109
AgileBits
1Password for Windows - version 4
2. In the main 1Password program, select the Login item you want to use.
3. In the details area, click the auto-type icon next to the Username field.
After 1Password fills in the stored username value, click the OK button in the message that appears.
4. Back on the login page, place the insertion point in the password field.
5. In 1Password again, click the auto-type icon next to the Password field.
After 1Password fills in the stored password value, submit the login page.
Prefilled fields
Some sites prefill form fields with “prompts“—a hint or default value, for example—on the assumption that
you’ll select and replace the prefilled text with your own username or password. Such a form could prevent
1Password from correctly auto-typing your saved values, by prefixing or appending your username or
password to the prefilled characters.
If you encounter such a form, edit the corresponding Login to enable the Send Ctrl+A before auto-type
option, and 1Password will do exactly that: select the prefilled value in each field before auto-typing the
value you saved for that field.
Last update: 2014/11/26 19:30:06
Page 88 of 109
AgileBits
1Password for Windows - version 4
Working with attachments
Adding and removing attachments is the one thing you can do to an item without editing it. Simply select the
item to perform the following tasks in the details area.
To add an attachment: Drag a file onto the “attachments” field.
1Password encrypts this internal copy. You can decide whether to keep or delete the original file on your
computer.
To view or save an attachment: Double-click on the file in the “attachments” field.
1Password asks where you want to save a decrypted copy of the attachment. When you’re finished viewing
the copy, you can decide whether to keep or delete the copy on your computer.
(Viewing an attachment requires creating a decrypted copy of the attachment, and that copy would be
available for anyone to find; so it’s better to have you explicitly save the attachment to a known location and
decide whether it needs to be deleted after it’s been viewed.)
To remove an attachment: Select the file in the “attachments” field, and choose Edit > Delete.
1Password reminds you that the attachment will be permanently destroyed, so you have a chance to save it
first.
Last update: 2014/11/26 19:30:06
Page 89 of 109
AgileBits
1Password for Windows - version 4
Working with folders and tags
In 1Password for Windows, you can create folders to organize your Logins and other items in any way that
makes sense to you. You can also apply as many tags as you like to make items easier to find.
Remember that folders and tags are completely separate from categories. Here’s how they’re used in
1Password for Windows.
• Every item is always listed in exactly one of the following categories:
◦ Logins category
◦ Wallet category
◦ Accounts category
◦ Software category
◦ Secure Notes category
◦ Identities category
◦ Generated Passwords category
◦ Trash
• Every item (unless it’s in the Trash) is also listed in the built-in All folder, which always lists all your
1Password items, regardless of type.
• Every item (unless it’s in the Trash) can also be in exactly one folder that you created; if it isn’t, it’s
automatically listed in the built-in Unassigned folder.
• Each item can be associated with as many tags as you like.
Notes:
• The Unassigned folder doesn’t appear in 1Password for Mac.
• 1Password for Windows currently does not display tags in the sidebar. Add and remove tags as you
edit individual items. Search for tagged items by typing the tag name (or by pressing Alt+↓ and
selecting the tag name) in the search field.
• In the browser extensions, just start typing to filter the list to show Logins with matching title, URL, or
tag.
Last update: 2014/11/26 19:30:06
Page 90 of 109
AgileBits
1Password for Windows - version 4
Using the Security Audit items
Toggles on the View menu configure the 1Password sidebar to show several Security Audit items:
• Weak Passwords
Lists any of your Logins with passwords that 1Password evaluates as being relatively weak. Strong,
unguessable passwords are easy to create in 1Password.
• Duplicated Passwords
Lists any of your Logins that share a password with one or more of your other Logins. Unique
passwords are a key to Internet security. It’s easy to create unique passwords in 1Password.
• Heartbleed
Lists any of your Logins associated with sites that appear in the Alexa Top 10,000 list of sites
vulnerable to the Heartbleed problem. We recommend you follow the advice shown in red in the
details area when one of the Logins is selected.
• Watchtower
Lists any of your Logins associated with sites for which our Watchtower tool suggests some action.
We recommend you follow the advice shown in red in the details area when one of the Logins is
selected.
Last update: 2014/11/26 19:30:06
Page 91 of 109
AgileBits
1Password for Windows - version 4
Using Secure Desktop
1Password gives you the option to use Windows’ “secure desktop” feature when enter your master
password, so that key loggers and other malware cannot capture it.
Logging in to the main 1Password program, just click the Use Secure Desktop button.
To use secure desktop for the 1Password extensions, too, just enable the Use Secure Desktop option on
the Browsers tab of 1Password preferences.
Last update: 2014/11/26 19:30:06
Page 92 of 109
AgileBits
1Password for Windows - version 4
Using custom icons
Login items typically get “rich icons” automatically, as described in the Logins tab topic.
Software and Wallet items can have icons, too; you can even use a custom icon for a Login item. These are
called “custom icons”. Custom icons are included with your 1Password data, so they sync to other
1Password installations.
Editing a Software item
Click on the Select Icon button (or double-click on the icon thumbnail), and locate the .exe, .ico, or other file
that contains the icon you want to use:
Editing a Login item
Double-click on the icon thumbnail square, and locate the .exe, .ico, or other file that contains the icon you
want to use:
Editing a Wallet item
Double-click on the 1Password icon in the upper left of the edit window, and locate the .ico, .png, or .jpg file
that contains the icon you want to use.
Last update: 2014/11/26 19:30:06
Page 93 of 109
AgileBits
1Password for Windows - version 4
Using keyboard shortcuts
In the main program
Ctrl+Shift+C Copy the value in the password field of the selected Login item.
Ctrl+C
Copy the selected item to the clipboard (for pasting into another vault (or into an email message,
where it can be clicked by the recipient to add to another vault).
Ctrl+R
Get a quick peek at an obfuscated password.
Ctrl+N
Display the New Item menu.
Enter
Shift focus from folders or categories area to list area.
Alt+↓
In the search field, display the list of defined tags.
(down arrow)
Ctrl+click
On the Add URL button in the “edit Login” dialog box, display a list of running programs; used in
creating an application Login.
In a 1Password-enabled browser
Ctrl+\
Invoke the 1Password extension to fill the displayed form, present matching Login items, or
display the full menu (depending on the number of matching Login items).
Ctrl+Alt+\
Invoke the 1Password extension to display the full menu, regardless of the number of matching
Login items.1
↑↓→←
Navigate the extension menu.
(arrow keys)
Tab
Expand the highlighted Login Identity, or Credit Card item in the extension menu.
Ctrl+click
Copy the value in the highlighted field of the highlighted Login, Identity, or Credit Card item.
1
This is always the Alt key “plus” the shortcut defined on the Logins tab, as in the Ctrl+\ and Ctrl+Alt+\
default shortcuts.
In other programs
Ctrl+\
Auto-type the username and password (with an intervening Tab) into the program in the foreground, if
that program is associated with the Login in the main 1Password program, as described above.
Last update: 2014/11/26 19:30:06
Page 94 of 109
AgileBits
Last update: 2014/11/26 19:30:06
1Password for Windows - version 4
Page 95 of 109
AgileBits
1Password for Windows - version 4
Creating a new vault
If you want to create an additional vault, just choose File > New 1Password Vault.
Caution: Be sure to remember the master password! Without it, you won’t be able to open your new vault
the next time you need it. (1Password for Windows does not include the concept of primary and secondary
vaults, so each vault is locked and unlocked separately.)
Starting over
With 1Password 4’s enhanced support for creating and switching among multiple vaults, you’re unlikely to
need to start over without any existing data. If for some reason you do, though, you can follow these steps:
1. Quit 1Password and any running web browsers.
2. In Windows Explorer, locate your data file.
Tip: You can find the location of your data file by looking on the General tab of 1Password
preferences.
3. Rename the data file, perhaps by adding “_old” to the file name.
You could simply delete the file, but to be safe it’s better to rename it. You can always delete the
renamed file, later, if you decide you don’t need it.
4. Start 1Password to see the “new installation” instructions described in the Quick Start section of this
user’s guide.
Last update: 2014/11/26 19:30:06
Page 96 of 109
AgileBits
1Password for Windows - version 4
Using 1PasswordAnywhere
With native, platform-specific versions of 1Password available for Windows, Mac, iOS, Android, and even
(“read-only”) Windows Phone devices, you need never be separated from your 1Password data.
If you find yourself completely stranded, though, and you’re syncing your 1Password data among all those
devices using Dropbox, you’re in luck! If you can sign in to your Dropbox account on the web, you have
read-only access to 1PasswordAnywhere.
To use 1PasswordAnywhere
1. Sign in to your Dropbox account on the web.
2. On your private dropbox.com web site, locate and open the .agilekeychain folder that represents the
vault you want to use.
3. Double-click the 1Password.html file you find inside.
4. Enter your master password on the “vault door” screen.
Notes:
• 1PasswordAnywhere will lock itself automatically after 1 minute of inactivity.
• Because local file access can present a security risk, most modern browsers will block you from
opening the local copy of 1Password.html, reporting a problem with the encryptionKeys.js file.
Note: Safari—which has not been updated since 2012!—allows access to the local copy, without
modification.
• The .opvault format currently does not include the 1Password.html file and other resources required
for access to 1PasswordAnywhere.
Last update: 2014/11/26 19:30:06
Page 97 of 109
AgileBits
1Password for Windows - version 4
Sharing an item
When you select a Login or other item in the list area, the details area includes a “share” button. Clicking
that button reveals two options:
• Copy to Clipboard
• Send E-mail Message
Copy
Copying an item to the clipboard (like selecting the item in the list area and pressing Ctrl+C) copies the item
to the system clipboard. You can then switch vaults and press Ctrl+V to paste a copy of the item into the
newly opened vault.
Send
Sending an email message (which requires that you have a program associated with the “mailto” protocol)
launches your email program and preloads the message body with a long string of characters that looks
something like this:
onepassword://share/1?d=Sev3ral...LiN3s...0f...GoBbLeDyGo0k...aNd...mUmboJumB0
Address and send the message; the recipient can simply click on the “onepassword protocol” link in the
message body to load the item into 1Password on his or her PC or Mac.
Last update: 2014/11/26 19:30:06
Page 98 of 109
AgileBits
1Password for Windows - version 4
Sharing a vault
With 1Password for Windows, you use Dropbox syncing to share vaults with other 1Password users.
1. In the main 1Password program, open the vault you want to share.
2. If you haven’t yet set up Dropbox syncing, follow these steps:
1. Click on the Preferences tool.
2. Select the General tab, and click on the Move to Dropbox button.
Dropbox will begin copying your data up to your private dropbox.com web site.
3. Still on the General tab of 1Password preferences, note the full path of the current vault.
It should look something like this:
C:\Dropbox\1Password\vault-name.agilekeychain
4. In Windows Explorer, locate the vault-name.agilekeychain folder.
Tip: We do not recommend sharing your entire Dropbox folder unless you want others to have access
to all the files you store in Dropbox.
5. Right-click on the vault-name.agilekeychain folder, and choose Share this folder.
6. On your private dropbox.com web site, which opens in a browser window, invite the other Dropbox
users with whom you want to share this vault, making sure you leave the Can edit option selected.
The Dropbox users you specify will receive an invitation from Dropbox to “join” the shared folder. People
who accept the invitation will see the vault-name.agilekeychain folder synced to their local Dropbox folder.
They need only open it in 1Password (by choosing File > Open 1Password Vault) and enter the master
password you provide them.
Note: Once you provide them with the master password for that vault, they’ll have full access to all the
Logins and other items stored within it. They’ll be able to open the vault from within the browser extensions
and the main 1Password program, where that they can add, modify, and delete Logins and other items
within the vault. Until you “unshare” that vault-name.agilekeychain folder, any changes they make to the
vault will be synced to everyone else’s local copy and to the copy on your private dropbox.com web site.
Remember, too, that “unsharing” the folder won’t delete any local copies they may have made.
Last update: 2014/11/26 19:30:06
Page 99 of 109
AgileBits
1Password for Windows - version 4
Learn more
Want to know more about 1Password? We’ve got you covered.
Keep in touch
We’re everywhere! For everything from news and announcements to tips and tricks, there are lots of ways to
stay informed.
• Newsletter: Sign up for the AgileBits newsletter to receive news and announcements by email. We
send newsletters approximately every month, and we promise not to spam you.
• Blog: Subscribe to our blog to see all the exciting things going on at AgileBits and important security
topics that are relevant to you.
• Twitter: Follow us on Twitter.
• Facebook: Like us on Facebook.
Have a question?
Have you read through this user’s guide and still have questions or not sure how to deal with an issue?
• Knowledgebase: The 1Password for Windows knowledgebase contains troubleshooting tips and
answers to common questions.
• Forums: Join us in our discussion forums for one-on-one help from fellow users and AgileBits staff.
Last update: 2014/11/26 19:30:06
Page 100 of 109
AgileBits
1Password for Windows - version 4
1Password Glossary
1Password app or program
The main interface for creating, viewing, and editing your 1Password data. See also Layout.
(Mac) The window that appears when you click the 1Password icon in the Dock or open it in the Applications
folder.
(Windows) The window that appears when you run 1Password from the Windows “start” menu or open it in
the Program Files folder. Note that 1Password for Windows isn’t an app (which runs in Metro) but a full
Desktop-mode program.
1Password mini
(Mac only) 1Password mini is 1Password’s second major component. By default, its icon appears in the
menu bar at the top of your screen.
1PIF
1Password Interchange Format. An unencrypted export format best suited for use in one-time data
migration. All item types can be exported to a 1PIF file.
Caution: Because 1PIF stores your data as plain text, you should protect a .1pif file in transit and securely
delete it as soon as you finish the transfer.
Accounts
(Windows) A collection of various item types that are listed individually in 1Password for Mac. The Accounts
category will be phased out in a future release.
See also Wallet.
.agilekeychain folder (a.k.a. keychain, data folder, or vault)
(Mac) The “sync point” (storage format) for use with the Dropbox or Folder sync method, created by
1Password for Mac when you choose either of those sync methods. Because sync settings are vaultspecific, the file is named after the selected vault (for example, work.agilekeychain). The exception to this is
the primary vault, which is always saved as 1Password.agilekeychain.
Last update: 2014/11/26 19:30:06
Page 101 of 109
AgileBits
1Password for Windows - version 4
(Windows) Your 1Password database. See also .opvault folder and Vault.
All Items (a.k.a. All) folder
The built-in folder that displays all your 1Password items.
Auto-lock
The optional mechanism by which 1Password locks your data after a period inactivity or on any of a number
of actions or events, defined in 1Password preferences.
Auto-save
The optional feature by which 1Password automatically offers to create a new Login when you submit a form
at a URL for which you do not yet have a Login stored.
Auto-submit
The optional feature by which 1Password automatically submits a web form after filling it with your stored
credentials.
Auto-type
(Windows only) An alternative form-filling mechanism that may work on sites that don’t accept 1Password’s
standard method and even in some programs that are not browser-based.
Auto-update
The optional feature by which 1Password automatically offers to modify an existing Login, typically with just
the new password, rather than replacing the entire Login or creating a new one.
Backup
The mechanism by which 1Password periodically saves the current state of your data. Backup files are
useful in restoring data in case of damage or permanent loss. Backup files are intended only for use by the
“restore” function in 1Password on the same platform; they are not suitable for direct import or for
restoration into 1Password running on a different platform. For cross-platform transfers, use syncing or 1PIF
export and import.
Browser extension
Last update: 2014/11/26 19:30:06
Page 102 of 109
AgileBits
1Password for Windows - version 4
See Extension.
Categories or item types
These are the various types of information that you can save in 1Password. Different item types have
different “templates” (default fields); you can add custom fields, but you cannot “move” an item from one
category to another. See also individual item types.
Category area
(Mac) There are four categories that 1Password always displays, even in a new vault with no information in
it: Logins, Secure Notes, Credit Cards, and Identities. The other categories appear in the sidebar only if
you’ve saved an item of that type in your vault.
(Windows) All categories are listed, even if you haven’t yet saved an item of that type in your vault.
(iOS, Android) The Categories tab is where all of the items in your vault are stored, sorted into their
categories. The Categories tab is also where you add new items.
Credit Cards
Each item holds credit card, debit card, and store card information that 1Password can use to fill payment
forms.
Custom fields and sections
Additional information you may choose to store in any item type. Note that the values in custom fields are
not available for use in filling forms, though you can copy the values and paste them as needed. Compare
Web form details.
Database
(Mac) The internal name used to refer to all of your 1Password data, including vaults. Whether you have
one vault or five, they are contained in a single database. See also Vault.
(Windows) Synonymous with “vault”; there is no separate internal database. See also Vault.
Details area
The area that displays the details of the selected item.
Last update: 2014/11/26 19:30:06
Page 103 of 109
AgileBits
1Password for Windows - version 4
(Mac) In the “left” layout, details are shown in the rightmost column; in the “top” layout, it’s the lower right
pane.
(Windows) Details are shown in the lower right quadrant.
Domain matching
The mechanism by which 1Password determines whether you have a Login saved that can be used to fill a
form on the web page currently displayed in your 1Password-enabled browser. See also Lenient URL
matching.
(Windows) A set of controls with which you can refine 1Password’s domain-matching algorithms.
Duplicated Passwords
See Security Audit.
Extension
The 1Password icon that you can add to your web browser’s toolbar; extends much of 1Password’s
functionality to your web browser. Note that use of the extensions requires installation of the main
1Password app/program on the same machine.
Note that iOS does not allow the level of integration required for extension of 1Password into Safari and
other browsers on your iOS device, so the 1Password for iOS app includes 1Browser for your convenience.
Favorites
The built-in folder that displays any items you have “starred.”
Fill Login
In a 1Password-enabled browser, the act of filling a form on the currently displayed page with the
credentials and other form data saved in an existing Login, when you select that Login from the 1Password
extension menu. Compare Go & Fill.
Folder
A means of organizing your 1Password data. An item can be associated with only one folder, but folders
can contain items of any type.
Last update: 2014/11/26 19:30:06
Page 104 of 109
AgileBits
1Password for Windows - version 4
(Mac) The Folders section in 1Password’s sidebar appears only if you’ve created a folder.
Compare Smart folders.
Generated Passwords
A special category in which 1Password creates an item whenever you use the password generator. See
also Security Audit.
(Mac) The category is labeled simply Passwords. When you create a Login using a generated password, the
Password item is automatically converted into a Login.
(Windows) In the main 1Password program, choose the View > Generated Passwords command to toggle
display of the category. (The File > New Item submenu includes a Password command only when the
Generated Passwords category is displayed in the sidebar.)
Go & Fill
A step-saving function that takes you to the saved login page, fills the form with your saved credentials, and
(optionally) submits the form, when you’re on a blank web page in your browser and you select a saved
login from 1Password’s menu, or when the URL stored in the Login you select doesn’t match the URL of the
current page, or when you’re in the main 1Password app/program and click on a URL in a Login. Compare
Fill Login.
Heartbleed
(Windows) See Security Audit.
Helper
(Windows) The 1Password component (Agile1pAgent.exe) that facilitates communication between the
1Password extensions and the main 1Password program. Software that blocks the WebSocket technology
used by the Helper—typically antivirus, anti-malware, and firewall tools—breaks the connection between the
extensions and the main program. The Helper also displays the 1Password icon in the Windows notification
area (a.k.a. the “system tray”).
Identities
Each item holds name and address information that 1Password can use in your web browser to fill shipping
and billing forms.
Last update: 2014/11/26 19:30:06
Page 105 of 109
AgileBits
1Password for Windows - version 4
Item
A unit of data that you store in 1Password. See also Categories or item types.
Layout
The arrangement in which your 1Password data is presented in the main window. 1Password for Mac offers
two layout options: “top” (the default, similar to the layout in 1Password for Windows) and “left” (columnar).
1Password for Windows uses a four-quadrant layout that is similar to the “top” layout in 1Password for Mac.
Lenient URL matching
An option with which you can modify 1Password’s standard domain-matching algorithm. See also Domain
matching.
(Windows) Enable the option (on the Logins tab of 1Password preferences) if you use multiple URLs in a
single Login item.
List area
The area that displays items in the selected category.
(Mac) In the “left” layout, items in the selected category or folder (or with the selected tag) are listed in the
middle pane; in the “top” layout, it’s the upper right pane. Click the pane header to sort the listed items.
(Windows) Items in the selected category or folder (or with the selected tag) are listed in the upper right
quadrant. Click the column headings to sort the listed items.
Logins
Each item holds a set of login credentials (username and password), along with the URLs of one or more
sites where 1Password can use the credentials to fill a login form.
Login fields
See Web form details.
Master password
The password you create the first time you run 1Password. Your master password is used to lock
1Password and to encrypt your data. It is known only to you—we cannot restore or reset it for you—so it is
Last update: 2014/11/26 19:30:06
Page 106 of 109
AgileBits
1Password for Windows - version 4
equally vital that you remember it and that it be impossible for someone else to guess. Anyone with your
master password and a copy of your 1Password data has full access to that data.
mini
See 1Password mini.
.opvault folder (a.k.a. keychain, data folder, or vault)
(Mac) The new “sync point” format to replace the .agilekeychain format.
(Windows) The new database format to replace the .agilekeychain format.
See also .agilekeychain folder and Vault.
Passwords
See Generated Passwords.
Password generator (a.k.a. strong password generator or SPG)
Whether invoked from the browser extension, the main app/program, or (on the Mac) the mini, the
1Password feature with which create unique and essentially unguessable passwords that conform to the
specific requirements of nearly any web site.
Primary and secondary vaults
See Vault.
Restore
See Backup.
Secure Notes
Each item holds free-form plain text in which you can store any information you like.
Security Audit
(Mac) A special collection of built-in saved searches, in which your Logins with weak, duplicate, or old
passwords or for which our Watchtower tool recommends some protective action are automatically collected
so it’s easier for you to find and correct them.
Last update: 2014/11/26 19:30:06
Page 107 of 109
AgileBits
1Password for Windows - version 4
(Windows) The Weak Passwords, Duplicated Passwords, Heartbleed, and Watchtower categories. Like
Generated Passwords, display of these categories is toggled on the View menu.
Sidebar (a.k.a. category area and folder area)
(Mac) The main app window consists of three panes. In both the “left” and “top” layouts, the sidebar is the
left-most pane.
(Windows) The main program window comprises four quadrants. The upper left is for categories, and the
lower left is for folders and tags. The category and folder areas are sometimes collectively called the
sidebar.
Smart folders (a.k.a. saved searches)
(Mac) A set of search criteria you’ve used to find particular information and saved for reuse at any time.
Saved searches are displayed as slightly different folders in 1Password’s sidebar. You don’t manually add
items to a smart folder; instead, any items that meet the saved search criteria are automatically listed when
you select the smart folder.
(Windows) Smart folders cannot yet be viewed or created.
Sync
A means of sharing your 1Password data among multiple computers and devices, so that it is kept up to
date on all of them. Additions, modifications, and deletions in 1Password on any synced device are
synchronized to all the other synced devices. 1Password preferences include several sync options.
Sync point
See .agilekeychain folder and .opvault folder.
Tag
A keyword that you can optionally assign to any item. You can assign multiple tags to an item.
(Mac) Tags appear in the special Tags section of the sidebar, but only if at least one tag has been created.
(Windows) Add and delete tags while creating or editing an item; search for tags by pressing Ctrl+↓ in the
search field.
(iOS, Android) Tags are readable, but cannot yet be created or added to items.
Last update: 2014/11/26 19:30:06
Page 108 of 109
AgileBits
1Password for Windows - version 4
Trash
The folder that contains items you have deleted. As with the operating system’s Trash or Recycle Bin, you
can recover items from 1Password’s Trash until you explicitly empty it.
Vault
A collection of Logins, Identities, Secure Notes, and other saved data.
(Mac) 1Password automatically creates a primary vault when you run it for the first time. Everything you see
when you open 1Password—all of your saved items, folders, and tags—is in the currently open vault. You
can also create secondary vaults. Each time you switch to a different vault, the 1Password window is
refreshed to show only the contents of the vault you select.
(Windows) Each vault is a separate .agilekeychain folder with an independent master password. 1Password
for Windows does not yet include the concept of “primary” and “secondary” vaults.
(iOS) Vaults can be opened and their contents edited, but only primary vaults can be created.
(Android) Only primary vaults can be created, opened, and have their contents edited.
Wallet
(Windows) A collection of various item types that are listed separately in 1Password for Mac. The Wallet
category will be phased out in a future release. See also Accounts.
Watchtower
See Security Audit.
Weak Passwords
See Security Audit.
Web form details
Additional fields (besides username and password) that can be saved automatically in the 1Password
extension or added manually in the main 1Password app/program, so they’re available for form filling on
future visits to the associated site. Compare Custom fields.
Last update: 2014/11/26 19:30:06
Page 109 of 109


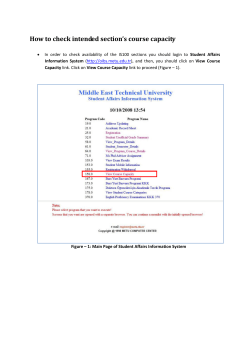

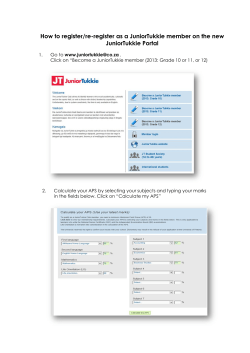
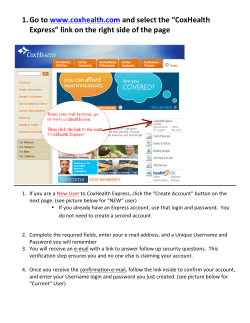


© Copyright 2026