
AUTOMOTIVE FLAREMASTER
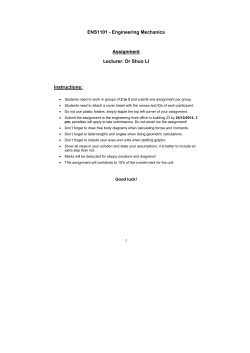
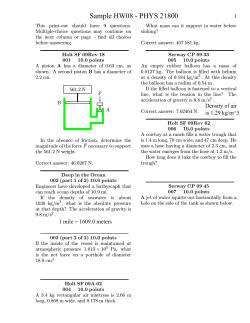
E
X
P
O
R
T
L
I
M
I
T
E
D
AUTOMOTIVE FLAREMASTER
027250 FLAREMASTER 2
027295 FLAREMASTER 2 KIT
027297 FLAREMASTER 2 - STAINLESS VERSION
Pipe Preparation
E-MAIL: [email protected]
Tel: +44 1785 714320
Fax: +44 1785 714281
Stainless Steel Pipe
Ensure pipe is cut accurately and fully deburred both internally and
E XFailure
P to O
R result
T in off-centre
L I flares.
M
externally prior to flaring.
do so will
Careful pipe preparation is very important to ensure accurate flares.
The end must be cut squarely and the pipe fully de-burred internally
and externally.
Always grip the pipe on a straight section which has not been clamped
previously. If the flare is not satisfactory first time always cut off
sufficient pipe to ensure a new portion of pipe is gripped in the tool.
Correct pressure holding the dies ensure accurate flares and ongoing
servicability of the tool.
1
CONTACT:
SYKES-PICKAVANT EXPORT LIMITED
UNIT 9, PILLATON HALL FARM
PENKRIDGE
STAFFORDSHIRE
ST19 5RZ
UNITED KINGDOM
I
Stainless steel pipe is much more difficult to work with and achieve
T results.
E Extreme
D
good
care must be taken in the preparation and
clamping of the pipe. Prior to making the flare it helps to apply a
small amount of flaring compound to the tip of the punch.
Products such as MOLYSLIP (Metal Cutting Compound) or similar
assists in flaring stainless tubing. This allows the material to form
correctly. Take care to avoid blockage in the pipe through too
much flaring compound.
Thrust washers are provided to be used under the clamping nut
to ensure the stainless steel pipe is gripped firmly. This ensures the
tool is level avoiding slippage when flaring.
Instructions for Use
2
1 Select the correct die-form and insert the pipe until the pipe
end is flush with the face on the die. Swing the hinged
portion of the die holder over to clamp the pipe.
2 Fully tighten the clamp nut ensuring the thurst washer is in
place under the nut and between the casting.
3 Select the correct punch (ie. 4.75mm DIN or 3/16” OP 1 SAE)
3
Die
3/16” SAE
OP 1 Punch
Punch
3/16” SAE
OP 2 Punch
4.75mm
DIN Punch
Quick
Release
Chuck
and fit into the quick release chuck on the end of the power
ram. Please note 3/16” OP 1 punch has a plain knurled body
and 4.75mm DIN punch has a grooved knurled body.
4 Place the bridge piece onto the main body and insert the
ram. Once in position, wind the T-Bar pressure screw fully
home until the rubber O-Ring under the head of the screw
starts to compress.
5 For completion of an SAE Double Lap Flare (Concave Form)
5
NOTE: The second OP flare form is only available on SAE.
To produce DIN form flares the tool is reversed and operated from
the other side with the correct punch inserted in the ram.
Spare Parts
Part No.
Description
027255
Handle Assembly
027252
Bridge
027260
Hydraulic Ram C/W Pressure Screw
027270
Hydraulic Ram - Stainless Version
027204
3/16” Sae & 4.75mm Die Set
027251
3/16” OP 1 SAE Punch
027271
3/16” OP 2 SAE Punch
027261
4.75mm Din Punch
0099-11V3
4
remove the ram from the bridge and replace the OP 1 SAE
punch with the OP 2 SAE punch. Insert the ram into the
bridge and tighten to complete the flare.


© Copyright 2026