
The Beginner’s Cooking Manual Revised copy 2012
The Beginner’s Cooking Manual Revised copy 2012 Prepared by the Chronic Disease Prevention – Children & Youth Program, Health Living Division, Public Health Services, City of Hamilton. Sponsored by Child and Youth Workgroup of Healthy Living Hamilton. Healthy Cooking, Healthy Living The Beginner’s Cooking Manual Disclaimer The Healthy Cooking, Healthy Living – Beginner’s Cooking Manual was developed by City of Hamilton Public Health Services and sponsored by the Child and Youth Workgroup of Healthy Living Hamilton. The material contained in this Manual is provided for general guidance only and while it may be used and reproduced by other individuals and organizations, the City of Hamilton assumes no liability or responsibility for any loss or damage caused or alleged to be caused directly or indirectly by the information in this Manual or resulting from unsafe food handling practices. Healthy Living Hamilton was funded in part by the Government of Ontario. The views expressed in these materials do not necessarily reflect those of the Government of Ontario. For more information about the Beginner’s Cooking Manual, please contact: Chwen Johnson, MSc, RD Public Health Dietitian Chronic Disease Prevention Healthy Living Division Public Health Services Tel: 905-546-2424, ext. 5020 Fax: 905-546-3658 Email: [email protected] Healthy Cooking, Healthy Living 2 The Beginner’s Cooking Manual Table of Contents DISCLAIMER................................................................................................................................2 Background...............................................................................................................................6 Aim............................................................................................................................................6 The Lesson Plans .....................................................................................................................6 The Recipes..............................................................................................................................7 GROUP MANAGEMENT..............................................................................................................8 Helping Students To Set Ground Rules ....................................................................................8 Managing Your Group...............................................................................................................8 Contracting Good Behaviour.....................................................................................................8 Setting Your Standard...............................................................................................................9 Tips for Cooking with Kids.........................................................................................................9 Planning Ahead.......................................................................................................................10 Before Each Session...............................................................................................................10 Start /During Session ..............................................................................................................10 End of Session or During Meal Time ......................................................................................11 Facilitator Set-up Checklist .....................................................................................................11 Clean-up Checklist ..................................................................................................................11 SAMPLE FORMS .......................................................................................................................12 Sample School Letter..............................................................................................................13 Sample Participant Letter........................................................................................................14 Permission Letter ....................................................................................................................15 Attendance Sheet ...................................................................................................................16 Lesson Review Sheet .............................................................................................................17 Menu Mind Map ......................................................................................................................18 Task Assignment Sheet ..........................................................................................................20 LESSON PLANS ........................................................................................................................21 Lesson Plan 1 - Hand Washing, Kitchen Safety, Knife Safety ................................................22 Lesson Plan 2 - Danger Zone, Cross-Contamination..............................................................32 Lesson Plan 3 - Manual Utensil & Dishwashing......................................................................38 Lesson Plan 4 - Reading a Recipe, Kitchen Equipment..........................................................42 Lesson Plan 5 - Measuring Ingredients...................................................................................49 Lesson Plan 6 - Basic Table Manners, Setting a Table ..........................................................53 Lesson Plan 7 - Trimming the Fat, Taste the Flavour .............................................................58 Lesson Plan 8 - Dietary Fibre..................................................................................................60 Lesson Plan 9 - Vegetables and Fruit .....................................................................................62 Lesson Plan 10 - Healthy Eating.............................................................................................67 Healthy Cooking, Healthy Living 3 The Beginner’s Cooking Manual BEGINNER COOKING CLUB RECIPES....................................................................................70 Salads .....................................................................................................................................71 Snacks ....................................................................................................................................77 Entrees....................................................................................................................................84 Breakfast.................................................................................................................................94 Vegetables ............................................................................................................................100 Desserts................................................................................................................................104 APPENDIX A ............................................................................................................................109 Certificate of Completion.......................................................................................................110 Student Evaluation Form.......................................................................................................111 Parent Volunteer Evaluation .................................................................................................113 APPENDIX B ............................................................................................................................115 Suggested Start-up Equipment .............................................................................................116 Additional resources:.............................................................................................................118 How to Cook Pasta ...............................................................................................................119 How to Blanch and Refresh Vegetables................................................................................120 How to Cook Rice .................................................................................................................121 Cooking Terms and Techniques ...........................................................................................122 ADDITIONAL HANDOUTS .......................................................................................................123 Canada’s Food Guide to Healthy Eating ...............................................................................123 Trim the Fat, Taste the Flavour .............................................................................................123 Fat Facts ...............................................................................................................................123 Fit Fibre Into Your Day ..........................................................................................................123 5 to 10 a Day for Better Health..............................................................................................123 Healthy Cooking, Healthy Living 4 The Beginner’s Cooking Manual Acknowledgements Healthy Cooking, Healthy Kids – Youth Cooking Club Manual (2000) was co-written by Michelle Tobias-Murray, BA, B. Ed. and the Nutrition Promotion Program, Public Health and Community Services Department, City of Hamilton. Public Health Services, Healthy Living Division, Chronic Disease Prevention, Children & Youth Program and Healthy Living Hamilton would like to thank the following individuals and groups for their valuable contribution to the revision of the Healthy Cooking, Healthy Kids – Youth Cooking Club Manual to the Healthy Cooking, Healthy Living – Beginner’s Cooking Manual (2006): • The Child and Youth Workgroup of Healthy Living Hamilton. • The parents and administration from local schools running the program since 2000. • Veronica Kozelj, Public Health Inspector, Health Protection Division, Public Health Services, City of Hamilton. Healthy Living Hamilton was funded in part by the Ontario Ministry of Health & Long Term Care, Community & Health Promotion Branch. Healthy Cooking, Healthy Living 5 The Beginner’s Cooking Manual Introduction A cooking club is a great opportunity for everyone to learn how to prepare and enjoy healthy recipes in a fun and inviting kitchen atmosphere. Cooking clubs for healthy eating was part of a broader vision for healthy living in the City of Hamilton. Background Cooking clubs are popular for children between the ages of 11 to 13. Children at this age show an eagerness to learn to cook. They are open to learn life skills and are beginning to take increased responsibility for their health and well being. Healthy decisions about diet, activity and tobacco use made early in life can result in less chronic diseases later in life. Aim Cooking clubs introduce children to healthy eating in a practical setting that encourages skill development. The cooking club experience will help children: • Identify and select healthy foods • Understand how to prepare foods using good sanitary practices • Prevent injury in the kitchen • Learn basic food preparation skills Cooking clubs give children a chance to appreciate healthy foods firsthand and gain confidence in their ability to produce tasty and healthy meals. The Lesson Plans This manual consists of 10 lesson plans and 1 take-home introductory package. The first three lesson plans are compulsory as they contain important information students must know regarding food safety and sanitation. Facilitators can choose to implement some or all of the remaining lesson plans with their group. Each lesson plan consists of the following 5 components: • • • • • Get Ready Objectives Key Points Cooking Activity Cleaning Activity Healthy Cooking, Healthy Living outlines things to prepare before the class. outlines goals of the lesson plan. outlines potential discussion points of the lesson plan. outlines cooking instructions and discussion points. outlines things to do for cleaning and sanitation. 6 The Beginner’s Cooking Manual Overheads for each lesson plan are provided to help facilitators summarize key points of the lesson. A “Menu Mind Map” is included in the sample forms session. It can be used as a paper activity for students while dinner is cooking or as a take-home assignment. The Recipes There are 30 recipes in the manual grouped into 5 categories: Salads, Snacks, Entrées, Breakfasts and Vegetables. Recipes provide the amounts of ingredients required for serving 4, 8 and 12 persons. The facilitators will choose 1-3 recipes each week to try to create a balanced meal with the group. For example, if you choose the recipe for spaghetti and meatballs, you can purchase milk to drink and fresh fruit for dessert to create a simple balanced meal. The sample task assignment sheet can be used to help divide up cooking tasks among club members. For efficient use of time, try to choose recipes that require different cooking equipment or tools. Healthy Cooking, Healthy Living 7 The Beginner’s Cooking Manual Group Management Helping Students To Set Ground Rules Providing a take-home introductory package for students and parents (sample provided) before the first cooking session will enable the students to become familiar with some preliminary ground rules. With the students, discuss which behaviors the club members will absolutely not tolerate. For example, “No swearing”, “No horseplay”, “No teasing”. The fewer hard fast rules you have, the less likely you are to corner yourself. Remember, this is an after school activity and students are there to have fun. So a “No loud talking” rule may not be appropriate. In addition, look at your facility for safety hazards. Do you need rules to protect club members from personal injury? Do you need to have rules to protect personal property? Are there school rules that you should be aware of? You will need to enforce these. Managing Your Group • Convey your expectations • Ensure rules being followed • Make students accountable by having them sign an agreement (e.g. student contract) • Assign tasks and ensure their completion • Remind students to clean as they go • Be firm, but respectful Contracting Good Behaviour A student contract is included in the take-home introductory package. For this to be meaningful for the club members, they should help to set the criteria for each behaviour concept outlined on the handout “Positive Participation”. Student involvement in setting their own standards goes a long way to building a partnership between students and facilitators. When students suggest the standard for behaviour, they are more likely to commit to it. This also creates the expectation that those around them also have to commit to this behaviour. Facilitators can continue to build an atmosphere of mutual respect and mature behaviour by dealing positively with students who disrupt others. For example, “ That’s an excellent point, Jane, but you are interrupting Tom.” Remind students that they are young adults and that adultlike behaviour is what you expect from them. On the other hand, dangerous or malicious behaviour should be dealt with swiftly. Depending on the severity of the behaviour, or the responsiveness of the student to comply, this action should be done in one of the following Healthy Cooking, Healthy Living 8 The Beginner’s Cooking Manual ways: talk to the student in private about his or her behaviour, ask the student to leave, or call the administrator on duty to remove the student. Do not get into a shouting match with a student. Do not take the student off alone somewhere to talk to him or her. Discipline in view of others. Adults, even in non-contentious situations, put themselves at risk (of accusations) when alone with a student. Setting Your Standard Have the club members address facilitators by their last names (Mr. Mrs. Ms. etc.). By doing this you maintain a position of authority, which you may be required to exercise in a disciplinary situation. Generally, the students accept and expect to be on a last name basis with adults in school related activities. The mutual respect that you build into your sessions is key to a comfortable rapport with the students. Modeling behaviour is also important. Your attitude towards the students, as a group or individually, will be reflected in their attitudes. If you want students to be scrupulous about hand washing, so must you be. If you want them to respect you, you must also respect them. Finally, when assigning students to work with each other, take into consideration their personalities and requests. If a student tells you they really can’t work with so-and-so, consider their request. You may possibly avoid a lot of conflict. Be flexible when assigning groups. Tips for Cooking with Kids • Show and Tell. Show them and explain to them everything you’re doing and why. • Give them tasks. Tell them what needs to be done and assign tasks. • Compliment them. Be encouraging and proud of their efforts – big or little. • Keep an eye on them. Never leave them unattended when they are cooking. • Teach them life skills. Explain to the kids how to purchase fresh fruits and vegetables, why they should wash them, and how to store them. Healthy Cooking, Healthy Living 9 The Beginner’s Cooking Manual General Planning Notes for Volunteers/Facilitators Planning Ahead Make copies of the take-home package to distribute to each student to review prior to the start of the cooking club. The following administrative forms should be completed or collected from participants prior to or on the first day of the cooking club: Locate or assemble First-Aid kit and have on hand for every session. Permission Letter signed by participant’s parent/guardian. (in take-home package) Student Contract signed by participant and parent/guardian. (in take-home package) Create a student (participant) information binder with permission forms and health information in case of emergency. Be sure to have this on hand at every cooking session. Determine which parent volunteer(s) will be responsible for the student information binder. Before Each Session Determine tasks for each parent volunteer: facilitation of lesson plans, shopping, administration…etc. Purchase groceries. Ensure that you can properly store them until the club meeting. Photocopy the required number of recipes, handouts, “Menu Mind Map”. If your photocopy budget does not allow you to give copies of everything to each student, consider making and using overheads where practical. Request for an overhead projector if necessary. Check grocery list and supplies. Is there any equipment you don’t have that is absolutely necessary? Check your equipment. Is everything where it should be and in proper working order? Decide where cooking stations will be for each group for the session. If last session, prepare Certificates of Completion. Start /During Session Do a quick attendance. Are students who are not present accounted for? Review ground rules, safety and sanitation guidelines from the take-home package. Review lesson plan objectives, background information, recipes. Ask and answer questions based on learning objectives. Choose a tip from each category to be inserted into the “Menu Mind Map” as a paper activity if time is permitted. Healthy Cooking, Healthy Living 10 The Beginner’s Cooking Manual Assign groups and tasks using Task Assignment Sheet. Combine duties if there are not enough students for each task. Remind groups to complete set-up checklist. While dinner is cooking, complete a paper activity, e.g. puzzle or questionnaire (if time permits). Assign cleaning tasks. End of Session or During Meal Time Complete lesson review sheet with the whole group. Ask: What of tonight’s meal would you make at home? Ask: Which recipes will we make next week? Review clean-up list. Complete clean up. Check pantry supplies. Ensure the kitchen is clean and all food and equipment has been put away properly. Check and close up room. If this is your last session, distribute certificates of completion. Facilitator Set-up Checklist Bags and backpacks put away. Long hair tied back. Outdoor coats removed, apron on. No gum or candy. Hands washed before handling food/equipment. Recipe reviewed and understood. Work areas wiped and sanitized. Equipment and ingredients assembled. Clean-up Checklist Equipment washed, dried and returned to proper place. Sinks and drains are food free and clean. Countertops and cutting boards have been washed and sanitized. Stove tops and burners are grease and stain free. Stove elements and ovens are turned off. Ingredients have been properly covered and put away. Garbage and recyclable materials sorted and disposed of. Linens have been put away or set aside for laundering. Healthy Cooking, Healthy Living 11 The Beginner’s Cooking Manual SAMPLE FORMS Healthy Cooking, Healthy Living 12 The Beginner’s Cooking Manual School Letterhead Sample School Letter Date:____________ Dear Parents, __________________________ School is considering starting a weekly after school Beginner’s Cooking Club. The cooking sessions can run for a series of 6 -10 weeks, with each session lasting about 2 hours. A cooking club is a great opportunity for students in grades 6 through 8 to learn how to prepare and enjoy healthy recipes in a fun, safe, and inviting atmosphere. Children aged 11-13 are eager to learn to cook and are beginning to take increased responsibility for their own health. Parent volunteers will: • shop for recipe ingredients (each parent volunteer will not need to do this) • guide the students through a series of nutritionally balanced food and kitchen safety rules each week • help students prepare a meal each week • learn how to serve healthy foods on a budget • share the meal with the club members Students will: • learn simple food preparation techniques • prepare a meal and serve the food with proper table etiquette • share the meal with their club member friends and parents • help with clean-up • take the recipe home to share and re-create with their family Each session of the series of cooking classes will be held _________________________ (where). The cost per student to join the club will be ________________________weekly. The student and parent volunteers will be having supper at school the evening that the Beginner’s Cooking Club has its session. Parents will need to arrange for pick-up of their child(ren) at the end of every session. If you are interested in having your child participate in the club, or if you are interested in becoming a parent volunteer, please sign the form below and indicate which day of the week is preferred for club sessions. Thank you for your interest. School Principal:_________________________ School Public Health Nurse:_____________________ Student Name and Grade: ______________________________________________________________ Parent Name:________________________________ Yes. I am interested in a parent volunteer position. Phone number:________________________ Day of week preferred (please circle): MON Healthy Cooking, Healthy Living TUE 13 WED THU FRI The Beginner’s Cooking Manual School Letterhead Sample Participant Letter _________________________(School Name) Beginner’s Cooking Club Dear Parents: ___________________(School Name) is ready to cook! Your son/daughter expressed an interest in our after-school Beginner’s Cooking Club. The cooking sessions will be offered every _______, starting __________ (Date), for a series of ___ weeks, ending on_________. Each session will run from ______ to _____ pm. The Beginner’s Cooking Club is an opportunity for students in grades 6-8 to learn how to prepare and enjoy healthy recipes in a fun, safe and inviting atmosphere. Students will: Learn simple food preparation techniques Prepare a meal and serve the food with proper table etiquette Share the meal with their club member friends and volunteers Help with clean-up Take the recipe home to share and re-create with their family Each session of the Club will be held in the ________________(location) . The cost per student to join the club is $_______ weekly. Every session, students will get to eat what they have prepared. Please complete the attached permission form to have your child participate in the Club, submit the indicated fee ($_____ total for all sessions), and have your child return all items to the office on __________date. Happy Cooking! Principal Healthy Cooking, Healthy Living Cooking Club Coordinator 14 The Beginner’s Cooking Manual School Letterhead Permission Letter ____________(School Name) Beginner’s Cooking Club Student Name: ________________________________________________________________ Student’s Home Phone Number: __________________________________________________ Emergency Contact and Phone Number: ___________________________________________ Health Card Number (with version code): ___________________________________________ Family Doctor’s Name and Phone Number: _________________________________________ Food Allergies: _____________________ Food Intolerances:___________________________ Dietary Restrictions: ____________________________________________________________ Medical Conditions /medications necessary to note regarding performance in the Beginner’s Cooking Club: ____________________________________________________________________________ ____________________________________________________________________________ How will your child go home at the end of each session? Must wait to be picked up. Travel home has been arranged with: ________________________________________ I give permission for my son/daughter ___________________________________ to participate (child’s name) in the ____________________(school’s name) Beginner’s Cooking Club. I am submitting $____ with this form to cover the fee for the full 6 sessions. Parent’s signature: ____________________________ Date: ___________________________ PRINT PARENT’S NAME: ______________________________________________________ Please submit all monies in an envelope labeled “Beginner’s Cooking Club” with your child’s name. PLEASE RETURN THIS FORM BY ____________________________(Date) Healthy Cooking, Healthy Living 15 The Beginner’s Cooking Manual Attendance Sheet ________(School Name) Beginner’s Cooking Club Student Date Date Healthy Cooking, Healthy Living Date Date Date 16 Date Date Date Date The Beginner’s Cooking Manual Lesson Review Sheet Planning and organization Recipes What went well? What worked well? What didn’t go well? What didn’t work? Next time remember to: Next time remember to: Healthy Cooking, Healthy Living 17 The Beginner’s Cooking Manual Menu Mind Map Choose a tip you learned today from each category and write into the proper bubble on this weeks mind map. Cooking Tip: Lesson Plan #____ Safety Tip: Sanitation Tip: Healthy Cooking, Healthy Living 18 The Beginner’s Cooking Manual Student Cleaning Schedule Task Wk 1/Name Wk 2/Name Wk 3/Name Wk 4/Name Wk 5/Name Wk 6/Name Wash dishes/pots/utensils Rinse dishes/pots/utensils Dry dishes/pots/utensils Put away dishes/pots/containers Clean counter/stove/table top Students are expected to: 9 Wash and dry the utensils, equipment, dishes and pots they used for the recipe 9 Clean their work station 9 Scrape their plates after eating 9 Put away ingredients they used 9 Participate in cleaning rotation Healthy Cooking, Healthy Living 19 The Beginner’s Cooking Manual Task Assignment Sheet Recipe:_______________________ # Task Responsible Person (s) 1 2 3 4 5 6 Healthy Cooking, Healthy Living 20 The Beginner’s Cooking Manual Lesson Plans Healthy Cooking, Healthy Living 21 The Beginner’s Cooking Manual Healthy Cooking, Healthy Living Lesson Plan 1 - Hand Washing, Kitchen Safety, Knife Safety Getting Ready • • • • Review general planning notes & set-up check list. Assemble and photocopy (or make overheads) all resource materials needed for the session: recipes, overheads & handouts. Organize these materials for easy distribution to students. Gather supplies needed for the chosen recipes. Check participant’s names off the attendance sheet. Objectives • • • • Participants will be able to state the importance of hand washing. Participants will be able to model proper hand washing. Participants will be able to state at least 3 tips for kitchen safety. Participants will be able to state at least 2 tips for safe knife use. Introduction • • • • • Welcome participants to the first cooking session. Introduce facilitators by the name they wish to be addressed. Briefly describe your role and objectives of the Beginner’s Cooking Club. Ask students to introduce themselves, or introduce themselves to someone near them that they do not already know. With students, develop a list of ground rules. (Overhead #1) Hand out the “Positive Participation” sheet, brainstorm the behavior criteria for the key concepts in “Positive Participation”. Have students fill in the criteria for each concept. (You may have to write criteria on a board or large piece of paper so students can quickly fill in blanks). Hand out student contracts. Review with students. Have them sign their names. Instruct the students to take their contracts home to be signed by their parents to be returned the following week. Key Points to Cover • • • Discuss importance of hand washing: - reduce risk of getting and giving common cold to others. - help keep food safe. - help prevent the spread of disease. Demonstrate proper hand washing steps (Overhead #2) Discuss when to wash your hands. (Overhead #3) Healthy Cooking, Healthy Living 22 The Beginner’s Cooking Manual • Discuss tips for safe knife use. (Handout) Cooking Activities • • • • • • Review recipes and tips. Go over the steps necessary to produce the finished products. Assign groups and tasks. Help students get organized and manage time. Demonstrate cooking techniques as needed. Provide verbal cues or physical assistance for some steps in the recipes. Cleaning Activity • • Assign tasks. Complete clean-up list. Healthy Cooking, Healthy Living 23 The Beginner’s Cooking Manual Student Contract Name: ______________________ Cooperation: I will cooperate with my club and team members to get work done Responsibility: I will be responsible for all work assigned to me (cooking and cleaning) Respect: I will show respect to all those working with me (teachers and students) i.e. I will call adults by their last name (i.e. Miss, Mrs. Mr.) Behaviour: I will conduct myself according to the club rules and requirements I agree to all of the above cooking club conditions. Student Signature: ________________ Parent/Guardian Signature: _______ Date:________________________________________________________ Please return to facilitator by next club meeting. Healthy Cooking, Healthy Living 24 The Beginner’s Cooking Manual Positive Participation Discuss with your club members and facilitator the following statements: Cooperative people are: Responsible people are: Respect others by: Behaviour that is positive is: ____________________________________________________________________________ Healthy Cooking, Healthy Living 25 The Beginner’s Cooking Manual Overhead #1 • Respect each other • No running, no shouting • No swearing, no horseplay, no teasing • No gum chewing • No loose hair, no loose sleeves • Clean your work area • Wash your dishes • Wash your hands before cooking and eating Healthy Cooking, Healthy Living 26 The Beginner’s Cooking Manual Overhead #2 Wash Your Hands Healthy Cooking, Healthy Living 27 The Beginner’s Cooking Manual Overhead #3 Handwashing & Personal Hygiene When to wash your hands Before touching food or utensils Before eating After eating Before and after using the bathroom After coughing, sneezing or blowing your nose After touching your hair or face After handling raw meat, poultry or fish After handling toxic or hazardous substances Personal Hygiene If you are sick (infectious), stay home. Arrive to cook with neatly clipped nails and clean clothing, hair, mouth and body Before beginning to cook do the following in order: Tie your long hair back. Put on a clean apron. Wearing an apron reduces the possibility of food contamination from outside sources. Wash your hands with hot water and soap and dry them well. If you have a cut or sore, keep it covered with a bandage. Healthy Cooking, Healthy Living 28 The Beginner’s Cooking Manual Handout Tips for Safe Knife Use 9 Choose the right knife for the job. Do not use a large knife to peel potatoes, for example. 9 Always use a sharp knife. A dull knife requires more pressure and will slip away from food more easily. 9 Always cut away from yourself. 9 Always cut on a proper cutting surface. Again, this will prevent the knife from slipping. 9 Place a damp cloth under your cutting board to prevent the board from moving. 9 Hold the knife firmly by the handle when using. This allows for greater control. 9 When chopping, mincing, dicing etc., keep the tip of the knife blade on or as close to the cutting board as possible. 9 Never wave the knife around in the air when gesturing. 9 If you need to leave what you are doing, don’t take your knife with you. 9 To carry a knife: hold it by your side, firmly by the handle, tip pointing down. 9 If a knife begins to fall, never try to catch it – step back and let it fall. 9 Always wash knives separately from other dishes. 9 Never leave a knife in a sink of water where others may not see it. 9 Store knives safely in their proper place Healthy Cooking, Healthy Living 29 The Beginner’s Cooking Manual Handout Basic Rules for Kitchen Safety Prevent Burns: • Always use dry oven mitts or potholders to lift hot things. • Keep hot handles turned to the centre of the stove. • When checking under the lid of a pot, tip the lid away from your face to allow steam to escape. • When walking past people with a hot pot, warn them it is hot. • Ask for help when carrying hot items that are too heavy for you. • Wear close fitting clothing and jewelry that does not dangle, this will prevent getting caught on hot items. • Wear an apron to keep clothing close to your body and away from heat sources. Prevent Cuts: • Use the correct knife for the job. • Always use a sharp knife, dull one requires more pressure and may slip. • Wash knives separately and store in their proper place. • Cut away from your body. • Do not use knives to open cans, cut string or sharpen pencils. • Sweep large pieces of glass with a broom and dustpan, pick-up smaller pieces with a wet paper towel. • If a knife begins to fall, never try to catch it – step back and let it fall. • Always pay attention to what you are doing. Healthy Cooking, Healthy Living 30 The Beginner’s Cooking Manual Prevent Falls: • Walk, do not run. • Pick-up dropped food and wipe up spills immediately. • Keep work area floors clear of objects you may trip over. • Use a stepladder to reach high places. • Never horseplay and always watch where you are going. Prevent Electrical Shocks: • Never use electrical equipment near water, or with wet hands. Be sure electrical cords are not damaged. • If a machine is not working, unplug it, report it to the person in charge and place an “out of order” sign on it. • Be sure an appliance is turned off before plugging it in. • Never use a machine that you are unfamiliar with. Prevent Poisoning: • Use chemicals only after you have carefully read the label. • Never store chemicals in cupboards with food. • Always store chemicals in their original containers. • When using chemicals on food preparation surfaces or tools, be certain that all residue is rinsed completely away. Prevent Fires: • Keep flammables away from heat sources. • Never leave cooking food unattended. • Clean grease from stovetops and ovens. • Make sure electrical equipment is in good working order. • Make sure pilot lights in gas stoves are working. Healthy Cooking, Healthy Living 31 The Beginner’s Cooking Manual Healthy Cooking, Healthy Living Lesson Plan 2 - Danger Zone, CrossContamination Getting Ready • • • • • Review general planning notes & set-up check list. Assemble and photocopy (or make overheads) all resource materials needed for the session: recipes, overheads & handouts. Organize these materials for easy distribution to students. Gather supplies needed for the chosen recipes. Check participants’ names off the attendance sheet. Collect signed Student Contracts from participants. Objectives • • Participants will be able to explain what danger zone is and how to keep foods out of the danger zone. Participants will be able to explain cross-contamination and list at least 2 ways it commonly occurs. Key Points to Cover • • • Discuss the danger zone: (Overhead #4 & 5) - The danger zone is the temperature range between 4°C & 60°C. (Overhead #6) - Keep food out of the danger zone. Bacteria will multiply quickly in the danger zone. - Keep hot food hot (60°C) and cold food cold (4°C). - Do not allow hazardous food to be in danger zone longer than 2 hours when preparing food. Explain cross-contamination and how it commonly occurs (Overhead #6) - Raw food or its juice come in contact with cooked food. - Contaminated hands touching food. - Using the same equipment to handle raw and cooked foods. Discuss how to prevent cross-contamination. (Overhead #7) Cooking Activities • • • • • • Review recipes and tips. Go over the steps necessary to produce the finished products. Assign groups and tasks. Help students get organized and manage time. Demonstrate cooking techniques as needed. Provide verbal cues or physical assistance for some steps in the recipes. Cleaning Activity Healthy Cooking, Healthy Living 32 The Beginner’s Cooking Manual • • Assign tasks. Complete clean-up list. Healthy Cooking, Healthy Living 33 The Beginner’s Cooking Manual Overhead #4 Healthy Cooking, Healthy Living 34 The Beginner’s Cooking Manual Overhead #5 The Danger Zone The Danger Zone is the range in which bacteria grow most rapidly. The Danger Zone is from 4 degrees C – 60 degrees C (40 degrees F – 140 degrees F). It is very important to keep foods out of the Danger Zone. Foods that have not been properly refrigerated or kept very hot for 2 hours or more are usually in the Danger Zone. Foods do not need to look funny or be foul smelling to contain a lot of bacteria. When in doubt throw it out. Bacteria grow exponentially. One single bacterium splits every 15 minutes. Bacteria can increase from 1 to 1 million in five hours. Bacteria, eat, produce waste and multiply. Bacteria are not killed by refrigeration or freezing. High cooking temperatures will kill most bacteria. Eating food that has a high amount of bacteria can lead to sickness or death. Healthy Cooking, Healthy Living 35 The Beginner’s Cooking Manual Overhead #6 Cross-contamination What is cross-contamination? Cross-contamination is when one food comes in contact with a surface or utensil that has been contaminated by another. How to prevent cross-contamination? When you use tools or a cutting board to prepare meats, poultry or fish, do not re-contaminate that food after cooking by placing it on the same unwashed surface. Wash and sanitize a surface that has been used to prepare meat, poultry or fish before using it again. Do this before moving onto the next task. Take special precautions with poultry, which could be contaminated with salmonella, and ground beef, which could be contaminated with E. coli. It is best to have a cutting board to be used exclusively for meats, poultry and fish. Wash and sanitize a surface that has been used to prepare highly allergic goods such as nuts, eggs or shellfish, surfaces before using it again. Use only clean utensils and equipment. When you have finished preparing one recipe, clean up completely before moving onto the next. Healthy Cooking, Healthy Living 36 The Beginner’s Cooking Manual Overhead #7 Storing, Heating and Cooling Foods Keep hot foods hot and cold foods cold. Store uncooked meat, poultry and fish below all other foods in the refrigerator, especially from ready-to-eat foods. Refrigerator temperature should be: 40 degrees F (4 degrees C) or less at all times. Using a refrigerator thermometer will help keep food storage in this range. Do not put really hot containers of food in the refrigerator as it will increase the temperature above 40 degrees F (4 degree C). Cool foods quickly before refrigerating by placing pot in a clean sink of very cold water. Stir frequently. Leave container uncovered. This process is sped up if the pot is placed on a rack to allow water to circulate under it. Frozen foods should not be thawed at room temperature, but in the refrigerator, under cold running water, or in the microwave oven. Do not refreeze defrosted foods. When reheating foods they should be brought to a full boil before using. Do not taste foods with cooking utensils. Do not taste foods twice with the same spoon. Wash it properly or use another. Healthy Cooking, Healthy Living 37 The Beginner’s Cooking Manual Healthy Cooking, Healthy Living Lesson Plan 3 - Manual Utensil & Dishwashing Getting Ready • • • • Review general planning notes & set-up check list. Assemble and photocopy (or make overheads) all resource materials needed for the session: recipes, overheads & handouts. Organize these materials for easy distribution to students. Gather supplies needed for the chosen recipes. Check participant’s names off the attendance sheet. Objectives • • • Participants will be able to explain dishwashing procedures using two or three compartment sinks. Participants will be able to clean dishes using 3-compartment sinks. Participants will be able to follow proper procedures to clean work area. Key Points to Cover • • Discuss manual utensil & dishwashing using two and three compartment sinks. Demonstrate the set up of sink(s) for dishwashing. If your facility has only one sink for dishwashing, follow these steps: 1. Get 2 plastic bins large enough to accommodate cups, plates, cutting boards, knives. etc. 2. Use one sink for warm water and detergent. 3. Fill the first bin with clear water minimum 43°C for rinsing. 4. Fill the second bin with a sanitizing solution in it. • Discuss how to sanitize work area.- demonstrate how to prepare sanitizing solution using household bleach e.g. 1 tablespoon per gallon of water. (Overhead #8) Cooking Activities • • • • • • Review recipes and tips Go over the steps necessary to produce the finished products. Assign groups and tasks Help students get organized and manage time Demonstrate cooking techniques as needed Provide verbal cues or physical assistance for some steps in the recipes. Cleaning Activity • • Assign tasks. Complete clean-up list. Healthy Cooking, Healthy Living 38 The Beginner’s Cooking Manual Overhead #8 Healthy Cooking, Healthy Living 39 The Beginner’s Cooking Manual Healthy Cooking, Healthy Living 40 The Beginner’s Cooking Manual Sanitizing Solution for Dishwashing A chlorine solution of not less than 100 p.p.m. available chlorine, at a temperature of not less than 45 degrees C. Examples using household bleach: a) 1 tablespoon per gallon of water. b) 1/2 ounce per gallon of water. c) 1/2 teaspoon per litre of water (1000 mL). d) 2 mL per litre of water (1000 mL). Change water as often as necessary. ** The Hamilton Wentworth District Public School Board has a policy that does not allow the use of bleach as a cleaning agent by custodial staff due to the environmental impact when used in large quantities. Public schools are to use a product called F-25, a concentrated quaternary ammonium chloride product. The product is approved as a sanitizing agent by Public Health Services. To sanitize equipment, utensils, cutting boards and surfaces at 200 ppm of active quaternary, use 2ml of F-25 to 1 litre of water. Sanitizing Solution for Work Sufaces, Equipment, Cutting Boards Mix 1 teaspoon (5 mL) of household bleach with 2 cups (500 mL) of water. Do not add other cleaning products. Pour mixture into a spray bottle. Label the spray bottle clearly. Use the solution to sanitize equipment, work surfaces, cutting boards and utensils. Wash your hands after completing sanitizing. Prepare a new solution each time. Healthy Cooking, Healthy Living 41 The Beginner’s Cooking Manual Healthy Cooking, Healthy Living Lesson Plan 4 - Reading a Recipe, Kitchen Equipment Getting Ready • • • • Review general planning notes & set-up check list. Assemble and photocopy (or make overheads) all resource materials needed for the session: recipes, overheads & handouts. Organize these materials for easy distribution to students. Gather supplies needed for the chosen recipes. Check participant’s names off the attendance sheet. Objectives • • Participants will be able to identify 4 parts of a recipe and follow recipe instructions. Participants will be able recognize, and put a name to utensils commonly used in the kitchen. Key Points to Cover • • Discuss how to read a recipe; introduce 4 parts of a recipe. (Overhead #9) - Read the entire recipe – Get the ingredients ready to use. - Arrange your ingredients in an orderly line on the counter. Discuss kitchen equipment: (Overhead #10 & 11) - Display an array of kitchen utensils on a table in front of the students. Introduce each kitchen utensil, its name and function(s). - Ask participants to choose all the utensils needed for today’s recipes. Cooking Activities • • • • • • Review recipes and tips. Go over the steps necessary to produce the finished products. Assign groups and tasks. Help students get organized and manage time. Demonstrate cooking techniques as needed. Provide verbal cues or physical assistance for some steps in the recipes. Cleaning Activity • Assign tasks. Healthy Cooking, Healthy Living 42 The Beginner’s Cooking Manual • Complete clean-up list. Healthy Cooking, Healthy Living 43 The Beginner’s Cooking Manual Overhead #9 Reading a Recipe A Recipe has 4 parts: Name Yield & preparation time Ingredients Instructions Name The name of the recipe tells you what the recipe is preparing. Yield & Preparation Time Yield tells you how many people you can expect to serve from a recipe or how much it makes. Preparation time tells you how long it will take to prepare this recipe. Will it be ready when you want it to be? Ingredients The ingredients section tells you what you need and how much. The ingredients section of the recipe is very important to read well in advance of preparation. Instructions The instructions tell you what to do with the ingredients. Make sure you understand all terms and techniques before you begin cooking. Healthy Cooking, Healthy Living 44 The Beginner’s Cooking Manual For Reference Kitchen Tools Liquid Measuring cups These are made of clear glass or plastic marked with lines that measure 1 or more cups or parts of a cup and are used to measure liquids. Dry measuring cups These are made of metal or plastic and come in a set that includes ¼, 1/3, ½, and 1 cup sizes. They usually nest one inside the other and are used to measure flour, sugar, and other dry ingredients. Measuring spoons These come in metal or plastic sets. Most sets include spoons ranging from 1/8 teaspoon to 1 tablespoon. They can measure both liquid and dry ingredients. Grater For grating or shredding cheese, carrots, and other foods into fine or coarse pieces. Strainer/Sieve A bowl-shaped basket made of metal mesh and attached to a long handle. The tiny holes in the strainer make it possible to separate liquids from solids. Colander A plastic or metal utensil shape like a bowl and punched with holes. It is used fro draining pasta, vegetables, and other foods. Wooden spoons For gentle, no-clang stirring Vegetable peeler For taking skins off apples, potatoes, carrots and other vevegatles and fruits. Metal spatula For flipping omelets and pancakes; comes in metal or plastic for non-stick pans. Baking sheet A shallow, rectangular pan that usually measures about 15 by 10 inches. It is used for baking cookies, thin cakes, and other items. Healthy Cooking, Healthy Living 45 The Beginner’s Cooking Manual For Reference Wire whisk For blending, egg beating, and stirring lumps out of sauce. Paring knife This is the smallest in the family of knives. It’s the knife that peels, seeds, pits fruits and vegetables, swirls eyes out of potatoes, slits meat, de-caps strawberries, and cuts broccoli or cauliflower into florets. Chef knife The most popular length is 6 to 8 inches long. Aside from any slicing and cutting tasks, these large knives are used to make food small. They chop parsley (reducing leaves to a handful of flakes), chop onions into dices and garlic into tiny minced particles. Serrated knife This knife has a wavy or saw-toothed edge. A long one is used for slicing bread, while smaller sizes are for cutting tomatoes and citrus fruits. Skillet A wide, shallow pan that comes in sizes ranging from 6 to 10-inches. Most recipes call for a small, medium, or large skillet rather than a certain size. Tongs For turning or grabbing just about any foods, especially fried foods, without piercing. Pastry brush For brushing with butter. Muffin tin A metal pan containing individual cups. Muffin pans come with small, medium, or large cups with 6 or 12 cups each. They are used for making muffins and cupcakes. Pizza cutter A utensil with a round metal wheel on top and a wooden, plastic or metal handle. The sharp wheel easily cuts through pizza, dough, and other bread products. Rolling pin A heavy wood cylinder-shaped tool with two handles. A rolling pin is used for rolling out dough and pastry and for crushing crackers into crumbs. Wok A large, round pan with sloping sides. A wok is used for stir-frying and for Oriental-style dishes. Wire cooling rack A round or rectangular rack used for cooling muffins, breads, cookies, and other baked goods after they come out of the oven. Healthy Cooking, Healthy Living 46 The Beginner’s Cooking Manual Overhead #10 / Handout Useful Utensils Here are some of the utensils you may want to have on hand: Metal Spatula Slotted Spoon Large Spoon Wooden Spoon Paring Knife Garlic Press Chef’s Knife Vegetable Peeler Grater Potato Masher Dry Measuring Cups Tongs Pizza Cutter Liquid Measuring Cup Measuring Spoons Juicer Pastry Blender Pastry Brush Rolling Pin Whisk Healthy Cooking, Healthy Living 47 The Beginner’s Cooking Manual Overhead #11 / Handout Useful Utensils Here are some of the utensils you may want to have on hand: Strainer Cookie Sheet Egg Beater Wire Cooling Rack Colander Loaf Pan Cookie Cutters Cake Pans Steamer Roasting Pan Healthy Cooking, Healthy Living 48 Wok Casserole Dish The Beginner’s Cooking Manual Healthy Cooking, Healthy Living Lesson Plan 5 - Measuring Ingredients Getting Ready • • • • Review general planning notes & set-up check list. Assemble and photocopy (or make overheads) all resource materials needed for the session: recipes, overheads & handouts. Organize these materials for easy distribution to students. Gather supplies needed for the chosen recipes. Check participant’s names off the attendance sheet. Objectives • • Participants will be able to state the proper way of measuring dry and liquid ingredients. Participants will be able to demonstrate proper ways to measure different ingredient. Key Points to Cover • Discuss how to measure different ingredients: (Overhead12 & 13) - Using measuring cups and measuring spoons as visual aids for participants, discuss relative sizes of the measuring cups and measuring spoons. - Using water, flour or brown sugar, have the students follow along as a staff person/volunteer demonstrates measuring different ingredients. Cooking Activities • • • • • • Review recipes and tips. Go over the steps necessary to produce the finished products. Assign groups and tasks. Help students get organized and manage time. Demonstrate cooking techniques as needed. Provide verbal cues or physical assistance for some steps in the recipes. Cleaning Activity • • Assign tasks. Complete clean-up list. Healthy Cooking, Healthy Living 49 The Beginner’s Cooking Manual Overhead #12 Measuring Ingredients For accurate measurement of liquid and dry ingredients use the following methods. DRY INGREDIENTS: FLOUR, SUGAR, BAKING POWDER, SPICES When measuring dry Over the ingredients original Fill cup(s) so that they are container, level with a straight ingredients, first select proper heaping full. size(s) of measuring cups. edge. LIQUIDS: MILK, JUICE, WATER, ETC Liquid measures are clear Place cup on flat surface and glass so that graduated pour in liquid. amounts can be easily read. Healthy Cooking, Healthy Living 50 Bend down and check the amount at eye level. The Beginner’s Cooking Manual Overhead #13 SHORTENING, PEANUT BUTTER, BROWN SUGAR Use the correct size of measuring cup. Healthy Cooking, Healthy Living Firmly pack the ingredient in a dry measuring cup by pressing down on the ingredient with a spoon or a rubber spatula. 51 Form a flat surface across the top by removing any extra ingredient with the edge of a knife or metal spatula. The Beginner’s Cooking Manual Handout Metric Conversion Chart ¼ tsp. = ½ tsp. = 1 tsp. = 1 ½ tsp. = 2 tsp. = 1 Tbsp. = 2 tbsp. = ¼ cup (c.) = 1/3 cup (c.) = ½ cup (c.) = 2/3 cup = ¾ cup = 1 cup = 1 ¼ cup = 1 1/3 cup = 1 ½ cup = 1 ¾ cup = 1 2/3 cup = 2 cups = 1mL 2 mL 5 mL 7 mL 10 mL 15 mL 30 mL 50 mL 75 mL 125 mL 150 mL 175 mL 250 mL 300 mL 325 mL 375 mL 425 mL 400 mL 500 mL USING THE SCALE 30 g 454 g = = 1 oz. 1 lb. Healthy Cooking, Healthy Living 52 The Beginner’s Cooking Manual Healthy Cooking, Healthy Living Lesson Plan 6 - Basic Table Manners, Setting a Table Getting Ready • • • • Review general planning notes & set-up check list. Assemble and photocopy (or make overheads) all resource materials needed for the session: recipes, overheads & handouts. Organize these materials for easy distribution to students. Gather supplies needed for the chosen recipes. Check participant’s names off the attendance sheet. Objectives • • • Participants will be able to state at least 3 basic table manners. Participants will be able to demonstrate good table manners during mealtime. Participants will be able to correctly place plate, knives, forks, spoons, glasses on the table during mealtime. Key Points to Cover • • Review the basic table manners for kids. (Overhead #14 & 15) Demonstrate proper way of table setting. (Overhead #16/Handout) - Gather a set of dinnerware and place them on the table in front of the students. - Set the table according to the handout provided. - Ask students to work in pairs and practice setting a table. Cooking Activities • • • • • • Review recipes and tips. Go over the steps necessary to produce the finished products. Assign groups and tasks. Help students get organized and manage time. Demonstrate cooking techniques as needed. Provide verbal cues or physical assistance for some steps in the recipes. Cleaning Activity • • Assign tasks. Complete clean-up list. Healthy Cooking, Healthy Living 53 The Beginner’s Cooking Manual Healthy Cooking, Healthy Living 54 The Beginner’s Cooking Manual Overhead #14 Basic Table Manners for Kids 9 Wash hands before sitting down. 9 Sit up straight. Try not to slouch or lean back. 9 Keep your elbows off the table. Elbows take up table space and can be a danger in knocking plates or glasses. 9 Put a napkin on your lap so that food doesn't get onto your clothes. 9 Wait until everyone is seated and served before starting to eat. If grace is said, wait to eat until it is completed. Don't giggle during grace. 9 Eat with a fork unless the food is meant to be eaten with fingers. 9 Use utensils quietly without banging them on the table or plate. 9 Don’t stuff your mouth full of food; chew with your mouth closed. 9 Eat slowly, don’t gobble up the food. 9 Don’t speak with your mouth full of food. Healthy Cooking, Healthy Living 55 The Beginner’s Cooking Manual Overhead #15 Basic Table Manners for Kids 9 Don’t make any rude comments about any food being served. 9 Always say thank you when served something. Use the words“please” and “thank you” when passing dishes to each other. 9 Ask politely for seconds if you want them. 9 Don’t reach over someone’s plate for something; ask for the item to be passed to you. 9 Don’t pick anything out of your teeth, it’s inappropriate. 9 Burping is not considered polite. 9 Never wave or throw utensils. 9 If you need to leave the table, excuse yourself before going. 9 Wait until everyone has finished eating before getting up from the table. 9 Clear your plate from the table and take it into the kitchen. Healthy Cooking, Healthy Living 56 The Beginner’s Cooking Manual Overhead #16/Handout Setting the Table 1. Put down the table cloth and the correct number of place mats, if these are being used. 2. Arrange the place setting on top. A place setting is made up of all the items each person needs for eating. 3. The plate goes in the centre of the place setting. The fork goes to the left of the plate, with the tines pointing up. The napkin can go under the fork or to the left of it. The napkin can also go on top of the plate. The knife is placed to the right of the plate, with its sharp side pointing in. The spoon is set next to the knife, and the beverage glass goes above the tip of the knife. 4. If more flatware is needed, place it in the order in which it will be used, from the outside in. 5. If several dishes or courses are served at one meal, you may need extra dishes, such as a small salad plate or bowl, or bread and butter plate. The extra dish goes to the left and slightly above the fork or napkin. A cup and saucer for hot beverages should go to the right of the spoons. Healthy Cooking, Healthy Living 57 The Beginner’s Cooking Manual Healthy Cooking, Healthy Living Lesson Plan 7 - Trimming the Fat, Taste the Flavour Getting Ready • • • • Review general planning notes & set-up check list. Assemble and photocopy (or make overheads) all resource materials needed for the session: recipes, overheads & handouts. Organize these materials for easy distribution to students. Gather supplies needed for the chosen recipes. Check participant’s names off the attendance sheet. Objectives • • Participants will be able to state at least 2 health risks of a high-fat diet. Participants will be able to state at least 2 ways to reduce dietary fat intake. Key Points to Cover • Discuss health risks of a high fat diet - heart disease, obesity, diabetes, osteoarthritis, high blood pressure, etc. • Discuss ways to trim fat from diet: (Overhead #17/Handout) - Remove visible fat from meat before cooking. - Use low-fat cooking methods. - Use a nonstick pan or vegetable oil spray when cooking. Cooking Activities • • • • • • Review recipes and tips. Go over the steps necessary to produce the finished products. Assign groups and tasks. Help students get organized and manage time. Demonstrate cooking techniques as needed. Provide verbal cues or physical assistance for some steps in the recipes. Cleaning Activity • • Assign tasks. Complete clean-up list. Healthy Cooking, Healthy Living 58 The Beginner’s Cooking Manual Overhead #17/Handout Tips for Low-Fat Cooking • Remove all visible fat from meat before cooking. • Remove the skin from poultry before eating. • Drain browned ground beef and transfer to a dish lined with paper towels, blot cooked meat all over with paper towels, transfer to a colander, then rinse with very hot water. • Chill soups and stews to make the removal of fat easier. • Instead of frying food, try low-fat cooking methods including broiling, braising, barbecuing, steaming, stewing, poaching, roasting, baking, stir-frying, or grilling. • Reduce or eliminate butter, margarine or oil when preparing foods. • Use herbs, spices, vegetable stock, fruit juice or vegetables juice to flavour foods instead of oil or butter. • Cook with plenty of grain products, vegetables and fruit. • Use a nonstick pan or vegetable oil spray when cooking eggs, pancakes, or other breakfast items. Healthy Cooking, Healthy Living 59 The Beginner’s Cooking Manual Healthy Cooking, Healthy Living Lesson Plan 8 - Dietary Fibre Getting Ready • • • • Review general planning notes & set-up check list. Assemble and photocopy (or make overheads) all resource materials needed for the session: recipes, overheads, handouts. Organize these materials for easy distribution to students. Gather supplies needed for the chosen recipes. Check participant’s names off the attendance sheet. Objectives • • • Participants will be able to state at least 2 health benefits of dietary fibre. Participants will be able to identify high-fibre foods. Participants will be able to state at least 2 ways to increase fibre intake. Key Points to Cover • • • Discuss health benefits of fibre: - Lower blood cholesterol levels, control blood sugar levels, prevent constipation, prevent bowel problems, lower risk of certain cancers. Discuss good sources of fibre: (Overhead #18/Handout) - Wheat bran, bran cereals, whole grain products, vegetables and fruits, legumes, oats, barley, psyllium. Discuss ways to increase fibre intake: - Start off the day with whole grain cereal. - Use whole grain flour when baking. - Snack on raw fruits and vegetable and whole grain crackers. - Include legumes in the diet more often. Cooking Activities • • • • • • Review recipes and tips. Go over the steps necessary to produce the finished products. Assign groups and tasks. Help students get organized and manage time. Demonstrate cooking techniques as needed. Provide verbal cues or physical assistance for some steps in the recipes. Cleaning Activity • Assign tasks. • Complete clean-up list. Healthy Cooking, Healthy Living 60 The Beginner’s Cooking Manual Overhead #18/Handout Good Sources of Fibre Roll Oats Legumes Potato Almonds Mango Turnip Banana Peas Healthy Cooking, Healthy Living Apple Whole Wheat Bread Broccoli Raisins Brussels Sprouts Strawberries Pear Brown Rice Okra All Bran 61 The Beginner’s Cooking Manual Healthy Cooking, Healthy Living Lesson Plan 9 - Vegetables and Fruit Getting Ready • • • • Review general planning notes & set-up check list. Assemble and photocopy (or make overheads) all resource materials needed for the session: recipes, overheads & handouts. Organize these materials for easy distribution to students. Gather supplies needed for the chosen recipes. Check participants’ names off the attendance sheet. Objectives • • Participants will be able to state at least 2 benefits of eating vegetables and fruit. Participants will be able to state the recommended daily intake for vegetables and fruit and give examples of what counts as one serving. Key Points to Cover • Discuss health benefits of eating 5-10 servings of vegetables and fruit per day: - Can help reduce risk of cancer, heart disease and stroke. • Explain the recommended daily intake and the serving size. (Handout) - Recommended daily intake: 5-10 servings. - One medium-sized fruit, 125mL (½ cup) juice, 125mL (1/2 cup) raw, cooked, frozen or canned vegetables or fruit, 250mL (1 cup) salad, 50mL (1/4 cup) dried fruit. • Discuss ways to increase intake of vegetables and fruit. (Overhead #19 & 20/Handouts) Cooking Activities • • • • • • Review recipes and tips. Go over the steps necessary to produce the finished products. Assign groups and tasks. Help students get organized and manage time. Demonstrate cooking techniques as needed. Provide verbal cues or physical assistance for some steps in the recipes. Cleaning Activity • • Assign tasks. Complete clean-up list. Healthy Cooking, Healthy Living 62 The Beginner’s Cooking Manual Handout Healthy Cooking, Healthy Living 63 The Beginner’s Cooking Manual Overhead #19/Handout Tips To Help Your Kids Eat More • Keep vegetables and fruit available and in sight. • Include vegetables and fruit with meals and snacks. • Offer vegetables and fruit when your child is most hungry or thirsty. • Offer a variety of vegetable and fruit choices. • Make vegetables and fruit bite-sized or as a “grab-and-go” snack. • Offer an assortment of chopped vegetables with a low-fat dip or salad dressing. • Involve kids in shopping and preparing vegetables and fruit. • Pay attention to how food is presented. Make it interesting, colourful and appealing. • Do not give up if your kids do not like certain vegetables or fruit the first time, keep trying! • Be a good role model, eat lots vegetables and fruit yourself. • Use vegetables and fruit as ingredients (see suggestions next page) whenever possible. Healthy Cooking, Healthy Living 64 The Beginner’s Cooking Manual Overhead #20/Handout Different Ways to Offer Your Kids Add sliced banana, berries, or dried fruit such as raisins to cereal. Add fruit to salads; for example crushed pineapples with coleslaw; Mandarin orange segments, strawberries, apple chunks or nectarine slices to greens. Add sliced kiwi, berries, orange sections or other chopped fruit to yogurt. Try muffins or snack breads made with zucchini, carrot, banana, pineapple, apple, or apricots. Add generous amounts of chopped vegetables to soups, casseroles, stews, chili, omelets, spaghetti or lasagna. Add lots of vegetable toppings to pizza. Make a smoothie with yogurt, fruit and crushed ice. Top desserts, such as frozen yogurt with chopped fruit or sliced berries. Replace pop with 100% unsweetened fruit juice. Healthy Cooking, Healthy Living 65 The Beginner’s Cooking Manual For Reference Vegetable Cuts Vegetables can be cut in a variety of ways. How you cut your vegetables can give a dish eye appeal. In other words, it looks good to eat. Whatever shapes you decide on, they must be uniform or similar sizes for even cooking. The following table will give you some ideas of cuts to use for your stir-fry. Medallions (or coins): Cut on a diagonal: *use for carrots or zucchini *use for celery, or green onions Matchsticks: Dice (small, medium, or large): *use for any vegetable *very good for onions and peppers Mince: Half moons: *use for garlic and ginger * use for carrots or zucchini Healthy Cooking, Healthy Living 66 The Beginner’s Cooking Manual Healthy Cooking, Healthy Living Lesson Plan 10 - Healthy Eating Getting Ready • • • • Review general planning notes & set-up check list. Assemble and photocopy (or make overheads) all resource materials needed for the session: recipes, overheads & handouts. Organize these materials for easy distribution to students. Gather supplies needed for the chosen recipes. Check participant’s names off the attendance sheet. Objectives • • Participants will be able to identify 2-3 key aspects of Canada’s Food Guide to Healthy Eating. Participants will be able to state at least 2 diet tips for a healthy eating. Key Points to Cover • Discuss Canada’s Food Guide to Healthy Eating (Handout) - Four food groups. - Recommended number of daily servings for each food group. - Portion sizes. • Guidelines - Enjoy a variety of foods from each group every day. - Choose lower-fat foods more often. Cooking Activities • • • • • • Review recipes and tips. Go over the steps necessary to produce the finished products. Assign groups and tasks. Help students get organized and manage time. Demonstrate cooking techniques as needed. Provide verbal cues or physical assistance for some steps in the recipes. Cleaning Activity • • Assign tasks. Complete clean-up list. Healthy Cooking, Healthy Living 67 The Beginner’s Cooking Manual Handout Healthy Cooking, Healthy Living 68 The Beginner’s Cooking Manual The Beginner’s Cooking Club 2006 Healthy Cooking, Healthy Living 69 The Beginner’s Cooking Manual Healthy Cooking, Healthy Living BEGINNER COOKING CLUB RECIPES SALADS Caesar Salad Tossed Salad Basic Vinaigrette Dressing Spinach-Orange Tossed Salad Pasta Salad 68 70 71 85 73 SNACKS Bruschetta Pita Pizzas Crispy Cheese Potatoes Tacos Cheesy Quesadillas Tuna Melt on Pita 74 75 76 77 79 80 ENTREES Pasta & Spring Vegetables Chicken & Vegetable Stir-Fry with Rice Noodles Beef & Broccoli Stir-Fry with Rice Spaghetti & Tomato Sauce Meatballs Chicken Nuggets 81 82 84 86 88 89 BREAKFASTS Potato Cheese Muffins French Toast Denver Scrambled Eggs Pancake & Waffle Batter Confetti Omelets 91 92 93 94 96 VEGETABLES Stir-Fried Vegetables Broccoli-Onion Casserole Glazed Carrots Sweet Pepper Trio 97 98 99 100 DESSERTS Apple Crisp Creamy Rice Pudding Banana Bread Fruit Salad & Orange-Honey Yogurt Sauce 101 102 103 104 LIGHT MEALS Healthy Cooking, Healthy Living 70 The Beginner’s Cooking Manual Apricot-Filled Oatmeal Bars 105 Salads Caesar Salad Preparation time: 35 minutes Ingredients Stale bread, cut into ½” cubes (French, rye or Italian) Vegetable oil Garlic powder Black pepper Romaine lettuce, shredded Dressing: Vegetable oil Lemon juice Cold Water Parmesan cheese Clove garlic, finely chopped Dry mustard Granulated sugar Salt and pepper 4 Servings 250mL/ 1 cup 8 Servings 500mL/ 2 cups 12 Servings 750mL/ 3 cups 5mL/ 1 tsp. 2mL/ ½ tsp. 2mL/ ½ tsp. 1/2 10mL/ 2 tsp. 5mL/ 1 tsp. 5mL/ 1 tsp. 1 15mL/ 3 tsp. 7mL/ 1 ½ tsp. 7mL/ 1 ½ tsp. 1 1/2 30mL/ 2 tbsp. 30mL/ 2 tbsp. 15mL/ 1 tbsp. 15mL/ 1 tbsp. 1/2 2mL/ ½ tsp. 2mL/ ½ tsp. 2mL/ ½ tsp. 60mL/ 4 tbsp. 60mL/ 4 tbsp 30mL/ 2 tbsp. 30mL/ 2 tbsp. 1 5mL/ 1 tsp. 5mL/ 1 tsp. 5 mL/ 1 tsp. 90mL/ 6 tbsp. 90mL/ 6 tbsp. 45mL/ 3 tbsp. 45mL/ 3 tbsp. 1 1/2 7mL/ 1 ½ tsp. 7mL/ 1 ½ tsp. 7mL/ 1 ½ tsp. Directions: 1. 2. 3. 4. 5. 6. Preheat oven to 200°F (95°C). Drizzle the bread cubes with oil. Toss. Sprinkle with the garlic powder and pepper. Bake at 200 °F (95°C) for 30 minutes or until crisp. Wash and dry the romaine lettuce. Tear into bite-sized pieces. Place in large bowl and set aside. Add croutons to the romaine lettuce. Whisk together the dressing ingredients in a small bowl. Pour the dressing over the romaine lettuce and toss gently. Add salt and pepper to taste. Serve immediately. Notes: tasty additions include hard-boiled eggs, chick peas, or thinly sliced red onions. Substitutions: Substitute one 10 oz. package of fresh spinach for Romaine lettuce. Healthy Cooking, Healthy Living 71 The Beginner’s Cooking Manual Equipment: Caesar Salad Equipment – Caesar • Serrated knifeSalad • Small, sharp knife • Measuring spoons • Measuring cups • Baking sheet • Large mixing bowl • Wire whisk • Small bowl • Cutting board • Clean tea towels Healthy Cooking, Healthy Living 72 The Beginner’s Cooking Manual Tossed Salad Preparation time: 20 minutes Ingredients Lettuce Tomato Carrots 4 servings 1/2 1/2 2 8 servings 1 1 4 12 servings 1 1/2 1 1/2 6 Directions: 1. 2. 3. 4. 5. 6. Wash the lettuce in a colander under running cold water. Wash tomato & carrots. Tear lettuce into bite size pieces. Dice tomatoes into small cubes. Peel and slice carrots into pieces. Mix lettuce, carrots and tomato together. Add salad dressing and toss. Substitutions: For extra nutrients use Romaine lettuce. Equipment: • • • • • • Colander Small, sharp knife Vegetable peeler Cutting board Large mixing bowl Tongs Healthy Cooking, Healthy Living 73 The Beginner’s Cooking Manual Basic Vinaigrette Dressing Preparation time: 15 minutes Ingredients Red wine vinegar Vegetable oil Water Granulated sugar Cloves of garlic, finely chopped Salt Pepper 4 servings 60mL/ 4 tbsp. 30mL/ 2 tbsp. 15mL/ 1 tbsp. 15mL/ 1 tbsp. 1 2mL/ ½ tsp. 1mL/ ¼ tsp. 8 servings 125mL/ ½ cup 60mL/ 4 tbsp. 30mL/ 2 tbsp. 30mL/ 2 tbsp. 2 5mL/ 1 tsp. 2mL/ ½ tsp. 12 servings 175mL/ ¾ cup 90mL/ 6 tbsp. 45mL/ 3 tbsp. 45mL/ 3 tbsp. 3 7mL/ 1 ½ tsp. 5mL/ 1 tsp. Directions: 1. Mix the ingredients in a clean glass jar, put the lid on and shake. 2. Pour over salad greens and toss. Note: This dressing can be prepared in advance and stored in the refrigerator. Equipment: • • • • • Liquid measuring cup Measuring spoons Small, sharp knife Cutting board Clean glass jar with lid or plastic container with tight fitting lid Healthy Cooking, Healthy Living 74 The Beginner’s Cooking Manual Spinach-Orange Tossed Salad Preparation time: 10 minutes Ingredients Baby spinach 11oz (325mL) can mandarin orange sections, drained Sliced fresh mushrooms Olive oil Lemon juice Poppy seeds Salt Toasted slivered almonds 4 servings 8 oz/ 6 cups 1 8 servings 16 oz/ 12 cups 2 12 servings 24 oz/18 cups 3 250mL/ 1 cup 45mL/3 tbsp. 15mL/ 1 tbsp. 2mL/ ½ tsp. 1mL/ 1/4 tsp. 175mL/ ¾ cup 500mL/2 cups 90mL/6 tbsp. 30mL/ 2 tbsp. 5mL/1 tsp. 2mL/1/2 tsp. 325mL/ 1 1/3cups 750mL/ 3 cups 125mL/ ½ cup 45mL/ 3 tbsp. 7mL/ 1 ½ tsp. 2mL/ ½ tsp. 500mL/2 cups Directions: 1. 2. 3. 4. 5. Place spinach in a large salad bowl. Rinse with cold water and pat dry. Add mandarin orange sections. Slice fresh mushroom and add to spinach. Toss lightly; cover and chill. For dressing, in a screw-top jar combine salad oil, lemon juice, poppy seeds, and salt. Cover and shake well. Chill. 6. Shake again and pour the dressing over the spinach-orange mixture. 7. Toss salad lightly to coat. 8. Sprinkle toasted almonds over top. Equipment: • • • • • • • • • • Colander Paper towels Cutting board Small, sharp Knife Large salad bowl Screw-top jar Tongs Can opener Measuring spoons Measuring cups Healthy Cooking, Healthy Living 75 The Beginner’s Cooking Manual Pasta Salad Preparation time: 35 minutes Ingredients Low-fat sour cream Low-fat mayonnaise Lemon juice Honey mustard Minced fresh dill Salt Black pepper 12-oz medium shell pasta Imitation crabmeat or tuna Diced red pepper Diced green pepper Chopped green onions 4 servings 75mL/ ¾ cup 75mL/ ¾ cup 10mL/ 2 tsp. 10mL/ 2 tsp. 10mL/ 2 tsp. 1mL/ ¼ tsp. dash 625mL/2.5 cups 227g/ 0.5 lb. 75mL/ ¾ cup 75mL/ ¾ cup 75mL/ ¾ cup 8 servings 150mL/ 2/3 cup 150mL/ 2/3 cup 20mL/ 4 tsp. 20mL/ 4 tsp. 20mL/ 4 tsp. 2mL/ ½ tsp. 1 mL/ ¼ tsp. 1250mL/5 cups 454g/ 1 lb. 150mL/2/3 cup 150mL/ 2/3 cup 150mL/ 2/3cup 12 servings 250mL/ 1 cup 250mL/ 1 cup 30mL/ 2 tbsp. 30mL/ 2 tbsp. 30mL/ 2 tbsp. 2mL/ ½ tsp. 1mL/ ¼ tsp. 1875mL/7.5cups 681g/ 1.5 lbs. 250mL/ 1 cup 250mL/ 1 cup 250mL/ 1 cup Directions: 1. In a small bowl, combine sour cream, mayonnaise, lemon juice, honey mustard, dill, salt, and pepper. Refrigerate dressing until ready to use. 2. Cook shells according to package directions. Drain well. Rinse with cold water and drain again. Transfer pasta to a large bowl. 3. Add crabmeat or tuna, bell peppers, onions, and dressing. Mix well. 4. Cover and refrigerate until ready to serve. Equipment: • • • • • • • • • Small bowl Measuring cups Measuring spoons Small, sharp knife Cutting board Large size pot Large bowl Wooden spoon Colander Healthy Cooking, Healthy Living 76 The Beginner’s Cooking Manual Snacks Bruschetta Preparation and cooking time: 10 minutes Ingredients Medium tomato Medium onion Olive oil Black pepper Italian seasoning Parmesan cheese, grated Sliced French bread 4 servings 2 1/2 10mL/2 tsp. dash 15mL/ 1 tbsp. 15mL/ 1 tbsp. 4 slices 8 servings 4 1 20mL/ 1 tbsp. dash 30mL/ 2 tsp. 30mL/2 tbsp. 8 slices 12 servings 6 1 1/2 30mL/ 2tbsp. 1 mL/¼ tsp. 45mL/3 tbsp. 45mL/3 tbsp. 1 2 slices Directions: 1. 2. 3. Chop tomatoes and onion into small pieces. Mix all ingredients together. Put 15mL (1 tbsp) mixture on the top of bread and bake in oven at 350°F (175°C) for 5-7 minutes. Equipment: • • • • • • • • Small, sharp knife Cutting board Measuring spoons Serrated knife Medium bowl Wooden spoon Baking sheet Oven mitts Healthy Cooking, Healthy Living 77 The Beginner’s Cooking Manual Pita Pizzas Preparation and cooking time: 45 minutes Ingredients Pita style bread (pocket) Green pepper, finely chopped Tomato sauce Mushrooms, sliced Onion, finely chopped Medium tomato, chopped Part-skim mozzarella cheese, shredded Dried Basil Dried oregano Salt & Pepper 4 servings 2 50mL/1/4 cup 175mL/ ¾ c 50mL/ ¼ c 30mL/ 2 tbsp. 1/2 125mL/ ½ cup 8 servings 4 125mL/ ½ cup 375mL/ 1 ½ cups 125mL/ ½ cup 50mL/ ¼ cup 1 250mL/1 cup 12 servings 6 150mL/ 2/3 cup 550mL/ 2 ¼ cups 150mL/ 2/3 cup 90mL/ 6 tbsp. 1 1/2 375mL/ 1 ½ cups 1mL/ ¼ tsp. 1mL/ ¼ tsp. 2mL/ ½ tsp. 2mL/1/4 tsp 2 mL/1/4 tsp 5mL/1 tsp 5mL/ 1 tsp. 5mL/ 1 tsp. 7mL/ 1 ½ tsp. Directions: 1. 2. 3. 4. 5. Preheat oven to 350°F (175°C). Place pita bread on a baking sheet. Spread tomato sauce on each pita. Sprinkle evenly with basil, oregano, salt and pepper. Put onion, green pepper and mushrooms on top of each pita. Sprinkle with cheese. Bake until cheese melts (about 20 to 25 minutes). Equipment: . • • • • • • • • • Small, sharp knife Cutting board Soup spoon Measuring cups Baking sheet Spatula Chef’s Knife or pizza cutter Grater Oven mitts Healthy Cooking, Healthy Living 78 The Beginner’s Cooking Manual Crispy Cheese Potatoes Preparation and cooking time: 30 minutes Ingredients Idaho potatoes, thinly sliced Salt Pepper Reduced-fat cheddar cheese, grated 4 servings 1.0 kg / 2.2 lbs 1mL/ ¼ tsp. 1 mL/ ¼ tsp. 50mL/ 1/4 cup 8 servings 2.0kg/ 4.4lbs 2mL/ ½ tsp. 2mL/ ½ tsp. 125mL / 1/2 cup 12 servings 3.0kg/6.6 lbs 5 mL/1 tsp. 5mL/1 tsp 175mL/ ¾ cup Directions: 1. 2. 3. 4. Preheat oven to 400°F (200°C). Line a baking sheet with foil for easy cleanup. Wash the potatoes well, but don’t peel them. Pat dry. Slice the potatoes into thin slices. Place potato slices on a baking sheet. Do not overlap slices. Sprinkle with salt and pepper. 5. Bake in over 20-25 minutes or until potatoes are tender. 6. Sprinkle cheese over potato slices. Return baking sheet to oven and bake until cheese is melted, about 1 to 2 minutes. Serve right away. Equipment: • • • • • • • • Aluminum foil Paper towels Measuring cups Measuring spoons Cutting board Baking sheet Chef’s Knife Oven mitts Healthy Cooking, Healthy Living 79 The Beginner’s Cooking Manual Tacos Preparation and cooking time: 35 minutes Ingredients Lean ground beef Medium onion, chopped Green pepper, chopped Cloves of garlic, finely chopped Ground cumin Chili powder Canned tomatoes, mashed Taco shells, soft/hard shells Low fat cheddar cheese, grated Salsa, mild, medium or hot Low fat sour cream Lettuce, shredded 4 servings 225g/ 0.5 lb. 1/2 30mL/ 2 tbsp. 1 1/2 2mL/ 1/ 2 tsp. 2mL/ ½ tsp. 150mL/ 2/3 cup 5 125g/ ¼ lb. 125mL/4 oz. 125mL/4 oz. 1/2 8 servings 450g/ 1 lb. 1 75mL/ 1/3 cup 3 5ml/ 1 tsp. 5ml/ 1 tsp. 300mL/ 1 ¼ cup 10 250g/ ½ lb 250mL/ 8 oz 250mL/ 8 oz 1 12 servings 675g/ 1.5 lb. 1 1/2 125mL/ ½ cup 4 1/2 7mL/ 1 ½ tsp. 7mL/ 1 ½ tsp. 425mL/ 1 ¾ cups 15 375g/ ¾ lb. 375mL/ 12 oz. 375mL/ 12 oz. 1 1/2 Directions: 1. Preheat oven to 350°F (175°C). 2. Put cheese, salsa, sour cream and lettuce in separate bowls in the refrigerator while preparing the meat. 3. In a large frying pan, brown the meat with the onion, garlic and green pepper. Drain off extra fat. 4. Stir in the cumin, chili powder and mashed tomatoes. Heat through for 5 minutes. 5. Place the taco shells on a baking sheet and warm them in the oven for 5 minutes. 6. Put the meat mixture in a bowl. Serve with the taco shells and toppings. Let everyone make his or her own tacos. Substitutions: Substitute ground turkey for lean ground beef. Healthy Cooking, Healthy Living 80 The Beginner’s Cooking Manual Equipment: Tacos • • • • • • • • • • • • • • • Large frying pan Wooden spoon 2 French knives Grater Cutting boards Can opener Potato masher Liquid measure cups Dry measuring cups Measuring spoons Baking sheet 2 small bowls 4 serving spoons (use soup spoons for toppings) Spatula Oven mitts Healthy Cooking, Healthy Living 81 The Beginner’s Cooking Manual Cheesy Quesadillas Preparation and cooking time: 25 minutes Ingredients 8-inch (20 cm) whole wheat flour tortillas Shredded part-skim Mozzarella cheese Green onions, chopped Green pepper, chopped Salsa Lettuce, chopped 4 servings 4 125mL/ ½ cup 30mL/ 2 tbsp. 30mL/ 2 tbsp. 50mL/1/4 cup 1/4 8 servings 8 250mL/ 1 cup 60mL/ 4 tbsp. 60mL/ 4 tbsp. 125mL/1/2 cup 1/2 12 servings 12 375mL/ 1 ½ cups 90mL/ 6 tbsp. 90mL/ 6 tbsp. 175mL/ 3/4 cup 1 Directions: 1. 2. Preheat oven to 350° F (175°C) Sprinkle tortillas with cheese, green pepper and green onions. Layer another tortilla on the top and press edges together. Place tortillas on a baking sheet and bake at 350° F (175°C) for 10 minutes or until crisp. Remove from oven and cut into 6 wedges. Top with salsa and shredded lettuce. 3. 4. Substitutions: Monterey Jack cheese (low fat) for Mozzarella. Sweet red pepper for green pepper. Equipment: • • • • • • • • • • Grater Knives Baking sheets Small bowl or plate Measuring cups Measuring spoons Cutting board Oven mitts Spatula Pizza cutter Healthy Cooking, Healthy Living 82 The Beginner’s Cooking Manual Tuna Melt on Pita Preparation and cooking time: 20 minutes 1 serving = 1 pita Ingredients 4 servings Light mayonnaise 30mL/ 2 tbsp. 15 cm (6”) pita bread 4 Cans (213g/7.5oz) flaked water1 packed tuna, drained Chopped celery 30mL/ 2 tbsp. Minced green onion 30mL/ 2 tbsp. Chopped dill pickles 1 Grated low-fat cheddar cheese 125mL/ ½ cup 8 servings 60mL/ 4 tbsp. 8 2 12 servings 90mL/ 6 tbsp. 12 3 60mL/ 4 tbsp. 60mL/ 4 tbsp. 2 250mL/ 1 cup 90mL/ 6 tbsp. 90mL/ 6 tbsp. 3 375mL/1 1/2 cup Directions: 1. Heat the broiler with the oven rack 10cm (4-5”) from the element. 2. Spread 5mL (1tsp.) of mayonnaise on each pita. 3. Combine tuna, celery, green onions, pickles and remaining mayonnaise in a small mixing bowl. 4. Spread the tuna mixture over the pitas and sprinkle evenly with the grated cheese. 5. Place on a baking sheet and broil for 3 minutes or until hot and bubbling. Equipment: • • • • • • • • • Measuring spoons Small mixing bowl Cheese grater Baking sheet Measuring spoons Measuring cups Cutting board Small, sharp knife Oven mitts Healthy Cooking, Healthy Living 83 The Beginner’s Cooking Manual Entrees Pasta with Spring Vegetables Preparation and cooking time: 40 minutes Ingredients Olive oil Green onions, chopped Carrots, peeled, sliced Basil Green pepper, diced Chicken broth Broccoli, cut into florets Cornstarch (optional) Cold Water Pasta, cooked Salt & pepper 4 servings 15mL/ 1 tbsp. 3 2 7mL/ 1 ½ tsp. 1 375mL/ 1 ½ cup 1 each 15mL/ 1 tbsp. 45mL/ 3 tbsp. 1L/ 4 cups Dash 8 servings 30mL/2 tbsp. 6 4 15mL/1 tbsp. 2 750mL/3 cups 2 30mL/2 tbsp. 90mL/6 tbsp. 2 L/ 8 cups Dash 12 servings 45mL/3 tbsp. 9 6 25mL/5 tsp. 3 1.125L/4.5 cups 3 45mL/3 tbsp. 125mL/ ½ cup 3 L/ 12 cups Dash Directions: 1. Bring water, salt and little bit of oil to boil and add pasta. Cook pasta while preparing vegetables. 2. Heat oil in frying pan over medium heat. Add green onions and carrots; cook for 3 minutes. 3. Add basil and green pepper. Mix and cook for 4 minutes. 4. Add chicken stock (broth) and broccoli. Add salt and pepper and cook for 4 minutes. 5. Dissolve cornstarch in cold water; incorporate into sauce and cook 1 minute. Correct seasoning. 6. Serve over hot pasta. Substitutions: Choose fresh vegetables depending on seasons. Use sweet red or yellow peppers, asparagus, snow peas or zucchini. Equipment: • • • • • • • • • • • 1 large pot Measuring cups Measuring spoons Slotted spoon Vegetable peeler Large frying pan Small, sharp knife Colander Cutting board Spatula Small bowls Healthy Cooking, Healthy Living 84 The Beginner’s Cooking Manual Chicken and Vegetables Stir Fry with Rice Noodles Preparation and cooking time: 50 minutes Ingredients Chicken breast, boneless and skinless Broccoli, cut into small pieces Vegetable oil Carrots, thinly sliced Celery, thinly sliced Bovril (chicken flavor) cornstarch Cold water Soy sauce Black pepper Rice noodles 4 servings 175g/ 1/3 lb. 375mL/1 ½ cups 5mL/1 tsp. 250mL/ 1 cup 250mL/ 1 cup 1 pkg. 10mL/2 tsp. 45mL/ 3 tbsp. 15mL/ 1 tbsp. 2mL/ ½ tsp. 125g/ 4 oz. 8 servings 350g/ ¾ lb. 750mL/ 3 cups 10mL/ 2tsp. 500mL/ 2 cups 500mL/ 2 cups 2 pkg. 20mL/ 4 tsp. 90mL/ 6 tbsp. 30mL/ 2 tbsp. 5mL/1 tbsp. 250g/ 8 oz. 12 servings 525g/ 1 ¼ lbs. 1125mL/4½ cups 15mL/ 3 tsp. 750mL/ 3 cups 750mL/ 3 cups 3 pkg. 30mL/ 1 tsp. 125mL/1/2 cup 45mL/ 3 tbsp. 7mL/ 1 ½ tsp. 375g/ 12 oz. Directions: 1. 2. 3. 4. 5. 6. Cut chicken breast in small thin strips. Put aside. Turn on stove to high heat. Half fill a medium saucepan with water and heat to boiling. Cook broccoli in boiling water for 3 minutes. Drain. Put broccoli in cold water and drain again. Turn on stove to medium-high heat. Heat oil in a large fry pan. Add chicken strips and stir-fry until chicken is cooked (5-6 minutes). Add chicken Bovril once chicken is cooked. Add a little bit of water if the mixture looks dry. Add broccoli, carrots and celery to the chicken. Stir-fry until vegetables are crisp-tender, about 6 to 8 minutes. Mix cornstarch, water and soy sauce in a small bowl. Stir into the chicken and vegetables. Cook and stir until sauce boils and thickens. Add pepper to taste. Meanwhile, in a large pot of boiling water, cook the rice noodles until tender but firm; drain. Serve the chicken mixture over the rice noodles. Healthy Cooking, Healthy Living 85 The Beginner’s Cooking Manual Equipment: Chicken & Vegetable Stir Fry with Rice Noodles • • • • • • • • • • • • Chef’s Knife Small, sharp knife Cutting board Colander 1 medium sauce pan Vegetable peeler Measuring cups Measuring spoons 2 small bowls Large frying pan or wok Large pot Wooden spoon or spatula Healthy Cooking, Healthy Living 86 The Beginner’s Cooking Manual Beef & Broccoli Stir Fry with Rice Preparation and cooking time:40 minutes Ingredients Beef, round or sirloin, thinly sliced Broccoli, cut into small pieces Vegetable oil Gingerroot, peeled, finely chopped Cloves garlic, peeled and finely chopped Cooked rice Marinade: Soy sauce Water Sesame oil (optional) Sauce: Stock or water Soy sauce Granulated sugar Cornstarch 4 servings 350g/ ¾ lb. 1 30mL/ 2 tbsp. 15mL/ 1 tbsp. 3 8 servings 700g/ 1 ½ lbs. 2 60mL/ 4 tbsp. 30mL/ 2 tbsp. 6 12 servings 1050g/2 ¼ lbs. 3 90mL/ 6 tbsp. 45mL/ 3 tbsp. 9 1 L/ 4 cups 2 L/8 cups 3 L/ 12 cups 15mL/ 1 tbsp. 5mL/ 1 tsp. 5mL/ 1 tbsp. 30mL/2 tbsp. 10mL/ 2 tsp. 10mL/ 2 tsp. 45mL/ 3tbsp. 15mL/ 3 tsp. 15mL/ 3 tsp. 75mL/ 1/3 cup 15mL/ 1 tbsp. 2mL/ ½ tsp. 15mL/ 1 tbsp. 150mL/2/3 cups 30mL/ 2 tbsp. 5mL/ 1 tsp. 30mL/ 2 tbsp. 250mL/ 1 cup 45mL/ 3 tbsp. 7mL/ 1 ½ tsp. 45mL/ 3 tbsp. Directions: 1. To make the marinade, whisk together the soy sauce, water and oil. Toss with the beef strips to coat. Refrigerate. 2. Wash and cut broccoli florets into bite-sized chunks. Steam the broccoli, uncovered, above a small amount of boiling water for 3-5 minutes. Drain and spread on a baking sheet to cool. 3. Prepare ginger and garlic. 4. To make the sauce, whisk together stock, soy sauce, sugar and cornstarch. Set aside. 5. In a wok or large frying pan, heat the oil over medium-high heat. Swirl gently to coat the sides of the pan. Cook the ginger and garlic in the hot oil for 10 seconds. 6. Add the beef. Stir fry the beef for 2 to 3 minutes until almost cooked through. 7. Add broccoli and continue to stir fry for 5 minutes. Then add the sauce and continue to stir fry until clear and thickened. Substitutions: Substitute Chinese broccoli or rapini for broccoli. Healthy Cooking, Healthy Living 87 The Beginner’s Cooking Manual Ingredients: Beef & Broccoli Stir Fry with Rice • • • • • • • • • • • • • • • • • Small wire whisk Measuring spoons Measuring cups Cutting board Chef’s knife Paring knife Large bowl Small bowl Fork Vegetable steamer Baking sheet Colander Small pot Large pot Large frying pan or wok Medium pot with lid Wooden spoon or spatula Healthy Cooking, Healthy Living 88 The Beginner’s Cooking Manual Spaghetti & Tomato Sauce Preparation and cooking time: 60 minutes Ingredients Medium onions, chopped Garlic cloves, finely chopped Vegetable oil Canned tomatoes, 28 oz./796 mL Tomato paste, (5.5oz/156mL can) Dried basil Dried oregano Red pepper flakes Sugar Salt & Pepper Spaghetti 4 servings 1 2 5mL/1 tsp. 1 1/2 15mL/ 1 tbsp. 5mL/ 1 tsp. 1mL/ ¼ tsp. 2mL/ ½ tsp. 2mL/ ½ tsp. 2 cups/ 112g 8 servings 2 4 10mL/ 2 tsp. 2 1 30mL/ 2 tbsp. 10mL/ 2 tsp. 2mL/ ½ tsp. 5mL/ 1 tsp. 5mL/ 1 tsp. 4 cups/ 225g 12 servings 3 6 15ml/1 tbsp. 3 1 1/2 45mL/ 3 tbsp. 15mL/ 3 tsp. 3mL/ ¾ tsp. 7mL/ 1 ½ tsp. 7mL/ 1 ½ tsp. 6 cups/ 337g Directions: 1. 2. 3. 4. 5. Prepare onions and garlic as directed. In a large pot, heat the oil. Sauté the onion and garlic in the oil until soft. Add the tomatoes, tomato paste, basil, oregano, red pepper flakes and sugar. Break the tomatoes up with a potato masher. Heat to boiling, stirring constantly; then reduce the heat and simmer uncovered for 20 to 30 minutes until the sauce begins to thicken. Add salt, pepper and more seasoning if needed. * To cook dry spaghetti: Bring large amount of water to a boil; add spaghetti and cook according to package directions or al dente (tender but firm), about 10minutes. Drain well. Note: Add extra vegetables to this sauce such as 2 to 3 stalks of chopped celery, a grated carrot or ½ chopped green pepper. Healthy Cooking, Healthy Living 89 The Beginner’s Cooking Manual Equipment: Spaghetti & Tomato Sauce • • • • • • • • Small, sharp knife Cutting board Potato masher Large pot Large frying pan Wooden spoon Measuring spoons Colander Healthy Cooking, Healthy Living 90 The Beginner’s Cooking Manual Meatballs Preparation and cooking time: 55 minutes Ingredients Egg Dried breadcrumbs Small onions, finely chopped Salt Pepper Lean ground beef 4 servings 1 50mL/¼ cup 1 2mL/½ tsp. 1mL/ ¼ tsp. 450g/1 lb. 8 servings 2 100mL/ ½ cup 2 5mL/ 1 tsp. 2mL/ ½ tsp. 900g/ 2 lbs. 12 servings 3 150mL/ 2/3 cup 3 7mL/ 1 ½ tsp. 5mL/ 1 tsp. 1350g/ 3 lbs. Directions: 1. 2. Preheat oven to 350°F (175°C). In a large bowl, beat together the egg and breadcrumbs. Stir in the onion, salt and pepper. Add the meat and knead with wet hands until well blended. Pinch off 1 large tbsp. (golf ball size) of meat mixture and form into a ball and place on a baking pan until you have 20 meatballs. (Note: to prevent meat from sticking to your hands, wet your hands before shaping the meatballs.) Bake for 25 minutes or until browned and no longer pink inside. 3. 4. Substitutions: Substitute ground turkey for lean ground beef. Equipment: • • • • • • Large bowl Wire whisk Measuring cups Measuring spoons Baking pan Oven mitts Healthy Cooking, Healthy Living 91 The Beginner’s Cooking Manual Chicken Nuggets Preparation and cooking time: 40 minutes Ingredients Herb-season bread crumb stuffing Parmesan cheese Margarine Low-fat butter milk Black pepper Boneless chicken breast 4 per serving 4 servings 435mL/ 1 ¾ cups 50mL/ ¼ cup 45mL/ 3 tbsp. 50mL/ ¼ cup 1mL/ ¼ tsp. 1 lb./454g 8 servings 875mL/ 3 ½ cups 1310mL/ 5 ¼ cups 12 servings 125mL/ ½ cup 90mL/ 6 tbsp. 125mL/ ½ cup 2mL/ ½ tsp. 2 lbs/908g 175mL/ ¾ cup 135mL/ 9 tbsp. 175mL/ ¾ cup 4mL/ ¾ tsp. 3lbs/1362g Directions: 1. Preheat oven to 450°F(232°C) 2. Measure stuffing mix into resealable plastic bag. Seal bag and place on flat surface. Crush crumbs by rolling and pressing rolling pin over bag. 3. Open bag and add Parmesan cheese. Reseal bag and shake to mix thoroughly. Set aside. 4. Melt margarine. 5. Place melted margarine, buttermilk, and pepper in medium shallow bowl. Stir well with spoon. Set aside. 6. Rinse chicken breasts and pat dry with paper towels. 7. Place chicken breasts on cutting board. Cut chicken with small, sharp knife into 16 chunks of equal size. 8. Dip each chicken chunk into buttermilk mixture, covering all sides. Let extra buttermilk mixture drip off. Place 3 dipped chunks at a time into bag of crumbs. Seal bag tightly and shake until chicken pieces are evenly coated with crumbs. 9. Place coated nuggets on an ungreased baking sheet. Repeat with remaining chicken chunks. 10. Place baking sheet in oven. Bake nuggets 5 minutes on each side. Healthy Cooking, Healthy Living 92 The Beginner’s Cooking Manual Equipment: Chicken Nuggets • • • • • • • • • • • • • Measuring cups Measuring spoons Resealable plastic bag (1 gallon size) Rolling pin Small saucepan Medium shallow bowl Mixing spoon Paper towels Cutting board Small sharp knife Baking sheet Oven mitts Tongs Healthy Cooking, Healthy Living 93 The Beginner’s Cooking Manual Breakfast Potato Cheese Muffins Preparation and cooking time: 30 minutes Ingredients All-purpose flour Granulated sugar Baking powder Salt Eggs 2% milk Cooked mashed potatoes Grated light cheddar cheese Margarine, melted 1 serving = 1 muffin 6 servings 250mL/ 1 cup 30mL/ 2 tbsp. 10mL/ 2 tsp. 2mL/ ½ tsp. 1 175mL/3/4 cup 75mL/ 1/3 cup 75mL/ 1/3 cup 30mL/ 2 tbsp. 12 servings 500mL/2 cup 60mL/ 4 tbsp. 20mL/ 4 tsp. 5mL/ 1 tsp. 2 375mL/ 1 ½ cups 150mL/ 2/3cup 150mL/ 2/3cup 60mL/ 4 tbsp. Directions: 1. Preheat the oven to 200°C (400°F). Line 12 muffin tins with paper cups or spray with vegetable oil spray. 2. In a large mixing bowl, combine the flour, sugar, baking powder and salt. 3. In a medium-sized mixing bowl, beat the eggs well with an electric mixer or a wooden spoon. 4. Stir in the milk, mashed potatoes, grated cheese, and melted margarine. Mix well 5. Add the egg mixture to the flour mixture and stir just until mixed. 6. Spoon the batter into the paper lined muffin tins and bake at 200°C (400°F) for 25 minutes, or until firm and slightly browned. Equipment: • • • • • • • • • • • • • Muffin pan Muffin paper cups Measuring spoons Measuring cups Cheese grater Potato masher Vegetable peeler Large mixing bowl Medium-sized mixing bowl Wire whisk Wooden spoon Large spoon Oven mitts Healthy Cooking, Healthy Living 94 The Beginner’s Cooking Manual French Toast Preparation and cooking time: 20 minutes Ingredients Beaten eggs 2% milk Granulated sugar Ground cinnamon Whole wheat bread slices 4 servings 3 175mL/ ¾ cup 15mL/ 1 tbsp. 0.5mL/1/8 tsp. 8 8 servings 6 325mL/ 1 1/3 cups 30mL/2 tbsp. 1 mL/ ¼ tsp. 16 12 servings 9 500mL/2 cups 45mL/3 tbsp. 2mL/ ½ tsp. 24 Directions: 1. In a shallow bowl beat together eggs, milk, sugar, cinnamon and ¼ tsp. salt. 2. Dip bread in egg mixture, coating both sides. 3. In a skillet, cook bread on both sides in a small amount of hot butter, margarine, or oil over medium-high heat till golden brown; add more butter as needed. 4. Serve with maple-flavoured syrup. Equipment: • • • • • • Shallow bowl Wire whisk Skillet Spatula Measuring spoons Measuring cups Healthy Cooking, Healthy Living 95 The Beginner’s Cooking Manual Denver Scrambled Eggs Preparation and cooking time: 10 minutes Ingredients Diced cooked ham 2-oz can mushroom stems and pieces, drained Chopped onion Chopped green pepper Butter or margarine Eggs 2% milk 4 servings 250mL/ 1 cup 1 8 servings 500mL/2 cups 2 12 servings 750mL/3 cups 3 50mL/ ¼ cup 30mL/ 2 tbsp. 30mL/ 2 tbsp. 8 75mL/ 1/3 cup 125mL/ ½ cup 50mL/ ¼ cup 50mL/ ¼ cup 16 150mL/ 2/3 cup 175mL/ ¾ cup 90mL/6 tbsp. 90mL/ 6 tbsp. 24 250mL/1 cup Directions: 1. In a 10-inch skillet, cook ham, mushrooms, onion, and green pepper in butter or margarine over medium heat for about 5 minutes or till vegetables are tender but not brown. 2. Beat together eggs, milk, ¼ teaspoon salt, and dash pepper, add to skillet. 3. Cook, without stirring, till mixture begins to set on the bottom and around edges. 4. Using a large spoon or spatula, lift and fold partially cooked egg mixture so uncooked portion flows underneath. 5. Continue cooking over medium heat about 4 minutes or till eggs are cooked throughout but are still glossy and moist. Equipment: • • • • • • • • • Small, sharp knife Cutting board 10-inch skillet Wooden spoon Fork or wire whisk Spatula Measuring cups Measuring spoons Can opener Healthy Cooking, Healthy Living 96 The Beginner’s Cooking Manual Pancake and Waffle Batter Preparation and cooking time: 30 minutes Ingredients All-purpose flour Baking powder Granulated sugar Salt Low-fat plain yogurt Baking soda 2% milk Egg whites Vanilla extract Butter 1 serving = 2 pancakes 4 servings 250mL/ 1 cup 7ml/1/1 ½ tsp. 7mL/ 1 ½ tsp. 1mL/ ¼ tsp. 75mL/ cup 2mL/1/2 tsp. 175mL/ ¾ cup 1 2mL/1/2 tsp. 15mL/ 1 tbsp. 8 servings 500mL/ 2 cups 15mL/ 1 tbsp. 15mL/ 1 tbsp. 2mL/ ½ tsp. 125mL/ ½ cup 5mL/ 1 tsp. 325mL/ 1 1/3 cups 2 5mL/ 1 tsp. 30mL/ 2 tbsp. 12 servings 750mL/ 3 cups 20mL/2 tsp. 20mL/ 2 tsp. 2mL/ ½ tsp. 250mL/1 cup 7mL/ 1 ½ tsp. 500mL/2 cups 3 7mL/ 1 ½ tsp. 45mL/ 3 tbsp. Directions: 1. In a large mixing bowl combine the flour, baking powder, sugar and salt. 2. In a measuring cup add the baking soda to the yogurt and let it foam. 5. In a small mixing bowl stir together the milk, egg whites, vanilla and melted butter until blended. 6. Add the yogurt mixture and the milk mixture to the flour mixture and stir until blended. Mixture should be thick and slightly lumpy; thin the batter with milk if it is too thick. 7. Lightly spray a large skillet or griddle with vegetable oil spray and preheat to medium heat. 8. Scoop 50mL (1/4 cup) pancake mix for each pancake onto the hot griddle. When bubbles on the surface of the pancakes start to pop and the edges are golden, turn the pancake and cook the other side. Substitutions: Add any of the following to the batter: 1 cup (250mL) of blueberries, fresh peach slices or sliced bananas and/or substitute ½ cup (125mL) of the flour with oat bran, whole wheat flour or cornmeal. Healthy Cooking, Healthy Living 97 The Beginner’s Cooking Manual Equipment: Pancake and Waffle Batter • • • • • • • • • • Large mixing bowl Measuring cups Small mixing bowl Wire whisk Wooden spoon Measuring spoons Measuring cups 50mL-scoop Large skillet Spatula Healthy Cooking, Healthy Living 98 The Beginner’s Cooking Manual Confetti Omelets Preparation and cooking time:20 minutes Ingredients Green bell pepper Onion Cherry tomatoes Fresh basil leaves Eggs 1% milk Grated cheddar cheese Salt and pepper to taste Non-stick cooking spray 4 servings 45mL/3 tbsp. 45mL/3 tbsp. 12 2 4 50mL/ 1/4 cup 30mL/ 2 tbsp. 8 servings 90mL/ 6 tbsp. 90mL/ 6 tbsp. 24 4 8 125mL/ 1 cup 60mL/ 4 tbsp. 12 servings 125mL/ 1 cup 125mL/ 1 cup 36 6 12 175mL/ ¾ cup 90mL/ 6 tsp. Directions: 1. 2. 3. Finely chop bell pepper, onion and tomatoes. Slice basil into threads. Whisk together eggs, milk, salt and pepper. Heat non-stick skillet on medium-high heat. Coat skillet with cooking spray. Sauté chopped vegetables, except basil, until onions are transparent. Pour egg mixture and basil into skillet with vegetables and cook until egg solidifies around edges. Lift edges occasionally to allow egg mixture to cook under omelet. When done, sprinkle with cheese and fold in half. Continue to cook until done. 4. 5. Equipment: • • • • • • • • Small, sharp knife Cutting board Whisk 2 medium bowls Non-stick skillet Spatula Measuring cups Measuring spoons Healthy Cooking, Healthy Living 99 The Beginner’s Cooking Manual Vegetables Stir Fried Vegetables Preparation and cooking time: 40 minutes Ingredients Mixed vegetables e.g. onions, sweet green pepper, carrots, celery, zucchini, mushrooms, bean sprouts Vegetable oil Soy sauce 4 servings 750mL/3 cups 8 servings 1500mL/ 6 cups 12 servings 2250mL/ 9 cups 30mL/ 2 tbsp. 15mL/1 tbsp. 50mL/ ¼ cup 30mL/ 2 tbsp. 90mL/ 6 tbsp. 45mL/ 3 tbsp. Directions: 6. 7. 8. 9. Wash all vegetables. Cut up vegetables. Keep the vegetables separate from each other. In a wok or large frying pan, heat the oil over medium-high heat. Add vegetables starting with the firmer vegetables. Stir fry for 1 to 2 minutes between each group of vegetables. Toss with the soy sauce and serve immediately. 10. Equipment: • • • • • • • Small, sharp knife Cutting board Measuring cups Measuring spoons Vegetable peeler Large frying pan or a wok Spatula Healthy Cooking, Healthy Living 100 The Beginner’s Cooking Manual Broccoli-Onion Casserole Preparation and cooking time: 60 minutes Ingredients 10-oz package frozen cut broccoli Medium fresh onion, cut into wedges Butter or margarine All-purpose flour Salt 2% milk 3-oz package cream cheese, cut up Shredded American cheese Butter or margarine Soft bread crumbs 4 servings 1 8 servings 2 12 servings 3 2 4 6 15mL/ 1 tbsp. 15mL/ 1 tbsp. 0.5mL/ 1/8 tsp. 125mL/ ½ cup 85g/ 3 oz 30mL/ 2 tbsp. 30mL/ 2 tbsp. 1mL/ ¼ tsp. 250mL/1 cup 170g/ 6 oz 45mL/3 tbsp. 45mL/ 3 tbsp. 2mL/ 1/2 tsp. 375mL/1½ cups 255g/ 9 oz 50mL/ ¼ cup 15mL/ 1 tbsp. 125mL/ ½ cup 125mL/ ½ cup 30mL/ 2 tbsp. 250mL/ 1 cup 175mL/ ¾ cup 45mL/ 3 tbsp. 375mL/1½ cup Directions: 1. Preheat oven to 350° (175°C). 2. Cook broccoli according to package directions. Drain well; set aside. 3. Cook onion in boiling salted water about 10 minutes or till tender. Drain; set aside. 4. In the same saucepan melt the 2 tbsp butter. Stir in flour, salt, and dash pepper. 5. Add milk. Cook and stir till thickened and bubbly. Cook and stir 1 to 2 minutes more. 6. Add cream cheese; stir till melted. 7. Stir in broccoli and onions. 8. Turn into 11/2 –quart casserole. Top with American cheese. 9. Melt the remaining 2 tbsp. butter, toss with crumbs. Sprinkle over casserole. 10. Bake in the oven for 35 to 40 minutes. Equipment: • • • • • • • • • • Small, sharp knife Cutting board 2 medium sauce pans Colander Wooden spoon Measuring cups Measuring spoons Cheese grater 1 ½ quart casserole Oven mitts Healthy Cooking, Healthy Living 101 The Beginner’s Cooking Manual Glazed Carrots Preparation and cooking time: 25 minutes Ingredients Medium carrots Butter or margarine Brown sugar Snipped parsley 4 servings 6 30mL/2 tbsp. 75mL/ 1/3 cup 15mL /1 tbsp. 8 servings 12 60mL/ 4 tbsp. 150mL/ 2/3 cup 30mL/ 2 tbsp. 12 servings 18 90mL/6 tbsp. 250mL/ 1 cup 45mL/ 3 tbsp. Directions: 1. Cut carrots in half crosswise then lengthwise into 2 or 3 sticks. 2. In a medium pot, simmer carrots in a small amount of boiling salted water for about 10 minutes or till crisp-tender. Drain. 3. In a saucepan, melt the butter, stir in brown sugar till dissolved. 4. Add carrots. Cook over medium-low heat about 10 minutes, turning often. 5. Sprinkle with snipped parsley. Equipment: • • • • • • • Cutting board Chef’s knife Medium pot Colander Medium saucepan Measuring spoons Table spoons Healthy Cooking, Healthy Living 102 The Beginner’s Cooking Manual Sweet Pepper Trio Preparation and cooking time:10 minutes Ingredients Olive oil Garlic, minced Balsamic vinegar Salt and pepper to taste Green bell pepper, sliced Red bell pepper, sliced Yellow bell pepper, sliced 4 servings 15mL/1 tbsp. 10mL/2 tsp. 10mL/2 tsp. 8 servings 30mL/ 2 tbsp. 20mL/ 4 tsp. 20mL/ 4 tsp. 12 servings 45mL/ 3 tbsp. 30mL/ 2 tbsp. 30mL/ 2 tbsp. 2 2 2 4 4 4 6 6 6 Directions: 1. Remove stem and seeds from peppers; slice into strips. 2. Heat olive oil in a large skillet over medium-high heat. 3. Add peppers and garlic and sauté for approximate 3 minutes; peppers should still be somewhat firm. 4. Add vinegar and season with salt and pepper. Equipment: • • • • • Small, sharp knife Cutting board Measuring spoons 1 large skillet Spatula Healthy Cooking, Healthy Living 103 The Beginner’s Cooking Manual Desserts Apple Crisp Preparation and cooking time: 60 minutes Ingredients Apples, peeled and sliced Rolled oats All-purpose flour Brown sugar Ground cinnamon Butter 4 servings 0.625L/2 ½ cup 50mL/ ¼ cup 30mL/2 tbsp. 50mL/1/4 cup 1mL/1/4 tsp. 30mL/2 tbsp. 8 servings 1 ¼ L/5 cups 125mL/ ½ cup 60mL/4 tbsp. 125mL/1/2 cup 2mL/1/2 tsp. 50mL/1/4 cup 12 servings 1.875L/7 ½ cups 175mL/3/4 cup 90mL/6 tbsp. 175mL/3/4 cup 5mL/1 tsp. 75mL/1/3 cup Directions: 1. Preheat the oven to 350◦F (175◦C). 2. Place the apples in a medium baking dish. 3. In a bowl, mix the rolled oats, flour, brown sugar, cinnamon and butter or soft margarine until combined. Sprinkle over the fruit. 4. Bake for 40 minutes or until the fruit is tender. Substitutions: Substitute peaches, pears or rhubarb for apples. Equipment: • • • • • • • • • Vegetable peeler Paring knife Cutting board 1 medium baking dish Measuring cups Measuring spoons Large bowl Wooden spoon Oven mitts Healthy Cooking, Healthy Living 104 The Beginner’s Cooking Manual Creamy Rice Pudding Preparation and cooking time: 40 minutes Ingredients Cooked rice Water Skim milk powder White sugar Raisins Ground cinnamon Salt Vanilla extract 4 servings 500mL/ 2 cups 375mL/ 1 ½ cup 250mL/ 1 cup 50mL/ ¼ cup 50mL/ ¼ cup 2mL/ ½ tsp. 1 mL/¼ tsp. 7mL/ 1 ½ tsp. 8 servings 1L/ 4 cups 750mL/ 3 cups 500mL/ 2 cups 125mL/ ½ cup 125mL/ ½ cup 5mL/ 1 tsp. 2mL/ ½ tsp. 15mL/ 1 tbsp. 12 servings 1.5L/ 6 cups 1125mL/ 4 ½ cups 750mL/ 3 cups 175mL/ ¾ cup 175mL/ ¾ cup 7mL/ 1 ½ tsp. 5mL/ 1 tsp. 20mL/ 4 tsp. Directions: 1. 3. Put cooked rice, water, skim milk powder, sugar, raisins, cinnamon and salt into a medium saucepan. Mix well. Turn stove on to low heat. Cook and stir until pudding is creamy. This will take about 20 minutes. Stir in vanilla. Sprinkle with cinnamon. Serve warm. ∗ If you don’t have two cups of leftover cooked rice, follow these directions: 2. Put 1 cup (250mL) rice, 2 cups (500mL) water and 1 tsp. (5mL) salt into a medium saucepan. Turn on stove to high and heat to boiling. Turn heat to low, cover and simmer until rice is tender. This will take about 20 minutes and all the water will be absorbed. Equipment: • • • • • 1 medium sauce pan Liquid measuring cup Dry measuring cups Measuring spoons Wooden spoon Healthy Cooking, Healthy Living 105 The Beginner’s Cooking Manual Banana Bread Preparation and cooking time:60 minutes Ingredients Margarine Sugar Egg Overripe bananas All-purpose flour Whole-wheat flour Salt Baking soda Wheat germ Chopped nuts (optional) 12 servings 1/2 cup / 125mL 175mL / ¾ cup 2 5 250mL/ 1 cup 250mL/ 1 cup 5mL/ 1 tsp. 10mL/ 2 tsp. 125mL/ ½ cup 250mL/ 1 cup Directions: 1. Preheat oven to 350°F (175°C). 2. Grease two 8 ½ -inch loaf pans. 3. Cream margarine and sugar in the bowl with a whisk. Add eggs and bananas and blend until bananas are thoroughly mashed. 4. In a separated bowl, sift the flours, salt and baking soda. Stir in wheat germ and nuts, if desired. 5. Add dry ingredients to the banana mixture and blend just until mixed. Pour batter into prepared pans, divided evenly. 6. Bake loaves for 50 minutes. Equipment: • • • • • • • 2 x 8 ½-inch loaf pans Measuring spoons Measuring cups Wire whisk Sieve 2 medium mixing bowls Oven mitts Healthy Cooking, Healthy Living 106 The Beginner’s Cooking Manual Fruit Salad with Orange-Honey Yogurt Sauce Preparation and cooking time: 10 minutes Ingredients Fresh fruit e.g. melon, bananas, grapes, orange sections, apple Sauce: Low-fat plain yogurt Orange rind, grated Orange juice Liquid honey Vanilla extract 4 servings 1 L/ 4 cups 8 servings 2 L/ 8 cups 12 servings 3 L/ 12 cups 250mL/1 cup 5mL/ 1 tsp. 15mL/1 tbsp. 30mL/ 2 tbsp. 2mL/ ½ tsp. 500mL/ 2 cups 10mL/ 2 tsp. 30mL/ 2 tbsp. 50mL/ 4 tbsp. 5mL/ 1 tsp. 750mL/ 3 cups 15mL/ 3 tsp. 45mL/ 3 tbsp. 90mL/ 6 tbsp. 7mL/ 1 ½ tsp. Directions: 1. 2. Wash, peel, and cut fruit into bite size pieces in a bowl. In a separate bowl, combine yogurt, orange rind, orange juice, honey and vanilla; mix well. Add orange-honey yogurt sauce to the fruit, mix together and serve in individual bowls. 3. Note: Any kind of fresh fruit is wonderful with this tasty, easy-to-make sauce. Choose fruits depending on the season. Equipment: • • • • • • • • • Paring knife Cutting board Vegetable peeler Liquid measuring cup Measuring spoons Large bowl Small bowl Grater Wooden spoon Healthy Cooking, Healthy Living 107 The Beginner’s Cooking Manual Apricot-Filled Oatmeal Bars Preparation and cooking time: 40 minutes Ingredients All-purpose flour Quick-cooking rolled oats Brown sugar Baking soda Butter or margarine Apricot preserves 15 servings 175mL/ 3/4cup 175mL/ 3/4cup 125mL/ 1/2cup 1mL / ¼ tsp 75mL / 1/3 cup 125mL / ½ cup 30 servings 375mL/1 ½ cups 375mL/ 1 ½ cups 250mL/ 1 cup 2mL/ ½ tsp. 150mL/ 2/3 cup 250mL/ 1 cup Directions: 1. 2. 3. 4. 5. 6. Stir together flour, oat, brown sugar, and baking soda. Cut in butter or margarine till mixture is crumbly. Pat 2/3 of the crumbs in the bottom of an ungreased 13x9x2-inch baking pan; Spread with preserves. Sprinkle with remaining crumbs. Bake in a 375°F(190°C) oven for 25 to 30 minutes. Cool on a wire rack. Cut into bars. Substitution: Omit apricot preserves and use raisin filling. For raising filling, in a saucepan combine ¼ cup granulated sugar and 1 tbsp. cornstarch. Stir in 2 cups raisins and 1 cup water. Cook and stir till bubbly. Spread atop crumb mixture. Continue as directed. Equipment: • • • • • • • • • Sieve Medium mixing bowl Wooden spoon Measuring cups Measuring spoons 13x9x2” baking pan Table Knives Wire cooling rack Oven mitts Healthy Cooking, Healthy Living 108 The Beginner’s Cooking Manual Appendix A Certificate of Completion Student Evaluation Form Parent Volunteer Evaluation Form Healthy Cooking, Healthy Living 109 The Beginner’s Cooking Manual Certificate of Completion Awarded to ____________________________________ For successfully completing the Beginner’s Cooking Club Program Principal Healthy Cooking, Healthy Living Date 110 The Beginner’s Cooking Manual The Beginner’s Cooking Club Student Evaluation Form Name of School: ___________________ Program Dates: _____________________ Please circle one response. 1. I enjoyed being in the Beginner’s Cooking Club. Not at all 2. Most of the time All of the time A little bit Most of the time All of the time A little bit Most of the time All of the time The recipes were easy to follow? Not at all 6. A little bit I received enough instructions on how to prepare a recipe? Not at all 5. All of the time I have learned hand-washing and some food safety, food preparation and cooking skills. Not at all 4. Most of the time I would recommend the Beginner’s Cooking Club to other students. Not at all 3. A little bit A little bit Most of the time All of the time A little bit Most of the time All of the time Healthy Cooking, Healthy Living 111 I liked the recipes? Not at all The Beginner’s Cooking Manual 7. My 3 favorite recipes were: (Please check three) _____ Caesar Salad _____Tossed Salad _____ Basic Vinaigrette Dressing _____Spinach-Orange Toss Salad _____ Pasta Salad _____Bruschetta _____ Pita Pizzas _____Crispy Cheese Potatoes _____ Tacos _____ Cheesy Quesadillas _____ Tuna Melt on Pita _____ Pasta & Spring Vegetables _____ Chicken & Vegetables Stir-Fry with Rice _____ Beef & Broccoli Stir-Fry with Rice _____ Spaghetti & Tomato Sauce _____ Meatballs _____ Chicken Nuggets _____ Potato Cheese Muffins _____ French Toast _____ Denver Scrambled Eggs _____ Pancake & Waffle Batter _____ Confetti Omelets _____ Stir-Fried Vegetables _____ Broccoli-Onion Casserole _____ Glazed Carrots _____ Sweet Pepper Trio _____ Apple Crisp _____ Creaming Rice Pudding _____ Banana Bread _____ Fruit Salad & Orange-Honey Yogurt Sauce _____ Apricot-Filled Oatmeal Bars 8. Do you have a recipe that you would like us to put in the Beginner’s Cooking Manual? 9. The part I liked best about the club: (Please check one) ____ Lessons ____Cooking ____Eating the food ____Learning new things Others_________________________________________________________________ 10. Do you have any suggestions for future classes? Thank you! Healthy Cooking, Healthy Living 112 The Beginner’s Cooking Manual The Beginner’s Cooking Club Parent Volunteer Evaluation Name of Organization______________________________ Date:____________________ The purpose of this questionnaire is to get your feedback on the Beginner’s Cooking Club and the Cooking Manual. Please circle one response. (Questions 1-6 are to be completed by the facilitator) 1. The lesson plans were clear; Strongly Agree Agree Disagree Strongly Disagree I knew what I had to do. 2. It did not take a long time to prepare for the lessons. Strongly Agree Agree Disagree Strongly Disagree 3. The manual contained useful handouts and overheads. Strongly Agree Agree Disagree Strongly Disagree 4. The manual contained basic information on cooking and food safety. Strongly Agree Agree Disagree Strongly Disagree 5. The distribution of the Student Take Home Package prior to the start of class was useful. Strongly Agree Agree Disagree Strongly Disagree 6. The sample forms were handy and useful. Strongly Agree Agree Disagree Strongly Disagree 7. There were enough recipe varieties to choose from. Strongly Agree Agree Disagree Strongly Disagree 8. Most recipes were easy for beginners to follow. Strongly Agree Agree Disagree Strongly Disagree 9. The cooking kits contained adequate equipment/resources. Strongly Agree Agree Disagree Strongly Disagree 10. The cooking kits were easy to manage. Strongly Agree Agree Disagree Strongly Disagree 11. The task and time for grocery shopping was manageable. Strongly Agree Agree Disagree Strongly Disagree 12. The cost to purchase ingredients for most recipes was reasonable. Strongly Agree Agree Disagree Strongly Disagree 13. The Student Cleaning Schedule was useful to help organize tasks among students. Strongly Agree Agree Disagree Strongly Disagree 14. Most students participated in the cleaning tasks. Strongly Agree Agree Disagree Strongly Disagree 15. Overall, it has been a valuable experience to participate in the cooking club. Strongly Agree Agree Disagree Strongly Disagree 16. I have gained some knowledge and skills from the Beginner’s Cooking Club. Strongly Agree Agree Disagree Strongly Disagree 17. I would like to help again if another cooking class starts. Strongly Agree Agree Disagree Strongly Disagree Healthy Cooking, Healthy Living 113 The Beginner’s Cooking Manual Do you have any suggestions for improvement? Thank you! Healthy Cooking, Healthy Living 114 The Beginner’s Cooking Manual Appendix B Additional Resources & Handouts Healthy Cooking, Healthy Living 115 The Beginner’s Cooking Manual Healthy Cooking, Healthy Living Suggested Start-up Equipment 2-3 Corningware dish sets ( large & small plates, cups and saucers) 2-3 sets of cutlery ( soup spoons, small spoons, forks and knives) 2 large pots 3 chopping knives 3 cutting boards baking dish baking sheet(s) 1-2 basin(s) bread knife can opener colander dish cloth dish rack dish soap drink jugs foil wrap grater(s) ladle lifter loaf pan measuring cups (dry) measuring cups (liquid) measuring spoons (2) mixing bowls (large and small) oven mitts paper napkins paper towel potato masher salad bowl/serving spoons salad dressing jar (glass jar with lid) scouring pads small serving bowls (4) spatula – small storage bins storage containers for dry and refrigerated foods tea towels vegetable peeler whisk wok or large frying pans wooden spoons refrigerator thermometer Healthy Cooking, Healthy Living 116 The Beginner’s Cooking Manual scissors* stapler* staples* fire safety equipment* first aid kit* *Schools can loan these items to you. Some pantry items to start with: Rice, sugar, baking powder, chicken bouillon, oil, rolled oats, salt, pepper, flour, baking soda, spices. Healthy Cooking, Healthy Living 117 The Beginner’s Cooking Manual Healthy Cooking, Healthy Living Additional resources: “Clueless in the Kitchen. A Cookbook for Teens”. Evelyn Raab. Key Porter Books Limited, Toronto, 1998. “Kid’s Choice Cookbook”. Colleen Bartley & John Pateman. Lifescan Canada Ltd.1995. www.epicurious.com Kellogg's Web site www.missionnutrition.ca Dietitians of Canada www.dietitians.ca Health Canada www.hc-sc.gc.ca Healthy Cooking, Healthy Living 118 The Beginner’s Cooking Manual Healthy Cooking, Healthy Living How to Cook Pasta 1. To cook 454 g pasta use a 6 – 8 L pot. Brings at least 4 L of cold water to a full boil. 2. Add 25 mL of salt to the boiling water. 3. Add your pasta. Stir with a slotted spoon or tongs, to prevent sticking, until water returns to a full boil. 4. Begin to count cooking time, as indicated on the box, stirring occasionally. Do not cover the pot. 5. When cooking time is up, check pasta for doneness. Do not throw it against the wall to see if it sticks! Bite it. Does it have a crunchy centre? If so, it is not ready. • Pasta should not be mushy either. Properly cooked pasta should be tender but firm to the bite. This is called “al dente”. • Drain the pasta into a colander that has been placed in a clean sink. • Do not rinse the pasta with cold water unless you are using it for a salad, using it later, or stuffing it. • Toss or serve the well-drained, still hot pasta with your prepared sauce. • Freshly cooked pasta is best served immediately, so have your sauce ready before your pasta is cooked, if possible. Healthy Cooking, Healthy Living 119 The Beginner’s Cooking Manual Healthy Cooking, Healthy Living How to Blanch and Refresh Vegetables 1. Bring a pot of cold water to a full boil. 2. Place your cleaned and prepared vegetable into the pot. Do not cover. 3. Bring water back to a boil. Your vegetable is now blanched. 4. Immediately drain vegetable in a colander and plunge into a bowl or clean sink full of very cold water (refresh). Why blanch and refresh? • This process partially cooks foods that are to be re-heated at a later time (to blanch is to partially cook an item very briefly in boiling water). • It helps to preserve the colour, taste and nutrients. • When you refresh the partially cooked vegetable you stop the cooking process. Now when you add your vegetable later you do not risk over cooking it in the reheating process. Healthy Cooking, Healthy Living 120 The Beginner’s Cooking Manual Healthy Cooking, Healthy Living How to Cook Rice 1. Wash and drain rice several times until water is somewhat clear. Drain well. 2. Combine rice and cold water (approximately 1 – 2 cups of water per cup of rice depending on the desired firmness of rice) in a saucepan. Bring to a boil over high heat, uncovered. 3. Reduce heat to low, and simmer until almost all water has evaporated and crater-like holes appear in the rice. Cover saucepan and simmer for about 20 minutes. 4. Remove from heat and let stand 8-10 minutes to complete final cooking. Healthy Cooking, Healthy Living 121 The Beginner’s Cooking Manual Healthy Cooking, Healthy Living Cooking Terms and Techniques Beat: Blend: Boil: Broil: Chop: Coat: Dice: Drain: Fold: Fry: Garnish: Grate: Grill: Knead: Marinate: Mince: Mix: Pinch: Puree: Sift: Sauté: Season: Separate: Shred: Simmer: Stir: Toss: Whisk: Make a smooth mixture by stirring vigorously with a fork, spoon, whisk or electric mixer. Mix or stir two or more ingredients together to make a smooth mixture. Cook a liquid over a high heat until bubbles rise to the surface. Cook under “broiler” (top heating element) in the oven. Cut into pieces with a sharp knife. Cover or roll food in another ingredient. Cut into very small (5mm or ¼ inch) squares. Pour off or strain liquid from food. Mix gently with a rubber scraper or spoon by lifting the bottom of the mixture outwards and over the top. Cook in an open skillet. Decorate food with colourful additions such as parsley or fruit. Rub food against a grater to make very small bits. Broil under high heat or over hot coals. Work dough by pressing and folding it with hands. Let food soak in a flavourful liquid. Chop or cut into very tiny pieces. Combine two or more ingredients together until well blended. A small amount of seasoning that you can hold between your thumb and forefinger. Process or grind food into a smooth pulp in a food processor or blender. To pass flour or other dry ingredients through a sieve or sifter before measuring. (or stir-fry) Cook in a skillet over medium to high heat while stirring constantly. Flavour food by sprinkling with herbs and spices. Remove egg yolk from egg white before cooking. Cut into very thin strips. Cook slowly at a low heat. Mix with a spoon in a circular motion. Mix food by lifting gently with salad tongs or two spoons. Beat or stir food with a wire “whisk”. Healthy Cooking, Healthy Living 122 The Beginner’s Cooking Manual ADDITIONAL HANDOUTS Canada’s Food Guide to Healthy Eating Trim the Fat, Taste the Flavour Fat Facts Fit Fibre Into Your Day 5 to 10 a Day for Better Health Healthy Cooking, Healthy Living 123 The Beginner’s Cooking Manual
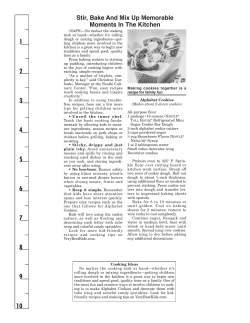


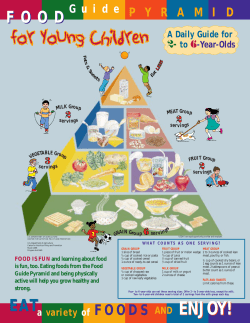


© Copyright 2026