
Baby Orangutan Robot Controller
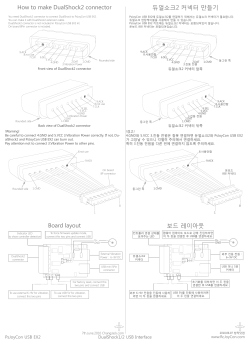
Baby Orangutan Robot Controller
Quick-Start Sheet
Overview
The Pololu Orangutan robot controller is a complete control solution for small robots. The small module includes a powerful Atmel
mega48/168 microcontroller, two channels of bidirectional motor control, a potentiometer, eight analog-to-digital channels, and generalpurpose digital I/O lines that can be used to expand the system. A battery, motors, and sensors can be connected directly to the module to
create simple robots.
Contacting Pololu
You can check the Pololu web site at http://www.pololu.com/ for additional information about the Baby Orangutan robot controller,
including color pictures, application examples, and troubleshooting tips.
We would be delighted to hear from you about your project and about your experience with our product. You can contact us through our
online feedback form or by email at [email protected]. Tell us what we did well, what we could improve, what you would like to see
in the future, or anything else you would like to say!
Programming the Microcontroller
The Baby Orangutan is designed to be programmed using a 6-pin in-system programmer such as the AVRISP from Atmel. The six pads at
the bottom of the board can be used for this purpose; pin1 is indicated by a small arrow on the printed circuit board.
Schematic Diagram
The complete schematic for the system is shown on the back of this sheet. The basic schematic is identical to that of the larger Orangutan
controller. Connections to a buzzer, LCD, and pushbutton switches should be made as indicated if you want to make a system compatible
with the larger Orangutan. Please note that unlike the Orangutan, the resonator pins (PB6 and PB7) are not available for use as generalpurpose I/O.
Minimal Connection
The Baby Orangutan will run with power applied across the VIN and GND pins. The supply voltage should be 5-10 volts, so a 5- to 8-cell
NiCd or NiMH battery pack is a good choice. The reset pin can be brought low to reset the controller, but it can otherwise be left
disconnected.
Module Pinout and Component Identification
VCC
M1
M2
PB0
PB3
PB4
PB5
PD0
PD1
PD2
PD3
PD4
PD7
VIN
GND
M3
M4
PC5
PC4
PC3
PC2
PC1
PC0
ADC6
RST
ISP PIN 1 ADC7
Pololu
© 2005 Pololu Corporation
http://www.pololu.com/
power LED
(green)
red user LED
(on PD1)
ATmega48/168
microcontroller
20 MHz
resonator
voltage
regulator
dual
H-bridge
trimmer
potentiometer
(on ADC7)
programming
connector
ORG02B
Pololu
2
4
6
D2
Green
ISP header
1
3
5
D1
13
9
PB2
PD6
7
14
8
2
6
PB3
7
8
PB6
VCC
VS1
VS2
1
4
11
20 MHz
3 PB7
32
1
2
9
10
11
PD2
PD3
PD4
PD5
PD6
PD7
OUT3 12
OUT4 10
LB1836M
GND
GND
3
OUT1
Vcont OUT2 5
IN3
IN4
IN1
IN2
U3
1
Y1
12
13
14
15
16
17
PB0
PB1
PB2
PB3
PB4
PB5
U1 LP2981-5.0
3
IN
OUT
GND
PB1
PD5
VCC
0.1 uF
C1
1
2
© 2005 Pololu Corporation
http://www.pololu.com/
R1
1K
VCC
PB4
PB5
PC6
GND
VIN
VBAT
4.7 uF
C3
0.1 uF
0.1 uF
VCC
VBAT
Motor2
MO3
MO4
MO1
MO2
Motor1
PC6
C6
C0603
0.1 uF
R4
10k
VCC
PC0
PC1
PC2
PC3
PC4
PC5
ADC6
ADC7
23
24
25
26
27
28
19
22
Inductor Iron
10uH
PD1
PD0
PC6 (RESET) 29
PC0 (ADC0)
PC1 (ADC1)
PC2 (ADC2)
PC3 (ADC3)
PC4 (ADC4/SDA)
PC5 (ADC5/SCL)
ADC6
ADC7
PD1 (TXD)
PD0 (RXD)
1K
R2
L1
VCC
PD1
31
30
AVCC 18
20
AREF
6
VCC 4
VCC
ATmegaX8-16MC
C5
C4
PB6 (XTAL1/TOSC1)
PB7 (XTAL2/TOSC2) GND
PD2 (INT0)
PD3 (INT1)
PD4 (XCK/T0)
PD5 (T1)
PD6 (AIN0)
PD7 (AIN1)
PB0 (ICP)
PB1 (OC1A)
PB2 (SS/OC1B)
PB3 (MOSI/OC2)
PB4 (MISO)
PB5 (SCK)
U2
0.1 uF
C2
VCC
R3
10k
TRIMPOT
VCC
D3
Red
LCD
DB7
DB6
DB5
DB4
DB3
DB2
DB1
DB0
E
R/W
RS
Vo
VDD
Vss
PD4
6
PB5
PD7
14
PB4
12
13
PB3
11
10
9
8
1K
PD3
5
7
PD2
10k
4
3
2
1
VCC
BUZZER
10k
1K
PB0
10k
1K
ORG02B
10k
1K
Recommended LCD, pushbutton, and
buzzer connections for Baby Orangutan
Baby Orangutan Robot Controller Schematic Diagram
4
21
5
3


© Copyright 2026