
ENGLISH N SOUL UK manual cover 4/10/99 6:24 pm ...
N SOUL UK manual cover
4/10/99
6:24 pm
Page 1
ENGLISH
The Nomad Soul ™ Quantic Dream 1999.
© & Published by Eidos Interactive 1999. All Rights Reserved.
EPILEPSY WARNING
Important - Eidos Interactive Limited Warranty
Please read before using this video game system or allowing your children to use it. Some
people are susceptible to epileptic seizures or loss of consciousness when exposed to
certain flashing lights or light patterns in everyday life. Such people may have a
seizure while watching certain television images or playing certain video games.
This may happen even if the person has no medical history of epilepsy or has
never had any epileptic seizures. If you or anyone in your family has ever
had symptoms related to epilepsy (seizures or loss of consciousness) when
exposed to flashing lights, consult your doctor prior to playing. We advise
that parents should monitor the use of video games by their children. If
you or your child experience any of the following symptoms: dizziness,
blurred vision, eye or muscle twitches, loss of consciousness,
disorientation, any involuntary movement or convulsion, while playing a
video game, IMMEDIATELY discontinue use and consult your doctor.
PRECAUTIONS TO TAKE DURING USE
• Do not stand too close to the screen. Sit a good distance away from the
television screen, as far away as the length of the cable allows.
• Preferably play the game on a small television screen.
• Avoid playing if you are tired or have not had much sleep.
• Make sure that the room in which you are playing is well lit.
• Rest for at least 10 to 15 minutes per hour while playing a video game.
Eidos Interactive Ltd reserves the right to make changes and improvements to this product at any time and without notice. Eidos
Interactive Ltd warrants to the original purchaser of this product that the physical medium on which the software program in this
product is recorded will under normal use and conditions be free from material defects in materials and workmanship for a period of
ninety (90) days from the date of purchase. The entire liability of Eidos Interactive Ltd under the limited warranty set out above will be
at its sole option either to repair or to replace free of charge the product provided you return it in its original condition to the point of
purchase with a copy of your receipt.
THIS LIMITED WARRANTY DOES NOT AFFECT YOUR STATUTORY RIGHTS. SUBJECT TO THE LIMITED WARRANTY ABOVE,
THIS PRODUCT IS PROVIDED "AS IS" AND WITHOUT WARRANTY OF ANY KIND. TO THE MAXIMUM EXTENT PERMITTED BY
APPLICABLE LAW, EIDOS INTERACTIVE LTD FURTHER DISCLAIMS ALL WARRANTIES (INCLUDING, WITHOUT LIMITATION,
THOSE IMPLIED BY LAW, STATUTE, CUSTOM OR OTHERWISE) RELATING TO MERCHANTABILITY, SATISFACTORY QUALITY,
AND/OR FITNESS FOR A PARTICULAR PURPOSE IN RESPECT OF THE PRODUCT.
Eidos Interactive Customer Support
If you require technical assistance, call the Technical Support helpline on:
0121 356 0831
or e-mail us on:
[email protected]
All telephone charges incurred by you in connection with this facility will be met by you. Eidos Interactive shall pay postage costs in
returning to you any program which is returned to Eidos Interactive by you under this agreement but shall not be responsible for
postage costs incurred by you in returning the program to Eidos Interactive.
Having trouble with The Nomad Soul?Then try our recorded Gameplay Helpline on:
09067 53 50 60*
*Please note that this call is more expensive than a normal call and at the time of publication is charged at 75p per minute at all times.
Callers must legally be aged 16 or over. This service is provided in the UK by Eidos Interactive Limited, Unit 2, Holford Way, Holford,
Birmingham, B6 7AX.
12
2
12
INSTRUMENTAL SONGS
1.
CONTENTS
20. Fight Scene Three *
Akas Bar *
2. Awaken 2 **
21. Fight Scene Four *
3. Bar Concert *
22. Fight Scene Five *
4. Epilogue *
23. Shooting Scene A *
5. Gandhar *
24. Shooting Scene B *
6. Gandhar Ambient *
25. Shooting Scene C *
7.
26. Shooting Scene D *
Jangir **
8. Jaunpur Casbah Ambient *
27. Shooting Scene E *
9. Jaunpur Casbah *
28. Pretty Things Are Going To Hell
(Easy Listening Version) **
10. Loge Akas Bar Ambient *
29. We All Go Through
(Easy Listening Version) **
11. Nomad Soul *
12. Palace Ambient *
30. The Dreamers
(Easy Listening Version) **
13. Peep Show *
14. Qualisar **
16. Shooting Gallery *
31. Thursday’s Child
(Easy Listening Version) **
17. Thrust **
32. Market Place *
18. Fight Scene One *
33. Asteroth *
19. Fight Scene Two *
34. Room of The Throne *
15. Save Your Soul *
* Written and performed by Reeves Gabrels
Publisher: North America My Half Music (ASCAP) administered by Bug Music, Inc.
Rest Of World My Half Music/Bug Music, Ltd.
** Written by and Performed by David Bowie and Reeves Gabrels.
Publisher: North America Nipple Music (BMI) administered by RZO Music, Inc.,
My Half Music (ASCAP) administered by Bug Music, Inc.
Rest Of World Nipple Music/RZO Music Ltd., My Half Music/Bug Music, Ltd.
46
INTRODUCTION...............................4
TECHNICAL...................................5
SYSTEM REQUIREMENTS ...................5
INSTALLATION ..................................5
LOADING ..........................................5
THE MAIN MENU.............................6
MENU CONTROLS..............................6
NEW GAME ......................................7
LOAD GAME......................................7
OPTIONS..........................................7
Video Option..............................7
Audio Options ............................8
Game Options.............................9
Controls...................................10
Quit .........................................11
GETTING STARTED ........................12
THE BASICS ...................................12
The 3D World of Omikron..........12
Action Sequences.....................12
The Control Keys ......................13
Conversations ..........................14
Animation Screens....................15
Picking Up Objects/Items.........15
Inventory Management..............15
THE SNEAK ....................................16
What is it? ..............................16
Accessing the SNEAK ...............17
SNEAK Modes ...........................18
Getting Back to the Game........25
THE MULTIPLAN VIRTUAL LOCKER...26
Accessing the Multiplan ...........26
Transfering items to
the Multiplan ...........................27
Transfering items from
the Multiplan ...........................27
Examining Objects ...................27
Deleting Objects......................28
SAVING YOUR GAME .......................28
In-game Save and
Advice Points ..........................28
Magic Rings.............................29
GETTING AROUND OMIKRON ............30
Walking ...................................30
Using Elevators .......................30
Using the Sliders ...................30
LOOKING AROUND...........................32
First Person Perspective .........32
Investigating ...........................33
SURVIVING .....................................33
Checking your Energy ..............33
Eating and Drinking .................34
Money......................................35
FIGHTING AND COMBAT ..................35
The Fighting Controls...............36
The Shooting Controls ..............37
SWIMMING .....................................38
The Swimming Controls ............39
MANA AND SPELLCASTING ..............39
CREDITS .....................................40
OMIKRON: THE NOMAD SOUL ..........43
INSTRUMENTAL SONGS .................46
TECHNICAL SUPPORT ...................47
3
INTRODUCTION
I have many things to tell you, and very little time. My... my
name is Kay’l, I come from a parallel universe to yours. My
world needs your help, you’re the only one who can save us.
I succeeded in opening a breach between my world and yours.
Through your computer, you can enter our world and help us.
But in order to do this, you must transfer your soul into my
body.
“The Dreamers”
Written by:
Publisher:
David Bowie and Reeves Gabrels
North America Nipple Music (BMI) administered by RZO Music, Inc., My Half Music (ASCAP)
administered by Bug Music, Inc.
Rest Of World Nipple Music/RZO Music Ltd., My Half Music/Bug Music, Ltd.
© 1999 David Bowie under exclusive license to Virgin Records America, Inc.
David Bowie appears courtesy of Virgin Records America, Inc.
Do you accept? Press any key to say yes, but hurry... there
isn’t much time.
I knew I could count on you. Now you must concentrate.
You’ve done it. Now your soul occupies my body. This is the last time that we’ll be able to speak together. Once you’ve
crossed the breach, you’ll be on your own. I will take over my body when you leave the game, and hold your place for you
until you return.
Now I must explain to you how to control my body. These are the main controls that allow you to act in my universe.
That’s it. You’re ready. But remember, once you’ve crossed the breach, you’re on your own.
There’s no saving and going back if you get into trouble. You are entering a real world. If you make mistakes, you’ll just
have to accept the consequences.
Now listen carefully. To begin your investigation, go first to my apartment. There’s no more time to talk, you must cross
the breach before it closes. Oh and one more thing... be careful with my body, it’s the only one I’ve got.
4
45
“Seven”
Written by:
Publisher:
David Bowie and Reeves Gabrels
North America Nipple Music (BMI) administered by RZO Music, Inc., My Half Music (ASCAP)
administered by Bug Music, Inc.
Rest Of World Nipple Music/RZO Music Ltd., My Half Music/Bug Music, Ltd.
“We All Go Through”
Written by:
David Bowie and Reeves Gabrels
Publisher:
North America Nipple Music (BMI) administered by RZO Music, Inc., My Half Music (ASCAP)
administered by Bug Music, Inc.
Rest Of World Nipple Music/RZO Music Ltd., My Half Music/Bug Music, Ltd.
“The Pretty Things Are Going To Hell”
Written by:
David Bowie and Reeves Gabrels
Publisher:
North America Nipple Music (BMI) administered by RZO Music, Inc., Exploded View Music
(ASCAP) administered by Bug Music, Inc.
Rest Of World Nipple Music/RZO Music Ltd., Exploded View Music/Bug Music, Ltd.
“Omikron (New Angels of Promise)”
Written by:
David Bowie and Reeves Gabrels
Publisher:
North America Nipple Music (BMI) administered by RZO Music, Inc., My Half Music (ASCAP)
administered by Bug Music, Inc.
Rest Of World Nipple Music/RZO Music Ltd., My Half Music/Bug Music, Ltd.
44
TECHNICAL
SYSTEM REQUIREMENTS
Minimum:
• Pentium 233MHz processor or equivalent
• Windows® 95/98
• 32 Mb RAM
• 4 Mb SVGA Video Card (100% DirectX™ 6.1 compatible)
100% DirectX™ 6.1 compatible Soundcard
4x CD-ROM Drive
350MB Hard Disc Space
DirectX® 6.1 or higher (included on CD)
Recommended:
• Pentium® II 266MHz (or better)
• 8x CD-ROM Drive or faster
• 4 Mb 3D Card (100% DirectX™ 6.1 compatible)
Installation
• Insert The Nomad Soul CD 1 into your CD-ROM drive. If Autorun is enabled, The Nomad Soul will take you to the
Installation Screen.
• Simply click on the Install button and follow all on-screen directions. You will be asked to insert CDs 2 and 3.
• Once The Nomad Soul is installed it will appear in the Program group on the Start Menu.
Loading
• Select Start/Programs/Eidos Interactive/Quantic Dream/The Nomad Soul and then highlight ‘The Nomad Soul’.
• The game will now load.
5
THE MAIN MENU
OMIKRON: THE NOMAD SOUL
MENU CONTROLS
To navigate through all menus in The Nomad Soul use the following keys:
To Select
Arrow (Cursor) Keys
Use Left/Right/Up/Down to navigate through various menu options. The
relevant selections will be highlighted.
To Action / Use
Enter Key
Pressing the Enter Key will select any highlighted option.
To Cancel Action/Return to Previous Menu
Spacebar
Pressing the spacebar will always return you to the previous menu or
cancel an action.
The first screen you will see is the Main Menu screen. This gives you the following Options:
6
“Thursday’s Child”
Written by:
David Bowie and Reeves Gabrels
Publisher:
North America Nipple Music (BMI) administered by RZO Music, Inc., My Half Music (ASCAP)
administered by Bug Music, Inc.
Rest Of World Nipple Music/RZO Music Ltd., My Half Music/Bug Music, Ltd.
“Something In The Air”
Written by:
David Bowie and Reeves Gabrels
Publisher:
North America Nipple Music (BMI) administered by RZO Music, Inc., My Half Music (ASCAP)
administered by Bug Music, Inc.
Rest Of World Nipple Music/RZO Music Ltd., My Half Music/Bug Music, Ltd.
“Survive”
Written by:
Publisher:
David Bowie and Reeves Gabrels
North America Nipple Music (BMI) administered by RZO Music, Inc., My Half Music (ASCAP)
administered by Bug Music, Inc.
Rest Of World Nipple Music/RZO Music Ltd., My Half Music/Bug Music, Ltd.
43
CREDITS: EIDOS INTERACTIVE
Producer
UK
Herve Albertazzi
Shadow Producer
US
Tom Marx
Senior Designer
Philip Campbell
Additional support and ideas
Paul Glancey
QA Managers
UK
US
QA Project Co-Ordinator
QA Teams:
UK
Europe
US
David Rose
Nicholas Earl
Product Managers
UK
US
France
Germany
Michael Newey
Susan Boshkoff
Olivier Salomon
Lars Wittkuhn
PR
David Rousseau with
Nicolas Gianel
Guillaume Petit
David Asenkat
Jon Reddington
Tyrone O’Neil
Linus Dominique
Sammy Kil
Alexandre Lepoureau
Clayton Palma with
Chris Lovenguth
Pierre Roux,
Flavia T Grant with
Holly Andrews
Development Managers
Tony Bourne
Mike McHale
Dominic Berzins
US
Compatibility Testing
Localisation
Creative Manager:
Creative Co-ordinator:
UK
Jonathan Rosenblatt &
Steve Starvis
France
Priscille Demoly
Germany Sascha Gree-Kaiser
Matt Carter-Johnson
Caroline Simon
SPECIAL THANKS TO:
Charles Cornwall, Ian Livingstone, Mike McGarvey, John Kavanagh,
Rob Dyer, William Zysblat, Robert Goodale, Janey de Nordwall, Nick
Davies, Debbie Lash, Eva Whitlow, Rose Montgomery, Lee Briggs,
Paul Sheppard, Amanda & Sam.
Jason Walker
Manual text
Manual design & layout
42
The Write Stuff
A Creative Experience,
London
NEW GAME
Start a new game of The Nomad Soul. You will have to enter a Game Name, (using the keyboard) then
you will be shown the introduction.
LOAD GAME
Select Load Game to open the Load Game Menu. This will reveal a list of previously saved games
• Simply highlight the name of the saved game you want to load and press Enter to select.
Then highlight the Load option. Press Enter again to Load and The Nomad Soul will load
to the saved point.
In this menu screen you can also Delete a Saved Game or Cancel the Menu (to return to the
previous screen).
OPTIONS
This features a range of options to set up the game to suit the specification of your particular
machine. You might need to adjust some of these Options if you find that the game is running slow.
Video Option
Video Options gives you a chance to configure the game graphics to the specification of your
machine. Select with the option with the arrow keys and confirm by pressing the Action key.
RESOLUTION
Select a screen resolution (640x480; 800x600; etc)
CLIPPING DISTANCE
Select a Clipping Distance from Very Near to Very Far
7
DISPLAY SKY YES/NO
Select whether to display sky graphics or not
Sound Effects, Ambient &
Additional tracks:
DISPLAY SHADOWS YES/NO
Select to display shadow effects
Original English Voices by:
DETAIL LEVEL
Select a level of detail from Low to High.
STREET ACTIVITY
Select a level of ‘street activity’ from None/Low/Medium/High/Very High
SELECT 3D ACCELERATION
Choose a 3D acceleration mode from Display (your 3D card), Software Rendering (in software)
or Direct X Software Renderer
Audio Options
Audio options give you control over all of the audio elements of The Nomad Soul
DIALOGUE VOLUME
Use the arrow keys to adjust the slider for character speech volume
AMBIENT VOLUME
Use the arrow keys to adjust the slider for background sound volume
8
Body Motion Capture by:
Acti System
Xavier Despas
QUANTIC DREAM WOULD LIKE TO THANK:
John for his faith. Bruno for believing when there really was no
reason to. Iman, David and Reeves for their enthusiasm, their
talent and their intelligence. Charles for accepting the challenge.
Philip for his support and enthusiasm. Eidos and Eidos, France.
Tony and Ed for the quality of the casting and devoting so much
time to us. All the people that sent us encouraging e-mails and
supported us from the start. Our wives and girlfriends for being
patient and understanding. All the staff at Quantic Dream for the
sleepless nights and the long week-ends.
David Bowie
David Gasman
Paul Bandey
Karen Strassman
Christian Erickson
Barbara Weber
Gay Marshall
Edward Marcus
Allan Wenger
Joe Rezwin
Patrick Floersheim
Iman 631:
Iman
The Dreamers:
David Bowie
Reeves Gabrels
Gail Ann Dorsey
Sound Engineer:
Jean-Jacques Toroella
Motion Capture Acting:
Marc Chung
Minh Minh Ngo
Pascal Gentil
Emmanuelle Parlant
Tony Dehas
Original Songs and
Soundtrack:
David Bowie & Reeves Gabrels
Facial Lipsynching and
Dialogue Motion Capture:
Tribu
Mr Bowie’s Motion Capture created & performed by Edouard Locke
41
CREDITS: QUANTIC DREAM
Written and Directed by
David Cage
Project Manager:
Olivier Demangel
Internal Producer:
Anne Devouassoux
Designs and Graphics:
Lead Graphists:
Loic Normand with
Stephane Elbaz - Philippe Aballea
Olivier Demangel
Edouard Pham
Xavier Malard
Eric Seigaud
Pierre Roux
Nathalie Chody
Tsoa Rakotoarisoa
Kamel Gali
Franck Aubessard
Amar Hamidi
Corentin Jaffre
Yann Legal
Programming:
SOUND FX
Use the arrow keys to adjust the slider for all sound effects volume
Francois Kermorvant
Stephane Fournier
Julien Varnier
Christophe Vivet
Jean-Charles Meyrignac
Animations:
Olivier Nallet &
Fabien Fessard with
Frederic Hanoulle
Antoine Viau
40
Tony Lejuez with
Christophe Leulier
Xavier Malard
Yan Le Gall
IAM scripting:
Sophie Buhl with
Nathalie Chody
Audrey Leprince
Cameras:
Daniel Cinglant & David Cage
Dialogue:
Christophe Leulier
Tsoa Rakotoarisoa
Marie Catherine Herveau
Anne Devouassoux
Regis Carlier
3D SOUND
Select to enable 3D sound (if applicable to your system)
Game Options
Game Options allow you to set in-game options and difficulty levels
FIGHT DIFFICULTY
Select a level of difficulty for the fight sections of the game from Easy, Medium or Hard
SHOOT DIFFICULTY
Select a level of difficulty for the shooting sections of the game from Easy, Medium or Hard
FIGHT CAMERA
Select your preference of camera view for the fight sequences, from Side or Back View.
9
Controls
SET KEYBOARD & MOUSE CONTROLS
All control settings in The Nomad Soul are fully customisable. By selecting this option you will be able to redefine all
controls used in the following action sections:
ADVENTURE CONTROLS
Moving around the 3D world
FIGHT CONTROLS
Unarmed fighting controls
SHOOT CONTROLS
Armed fighting controls
Forward
Up Arrow
Back
Down Arrow
Turn Left
Left Arrow
Turn Right
Right Arrow
Action / Use
Enter
Dive
Right CTRL
Crawl Stroke
Right Shift
MANA AND SPELLCASTING
At some point in your adventure you will need to cast spells. Mana (the value in the
Characteristics Mode of the SNEAK) is the energy that empowers you to cast spells. You can
increase your Mana level by gathering potions throughout the adventure on Omikron and using
them as appropriate.
SWIM CONTROLS
Swimming controls
To
•
•
•
The Swimming Controls
redefine a key:
Highlight the function you want to change
Press Enter and it will begin to flash
Press the new selected key on the keyboard/mouse and it will appear on-screen
10
39
SWIMMING
Your character will have to swim at various points in the adventure. You can make him swim on the water (crawl or
breaststroke), dive and swim underwater. Be aware that, unless you have made special provisions, he will use up oxygen
and will need to come to the surface to rest and take in more air.
MOUSE SETTINGS
Adjusts the settings for your Mouse and will give you the following options:
MOUSE SENSITIVITY (HORIZONTAL)
and
MOUSE SENSITIVITY (VERTICAL)
If you find your Mouse too responsive or less responsive on either plane,
adjust here using the arrow keys.
INVERT MOUSE
This will invert the vertical control of the Mouse.
SET JOYPAD CONTROLS
Same as ‘Set Keyboard and Mouse controls’ but:
To
•
•
•
redefine a button:
Highlight the button you want to change
Press Action and it will begin to flash
Press the new selected button on the joypad etc and it will appear on screen
Quit
Select this option to Quit the game. You will be asked to confirm your choice.
38
11
GETTING STARTED
HEALTH BARS
Your Health bar will appear on the left of your screen to show your health in any combat.
You’ve installed and loaded the game, set up your options, watched the introduction and now you’re eager to get on with
the game - what else do you need to know? The Nomad Soul is a game where you will discover many things so, in this
manual, you will be told nothing about the story or how to succeed in the game, it will only give you essential information
that you will need to enjoy the game fully.
THE BASICS
The 3D World of Omikron
You control a character who is exploring a vast 3D world. Neither you,
nor the character, know anything about this world but everything is
there to be discovered. There are messages to be read, objects to be
picked up, other characters to talk to, and items to be bought. There
is no end to the things you can do in this game but it’s up to you to
structure your actions in such a way as to help you through the
adventure. Don’t worry that you might get lost in this vast world there are several devices that will easily bring you back on track.
Action Sequences
The Nomad Soul is not just an adventure game. It also features unarmed fighting (in side-on or behind view), with all
the excitement of discovering secret moves, punches, kicks etc; armed combat (in first person view), featuring a variety
of deadly enemies, weapons, ammo, manoeuvres etc; and swimming sequences - sometimes it will be necessary for your
character to get into the water and swim to other parts of the world. All these action sequences have their own fully
customisable key controls.
12
The Shooting Controls
Forward
Up Arrow
Backward
Down Arrow
Strafe Left
Left Arrow
Strafe Right
Right Arrow
Fire
Shift / Left Mouse Button
Action / Use
Enter
Jump
Spacebar / Right Mouse Button
Crouch
Right CTRL
Change Weapon
Alt
Turn Left
Number Pad 4
Turn Right
Number Pad 6
Look Up
Number Pad 8
Look Down
Number Pad 2
37
The Fighting Controls
Move Forward
Right Arrow
Move Backward
Left Arrow
Strafe Left
Delete
The Control Keys
The Adventure part of the game can be controlled using the Adventure/Movement Keys listed below. All keys are shown
here but when you are playing the game you would be wise to have The Nomad Soul Key Guide close at hand.
ADVENTURE/MOVEMENT CONTROL KEYS
Strafe Right
End
Move Forward
Up Arrow
Jump
Up Arrow
Move Backwards
Down Arrow
Crouch
Down Arrow
Turn Left
Left Arrow
Punch 1
Q
Turn Right
Right Arrow
Punch 2
W
Strafe / Half Turn
Control
Kick 1
A
Action/Use
Enter
Kick 2
S
Jump/Cancel
Spacebar
Note: There are many other ‘special moves’ involving various combinations of keys there to be discovered.
First Person View
Left Mouse Button or Key ‘L’ (Held down)
Run
Shift
Open ‘SNEAK’
TAB
Note that the Spacebar will make the character jump when moving around the 3D world but it will also cancel an action.
For example, if a character is holding an object (picked up using the Action key) and you want to return it, simply press
the Spacebar.
36
13
Conversations
You will not make any progress in the game without talking to other characters. They will give you valuable information
(good or bad) that you may be able to use later.
• To talk to another character, approach him/her and press Action. If he/she has anything to say, the screen will change
(widescreen style and text will appear below it).
AT THE RESTAURANT
Restaurants are similar to vending machines.
To drink or eat the item:
• Select the item on the SNEAK and press Action.
• Select the ‘Use’ option at the top of the screen and press Action (your character will have consumed the item).
Money
Remember that everything has a price (in Seteks) and you cannot buy anything without
money. When you buy something the total will be deducted from your Setek total shown in
your SNEAK. Your character will find some Seteks in various locations but there are
opportunities to get more money throughout the game (look out for ads or flyers announcing
these opportunities). Money will help you buy better weapons (which are readily available
but sometimes very expensive) or even advice.
If a character is talking at length and you want to read the subtitles that have yet to appear, you will see two red arrows
next to the text. Use your up/down arrow keys to view next/previous subtitles.
You will at some point have to respond. If a response is needed then a list of choices may be shown. Read these carefully
(for what you say may be crucial), highlight your choice and press Action. The character will then act on your response.
FIGHTING AND COMBAT
You cannot succeed in The Nomad Soul without learning how to fight unarmed and with
weapons. There are several opportunities to develop your skills in both these types of combat
in the early stages of the game. You’re advised to take these opportunities when you can they will build up your experience and sharpen up all your fighting skills. Practice and
experience of actual combat and various potions can improve the character statistics
shown in the SNEAK.
If you’ve already talked to the character and wish to move quickly through conversation sections of the game then you
can press the Action to progress.
14
35
MEDIKITS
Medikits can be found in many locations. Pick them up and put them into your SNEAK as normal and they will be shown on
the Inventory list.
To
•
•
•
top up your energy level (if you are anticipating a fight):
Open your SNEAK (press Tab)
Select the Medikit (large or small) using the arrow keys and press Action.
Select the USE option and press Action - you will find that your character has had an energy boost.
Eating and Drinking
There are many places in Omikron that provide food and drink to sustain your character - they could be anything from
bars, vending machines or restaurants.
AT THE BAR
If you want a drink in a bar, stand close to a bartender and press Action. You will be asked what you want.
• Select your choice and press Action.
VENDING MACHINES
There is a selection of standard food/drink vending machines on Omikron.
• Stand in front of the machine and press Action. You will see a menu screen allowing you to choose from Buy, Examine
or Quit.
• Highlight the Buy icon with the arrow keys and press Action
• Select the item from the list with the arrow keys and press Action to put it into
your SNEAK inventory (say, a can of beer).
34
Animation Screens
Throughout The Nomad Soul you will be shown animated sequences of vital information - these animations could be a
preview of an action section showing you the area you will have to battle in etc. In all cases the screen will switch to
‘widescreen mode’ to let you know that all you have to do is watch the next section
Picking Up Objects/Items
You will find many objects or items in The Nomad Soul. Some of these objects
may be useful to you (some will be crucial to your investigations) but others
will not. It is up to you to decide. If you see an object that you want to
pick up, move the character close to it and press Action, the character will
pick it up in his hand and a message will inform you what it is.
If you want to take the object press Action again and it will be placed into
your SNEAK Inventory (see below). If you do not want the object, press
Cancel. This will make the character return it to its original location. Once
you have the object in your possession, you can choose to Use it or Examine
it by accessing the SNEAK options.
Inventory Management
You cannot hold everything you find in your hands. You have the use of a ‘SNEAK’ that, among its many uses, will help you
manage your inventory of all the objects you have collected.
15
THE SNEAK
Investigating
You’re advised to investigate everything you find - this may take time but you do not want to miss out on any item or
information that could be crucial to your success in the adventure. If there is a cupboard and it’s open (or you find a key)
why not open it and see what’s inside?
• Stand your character in front of the cupboard etc and press Action. The character’s hand will touch the cupboard and
open it - if it’s locked or it’s not worth bothering about, he will tell you.
Inside the cupboard there may be nothing or there may be several useful objects.
• Stand close to the objects and press Action to pick one up.
What is it?
Grafted on to Kay’l’s forearm is the latest Khonsu-designed SNEAK - the MK400 computer terminal. It can perform a large
number of useful tasks and give you vital information about the world you are exploring (and your own character!).
You will probably use it most often for inventory management.
Thanks to the latest molecular disassembly technology, the MK400 enables you to carry up to 18 different objects with
you on your adventure. The SNEAK can be used in conjunction with the Multiplan Virtual Locker that allows you to store
objects and retrieve them easily and efficiently and can be accessed from many points in the game world (see later).
Using and controlling the SNEAK is an essential part of the game. It is accessible at all times in the adventure section
of the game.
A description will appear on the screen.
• If you want to take it press Action again.
• If you want to drop it press the Cancel button.
Some cupboards have several objects, to pick up all items repeat the above process.
SURVIVING
Your character is on a world he knows nothing about. Chances of survival are low unless you get to grips with the basics
such as eating and drinking, keeping up energy levels and acquiring money.
Checking your Energy
It’s important that you check the energy level of your character. If it is too low that character cannot perform to the
maximum and will probably lose any fights or be adversely affected by any physical exertion. To add energy the character
can eat food, drink or use any Medikits or correct potions picked up during the adventure for an instant boost.
Special Note: SNEAKs have technical limitations. If you ever switch SNEAKS, certain types of objects (like weapons and
Medikits) will not be transferred to your new SNEAK.
16
33
LOOKING AROUND
First Person Perspective
The Nomad Soul will select a view of the adventure for you in ‘cinematic style’ (long shots, close-ups, high angle, tracking
shots etc.) This adds to the ‘cinematic’ quality of the adventure. However, at certain points you may want to know just
what it is you are about to walk into and the default view taken by the game is not helpful. In such a case:
• Either, press (and hold down) the left mouse button,
• Or, press (and hold down) key ‘L’ to get a first person perspective view through the eyes of your character.
Accessing the SNEAK
• Press the TAB Key to open the SNEAK menu.
The SNEAK will always open on the Inventory option (probably the most used option) but the following is a breakdown of
everything it does:
Characteristics
Call the slider
Quit
Inventory
Seteks
Memory
Magic Rings
Options
Map
• Then you can look all around you by moving the mouse freely.
This view will only work when the character is standing still.
32
17
SNEAK Modes
There are six SNEAK Modes accessible:
• Your Character
• Calling the Slider
• Inventory (includes Saving, Currency and Map)
• Memory
• Options
• Quit
CALLING THE SLIDER
• Highlight the second icon down (green) from the left using the arrow keys. This will flash and change the SNEAK Mode
to Calling the Slider.
YOUR CHARACTER
This is an ID on which character you are in the game (it can change) and on the varying abilities of that character.
• Using the arrow keys highlight the top left (blue) icon. The icon will flash when highlighted and a rotating image of
your character will appear in the visual display.
• Press the right arrow key and you will highlight the Identity box. This will display all character details such as Name,
Age, Sex, Blood Type etc.
• Press the right arrow key again and you will highlight the
Characteristics box. This will display a range of values for the
character:
• Press the right arrow key to highlight the ‘Calling the Slider’ options.
• Use the up/down arrow keys to select a location you want to be taken to (eg Kay’l’s Apartment) and press Action.
If you are not in a suitable location to be picked up by the Slider you will be given a message to that effect.
If you are by a roadside, your screen view will change to a chase view of a Slider responding to your call and you will
follow it as it makes its way towards your character.
• When it arrives, get your character close to it (somewhere near the middle) and press Action.
The Slider door will open and you will get in. Be careful standing in or crossing the road - you might get hit by the traffic!
The Slider will drive you to the correct address and deposit you as near as possible to the building entrance.
18
31
GETTING AROUND OMIKRON
This section gives you a brief overview of the ways you can move your character around Omikron.
Walking
Obviously you’re going to do a lot of walking in this adventure. Use the arrow keys for Forward/Backward/Left/Right +
Control Left/Right for side-step left/right. If you want to run whilst moving forward, hold down the Run.
Using Elevators
This is a vast world where most apartments, offices and buildings have to be accessed via elevators. To change levels in
most buildings or to get access to most apartments, simply enter the elevator and press Enter. Offices such as the
Security Centre will offer you a number of levels that can be accessed.
• Use the arrow keys to select a level and press Action to activate the elevator.
ENERGY
A general value for the amount of energy the character has. A low value before a fight or combat,
or any form of physical exertion, is not advised. Energy can be topped up using Medikits, Food or
special Potions.
MANA
The ability of the character to cast spells.
FIGHT EXPERIENCE
A general description of the fighting experience of the character. This can be improved
by practice.
ATTACK
The unarmed fighting ‘bonus’ of the character. The higher this value is, the more damage
your character will inflict on opponents. This can only be improved by practice.
DODGE
The combat agility of the character. This can be improved by practice.
Using the Sliders
One of the first things you will have to do in the adventure is get to Kay’l’s apartment and to do this quickly you will have
to use a Slider. Sliders are the personal transportation system on Omikron and are the means by which you will travel
around the vast world.
BODY RESISTANCE
The ability of the character to resist or defend himself against an attack.
SPEED
The speed of the character in armed combat situations. This can be improved by practice.
Remember that different characters will have different abilities. Study these carefully and use them wisely.
30
19
THE SLIDER TRANSPORTER
The next icon on your SNEAK is the control for calling the Slider.
You can walk to many destinations in the game world but to get somewhere fast
you will use a ‘Slider’. Sliders are individual transportation vehicles on Omikron
that will, when summoned, pick you up when you are outside and take you to a
pre-designated address.
CALLING THE SLIDER
• Highlight the second icon (green) down from the left using the arrow keys. This will flash and change the SNEAK
Mode to Calling the Slider.
• Press the right arrow key to highlight the ‘Calling the Slider’ options.
• Use the up/down arrow keys to select a location you want to be taken to (e.g.
Kay’l’s Apartment) and press Action.
SAVING THE GAME
• The top option shows ‘New Save’. Highlight the Save option and press Action. The game will be saved and you will be
returned to the 3D world. The name will be dependant on which character you are playing, the date and time of the save.
GETTING ADVICE
• The second option allows you to Buy Advice. A list of characters you have
met and talked to is shown with details of the key information you should
be acting on. Highlight the character you want advice about and you will see
a cost in Magic Rings (and a summary of how many Rings you are carrying).
If you have sufficient Rings, select Buy or Cancel.
Magic Rings
As mentioned above, you may have found a number of special magic rings in the adventure that are now in your SNEAK (in
a special section along with your Omikron currency and Map). These magic rings can be collected like other objects but
will appear in your SNEAK Inventory as a rotating object.
If you are not in a suitable location to be picked up by the Slider you will be given a message to that effect. If you
are by a roadside, your screen view will change to a chase view of the Slider and you will follow it as it makes its
way towards you. When it arrives, get close to the door (located near its middle) and press Action. The Slider door
will open and you will get in. Be careful standing in the road - you might get run over by the traffic! The Slider will
drive you to your destination and deposit you as near as possible to the building entrance.
20
Note that Magic Rings can have other uses and that there are a limited number available in the game.
29
Deleting Objects
You can delete any object from the Multiplan list.
• Highlight the fourth icon down using the arrow key and press Action.
• Select an item using the up/down arrow keys and press Action, that item will be deleted permanently. Think twice
before you do this!
SAVING YOUR GAME
It’s very important to save the game as often as you can, because you’ll never know what’s going to happen to your
character just around the next corner. To save a game you need to find any of the permanent Save/Advice Points and use
Magic Rings.
In-game Save/Advice Points
Throughout the game there are pre-set Save/Advice Points indicated by three rotating rings.
• To save your game, simply approach the rings and press the Action key.
This will open the Save/Advice Option screen. This allows you to save the current
game and to ‘buy’ advice about key aspects of the game.
INVENTORY
The next mode on the SNEAK is the Inventory. This is one of the main uses of the SNEAK. Control of inventory is crucial
to success in the game.
Throughout the game there will be objects that can be picked up. To pick up an item, stand near the object and press
Action. Your character will pick it up and a short description will appear on the screen. If you want to keep the object
(you think it might be useful later in the game) press Action again and it will be transferred to the SNEAK and will then
appear in this Inventory section. If you want to drop it press Cancel.
ACCESSING THE INVENTORY
• Highlight the third icon down (brown) on the left using the arrow keys. The icon will flash and change the display
on the SNEAK to a list of Inventory items.
Magic Rings
Map
Seteks
List
• Press the right arrow key once and this will highlight one of possibly three objects in your possession. These items
are always with you and can be added to throughout the game
28
21
SETEKS
The Setek is the Omikron currency and you won’t survive long without money. If you find Seteks during the adventure
they will be added here. When you spend money the total will be deducted from that shown here.
MAGIC RINGS
The rings held in the Inventory have two uses - most importantly a Ring enables you to Save a game at special saving
points (see below Saving the Game). Rings can be found in various locations but there are a limited number in the game.
A Ring can also be used as a means to Buy Advice (see below).
MAP
The map is accessible when your character is out on the city streets. Select with the arrow keys and press Enter. You
will see a map of the district.
INVENTORY LIST
• Press the right arrow again and you will highlight an object on the Inventory list. The SNEAK holds these objects
in molecularly disassembled form.
• Select an object from your inventory and then press Action. The panel at the top of the screen will be highlighted
showing USE - USE ON - EXAMINE.
By using the arrow key left/right you can highlight these options for that object:
Use
Use it immediately (such as a key for an apartment). Press Action in the 3D world and it will be used.
Use On
Use it with something else. Select an object, press Action, select USE ON with the arrow keys,
select another object and press Action again. If the combination is impossible you will be told.
Examine
Look at the object (you will usually see the object in rotating form or read any message or text on
the object).
22
Transferring items to the Multiplan
The top option is the transfer TO the Multiplan from the SNEAK inventory.
• Highlight the top right icon. An arrow will flash pointing into the blue box and the message panel at the top of the
screen will read ‘Transfer to Multiplan’.
• To transfer items from the SNEAK to the Multiplan press Action (the arrow will stay lit).
• Now you can select one of the objects with the up/down arrow keys.
• When you have highlighted an item, press Action. That item will disappear from the SNEAK list. It has been transferred
to the Virtual Locker.
Transferring items from the Multiplan
In the same way you can transfer items FROM the Virtual Locker back to your Inventory.
• Highlight the second icon down on the right. A flashing red arrow pointing out from a red box will show ‘Transfer from
Multiplan’.
Now the central display will show you what is currently in the Virtual Locker.
• Select an item, using the arrow keys, and press Action. It will be moved out of the Multiplan and returned to your
SNEAK.
Examining Objects
You can also examine all objects held in the Virtual Locker and in the SNEAK
• Highlight the third icon down using the up/down arrow keys and press Action.
• Select an item, using the up/down arrow keys, and press Action.
You will see that object on the screen.
27
THE MULTIPLAN VIRTUAL LOCKER
The SNEAK will only hold a limited number of objects but the game requires that you have access to a wide range of items.
On Omikron these objects can be stored in a virtual locker. Working in conjunction with the Khonsu MK400 SNEAK, the
Multiplan Virtual Locker is accessible on many locations in Omikron (Kay’l’s Apartment, Office, other characters’ offices
etc.) Essentially it is the means by which you can transfer objects to a safe place without having to carry everything
around with you.
If the Inventory list is longer than the visible screen press the down arrow to scroll down. Remember that the Cancel
button will always return you to the previous menu.
The SNEAK will only carry a limited number of objects (18) and must therefore be used in conjunction with the Multiplan
Virtual Locker (see below). Always check your inventory. It will be the default selection when you press TAB to open
the SNEAK. If you do not have the right item in your possession in certain stages of the game, you will not succeed
in your quest!
Accessing the Multiplan
• Locate a terminal then stand your character in front of it and press Action.
MEMORY
The next section of the SNEAK is the Memory function.
Throughout the game you will have many conversations with characters or read items in newspapers, see news broadcasts
etc that are key to your success in the game. You cannot be expected to remember all this information, or make copious
hand-written notes, so that is why the SNEAK has a Memory function.
This will open the Multiplan Virtual Locker menu.
In the centre of the screen are the items you are carrying in your SNEAK inventory.
You can scroll up / down this list using the up/down arrow keys.
When vital information is discovered by your character the message Data Memorized will appear on the screen. This
indicates that the information (or at least the key parts of it) are stored in your SNEAK memory mode.
• Highlight the fourth icon (yellow) down from the left using the arrow keys. The icon
will flash and change the central display on the SNEAK to a list of Memorised items
or the names of the source of the information.
• Press the right arrow and (if there is one) you will highlight a memory source (such
as a name). At the same time a box will appear on the central display revealing a
vital piece of information that has been ‘memorised’. If there are many memory
items scroll through them using the up/down arrow keys.
Arrow keys will take you back out of the Memory section. The spacebar will take you back to the 3D world.
26
23
OPTIONS
The next SNEAK mode is the Game Options function. If you want to adjust Game Options, now that you are in-game, you
can do so from here. The options shown are the same as the Main Menu screen options (see above).
• Highlight the fifth icon down (the red one) from the left using the arrow keys icon. This icon will flash and change the
display on the SNEAK to the list of Game Options.
QUIT
The Quit option gets you out of the game.
If you want to leave the game at any point select this option.
• Press the down arrow to highlight the (white) Quit icon on the lower right side of the screen. This will flash.
• Press Action and confirm your choice (Yes/No)
You have now explored the SNEAK. As you can see it has a multitude of uses and will be very useful to you in your
adventure.
Getting Back to the Game
• Press TAB or the spacebar to return to the 3D world.
•
•
•
•
•
Use the right arrow key to enter the options section and the up/down arrow keys to select from:
Video Options
Audio Options
Game Options (includes Difficulty Settings)
Controls Options (includes Redefine the keys)
For a full explanation of these Options see the Main Menu screen section (above).
• Press the left arrow key to return to the SNEAK menu or the Cancel button to return to the 3D world.
24
25
THE MULTIPLAN VIRTUAL LOCKER
The SNEAK will only hold a limited number of objects but the game requires that you have access to a wide range of items.
On Omikron these objects can be stored in a virtual locker. Working in conjunction with the Khonsu MK400 SNEAK, the
Multiplan Virtual Locker is accessible on many locations in Omikron (Kay’l’s Apartment, Office, other characters’ offices
etc.) Essentially it is the means by which you can transfer objects to a safe place without having to carry everything
around with you.
If the Inventory list is longer than the visible screen press the down arrow to scroll down. Remember that the Cancel
button will always return you to the previous menu.
The SNEAK will only carry a limited number of objects (18) and must therefore be used in conjunction with the Multiplan
Virtual Locker (see below). Always check your inventory. It will be the default selection when you press TAB to open
the SNEAK. If you do not have the right item in your possession in certain stages of the game, you will not succeed
in your quest!
Accessing the Multiplan
• Locate a terminal then stand your character in front of it and press Action.
MEMORY
The next section of the SNEAK is the Memory function.
Throughout the game you will have many conversations with characters or read items in newspapers, see news broadcasts
etc that are key to your success in the game. You cannot be expected to remember all this information, or make copious
hand-written notes, so that is why the SNEAK has a Memory function.
This will open the Multiplan Virtual Locker menu.
In the centre of the screen are the items you are carrying in your SNEAK inventory.
You can scroll up / down this list using the up/down arrow keys.
When vital information is discovered by your character the message Data Memorized will appear on the screen. This
indicates that the information (or at least the key parts of it) are stored in your SNEAK memory mode.
• Highlight the fourth icon (yellow) down from the left using the arrow keys. The icon
will flash and change the central display on the SNEAK to a list of Memorised items
or the names of the source of the information.
• Press the right arrow and (if there is one) you will highlight a memory source (such
as a name). At the same time a box will appear on the central display revealing a
vital piece of information that has been ‘memorised’. If there are many memory
items scroll through them using the up/down arrow keys.
Arrow keys will take you back out of the Memory section. The spacebar will take you back to the 3D world.
26
23
SETEKS
The Setek is the Omikron currency and you won’t survive long without money. If you find Seteks during the adventure
they will be added here. When you spend money the total will be deducted from that shown here.
MAGIC RINGS
The rings held in the Inventory have two uses - most importantly a Ring enables you to Save a game at special saving
points (see below Saving the Game). Rings can be found in various locations but there are a limited number in the game.
A Ring can also be used as a means to Buy Advice (see below).
MAP
The map is accessible when your character is out on the city streets. Select with the arrow keys and press Enter. You
will see a map of the district.
INVENTORY LIST
• Press the right arrow again and you will highlight an object on the Inventory list. The SNEAK holds these objects
in molecularly disassembled form.
• Select an object from your inventory and then press Action. The panel at the top of the screen will be highlighted
showing USE - USE ON - EXAMINE.
By using the arrow key left/right you can highlight these options for that object:
Use
Use it immediately (such as a key for an apartment). Press Action in the 3D world and it will be used.
Use On
Use it with something else. Select an object, press Action, select USE ON with the arrow keys,
select another object and press Action again. If the combination is impossible you will be told.
Examine
Look at the object (you will usually see the object in rotating form or read any message or text on
the object).
22
Transferring items to the Multiplan
The top option is the transfer TO the Multiplan from the SNEAK inventory.
• Highlight the top right icon. An arrow will flash pointing into the blue box and the message panel at the top of the
screen will read ‘Transfer to Multiplan’.
• To transfer items from the SNEAK to the Multiplan press Action (the arrow will stay lit).
• Now you can select one of the objects with the up/down arrow keys.
• When you have highlighted an item, press Action. That item will disappear from the SNEAK list. It has been transferred
to the Virtual Locker.
Transferring items from the Multiplan
In the same way you can transfer items FROM the Virtual Locker back to your Inventory.
• Highlight the second icon down on the right. A flashing red arrow pointing out from a red box will show ‘Transfer from
Multiplan’.
Now the central display will show you what is currently in the Virtual Locker.
• Select an item, using the arrow keys, and press Action. It will be moved out of the Multiplan and returned to your
SNEAK.
Examining Objects
You can also examine all objects held in the Virtual Locker and in the SNEAK
• Highlight the third icon down using the up/down arrow keys and press Action.
• Select an item, using the up/down arrow keys, and press Action.
You will see that object on the screen.
27
Deleting Objects
You can delete any object from the Multiplan list.
• Highlight the fourth icon down using the arrow key and press Action.
• Select an item using the up/down arrow keys and press Action, that item will be deleted permanently. Think twice
before you do this!
SAVING YOUR GAME
It’s very important to save the game as often as you can, because you’ll never know what’s going to happen to your
character just around the next corner. To save a game you need to find any of the permanent Save/Advice Points and use
Magic Rings.
In-game Save/Advice Points
Throughout the game there are pre-set Save/Advice Points indicated by three rotating rings.
• To save your game, simply approach the rings and press the Action key.
This will open the Save/Advice Option screen. This allows you to save the current
game and to ‘buy’ advice about key aspects of the game.
INVENTORY
The next mode on the SNEAK is the Inventory. This is one of the main uses of the SNEAK. Control of inventory is crucial
to success in the game.
Throughout the game there will be objects that can be picked up. To pick up an item, stand near the object and press
Action. Your character will pick it up and a short description will appear on the screen. If you want to keep the object
(you think it might be useful later in the game) press Action again and it will be transferred to the SNEAK and will then
appear in this Inventory section. If you want to drop it press Cancel.
ACCESSING THE INVENTORY
• Highlight the third icon down (brown) on the left using the arrow keys. The icon will flash and change the display
on the SNEAK to a list of Inventory items.
Magic Rings
Map
Seteks
List
• Press the right arrow key once and this will highlight one of possibly three objects in your possession. These items
are always with you and can be added to throughout the game
28
21
THE SLIDER TRANSPORTER
The next icon on your SNEAK is the control for calling the Slider.
You can walk to many destinations in the game world but to get somewhere fast
you will use a ‘Slider’. Sliders are individual transportation vehicles on Omikron
that will, when summoned, pick you up when you are outside and take you to a
pre-designated address.
CALLING THE SLIDER
• Highlight the second icon (green) down from the left using the arrow keys. This will flash and change the SNEAK
Mode to Calling the Slider.
• Press the right arrow key to highlight the ‘Calling the Slider’ options.
• Use the up/down arrow keys to select a location you want to be taken to (e.g.
Kay’l’s Apartment) and press Action.
SAVING THE GAME
• The top option shows ‘New Save’. Highlight the Save option and press Action. The game will be saved and you will be
returned to the 3D world. The name will be dependant on which character you are playing, the date and time of the save.
GETTING ADVICE
• The second option allows you to Buy Advice. A list of characters you have
met and talked to is shown with details of the key information you should
be acting on. Highlight the character you want advice about and you will see
a cost in Magic Rings (and a summary of how many Rings you are carrying).
If you have sufficient Rings, select Buy or Cancel.
Magic Rings
As mentioned above, you may have found a number of special magic rings in the adventure that are now in your SNEAK (in
a special section along with your Omikron currency and Map). These magic rings can be collected like other objects but
will appear in your SNEAK Inventory as a rotating object.
If you are not in a suitable location to be picked up by the Slider you will be given a message to that effect. If you
are by a roadside, your screen view will change to a chase view of the Slider and you will follow it as it makes its
way towards you. When it arrives, get close to the door (located near its middle) and press Action. The Slider door
will open and you will get in. Be careful standing in the road - you might get run over by the traffic! The Slider will
drive you to your destination and deposit you as near as possible to the building entrance.
20
Note that Magic Rings can have other uses and that there are a limited number available in the game.
29
GETTING AROUND OMIKRON
This section gives you a brief overview of the ways you can move your character around Omikron.
Walking
Obviously you’re going to do a lot of walking in this adventure. Use the arrow keys for Forward/Backward/Left/Right +
Control Left/Right for side-step left/right. If you want to run whilst moving forward, hold down the Run.
Using Elevators
This is a vast world where most apartments, offices and buildings have to be accessed via elevators. To change levels in
most buildings or to get access to most apartments, simply enter the elevator and press Enter. Offices such as the
Security Centre will offer you a number of levels that can be accessed.
• Use the arrow keys to select a level and press Action to activate the elevator.
ENERGY
A general value for the amount of energy the character has. A low value before a fight or combat,
or any form of physical exertion, is not advised. Energy can be topped up using Medikits, Food or
special Potions.
MANA
The ability of the character to cast spells.
FIGHT EXPERIENCE
A general description of the fighting experience of the character. This can be improved
by practice.
ATTACK
The unarmed fighting ‘bonus’ of the character. The higher this value is, the more damage
your character will inflict on opponents. This can only be improved by practice.
DODGE
The combat agility of the character. This can be improved by practice.
Using the Sliders
One of the first things you will have to do in the adventure is get to Kay’l’s apartment and to do this quickly you will have
to use a Slider. Sliders are the personal transportation system on Omikron and are the means by which you will travel
around the vast world.
BODY RESISTANCE
The ability of the character to resist or defend himself against an attack.
SPEED
The speed of the character in armed combat situations. This can be improved by practice.
Remember that different characters will have different abilities. Study these carefully and use them wisely.
30
19
SNEAK Modes
There are six SNEAK Modes accessible:
• Your Character
• Calling the Slider
• Inventory (includes Saving, Currency and Map)
• Memory
• Options
• Quit
CALLING THE SLIDER
• Highlight the second icon down (green) from the left using the arrow keys. This will flash and change the SNEAK Mode
to Calling the Slider.
YOUR CHARACTER
This is an ID on which character you are in the game (it can change) and on the varying abilities of that character.
• Using the arrow keys highlight the top left (blue) icon. The icon will flash when highlighted and a rotating image of
your character will appear in the visual display.
• Press the right arrow key and you will highlight the Identity box. This will display all character details such as Name,
Age, Sex, Blood Type etc.
• Press the right arrow key again and you will highlight the
Characteristics box. This will display a range of values for the
character:
• Press the right arrow key to highlight the ‘Calling the Slider’ options.
• Use the up/down arrow keys to select a location you want to be taken to (eg Kay’l’s Apartment) and press Action.
If you are not in a suitable location to be picked up by the Slider you will be given a message to that effect.
If you are by a roadside, your screen view will change to a chase view of a Slider responding to your call and you will
follow it as it makes its way towards your character.
• When it arrives, get your character close to it (somewhere near the middle) and press Action.
The Slider door will open and you will get in. Be careful standing in or crossing the road - you might get hit by the traffic!
The Slider will drive you to the correct address and deposit you as near as possible to the building entrance.
18
31
LOOKING AROUND
First Person Perspective
The Nomad Soul will select a view of the adventure for you in ‘cinematic style’ (long shots, close-ups, high angle, tracking
shots etc.) This adds to the ‘cinematic’ quality of the adventure. However, at certain points you may want to know just
what it is you are about to walk into and the default view taken by the game is not helpful. In such a case:
• Either, press (and hold down) the left mouse button,
• Or, press (and hold down) key ‘L’ to get a first person perspective view through the eyes of your character.
Accessing the SNEAK
• Press the TAB Key to open the SNEAK menu.
The SNEAK will always open on the Inventory option (probably the most used option) but the following is a breakdown of
everything it does:
Characteristics
Call the slider
Quit
Inventory
Seteks
Memory
Magic Rings
Options
Map
• Then you can look all around you by moving the mouse freely.
This view will only work when the character is standing still.
32
17
THE SNEAK
Investigating
You’re advised to investigate everything you find - this may take time but you do not want to miss out on any item or
information that could be crucial to your success in the adventure. If there is a cupboard and it’s open (or you find a key)
why not open it and see what’s inside?
• Stand your character in front of the cupboard etc and press Action. The character’s hand will touch the cupboard and
open it - if it’s locked or it’s not worth bothering about, he will tell you.
Inside the cupboard there may be nothing or there may be several useful objects.
• Stand close to the objects and press Action to pick one up.
What is it?
Grafted on to Kay’l’s forearm is the latest Khonsu-designed SNEAK - the MK400 computer terminal. It can perform a large
number of useful tasks and give you vital information about the world you are exploring (and your own character!).
You will probably use it most often for inventory management.
Thanks to the latest molecular disassembly technology, the MK400 enables you to carry up to 18 different objects with
you on your adventure. The SNEAK can be used in conjunction with the Multiplan Virtual Locker that allows you to store
objects and retrieve them easily and efficiently and can be accessed from many points in the game world (see later).
Using and controlling the SNEAK is an essential part of the game. It is accessible at all times in the adventure section
of the game.
A description will appear on the screen.
• If you want to take it press Action again.
• If you want to drop it press the Cancel button.
Some cupboards have several objects, to pick up all items repeat the above process.
SURVIVING
Your character is on a world he knows nothing about. Chances of survival are low unless you get to grips with the basics
such as eating and drinking, keeping up energy levels and acquiring money.
Checking your Energy
It’s important that you check the energy level of your character. If it is too low that character cannot perform to the
maximum and will probably lose any fights or be adversely affected by any physical exertion. To add energy the character
can eat food, drink or use any Medikits or correct potions picked up during the adventure for an instant boost.
Special Note: SNEAKs have technical limitations. If you ever switch SNEAKS, certain types of objects (like weapons and
Medikits) will not be transferred to your new SNEAK.
16
33
MEDIKITS
Medikits can be found in many locations. Pick them up and put them into your SNEAK as normal and they will be shown on
the Inventory list.
To
•
•
•
top up your energy level (if you are anticipating a fight):
Open your SNEAK (press Tab)
Select the Medikit (large or small) using the arrow keys and press Action.
Select the USE option and press Action - you will find that your character has had an energy boost.
Eating and Drinking
There are many places in Omikron that provide food and drink to sustain your character - they could be anything from
bars, vending machines or restaurants.
AT THE BAR
If you want a drink in a bar, stand close to a bartender and press Action. You will be asked what you want.
• Select your choice and press Action.
VENDING MACHINES
There is a selection of standard food/drink vending machines on Omikron.
• Stand in front of the machine and press Action. You will see a menu screen allowing you to choose from Buy, Examine
or Quit.
• Highlight the Buy icon with the arrow keys and press Action
• Select the item from the list with the arrow keys and press Action to put it into
your SNEAK inventory (say, a can of beer).
34
Animation Screens
Throughout The Nomad Soul you will be shown animated sequences of vital information - these animations could be a
preview of an action section showing you the area you will have to battle in etc. In all cases the screen will switch to
‘widescreen mode’ to let you know that all you have to do is watch the next section
Picking Up Objects/Items
You will find many objects or items in The Nomad Soul. Some of these objects
may be useful to you (some will be crucial to your investigations) but others
will not. It is up to you to decide. If you see an object that you want to
pick up, move the character close to it and press Action, the character will
pick it up in his hand and a message will inform you what it is.
If you want to take the object press Action again and it will be placed into
your SNEAK Inventory (see below). If you do not want the object, press
Cancel. This will make the character return it to its original location. Once
you have the object in your possession, you can choose to Use it or Examine
it by accessing the SNEAK options.
Inventory Management
You cannot hold everything you find in your hands. You have the use of a ‘SNEAK’ that, among its many uses, will help you
manage your inventory of all the objects you have collected.
15
Conversations
You will not make any progress in the game without talking to other characters. They will give you valuable information
(good or bad) that you may be able to use later.
• To talk to another character, approach him/her and press Action. If he/she has anything to say, the screen will change
(widescreen style and text will appear below it).
AT THE RESTAURANT
Restaurants are similar to vending machines.
To drink or eat the item:
• Select the item on the SNEAK and press Action.
• Select the ‘Use’ option at the top of the screen and press Action (your character will have consumed the item).
Money
Remember that everything has a price (in Seteks) and you cannot buy anything without
money. When you buy something the total will be deducted from your Setek total shown in
your SNEAK. Your character will find some Seteks in various locations but there are
opportunities to get more money throughout the game (look out for ads or flyers announcing
these opportunities). Money will help you buy better weapons (which are readily available
but sometimes very expensive) or even advice.
If a character is talking at length and you want to read the subtitles that have yet to appear, you will see two red arrows
next to the text. Use your up/down arrow keys to view next/previous subtitles.
You will at some point have to respond. If a response is needed then a list of choices may be shown. Read these carefully
(for what you say may be crucial), highlight your choice and press Action. The character will then act on your response.
FIGHTING AND COMBAT
You cannot succeed in The Nomad Soul without learning how to fight unarmed and with
weapons. There are several opportunities to develop your skills in both these types of combat
in the early stages of the game. You’re advised to take these opportunities when you can they will build up your experience and sharpen up all your fighting skills. Practice and
experience of actual combat and various potions can improve the character statistics
shown in the SNEAK.
If you’ve already talked to the character and wish to move quickly through conversation sections of the game then you
can press the Action to progress.
14
35
The Fighting Controls
Move Forward
Right Arrow
Move Backward
Left Arrow
Strafe Left
Delete
The Control Keys
The Adventure part of the game can be controlled using the Adventure/Movement Keys listed below. All keys are shown
here but when you are playing the game you would be wise to have The Nomad Soul Key Guide close at hand.
ADVENTURE/MOVEMENT CONTROL KEYS
Strafe Right
End
Move Forward
Up Arrow
Jump
Up Arrow
Move Backwards
Down Arrow
Crouch
Down Arrow
Turn Left
Left Arrow
Punch 1
Q
Turn Right
Right Arrow
Punch 2
W
Strafe / Half Turn
Control
Kick 1
A
Action/Use
Enter
Kick 2
S
Jump/Cancel
Spacebar
Note: There are many other ‘special moves’ involving various combinations of keys there to be discovered.
First Person View
Left Mouse Button or Key ‘L’ (Held down)
Run
Shift
Open ‘SNEAK’
TAB
Note that the Spacebar will make the character jump when moving around the 3D world but it will also cancel an action.
For example, if a character is holding an object (picked up using the Action key) and you want to return it, simply press
the Spacebar.
36
13
GETTING STARTED
HEALTH BARS
Your Health bar will appear on the left of your screen to show your health in any combat.
You’ve installed and loaded the game, set up your options, watched the introduction and now you’re eager to get on with
the game - what else do you need to know? The Nomad Soul is a game where you will discover many things so, in this
manual, you will be told nothing about the story or how to succeed in the game, it will only give you essential information
that you will need to enjoy the game fully.
THE BASICS
The 3D World of Omikron
You control a character who is exploring a vast 3D world. Neither you,
nor the character, know anything about this world but everything is
there to be discovered. There are messages to be read, objects to be
picked up, other characters to talk to, and items to be bought. There
is no end to the things you can do in this game but it’s up to you to
structure your actions in such a way as to help you through the
adventure. Don’t worry that you might get lost in this vast world there are several devices that will easily bring you back on track.
Action Sequences
The Nomad Soul is not just an adventure game. It also features unarmed fighting (in side-on or behind view), with all
the excitement of discovering secret moves, punches, kicks etc; armed combat (in first person view), featuring a variety
of deadly enemies, weapons, ammo, manoeuvres etc; and swimming sequences - sometimes it will be necessary for your
character to get into the water and swim to other parts of the world. All these action sequences have their own fully
customisable key controls.
12
The Shooting Controls
Forward
Up Arrow
Backward
Down Arrow
Strafe Left
Left Arrow
Strafe Right
Right Arrow
Fire
Shift / Left Mouse Button
Action / Use
Enter
Jump
Spacebar / Right Mouse Button
Crouch
Right CTRL
Change Weapon
Alt
Turn Left
Number Pad 4
Turn Right
Number Pad 6
Look Up
Number Pad 8
Look Down
Number Pad 2
37
SWIMMING
Your character will have to swim at various points in the adventure. You can make him swim on the water (crawl or
breaststroke), dive and swim underwater. Be aware that, unless you have made special provisions, he will use up oxygen
and will need to come to the surface to rest and take in more air.
MOUSE SETTINGS
Adjusts the settings for your Mouse and will give you the following options:
MOUSE SENSITIVITY (HORIZONTAL)
and
MOUSE SENSITIVITY (VERTICAL)
If you find your Mouse too responsive or less responsive on either plane,
adjust here using the arrow keys.
INVERT MOUSE
This will invert the vertical control of the Mouse.
SET JOYPAD CONTROLS
Same as ‘Set Keyboard and Mouse controls’ but:
To
•
•
•
redefine a button:
Highlight the button you want to change
Press Action and it will begin to flash
Press the new selected button on the joypad etc and it will appear on screen
Quit
Select this option to Quit the game. You will be asked to confirm your choice.
38
11
Controls
SET KEYBOARD & MOUSE CONTROLS
All control settings in The Nomad Soul are fully customisable. By selecting this option you will be able to redefine all
controls used in the following action sections:
ADVENTURE CONTROLS
Moving around the 3D world
FIGHT CONTROLS
Unarmed fighting controls
SHOOT CONTROLS
Armed fighting controls
Forward
Up Arrow
Back
Down Arrow
Turn Left
Left Arrow
Turn Right
Right Arrow
Action / Use
Enter
Dive
Right CTRL
Crawl Stroke
Right Shift
MANA AND SPELLCASTING
At some point in your adventure you will need to cast spells. Mana (the value in the
Characteristics Mode of the SNEAK) is the energy that empowers you to cast spells. You can
increase your Mana level by gathering potions throughout the adventure on Omikron and using
them as appropriate.
SWIM CONTROLS
Swimming controls
To
•
•
•
The Swimming Controls
redefine a key:
Highlight the function you want to change
Press Enter and it will begin to flash
Press the new selected key on the keyboard/mouse and it will appear on-screen
10
39
CREDITS: QUANTIC DREAM
Written and Directed by
David Cage
Project Manager:
Olivier Demangel
Internal Producer:
Anne Devouassoux
Designs and Graphics:
Lead Graphists:
Loic Normand with
Stephane Elbaz - Philippe Aballea
Olivier Demangel
Edouard Pham
Xavier Malard
Eric Seigaud
Pierre Roux
Nathalie Chody
Tsoa Rakotoarisoa
Kamel Gali
Franck Aubessard
Amar Hamidi
Corentin Jaffre
Yann Legal
Programming:
SOUND FX
Use the arrow keys to adjust the slider for all sound effects volume
Francois Kermorvant
Stephane Fournier
Julien Varnier
Christophe Vivet
Jean-Charles Meyrignac
Animations:
Olivier Nallet &
Fabien Fessard with
Frederic Hanoulle
Antoine Viau
40
Tony Lejuez with
Christophe Leulier
Xavier Malard
Yan Le Gall
IAM scripting:
Sophie Buhl with
Nathalie Chody
Audrey Leprince
Cameras:
Daniel Cinglant & David Cage
Dialogue:
Christophe Leulier
Tsoa Rakotoarisoa
Marie Catherine Herveau
Anne Devouassoux
Regis Carlier
3D SOUND
Select to enable 3D sound (if applicable to your system)
Game Options
Game Options allow you to set in-game options and difficulty levels
FIGHT DIFFICULTY
Select a level of difficulty for the fight sections of the game from Easy, Medium or Hard
SHOOT DIFFICULTY
Select a level of difficulty for the shooting sections of the game from Easy, Medium or Hard
FIGHT CAMERA
Select your preference of camera view for the fight sequences, from Side or Back View.
9
DISPLAY SKY YES/NO
Select whether to display sky graphics or not
Sound Effects, Ambient &
Additional tracks:
DISPLAY SHADOWS YES/NO
Select to display shadow effects
Original English Voices by:
DETAIL LEVEL
Select a level of detail from Low to High.
STREET ACTIVITY
Select a level of ‘street activity’ from None/Low/Medium/High/Very High
SELECT 3D ACCELERATION
Choose a 3D acceleration mode from Display (your 3D card), Software Rendering (in software)
or Direct X Software Renderer
Audio Options
Audio options give you control over all of the audio elements of The Nomad Soul
DIALOGUE VOLUME
Use the arrow keys to adjust the slider for character speech volume
AMBIENT VOLUME
Use the arrow keys to adjust the slider for background sound volume
8
Body Motion Capture by:
Acti System
Xavier Despas
QUANTIC DREAM WOULD LIKE TO THANK:
John for his faith. Bruno for believing when there really was no
reason to. Iman, David and Reeves for their enthusiasm, their
talent and their intelligence. Charles for accepting the challenge.
Philip for his support and enthusiasm. Eidos and Eidos, France.
Tony and Ed for the quality of the casting and devoting so much
time to us. All the people that sent us encouraging e-mails and
supported us from the start. Our wives and girlfriends for being
patient and understanding. All the staff at Quantic Dream for the
sleepless nights and the long week-ends.
David Bowie
David Gasman
Paul Bandey
Karen Strassman
Christian Erickson
Barbara Weber
Gay Marshall
Edward Marcus
Allan Wenger
Joe Rezwin
Patrick Floersheim
Iman 631:
Iman
The Dreamers:
David Bowie
Reeves Gabrels
Gail Ann Dorsey
Sound Engineer:
Jean-Jacques Toroella
Motion Capture Acting:
Marc Chung
Minh Minh Ngo
Pascal Gentil
Emmanuelle Parlant
Tony Dehas
Original Songs and
Soundtrack:
David Bowie & Reeves Gabrels
Facial Lipsynching and
Dialogue Motion Capture:
Tribu
Mr Bowie’s Motion Capture created & performed by Edouard Locke
41
CREDITS: EIDOS INTERACTIVE
Producer
UK
Herve Albertazzi
Shadow Producer
US
Tom Marx
Senior Designer
Philip Campbell
Additional support and ideas
Paul Glancey
QA Managers
UK
US
QA Project Co-Ordinator
QA Teams:
UK
Europe
US
David Rose
Nicholas Earl
Product Managers
UK
US
France
Germany
Michael Newey
Susan Boshkoff
Olivier Salomon
Lars Wittkuhn
PR
David Rousseau with
Nicolas Gianel
Guillaume Petit
David Asenkat
Jon Reddington
Tyrone O’Neil
Linus Dominique
Sammy Kil
Alexandre Lepoureau
Clayton Palma with
Chris Lovenguth
Pierre Roux,
Flavia T Grant with
Holly Andrews
Development Managers
Tony Bourne
Mike McHale
Dominic Berzins
US
Compatibility Testing
Localisation
Creative Manager:
Creative Co-ordinator:
UK
Jonathan Rosenblatt &
Steve Starvis
France
Priscille Demoly
Germany Sascha Gree-Kaiser
Matt Carter-Johnson
Caroline Simon
SPECIAL THANKS TO:
Charles Cornwall, Ian Livingstone, Mike McGarvey, John Kavanagh,
Rob Dyer, William Zysblat, Robert Goodale, Janey de Nordwall, Nick
Davies, Debbie Lash, Eva Whitlow, Rose Montgomery, Lee Briggs,
Paul Sheppard, Amanda & Sam.
Jason Walker
Manual text
Manual design & layout
42
The Write Stuff
A Creative Experience,
London
NEW GAME
Start a new game of The Nomad Soul. You will have to enter a Game Name, (using the keyboard) then
you will be shown the introduction.
LOAD GAME
Select Load Game to open the Load Game Menu. This will reveal a list of previously saved games
• Simply highlight the name of the saved game you want to load and press Enter to select.
Then highlight the Load option. Press Enter again to Load and The Nomad Soul will load
to the saved point.
In this menu screen you can also Delete a Saved Game or Cancel the Menu (to return to the
previous screen).
OPTIONS
This features a range of options to set up the game to suit the specification of your particular
machine. You might need to adjust some of these Options if you find that the game is running slow.
Video Option
Video Options gives you a chance to configure the game graphics to the specification of your
machine. Select with the option with the arrow keys and confirm by pressing the Action key.
RESOLUTION
Select a screen resolution (640x480; 800x600; etc)
CLIPPING DISTANCE
Select a Clipping Distance from Very Near to Very Far
7
THE MAIN MENU
OMIKRON: THE NOMAD SOUL
MENU CONTROLS
To navigate through all menus in The Nomad Soul use the following keys:
To Select
Arrow (Cursor) Keys
Use Left/Right/Up/Down to navigate through various menu options. The
relevant selections will be highlighted.
To Action / Use
Enter Key
Pressing the Enter Key will select any highlighted option.
To Cancel Action/Return to Previous Menu
Spacebar
Pressing the spacebar will always return you to the previous menu or
cancel an action.
The first screen you will see is the Main Menu screen. This gives you the following Options:
6
“Thursday’s Child”
Written by:
David Bowie and Reeves Gabrels
Publisher:
North America Nipple Music (BMI) administered by RZO Music, Inc., My Half Music (ASCAP)
administered by Bug Music, Inc.
Rest Of World Nipple Music/RZO Music Ltd., My Half Music/Bug Music, Ltd.
“Something In The Air”
Written by:
David Bowie and Reeves Gabrels
Publisher:
North America Nipple Music (BMI) administered by RZO Music, Inc., My Half Music (ASCAP)
administered by Bug Music, Inc.
Rest Of World Nipple Music/RZO Music Ltd., My Half Music/Bug Music, Ltd.
“Survive”
Written by:
Publisher:
David Bowie and Reeves Gabrels
North America Nipple Music (BMI) administered by RZO Music, Inc., My Half Music (ASCAP)
administered by Bug Music, Inc.
Rest Of World Nipple Music/RZO Music Ltd., My Half Music/Bug Music, Ltd.
43
“Seven”
Written by:
Publisher:
David Bowie and Reeves Gabrels
North America Nipple Music (BMI) administered by RZO Music, Inc., My Half Music (ASCAP)
administered by Bug Music, Inc.
Rest Of World Nipple Music/RZO Music Ltd., My Half Music/Bug Music, Ltd.
“We All Go Through”
Written by:
David Bowie and Reeves Gabrels
Publisher:
North America Nipple Music (BMI) administered by RZO Music, Inc., My Half Music (ASCAP)
administered by Bug Music, Inc.
Rest Of World Nipple Music/RZO Music Ltd., My Half Music/Bug Music, Ltd.
“The Pretty Things Are Going To Hell”
Written by:
David Bowie and Reeves Gabrels
Publisher:
North America Nipple Music (BMI) administered by RZO Music, Inc., Exploded View Music
(ASCAP) administered by Bug Music, Inc.
Rest Of World Nipple Music/RZO Music Ltd., Exploded View Music/Bug Music, Ltd.
“Omikron (New Angels of Promise)”
Written by:
David Bowie and Reeves Gabrels
Publisher:
North America Nipple Music (BMI) administered by RZO Music, Inc., My Half Music (ASCAP)
administered by Bug Music, Inc.
Rest Of World Nipple Music/RZO Music Ltd., My Half Music/Bug Music, Ltd.
44
TECHNICAL
SYSTEM REQUIREMENTS
Minimum:
• Pentium 233MHz processor or equivalent
• Windows® 95/98
• 32 Mb RAM
• 4 Mb SVGA Video Card (100% DirectX™ 6.1 compatible)
100% DirectX™ 6.1 compatible Soundcard
4x CD-ROM Drive
350MB Hard Disc Space
DirectX® 6.1 or higher (included on CD)
Recommended:
• Pentium® II 266MHz (or better)
• 8x CD-ROM Drive or faster
• 4 Mb 3D Card (100% DirectX™ 6.1 compatible)
Installation
• Insert The Nomad Soul CD 1 into your CD-ROM drive. If Autorun is enabled, The Nomad Soul will take you to the
Installation Screen.
• Simply click on the Install button and follow all on-screen directions. You will be asked to insert CDs 2 and 3.
• If Autoplay has not been enabled then you’ll have to double-click on the ‘My Computer’ icon on the desktop, then on the
CD-ROM icon and then click on Setup.exe.
• Once The Nomad Soul is installed it will appear in the Program group on the Start Menu.
Loading
• Select Start/Programs/Eidos Interactive/Quantic Dream/The Nomad Soul and then highlight ‘The Nomad Soul’.
• The game will now load.
5
INTRODUCTION
I have many things to tell you, and very little time. My... my
name is Kay’l, I come from a parallel universe to yours. My
world needs your help, you’re the only one who can save us.
I succeeded in opening a breach between my world and yours.
Through your computer, you can enter our world and help us.
But in order to do this, you must transfer your soul into my
body.
“The Dreamers”
Written by:
Publisher:
David Bowie and Reeves Gabrels
North America Nipple Music (BMI) administered by RZO Music, Inc., My Half Music (ASCAP)
administered by Bug Music, Inc.
Rest Of World Nipple Music/RZO Music Ltd., My Half Music/Bug Music, Ltd.
© 1999 David Bowie under exclusive license to Virgin Records America, Inc.
David Bowie appears courtesy of Virgin Records America, Inc.
Do you accept? Press any key to say yes, but hurry... there
isn’t much time.
I knew I could count on you. Now you must concentrate.
You’ve done it. Now your soul occupies my body. This is the last time that we’ll be able to speak together. Once you’ve
crossed the breach, you’ll be on your own. I will take over my body when you leave the game, and hold your place for you
until you return.
Now I must explain to you how to control my body. These are the main controls that allow you to act in my universe.
That’s it. You’re ready. But remember, once you’ve crossed the breach, you’re on your own.
There’s no saving and going back if you get into trouble. You are entering a real world. If you make mistakes, you’ll just
have to accept the consequences.
Now listen carefully. To begin your investigation, go first to my apartment. There’s no more time to talk, you must cross
the breach before it closes. Oh and one more thing... be careful with my body, it’s the only one I’ve got.
4
45
INSTRUMENTAL SONGS
1.
CONTENTS
20. Fight Scene Three *
Akas Bar *
2. Awaken 2 **
21. Fight Scene Four *
3. Bar Concert *
22. Fight Scene Five *
4. Epilogue *
23. Shooting Scene A *
5. Gandhar *
24. Shooting Scene B *
6. Gandhar Ambient *
25. Shooting Scene C *
7.
26. Shooting Scene D *
Jangir **
8. Jaunpur Casbah Ambient *
27. Shooting Scene E *
9. Jaunpur Casbah *
28. Pretty Things Are Going To Hell
(Easy Listening Version) **
10. Loge Akas Bar Ambient *
29. We All Go Through
(Easy Listening Version) **
11. Nomad Soul *
12. Palace Ambient *
30. The Dreamers
(Easy Listening Version) **
13. Peep Show *
14. Qualisar **
16. Shooting Gallery *
31. Thursday’s Child
(Easy Listening Version) **
17. Thrust **
32. Market Place *
18. Fight Scene One *
33. Asteroth *
19. Fight Scene Two *
34. Room of The Throne *
15. Save Your Soul *
* Written and performed by Reeves Gabrels
Publisher: North America My Half Music (ASCAP) administered by Bug Music, Inc.
Rest Of World My Half Music/Bug Music, Ltd.
** Written by and Performed by David Bowie and Reeves Gabrels.
Publisher: North America Nipple Music (BMI) administered by RZO Music, Inc.,
My Half Music (ASCAP) administered by Bug Music, Inc.
Rest Of World Nipple Music/RZO Music Ltd., My Half Music/Bug Music, Ltd.
46
INTRODUCTION...............................4
TECHNICAL...................................5
SYSTEM REQUIREMENTS ...................5
INSTALLATION ..................................5
LOADING ..........................................5
THE MAIN MENU.............................6
MENU CONTROLS..............................6
NEW GAME ......................................7
LOAD GAME......................................7
OPTIONS..........................................7
Video Option..............................7
Audio Options ............................8
Game Options.............................9
Controls...................................10
Quit .........................................11
GETTING STARTED ........................12
THE BASICS ...................................12
The 3D World of Omikron..........12
Action Sequences.....................12
The Control Keys ......................13
Conversations ..........................14
Animation Screens....................15
Picking Up Objects/Items.........15
Inventory Management..............15
THE SNEAK ....................................16
What is it? ..............................16
Accessing the SNEAK ...............17
SNEAK Modes ...........................18
Getting Back to the Game........25
THE MULTIPLAN VIRTUAL LOCKER...26
Accessing the Multiplan ...........26
Transfering items to
the Multiplan ...........................27
Transfering items from
the Multiplan ...........................27
Examining Objects ...................27
Deleting Objects......................28
SAVING YOUR GAME .......................28
In-game Save and
Advice Points ..........................28
Magic Rings.............................29
GETTING AROUND OMIKRON ............30
Walking ...................................30
Using Elevators .......................30
Using the Sliders ...................30
LOOKING AROUND...........................32
First Person Perspective .........32
Investigating ...........................33
SURVIVING .....................................33
Checking your Energy ..............33
Eating and Drinking .................34
Money......................................35
FIGHTING AND COMBAT ..................35
The Fighting Controls...............36
The Shooting Controls ..............37
SWIMMING .....................................38
The Swimming Controls ............39
MANA AND SPELLCASTING ..............39
CREDITS .....................................40
OMIKRON: THE NOMAD SOUL ..........43
INSTRUMENTAL SONGS .................46
TECHNICAL SUPPORT ...................47
3


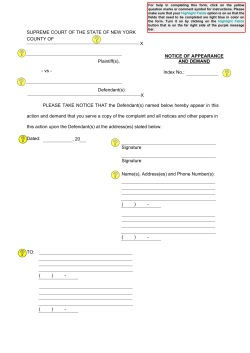


© Copyright 2026