
Schedule 80 PVC and CPVC Schedule 40 PVC Piping
Schedule 80 PVC and CPVC Schedule 40 PVC Technical Manual Piping Systems Table of Contents Introduction: PVC and CPVC Piping Systems .............................................................................................. 4 Product Summary . ................................................................................................................................................................ 4 Material Data . .................................................................................................................................................................... 5-6 Engineering Data . ........................................................................................................................................ 7 Pressure Ratings ................................................................................................................................................................7-9 Water Hammer . ................................................................................................................................................................ 9-11 Temperature — Pressure Relationship .............................................................................................................................. 12 Thermal Expansion and Contraction ............................................................................................................................ 13-17 Friction — Loss Characteristics ....................................................................................................................................18-21 Installation Instructions . ........................................................................................................................... 22 Storage and Handling .......................................................................................................................................................... 22 Solvent Welding . .............................................................................................................................................................22-27 Threading ....................................................................................................................................................................... 28-29 Flanging . .............................................................................................................................................................................. 30 Above Ground Installation ..............................................................................................................................................31-33 Below Ground Installation . ........................................................................................................................................... 34-36 Standards ................................................................................................................................................... 37 ASTM ............................................................................................................................................................................ 37-38 ASME/ANSI............................................................................................................................................................................ 38 NSF/ANSI............................................................................................................................................................................... 38 Specifications ........................................................................................................................................ 39-41 IPS Socket Dimensions............................................................................................................................... 42 Weld Lines in Molded Fittings..................................................................................................................... 43 Useful Charts and Conversions ........................................................................................................... 44-46 3 Introduction: PVC and CPVC Piping Systems Product Summary Thermoplastics PVC (Polyvinyl Chloride) and CPVC (Chlorinated Polyvinyl Chloride) are light, flexible, tough and provide exceptional corrosion resistance. Because of these and other properties of a high quality engineered thermoplastic, the savings that can be realized in initial installation and continuing maintenance costs are substantial. Temperature PVC can handle temperatures up to 140˚F (60°C). CPVC handles temperatures up to 210˚F (99°C). Chemical Resistance PVC and CPVC thermoplastics are highly resistant to acids, alkalis, alcohols and many other corrosive materials. Both materials are ideal for process piping installation and most service piping applications. For details, please consult our Chemical Resistance Chart or contact your local sales representative. Maintenance Free Service PVC and CPVC thermoplastics will not rust, scale, pit or corrode, nor are they subject to electrolysis. You are assured many years of leak-free, maintenance-free service. For buried applications, PVC and CPVC are not affected by soil conditions or galvanic corrosion.. Painting is not required for indoor non-exposed installations. For outdoor installation where the piping may be exposed to significant sunlight, we recommend painting; two coats of a white or light-colored, water-base, outdoor latex paint provides added protection. Lower Installed Cost Both PVC and CPVC have installed costs substantially lower than steel alloys or lined steel and are usually more competitive than carbon steel. Solvent cemented connections contribute to this lower installed cost while the much lighter weight (about one-sixth as much as steel) speeds and simplifies handling during installation. Applications: Versatility and Dependability PVC and CPVC fittings, pipe and valves have been found suitable for more than 50% of the corrosive and non-corrosive applications within the Chemical Process Industries. Vinyl piping systems have been sold into industrial applications for over 50 years. The establishment of strong industry standards and specifications, plus a third party certification through NSF, provides the specifying engineer, contractor and end user with a tested and accepted piping system to solve their corrosion problems. 4 Material Data Physical Properties of Rigid PVC and CPVC Thermoplastic Materials The following table lists typical physical properties of PVC and CPVC thermoplastic materials. Variations may exist depending on specific compounds and product. Mechanical Properties Unit PVC CPVC Specific Gravity g/cm3 1.40 ± .02 1.55 ± .02 Remarks ASTM Test D-792 Tensile Strength @ 73°F PSI 7,200 8,000 Same in Circumferential Direction D-638 Modules of Elasticity Tensile @ 73°F PSI 430,000 360,000 Ratio of Stress on Bent Sample at Failure D-638 Compressive Strength @ 73°F PSI 9,500 10,100 Flexural Strength @ 73°F PSI 13,000 15,100 Tensile Stress/Strain on Bent Sample at Failure D-790 Izod Impact @ 73°F Ft-Lbs/In of Notch 1.0 1.5 Impact Resistance of a Notched Sample to a Sharp Blow D-256 Relative Hardness @ 73°F Durometer “D” Rockwell “R” 80 ± 3 110-120 — 119 Equivalent to Aluminum — D-2240 D-785 Remarks D-695 Thermodynamics Properties Unit PVC CPVC Coefficient of Thermal Linear Expansion per °F in/in/°F 2.8 x 10⁻⁵ 3.4 x 10⁻⁵ Thermal Conductivity BTU/hr/ft2/ F/in 1.3 0.95 Specific Heat CAL/g/°C 0.20-0.28 Maximum Operating Temperature °F 140 210 Pressure Rating is Directly Related to Temperature Heat Distortion Temperature @ 264 PSI °F 158 217 Thermal Vibration and Softening Occurs Decomposition Point °F 400+ 400+ Scorching by Carbonization and Dehydrochloration Properties Unit PVC CPVC Remarks Average Time of Burning sec. <5 <5 Average Extent of Burning mm ASTM Test D-696 Average Specific Heat of 0-100°C C-177 Ratio of Thermal Capacity to that of Water at 15°C D-648 Flammability Test Method D-635 <10 <10 Flame Spread Index <10 <10 E-162 Flame Spread 10-25 4-18 E-84 730 900 D-1929 Smoke Developed* 1000 285 Flammability (.062”) V-O V-O, 5VB 5VA Flash Ignition °F Softening Starts, approx. °F 250 295 Material Become Viscous °F 350 395 Material Carbonizes °F 425 450 Limiting Oxygen Index (LOI) Vol. % 43 60 UL-94 D-2863 5 Other Properties Unit Water Absorption % PVC +0.05 CPVC Poisson’s Ratio @ 73°F 0.38 0.27 ASTM Cell Classification Industry Standard Color 12454-B 23447-B Dark Gray/ Medium Gray White NSF Potable Water Approved Yes Remarks +0.03 @ 73°F Weight Gain in 24 Hours +0.55 @ 212°F ASTM Test D-570 D-1784 Yes Note: This data is based on information supplied by the raw material manufacturers. It should be used as a general recommendation only and not as a guarantee of performance or longevity. The determination of the suitability of any material for a specific application is the responsibility of the end user. 6 Engineering Data In the engineering of thermoplastic piping systems, it is necessary to have not only a working knowledge of piping design but also an awareness of a number of the unique properties of thermoplastics. In addition to chemical resistance, important factors to be considered in designing piping systems employing thermoplastics are 1. Pressure ratings 2. Water hammer 3. Temperature-Pressure relationships 4. Thermal expansion and contraction 5. Friction-loss characteristics These factors are considered in detail in this manual. Pressure Rating Determining pressure-stress pipe relationships ISO Equation: The pressure rating of a pipe is determined by the circumferential stress which results from internal pressure. The relationship between internal pressure, circumferential stress, wall thickness, and diameter is governed by an ISO equation. In various forms this equation is: Log T = a + b log S Where: a and b are constants describing the slope and intercept of the curve, and T and S are time-tofailure and stress, respectively. The regression curve may be plotted on a log-log paper, as shown in the Regression Curve figure below, and extrapolated from 10,000 to 100,000 hours (11.4 years). The stress at 100,000 hours is known as the Long Term Hydrostatic Strength (LTHS) for that particular thermoplastic compound. From this (LTHS) the Hydrostatic Design Stress (HDS) is determined by applying the service factor multiplier, as shown on page 8. Long-Term Strength Test per ASTM D-1598 ( ) 2S 2St P = R-1= DO-t 2S DO P = t -1 2S P = R - 1 S= Where: P = S = t = DO = R = characteristic regression curve that represents the stress/time-to-failure relationship for the particular thermoplastic pipe compound under test. This curve is represented by the equation: Figure 1-C P (R-1) 2 Internal Pressure, psi Circumferential Stress, psi Wall Thickness, in. Outside Pipe Diameter, in. DO/t Pipe test specimen per ASTM D-1598 for “Time-to-Failure of Plastic Pipe Under Long-Term Hydrostatic Pressure” Regression Curve — Stress/Time-to-Failure for PVC Type 1 Long-Term Strength: To determine the long-term strength of thermoplastic pipe, lengths of pipe are capped at both ends (see Fig. 1-C) and subjected to various internal pressures, to produce circumferential stresses that will produce failure within 10 to 10,000 hours. The test is run according to ASTM D 1598 — Standard Test for Time Hydrostatic Pressure. The resulting failure points are used in a statistical analysis (outlined in ASTM D 2837) to determine the 7 Service Factor: The Hydrostatic Stress Committee of the Plastics Pipe Institute (PPI) has determined that a service (design) factor of one-half the Hydrostatic Design Basis would provide an adequate safety margin for use with water to ensure useful plastic-pipe service for a long period of time. While not stated in the standards, it is generally understood within the industry that this “service life” is a minimum of 50 years. Accordingly, the standards for plastic pipe, using the 0.5 service factor, required that the pressure rating of the pipe be based upon this Hydrostatic Design Stress, again calculated with the ISO equation. While early experience indicated that this service factor, or multiplier, of 0.5 provided adequate safety for many if not most uses, some experts felt that a more conservative service factor of 0.4 would better compensate for water hammer pressure surges, as well as for slight manufacturing variations and damage suffered during installation. The PPI has issued a statement recommending this 0.4 service factor. This is equivalent to recommending that the pressure rating of the pipe should equal 1.25 times the system design pressure for any particular installation. Based upon this calculation, many thousands of miles of thermoplastic pipe have been installed in the United States without failure. It is best to consider the actual surge conditions, as outlined later in this section. In addition, reductions in working pressure should be considered when handling aggressive chemical solutions and in high-temperature service. Numerical relationships for service factors and design stresses of PVC and CPVC are shown in the table below. Service Factors and Hydrostatic Design Stress (HDS)* (Hydrostatic Design Basis equal 4000 psi) (27.6 MPa) Service Factor HDS 0.5 2000 psi (13.8 MPa) 0.4 1600 psi (11 MPa) *Material: PVC Type I & CPVC 8 Maximum Pressures: The pressure ratings of thermoplastic pipe represent the maximum allowable operating pressure within a piping system for water at 73°F (22.8°C) based upon a service factor of 0.5. Maximum Pressure Rating for Schedule 80 PVC/CPVC Pipe at 73°F Size PSI Bar ½” 848 57.7 ¾” 688 46.8 1” 630 42.9 1¼” 520 35.4 1½” 471 32.0 2” 404 27.5 2½” 425 28.9 3” 375 25.5 4” 324 22.0 6” 279 19.0 8” 246 16.7 10” 234 15.9 12” 228 15.5 External Pressures — Collapse Rating Thermoplastic pipe is frequently specified for situations where uniform external pressures are applied to the pipe, such as underwater applications. In these applications, the collapse rating of the pipe determines the maximum permissible pressure differential between external and internal pressures. The basic formulas for collapsing external pressure applied uniformly to a long pipe are: 1.For thick wall pipe where collapse is caused by elastic instability of the pipe wall: Pc = Ó 2 (DO2 - Di2) 2DO 2.For thin wall pipe where collapse is caused by elastic instability of the pipe wall: t 3 Pc = 2cE2 1-v Dm ( ) Where: Pc = Collapse Pressure (external minus internal pressure), psi Ó = Compressive Strength, psi v = Poisson’s Ratio E = Modulus of Elasticity, psi DO = Outside Pipe Diameter, in. Dm = Mean Pipe Diameter, in. Di = Inside Pipe Diameter, in. t = Wall Thickness, in. c = Out of Roundness Factor, Approximately 0.66 Choice of Formula: By using formula 2 on thick wall pipe an excessively large pressure will be obtained. It is therefore necessary to calculate, for a given pipe size, the collapse pressure using both formulas and use the lower value as a guide to safe working pressure. See the following table for short term collapse pressures at 73°F. For long term loading conditions, appropriate long term data should be used. Vacuum Service As implied by the collapse rating, thermoplastic pipe is suitable for vacuum or negative pressure conditions that are found in many piping applications. Laboratory tests have been conducted on Schedule 80 PVC pipe to determine performance under vacuum at temperatures above recommended operating conditions. A 6” pipe showed slight deformation at 165°F and 20 inches of mercury. Above this temperature, failure occurred due to thread deformation. Conclusion: All sizes of Schedule 80 PVC and CPVC thermoplastic pipe are suitable for vacuum service up to 140°F and 30 inches of mercury. In addition, CPVC may be used up to 210°F. Solvent cemented joints are required for vacuum applications. Short Term Collapse Pressure in psi at 73°F ½” ¾” 1” 1¼” 1½” 2” 3” 4” 6” 8” 10” 12” 494 Schedule 40 PVC 2095 1108 900 358 211 180 109 54 39 27 29 2772 2403 2258 1389 927 632 521 335 215 147 126 117 Schedule 80 PVC/CPVC Note: These are short term ratings; long term should be reduced by ¹/3 to ½ of the short term ratings. Water Hammer Surge pressures due to water hammer are a major factor contributing to pipe failure in liquid transmission systems. A column of moving fluid within a pipeline, owing to its mass and velocity, contains stored energy. Since liquids are essentially incompressible, this energy cannot be absorbed by the fluid when a valve is suddenly closed. The result is a high momentary pressure surge called water hammer. The five factors that determine the severity of water hammer are: 1. Velocity (The primary factor in excessive water hammer; see discussion of “Velocity” and “Safety Factor” below) 2. Modulus of elasticity of pipe material 3. Inside diameter of pipe 4. Wall thickness of pipe 5. Valve closing time Maximum pressure surges caused by water hammer can be calculated by using the equation below. This surge pressure should be added to the existing line pressure to arrive at a maximum operating pressure figure. Ps =V ( E t E+ t33960 10 Di ) Where: Ps V Di E t ½ x = = = = = 5 Surge Pressure, in psi Liquid Velocity, in feet per second Inside Pipe Diameter, inch Modulus of Elasticity of Pipe Material, psi Wall Thickness, inch Calculated surge pressure, which assumes instantaneous valve closure, can be calculated for any material using the values for E (Modulus of Elasticity). However, to keep water hammer pressures within reasonable limits, it is common practice to design valves for closure times considerably greater than 2L/c. 2L Tc > c Where: Tc = L = c = Valve Closure Time, second Length of Pipe Run, feet Sonic Velocity of the Pressure Wave = 4720 ft/second 9 Velocity Thermoplastic piping has been successfully installed in systems with a water velocity in excess of 10 feet per second. Thermoplastic pipe is not subject to erosion caused by high velocities and turbulent flow and in this respect is superior to metal piping systems, particularly where corrosive or chemically aggressive fluids are involved. The accepted industry position is that while the maximum safe water velocity in a thermoplastic piping system depends on the specific details of the system and the operating conditions, five feet per second is considered safe. Higher velocities may be used in systems where the operating characteristics of the valves and pumps are known and sudden changes in flow velocity can be controlled. It is important that the total pressure in the system at any time (operating plus surge or water hammer) not exceed 150 percent of the pressure rating for the system. Safety Factor Since the duration of any pressure surges due to water hammer is extremely short — seconds, or more likely, fractions of a second — the calculations used in determining the Safety Factor, the maximum fiber stress due to internal pressure must be compared to some very short-term strength value. Referring to the “Regression Curve” chart on page 7, it shows that the failure stress for very short time periods is very high when compared to the Hydrostatic Design Stress. Using this premise, the calculation of Safety Factor may be based, very conservatively, on the 20-second strength value given in the “Regression Curve” chart (page 7) — 8470 psi for PVC Type I. A sample calculation is shown below, based upon the listed criteria: Pipe = 1¼” Schedule 80 PVC I O.D. = 1.660; Wall = 0.191 HDS = 2000 psi The calculated surge pressure for 1¼” Schedule 80 PVC pipe at a velocity of 1 ft/sec. is 26.2 psi/ft/sec. (see next page) 10 Water Velocity = 5 feet per second Static Pressure in System = 300 psi Total System Pressure = Total Static + Surge Pressure Pt= P + PS = 300 + 5 x 26.2 = 431.0 psi Maximum circumferential stress is calculated from a variation of the ISO Equation: S = Pt (Do-t) = 431 (1.660 - 191) = 1657.4 2t 2 x 191 Safety Factor = 20-second strength Maximum stress = 8470 = 5.11 1657 Surge Pressure, Ps in psi at 73°F water velocity (ft./sec.) ½” ¾” 1” 1¼” 1½” 2” 3” 4” 6” 8” 10” 12” Schedule 40 PVC 1 27.9 25.3 24.4 22.2 21.1 19.3 18.9 17.4 15.5 14.6 13.9 13.4 2 55.8 50.6 48.8 44.4 42.2 38.6 37.8 34.8 31.0 29.2 27.8 26.8 3 83.7 75.9 73.2 66.6 63.3 57.9 56.7 52.2 46.5 43.8 41.7 40.2 4 111.6 101.2 97.6 88.8 84.4 77.2 75.6 69.6 62.0 58.4 55.6 53.6 5 139.5 126.5 122.0 111.0 105.5 96.5 94.5 87.0 77.5 73.0 69.5 67.0 6 167.4 151.8 146.4 133.2 126.6 115.8 113.4 104.4 93.0 87.6 83.4 80.4 Schedule 80 PVC/CPVC 1 32.9 29.9 28.7 26.2 25.0 23.2 22.4 20.9 19.4 18.3 17.3 17.6 2 65.6 59.8 57.4 52.4 50.0 46.4 44.8 41.8 38.8 36.6 35.6 35.2 3 98.7 89.7 86.1 78.6 75.0 69.6 67.2 62.7 58.2 59.9 53.4 52.8 4 131.6 119.6 114.8 104.8 107.0 92.8 89.6 83.6 77.6 73.2 71.2 70.4 5 164.5 149.5 143.5 131.0 125.0 116.3 112.0 104.5 97.0 91.5 89.0 88.0 6 197.4 179.4 172.2 157.2 150.0 133.2 134.4 125.4 116.4 109.8 106.8 105.6 The “Safety Factors vs. Service Factors” table (see below) gives the results of Safety Factor calculations based upon Service Factors of 0.5 and 0.4 for the 1¼” PVC I Schedule 80 pipe of the example shown on page 10 using the full pressure rating calculated from the listed Hydrostatic Design Stress. In each case, the Hydrostatic Design Basis = 4000 psi, and the water velocity = 5 feet per second. Safety Factors vs. Service Factors — PVC Type I Thermoplastic Pipe Pipe Class Service Factor HDS, psi Pressure Rating psi Surge Maximum Pressure Pressure psi at 5 ft./sec. Maximum Stress psi Safety Factor 1¼” Sch. 80 0.5 2000 520 131.0 651.0 2503.5 3.38 1¼” Sch. 80 0.4 1600 416 131.0 547.0 2103.5 4.03 Pressure Rating values are for PVC I pipe, and for most sizes are calculated from the experimentally determined Long Term Strength of PVC I extrusion compounds. Because molding compounds may differ in Long Term Strength and elevated temperature properties from pipe compounds, piping systems consisting of extruded pipe and molded fittings may have lower pressure ratings than those shown here, particularly at the higher temperatures. Caution should be exercised in design of systems operating above 100°F. Comparing Safety Factors for this 1¼” Schedule 80 pipe at different Service Factors, it is should be noted that changing from a Service Factor of 0.5 to a more conservative 0.4 increases the Safety Factor only by 16%. Cyclic Fatigue in Vinyl Piping Systems When discussing water hammer or pressure surge in a piping systems, one should also be aware of a failure mode termed “Cyclic Fatigue.” A piping system that has frequent and significant changes in flow conditions or pressure, creating a fluctuating surge, can have an effect on the structural integrity of a thermoplastic fitting. This condition has been observed in golf course irrigation systems that experience tens of thousands of water pressure surges over the course of a year. The resultant failure from cyclic fatigue is very similar in ap- pearance to long-term static failure and it may be very difficult to ascertain the exact cause of such failures. However, the design engineer should consider this phenomenon when designing a GF Piping System with frequent pressure changes, particularly if the surge pressure exceeds 50% of the systems working pressure. Based on some testing by Keller-Bliesener Engineering, the engineer may want to consider devaluing the fitting by 40% from the published pipe burst pressure. Keeping the flow velocity to 5 fps or less will also have an effect on pressure surges. Other considerations would be to use actuated valves that can be set to provide a slow opening or to install “soft start” pumps, as both of these will limit the water hammer and the resultant pressure surges. 11 Temperature-Pressure Relationship The effects of temperature have been exhaustively studied and correction (derating) factors developed for each thermoplastic piping material. To determine the maximum operating pressure at any given temperature, multiply the pressure rating for the pipe size and type found in the following table by the temperature derating factor (f). Pressure ratings for thermoplastic pipe are generally determined using water at room temperature (73°F). As the system temperature increases, the thermoplastic pipe becomes more ductile, increases in impact strength and decreases in tensile strength. The pressure ratings of thermoplastic pipe must, therefore, be decreased accordingly. P DR = D/t 73˚F t Wall D Outside Dia Nom. Size (inch) Solvent-Welded Pressure Rating vs. Service Temperature — PVC and CPVC 90˚F 100˚F 110˚F 120˚F PVC CPVC PVC CPVC PVC CPVC PVC CPVC PVC f=1.00 f=1.00 f=0.92 f=0.85 f=0.77 f=0.75 f=0.62 f=0.50 130˚F CPVC PVC f=0.40 f=0.70 140˚F CPVC PVC f=0.30 f=0.62 150˚F 160˚F 180˚F 200˚F 210˚F CPVC CPVC CPVC CPVC CPVC CPVC f=0.22 f=0.50 f=0.47 f=0.40 f=0.25 f=0.18 f=0.16 s=2000 s=2000 s=1500 s=1840 s=1240 s=1700 s=1000 s=1540 s=800 s=1400 s=600 s=1240 s=440 s=1000 s=940 s=800 s=500 s=400 s=320 ½ 0.84 0.15 5.71 848 848 636 780 526 721 424 653 339 594 254 526 187 466 399 339 212 153 136 ¾ 1.05 0.15 6.82 688 688 516 633 426 585 344 530 275 482 206 427 151 378 323 275 172 124 110 101 1 1.32 0.18 7.35 630 630 473 580 390 536 315 485 252 441 189 391 139 347 296 252 158 113 1¼ 1.66 0.19 8.69 520 520 390 478 322 442 260 400 208 364 156 322 114 286 244 208 130 94 83 1½ 1.90 0.20 9.50 471 471 353 433 292 400 236 363 188 330 141 292 104 259 221 188 118 85 75 2 2.38 0.22 10.89 404 404 303 372 251 343 202 311 162 283 121 250 89 222 190 162 101 73 65 2½ 2.88 0.28 10.42 425 425 319 391 263 361 213 327 170 298 128 264 94 234 200 170 106 77 68 3 3.50 0.30 11.67 375 375 281 345 233 319 188 289 150 263 113 233 83 206 176 150 94 68 60 4 4.50 0.34 13.35 324 324 243 298 201 275 162 249 130 227 97 201 71 178 152 130 81 58 52 6 6.63 0.43 16.34 279 279 209 257 173 237 140 215 112 195 84 173 61 153 131 112 70 50 45 8 8.63 0.50 17.25 246 246 185 226 153 209 123 189 98 172 74 153 54 135 116 98 62 44 39 10 10.75 0.59 18.13 234 234 175 215 145 199 117 180 94 164 70 145 51 129 110 94 59 42 37 12 12.75 0.69 18.56 228 228 171 210 141 194 114 176 91 160 68 141 51 125 107 91 57 41 36 P = P = S = D = 2St = 2S = P f 73°F D-t DR-1 Pressure rating of pipe at service temperatures (psi) Hydrostatic design stress (psi) Outside diameter of pipe (inches) 1) Figures for pressure rating at 73°F are rounded off from actual calculated values. Pressure ratings for other temperatures are calculated from 73°F values. 2) Pressure rating values are for PVC (12454-B) and CPVC (23447-B) pipe and for most sizes are calculated from the experimentally determined long-term strength of PVC1 and CPVC extrusion compounds. Because molding compounds may differ in long-term strength and elevated temperature properties from pipe compounds, piping systems consisting of extruded pipe and molded fittings may have lower pressure ratings than those shown here, particularly at the higher temperatures. Caution should be exercised when designing PVC systems operating above 100°F and CPVC systems operating above 180°F. 3) The pressure ratings given are for solvent-cemented systems. When adding valves, flanges or other components, the system must be derated to the rating of the lowest component. (Pressure ratings: molded or cut threads are rated at 50% of solvent-cemented systems; flanges and unions are 150 psi; for valves, see manufacturer’s recommendation.) 12 Thermal Expansion and Contraction Thermoplastics exhibit a relatively high coefficient of thermal expansion — as much as ten times that of steel. When designing plastic piping systems, expansion of long runs must be considered. Installation temperature versus working temperature or summer to winter extremes must be considered. Linear Expansion and Contraction @T 180 Coefficient of Thermal Linear Expansion 170 PVC = 2.8 x 10⁻⁵ in/in/°F CPVC = 3.4 x 10⁻⁵ in/in/°F 160 To Calculate: ∆L = Change in pipe length due to thermal changes. 150 L = Straight runs of pipe with no changes in direction. Y = Coefficient of thermal expansion (see above). CP VC 140 130 ∆T = maximum change in temperature between installation and operation (T MAX. - T. MIN.) PV C 120 110 ∆L = Y x L x ∆T Example: • A system has 350 feet (4,200”) of straight run (L) with no direction change. 100 90 • Pipe material is CPVC. Coefficient (Y) is 3.4 x 10⁻⁵ (0.000034”). 80 • Pipe is installed at an ambient temperature of 60°F. Maximum anticipated operating temperature is 140°F. The difference (∆T) is 80°F. 70 60 ∆L = 0.000034 x 4200 x 80 ∆L = 11.4” of linear expansion in 350 ft. in pipe. 50 40 30 20 10 0.01 0.02 0.03 0.04 0.05 0.06 0.07 Change in Pipe Length (Inches/Foot) 0.08 0.09 0.10 @L 13 1. Offsets: Most piping systems have occasional changes in direction which will allow the thermally induced length changes to be taken up in offsets of the pipe beyond the bends. Where this method is employed, the pipe must be able to float except at anchor points. 2. Expansion Joints: Piston type expansion joints can be an effective means of compensating for expansion or contraction when the system has critical dimensions with no room for movement, or where appearance is important. It is important to follow the manufacturers recommendations regarding support, anchoring and the proper setting of the expansion joint. Tables for expansion loops, offsets and expansion joints have been generated for elevated temperatures as noted beneath each table. If the change in temperature and working temperatures are lower than those used to derive expansion loop and offset tables, the figures will be conservative. These tables can be generated for any temperature and expansion by using the following equations and the modulus of elasticity and working stress at the given temperature. Assume the pipe to be a cantilevered beam. For a beam, the bending stress can be calculated by “Equation 1:” S=M*C I Where: S = M = C = I = Stress (psi) Moment (in lbs.) Distance from neutral axis (in.) Moment of Inertia (in4) For application to pipe, the maximum stress occurs where C equals the radius of the pipe. Substituting the radius for C and rearranging the equation to solve for the Moment is shown in “Equation 2:” M=2*S*I OD Where: OD = Pipe Outer Diamter (in) C = Radius of pipe = OD/2 (in) 14 The free body diagram which most closely approximates the deflected pipe in an expansion loop, offset or change in direction is shown in Figure A (see page 16). This is not a cantilever beam but rather a guided cantilever beam. For a guided cantilever, the moment induced by an imposed deflection is calculated by “Equation 3:” M = 6 * E * I2* y DPL Where: E = Modulus of Elasticity (psi) y = imposed deflection (in) DPL = deflected pipe length (in) By equating “2” and “3,” the equation for the deflected beam length (DPL) can be solved: 2 * S * I OD = 6*E*I*y DPL 2 “Equation 4:” DPL = √ 3 * E * OD * y S After determining the proper allowable stress, “Equation 4” gives an estimate of the minimum deflected pipe length (DPL) required to sustain a piping thermal movement of length y normal to the piping. “Equation 4” can be used to calculate the minimum deflected pipe length for expansion loops, offsets and change of directions: Note: In some cases, a stress intensification factor (i) is added as shown in “Equation 5.” The stress intensification factor is used as a safety factor to account for the effect of localized stresses on piping under repetitive loading. For example, the stress intensification factor for socket welded joints is 1.3 and for threaded joints the factor is 2.3 per ANSI/ASME B31.3, B31.4, B31.5 and B31.8 codes. “Equation 5:” DPL = √ 3 * E * OD * y * i S “Equation 6” is used to calculate the change in length caused by thermal expansion: ∆L = 12 * e * L * ∆T Where: ∆L e L ∆T = Change in length (in) = Coefficient of Thermal Expansion (in/in °F) = Length of Straight Pipe Run (ft) = Change in Temperature (°F) For the expansion loop, shown in Figure B (see page 16), the imposed deflection is one-half the change in length as repre- “Equation 10:” Offsets and Change of Direction DPL = 6.0 * √ E * OD * e * L * ∆T S Where: DPL = Deflected Pipe Length (in) E = Modulus of Elasticity (psi) OD = Pipe Outer Diameter (in) e = Coefficient of Thermal Expansion (in/in °F) L = Length of Straight Pipe Run (ft) ∆T = Change in Temperature (°F) S = Allowable Stress (psi) sented in “Equation 7”: “Equation 11” Piston Type Expansion Joints y = ∆L 2 Px = Tmax – Tamb x ∆L Tmax – Tmin “Equation 4” can be modified to replace the deflection (y) with equation 6 for the change in length (∆L) according to the relationship shown in “Equation 7.” “Equation 8:” Expansion Loop √ E * OD * e * L * ∆T DPL = 4.243 * S Where: DPL = Deflected Pipe Length (in) E = Modulus of Elasticity (psi) OD = Pipe Outer Diameter (in) e = Coefficients of Thermal Expansion (in/in °F) L = Length of Straight Pipe Run (ft) ∆T = Change in Temperature (°F) S = Allowable Stress (psi) Where: Px = Tmax= Tmin = Tamb= ∆L = Piston Installation Position Maximum temperature Minimum Temperature Ambient Temperature Length of Expansion Joint (6” or 12”) Note: In the tables to follow (see page 16), we have chosen to use values for the allowable stress (S) and the modulus of elasticity (E) at the upper temperature limit. Many calculations (in other manufacturers’ literature) are based on the allowable stress and the modulus of elasticity at ambient conditions. This simplification is allowed because for most plastics (S) and (E) vary with temperature at approximately the same rate. For the offset shown in Figure C (see page 17) and the change in direction shown in Figure D (page 17), the imposed deflection is equal to the change in length caused by thermal expansion. “Equation 9:” y = ∆L “Equation 4” can be modified to replace the deflection (y) with “Equation 6” for the change in length ∆L according to the relationship shown in “Equation 9.” 15 PVC Expansion Loops PVC Pipe Size (in.) Length of Run (feet) 10 20 30 O.D. of Pipe (in.) 40 50 60 70 80 90 100 Minimum Deflected Pipe Length (DPL) (inches) ½ 0.840 11 15 19 22 24 27 29 31 32 34 ¾ 1.050 12 17 21 24 27 30 32 34 36 38 1 1.315 14 19 23 27 30 33 36 38 41 43 1¼ 1.660 15 22 26 30 34 37 40 43 46 48 1½ 1.900 16 23 28 33 36 40 43 46 49 51 2 2.375 18 26 32 36 41 45 48 51 55 58 3 3.500 22 31 38 44 49 54 58 62 66 70 4 4.500 25 35 43 50 56 61 66 71 75 79 6 6.625 30 43 53 61 68 74 80 86 91 96 8 8.625 35 49 60 69 78 85 92 98 104 110 10 10.750 39 55 67 77 87 95 102 110 116 122 12 12.750 42 60 73 84 94 103 112 119 127 133 70 80 90 100 PVC Offsets and Change of Directions PVC Pipe Size (in.) Length of Run (feet) 10 20 40 50 60 Minimum Deflected Pipe Length (DPL) (inches) ½ 0.840 15 22 27 31 34 37 41 43 46 48 24 30 34 38 42 45 48 51 54 ¾ 1.050 17 1 1.315 19 27 33 38 43 47 51 54 57 61 1¼ 1.660 22 30 37 43 48 53 57 61 65 68 1½ 1.900 23 33 40 46 51 56 61 65 69 73 2 2.375 26 36 45 51 58 63 68 73 77 81 3 3.500 31 44 54 62 70 77 83 88 94 99 4 4.500 35 50 61 71 79 87 94 100 106 112 6 6.625 43 61 74 86 96 105 114 122 129 136 8 8.625 49 69 85 98 110 120 130 139 147 155 10 10.750 55 77 95 110 122 134 145 155 164 173 12 12.750 60 84 103 119 133 146 158 169 179 189 Figure A: Guided Cantilever Beam 30 O.D. of Pipe (in.) 16 Figure B: Expansion Loop CPVC Expansion Loops CPVC Pipe Size (in.) Length of Run (feet) 10 20 30 O.D. of Pipe (in.) 40 50 60 70 80 90 100 Minimum Deflected Pipe Length (DPL) (inches) ½ 0.840 15 21 26 30 33 36 39 42 44 47 ¾ 1.050 17 23 29 33 37 40 44 47 50 52 1 1.315 18 26 32 37 41 45 49 52 55 58 1¼ 1.660 21 29 36 42 46 51 55 59 62 66 1½ 1.900 22 31 39 44 50 54 59 63 67 70 2 2.375 25 35 43 50 56 61 66 70 75 79 3 3.500 30 43 52 60 67 71 80 85 91 95 4 4.500 34 48 59 68 77 84 91 97 103 108 6 6.625 42 59 72 83 93 102 110 117 125 131 8 8.625 47 67 82 95 106 116 125 134 142 150 10 10.750 53 75 92 106 118 130 140 150 159 167 12 12.750 58 81 100 115 129 141 152 163 173 182 70 80 90 100 CPVC Offsets and Change of Directions CPVC Pipe Size (in.) Length of Run (feet) 10 20 30 O.D. of Pipe (in.) 40 50 60 Minimum Deflected Pipe Length (DPL) (inches) ½ 0.840 21 30 36 42 47 51 55 59 63 66 33 40 47 22 57 62 66 70 74 ¾ 1.050 23 1 1.315 26 37 45 52 58 61 69 74 78 83 1¼ 1.660 29 42 51 59 66 72 78 86 88 93 1½ 1.900 31 44 54 63 70 77 83 89 94 99 2 2.375 35 50 61 70 79 86 93 99 105 111 3 3.500 43 60 74 85 95 105 113 121 128 135 4 4.500 48 68 84 97 108 119 128 137 145 153 6 6.625 59 53 102 117 131 144 155 166 176 186 8 8.625 67 95 116 134 150 164 177 189 201 212 10 10.750 75 106 130 150 167 183 198 212 224 237 12 12.750 81 115 141 163 182 200 216 230 244 258 Figure C: Expansion Offset Figure D: Change of Direction 17 Friction-Loss Characteristics Introduction Hazen and Williams Formula A major advantage of thermoplastic pipe is its exceptionally smooth inside surface area, which reduces friction loss compared to other materials. The head losses resulting from various water flow rates in plastic piping may be calculated by means of the Hazen and Williams formula: Friction loss in plastic pipe remains constant over extended periods of time, in contrast to many traditional materials where the value of the Hazen and Williams C factor (constant for inside roughness) decreases with time. As a result, the flow capacity of thermoplastics is greater under fully turbulent flow conditions like those encountered in water service. C Factors Tests made both with new pipe and pipe that had been in service revealed C factor values for plastic pipe between 160 and 165. Thus, the factor of 150 recommended for water in Equation 12 is on the conservative side. On the other hand, the C factor for metallic pipe varies from 65 to 125, depending upon age and interior roughening. A benefit with plastic piping systems is that it is often possible to achieve the desired flow rate using a smaller diameter pipe, resulting in less initial cost for pipe, valves, fitting and pumps, and still maintain the same or even lower friction losses. A longer term benefit would be the resultant savings in energy required to operate the system. 18 “Equation 12:” f = 0.2083 100 C ( ) 1.852 1.852 x g 4.8655 Di = 0.0983 q1.852 for C = 150 Di4.8655 P = 4335f Where: f = P = Di= g = C = Friction Head in ft. of Water per 100 ft. of Pipe Pressure Loss in psi per 100 ft. of Pipe Inside Pipe Diameter, in. Flow Rate in U.S. gal./min. Constant for Inside Roughness (C equals 150 for thermoplastics) Friction Loss — Schedule 40 Pipe Carrying capacity, friction loss and flow data for Schedule 40 thermoplastic pipe are presented in tabular form in the table below. This table is applicable to pipe made of any of the thermoplastic piping materials as all have equally smooth interior surfaces. Carrying Capacity and Friction Loss — Schedule 40 Thermoplastics Pipe 1 in. 0.22 0.44 2.48 4.56 8.68 18.39 32.32 0.77 1.93 2.72 3.86 5.79 7.72 9.65 0.009 11.58 0.013 0.013 0.017 0.022 0.56 0.030 0.67 0.043 0.79 0.048 0.84 0.056 0.90 0.069 1.01 0.082 1.12 0.125 1.41 0.17 1.69 0.235 1.97 0.30 2.25 0.45 2.81 0.63 3.37 0.85 3.94 1.08 4.49 1.34 5.06 1.63 5.62 8.43 11.24 0.55 1.72 3.17 6.02 12.77 21.75 32.88 46.08 1¼ in. 0.24 0.75 1.37 2.61 5.53 9.42 14.22 19.95 0.44 1.11 1.55 2.21 3.31 4.42 5.52 6.63 7.73 8.84 9.94 6 in. 0.02 0.009 11.05 0.03 0.013 0.04 0.017 0.05 0.022 0.05 0.022 0.06 0.026 0.08 0.035 0.65 0.12 0.052 0.81 0.16 0.069 0.97 0.22 0.096 1.14 0.28 0.12 1.30 0.43 0.19 1.63 0.60 0.26 1.94 0.79 0.34 2.27 1.01 0.44 2.59 1.26 0.55 2.92 1.53 0.66 3.24 3.25 1.41 4.86 5.54 2.40 6.48 8.11 9.72 0.14 0.44 0.81 1.55 3.28 5.59 8.45 11.85 15.76 20.18 25.10 30.51 1½ in. 0.06 0.19 0.35 0.67 1.42 2.42 3.66 5.13 6.82 8.74 10.87 13.21 0.33 0.81 1.13 1.62 2.42 3.23 4.04 4.85 5.66 6.47 7.27 8.08 9.70 0.07 0.22 0.38 0.72 1.53 2.61 3.95 5.53 7.36 9.43 11.73 14.25 19.98 0.012 0.015 0.017 0.024 0.030 0.048 0.069 0.091 0.12 0.14 0.17 0.37 0.63 0.95 1.33 0.03 0.09 0.17 0.31 0.66 1.13 1.71 2.39 3.19 4.08 5.80 6.17 8.65 0.49 0.69 0.98 1.46 1.95 2.44 2.93 3.41 3.90 4.39 4.88 5.85 6.83 7.32 7.80 8.78 9.75 0.066 0.11 0.21 0.45 0.76 1.15 1.62 2.15 2.75 3.43 4.16 5.84 7.76 8.82 9.94 12.37 15.03 0.027 0.035 0.05 0.065 0.09 0.11 0.13 0.28 0.48 0.73 1.01 1.72 2.61 0.012 0.015 0.022 0.028 0.039 0.048 0.056 0.12 0.21 0.32 0.44 0.74 1.13 0.029 0.048 0.091 0.19 0.33 0.50 0.70 0.93 1.19 1.49 1.80 2.53 3.36 3.82 4.30 5.36 6.51 12 in. 1.01 1.16 1.30 1.45 2.17 2.89 3.62 4.34 5.78 7.23 0.027 0.04 0.05 0.06 0.12 0.20 0.31 0.43 0.73 1.11 Friction loss pounds per square inch Friction head feet 3 in. 10 in. 0.82 1.03 1.23 1.44 1.64 1.85 2.05 3.08 4.11 5.14 6.16 8.21 10.27 Velocity feet per second Friction loss pounds per square inch Friction head feet 2 in. 8 in. 0.03 0.035 0.04 0.055 0.07 0.11 0.16 0.21 0.27 0.33 0.40 0.85 1.45 2.20 3.07 Velocity feet per second Friction loss pounds per square inch Friction head feet Velocity feet per second Friction loss pounds per square inch Friction head feet Velocity feet per second Friction loss pounds per square inch Friction head feet ¾ in. 0.51 1.02 5.73 10.52 20.04 42.46 72.34 5 in. 0.02 0.03 0.03 0.04 0.05 0.07 0.10 0.11 0.13 0.16 0.19 0.29 0.40 0.54 0.69 1.05 1.46 1.95 2.49 3.09 3.76 Velocity feet per second 0.63 1.26 3.16 4.43 6.32 9.48 0.013 12.65 0.017 0.026 0.49 0.035 0.57 0.048 0.65 0.056 0.73 0.069 0.81 0.095 0.97 0.13 1.14 0.15 1.22 0.16 1.30 0.20 1.46 0.25 1.62 0.38 2.03 0.53 2.44 0.71 2.84 0.90 3.25 1.36 4.06 1.91 4.87 2.55 5.69 3.26 6.50 7.31 8.12 0.90 1.80 10.15 18.64 35.51 Friction loss pounds per square inch Friction head feet Friction loss pounds per square inch Friction head feet ½ in. 2.08 4.16 23.44 43.06 82.02 4 in. 0.51 0.03 0.64 0.04 0.77 0.06 0.89 0.08 1.02 0.11 1.15 0.13 1.28 0.16 1.53 0.22 1.79 0.30 1.92 0.34 2.05 0.38 2.30 0.47 2.56 0.58 3.20 0.88 3.84 1.22 4.48 1.63 5.11 2.08 6.40 3.15 7.67 4.41 8.95 5.87 10.23 7.52 1.13 2.26 5.64 7.90 11.28 Velocity feet per second 1 2 5 7 10 15 20 25 30 35 40 45 50 60 70 75 80 90 100 125 150 175 200 250 300 350 400 450 500 750 1000 1250 1500 2000 2500 Velocity feet per second Gallons per minute Independent variables: Gallons per minute and nominal pipe size O.D. (Min. I.D.) Dependent variables: Velocity, friction head and pressure drop per 100 feet of pipe, interior smooth. 0.03 0.49 0.68 1.03 1.37 1.71 2.05 2.39 2.73 3.08 3.42 4.10 4.79 5.13 5.47 6.15 6.84 8.55 10.26 0.015 0.021 0.03 0.07 0.11 0.17 0.23 0.31 0.40 0.50 0.60 0.85 1.13 1.28 1.44 1.80 2.18 3.31 4.63 6.16 7.88 11.93 0.007 0.009 0.013 0.030 0.048 0.074 0.10 0.13 0.17 0.22 0.26 0.37 0.49 0.55 0.62 0.78 0.94 1.43 2.00 2.67 3.41 5.17 0.012 0.017 0.022 0.026 0.052 0.087 0.13 0.19 0.32 0.49 19 Friction Loss — Schedule 80 Pipe Friction Loss — Schedule 80 Fittings Carrying capacity, friction loss and flow data for Schedule 80 thermoplastic pipe are presented in tabular form in the table below. This table is applicable to pipe made of any of the thermoplastic piping materials as all have equally smooth interior surfaces. The table “Friction Loss in Equivalent Feet of Pipe” gives the estimated friction loss in equivalent feet of pipe, through thermoplastic fittings of various sizes and configurations. Carrying Capacity and Friction Loss — Schedule 80 Thermoplastics Pipe 0.54 0.63 0.72 0.81 0.90 1.08 1.26 1.35 1.44 1.62 1.80 2.25 2.70 3.15 3.60 4.50 5.40 6.30 7.19 8.09 8.99 1” 0.94 2.34 3.23 4.68 7.01 9.35 11.69 5 in. 0.03 0.013 14.03 0.04 0.017 0.04 0.017 0.05 0.020 0.07 0.030 0.63 0.10 0.043 0.75 0.13 0.056 0.88 0.14 0.061 0.94 0.16 0.069 1.00 0.20 0.087 1.13 0.24 0.10 1.25 0.37 0.16 1.57 0.52 0.23 1.88 0.69 0.30 2.20 0.88 0.38 2.51 1.34 0.58 3.14 1.87 0.81 3.76 2.49 1.08 4.39 3.19 1.38 5.02 3.97 1.72 5.64 4.82 2.09 6.27 9.40 12.54 1¼ “ 0.88 2.78 5.04 9.61 20.36 34.68 52.43 73.48 0.33 1.19 2.19 4.16 8.82 15.02 22.70 31.62 0.52 1.30 1.82 2.60 3.90 5.20 6.50 7.80 9.10 10.40 11.70 6 in. 0.03 0.013 13.00 0.04 0.017 0.05 0.022 0.06 0.026 0.07 0.030 0.08 0.035 0.10 0.043 0.16 0.068 0.90 0.22 0.095 1.07 0.29 0.12 1.25 0.37 0.16 1.43 0.56 0.24 1.79 0.78 0.34 2.14 1.04 0.45 2.50 1.33 0.68 2.86 1.65 0.71 3.21 2.00 0.87 3.57 4.25 1.84 5.36 7.23 3.13 7.14 8.93 10.71 0.21 0.66 1.21 2.30 4.87 8.30 12.55 17.59 23.40 29.97 37.27 45.30 1½” 0.09 0.29 0.53 1.00 2.11 3.59 5.43 7.62 10.13 12.98 16.14 19.61 0.38 0.94 1.32 1.88 2.81 3.75 4.69 5.63 6.57 7.50 8.44 9.38 11.26 0.10 0.30 0.55 1.04 2.20 3.75 5.67 7.95 10.58 13.55 16.85 20.48 28.70 0.019 0.022 0.033 0.039 0.61 0.087 0.12 0.15 0.18 0.22 0.47 0.80 1.20 1.68 0.041 0.126 0.24 0.45 0.95 1.62 2.46 3.44 4.58 5.87 7.30 8.87 12.43 0.56 0.78 1.12 1.63 2.23 2.79 3.35 3.91 4.47 5.03 5.58 6.70 7.82 8.38 8.93 10.05 11.17 0.10 0.15 0.29 0.62 1.06 1.60 2.25 2.99 3.86 4.76 5.79 8.12 10.80 12.27 13.83 17.20 20.90 0.036 0.045 0.07 0.085 0.11 0.14 0.17 0.36 0.61 0.02 1.29 2.19 3.33 0.015 0.02 0.03 0.037 0.048 0.061 0.074 0.16 0.26 0.40 0.56 0.95 1.44 0.040 0.088 0.13 0.27 0.46 0.69 0.97 1.29 1.66 2.07 2.51 3.52 4.68 5.31 5.99 7.45 9.05 0.39 0.54 0.78 1.17 1.56 1.95 2.34 2.73 3.12 3.51 3.90 4.68 5.46 5.85 6.24 7.02 7.80 9.75 11.70 0.05 0.07 0.12 0.26 0.44 0.67 0.94 1.25 1.60 1.90 2.42 3.39 4.51 5.12 6.77 7.18 8.72 13.21 18.48 12 in. 1.12 1.28 1.44 1.60 2.40 3.20 4.01 4.81 6.41 8.01 9.61 11.21 12.82 0.037 0.05 0.06 0.07 0.15 0.20 0.40 0.55 0.84 1.42 1.99 2.65 3.41 3” 0.022 0.032 0.052 0.11 0.19 0.29 0.41 0.64 0.89 0.86 1.05 1.47 1.35 2.22 2.50 3.11 3.78 5.72 8.00 0.25 0.35 0.50 0.75 1.00 1.25 1.49 1.74 1.99 2.24 2.49 2.98 3.49 3.74 3.99 4.48 4.98 6.23 7.47 8.72 9.97 12.46 0.02 0.023 0.04 0.09 0.15 0.22 0.31 0.42 0.54 0.67 0.81 1.14 1.51 1.74 1.94 2.41 2.93 4.43 6.20 8.26 10.57 16.00 0.016 0.022 0.026 0.030 0.065 0.11 0.17 0.24 0.41 0.62 0.86 1.15 1.48 Friction Loss in Equivalent Feet of Pipe — Schedule 80 Thermoplastics Fittings Nominal Pipe Size, In. Tee, Side Outlet 90° Ell 45° Ell Insert Coupling Male-Female Adapters 20 / 3 1½ ¾ — — 3 8 ½ 4 1½ ¾ ½ 1 ¾ 5 2 1 ¾ 1½ 1 6 2¾ 13/8 1 2 1¼ 7 4 1¾ 1¼ 2¾ 1½ 8 4 2 1½ 3½ 2 12 6 2½ 2 4½ 2½ 15 8 3 3 — 3 16 8 4 3 6½ 3½ 20 10 4½ — — 4 22 12 5 4 9 Friction loss pounds per square inch Friction head feet Velocity feet per second Friction loss pounds per square inch Friction head feet 2½” 10 in. 0.90 1.14 1.36 1.59 1.81 2.04 2.27 3.40 4.54 5.67 6.80 9.07 11.34 Velocity feet per second Friction loss pounds per square inch Friction head feet 2” 8 in. 0.045 0.05 0.075 0.09 0.14 0.20 0.27 0.34 0.42 0.51 1.08 1.84 2.78 3.89 Velocity feet per second Friction loss pounds per square inch Friction head feet Velocity feet per second Friction loss pounds per square inch Friction head feet Velocity feet per second 0.017 0.026 0.035 0.048 0.061 0.074 0.091 0.13 0.17 0.19 0.22 0.27 0.33 0.50 0.70 0.93 1.19 1.81 2.52 3.35 4.30 0.37 0.74 4.19 7.59 14.65 31.05 Friction loss pounds per square inch 4 in. 0.04 0.06 0.08 0.11 0.14 0.17 0.21 0.30 0.39 0.45 0.50 0.63 0.76 1.16 1.61 2.15 2.75 4.16 5.33 7.76 9.93 ¾” 0.86 1.72 9.67 17.76 33.84 71.70 Friction head feet 0.57 0.72 0.86 1.00 1.15 1.29 1.43 1.72 2.01 2.15 2.29 2.58 2.87 3.59 4.30 5.02 5.73 7.16 8.60 10.03 11.47 0.74 1.57 3.92 5.49 7.84 11.76 Velocity feet per second 1.74 3.48 19.59 35.97 Friction loss pounds per square inch ½” 4.02 8.03 45.23 83.09 Friction head feet Friction loss pounds per square inch 1.43 2.95 7.89 10.34 Velocity feet per second Friction head feet 1 2 5 7 10 15 20 25 30 35 40 45 50 60 70 75 80 90 100 125 150 175 200 250 300 350 400 450 500 750 1000 1250 1500 2000 2500 3000 3500 4000 Velocity feet per second Gallons per minute Independent variables: Gallons per minute and nominal pipe size O.D. (Min. I.D.) Dependent variables: Velocity, friction head and pressure drop per 100 feet of pipe, interior smooth. 6 32 18 8 6¼ 14 8 38 22 10 — — 0.009 0.013 0.017 0.039 0.055 0.095 0.13 0.13 0.23 0.29 0.35 0.49 0.65 0.74 0.84 1.04 1.27 1.92 2.68 3.58 4.58 8.93 Head Loss Characteristics of Water Flow Thru Rigid Plastic Pipe This nomograph provides approximate values for a wide range of plastic pipe sizes. More precise values should be calculated from the Hazen and Williams formula. Experimental test value of C (a constant for inside pipe The values of this chart are based on the Hazen & Williams formula: f = 0.2083 100 C ( ) 1.852 1.852 x g 4.8655 Di 1.852 = 0.0983 g 4.8655 for C = 150 Di P = 4335f Where: f = P = Di= g = C = Friction Head in ft. of Water per 100 ft. of Pipe Pressure Loss in psi per 100 ft. of Pipe Inside Pipe Diameter, in. Flow Rate in U.S. gal./min. Constant for Inside Roughness (C equals 150 for thermoplastics) roughness) ranges from 155 to 165 for various types of plastic pipe. Use of a value of 150 will ensure conservative friction loss values. The nomograph is used by lining up values on the scales by means of a ruler or straight edge. Two independent variables must be set to obtain the other values. For example: line (1) indicates that 500 gallons per minute may be obtained with a 6-inch inside diameter pipe at a head loss of about 0.65 pounds per square inch at a velocity of 6.0 feet per second. Line (2) indicates that a pipe with 2.1 inch inside diameter will give a flow of about 60 gallons per minute at a loss in head of 2 pounds per square inch per 100 feet of pipe. Line (3) and dotted line (3) show that in going from a pipe 2.1 inch inside diameter to one of 2 inches inside diameter, the head loss goes from 3 to 4 pounds per square inch in obtaining a flow of 70 gallons per minute. Remember, velocities in excess of 5.0 feet per second are not recommended. Nomograph courtesy of Plastics Pipe Institute, a division of The Society of The Plastics Industry. 21 Installation Instructions Storage and Handling GF thermoplastics have excellent resistance to weathering and can be stored outside for long periods. However, it is recommended that any plastic pipe stored outside be covered with a light tarpaulin, or kept under cover in a warehouse or shed that is well ventilated to prevent excessive temperature buildup and possible warping. Care should also be exercised to keep the product away from exposure to UV from direct sunlight. The storage area should not be located near steam lines or other heat sources. To prevent sagging or “draping,” particularly of the longer sections, pipe should be stored on racks that provide close or continuous support. Any sharp edges or burrs on the racks should be removed or covered. To prevent excessive deflection, loose stacks of pipe should not exceed a height of three feet. Bundled pipe can be stacked twice as high. Fittings and flanges should be kept in their original packaging or in separate bins until they are needed. They should never be mixed with metal piping components. Since plastic pipe has lower impact strength and resistance to mechanical abuse than steel, it requires somewhat more care in handling. Pulling a length of pipe off a truck bed and letting the free end plummet to the ground should be avoided. Also to be avoided is dragging the pipe over rough ground, dropping heavy objects on it, or using any kind of chains. The resulting scratches, splits or gouges can reduce the pressure rating. If damage from careless handling does occur, one of the advantages of plastic pipe is readily apparent. The damaged section can be quickly cut out and the pipe ends rejoined using the cutting and joining techniques described below. Solvent Welding PVC and CPVC Pipe and Fittings Basic Principles The solvent cemented connection in thermoplastic pipe and fittings is the last vital link in a plastic pipe instal- 22 lation. It can mean the success or failure of the system as a whole. Accordingly, it requires the same professional care and attention given to other components of the system. There are many solvent cementing techniques published covering step by step procedures on just how to make solvent cemented joints. However, we feel that if the basic principles involved are explained, known and understood, a better understanding would be gained, as to what techniques are necessary to suit particular applications, temperature conditions, and variations in sizes and fits of pipe and fittings. To consistently make good joints the following should be clearly understood: 1. The joining surfaces must be dissolved and made semi-fluid. 2. Sufficient cement must be applied to fill the gap between pipe and fitting. 3. Assembly of pipe and fittings must be made while the surfaces are still wet and fluid. 4. Joint strength develops as the cement dries. In the tight part of the joint the surfaces will tend to fuse together, in the loose part the cement will bond to both surfaces. Penetration and dissolving can be achieved by a suitable primer, or by the use of both primer and cement. A suitable primer will penetrate and dissolve the plastic more quickly than cement alone. The use of a primer provides a safety factor for the installer for he can know, under various temperature conditions, when he has achieved sufficient softening. More than sufficient cement to fill the loose part of the joint must be applied. Besides filling the gap, adequate cement layers will penetrate the surface and also remain wet until the joint is assembled. Prove this for yourself. Apply on the top surface of a piece of pipe two separate layers of cement. First apply a heavy layer of cement, then alongside it, a thin brushed out layer. Test the layers every 15 seconds or so by a gentle tap with your finger. You will note that the thin layer becomes tacky and then dries quickly (probably within 15 seconds). The heavy layer will remain wet much longer. Check for penetration a few minutes after applying these layers. Scrape them with a knife. The thin layer will have achieved little or no penetration. The heavy one, much more penetration. As the solvent dissipates, the cement layer and the dissolved surfaces will harden with a corresponding increase in joint strength. A good joint will take the required working pressure long before the joint is fully dry and final strength will develop more quickly than in the looser (bonded) part of the joint. If the cement coatings on the pipe and fittings are wet and fluid when assembly takes place, they will tend to flow together and become one cement layer. Also, if the cement is wet the surfaces beneath them will still be soft, and these softened surfaces in the tight part of the joint will tend to fuse together. 23 Making the Joint Step 1: 1. Cutting: Pipe must be squarely cut to allow for the proper interfacing of the pipe end and the fitting socket bottom. This can be accomplished with a miter box saw or wheel type cutter. For saw cuts on pipe too large for a miter box, a pipe wrap should be used and a line drawn with marker. If using a wheel cutter, it must have a cutting blade specifically designed for plastic pipe. Note: Power saws should be specifically designed to cut plastic pipe. 2. Deburring: Use a plastic deburring tool or file to remove burrs from the end of small diameter pipe. Be sure to remove all burrs from around the inside as well as the outside of the pipe. A slight chamfer (bevel) of about 10°-15° should be added to the end to permit easier insertion of the pipe into the fitting. Failure to chamfer the edge of the pipe may remove cement from the fitting socket, causing the joint to leak. For pressure pipe systems of 2” and above, the pipe must be end-treated with a 15° chamfer cut to a depth of approximately 3/32.” Commercial power bevelers are recommended. Step 2: 3. Test Dry Fit of the Joint: Tapered fitting sockets are designed so that an interference fit should occur when the pipe is inserted about 1/3 to 2/3 of the way into the socket. Occasionally, when pipe and fitting dimensions are at the tolerance extremes, it will be possible to fully insert dry pipe to the bottom of the fitting socket. When this happens, a sufficient quantity of cement must be applied to the joint to fill the gap between the pipe and fitting. The gap must be filled to obtain a strong, leakfree joint. Step 3: A 15° chamfer cut to a depth of approx. 3/32 .” 24 4. Inspection, Cleaning, Priming: Visually inspect the inside of the pipe and fitting sockets and remove all dirt, grease or moisture with a clean, dry rag or cloth. If wiping fails to clean the surfaces, a chemical cleaner must be used. Check for possible damage such as splits or cracks and replace if necessary. Step 4: Depth-of-Entry Mark: Marking the depth of entry is a way to check if the pipe has reached the bottom of the fitting socket in step #6. Measure the fitting socket depth and mark this distance on the pipe O.D. We recommend that you add a second mark 2” above this mark as the primer and cement may destroy the first mark and this second line can be used to ensure that the pipe is fully inserted into the fitting socket. Apply primer to the surface of the pipe and fitting socket using an approved applicator, working the primer in the surface of both the fitting socket and pipe O.D. You should continue to vigorously work the primer into these surfaces until you can feel the applicator start to “drag” indicating a softening of the material. It may take several applications of the primer to effectively break down the surface of the material, but this is a critical step in the cementing process. Move quickly, without hesitation, to the cementing procedure while the surfaces are still wet with primer. Caution: Primers and cements are extremely flammable and must not be stored or used near heat or open flame. Read all warnings on primer and cement cans. 5. Application of Solvent Cement: A critical part of the solvent cementing process is to make sure the cement is well mixed. Periodically cover the container and shake the cement to make sure it stays mixed and uniform. Apply the solvent cement evenly and quickly around the outside of the pipe and at a width a little greater than the depth of the fitting socket while the primer is still wet. Note: Individual scrape tests may be needed for pipes and fittings from different manufactures or even for pipes of different surface finishes to determine satisfactory penetration and softening of the material. Step 5: Apply a lighter coat of cement evenly around the inside of the fitting socket. Avoid puddling. Apply a second coat of cementing to the pipe end. 25 For sizes 6” and above, and possibly 4” in hot weather, we recommend the consideration of two-man crews to effectively prime both pipe and fitting surfaces and apply the cement while the material is still wet with primer. Step 5: (cont.) Note: When cementing bell-end pipe, be careful not to apply an excessive amount of cement to the bell socket. This will prevent solvent damage to the pipe. For buried pipe applications, do not throw empty primer or cement cans into the trench along side the pipe. Cans of cement and primer should be closed at all times when not in use to prevent evaporation of chemicals and hardening of cement. 6. Joint Assembly: Working quickly, squarely insert the pipe into the fitting socket, giving the pipe or fitting a ¼ turn during insertion to evenly distribute the cement. Do not continue to rotate the pipe after it has hit the bottom of the fitting socket. A good joint will have sufficient cement to form a uniform bead all the way around the outside of the fitting hub. The fitting will have a tendency to slide back on the pipe while the cement is setting, so hold the joint tightly together for about 30 seconds. Please use the cement manufacturer’s written recommendations regarding joint set time, for initial movement of a joint, and cure time before a pressure test. For pipe sizes 4” and above, greater axial forces are necessary for the assembly of interference fit joints. Mechanical forcing equipment may be needed to join the pipe and hold the joint until the cement “sets.” The joint may have to be held together for up to 3 minutes. Consult the factory for specifics. Note: It may be necessary for two workers to perform this operation for larger sizes of pipe. Step 6: Note: Always wait at least 24 hours before pressure testing a piping system to allow cemented joints to cure properly. For colder temperatures, it may be necessary to wait a longer period of time. Please reference the solvent cement manufacturer’s curing time. Note: When using mechanical joining equipment, it will not be possible to apply the ¼ turn as the pipe is inserted into the fitting. 7. Clean-up and Joint Movement: Remove all excess cement from around the pipe and fitting with a dry, cotton rag or cloth. This must be done while the cement is still soft. The joint should not be disturbed immediately after the cementing procedure and sufficient time should be allowed for proper curing of the joint. Exact drying time is difficult to predict because it depends on variables such as temperature, humidity and cement integrity. For more specific information, contact your solvent cement manufacturer. 26 Step 7: Joining Plastic Pipe in Hot Weather There are many occasions when solvent cementing plastic pipe in 95°F temperatures and over cannot be avoided. At surface temperatures exceeding 110°F, we recommend that the solvent cement manufacturer be contacted. If special precautions are taken, problems can be avoided. Solvent cements for plastic pipe contain high-strength solvents which evaporate faster at elevated temperatures. This is especially true when there is a hot wind blowing. If the pipe is stored in direct sunlight, surface temperatures may be 20°F to 30°F above air temperature. Solvents attack these hot surfaces faster and deeper, especially inside a joint. Thus it is very important to avoid puddling inside socket and to wipe off excess cement outside. By following our standard instructions and using a little extra care, as outlined below, successful solvent cemented joints can be made in even the most extreme hot weather conditions. Tips to Follow When Solvent Cementing in High Temperatures 1. Store solvent cements and primers in a cool or shaded area prior to use. 2. If possible, store fitting and the pipe, or at least the ends to be solvent welded, in shady area before cementing. 3. Cool surfaces to be joined by wiping with a damp rag. Be sure that surfaces dry prior to applying solvent cement. 4. Try to do the solvent cementing in cooler morning hours. 5. Make sure that both surfaces to be joined are still wet with cement when putting them together. With large size pipe, more people on the crew may be necessary. 6. Use a heavier, high viscosity cements since they will provide a little more working time. As you know, during hot weather there can be a greater expansion-contraction factor. Joining Plastic Pipe in Cold Weather Working in freezing temperatures is never easy. But sometimes the job is necessary. If that unavoidable job includes cementing plastic pipe, you can do it successfully with regular cements. Good Joints Can Be Made at Sub-Zero Temperatures By following standard instructions and using a little extra care and patience, successful solvent cemented joints can be made at temperatures even as low as -15°F. In cold weather, solvents penetrate and soften the surfaces more slowly than in warm weather. Also the plastic is more resistant to solvent attack. Therefore, it becomes more important to pre-soften surfaces with a primer. And, because of slower evaporation, a longer cure time is necessary. Cure schedules already allow a wide margin for safety. For colder weather, simply allow more time. Tips to Follow in Solvent Cementing During Cold Weather 1. Prefabricate as much of the system as possible in a heated working area. 2. Store cements and primers in a warmer area when not in use and make sure they remain fluid. 3. Take special care to remove moisture including ice and snow. 4. Use a primer to soften the joining surfaces before applying cement. 5. Allow a longer cure period before the system is used. 6. Read and follow all of our directions carefully before installation. Regular cements are formulated to have well balanced drying characteristics and to have good stability in sub-freezing temperatures. Some manufacturers offer special cements for cold weather because their regular cements do not have that same stability. For all practical purposes, good solvent cemented joints can be made in very cold conditions with existing products, provided proper care and a little common sense are used. Guideline on Cement Usage Pipe Size ½” ¾” 1” 1¼” 1½” 2” No. of Joints 300 200 125 105 90 60 2½” 3” 4” 6” 8” 10” 12” 50 30 10 5 2-3 1-2 40 Note: This information is provided as a general guideline. Recommendation is for the number of joints per quart. A Tee will have 3 joints, an Ell will have 2 joints. Our recommendation for primer is to use 150% of the cement number. 27 Threading While threaded thermoplastic systems are not recommended for high-pressure systems, piping layouts where leaks would be dangerous, or for larger pipe sizes (more than two inches), they have two definite advantages. They quickly can be dismantled for temporary or take-down applications; and they can be used to join plastic to nonplastic materials. Following are recommendations for making threaded joints with thermoplastic pipe and fittings. 1. Thread only pipes that have wall thicknesses equal to or greater than those of Schedule 80 pipe. 2. For pressure-rated pipes of PVC and CPVC reduce the pressure rating of threaded pipe to one-half that of unthreaded pipe. 3. To cut the threads, use only pipe dies designed for plastic pipes. Keep the dies clean and sharp. Do not cut other materials with them. 4. Vises for holding the pipe during thread cutting and pipe wrenches should be designed and used in such a manner that the pipe is not damaged. Strap wrenches are recommended. Wooden plugs can be inserted into the end of the pipe, if needed to prevent distortion of the pipe walls and cutting of off-center threads. 5. The following general procedure for cutting threads may be used: A. Use a die stock with a proper guide so the die will start and go on square to the pipe axis. Any burrs or sharp edges on the guide that can scratch the pipe must be removed. B. Do not use cutting oil. However, a drop of oil may be rubbed onto the chasers occasionally. This prevents tearing and helps to promote clean, smooth threads. C. If lubrication is necessary, it is best to use a water based lubricant. 6. Before assembly, the threads should be lubricated and sealed with a non-hardening pipe dope or wrapped with Teflon® tape. 7. The proper threading of plastic parts requires some cautions and concerns to maintain the integrity of the threads. Since plastic threads can be easily damaged or cross threaded, it is important that these threads 28 be properly lubricated using a pipe dope, which is compatible with the materials being threaded, or TFE tape. TFE taped must be installed in a clockwise direction, starting at the bottom of the thread and overlapping each pass. Do not employ more than 3 wraps. The starting of the thread is critical, to avoid thread damage which could result in a leak. Product must never be installed more than ½ - 1 turn past hand tight and only strap wrenches should be used to tighten plastic connections. 8. In general, applications for threaded plastic pipe fittings fall into two categories: A. Fittings for use in an all-plastic system where both the male and female parts are plastic. B. Fittings for use as transition fittings from plastic to metal. Theoretically, it is possible to use any combination of threaded parts such as: 1. Metal male to plastic female. 2. Plastic male to plastic female. 3. Metal female to plastic male. Practical experience, however, suggests that the METAL MALE TO PLASTIC FEMALE combination is more susceptible to premature failure than the other two applications. The reason for this is due to the incompressibility of metal. Standard instructions call for the male part to be run in hand tight and then tightened ½ turn more. It has been our observation, however, that it is very common to find male metal parts screwed in for a total of 7 to 8 threads. This results in excessively high stress levels in the plastic female part. The tensile strength of the Type I PVC is 7200 psi. However, all fittings have knit lines (where the melted material joins together after flowing around the core which forms the waterway) which are the weakest portions of the fitting. The tensile strength at the knit lines is therefore lower than the minimum of 7200 psi. A metal nipple screwed in 7½ turns will generate a stress Teflon® is a registered trademark of E.I. DuPont de Nemours & Co. of approximately 6600 psi. This means that if the fitting doesn’t crack open immediately, there will probably be a small crack initiated on the inside which will ultimately cause failure. It is for this reason that George Fischer Piping Systems recommends that its threaded plastic pipe fittings be used only in the following two combinations: 1. PLASTIC MALE TO PLASTIC FEMALE 2. PLASTIC MALE TO METAL FEMALE If it is absolutely necessary to use a plastic female thread for transition to metal nipple, then it is IMPERATIVE that the nipple not be turned more than ½ turn past HANDTIGHT (“fingertight” for strong hands). To insure a leakproof joint, a good sealant is recommended (Teflon® tape or Teflon® pipe dope). Note: Angle between sides of thread is 60 degrees. Taper of thread, on diameter, is ¾ inch per foot. The basic thread is 0.8 x pitch of thread and the crest and root are truncated an amount equal to 0.033 x pitch, excepting 8 threads per inch which have a basic depth of 0.788 x pitch and are truncated 0.045 x pitch at the crest and 0.033 x pitch at the root. American Standard Taper Pipe Thread Dimensions Nominal Size (in.) Pipe Outside Diameter (in.) Number of Threads Per Inch D / ¼ 3 8 / ½ ¾ 1 1¼ 1½ 2 2½ 3 3½ 4 5 6 8 10 12 1 8 .405 .540 .675 .840 1.050 1.315 1.660 1.900 2.375 2.875 3.500 4.000 4.500 5.563 6.625 8.625 10.750 12.750 Normal Engagement by hand (in.) C 27 18 18 14 14 11½ 11½ 11½ 11½ 8 8 8 8 8 8 8 8 8 .180 .200 .240 .320 .339 .400 .420 .420 .436 .682 .766 .821 .844 .937 .958 1.063 1.210 1.360 Thread Length of Total Length Effective Thread End of Pipe to (in.) Vanish Point (in.) A B .2639 .3924 .4018 .5946 .4078 .6006 .5337 .7815 .5457 .7935 .6828 .9845 .7068 1.0085 .7235 1.0252 .7565 1.0582 1.1375 1.5712 1.2000 1.6337 1.2500 1.6837 1.3000 1.7337 1.4063 1.8400 1.5125 1.9472 1.7125 2.1462 1.9250 2.3587 2.1250 2.5587 Pitch Diameter at End of Internal Thread (in.) E .39476 .48989 .62701 .77843 .98887 1.23863 1.58338 1.82234 2.29627 2.76216 3.38850 3.88881 4.38713 5.44929 6.50597 8.50003 10.62094 12.61781 Depth of Thread (Max.) (in.) .02963 .04444 .04444 .05714 .05714 .06957 .06957 .06957 .06957 .10000 .10000 .10000 .10000 .10000 .10000 .10000 .10000 .10000 29 Flanging The use of flanges in a PVC/CPVC piping system may have an advantage if there is a need to dismantle the pipe, when the system is temporary and mobility is required or when transitioning to dissimilar materials. Flanging should also be considered when it is environmentally impossible to make solvent cemented joints on location. Selection of Materials 1. Gasket: full faced elastomeric material (Durometer “A” Scale of 55 to 80) usually 1/8” thick. Gasket material must be resistant to the media in the pipe. 2: Fasteners: All nuts, bolts and flat washers must be resistant to the chemical environment. All listed torque values are using well lubricated bolt threads. Flat washers are required for both the nut and the bolt head to minimize point loading on the flange. We recognize that some facilities do not allow lubrication, but the variables to determine torque values in such situations are beyond the scope of this document and require specific engineering considerations. 3. Torque Wrench: A necessity for tightening bolts to prevent excessive or uneven torque. Flange Bolt Tightening Pattern (tighten bolts evenly: follow numerical sequence) Flange Assembly 1. Join the flange to the pipe. Solvent cemented joints must be allowed sufficient cure time per the manufacturer’s written recommendations prior to any movement or assembly 2. Align the flanges and gasket by inserting all the bolts through the matching bolt holes. Proper mating of flanges and gaskets is very important for a positive seal. Misalignment of flanges (Cold Springing), pulling the flanges together, as well as uneven torque can result in premature, possibly catastrophic, failure. 3. Use a torque wrench: The proper torque, as well as the gradual tightening of the bolts, is necessary to secure an effective seal and minimize those conditions which could lead to premature failure. Note: 1. Do not over-torque flange bolts. 2. Use the proper bolt tightening sequence. 3. Make sure the system is in proper alignment. 4. Flanges should not be used to draw piping assemblies together. 5. Flat washers must be used under every nut and bolt head. Recommended Torque Pipe Size (IPS) No. Bolt Holes Bolt Diameter Approx. Bolt Length* Recommended Torque ft/lbs 10-15 ½ 4 ½ 2½ ¾ 4 ½ 2½ 10-15 1 4 ½ 2½ 10-15 1¼ 4 ½ 3 10-15 1½ 4 ½ 3 10-15 2 4 5 8 / 3 20-30 2½ 4 5 8 / 3½ 20-30 3 4 5 8 / 3¾ 20-30 4 8 5 8 / 4 20-30 6 8 ¾ 4¾ 33-50 8 8 7 8 / 5¼ 33-50 10 12 7 8 / 6 53-75 12 12 7 8 / 6½ 53-75 *Bolt lengths were calculated using two flanges. Additional accessories or different mating surfaces will alter these numbers. Note: Flange bolt hole pattern meets ANSI B16.5. 30 Above-Ground Installation Support Spacing 4 y = .00541 wL EI Where: y = Deflection or sag (in.) w = Weight per unit length (lb./in.) L = Support spacing (in.) E = Modulus of elasticity at given temperature (lb./in.2) I = Moment of inertia (in.4) When thermoplastic piping systems are installed above-ground, they must be properly supported to avoid unnecessary stresses and possible sagging. Horizontal runs require the use of hangers as described on the next page, spaced approximately as indicated in the table below. Note that additional support is required as temperatures increase. Continuous support can be accomplished by the use of smooth structural angle or channel. If 0.100 in. is chosen arbitrarily as the permissible sag (y) between supports, then: L4 - 18.48 EL w Where: w = Weight of pipe + weight of liquid (lb./in.) For a pipe I = (Do4-Di4) 64 Where: Do = Outside diameter of the pipe (in.) Di = Inside diameter of the pipe (in.) Where the pipe is exposed to impact damage, protective shields should be installed. Tables are based on the maximum deflection of a uniformly loaded, continuously supported beam calculated from: Then: L = .907 E (Do4-Di4) W ( ) E = .976 ( W Do -Di ) 4 4 ¼ ¼ Recommended Support Spacing* (In Feet) Nom. Pipe Size (In.) PVC Pipe CPVC Pipe 60 80 100 120 140 60 80 100 120 140 60 80 100 120 140 180 ½ 4½ 4½ 4 2½ 2½ 5 4½ 4½ 3 2½ 5½ 5½ 5 4½ 4½ 2½ ¾ 5 4½ 4 2½ 2½ 5½ 5 4½ 3 2½ 5½ 5½ 5½ 5 4½ 2½ 1 5½ 5 4½ 3 2½ 6 5½ 5 3½ 3 6 6 6 5½ 5 3 1¼ 5½ 5½ 5 3 3 6 6 5½ 3½ 3 6½ 6½ 6 6 5½ 3 1½ 6 5½ 5 3½ 3 6½ 6 5½ 3½ 3½ 7 7 6½ 6 5½ 3½ 2 6 5½ 5 3½ 7 7 6½ 6 4 3½ 7 7 7 6½ 6 3½ 2½ 7 6½ 6 4 3½ 7½ 7½ 6½ 4½ 4 8 7½ 7½ 7½ 6½ 4 3 7 7 6 4 3½ 8 7½ 7 4½ 4 8 8 8 7½ 7 4 4 7½ 7 6½ 4½ 4 9 8½ 7½ 5 4½ 9 9 9 8½ 7½ 4½ 6 8½ 8 7½ 5 4½ 10 9½ 9 6 5 10 10½ 9½ 9 8 5 8 9 8½ 8 5 4½ 11 10½ 9½ 6½ 5½ 11 11 10½ 10 9 5½ 10 10 9 8½ 5½ 5 12 11 10 7 6 11½ 11½ 11 10½ 9½ 6 12 11½ 10½ 9½ 6½ 5½ 12 11 10 7 6 12½ 12½ 12½ 11 10½ 6½ 14 12 11 10 7 6 13½ 13 11 8 7 16 12½ 11½ 10½ 7½ 6½ 14 13½ 11½ 8½ 7½ Schedule 40 Schedule 80 Temp. °F Temp. °F Schedule 80 Temp. °F Note: This data is based on information supplied by the raw material manufacturers. It should be used as a general recommendation only and not as a guarantee of performance or longevity. *Chart based on spacing for continuous spans and for uninsulated lines conveying fluids of specific gravity up to 1.00. 31 Hangers There are many hangers and supports suitable for use in plastic piping systems, although some may require modification. It is important in a plastic piping system to provide a wide load-bearing surface and that any restraints recognize that vinyl piping systems are somewhat notch sensitive. Also, if the thermal movement of a plastic piping system might cause the pipeline to abrade on a rough surface, such as concrete, some means of isolating the pipe should be considered. Wear pads of plastic can be fashioned from the pipe or wooden isolators can be used. It is also important to recognize the thermal movement in any plastic piping system and the hangers and support structures should allow for, or direct, the expansion that may be in a particular system. Pipe hangers must be carefully aligned and must have no rough or sharp edges that could contact and potentially damage the pipe. The hanger or support system should recognize the thermal expansion in a plastic pipe system and pipe should be allowed to move. Vertical lines must also be supported at intervals so that the fittings at the lower end of a riser or column are not overloaded. The supports should not exert a compressive strain on the pipe, such as riser–type clamps that squeeze the pipe. A double bolt type, in conjunction with using a fitting shoulder, may afford the best method for supporting vertical systems. Recommended Hangers for Plastic Piping Systems Band Hanger with Protective Sleeve Roller Hanger Clevis Pipe Roll and Plate Adjustable Solid Ring Swivel Type Riser Clamp Single Pipe Roll Double-Bolt Clamp Sunlight and Plastics Plastic pipe and fittings have been used extensively outdoors and are resistant to weathering, but may have some surface degradation from intense and prolonged exposure to the ultraviolet (UV) rays in sunlight. This degradation is a surface effect, reducing the impact rating but has no affect on the temperature capability as well as the chemical resistance or pressure rating of the pipe. This reduced impact rating can be eliminated by removal of the affected surface area and covering with a good bonding exterior latex paint. The latex paint must be applied thick enough, probably several coats, to create an opaque covering. If the pipe and fittings are prepared properly for painting (cleaning and very light sanding), a good grade of exterior latex should last for many years. White or light colored pigment is suggested, which offers a more reflective surface. 32 A Typical Method of Anchorage of a Change in Direction Anchors and Guides Typical Method of Anchorage Anchors in a piping system direct movement of pipe within a defined reference frame. At the anchoring point, there is no axial or transverse movement. Guides are used to allow axial movement of pipe but prevent transverse movement. Anchoring and guides should be engineered to provide the required function without point loading the plastic pipe. Typical Support Arrangements Guides and anchors are used whenever expansion joints are used and are also on long runs and directional changes in piping. Continuous Support Arrangements 33 Below-Ground Installation Trenching and Bedding 1. Depth: When installing underground piping systems, the depth of the trench is determined by the intended service and by local conditions (as well as by local, state and national codes that may require a greater trench depth and cover than are technically necessary). Underground pipes are subjected to external loads caused by the weight of the backfill material and by loads applied at the surface of the fill. These can range from static to dynamic loads. Static loads comprise the weight of the soil above the top of the pipe plus any additional material that might by stacked above ground. An important point is that the load on a flexible pipe will be less than on a rigid pipe buried in the same manner. This is because the flexible conduit transfers part of the load to the surrounding soil and not the reverse. Soil loads are minimal with narrow trenches until a pipe depth of 10 feet is attained. Dynamic loads are loads due to moving vehicles such as trucks, trains and other heavy equipment. For shallow burial conditions, live loads should be considered and added to static loads, but at depths greater than 10 feet, live loads have very little effect. 3. Snaking: To compensate for thermal contraction, the snaking technique of offsetting the pipe with relation to the trench centerline is recommended. Example: Snaking is particularly important when laying small diameter pipe in hot weather. For example, a 100-foot length of PVC Type I pipe will expand or contract about ¾” for each 20°F temperature change. On a hot summer day, the direct rays of the sun on the pipe can drive the surface temperature up to 150°F. At night, the air temperature may drop to 70°F. In this hypothetical case, the pipe would undergo a temperature change of 80°F — and every 100 feet of pipe would contract 3”. This degree of contraction would put such a strain on newly cemented pipe joints that a poorly made joint might pull apart. Installation: A practical and economical method is to cement the line together at the side of the trench during the normal working day. When the newly cemented joints have dried, the pipe is snaked from one side of the trench to the other in gentle, alternative curves. This added length will compensate for any contraction after the trench is backfilled (see “Snaking of Pipe Within Trench” illustration below). For static and dynamic soil loading tables, refer to specific materials sections, PVC and CPVC. The “Snaking Length” table below gives the required loop length, in feet, and offset in inches, for various temperature variations. Pipe intended for potable water service should be buried at least 12 inches below the maximum expected frost penetration. Snaking of Pipe Within Trench 2. Bedding: The bottom of the trench should provide a firm, continuous bearing surface along the entire length of the pipe run. It should be relatively smooth and free of rocks. Where hardpan, ledge rock or boulders are present, it is recommended that the trench bottom be cushioned with at least four (4) inches of sand or compacted fine-grained soils. Snaking of thermoplastic pipe within trench to compensate for contraction. Snaking Length vs. Offset (in.) to Compensate for Thermal Contraction Snaking Maximum Temperature Variation (°F) Between Time of Cementing and Final Backfilling Length, 10° 20° 30° 40° 50° 60° 70° 80° 90° 100° (ft.) Loop Offset, (in.) 20 50 100 34 2.5 6.5 13.0 3.5 9.0 18.0 4.5 11.0 22.0 5.20 12.75 26.00 5.75 14.25 29.00 6.25 15.50 31.50 6.75 17.00 35.00 7.25 18.00 37.00 7.75 19.25 40.00 8.00 20.25 42.00 Anchors and Other Connections Plastic pipe is not designed to provide structural strength beyond sustaining internal pressures up to its designed hydrostatic pressure rating and normal soil loads. Anchors, valves and other connections must be independently supported to prevent added shearing and bending stresses on the pipe. Risers: The above piping design rule applies also where pipe is brought out of the ground. Above-ground valves or other connections must be supported independently. If pipe is exposed to external damage, it should be protected with a separate, rigidly supported metal pipe sleeve at the danger areas. Thermoplastic pipe should not be brought above ground where it is exposed to high temperatures. Elevated temperatures can lower the pipe’s pressure rating below design levels. Backfilling Before making the final connections and backfilling, the pipeline should be cooled to near the temperature of the soil. During hot weather, for example, backfilling should be done early in the morning, when the solventcemented joints are completely dried and the line is fully contracted. Assuming that the pipe is uniformly and continuously supported over its entire length on firm, stable material, it should first be covered with 6 to 8 inches of soil that is free of debris and rocks larger than one-half inch in diameter. This initial layer should be compacted by hand or, preferably, by mechanical tamper so that it acts as a protective cushion against the final backfill. Any large, sharp rocks that could penetrate the tampered layer around the pipe should be removed from the final backfill. Heavy Traffic: When plastic pipe is installed beneath streets, railroads or other surfaces that are subjected to heavy traffic and resulting shock and vibration, it should be run within a protective metal or concrete casing. Locating Buried Pipe: The location of plastic pipelines should be accurately recorded at the time of installation. Since pipe is a non-conductor, it does not respond to the electronic devices normally used to locate metal pipelines. However, a copper or galvanized wire can be spiraled around, taped to or laid alongside or just above the pipe during installation to permit the use of a locating device. Note: For additional information, see ASTM D-2774, “Underground Installation of Thermoplastic Piping.” 35 Trench Widths for PVC Soil Load and Pipe Resistance for Flexible Thermoplastic Pipe — PVC Schedule 80 Pipe W H Nom. Size Wc’ = Load Resistance of Pipe (lb./ft.) Schedule 80 Pipe E’ = 200 1½ 2 H 3 1400 1593 1416 1879 1772 W 3½ 4 5 H 1161 1561 W 2½ H 1375 E’ = 700 1318 1266 1206 1731 1735 1796 W 6 Note: W = Trench Width at Top of Pipe. 8 10 12 1323 1319 1481 1676 2028 2250 2649 3067 H=Height Wc = Soil Loads at Various Trench Widths at Top of fill of Pipe (lb./ft.) above pipe (ft.) 2 ft 3 ft. 4 ft. 5 ft. 10 106 125 136 152 20 138 182 212 233 30 144 207 254 314 40 — 214 269 318 10 132 156 170 190 20 172 227 265 291 30 180 259 317 392 40 — 267 337 398 10 160 191 210 230 20 204 273 321 352 30 216 306 377 474 40 — 323 408 482 10 196 231 252 280 20 256 336 392 429 30 266 266 384 469 40 — 394 497 586 10 223 266 293 320 20 284 380 446 490 30 300 426 524 660 40 — 450 568 670 10 252 297 324 360 20 328 432 540 551 30 342 493 603 743 40 — 506 639 754 10 310 370 407 445 20 395 529 621 681 30 417 592 730 918 40 — 625 790 932 10 371 437 477 530 20 484 636 742 812 30 503 725 888 1093 40 — 745 941 1110 10 483 569 621 690 20 630 828 966 1057 30 656 945 1156 1423 40 — 970 1225 1415 10 602 710 774 860 20 785 1032 1204 1317 30 817 1177 1405 1774 40 — 1209 1527 1801 10 714 942 919 1020 20 931 1225 1429 1562 30 969 1397 1709 2104 40 — 1434 1811 2136 Note 1: Figures are calculated from minimum soil resistance values (E’ = 200 psi for uncompacted sandy clay foam) and compacted soil (E’ = 700 for side-fill soil that is compacted to 90% or more of Proctor Density for distance of two pipe diameters on each side of the pipe). If Wc’ is less than Wc at a given trench depth and width, then soil compaction will be necessary. Note 2: These are soil loads only and do not include live loads. 36 Standards Standards allow an engineer to develop a specification which will provide accepted material and product performance. Having strong industry standards provides the market with the necessary criteria to determine the suitability of a specific material and/or product for a specific application. Within the plastics industry the primary source of these standards is ASTM which are usually the basis of most specifications. Manufacturers may also subscribe to other standards, such as IAPMO, NSF, ANSI, ASME and UL. For the purposes of this manual we will restrict our listing of standards to those that are relevant to Schedule 80 PVC and CPVC. ASTM (American Society for Testing and Materials) D-1784: ”Standard Specification for Rigid Poly(vinyl Chloride) (PVC) and Chlorinated Poly(Vinyl Chloride) (CPVC) Compounds” materials, workmanship, dimensions, and burst pressure. D-2672: “Standard Specification for Joints for IPS PVC Pipe using Solvent Cement” This specification covers the socket produced for solvent cements joints on both pressure and non-pressure IPS pipe. It also covers the testing of the joints on both pressure and non-pressure pipe, and includes requirements for socket dimensions, burst pressure, and joint tightness tests of the solvent cemented joints. The tests described are not intended for routine quality control, but rather to evaluate the performance characteristics of the joint. D-2855: “Standard Practice for Making SolventCemented Joints with Poly(Vinyl Chloride) (PVC) Pipe and Fittings” This specification covers the compound materials physical requirements for PVC and CPVC pipe, valves and fittings based on several physical and chemical properties. This recommended practice describes, in detail, procedures for making solvent cemented joints. Preparation of the surfaces, applying the cement, making the assembly, handling after assembly, testing and a schedule of drying times related to temperature and pipe sizes are covered. D-1785: “Standard Specification for Poly(Vinyl Chloride) (PVC) Plastic Pipe, Schedules 40, 80 and 120” F-1498: “Standard Specification for Taper Pipe Threads 60° for Thermoplastic Pipe and Fittings” This specification covers poly(vinyl chloride) (PVC) pipe made in Schedule 40, 80 and 120 sizes and pressurerated for water. Included are criteria for classifying PVC plastic pipe materials and PVC plastic pipe, a system of nomenclature for PVC plastic pipe and requirements and test methods for materials, workmanship, dimensions, sustained pressure, burst pressure, flattening, and extrusion quality. This specification established requirements for dimensions and gauging of taper pipe threads used on threaded plastic pipe and fittings. D-2466: “Standard Specification for Poly(Vinyl Chloride) (PVC) Plastic Pipe Fittings, Schedule 40” This specification covers poly(vinyl chloride) (PVC) Schedule 40 pipe fittings. Included are requirements for material, workmanship, dimensions, and bust pressure. D-2467: “Standard Specification for Poly(Vinyl Chloride) (PVC) Plastic Pipe Fittings, Schedule 80” This specification covers poly(vinyl chloride) (PVC) Schedule 80 pipe fittings. Included are requirements for F-402: “Standard Practice for Safe Handling of Solvent Cements, Primers, and Cleaners Used for Joining Thermoplastic Pipe and Fittings” This recommended practice covers procedures for the safe handling of solvent cements containing solvents which may be flammable, toxic or irritants. It recommends precautions and safeguards against the hazards of fire. F-437: “Standard Specification for Threaded Chlorinated Poly(Vinyl Chloride) (CPVC) Plastic Pipe Fittings, Schedule 80” This specification covers chlorinated poly(vinyl chloride) (CPVC) threaded Schedule 80 pipe fittings. Included are requirements for materials, workmanship, dimensions, 37 and burst pressure. F-439: “Standard Specification for Chlorinated Poly(Vinyl Chloride) (CPVC) Plastic Pipe Fittings, Schedule 80” This specification covers chlorinated poly(vinyl chloride) (CPVC) Schedule 80 pipe fittings. Included are requirements for materials, workmanship, dimensions, and burst pressure. F-441: “Standard Specification for Chlorinated Poly(Vinyl Chloride) (CPVC) Plastic Pipe, Schedules 40 and 80” This specification covers chlorinated poly(vinyl chloride) (CPVC) pipe made in Schedule 40 and 80 sizes and pressure-rated for water. Included are criteria for classifying CPVC plastic pipe materials and CPVC plastic pipe, a system of nomenclature for CPVC materials, workmanship, dimensions, sustained pressure, burst pressure, flattening and extrusion quality. Methods of marking are also given. ASME/ANSI (American Society of Mechanical Engineers / American National Standards Institute) These standards were developed for metal pipe systems and some or all of the components have been adopted by the plastic piping industry. It its extremely important for the engineer or specifying influence to understand the scope of these standards and the extent to which plastic piping will conform. B16.6: Flanges and Flanged Piping In plastic piping systems, this standard is used to establish the flange O.D., bolt hole pattern and bolt hole size. B1.20.1: National Pipe Thread Taper - Pipe Thread Dimensions This is a dimensional specification covering standard tapered pipe threads, identified by GF Piping Systems as FPT (Female Pipe Thread ) and MPT (Male Pipe Thread). 38 NSF/ANSI (National Sanitation Foundation / American National Standards Institute) This company acts as the third-party certification agency for the plastics industry, as well as providing a certification regarding the acceptability of product for certain applications, such as potable water or chemical waste. Standard 14: Plastic Piping Systems Components and Related Materials This standard applies to inspection for compliance with all relevant industry standards. This primarily relates to ASTM but NSF will certify compliance with any standards the company publicly claims to meet. Standard 61: Drinking Water Systems Components – Health Effects This standard relates to the suitability of product in potable water systems. Sample Specification PVC Schedule 40 Pipe and Fittings Scope: This sample specification covers the manufacturer’s requirements for PVC Schedule 40 pipe and fittings manufactured of Rigid Poly (Vinyl chloride) (PVC). All pipe and fittings shall be as manufactured by Georg Fischer Piping Systems, Little Rock, Arkansas. Materials: All materials shall be PVC type I, Grade I, meeting, or exceeding, the requirements of ASTM D-1784, cell classification 12454-B. All compound components shall be listed with NSF and meet the requirements of ANSI/NSF Standard 61 as suitable for Potable Water. Pipe: All PVC Schedule 40 pipe shall meet, or exceed, the requirements of ASTM D-1785. Any pipe bells shall meet the requirements of ASTM D-2672. All piping shall be listed with NSF under Standards 14/61 and shall carry the NSF seal for suitability with Potable Water. Fittings: All PVC Schedule 40 fittings shall meet, or exceed the requirements of ASTM D-2466 and shall be listed with NSF under standards 14/61. Product shall carry the NSF seal for suitability with Potable Water. Installation: Installation and testing shall be in accordance with accepted engineering and installation practices as noted in the Georg Fischer Piping Systems Technical Manual as well as the solvent cement manufacturer’s written instructions. To ensure compatibility all pipe, valves and fittings shall be manufactured and supplied by Georg Fischer Piping Systems. ******** CAUTION ******** Do not test with Air or Air over Water. 39 Sample Specification CPVC Schedule 80 Pipe and Fittings Scope: This sample specification covers the manufacturer’s requirements for CPVC Schedule 80 pipe and fittings manufactured of Rigid Chlorinated Poly (Vinyl Chloride) (CPVC). All pipe, valves and fittings shall be as manufactured and supplied by Georg Fischer Piping Systems, Little Rock, Arkansas. Materials: All materials shall be CPVC Type IV, Grade I, cell classification 23447-B, and shall meet, or exceed, the requirements of ASTM D-1784. All compound components shall be listed with NSF under Standard 61 and be certified as suitable for potable water systems. Pipe: All CPVC Schedule 80 pipe shall meet, or exceed, the requirements of ASTM F-441. Any pipe bells shall meet the requirements of ASTM D-2672. All pipe shall be listed with NSF under Standards 14/61 and shall carry the NSF seal for Potable Water. Any threaded PVC 80 pipe shall meet the requirements of ASME/ANSI B1.20.1 and shall be accomplished with pipe dies specifically designed for use with plastic pipe. Fittings: Socket: All CPVC Schedule 80 fittings shall meet, or exceed, the dimensional and tolerance requirements of ASTM F-439 Threads:All PVC Schedule 80 threaded fittings shall meet, or exceed, the dimensional and tolerance requirements of ASTM F-437 All fittings shall meet, or exceed, the requirements of ASTM F 439 and shall be listed with NSF under standards 14/61 and shall carry the NSF seal for Potable Water. Valves: All valves shall be of compatible materials utilizing EPDM or FPM O-rings and seals with TFE seats as manufactured and supplied by Georg Fischer Piping Systems. Installation: Installation and testing shall be in accordance with accepted engineering and installation practices as noted in the Georg Fischer Piping Systems Technical Manual as well as the solvent cement manufacturer’s written instructions. To ensure compatibility all pipe, valves and fittings shall be manufactured and supplied by Georg Fischer Piping Systems. ******** CAUTION ******** Do not test with Air or Air over Water. 40 Sample Specification PVC Schedule 80 Pipe and Fittings Scope: This sample specification covers the manufacturer’s requirements for PVC Schedule 80 pipe and fittings manufactured of Rigid Poly (Vinyl Chloride) (PVC). All pipe, valves and fittings shall be as manufactured and supplied by Georg Fischer Piping Systems, Little Rock, Arkansas. Materials: All materials shall be PVC Type I, Grade I, with a cell classification of 12424-B, and shall meet, or exceed, the requirements of ASTM D-1784. All compound components shall be listed with NSF and meet the requirements of NSF Standard 61 as suitable for potable water. Pipe: All PVC Schedule 80 pipe shall meet, or exceed, the requirements of ASTM D-1785. Any pipe bells shall meet the requirements of ASTM D-2672. All pipe shall be listed with NSF under Standards 14/61 and shall carry the NSF seal for Potable Water. Any threaded PVC 80 pipe shall meet the requirements of ANSI B1.20.1 and shall be accomplished with pipe dies specifically designed for use with plastic pipe. Fittings: Socket: All PVC Schedule 80 fittings shall meet, or exceed, the dimensional and tolerance requirements of ASTM D-2467 Threads:All PVC Schedule 80 threaded fittings shall meet, or exceed, the dimensional and tolerance requirements of ASTM D-2464 All fittings shall be listed with NSF under standards 14/61 and shall carry the NSF seal for Potable Water. Valves: All valves shall be of compatible materials utilizing EPDM or FPM O-rings and seals with TFE seats. Valves shall be manufactured and supplied by Georg Fischer Piping Systems, Little Rock, AR. Installation: Installation and testing shall be in accordance with accepted engineering and installation practices as noted in the Georg Fischer Piping Systems Technical Manual as well as the solvent cement manufacturer’s written instructions. To ensure compatibility, all pipe, valves and fittings shall be manufactured and supplied by Georg Fischer Piping Systems. ******** CAUTION ******** Do not test with Air or Air over Water. 41 PVC IPS Schedule 40/80 Socket Dimensions Entrance (A) Size Pipe O.D. Max. Min. Bottom (B) Max. Min. Max. out of round Schedule 40 socket depth (C) (min.) Schedule 80 socket depth (C) (min). ¼ 0.540 0.556 0.548 0.540 0.532 0.016 0.500 0.625 ³/8 0.675 0.691 0.683 0.675 0.667 0.016 0.594 0.750 ½ 0.840 0.852 0.844 0.840 0.832 0.016 0.688 0.875 ¾ 1.050 1.062 1.054 1.050 1.042 0.020 0.719 1.000 1 1.315 1.330 1.320 1.315 1.305 0.020 0.875 1.125 1¼ 1.660 1.675 1.665 1.660 1.650 0.024 0.938 1.250 1½ 1.900 1.918 1.906 1.900 1.888 0.024 1.094 1.375 2 2.375 2.393 2.381 2.375 2.363 0.024 1.156 1.500 2½ 2.875 2.896 2.882 2.875 2.861 0.030 1.750 1.750 3 3.500 3.524 3.508 3.500 3.484 0.030 1.875 1.875 3½ 4.000 4.024 4.008 4.000 3.984 0.030 2.000 4 4.500 4.527 4.509 4.500 4.482 0.030 2.000 5 5.563 5.593 5.573 5.563 5.543 0.060 3.000 6 6.625 6.658 6.636 6.625 6.603 0.060 3.000 8 8.625 8.670 8.640 8.625 8.595 0.090 4.000 4.000 10 10.750 10.795 10.765 10.750 10.720 0.100 5.000 5.000 12 12.750 12.795 12.765 12.750 12.720 0.120 6.000 6.000 42 2.250 3.000 Weld Lines (Knit Lines) in Molded Fittings Injection molding is the forcing of a viscous material, under pressure, to fill a space, forming a part. In the injection molding of fittings there are two basic components, a mold, which forms the outside of the part, and a core, which forms the inside of the part. The injection molding process forces the molten plastic material into this interstitial space where the material is cooled and then released. Inherent in this process, for most geometries, is the flowing together of the material and the development of a weld line. The point where the plastic material is forced into the mold is termed the gate. The plastic material flows through this gate, and when it hits the core it will flow around it in both directions. At the point where the material flows back together there will usually be a line, termed a weld line or a knit line. This point of the material flowing back together is usually located about 180˚ from the gate and, since the weld line is visible on both the OD and ID, it can sometimes be thought to be a crack. This knit line is a surface phenomenon and does not indicate a weakness or a defect in the part. Fittings are subject to some significant pressure tests, using ASTM Specifications, assuring the user of a quality molded component. The melted plastic material is introduced to the mold and starts to flow around the core. Notice how the material tends to flow fairly evenly. The plastic will continue to flow around the core. As the material flows together, a knit line starts to form. This knit line is fairly obvious at this point in the molding process. However, as the mold cavity starts to fill, the material tends to flow together and the knit lines become less obvious. When the mold is completely full, the knit lines are still there, as they are part of the process. This is just how the part is manufactured. 43 Conversion Charts Decimal and Millimeter Equivalents of Fractions Fractions Inches Decimals Milli meters Fractions Inches Decimals Milli meters Fractions Inches Decimals Milli meters Fractions Inches Decimals Milli meters 1/64 .015625 .397 17/64 .265625 6.747 33/64 .515625 13.097 49/64 .765625 19.447 1/32 .03125 .794 9/32 .28125 7.144 17/32 .53125 13.494 25/32 .78125 19.844 3/64 .046875 1.191 19/64 .296875 7.541 35/64 .546875 13.891 51/64 .796875 20.241 1/16 .0625 1.588 5/16 .3125 7.938 9/16 .5625 14.288 13/16 .8125 20.638 5/64 .078125 1.984 21/64 .328125 8.334 37/64 .578125 14.684 53/64 .828125 21.034 3/32 .09375 2.381 11/32 .34375 8.731 19/32 .59375 15.081 27/32 .83475 21.431 7/64 .109375 2.778 23/64 .359375 9.128 39/64 .609375 15.478 55/64 .859375 21.828 1/8 .125 3.175 3/8 .375 9.525 5/8 .625 15.875 7/8 .875 22.225 9/64 .140625 3.572 25/64 .390625 9.922 41/64 .640625 16.272 57/64 .890625 22.622 5/32 .15625 3.969 13/32 .40625 10.319 21/32 .65625 16.669 29/32 .90625 23.019 11/64 .171875 4.366 27/64 .421875 10.716 43/64 .671875 17.066 59/64 .921875 23.416 3/16 .1875 4.763 7/16 .4375 11.113 11/16 .6875 17.463 15/16 .9375 23.813 13/64 .203125 5.159 29/64 .453125 11.509 45/64 .703125 17.859 61/64 .953125 24.209 7/32 .21875 5.556 15/32 .46875 11.906 23/32 .71875 18.256 31/32 .96875 24.606 15/64 .23475 5.953 31/64 .484375 12.303 47/64 .734375 18.653 63/64 .984375 25.003 1/4 .250 6.350 1/2 .500 12.700 3/4 .750 19.050 1 1.000 25.400 Length Conversion Units of Length Multiply units in left column by proper factor below in. ft. yd. mile mm cm m km 1 inch 1 0.0833 0.0278 — 25.4 2.540 0.0254 — 1 foot 12 1 0.3333 — 304.8 30.48 0.3048 — 1 yard 36 3 1 — 914.4 91.44 0.9144 — 1 mile — 5280 1760 1 — — 1609.3 1.609 1 millimeter 0.0394 0.0033 — — 1 0.100 0.001 — 1 centimeter 0.3937 0.0328 0.0109 — 10 1 0.01 — 1 meter 39.37 3.281 1.094 — 1000 100 1 0.001 1 kilometer — 3281 1094 0.6214 — — 1000 1 (1 micron = 0.001 millimeter) Weight Conversion Units of Weight Multiply units in left column by proper factor below grain oz. lb. ton gram kg metric ton 1 grain 1 — — — 0.0648 — — 1 ounce 437.5 1 0.0625 — 28.35 0.0283 — 1 pound 7000 16 1 0.0005 453.6 0.4536 — 1 ton — 32,000 2000 1 — 907.2 1 gram 15.43 0.0353 — — 1 0.001 1 kilogram — 35.27 2.205 — 1000 1 1 metric ton — 35,274 2205 1.1023 — 1000 44 — 1 Density Conversion Units of Density 1 pound/in. 3 Multiply units in left column by proper factor below lb./in.3 lb./ft.3 lb./gal. g/cm3 g/liter 1 1728 231.0 27.68 27,680 1 pound/ft.3 — 1 0.1337 0.0160 16.019 1 pound/gal. 0.00433 7.481 1 0.1198 119.83 1 gram/cm3 0.0361 62.43 8.345 1 1000.0 1 gram/liter — 0.0624 0.00835 0.001 1 in. 2 ft. 2 acre mile2 cm2 m2 hectare 1 0.0069 — — 6.452 — — Area Conversion Units of Area 1 inch2 Multiply units in left column by proper factor below 1 foot2 144 1 — — 929.0 0.0929 — 1 acre — 43,560 1 0.0016 — 4047 0.4047 1 mile2 — — 640 1 — — 259.0 1 centimeter2 0.1550 — — — 1 0.0001 — 1 meter2 1550 10.76 — — 10,000 1 — 1 hectare — — 2.471 — 1 10,000 1 Volume Conversion Units of Volume Multiply units in left column by proper factor below in. liter U.S. gal. Imp. gal. 1 — — 16.387 — 0.0164 — — 1 foot3 1728 1 0.0370 28,317 0.0283 28.32 7.481 6.229 1 yard3 46,656 27 1 — 0.7646 764.5 202.0 168.2 1 centimeter 3 0.0610 — — 1 — 0.0010 — — 1 meter3 61,023 35.31 1.308 1,000,000 1 999.97 264.2 220.0 1 inch 3 3 ft. 3 yd. 3 cm.3 meter 3 1 liter 61.025 0.0353 — 1000.028 0.0010 1 0.2642 0.2200 1 U.S. gallon 231 0.1337 — 3785.4 — 3.785 1 0.8327 1 Imp. gallon 277.4 0.1605 — 4546.1 — 4.546 1.201 1 Pressure Conversion Multiply units in left column by proper factor below Units of Pressure lbs./in. 2 lb./ft. 2 Int. etc. kg/cm2 mm Hg at 32°F in. Hg at 32°F ft. water at 39.2°F kPa lb./in.2 1 144 - 0.0703 51.713 2.0359 2.307 6.894 lb./ft. 2 Int. etc. 0.00694 1 - - 0.3591 0.01414 0.01602 0.04788 14.696 2116.2 1 1.0333 760 29.921 33.90 - kg/cm2 14.223 2048.1 0.9678 1 735.56 28.958 32.81 98.066 mm Hg 0.0193 2.785 - - 1 0.0394 0.0446 0.1333 in Hg 0.4912 70.73 0.0334 0.0345 25.400 1 1.133 3.386 ft H20 0.4335 62.42 - 0.0305 22.418 0.8826 1 2.988 kPa 0.00145 20.89 - 0.010169 7.5006 0.2953 0.3346 1 45 Temperature Conversion °F -459.4 -450 -440 -430 -420 -410 -400 -390 -380 -370 -360 -350 -340 -330 -320 -310 -300 -290 -280 -273 -270 -260 -250 -240 -230 -220 -210 -200 -190 -180 -170 -160 -150 -140 -130 -120 -110 -100 -90 -80 -70 -60 -50 -40 -30 -20 -10 0 46 °C -273 -268 -262 -257 -251 -246 -240 -234 -229 -223 -218 -212 -207 -201 -196 -190 -184 -179 -173 -169 -168 -162 -157 -151 -146 -140 -134 -129 -123 -118 -112 -107 -101 -96 -90 -84 -79 -73 -68 -62 -57 -51 -46 -40 -34 -29 -23 -17.8 °F 1 2 3 4 5 6 7 8 9 10 11 12 13 14 15 16 17 18 19 20 21 22 23 24 25 26 27 28 29 30 31 32 33 34 35 36 37 38 39 40 41 42 43 44 45 46 47 48 49 50 51 52 53 54 55 56 57 58 59 60 °C -17.2 -16.7 -16.1 -15.6 -15 -14.4 -13.9 -13.3 -12.8 -12.2 -11.7 -11.1 -10.6 -10 -9.4 -8.9 -8.3 -7.8 -7.2 -6.7 -6.1 -5.6 -5 -4.4 -3.9 -3.3 -2.8 -2.2 -1.7 -1.1 -0.6 0 0.6 1.1 1.7 2.2 2.8 3.3 3.9 4.4 5 5.6 6.1 6.7 7.2 7.8 8.3 8.9 9.4 10 10.6 11.1 11.7 12.2 12.8 13.3 13.9 14.4 15 15.6 °F 61 62 63 64 65 66 67 68 69 70 71 72 73 74 75 76 77 78 79 80 81 82 83 84 85 86 87 88 89 90 91 92 93 94 95 96 97 98 99 100 110 120 130 140 150 160 170 180 190 200 210 212 220 230 240 250 260 270 280 290 °C 16.1 16.7 17.2 17.8 18.3 18.9 19.4 20 20.6 21.1 21.7 22.2 22.8 23.3 23.9 24.4 25 25.6 26.1 26.7 27.2 27.8 28.3 28.9 29.4 30 30.6 31.1 31.7 32.2 32.8 33.3 33.9 34.4 35 35.6 36.1 36.7 37.2 37.8 43 49 54 60 66 71 77 82 88 92 99 100 104 110 116 121 127 132 138 143 °F 300 310 320 330 340 350 360 370 380 390 400 410 420 430 440 450 460 470 480 490 500 510 520 530 540 550 560 570 580 590 600 610 620 630 640 650 660 670 680 690 700 710 720 730 740 750 760 770 780 790 800 810 820 830 840 850 860 870 880 890 °C 149 154 160 166 171 177 182 188 193 199 204 210 215 221 227 232 238 243 249 254 260 266 271 277 282 288 293 299 304 310 316 321 327 332 338 343 349 354 360 366 371 377 382 388 393 399 404 410 416 421 427 432 438 443 449 454 460 466 471 477 °F 900 910 920 930 940 950 960 970 980 990 1000 1020 1040 1060 1080 1100 1120 1140 1160 1180 1200 1220 1240 1260 1280 1300 1350 1400 1450 1500 1550 1600 1650 1700 1750 1800 1850 1900 1950 2000 2050 2100 2150 2200 2250 2300 2350 2400 2450 2500 2550 2600 2650 2700 2750 2800 2850 2900 2950 3000 °C 482 488 493 499 504 510 516 521 527 532 538 549 560 571 582 593 604 616 627 638 649 660 671 682 693 704 732 760 788 816 843 871 899 927 954 982 1010 1038 1066 1093 1121 1149 1177 1204 1232 1260 1288 1316 1343 1371 1399 1427 1454 1482 1510 1538 1566 1593 1621 1649 GF Piping Systems > worldwide at home Our sales companies and representatives ensure local customer support in over 100 countries. 7777 Sloane Drive, Little Rock, AR 72206 Tel. (501) 490-7777, Toll Free (800) 423-2686 Fax (501) 490-7100 e-mail: [email protected] www.gfpiping.com Australia George Fischer Pty Ltd Kingsgrove NSW 2008 Phone +61(0)2-9554 3977 [email protected] www.georgefischer.com.au Denmark / Iceland Georg Fischer A/S 2630 Taastrup Phone +45 (0)70 22 19 75 [email protected] www.georgfischer.dk India George Fischer Piping Systems Ltd 400 093 Mumbai Phone +91(0)22-2821 7749 [email protected] Norway Georg Fischer AS 1351 Rud Phone +47 67 18 29 00 [email protected] www.georgfischer.no Sweden / Finland Georg Fischer AB 12523 Älvsjö-Stockholm Phone +46(0)8-506 775 00 [email protected] www.georgfischer.se Austria Georg Fischer Rohrleitungssysteme GmbH 3130 Herzogenburg Phone +43(0)2782-856 430 [email protected] www.georgfischer.at France George Fischer S.A.S. 93208 Saint-Denis Cedex 1 Phone +33(0)1-492 21 34 1 [email protected] www.georgefischer.fr Italy Georg Fischer S.p.A. 20063 Cernusco S/N (MI) Phone +39 02-921 861 [email protected] www.georgfischer.it Poland Georg Fischer Sp. z o.o. 02-226 Warszawa Phone +48(0)22-313 10 50 [email protected] www.georgfischer.pl Switzerland Georg Fischer Rohrleitungssysteme (Schweiz) AG 8201 Schaffhausen Phone +41(0)52-631 30 26 [email protected] www.piping.georgfischer.ch Belgium / Luxembourg Georg Fischer NV/SA 1070 Bruxelles/Brüssel Phone +32(0)2-556 40 20 [email protected] www.georgfischer.be Germany Georg Fischer GmbH 73095 Albershausen Phone +49(0)7161-302-0 [email protected] www.rls.georgfischer.de Japan Georg Fischer Ltd 556-0011 Osaka Phone +81(0)6-6635 2691 [email protected] www.georgfischer.jp Romania Georg Fischer Rohrleitungssysteme AG 70000 Bucharest - Sector 1 Phone +40(0)21-222 91 36 [email protected] United Kingdom / Ireland George Fischer Sales Limited Coventry, CV2 2ST Phone +44(0)2476 535 535 [email protected] www.georgefischer.co.uk Malaysia Georg Fischer (M) Sdn. Bhd. 47500 Subang Jaya Phone +603-8024 7879 [email protected] Singapore George Fischer Pte Ltd 417 845 Singapore Phone +65(0)67-47 06 11 [email protected] www.georgefischer.com.sg USA / Canada / Latin America / Carribean George Fischer Inc. Tustin, CA 92780-7258 Phone (714) 731-8800, Toll Free (800) 854-4090 [email protected] www.gfpiping.com Netherlands Georg Fischer N.V. 8161 PA Epe Phone +31(0)578-678 222 [email protected] www.georgfischer.nl Spain / Portugal Georg Fischer S.A. 28009 Madrid Phone +34(0)91-781 98 90 [email protected] www.georgfischer.es Brazil George Fischer Ltda 04795-100 São Paulo Phone +55(0)11-5687 1311 [email protected] www.georgefischer.com.br China Georg Fischer Piping Systems Ltd Shanghai Pudong, Shanghai 201319 Phone +86(0)21-5813 3333 [email protected] www.cn.piping.georgfischer.com Item #469 (1/07) © George Fischer, Inc. 2007 Printed in USA Georg Fischer DEKA GmbH 35232 Dautphetal-Mornshausen Phone +49(0)6468-915-0 [email protected] www.dekapipe.de Greece Georg Fischer S.p.A. 10434 Athens Phone +30(0)1/882 04 91 [email protected]
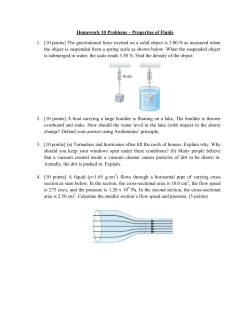
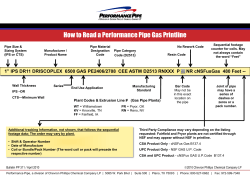
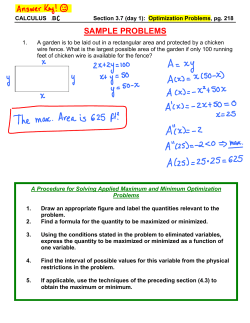
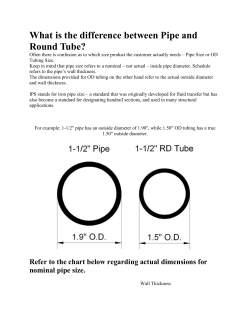


© Copyright 2026