
Scratch Story Sessions
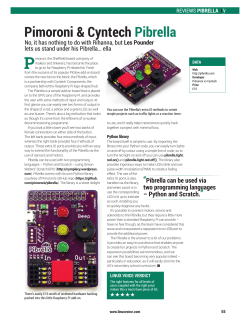
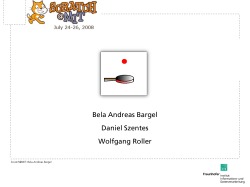
Scratch Story Sessions Incorporating Nonlinear Storytelling Through Nonlinear Programming on Scratch Remixed by Ji-Sun Ham T550 Designing for Learning by Creating Professor Karen Brennan A NOTE OF CREDIT These sessions are a remix of the original three sessions that were part of a curriculum developed by the Scratch Ed team. Some original structures, activities, and notes have remained in these remixed versions. While the original curriculum is no longer available online, the newest Creative Computing Guide can be found and downloaded at the website below. Many of the activities from the older version have remained in the Creative Computing Guide. www.scratched.gse.harvard.edu/guide 2 A BRIEF EXPLANATION While stories are encouraged to be written and told in a more logical format (clear beginning, then middle, and end) by academia, the acts of storytelling and story-‐writing are not always conducive to this strict, linear style. Some research examining people telling stories concluded that we often share our stories usually without ordering the events sequentially. Often, when we tell stories, we hardly share stories with this clear beginning-‐ middle-‐end structure. Yet, in school, we are encouraged to write and tell stories linearly, without leaving space to explore nonlinear creation and telling. These remixed sessions are an attempt to address this contradiction. In these remixed sessions, you will find text that is the same or similar to the original Scratch story sessions, as noted previously, and that the layout has been changed into a more traditional lesson plan. However, you will also find parts of the sessions that have been added or replaced as an effort to discover more nonlinear storytelling and creation through Scratch. During reflections, there will be MetaMoments, which are questions teachers can pose to their students to help them engage in metacognition, or thinking about their thinking. Metacognition has been shown to increase student learning as well as problem solving skills, which will be useful in Scratch programming. At the end of each session, there are handouts and examples that you may use with your students. I hope these sessions will be helpful in providing one way to explore nonlinear storytelling via Scratch programming. Happy Storytelling! Ji-‐Sun Ham 3 Session 6b 55 Minutes Session Description In this session, students explore the concepts of parallelism, sequential events, and non-‐ sequential events through performance and sample passages. Objectives The students will: • Be able to explain what parallelism is and how it works in Scratch • Be able to explain what sequential events are and how they work in Scratch • Be able to explain what non-‐sequential events are and how they work in Scratch Session Activities Summary • Respond to design notebook question • Overview and brief analysis of linear and nonlinear stories • Perform parallel and event-‐driven activities Materials Needed • Large versions of Scratch blocks as sample programs • Scratch blocks for each group, divided into the categories • 8.5 x 11 sheets of blank paper for each group • Writing utensils • Tape Part 1: Prepare (5 minutes) Connection Through Reflection In their Scratch journals, have students reflect on the previous session. • What was a challenge you overcame in your last project? • What is one thing you still want to figure out? MetaMoment! Ask your students: • Can you remember what you were thinking when you faced a challenge? Part 2: Engage (35 minutes) Storytelling Styles Overview (10 minutes) In groups of four, have students read short excerpts that incorporate different storytelling styles (i.e. flashbacks, parallel stories). Some suggestions are: • Black and White by David Macaulay, pp. 1-‐10 • When You Reach Me by Rebecca Stead, Ch. 1 Have students compare the differences in story structure, as compared to a linear story example. Make group Venn diagram, comparing the differences and similarities between the nonlinear and the linear examples. • Here, feel free to choose a story, such as a Cinderella, which has a clear beginning, middle, and end. • An example of the Venn diagram is provided at the end of this session. 4 Session 6b, continued Exploring Linear and Nonlinear Plots (25 minutes) Have two members of each group will act out a series of instructions. The instructions highlight parallelism (things happening at the same time) and events (one thing causing another thing to happen): • Set a “timeline” on the board or along a row of desks, to represent the “past,” “present,” and “future”. This timeline will be important for the next iteration of this Exploration. • In front of the “present time” area, have one person do one action, such as walk in place. • Have that person reset (return to the original starting place). • Have that person do two things simultaneously, such as walk in place and talk. • Add the second person, by having the second person simultaneously but independently do a task, like talking. • Have the second person do a dependent task, like responding to the first person instead of talking over. Bring the other two members of each group to the “past” area of the timeline to act out a series of instructions that will represent a “memory” or “flashback.” • The “present” students talk to each other about what they did last week at school. They must cue the “past” students to recreate the “memory.” • Allow this time for student creation and imagination to flow! Part 3: Reflect to Connect (15 minutes) After the scripts have been performed, discuss the experience with the volunteers and the other students: • What were the different ways in which things were happening at the same time (parallel events)? • What are the mechanisms that enable parallelism in both present and past in Scratch? • What are the different ways that actions were triggered? • What are the mechanisms for events such as flashbacks or memories in Scratch? MetaMoment! Ask your students: • How did you identify the different ways just now? What were you thinking? Did it seem like your thoughts were following a line or a web? • Try starting your answers with “I noticed” or “I think” if you are stuck. 5 Session 6b continued Some Notes Several weighty ideas are explored in these activities. • First, the notion of reset is something Scratchers struggle with as they get started. You program everything in Scratch and if you want things to start in a particular location, with a particular orientation, etc., you must replace and/or reorient all the characters to their original starting places. • Second, there are multiple levels of parallelism with Scratch. A single sprite can do multiple things at once, and multiple sprites can also perform actions simultaneously. • Finally, there are different approaches to coordinating action within/across sprites. Many beginners use a central event (like the green flag) and wait blocks to control timing – there is a lot of power and excitement in learning the “broadcast” and “when I receive” block pair. 6 Session 6b Resources Sample Venn Diagram to Compare and Contrast Linear and Nonlinear Stories Linear Stories Strict beginningmiddle-end order! Can use parallel events to show what’s happening in two different places at the same time! Nonlinear Stories Same Events and order of events create the story! Not strict beginningmiddle-end order! Can use parallel storylines that could show events that occur at different times! Sample Venn Diagram to Compare and Contrast Linear and Nonlinear Storytelling Linear Storytelling Starts from beginning, continues to middle events, and ends with end! Follows the timeline of past ! present ! future! Nonlinear Storytelling Same Events and order of events create the story! Does not always start from the beginning! Usually jumps around the timeline of events! 7 Session 6b Resources Sample List of Scratch Blocks 8 Session 7b 55 Minutes Session Description In this session, students explore computational creation within the genre of stories by designing collaborative, linear and nonlinear stories. Objectives The students will: • Be able to explain the benefits of remixing while designing • Be able to create a Scratch project that tells a story by building on the work of others Session Activities Summary • Respond to design notebook question • Create creature characters • Collaboratively create Scratch story • Share and discuss creations Materials Needed • Blank paper folded into thirds, enough for 2 per student • Writing utensils • Scratch program or online editor open • Sticky notes Part 1: Prepare (5 minutes) Connection Through Reflection • In your design journal, write or draw what your answers to: What is remixing? Part 2: Engage (45 minutes) Creature Construction Traditional Creature Construction (5 minutes) • Have students break up into groups of three. Give each student a tri-‐folded sheet of blank paper. • First, each student has a minute to draw a “head” for his or her creature. After one minute, pass the creature to another student. • Next, each student has a minute to draw a “middle” for their creature, using the guides from the head. After one minute, pass the creatures. • Finally, each student has one minute to draw a “bottom” for the creature. Once all creatures are done, return the drawings to each student, based on who drew the head of the creature first. • In their groups, have students talk with each other about how they chose what to draw. Some guiding questions are: “What made you draw this [part]? What part of the [head/middle] made you want to draw the [middle/bottom] like that?” 9 Session 7b, Continued Creature Construction REMIXED (5 minutes) • Have students break up into groups of three. Give each student another tri-‐folded sheet of blank paper, only the middle section should be larger than the two flaps. • First, each student has a minute to draw a “bottom” for his or her creature. They fold the paper over so that the bottom is hidden and pass the creature to another student. • Next, each student has a minute to draw a “head” for their creature. After the heads are hidden, pass the creatures. • Finally, each student has a minute to draw a “middle” for his or her creature. Once the creatures are complete, unfold the papers to see the collaboratively constructed creatures. Return the drawings to each student, based on who drew the head of the creature first. • In their groups, have students talk with each other about how they chose what to draw. Some guiding questions are: • What made you draw this [part]? • What part of the [head/middle/bottom] made you want to draw the [head/middle/bottom] like that? Regroup and Debrief (5 minutes) Regroup students into class. Briefly discuss what were the similarities and differences in the Creature Creation processes. Some guiding questions are: • Did you do anything that was the same or different during the second Creature Creation? • Why do you think starting from the middle or the end could be a good way to start creating something? Need more time? If you feel that the activity was helpful and wish to wait until the next session date for the following work, please feel free to split Session 7b into two sessions. 10 Session 7b, Continued Nonlinear Creating: Pass-‐Scratch-‐On (30 minutes) • Divide the group into pairs. • Introduce students to the concept of a pass-‐it-‐on-‐story, a project that is started by a pair of people, and then passed on to other pairs to extend and re-‐imagine. • Encourage students to start in whatever way they want – focusing on characters, scene, or whatever element excites them. • However, encourage students to start their stories so that others can add to it before, after, or in the middle of it. Leave it open! • Each pair has 10 minutes to work on their contribution to the collaborative project before the group rotates. • Again, encourage students to create parts of the story that are more open to others adding to it before or after. • During the last rotation, have students to review and fill in the areas they think it needs to feel “complete.” Here, “complete” is up to the creators in that rotation. It does not mean the story must have a clear beginning, middle, or end, but rather it feels like the end of the project connects all the parts. • Leave time for students to return to the other projects they contributed to, to see how the projects developed. • Ask students to post their projects to the Scratch website. Part 3: Reflect to Connect (5 minutes) Have students individually write a quick reflection on sticky notes. These could be puzzles or questions about their projects or their classmates projects. Some prompts for reflection are: •What was the hardest part of making a non-‐linear story on Scratch? The easiest? • What would you do differently if you had more time? MetaMoment! Ask your students: • How did you go about those hard parts? What were you thinking? 11 Session 7b Resources Creature Construction Paper Layout 8.5 x 11 inches Head Feel free to use larger paper! FOLD HERE Middle FOLD HERE Bottom 12 Session 8b 60 Minutes Session Description In this session, students will have time to build on an already-‐started project or to start a new computational exploration within the genre of stories. Objectives The students will: • Develop greater fluency with computational concepts (i.e. parallelism, events) and practices (i.e. iterative and incremental development, testing and debugging, reusing and remixing, abstracting and modularizing) by working on a self-‐directed project Session Activities Summary • Respond to design notebook question • Work on Scratch projects Materials • Stories starter projects handouts • Stories starter sample projects (optional) • Sticky notes • Writing utensils Part 1: Prepare (5 minutes) Connection Through Reflection & MetaMoment! In their design notebooks, ask students to reflect on the question: • How was working with someone else different from your prior experiences of designing your Scratch projects? • What were you thinking? How do you think your thinking could have changed if you had to work alone? 13 Session 8b, Continued Part 2: Engage (50 minutes) Open-‐Ended Designing Explain to students that this session is an opportunity to go back to a project they started in a previous session or to start on a fresh idea. • Offer the starter projects handouts to (and/or have brainstorm session with) students who are looking for project ideas to work on, including: • Conversation: Get two characters talking to each other. Use the say and wait blocks to coordinate the conversation. • Scenes: Use the broadcast and when I receive blocks to create a multi-‐scene story. • How do we create scenes that represent a memory, especially if it is a memory that takes place in the same setting? • Slideshow: Create your own slideshow – a collection of background images accompanied by audio narration. • Slideshows could be used to represent parallel storylines! Partway through the session, encourage students to check in with a neighbor to share what they have been working on. • Ask students to post their projects on the Scratch website. Need more time? If you feel that your students need more time to develop their stories, please feel free to split Session 8b into two sessions. Part 3: Reflect to Connect (5 minutes) MetaMoment! Have students individually reflect on their nonlinear story and their process through commenting directly on their Scratch projects on the online editor, or by printing a screenshot of their project and providing sticky notes for each student. Some guiding prompts are: • How do you think your thinking and programming changed when you were making your nonlinear story? • Was it harder? Easier? What made it harder or easier? 14 Session 8b Resources Sample Nonlinear Scratch Project To watch and explore an example of a nonlinear story project on Scratch, please follow the link below. The Scratch project was created by Ji-‐Sun Ham, based on the book, Black and White, by David Macaulay. www.scratch.mit.edu/projects/35827344/ 15


© Copyright 2026