
Proper Processing of COLLEGE OF AGRICULTURAL SCIENCES AGRICULTURAL RESEARCH AND
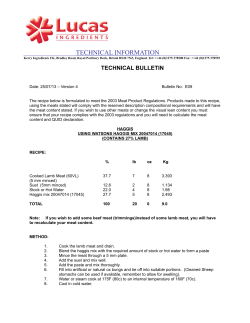
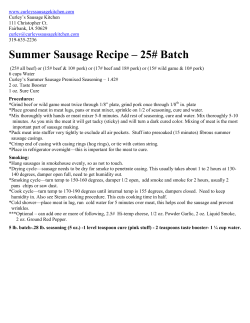
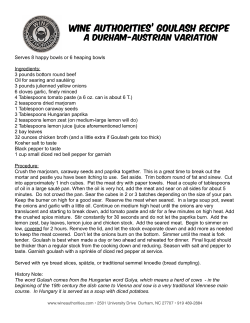
Proper Processing of
WILD GAME AND FISH
○
○
○
○
○
○
○
○
○
○
○
○
○
○
○
○
○
○
○
○
○
○
○
○
○
○
○
○
○
○
○
○
○
○
○
○
○
○
○
○
○
○
○
○
○
○
○
○
○
○
○
○
○
○
○
○
○
○
○
○
○
○
○
○
○
○
○
○
○
○
○
○
○
○
○
○
○
○
○
○
○
○
○
○
○
○
○
○
○
○
○
○
○
○
○
○
○
○
○
○
○
○
○
○
○
○
○
○
○
○
○
○
○
○
○
○
○
○
○
○
○
○
○
○
○
○
○
○
○
○
○
○
○
○
○
○
○
○
○
○
○
○
○
○
○
○
○
○
○
○
○
○
○
○
○
○
○
○
○
○
○
○
○
○
○
○
○
○
○
○
○
○
○
○
○
○
○
○
○
○
○
○
○
○
○
○
○
○
○
COLLEGE OF AGRICULTURAL SCIENCES
AGRICULTURAL RESEARCH AND
COOPERATIVE EXTENSION
○
○
○
○
○
○
○
○
○
○
○
○
○
○
○
TABLE OF CONTENTS
INTRODUCTION
Introduction 2
Importance of Temperature Control 3
Processing of Wild Game and Fish 4
Aging 4
Cutting/Processing
4
Curing 5
Smoking 7
Canning 8
Jerky 11
Sausage Making
12
Cooking with Meat Thermometers
Nutritive Value of Game Foods 14
Recipes 14
2
13
Hunting of wild game and fishing are
sports that have a tremendous impact
on Pennsylvania’s economy. According to the Pennsylvania Game Commission, 2.5 million hunting licenses
and nearly 1 million fishing licenses
were issued in the state in 1998, the
most in the United States. Many hunters and anglers enjoy these activities
not only for sport, but also for food.
The meat from hunted animals,
birds, or fish is consumed, processed,
or preserved for immediate or later
consumption.
Those who handle animals, fish,
and birds in the field are sometimes
unaware of the potential risks involved in contaminating the meat or
fish with foodborne pathogens while
dressing, handling, and transporting
it. As with any perishable meat, poultry, or fish, raw or undercooked game
meat can contain harmful bacteria
such as Salmonella and Escherichia coli
O157:H7. These bacteria live in the
intestinal tracts of game, livestock,
poultry, and other domestic warmblooded animals, and cause illness in
humans when eaten. Contamination
of game or fish is usually related to
the manner in which the animal,
bird, or fish was wounded, dressed,
handled, or processed. Improper
temperature control, preservation
practices (canning, dehydration),
cooking, and handling also may lead
to bacterial outgrowth and
foodborne outbreaks in these meats.
Therefore, proper handling of game
meat or fish from the field or stream
to the table is extremely important.
This publication contains guidelines
and hints to help you make sure the
food you are consuming is handled
and prepared safely.
THE IMPORTANCE OF TEMPERATURE CONTROL
The Temperature
Danger Zone
(41–140°F (5–60°C)
170
160
150
140
130
120
110
100
90
80
70
60
50
40
30
20
60
50
40
30
20
Degrees Celsius
can cause foodborne illness. When
roasting meat and poultry, use an
oven temperature no lower than
325°F. Cook ground meats to an internal temperature of 160°F. Steaks
and roasts cooked to an internal temperature of 145°F are medium rare,
160°F are medium, and 170°F are
well done. For doneness, cook game
bird breast meat to an internal temperature of 170°F, and to 180°F for
whole birds. Use a meat thermometer
to assure that game meats have
reached a safe internal temperature.
If raw game meat, birds, and fish
have been processed and handled
safely, using the above temperature
guidelines will make them safe to eat.
If raw meat has been mishandled (for
example, left in the temperature danger zone too long), bacteria may grow
and produce toxins that can cause
foodborne illness. Cooking does not
destroy those toxins that are heat resistant. Therefore, even though it has
been cooked properly, meat and
poultry mishandled in the raw state
may not be safe to eat.
Safe food-handling practices are a
good defense against foodborne illness. Because we know how different
temperatures affect the growth of
bacteria in our food, we can protect
ourselves and our families from
foodborne illnesses by properly handling, cooking, and storing game
meat, birds, or fish at safe temperatures.
Degrees Fahrenheit
Bacteria exist everywhere in nature—
in the soil, air, water, and the foods
we eat. When they have nutrients
(food), moisture, time, and favorable
temperatures, they grow, rapidly increasing in numbers to the point
where some can cause illness. Therefore, understanding the important
role temperature plays in keeping
food safe is critical to prevent
foodborne illness.
Bacteria grow most rapidly in the
range of temperatures between 40°F
and 140°F, doubling in number in as
little as 20 minutes. This range of
temperatures is often called the temperature danger zone.
Temperatures below 40°F will slow
the growth of the bacteria but will not
kill them. This observation explains
why perishable foods such as meat
and poultry will gradually spoil in the
refrigerator. Spoilage bacteria will
make themselves known in a variety
of ways. The meats may develop
an uncharacteristic odor or color
and/or may become sticky or slimy.
Molds may also grow and become visible. Bacteria capable of causing
foodborne illness either don’t grow
or grow very slowly at refrigerator
temperatures. Always use a refrigerator/freezer thermometer to verify
that the temperature of the unit is
below 40°F.
Properly handled game meat,
birds, or fish stored in a freezer at 0°F
will always be safe. Freezing slows the
movement of molecules, causing bacteria to enter a dormant stage. Once
thawed, however, these bacteria can
again become active and multiply to
levels that may lead to foodborne illness. Because bacteria on these foods
will grow at about the same rate as
they would on fresh food, thawed
foods should be handled in the same
way as any other perishable food.
Always cook raw game meat, birds,
and fish to a safe internal temperature. Temperatures (160 to 212°F)
reached in baking, roasting, frying,
and boiling will destroy bacteria that
10
0
3
PROCESSING OF WILD GAME OR FISH
Aging
not need to be aged, since further
Aging of meat (also known as seasoning, ripening, or conditioning) is the
practice of holding carcasses or cuts
under low controlled temperature
and humidity for several days to enhance flavor, tenderize, and complete
curing reactions. Game meat typically
is aged to enhance flavor and the tenderization process, which occurs
when enzymes break down or degrade complex proteins in the
muscle over time. See graph below.
Meat from game animals is generally less tender than that of domestic
animals because of the exercise wild
animals exert in foraging for food
and the low-energy diet they consume. The degree of tenderness is
related to the age of the animal. The
most tender meat comes from young,
healthy, alert animals. The condition
of the animal immediately before
harvest also affects the quality of the
meat. For example, if an animal has
run a long distance before being
killed, its meat may be darker in color
(brown to purplish-black), sticky, or
gummy in texture. The pH of the
meat is also higher in these animals
because the energy stores in the
muscle are depleted, whereas the pH
of meat of rested animals is 5.6 to 5.8.
The increase in pH reduces the overall meat quality and increases the
potential for bacterial growth.
Meat that is to be ground, cured,
or made into sausage or bologna does
processing tenderizes the meat. Aging is not recommended for a carcass
with little or no fat covering, as the
carcass may dry out during the aging
process. If you choose to cook your
game by braising, roasting, or stewing, then aging is not necessary, since
moist heat cooking also tenderizes
the meat.
If you will be aging a carcass at
home or a camp, leave the hide on
to protect against excessive dehydration, discoloration, and contamination from dirt, insects, leaves, bacteria, mold, etc. State laws require that
the hide be removed before processing at commercial processors. If you
age at home, remember to do so in
clean, cool, well-ventilated areas free
from gas, oil, or paint odors, as the
meat may absorb them.
Aging for 5–7 days should improve
tenderness without undue spoilage.
It is extremely important, however, to
age game carcasses or meat under refrigerated conditions (at a temperature below 40°F). Although the action of the tenderization enzymes is
much faster at warmer temperatures
(greater than 40°F), spoilage occurs
more quickly and bacteria of public
health concern (Salmonella, E. coli
O157:H7) also grow much faster.
Aging at warmer temperatures can
present both meat quality defects and
health hazards. “Off” odors associated with aged carcasses generally are
Relationship between meat tenderness and aging.
Tenderness levels off
More tender
Tenderness decreases
Less tender
Tenderness increases
Tough
0
4
1
2
3
4
5
6
7
Days of aging
8
9
10
11
12
indicative of microbial growth. Under these circumstances, it is advised
that the meat be discarded. Even if
cooked, the meat will be objectionable and may present health hazards.
Aging birds is a matter of personal
preference. If you decide to age,
hang birds by the feet in a cool
(<40°F), dry, airy place for no more
than 2–3 days. You can dust feathers
with charcoal and/or cover with
cheesecloth to protect from insects.
Cutting/Processing
If you intend to use a meat processor, you should make arrangements
with a licensed, reputable establishment ahead of time to ensure your
carcass will be handled, processed,
and stored properly. It is also your
responsibility to dress and remove the
hide of the carcass before entering
the processing or refrigerated areas
of the licensed establishment. Processors must follow several regulations:
• Any game carcasses stored in licensed establishments must be
contained and handled such that
there is complete separation from
domestic meat, poultry, and meat
products.
• The licensed establishment must
provide the USDA a written list of
days and times when game carcasses are processed.
• Any equipment used to process
game carcasses or meat must be
thoroughly cleaned and sanitized
before it can be used for processing domestic meat, poultry, and
meat products.
Most meat processors will do a good
job of cutting and wrapping your
meat for the freezer. It’s a good idea
to let the processor know what cuts
you want, the number of steaks, etc.
Some processors also will make boneless cuts. Although they are more
expensive, you’ll end up with higher
quality cuts that are easier to store
and serve.
If you cut the carcass yourself,
make sure you have a clean, roomy,
well-ventilated place to work, as well
as a clean sharp knife and/or saw. Be
sure to separate entire muscles, keep
the knife close to the bone, and cut
across the grain when making roasts
and steaks. Boneless cuts will use up
less space in a freezer and are easier
to wrap and carve.
Specific cuts and areas for cutting
large game animals are illustrated
below:
The cutting method for large
game carcasses (Field, 1983) is as follows:
back. The flank and breast may be
boned for ground meat.
K to L. The flank is removed from
the short loin by cutting next to the
tenderloin. The rib and loin may be
cut into steaks.
Once the cuts are made, you can
further process the muscles to steaks,
roasts, sausage, bologna, etc.
Curing
Curing is defined as adding salt, salt
brine, nitrites, and sometimes sugar,
spices, and other ingredients to a
meat, poultry, or fish product. Game
meats, birds, or fish are cured for
three main reasons: preservation, flavor, and color. Only properly butchered and thoroughly cooled meats
should be cured.
To preserve meat and poultry, you
must inactivate and destroy the undesirable microorganisms on the
meat surfaces that cause spoilage and
foodborne illnesses. Many techniques help in this process, including smoking, cooking, drying, chilling, and adding cure ingredients.
One of the most effective is introducing salt into the meat. The salt curing process requires careful temperature control. The temperature must
be warm enough to allow the salt to
penetrate the meat, but cold enough
(less than 41°F) to prevent decomposition. The resistance of different
types of bacteria to salt varies widely.
The growth of some bacteria (e.g.,
Salmonella) is inhibited by salt con-
A to B. Remove the neck and shoulder. You may want to bone out the
muscle for ground meat.
C to D. Separate the shoulder from
the rib between the 5th and 6th rib
(counting from front of carcass).
E to D. The brisket and foreshank are
removed just above the elbow joint.
Arm and blade roasts may be cut and
trimmed. Portions of the shoulder
not suitable for roasts and foreshank
may be boned for ground meat.
F to G. Cut the leg from the loin, leaving one vertebra on the leg. Sirloin
steaks and bone-in leg roasts are
made from these cuts. The hind
shank and trimmings may be boned
and used for ground meat.
H to I. Separate the rib and shortplate from the flank and loin by cutting between the 12th and 13th ribs.
J to K. The rib is separated from the
breast by a 1/2" ventral cut to the
blade bone on a line parallel to the
Location of various cuts on a carcass.
F
H
A
Neck
C
Chuck or
Shoulder
Roast
J
L
Rib
K
Shortplate
Brisket
B
Arm Roast
Rump
Loin
D
E
Foreshank
Leg or Round
Flank
G
I
Shank
centrations as low as 3%, whereas
other types (e.g., Staphylococcus) are
able to survive in much higher concentrations. Fortunately, low salt concentrations inhibit the growth of
many of the undesirable organisms
normally found in cured meat and
poultry products.
Nitrite, another compound associated with curing, is a highly reactive chemical that interacts with several of the components in meat, including pigments, protein, and fat.
Nitrite also provides an important
antimicrobial effect, preventing the
outgrowth of Clostridium botulinum
and the formation of its deadly toxin.
To date, no other single chemical
additive can perform all the functions of nitrite in cured meat.
The flavor of cured meats is
thought to be a composite of the flavors of the curing agents and those
developed by bacterial and enzymatic
action. Sugar is added to many cured
products; however, it is a minor part
of the composite flavor. It serves
mostly to reduce the harshness of the
tremendous amount of salt in cured
meat and poultry. Sugar also plays an
important role as food for the flavorproducing bacteria of meat during
long curing processes. Another probable cause of the characteristic flavor
of cured meat, poultry, and fish products is the effectiveness of nitrite in
retarding lipid oxidation and the
development of “off” flavors.
Smoking also gives the product a
characteristic flavor, which can be
varied slightly with cure and types of
smoke. In addition to smoke generated from hardwoods or liquid
smoke, a smoke flavoring solution
can be sprayed onto meat food products during the cooking process.
Developing and maintaining a
stable red color is very important in
cured and smoked meat operations.
Sodium or potassium nitrate or nitrite, the cure agent used to process
cured meats, is responsible for the
development of this color. Nitrate is
used sometimes as a source of nitrite.
The further reduction of nitrite to
nitric oxide, which reacts with myoglobin (muscle pigment) to produce
5
the cured color, is affected by several
environmental conditions such as
temperature, moisture content, salt
content, and pH. The time required
for this color to develop may be shortened with the use of cure accelerators such as ascorbic acid or a derivative, erythorbic acid or a derivative,
sodium ascorbate, and sodium erythorbate. Cure accelerators speed up
the chemical conversion of nitrous
acid to nitric oxide. They also serve
as oxygen scavengers, which prevent
the fading of the cured meat color
in the presence of sunlight and
oxygen.
Dry Sugar Curing
A full concentration of the following
ingredients (the “8–3–2–1 formula”)
is applied directly to the meat surface:
8 pounds table or curing salt
3 pounds cane sugar
2 ounces nitrate (saltpeter)
1 ounce sodium or potassium
nitrite
Curing Methods for Game
There are several general methods of
curing, with a number of modifications for each method. These methods include pickle curing, dry curing,
dry salt curing, or application of curing solutions by osmosis, stitch pump,
spray pump, artery pump, and machine pump.
Dry Salt Curing
Another modification of the dry curing method, commonly referred to
as dry salt curing, involves salt only
or salt plus nitrate. Just before being
covered with the dry mix, the meat
may be momentarily moistened to
facilitate penetration of the salt into
the muscle.
Pickle Curing
A typical pickle curing solution could
include water and salt (called a
“plain” or “salt” pickle); water, salt,
nitrate, and/or nitrite; or water, salt,
nitrate, and/or nitrite to which sugar
has been added (a “sweet” pickle).
Other ingredients could be added to
enhance flavor. A basic brine solution
generally consists of 1 lb brown sugar,
2 lbs uniodized salt, and 3 gallons of
water. Use a noncorrosive container
to hold the brine and meat during
the curing process. Wood, crockery,
stainless steel, or plastic containers
work well. Place the meat in the container and pour the brine over it until it is covered. If the meat floats, you
may have to place a weight on it to
keep it submerged. Turn the meat
in the brine periodically to cover all
surfaces.
Injecting or Pumping
The purpose of injecting or pumping is to distribute pickle ingredients
throughout the interior of the meat
to cure it from the inside out as well
as from the outside in. This protects
the meat against spoilage and provides a more even curing. Once the
brine solution is applied by any of the
methods described below, curing
should take place in a refrigerated or
cool room at temperatures less than
35°F. Rearrange the meat at least
once during the curing process to
ensure even distribution of the cure
into the product. Do not recycle the
brine because of the possibility of
bacterial growth over time.
Five general methods are used to
apply curing solutions to meat and
poultry cuts:
1. Osmosis involves covering the
meat cuts with dry cure or completely
submerging them in a curing solution for an extended period of time.
Using this method, the brine soaks
the meat approximately 1/2 inch per
24 hours. Thus, the cure does not
penetrate deeply into the meat with
this method. For pieces of game meat
or birds more than 2 inches thick,
Dry Curing
Dry curing involves the rubbing and
packing of meat in salt and other
compounds for considerable periods
of time. Dry curing materials might
include salt alone; salt, nitrate, and/
or nitrite; or salt, nitrate, and/or nitrite with sugar. One example of a dry
cure is dry sugar cure:
6
Use 1 ounce of 8-3-2-1 formula for
each pound of meat. Place rubbed
meats in boxes under refrigerated
(<40°F) conditions. Cure 7 days per
inch of meat thickness.
pumping with brine is advised (see
below). Cure 1/4- to 1/2-inch-thick
slices or slabs for at least 24 hours.
2. The stitch method involves injecting curing solution deep into the
muscles with a single orifice needle.
With this method, you can quickly get
deep penetration of the solution into
the product. Start by scrubbing the
pump in warm soap water and rinsing it. Then, to keep the pump sanitary while pumping meat, do not
touch the needle with your hands or
lay it down. When not in use, the
pump needle should be placed enddown in the container that holds the
pickle. To use it, draw the pump full
of pickle and insert the needle all the
way into the meat. Push with slow,
even pressure. As pickle is forced into
the meat, draw the pump toward you
to distribute the pickle as evenly as
possible. Always fill the pump full of
pickle to prevent air pockets. The
meat will bulge a little, and a small
amount of pickle will run out of it
when the pump is withdrawn. To stop
this, pinch the needle holes together
with your thumb and forefinger for
a few seconds. Use three or four
pumpfuls of pickle for legs and shoulders that weigh 10 to 15 pounds, and
five or six pumpfuls for those that
weigh 15 to 25 pounds.
3. Spray pumping is a variation of
the stitch method that uses a needle
with many orifices to allow for more
uniform distribution of the pickle
throughout the product.
4. Artery pumping is the introduction of the curing solution into the
natural circulatory system of the
muscle. Force a pickle solution into
the femoral artery by means of a small
needle attached to a hose and pump
that exerts 40–50 pounds of pressure.
Artery-pumped meats can be rubbed
with a dry cure mix or placed in a
pickle solution for 5–7 days to complete the curing process.
5. Machine pumping uses a machine with many needles for injecting product with curing solutions.
This method is considered efficient
and economical and is used primarily for curing large volumes of meat.
Curing ingredients such as
Morton’s Quick Cure can be found
in many rural grocery stores or ordered through your local supermarket. Most outdoor catalogs also carry
seasoning and curing products, or
you can purchase these ingredients
through your local butcher shop.
After the meat, poultry, or fish
product is cured, soak it in cold
(<40°F) water for 30 minutes to 2
hours. This process is known as clearing. It removes excess salt from the
surface and equalizes the salt content
in the meat. The thicker the meat,
the longer the clearing time should
be. After clearing, thoroughly drain
the cured product. At this point, the
cured product is usually cooked, either with or without smoke.
Smoking
Smoking is cooking food indirectly
in the presence of a fire. It can be
done in a covered grill if a pan of
water is placed beneath the meat on
the grill; meats also can be smoked
in a “smoker,” an outdoor cooker especially designed for smoking foods.
Smoking is much slower than grilling, so less tender meats benefit from
this method, and a natural smoke flavoring permeates the meat.
Depending on the method, some
products may be cooked and smoked
simultaneously, smoked and dried
without cooking, or cooked without
smoking. Smoke may be produced by
burning wood chips or using an approved liquid smoke preparation.
Liquid smoke preparations also may
be substituted for smoke flavor by
adding them directly onto the product in lieu of using a smokehouse or
another type of smoking vessel.
It is important to use a meat thermometer to ensure the food has
reached a safe internal temperature.
Smoking Large Game
Smoking adds flavor to large cuts of
meat and keeps them tender. It can
require up to 8 hours, depending on
the meat’s size and the outdoor air
temperature. Use high-quality charcoal to build a hot fire. Pile about 50
briquettes in the center, and when
they are covered with gray ash, push
them into two piles. Center a pan of
water between the piles.
Place the meat on the grill over the
water pan, close the lid, and keep the
grill vents open. Add about 10 briquettes every hour to maintain the
temperature in the smoker at 225 to
300°F for safety. Smoke until the internal temperature of the meat
reaches a minimum of 165°F. Use a
meat thermometer to check the temperature, measuring in the thickest
part of the meat.
Wood chips such as mesquite can
be used for additional flavor. Using
dry chips at the start creates a fast
smoke; wet them later for sustained
heat. Hardwoods such as hickory,
maple, chokecherry, oak, or apple are
best for smoking. Never use a soft
wood such as pine, because the resin
tars will produce “off” flavors. Be sure
to keep water in the pan to ensure
80–90% humidity, which will prevent
weight loss and drying of the meat.
Smoking Fish
Note: the following information is
recommended for salmon, rockfish,
and flatfish (sole, cod, flounder).
Safe processing times for other
smoked fish have not been developed.
Whether caught or purchased, fish
can be smoked successfully at home.
Fish smoked without proper salting
and cooking, though, can cause food
poisoning. The bacteria that cause
botulism food poisoning could start
to grow after 2 to 3 weeks in refrigeration. For long-term storage,
smoked fish must be frozen or
canned. Canning is preferred by
many who smoke fish at home, and
the fish must be processed in a pressure canner to destroy Clostridium
botulinum spores. Unfortunately, the
length of processing time needed to
guarantee safety can affect the quality of home-canned smoked fish. Canning tends to dry the flesh, darken
the color, and intensify the smoked
flavor; reducing the processing time
to lessen these undesirable quality
changes is unsafe. Instead, the smoking procedure must be modified.
For best quality, fish that will be
canned should be smoked for a
shorter time than ready-to-eat products. Lightly smoked fish must be
promptly canned to assure that it will
be safe and top quality. It should not
be eaten before it is canned, as some
bacteria survive the short smoking
process and are destroyed only during canning. If you plan to can your
fish, the following smoking procedure will give the best results.
Preparing Fish for Smoking
Different species of fish require different preparation techniques.
Salmon usually are prepared by removing the backbone and splitting
them. Bones usually are not removed.
Rockfish and flatfish such as sole,
cod, and flounder should be filleted.
You’ll need about 2/3 pound of
smoked fish for each 1-pint canning
jar. About 1 1/2 to 3 pounds of whole
fish will yield this amount of smoked
fish, depending on the amount of
waste removed such as the head, tail,
fins and entrails. Be sure to use good
quality, firm fish. Smoking and canning won’t improve poor quality!
Keep fish refrigerated or on ice before smoking.
Clean all fish thoroughly to remove blood, slime, and bacteria.
Keep fish cold at all times, but do not
refreeze. Remove scales and skin, if
desired. Cut prepared fish into pieces
that will fit vertically into pint canning jars, about 1 inch shorter than
the jar height. Salt will be more uniformly absorbed if pieces are of a
similar size.
Salting
Soaking fish in a strong salt solution
(brine) before smoking will give a
good surface texture and retard surface spoilage. For each 2 to 3 pounds
of prepared fish, dissolve 1 cup salt
in 7 cups water. Soak thin pieces of
fish (1/2 inch at the thickest point)
for about 5 to 10 minutes. Larger,
thicker pieces of fish (over 1/2 inch
thick) will need 30 to 45 minutes of
soaking.
Note: If you want less salt in the
finished product, reduce the brining
time and smoke for no longer than 1
hour. Be sure to can lower-salt fish
7
immediately after smoking to ensure
safety.
Smoking for Canning
Because smoke alone is not an effective preservative under most conditions, small factory-made electric or
charcoal smokers are suitable only for
smoking fish that also will be canned.
Lightly smoked fish for canning
doesn’t have to reach the internal
temperature required for ready-to-eat
products, which is 160°F for at least
30 minutes.
Smoke the amount of fish that you
plan to can that same day. Smoke fish
for up to 2 hours, depending on the
level of smoke flavor desired. Since
lightly smoked fish isn’t safe to eat,
don’t taste it to see if it’s done. The
best way to judge doneness is to measure weight loss. Weight is lost as
moisture evaporates during smoking.
A 10% weight loss yields a moist,
good-quality product after canning.
The moisture loss in most ready-toeat smoked fish is generally 20 to 30
percent. Lightly smoked oily fish such
as black cod will seem very moist because of their higher fat content. You
can measure weight loss easily with a
kitchen scale. Calculate percentage
loss by comparing the difference in
the weight of one piece of raw fish
before and after smoking. Do the following:
1. Weigh a piece of fish before smoking.
2. Weigh the same piece of fish after
smoking.
3. Subtract the ending weight (B)
from the beginning weight (A) to
calculate the weight lost (C).
4. Divide the weight lost (C) by the
beginning weight (A).
5. Multiply the result (D) by 100 to
calculate the percent of weight loss
(E).
For example:
8 ounces beginning weight (A)
–7 ounces ending weight (B) =
1 ounce weight lost (C)
1 ounce (C) ÷ 8 ounces (A) = .125 (D)
.125 (D) x 100 = 12.5 percent (E)
8
This 12.5 percent weight loss
would yield a fairly moist piece of
smoked fish after canning. A 20 to
30 percent weight loss would be too
dry after canning.
Note: If your smoked fish cannot
be processed immediately, refrigerate
it for processing later that day. If canning will be delayed for more than 1
day, freeze the fish. Frozen smoked
fish must be thawed to refrigerator
temperature before canning. Thaw
fish in the refrigerator, not on the
counter.
Smoking Game Birds
Smoking can add new flavor, convenience, and increased shelf life to
your game meat. Game birds can be
processed in a salt brine, in which the
salt has been smoked or to which liquid smoke has been added, and
cooked in a home oven without a special smokehouse. Using another
method, the meat is cured in a sugar
and salt brine and then smoked using hardwoods. While more cumbersome, the smoke flavor penetrates
the meat, resulting in a better flavor.
Heat the carcass at 140°F for 30
minutes, then turn on the smoke,
increase smokehouse humidity by
placing pans of water over the heat
source, and heat at 150°F for one
hour. Turn off the smoke and heat at
170°F for 2 hours followed by 185 to
200°F smokehouse air temperature
until the internal temperature
reaches 165°F, as measured by a meat
thermometer.
Smoking will give the game birds
a light brown color and smoky aroma.
After smoking, the meat must be refrigerated at temperatures less than
40°F. Smoked birds may keep for up
to 3–4 weeks in a refrigerator. If the
product will not be consumed immediately, freeze for up to 6 months.
Because of the rancidity and stale,
“off” flavors associated with poultry
fat, it is not advised to store game
birds much longer than 6 months.
To serve your smoked product,
reheat in a conventional oven from
275–325°F for 15–20 minutes per
pound of product. Cover the meat
with foil to retain the moisture and
eliminate the need for basting.
Canning
Only good-quality, properly cleaned
and cooled game or fish should be
canned. To ensure safety of canned
meats or fish, all jars or cans must be
processed in the pressure canner at
a sufficiently high temperature for a
long enough time to kill all bacteria
that cause spoilage or food poisoning. Large game animals are canned
like beef, and small game animals
and birds like poultry. Either type of
meat can be raw packed or hot
packed.
Before starting any canning
projects, it is advisable to a) have your
local extension office check and calibrate your dial gauge; b) use only
quality canning equipment: standard
glass mason-type jars and a two-piece
flat lid and screw band; and c) follow
the manufacturer’s directions for safe
operation of the canner. For detailed
canning instructions, consult the
1994 USDA publication Complete
Guide to Home Canning: Guide 5, Preparing and Canning Poultry, Red Meats,
and Seafoods, available at your local
extension office.
Canning Small Game Animals and Birds
Choose freshly killed and dressed
healthy animals or birds. Soak
dressed meat for 1 hour in water containing 1 tablespoon of salt per quart,
then rinse. Remove excess fat. Cut
meat into suitable sizes for canning.
Can with or without bone.
For hot pack, boil, steam, or bake
meat until about two-thirds done.
Add 1 teaspoon salt per quart, if desired. Fill jars with pieces and hot
broth, leaving 1 1/4 inch of
headspace.
For raw pack, add 1 teaspoon salt
per quart, if desired. Fill jars loosely
with raw meat pieces, leaving 1 1/4
inch of headspace. Do not add
liquid.
Follow the recommendations in
the tables below for additional information about canning meat safely.
Canning Large Game Animals (Strips,
Cubes, or Chunks)
Choose high-quality chilled meat.
Remove excess fat. Soak strongflavored wild meats for 1 hour in
brine water containing 1 tablespoon
of salt per quart. Rinse. Remove large
bones.
For hot pack, precook meat until
rare by roasting, stewing, or browning in a small amount of fat. Add 1
teaspoon of salt per quart, if desired.
Fill jars with pieces and add boiling
broth, meat drippings, water, or tomato juice, leaving 1 inch of
headspace.
For raw pack, add 1 teaspoon of
salt per quart, if desired. Fill jars with
raw meat pieces, leaving 1 inch of
headspace. Do not add liquid.
Adjust lids and process following
the recommendations in the tables
below, according to the canning
method used.
Canning Ground or Chopped Meat
Pressure and adequate time are necessary to produce a safe, canned meat
product. Choose fresh, chilled meat.
With venison, add one part highquality pork fat to three or four parts
venison before grinding. Use freshly
made sausage, seasoned with salt and
cayenne pepper (sage may cause a
bitter “off” flavor). Shape chopped
meat into patties or balls or cut case
sausage into 3- to 4-inch links. Cook
until lightly browned. Ground meat
may be sautéed without shaping. Remove excess fat. Fill jars with pieces.
Add boiling meat broth, tomato juice
or water, leaving 1 inch of headspace.
Add one teaspoon of salt per quart
to the jars, if desired.
Adjust lids and process following
the recommendations in the tables
below, according to the canning
method used.
Table 1. Recommended Process Time for Canning Strips, Cubes, or Chunks of Meat in a Dial-Gauge Pressure Canner
Style of Pack
Hot or Raw
Jar Size
Pints
Quarts
Time (min)
75
90
Canner Pressure (PSI) at altitudes of:
0–2,000 ft
2,001–4,000 ft
4,001–6,000 ft
11 lbs
12 lbs
13 lbs
11
12
13
6,001–8,000 ft
14 lbs
14
Information obtained from USDA Extension Service
Table 2. Recommended Process Time for Canning Strips, Cubes, or Chunks of Meat in a Weighted-Gauge Pressure Canner
Style of Pack
Hot or Raw
Jar Size
Pints
Quarts
Time (min)
75
90
Canner Pressure (PSI) at altitudes of:
0–1,000 ft
Above 1,000 ft
10 lbs
15 lbs
10
15
Information obtained from USDA Extension Service
Table 3. Recommended Process Time for Canning Ground or Chopped Meat in a Dial-Gauge Pressure Canner
Style of Pack
Hot
Jar Size
Pints
Quarts
Time (min)
75
90
Canner Pressure (PSI) at altitudes of:
0–2,000 ft
2,001–4,000 ft
4,001–6,000 ft
11 lbs
12 lbs
13 lbs
11
12
13
6,001–8,000 ft
14 lbs
14
Information obtained from USDA Extension Service
Table 4. Recommended Process Time for Canning Ground or Chopped Meat in a Weighted-Gauge Pressure Canner
Style of Pack
Hot
Jar Size
Pints
Quarts
Time (min)
75
90
Canner Pressure (PSI) at altitudes of:
0–1,000 ft
Above 1,000 ft
10 lbs
15 lbs
10
15
Information obtained from USDA Extension Service
9
Canning Fresh Fish
Although freezing is the easiest way
to preserve fish, canning does offer
some advantages. Canning heat inactivates enzymes that degrade muscle
or flesh; precooked canned foods are
ready to eat; and canning avoids the
problem of freezer burn. The only
safe way to process fish is in a pressure canner. Follow recommended
canning procedures carefully, always
using pint jars, rather than quarts.
Fish may be canned with its bones,
which add to the flavor and nutritive
value of the product. To safely can
fish that has been frozen, thaw it first
in a refrigerator and can promptly.
Eviscerate fish within 2 hours after they are caught. Keep cleaned fish
on ice until ready to can. Remove
head, tail, fins, and scales. Wash and
remove all blood. Split fish lengthwise, if desired. Cut cleaned fish into
3 1/2-inch lengths. Fill pint jars with
the skin side of the fish next to the
glass, leaving 1 inch of headspace.
Add one teaspoon of salt per pint, if
desired. Do not add liquid. Adjust lids
and process according to the canning
timetables for fish, below.
Note: Glasslike crystals of magnesium ammonium phosphate sometimes form in canned salmon. There
is no way for the home canner to prevent these crystals from forming, but
they usually dissolve when heated and
are safe to eat.
Canning Smoked Fish
Note: The USDA recommends that
only lightly smoked salmon, rockfish,
and flatfish such as sole, cod, and
flounder be canned. Safe canning
recipes for other smoked fish have
not been determined; therefore,
these fish should be frozen.
Use a 16- to 22-quart pressure canner. Do not use quart jars or tin cans.
Thaw frozen smoked fish in the refrigerator until no ice crystals are
present. Cut fish into proper sizes to
fit into pint canning jars, leaving 1
inch of headspace. Do not add liquid. Process according to to the canning timetables for smoked fish, below. Follow the manufacturer’s instructions for use of a home canner;
contact your local extension office for
assistance; or refer to the 1994 USDA
publication Complete Guide to Home
Canning: Guide 5, Preparing and Canning Poultry, Red Meats, and Seafood.
Table 5. Recommended Process Time for Canning Fish in a Dial-Gauge Pressure Canner
Style of Pack
Raw
Jar Size
Pints
Time (min)
100
Canner Pressure (PSI) at altitudes of:
0–2,000 ft
2,001–4,000 ft
4,001–6,000 ft
11 lbs
12 lbs
13 lbs
Information obtained from USDA Extension Service
Table 6. Recommended Process Time for Canning Fish in a Weighted-Gauge Pressure Canner
Style of Pack
Raw
Jar Size
Pints
Time (min)
100
Canner Pressure (PSI) at altitudes of:
0–1,000 ft
Above 1,000 ft
10 lbs
15 lbs
Information obtained from USDA Extension Service
Table 7. Recommended Process Time for Canning Smoked Fish in a Dial-Gauge Pressure Canner
Jar Size
Pints
Time (min)
110
Canner Pressure (PSI) at altitudes of:
0–2,000 ft
2,001–4,000 ft
4,001–6,000 ft
11 lbs
12 lbs
13 lbs
6,001–8,000 ft
14 lbs
Information obtained from USDA Extension Service
Table 8. Recommended Process Time for Canning Smoked Fish in a Weighted-Gauge Pressure Canner
Jar Size
Pints
Time (min)
110
Information obtained from USDA Extension Service
10
Canner Pressure (PSI) at altitudes of:
0–1,000 ft
Above 1,000 ft
11 lbs
15 lbs
6,001–8,000 ft
14 lbs
Canning Rabbit
Choose freshly killed and dressed,
healthy animals. Dressed rabbits
should be chilled for 6 to 12 hours
before canning, soaked for 1 hour in
water containing 1 tablespoon of salt
per quart, and then rinsed. Remove
excess fat. Cut the rabbit into suitable
sizes for canning. Can with or without bones.
For hot pack, boil, steam, or bake
meat until about two-thirds done.
Add 1 teaspoon salt per quart to the
jar, if desired. Fill jars with pieces and
hot broth, leaving 1 1/4 inch of
headspace. For raw pack, add 1 teaspoon salt per quart, if desired. Fill
jars loosely with raw meat pieces, leaving 1 1/4 inch of headspace. Do not
add liquid.
Adjust lids and process following
the recommendations in the tables
below, according to the canning
method used.
Jerky
Drying is the world’s oldest and most
common method of food preservation. Canning technology is less than
200 years old, and freezing became
practical only during this century
when electricity became widely available. Drying technology is both
simple and readily available to most
of the world’s cultures. Jerky is a food
known at least since ancient Egypt.
Humans made jerky from the meat
of animals that were too big to eat all
at once such as bear, buffalo, or
whales. North American Indians
mixed ground dried meat with dried
fruit or suet to make “pemmican.”
“Biltong” is dried meat or game eaten
in many African countries. Our word
“jerky” came from the Spanish word
“charque.”
Removing moisture from food
prevents enzymes from contacting or
reacting with it. Whether these enzymes are bacterial, fungal, or naturally occurring, preventing their ac-
tion preserves the food. Recent illnesses caused by Salmonella and E. coli
O157:H7 in homemade jerky have
raised questions about the safety of
traditional drying methods for making beef and venison jerky. If improperly cooked, homemade jerky may
contain bacteria that can result in
severe, life-threatening illness and
possibly death.
In 1995, a Salmonella outbreak
caused by jerky affected 93 people in
New Mexico. Although the product
had been dried at 140°F for 3 hours
and held at 115°F for 19 hours, the
jerky (beef) had not been heated to
160°F, allowing the bacterium to survive. Another jerky outbreak occurred in Oregon in 1995, affecting
11 people with E. coli O157:H7. The
jerky from this outbreak had been
dried to 124 to 135°F for 12–18 hours,
but not to 160°F. These outbreaks
have raised concern about drying
methods used to make jerky at home.
Table 9. Recommended Process Time for Rabbit in a Dial-Gauge Pressure Canner
Style of Pack
Without Bones:
Hot or Raw
With Bones:
Hot or Raw
Jar Size
Time (min)
Canner Pressure (PSI) at altitudes of:
0–2,000 ft
2,001–4,000 ft
4,001–6,000 ft
6,001–8,000 ft
Pints
Quarts
75
90
11 lbs
11
12 lbs
12
13 lbs
13
14 lbs
14
Pints
Quarts
65
75
11 lbs
11
12 lbs
12
13 lbs
13
14 lbs
14
Information obtained from USDA Extension Service
Table 10. Recommended Process Time for Rabbit in a Weighted-Gauge Pressure Canner
Style of Pack
Without Bones:
Hot or Raw
With Bones:
Hot or Raw
Jar Size
Time (min)
Canner Pressure (PSI) at Altitudes of:
0–1,000 ft
Above 1,000 ft
Pints
Quarts
75
90
10 lbs
10
15 lbs
15
Pints
Quarts
65
75
10 lbs
10
15 lbs
15
Information obtained from USDA Extension Service
11
The USDA’s current recommendation for making jerky safely is to
heat meat to 160°F before the dehydrating process. This step assures that
any bacteria present will be destroyed
by wet heat. But most dehydrator instructions do not include this step,
and a dehydrator may not reach temperatures high enough to heat meat
to 160°F. Thus, the meat must be
cooked first by baking or simmering
before being placed in the dehydrator. Using the dehydrator alone will
inactivate microorganisms but not kill
them. The right conditions of heat
and moisture may cause the microorganisms to become active without
the consumer being aware of a potentially dangerous situation. After
heating the meat to 160°F, maintain
a constant dehydrator temperature of
130 to 140°F during the drying process. This is important because the
process must be fast enough to dry
food before it spoils, and it must remove enough water to prevent microorganisms from growing.
The following are additional recommendations for making jerky at
home:
• Always wash hands thoroughly
with soap and water before and
after working with meat products.
• Use clean equipment and utensils.
• Keep meat refrigerated at 40°F or
slightly below; use or freeze
ground beef and poultry within 2
days; whole red meats, within 3 to
5 days.
• Defrost frozen meat in the refrigerator, not on the kitchen counter.
• Marinate meat in the refrigerator.
Don’t save marinade for re-use.
Marinades are used to tenderize
and flavor the jerky before dehydrating it.
• Steam, boil, or roast meat to 160°F,
as measured with a meat thermometer, before dehydrating it.
• Dry meats in a food dehydrator
that has an adjustable temperature
dial and will maintain a temperature of at least 130 to 140°F
throughout the drying process.
12
Baking Jerky in an Oven
Place the jerky on cake racks placed
on baking sheets, and bake in a 325°F
oven. Check the internal temperature using a meat thermometer to
make sure it has reached 160°F. Proceed with the directions for drying
jerky in a dehydrator (adjustments in
the listed length of time to dry will
be required), or dry in the oven using the following guidelines.
The temperature of the oven
should be 170°F or higher and the
door should be propped open 2 to 6
inches. Circulation can be improved
by placing a fan outside the oven near
the door. Dry until a test piece cracks
but does not break when it is bent (5
to 6 hours). Pat off any beads of oil
with absorbent toweling and cool.
Remove strips from the racks. Cool.
Package and store in a cool, dry place.
Simmering Jerky in a Marinade
(See recipe section for additional version of
this recipe.)
Pre-freeze meat to be made into jerky
so it will be easier to slice. Cut partially thawed meat into long slices of
1/4" thick. For tender jerky, cut at
right angles to long muscles (across
the grain). Remove as much fat from
the slices as possible to prevent “off”
flavors.
Prepare 2–3 cups of your favorite
marinade and bring it to a rolling boil
over medium heat. Add a few meat
strips, making sure the marinade covers them. Reheat to a full boil. (Note:
It is not advised to presoak the strips
in marinade. Putting unmarinated
strips into boiling marinade minimizes any cooked flavors and maintains the safety of the marinade.)
Remove the pan from the heat
source. Remove the strips from the
hot marinade and place them in a
single, nonoverlapping layer on drying racks.
Dry the strips at 140 to 150°F in a
dehydrator, oven, or smoker. Test for
doneness by letting a piece cool.
Strips should crack but not break
when bent and should not contain
any moist or underdone spots. Refrigerate the strips overnight. Check
again for doneness. If necessary, dry
strips further.
Poultry Jerky
Cut the breast meat into thin strips
(1/4" thin and 1" wide). Cure the
strips for 24 hours in brine solution
and hold at <40F. Rinse and soak the
strips in cold water for 30 minutes,
drain, and arrange one layer thick on
a Teflon-coated cookie sheet. Place
the meat in a 325°F oven for 1 hour.
Using a meat thermometer, make
sure the meat has reached an internal temperature of 160°F. Reduce the
oven temperature and heat until the
meat exhibits the desired dryness.
Use any jerky within one week; otherwise freeze it to prevent rancidity.
Sausage Making
Sausages are defined as chopped
or ground meat that is blended with
spices or other seasonings and stuffed
in natural or manufactured casings.
There are several different types of
sausages, including fresh sausage,
cooked smoked sausage, or dry or
semi-dry sausage. There are several
recommendations for making sausage from game meats:
• Wash your hands with soap and
water before working with meats,
after changing tasks, and when finished.
• Start with clean equipment—sanitize surfaces with a solution of 1
tablespoon chlorine bleach per
gallon of water.
• Select only fresh, high quality meat
and other ingredients (spice, cure,
etc).
• If using frozen meat, thaw in refrigerator or cooler.
• Select the proper lean-to-fat ratio
to ensure good texture and binding properties.
• Use cure ingredients (sodium nitrite) purchased from a reputable
source. Sodium nitrite will give
sausage the characteristic pink
color, improve flavor, and inhibit
growth of Clostridium botulinum.
• Keep the temperature of the meat
as cold as possible (<40F) during
grinding and mixing.
• Mix the dry ingredients in water
to dissolve the curing ingredients
•
•
•
•
and allow for even distribution
throughout the product during
regrind.
If you have the grinding equipment, coarse-grind the meat, add
the rest of the other ingredients,
and regrind.
If stuffing sausage, choose only
high-quality hog casings that have
been salted.
Soak casings in clean water 30 minutes before use, and rinse them in
cold water to remove excess salt.
Clean grinding and stuffing equipment thoroughly and sanitize surfaces with solution of 1 tablespoon
chlorine bleach per gallon of water when done.
• Use meat thermometers to ensure
cooked sausage products have
reached proper internal temperature of 160°F.
Cooking with Meat Thermometers
Using a meat thermometer is the only
reliable method to ensure that your
game meat, birds, or fish have
reached a proper internal temperature during cooking. For these foods
to be safe, internal temperatures
must be high enough to kill any
harmful microorganisms.
Cook ground meats and other cuts
of game meat such as chops, steaks,
and roasts to 160°F to ensure destruction of foodborne bacteria and parasites. For tenderness and doneness,
cook whole game birds to 180°F and
breast meat to 170°F. Cooked muscle
meats can be pink even when the
meat has reached a safe internal temperature. The pink color can be
caused by the cooking method, smoking, or added ingredients such as
marinades. If fresh game has reached
160°F throughout, even though it
may still be pink in the center, it
should be safe.
It should be noted that color
change in a meat product is not always indicative of a proper internal
temperature. In some instances, meat
may change color (pink to gray or
brown) before it reaches a temperature at which pathogens are destroyed. To take the guesswork out of
cooking your game, birds, or fish, use
a digital, fork, bimetallic-coil, or dial
oven-safe thermometer.
Digital Instant-Read (Thermistor)
Reads in 10 seconds
• Place at least 1/2" deep
• Gives fast
reading
• Can measure
temperature in
thin and thick
foods
• Not designed to remain in food
while it’s cooking
• Check internal temperature of
food near the end of cooking time
• Some models can be calibrated;
check manufacturer’s instructions
• Available in kitchen stores
Table 11. Recommended Minimum Internal Cooking Temperatures for Game Meats
Types of Game Meat or Bird
Ground Meat and Meat Mixtures
Ground Venison, Sausage, Deer Bologna
Fresh Venison (Chops, Steaks, Roasts)
Medium
Well Done
Game Birds/Waterfowl
Game Bird/Waterfowl, Whole
Wild Turkey, Whole
Breasts, Roasts
Thighs, Wings
Stuffing (cooked alone or in bird)
Duck/Goose
Degrees Fahrenheit
160°
160°
170°
180°
180°
170°
180°
165°
180°
Fork
Reads in 2–10 seconds
• Place at least 1/4" deep in thickest part of
food
• Can be used in
most foods
• Not designed
to remain in
food while it is cooking
• Sensor in tine of fork must be fully
inserted
• Check internal temperature of food
near end of cooking time
• Cannot be calibrated
• Convenient for grilling
Dial Instant-Read (Bimetallic-coil)
Reads in 15–20 seconds
• Place 2 to 2 1/2" deep in thickest
part of food
• Can be used in
roasts, casseroles, and
soups
• Temperature is
averaged along probe, from tip to
2–3" up the stem
• Cannot measure thin foods unless
inserted sideways
• Not designed to remain in food
while it is cooking
• Use to check the internal temperature of a food at the end of cooking time
• Some models can be calibrated;
check manufacturer’s instructions
• Readily available in stores
Dial Oven-Safe (Bimetallic-coil)
Reads in 1–2 minutes
• Place 2 to 2 1/2" deep in thickest
part of food
• Can be used in
roasts, casseroles, and soups
• Not appropriate
for thin foods
• Can remain in food while it’s
cooking
• Heat conduction of metal stem can
cause false high reading
• Some models can be calibrated;
check manufacturer’s instructions
13
RECIPES
Because game animals’ diets and activity levels are not the same as those
of domestic animals and poultry, the
meat of game animals has a different
flavor—stronger than that of domesticated species. Factors that determine the meat’s quality include the
age of the animal (younger animals
are more tender), the animal’s diet,
and the time of year the animal was
harvested. (The best is in the fall, after a plentiful spring and summer
feeding.)
Also important is how the animal,
bird, or fish was handled in the field.
As mentioned in the previous sections, it should be eviscerated within
an hour of harvest, and the meat refrigerated within a few hours. Meat
will become damaged (and sometimes ruined) if it is not dressed,
transported, and chilled properly.
In general, wild game meat is less
tender than meat from domestic ani-
mals because the wild animals get
more exercise and have less fat. Fat
may contain “off” flavors and should
be removed. For maximum tenderness, most game meat should be
cooked slowly and not overdone. It
can be cooked with moist heat by
braising or with dry heat by roasting.
Oven-Grilled Rabbit
Fried Rabbit
Cut rabbits in quarters. Rub pieces
with garlic or lemon/lime juice and
let stand for 30 minutes. Sprinkle
with salt and pepper. Roll pieces in
flour or crushed cereal. Place pieces
in melted fat in bottom of deep baking dish. Bake at 375°F for 30 minutes or until brown. Turn and bake
30 minutes longer. Remove pieces
and drain on paper towels. Serve hot.
Rabbit, cut up into serving pieces
Flour
Salt and pepper
Oil
Roll rabbit pieces in mixture of flour,
salt, pepper. Heat oil about 1/2" deep
in heavy frying pan. Use moderate
temperature. Cook all pieces until
well browned and tender.
Young rabbits
1 clove garlic or 1/2 lemon or
1/2 lime
Salt and pepper
1/2 cup flour or crushed cereal
1/2 cup fat, melted
Table 12. Nutritive Value of Game Foods
Game
Preparation Portion
Calories
Antelope
Beefalo
Buffalo (bison)
Deer
Roasted
Roasted
Roasted
Roasted
3 oz
3 oz
3 oz
3 oz
Roasted
Raw+
Roasted
Raw+
Raw+
Fowl—flesh only
Duck
Domestic
Wild
Goose
Pheasant
Quail
Raw+
1 lb r-t-c*
1/2 breast
1 lb r-t-c*
1/2 breast
leg, 1 lb,
r-t-c*
1quail
Rabbit
Domestic
Wild
Squirrel
Roasted
Stewed
Roasted
3 oz
3 oz
3 oz
127
160
122
134
Protein
(g)
25
26
24
25.7
Total Fat
(g)
2.2
5.4
2.1
2.7
201
102
340
243
132
23.5
16.5
41.4
44.4
21.9
11.2
3.5
18.1
5.9
4.2
123
20
131
147
116
19.4
28.1
20.5
Saturated Fat
(g)
.9
2.3
.8
1.1
Cholesterol Iron Sodium
(mg)
(mg) (mg)
107
3.6
46
49
2.6
70
70
2.9
48
95
3.8
46
Zinc
(mg)
1.4
5.4
3.1
2.3
4.2
1.1
6.5
1.9
1.5
89
—
138
—
—
2.7
3.7
4.1
1.4
1.8
65
47
108
60
44
2.6
.6
—
1.1
1.5
4.2
1.2
—
4.2
47
—
5.4
2.9
3.1
1.6
.9
.4
55
104
80
1.5
4.1
4.5
31
38
80
1.5
NA
NA
NA = No information available
— = Lack of reliable data for a constituent believed to be present in measurable amount.
* r-t-c = ready to cook
+ = Values for cooked not available.
Sources: USDA Handbook no. 8-5, 1979, Composition of Foods, Poultry Products, Raw, Processed, Prepared, and USDA Handbook no. 8-17, 1989, Composition of
Foods, Lamb, Veal, and Game Products, Raw, Processed, Prepared.
14
Hasen Pfeffer
Pheasant
1 rabbit, cut into serving pieces
2 to 3 cups vinegar
2 to 3 cups water
1/2 cup sugar
1 onion, sliced
2 tsp. salt
1/4 tsp. pepper
1 tsp. pickling spices
Flour
Cooking oil
1/2 tsp. kitchen bouquet
1 pheasant
Marinade of sauterne wine and
water
Seasoned flour
1/2 pint whipping cream
1 small can mushrooms
Cover rabbit with equal parts vinegar
and water. Add sugar, onion, salt,
pepper, and pickling spices. Cover
and store rabbit in pickling solution
for 2 days in refrigerator. Remove
rabbit from solution and pat dry with
paper towels. Roll rabbit pieces in
flour and brown them in hot fat.
Gradually add 1 cup of remaining
pickling solution to browned pieces.
Cover and simmer about 1 hour or
until tender. Add kitchen bouquet to
remaining liquid and thicken with
flour for gravy.
Birds Baked in Sour Cream
1 pheasant, duck, wild turkey, or
grouse (approximately 2 to
2 1/2 lb) cut into serving pieces
Flour, seasoned with salt and
pepper to taste
1/4 cup butter
1/2 cup sliced mushrooms
(optional)
1 cup sour cream (acts as a tenderizing agent)
1/2 cup water
1/4 tsp. thyme
Preheat over to 325°F. Roll bird
pieces in seasoned flour, then brown
in butter in large skillet. Transfer
pieces to a casserole dish. Cover
pieces with sour cream and mushrooms. Add water to skillet and pour
into casserole. Sprinkle with thyme
and cover tightly. Bake until meat is
tender (about 1 hour). Serve with
rice or boiled potatoes.
Mix equal parts wine with water to
cover the pheasant. Marinade for 6
hours or less. Remove bird from marinade, debone, and cut into smaller
bite-sized pieces. Toss pieces in seasoned flour and brown in butter in
large skillet. Place browned pieces in
a buttered casserole. Add whipping
cream. Bake 35 min at 350°F. Add
mushrooms and bake an additional
10 minutes. Serve on a bed of wild
rice.
Roast Wild Duck
3–5 lb duck
Salt and pepper
1 medium apple, sliced
1 small onion, sliced
Wine or orange juice
Season duck inside and out with salt
and pepper. Put apple and onion into
cavity of duck. Place on rack of roasting pan. Do not cover. (If it is an old
bird, cover the last half of the cooking time.) Do not add water. Cook at
325°F for 2 to 3 hours or until tender. Baste occasionally with wine or
orange juice. Remove apple and onion before serving.
Sweet Pickle Cure of Game
Put meat in a container such as a
crock, barrel, sealed wooden box,
stainless steel container, or a plastic
container that is approved for food
products. Do not use other metal
containers. Add water to cover the
meat. Remove the meat and add
enough salt to the water so an egg
will float, measuring as you add. If
you do not have a specific pickle cure
recipe, add sugar to equal 1/2 the
amount of salt used. Add commercial
cure to pickle according to package
directions.
Put meat into pickle. Let stand at
38°F for 3 days per pound of meat
(45 days for 15 pounds meat). If temperature becomes warm and brine
becomes ropy, remove meat. Wash
the meat. Boil and skim pickle or
make a new one. The new pickle
should be as strong as the original. If
space is a limiting factor, it might be
advantageous to bone out the wild
game. Keep the pieces of meat as
large as possible, then smoke after
curing is complete.
Corning Game
You can corn venison, antelope,
moose, bear, or beef with the same
corning method. It makes all of these
meats “plain good eating.” A good
piece of round is wonderful corned,
but less desirable cuts of meat like the
brisket can be corned. People who
will not eat wild meats may like them
corned, as corning takes out the
musky wild flavor and tenderizes the
toughest meats.
To make 6 gallons of corning liquid,
use:
3 pounds (6 3/4 cups) salt
10 ounces (1 3/8 cups) sugar
2 ounces sodium nitrate
1/2 ounce sodium nitrite
3 level teaspoons black pepper
3 level teaspoons ground cloves
6 bay leaves
12 level teaspoons mixed pickling
spice
For onion flavor, add one mediumsized onion, minced. For garlic flavor, add four garlic cloves, minced.
Put the ingredients into a pickle
crock or glass jar and add enough
water to make a total of 6 gallons, including the ingredients. Place meat
into the liquid. Put a heavy plate on
the meat and weight it, if necessary,
to keep meat below pickle brine.
Cover the container.
The ideal temperature for coming
meat is about 38° F. During the fall
or spring months, this is not too difficult to obtain. In the winter, an unheated part of the basement can be
used for corning meat. During the
15
summer months, it is hard to find a
place around 38°F. Higher temperatures need not affect the end result
of the corning process at all, if you
add one-third more salt for every 15
degrees of temperature above 38° F.
At 83°F, add 3 pounds more salt,
making a total of 6 pounds of salt.
Leave the meat in the corning liquid for 15 days. On the fifth and tenth
days, stir the liquid well, remove the
meat, and put it back so the bottom
piece is on top. After the fifteenth
day, remove the meat. Use what you
want immediately and store the balance in a cool place refrigerated at
38°F. After meat is removed from the
corning liquid, it should be cooked
and consumed within one week or
frozen for up to one month.
The meat at this stage has a grayish pink color. When cooked, corned
meat changes to the characteristic
pink color associated with a cured
product.
Cooking Corned Meat
Place the corned meat in a pan with
a cover. Add cold water to cover the
meat. Bring to a boil and remove the
scum from the water. Reduce the heat
and simmer for about 5 hours or until tender.
Venison Summer Sausage
Venison Bologna
15 pounds venison
10 pounds pork trimmings (5
pounds lean trimmings, 5
pounds fat trimmings)
7 ounces (2/3 cup) salt
1 ounce (2 tablespoons) commercial cure
1 ounce (2 tablespoons) mustard
seed
3 ounces (1/2 cup) pepper
3 ounces (1/2 cup) sugar
1/2 ounce (3 tablespoons)
marjoram
10 pounds ground venison
1 pound hamburger
1/2 cup Morton’s Tender Quick Salt
2 1/2 cups vegetable oil
5 teaspoons garlic powder
2 teaspoons hickory smoke salt
2 teaspoons onion powder
4 teaspoons black pepper
5 teaspoons Liquid Smoke
1 tablespoons hot pepper sauce
2 envelopes Lipton beefy onion
soup mix
Use casings or shape into logs approximately 1 1/2 inches in diameter.
Wrap in foil. Bake in 350°F oven for
approximately 1 hour or until internal temperature reaches 160°F.
Mix salt and cure with coarsely
ground venison and pork trimmings.
(Cure is optional. It is used to develop
a pink color and as a preservative.)
Pack in shallow pan and place in
cooler for 3 to 5 days. Then add rest
of ingredients and mix well. Smoke
sausage until internal temperature
reaches 160°F. Sausage is quite spicy.
If you like less spice, cut down proportions of spices.
Smoked Sausage
Stuff prepared sausage into 3-inchdiameter fibrous casings and smoke
at 140°F for 1 hour; at 160°F for 1
hour, and at l80°F until internal temperature reaches 160°F (insert a meat
thermometer in the thickest part of
the sausage). Remove from
smokehouse and spray with hot water for 15 to 30 seconds. Follow with
cold spray or place in ice water to cool
down rapidly. Store in cooler at 40°F
or colder.
Source: http://www.geocities.com/
Yosemite/Gorge/5037/page6a.html
Venison Chili
1 to 1 1/2 pounds venison burger,
browned and drained
1/2 pound fresh mushrooms,
coarsely chopped
1 green pepper, coarsely chopped
1 (14 1/2 ounce) can sliced stewed
tomatoes, undrained
1 (6 ounce) can tomato paste
3 (14 1/2 ounce) cans dark red
kidney beans, undrained
2 tablespoons chili powder
1 teaspoon cumin pepper
1/4 teaspoon Tabasco sauce
1/2 teaspoon cayenne pepper
3–4 dashes crushed red pepper
1–2 dashes celery salt
dash of black pepper
2 cloves of garlic, crushed
Combine all ingredients in a 4-quart
slow cooker (crock pot) and preferably refrigerate overnight. Cook on
low heat setting for 8 to 10 hours. Top
each serving with freshly chopped
onion and shredded cheddar cheese.
Note: This is a very good, mildly hot
chili that is complimented by freshly
baked bread. Yields six servings.
Source: http://www.geocities.com/
Yosemite/Gorge/5037/page6a.html
16
Wild Game Polish Sausage
“Mock” Salmon
Hot Pickle Cure Jerky
25 pounds 50/50 pork trimmings
(50% lean and 50% fat)
20 pounds wild game (lean meat)
1 quart water
14 ounces (1 1/3 cups) salt
2 ounces (4 tablespoons) cure
1/2 ounce (6 teaspoons) marjoram
1 1/2 ounces (3 tablespoons)
mustard seed
3 cloves garlic
2 ounces (1/4 cup) pepper
Allow 2 1/4 to 3 pounds of whole fish
for each pint of canned fish. Clean
and prepare fish. Remove heads, fins,
and tail. Remove skin, if desired. If
the fish is slimy, a solution of 1 tablespoon vinegar to 2 quarts water helps
remove the slime. The color of some
fish can be improved by soaking it for
30 minutes in cold water containing
1/2 cup salt to 1 gallon water. Do not
reuse salt water. Rinse fish in clean
water, and cut into jar-sized lengths.
Combine and heat the above ingredients. This makes enough sauce
for about 8 pints. Pack fish into jars
to within 1 inch of the top. Cover with
sauce, leaving 1 inch headspace. Remove air bubbles, wipe jar rims, place
prepared lids on jars, and tighten the
screw bands. Proceed according to
canning timetable for fish.
Use fresh lean deer meat free of fat
and connective tissue. Five pounds of
fresh meat should weigh approximately two pounds after drying or
smoking.
1. Slice 5 pounds of meat (1/4-inch
strips) with the grain, not crosswise. Spread out meat and sprinkle
on 3 tablespoons salt, 2 teaspoons
ground black pepper, and 2 tablespoons sugar. Put the meat in a
pan or dish and let it stand for 24
hours in the refrigerator.
2. Pound the meat on both sides to
work in the spice. Optional: Dip
strips of meat in a liquid smoke
solution (5 parts water to 1 part
liquid smoke) for 1 to 2 seconds
for added flavor.
3. Make a brine by dissolving 3/4 cup
salt, 1/2 cup sugar, and 2 tablespoons ground black pepper in a
gallon of water. Stir to dissolve the
salt and sugar.
4. Bring the brine to a low to medium boil. Immerse the fresh meat
strips (a few at a time) into the
boiling brine until they turn gray
(approximately 1 to 2 minutes).
Remove meat from brine, using
clean tongs or other utensils that
have not contacted raw meat.
5. Spread out meat on a clean dehydrator rack or on a clean rack in
the top half of a kitchen oven. If
you use a kitchen oven, open the
oven door to the first or second
stop. Heat at 120 to 150°F (lowest
oven temperature) for 9 to 24
hours or until the desired dryness
is reached. Remove jerky from
oven before it gets too hard or
brittle. Properly dried jerky should
crack when bent in half but should
not break into two pieces.
6. Store in clean jars or plastic bags,
or wrap in freezer paper and
freeze. If kept dry, properly prepared jerky will last almost indefinitely at any temperature, but its
quality deteriorates in a few
months.
Mix all ingredients together and
grind the product through a coarse
plate, followed by a fine grind. Stuff
in hog casing and follow smoking
procedure for Smoked Sausage, p.
16.
Quick Sausage
2 pounds hamburger or deer
burger mix
1/2 teaspoon pepper
1/8 teaspoon garlic powder
1/4 teaspoon onion powder
2 tablespoons curing salt
1 tablespoon liquid smoke
1 cup water
1 tablespoon mustard seed (optional)
Pack mixture in a water glass to
within 1/2 inch of the top. Use large
glass container or enough glass tumblers. Cover and freeze overnight.
Run warm water on glass to release.
Plastic containers will not crack and
are safer, but may pick up flavors from
the sausage. Wrap in cellophane
wrap. Tie ends. Simmer 1 hour in
water. Slice thin.
Note: Hamburger or pork sausage
can be mixed with ground venison.
Quick Pink Salmon
To each pint of fish, add:
1 tablespoon vinegar
1/4 teaspoon salt
2 tablespoons tomato juice
Leave 1 inch headspace. Adjust lids.
Process according to the table for
fish.
17
REFERENCES
Beck, P. and M. Marchello. 1987. Wild
Side of the Menu: Preservation of Game
Meats. North Dakota State University
Extension Service, Fargo, ND.
Cutter, C. N. 2000. Proper Care and
Handling of Venison from Field to Table.
Penn State Cooperative Extension,
University Park, PA.
Romans, J. R., W. J. Costello, C. W.
Carlson, M. L. Greaser, and K. W.
Jones. 1994. The Meat We Eat, thirteenth edition. Interstate Publishers,
Inc., Danville, IL.
Smith, Ned. “To Field-Dress a Deer,”
Pennsylvania Game News, Pennsylvania
Game Commission, Harrisburg, PA.
Cutter, C. N. 2000. Proper Care and
Handling of Game Birds from Field to
Table. Penn State Cooperative Extension, University Park, PA.
USDA—Food Safety Inspection Service. 1999. http://www.fsis.usda.gov/
ofo/hrds/state/retail/curing.htm.
Curing meat.
Cutter, C. N. 2000. Proper Care and
Handling of Fish from Stream to Table.
Penn State Cooperative Extension,
University Park, PA.
USDA—Food Safety Inspection Service. 1999. http://www.fsis.usda.gov/
OA/pubs/tempfood.htm. Temperature control.
Dray, J. F. Nutritive Value of Game Foods.
Kansas State University, Manhattan,
KS. http://www.abs.sdstate.edu/
flcs/foodsafety/menulist/doc/
nutval.htm
USDA
Web
site:
http://
www.nal.usda.gov/fnic/foodcomp/
index.html. Nutrition information.
Field, R. A. and C. A. Raab. 1983. You
and Your Wild Game. University of
Wyoming Agricultural Extension Service, Laramie, WY.
Marchello, M. 1993. Wild Side of the
Menu: Field to Freezer. North Dakota
State University Extension Service,
Fargo, ND.
Marchello, M. 1996. Wild Side of the
Menu: Care and Cookery. North Dakota
State University Extension Service,
Fargo, ND.
Marchello, M., J. Garden-Robinson.
1998. The Art and Practice of Sausage
Making. North Dakota State University Extension Service, Fargo, ND.
Miller, B. F. and H. L. Enos. 1998.
Smoking Poultry Meat. Number 9.325.
Colorado State University Cooperative Extension, Fort Collins, CO.
National Food Safety Database. 1999.
http://www.foodsafety.ufl.edu/consumer/sd/sd019.htm#CURING
Raab, C. A. and K. S. Hildebrand.
1998. Oregon State University Extension Service Web site: http://
www.foodsafety.ufl.edu/consumer/
fs/fs070.htm.
18
Compiled by Catherine N. Cutter,
assistant professor, Department of
Food Science, Penn State.
Penn State College of Agricultural Sciences
research, extension, and resident education
programs are funded in part by Pennsylvania
counties, the Commonwealth of Pennsylvania,
and the U.S. Department of Agriculture.
This publication is available from the Publications Distribution Center, The Pennsylvania
State University, 112 Agricultural Administration Building, University Park, PA 16802. For
information telephone (814) 865-6713.
Issued in furtherance of Cooperative Extension Work, Acts of Congress May 8 and June
30, 1914, in cooperation with the U.S. Department of Agriculture and the Pennsylvania Legislature. T. R. Alter, Director of Cooperative
Extension, The Pennsylvania State University.
This publication is available in alternative media on request.
The Pennsylvania State University is committed to the policy that all persons shall have
equal access to programs, facilities, admission,
and employment without regard to personal
characteristics not related to ability, performance, or qualifications as determined by
University policy or by state or federal authorities. The Pennsylvania State University does
not discriminate against any person because
of age, ancestry, color, disability or handicap,
national origin, race, religious creed, sex,
sexual orientation, or veteran status. Direct
all inquiries regarding the nondiscrimination
policy to the Affirmative Action Director, The
Pennsylvania State University, 201 Willard
Building, University Park, PA 16802-2801: Tel.
(814) 865-4700/V, (814) 863-1150/TTY.
© The Pennsylvania State University 2000
10M9/00PS


© Copyright 2026