
Indirect Techniques â Stimulating the Mechanisms for
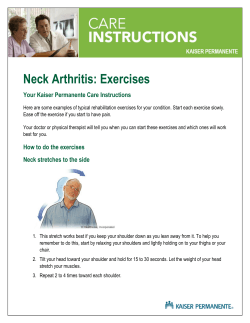
[email protected] www.brucestark.com.au Indirect Techniques – Stimulating the Mechanisms for Structural Change AAMT National Conference 2015 Workshop Overview Review the mechanisms of indirect techniques Outline the principles of structural work from a positional release perspective Learn basic release positions for the neck, thoracic outlet and knees Activate proprioceptive re-education of the cervical and upper thoracic spine and knees Practise client home exercises for maintaining postural changes and structural alignment Learning Objectives Understand the basic principles of positional release and indirect techniques Release stress and structural imbalances in the neck, upper thoracics and knees Understand the dynamics of postural alignment and orientation Stimulate proprioceptive awareness through targeted movements Teach clients exercises that will support on-going postural change Key developers of positional release Andrew Taylor Still (1828-1917) Developed osteopathy 1|Page Copyright 2015 Bruce Stark William Sutherland (1873-1954) Cranial osteopathy Lawrence Jones (1913-1996) Developed Strain-Counterstrain; published “Spontaneous Release by Positioning” 1964 Arthur Lincoln Pauls (1929-1997) Developed Phased Reflex Techniques, later called OrthoBionomy Principles of Positional Release Structure governs function Exaggeration of the preferred posture/preferred direction commonly the distortion The body will release imbalances when it is in positions of comfort - no pain to release pain Follow what the body is doing rather than forcing it Use tender points to monitor the tissue for maximum relaxation or softening to identify the release position “Fine tune” the position by using gentle movements to stimulate the maximum state of relaxation around the joint Quality of Contact and Interaction Generally a gentle compression will stimulate and speed up the release within a joint or its surrounding tissues The most effective method is to do less to initiate the self-corrective reflex and to allow the person to do more for themselves - “Less is more” Non-investment in change - it is more important to notice what the outcome is rather than to try to create a specific outcome The body has many of the resources to balance itself - our role as Practitioner is to facilitate these naturally occurring processes Relaxed hand contact allows greater sensing capacity for the Practitioner Body Schema Proprioception (from Alter 1996) Articular mechanoreceptors Type I – Located in the external layers of the joint capsule; low-threshold, slow-adapting; static and dynamic Signal direction, amplitude and velocity of joint movements produced actively or passively Regulating joint pressure changes Significant contribution to postural and kinaesthetic sensation 2|Page Copyright 2015 Bruce Stark Facilitates the CNS in regulating postural muscle tone and muscle tone during joint movement Producing an inhibitory effect on the flow of nociceptive afferent activity from the Type IV receptors Type II – Located in the deeper layers of the fibrous joint capsule and in the articular fat pads, found more in joints located more distally than proximally; dynamic Measure quick changes in movement such as acceleration and deceleration Type III – Located in the surfaces of joint ligaments (collateral and intrinsic); high-threshold, slowadapting; dynamic Monitor direction of movement Activate strong reflex inhibition of the muscles operating over the joint Type IV – IVa located in joint fat and throughout the entire thickness of the joint capsule; IVb located in the intrinsic and extrinsic ligaments; NOT present in synovial tissue, intraarticular menisci and articular cartilage; very high-threshold, non-adapting Nociceptors – pain receptors Muscle Spindles Located in nearly all skeletal muscle, and present in much higher concentration in the small, delicate muscle of the hand and eye Intrafusal fibres measuring stretch in the motor unit Conscious interaction to create muscular contraction comes through the gamma efferent neuronal activation Golgi Tendon Organs . Located in the muscle-tendon junctions and not within tendons Highly sensitive to stimuli and precisely localise and relay information to CNS Lie in series to muscle fibres (as opposed to muscle spindles lying parallel with muscle fibres) Interoception Sensing one’s internal states including hot/cold, pain, respiration General Protocol for Release Techniques Assess the imbalance or identify the point of tenderness or discomfort Move the body into a position which either exaggerates the direction of ease or folds around a point of discomfort and maximally softens the area Apply a gentle compression (sometimes traction) into the joint - only enough to gently stimulate a response from the body 3|Page Copyright 2015 Bruce Stark Wait 10 to 30 seconds (sometimes up to a minute) for the body to respond After the response slowly move out of the position Gently move the area or explore a little range of motion Recheck the imbalance or point of discomfort When monitoring a point of tenderness or discomfort the amount of pressure by the monitoring finger is feather light - the quality of touching a butterfly wing without breaking it Releases can be any change in tissue quality, pulse, temperature, rebound, recoil or any other sign from the joint or tissues Neck Movement Preferences Rotation Gently rotate the neck to one side and then to the opposite side. Assess the direction of rotation which is most comfortable or moves most easily. Rotate the neck to the easier/preferred side. Gently compress from the crown of the head directly down the spine. After the release gently bring the neck back to neutral and recheck the rotation. Lateral Flexion Gently laterally flex the neck to one side and then to the opposite side. Assess the direction of lateral flexion which is most comfortable or moves most easily. Laterally flex the neck to the easier/preferred side. Gently compress from the crown of the head directly down the spine. After the release gently bring the neck back to neutral and recheck the lateral flexion. 4|Page Copyright 2015 Bruce Stark Flexion and Extension Gently flex the neck forward and then extend the neck back. Assess the direction which is most comfortable or moves most easily. Flex or extend the neck to the easier/preferred direction. Gently compress from the crown of the head directly down the spine. After the release gently bring the neck back to neutral and recheck the range of motion. Imbalance Indicators Assess for tenderness, tightness or restriction along the transverse processes of the cervical spine. You can also assess along the spinous processes and anywhere else on the neck posteriorly and anteriorly. Note: When working with the neck it is recommended to begin with the mid-neck before releasing the rest of the neck as this will facilitate greater movement in the upper and lower neck regions. Mid Neck (C3-6) Laterally flex and rotate the neck toward the point of restriction Incorporate extension or flexion of the neck if either of those increases softening of the tissue at that point Apply a gentle compression (or alternatively traction if that is more comfortable) directly from the crown of the head toward the point After the release, slowly return the head and neck to the midline and recheck the point. 5|Page Copyright 2015 Bruce Stark Lower Neck (C6-T1) Rotate the head and neck toward the opposite direction from the point of restriction Maintaining the head in this rotated position laterally slide the head and neck towards the midline without any rotation in the neck Slightly rotate the neck back towards the midline stopping when the indicator point is most relaxed Apply a gentle compression (or alternatively traction if that is more comfortable) directly from the crown of the head toward the point After the release, slowly return the head and neck to the midline and recheck the point 6|Page Copyright 2015 Bruce Stark Upper Neck – Atlas and Axis (C1-2) Laterally deviate (“lateral slide” or “Balinese” movement) directly away from side with the point of restriction Extend the neck (chin moves upwards) and gently rotate the neck toward the point of restriction Apply a gentle compression (or alternatively traction if that is more comfortable) directly from the crown of the head toward the point After the release, slowly return the head and neck to the midline and recheck the point. Note: All of the releases above can be modified for points of restriction located anywhere on the neck by incorporating more neck extension for posterior points or flexion for more anterior points as required. 7|Page Copyright 2015 Bruce Stark First Rib Because of the anatomical positioning of the first rib in relationship to the scalene muscles of the neck and the brachial plexus for enervating the arm an isometric/isotonic can be particularly helpful in releasing tension and imbalances in the neck, shoulder and upper ribcage areas. Isometric: An active contraction by the client in which the muscle length does not change (the practitioner holds the client stationary) – “same” “length” Procedure for an isometric: The practitioner holds the client in the release position whilst the client actively pushes out of the position into the practitioner’s resistance. The practitioner holds the isometric for 7 – 10 seconds—any longer and the reflex responses could be fatigued. The client only uses 10-20 per cent of their strength. After 7 – 10 seconds the practitioner tells the client to stop pushing or to release the contraction/relax Then the practitioner follows through with the movement by taking the arm through the range of movement that the client was trying to accomplish but the practitioner was restricting. For the first rib it is often helpful to follow the isometric with a positional release by abducting the shoulder softening the area around the first rib and then compressing the scapula gently towards the spine. Shoulder Flexed/Elbow Bent Isometric With clients elbow bent practitioner brings client’s shoulder in flexion so that the arm is perpendicular to the table Practitioner holds this position as client presses arm towards the table (shoulder extension) After 7 – 10 seconds the client relaxes and the practitioner follows through with the movement towards the table Practitioner brings client’s arm into abduction and gently compresses the shoulder girdle towards the first rib until there is a softening of the first rib area After the release, replace the arm and shoulder on the table. Repeat the isometric 2 – 3 times 8|Page Copyright 2015 Bruce Stark Shoulder Elevated (“Shrugged”) Isometric Use this isometric if the client is unable to flex or abduct their shoulder Shrug client’s shoulder on the affected side towards the client’s ear Practitioner slides their arm between the client’s arm and torso hence shrugging the shoulder more Client tries to push their shrugged shoulder inferiorly towards their feet whilst the practitioner resists After 7 – 10 seconds client relaxes and the practitioner follows through with the movement of the shoulder towards the client’s feet Practitioner folds the client’s arm against the ribcage and gently compresses the shoulder girdle towards the first rib until there is a softening of the first rib area After the release, replace the arm and shoulder on the table. 9|Page Copyright 2015 Bruce Stark Knee Imbalance Indicators Pain in the knee cap, knee joint, surrounding muscles, restriction in range of motion and pain with use may be indicators of imbalances in the knee. Patella (Knee Cap) Assess the patella for movement ease or preferences in the following directions: superior/inferior and medial/lateral Practitioner gently exaggerates the preference or direction of ease of the patella and applies a gentle compression of the patella towards the knee joint After the release or rebound, gently reposition the patella and reassess the movement preferences Intrinsic Movements of the Knee Joint Rotation Practitioner stabilises the client’s thigh with one hand whilst assessing movement preference or ease with the lower leg rotating medially and laterally Practitioner gently exaggerates the movement preference and compresses the femur and the tibia toward the knee joint simultaneously 10 | P a g e Copyright 2015 Bruce Stark After the release or rebound, gently reposition the knee and reassess the movement preference Lateral/Medial Movement Practitioner stabilises the client’s thigh with one hand whilst assessing the direct lateral and medial movement of the knee joint by flexing the lower leg towards the midline and laterally Practitioner gently exaggerates the movement preference and compresses the femus and the tibia toward the knee joint simultaneously After the release or rebound, gently reposition the knee and reassess the movement preference 11 | P a g e Copyright 2015 Bruce Stark Femoral Over Ride (Anterior Slide) and Under Ride (Posterior Slide) The anterior and posterior slide of the femur along the top of the tibia is held in check by the cruciate ligaments (posterior cruciate ligament [PCL] prevents anterior slide and anterior cruciate ligament [ACL] prevents posterior slide). Assessment for Exaggerated Anterior OR Posterior Slide Practitioner stabilises the client’s thigh with one hand Placing the other hand proximal and posterior to the ankle the practitioner gently attempts to hyperextend the client’s knee If there is restriction or incomplete extension of the knee joint then there is likely a Femoral Over Ride If there is an excess of hyperextension or a large amount of hypermobility then there is likely a Femoral Under Ride Releasing a Femoral Over Ride Practitioner places their arm under the leg of the affected knee and rests their hand on the anterior of the opposite thigh thereby bringing the femur of the affected side more anterior Practitioner places the other hand just distal to the knee on the shin and gently presses the tibia posteriorly Practitioner may also apply compression of the tibia into the femur After the release or rebound, the practitioner repositions the leg and reassesses using the imbalance indicator assessment 12 | P a g e Copyright 2015 Bruce Stark Releasing a Femoral Under Ride Practitioner stabilises the client’s thigh with one hand whilst placing the other hand distal and posterior to the knee Practitioner then gently draws the tibia directly anteriorly (thereby exaggerating the posterior movement of the femur) Practitioner may also apply compression of the tibia into the knee joint of that is comfortable After the release or rebound, the practitioner repositions the leg and reassesses using the imbalance indicator assessment Tender Points Around the Knee Assess for points of restriction or tenderness around the knee joint especially on the posterior aspects of the medial and lateral condyles of the femur and tibia where the hamstring and calf muscles attach Monitoring the point of imbalance the practitioner flexes the client’s knee until the point is maximally softened If the point is on the medial aspect of the knee the leg is generally dropped laterally whilst bringing the foot towards the midline thereby softening the medial aspect of the knee (the foot may also be inverted to assist the softening further) If the point in on the lateral aspect of the knee the leg is generally rotated toward the midline and the foot is brought out laterally thereby softening the lateral aspect of the knee (the foot may alse be everted to assist the softening further) Practitioner gently compresses the tibia into the knee joint from the bottom of the foot After the release or rebound, the practitioner repositions the leg and reassesses the imbalance points 13 | P a g e Copyright 2015 Bruce Stark Self Care and Re-education Exercises Neck Phased Yoga Releases pain, tension and stress in the neck All variations done lying down with pillows supporting the head as needed. o Lateral Flexion: lie on your back and side bend your neck towards each shoulder. o Rotation: lie on back and rotate your neck one side and the other. o Flexion and extension: lie on your side and bring your chin towards your chest (flexed) or arching your neck back (extension) Find the position of greatest comfort/maximum ease; Allow yourself to relax in this position up to 5 minutes; Visualise moving in the opposite direction for about 30 seconds without actually doing so; 14 | P a g e Copyright 2015 Bruce Stark Move to the opposite direction, rest for a brief moment and then straighten back out coming back to a neutral position. Self Isometrics Releases pain, tension and stress in the neck and re-educates the postural support of the neck Use rotation, side bending, and flexion/extension of the neck to find the preferred position; Place hand or arm on the side of the head away from the preferred position; Initiate an isometric contraction pressing "out" of the position (isometric means to contract the muscles without letting them move); Release the contraction and move the head toward the position opposite of the preferred position and return to neutral. Pencil in Ear Releases tension and strain along the sides of the neck Visualise a pencil sticking out of your ear with the point in the air; Slowly write the letters of your name or draw in the air at the end of the "pencil"; Visualise the pencil in the other ear and repeat. Ceiling Spirals Releases tension and strain in the back of the neck Visualise a beam of light radiating from the crown of the head and going up toward the ceiling; Move the "beam of light" to make spirals on the ceiling. Knees Resets the alignment of the femur and tibia and releases tension around the menisci Stand with your feet hip-width apart Slowly move your knees apart allowing your inner arch to lift up but keeping your lateral arch on the ground Maintain that position whilst slowly lifting the heel off the ground shifting your weight to the ball of the foot at the base of the little toe Slowly bring your knees together transferring the weight across the ball of the foot to the base of the big toe Reverse the movements and bring the knees back to neutral Repeat slowly 5-10 times 15 | P a g e Copyright 2015 Bruce Stark References Alter, Michael (1996) Science of Flexibility, 2nd edition. Human Kinetics Publishing, Champaign IL Chaitow, Leon (2007) Positional Release Techniques, 3rd edition. Churchill Livingstone Elsevier, London Fogel, Alan (2009) Body Sense: The Science and Practice of Embodied Self-Awareness. WW Norton, New York, NY Fogel, Alan (2009) The Psychophysiology of Self-Awareness: Rediscovering the Lost Art of Body Sense. WW Norton, New York NY Jones, Lawrence (1981) Strain and Counterstrain. American Academy of Osteopathy, Indianapolis IN Kain, Kathy with Jim Berns (1997) Ortho-Bionomy: A Practical Manual. North Atlantic Books, Berkeley CA Overmyer, Luann (2009) Ortho-Bionomy: A Pathe to Self-Care. North Atlantic Books, Berkeley CA Still, A T. (1910) Osteopathy: Research and Practice. Reprinted 1992, Eastland Press, Seattle WA Sutherland, William (1990) Teachings in the Science of Osteopathy. Sutherland Cranial Teaching Foundation. Watkins, James (2010) Structure and Function of the Musculoskeletal System, 2nd edition. Human Kinetics Publishing, Champaign IL Resources For further training opportunities visit www.brucestark.com.au to get course offerings, class descriptions and further resources for learning Ortho-Bionomy and structural bodywork. www.facebook.com/BruceStarkOrthoBionomy @brucestark Detailed information on Practitioner Training Programmes can be found at: Ortho-Bionomy Australia Ltd www.ortho-bionomy.org.au Society of Ortho-Bionomy International www.ortho-bionomy.org Photographer: Chris Griffith Model: Hank Adam Thank you Chris and Hank for your help! 16 | P a g e Copyright 2015 Bruce Stark


© Copyright 2026