
Round Glass Button Tutorial
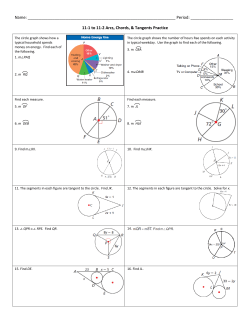
1
Round Glass Button Tutorial
for Paint Shop Pro
This tutorial was inspired by a Photoshop tutorial by NeoFrog (NeoFrog’s site is no longer
online).
It is an intermediate level tutorial, and you should be familiar with the following:
Making, saving and modifying selections.
Layer blend modes, turning layers off and on, adjusting layer transparency, merging layers
and adjustment layers.
Creating, saving and using masks.
Copyright ©2001 - 2013 Anne Alexander. All rights reserved.
2
Open a new image – Width: 200 Height: 200 Resolution: 72 pixels/inch
Background: Transparent Image type: 16.7 million colors
1. Flood fill Layer 1 with whatever color you prefer to work on or leave it transparent.
2. Create a new layer named button color and make a selection using the Selection
tool.
Selection type: Circle Feather: 0 Antialias: Checked
Click on: Selections –>Save to Alpha Channel and hit OK each time, name it Selection 1.
Flood Fill with a medium solid color. I used R: 244 G:164 B: 96
Figure 1
Note: Assume the selection stays active until the instructions advise you to deselect.
3. Selections –> Modify –> Contract Number of Pixels: 6
Figure 2
Hold down the Right button on your mouse and use the Mover tool
up until it looks like the circle in Figure 3.
to move the selection
Figure 3
3
Hold down the Control key and using the Selection tool with the same settings as before, make
a circle approx. the same as the first. (This will be easier if you make a note of the starting point
for your first circle).Your selection should look like the one in Figure 4.
Figure 4
Use the Mover tool to move the selection (don't forget to hold down the right mouse button)
until it is back on the circle. Your selection should look like the last circle in Figure 5.
Figure 5
Save the selection to an Alpha Channel (this will be Selection #2) and Deselect.
4. Create a new layer and Flood fill it with white. Load the selection you just saved (Selection
#2) and Flood fill it with black.
Deselect and click on: Effects –> Blur –> Gaussian Blur Radius: 5
Figure 6
Turn off the visibility of the two bottom layers.
Working on the new layer, Right click and choose New Adjustment Layer –> Levels
Settings: 180 1.00 200
Note: If you are using Version 5, press Shift + b. Enter 0 for Brightness and 92 for Contrast.
Right click and choose Merge –> Visible and rename the merged layer top highlight.
Figure 7
You can go ahead and turn the visibility back on for the bottom layers, but keep working on the
top highlight layer.
Masks –> New –>From image. Check Source Luminosity and Invert Mask Data.
Masks –> Save Mask to Alpha Channel. Click OK twice. This is Selection #3.
Masks –> Delete and Click Yes. Press the Delete key to clear the layer.
4
5. Load Selection #3 from the Alpha Channel and Fill with a Linear Gradient: #2 Fading
Foreground (with the Foreground Color set to white and the Background color to the color of
the button).
Angle: 180 Repeats: 0 Invert Gradient is unchecked.
Figure 8
6. Create a new layer named bottom highlight.
Selections –> Modify –> Feather Number of Pixels: 5
Flood fill with white and Deselect.
Figure 9
Click on: Image –> Flip (If the highlight is not on the circle, move it back onto the bottom of
the circle).
Effects –> Blur –> Gaussian Blur Radius: 5
Figure 10
Change the layer's Blend Mode to Dodge and adjust the Transparency to 50%.
Figure 11
7. Create a new layer and choose Selections –> Load From Alpha Channel. Choose Selection
#1.
Flood fill with black
Selections –> Modify –> Contract Number of Pixels: 3
Selections –> Modify –> Feather Number of Pixels: 5
Click on the Delete key and Deselect. Change the layer Transparency to 35%.
You can stop here or go on to the next step.
Figure 12
5
8. Duplicate the last layer. Load Selection #1.
Effects –> Blur –>Gaussian Blur Radius: 2
Deselect and change the layer's Blend Mode to Burn. Adjust the Transparency to 60%.
Save your creation in .psp format and you'll have a versatile button file. You can change the
color (medium shades work the best) by changing the color used on the button color layer or
use a texture instead of a solid color. Resize it, add text, change the background and play with
transparency settings.
If you have questions or comments about this tutorial, please use the form on my Contact page.
Copyright ©2001 - 2013 Anne Alexander. All rights reserved.
Figure 13


© Copyright 2026