
Convenience Store Guide from ADCO Industries
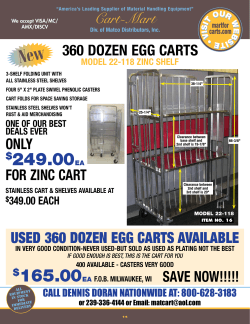
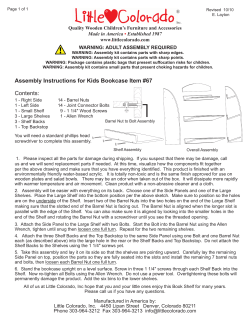
2015 GUIDE TO
SUCCESSFUL
BEVERAGE COOLER
MANAGEMENT
A COMPREHENSIVE MANAGEMENT PROGRAM
FOR BEVERAGE COOLERS USING THE MINI
MULE DOLLY SYSTEMTM
“Minnie”
TABLE OF CONTENTS
Page
Introduction........................................................................................... 2
Health Department ............................................................................... 3
Proper Lifting........................................................................................ 4
The Concept ......................................................................................... 5
The Ultimate “CLEAN” Cooler ............................................................ 6
Mini Mules .......................................................................................... 7
Vault Shelving........................................................................................ 15
Wall Solutions Shelving
............................................................................ 21
Powershelf and Powershelf II ............................................................... 26
Beer Cave Shelving .............................................................................. 31
Check Temp........................................................................................... 36
Easy Cut 4000....................................................................................... 41
Pocket Cutter ........................................................................................ 47
Mega Spill Dust Pan ............................................................................. 54
Hand Truck .......................................................................................... 57
ADCO Scraper ..................................................................................... 58
Introduction
Guide to the Convenient Store Cooler
The largest profit center in your store is the beverage cooler. It is also unfortunately one of the most
difficult areas to manage due to the constant movement of product and physical conditions. These
conditions are conducive to back-related injuries which account for 24% of all insurance claims in the
convenience store industry.
What Customers are buying?
50
44%
40
%
of 30
Sales 20
10
0
Tobacco
Mags
Candy
Snacks
Cooler Products
Since the beverage cooler is such an important area, and yet so troublesome, a new system needed to
be implemented, resulting in the creation of the ADCO System. This is a comprehensive program that
mobilizes and organizes the hardest place to work in your store. After unleashing your “mules”, you
will immediately notice these benefits.
• You and your employees are spending less time in the cooler.
• You are rolling heavy cases instead of lifting them.
• Your vendors start placing their delivery on the Mules.
• Your floor is easier to clean.
• Your displays are easier to move and are more attractive.
• You are now compliant with the health department rules and regulations.
This guide will show you how to work in your cooler more efficiently, and be safer at the same time.
You will also learn how to maximize all your space and how to prevent deductions from the health
department. Assembly instructions to certain components are also enclosed.
Why This Guide?
Along with making the cooler an easier and safer place to work, we also wanted to make you aware
that local and county health departments consider the convenience store inspection process one of the
prime enforcement tools. During 2014, health departments conducted over 50,000 inspections of
convenient stores and coolers (approximately 1/3 of registered convenience stores in the U.S., which
totaled 152,282). Clearly this is an important way of determining whether or not your store is in
compliance with health department laws and regulations. Many of the regulatory actions these departments
impose against convenient stores are based in findings during inspections.
Teamwork is essential to success in this area from top management, store managers, employees, and
vendors. But a good team is only as good as their game plan, and this plan is a winner. This guide will
serve as your playbook, to help your team tackle an old job with a new approach.
What is the Health Inspector Looking For?
TEMPERATURE
The first item on their list is to insure that all your perishable foods are of proper temperature.........and they bring their own
thermometer.
CLEANLINESS
Is the cooler floor sticky? Is there trash on the floor? Any exposed foods laying around? And yes, they are also looking for the
dreaded insect and rodent signs.
EQUIPMENT CONDITION
How are the door gaskets? Any of the shelving rusty or peeling? Using cardboard for shelf liners that breed mold?
Any leaks in the refrigeration units?
Also, adequate lighting must be
provided for cleaning and
inspection of cooler.
Proper Lifting Techniques
Lifting Basics
Techniques For Safe Lifting
Safe lifting means keeping your back aligned while you lift, maintaining your center of
balance and letting the strong muscles in your legs do the actual lifting. By using the following
techniques you can learn how to lift safely and save your back
from accidental strain and injury.
1.Bend Your Knees
Bend your knees, not your waist. This helps you keep your center
of balance and lets the strong muscles in your legs do the lifting.
2."Hug" The Load
Try to hold the object you're lifting as close to your body as
possible, as you gradually straighten your legs to a standing
position.
3.Avoid Twisting
Twisting can overload your spine and lead to serious injury.
Make sure your feet, knees and torso are pointed in the same
direction when you are lifting.
The Safe Way To Lift
Before you lift anything, think about it. Ask yourself:
• Can I lift it alone ?
• Do I need mechanical help?
• Is it too awkward for one person to handle?
• Should I ask a co-worker for help?
If the load is manageable, follow the steps to lift it safely.
Tips To Remember
In addition to these techniques, remember to make sure that your footing is firm before you
start and that your path is clear. Be sure to use the same safe techniques when you set down
your load. It takes no more time to do a safe lift than to do an unsafe lift. Why not play it
safe and lift it right?
The Concept
Proper rotation insures freshness and customer satisfaction.
AVOID FLOOR
CLUTTER BY
PUTTING BROKEN
CASES AND SLOW
MOVING ITEMS ON
SHELVES, THEN
FRONT TO GRAVITY
SHELVES
Total mobility allows you to easliy find, count and front your inventory.
NOW YOU DON’T HAVE TO LIFT CASES OUT OF THE WAY TO LOCATE OR COUNT STOCK
The Ultimate “CLEAN” Cooler
Easily moveable Mules allow you to clear an area to clean without lifting!
FINALLY, YOUR ENTIRE
FLOOR CAN BE
CLEARED AND
CLEANED EASILY!
FOUR PLEX ROLLS BACK TO CLEAN THE DIRTIEST AREA OF YOUR
COOLER, UNDER THE GRAVITY SHELVES.
THIS IS MORE ATTRACTIVE
TO YOUR CUSTOMERS,
RATHER THAN LOOKING
THROUGH WIRE SHELVING
AT YOUR FLOOR.
BEER
SOFTDRINKS
OTHER
DAIRY
MULE SPECIFICATIONS
• 250 Lb. Capacity
• Color: Red
• Tough, Impact Resistant Plastic Construction
• One Case or 24 Pack Fits Perfectly
• Pull Handle Optional
• Jumbo Mule: 13”W x 18.25”L x 3.125”H
• Mini Mule: 11”W x 16.25L” x 3.125”H
• Makes Inventory Control Easy
• Prevents Injury to Employees
• Helps Organize Your Store & Vault
• Saves Valuable Time
• Build Portable Floor Displays
• Move Products Effortlessly
• Maximizes Vault Area, Cleanliness
11333 Pagemill Rd., Dallas, TX 75243
Toll Free 800-527-4609 • www.adcoindustries.com
Heavy Duty
360° Casters
Mule Handle
Assists Moving of
Loaded Mules
4 Plex
25” x 32-1/2” Area
Forms Unique
Display Layouts
Cases/12 Packs
Fit Precisely
Reinforced Ribs
For Strength
Forms
Large
Moveable
Displays
Heavy Duty
360° Casters
Hook Connects
Dollies Together
Carrying Handle
Set up and Use your Mules
Mini Mule
Jumbo Mule
16” x 10 3/4” x 3”
Capacity: 250 lbs.
18” x 12 7/8” x 3”
Capacity: 250 lbs.
Step 1
Set Mini Mule on level floor and hook j-hooks in tucked-in position.
Step 2
Place full cases of drinks in the center of "mule".
Important! Never put incomplete cases on Mini Mule.
Step 3
Repeat with full cases and stack evenly, no higher than five (5)
feet/ 60 inches from the floor.
Note: When stacking bottles, make sure the top of bottles seat
with case above.
Note: When stacking various size boxes, make sure larger and
heavier boxes start at the bottom, then progress to smaller, lighter
boxes.
Step 4
Handle
To Safely move, use Mini Mule handle to place
into two holes on any side. Place your other
hand on top of stack to secure while rolling.
Note: To move long distances or over extremely
rough floors, use your specially designed Twowheeled Mule Truck. This tool can be used as
a conventional hand truck also.
Mule
Truck
j-hooks tucked in
PRODUCT PROFILE
Jumbo Mule Dolly
Description:
Portable Jumbo-Mule Dolly
This four-wheeled flatbed dolly weighs only 6 lbs. but holds up to 250 lbs. of product! With slightly larger dimensions than the minimule, the jumbo-mule is ideal for transporting bottled beverage cases. Jumbo-mules are made of robust glass-filled nylon with reinforced
ribs for increased structural strength and impact rigidity. Solid steel J-hooks easily connect to other ADCO dollies, to provide a complete,
portable storage system with multiple configurations. Heavy duty full-rotation castors enable large movable displays and unique instore layouts. Beverage cases and 24-packs fit perfectly across flatbed for maximum storage capacity. One and two-piece handle sets
are also available to effortlessly transport dollies throughout a beverage cooler or retail store. ADCO mules offer easy mobility and
quick access to product inventory, improving in-store efficiency and reducing injuries related to heavy lifting.
Tech Specs:
Use:
Materials:
Color(s):
Capacity:
Dimensions:
Unit weight:
Units per case:
Case weight:
Case dimensions:
Case cube:
Cases per pallet:
Pallets per truck:
Ships from:
Item number:
Beer Caves and Walk-in Coolers
Glass-filled Nylon with Plastic Wheels
Red
600 lbs.
18”L x 12.875”W x 3”H
6 lbs.
6
36 lbs.
19” x 14” x 14”
2.15 Cubic Feet
35
24
China
09973
ADCO Industries
I
11333 Pagemill Road
I
Dallas, Texas 75243
I
800.527-4609
I
www.adcoindustries.com
Use Mini Mules for Displays
How to Use Your Mini Mules for
Store Displays
Step 1
Place Mini Mules according to the size and shape
of Display. (see examples)
Step 2
Attach on board J-hooks to connecting "mules"
to form palette.
Step 3
Place display items uniformly and centered on
"mules" until complete.
Note: Please Refer to Techniques for Safe lifting!
Step 4
Place Mini Mule Sign Holder at rear of
display, placing plate between display items.
Adjust telescopic pole to desired height
Place sign in spring clip.
Step 5
When using border-wrap advertising, position wrap
to bottom edge of "mule", off the floor. Secure
with tape to rear of display making sure that wrap
is straight and without wrinkles.
Step 6
To move displays from one location to another,
simply use the Mini Mule Handle in the two holes
provided on the "mule". Move gently while placing
other hand on top of display for added stability.
The Configurations are Endless!
Set up and Use the Four-Plex
Four Plex
321/2” x 251/4” x 3”
Capacity: 2000 lbs.
Step 1
Remove the lowest shelf from the gravity flow shelves
where cased product is sold to the consumer.
Step 2
Completely sanitize and clean the floor to permit easy
rolling of Four-Plex.
Step 3
Roll Four-Plex unit into place.
Step 4
To load product onto the Four-Plex simply pull out unit
using the handle. There are two holes located in the steel
harness. Place handle into holes and pull out unit like a
drawer.
Note: Please Refer to Techniques for Safe lifting!
Step 5
Now you can load cased beverages from a safer position
and clean the floor the more easily.
Step 6
To return Four-Plex to a selling position, simply roll the
loaded unit back into place by using the handle.
Step 7
To refill product simply rotate the unused stock to a forward
selling position. Once you have completed fronting the
product, add more product to maximize inventory.
VAULT SOLUTIONS SHELVING
•
•
•
•
•
•
31 Bars per Foot (Holds the Smallest of Objects)
Adjustable Feet for Leveling Shelving
Wall Mounts Available
Comes With U Bracket for Strength
Each Unit Comes With Three Shelves
Numbered Posts
•
•
•
•
•
•
250 Lb. Shelf Capacity
750 Lb. Unit Capacity
Designed to Work With the Mules
Rated NSF 7 (For Cooler Vault)
Super Strong
Heavy Duty Numbered Posts
11333 Pagemill Rd., Dallas, TX 75243
Toll Free 800-527-4609 • www.adcoindustries.com
Available in Two Sizes
24” x 36” x 72”
24” x 48” x 72”
3 Shelves Per Kit
Extra Shelves
Sold Separately
Capacity:
250 Lb./Shelf
750 LB. Unit Max
31 Bars Per Foot
Holds the Smallest
of Items
Leaving the Lower
Shelf High Gives
Room for Loaded
Dollies to be Rolled
Into Lower Area
Fully Numbered
72” Posts - Top to Bottom
Adjustable Feet
For Leveling Shelving
Heavy Duty Steel Frame,
U-Bracket and Shelving
U-Bracket Supports
Lower Legs and
Provides Shelf Stability
Maximize Your Coller Vault Storage
Area with Vault Solutions Shelving
U-Bracket
Designed to Work
With Mini-Mules
Install Vault Solution Shelving
Directions: Remove all poles (4) and shelves from boxes. Plastic two-piece clips are included,
along with (3) shelves and a U-bracket
Tools Needed: Rubber Mallet
Step 1
Prepare all posts. Snap two-piece clips to post where the number (5) is
slightly showing at the top of clip. Repeat for all posts making sure that
clips snap securely together. Make sure the tapered end of plastic clips
is pointing to higher numbers.
Step 2
Installation of U-Bracket. Run top of post through larger opening in ubracket, bringing it to secure to plastic clips. Seat with mild pressure.
Repeat with all poles. Tap top of u-bracket with rubber mallet evenly
on all sides until secure.
Step 3
Place 1st Shelf to at least 48 High. Snap Plastic Clips to #48 or higher
on all poles. Bring lowest shelf over post and seat on plastic clips. Tap
the top EDGE of shelf with rubber mallet evenly on all sides until secure.
Step 4
Repeat procedure for Second shelf popular spacing distant from 1st shelf
is from 12 to 16
Step 5
Insert Safety Wall Mount on Back Posts Snap plastic clips together and
place on rear post close to 65 from floor. Slide Safety Wall Mount over
clips and secure by hand. Use dial to telescope rod in case of drain
pipes, etc. Tighten wing screw.
Install Vault Solution Shelving (cont)
Step 6
Install Top Shelf. Place plastic clips to desired height, insert
shelf over clips. Tap top EDGE of shelf with rubber mallet.
Step 7
Level the Shelving After Placing in Position. Tighten or loosen leveling screws in bottom of post
to take out any rocking motion.
Step 8
Secure Shelving to Wall with Safety Wall Mount.
Secure wall mount to cooler wall by either:
1. Use three sheet metal screws; cap off screw head with silicone sealer.
2. Use contact cement, applying to both the cooler wall and the wall mount.
Optional Equipment for a more flexible shelf setup is available!
Quick Adjust Shelving allows you to
install additional shelves without
removing existing shelves.
How to use Your Vault Solution Shelving
The design of your Vault Solution Shelving is different for a purpose. The theory is to put all of
the broken cases and your slower moving beverages on the three shelves provided.
This greatly reduces the clutter of half-full boxes laying around that are just taking up floor
space.The reason the bottom shelf is so high off the ground is to roll in stacks of your faster moving
product all the way to the back wall. This design uses all of your floor space, which is a precious
commodity in your store. A common technique that creates problems, is when a low shelf is used
that is constantly blocked by stacks of beverages and difficult to reach without a lot of bending
and lifting.
PRODUCT PROFILE
Vault Shelving
Description:
Versatile Vault and Display Shelving
Heavy-duty steel frame and powder-coated finish ensure shelves are chemical and chip resistant – and guaranteed to last! Shelves are
constructed of 31 crossbars per foot (compared to half that on other shelves) and boast a 250-lb storage capacity, ensuring products
stay in place! A unique numbering system on the vertical posts enables quick and accuruate shelf alignment. U-brackets and adjustable
feet provide added stability. Ideal for commercial storage (cold-vault and display) and also the home (garage, laundry room, office,
workshop). Changing the way cooler vault products are stored, ADCO Vault Shelving earned the highest rating for cold storage from
the National Sanitation Foundation (NSF).
*ADCO Vault Shelving works in conjunction with other ADCO Shelving and Dollies for the optimal storage system!
Tech Specs:
Use:
Materials:
Color(s):
Dimensions:
Cooler Vault Shelving (NSF Approved)
Powder Coated Steel
Silver Powder Coat
20”D x 48”W x 72”H
20”D x 36”W x 72”H
Unit weight:
69 lbs.
Sizes:
20” x 48” x 72” and 20” x 36” x 72”
Units per case:
1 unit = 4 Poles, 3 Shelves and U-bracket
Case weight:
69 lbs
Case dimensions: Vault Shelving Box: 48” x 22” x 7”
Pole Box: 76” x 4” x 1”
Cases per pallet: 10 Units per Pallet
Pallets per truck: 24
Ships from:
China
Item number:
09905 - 20”D x 48”W x 72”H
09900 - 20”D x 36”W x 72”H
ADCO Industries
I
11333 Pagemill Road
I
Dallas, Texas 75243
I
800.527-4609
I
www.adcoindustries.com
Install Wall Solutions Shelving
Wall
Solution
Shelving
INSTALLATION
INSTRUCTIONS:
Customize Wall Solutions Shelving
Cutting for Custom Fit
CUSTOM LENGTH: IN THIS EXAMPLE THE SHELF WILL BE 3 FEET WIDE
1. Measure length of wall that shelving is being installed onto.
2. Mark shelving cross bars with the desired length minus 1/2” and Mark wall Support length minus 1/2”
3”
3”
MARK AT 3”
4. Using a hack saw or cutt-off saw, cut the shelving cross bars and wall support to the desired
length.
3”
3”
6. Place plastic end protectors on both the cut cross bars of the shelf and the other end cross bars
of the shelf.
7. Follow installation directions:
POWERSHELF II
Self-Adjusting Shelf System
Ensures Stocking & Shopping Ease!
•
Allows instant shelf resets without removing product
(Standard system requires complete product removal for shelf adjustments)
•
•
•
•
•
•
Ability to rotate stock quickly and adjust seasonal products as needed
•
•
•
Any employee, any time can quickly reposition shelves for different beverage sizes
Simply pull out adjustment bar, lower or raise to desired height and snap into place.
Numbered shelf slots on each side for quick, accurate alignment
Removable rolling shelf on bottom (optional) for effortless case loading
PowerGlide shelves (sold separately) allow drinks to roll to front, for easy access
and stock rotation
Increased merchandise sales (up to 30%)
FEATURES:
Labor savings from reduced inventory rotations
• Quick adjust shelving height
10-year warranty
• Roll-in bottom shelf
*PowerShelf I with infinite gear adjustment also available
• Adjustable shelving angle
• Numbered posts
• PowerGlide optional
www.adcoindustrties.com
•
214-217-7800
BEER CAVE SPECS
• 31 Bars Per Foot (A pencil can’t fall throught the gaps).
• 48” x 36”, 36” x 36”, 48” x 24” and 36” x 24” Sizes
• Casters Available
• Adjustable to 27 Different Heights, 2” Increments
• Lowest Shelf 6” From Floor (Meets NSF7 Standards)
• Easy to Adjust Shelving Positions
900 LB. SHELF CAPACITY
2700 LB. UNIT CAPACITY
4 SIZES TO CHOOSE FROM
RATED NSF7
48” x 36” Shelf Size
54”W x 37.5”D x 61”H Overall
3 Shelves/Kit
27 Shelf Settings (2” Increments)
31 Bars/Foot Holds The Smallest of Items
48” x 24” Shelf Size
54”W x 28”D x 61”H Overall
3 Shelves/Kit
27 Shelf Settings (2” Increments)
Shelving Drops
Into Slot Easily
Shared
Adjustments
For Multiple
Shelving Units
Easy to Adjust
Shelf Brackets
Make Changing
Position a Snap!
Casters
Optional
Adjustable Feet
for Accurate
Level
2700 LB.
UNIT CAPACITY
36” x 24” Shelf Size
43”W x 25.5”D x 61”H Overall
3 Shelves/Kit
27 Shelf Settings (2” Increments)
36” x 36” Shelf Size
43”W x 37.5”D x 61”H Overall
3 Shelves/Kit
27 Shelf Settings (2” Increments)
PRODUCT PROFILE
Beer Cave Shelving
Description:
Retail Beer Cave Shelving System
The toughest and most heavy-duty shelving system in the ADCO line, with up to 2700 lbs. storage capacity (900 lbs. per shelf )! Powercoated black steel frame construction is chemical and chip resistant – and guaranteed to last! Shelves are constructed of 31 crossbars
per foot (compared to half that on other brands), ensuring products stay in place and don't tip! Easy-to-adjust brackets make changing
shelf position a snap; and shelves drop easily into slots (adjustable to 27 different heights, 2” increments). U-brackets and adjustable
feet provide added stability (casters also available). Available in four different dimensions to suit any storage need!
Changing the way cooler vault products are stored, ADCO Shelving systems have earned the highest rating for cold storage from the
National Sanitation Foundation (NSF). Ideal for commercial storage (cold-vault and display) and also the home (garage, laundry room,
office, workshop). Works in conjunction with other ADCO Shelving and Dollies for the optimal storage system!
Tech Specs:
Use:
Materials:
Color(s):
Shelf capacity:
Dimensions:
Unit weight:
Units per case:
Case weight:
Case dimensions:
Cases per pallet:
Pallets per truck:
Ships from:
Item number:
Beer Caves and Walk-in Coolers
Powder Coated Steel
Black
900 lbs.
54”L x 37”D x 61”H
185 lbs.
1
185 lbs.
Support Brace Box: 55” x 10” x 8”
End Panel Box: 61” x 38” x 6”
Shelf Case: 50” x 37” x 5”
5
24
China
24x36 - 09407
24x48 - 09408
36x36 - 09409
36x48 - 09410
ADCO Industries
I
11333 Pagemill Road
I
Dallas, Texas 75243
I
800.527-4609
I
www.adcoindustries.com
CHECK TEMP THERMOMETER
• ALARM: Extended Over Temp Alarm
• RANGE: -50°C~70°C (-58°F~158°F)
• RESOLUTION: ±.1°C
• ACCURACY: 1°C (2°F)
• DISPLAY: Constant
• SAMPLING: Every 10 Seconds
• LED LIGHT: Over Temp Alarm Light
• POWER: Button Cell CR2032 Equivalent 3VDC
• SOLAR CELL: Activates Display when Light is on
• BATTERY LIFE: 1 Year
• EXTERNAL PROBE: 28AWG 2 Core 3.2M Long
• COLOR: White
Default temperature setting is preset to
37°F / 5°C when first turned on. Default
temperature can be changed.
BUTTON COVER
To reset default temperature setting:
Remove cover, hit reset button, change default
temperature up or down using the TEMP UP and
TEMP DOWN buttons.
ALARM TEMP UP
- (NEGATIVE)
3V BATTERY
SET DEFAULT TEMPERATURE:
Standard default is 37°F. Reset the default setting
to the maximum temperature experienced during
unit defrost cycle. (Contact manufacturer for maximum
defrost temperature).
DISPLAY UNIT
+ (POSITIVE)
IMPORTANT:
ALARM TEMP DOWN
°C/°F TOGGLE
RESET BUTTON
TEMP TOO HIGH
INDICATOR
(FLASHING RED LED)
Example 1. Maximum defrost temperature for unit is
40°F. Reset your Check-Temp to 40°F.
Example 2. Cooler defrost maximum temperature is
42°F. Set your default temperature to 42°F.
Battery Installation Instructions:
1. Turn unit over, turn battery cap counterclockwise and remove cap.
2. Insert battery with the + side up, slide battery under the + connection and press down onto the - connectors and snap into
place, reinstall battery cap. (Default temperature setting is preset to 37°F / 5°C when turned on or reset button is pressed.)
Installation Instructions:
1. Default temperature setting is preset to 37°F / 5°C when turned on or reset button is pressed. To change this default setting
for your municipality, remove button cover, hit reset, toggle to °C or °F, set desired default setting.
2. Replace button cover.
3. Secure display unit with magnetic backing on metal surface covering the refrigeration coils.
4. Attach sensor on the lowest shelf in the rear of the cooler. Slightly raise the glass shelf, slide the flange onto the metal shelf
bracket and lower glass shelf.
5. Using the provided clips, secure sensor wire to shelf.
6. Run the sensor wire to the rear of the shelving along the standard. Using a plastic putty knife, tuck the wire in along the
standard.
7. Secure excess wire with a “wire tie” and tuck gently behind coil cover.
8. Once properly installed the wire should be out of view.
Display and LED Function
1. LCD Display gives you information on temperature units, current temperature,
and default setting.
2.
Red Flashing LED: If the current temperature exceeds the default setting
for more than 10 minutes, the LED begins to blink once per second. If the
current temperatures return below the default setting, the LED continues
to blink at once every two seconds. If you see the LED blinking, the
temperature has exceeded the default setting for more than 10 minutes.
You must reset the unit to stop the LED from blinking.
11333 Pagemill Road
Dallas, TX 75243
800-527-4909
RED LED BLINKING:
When you see the red LED blinking, the
Check-Temp is stating that a temperature
anomaly has occurred.
The default maximum temperature has
been exceeded for at least ten minutes or
possibly more.
Please check the unit operation, current
temperature and product.
Reset Check-Temp when satisfied unit is
working properly.
www.adcoindustries.com
PRODUCT PROFILE
Check-Temp Thermometer
Description:
Digital refrigerator cooling monitor
Check-temp measures the average temperature of food products in refrigeation systems, and not just ambient air -- offering a truly
accurate gauge for power failures and other cooling interruptions. Use the default setting or preset the LED alarm to adhere to local
health department requirements – when the temperature rises above that preset number, a red light flashes. This indicates a power
failure or some other problem with the cooling system, which should be checked and monitored regularly to ensure quality control
of food products. Option to set temperatures at both Celsius and Fahrenheit with a range of -50° to 70°C (-58° to 158°F). Powered by
enclosed button-cell battery and back-up solar cells to ensure continuous monitoring. Small unobtrusive design, large digital readout (accuracy rating of 1°C, 2°F); and easy magnetic snap-on installation. Ideal for cooler vaults, open-air cases, beverage boxes, etc.
Health departments and store owners love this product – and so will you!!
Tech Specs:
Use:
Materials:
Color:
Range:
Resolution:
Accuracy:
Display:
Dimensions:
Unit weight:
Units per case:
Case weight:
Case dimensions:
Case cube:
Cases per pallet:
Pallets per truck:
Ships from:
Item number:
Monitors temperature of food products in refrigeration systems
Plastic/wire
White
-50°C~70°C(-58°F~158°F)
+/- .1°C
1°C (2°F)
Constant LCD
2.76” x 2.68” x .71” (Not including probe)
4.10 oz
162 each
44.09 Lb (20 kg)
19” by 17” by 10”
1.87 cubic feet
30
24
China
Unknown
ADCO Industries
I
11333 Pagemill Road
I
Dallas, Texas 75243
I
800.527-4609
I
www.adcoindustries.com
BATTERY INSTALLATION INSTRUCTIONS
IMPORTANT:
+
PLACE BATTERY SIDE UP UNDER THE POSITIVE
TERMINALS AND THEN PRESS IN TO LOCKED
POSITION.
POSITIVE TERMINAL
Step 1:
Step 2:
Step 3:
Turn unit over. Using a coin, turn battery cover
counterclockwise and remove cover.
Remove battery from package. Position unit as
shown below, with the CheckTemp logo upright.
PLACE BATTERY + SIDE UP UNDER THE POSITIVE
TERMINALS AND THEN PRESS IN TO LOCKED
POSITION.
TURN COUNTERCLOCKWISE
POSITIVE TERMINAL
CHECK TEMP LOGO
POSITIVE TERMINAL
Step 4:
Step 5:
Step 6:
Press battery into place as shown below.
Turn unit over and make sure it is working.
Replace battery cover by turning clockwise as
shown below.
PRESS BATTERY DOWN
CHECK TO SEE IF
IT IS WORKING
TURN COUNTERCLOCKWISE
4000
Retailers’
solution
to opening boxes
quickly and safely!
This safety knife has been completely re-engineered for superior performance and longlasting use, even in the most demanding retail environments!
Easy Cut 4000 features include:
•
Patented “blade vanishing technology” and radius-tip blade protect users
from accidents and products from damage!
•
Three refined blade-depth settings ensure precise, safe cutting for all
types of boxes.
•
Enhanced clip-on holster and lanyard (stretches up to 6 feet with
360-degree rotation) offers convenient, safe storage.
•
•
Retractable, dual-sided edge guides ensure smooth, accurate top cuts.
On-board blade storage enables fast, tool-free blade changes.
Sturdy, lightweight and always reliable, Easy Cut 4000 is the safest box cutter you’ll ever buy!
PRODUCT PROFILE
Easy Cut 4000
Description:
The safest box cutter on the market today
Easy Cut 4000 is a breakout new box cutter that stops product damage, reduces accidents and increases profits! It is the engineering
design of both the cutter and the blade that make this possible. Easy Cut has precise blade depth settings for single, double and
triple wall boxes – and a lock position for added safety. By setting the dial to the appropriate cardboard density, the unique blade
penetrates through cardboard, touches the product inside and does not damage the product! The blade automatically retracts when
the blade loses contact with the cutting surface, providing added protection to users. Easy Cut has an ergonomic handle and
ambidextrous edge guides, to allow safe, accurate cutting. The clip-on holster and lanyard (stretches up to 6 feet!) offers convenient,
safe storage – and reduces cutter purchases! This safety knife has been re-engineered for superior performance and function and is
the champion of cutters in the Easy Cut line.
* When ordering replenishment blades, the Easy Cut 2000 blades are ideally suited for this knife.
Tech Specs:
Use:
Materials:
Mechanism:
Dial:
Color(s):
Dimensions:
Unit weight:
Units per case:
Case weight:
Case dimensions:
Case cube:
Cases per pallet:
Pallets per truck:
Ships from:
Item number:
Opening/cutting boxes safely and quickly
97% nylon, 3% glass fiber
Carbon Steel (spring) heat treated
Metal shaft steel, plastic/nylon coated
Unit and Handle (Two-tone Grey)
6”L x 1.75”D x 1.5”H
3.2 oz (60 g)
144
38.3 lbs (15.88 kg)
20.25” x 11.4” x 13.5”
2.22 cubic feet
28
26
China
09307
ADCO Industries
I
11333 Pagemill Road
I
Dallas, Texas 75243
I
800.527-4609
I
www.adcoindustries.com
How to hold your Easy Cut
Pinch the cutter on the edge guide with your thumb
and forefinger, with your thumb running parallel with
the body of the cutter. Your forefinger is on a 90 degree
angle with the body of the cutter covering the opposite
edge guide. All of the pressure to hold the cutter is at
this point. The remaining three fingers wrap gently
around the trigger. The focus is on the pinky finger.
You should engage the blade by squeezing the trigger
with the pinky finger with the other two fingers gently
on the trigger.
Blade Depths
HOLD AS
SHOWN
HERE
SQUEEZE GENTLY
WITH PINKY FINGER
squeezing the trigger with the pinky finger
with the other two fingers gently on the trigger
IMPORTANT: The cutter is engineered to cut single wall
boxes, double walled boxes and stretch wrap. ALL
SINGLE WALLED BOXES USE SETTING #1, DOUBLE
USE SETTING #2, AND STRETCH WRAP USE
SETTING #3. SETTING L LOCKS THE BLADE INSIDE
THE CUTER FOR SAFETY. To adjust the depth setting,
locate the dial, press and turn to appropriate setting.
PLEASE FOLLOW THESE PROCEDURES FOR ALL
CUTS.
4000
Safe Cutting
Instructions
Tape Cut/Top Cut
IMPORTANT: TAPE CUTS USE SETTING #2. Cut both taped sides and top of tape as shown
below. Open each flap and cut along score line as shown below, this keeps the international
“CARDBOARD” boxes from disentegrating when you try a normal top cut.
Stretch Wrap
IMPORTANT: STRETCH WRAP USE SETTING #3. Starting a few inches from the uppermost
section of stretch wrap, pull the blade downward through the stretch wrap. When you get to the
bottom, return to the top and finish the last few inches. The reason for leaving some connected
at the top is it holds tension on the wrap till you get it cut to the bottom.
WITH AUTO RETRACT
Changing Blades:
Cutting Angle:
Open cover, remove used blade. With new blade in hand, place blade tip in carriage and rest
back of blade on bridge, as shown below. Release blade. Blade will slide into place. When both
sides of the blade are used, dispose of blade in blade recycle box. CLOSING CARRIAGE COVER:
Make sure blade is flush with carriage, as shown below. Close cover. Blade must not interfere
with cover closing. If cover does not close, repeat blade loading procedure. Dispose of used
blades properly.
IMPORTANT: Never cut with the blade perpendicular to the surface. Always angle the cutter
to ride along the flattened area (about 15°to 20°) and place your thumb on the edge guide
while cutting, as shown below.
15°
Cutting Posture:
IMPORTANT: Center cut on your body for all types of cuts. Hold the box away from the cut
with your non-cutting hand as shown below, left. Use this posture for tape cuts, top cuts,
window cuts, tray cuts.
ALWAYS
CENTER
THE CUT
ON BODY
Spare Blade Compartment:
ACCESSING SPARE BLADES: Open spare
blade cover to access spare blade compartment.
When closing, make sure blades are flush with
carriage. Blades must not interfere with lid
closing. SPARE BLADE STORAGE:
(IMPORTANT) Place only two spare blades in
the rear storage area. ADDITIONAL BLADES
WILL CAUSE A MALFUNCTION.
Deploying Edge Guides:
When the edge guides are required, simply push the appropriate edge guide out with the
thumb. When using the edge guides, hold the cutter as shown below and place the thumb
on the edge guide to perform the cut.
ALWAYS
CENTER
THE CUT
ON BODY
PRODUCT PROFILE
Pocket Cutter disposable cutter
Description:
If productivity is your #1 concern, this is the box cutter for you!
Copy to come
Tech Specs:
Use:
Materials:
Mechanism:
Color(s):
Dimensions:
Unit weight:
Units per case:
Case weight:
Case dimensions:
Case cube:
Cases per pallet:
Pallets per truck:
Ships from:
Item number:
Opening/cutting boxes
97% nylon, 3% glass fiber, steel
Trigger activated, vanishing blade technology
Unit (Black); Handle (Yellow)
7”L x 1.5”D x 2”H
3.2 oz (60 g)
144
34 lbs (15.88 kg)
16.125” x 13.25” x 12.875”
1.59 cubic feet
36
26
China
09700
ADCO Industries
I
11333 Pagemill Road
I
Dallas, Texas 75243
I
800.527-4609
I
www.adcoindustries.com
PRODUCT PROFILE
Mega Spill Dust Pan
Description:
Large Capacity Dust Pan
The Mega Spill Dust Pan provides quick and easy clean-up of large spills, excessive dirt and grime on the floor. An extra-large collection
area holds up to a quart of water that won’t flex even under extreme conditions, thanks to durable materials and structural reinforcements.
The deep cavity and sloping lip ensure liquid stays put during transport. The 90-degree front edge is flush with the floor, preventing
even the smallest particles from slipping through the cracks! Serrated, molded-in “teeth” in the side panels enable a quick-action swipe
of the broom’s bristles to remove stuck-on particles. The handle snaps tightly to a standard upright broom for convenient storage.
Constructed of heavy-duty ABS plastic, the Mega Spill Dust Pan was designed for commercial use, but it’s also ideal for large clean-up
jobs around the home.
Tech Specs:
Use:
Materials:
Color:
Dimensions:
Unit weight:
Units per case:
Case weight:
Case dimensions:
Case cube:
Cases per pallet:
Pallets per truck:
Ships from:
Item number:
Large liquid spillcleanup, holds up to 1 qt.
Plastic
Black
12”W x 16”L x 4.5”H
7.2 oz (60 g)
6
3 lbs (1.36 Kg)
UNKNOWN20.25” x 114” x 13.5”
UNKNOWN2.22 Cubic Feet
UNKNOWN28
26
China
09328
ADCO Industries
I
11333 Pagemill Road
I
Dallas, Texas 75243
I
800.527-4609
I
www.adcoindustries.com
PRODUCT PROFILE
Hand Truck Mule Dolly
Description:
If productivity is your concern, this is the ultimate dolly for you!
This versatile aluminum upright dolly is ideal for transporting ADCO mini- and jumbo mules stacked with product long distances over
extremely rough floors! It is also the perfect companion in the shop, retail store, warehouse or garage at home. The ergonomic double
u-loop handle wrapped in soft- polymer enables firm grip and optimal direction control. Extruded aluminum side rails with riveted
crossbars provide reinforced strength and rigidity. A beveled nose plate and secondary 16-inch folding u-brace provide secure storage
and flexible transport options. 10-inch inflated tires ensure smooth ride, solid grounding and extended life cycle. Lightweight and built
to last, this dolly offers a 300 lb. capacity for large loads and guaranteed easy transport!
Tech Specs:
Use:
Materials:
Mechanism:
Color(s):
Dimensions:
Unit weight:
Units per case:
Case weight:
Case dimensions:
Case cube:
Cases per pallet:
Pallets per truck:
Ships from:
Item number:
Transporting Mule Dollies and Case Products in Retail Stores
Aluminum with Rubber Tires
Aluminum Fold Down Dolly Support bar
Aluminum with Red Rubber Handles and Black Tires
21”L x 21”D x 63”H
26 Lbs (11.79 Kg)
1
28 lbs (12.70 Kg)
22” x 21” x 63”
16.08 Cubic Feet
4
26
China
Unknown
ADCO Industries
I
11333 Pagemill Road
I
Dallas, Texas 75243
I
800.527-4609
I
www.adcoindustries.com
ADCO Scraper
4” Scraper with Safety Guard
•
•
•
•
•
Retractable safety guard
51” heavy-duty handle
Lightweight, but rugged for tough jobs
In-handle blade storage (10 extra blade Capacity)
Removes all types of residue:
wax, gum, tape, adhesive, dirt & grime
Featuring a Built In Safety Guard!
4” BLADE
BUILT IN SAFETY GUARD
ACTUAL SIZE
ADCO Scraper
4” Scraper with Safety Guard
•
•
•
•
4” Wide Blade
51” Long - Blade to Handle Top
Heavy Duty Aluminum Handle
Up to Ten Extra Blades on Board
Adco Scraper Packaging: 4 Each per Case
Adco Scraper Replacement Blades:
40 Each Box (Comes with 4 tubes of 10 Blades
each and a recycle box. Just send your used blades
back and save the environment!
Heavy Duty
Extruded
Aluminum
Handle with
Extra Blade
Storage!
51”
Blade Recycling System
PRODUCT PROFILE
Adco Floor Scraper
Description:
Adco Scraper
Used to scrape residue, wax, adhesive off of the retail store flooring and under retail store shelving.
Tech Specs:
Use:
Materials:
Color:
No. per box:
Dimensions:
Unit weight:
Units per case:
Case weight:
Case dimensions:
Case cube:
Cases per pallet:
Pallets per truck:
Ships from:
Item number:
Floor scraping
Aluminum/Steel/Plastic
Metallic/Black
4 scrapers per box
54” by 6.5” by 1.375”
4 lbs.
4 each
4 lbs. (1.815 kg)
54” by 6.5” by 1.375”
.2793 cubic foot
250
24
China
09300
ADCO Industries
I
11333 Pagemill Road
I
Dallas, Texas 75243
I
800.527-4609
I
www.adcoindustries.com
PRODUCT PROFILE
Adco Scraper Blades
Description:
Adco Scraper Replacement Blades
These heavy duty floor scraper blades are for use in the Adco floor scraper. Used to scrape residue, wax, adhesive off of the retail store
flooring and under retail store shelving.
Tech Specs:
Use:
Materials:
Color:
No. per box:
Dimensions:
Unit weight:
Units per case:
Case weight:
Case dimensions:
Case cube:
Cases per pallet:
Pallets per truck:
Ships from:
Item number:
Floor scraping
Steel
Metallic
40 blades per box
5.25” by 3.25” by 1”
7.15 oz.
48 each
21.43 lbs. (9.72 kg)
14” by 12” by 6”
.58 cubic foot
96
24
China
09302
ADCO Industries
I
11333 Pagemill Road
I
Dallas, Texas 75243
I
800.527-4609
I
www.adcoindustries.com


© Copyright 2026