
KWIK•SEW 'S SEWING ROOM SERIES MEASURING & BASIC ALTERATIONS
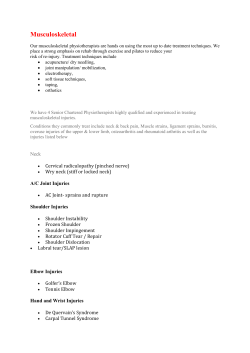
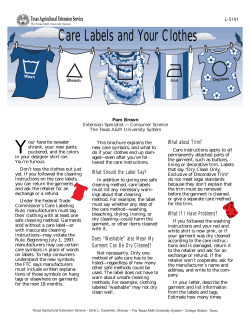
KWIK•SEW 'S
SEWING ROOM SERIES
®
MEASURING & BASIC ALTERATIONS
Use the expertise behind KWIK•SEW patterns to help achieve a perfect fit!
“MEASURE FOR SUCCESS”
Measuring the body and choosing the
correct size pattern.
Making basic pattern adjustments
INDEX
INDEX
How sizes are determined..................................pg. 2
How to choose the right size..............................pg. 3
How to measure the body..................................pg. 4
How to measure for finished length...................pg. 5
How to choose the correct fabric.......................pg. 7
C
“A PERFECT FIT”
©Copyright MMVIII KWIK•SEW® Pattern Co., Inc. All Rights Reserved.
Length Adjustments.........................................pg. 8
Width Adjustments...........................................pg. 9
Shoulder Adjustments......................................pg. 11
Bust Adjustments.............................................pg. 12
Petite Size Adjustments...................................pg. 13
Available online at kwiksew.com
1
MEASURE FOR SUCCESS
Use the following tips on taking body measurements and comparing
them to the pattern measurements in order to choose the right size and
producing a well fitting garment.
HOW SIZES ARE DETERMINED
All KWIK•SEW patterns are multi-sized. On the
back of the pattern envelope, Standard Body
Measurements are listed below each size. The
following body measurements are used to help
determine which size to choose:
• Misses' and Women's tops, blouses, shirts, jackets
and dresses by bust measurement. Skirts, pants
and shorts by hip measurement.
• Men's shirts, jackets and robes by chest measurement. Pants and shorts by waist measurement.
• Girls' and Boys' by height.
• Toddler's by height.
• Babies' by height and weight.
LDER
SHOU
L
XL
Patterns are designed for the following heights:
• Misses’and Women's sizing is for those approximately 5’6” (168 cm).
• Men’s sizing is for those approximately 5’10”
(178 cm).
• Children's and toddler's sizing include height
for each size.
• Babies' sizing includes height and weight for
each size.
XS
S
M
L
XL
NE
C
KWIK
SEW
KL
IN
E
DESIGNED BY:
KERSTIN MARTENSSON
1.
®
PATTERN 3532
VIEW A & B
FRONT
CUT 1 ON FOLD
AR
MH
OLE
®
1/4" (6 mm) SEAM
ALLOWANCES INCLUDED
XS
S
M
L
Measurement of finished garment
at fullest part of BUST:
XL
L
S
M
46"
42"
35 1/2" 38 1/2"
(90 cm) (98 cm) (106 cm) (116 cm)
GRAIN OF FABRIC
EASE
XS
32"
(82 cm)
Measurement of finished garment
at fullest part of HIP:
XS
XL
L
S
M
34"
47 1/2"
43 1/2"
37"
40"
(86 cm) (94 cm) (102 cm) (110 cm) (120 cm)
STRETCH OF FABRIC
CENTER FRONT - PLACE ON FOLD
M
SHORTEN OR LENGTHEN LINE
SIDE SEA
XL
KWK•SEW patterns have great, easy to understand
step-by-step written and illustrated instructions. For
consistency in fit, every KWIK•SEW garment pattern
begins with the same base size. Each pattern contains
detailed design information and multiple sizes, each
printed in a different color on durable white paper.
XS
M S
SHORTEN OR LENGTHEN LINE
BOTTOM EDGE 1” (2.5 cm) HEM ALLOWED
XS
S
M
L
XL
MEASURE FOR SUCCESS
kwiksew.com
2
HOW TO CHOOSE THE RIGHT SIZE
Choose the size with the measurements that are
closest to the body measurements. If the body
measurements are in between sizes, choose the
larger size. It is easier to make a garment smaller
than larger. On the back of the pattern envelope,
there is a brief description of the design, indicating
if the style is close fitting, loose fitting or semi-fitted.
The Measurement of the Finished Garment will
also help you decide what size to choose when
body measurements are in between sizes. Finished
measurements are printed on the pattern pieces.
After deciding what size to use, and when
cutting or tracing the pattern pieces, always
follow the same size on all lines and pieces.
Never cut between sizes or "blend" sizes by
cutting from one size to another.
For more information visit
www.kwiksew.com/support
KWIK•SEW patterns are designed to fit the body
measurements listed on the envelope, both fit and
design ease have been taken into account by our
design studio.
EASE
The extra amount of room allowed in the pattern
There are different types of ease:
• Fit or movement ease is the amount of room needed for the garment to be comfortable to wear.
• Design ease is the extra amount of room (beyond
fit ease) that gives the garment a certain style and
this changes with fashion.
• Occasionally, the patterns are designed without
extra ease, and the finished garment will be smaller
than the body measurements. This occurs when a
pattern is designed for fabrics with stretch, such
as spandex Lycra®, and the garment, such as a
swimsuit, is intended to stretch to fit the body.
For optimum fit, it is very important that you
follow the suggested fabric types on the
back of the pattern envelope.
KWIK•SEW patterns have the Measurement of the
Finished Garment printed on the pattern pieces.
When comparing the Standard Body Measurements on the back of the pattern envelope to the
Finished Garment Measurements on the pattern
piece, it is easy to determine the amount of ease
allowed in the pattern. For example: the Finished
Garment Measurement is 40” (102 cm) and the
Standard Body Measurement is 37” (94 cm); there
is 3” (8 cm) of ease, or in other words, an extra 3”
(8 cm) in the design for comfort and style.
MEASURE FOR SUCCESS
kwiksew.com
3
HOW TO MEASURE THE BODY
Accurate body measurements are key to making a
garment that fits. When taking measurements, proper
fitting undergarments should be worn. Use a flexible
tape measure. Be sure to record each measurement
as it is taken.
You can use any KWIK SEW pattern and
adjust for petite sizes. Making adjustments
for petite sizing is covered in Section II, "A
Perfect Fit".
It’s almost impossible to accurately measure yourself. If you are making the garment for yourself, have
a friend measure you.
HEIGHT—For adults and children, have the person
stand against a wall without shoes; place a ruler
straight across the head to the wall and mark.
To measure a baby’s length, lay the baby on a flat
surface, measure and mark from the top of the head
to the bottom of the foot.
BUST & CHEST —Measure around the back, under
the arms and over the fullest part. The tape measure
should be straight across the back. Arms should be
resting at the sides of the body while measuring.
RISE
SHOULDER
AND ARM
LENGTH
BUST
WAIST
HIP—Measure over the fullest part of the hip, usually
7” – 9” (18 cm – 23 cm) below the waist. As each
person’s body shape is different, the fullest part of
the hip may be higher or lower.
SHOULDER AND ARM LENGTH—Loosely place a
string around the neck (where the string rests is the
natural neckline). Bend the arm slightly, measure the
shoulder from the natural neckline (string position) to
the shoulder joint and continue over the elbow, down
to the wrist bone. Note the shoulder width separately,
1
the arm length separately, and the shoulder and arm
length combined.
1
BACK WAIST LENGTH — Measure from
the top of
SHOULDER
the backbone (from the string position
the back
ANDat
ARM
LENGTH
of the neck), to the natural waist (where
the string is
BUST
tied around the waist).
SHOULDER
Remember, Misses' and Women’s pants
and skirt sizes are determined by the
hip measurement. Men’s pants sizes are
determined by the waist measurement.
2
6
2
3
RISE
BACK WAIST
LENGTH
3
6a
TOP
LEN
RISE
WAIST
BUST
HIP
RISE (Crotch depth)—Have the person sit up straight
WAIST
on a flat table or a hard chair which does not have
any curves in the seat. At the side, measure from the
HIP
waist (where the string is tied around the waist) over
the curve of the hip to the top of the table or chair.
MEASURE FOR SUCCESS
The natural waist may not
BACK WAIST
be at theLENGTH
same place as the
top of your pants.
Leave the string tied around
the waist until all body measurements are taken.
HIP
NATURAL WAIST — Tie a string around the waist
to determine the natural waist. Measure around
the waist; don’t pull too tight, be sure the tape can
move around.
AND ARM
LENGTH
2
1
kwiksew.com
TOP
LENG
BACK WAIST
LENGTH
4
3
2
5
4
RISE
2
HOW TO MEASURE
3 FOR
FINISHED LENGTHS
BACK WAIST
5
4
TOP
LENGTH
LENGTH
The body or a favorite garment can be measured for
the desired finished length.
RISE
3
4
When measuring the body, measure
for desired
length as follows:
BACK WAIST
• TOPS — Measure from the top of the backbone
LENGTH
RISE
to the desired length.
• SKIRTS — Measure from the waist to the desired
length. Begin by placing
the end of the tape at
TOP
the position you wishLENGTH
the skirt to end, this will
make it easier to read the measurement.
• PANTS—Measure the inside leg from the desired
hemline to the crotch.
Fit Brochure p.1
INSIDE
LEG
5
TOP
LENGTH
SKIRT
LENGTH
INSIDE
LEG
INSIDE
LEG
SKIRT
LENGTH
SKIRT
LENGTH
5a
6b
When measuring a favorite garment, measure
finished length as follows:
• TOPS—Choose a top with a neckline that rests at
6b from
the top of the backbone when worn. Measure
the neckline to the finished bottom edge of the top.
• SKIRTS—Place skirt on a flat surface and meaure
along a side or center back from the waist to the
6a
finished bottom edge.
• PANTS—Measure along the inside leg seam from
the finished bottom edge to the crotch seam.
6b
6a
Comparing6a
Lengths
Determine if pattern adjustments are necessary by
comparing lengths. Basic pattern adjustments are
shown in Section II, "A Perfect Fit".
7
7
• First compare the Back Waist Length of body to
the Back Waist Length on pattern envelope and
note any differences.
• Next compare Finished Length on the pattern
envelope to the desired garment length and
note any differences.
MEASURE FOR SUCCESS
kwiksew.com
5
HIP
SKIRT
LENGTH
6
6a
SLEEVE LENGTH
Dropped and extended shoulders
To check the sleeve length on the pattern, overlap
the sleeve at the shoulder by the amount of the seam
allowances. Measure the pattern from the neckline to
3
2 of the sleeve and be sure to deduct
the bottom edge
6
the hem or add the cuff to this measurement.
3
4
For a dolman or raglan sleeve, measure using the
RISE
same procedure. If the pattern has a wide neckline,
make sure to take this into consideration.
1
R
RISE
BUST
ACK WAIST
WAIST
NGTH
HIP
Fit 5Brochure p.1
4
5
6a
TOP
LENGTH
BACK WAIST
LENGTH
Compare this measurement
to the person's Shoulder
and Arm Length measurement. If TOP
making sleeves
with cuffs, add 1" (2.5 cm) to the LENGTH
length for ease.
Note any differences.
INSIDE
LEG
INSIDE
LEGSKIRT
LENGTH
SKIRT
LENGTH
5a
6
Fitted sleeves
If using a pattern with set-in sleeves, compare the
length of the sleeve to the person's Arm Length
measurement and note any differences. Measure the
pattern from the cap of the sleeve, minus the seam
allowance, to the bottom edge; be sure to deduct
the hem or add the cuff to this measurement. The
shoulder width and sleeve length
will be adjusted
6a
separately (see shoulders under Adjusting Width in
"A
6a Perfect Fit").
6b
6b
Men's sleeves
Men's shirt sleeve length in ready-to-wear includes
the measurement from the center back, over the
shoulder and elbow, to the wrist bone. If using the
ready-to-wear sleeve length, measure the sleeve
length on the pattern as follows:
• Overlap the sleeve at the shoulder on the back of
the yoke by the amount of the seam allowances.
Add cuffs or deduct for the hem.
• Measure from the center back over the shoulder
and to the bottom of the sleeve.
• Compare this measurement to the ready-to-wear
measurement and note any differences.
MEASURE FOR SUCCESS
kwiksew.com
7
7
6
8
RISE (Crotch Depth)
To determine if the rise needs adjusting, measure the
front pant pattern piece as follows:
• Draw a line at the crotch, perpendicular to the grain
line.
• Measure from this line to the waist; for pull-on
pants, be sure to deduct the amount allowed for
the casing.
• Compare this measurement with the body measurement and note any differences.
INSIDE LEG
• To determine if pant leg needs adjusting, compare
the Finished Inside Leg Seam measurement on the
pattern envelope to the person's measurement and
note any differences.
Now that all measurements have been taken, and
any necessary changes noted, you are well on your
way to A PERFECT FIT.
Remember to note any differences after each
measurement is taken.
CHOOSE THE CORRECT FABRIC
Each KWIK•SEW pattern is designed for a particular
fabric type, specifically knit or woven. Light, medium,
heavy, soft, or crisp fabric properties are also considered for each design. It is important to choose
fabric that will compliment the pattern design.
To assist you in selecting fabrics for your sewing
project, suggested fabrics are given on the back
of the pattern envelope. Using fabrics other than
the suggested fabric types may change the look
of the design or the fit of the garment.
If using patterns designed for stretch knits, use fabric
with the degree of stretch that the pattern recommends. To determine the correct amount of stretch,
use the stretch chart on the pattern envelope.
3521
3574
MEASURE FOR SUCCESS
kwiksew.com
7
A PERFECT FITPATTERN ADJUSTMENTS
Making the most common minor pattern adjustments is easy!
9
8
9
Pattern sizes are made for standard sizes, therefore,
basic pattern adjustments are sometimes necessary
to make a garment fit properly.
LENGTH ADJUSTMENTS
To lengthen a pattern piece
1. Cut the pattern piece apart on the Shorten or
Lengthen Line.
2. Place a piece of paper under one piece and tape
in place.
9
3. Extend 8the grain line to the paper.
9a
4. Draw a parallel line on the paper according to the
amount you wish to lengthen the pattern.
10
11
5. Tape the other part of the pattern, matching the
grain line.
6. Connect the lines at the sides; these lines can be
straight or curved depending on the original pattern (see illustration). Be sure to make the same
adjustments on Front and Back pieces and any
related pieces.
When cutting or tracing the pattern pieces,
always follow the same size on all lines and
pieces. Never cut between sizes or "blend"11
sizes by cutting from one size to another.
9
11a
Fit Brochure p.2
9a
10
To shorten a pattern piece
1. Draw a line on the pattern parallel to the Shorten or
Lengthen Line according to the amount you wish
to shorten the pattern.
2. Cut the pattern apart on the Shorten or Lengthen Line.
3. Overlap the pattern piece to the drawn line, matching the grain line and tape in place.
4. Redraw the sides (see illustration). Be sure to make
the same adjustments on Front and Back pattern
pieces and any related pieces.
A PERFECT 11
FIT
kwiksew.com
8
11a
11
WIDTH ADJUSTMENTS
HIP
If you are making a dress or tunic and you have
selected the pattern size by the bust measurement,
you may have to adjust the pattern at the hip.
To adjust for a larger hip
1. Determine the amount
9 to be increased by
comparing the difference between the hip measurement and the measurement on the back of the
pattern envelope.
Fit Brochure
9a
10
2. Divide this amount into four.
3. Draw a horizontal line on the pattern piece at the
fullest part of the hip perpendicular to the grain
line.
4. Draw a vertical line from hip line to bottom edge.
5. Cut pattern piece apart on line from side seam to
bottom edge.
6. Place a piece of paper under pattern and spread
pattern the amount you need to increase the hip.
For example, if 2" (5 cm) is needed, spread 1/2"
(1.3 cm) apart. Redraw the sides and bottom edge.
11 amount to the Front and
Be sure to add the same
Back pattern pieces.
11a
To adjust for a smaller hip
1. Determine the amount to be reduced by comparing the difference between the hip measurement and the measurement on the back
of the pattern envelope.
2. Divide this amount into four.
3. Draw a horizontal line on the pattern piece at
the fullest part of the hip perpendicular to the
grain line.
4. Draw a vertical line from hip line to bottom edge.
5. Cut pattern piece apart on line from side seam to
bottom edge.
6. Overlap pattern pieces the amount needed to
decrease the hip. For example: If you need to
reduce the hip measurement by 2" (5 cm) overlap pattern pieces 1/2" (1.3 cm). Redraw the
sides. Be sure to deduct the same amount on
Front and Back pattern pieces.
Remember to always make the same adjustments to the Front and Back pattern pieces.
A PERFECT FIT
9
kwiksew.com
12
WAIST
To adjust for a larger waist
1. Determine the amount of adjustment needed and
divide this measurement into four.
2. If the pattern has tucks or darts, make each one
smaller and add the remaining to the side seam to
equal the amount of adjustment needed. Be sure
to make the same adjustment on Front and Back.
3. If the garment has a waistband, make sure to add
half the amount of the total adjustment needed to
the waistband.
13
12
To adjust for a smaller waist
1. Determine the amount of adjustment needed and
divide this measurement into four.
14
15
14a
2. If the pattern has tucks or darts, make each
one larger and deduct the remaining from the
side seam to equal the amount of adjustment
needed. Be sure to make the same adjustment
on Front and Back.
3. If the garment has a waistband, make sure to
deduct half the amount of the total adjustment
needed to the waistband.
If the garment is gathered at the waist with a
waistband, you only need to make the waistband smaller and adjust the gathers to fit.
14
A PERFECT FIT
14a
16
15
kwiksew.com
10
14
14a
SHOULDER ADJUSTMENTS
13
12
1. Draw a vertical line parallel to the grain line, from
the center of the shoulder to 1"- 2" (2.5 cm - 5 cm)
above the bottom edge of the armhole.
2. Draw a perpendicular line from this point to the
edge of the armhole.
3. Cut the pattern piece on the line from shoulder
to armhole.
15
14a
14
To adjust for a wide shoulder
1. Place a piece of paper under the pattern, follow
steps 1-3 above then pivot at armhole, spread
pattern the amount needed at the shoulder and
tape in place (see illustration).
2. Redraw the shoulder line. Be sure to add the same
amount to the Front and Back pattern pieces.
14
14a
15
To adjust for a narrow shoulder
1. Follow steps 1-3 (top of page). Pivot at armhole
and overlap the pattern the amount needed to
decrease the shoulder and tape in place (see
illustration).
2. Redraw the shoulder line. Be sure to reduce the
same amount on the Front and Back pattern
pieces.
Final fitting adjustments should be made
during the construction of the garment. For
set-in sleeves, always baste the sleeves
in place and try on the garment. Mark the
armhole line on the garment during this
fitting. Remove the sleeve and adjust the
shoulder as needed.
A PERFECT FIT
kwiksew.com
11
BUST ADJUSTMENT
BUST SIZE
KWIK•SEW patterns are designed to fit the following
cup sizes (approximately):
• Misses' sizes
XS & S = B cup, M = C cup, L & XL = D cup
• Women's sizes
1X = D cup, 2X & 3X = DD, 4X = DDD
• For a larger cup size, you will need to increase
the front length.
• For a smaller cup size you will need to shorten
the front length.
• For each cup size the front length changes approximately 3/8" (1 cm). For example, if you
have chosen a size M, which is designed for a
C cup, but you have a D cup, you will need to
lengthen the front 3/8" (1 cm) and make a larger
bust dart, if you have a B cup, you will need
to shorten the front 3/8" (1 cm) and make a
15
smaller
bust dart.
14a
For each cup size, the front length changes
approximately 3/8" (1 cm).
16
To increase the length
1. Draw a line through the center of the dart and
across to the front edge.
2. Cut the pattern apart on this line and place a piece
of paper underneath.
3. Spread the pattern pieces the amount needed.
4. Tape the pieces in place and redraw the dart
(see illustration).
17
To decrease the length
1. Draw a line through the center of the dart and
across to the front edge.
2. Cut the pattern apart on this line and overlap the
pattern to reduce the length.
3. Tape the pattern pieces together and redraw the
dart (see illustration).
A PERFECT FIT
kwiksew.com
12
3/8'' (1 cm)
21
20
19
5/8''
5/8''
(1.5 cm)(1.5 cm)
DART PLACEMENT
To determine bust point
1. Measure the body from the middle of the shoulder
to the point of the bust (bust point or apex).
2. Compare this measurement to the pattern. The
difference is how much the dart should be raised
or lowered.
20
21
20
21
22
22
To
lower the dart
19raise or
19
1. On the pattern, draw a "three sided box" around
the existing dart, just slightly larger than the dart
legs and the dart length.
2. Cut out the box.
3. Place a piece of paper under the pattern so that
it extends beyond the dart at the side seam.
4. Slide "the box" up or down by the amount you
wish to raise or lower the dart and tape in place.
5. Redraw the side.
17
Fit B
18
PETITE SIZES
You can use any KWIK•SEW Pattern and adjust
for petite sizes. The petite sizing is for a woman
5' 2" - 5' 4" (157 cm - 162 cm) with a 1" (2.5 cm)
shorter Back Waist Length than Misses' sizes.
3/8''
(1 cm)
3/8'' (1 cm)
To adjust for petite sizing, shortening should be done
in two places on the pattern pieces for the bodice.
1. Shorten the pattern 3/8" (1 cm) halfway between
the shoulder and the underarm.
5/8''
(1.5 cm)
2. Shorten the sleeve cap the same amount halfway
between the cap and the underarm.
3. Shorten 5/8" (1.5 cm) between the underarm and
the waist. Be sure to make the same adjustments
on the Front and Back pattern pieces.
Now that all basic adjustments have been made, get sewing and enjoy!
A PERFECT FIT
kwiksew.com
20
21
13
22


© Copyright 2026