
View install docs
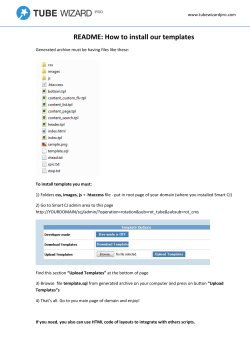
MMUI STORE TO CSSUI
Updated April, 2015
The MMUI to CSSUI Module is a Developer Tool that will help you take your store from the old interface of
MMUI to the new foundation of CSSUI in a few easy steps.
While we’ve done everything we can to make this process as simple as possible, we do recommend that
only Developers make this change for your store to limit down time for your site. There are some technical
steps that need to be done and they will be easier for your Developer to handle for you.
STEP 1—
CREATE A COPY/BACKUP OF YOUR STORE:
1) Contact your host and ask them to make a copy of your store and move it to a development site. If
Miva is your host, contact support at [email protected] and let them know you would like a copy of
your store on our dev servers.
Once you have a copy of your dev store, you’re ready to step 2.
STEP 2—
In Step 2 you will be working on your dev store and you will completely wipe out the look and feel of your
site with the new MMUI Module. It will maintain all of your products and categories, but any custom work
or previously installed modules will all be lost in this process. What you’ll want to do is go through your
custom modules and write a list of what you have so once your store is updated and your new framework
is uploaded, you can see if the modules need to be added back in for usability.
Install MMUI Module:
1) N
ow that you have a copy of your store in Development, you’ll want to upload the MMUI Module. In
order to use this module you have to be logged in as the store manager. If you don’t have the store
manager credentials, here’s how you assign your login as the store manager.
a) Click on Menu, scroll down to “Store Settings”
b) Under “Store Settings” go to “Manager” then select “LOOK UP”, find your username and select it.
Then hit “Update”
Now that you’re login as Store Manager, proceed to the installation instructions:
a) In your Miva Admin, click Menu and scroll down and click on Modules.
b) Click on the Upload button, navigate to your module and upload it, then click the “Update” button
2. Run the wizard on your dev store.
a) To begin the wizard, go up to your Search Box and type in “MMUI” and hit return. It will bring up a
link called “Wizard” - click on the link.
b) You will get your first wizard screen explaining the steps of the MMUI to CSSUI migration. Read the
instructions and then click “Next”
c) A screen will then appear that asks you to confirm that you have made a backup of your store. Follow
the instructions and click “Next.”
d) A confirmation screen will appear, again, making sure you have a backup copy of your site before
proceeding.
e) The next screen will show you if there were any errors in the migration. You can go ahead and click
“Finish” now to complete the wizard process.
Your store is now using the new CSSUI user interface and has the generic Framework applied.
The next step is to either choose one of our ReadyThemes or have your Developer create a new design
on top of our Framework. We highly recommend our ReadyThemes as they are created with simplicity in
mind and are very easy to use.
STEP 3:
APPLYING A READYTHEME TO YOUR STORE:
1) If choosing a ReadyTheme from Miva, click on this link and choose the ReadyTheme that best fits
the needs of your clients online store. Once you’ve found the ReadyTheme you like, download the file
so you can import it into your Frameworks. In the folder that contains your pkg file there will also be
documentation on how to install, apply and customize your ReadyTheme.
2) Once you have the ReadyTheme installed and customized you’ll want to test your store with the new
CSSUI user interface. Make sure everything is working properly. Once you are comfortable with the
new usability, you’ll want to export your new pkg file from your Dev Store so you can upload it to your
Production store.
Here’s how to export your new design:
a) Click on “Menu” then scroll down to “User Interface”
b) Click on “Frameworks” then click on the “Save” icon.
The Save Framework screen will then ask for some basic information. Type in a code, a name, and if
you want, a Framework Description. A preview image isn’t necessary. You will see down below that the
Framework Pages and Components to Export fields already have everything selected so you don’t have
to do anything there.
c) Go ahead and click “Save Framework.”
d) Now that your Framework is saved, you’ll need to ftp into your account to get the pkg file. Here’s the
path to find your pkg file: mm5/frameworks/00000001/yourfilename.pkg
Now you are ready to Install your ReadyTheme to your Production (Live) store. Here’s how:
STEP 4:
FIRST PLACE YOUR LIVE STORE IN MAINTENANCE MODE:
You might want to wait for after hours to do this to reduce downtime of your site for your clients.
a) Click on “Menu,” then scroll down and click on “Store Settings.”
b) Under the Store Details tab you want to scroll down and look for “Maintenance Mode.”
c) Here you will want to click the “Off-line” option and enter the date and time you want to take it down.
Once your store is in Maintenance mode, it’s time to install your ReadyTheme.
STEP 5:
APPLYING A READYTHEME TO YOUR STORE:
a) Click on “Menu,” and scroll down and select “User Interface.”
b) Now click on “Frameworks”
c) Click on the cloud icon to upload/overwrite the new pkg file that you exported from your dev store.
To bring over ALL the files you need for this new ReadyTheme we are going to have you reinstall the
initial ReadyTheme pkg file first before installing your customized theme. While most of the files do come
over with your packaged theme, unfortunately not all of them do. So go through the process of uploading
the original ReadyTheme pkg file according to the documentation provided. Once you’ve uploaded and
applied the ReadyTheme Framework of the original file, you then want to upload your customized pkg
ReadyTheme file on top of it.
Once your ReadyTheme is installed, you should test your store out to make sure everything is functioning.
Take your store out of maintenance mode, test and enjoy your new design and user interface.


© Copyright 2026