
Wee Care
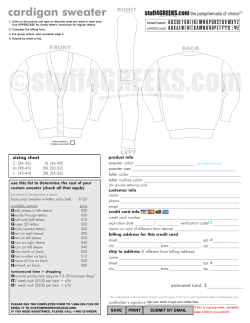
Wee Care
AUSTRALIAN SMOCKING & EMBROIDERY ISSUE 48
916 South Road, Edwardstown, South Australia 5039
hone +61
8 8293MALVERN,
8600 fax +61
8 8293 8733
COUNTRY BUMPKIN, 315 pUNLEY
ROAD,
SOUTH
AUSTRALIA 5061
w
ebsit
e
www.countrybumpkin.com.au
PH +61 8 8372 7600 · FAX +61 8 8372 7601
email [email protected]
www.countrybumpkin.com.au · EMAIL [email protected]
DESIGNED
AND
SMOCKED
BY
WENDY LEE
OF
SOUTH AUSTRALIA
T
hese precious little gowns are made from the softest batiste and feature miniature smocking
designs at the neckline and sleeves. The sleeves are edged with fine cotton lace and the hems
are finished with machine pin stitch. The gowns open down the centre back.
REQUIREMENTS
Sizes:
Newborn: 3.2kg (7lb)
Premie: 2.3 - 2.7kg (5 - 6 lb)
Small: 1.4 - 1.8kg (3 - 4 lb)
Tiny: 500 - 900g (1 - 2 lb)
Teeny Weeny: less than 500g (1lb)
Fabric
Imperial batiste 112 cm (44") wide:
Newborn: 65cm (25 5/8")
Premie: 60cm (23 5/8")
Small: 55cm (21 5/8")
Tiny: 50cm (19 5/8")
Teeny Weeny: 20cm (8")
Notions
Cotton lace edging 10 - 15mm
(3/8" - 5/8") wide for sleeves:
Newborn and Premie: 60cm (23 5/8")
Small and Tiny: 50cm (19 3/4")
Teeny Weeny: 30cm (12")
2 clear plastic snap fasteners
Water soluble fabric marker
No. 9 crewel needle (smocking)
No. 9 straw needle (embroidery)
Threads
See page 3.
PATTERN
See pages 5 and 6.
The finished length from the centre
back neckline to the hemline is:
Newborn: 35cm (13 3/4")
Premie: 30cm (11 3/4")
Small: 25cm (10")
Tiny: 20cm (8")
Teeny Weeny: 14cm (5 1/2")
For the larger sizes the hem allowance
is 5cm (2"). The hem allowance for
the teeny weeny size is 2.5cm (1").
CUTTING OUT
See page 4 for the cutting layout and
cutting out instructions and page 6 for
the armhole shaping templates.
The front and back of the gown are
formed by folding one rectangle
of fabric twice and cutting the
armhole shaping from one side at
the upper edge. The sleeves are
cut separately.
PREPARATION & PLEATING
Sleeves
With right sides together, pin the lace
to the lower edge of the sleeve, with
the lace heading 2-3mm (1/8") from
the raw edge.
Using a narrow zig zag, roll and whip
the lace edging to the lower edge of
each sleeve. Press the lace away from
the sleeve.
Pleat five half space rows (including
two holding rows) with the lower row
just above the seam.
1
1
Unpick the pleating threads for
2cm (3/4") at each side and flatten out
the pleats.
After the neckline is pleated, pull up
the pleats on each sleeve and tie off to
measure approximately:
Newborn and Premie: 10cm (4")
Small and Tiny: 8cm (3 1/8")
Teeny Weeny: 6cm (2 3/8")
Neckline
See page 5 for the bishop blocking guide.
Stitch the underarm seams and set
the sleeves into the front and back
armholes following the directions in
the centre liftout.
Pleat the appropriate number of rows
according to the instructions below
(including two holding rows).
Newborn, Premie, Small and Tiny:
9 half space rows
Teeny Weeny: 6 half space rows
The top holding row is 5mm (3/16")
from the raw edge for all sizes.
All sizes: unpick the pleating threads
for 3cm (1 1/4") at the back opening
edges.
Place the pleated neckline over the
bishop blocking guide, matching
centre front, centre backs and sleeve
seams. Fan out the pleats to fit the
guide and pin in place. Tie off the
pleating threads, except for the top
holding row.
H
1
D
D
2
B
3
D
4
5
D
B
6
D
7
H
PATTERN REPEAT
Pink gown
H
1
A
2
3
A
4
5
A
6
7
PATTERN REPEAT
H
Blue gown
2
2
SMOCKING
EMBROIDERY
The smocking is worked with two
strands of thread. All rows are half
space rows.
Note for Teeny Weeny size
Blue gown: work rows 3 - 7 only.
Pink gown: work rows 1 1/2 - 4 1/2 only.
Adjust the embroidery accordingly.
Blue gown neckline
Count the pleats and mark the centre
valley.
Row 1 - 2. Begin at the centre two
pleats on row 1 with an over cable.
Wave down to row 2, under cable,
wave up to row 1. Continue to the end
of the row. Turn the work upside
down, return to the centre and
complete the row.
Row 2 - 3. Work a mirror image of the
previous row.
Rows 3 - 5. Repeat rows 1 - 3.
Row 5 - 6. Refer carefully to the graph
for the placement of the sets of four
half space waves. Work each set of
four waves separately, ending off after
each set.
Row 6 - 7. Referring to the graph, work
a half space wave in the centre of each
set of four waves worked in the
previous row.
Pink gown neckline
Count the pleats and mark the centre
valley.
Row 1 1/2 - 2. Begin at the centre two
pleats on row 2 with an under cable.
Wave up to row 1 1/2, over cable, wave
down to row 2. Continue to the end of
the row. Turn the work upside down,
return to the centre and complete the
row.
Row 2 - 3 1/2. Begin at the centre two
pleats on row 3 1/2 with an under cable.
Work three step trellis up to row 2, over
cable, three step trellis down to row
3 1/2. Continue to the end of the row.
Turn the work upside down, return to
the centre and complete the row.
Rows 2 1/2 - 4 1/2. Repeat the previous
row twice.
Rows 5 - 7 1/2. Repeat the previous row
three times.
Sleeves (both gowns)
Row 1 - 2. Work a row of half space
wave.
Row 2 - 3. Work a mirror image of the
previous row.
Blue gown
Refer to the graph for placement of
the tiny white roses with detached
chain leaves.
CONSTRUCTION
See page 4.
HINTS AND IDEAS
FOR WEE CARE
GOWNS
H
1
A
or
D
2
3
H
Smocking on sleeve
All embroidery is worked using two strands
of thread unless otherwise specified.
Roses
Centre = A
(1 bullion loop, 8 wraps)
Petals = A (3 bullion knots, 10 wraps)
Leaves = E (1 strand, detached chain)
Pink gown
Pretty pink roses and buds alternate
around the smocking. Refer to the
graph for exact placement.
Roses
Centre = C
(bullion loop, 8 wraps)
Petals = D
(3 bullion knots, 10 wraps)
Buds = C (1 bullion knot, 8 wraps)
Leaves = E (1 strand, detached chain)
COLOUR KEY
DMC stranded cotton
Pink gown
B = ecru
C = 224 vy lt shell pink
D = 818 baby pink
E = 3023 lt Jacobean green
Blue gown
A = blanc
E = 3023 lt Jacobean green
Smocking (2 strands)
Blue gown = A
Pink gown = B and D
3
3
Fabrics
Use very soft fabrics such as Imperial
batiste or 100% cotton batiste or voile.
Colours
Suggested colours for the gowns are
pale pink, pale blue, cream and white.
Colours for the smocking should be as
delicate as the fabric.
Tiny sprays of embroidery look beautiful
on these gowns. Some suggested colours
for the embroidery are
DMC stranded cotton
Blanc, ecru, 224, 225, 341, 746,
747, 775, 776, 818, 819, 948,
3023, 3713, 3747 or 3753
Anchor stranded cotton
23, 48 or 73
Hems
Hems can be finished in a variety of
ways including lace edging, machine
scallops, pintucks, pinstitch, or hand
hemmed. Embroidery stitches such as
featherstitch can be used to secure the
hem. Ensure that any finishes are in
keeping with the overall delicate look of
the gown.
Sleeves
Sleeves can be finished with lace, a tiny
hand stitched hem or machine scallops.
To finish the ends of the sleeves before
smocking, cut the sleeves 2.5cm (1")
longer than the pattern and finish the
raw edge. Turn the 2.5cm (1") hem to
the inside and baste in place. Pleat
through the double layer.
The smocking will hold the hem in place
and the basting can be removed later.
When working the smocking around
the sleeves, use a looser than usual
tension to ensure that the sleeves will
slip easily on and off the baby’s arms.
Neckline
To make the neckline adjustable on the
two smallest sizes, leave the ends of the
binding open and thread a length of
very narrow ribbon through the
binding, leaving sufficient at the ends
to tie.
Construction
Some people find it easier to construct the
bishop before smocking.
Ensure that all seams are tiny and well
finished.
Cc O
R u
U cC tT iI oO nN
o N
n Ss T
t r
Sizes Newborn, Premie, Small, Tiny,
Teeny Weeny
R
Front
view
back
front
PREPARATION
All seam allowances are 5mm (3⁄16") (unless
otherwise specified.
Sleeve underarm seams
Stitch each sleeve underarm seam with a
tiny French seam, keeping the pleating
threads out of the way (diag 5).
sleeve
French seam
CONSTRUCTION
double fold
Wee Care
double fold,
matching the
edges of the fabric
with the
corresponding
edges of the
template.
Diag 3a
Using a water
soluble fabric marker, mark along the
curved edge of the template. Cut out
through all four layers along the marked
line (diags 3a & 3b).
back
Diag 3b
REQUIREMENTS
For full details, see page 1.
CUTTING OUT
1. Front & back rectangle
2. Sleeve rectangle
3. Neck binding
Larger sizes: 112cm (44") wide
selvedge
1
cut edges
3
Teeny Weeny: 112cm (44") wide
selvedge
Diag 2
2
2
2
1
2
3
4
4
selvedge
double fold
Fold again,
bringing the cut
edges to the
fold (diag 2).
Place the
armhole cutting
template on the
fold
Diag 1
sleeve
gown
Diag 6
Trim the seam to approximately 3mm (1⁄8"),
neaten and press. To prepare for pleating,
lay out the gown with the right side facing.
Ensure that the sleeve is sitting flat (diag 7).
neckline
sleeve
back
sleeve
front
back
Diag 7
CONSTRUCTION
CUTTING LAYOUTS
selvedge
fold
Trace the armhole cutting templates onto
lightweight interfacing or tracing paper,
transferring the pattern markings. Cut out
all pieces according to the appropriate
cutting layout.
Gown front and back (cut in one piece)
Cut one rectangle,
Newborn: 41cm x 112cm wide (16" x 44")
Premie: 36cm x 112cm wide (14" x 44")
Small: 31cm x 92 cm wide (12” x 36")
Tiny: 26cm x 92cm wide (10" x 36")
Teeny Weeny: 17cm x 53cm wide
(6 1⁄2" x 21")
Cutting out the armhole shaping
Fold the rectangle in half down the length
(diag 1).
Diag 5
Attaching the sleeves to the
front and backs
With right sides together, pin each sleeve
into the corresponding armhole. Stitch the
U-shaped seam (diag 6).
1. Back opening edges
On each back
opening edge,
fold under 1cm
(3⁄8") and press.
Press under a
further 1cm
(3⁄8") and pin in
place. Stitch the
band in place
back
Diag 8
close to the
inner folded edge (diag 8).
2. Binding the neckline
With wrong sides together, fold the
binding in half along the length and press.
Matching raw edges, pin the doubled
binding to the right side of the neckline,
stretching the binding slightly. Leave 5mm
(3⁄16") of the binding extending beyond the
back opening foldlines. Stitch (diag 9).
button band
Back
view
Sleeves
Cut two rectangles, each
Newborn: 19cm x 26cm wide (7 1⁄2" x 10")
Premie: 15cm x 26cm wide (6" x 10")
Small: 13cm x 23cm wide (5" x 9")
Tiny: 10cm x 23cm wide (4" x 9")
Teeny Weeny: 6.5cm x 14cm wide
(2 1⁄2" x 5 1⁄2")
Cutting the armhole shaping
Fold each rectangle
in half down the
length.
Place the sleeve
armhole template to
match the cut edges.
Trace along the
curved edge (diag 4).
Diag 4
Cut out as before.
Pleat the sleeves according to the
instructions on page 1. Flatten out the pleats.
Neck binding
Cut one, 3cm (1 1⁄4") (wide on the bias
Newborn: 27cm (10 1⁄2")
Premie: 22cm (8 1⁄2")
Small: 18cm (7")
Tiny: 15cm (6")
Teeny Weeny: 10cm (4")
Cc O
R u
U cC tT iI oO nN
o N
n Ss T
t r
Alternatively, handstitch the hem in place
or use a decorative stitch such as
featherstitch.
4. Finishing
Attach one clear snap fastener to the ends
of the neck binding and one 2cm (3⁄4")
below on the button band (diag 11).
handstitch
Diag 9
On the right side, check that the binding is
even and the pleats are straight. Adjust if
necessary. Trim the seam to 3mm (1⁄8").
Fold in the ends of the binding. Fold the
binding over the seam to the wrong side.
Pin the binding in place with the folded
pressed edge concealing the previous
stitching. Ensure that the binding is firmly
wrapped over the seam to avoid wrinkles in
the neck binding.
Handstitch the binding in place (diag 10).
Diag 10
3. Hem
For all sizes except Teeny Weeny, fold under
5mm (3⁄16") along the lower edge of the
gown. Press under a further 4.5cm (1 3⁄4").
For Teeny Weeny, fold under 5mm (3⁄16")
along the lower edge. Press under a further
2cm (3⁄4").
Pin the hem in place. Secure the hem with
a machine pinstitch, referring to your
sewing machine manual for instructions.
left
back
right
back
Diag 11
P A T T E R N
sleeve
ba
cu ck
tti op
ng en
lin ing
e
ba
cu ck
tti op
ng en
lin ing
e
seam
sleeve
seam
centre front
m
sl
a
se
ee
ve
se
a
ve
ee
sl
m
Newborn & Premie
Small & Tiny
Teeny Weeny
MASTER COPY
Wee Care
DO NOT CUT
Copyright Reserved © 2007
Country Bumpkin Publications
Sizes Newborn, Premie, Small,
Tiny, Teeny Weeny
NECKLINE BLOCKING GUIDE
5
5
ny wee
Pp A
R n
N
a T
t T
t E
e r
n
allowance
allowance
5mm
(3/16")
Size Teeny Weeny
seam allowance
Size Tiny
Size Small
Size Premie
y
n
Size Newborn
yy
side edge
Teeny wee
Copyright Reserved © 2007
Country Bumpkin Publications
Wee Care
side
side edge
edge
PAT T E R N K E Y
MASTER COPY
DO NOT CUT
enn
TTeeeennyy wweee
5mm
5mm
y
((33//16
16")
") seam
seam
Teeny w
ee
side edge
ny
w
TTeeeennyyw
Teeny wee
5mm (3/16") seam allowance
side edge - dou
n
y
side
side edge
edge -- dd
eee
ennyy
n
Sizes Newborn, Premie, Small,
y
Tiny, Teeny
Weeny
ee
ny
top edge
Teeny w
ee
side edge - double fold
top edge
Teeny w
ARMHOLE CUTTING
GUIDE FOR SLEEVES
top edge
Wee Care
Teeny w
side edge
Teeny wee
5mm (3/16") seam allowance
side edge - double fold
ny
Sizes Newborn, Premie, Small,
Tiny, Teeny Weeny
top edge
Wee Care
ARMHOLE CUTTING GUIDE
FOR FRONT & BACK
6
6
ee
side edge - double
ny
Wee Care
S I Z E S N E W B O R N , P R E M I E , S M A L L , T I N Y, T E E N Y W E E N Y
Front view
Back view
Suggested fabrics: cotton or polycotton blend lightweight fabrics
eg lawn, voile or Imperial batiste
Size
Newborn
Weight
Height
Chest
Waist
3.2kg · 7lb
56cm · 22 1⁄ 4"
41cm · 16"
41cm · 16"
Premie
2.3-2.7kg · 5-6lb
Small
1.4-1.8kg · 3-4lb
Tiny
500-900g · 1-2lb
Teeny Weeny
Less than 500g · 1lb
Fabric and notion requirements can be found inside.
The pattern, smocking design and contents are owned by Country Bumpkin Publications and cannot be used in full or part under any circumstance without the written permission of
Country Bumpkin Publications. Each user of the pattern must purchase their own copy from www.countrybumpkin.com.au.
It is illegal to copy or reproduce copyright material and give it or sell it to another person. Not only can Country Bumpkin Publications take legal action against you, but Australian law
enforcement agencies often do as well. Even the most minor copyright infringement can be pursued and it is becoming commonplace for such action to occur regularly.
© Country Bumpkin Publications 2007
COUNTRY BUMPKIN, 315 UNLEY ROAD, MALVERN, SOUTH AUSTRALIA 5061
PH +61 8 8372 7600 · FAX +61 8 8372 7601
www.countrybumpkin.com.au · EMAIL [email protected]
to v ie w o ur comp l e t e rang e of smo c king and embr oidery pat t er ns, v isit
www.countrybumpkin.com.au
To view our complete range of smocking and embroidery patterns, visit
www.countrybumpkin.com.au


© Copyright 2026