
Total Hip and Knee Replacement - the Bay of Plenty District Health
Total Hip and Knee Replacement A HANDBOOK FOR PATIENTS AND THEIR WHĀNAU Welcome to hospital This book belongs to: Name National Health Index – your unique number Your contacts: Doctor (GP) Surgeon Physiotherapist Occupational Therapist Social Worker District Nurse Māori Health Services Please bring this book with you every time you come to hospital. Index Index Introduction ..............................................................................2 Before coming to hospital ............................................. 11 In hospital .............................................................................. 35 At home ................................................................................... 45 Hip exercises ........................................................................ 58 Knee exercises .................................................................... 63 General advice...................................................................... 70 Our values CARE “Compassion, Attitude, Responsiveness and Excellence”. 1 Introduction Introduction Na, ko tēnei mea te whakauru mai ki roto i te hōhīpere he āhuatanga hou pea ki a koe. Mā te āta mārama ka ahatia i mua, i waenga, i muri hoki o tō nohoanga mai ka mauri tau ake ai tēnei āhuatanga ki a koe, hei āwhina i tō whakapiki ora. He mea waihanga e ngā kaimahi o Hauora a Toi (Bay of Plenty District Health Board) tēnei pukapuka e mārama pū ake ai koe ki te ara whakahou mārika ake i tō/ōu pona, turi, tiki hope rānei. Mā ngā kōrero o roto koe e whakamārama me pēhea te whakarite i a koe mō te pokanga, waihoki, mō te wā e puta atu ai koe i te hōhīpere. Ko te manako ia ka haria mai e koe tēnei pukapuka ki te hōhīpere. Tēnā, ko te īnoi rā ia, ka āta horoa e koe ngā kai o roto i te pukapuka nei i mua i tō pokanga, ka tuhituhi ai hoki i ō patapatai mehemea he patapatai āu ki ngā whārangi o muri rawa nei. Pēnā kei te mātua rite ā wairua, ā tinana, ā hinengaro hoki koe, ka tere kē atu te tae mai a toiora a taihoa ake nei. 2 This booklet has been designed by staff at Bay of Plenty District Health Board, and is designed to provide you with information about having a total hip or knee joint replacement. The booklet will explain how to prepare for your surgery, what you can expect after your surgery and how to prepare for your discharge home from hospital. We encourage you to bring this booklet with you into hospital. Introduction Entering a hospital may be a new experience for you. Understanding what happens before, during and after your stay will make your experience more pleasant and assist your recovery. It is recommended that you read this booklet thoroughly before your surgery and write down any questions you may have in the blue question pages throughout this booklet. The more prepared you are for surgery, physically and emotionally, the quicker you will recover from it. Why do I need a hip or knee joint replacement? The most common cause of deterioration of the hip or knee joint is osteoarthritis; other conditions that can cause damage to a joint are rheumatoid arthritis and fractures (broken bones). Osteoarthritis is a common disease affecting the joints in the body, most commonly the knees and hip. The joint surfaces, which are covered in smooth cartilage, become damaged, gradually get thinner and roughen and this produces pain. Eventually, there may be no cartilage left in some areas of the joint. 3 Introduction 4 Healthy hip Osteoarthritic hip Healthy knee Osteoarthritic knee A total hip replacement is a surgical procedure for replacing the hip joint. The hip joint is made up of two parts, the hip socket (acetabulum, a cup shaped bone in the pelvis) and the “ball” or head of the thigh bone (femur). During the operation, these two parts are removed and replaced with smooth artificial surfaces. These artificial pieces (the prosthesis) are implanted into healthy portions of the pelvis and thigh bone. The total hip replacement operation is designed to relieve pain, reduce stiffness and improve your ability to walk. Introduction What is a total hip replacement? What is a total knee replacement? A total knee replacement is a surgical procedure for replacing the knee joint. The knee joint is made up of the lower end of the thigh bone (femur) which rotates on the upper end of the shin bone (tibia) and the knee cap (patella), which slides in a groove on the end of the femur. During the operation, these parts are removed and replaced with smooth artificial surfaces. 5 Introduction If required, a plastic button is put on the knee cap. A partial knee replacement only replaces the worn part of the knee. The total and partial knee replacement operations are designed to relieve pain, reduce stiffness and improve your ability to walk. What can be expected after a total knee or total hip replacement? A total knee or hip replacement will provide a large reduction in pain in 90% of patients and allow patients to carry out normal daily activities. Most total joint replacements last over 10 years (95%). The artificial joint may or may not allow you to return to active sports or heavy labour and you must be guided by your surgeon. Taking part in high impact activities and being overweight may speed up the wear and tear process, which could result in the artificial joint loosening and becoming painful. Your surgeon will advise you on what level of activity you can do. The aim of surgery is for you to be able to resume your normal everyday activities without pain, including climbing stairs and walking. It is also possible to participate in recreational walking, swimming, golf, driving, light hiking, cycling and ballroom dancing. Activities not suitable include jogging or running, contact sports, jumping sports and high impact aerobics. The reasons for this are that the knee or hip replacement will wear out more quickly or an injury involving the replacement may be difficult to treat. 6 This section is not meant to frighten you, but help you to make an informed decision on whether to have a total hip or knee replacement, and to help you cope better with any complications that may occur. It is important that you understand that there are possible risks linked with any major operation. Total hip or knee replacements are no exception. Introduction What complications (risks) can occur? Total hip or knee replacement surgery is usually very successful but a small percentage of patients may develop complications. Illness, smoking and obesity may increase the chance for complications. Though uncommon, when these complications occur, they may delay or limit your full recovery. Infection An infection can occur in the wound or deep tissue around the prosthesis. This could happen while you are in hospital, after you go home and can even occur years later as any infection in your body can spread to your joint replacement. Minor infections are usually treated with antibiotics but major infections can sometimes require surgery and removal of the prosthesis. Dislocation Occasionally after a total hip joint replacement the head of the prosthesis can become dislodged from the socket. In most cases the hip can be relocated without surgery. The period that you are most at risk for dislocation is the first six weeks following surgery. Blood clots, deep vein thrombosis (DVT) This is the term used when a blood clot develops in the deep veins in the back of your lower leg. When detected the treatment may involve blood thinning injections followed by a course of tablets. There is about a 4% risk of developing a DVT following surgery. 7 Introduction Foot Drop It is unusual to damage any major nerves or blood vessels. However, a nerve maybe stretched or damaged during surgery (this is called nerve palsy). This can result in a weakened lower leg or a foot that drops down, over time nerve injuries may improve. This complication is rare; occurring in less than 1:1000 patients. Loosening of the prosthesis Hip replacements do wear and some will require replacing. Wear or loosening of the components may occur between 10-15 years after surgery; this can be accelerated in excessive activity or obesity. Revision operations can usually be performed; however the results may not be as good as the initial operation and the risks or complications are greater. Difference in leg length Your surgeon will do their best to ensure that your leg length is equal, however sometimes this is not always possible as arthritis or wear and tear may have destroyed some of your bone, which could cause your operated leg to become shorter. This may result in you needing to wear a raised shoe or insole. 8 Please use the space below to write down any questions you wish to have answered and bring this book with you to the hospital. Introduction Questions 9 Introduction Questions Please use the space below to write down any questions you wish to have answered and bring this book with you to the hospital. Reference Material Educational videos for hip and knee replacement can be viewed on the Ministry Of Health (MOH) website. The videos are designed to provide you with information on how you can prepare for your operation, what to expect when you go into hospital and your recovery. www.health.govt.nz/your-health/conditions-and-treatments/ treatments-and-surgery/knee-hip-replacement-patienteducation-videos 10 You may also find the information contained in this internet link useful. Youtube – DrMikeEvans – hip and knee surgery www.Youtube.com/watch?v=xAL_TrQdtTY Your hospital journey You attend an Outpatient appointment to see an Orthopaedic Surgeon and a decision is made to go ahead with a hip or knee joint replacement. The decision is to manage your hip or knee joint with non-surgical treatment and you remain under the care of your GP. You attend a preassessment clinic appointment to determine if you are fit for an anaesthetic. If you are not fit enough you may be returned to the care of your GP. Before coming to hospital Before coming in to hospital You are informed of your surgery date and you attend an education class. You may also attend exercise classes. You are admitted on the day of your surgery and expect to stay in hospital for 3 – 5 days. You will be followed up approximately 6 weeks after your operation to check your recovery. 11 Before coming to hospital 12 Your appointments You must attend these appointments. Keep a record of your appointment times here: Appointment Who Where Date Orthopaedic Outpatient appointment to see the Surgeon Outpatients Department at the hospital Pre-assessment to see a nurse Pre-assessment clinic at Tauranga Hospital or Surgical Assessment Unit at Whakatane Hospital Pre-assessment to see an Anaesthetist (if required) Pre-assessment clinic at Tauranga Hospital or Surgical Assessment Unit at Whakatane Hospital Exercise classes (if required) Physiotherapy Department at the hospital Education class Physiotherapy Department at the hospital Time Appointment Who Where Date Day of surgery / hospital stay On arrival - Surgical Admission Unit (SAU) After your surgery – Surgical Ward at the hospital 6 week outpatient appointment to see surgeon Outpatients Department at the hospital One year outpatient appointment to see surgeon (if required) Outpatients Department at the hospital Time Before coming to hospital 13 Before coming to hospital Pre-assessment Clinic - nurse The Pre-assessment Nurse will ask you about your general health, medical history, previous anaesthetics and if there were any problems. Please bring all your current medications in their original packaging with you. It is important that you are assessed prior to your operation to minimise the risks associated with your surgery. Most people will have their first assessment for their fitness for surgery with the Pre-assessment Nurse in a specialist pre-assessment clinic. This clinic typically takes place soon after you have seen the Specialist (Surgeon) in the clinic. It may even occur the same day. A record will be made of any family history of anaesthetic problems, medicines, pills, inhalers or alternative medications that you use allergies, smoking, alcohol and whether you have any loose, capped or crowned teeth. You may have investigations such as blood tests, a heart trace (ECG), urine tests and X-rays. This helps your anaesthetist consider any medical problems which may either affect the risks to yourself or the likelihood of complications from the anaesthetic or surgery. The Pre-assessment Nurse will give you time to ask questions about any possible problems and give advice and education on your hospital stay and activities following your surgery. Consent You will need to sign a consent form that says you agree to the operation and the collection of specimens and technical data. A full explanation of the surgery and risks should be given to you before you sign the consent form. You will also need to give consent for anaesthesia, blood transfusion and joint registration. 14 The New Zealand Orthopaedic Association has a National Joint Register which records all the technical data on all joint replacement surgery performed in New Zealand. This provides independent data on the performance of these joints over the years. The data will be used in future audits of joint replacement outcomes and will identify factors which will provide the best long term surgical results for all New Zealanders. You are asked for your consent to allow your name, address, date of birth, National Health Index number along with the technical data on your joint surgery to be forwarded to the registry. Before coming to hospital The National Joint Register 15 Before coming to hospital Instructions for taking your medicines prior to your surgery Your medicines have been reviewed and you should follow these instructions prior to your surgery date. STOP these medications before your surgery Take the following medications on the morning of your surgery 16 Before coming to hospital DO NOT TAKE the following medications on the morning of your surgery Urine Test 2 weeks before operation: Please take your urine sample, with your Medlab form to any Medlab. Please phone your GP to check the result. Blood Test 2-4 days before your operation: Please go to any Medlab for a blood test. Please take your blood test form with you. Other Instructions 17 Before coming to hospital Pre-assessment Clinic – anaesthetist (if required) The anaesthetist will see you before your operation to discuss your health, the types of anaesthetic and pain relief that can be used and their risks and benefits. Consent for your anaesthetic will also be sought at this time. Nothing will happen to you until you understand and agree with what has been planned for you. You have the right to refuse if you do not want the treatment suggested or if you want more information or more time to decide. Types of Anaesthetics General anaesthesia 18 Produces a state of controlled unconsciousness during which you feel nothing. You will receive anaesthetic drugs, strong pain relieving drugs, oxygen to breathe and sometimes a drug to relax your muscles. You will need a breathing tube in your throat once you are unconscious, and will be put on a breathing machine (ventilator) during your operation. When the operation is finished the anaesthetic is stopped and you regain consciousness. You will be unconscious during your operation. Risks Common side-effects (<1 in 100) include headache, sore throat, feeling sick or vomiting, dizziness, bladder problems, damage to the lips or tongue, temporary confusion or memory loss, aches and pains and bruising/soreness. Uncommon side-effects (<1 in 1000) include chest infection, muscle pains, damage to teeth, becoming conscious during your operation, slow breathing and existing medical conditions getting worse. Before coming to hospital Advantages Rare side effects (less than 1 in 10,000+) include damage to the eyes, serious drug allergy, nerve damage, equipment failure, heart attack, stroke or death. Spinal anaesthesia A measured dose of local anaesthetic is injected into the area of the back that contains spinal fluid using a very small needle. The injection is generally well tolerated and will make you go numb from the waist down. This means you will feel no pain, though you will remain conscious. A screen will shield the operation so you will not see the operation unless you want to. Your anaesthetist is always near you and you can speak to them whenever you want to. If you prefer, you can also have drugs that make you feel sleepy and relaxed (sedation). This will mean you will not be aware of what is happening during surgery though you may hear the noises of what is going on around you. Advantages This generally provides better pain relief, and as such you do not need so much strong pain relieving medicine in the first 24 hours after the operation. 19 Before coming to hospital There is some evidence that less bleeding may occur during surgery which would reduce your risk of needing a blood transfusion or developing blood clots. You remain in full control of your breathing. Your breathing should be better in the first few hours after the operation, so you have a lower chance of developing a chest infection. You should have less sickness and drowsiness after the operation and may be able to eat, drink and walk sooner. Risks Common side-effects (less than 1 in 100) include headache, dizziness, bladder problems, aches and pains and bruising/ soreness. Uncommon side-effects (less than 1 in 1000) include itching and existing medical conditions getting worse. Rare side effects (less than 1 in 10,000+) include serious drug allergy, nerve damage, equipment failure, heart attack, stroke or death. Surgical infiltration Local anaesthetic is injected in and around the joint by the surgeon at the time your new joint is going is being replaced. It is typically combined with spinal or general anaesthesia. Advantages Provides good pain relief immediately following surgery. Reduces the need for strong painkiller injections like morphine and therefore reduces side effects like nausea and vomiting. It also allows early mobilisation and physiotherapy. Risks May not provide adequate pain relief and hence may need to be combined with morphine injection. 20 This is an injection of local anaesthetic near the nerves which go to your leg. This will numb part of the leg and make it pain-free for several hours after surgery. You may also not be able to move it properly during this time. Advantages You won’t need such strong pain relieving medication during and after your anaesthetic, and therefore won’t feel so sick. You should be more comfortable for several hours after your operation. Before coming to hospital Nerve block Risks The numbness and weakness may last up to 16-24 hours, delaying your ability to walk and do your exercises. Rarely there is risk of damage to the nerves. Blood products There is a small risk that you may need to have a blood transfusion. A transfusion of blood or blood products is only given when the benefits outweigh the risks. You have the right to decide whether you want to have the treatment or not. You can ask as many questions as you need to ensure you are making the right choice. You will be asked to sign a consent form to show that the benefits, risks and alternatives for your treatment, including transfusion of blood products, have been explained to you. The consent form will confirm that you have been able to ask any questions and you agree to receive the treatment. If you refuse to have a transfusion when needed, the risks to your health are likely to increase. Further information about blood transfusions can be found at: www.nzblood.co.nz 21 Before coming to hospital Education Class Before your operation you will need to attend a pre-operative education class. This will usually be two or three weeks before your surgery. This is a group session run by staff who will be involved in your care. The class is designed to help better inform and prepare you for your upcoming hip or knee replacement surgery. You are encouraged to ask any questions you have, however simple you may feel they are. Please note you will be loaned home equipment during this class that will need to be carried back to your car. We therefore encourage you to bring a support person with you. To assist in providing you with your home equipment, please complete the following page. Remember to bring this book with you to the Education Class. 22 NHI Number TAURANGA/ WHAKATANE HOSPITAL OCCUPATIONAL THERAPY – MEASUREMENT SHEET Please bring this completed form with you to education Class. Please complete this form for where you will be staying on discharge. Armchair Height Before coming to hospital Name cm Measure from the front of the depressed cushion to the floor (ask someone to sit on the seat & measure from the lowest point) Legs Castors Domes Dining Chair Measure from the seat to the floor. Height cm Bed Height cm Measure from the top of the depressed mattress to the floor (ask someone to sit on the bed & measure from the lowest point) Size (eg single/double) Legs Castors No. of legs/castors 23 Before coming to hospital Toilet Height cm Measure from the top of the ceramic bowl to the floor (do not include the seat) Are there rails fitted? If yes, where Is there equipment fitted? If yes, list: House Steps into the house? – if yes how many Level inside ? If no, how many stairs? List Equipment required: (√ if issued) Shower Over Bath Are there rails fitted? If yes, where Cubicle Wet Area / Level Is there equipment fitted? If yes, list: *Bath / *Shub *(circle) Height of Bath Side cm Width of the bath rim (i.e. next to the wall) cm Are there rails fitted? If yes, where Is there equipment fitted? If yes, list: To be completed by the Occupational Therapist Popliteal to floor: Signed: 24 Date: cm Optimum Height: Name of Therapist: cm Please use the space below to write down any questions you wish to have answered and bring this book with you to the hospital. Before coming to hospital Questions 25 Before coming to hospital 26 Questions Please use the space below to write down any questions you wish to have answered and bring this book with you to the hospital. It is important to consider how you will manage your care in your home once you are discharged from hospital. It is essential to start planning now. Before you come to hospital organise your daily living needs in preparation for your return home. Please note you should be ready to go home by 11am on the day you are discharged. Please make plans for your transport home accordingly. Before coming to hospital Preparing for your discharge home from hospital This list will help you prepare for your return home: Arrange for someone to take me to hospital. Arrange for someone to take me home on the day I am discharged. Arrange for someone to stay with me for a few days after discharge (if I live alone). Tell family, friends and/or neighbours about my operation. Organise family/friends who are willing to help with chores/ housework. Cook extra meals and freeze them. Buy extra groceries and/or arrange for someone to do my grocery shopping. If necessary, cancel my home help, Meals on Wheels, or other services that come to my home, while I am in hospital. Organise appropriate seating at my home. Consider buying a long-handled shoehorn and sock-aid. Place commonly used items at waist height to prevent the need to bend. 27 Before coming to hospital Get a clothes horse for my laundry. Organise a gardener for six weeks if needed. Organise someone to look after my pets. Check my house security, cancel paper delivery and organise for my letterbox to be cleared. Make a list of useful contact numbers. Remove rugs and mats, loose cords and anything that can be a trip hazard. Pack ALL my medications/herbal products/alternative medications and supplements. Preparing for your hospital stay Smoking and your lungs We strongly advise that you try to avoid getting chest infections (stay away from people with coughs and colds) and give up smoking at least two weeks before the operation date. Continuing to smoke doubles your risk of complications, compromises healing and can add to the risk of developing confusion after your operation. It can also intensify the effects of your anaesthetic. If you need help to quit smoking, please contact resources such as your Doctor (GP) or Quitline (0800 778 778) www.quit.org.nz or www.health.govt.nz\tobacco Bay of Plenty District Health Board has a “No Smoking” policy onsite and throughout hospital grounds. To minimise withdrawals from nicotine, nicotine patches are available for free for the duration of your hospital stay. Alcohol and drugs (such as Cannabis and P) We encourage you to minimise your drug/alcohol consumption prior to and after your surgery. Drug/alcohol consumption significantly increases the risk of complications, compromises healing and can 28 Reduce sources of infection Surgery may be cancelled if you have any source of infection such as ulcers, tooth problems, sores or open wounds. We advise you to see your dentist to have your teeth checked prior to having a joint replacement operation. Please visit your GP to have ulcers and other sores checked. Regulate your weight If you are overweight, recovery can be more difficult as you have more strain on your muscles and joints. It can be hard to lose weight, especially with reduced mobility but exercise and changes in diet even without weight loss can reduce your chance of complications after surgery. Talk to your GP or other health professional about managing your weight. Before coming to hospital add to your risk of developing confusion after your operation. It can affect your anaesthetic and pain relief requirements. Exercise It is advisable to remain as active as possible leading up to your surgery, to strengthen your muscles and speed up recovery. What to do if you become unwell It is important we know if you have any of the following: • A cold or cough. • Skin infections – such as a sore, graze, pimple or eczema, especially around your operation site. • Burning pain or passing urine more often than usual. • You are generally unwell - such as diarrhoea, vomiting or high temperature. Any of these conditions could cause your operation to be postponed. For your safety it is important that we know about them prior to your operation. You will receive a phone call from the Surgical Admission Unit two days before your operation day to check whether you are unwell. 29 Before coming to hospital If you do not receive a call and you are unwell please phone the hospital where you are having your operation and ask to speak to someone in the Surgical Admission Unit. Tauranga 07 579 8000 Whakatane 07 306 0999 What do I bring to hospital? • You should leave valuables at home (eg; jewellery, bank or credit cards etc.) The Bay of Plenty District Health Board does NOT take responsibility for stolen items. • You may bring something to read. • Night clothes, easy to wear day clothes, shoes or slippers, toiletries. • Walkers or other aids you may use. • You may also bring your own pillow which will make your hospital stay more comfortable. Please make sure your pillowcase is not blue or white (these are hospital colours). • Please bring all your current medications in their original packaging Please name your personal belongings. Mobile phones may be used on the ward, but please be considerate of other patients. 30 Your skin – using the body wash To help prevent a wound infection after your operation, we ask that you use the Chlorhexidine 4% skin wash. The tube is intended for two washes before your operation. We ask that you shower or bath the night before and the day of your surgery. If possible, we would prefer that you shower rather than bath. When you shower or bath, wet your body all over and then turn the shower off or stand up in the bath. Using half of the tube of Chlorhexidine soap, lather your body and hair with foam and remember to wash skin folds and inside your tummy button. Be careful to avoid contact with your eyes. Before coming to hospital The day before your operation Leave the foam on the skin for at least two minutes and then rinse off and dry your body thoroughly using a clean towel. Get dressed in clean clothes. Don’t shave, pluck or wax your skin It is very important that you do not shave or wax anywhere within the vicinity of the operation site before your operation. If it is necessary for hair to be removed, the staff will clip the hair with a specially cleaned surgical clipper on the day of surgery. This is to help reduce the risk of infection. 31 Before coming to hospital Eating and drinking An empty stomach is important for a safe anaesthetic. We suggest you have a generous supper (after dinner snack) the night before you come to hospital. Unless you are a diabetic you will have been given two tetra packs of Nutricia PreOp drink when you attended the Education Class. Please follow these instructions carefully. Please do not drink the Nutricia PreOp if you are a known diabetic or taking medications for diabetes Eating and drinking instructions You may eat (unless you have been instructed otherwise) up to six hours before your operation. You must not eat any food from (date) (time) Up to two hours before the time of your operation you may continue to drink clear fluids (up to 400mls only); this will include your two cartons of Nutricia PreOp which need to be drunk just prior to the two hours before your operation. Clear fluids are any liquids that you can see through; this includes water and clear fruit juice without pulp and tea or coffee without milk. You should avoid carbonated (fizzy) drinks. Morning surgery admit Tauranga 7am, Whakatane 7.15am • Drink one Nutricia PreOp drink at 5.30am • Drink the second Nutricia PreOp drink at 5.45am (finish both by 6.00am. Afternoon surgery admit Tauranga 12.30pm, Whakatane 11am • Drink one Nutricia PreOp drink at 10.30am • Drink the second Nutricia PreOp drink at 10.45am (finish both by 11.00am. Nutricia PreOp * is a clear lemon-flavoured carbohydrate (sugar) drink designed to prepare your body for your operation; it is best served chilled, shake well before use. 32 In the six hours prior to surgery DO NOT chew chewing gum, suck lozenges or lollies. Please use the space below to write down any questions you wish to have answered and bring this book with you to the hospital. Before coming to hospital Questions 33 Before coming to hospital 34 Questions Please use the space below to write down any questions you wish to have answered and bring this book with you to the hospital. The day of your surgery You will be admitted to hospital on the day of your surgery In hospital In hospital Medications On the morning of your surgery, take medication as instructed by pre-assessment staff. Refer to Preassessment Nurse section – see page 16 Keeping warm Please bring clothing to keep you warm prior to your operation. Keeping your body warm reduces the risk of complications during surgery. Please also bring warm, comfortable clothes and supportive shoes/slippers into the hospital for you to wear in the days after your operation. Jandals or slip on footwear are not advisable. 35 In hospital Where do I go before surgery? You will have been advised of the date of your surgery by letter from the surgical booking office. You will need to report to the Surgical Admission Unit. Please ask at the main reception of the hospital if you are unsure of how to get there. The operation itself Getting ready for theatre Before surgery you will be given a gown and fitted with an elastic stocking on your non-operative leg to help prevent blood clots. Your blood pressure, temperature and heart rate will be checked. All your belongings will be taken directly to the ward where you will recover after surgery. You will be visited by the surgeon and anaesthetist. The surgeon will check your leg, and mark with a marker pen to highlight the side for operation. He will also discuss the consenting process and answer any questions you may have. You are also likely to have a drip placed in your arm. In the operating room You will be taken to the operating room, an anaesthetist and the anaesthetic team, several nurses, the surgeon and their surgical teams will be present. Once in the operating room you will receive an anaesthetic as previously discussed with you by your anaesthetist. In recovery Following your operation, you will be transferred to the recovery room. Nursing staff will check on you frequently to make sure you are safe and comfortable. You may have: • Foot pumps attached to your feet • An intravenous (IV) drip in your arm – this is used to give you 36 In hospital fluids, antibiotics and painkillers. • A facial mask or nasal prongs to give you oxygen. • A urinary catheter in place – this will have been put in place during your surgery. • A wound drain – this is used to drain excess blood and fluid, and will be covered by a large bandage. • A cryocuff on your knee – if you have had a knee replacement – this is similar to an ice pack which helps reduce pain and swelling. • A few sips of water if you feel able to. • A pain pump (patient controlled analgesia) with a button to push whenever you need pain relief. The PCA is a computer controlled machine which delivers small amounts of strong pain relieving medication at the push of a button. The PCA is prescribed by the anaesthetist with a dose that is appropriate and safe for you Side effects can sometimes occur but can usually be treated effectively. The most common side effects with PCA medications are drowsiness, nausea, vomiting or itching. On returning to the ward When the recovery staff are satisfied that you have recovered safely from the anaesthetic, you will be taken back to the ward On returning to the ward you can expect the following to happen: • Your condition will be monitored regularly particularly in the first two hours • You will be encouraged to drink and eat as soon as you are able • Your wound dressing will be checked regularly 37 In hospital The day after your operation – Day 1 We encourage you to be as independent as possible after your surgery. You will receive help with tasks such as washing, dressing and walking to the toilet, but the aim is to wean off this help as soon as it is safe to do so. On day one after your operation you can expect the following to happen: • You will be seen by a doctor from the Orthopaedic Team. • Your urinary catheter will be removed. • Your pain pump (patient controlled analgesia) may be stopped. • You will receive regular oral medication to minimise your pain, nausea and help prevent constipation. • Your oxygen will be stopped if you no longer require it. • Your wound drain (if you have one) will be removed. • A simple blood test will be taken to check you are not anaemic (have low red blood cells or haemoglobin) after your operation. • Some of your bandages, if you have had a knee replacement, will be removed to reduce bulk and size. • Your IV fluids will stop if you are able to drink. 38 • You may receive a small daily injection to help reduce the risk of developing a blood clot. • You may have foot pumps attached to your feet whilst in bed. In hospital • Your IV cannula will be removed once you have been given a final dose of antibiotics. • Nursing staff will assist you with washing and dressing as required. • You will be encouraged to sit out of bed for meals. • Your physiotherapist or their assistant will visit you at least once a day to help you with your exercises and assist you to walk. • You may receive a visit from a social worker. Pain relief Good pain control helps you recover more quickly after your operation. It is important to tell the doctors or nurses if you are in pain, do not wait to be asked and do not feel afraid of being a nuisance. If your pain is well controlled, post-operative complications are reduced, you sleep better and it helps your body heal more quickly. Pain relief is important and some people need more pain relief medication than others. An assessment scale is used to measure your pain regularly. The nurses will ask you to rate your pain at rest and on movement. They may use a number scale of 0 – 10, 0 meaning no pain and 10 being severe pain. It is important that you are honest about your pain so that you can receive the correct treatment for you. Occasionally, despite regular painkillers, you may experience stronger pain. This may occur during physiotherapy exercises or walking. You will have additional painkillers prescribed to help relieve this pain but you have to ask your nurse for these. You must inform the nurses who will give you these extra painkillers. It is important that you are comfortable enough to be able to participate in physiotherapy to help your recovery. 39 In hospital The second day after your operation – Day 2 You’re on your way to being as independent as possible after your surgery. You will need less help with tasks such as washing, dressing and walking to the toilet, and you may be able to manage most of this on your own. On day two after your operation you can expect the following to happen: • You will be seen by a doctor from the Orthopaedic Team. • You will continue to receive regular oral medication. • Your pain pump (patient controlled analgesia), if not stopped yesterday, may now be removed. • You will be encouraged to wash, dress and toilet yourself as independently as possible. • You will need to dress in your own clothes. • You will sit out of bed for all your meals. • Your physiotherapist or their assistant will visit you at least once a day to help with your exercises and supervise your walking. • Your physiotherapist may also take you up and down some stairs to check you are safe to do this. • You may receive a visit from a social worker to assess any social needs for your discharge. • Your occupational therapist may assess your ability to manage essential everyday tasks. This may include transfers on and off a bed, chair and toilet. They will also ensure that you can wash and dress yourself in line with post-operative hip precautions. 40 • Your occupational therapist may also issue you with any further equipment you may need at home. Please use the space below to write down any questions you wish to have answered before you go home. In hospital Questions before you prepare to go home… 41 In hospital 42 Questions Please use the space below to write down any questions you wish to have answered and bring this book with you to the hospital. You will be discharged (so long as it is safe) on day three after your operation around 11am. In hospital The third and following day(s) after your operation You may be transferred to our transit lounge. This is provided for your comfort while you are awaiting discharge. A nurse will be present during this time. You can expect the following to happen: • You will be seen by a doctor from the Orthopaedic Team. • You will continue to receive regular oral medication. • You should be able to wash, dress and toilet yourself independently. • Your physiotherapist will visit you to check you are able to undertake your exercises independently and can walk safely. • Your physiotherapist will also check you are safe to go up and down stairs (if you have steps at home). • You may receive a visit from a social worker to assess any social needs for your discharge. • Your occupational therapist will assess your ability to manage essential everyday tasks. This may include transfers on and off a bed, chair and toilet. They will also ensure that you can wash and dress yourself in line with post-operative precautions. • Your occupational therapist will also issue you with any further equipment you may need at home. • Nursing staff will discuss your discharge arrangements to ensure everything is in place for a safe return home. 43 In hospital Before you can go home we need to make sure: You can get in and out of bed independently. You can walk unsupervised with a walking aid. You can walk up and down stairs safely if applicable. You can perform your exercise programme independently. Your pain is well managed with tablets. There is support in place at home. You are given a prescription for pain medication. You will be issued with any additional equipment that you will require at home. 44 Hip precautions At home At home It is important that for the first 6 to 8 weeks following your operation you take special care to protect the joint and prevent dislocation. DO NOT bend your operated hip further than 90 degrees. Sit in a high chair so that you do not bend your hip too far when you are sitting/standing. When bending down to pick something up, keep your operated leg behind you. DO NOT cross your operated leg over the midline of your body when sitting. DO NOT turn your operated leg inwards or twist on your operated leg. DO NOT cross your operated leg over the midline of your body when lying down. 45 At home After being discharged home Medication You will have been given a prescription for pain medication It is recommended that you take the medication as instructed. Continue all other medication unless advised otherwise. Follow up appointments You will receive a phone call from the hospital approximately two days after your discharge to make sure you are recovering well and answer any questions you may have. You may have a follow up appointment with your surgeon 4-6 weeks following your surgery. You will receive an appointment in the mail. Make sure you write it in the appointments section of this book for safe keeping. Any further follow up appointments will be made at your review. Physiotherapy The Physiotherapy Department may contact you to organise an outpatient physiotherapy appointment if this has been planned for you. Diet You may eat your usual diet but we suggest you eat more fruit, vegetables and fibrous foods. We also encourage you to drink plenty of fluid. 46 Normal bowel action The normal frequency of passing bowel motions should be from three times per day to three times per week. Bowel motions should be formed and easy to pass. At home Constipation post operatively What is constipation? Constipation is when you have hard, dry, difficult to pass bowel movements, or you go longer than usual between bowel movements. Note - A mixture of hard and runny loose bowel motions can be a sign of severe constipation. What causes constipation? • • • • • • Not drinking enough water. Having too much fibre in your diet. Limited intake of food. Lack of exercise or mobility. Ignoring the urge to go to the toilet. Medications – many pain relief tablets can lead to constipation. What are the signs and symptoms of constipation? • • • • • • Straining to pass a bowel motion. Pain or bleeding from the rectum during your bowel movement. A feeling that you did not empty your bowel completely. Nausea/reduced appetite. Stomach cramps and bloating. Headache. What can I do to manage my constipation? • • • • Increase your fluid intake to 1-2 litres a day. Eat regular healthy meals including all the food groups. Exercise – go for regular short walk. Go to the toilet around ten minutes after you have eaten. 47 At home It is important not to wait too long before you seek assistance with constipation. If your symptoms persist for 3 days, please contact your GP. Treatment You should talk to your GP about your constipation to ensure you are taking the most suitable bowel medication for you. These include: • Stool softeners • Bowel stimulants • Osmotic laxatives • Bulk formers • Suppositories and enemas Exercise It is important you continue to regularly undertake the exercises you were given by your physiotherapist. Surgical Stockings Please wear your surgical stockings for six weeks following your surgery. Wound care You should keep your wound covered with the waterproof dressing applied during your hospital stay, for 5-7 days following surgery. Wounds can take about 10 days to heal and you may notice some oozing for a few days. After 7 days no dressing is required if the wound has healed and you may remove the dressing. If the wound is red, or oozing longer than a week after surgery, or is very swollen and painful then you should seek advice from your GP. Your GP may decide to inform your surgeon by phone call or send you to the hospital for review. The wound and skin around the wound will be warm to touch for 48 Knee swelling after a knee replacement At home some weeks and sometimes months following surgery. There will be swelling of the tissues around the wound that will decrease over a few weeks to months. Your knee will swell for several weeks after your operation. Continue with your exercises. To further reduce swelling, when resting, sit with your leg up, straight, and well supported. You can use a bag of ice wrapped in a clean, damp cloth and mould this around your knee for a maximum of 15 minutes to reduce swelling. This can be done two to three times per day. It is important that you do not keep ice on for long periods as it could result in an ice burn. Limb swelling If you have significant swelling of one or both of your legs that does not reduce by having your leg up, then consult your GP. Your GP may decide to perform an ultrasound scan or send you to the hospital to investigate for a blood clot. If you have any concerns regarding your health after your discharge from hospital, please seek advice from your GP. The following signs and symptoms are especially important: • • • • • • • Chest pain Calf pain or swelling Shortness of breath Fever or chills Nausea or vomiting Bleeding If your wound becomes red, painful, inflamed, or has a lot of oozing. 49 At home Returning to work/hobbies After your surgery it is important not to take on too much too soon. Plan your day so that you spend small amounts of time doing different tasks. Remember that you need to rest when you are tired. At your follow-up appointment with your surgeon, you will be advised when you can return to work, drive a car, and take part in other physical activities including sport, hobbies. If in any doubt, do not return to work without discussing it with your surgeon. 50 At home The next two pages are sealed, they contain explicit sexual information. This is intended to inform, not offend you – tear perforation to view. If you have further questions after reading this please talk to your GP or any health practitioner. Sexual activity Following total hip replacement, safe resumption of sexual relations can be resumed. Attention to proper positioning and comfort will enhance the return to intimacy. Avoid kneeling positions initially. Check with your health professional if you are unsure when to safely resume sexual activity. 51 At home Missionary Position – This is generally a comfortable position for either a male or female with a new hip. The female assumes the bottom position. If she has a new hip, she can bend her knees slightly with her feet on the bed. Pillows can be used to support the legs on the outside. If the male has a new hip, he can stretch his legs out behind him. He can place a pillow between his knees to keep his operative leg from crossing the midline of the body. He supports his weight with his arms. Face-To-Face Position – This position can be used for either a male or female. The person with the new joint is on the bottom and can recline on pillows propped behind the back. A female can bend her knees slightly with her feet on the bed. A male can put a pillow between his knees to keep the operative leg from crossing the midline of the body. Sitting Position – This position can be used for either a male or female. In all cases, the male sits on the chair with his knees pointing away from the midline of his body and his feet on the floor. The female sits on his lap. She must be able to have her feet planted on the floor, particularly if she has a new joint. She must avoid leaning too far forward to prevent the hip from bending more than 90 degrees. 52 – This position can be used for either a male or female. The female with a new hip lies on her back with her buttocks near the edge of the bed. Feet must be firmly planted on the floor with knees pointing away from the midline of the body. If the male has a new hip, he can assume the position of kneeling in front of his partner. For comfort, he can use pillows under his knees. He must keep his back straight and avoid leaning over his partner to prevent the hip from bending more than 90 degrees. At home Kneeling Position Side Lying Positions – This position can be used for either a male or female. In the spoon position, the person with a new hip can lie on either side. For a female with a new hip, pillows can be used to support the upper leg. A male with a new hip can drape his upper leg over his partner. Other Side Lying Positions – This position can be used for a female with a new hip. With her partner on his side, she can lie on her back and drape both legs over his body, with legs apart to keep the operative leg from crossing the midline of the body. The female can also lie on her back and drape her non-operative upper leg over her partner’s body. Other Side Lying Positions – The partners can also face each other. The person with a new hip can lie on either side. The upper leg can be draped over the partner’s legs. 53 At home Household tasks You will need help with everyday household tasks. Please ask your family/whānau and friends if they can help you with this. Dressing and undressing Wear loose-fitting clothing. It is recommended that you sit in a chair or on the side of the bed. Dress the operated leg first and undress the operated leg last. You may find a long-handled shoehorn helpful. Making your bed Stay in bed and pull up the top sheet and duvet. When you get out of bed the task should be simply smoothing the covers. Make sure the floor is clear around the bed to avoid tripping or falling. Meal preparation The contents of your cupboards should be arranged so that essential items are within reach without bending or stretching (between shoulder and waist height). Avoid lifting heavy saucepans. Slide them across the bench instead. If you live alone you may need a trolley to move heavier items across the room. Your occupational therapist can provide loan equipment if needed. You should think about using a stool while preparing food, washing up and using the stove top, to provide short breaks from standing. Avoid using the oven if it is not at waist height. Small items can be carried in a backpack or an apron with pockets. Think about using a frozen meal or meal delivery service. 54 Wash small loads of clothes over the week, rather than one large, heavy load. At home Laundry Adjust the clothesline to avoid stretching or try using a clotheshorse for smaller items. Showering / body washing Your occupational therapist will provide you with the appropriate equipment aides for using in your shower or bath. For safety, sit on the shower chair, stool or bathing equipment provided to you. This will be adjusted to the correct height for you. Use a reacher with a sponge or flannel wrapped around it to wash your legs. Wrap a towel around a reacher to dry your legs. Shopping Shop with someone who is happy to carry items for you. Avoid shopping during peak times. Do smaller, regular shopping trips to avoid heavy shopping bags and trolleys. Have items packed into several smaller bags for easier carrying. If possible, use a trolley to push your groceries rather than carry them. If you must carry shopping, divide the weight evenly into at least two bags with one in each arm, or try using a backpack. Consider shopping for groceries on the internet. 55 At home Cleaning Once you return to cleaning, use long-handled aids and lightweight items. Avoid twisting and bending. Getting in and out of the car If possible, get into the car on a flat area such as a driveway or road. Have the car parked away from the curb so your feet are on the road. This allows room for your mobility aid and makes the car seat higher. Avoid very low and very small cars. Do not get into the back of a 2-door car. Have the passenger seat pushed as far back as possible with the back of the seat in a recline position. Back yourself up towards the car so that you are facing away from it. You will be getting into the car bottom-first. Reach for the seat back or dashboard, not the car door. Gently lower yourself down to the seat, bending your operated leg only as much as is comfortable but no more than 90°. Shuffle yourself backwards into the seat as far as possible, leaning back against the seat until you are able to bring both legs into the car. Getting out of the car is done in the same way, only in reverse. Tip: Raise the passenger seat by placing a folded blanket on it, and put a plastic bag on top of the blanket to help you swivel around and slide your bottom much easier. 56 You may not be able to drive for up to six weeks following your surgery. You should discuss this with your surgeon. Before you return to driving you need to be able to get in and out of the car safely and also control the vehicle. Please check with your insurance company if you are going to drive. At home Driving Air travel It is advisable not to fly within the first six weeks following a joint replacement. If you are planning on flying within New Zealand or overseas, it is important that you discuss this with your surgeon. 57 Hip exercises Hip exercises A physiotherapist will assist you with exercises to help your circulation and help restore movement to the joint. They will also assist and teach you to walk. If your surgeon has used a lateral approach for your hip surgery, then please do not perform abduction exercises (side lifting of the leg) for 6 weeks. Your surgeon may provide alternative exercises. Day of operation It is important that you start with some simple exercises straight after your surgery. Deep breathing exercises Lying or sitting down, take a deep breath in through your nose and feel your tummy rise. Then breathe out slowly through your mouth. Take four to five breaths like this. Repeat five to six times a day. Circulation exercises With your knees straight, stretch your ankles up and down. This helps your circulation and will help to prevent a DVT (deep vein thrombosis). Do this regularly (every hour). Gluteal (buttock) exercises Lying on your back, squeeze your buttocks firmly together. Hold for three seconds, then relax. 58 Repeat 10 times each hour. These exercises are designed to increase the mobility of your new hip. All exercises should be done slowly and in a controlled manner. You should be aiming to do all of these exercises about four to five times a day. Hip exercises Day 1 after your operation As you get stronger you will be able to do more each time. To start with, aim to do 10 repetitions of each exercise and build to do 20. Quadriceps (thigh) exercise With your toes pulled towards you, tighten your thigh muscles by pushing your knee down into the bed. Hold for five seconds and relax. Knee extension Place a rolled towel under your knee. Keep your thigh resting on the rolled towel and lift your heel off the bed so that you fully straighten your knee. Hold for five seconds and slowly lower. Hip and knee flexion Lying on your back, slowly slide your heel up the bed, bending your knee, then slowly straighten again. Hip abduction (not for lateral approach) Lying on your back, keep your knee straight and your toes facing the ceiling and slide your leg out to the side. Slide it back to the middle. 59 Hip exercises Standing exercises Your physiotherapist will instruct you when you can start doing these exercises. • Hold onto a bench or solid surface to do these exercises. • strengthen your “new” hip. Hip abduction (not for lateral approach) Stand straight holding onto a support. Lift your leg to the side, making sure that your toes face forward and that your trunk stays upright. Hip extension Stand straight holding onto a support. Bring your leg backward, making sure that you keep your knee straight and do not lean forward. Knee extension Sit on a chair, pull your toes up, tighten the front of your thigh muscle and straighten your knee slowly. Hold for five seconds, then slowly lower. 60 Walking When you are using your crutches or walking frame, always remember... Hip exercises Using crutches or frames • stand up straight and keep your head up • to take a step - take both crutches forward first • step forward with your affected leg and take the weight through your arms • step forward with your good leg • walk with your feet pointing straight ahead - try not to let your affected leg turn out to the side. Getting up and down from sitting • Use chair arms or bed to push up into standing, then put hands/ arms into crutches. • Do not put hands/arms into crutches before standing. • Remove your hands/arms from the crutches, then use the chair arms/ bed to sit down. 61 Hip exercises Stairs A good way to remember which leg goes first when going up / down stairs with crutches, is using the acronyms GAS and SAG. Going up Place GOOD leg first. Then AFFECTED leg up same step. Followed lastly by STICKS (crutches). If using a banister/hand rail, put your crutches into one hand in the shape of a cross, and hold the banister with the other hand, as in the first picture. If someone is with you when using the stairs, please ask them to carry one crutch to enable you to use the banister/hand rail. Going down Place STICKS (crutches) down a step first. Then AFFECTED leg on step. Followed by GOOD leg on same step. 62 A physiotherapist will assist you with exercises to help your circulation and help restore movement to the joint. They will also assist and teach you to walk. Your surgeon may provide alternative exercises. Knee exercises Knee exercises Day of operation It is important that you start with some simple exercises straight after your surgery. Deep breathing exercises Lying or sitting down, take a deep breath in through your nose and feel your tummy rise. Then breathe out slowly through your mouth. Take four deep breaths every hour. Ankle exercises Move your feet up and down at the ankles. Repeat 10 times each hour. This is to help your circulation. Quadriceps (thigh) exercises Press the back of your knees down into the bed. Hold for five seconds, then relax. Repeat 10 times each hour. Gluteal (buttock) exercises Lying on your back squeeze your buttocks firmly together. Hold for five seconds, then relax. Repeat 10 times each hour. 63 Knee exercises Days 1 - 3 after your operation Repeat all exercises 4 - 5 times a day. Build-up how many repetitions you do. Quadriceps (thigh) exercises Pull your toes towards you. Press your knee down into the bed. Hold for five seconds, relax. Repeat five times. Inner-range quads Place a rolled up towel under your knee. Keep your thigh resting on the towel and lift your heel so that you straighten your knee. Straight leg raise Keep your knee straight and your toes pulled back. Tighten your thigh muscles. Lift your leg about 10cm off the bed. Lower slowly. 64 Knee straightening Place your heel on a pillow or rolled up towel. Let your knee hang down. This will stretch out the structures at the back of your knee, helping you to get a straight leg. Knee exercises Exercises designed to help you stretch your knee. Do it for a minute to start with and build up. Knee bends Bend your knee and slide your foot towards you. If this is difficult we can give you a board to do it on. At home you can use a tray or plastic bag. Sitting knee bends Sit in a chair with your foot on the ground. Slide the foot firmly towards you and then release. Hold for five seconds each time in the fully bent position. Do not allow your hips to move, just the foot. You can use your “good” foot to help slide the “operated” leg back. 65 Knee exercises Days 3 - 4 after your operation These exercises are designed to help you to strengthen and stretch your knee. Knee extension Sit on a chair (if you like, you can have a small 1-2kg weight around your ankle). Pull your toes up, tighten the front of your thigh muscle and straighten your knee slowly. Hold for approximately five seconds, lower slowly. Sustained knee extension Rest your foot on a foot stool, let your knee straighten. Let gravity pull your knee down straight. Hold as long as you can tolerate (eg - one minute to 10 minutes). You need to continue these exercises when you get home from hospital. Your physiotherapist will give guidance on when to extend your walking distances and when you can move on to the more challenging exercises. 66 Assisted knee flexion While sitting, bend your operated knee as far as you can. Then cross your good leg over your operated leg to assist further knee bend. Knee exercises More challenging exercises Hold for five seconds. Knee flexion in standing Stand, holding on to a solid support. Keeping your knees together, bend your foot up behind you. Mini knee squats Stand and lean against a wall. Place feet hip width apart, about 20cm away from wall. Gently slide down wall as far as comfortable. Hold for five seconds. Gentle lunges Place your operated leg in front. Stand by a step, hold railing for support. Place operated leg onto step. Gently bend knee and lunge forward. Hold for three seconds. 67 Knee exercises Getting around Standing and sitting with crutches Do not stand up or sit down with your hands through the crutches. Place your crutches together to make an “H” shape. Hold the handles of your crutches together with your operated side hand and place your other hand on the arm of your chair or on the edge of your bed. Push up from the bed / chair and your un-operated leg to stand up. Once standing, place one arm into one of the crutches and hold onto the other crutch as you put your other hand in it. Then bring your crutches out to each side. To sit, reverse this procedure remembering to put your operated leg out in front of you when you sit. Walking with crutches / frame Stand up straight and keep your head up. To take a step: • take both crutches forward first • step forward with your affected leg and take the weight through your arms • step forward with your good leg. Walk with your feet pointing straight ahead — try not to let your affected leg turn out to the side. Turning — do not pivot or swivel on a fixed leg, but lift feet up and take small steps. 68 A good way to remember which leg goes first when going up / down stairs with crutches, is using the acronyms GAS and SAG. Going up Place GOOD leg first. Knee exercises Stairs Then AFFECTED leg up same step. Followed lastly by STICKS (crutches). If using a banister/hand rail, put your crutches into one hand in the shape of a cross, and hold the banister with the other hand, as in the first picture. If someone is with you when using the stairs, please ask them to carry one crutch to enable you to use the banister/hand rail. Going down Place STICKS (crutches) down a step first. Then AFFECTED leg on step. Followed by GOOD leg on same step. 69 General advice General advice Total Mobility is a nationwide scheme designed to help eligible people with impairments to use appropriate transport to help make their community participation better. This help is given in the form of subsidised door-to-door transport services wherever scheme transport providers operate. In the Bay of Plenty it’s run by Bay of Plenty Regional Council. The scheme gives financial assistance by way of a voucher that allows registered users of the scheme to a 50% discount on taxi fares. The user is required to pay the other half of the fare to the taxi driver, at the time the trip is taken. Users of the scheme must carry a Total Mobility photo ID card to be able to use vouchers. The definition of eligibility for participation in the scheme is as follows: An eligible applicant must have an impairment that prevents them from undertaking any one or more of the following five components of a journey unaccompanied, on a bus, train or ferry in a safe and dignified manner: • • • • • getting to the place from where the transport departs getting on the transport riding securely getting off the transport getting to the destination The following list of disabilities is an aid to assist decision making on the level of mobility impairment which would qualify for eligibility: • Inability to walk to the nearest bus stop or board and alight from a bus for reasons such as pain, respiratory problems, sensory disabilities, neurological fatigue, reliance on complex walking 70 • • • • • General advice • aids, or requiring the constant assistance of another person for mobility. Total loss of or severe impairment of vision preventing the independent use of public passenger transport. Intellectual, cognitive or psychiatric disabilities which may necessitate the constant assistance of another person for travel on public passenger transport. People with impairments who meet the criteria for the Total Mobility scheme, and are able to use bus, train or ferry services some of the time, but not all the time, are eligible for the scheme (e.g. people with impairments such as epilepsy or arthritis). People who meet the criteria for the Total Mobility scheme and have an impairment that has lasted, or is expected to last for six months or more are eligible. People with impairments who meet the criteria for the Total Mobility scheme and live in residential care are eligible for the scheme. Children with impairments who meet the criteria for the Total Mobility scheme are eligible. Phone 0800 884 880 Fax 0800 884 882 Email [email protected] © 2014 Bay of Plenty Regional Council Hand hygiene Hand hygiene is the single most important way to prevent the spread of harmful germs (bacteria and viruses) that can cause infection. In hospital you can expect your healthcare workers (doctors, nurses, healthcare assistants and others) to perform excellent hand hygiene before, during and after caring for you. Healthcare workers should clean their hands: • Before they touch you. • After they have touched you, before they leave. • Directly before and directly after they perform a procedure on you. 71 General advice • After they are exposed to body fluids. • After touching your surroundings (e.g. bed) if none of the above have occurred. It’s OK to ask We take hand hygiene seriously, however, we are not perfect and there may be times when we do not clean our hands as often as we should. If you are worried that a staff member has not cleaned his or her hands properly it is ok to remind us, in fact, we welcome it. What you can do Germs are present all around us. When we are ill we are more at risk of developing an infection from harmful bacteria or viruses that we may pick up, either from something we have touched or from someone passing it onto us. The risk of infection being spread from a healthcare worker’s hands to you is reduced when they perform correct hand hygiene. In addition, it is important that you clean your own hands at the following times while you are in hospital: • Before eating food. • After using the bathroom. • At any time a healthcare worker has advised you to do so (e.g. caring for your own catheter). If you have visitors, they can protect you from harmful germs by cleaning their hands: • Before they touch you. • Before they give you food. • After using the bathroom. • At any other time a healthcare worker has advised them to do so (e.g. assisting with your wound dressings). 72 Our “Keeping You Safe from Falls” programme starts when you enter hospital. Slips, trips and falls can happen to anyone and sometimes patients can fall while in hospital. General advice Moving safely and preventing falls while in hospital Why does this happen? • • • • A number of medical conditions can increase your risk of falling. Disorientation due to unfamiliar surroundings. The effect of medications. Problems with walking and balance. Unfortunately some patients will still fall despite all of us following the advice given on this page. However by working together with you, your relatives and carers, we aim to minimise the risk of falls. So what will the hospital do? We may: • Move your bed to a more suitable position on the ward to allow us to observe you more closely. • Assist you if you are having difficulty with walking, or if you need help with your personal care. • Teach you how to move safely with appropriate walking aids. Remember that if you need help, please ask! CALL – DON’T FALL What can I do to keep myself safe? You can: • Use your call bell. • Keep everything you need within easy reach and reduce clutter by sending home anything that you don’t need. • Bring with you all your necessary personal items such as your glasses and hearing aids. 73 General advice • Bring any walking aids from home and follow the advice provided by therapists, nursing and medical staff. • Wear non slip socks, slippers or shoes that fit well – socks alone are slippery. • Wear clothes that are not too long or too loose. • Take your time when standing or getting out of bed. • At night, turn on the light before you get out of bed, and turn on the light in the toilet. • Take extra care on wet or slippery floors . • Watch out for any clutter or obstacles in your way, and ask one or our team to move them. • Do not use hospital furniture for support as it may not support you. How can my friends and family help? They can: • Tell us if you have had any falls in the past. • Put back anything that they may have moved during their visit. • Minimise clutter by taking any unnecessary personal items home. 74 Take action and fight the 5 home hazards Moss, rugs, power cords, chairs and puddles - these are just 5 of the many things responsible for over 280,000 serious falls around New Zealand homes last year. Find out how to take action and Fight the 5 – you’ll see that it’s surprisingly easy to avoid injury and make your home a safer one. 1 Moss Moss on outside steps, paths and decks can be very slippery. Action: • Waterblast, scrub or spray these areas with moss removal products • Cut trees and shrubs back to prevent shade – conditions which moss thrives in • Highlight step edges with painted strips • Light any dim outside areas • Build new decks with grooved timber • When painting decks, use nonslip paint or a grit-additive. 2 Power Cords Snaking power cords, telephone wires and general clutter are easy to trip over. Action: • Get them out of harm’s way with cord clips, quick-release power cords or multi-boxes • Secure any loose cords or wires to the wall • Tidy away general clutter, use baskets and other storage systems. 3 Rugs & Mats Unsecured rugs and mats on floors and stairs can cause falls. Action: • Secure them with anti-slip tape or spray on a non-slip coating • Use carpet grips for mats • Repair damaged carpet on stairs • If you’re buying a new rug, then look for one with a non-slip backing • Wear shoes or slippers (rather than socks) on wooden floors. General advice Preventing falls while at Home 4 Chairs Chairs aren’t ladders and are very unstable if you stand on them. Action: • Use a ladder or step-ladder to reach high objects • Store heavy, regularly used objects down lower • Use long-life smoke alarms and light bulbs so you don’t have to change them so often. 5 Puddles Wet areas are hazardous. Action: • Wipe up spills as soon as they happen with mops, sponges or cloths • Use non-slip bath/shower mats • Use floor mats to absorb any excess water • Install handrails to assist getting out of the bath/shower • If renovating, install non-slip flooring in wet rooms (bathroom, kitchen and laundry). 75 General advice Recognising heart attack Warning signs vary from person to person and they may not always be sudden or severe. Although chest pain or discomfort is the most common symptom, some people will not experience chest pain at all. Symptoms may include pain, pressure, heaviness or tightness in one or more parts of the upper body including chest, neck, jaw, arm(s), shoulder(s) or back in combination with other symptoms such as nausea, shortness of breath, dizziness or a cold sweat. Knowing the warning signs of heart attack and acting quickly by calling Triple One (111) can reduce damage to your heart and increase your chance of survival. It could save your life, or the life of someone you love. If you experience the warning signs of heart attack for 10 minutes, or if they are severe or get progressively worse, call Triple One (111) immediately and ask for an ambulance. Recognising stroke Is it a stroke? Check it out the FAST way! Call 111 immediately if you suspect a stroke! The FAST campaign encourages New Zealanders to learn the key signs of stroke and to act fast by calling 111 if they suspect a stroke. Prompt action can save lives, improve recovery and reduce ongoing costs from stroke to families, caregivers and the health services. It is vital to recognise when someone is having a stroke and to start treatment as soon as possible, because the sooner medical treatment begins, the more likely brain damage can be reduced and a better outcome achieved. What are the symptoms of stroke? The signs and symptoms of stroke usually come on suddenly. The type of symptoms experienced will depend on what area of the brain is affected. 76 • sudden weakness and/or numbness of face, arm and/or leg especially on one side of the body • sudden blurred or loss of vision in one or both eyes • sudden difficulty speaking or understanding what others are saying • sudden loss of balance or an unexplained fall or difficulty controlling movements, especially with any of the other signs. General advice Common first symptoms of stroke include: How can you tell if someone is having a stroke? By learning to recognise the symptoms of stroke you could save a life! Learn the FAST check. Stroke is always a medical emergency. Even if the symptoms go away quickly or don’t cause pain call 111 immediately. Face Smile – is one side drooping? Arms Raise both arms – is one side weak? Speech Speak – unable to? Words jumbled, slurred? Time Act fast and call 111. Time lost may mean brain lost 77 General advice Flu Have you had your flu vaccine? Influenza spreads very easily and up to 1 in 5 of us come in contact with influenza every year. At its worst, influenza can put you in hospital and can even be fatal. In many cases, influenza can keep you in bed for a week or two, and drain your energy keeping you from work, sport or just about anything that requires leaving the house. For adults with long-term health conditions and people aged 65 years and older, influenza can be a serious illness. For this reason the influenza immunisation is provided FREE to these groups. Don’t take the risk! Call your local general practice or medical clinic to arrange a FREE vaccination if you are in any of the following groups: • • • • • • • regularly use an asthma preventer have diabetes have heart disease have kidney problems have cancer have a serious medical condition are aged 65 years or over If you do not have one of these eligible conditions, you still benefit from an influenza immunisation. available at a small cost. Flu vaccines are administered free between the 1st March – 31st August each year, beginning and start dates however can change. 78 Patients’ General advice Your rights and responsibilities Code of Responsibilities Bay of Plenty District Health Board staff are committed to working in partnership with you to achieve the best possible outcomes. Help us to help you by: n Being completely frank and honest about your health, family history of illness, current medications and treatments n Cooperating and being involved in your care and treatment n Asking questions about anything you do not understand n Informing us if you are unable to keep an appointment n Understanding your rights and telling us if you feel they are not being met n Showing consideration to other patients by respecting their comfort, privacy and confidentiality n Respecting the staff and property of the Bay of Plenty District Health Board smokefree ZERO tolerance to violence If you need more information: • Ask a staff member or the manager of the ward / department • Contact Quality and Patient Safety Team, Mon-Fri, 8am-4pm on 07 579 8176 or the After Hours Manager on Tga 07 579 8000 or Whk 07 306 0999 79 General advice How to feedback to the Bay of Plenty District Health Board Why Feedback? At the Bay of Plenty District Health Board we understand that being in a hospital, whether it is youself or for a loved one, can be a very distressing experience. We welcome feedback as it provides us with an opportunity to review the services we offer and guides us to make quality improvements as we strive for health excellence. Ways to provide Feedback If you wish to provide feedback, make a compliment, comment or complaint, there are a number of ways you can do so: • Speak to any staff member, Nurse, or Doctor • Speak to Regional Māori Health Services Kai Awhina (07) 579 8737 or Regional Maori Health Services, Tauranga Hospital (07) 579 8560 or Te Pou Kokiri Māori Health Services, Whakatane Hospital (07) 306 0954. • Complete our “Would you like to tell us something?” form available throughout the hospital and leave it at any reception • Phone the Quality & Patient Safety Team by calling the on-call Quality Coordinator on 021 791 864, or calling the telephone operator on (07) 579 8000 and ask to be put through to the on-call Quality Coordinator, or call (07) 579 8176 • Fill out an online form on the BOPDHB website at http://www. bopdhb.govt.nz/your-dhb/quality-and-patient-safety/feedbackon-patient-care/feedback-on-patient-care-form/ • Write a letter to: Quality & Patient Safety Administrator Bay of Plenty District Health Board Level 2, Tauranga Hospital Private Bag 12024 Tauranga 3143 • Email the Quality and Patient Safety Administrator on: [email protected] 80 Every hour, day week, month and year that you go without smoking, your health will improve. When you quit, your body starts to repair itself straightaway – you’ll notice the difference! Quitting is a great thing to do at any age – you’ll live longer, and your quality of life will improve. 8 hours Your heartbeat slows down to normal, and your blood pressure goes down. 24 hours Carbon monoxide is out of your system within a day, and your lungs work better. 3-5 days Your senses of taste and smell begin to improve. The phlegm in your lungs loosens, and you start to cough it up and get rid of it. 1-6 months You feel fitter and are able to exercise more easily. The blood flow (circulation) to your hands and feet improves. You produce less phlegm. If your blood pressure has been high, it is likely to fall. 1 year You have almost halved your risk of sudden death from heart attack. 5 years Your risk of cancers of the mouth, throat and oesophagus is half that of a person who continues to smoke. 10 years Your risk of lung cancer is less that half that of a person who continues to smoke. 15 years Your risk of sudden death from heart attack is almost the same as that of a person who has never smoked. General advice Health benefits when you quit smoking 81 General advice Basic life support 111 82 82 Police / Fire / Ambulance dial 111 Ministry of Health Healthline www.health.govt.nz 0800 611 116 If you or a family member are feeling unwell but not sure whether you need to see a doctor, you can call the Healthline for free advice from trained registered nurses 24 hours a day, 7 days a week. General advice Useful telephone numbers and internet links BOPDHB website Send a patient a message link Arthritis NZ...............................................................0800 663 463 Age Concern..............................................................06 759 9196 Family Violence.........................................................800 456 450 Disability Information Centre...................................06 759 0019 Health & Disability Commission.........................www.hdc.org.nz Quitline........................................ www.quit.org.nz 0800 778 778 St Johns Health Shuttle (Tauranga only)................0800 785 646 83 Notes 84 85 www.bopdhb.govt.nz April 2015 86


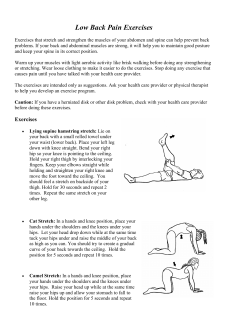


© Copyright 2026