
SEWING WITH KNITS – TIPS AND TRICKS
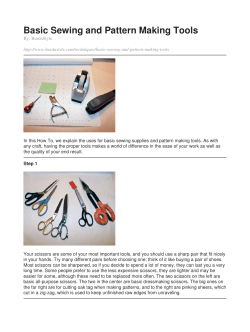
SEWING WITH KNITS – TIPS AND TRICKS
INTRODUCTION
I’m always surprised that many sewers are afraid of sewing with knits. Let me tell you, it’s easier
than you think. My favorite thing about sewing with knits is all the flexibility. A garment made
from a stretchy fabric doesn’t have to fit as precisely as one made from a woven, so knits
eliminate the pressure of exact measurement and altering patterns. Plus they are super comfy
to wear! We offer some GREAT pattern to learn to love knits.
The first rule when sewing with knits is that if the fabric stretches, the seams must stretch too, so
that the stitching will not pop as you bend and move. You can get successful results on knits
with basic sewing machines as well as sergers (you just need to know a couple tricks). Spend a
little time familiarizing yourself with your machine capabilities. Read your manual (many
machines have a mock-overlock stitch or a stretch stitch) and set aside an afternoon to really
master your machine. Fiddle with different settings and plenty of scraps to test. Write on the
scraps with a sharpie what settings you used. A little time and experimentation learning the
techniques and figuring out the settings for your machine are definitely worth the effort.
*** Preshrink your fabric by washing, drying and ironing (if needed) exactly how you would care
for the finished item before you begin. Knits are notorious for shrinking! ***
Not all knit fabrics stretch the same amount, use the following ruler to determine the stretch of
your fabric. We recommend fabrics that have a 2-way stretch and moderate (35% -- jersey
knit and interlock) to super (75% -- rib knit and fabric with spandex/lycra) stretchability.
Fold the knit perpendicular the grainline (along the direction of stretch). Place pins 4” apart.
Hold knit firmly at edge of gauge and stretch without distorting the fabric. If distortion (parallel
folds) appears, relax tension. Note the distance the knit stretched beyond its original length.
Release the pulled end; if it returns to its original location, it has excellent recovery.
25
50
PERCENT OF STRETCH
1
2
3
4
Page 1— www.jocole.com
75
100
CUTTING
Make sure you cut your pieces so that the greatest amount of stretch goes around the body,
width wise. Pattern weights are ideal instead of pins. (River rocks, large washers, tuna cans).
NOTIONS
thread, universal, ballpoint or stretch needles
REQUIRED TOOLS
scissors, basic sewing machine
OPTIONAL TOOLS
serger sewing machine, stretch twin needle, wooly nylon thread, fold-over elastic
BASIC SEWING MACHINE TIPS
STRETCH NEEDLES:
Stretch or Ballpoint needles are best.
pinch.
Universal will work in a
TENSION:
Reducing the tension will provide more give to your stitching. (My
machine is usually at 5, but I turn it down to a 4 for stretch stitching – your machine may differ).
THREAD:
You can use all-purpose cotton-wrapped polyester thread or polyester
cone thread. To get the maximum stretchability (especially required on neckline and hems)
use a wooly nylon thread in the bobbin and normal thread in the needle. Wooly nylon has a
fluffy feel and is extra stretchy. Because you’ll only use it in your bobbin the color doesn’t have
to match exactly. I’ve been told to hand wind the bobbin, but I wind it by machine – your
machine may differ.
STRAIGHT STITCH:
Use a medium to long stitch (short stitches will stretch out the
fabric undesirably – I use 3.5) and gently stretch the seam as your sew. Stretch as much as the
fabric stretches easily … don’t pull it super taut! The seam may be wavy, pressing and steam
will help it return to its normal length, the stitches are closer together and the upper and lower
thread tensions have loosened. You can then press the seams open or to one side, and
topstitch if desired. Knits do not ravel, so seam finishing isn’t necessary.
FAUX-COVERSTITCH: You can use a twin needle in your sewing machine to give you
the appearance of a coverstitch. Topstitching the hem, especially with a twin needle, may
result in tunneling. One solution is to stabilize the hem with strips of fusible interfacing. It’s
easiest to stabilize the hems before assembling the garment. Cut 1/2 inch wide strips of soft,
all-bias knit fusible interfacing. Sew or serge the right side of the strip to the wrong side of the
hem edge (adhesive side up). After constructing the garment, fold the hem up, fuse in place,
and topstitch from the right side. Spray starch and pressing can also help things stay in place.
Hemming before you sew or serge the side seams together is a great trick. It’s much easier to
hem a flat piece of fabric than it is to hem a loop – especially small children’s wear items.
ZIGZAG STITCH:
Perfect stitch for knits. For very stretchy knits use a medium to
wide zigzag stitch, especially on hemming. Narrow zigzags can be used in place of straight
stitching, but the seams will have the appearance of a ladder if the seam is pulled open. Use
a lower than normal tension when zigzag stitching on knits – I prefer stretching the seam while
using a straight stitch.
Page 2— www.jocole.com
WALKING FOOT:
An excellent tool if you’re planning on sewing knits, but not ready
to spend money on a serger is a walking foot (average cost of $25). It is a special attachment
for your sewing machine that has built in feed dogs that move the top of the fabric at the
same time and rate of speed as the feed dogs on your sewing machine that move the
bottom of the fabric. (Sewingsupplywarehouse.com/sewmacfeet.html carries universal feet,
and you only need to know whether your machine has a low, high or slant shank.)
Knits can get pushed down through the throat plate and generally occurs on the edge
when starting a seam. Start the seam ½” from the top edge, go back and re-stitch the1/2”
from the other direction.
Knits have a tendency to curl – especially at the hem; to help circumvent the issue
spray starch can be used. To make your own simply mix 16 oz water with 3/4 Tbsp cornstarch
in a spray bottle. Just make sure to shake it before using it as it settles rather quickly. Press
(don’t glide) in an up-and-down motion to keep your pieces from being pulled out of shape.
Don’t hold iron in the same place for too long or you can end up with scorch marks that you
cannot remove. Iron from the back to avoid flecks on the front. To remove buildup on your
iron, dampen a cloth with white vinegar and iron over the cloth with a hot iron, or a wet Mr.
Clean Magic Eraser on a cold iron. Wash items before storage, as cornstarch is a food
product and can attract bugs!
Beware of pinning as they have a tendency to stretch the fabric while you’re sewing and
generally not where you want it to stretch. Keep as much of your work on the table as
possible, not hanging over the edge and in your lap. It pulls on the knit and can stretch it out
undesirably.
SERGER MACHINE TIPS
SERGER STITCHES:
If you have a serger, you’ll find it’s very easy to assemble knits with
a finished, professional look, and the seams have a built-in elasticity, so you don’t need to
stretch as you sew. Make sure your stitch is balanced, adjusting the tension as needed. The
stitches are stretchy on their own, but can be made even more elastic by using wooly nylon
thread in both the upper and lower loopers. Both 3-thread and 4-thread overlock stitches can
be used on knit fabrics. 3-thread overlock is the most versatile stitch. It uses only one needle
(either left [wider] or right [narrow]). With some slight adjustments it can become a 3-thread
rolled hem.
TYING ON:
Here’s a quick method when you need to change your thread
color, turn the tension dials to zero – please take note to what they were set to before you
change them. Just clip the old thread color at the cone and tie the new thread onto the old
thread tail and pull it through your machine. Be careful while the knot is going through the
tension dials and the needle holes – go slowly so the thread doesn’t break. You might need to
clip the threads when you get to the needles are re-thread them. Turn tension dials back to
where they belong.
STITCH LENGTH:
Commonly set to 2.5mm. For heavier, thicker fabrics, use a
longer stitch length, and for thinner fabrics use a tighter stitch length.
STTICH WIDTH:
Determined by the needle position and cutting width setting. If
you use the left needle, then the stitch can be 5-7mm wide (about ¼” wide), while a right
Page 3— www.jocole.com
needle position will form a narrower 3-5mm wide (about 1/8” wide) stitch. The cutting width you
choose will depend on the heaviness of the fabric. For a very delicate fabric, you should use
a smaller cutting width, while something like thick denim is better suited for a wider setting. If
the seam is cupping (not laying flat), the cutting width needs to be smaller. This happens when
the machine is trimming the fabric too wide and wrapping it in too-narrow thread channel. At
the other extreme, if the loops are hanging off the edge of the fabric, then the cutting width
needs to be bigger.
THREAD TENSION:
This needs to be adjusted depending on the stitch width and the
bulkiness of the thread and fabric. If you’re having tension issues, testing things out with
different colored threads is the quickest way to determine where the imbalance is.
SERGING CURVES:
To serge around inside or outside curves, guide the fabric into the
blade, not the needle. Remember, cutting takes place before the fabric reaches the needle.
Because the long serger presser foot holds the fabric more securely, you may need to raise
and lower the presser foot several times to maneuver around very tight curves.
DEALING WITH SERGER CHAINS:
Unlike a conventional sewing machine, instead of
starting on the fabric you will start before the needle meets the fabric and continue after you’re
done, leaving a chain of thread at both ends.
Three ways to deal with serger chains:
SECURING ENDS:
In most cases serged seams are secured by an
intersecting seam. If that is not the case, there are several options for securing seams:
(A) Tie a knot. (B) Apply a dot of seam sealant on the thread chain at the fabric edge
and cut off excess thread chain. (C) Use a large tapestry needle to weave the chain
back into the stitching.
BEGINNING: Take 2-3 stitches into the fabric, leaving the needle(s) in the
lowest position to anchor the fabric. Raise the presser foot, smooth the thread chain
and bring the chain around and under the foot so that it aligns with the edge of the
fabric. Lower the foot and continue serging, catching the thread chain in the stitches
for about 1”. Let the blades cut off any remaining thread chain.
END:
Take 1 stitch off the end of the seam. Raise the presser foot and
bring the needle(s) to the highest position. Pull back gently on the fabric to clear the
stitch fingers. Turn the fabric over, end to end, and reposition it under the presser foot
with the needle at the seam edge, aligned with the previous needle line. Lower presser
foot and serge 5-6 stitches over the previous stitches, being careful not to cut them.
You may want to flip the cutting blade lock switch. Pivot the fabric and chain off.
Page 4— www.jocole.com
RESOURCES
Here are some of my favorite places to get knit fabric. Sure you can get some at your local
sewing store, but there is a much wider variety online.
www.Fabric.com – They have a great selection of knits, including eco-friendly options.
Plus they offer free shipping on orders over $35.
www.SpandexWorld.com – They offer a wide variety of knits that have spandex (lycra) in
them. LOVE their options … try the Rayon Lycra … its super super soft! They offer free
fabric swatches (up to 10) if you need to match colors.
Spoonflower.com – It is incredible because you can print any design – including your
OWN! They only offer an organic, knit interlock … but the designs are endless!! More
expensive than other options, but you can be guaranteed that you won’t find this fabric
in any other store!
Other options with a wide variety of prints and fibers:
HartsFabric.com,
SewzannesFabrics.com,
TheFabricFairy.com,
ChezAmi.com,
Banberryplace.com, NearSeaNaturals.com, SewMamaSew.com, denverfabrics.com,
FashionFabricsClub.com – (I’ve heard they take forever to ship … so be warned.)
SpandexWarehouse.com , Koshtex.com (large minimums).
FOLD-OVER ELASTIC RESOURCES:
eEay.com,
sewzannesfabrics.com,
foeyourdiaper.com,
elasticbytheyard.com,
sewsassy.com, kidsinthegarden.com, poshnpretty.com, diapersewingsupplies.com,
foldoverelastic.com
Page 5— www.jocole.com


© Copyright 2026