
de sig n g
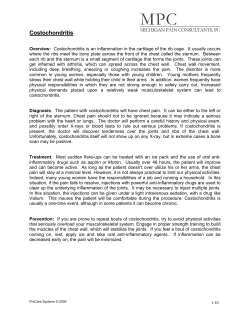
128 129
design guide
rio cascade (pages 22, 24)
Create laying patterns in minutes using the Stonemarket
Paving Generator, available at www.stonemarket.co.uk or at
your local stockist.
5
10
8
6
7
4
7
8
9
1.63m
STEPS
4.12m
4
3
460mm
2
320mm
3
300mm
5
460mm
4
300mm
5
300mm
300mm
1
2
3
385mm
2.92m
685
x
460
300mm
1
2
3
4
4
485
x
460
10
385mm
1
5
600mm
585
x
460
785
x
460
35mm
6
120mm
0.69m
STEP
3m
120mm
7
280mm
8
280mm
3m
feature
wave
280mm
(photo page 22)
Both these layouts
use the exact
quantities contained
in our project packs
of Haüs paving:
10
3
9
6
7
8
1
4
4.5 x 2.3m = 10.3m2
(including 165mm wide rill)
2.54 x 4.6m = 11.68m2 (including joints)
all layouts to 1:50 scale
9
8
9
3
2
10
600 x 300
9
10
600mm
1
5
6
120mm
2
4
5
10 No. 785 x 460mm
10 No. 685 x 460mm
10 No. 585 x 460mm
10 No. 485 x 460mm
5.08 x 2.3m = 11.68m2 (including joints)
3
1
5
Haüs
Project Pack
485
x
460
5
5 piece
Wavesets have a
length of 3.0m. All curves have a
radius of 2.15m. Invert alternate
wavesets to bond the joints.
2
2
3
1
Haüs is a range of reconstituted stone paving with an uncluttered contemporary
feel. It is available in a choice of two surface finishes, Smooth and Riven. There
are two new colour shades for 2014; the light grey, almost white Carrara and the
warm grey Mocha. These join the light creamy buff Dune and the improved and
renamed Midnight. (Dune and Carrara may require more regular cleaning due to
their light coloured nature)
Haüs is designed to be laid in a random coursed pattern to get that clean
modern look, and should be laid on a full bed of mortar, see Paving Flag Laying
Guide, page 137. It comes in 4-size Project Packs containing 10 of each of the 4
carefully designed sizes. Each pack covers 11.68m2.
585
x
460
4
5 piece Straight Edge Sets are used where Wavesets meet rectangular
paving or other straight edges.
2
haüs paving (pages 14-19)
685
x
460
5
4
1
6
9
design guide
785
x
460
1
cascade patios
Generate: • Your layout simply, following the step-by-step
process.
• Layouts using all Stonemarket products,
including circular features and driveway pavers.
• Any shaped patio you like.
• A range of laying patterns, from the
contemporary to the traditional.
• The quantity of materials required.
• The carbon footprint of your project.
3
2
300
x
300
300mm
120mm
35mm
design guide
wavesets
The Rio Cascade system can be extended as far as you wish in each
direction using the same Wavesets. Components are supplied labelled
with numbers for easy identification. For easy laying, line up the straight
joints precisely. Inserting temporary spacers will help to keep joint
widths consistent. In the drawings, some No.3 and No.8 Modules have
been cut in half. Dimensions assume Rio Paving laid with 3mm sand
filled joints. If wider mortared joints are used, dimensions will increase
and the shape will not be so precise.
design guide
130 131
millstone flag paving (pages 26-31)
465
x
310
310
x
310
775
x
620
620
x
620
775
x
465
This layout uses the exact
quantities contained
in our project packs of
Millstone Flag.
620
x
310
3 No. 930 x 620mm
6 No. 775 x 620mm
4 No. 620 x 620mm
2 No. 775 x 465mm
4 No. 620 x 465mm
2 No. 465 x 465mm
4 No. 620 x 310mm
4 No. 465 x 310mm
6 No. 310 x 310mm
930
x
620
620
x
465
One slab of each of the 10
Millstone Flag sizes shown
covers a total of 3.34 square
metres. One full pack of each
of these 10 sizes covers a total
of 79.2 square metres.
General Principles for
Random Layouts
600
x
300
300
x
300
600
x
450
The drawings shown are examples only and
will need to be adapted to the actual shape and
size of the area you wish to cover. For the best
effect, use as many different sizes as possible, in
approximately equal quantities of each size. Avoid
four slab corners coming together, or two identical
slabs laid side by side. Keep straight lines to a
reasonable length, never across the whole area.
For narrow, irregular shaped and small areas, we
recommend drawing the design before starting to
lay the slabs.
450
x
450
design guide
465
x
465
yorkstone riven paving (page 36)
This layout uses
the exact quantities
contained in our project
packs of Yorkstone
Riven:
600
x
600
450
x
300
10 No. 600 x 600mm
10 No. 600 x 300mm
12 No. 300 x 300mm
12 No. 600 x 450mm
8 No. 450 x 450m
12 No. 450 x 300mm
One slab of each of the 8
Yorkstone Riven sizes available
covers a total of 1.39 square
metres. One full pack of each of
the 8 sizes covers a total of 55.3
square metres.
4.18 x 2.48m = 10.3m2
4.8 x 2.7m = 12.9m2
millstone radius (pages 28, 29, 31)
Circles of 0.46m, 0.92m, 1.84m and 2.76m diameter can
be constructed, depending on the number of rings added
to the design. This 2.76m diameter Circle uses MultiPurpose Segments laid with continuous radial joints.
Central option of Radius Centre Stone plus Inner Tile
Segments laid with offset radial joints then surrounded by
Radius Brick Edging to give a total diameter of 3.22m.
Koi Mosaic, surrounded by 16 Mid
Segments has been squared off
using 3 piece Corner Infill Sets.
yorkstone radius (page 37, 39)
Circles of 0.45m, 0.9m, 1.8m, 2.7m and 3.6m diameter can be constructed,
depending on the number of rings added to the design.
All 2.76m diameter Circles can be
converted to a square with sides of
2.79m by the addition of four 5 piece
Corner Infill Sets. In the example
below our Aztec Sun has been
surrounded by 16 Outer Segments.
Radius Centre
Stone
460mm diameter
Inner Tile Segment
4 units per 0.92m
diameter ring
360mm
360mm
Outer Segment
16 units per
2.76m diameter ring
460mm
460mm
Radius Brick Edging
16 units per
3.22m diamter ring
540mm
230mm
610mm
360mm
Radius Centre
Stone
450mm diameter
Stone Segment
4 units per 0.9m
diameter ring
Quadrant
4 units per 0.9m
diameter ring
Yorkstone Radius
Components
525mm
450mm
350mm
465mm
460mm
360mm
180mm
Millstone Radius
Components
220mm
225mm
720mm
Mid Segment
16 units per
1.84m diameter ring
Multi Purpose Segment
8 units per
0.92m diameter circle
This 2.7m diameter
Circle is made up
from our 1.8m Stone
Segment Circle Kit
surrounded by 20
no. Mid Segments
(1pack) laid with
continuous radial
joints and squared off
using 5 piece Corner
Infill Sets.
This 2.7m diameter
Circle is made up
from our 1.8m
Quadrant Circle Kit
surrounded by 20
no. Mid Segments
(1pack) laid with
offset radial joints.
5 Piece
Corner Infill
Set To square off 2.76m
diameter circle
700mm
Inner Segment
465mm
20 units per 1.8m
diameter ring
3 Piece
Corner Infill
Set To square
off 1.84m
diameter circle
140mm
Mid Segment
Outer Segment
20 units per 2.7m
diameter ring
20 units per 3.6m
diameter ring
280mm
540mm
280mm
all layouts to 1:50 scale
425mm
450mm
425mm
450mm
450mm
450mm
450mm
700mm
565mm
3 Piece
Corner
Infill Set
To square off 1.8m
diameter circle
5 Piece
Corner
Infill Set
To square off 2.7m
diameter circle
7 Piece
Corner
Infill Set
To square off 3.6m
diameter circle
When laying circles
always lay from the
centre outwards. We
advise first laying
out dry to determine
optimum spacings
before fixing on mortar.
design guide
132 133
yorkstone octant (page 37, 39)
yorkstone octant walling (page 39)
vintage stone paving
Raven (pages 66, 67)
design guide
Available in York Buff,
Old English,
Weathered York
and Weathered
Bronze
colours
This layout uses the exact quantities contained in our project packs
of Vintage Stone Raven.
4 No. 855 x 570mm
13 No. 570 x 570mm
12 No. 570 x 425mm
11 No. 570 x 285mm
10 No. 285 x 285mm
570
x
425
285
x
285
570 x 285
570
x
570
855
x
570
Straight
Tile on Edge
32
5m
Octant Block
150mm
21
0m
225mm
525mm
Infills
0
0
8
24
48
80
Yorkstone Walling Units at 1:25 scale
Half Block
m
vintage stone paving
B (m)
0.220
0.655
1.090
1.525
1.960
2.395
0.435
0.200
100mm
150mm
225mm
160mm 50
m
175mm
Octant Coping
Full Block
Area (m2)
0.23
2.05
5.70
11.18
18.48
27.61
varies
varies
(pages 64, 65, 67)
450mm
m
m
A (m)
0.525
1.575
2.625
3.675
4.725
5.775
1.050
0.450
Straight Coping
220mm
2.56 x 4.56m = 11.7m2
The 2.27m Vintage Stone Compass Points Feature
is meticulously cut from Vintage Stone Manor,
Raven and Limestone and has an intricate brass
inlay to mark North. It is supplied as a complete
57 piece kit. Shown here with Vintage Stone
Corner Infill Sets, 4 sets make a square of side
2.85m. Corner Infill Sets are available in three
Vintage Stone colours enabling the Compass
Points feature to be easily inlaid into Manor,
Raven or Limestone paving.
435mm
Octant
Tile on Edge
m
11
0m
435mm
A
Corners
CENTRE
0
+1 ring
8
+2 rings
16
+3 rings
24
+4 rings
32
+5 rings
40
Each additional ring will add
Tile on Edge border adds
Yorkstone
Octant Cornerstone
525mm
B
Yorkstone
Octant Infill
225mm
Octant
Centre Stone
vintage stone compass points
This drawing demonstrates how Yorkstone Half Blocks and
Octant Blocks can be used to surround Yorkstone Octant
Paving, both inside and outside, without any cutting being
necessary. The Octant Block is supplied in both left and
right hand versions to enable a vertical bond to be achieved.
Inverting a block changes it to the opposite hand.
One slab of
each of the 5
sizes shown
covers a total
of 1.3 square
metres.
125mm
150mm
175mm
450mm
50
m
m
When laying Octant paving always lay from the centre outwards. We advise first
laying out dry to determine optimum spacings before fixing on mortar.
trustone linear paving
(pages 68, 69, 75)
x
x
x
x
Manor, Frost, Abbey Earthen, Abbey Silver, Vintage Limestone (pages 62-67)
This layout uses the exact quantities contained in our project packs
of Vintage Stone Manor, Frost, Abbey Earthen, Abbey Silver and
Vintage Limestone.
9 No. 855 x 570mm
8 No. 570 x 570mm
10 No. 570 x 425mm
570
x
425
285
x
285
570
x
285
x
10 No. 570 x 285mm
8 No. 285 x 285mm
570
x
570
855
x
570
x
x
x
One slab of
each of the 5
sizes shown
covers a total
of 1.3 square
metres.
Both these layouts use the exact
quantities contained in our project
packs of Trustone Linear:
12 No. 855 x 570mm
12 No. 855 x 285mm
12 No. 855 x 142mm
12 No. 570 x 142mm
8 No. 427 x 142mm
2.56 x 4.56m = 11.7m2
3.42 x 3.42m = 11.69m2
all layouts to 1:50 scale
5.13 x 2.27m = 11.69m2
Trustone Linear
Available in this innovative paving format, Trustone Linear
has diamond-sawn edges and a riven face, and comes in
project packs containing 11.69m2. To stagger the joints a small
number of slabs have been cut, marked x on the plan.
134 135
design guide
trustone paving (pages 70-75)
arctic granite revolve
10 No. 570 x 285mm
8 No. 285 x 285mm
One slab of each of the 5 sizes shown covers a total of 1.3 square metres.
570
x
425
285
x
285
570
x
570
570 x 285
Truslate Circle, Copper
is available either
as a complete 2.6m
diameter 31-piece kit,
or as a 51-piece kit
including corner infills.
The completed square
measures 3.04m.
Supplied as a
complete 73 piece kit
the Revolve feature is
2.4m square. It can
be surrounded by
20 no. Arctic Granite
Glacier 600 x 600mm
to increase its size
to 3.6m square as
shown on page 78.
855
x
570
2.56 x 4.56m = 11.7m2
trustone radius (pages 73, 75)
425mm
Radius Centre Stone*
560mm diameter
First Ring Segment*
8 units per 1.70m
diameter ring
225mm
425mm
truslate star (pages 86,87)
570mm
The 1.8m square Truslate Star
feature comes as a complete
17-piece kit. Each piece is made
up of pieces of blue and ochre
tumbled slate carefully bonded to
a mesh backing. The colour shades
blend well with all three colours of
Truslate.
The pieces should be laid on a full
bed of mortar and pointed with Fast
Point for easy and quick installation.
7 Piece
Corner Infill Set
To square off 3.98m dia
circle (Fieldland only)
570mm
570mm
670mm
Second Ring Segment*
16 units per 2.84m
Third Ring Segment
diameter ring
32 units per 3.98m diameter
335mm
ring (Fieldland only)
280mm
570mm
5 Piece
Corner Infill Set
To square off 2.84m dia
circle(Fieldland, Glenmoor
and Fellstyle)
This layout uses:
10 No. Truslate Borders
4 No. Truslate Corners
3 No.Truslate 610 x 610mm
20 No. Truslate 610 x 305mm
3 No. Truslate 305 x 305mm
Truslate Star Border and
Corner units are available
separately. The Border unit is
600 x 300mm and the Corner
unit is 300mm square. In the
layout shown the Border and
Corner units are used to create
a border to an area of Truslate.
The layout can be enlarged to
suit the available space.
425mm
570mm
560mm
* Available in Fieldland and Glenmoor
390mm
3 Piece
Corner Infill Set
To square off 1.7m dia
circle(Fieldland only)
Circles of 0.56m, 1.70m, 2.84m and 3.98m diameter can be constructed,
depending on the number of rings. This 3.98m circle (only available in
Fieldland) laid with offset radial joints has been squared off using 7 piece
Fieldland Corner Infill Sets.
marketstone paving (pages 94, 95)
This layout uses the exact quantities contained in our
project packs of Marketstone.
The Tortoiseshell
Butterfly, see page 73,
is 1.70m diameter and
is supplied as a
complete 44 piece kit.
It can be squared off
with 3 piece Corner
Infill Sets but is shown
here surrounded by
Fieldland Second Ring
Segments to make a
2.84m diameter circle.
9 No. 855 x 570mm
8 No. 570 x 570mm
10 No. 570 x 425mm
570
x
425
The Emperor Dragonfly, see page 73,
is 1.70m diameter and is supplied as a
complete 21 piece kit. It is shown here
squared off with 3 piece Corner Infill Sets
The Fieldland Nautical Star, see page 73,
is 1.70m diameter and is supplied as a
complete 33 piece kit. It is shown here
squared off with 3 piece Corner Infill Sets
285
x
285
570 x 285
One slab of each of the 5 sizes shown covers a total of 1.3 square
metres. When the plan is used for Marketstone Sand Multi Paving,
it will cover 13.4 square metres due to the slab sizes being larger
in that colour.
570
x
570
855
x
570
2.56 x 4.56m = 11.7m2
all layouts to 1:50 scale
10 No. 570 x 285mm
8 No. 285 x 285mm
design guide
9 No. 855 x 570mm
8 No. 570 x 570mm
10 No. 570 x 425mm
truslate circle (page 87)
(pages 78, 79, 81)
This layout uses the exact quantities contained in our
project packs of Trustone Fieldland, Glenmoor, Fellstyle,
Torvale and Cotsdale.
planning and laying guide
design guide
136 137
Preparation
marketstone circles (pages 94, 95)
Marketstone Circles are
available in all of our
Marketstone colours.
Pink Multi, Grey Multi and
Autumn Multi Circles are
2.84m diameter and are
supplied as complete 37
piece kits. Sand Multi and
Sahara Circle share the
same configuration but are
2.44m diameter.
Radius Centre Stone
560mm diameter
Segment Number One
12 units per 1.70m
diameter ring
Segment Number Two
24 units per 2.84m
diameter ring
150mm
220mm
570mm
570mm
Planning Suggestions
•
•
•
•
•
440mm
370mm
Draw the area to be paved using graph paper.
A scale of 1:50 will allow direct use of the
drawings on pages 128-137.
Use dimensions that minimise cuts to paving.
Paving surface must be at least 150mm
below the damp course in any adjacent wall.
Provide a gradient of 1:40 or steeper, towards
adequate drainage.
•
•
This is heavy work, requiring specific skills,
tools and experience.
Before starting, refer to suitable professional
advice, publications or websites.
The following advice assumes you have acquired
a basic knowledge of what is required, including
health and safety precautions.
Foundations
•
millstone driveway setts (pages 108, 109)
•
Millstone Driveway Sett
•
Stonemarket Driveway jointing Compound
•
30mm sharp river sand
•
•
•
•
Geo textile membrane
trident circle 60mm (page 120, 121)
When the circle pack arrives it will be 8 layers high. It will include slightly
more blocks of some sizes than are required. When laying the first 3 rings
there will be a lot of play in the blocks, however when the full circle is laid
the interlocking effect eliminates this.
•
T
Centrepiece:
1st ring
2nd ring
3rd ring
4th ring
5th ring
6th ring
7th ring
8th ring
9th ring
R
E
9
R
8
7
•
•
1
•
R W
•
T
T
R T
H T R
R T
R
•
T
E
E
Avoid rubbing and damage to Flags by carefully
stacking them on timber battens with spacers
between them.
Select paving from different packs throughout
the job, to blend colour shades.
Laying
O
W
T
Diameter 3.04m
•
all layouts to 1:50 scale
•
Do not walk on the paving for at least 24 hours.
During wet or frosty weather, cover the paving for
protection until mortar has cured.
Then point as soon as possible.
Pointing
•
•
•
•
•
•
•
For most paving flags Stonemarket Fast Point
Jointing system can be used where a minimum
10mm joint and 22mm thick paving units are being
utilised. For thicker flags 25mm and over the width
can be reduced to 8mm.
Alternatively, use a damp mortar mix of 1 part
cement to 4 parts building sand.
Press firmly onto the joints to produce a dense,
impervious surface that will drain water across
the paving.
If mortar gets onto the faces of the Flags, clean
off immediately using a damp sponge frequently
rinsed in clean water.
Jointing sands and other pervious materials
are not recommended except where paving
is laid with minimal joints. Stonemarket will
not accept responsibility for contaminations/
staining incurred from use of manufactured
jointing compounds.
Where minimal joints are recommended, these
should be 2-5mm and a good quality external grout
should be considered.
Where minimal joints are suggested with single
size layouts or in courses, you could consider
larger joints for ease of pointing and improved
durability of the joint.
Butt jointing is not recommended for any of our
products.
Driveways
•
3
•
•
Getting Ready
5
4
Mark out the area and dig out to the required
total depth.
Tap in wooden pegs to show the levels for the
finished surface, including the required gradients.
Infill the appropriate foundations and remove
the pegs before laying the paving.
For Rio Paving, Opera Paving and all Paviors,
follow Pavior Laying Guide.
For all other paving (including Rio and Opera if
preferred), follow Paving Flag Laying Guide.
After Laying
•
•
6
H
2 No. O
8 No. W
8 No. W, 8 No. R
26 No. T
34 No. T
21 No. T, 21 No. R
26 No. T, 24 No. R, 2 No. H
30 No. T, 30 No. R
30 No. T, 25 No. E, 5 No. R
33 No. T, 32 No. E, 1 No. R
•
Tap the Flag down to the required level, using a
rubber mallet.
If the Flag will not level with several gentle taps,
lift it, adjust the level of the mortar bed and relay
the Flag.
Keep checking levels and gradient across a
number of slabs. Stringlines can be helpful to
define levels and lines within the laying pattern.
Maintain the correct joint width by gently shuffling
with a trowel. Small pieces of timber are useful as
temporary spacers.
If you need to cut Flags, a power tool with a
suitable diamond tipped cutting disc will cut
accurately through our products.
Paving Flag Laying Guide
2
W
These depend on ground conditions and
expected use.
For light pedestrian use on solid, even ground,
40mm compacted sharp sand may be adequate.
For less stable or wet ground, provide 100mm
well compacted hardcore beneath the sand.
For domestic driveways, increase the hardcore
depth to 150mm. For Paviors follow the Pavior
Laying Guide; for Flagstones follow the section
headed Driveways.
Groundworks
150mm MOT type 1 thoroughly
compacted in 2 layers
O
•
Paving Installation
•
It is essential that the
‘Millstone Driveway Setts’
Installation Guide’ is always
followed, to order a copy call
the Stonemarket Technical
Helpline on 024 7651 8700.
Every pack of Millstone Setts
comes with the right amount
of Jointing Compound
and can be installed on a
standard MOT Type 1 and
Sharp Sand sub-base.
•
Make up a slightly wet mortar mix of 1 part
cement to 5 parts building sand.
A PVA, SBR or equivalent bonding agent can be
added to the mortar to assist bonding,
particularly with natural stones. Alternatively coat
the back of each flag with neat wet cement and
bonding additive just before laying.
You may also consider using an appropriate
plasticiser additive in the mix.
Prepare a full bed of mortar ahead of each Flag,
approximately 25mm thick, but allowing for the
variation in thickness between Flags.
Our Pavior ranges are specifically designed for high
performance in areas used by domestic vehicles.
However, many of our customers prefer the look
of flagstones. Millstone Flag, Trustone (Fieldland,
Glenmoor and Fellstyle) and Vintage Stone Manor have
been used successfully.
Extra care with the foundations is essential. Lay
the Flags directly onto a 100mm thick wet concrete
bed (1:5 cement: sharp sand) on top of 150mm well
compacted hardcore. Damage can be caused by
heavy and four wheel drive vehicles, or by using power
steering whilst stationery.
Specific Advice
(i)
TRUSTONE, VINTAGE STONE, MARKETSTONE
Always lay larger face upwards.
Correct way up
Incorrect way up
(ii) NATURAL STONES PARTICULARLY
SLATES, LIMESTONES & GRANITES.
Coating the back of each Flag with neat wet
cement and PVA additive just before laying,
will assist bonding.
(iii) TRUSLATE GREEN,
ARCTIC GRANITE GLACIER
These products sometimes absorb colour
from Ordinary Portland Cement. We strongly
recommend substituting White Cement in
the mortar and adding a PVA, SBR or other
bonding agent. Lay Arctic Granite with the
textured slip resistant face upwards.
(iv) ARCTIC GRANITE, AVANT-GARDE
Depending on site conditions, moisture
transparency from the bed below is a natural
characteristic of these stones that can result
in darkening and patchiness on installed
product particularly on less well drained
constructions.
(v) REVOLVE FEATURE
This should be dry laid before final
positioning on mortar bed, starting from the
centre outward.
(vi) RIO PAVING
Not suitable for vehicles. Can be laid as
per above guide or on a flexible bed, as per
Pavior Laying Guide. Do not use a vibrator
on top of the paving. Level off with a paver’s
maul when laying on a flexible bed.
(vii) RIO SMOOTH
Silicon is used as spacers during
transportation. Small dark patches may
occasionally result, be assured this is only a
temporary weathering condition.
(viii) TIMBERSTONE
Post/Sleeper combination if being used as a
retaining wall may need a retaining skin, and
when being used as a retaining bed/planter
always have a waterproof skin
Indoor Use
For indoor use, a coating is advised to reduce
dusting and make cleaning easier.
Use Around Swimming Pools
Advice from Stonemarket should be sought
about suitability for use of products around
swimming pools.
Pavior Laying Guide
For a comprehensive guide to installing PermeaPave
and Rio PermeaPave we would strongly advise referring
to the Stonemarket PermeaPave Technical Installation
Guide, available by calling 024 7651 8700 or at
www.stonemarket.co.uk.
Edge Restraint
•
•
•
Paviors must be surrounded by a firm edge
restraint to stop the blocks and sand layer
from creeping.
Kerbs are usually best, but walls, decorative
edgings or the paviors themselves can also
be used as restraints.
Lay the restraint on a concrete bed,
haunching kerbs or edgings in concrete and
allow to cure and strengthen before any
vibration.
138 139
planning and laying guide
Screeding
•
•
•
Screed out a layer of coarse concreting sand
to a depth of 35mm on the excavated area and
within the edging.
Compact the sand with a plate vibrator.
Add more sand and screed off to give a firmly
compacted thickness of 50mm. (One tonne of
sand covers about 8m2.)
Laying
•
•
•
Start from a corner or long edge and proceed
along one laying face. Place individual blocks
vertically onto the sand bed according to the
pattern.
It is important to mix blocks from at least 3
packs to achieve a good blend of shades.
Use stringlines and adjust the width of joints to
within 2-5mm to ensure the lines in the pattern
remain straight.
Cutting
•
•
•
To fill gaps along edges, cut the blocks using a
hammer and bolster chisel.
For a lot of cutting, use a mechanical block
splitter or power cutter with an appropriate
blade.
Avoid cutting and laying blocks less than a
quarter of their original size.
Vibrating
•
•
•
•
Using a stiff broom, brush bedding course sand
over the paviors to partially fill the joints and
ensure stability during initial vibration.
After ensuring the surface is clean, vibrate the
paving to settle the sand in the joints.
Top up the joints with our Pavior Jointing Sand.
Sweep the surface and then pass the vibrator
over the whole area several times to level the
paviors.
Brush more Pavior Jointing Sand over the area
to ensure all joints are topped up and make one
more pass with the vibrator. The paving is then
ready for immediate use.
Specific Advice
(A) TRUSTONE PAVIORS, ELEMENTAL PAVIORS,
RIO PAVIORS, RIO PERMEAPAVE
We recommend using a rubber mat when
vibrating to protect undulating surfaces.
(B) TRUSTONE PAVIORS, ELEMENTAL PAVIORS
Please refer to our installation recommendations
for laying on a flexible bed with spacers. For
certain driveway installations laying on a mortar
bed may be more appropriate. See our website
for more information.
(C) MILLSTONE DRIVEWAY SETTS
• Stonemarket Driveway Jointing must always be
used with Millstone Driveway Setts to ensure
structural stability.
• Always use a vertical edge restraint, to restrain
the drive.
• Always construct the sub-base in 2 layers
of 75mm MOT Type 1. Each layer must be
thoroughly compacted.
• In all cases compact the first layer of sand, then
screed remaining layer to achieve finish laying
course.
• The ideal depth of sharp river sand is 30mm.
In all situations no more than 40mm should
be used. Failure to follow will result in the
installation being compromised
• On all occasions take blocks from a minimum
of 3 packs (6 for multi-coloured product) to the
laying face.
• Compact Millstone Driveway Setts using a
rubber protection mat, BEFORE any jointing
compound is introduced onto the blocks. Failure
to do so will result in face marking of the blocks.
• Partially wet blocks with a light spray of water,
then brush jointing compound into joints using a
stiff brush. Top up any hungry joints.
• Use light water spray and a soft brush to
remove excess jointing compound from the
surface profile of the blocks as it is extremely
difficult to remove once curing commences.
IMPORTANT
• Millstone Driveway Setts come with a
protective transportation seal which will remain
slightly slippy underfoot until weathered.
• Once protective seal has dissipated the block
may take on a lighter appearance.
• The correct amount of jointing compound is
supplied with every pack of Millstone Driveway
Setts.
(D) DRIVEGRID
• In all cases use an edge restraint, and fill with
angular gravel 5-16mm.
• A 10-20mm layer of angular gravel (5-16mm)
must be spread on top of the finished cell
height.
• There is no need to compact.
• 1 tonne of gravel will cover approximately 1417sqm depending on density.
• Stonemarket recommends the use of a
driveway entrance apron for stability.
Wall Building Guide
•
•
Bricklaying, Mortar & Joints
•
•
•
•
•
•
•
Get professional advice if you are in any doubt,
particularly with walls over 1.5m high and
complex or stress carrying structures.
Plan the wall and draw a design; this helps
with calculating quantities and makes building
quicker.
Get the right tools; spade, concrete mixer,
trowel, spirit level, club hammer, 60-120mm
bolster chisel, stringline and pointing tool.
A firm foundation is essential
•
•
Walls need a concrete foundation three times
wider than the thickness of the wall. Its depth
should be at least 100mm with the base 300mm
below ground level.
For walls over 1m high the foundation base
depth should be one third of the height of the
wall above ground.
•
•
Single skin walls 100mm thick should not be
higher than 1m and need 215mm square piers
every 2m.
Walls over one metre high should be double
skin construction, with the two skins tied
together and should have support pillars at least
every 3m.
Whilst Rio Walling can be built using normal
mortar we recommend the use of M-Fix walling
adhesive.
Millstone Walling (pages 30, 31)
•
•
•
•
•
•
•
Blocks are faced on one side and both ends.
Use almost equal quantities of all six block sizes
to create an authentic antique look. One block of
each size will build 0.19 sq. m. of single skin wall.
N.B. Block lengths are in the ratio of 1: 1¼: 1½.
A 215mm block used to tie the skins together
provides a half module and the appearance of a
fourth length.
Lay in random courses using blocks of different
lengths but the same height in each course.
Use 10mm mortar joints and bond the blocks by
staggering vertical joints.
Alternate course heights of 65mm and 140mm,
though not strictly.
To avoid a top heavy look, place extra 140mm
courses near the base and extra 65mm courses
near the top.
Yorkstone Walling (pages 38, 39)
•
•
Walls up to 12 courses high that are not subject
to load can be built semi-dry by using dabs of
mortar within the indentations on top of each
block.
Walls over 12 courses high should have
full mortar joints and normal construction
techniques.
Avant-garde Walling (pages 60,61)
•
•
Whilst Avant-garde Walling can be built using
normal mortar we recommend the use of M-Fix
walling adhesive.
Walling blocks are manufactured with a tolerance
making very flat faces on both sides of a single
skin wall difficult to maintain.
Vintage Stone Walling (pages 63, 65, 67, 70)
•
Construction
•
Use normal bricklaying techniques including
damp proof courses where appropriate.
Mortar should be 1 part masonry cement to 4
parts soft bricklayers sand.
Mix bricks/blocks from different packs to ensure
a blend of shades. If using just one pack, select
from the top down.
With raised planters and retaining walls, leave
some vertical joints un-mortared for drainage.
Raised pools require a waterproof liner and a
design that will support the weight of water.
Rio Walling (pages 23, 25)
Key points before you start
•
All walls need provision for expansion and
contraction about every 6m.
Protect the top of the wall with copings and pier
caps or suitably sized paving slabs.
•
Before commencing to build, blocks should be
sorted to enable blocks of similar height to be
laid in the same course.
As Vintage Stone is a natural stone product,
block height can vary. The ends of the blocks are
dressed at an angle.
Carluke Walling (page 126)
•
Each block is faced on a minimum of one length
and one end.
•
After the wall is built and the mortar has set firm,
clean the blocks with a hose to reveal the full
colour.
Cotstone Walling (page 126)
•
•
Carefully mix the various profiles.
Rake out mortar joints to same depth as the
moulded joints to achieve the appearance of
continuous random natural stone.
Health & Safety
Mixing Mortar
Dry or damp cement and wet concrete or mortar
can cause irritation and burns to the eyes and skin.
Suitable eye protection and PVC gloves should
be worn. If contact with the eyes or skin occurs,
irrigate or wash off with plenty of water. If irritation
or burning persists, seek immediate medical
attention.
General Information
Dimensions
All dimensions given are nominal and subject to
manufacturing tolerances. The quoted sizes and
coverage of our paving ranges, except where
using minimal joints, are for the overall areas
including appropriate joints, making it easier
for you to plan a project and order the right
quantities. For precise dimensions, measure
several product samples at a stockist.
Colours
Using high speed cutters on concrete and stone
products produces dust. If inhaled in excessive
amounts over a long period this may cause longterm health problems. Suitable safety goggles and a
dust mask should be worn.
Variations in colour shade occur in all
Stonemarket products. While the colours shown
in this brochure are as accurate as reprographic
processes allow, it is essential that you see
actual materials at your local stockist before
choosing. This is particularly important with
natural stone products where considerable
variation occurs. Our reconstituted stone
products contain natural aggregates so we
cannot guarantee that products made at different
times will have identical shades. When using
several packs, mix products from each pack to
achieve a blended overall appearance.
Manual Handling
Dusting
Cutting
Most of our products are abrasive and heavy, some
are very heavy. Appropriate handling precautions
include wearing protective gloves and footwear and
obtaining assistance when moving items weighing
over 20kg.
Safety Data Sheets
Available by calling 024 7651 8700.
www.stonemarket.co.uk/healthandsafety
Maintenance
•
•
•
•
•
Keep pavior joints well filled with Pavior Jointing
Sand.
Pressure washers and chemical cleaners are not
recommended on any of our products particularly
reconstituted stone, natural limestone and Arctic
Granite Midnight.
To clean, wet thoroughly with lukewarm soapy
water and use a stiff hard broom.
Never use common salt to de-ice reconstituted
stone or limestone. Alternative products are
available, specially formulated for this purpose.
Light coloured natural stone and concrete
blocks, whilst structurally sound for use on
driveways, may emphasize tyre marks and oil
spills on the driveway and may require more
maintenance to maintain appearance.
Coatings/Sealants
If a coating or sealant is used make sure paving is
completely dry and free of efflorescence before
applying. Responsibility for the performance of any
coating rests with the user and the manufacturer of
the coating. Always read the instructions carefully
and first test a small area for colour and slip
resistance, wet and dry. For further advice refer to
our sales office.
Some dusting may very occasionally occur in
some of our highly pigmented reconstituted stone
ranges. If transfer is causing an inconvenience
an appropriate dustproofer may need to be
considered.
Efflorescence
All concrete products in their early life can exhibit
efflorescence, which may appear as a white
deposit and/or apparent colour fading and/or drip
staining. The effect will always be more apparent
on bolder, darker coloured products. This
condition can also on occasion migrate through
sandstone from the mortar bed. Efflorescence
will generally diminish over time and will not
affect long term performance. Stonemarket
cannot accept responsibility for any of the above
conditions
Other Weathering
Weathering and site conditions can occasionally
cause other variations in shade to appear.
Differential weathering can cause patchy dark
discolourations on the surface of individual units.
Again this will generally diminish over time and
will not affect long term performance. Natural
stone may develop shaded marking, deposits or
patches as mineral content oxidises.
All products can develop algae and organic
growths under certain environmental conditions
and may require cleaning. Areas adjacent to
borders, plant pots and trees may discolour
from transfer of plant-life; specialist maintenance
advice may need to be sought. It is possible
for bird droppings and other staining agents
to mark all paving types. Dark Staining agents
will be more aparent on light coloured paving.
Stonemarket cannot accept responsibility for any
of the above conditions
Terms and Conditions
We are continually making innovations and
improving products so we reserve the right to
vary designs and specifications without notice.
In the unlikely event of products reaching you in
less than satisfactory condition, please notify the
retailer immediately. Please note that if you lay
a product with a defect apparent prior to laying,
then we may not accept responsibility for costs
incurred.
While every effort has been made to give
sound advice, Stonemarket cannot accept
responsibility for any loss, damage or injury
sustained in following it. We cannot accept any
liability if products are used for purposes other
than those for which they were intended, or if
damage is due to not following our advice. All
instruction given is for guidance purposes;
building regulations should be followed at all
times
Avenu*, Applesby, Arctic, Auldwick , Avantgarde, Cascade, Colossus*, Compass
Points, Cordara*, Cotstone, Cottage Garden,
Cromwell, Dorian*, Driftwood, Elemental,
Equinox, Fairstone, Fast Point, Haüs, Ingleston,
Marketstone, Millstone, Nautical Star, Nordus*,
Octant, Opera, Permeapave, Quartos*,
Rhombix*, Rio*, Scoutmoor, Stonemarket,
Timberstone, Trident, Truslate, Trustone, Vecta
and Vintage are all Registered Trademarks
(* trademark pending). Other Trademark rights
are also claimed. Design copyright and patents
are also held for many of the products within this
publication. Registration numbers are available
on request. Any infringement of such copyright
will be vigorously pursued. No part of this
publication may be reproduced or transmitted
in any form without permission in writing from
Stonemarket. Stonemarket is a trading name of
Marshalls Mono Limited. Registered in England
No.509579. Registered Office: Birkby Grange,
Birkby Hall Road, Huddersfield. HD2 2XB
Acknowledgements
Gloster, furniture p2, 4, 5, 7, 13, 14, 17, 18, 20,
34, 49, 58, 68, 77, 82, 89, 90, 92
Summit, furniture p5, 8, 26, 44, 46, 50, 52, 56
Andrew Crace, furniture p66
Barlow Tyrie, furniture p16, 36
Neptune Classics, furniture p40, 62
Kitstone, furniture p37
David Harber, sculpture p37, 60, sundial p65
Bright Green, planters p16, 18
Whichford Pottery, flowerpots p28, 29, 30, 66
Capital Garden Products, water feature p63
Urbis, planters p12, 52
Haddonstone, urn p42
Ornate Products, urns p30, 65
Cadix, planters p45, 50, 90
Modern Garden Company, furniture p10
Jaguar Landrover, cars, p1, 5, 105, 110, 117


© Copyright 2026