
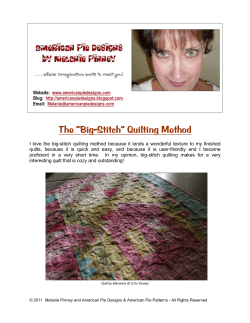
Sugar Skull - Pop Art by Julie Roces
Sugar Skull - Pop Art by Julie Roces
A sugar skull is a representation of human skull made from either sugar or clay which is used in the
Mexican celebration of the Day of the Dead and the Roman Catholic holiday All Souls Day.
You will need
Your basic tool kit plus:
Plus
Coloured insert card.
Trace
Attach a plain sheet of parchment to the pattern and trace the skull base pattern with a white pencil or
white ink. Trace all of the 3D elements separately.
Emboss
Emboss the outlines of the skull base using your Medium or Large Ball embossing tools. Emboss the
elements inside the skull base using the various sizes of your Ball tools. Emboss all of the 3D elements
including the areas marked E.
Stipple
Use your One Needle tool to stipple the 3D elements marked ‘S’. Stipple the scroll motifs of the skull
base also marked ‘S’.
Perforate
Perforate within the grey shaded areas using either your Four Needle or Two Needle perforating tools.
Perforate around the basic outline of the skull base. Perforate around the outer outlines of the 3D
elements.
Finishing
Cut out all of the perforated pieces. You will need the assembly guide pattern to arrange all the
elements of the sugar skull together. Place the skull base parchment over the assembly guide and
temporarily secure with tape. Arrange all of the 3D elements in their correct placements according to
the pattern. Apply glue sparingly as you work from one element to another, securing each piece to the
skull base. Remove the assembly guide pattern when done and mount your finished skull project onto a
card stock or mat board.
My Sepia Roses by Bruno Piechota
Experienced parchment crafters will relish the challenge that this floral design provides.
You will need
Your basic tool kit plus:
Pergamano
Semi Circle perforating tool
Mini Semi Circle perforating tool
Angle perforating tool
Dorso Colours (lively collection)
Dorso Oil
Tinta white ink
Tinta sepia ink
Perga Glue
Plus
Black insert card
Perforate (Shallow)
Place a plain piece of parchment over the outer circle pattern (A) and shallow perforate the outside
border and the circle in the centre with your Semi Circle, Two Needle and Angle perforating tools.
Trace
Still attached to the circle pattern, use white ink to trace the outer lines. Remove from the circular
pattern and place over the rose pattern (B) ensuring that the parchment is in the middle. Use white ink
and a mapping pen to trace all of the lines in the outer border. Use a combination of white and sepia ink
to trace the roses.
Dorse
Use light blue and yellow crayons to dorse on the back of the circle.
Emboss
Working on the reverse use your Extra Small Ball tool to emboss the outer border on the circular pattern
making rounded spots between the perforated points. Use your Stylus tool to emboss between the
perforated points of the inner circle (see detail of Pattern B). Emboss with your Shader tool the roses
and leaves.
Detail
Once you have embossed the roses, you can add the detailing. Bruno used sepia ink and a mapping pen
applying a technique known as Pointillism. It’s very similar to stippling, in the fact you’re essentially
dotting sepia ink within the roses. This method does require patience and concentration but the finished
effects are stunning.
Emboss
Use your Shader tool to emboss the sepia roses on the reverse of the work.
Perforate (Deep)
Carefully re-perforate the whole design using your Semi Circle, Two Needle and Angle perforating tools.
Cut
Cut all of the perforation points as shown and remove the excess paper.
Finishing
Place a few dots of Perga Glue behind some of the embossed parts of the sepia sections and secure to a
black sheet of insert card.
Bruno Says…
If you’re not ready to use the Pointillism technique, you can either emboss or colour them in.
Fancy and Fragrant by Maggie Byford
This project is made up of two identical circle designs worked on the Multi Grid which are threaded
together with ribbon to form a sachet and then filled with potpourri.
You will need
Your basic tool kit plus:
Pergamano
Multi Grid No. 6
Perga Glue
Plus
2g Potpourri
3mm ribbon (approx. 33” in length) - 21” for the sachet and 12” to make two bows
Adhesive gems or pearls to decorate
Instructions
STEP 1 - Emboss on the Grid
Align a sheet of parchment over the circle design on the grid and attach with low tack masking tape.
Wipe a dry tumble dryer sheet over the surface of the parchment to make embossing easier. Place work
on an embossing mat and use your Small, Extra Small and Fine Stylus tools to emboss the shapes within
the circle (see Fig 1).
Top Tip: To give your embossed shapes more definition begin by embossing against the inside edges
of the shapes with a Small Ball tool then filling in with either a Small or Extra Small Ball tool
depending on the size of the area to be embossed.
STEP 2 - Perforate on the Grid
Leave your parchment attached to the Grid and turn everything over so that the Grid is on top. Place
your work on a thick perforating mat and use a One Needle tool to perforate within the circle and
around the outside edges of the circle (see Fig 2). As the Two and Four Needle tools are compatible with
the Multi Grids you could use these instead of a One Needle tool if preferred. Note: The Five in a Circle
perforations (Fig 3) are worked off the grid at Step 4.
STEP 3 - Cut
Use parchment scissors or snips to then cut the Four Needle perforations to crosses. Also cut between
the perforations along the outside edges of the circle. On a separate piece of parchment repeat steps 1
to 3 above to make another circle.
STEP 4 - Make Ribbon Slots with Five in a Circle tool
Place one finished cutaway circle on top of the other with the front of one facing the back of the other,
making sure that the embossed shapes and outer scallop edges match up with each other. Attach
together temporarily with low tack tape.
On a thin mat use your Five in a Circle tool to shallow-perforate through both layers where indicated in
Figure 3. On a thick mat and still working through both layers use a One Needle bold tool to deeply
perforate each of the Five in a Circle perforations. Separate the two cutaway circles and use parchment
scissors or snips on both circles to cut all of the Five in a Circle perforations to form star shapes.
STEP 5 - Finishing
Place the two cutaway circles together once again but this time with the insides facing each other
making sure the embossed shapes match up as before, especially the star slots and outer scallop edges.
Neatly thread the longer length of ribbon through the star slots starting and ending in the top centre
leaving a small gap to put in the potpourri before closing. Note: Leave at least 4” of ribbon before and
after threading to form a hanging loop.
Add the potpourri then knot the ends of the ribbon and trim as necessary. Make two bows with the rest
of the ribbon and attach to the front and back of the sachet with a little Perga Glue. Decorate the sachet
with adhesive gems or pearls as desired.
The Garden Party by Judith Maslen
Featuring an image which leans towards the Renaissance period; this immaculately dressed white work
lady is sure to impress your recipient.
You will need
Your basic tool kit plus:
PCA
Small Sun embossing tool
Bold Diagonal Flexi Duo Grid
Plus
Sepia ink
Blendable pencils
Blending medium
Four brads
Blue insert card
Trace
Attach a plain sheet of parchment to the pattern and use sepia ink to trace the profile and the hair. Use
a white pencil to trace the rest of the design.
Colour
Turn the parchment to work on the reverse and use blendable pencils to colour inside the archway,
around the girl and the parasol and underneath the curtains. Start with blue at the top blending into
green at the bottom of the picture. Smooth out with a little blending medium on a tissue.
Emboss
• Use an Extra Small Ball tool to emboss the line around the outside of the design, the edges of the four
lace ribbons, the archway and the outline of the parasol.
• Still working on the parasol, emboss and stipple where shown.
• Starting with a Large Ball tool, softly emboss the dress without any outlines.
• With your Small Ball tool, emboss tiny dots on the shoulder and the hems of the dress as shown in the
example.
• Decorate the hat with your Small Sun tool.
• Softly emboss the curtains with your Large Ball tool and add a little more embossing with a Small Ball
tool where the light catches the curtains.
• Emboss the dots which make up the flowers on the lace ribbons and add the dots around both sides of
the lace ribbons.
Colour
Turn the parchment to work on the front and use blendable pencils to colour the face and the hair,
Smooth out the colour with a little blending medium.
Grid Work
Place the parchment on your Bold Grid and perforate the ribbons.
Finishing
Work around the outside of the design with a Two Needle tool, then snip the perforations to release the
parchment. Attach to a sheet of blue card with a decorative brad in each corner. Trim the card then stick
to a folded sheet of white card with double sided tape.
Judith Says…
To make more of a contrast between the hair and the white work dress and parasol, I added a little
colour from a brown felt-tip pen to the hair, taking it from the pen with a slightly moist paintbrush.
It’s All in the Detail by Gerti Hofman
A stylised white carnation which has been worked on coloured parchment and then finished off with a
splattering of glitter.
You will need
Your basic tool kit plus:
Pergamano
Hockey Stick embossing tool
Multi Grid No. 32
Perga Liners
Sticky ink
Plus
Violet coloured parchment
Hydrangea coloured parchment
Faber Castell Polychromos pencils
Derwent Colour pencils
Embroidery thread and needle
Trace
Trace with a white pencil (on the back) the fold line and the pattern on a sheet of hydrangea coloured
parchment.
Colour
Using the dry colouring technique with Perga Liner B1, colour all of the petals working from the outer
edge of the petals to the centre of the flower. Use B5 from the inside of the petal to the outside.
Emboss
Use your One Needle tool to emboss the double frame lines around the flower, and then the diagonal
and straight lines. With your Extra Small Ball tool use Multi Grid No. 32 to emboss the swirls between
the two diagonal squares. Use your Large Ball tool to lightly emboss between the double lines of the
frame. Emboss the white sections of the flower and stalk using your Hockey Stick, Large, Small and
Stylus tools.
Stipple
Stipple between the double lines of the frame and around the diagonal squares with your One Needle
tool.
Finishing
Fold the parchment in half then shallow perforate with your Two Needle tool around the outside of the
card. Perforate again, this time with your One Needle tool. Cut the card along the perforations. Cut and
fold the inner card (13 x 26cm). Attach the inner card to the outer card with an embroidery thread.
Apply a layer of glitter to the sections worked with your Multi Grid.
Gerti says…
This card features simple and basic techniques and allows you to develop your parchment skills.
Surf’s Up by Narumi Okanishi
Designed for the man or teenager in your life, this quick card can easily be adapted by changing the
insert.
You will need
Your basic tool kit plus:
Pergamano
Hockey Stick embossing tool
Star embossing tool
Five Needle perforating tool
Seven Needle perforating tool
Semi Square perforating tool
Dorso colours (lively and natural collection)
Plus
Deckle edged scissors
Blue insert card
Trace
Begin by tracing the fold line with a white pencil. Use white ink and a rule to trace the whole design and
the border. On a separate sheet trace the surf board.
Perforate
Following the reference guides and the finished image, perforate the design (and surfboard) using your
Semi Square, Five and Seven Needle tools. Carefully make an incision along the top of the roof.
Emboss
Use your Hockey Stick and Ball tools to emboss the car, sea, hearts on the surfboard and island. Emboss
within each Semi Square, Seven Needle and Five Needle perforation using your Extra Small Ball and Star
tools.
Dorse
Turn your parchment over and use the following colours:
Use dark blue for the sea and windows and dark brown for the road. Apply purple, light green and
orange for the surfboard and orange for the island. Red for the car.
Re-Perforate
Re-perforate the design using your Semi Square, Five Needle and Seven Needle tools.
Cut
Use your parchment scissors to cut around the edge.
Finishing
Fold the parchment at the fold line and attach to a blue insert. Trim around the blue insert with deckle
edged scissors and insert the surfboard on the roof.
My Motto by Tina Cox
This wall hanging’s been created using traditional techniques such as tracing, grid work, painting,
embossing, perforating and cutting. It can be made up as a card if you prefer with as many or as a few
dragonflies as you like.
You will need
Your basic tool kit plus:
Pergamano
Multi Grid No. 4
Perga Colours Exclusive (PCE)
Paint Brush No. 2
Tear off palette
Plus
PVA glue
Ultra fine glitter
Silver liquid pearl
Needle and thread
Ribbon
Candi
Grid Work
For both parchment borders, stick the piece of parchment on Multi Grid No. 4 and secure with masking
tape. Following the grid design shown on the pattern, emboss the dots using an Extra Small Ball tool.
Without removing the parchment from the Grid, turn the piece over and perforate the design using your
One Needle tool. Remove the parchment from the Grid and attach it to the pattern using low tack tape.
Trace
With a white pencil and rule, trace all of the straight lines. Trace the flowers with white ink. Use black
ink for the words and dragonflies on a separate sheet, filling in the wider areas of the words and the
dragonfly bodies.
Emboss
Use your Stylus tool to emboss all of the white traced flowers and your Small Ball tool for the flowers.
Paint
Rub the colour from each PCE pen onto a palette. Using a damp no. 2 round brush, paint a wash on the
front over each section of the wing using the lightest colours (PCE 14 and PCE 16). Using a feathering
technique (or fine line techniques) paint some long and some short strokes using the medium colour
(PCE10) from the outside of each section to the inside. Repeat, this time with shorter strokes using the
darkest colour (PCE20).
Perforate (Deep)
Using your Two Needle tool, perforate the outside of the dragonflies as indicated on the pattern. Cut
between all of the perforations on all of the pieces.
Finishing
• Cut a piece of rainbow card slightly larger than the cut out grid piece and the silver card and white
card slightly larger than the other.
• Attach the gridded piece with the front side up to the rainbow card with low tack tape.
• With your One Needle tool, perforate the flower centres through the two pieces.
• Thread a needle with blue thread and stick the end on the back of the rainbow card with tape and
bring it up through a hole, pick up a bead and back down the same hole. Repeat this for the remaining
flower centres.
• Remove the low tack tape from the front. Stick this piece to the silver card using double sided tape and
this to white card with a piece of ribbon for the hanging loop sandwiched between these two layers.
• Thread a few beads on the ribbon before sticking it between the silver and white card.
• Trace over the words dragonfly bodies with a Quickie glue and sprinkle ultrafine glitter powder to add
sparkle to the wall hanging.
• Stick the dragonflies and Candi on the wall hanging and finish off with dots on the dragonfly wings and
around the words using the silver liquid pearl.
Tina Says…
The title of this piece reflects my opinion on life.
Sepia Shades by Christine Coleman
Shades of Sepia give this card an old-fashioned appearance.
You will need
Your basic tool kit plus:
PCA
Micro Sun embossing tool
Large Sun embossing tool
Bold Straight Flexi Duo Grid
Plus
Blendable pencils
Oil pastels
Green brads
Green insert card
Trace
Attach a plain piece of parchment to the pattern and use sepia ink to trace the scallop edge of the
postcard, the text, flowers and leaves. Use white pencil to trace the leaves and stems on the
background.
Dorse
Use brown, yellow ochre and cream oil pastels to work the back of the postcard. Use a dark brown
pencil to colour around the outer edge of the postcard to form a shadow. Colour the leaves on the outer
section with a green coloured pencil.
Emboss
Use your Scriber tool to finely outline the leaves and stems. Emboss the flowers and leaves in the usual
way. Work around the scallops and between the flowers and stems as on the pattern with your Micro
Sun tool.
Colour
Use a brown coloured pencil to colour the unembossed areas on the flowers and leaves.
Grid Work
Place your parchment on your Bold Straight Grid and work the pattern following the corner reference.
Work within the perforations with your Large Sun tool.
Cut
Use scissors or snips to remove the excess parchment.
Finishing
Secure the finished piece of work to your chosen insert, securing with brads.
August Peridot and Poppy Card by Helen Osborne
This August themed card is suitable for an intermediate parcher, with the subtle colours bringing out the
green of the peridot stone.
You will need
Your basic tool kit plus:
PCA
Fine Straight Flexi Duo Grid
Bold Straight Flexi Duo Grid
Fine Oct perforating tool
Bold Oct perforating tool
Small Sun embossing tool
Medium Sun embossing tool
Plus
PVA glue
Adhesive peridot gems
Coloured ribbons
Green insert card
Grid Work (Top Layer)
Place a plain piece of parchment on your Fine Straight Grid and with your Fine Oct or Uni Bold tool,
perforate as per the pattern.
Trace
Attach the parchment to pattern and trace the poppy and the lettering with a white pencil.
Emboss
Using various sizes of Ball tool or Shader, emboss the flower to show light and shade remembering to let
your work rest between, to let the parchment shrink back and avoid buckling. The fine detail and
stamens are made by using a Stylus or Scriber tool. Use the Scriber tool to emboss the lettering from the
back making sure to press firmly to make it white. The outer edge design is achieved by using a Small
Sun tool.
Re-Perforate
Using your Fine Oct or Uni Fine tool on a thick mat, re-perforate the Grid Work deeply for ease of
cutting.
Cut
Using scissors or snips cut out the Grid Work as per pattern. Remember to cut the longer bridges first to
avoid tearing.
Grid Work (Bottom Layer)
Secure a second sheet of parchment to your Bold Straight Grid and using a Bold Oct or Uni Bold Tool,
perforate as per the pattern.
Emboss
Emboss the design as per the pattern with your Medium Sun tool. Use a Small Ball tool to emboss the
dots between.
Trace
Using a gold pen or ink, trace the lettering as per the pattern. To avoid smudging, remember to let one
line dry before starting the next.
Re-Perforate
Using a Bold Oct or Uni Bold tool and a thick mat, re-perforate the Grid Work deeply for ease of cutting.
Cut
With scissors or snips cut out the Grid Work as per the pattern.
Finishing
Fold and cut a piece of green cardstock to fit the bottom layer of parchment. Using pink cardstock for
the layer behind the top layer of parchment, cut to fit. Using 3mm permanent double sided tape, cut
small pieces and stick to white embossed areas to disguise, and secure top layer to a piece of pink card.
Use the tape on the back of the card and layer onto the bottom layer of parchment, then stick the
bottom layer to the green card. Use a strong PVA glue to stick the jewels of your choice into place,
adding a bow of coloured ribbons to match card colours. And an insert to complete the card.
Big Ambitions by Anneke Oostmeijer
Congratulations! Well done, you did it!
You will need
Your basic tool kit plus:
Pergamano
Hockey Stick embossing tool
Four Needle perforating tool
Perga Colours Exclusive (PCE)
Perga Liners
Tinta black ink
Fantasy parchment red
Plus
Black pigment liner 0.1 mm
Spray glue
Trace
Secure your parchment to the pattern and use a black pigment liner pen to trace the centre design. Use
a white pencil for the fold line and sidelines.
Perforate (Shallow)
Following the pattern, use your Four Needle tool to perforate the design.
Stipple
Use your Four Needle tool to stipple the sections marked ‘B’.
Emboss
Use your Hockey Stick and Ball tools to emboss the flowers, leaves, text, books, graduation hat,
certificate and motifs between the perforations.
Colour
Working on the back of the parchment, use your PCE pens to colour in the image. Colour the flowers
with red 7, the leaves with moss green 17, the books yellow 3 and the pages with yellow 1. On the front
of the parchment with Perga Liners, colour the flowers with B11, the leaves B15 and you’re your black
pigment liner, the pistil in the flowers.
Paint
Use black ink to fill in the mortar board.
Perforate (Deep)
Re-perforate the design with your Four Needle tool.
Cut
Use your parchment scissors or snips to cut out all of the parts marked ‘A’.
Finishing
Fold the parchment in half and insert a piece of Fantasy parchment paper Red into the card with spray
glue. Fold the card and perforate with your Two Needle tool (shallow) through all three layers along the
outline of the card. Perforate again along the existing perforations with your One Needle tool (deep).
Cut the outer perforations out along the outline as shown in the finished card.
Mr & Mrs by Wendy Walters
This design can be used for a modern wedding card or for an anniversary.
You will need
Your basic tool kit plus:
PCA
Micro Sun embossing tool
Pergamano
Multi Grid No. 28
Plus
Distress pens:
Dusty concord
Worn lipstick
Barn door
Blender pen
Needle & white cotton
Cosmic shimmer glue
Quickie glue pen
Fine crystal glitter
Trace
Attach a sheet of parchment over the pattern and secure with low tack tape. Lightly trace the outline
using a graphite pencil and rule. Trace the rest of the design and 3D flowers (on a separate piece of
parchment) using a mapping pen and white ink.
Grid Work
Secure the traced piece of parchment to Multi Grid No. 28 with the right side facing up. Following the
grid pattern, start in the bottom right hand corner and work around the border following your pencil
line. Erase any visible pencil lines. Emboss the dots in the position as shown in the grid pattern, you can
do this by free hand with a Medium Ball tool or cheat and use a hole that fits within the lace work from
pre patterned grid (Wendy used a Siesta Tulip Grid). Emboss inside the lace border using a Micro Sun
tool in areas marked in the grid pattern.
Cut
Cut the inside lace sections as shown in the pattern, then cut around the outer perforations.
Emboss
Emboss the main image and 3D flowers using your Micro Ball tool.
Perforate
Place and secure on Multi Grid No. 28 and perforate all of the holes within both bells using a Uni Bold
tool.
Colour
Using Distress marker pens (or any other water based pens) and a blender pen work on the back and
add a small amount of colour ‘dusty concord’ to the shadowy areas of the ribbon and words.
Drag the colour out using a blender pen to fill the rest of the ribbon ends. For the main flowers colour
direct with no blending using worn lipstick and for the 3D flowers, dusty concord. Colour the hearts
using two applications of barn door.
Finishing
Sew the design onto a piece of lilac card using some of the inside perforations in the lace border. Cut out
the 3D flowers using fine pointed scissors; gently shape them on a perforating mat by pressing in the
centre with a Ball tool. Attach them to the main design using a small amount of cosmic shimmer glue.
Add sparkle to your design to the flower centres, ball clapper and heart swirls using a
Quickie glue pen and a fine crystal glitter.
Hearts and Roses by Linda Williams
These projects have been designed by Linda Williams. The white work version was made by her and the
alternative painted project has been made by Pat Murphy. This demonstrates how two similar designs
can look so different by choosing alternative techniques.
You will need
Your basic tool kit plus:
Pergamano
Hockey stick embossing tool
Star perforating tool
Semi Circle perforating tool
Tinta green ink
Tinta yellow ink
Tinta red ink
Tinta fuchsia ink
Tinta violet ink
Tinta orange ink
Plus
Purple insert card
Purple glitter card
4mm Glitter brad
White Work Card
Trace
Using a white pencil, trace the whole design including the fold line.
Shallow (Perforate)
Perforate the border according to the pattern with your Two Needle tool.
Emboss
Using the Fine Stylus, emboss the fold line, straight lines of the borders on the card and the tag, script,
and hearts. Emboss the wavy vertical lines, the 3D bow and the thicker parts of the hearts and script
with your Extra Small Ball tool. With the Extra Large, Large 4.5mm and 3mm, Small, Extra Small and Fine
Stylus tools emboss the rose design to show light and shade. Finish off the embossing by using your
Large 3mm Ball tool to emboss the triangular shapes within the border perforations.
Re-Perforate
Re-perforate around the border using your Two Needle tool. With the same tool, perforate around the
3D tag and bow and within the areas marked X on the pattern.
Cut
Cut out around the outer perforations of the border. Cut out within the areas marked X and around the
3D tag and bow.
Finishing
Fold and cut an insert from the glitter card stock to measure 16cms x 12.2cms. Fold the parchment card
at the fold line and cut out the back to size. Sew the two layers together at the spine. Cut out a tag from
the glitter card which is slightly larger than the parchment tag. Put these two pieces together with the
bow and hold together with the brad. Attach to the card using sticky pads.
Painted Version
Trace
Work the border lines with a white pencil. Trace the hearts and scrolls with red, orange, fuchsia, violet
ink. There’s no need to trace the rose spray at this point as it is painted directly onto the parchment.
Paint
With your parchment still attached to the pattern, paint the three stems with green ink. Paint a light
amount of green at the base of all three roses then a small amount of yellow slightly watered down to
give a lighter but uneven shade. The final colour to be added is red for the left rose, fuchsia for the right
and a combination of orange and red for the centre. The bow has a rainbow effect running through it, so
use a splash of each colour, making sure you clean your brush thoroughly. Fill in the squares accordingly.
Perforate
Work the border with your Semi Circle tool.
Emboss
Add a Star tool impression within each Semi Circle mark. Use your Hockey Stick or Large embossing tool
to emboss the smaller parts of the rose. Use your Medium tool for the stems, leaves and ribbon. Use
your Micro Sun tool at the base of the hearts, then stipple within in the scrolls.
Finishing
Cut away the waste parchment from the Semi Circle border before folding and stitching to your chosen
insert.
From the Archives (July 2004)
In this feature, we delve into the archives to bring to you a project or card design from a respected
crafter or sold out edition of Parchment Craft. This month the team have selected a lovely card design
submitted by Josie Davidson, originally published in the July 2004 issue.
Rainbow and Roses by Josie Davidson
A rainbow effect with scalloped divide separates Josephine Davidson’s pink roses, accentuated on a
simple Grid pattern.
You will need
Your basic tool kit plus:
PCA
Large Sun embossing tool
Fine Straight Flexi Duo Grid
Plus
Oil pastels
Blending medium
Coloured insert card
Trace
Trace all of the outlines with white ink or a white pencil.
Emboss
Use your Ball tools to emboss the roses and leaves, scallops and outlines of the card.
Colour
Apply different shades of oil pastel on the back of the card down the centre section and blend together
with a blending medium to produce a rainbow effect (you will need to mask off the outline of the card
with low tack tape to get a straight edge to the colouring). Colour the roses and leaves with pencil on
the back of the card.
Emboss
Emboss along the edge of the scallops using a Large Sun tool. Emboss a small dot in the centre of each
Sun tool.
Stipple
Stipple the teardrop shapes between the scallops with your One Needle perforating tool.
Perforate
Using a Fine Grid, perforate alternate holes in the areas around the roses. Perforate the areas marked
‘X’ in the scallops with a Two Needle tool and cut out.
Finishing
Emboss the fold line, add an insert of your choice and cut straight through all thicknesses with a craft
knife and rule.
We Talk To
Ann Hubbard lives in the seaside town of Holland-on-Sea. She’s married to Steve and they’ve been
together for 34 years. They have two sons, Michael who is 34 years old, and his partner is expecting
their first child and Robert who is 31 years old and lives in Australia.
How long have you been crafting?
I have been crafting since about the age of 7 (more years ago than I care to remember!). My mother
taught me to knit and crochet and my first project was to make a pair of mittens for my cousin.
What’s your craft background?
Back in the eighties I knitted garments for a designer. I have dabbled a little with dressmaking and
embroidery. I then went on to paint until I discovered parchment craft.
What other crafts are you involved in?
Parchment craft is my main craft, but I have just started knitting again as my husband and I are
expecting our first grandchild.
And specifically, how long have you been parchment crafting?
I have been parching for approximately eight years.
Who, where and when introduced you to the craft?
No one introduced me to the craft, but whilst flicking through the TV channels one wet Saturday in
January 2006 I discovered a programme where someone was demonstrating the art of parchment
craft. I did no more than jump in the car and visited my local craft shop and purchased a starter kit.
Who or what influences your designs?
No one person influences my designs, but I get a lot of inspiration from nature. Whilst on holiday in
Australia I took hundreds of photographs of animals, birds and flowers.
Of all of your designs published in the magazine, do you have a favourite?
I think I have to say that my favourite is the “Cute Koala”.
What are your favourite parchment techniques?
I have two favourites, white work and pencil work.
On average, how long can one craft project take you?
My latest project has taken three days, but it really depends upon how intricate I make it.
Have you ever had any crafting disasters?
Many, many disasters, but nothing that a bow, gemstone or butterfly can’t hide.
What tool couldn’t you live without?
I couldn’t be without the Five Needle perforating tool. It’s great for a simple border.
Where do you keep your parchment equipment?
I live in a two bedroomed bungalow with my husband and one half of our second bedroom is our
office and the other half is my craft area with a table and huge cupboard, but I think I need an
extension for my ever growing amount of materials and equipment.
What other hobbies do you have?
Just parchment craft and currently knitting the baby clothes. There’s no time for any others.
What craft have you always thought was too hard to learn?
I think beading looks hard and extremely fiddly.
What is your most recent craft purchase?
I bought two packs of Pergamano Parchment Paper Botanical Garden for my next class.
What are you working on at the moment?
I am working on Christmas cards (I know it’s a bit early), which will be featured in my second Pattern
Pack.
How many different craft projects do you have going at one time?
Just two, one parchment Christmas card and I am currently knitting a baby jacket.
How much time do you spend crafting per week?
I work full-time so cannot spend as much time as I’d like, but I suppose about ten hours a week.
Do you have any top tips?
I would just say never rush your piece of work, you’re more likely to make mistakes if you do.
Do you teach workshops/classes? If so, how often, and how busy are they?
Yes I have been teaching since 2009 and have a class which is held generally the second Saturday of
the month at Holland-on-Sea, Essex. At the moment I have nine ladies that come along for a three
hour class.
Workshop: Grid Work by Josie Davidson
This month I’ve created a card design using a Straight Grid and although there are romantic undertones
to it, it can be made at any time of the year! I used the Five Needle tool to create the edging of the outer
parchment layer, a technique I covered in the June 2014 issue.
You will need
Your basic tool kit plus:
PCA
Micro Sun embossing tool
Scallopedge Cutter
Fine Straight Flexi Duo Grid
Plus
Ribbon and gems
Didi glue dots
Double sided tape
Silicone glue
Clear nail varnish
Ultra fine crystal glitter
Red insert card
Black insert card
Topper
Trace
Trace all of the design with a graphite pencil omitting the straight line borders. (These are for the Five
Needle tool topper layer).
Grid Work
Use your Two Needle perforating tool in patterns ‘A’ and ‘C’ following the grid perforating guides. When
perforating, make sure you push the tool down to the full depth, holding it upright at all times. Emboss
the dots on section ‘B’ using the compatible Ball tool. You may need to rock your Ball tool slightly in the
hole to produce a nice round dot.
Emboss
Use your Micro Sun tool in ‘A’ following the embossing guide. Emboss the lines within section ‘B’ using
your Scriber and rule. Work the lines of hearts and around ‘C’ with a Small Ball tool.
Stipple
Stipple with your One Needle tool between the double outlines around the hearts. Work on the back of
the parchment and lightly emboss the area with your Extra Large Ball tool. Tap the area lightly with your
One Needle tool to fill the area with tiny raised dots on the front of the work.
Top Tip:
Place a piece of fine sandpaper under your parchment when stippling to make it whiter.
Cut
Cut out all of the perforations in ‘A’ following the cutting guide. The perforations ‘C’ are cut down either
side to produce slots.
Perforate
Perforate around the outline of the topper with a Scallopedge tool on a thin foam mat. Emboss in each
scallop with a Small Ball tool. Re-perforate the scallops on a thick foam mat, removing the waste
parchment. Sweep along the edge of the scallops with clear nail varnish and dip into glitter.
Finishing
Attach the topper to the card with glue dots in the corners where the gems are and under the stippling.
Matt this layer onto contrasting card. If using the Five Needle tool, matt this onto two layers, (like for
the main topper) and then matt the main topper onto it. The finished layered topper is then matted
onto a base card, a ribbon and a large gem has been added to the side of the card with silicone glue
Having problems getting perfect cuts?
When cutting out, put just the points of the scissors into the holes, and make sure that you hold them as
flat to your parchment as possible. As you snip, you need to give a little turn to the left and this will
produce the point between the holes.
Dear Josie,
Loving your workshops! Can you help me with a problem I’m having when perforating. Sometimes when
I’m working on the grid I get raised pieces of parchment around the hole I have just made. Could you tell
me if there is a way to stop this happening?
Regards
Jackie
Dear Jackie,
When you are perforating through any grid you need to hold your One Needle tool upright to produce a
nice neat round hole instead of a misshaped one. Also as you pull the tool out of the grid the tool should
be kept upright and not at an angle which means you can catch the underside of the parchment with the
point of the needle and creating a little ‘snag’ which then sticks upwards.
Josie
Butterfly Waltz by Svetlana Lichmanova
This first piece of work has been submitted by one of Bruno Piechota’s students. It’s an intricate design
which if you look closely features of butterflies.
You will need
Your basic tool kit plus:
Pergamano
Hockey stick embossing tool
Swirl perforating tool
Perga Glue
Plus
Black insert card
Trace
Secure a plain piece of parchment to the pattern and trace the main image with either white ink or a
sharp white pencil. On a separate sheet, trace the smaller butterfly image six times and larger butterfly
six times.
Perforate
Working on the front of the parchment, perforate the whole design using either a One or Two Needle
tool. Perforate all of the additional butterfly images.
Emboss
Turn the main sheet of parchment over and emboss. Use your Extra Large Ball tool for the bodies of the
butterflies (including the 3D ones), then re-emboss with a Small Ball tool. You could if you choose to use
a Hockey stick embossing tool. Emboss all of the lines with your Small Ball tool.
Perforate
Using a Swirl perforating tool, perforate inside the ring under the border (see pattern). Re-perforate all
of the points of the work.
Cut
Working from the centre of the design, use your snips or scissors to carefully cut out all of the
perforated sections.
Finishing
Using Perga Glue, layer up and attach the 3D butterflies to every other butterfly on the border. Apply
more glue to the reverse of the original sheet and attach to a coloured or black insert sheet.
Svetlana Says…
I love to watch the butterflies dance in my garden.


© Copyright 2026