
Document 96881
Q U ILTIN G
EMBROIDERY
Issue 22
What’s
Inside
Silk Organza Dahlia
• Textured Silk Jacket
• Flowers Plus
• Sew Retro 2
• Heirloom Baby
PAGE 16
• Couched Quilts
• Digitizing 101
• Stitch Recipe:
Metro Quilting
• Double Bind!
• Whatd’Ya Sew?
• Conversation Heart
Pillow
• Snappy Seams
• Quilt Leadership Award
• Double Cord Belt
SPECIAL ISSUE:
$6.95
table of
contents
TEXTURED SILK JACKET
4
The unique needle-punched collar treatment and fun closures of this silk jacket make
a fashion statement that says, “Style”!
FLOWERS PLUS
6
These beautifully framed rustic flowers stitched on printable backgrounds will
brighten any room whether using them on a table or as artwork on the wall.
12
SEW RETRO 2
8
Using decorative threads on the bobbin gives an entirely new look to the stitches of
your machine, greatly expanding the creative possibilities at your fingertips! See this
technique recreated from a vintage BERNINA® publication.
HEIRLOOM BABY
10
Vintage hankies, lace insertion, and a few heirloom sewing techniques make an
adorable dress that’s simple to make and fun for baby to wear!
COUCHED QUILTS
13
Sewing yarn onto the surface of a quilt using free-motion stitching adds detail,
texture, and dimension, and is suitable for use on both wall hangings and bed quilts.
SILK ORGANZA DAHLIA RING BEARER’S PILLOW
16
Create a special pillow for that very special day. Beautiful dahlia petals cascade from
this ring bearer’s pillow—lovingly fashioned to make a most memorable day even
more delightful.
DIGITIZING 101
20
Start at the beginning and learn the art of Digitizing from Master Digitizer, Debbi
Lashbrook. First in a three-part series, this article applies to any version of the
BERNINA® Embroidery Software.
STITCH RECIPE: METRO QUILTING
22
The wide variety of BERNINA® decorative stitches available are great for quilting,
especially when working with the richly-patterned Metro Fabric Collection by
Benartex.
DOUBLE BIND!
24
This simple double binding technique adds an accent of color to quilts using the
BERNINA® Binder Attachment #84. Start with a standard folded or French binding,
add a contrasting strip and apply it to your quilt for a unique finish.
WHATD’YA SEW?
26
Whether it is quilting, fashion, crafting, embellishment, home dec, or all of the
above, you’ll improve your sewing and increase your skill level if you know which
presser feet and accessories are best for the techniques you love!
CONVERSATION HEART PILLOW
28
Simple appliqué and easy construction make this colorful, fun pillow a great beginner
project.
SNAPPY SEAMS
32
Count 1, 2, 3! - that’s how many steps it takes to create a wardrobe of easy summer
skirts. The secret in transforming them from ho-hum to “wow” is all in the specialty
seams.
DOUBLE CORD BELT
35
Make this simple fashion accessory to add a focal point to any outfit. Couch decorative cord down the center to enhance the belt and make a unique closure in one step!
28
Managing Editor/Creative Director
Susan Beck
Contributing Editor
Jill Danklefsen
Through The Needle is published five times
a year by BERNINA® of America, Inc. for
machine stitchers and embroiderers of all
types and all skill levels. No portion of this
publication may be reproduced in any form
without prior written permission of the
publisher.
Bernina® of America, Inc.
3702 Prairie Lake Court
Aurora, IL 60504
Phone: 630-978-2500
Website: www.berninausa.com
E-mail: [email protected]
For subscription information, contact:
QRI Subscription Department, 3702 Prairie
Lake Ct, Aurora, IL 60504-6182
Printed in the U.S.A.
1
CONTRIBUTORS
NINA MCVEIGH
During 14 years of owning her own store, Nina developed and taught her
original patterns and designs in BERNINA® Clubs and Classes. An avid
quilter, heirloom sewer and lover of all kinds of embellishment, she is also a
collector of scissors, buttons and thread.
PAULA HARMON
Paula Harmon came to Oklahoma Embroidery Supply and Design from
Southwest Florida where she taught a variety of classes including
BERNINA® Software and Machine Mastery. Her love of embroidery
software has given her the ability to teach many levels of students from
beginner to advanced with enthusiasm and patience. Paula came to love software after
purchasing her first machine with a 4” x 4” hoop and is a master design splitter.
16
NANCY BEDNAR
Nancy is a BERNINA® Educator who loves recreating high end ready-to-wear
garments at a fraction of the cost. She is co-author of The Encyclopedia of
Sewing Machine Techniques. Her newest book is Creative Serging: A Comprehensive Guide.
MERCI APODACA
Currently working at Mel’s Sewing in Tustin, CA, Merci describes herself
as a “big-time fabric-holic.” She started sewing by making doll clothes
and progressed to making her own clothes in high school. Merci now loves
making quilts and clothes for her granddaughters.
AMY STEWART WINSOR
A quilt artist and instructor from Morrisville, North Carolina, Amy doesn’t
measure, doesn’t make templates, avoids matching corners, never plans
ahead, and usually fudges the rules. Her workshops are especially directed
toward Precision-Impaired Quilters like herself. She encourages her students
to quit stressing out, so they can frolic in the fabric. http://WinsorArtQuilts.com
32
REGULAR CONTRIBUTORS:
Jill Danklefsen
BERNINA® Product Support Specialist,
BERNINA® of America, Inc.
Kristie Smith
BERNINA® Educator,
BERNINA® of America, Inc.
2
MARY JO HINEY
Owner of Mary Jo Hiney Designs and creator of Silk Adaptation, Mary Jo
has been in the sewing, quilting and crafting industries since 1993 when
she was given the opportunity to design projects for book publishers, leading to authoring numerous books. Before that, Mary Jo was the owner of
Something Special, Made by Hand, a manufacturer of hand made gifts and decorative
accessories, With a degree from the Fashion Institute of Design and Merchandising,
Mary Jo has a sincere love for sewing and believes in the positive power of creativity.
LYNN SCHIEFELBEIN
Lynn has degrees in Textiles and Clothing Design and Fine Art. She works
full time as an advertising graphic artist and is also the owner of Oak Street
Quilts and Embroidery. Lynn spends her free time designing quilt patterns
and embroidery designs. She also enjoys teaching quilt classes at Heirloom
Creations in Sioux Falls, SD. Visit her website: www.oakstreetquilts.com
DEBBI LASHBROOK
A former teacher at the University level, Debbi also managed the BERNINA®
Sewing Center in Plano, TX for five years before joining the Education staff
at BERNINA® of America. Her specialties include garment construction, pattern drafting and fitting, and embroidery software.
from BERNINA®
BY SUSAN BECK
If you’ve been using a BERNINA® machine for any length of time, you know that this family-owned
company stays true to its Swiss heritage of accuracy and precision by offering 75+ presser feet and
accessories for today’s stitcher – the right tool for any sewing task. Occasionally, a sewer new to
BERNINA® will exclaim, “Do I have to use all of those presser feet?” I always answer, “No, you get to
use all those presser feet!” All sewing machines come with a few presser feet; usually the more fullyfeatured the machine, the more presser feet included. The truth is, you could sew for the rest of your
life with only the few presser feet that come with your machine. But, if you want to use the fastest
and easiest techniques, if you want to get the most professional-looking results, and if you want to
explore the outer limits of creativity, then you want to investigate every single one of the presser feet
and accessories BERNINA® has to offer.
The focus of this issue of Through The Needle is
helping you get the most from BERNINA® presser
feet and accessories as you stitch your way through
dozens of projects. While we can’t feature every
foot on these pages, we’ve tried to showcase a variety of them being used in some familiar ways and hopefully, in some new and interesting ways. The
double binding method shown on page 24 is a great way to add an accent color to your quilt binding
using the Binder Attachment #84 and the newest feet, Double Cord Feet #59C and #60C are used on
page 35 to make a cute and easy belt.
The silk jacket on page 4 of this issue uses both the Needle Punch Accessory set and the BERNINA® Stitch Regulator to create a unique textured
collar. To find the most popular presser feet and accessories for the type
of sewing you do, see Whatd’Ya Sew? on page 26.
If you’re really serious about learning to use the BERNINA® presser feet
and accessories, then join our latest online society, the Quarterly Accessory Society. This group downloads a new project every quarter that
uses a variety of presser feet. The lessons create technique swatches
and offers printable mounting cards for organizing and building a
reference library for all BERNINA presser feet. After practicing on
the swatches, you move to the project to put the techniques in
action. To join the group or download the lessons and printable mounting cards, go to: www.berninausa.com > Online
Classes > Quarterly Accessory Society.
We’re still celebrating the 75th
anniversary of the BERNINA® brand
so we’ve brought you another set
of stitching techniques from a
vintage BERNINA® publication.
See page 10 for how to recreate the
same techniques BERNINA® stitchers were using
in the 1950s and 60s.
For more information on specific BERNINA® presser
feet and accessories, go through the pages of Feet-ures,
Volumes 1, 2, and 3. You can also visit our web site at
www.berninausa.com and view video clips that show the basic
uses of all of the feet. To see the feet or accessories up close,
go to your local BERNINA® store and ask for a demo – there’s
always something new to learn!
T H R O U G H
THE
N EED L E
BY NINA MCVEIGH
CUTTING AND PREPARATION
SUPPLIES
• BERNINA® Decorative Needle
Punch Accessory Set
• BSR - BERNINA® Stitch
Regulator or other free-motion
presser foot
• Simple jacket pattern with
jewel neckline – sample used
out-of-print Simplicity 4405:
June Colburn Designs II
• Jacket fabric: Silk Noil in
amount according to pattern
• Assorted pieces of Silk
Dupioni in several
complementary colors for
needle punching the collar
• Lining fabric in amount
according to pattern
• Strips of dupioni and various
cords, threads and ribbon
for closures
• Armo Weft interfacing
• Buttons
• Fabric marking pen
• Assorted seed beads
• Size 60 Universal needle
• Monofilament thread
• Lightweight bobbin thread
• Metallic Thread
Cut out all pieces of the jacket and lining (except the upper collar piece) as directed by the
pattern.
Rough-cut a piece of jacket fabric slightly larger than the upper collar pattern piece. Fuse
Armo Weft to the wrong side in preparation for needle punching.
Using a fabric marker, trace the upper collar onto the prepared fabric, including the
cutting lines and seam lines.
NEEDLE PUNCHING
Tear strips of silk dupioni about 1½” wide, then cut into 1½” pieces.
Attach the BERNINA® Decorative Needle Punch Accessory Set to your
machine, removing the bobbin case and hook system, according to the
instructions on the DVD included with the set.
Cover the traced collar with silk pieces, randomly mixing the colors
and letting the strips extend unevenly beyond the collar edge.
Punch entire collar leaving about ¾” un-punched around the
outer edge (slightly more than the seam allowance).
The BERNINA®
Decorative Needle
Punch Accessory Set
is available for current
BERNINA® machines
with a CB hook system
(maximum 5.5mm
stitch width). This
includes all activa and
aurora models, the artista 630, retired activa, virtuosa
and artista 165/170 machines.
Needle punching by machine topped with free-motion stitching
and a scattering of beads add color, texture, and movement to this
simple jacket. The unique collar treatment and fun closures make
this garment a fashion statement that says, “Style”!
4
I S S U E
22
Pull back the extending silk pieces around the outside edge and pin to the collar to keep them out
of the seam allowance. Trim the fabric on the cutting line of the traced collar.
Place the under collar (lining) right side down on the needle punched upper collar;
pin. Sew the lining to the collar, being careful not to catch any of the loose silk
ends in the seam. Turn the collar right side out and punch the silk along the
outer edge; add extra pieces to fill in as desired. Remove all pins and trim silk
pieces as needed for the look you want.
FREE-MOTION STITCHING
Remove the Needle Punch Accessory Set from the machine and replace
the hook system and bobbin case. Attach the BSR – BERNINA® Stitch
Regulator and thread the machine with metallic thread (Glitter #204 by
Superior). Lower the feed-dog of the machine. Note: Other free-motion presser feet such as Freehand Embroidery Foot #24 or Freehand
Quilting Foot #29/29C may be used instead of the BSR.
Select the straight stitch and free-motion stitch over the needle-punched
area to add texture and interest to the collar.
BEADING
Insert a size 60 needle; thread the needle with
monofilament thread and the bobbin with
lightweight thread. Machine beading is a
free-motion technique so leave the feed
dog lowered and remove the presser
foot as this technique requires none.
Note: You may want to place fabric in a
spring hoop.
Pull the bobbin thread to the top
of the fabric; take a few anchoring
stitches and cut the thread ends.
Using tweezers, hold a bead with the hole facing up. Turn the hand wheel
until the tip of the needle is in the bead. If the bead is not exactly where you
want, you can actually drag it with the tip of the needle to the right spot.
Move your fingers away from the needle. Lower the needle into the bead,
and then raise it. Tip: If your machine is equipped with an electronic foot
control, tap your heel on the back of
the foot control, dropping the needle
into the bead; using your heel again,
raise the needle. Move slightly away
from the bead and take a stitch. The
bead will flip over on its side and lay
the way it should.
Travel by stitching to where you
want the next bead. Repeat the
process until the beading is as desired, taking a few tiny stitches to
tie off the thread; clip thread ends.
JACKET ASSEMBLY
Finish constructing the jacket according to the pattern directions.
Make buttonholes as directed by the pattern. Tie narrow strips of dupioni
and various cords, threads and ribbon through the holes or decorative
openings of the buttons; sew buttons onto the jacket to correspond with
buttonholes. Hint: If using large decorative buttons you may want to sew
snaps on the jacket under the buttons.
5
T H R O U G H
THE
N EED L E
BY PAULA HARMON
These beautifully framed rustic flowers will
brighten any room whether using them
on a table or as artwork on the wall. The
designs are from OESD Crafter’s Collection
#823 Flowers…Plus! by Helen Vladykina
and this unique collection of beautiful
florals has a new feature called Printable
Backgrounds. These backgrounds give
more impact and interest to your designs without increasing your stitching
time. With 13 different backgrounds,
you have a wide variety of styles and
colors from which to choose.
PRINTING THE BACKGROUND
For these examples
the frames are 8” x 8” and the prints
should turn out to be about the same size.
With each collection there is a CD with the
printable backgrounds. Note: This is true
even if you purchase a design card that goes
directly in your machine rather than a CD.
When you place the CD in the CD drive in
your computer, a menu will open. Click on
Printable Backgrounds! Locate the background you would like to use; for this sample,
I have used 02_Olive.jpg.
Double click on the desired background to bring
the file into the photo editing software on your
computer (this program will vary depending on
which programs are on your computer). In order
for the background to fill the frame, print it in
the 8” x 10” (full page) size. Each background is
square so this gives an 8” x 8” print with some
borders to trim away later.
Be sure to place the photo transfer paper in the
printer before selecting PRINT! After printing, trim
the transfer paper close to the edge of the color
portion of the picture.
6
SUPPLIES
• OESD Design Collection:
#823 Flowers…Plus! By
Helen Vladykina by OESD
• artista 730 with large oval
hoop and embroidery
accessories (or any BERNINA®
embroidery machine with a
5” x 7” or larger field)
• OESD Ultra Clean and Tear stabilizer
• Isacord thread as desired
• HRFive Temporary Spray
Adhesive
• OESD Iron-On Transfer Paper
• Iron
• Quilting Ruler
• Painter’s Tape
I S S U E
PREPARING THE BASE FABRIC
Next, cut the base fabric. For this sample, I chose a simple 100% cotton fabric
since the printable background is going to fill the picture frame. The embroidered
fabric will be trimmed to 10” x 10” before framing so make sure your base fabric
is larger than 10” x 10” and large enough for the hoop. Press the base fabric to
ensure there are no wrinkles in it.
Make sure the fabric is right side up and place the trimmed transfer in the center
of the fabric face down. Iron the transfer to the fabric following the manufacture’s
instructions. Note: Be sure that you press by setting the iron in place and lifting it
before moving to another area of the transfer.
22
Choose the design you wish to embroider and
load it into your machine. Note: It is recommended that you print a template to see the
size of the embroidery design in relationship to
the size of your background. If you choose to
resize the design, be sure to center the design
using the marked tape as a reference. Once
you are satisfied with placement, remove the
tape.
Following the manufacturer’s instructions, remove the
paper from your transfer. Be careful that you do not
have any areas that are not completely transferred.
The next step is to mark the center of the background.
There are several different ways to do this, however
you don’t want to mark directly on the transfer. For
this reason, I use Painter’s Tape. Cut a piece of the
tape, 1” square. Using a quilting ruler, mark the center of this square.
Embroider your selected design on the background.
Carefully remove the design from the hoop
and tear away all stabilizer. Be sure to support
the stitches with your thumb and forefinger
of one hand while gently tearing the stabilizer
with the other.
FRAMING THE FLOWER
Trim the fabric to 10” x 10” square, centering
the transfer.
Measure the background to determine how far from one corner you will need to
measure to find the center. Our square is 8” x 8” so using the same quilters ruler,
we can measure 4” from the corner to place the tape. Gently lift the corner of the
ruler that is in the center of the square and slide your tape under it, aligning the
marks on the tape with the center of the ruler.
STITCHING THE DESIGN
Use two layers of OESD Ultra Clean and Tear bonded together with HRFive temporary spray adhesive. Repeat this step with the fabric so that all layers of stabilizer
and fabric are adhered together as one unit. Hoop your “sandwich”, making sure
the marked center point (on the tape) is close to the center of the hoop and the
fabric is straight.
Cut 2 pieces of batting, 8” x 8” each. Most
picture frames come with a piece of cardboard the size of the frame opening. Using this
cardboard (or cut one if your frame doesn’t
have it), place both pieces of batting on top of
the cardboard. Then, place the embroidered
piece face up over the batting, centering the
embroidery. Flip this upside down and stretch
the fabric over the cardboard. Tape each side
down while holding the fabric taut.
Assemble the frame, inserting the mounted
design.
7
BY JILL DANKLEFSEN
The vintage BERNINA®
publication shown here
features a decorative
stitching technique referred to
as Bobbin Play. This is the process of winding
heavy weight threads/yarns (too thick to go through the eye of the
needle) onto a bobbin and using regular sewing thread in the needle.
The stitching is sewn with the fabric upside down (wrong side up); the
resulting stitch on the right side of the fabric is thick and dimensional.
Using decorative threads on the bobbin gives an entirely new look to
the stitches of
your machine,
greatly expanding
the creative
possibilities at
your fingertips!
Stitches
Supplies
• Base fabric – linen was used in the sample
• Decorative Heavyweight Threads/Yarns – choose a
thread uniform in diameter and texture (YLI Success
Serging Yarn was used in the samples shown)
• Construction quality thread for the needle
• Machine needle appropriate for the fabric
• Secondary bobbin case
• Small Screwdriver
• Open Embroidery Foot #20/20C
• Stabilizer as needed for the fabric used – OESD
Lightweight Tear Away was used
8
In many instances, the best stitches to use for Bobbin Play are
some of the simplest and most basic. The recipes shown make
use of 4 utility/practical stitches - - Straight stitch, Zigzag, Blindstitch and Running stitch
Auditioning Decorative Threads
Recipe Steps
Select yarns that are not too thick (they still need to be able to
work with the tension mechanism on the bobbin case) and they
must be uniform in diameter, thickness, and texture.
Shown here are some thread/yarn choices to consider; please
note that these represent only a few of the possible choices.
After you have auditioned threads and selected your stitches,
sew a test sew-out to determine the desired stitch length, stitch
width and tension setting. The “correct” stitch settings depend
largely on the look you want to create so try a variety of adjustments until you are satisfied with the look.
The two stitch recipes shown here are sewn in the same manner
as Stacked Stitches recipes; this simply means that the stitching
starts in the center of the recipe and stitches are added on either
side to achieve the final look.
Stabilize the wrong side of the fabric as needed to provide adequate support for the stitching.
Superior Razzle
Dazzle
YLI Multi’s
Yarn
YLI Success
Serging Yarn
Attach Open Embroidery Foot #20/20C to the machine; the open
area of the foot leaves the stitching area visible to make it easy to
align the stitches as you sew. The indentation on the sole of the
foot allows it to easily move over the thickness of the stitch as it
is formed.
Mark the stabilizer by drawing a long center line and then a horizontal line at the desired starting points for the rows of stitching.
These markings are for the alignment of the stitched rows.
YLI Shimmer
Ribbon Floss
YLI Ribbon
Floss
Embroidery
Floss
Silk Cordonnet
Thread
Start sewing from the center of the recipe out on both the right
and left sides, positioning the needle on the marked horizontal
line. Note: Use the features and functions of the machine as
needed to help perfectly align the stitches - Needle Stop Down,
Mirror Image, adjustable Needle Position, Pattern Begin.
Bobbin Play Basics
• Use a secondary bobbin case where the tension can be
adjusted. Note: It’s easy to adjust the tension for bobbin play
but not so easy to re-adjust for perfect sewing. Save yourself a
lot of frustration by using a separate case for this technique.
• Use a “Black Latch” case (available for CB hook models only)
or mark a second bobbin case latch with a dot of fingernail
polish or permanent marker so that you know that it is your
“play” case.
• Remember the rule – “Righty Tighty, Lefty Loosey” – for
adjusting the bobbin case tension.
• If using a machine equipped with a bobbin level monitor, be
aware that it will probably not indicate to you soon enough that
you are running low on thread. Always check to make sure that
you have enough thread/yarn on the bobbin before beginning a
new row of stitching.
• Don’t forget that you will be adjusting the top tension on your
sewing machine as well – you will be increasing the tension to
“pull” the bobbin thread/yarn into a stitch pattern.
• Remember: You will be sewing upside down! If you need lines
to stitch on, mark your stabilizer or the back of your fabric.
9
T H R O U G H
THE
N EED L E
BY MERCI APODACA
Supplies
• 8 vintage hankies
(pre-washed,
starched and
ironed) Note: The
directions for the
skirt are for size 6
months. If you make
a different size, you
may have to add or
decrease the number
of hankies and gores.
The key is that the skirt
be double the width of
the bodice to which it will
be attached, so you have
a nice, full gather.
• 1½ yards batiste fabric
(pre-washed, starched and
ironed)
• 3½ yards ½” wide cotton
insertion lace (starched and
ironed)
• 70/10 universal needle
• Cotton 50 wt sewing thread
(Madeira Cotona)
• Wash-away fabric marking pen
• Small appliqué scissors
• Rotary cutter
• Nifty Notions Cut For A Cure Ruler
• Open Embroidery Foot #20/20C
• Gathering Foot #16
Mercedes Espi
noza, grandchi
ld of author
Vintage hankies, lace
insertion, and a few heirloom sewing techniques make an adorable
dress that’s simple to make and fun for baby to wear!
Stitch Settings
The technique used to join lace to fabric in this dress calls for alternating between two different settings of the zigzag stitch. There are two ways to make this easy and eliminate the need
to continually change the settings back and forth.
Zigzag Stitch A: SL=1.5mm; SW=1.0mm
Zigzag Stitch B: SL=1.0mm; SW=2.0mm
Temporary Altered Stitch Memory
For all current and retired computerized BERNINA® models: Use the straight
stitch as a zigzag, adjusting the length and width to the indicated settings for Zigzag A. Use the zigzag stitch for the second set of adjustments (Zigzag B). As you alternate between the two, the Temporary
Altered Stitch Memory of the machine will remember your adjustments
and you will only make them once for each zigzag stitch. This memory
remains until the stitch is changed or the machine is turned off.
Personal Program
For models equipped with the Personal Program feature: Select
the zigzag stitch and make the first adjustments (Zigzag A). Program this adjusted stitch into your Personal Program. Repeat
with the second set of adjustments (Zigzag B). As you sew, you
will select the desired zigzag stitch from the Personal Program
screen. These settings will stay in your Personal Program until you
remove them, even though the machine is turned off.
10
Hanky Skirt
Select one corner of each hanky that you’d like to use as a focal
point. Using the template on page 14 (photocopy and enlarge),
cut the hankies with the rotary cutter and ruler; handle carefully
after cutting, due to the bias.
Pin and stitch where the lace overlaps using the same settings as
the previous stitching and taking a few backstitches where you start
and finish. Trim excess lace. Continue until you have four sets of two
connected hanky units.
Cut batiste fabric into eight 8½” x 6” rectangles.
Using the ruler and blue pen, mark a ¼” seam line on the two
long sides of the cut hankies. Position lace along the blue
marked lines and pin in place.
Place a 2-hanky unit down and slide a rectangle of batiste behind the
open “V” space between the two hankies.
Pin along one side. Return the settings of the machine to Zigzag
Stitch A and stitch.
Set the machine to Zigzag Stitch A; stitch lace to hankies. Press
seam allowance toward hankie.
Press seam towards fabric, from right side, sew with Zigzag Stitch B.
Trim excess fabric close to seam line. Continue until you have four
units, and then join all units following the same steps.
Trim the upper edge of the joined hankies so that you end up with a
straight and even top. Use Gathering Foot #16 to gather the edge for
attaching to bodice.
Change to Zigzag Stitch B; stitch along previous seam line on the right
side of hanky. Trim excess fabric close to seam line.
Continue the above steps until all eight hankies have lace on both sides.
Two at a time, place the hankies on cutting board or lace insertion
board and align the points evenly. The hankies will touch at the point
forming a “V”; the lace will overlap.
Bodice
Construct bodice according to pattern. Optional: Embroider a design of
your choice on the front of the bodice if desired. Once bodice and skirt
are completed, attach skirt to bodice following directions on the pattern.
11
TH R O U G H
TH E
NEEDL E
Panties
Panties were cut and constructed following the directions on
the pattern. Add cute “hanky ruffles” to the back of the panties as follows:
Cut fifteen corners (using template) from the hanky scraps.
Cut three strips from the batiste fabric 1¼” by 11”.
Using Gathering Foot #16, gather the upper edge of the five corners side
by side. Pin with right side of hankies down, onto a batiste strip ½” from
each edge.
Stitch with ¼” seam. Press seam towards strip. Fold and press ¼” around
all remaining raw edges of the batiste strip.
Make two more ruffle units.
Topstitch three ruffle bands onto the panties, securing all
sides of batiste bands. Cover the band on the top ruffle
by stitching purchased trim on top of it.
Photocopy and enlarge
patterns 150%
12
BY AMY STEWART WINSOR
Of all the textile embellishments I have
used, couched yarn is one of the most
effective. Sewing yarn onto the surface of
a quilt adds detail, texture, and dimension,
quickly changing the look, and is suitable
for use on both wall hangings and bed quilts.
With all the novelty yarn available today,
it’s easy to find the right color and texture
for quilts of any style and color.
Fabulous Fibers
Yarn – continuous strand of twisted fibers. In this article, the
word “yarn” also refers to trims that are narrow and do not have
a right and wrong side, such as rattail cording, or 1/8” ribbon.
Why add yarn to a quilt?
1. Yarn can jazz up boring sections of the quilt.
2. Yarn adds texture to an otherwise flat quilt.
3. Yarn is one of the few embellishments that can be used on a
bed quilt; it’s soft and won’t scratch the way some beads or
other trims do.
Couching - laying yarn on top of fabric, then using another thread
to stitch it in place; the yarn itself is not sewn through the fabric.
Tip: Pretest yarn to see if it shrinks or bleeds before sewing it
onto your quilt.
13
STABILIZING THE FABRIC
Before couching, the fabric needs to be stabilized to provide sufficient support for the added yarn and stitching. To do this, place
the fabric on top of an additional layer: batting, batting/backing,
or stabilizer (if it is to be sandwiched later.) Couching on top of a
single layer of fabric without any type of stabilizer will cause it to
pucker, pull, or scrunch up.
MACHINE SETTINGS
Sew with the feed dog up if you are sewing forward, or with the
feed dog down if doodling in all directions.
Use monofilament thread in the needle and regular thread in the
bobbin. Select a zigzag stitch with a width wide enough to go
over the yarn.
PRESSER FEET
I learned to couch yarns and trims using a standard presser foot.
The problem with this is that the foot presses down on the trim
or yarn, and shoves it along. After measuring carefully, cutting the
yarn to the exact length of the fabric, and sewing it down, you
might find that there is yarn left over at the end. This is undesirable because it is evidence that the fabric has been slightly
gathered under the stretched yarn.
I prefer trims and yarns to be sewn down while they are lying on
top of the quilt in a relaxed position, instead of being stretched.
There are two presser feet that I recommend for use in couching
yarn. Editor’s Note: This article discusses free-motion couching stitched with the feed dog of the machine lowered and
the stitcher determining the movement of the fabric. There are
several additional BERNINA® presser feet suitable for couching
when stitching with the feed dog up, using the preprogrammed
stitches of the machine. For more information on these feet, see
Feet-ures, Volumes 1, 2, and 3.
Freemotion Couching Foot #43
For couching most yarn, use
Freemotion Couching Foot
#43. Thread the yarn through
the hole in the side of the
presser foot and sew with a
straight stitch. The underneath surface of the presser
foot has been hollowed out
so the yarn slips through without being stretched.
• Advantages: The yarn feeds automatically through the foot
and comes out under the needle, in the exact spot where
the needle will sew through it; very little skill is required.
• Disadvantages: Yarn must be small enough to feed through
the hole and uneven nubby yarns do not slide through
smoothly.
Free-motion Quilting Foot #29/29C
Although this foot was not
designed for couching, I like
using it because it does not
press down on the fabric
or yarn. In the down (or
engaged) position, the freemotion foot sits just above
the level of the fabric. Its
main purpose is to prevent
flagging, which means keeping the fabric from traveling
up the needle as it pulls out of the fabric. It does a beautiful job
couching because the yarn isn’t pushed or stretched in any way.
• Advantages: This foot is easy to use when doodling loops
and squiggles, because you can sew in any direction without
turning the fabric; use with the feed dog down. Can be used
with bumpy or fluffy yarns, or any fiber that is uneven or
larger than the hole in the #43 foot.
• Disadvantage: A bit more skill is required because the yarn
must be guided under the needle.
COUCHING OPTIONS
WHEN ADDING FIBERS TO YOUR
QUILT, CONSIDER THE FOLLOWING
OPTIONS FOR PLACEMENT AND
TECHNIQUE.
Binding
Variegated yarn is an interesting detail to add just inside the
binding. Lay the yarn in the ditch and couch it in place.
16
Raw Edges
Yarn can be used to cover unconventional
seams. In the quilt, Spangled Banner, I did
not piece the stripes together. I merely laid
the red and white stripes onto a foundation fabric. Then I covered the raw edges
with couched red yarn. Note: When
covering raw edges, use a wider zigzag
stitch for more secure coverage.
Freemotion Doodling
Put the feed dog down if you are sewing in all
directions. An advantage to using the quilting
foot is that you can place yarn loops onto the
fabric directly in front of the foot, and cross over
them and sew along the loop without ever
turning the fabric. When using the couching
foot, you must turn the fabric under the needle
as you go around loops, because the yarn
comes out only in one direction.
Squiggly – a flat variegated yarn is
couched over the woven patchwork.
The Opera Quilt – the leaves on the border of were too sparse, so
yarn doodles were added to make the border more attractive.
Seamlines and Outer Edges
I often couch yarn along the seamlines of my quilts, after adding the batting. In the Limelight
(shown on page 15) uses yarn with pink and yellow sprigs that show up as playful three-dimensional details on an otherwise “normal” crooked log cabin quilt.
Couching the outer edges works well for a “pillowcased” quilt (seamed and turned right side
out). Cut 3/4” wide strips of Aqua Mesh Plus water-soluble embroidery stabilizer and stick
them around edges of quilt with the sticky side to the wrong side of the quilt. Looking at the
Couching outer edges of In the Limelight
right side of quilt, butt yarn against the outer edge of the quilt on top of the sticky strips.
Stitch with a zigzag wide enough to catch the edge of the quilt and the yarn. As you sew, use
a stiletto or seam ripper to hold the yarn against the edge of the quilt, so there is no space between. To start and end the yarn, thread it
between the layers of the quilt sandwich with a large hand-sewing needle. After completion, the stabilizer is easily removed by laundering
the quilt, or, if the quilt cannot be laundered, scrubbing the edge with a washcloth and hot water.
15
TH R O U G H
TH E
NEEDL E
SUPPLIES
• Silk Adaptation—Individual Silk Organza Pieces;
each piece is 14” x 18”. Pillow shown used: Ivory,
Pale Pink, Light Apricot, Light Orchid
• 1/3 yd of 44”-wide Blush silk dupioni for
pillow and petal layer foundations
• 2/3 yd 20”-wide white Fusi-Knit interfacing
• ¼ yd 44”-wide Fusible Fleece
• 2 yards ¼” Blush Pink double-face silk satin
ribbon
• 10” x 20” of muslin to make 8” round pillow
insert
• Polyester stuffing (12 oz.) or 8” round pillow
form
• Bead Gravy: Strawberry Puree
Note: The above supplies are available in kit
form. To allow you to choose your own
petal colors, the kit includes everything
except the Silk Adaptation Organza. Ask
for the kit at your BERNINA® dealer or at
your local independent sewing store.
• Blank newsprint paper (6 sheets, each 14” x 18”)
• Sewing thread: Blush-colored
• Machine embroidery thread: Pale Gold
• Clear Foot #34/34C
• Machine needles: Size 12 Universal, Size 14
machine embroidery
• Hand needles: Beading or milliner’s needles
• Rotary mat and cutter
• Pencil
• Nifty Notions Cut for the Cure ruler
• Fabric scissors
• Steam iron and ironing board
• Straight pins
• Basic sewing supplies
Silk Organza Dahlia
reate a very special pillow for that very special day. Silk designer
Mary Jo Hiney guides you step by step. Beautiful dahlia petals cascade
from this ring bearer’s pillow—lovingly fashioned to make a most memorable
day even more delightful.
Embroidery Design Lines
PREPARE THE ORGANZA
In order to easily accomplish the
crisp press needed for the sheer,
dahlia pillow petals, a natural
fiber is required. Silk organza is
the most wonderful of choices,
but cotton voile would also fit
the bill. Synthetic fibers will not
take or hold a crisp press.
Press organza. Pin blank
newsprint under each organza
piece. Using decorative stitches,
embellish the silk organza with
pale gold embroidery thread,
DIAGRAM 1
working from four to seven
randomly curved rows on the fabric with the stitches. Use a different decorative stitch for
each shade of organza. Diagram 1. Embellishing with the same thread shade on each
piece unifies the dahlia composition.
Attach Clear Foot #34/34C to the machine. The
foot offers visibility so you can see exactly where
and what you are stitching. If you choose to draw
guidelines on the newsprint, you will easily be able
to follow them, aligning each drawn line with the
center red mark on the foot.
The following artista 730 decorative stitches were
used on the pillow shown: Ivory Stitch 414: width
6mm, default length; Pale Pink Stitch 656: width,
default length; Light Orchid Stitch 708: default width,
length 2.0mm, Pattern Extend 2x; Light Apricot
Stitch 813: default width and length.
Note: If using BERNINA® models other than artista, choose similar stitches. A Stitch
Conversion Chart for current BERNINA® models is at www.berninausa.com>Sewing
Studio>Training>Stitch Conversion Chart.
Tear away newsprint from embellished organza. The porous nature of newsprint makes
the tear-away process easy. Use a straight pin or small tweezers to pick-out paper from
some of the smaller stitched areas. Press organza.
16
BY MARY JO HINEY
CUTTING
Note: See Cutting Diagram 4 on page 21.
Organza Petals
Here’s a time saving, fabric-cutting tip—use the pencil
and grid lined ruler to trace (see Pattern Insert) full-sized
Petal Patterns A, B, C and D onto the blank newsprint
paper. Diagram 2: three A, six B, five C, four D. Diagram 3:
four A, five B, four C, five D. Label the hand-drawn patterns.
Pin the Diagram 2 newsprint pattern onto layered fabrics 1, 2 and 3. Pin
Diagram 3 onto fabric 4. Cut all. Pile like petal sizes together.
B
A
A
A
A
C
C
B
B
C
B
B
B
D
B
B
B
C
C
C
C
C
D
D
D
press edge down
Organza Fabric 4
C
D
Fold and press the folded-edge
corners diagonally down, forming a
triangle. Set the triangles aside in piles
of like colors and like sizes. (Some
petals may not be embellished.This
adds to the subtle beauty of the
composition.)
3
D
MAKE THE DAHLIA PETALS
Working with Petal pieces A, B, C and
D, fold and press each rectangular
piece down ¾” along one long edge.
Diagram 5.
B
B
Pillow, Petal Layers, Dupioni, Interfacing, Fleece From dupioni and interfacing,
cut one each of Petal Layers 1, 2, 3, 4,
5 and 6. Be sure to cut fabric ¼” larger
Organza Fabrics 1, 2 and
all around than pattern. Cut one each
from interfacing. Cut one Pillow Front,
one Pillow Upper Half Back and one
Pillow Lower Half Back to pattern size.
A
A
A
Cut one each from interfacing. Diagram 4. From fleece, cut one of each
Petal Layers 1, 2, 3, 4, 5 and 6 and Pillow
Front. For Petal Layers, cut fleece scant
1
/8” smaller all around than patterns.
For Pillow Front, cut fleece without the
3
/8” seam allowance.
D
DIAGRAM 2
press corner down
DIAGRAM 5
D
D
DIAGRAM 3
press corner down
17
TH R O U G H
TH E
NEEDL E
PREPARE THE PETAL LAYERS
For stability and ease when working with silk, apply Fusi-knit
interfacing to the wrong side of the fabric.The organza petal fabrics
are not interfaced, but the dupioni for the Pillow and Petal Layers is
fused. Fuse interfacing (centered) to the wrong side of each Petal
Layer fabric circle, matching sizes. Fuse interfacing to wrong side
of pillow pieces. Set pillow pieces aside.
DIAGRAM 8
The Petal Layer patterns are utilized to create an appliqué-type of
finished edge for a portion of the dahlia construction.With this in
mind, cut the Petal Layer paper patterns out very cleanly along the
cutting lines. Place Fabric Circle #1 paper pattern centered over
fabric.
Using a steam iron, press raw edge of fabric up and over onto paper pattern, shaping a perfect circle. Be careful to not form points
along edges. Spray a bit of water if necessary to achieve a crisp
edge.
serpentine
stitch
DIAGRAM 9
Remove paper pattern. Press fabric circle edge again from both
interfaced and right sides. Repeat for each Petal Layer.
Fuse the fleece to interfaced side of circles. No fleece should be
visible from right side of Petal Layer circles.
ARRANGE THE PETALS
CONSTRUCTION NOTES: The dahlia flower is made by chain gathering
the petals together in rings, which are then layered. Petal quantities
and sizes are different for each ring.There are a total of eight ring
layers.
The dahlia is assembled beginning with the outermost layer (#1).
Subsequent layers are built upon the first, ending at the center.
Each petal row is gathered to a specific measurement that corresponds to the Petal Layer circle. The Petal Layer circles create a
very clean finish for the often-unwieldy petals.
DIAGRAM 10
PETAL CHART SIZES
Arrange petals in rows with the appropriate size and amount of
petals in each row, following the chart on the following page and
using the different fabric shades with a confetti-type of approach.
Thread a hand-sewing needle with doubled thread. Knot ends.
FORM THE INDIVIDUAL PETAL RINGS
Working with the first row of petals, hand gather-stitch across
straight edge of first petal, placing stitches ¼” up from raw edge.
Diagram 7. Before reaching end of first petal, overlap the next
petal about ¼” onto the first; continue stitching.
DIAGRAM 7
Continue to chain gather-stitch the petals together. Trim away the
fabric frays as necessary.Diagram 8. Pull gathering thread so that
chained petals gather to the measurement listed in Diagram 6.
Secure thread, then join last petal to the first, forming a ring. Knot
and trim away excess thread. Adjust petal gathers so they are
evenly spaced. Place petal ring on work surface, right side up.
Diagram 9.Place Petal Layer #1 circle centered over petals, overlapping finished edge onto petal ring gather-stitch line. Pin in place.
18
DIAGRAM 11
Machine stitch circle to petal ring. Diagram 10. Try a serpentine
stitch—it’s both forgiving and decorative. Set stitch width at 2.0mm
and length at 1.5mm.
Continue to chain gather-stitch the remaining petals, forming
rings, finishing each with the appropriate Petal Layer circle. The
final two rings (center layers) are not finished with a Petal Layer
circle.
SEW THE PETAL LAYERS TOGETHER
Place finished Layer #1 on work surface, right side up. Center
Layer #2 over first layer. Machine sew the layers together, placing stitches a scant ¼” inward from the upper circle’s outer edge.
Diagram 11.
Continue to build layers in this manner. At some point, the layers
may become too thick to sew by machine and it may be necessary to sew them together by hand.
I S S U E
22
For the center, hand-sew petal ring #7 to the flower center, being
very careful to sew the raw edges down with whipstitching. Handsew the final two center petals in place, manipulating the petals so
that all raw edges are hidden.
MAKE THE PILLOW
Sew a ½” doubled hem along both straight edges of the Back
pieces. Cut four 12” lengths from ribbon. Sew ribbon to Upper and
Lower Back pieces, where indicated on pattern, using the serpentine stitch.
Fuse fleece to wrong side of Front. Place Front on work surface,
right side up. Place upper Back onto Front, right sides facing,
aligning outer curved edges. Place lower Back onto Front in the
same manner. Note: From wrong side, Lower Back overlaps onto
Upper Back. Sew outer edges together, using a 3/8” seam allowance
and size 1.5 stitch length. Edge press seam allowance open. Turn
right side out. To make pillow insert, cut two Fronts from muslin.
Sew outer edges, using a ½” seam allowance, leaving a 4” opening
somewhere along the seam line. Turn right side out. Hand stuff and
sew opening closed. Slip pillow insert through Back opening. Use
ribbons to tie Back closed. Tie knots at ribbon ends and trim at a
slant.
FINISHING TOUCHES
Pillow and Petal
Pin centered dahlia onto
Front. Hand-sew to Front
PETAL
PETAL
along outer edge of botLAYER #5
LAYER #4
tom Petal Layer, being
careful to not sew dahlia
petals through to pillow
insert. Using a single layer
PETAL LAYER #1
PETAL LAYER #2
of thread, hand-sew Bead
Gravy seed beads to some
petals along the decoratively embroidered stitch
lines. Use either a beading or milliner’s needle. Hand-sew the remaining piece of ribbon
under the center two petals. Tie knots at ribbon ends and trim at a
slant. When it’s time, tie wedding rings onto ribbon.
Layer Fabric and Interfacing Cutting Diagram
PILLOW Lower
Half BACK
(for small dahlia)
PETAL
LAYER
#6
PILLOW FRONT
(for small dahlia)
PETAL LAYER #3
PILLOW Upper Half BACK
(for small dahlia)
DIAGRAM 4
Mary Jo Hiney’s Embrace Bag pattern uses several of the techniques that she has shared for creating the Ring Bearer’s Pillow.
These precious handbags would make lovely gifts for bridesmaids or the mothers of the bride and groom. Ask for this pattern
at your BERNINA dealer or at your independent quilting and
sewing store.
19
TH R O U G H
TH E
Part 1
NEEDL E
BY DEBBI LASHBROOK
One of the best features of some embroidery
software programs is the ability to create
your own designs. Turning artwork into
stitches – digitizing – is a creative process that
can be satisfying and rewarding. The first in a 3-part series, this article offers insight into the theory of digitizing. A
good design starts long before the stitching process because good embroidery can never make up for bad digitizing.
Parts of a Design
Elements of a Good Design
Learn to identify the parts of a
design to make
planning your own
designs easier.
Good embroidery
is the result of
careful planning.
Being able to recognize a good design gives you tools that will
serve you well when digitizing your own. Look for a majority of
these points in a good design.
• Attractive, well-balanced design that sews well
• Colors and order of stitching are well thought out so that color
changes are kept to a minimum
• Does not have an excessive number of jump stitches, therefore
is not too time-consuming to sew out
• Density is compatible with the fabric - fill stitches are not
“bulletproof” nor are they too open
• Has texture and movement
• Doesn’t have too many small details
• Design is not flat, but has detail and dimension
• Fills are varied and don’t run in same direction (stitch angle)
• Underlay stitching is present
• Outlines are precise and continuous around the design
• Colors have the right impact and are appropriate for the design
• Size and scale of design are the right proportions for the article
on which it is stitched
• Design is properly placed on the article on which it is stitched
• Outlines—single,
triple, satin,
stemstitch, backstitch, candlewicking, blanket
stitch, pattern, or
blackwork run
• Fills—step, fancy,
satin, pattern,
lace, candlewicking, blackwork
• Understitching (underlay)—runs perpendicular under the fills
• Travel Stitches (walk stitches)—single stitches that run between
two sections that are stitched in the same color, echo the edge
of the section that they travel under or cut through the area
• Jump Stitches – long stitches that result when the needle
moves from one section to another of the same color; should
be removed before they are stitched over
• Overstitching—stitches that are set on top of a fill to give it
additional texture and depth, can use specialty threads such as
metallics, holographic threads, solar threads
• Free Stitching—Stitches added to complete the look, not
strictly fill or outline—grass, bubbles, rays; created with running
stitches or pattern stitches
• Overlap—part of a design that purposely stitches out over the
top of another portion of the design
20
Independent Study
To increase your knowledge
of digitizing, watch as
professionally digitized designs
stitch—look at the stitch length,
the underlay stitching, the thread
path, how the design is
sequenced, and how texture is
formed in the design. You’ll learn to
incorporate these elements into the
designs you digitize.
I S S U E
Artwork for Digitizing
• Types of suitable artwork: drawing, clip art, bitmap file, black
and white line art, photograph, sketch in a drawing program
• Clipart websites have CDs or downloadable artwork that can
be purchased for personal use.
• High resolution artwork is not necessary; it won’t lose clarity
when enlarged, but once artwork is brought into the software,
resolution of artwork is lowered
• Be careful about copyright! You must even be careful about
designs you are using for your own personal use—it is best to
ask or use copyright-free artwork
• There are copyright-free designs on the market, including many
Dover publications (www.dover.com)
Elements of Good Artwork
• Image must be in a format that your software will recognize;
programs such as Paint Shop Pro or PhotoShop can be used
to convert the format
• Examining artwork from a distance makes it easier to see
which lines of detail are important
• Good clear artwork is important—the crisper and more accurate the artwork, the easier it is to interpret with stitches
• If the picture has too many colors, some of the lower priority colors can be omitted or combined with some of the other
colors
• If you need to enlarge the artwork, decrease the size, or crop, it
is best to do so before digitizing
• You may need to add details to give dimension to simple
designs
• If the design has too much detail, some elements can be
omitted; for example, spots on a leopard can be decreased
• Use details in the artwork as a guideline for angle separations
to create subtle color changes since the same color of thread
stitched in different angles will appear to be different colors.
This helps eliminate color changes. To create more separation
of these sections, an outline can be used to add detail.
• Artwork with high contrast is better for shading
Developing a Digitizing Plan
Use copies of the artwork for planning and recording information—“Embroider the paper with your eyes.”
• Print one copy the actual size of the finished design so you can
see what needs to be changed (details added and/or subtracted) in the drawing
22
• Make one copy two or three times larger than the actual size so
information can be recorded on it
• Decide which parts of the bitmap are in the background, which
in middle, and which in the foreground, similar to planning an applique design. This helps determine the digitizing/stitching order
• Determine if there any parts of the design that can be created
by duplicating portions of the design, thus saving time
Create a “Road Map” for Better Digitizing
Note: Several of the terms and tasks listed here will be covered in
Parts 2 and/or 3 of this series.
• Successful digitizing is like planning a trip to visit several places
using the least amount of fuel and time—think through the
whole design from beginning to end to achieve better results.
• First, determine where you should begin stitching although
sometimes it is easier to start at the end and work toward the
beginning to determine the starting point
• When you plan the path of the design, the trick is to keep the
needle in the fabric except where there is a color change
• Mark a plan for walking stitches to travel from one color area
to another area of the same color; this is best done along the
edge for decreased density designs
• Mark all areas in the design with a notation about:
- Type of fill
- Color
Create a chart similar to the
- Density
legend below to document the
- Stitch length
- Stitch angle
choices you make for your design.
- Type of underlay
- Traveling from one area to another
- Mark the starting and ending points of each area
- How much pull compensation is needed
• Use colored pencils to color a black and white picture; color in
the direction to lay the stitches—use a protractor to measure
the angle
• Determine if the same color absolutely must be sewn at different times
• Use numerals 1, 2, 3, etc. to record the stitching order for objects—this is important if you need to edit the design later
• Write down the probable color sequence along the side of the
road map or make colored dots along the side such as ones
found along the selvage edge of printed fabrics
• Decide on special effects: specialty threads to use, appliqué
technique, special fabrics, etc.
Coming in Digitizing 101 - Part Two:
Stitching Order, Color, Digitizing and
Refining a Design
Note: For full-size versions of Road Map and Legend, go to www.berninausa.com > Online Classes > Software Classes
21
BY JILL DANKLEFSEN
Add subtle visual interest to your quilting by using decorative stitches instead of
the traditional straight stitch. The wide variety of BERNINA® decorative stitches
available are great for quilting, especially when working with the richly patterned
Retro Landscape from the Metro Fabric Collection by Benartex. Choose your
favorite stitches, machine-quilting thread, attach
Walking Foot #50 and you’re ready to quilt!
METRO QUIL
TING
Easy Stitching Tips
• “Scale” (adjust stitch length and
width) stitches to match the size
or scale of the print.
• Engage the Pattern Begin function,
if available, when beginning a new
row of stitching
• Make pivoting and maneuvering
the printed shapes easier by
engaging the Needle Stop Down
feature, if available
• Use the FHS (Free Hand
System), if available, for pivoting
and maneuvering around the
motifs – remember it speeds
your sewing by 20%!
SUPPLIES
• Metro Fabric
– Retro Landsc
ape and Para
• Low-loft batti
llel Lines – fat
ng – fat quarte
quarter of each
r
size
• Backing fabr
ic – fat quarte
r
• Machine Qui
lting Thread (
YLI #V71 – Rio
• 80/12 Topstit
de Janeiro is sh
ching needle
own)
• Bead Gravy
– Rich Paprika
co
lor (#BDGR-4
• Elegance Rib
) (optional)
bon – Picot O
mbré, (optiona
• Walking Foot
l)
#50 – use the
open sole if av
• BERNINA® M
ailable
agnifier Set (o
ptional)
Directions
Piece fabrics
as desired; th
e sample show
scape pieced
n has two fabr
with Parallel Li
ics from the M
nes cut on the
etro collection:
with a bit of El
bias. As an em
egance Ribbo
Retro Landbellishment, th
n to divide the
e diagonal seam
2 fabric pieces
is covered
.
• As you quilt, following the lines
TING
of the print fabrics, you may
METRO QUIL
need help - check out
bric layers.
the BERNINA®
een the two fa
tw
be
ng
tti
ba
ad.
w-loft
Magnifier set.
ne quilting thre
g fabric with lo
in) with machi
ding a backin
bb
ad
bo
by
d
h”
an
ic
e
w
You’ll see things that
dl
sand
(nee
Make a “quilt
ad the machine
oves the
g needle. Thre
you’ve never seen
in
ch
tit
ps
to
ne. This foot m
a
hi
ac
m
Insert
e
th
to
, keeping
Foot #50
before!
the same rate
Attach Walking
at
le
ed
ne
e
th
rves
ilt under
g the gentle cu
layers of the qu
you stitch alon
as
g
only”
in
ch
ift
tit
sh
-s
m
ht
t a “straig
the fabric fro
no
is
is
Th
e:
ot
ception
design. N
hine with the ex
of the printed
ac
m
ur
yo
on
models.
any stitch
top-of-the-line
foot! Use with
on
d
un
fo
s
he
otion stitc
of Sideways M
er, followe layers togeth
th
ilt
qu
d
an
d
s as desire
great lines to
Select stitche
ndscape has
La
ro
et
R
s.
ic
and give
the fabr
fine the shapes
ing the print of
de
s
he
itc
st
e
decorativ
e stitching.
s of decorativ
follow and the
w
ro
e
iv
tit
pe
re
for
a simple layout
llel Lines offers
ra
Pa
.
rn
tte
t.
pa
e
vy assortmen
definition to th
the Bead Gra
g
in
us
d
re
si
s as de
hes, add bead
llishment touc
be
em
e
lik
u
If yo
22
DOUBLE
BIND!
Miniature Hearts: Finished size: 39” x 44”
This simple double binding technique adds an accent
of color to quilts using the BERNINA® Binder
Attachment #84. Start with a standard folded or
French binding, add a contrasting strip and apply
it to your quilt for a unique finish.
BY LYNN SCHIEFELBEIN
THE BERNINA® BINDER ATTACHMENT #84 IS AVAILABLE IN THREE SIZES:
20mm – 24mm (0.78” – 0.94”)
• Approximate width of finished binding = 5 - 6mm (0.20” – 0.24”)
• Often used for lace, sheer, and lightweight fabric
• Strips should be cut a scant 7/8” wide
22mm – 26mm (0.87” – 1.02”)
• Approximate width of finished binding = 5.5 - 6.5mm (0.22” – 0.26”)
• Often used for garments and medium weight fabric
• Strips should be cut a scant 1” wide
26mm – 30mm (0.94” – 1.18”)
• Approximate width of finished binding = 6 - 7.5mm (0.24” – 0.30”)
• Often used for home dec projects and quilts with low-loft batting
• Strips should be cut a scant 11/8” wide
BINDING
Cut the number of 2½” strips needed for standard binding on the bias or straight of grain so you have enough
to go around your quilt plus about 10” - 12” for mitering the corners. When piecing strips end to end, stitch
together on the diagonal and trim the excess. Press seams to one side. Fold the strip in half lengthwise,
meeting raw edges. To avoid stretching, press with steam and spray starch or fabric finishing spray using
an up and down motion. This helps to preshrink the binding and stabilizes it to help prevent rippling.
ACCENT EDGE
Prepare the accent fabric by pressing it on the back with steam and spray starch or fabric finishing
spray. Starch at least twice and press until dry.
Tip: When using spray starch, spray the back and let it sit for a few minutes before pressing. This
allows the starch to penetrate the fabric and prevents flaking and build-up on your iron. Starching the back will also help the fabric roll towards the wrong side as you feed it through the binder
attachment.
Cut the starched fabric into enough bias strips to match the length of your binding. Check the
instruction sheet with your Binder Attachment for the appropriate width (or see above). Join
the strips on the diagonal and trim the excess with pinking shears. Tip: Trimming with
pinking shears help to reduce
the bulk of the seam as it feeds
through the binder.
SUPPLIES
• Fabric for quilt binding
• Accent fabric in a contrasting color to the
binding
• BERNINA® Binder Attachment #84
• Binder Foot #94
• Patchwork Foot #37 or Walking Foot #50
• Edgestitch Foot #10/10C
• Multiple stitch throat plate - not the straight
stitch plate.
24
Cut one end of the bias accent edging on the diagonal and feed
it into the binding attachment with the right side facing away from
you. You may need to use a pin or a stiletto in the slot to guide the
fabric through the binder. Move the needle position 2 or 3 spaces to
the right until it’s just to the right of the edge of the accent bias binding. Pull the bias accent binding through the attachment and take
a few stitches to start the process. Adjust your stitch length so it is
between 2.5 and 3 mm. A smaller stitch length will cause the accent
bias binding to ripple.
Feed the folded edge of the
prepared standard binding
so it is against the lip of the
binder. The accent bias binding will encase the folded edge
as shown in the photo. When
you have finished adding the
accent edge, press well again.
LYNN’S BINDER TIPS
• Check your stitching before proceeding too far and make
adjustments as needed to the needle position, stitch length,
and feeding of fabric.
• For best results, don’t stitch too fast; an even, consistent,
moderate speed works best.
• Feed the bias accent binding through the binder without any
tension and do not pull it forward. It must feed at it’s own pace
for it to properly form the bias edging.
BINDING A QUILT
Trim your quilt sandwich and square the corners with a square up.
Using Patchwork Foot #37 or the Walking Foot #50, attach the prepared binding to the back of the quilt. Leave a 4” or 5” tail and start
with your needle right in the corner of the quilt. Sew at a 45˚ angle
into the quilt and pivot to sew normally at the ¼” seam line. Stitch
the binding to the side of the quilt using a ¼” seam.
Stop ¼” from the edge
at the corner with the
needle down. Pivot and
sew at a 45˚ angle off the
corner of the quilt. Fold
the binding straight up,
and then bring it straight
down, aligning the folded
edge of the binding
exactly on the cut edge if of the quilt. Restart stitching ¼” from the
edge and secure by back-stitching a stitch or two. Repeat this process for the next two corners. On the last corner, stitch to within ¼”
of the edge, pivot and stitch at a 45˚ angle off the corner of the quilt.
Line up the two binding tails
at the corner and draw a
chalk line straight up from
the ¼” pivot point. Draw a
horizontal line ½” inch from the folded edge. Draw 45˚ line up and
to the right from the bottom pivot point. Draw another 45˚ line down
and to the right from the top of the binding. The two lines will intersect on the horizontal line. Sew directly on this line in a “V” starting
at the pivot point and ending at the top of the binding. See inset in
photo. Press flat and trim close.
On the back of the quilt,
press the binding away
from the quilt. Check that
the seam allowance is flat
behind the binding and also
pressed away from the quilt.
Fold the binding to the front,
extend it just beyond the
stitching line and press.
Pre-fold the miter and press
at the corners. Fold the right
edge down first. Then fold the top edge over it, mitering the corner
and matching the binding and accent edges. Continue around.
Attach the Edgestitch foot
#10/10C. Move the needle
2 positions to the right. With
a straight stitch between
2.5 and 3 mm, use thread
to match the accent edge.
Guide the bias edge so it is
touching the guide on the
toot and stitch the binding to
the quilt on the front. Make sure you cover the previous stitching line.
Your stitching should be next to the edge on the accent bias strip.
As you come to the corner, use a stiletto to hold the miter in position. Check that the bottom binding is under the side binding as you
stitch into the corner. With your needle position down, stitch into the
corner, stop and pivot. Continue stitching down the side and repeat
the process. This will tack down the
bottom corner before you stop and pivot,
helping to give you a crisp corner that will
match. Press when completed. Tip: Try a
decorative stitch when
attaching binding to the front.
Photos by Dave Eggen from Inertia
25
Most of us sew what we like,
whether it is quilting, fashion,
crafting, embellishment, home
dec, or all of the above. The
groupings below show the 6 most
often-used presser feet or groups
of presser feet for each type of
sewing with a brief listing of the
favorite techniques for which
they are used. Make sure you
have what you need for the
sewing tasks you do most often.
QUILTING
1. Edgestitch Foot #10/10C – stitching in the ditch;
securing binding
2. Freehand Quilting Foot #29/29C – freehand
quilting (outline, echo, stippling, etc.)
3. Patchwork Foot #37 – precise piecing
4. BERNINA Stitch Regulator – BSR #42 –
free-motion quilting (outline, echo, stippling, etc.)
5. Walking Foot #50 – machine-fed quilting (grid,
channel, decorative stitching, etc.)
6. Patchwork Foot with Guide #57 – precise piecing
For more information and specific instructions
for each technique, consult Feet-ures,
Volumes 1, 2, and 3.
26
I S S U E
22
CRAFTING
1. Jeans Foot #8 – riding smoothly over varying
thicknesses; penetrating heavy layers
2. Clear Embroidery Foot #39/39C – satin stitch
appliqué; couching narrow cord
3. BERNINA Stitch Regulator – BSR #42 –
free-motion quilting (outline, echo, stippling, etc.)
4. Roller Foot #55 – outline quilting; echo quilting
FASHION SEWING
1. Buttonhole Foot #3A – repeatable buttonholes
2. Blindhem Foot #5 – blind hemming
5. Bias Binder Attachment #84 with Foot #94
– bound edges, ties
6. Needle Punch
Accessory Set –
needle punching
3. Edgestitch Foot #10/10C – understitching;
edgestitching
4. Zipper Foot with Guide #14 – lapped or center
zippers; tucks
5. Invisible Zipper Foot #35 – invisible in-seam
zippers
6. Bias Binder Attachment #84 with Foot #94 – Hong
Kong seam finish; neckline binding; straps
HOME DEC SEWING
1. Bulky Overlock Foot #12/12C – piping; corded
edges
2. Piping Foot #38 – attaching trims and webbing
3. Invisible Zipper Foot #35 – invisible in-seam
zippers for decorative pillows
4. BERNINA® Stitch Regulator – BSR #42 –
free-motion quilting
EMBROIDERY &
EMBELLISHMENT
1. Embroidery Foot #15 – machine embroidery;
double needle embroidery
5. Double Cord Feet #59C and #60C – attaching
decorative cords; double piping
6. Ruffler Attachment #86 – ruffled edges for pillows,
curtains, and coverlets
2. Cording Feet #22 and #25 – multiple cord
couching
3. Pintucks Feet #30-31 – pintucked texture
4. BERNINA® Stitch Regulator – BSR #42 –
free-motion quilting; bobbin play; thread painting
5. Freemotion Couching #43 – freemotion couching;
couched machine embroidery
6. Needle Punch Accessory Set – needle punching
27
T H R O U G H
THE
N EED L E
Finished size:
approximately 14” x 14”
BY JANE DUMLER
Simple appliqué and easy
construction make this
colorful, fun pillow a great
beginner project.
Cutting and Preparation
Cut the following pieces:
15” square for the pillow front
2 pieces, 15” x 20” each for envelope back
2 strips, 2½“ wide x the width of the fabric
Trace the appliqué shapes on the paperbacked fusible web (background shape + 4 rectangles and 2 hearts),
cut out the shapes leaving some paper beyond the traced lines.
Following the manufacturer’s directions, fuse on the wrong side of the fabrics to be used for the appliqués, and then cut
the shapes out on the drawn lines.
-
Applique
Remove the paper from the back of the cut-out appliqué shapes and fuse all of them except the curlicue heart onto the center of the pillow
front, using the diagram and photo as a guide.
Set the machine for a zigzag stitch or a blanket stitch as desired and adjust the needle
position to the far right. Attach Open Embroidery Foot #20/20C to the machine.
If needed, place a sheet of tear-away stabilizer on the wrong side of the prepared pillow
front, holding it in place using
temporary spray adhesive.
Remove the stabilizer after all
appliqué stitching is complete.
Position the pillow front under
the needle, aligning the edge of
the shape with the inner edge
of the right toe of the presser
foot. The stitch will fall mostly
on the appliqué shape but will
swing to the right and sew on
the background fabric. Stitch
in this manner along all sides of the fused shapes, mixing the stitches (zigzag
and blanket) as desired. Note: The stitch length of the zigzag can be varied from
0.5mm – 2mm to get the look you want.
Remove the paper from the back of the large prepared heart and fuse it over the
first heart. Blanket-stitch around the heart in the same manner as before.
28
I S S U E
Pillow Back
Press each back piece in half (wrong sides together) to be 15” x 10”. Place both
pieces on the wrong side of the pillow front with raw edges matching and folded
edges overlapping at the center back of the pillow. Stitch all layers together, about
½” from the outer edge. Tip: Test fit the size of the pillow by inserting the form at this
time. Adjust the seam allowance if necessary for the proper fit; remove pillow form.
Binding and Finishing
Stitch the binding strips together to form one long strip. Press in half lengthwise with
wrong sides together.
On the back, place the binding along the edge of the pillow with raw edges even.
Stitch the binding to the pillow, mitering the corners.
Wrap the binding to the front and stitch in place using a blanket stitch.
22
Supplies
• Firmly-woven fabric for pillow front,
back, and binding
• Appliqué fabric:
- Background rectangle – 12” square
of fabric
- Center rectangle – ½ yard
- Hearts – ¼ yard each of 2 fabrics
- Side Rectangles – 1/8 yard of 2 fabrics
• 1 yard paper-backed fusible web
• 14” pillow form
• Open Embroidery Foot #20/20C
• OESD Tear-away stabilizer
• HRFive Temporary Spray Adhesive
Insert the form into the pillow.
-
Conversation Heart Applique Pattern
Photocopy at
200% for fullsize pattern.
Pattern
reversed for
tracing onto
fusible web.
29
75th Anniversary Website
If you haven’t heard, BERNINA® is celebrating
the 75th anniversary of the BERNINA® brand.
Check out the 75th anniversary website
– Our anniversary. Your year.
www.berninausa.com/75
Quarterly Accessory Society – QAS
Lesson 1 – Silk Medley Shoulder Bag
Do you have a large collection of presser feet
and are not sure what to do with them? Join
our newest Society and learn to use a wide
variety of BERNINA® Presser Feet and
Accessories. Ask questions, share your
projects, and communicate with other stitchers who love to sew the way you do!
These lessons feature fun-to-sew projects and also include helpful video clips from
BERNINA® Educators. Join today!
Online Classes > Quarterly Accessory Society > QAS Lessons
Quarterly Software Society – QSS Lesson 5
– Creating a Signature Label
If you haven’t joined our premiere society, it’s
never too late! Lesson 5 features information
using the lettering features of the BERNINA®
Embroidery Software to create your own
Signature Label.
Online Classes > Quarterly Software Society > QSS Lessons
TTN Back Issue CD’s
Get yours now - back Issue CD’s are available for Through
The Needle! Starting with the very first issue, the CDs
are available for 2002, 2003, and 2004 at your
BERNINA® store. Included on each CD are the
year’s complete magazine issues in PDF files.
Sewing Studio > Through The Needle
About Ambience – Class 2
Check out the second class in the series of online classes entitled About Ambience. This series works through the creation
of a quilt based on the book Aquamarine Ambience by Simon
and Jenny Haskins.
Online Classes > About Ambience
TH R O U G H
TH E
NEEDL E
BY NANCY BEDNAR
32
COUNT 1, 2, 3! - that’s how many steps it takes to create a wardrobe of easy summer skirts. Made with
fun and easy techniques using your serger and sewing machine, these multi-gored, easy-fit skirts
can be fashioned from humble denim, vintage fabric finds or even quilting cottons. The secret in
transforming them from ho-hum to “wow” is all in the specialty seams.
All skirts are sewn from the same pattern: “Cute Skirts” #V023 by Favorite Things. All notions listed
on the pattern directions remain the same. Each skirt is cut out per the pattern directions.
Machine Set-up
Set serger for a 3-thread flatlock:
• Left needle – silk finish cotton thread
– tension 1
• Upper looper – white serger thread –
tension 4
• Lower looper – white serger thread –
tension 8
• Cutting width = 3mm
• Stitch length = 1mm
Note: The settings above are approximate as
each serger is different and may require
slight adjustments.
With right sides together, flatlock 3 panels
together along the seam lines to create the
skirt front unit. Place the cut edge of the
seam allowance along the 5/8” marking on the
bed of the serger, cutting off any excess as it
is serged. Pull the seam flat, resulting in rows
of parallel stitches on the right side of the
garment. Press flat.
Note: The thread in the left needle, sometimes called a “ladder stitch” is the one
Navy and Pink
Ethnic Print
TWO-STEP SEAM: Serger
Narrow Rolled Hem and Sewing
Machine Zigzag
FABRIC: Vintage ethnic print
cotton – estate sale find
STEP ONE: Rolled Hem Edging
Machine Set-up
Set serger for a 3-thread rolled hem:
• Right needle – all purpose serger thread
- tension 5
• Upper looper – 2 serger threads drawn
through the same tension discs/guides/
needle. Using 2 threads in the upper looper in a rolled hem stitch will give a rich,
filled-in look to the hem edge, duplicating
the look of tiny piping with very little effort!
Tip: Place 2nd upper looper thread in a
glass or cup placed on the table directly
behind the upper looper thread spool pin
that will show on the right side of the
skirt.
Flatlock the remaining 5 panels together in
the same manner, pulling each seam flat,
creating the skirt back unit.
Following the pattern guide sheet, flatlock the
front and back waistband units to the
serged seamed skirt and back units.
Fold the edge of the back waistband under
and then in half to the wrong side; slipstitch
(by hand) in place, inserting elastic per the
directions. Secure the ends of elastic
to the left and right side of the waistband using a sewing machine.
Simple and Elegant Denim
ONE-STEP SEAM: 3-thread serger
flatlocked seams
FABRIC: lightweight cotton denim
– dress weight 6-7oz.
waistband. Slipstitch or edgestitch the waistband in place.
Hem the skirt as desired.
Complete the skirt assembly by
serging the skirt front to the skirt
back using flatlocking so that all
seams have the same decorative
detail. Fold the edge of the front
waistband under and then in half
over the raw edges of the back
• Lower looper – all purpose serger
thread - tension 7
• Cutting width = 1mm
• Stitch length = 1mm
• Rolled hem lever engaged
Note: The settings above are approximate
as each serger is different and may
require slight adjustments.
Tip: Vintage fabrics may have gone through
many washings before they entered
your life. If your fabric seems extremely
soft due to previous launderings, spray
each seam allowance with spray starch
to add body while serging and enable
you to produce a smooth finished result.
Roll hem all seam allowances, cutting off
any excess fabric. Guide the cut edge of
each seam along the 5/8” marking located
on the bed of the serger. Press seams flat.
STEP TWO: Zigzag Joining
Set sewing machine for a narrow zigzag,
approximately SW=3mm and SL=1.5mm.
Attach Edgestitch Foot #10/10C to the
sewing machine.
Place one skirt piece on the left and one on
the right side of the center guide of the foot
with the rolled hem edges butted together.
Zigzag the two serged edges together, joining the panels. Zigzag 3 panels together for
the skirt front unit and 5 panels together for
the skirt back unit.
Follow the pattern directions for the rest of
the skirt assembly. Add waistbands with a
traditional sewing machine straight stitch. Return to the zigzag joining for the side seams.
A narrow rolled hem on the serger is the hem
finish of choice for this skirt. Remember to
use two threads in the upper looper to match
the richness of detail created in the seams.
33
Pink Cherry Blossoms
Cotton Skirt
THREE-STEP SEAM DETAIL:
Sewing machine fagoting
FABRIC: Fine quality quilting
cotton
Step One: Serge-finishing seam allowances
Machine Set-up
Set serger for 3-thread overlock stitch:
• Right Needle/Upper & Lower Looper - all
purpose serger thread – tension 5
• Cutting width = 2.5mm
• Stitch length = 2.5mm
Note: The settings above are approximate
as each serger is different and may
require slight adjustments.
Serge all seam edges, trimming fabric whiskers. Do not cut seam allowances.
Step Two: Fagoting
Machine Set-up
Thread sewing machine with matching
thread in both the needle and bobbin. Attach Tailor Tack Foot #7 to machine. Select
a zigzag stitch, SW=4mm and SL= 0.5mm.
Adjust upper tension to 1.
34
You will be seaming panels together using
a very loose zigzag formed over the center
blade on the Tailor Tack foot. It will look very
loose, but this is correct. Note: Even though
the pattern calls for ½” seam allowances,
the fagoting detail
adds a little
bit of room
in each
seam. In
order to
assure the
proper fit,
stitch these seams on the 5/8” seam allowance marking to assure a correct seam size.
With right sides together, seam 3 panels for
the skirt front and 5 panels for the skirt back
using the settings above.
Pull the seams flat, folding back the seam
allowances to reveal only a wide band of
thread on the seamline. Press the seam allowances away from the seam.
Step Three: Bundling The Threads
Attach Open Embroidery Foot #20/20C
to the sewing machine. Select the Triple
Straight Stitch, SL= 4, upper tension returned to normal.
Sew a row
of triple
straight
stitches
down the
center of
the tunnel
of thread
that was
created in the previous step. The forwards
and backwards motion of the triple straight
stitch will bundle clusters of the thread band
together to form little bows- a truly unique
thread and seam detail!
It is a great idea at this time to edgestitch
on the left and right hand side of each of the
fagoted and bundled seams to secure the
decorative work in place.
Final Skirt Assembly:
Add waistbands and elastic per pattern.
Seam front and back together using the fagoted seam detail. Complete skirt per pattern
instructions and hem as desired.
BY KRISTIE SMITH
Double Cord
BELT
Make this simple
fashion accessory to add
a focal point to any outfit.
Couch two rows of decorative
cord at the same time
using Double Cord
Foot #59C to enhance
the belt and make
a unique closure
in one step!
Instructions
Align the edge of the walking foot with the long edge of the belt and
sew the length of the belt. Raise the needle and raise the presser
foot, using the Free Hand System if available. Turn the fabric and
align the outer edge of the foot with edge of first zigzag, and stitch
the length again. (This serves two purposes: conserves thread and
keeps the belt from distorting.) Follow this procedure until there are
several rows of zigzags covering the belt.
Machine set up: Attach Double Cord Foot #59C to the machine.
Select Feather stitch (#44 on activa 240) and thread machine with
thread to match cording.
Fold the cord in half lengthwise so that there is a loop on one end
and raw edges on the other end. Masking tape should be in place
on ends of cord to prevent raveling.
Fuse interfacing to the wrong side
of the fabric; fold in half lengthwise
right sides together and press.
Machine set up: Insert Jeans
needle; Select straight stitch #1;
Attach Walking Foot #50, thread
machine with construction
thread in the needle and bobbin
and engage the Needle Stop
Down feature of the machine.
Stitch around the three edges
(both long edges and one short
edge) of fabric layers with ¼”
seam. The ¼” line is marked
just inside the toe of the walking foot. One short edge of
fabric should be open. Clip
corners, and turn. Fold open
edges inward and stitch.
Machine set up: Select Zigzag stitch #2 and thread machine with contrasting thread.
Adjust the stitch length of the
Zigzag stitch to 3.0mm and
the stitch width to 5.5mm.
Supplies
• Base Fabric:
- Length = waist or hip measurement (desired place for belt to sit
on the body) + 4”
- Width = 9” (fabric may be pieced)
• Fusible interfacing: same as above
• Walking Foot #50
• 90/14 Jeans needle
• Construction thread to match
fabric
With a marking pen, draw a centerline down the belt. Position the
belt under the foot with cording on the marked centerline. Start
stitching 1” from end of cording, leaving a 1” loop under the foot.
Both cords simultaneously feed and couch easily with the #59C
foot. Stitch toward the raw ends of cord until about ½” from the
other end of the belt. Remove belt from the machine, tie loose ends
of cord together to form a knot and cut the length desired. If cord
ends are left long, remove masking tape and fray ends.
Feed the cord knot into the corresponding loop to provide a closure
and decorative detail for your belt.
• Isacord embroidery thread to
contrast fabric
• Double Cord Foot #59C (6 mm
grooves)
• 6mm decorative cord: length of
cord should equal 2x the length
above plus about 6-8” (masking
tape around each end of cord)
• Fabric marking pen
• Isacord embroidery thread to
match cording
35
I S S U E
BERNINA
®
The winners of the 2006 BERNINA® Quilt Leadership Award
was recently announced at the 2007 International Quilt Festival in Rosemont, IL by Jennifer Gigas, Director of Education
and Training for BERNINA® of America, Inc. The award was
presented prior to the BERNINA® Fashion Show and honors
the duo affectionately known throughout the quilting world
as “Fons & Porter” for their contagious and influential
enthusiasm for quilting.
Marianne Fons and Liz Porter began teaching quilting in the
late 1970’s and Liz says, “Neither of us felt accomplished
enough to teach others, so we did it together, figuring we
could fake our way through it if we did it together.” As they
continued to teach, they became better quilters. With few
quilting books on the market at the time, their teaching
led naturally to writing. Together, they have written many
best-selling quilting books. Their writing and teaching led
to creating how-to programming for public television.
They have hosted over 200 how-to quilting episodes on
Public Television. “Fons & Porter’s Love of Quilting” is
the No. 1 quilting show on PBS, reaching 82 percent of
American households.
Marianne and Liz are Co Editors-in-Chief of Love of
Quilting magazine, a bi-monthly publication with a
circulation of almost 300,000. LOQ is the largest
circulated quilting magazine in the world, in history. “Quilting has been
around for generations, but Marianne and Liz began reinvigorating quilting
years ago when they launched the appropriately named magazine, Love of
Quilting,” said Martin Favre, president of BERNINA® of America.
Additionally, these inspiring women are creators of www.FonsandPorter.
com, its accompanying www.ShopFonsandPorter.com online store and the
Quilters’ Blogs blogsite. Fons and Porter also present at hundreds of quilting events, offering a series of motivational and inspiring lectures, such as
“A Funny Thing Happened on the Way to My Sewing Machine” that showcases how they use quilting as an outlet for an unbridled sense of humor.
Marianne Fons accepted the award on behalf of herself and Liz and they
each received a distinctive music box, hand-crafted in Switzerland with
beautiful inlaid wood techniques. Past winners of the BERNINA® Quilt
Leadership Award include Karey Bresenhan – 2001, Georgia Bonesteel
– 2002, Caryl Bryer Fallert – 2003 Libby Lehman –2004 and Alex
Anderson – 2005.
36
22


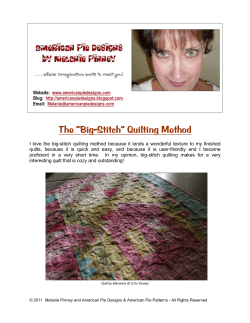


© Copyright 2026