
Manual Octa-Switch MK3
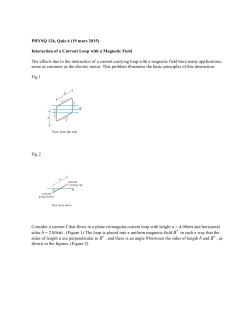
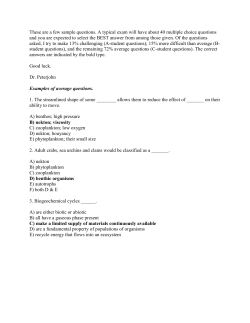
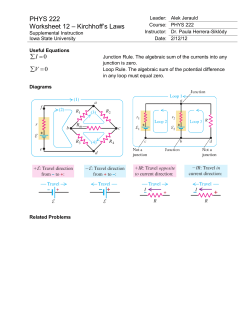
Manual Octa-Switch MK3
Ok, so you have eight effects pedals which you use regularly. You use various combinations of these pedals
in various songs, but you are not good at tap dancing…or you are just clumsy and have stepped on the ultra
tricked out-metalized-distortion pedal for the lead in your one ABBA cover. You have seen the digital effects
controllers they use on the big stages, and have secretly yearned for one, even though you may never make
the big stage? Enter Thomas Guldmann’s Octa-switch. Your eight effects plug into the eight effects-loops on
the back of this unit (all true-bypass, impedance free gold relays so you can run any of your pedals, new and
old without problem), and then by turning on or off the numbered switches in each of eight DIP Bank switches,
you determine which effects you wish to use simultaneously in each Bank. There is a blue LED for every
effects loop used and for each Bank (so once you are programmed, when you step on Bank 6 you will see the
lights of all the effects you have assigned to Bank 6 and the Bank 6 LED). Once you have each Bank
programmed, we recommend placing a piece of scotch or electrical tape over each DIP (….just to protect the
switch from damage or floods….like beer). There is a buffered (or not….switchable) Mono input and a stereo
Output, and the unit is powered by dual 9v batteries, or by a regulated power supply.
Then by turning on or off the numbered switches in each of eight DIP Bank
switches, you determine which effects you wish to use simultaneously in
each Bank. There is a blue LED for every effects loop used and for each
Bank (so once you are programmed, when you step on Bank 6 you will see
the lights of all the effects you have assigned to Bank 6 and the Bank 6
LED).
Please note, the DIP switches are slide type, NOT push down. They are
easily operated with a small screwdriver, a pen, or a very very small finger.
There is a buffered (or not….switchable) Mono input
On large stages when running long connected cables, there is a definite drop
in the high end of your guitar sound (more or less depending on the input
impedance of your amplifier). The solution according to Thomas was once
again ‘simple’. He built in a buffer circuit at the input, so the user can choose
between 100% true bypass, or buffered bypass to ‘beef’ up the signal.
Loop 8 offer a mono send and a stereo return on a stereo jack plug,
with left at the jack tip and right at the jack ring.
The Octaswitch has stereo outputs, and a stereo return on Loop 8 (this is
a stereo jack with tip-left and ring-right). Since stereo effects like choruses
are placed at the end of your effects-chain, we would typically insert them
in Loop 8.
The Octa-Switch has nine switches, the eight are presets and the ninth is a
true bypass switch, which bypass the unit for clean sound.
Please note if the buffer is engaged it will also be engaged in the bypass
mode, which we recommend as on large stages when running long connected
cables, there is a definite drop in the high end of your guitar sound, the buffer
prevent that.
The Octa-Switch has two external switching jacks for changing
channel on your amp, or other operational features.
Operation is very simple as on the two corresponding DIP
switches you simply engage which of the presets 1-8 you which
the amp to change channel or turn on reverb, - boost or other
operational features.
So say you which to shift to a high gain channel on preset 6 via
ext. switch 1 you simply engage DIP switch 6, so now every time
you enter preset 6, the amp go to the high gain channel.
Please note that the different amps switching systems varies, so
we recommend to us a stereo jack, and then try to solder either
the hot on ring or tip, till the wanted result are achieved.
The External switches is Lacthing, we suggest you check if your
amplifier can work like this.
Example on normal single amp operation
AMP
GUITAR
LOOP 5
LOOP 7
LOOP 8
LOOP 6
LOOP 3
LOOP 4
LOOP 2
LOOP 1
Example of mono dual amp operation
AMP´S
GUITAR
LOOP 5
LOOP 7
LOOP 8
LOOP 3
LOOP 4
LOOP 6
LOOP 2
LOOP 1
Use a Y-cable in left output with 2 mono and 1 stereo jack, connect Tip & Ring to (+)
Example of stereo dual amp operation
AMP´S
GUITAR
LOOP 5
LOOP 7
LOOP 3
LOOP 8
LOOP 6
LOOP 4
LOOP 2
LOOP 1
Use a Y-cable from the stereo unit to loop 8 return, left on ring and right on tip of the stereo jack.
Please notice that there is only full stereo operation with signal on the right output when there is a stereo pedal
in loop 8, and loop 8 is engaged i.e. a stereo chorus, to maintain output on both L/R also without the chorus
effect, you have to bypass the effect on the chorus pedal.
When there is no stereo pedal engaged there is no signal at the right output.
Example on mono operation with mute and tuner out
AMP
GUITAR
LOOP 5
LOOP 7
LOOP 8
LOOP 6
LOOP 1
LOOP 3
LOOP 4
LOOP 2
Connect a tuner to i.e. loop 1 send, and nothing in the loop return, select i.e. program 8 with only loop 1 engaged, this way you mute the system while getting signal to your tuner, without the signal passing through the
tuner.
Example on operation with some pedals going front in the amp, and
some in the amp's own loop
AMP LOOP SEND
AMP IN
AMP LOOP IN
GUITAR
LOOP 8
LOOP 6
return
send
LOOP 7
LOOP 5
LOOP 3
LOOP 4
LOOP 2
LOOP 1
As shown on the illustration in this example we do have 4 pedals going to the amp's input, and three pedals
in the amp's own loop.
So in the example we use LOOP 5 as the split loop (any can be used) loop 5 send goes the the amp's input,
so loop 1-2-3-4 are all front in. The amp's own loop send goes the loop 5 return, and the Octa-Switch main
out (left) goes to the amp's loop return, so loop 6-7-8 all will be inserted in the amp's loop after the pre-amp.
IMPORTANT LOOP 5 SHALL ALWAYS BE ACTIVATED.
Specifications
Input……………………….......... 500K Ohm (buffer)
Output……………….................. 560 Ohm (buffer)
S/N Ratio................................... 70 dB
Loops......................................... 8 pcs. true bypass relay
Presents.................................... 8 pcs via DIP switch
External switch.......................... 2 pcs (latching)
Dimensions .............................. 311 (W) x 155 (D) x 65 (H) mm
12,23” (W) x 6” (D) x 2.5” (H)
Weight....................................... 1,6Kg/ 3,5lbs
Power Requirements
Power consumption: max. 380 mA
Power supply: 9 V DC (regulated), 500 mA
minimum, 2.1 mm female plug, center negative (-)
ATTENTION: Please Use DC Power Supply Only!
Failure to do so may damage the unit and void the
warranty.
Warning: to Reduce the risk of fire or shock, do not expose the Carl Martin Octa-Switch to rain or moisture
and do not install it near any heat sources. Protect all wires and plugs from damage, and unplug the unit
when not in use. Please do not attempt to remove screws or covers; refer all servicing to a qualified service
technician.
Warranty: Carl Martin Research warrants the manufacturing, material and proper operation for a period of
one year from date of purchase. Carl Martin will replace defective parts, make necessary repairs or replace
the unit at the discression of our technicians. The warranty applies only to the original purchaser of this
product, and excludes any damage or faulty operation resulting from misuse, neglect or unauthorized
service.
East Sound Research
Raadmandsvej 24
8500 Grenaa
Denmark
[email protected]


© Copyright 2026