
Fabric and quilt by Pearl P. Pereira www.redroosterfabrics.com
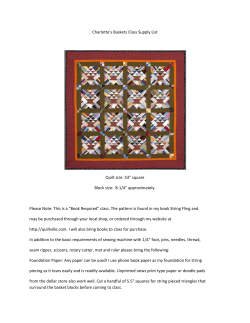
Fabric and quilt by Pearl P. Pereira
Machine quilting by Lois Russell
Finished si
ze of quilt:
www.redroosterfabrics.com
68" x 68"
Fabric from the “Little Red Riding Hood” collection (style #3325) by Pearl P. Pereira
of P3 Designs for Red Rooster Fabrics.
FABRIC REQUIREMENTS
Pattern # 17956 – BEI1 ...........................................................................21/4 yards
17957 – BEI1 ...........................................................................15/8 yards
17958 – BLA1..........................................................................1/8 yard
17959 – GOL1.........................................................................1/3 yard
17959 – BRO1 .........................................................................1/3 yard
17959 – GRE1 .........................................................................1/3 yard
17959 – BLU1 .........................................................................1/3 yard
17960 – BEI1 ...........................................................................1/4 yard
17960 – BLU1 .........................................................................1/8 yard
17960 – GRE1 .........................................................................1/8 yard
17960 – RED1 .........................................................................11/8 yards
(includes binding)
17960 – GOL1.........................................................................1/8 yard
17961 – BEI1 ...........................................................................2/3 yard
17961 – BLA1..........................................................................1/4 yard
17961 – DKBLU1 ....................................................................1/2 yard
17961 – DKGRE1....................................................................1/4 yard
17961 – GOL1.........................................................................1/2 yard
17961 – RED1 .........................................................................2/3 yard
17962 – BEI1 ...........................................................................2/3 yard
17963 – BEI1 ...........................................................................1/3 yard
16152 – BEI1 ...........................................................................3/4 yard
Flesh colored fabric.................................................................................1/8 yard
Backing....................................................................................................41/8 yards
Batting .....................................................................................................74" x 74"
Additional Supplies: Embroidery floss for eyebrows, nose, hood tie, and mouth.
Fabric paint for cheeks and lips.
DIAGONAL CORNER TECHNIQUE
This method is used in the piecing directions that follow. Draw a diagonal line
on reverse side of a small square. Place right sides together on a larger square or
a rectangle (Figure A). Stitch on the diagonal line. Trim to a 1/4" seam allowance.
Press seam open (Figure B). All seam allowances are 1/4".
Figure A
Figure B
APPLIQUÉ CENTER BLOCK
Pattern #17961 – BEI1 (pin dot):
Cut one 97/8" square (A).
Pattern #17960 – BLU1 (stripe):
Cut two 11/2" x 42" strips. Crosscut
two 11/2" x 97/8" strips (B) and
two 11/2" x 117/8" strips (C).
Pattern #17963 – BEI1 (motif toss):
Cut two 91/2" squares. Cut each
block once diagonally to make
four triangles (D).
Pattern #17961 – DKGRE1 (pin dot):
Cut two 11/2" x 42" strips. Crosscut
two 11/2" x 141/2" strips (E) and
two 11/2" x 161/2" strips (F).
Appliqué Center Block
Finished size: 18˝ square.
Make one.
APPLIQUÉ FABRICS
Pattern #17961 – RED1 (pin dot): hood and flower
Pattern #17960 – RED1 (stripe): cape
Pattern #17961 – BLA1 (pin dot): lower cape
Pattern #17960 – GRE1 (stripe): leaves
Pattern #17961 – DKGRE1 (pin dot): leaves
Pattern #17961 – GOL1 (pin dot): flower & flower center
Pattern #17960 – GOL1 (stripe): hair, flower & flower center
Pattern #17958 – BLA1 (check): flower center
Pattern #17961 – DKBLU1 (pin dot): eyes
Pattern #17960 – BLU1 (stripe): dress & eyes
Flesh colored fabric for face & neck
1. Prepare appliqué shapes using
your favorite method.
C
2. Position appliqué on the
7
9 /8" A square (Figure 1).
A
Appliqué by hand
or machine.
B
3. Sew B strips on opposing
Figure
2
Figure
1
sides of the A block.
Press toward B.
D
Repeat with C strips
(Figure 2). Press
toward C. Block
should measure
F
117/8" square.
4. Sew D triangles on
opposing sides of
block (Figure 3).
Press toward B.
Figure 3
Repeat with
Figure 4
E
remaining D triangles. Press toward C.
Square up block to 161/2" x 161/2".
5. Sew E strips on opposing sides of block. Press toward E. Repeat with F strips
(Figure 4). Press toward F. Block should measure 181/2" square.
6. Embroider eyebrows, nose, hood tie, and outline embroider mouth with embroidery floss in the color of your choice. Blush the cheeks and lips with fabric paint.
Round One: MOTIF BLOCKS & 9 PATCH
Pattern #17956 – BEI1 (panel print):
Cut eight 61/2" x 61/2" motif squares (A).
Pattern #17960 – BEI1 (stripe):
Cut three 21/2" x 42" strips (B).
Pattern #17961 – RED1 (pin dot):
Cut three 21/2" x 42" strips (C).
9-Patch Block
Finished size: 6˝ square.
Make eight.
1. Sew one B and two C strips together
(Figure 5). Press toward C. Crosscut
sixteen 21/2" C/B/C units (Figure 6).
2. Sew one C and two B strips together
(Figure 7). Press toward C. Crosscut
eight 21/2" B/C/B units (Figure 8).
Figure 5
3. Sew two C/B/C units and one
B
B/C/B unit together
(Figure 9). Press seams
C
open. Blocks should
B
measure 61/2" square.
Figure 7
4. Sew two 61/2" A motif
squares and one 9-Patch
block together. Press toward
the A squares. Make two. Sew
the strips to each side of the
center block (Figure 10).
5. Sew two 61/2" A motif
squares and three 9-Patch
blocks together. Press toward
the A squares. Make two. Sew
Figure 10
the strips to the top and bottom
of the appliqué unit (Figure 11).
The unit should
measure 301/2" square.
Figure 11
C
B
C
Figure 6
Figure 8
Figure 9
Make eight.
Round Two: DOGTOOTH STRIP
Pattern #17961 – DKBLU1 (pin dot):
Cut four 31/2" x 42" strips. Crosscut twenty 31/2" x 61/2"
rectangles (A) and four 31/2" squares (B).
Pattern #17962 – BEI1 (bouquet toss):
Cut four 31/2" x 42" strips. Crosscut forty 31/2" squares (C).
Dogtooth Unit
Finished
size: 3˝ x 6˝
Make twenty.
1. Diagonally sew one C square on each A rectangle as shown in Figure 12. Trim
to 1/4" seam allowance. Press seams open. Repeat on opposite side (Figure 13).
Blocks should measure 31/2" x 61/2".
C
A
6. Sew 9-Patch squares to each end of the two remaining strip sets (Figure 23).
Press seams away from the 9-Patch blocks. Make two. Sew units to top and
bottom of the quilt top. Press seams toward the strips. Quilt top should
measure 421/2" square.
Make two.
Figure 23
Make twenty.
Figure 13
Figure 12
2. Sew five Dogtooth units from Step 1 together (Figure 14). Make four strips.
Press seams open. Strips should measure 31/2" x 301/2".
Make four.
Figure 14
3. Refering to Figure 16, sew two Dogtooth strips to the sides of the quilt top. Press
toward center of the quilt.
4. Sew a B square to each end of the two remaining Dogtooth strips (Figure 15).
Press toward B.
B
Make two.
Figure 15
5. Sew the strips to the top
and bottom of the quilt
(Figure 16). Press toward
center of the quilt. Quilt
top should measure
361/2" square.
Figure 24
Round Four: MOTIF SQUARES & BASKET BLOCKS
Round Three:
STRIPS & SMALL
9-PATCH BLOCKS
Pattern #17960 – RED1
(stripe):
Cut four 11/2" x 42"
strips (A).
Cut one 11/2" x 42" strip.
Crosscut two 11/2" x 15"
Figure 16
(C) strips and one
11/2" x 8" (D) strip.
Pattern #17961 – GOL1 (pin dot):
Small 9-Patch Block
Cut eight 11/2" x 42" strips (B).
Finished size: 3˝ square.
Make four.
Pattern #17961 – BEI1 (pin dot):
1
Cut one 1 /2" x 42" strip. Crosscut
two 11/2" x 8" (E) strips and one 11/2" x 15" (F) strip.
1. Sew one A and two B strips together (Figure 17). Press toward A. Cut the length
of each strip set to measure 31/2" x 361/2". Make four.
B
A
B
Make four.
Figure 17
2. Sew one F and two C strips together
C
F
(Figure 18). Press seams toward C.
C
Crosscut eight 11/2" C/F/C units
Figure 18
(Figure 19).
3. Sew one D and two E strips together
E
D
(Figure 20). Press toward D.
E
Crosscut four 11/2" E/D/E units (Figure 21).
Figure 20
4. Sew two C/F/C units and one E/D/E unit
together (Figure 22). Press seams open.
Blocks should measure 31/2" square.
5. Sew two B/A/B strip sets to the left and right side of the quilt top
(Figure 24). Press toward the strip set.
Figure 19
Figure 21
Figure 22
Make four.
Pattern #17956 – BEI1 (main print):
Cut sixteen 61/2" x 61/2" motif squares.
Pattern #16152 – BEI1 (background):
Cut two 4" x 42" strips. Crosscut sixteen
4" (A) squares.
Cut three 31/2" x 42" strips. Crosscut thirty-two
31/2" (B) squares.
Pattern #17962 – BEI1 (bouquet toss):
Basket Block
Finished size: 6˝
Cut as many 35/8" squares as needed to yield sixteen
Make four of
triangles (C) with bouquet motifs after the squares have
each color.
been cut in half once on the diagonal. Only the motif
triangles will be used. Sixteen bouquet motif triangles
are needed to make sixteen basket blocks.
Pattern #17959 – GOL1, BRO1, GRE1, BLU1 (basket weave):
From each colorway:
Cut one 31/2" x 42" strip. Crosscut four 31/2" x 61/2" (D) rectangles.
Cut one 21/2" x 42” strip. Crosscut eight 21/2" (E) squares.
Cut two 11/4" x 42” strips. Crosscut eight 11/4" x 51/2" (F) rectangles.
The basket weave print is directional. Use the arrows as a guide to place the
fabric pieces in the correct direction.
1. Diagonally sew one E square on each B square
B
(Figure 25). Trim to 1/4" seam allowance. Press seams
E
open. Blocks should measure 31/2" square. Make four
left and four right from each basket weave fabric.
Figure 25
2. Diagonally sew left square units from
Step 1 to 31/2" x 61/2" D matching
D
fabric rectangles (Figure 26). Trim
to 1/4" seam allowance. Press seams
Figure 26
Figure 27
open. Make four from each fabric
(Figure 27).
3. Diagonally sew right square units
from Step 1 to the D rectangles
from Step 2 (Figure 28). Trim to 1/4"
Figure 29
Figure 28
seam allowance. Press seams open
(Figure 29). Make four from each
C
F
fabric. Blocks should measure
1
1
3 /2" x 6 /2".
Figure 30
4. Stitch one 11/4" x 51/2" F rectangle to the right side of each
C triangle (Figure 30). Press toward F. Do not trim F. Make four from each fabric.
5. Stitch one 11/4" x 51/2" F rectangle
to the left side of each C triangle
(Figure 31). Press toward F.
Trim F even with the C triangle
Figure 32
Figure 31
(Figure 32). Make four from
each fabric.
6. Cut one 4" A square diagonally
into two triangles. Position one
Figure 33
Figure 34
triangle on a motif unit as shown
in Figure 33. Stitch and press
toward A. Repeat on the left side (Figure 34). Block should measure 3½" x 6½".
Make four from each fabric.
7. Stitch the top and bottom basket units together. Press seams
away from the basket handle (Figure 35). Trim blocks
if needed. Blocks should measure 61/2" square. Make four
from each fabric.
8. Refering to the cover photo, stitch four basket
blocks and three 61/2" motif squares together.
Press seams away from the basket blocks. Make two.
Figure 35
Stitch to the sides of the quilt center. Press toward
the quilt center.
9. Refering to the cover photo, stitch four baskets and five 61/2" motif squares
together. Press seams away from the basket blocks. Make two. Stitch to the top
and bottom of the quilt center. Press. Quilt should measure 541/2" square.
BORDERS & BINDING
Pattern #17961 – RED1 (pin dot): Cut six 11/2" x 42" strips (inner border).
Pattern #17957 – BEI1 (border print): Cut four 61/2" x 561/2" strips (outer border).
Pattern #17960 – RED1 (stripe):
Cut eight 3" x 42" strips for binding.
1. Stitch the 11/2" x 42" inner border strips together end to end. Cut into two
541/2" lengths and two 561/2" lengths. Stitch the 541/2" strips to the sides of the
quilt. Press seams toward the border strips. Stitch the 561/2" strips to the top and
bottom of the quilt. Press seams toward the border strips.
2. Stitch two 61/2" x 561/2" outer border strips to the sides of the quilt. Press toward
the outer border.
3. Stitch appliqué corner blocks to the ends of the two remaining border strips.
Press toward the border strips. Stitch to the top and bottom of quilt. Press
toward the outer border.
FINISHING
1. Prepare backing to measure 74" square.
2. Layer backing, batting, and quilt top. Baste layers together.
3. Hand or machine quilt.
4. Trim layers even.
5. Join binding strips with diagonal seams. Press seams open. Bind using your
favorite method.
CORNER APPLIQUÉ BLOCK
Pattern #17961 – GOL1 (pin dot): flowers
Pattern #17961 – BLA1 (pin dot): flower centers
Pattern #17960 – GRE1 (stripe): leaves
Pattern #17961 – DKGRE1 (pin dot): leaves
Pattern #17961 – BEI1 (pin dot):
Cut one 61/2" x 42" strip. Crosscut four
61/2" squares.
Corner
Appliqué Block
Finished size: 6˝
Make four.
1. Prepare the appliqué shapes for the corner blocks
using your favorite method.
2. Appliqué one flower and leaf motif to each 61/2" square by hand or machine.
Dress
Cape
Cape
Lo
w
er
C
ap
e
Dress
Center Appliqué
Make one.
Enlarge
200%
Corner Appliqué
Make four.
Enlarge
200%
©2008 Red Rooster Fabrics. All rights reserved. Not intended for individual resale.
The design for this Red Rooster Fabrics’ pattern is protected by U.S. copyright law.
For additional copies of this pattern please call or write Red Rooster Fabrics at the address listed below.
253 West 35th Street, 11th Floor, New York, NY 10001 • 401.728.4200 • www.redroosterfabrics.com


© Copyright 2026