
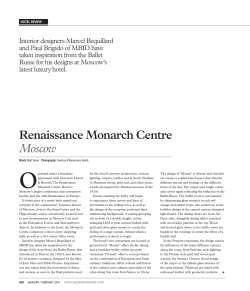
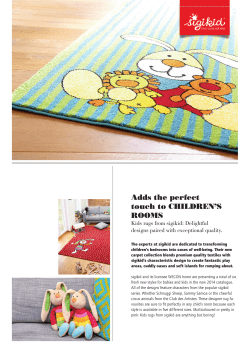
Installation of Needle Felt (Patterned) and Broadloom Carpets
Installation of Needle
Felt (Patterned) and
Broadloom Carpets
Gibbon Group
T: +61 7 3881 1777
F: +61 7 3881 1716
[email protected]
www.gibbongroup.com.au
Ind
dex
word be
eforeha
and
1. A w
1.1.
Reliable instructions
s and recom
mmendations
1.1.1. Inspection of the mateerials delive
ered
2. Pre
eparing
g the su
ubfloorss
2.1.
2.2.
2.3.
2.4.
2.5.
2.6.
2.7.
2.8.
2.9.
Inspectin
ng and prep
paring floor surfaces
Cement bonded su
ubfloors
Bitumen bonded su
ubfloors
Computer subfloors
s
Anhydrite subfloors
s
Extreme
ely smooth and
a dense ffloors
Subfloorrs with an existing
e
hard
d covering
Wooden
n floors
2.8.1. General preparations
Floors on
n which a previous
p
covvering was adhered
3. Fittting De
esso bro
oadloom
m carpe
et
3.1.
3.2.
3.3.
3.4.
3.5.
3.6.
3.7.
3.8.
3.9.
Prelimina
ary remarks
s
3.1.1. Inspecting the floor
3.1.2. Site condittions for fittiing
3.1.3. Preparatorry steps beffore installin
ng carpet sttrips
Adhering
g or stretching
3.2.1. Tufted con
ntract qualit ies
3.2.2. Woven con
ntract qualitties
Fitting diirection
Seam po
ositioning
Cutting
Cutting of
o the seam
ms
3.6.1. Backing ed
dges
3.6.2. Butt joining
g
3.6.3. Cutting the
e sides
Adhering
g
After app
plication of the adhesivve
Streching carpet on
nto underlayy and spike
ed strips
Gibbon Grou
up
T: +6
61 7 3881 177
77
F: +6
61 7 3881 1716
d
desso@gibbon
ngroup.com.a
au
www.gibbon
ngroup.com.a
au
3.10. Remova
able installattion
3.11. Patterne
ed carpet
3.11.1. Pattern shiifting (run o ut)
3.11.2. Pattern shiift between pieces from
m the same
e productionn
3.11.3. Bowing
3.11.4. Measuring up
3.11.5. Laying pattterned conttract carpetts
3.12. Wheelch
hair resistan
nt adhering
3.13. Adhering
g carpet witth underfloo
or heating
3.14. Adhering
g carpet witth low electtrical resista
ance values
s
4. Fittting De
esso carpet on
n stairs
4.1.
4.2.
4.3.
4.4.
4.5.
4.6.
4.7.
4.8.
General
Carpet pile
p direction
n
Old stairrs with worn
n treads
New wooden stairs
s
Old hard
d stone, tiled
d and conccrete stairs
New con
ncrete stairs
s finished w
with a ceme
ent coating
Adhering
g carpet on stairs
Carpetin
ng stairs using the strettching meth
hod
5. Ne
eedle fe
elt carpe
et
5.1.
5.2.
5.3.
5.4.
5.5.
Influentia
al factors off contract eenvironmentt
Subfloorr
Cutting
Special requiremen
r
ts with pattterned need
dle felt
Adhering
g
Gibbon Grou
up
T: +6
61 7 3881 177
77
F: +6
61 7 3881 1716
d
desso@gibbon
ngroup.com.a
au
www.gibbon
ngroup.com.a
au
Insstalllation
n off Ne
eed
dle
e
Fe
elt (Pa
atterne
ed) /
Bro
oad
dloom
m Carp
C petts
1. A w
word be
eforeha
and
The g
greatest posssible care has
s been given to manufactu
uring Desso carpet
c
and caarpet tiles. Yo
ou can be
rest a
assured that on
o leaving the factory the carpet and carpet
c
tiles fu
ully meet all thhe specifications
descrribed in the re
elevant produ
uct documenntation fully. Desso
D
carpet and carpet ttiles howeverr only really
come
e to life in the interior. It is therefore of g
great importa
ance that the instructions below are followed very
carefu
ully. Only then can you be
e assured of aan optimum result.
1.1..
Reliab
ble instru
uctions an
nd recom
mmendatio
ons
The in
nstructions and
a recomme
endations conncerning the handling and
d fitting of Dessso carpet and carpet
tiles a
are based on extensive tests carried ouut in our labo
oratory and ye
ears of practtical experience.
Although Desso guarantee
g
the
e accuracy off their advice, no responsibility whatsoeever can be taken
t
for
work,, instructions and/or desc
criptions supp
plied by any third
t
party. Sh
hould you haave any questtions in that
respe
ect the Techn
nical Services
s Departmentt at Desso wo
ould be pleased to assist yyou. Carpet is
s our trade,
and there really is virtually noth
hing in that arrea for which we will be un
nable to offerr you an apprropriate
solution.
1..1.1.
Insp
pection of the materia
als delivered
d
Dessso stresses th
hat you shou ld always insspect the carp
pet delivered to you beforre
commencing fittin
ng. Every ord
der is handled
d by Desso with
w the greateest possible care.
Inspe
ections are however alwaays carried ou
ut under cond
ditions that arre different to
o those
unde
er which the carpet
c
is to b
be fitted. It is therefore
t
to your
y
own advvantage to en
nsure that a
thoro
ough inspection is made.
NOTE
E: Make sure that the qualitty, colour, patttern, etc. corrrespond exacttly with your order.
o
Alwa
ays register any complaint b
before comme
encing cutting or fitting. Onlyy then will we
e be able to
accept and proces
ss any complaaint further.
Gibbon Grou
up
T: +6
61 7 3881 177
77
F: +6
61 7 3881 1716
d
desso@gibbon
ngroup.com.a
au
www.gibbon
ngroup.com.a
au
2. Pre
eparing
g the su
ubfloorss
2.1..
Inspe
ecting and
d prepari ng floor surfaces
s
When
n fitting carpe
et the subfloo
or always dem
mands specia
al attention. The
T subfloor q
quite literally forms the
base on which the
e carpet has to display its qualities and
d characteristtics. Aspectss such as dam
mp,
leveln
ness and com
mpression strength are exttremely impo
ortant in that respect.
r
Requuirements difffer with the
type o
of subfloor in
nvolved. The various
v
typess concerned are described
d separately below. In general it can
be sa
aid that the su
ubfloor must comply with the relevant standards, as
a mentioned
d in the appen
ndix, which
includ
des several In
nternational Standards.
S
Note: if in your case
e a subfloor is
s involved thatt is not discus
ssed here, please contact thhe Technical Services
S
d. We will then
n be able to advise
a
you with
h respect to flloor conditions in relation
Deparrtment at Desso beforehand
to the
e application options
o
for Des
sso contract ccarpet.
F
Fig A. Suspend
ded, well venttilated subfloo
or
Fig B. Su
uspended, unvventilated sub
bfloor
Fig C . Unsuspende
ed subfloor
Gibbon Grou
up
T: +6
61 7 3881 177
77
F: +6
61 7 3881 1716
d
desso@gibbon
ngroup.com.a
au
www.gibbon
ngroup.com.a
au
2.2..
Ceme
ent bonde
ed
subflo
oors
Alwayys check a ce
ement bonde
ed subfloor fo
or
damp
p. With the sttandard CM-m
measuremennt
the damp contentt should neve
er exceed 3%
%.
Using
g the alternatiive protimete
er measuremeent
metho
od the damp
p content sho
ould never
excee
ed 5%. Furthermore, the subfloor
s
shouuld
also b
be continuously dry. Chec
ck the
ation under the floor and in the outer
ventila
walls.. As a rule the
ere should be
e 5cm2
ventila
ation per m2 of floor surfa
ace.
A susspended cem
ment-bonded subfloor dem
mands a good isolation lay
yer. The subffloor should also
a be
clean
n, flat, solid an
nd free from grease. There
re should be no cracks, lo
oose flaky areeas or irregula
arities
prese
ent. In case th
he subfloor is
s granular, ro
ough or uneve
en it will require levelling. P
Porous and/o
or granular
subflo
oors should first
f
be prepa
ared using an acrylic or po
olyurethane based
b
primer.. If applicable
e an acrylic
based
d primer is prreferable, butt that form off preparation is the least environmenta
e
ally friendly. The
instru
uctions for the
e product concerned sho uld therefore
e be followed extremely caarefully. Sand
d off any
irregu
ularities and le
evel using a waterproof
w
ceement based
d or latex leve
elling compouund. Sand wh
herever
necesssary when dry.
d
2.3..
Bitum
men bond
ded subflo
oors
Level bitumen bon
nded subfloors and bitum
men insulation
n layers using cement baseed waterproo
of levelling
material. Sand wh
herever neces
ssary when d
dry. When levelling a cast asphalt
a
floor any abrasive
e sand used
shoulld be remove
ed beforehand
d.
2.4..
Comp
puter sub
bfloors
Comp
puter subfloo
ors usually co
onsist of
heigh
htened floor elements
e
mea
asuring 60 x
60cm
m, which are fastened
f
on separate
s
jackks.
The in
ndividual floo
or elements can be made of
wood
d, anhydrite, concrete
c
or metal.
m
The jaccks
have to be fixated and well-glu
ued to
guara
antee the con
nduction of person-chargee.
Conssidering this conduction,
c
itt is a good id ea
to glu
ue every 40m
m2 of 1.25 meter of copperr
band to the subflo
oor, making sure
s
that this
copper band is ad
dequately earrthed.
Gibbon Grou
up
T: +6
61 7 3881 177
77
F: +6
61 7 3881 1716
d
desso@gibbon
ngroup.com.a
au
www.gibbon
ngroup.com.a
au
Both with carpet tiles
t
and carp
pets a conduccting type of glue or tackifier should bee used. The copper
c
band should be in
nstalled traverrsely underneeath the carp
pet material. Computer
C
su bfloors have to comply
with sseveral requirrements. Diffe
erences in heeight between
n the panels may not exceeed 1 mm. Also
A the
room between the
e panels mayy not exceed 1 mm. Furthermore, the floor
f
elementts should nevver wobble
or cre
eak.
2.5..
Anhyd
drite subffloors
Anhyd
drite floors will
w require san
nding and vaacuum cleanin
ng before com
mmencing thhe fitting of th
he carpet.
Prior application of
o a primer or adhesion layyer, whether or not in com
mbination withh any levelling
g, may also
be ne
ecessary. In case
c
of any doubt
d
we reco
ommend con
ntacting the Technical
T
Serrvices Departtment at
Desso
o for further 00information
0
n.
2.6..
Extrem
mely smo
ooth and dense flo
oors (e.g. Granito tiles or
Terrazzzo)
Levelling is also offten necessary on smoothh and dense floors, espec
cially if there aare any rough
h spots on
the su
urface. Tiled floors often require
r
levellinng. First ensu
ure that a goo
od adhesion surface existts by
applyying a primer before levelling. In case aany 'sagging' occurs along
g the joins orr seams, leve
elling will
have to be repeate
ed. Sand wherever necesssary, when dry
d and hard..
2.7..
Subflo
oors with
h an existting hard covering
g
In casse the subfloor has alread
dy been finishhed with a ha
ard covering such
s
as linoleeum, PVC or suchlike,
the fo
ollowing precautions shou
uld be taken. Check wheth
her all of the existing coveering is still firrmly
attach
hed to the flo
oor surface. Iff any areas aare damaged they will have
e to be repairred first! Deg
grease the
entire
e floor and allow it to dry thoroughly. A
Apply an adhe
esive layer forr the benefit oof the adhesiive bed. If
repairr is not entire
ely possible th
hroughout thee existing covvering should
d be removed
d completely.
Note: if you have re
emoved the ex
xisting coverin
ng as a result of irreparable damage, befoore proceedin
ng any
furthe
er read the rem
marks in the se
ection entitled
d 'Floors on which
w
a previou
us covering w
was adhered'. The
T
instructions describ
bed in that sec
ction should b
be followed ve
ery carefully.
2.8..
Wood
den floors
s
Wood
den floors in particular, de
espite being ffitted with a hardboard
h
finishing layer, ccan neverthe
eless cause
the fo
ormation of im
mpressions in
n the carpet o
over the courrse of time. That also appllies to the ha
ardboard
itself a
as a consequ
uence of the natural workking of the underlying wood. The best ssolution for th
his problem
is a subfloor consttructed from e.g. plywood
d, hardboard or MDF. In that manner ssufficient solid
dity can be
obtain
ned to prevent any impres
ssions of the underlying floor from form
ming.
In gen
neral it can be
b said that a wooden floo
or never posssesses absolu
ute solidity byy definition, all
a the more
reaso
on for paying the utmost attention
a
to thhe finishing la
ayer.
Gibbon Grou
up
T: +6
61 7 3881 177
77
F: +6
61 7 3881 1716
d
desso@gibbon
ngroup.com.a
au
www.gibbon
ngroup.com.a
au
2..8.1.
Gen
neral preparations
First check the flo
oor ventilationn and take an
ny measures considered nnecessary. As
A a rule 5
2
2
cm per m of floo
or surface is ssufficient. Following that, check the flooor for loose boards
b
etc.
and replace or na
ail them into p
position as ne
ecessary. Ma
ake the floor d
dust-free.
Note: you should make
m
a clear d
distinction bettween old and
d new woodenn floors. Old floors
ally always req
quire levelling,, as the floorb
boards become warped and
d sag in the co
ourse of
virtua
time. Level the floo
or using cemeent based, elas
stic, waterproof levelling meedium. New wooden
w
floorss should not be
b levelled as the wood has
s not yet seaso
oned. With thee seasoning of
o the wood
the le
evelling mediu
um would bec ome loose and break up.
Once
e the necessary distinction between old and
a new wood
den floors as d
described abo
ove has
been
n made, prepa
are with hardbo
oard or chipboard. This sho
ould be perforrmed on the basis
b
of the
applicable descrip
ption below.
Afterr you have made the alreaady mentione
ed distinction between new
w and old wo
ooden
subflloor, you app
ply a levelling layer from fo
or instance ply
ywood, hardb
board or MDF, following
the supplier's
s
insttructions.
2.9..
Floorss on whic
ch a prevvious covering was
s adhered
d
All flo
oors on which
h some form of covering w
was previously adhered re
equire a thoroough inspectiion. Once
the old covering has
h been rem
moved the sub
bfloor will alm
most certainly show signs oof damage.
Furthermore, som
me old adhesivve will also innevitably be le
eft remaining. Always rem
move any old adhesive
a
first, tthoroughly re
emove all dirt and dust from
m the floor an
nd apply a prrimer or adheesive layer and allow it to
dry th
horoughly. Th
he floor shoulld then be levvelled and sa
anded wherev
ver necessaryy.
Gibbon Grou
up
T: +6
61 7 3881 177
77
F: +6
61 7 3881 1716
d
desso@gibbon
ngroup.com.a
au
www.gibbon
ngroup.com.a
au
3. Fittting De
esso bro
oadloom
m carpe
et
3.1..
Prelim
minary rem
marks
Beforre commencing the fitting of Desso co
ontract carpett please pay attention to tthe following general
remarks.
3..1.1.
Insp
pecting the floor
A de
etailed inspec
ction of the flo
oor and mate
erials is essen
ntial. The need
d to inspect the
t floor for
damp, ventilation, etc. has alreeady been diiscussed exte
ensively. Pleaase refer to th
he relevant
passsages in the first part of chhapter 2.
3..1.2.
Site
e conditions
s for fitting
In co
old and damp
p periods the carpet must be allowed to
t acclimatisee for at least 24 hours in
in which it iss to be laid. Only
the surroundings
s
O then may
y a start be m
made with fitting.
Furth
hermore, whe
en fitting Dessso contract carpet
c
a minimum workingg temperaturre of 15°C
is essential.
Hum
midity, especia
ally when adhhering, may also
a be an inffluencing facttor and therefore has to
be ta
aken into acc
count. Follow
w the instructio
ons of the ma
anufacturer oof the adhesivve. For
room
ms with floor heating
h
systeems, the onlyy technique applied is full aadhesion. Th
he heating
temp
perature need
ds to be reduuced 24 hourrs before insta
alling; 48 houurs after insta
allation is
completed, the heating system
m can be turn
ned up slowly
y. During winntertime, the floor
f
temp
perature has to be reduceed to a level between
b
15° and 18°C.
3..1.3.
Prep
paratory steps before
e installing carpet
c
strip
ps
The following
f
preparations alw
ways have to be done befo
ore installing sheets of floorcovering:
•
First step is the planning and lay out of
F
o the strips. There is no aabsolute rule. The
n
number
of se
eams should be reduced to
t a minimum
m. In areas w
with heavy and
d directed
t
traffic,
traffic flow should b
be along rath
her than acros
ss the seamss. Joints are always
a
f
fitted
on top of each othe r, never next to each othe
er. Exception here is the in
nstallation
w carpet grippers,
with
g
wheere sheets are
e joined exactly next to eaach other by sewing
s
or
g
gluing.
•
Second step
S
p: fitting and ttrimming of the floorcoverring. Pay atteention to the squareness
s
a the overlapping of thee edges durin
and
ng cutting to achieve invissible seams. Also
A pay
a
attention
to extra
e
materiall to cover doo
or openings. The above m
mentioned ste
eps are just
v
very
general rules. In the nnext paragrap
phs we will deal more speecifically with the
d
different
tech
hniques of insstalling carpett strips.
•
Second step
S
p: fitting and ttrimming of the floorcoverring. Pay atteention to the squareness
s
a the overlapping of thee edges durin
and
ng cutting to achieve invissible seams. Also
A pay
a
attention
to extra
e
materiall to cover doo
or openings. The above m
mentioned ste
eps are just
Gibbon Grou
up
T: +6
61 7 3881 177
77
F: +6
61 7 3881 1716
d
desso@gibbon
ngroup.com.a
au
www.gibbon
ngroup.com.a
au
vvery general rules. In the nnext paragrap
phs we will deal more speecifically with the
d
different
tech
hniques of insstalling carpett strips.
3.2..
Adhering or sttretching
When
n adhering orr stretching Desso
D
carpet a clear distinction should be made bettween tufted and woven
carpe
ets.
3..2.1.
Tuftted contrac
ct qualities
All tu
ufted project qualities from
m Desso can be adhered to
t a good su bfloor withou
ut any
prob
blem. Tufted qualities
q
are g
generally not suitable for stretching.
s
3..2.2.
Wovven contrac
ct qualitiess
On a sound subfloor woven q
qualities can be
b both adhe
ered and strettched. It is su
uggested
(for a more luxurio
ous installatio
on) that wherrever possible
e woven quallities be fitted
d over an
unde
erlay. This is ideal as far ass wear resistance and durability are cooncerned. Ho
owever this
will in
ncrease rollin
ng resistance and reduce wheelchair re
esistance. Thhe heavy conttract grade
woolllen qualities with a densee pile can also
o be adhered
d directly if req
quired.
Note: woven carpe
ets behave diffferent under tension
t
compa
ared to tufted
d carpets with a simple
m or jute backin
ng, due to thee different prod
duction proce
ess. They havee a better elas
sticity, which
foam
allow
ws the use of a knee kicker aand elongation in length dirrection (produuction direction
n). Tufted
carpe
ets which are more rigid req
quire a power stretcher.
Pane
els of softboarrd are not resillient and cann
not serve as a replacement of an underlay. They only
have a levelling fun
nction for the subfloor and always have to be provided
d with an adeq
quate
presssure-layer like
e water resistaant hardboard (Masonite) on
n which the caarpet can be adhered.
a
3.3..
Fitting
g directio
on
Beforre the carpet is cut the co
orrect fitting d
direction shou
uld be determ
mined. We reccommend se
electing this
in suc
ch a manner that the carp
pet is viewed in the direction of the pile
e when enteri ng the room: the carpet
then a
appears at itss best. You may
m of coursee also choosse a different direction wheen the practic
cal
argum
ments outweiigh any purely aesthetic reeasons. Our remarks rega
arding the dirrection of fittin
ng should
thereffore only be viewed
v
as a suggestion
s
inn relation to aesthetic
a
aspe
ects. Wherevver possible th
he sections
of carrpet should be
b fitted at rig
ght-angles in relation to th
he windows, which
w
will minnimise the vis
sibility of
any sseams. Ensurre, wherever possible, thaat the direction of fitting is the same eveerywhere ove
er an entire
floor o
of a building. Pay particula
ar attention to
o L-shaped corridors
c
etc. In corridors aand relativelyy long areas
it is usually prefera
able to lay the
e carpet leng
gthwise. Ensu
ure that no se
eams are locaated near enttrances.
With patterned ca
arpet the direc
ction of fitting
g also has to take the patttern into accoount in relatio
on to the
walls,, floor connec
ctions or furn
niture.
Gibbon Grou
up
T: +6
61 7 3881 177
77
F: +6
61 7 3881 1716
d
desso@gibbon
ngroup.com.a
au
www.gibbon
ngroup.com.a
au
3.4..
Seam
m position
ning
It is a
always importtant to prepare floor
layout and seam position
p
before
orderring a carpet. Desso can then
t
take tthat into acco
ount when prreparing
the ro
oll lengths, esspecially in th
he case
of spe
ecial producttions. Please pay
speciial attention to patterned carpets.
c
Note the repeat le
ength of the pattern
p
provid
ded in the offficial product
speciifications. See
e for further details
d
the paragraph dea
aling specifica
ally with
patterned carpetss. With piece dyed
qualitties one shou
uld make sure
e that
the se
ections of ca
arpet be laid
contin
nuously along
g the outer edges of
the ca
arpet breadth
h, i.e. that no
o fitting sectio
ons have to be
b cut out of the
t centre off the width for fitting
again
nst the outer edges
e
of full section
s
widthhs. When pro
oviding a seam
m plan it is alsso necessaryy to provide
a fittin
ng sequence that can be taken into acccount for the
e sequence of
o productionn rolls.
3.5..
Cuttin
ng
Once
e the fitting direction has been
b
determinned a start can be made on cutting thhe carpet. Alw
ways
mainttain an oversiize of ± 5 cm per section. Lay the secttions out in th
he same direcction next to each other.
Pay p
particular atte
ention to the pile direction . All pile musst face in the same directioon. Ensure to
o make
allowa
ance for patttern repeat where
w
approp riate. With woven carpet the
t marking tthread on the
e back can
serve
e as a useful aid.
a Always keep
k
the markking thread on
o the same side.
s
For felt and tufted ca
arpet pay
attenttion to the direction of the
e arrow or maarks on the back:
b
these must
m
always fa
face in the sa
ame
directtion.
3.6..
Cuttin
ng of the seams
To ac
chieve an opttimum end re
esult a clear d
distinction mu
ust be made between carrpet where the edges of
sectio
ons can be la
aid edge to ed
dge, and carrpet on which
h the edges have
h
to be cuut.
3..6.1.
Bac
cking edges
s
Backking edges us
sually are fouund with wove
en carpets. These
T
backingg edges will first
f
have to
be re
emoved by cutting them o
off with a kniffe to enable a correct patttern joint to be
b realised.
On deep
d
pile carp
pets it is reco
ommend to cut
c these strip
ps off from thhe back of the
e carpet.
Gibbon Grou
up
T: +6
61 7 3881 177
77
F: +6
61 7 3881 1716
d
desso@gibbon
ngroup.com.a
au
www.gibbon
ngroup.com.a
au
3..6.2.
Buttt joining
Proc
ceed as follow
ws for carpet that has to be
b laid seam to seam. Layy the first sec
ction to size
and place it along
g the wall or sskirting allow
wing a slight upward overlaap along the length. Lay
the other
o
sections
s next to and
d overlapping
g each other, cut the seam
ms, fold half the carpet
backk and glue the
em as descri bed in the pa
aragraph 'Adh
hering'. Afterr rolling press
s the seams
firmlyy together us
sing a knee sttretcher or se
eam stretcher, and in suchh a manner that
t
seams
close
e together an
nd the pile staands straight up.
3..6.3.
Cuttting the sid
des
On carpet
c
where the sides req
quire cutting go
g to work as follows: Layy the first sec
ction to size
and place it along
g the wall or sskirting allow
wing a slight upward overlaap along the length. Lay
the second
s
and any
a other secction as required, allowing the edges too overlap by ± 5 cm.
Once
e the carpet sections
s
are lying adjacen
nt to one ano
other, check tthe carpet ag
gain
thoro
oughly before
e gluing. Cut the first half of
o the longitu
udinal seam aand the follow
wing seams
to sizze. Always cu
ut along a steeel rule or straight edge. Itt is recommeended that the edges be
cut from the back
k of carpet w
with a deep pile.
Note: Never cut the carpet that lies in the adh
hesive. Otherw
wise adhesive is also remov
ved from a
partic
cularly critical adhesive locaation when the offcut is rem
moved!
3.7..
Adhering
Fold tthe last sectio
on laid back halfway along
g its length. Make
M
a
marking line on the subfloor alo
ongside the l ast section but
b one, also
length
hwise, and th
hen fold it half back. Repeeat the process up to the
first ssection laid. Smear
S
the floo
or with the reecommended
d adhesive.
Workk from the cen
ntre of a secttional length aand start with
h the last
folded
d section. Sp
pread the adh
hesive up to aapproximatelly 25 cm
awayy from the ma
arking line. Us
se a notched
d adhesive sp
preader. File
new n
notches in the spreader whenever
w
neccessary. In ge
eneral
applic
cable: Notch depth: 2 mm
m tooth distannce 2.4 mm, tooth width
2 mm
m.
Note: Always read the instruction
ns supplied w
with the adhesiive with
respe
ect to the type of adhesive spreader
s
requ ired, the corre
ect type of
adhessive and the quantity to be used.
Gibbon Grou
up
T: +6
61 7 3881 177
77
F: +6
61 7 3881 1716
d
desso@gibbon
ngroup.com.a
au
www.gibbon
ngroup.com.a
au
3.8..
After applicatio
on of the
e adhesive
Once
e the adhesive
e has been applied
a
roll thee carpet out into the adhe
esive bed. Thhe carpet can
n then be
rolled
d with a roller, both across
s the width annd in the leng
gth. Proceed in exactly thee same mann
ner for the
follow
wing sections. Never allow
w adhesive staains to dry, re
emove them immediately with the solvvent
recom
mmended byy the adhesive
e supplier. Ro
oll out any bliister, bubbles
s, etc. beforee the adhesive
e bonds. It
is imp
portant not to
o delay this operation. Afteer that the ca
arpet should be trimmed aall around.
Note: Ensure that the pile on the joints is stand
ding straight up
u and that tufts have not b
been pinched into the
seam. That is achie
eved by laying
g the seams off previously ad
dhered sections accurately and pressing them firmly
togeth
her.
3.9..
Stretc
ching carrpet onto underlay
y and spiked stripss
Stretc
ching with the
e carpet gripper method iis the oldest used installattion techniquue (although grippers
g
have improved a lot), but can only
o be used for specific types
t
of floor covering, maainly woven floor
f
coverring and carp
pets with a wo
oven second
dary backing. The carpet gripper
g
methood has advan
ntages to
the otther fitting tec
chniques like
e:
•
•
•
•
B
Better walking
g comfort imp
proved therm
mal and acousstic isolation
R
Removal and replacementt (eventually: re-use) can easily
e
be done
L
Lifetime of the
e floorcoverin
ng can be enhhanced by ussing an underlay
C
Certain prepa
arations for levvelling the suubfloor usuallyy may be om
mitted
Thhe stretching
g technique is
s more time cconsuming th
han gluing,
duue to the preparation requ
uired. It may nnot be seen as
a a means
to
o hide an imp
perfect subfloor. Uneven ssubfloors have to be
leevelled out to avoid that ex
xcessive highh spots would
d show
thhrough the ca
arpet. So, treat the subflooor as describ
bed in the
firrst part of thiss chapter. On
n cement bouund floors rep
pair all
crracks etc. Tre
eat wooden floors
f
as desccribed in the paragraph
'W
Wooden Floors'.
Fo
or wooden flo
oors use spik
ked strips fitteed with nails and fit
thhem with the spikes facing
g the skirting board around the entire
peerimeter of th
he room. To fit
f spiked strip
ps to concrette floors
usse steel nails or adhesive. In the latter case use a neoprene
n
or
ep
poxy adhesivve and work following
f
the instructions supplied
s
w
with the adhessive. Always use
u an adhessive on hard subfloors
s
or
if the subfloor becomes damaged as a result of nailing.
Gibbon Grou
up
T: +6
61 7 3881 177
77
F: +6
61 7 3881 1716
d
desso@gibbon
ngroup.com.a
au
www.gibbon
ngroup.com.a
au
Check this beforehand. If the 'adhesive method' is being used we recommend cutting the spiked strips
into lengths of ± 12 to 15 cm to enable a better bearing surface to be created. In this manner material
tension along the length of the strips can be avoided.
The same applies when fitting spiked strips around a column or pillar. When applying the stretching
method for heavy qualities in large areas, a wide spiked strip or a double row of standard spiked strips is
required. The strips should be kept free from the skirting at a distance of 2/3 the thickness of the carpet
to allow sufficient space for finishing.
The underlay should be laid within the strips applied, and stapled along the
seams and edges on wooden floors. The underlay should however first be
stretched slightly and any excess underlay removed. On hard subfloors a
small strip of the underlay should be glued along the edges and seams to
prevent it from slipping or sliding.
The carpet can be rolled out allowing
a slight overlap along the skirting. If
multiple sections are being laid, once
laid out, the seams have to be joined
together using seaming tape. Lay the
seaming tape underneath the seam
and on the underlay. Ensure that the
back and pile of the carpet fit
together well. Check the temperature adjustment on the seam welder and
position it at the beginning of a seam.
The carpet edges should fall on both sides of the seam weld with the handgrip emerging between them.
Once the welder begins to glide easily, slide it slowly forwards and press the carpet behind it into the
adhesive bed using the flat of the hand. The carpet backs should meet perfectly and the pile should be
standing straight up.
Gibbon Group
T: +61 7 3881 1777
F: +61 7 3881 1716
[email protected]
www.gibbongroup.com.au
Note: Do not exert any pressure with your knees. Allow the seam to cool. Bulging can be prevented by covering
the seam with a strip of carpet of hardboard. Note: Do not apply any pressure on the seams.
The wall to which the carpet is attached before stretching, has to be
chosen in function of the highest tension to be used lengthwise. Begin
stretching the carpet from a corner. Stretch the carpet onto the spikes
using your knee tensioner and a hammer.
The claws of your knee tensioner should grip into the backing of the
carpet. Now use the power stretcher to stretch the carpet fully. Place the
tailpiece in the corner in which you started, and stretch the carpet
towards the opposite corner.
Note: Place a piece of carpet between the tailpiece and wall to prevent damage to the wall.
Stretch the carpet following the examples and sequences provided. Make sure when stretching that the
carpet is free in the length from the starting position towards the wall to which you are working. Be
careful of any seams, ensuring they remain straight and parallel to the walls. If possible always stretch
away from the seams and place the head of the power stretcher in the middle of the seam being
stretched over its length. Use a palette knife or a special carpet bolster to drive the carpet in behind the
spiked strips, so that it hooks onto the strips when the tension being applied is released.
Gibbon Group
T: +61 7 3881 1777
F: +61 7 3881 1716
[email protected]
www.gibbongroup.com.au
Afterr making a full check, cut the carpet annd use the ca
arpet
bolstter to work th
he carpet in between
b
the sspiked strip, wall or
skirti ng. After the carpet has been
b
stretcheed over the whole
w
room,
the eedges are trim
mmed and pu
ushed down into the gap between
wall aand carpet gripper.
g
Use strong
s
profiled
d edging trim
ms on areas
wherre the carpet ends and a different
d
floorr surface beg
gins. A
profilled edging trim will help prevent
p
damaage and unravvelled
edgees.
3.10
0. Remo
ovable ins
stallation
The p
purpose of this type of installation is to
o leave the su
ubfloor intact after removinng the floor covering.
The d
difference with the glued down
d
fitting iss the type of adhesive use
ed: a self-adhhesive memb
brane or an
adhessive that doe
es not produc
ce a permaneent bond, the
e so called 're
elease type ad
adhesive'. The
e
prepa
aration of the
e subfloor, especially cleanning and dustting, is essen
ntial for obtainning good res
sults.
During removal, th
he splitting ha
as to occur b
between glue and carpet backing,
b
and not between
n primary
and ssecondary ba
or coverings with SBR-foam backing aare not resisttant to the
acking! In many cases, floo
ammo
onium substa
ances in the release type adhesive, an
nd should nott be used in rrelease systems.
3.11
1. Pattered carpe
et
Fitting
g patterned carpet
c
require
es a great deeal more atten
ntion and time than plain ccarpet. A goo
od section
plan tthat takes co
orrect matchin
ng and patterrn repeat length into acco
ount is an esssential compo
onent of
fitting
g patterned ca
arpet.
3..11.1. Patttern shifting
g (run out)
Sligh
ht pattern shiffting should aalways be tak
ken into acco
ount. Pattern shifts can no
ot only
occu
ur during the production p
process, but also
a as a resu
ult of shrinkaage under cha
anging
atmo
ospheric cond
ditions (e.g. d
during transp
port). Any patttern shift, how
wever small, will have to
be corrected whe
en fitting. Thee extent to wh
hich any pattern shift is vissible in practtice is
greattly dependen
nt on the sizee of the area, the pattern and
a the colouur, and the co
orrections
required when fittting. The app
plication of strraight stripes across the w
width of the carpet is not
recommended, as
a even with g
good correction a slight shift virtually aalways remain
ns visible.
The Desso projec
ct group can supply you with
w supplemental informaation in this re
espect.
Gibbon Grou
up
T: +6
61 7 3881 177
77
F: +6
61 7 3881 1716
d
desso@gibbon
ngroup.com.a
au
www.gibbon
ngroup.com.a
au
3..11.2. Patttern shift be
etween pie
eces from the same production
A pa
attern shift ma
ay occur withhin one produ
uction. Patterrn repeat lenggth between =0 cm and
<10 cm maximum
m deviation 2
2% of the pattern repeat. Pattern
P
repeaat length betw
ween
=10c
cm and <100
0 cm maximuum deviation 1% of the pa
attern repeat. Pattern repe
eat length
=100
0cm as quote
ed by manufaacturer.
Patttern Shift
½ Patttern Shift
Gibbon Grou
up
T: +6
61 7 3881 177
77
F: +6
61 7 3881 1716
d
desso@gibbon
ngroup.com.a
au
www.gibbon
ngroup.com.a
au
3..11.3. Bow
wing
Z-bo
owing is defin
ned as the deeviation from squareness. The edges oof the strip se
ections do
not liie in one line.. See drawing
g. In this case
e a maximum
m deviation off 4 cm is perm
mitted.
S-bo
owing is defin
ned as the bo
owing in relation to a straig
ght line on thhe strip sectio
on. A
maxiimum deviatio
on of 4 cm iss also applica
able in this ca
ase.
3.11.4.
Mea
asuring up
Whe
en multiple se
ections are beeing laid toge
ether extra me
etres will alwaays be requirred when
applyying a carpett with a patteern, and the undersizes
u
will be distributted over seve
eral rolls.
Both
h the pattern repeat lengthh and the patttern repeat width
w
are of im
mportance when
w
calcu
ulating the nu
umber of mettres required. Information regarding thee pattern rep
peat length
and width
w
can be
e found in thee product spe
ecifications. Consult
C
the D
Desso Group or Desso
Tech
hnical Service
es if necessarry. As a gene
eral guideline it applies thaat: floor length + cutting
losse
es (minimum 10 cm) + on e extra repea
at length = se
ection length.. This length should be
state
ed when orde
ering. It is thee responsibilitty of the carp
pet fitter to suubmit a correc
ct section
plan for patterned
d carpet that takes the ab
bove into account. Note: Inn certain area
as you
shou
uld also take the
t repeat w
width into acco
ount for the correct
c
quanttity of carpet!! In some
case
es an extra se
ection length may be requ
uired.
Gibbon Grou
up
T: +6
61 7 3881 177
77
F: +6
61 7 3881 1716
d
desso@gibbon
ngroup.com.a
au
www.gibbon
ngroup.com.a
au
3..11.5. Layiing patterned contrac
ct carpets
Lay out
o the first section
s
fully w
with an overla
ap on the skirting or other edges or obstacles. If a
long or large repe
eat has been chosen, you
u will have to take
t
the distrribution of the
e pattern at
the beginning
b
and
d at the end o
of the section
n in relation to
o the walls, d
doors, etc. intto account.
The second section can now be laid in suc
ch a manner that the seam
m pattern alo
ong the
seam
ms of both se
ections matchhes. When laying 'on the repeat'
r
you hhave to begin
n at the
d to the rightt. Any pattern
centre and work to
t the left and
n or repeat shhift in woven carpet can
be corrected with
h the knee strretcher and/o
or power stre
etcher. For ad
dhering the carpet,
pleasse refer to the
e paragraph 'Adhering', and
a for seams
s that do or d
do not require cutting,
pleasse refer to the
e paragraph 'Cutting to size'.
Note: When fitting, first lay out aall sections ne
ext to one another to ensuree correct matc
ching of the
patte
ern. Any possible pattern sh
hift or straighte
ening in relatio
on to walls etcc. can then be
e easily
corre
ected.
3.12
2. Whee
elchair res
sistant ad
dhering
The 'w
wheelchair re
esistant' qualities must of course also be adhered to
t the subflooor in an effective
'whee
elchair resista
ant'- manner. A subfloor o
only qualifies as wheelcha
air resistant if it complies with
w a
comp
pression resisstance of at le
east 250 kg p
per cm2.
Note tthat for use on
n carpets a wheel chair alw
ways must be provided
p
with wheels accorrding certain
speciffications (see the Appendix
x with Internatiional Standard
ds) i.e. 'hard' wheels
w
(type H
H) with the ma
andatory
measurements: dia
ameter 50 mm and width 20
0 mm. 'Soft' wheels
w
(type W)
W of existing cchairs thereforre have to
be rep
placed.
Gibbon Grou
up
T: +6
61 7 3881 177
77
F: +6
61 7 3881 1716
d
desso@gibbon
ngroup.com.a
au
www.gibbon
ngroup.com.a
au
he fitting method and qua
antity of adhessive required
d please refer to the instrucctions supplied by the
For th
adhessive manufac
cturer. Always
s ensure thatt the notchess on the adhe
esive spreadeer being used
d are in
good condition!
3.13
3. Adhering carp
pet with underfloorr heating
The u
underfloor heating must ha
ave been in o
operation for at least 10 days before thhe carpet is la
aid to
ensurre that any re
esidual moistu
ure has comp
pletely evapo
orated. The ca
arpet can of course be laid loose,
but th
hat is not recommended for
f large areaas, as corruga
ations or shrinkage may ooccur. If the carpet
c
is
being
g stretched th
he use of und
derlay is recom
mmended.
When
n using underrlay the heat permeability resistance of the underlay
y and carpet should be ad
dded
together. The colle
ective value may
m not exceeed a value of
o 0.17m2/K/W
W. When glu ing the carpe
et with a
dispe
ersion adhesivve the floor te
emperature m
may never be
e any higher th
han 200 ºC. IIn this connection follow
the in
nstructions su
upplied by the
e adhesive m
manufacturer and ensure the adhesive being used is
s in fact
suitab
ble for applica
ation on a flo
oor with undeerfloor heating
g.
In sho
ort the follow
wing values are applicable:
•
•
•
F
Floor Temperatture: Max. 20º / Min. 10 ºC
R
Room Tempera
ature: Max. 25º / Min. 15 ºC
R
Relative Humidity: Max. 75% / Min. 55%
After gluing the ca
arpet, the und
derfloor heati ng temperatu
ure may not be
b raised for 48 hours. Th
he heating
temperature can then
t
be gradu
ually increaseed up to the normal
n
opera
ating temperaature.
3.14
4. Adhering carp
pet with lo
ow electrical resistance va lues
In are
eas that acco
ommodate mainframes annd precision electronic
e
equ
uipment, strinngent antistatic
requirrements are applicable.
a
If Desso contraact carpet wiith low electrical resistancce values is be
eing fitted it
mightt be necessa
ary to adhere the carpet ussing a condu
uctive adhesiv
ve. In exceptiional cases th
he
applic
cation of a so
o-called 'copper band' is recommende
ed. In conside
eration of thee highly dema
anding
conditions in computer centres
s and similar locations, De
esso can also
o produce coontract carpe
ets with a
reduc
ced electrical resistance. Several
S
Dessso products possess
p
this property
p
as sstandard. Please refer to
the product speciffications for the
t various q ualities or consult the Des
sso project g roup.
Note:: On insulating floors we recommend ffitting the sub
bfloor with a conducting
c
ccopper strip of
o ± 1.25 m
2
per 40 m or per ro
oom. This so-called 'copp
per band' sho
ould be well earthed.
e
For ffurther advice
e please
consu
ult the Techn
nical Services Departmentt at Desso.
Gibbon Grou
up
T: +6
61 7 3881 177
77
F: +6
61 7 3881 1716
d
desso@gibbon
ngroup.com.a
au
www.gibbon
ngroup.com.a
au
4. Ne
eedle fe
elt (patte
erned) carpet
4.1..
Influe
ential factors of co
ontract en
nvironment
The p
properties of needle felt ca
arpets are - likke with any other
o
textile floor covering influenced by
b factors of
the en
nvironment, such
s
as temp
perature and humidity. Th
hese have to be taken intoo account during the
installation processs. Before the
e installation tthe needle fe
elt carpet has to be stored
d in a dry and
d warm
room. It is recomm
mended to let the carpet aacclimatize in
n the room att least 1 hourr, but preferably 24
hourss.
4.2..
Subflo
oor
When
n installing ne
eedle felt carp
pets the cond
ditions of the subfloor sho
ould be the saame as with other
o
textile
floor c
coverings, su
uch as broadloom and carrpet tiles. This means thatt the subfloorr has to be evven, sturdy,
free o
of cracks and
d dry. Dense surfaces, likee for instance
e PVC, have to
t be made a little bit abso
orbing
accorrding to the applicable
a
no
orms (see the appendix). In
n situations with
w a floor heeating system
m the
temperature has to
t be reduced
d before instaallation, in the
e same mann
ner as describ
bed in the ch
hapters
aboutt broadloom carpets and carpet tiles. A
After the insttallation the te
emperature hhas to be gra
adually
turned up. For floo
ors with old adhesive
a
see the referring paragraphs in second chhapter.
4.3..
Cuttin
ng
Cuttin
ng of needle felt carpets should
s
take p
place before adhering.
a
The
e carpet has to be rolled out
o with an
overla
ap of 3 to 5 cm.
c Net one has
h to cut thee seams in one
o movemen
nt along an stteel ruler with
h a sharp
'hookked' knife.
Note: Laying the orriginal edges of
o the carpet aagainst one an
nther is not a professional
p
innstallation me
ethod!
4.4..
Speciial require
ements w
with patte
erned nee
edle felt
It is in
nherent to pa
atterned need
dle felt qualitiees that there is a chance of
o line markinng on the sea
ams. This is
dependent of the design and the colour. Fo
or optimum re
esults the following is abssolutely neces
ssary:
•
•
•
•
D
Dense, absolutely straight sea
ams
U
Usage of seam clasps or a kicker with doub
ble head until the
t glue has dried
E
Environmental conditions
c
sho
ould be as speecified in the no
orm VOB DIN 18365 (see thee Appendix with
in
nternational no
orms)
B
Butt joining for an optimized over-all
o
floor ap
ppearance.
Gibbon Grou
up
T: +6
61 7 3881 177
77
F: +6
61 7 3881 1716
d
desso@gibbon
ngroup.com.a
au
www.gibbon
ngroup.com.a
au
4.5..
Adhering
The te
emperature of
o the subfloo
or is not allow
wed to drop below
b
15 ºC, while the relaative humidityy may not
be more than 75%
% (50 to 60%
% RH is ideal).. The carpet should
s
be ad
dhered preferrably with a fa
ast drying
and h
hardening disspersion glue, using a notcched adhesivve spreader with
w a notch d
depth of 2.7 mm and a
tooth width of 2.9 mm. When all
a is cut and tightly fitting and the seam
ms have beeen completelyy closed by
use o
of seam clips,, the whole flo
oor should b e thoroughly rolled with a roller after aabout 20 minu
utes,
depending on the instructions of the tackifieer manufactu
urer.
Note: Thoroughly ro
olling the seam
ms is especiallly of the utmo
ost importance!
Gibbon Grou
up
T: +6
61 7 3881 177
77
F: +6
61 7 3881 1716
d
desso@gibbon
ngroup.com.a
au
www.gibbon
ngroup.com.a
au


© Copyright 2026