
MySciLEARN User Guide
MySciLEARN™ User Guide For educators and providers using the Fast ForWord® and Reading Assistant™ programs April 2015 Copyright © 1996 through 2015 Scientific Learning Corporation. All rights reserved. This document is supplied subject to the terms of the Scientific Learning Corporation license agreement. Information in this document is subject to change without notice. Names, data, and other information used in examples and exercises herein are fictitious. Trademarks Fast ForWord® and SciLEARN® are registered trademarks of Scientific Learning Corporation, registered in the U.S. and certain other countries. MySciLEARN™, Reading Assistant™, and SciLEARNU™ are trademarks of Scientific Learning Corporation. Third-party trademarks Apple, the Apple logo, Macintosh, Mac, iPad, iPhone, and iTunes are trademarks of Apple Inc., registered in the U.S. and other countries. App Store is a service mark of Apple Inc. Microsoft and Windows are either registered trademarks or trademarks of Microsoft Corporation in the United States and/or other countries. Chrome™, Chromebook™, and Chrome OS™ are trademarks of Google Inc. © 2012 Google Inc. All rights reserved. Apache is a trademark of the Apache Software Foundation. Lexile® is a trademark of MetaMetrics, Inc., and is registered in the United States and abroad. Other brands and their products are trademarks of their respective holders. Trademark symbols are used only in the first occurrence of a trademarked name. Scientific Learning Corporation 300 Frank H. Ogawa Plaza, Suite 600 Oakland, CA 94612-2040 888-665-9707 510-444-3580 (fax) www.scientificlearning.com Customer Support 888-358-0212 (US & Canada) 520-917-1200 (International) www.scilearn.com/contact Contents Contents 3 About this manual 8 What’s new Tips for using this manual PDF manuals and guides Getting help 1 Getting started MySciLEARN quick start About MySciLEARN Navigating MySciLEARN Navigating Student Exercises Navigating Manage pages Students Staff Schools System Navigating Results Additional staff links Logging in to MySciLEARN Logging in as a staff member Logging in as a student Managing your staff account Accessing your staff account Editing your staff account Resetting your staff password 2 System requirements Basic client requirements Fast ForWord on iPad requirements Session Monitor app requirements Internet bandwidth requirements Reading Assistant headset requirements Content server requirements Troubleshooting browser display issues 3 Using Reading Assistant browser plug-in About the Reading Assistant Plug-in Installing the Reading Assistant Plug-in Updating the Reading Assistant Plug-in Advanced plug-in installation (system administrators) Uninstalling the Reading Assistant Plug-in 4 Using content servers 9 10 12 13 14 15 18 20 21 22 22 23 23 24 25 26 28 29 30 35 36 37 38 40 41 42 43 44 45 46 47 48 49 50 53 55 56 58 3 Contents About content servers Installing the content server software Content server install requirements Installation checklist Windows content server install steps Macintosh content server install steps Configuring the content server Accessing the Performance screen Adding content server settings Editing content server settings Deleting content server settings Optimizing content access for home use (advanced) Testing the content server Troubleshooting the content server 5 Managing general settings Accessing the General screen Viewing student login security for the district 6 Managing staff roles About staff roles and permissions Accessing the Staff Roles screen Viewing staff roles Editing standard staff roles Creating custom staff roles Editing custom staff roles Deleting custom staff roles 7 Managing licenses About licenses Accessing the Licenses screen Viewing all licenses 8 Managing schools About schools Accessing the Schools page Using the schools list Using a school profile Editing school information Setting Reading Progress Indicator school defaults Setting Fast ForWord school defaults Setting Reading Assistant school defaults Viewing licenses for a school Managing per student licenses for a school 9 Managing staff About staff members Accessing the Staff page 59 63 63 63 63 65 68 69 70 71 72 73 75 77 78 79 80 81 82 84 85 86 88 90 92 93 94 95 96 99 100 101 102 103 105 106 109 113 117 119 121 122 126 4 Contents Using the staff list Using staff profiles Adding staff Adding a new staff member Importing staff from a file Step 1 – Creating a staff CSV file Step 2 – Entering staff info in the CSV file Step 3 – Importing staff into the system Editing staff Deleting staff 10 Importing and transferring students 127 129 132 133 136 137 140 142 144 147 148 Importing students from a file Step 1 – Creating a student CSV file Step 2 – Entering student info in the CSV file Step 3 – Importing students into the system Transferring students to another school 149 150 154 160 162 11 Managing student enrollments 165 About students Accessing the Students page Using the students list Using student profiles About student usernames and passwords Adding a new student Editing student information Deleting students Managing student groups Adding a new student group Managing student group membership Renaming a student group Deleting a student group Managing per student licenses for students Associating students with instructors Changing the grade for students Changing the Fast ForWord protocol for students Setting student access to demos About setting Reading Progress Indicator and Auto Assign for students Printing student usernames and passwords 12 Managing Fast ForWord assignments About Fast ForWord assignments Accessing the Assign feature About Fast ForWord assignment settings About Fast ForWord protocols About Fast ForWord exercise introduction languages Choosing a Fast ForWord assignment method About Fast ForWord Auto Assign Setting Fast ForWord Auto Assign for students Troubleshooting Fast ForWord Auto Assign 166 167 168 176 181 182 186 188 189 191 193 194 195 196 200 202 203 206 207 209 210 211 212 214 215 216 217 218 221 223 5 Contents Assigning the Fast ForWord products Editing a Fast ForWord product assignment Stopping and deleting a Fast ForWord product assignment 13 Managing Reading Assistant assignments Accessing the Assign feature About Reading Assistant content organization About Reading Assistant reading levels About Reading Assistant assignment settings About library assignments Changing library assignments About Reading Assistant schedules About instruction language About glossary language About content progression About content placement Content placement – Use RPI (Automatic) Content placement – Use Reading Level Content placement – Use Content Overview Changing content placement About speech recognition settings About language support Choosing a Reading Assistant assignment method About Reading Assistant Auto Initial Assignment Setting Reading Assistant Auto Initial Assignment for students Troubleshooting Reading Assistant Auto Initial Assignment Assigning the Reading Assistant product Editing a Reading Assistant assignment Stopping and deleting a Reading Assistant assignment Advancing to the next Reading Assistant library 14 Managing Reading Assistant libraries About libraries Accessing the Content Libraries page Viewing content packs Viewing custom libraries Creating custom libraries Publishing custom libraries Unpublishing custom libraries Editing custom libraries Add new content to a custom library Renaming a custom library Managing the content in a custom library Deleting custom libraries Managing locked custom libraries 15 Using Fast ForWord programs Starting Fast ForWord training sessions Exiting Fast ForWord training sessions 225 227 229 233 234 236 237 238 239 240 241 243 244 245 247 249 250 252 254 255 257 258 259 262 264 265 267 269 273 274 275 277 278 279 282 284 286 288 290 291 292 293 294 295 296 300 6 Contents 16 Using Fast ForWord programs on iPad About Fast ForWord programs on iPad Downloading Fast ForWord program apps for iPad Tips for using Fast ForWord programs on iPad Starting Fast ForWord training sessions on iPad Exiting Fast ForWord training sessions on iPad Troubleshooting Fast ForWord programs on iPad 17 Using Reading Assistant program Preparing for Reading Assistant training Using Reading Assistant speech technology Enabling microphone access in Chrome Setting up the Reading Assistant lab Connecting the Reading Assistant headset Completing the Reading Assistant microphone check Correcting Reading Assistant audio issues Starting Reading Assistant training sessions Working on Reading Assistant for the first time Continuing work on Reading Assistant Exiting Reading Assistant training sessions 18 Using Reading Progress Indicator About Reading Progress Indicator Setting RPI access for students Administering an RPI assessment Voiding an RPI assessment for a student Reading Progress Indicator FAQ 19 Monitoring student sessions Monitoring sessions for a group Managing a locked Fast ForWord session Terminating a locked training session 20 Monitoring students from a mobile device About Session Monitor app Downloading Session Monitor app Using Session Monitor app Troubleshooting Session Monitor app 21 Using the program demos Using the Fast ForWord demos Using the Fast ForWord demos on iPad Using the Reading Assistant tutorial Glossary 302 303 306 307 310 314 317 321 322 323 324 328 329 332 335 337 338 342 345 347 348 350 352 355 357 362 363 366 368 370 371 373 374 381 383 384 389 395 398 7 About this manual Use this chapter to learn how this manual is organized, what's new, and how to get more help. What's in this chapter What’s new 9 Tips for using this manual 10 PDF manuals and guides 12 Getting help 13 8 About this manual What’s new This topic includes the latest updates to MySciLEARN. For an historical record of updates see the release notes at http://scilearn.force.com/Support/articles/Informational/3163. Session Monitor app for mobile digital devices. 4/30/15 • Added a mobile app that lets you monitor student training sessions. See "Monitoring students from a mobile device" on page 370. Updated PDF user guides. 4/30/15 • Updated MySciLEARN User Guide and MySciLEARN System Requirements. See "PDF manuals and guides" on page 12. Chromebook™ support for Reading Assistant. 3/19/15 • Added support for using the Reading Assistant program on Chromebook™ notebook computers. See "Basic client requirements" on page 41 and "Enabling microphone access in Chrome" on page 324. Reading Assistant Plug-in and Chrome™ browser. 3/19/15 • The Reading Assistant Plug-in is no longer required when using the Chrome browser. See "About the Reading Assistant Plug-in" on page 49. Fast ForWord product enhancements. 3/19/15 • • Updated the Fluency Round for Paint Match and Laser Match. • The student clicks target words instead of shooting them. • Keyboard shortcuts removed. Updated all of the Reading exercises to include the following enhancements. • Fun reward animations and more engaging background scenes that emphasize and reward student progression within an exercise session. • Session consecutive correct counters that indicate the number of consecutive correct responses within an exercise session. As the student continues answering trials correctly, reward animations increase. • More percent complete markers within each exercise that indicate the percentage of completed content in the exercise. • More stars on the Success Viewer screen for each exercise, which correspond to the percent complete markers within the exercises. 9 About this manual Tips for using this manual Read the following notes for tips on using this manual. Which topics or chapters should I read? This manual includes all of the information required to administer MySciLEARN at a school or district. Each chapter within the manual is organized as follows: • By major functionality – Each chapter includes multiple topics related to that function. For example, the "Managing Staff" section includes the tasks related to adding staff members to the system. • By staff member role hierarchy – Each chapter is targeted for the appropriate staff role within MySciLEARN. For example, the first few chapters in the manual after Getting Started include district manager tasks that are not relevant to school managers or instructors. However, this information is provided to all staff members in case it might prove helpful. Use this table to learn which chapters and topics are related to you and your MySciLEARN role. All staff Chapter 1 “Getting started” on page 14 Chapter 2 “System requirements” on page 40 Chapter 3 “Using Reading Assistant browser plug-in” on page 48 District managers Chapter 4 Chapter 5 Chapter 6 Chapter 7 School managers Chapter 8 “Managing schools” on page 99 Chapter 9 “Managing staff” on page 121 Chapter 10 “Importing and transferring students” on page 148 Instructors (teachers) Chapter 11 Chapter 12 Chapter 13 Chapter 14 Chapter 15 Chapter 16 Chapter 17 Chapter 18 Chapter 19 Chapter 20 Chapter 21 “Using content servers” on page 58 “Managing general settings” on page 78 “Managing staff roles” on page 81 “Managing licenses” on page 93 “Managing student enrollments” on page 165 “Managing Fast ForWord assignments” on page 210 “Managing Reading Assistant assignments” on page 233 “Managing Reading Assistant libraries” on page 274 “Using Fast ForWord programs” on page 295 “Using Fast ForWord programs on iPad” on page 302 “Using Reading Assistant program” on page 321 “Using Reading Progress Indicator” on page 347 “Monitoring student sessions” on page 362 “Monitoring students from a mobile device” on page 370 “Using the program demos” on page 383 10 About this manual How often is the documentation updated? As part of our commitment to excellence, Scientific Learning regularly updates the help, the user guides, and other product documentation to reflect the continuous improvement and enhancement of our products. To ensure that you have access to the most recent PDF guides, you may want to periodically visit the help system in MySciLEARN and check for any updates. Staff role references within the documentation Throughout the documentation, you'll see references to the standard staff roles of district manager, school manager, and instructor. Unless otherwise indicated, all general references to a standard staff role also apply to the custom roles based on that standard role. Check with your district manager if you have any questions about a specific custom staff role. For more information on staff roles, see Chapter 6 “Managing staff roles” on page 81 and Chapter 9 “Managing staff” on page 121. 11 About this manual PDF manuals and guides MySciLEARN provides these user manuals and guides, accessible in MySciLEARN Help. User guides MySciLEARN User Guide MySciLEARN System Requirements MySciLEARN Content Server Guide Fast ForWord Program User Guide Fast ForWord Program on iPad User Guide Fast ForWord Program on iPad User Guide Parents How to Use Reading Assistant Reading Assistant Plug-in Install Guide Teacher manuals Fast ForWord Language v2 Teacher Manual Fast ForWord Language to Reading v2 Teacher Manual Fast ForWord Literacy Teacher Manual Fast ForWord Literacy Advanced Teacher Manual Fast ForWord Reading Readiness Teacher Manual Fast ForWord Reading Level 1 Teacher Manual Fast ForWord Reading Level 2 Teacher Manual Fast ForWord Reading Level 3 Teacher Manual Fast ForWord Reading Level 4 Teacher Manual Fast ForWord Reading Level 5 Teacher Manual Reading Assistant Teacher Resource Guide 12 About this manual Getting help MySciLEARN provides several methods for getting help. Use the Get Help link Use the Get Help link at the top of any page in the program to access MySciLEARN Help, which provides access to user-specific topics and the PDF manuals and guides. Download the PDF manuals Scientific Learning provides user manuals, guides, and specifications in PDF format. Use the Get Help link within MySciLEARN to download them. Visit SciLEARNU This professional development hub within MySciLEARN provides access to all program training materials, including video tutorials, staff training courses, teacher guides, and special learning events. Use the SciLEARNU tab in MySciLEARN to access it. Search our knowledge base Our knowledge base provides up-to-date troubleshooting articles and tips on using the software, along with release notes. To search the knowledge base, go to http://scilearn.force.com/Support. Contact Customer Support If you need further assistance or have more questions, contact Scientific Learning Customer Support. Customer Support Web www.scilearn.com/company/contact-us Email [email protected] Phone 1-888-358-0212 (US & Canada) 1-520-917-1200 (International) Hours Monday - Friday 5 AM - 5 PM PT 13 1 Getting started 1 Getting started If you’re new to the software, you’re in the right place; reviewing the basics is the best way to get started with the Fast ForWord and Reading Assistant programs in MySciLEARN. For this brief tour, you don’t need to know anything about MySciLEARN. What's in this chapter MySciLEARN quick start 15 About MySciLEARN 18 Navigating MySciLEARN 20 Navigating Student Exercises 21 Navigating Manage pages 22 Navigating Results 25 Additional staff links 26 Logging in to MySciLEARN 28 Logging in as a staff member 29 Logging in as a student 30 Managing your staff account 35 Accessing your staff account 36 Editing your staff account 37 Resetting your staff password 38 14 1 Getting started MySciLEARN quick start This topic provides a short list of tasks for getting started with MySciLEARN, based on your staff role. For a complete list of topics relevant to your staff role, see "Which topics or chapters should I read?" on page 10 for details. Tip: For smaller implementations of MySciLEARN, review the steps for all three roles. Quick start for district managers Follow these steps to get started with MySciLEARN as a district manager: 1. Log in to MySciLEARN and click the Manage tab. • "Logging in to MySciLEARN" on page 28 2. On the System page, verify the district settings as needed. • Chapter 4 “Using content servers” on page 58 • Chapter 5 “Managing general settings” on page 78 • Chapter 6 “Managing staff roles” on page 81 • Chapter 7 “Managing licenses” on page 93 3. On the Schools page, verify the default settings for the schools in your district. • Chapter 8 “Managing schools” on page 99 4. On the Staff page, add the staff members who will serve as school managers at the schools in your district. • Chapter 9 “Managing staff” on page 121 5. On the Students page, import students into the schools within your district as needed. • Chapter 10 “Importing and transferring students” on page 148 6. Inform the school managers that the software is ready for them to set up their schools and add instructors to their schools. • "Quick start for school managers" on page 16 7. After students use the program, use the Results pages to view student reports for the district. 15 1 Getting started Quick start for school managers Follow these steps to get started with MySciLEARN as a school manager: 1. Log in to MySciLEARN and click the Manage tab. • "Logging in to MySciLEARN" on page 28 2. On the Schools page, verify the default settings for your school. • Chapter 8 “Managing schools” on page 99 3. On the Staff page, add the staff members who will serve as instructors at your school. • Chapter 9 “Managing staff” on page 121 4. On the Students page, import students into your school as needed. • Chapter 10 “Importing and transferring students” on page 148 5. Inform the instructors at your school that the software is ready for them to create assignments and guide their students in using the software. • "Quick start for instructors (teachers)" on page 17 6. After students start using the software, use the Results pages to view student reports for your school. 16 1 Getting started Quick start for instructors (teachers) Follow these steps to get started with MySciLEARN as an instructor, teacher, or coach: 1. Log in to MySciLEARN and click the Manage tab. • "Logging in to MySciLEARN" on page 28 2. On the Students page, perform the following student enrollment tasks as needed: • Add your students to the system (if they are not already enrolled) and create student groups. • • Chapter 11 “Managing student enrollments” on page 165 Assign the Fast ForWord or Reading Assistant products to your students. • Chapter 12 “Managing Fast ForWord assignments” on page 210 • Chapter 13 “Managing Reading Assistant assignments” on page 233 • Chapter 14 “Managing Reading Assistant libraries” on page 274 3. If your students will be using the Fast ForWord program on iPad, download the Fast ForWord apps onto their iPads. • "Downloading Fast ForWord program apps for iPad" on page 306 4. Guide your students in logging in to the MySciLEARN Student Exercises and using the software. • Chapter 15 “Using Fast ForWord programs” on page 295 • Chapter 16 “Using Fast ForWord programs on iPad” on page 302 • Chapter 17 “Using Reading Assistant program” on page 321 • Chapter 18 “Using Reading Progress Indicator” on page 347 5. Review the Results reports for your students. 17 1 Getting started About MySciLEARN This topic answers frequently asked questions about MySciLEARN. What is MySciLEARN? MySciLEARN leverages the latest Internet technology and platform architecture to provide a reliable, scalable, and high-performance learning solution for the web-based Fast ForWord and Reading Assistant products—anytime, anywhere. MySciLEARN delivers the following features within one centralized web application: • Home – This page provides customized dashboard that serves as a home base for all staff. • Manage – These pages allow staff to perform all MySciLEARN administrative and user management tasks. • Results – These pages allow staff to review student results reports at the district, school, group, and student level. • SciLEARNU – These pages provide staff with a professional development hub and customer resource center. • Student Exercises – This separate student training portal serves the Fast ForWord and Reading Assistant products to students—in the classroom or at home. For a quick tour of the pages in MySciLEARN, see "Navigating MySciLEARN" on page 20. How does MySciLEARN work? Hosted by Scientific Learning, MySciLEARN provides centralized management for the implementation of the Fast ForWord and Reading Assistant products, eliminating the need for an onsite server. MySciLEARN achieves this goal using web-based technology to facilitate communication with client computers over the Internet. Any computer with a web browser can be used as a client—either in the classroom or at home—as long as that computer meets the minimum requirements for MySciLEARN and the Fast ForWord and Reading Assistant programs. See Chapter 2 “System requirements” on page 40 for details. With the Fast ForWord products, students can optionally use an iPad mobile digital device instead of a computer. See the Fast ForWord Program on iPad User Guide for more information. MySciLEARN also allows schools to install and use Scientific Learning content servers to provide local access to the Fast ForWord and Reading Assistant content. Content servers can be installed at the schools or the district on an as-needed basis. See Chapter 4 “Using content servers” on page 58 for more information. 18 1 Getting started Note: MySciLEARN requires strict adherence to the minimum specifications requirements as detailed in Chapter 2 “System requirements” on page 40. Ignoring these rules can result in performance issues. If you have any questions or concerns, contact Scientific Learning Customer Support. Will I need to install any software to use MySciLEARN? In general, MySciLEARN clients do not require any software installation or setup other than a web browser with Adobe Flash player. Note the following exceptions: • Depending on your browser or platform, the Reading Assistant program may require that you install the Reading Assistant Plug-in on the student's computer (see Chapter 2 “System requirements” on page 40 to learn more). The plug-in is included with MySciLEARN. You can install the plug-in before students start working, or follow the prompts to install it when Reading Assistant first opens. See Chapter 3 “Using Reading Assistant browser plug-in” on page 48 for install instructions. • The Fast ForWord program for iPad requires that you install the Fast ForWord program apps on the student's iPad. See Chapter 16 “Using Fast ForWord programs on iPad” on page 302 for more information. See Chapter 2 “System requirements” on page 40 for more information. How secure is MySciLEARN? To provide secure access to the system, MySciLEARN requires that all staff members and students use a unique login and password. In addition, all of the data for MySciLEARN is hosted by Scientific Learning. If you have any additional questions about security, contact Scientific Learning Customer Support. 19 1 Getting started Navigating MySciLEARN Students and staff members use MySciLEARN by logging in to the program over the Internet. Each MySciLEARN user has their own unique login and password that provides secure access to the program. MySciLEARN uses this login to identify the user and customize the user’s experience based on their staff role. See "Logging in to MySciLEARN" on page 28 for more information and steps. MySciLEARN is organized into several pages that allow staff and students to use the software. • Home – This page provides customized dashboard that serves as a home base for all staff. • Manage – These pages allow staff to perform all MySciLEARN administrative and user management tasks. • Results – These pages allow staff to review student results reports at the district, school, group, and student level. • SciLEARNU – These pages provide staff with a professional development hub and customer resource center. • Student Exercises – This separate student training portal serves the Fast ForWord and Reading Assistant products to students—in the classroom or at home. As a staff member, you'll mainly use the Manage and Results pages, and your students will use the Student Exercises. See the following topics for a quick tour of these MySciLEARN pages. • "Navigating Student Exercises" on page 21 • "Navigating Manage pages" on page 22 20 1 Getting started Navigating Student Exercises Only students can access the Student Exercises page. The Student Exercises page appears when a student logs in to MySciLEARN, providing access to that student's product assignments, to Reading Progress Indicator assessments, and to the product demos. See "Logging in as a student" on page 30 for steps. To learn how students use the Student Exercises page to train on the Fast ForWord and Reading Assistant products, take RPI assessments, and access the demos, see the following topics: • Chapter 15 “Using Fast ForWord programs” on page 295 • Chapter 16 “Using Fast ForWord programs on iPad” on page 302 • Chapter 17 “Using Reading Assistant program” on page 321 • Chapter 18 “Using Reading Progress Indicator” on page 347 • Chapter 21 “Using the program demos” on page 383 Student Exercises 21 1 Getting started Navigating Manage pages The Manage pages in MySciLEARN allows staff to perform all administrative tasks for MySciLEARN, including managing the system settings, managing the schools settings, and managing all staff and student users in the system. The Manage pages are built into MySciLEARN so they're easy to access—click the Manage tab to view them. To get started, open a web browser on any computer connected to the Internet, point to the MySciLEARN server, and log in. For more information on logging in to MySciLEARN, see "Logging in to MySciLEARN" on page 28. MySciLEARN provides access to the following Manage pages based on your role. See the rest of this topic for details. Students All staff members can access the Students page. The Students page allows staff members to manage student enrollments and assignments. See the following topics for details on how to use the Students page: • Chapter 11 “Managing student enrollments” on page 165 • Chapter 12 “Managing Fast ForWord assignments” on page 210 • Chapter 13 “Managing Reading Assistant assignments” on page 233 Students 22 1 Getting started Staff Only district managers and school managers can access the Staff page. The Staff page allows these staff members to create and manage other staff members. See Chapter 9 “Managing staff” on page 121 for details on how to use the Staff page. Staff Schools Only district managers and school managers can access the Schools page. The Schools page allows these staff members to manage the settings for their schools. See Chapter 8 “Managing schools” on page 99 for details on how to use the Schools page. 23 1 Getting started Schools System Only district managers can access the System page. The System page allows these staff members to manage the system settings for the entire district. See the following topics for details on each page: • General – Chapter 5 “Managing general settings” on page 78 • Staff Roles– Chapter 6 “Managing staff roles” on page 81 • Performance – Chapter 4 “Using content servers” on page 58 • License – Chapter 7 “Managing licenses” on page 93 System 24 1 Getting started Navigating Results All staff members can access the Results page. The Results reports in MySciLEARN present Fast ForWord and Reading Assistant student usage data at the district, school, and student levels. See MySciLEARN Help for completed details on how to use the reports. Results 25 1 Getting started Additional staff links When logged in as a staff member, the MySciLEARN pages provide additional links to help facilitate the use of the software. Students cannot access these links. MySciLEARN header links MySciLEARN header • Exercise Demos – Provides staff access to the demos for the Fast ForWord and Reading Assistant products. • Content Libraries – Provides staff access to the Reading Assistant content libraries. • My Account – Provides access to your staff account, where you can view and edit your account information. • Get Help – Provides access to the MySciLEARN Help system, along with all user manuals and guides. • Log Out – Logs you out of the system. MySciLEARN footer links MySciLEARN footer • Contact – Provides Scientific Learning contact information. • MySciLEARN Info – Provides the version number and credits. • About Scientific Learning – Provides the Scientific Learning mission and a link to the corporate site. • Quick Links – This section in the lower right corner includes the following quick links: • Student Login – Opens the Student Login page • Support – Opens the Customer Support site. • SciLearn.com – Opens the Scientific Learning corporate Web site. 26 1 Getting started Feature-level help Feature-level help If you see the text What is this followed by a question mark icon, click the icon to open a help dialog and learn more about the feature. When available, click the More Help link at the bottom of the dialog to open a detailed Help topic on that feature. To close the help screen, click the Close button or the X in the upper right corner. 27 1 Getting started Logging in to MySciLEARN MySciLEARN allows users to access the software from any computer connected to the Internet. Staff members and students simply open their web browser and point to a specific web address that connects to MySciLEARN and loads the software into the browser. To provide secure access to the software, MySciLEARN requires that both staff and student users enter a unique and secure login. See the following topics for detailed steps. • "Logging in as a staff member" on page 29 • "Logging in as a student" on page 30 28 1 Getting started Logging in as a staff member Staff members use the Staff Login page to access MySciLEARN. Staff Login The Staff Login page requires that you enter your login email (username) and your password to access MySciLEARN. Your login email was automatically emailed to you when your user account was created. That email also provides a link to create your password. • Login email (username) – This is the staff member's actual email address that was entered into the system when the staff member's account was created. • Password – This is a unique alphanumeric code created by the staff member through a link in their account confirmation email. If you forget your login email or your password, you can use the corresponding links on the Staff Login page to obtain them (for steps see "Resetting your staff password" on page 38). For information on your individual staff login see "Managing your staff account" on page 35. You can also access the Student Exercises login from this page using the Go to Student Login button. To access the Staff Login page and log in to MySciLEARN 1. Connect your computer to the Internet. 2. Open a web browser and point to the MySciLEARN Staff Login page: www.myscilearn.com 3. Enter your login email and password on the Staff Login page and then click Log In. MySciLEARN checks your login and when validated, opens and displays the Home page. Click another tab as needed to access those pages: Manage, Results, SciLEARNU. 29 1 Getting started Logging in as a student Students use the Student Login page to access MySciLEARN. Student Login The Student Login page requires that students enter their username and password to access the software. If a student forgets their username or password, a staff member can access this information from the Students page (see "About student usernames and passwords" on page 181 for steps). The steps to log in as a student vary based on workstation type: computer or mobile digital device. • "Log in as a student on a computer" on page 30 • "Log in as a student on iPad" on page 33 Tip: Some students may require guidance while performing this task, especially if the student is young, or if this is the first time the student is logging in. Log in as a student on a computer Follow these steps to log in to MySciLEARN on a desktop, laptop, or notebook computer. 1. Connect your computer to the Internet. 30 1 Getting started 2. Open a web browser and point to the MySciLEARN Student Login page: www.myscilearn.com/learner If this is the first time the student has accessed MySciLEARN on this computer (or if the web browser’s cache on the computer has been cleared), the software may ask the student to choose their school or district name: 3. If needed, enter the first few letters of your school or district in the Choose School or District field to see a list of schools and districts, then select your school or district from the list and click Continue. If your school or district does not appear right away, keep entering letters until it appears: 4. Enter your student username and password and click Log In. 31 1 Getting started Student Login MySciLEARN checks the username and password and when validated, opens the Student Exercises page. For details on using the programs see the following chapters: • Chapter 15 “Using Fast ForWord programs” on page 295 • Chapter 17 “Using Reading Assistant program” on page 321 • Chapter 18 “Using Reading Progress Indicator” on page 347 • Chapter 21 “Using the program demos” on page 383 32 1 Getting started Log in as a student on iPad The student can open any Fast ForWord program app—including the Reading Progress Indicator app—to log in to MySciLEARN and view their assignments and the demos. However, to actually work on a product or demo, that app must be installed on iPad. For example, a student can open the Fast ForWord Literacy app, log in, and take an RPI assessment, as long as the Reading Progress Indicator app is also installed on his or her iPad. See "Downloading Fast ForWord program apps for iPad" on page 306 for information. 1. Connect the iPad to the Internet. 2. On the iPad Home screen, open a Fast ForWord program app to connect to MySciLEARN and view the Student Login screen. If this is the first time the student has accessed MySciLEARN on this device, the software may ask the student to choose their school or district name: 3. If needed, enter the first few letters of your school or district in the Choose School or District field to see a list of schools and districts, then select your school or district from the list and tap Yes to confirm your choice. If your school or district does not appear right away, keep entering letters until it appears on the right: 33 1 Getting started 4. Enter your student username and password and tap Log In. Student Login MySciLEARN checks the username and password and when validated, opens the Student Exercises page. For details on using the programs see the following chapters: • Chapter 16 “Using Fast ForWord programs on iPad” on page 302 • "Using the Fast ForWord demos on iPad" on page 389 • Chapter 18 “Using Reading Progress Indicator” on page 347 34 1 Getting started Managing your staff account Each staff member has their own account that her or she can view and edit within MySciLEARN. View My Account Each staff account provides access to the following information: • Your name • Your staff role (click View Role Details to see the permissions for your assigned staff role) • Your schools (all schools if you are a district manager) • Your login email • Your password (encrypted format only) • Your employee ID, if entered • Any additional information about you, if entered • A print button to print your account information • An Edit button to edit your staff account details See the following topics for details on managing your staff account. To manage accounts for other staff members, see Chapter 9 “Managing staff” on page 121. • "Accessing your staff account" on page 36 • "Editing your staff account" on page 37 • "Resetting your staff password" on page 38 35 1 Getting started Accessing your staff account When you log in to MySciLEARN as a staff member, you can access your staff account from several places within the system. For steps on logging in see "Logging in as a staff member" on page 29. • From the My Account link at the top of any page • From the My Account link on the Staff page Your staff account See the following topics for details on editing your staff account: • "Editing your staff account" on page 37 • "Resetting your staff password" on page 38 36 1 Getting started Editing your staff account Use your staff account to edit the following information. • Name • Login email (requires that you log in again) • Password • Employee ID • Additional Information 1 and 2 You’ll need to log in to MySciLEARN to access your account. For steps on resetting a lost or forgotten password, see "Resetting your staff password" on page 38. To edit your staff account 1. Log in to MySciLEARN. 2. Access your account one of the following ways: • At the top of any page, My Account link. • Click the Staff tab and then click the My Account link on right side of the Staff page. 3. On your account page, click the Edit button. Your staff account 4. Make any changes to the account information as needed and click Save. If you changed your login email, the system will log you out automatically to apply the changes.You’ll need to log back in using your new login email. 37 1 Getting started Resetting your staff password Each staff member has a specific staff login that provides access to MySciLEARN. This staff login includes two items (for more details see "Logging in as a staff member" on page 29). • Login email (username) – This is the staff member's email address that was entered into the system when the staff member’s account was created. This item can also be viewed within the staff member’s profile (see "Using staff profiles" on page 129). • Password – This is a unique alphanumeric code created by the staff member through a link in their account confirmation email. Passwords must be at least six characters, contain one uppercase letter, one lowercase letter, and one number. For security purposes, staff passwords are not archived anywhere in the system. You can reset your own password as needed; for example, if you’ve lost or forgotten your password, or you’d like to change your current password for security reasons. At minimum, you'll need your login email to reset your password. If you’ve forgotten which email address you're using as your login email, contact your system administrator or Scientific Learning Customer Support for assistance. What you'll need: • To reset a lost or forgotten password, you'll need your login email. • To change your password, you'll need your login email and your current password. To reset your lost or forgotten staff password 1. Open the Staff Login page for MySciLEARN on a web browser. 2. Click the Forgot Your Password link in the lower right corner. Staff Login 38 1 Getting started 3. Enter your login email in the Login Email field. Your login email is your actual email address. If you're not sure which email address you're using with MySciLEARN, contact your administrator (either a district manager or a school manager). He or she can access your staff profile to look up your login email and then send it to you. 4. Click Send Reset Instructions. A confirmation screen appears, indicating that the system sent you an email with a link that allows you to create a new password. Follow the instructions in the email to create the password. The password must be at least six characters, contain one uppercase letter, one lowercase letter, and one number. When the new password is created, you can use it immediately. To change your current staff password 1. Log in to MySciLEARN and access your account one of the following ways: • At the top of any page, My Account link. • Click the Staff tab and then click the My Account link on right side of the Staff page. 2. On your account page, click the Edit button. Your staff account 3. Follow the instructions to enter your new password and confirm it, and click Save. The password must be at least six characters, contain one uppercase letter, one lowercase letter, and one number. The next time you log in, you will be able to use your new password. 39 2 System requirements 2 System requirements Use these topics to review the minimum system requirements for using MySciLEARN. If you have any questions or concerns about these requirements, contact Scientific Learning Customer Support. System requirements change periodically. For the most up-to-date requirements see MySciLEARN Help. What's in this chapter Basic client requirements 41 Fast ForWord on iPad requirements 42 Session Monitor app requirements 43 Internet bandwidth requirements 44 Reading Assistant headset requirements 45 Content server requirements 46 Troubleshooting browser display issues 47 40 2 System requirements Basic client requirements These requirements apply to students and staff using MySciLEARN on a computer, laptop, or Chromebook. For students using iPad see "Fast ForWord on iPad requirements" on page 42. In addition to these requirements, MySciLEARN clients must meet the minimum specifications for the operating system and must have enough available resources to successfully run the browser. OS Windows XP / Windows Vista / Windows 7 / Windows 8 Mac OS X 10.5 or later Chrome OS™ on Chromebook (touchscreen not supported) Browser Internet Explorer 8+ (32-bit with compatibility view disabled) Firefox 10+ Chrome 17+ Safari 4+ Network 10Mb Ethernet or 802.11g/n wireless connection (see "Internet bandwidth requirements" on page 44) Display 1024 x 768 resolution or higher Sound card students only Creative Labs SoundBlaster® or 100% compatible with DirectSound support Headphones students only Fast ForWord – High-quality stereo headphones with padded cups to cover ears, and a stereo headphone Y-adapter to let coaches listen without interrupting (see support article #1383 to learn more) Reading Assistant – Approved microphone headset and USB adapter (see "Reading Assistant headset requirements" on page 45) Other software students only Adobe Flash Player 10.3+ Reading Assistant Plug-in (not needed for Chrome or Chromebooks) 41 2 System requirements Fast ForWord on iPad requirements These requirements apply to students using the Fast ForWord program apps on iPad. Mobile digital device iPad 2 or later (includes iPad Air™) OS iOS 6 or later Network Wi-Fi or 3G/4G cellular connection with Internet access (see "Internet bandwidth requirements" on page 44) Storage App size varies—check the app size listed on the App Store℠ Headphones High-quality stereo headphone set with padded cups to cover ears, and a stereo headphone Y-adapter to let coaches listen without interrupting (see support article #1383 to learn more) 42 2 System requirements Session Monitor app requirements These requirements apply to staff using the Session Monitor app on a mobile digital device. Mobile digital device iPad 2 or later (includes iPad Air™) iPhone 4 or later OS iOS 7 or later Network Wi-Fi or 3G/4G cellular connection with Internet access Storage App size varies—check the app size listed on the App Store℠ 43 2 System requirements Internet bandwidth requirements For each active student session, the Fast ForWord and Reading Assistant programs transmit approximately 10 KB of data per minute. The programs vary in the amount of data transmitted and received based on multiple factors, such as the current exercise or reading selection, the program protocol or schedule, and the current status in the program. In addition, bandwidth requirements vary during an individual student session, with larger data transfers occurring during the first few minutes of a session, and in the case of Reading Assistant, after a recording session. Schools • 128 Kbps per concurrent student training session • Maximum 250 ms latency • Total data used per session: • Fast ForWord program (browser) – 1MB to 6MB • Reading Assistant program (browser) – 1.8MB • Fast ForWord program apps (iPad) – 500KB to 1MB Tip: A good way to improve network bandwidth usage in schools is to use a content sever. Content servers help reduce WAN traffic and increase performance by providing the Fast ForWord and Reading Assistant content at a local level. On average, a content server at the district or school level will allow 3 to 7 times more concurrent users where available bandwidth is a limiting factor. Note that content servers are not needed when using the Fast ForWord program apps on iPad. Home access • DSL or faster broadband Internet connection: • Fast ForWord programs (browser) – 1.5 Mbps/0.5 Mbps (download/upload) • Reading Assistant program (browser) – 1.5 Mbps/0.5 Mbps (download/upload) • Fast ForWord program apps (iPad) – 1 Mbps/0.5 Mbps (download/upload) 44 2 System requirements Reading Assistant headset requirements Reading Assistant requires an approved headset with either an integrated USB connection or an approved USB audio adapter. For complete details on headsets and purchasing information (including discount codes), review this article at http://scilearn.force.com/Support/articles/Informational/1383 or contact Scientific Learning Customer Support. Headsets with separate adapters Headsets with integrated USB audio Headsets Adapters (pair with any headset) • • • • Andrea NC-250V Andrea EDU-455 Califone 3066AV Cyber Acoustic AC-960 • • • Logitech H390 (with ClearChat Comfort USB) Microsoft LifeChat LX-3000 N/A • • • • • Andrea PureAudio USB-SA Parts Express USB Sound Adapter SYBA SD-CM-UAUD SYBA SD-AUD-20066 StarTech ICUSBAUDIO StarTech ICUSBAUDIOB • If a microphone headset or USB adapter is not included in this list, it has not been certified to work with our software. • You must purchase the exact USB adapter model number shown. Other adapters sold by the same manufacturer are not approved. • All of these headsets will also work with the Fast ForWord products except for the Logitech H390 headset, which is not recommended if you plan to use Reading Assistant and the Fast ForWord products together. • For all plug-in users, the Microsoft LifeChat LX-3000 headset requires version 2.2.0.12 or later of the Reading Assistant plug-in1. You can check your plug-in version several ways; for example, using the Tools menu inside the Reading Assistant program (under System Information). If you need further assistance, check with your system administrator or contact Scientific Learning Customer Support. 1Applies to non-Chrome users only—Chrome and Chromebook users do not require the Reading Assistant Plug-in. 45 2 System requirements Content server requirements Content servers provide local access to the Fast ForWord and Reading Assistant program content. They are optional when using MySciLEARN. If your school or district chooses to implement a content server, it must meet the following requirements. Note that content servers are not needed when using the Fast ForWord program apps on iPad. Windows Mac OS X OS Windows XP / Vista / Windows 7 Windows Server 2003 / 2008 / 2012 OS X 10.5 - 10.9 Memory 2GB 4GB (Windows Server 2008 / 2012) 2GB Processor 2GHz Dual Core Pentium or equivalent 1.5GHz Intel Core Duo or equivalent Network 100Mb Ethernet 100Mb Ethernet Hard disk 10GB free disk space 10GB free disk space Other software Apache HTTP Server (httpd) 2.2 (included with Scientific Learning Content Server installer) Apache HTTP Server (httpd) 2.2 (included with OS X) 46 2 System requirements Troubleshooting browser display issues If you encounter any user interface or display issues while using Internet Explorer, make sure that Compatibility View has been disabled within Internet Explorer. For details on performing this task, visit Microsoft’s Web site and search for Compatibility View. Tip: Clearing your browser's cache If you continue to experience display issues or are having general problems using the software in your browser, you may want to try clearing your browser's cache. If you are not familiar with this task, check with your system administrator or contact Scientific Learning Customer Support. If you have any questions or concerns, or if you need further assistance, contact Scientific Learning Customer Support. 47 3 Using Reading Assistant browser plug-in 3 Using Reading Assistant browser plug-in Use this chapter to learn how to install the Reading Assistant Plug-in on the student workstations. The Reading Assistant Plug-in allows students to run Reading Assistant in a web browser other than Chrome. It's required to use the Reading Assistant program on those browsers. If your students are using Reading Assistant on Chrome or Chromebooks exclusively, you don't need to install the plug-in. To learn more see "Using Reading Assistant speech technology" on page 323. About the Reading Assistant Plug-in 49 Installing the Reading Assistant Plug-in 50 Updating the Reading Assistant Plug-in 53 Advanced plug-in installation (system administrators) 55 Uninstalling the Reading Assistant Plug-in 56 48 3 Using Reading Assistant browser plug-in About the Reading Assistant Plug-in A plug-in is a set of software components that adds functionality to a larger software application. Plug-ins are commonly used in web browsers to perform specific tasks. In MySciLEARN, the Reading Assistant Plug-in lets some web browsers perform essential speech recognition tasks that otherwise could not be executed. All web browsers except Chrome need the Reading Assistant Plug-in installed on the student workstation. Chrome and Chromebook users do not need the plug-in (although it won't cause a problem if it's installed on the workstation). See "Using Reading Assistant speech technology" on page 323 to learn more. The Reading Assistant Plug-in is part of MySciLEARN and only takes a few quick steps to install. You can install the Reading Assistant Plug-in using one of two options. If you have any questions, or would like help with this task, contact Scientific Learning Customer Support. Basic installation (instructors) In most cases you'll be performing a basic installation; for example, when installing the plug-in on a few student workstations, or when adding a new workstation. When a student starts training on Reading Assistant before the plug-in is installed on the workstation, Reading Assistant will automatically notify the student to contact their instructor, and then prompt the instructor to download and install the plug-in. See "Installing the Reading Assistant Plug-in" on page 50 for steps. Advanced installation (system administrators) The Reading Assistant Plug-in supports flexible deployment methods that allow system administrators to install the plug-in on large groups of workstations. Use this option to install the plugin before your students begin training on Reading Assistant. The plug-in is available from MySciLEARN and can be accessed directly from a web browser on the student workstation. See "Advanced plug-in installation (system administrators)" on page 55 for steps. 49 3 Using Reading Assistant browser plug-in Installing the Reading Assistant Plug-in Review this entire topic before installing the software. For steps on installing the plug-in before students start training, see "Advanced plug-in installation (system administrators)" on page 55. When a student starts using Reading Assistant before the plug-in is installed on the student's workstation, Reading Assistant will automatically notify the student to contact their instructor, and then prompt the instructor to download and install the plug-in. All web browsers except Chrome need the Reading Assistant Plug-in installed on the student workstation. Chrome and Chromebook users do not need the plug-in and will not be prompted to install it. Reading Assistant – Instructor Message Installation requirements When you meet these requirements, follow the steps to install the plug-in based on your platform: • No other software programs are running on the student workstation. • The student workstation is connected to the Internet. • The user is logged in to the student workstation with administrator rights. Windows installation steps This task assumes that the student has already logged in to MySciLEARN, started the Reading Assistant training session, and received a message telling the student to ask their teacher for help. The instructor should continue with these steps to install the plug-in. 50 3 Using Reading Assistant browser plug-in IMPORTANT! The plug-in installer requires that the user be logged in with administrator rights on the computer. If the student does not have administrator rights, exit the student session, log in as an administrator user, and restart the student session before you start this task. 1. Click the arrow next to Instructor Message to expand the message. 2. Click Download Plug-in to start downloading the plug-in. If Windows displays any security warning messages, click Run to allow the installer to start. 3. When the installer opens, review the license agreement. 4. Accept the terms of the license agreement and click Next to start the installation. 5. If prompted, click Yes on the User Account Control message to allow the Reading Assistant Plug-in installer to make changes to this computer. 6. When the installation completes, click Finish to exit the installer. All students can now use Reading Assistant on this workstation. Macintosh installation steps This task assumes that the student has already logged in to MySciLEARN, started the Reading Assistant training session, and received a message telling the student to ask their teacher for help. The instructor should continue with these steps to install the plug-in. 1. Click the Instructor Message arrow to expand the message. 2. Click Download Plug-in to download the plug-in and start the installer. If the installer does not automatically start, double-click ASRPlugin.pkg in the Downloads window to start the installer. 3. When the installer opens and displays the Introduction screen, click Continue. 4. Review the license agreement and click Continue, then click Agree to accept the terms of the license agreement. 5. If prompted, click the displayed install option on the Select a Destination screen, then click Continue. 51 3 Using Reading Assistant browser plug-in Reading Assistant Plug-in Installer – Select a Destination 6. On the Installation Type screen, click Install to start the installation. 7. If prompted, enter the password for the admin user account on the workstation and click OK. 8. When the installation completes, click Close to exit the installer. All students can now use Reading Assistant on this workstation. 52 3 Using Reading Assistant browser plug-in Updating the Reading Assistant Plug-in If the student workstation has an older version of the Reading Assistant Plug-in installed, Reading Assistant displays a warning message after the student logs in and starts the Reading Assistant training session. This message tells the student to contact their instructor, and then prompts the instructor to download and install the update. Best practice: You must install all required updates. You can opt out of optional updates; however, to provide the best experience with the Reading Assistant product, we strongly recommend that you install the latest plug-in whenever possible. Installing required updates Reading Assistant – Update Error Message When a plug-in update is required, an error message appears after the student logs in to the system and starts the Reading Assistant training session. This error will appear until you install the update. To download and install the new plug-in, go to "Installing the Reading Assistant Plug-in" on page 50 and follow the steps for your platform. 53 3 Using Reading Assistant browser plug-in Managing optional updates Reading Assistant – Update Warning Message When a plug-in update is optional, a warning message appears after the student logs in to the system and starts the Reading Assistant training session. • To download and install the new plug-in, go to "Installing the Reading Assistant Plug-in" on page 50 and follow the steps for your platform. • To continue without installing the update, click the Install Later button. You won't be prompted again, but an reminder icon will appear next to the Tools menu inside the Reading Assistant program. Choose Plug-in Update from the Tools menu to download the update and install it at your convenience. 54 3 Using Reading Assistant browser plug-in Advanced plug-in installation (system administrators) The Reading Assistant Plug-in supports flexible deployment methods such as Windows Group Policy package deployment, Macintosh Workgroup Manager deployment, and command-line deployment, allowing system administrators to easily install the plug-in on large groups of student workstations. MySciLEARN hosts the plug-in installers as follows: • Windows: http://content01.scilearn.com/ra-plugin/ASRPlugin.msi • Macintosh: http://content01.scilearn.com/ra-plugin/ASRPlugin.pkg Tip: You can also download the installer and then run it on individual workstations as needed, before or after students start training. For steps on running the installer on a workstation, see "Installing the Reading Assistant Plug-in" on page 50 (start with step 3). After downloading the installer, follow these steps to deploy the plug-in to a group of workstations. You can also use these same deployment methods to remove the plug-in, if needed. Windows deployment method For Windows platforms, after you download the installer, you can deploy the plug-in from the command line using this syntax: • msiexec /i \\<installer location>\ASRPlugin.msi /qn Macintosh deployment method For Macintosh platforms, extract the ASRPlugin.plugin file from ASRPlugin.pkg and copy that file into the following location on the workstations: • Macintosh HD > Library > Internet Plug-Ins If you have any questions or concerns, or need further help performing these tasks, contact Scientific Learning Customer Support for assistance. 55 3 Using Reading Assistant browser plug-in Uninstalling the Reading Assistant Plug-in In most cases, you'll never need to remove the Reading Assistant plug-in. However, you can remove the Reading Assistant Plug-in from a workstation, if needed, following these steps. If you have any questions before removing the plug-in, contact Scientific Learning Customer Support. Note: You can also remove the Reading Assistant Plug-in by running the installer and choosing to uninstall the program. Follow the steps for your platform as detailed in "Installing the Reading Assistant Plug-in" on page 50 (starting from step 3) and when prompted, choose to uninstall the program. To remove the plug-in from a Windows workstation 1. Log in to the workstation as an administrator user. 2. From the Start menu, open Windows Control Panel. If needed, you can select View by Category from the menu in the upper right corner to change the Control Panel view to match these install instructions. 3. Under Programs, click Uninstall a Program. For earlier versions of Windows , open Add Remove Programs. 4. Right click ASRPlugin in the list and click Uninstall or Remove. 5. Click Yes to confirm that you want to uninstall the plug-in. When the uninstall completes, the system does not display a message; it just removes the ASRPlugin item from the Programs and Features list. To remove the plug-in from a Macintosh workstation 1. Log in to the workstation as an administrator user. 2. Open Macintosh Finder and open your hard drive (Macintosh HD). 3. Open the Library folder. If you cannot locate the Library folder, it may have been hidden by the operating system. Check with your operating system documentation on how to find and view the Library folder. 4. Open the Internet Plug-Ins folder. 56 3 Using Reading Assistant browser plug-in 5. Locate the ASRPlugin.plugin file and delete it from your computer (drag and drop it in the trash and then empty the trash). 57 4 Using content servers 4 Using content servers As a system administrator or district manager, use this chapter to learn how to install, configure, and manage content servers. Content servers allow student workstations to access the Fast ForWord and Reading Assistant multimedia content at the district and school level. Using a content server at the local level can help improve the performance of the software. To download the content server installer from our Web site: go to www.scilearn.com/slp-downloads, log in, and accept the terms to access the SciLEARN Platform Software Download page. What's in this chapter About content servers 59 Installing the content server software 63 Content server install requirements 63 Installation checklist 63 Windows content server install steps 63 Macintosh content server install steps 65 Configuring the content server 68 Accessing the Performance screen 69 Adding content server settings 70 Editing content server settings 71 Deleting content server settings 72 Optimizing content access for home use (advanced) 73 Testing the content server 75 Troubleshooting the content server 77 58 4 Using content servers About content servers The Scientific Learning content server software allows you to set up a local source for the Fast ForWord and Reading Assistant multimedia assets and content files, enabling web-based clients to access that content locally rather than from MySciLEARN. Using a content server at the local level can help improve the performance of the software. This topic answers the following questions: • "Is a content server required?" on page 59 • "How does a content server work?" on page 59 • "What are some content server deployment options?" on page 61 • "What if a content server stops working?" on page 61 • "How do I set up a content server?" on page 62 Is a content server required? You don't need a Scientific Learning content server to use the Fast ForWord and Reading Assistant products. By default, MySciLEARN provides direct access to the multimedia content files. However, MySciLEARN gives you the option to set up a content server to help improve performance. If you’d like help determining whether your school or district would benefit from a content server, contact Scientific Learning Customer Support. Note for iPad users When using the Fast ForWord program apps for iPad, you do not need a MySciLEARN content server. Each Fast ForWord program app includes all of the content required to use that app. Any content servers already in use by the school or district will not be used or affected by the Fast ForWord program apps for iPad. How does a content server work? When set up on your local computer, the Scientific Learning content server uses the Apache HTTP Server 2.2 software application, which has been configured to use its mod_proxy and mod_cache modules. These modules turn Apache into a caching proxy server, which caches the Fast ForWord and Reading Assistant multimedia assets and content files from MySciLEARN. This type of content server is also referred to a reverse proxy server. A reverse proxy server is designed to retrieve resources on behalf of a client from one or more servers, then return those resources to the client as though the resources originated from the reverse proxy server itself. 59 4 Using content servers The following example illustrates a basic content server setup: IMPORTANT! Scientific Learning content servers are restricted to Scientific Learning’s Fast ForWord and Reading Assistant product content only, and will not cache proxy content from any other web server or program. When students first start working on the products, the local content server connects to MySciLEARN and downloads the multimedia assets and content files, which are then stored and served to the student workstations at the school. The content server periodically checks MySciLEARN for updated content. For districts that plan to use content servers while supporting location-based training (such as home use), MySciLEARN provides an advanced option that uses the district’s client network settings to accelerate content access. For more information on using this option see "Optimizing content access for home use (advanced)" on page 73. 60 4 Using content servers What are some content server deployment options? MySciLEARN provides a wide range of flexibility for utilizing content servers in your district, allowing you to customize the experience to your individual needs. • You can set up one content server for the entire district. MySciLEARN will automatically route all schools to this content server. • You can set up separate content servers for individual schools in the district. • You can set up one content server for the district, and then set up individual content servers for a few schools in that district that need local access. The rest of the schools will use the district content server. • You can set up one content for several schools; for example, if you have two schools in close proximity and you want to save resources by using one content server for both locations. Additional content server setup options To use one district content server for all schools: • Enter the district content server settings for the district. All schools will automatically default to the district content server. To use one district content server and a few school content servers: • Enter the district content server settings for the district. • Enter the different school content server settings for those few schools. All of the rest of the schools will automatically default to the district content server. To use one school content server for several schools: • Enter the same school content server settings for those schools. What if a content server stops working? If your students run into any issues accessing the multimedia assets and content files from the content server, the system will automatically choose a new content service so your students can keep working without interruption. For example, if the system can’t access your school content sever, it will automatically check for a district content server and try to access the content from there. If it doesn’t find a district content server or it finds one but can’t access it, the system will automatically start accessing the content from MySciLEARN. The next time the student logs in, the system will try the school content server again and repeat the process. For more troubleshooting tips see "Troubleshooting the content server" on page 77 61 4 Using content servers How do I set up a content server? You’ll need your own local computer on which to install and configure the Scientific Learning content server software. To download the installer, go to www.scilearn.com/slp-downloads, log in to Customer Connect, and accept the terms to access the SciLEARN Platform Software Download page. When your content server has been installed, you’ll need to enter the content server settings into MySciLEARN. If your district supports home use, you can also enter the client network settings for your district to help students avoid delays when first starting a training session from home. See the following topics for details on installing, setting up, and managing content servers. • "Installing the content server software" on page 63 • "Configuring the content server" on page 68 • "Testing the content server" on page 75 • "Troubleshooting the content server" on page 77 62 4 Using content servers Installing the content server software Use the Scientific Learning Content Server Installer to install the content server software. Please review the entire section before installing the software. Before you start, make sure that the computer meets the minimum system requirements for a content server. Content server install requirements Before you start, make sure that your system meets the minimum specification requirements for a content server. See "Content server requirements" on page 46. Then, verify that you meet the following requirements before you install the Scientific Learning Content Server software. • No other software programs are running on the content server computer • No computer processes are using port 80, including web servers, administration consoles, or Instant Messaging (IM) clients • Any existing firewalls are set to allow access to port 80 Installation checklist Before you start the installation, make sure that you have the following items at hand: • The Scientific Learning Content Server Installer. • • Download the installer from our Web site: go to www.scilearn.com/slp-downloads, log in to Customer Connect, and then accept the terms to access the SciLEARN Platform Software Download page. The MySciLEARN server URL and port: • Server URL: content01.scilearn.com • Port: 80 Windows content server install steps Follow these steps to install and configure the content server software. 1. On the Windows computer you plan to set up as a content server, log in as an administrator user and run the Scientific Learning Content Server Installer. 2. On the Terms and Conditions screen, review and accept the terms and conditions, then click Next. 3. On the Server Configuration screen, enter the MySciLEARN URL and port number in the following fields and click Install. • Hostname/IP Address: content01.scilearn.com • Port Number: 80 63 4 Using content servers Server Configuration 4. Click OK to start the Apache HTTP server installer. Install Apache HTTP Server Software The Apache HTTP server installer starts and opens the Apache Installation Wizard. Follow the prompts to install the Apache HTTP server. During the installation, make sure to select the following options: • On the Server Information screen, accept the defaults (this is populated by the content server installer), and select the option to install the software for all users, on port 80, as a service. • On the Setup Type screen, select Typical. • Accept the default install location. 64 4 Using content servers • On Windows 7/Vista, select Yes for all user account control requests. 5. Write down the IP Address and Port Number details listed on the Installation Complete screen. This is the IP address and port number of this content server computer. You will need to enter this information into MySciLEARN to set up the content server before you can use it. See "Configuring the content server" on page 68 for details. Installation Complete 6. Click Done to exit the installer. Macintosh content server install steps Because the Macintosh OS includes Apache HTTP server software, it does not need to be installed; therefore, the steps are slightly different on a Macintosh. Follow these steps to install and configure the content server software on a Macintosh. 1. On the Macintosh computer you plan to set up as a content server, log in as an administrator user. On Macintosh 10.5.8, log in as the root user. Check with your system administrator if you need help with this step. 2. Run the Scientific Learning Content Server Installer. 3. On the Authentication screen, click the lock and follow the prompts to enter the Macintosh Administrator password. You’ll need to enter your administrator user password for this Macintosh computer. Check with your system administrator if you are not an administrator user. 65 4 Using content servers Authentication 4. On the Terms and Conditions screen, review and accept the terms and conditions, then click Next. 5. On the Server Configuration screen, enter the MySciLEARN URL and port number in the following fields and click Next. • Hostname/IP Address: content01.scilearn.com • Port Number: 80 Server Configuration 6. Write down the IP Address and Port Number details listed on the Installation Complete screen. 66 4 Using content servers This is the IP address and port number of this content server computer. You will need to enter this information into MySciLEARN to set up the content server before you can use it. See "Configuring the content server" on page 68 for details. Installation Complete 7. Click Done to exit the installer. 8. From the Dock on this Macintosh computer, open System Preferences > Sharing and enable Web Sharing (required). 67 4 Using content servers Configuring the content server You'll need to perform the tasks listed in this topic to configure a content server. Entering the content server settings in MySciLEARN (required) Before you can use the content server, you'll need to log in to MySciLEARN as a district manager and add the content server settings. See the following topics for steps: • "Adding content server settings" on page 70 Note: The content server hostname/IP address and port information is provided on the last screen when installing the content server. If you no longer have access to this information, contact your system administrator. For information on managing the content server settings after they are entered, see the following topics: • "Editing content server settings" on page 71 • "Deleting content server settings" on page 72 Optimizing content access for home use (optional) For districts that want to use a content server while supporting location-based training, MySciLEARN provides an option that accelerates content access on startup by using your district network settings to check a student’s training location and then directing that student to the appropriate content service.To use this option, you’ll need log in to MySciLEARN as a district manager, access the System Performance screen, and enter the subnet IP address and subnet mask for your district network that defines the district’s external IP address range. Your district or school system administrator should be able to provide this information; however, if you have any questions or concerns, or would like help with this process, contact Scientific Learning Customer Support. See the following topic for steps: • "Optimizing content access for home use (advanced)" on page 73 68 4 Using content servers Accessing the Performance screen Use the System page to access the Performance screen, where you can configure the content servers for your school or district. System – Performance When you log in to MySciLEARN, you can access the System page based on your staff role: • District managers can see the System tab and access the Performance screen. • School managers and instructors cannot see the System tab and cannot access the Performance screen. To access the Performance screen 1. Log in to MySciLEARN as a district manager. For details see "Logging in as a staff member" on page 29. 2. Click the Manage tab to access the Manage section. 3. Click the System tab to access the System page. 4. Click the Performance tab to open the Performance screen. 69 4 Using content servers Adding content server settings When your school or district has installed and configured the Scientific Learning content server software on a local computer, you’ll need to enter the content server settings into MySciLEARN. You must perform this task to use a content server. Before you begin, make sure you have the following information for the content server you plan to set up. Check with your system administrator for details. • The hostname or IP address and port of the content server computer See the topic "What are some content server deployment options?" on page 61 for helpful tips on how to set up content servers at your district or school. To add settings for a school or district content server 1. Log in to MySciLEARN as a district manager and click the Manage tab to access the Manage section. 2. Click the System tab to access the System page. 3. Click the Performance tab to open the Performance screen. 4. Select your school or district from the menu. When you set up a district content server, it becomes the default content server for all schools in the district, unless those schools are mapped to another content server. Performance – Add Content Server Settings 5. Enter the following information for the content server computer and click the Add button: If needed, check with your system administrator for details on these settings. • In the Hostname or IP field, enter the content server computer’s hostname or IP address. • If the content server is using a port other than port 80, enter that port in Port field. 70 4 Using content servers Editing content server settings If the content server IP address or port has changed, or if the client network settings have changed while using the advanced setup, you’ll need to update the content server settings in MySciLEARN to keep using that content server. To edit the settings for a school or district content server 1. Log in to MySciLEARN as a district manager and click the Manage tab to access the Manage section. 2. Click the System tab to access the System page. 3. Click the Performance tab to open the Performance screen. 4. Click the Edit button for the content server setting you want to edit. The content server settings open for edit, and the Edit button turns into a Save button: System – Edit Content Server Settings 5. Make changes to the settings as needed and click the Save button. 71 4 Using content servers Deleting content server settings Deleting the content server settings from MySciLEARN allows the client computers to access the program content from MySciLEARN instead of the local content server. For example, you can delete the content server settings if you no longer plan to use a content server at a particular location. Note: If your district has both a district and a school content server, you’ll need to remove the settings for both content servers in order for the students to access the content directly fromMySciLEARN. To delete the settings for a school or district content server 1. Log in to MySciLEARN as a district manager and click the Manage tab to access the Manage section. 2. Click the System tab to access the System page. 3. Click the Performance tab to open the Performance screen. 4. Click the trash icon on the left side of the content server name for the content server settings you want to delete. System – Delete Content Server Settings 5. On the confirmation message, click Delete Settings, and the system will immediately stop using the local content server start accessing the content directly from MySciLEARN. 72 4 Using content servers Optimizing content access for home use (advanced) For districts that want to use a content server while supporting location-based training, MySciLEARN provides an option that accelerates content access on startup by using your district network settings to check a student’s training location and then directing that student to the appropriate content service. For example, when the student starts a training session, the system checks to see if the student’s computer is within the district network. If so, the system immediately directs the client to the content server. If the student’s computer is outside of the district network—for example, at home—the system immediately directs the client to the MySciLEARN service. To use this option, you’ll need to enter the IP address and subnet mask for your district network that defines the district’s external IP address range. Your district or school system administrator should be able to provide this information; however, if you have any questions or concerns, or would like help with this process, contact Scientific Learning Customer Support. See the following topics for details on optimizing content access for home use. Adding the district network settings for home use Before you begin, make sure you have the following information for the district network you plan to set up: • The IP address and subnet mask for the district network that defines the district’s external IP address range To add the district network settings for home access acceleration 1. Log in to MySciLEARN as a district manager and click the Manage tab to access the Manage section. 2. Click the System tab to access the System page. 3. Click the Performance tab to open the Performance screen. 4. Under Optimize for Home Use, enter the following information and click the Save button. If needed, check with your system administrator for details on these settings. • In the Network ID field, enter the IP address for the district network. • In the Mask field, enter the subnet mask for the district network. Performance – Add District Network Settings 73 4 Using content servers Editing the district network settings for home use If your district network settings have changed, you’ll need to update those settings in to continue accelerating content access for home use. To edit the district network settings for home use 1. Log in to MySciLEARN as a district manager and click the Manage tab to access the Manage section. 2. Click the System tab to access the System page. 3. Click the Performance tab to open the Performance screen. 4. Under Optimize for Home Use, click the Edit button next to the district network settings. The district network settings open for edit, and the Edit button turns into a Save button. Performance – Edit District Network Settings 5. Make changes to the district network settings as needed and click the Save button. Deleting the district network settings for home use You can remove the district networks settings from MySciLEARN at any time. The students will still access content from the content server when training at school, and will still access content from MySciLEARN when training at home. To delete the district network settings for home use 1. Log in to MySciLEARN as a district manager and click the Manage tab to access the Manage section. 2. Click the System tab to access the System page. 3. Click the Performance tab to open the Performance screen. 4. Under Optimize for Home Use, click the trash icon for the district network settings. 5. On the confirmation message, click Delete Settings. 74 4 Using content servers Testing the content server Perform the following steps to check that the content server is set up correctly and can access and cache the product multimedia files. You can run this test before configuring the content server in MySciLEARN, if needed. However, before students can use the content server, you’ll need to set it up in MySciLEARN. See "Configuring the content server" on page 68 for details. If the test fails, try restarting the content server (see "To restart the content server" on page 76). To test the content server 1. On any client computer at the school, open a browser. 2. Access any of the following URLs, depending on the product you are checking: Fast ForWord: • http://<content server>/fastforword/content/LAP/assets/BCP/BCP_UI.swf • http://<content server>/fastforword/content/LAP/assets/FRM/FRM_UI.swf • http://<content server>/fastforword/content/LAP/assets/GYM/GYM_UI.swf Reading Assistant: • http://<content server>/raweb-media/images_content/6.JPG • http://<content server>/raweb-media/images_content/1244.JPG • http://<content server>/raweb-media/images_content/20245.JPG Replace <content server> with the hostname or IP address of the content server computer, which is available on the System page in MySciLEARN (see the user manual for details). Note: If you are not using the default port for the content server (port 80), include the port after the IP address in the URL. For example, if you are using port 8006, change the URL to this: http://1.23.45.678:8006/fastforword/... 3. Verify that the files accessed from the URLs open and display the following content in the browser, depending on the content you are checking: • Fast ForWord – Exercise graphics should appear. Note that the exercises will not actually run; only the graphic will appear. • Reading Assistant – Graphics from the reading selections should appear. 4. Verify that the ecat folder on the content server starts caching folders with two-letter names. If not, try restarting the content server. By default, the ecat folder is located in the following location on the content server: 75 4 Using content servers • Windows: C:\ecat_cacheroot • Macintosh: Macintosh HD > ecat_cacheroot Cached Content Example To restart the content server If the content server test fails (the folders do not appear on the content server), try restarting the Apache HTTP server software. The easiest way to do this is to restart the content server computer. Then, repeat the test. Tip for Macintosh content servers On a Macintosh content server, you can use the restart_apache.sh script to restart the Apache server software without rebooting. Follow these steps, then repeat the test. 1. Open Terminal on the content server computer and navigate to the content server install folder: cd /scilearn_content_server/mac 2. In Terminal, run the restart script file: ./restart_apache.sh 76 4 Using content servers Troubleshooting the content server If students run into any issues using the content server, check below for some troubleshooting tips, or review "Testing the content server" on page 75. If you have any questions or concerns, contact Scientific Learning Customer Support at 888-358-1202 for assistance. Content not cached If you suspect that the content server is not caching the content, see "Testing the content server" on page 75 and follow the instructions to test the content server. If the tests do not pass, contact Scientific Learning Customer Support for further assistance. Content server connection lost If a client workstation is unable to access the content server for any reason—such as server or network failure—you don’t have to do anything; the system will automatically choose a new content service. For example if the system can’t access your school content sever, it will automatically check for a district content server and try to access the content from there. If it doesn’t find a district content server or it finds one but can’t access it, the system will automatically start accessing the content from MySciLEARN. The next time the student logs in, the system will try the school content server again and repeat the process. 77 5 Managing general settings 5 Managing general settings As a district manager, use this chapter to learn how to view the MySciLEARN system general settings defaults for the district. What's in this chapter Accessing the General screen 79 Viewing student login security for the district 80 78 5 Managing general settings Accessing the General screen Use the System page to access the General screen. The General screen allows you to view the student security settings for the entire district. System When you log in to MySciLEARN, you can access the System page based on your staff role: • District managers can see the System tab and access the General screen. • School managers and instructors cannot see the System tab and cannot access the General screen. To access the General screen 1. Log in to MySciLEARN as a district manager. For details see "Logging in as a staff member" on page 29. 2. Click the Manage tab to access the Manage section. 3. Click the System tab. The System page opens and displays the General screen. 79 5 Managing general settings Viewing student login security for the district Access this information from the General screen on the Systems page (available to district managers only). System – General Settings To provide secure access to the software, MySciLEARN requires that both staff and student users enter a unique and secure login to access the software. When adding a student to MySciLEARN, you will be required to create both a username and a password. For more information see "About student usernames and passwords" on page 181. 80 6 Managing staff roles 6 Managing staff roles As a district manager, use this chapter to learn how to manage the MySciLEARN staff role settings, and how to create and manage custom staff roles. What's in this chapter About staff roles and permissions 82 Accessing the Staff Roles screen 84 Viewing staff roles 85 Editing standard staff roles 86 Creating custom staff roles 88 Editing custom staff roles 90 Deleting custom staff roles 92 81 6 Managing staff roles About staff roles and permissions In MySciLEARN, a staff role is set of user rights, or permissions, assigned to a specific staff member. Each role has a specific function within the software that includes a specific set of permissions. When you create a staff member, the software prompts you to assign a role to that staff member. To allow districts maximum flexibility, MySciLEARN provides two types of roles: standard roles and custom roles. About standard staff roles All of the staff roles in MySciLEARN are based on three standard roles, which are the default roles in the system. For details on these three standard staff roles, see "About staff members" on page 122 • A district manager role provides complete administrative rights within the system. • A school manager role provides administrative rights for all of the staff members, students, and groups at specific schools in the district. • An instructor role management rights over specific students and groups at an individual school. Use the following pages in the program to manage standard staff roles: • District managers – Use the Staff Roles page to view and edit permissions for the standard staff roles. Standard roles are part of the program and cannot be deleted from the system. • District managers and school managers – Use the Staff page to assign standard staff roles to staff members. About custom staff roles Generally, the standard staff roles meet the needs of most districts. However, MySciLEARN allows districts to create customized staff roles from the three standard roles to meet the their specific staff needs within the software. For example, districts can: • Create roles with names that reflect the staff titles in their district, such as reading specialist, special education coordinator, school principal • Customize the permissions to reflect the security in their district; for example, limiting the ability to delete students from the software program All custom roles are based on one of the three standard staff roles: district manager, school manager, and instructor. When creating a custom role, select the standard role that most closely meets the needs of your new custom role. • A district manager role provides complete administrative rights within the system. 82 6 Managing staff roles • A school manager role provides administrative rights for all of the staff members, students, and groups at specific schools in the district. • An instructor role management rights over specific students and groups at an individual school. Use the following pages in the program to manage custom staff roles: • District managers – Use the Staff Roles page to create, edit, and delete custom roles. • District managers and school managers – Use the Staff page to assign custom staff roles to staff members. More about staff roles • For details on managing custom staff roles, see the following topics: • "Creating custom staff roles" on page 88 • "Editing custom staff roles" on page 90 • "Deleting custom staff roles" on page 92 • For details on creating and managing staff members, see Chapter 9 “Managing staff” on page 121. • This document includes references to the roles of district manager, school manager, and instructor. Unless otherwise noted, these references also apply to the custom roles based on that standard role. See your district manager if you have any questions about a specific staff role. 83 6 Managing staff roles Accessing the Staff Roles screen Use the System page to access the Staff Roles screen. System – Staff Roles When you log in to MySciLEARN, you can access the System page based on your staff role: • District managers can see the System tab and access the Staff Roles screen. • School managers and instructors cannot see the System tab, but they can view their roles when reviewing their account. See "Managing your staff account" on page 35 for details. To access the Staff Roles screen 1. Log in to MySciLEARN as a district manager. For details see "Logging in as a staff member" on page 29. 2. Click the Manage tab to access the Manage section. 3. Click the System tab to access the System page. 4. Click the Staff Roles tab to open the Staff Roles screen. 84 6 Managing staff roles Viewing staff roles Use the Staff Roles screen to view the staff roles. In MySciLEARN, access this screen as follows : • From the System page, using the Staff Roles tab • From your staff profile on the Staff page, using the View Role Details link • From the My Account screen, using the View Role Details link Note: Only district managers can access the Staff Roles screen. School managers and instructors can view the staff role details from their account; see "Managing your staff account" on page 35 for steps. The Staff Roles page lists the permissions for a staff role below that role. To view the permissions for the custom roles, click the arrow next to the role to expand it. If any of the permissions for a role are changed, the text will show those roles as enabled or disabled accordingly. See "About staff members" on page 122 to learn about the default permissions for the standard staff roles. Custom roles have access to the same set of permissions as the standard roles on which they were based; for example, if a custom role is based on a district manager, that custom role will have access to the same set of permissions as a district manager. 85 6 Managing staff roles Editing standard staff roles When needed, you can edit permissions for the standard school manager and instructor roles; for example, if you want to prevent instructors from adding, editing, and deleting students. You cannot edit the permissions for a district manager. When a standard role is edited, the changes immediately apply to all staff members with that role in the district. All new custom roles based on the edited school manager role will use these new permissions; however, the changes are not applied to any existing custom roles. To edit the permissions for an existing custom role, see "Editing custom staff roles" on page 90. Note: Editing the permissions for a staff role can remove access to a feature or page within MySciLEARN. For example, if you edit permissions for the school manager role and turn off Manage instructors for their schools, school managers will no longer have access to the Staff page. To edit the permissions for a standard staff role 1. Log in to MySciLEARN as a district manager and click the Manage tab to access the Manage section. 2. Click the System tab to access the System page. 3. Click the Staff Roles tab to open the Staff Roles screen. 4. Click the Edit button for the role you’d like to edit. 5. Edit the permissions for that role as needed. • To allow staff members with that role to perform a task, click the On button. • To prevent staff members with that role from performing a task, click the Off button. • Enter a description for the new set of permissions in the Description field, if needed. • A description can help identify the changes to the role. For example, if you turn off access to manage groups, you might add “Cannot Manage Groups” in the Description field. 86 6 Managing staff roles System – Edit Staff Role Permissions 6. Click Save. The edits are saved and will be available to all new staff members who are assigned that standard role. For existing staff members, the changes will take effect the next time the staff member logs in to MySciLEARN. 87 6 Managing staff roles Creating custom staff roles When you create a custom role, the system bases that new role on one of the three standard staff roles: district manager, school manager, and instructor. Select the role type that most closely meets the needs of your new custom role. For example, if you want the new role to have most of the districtwide permissions, select district manager as the role type and then turn off the permissions you want to remove from that role. When naming a custom role, use a unique name to identify that role within your district. A custom role name must be unique across the district or it will not be accepted. For example: • Reading Specialist • Special Education Coordinator • School Principal Follow these steps to create a custom staff role. When created, the custom role will be immediately assignable to all staff members in the district. To create a custom staff role 1. Log in to MySciLEARN as a district manager and click the Manage tab to access the Manage section. 2. Click the System tab to access the System page. 3. Click the Staff Roles tab to open the Staff Roles screen. 4. Click the New Role button at the top of the screen. If you cannot see the New Role button, you do not have permission to access this feature. Contact your district manager for more information. 5. Enter the following information for the new custom staff role: • Under Role Name, enter a unique name for the role. • Under Role Type, select the standard staff role on which you want to base the custom role. Choose from instructor, school manager, or district manager. By default, the new role will have the same permissions as the selected standard role. • Enable or disable permissions for the new role as needed using the On and Off buttons. • Enter a description of the changes in the Description field. This will help identify the current role changes. For example, if you turn off access to manage groups, you could add “Cannot Manage Groups” in the description field. 88 6 Managing staff roles System – New Custom Staff Role 6. Click Save. The new custom role appears on the Staff page and can be assigned to staff members. See the following topics for steps: • "Adding staff" on page 132 • "Editing staff" on page 144 89 6 Managing staff roles Editing custom staff roles If needed, district managers can edit a custom role—to change the name of the role or to change the permissions for that role. When a custom role is edited, the changes apply to all staff members in the district with that role. For existing staff members, the edits will take effect the next time the staff member logs in to MySciLEARN. Note: Changing the permissions for a staff role can remove access to a feature within MySciLEARN. For example, if you turn off Manage their groups for a custom role, staff members with that role will no longer have access to the Staff page. To edit a custom staff role 1. Log in to MySciLEARN as a district manager and click the Manage tab to access the Manage section. 2. Click the System tab to access the System page. 3. Click the Staff Roles tab to open the Staff Roles screen. 4. Locate your custom role and use the arrow next to that custom role to expand it. 5. Click the Edit button to open the custom role for edit. • If you cannot see the Edit button, you do not have permission to access this feature. Contact your district manager for more information. 6. Make the changes to the custom role as needed and click Save. For existing staff members, the edits will take effect the next time he or she logs in to MySciLEARN. 90 6 Managing staff roles System – Edit Custom Staff Role 91 6 Managing staff roles Deleting custom staff roles You can delete a custom staff role when needed; for example, if the custom role is no longer being used at the district. Before you delete a custom role, verify that no staff member is currently using that role. Use the Staff page to determine whether a custom role is assigned to a staff member. For more information, see "Using the staff list" on page 127. Follow these steps to permanently delete a custom staff role from the system. When deleted, the role is immediately removed from the system. Be sure you want to permanently delete the custom role before you perform this task, as you cannot undo this action. To delete a custom staff role 1. Log in to MySciLEARN as a district manager and click the Manage tab to access the Manage section. 2. Click the System tab to access the System page. 3. Click the Staff Roles tab to open the Staff Roles screen. 4. Locate the custom role you’d like to delete and then use the arrow next to that custom role to expand it. 5. Click the Delete button below the title of the custom role. If you cannot see the Delete button, you do not have permission to access this feature. Contact your district manager for more information. System – Custom Staff Role The role is immediately deleted from the system, unless it is still assigned to a staff member; in this case, it is not deleted and an error message appears. Make sure that the role is not assigned to any staff members and try again. 92 7 Managing licenses 7 Managing licenses As a district manager, use this chapter to learn how to view the Scientific Learning licenses. What's in this chapter About licenses 94 Accessing the Licenses screen 95 Viewing all licenses 96 93 7 Managing licenses About licenses A Scientific Learning license file is a protected computer file that includes the legal agreement with Scientific Learning. When the license is purchased, that file allows you to use the Fast ForWord products and/or the Reading Assistant product on MySciLEARN for a specific length of time and under specific terms and conditions. Scientific Learning offers two MySciLEARN license options for K-12 schools in the United States and Canada, which include access to either the Fast ForWord products or the Reading Assistant product: • A site license permits the students who are regularly enrolled at one school to access the licensed product(s) during the specified license term. • A per student license permits one individual student to access the licensed product(s) during the specified license term. See below for more information about these license options. To purchase a new license or to inquire about the terms of an existing license, check with your district or school administration staff, or contact Scientific Learning Customer Support. About site licenses When a school purchases a site license for the Fast ForWord or Reading Assistant products, the licensed products may be used on an unlimited number of computers only at the school site during the license term. If you have any questions about using a site license at your school, please contact Scientific Learning Customer Support. About per student licenses When implementing per student licenses, a school will typically purchase multiple Fast ForWord or Reading Assistant per student licenses, which are then automatically used on an as-needed basis by the students enrolled at the school. When all of a school’s per student licenses are in use, the student actions that require available product licenses may be affected, including: • Transferring students to a school that is using per student licenses • Assigning a Fast ForWord product to students for the first time • Assigning a Reading Assistant product to students for the first time In this case, you can move students to new per student licenses, if your school has purchased them. See the following topics for steps. • To move student licenses see "Managing per student licenses for students" on page 196. • To move school licenses see "Managing per student licenses for a school" on page 119. If you still have questions about per student licenses, contact Scientific Learning Customer Support. 94 7 Managing licenses Accessing the Licenses screen Use the System page to access the License screen. System – License When you log in to MySciLEARN, you can access the System page based on your staff role: • District managers can see the System tab and can access the License screen. • School managers and instructors cannot see the System tab and cannot access the License screen. Tip: School managers can view the licenses for their schools on the Schools page, and instructors can view per student licenses for their students from a student's profile. For details see "Viewing licenses for a school" on page 117 and "Using student profiles" on page 176. To access the License screen 1. Log in to MySciLEARN as a district manager. For details see "Logging in as a staff member" on page 29. 2. Click the Manage tab to access the Manage section. 3. Click the System tab to access the System page. 4. Click the License tab to open the License screen. 95 7 Managing licenses Viewing all licenses The License screen allows district managers to view the current license for each school in the district, along with the following details: • The licensed products and services • The start date and expiration date for the products and services • Alert messages when a product or service is about to expire or has already expired Tip: School managers can view the licenses for their schools on the Schools page, and instructors can view per student licenses for their students from a student's profile. For details see "Viewing licenses for a school" on page 117 and "Using student profiles" on page 176. To view the school licenses at your district 1. Log in to MySciLEARN as a district manager and click the Manage tab to access the Manage section. 2. Click the System tab to access the System page. 3. Click the License tab to open the License screen. 4. Under Current Licenses and Agreements, click View Current Licenses to open the Licenses by School screen. The Licenses by School screen shows status messages for a school, when applicable: • Expiring soon – This orange status message indicates that one or more of the products or services at the school are about to expire. The message first appears when a product or service has 60 days to expire, and remains until the expiration date is reached. • Expired – This red status message indicates that one or more of the products or services at the school have expired. • Deactivated – This status message appears when all of the products and services at a school have been deactivated. You cannot access the license screen for this school until a new license is activated. 96 7 Managing licenses System – License by School 5. Click an arrow next to a school to expand it and view the license details for that school. Each school shows the following details for the licensed product bundles and service bundles: • A list of licensed products and services • The start date for each licensed product and service • The expiration date for each licensed product and service • Product license type, when applicable (site or per student) • Product per student licensing details, when applicable: • Quantity – The number of per student licenses purchased by the school • Used – The number of per student license currently in use at the school • Any product or service that is about to expire (license appears in orange) • Any product or service that has already expired (license appears in red) 97 7 Managing licenses System – License by School Details 6. Click the X in the upper right corner to close the License by School screen and return to the License screen. 98 8 Managing schools 8 Managing schools As a district manager or school manager, use this chapter to learn how to manage the school settings within MySciLEARN. What's in this chapter About schools 100 Accessing the Schools page 101 Using the schools list 102 Using a school profile 103 Editing school information 105 Setting Reading Progress Indicator school defaults 106 Setting Fast ForWord school defaults 109 Setting Reading Assistant school defaults 113 Viewing licenses for a school 117 Managing per student licenses for a school 119 99 8 Managing schools About schools MySciLEARN uses the Schools page to organize all of the schools in your district. When a school or district purchases a license, MySciLEARN automatically performs the following tasks for you, before you ever log in to the system. • Adds the licensed school to the Schools page, where you can manage all of the school's settings • Updates the school information, such as the school's name and contact information • Sets all of the school settings to their default state, such as the Fast ForWord and Reading Assistant product settings See the following topics for details on managing default school settings: • "Setting Reading Progress Indicator school defaults" on page 106 • "Setting Fast ForWord school defaults" on page 109 • "Setting Reading Assistant school defaults" on page 113 Best practice Before you enroll students at your school, take a few minutes to set the default school settings to those that you’d like your students to use. Then, when you enroll new students and assign a program, those students will automatically use your preferred default settings and you won’t have to set these options again. For example, the default protocol for the Fast ForWord products is 30 minutes a day, 5 days a week. However, your school may want to use the products for 50 minutes a day, 3 days a week. In this case, you can change the default school setting to use the 50-minute/3 day protocol. That way, when you assign a Fast ForWord product to your students, the system will automatically use the 50-minute/3 day protocol. 100 8 Managing schools Accessing the Schools page Use the Schools page to manage the information and settings for the schools in your district. Schools When you log in to MySciLEARN and access the Schools page, it opens and displays the licensed schools based on your staff role: • District managers can see all of the schools in the district. • School managers can only see schools associated with them by a district manager. • Instructors cannot see the Schools tab and cannot access the Schools page. To access the Schools page 1. Log in to MySciLEARN as a district manager or school manager. For details see "Logging in as a staff member" on page 29. 2. Click the Manage tab to access the Manage section. 3. Click the Schools tab to access the Schools page. 101 8 Managing schools Using the schools list When you log in to MySciLEARN, the software reviews your staff role, permissions, and school associations, then organizes the Schools page based on that information. • If you are associated with one school, the Schools page automatically displays that school’s profile, and does not show the school list. For more information see "Using a school profile" on page 103 • If you are associated with more than one school, the Schools page displays all of your schools in the school list. This is the default view for all district managers and some school managers: Schools list Use these navigational tools to locate a school in the schools list: • Use the Search feature at the top of the Schools page to search for the school by name. • Click a column at the top of the list to sort the list, by name or school (organization) ID. • Use the Navigation bar at the bottom of the page to scroll through the list pages. • To temporarily reorder the columns in the list, drag and drop the columns in any order. 102 8 Managing schools Using a school profile Every school in the district has a school profile. Schools – School Profile A school profile provides the following information about that school to district managers and school managers, along with the default settings for that school. Navigate the page as follows: • Review the school info such as school organization ID, address, phone number, and email address. See "Editing school information" on page 105 for details. • Set the default settings for the students at the school, detailed in the following topics: • "Setting Reading Progress Indicator school defaults" on page 106 • "Setting Fast ForWord school defaults" on page 109 • "Setting Reading Assistant school defaults" on page 113 • At the bottom of the page you can view a list of staff, groups, and students at the school. When there are more than a few in the list, you can click a link to go to that page. • View all of the school’s product and support licenses. See "Viewing licenses for a school" on page 117 for details. • Use the List of All Schools link at the top of the page to return to the Schools list. 103 8 Managing schools To view a school profile 1. In MySciLEARN Manage section, click the Schools tab to access the Schools page. If you cannot see the Schools tab, you do not have permission to access this page. Contact your district manager for more information. 2. If needed, click the school name in the Schools List to open the school profile. 104 8 Managing schools Editing school information You can edit the following school information items as needed; for example, if the email address changes, or if you'd like the school name to appear differently within the system. You cannot edit the school's Org ID, as it is created and maintained by Scientific Learning. • School name • Org ID (set by MySciLEARN) • Address • Email address • Phone number To edit school information 1. In MySciLEARN Manage section, click the Schools tab to access the Schools page. If you cannot see the Schools tab, you do not have permission to access this page. Contact your district manager for more information. 2. If needed, click the school name in the schools list to open the school profile. 3. Click the Edit button on the left side of the page. 4. Make any edits to the school information as needed and click Save. 105 8 Managing schools Setting Reading Progress Indicator school defaults By default, the system enables Reading Progress Indicator for all new schools and sets RPI to use the standard school year option (instead of year round school). MySciLEARN provides the ability to edit these RPI settings at the school level, as needed. For more information on Reading Progress Indicator, see Chapter 18 “Using Reading Progress Indicator” on page 347. This topic provides steps for setting the RPI defaults for a school. • Setting RPI access for a school • Setting the RPI school year for a school Best practice: Before you enroll students at your school, set the default Reading Progress Indicator school settings to those you’d like your students to use. Then, when you enroll new students, those students will automatically use the new default settings and you won’t have to set these options again. Setting RPI access for a school The Default RPI Settings for New Students option allows you to set the system to automatically turn RPI on or off for all new students upon enrollment. It does not impact currently enrolled students. By default, RPI access is enabled for all schools. Edit School Settings - RPI Follow the steps below to set turn RPI on or off for new students. • When changing the option, perform this task before enrolling any students at your school. That way, all students will automatically use the new default setting upon enrollment. • If you’ve already enrolled your students, you can still set the RPI availability for existing students. See "Setting RPI access for students" on page 350 for details. 106 8 Managing schools IMPORTANT! If you disable RPI access for a school, Fast ForWord Auto Assign and Reading Assistant Auto Initial Assignment will also be disabled for new students at the school. You will still be able to set these features at the student level (see "About Fast ForWord Auto Assign" on page 218 and "About Reading Assistant Auto Initial Assignment" on page 259 for details), but if most of your students will be using these features, it's best to leave RPI on at the school level. Before disabling RPI, consider how many students at the school will be using these features and plan accordingly. To set the default RPI access for a school 1. In MySciLEARN Manage section, click the Schools tab to access the Schools page. If you cannot see the Schools tab, you do not have permission to access this page. Contact your district manager for more information. 2. If needed, click the school name in the schools list to open the school profile. 3. Under School Settings, click the Change Settings button. 4. Under Default RPI Settings for New Students, select a new default option, then click Save. The change will be applied to all new students enrolled in the system for that school. Setting the RPI school year for a school The RPI School Year Setting option allows you to set the yearly schedule followed at your school. Reading Progress Indicator provides two options based on the yearly schedule followed at your school: • Standard School Year – This option does not administer follow-up assessments after breaks of more than three weeks. • Year-Round School – This option allows students to receive follow-up assessments after breaks of more than three weeks. Edit School Settings - RPI 107 8 Managing schools By default, the standard school year option is selected. This option is recommended for most schools. However, you can change this option for your entire school, as needed. For example, if the school’s schedule includes breaks of three weeks or longer. When you change this setting, it affects all existing students at the school, and all new students upon enrollment. Note: The standard school year option helps ensure the most accurate Reading Progress Indicator results and is strongly recommended. To set the RPI school year default for a school 1. In MySciLEARN Manage section, click the Schools tab to access the Schools page. If you cannot see the Schools tab, you do not have permission to access this page. Contact your district manager for more information. 2. If needed, click the school name in the schools list to open the school profile. 3. Under School Settings, click the Change Settings button. 4. Under RPI School Schedule, select a new default school year option and click Save. The change is applied to all students at the school. 108 8 Managing schools Setting Fast ForWord school defaults Before you enroll students at your school, you can reset the default Fast ForWord product assignment settings to those that you’d like your students to use. Then, when you enroll new students and assign a Fast ForWord product, those students will automatically use the new default settings and you won’t have to set these options for each individual student. This topic provides steps on setting Fast ForWord assignment defaults for a school. • Setting Fast ForWord Auto Assign availability for a school • Setting the Fast ForWord default protocols for a school • Setting the Fast ForWord default introduction language for a school Best practice: Before you enroll students at your school, set the default Fast ForWord school settings to those you’d like your students to use. Then, when you enroll new students and assign a Fast ForWord product, those students will automatically use the new default settings and you won’t have to set these options again. Setting Fast ForWord Auto Assign for a school The Auto Assign option allows you to set the system to automatically turn Fast ForWord Auto Assign on or off for new students at a school upon enrollment. It does not impact currently enrolled students. By default, the system enables Fast ForWord Auto Assign for all schools with Fast ForWord product licenses. For more information about Fast ForWord Auto Assign see "About Fast ForWord Auto Assign" on page 218. Edit School Settings – Fast ForWord Auto Assign To set the Auto Assign default for a school 1. In the MySciLEARN Manage section, click the Schools tab to access the Schools page. If you cannot see the Schools tab, you do not have permission to access this page. Contact your district manager for more information. 109 8 Managing schools 2. If needed, click the school name in the Schools List to open the school profile. 3. Under School Settings, click the Change Settings button. 4. Under Assignment Method in the Fast ForWord section, select a new default option and click Save, and the change will be applied to all new students enrolled at the school: • Auto Assign – Allows the software to assess the students and assign the appropriate product • Manual Assign – Allows staff to manually assign a product to the students IMPORTANT! If you are unable to access the Auto Assign option, the RPI Availability option for your school may have been disabled. You must have RPI Availability enabled at the school level to use Fast ForWord Auto Assign at the school level. See the following topics for help: • For steps on how to enable RPI Availability for your school, see "Setting Reading Progress Indicator school defaults" on page 106. You'll want to do this if many or most of your students will be using Fast ForWord Auto Assign. • For steps on how to use Auto Assign at the student level without having to enable the RPI Availability option for your school, see "Setting Fast ForWord Auto Assign for students" on page 221. This method is best when only a few students at the school will be using Fast ForWord Auto Assign. Setting Fast ForWord default protocols for a school A Fast ForWord product’s protocol determines which exercises are worked on in that product, how often those exercises are worked on, and the length of time spent working in each exercise on a given day. These protocols have been proven to help maximize the benefits of the products. To learn more about protocols see "About Fast ForWord protocols" on page 215. By default, all new Fast ForWord assignments at the school use the 5 day/30-minute protocol. This option lets you to change the default protocol for one or more Fast ForWord products. That way, all new assignments created at the school will automatically use the new protocol. 110 8 Managing schools Edit School Settings – Fast ForWord Products To set the default protocol for a Fast ForWord product 1. In MySciLEARN Manage section, click the Schools tab to access the Schools page. If you cannot see the Schools tab, you do not have permission to access this page. Contact your district manager for more information. 2. If needed, click the school name in the schools list to open the school profile. 3. Under School Settings, click the Change Settings button. 4. Under Default Weekly Protocol and Introduction Language, select a new default protocol for the products and click Save, and the next time a student is assigned to that product, the new default protocol will be used. First choose the number of day per week (3 days or 5 days), then choose the number of minutes per day (30, 40, 50, or 90 minutes). Note that the 3-day protocols are only available for 30 and 50 minutes per day. For more about protocols see "About Fast ForWord protocols" on page 215. Setting Fast ForWord default introduction language for a school Each of the exercises in a Fast ForWord product begins with an introduction that explains how to work on that exercise. By default, these instructions are presented in English. However, you can 111 8 Managing schools choose to present the introductions in another language, such as Spanish. This option lets you to change the default introduction language for one or more Fast ForWord products. That way, all new assignments at the school will automatically use the new introduction language. To see a list of available languages, check the Protocol Settings menu on the Edit Schools screen. If a language does not appear in that menu, it is not supported at this time. Edit School Settings – Fast ForWord Products To set the default introduction language for a Fast ForWord product 1. In MySciLEARN Manage section, click the Schools tab to access the Schools page. If you cannot see the Schools tab, you do not have permission to access this page. Contact your district manager for more information. 2. If needed, click the school name in the schools list to open the school profile. 3. Under School Settings, click the Change Settings button. 4. Under Default Weekly Protocol and Introduction Language, select a new introduction language for the products and click Save, and the next time a student is assigned to that product, the new default introduction language will be used. 112 8 Managing schools Setting Reading Assistant school defaults Before you enroll students at your school, you can reset the default Reading Assistant assignment settings to those that you’d like your students to use. Then, when you enroll new students and assign the Reading Assistant product, those students will automatically use the new default settings and you won’t have to set these options for each individual student. This topic provides steps on setting Reading Assistant assignment defaults for a school. • Setting Reading Assistant Auto Initial Assignment availability for a school • Setting the Reading Assistant default language for a school • Setting the Reading Assistant default audio support for a school Best practice: Before you enroll students at your school, set the default Reading Assistant school settings to those you’d like your students to use. Then, when you enroll new students, those students will automatically use the new default setting and you won’t have to set these options again. Setting Reading Assistant Auto Initial Assignment for a school The Auto Initial Assignment option allows you to set the system to automatically turn Reading Assistant Auto Initial Assignment on or off for new students at a school upon enrollment. It does not impact currently enrolled students. By default, the system disables this option for all schools. To change the default setting, perform this task before enrolling any students at your school. That way, all students will automatically use the new default setting upon enrollment. See "About Reading Assistant Auto Initial Assignment" on page 259 for complete details on using this feature. Edit School Settings – Reading Assistant Auto Initial Assignment 113 8 Managing schools More about Auto Initial Assignment Reading Assistant Auto Initial Assignment only performs the initial assignment and placement for a student. When a student finishes that content, you'll need to manually assign more content to the student. See "Advancing to the next Reading Assistant library" on page 273 for more information. If you are unable to access the Auto Initial Assignment option, the RPI Availability option for your school may have been disabled. You must have RPI Availability enabled at the school level to use Auto Initial Assignment at the school level. See the following topics for help: • For steps on how to enable RPI Availability for your school, see "Setting Reading Progress Indicator school defaults" on page 106. You'll want to do this if many or most of your students will be using Reading Assistant Auto Initial Assignment. • For steps on how to use Auto Initial Assignment at the student level, without having to enable RPI Availability option for your school, see "Setting Reading Assistant Auto Initial Assignment for students" on page 262. This method is best when only a few students at the school will be using Reading Assistant Auto Initial Assignment. To set the Reading Assistant Auto Initial Assignment default for a school 1. In the MySciLEARN Manage section, click the Schools tab to access the Schools page. If you cannot see the Schools tab, you do not have permission to access this page. Contact your district manager for more information. 2. If needed, click the school name in the Schools List to open the school profile. 3. Under School Settings, click the Change Settings button. 4. Under Assignment Method in the Reading Assistant section, select a new default option and click Save, and the change will be applied to all new students enrolled in the system for that school: • Auto Initial Assignment – Allows the software to assess the students, assign Reading Assistant, and place the students in the appropriate library and starting point. • Manual Assign – Allows staff to manually assign Reading Assistant to the students Setting the Reading Assistant default language for a school The Reading Assistant software provides audio instructions throughout the product. By default, the software presents these instructions in English. As an alternative, you can choose to present the 114 8 Managing schools instruction audio in Spanish. In addition, the Reading Assistant software provides a glossary for some of the words within a selection. By default, the software provides the glossary information in English. As an alternative, you can choose to present glossary information in both English and Spanish. Edit School Settings – Reading Assistant Default Language To set the Reading Assistant default language option for instructions 1. In MySciLEARN Manage section, click the Schools tab to access the Schools page. If you cannot see the Schools tab, you do not have permission to access this page. Contact your district manager for more information. 2. If needed, click the school name in the schools list to open the school profile. 3. Under School Settings, click the Change Settings button. 4. Under Reading Assistant, select either English Instructions or Spanish Instructions. 5. Click Save, and the next time a student is assigned to Reading Assistant, the new setting will be used. To set the Reading Assistant default language option for the glossary 1. In MySciLEARN Manage section, click the Schools tab to access the Schools page. If you cannot see the Schools tab, you do not have permission to access this page. Contact your district manager for more information. 2. If needed, click the school name in the Schools List to open the school profile. 3. In the School Settings section, click the Change Settings button to open the settings for edit. 4. Under Reading Assistant, select English Glossary or English and Spanish Glossary. 115 8 Managing schools 5. Click Save, and the next time a student is assigned to Reading Assistant, the new setting will be used. Setting the Reading Assistant default audio support for a school The Reading Assistant software provides audio support for the Think About Its, as well as the Take the Quiz comprehension questions. When a question opens, the software automatically reads the quiz question, all possible answers, and the Think About It hints aloud. Audio icons allow the student to replay the audio. The audio support option is enabled by default, but you can disable it for students who do not need the additional assistance. Edit School Settings – Reading Assistant Audio Support To set the Reading Assistant default audio support for a school 1. In MySciLEARN Manage section, click the Schools tab to access the Schools page. If you cannot see the Schools tab, you do not have permission to access this page. Contact your district manager for more information. 2. If needed, click the school name in the schools list to open the school profile. 3. Under School Settings, click the Change Settings button. 4. Under Default Audio Support, select or deselect the Enable Audio Support option and click Save, and the next time a student is assigned to Reading Assistant, the new setting will be used. 116 8 Managing schools Viewing licenses for a school The License section on the School Profile screen allows you to see the licenses purchased by the school. For more information on licensing, see "About licenses" on page 94, or contact Scientific Learning Customer Support. School Profile – Licenses About license details for a school The License section provides the following details for the products and services licensed by the school: • The licensed product and service • The start date of each product and service • The expiration date for each licensed product and service • Product license type: site or per student • Any product or service that is about to expire (license appears in orange) • Any product or service that has already expired (license appears in red) • Per student license details: • Quantity – The total number of per student licenses purchased by the school • Used – The number of per student licenses currently in use at the school 117 8 Managing schools Moving per student licenses When the students at the school are using per student licenses, you may see a Move Licenses button next to that product license. The Move Licenses button allows you to manage how your students use new per student licenses. For example, if the per student licenses expire, or if your school purchases new per student licenses for next year, you can decide which students you want to move to the new licenses and then move those students when ready. See the following topics for more information: • To move per student licenses for a school, see "Managing per student licenses for a school" on page 119. • To move per student licenses for students at the individual or group level, see "Managing per student licenses for students" on page 196. • For general information on per student licenses, see "About licenses" on page 94, or contact Scientific Learning Customer Support. To view license details for a school 1. In MySciLEARN Manage section, click the Schools tab to access the Schools page. If you cannot see the Schools tab, you do not have permission to access this page. Contact your district manager for more information. 2. If needed, click the school name in the Schools List to open the school profile. The School Profile screen opens, with the Licenses section at the bottom of the screen. 118 8 Managing schools Managing per student licenses for a school MySciLEARN allows you to manage per student licenses for the students at your schools. For example, if the per student licenses expire, or if your school purchases new per student licenses for next year, you can decide which students need the new licenses and then move those licenses when ready. For more information on licensing, see "About licenses" on page 94. This topic covers moving licenses at the school level. Only district managers and school managers can perform this task. Tip: All staff members can move licenses at the student level, for an individual student and for groups of students. See "Managing per student licenses for students" on page 196 for steps. To move per student licenses for a school 1. In MySciLEARN Manage section, click the Schools tab to access the Schools page. If you cannot see the Schools tab, you do not have permission to access this page. Contact your district manager for more information. 2. Scroll down to the Licenses section. The following status details help indicate if per student licenses need to be moved: • The start date and expiration date of each license • Licenses that are about to expire (license appears in orange) • Licenses that have already expired (license appears in red) You'll also see how many per student licenses are available within each product license: • Quantity – The number of per student licenses purchased by the school • Used – The number of per student licenses currently in use at the school To move licenses, you'll need one available per student license for each student. School Profile – Licenses 3. Click the Move Licenses button next to the product license you want to move. The Move Per Student Licenses screen opens and displays all of the valid licenses for that product. If the current license is not expired, it will also appear in the dialog highlighted in yellow. 119 8 Managing schools Move Per Student Licenses 4. Click the radio button next to the new product license and click Apply. The students can immediately start training. Please note that if the new license has a future start date, the students will not be able to train until that start date is reached. Note: If there are not enough new per student licenses for all of the students, none of the students will be moved. To continue, try moving fewer students at one time. See "Managing per student licenses for students" on page 196 for steps. 120 9 Managing staff 9 Managing staff As a district manager or school manager, use this chapter to learn how to create and manage staff members within MySciLEARN. What's in this chapter About staff members 122 Accessing the Staff page 126 Using the staff list 127 Using staff profiles 129 Adding staff 132 Adding a new staff member 133 Importing staff from a file 136 Editing staff 144 Deleting staff 147 121 9 Managing staff About staff members In MySciLEARN, a staff member is a user whose rights (or permissions) within the software are defined by an assigned role. Each role has a specific function within the software. When you create a staff member, the software prompts you to assign a role to that staff member. By default, MySciLEARN provides three standard staff roles for its staff members: • A district manager has complete administrative rights within the system. • A school manager has administrative rights for all of the staff members, students, and groups at specific schools in the district. • An instructor has management rights over specific students and groups at an individual school. More about staff members • For complete details on staff roles and permissions, as well as steps for creating and managing custom staff roles, see Chapter 6 “Managing staff roles” on page 81. • To learn how to manage your own staff profile see "Managing your staff account" on page 35. • For steps on how to manage staff profiles, see the following topics: • "Adding staff" on page 132 • "Editing staff" on page 144 • "Deleting staff" on page 147 122 9 Managing staff About district managers MySciLEARN requires at least one standard district manager in the system at all times. The very first staff member is a district manager, created by Scientific Learning. The district manager role provides complete administrative rights within MySciLEARN. Staff with this role: • Can access all schools, groups, and students in the district • Can perform all tasks for every school, group, student, and staff member in the district • Can create staff members for any school and can assign any role to those staff members • Can create custom staff roles • Can create custom Reading Assistant libraries • Can access all MySciLEARN Manage pages: Students, Staff, Schools, System • Have the following basic responsibilities: • • Managing the system settings • Creating other district managers • Creating school managers and assigning schools to them • Creating and managing custom staff roles • Importing students or staff from a file Have the following permissions (cannot be edited): • Manage all student profiles • Manage all groups • Manage assignments for all students • Manage all staff • Manage staff roles • Import students from a file • Manage all schools • Manage licenses for all students 123 9 Managing staff About school managers The school manager role provides administrative rights similar to the district manager, but only for the schools assigned to that school manager. Staff with this role: • Can only access schools that have been associated with them by a district manager • Can only access the groups and students in their schools, but can perform all management tasks for the groups and students in their schools • Can create and manage staff members for their schools, but can only assign school manager-based and instructor-based roles to those staff members • Can view licenses for their schools • Can create custom Reading Assistant libraries for their schools • Can access the following MySciLEARN Manage pages: Students, Staff, Schools • Have the following basic responsibilities: • • Managing the settings for their schools such as Reading Progress Indicator (RPI) settings and default program settings • Managing the information for their schools such as the school address and other contact details • Creating instructors for their schools and assigning groups and students to those instructors • Importing students from a file Have the following permissions by default. For details on editing staff role permissions, see "Editing standard staff roles" on page 86. • Manage student profiles for their schools • Manage groups for their schools • Manage student assignments for their schools • Manage school managers and instructors for their schools • Import students from a file for their schools • Manage their schools • Manage student licenses for their schools • Manage custom libraries for their schools 124 9 Managing staff About instructors The instructor role does not include any MySciLEARN administrative rights. Staff with this role: • Can only access one school • Can only access the students and groups within their school that have been associated with them by a school manager or district manager • Can only perform management tasks for their groups and students • Can access the following MySciLEARN Manage pages: Students • Have the following basic responsibilities: • • Creating new students and groups at their school • Managing their students and groups, and managing product assignments for those students • Managing the settings for their students such as Reading Progress Indicator (RPI) settings, Auto Assign access, and other program settings • Leading and monitoring student training sessions • Reviewing student results Have the following permissions by default. For details on editing these permissions, see "Editing standard staff roles" on page 86. • Manage student profiles for their groups • Manage their groups • Manage assignments for their students • Manage licenses for their students • Cannot manage custom libraries for their school (this is the default permission setting for instructors, which can be changed by school managers and district managers as needed) 125 9 Managing staff Accessing the Staff page Use the Staff page to create and manage staff members within MySciLEARN. Staff When you log in to MySciLEARN and access the Staff page, it opens and displays staff members based on your staff role: • District managers can see all staff members in the district, including all district managers. • School managers can only see their schools, and can only see the school managers and instructors in those schools. • Instructors cannot see the Staff tab and cannot access the Staff page. To access the Staff page 1. Log in to MySciLEARN as a district manager or school manager. 2. For details see "Logging in as a staff member" on page 29. 3. Click the Manage tab to access the Manage section. 4. Click the Staff tab to access the Staff page. 126 9 Managing staff Using the staff list When you log in to MySciLEARN, the software reviews your staff role, permissions, and school associations, then organizes the Staff page based on that information. • District managers see all of the staff members in the district • School managers see all of the school managers and instructors in their schools Staff Using staff list filters Use the filters on the Staff page as follows. You can use the filters together; for example, to view the currently assigned roles within a specific school. • Browse by School – Use this list to filter the list by school. This filter displays the number of staff members associated with each school; however, because district managers are not associated with an individual school, they will only be counted when you select All Schools in this list. If you have access to more than five schools, the list of schools will collapse when you select a school in the Browse by School filter. To open the list and see all of your schools, click View List. • Browse by Role – Use this list to filter the list by role. Custom roles appear in the Browse by Role list below the standard role on which they are based, in alphabetical order. For example, a custom district manager will appear below the District Manager role. 127 9 Managing staff When viewing the Staff page, use the following navigation tools to find a specific staff member: • Use the Search feature at the top of the Staff page to search for a staff member by name. • Click the top of the Last Name, First Name, or Role columns to sort the list alphanumerically by those values. Click again to reverse the sort order. • Use the Pagination bar at the bottom of the page to scroll through the pages. • To temporarily reorder the columns in the list, drag and drop the columns in any order. Once you’ve located the staff member, click the staff member’s name to view the staff member’s profile. 128 9 Managing staff Using staff profiles Each staff member has a staff profile. To view the staff profile, click the staff member in the staff list. The staff profile looks slightly different based on that staff member’s role. The staff profiles for instructors, school managers, and district managers are described in this topic. • District manager staff profile • School manager staff profile • Instructor staff profile District manager staff profile This topic describes the staff profile for a district manager. This description also applies to all custom roles based on a district manager. District manager staff profile Only district managers can view and manage another district manager’s staff profile. A district manager’s staff profile provides the following information for that staff member: • The staff member details, such as name, login email, and employee ID (if entered) • The role assigned to that staff member (district manager) and a link to view that role’s details You can also perform the following tasks from a district manager’s staff profile: • Add, edit, or delete the district manager’s staff profile (you can’t delete your own district manager staff profile) • Print the district manager’s staff profile using the printer icon in the upper right corner 129 9 Managing staff School manager staff profile This topic describes the staff profile for a school manager. This description also applies to all custom roles based on a school manager. School manager staff profile Staff members can view and manage school manager staff profiles as follows: • District managers can view and manage all school managers in the district. • School managers can only view and manage the school managers in their schools. A school manager’s staff profile provides the following information for that staff member: • The staff member details, such as name, login email, and employee ID (if entered) • The role assigned to that staff member (school manager), and a link to view that role’s details • The schools associated with that staff member, with a list of all groups in the school • Click the Show/Hide Groups button to open and close the list of groups for the associated schools, as needed • Click a school name to view the school’s profile. You can also perform the following tasks from a school manager’s staff profile: • Add, edit, or delete the school manager’s staff profile • Add or remove a school manager’s school access (at least one school must be associated with a school manager) • Print the school manager’s staff profile using the printer icon in the upper right corner 130 9 Managing staff Instructor staff profile This topic describes the staff profile for an instructor. This description also applies to all custom roles based on an instructor. Instructor staff profile District managers and school managers can view and manage an instructor’s staff profile. An instructor’s staff profile provides the following information for that staff member: • The staff member details, such as name, login email, and employee ID (if entered) • The role assigned to that staff member (instructor), and a link to view that role’s details • The school associated with that staff member • A list of groups associated with that staff member (click the Show/Hide Groups button to open and close the list of groups, as needed) You can also perform the following tasks from an instructor’s staff profile: • Edit or delete the instructor’s staff profile • Add or delete group ownership for the instructor • Print the instructor’s staff profile using the printer icon in the upper right corner 131 9 Managing staff Adding staff Before a staff member can access MySciLEARN, that staff member must be created within the MySciLEARN software program. You can add new staff members as follows: • Add individual staff members • Add multiple staff members using import from a file To access the system and create staff members, you must be added to the system as a staff member. Scientific Learning creates the first staff member—a district manager—and then automatically emails all login details to that person. After this district manager is created, he or she can start adding other staff members to the system. As staff members are added, the system automatically sends each staff member a confirmation email with instructions on how to create a password and how to log in to MySciLEARN. When you receive your staff member confirmation email and create your password, you can start using MySciLEARN and if allowed, add new staff members. See the following topics for steps: • "Adding a new staff member" on page 133 • "Importing staff from a file" on page 136 132 9 Managing staff Adding a new staff member This topic details the steps for adding a new staff member to MySciLEARN. For steps on adding multiple staff members see "Importing staff from a file" on page 136. Each staff member needs a login email (username) and a password to log in to MySciLEARN. A staff member’s login email is created when that staff member is added. Then, the system sends a confirmation email to the staff member, which includes a link that allows the staff member to create a password. Passwords must be at least six characters, contain one uppercase letter, one lowercase letter, and one number. Tip: If a staff member loses the password, he or she can create a new one from the Staff Login page. See "Resetting your staff password" on page 38 for steps. Required staff information The following information is required when adding a staff member. All other fields are optional. • First Name – Minimum 2 characters • Last Name – Minimum 2 characters • Login Email – An actual email address for the staff member. This will become the username when logging in to MySciLEARN, and will be used to send the staff member login details and a link for creating a password. Login emails must be unique across the system. • Role – The staff member’s role: instructor, school manager, district manager, or custom role • School – The name of the school that you would like to associate with the school manager or instructor (district managers don’t need to select a school). To associated multiple schools for a school manager, press and hold the Control or Command key while selecting the schools. You can assign a role to a new staff members based on your staff role, as follows: • District managers can assign any role. • School managers can only assign the school manager and instructor roles, and can only assign custom roles based on a school manager or an instructor. Additional staff information You can also enter the following non-required information for a staff member. No special characters are allowed; only alphanumeric characters are accepted. When viewing your own user account, these fields only appear when they have information to display. 133 9 Managing staff • Middle Initial (MI) • Employee ID • Additional Information 1 and 2 To add a new staff member to MySciLEARN 1. In MySciLEARN Manage section, click the Staff tab to access the Staff page. If you cannot see the Staff tab, you do not have permission to access this page. Contact your district manager for more information. 2. Click the +New Staff button in the upper left corner. The New Staff screen opens on the right side of the staff list. 3. Enter staff information into the profile. • You must enter information in all of the required fields marked with an asterisk. • In the Login Email field, enter the new staff member’s actual email address. 4. Select a role for the staff member from the Role menu. Roles are available in the menu based on your staff role. • If you are a district manager, you can assign the roles of instructor, school manager, district manager, and any custom role. • If you are a school manager, you can only assign the role of school manager or instructor, and any custom role based on a school manager or instructor. Custom roles appear in alphabetical order below the role on which they were based. 5. Select schools and groups for the following staff members, according to the role: • For a school manager, select one or more schools. • For an instructor, select one school, and select one or multiple groups. To select multiple items, press and hold the Shift key on Windows or the Command (Apple) key on Macintosh while selecting the items in the list. 6. Click Save to create the staff profile and end the process, or click Save and Add to create the staff profile and add another new staff member. 134 9 Managing staff Note: When the staff member is added to MySciLEARN, Scientific Learning automatically sends a confirmation email to the new staff member. Before the staff member can access MySciLEARN, he or she must review the confirmation email— which includes important login and account information—and then use the link in the email to create a staff password. Follow the instructions in the email to create a password. 135 9 Managing staff Importing staff from a file These instructions detail the steps for adding multiple staff members at one time by importing them from a file. For information on adding an individual staff member, see "Adding a new staff member" on page 133. To access the import feature, log in to MySciLEARN and click the Staff tab to open the Staff page. The Import feature is available based on your staff role: • District managers can always access the Import Staff feature. • School managers cannot see the Import button and cannot access the Import Staff feature. Importing staff from a file includes two steps. See the following topics for details: • "Step 1 – Creating a staff CSV file" on page 137 • "Step 2 – Entering staff info in the CSV file" on page 140 • "Step 3 – Importing staff into the system" on page 142 136 9 Managing staff Step 1 – Creating a staff CSV file The first step in the import process is to create a comma separated value (CSV) file and add the staff information you plan to import into the system. When you've completed the tasks in this topic, advance to the next topic, "Step 2 – Entering staff info in the CSV file" on page 140. Import Staff About staff CSV files A CSV file (sometimes called a comma-delimited file) uses commas to separate staff information into columns and fields, and uses lines (rows) to separate each individual staff member. MySciLEARN uses a CSV file to identify and then import the staff information into the system and then create your staff members. For example, the following MySciLEARN staff information—First Name,Last Name, Employee ID, Assigned Role—would look like this in a CSV file (the first line is always the header): FIRST_NAME,LAST_NAME,ASSIGNED_ROLE,EMAIL,SCHOOLS Jane,Doe,school manager,[email protected],123456 John,Doe,instructor,[email protected],234546&234577 See the following tasks for steps on creating a CSV file to import staff: • "Generating a staff CSV file in MySciLEARN" on page 138 • "Creating your own staff CSV file" on page 139 137 9 Managing staff Generating a staff CSV file in MySciLEARN To help simplify the import process, MySciLEARN allows you to automatically generate a CSV template file that follows our requirements. See the following task for steps. If you already have your own CSV file, you can use that file instead—see Creating your own staff CSV file to learn more. 1. In MySciLEARN Manage section, click the Staff tab to access the Staff page. If you cannot see the Import button, you do not have permission to access this feature. Contact your district manager for more information. 2. Click the Import button at the top of the page. 3. On the Import Staff screen, expand the Basic Fields category to review the fields you can include in your template. Each field corresponds to specific student information. Fields with an asterisk are required and must be included in your template (they cannot be deselected). For a definition of each field see the tables in "Step 2 – Entering staff info in the CSV file" on page 140. Import Staff – Basic fields 4. Add any additional fields to your template by checking the box next to those fields. Tip: To generate a CSV template with only the required fields, click the Save Template button without making any changes to the categories. 5. Click the Save Template button and follow the prompts to save the file to your local computer. 138 9 Managing staff If your browser asks you to choose between opening and saving the file, choose to save the file. If you choose to open the file, it may not be generated properly and will require that you generate the CSV file again. Continue with "Step 2 – Entering staff info in the CSV file" on page 140. Creating your own staff CSV file As an alternative to "Generating a staff CSV file in MySciLEARN" on page 138, you can use your own CSV file to import staff members. For example, if you’ve already created a CSV file for importing staff into MySciLEARN last year, you can use that file again as needed. Make sure that your CSV file uses the correct header format. Follow these steps: 1. Generate a new CSV template that includes the fields you want to include in your CSV file. See "Step 2 – Entering staff info in the CSV file" on page 140 for details about each of the fields. 2. Either copy the template header into your CSV file or copy your staff information into the template body below the header line. Use a spreadsheet program such as Microsoft® Excel (save the file in CSV format) or a text editor software program such as Microsoft® Notepad or Apple’s TextEdit. Continue with "Step 2 – Entering staff info in the CSV file" on page 140. 139 9 Managing staff Step 2 – Entering staff info in the CSV file After you've created your CSV template file, the next step in the import process is to edit the CSV file and add the staff information you plan to import into the system. When you've completed the tasks in this topic, advance to "Step 3 – Importing staff into the system" on page 142. If you haven't yet created a CSV file, return to "Step 1 – Creating a staff CSV file" on page 137. All staff information added to the CSV file must conform to the specific format requirements listed in this topic. To enter the staff information into the CSV file, edit the file using a spreadsheet program such as Microsoft® Excel (you must save the file in CSV format) or a text editor software program such as Microsoft® Notepad or Apple’s TextEdit, then enter the information as follows: • Use a separate line (row) for each staff member. • Enter data in all of the required fields for each staff member or the file will not be accepted. Required fields are marked with a red asterisk in the following table. • Make sure that the information in each field conforms to the format requirements and does not include invalid or extra information (such as a school that does not exist). • If you created your own CSV file, make sure the header row conforms to the required format (do not include asterisks). Only include the headers for fields in which you plan to add staff data. See Creating your own staff CSV file for details. • Unless otherwise indicated in the table, only use the following characters in the file: alphanumeric, spacebar, minus sign (as a hyphen), underscore. Follow these formatting requirements for each field in the CSV file. Required fields are marked with an asterisk * Header name Description and requirements *FIRST_NAME Staff member first name Minimum 2 characters MIDDLE_INITIAL Staff member middle initial One character only *LAST_NAME Staff member last name Minimum 2 characters EMPLOYEE_ID A employee ID you'd like to associate with the staff member Must be unique across the school district *ASSIGNED_ROLE The new staff member's role in MySciLEARN. For custom roles, the custom role must already exist in the system Required format for standard role (not case sensitive): instructor, school manager, district manager Required format for custom role (not case sensitive): custom role name. For example: reading specialist 140 9 Managing staff Header name Description and requirements *EMAIL An existing email address for the staff member, to be the username (login email) when logging in to the system Will also be used to send the staff member login details and a link for creating a password Required format: name@domain *SCHOOLS The organization ID for a school or district to associate with the staff member Located on the Schools page in the Manage section. For district managers, use the district organization ID. To associate a school manager with multiple schools, use an ampersand (&) with no spaces to separate the IDs For example: 23456&34567 GROUPS Group ownership for instructors. Group must already exist in the system To give ownership of multiple groups, use an ampersand (&) with no spaces to separate group names For example: Fall 2010&After school ADDITIONAL_ STAFF_INFO_1 Any additional school or district defined staff information ADDITIONAL_ STAFF_INFO_2 Any additional school or district defined staff information 141 9 Managing staff Step 3 – Importing staff into the system To add the staff to MySciLEARN, this task uses the CSV import file you created in "Step 1 – Creating a staff CSV file" on page 137 and "Step 2 – Entering staff info in the CSV file" on page 140 . If you have not yet set up your CSV import file, complete those tasks first. To import the information and add staff to the system 1. In MySciLEARN Manage section, click the Staff tab to access the Staff page. If you cannot see the Staff tab, you do not have permission to access this page. Contact your district manager for more information. 2. Click the Import button at the top of the page to access the Import Staff screen. If you cannot see the Import button, you do not have permission to access this feature. Contact your district manager for more information. 3. On the Import Staff screen, under step 3, click Browse to navigate to your CSV import file, then select it. Import Staff 4. Click Import. The Import Staff Summary screen appears. • If no errors are detected, continue with step 5. 142 9 Managing staff • If the system detects any problems with the information in the file, it displays an error message. To access a detailed list of these errors, click the download error file link. If needed, you can save that error list as a text file on your desktop, or copy and paste the error list into a text file. Then you can correct the errors in the import file and return to the first step in this task. Import Staff – Summary with Errors 5. On the Import Staff Summary screen, click Confirm Import to import the staff. A success message appears when the import is complete. • If your file included staff rows with errors, the staff members with errors are not imported; however, all staff members without errors are imported. A confirmation message appears that includes details about the staff members who were not imported. Follow the instructions to view a list of errors for those staff members. If needed, you can save that error list as a text file on your desktop, or copy and paste the error list into a text file. • If your file did not include any staff rows with errors, all of the staff members in the file are imported into MySciLEARN and the process is complete. 6. Close the success message. Before the staff member can access MySciLEARN, he or she must review the confirmation email from Scientific Learning, which includes important login and account information, and then use the link in the email to create a staff password. 143 9 Managing staff Editing staff Use the Staff Profile screen to review and update a staff member’s information at any time; for example, if their employee ID or staff role has changed. You can also edit the group ownership and school associations within an instructor’s or school manager’s staff profile, or delete the staff member from the system. You can only edit one staff member at a time. In addition, you can only edit a staff member’s profile based on your staff role. • District managers can edit staff profiles for any role, including all other district manager roles. • School managers can only edit staff profiles for school managers and instructors in their school. To manage your own account settings, see "Managing your staff account" on page 35. Editing staff profile information Follow these steps to review and update a staff member’s information at any time; for example, when their employee ID, role, or email address has changed. 1. In MySciLEARN Manage section, click the Staff tab to access the Staff page. If you cannot see the Staff tab, you do not have permission to access this page. Contact your district manager for more information. 2. Locate the staff member in the staff list and click the staff member’s name to open the Staff Profile screen. You can filter the staff list by using the Browse By School or Browse by Role filters on the left, or you can search for a staff member using the Search feature at the top of the screen. 3. Click the Edit button below the staff member’s name. 4. Make any necessary edits to the staff information and click Save. • First Name • Middle Initial • Last Name • Employee ID • Login Email • Role 144 9 Managing staff • Additional Information 1 & 2 Editing staff ownership of groups Follow these steps to edit group ownership for staff members with the following roles. These steps also apply to all custom roles based on these roles: • Instructors – Add or remove group ownership, and create a new group • School manager – Create a new group at a school You do not need to perform this task for a district manager as they own all schools and groups. 1. In MySciLEARN Manage section, click the Staff tab to access the Staff page. If you cannot see the Staff tab, you do not have permission to access this page. Contact your district manager for more information. 2. Locate the staff member whose information you would like to edit and click the staff member’s name to open the Staff Profile screen. You can filter the staff list by using the Browse By School or Browse by Role filters on the left of the Staff screen, when available, or you can search for a staff member using the Search feature at the top of the screen. 3. Under Groups Owned, make any changes needed (click Show Groups if the groups are hidden). When editing an instructor profile: • To create a new group, click the New Group button, then enter a new group name in the New Group Name field and click Give Ownership. • To give ownership of an existing group, click the New Group button, then select the group name from the Select a Group menu and click Give Ownership. • To remove ownership of a group, click the Remove button next to the group name. When editing a school manager profile: • To create a new group at a school, click the New Group button for that school, then enter a new group name in the New Group Name field and click Give Ownership. School managers automatically own all groups at a school. Editing a school manager’s school access Follow these steps to add or remove school access for a school manager. These steps also apply to all custom roles based on a school manager. 145 9 Managing staff Note: This task can only be performed for school managers because instructors cannot access more than one school, and because district managers always have access to all schools. 1. In MySciLEARN Manage section, click the Staff tab to access the Staff page. If you cannot see the Staff tab, you do not have permission to access this page. Contact your district manager for more information. 2. Locate the staff member in the staff list and click the staff member’s name to open the Staff Profile screen. You can filter the staff list by using the Browse By School or Browse by Role filters on the left of the Staff screen, when available, or you can search for a staff member using the Search feature at the top of the screen. 3. Make any changes needed to the school manager’s school associations: • To give the school manager access to a school, click the Add School Access button, then select the school or schools and click Give Access. • To remove the school manager’s access to a school, find the school in the list of schools and click the Remove button in the upper right corner of that school’s panel. 146 9 Managing staff Deleting staff Use this feature to permanently delete a staff member; for example, if the staff member no longer works at the school. Only district managers and school managers can delete other staff members: • District managers can delete any staff member, including another district manager. • School managers can only delete the school managers and instructors in their schools. • You cannot delete your own staff profile. You can also delete an individual staff member from his or her profile using the Delete button. See "Editing staff" on page 144 for more information. To delete staff members from MySciLEARN 1. In MySciLEARN Manage section, click the Staff tab to access the Staff page. If you cannot see the Staff tab, you do not have permission to access this page. Contact your district manager for more information. 2. Locate the staff members in the staff list. You can filter the staff list by using the Browse By School or Browse by Role filters on the left of the Staff screen, when available, or you can search for a staff member using the Search feature at the top of the screen. 3. Select the checkbox next to the staff members, or select the All checkbox at the top of the staff list to select all of the staff on the screen. 4. Click the Delete button at the top of the screen. 5. On the confirmation message, click Delete Staff. 147 10 Importing and transferring students 10 Importing and transferring students As a district manager or school manager, use this chapter to learn how to import and transfer students within MySciLEARN. For details on enrolling individual students, see Chapter 11 “Managing student enrollments” on page 165. What's in this chapter Importing students from a file 149 Step 1 – Creating a student CSV file 150 Step 2 – Entering student info in the CSV file 154 Step 3 – Importing students into the system 160 Transferring students to another school 162 148 10 Importing and transferring students Importing students from a file Before students can access the Fast ForWord and Reading Assistant products, you must enroll those students into the MySciLEARN software program. This topic provides steps on how to enroll multiple students at one time by importing them from a file. For steps on enrolling an individual student, see "Adding a new student" on page 182. To access the import feature, log in to MySciLEARN and click the Students tab to open the Students page. The Import feature is available based on your staff role: • District managers can always access the Import feature. • School managers can access the Import feature unless the school manager role permissions have been changed. In this case, school managers will not see the Import button. • Instructors cannot see the Import button and cannot access the feature. Importing students from a file includes three steps. See the following topics for details: • "Step 1 – Creating a student CSV file" on page 150 • "Step 2 – Entering student info in the CSV file" on page 154 • "Step 3 – Importing students into the system" on page 160 149 10 Importing and transferring students Step 1 – Creating a student CSV file The first step in the import process is to generate a comma separated value (CSV) template file that includes the student information you plan to import into the system. • "About student CSV files" on page 151 • "Generating a student CSV file in MySciLEARN" on page 151 • "Creating your own student CSV file" on page 153 When you've completed the tasks in this topic, advance to the next topic, "Step 2 – Entering student info in the CSV file" on page 154. Import Students 150 10 Importing and transferring students About student CSV files A CSV file (sometimes called a comma-delimited file) uses commas to separate student information into columns and fields, and uses lines (rows) to separate each individual student. MySciLEARN uses a CSV file to identify and then import the student information into the system and then create your students. For example, the following MySciLEARN student information—First Name, Last Name, Date of Birth, Gender, Grade, School (organization ID), Special Education, English Language Learner (ELL)—would look like this in a CSV file (the first line is always the header): FIRST_NAME,LAST_NAME,DOB,GENDER,GRADE,SCHOOL_ID,SPECIAL_ED,ELL Jane,Doe,12/21/2001,f,4,123456,y,n John,Doe,01/05/2002,m,4,123456,n,n See the following tasks for steps on creating a CSV file to import students: • "Generating a student CSV file in MySciLEARN" on page 151 • "Creating your own student CSV file" on page 153 Generating a student CSV file in MySciLEARN To help simplify the import process, MySciLEARN allows you to automatically generate a CSV template file that follows our requirements. See the following task for steps. If you already have your own CSV file, you can use that file instead—see Creating your own student CSV file to learn more. 1. In MySciLEARN Manage section, click the Student tab to access the Students page. If you cannot see the Import button, you do not have permission to access this feature. Contact your district manager for more information. 2. Click the Import button at the top of the page. 3. On the Import Students screen, expand the each of the categories (Basic Fields, Fast ForWord Fields, Reading Assistant Fields) to review the fields you can include in your template. Each field corresponds to specific student information. Fields with an asterisk are required and must be included in your template (they cannot be deselected). For a definition of each field see the tables in "Step 2 – Entering student info in the CSV file" on page 154. 151 10 Importing and transferring students Import Students – All fields 4. If needed, add additional fields to your template by checking the box next to those fields. To generate a CSV template with only the required fields,skip this step and click the Save Template button without making any changes to the categories. 5. Click the Save Template button and follow the prompts to save the file to your local computer. If your browser asks you to choose between opening and saving the file, choose to save the file. If you choose to open the file, it may not be generated properly and will require that you generate the CSV file again. Continue with "Step 2 – Entering student info in the CSV file" on page 154. 152 10 Importing and transferring students Creating your own student CSV file As an alternative to "Generating a student CSV file in MySciLEARN" on page 151, you can create your own CSV file. For example, you can: • Create a student CSV file from your SIS – Many districts and schools use student information systems (SIS), which allow you to easily export student data in a CSV formatted file. See your SIS documentation for details on how to do this. • Use an existing MySciLEARN CSV file – If you’ve already created a CSV file for importing students (for example, for last year's implementation), you can use that file again as needed. Make sure that your CSV file uses the correct header format for MySciLEARN. Follow these steps: 1. Generate a new CSV template that includes the fields you want to include in your CSV file. See "Step 2 – Entering student info in the CSV file" on page 154 for details about each of the fields. 2. Either copy the template header into your CSV file or copy your student info into the template below the header line. Use a spreadsheet program such as Microsoft® Excel (save the file in CSV format) or a text editor software program such as Microsoft® Notepad or Apple’s TextEdit. Continue with "Step 2 – Entering student info in the CSV file" on page 154. 153 10 Importing and transferring students Step 2 – Entering student info in the CSV file After you've created your CSV template file, the next step in the import process is to edit the CSV file and add the student information you plan to import into the system. When you've completed the tasks in this topic, advance to "Step 3 – Importing students into the system" on page 160. If you haven't yet created a CSV file, return to "Step 1 – Creating a student CSV file" on page 150. All student information added to the CSV file must conform to the specific format requirements listed in this topic. To enter the student information into the CSV file, edit the file using a spreadsheet program such as Microsoft® Excel (you must save the file in CSV format) or a text editor software program such as Microsoft® Notepad or Apple’s TextEdit, then enter the information as follows: • Use a separate line (row) for each student. • Enter data in all of the required fields for each student or the file will not be accepted. Required fields are marked with a red asterisk in the following table. • Make sure that the information in each field conforms to the required format and does not include invalid or extra information (such as a school that does not exist). • If you created your own CSV file, make sure the header row conforms to the required format (do not include asterisks). Only include the headers for fields in which you plan to add student data. See Creating your own student CSV file for details. • Unless otherwise indicated in the tables, only use the following characters in the file: alphanumeric, spacebar, minus sign (as a hyphen), underscore. Follow these formatting requirements for each field in the CSV file. Required fields are marked with an asterisk * Basic fields format Header name Description and requirements *FIRST_NAME Student first name Minimum 2 characters MIDDLE_INITIAL Student middle initial One character only *LAST_NAME Student last name Minimum 2 characters STUDENT_ID An ID assigned to the student by school staff Must be unique across the school district *DOB The student's date of birth Required format: mm/dd/yyyy 154 10 Importing and transferring students Header name Description and requirements *GENDER The student's gender Required format (not case sensitive): male, female, m, f *GRADE The student's grade Required format (not case sensitive): pre, prek, k, kindergarten, 112, 13+ *SCHOOL_ID The organization ID for the student's school Located on the Schools page in the Manage section. *SPECIAL_ED Is the student currently receiving Special Education services? Required format (not case sensitive): yes, no, y, n *ELL Does the student have English language learner (ELL) status? Required format (not case sensitive): yes, no, y, n TITLE1 Is the student currently receiving Title 1 services? Required format (not case sensitive): yes, no, y, n MIGRANT Does the student have migrant status? Required format (not case sensitive): yes, no, y, n ETHNICITY The race/ethnicity of the student Limited to one of the following ethnicities, using the following format: • Aboriginal • American Indian or Alaska Native • Asian • Black or African American • Hispanic/Latino of any race • Native Hawaiian or Other Pacific Islander • Other • White ADDITIONAL1 Any additional staff, school, or district defined student information ADDITIONAL2 Any additional staff, school, or district defined student information ADDITIONAL3 Any additional staff, school, or district defined student information INSTRUCTOR The name of an existing instructor that you want to associate with the student This instructor must already exist in the system. Required format: firstname lastname 155 10 Importing and transferring students Header name Description and requirements GROUP The name of an existing group in which you want to enroll the student This group must already exist in the system. To enroll the student in multiple groups, use an ampersand (&) with no spaces to separate group names. For example: Fall 2010&After school If left blank, the student will be enrolled in the default group USERNAME *Required if student password entered in the PASSWORD field The student login username you would like to assign to the student. If left blank, a username is automatically generated unless you enter a password; in this case, you must enter a username in this field. PASSWORD The student login password you would like to assign to the student A password is needed if using student secure logins. Required format: 5 to 25 characters (not case sensitive). For example: janedoe If left blank when required, a password is automatically generated. ASSIGNMENT IMPORTANT! Use this field for manual assignment only: • Do not enter a Fast ForWord product if using Fast ForWord Auto Assign • Do not enter "RA" if using Reading Assistant Auto Initial Assignment The product(s) that you would like to manually assign to the student Required format (not case sensitive): Product short name: • LAv2 = Language v2 • LRv2 = Language to Reading v2 • LIT = Literacy • LTA = Literacy Advanced • RR = Reading Readiness • RL1 = Reading Level 1 • RL2 = Reading Level 2 • RL3 = Reading Level 3 • RL4 = Reading Level 4 • RL5 = Reading Level 5 • RA = Reading Assistant To assign multiple products, use an ampersand (&) with no spaces to separate the products; for example: LAv2&LRv2&RA If you enter a product in this field, you may be required to enter additional assignment information in the Fast ForWord fields or the Reading Assistant fields. For schools with per student licenses, if you enter an assignment when your school does not have enough available per student licenses, not all students will be imported. 156 10 Importing and transferring students Header name Description and requirements RPI Enter "y" in this field to use Auto Assign or Auto Initial Assignment *Required if a product entered in ASSIGNMENT field (see "Basic fields format" on page 154) Use Reading Progress Indicator for the student? Required format (not case sensitive): yes, no, y, n PARENT_EMAIL_1 A parent email address to which you would like to send student info. Required format: [email protected] PARENT_EMAIL_2 A parent email address to which you would like to send student info. Required format: [email protected] Fast ForWord fields format Header name Description and requirements PROTOCOL_DAYS *Required if this field exists in the template The days per week for the Fast ForWord products Required format: protocol days per week: 3, 5 If you enter 3 in this field, enter 30 or 50 in PROTOCOL field (3-day protocol is only available for 30 or 50 minutes) If this field does not exist in the template, the software uses the default option of 5 PROTOCOL *Required if a Fast ForWord product entered in ASSIGNMENT field (see "Basic fields format" on page 154) The minutes per day for the Fast ForWord products Required format: protocol minutes: 30, 40, 50, 90 Reading Readiness only accepts 30 in this field If you entered 3 in PROTOCOL_DAYS field, enter 30 or 50 in this field (3-day protocol is only available for 30 or 50 minutes) INTRODUCTION_LANGUAGE The exercise introduction language for the Fast ForWord products Required format (not case sensitive): English, Spanish If left blank, the software uses the default option of English 157 10 Importing and transferring students Reading Assistant fields format Header name Description and requirements CONTENT_LIBRARY Do not use this field for Auto Initial Assignment *Required if RA entered in ASSIGNMENT field (see "Basic fields format" on page 154) The Reading Assistant library you’d like to assign to the students Required format content pack (not case sensitive): k-3, 4-5, 6-8, 912 Required format custom library (not case sensitive): library name; for example: Period 4 Library 2011 SCHEDULE *Required if a custom library entered in CONTENT_LIBRARY field The schedule you would like to use for the content pack or custom library Required format: schedule minutes: none, 20, 30, 40 The K-3 and 4-5 content packs only support none, 20, 30 If left blank for a content pack, the software uses the default schedule INSTRUCTION_LANGUAGE The language for the audio instructions provided throughout Reading Assistant Required format (not case sensitive): English, Spanish If left blank, the software uses the default option of English GLOSSARY_LANGUAGE The available languages for the glossaries within the Reading Assistant Required format (not case sensitive): English, English and Spanish If left blank, the software uses the default option of English AUDIO_SUPPORT Audio support for Think About It/Take the Quiz questions in the Reading Assistant Required format (not case sensitive): yes, no, y, n If left blank, the software uses the default option of yes CONTENT_PROGRESSION The content progression method you’d like to assign to the students Required format (not case sensitive): locked, student selected, unlocked If left blank, the software uses the default option of locked PRONUNCIATION_ CORRECTNESS Strictness level when evaluating student pronunciation of a word, where lower = less strict, higher = more strict Required format: intervals of 5: 0, 5, 10...90, 95, 100 If left blank, the software uses the default option of 50 158 10 Importing and transferring students Header name Description and requirements INTERVENTION_WAIT_TIME How long the software waits before intervening. Settings do not correspond to a fixed number of seconds, but instead are relative to the selection's reading level. Required format: 1, 2, 3, 4 (1 = less time, 4 = maximum time) If left blank, the software uses the default option of 2 READING_LEVEL_ PLACEMENT Do not use this field for Auto Initial Assignment The method you’d like to use to place the students in the content pack Required format (not case sensitive): RPI, reading level, content If left blank, the software uses the default option of RPI (if licensed) or reading level (if RPI not licensed) Note: This field is for content packs only, not applicable for custom libraries READING_LEVEL_MEASURE Do not use this field for Auto Initial Assignment *Required if “reading level” entered in READING_LEVEL_ PLACEMENT field The measure to use to place the students in the content pack Required format (not case sensitive): grade equivalent, guided reading, lexile Note: This field is for content packs only, not applicable for custom libraries READING_LEVEL Do not use this field for Auto Initial Assignment *Required if anything entered in READING_LEVEL_MEASURE field The actual score/measure to place the student in the content pack For example: • Grade equivalent: 1.0-12.0 • Guided reading: D-Z • Lexile: 200L-1600L Note: This field is for content packs only, not applicable for custom libraries STARTING_CONTENT_TOPIC Do not use this field for Auto Initial Assignment The topic where you’d like the student to start in a content pack, or the selection where you’d like the student to start in a custom library Use when "content" entered in READING_LEVEL_PLACEMENT field, or a custom library entered in CONTENT_LIBRARY field If left blank, it uses the first topic (content pack) or the first selection (custom library) 159 10 Importing and transferring students Step 3 – Importing students into the system To add the students to MySciLEARN, this step uses the CSV import file you created in "Step 1 – Creating a student CSV file" on page 150 and "Step 2 – Entering student info in the CSV file" on page 154. If you have not yet set up your CSV import file, complete those steps first. To import the information and add the students 1. In MySciLEARN Manage section, click the Students tab to access the Students page. 2. Click the Import button at the top of the page to access the Import Students screen. If there are no students in the system, a note appears on the screen with a Import button. If you cannot see an Import button anywhere on the Students page, you do not have permission to import from a file. Contact your district administrator for more information. 3. On the Import Students screen, under Step 3, click Browse to navigate to your CSV import file, then select it. Import Students 4. Click Import. The Import Students Summary screen appears. • If no errors occur, continue with step 5. 160 10 Importing and transferring students • If the system detects any problems with the information in the file, it displays an error message on the Import Students Summary screen. To access a detailed list of all errors in the file, click the download error file link. Then you can correct the errors in the import file and return to the first step in this task. Import Students – Summary with Errors 5. On the Import Students Summary screen, click Confirm Import to import the students. A success message appears when the import is complete. • If your file included student rows with errors, those students are not imported; however, all students without errors are imported. A confirmation message appears that includes details about the students who were not imported. Follow the instructions to view a list of errors for those students. If needed, you can save that error list as a text file on your desktop, or copy and paste the error list into a text file. • If your file did not include any students with errors, all of the students in the file are imported into the system and the process is complete. 6. Close the success message. If you are using Fast ForWord Auto Assign, the process is complete—the students are added and can start training. Otherwise, you'll need to assign a product to those students. See the following topics for details: • Chapter 12 “Managing Fast ForWord assignments” on page 210 • Chapter 13 “Managing Reading Assistant assignments” on page 233 161 10 Importing and transferring students Transferring students to another school The Transfer feature allows staff to move MySciLEARN students to other schools in the district; for example, when a student moves to a new school, or a group of students graduate to middle or high school. You can transfer an individual student, a group of students at a school, or all of the students in a school. The transfer actually happens within the MySciLEARN server, so student transfer files do not need to be created or physically moved to a new location. To access the transfer feature, log in to MySciLEARN and click the Students tab to open the Students page. The Transfer feature appears in the More Actions menu based on your staff role: • District managers and school managers can always access this feature. • Instructors cannot see the Transfer menu item and cannot access the feature. To complete a transfer, you must have access to both schools—the original school with the students and the new school for the students; however, if you are a school manager and are not associated with both schools, you can transfer the students to the district. From there, the district manager can complete the transfer. Those students will retain their student profiles and product assignments; however, they will not be able to train on the products until they are transferred in to the new school. More about transferring students • When you transfer a student out of a school, that student will lose their staff and group associations at that school. • Transferred students will use the same Fast ForWord Auto Assign and Reading Assistant Auto Initial Assignment options that they were using in the original school, independent of the new school’s settings. • For students to continue with their original assignments after the transfer, the new school will need a valid product license. See "About licenses" on page 94 for more information on licensing. To transfer students from one school to another school or district 1. Log in to MySciLEARN as a district manager or school manager and click the Manage tab to access the Manage section. 2. Click the Students tab to access the Students page. 3. Locate the students in the students list. 162 10 Importing and transferring students You can filter the student list by using the Browse by School, Filter by My Groups, or Filter by Staff options on the left, or you can search for a student using the Search feature at the top of the screen. 4. Select the students by choosing the checkbox next to the student name. Or, click the checkbox at the top of the column to select all students in the list. You can also transfer an individual student while viewing that student’s profile (start with the next step). 5. From the More Actions menu, select Transfer to Another School. 6. Select the school that you want to transfer the students into and click the Transfer Students button. Transfer students • If you are not associated with the new school and cannot find it in the menu, select the school district instead. • If you selected the new school, the task is complete, and the students are transferred into the default group at the new school. To set up the students at the new school, continue with these tasks as needed: • • Move the students to a different group at the new school. See "Managing student groups" on page 189 for details. • Associate the students with an instructor at the new school. See "Associating students with instructors" on page 200 for details. If you selected the district in step 6, you will need to contact a district manager so that they can complete the process and transfer the student from the district into the new school. In addition, you will also need to provide that district manager with the student names and the name of the new school, if known. 163 10 Importing and transferring students To transfer students from the district into the new school (district managers only) 1. Log in to MySciLEARN as a district manager and click the Manage tab to access the Manage section. 2. Click the Students tab to access the Students page. 3. Select Unaffiliated in the Browse by School filter to view students not in a school. 4. Select the students you plan to transfer by choosing the checkbox next to the student name. You can also transfer an individual student while viewing that student’s profile from the Unaffiliated item under Browse by School (start with the next step). 5. From the More Actions menu, select Transfer to Another School. 6. Select the school that you want to transfer the students into and click the Transfer Students button. Transfer students The students are transferred into the default group at the new school. To set up the students at the new school, continue with the following tasks as needed: • Move the students to a different group at the new school. See "Managing student groups" on page 189 for details. • Associate the students with an instructor at the new school. See "Associating students with instructors" on page 200 for details. 164 11 Managing student enrollments 11 Managing student enrollments Use this chapter to learn how to add, manage, edit, and delete students and groups in MySciLEARN. What's in this chapter About students 166 Accessing the Students page 167 Using the students list 168 Using student profiles 176 About student usernames and passwords 181 Adding a new student 182 Editing student information 186 Deleting students 188 Managing student groups 189 Adding a new student group 191 Managing student group membership 193 Renaming a student group 194 Deleting a student group 195 Managing per student licenses for students 196 Associating students with instructors 200 Changing the grade for students 202 Changing the Fast ForWord protocol for students 203 Setting student access to demos 206 About setting Reading Progress Indicator and Auto Assign for students 207 Printing student usernames and passwords 209 165 11 Managing student enrollments About students Before your students can work on the Fast ForWord and Reading Assistant products, you’ll need to add those students to the system, set up student groups, and create student assignments. Use the Students page to manage these enrollment tasks. For steps on accessing this page see "Accessing the Students page" on page 167. See the following topics to learn about managing students: • To learn how to use the Students page, see "Using the students list" on page 168 and "Using student profiles" on page 176. • To add students to the system, manage student settings, and create student groups, see the rest of the topics in this chapter. • To add multiple students to the system or to transfer students across schools, see Chapter 10 “Importing and transferring students” on page 148. • To assign the Fast ForWord programs to your students, see Chapter 12 “Managing Fast ForWord assignments” on page 210. • To assign the Reading Assistant program to your students, see Chapter 13 “Managing Reading Assistant assignments” on page 233. • To create custom Reading Assistant content libraries, see Chapter 14 “Managing Reading Assistant libraries” on page 274. 166 11 Managing student enrollments Accessing the Students page Use the Students page to create and manage the students at your schools. Students When you log in to MySciLEARN and click the Students tab, the Students page opens and displays schools and students based on your staff role and the permissions for your role: • All staff members can access the Students page, but each role has a unique view of that page. These views are detailed in the topic "Using the students list" on page 168. To access the Students page 1. Log in to MySciLEARN as a staff member. For details see "Logging in as a staff member" on page 29. 2. Click the Manage tab to access the Manage section. 3. Click the Students tab to access the Students page. 167 11 Managing student enrollments Using the students list When you log in to MySciLEARN and access the Students page, the software reviews your staff role, permissions, and school access, then presents a list of students based on that information. The students list displays different information as you view an individual school, filter by group, or filter by staff. You can also use navigation tools to search for students. This topic provides information on the different ways you can navigate and use the students list. Instructor view When you log in as an instructor and access the Students page, it opens and displays your school. Students – Instructor View Within your school, the students are organized and available as follows: • All of the students associated with you appear in the student list. • Use the Filter by My Groups list to filter the student list by group; just select that group. To clear the filter, select All Groups at the top of the filter. • To temporarily reorder the columns in the list, drag and drop the columns in any order. By default, instructors can access these features and perform these tasks: • Add, edit, and delete all of their students and manage all of their groups • Assign, edit, and delete product assignments for their students • Use the More Actions menu to manage their students, groups, and assignments • Monitor training sessions for their students 168 11 Managing student enrollments School manager view When you log in as a school manager and access the Students page, it opens all of your schools. If you are associated with only one school, the Students page opens for that school and displays all of the students in that school. If you are associated with multiple schools, the Students page displays all of the students in your schools. To filter the list by school, select a school from the Browse by School filter. To clear the filter, select All Schools at the top of the filter. Students – School Manager View When you select a school, you can continue to filter the student list as follows: • Use the Filter by My Groups list to filter the student list by group; just select that group. To clear the filter, select All Groups at the top of the filter. • Use the Filter by Staff list to filter the student list by staff member; just select that staff member’s name. To clear the filter, select All Staff at the top of the filter. • To temporarily reorder the columns in the list, drag and drop the columns in any order. By default, school managers can access these features and perform these tasks: • Add, edit, and delete students • Assign, edit, and delete product assignments • Use the More Actions menu to manage students, groups, and assignments • Import students from a file • Monitor student work sessions 169 11 Managing student enrollments District manager view When you log in as a district manager and access the Students page, it opens and displays all of the students in all of the schools across the district. Students – District Manager View To filter the student list by school, select a school from the Browse by School filter. Then, you can continue to filter the student list as follows: • Use the Filter by My Groups list to filter the student list by group; just select that group. • Use the Filter by Staff list to filter the student list by staff member; just select that staff member’s name. • To clear any of the filters, select the All Schools/All Groups/All Staff options at the top of the corresponding filter. • To temporarily reorder the columns in the list, drag and drop the columns in any order. District managers can access all features and perform all tasks on the Students page: • Add, edit, and delete any student in the system, and manage all groups in all schools • Assign, edit, and delete product assignments for any student in the system • Use the More Actions menu to manage students, groups, and assignments • Import students from a file into any school • Monitor trainings sessions for any student in the system 170 11 Managing student enrollments Browse by School filter When browsing a school on the Students page, the students list provides the following information for that school: • Last/First – The first and last name of all students in that school, sorted by last name. When a student is training or taking an RPI assessment, an orange icon appears next to that student’s name • School – The name of the school you are viewing • School Staff – The staff members associated with the student • Groups – The groups to which that student belongs • Settings – Provides access to the following settings for a student, with buttons that show current state (green = on, gray = off): • Turn Fast ForWord Auto Assign off and on (RPI must be on). • Turn Reading Assistant Auto Initial Assignment on and off (RPI must be on). • Turn RPI off and on. When off, both Auto Assign options are disabled. If you are associated with only one school, you won’t see the Browse by School filter, but you will see the same details for your individual school: Students – Browse by School: One School If you are associated with more than one school, the Students page will include the Browse by School filter, which allows you to select and view an individual school. If you are a school manager or district manager and you have access to more than five schools, the list of schools will collapse when you select a school in the Browse by School filter. To open the list and see all of your schools, click View List. The Browse by School filter will expand to include all schools. 171 11 Managing student enrollments Students – Browse by School: Multiple Schools 172 11 Managing student enrollments Filter by My Groups The Filter by My Groups filter only appears when you are viewing a school. Students – Filter by Group When you filter the school view by a group, the students list displays the following details for each student in that group: • Last/First – The first and last name of each student in the group, sorted by last name. • Assigned Products – The student’s assigned products and product status. See "More about Assigned Products" on page 174. • Protocol – The protocol (schedule) for each assigned product. • Lang – The language for each assigned product. • English • Spanish • GR – The student’s grade. • Settings – Provides access to the following settings for a student, with buttons that show current state (green = on, gray = off): • Turn Fast ForWord Auto Assign off and on (RPI must be on). • Turn Reading Assistant Auto Initial Assignment off and on (RPI must be on). • Turn RPI off and on. When off, both Auto Assign options are disabled. • When training, an orange icon shows next to the student’s name. 173 11 Managing student enrollments More about Assigned Products By default, the group view shows all product assignments for your students. However, you can filter the group by individual product; for example, you can select Reading Level 1 from the Filter by Product menu to see only those students with that product assignment. In addition, each product assignment that appears in the group view includes the following status information in the Assigned Products column: • New – The student has not started working on the product (this is different from 0%, where the student has actually started working on the product but has not yet completed 1%) • If the student has started working on the product, a completion status appears as follows: • • The Fast ForWord products display a percent complete score for the product. • Reading Assistant displays the total number of selections worked on out of the total number of selections in the library, for the current library only When using per student licenses, products with expired licenses and licenses that have a future start date appear in red. For information on enabling those students to continue working, see "Managing per student licenses for students" on page 196. 174 11 Managing student enrollments Filter by Staff The Filter by Staff filter is only available for district managers and school managers, and only appears when viewing an individual school. When you filter the school view by a staff member, the students list only shows the students associated with that staff member. To return to the original view and see all students, click All Staff at the top of the Filter by Staff list. Students – Filter by Staff (School Manager View) Search the students list Use the following navigation tools on the Students page to find a specific student: • Use the Search feature at the top of the Students page to search for a student by first name or last name. If you're an instructor, the Search feature will only show results for students that are associated with you. • Click the Last name, First Name, or School columns at the top of the student list to sort the list alphanumerically. Click again to reverse the sort order. • Use the Pagination bar at the bottom of the page to scroll through the list pages. When you’ve located your student, click the student’s name to view the student’s profile. For details on the viewing a student’s profile, see the next topic, "Using student profiles" on page 176. 175 11 Managing student enrollments Using student profiles Each student has a student profile. To view the student profile, click the student in the students list. Students – Student Profile The student profile includes the following information for that student: • "Basic information " on page 177 • "Assignments" on page 178 • "Auto Assign and Reading Progress Indicator" on page 179 • "Groups" on page 180 • "School Staff" on page 180 • "Additional items" on page 180 176 11 Managing student enrollments Basic information Along with the student's name, this section in the top left corner provides basic student information: Student Profile – Student info Use the Edit button to change this information. See "Editing student information" on page 186 to learn more. • School • Grade • Username • Password • Date of Birth • Gender • Other demographic information such as English language learner (ELL) 177 11 Managing student enrollments Assignments This section in the top right corner allows you to manage the student's assignments: Student Profile – Assignments Use the Assignments section as follows. See "Managing Fast ForWord assignments" on page 210 and "Managing Reading Assistant assignments" on page 233 to learn more. • When automatically assigning products, you can edit an assignment at any time. • When manually assigning products, you can add, edit, stop, resume, or delete an assignment • If the student is using a per student license, a License button appears next to the product, allowing you to move licenses for that product when they are expiring or expired. See "Managing per student licenses for students" on page 196. • Fast ForWord Auto Assign appears in the Assignment panel when the student is using that feature. • Reading Assistant Auto Initial Assignment appears in the Assignments panel when the student is using that feature. • If the student has not started an assignment, New appears next to the assignment. • If the student has started working on a Fast ForWord product assignment, the percent complete score appears next to the assignment. • If the student has started working on a Reading Assistant assignment, the following information appears next to the assignment: • The name of the assigned library • The number of completed selections and the total number of selections in the assigned library; for example: 6 of 14 • If the student has completed a product to the point of earning a Complete status alert, a green checkmark appears next to the assignment. • If a product assignment has been stopped, Resume appears next to the assignment. 178 11 Managing student enrollments • When using Fast ForWord Auto Assign, if it cannot assign a product, a Warning (!) icon appears next to the product name advising staff to manually assign a product to the student. If the student is currently training, a Session Activity section appears in the upper right corner of that student’s profile, above the Assignments section, and displays the status of the student's session as follows. Note that you cannot edit a student profile while that student is training: • • Fast ForWord session details: • The name of the Fast ForWord product and exercise • The number of minutes left in the exercise • The number of trials completed in the exercise Reading Assistant session details: • The name of the Reading Assistant library and selection • The number of minutes completed in the session, if the student is using a Reading Assistant schedule Auto Assign and Reading Progress Indicator This section allows you to enable or disable Fast ForWord Auto Assign or Reading Assistant Auto Initial Assignment for the student, and void the most recent assessment for a student. See "About setting Reading Progress Indicator and Auto Assign for students" on page 207 to learn more. Student Profile – Auto Assign and RPI If the student has completed an RPI assessment, the following assessment results appear in the Reading Progress Indicator panel. • Initial assessment: grade equivalent, percentile 179 11 Managing student enrollments • Follow-up assessment: grade equivalent, grade equivalent gain, percentile, percentile gain Groups This section lists the groups to which the student belongs.See "Managing student group membership" on page 193 to learn more. Student Profile – Groups School Staff The section lists the school staff associated with that student (district managers/school managers only). See "Associating students with instructors" on page 200 to learn more. Student Profile – School Staff Additional items The student profile screen also includes the following items: • More Actions menu – This menu at the top of the screen allows you to delete a student's profile or transfer that student to another school. See "Deleting students" on page 188 and "Transferring students to another school" on page 162. • Print button – Use this button at the top of the screen to print a copy of the student's profile. 180 11 Managing student enrollments About student usernames and passwords Each student needs a username and password to log in to the application. Creating student usernames and passwords You can create student usernames and passwords several ways. See the following topics for steps: • "Adding a new student" on page 182 • "Importing students from a file" on page 149 • "Editing student information" on page 186 When creating usernames and passwords, you can allow the system to automatically generate them or you can manually create them. Each task provides details on how to do this.If you would like to manually create usernames or passwords, follow these guidelines. • When creating a student username, choose something simple for younger students to remember, such as first initial, last name, and the students age or day of birth; for example: jdoe24. • All student usernames must be unique across the district. • When creating a student password, enter a minimum of five alphanumeric characters. • Student passwords are not case sensitive; the system will save all letters as lowercase. Viewing student usernames and passwords You can view student usernames and passwords at any time, as follows: • You can view an individual student’s username and password within their student profile, in case the information is lost or forgotten. See "Using student profiles" on page 176 • You can print a list of student usernames and passwords, as needed, to distribute to younger students as an easy reference or to keep as a backup for other students. For details see "Printing student usernames and passwords" on page 209. 181 11 Managing student enrollments Adding a new student Before students can access to the Fast ForWord products, you must add (enroll) the students into the system. You can add and individual student, or you can add multiple students from a file. This topic details the steps for adding a new student to MySciLEARN. For information on adding multiple students, see "Importing students from a file" on page 149. Required student information The following information is required when adding a student. All other fields are optional. To automatically generate a unique student username and password, use the Autogenerate Username and Autogenerate Password buttons next to the Student Username and Student Password fields. For tips on choosing your own student usernames and passwords, see "About student usernames and passwords" on page 181. • First Name, Last Name, Date of Birth • Student Username (must be unique across the district) • Student Password (not case sensitive; the system will save all letters as lowercase) • Grade, Gender, English Language Learner (ELL), Special Education, School Additional student information The following information can also be entered for a student but is not required. Enter as much student information as possible. This information is helpful when evaluating a student’s performance using Progress Tracker. • Middle Initial (MI) • School Staff (selections are limited based on your staff role) • Group (selections are limited based on your staff role) • Student ID (must be unique across the district) • Parent Email 1 and 2 • Race/Ethnicity (only one option allowed): • Aboriginal, American Indian or Alaska Native, Asian, Black or African American, Hispanic/Latino of any race, Native Hawaiian or Other Pacific Islander, Other, White • Title 1 • Migrant Student • Additional Info 1, 2, 3 • Additional Classifications (can select more than one): 182 11 Managing student enrollments • Dyslexia, Down Syndrome, Phonological Disorder, Autism, Asperger’s Syndrome, Expressive Communicative Disorder, Developmental Delay, Special Learning Disability, Attention Deficit Disorder, Rett’s Disorder, Childhood Disintegrative Disorder, Receptive Communication Disorder To add a new student to MySciLEARN 1. In MySciLEARN Manage section, click the Students tab to access the Students page. 2. Click the +New Student button to open the New Student screen. If there are no students in the system yet, a note appears in the middle of the screen with a New Student button. Click that button. The New Student screen opens: New Student 3. Enter the student’s first name, last name, and date of birth into the profile. This information must be unique across the system. To verify that a student with the same first name, last name, and date of birth does not already exist in the system, use the Check For Name And Date of Birth Duplicates button. If a duplicate student does exist, verify whether this is the same student or a different student. 183 11 Managing student enrollments • If it is the same student, you can check with a district manager to request that the student be transferred to your school. • If it is a different student, change the student name for this new student. 4. Enter the rest of the required student information into the profile: username, password, grade, gender, ELL status, SES status, school • Student usernames must be unique across the system. You can generate a username using the Autogenerate Username button. • Passwords are not case sensitive. You can generate a password using the Autogenerate Password button. 5. Enter any additional information for the student, as needed. • If you enter a student ID, it must be unique across the district. • Click the Show Additional Information at the bottom of the screen to view the rest of the student information fields, then enter any relevant information. 6. Add the student to a group by selecting that group under Group. To add the student to multiple groups, press and hold the Shift key on Windows or the Command (Apple) key on Macintosh while selecting the groups in the list. Tip: If you don't have any groups yet, you can cancel this process and create a group before you add the student, or you can continue and the student will be automatically added to Default Group (see "Using the default group" on page 189 for more information). 7. If you are a district manager or school manager, select school and staff associations in the profile, as needed: • Select a school from the School menu, if needed. • Associate the student with instructors under School Staff. An instructor must be associated with a student to work with that student. To select multiple staff members, press and hold the Shift key on Windows or the Command (Apple) key on Macintosh while selecting the items in the list. Tip: You can also select staff associations on the Student Profile page after you save the new student. 8. Click Save to create the student profile and end the process, or click Save and Add to create the student profile and add another new student. If you are an instructor, the student is automatically associated with you. 184 11 Managing student enrollments If the student is using Fast ForWord Auto Assign or Reading Assistant Auto Initial Assignment, the process is complete. If not, you must manually assign a product to the student. See the following topics for details: • Chapter 12 “Managing Fast ForWord assignments” on page 210 • Chapter 13 “Managing Reading Assistant assignments” on page 233 185 11 Managing student enrollments Editing student information Use the Student Profile to review and update a student’s profile; for example, if any of their information has changed, such as Parent Email or Title 1 status. For details on the information available for edit, see "Adding a new student" on page 182. Student Profile – Edit To edit a student's information 1. In MySciLEARN Manage section, click the Students tab to access the Students page. 2. Locate the student in the students list. You can filter the student list by using the Browse by School, Filter by My Groups, or Filter by Staff options on the left, or you can search for a student using the Search feature at the top of the screen. 3. Click the student’s name to open that student’s profile. 4. Click the Edit button under the student’s name to open the student information for edit. 5. Make any necessary edits and click Save. 186 11 Managing student enrollments Tip: To edit the other information in a student's profile, see the following topics: • "Editing a Fast ForWord product assignment" on page 227 • "Editing a Reading Assistant assignment" on page 267 • "About setting Reading Progress Indicator and Auto Assign for students" on page 207 • "Associating students with instructors" on page 200 187 11 Managing student enrollments Deleting students You can permanently delete a student from the system; for example, if the student moves to a new district that is not using MySciLEARN, or the student will no longer use the Fast ForWord or Reading Assistant products. IMPORTANT! This option permanently deletes that student and his or her data from MySciLEARN, and you will not be able to recover it. If a student is only completing a product or is transferring to another school, do not delete the student. Instead, perform one of these tasks: • "Stopping and deleting a Fast ForWord product assignment" on page 229 • "Stopping and deleting a Reading Assistant assignment" on page 269 • "Transferring students to another school" on page 162 To delete students from MySciLEARN 1. In MySciLEARN Manage section, click the Students tab to access the Students page. 2. Locate the students in the students list. You can filter the student list by using the Browse by School, Filter by My Groups, or Filter by Staff options on the left, or you can search for a student using the Search feature at the top of the screen. 3. Select the checkbox next to those students, or select the All checkbox at the top of the students list to select all of the students on the screen. 4. From the More Actions menu, select Delete Student Profile. 5. On the confirmation message, click Delete Profile. Delete Student Profiles 188 11 Managing student enrollments Managing student groups MySciLEARNworks best when you organize your students into groups. Groups are designed to help you manage students that have something in common. Think of a group as a class within a school. For example, you can organize groups based on the school year and one of the following criteria: • Training time and date – 1st Period Fall 2010, 10am Spring 2011 • Classroom or teacher – Mr Perez 2010-11 • Training location – In Class Fall 2010, Spring 2011 At Home • Demographic data – ELL 2010-11, 3rd Grade 2010 Students must belong to at least one group. However, students can belong to more than one group; this will not impact their experience with the Fast ForWord or Reading Assistant products. Use the Students page to manage groups of students. See the following topics for instructions: • "Adding a new student group" on page 191 • "Managing student group membership" on page 193 • "Renaming a student group" on page 194 • "Deleting a student group" on page 195 Using the default group Because all students must belong to at least one group, MySciLEARN provides a default group for each school. This group, named Default Group, functions just like any other group in your school, providing access to the group functions on the Students page and the teacher reports on the Results page. • Just like any other group at the school level, district managers and school managers are automatically associated with the default group, but instructors are not. This provides additional security and privacy for students at the school. District managers and school managers can associate instructors with the default group as needed. See "Editing staff" on page 144 for steps on associating instructors with groups. • Students who are not associated with any group will be added to the school's default group. For example: • When transferring a student to another school, that student will be added to that school's default group. See "Transferring students to another school" on page 162. • When importing students from a file, if you don't specify a group in the import file, those students will be added to the default group. See "Importing students from a file" on page 149. • When removing a student from that student's only group, the student will be added to that school's default group. See "Managing student group membership" on page 193. • Also, when deleting a group that includes students who are not in any other groups, those students will be added to that school's default group. See "Deleting a student group" on page 195. 189 11 Managing student enrollments • • When an instructor who does not own any groups adds a new student, that student will be added to the default group. See "Adding a new student" on page 182. The default group cannot be renamed or deleted from the system. 190 11 Managing student enrollments Adding a new student group You can organize your students into groups using several methods: • By using the +New Group button and the More Actions menu on students list • By using the Add to Group button inside a student’s profile, see "Managing student group membership" on page 193 • By using the New Group button inside a staff member’s profile, see "Editing staff" on page 144 This topic provides steps on how to add a new student group from the students list. To add a new group from the students list 1. In MySciLEARN Manage section, click the Students tab to access the Students page. 2. Select your school from the Browse by School list, if needed. • If you do not plan to add students to the new group right away, click the New Group button under the Filter by My Groups and add a new group. You can add students to the group later. See "Managing student group membership" on page 193. • If you want to add students to the new group now, continue with the next step. 3. Locate the students in the students list. You can filter the student list by using the Filter by My Groups, or Filter by Staff options on the left, or you can search for a student using the Search feature at the top of the screen. 4. Select the checkbox next to the students, or select the All checkbox at the top of the students list to select all of the students on the screen. 5. From the Add To/Remove From Group menu, select Add to New Group. 6. Enter a significant and unique name for the group in the New Group Name field. Note: Be sure to use a unique name when naming your group. See "Managing student groups" on page 189 for tips on naming a group. 191 11 Managing student enrollments Students – Add Students to New Group 7. Click Add Students to Group. The new group is automatically associated with you. To associate the group with other staff members, contact your school manager or district manager. See "Editing staff" on page 144 for steps on how this task is performed. 192 11 Managing student enrollments Managing student group membership This topic provides instructions for managing the students in a group, including adding students to a group and removing students from a group. All students must belong to at least one group. To add students to a group 1. In MySciLEARN Manage section, click the Students tab to access the Students page. 2. Select your school from the Browse by School list, if needed. 3. Locate the students that you would like to add to or remove from the group. • If you are removing students from a group, select that group in the Filter by My Groups option on the left of the Student page. • If you are adding students to a group, you can filter the student list by using the Filter by My Groups or Filter by Staff options on the left, or you can search for a student using the Search feature at the top of the screen. 4. Select the checkbox next to the students you're moving, or select the All checkbox at the top of the students list to select all of the students on the screen. 5. From the Add to/Remove from Group menu, select the option you’d like to perform: • Add to (existing group name) • Remove from (existing group name) Students – Add to/Remove from Group Note: When removing students from a group, the students must belong to at least one other group. If not, the students will be automatically added to the school's default group. 6. On the Confirmation screen, confirm the action to complete the task. 193 11 Managing student enrollments Renaming a student group Use the following instructions to rename an existing group; for example, if the name is no longer significant, or if it is being confused with another group name. To change the name of an existing group 1. In MySciLEARN Manage section, click the Students tab to access the Students page. 2. Select your school from the Browse by School list, if needed. 3. From the Filter by My Groups list, select the group you’d like to rename. 4. Select Rename/Remove next to the Group name. The group opens for edit. Students – Edit Group 5. Type the new group name in the group name field and click Save. 194 11 Managing student enrollments Deleting a student group Groups can be deleted when all of the students have been removed from that group and the group is no longer needed. For example, at the end of the school year, you can remove a group for students who have completed the Fast ForWord products and have been either deleted from the system or moved to other groups. Note that if the group you plan to delete has students in it that do not belong to any other groups, those students will be automatically added to the school's default group. To delete an existing group 1. In MySciLEARN Manage section, click the Students tab to access the Students page. 2. Select your school from the Browse by School list, if needed. 3. From the Filter by My Groups list, select the group you’d like to delete. 4. Select Rename/Remove next to the Group name. The group opens for edit. 5. Click the trash icon next to that group name to move the group to the trash. Students – Edit Group 6. On the confirmation message, click Confirm Delete Group. Any students that did not belong to another group can now be found in the default group. 195 11 Managing student enrollments Managing per student licenses for students MySciLEARN allows you to manage per student licenses for your students. For example, if the per student licenses expire, or if your school purchases new per student licenses for next year, you can decide which students need the new licenses and then move those licenses when ready. For more information on per student licenses, see "About licenses" on page 94. This topic covers moving licenses at the student level, for an individual student and for groups of students. Tip: You can also move licenses at the school level (school managers and district managers only). See "Managing per student licenses for a school" on page 119 for steps. To move licenses for an individual student from the student's profile 1. In MySciLEARN Manage section, click the Students tab to access the Students page. 2. Locate your student in the students list. You can filter the student list by using the Browse by School, Filter by My Groups, or Filter by Staff options on the left, or you can search for a student using the Search feature at the top of the screen. 3. Click the student’s name to open that student’s profile. The student profile opens and displays the Assignments panel in the upper right corner: Student Profile – Assignments 196 11 Managing student enrollments Tip: The Assignments panel indicates expired licenses by showing a warning icon next to the License button; for example, if the student is using a product license that is expired, or if all of the available licenses for that product are expired (in this case, the system will also disable the License button). If you see a warning or you can’t access the License button, ask your school manager to check the licenses at your school. 4. Click the License button next to the product with the per student license. The Move Per Student Licenses dialog opens and displays all of the valid licenses for that product. If the student's current license is not expired, it will also appear in the dialog highlighted in yellow. Each product license indicates how many per student licenses are available by displaying the following information: • Quantity – The number of per student licenses purchased by the school • Used – The number of per student license currently in use at the school You'll need at least one available per student license to complete this task. Move Per Student Licenses 5. Click the radio button next to the new product license and click Apply. The student can immediately start training. Please note that if the new license has a future start date, the student will not be able to train until that start date is reached. To move licenses for one or more students from the Students page 1. In MySciLEARN Manage section, click the Students tab to access the Students page. 2. Select the group with your students. 197 11 Managing student enrollments Your students must be in a group to move licenses from the Students page. For more information on groups, see "Managing student groups" on page 189. To locate your group, you can filter the student list by using the Browse by School and Filter by My Groups options on the left of the Students page. 3. Select the checkbox next to your students, or select the All checkbox at the top of the students list to select all of the students on the screen. To indicate a product's license status and help you determine which students to select, the product name in the Assigned Products column appears in red when a per student license is not valid (that is, it is expired or has a future start date). 4. From the More Actions menu at the top of the students list, select the appropriate menu item based on the product your students are using: • To move Fast ForWord users to new per student licenses, select Move FFW Licenses. • To move Reading Assistant users to new per student licenses, select Move RA Licenses. The Move Per Student Licenses dialog opens and displays all of the valid licenses for that product. Each product license indicates how many per student licenses are available by displaying the following information: • Quantity – The number of per student licenses purchased by the school • Used – The number of per student licenses currently in use at the school You'll need one per student license for each selected student to perform this task. Students List – Move Per Student Licenses 5. Select the new product license and click Apply. The students can immediately start training. Please note that if the new license has a future start date, the students will not be able to train until that start date is reached. 198 11 Managing student enrollments Note: If there are not enough available per student licenses for all of the selected students, none of those students will be moved. To continue, try moving fewer students at one time. 199 11 Managing student enrollments Associating students with instructors Instructors must be associated with a student to work with that student. District managers and school managers can use this option to associate students with an instructor. Here are some examples of when to use this feature: • When a new instructor is added • When students are imported from a file and the instructor was not known at the time of import • When a student is transferred from another school, or graduates and enters a new classroom • When a student uses the program in more than one class You can perform this task for an individual student or multiple students using the More Actions menu on the Students page, or you can perform the task for an individual student from that student’s profile. The instructor must already exist in the school before you can perform this task. For more information on instructors see "About staff members" on page 122. To associate students with an instructor 1. In MySciLEARN Manage section, click the Students tab to access the Students page. 2. Perform one of the following tasks: To associate an individual student from a student’s profile: • Locate the student in the students list. You can filter the student list by using the Browse by School, Filter by My Groups, or Filter by Staff options on the left, or you can search for a student using the Search feature at the top of the screen. • Click the student’s name to open that student’s profile. • In the School Staff section, click Associate with Instructor. To associate one or more students from the students list: • Select your school from the Browse by School list, if needed. • Select your group from the Filter by Group list. • From the More Actions menu, select Associate Student with Instructor. 3. Select the instructor from the School Staff menu and click Save. 200 11 Managing student enrollments Associate Student with Instructor 201 11 Managing student enrollments Changing the grade for students The Change Grade option allows you to change the grade for multiple students at one time. For example, at the end of the school year, you can prepare for the next school year by setting the grade one year ahead for all of the students in your class or school. Note that each student’s grade is incremented or decremented independently. For example, let's say that two students are in Grade 4 and two students are in Grade 5. When you select all four students and select Increment +1, the first two student’s grades will change to Grade 5 and the second two student’s grades will change to Grade 6. You can increment the grade +1, +2, +3 grades or decrement the grade -1, -2, -3 grades. To change the grade for your students 1. In MySciLEARN Manage section, click the Students tab to access the Students page. 2. Locate the students in the students list. You can filter the student list by using the Browse by School, Filter by My Groups, or Filter by Staff options on the left, or you can search for a student using the Search feature at the top of the screen. 3. Select the checkbox next to the students, or select the All checkbox at the top of the students list to select all of the students on the screen. 4. From the More Actions menu, select Change Grade. 5. Select the option you’d like to apply to your students and click Change Grade. • Increment +1 Grade/+2 Grades/+3 Grades • Decrement -1 Grade/-2 Grades/-3 Grades Change Grade 202 11 Managing student enrollments Changing the Fast ForWord protocol for students A Fast ForWord product’s protocol determines which exercises are worked on in that product, how often those exercises are worked on, and the length of time spent working in each exercise on a given day. These protocols have been proven to help maximize the benefits of the products. To learn more about protocols, see "About Fast ForWord protocols" on page 215. The protocol for a Fast ForWord product is set when you assign that product to your students. The Change Fast ForWord Protocol feature lets you move multiple students to another protocol in one easy step. When you change the protocol, MySciLEARN updates all of a student's existing Fast ForWord assignments, including assignments at 100%. To change the protocol for a student on an individual basis—for example, to change the protocol for just one Fast ForWord assignment—use the Edit Assignment feature (see "Editing a Fast ForWord product assignment" on page 227 for steps). If your school plans to implement the new protocol for all students going forward, consider also updating the default protocol at the school level. That way, all new student assignments will automatically use the new protocol and you won't have to change it later. For steps see "Setting Fast ForWord default protocols for a school" on page 110. More about changing the protocol • When changing the protocol, any assignments made by Fast ForWord Auto Assign will be included (see "About Fast ForWord Auto Assign" on page 218). • Reading Assistant assignments or "stopped" Fast ForWord assignments will not be included when changing the protocol (see "Stopping and deleting a Fast ForWord product assignment" on page 229). • Because Reading Readiness only uses 30-minute protocols, only the number of days will be updated for those assignments. For example, let's say that you want to move a group of students to the 3-day/50-minute protocol, and a few of those students have a Reading Readiness assignment. The Reading Readiness assignments will be set to the 3-day/30-minute protocol, while all of the other Fast ForWord assignments will be set to the 3-day/50-minute protocol. See About Fast ForWord protocols to learn more. • When changing the protocol for large numbers of students, note that it takes about one second per Fast ForWord assignment to change the protocol. The key to estimating the amount of time is to consider both the number of students and the number of Fast ForWord assignments per student: • 100 students with 1 assignment each (100 assignments): 1-2 minutes • 100 students with 5 assignments each (500 assignments): 5-7 minutes 203 11 Managing student enrollments Best practice: The best time to change the protocol is at the beginning of the week, before your students start training. This will avoid any impact on their weekly participation and attendance scores. To change the protocol for a student's Fast ForWord assignments 1. In MySciLEARN Manage section, click the Students tab to access the Students page. 2. Locate the students in the students list. You can filter the student list by using the Browse by School, Filter by My Groups, or Filter by Staff options on the left. To view the current protocols for all of the student assignments on the list, filter the list by group. See "Filter by My Groups" on page 173 for more information. 3. Select the checkbox next to your students, or select the All checkbox at the top of the students list to select all of the students on the screen. 4. From the More Actions menu, select Change Fast ForWord Protocol. 5. Select a new protocol for your students. First choose the number of day per week (3 days or 5 days), then choose the number of minutes per day (30, 40, 50, or 90 minutes). Note that the 3-day protocols are only available for 30 and 50 minutes per day. For more about protocols see "About Fast ForWord protocols" on page 215. The new protocol will be set for all of a student's Fast ForWord assignments, including assignments at 100%. Any Reading Assistant assignments or "stopped" assignments will be skipped. Change Fast ForWord Protocol 204 11 Managing student enrollments Tip: To change the protocol for one Fast ForWord assignment at a time, edit the student's assignment manually. See "Editing a Fast ForWord product assignment" on page 227 for steps. 6. Click Change Protocol. Depending on how many students you've selected and the number of Fast ForWord assignments being changed, this process may take some time. The dialog displays a bar to indicates progress. When the change is complete, the system displays the status, along with any errors for assignments that could not be changed. When the protocol is successfully changed for an assignment, the student will see the new protocol immediately. Students who have already used the program that day will see the new protocol on the next day. Change Fast ForWord Protocol — Complete 205 11 Managing student enrollments Setting student access to demos MySciLEARN provides demo versions of the Fast ForWord exercises, along with a Reading Assistant tutorial. Demos are intended for demonstration purposes only, and do not save points and will not save a student's status in the program. For information on how students use the demos see Chapter 21 “Using the program demos” on page 383. By default, all students have access to the demos. However, MySciLEARN allows you to remove demos access for a student; for example, if that student is spending too much time in the demos instead of working on the products. To set demo access for your students 1. In MySciLEARN Manage section, click the Students tab to access the Students page. 2. Locate the students in the students list. You can filter the student list by using the Browse by School, Filter by My Groups, or Filter by Staff options on the left, or you can search for a student using the Search feature at the top of the screen. 3. Select the checkbox next to the students, or select the All checkbox at the top of the students list to select all of the students on the screen. 4. From the More Actions menu, select the appropriate action. • Add access to demos • Remove access to demos 206 11 Managing student enrollments About setting Reading Progress Indicator and Auto Assign for students The Reading Progress Indicator and Auto Assign panel in a student's profile provides access to the following features, detailed in these topics: • "Setting RPI access for students" on page 350 • "Voiding an RPI assessment for a student" on page 355 • "Setting Fast ForWord Auto Assign for students" on page 221 • "Setting Reading Assistant Auto Initial Assignment for students" on page 262 Student Profile – Reading Progress Indicator and Auto Assign 207 11 Managing student enrollments Tip: Setting RPI options at the school level If most of your students are going to use the Reading Progress Indicator and Auto Assign settings, you'll want to set those options a the school level rather than having to set them at the student level for each individual student. For information on setting these options at the school level , see the following topics: • "Setting Reading Progress Indicator school defaults" on page 106 • "Setting Fast ForWord school defaults" on page 109 • "Setting Reading Assistant school defaults" on page 113 208 11 Managing student enrollments Printing student usernames and passwords All enrolled students must use a username and password to log in to MySciLEARN.The Students page allows you to print the usernames and passwords for your students. For more information see "About student usernames and passwords" on page 181. To print usernames and passwords for your students 1. In MySciLEARN Manage section, click the Students tab to access the Students page. 2. Locate the students in the students list. You can filter the student list by using the Browse by School, Filter by My Groups, or Filter by Staff options on the left, or you can search for a student using the Search feature at the top of the screen. 3. Select the checkbox next to the students, or select the All checkbox at the top of the students list to select all of the students on the screen. 4. From the More Actions menu, select Print Usernames and Passwords to open a new page with the new the usernames and passwords. If a new page does not open, check your browser’s security settings; it may have pop-ups blocked. In this case, follow your browser’s instructions to allow pop-ups for the site. More Actions menu – Print Usernames and Passwords 5. To save the information, you can print the page, or you save the file as a text (.txt) file and then import that information into a word processing or spreadsheet software program, as needed. 209 12 Managing Fast ForWord assignments 12 Managing Fast ForWord assignments Use this chapter to learn how to assign the Fast ForWord products to your students and how to manage those assignments. What's in this chapter About Fast ForWord assignments 211 Accessing the Assign feature 212 About Fast ForWord assignment settings 214 About Fast ForWord protocols 215 About Fast ForWord exercise introduction languages 216 Choosing a Fast ForWord assignment method 217 About Fast ForWord Auto Assign 218 Setting Fast ForWord Auto Assign for students 221 Troubleshooting Fast ForWord Auto Assign 223 Assigning the Fast ForWord products 225 Editing a Fast ForWord product assignment 227 Stopping and deleting a Fast ForWord product assignment 229 210 12 Managing Fast ForWord assignments About Fast ForWord assignments Before your students can work on a Fast ForWord program, the product must be assigned to the student. The Fast ForWord program can be assigned to an individual student, or to multiple students within a group. Use the Students page to manage product assignments. To access the Assign feature on the Students page see "Accessing the Assign feature" on page 234. See the following topics to learn more about Fast ForWord assignments: • If you have not yet added students to the system, see "About students" on page 166. • Learn about Fast ForWord protocols and other settings in "About Fast ForWord assignment settings" on page 214. • To determine the assignment method that best meets your needs, see "Choosing a Fast ForWord assignment method" on page 217. • To learn about automatically creating Fast ForWord assignments, see "About Fast ForWord Auto Assign" on page 218. • To manually create Fast ForWord assignments, see "Assigning the Fast ForWord products" on page 225. • To manage assignments see "Editing a Fast ForWord product assignment" on page 227 and "Stopping and deleting a Fast ForWord product assignment" on page 229. • If you plan to use the Reading Assistant program, see Chapter 13 “Managing Reading Assistant assignments” on page 233. 211 12 Managing Fast ForWord assignments Accessing the Assign feature When you log in to MySciLEARN and click the Students tab, the Students page opens and displays schools and students based on your staff role and the permissions for your role. All staff members can access the Students page. For more information about using the Students page see "Using the students list" on page 168. For more details on how staff log in to the system, see "Logging in as a staff member" on page 29. Follow these steps to access the Assign feature for an individual student or multiple students. To access the Assign feature for an individual student 1. From the Students page, select your school from the Browse by School list, if needed. 2. Locate the student and click the student’s name to open that student’s profile. The Assignments panel appears at the top right of the screen. To assign the products see the following topics: • "Choosing a Fast ForWord assignment method" on page 217 • "Choosing a Reading Assistant assignment method" on page 258 Student Profile – Assignments Panel 212 12 Managing Fast ForWord assignments To access the Assign feature for a group 1. From the Students page, select your school from the Browse by School list, if needed. 2. Select a group from the Filter by My Groups list. The Manage Assignments menu appears at the top of the screen. To assign the products see the following topics: • "Choosing a Fast ForWord assignment method" on page 217 • "Choosing a Reading Assistant assignment method" on page 258 Students – Group Assignment Menu 213 12 Managing Fast ForWord assignments About Fast ForWord assignment settings When assigning a Fast ForWord program to a student, you can customize the product options for that student. You can also edit the options after a product has been assigned. See the following topics for information on the Fast ForWord assignment settings for students: • "About Fast ForWord protocols" on page 215 • "About Fast ForWord exercise introduction languages" on page 216 214 12 Managing Fast ForWord assignments About Fast ForWord protocols A Fast ForWord product’s protocol determines which exercises are worked on in that product, how often those exercises are worked on, and the length of time spent working in each exercise on a given day. These protocols have been proven to help maximize the benefits of the products. By default, each of the Fast ForWord programs presents two to three exercises each day, for a total of 30 minutes each day, five days a week. For those who require more flexibility, the software provides alternate protocols to meet different student requirements. For example, if your students have extra time each day to work on the Fast ForWord programs, a protocol with a longer daily participation time may be more appropriate. See the following topics to learn how to manage the Fast ForWord program protocols: • "Setting Fast ForWord default protocols for a school" on page 110 – Learn how to set the default protocols for all future Fast ForWord program assignments at the school (district managers and school managers only). • "Assigning the Fast ForWord products" on page 225 – Learn how to set the protocol for a student or a group of students while assigning the Fast ForWord program. • "Editing a Fast ForWord product assignment" on page 227 – Learn how to change a protocol for an individual student's existing Fast ForWord assignment. • Changing the Fast ForWord protocol for students – Learn how to change the protocol for multiple students and existing Fast ForWord assignments at one time. Tips for choosing a protocol MySciLEARN provides the following protocols for each Fast ForWord product (except for Reading Readiness, which uses only the 30-minute protocols). For details on how to determine which protocol will best meet the needs of your students, visit SciLEARNU and review the "Implementation Fidelity and Protocols" document. • 30 minutes a day, 5 days a week (default) • 40 minutes a day, 5 days a week • 50 minutes a day, 5 days a week • 90 minutes a day, 5 days a week • 30 minutes a day, 3 days a week • 50 minutes a day, 3 days a week 215 12 Managing Fast ForWord assignments About Fast ForWord exercise introduction languages Each of the exercises in the Fast ForWord programs begins with an introduction that explains how to work on that exercise. By default, these instructions are presented in English. However, MySciLEARN also provides these introductions in Spanish. • District managers and school managers can change the default introduction language for all new students at a school. Access this option from the Schools page.See "Setting Fast ForWord school defaults" on page 109 for steps. • The Assignment option allows you to select the program introduction language for an individual student or for multiple students within a group during the manual assignment process. Access this option from the Students page. See "Assigning the Fast ForWord products" on page 225 for steps. • The Edit Assignment option allows you to change the Fast ForWord program introduction language for an individual student after the program has been assigned. Access this option from the Students page. See "Editing a Fast ForWord product assignment" on page 227 for steps. 216 12 Managing Fast ForWord assignments Choosing a Fast ForWord assignment method Before a student can work on a Fast ForWord product, the product must be assigned to the student. MySciLEARN provides two ways to assign the Fast ForWord products to students. • Fast ForWord Auto Assign – This feature enables the software to assess your students and automatically assign the appropriate Fast ForWord product to each student. This is the default assignment method in MySciLEARN. • Manual assign – This feature allows you to determine which Fast ForWord products you’d like to assign to your students. Review the following topics to learn which method will work best for your students: • "About Fast ForWord Auto Assign" on page 218 • "Setting Fast ForWord Auto Assign for students" on page 221 • "Assigning the Fast ForWord products" on page 225 Note: If your school is using per student licenses, you can only assign products to a new student when a license is available. If you have any questions, contact Scientific Learning Customer Support. 217 12 Managing Fast ForWord assignments About Fast ForWord Auto Assign The Fast ForWord Auto Assign feature in MySciLEARN streamlines the student assignment process by quickly, efficiently, and accurately identifying the most appropriate Fast ForWord program for a student and then automatically assigning that product to the student. As the student completes his or her assignments, Fast ForWord Auto Assign continues to identify and assign appropriate Fast ForWord programs until the student has completed the entire Fast ForWord program suite. This easy-to-use assignment feature provides the following benefits: • Accelerates implementation – Because Fast ForWord Auto Assign does not require any additional assessment time beyond taking an RPI assessment, students can maximize their time on Fast ForWord program use and other learning activities. In addition, staff members can spend more time with their students instead of scoring and analyzing assessments or managing supplementary assessment materials. • Motivates students – Because students are immediately placed in the most appropriate Fast ForWord program, students spend less time on products that are too easy or too hard, resulting in enhanced motivation and maximized reading gains. This topic answers the following questions: • "How does Fast ForWord Auto Assign work?" on page 218 • "Can I use Fast ForWord Auto Assign for all of my students?" on page 219 • "Why does Fast ForWord Auto Assign require Reading Progress Indicator?" on page 219 • "Can I use Fast ForWord Auto Assign with Reading Assistant?" on page 219 • "When using Fast ForWord Auto Assign, some assign features are missing from the student profile. Is this OK?" on page 219 • "I needs some help troubleshooting Fast ForWord Auto Assign. What can I do?" on page 220 How does Fast ForWord Auto Assign work? When enabled, Fast ForWord Auto Assign automatically assesses a student’s reading level and then places the student in the most appropriate Fast ForWord program based on his or her needs. Fast ForWord Auto Assign uses specific criteria to determine a student’s reading level, such as Reading Progress Indicator (RPI) assessment scores, the student’s grade, and any educational classifications such as ELL or SES. In addition, Fast ForWord Auto Assign checks the students product history records to note which, if any, Fast ForWord programs have already been completed. Once Fast ForWord Auto Assign determines the appropriate product for the student, it automatically assigns that product to the student. When the software determines that the student is ready to move to the next Fast ForWord program, it stops that product assignment and automatically assigns the next appropriate product. 218 12 Managing Fast ForWord assignments Can I use Fast ForWord Auto Assign for all of my students? Pre-Kindergarten students and students who are using multiple Fast ForWord programs cannot use Fast ForWord Auto Assign. All other students are eligible to use Fast ForWord Auto Assign, provided they meet the assignment criteria. See "Troubleshooting Fast ForWord Auto Assign" on page 223 for more information if you find that you cannot use Fast ForWord Auto Assign with a student. Why does Fast ForWord Auto Assign require Reading Progress Indicator? When using Fast ForWord Auto Assign, you must have Reading Progress Indicator enabled for the student. Fast ForWord Auto Assign uses RPI assessment scores to determine product placement. For steps on enabling RPI for students, and for complete details on using RPI assessments, see Chapter 18 “Using Reading Progress Indicator” on page 347. Can I use Fast ForWord Auto Assign with Reading Assistant? Fast ForWord Auto Assign will not assign the Reading Assistant product; however, you can use Reading Assistant Auto Initial Assignment to automatically assign Reading Assistant while using Fast ForWord Auto Assign. See "About Reading Assistant Auto Initial Assignment" on page 259 for more information. When using Fast ForWord Auto Assign, some assign features are missing from the student profile. Is this OK? When using Fast ForWord Auto Assign, you may notice the following assign features are missing. This is by design: • Stop – When a student works on a product, the Stop button normally appears in the Assignments panel next to a product assignment. The Stop button is not needed because Auto Assign automatically stops products for you. When Auto Assign stops a product, the Resume button will still appear. You can use this button to resume a stopped product; however, Auto Assign will be disabled for that student when you click Resume for a product. See "Stopping and deleting a Fast ForWord product assignment" on page 229 for details. • Delete – The Delete Assignment feature is removed because Auto Assign does not allow product deletions. If you need to delete a product for a student, you’ll need to disable Auto Assign for that student. See "Stopping and deleting a Fast ForWord product assignment" on page 229 for details. • Edit – The Edit option in the Student Profile Assignments panel is not available until Fast ForWord Auto Assign has placed the student. See "Editing a Fast ForWord product assignment" on page 227 for details. For more information on student profiles, see "Using student profiles" on page 176. 219 12 Managing Fast ForWord assignments I needs some help troubleshooting Fast ForWord Auto Assign. What can I do? If you run into any issues with Fast ForWord Auto Assign see "Troubleshooting Fast ForWord Auto Assign" on page 223 for tips. 220 12 Managing Fast ForWord assignments Setting Fast ForWord Auto Assign for students By default, MySciLEARN enables the Fast ForWord Auto Assign feature at the school level. You can change the Auto Assign setting as follows: • For all students at a school, set at the school level. See "Setting Fast ForWord school defaults" on page 109. • For an individual student or multiple students, set at the student level. This topic provides instructions on how to enable and disable Fast ForWord Auto Assign at the student level. If you run into any issues see "Troubleshooting Fast ForWord Auto Assign" on page 223. Auto Assign rules at the student level When setting Fast ForWord Auto Assign at the student level, the system employs these rules: • • Enabling Fast ForWord Auto Assign – When you enable Fast ForWord Auto Assign for a student, the software will evaluate the student’s eligibility and start the auto assign process as follows: • If the student is eligible and has no active assignments, the software will immediately start the auto assign process. • If the student is eligible and has one active assignment, the software will wait for the student to complete the current assignment and then start the auto assign process. • If the student is not eligible for Fast ForWord Auto Assign, a notification message will appear. See "Troubleshooting Fast ForWord Auto Assign" on page 223 for details. • If your school is using per student licenses, Fast ForWord Auto Assign can only assign products when a license is available. If you have any questions, contact Scientific Learning Customer Support. Disabling Fast ForWord Auto Assign – When you disable Fast ForWord Auto Assign for a student, you can turn it back on for that student at any time. • When you turn Fast ForWord Auto Assign off, see "Assigning the Fast ForWord products" on page 225 for steps on managing assignments for these students. • If you turn Fast ForWord Auto Assign back on, the feature will re-evaluate the student and assign a product accordingly. If the student is currently working on a Fast ForWord product, Fast ForWord Auto Assign will wait for the student to complete that product before starting the placement process. To set Fast ForWord Auto Assign for your students 1. In the MySciLEARN Manage section, click the Students tab to access the Students page. 221 12 Managing Fast ForWord assignments 2. Select the school in the Browse by School list, if needed. 3. Locate the students in the students list. You can filter the student list by using the Browse by School, Filter by My Groups, or Filter by Staff options on the left, or you can search for a student using the Search feature at the top of the screen. 4. Perform one of the following tasks: To set Fast ForWord Auto Assign for an individual student from the student’s profile: • Click a student’s name to open that student’s profile. • In the Auto Assign and Reading Progress Indicator section, click the Settings button. • Under Fast ForWord Auto Assign, select the availability option you’d like to set for this student and click Apply: • To disable Fast ForWord Auto Assign, select Manual Assign. • To enable Fast ForWord Auto Assign, select Auto Assign. Please note that Reading Progress Indicator must be enabled for the student to enable Fast ForWord Auto Assign. To set Fast ForWord Auto Assign for one or more students from the students list: • In the Settings column, click the FFW Auto Assign button (A) to turn Fast ForWord Auto Assign on or off. • When the setting is turned on, the FFW Auto Assign button appears green. To turn Fast ForWord Auto Assign on, Reading Progress Indicator must be enabled for the student. • When the setting is turned off, the FFW Auto Assign button appears gray. To set Fast ForWord Auto Assign for one or more students from the More Actions menu: • Select the checkbox next to the students, or select the All checkbox at the top of the students list to select all of the students on the screen. • From the More Actions menu, select the appropriate action: • Select Turn FFW Auto Assign Off, then click Disable Auto Assign to confirm the action. • Select Turn FFW Auto Assign On, then click Enable Auto Assign to confirm the action. 222 12 Managing Fast ForWord assignments Troubleshooting Fast ForWord Auto Assign If the software is unable to auto assign a product to a student, it disables Fast ForWord Auto Assign for that student and displays an error message at the top of the screen. Use the following table to help you correct the errors, then enable Fast ForWord Auto Assign again for that student. If the problem persists, or you’d like help with this task, contact Scientific Learning Customer Support for assistance. Error message Error details and solutions Cannot auto assign <student name>: student is enrolled in grade PreK. Students who are in Pre-Kindergarten cannot use Fast ForWord Auto Assign. Fast ForWord Auto Assign has been disabled for the student. To allow the student to use Fast ForWord Auto Assign, you’ll need to change the student’s grade to K or higher, and then enable Fast ForWord Auto Assign for the student. See "Changing the grade for students" on page 202. Cannot auto assign <student name>: student is assigned more than one Fast ForWord product. Students who have more than one active Fast ForWord product assignment cannot use Fast ForWord Auto Assign. Fast ForWord Auto Assign has been disabled for the student. To allow the student to use Fast ForWord Auto Assign, you’ll need to Stop all but one of the currently assigned Fast ForWord products, and then enable Fast ForWord Auto Assign for the student. See "Stopping and deleting a Fast ForWord product assignment" on page 229. Cannot auto assign <student name>: no license available. The school is using per student licenses, and there are no more licenses available for this assignment. Fast ForWord Auto Assign has been disabled for the student. To correct the issue, you must free up or purchase a per student license, and then enable Fast ForWord Auto Assign for the student. See "Managing per student licenses for students" on page 196. Contact Customer Support if you have any questions. Cannot auto assign <student name>: the product identified as the student's next assignment is already in their product use history. Review the student's profile and manually assign the appropriate product. The student has already completed the Fast ForWord product scheduled by Fast ForWord Auto Assign. Fast ForWord Auto Assign has been disabled for the student. To allow the student to work on the Fast ForWord products, review the student's profile and manually assign the appropriate product. See "Assigning the Fast ForWord products" on page 225. 223 12 Managing Fast ForWord assignments Error message Error details and solutions Cannot auto assign <student name>: the product identified as the student's next assignment is Reading Level 5, which is already in their product use history. Review the student's profile and manually assign the appropriate product. The student has completed all of the available Fast ForWord products as scheduled by Fast ForWord Auto Assign.Fast ForWord Auto Assign has been disabled for the student. Fast ForWord Auto Assign could not be enabled for <student name> because RPI is disabled for this student. Students must have RPI enabled to use Fast ForWord Auto Assign. To allow the student to work on the Fast ForWord products, review the student's profile and manually assign the appropriate product. See "Assigning the Fast ForWord products" on page 225. To allow the student to use Fast ForWord Auto Assign, enable RPI for the student and then enable Fast ForWord Auto Assign for the student. See "Setting RPI access for students" on page 350. 224 12 Managing Fast ForWord assignments Assigning the Fast ForWord products This topic provides steps on how to manually assign the Fast ForWord products within MySciLEARN. If you have not yet added students to MySciLEARN, see "Adding a new student" on page 182. You can use the assign feature as follows: • You can use a student’s profile to manually assign products to that student. • You can use the students list to manually assign products to students. More about assigning Fast ForWord products • By default, MySciLEARN enables Fast ForWord Auto Assign for all schools. To use the manual assignment method, you’ll need to disable Fast ForWord Auto Assign for the student. See the following topics for steps: • "Setting Fast ForWord Auto Assign for students" on page 221 • "Setting Fast ForWord school defaults" on page 109 • If your school is using per student licenses, you can only assign products to a new student when a license is available. For more information see "Managing per student licenses for students" on page 196. If you have any questions, contact Scientific Learning Customer Support. • Scientific Learning does not recommend assigning more than one product to a student at a time. However, MySciLEARN does provide this option for use by administrators who want to carefully tailor a learner’s experience to maximize learning time. To manually assign a Fast ForWord product to your students 1. In MySciLEARN Manage section, click the Students tab to access the Students page. 2. Perform one of the following tasks: To assign a product to an individual student from a student’s profile: • Locate the student in the students list. You can filter the student list by using the Browse by School, Filter by My Groups, or Filter by Staff options on the left, or you can search for a student using the Search feature at the top of the screen. • Click the student’s name to open that student’s profile. • Click the New Assignments button in the Assignments section. To assign a product to one or more students from the students list: • Select your school from the Browse by School list, if needed. • Select your group from the Filter by Group list. 225 12 Managing Fast ForWord assignments • Select the checkbox next to one or more students, or select the checkbox at the top of the students list to select all of the students on the screen. • Select Assign New from the Manage Assignments menu. 3. On the Assign New Product screen, select a Fast ForWord product, and if needed, select an alternate protocol or introduction language. When choosing a protocol, first choose the number of day per week (3 days or 5 days), then choose the number of minutes per day (30, 40, 50, or 90 minutes). Note that the 3-day protocols are only available for 30 and 50 minutes per day. For more about protocols see "About Fast ForWord protocols" on page 215. Students – Assign New Product 4. Click Assign. 226 12 Managing Fast ForWord assignments Editing a Fast ForWord product assignment When needed, you make changes to a student’s Fast ForWord product assignment. For example, you can select an alternate protocol to meet specific time requirements. For detailed descriptions of these settings, see "About Fast ForWord assignment settings" on page 214. You can only edit assignments for an individual student. Note: If you're using Fast ForWord Auto Assign, you can edit the assignment settings for a Fast ForWord product once the student has been assigned that product. For more information on Fast ForWord Auto Assign, see "About Fast ForWord Auto Assign" on page 218. Best practice: The best time to change the protocol is at the beginning of the week, before your students start training. This will avoid any impact on their weekly participation and attendance scores. To edit the Fast ForWord product assignment settings for a student 1. In MySciLEARN Manage section, click the Students tab to access the Students page. 2. Locate the student in the students list. You can filter the student list by using the Browse by School, Filter by My Groups, or Filter by Staff options on the left, or you can search for a student using the Search feature at the top of the screen. 3. Click the student’s name to open that student’s profile. 4. In the Assignments section, click the Edit icon next to the Fast ForWord product. You will not see the Stop Sign icon if the student is using Auto Assign. Auto Assign automatically stops the Fast ForWord products for each student as needed. For more information see "About Fast ForWord Auto Assign" on page 218 5. On the Edit Assignment screen, make the edits to the Fast ForWord product as needed. • Change the protocol as needed. This change will take effect on the next training day. • Change the introduction language as needed. This change will take effect immediately. When changing the protocol, first choose the number of day per week (3 days or 5 days), then choose the number of minutes per day (30, 40, 50, or 90 minutes). Note that the 3-day protocols are only available for 30 and 50 minutes per day. For more about protocols see "About Fast ForWord protocols" on page 215. 227 12 Managing Fast ForWord assignments Student Profile – Edit Assignment 6. Click Save. 228 12 Managing Fast ForWord assignments Stopping and deleting a Fast ForWord product assignment When you assign a Fast ForWord product to a student, you can go back at any time and remove that assignment—for either an individual student or multiple students within a group, by either stopping or deleting that assignment. Choose from the following two removal options: • Stop – Perform this task to remove student access to the Fast ForWord product but leave the student's product data intact. • Delete – Perform this task to remove access to the Fast ForWord product and permanently delete the student's product data from the system. Note: You cannot stop or delete an assignment for a student who is actively using Fast ForWord Auto Assign. For details see "About Fast ForWord Auto Assign" on page 218. • Fast ForWord Auto Assign automatically stops the Fast ForWord products for each student as needed, so you don’t need to perform this task. • Fast ForWord Auto Assign does not allow product assignment deletions. To delete a product that was auto assigned, you’ll need to disable Fast ForWord Auto Assign for that student. Stopping a Fast ForWord product assignment Perform this task when a student has finished working on a Fast ForWord product and you still want to keep a record of that student’s work; for example, if that student plans to continue working on another Scientific Learning product. When you stop a Fast ForWord product assignment, the software removes the product from the Exercises screen and shows Resume next to the product name in the Assign screen. The product data will remain intact, and the results will continue to appear in Progress Tracker, and a completion certificate for that product will appear in the student’s Weekly Achievement report. If you click Resume, the student will resume the product from where he or she left off. You can only stop a Fast ForWord product assignment for an individual student. Note: Fast ForWord Auto Assign does not allow you to stop a Fast ForWord product assignment. Fast ForWord Auto Assign automatically stops the Fast ForWord products for each student as needed. To access this feature, you'll need to disable Fast ForWord Auto Assign for that student first. For more information see "About Fast ForWord Auto Assign" on page 218. 229 12 Managing Fast ForWord assignments To stop a Fast ForWord product assignment 1. In MySciLEARN Manage section, click the Students tab to access the Students page. 2. Locate the student in the students list. You can filter the student list by using the Browse by School, Filter by My Groups, or Filter by Staff options on the left, or you can search for a student using the Search feature at the top of the screen. 3. Click the student’s name to open that student’s profile. 4. In the Assignments section, click the stop sign icon next to the Fast ForWord product you’d like to stop. Student Profile – Assignments The assignment is stopped. • The student data remains intact in MySciLEARN and Progress Tracker. • The product is removed from the Student Exercises screen. • Resume appears next to the product name on the Student Profile screen. Clicking Resume will resume the product, and the student will start where he or she left off. • A Fast ForWord product completion certificate is generated in the student’s Weekly Achievement report in Progress Tracker. Deleting a Fast ForWord product assignment Perform this task when the student will no longer work on the assigned Fast ForWord product and you do not want to keep any record of the student’s work on the product. You can also perform this task if you assigned the product by mistake. When you delete a Fast ForWord product assignment, the student’s product access is removed from the Student Exercises page. Additionally, the student’s data for that product is permanently deleted from the MySciLEARN. If you assign the product again, the student will start at the beginning of the product. You can use the delete assignment feature as follows: 230 12 Managing Fast ForWord assignments • Delete an individual student's assignment from that student’s profile. • Delete assignments for a group of students from the students list. Fast ForWord Auto Assign does not allow you to delete a Fast ForWord product assignment. To delete a product that was auto assigned, you’ll need to disable Fast ForWord Auto Assign for that student.For more information see "About Fast ForWord Auto Assign" on page 218. To delete a Fast ForWord product assignment IMPORTANT! Deleting a Fast ForWord product assignment permanently removes all the student's product data files from MySciLEARN. The product can be assigned to the student again; however, the student's original results will be lost, and the student will start from the beginning of the product. 1. In MySciLEARN Manage section, click the Students tab to access the Students page. 2. Perform one of the following tasks: To delete an assignment for an individual student from the student’s profile: • Locate the students in the students list. You can filter the student list by using the Browse by School, Filter by My Groups, or Filter by Staff options on the left, or you can search for a student using the Search feature at the top of the screen. • Click the student’s name to open the profile. • In the Assignments section, click the trash icon next to the Fast ForWord product assignment. To delete an assignment for one or more students from the students list: • Select your school from the Browse by School list, if needed. • Select your group from the Filter by Group list. • Select the checkbox next to one or more students, or select the checkbox at the top of the students list to select all of the students on the screen. • Select Delete Assignment from the Manage Assignments menu. • Select the Fast ForWord product assignment from the product menu and click Delete. 3. On the delete assignment confirmation message, click Confirm Delete. You can assign the deleted Fast ForWord product again; however, the student will start from the beginning of the exercises. 231 12 Managing Fast ForWord assignments • If the student has worked on the product, the product is removed from the Assignments section and that student’s data files for that product are permanently deleted from the system. • If not, the assignment is simply erased as if it never existed. Confirm Delete Product Assignment 232 13 Managing Reading Assistant assignments 13 Managing Reading Assistant assignments Use this chapter to learn how to assign the Reading Assistant product to your students and how to manage those assignments. What's in this chapter Accessing the Assign feature 234 About Reading Assistant content organization 236 About Reading Assistant reading levels 237 About Reading Assistant assignment settings 238 About library assignments 239 Changing library assignments 240 About Reading Assistant schedules 241 About instruction language 243 About glossary language 244 About content progression 245 About content placement 247 About speech recognition settings 255 About language support 257 Choosing a Reading Assistant assignment method 258 About Reading Assistant Auto Initial Assignment 259 Setting Reading Assistant Auto Initial Assignment for students 262 Troubleshooting Reading Assistant Auto Initial Assignment 264 Assigning the Reading Assistant product 265 Editing a Reading Assistant assignment 267 Stopping and deleting a Reading Assistant assignment 269 Advancing to the next Reading Assistant library 273 233 13 Managing Reading Assistant assignments Accessing the Assign feature When you log in to MySciLEARN and click the Students tab, the Students page opens and displays schools and students based on your staff role and the permissions for your role. All staff members can access the Students page. For more information about using the Students page see "Using the students list" on page 168. For more details on how staff log in to the system, see "Logging in as a staff member" on page 29. Follow these steps to access the Assign feature for an individual student or multiple students. To access the Assign feature for an individual student 1. From the Students page, select your school from the Browse by School list, if needed. 2. Locate the student and click the student’s name to open that student’s profile. The Assignments panel appears at the top right of the screen. To assign the products see the following topics: • "Choosing a Fast ForWord assignment method" on page 217 • "Choosing a Reading Assistant assignment method" on page 258 Student Profile – Assignments Panel 234 13 Managing Reading Assistant assignments To access the Assign feature for a group 1. From the Students page, select your school from the Browse by School list, if needed. 2. Select a group from the Filter by My Groups list. The Manage Assignments menu appears at the top of the screen. To assign the products see the following topics: • "Choosing a Fast ForWord assignment method" on page 217 • "Choosing a Reading Assistant assignment method" on page 258 Students – Group Assignment Menu 235 13 Managing Reading Assistant assignments About Reading Assistant content organization Before you assign the Reading Assistant product to your students, review the following topic to gain a thorough understanding on the Reading Assistant content structure and design. Then, see "Assigning the Reading Assistant product" on page 265 for steps on setting these options while assigning the program. Based on age and reading ability, learners can have a wide range of reading needs. To address these needs, the Reading Assistant software organizes its content as follows: • Library – Also called a content library. A set of selections (texts) that can be assigned to a student. Reading Assistant provides two types of libraries: content packs and custom libraries. • Content pack – A library organized by the reading experts at Scientific Learning, designed to appeal to age-specific interests across a range of readability levels. For example, Content Pack 6-8—which is written to interest students ages 11-14—includes a selection about skateboarding designed to appeal to a 6th grader, but written at a 3rd grade reading level to accommodate a 6th grade struggling reader. • Custom library – A library organized by you to meet the individual reading needs of your students, created using selections from the Reading Assistant content packs. • Reading level – The difficulty level of the selections within the content libraries. • Content placement – A student’s starting point within a content library. The student can be placed automatically or manually based on a reading score, or based on a review of the content within the library. With custom libraries, you must manually set the starting point. • Content progression – How a student moves through the content in their assigned library. Locked progression only allows the student move through the content as it is ordered within the library. Student-selected progression allows the student to choose the order in which they move through the selections or activities. Unlocked progression allows teachers to access any activity in any selection at any time, providing flexibility for classroom instruction. You may also encounter the following terms that identify further groupings of reading content. • Topic – A group of selections within a content pack at the same reading level, related in content by subject, theme, or set of ideas. Topics do not appear within custom libraries. • Selection – An individual text to be read by the student. • Activity – A set of required tasks within a selection. Each selection includes three activities: • Preview and Read on My Own (Step 1) • Read and Record (Step 2) • Take the Quiz (Step 3) 236 13 Managing Reading Assistant assignments About Reading Assistant reading levels Because every classroom includes students with a range of reading abilities, each selection in Reading Assistant has been carefully evaluated for readability and then leveled using the following widely-adopted leveling systems. You can use these reading levels to help assign the most appropriate library to your students. See "Assigning the Reading Assistant product" on page 265 for steps. Grade equivalent To help identify the complexity of the readings, Reading Assistant assigns a grade equivalent from the Spache (K-3) or the Dale-Chall (4-12) readability formulas to each selection. For example, a grade equivalent of 1 identifies text that is suitable for a typical first-grade reader, and a grade equivalent of 2.5 identifies text that is suitable for a typical second-grade reader who is halfway through the year. Guided Reading Level Each selection in Reading Assistant has been associated with a Guided Reading Level based on the widely accepted research done by Fountas and Pinnell, as presented in Leveled Books, K–8: Matching Texts to Readers for Effective Teaching (Heinemann, © 2005). Guided Reading Levels A–Z—with A being least difficult—are determined through an analysis of the text with respect to genre, text structure, content, themes and ideas, language and literary features, sentence complexity, vocabulary, words (length and complexity), illustrations, and text features. Non-prose text, which cannot be analyzed according to the same criteria as prose, is labeled NP. The Lexile® Framework for Reading The text of each selection in Reading Assistant has been analyzed by MetaMetrics to determine the Lexile text measure. Each Lexile text measure is based on two strong predictors of a text’s difficulty: word frequency and sentence length. The text-analyzing software assigns a Lexile measure based on these analyses: • Text that contains many common or high-frequency vocabulary words yields a low Lexile measure. Text that contains words that do not occur frequently in common usage, such as subject-specific academic words, yields a higher Lexile measure. • Sentence length is a general predictor of difficulty. The analysis software counts the number of words in each sentence and calculates an average sentence length. Text with a shorter average sentence length yields a lower Lexile measure than text with a longer average sentence length. Poetry cannot be analyzed by these criteria, so poetry receives a Lexile text measure of NP (nonprose). 237 13 Managing Reading Assistant assignments About Reading Assistant assignment settings When you assign the Reading Assistant product to a student, you will need to set up the reading assignment for that student. This topic includes detailed definitions of the Reading Assistant settings. Review the entire topic for a thorough understanding of these settings before you perform a Reading Assistant assignment. Then, see "Assigning the Reading Assistant product" on page 265 for steps on setting these options while assigning the program. Reading Assistant – Assign New Product All Reading Assistant assignments include specific product settings. See the following topics: • "About library assignments" on page 239 • "About Reading Assistant schedules" on page 241 • "About instruction language" on page 243 • "About glossary language" on page 244 • "About content progression" on page 245 • "About content placement" on page 247 • "About speech recognition settings" on page 255 • "About language support" on page 257 238 13 Managing Reading Assistant assignments About library assignments To use Reading Assistant, the student must have a library assignment. When you assign Reading Assistant to a student, the software automatically selects the content pack that includes the student’s current grade. For example, a 4th grade student is automatically assigned Content Pack 45: Library Assignment Menu When assigning the program, you can accept the default library assignment, or you can select a different library based on your student’s needs. See "Assigning the Reading Assistant product" on page 265 for steps. You can also create and assign your own custom libraries. For help choosing a library assignment for your student, see Chapter 14 “Managing Reading Assistant libraries” on page 274. Note: A student can only be assigned one Reading Assistant library at a time. 239 13 Managing Reading Assistant assignments Changing library assignments On occasion, you may want to change the currently assigned library to another library. For example: • If the student has completed all of the selections in a content pack, you may want to start the student on a new assignment in the next content pack. • If after a week of training, you discover that the student has needs that are not met by one of the content packs, you can create a custom library and assign it to the student. See "Editing a Reading Assistant assignment" on page 267 for instructions on how to change a library assignment. If you have not yet assigned the program to the student, see "Assigning the Reading Assistant product" on page 265. More about changing library assignments • If a student was assigned to a custom library that is no longer published, the library will still appear in the Library menu until you change the library assignment. For information on custom libraries, see "About libraries" on page 275. • If a student is finishing up a library and is ready to move on to the next library, see "Advancing to the next Reading Assistant library" on page 273. 240 13 Managing Reading Assistant assignments About Reading Assistant schedules A Reading Assistant schedule determines the length of time spent training in the product each day. You can determine the daily work time for a Reading Assistant assignment as follows: • Using a schedule – Automatically notifies the student after a set number of minutes (default) • Opting out of schedules – Allows the student to work without a schedule While first assigning the program to your students, you can select the schedule for an individual student or for multiple students within a group (see "Assigning the Reading Assistant product" on page 265 for steps). Once you've assigned Reading Assistant to a student, use the Edit Assignment option to change the schedule for an individual student (see "Editing a Reading Assistant assignment" on page 267 for steps). Schedule Menu Using a schedule Reading Assistant provides schedules to help time the student’s work session each day. For example, when the student completes the current selection after working for the scheduled number of minutes, the software will notify the student that time is up. The student can either exit or continue the session. The schedule always starts over on the next work session, even if the schedule has time remaining. Libraries includes multiple schedule options: None, 20, 30, or 40 minutes. When you assign a library, the system sets the schedule based on the library type. You can manually change the schedule as needed: • Content packs automatically assign a schedule as follows: • K-3: 20 minutes 241 13 Managing Reading Assistant assignments • • 4-5: 30 minutes • 6-8: 40 minutes • 9-12: 40 minutes Custom libraries do not default to any schedule; you must manually select a schedule option. Opting out of schedules As an alternative, you can opt out of the schedules entirely and implement the student’s daily work schedule on your own. For example, you could instruct the student to work on Reading Assistant until he or she completes a specific set of activities each day, regardless of the time spent training. Or, you could allow the student to work on the activities as long he or she likes. To disable the schedules, select None as the assigned schedule. 242 13 Managing Reading Assistant assignments About instruction language The Reading Assistant software provides audio instructions throughout the product. By default, the software presents the instructions in English. As an alternative, you can choose to present the instruction audio in Spanish. See "Assigning the Reading Assistant product" on page 265 for steps on setting this option. Instructions Language Menu Tip: District managers and school managers can change the default instruction language for an entire school. Access this option from the Schools page. See "Setting Reading Assistant school defaults" on page 113 for details. 243 13 Managing Reading Assistant assignments About glossary language The Reading Assistant software provides a glossary for some of the words within a selection. By default, the software provides the glossary information in English. As an alternative, you can choose to present glossary information in both English and Spanish.Then, students can use an Español button to access the Spanish glossary information. See "Assigning the Reading Assistant product" on page 265 for steps on setting this option. Glossary Language Menu Tip: District managers and school managers can change the default glossary language for an entire school. See "Setting Reading Assistant school defaults" on page 113 for details. 244 13 Managing Reading Assistant assignments About content progression When assigning Reading Assistant, you’ll need to decide how you want the student to progress through the content. Choose from the following three options. • Locked – The student must complete topics, selections, and activities in a planned order (default) • Student-selected – The student has flexibility in selection choices only • Unlocked – Allows for total flexibility in content progression and completion (recommended for teachers only) See "Assigning the Reading Assistant product" on page 265 for steps on setting this option. Content Progression Menu Locked content progression When you assign the Reading Assistant product, content progression is automatically locked. The student must complete all activities within a selection and all selections within a topic, in the order that they appear in the library. The student may not move from one selection to the next without completing all of the activities, in order. Student-selected content progression As an alternative, you can allow the student to have more control over the content progression. This option allows the student to work on any selection in a library; however, once a selection is started, the student must complete all of the selection activities, in order, before moving on to a new selection. A selection is considered started when the student responds to one Think About It in the Preview and Read on My Own activity. 245 13 Managing Reading Assistant assignments Unlocked content progression Recommended for teachers/classroom instruction only, this option allows the user to access any selection within any topic, and any activity within that selection, in any order. Unlocked progression provides teachers and other staff with the flexibility to model different aspects of the program to a student. 246 13 Managing Reading Assistant assignments About content placement When using the program, the student should start at the reading level that best suits his or her reading ability. When the software knows the student’s reading level, it can select the best starting topic at which the student should begin reading. The student will work through the content in the assigned library from that point forward until complete. When assigning a library, use one of the following options to place the student into the appropriate reading level. See "Assigning the Reading Assistant product" on page 265 for steps on setting this option. • Use RPI (Automatic) – Automatically place the student in a content pack based on a Reading Progress Indicator (RPI) assessment score. This is the default option when you assign a content pack and when using Reading Assistant Auto Initial Assignment (see "About Reading Assistant Auto Initial Assignment" on page 259). • Use Reading Level – Place the student in a content pack based on known reading scores such as grade equivalent scores, Guided Reading Levels, or Lexile® measures. • Use Content Overview – Review the content and select the starting point in a content pack or custom library that you feel is most appropriate. Content Placement Menu The following topics provide more details content placement. • "Content placement – Use RPI (Automatic)" on page 249 • "Content placement – Use Reading Level" on page 250 • "Content placement – Use Content Overview" on page 252 • "Changing content placement" on page 254 247 13 Managing Reading Assistant assignments More about content placement The Use Content Overview placement method provides the most control over where your students start within the assigned library. To further tailor the experience to your students' needs, you can build custom libraries and place your students exactly where you'd like them to start. For more information about how to use custom libraries, see "About libraries" on page 275. 248 13 Managing Reading Assistant assignments Content placement – Use RPI (Automatic) When you assign a content pack to a student, Use RPI (Automatic) is the default placement method for selecting a starting point in that content pack. This placement method requires that the student complete an RPI assessment. MySciLEARN uses the grade equivalent score attained in the RPI assessment to place the student at the appropriate starting topic within the content pack. The student will start with that topic, and then continue working through the rest of the topics to end of the content pack. See "Assigning the Reading Assistant product" on page 265 for steps on setting this option. Content Placement – Use RPI More about Use RPI (Automatic) • IMPORTANT! If you select the Use RPI (Automatic) placement method and then disable RPI after assigning Reading Assistant, the content placement for your students may change. Before disabling RPI for those students, you may want to wait until your students have been placed into the content or you may want to manually change the content placement method on your own, to make sure the students are placed as you'd like them to be. • If your school is not using Reading Progress Indicator, or if you have disabled Reading Progress Indicator for this student, the software automatically defaults to the second option, Use Reading Level, with Grade Equivalent selected and the starting point set at the lowest reading level score. See "Content placement – Use Reading Level" on page 250 for details. • The Use RPI (Automatic) placement method is only available for content packs. If you assign a custom library, you must use the Use Content Overview placement method to select a starting point. See "Content placement – Use Content Overview" on page 252 for details. 249 13 Managing Reading Assistant assignments Content placement – Use Reading Level Within an educational environment, teachers use various evaluation methods to assess a student’s reading level. For more information on reading levels, see "About Reading Assistant reading levels" on page 237. The Use Reading Level placement option allows you to use the most common types of reading scores to select a student’s starting point within a content pack: • Grade equivalent scores • Guided reading levels • Lexile measures When you select the Use Reading Level placement method and choose a reading level score, the software uses that score to place the student at the appropriate starting topic within the assigned content pack. The software assigns that starting topic and all of the topics from that point forward to the end of the content pack. • If your school is not using Reading Progress Indicator, or if you have disabled Reading Progress Indicator for this student, the software automatically defaults to the Use Reading Level placement method, with Grade Equivalent selected and the starting point set at the lowest reading level score in the content pack. • If you use the Use Reading Level placement method but do not choose a reading level score, the software will automatically set the starting point at the lowest reading level score in the content pack. See "Assigning the Reading Assistant product" on page 265 for steps on setting this option. Content Placement – Use Reading Level 250 13 Managing Reading Assistant assignments More about Use Reading Level • When you choose the Use Reading Level placement method, Reading Assistant uses a specific algorithm to make placement decisions based on reading scores. To revise student placements, select the Use Content Overview placement method. • The Use Reading Level placement method is only available for content packs. If you assign a custom library, you must use the Use Content Overview placement method to select a starting point. See "Content placement – Use Content Overview" on page 252 for details. 251 13 Managing Reading Assistant assignments Content placement – Use Content Overview The content overview placement method allows you to review all of the content in the selected library and manually select the starting point based on selection content or reading level. Once you select a starting point and click OK,The student will start with that topic, and then continue working through the rest of the topics to end of the library. See "Assigning the Reading Assistant product" on page 265 for steps on setting this option. When using the content overview placement method, the Select Starting Point screen allows you to review content information and select a starting point based on the library type: content pack or custom library. For help determining which library will work best for a student, see Chapter 14 “Managing Reading Assistant libraries” on page 274. Content pack placement With content packs, the Select Starting Point screen opens when you select the Use Content Overview option. All of the topics in that content pack appear in a list. Each topic provides the following details, which can help you choose the best starting point: • A recommended grade for that topic; for example, “G1 Beginning” indicates that the topic Animal Stories is written at a reading level that corresponds to the beginning of 1st grade • The reading level ranges for that topic: grade equivalent, Guided Reading Level, and Lexile measure Use Content Overview – Content Pack Placement 252 13 Managing Reading Assistant assignments Tip: To select a starting point based on the selections in each topic, use the Content Libraries page to view the topic selections and details. See "Viewing content packs" on page 278 for more information. Custom library placement When you assign a custom library, the Select Starting Point screen automatically opens. All of the selections in the custom library appear in a list. To help you choose the best starting point, each selection in the list shows its corresponding reading level score: grade equivalent, Guided Reading Level, and Lexile measure. Custom Library Placement Tip: To select a starting point based on selection details, view the library on the Content Libraries page. See "Viewing custom libraries" on page 279 for details. 253 13 Managing Reading Assistant assignments Changing content placement On occasion, you may want to change the student's current starting point in the library after the student works on the Reading Assistant product. For example: • If the student is struggling with a particular selection to the point where he or she is becoming too frustrated to make significant progress, you might want to move the student to content at a lower reading level in the library. In this case, the student may revisit previously completed content. • If the content is too easy for the student, you can move them forward to a more challenging reading level in the library. See "Editing a Reading Assistant assignment" on page 267 for instructions on how to change a student's content placement or library assignment. When changed, the software will automatically adjust the current assignment and place the student at a new starting point. 254 13 Managing Reading Assistant assignments About speech recognition settings For most readers, the default speech recognition settings will support their use of the Reading Assistant product during the Read and Record activity. However, some students may need their settings adjusted to help maximize their experience. Reading Assistant allows you to change the following speech recognition settings as needed. • Pronunciation correctness • Intervention wait time See "Editing a Reading Assistant assignment" on page 267 for steps on adjusting these settings for a student. When changed, the new settings take effect immediately. To change the settings before assigning the program, see "Assigning the Reading Assistant product" on page 265. Speech Recognition Settings Pronunciation correctness The accuracy with which a student pronounces a word during the Read and Record activity can vary depending on the student’s understanding of that word, or as a result of an accent or other speech characteristics. The Pronunciation Correctness option allows you to adjust the software to be more strict or less strict (on a scale of 1 to 100) when evaluating a word. Finding the appropriate setting can greatly enhance the experience with the product. For example: • If the student is struggling excessively with his or her reading, you might want to decrease (or relax) the strictness of the pronunciation requirements. Start by moving the correctness slider to the left toward Less Strict, from the default 50 mark to the 25 mark. If the student is still having difficulty, you can move the correctness slider all the way to the 1 mark; however, at this lowest setting the software will be extremely lenient and will not correct most mispronunciations. • If the software allows the student to mispronounce many words without intervening, you may want to increase the strictness. Move the slider to the right toward More Strict by increments of 10, then adjust as necessary. Use the Reset button to restore the pronunciation correctness setting to 50. 255 13 Managing Reading Assistant assignments Speech Recognition Settings – Pronunciation Correctness Tip: If you notice that the software continually intervenes on correctly read words, and the student does not have a strong accent or other speech issue, there may be a problem with the audio quality. Listen to the student’s recording to determine if audio quality is the issue. If so, correct the audio issue rather than change the correctness slider. Intervention wait time Use the Intervention Wait Time option to change the amount of time before the product intervenes during the Read and Record activity. For example, if the student is struggling and needs more time to decode words, you could increase the time before an intervention so that the student has adequate time to read the text. In this case, move the slider to the right, toward More Time. Use the Reset button to restore the default intervention wait time. Speech Recognition Settings – Intervention Wait Time 256 13 Managing Reading Assistant assignments About language support The Reading Assistant software provides audio support for the Think About Its, as well as the Take the Quiz comprehension questions. When a question opens, the software automatically reads the following items aloud, and audio icons allow the student to replay the audio: • Think About It hints • Take the Quiz questions and all possible answers The Enable Audio Support option is selected by default. You can disable it for students who do not need the additional assistance. When changed, the new settings take effect immediately. See "Assigning the Reading Assistant product" on page 265 for steps on setting this option. Language Support Note: District managers and school managers can change the default language support option for an entire school. See "Setting Reading Assistant school defaults" on page 113 for details. 257 13 Managing Reading Assistant assignments Choosing a Reading Assistant assignment method Before a student can work on Reading Assistant, the product must be assigned to the student. MySciLEARN provides two ways to assign Reading Assistant to students. • Reading Assistant Auto Initial Assignment – This feature allows the software to assess your students, automatically assign Reading Assistant to each student, and choose the most appropriate library and starting point for each student. • Manual assign – This feature allows you to assign Reading Assistant to your students and choose how to place them in the Reading Assistant libraries. This is the default assignment method for Reading Assistant. Review the following topics to learn which method will work best for your students: • "About Reading Assistant Auto Initial Assignment" on page 259 • "Setting Reading Assistant Auto Initial Assignment for students" on page 262 • "Assigning the Reading Assistant product" on page 265 Note: If your school is using per student licenses, you can only assign Reading Assistant to a new student when a license is available. If you have any questions, contact Scientific Learning Customer Support. 258 13 Managing Reading Assistant assignments About Reading Assistant Auto Initial Assignment The Reading Assistant Auto Initial Assignment feature in MySciLEARN streamlines the student assignment process by quickly, efficiently, and accurately assessing the student and then automatically assigning Reading Assistant and placing the student in the appropriate content and starting point. This easy-to-use assignment feature provides the following benefits: • Accelerates implementation – Because Reading Assistant Auto Initial Assignment does not require any additional administration or assessment time beyond taking an RPI assessment, students can maximize their time on Reading Assistant product use and other learning activities. In addition, staff members can spend more time with their students instead of manually analyzing assessments and performing assignment tasks. • Motivates students – Because students are immediately placed in the most appropriate library and starting point in Reading Assistant, students spend less time on content that is too easy or too hard, resulting in enhanced motivation and maximized reading gains. This topic answers the following questions: • "How does Reading Assistant Auto Initial Assignment work?" on page 259 • "Can I use Reading Assistant Auto Initial Assignment for all of my students?" on page 260 • "Why does Reading Assistant Auto Initial Assignment require Reading Progress Indicator?" on page 260 • "Will Reading Assistant Auto Initial Assignment work with my custom libraries?" on page 260 • "Can I use Reading Assistant Auto Initial Assignment with the Fast ForWord products?" on page 260 • "My student finished all of the content assigned by Reading Assistant Auto Initial Assignment. What happens now?" on page 260 • "When using Reading Assistant Auto Initial Assignment, some assign features are missing from the student profile. Is this OK?" on page 261 • "I needs some help troubleshooting Reading Assistant Auto Initial Assignment. What can I do?" on page 261 How does Reading Assistant Auto Initial Assignment work? When enabled, Reading Assistant Auto Initial Assignment automates the entire assignment process for you. All you need to do is add the students to MySciLEARN and let the system do the rest: • First, it will assign Reading Assistant to the student. • Then it will place the student in one of four content packs (libraries) based on the student's grade you entered during the enrollment process. 259 13 Managing Reading Assistant assignments • Finally it will assess the student’s reading level by administering Reading Progress Indicator (RPI), and then use the results to place the student at the appropriate starting point in that content pack. Can I use Reading Assistant Auto Initial Assignment for all of my students? Pre-Kindergarten students and students who are already using Reading Assistant cannot use Reading Assistant Auto Initial Assignment. All other students are eligible to use Reading Assistant Auto Initial Assignment. See "Troubleshooting Reading Assistant Auto Initial Assignment" on page 264 for more information if you find that you cannot use Reading Assistant Auto Initial Assignment with a student. Why does Reading Assistant Auto Initial Assignment require Reading Progress Indicator? When using Reading Assistant Auto Initial Assignment, you must have Reading Progress Indicator enabled for the student. Reading Assistant Auto Initial Assignment uses RPI assessment scores to determine content placement. For steps on enabling RPI for students, and for complete details on using RPI assessments, see Chapter 18 “Using Reading Progress Indicator” on page 347. Will Reading Assistant Auto Initial Assignment work with my custom libraries? No. Reading Assistant Auto Initial Assignment only works with our four standard content packs (see "About libraries" on page 275 for more information). If you want your students to use a custom library, you'll need to manually assign Reading Assistant to those students. See "Assigning the Reading Assistant product" on page 265 for details on manually assigning Reading Assistant. Can I use Reading Assistant Auto Initial Assignment with the Fast ForWord products? Reading Assistant Auto Initial Assignment will not assign a Fast ForWord product; however, you can use Fast ForWord Auto Assign to automatically assign the Fast ForWord products while using Reading Assistant Auto Initial Assignment. See "About Fast ForWord Auto Assign" on page 218 for more information. My student finished all of the content assigned by Reading Assistant Auto Initial Assignment. What happens now? Reading Assistant Auto Initial Assignment only performs the initial assignment and placement for a student. When a student finishes that content, you'll need to manually assign more content to the 260 13 Managing Reading Assistant assignments student. See "Advancing to the next Reading Assistant library" on page 273 for more information. When using Reading Assistant Auto Initial Assignment, some assign features are missing from the student profile. Is this OK? When using Reading Assistant Auto Initial Assignment, you may notice the following assign features are missing from the student's profile. This is by design: • Stop – The Stop Assignment feature is removed because Reading Assistant Auto Initial Assignment does not allow you to stop the assignment. If you need to stop the assignment for a student, you’ll need to disable Reading Assistant Auto Initial Assignment for that student. See "Stopping and deleting a Reading Assistant assignment" on page 269. • Delete – The Delete Assignment feature is removed because Reading Assistant Auto Initial Assignment does not allow product deletions. If you need to delete a product for a student, you’ll need to disable Reading Assistant Auto Initial Assignment for that student. See "Stopping and deleting a Reading Assistant assignment" on page 269. • Edit – The Edit option in the Student Profile Assignments panel is not available until Reading Assistant Auto Initial Assignment has placed the student. See "Editing a Reading Assistant assignment" on page 267. For more information on student profiles, see "Using student profiles" on page 176. I needs some help troubleshooting Reading Assistant Auto Initial Assignment. What can I do? If you run into any issues with Reading Assistant Auto Initial Assignment, see "Troubleshooting Reading Assistant Auto Initial Assignment" on page 264 for tips. 261 13 Managing Reading Assistant assignments Setting Reading Assistant Auto Initial Assignment for students By default, MySciLEARN disables the Reading Assistant Auto Initial Assignment feature at the school level. You can change the Reading Assistant Auto Initial Assignment setting as follows: • For all students at a school, set at the school level. See "Setting Reading Assistant school defaults" on page 113 • For an individual student or multiple students, set at the student level. This topic provides instructions on how to enable and disable Reading Assistant Auto Initial Assignment at the student level. Reading Assistant Auto Initial Assignment rules at the student level When setting Reading Assistant Auto Initial Assignment at the student level, the system employs these rules: • • Enabling Reading Assistant Auto Initial Assignment – When you enable Reading Assistant Auto Initial Assignment for a student, the software will evaluate the student’s eligibility and start the auto assign process as follows: • If the student is eligible for Reading Assistant Auto Initial Assignment and does not have a Reading Assistant assignment, the software will immediately start the auto assign process. • If the student is not eligible for Reading Assistant Auto Initial Assignment, a notification message will appear. See "Troubleshooting Reading Assistant Auto Initial Assignment" on page 264 for details. • If your school is using per student licenses, Reading Assistant Auto Initial Assignment can only assign the product when a license is available. If you have any questions, contact Scientific Learning Customer Support. Disabling Reading Assistant Auto Initial Assignment – When you disable Reading Assistant Auto Initial Assignment for a student, you can turn it back on for that student at any time. • When you turn Reading Assistant Auto Initial Assignment off, see "Assigning the Reading Assistant product" on page 265 for steps on manually assigning Reading Assistant to that student. • If you turn Reading Assistant Auto Initial Assignment back on, the feature will reevaluate the student and assign Reading Assistant accordingly. Note that Reading Assistant Auto Initial Assignment only performs the initial assignment and placement for a student. When a student finishes that content, you'll need to manually assign more content to the student. See "Advancing to the next Reading Assistant library" on page 273 for more information. 262 13 Managing Reading Assistant assignments To set Reading Assistant Auto Initial Assignment for your students 1. In the MySciLEARN Manage section, click the Students tab to access the Students page. 2. Select the school in the Browse by School list, if needed. 3. Locate the students in the students list. You can filter the student list by using the Browse by School, Filter by My Groups, or Filter by Staff options on the left, or you can search for a student using the Search feature at the top of the screen. 4. Perform one of the following tasks: To set Reading Assistant Auto Initial Assignment for an individual student from the student’s profile: • Click a student’s name to open that student’s profile. • In the Auto Assign and Reading Progress Indicator section, click the Settings button. • Under Reading Assistant Assignment Method, select the availability option you’d like to set for this student and click Apply: • To disable Reading Assistant Auto Initial Assignment, select Manual Assign. • To enable Reading Assistant Auto Initial Assignment, select Auto Initial Assign. Note that RPI must be enabled for the student to enable Reading Assistant Auto Initial Assignment. To set Reading Assistant Auto Initial Assignment for one or more students from the students list: • In the Settings column, click the RA Auto Initial Assignment button (A) to turn Reading Assistant Auto Initial Assignment on or off. • When the setting is turned on, the button appears green. To turn Auto Assign on, Reading Progress Indicator must be enabled for the student. • When the setting is turned off, the button appears gray. To set Reading Assistant Auto Initial Assignment for one or more students from the More Actions menu: • Select the checkbox next to the students, or select the All checkbox at the top of the students list to select all of the students on the screen. • From the More Actions menu, select the appropriate action: • Select Turn RA Auto Initial Assignment On, then click Disable Auto Assign. • Select Turn RA Auto Initial Assignment Off, then click Enable Auto Assign. 263 13 Managing Reading Assistant assignments Troubleshooting Reading Assistant Auto Initial Assignment If the software is unable to use Reading Assistant Auto Initial Assignment for a student, it disables Reading Assistant Auto Initial Assignment for that student and displays an error message at the top of the screen. Use the following table to help you correct the errors and then enable Reading Assistant Auto Initial Assignment again for that student. If the problem persists, or you’d like help with this task, contact Scientific Learning Customer Support for assistance. Error message Error details and solutions Cannot auto assign <student name>: student is enrolled in grade PreK. Students who are in Pre-Kindergarten cannot use RPI or Reading Assistant Auto Initial Assignment, and it has been disabled for the student. To allow the student to use Reading Assistant Auto Initial Assignment, you’ll need to change the student’s grade to K or higher, and then enable Reading Assistant Auto Initial Assignment for the student. See "Changing the grade for students" on page 202. Cannot auto assign <student name>: student is already assigned the Reading Assistant product. Students who already have a Reading Assistant assignment cannot use Reading Assistant Auto Initial Assignment, and it has been disabled for the student. To allow the student to use Reading Assistant Auto Initial Assignment, you’ll need to stop the current Reading Assistant assignment and then enable Reading Assistant Auto Initial Assignment for the student. See "Stopping and deleting a Reading Assistant assignment" on page 269. Cannot auto assign <student name>: no license available. The school is using per student licenses, and there are no more licenses available for this new assignment. Reading Assistant Auto Initial Assignment has been disabled for the student. To correct the issue, you must free up or purchase a per student license, and then enable Reading Assistant Auto Initial Assignment for the student. See "Managing per student licenses for students" on page 196. Contact Customer Support if you have any questions. Reading Assistant Auto Initial Assignment could not be enabled for <student name> because RPI is disabled for this student. Students must have RPI enabled to use Reading Assistant Auto Initial Assignment. Turn on RPI for the student and then enable Reading Assistant Auto Initial Assignment for the student. See "Setting RPI access for students" on page 350. 264 13 Managing Reading Assistant assignments Assigning the Reading Assistant product This topic provides steps on how to manually assign the Reading Assistant product within MySciLEARN. If you have not yet added students to MySciLEARN, see "Adding a new student" on page 182. You can access the Reading Assistant assignment features as follows: • Use a student’s profile to assign products to that student. • Use the students list on the Students page to assign products to one or more students. More about assigning Reading Assistant • MySciLEARN provides Reading Assistant Auto Initial Assignment, which automatically assigns Reading Assistant to your student and then place that student at the appropriate starting point in the content.See the following topics for steps: • "Setting Reading Assistant Auto Initial Assignment for students" on page 262 • "Setting Reading Assistant school defaults" on page 113 • If your school is using per student licenses, you can only assign products to a new student when a license is available. For more information see "Managing per student licenses for students" on page 196. If you have any questions, contact Scientific Learning Customer Support. • To change a student's assignment settings see "Editing a Reading Assistant assignment" on page 267. To end a student's assignment see "Stopping and deleting a Reading Assistant assignment" on page 269. To assign Reading Assistant to your students 1. In MySciLEARN Manage section, click the Students tab to access the Students page. 2. Perform one of the following tasks: To assign a product to an individual student from a student’s profile: • Locate the student in the students list. You can filter the student list by using the Browse by School, Filter by My Groups, or Filter by Staff options on the left, or you can search for a student using the Search feature at the top of the screen. • Click the student’s name to open that student’s profile. • Click the New Assignments button in the Assignments section. To assign a product to one or more students from the students list: • Select your school from the Browse by School list, if needed. • Select your group from the Filter by Group list. 265 13 Managing Reading Assistant assignments • Select the checkbox next to one or more students, or select the checkbox at the top of the students list to select all of the students on the screen. • Select Assign New from the Manage Assignments menu. 3. On the Assign New Product screen, select Reading Assistant from the Product menu. Reading Assistant – Assign New Product 4. Select a library from the Library menu as needed. • The content pack that includes the student’s grade is selected by default. • If you select a custom library, you’ll need to select a schedule from the Schedule menu. 5. Make adjustments to the assignment settings as needed. For info on how settings impact an assignment see "About Reading Assistant assignment settings" on page 238. • Schedule (required when assigning a custom library) • Instruction Language • Glossary Language • Content Progression • Content Placement • Advanced Settings (click Show Advanced Settings to access): • Pronunciation Correctness • Intervention Wait Time • Language Support: Audio Support 6. Click Assign. The student can immediately start training on Reading Assistant. 266 13 Managing Reading Assistant assignments Editing a Reading Assistant assignment When needed, you make changes to a student’s Reading Assistant assignment; for example, you can select a new library for the student to work on. For detailed descriptions of these settings, see "About Reading Assistant assignment settings" on page 238. You can only edit assignments for an individual student. Note: If you're using Reading Assistant Auto Initial Assignment, you can edit the assignment settings once the student has been assigned and placed into Reading Assistant; for example, to change any of the default assignment settings before the student starts training. For more information see "About Reading Assistant Auto Initial Assignment" on page 259. To edit the Reading Assistant assignment settings for a student 1. In MySciLEARN Manage section, click the Students tab to access the Students page. 2. Locate the student with the assignment you want to edit and click the student’s name. You can filter the student list by using the Browse by School, Filter by My Groups, or Filter by Staff options on the left, or you can search for a student using the Search feature at the top of the screen. 3. In the Assignments section, click the Edit icon next to the product you’d like to edit. 4. Make the edits to the Reading Assistant assignment settings as needed. Students – Edit Assignment You can change the following assignment settings. For details on these settings, see "About Reading Assistant assignment settings" on page 238. • Library 267 13 Managing Reading Assistant assignments • Schedule • Instruction Language • Glossary Language • Content Progression • Content Placement Method • Content placement within a library • Advanced Settings (click Show Advanced Settings to access): • Pronunciation Correctness • Intervention Wait Time • Language Support: Audio Support If you are changing the content placement within the library, the library will show the student’s current place as follows: • If the student is using a content pack, the Use Content Overview option will indicate the topic that the student is currently working on. • If the student is using a custom library, the Use Content Overview option will indicate the selection that the student is currently working on. 5. Click Save. 268 13 Managing Reading Assistant assignments Stopping and deleting a Reading Assistant assignment When you manually assign Reading Assistant to a student, you can go back at any time and remove that assignment—for either an individual student or multiple students within a group, by either stopping or deleting that assignment. Choose from the following two removal options: • Stop – Perform this task to remove student access to Reading Assistant but leave the student's product data intact. • Delete – Perform this task to remove access to the Reading Assistant and permanently delete the student's assignment data from the system. Note:Reading Assistant Auto Initial Assignment does not allow you to stop or delete a Reading Assistant assignment for a student. To access these features, you'll need to disable Reading Assistant Auto Initial Assignment for that student first. For more information see "About Reading Assistant Auto Initial Assignment" on page 259. Stopping a Reading Assistant assignment Perform this task when a student has finished working on Reading Assistant and you still want to keep a record of that student’s work; for example, if that student plans to continue working on another Scientific Learning product. When you stop a product assignment, the software removes the product from the Exercises screen and shows Resume next to the product name in the Assign screen. The product data will remain intact, and the results will continue to appear in Progress Tracker, and a completion certificate for that product will appear in the student’s Weekly Achievement report. If you click Resume, the student will resume the product from where he or she left off. You can only stop an assignment for an individual student. Note: Reading Assistant Auto Initial Assignment does not allow you to stop a Reading Assistant assignment for a student. To access this feature, you'll need to disable Reading Assistant Auto Initial Assignment for that student first. For more information see "About Reading Assistant Auto Initial Assignment" on page 259. To stop a Reading Assistant assignment 1. In MySciLEARN Manage section, click the Students tab to access the Students page. 2. Locate the student in the students list. 269 13 Managing Reading Assistant assignments You can filter the student list by using the Browse by School, Filter by My Groups, or Filter by Staff options on the left, or you can search for a student using the Search feature at the top of the screen. 3. Click the student’s name to open that student’s profile. 4. In the Assignments section, click the Stop Sign icon next to Reading Assistant. Student Profile – Assignments The assignment is stopped. • The student’s Reading Assistant data remains intact in MySciLEARN and Progress Tracker. • Reading Assistant is removed from the Student Exercises screen, and students can no longer train on the product. • Resume appears next to Reading Assistant on the Student Profile screen. Clicking Resume will resume Reading Assistant, and the student will start where he or she left off. Deleting a Reading Assistant assignment Perform this task when the student will no longer work on the Reading Assistant assignment and you do not want to keep any record of the student’s work on Reading Assistant. Also perform this task if you assigned Reading Assistant by mistake. When you delete a Reading Assistant assignment, the student’s access to Reading Assistant is removed from the Student Exercises page. Additionally, the student’s Reading Assistant data is permanently deleted from the MySciLEARN. If you assign Reading Assistant again, the student will need to repeat any previously completed content. You can use the delete assignment feature as follows: • Delete an individual student's assignment from that student’s profile. • Delete assignments for a group of students from the students list. 270 13 Managing Reading Assistant assignments Note: You cannot delete a Reading Assistant assignment for a student who is using Reading Assistant Auto Initial Assignment. To access this feature, you'll need to disable Reading Assistant Auto Initial Assignment for that student first. For more information see "About Reading Assistant Auto Initial Assignment" on page 259. To delete a Reading Assistant assignment IMPORTANT! Deleting a Reading Assistant assignment permanently removes all the student's product data files from MySciLEARN. The product can be assigned to the student again; however, the student's original results will be lost. 1. In MySciLEARN Manage section, click the Students tab to access the Students page. 2. Perform one of the following tasks: To delete an assignment for an individual student from the student’s profile: • Locate the students in the students list. You can filter the student list by using the Browse by School, Filter by My Groups, or Filter by Staff options on the left, or you can search for a student using the Search feature at the top of the screen. • Click the student’s name to open the profile. • In the Assignments section, click the trash icon next to the Reading Assistant assignment. To delete an assignment for one or more students from the students list: • Select your school from the Browse by School list, if needed. • Select your group from the Filter by Group list. • Select the checkbox next to one or more students, or select the checkbox at the top of the students list to select all of the students on the screen. • Select Delete Assignment from the Manage Assignments menu. • Select Reading Assistant from the product menu and click Delete. 3. On the delete assignment confirmation message, click Confirm Delete. You can assign Reading Assistant again if needed; however, the student will need to repeat any previously completed content. • If the student has worked on Reading Assistant, it is removed from the Assignments section and the student’s data files for Reading Assistant are permanently deleted from the system. • If not, the Reading Assistant assignment is simply erased as if it never existed. 271 13 Managing Reading Assistant assignments Confirm Delete Product Assignment 272 13 Managing Reading Assistant assignments Advancing to the next Reading Assistant library When a student completes a library and will no longer work on that library, you will need to edit the student’s Reading Assistant assignment to assign a new library. Here’s what happens after you change the student’s library assignment: • The Student Profile screen will adjust the assignment status to reflect the new library assignment. • The student will only have access to the new library, and will no longer have access to the content in the completed library. • The student’s data for the original library will remain intact, along with the audio recordings for that library, which will still be accessible for review from the MySciLEARN Results reports. Also, the Reading Assistant reports in MySciLEARN Results will still include that student’s data from the completed library. See "Editing a Reading Assistant assignment" on page 267 for steps on assigning another library. Note: If you're using Reading Assistant Auto Initial Assignment, you'll need to manually advance to the next Reading Assistant library. Reading Assistant Auto Initial Assignment only makes the initial placement in the product. For more information see "About Reading Assistant Auto Initial Assignment" on page 259. 273 14 Managing Reading Assistant libraries 14 Managing Reading Assistant libraries Use this chapter to learn how to create and manage Reading Assistant content libraries. What's in this chapter About libraries 275 Accessing the Content Libraries page 277 Viewing content packs 278 Viewing custom libraries 279 Creating custom libraries 282 Publishing custom libraries 284 Unpublishing custom libraries 286 Editing custom libraries 288 Add new content to a custom library 290 Renaming a custom library 291 Managing the content in a custom library 292 Deleting custom libraries 293 Managing locked custom libraries 294 274 14 Managing Reading Assistant libraries About libraries A library (also referred to as a content library) is a set of selections (texts) that can be assigned to a student. Reading Assistant provides two types of libraries: content packs and custom libraries. You can choose a library for a student when you assign the Reading Assistant product. About content packs The Reading Assistant software license provides four standard libraries called content packs, which are organized by grade to include selections (texts) written for specific ages across a range of reading levels. • Content Pack K-3 • Content Pack 4-5 • Content Pack 6-8 • Content Pack 9-12 Created by the reading experts at Scientific Learning, content packs automatically customize the reading experience for each student as follows: • Each content pack presents texts designed specifically for a student’s age group and reading ability. For example, Content Pack 6-8 includes a selection about skateboarding designed to appeal to a 6th grader, but written at a 3rd grade reading level to accommodate a 6th grade struggling reader. • The difficulty level of the selections in a content pack ranges from below the lowest grade level to the grade level of the highest grade. For example, in Content Pack 4-5, the reading levels range from 1st grade to 5th grade. As the student progresses in the content pack, the content difficulty increases. In addition, content packs make the student enrollment process even easier—when you assign the Reading Assistant product to a student, the software automatically defaults the library assignment to the content pack that includes the student’s current grade. For example, a 4th grade student’s library assignment will be set automatically to Content Pack 4-5. For details on library assignments, including changing a library assignment, see Managing Reading Assistant assignments. To review the actual texts within a content pack, use the Content Libraries page. Any staff member can view and assign content packs to their students. Because content packs are created by Scientific Learning, there are no management tasks needed. About custom libraries To provide more flexibility with content, Reading Assistant allows you to create custom libraries for your schools. Custom libraries allow you to tailor the reading experience directly to the needs of your students, and provide additional material for further reading practice. You can build a custom library with the selections from any of the content packs and then place the selections in any order within your custom library. Here are just a few examples of how you can organize a custom library: 275 14 Managing Reading Assistant libraries • If you have a group of students that are all at the same reading level, and you want those students to do a little extra work in that reading level, you could create a custom library with content at that reading level only. • If you plan to introduce a new academic subject to a group of students, you could create a custom library that only includes selections around that subject; for example, nonfiction texts of history or science, or poetry and songs. And you could further customize the library by selecting these texts at reading levels specific to those students. When you’ve created your custom library, its easy to assign that custom library to a student. Any staff member can view the custom libraries at their schools and assign the custom libraries to their students. However, custom library management tasks are limited based on a staff member’s role. Note:Reading Assistant Auto Initial Assignment does not place students in custom libraries. For more information see "About Reading Assistant Auto Initial Assignment" on page 259. See the following topics for details on managing custom libraries: • "Accessing the Content Libraries page" on page 277 • "Viewing content packs" on page 278 • "Viewing custom libraries" on page 279 • "Creating custom libraries" on page 282 • "Publishing custom libraries" on page 284 • "Editing custom libraries" on page 288 • "Deleting custom libraries" on page 293 • "Managing locked custom libraries" on page 294 276 14 Managing Reading Assistant libraries Accessing the Content Libraries page MySciLEARNorganizes all of the content libraries in one place, accessible from any page using the Content Library button at the top of the Manage section within MySciLEARN: Header – Content Library Button When you log in to MySciLEARN, you can access the Content Libraries page based on your staff role and your association with the schools who have a valid Reading Assistant license: • District managers can access the Content Libraries page when at least one school in the district has a valid Reading Assistant product license. • School managers can only access the Content Libraries page if one of their schools has a valid Reading Assistant product license. • Instructors can only access the Content Libraries page if their school has a valid Reading Assistant product license. Content Libraries To access the Content Libraries page 1. Log in to MySciLEARN as a staff member. For details see "Logging in as a staff member" on page 29. 2. Click the Manage tab to access the Manage section. 3. Click the Content Libraries button at the top right of the screen to access the Content Libraries page. 277 14 Managing Reading Assistant libraries Viewing content packs When you access the Content Libraries page, the content packs and any custom libraries appear on the left. Content Libraries – View a Content Pack All staff members can view content packs. The four content packs appear on the left side of the screen, in grade-level order: • Content Pack K-3 • Content Pack 4-5 • Content Pack 6-8 • Content Pack 9-12 Within a content pack, topics appear in order of difficulty: easier to more difficult. To browse through a content pack: • Click the content pack to view all of its topics and selections. • Click a selection title within a topic to view the following details: • Selection title and text, with glossary words underlined • Think About Its • Take the Quiz questions 278 14 Managing Reading Assistant libraries Viewing custom libraries When you access the Content Libraries page, the content libraries appear listed on the left, under Content Packs and Custom Libraries. Content Libraries – View a Custom Library All staff members can view the custom libraries in their schools. When created, the custom libraries appear on the left side of the screen, in alphabetical order. To browse through a custom library: • Click a custom library to view all of the selections within that custom library. • Click a selection title to view the following details: • Selection title and text, with glossary words underlined • Think About Its • Take the Quiz questions When viewing custom libraries, they will always appear in one of the three following states: • Draft – The library has been created and saved but not published. The library name appears in italics to indicate the draft/edit status. • Published – The library is available for student assignment. You cannot edit or delete a published library until you unpublish that library. • Locked – The library has been published and is currently assigned to a student. A lock icon appears next to the library name to indicate the status. You cannot edit or delete a locked library. Viewing draft custom libraries A draft library has been created and saved but not published: 279 14 Managing Reading Assistant libraries Content Libraries – Draft Custom Library A draft library name appears in italics to indicate the draft/edit status. When viewing a draft library, you can perform all library management, including editing, publishing, and deleting the library. See the following topics for details: • "Creating custom libraries" on page 282 • "Publishing custom libraries" on page 284 • "Editing custom libraries" on page 288 • "Deleting custom libraries" on page 293 • "Managing locked custom libraries" on page 294 Viewing published custom libraries A published library is available for student assignment: Content Libraries – Published Custom Library 280 14 Managing Reading Assistant libraries You cannot edit or delete a published library until you unpublish that library. See "Publishing custom libraries" on page 284 for details. Viewing locked custom libraries A locked library has been published and is currently assigned to a student: Content Libraries – Locked Custom Library A lock icon appears next to the library name to indicate the locked status. You can view a locked library, but you cannot edit or delete a locked library. See "Managing locked custom libraries" on page 294 for details. 281 14 Managing Reading Assistant libraries Creating custom libraries Use the Content Libraries page to create a custom library for the students in your schools. Reading Assistant allows you to build your custom library by selecting content from the content packs. Follow these tips when selecting content for a custom library: • You can select individual reading selections or whole topics. When you select a topic, all selections in that topic are automatically selected. Each topic is labeled with the content pack from which it came, so you’ll know the approximate grade level for the topic and its selections. • You can view and select content based on reading levels such as grade equivalent scores, Guided Reading Levels, or Lexile measures. You can create custom libraries based on your staff role: • District managers can create custom libraries for any school in the district. • School managers can create custom libraries for their schools. • Instructors cannot create custom libraries for their school unless the instructor role permissions have been changed. When creating a custom library, use a unique name to identify that custom library. Custom library names must be unique across the school. Here are some examples of possible names: • Custom library content – Reading levels 3-4, Fiction K-1 • Training time and date – 1st Period Fall 2010, 10am Spring 2011 • Classroom or teacher – Mr Perez 2010-11 • Student data – ELL 2010-11, 3rd Grade 2010 To create a custom library 1. In MySciLEARN Manage section, click the Content Libraries button to access the Content Libraries page. 2. Use the School menu to select the school where you want to add the custom library, as needed. 3. Under Custom Libraries, click New Library. If you cannot see the New Library button, you do not have permission to manage custom libraries. Contact your district manager for more information. 4. On the Add New Library screen, enter a unique name for the custom library and click Save. Custom library names must be unique across your school. The Add Content screen shows all of the topics and selections from the content packs. By default, all of the content from the content packs is available. Use the Content Pack filter in the upper left corner to view content from an individual content pack. 5. Scroll through the content list and select the content to add to your new custom library. 282 14 Managing Reading Assistant libraries • You can select individual reading selections or whole topics. When you select a topic, all selections in that topic are automatically selected. Each topic is labeled with the content pack from which it came, so you’ll know the approximate grade level range for the topic and selections. • You can also view and select content based on reading levels such as grade equivalent scores, Guided Reading Levels, or Lexile measures. Content Libraries – Add Content 6. When you have selected all of the content you want in your custom library, click the Add Content button in the lower right corner. The custom library is saved as a draft, and appears in the list of Custom Libraries on the left. To allow more flexibility when ordering your content, custom libraries do not show topics, only selections. 7. Make any changes to the content, as needed. • Use the up and down arrows next to each selection to change the order of the selections. • Click the trash next to a selection to delete any unwanted selections. When you are finished changing the content, the create new library task is complete. Advance to the next topics as needed: • Before you can assign the custom library to a student, you’ll need to publish that custom library. See "Publishing custom libraries" on page 284. • If you'd like to edit the custom library before you publish it, see "Editing custom libraries" on page 288. 283 14 Managing Reading Assistant libraries Publishing custom libraries This topic covers how to publish a custom library. For steps on unpublishing a custom library, see "Unpublishing custom libraries" on page 286. When you create a custom library and add content, that library remains in draft mode and is not available for student assignment until you publish the library. This allows you to make sure the custom library is set up exactly how you want it before other staff members start assigning it to their students. You can publish custom libraries based on your staff role: • District managers can publish custom libraries for any school in the district. • School managers can publish custom libraries for their schools. • Instructors cannot publish custom libraries for their school unless the instructor role permissions have been changed. More about publishing custom libraries • Once you publish a custom library, that library becomes available to all school staff members for student assignment. You’ll need to unpublish that custom library to prevent students from using it; see "Unpublishing custom libraries" on page 286 for steps. • To edit or delete a custom library, you’ll need to unpublish that custom library. • Once a custom library is assigned to a student, it becomes locked. Locked libraries can no longer be edited or deleted, but you can unpublish a locked custom library to prevent other students from using it. See "Managing locked custom libraries" on page 294 for more information. To publish a custom library 1. In MySciLEARN Manage section, click the Content Libraries button to access the Content Libraries page. 2. If needed, use the School menu to select the school with the custom library. 3. Under Custom Libraries, select the custom library. Make sure the library has content added to it. You cannot publish libraries without content. 4. Click the Publish button in the upper right corner to publish the library. If the library is unpublished but you cannot see the Publish button, you do not have permission to manage the custom library. Contact your district manager for more information. 284 14 Managing Reading Assistant libraries Content Libraries – Publish 285 14 Managing Reading Assistant libraries Unpublishing custom libraries This topic covers how to unpublish a custom library. For steps on publishing a custom library, see "Publishing custom libraries" on page 284. In some cases, you may want to unpublish a library; for example, if you discover that you need to edit the custom library before students use it, or if you no longer want the custom library to be available for student assignment. Unpublishing a custom library does not delete the library; it only removes it from the Assign feature. When you unpublish a custom library, students who currently have that custom library assignment will still be able to access and work in that custom library; however, staff members will no longer be able to assign that custom library to any other students. Note: If a student was assigned to a custom library that has been unpublished, the library will still appear in the Library menu until you change the student’s library assignment. For details see "About library assignments" on page 239. To unpublish a custom library 1. In MySciLEARN Manage section, click the Content Libraries button. 2. If needed, use the School menu to select the school with the custom library. 3. Under Custom Libraries, select the custom library. 4. Click the Unpublish button in the upper right corner. If you cannot see the Unpublish button, you do not have permission to manage the custom library. Contact your district manager for more information. Content Libraries – Custom Library Continue with the following topics as needed: • "Editing custom libraries" on page 288 286 14 Managing Reading Assistant libraries • "Deleting custom libraries" on page 293 287 14 Managing Reading Assistant libraries Editing custom libraries This topic covers how to edit a custom library. You can edit custom libraries as follows: • Rename the custom library • Edit the order of the current selections in the custom library • Remove selections from a custom library • Add new content to a custom library You can edit custom libraries based on your staff role: • District managers can edit custom libraries for any school in the district. • School managers can edit custom libraries for their schools. • Instructors cannot edit custom libraries for their school unless the instructor role permissions have been changed. More about editing custom libraries • Before you can edit a custom library, you must unpublish that library, if it is published and not locked. See "Unpublishing custom libraries" on page 286 for steps on unpublishing a library. • Once a custom library is published and assigned to a student, the library is locked and you can no longer edit or delete that custom library. See "Managing locked custom libraries" on page 294 for steps on how to manage locked custom libraries. To open a custom library for edit 1. In MySciLEARN Manage section, click the Content Libraries button to access the Content Libraries page. 2. If needed, use the School menu to select the school with the custom library. 3. Under Custom Libraries, select the unpublished custom library. • If the library is published but not locked, you must unpublish the library to make any edits. See "Unpublishing custom libraries" on page 286. • If the library is unpublished but you cannot see the Add Content button, you do not have permission to manage the custom library. Contact your district manager for more information. 288 14 Managing Reading Assistant libraries Content Libraries – Draft Custom Library Continue with the following editing tasks as needed: • "Add new content to a custom library" on page 290 • "Renaming a custom library" on page 291 • "Managing the content in a custom library" on page 292 289 14 Managing Reading Assistant libraries Add new content to a custom library This topic covers how to add new content to a custom library. Before you begin, you’ll need to open that library for edit. See "Editing custom libraries" on page 288. To add new content to the custom library that is open for edit 1. Click the Add Content button in the upper right corner. The Add Content screen shows all of the topics and selections from the content packs. By default, all of the content from the content packs is available. Use the Content Pack filter in the upper left corner to view content from an individual content pack. 2. Scroll through the list of content and select the content you want to add to your new custom library. • You can select individual reading selections or whole topics. When you choose a topic, all selections in that topic are automatically selected. Each topic is labeled with the content pack from which it came, so you’ll know the approximate grade level range for the topic and selections. • You can also view and select content based on reading levels such as grade equivalent scores, Guided Reading Levels, or Lexile measures. Edit Custom Library 3. When you have selected all of the content you want in your custom library, click the Add Content button in the lower right corner. Before you can assign the custom library to a student, you’ll need to publish that custom library. See "Publishing custom libraries" on page 284. 290 14 Managing Reading Assistant libraries Renaming a custom library This topic covers how to rename a custom library. Before you begin, you’ll need to open that library for edit. See "Editing custom libraries" on page 288. To change the name of the custom library that is open for edit 1. Click the Rename/Remove link next to the library name. 2. Enter a new unique custom library name. Custom library names must be unique across your school. Content Library – Rename/Remove 3. Click Save. Before you can assign the custom library to a student, you’ll need to publish that custom library. See "Publishing custom libraries" on page 284. 291 14 Managing Reading Assistant libraries Managing the content in a custom library This topic covers how to manage the content in a custom library. Before you begin, you’ll need to open that library for edit. See "Editing custom libraries" on page 288. To manage the existing content in the custom library that is open for edit • Use the up and down arrows next to each selection to change the order of the selections. • Click the trash icon next to a selection to delete any unwanted selections.To confirm the deletion of that selection, click Confirm Remove. Edit Custom Library – Open for Edit Before you can assign the custom library to a student, you’ll need to publish that custom library. See "Publishing custom libraries" on page 284. 292 14 Managing Reading Assistant libraries Deleting custom libraries MySciLEARNallows you to delete any unwanted custom libraries. Deleting a custom library permanently removes that library from MySciLEARN.You can delete custom libraries based on your staff role: • District managers can delete custom libraries for any school in the district. • School managers can delete custom libraries for their schools. • Instructors cannot delete custom libraries for their school unless the instructor role permissions have been changed. Before you can delete a custom library, you must unpublish that library if it has been published. See "Unpublishing custom libraries" on page 286 for steps. Note: Once a custom library is published and assigned to a student, the library is locked and you can no longer edit or delete that custom library. See "Managing locked custom libraries" on page 294 for steps on how to manage locked custom libraries. To delete a custom library 1. In MySciLEARN Manage section, click the Content Libraries button to access the Content Libraries page. 2. If needed, use the School menu to select the school with the custom library you want to delete. 3. Under Custom Libraries, select the custom library. • You cannot delete published custom libraries. See "Unpublishing custom libraries" on page 286 for steps on unpublishing a library. • You cannot delete locked libraries. See "Managing locked custom libraries" on page 294 for steps on managing locked custom libraries. 4. Click the Rename/Remove link next to the library name. If the library is unpublished but you cannot see the Rename/Remove link, you do not have permission to manage the custom library. Contact your district manager for more information. 5. Click the trash icon to the left of the custom library name. 6. On the Remove Library screen, click the Confirm Remove button. 293 14 Managing Reading Assistant libraries Managing locked custom libraries When you create a custom library and publish it, that library becomes available to all school staff members for student assignment. However, once a custom library is assigned to a student, it becomes locked and can no longer be edited or deleted. Locked libraries show a lock icon next to the library name. Locking a custom library once it’s in use protects the students who are working in that library—it keeps the student work schedules and performance data intact within MySciLEARN. Content Libraries – Locked Custom Library You can manage locked libraries as follows: • To prevent any new students from accessing a locked custom library, you can remove that library from the assignment feature by unpublishing that library. See "Unpublishing custom libraries" on page 286 for steps. • If needed, you can unlock a custom library by deleting all Reading Assistant student assignments that include the custom library. However, because deleting an assignment permanently deletes that data for those students, consult with Scientific Learning Customer Support before performing this task. 294 15 Using Fast ForWord programs 15 Using Fast ForWord programs Use this chapter to learn how students work on the Fast ForWord products within MySciLEARN. For specific details on each of the Fast ForWord programs see the Fast ForWord Program User Guide. If your students are using the Fast ForWord program on iPad, see the Chapter 16 “Using Fast ForWord programs on iPad” on page 302. What's in this chapter Starting Fast ForWord training sessions 296 Exiting Fast ForWord training sessions 300 295 15 Using Fast ForWord programs Starting Fast ForWord training sessions Instruct your students to follow these steps to use the Fast ForWord program each day. If your students are using the program on iPad, use the instructions in . For a detailed description of how each Fast ForWord exercise works, see the Fast ForWord Program User Guide. To use the Fast ForWord demos see "Using the Fast ForWord demos" on page 384. Each day, before your students start, verify the following: • The Fast ForWord headphones are plugged in • The volume on the computer is adjusted to a comfortable level Tip: Some students may require guidance through this task, especially if the student is young, or if this is the first time the student is using the program. To use the Fast ForWord program If the student is using the program on iPad, follow the instructions in "Starting Fast ForWord training sessions on iPad" on page 310. 1. From any student computer connected to the Internet, log in to MySciLEARN (see "Logging in as a student" on page 30). The Student Exercises page opens and displays the student's assignment • If another student's name appears on the Student Exercises page, the student should click That’s Not Me to log out and return to the Student Login page, then log in with his or her username and password. • If the RPI graphic appears on the screen instead of a Fast ForWord graphic, the student will need to complete the RPI assessment first. See "Administering an RPI assessment" on page 352 for steps on completing an assessment, then return to the next step in this task. • If the student has no assignments, you'll need to create one before the student can continue. See Chapter “Assigning the Fast ForWord products” on page 225. 296 15 Using Fast ForWord programs Student Exercises – My Assignments 2. Put on your headphones and click a Fast ForWord graphic to open that program. 3. On the Exercise Selection screen, click one of the available exercise graphics to open that exercise. For information on how the system determines the student's schedule each day, see "About Fast ForWord protocols" on page 215. Reading Level 1 Exercise Selection 297 15 Using Fast ForWord programs 4. Work on the exercise until the time requirement is met and the exercise ends. If the student needs to exit the exercise before the time requirement is met, see "Exiting Fast ForWord training sessions" on page 300 for steps. Students should never exit an exercise by closing the web browser. Reading Level 1 exercise 5. Choose another exercise and continue working until all available exercises are completed and the Success Viewer appears. The Success Viewer provides a summary of the student's success on that Fast ForWord product, along with any points earned: 298 15 Using Fast ForWord programs Reading Level 1 Success Viewer 6. Click Exit on the Success Viewer to return to the Student Exercises screen. At this point, the day's session is complete. If the student wants to start a new session and keep working on the exercises, that's OK—this will not affect the next day's protocol. 7. Click Log Out on the Student Exercises screen to log out of the program and allow another student to use the Fast ForWord program. 299 15 Using Fast ForWord programs Exiting Fast ForWord training sessions Occasionally, a student may need to exit an exercise or a session before the protocol completes; for example, to take a short break. In this case, the student can use the Status screen to exit the exercise, and then exit the session as needed.The student should start another session that day and continue working on all available exercises until they are completed and the protocol for the day is met. Note: Students should never exit an exercise by closing the web browser. Instead, instruct students to use the Exit buttons within the program as described here. To exit a Fast ForWord training session Tip: If the student is using the program on iPad, follow the instructions in "Exiting Fast ForWord training sessions on iPad" on page 314. 1. While in an exercise, access the Status screen. • Windows – Press and hold the Control key, then press = • Macintosh – Press and hold the Control or Command (Apple) key, then press = 2. Click Exit on the Status screen to close the exercise. The Status screen also lets the student view the time remaining and return to the exercise. The exercise clock does not pause while the Status screen is displayed, so the student should not take a break on the Status screen. Reading Level 1 Status 300 15 Using Fast ForWord programs 3. Click Exit on the Exercise Selection screen. Reading Level 1 Exercise Selection 4. Click Exit on the Success Viewer. Reading Level 1 Success Viewer 5. Click Log Out on the Student Exercises screen to log out of MySciLEARN. 301 16 Using Fast ForWord programs on iPad 16 Using Fast ForWord programs on iPad Use this chapter to learn how to use the Fast ForWord program iPad apps within MySciLEARN. For specific details on each of the Fast ForWord products see the Fast ForWord Program User Guide. For iPad system requirements see "Fast ForWord on iPad requirements" on page 42. To learn about the exercise demos see "Using the Fast ForWord demos on iPad" on page 389. What's in this chapter About Fast ForWord programs on iPad 303 Downloading Fast ForWord program apps for iPad 306 Tips for using Fast ForWord programs on iPad 307 Starting Fast ForWord training sessions on iPad 310 Exiting Fast ForWord training sessions on iPad 314 Troubleshooting Fast ForWord programs on iPad 317 302 16 Using Fast ForWord programs on iPad About Fast ForWord programs on iPad The Fast ForWord program apps for iPad allow students to log in to MySciLEARN from an iPad mobile digital device and work on the Fast ForWord program. The apps leverage the latest mobile technologies to provide MySciLEARN users with the best possible Fast ForWord program experience on iPad. For example: • More engaging – Touchscreen technology and bright, animated graphics captivate grammar school and high school students alike. • More accessible – iPad portability allows students to use the Fast ForWord program wherever they want, whenever they want. • More versatile – With just a username and password, students can access their exercises from any supported device and switch among them (computer to iPad to laptop, and so on). This topic answers some frequently asked questions about the Fast ForWord program apps for iPad. If you have any further questions, you can always contact Scientific Learning Customer Support. How do the Fast ForWord program apps work? Just like the MySciLEARN web browser clients on a desktop or laptop computer, the Fast ForWord program apps use the Internet to communicate with MySciLEARN. When the student opens a Fast ForWord program app on iPad, it connects to MySciLEARN and prompts the student to log in and use the Fast ForWord exercises as usual. When the session ends, the student's results are added to the MySciLEARN reports. See "Starting Fast ForWord training sessions on iPad" on page 310 to learn more about how students use the apps on iPad. Which Scientific Learning programs are available for iPad? All of the Fast ForWord products are available for iPad, including the Reading Progress Indicator (RPI) assessments. See "Downloading Fast ForWord program apps for iPad" on page 306 for more information. Please note that in order to use the RPI app, you'll need an active Results Now! package subscription for your MySciLEARN account. The Fast ForWord exercise demos are also available for students using iPad, and can be accessed within the program apps. See "Using the Fast ForWord demos on iPad" on page 389 for steps. To use the demos as a staff member, use a web browser on a computer. Reading Assistant is not available for iPad at this time. Are there any changes to the Fast ForWord program for iPad? The Fast ForWord programs for iPad are the same Fast ForWord programs used on the browser, with a few minor enhancements for iPad. See "Tips for using Fast ForWord programs on iPad" on page 307 for a detailed list of these changes. 303 16 Using Fast ForWord programs on iPad Are there any technical requirements, licenses, or fees? There are a few minor system requirements, including which iPad mobile digital devices are supported. See "Fast ForWord on iPad requirements" on page 42 for details. No new licenses or fees are required—any student with a Fast ForWord program license and an active online MySciLEARN account can use the Fast ForWord program apps. If you have any questions about licensing, check with your school administrator or contact Scientific Learning Customer Support. Do I need to change any MySciLEARN settings to use the Fast ForWord program apps? No, the Fast ForWord program apps do not require anything new or special on the administration side of MySciLEARN. As a staff member, you'll continue using MySciLEARN as usual—managing students and assigning products, monitoring student training sessions, and reviewing student results reports. Can a learner use more than one type of device to work on the Fast ForWord program? Yes, students can switch between supported devices as they like. The Fast ForWord program apps function as a typical MySciLEARN client, so a student can switch between a computer and iPad at any time, without any issues. Can a learner use the web browser on iPad to work on a Fast ForWord program? No. Students need to use a Fast ForWord program app to use the Fast ForWord program on iPad. Do the Fast ForWord program apps work with MySciLEARN content servers? The Fast ForWord program apps do not need a MySciLEARN content server. When installed, each Fast ForWord program app also installs all of the content required to use that app. Any content servers already set up at the school or district will not be used or affected by the Fast ForWord program apps on iPad. How secure are the Fast ForWord program apps? The Fast ForWord program apps employ the same security as MySciLEARN, which requires that all 304 16 Using Fast ForWord programs on iPad students use a unique login and password to access the program. In addition, all of the data for MySciLEARN is hosted by Scientific Learning. If you have any additional questions about security, contact Scientific Learning Customer Support. Is there anything else I need to know? Before your students start using the apps, review "Tips for using Fast ForWord programs on iPad" on page 307, which includes a few important changes to the Fast ForWord programs for iPad. How do I get started? To start using the Fast ForWord program apps on your iPad mobile digital device, review the following topics: • "Fast ForWord on iPad requirements" on page 42 • "Downloading Fast ForWord program apps for iPad" on page 306 • "Tips for using Fast ForWord programs on iPad" on page 307 • "Starting Fast ForWord training sessions on iPad" on page 310 • "Exiting Fast ForWord training sessions on iPad" on page 314 • "Using the Fast ForWord demos on iPad" on page 389 305 16 Using Fast ForWord programs on iPad Downloading Fast ForWord program apps for iPad The App Store℠ lets you download Fast ForWord program apps directly to your iPad. The apps are free, but each student will need a Fast ForWord program license and an active online MySciLEARN account to use them (the RPI app also requires an active Results Now! package subscription). Contact your school's system administrator if you need help with this task. Tip: Install all of the Fast ForWord apps your students plan to use, including the RPI app. Students can open any of the installed apps to log in to MySciLEARN and access their assignments and the demos. Fast ForWord Language app Language v2, Language to Reading v2 Fast ForWord Literacy app Literacy, Literacy Advanced Fast ForWord Reading app Reading Readiness, Reading Levels 1 - 5 Reading Progress Indicator app RPI assessments An easy way to find the Fast ForWord program apps is to search for "Fast ForWord" or "Scientific Learning" on the App Store, or use the app links on our iTunes® company page. Once you've installed an app, the App Store will notify you when updates are available. You'll also be notified when you open that app as follows. Always update the app as soon as possible. • Update Available – The student can continue using the program without updating, but update the app as soon as possible. You'll be reminded until you update the app. • Update Required – The student cannot use the program until you update the app. 306 16 Using Fast ForWord programs on iPad Tips for using Fast ForWord programs on iPad This topic lists a few changes to the Fast ForWord programs for use on iPad, and some helpful tips. Fast ForWord program apps display in landscape orientation The Fast ForWord program always displays in landscape (horizontal) orientation, even when you rotate iPad or lock the rotation. This is the best view for using the Fast ForWord program. No keyboard or mouse in the Fast ForWord program apps After a student logs in to a Fast ForWord app, the program fully implements iPad touchscreen technology and no longer provides access to the iPad keyboard. This means that the keyboard shortcuts within the exercises are not available on iPad. Also, because iPad does not require a mouse, if an exercise instructs the student to "click" an object or graphic, the student should "tap" it instead. Exit button added to all Fast ForWord exercises Because the Fast ForWord program apps for iPad do not include access to the keyboard, the keyboard shortcut to exit an exercise is not available on iPad. Instead, an Exit button has been added to the top of each Fast ForWord exercise. When the Exit button is active, tapping it opens the Status screen, which allows the student to exit an exercise. For detailed steps and usage recommendations, see "Exiting Fast ForWord training sessions on iPad" on page 314. 307 16 Using Fast ForWord programs on iPad Internet connection status icon added to all Fast ForWord exercises If the Fast ForWord program loses access to MySciLEARN during an exercise session, the exercise Exit button becomes a red network icon. Tapping the network icon opens the Status screen and shows an error message with instructions. Follow the instructions to resolve the issue. For more information see "Troubleshooting Fast ForWord programs on iPad" on page 317. 308 16 Using Fast ForWord programs on iPad 309 16 Using Fast ForWord programs on iPad Starting Fast ForWord training sessions on iPad Instruct your students to follow these steps to use the Fast ForWord program apps on iPad each day. Be sure to review "Tips for using Fast ForWord programs on iPad" on page 307 before you start. For a detailed description of how the Fast ForWord programs work, see the Fast ForWord program user guide. To learn how to use the demos see "Using the Fast ForWord demos on iPad" on page 389. Each day, before starting, have the student check the following: • The Fast ForWord headphones are plugged in • The volume on iPad is adjusted to a comfortable level Some students may require guidance through this task, especially if the student is young, or if this is the first time the student is using the program. To use a Fast ForWord program app as a student 1. On the iPad Home screen, open a Fast ForWord program app to connect to MySciLEARN and view the Student Login screen (for steps see "Logging in as a student" on page 30). The student can open any Fast ForWord program app—including the RPI app—to log in to MySciLEARN and view their assignments. However, to work on an assigned product, that app must be installed on iPad. For example, a student can open the Literacy app, log in, and use Reading Level 1, as long as the Reading app is also installed. 2. Enter your username and password to log in to MySciLEARN and access your assignments. The Student Login screen may prompt the student to choose a school or district first. Enter the first few letters of the name of the school or district, then choose it from the list. 310 16 Using Fast ForWord programs on iPad 3. Put on your headphones and tap a Fast ForWord assignment to open that program. • If another name appears on the Student Exercises page, the student should tap That’s Not Me to log out, then log in with his or her username and password. • If the RPI graphic appears on the screen instead of a Fast ForWord graphic, the student will need to complete the RPI assessment first. Students can use their iPad to take the assessment, as long as the Reading Progress Indicator app is installed on their iPad. See "Downloading Fast ForWord program apps for iPad" on page 306 for installation steps. See Chapter 18 “Using Reading Progress Indicator” on page 347 for steps on how students take an RPI assessment. 4. On the Exercise Selection screen, tap one of the available exercise graphics to open that exercise. 311 16 Using Fast ForWord programs on iPad For information on how the system determines the student's schedule each day, see "About Fast ForWord protocols" on page 215. 5. Work on the exercise until the time requirement is met and the exercise ends. If the student needs to exit the exercise early, the student should tap the Exit icon at the top of the exercise instead of using the Home button or multitasking gestures to close the app. See "Exiting Fast ForWord training sessions on iPad" on page 314 for more information. 6. Choose another exercise and continue working until all available exercises are completed and the Success Viewer appears. The Success Viewer provides a summary of the student's success on that Fast ForWord product, along with any points earned: 312 16 Using Fast ForWord programs on iPad 7. Tap Exit on the Success Viewer to return to the Student Exercises screen. At this point, the day's session is complete. If the student wants to start a new session and keep working on the exercises, that's OK—this will not affect the next day's protocol. 8. Tap Log Out on the Student Exercises screen to log out of the program and allow another student to use the Fast ForWord program app. 313 16 Using Fast ForWord programs on iPad Exiting Fast ForWord training sessions on iPad Occasionally, a student may need to exit an exercise or a session before the protocol completes; for example, to take a break. In this case, the student can use the Status screen to exit the exercise, and then exit the session as needed. The student should start another session that day and continue working on all available exercises until they are completed and the protocol for the day is met. Students should not use the Home button or multitasking gestures to exit an exercise. Instead, instruct students to use the Exit buttons within the app as described in this topic. Reading Progress Indicator app provides its own Exit button at the bottom of the screen. To exit a Fast ForWord program app from an exercise 1. While in an exercise, tap the Exit button at the top of the screen to open the Status screen. 314 16 Using Fast ForWord programs on iPad 2. Tap Exit on the Status screen to close the exercise. The Status screen also lets the student view the time remaining in the exercise, or return to the exercise. The exercise clock does not pause while the Status screen is displayed, so the student should not take a break on the Status screen. 3. Tap Exit on the Exercise Selection screen. 4. Tap Exit on the Success Viewer. 315 16 Using Fast ForWord programs on iPad 5. Tap Log Out on the Student Exercises screen to log out of the program. 316 16 Using Fast ForWord programs on iPad Troubleshooting Fast ForWord programs on iPad If a student encounters any issues using a Fast ForWord program app, use these troubleshooting tips. You can also check "Tips for using Fast ForWord programs on iPad" on page 307 for more help. If you have any questions or you need additional help, contact Scientific Learning Customer Support for assistance. • Quick steps to fix most errors on iPad • Closing Fast ForWord apps using iPad multitasking • Correcting MySciLEARN connection errors on iPad • Troubleshooting other known issues on iPad Quick steps to fix most errors on iPad If a student runs into problems while using the Fast ForWord apps on iPad—for example, an app stops responding or does not work properly—try these tips, in this order. If you're running multiple Fast ForWord program apps, close them all before using any of them again. 1. Check the Internet connection on the student's iPad. If the connection is lost, restore it. See "Correcting MySciLEARN connection errors on iPad" on page 319. 2. Manually exit the Fast ForWord app, if possible, then open it again. See "Exiting Fast ForWord training sessions on iPad" on page 314. 3. If you can't manually exit the Fast ForWord app, press the Home button on iPad, then open the Fast ForWord app again. 4. Close the Fast ForWord app from the multitasking screen, then open it again. See "Closing Fast ForWord apps using iPad multitasking" on page 318. 5. Restart iPad (press and hold the Sleep/Wake button on iPad until the red slider appears, drag the slider to turn iPad completely off, then turn iPad on again). 6. If you are using an earlier version of iPad software, try updating to the latest version. Apple is continually improving iPad software and updating to the latest supported iOS may resolve the issue. If these steps do not resolve the issue, review the rest of the information in this chapter. Or, take a look at "Managing a locked Fast ForWord session" on page 366. You can also visit Apple at http://www.apple.com/support/ipad for more tips. If you require further assistance, contact Scientific Learning Customer Support. 317 16 Using Fast ForWord programs on iPad Closing Fast ForWord apps using iPad multitasking In general, mobile digital devices such as iPad manage applications differently than computers do. For example, most computers provide a large desktop area for you to view and manage multiple software applications at the same time—such as a web browser, word processor, media player, and more. iPad, on the other hand, provides multitasking as a way to view and manage all of your active software apps from one location. Multitasking allows you to switch quickly among recently used apps by suspending those apps in the background instead of closing them: iPad multitasking (iOS 7) If a student runs into issues while using the Fast ForWord apps—for example, an app stops responding or does not work properly—you can try closing the app from the multitasking screen and then opening the app again. If you're running multiple Fast ForWord program apps, close them all before using any of them again. Visit Apple at http://www.apple.com/support/ipad to learn more about multitasking. To close Fast ForWord program apps from the multitasking screen From the Home screen, double-click the Home button to open the multitasking screen, then continue based on your iOS version: • iOS 7 and later: Swipe left or right as needed to locate the Fast ForWord program apps, then drag each Fast ForWord program app up from the multitasking screen to close it. • iOS 6: Touch and hold a Fast ForWord program app until the icons in the multitasking bar begin to jiggle, then tap the minus sign on each Fast ForWord program app to close it. 318 16 Using Fast ForWord programs on iPad Correcting MySciLEARN connection errors on iPad The Fast ForWord program apps use the Internet to communicate with MySciLEARN during training sessions. If iPad cannot access the Internet, the apps will not work properly and you may see one of the following error messages. Unable to access MySciLEARN. Please check your Internet connection and try again. When a Fast ForWord app is opened, it shows this message if it cannot access the MySciLEARN server. Tap OK to close the message, then press the Home button and check your iPad Internet connection. MySciLEARN connection lost. Reconnect to the Internet or this session will be lost. If a Fast ForWord program app loses access to the MySciLEARN server during an exercise session, the exercise Exit button becomes a red network icon (for more information see "Tips for using Fast ForWord programs on iPad" on page 307). When this icon appears, tap it to open the Status screen, review the message, and correct the issue as needed: • Exit the training session on iPad and check the Internet connection. Tap Exit and then follow the steps on "Exiting Fast ForWord training sessions on iPad" on page 314 to exit the session, then press the Home button and reconnect iPad to the Internet. • If the Internet connection will be restored within a minute or two, you can tap Return on the Status screen to let the student keep working. However, if the connection is not restored soon, the app will automatically cancel the session. Unable to continue this session because the connection to MySciLEARN was lost. Please check your Internet connection and try again. This message appears when the MySciLEARN server connection has been lost for more than a few minutes during an exercise session. Tap Exit to cancel the exercise session. Some of the student's recent data may be lost. If you continue to experience issues after restoring your Internet connection, see "Troubleshooting other known issues on iPad" on page 320 or try following the tips in "Quick steps to fix most errors on iPad" on page 317. 319 16 Using Fast ForWord programs on iPad Troubleshooting other known issues on iPad While using the Fast ForWord program apps, you may run into a few minor issues. Use the following tips to resolve the issues and continue using the program. Sometimes when I tap on iPad screen, it does not seem to register. This issue occasionally occurs on iPad in general, when using an earlier version of iPad software. Apple has improved iPad software and updating to the latest supported iOS should resolve the issue. "Loading, please wait" message remains on the screen for more than a few minutes. To resolve the issue, press the Home button and then open the app again. After restoring the Internet connection, I see the message "Unable to access MySciLEARN. Please check your Internet connection and try again." Tap OK to close the message. If the Internet connection has been restored, you should be able to continue using the program. If you continue to experience issues, try following the tips in "Quick steps to fix most errors on iPad" on page 317. 320 17 Using Reading Assistant program 17 Using Reading Assistant program Use this chapter to learn how students work on the Reading Assistant program within MySciLEARN. For specific details on the Reading Assistant program see the Reading Assistant User Guide. What's in this chapter Preparing for Reading Assistant training 322 Using Reading Assistant speech technology 323 Enabling microphone access in Chrome 324 Setting up the Reading Assistant lab 328 Connecting the Reading Assistant headset 329 Completing the Reading Assistant microphone check 332 Correcting Reading Assistant audio issues 335 Starting Reading Assistant training sessions 337 Working on Reading Assistant for the first time 338 Continuing work on Reading Assistant 342 Exiting Reading Assistant training sessions 345 321 17 Using Reading Assistant program Preparing for Reading Assistant training Before students can use the Reading Assistant program, you’ll need to perform several important tasks. When these tasks are complete, see "Starting Reading Assistant training sessions" on page 337 to learn how your students use the program. • "Using Reading Assistant speech technology" on page 323 • "Enabling microphone access in Chrome" on page 324 • "Setting up the Reading Assistant lab" on page 328 • "Connecting the Reading Assistant headset" on page 329 • "Completing the Reading Assistant microphone check" on page 332 • "Correcting Reading Assistant audio issues" on page 335 For specific details on the activities and reports within the program, see the How to Use Reading Assistant manual. 322 17 Using Reading Assistant program Using Reading Assistant speech technology The most important component of Reading Assistant is its patented speech recognition technology, which allows the program to listen and follow along as a student reads aloud. Reading Assistant implements this technology in MySciLEARN based on the student's web browser. For an in-depth look at how Reading Assistant technology works, see our whitepaper Reading Assistant Technology for Guided Oral Reading at http://www.scilearn.com/Reading-Assistant-technology-guided-oralreading.pdf. Chrome web browser For Chrome and Chromebooks, Reading Assistant implements the speech recognition technology directly within the Chrome web browser, eliminating the need for any plug-ins or extensions. However, Reading Assistant requires microphone access within the Chrome web browser. See "Enabling microphone access in Chrome" on page 324 for information on how to perform this task. For existing Reading Assistant users, note that Chrome will automatically ignore the Reading Assistant Plug-in if it’s currently installed on the computer, so you don’t need to remove it. In fact, you’ll want to leave it installed on the computer if you plan to use Reading Assistant with other web browsers. All other web browsers For all other web browsers, Reading Assistant uses a lightweight browser plug-in to provide speech recognition. You'll need to install the plug-in on the student workstation before your students can use the program. See Chapter 3 “Using Reading Assistant browser plug-in” on page 48. 323 17 Using Reading Assistant program Enabling microphone access in Chrome For Chrome and Chromebooks, Reading Assistant implements its speech recognition technology directly within the Chrome web browser. This means that to use Reading Assistant, you'll need to enable microphone access within Chrome. Follow the steps in this topic. To learn more see "Using Reading Assistant speech technology" on page 323. If you have any further questions, contact Scientific Learning Customer Support. How microphone access works By default, when a student starts Reading Assistant in Chrome for the first time, Chrome automatically prompts the student to enable microphone access within the browser. At the same time, Reading Assistant shows the following message with detailed instructions. To enable microphone access in Chrome, click the Allow button at the top of the Reading Assistant web page. The student can continue using Reading Assistant as usual and should not have to set this option again. Tip: With Chromebooks, the microphone access setting is automatically saved in each student's Google Account using Chrome's sync ability. This makes sharing Chromebooks easy. Learn more » at http://support.google.com/chromebook/answer/1281195. 324 17 Using Reading Assistant program Re-enabling microphone access If the Deny button is clicked when prompted to allow microphone access—or if microphone access has already been denied for Reading Assistant—Chrome will not let the student use the program. Instead, the student will see the following message every time he or she opens Reading Assistant. To let the student use Reading Assistant, follow these steps to re-enable microphone access in Chrome. To re-enable microphone access in Chrome This task assumes that the student has already logged in to MySciLEARN, started a Reading Assistant session in Chrome, and received the above message telling the student to ask their teacher for help. Continue with these steps to re-enable microphone access. 1. Click the camera icon at the end of the address bar to view the Chrome error message: 325 17 Using Reading Assistant program 2. On the Chrome error message, choose the option "Always allow..." and click Done. When you make this change, Chrome will prompt you to reload the page. 3. Click the Reload button to reload the page. 326 17 Using Reading Assistant program Chrome reloads the Reading Assistant page, this time with microphone access enabled. The student can continue using Reading Assistant as usual and should not have to set this option again. 327 17 Using Reading Assistant program Setting up the Reading Assistant lab To improve the audio quality in the lab or classroom (or anywhere your students use the program), we suggest that you comply with the following recommendations: • If you are in a computer lab, provide sufficient space between computers. A lab where computers are facing each other or are in a “zigzag” pattern is better than an “L-shaped” setup. • Do not place computers next to loud equipment that may be producing a hum. • Do not allow power cords from different computers to cross each other. • Do not seat very soft-spoken students next to very loud students. Before the student can start working on the Reading Assistant product, you must connect and position the headset properly. Then, when the student starts the product and works on the Read and Record activity, he or she will then complete the microphone check. See the following topics: • "Connecting the Reading Assistant headset" on page 329 • "Completing the Reading Assistant microphone check" on page 332 328 17 Using Reading Assistant program Connecting the Reading Assistant headset Because the Reading Assistant software uses speech recognition and verification technology, the quality of the audio signal greatly impacts the user's experience with the product. Correct microphone connections and headset placement are essential for a clear audio signal. Note: Use the headsets and USB adapters approved by Scientific Learning. A USB headset should always be used with an approved USB adapter. For a list of approved headset adapters see "Reading Assistant headset requirements" on page 45, visit our Web site at www.scientificlearning.com, or check SciLEARNU. If you are using a non-USB headset, plug the headset directly into the computer. If you are using a USB headset, follow these instructions to connect and position the headset, to control the volume, and to store the headset. To connect a USB headset to the computer 1. Plug each headset cable into the USB adapter (plug the microphone cable into the microphone jack and the headphone cable into the headphone jack). On some headsets, you can match the pink and green color coding of the headset jacks with the corresponding colors on the USB adapter input. For the Califone 3066AV headset, match the black headset cable to the green adapter input and match the red headset cable to the pink adapter input. For headsets without color coding, check for the microphone or headphone symbol on the jacks or next to the jack sockets. 2. Connect the USB adapter to the computer by plugging the USB cable into a USB port. • If you're using the Chrome web browser on Windows and you plugged in the headset while the browser was open, you may need to restart the browser. When the headset is properly connected to the computer, make sure that the student knows how to position the headset and microphone correctly. 329 17 Using Reading Assistant program To position the headset and microphone 1. Place the microphone to the side of the mouth, not in front of it, about two fingers away from the corner of the mouth. Otherwise, the student's breath will strike the microphone and cause popping noises that can distort the signal. To accommodate this placement, you may need to bend the microphone boom at a right angle approximately 3/4 of the way down towards the microphone tip. 2. If present, make sure that the colored dot on the microphone (found on the plastic collar next to the foam microphone cover) is facing the user and has not rotated. If the dot is facing in another direction, twist the microphone so that the dot is again facing the student. 3. Have the student place both hands to the sides of the mouth (as if shouting) and move them away. If this can not easily be done without bumping into the microphone, it is too close; have the student move it farther to the side of his or her mouth. Note: Once positioned correctly, students should not touch the headset or move the microphone. Moving the microphone while reading will not help the software hear the student; instead, it will only add noise to the audio. Controlling the volume from the headset In addition to controlling the sound volume through the computer, the headphone playback volume can be adjusted by using the volume controls on some of the headsets. Please note that adjusting the volume using these controls can lead to issues if the volume accidentally gets turned down all the way. If a student has a problem with the audio, make sure to check that the volume control on the headset is set properly. 330 17 Using Reading Assistant program Storing the headset When possible, always store the headset with the microphone boom still in the bent position. This will reduce the need for microphone positioning adjustment for the next user and will limit wear and tear on the headset. 331 17 Using Reading Assistant program Completing the Reading Assistant microphone check To ensure good audio signal quality and a satisfactory experience with the Reading Assistant product, the software automatically administers a microphone check to adjust the audio settings for the student. The microphone check automatically begins the first time a student works on the Read and Record activity in a new session. A student or teacher can also manually initiate a microphone check from the Tools menu at the top of the screen; for example, if the microphone is unplugged or if the headset needs adjusting. Using both text and audio instructions, the microphone check prompts the student to read through a few simple screens. The microphone check then analyzes and adjusts the audio signal as needed. During the microphone check, the audio signal from the microphone will appear in the Volume bar. Occasionally, the microphone check will detect audio problems. When this occurs, it provides the instructor with some basic troubleshooting and then initiates the microphone check again. For more tips on troubleshooting see "Correcting Reading Assistant audio issues" on page 335. The Reading Assistant software automatically guides the student through the microphone check step by step, as follows. Before you start, make sure that the headset is positioned correctly. See "Connecting the Reading Assistant headset" on page 329 for details. The software repeats the microphone check each new work session, when the student accesses the Read and Record activity. This verifies that the microphone is properly connected and positioned for each reading. Tip: If your students are using Chrome or Chromebooks, see "Enabling microphone access in Chrome" on page 324 for additional information. To complete the microphone check 1. The first screen introduces the microphone check, and reminds the student to make sure the headset is properly adjusted and the microphone is not directly in front of his or her mouth. (breathing directly into the microphone will cause poor performance. When ready, the student clicks Next to begin. Microphone Check – Step 1 332 17 Using Reading Assistant program 2. The next screen presents the Volume Test, which prompts the student to count to ten. The student should use a normal speaking voice. The Volume bar shows the audio signal of the student’s voice. While the student counts, the software adjusts the volume of the audio signal according to how loudly the text is read. The volume should appear in the green section of the graph. When prompted, the student clicks Next to continue. Microphone Check – Step 2 3. The next screen presents the Quality Test, which prompts the student to repeat a p-heavy phrase, such as Please pay for the popcorn. The student should use a normal speaking voice. The Volume bar shows the audio signal of the student’s voice.When done reading the phrase, the student can use the Replay button to hear that reading. When prompted, the student clicks Next to continue. 333 17 Using Reading Assistant program Microphone Check – Step 3 The software then analyzes this sentence. If the software detects an audio problem, it provides the student with tips on how to resolve that problem. For example, if the microphone is too close to the mouth, the software may instruct the student on the correct placement of the microphone. • If it still detects a problem, the software advises the student to ask a teacher for help. • If no audio problems are detected, the microphone check ends. If the microphone check was initiated by the software, the recording automatically starts. Otherwise, the student clicks OK to exit the microphone check. 334 17 Using Reading Assistant program Correcting Reading Assistant audio issues Occasionally, the microphone check detects audio problems. When this occurs, it guides the student through some basic troubleshooting and then initiates the microphone check again. The following are examples of potential issues and solutions: • No audio signal detected – The student should check the headset connection and position. If the microphone check still cannot hear the student, it instructs the student to ask a teacher for help. • A low signal-to-noise ratio is detected – In this case, the noise in the room is loud relative to the student’s voice. For example, the student may be soft-spoken, or may be sitting next to an unusually loud child. Repositioning the microphone closer to the user's mouth may help, but remember to keep the microphone to the side of the mouth, as the student's breath can be a source of noise. You can also encourage students to speak clearly and not too softly into the microphone. If the software still detects a problem after one attempt to correct the issue, a message appears, prompting the student to ask for teacher assistance. The message also provides an instructor section with information on how to troubleshoot and correct the problem. Tip: If your students are using Chrome or Chromebooks, see "Enabling microphone access in Chrome" on page 324 for additional information. Continuous audio checking While the student reads aloud in a selection, the Reading Assistant software continuously monitors the audio quality in the background, checking for issues that could be affecting speech recognition and verification performance. If it detects an audio problem, the software automatically makes adjustments behind the scenes to help improve the audio signal. If the software detects a problem that cannot be resolved behind the scenes, it displays a message prompting the student to ask for teacher assistance. The message also provides an instructor section with information on how to troubleshoot and correct the problem. Additional audio troubleshooting tips If needed, you can try these basic audio troubleshooting tips, in this order. If the problem persists or you need help, contact Scientific Learning Customer Support. 1. If your headset has a volume control or mute button, make sure that it's set properly. See "Connecting the Reading Assistant headset" on page 329. 2. Make sure that the headset is properly connected to the computer. See "Connecting the Reading Assistant headset" on page 329. 3. Check the microphone settings on your computer or device and make sure that the headset is selected and the volume is not muted or too low. 335 17 Using Reading Assistant program 4. Exit the Reading Assistant program and restart it. 5. Log the student out of the Student Exercises and restart the web browser. 6. Restart the computer. 336 17 Using Reading Assistant program Starting Reading Assistant training sessions Before the student starts working on the product, verify the following: • All of the preparation tasks have been completed. See "Preparing for Reading Assistant training" on page 322 for details. • All other software programs have been closed (including screen savers) • The computer’s volume is adjusted to a comfortable level To work on Reading Assistant, the student follows specific steps based on whether or not the student is starting Reading Assistant for the first time. See the following topics for steps as needed. • "Working on Reading Assistant for the first time" on page 338 • "Continuing work on Reading Assistant" on page 342 For complete details on how students use and progress through the Reading Assistant product, see the How to Use Reading Assistant manual. 337 17 Using Reading Assistant program Working on Reading Assistant for the first time Review these steps to learn how a student works on the Reading Assistant product for the first work session. Make sure to review all of the topics in "Preparing for Reading Assistant training" on page 322 before you begin. If this is not the first work session for the student, see "Continuing work on Reading Assistant" on page 342. Please note that Reading Assistant is not available on iPad at this time. Tip: Some students may require guidance through this task, especially if the student is young, or if this is the first time the student is using the program. To work on Reading Assistant for the first time as a student Before your student starts using the program, make sure you've completed all of the tasks in "Preparing for Reading Assistant training" on page 322. 1. From any student computer connected to the Internet, log in to MySciLEARN (see "Logging in as a student" on page 30). The Student Exercises page opens and displays the student's assignment • If another student's name appears on the Student Exercises page, the student should click That’s Not Me to log out and return to the Student Login page, then log in with his or her username and password. • If the RPI graphic appears on the screen instead of the Reading Assistant graphic, the student will need to complete the RPI assessment first. See "Administering an RPI assessment" on page 352 for steps on completing an assessment, then return to the next step in this task. • If the student has no assignments, you'll need to create one before the student can continue. See Chapter “Assigning the Reading Assistant product” on page 265. 338 17 Using Reading Assistant program Student Exercises – My Assignments (Content Pack K-3) 2. Verify that your headset and microphone are positioned correctly and the computer’s volume is at a comfortable level. 3. Click the Start button on the Reading Assistant product graphic. • If needed, Reading Assistant may prompt the student to install the plug-in on the workstation or enable microphone access in the browser. See "Using Reading Assistant speech technology" on page 323 to learn more about these tasks. The Reading Assistant tutorial video automatically opens for all first-time users. For details on using the tutorial, see "Using the Reading Assistant tutorial" on page 395. When the student has finished watching the video, the My Library screen opens and organizes the content based on the library assigned to the student: content pack or custom library. Content Pack – A list of topics appear on the left. The selections in the current topic appear in the right. Each selection has its own book graphic with a Go button: 339 17 Using Reading Assistant program My Library – Content Pack (locked progression) Custom Library – No topics are listed; only selections appear on the page. Each selection has its own book graphic with a Go button. My Library – Custom Library (locked progression) 340 17 Using Reading Assistant program In addition, the content availability on the My Library screen is based on the content progression method set for the library. For more details on how the library assignments work, see Chapter 13 “Managing Reading Assistant assignments” on page 233. • Locked – In this default setting, the student must start with the first selection in the library assignment, and continue in order through the content in the library. Within each selection, the student must complete each activity, in order, before moving to the next selection. • Student-selected – The student can choose any selection in the library. Once started, however, the student must complete all of the activities in that selection before moving to another selection. • Unlocked – Recommended for teachers/classroom instruction only. The user can choose any activity within any selection, in any order. The user does not have to complete a selection or activity before moving on to a new selection or activity. 4. Open a reading selection using the Go button on an available selection. 5. Click the Start button to begin working on the selection. Reading Assistant – My Reading Each selection presents the following activities to the student: Preview and Read on My Own, Read and Record, and Take the Quiz. The student should continue working on all of the available activities until the work session ends. To exit the program, see "Exiting Reading Assistant training sessions" on page 345 for steps. Students should never exit an exercise by closing the web browser. When that student logs out of MySciLEARN, another student can begin working on a product from that workstation, as needed. For complete details on how students work on and progress through the Reading Assistant product, see the How to Use Reading Assistant manual. 341 17 Using Reading Assistant program Continuing work on Reading Assistant Review these steps to learn how a student works on the Reading Assistant product after the first work session. Make sure to review all of the topics in "Preparing for Reading Assistant training" on page 322 before you begin. If this is the first work session for the student, see "Working on Reading Assistant for the first time" on page 338. Please note that Reading Assistant is not available on iPad at this time. Tip: Some students may require guidance through this task, especially if the student is young, or if this is the first time the student is using the program. To continue working on Reading Assistant as a student Before your student starts using the program, make sure you've completed all of the tasks in "Preparing for Reading Assistant training" on page 322. 1. From any student computer connected to the Internet, log in to MySciLEARN (see "Logging in as a student" on page 30). The Student Exercises page opens and displays the student's assignment • If another student's name appears on the Student Exercises page, the student should click That’s Not Me to log out and return to the Student Login page, then log in with his or her username and password. • If the RPI graphic appears on the screen instead of the Reading Assistant graphic, the student will need to complete the RPI assessment first. See "Administering an RPI assessment" on page 352 for steps on completing an assessment, then return to the next step in this task. • If the student has no assignments, you'll need to create one before the student can continue. See Chapter “Assigning the Reading Assistant product” on page 265. 342 17 Using Reading Assistant program Student Exercises – My Assignments (Content Pack K-3) 2. Verify that your headset and microphone are positioned correctly and the computer’s volume is at a comfortable level. 3. Click the Start button on the Reading Assistant product graphic. • If needed, Reading Assistant may prompt the student to install the plug-in on the workstation or enable microphone access in the browser. See "Using Reading Assistant speech technology" on page 323 to learn more about these tasks. The Start Where You Left Off screen shows the selection, activity, and page where you left off. My Library – Start Where You Left Off The student can choose from the following options: • Go – Clicking this button opens the selection and activity where the student left off. 343 17 Using Reading Assistant program • View My Library – Clicking this link opens the My Library screen, where the student can browse the selections in their library assignment. • View My Points – Clicking this link opens the My Points report on the My Library screen, where the student can view points and progress in their selections. 4. Open the reading selection using the Go button. The My Reading screen opens to the place where the student last left off. 5. Start working on the selection. Each selection presents the following activities to the student: Preview and Read on My Own, Read and Record, and Take the Quiz. The student should continue working on all of the available activities until the work session ends. To exit the program, see "Exiting Reading Assistant training sessions" on page 345 for steps. Students should never exit an exercise by closing the web browser. When that student logs out of MySciLEARN, another student can begin working on a product from that workstation, as needed. For complete details on how students work on and progress through the Reading Assistant product, see the How to Use Reading Assistant manual. 344 17 Using Reading Assistant program Exiting Reading Assistant training sessions Instruct your students to follow these steps to exit a Reading Assistant training session. Note: Students should never exit Reading Assistant by closing the web browser. Instead, instruct students to use the Exit buttons within the program as described here. To exit a Reading Assistant training session 1. From anywhere inside Reading Assistant, click the Exit button in the upper right corner until you return to the Student Exercises screen. My Library 2. Click Log Out in the upper right corner of the Student Exercises screen to log out of MySciLEARN. 345 17 Using Reading Assistant program Student Exercises 346 18 Using Reading Progress Indicator 18 Using Reading Progress Indicator Use this chapter to learn how to use Reading Progress Indicator (RPI) within MySciLEARN. What's in this chapter About Reading Progress Indicator 348 Setting RPI access for students 350 Administering an RPI assessment 352 Voiding an RPI assessment for a student 355 Reading Progress Indicator FAQ 357 347 18 Using Reading Progress Indicator About Reading Progress Indicator Reading Progress Indicator (RPI) provides reading assessments within MySciLEARN and reports the results in the Results section of MySciLEARN. The Reading Progress Indicator assessments correlate to nationally recognized normed assessments, are reliable and validated, and provide overall reading scores that can help indicate how students are responding to Fast ForWord product use. Reading Progress Indicator provides four assessment levels based on the grade entered for the student: K-1, 2-3, 4-6, and 7-13+ (pre-Kindergarten students are not eligible for the assessments). The assessments are not timed. The student may complete an assessment across work sessions and days, but should complete it in a timely manner. The products remain unavailable until the student completes the assessment. For more information on Reading Progress Indicator and how the scores are calculated and used, see "Reading Progress Indicator FAQ" on page 357. If you have any additional questions or concerns, contact Scientific Learning Customer Support. Tip: If your students are using iPad mobile digital devices, you can install the Reading Progress Indicator app to allow your students to take RPI assessments on iPad. See "Downloading Fast ForWord program apps for iPad" on page 306 for more information. How the system administers RPI assessments During each student work session, MySciLEARN determines if the student is eligible for an assessment. If so, the Reading Progress Indicator graphic appears on the Student Exercises screen in place of the assigned product graphic. When clicked, MySciLEARN presents the actual assessment. Reading Progress Indicator provides both initial assessments and follow-up assessments for the Fast ForWord program, and provides initial assessments for the Reading Assistant program. MySciLEARN administers RPI assessments as follows: • The system automatically administers an initial assessment upon enrollment in the Fast ForWord or Reading Assistant program. • When the student nears the completion of a Fast ForWord program, the system evaluates whether a follow-up assessment is needed, and if so, it administers that follow-up assessment. • The system sends the assessment results to the Results section of MySciLEARN, where you can view the results in the Gains reports (Reading Assistant students can also view the results for their placement RPI assessments in the Group Gains report). MySciLEARN uses a specific method to determine when to present an assessment. If a student finishes a Fast ForWord program, starts a new program, or starts a new school year and it does not present an assessment, this is by design. For example, let's say that a group of students completes a Fast ForWord program just before the start of winter break. When the students return to school a few 348 18 Using Reading Progress Indicator weeks later, the teacher starts the group on a new Fast ForWord program. In this case, MySciLEARN may not present a new assessment because the assessments from a few weeks ago may still be valid. 349 18 Using Reading Progress Indicator Setting RPI access for students By default, MySciLEARN enables Reading Progress Indicator for all schools in the district. However, you can disable or enable RPI as follows: • For all new students (set at the school level only) • For existing students (set at the student level only) For details on setting the RPI availability for all new students at the school level, see "Setting Reading Progress Indicator school defaults" on page 106. IMPORTANT! If you disable RPI for a student, you cannot use Fast ForWord Auto Assign or Reading Assistant Auto Initial Assignment for that student. You will need to manage the student’s assignments manually. See the following topics for details: • "Setting Fast ForWord Auto Assign for students" on page 221 • "Setting Reading Assistant Auto Initial Assignment for students" on page 262 • "Assigning the Reading Assistant product" on page 265 • "Assigning the Fast ForWord products" on page 225 Please note that when disabling RPI for Reading Assistant students, the content placement settings for those students using the RPI (Automatic) placement method may change. For more information see "Content placement – Use RPI (Automatic)" on page 249. To set RPI access for your students 1. In MySciLEARN Manage section, click the Students tab to access the Students page. 2. Perform one of the following tasks: To set RPI for an individual student from the student’s profile: • Click the student’s name to open that student’s profile. • In the Auto Assign and Reading Progress Indicator section, click the Settings button. • Under Reading Progress Indicator, select the availability option you’d like to set for this student and click Apply: • To disable RPI, select Do not use Reading Progress Indicator assessments. • To enable RPI, select Use Reading Progress Indicator assessments. To set RPI for one or more students from the students list: • In the Settings column, click the RPI button (R) to turn RPI on or off. 350 18 Using Reading Progress Indicator • When the setting is turned on, the RPI button appears green. To turn RPI on, Reading Progress Indicator must be enabled for the student. • When the setting is turned off, the RPI button appears gray. To set RPI for one or more students from the More Actions menu: • Select the checkbox next to the students, or select the All checkbox at the top of the students list to select all of the students on the screen. • From the More Actions menu, select the appropriate action: • Select Turn RPI Off, then click Disable RPI to confirm the action. • Select Turn RPI On, then click Enable RPI to confirm the action. 351 18 Using Reading Progress Indicator Administering an RPI assessment This topic covers taking an assessment, exiting an assessment early, and when to take a follow-up assessment. Assessments should always be taken at school, under the supervision of school staff. If the student is using iPad, you can install the Reading Progress Indicator app to provide access to the RPI assessments on iPad. See "Downloading Fast ForWord program apps for iPad" on page 306 for more information. Before allowing the student to take the assessment, verify the following: • The Fast ForWord headphones are plugged in • The volume on the computer is adjusted to a comfortable level Tip: Some students may require guidance through this task, especially if the student is young, or if this is the first time the student is using the program. To take an assessment as a student 1. Log in to MySciLEARN. For detailed steps see "Logging in as a student" on page 30, which provides instructions for both computer users and iPad users. For additional information on how students use the apps on iPad see "Starting Fast ForWord training sessions on iPad" on page 310. When the student logs in, the Student Exercises page opens. If the student is eligible for an assessment, the RPI graphic appears. If another student's name appears on the Student Exercises page, the student should click That’s Not Me to log out and return to the Student Login page, then log in with his or her username and password. 352 18 Using Reading Progress Indicator Student Exercises – My Assignments (RPI) 2. Put on your headphones and click the Start button on the Reading Progress Indicator graphic. The assessment starts. Reading Progress Indicator presents questions or instructions, one at a time. Some items are read aloud; others are presented as text and graphics only. RPI Assessment 3. Answer each item and click Next after answering each item. When the assessment is complete, click the Exit button. The Student Exercises page reappears and displays the assigned product. 353 18 Using Reading Progress Indicator After the student completes an assessment, you can immediately view the results on the student's profile on the Students page (see "Using student profiles" on page 176 for more information). In addition, MySciLEARN sends the assessment data to the Results section of MySciLEARN, where you can review the results in the Gains reports (Reading Assistant students can also view the results for their placement RPI assessments in the Group Gains report). Exiting an assessment early If the student exits the assessment before completing it, the Reading Progress Indicator graphic will remain on the Student Exercises screen until the assessment is completed. When opened again, the assessment will resume and present the next item. If the assessment starts from the beginning, this means that the student waited too many days before resuming the assessment. Taking a follow-up assessment When the student finishes working on the product, MySciLEARN will present a follow-up assessment as needed. Follow the same steps to take the follow-up assessment. MySciLEARN uses a specific method to determine when to present an assessment. If a student finishes a product, starts a new product, or starts a new school year and MySciLEARN does not present an assessment, be assured that this is by design. 354 18 Using Reading Progress Indicator Voiding an RPI assessment for a student If necessary, you can void an assessment for an individual student; for example, if the wrong student took the assessment, or if the student was not completely focused while taking the assessment. Use the Student Profile screen on the Students page to perform this task. More about voiding assessments • You can void an assessment for an individual student only. • Voiding an assessment permanently deletes it from the system. • You can only void the following assessments: • • A student’s most recent assessment, if it was completed in the last 30 calendar days • An assessment that still in progress, if it was worked on in the last 30 calendar days If the Void option does not appear next to the assessment, that assessment is not eligible to be voided. To void an assessment for a student 1. In MySciLEARN Manage section, click the Students tab to access the Students page. 2. Locate the student in the students list. You can filter the student list by using the Browse by School, Filter by My Groups, or Filter by Staff options on the left of the Students page, or you can search for a student using the Search feature at the top of the screen. 3. Click the student’s name to open the student’s profile. 4. In the Reading Progress Indicator section, click the Void button next to the assessment. If the Void option does not appear next to the assessment, that assessment is not eligible to be voided. 355 18 Using Reading Progress Indicator Student Profile – Void Assessment 5. On the confirmation message, click Confirm Void to permanently delete the assessment from the system. 356 18 Using Reading Progress Indicator Reading Progress Indicator FAQ This topic provides answers to some frequently asked questions about Reading Progress Indicator. If you still have questions or concerns, or would like more information, contact Scientific Learning Customer Support. • "General questions" on page 357 • "Understanding RPI scores" on page 358 • "Interpreting RPI scores" on page 360 Using assessments to evaluate students When using assessments to evaluate students, it's important to note that assessment scores only represent a partial snapshot of a student's performance at a given time, which can be influenced by the student's psychological or physical state at the time of testing. As such, assessment tools can be subject to errors. Scientific Learning recommends using both a pattern of test performance over time and multiple assessment tools to provide a more accurate measure of a student's true performance. Additionally, please note that an assessment is considered to be at or below chance if the student scored below 30% on the assessment. Assessment scores below 30% correct cannot be distinguished from random guessing, and therefore are not a good basis for a valid evaluation. When reviewing RPI scores for your students, consider whether unexpectedly low scores seem reasonable for those students. If not, you may choose to void the RPI assessment and have the student complete a new assessment. MySciLEARN provides detailed RPI scoring results in the Gains reports. See General questions What is Reading Progress Indicator? Reading Progress Indicator (RPI) is an online assessment that rapidly measures the effects of the Fast ForWord family of products by evaluating reading performance as students progress from product to product. Scientific Learning partnered with a third party to develop this research-based and psychometrically sound evaluation tool. Numerous studies have demonstrated that RPI is positively correlated with other nationally-normed reading assessments, as well as the high-stakes reading tests from various states across the nation. What reading skills does Reading Progress Indicator measure? Reading Progress Indicator measures four skills: phonological awareness, decoding, vocabulary, and comprehension. These skills are defined as follows: 357 18 Using Reading Progress Indicator • Phonological awareness – The ability to discriminate, identify, and manipulate the sounds in words; for example, recognizing words that rhyme, or removing the first sound of cat to make the word at. • Decoding – The ability to decipher written words. Decoding requires phonological awareness as well as an understanding of sound-symbol correspondences. • Vocabulary – The ability to understand a word's meaning and syntactical role, and to recognize the individual morphemes in a word. Morphemes are the smallest unit of meaning in a language and include roots, prefixes, and suffixes. • Comprehension – The ability to read text (or listen to spoken language) and actively construct meaning so as to understand the author’s message. Can Reading Progress Indicator help diagnose specific language or reading disabilities? No. Reading Progress Indicator is not designed to be a diagnostic tool. Can Reading Progress Indicator replace the other clinical, district, or state assessments I have been using with my students? No. Reading Progress Indicator is not designed to replace any other clinical, district, or state assessment. What if a student's Individualized Education Program (IEP) calls for accommodations or modifications while taking tests? If a student's IEP calls for specific modifications during testing, accommodations can be implemented for that student as necessary. The same modifications should be in place during each RPI assessment, so that Reading Progress Indicator can effectively assess the benefits of the Fast ForWord products for that student. Are the RPI assessments available for iPad? Yes. If your students are using iPad mobile digital devices, MySciLEARN provides the Reading Progress Indicator app for iPad. See Chapter 16 “Using Fast ForWord programs on iPad” on page 302 for more information. Understanding RPI scores What kinds of scores does Reading Progress Indicator assess? For each assessment, Reading Progress Indicator assesses national percentile scores and grade equivalent scores, along with the percent correct in each reading skill area. Gain scores are available for students who have taken at least one follow-up assessment. A student’s overall gain score reflects improvement from the initial assessment to the latest follow-up assessment. How were the scores for Reading Progress Indicator developed? 358 18 Using Reading Progress Indicator The scores in Reading Progress Indicator are based on the results of a calibration study in which Reading Progress Indicator was administered to a large, nationally representative sample of students. This sample was selected to include students of different ethnicities, and students from all regions of the United States. Fast ForWord product use was not considered in the selection process. Normalized scores were developed based on the performance of the students in this study. What are grade equivalent scores? Grade equivalent scores provide a general idea of how a student is performing with reference to younger and older students who took the same test. For example, a very advanced third grader might earn a grade equivalent score of 5.3 on the level 2-3 RPI assessment. This score means that the student performed as well as an average fifth grader who took the same test three months into the school year. A third grader who earns a score of 5.3 is performing well above average on third grade level material (at the 83rd percentile, to be precise), yet this does not mean the student is ready for fifth grade level material. What are national percentile scores? National percentile scores allow you to compare one student's score to the scores of a large national sample. For example, if a student scored in the 70th percentile on an assessment, that student performed better than 70% of the students in his or her grade who took the same assessment as part of the calibration study. In contrast, percent correct scores indicate the proportion of questions that were answered correctly. For example, if a student scored 40% correct on a set of 10 questions, it means that the student got 4 correct answers. Reading Progress Indicator provides a national percentile score for the student’s performance on the whole test, along with percent correct scores for the sets of questions on the four skill areas: phonological awareness, decoding, vocabulary, and comprehension. In addition, percentile scores for Reading Progress Indicator are based on the middle of the year and do not vary with the season. For example, for students in second grade, the 50th percentile corresponds approximately to a grade equivalent of 2.5. A second grader scoring at grade level earlier in the year will have a percentile score below 50, whereas a second grader scoring at grade level later the year will have a percentile score above 50. For those who are familiar with percentiles, please note that percentiles in Reading Progress Indicator range from 1 to 99. What are gain scores? Gain scores reflect improvement from an earlier assessment to a later assessment. A student’s overall gain score shows improvement from the initial assessment to the latest follow-up assessment. Gain scores are reported in terms of grade equivalent scores and percentile scores. Grade equivalent scores are based on a ten month academic school year, so a student who earned an initial assessment score of 2.2 and a follow-up assessment score of 3.4 would have a gain score of 1.2 (that is, one year and two months). What are reading proficiency levels? Reading proficiency levels are categories of achievement that describe student performance in the skills measured by Reading Progress Indicator. There are four levels: struggling, emerging, established, and advanced. These proficiency levels were established by aligning results from the 359 18 Using Reading Progress Indicator Reading Progress Indicator calibration study with information from various states regarding the percentage of students that achieve proficiency on high-stakes assessments. The levels are defined as follows. Occasionally the results are color coded. • Struggling – Indicates minimal success with the fundamental skills assessed by Reading Progress Indicator (students at the 1st to 29th percentile). • Emerging – Indicates a partial mastery of the skills assessed by Reading Progress Indicator (students at the 30th to 54th percentile). • Proficient – Indicates a solid understanding of the skills assessed by Reading Progress Indicator (students at the 55th to 79th percentile). • Advanced – Indicates a superior performance demonstrating excellent understanding of the skills assessed by Reading Progress Indicator (students at the 80th to 99th percentile). Please note that percentiles in Reading Progress Indicator range from 1 to 99. How are the average scores for a group, school, or district calculated? Neither grade equivalent scores nor percentiles can be mathematically averaged. To report average grade equivalent gains, MySciLEARN averages the students' scaled scores on the initial assessment and the latest follow-up assessment, references the grade equivalent scores corresponding to those averages, and then uses those grade equivalent scores to calculate the average gain score. To report average percentile gains, MySciLEARN averages the students’ normal curve equivalent scores on the initial assessment and the latest follow-up assessment, references the percentile scores corresponding to those averages, and then uses those percentiles to calculate the average gain score. Interpreting RPI scores Some of my students scored at grade level on the initial assessment. Does this mean they should stop using the Fast ForWord products? The Fast ForWord products have been shown to benefit students who are performing at grade level as well as those who are performing above and below grade level. The initial assessment showed that one of my students is performing well in phonological awareness but not as well in comprehension. Should the student skip the Fast ForWord Language product? Fast ForWord Language v2 works on a wide range of language, reading, and cognitive skills. We generally recommend that struggling students start with Fast ForWord Language v2 or Fast ForWord Literacy. One of my students did not show significant gains on the Gains reports. Are the Fast ForWord products working? 360 18 Using Reading Progress Indicator A given test score is just a partial snapshot of a student's ability at a given time. Performance can be influenced by a student's physical or psychological state at the time of the test, and may not always reflect the student’s best effort. To determine whether a student is benefiting from Fast ForWord use, conduct progress monitoring using a variety of assessments and look for signs of progress in the student's classroom work and behavior. My school's average score only improved from the 3rd percentile to the 6th percentile, but I see noticeable improvements in classroom. What's going on? Percentile rank is not an equal-interval scale; that is, the difference between any two scores is not the same as the difference between any other two scores. Scores become increasingly spread out as they move further from the 50th percentile in either direction, so that gains on the far ends of the spectrum are more difficult to achieve. For example, a student whose percentile score went from 2 to 12 has made a greater improvement in performance than a student whose score went from 50 to 60, even though both students had a gain score of 10 percentile points. Because their scores are at the extreme end of the spectrum, students whose percentile scores improve from 3 to 6 may indeed be making gains that translate into improved classroom performance. 361 19 Monitoring student sessions 19 Monitoring student sessions Use this chapter to learn how to monitor students from your web browser as they work on the Fast ForWord and Reading Assistant programs. To learn how to monitor students on your mobile device, see Chapter 20 “Monitoring students from a mobile device” on page 370. What's in this chapter Monitoring sessions for a group 363 Managing a locked Fast ForWord session 366 Terminating a locked training session 368 362 19 Monitoring student sessions Monitoring sessions for a group This topic details how to monitor student sessions from a web browser. To learn how to monitor student sessions on your mobile device, see Chapter 20 “Monitoring students from a mobile device” on page 370. The Monitor screen in MySciLEARN allows you to watch a group of students as they train, providing real-time participation details for each student's exercise session. It lets you check in and see exactly what product and exercise each student is working on, or whether a student is working at all. You can monitor students that are working in another classroom or building and get feedback on each student’s status. Access the Monitor screen from the Students page while viewing a group (see "Using the students list" on page 168 for steps). Turn the Monitor on or off using the slider on the right side of the page. The Monitor provides information based on the current product your students are using: Fast ForWord or Reading Assistant (if a student is taking an RPI assessment, the monitor shows "Reading Progress Indicator" as the current product). The session details for each product are described as follows. Monitoring Fast ForWord sessions Monitor – Fast ForWord Training Sessions The Monitor shows the following details for all current Fast ForWord training sessions in the selected group: • The student name and the current Fast ForWord product • The current exercise in the Fast ForWord product 363 19 Monitoring student sessions • The number of trials taken and the minutes remaining in the exercise • The number of exercises remaining in the day's protocol • An Unlock icon that lets you manage a locked training session (appears for locked sessions only; see "Managing a locked Fast ForWord session" on page 366 for details) • A red X icon that stops the student’s training session, which should only be used when absolutely necessary (see "Terminating a locked training session" on page 368 for details) To view Fast ForWord session activity details for a student, hold the mouse over that student in the list. The following information will appear for that student’s session: • All of the exercises worked on in the session, including the current exercise • The number of trials taken and the minutes spent working in each exercise Monitoring Reading Assistant sessions Monitor – Reading Assistant Training The Monitor screen displays the following information for all current Reading Assistant training sessions in the selected group: • The student name and the current product: Reading Assistant • The current selection in the Reading Assistant product (if the student is not working on a selection, this field shows None) • The current selection activity: • Step 1 – Preview and Read on My Own • Step 2 – Read and Record 364 19 Monitoring student sessions • Step 3 – Take the Quiz • The number of minutes remaining in the session, if the student is using a schedule (if not, this column shows N/A) • A red X icon that stops a student’s training session, which should only be used when absolutely necessary (see "Terminating a locked training session" on page 368 for details) 365 19 Monitoring student sessions Managing a locked Fast ForWord session This topic details how to manage a locked Fast ForWord student sessions from a web browser. If you are using the Session Monitor app, follow the steps in this topic (the Session Monitor app does not provide access to this feature). Under most circumstances, if a student workstation temporarily loses connection to the SciLEARN platform server while a student is training on a Fast ForWord product, the student’s training session should not be affected. However, there are cases where a lost connection may impact the training session; for example, if a student loses the network connection while working on an exercise, and the connection is not restored before the exercise ends. When this happens, the student workstation will display a message indicating that it has lost its network connection, and the system will lock the Fast ForWord exercise on which the student was working. Locking the Fast ForWord exercise protects the student’s exercise training data for that session. When an exercise is locked, the Monitor screen displays an Unlock icon next to the student name. To view instructions on how to continue, hold the mouse cursor over the student’s name. Monitor – Unlock icon Monitor – Unlock icon message 366 19 Monitoring student sessions To allow the student to continue working when an exercise is locked, try one of the following options: • Restore the network connection on the original student workstation. This is the preferred option, as it preserves the training data for the locked Fast ForWord exercise. • If you cannot restore the connection but you want the student to continue training, move the student to another workstation and do one of the following: • Allow the student to work on any remaining non-locked Fast ForWord exercise. This gives the original workstation one hour to reconnect and save the locked exercise data. If it fails, the exercise will unlock and the student will likely need to repeat that training session. • Click the Unlock icon on the Monitor screen to unlock the Fast ForWord exercise and allow the student work on that exercise. The student will likely lose the data from the locked exercise and need to repeat that training session. If none of the above options work and the student still can’t train on the Fast ForWord product, you can try terminating the locked training session. See "Terminating a locked training session" on page 368 for details. 367 19 Monitoring student sessions Terminating a locked training session This topic details how to terminate a locked student sessions from a web browser. If you are using the Session Monitor app, follow the steps in this topic (the Session Monitor app does not provide access to this feature). Occasionally, a student's training session may lock up and continue to appear on the Monitor screen no matter what actions you take. When this happens, you can manually terminate that session by choosing the red X icon next to that student’s name on the Monitor screen. If you use this option to terminate a student’s training session, all of the training data for that session will be lost. If you have any questions or concerns about using this option, please contact Scientific Learning Customer Support. Monitor – Terminate session IMPORTANT! Do not use this option to close an active student training session; always have the student exit their training session from the Student Exercises workstation. Otherwise, all of the training data for that session will be lost. To terminate a locked student training session 1. In MySciLEARN Manage section, click the Students tab to access the Students page. 2. Click the On button to activate the Monitor screen. 3. Select the group that includes the student with the locked training session. 4. Click the red X icon next to that student’s name. 5. On the Warning message, click Terminate Session. 368 19 Monitoring student sessions Monitor - Terminate Locked Session Warning 369 20 Monitoring students from a mobile device 20 Monitoring students from a mobile device Use this chapter to learn how to use the Session Monitor app to monitor students as they work on the Fast ForWord and Reading Assistant programs. To use the Monitor feature on a web browser see Chapter 19 “Monitoring student sessions” on page 362. To check system requirements for the app see "Session Monitor app requirements" on page 43. About Session Monitor app 371 Downloading Session Monitor app 373 Using Session Monitor app 374 Troubleshooting Session Monitor app 381 370 20 Monitoring students from a mobile device About Session Monitor app Session Monitor app for MySciLEARN lets you use a mobile digital device to watch your students as they use the Fast ForWord and Reading Assistant programs. Keep an eye on student training sessions while you sit at your desk, walk around the classroom, or move around the school. Access up-to-the-minute session details for each student, including timely alerts when a student strays off task. Just download the app on your mobile device and you're ready to go. How does Session Monitor app work? Just like a MySciLEARN web browser client on a computer, Session Monitor app uses the Internet to connect to MySciLEARN, load your student groups, and monitor student training sessions. See "Using Session Monitor app" on page 374 to learn more. How does the app compare to the Monitor feature in MySciLEARN? Session Monitor app and the Monitor feature in MySciLEARN are very similar, with just a few slight differences to optimize for mobile use. For details see "Using Session Monitor app" on page 374. • Session Monitor app color codes your students to help you quickly identify when a student is actively working or off task. • Session Monitor app lets you customize how you view your students—choose from list view or grid view. • If needed, you can use the Monitor feature in MySciLEARN to manage locked training sessions. See "Terminating a locked training session" on page 368. Are there any technical requirements, licenses, or fees? There are a few minor system requirements, including which mobile digital devices are supported. See "Session Monitor app requirements" on page 43 for details. No new licenses or fees are required—any MySciLEARN staff member can use the Session Monitor app to monitor their student training sessions. If you have any questions, check with your school administrator or contact Scientific Learning Customer Support. Do I need to change any MySciLEARN settings to use Session Monitor app? No, the Session Monitor app does not require any new or special settings on the administration side of MySciLEARN, and it does not affect anyone else monitoring student sessions. 371 20 Monitoring students from a mobile device Can I use more than one type of device to monitor student sessions? Yes, you can switch among supported devices as you like (web browser, tablet, smartphone) without any issues. How secure is Session Monitor app? The Session Monitor app employs the same security as MySciLEARN, which requires that all staff members use a unique login and password to access the program. If you have any additional questions about security, contact Scientific Learning Customer Support. How do I get started? To start using Session Monitor app on your mobile digital device, review the following topics: • "Session Monitor app requirements" on page 43 • "Downloading Session Monitor app" on page 373 • "Using Session Monitor app" on page 374 372 20 Monitoring students from a mobile device Downloading Session Monitor app The App Store℠ lets you download the Session Monitor app directly to your iPad or iPhone. The app is free, but you'll need a MySciLEARN staff account to use it. An easy way to find the Session Monitor app is to search for "Scientific Learning" on the App Store, or use the app links on our iTunes® company page. Once you've installed the app, the App Store will notify you when any updates are available. If an update is required, you'll also be notified when you open the app. Tip: Always update the app as soon as possible. With required updates, you cannot use the program until you update the app. 373 20 Monitoring students from a mobile device Using Session Monitor app Follow these simple steps to start monitoring your students from a mobile device. To learn how to monitor student sessions from a web browser, see Chapter 19 “Monitoring student sessions” on page 362. • "Session Monitor at a glance" on page 375 • "Starting the app and logging in" on page 376 • "Choosing a group to monitor" on page 377 • "Monitoring sessions on a tablet" on page 378 • "Monitoring sessions on a phone" on page 380 374 20 Monitoring students from a mobile device Session Monitor at a glance Tablet overview Phone overview 375 20 Monitoring students from a mobile device Starting the app and logging in Getting started is easy. Once you've download the Session Monitor app on your mobile device, simply open the app, enter your MySciLEARN staff login email and password, and tap Submit. • To save your login credentials on a device, select Remember Me before you tap Submit. If you share the device, you can clear your saved credentials by logging out and removing your information from the login and password fields. • The first time you log in to Session Monitor, a short tutorial opens to show you how the app works. Swipe left to scroll through the tutorial pages. Tap outside the tutorial to close it. • For a refresher on how your MySciLEARN staff login works see "Managing your staff account" on page 35. • If you have not yet downloaded the app on your device, see "Downloading Session Monitor app" on page 373. 376 20 Monitoring students from a mobile device Choosing a group to monitor When you log in to Session Monitor, it validates your MySciLEARN staff credentials, then shows all of your groups in a list. Choose the group that includes the students you'd like to monitor (students who are currently using the programs). The group opens and shows all active training sessions for those students. to return to the Choose a Group screen and view a different group of • Use the Menu icon students. • If you don't see any activity for a group (that is, the screen is blank), none of the students in the group have started a training session. Try choosing a different group. 377 20 Monitoring students from a mobile device Monitoring sessions on a tablet On a tablet, when you choose a group of active students, the app shows the students in a list. You can view your students in a grid instead of a list using the View icon (next to the Menu icon). Both views show session activity for each student based on the current program. • Fast ForWord – Shows the current product and exercise, the trials taken and minutes left in the exercise, and the number of exercises left in today's protocol. • Reading Assistant – Shows the current reading selection and activity (Step 1, Step 2, or Step 3), and the minutes left in today's schedule, if using a schedule. • Reading Progress Indicator – Shows that an RPI assessment is in progress. 378 20 Monitoring students from a mobile device Each student is color coded to help you quickly identify a student's status. • Green – This student is actively using the program and is on task. • Red – This student has started a training session but is no longer on task. Tap a student to view a summary of the session. • Fast ForWord – Shows all of the exercises worked on in the session, along with the trials taken and minutes spent in those exercises. • Reading Assistant – Shows the current reading selection and activity (Step 1, Step 2, or Step 3). • Reading Progress Indicator – Shows that an RPI assessment is in progress. 379 20 Monitoring students from a mobile device Monitoring sessions on a phone On a smartphone, when you choose a group of active students, the app shows the students in a list. Each student is color coded to help you quickly identify a student's status. • Green – This student is actively using the program and is on task. • Red – This student has started a training session but is no longer on task. Tap a student to view session activity details for that student based on the current program. • Fast ForWord – Shows the current program and exercise, the trials taken and minutes left in the exercise, and the number of exercises left in today's protocol. The Session Activity Summary shows all of the exercises worked on that session, along with the trials taken and minutes spent in those exercises. • Reading Assistant – Shows the current reading selection and the minutes left in today's schedule, if using a schedule. The Session Activity Summary shows the current selection. • Reading Progress Indicator – Shows that an RPI assessment is in progress. 380 20 Monitoring students from a mobile device Troubleshooting Session Monitor app Use these tips to help you troubleshoot any Session Monitor app issues. If you have any questions or you need additional help, check our knowledge base or contact Scientific Learning Customer Support. • Quick steps to fix most errors • Closing Session Monitor app using iOS multitasking Quick steps to fix most errors If you run into problems while using the Session Monitor app—for example, the app stops responding or does not work properly—try these tips, in this order. 1. Check the Internet connection on your mobile digital device and reconnect if needed. 2. Log out of the Session Monitor app using the Log Out icon, then log in again. 3. Close the Session Monitor app from the multitasking screen, then open it again. See "Closing Session Monitor app using iOS multitasking" on page 382. 4. Restart your device (press and hold the Sleep/Wake button until the red slider appears, drag the slider to turn the device completely off, then turn the device on again). 5. Check the App Store to see if there is a Session Monitor app update, and if so, download the update. See "Downloading Session Monitor app" on page 373. 6. If you are not using the latest supported version of the operating system software, try updating the OS. Device manufacturers are continually improving their OS software and updating to the latest supported OS may resolve the issue. 381 20 Monitoring students from a mobile device Closing Session Monitor app using iOS multitasking In general, mobile digital devices manage applications differently than computers do. For example, most computers provide a large desktop area for you to view and manage multiple software applications at the same time—such as a web browser, word processor, media player, and more. iOS devices, on the other hand, provide multitasking as a way to view and manage all of your active software apps from one location. Multitasking allows you to switch quickly among recently used apps by suspending those apps in the background instead of closing them: If you run into issues while using the Session Monitor app—for example, an app stops responding or does not work properly—you can try closing the app from the multitasking screen and then opening the app again. Visit Apple at http://www.apple.com/support to learn more about multitasking. To close Session Monitor app from the multitasking screen 1. From the Home screen, double-click the Home button to open the multitasking screen. 2. Swipe left or right as needed to locate the Session Monitor app. 3. Swipe the app up from the multitasking screen to close it. 382 21 Using the program demos 21 Using the program demos Use this chapter to learn how to use the Fast ForWord and Reading Assistant demos within MySciLEARN. What's in this chapter Using the Fast ForWord demos 384 Using the Fast ForWord demos on iPad 389 Using the Reading Assistant tutorial 395 383 21 Using the program demos Using the Fast ForWord demos MySciLEARN provides demo versions of the Fast ForWord products that allow staff to step through the product exercises as a demonstration for students, parents, or other interested parties. In addition, students can use the demos to explore the exercises on their own. Demos are intended for demonstration purposes only, and do not save points and will not save a student's status in the exercises. You can disable demo access for a student if needed, and the student will not see any demos on the Demos screen (see "Setting student access to demos" on page 206 for details). Tip: For students using iPad, follow the steps in "Using the Fast ForWord demos on iPad" on page 389. Staff members can demo the Fast ForWord exercises on a computer, as detailed in this topic. To access the demos as a staff member 1. From any computer connected to the Internet, log in to MySciLEARN as a staff member. 2. Click the Manage tab to access the Manage section. 3. Click the Exercise Demos button in the upper right corner of any page. The Demos screen opens: 384 21 Using the program demos Staff Demos To access the demos as a student For students using iPad, follow the steps in "Using the Fast ForWord demos on iPad" on page 389. 1. From any computer connected to the Internet, log in to MySciLEARN (see "Logging in as a student" on page 30). The Student Exercises page opens. If another student's name appears on the Student Exercises page, the student should click That’s Not Me to log out and return to the Student Login page, then log in with his or her username and password. 2. Click the Demos tab at the top of the Student Exercises page. The Demos screen opens: 385 21 Using the program demos Student Exercises – Demos To run the Fast ForWord product demos 1. Choose a product and select an entry point for an exercise. Each Fast ForWord product demo provides multiple entry points at different levels in the product, along with both Spanish and English Introductions. 386 21 Using the program demos Demos – Select Entry Point When you select an entry point, the exercise demo session starts. 2. Work on the Fast ForWord exercise demo Each exercise demo session has a time limit of 20 minutes, after which the Success Viewer appears so you can explore a few examples of exercise performance. To end the demo session, click Exit. You can also exit a demo session early (see the following task). To exit a Fast ForWord exercise demo session early An exercise demo session has a time limit of 20 minutes. To exit a demo session early, use the Exit buttons within an exercise as follows. 1. While in an exercise, access the Status screen. • Windows – Press and hold the Control key, then press = • Macintosh – Press and hold the Control or Command (Apple) key, then press = 2. Click Exit on the Status screen to close the exercise. 387 21 Using the program demos Status 3. Click Exit on the Success Viewer to end that demo session. Success Viewer 388 21 Using the program demos Using the Fast ForWord demos on iPad Each of the Fast ForWord program apps provides demo versions of the Fast ForWord programs that allow students to explore the programs on their own using their iPad. Demos are intended for demonstration purposes, and do not save points or the student's status in the exercises. You can disable demo access for a student if needed, and the student will not see any demos on the Product Demos screen (see "Setting student access to demos" on page 206). The Fast ForWord demos for iPad are only available to students. As a staff member, you can still use the Fast ForWord demos through a web browser. See "Using the Fast ForWord demos" on page 384 for steps. To use the Fast ForWord demos on iPad as a student 1. On the iPad Home screen, open a Fast ForWord program app to connect to MySciLEARN and view the Student Login screen (for steps see "Logging in as a student" on page 30). The student can open any Fast ForWord program app—including the RPI app—to log in to MySciLEARN and access the demos. However, to work on a product demo, that app must be installed on iPad. For example, a student can open the Literacy app, log in, and start the Reading Level 1 demos, as long as the Reading app is also installed. 2. On the Student Login screen, enter your username and password to log in to MySciLEARN. The Student Login screen may prompt the student to choose a school or district first. Enter the first few letters of the name of the school or district, then choose that school or district and confirm it. 389 21 Using the program demos 390 21 Using the program demos 3. Tap the Product Demos link at the top right of the Student Exercises screen, next to the Log Out button. 4. Tap a product demo, then select an entry point for an exercise. 391 21 Using the program demos Each Fast ForWord product demo provides multiple entry points at different levels in the product, along with both Spanish and English Introductions. When you select an entry point, the exercise demo session starts. 5. Work on the Fast ForWord exercise demo. Each demo session has a time limit of 20 minutes, after which the Exercise Selection screen appears. Tap the Exit button to go to the Success Viewer and explore a few examples of exercise performance. To end the demo session, tap Exit. You can also exit a demo session early, if needed. See the next task in this topic on page 393. 392 21 Using the program demos To exit a Fast ForWord demo session on iPad early Each demo session has a time limit of 20 minutes. To exit a demo session early, use the Exit buttons within an exercise as follows. 1. While in an exercise demo, tap the Exit button at the top of the screen to open the Status screen. 2. Tap Exit on the Status screen to close the exercise. 393 21 Using the program demos 3. Tap Exit on the Exercise Selection screen. 4. Tap Exit on the Success Viewer to end that demo session. 394 21 Using the program demos Using the Reading Assistant tutorial Reading Assistant provides a short tutorial video that demonstrates how a student works on the product. The tutorial opens the first time the student works on Reading Assistant. Students can also run the tutorial from within Reading Assistant by accessing the Reading Assistant Help menu. To access the demos as a staff member 1. From any computer connected to the Internet, log in to MySciLEARN as a staff member. 2. Click the Manage tab to access the Manage section. 3. Click the Exercise Demos button in the upper right corner of the page. The Demos screen opens. Staff Demos 395 21 Using the program demos To access the demos as a student 1. From any computer connected to the Internet, log in to MySciLEARN (see "Logging in as a student" on page 30). The Student Exercises page opens. If another student's name appears on the Student Exercises page, the student should click That’s Not Me to log out and return to the Student Login page, then log in with his or her username and password. 2. Click the Demos tab at the top of the Student Exercises page. The Demos screen opens. Student Exercises – Demos Tip: You can also access the tutorial from the Reading Assistant program by choosing the Start button on the Reading Assistant product graphic. If this is the first time that you have accessed the Reading Assistant product, the Reading Assistant tutorial video automatically opens. If not, click the Help button in the right corner of the screen to view the tutorial. 396 21 Using the program demos To play the Reading Assistant tutorial video 1. On the tutorial screen, click the Play (>) button. Reading Assistant tutorial 2. While viewing the tutorial, control the video as follows: • Click the Pause (||) button to pause the video during playback. Click it again to continue. • Drag the volume slider left and right to adjust the volume. • Click the Expand button in the lower right corner to switch to full screen mode. Click it again to exit full screen mode. • Click the Close button or the X in the upper right corner to exit the video. 3. Exit the video at any time using one of the methods from step 2, or wait until the tutorial is complete. 397 Glossary Glossary A activity A set of required tasks within a Reading Assistant selection. Each selection includes three activities: Preview and Read on My Own, Read and Record, and Take the Quiz. audio support A speech recognition assignment setting for Reading Assistant that allows staff to manage audio support for the Think About Its and the Take the Quiz questions in a selection. Audio support is enabled by default. auto assign See "Fast ForWord Auto Assign" and "Reading Assistant Auto Initial Assignment" C comprehension score In Reading Assistant, how well the student understands the material, measured by the quiz score. Student demonstrate comprehension in the third activity, Take the Quiz. content library See "library" content overview placement See "content placement" content pack A Reading Assistant library, organized by the reading experts at Scientific Learning, designed to appeal to age-specific interests across a range of readability levels. For example, Content Pack 6-8—written to interest students ages 11-14—includes a selection about skateboarding designed to appeal to a 6th grader, but written at a 3rd grade reading level to accommodate a 6th grade struggling reader. content placement The method for choosing a student’s starting point in an assigned Reading Assistant library. Choose from 1) Use RPI Automatic (default), which automatically administers an RPI assessment and then uses the results to place the student, 2) Use Reading Level, which allows staff to use a student's reading scores (grade equivalents, Guided Reading Levels, and Lexile measures) to place the student, or 3) Use Content Overview, which allows staff to review the library selections and then manually place the student. 398 Glossary content progression How a student moves through the content in their assigned Reading Assistant library. Choose from: 1) locked (default), which only allows the student move through the content as it is ordered within the library, 2) student selected, which allows the student to choose the order in which they move through the selections or activities, or 3) unlocked (teachers only), which allows users to access any activity in any selection at any time for classroom instruction. content server A server set up at by a school or district that provides a local source for the product content files, helping improve the performance of the Fast ForWord and Reading Assistant products. Requires our Scientific Learning Content Server software. CSV file (comma separated file) A file used to import multiple staff members or students into MyScilearn. CSV files use commas to separate information into columns and fields, and use a new line to create rows of individual items. custom library A Reading Assistant library organized by a staff member to meet the individual reading needs of their students, created using selections from the Reading Assistant content packs. custom staff role One of three standard staff roles (district manager, school manager, instructor) whose permissions and/or role name have been modified to meet specific staff needs at a school or district. D default group A group created by MyScilearn that functions like any other group in the school, providing access to the group functions on the Students page and the teacher reports on the Results page. demos Shortened versions of the Fast ForWord products that allow staff to step through the exercises as a demonstration for students, parents, or other interested parties, and that allow students to practice training on the exercises without impacting their overall scores. Developing or Above In the Reading Assistant reports, a benchmark that indicates the percentage of selections completed by the student at a performance level of developing or proficient. See "performance level" for more information on selection performance. district manager A standard staff role that provides complete administrative rights for all schools in the district. This is the highest level role within MySciLEARN, and is intended for district and system administrative staff. 399 Glossary E exercise (n.) A fun, interactive component within a Fast ForWord product that focuses on a set of specific cognitive skills. Each Fast ForWord product includes multiple exercises that work together to help strengthen language and reading skills. F Fast ForWord Auto Assign The default Fast ForWord assignment method within MySciLEARN that automatically assesses and places a student in the most appropriate Fast ForWord product. Can be set at the school level or the individual student level. Requires Reading Progress Indicator (RPI). fluency In the context of reading, the ability to read a text accurately and quickly. Fluent readers can decode and recognize words automatically and understand their meaning at the same time. fluency score In Reading Assistant, how quickly and accurately the student can read the material, measured by comparing the words correct per minute (WCPM) score to a fluency goal specific to each selection. Students demonstrate fluency in the second activity, Read and Record. G glossary language A Reading Assistant assignment setting that allows staff to choose the language(s) for the glossary within a selection. Choose from English (default) or English and Spanish. grade equivalent An identifier that maps a student's test score to a grade-appropriate skill level, used by Reading Assistant to identify the readability level of a selection. group (n.) A set of students within a single school, created by a staff member to more effectively manage students that have something in common; for example, students in the same classroom, in same grade, or at the same reading level. Guided Reading Level A method developed by Fountas and Pinnell and used by Reading Assistant to identify the readability level of a selection. 400 Glossary I import file A CSV file created by staff used to import multiple students or staff members into MySciLEARN. instructions language A Reading Assistant assignment setting that allows staff to choose the language for the student instructions in the program. Choose from English (default) or Spanish. instructor A standard staff role that provides management rights over specific students and groups at an individual school. The instructor role is intended for staff members such as teachers and lab coaches. intervention wait time A speech recognition assignment setting for Reading Assistant that determines how long the program waits to intervene during a student's reading of a selection. introduction language A Fast ForWord assignment option that allows you to set the language used in the introductions at the beginning of each exercise, which explains how to work on that exercise. Choose from English (default) or Spanish. L Lexile® Framework for Reading An educational tool developed by MetaMetrics, Inc., used by Reading Assistant to identify the readability level of a selection. library A set of Reading Assistant selections (texts) that can be assigned to a student. Reading Assistant includes two types of libraries: content packs and custom libraries. location-based training An implementation scenario where students train on the SLC products from multiple locations; for example, from school and from home. locked progression See "content progression" N network ID Used along with the subnet mask to define the external IP address range for the district network. Required when setting up a Scientific Learning content server for home use. 401 Glossary P per student license A license that permits one individual student to access the licensed product(s) during the specified license term. performance level In the Reading Assistant reports, a score that indicates performance in a selection by measuring two critical reading skills: fluency and comprehension. Students can earn one of three performance level scores: proficient, developing, and emerging. This score is used to calculate reading level high scores. plug-in A set of software components that adds functionality to a larger software application, commonly used in web browsers to perform specific tasks. product A Scientific Learning software program available on the MySciLEARN platform, including the Fast ForWord family of products and Reading Assistant. pronunciation correctness A speech recognition assignment setting for Reading Assistant that allows staff to choose how strictly the program monitors the student's pronunciation. protocol A Fast ForWord product usage schedule that determines which exercises are worked on, how often those exercises are worked on, and how long each exercise is worked on a given day. The Fast ForWord protocols have been proven to help maximize the benefits of the products. R Reading Assistant Auto Initial Assignment An optional assignment method within MySciLEARN that automatically assigns Reading Assistant, assesses a student, then places that student at the most appropriate starting point. Can be set at the school level or the individual student level. Requires Reading Progress Indicator (RPI). Reading Assistant Plug-in A plug-in that enables the web browser on a student computer to perform essential speech recognition tasks required by Reading Assistant. reading level The difficulty level of the Reading Assistant selections. 402 Glossary Reading Level High Score In the Reading Assistant reports, a score that represents the highest reading level mastered by the student. Students master a reading level by completing selections at that reading level and achieving an acceptable words correct per minute (WCPM) score while maintaining good comprehension (that is, completing at least one selection at the proficient level or two selections at the developing level). See "performance level" for more information on selection performance. reading level placement See "content placement" Reading Progress Indicator An assessment tool within MySciLEARN that automatically administers reading assessments to students. The RPI assessments provide overall reading scores that can help indicate how students are responding to Fast ForWord product use. RPI See "Reading Progress Indicator" RPI (automatic) placement See "content placement" RPI school schedule A school level option for RPI that sets the yearly schedule followed at your school: standard school year (default) or year-round school. S schedule A Reading Assistant assignment option that allows staff to set a 20 minute timeout for training sessions. school manager A standard staff role that provides administrative rights for all of the staff members, students, and groups at specific schools in the district. SciLEARNU A professional development hub within MySciLEARN that provides access to all product training materials and other resources such as video tutorials, staff training courses, and the teacher guides. It also provides access to special learning events and an online community. selection An individual text in an assigned Reading Assistant library to be read by the student. site license A license that permits an unlimited number of students enrolled at one school to access the licensed product(s) during the specified license term. 403 Glossary staff member A MySciLEARN user whose rights, or permissions, are defined by an assigned staff role that has a specific function and includes a specific set of permissions. staff role A set of permissions assigned to a staff member. The system includes three standard staff roles (district manager, school manager, instructor). You can also create custom staff roles to meet your school or district needs. standard staff role One of three staff roles built into MySciLEARN: district manager, school manager, instructor. Can be modified and saved as a custom staff role to meet district and school needs. student A learner who is using the Fast ForWord or Reading Assistant products within MySciLEARN. Student Exercises A student's home page within MySciLEARN that provides access to that student's product assignments, Reading Progress Indicator assessments, and the product demos. Only students can access the Student Exercises page. student login security The default security level for MySciLEARN, which requires that all student users enter a secure login and password to access the software. student password A password created by staff (or automatically generated by the system) used by a student, along with the student's username, to log in to MySciLEARN. student username A username created by staff (or automatically generated by the system) used by a student, along with the student's password, to log in to MySciLEARN. student-selected progression See "content progression" subnet mask Used along with the network ID to define the external IP address range for the district network. Required when setting up a Scientific Learning content server for home use. T topic A group of Reading Assistant selections at the same reading level within a content pack, related in content by subject, theme, or set of ideas. 404 Glossary transfer A feature that allows district staff to move MySciLEARN students from one school to another school. U unlocked progression See "content progression" 405


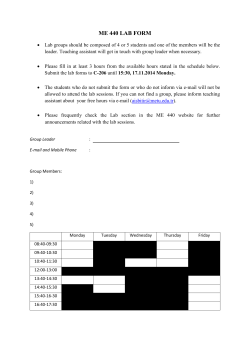


© Copyright 2026