
Draft Part 2
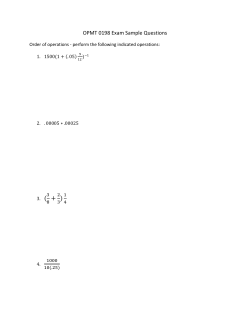
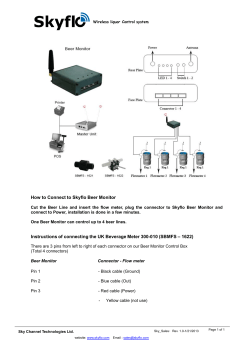
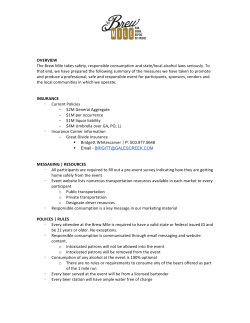
Welcome To Draft Part II Anatomy of Your Draft System 1. Tap and Tower 2. Beverage Line 3. Beverage OUT connector valve 4. Gas IN connector valve 5. Gas Line 6. CO2 Regulator 7. CO2 Tank www.craftbrewhouse.org [email protected] Anatomy of a Ball Lock Cornelius Keg PRESSURE RELIEF VALVE: This valve is located in the center of the lid and is simply used to purge the pressure from the keg at any time. Typical use this to relieve excess pressure after carbonating your beer at a pressure higher than your desired serving pressure. KEG POSTS: The keg has (2) posts, beer out and gas in, these are not interchangeable. There is one purpose to these posts, provide a means by which to secure a gas line and a beer line. Ball lock kegs are like quick disconnects with small ball bearings that will catch in a groove on the post to secure the connector. www.craftbrewhouse.org [email protected] Connecting a Keg to your Draft System First, find the "Gas IN" post on your keg. Gray = Gas Black = Beer Second, pickup the gray (sometimes white) connector valve. A connector valve has a spring loaded collar around its base and when lifted, a series of ball bearings are free to move outwards. When the collar is released the ball bearings move back towards and are locked into a groove on the post. Lift the collar upwards whilst simultaneously pushing the connector valve onto the relevant post. When the connector valve stops moving downwards onto the post, release the collar. Without lifting the collar, give the connector a quick tug upwards to ensure it is locked onto the post. To remove a connector from a post simply raise the collar and lift the connector. www.craftbrewhouse.org [email protected] How Pressure Works At this point, it’s important to understand the basic mechanics of the keg. The following diagram shows five gallons of beer in your keg. The dip tube is connected to the liquid post and goes all the way to the bottom. As you add CO2 through the gas post [1], you increase the pressure on top of the beer [2]. This pushes down on the beer, pushing it up the dip tube [3] and out the liquid post [4]. … it’s not too complicated. Maintaining Quality Five things must be done to maintain the quality of the beer being dispensed. 1. Allow a keg to SETTLE before serving. It could take all day for this to happen, so plan/order accordingly. Settling is important for flavor and clarity. When a keg is moved, tilted, or rocked; yeast is mixed back into the beer. This causes your beer to become cloudy and taste dry. When every possible, let your keg rest and don’t wake a sleeping baby! 2. The beer must be kept cold (40F or 10C). Higher temperatures greatly accelerate over carbonation and spoilage. The entire system must be kept cold, from the keg to the faucet. A good rule is to treat beer the same way you would treat milk. 3. The beer must be consumed in a reasonable amount of time. Draft beer is generally prime for 14 days after it is tapped. After 14 days, keg pressure may change and require some extra care. Don't buy a keg to save money if you cannot consume it in a reasonable amount of time, you will be doing yourself a favor to only buy as much beer as you can consume in a week, two at the most. 4. The beverage lines should be cleaned once a month. We are dedicated to preserving the quality of our hand crafted beer; call or email us to clean your draft line. ([email protected]) 5. You must keep the glassware in very good condition. If you do not use cleaner designed for bar glasses then beer glasses should be cleaned especially well and rinsed very well. Always allow them to air dry, do not towel dry. If (god forbid) you freeze your glasses, don't put them in the freezer 'til they're dry. Freezing your glassware will destroy the beer's flavor and cause a lot of foam. www.craftbrewhouse.org [email protected] All About Beer Foam When serving a beer, how much is the right amount of foam and why is this important? Most importantly, a good head helps release the aromas of the beer, especially the hops. Aroma is everything for enjoyment of a good brew. When enjoying a super-hoppy IPA, you should always use a glass that provides a large surface area for aromatics to rise from. It can also provide the a pleasant mouth feel. Stouts definitely benefit from a thick, silky head. And lastly, it's eye candy. As for the right amount of head, it varies. Generally in an average glass you want 1-2 finger-widths of head. Some hefeweizens and wit beers are best with a bit more. Customers from the UK usually want no or minimal amount of foam. In Japan the foam is quite important, and most of the time people know how to pour the beer in the right way to produce foam. Take a look at the image above and use this as a guide for most customers. Why do I have too much foam? The most common problem with draft beer is its propensity to be foamy beer. When a third or more of each glass is foam you're likely losing patience with draft beer. Before you give up on draft beer and stop using your kegerator, let's break down the problem and give you some solutions. Whenever beer is foamy it’s 95% certain that there is a temperature problem. Most beer is carbonated to a level that requires it to be sold cold because cold beer (or any liquid) can hold more dissolved gas. In the case of beer that gas is carbon dioxide. So when you have foamy pours coming from your kegerator the first thing to do is look for warm temperatures in your system. The other 5% of foam problems are caused by mechanical issues. Before we go on to the diagnosis of the problem, let's confirm that the beer is being poured correctly. Improper pouring technique can cause foam. Also, make sure that your keg has had enough time to cool down in the kegerator and settle before you start pouring. A keg can take a day to cool down after transporting it – and if it had just been delivered. www.craftbrewhouse.org [email protected] 1. Often improper pouring technique is responsible for foamy beer. Make sure that: you are opening the faucet with one quick steady motion. A draft faucet should be fully closed or fully opened. Unlike the kitchen or bathroom faucet, you shouldn't try to control flow by only partially opening the faucet or opening it too slowly. (If you have flow control taps, please consult us) 2. Use clean, unfrozen glasses with smooth inside surfaces. No foam cups, frozen mugs, dirty or soap film on the glasses. 3. The mouth of the glass should be held just below the faucet mouth, not touching it. Your glass should be held at a 45 degree angle and then brought to the upright position as the glass fills up past the halfway point. Now that we've confirmed that you're pouring correctly get two pint glasses and in succession attempt to pour two beers. Based on the descriptions below decide which best describes what happened: The first glass was nearly all foam, but the second glass was successful. If this is the case, start at step 2 below: Neither pour was acceptable, foam was 50% or more of each glass. If this is the case, start at step 1 below: The pour exploded into both glasses very fast and all foam. If this is the case, start at step 4 below. 1. Fill a glass with tap water and set it on your kegerator floor overnight then take the temperature of that water in the morning using an immersible thermometer. What's the temperature? Is it under 40 degrees? If so the bottom of your keg is cold enough. This is the same region of the kegerator where the beer is served from (since the beer is pushed up from the bottom of the keg). Do not use an air temperature thermometer such as an oven thermometer. These are not accurate enough. Also, you are interested in liquid temperature only. If your glass of water is not cold enough, your kegerator is not cooling the beer down sufficiently. Adjust the temp of the kegerator and repeat step 1. 2. Fill a pint glass with tap water and put the glass of water on top of the keg or otherwise arrange the glass so that it is near the top of the box. Leave it there overnight and then take the temperature. This is the temperature of the beer lying inside your beer line above the keg up to the hose exit to the tower. Is this temperature under 40 degrees? If so your exiting temperature is cold enough. If not, you will need to wait for the small bit of foam to subside before serving; or if you are serving two beers at a time, split the foam between the two glasses and serve promptly. 3. Dump the cold water out of the glass and pour beer into the glass from the faucet. Dump this beer in the sink or chug it if you want. Now pour a fresh beer into the same glass. Take the temperature of this beer. Is it under 40 degrees? If so, your beer is cold enough. Drink the beer because you don't have a temperature problem. See step four below to solve your foam problem. 4. Can't get enough beer into the glass to take a temperature at all because it's all foam? Complete steps one and two above to confirm the proper temperature inside your box. www.craftbrewhouse.org [email protected] Now disconnect the keg coupler from the keg and take a rough measurement of the length of your beer line. Measure from the keg couplet to the entrance to the tower, then measure the tower and add the two measurements. In most cases you should have five or six feet of line. If it is less than this, there is not enough resistance in your draft system. If your beer line is the proper length, see step five below for adjusting your gas pressure properly. 5. Look at the outbound gauge on your gas regulator (you have two gauges; you want the one with the low pressure readings). Depending on your beer style the gauge should be reading 10-16 PSI. If it is higher than this, it is most likely too high unless you are dispensing beers like hefeweizens or your beer line is more than six or seven feet. Make sure the gauge is working properly by uncoupling the keg and engaging the pressure relief valve on the regulator. The free flowing gas should noticeably bring down the gauge pressure while the relief valve is open. If not the gauge may be faulty, but it is replaceable. Or the regulator may need to be disassembled and cleaned. Also, if the gauge pressure goes up after you've set it, the regulator may need to be disassembled and cleaned. Temperature and CO2 Balance The temperature of the beer effects the amount of pressure needed in the keg to control the carbonation level. As temperature increases, CO2 bubbles expand and will come out of the beer. As temperature drops, CO2 dissolves more easily into the beer. For example, at 38 degrees F, Coors Light needs 15 psi to maintain its CO2 level. At 40 deg F it needs 16 psi. At 36 deg F it needs 14 psi. Generally, a two degree increase in temperature requires a one pound increase in pressure. Illustration "A" represents CO2 pressure adjusted properly for the storage temperature and carbonation level of the beer. There is an equal amount of CO2 dissolving into and breaking out of the beer. Illustration "B" represents too little CO2 pressure. Gas breaks out of the beer into the head space of the keg and in the lines. Pockets of gas will accumulate in the lines creating pouring problems as well as flat tasting beer. Illustration "C" represents too much CO2 pressure, more CO2 is dissolving into the beer than is breaking out. The carbonation level of the beer is increasing. Pouring problems and "buzzy" tasting beer will result when the keg is low and dispenses the over carbonated beer. Over carbonated is often perceived as tasting extra bitter. www.craftbrewhouse.org [email protected] OTHER TROUBLESHOOTING To diagnose a draft problem, hold a clean glass at a 45 degree angle under the faucet and open the tap completely. Use the troubleshooting guide below to find a potential cause and solution for your problem. Problem No Beer is Coming Out Potential Causes Symptoms Gas will rush out of Keg is empty faucet Other draft lines will start to pour slowly, gas Gas tank is empty tank volume gauge will read "0" Beer pours very slowly and stops, but gas tank Gas valves are shut volume gauge shows off that there is gas in the tank Beer trickles out or Beer line is frozen stops in one tap or multiple adjacent taps Beer is Pouring Foamy Beer lines are dirty Beer slowly becomes foamy over several weeks time and lines have not been professionally cleaned Beer pouring very Gas regulator set rapidly or very slowly, at wrong pressure with excessive foam Keg pressure too high Connect a full keg Connect a full gas tank Turn the toggle so that it is parallel with the gas line or reconnect the gas line to the keg Soak a towel in warm water and wrap the frozen beer line or Turn the cooling system off for 1 hour, then try pouring Contact us to clean lines every month or depending on your rate of consumption. Adjust pressure - direct draw systems (under the bar) should be set at about 10 to 16 psi Beer pouring with excessive foam but Disconnect keg from CO2 take and tastes flat. Line from the pull the pressure relief valve a few keg to the tap will turn times. Repeating this step every straight to bubbles few hours is suggested. when you stop pouring. Keg storage or coolant Beer pours above 40°F temperature is too with excessive foam high Beer was just delivered Possible Solutions The first few pints in a keg pour foamy and cloudy www.craftbrewhouse.org Lower the cooler temperature, limit traffic through the cooler door, and lower the temperature to about 35°F Wait 6-8 hours, then pour again [email protected] Problem Potential Causes Beer Tastes Keg lid or value Flat and has a leak. Looks Dead Symptoms Beer doesn’t foam during dispensing Beer tastes flat and Gas regulator set there are no visible at wrong pressure bubbles on the side of the glass Beer tastes flat and Keg has been there are no visible under carbonated bubbles on the side of the glass There is a warm spot, kink, pinhole, The beer starts pouring Beer "Burps" or bacteria buildup or Sputters fine, then "burps" somewhere in the beer line There is a bad seal The beer starts pouring around the faucet fine, then "burps" or keg coupler Keg pressure set too low and your The beer starts pouring keg is off gassing fine, then "burps" and small bubbles in beer tastes a bit flat the beer line. Beer tastes metallic when Beer Tastes running through "Off" recently cleaned lines Beer has a strong buttery or butterscotch flavor Beer has a "creamed corn" flavor Beer tastes stale, with a papery or "wet cardboard" aroma All beers on draught have a metallic taste Diacetyl could have formed in the beer due to hot storage, creating this off taste D.M.S. could have formed in the beer during fermentation, creating this off-taste The keg could be past it's expiration date, or air could have been pumped into the keg www.craftbrewhouse.org Possible Solutions Verify the leak by connecting the CO2 to the keg and listening for leaks. Spray or wipe soapy water over seals to view possible gas escaping. Call us if you see/hear leaks. Adjust pressure - direct draw systems (under the bar) should be set at about 10 to 16 psi Adjust pressure - direct draw systems (under the bar) should be set at about 10 to 16 psi. In a hurry? See directions below Check to see if a full keg could be sitting on a beer line. If not, check the insulation and seals on the line with a sponge and warm soapy water, and plan to get lines cleaned Replace washers in the keg coupler and faucet or exchange for new equipment Check kegerator temp is between 35-40F. Adjust regulator to 1416psi Lines cleaned with caustic acid can leave a faint metallic taste. You can request that your lines be cleaned with a chemical-free method, or just pour a few pints off and the taste should return to normal The keg is filled with bad beer and should be returned, with a request to notify the brewer The keg is filled with bad beer and should be returned, with a request to notify the brewer Ensure that you are pressurizing kegs with CO2, not with oxygen rich air. If the keg has been on tap for longer than 4 weeks, it can go bad, and should be returned. [email protected]


© Copyright 2026