ABC
docz
Explore
Log in
Create new account
Download
Report
technology and computing
operating systems
mac os
iCloud Design Guide
iCloud: iCloud storage and backup overview 8/12/2014
iCloud Keychain and iOS 7 Data Protection Andrey Belenko
Introduction to iCloud Overview
! Apple’s iCloud: Thoughts on Security and the Storage APIs
Applications for iPad, iPhone & iPod Touch
O our favorite Picturebook Apps Children’s Literature Reviews
Best Apps for Kids
Cool Things to do on an iPad
Windows 8 Quick Reference Card Start screen
From the Acting Principal Newsletter Title St Raphael’s School
Twenty Interesting Ways* to use an iPad in the
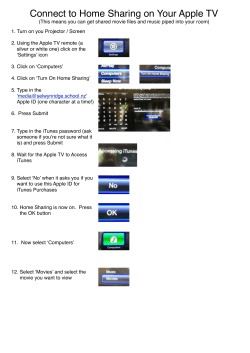
Connect to Home Sharing on Your Apple TV
© Copyright 2026
About abcdocz
DMCA / GDPR
Report