
How to Use Google Maps to Create Personalized Maps
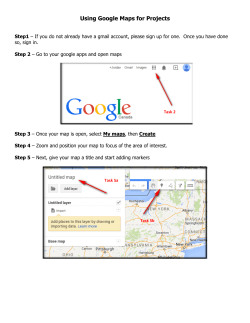
How to Use Google Maps to Create Personalized Maps
1.
2.
3.
4.
5.
To do this you must have a Google Account. First log into your Google account.
Then go to “Maps” (See blue oval in Figure 1.)
Click “Create new map” (See green oval in Figure 1.)
Name your map – I named mine “Journey to School”
Use the Pin Point, Line, and Polygon tools to create a meaningful map. (See red oval in Figure1. for the location
of these tools)
Figure 1.
6. Note Figure 2. Pinpoints denote both “Home” and the “A-School”. The Line denotes the path traveled to
school
7. To share your map with other you must make it “Public” (See pink oval in Figure 2.) This makes your map
searchable through Google web searches. To directly link someone to this map you must either embed it in a
webpage (See other tutorial “How to Embed Google Maps into a webpage”) or link to it. (See the purple oval in
Figure 3. for the link tool)
8. Your map is now public and can be shared with others
Figure 2.
.
Figure 3.


© Copyright 2026