
www.biobidet.com BBC Innovation Corporation Head office: 205 Berg St
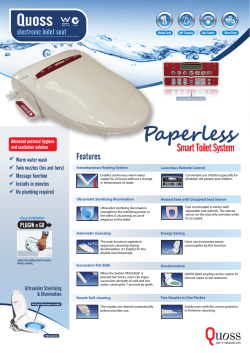
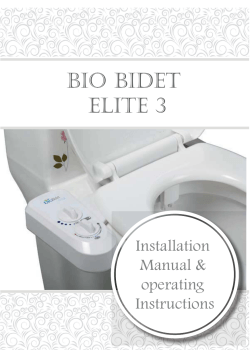
www.biobidet.com
BBC Innovation Corporation
Head office:
205 Berg St
Algonquin, IL 30102
U.S.A
Tel: (847) 854-7292
Fax: (847) 854-1296
PERSONLAL HYGIENE APPLIANCE
lifestyle Upgrade
Installation Manual and
Operating Instructions
BB-800 & BB-1000
This Product should be installed according to this manual.
Please read this manual carefully and install properly.
Please keep this manual for future reference.
Please register Warranty for proper service.
lifestyle Upgrade
Thank you for purchasing Bio Bidet Advanced Toilet Seat
This unit was manufactured for household use.
2
Installation Manual and Operating Instructions
Lifestyle Upgrade
6
INSTALLATION
CAUTION BEFORE INSTALLATION
•Do not plug in before installation.
•If you need an electric power system or extension, please consult a qualified electrician.
STEPS
1
2
Turn Off Water.
•Shut off the water supply shut off valve.
Drain the toilet tank completely.
Then remove the existing fill valve
water supply hose.
Removing the existing seat and lid.
•Remove mounting bolts to release existing
toilet seat from toilet.
Flexible Tube
3
4
Connect T-Valve.
•Remove existing supply tube from fresh tank
•Connect supplied 1/2" T-Valve Adaptor.
Use 3/8" conversion nut if existing shut off
valve is 3/8".
3/8" conversion nut
with packing
※Check for any water leaks.
14
Installation Manual and Operating Instructions
Water Supply to Tank Assembly.
•Connect supplied fill valve water supply hose as
illustrated.
lifestyle Upgrade
5
Installation Catch Plate.
6
Place the plate and guides over each mounting hole.
Insert the mounting bolts through the plate and
mounting holes.
Bolt and Nut Assembly.
Slide cone packing and washers onto the bolts
then fasten to securely mount bidet seat to toilet.
Bolt Guide
Bolt
Cone Packing
Washer
Nut
catch plate
Assembly.
1. Slide this product onto the catch plate
centering the unit with the guide arrows on the Base.
2. You will hear a click once this product is securely
mounted to the catch plate.
3. This product will feel a little loose on the toilet bowl.
Adjust the fit from front to back and side to side for balance.
4. Tighten the nuts on both bolts securely.
8
Water Supply Tube Assembly.
INSTALLATION
7
1. Connect the flexible tube from side of
T-Valve to the this product.
2. Open water valve.
3. Check for leaks.
4. If there are no leaks and the surrounding
area is clean and dry, connect the power
cord to a ground protected power outlet.
※Check for any water leaks.
Installation Manual and Operating Instructions
15
lifestyle Upgrade
6
9
INSTALLATION
Deodorizer Installation.
Insert the deodorant cartrige into the unit.
(BB- 1000 Only)
How to change the deodorant catalyst
1
•Deodorant assembly diagram.
•Follow the below photos to change the deodorant.
Deodorant case
Deodorant
Cover
2
10
Insert the new deodorant case into the unit.
Wireless remote mounting guide. (BB-1000)
1. Remove adhesive from back of bracket and
place bracket where desired.
2. Place remote into remote bracket.
Adhesive Tape
16
Installation Manual and Operating Instructions
Insert supplied batteries and
close battery cover
lifestyle Upgrade
7
SEPARATION OF UNIT FROM THE TOILET BOWL
Disconnect the power plug.
2
Close water supply shut-off valve.
3
Drain water from bidet seat using drainage
as illustrated.
4
Remove bidet seat from toilet as illustrated.
-Drainage is also release button from catch plate.
INSTALLATION
1
Do not turn unit upside down.
Installation Manual and Operating Instructions
17
lifestyle Upgrade
13
INFORMATION TO THE USER (For America)
This equipment has been tested and found to comply with the limits for a Class B digital device, pursuant to part 15 of the
FCC Rules. These limits are designed to provide reasonable protection against harmful interference in a residential installation.
This equipment generates, uses and can radiate radio frequency energy and, if not installed and used in accordance with the
instructions, may cause harmful interference to radio communications. However, there is no guarantee that interference will
not occur in a particular installation. If this equipment does cause harmful interference to radio or television reception, which
can be determined by turning the equipment off and on, the user is encouraged to try to correct the interference by one more
of the following measures:
•Reorient or relocate the receiving antenna.
•Increase the separation between the equipment and receiver.
•Connect the equipment into an outlet on a circuit different from that to which the receiver is connected.
•Consult the dealer or an experienced radio/TV technician for help.
WARNING
Changes or modifications not expressly approved by the manufacturer could void the user's authority to
operate the equipment.
Note : The manufacturer is not responsible for any Radio or TV interference caused by unauthorized
modifications to this equipment. Such modifications could void the user's authority to operate the equipment.
For Service & Technical Support, call or write to:
BBC Innovation Corporation
205 Berg St
Algonquin, IL 30102
U.S.A
MAINTENANCE
Tel: 847.854.7292
Fax: 847.854.1296
[email protected]
Installation Manual and Operating Instructions
23


© Copyright 2026