
Welcome to the Lund family! On behalf of everyone at Lund... you for purchasing the best boat on the water, designed by...
Welcome to the Lund family! On behalf of everyone at Lund Boat Company, thank you for purchasing the best boat on the water, designed by fishermen for fishermen. We are confident your new Lund will deliver the ultimate fishing experience you expect for many years to come. Our passion for fishing is designed into each Lund boat we build. It is this dedication to our sport that makes Lund the choice of serious anglers all across North America. With your purchase, you have joined this band of knowledgeable, accomplished anglers. Your new Lund boat is a wise investment that will allow you to enjoy more days on the water, and is your number one tool to better fishing. And, with proper care and maintenance, it will return to you the highest resale value in the boating industry. We hope this manual will aid you in your enjoyment of our product and give you some guidance in the care, maintenance and operation of your Lund boat. This manual cannot cover every aspect of boat ownership and operation, nor is it intended to. For additional information, please consult your Lund dealer. Local boating organizations can also provide valuable information or direction as to where to find additional information. If, for any reason, your dealer is unable to answer your questions regarding your new Lund boat, please contact us for assistance. We encourage you to practice safe boating at all times, and respect the environment and our resources so that all of us and our children may enjoy them for years to come. Thank you again for choosing the best, a Lund boat, and Good Fishing! Lund Boat Company, P.O. Box 248, New York Mills, MN 56567, (218) 385-2235 Lund Boats Canada, Box 2080, 92 PTH 52 West, Steinbach, Mb, R0A 2A0 www.lundboats.com email: [email protected] 1 Lund-Front_Matter.indd 1 7/9/10 1:42 PM Table of contents General Information..........................................................1.1 About This Manual....................................................................................................1.1 You and Your New Boat............................................................................................1.1 Certification...............................................................................................................1.2 Service........................................................................................................................1.3 Responsibilities..........................................................................................................1.3 Additional Information..............................................................................................1.4 Boating Laws and Regulations..................................................................................1.5 Hazard Communication Labels.................................................................................1.6 How to Read Your Hull I.D. Plate.............................................................................1.9 Boat and Trailer Data Sheet.......................................................................................1.9 Safety.............................................................................................2.1 Safe Boating Checklist..............................................................................................2.1 Hazard Statements.....................................................................................................2.2 Advisory Statements..................................................................................................2.3 Safety Equipment.......................................................................................................2.3 Additional Recommended Equipment.......................................................................2.8 Carbon Monoxide and Boating..................................................................................2.9 Lanyard Stop Switch................................................................................................2.11 Safe Boating Practices.............................................................................................2.12 Water Sports.............................................................................................................2.15 Basic Seamanship.....................................................................3.1 Boating Regulations...................................................................................................3.1 Rules of Seamanship..................................................................................................3.1 Navigational Aids......................................................................................................3.5 Recommended Reading.............................................................................................3.7 Contacts......................................................................................................................3.8 Owner’s Logs and Records........................................................................................3.9 Navigational Aids Chart............................................................................................3.9 Float Plan.................................................................................................................3.12 Fuel Log...................................................................................................................3.13 Service/Maintenance Log........................................................................................3.14 i Lund-Front_Matter.indd 1 7/9/10 1:42 PM Trailering...................................................................................4.1 Gross Vehicle Weight Rating.....................................................................................4.1 Weight Distribution....................................................................................................4.1 Hitch...........................................................................................................................4.2 Safety Chains or Cables.............................................................................................4.2 Brakes........................................................................................................................4.3 Turning While Towing a Trailer................................................................................4.3 Backing A Trailer.......................................................................................................4.4 Launching Guidelines................................................................................................4.4 Loading Your Boat On The Trailer............................................................................4.5 Trailer Maintenance...................................................................................................4.6 Wheel Bearings..........................................................................................................4.7 Electrical System.................................................................5.1 12-Volt DC Boat System...........................................................................................5.1 Trolling Motor System...............................................................................................5.1 Battery........................................................................................................................5.2 AC/DC Battery Charger............................................................................................5.3 Battery Charging........................................................................................................5.3 Overload Protection...................................................................................................5.4 Transducer Mounting (Dealer or Customer Installed)..............................................5.4 Trolling Motor Receptacle.........................................................................................5.4 Wiring Color Codes...................................................................................................5.5 Corrosion...................................................................................................................5.6 Boat Systems & Equipment................................................6.1 Engines.......................................................................................................................6.1 Fuel System................................................................................................................6.1 Propeller.....................................................................................................................6.2 Steering System.........................................................................................................6.4 Livewell System........................................................................................................6.5 Livewell Operation....................................................................................................6.5 Bilge...........................................................................................................................6.6 Bilge Pump................................................................................................................6.6 Fishing Seats . ...........................................................................................................6.7 Instruments and Controls..............................................7.1 Helm Instruments.......................................................................................................7.1 Engine Throttle/Shift Control....................................................................................7.2 Switches.....................................................................................................................7.4 Front Bow Panel........................................................................................................7.5 ii Lund-Front_Matter.indd 2 7/9/10 1:42 PM Getting Underway..................................................................8.1 Skipper’s Checklist....................................................................................................8.1 Fueling.......................................................................................................................8.2 Loading Passengers and Gear....................................................................................8.4 Starting Procedures....................................................................................................8.5 Maneuvering..............................................................................................................8.7 High Performance Boats............................................................................................8.8 Acceleration...............................................................................................................8.9 Power Trim Operation.............................................................................................8.10 Steering Force..........................................................................................................8.11 Anchoring................................................................................................................8.12 Returning To Shore..................................................................................................8.13 Navigation Lights....................................................................................................8.15 Hazardous Conditions..............................................................................................8.16 Reacting To Emergencies........................................................................................8.18 Caring For Your Boat..........................................................9.1 Battery Care...............................................................................................................9.1 Fuel System................................................................................................................9.2 Steering System.........................................................................................................9.2 Floor Covering...........................................................................................................9.2 Aluminum Trim Surface............................................................................................9.2 Storage Compartments...............................................................................................9.2 Painted Aluminum Surfaces......................................................................................9.3 Bottom Surfaces.........................................................................................................9.3 Salt Water Information...............................................................................................9.3 Galvanic Corrosion....................................................................................................9.3 Repairs.......................................................................................................................9.4 Cracked Aluminum....................................................................................................9.5 Repainting Aluminum................................................................................................9.5 Upholstery..................................................................................................................9.6 Windshields................................................................................................................9.8 Canvas........................................................................................................................9.8 Storage.......................................................................................................................9.8 Winter Layup and Storage.............................................10.1 Prior to Storage........................................................................................................10.1 Engine......................................................................................................................10.1 Livewell...................................................................................................................10.3 Wash-Down Pumps..................................................................................................10.3 Interior Cleaning......................................................................................................10.4 Storage on Trailer....................................................................................................10.4 Recommissioning the Boat After Storage...............................................................10.5 TROUBLE SHOOTING GUIDE.................................................. 11.1 BOATING TERMS........................................................................12.1 iii Lund-Front_Matter.indd 3 7/9/10 1:42 PM 1 ABOUT THIS MANUAL More and more people are joining the ranks of boat owners who find enjoyment in the leisure activity of boating and fishing. For this reason, this manual is written for the first-time boat owner or operator. Even if you are an experienced boater, you will still find valuable information regarding the safe operation and maintenance of your boat, motor and trailer. For your own safety and the safety of others, take the time to read this entire manual before you take the boat out for the first time. Use it as a guide to familiarize yourself with its systems and components. The information in this manual will help you with the operation and maintenance. The suppliers of more complex components, such as engines, pumps, and electronics, supply their own manuals. They are included in your Owner’s Packet. The suppliers of these products maintain their own manufacturers’ warranties and service facilities. One of the first orders of business should be to fill out each warranty card and mail it back to the manufacturer to register your ownership. gENERAL INFORMATION GENERAL INFORMATION Make sure you read and understand the safety, emergency, and operating procedures in this manual and pass this information along to your family and passengers. Pay close attention to safety warnings. Remember that along with the freedom and fun of boating and fishing comes the responsibility for the safety of your passengers, other boaters, and the environment which we all share. This manual is part of your boat’s equipment. Always keep it on board. If you transfer ownership of the boat to someone else, give this manual to the new owner. In some cases, this manual provides general information; more specific information is available in the original equipment manufacturer (OEM) manuals. This owner’s manual does not supersede or change any of the original manufacturers’ specifications, operation or maintenance instructions. If the information in this manual conflicts with that in the OEM manuals, the OEM manuals take precedence. Note: This manual may include information about systems and equipment not provided on your boat. Check with your dealer if you have any questions. YOU AND YOUR NEW BOAT If you are new to boating, you may not be familiar with some common boating terms. Figure 1-1 lists some of these terms and identifies their meaning in relation to a typical boat. 1.1 Lund-01.indd 1 7/9/10 1:44 PM gENERAL INFORMATION LENGTH OVERALL PORT COCKPIT B E A M TRANSOM STARBOARD STERN STEERING HELM FORWARD AFT BOW WATERLINE KEEL Figure 1-1 Terminology Manufacturer's CERTIFICATION As a boat manufacturer, Lund builds their products to guidlines established under the Federal Boat Safety Act of 1971. The Act is promulgated by the United States Coast Guard who has authority to enforce these laws on boat manufacturers that sell products in the United States. Lund ensures that all of its products comply with these laws. The National Marine Manufacturers Association (NMMA) provides Lund with a third party certification. The NMMA is an organization that represents the marine industry and assists manufacturers, boat dealers, marinas, repair yards and component suppliers in areas of legislation, environmental concerns, marine business growth and state and federal government agency interaction. The third party dertification that Lund participates in, uses the well known Standards and Recommended Practices of the American Boat and Yacht Council (ABYC). Lund Boats participates extensively in the American Boat and Yacht Council which is a nonprofit organization that developes and publishes voluntary standards and recommended practices for boat and equiptment design, construction of your Lund boat. Finally, Lund sells their products world wide and as such must conform to the various rules and regulations required by other countries. Most notably, are the ISO standards in Europe which require the application of the Common European (CE) mark. This mark, much like the NMMA certification here in the US, gives you the boat owner 1.2 Lund-01.indd 2 7/9/10 1:44 PM SERVICE If you have a problem with your new boat as a result of workmanship or materials, we want to correct it and get it back in service as quickly as possible. Contact the Lund Boats dealer from whom you purchased the boat. An authorized dealer must process all warranty repairs. If the dealer fails to remedy the cause of the problem, contact us within 30 days. It is your responsibility to deliver the boat to the dealer for repair. gENERAL INFORMATION specific information concerning your craft. Information about service, replacement parts, or additional equipment is available from your dealer or Lund Boats. You can get in touch with us directly at: Lund Boat Company P.O. Box 248 New York Mills, MN 56567 (218) 385-2235 LUND BOATS CANADA 98 PTH 52 West Steinbach, MB R5G 1Y1 Canada RESPONSIBILITIES Boat Owner/Operator You should inspect the boat at the time of delivery to verify that all systems and components are operating safely and acceptably. We recommend that you refer to the engine warranty certificate for initial inspection and service requirements. Be sure to review the pre-delivery checklist for the boat and engine with your dealer when you take delivery. Your dealer will also record all important information about your boat and its major components on the Boat Data Sheet. (You will find the Boat Data Sheet at the end of this chapter.) After all the data has been entered, make a photocopy and store at home or another safe place. You are responsible for following proper procedures during the break-in period. Check with your dealer if you have any questions. You should also schedule the 20-hour checkup with your dealer. At the 20-hour checkup, your dealer should perform an engine check according to recommended procedures as stated by the engine manufacturer in the engine owner’s manual. The operator is also responsible for complying with the following procedures and operational requirements: 1.3 Lund-01.indd 3 7/9/10 1:44 PM gENERAL INFORMATION •Registering the boat with the appropriate jurisdiction. • Safety training of passengers and crew. •Ensuring the boat’s continued safe operation through proper maintenance and repair. • Obtaining adequate insurance coverage. • Following safe operating practices at all times. • Learning the Rules of the Road. • Developing an understanding of boat systems. •Operating and maintaining all equipment in compliance with the manufacturer’s instructions. • Avoiding the use of drugs and alcohol. • Complying with environmental regulations. Along with boating comes the responsibility of complying with environmental regulations. Please think about the future of our waterways, oceans, and marine life while you’re out enjoying them– and take all necessary measures to help protect our natural habitats. Keeping our waterways and marine habitats free from debris, and showing consideration for the creatures who thrive in these environments are some ways you can help assure the pleasure of boating for years to come. Dealer Your dealer will inspect your boat when you take delivery to make sure it is in flawless condition and that all components are working properly. Your dealer will discuss the terms of all warranties and emphasize the importance of registering each warranty with the manufacturer. He will also explain the proper procedures for obtaining warranty service. If requested, he will instruct you in the operation of the boat and its systems and components. ADDITIONAL INFORMATION Maintenance and Repair Proper maintenance and repair are critical to your continued enjoyment of and the safe use of your boat. Your dealer is always ready to help you. There are areas that you, the owner, cannot service because of today’s complex technology. Your dealer has access to factory trained specialists, when they are needed, for such equipment as engines and trailers. You can handle basic servicing such as checking engine oil levels 1.4 Lund-01.indd 4 7/9/10 1:44 PM We suggest you develop a routine maintenance plan for the engine and trolling motor to assure that they remain in first-rate condition and continue to operate properly. Follow the maintenance and service schedule recommended by the manufacturer. Cleaning the hull and deck regularly will keep your boat looking like new. Boating Education It is highly recommended that the boat operator and a standby operator enroll in a boating safety course. Such organizations as the U.S. Power Squadron, United States Coast Guard Auxiliary, and the American Red Cross sponsor educational programs. Chapter 3 has general information about such courses. See your Lund Boats dealer about special courses available in your area. gENERAL INFORMATION and inspecting the condition of hoses, sea cocks, bilge pumps, and electrical connections, but all other maintenance and repair should be performed by properly trained and qualified technicians. There are many good boating publications that have helpful information. Pamphlets prepared by the Coast Guard explain “Rules of the Road,” signal lights, buoys, safety, international and inland regulations, and other information beyond the scope of this manual. Check Chapter 3 for a partial listing. You can contact the local U.S. Coast Guard Unit or call the Coast Guard Boating Safety Hotline at 1-800-368-5647. Contact the Canadian Coast Guard at 800-267-6687. Your dealer will also have information about your area and what other boaters are doing, such as club memberships and other activities. BOATING LAWS AND REGULATIONS The Coast Guard is the authority of the waterways; it is there to help the boating public. Boating regulations are also enforced by local authorities. You are subject to marine traffic laws and “Rules of the Road” for both federal, state and provincial waterways. You must stop if signaled to do so by enforcement officers, and permit them to board if asked. Some localities have specific local trailer specifications and legal limits on speed and noise. It is your responsibility to be aware of these laws and to ensure that your boat and trailer comply. Check with your dealer and consult with the local Marine Patrol or local Coast Guard office about any local requirements. Registration Register your boat in the state or province in which it is principally used. In a few jurisdictions, the Coast Guard retains registration authority. Registration numbers and validation stickers must be displayed on the boat according to regulations, and the registration certificate must be carried on board when the boat is in use. Your dealer will either supply registration forms or tell you where they may be obtained. 1.5 Lund-01.indd 5 7/9/10 1:44 PM gENERAL INFORMATION Insurance In most states, the boat owner is legally responsible for damages or injuries he or she causes, even if someone else is operating the boat at the time of the accident. Common sense dictates that you carry adequate personal liability and property damage insurance, just as you would on an automobile. You should also protect your investment by insuring the boat against physical damage or theft. Accident Reporting After an accident, the operator of the boat is responsible for filing a report with the appropriate authorities. Reports are generally necessary for accidents involving loss of life, injury, or in some cases when the damage amount exceeds a specific limit. Ask your insurance agent for more information. If you are involved in an accident, check with your local authorities for reporting requirements. If you see a distress signal, you must assume it is a real emergency and render assistance immediately. The person in charge of a boat is obligated by law to provide assistance to any individual in danger at sea. However, you should not put your crew or passengers in a dangerous situation which exceeds your capabilities or those of your boat. In the United States the 1971 Boating Safety Act grants protection to a “Good Samaritan” boater offering good faith assistance, and absolves a boater from any civil liability arising from assistance given. Discharge of Oil Regulations prohibit the discharge of oil or oily waste into or upon navigable waters, if such discharge causes a film or sheen upon, or a discoloration of, the surface of the water or causes sludge or an emulsion beneath the surface of the water. Violators are subject to a monetary penalities as allowed by law. Disposal of Plastics & Other Garbage Plastic refuse dumped in the water can kill fish and marine wildlife and can foul boat propellers and cooling water intakes. Other forms of waterborne garbage can litter our beaches and make people sick. Regulations prohibit the dumping of plastic refuse or other garbage mixed with plastic into the water anywhere, and restrict the dumping of other forms of garbage within specified distances from shore. HAZARD COMMUNICATION LABELS Some or all of the hazard communication labels shown on the following pages can be found in various locations on your boat or trailer. (Labels are not necessarily to size or scale.) The appropriate labels are determined by the standard and optional equipment actually installed upon delivery. Check with your dealer to find out what labels your boat or trailer should have. If any label is missing, ask your dealer for a replacement. 1.6 Lund-01.indd 6 7/9/10 1:44 PM gENERAL INFORMATION ! 1.7 Lund-01.indd 7 7/9/10 1:44 PM gENERAL INFORMATION WARNING CARBON MONOXIDE CAN ACCUMULATE IN THIS AREA. TO AVOID CO POISONING, DO NOT OCCUPY THIS AREA WHEN ENGINE(S) IS RUNNING. 1.8 Lund-01.indd 8 7/9/10 1:44 PM gENERAL INFORMATION HOW TO READ YOUR HULL I.D. PLATE Your I.D. plate is located on the outboard side of the starboard transom, above the waterline. The hull I.D. (serial number) should be included in any inquiries or when ordering parts. The U.S.C.G. requires that your H.I.D. be permanently affixed on the starboard transom of the boat. US-LBBE0000H005 US-YBVE0000H005 YEAR MFG. MODEL YEAR “H” stands for August. . .as “A” thru “L” stands for January to December, for the year of manufacture. Boat and Trailer Data Owner_______________________________________________________________ Date Purchased________________________________________________________ Address______________________________________________________________ Dealer_______________________________________________________________ Phone_______________________________________________________________ Address______________________________________________________________ Boat Model___________________________________________________________ Hull Identification Number_______________________________________________ Motor_______________________________________________________________ Serial Number_________________________________________________________ Trailer_______________________________________________________________ Serial Number_________________________________________________________ Other________________________________________________________________ ____________________________________________________________________ 1.9 Lund-01.indd 9 7/9/10 1:44 PM gENERAL INFORMATION 1.10 Lund-01.indd 10 7/9/10 1:44 PM SAFE BOATING CHECKLIST SAFETY 2 Safety Boating safety and the safety of your passengers is YOUR responsibility. ■Observe the instructions on all safety labels. They are there to assure that you have a safe and enjoyable outing. ■Never operate a boat while under the influence of drugs or alcohol. It is a Federal offense. Allow only qualified drivers to operate your boat. ■At least one passenger should be able to operate the boat in case the operator is unexpectedly unable to do so. ■Don’t overload the boat. Heavy seas reduce capacity. A weight capacity plate is not an excuse for failure to use common sense or rational judgment. ■Always use the lanyard stop switch when operating the boat and ensure that all passengers are familiar with its use. ■Regularly inspect the boat, the hull, engine, safety equipment, and all other boating gear and keep them in safe operating condition. ■Be sure you have the minimum required safety equipment and any additional gear needed for your cruise. ■Check that all lifesaving equipment, including fire extinguisher, is in safe operating condition and in easily accessible locations. Show all passengers where this equipment is, and make sure they know how to use it. ■Be very careful while fueling. Know the capacity of the fuel tank. Avoid fueling at night except under well-lit conditions. Gas spills are unnoticeable in the dark. Extinguish all open flames when fueling. ■Each time you fill up, be sure the engine compartment is free of gasoline vapors, and inspect fuel lines for leaks and hose deterioration. ■Keep enough fuel on board for the planned trip. Allow for changes due to adverse weather or other delays. Use 1/3 of the fuel to reach your destination, use 1/3 to return, and keep 1/3 in reserve. ■Keep an eye on the weather. Check local weather broadcasts before departure. Be alert to changing conditions. The skipper should personally take the helm during storms. ■Always keep accurate up-to-date charts of the boating area on board. Before getting underway, check water conditions in the planned boating area. ■Before departure, file a Float Plan with a responsible person ashore. 2.1 Lund-02.indd 1 7/9/10 1:46 PM SAFETY ■Always operate your boat with consideration, courtesy, and common sense. YOU are responsible for your own safety, as well as the safety of your passengers and your fellow boaters. You should fully understand and become familiar with the operating procedures and safety precautions in this manual and the other information in the Owner’s Packet before you launch the boat. Before leaving on a cruise, whether for an hour or several days, go through the Safety Checklist on page 2-1. Always operate your boat with consideration, courtesy, and common sense. HAZARD STATEMENTS As you read your Owner’s Manual, please note the hazard warnings which alert you to safety precautions related to unsafe conditions or operating procedures. We have included these warnings because we are concerned about your safety and the safety of your passengers. ! The safety alert symbol is recognized around the world. In this manual, it means read this information carefully! Be sure you understand the consequences of a hazard and how to avoid them. Failure to follow the recommendations in a hazard communication statement may result in property damage, personal injury, or death. People often refer to a hazard statement as a warning in a general sense. This manual uses three kinds of “warnings” depending on the likely effect of a hazard (minor The safety symbol and this signal word indicate a potentially hazardous situation which, if not avoided, may result in minor or moderate personal injury or property damage. It may also be used to alert against unsafe practices. The safety symbol and this signal word indicate a potentially hazardous situation which, if not avoided, COULD result in severe injury, death or substantial property damage. The safety symbol and this signal word indicate an imminently hazardous situation, which, if not avoided, WILL result in severe personal injury or death. 2.2 Lund-02.indd 2 7/9/10 1:46 PM The warnings in this manual do not and cannot address every conceivable situation. Always use common sense! If a procedure, method, tool, or part is not specifically recommended, you must satisfy yourself that it is safe for you and others and that your boat will not be damaged or made unsafe as a result of your decision. SAFETY injury, severe injury, death). Advisory Statements Advisory statements alert you to conditions that affect equipment operation, maintenance, and servicing practices. An IMPORTANT statement indicates a procedure intended to prevent damage to equipment or associated components. A Note statement is a general advisory statement relating to equipment operation and maintenance procedures. SAFETY EQUIPMENT As the owner of the boat, you are responsible for assuring that all required safety equipment is aboard. You should also consider supplying additional equipment as needed for your safety and that of your passengers. Check state and local regulations for information about required safety equipment. Required Safety Equipment While most required safety equipment has been provided on your boat, it is your responsibility to properly equip your boat. Check with your dealer or with boating authorities to determine equipment needed. Personal Flotation Devices (PFDs) Federal regulations require that you have at least one Coast Guard approved personal flotation device (PFD) for each person in a recreational boat. You may not use your boat unless all PFDs are in serviceable condition, readily accessible, legibly marked with the Coast Guard approval number, and of an appropriate size (within the weight range and chest size marked on the PFD) for each person on board. A PFD provides buoyancy to help keep your head above the water and to help you remain in a satisfactory position while in the water. Body weight and age should be considered when selecting a PFD. The buoyancy provided by the PFD should support your weight in water. The size of the PFD should be appropriate for the wearer. Body weight or chest size are common methods used to size PFDs. It is your responsibility to ensure that you have the proper number and types of PDF's on board and that your passengers know where they are and how to use them. 2.3 Lund-02.indd 3 7/9/10 1:46 PM SAFETY PFD Types Five types of PFDs have been approved by the U.S. Coast Guard. PFD Type I, Wearable (Figure 2-1) has the greatest required buoyancy. Its design allows for turning most unconscious persons in the water from face down position to a vertical or slightly backward, face-up position. It can greatly increase the chances of survival. Type I is most effective for all waters, especially offshore when rescue may be delayed. It is also the most effective in rough waters. Figure 2-1 Type I, Wearable PDF Type II, Wearable (Figure 2-2) turns its wearer in the same way as Type I, but not as effectively. The Type II does not turn as many persons under the same conditions as a Type I. You may perfer to use this PDF where there is a probability of quick rescue such as in areas where other people are commonly involved in water activities. Figure 2-2 Type II, Wearable PFD Type III, Wearable (Figure 2-3) allows wearers to place themselves in a vertical or slightly backward position. It does not turn the wearer. It maintains the wearer in a vertical or slightly backward position and has no tendency to turn the wearer face down. It has the same buoyancy as a Type II PFD and may be appropriate in areas where other people are commonly involved in water activities. Figure 2-3 Type III, Wearable 2.4 Lund-02.indd 4 7/9/10 1:46 PM SAFETY PFD Type IV, Throwable (Figure 2-4) is required in addition to the PFDs previously discussed. The most common Type IV PFD is a buoyant cushion or ring buoy. It is designed to be thrown to a person in the water, grasped and held by the user until he or she is rescued. A Type IV PFD should always be in serviceable condition and immediately available for use. Grasping this PFD may be difficult if the rescue is delayed or if the user is overcome by hypothermia (loss of body heat). Figure 2-4 Type IV, Throwable PFD Type V, Wearable (Figure 2-5) must be worn. When inflated, it provides buoyancy equivalent to Type I, II or III PFDs. When it is deflated, however, it may not support some people. Figure 2-5 Type V, Wearable PFD Pointers The purpose of a PFD is to help save your life. If you want it to support you when you are in the water, it needs to fit, float, and be in good condition. •Try the PFD on and adjust it until it fits comfortably in and out of the water. Mark your PFD if you are the only wearer. •To make sure the PFD works, wear it in the water. This will show you how it works and give you confidence when you use it. •Teach children how to put a PFD on and allow them to try it in the water. That way, they know what the PFD is for and how it works. They will feel more comfortable with it if they suddenly find themselves in the water. •If the PFD is wet, allow it to dry thoroughly before storing it. Do not dry it in front of a radiator or heater. Store it in a well-ventilated area. 2.5 Lund-02.indd 5 7/9/10 1:46 PM SAFETY •Keep PFDs away from sharp objects which can tear the fabric or puncture the flotation pads. •For their own safety and the safety of others, all non-swimmers, poor swimmers, and children should wear PFD’s at all times, whether the boat is stationary or moving. •Check the PFD frequently to make sure that it is not torn, that flotation pads have no leaks, and that all seams and joints are securely sewn. •If a PFD contains kapok, the kapok fibers may become waterlogged and lose their buoyancy after the vinyl inserts are punctured. If the kapok becomes hard or if it is soaked with water, replace it. It may not work when you need it. Hypothermia Hypothermia, the loss of body heat to the water, is a significant cause of deaths in boating accidents. After an individual has succumbed to hypothermia, he or she will lose consciousness and then drown. PFD’s can increase survival time because of the insulation they provide. Naturally, the warmer the water, the less insulation one will require. When operating in cold water (below 40°F) consideration should be given to using a coat or jacket style PFD as they cover more of the body than the vest style PFD’s. Some points to remember about hypothermia protection: 1.While afloat in the water, do not attempt to swim unless it is to reach a nearby craft, fellow survivor, or a floating object on which you can lean or climb. Unnecessary swimming increases the rate of body heat loss. In cold water drownproof methods that require putting your head in the water are not recommended. Keep your head out of the water. This will greatly lessen heat loss and increase your survival time. 2.Keep a positive attitude about your survival and rescue. This will improve your chances of extending your survival time until rescue. Your will-to-live does make a difference! 3.If there is more than one person in the water, huddling is recommended while waiting to be rescued. This action tends to reduce the rate of heat loss and thus increase the survival time. 4.Always wear your PFD. It won’t help you fight off the effects of hypothermia if you don’t have it on when you go into the water. Fire Extinguishers As the owner of the boat, you are responsible for supplying a fire extinguisher approved by the U.S. Coast Guard. 2.6 Lund-02.indd 6 7/9/10 1:46 PM SAFETY All Class 1 powerboats (16 to less than 26 feet) are required to carry one (1) B-I type hand portable fire extinguisher unless the boat is equipped with a fixed fire extinguishing system in the engine compartment. Hand-held portable fire extinguishers should be mounted in readily accessible locations away from the engine compartment. All persons aboard should know the location and proper operation of the fire extinguisher(s). Fire! In case of fire, do not open engine compartment. Turn off engine. Using portable CO2 fire extinguisher, continuously discharge entire contents at base of fire. Note: Don’t test fire extinguishers by squirting small amounts of the extinguishing compound. The extinguisher might not work when you really need it! Visual Distress Signal Devices Visual distress signal devices approved by the U.S. Coast Guard are required on all recreational boats operating on coastal waters and on boats owned in the United States when they are operating on the high seas. Coastal waters include territorial seas and those waters directly connected to the Great Lakes and the territorial seas up to a point where the waters are less than two miles (3.2 km) wide. Visual distress signal equipment may be of the pyrotechnic or non-pyrotechnic type. Regulations prohibit display of visual distress signals on the water under any circumstances except when assistance is required to prevent immediate or potential danger to persons on board a vessel. The equipment must be approved by the U.S. Coast Guard, be in serviceable condition, and be stowed in a readily accessible location. Equipment having a date for serviceable life must be within the specified usage date shown. Careful selection and proper stowage of visual distress equipment is very important if young children are aboard. Day Use Only Three orange smoke signals (one hand held and two floating) or one orange flag with black square and disk Night Use Only Day and Night Use One S-O-S electric distress Three flares of the hand light held, meteor or parachute type 2.7 Lund-02.indd 7 7/9/10 1:46 PM SAFETY Sound Signalling Devices Note: No single signaling device is appropriate for all purposes. Consider keeping various types of equipment on board. Boats less than 26 feet (7.9 m) in length are required to carry a hand, mouth, or power operated horn or whistle. It must produce a blast of two-second duration and audible at a distance of at least one-half (1/2) mile. Following are standard whistle signals: • • • • • One Prolonged Blast One Short Blast Two Short Blasts Three Short Blasts Five or More Blasts Warning signal Pass on my port side Pass on my starboard side Engines in reverse Danger signal Navigation Lights Navigation lights are intended to keep other vessels informed of your presence and course. If you are out on the water between sunset and sunrise, you are required to display appropriate navigation lights. ADDITIONAL RECOMMENDED EQUIPMENT It is recommended that you acquire additional equipment for safe, enjoyable cruising. This list, which is not all-inclusive, includes items you should consider acquiring. Basic Gear Flashlight Mooring lines Compass Oar or paddle Distress signals First aid kit Dock fenders VHF radio EPIRB Boat hook Extra warm clothing Charts Suntan lotion Tow line Second anchor and line Dewatering device (pump or bailer) Emergency supply of drinking water and food Tools Spark plug wrench Jackknife Adjustable wrench Duct tape Hammer Pliers Lubricating oil Screwdrivers Electrician’s tape Prop wrench 2.8 Lund-02.indd 8 7/9/10 1:46 PM Extra bulbs Extra drain plug Extra prop nut/washer Spare propeller Spark plugs SAFETY Spare Parts Extra fuses Spare wire CARBON MONOXIDE AND BOATING Carbon monoxide is a colorless, odorless gas by-product of the burning of carbon based fuels like gasoline. In high concentrations, CO can be fatal within minutes. The effects of CO in lower concentrations are cumulative and can be just as lethal over long periods of time. Symptoms of carbon monoxide poisoning include: itchy and watering eyes, flushed appearance, throbbing temples, inability to think coherently, ringing in the ears, tightness across the chest, headaches, drowsiness, nausea, dizziness, fatigue, vomiting, collapse and convulsions. CARBON MONOXIDE POISONING IS OFTENTIMES CONFUSED WITH SEASICKNESS. Outboard motors exhaust carbon monoxide and other gases typically through the hub or the propeller. To avoid exposure to carbon monoxide, do not stand or swim near the motor when the engine is idling. Outboard powered open boats present a lower risk of exposure to dangerous levels of carbon monoxide from their own motors because natural ventilation dissipates the majority of the engine exhaust. However, engine or generator exhaust from other boats docked or anchored nearby can emit poisonous carbon monoxide gas and endanger people in the vicinity. Be alert for exhaust from other boats alongside your boat, and monitor people around you for symptoms of carbon monoxide poisoning. If you suspect carbon monoxide poisoning, evacuate the area and move the victim to fresh air. Get medical help immediately. Carbon Monoxide Accumulation If the boat has a boarding platform or swim ladder see warning label on page 1.14. Following are examples of possible situations where carbon monoxide may accumulate within your boat while docked, anchored, or underway. Become familiar with these examples and their precautions to prevent DANGEROUS accidents. Exhaust Fumes! Generator or hull exhaust from other vessels while either docked or anchored can emit poisonous carbon monoxide gas and cause excessive accumulation within cabin and cockpit areas. See Figure 2-6. Be alert for generator exhaust from other vessels alongside. 2.9 Lund-02.indd 9 7/9/10 1:46 PM SAFETY Figure 2-6 Vessel Alongside Backdrafting! Under certain conditions, moving air currents can direct poisonous carbon monoxide fumes into boat (Figure 2-7). These fumes can accumulate to dangerous levels without proper airflow. Provide adequate ventilation, redistribute the load or bring boat out of high bow angle. Figure 2-7 While Underway (Backdrafting) While underway, CO concentrations can increase by backdrafting or “the station wagon effect.” Backdrafting is caused by factors such as relative wind direction, speed, or the bow being too high. To prevent this, open canvas whenever possible to provide positive airflow through the hull, or increase boat speed to increase ventilation. Exhaust Fumes! Hull exhaust from your boat can cause excessive accumulation of poisonous carbon monoxide gas within cockpit area when using protective weather coverings while underway (Figure 2-7) or while stationary. Provide adequate ventilation when the canvas top, side curtains, and/or back curtains are in their closed protective positions. 2.10 Lund-02.indd 10 7/9/10 1:46 PM SAFETY Boat houses, seawalls, and other boats in close proximity or confined areas can contribute to increased CO levels. Operators must be aware that operation, mooring, and anchoring in an area with other boats puts them in jeopardy of CO accumulation from other sources. Likewise, a boat operator must be aware of how exhaust from his/her boat will affect others. Operation of the engines while moored may cause CO accumulation in your boat and those around you. Figure 2-8 Confined Areas Figure 2-8 With canvas in place Installing rear canvas while underway increases the chance of CO accumulation in your boat. Be sure to provide adequate ventilation. If the windshield has vents, open them before getting underway to increase positive air flow and decrease the chances of CO accumulation. Even with the best boat design and construction, CO may still accumulate in enclosed areas under certain conditions. Continually observe passengers for symptoms of CO poisoning. LANYARD STOP SWITCH This safety device automatically stops the engine if the lanyard is attached to the operator and the operator falls from the control station. Refer to the engine manual for detailed information about using this switch. The stop switch (Figure 2-9) incorporates a shutoff switch, switch clip, lanyard, and lanyard clip. The lanyard clip must be securely attached to the operator’s PFD, 2.11 Lund-02.indd 11 7/9/10 1:46 PM SAFETY clothing, arm, or leg. Be sure to attach the lanyard to a place where it is free of obstructions and to something that will move with the operator if he or she leaves the helm station. If the engine shuts down because this switch was activated, the clip must be reinstalled on the interrupter switch before the engine can be started. Keep lanyard stop switch free from obstructions that could interfere with its operation. Do not modify or remove lanyard stop switch or bypass its safety features. The proper use of the lanyard stop switch can prevent a runaway boat situation which can cause severe personal injury or death. Figure 2-9 Typical Ignition interrupter (Stop Switch) with Lanyard SAFE BOATING PRACTICES YOU are responsible for your own safety, the safety of your passengers, and the safety of fellow boaters. Drugs and Alcohol Alcohol consumption and boating do not mix! Operating under the influence endangers the lives of your passengers and other boaters. Federal laws prohibit operating a boat under the influence of alcohol or drugs. Do not use drugs or drink alcohol while operating a boat. Like driving a car, driving a boat, requires sober, attentive care. Operating a boat while intoxicated or under the influence of drugs is not only dangerous, but it is also a Federal offense carrying 2.12 Lund-02.indd 12 7/9/10 1:46 PM SAFETY a significant penalty. These laws are vigorously enforced. The use of drugs and alcohol, singly or in combination, decreases reaction time, impedes judgment, impairs vision, and inhibits your ability to safely operate a boat. Safe Operation Safe operation means that you do not misuse your boat nor do you allow your passengers to do so. Safe operation means using good judgment at all times. It includes, without limitation, the following actions: •Load the boat within the limits listed on the capacity plate. Balance loads bow to stern and port to starboard. •Maintain boat speed at or below the local legal limit. Avoid excessive speed or speeds not appropriate for operating conditions. •Do not use the boat in weather or sea conditions beyond the skill or experience of the operator or the comfortable capability of the boat or passengers. •Be sure at least one other passenger is familiar with the operation and safety aspects of the boat in case of an emergency. •Make sure that passengers and gear do not obstruct the operator’s view or ability to move. •Do not exceed the maximum engine power rating stated on the certification plate attached to the boat. •Observe all safety signs and warnings both inside the boat and in the immediate boating area. Passenger Safety Before getting underway, show all passengers where emergency and safety equipment is stowed, and explain how to use it. Everyone aboard should wear rubbersoled shoes which resist slipping on wet surfaces. While underway, passengers should remain seated inside the deck rails. Don’t allow passengers to drag their feet or hands in the water. Always use handholds and other safety hardware to prevent falls. All non-swimmers, poor swimmers, and small children should wear PFD’s at all times. Propeller Personal Injury! Do not allow anyone near a propeller, even when the engine is off. Propeller blades can be sharp and can continue to turn even after the engine is shut off. Do not allow anyone near the propeller when the throttle is in the neutral position. Contact with propeller will result in serious injury or death. 2.13 Lund-02.indd 13 7/9/10 1:46 PM SAFETY First Aid As a boat operator, you should be familiar with basic first aid procedures that may be needed while you are far from help. Fish hook accidents or minor cuts and abrasions may be the most serious mishaps on board a boat, but you should also learn the proper procedures and be ready to deal with the truly serious problems like excessive bleeding, hypothermia, and burns. First aid literature and courses are available through most Red Cross chapters. Operation By Minors Minors should always be supervised by an adult whenever operating a boat. Some regions also have laws regarding the minimum age and licensing requirements of minors. Be sure to contact the local boating authorities for information. Rules of the Road As a responsible boater, you will comply with the “Rules of the Road,” the marine traffic laws. Navigating a boat is much the same as driving an automobile. Operating either one responsibly means complying with a set of rules intended to prevent accidents. Just as you assume other car drivers know what they are doing, other boaters assume you know what you are doing. Chapter 3 has more information about navigational rules and the Rules of the Road. Voluntary Inspections Boating officials in many regions or the U.S. Coast Guard Auxiliaries offer courtesy inspections to check out your craft. They will check for compliance with safety standards and required safety equipment. You may voluntarily consent to one of these inspections, and you are allowed time to make corrections without prosecution. Check with the appropriate state agency or the Coast Guard Auxiliary for details. Safe Boating Courses The local U.S. Coast Guard Auxiliary and the U.S. Power Squadrons offer comprehensive safe boating classes several times a year. You may contact the Boat/U.S. Foundation at 1-800-336-BOAT (2628) or, in Canada contact the Canadian Power Squadron at 1-800-268-3579, for a course schedule in your area. Also contact the local U.S. Coast Guard Auxiliary or Power Squadron Flotilla for the time and place of their next scheduled class. 2.14 Lund-02.indd 14 7/9/10 1:46 PM • Navigation • Seamanship and boathandling • Rules of the Road, international-inland • Weather prediction • Safety at sea • Survival in bad weather SAFETY It is your responsibility to gain knowledge and experience in skills such as: • Respect for others on the water • First Aid • Radio communication • Distress signals • Pollution controls WATER SPORTS Personal Injury! Your boat is not designed for and should not be used for pulling parasails, kites, gliders, or any device which can become airborne. Use boat only for appropriate water sports. Use Caution with skier in tow as the tow as the tow rope may snap back into cockpit when released. Ski pulon is for skiing, wake and knee boarding only. All other recreational towables use transom stern eyes. Do not tow other boats or use for parasailing See labels on ski pylon for additional warnings. Water skiing, kneeboarding, or riding a towed, inflatable apparatus are some of the more popular water sports. Taking part in any water sport requires increased safety awareness by the participant and the boat operator. If you have never pulled someone behind your boat before, it is a good idea to spend some hours as an observer, working with and learning from an experienced driver. It is also important to be aware of the skill and experience of the person being pulled. Always have a second person on board to observe the person in the water so the driver can concentrate on operating the boat. Everyone participating in a water sport should observe these guidelines: 1.Allow only capable swimmers to take part in any water sport. 2.Always wear an approved personal flotation device (PFD). Wearing a properly designed PFD helps a stunned or unconscious person stay afloat. 3.Be considerate to others you share the water with. 2.15 Lund-02.indd 15 7/9/10 1:46 PM SAFETY 4.Give immediate attention to a person who has fallen. He or she is vulnerable in the water alone and may not be seen by other boaters. 5.Approach a person in the water from the lee side (opposite the direction of the wind). Turn off the motor before coming close to the person. 6.Turn off engine and anchor before swimming. 7.Always participate in water sports in safe areas. Stay away from other boats, beaches, restricted areas, swimmers, and heavily traveled waterways. 8.Swim only in areas designated as safe for swimming. These are usually marked with a swim area buoy (Figure 2-10). Do not swim alone or at night. SW IM AREA Figure 2-10 Swim Area Buoy Rotating Propeller! Rotating propeller can cut or sever, causing serious injury or death. Shut engine off and remove ignition key when anyone is swimming nearby. 9.Do not allow anyone near the propeller(s), even when the engine is off. Propeller blades can be sharp and can continue to turn even after the engine is off. Stay at least 150 feet away from areas marked by a diver down float (Figure 2-11). 2.16 Lund-02.indd 16 7/9/10 1:46 PM SAFETY Figure 2-11 Diver Down Float 10.Do not drive the boat directly behind a water skier. At 25 miles per hour, the boat will overtake a fallen skier who was 200 feet in front in about 5 seconds. Water Skiing The popular sport of water skiing has brought a special set of safety precautions to observe in boating. The following guides help prevent accidents while water skiing. 1.Water ski only in safe areas, away from other boats and swimmers, out of channels, and in water free of underwater obstructions. 2.Allow no one who cannot swim to water ski. Skiers must wear a USCG approved personal flotation device. A type III water-ski vest is an approved and practical PFD. 3.Have a second person aboard to observe the skier and inform the driver about the skier’s hand signals (Figure 2-12). The driver must give full attention to operating the boat and the waters ahead. 4.Give immediate attention to a fallen skier. He or she is vulnerable in the water alone and may not be seen by other boaters. Be careful not to swamp the boat while taking a skier on board. 5.Always participate in water sports in safe areas. Stay away from other boats, beaches, swimmers, and heavily traveled waterways. 6.Be considerate to others you share the water with. 7.Approach a person in the water from the lee side (opposite the direction of the wind). Stop the motor before coming close to the person. 8.Turn off engine and anchor your boat before swimming. 2.17 Lund-02.indd 17 7/9/10 1:46 PM SAFETY Rotating Propeller! Rotating propeller can cut or sever, causing serious injury or death. Switch engine off before skiers enter the water and before taking skiers aboard. Do not leave engine running in neutral. Accidentally engaging shift can seriously injure skier. 9.Do not water ski between sunset and sunrise. It is illegal in most states. TURN TURN RIGHT TURN LEFTS OR OR GO FASTER OK AFTER FALL TOP GO SLOWER SKIER IN WATER CUT MOTOR BACK TO DOCK Figure 2-12 Skiing Signals For more information about water skiing, please contact the American Water Ski Association, 799 Overlook Drive, Winter Haven, FL 33884 (1-800-533-2972) 2.18 Lund-02.indd 18 7/9/10 1:46 PM 3 This chapter summarizes basic rules of seamanship, provides general information about navigational aids, and identifies sources for additional reading and boater education. BOATING REGULATIONS The Coast Guard is the authority of the waterways. Boating regulations are also enforced by local authorities. Your boat is subject to the marine traffic laws known as “Rules of the Road,” which are enforced by the Coast Guard. You are subject to marine traffic laws and “Rules of the Road” for both federal and state waterways; you must stop if signaled to do so by enforcement officers, and permit them to board if asked. The “Rules of the Road” can be obtained from the local Coast Guard Unit or the United States Coast Guard Headquarters by calling (202) 5121800 or faxing your request to (202) 512-2250, and asking for the publication titled “Navigational Rules, International-Inland.” In Canada contact the local Coast Guard unit. BASIC SEAMANSHIP Basic Seamanship Many pamphlets prepared by the Coast Guard are available. They explain signal lights, buoys, safety, international and inland regulations, and other information which goes beyond the scope of this manual. “Aids to Navigation” (U.S. Coast Guard pamphlet #123) explains the significance of various lights and buoys. Because of proposed alterations to buoys and markers, contact the U.S. Coast Guard to stay informed of changes.) Other pamphlets, including the “Boating Safety Training Manual” and “Federal Requirements For Recreational Boats,” are also available from the U.S. Coast Guard Headquarters. Note: The spoken word “MAYDAY” is the international signal of distress. MAYDAY should NEVER be used unless there is grave or imminent danger, and you are in need of immediate assistance. RULES OF SEAMANSHIP Right-of-Way In general, boats with less maneuverability have right-of-way over more agile craft. You must stay out of the way of the following vessels: 3.1 Lund-03.indd 1 7/9/10 1:48 PM BASIC SEAMANSHIP A vessel not under command or aground These vessels have no maneuverability. A vessel restricted in its maneuverability These vessels are performing work, such as surveying, dredging, laying pipe or cable, or servicing navigational markers among others, which limits their maneuverability. A vessel engaged in fishing Sailboats These include boats fishing with lines, trawls, or nets; but not trolling lines. Sailboats have the right-of-way over power boats; however, if a sailboat is using a propeller to move forward, it is considered a power boat even if its sails are up. Meeting Head-On When two boats meet head-on, neither boat has the right-of-way. Both boats should decrease speed and pass port to port. However, if both boats are on the left side of a channel, each vessel should sound two short horn blasts and pass starboard to starboard. See Figure 3-1. Figure 3-1 Meeting Head-On 3.2 Lund-03.indd 2 7/9/10 1:48 PM 12 O'CLOCK Crossing Situations In a crossing situation, the boat on the right from the 12-4 o’clock position has the right-ofway. It must hold course and speed. The boat without right-ofway must keep clear and pass to the stern. See Figure 3-2. PRIVILEGED VESSEL DANGER ZONE BURDENED VESSEL 4 O'CLOCK Figure 3-2 Crossing STAND-ON (PRIVILEGED) VESSEL BEING OVERTAKEN T Overtaking The boat overtaking the one ahead must yield the right-ofway to the boat being passed. The overtaking boat must make any necessary adjustments to keep out of its path. The boat being passed should hold its course and speed. See Figure 3-3. GIVE-WAY (BURDENED) VESSEL OVERTAKING Figure 3-3 Overtaking 3.3 Lund-03.indd 3 7/9/10 1:48 PM The General Prudential Rule BASIC SEAMANSHIP The general prudential rule regarding right-of-way is that if a collision appears unavoidable, neither boat has right-of-way. As prescribed in the Rules of the Road, both boats must act to avoid collision. Night Running Boats operating between sunset and sunrise (hours vary by state), or in conditions of reduced visibility, must use navigational lights. Night-time operation, especially during bad weather or fog, can be dangerous. All Rules of Road apply at night, but it is best to slow down and stay clear of all boats regardless of who has right-of-way. To see more easily at night, avoid bright lights when possible. Also, it is helpful to have a passenger keep watch for other boats, water hazards, and navigational aids. To determine the size, speed, and direction of other vessels at night, you should use the running lights. A green light indicates the starboard side, and a red light indicates the port side. Generally, if you see a green light, you have the right-of-way; if you see a red light, give way to the other vessel. See Figure 3-4. Note: When conditions require the use of navigational lights, the bow mount trolling motor must be deployed in the furthest down position when in use, to prevent obstruction of the navigation lights. WHITE GREEN IF YOU SEE GREEN: CAUTIOSLY HOLD COURSE WHITE RED IF YOU SEE RED: GIVE WAY! Figure 3-4 Night Running 3.4 Lund-03.indd 4 7/9/10 1:48 PM Out on the water, whistle signals are commonly used. Although using a whistle signal is not necessary every time a boat is nearby, operators must signal their intentions when necessary to avoid potentially confusing or hazardous situations. Use whistle blasts early enough to be noticed and understood by other boaters. It is customary for the privileged boat to signal first and the yielding boat to return the same signal to acknowledge she understands and will comply. Use the danger signal (five or more short and rapid blasts) if intent is not clear. A short blast is 1 or 2 seconds long. A long blast is 4 to 6 seconds long. The Navigational Aids Chart at the end of this chapter lists the meanings of the various whistle signals. NAVIGATIONAL AIDS BASIC SEAMANSHIP Whistle Signals Aids to navigation (ATONS) help you to travel safely on the water. They help you get from one place to another and are most helpful if you have a nautical chart. A navigational aids chart is at the end of this chapter. IMPORTANT: NEVER tie your vessel to an ATON. It is illegal because it blocks the ATON from the view of other boaters. Decreased visibility can contribute to a serious accident which may result in property damage, personal injury, or death. There are two ATON systems. The system used on federal waters is known as the International Association of Lighthouse Authorities System B (IALA-B). The Coast Guard maintains this system. The second system is the Uniform State Waterway Marking System (USWMS). This system is maintained by state authorities. International Association of Lighthouse Authorities System B (IALA-B) IALA-B uses four types of ATONS. This chapter discusses the two most common markers: lateral markers and safe water markers. Other federal markers include special markers and isolated danger markers. The Navigational Aids Chart at the end of this chapter shows these aids. Lateral Markers Lateral markers indicate the sides of navigable channels. They consist of lighted can or nun buoys and daymarks. Each has a number and is either red or green. The numbers on green markers are odd. Red markers have even numbers. Buoys are red or green floating ATONS. If lighted, they have either red or green lights. Unlighted green buoys, called cans, look like cylinders. Unlighted red nun buoys have cone shaped tops with their points cut off. Don’t pass too close to a buoy. You may foul the propeller in its chain. 3.5 Lund-03.indd 5 7/9/10 1:48 PM Note: Buoys are anchored floating objects and may not always be exactly in the same position. BASIC SEAMANSHIP Daymarks are red or green boards with numbers. They are on posts or groups of pilings tied together and called dolphins. Daymarks and their supports are daybeacons. Daybeacons may or may not have lights. If a red or green daybeacon has a light, it is the same color as the marker – red or green. Red daymarks are triangular and have even numbers. Green daymarks are square and have odd numbers. Red, Right, Returning is a basic rule to assist you in using lateral markers. When you are returning from seaward, keep red markers on the starboard (right) side when you pass them. Keep green markers to the port side. Returning from seaward is very clear if you have been on the ocean. You are returning to port. By agreement, going upstream on a navigational river is returning from seaward. The outlet ends of the Great Lakes are also the seaward ends. Travelling from a large body of water to a smaller one is considered returning from seaward. Safe Water Markers Safe water markers have vertical red and white stripes and mark the center of navigable channels and fairways. Safe water markers include both lighted and unlighted buoys and daymarks. If a marker is lighted, the light is white and flashes the letter “A” in Morse code. Preferred Channel markers have horizontal red and green bands. If lighted, the color of the light is the same as the top of the band. They show the preferred channel for you to use at a junction point. Be sure to notice the color of the top band, and treat it as any other marker you would of that color. If the band is red and you are returning from seaward, keep the marker to the right. Most lights on markers flash on and off. Others, such as lights on aids with no lateral significance, are fixed. They stay on all night. ATON lights flash in regular patterns. For example, they may flash every three seconds, or in groups such as two flashes and a pause. There are a number of flashing patterns, which help you identify the light at night. To identify a light, note its color and pattern or timing of flashes, and compare it to your chart to find its location. The Uniform State Waterway Marking System This section discusses three kinds of markers in this system: Regulatory, Informational, and Lateral. Regulatory markers in this system are either signs or buoys. Signs are square with orange borders. Regulatory buoys are white and shaped like cylinders. They have horizontal orange bands near their tops and just above the water’s surface. An orange circle on a marker means a controlled area. A message such as “No Wake, 3.6 Lund-03.indd 6 7/9/10 1:48 PM Informational markers are white signs with orange borders. They give information such as direction, distance, and location. Lateral markers in the USWMS system are either numbered red or black buoys. Black buoys may have green reflectors or lights. They are the equivalent of green buoys in the IALA-B system. Red buoys may have red reflectors or lights. They are the same as red buoys in the IALA-B system. Red and black buoys are usually found in pairs – pass between them. A Special Sign BASIC SEAMANSHIP dle Speed, No Skiing, or 5 MPH” may appear on the marker. An orange diamond means danger. If the diamond has an orange cross inside it, don’t enter the area. The reason you should stay out, such as “Swim Area,” may be printed in black on the marker. In Florida, you may see a special sign: “Caution, Manatee Area.” When you see this sign, slow down to idle speed. Manatees, an endangered species, are passive, large, slow-moving mammals. Many manatees are seriously injured or killed each year by boat propellers. Noise Always be aware of local laws on noise limits. Noise means engine noise, radio noise, or even yelling by people on your boat. Good seamanship demands that you operate your boat quietly so as not to infringe on the rights of others. RECOMMENDED READING We recommend that you read the boating literature published by your state boating agency and the U.S. Coast Guard. Other suggested reading includes the following: Damford, Don. Anchoring. (ISBN 0-915160-64-1). Seven Seas. United States Coast Guard Auxiliary. Boating Skills and Seamanship. LC74-164688. (illus.). (ISBN 0-930028-00-7). U.S. Coast Guard. Bottomley, Tom. Boatman’s Handbook, (illus.). 316 p. (ISBN 0-688-03925-1, Hearst Marine Book). Morrow. Whiting, John and Bottomley, Tom. Chapman’s Log and Owner’s Manual. 192 p. (ISBN 0-87851-801-0); (ISBN 0-686-96737-2). Hearst Marine Book. Chapman, Charles F. and Maloney, E.S. Chapman’s Piloting, Seamanship and Small Boat Handling. (illus.) 62 p. (ISBN 0-87851-814-2, Pub. by Hearst Bks.); deluxe ed. (ISBN 0-87851-815-0). Morrow 3.7 Lund-03.indd 7 7/9/10 1:48 PM National Fire Protection Association. Fire Protection Standard for Pleasure and Commercial Motor Craft. (ISBN 0-317-07388-5, NFPA 302). National Fire Protection Association. BASIC SEAMANSHIP Brotherton, Miner. Twelve-Volt Bible. (ISBN 0-915160-81-1). Seven Seas. CONTACTS There are many good boating publications that have information about your area and what other boats are doing, such as clubs and other activities. Education programs are sponsored by publications and organizations such as the U.S. Power Squadron, U.S. Coast Guard Auxiliary, and The American Red Cross. See your dealer about special courses available in the area. For detailed information contact: American Red Cross Local address (see local telephone directory) Boat U.S. Foundation for Boating Safety Hotline 1-800-336-BOAT 1-800-245-BOAT (in Virginia) Coast Guard Boating Safety Hotline 1-800-368-5647 NMMA Sources of Waterways Information – National Marine Manufacturers Association has five (5) booklets which list sources for safety, cruising, and local waterway information. Each covers a different region of the U.S. (North Central, South Central, Northeastern, Southeastern, and Western). For single copies, write Sources of Waterways Information, NMMA, 401 N. Michigan Avenue, Chicago, Illinois 60611. Ask for the booklet for your region. Skippers Course GPO Superintendent of Documents Washington, DC 20012 United States Coast Guard Auxiliary Local Flotilla or contact appropriate Coast Guard District Headquarters United States Coast Guard Headquarters 202-512-1800 202-512-2250 (fax) United States Power Squadron P.O. Box 30423 Raleigh, NC 27617 3.8 Lund-03.indd 8 7/9/10 1:48 PM OWNER’S LOGS AND RECORDS The Float Plan provides a record of your destination, departure and return times, boat description, passenger list, and other information about the trip you have planned. At the bottom of the form is space for listing emergency telephone numbers in case your return is delayed past the expected time. It also has space for indicating information about the person filing this report. Leave the completed form ashore with a responsible person. We recommend you make several copies of this form each boating season to assure an ample supply. The Fuel Log is a handy way to record information covering engine hours, fuel consumption, miles traveled, as well as RPM (revolutions per minutes), average mph (miles per hour), and gph (gallons per hour). BASIC SEAMANSHIP At the end of this chapter are several forms which you will find very helpful. The Service/Maintenance Log provides a record of maintenance work completed, the date of completion, and the engine hour reading. This log also helps you identify the frequency of routine maintenance work, such as engine oil changes. If you should decide to sell your boat, it demonstrates to prospective buyers that you have done a good job of taking care of it. NAVIGATIONAL AIDS CHART The illustrated Navigational Aids Chart on the next two pages contains information concerning whistle signals, storm warnings, bridge signals, and buoy descriptions.. 3.9 Lund-03.indd 9 7/9/10 1:48 PM NAVIGATIONAL AIDS CHART REMEMBER THESE RULES BASIC SEAMANSHIP 1. OVERTAKING - PASSING: Boat being passed has the right-of way. KEEP CLEAR. 2. MEETING HEAD ON: Keep to the right. 3. CROSSING: Boat on right has the right-of-way. Slow down and permit boat to pass. STARBOARD PORT DANGER ZONE (Dead ahead to 2 points abaft your starboard beam) Yield right-of-way to boats in your DANGER ZONE! WHISTLE SIGNALS ONE LONG BLAST: Warning signal (Coming out of slip) ONE SHORT BLAST: Pass on my port side TWO SHORT BLASTS: Pass on my starboard side THREE SHORT BLASTS: Engine(s) in reverse FOUR OR MORE BLASTS: Danger signal BRIDGE SIGNALS DAY NIGHT (Flag) (Lights) SOUND VISUAL VESSEL: Open VESSEL: Open BRIDGE: OK BRIDGE: OK Same No VESSEL: Replys: RADIO: VHF CH. 13 or Same No STORM WARNINGS RED FLAG Small craft (winds to 33 knots) 2 RED FLAGS Gale (winds up to 47 knots) SQUARE RED FLAG BLACK BOX (Storm) 2 SQUARE RED FLAGS BLACK BOX (Hurricane) 3.10 Lund-03.indd 10 7/9/10 1:48 PM LATERAL AIDS AS SEEN ENTERING FROM SEAWARD ODD NUMBERED AIDS SAFE WATER MID-CHANNELS OR FAIRWAYS NO NUMBERS-MAY BE LETTERED STARBOARD SIDE EVEN NUMBERED AIDS GREEN LIGHT ONLY RED LIGHT ONLY ■ WHITE LIGHT ONLY MORSE CODE FLASHING Mo(A) FLASHING OCCULTING OCCULTING QUICK FLASHING QUICK FLASHING ISOPHASE SPHERICAL ISOPHASE RW SP "G" RW "A" G "9" FI G 4sec LIGHTED BUOY R "8" FI R 4sec LIGHTED BUOY MR G CAN "7" R N "6" NUN RW "N" Mo (A) LIGHTED AND/OR SOUND SG DAYMARK BASIC SEAMANSHIP PORT SIDE G "1" TR PREFERRED CHANNEL NO NUMBERS-MAY BE LETTERED DAYMARK R "2" COMPOSITE GROUP FLASHING ( 2 + 1) ■ ■ ■ ■ ■ ■ ■ ■ ■ GREEN LIGHT ONLY GR "C" FI (2 + 1) RG "B" FI (2 + 1) RED LIGHT ONLY LIGHTED PREFERRED CHANNEL TO STARBOARD TOPMOST BAND GREEN GR C "L" PREFERRED CHANNEL TO PORT TOPMOST BAND RED RG N "W" NUN CAN JR JG GR "A" RG "B" 3.11 Lund-03.indd 11 7/9/10 1:48 PM Float Plan BASIC SEAMANSHIP Copy this page and fill out the copy before going boating. Leave the completed copy with a reliable person who can be depended upon to notify the Coast Guard, or other rescue organization, should you not return as scheduled. DO NOT file this plan with the Coast Guard. Name________________________ Telephone______________________________ Description of Boat:____________ Type_ ______ Color_______ Trim___________ Registration Number___________________________________________________ Length_________________ Name______________ Make___________________ Hull Identification Number______________________________________________ Other Info.___________________________________________________________ Persons Aboard: NameAge Address Telephone ____________________________________________________________________ ____________________________________________________________________ ____________________________________________________________________ Engine Type:_____________________ HP__________________________________ No. of Engines:___________________ Fuel Capacity:_ _______________________ Survival Equipment: PFDs___________________ Flares_ _______________ Mirror_ ______________ Smoke Signals____________ Flashlight_ ____________ Food_________________ Paddles_ ________________ Water_________________ Anchor_______________ Raft or Dinghy_ __________ EPIRB________________ Sea Anchor_ __________ Navigation Equipment Compass____________ Loran__________ GPS____________Radar____________ Radio: Yes_____ No_____ Type________________ Freq___________________ Phone: Yes_____ No_____ Phone No.___________________________________ Destination______________________ Est. Time of Arrival__________________ Expect to Return By_______________ Auto Type_______________________ License No._ ________________________ Where__________________________ If not returned by_______________ call the Coast Guard, or_________________ . (Local Marine Authority) Coast Guard Telephone Number:___ Local Marine Authority Telephone Number:_____________________________ 3.12 Lund-03.indd 12 7/9/10 1:48 PM FUEL LOG HOURS RUN FUEL (GAL) RANGE (MI) RPM MPH GPH BASIC SEAMANSHIP DATE 3.13 Lund-03.indd 13 7/9/10 1:48 PM SERVICE/MAINTENANCE LOG DATE HOUR METER READING SERVICE/REPAIRS PERFORMED BASIC SEAMANSHIP 3.14 Lund-03.indd 14 7/9/10 1:48 PM 4 A correctly selected trailer supports the boat properly, makes towing safer, and makes loading and unloading easier. Improper trailering can cause serious traffic accidents and is one of the major causes of boat damage. The warranty does not cover damage of this type. Familiarize yourself with proper towing procedures before towing your boat on the road. If using the transportation and storage top, the supplied poles must be installed to keep the top tight. If the top is not tight, damage can occur during storage or trailering. IMPORTANT: Your boat’s trailer was specifically designed to properly transport your boat. Do not use any other trailer with your boat. Your dealer can help you with the proper tow vehicle connections. Check with the state Department of Motor Vehicles for registration and licensing regulations in your state. Some states require that boat trailers be registered and licensed. Some states, and provinces, also have brake requirements of which you should be aware. TRAILERING Trailering Overloading trailer can lead to frame or component failure or loss of tow vehicle control. To prevent accidents and injury, total weight of trailer, boat, and gear must not exceed trailer weight rating. GROSS VEHICLE WEIGHT RATING The trailer should be able to accommodate the weight of the boat, engine, full fuel tank, and any other equipment that will normally be carried. Check the certification label on the frame of the trailer for the gross vehicle weight rating (GVWR). The total weight of your boat, engine, fuel, gear, and trailer should not exceed the GVWR. WEIGHT DISTRIBUTION If your towing vehicle is equipped with a weight distribution hitch, it must be capable of handling the GVWR. The weight on the trailer should be evenly distributed. If too much weight rests on the hitch, the front end of the vehicle will sway or oversteer. Insufficient tongue weight will cause the trailer to fishtail. In either case, the vehicle will be hard to handle and could become uncontrollable at high speeds. State and provincial regulations usually require that trailers above a specified weight rating be equipped with brakes. Requirements vary; check with your dealer for additional information. 4.1 Lund-04.indd 1 7/9/10 1:49 PM HITCH Overloading can cause hitch failure, leading to injury-causing accidents. Total weight of the loaded trailer must not exceed capacity marker on hitch of tow vehicle. TRAILERING Hitches are divided into classes that specify the gross trailer weight and maximum tongue weight for each class. Always use a hitch with the same class number as the trailer. Most boat trailers connect to a ball hitch that is bolted or welded to the towing vehicle. Be certain that the tow vehicle is equipped with a hitch capable of handling the GVWR. The two basic types of trailer hitches are a weight-carrying hitch, which is adequate for some of the smaller models, and a weight-distributing hitch for heavier models. The trailer hitch coupler must match the size of the hitch ball. The correct ball diameter is marked on the trailer coupler. When it is latched, the coupler should fit snugly on the ball. SAFETY CHAINS or Cables Safety chains or cables provide added insurance that an unhitched trailer will not become completely separated from the towing vehicle while it is being towed. Crisscross the chains or cables under the trailer tongue to prevent the tongue from dropping to the road if the trailer separates from the hitch ball (Figure 4-1). Safety chain or cables should have a minimum breaking strength equal to the upper limit of the GVWR. Figure 4-1 Safety Chains 4.2 Lund-04.indd 2 7/9/10 1:49 PM BRAKES Your boat trailer may be equipped with surge brakes. Trailer brakes help relieve stress on the tow vehicle by transferring some of the braking action to the trailer wheels. As the towing vehicle slows and decelerates, the momentum of the trailer applies pressure through linkage to the trailer’s master cylinder mounted on the tongue near the coupler. This hydraulic pressure is transmitted through the brake lines to the wheel brake assemblies to assist with slowing or stopping the vehicle and the trailer. A shock absorber assures smooth and even operation of the brakes by preventing intermittent application of the brakes. TRAILERING Property Damage! Personal Injury! Failure to use brakes when required can result in an injury-causing accident. Observe conditions carefully and be prepared to stop. Maintain brakes properly to assure they are in good working order. Some trailers are equipped with disc brakes. The wiring harness for these trailers incorporate a 5 connector plug. The tow vehicle wiring harness plug must be wired as shown to release the disc brakes when backing. WHITe - Ground BROWn - Running/Tail lights YellOW - left Turn Signal GReen - Right Turn Signal BlUe - Backup lights TURNING WHILE TOWING A TRAILER When you are towing a trailer, be aware that the trailer will track in a tighter turn than the tow vehicle (Figure 4-2). When making a turn, be careful that the trailer does not strike another vehicle or object. Turns made when you are towing a trailer should be made at appropriate speeds. 4.3 Lund-04.indd 3 7/9/10 1:49 PM TRAILER PATH Figure 4-2 Turning with Trailer BACKING A TRAILER Practice backing with a trailer before you get into a confined launch site. Get accustomed to using the trailer in an open area. Take someone with you who knows how to back a trailer. Backing a trailer works the opposite of backing a car. If the trailer needs to travel to the right, turn the steering wheel to the left and vice versa (Figure 4-3). Do not turn the wheel too far or oversteer. Turn the wheel gradually until you get the feel of safe backing. BACKING TO RIGHT FOLLOWING THRU TURN BACKING TO LEFT Figure 4-3 Backing A Trailer LAUNCHING GUIDELINES Before launching your boat, stay to one side and watch a couple of launchings to notice any problems on the ramp and the effects of the wind and the current on launching. It’s a common courtesy to prepare the boat for launching away from the ramp. This includes removing tie-downs, securing loose gear, loading personal gear, and making sure drain plugs are installed. 4.4 Lund-04.indd 4 7/9/10 1:49 PM Have an individual at the launch ramp give you directions. Back slowly down the ramp. Always remember to launch the boat at a right angle to the shoreline. If launching from a trailer, tilt the outdrive up to avoid damage. TRAILERING When the boat’s transom is in several inches of water, stop the towing vehicle. If the vehicle has a manual transmission, leave it in gear. If it has an automatic transmission, shift to PARK. Turn off the engine and set the parking brake. Place blocks behind the vehicle’s back wheels. Do not detach the winch cable from the bow eye until a mooring line has been secured to one of the boat’s cleats. Otherwise, the boat could slide off the trailer and float away. Attach one line to the bow and one line to the stern to help control the boat. See the mooring information in Chapter 8 for suggested securing procedures. After moving the boat down and off the trailer into the water, secure it to the dock or have someone hold mooring lines. Then lower the outdrive all the way into the water. Pull the towing vehicle away from the launch ramp. Park only in designated areas. When parking, be sure the towing vehicle and trailer do not block other boaters from approaching the launch ramp or hinder their ability to maneuver a boat and trailer when launching. LOADING YOUR BOAT ON THE TRAILER Loading your boat is similar to launching except loading is done in reverse. 1. Back the trailer into the water. 2.When the trailer is in enough water so the boat will “float on” the trailer bunks: • STOP the towing vehicle. •Leave manual transmission in gear or place automatic transmission in park. • Turn off the engine. • Set the parking brake. • Place blocks behind the vehicle’s back wheels. 4.5 Lund-04.indd 5 7/9/10 1:49 PM TRAILERING 3.Tilt the boat’s drive up to the high tilt position to avoid damage while loading. 4. Pull boat up onto trailer and secure safety chain. 5.After securing the boat to the trailer, start engine on towing vehicle and pull trailer out of water to boat securing area. (If blocks are connected with a rope to the trailer tongue, you will not need to remove them before pulling trailer out.) 6.Open the drain plug to allow bilge to drain. Keep plug open to prevent accumulation of water in bilge. Be sure to close drain plug before next boat usage, to prevent flooding. 7.Use tie-downs to secure boat on trailer. Use stern tie-downs to prevent the boat from shifting. 8. Wipe hull down to prevent water spots and keep hull clean. 9.Make sure all cargo, lids, and canvas are secure or tied down before trailering on the road. Place loose gear in towing vehicle. 10. Reconnect trailer lights. Check that lights are working. 11.Be sure the coupler is secured to the trailer hitch and safety chains or cables are attached. TRAILER MAINTENANCE 1.Check tires for proper inflation (check tire rating on sidewall). Underinflated tires heat up rapidly and may blow-out or cause uncontrolled swaying. 2.All lug nuts must be checked to trailer manufacturer specifications after 25 miles, again after 100 miles, and periodically thereafter. Lug nuts must be tightened in a star crisscross pattern (see illustration) to insure uniform pressure and alignment. Apply torque evenly by repeating star pattern until desired torque is reached. 1 4 3 2 5 4.6 Lund-04.indd 6 7/9/10 1:49 PM 3.Be sure the coupler is secured to the trailer hitch and safety chains or cables are attached. 4.Check the brakes for proper operation prior to departure. See Owner’s Manual for brakes or trailer for complete instructions. 5.Check the springs and under carriage for loose parts. 6.Carry a spare tire for both the trailer and towing vehicle. On extended trips, carry spare wheel bearings, seals, and races. Be sure and carry the proper tools to complete the repairs. 7.When traveling, check the wheel hubs during stops at gas stations, restaurants, or other places. If the hub feels abnormally hot, the bearing should be inspected before continuing the trip. TRAILERING Note: All boats and trailers used in salt or brackish waters must be rinsed off completely with fresh water immediately after use, to prevent rust and corrosion. Failure to rinse the trailer could cause cosmetic trailer damage that is not covered by your warranty. WHEEL BEARINGS The best protection you can give to your wheel bearings is to always keep the hubs fully lubricated. Periodically add fresh grease to the trailer hubs with a water resistant wheel bearing grease. Fill the hubs with grease to the manufacturer’s specifications. 4.7 Lund-04.indd 7 7/9/10 1:49 PM Electrical System 5 Electric Shock! Equipment Damage! Disconnect battery cables before performing all inspections, checks, and repairs to avoid possible personal injury and damage to equipment. INSTALLING ELECTRICAL COMPONENTS: When hooking up sonar and other electronics, be certain all are proper grounded and protected from over-current situations. The aluminum hull is not a ground path as automotive car frames are and improper grounding to the aluminum hull will cause electolysis and will void your warranty. It is always best to consult with a dealer regarding the electronics hook up unless you have a clear understanding for circuit protection and proper grounding procedures. ELECTRICAL SYSTEM This section of the manual includes information about your boat’s electrical system. Your boat is designed with a safe electrical system to protect you from hazardous shocks and was checked carefully before it was shipped to your dealer. To protect yourself from electric shock, always have a qualified technician make any modifications to the system. If you have questions, see your dealer for more information. 12-VOLT DC Boat System The 12-Volt D.C. electrical system is a 12-Volt, 2-wire, negative ground type. The hot wire is positive, feeding the lights and appliances for instance, and the negative return is by an insulated wire to the negative terminal of the battery. Trolling MOtor System The Trolling Motor System on your boat is designed to use the stored electrical power from 1, 2, or 3 deep cycle marine batteries to power your trolling motor. The number of batteries you have, and the type of trolling motor on your boat, will determine how this system is configured. IMPORTANT: Turning the ignition switch off does not cut off power to all components. Powered components, such as the stereo, can draw down the battery if they are left on for an extended period without running the engine. A power switch, which can shut off these components, is standard on some models. 5.1 Lund-05.indd 1 7/9/10 1:50 PM The electrical system is wired at the factory to handle factory-installed electrical equipment. It is recommended that you have your dealer install any additional equipment. An error in wiring the electrical circuits can cause a fire or damage electrical system components. Have your dealer repair the electrical system and install additional equipment. ELECTRICAL SYSTEM Fire or Explosion Hazard! Electrical system parts are designed and manufactured to comply with U.S. Coast Guard requirements to minimize risks of fire or explosion. Never substitute automotive parts for marine parts. Automotive parts do not provide the necessary ignition spark protection. If you do add additional equipment, it must be adaptable to the negative ground system. When installing additional equipment, be sure to take the power supply from the fuse panel. If additional circuit protection is required, it must be added at the fuse block at the helm console. Be sure to protect all electrical components from rain, water, or sea spray. Note: Power feeds for accessory equipment must NOT be taken from the voltmeter terminals. Consult with your dealer for additional DC power needs. Battery Poison! Sulfuric acid in batteries can cause severe burns. Avoid contact with skin, eyes, or clothing. Wear goggles, rubber gloves, and protective apron when working with batteries. In case of skin contact, flush with water at least 15 minutes. If swallowed, drink large quantities of water or milk. Follow with Milk of Magnesia, beaten egg, or vegetable oil. Get medical attention immediately. Fire or Explosion Hazard! Only qualified personnel should install batteries and perform electrical system maintenance. Do not expose batteries to open flame or sparks. Do not smoke near batteries. Your dealer has installed a battery or batteries which supply power to the DC electrical system. Marine batteries provide high reserve capacity plus cold cranking performance. When the engine is running, the battery is charged automatically. 5.2 Lund-05.indd 2 7/9/10 1:50 PM Batteries produce hydrogen and oxygen gases when being charged. These explosive gases escape through the vent/fill caps and may form an explosive atmosphere around the battery if ventilation is poor. This gas may remain around the battery for several hours after charging. Sparks or flames can ignite the gas and cause an explosion. Note: Never disconnect the battery cables while the engine is running. Doing so can damage the electrical system. Your boat may have a battery charger installed. Review the information supplied with the battery charger manual for proper opertation procedures. Your dealer can also assist you with the use of this equipment. CAUTION: Before plugging in battery charger, make sure all trolling motors are unplugged. Failure to do so could damage trolling motor . Always make your extension cord connection on the charger side before connecting to a nearby 120VAC GFCI protected (Ground Fault Circuit Interupt) outlet. Failure to use a GFCI outlet may result in electric shock. ELECTRICAL SYSTEM AC/DC BATTERY CHARGER Battery Charging The engine alternator will recharge the engine battery when the engine is running. On some models a voltage regulator controls the rate of charge by sensing battery voltage and increases or decreases alternator output accordingly. If your boat is equipped with a battery charger, please refer to battery charger owner’s manual for detailed instructions. To prevent personal injury, do not attempt to start your engine with jumper cables. The use of jumper cables could create dangerous sparks, which could cause the battery’s hydrogen vapors or gasoline fumes to explode. 5.3 Lund-05.indd 3 7/9/10 1:50 PM OVERLOAD PROTECTION The engine is equipped with a fuse or circuit breaker to protect the engine wiring harness and instrumentation power leads. If an electrical overload occurs, a circuit will “open” and interrupt current flow when the current draw exceeds the rated amperage. Refer to your engine manual for breaker location, resetting procedure, or for fuse rating and replacement procedure TRANSDUCER MOUNTING (Dealer or Customer Installed) Transducer Boards are available from your dealer. Mounting boards must not extend below bottom of boat, and should be mounted 1/4” above bottom of boat. Use marine grade silicone (approved for use below water line) to seal all mounting screws. ELECTRICAL SYSTEM STARB PORT PAINT LINE MOUNTING BOARDS 1/4" UP FROM BOTTOM OF BOAT ONLY HIGH SPEED TRANSDUCERS MAY EXTEND BELOW BOTTOM OF BOAT. (ACCORDING TO MANUFACTURERS RECOMMENDATIONS) TROLLING MOTOR RECEPTACLE Your boat may have a trolling motor receptacle located at the bow of the boat. This receptacle is to be used only when the trolling motor is in use. Running from the receptacle is a heavy-duty copper wire harness that extends back to your batteries. This extra-heavy wire assures you of maximum thrust and longer battery life. All of our boats feature an electrical device that protects this harness, which is located near the trolling motor batteries. Note: To prevent equipment damage and possible injury, always connect the trolling motor and batteries by using the factory or dealer supplied wiring. 5.4 Lund-05.indd 4 7/9/10 1:50 PM main accessory Harness Functions Battery Positive (+) Battery Positive (Switched +) Battery Ground (-)B Navigation lights (Bow lights) anchor light (Stern light)G BilgeB auto Bilge Blower Fuel SenderP courtesy lights (Switched) Horn radio (Switched Power) radio (Power/memory) 12 Volt Outlet livewell aerator (aft) livewell aerator (Front) livewell recirculator (Front) livewell recirculator (aft)B accessory Bowr accessory Stern/console Washdown PumpO antenna powerO (To F.B. or master Power Sw.) (master Power Sw. to F.B.) Wires Off Fuse Block Functions 12V. accessory Plug accessory (Both 1 & 2) Bilge1 Blower Bow accessory Power courtesy lightsB GroundB Horn livewell aerator (aft.)T livewell aerator (Fwd.)T livewell recirculator (aft.) livewell recirculator (Fwd.) Navigation/anchor lightsG radio memory radio Powerr Washdown pumpO Wire color red red/White lack Gray/Green ray/Blue rown Brown/red Yellow ink Blue/Yellow White 14ga. red/Purple Yellow/red red/Black Brown/Orange Brown/Yellow Brown/White rown/Blue ed/Blue red/Purple range range/red ELECTRICAL SYSTEM mEP/lUND cOlOr cODES Wire color 14ga. red/Black Orange 4ga. Brown/Black Yellow/Black red/Blue lue lack White/Black an/Yellow an/White Orange/Brown Tan/Blue ray 14ga. Yellow/red ed/Purple range/Brown 5.5 Lund-05.indd 5 7/9/10 1:50 PM Trolling Motor System ELECTRICAL SYSTEM The trolling motor plug located in your boat is designed to allow you to use the electrical charge from 1/2/or 3 deep cycle marine batteries to power your trolling motor. Depending on how many batteries you use, and the type of trolling motor you have, there are many different methods of configuring the batteries. Your Lund dealer can prepare the electrical connections between your battery(ies) and trolling motor(s). He has the knowledge and proper equipment to safely configure this system to avoid risk of electrical failure, fire, or equipment damage. Have your dealer perform this service. Mounting Trolling Motor The front deck of your boat has been reinforced to withstand the maximum thrust put out by today’s heavy-duty trolling motors. Follow manufacturer’s directions when mounting trolling motor bracket. Always use washers on the underside of the deck when bolting on a trolling motor, and use all available bolt holes for maximum strength. Detachable Trolling Motor Mount Some models are equipped with a device that allows removal of the trolling motor. Please refer to the owner’s manual for proper mounting and securing instructions. Corrosion Corrosion of metal parts, especially those exposed to brackish water, is common for boats. Corrosion can be caused by stray electric currents from shorepower installations, improperly grounded electrical lines and circuits, and poorly insulated D.C. powered equipment from boats moored nearby. Corrosion is accelerated when electric current is present. For example, in the following list, aluminum is less noble than copper. This means the aluminum will corrode faster than copper if the two are submerged in seawater. 5.6 Lund-05.indd 6 7/9/10 1:50 PM Be aware of the fact that your boat’s hull is not a ground path. Never ground any electronics to the hull. Use grounding blocks that are provided. Grounding components to the hull may result in hull damage by electolysis. Make sure your battery terminals are kept clean at all times. Make sure that no electrical connections are in an area of your boat that could come in contact with water. If you are adding any accessories to your boat, insulate the accessory to avoid physical contact with the aluminum in your boat, if the accessory is manufactured from a dissimilar metal. The metals in the chart (below) range from the Least Noble (Anode Active) to the Most Noble (Cathode Passive). Combinations of any of them will show you what to expect relative to Active and Passive Corrosion. This information is important to know when adding or replacing hull fittings: use metals that are close to each other in the galvanic series. The best way to avoid corrosion is to use genuine replacement parts. When adding accessories not supplied by us, consult your dealer regarding selection and proper installation. Least Noble (Anode-Active) 1. Zinc 2. Galvanized steel or galvanized iron 3.Aluminum 4.Cadmium 5.Mild steel 6. Wrought iron 7.Cast Iron 8. Ni-Resist 9. Type 304 Stainless Steel 10.Lead 11. Tin 12.Manganese bronze 13. Naval brass (60% copper-39% zinc) 14. Nickel (active) 15. Yellow brass (65% copper-15% zinc) 16.Admiralty brass 17.Aluminum bronze 18.Red brass (85% copper-35% zinc) 19.Copper 20. Silicon bronze 21. Nickel (passive) 22. Hastelloy C Most Noble (Cathode-Passive) ELECTRICAL SYSTEM Galvanic Series of Metals 5.7 Lund-05.indd 7 7/9/10 1:50 PM 6 Boat Systems & Equipment This chapter discusses major systems or components on your boat. Information about boat controls is in Chapter 7. Equipment discussed in this chapter is standard or optional on some models and not available on others. See your dealer for more information. ENGINES Keep your engine well tuned to decrease exhaust hydrocarbon emissions that pollute the air and water. Your dealer employs factory trained technicians certified to service the engine. If you choose to do so, you can handle basic servicing such as checking engine oil. But with today’s ever-advancing engine technology, these technicians have the tools and the expertise required for efficient and safe engine service. Do not attempt to maintain or adjust an engine while it is running. Failure to shut off the engine for maintenance or adjustment can result in serious injury or death. BOAT SYSTEMS & EQUIPTMENT Your boat may be available with a range of engine options. In your Owner’s Packet is an owner’s manual for the engine. Refer to that manual for information about engine care and maintenance. FUEL SYSTEM The fuel system is designed to prevent fire and explosion and to provide a continuous flow of clean fuel to the engine. It meets or exceeds the Federal requirements of the U.S. Coast Guard at the time of manufacture. The system is also certified by the National Marine Manufacturers Association (NMMA). Every fuel tank must pass rigid tests and inspections by the tank manufacturer. Before you take delivery, check that your dealer has completed a full inspection of the entire fuel system. You should also inspect the entire system at least once a year. During the boating season, keep the fuel tank filled to prevent moisture condensation inside the tank. Check the tank exterior periodically and repair any scratches or nicks to prevent rust. 6.1 Lund-06.indd 1 7/9/10 1:51 PM Fire and Explosion Hazard! Leaking gasoline and fuel vapors can burst into flames or explode. Inspect fuel system regularly for leaks, deterioration, and corrosion. Replace defective parts before starting engine. •Gas Deck Fill: Your boat has an internal gas tank equipped with a deck fill plate labeled GAS or GASOLINE. Be sure to use the proper grade fuel as specified in the engine owner’s manual. See Chapter 9 for fueling instructions and recommendations. BOAT SYSTEMS & EQUIPTMENT •Gas Tank Vent: As the engine draws down fuel in the tank, air enters the tank through the vent to prevent a vacuum from forming inside the tank. While you are filling the tank, gasoline entering the tank pushes air in the tank out through the vent. Be careful when filling the tank, otherwise gas will be ejected through the vent when the tank is full or nearly full. •Valve: Your boat may be equipped with a reserve fuel tank selection valve. Your dealer can assist you with location and operation of this valve. •Fuel Tank: The internal fuel tank fittings are accessible through the engine compartment or under removable deck plates. The tank is equipped with a gas fill line, gas vent line, sending unit, and engine fuel pickup. Fire or Explosion Hazard! Ignition and fuel system parts are designed and manufactured to comply with U.S. Coast Guard requirements to minimize risks of fire or explosion. Never substitute automotive parts for marine parts. Automotive parts do not provide the necessary ignition spark protection. PROPELLER The selection of the correct propeller and its condition are the most important items for peak boat performance. Consult your dealer for proper propeller selection. See your engine owner’s manual for propeller removal and replacement procedures. 6.2 Lund-06.indd 2 7/9/10 1:51 PM All models should be “propped” to be in the upper half of the maximum RPM range with the boat lightly loaded and the outboard trimmed up to maximum. This configuration allows the engine to operate within the recommended RPM range with a heavy load. Note: Never run with a damaged propeller. You can damage the engine or drive unit. Keep a spare propeller on board. You can continue your excursion without spoiling your day. If the propeller is damaged, change it. Detailed procedures are in the engine manual. Otherwise, return to port slowly to prevent further drive and engine damage from an out-of-balance condition. Watch the temperature gauge to make sure the engine does not overheat. Cavitation Cavitation is the formation of air bubbles along the surface of the propeller. Typical causes of cavitation are a damaged propeller, the outboard trimmed out too far, or a hull projection in front of the engine. Recondition or replace damaged propellers. Ventilation Ventilation is the formation of a void around the propeller, usually on entering or leaving a sharp turn (Figure 6-2). Without water to turn in, the propeller runs free and the boat nearly stops moving forward until the propeller finds water to turn in again. When ventilation occurs, throttle back immediately. If ventilation continues when you resume speed, you may have to adjust engine trim or the load. BOAT SYSTEMS & EQUIPTMENT If fuel consumption is higher than normal or the handling characteristics have changed, the propeller may be damaged. A damaged or unbalanced propeller can cause excessive vibration or increased noise. If you notice either condition, stop the engine and check the propeller for nicks, cracks, pitting, distortion, or other damage. Figure 6-1 Propeller Ventilation 6.3 Lund-06.indd 3 7/9/10 1:51 PM STEERING SYSTEM Your boat is equipped with either a hydraulic steering system or a mechanical cable system. The hydraulic steering system is comprised of the helm pump and reservoir, hydraulic hoses, and the hydraulic cylinder. The helm assembly acts as a pump to move the oil through the system. In many respects this type of steering is similar to the mechanical system. Instead of activating a cable, turning of the helm causes fluid in the hydraulic hoses to flow and activate the hydraulic cylinder to turn the outboard motor. NOTICE BOAT SYSTEMS & EQUIPTMENT If equipped with the hydraulic system, a slight clicking sound may be heard as the wheel is turned. This sound is the opening and closing of the valves in the helm unit; this is normal. In the mechanized system, a rotary drum or rack and pinion assembly is mounted under the dash behind the steering wheel with a one-piece cable running through the boat to the engine. At the transom, the cable turns and is connected to the engine or outdrive. Steering Wheel Re-alignment • Remove center lock and washer. • Carefully remove steering wheel, allowing aluminum insert to remain on helm shaft. • Align steering wheel in desired direction and carefully place wheel back on helm shaft, making sure splines on aluminum hub align with steering wheel hub. • Re-install and tighten washer and lock nut. It is important that you get the “feel” of your boat’s steering system. Turn the steering wheel from full left to full right, and make sure the motor steering arm is turning accordingly. The system should operate freely and smoothly. The cable end and its fittings should be kept clear of fuel line, control cables, electrical wiring, or onboard gear when the motor is moved through its full steering cycle in both running and full tilt positions. All fittings and cables should be inspected for corrosion or damage and replaced if necessary. Check for the presence of the original self-locking nuts that are used to fasten the “steering link rod” or “drag link” between the steering cable(s) and the engine. These nuts must never be replaced by common or non-self-locking nuts, which can vibrate off. Also, the steering wheel should be inspected for looseness and tightened, if necessary. Replace the steering wheel if there are any cracks around hub or base of spokes. 6.4 Lund-06.indd 4 7/9/10 1:51 PM Steering or propeller torque can be present in any drive system. In some systems, it is more noticeable than in others. Note: See Steering Manufacturer’s recommendations for cleaning, lubrication, and maintenance of the steering system. Steering effort can vary significantly with engine acceleration, steering angle, trim angle, and sea condition. Whenever possible, it is best to trim your outboard to generate minimum steering effort. Under all circumstances, the boat operator should keep at least one hand on the steering wheel at all times. For additional information refer to the “Getting Underway” section of this manual. Livewell System The livewell system on your boat is designed to supply the water and oxygen needed for the survival of your catch. We encourage the careful handling and livewell maintenance of all fish that you catch, and ask that you consider the live release of any fish that you do not care to eat or mount as a trophy. BOAT SYSTEMS & EQUIPTMENT Note: The steering system should be inspected by a qualified mechanic at regular service intervals. Most livewell systems have a fresh water supply pump as well as a pump to recirculate the water in the livewell. Your boat is equipped with one of the following types of livewell systems. Note: To control water output from the aerator head in the livewell, turn the aerator head clockwise to close or counter-clockwise to open. LIVEWELL OPERATION Aerated Livewells: Operates with a single pump with a single-switch control. You also have the option of running the aerator pump continuously, in manual mode, or intermittently, in automatic mode. 6.5 Lund-06.indd 5 7/9/10 1:51 PM ProLong Livewells: Operates with a two pump design. One pump fills and aerates the well from above the fish, while the other recirculates and injects fresh air, via the Max-Air system, for maximum oxygenation. ProLong Plus Livewells: Same operation as the ProLong livewell system with the addition of the freshwater pickup. BOAT SYSTEMS & EQUIPTMENT Fresh Water Pick-up System: The Fresh Water Pick-up is controlled by a spray-head inside the live well which is turned on by turning counter clockwise and off by turning clockwise. This system uses a pick-up that is integrated into the bottom of the boat which scoops up water when the boat is moving forward without the use of a pump. General Livewell Plumbing Information The plumbing system for your livewell may consist of one or more pumps, hoses, fittings, and clamps. All hoses are heavy-duty and are reinforced for years of service. All hardware, clamps, screws, and valve control cables are stainless steel. Through-hull fittings are constructed of PVC, sealed with marine sealant, and have a retaining nut to prevent leaks. While the plumbing system is designed to be leak free, it is the owner’s responsibility to frequently check the system’s components for leaks, cracks, and worn components. In the event a leak should develop, contact your dealer immediately. BILGE The deepest part of the hull, under the floor, is the bilge. Water may accumulate in the aft portion of the bilge. Be sure to keep the bilge area free of debris so that water can drain through the stringers and bulkheads to the bilge pump area. It is normal to have a small amount of water in the bilge. Bilge Pump You boat may be equipped with an electric bilge pump, and may have an automatic float switch. Rising water activates a float switch to start the bilge pump. When the water is pumped out, the pump shuts off automatically. Note: Electrically operated bilge pumps can fail. There is no substitute for checking the bilge frequently, especially during periods of heavy rain, high seas, or storm 6.6 Lund-06.indd 6 7/9/10 1:51 PM conditions. If for some reason the pump fails to start, check the fuse and wiring connections. If the pump motor runs but no water is discharged, it may be clogged. Keep the area around the switch and the pump free of debris. If there is no visible debris clogging the pump or blocking the float switch and water is still not being removed, inspect the discharge hose for kinks or obstruction. The bilge pumps on some models may not have automatic float switches. You must check the water level in the bilge and, if necessary, operate the pump manually using the on-off switch at the helm. Check with your dealer if you have any questions. Fishing seats with power pedestal A “power pedestal” is a nitrogen gas filled steel cylinder that is used to raise and lower the fishing seats mounted on the forward and aft casting platforms. This enables you to The outboard motor may be damaged if the pedestal seat is installed on the aft casting platform, and the motor is tilted to the up position. Remove seat to avoid damage. select the proper seat height for comfort in any fishing situation. Pushing the empty seats all the way down helps provide an unobstructed viewing area around the boat when underway and the lower seats also offer less wind resistance. BOAT SYSTEMS & EQUIPTMENT If oil is spilled in the bilge, do not run the pump. Keep the oil from spreading in the bilge and properly dispose of the oil on shore. Your dealer can help you select products you can use to soak up the oil and give you advice about methods of disposal. To raise the seat, simply lift your weight slightly off the seat while raising the seat actuating (upper) lever simultaneously. To lower the seat, keep your weight on the seat Avoid serious or fatal injury due to rotation of seat. Lock swivel when speed exceeds 5 MPH and lift the lever up. The lower lever is used to lock the swivel motion of the seat. These pedestals are constructed to the highest standard of workmanship and will give years of trouble-free service. A minimum amount of care will insure proper operation. 6.7 Lund-06.indd 7 7/9/10 1:51 PM Periodically apply a light weight oil (like household “3 and 1” oil) to the power unit piston. Take care not to over stress the pedestal by placing excessive strain on the seat and power unit while it is extended into the full up position. Always lower the seat to the full down position when the boat is underway. We recommend that the seat and pedestal be removed from the front casting deck and remounted into the special base mounted in the front of the deck floor when running. Should your boat not have the additional base, the front fishing seat should be removed and securely placed in the floor of the boat. Your power pedestals are warranted for one full year against defects in materials and workmanship. Should a pedestal fail, return the unit to Springfield Marine, Attention: Warranty/Repair, Hwy. 160, P.O. Box 588, Nixa, Missouri 65714, or call 417-7252667. Repairs not covered by warranty will be charged at the regular rate. BOAT SYSTEMS & EQUIPTMENT If your power pedestal will not remain in position, either up or down, you may need to make a minor adjustment to the air cylinder that causes the pedestal to be raised up and Power unit is under pressure. Do not attempt to disassemble it or tamper with it in any way. Improper handling could result in severe injury or death. down. With your chair removed from the pedestal, use a screwdriver to move the adjustment screw as shown in the accompanying diagram. If your seat will not raise up to the proper height, remove seat and adjust the screw approximately 1/4 (one-quarter) turn in a counter-clockwise direction and try the pedestal again. If your seat will not remain in the upright position, move the adjustment screw approximately 1/4 (one-quarter) turn in a clockwise direction Note: You may need to fine-tune your pedestal by moving the adjustment screw a bit more in one direction or the other. 6.8 Lund-06.indd 8 7/9/10 1:51 PM BOAT SYSTEMS & EQUIPTMENT Figure 6-2 adjusting power pedestal 6.9 Lund-06.indd 9 7/9/10 1:51 PM INstruments and Controls 7 HELM INSTRUMENTS The instruments at the helm tell you what is going on inside the engine. Whenever an engine is running, check the instruments frequently for unusual readings. If a gauge shows a substantial variation from its normal reading, don’t take chances. Check for the cause immediately. When you take delivery, ask your dealer about the normal readings of the gauges. This provides a reference point for the life of the engine. Keep in mind that the reading on some gauges may fluctuate. INSTRUMENTS & CONTROLS Note: Your boat may not have all the instruments discussed in this section. The ranges of the gauges may also vary from the readings listed. Tachometer The tachometer shows engine rotation speed in revolutions per minute (RPMs) under all engine operating conditions. Engine speed is different from boat speed. Weather conditions, boat load, and other factors determine boat speed at a given engine RPM. Consult with your dealer if you require additional information. Do not exceed engine manufacturer’s recommendations for maximum RPM. 3 2 4 1 5 0 RPM 6 x1000 Tachometer Speedometer The speedometer measures boat speed in miles per hour (MPH). Boat speed is different from engine speed (RPMs). The accuracy of this instrument depends on the placement and cleanliness of the pickup tube. Some boats may be equipped with a remote pickup tube which may be tilted up for trailering to prevent damage. It may also be tilted up during operation in shallow water to prevent damage or clogging the tube with sand or silt. It should be tilted down while underway. 40 35 30 20 10 60 50 40 30 20 0 70 80 90 100 MPH Speedometer 7.1 Lund-07.indd 1 7/9/10 1:52 PM Fuel Gauge 1/2 The fuel gauge displays the approximate amount of fuel in the fuel tank(s). The most accurate reading of the gauge is at idle speed and when the boat is level. While running, the fuel gauge usually reads fuller than the actual level because the bow is higher. Since gauge readings are approximate, it is best to compare them to the hours of use versus known fuel consumption or gallons per hour (gph). F E FuEl Fuel Gauge Note: A good way to manage the fuel supply is the one-third rule. Use one-third of the fuel to travel to your destination, use one-third to return, and keep one-third in reserve for emergencies. INSTRUMENTS & CONTROLS Power Trim Gauge The power trim gauge shows the relative position of the outboard unit. Read the gauge carefully, as it does not show position of unit in the degrees. Proper trim should be indicated by bow attitude and engine RPM. For more information see the engine owner’s manual. dN Up TRIM Power Trim Gauge FORWARD IDLE ENGINE THROTTLE/SHIFT CONTROL NEUTRAL IDLE REVERSE IDLE FORWARD INCREASING THROTTLE INCREASING THROTTLE IN REVERSE TRIM/TILE The engine owner’s manual included SWITCH with your Owner’s Packet has detailed information about the throttle/shift conNEUTRAL THROTTLE trol installed on your boat. The control BUTTON SHIFT INTERLOCK serves two purposes: (1) it regulates the (SQUEEZE TO SHIFT) engine speed and (2) it acts as a gear shift lever to control the rotation of the propeller. When the handle is in the center, the Figure 7-1 typical Throttle gearshift is in neutral. Shift Control 7.2 Lund-07.indd 2 7/9/10 1:52 PM As you move the handle forward and backward, you should feel the handle drop into a detent when the handle moves into the NEUTRAL position. The engine will not start unless the control is in NEUTRAL. Figure 7-1 shows a typical control. IMPORTANT: Allow the engine to warm up before engaging the shift control. Monitor all instruments while engine is idling during warmup. See the engine manufacturer’s specifications for proper operating ranges. Some controls have an engine warmup button near the base. Pressing the warmup button allows the transmission to remain in neutral while the operator advances the throttle for warming up the engine. Allow the engine to warm up before engaging the shift control. The throttle control also acts as the gear shift lever to control forward or astern movement of the boat. Moving the throttle forward from the neutral position engages the shifting mechanism, causing the boat to move forward. Continuing the forward movement of the throttle increases engine RPM and causes the boat to move forward faster. Moving the throttle backward from the neutral position causes the boat to move backward. Continuing the backward movement increases the engine RPM. Continued aft movement causes the boat to move backward faster. Rapid acceleration in reverse can cause a wake that could rise above the transom and flood the boat. When maneuvering at low speeds, reversing the direction of propeller rotation causes a braking action which helps stop the boat. INSTRUMENTS & CONTROLS Moving the throttle forward or backward increases engine speed and increases boat speed if the engine is in either forward or reverse gear. The further the throttle is moved, the faster the engine runs. Note: When reversing direction, hesitate in neutral until engine slows to idle speed, to avoid damage to the shifting mechanism. Some controls may have a trim control switch which you can use to adjust the position of the outboard. Pressing the switch in the UP position moves the outboard out and away from the transom. Pressing the switch in the DOWN position, moves the outboard in closer to the transom. The switch returns to its center neutral position when released. Note: Some models may be equipped with trim control switches on the steering wheel. 7.3 Lund-07.indd 3 7/9/10 1:52 PM Switches Note: Not all models will have all switches. Bilge Pump The two position switch will turn the bilge pump on or off. Power Master This switch must be on in order for other switches and equipment to function. Courtesy Lights This switch operates illumination lighting for the console and bow panel, and on some models rod locker lighting. INSTRUMENTS & CONTROLS Navigation Lights This switch operates running lights on bow and stern. Acc. This spare switch is provided as a control switch for any aftermarket equipment that may be added to the boat. Horn This switch operates the boat’s horn. Aerator his switch controls the livewell aerator pumping new water into the livewell. The T two position switch turns the aerator on or off. The three position switch allows you to run the aerator in the automatic mode (cycles on and off automatically), in addition to full time on or off. Recirc his switch activates a pump that will recirculate the water already in the livewell T to increase the water’s oxygen content. This switch can be used any time there is water in the livewell, even while the boat is on the trailer. Note: All switches should be in the off position when not in use. Bilge and livewell system pumps can be damaged if allowed to run dry. 7.4 Lund-07.indd 4 7/9/10 1:52 PM Front Bow Panel INSTRUMENTS & CONTROLS The front bow panel on your boat has several switches, which may include outboard tilt switch, navigation lights, and courtesy lights. These switches work in the same manner as in the console and should be turned off while not in use. 7.5 Lund-07.indd 5 7/9/10 1:52 PM Getting Underway 8 Go through this checklist before starting your trip. ■Will the weather be favorable? Did you get a current weather report? ■Is there a suitable operator? Is operator impaired from drug or alcohol use? ■If the boat has been out of the water, have hull drain plugs been installed? ■Are the hull and propeller free of damage, excessive dirt, and marine growth? ■Are electrical system and navigation lights working? ■Is battery fully charged? Are connections clean and tight? ■Have you checked engine compartment for fuel odors? ■Have you checked engine(s) for leaks or signs of deterioration? Are fluid levels OK? ■Have you checked fuel system for odors, leaks, and deterioration? ■Does the steering system work smoothly? Are all components tight? ■Is the bilge pump OK? Have you pumped all water possible out of the bilge? ■Is all required safety equipment on board? Does it work? Is there one PFD for each passenger? Is safety equipment easily accessible? ■Do passengers and crew know what to do in an emergency? Do they know how to use safety equipment? ■Does the horn work? ■Is the lanyard safety switch working? ■Is other needed equipment on board, such as mooring lines, anchor and line, tool kit, first aid kit, etc.? ■Do you have enough fuel for your trip? Fuel tanks should be filled to slightly less than capacity. Allow space for fuel expansion. ■Do you have navigation charts and equipment on board? Are you familiar with area where you will be boating? ■Have you filed a float plan with a responsible party ashore? ■Do you have an emergency supply of food and water? ■Are all required documents on board? ■Are all passengers properly seated? ■Is the boat overloaded or underpowered (compared with capacity plate)? ■Are there any persons or debris near the propeller? ■Are the pedestal seats lowered from the fishing positions and stored so as not to interfere with visibility? GETTING UNDERWAY SKIPPER’S CHECKLIST 8.1 Lund-08.indd 1 7/9/10 1:53 PM ■Are all articles of clothing, fishing tackle, etc. stored and situated so that they will not be blown out of the boat or strike a passenger? ■Is the trolling motor folded up and resting securely on its mounting bracket and secured with the strap or latching mechanism supplied with the trolling motor? After the boat is in the water and secured to the dock, go through the Skipper’s Checklist before starting your cruise. FUELING Fire and Explosion Hazard! Gasoline leaking from any part of fuel system can burst into flames or explode, causing death or serious injury. Inspect entire fuel system carefully at regular intervals and after storage. Check all components for leakage, softening, hardening, swelling, or corrosion. Replace any component showing signs of deterioration before starting the engine. GETTING UNDERWAY Because gasoline fumes are heavier than air, they migrate to the lowest part of the boat. Fumes can accumulate in the bilge and, if conditions are right, in the cockpit. These areas must be thoroughly ventilated before starting an engine. Note: If 1/2 pint of gasoline explodes, it has the same power as 15 sticks of dynamite. Although alcohol boosts the octane level of gasoline, it also attacks the rubber fuel distribution lines and even metal fuel system components. Alcohol permeates most fuel hoses and other components such as fuel pump, gaskets, and seals, and can also contribute to fuel system contamination. The fuel hoses are alcohol-resistant as are the materials used by the engine manufacturers. If only fuel containing alcohol is available, or the presence of alcohol is unknown, you must perform more frequent inspections for leaks and abnormalities. Any sign of leakage or deterioration requires immediate attention. Refer to the engine manufacturer’s recommendations on fuel type and octane ratings. Preliminary Steps •Safely secure the boat to the dock. •Close all compartment lids to prevent accumulation of fuel vapors. •Make sure that a fire extinguisher is readily available. 8.2 Lund-08.indd 2 7/9/10 1:53 PM Pumping Fuel Fire and Explosion Hazard! Do not smoke. Extinguish all open flames. Stop engines. Do not use electrical switches and other devices that could cause a spark or flame. Close all openings. During fueling operations, smoking should be forbidden onboard or anywhere nearby. IMPORTANT: Follow engine manufacturer’s recommendations for types of fuel and oil. Use of improper products can damage the engine and void the warranty. 1.Be sure to fuel in a well-lit area. It’s hard to see gasoline spills if lighting is poor or in the dark. 3.The fuel delivery nozzle should be put in contact with the fill pipe before the flow of fuel is begun, and this contact should be maintained continuously until fuel flow has stopped. There is a serious hazard posed by static discharge unless this practice is observed. 4.Stand away from the fuel tank vent and gas fill during fueling. Fuel may splash back, irritate eyes, and/or create a fire hazard. 5.Avoid spilling gasoline. It can harm the environment. Wipe up any excess fuel immediately. 6.After pumping approximately 10 gallons of fuel into the fuel tank, inspect the engine and fuel tank area for any signs of leakage. If no leaks or other problems are detected, resume fueling. GETTING UNDERWAY 2.Remove the gas fill cover. 7.Allow space at the top of the tank for thermal expansion. Note: You may not be able to fill the tank to 100% of its dry-rated capacity. The boat’s floating attitude, which affects the position of the fuel tank and its vent, may limit the amount of fuel the tank will hold. If fuel flows out the tank vent, stop fueling immediately. The tank is as full as possible under current conditions. 8.If fuel cannot be pumped in at a reasonable rate, check for fuel vent blockage or a kink in the line. 8.3 Lund-08.indd 3 7/9/10 1:53 PM After Fueling 1.Replace the gas fill cover. Use rags to wipe up any fuel spilled and dispose of them properly on shore. 2.Open the fuel compartment lid. Check for fuel odors and visible fuel leakage. If you note any indication of odor or leakage, investigate the cause and correct the problem before starting an engine. Do not operate any electrical switch until problem is corrected. A spark from an electrical device could set off an explosion! Overloading and improper distribution of weight are significant causes of accidents. Do not exceed maximum load stated on capacity plate. For safety, carry a lighter load in rough waters. Distribute the load evenly. Keep the load low. GETTING UNDERWAY LOADING PASSENGERS AND GEAR Note: Your capacity label indicates the number of designated occupant positions available on board your Lund boat. Some vessels may permit a person't capacity that is a number greater than the amount of underway seats available on the vessel. Be sure to visit Lund's website at www.lundboats.com and review the designated occupant positions that are on your specific model. Always remember to properly and evenly distribute your load (persons or gear) for optimal safety and boat operation. U.S. COAST GUARD Affixed to your boat is a capacity rating plate MAXIMUM CAPACITIES showing the boat’s maximum load capacity under normal conditions. This plate shows the PERSONS OR 900 LBS maximum weight capacity for persons and for 1350 LBS. PERSONS, MOTOR, GEAR 50 H.P. MOTOR gear. The U.S. Coast Guard determines these THIS BOAT COMPLIES WITH U.S. COAST GUARD SAFETY load capacity ratings. Your boat’s capacity STANDARDS IN EFFECT ON THE DATE OF CERTIFICATION. MANUFACTURER: LUND BOAT CO.- DIV. GENMAR IND. plates are also certified by the National Marine NEW YORK MILLS, MN. Manufacturer’s Association (NMMA). MODEL: 1650 EXPLORER Overloading is a violation of Coast Guard regulations! Figure 8-1 capacity plate 5 The capacity plate also states the maximum horsepower engine that can be used on your boat. It is dangerous to exceed the recommended maximum horsepower capacity rating. Note: The operator is responsible for using sound judgment when loading the boat. Turbulent waters and adverse weather conditions reduce the maximum load capacity. Carrying the maximum load stated on the capacity plate can be dangerous. 8.4 Lund-08.indd 4 7/9/10 1:53 PM GETTING UNDERWAY When you are loading gear, have someone on the dock pass gear aboard instead of stepping into and out of the boat. Secure all gear firmly so it doesn’t shift or interfere with boat operation. When boarding, passengers should step into the boat one at a time, not jump. Passengers not helping load gear should be seated during loading to maintain an even trim. Position passengers and gear so that the load is balanced (Figure 8-2). Do not use swivel seats above trolling speed. Secure unoccupied seats. Observe warnings on seat pedestals. Figure 8-2 Loading Passengers STARTING PROCEDURES Note: The engine manual included with your Owner’s Packet has detailed starting instructions. The following information is merely a guide and does not explain all starting procedures in detail. Note: Run blower motor on inboard/outboard models for at least 5 minutes to clear fumes from bilge before starting. Preliminary Checks 1.If the boat is not secured to the dock, do so before starting the engine. Keep it secure until the engine is running and warmed up. 8.5 Lund-08.indd 5 7/9/10 1:53 PM 2.If the fuel system has a manual fuel valve, open it. Fire or Explosion Hazard! Gasoline vapors are explosive. Check fuel tank compartment for fumes or gasoline leaks before starting engine. Do not start engine if gasoline or fumes are present. 3.Run the bilge pump until the flow of water stops. 4.Make sure the throttle is in the neutral position and sterndrive is lowered into water. 5.Make sure passengers seated in the bow area do not obstruct the operator’s vision. GETTING UNDERWAY Starting Engine 1.Check the engine oil tank for proper level. 2.Pump the fuel primer bulb on the fuel line. 3.Turn the key to start the engine. Engine will not turn over if throttle is not in the neutral position. I MPORTANT: Do not operate starter continuously for more than 15 seconds without pausing. Starter will overheat and can be damaged. Allow at least two minutes between starting attempts so starter has time to cool. Carbon Monoxide Hazard! A cold engine produces more carbon monoxide than a warm engine. Provide adequate ventilation in the cockpit to prevent excessive exposure and reduce the possibility of carbon monoxide accumulation. Open all canvas and side vents to increase air movement. 4.After engine has warmed up, check water temperature gauge (if equipped) to ensure engine temperature stays within proper ranges. If temperature reading is abnormally high, stop engine immediately and inspect for cause of high reading. 8.6 Lund-08.indd 6 7/9/10 1:53 PM 5.Check steering operation. Turn steering wheel all the way in both directions, and check that outboard moves freely. 6.Turn the steering wheel full to port and starboard while observing outboard movement to check operation of the steering system. 7.With boat moored to the dock and engine idling, check for proper operation of the shifting motion by moving throttle forward, back, and then to neutral. Leave the engine in gear for only a second or two. MANEUVERING When you have finished all pre-departure checks, you are ready to leave the dock. Cast off the lines. Idle speeds work best when maneuvering. Take wind, tide, current, and other forces into account as you maneuver away from the dock. Check for other boats in the area. IMPORTANT: Falls from moving boats are a major cause of fatal recreational boating accidents. Do not allow passengers to ride on the bow with feet hanging over the side or ride while sitting on the stern, gunwales, or seat backs. The Coast Guard considers these acts to be negligent or grossly negligent operation and prohibits them by law. Leaving the Dock GETTING UNDERWAY Boat steering is not self-centering. Engine and propeller torque, wave and current action, and boat speed affect steering. Pay constant attention to steering for safe operation. Shift the engine into forward or reverse depending on whether you want to move the bow or the stern away from the dock first. Move the throttle lever to neutral, then push forward quickly and firmly to shift into forward gear or pull back to shift into reverse. Run the engine at a slow speed as you move away from the dock. If you move the bow out first, watch that the stern of the boat does not swing into the dock or a piling. Note: If you are new to boating, practice maneuvering. Once away from the dock, practice docking using an imaginary dock. Practice stopping and reversing direction. 8.7 Lund-08.indd 7 7/9/10 1:53 PM Stopping Practice stopping maneuvers and learn early how the boat reacts. If the boat is moving forward, pull the throttle back to NEUTRAL and let it coast. Depending on speed, the distance the boat will coast until it comes to a complete stop varies. Through experience, you will be able to measure that distance more accurately. There will be times when you must stop more quickly, but boats don’t have a brake pedal. Back down on the throttle and shift into NEUTRAL. The boat will begin to slow down. When the engine is idling, shift into REVERSE and gradually increase engine speed. The boat will stop in a shorter distance. Note: In reverse, a boat does not steer nearly as well as it does when going forward. Don’t expect to accomplish tight turning maneuvers when backing up. Steering GETTING UNDERWAY Boats steer by the stern. (The feeling is much like steering when you are backing up an automobile.) This means that when the boat is moving forward, the stern swings in the direction opposite to the turn. For example, when you turn the helm wheel to port, the stern swings to starboard. This is especially important to keep in mind when docking, operating in close quarters with other boats, or when approaching a swimmer or downed skier in the water. Once you have spent enough time practicing maneuvers and have a feel for how the boat handles, you are ready to run in open waters. High Performance Boats Your boat may be capable of being operated at very high speeds. It has been equipped and rigged for safe operation, but safe operation requires: •Driver awareness of how the boat will perform under all operating conditions. •Driver skill in anticipating and reacting to often rapidly changing boat control conditions. For the safety of boat occupants, and to prevent damage to the boat, the number of passengers, speed, and manner of boat operation must be adjusted to suit weather conditions. The boat operator is responsible for any acts of negligence or carelessness. 8.8 Lund-08.indd 8 7/9/10 1:53 PM Some models are capable of speeds in excess of 45 mph. Consult your dealer for full performance capabilities of your boat. High Performance Boats should not be operated by inexperienced persons until complete instruction is accomplished under the supervision of a qualified instructor. When first learning to drive a high performance boat, try to pick a day and time when the waterway is relatively clear of traffic. Driving a high performance boat requires concentration, coordination and an awareness of everything going on around the boat. You’ll feel more comfortable learning to operate your boat without a lot of other boats in the same area. ACCELERATION Poor Visibility! While accelerating, bow rises and obstructs forward vision. Before accelerating, be sure path is clear. Make sure passengers know you intend to accelerate. GETTING UNDERWAY The boat operator is responsible for the safety of all boat occupants, and nearby boaters. Passengers should be advised of the possibility of being thrown to the deck or overboard if they are not properly seated while the boat is operated at high speeds. Swivel seats are only to be used at trolling speeds. Do not operate at high speeds near other boats, pilings, underwater obstructions, people in the water, shorelines, seawalls, or any other obstacles. Before bringing the boat “on-plane,” check the entire area to make sure you have a clear, safe path. As you throttle up and accelerate, the boat’s trim angle changes, causing the bow to ride high (Figure 8-3). This trim angle is sometimes referred to as the “hump.” As the boat continues to accelerate, the boat levels out to its planing attitude. A few seconds at full throttle should get the boat over the hump and into its planing attitude; then throttle down to cruising speed. This also improves fuel efficiency. You are responsible for any damage or injury caused by your boat’s wake. Observe no wake speed zone warnings. Operate your boat with regard for the safety of other boats and people in your boating area. 8.9 Lund-08.indd 9 7/9/10 1:53 PM Note: Visibility, handling, and performance are reduced while accelerating. It’s a good idea to get “over the hump” as soon as possible. Bow High Planing Attitude Accelerating the "Hump" Figure 8-3 Planing Power Trim Operation GETTING UNDERWAY The power trim feature on your boat allows you to raise or lower the outboard motor to affect the boat’s running angle while underway. While your boat is onplane, the best performance is obtained when the boat is running at a 3° to 5° angle to the water, with the bow slightly out of the water. Note: The following information is general. Refer to the instructions in the engine manual for more detailed information about the power trim controls. 1.The standard trim control switch is on the control lever handle. 2.The switch controls the position of the outboard. Proper trim is very important in boating. Before you accelerate, the outboard should be down. 3.In the case of low or heavy bow attitude, the boat tends to “plow” (Figure 8-3). The outboard is trimmed too far down (in). Trim the outboard up (out) to correct this situation. 4.If the bow is too high, the boat tends to “porpoise” (Figure 8-4) and the bow will bounce up and down on the water. The outboard is trimmed too far up (out). Trim down (in) to correct. The boat is trimmed correctly when it is just short of porpoising. If you are an inexperienced driver or are having difficulty correcting a porpoising condition, reduce your speed until the boat levels off. 8.10 Lund-08.indd 10 7/9/10 1:53 PM 5.A good practice is to get underway with the outboard trimmed all the way in. After the boat is on-plane, trim the outboard up slightly to obtain the proper bow attitude and engine speed. 6.The outboard should never be trimmed up to a point where the propeller cavitates (or slips). A rapid increase in engine RPM’s is evidence of cavitation. If this occurs accidentally while running at full throttle, immediately trim the outboard down and reduce the throttle until the slipping stops. If necessary, consult your dealer for this problem. If the prop slips at lower planing speeds, the outboard may be trimmed too far up. Immediately trim the outboard down until the prop “grabs” again to restore efficiency. GETTING UNDERWAY Figure 8-4 Trimming The Boat Outdrive 7.Trimming the outboard up lifts the boat higher in the water. It will travel faster because less hull is in the water. Loss of Steering Control! Improper trim adjustment can result in loss of steering and can cause a serious accident. Steering forces As the motor’s propeller turns, it causes a twisting force on the motor about its 8.11 Lund-08.indd 11 7/9/10 1:53 PM steering axis. This twisting force, or torque, is felt as a force trying to twist the steering wheel out of the driver’s hands. At high speed, the driver must apply a correcting force on the steering wheel when the motor is trimmed up to hold the motor’s steering forces. The direction and amount of force on the wheel are affected by the height of the motor, the amount of propeller in water, the propeller type, and direction of propeller rotation. Turning the boat at high speed is always very touchy. Before attempting a high speed turn a common safe practice is to trim DOWN slightly. Avoid full trim DOWN position on moderate or high speed turns. If your outboard is equipped with power steering, the steering forces are partially controlled by the power steering system. You will feel minimal outside steering forces while the power steering system is functioning properly. If the power steering system is not functioning, operate at moderate speed until it can be repaired. ANCHORING GETTING UNDERWAY Note: This section includes general information about anchoring. It does not address all possible anchoring situations. It is recommended that you attend a safe boating course to learn more about anchoring. Anchors are available in different shapes, sizes, and weights to fit different boats, uses, and conditions. The boat’s size and weight governs the weight of the anchor and diameter of anchor line. Your dealer can tell you which anchor will work best. You need an anchor line at least 6 to 7 times longer than the depth of water anchored in (Figure 8-5). For example, if you anchor in water 20 feet (6 m) deep, use an anchor line 120 to 140 feet (36 to 43 m) long (minimum). Figure 8-5 Weighing Anchor If you are anchoring overnight or for extended periods, use two or more anchors set at 45° to each other. If you don’t use two anchors, make certain there is enough space for the boat to swing in a full circle to prevent damage in case of shifting winds. 8.12 Lund-08.indd 12 7/9/10 1:53 PM Note: Keep the anchor secure while underway to prevent damage or injury in case the boat’s attitude should shift suddenly. Dropping Anchor 1.Have a crew member carefully lower the anchor. Keep slight tension on the anchor line while lowering and maintain the tension after reaching the bottom. 2.Maneuver the boat slowly backwards until length of anchor line is 6 or 7 times the depth of the water. 3.Fasten the anchor line around the bow eye or deck cleat. Anchor flukes should dig in and catch. Watch for anchor drag by checking shoreline landmarks at the time the anchor is dropped and one-half hour later. If the boat has drifted away from these reference marks, the anchor is dragging and must be reset. Pulling In the Anchor The engine should be running when you pull in anchor. 1.Slowly maneuver the boat forward to reduce tension on the line and make retrieval of the anchor line easier. 2.Pull in anchor line until the line is vertical. Pull firmly to lift the anchor’s shank and free the flukes from the bottom. GETTING UNDERWAY IMPORTANT: Secure anchor line only to bow eye or bow cleat. Never tie anchor line to a rail, rail fitting, or other hardware not designed to support this stress. Never anchor using only a stern cleat. Waves could swamp your boat under windy conditions. If the anchor becomes stuck, attach the vertical line to the mooring cleat. Wave action on the bow may lift flukes from the bottom and free the anchor. If the anchor is still stuck, feed out a few feet of line and attach it to the bow cleat. Maneuver the boat slowly around the anchor, keeping the line firm. Determine the angle that will work to pull the anchor free. RETURNING TO SHORE Docking Always approach the dock slowly. If possible, come in against the wind or current, whichever is stronger. Approach the dock at a 30-45° angle. As the boat nears the dock, slowly swing parallel to it. Tie the bow line first; then the stern. 8.13 Lund-08.indd 13 7/9/10 1:53 PM Note: If wind or current is moving toward the dock, move parallel to the dock further out. Let the wind or current push you in. Use extreme caution if wind or current is from the stern. Back in toward the dock slowly at a slight angle with engine in slow reverse. Gently swing parallel. Tie stern first, then the bow. If the wind is changeable, place fenders over the side between the boat and the dock. Mooring GETTING UNDERWAY After you have positioned the boat next to the dock, secure it with mooring lines to keep it in position. Mooring lines must be long enough to secure the boat in any docking situation. For example, the length of the lines for a 16-foot runabout should be at least 15 feet (4.5 m). An eye splice at the end of each line works well with bow or stern cleats (Figure 8-6). If tides are a consideration, be sure to leave slack in the lines to make up for the rise and fall of the water while the boat is docked. Figure 8-6 Mooring Line Ties The mooring lines you use most often are the bow line, the stern line, and spring lines as shown on Figure 8-7. Each line has a specific purpose. The bow line and the stern line secure the boat’s bow and stern. The two spring lines keep the boat from moving forward or backward when you are moored alongside a dock. 8.14 Lund-08.indd 14 7/9/10 1:53 PM If you are mooring for a short time, bow and stern lines may be the only lines you need. If you are mooring for a longer time, the currents are swift, or the weather looks bad, you should use spring lines. The stern spring line leads from the boat’s stern cleat forward to the piling or cleat on the dock. The bow spring line leads from the bow cleat aft to the dock. If you are mooring in a slip, bow and stern lines, port and starboard, will keep the boat in position. Note: Manila rope, the standard for many years, is not as strong as some ropes made of synthetic materials. For mooring, its ability to stretch is an advantage, but it tends to shrink whenever it gets wet. Nylon rope is strong and elastic. Because of its elasticity, it works well for mooring lines and anchor lines. Rope made of high tensile strength polyester fibers like Dacron™ is just about as strong as nylon rope, but it does not stretch. Kevlar rope is strong and does not stretch, but it is quite expensive. Polypropolene rope tends to deteriorate rapidly when it is exposed to sunlight. Because it floats, it is well-suited for use as a tow rope for water skiing. Use for other nautical purposes is not recommended. GETTING UNDERWAY Figure 8-7 Mooring Lines NAVIGATION LIGHTS Cruising at night can be very pleasurable, but it can also be dangerous. Be especially careful of shallow waters and watch for submerged debris, rocks, and other obstacles in the water. Navigation lights are intended only to prevent collision, not to improve night vision. You may choose to use a spotlight, which is available from your dealer or local marine store, to aid in night navigation. 8.15 Lund-08.indd 15 7/9/10 1:53 PM Note: It is illegal to use a spotlight as a headlight. Use it only temporarily to check the position of your boat and the surrounding area. Your boat has one white (stern), one red (port) and one green (starboard) light. The stern light may be a removable pole light. To use the light, line up the two-prong plug in the pole with the receptacle in the base. Plug the light in, and lock it into place with lever/slide lock. When not in use, stow the light inside the boat for safe keeping. Check lights for proper operation before heading out at night. You should also learn to identify the running light combinations for other vessels. We recommend that you participate in a boating safety course to further learn about navigation lights and safe boating practices. A three-position switch at the helm controls the anchor lights and the navigation lights. You can use it to turn on just the stern (white) light when anchored or moored or to turn on all navigation lights while underway. HAZARDOUS CONDITIONS GETTING UNDERWAY Fog When warm air is above cooler water, its temperature drops. As the air cools, it loses its ability to hold moisture and fog will develop when the air temperature drops to the dewpoint temperature. Dewpoint temperature depends on the amount of humidity in the air. You should be aware that fog can form quickly as the air temperature drops, especially if the air is calm and humid. Remember the following guidelines: •Turn on running lights. •As fog sets in, take bearings and mark your position on the chart while continuing to log course and speed. •Prompt all persons aboard to put on their PFD (personal flotation device). •If your boat has depth finding equipment, take soundings to find the depth and match them to the depths shown on your charts. •Station a person forward on the boat as a lookout. •Reduce speed. From time to time, stop engine and listen for fog signals. •Sound the proper horn or fog bell at proper intervals to warn other boaters. •If there is any doubt in continuing boat movement, anchor. Listen for other fog signals while continuing to sound the proper fog horn or bell for a boat at anchor. 8.16 Lund-08.indd 16 7/9/10 1:53 PM Storms Storms sometimes appear without much advance notice. Although information from meteorological observation and reporting stations is available, we all know that weather forecasts aren't always accurate. Many marinas fly weather signals. You should learn to recognize these signals and monitor local weather forecasts before leaving port. While underway, keep a watch on the horizon for signs of an approaching storm. If there are signs of bad weather, turn the radio on. Dial in a local weather station and monitor the forecast. Use the VHF radio (if provided) to check the weather channels. Everyone aboard should put on a PFD. The best precaution is to return to a safe port if there is time. Note: Coping with a storm while underway can challenge the best of operators. The information presented in a safe boating course will be very valuable in this situation. Running Aground Operating in shallow water can present a number of hazards. Sand bars in narrow inlets are constantly shifting, making it difficult to mark them with buoys. Sometimes waves form into breakers when they pass over sand bars. In coastal areas, tides can change water levels by as much as 30 feet. Check with local marinas or Coast Guard stations for tide tables and current charts. GETTING UNDERWAY If you cannot get back to port, there is no substitute for knowing what to do. Close and secure all portals and hatches. Reduce speed as the seas build. Stow all loose gear below deck and tie down any gear required to remain on deck. Change course to one perpendicular to the storm’s path; you may be able to avoid it. If the boat runs aground, first check persons aboard for injury. Then check for damage to the boat. If the outboard strikes an underwater hazard, check for boat and outboard unit damage. If the engine vibrates excessively after striking an underwater obstruction, it may indicate a damaged propeller. If vibration is noticeable, return to port slowly to prevent further outboard damage from an out-of-balance condition. Watch the temperature gauge to make sure you do not overheat the engine. If the boat is not taking on any water, it may be possible to rock the boat by shifting the weight of the passengers and gear and by raising the outboard unit while reversing the engine. 8.17 Lund-08.indd 17 7/9/10 1:53 PM If you ground the boat on a sand bar, shut down the engine and seek help from another boater or radio for help. See your dealer as soon as possible, as sand ingested in the engine cooling system can cause major engine damage. If you need to be towed, we recommend using a commercial towing service. Deck cleats may pull free from deck. Towline broken under tension may whip about. To prevent injury, attach towline only to transom or bow towing eye. Stay clear of towline attachment points on towed and towing boats. Warning Markers It is a good idea to find out about hazardous areas and how they are marked by asking local authorities. GETTING UNDERWAY •Boaters must also recognize the flag designs which indicate that scuba divers are present and keep well clear of the area. •Watch for swimmers. Swimming areas may not be marked, so always remain alert. •Distress flags indicate a fellow boater is in need of assistance. •Navigation markers serve as a means of identifying navigable routes and indicate water hazards. Boaters should become familiar with navigation markers and stay within marked boundaries and clear of hazards. REACTING TO EMERGENCIES Note: In any emergency, the first thing all passengers must do is to put on their PFDs. Flooding If the boat starts taking on water, start the bilge pump immediately. Open all compartments and look for the cause of the flooding. Check all hoses and through hull fittings. If flooding occurs as a result of collision or grounding damage, call for assistance and head for shore if possible. Capsizing If the boat capsizes, and others were on board, find them and guide them to the safety of the hull. Even if the boat is floating upside-down, stay with it. Rescuers can spot a boat hull much easier than a human head sticking out of the water. Do not try to swim ashore; it may be further than it looks. 8.18 Lund-08.indd 18 7/9/10 1:53 PM Man Overboard Think through and follow these procedures if someone in the boat falls overboard. ATTENTION: If optional boarding ladder is not installed on the boat, the engine's cavitation plate can be used foremergency reboarding purposes. •Remember, every second counts, you must act fast. •Move throttle to idle position immediately and yell “MAN OVERBOARD.” •Throw a Type IV PFD out to the person immediately. (This is why it should be readily accessible at all times. If it’s not, throw out some other floating object.) •Keep the person in the water in sight at all times. Make one passenger responsible for watching the person. Do not go into the water to help the victim. One person in the water is enough trouble, and a panicky person in the water can present a drowning hazard to rescuers. •Circle around quickly, approaching into the wind and waves. When the person is alongside, put the engine in neutral and throw them a Type IV PFD with a line attached or extend a paddle or boat hook within his/her reach. Collision If a serious collision occurs, you should first check the condition of all passengers aboard, then inspect the boat to determine the extent of damage. If the boat or passengers are not in danger, prepare to assist the other vessel. If you need help and the boat has a ship-to-shore radio, first contact the U.S. Coast Guard (VHF Channel 16) or other rescue authorities immediately. GETTING UNDERWAY Rotating propeller may cause serious injury or death - do not approach when engine is running. If the bow of the other boat penetrated the boat’s hull, prepare to block the opening once the boats are separated. Shore up the hole with a spare PFD or bunk cushion. While blocking the hole, trim the weight of the boat (where hole exists) so that it is out of the water during repairs. Be sure to report the accident to the proper authorities. 8.19 Lund-08.indd 19 7/9/10 1:53 PM Fire IMPORTANT: All persons aboard should know the location and proper operation of the fire extinguishers. Most fires are caused by electrical problems or careless fueling practices. A fire is a serious emergency. You must work quickly to implement safety procedures. If a fire occurs, immediately stop the engine. If it is small, try to put it out with a fire extinguisher. If the fire is in the engine compartment, turn off the bilge blower. Do not open fuel tank compartment. This feeds oxygen to the fire and may cause it to flare up. If the fire gets out of control, execute a distress signal and call for help if equipped with a ship-to-shore radio. All persons aboard should jump overboard and swim a safe distance away from the flames. Guidelines for fire prevention: GETTING UNDERWAY •Use only approved marine cooking and heating systems. •Open flames demand constant attention. •Keep flammable materials in approved containers in a vented locker sealed from the interior of the boat. •Ensure ventilation systems are unobstructed. •Remove mooring covers before starting engine. •Check the bilge for fuel leaks. •Extinguish smoking materials carefully. •Use special care with flame or high temperatures around urethane foam. •Check cleaning products for flammability. •Ventilate when cleaning or painting. •Disconnect electrical system from its power source before performing maintenance. •Replace breaker or fuse with one of the same amperage. •Electrical appliances must be within rated amperage of boat circuits. Observe the boat carefully while the electrical system is being energized. •Allow only a qualified marine electrician to service the electrical system. Medical Emergency Accidents while boating can happen. Be prepared to handle these emergencies when they happen. Keeping a first aid kit and dry blankets on board can assist during these situations. It is also a good idea to contact the local Red Cross for information and training on first aid and CPR. 8.20 Lund-08.indd 20 7/9/10 1:53 PM Propulsion Failure Before you call for help regarding an outboard failure, it is a good idea to eliminate the possibility of simple problems. Turn off the engine and check to see that (1) there is fuel in the tank; (2) the engine cooling intakes on the outboard are not clogged; (3) props are clean and free of weeds, netting, etc.; (4) no hoses are leaking; (5) there is oil in the engine; (6) the lanyard stop switch is connected. Once you have checked out the possibilities listed above and find they are not the problem, call for help giving your position and a detailed description of your boat. In the unlikely event of a throttle/shift failure, shut down the engine immediately. Carefully check the control connections in the engine compartment to see if they are secure. If not, try to locate the attaching hardware and reassemble. If that is not possible, try to use whatever is available such as paper clips, hair clips, tape, etc., to secure the connections. If a temporary repair is made, return to port at the slowest steerable speed and be prepared to take emergency action should the temporary repair fail also. Have your dealer make repairs before using the boat again. Steering Failure If a problem with the steering occurs, shut down the engine immediately. Check the connections to the outboard unit. Some boats have a push/pull cable while others have hydraulic steering. With cable connections, check the attaching hardware and tighten it if necessary. If you have hydraulic steering, have your dealer check the fluid level of the reservoir. If the steering is not operating properly, do not operate the boat and call for assistance. GETTING UNDERWAY Control Failure 8.21 Lund-08.indd 21 7/9/10 1:53 PM Caring For your Boat 9 Proper care and maintenance preserves the value of your investment. This chapter explains how to keep your boat looking like new as the years go by. Fire Hazard! Spontaneous combustion can ignite rags wetted with acetone, cleaning fluids, fuel, or other solvents. Never store wetted rags on board. Dispose of them properly on shore. Use cleaning agents sparingly. Never discharge cleaning solutions into the waterways. Do not use products containing phosphates, chlorine, solvents, or nonbiodegradable or petroleum based products. 1. Check level of electrolyte solution and add only distilled water when needed. 2. Keep battery cables tightly connected and corrosion free. (A solution of baking soda and water works to remove corrosion on battery terminals.) 3. Periodic checks at your dock or service station will keep your battery running at top efficiency. 4. Store battery in cool place (but avoid freezing temperatures). All batteries will lose some charge when stored, but the lower the temperature, the less loss of charge. BATTERY INSTALLATION SPECIFICATIONS REFERENCE: Federal Boat and Safety Act No. 183.420 Dated 1/31/77 CARING FOR YOUR BOAT BATTERY CARE The battery must be installed with a boot on positive end and secured in the factory installed retainer hold down system. Battery movement must be restricted to a maximum of 1” in any direction (to all sides and up). MAINTENANCE 1. Check battery monthly for proper fluid levels. 2. Remove battery during prolonged boat storage periods. 9.1 Lund-09.indd 1 7/9/10 1:54 PM FUEL SYSTEM 1. 2. 3. 4. ll factory installed fuel systems comply with NMMA Standards. A During boating season, keep tanks filled to prevent condensation of moisture. Check exterior of your portable tank periodically. If scratched or nicked, treat with rust remover and touch up with a good grade of air-drying enamel. Once a year, have your dealer inspect the complete fuel system for leaks LEAKING FUEL IS A FIRE AND EXPLOSION HAZARD INSPECT SYSTEM REGULARLY. EXAMINE FUEL TANKS FOR LEAKS OR CORROSION AT LEAST ANNUALLY. ALLOW FOR FUEL EXPANSION. DO NOT OVERFILL. STEERING SYSTEM CARING FOR YOUR BOAT 1.Ask dealer to adjust steering. 2. Have your dealer winterize the steering system for storage. 3. At beginning of each boating season, ask your dealer to lubricate the steering system. FLOOR COVERING 1. Treat vinyl, and indoor/outdoor marine carpeting, as you would home floor covering. ALUMINUM TRIM SURFACE 1. Avoid acid or abrasive cleaners. 2. Occasionally rinse with clear water or mild detergent. 3. Wax for added protection. STORAGE COMPARTMENTS Do not store fuel or flammable liquids here. Ventilation has not been provided for explosive vapors. 9.2 Lund-09.indd 2 7/9/10 1:54 PM PAINTED ALUMINUM SURFACES 1. Rinse only with clear water until paint has cured properly (Allow several weeks for freshly painted or new boat finishes.) 2. After paint has cured, wash with clear water and apply liquid cleaner wax or automotive paste wax. 3. Keep surface free of dirt, and wash as needed. 4. If using a cleaner, test for abrasiveness by applying to small area where results will go unnoticed. BOTTOM SURFACES 1. Clean and wax underwater surfaces regularly to remove marine life. 3. If boat is kept in water, protect its surface with an anti-fouling paint. (See repainting section on page 9.6.) 4. Unpainted aluminum surfaces will oxidize and turn black. Oxidation is a pro tective coating and it is recommended it not be removed. SALT WATER INFORMATION LUND’S aluminum hulls are made of high quality 5052 Marine Aluminum recommended for salt-water use by the Aluminum Association. However, care must be taken in both salt water and fresh water to avoid creating electrolytic action. Do not place, brass, bronze or copper fittings in direct contact with the aluminum. A thorough fresh water bath after every use is recommended by Lund and will prolong the life of your boat. CARING FOR YOUR BOAT 2. Be more alert to marine life build-up if boating in salt water. (If not removed, marine life can reduce top speeds and increase fuel consumption drastically.) GALVANIC CORROSION Galvanic corrosion of aluminum boats is due primarily to the electrolytic action between dissimilar metals, such as aluminum and brass. When the two metals are immersed in a conductive fluid (water), an electric current flows and one metal will be corroded. The corrosion is intensified when the metals contact salt water due to the high conductivity of salt water. Unprotected aluminum is very susceptible to galvanic action and the resultant corrosion. 9.3 Lund-09.indd 3 7/9/10 1:54 PM Galvanic action can be hastened by the presence of stray electric currents. Batteries or any other sources of electricity should be disconnected when not in use. Due to the electrolytic action between dissimilar metals, all fittings and fasteners attached to an aluminum hull should be aluminum or stainless steel. The use of nickel, brass or ferrous fittings and fasteners may result in aluminum corrosion if the fitting or fastener contacts the aluminum. If nickel, brass or ferrous metals must be attached to aluminum, then the surfaces should be insulated with a non-wicking gasket, tape or sealant. Fasteners should be insulated by using nonmetallic sleeves, bushings and washers. REPAIRS LOOSE RIVETS 1. (Temporary repair.) Clean around head of rivet with wire brush. Apply a good marine seal or similar type sealer around the head. 2. (Retighten). Use steel hammer and a bucking tool. (Steel block) Shaped to fit the head of the rivet. Place bucking tool against rivet head and strike flattened end of rivet inside hull with steel hammer. CARING FOR YOUR BOAT BROKEN RIVETS 1. (Temporary repair.) Drill out remainder of rivet using drill slightly larger than original rivet. Dip sheet metal screw in sealer and insert. 2. (Permanent repair) Drill out remainder of rivet and install an over sized aluminum rivet. (Pop rivets cannot be used where a water tight seal or structural fastener is needed.) POP RIVETS 1. Pop rivets are used to fasten castings and other trim. Remove by inserting small punch through center hole and tapping out the center core. 2. Drill out remainder of the rivet. 3. Replace with pop riveting tool and pop rivet. 9.4 Lund-09.indd 4 7/9/10 1:54 PM CRACKED ALUMINUM 1.Obtain aluminum similar in thickness and alloy to original metal. (5052 H-34) 2. Cut patch large enough to extend 2 inches beyond the crack in every direction. 3. Form piece to fit contour of area to be patched. 4. Line edges of patch with 3/4-inch rubber tape. 5. Place patch on inside of hull over the crack. Rivet in place. 6. Space rivets every 1/2-inch around the edges of the patch. 7. Place one rivet at each end of crack itself and then install a line of rivets along the entire length of the crack, drilling holes directly in the crack. 8. Flow bead of sealant all around the edge of the patch inside the hull and along exposed areas of the crack outside the hull. TOUCH-UP 1. Get a can of aerosol touch-up paint (or the paint codes for your boat) from your LUND dealer. Follow instructions for use on the can. It should be understood that, on older boats exposed to sun and weather, colors may not match exactly. 2. A few tips: Using graded sand papers, smooth area to be painted; clean area with clearing agent to remove wax, dust, grease, etc. without lifting surround ing paint; treat bare surface with either zinc chromate primer or acid etch wash primer; always use several light coats of paint rather than a single heavy one. REPAINTING AFTER REMOVING OLD FINISH CARING FOR YOUR BOAT REPAINTING ALUMINUM 1. Always use an organic paint remover to soak all original paint and primer from the aluminum. Caustic base removers can be harmful to aluminum alloys. 2. Use a wire brush to clean soaked paint from around the rivet heads and seams. 9.5 Lund-09.indd 5 7/9/10 1:54 PM 3. Roughen the surface evenly with sandpaper, wire brush, emery cloth or steel wool. Take care not to gouge surface, it may show through the paint. 4. Thoroughly clean the surface with a lacquer thinner to remove all traces of dirt, grease, fingerprints, etc. 5. Spray bare aluminum with an acid etch wash primer in a uniform light coating. Take care not to produce runs. 6. After primer is dry, spray several light coats of vinyl base aluminum boat fin ish. Allow each coat to dry a few minutes before spraying the next. REPAINTING WITHOUT REMOVING OLD FINISHING 1. Touch up small scratches with touch-up paint. Allow to dry to a hard surface. 2. Lightly sand entire surface, including the touched-up areas. 3. Clean the entire surface with a mild cleaning agent. 4. Spray several light coats of vinyl base aluminum paint, allow each coat to dry a few minutes before spraying the next CARING FOR YOUR BOAT USE OF ANTI-FOULING PAINTS Under no circumstances should a copper, lead, arsenic, or mercury based anti-fouling paint be applied, either with or without the use of a primer coat. Consult your dealer and follow paint manufacturer’s application instructions. Lund boats cannot be held responsible for chemical reactions resulting from the application of antifouling paint products. To prolong the beauty of your boat, use fresh water to wash salt deposits off bare aluminum trim. UPHOLSTERY 1. As needed, wax all vinyl with a good grade of vinyl protective wax. 2. Avoid harsh detergents, as these may eventually damage the threads on seams. (Wax should clean soiled areas sufficiently.) 3. On fabric cushions, use foam type upholstery cleaner. Do not dry clean. 4. Do not use solvents, bleaches, or abrasive cleaners, as they will cause perma- nent damage. 9.6 Lund-09.indd 6 7/9/10 1:54 PM D. Mildew/Tough Stains: - To kill the bacteria creating the mildew, vigorously brush the stain area with a 4-to-1 mixture of water and ammonia. If brushing does not remove stain completely, briefly apply some bleach and rinse with water. E. Tough Mildew Stains: - Apply a mixture of one teaspoon of ammonia, one-fourth cup of hydro gen peroxide and three-fourths cup of distilled water. The peroxide bubbling appears to lift off the stain. Rinse with water. ALWAYS CLEAN STAIN IMMEDIATELY! 7. Cleaning Procedures On Fabrics A. Water Stains On Headliners: - If fabric is still wet use an air hose and nozzle. Go over wet areas, this will force stain back into fabric. B. Light Stains/Water Stains: - Using Lendow Glass Cleaner, spray over stained area. Let foam dissipate, rub area with clean towel. Repeat if necessary. C. Tough Stains/Set Water Stains: Always try Lendow method first! Step A. Spray Westley Clear Magic on area going 2” around stain or if possible bring wetness to a break point such as a bulkhead etc. Spray water on the same area as directed on bottle. Step B. Let set approximately 5 minutes. Step C. Rub area with clean towel rotating towel to clean area as stain is being removed. As you are rubbing go a little beyond wetness with towel flaring edges. Step D. Blow complete area over with air hose. Step E. Repeat if necessary, or try the Lendow cleaner. Step F. After stain is removed, use a clothes shaver to remove fuzzes. D. Ink/Pencil/Blood/Grease/Dirt/Blend Stick/Marker/Crayon: - Use Westley Clean Magic as directed on the bottle. E. Adhesives/Teak Oil: - Lift Off Spot Remover, then clean with Westley Clean Magic. CARING FOR YOUR BOAT 5. The marine vinyls have been treated to withstand the ultraviolet sunrays and mildew, as a precaution, the boat should be covered or shaded when not in use. 6. Cleaning Procedures on Vinyls A. Grease/Pencil/Dirt: - Medium soft brush. Ivory soap and warm water or Fantastic All- Purpose cleaner. Rinse with water then dry. B. Ink - Denatured Alcohol. Rinse with water then dry. C. Adhesive/Teak Oil/Tar/Gum: - Wipe or scrape off excess (chill gum with ice). Harris 3M Citrus Base Natural Cleaner, apply briefly, rinse with water, dry. 9.7 Lund-09.indd 7 7/9/10 1:54 PM WINDSHIELDS PLEXIGLASS WINDSHIELD 1. Rinse loose dirt from windshield with clear water only. 2. After all abrasive dirt is removed, use Plexiglass liquid cleaner and polish. 3. DO NOT wipe dirt from a dry windshield. 4. DO NOT use powdered cleaners with abrasive, or harsh liquids like gasoline, carbon tetrachloride, acetone, and lacquer thinner. 5. Remove minor surface scratches by buffing with plexiglass polish. GLASS WINDSHIELD Safety glass windshields should be cleaned just like automobile windows. CANVAS TOPSET CARING FOR YOUR BOAT Your topset will give you years of service, if you follow these simple rules. 1. Never roll up TOP when wet. 2. Never trailer your boat with Top up. 3. Brush down the TOP occasionally, both inside and out. 4. Vinyl coated tops can be cleaned with detergent and water. In extremely soiled cases on vinyl surfaces, scrub with a solution of ammonia and water, then rinse. 5. Do not allow bug sprays (petroleum products) to come in contact with top or curtains. 7. Remove boot occasionally to air out. We recommend setting up top periodically to dry out. Many models have a storage area (top hider) for the canvas topset, located in the aft portion of the boat. Be careful when placing topset in the storage area (or removing it) to avoid damaging the boat’s interior. Travel and Mooring Cover 1. Do not use the mooring cover for travel; the cover will damage paint on hull. 2. Do not use mooring cover with plexiglass windshield on boat; the cover will deform the windshield. STORAGE 1. Remove wet gear, and allow to dry before storing. 2. Clean the boat thoroughly inside and out. Wax. 3. Drain the engine block and manifolds on I/O. 4. Drain the outdrive and change the lubricant. 5. Lubricate all control and steering cables. 9.8 Lund-09.indd 8 7/9/10 1:54 PM 6. Plexiglass windshield should be washed with mild soapy water. Rinse. Allow to dry. If stored outdoors, boat should be covered against direct sunlight to prevent discoloration. 7. Remove battery, check water level, store in a warm, dry place. 8. Remove portable tanks. Gasoline left in tanks causes gum-like deposits and presents fire hazard. To further protect gas tanks, pour in a gaso line soluble rust inhibitor. Follow directions of rust inhibitor supplier. 9. Fill gas tanks or drain completely empty. If the tanks are full add a preservative to the fuel. 10. Drain bilge pump and hoses. 12. If boat is stored on trailer, block the trailer off the ground so that the weight is not on tires. Loosen tie-downs. check to be sure that transom and keel are supported properly. 13. If boat is covered, provide adequate ventilation to assure evaporation of condensed moisture and the prevention of mildew. If using the transportation and storage top, the supplied poles must be installed to keep the top tight. If the top is not tight, damage can occur during storage or trailering. 14. Put blocks under trailer to keep tires from wet ground. 15. Repack wheel bearings on trailer. 16. Store with bow up and drain plug removed. CARING FOR YOUR BOAT 11. Remove transom drain plug and store boat with bow higher than stern. 9.9 Lund-09.indd 9 7/9/10 1:54 PM Winter Layup & Storage 10 This section of your owner’s manual will assist you in preparing your boat for prolonged storage. When cold weather has arrived, or a change in your boats usage requires extended storage, we suggest you follow the guidelines contained within this section. For areas that do not require seasonal storage, Lund recommends a thorough annual inspection. IMPORTANT: Consult your engine manual for specific instructions covering winterization of the engine. Your dealer is qualified to perform engine winterization. Do not attempt to winterize the engine yourself without proper knowledge and equipment. PRIOR TO STORAGE Hull 1. Scrape off any barnacles or crusted marine growth. 2. Scrub the hull thoroughly to remove marine growth and scum. 4. Remove the hull drain plug and store in a safe place. Deck 1. Wash the deck, superstructure and cockpit. 2. Clean all deck hardware (i.e. cleats, rails, instruments, etc.) and apply a coat of metal polish or wax. 3. Clean the indoor/outdoor carpet. ENGINE WINTER LAYUP & STORAGE 3. Inspect the underwater gear and propellers for excessive wear or damage. 1. Drain the engine block(s) and manifolds. 2. Drain the outdrive and change lubricant. (Your dealer will perform No. 1 and No. 2 for a moderate fee.) IMPORTANT: In regions where temperatures fall below freezing, all engine plugs must be removed before storing your boat for the winter. Failure to do so will seriously damage the engine. Freeze damage is not covered by the Warranty. 10.1 Lund-10.indd 1 7/9/10 1:55 PM Make sure your boat’s engine is slightly bow up during the extended storage period. Fuel System Fill the fuel tank completely, or empty completely. Either method will minimize condensation. You may want to add a gasoline stabilizer solution to the fuel, if the tank is to remain full. Follow the product manufacturer’s recommended procedure. Engine Lubrication 1. Drain oil when engine is warm. This will ensure complete drainage of oil. If the engine oil contains sludge, use a flushing oil to clean away the residue. Refer to your engine manual. 2. Replace the engine oil filter. 3. Fill the crankcase(s) with the required quantity of recommended engine oil as specified in your engine manual. 4. Start the engine. 5. Pour or spray fogging oil through the carburetor air intake. Continue to pour or spray fogging oil until the engine stops. WINTER LAYUP & STORAGE 6. Clean and lubricate all linkage. 7. Spray the entire exterior surface of the engine with a rust and corrosion inhibitor. 8. Have the engine alignment checked and adjusted by a qualified marine technician. 9. Inspect all gaskets and seals, grease the U-joints, and change gear oil. 10. Remove the propeller. Clean and lubricate the prop shaft and check for damage. Battery 1. Remove battery, check water level, and store away from freezing temperatures. IMPORTANT: Battery should be stored in a cool dry place. 2. Clean outside battery case, terminals, and battery clamps with a solution of baking soda and water. NOTE: Do not allow baking soda/water solution to enter the cells. 10.2 Lund-10.indd 2 7/9/10 1:55 PM WARNING: To prevent personal injury, wear goggles, rubber gloves and protective apron when working with battery. Battery electrolyte can cause severe eye damage and burns to the skin. In case of spillage, wash area with a solution of baking soda and water. 3. Lightly sand battery posts and clamps with fine grit emery cloth. 4. Apply a light coat of petroleum jelly to the cover end of the battery cables. 5. A monthly recharge or continuous trickle charge should be applied to the battery during storage. LIVEWELL 2. It is important to remove the water remaining in the hoses and pumps. Use a compressed air hose in all fittings and drain holes to remove all remaining water. IMPORTANT: Failure to remove all water from the livewell system in freezing weather could result in component damage and/or leaks. This damage is not covered by the Warranty. Wash down pumps If water is not drained from the system during freezing temperatures, damage is likely to be sustained in the plumbing and in the pump. To prevent damage follow the instructions beneath: 1. Disconnect suction hose from water supply (sea water supply) or if water supply is taken from a tank, drain water storage tank. WINTER LAYUP & STORAGE 1. Remove the drain tube or stand pipe plug from the drain in the livewell. 2. Open all spray nozzles/taps. 3. Run pump until remaining water is expelled. 4. Disconnect inlet and outlet tubes. 10.3 Lund-10.indd 3 7/9/10 1:55 PM 5. Run pump until breifly to confirm that water has been expelled. 6. S pray nozzles/taps shall remain disconnected until temperatures are above freezing. Never start a frozen pump. Even if it is drained it might contain a small amount that locks the rotor. Make sure fittings are securely connected when returned to service. See Owners Manual for further onstructions. INTERIOR CLEANING 1. Scrub all interior surfaces including cupboards, cabinets and drawers. 2. Be sure to remove everything that can hold moisture and cause mildew. Remove and store OFF the boat, all cushions, mattresses, curtains, blankets and sheets, pillows, towels, and clothing. 3. If it is necessary to store cushions on board: • Open all zippers and elevate cover away from the foam padding. WINTER LAYUP & STORAGE • Place a small plastic bowl of other round blunt object inside the cushion to allow for adequate air circulation. • Seats that can be folded should be stored in the down posi- tion. • Use plastic seat covers to keep out dampness and protect against mildew. 4. Make sure the cabin is well ventilated. 5. Personal flotation devices (PFDs) and other safety equipment must be cleaned and dried. If left on board, place them where air can circulate around them. 6. Clean and thoroughly dry the bilge area. Remove all rags, sponges, or other cleaning materials from bilge area. 7. Allow the interior to completely air out for a couple of days, weather permitting. 8. If you store your boat outside, we recommend that you do not store it with the canvas and bow set on. Cover with a storage cover, tarp or plastic (available from Dealers)-especially if you live in an area of heavy snow. Whatever material you use for a cover, be sure the boat is properly ventilated. NOTE: After cleaning, make sure everything is thoroughly dry and air can circulate freely throughout the inside of your boat. 10.4 Lund-10.indd 4 7/9/10 1:55 PM STORAGE ON TRAILER If you are storing the boat on a trailer, make sure that the trailer supports are aligned with the structural members of the hull. Distribute the weight properly. Make sure the boat is well supported across the transom and keel. Loosen all tiedowns to relieve the stress on the hull. Position the bow to allow water to drain via the transom drain. Do not allow rain water to collect inside the boat. Put the rig on blocks or else move the trailer from time to time to prevent flat spots on the tires. Note: If it is possible for water to accumulate on the boat covers, poke a small hole near the back of the boat cover canvas. Prepare the hole with a grommet to prevent tearing. If the boat is tilted backwards, water will run through the hole and out the bilge drain hole. RECOMMISSIONING THE BOAT AFTER STORAGE Follow this handy checklist to recommission your craft after storage. NOTE: For detailed information about recommissioning, refer to the engine manual and accessory manuals in the Owner’s Packet. ■Charge the batteries before installing them. ■Inspect all battery wiring. Repair or replace if necessary. ■Attach the battery cables and tighten the cable clamps. After tightening, apply petroleum jelly or marine grade grease on posts and clamps to eliminate air pockets and acid build-up after clamps are tightened. ■Check bilge for signs of nesting animals and clean as necessary. ■Reinstall hull drain plug. ■Clean the bilge area. ■Test the navigational lights and all other lighting on board. WINTER LAYUP & STORAGE ■Inspect the fuel system and all associated equipment for proper connections, corrosion, leaks, or other damage. Always be aware of any odor of fuel vapors. ■Inspect all wiring for fraying, wear, loose connections, and other damage. ■Inspect all switches, controls, and other related equipment for proper operation. ■Inspect all safety equipment for proper operation and physical condition. 10.5 Lund-10.indd 5 7/9/10 1:55 PM WINTER LAYUP & STORAGE ■Launch the boat and start the engine. It may take a minute of cranking to allow the fuel system to prime. When the engine starts, keep a close watch over the gauge readings and check for leakage and abnormal noises. Keep speeds low until the engine has reached normal operating temperature. If the engine was fogged for winterization, you will see exhaust smoke for a few minutes while the fogging oil is burned off. 10.6 Lund-10.indd 6 7/9/10 1:55 PM TROUBLE SHOOTING GUIDE 11 BOAT TRAILERS Issue Possible Cause(s) Possible Solution(s) Boat not A-Trailer backed too A-Pull trailer forward loading evenly far into water B-Back trailer at an angle that onto trailer B-Unlevel boat ramp offsets unlevel ramp C-Trailer backed into C-Straighten trailer before water at an angle loading D-Poor weight D-Distribute weight as evenly as distribution causing possible listing while loading ELECTRICAL COMPONENTS Possible Cause(s) Possible Solution(s) A-Dead battery A-Test battery; if battery is good B-Master power then recharge, if battery is bad switch off then replace battery. C-Blown fuse or B-Turn on master power switch breaker at battery C-Reset circuit breaker or D-Loose or corrroded replace fuse battery connections D-Disconnect battery terminals, clean and retighten No power to accessory components A-Blown fuse for specific component B-Loose or coroded wiring connections A-Inspect fuses and replace as needed B-Check connections at switch and electric components and service as needed Transducer not reading properly A-Transducer not aligned properly B-Improper wiring connections A-Contact dealer for service or refer to Locater Owner's Manual B-Contact dealer for service or refer to Locater Owner's Manual LED courtesy flip-lights (Pro V models) will not come on A-LED Courtesy flip light is in centered/neutral off position A-Ensure light has been flipped upward or downward to work; center position is off position and light will not come on. TROUBLE SHOOTING GUIDE Issue No Power to switches 11.1 Lund-11.indd 1 7/9/10 1:56 PM Issue Fuel level varies or is inaccurate INSTRUMENTATION Possible Cause(s) Possible Solution(s) A-Fuel tank geometry A-For most accurate reading, contributes to check gauge when boat is level. variation Speedometer A-Speedometer not not working working due to plugged pickup at engine B--Speedometer not working due to hose disconnected at back of speedometer Water is leaking from underside of console A-Inspect pickup at engine and unplug, or refer to engine owner's manual, or contact dealer for service. B-Reconnect speedo hose to back of speedometer using a tie strap to tighten hose onto gauge. A-The most probable A-Reconnect speedo hose to cause is if the speedo back of speedometer using a tie hose has become strap to tighten hose onto gauge disconnected from the barb on the back of the speedometer. TROUBLE SHOOTING GUIDE BOAT PERFORMANCE Issue Possible Cause(s) Possible Solution(s) A-Distribute weight evenly Boat lists while A-Improper weight at rest distribution throughout boat cockpit including position of passengers and equipment. Boat lists while A-Improper weight underway distrubtion B-Improper adjustments to transom mounted accessories C-Propeller torque and rotation A-Distribute weight evenly throughout boat cockpit including position of passengers and equipment. B-Review accessory owner's manuals for installation instructions or contact dealer for service. C-Some listing is normal based on the amount of propeller torque from rotation however if severe, contact dealer for service. 11.2 Lund-11.indd 2 7/9/10 1:56 PM A-Overtrimmed engine B-Incorrect propeller C-Engine mounted too high on transom A-Lower trim of engine. B-Contact dealer to review propeller choices understanding that SS propellors maintain contact with water better than aluminum. C-Contact dealer for service. Boat has poor A-Not enough engine bow lift while trim underway B-Incorrect propeller C-Improper adjustments to transom mounted accessories D-Poor weight distribution E-Improper engine mounting height A-Trim engine upwards. B-Contact dealer to review propeller choices. C-Review accessory owner's manuals for installation instructions or contact dealer for service. D-Review location of passengers and equipment and determine if more weight can be distributed towards aft of boat or contact dealer for service. E-Contact dealer for service. Boat porpoises A-Overtrimmed while engine underway B-Incorrect propeller C-Engine trim tab D-Poor weight distribution E-Improper engine mounting height A-Lower engine trim angle. B-Contact dealer to review propeller choices. C-If engine is equipped with trim tab, adjust per engine owner's manual. D-Review location of passengers and equipment and determine if more weight can be distributed towards bow of boat or contact dealer for service. E-Contact dealer for service. Water spray is coming from transom of boat A-Review accessory owner's manuals for installation instructions or contact dealer for service. A-Improper adjustment to transom mounted accessories TROUBLE SHOOTING GUIDE Propeller cavitates 11.3 Lund-11.indd 3 7/9/10 1:56 PM MECHANICAL CABLE & HYDRAULIC STEERING Issue Possible Cause(s) Possible Solution(s) A-Adjust engine trim angle. Experiencing A-Improper engine B-Contact dealer to review steering torque trim angle while B-Incorrect propeller propeller choices. underway C-Improper engine C-Contact dealer for service. mounting height Issue Water is spilling out the top of livewell lid LIVEWELLS Possible Cause(s) Possible Solution(s) A-Spray head volume A-Spray head volume can be is greater than controlled by turning head overflow drain clockwise to reduce or shut off capacity water volume and counter clockwise to increase volume. Livewell is not A-Spray head is not filling open B-Livewell drain plug or overflow standpipe not installed A-Spray head must be opened by turning counter clockwise. B-Install livewell drain plug or standpipe overflow. TROUBLE SHOOTING GUIDE PEDESTALS Issue Possible Cause(s) Possible Solution(s) Air ride A-Air pedestal out of A-Remove seat from pedestal pedestal does adjustment and adjust screw on top of post not travel up or counter clockwise until down movement is achieved or contact dealer for service. Air ride pedestal will not hold position A-Air pedestal out of adjustment A-Remove seat from pedestal and adjust screw on top of post clockwise until seat holds position or contact dealer for service. 11.4 Lund-11.indd 4 7/9/10 1:56 PM HARDWARE Possible Cause(s) Possible Solution(s) A-Set screw has A-Adjust latch to proper setting loosened or is out of and tighten set screw on end of adjustment latch. B-Plastic nut for B-Tighten plastic retaining nut on assembly has underside of latch to keep latch loosened from turning. TROUBLE SHOOTING GUIDE Issue Door pull latch is loose or not working properly 11.5 Lund-11.indd 5 7/9/10 1:56 PM 12 Abaft Toward the stern. Abeam Amidships, at a right angle to the keel. Aboard On, in, or into a boat. ABYC American Boat and Yacht Council, Inc., the organization that sets voluntary safety and construction standards for small craft in the USA. Adrift Without motive power and without anchor or mooring. Afloat On the water. Aft Describing the after section of a vessel or things to the rear of amidships and near the stern. Aground Touching bottom. Amidships In the center, the center portion of a vessel. Anchor A forging or casting shaped to grip the sea bottom and, by means of a cable or rope, hold a boat in a desired position. Anchorage A customary, suitable, and (usually) designated harbor area in which vessels may anchor. Astern Toward the stern. An object that is aft of a boat is said to be astern of the boat. Athwart Across. Aweigh Off the bottom, said of an anchor. Aye Yes, while aboard a boat or ship. Means “I understand.” Bail (Bale) To remove water from a boat by pump or bailer. Beacon A post or buoy placed over a shoal or bank to warn vessels. Also a signal mark on land. Beam Imaginary line amidships at right angles to keel of vessel. Also vessel’s width amidships. Bearing The direction or point of the compass in which an object is seen. Belay To make fast to a cleat or belaying pin; to cancel an order. Below Beneath or under the deck. One goes below when going down into the cabin. Bend To fasten by means of a bend or knot. BOATING TERMS Boating Terms 12.1 Lund-12.indd 1 7/9/10 1:57 PM BOATING TERMS Berth A position, as a place to sleep or in which a vessel may be made fast; a margin of safety, as “a wide berth.” Bilge The lower internal part of a boat’s hull. Bollard A strong post for holding lines fast. Bow The forward part or front of the boat. Breakers Waves cresting as they reach shallow water, as at or on a beach. Breakwater A structure, usually stone or concrete, built to create a harbor or improve an existing one. Bulkhead Vertical partition in a boat. Burdened Vessel ormer term for the vessel which must F stay clear of vessels with the right-of-way. Camber The arch of a deck sloping downward from the center toward the sides. Capsize To turn over. Cardinal Points he four main points of a compass; north, east, south, and T west. Ceiling The inside lining of the hull. Certificate Government paper, such as a boat’s license. Chart A map of a body of water that contains piloting information. Chine The intersection of sides and bottom of a boat. Cleat A piece of wood or metal with projecting ends to which lines are made fast. Clinker A method of planking in which the lower edge of each strake overlaps the upper edge of the strake next below. (Also called lapstrake.) Coaming A raised edge, as around part or all of a cockpit, that prevents seawater from entering the boat. Coast Guard The federal marine law enforcement and rescue agency in the US and Canada. Cockpit A well or sunken space in the afterdeck of a small boat for the use of the helmsman and crew. Companionway A hatch or entrance from deck to cabin. Compass The instrument which shows the heading of a vessel. 12.2 Lund-12.indd 2 7/9/10 1:57 PM Hooded openings used for ventilation. Cradle A frame used to support a vessel on land. Current The movement of the water in a horizontal direction. Deadrise The rise of the bottom of a midships frame from the keel to the bilge. Deck Any permanent covering over a compartment. Deep-six To discard or throw overboard. Depth Sounder An electronic depth-finding instrument measuring the time a sound wave takes to go from the vessel to the bottom and return, then displaying the result in feet, fathoms, or meters. Dinghy A small, open boat. Displacement Hull Type of hull that plows through the water even when more power is added. Dock n enclosed or nearly enclosed water area; all the port instalA lations; a place where vessels can moor, as a pier, wharf, or floating dock. Dolphin A small group of piles in the water generally used for mooring or as a channel marker. Draft The depth of the vessel below the water line measured vertically to the lowest part of the hull. Dunnage Mats, boughs, pieces of wood, or other loose materials placed under or among goods carried as cargo in the hold of a ship to keep them dry and to prevent their motion and chafing; cushioning or padding used in a shipping container to protect fragile articles against shock and breakage; baggage or personal effects. Ebb An outgoing tide. Estuary An inlet or arm of the sea. Fathom Six feet. Fenders Objects placed along the side of the boat to protect the hull from damage. Flare The outward spread of the boat’s sides from the waterline to the rail at the bow. Also, a pyrotechnic signaling device that can indicate distress. Fore Used to distinguish the forward part of a boat or things forward of amidships. It is the opposite of aft or after. BOATING TERMS Cowls 12.3 Lund-12.indd 3 7/9/10 1:57 PM BOATING TERMS Forward Toward the bow. Frame Ribs of the hull extending from the keel to the highest continuous deck. Freeboard The vertical distance measured on a boat’s side from the waterline to the gunwale. Galley The kitchen area of a boat. Gimbals Swivels used to keep equipment level. Give-Way Vessel The one which must stay clear of vessels which have the right-of-way. Grab Rail A convenient grip on a cabin top or along a companion ladder. Gunwale The upper edge of a boat’s side. (Pronounced gunnel.) Harbor A safe anchorage protected from most storms; may be natural or man-made, with breakwaters and jetties; a place for docking and loading. Hatch (Lid) An opening in a boat’s deck for persons or cargo to go below. Head A marine toilet. Headway Forward motion of a vessel through the water. Helm The wheel or tiller by which a ship is steered. Holding Tank Storage tank for sewage so that it will not be pumped overboard into the water. Hull The body of a boat. Hypothermia A physical condition where the body loses heat faster than it can produce it. Inboard More toward the center of a vessel; inside; a motor fitted inside the boat. Inland Rules Rules of the road that apply to vessel operation in harbors and certain rivers, lakes, and inland waterways. Intracoastal Waterways (ICWs): bays, rivers, and canals along the coasts (such as Atlantic and Gulf of Mexico coasts) connected so that vessels may travel without going into the open sea. Jetty A structure, usually masonry, projecting out from the shore; a jetty may protect a harbor entrance. Keel The permanently positioned fore and aft backbone member of a boat’s hull. 12.4 Lund-12.indd 4 7/9/10 1:57 PM To bend a line. Also, a unit of speed equal to one nautical mile (6076.10 feet) an hour. Launch (1) To put a vessel into the water; (2) A small open powerboat mainly used for transportation between a vessel and shore. Lee The side opposite to that from which the wind blows. Leeward Situated on the side turned away from the wind. (Opposite of windward.) Leeway The amount a boat is carried sideways by the wind’s force or current. Lid (Hatch) An opening in a boat’s deck for persons or cargo to go below. Limber Holes Drainage holes in the bilge timbers of a vessel allowing water to run to a low point for pumping out. List (1) A continuous leaning to one side often caused by an imbalance in stowage or a leak into one compartment; (2) A light list is a printed listing of aids to navigation in geographical order or inclining of a vessel toward the side. LOA Length overall; the maximum length of a vessel’s hull, excluding projecting spars or rudder. Locker A storage place, a closet. Log A record or diary of a vessel’s journey. Lubber’s Line A mark or permanent line on a compass that shows the course of the boat. Making Way Making progress through the water. Marina A place, essentially a dock area, where small recreational craft are kept; usually where floats or piers as well as service facilities are available. MAYDAY A radio distress call from the French m’aidez (help me); SOS in Morse Code. Mooring Commonly the anchor chain, buoy, pennant, etc., by which a boat is permanently anchored in one location. Motor A source of mechanical power. Motorboat Any watercraft 65 feet or less in length propelled by machinery, whether or not such machinery is the principal source of propulsion. Navigation The art of conducting a ship from port to port. BOATING TERMS Knot 12.5 Lund-12.indd 5 7/9/10 1:57 PM BOATING TERMS Nautical Mile 6076.12 feet, or 1852 meters, an international standard; the geographical mile, the length of one minute of latitude at the equator, is 6087.20 feet. Nun Buoy A conical, red buoy bearing an even number and marking the starboard side of a channel from seaward. Oar A long, wooden instrument with a flat blade at one end used for propelling a boat. Outboard (1) A propulsion unit for boats attached at the transom; includes motor, drive shaft, and propeller; fuel tank and battery may be integral or installed separately in the boat; (2) Outside or away from a vessel’s hull; opposite of inboard. Outdrive A propulsion system for boats with an inboard motor operating an exterior drive with drive shaft, gears, and propeller; also called stern drive and inboard/outboard. Overall Length The extreme length of a vessel, excluding spars or rigging fittings. See LOA. Painter A rope attached to the bow of a boat for making it fast. PFD Personal Flotation Device. Pier A structure, usually wood or masonry, extending into the water used as a landing place for boats and ships. Pile A vertical wooden or concrete pole driven into the bottom; may be a support for a pier or floats; also used for mooring. Piling A structure of piles. Pitch (1) The up and down movement as the bow and stern rise and fall due to wave action; (2) The theoretical distance advanced by a propeller in one revolution. Planing Hull Type of hull that is shaped to lift out of the water at high speed and ride on the surface. Port The left side of a boat when you are facing the bow. Also a destination or harbor. Privileged Vessel Former term for the vessel with the right-of-way. Propeller Wheel or screw mechanism that pushes water aft to propel the boat. Rigging The general term for all lines (ropes) of a vessel. Roll The sideward motion of a boat caused by wind or waves. 12.6 Lund-12.indd 6 7/9/10 1:57 PM The nautical traffic rules for preventing collisions on the water. Scope The length of the anchor rope or chain. 6 to 1 scope means that the length of the anchor rope from the boat to the anchor is 6 times the depth of the water. Scupper A hole allowing water to run off the deck. Sea Anchor A floating canvas cone held open by wire rings with an opening in the smaller end and a rope bridle at the larger end attached to a line leading to the vessel; used in storm conditions to (a) keep the bow of the boat to the wind, and (b) slow downwind drift of the boat. Seacock A thru-hull valve; a shutoff on a plumbing or drain pipe between the vessel’s interior and the sea. Slip (1) A berth for a boat between two piers or floats; (2) The percentage difference between the theoretical and the actual distance that a propeller advances when turning in water under load. Sole The cabin or cockpit floor. Spar Buoy A channel marker that looks like a tall, slender pole. Stand-On Vessel The vessel with the right-of-way. Starboard The right side of a boat when you are facing the bow. Stern The after end or back of the boat. Stow To store items neatly and securely. Strake Planks running fore and aft on the outside of a vessel. Taffrail The rail around a boat’s stern. Tide The alternate rise and fall of waters caused by the gravitational attraction of moon or sun. Topsides (1) The sides of a vessel above the waterline; (2) On deck as opposed to below deck. Transom The transverse planking which forms the after end of a small, square-ended boat. (Outboard motors are usually attached to a transom.) Trim To arrange weights in a vessel in such a manner as to obtain desired draft at bow and stern. Unbend To cast off or untie. BOATING TERMS Rules of the Road 12.7 Lund-12.indd 7 7/9/10 1:57 PM BOATING TERMS Underway Vessel in motion, i.e. when not moored, at anchor, or aground. USPS United States Power Squadron, a private membership organization that specializes in boating education and good boating practices. Vessel Every kind of watercraft, other than a seaplane on the water, capable of being used as a means of transportation on water. VHF Radio A Very High Frequency electronic communications and direction-finding system. Wake Moving waves created by vessel motion. Track or path that a boat leaves behind it when moving across the water. Wash The loose or broken water left behind a vessel as it moves along; the surging action of waves. Waterline The intersection of a vessel’s hull and the water’s surface; the line separating the bottom paint and the topsides. Way Movement of a vessel through the water. Technically it is underway when not at anchor, aground, or made fast to the shore. The common usage is interpreted as progress through the water. Headway when going forward and sternway when going backward. Well Area at the rear of a boat where the motor may be located. Wharf A structure, parallel to the shore, for docking vessels. Wheel (1) The steering wheel; (2) The propeller. Whistle Signal A standard communication signal between boats to indicate change of course, danger, or other situations. Windward Situated on the side closest to the wind. (Opposite of leeward.) Yaw To swing or steer off course as when running with a quartering sea. 12.8 Lund-12.indd 8 7/9/10 1:57 PM NOTICE: Seven very important things to do now! •Read your owner’s manual and all other literature that accompanies your boat. • Acquire necessary and recommended safety equipment. • Comply with all state, provincial and federal registration requirements. • Know your boat; become familiar with all features on the boat. •Take advantage of boating education and safety courses and publications. • Read and understand the Limited Boat Warranty. •Make sure you and your dealer have filled out and mailed your Warranty Card. This manual has been compiled to help you operate your boat with safety and pleasure. It contains details of the boat, the equipment supplied or fitted, its systems, and information on its operation and maintenance. Please read it carefully and familiarize yourself with the craft before using it. If this is your first boat, or if you are changing to a type of boat you are not familiar with, for your own comfort and safety, please ensure that you obtain handling and operating experience before "assuming command" of the boat. Your dealer will be pleased to advise you of local sea schools or competent instructors. PLEASE KEEP THIS MANUAL IN A SECURE PLACE, AND HAND IT OVER TO THE NEW OWNER WHEN YOU SELL THE BOAT. Lund-IFB_Cover_2009.indd 1 7/9/10 1:42 PM

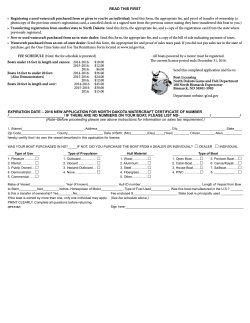


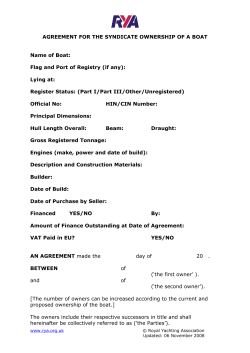


© Copyright 2026