
Using IBM Lotus Symphony Spreadsheets:
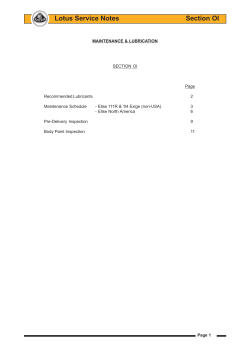
Using IBM® Lotus® Symphony™ Spreadsheets:
Basics
Student Guide
Using IBM® Lotus® Symphony™
Spreadsheets: Basics
Part Number: Y1300
Course Edition: 1.0
Notices
DISCLAIMER: You may not copy, reproduce, translate, or reduce to any electronic medium or machinereadable form, in whole or in part, any documents, software, or files provided to you without prior written
consent of IBM Corporation, except in the manner described in the documentation. While every reasonable
precaution has been taken in the preparation of this manual, the author and publishers assume no
responsibility for errors or omissions, nor for the uses made of the material contained herein and the decisions
based on such use. Neither the author nor the publishers make any representations, warranties, or guarantees
of any kind, either express or implied (including, without limitation, any warranties of merchantability, fitness for
a particular purpose, or title). Neither the author nor the publishers shall be liable for any indirect, special,
incidental, or consequential damages arising out of the use or inability to use the contents of this book, and
each of their total liability for monetary damages shall not exceed the total amount paid to such party for this
book.
TRADEMARK NOTICES The following terms are trademarks or service marks of International Business
Machines Corporation in the United States, other countries, or both: DB2®, Domino®, Domino® Designer,
Everyplace, ibm.com®, LearningSpace®, Lotus®, Lotus Enterprise Integrator®, Lotus Notes®, Lotus Workflow,
Quickr™, Rational®, Sametime®, Symphony™, Tivoli®, VisualAge®, and WebSphere®.
Java and all Java-based trademarks and logos are trademarks of Sun Microsystems, Inc., in the United
States, other countries, or both.
Microsoft, Windows, Windows NT, and the Windows logo are trademarks of Microsoft Corporation in the
United States, other countries, or both.
Intel, Intel Inside (logos), MMX and Pentium are trademarks of Intel Corporation in the United States, other
countries, or both.
UNIX is a registered trademark of The Open Group United States and other countries.
Linux is a trademark of Linus Torvalds in the United States, other countries, or both.
Copyright © 2008 IBM Corporation.
Lotus software, IBM Software Group, One Rogers Street, Cambridge, MA 02142
Under the copyright laws, neither the documentation nor the software may be copied, photocopied, reproduced,
translated, or reduced to any electronic medium or machine-readable form, in whole or in part, without the prior
written consent of IBM, except in the manner described in the documentation or the applicable licensing
agreement governing the use of the software.
All rights reserved.
Licensed Materials - Property of IBM
U.S. Government Users Restricted Rights - Use, duplication, or disclosure restricted by GSA ADP Schedule
Contract with IBM Corporation.
You must purchase one copy of the appropriate kit for each student and each instructor. For all other education
products you must acquire one copy for each user or you must acquire a license for each copy provided to a
user.
Using IBM® Lotus® Symphony™ Spreadsheets: Basics
Table of Contents
Using IBM® Lotus® Symphony™ Spreadsheets: Basics
Lesson 1: Introducing IBM® Lotus® Symphony™
Spreadsheets
Topic A. Getting Started with IBM® Lotus® Symphony™
Spreadsheets . . . . . . . . . . . . . . . . . . . . . . . . . . . . . . . . . . . . . . . . . . . . . .
2
What is Lotus Symphony Spreadsheets? . . . . . . . . . . . . . . . .
3
The Lotus Symphony Spreadsheets Interface . . . . . . . . . . . .
3
The Properties Sidebar . . . . . . . . . . . . . . . . . . . . . . . . . . . . . . .
4
Examining Preferences . . . . . . . . . . . . . . . . . . . . . . . . . . . . . .
6
Creating a Spreadsheet . . . . . . . . . . . . . . . . . . . . . . . . . . . . .
7
Creating a Spreadsheet from a Template . . . . . . . . . . . . . .
7
Opening an Existing Spreadsheet . . . . . . . . . . . . . . . . . . . . .
7
Saving a Spreadsheet . . . . . . . . . . . . . . . . . . . . . . . . . . . . . . .
7
Topic B. Adding Content to A Spreadsheet . . . . . . . . . . . . . . . . . . . . . .
7
Enter Data . . . . . . . . . . . . . . . . . . . . . . . . . . . . . . . . . . . . . . . . .
8
Insert and Edit Notes . . . . . . . . . . . . . . . . . . . . . . . . . . . . . . . .
8
Rotating Text . . . . . . . . . . . . . . . . . . . . . . . . . . . . . . . . . . . . . . .
8
Writing Multi-line Text . . . . . . . . . . . . . . . . . . . . . . . . . . . . . . . .
9
Inserting Special Characters . . . . . . . . . . . . . . . . . . . . . . . . .
10
Formatting Text . . . . . . . . . . . . . . . . . . . . . . . . . . . . . . . . . . . .
10
Displaying Formulas or Values . . . . . . . . . . . . . . . . . . . . . . . . .
11
The Formula Bar . . . . . . . . . . . . . . . . . . . . . . . . . . . . . . . . . . . .
11
Copying Formulas . . . . . . . . . . . . . . . . . . . . . . . . . . . . . . . . . .
12
Filling Cells Instantly . . . . . . . . . . . . . . . . . . . . . . . . . . . . . . . . .
14
Calculating in Lotus Spreadsheets . . . . . . . . . . . . . . . . . . . . .
14
© Copyright IBM Corporation 2008.
Using IBM® Lotus® Symphony™ Spreadsheets: Basics
Lesson 2: Formatting and Printing an IBM® Lotus®
Symphony™ Spreadsheet
Topic A. Formatting Cells . . . . . . . . . . . . . . . . . . . . . . . . . . . . . . . . . . . . .
22
Inserting and Deleting Rows, Columns, and Cells . . . . . . . .
23
Selecting Multiple Cells . . . . . . . . . . . . . . . . . . . . . . . . . . . . . .
23
Merging and Splitting Cells . . . . . . . . . . . . . . . . . . . . . . . . . . .
23
Cell Borders . . . . . . . . . . . . . . . . . . . . . . . . . . . . . . . . . . . . . . . .
24
Changing Row Height or Column Width . . . . . . . . . . . . . . . .
25
Sorting Data . . . . . . . . . . . . . . . . . . . . . . . . . . . . . . . . . . . . . . .
25
Topic B. Formatting Numbers . . . . . . . . . . . . . . . . . . . . . . . . . . . . . . . . .
26
Numbers with Decimals . . . . . . . . . . . . . . . . . . . . . . . . . . . . . .
27
Number Formats . . . . . . . . . . . . . . . . . . . . . . . . . . . . . . . . . . .
27
Formatting Numbers as Text . . . . . . . . . . . . . . . . . . . . . . . . . .
28
Using Rounded Off Numbers . . . . . . . . . . . . . . . . . . . . . . . . . .
29
Highlighting Negative Numbers . . . . . . . . . . . . . . . . . . . . . . .
30
Changing Currency Format for Cells . . . . . . . . . . . . . . . . . . .
30
Topic C. Printing a Spreadsheet . . . . . . . . . . . . . . . . . . . . . . . . . . . . . . .
30
Basic Print Options . . . . . . . . . . . . . . . . . . . . . . . . . . . . . . . . . .
31
Printing Rows or Columns on Every Page . . . . . . . . . . . . . . . .
31
Printing Sheet Details . . . . . . . . . . . . . . . . . . . . . . . . . . . . . . . .
33
Printing Multiple Sheets . . . . . . . . . . . . . . . . . . . . . . . . . . . . . .
33
Appendix A: Additional Resources
Glossary . . . . . . . . . . . . . . . . . . . . . . . . . . . . . . . . . . . . . . . . . . . . . . . .
43
Index . . . . . . . . . . . . . . . . . . . . . . . . . . . . . . . . . . . . . . . . . . . . . . . . . . . .
45
© Copyright IBM Corporation 2008.
Using IBM® Lotus® Symphony™ Spreadsheets: Basics
Introduction
About This Course
With IBM® Lotus® Symphony™ Spreadsheets, you can perform standard
and advanced spreadsheet functions to calculate, analyze, and manage
your data. Lotus Symphony Spreadsheets’ clean, simple interface will
allow you to utilize standard conventions for presenting data and calculations in rows and columns.
Course Description
Target Student
This course is designed for IBM® Lotus® Symphony™ end users who will
use these materials to learn the basic tasks associated with the Lotus
Symphony Spreadsheet editor.
Course Prerequisites
This course assumes that students have some experience with using
spreadsheet software.
How to Use This Book
As a Learning Guide
Each lesson covers one broad topic or set of related topics. Lessons are
arranged in order of increasing proficiency with IBM Lotus Symphony
Spreadsheets; skills you practice in one lesson are used and developed
in subsequent lessons. For this reason, you should work through the
lessons in sequence.
Introduction
i
Using IBM® Lotus® Symphony™ Spreadsheets: Basics
Introduction
Each lesson is organized into results-oriented topics. Topics include all the
relevant and supporting information you need to master Lotus Symphony
Spreadsheets, and activities allow you to apply this information to practical
hands-on examples.
As a Review Tool
Some of the information covered in class may not be relevant to your environment immediately, but it may become important later on. For this reason,
we encourage you to spend some time reviewing the topics and activities
after the course.
As a Reference
The organization and layout of the book make it easy to use as a learning
tool and as an after-class reference. You can use this book as a first source
for definitions of terms, background information on given topics, and summaries of procedures.
Course Objectives
After completing this course, you should be able to:
•
Explore Lotus Symphony Spreadsheets.
•
Format and print a Lotus Symphony Spreadsheet.
Course Requirements
Hardware
This course assumes users will be using their personal computer to take
this course. The following are the system requirements to support an installation of IBM® Lotus® Symphony™ 1.1:
•
At least 750 MB of free disk space on Linux, and at least 540 MB of
free disk space on Microsoft® Windows®.
•
ii
At least 512 MB of memory.
Introduction
Using IBM® Lotus® Symphony™ Spreadsheets: Basics
Introduction
Software
The following list identifies the software requirements for installing Lotus
Symphony 1.1. Please note that proper licensing for all software is required
and is the responsibility of the training organization.
•
Microsoft® Windows® XP with SP2 or Microsoft Windows Vista®
•
IBM Lotus Symphony 1.1
Class Setup
Course Files
The following table describes the course files.
Table 0-1: Course files
Title
Sales July to
Dec
File name
Sales July to
Dec BasicL2.ods
Description
Spreadsheet to be used in the lesson 2 activity.
Course Setup Tasks
Complete the tasks in the following table to set up the course prior to the
start of class. Detailed procedures for each task appear on the following
pages.
Table 0-2: Course setup tasks
Task
Procedure
1
Uninstall any previously installed version of IBM Lotus Symphony.
2
Install Lotus Symphony 1.1.
3
Install the course data files.
Task 1: Uninstall Previous Versions of IBM
Lotus Symphony
If you currently have an earlier version of Lotus Symphony installed, you will
need to uninstall it prior to installing Lotus Symphony 1.1. Follow these
steps to uninstall any previously installed versions of Lotus Symphony.
Introduction
iii
Using IBM® Lotus® Symphony™ Spreadsheets: Basics
Introduction
Table 0-3: Uninstall previous versions of IBM Lotus Symphony
Step
Action
1
Verify that Lotus Symphony is closed.
2
Click Start→Control Panel→Add or Remove Programs.
3
In the Add or Remove Programs dialog box, click IBM Lotus Symphony,
and then click Remove.
Note: It may take a few minutes for the program to uninstall.
Task 2: Install Lotus Symphony 1.1
If you have not yet installed Lotus Symphony 1.1, you will need to do so
before taking this course. Follow these steps to install Lotus Symphony 1.1.
Table 0-4: Install Lotus Symphony 1.1
iv
Step
Action
1
In a Web browser, go to http://symphony.lotus.com/software/lotus/
symphony/home.nsf/home and click Download to download the Lotus
Symphony 1.1 installation files. A new window opens and lists the IBM
Lotus Symphony installation types. Click the version for the Windows operating system. In the next window, the product information is displayed.
Select a language and click Continue. Select I agree after viewing the
licensing information, and then click I confirm.
2
In the Download using Download Director dialog box, select Lotus Symphony Setup for Windows and click Download now.
3
After the files have finished downloading, click Launch in the Download
Director.
4
The Installation Wizard for IBM Lotus Symphony is displayed. On the
Welcome to IBM Lotus Symphony 1.1 page, click Next.
5.
On the Software License Agreement page, select I accept the terms in
the license agreement, and click Next.
6.
On the next page, leave the default install location or browse to and select
a custom location, and then click Next.
7.
On the File Type Associations page, verify that the Open Document Format file types and OpenOffice.org 1.1 file types are selected by default.
Click Next.
8.
On the next page, click Install.
9
On the IBM Lotus Symphony Install Complete page, verify that Open
Lotus Symphony is selected, and then click Finish.
Introduction
Using IBM® Lotus® Symphony™ Spreadsheets: Basics
Introduction
Task 3: Install the Course Data Files
Data files for students to use during the course activities are provided and
installed as part of course setup.
Table 0-5: Install the course data files
Step
Action
1
Open the Y1300labfiles.zip file and run the Y1300labfiles.exe selfextracting file. This executable will create the \lotus_ed\ folder and install
sub-folders named \Documents, \Spreadsheets, and \Presentations.
Note: These course files apply to all Lotus Symphony modules, so you will
only need to install these files once.
Course Icons
The following table explains the icons used in this course.
Table 0-6: Course icons
Icon
Description
An activity is a student-centered learning process that allows students to learn by performing a task. Activities can be instructor-led or
completed independently.
Scenario information is used to introduce an activity problem or goal.
Scenarios use fictitious people and organizations to present details,
problem statements, and parameters that are used to complete the
activity or lab exercise.
Caution statements are included in the courseware to make students
aware of potential negative consequences of an action, setting, or
decision, that are not easily known.
Tips and notes provide additional information, guidance, or a hint
about a topic or task.
An Instructor Note is a special comment to the instructor regarding
delivery, classroom strategy, classroom tools, exceptions, and other
special considerations. The Instructor Note is included in the Instructor Guide only.
A Display Slide provides a prompt to the instructor to display a specific slide. The Display Slide icon is included in the Instructor Guide
only.
Introduction
v
1
Introducing IBM® Lotus®
Symphony™ Spreadsheets
■
Topic A: Getting Started with IBM® Lotus® Symphony™ Spreadsheets
■
Topic B: Adding Content to A Spreadsheet
© Copyright IBM Corporation 2008.
Lesson 1 ■ Introducing IBM® Lotus® Symphony™ Spreadsheets
Introduction
Imagine using a computer without having a basic understanding of its components and how it operates. Similarly, using a software application, such as
IBM® Lotus® Symphony™ Spreadsheets, without understanding its basic
components would be difficult. Exploring the Lotus Symphony Spreadsheets
environment will introduce you to some of its basic tools and functions,
which will help you get started with Lotus Symphony Spreadsheets.
After completing this lesson, you should be able to:
● Explore the Lotus Symphony Spreadsheets interface.
●
2
Add content to a spreadsheet.
© Copyright IBM Corporation 2008.
Using IBM® Lotus® Symphony™ Spreadsheets: Basics
Lesson 1 ■ Introducing IBM® Lotus® Symphony™ Spreadsheets
A
Topic A: Getting Started with IBM®
Lotus® Symphony™ Spreadsheets
It would be easier for you to perform in a new job if you received an overview of how to work in your new environment. Similarly, exploring IBM®
Lotus® Symphony™ Spreadsheet’s user interface will help you to familiarize
yourself with some of its basic functions, which, in turn, will help you use the
application effectively.
What is Lotus Symphony Spreadsheets?
Lotus Symphony Spreadsheets is a spreadsheet application that allows you
to calculate, analyze, and manage your data. With Lotus Symphony Spreadsheets, you can create, edit, share, and save a variety of spreadsheets. You
can create new documents, import existing documents, or choose from a
set of document templates.
The Lotus Symphony Spreadsheets Interface
When you select Create a new Spreadsheet from the Lotus Symphony
Home page, a new Lotus Symphony Spreadsheet file is opened for you.
The interface is simple and intuitive, and it contains the same standard
options as most spreadsheet editors.
Interface element
Description
Menu bar
High-level set of menus from which you can perform
any function available in Lotus Symphony Spreadsheets.
Tab bar
Region that shows all files currently open in Lotus
Symphony. Each tab represents an open file.
Content window
Main region of the document that contains all text,
tables, and diagrams that you have created.
Properties sidebar
Side pane of text and formatting properties that is
readily available while you are creating your document.
Status bar
Bar along the bottom of the window that provides
document information such as the page number, cursor position, magnification level, and the status of
various text editing modes.
© Copyright IBM Corporation 2008.
3
Topic A: Getting Started with IBM® Lotus® Symphony™ Spreadsheets
Lesson 1 ■ Introducing IBM® Lotus® Symphony™ Spreadsheets
The following figure shows and describes the different parts of the Lotus
Symphony Spreadsheets interface.
Figure 1-1: The Lotus Symphony Spreadsheets interface
The Properties Sidebar
The most notable user interface element of Lotus Symphony Spreadsheets
is the Properties sidebar, which is displayed to the right of the spreadsheet
you are creating. In some programs, formatting features may be hidden in
menus and hard to find. However, in Lotus Symphony, these formatting
properties are always easily accessible as you create your spreadsheet.
The contents of the Properties sidebar are context-sensitive, meaning that
the contents will change depending on whether you are modifying text, a
chart, or a graphic. The type of properties displayed for the current context
can be changed by clicking the pop-up menu in the heading of the sidebar.
4
© Copyright IBM Corporation 2008.
Using IBM® Lotus® Symphony™ Spreadsheets: Basics
Lesson 1 ■ Introducing IBM® Lotus® Symphony™ Spreadsheets
The following figure shows the Properties sidebar.
Figure 1-2: The Properties sidebar
© Copyright IBM Corporation 2008.
5
Topic A: Getting Started with IBM® Lotus® Symphony™ Spreadsheets
Lesson 1 ■ Introducing IBM® Lotus® Symphony™ Spreadsheets
Examining Preferences
In addition to the properties available on the Properties sidebar, there are
global properties that you can modify for Lotus Symphony Spreadsheets. In
the main menu bar, click File→Preferences to open the Preferences dialog
box. Expand IBM Lotus Symphony, if necessary, and then expand Lotus
Symphony Spreadsheets. The following figure illustrates the available preferences.
Figure 1-3: The Preferences dialog box
Nested within the Lotus Symphony Spreadsheets node in the navigation
pane, you can click any of these categories to adjust the preferences to
your needs.
Category
6
Preferences to Set
General (Lotus Symphony
Spreadsheets)
Options for updating links when opening an
existing document, tab stops, and cursor
behavior when pressing Enter.
Calculate
Optional for iterative references, calculations,
and decimal places.
Changes
Options for assigning colors to inserted text,
deleted text, and moved contents.
Sort Lists
Displays all sort lists currently defined, and
allows you to create additional ones.
© Copyright IBM Corporation 2008.
Using IBM® Lotus® Symphony™ Spreadsheets: Basics
Lesson 1 ■ Introducing IBM® Lotus® Symphony™ Spreadsheets
Category
View
Preferences to Set
Page display options such as cells, grid lines,
formulas, and selection handles; window display options such as headers, scroll bars, tabs,
and outline symbols, and show/hide settings
for objects, charts, and graphics.
Creating a Spreadsheet
Creating a new spreadsheet in Lotus Symphony is very simple. From the
Lotus Symphony Home page, click Create a new Spreadsheet. If you are
already working within a Lotus Symphony editor, you can either click File→
New or click the New button and select Lotus Symphony Spreadsheet.
Creating a Spreadsheet from a Template
Templates are an excellent way to standardize spreadsheets that need to
have the same formatting, and the Template Organizer within Lotus Symphony allows you to collect and organize all your templates for documents,
spreadsheets, or presentations in one location. To use a spreadsheet template, click File→New→From Template→Spreadsheet.
Note: You cannot use a spreadsheet template if you have not imported any into the
Template Organizer. The default template library in Lotus Symphony contains only
presentation templates.
Opening an Existing Spreadsheet
To open an existing spreadsheet in Lotus Symphony Spreadsheets, click
File→Open, and then navigate to the location where the file is located,
select it, and click Open. Lotus Symphony Spreadsheets will open
Microsoft® Excel®, OpenDocument, and OpenOffice file types.
Saving a Spreadsheet
Once a spreadsheet has been created, you will need to save it so that you
can access it again at a later time. Use the Save As option to save a file for
the first time, and also to save an existing file with a new name, to change
the file type, or to save it in a new directory. Use the Save option to save
changes made to an existing spreadsheet without changing its name, type,
or directory. Both the Save and Save As options are located on the File
menu. The default file type for saving a spreadsheet in Lotus Symphony
Spreadsheets is OpenDocument (.ods), but you can also choose to save a
spreadsheet file as OpenOffice or Microsoft Excel file types.
© Copyright IBM Corporation 2008.
7
Topic B: Adding Content to A Spreadsheet
Lesson 1 ■ Introducing IBM® Lotus® Symphony™ Spreadsheets
B
Topic B: Adding Content to A
Spreadsheet
In order to write a book, a writer has to fill the pages with words. Similarly,
to create informative workbooks in IBM® Lotus® Symphony™ Spreadsheets,
you need to enter data into worksheets. There are many ways to organize
your data, but a structure with column and row headings makes it much
easier to identify the information.
Enter Data
When you are entering data, cells can contain text, numbers, or formulas. In
a spreadsheet, text is used to organize and label the numerical information.
By default, text is left aligned in the cell and numbers are right aligned.
Insert and Edit Notes
Adding notes to cells in Lotus Symphony Spreadsheets allows you to retain
reminders for missing information, descriptions of cell contents, or other pertinent information. You can insert a note for any cell by clicking Create→
Note. A yellow text box will display with an arrow indicating which cell the
box is attached to. Within this text box you can type your notes. Once you
move away from this cell, the yellow text box is hidden and its existence
indicated by a tiny red square in the upper-right corner of the cell to which it
belongs.
The following figure shows cell notes in columns D and E.
Figure 1-4: Cell notes
Rotating Text
One of the ways you can customize your content is by manipulating the text
direction and alignment. Text that is aligned horizontally or vertically can be
rotated at a specified angle to provide a unique display. To rotate text, select
the cells whose text you want to rotate. Click Layout→Properties→Text
and Cells Properties. Or, you can click the All Text and Cell Properties
8
© Copyright IBM Corporation 2008.
Using IBM® Lotus® Symphony™ Spreadsheets: Basics
Lesson 1 ■ Introducing IBM® Lotus® Symphony™ Spreadsheets
button on the Properties sidebar. In the Text and Cell Properties dialog
box, click the Alignment tab. In the Text direction section, enter the rotation angle for the text. A positive number will rotate the text to the left and a
negative number will rotate text to the right. You can also specify the text
direction, horizontal or vertical, on the Alignment tab. Click OK to enable
your changes.
The following figure shows the rotation options on the Alignment tab of the
Text and Cell Properties dialog box.
Figure 1-5: The rotation options on the Alignment tab of the Text and
Cell Properties dialog box
Writing Multi-line Text
There are times when you will want to be sure all of the text you enter in a
cell is visible, even if the length of the text is greater than the width of the
cell. To format the text to include a line break at the right border of the cell,
select all the cells where you want the text to break at the right border.
Then, click Layout→Properties→Text and Cells Properties. Click the
Alignment tab, and under the Text in Cell section, select Word wrap, and
then click OK.
© Copyright IBM Corporation 2008.
9
Topic B: Adding Content to A Spreadsheet
Lesson 1 ■ Introducing IBM® Lotus® Symphony™ Spreadsheets
Inserting Special Characters
The Special Characters function allows you to insert special characters,
such as check marks, boxes, and other symbols, into your text. To access
special characters, click Create→Special Characters. In the Special Characters dialog box, you can view and select from all available characters.
Select the desired character and click OK to insert it in the currently active
cell of your spreadsheet.
Formatting Text
The Text and Cell Properties sidebar provides options to change the font
and font size, to choose a font style and color, and to add effects to text.
The following figure shows the Text and Cell Properties sidebar.
Figure 1-6: The Text and Cell Properties sidebar
10
© Copyright IBM Corporation 2008.
Using IBM® Lotus® Symphony™ Spreadsheets: Basics
Lesson 1 ■ Introducing IBM® Lotus® Symphony™ Spreadsheets
Displaying Formulas or Values
When viewing data in a spreadsheet, you can choose to have formulas display in cells or the results of the formula. If you want to display the formulas
in the cells, click File→Preferences→IBM Lotus Symphony→Lotus Symphony Spreadsheets→View. In the Page Display section, select
Formulas and click OK. If you want to view the calculation results instead
of the formula, do not select the Formulas check box or clear it if necessary.
The following figure shows the view preferences for Lotus Symphony
Spreadsheets.
Figure 1-7: View preferences for Lotus Symphony Spreadsheets
The Formula Bar
The Formula bar is one of the most important tools you will use when
working with spreadsheets. The Formula bar is used for entering and editing
formulas. You can choose to hide or show the Formula bar by clicking
View→Formula Input Line. If a check mark is displayed next to Formula
Input Line, then the Formula bar will be displayed. If the Formula bar is hidden, you can still edit cells selecting the cell you want to edit and pressing
F2 to activate edit mode. After editing cells, accept the changes by pressing
Enter, or discard entries by pressing Esc. Esc is also used to exit the edit
mode.
© Copyright IBM Corporation 2008.
11
Topic B: Adding Content to A Spreadsheet
Lesson 1 ■ Introducing IBM® Lotus® Symphony™ Spreadsheets
The following figure shows the Formula bar.
Figure 1-8: The Formula bar
Copying Formulas
When you copy a formula, Lotus Symphony Spreadsheets automatically
adjusts the formula to represent the new location. For example, if cell C24
contains the formula =sum(C4:C22) and you copy it to cell E24, the formula
would automatically adjust to =sum(E4:E22). The following table lists the
ways to copy a formula.
Method
12
Description
Menu option
Select the cell you wish to copy. Click Edit→Copy. Then
select the cell into which you want to copy the data, and click
Edit→Paste.
Right-click
option
Right-click the cell you wish to copy and click Copy. Then
right-click the cell into which you want to copy the data and
click Paste.
Keyboard shortcut
Select the cell you wish to copy. Press Ctrl+ C to copy it.
Then select the cell into which you want to copy the data,
and press Ctrl+V to paste it.
© Copyright IBM Corporation 2008.
Using IBM® Lotus® Symphony™ Spreadsheets: Basics
Lesson 1 ■ Introducing IBM® Lotus® Symphony™ Spreadsheets
Filling Cells Instantly
Lotus Symphony Spreadsheets includes fill options that allow you to automatically fill cells with either duplicate or sequential content. To automatically
fill cells with duplicate data, click Edit→Fill and select one of the following
options:
●
Up: Fills a selected range of at least two rows with the contents of the
bottom-most cell.
●
Down: Fills a selected range of at least two rows with the contents of
the top-most cell.
●
Right: Fills a selected range of at least two columns with the contents
of the left-most cell.
●
Left: Fills a selected range of at least two columns with the contents of
the right-most cell.
To automatically generate sequence, select the cell range whose existing
contents you want to extend to more cells. Click Edit→Fill→Sequence. In
the Fill Sequence dialog box, select the Direction you want to fill cells and
then select a Sequence Type for the cell content. If you select Date, then
you will also need to specify a Time Unit.
The following figure shows the Fill Sequence dialog box.
Figure 1-9: Fill Sequence dialog box
Automatic fill
To automatically increment data as you enter content down a column or
across a row, using the mouse, select the cell range whose existing contents you want to extend to more cells. Release the mouse button. Move
the mouse pointer on top of the automatic fill handle in the lower right of the
selected cell until the cursor turns into a target cross. Click and hold down
the left mouse button on the automatic fill handle, and drag in the desired
direction of the fill, selecting all the cells you want to contain data.
© Copyright IBM Corporation 2008.
13
Topic B: Adding Content to A Spreadsheet
Lesson 1 ■ Introducing IBM® Lotus® Symphony™ Spreadsheets
Automatic fill only increments data that Lotus Symphony Spreadsheets recognizes, such as numbers, dates, and cell references. If Lotus Symphony
Spreadsheets does not recognize data, automatic fill duplicates the data
exactly.
Calculating in Lotus Spreadsheets
A formula is a set of mathematical instructions that can be used to perform
calculations in spreadsheets. All formulas begin with an equal sign (=). Formulas contain various components, and a single formula can contain some
or all of these components:
●
References: Identify a cell or a range of cells on a worksheet and
refers to the location of the values or data on which you need to apply
the formula for calculation.
●
Operators: Symbols that specify the kind of calculation needed to be
performed on the components of a formula.
●
Constants: Numbers or text values that do not change in the formula.
If this value has to change, the formula itself has to be changed.
●
Functions: Predefined formulas used to simplify complex calculations.
Common mathematical operators used in formulas are:
●
Plus sign ( + ): Used for addition.
14
●
Minus sign ( – ): Used for subtraction.
●
Asterisk ( * ): Used for multiplication.
●
Forward slash ( / ): Used for division.
●
Caret symbol ( ^ ): Used for exponents.
●
Open and close parentheses ( ): Used for grouping computation instructions.
© Copyright IBM Corporation 2008.
Using IBM® Lotus® Symphony™ Spreadsheets: Basics
Lesson 1 ■ Introducing IBM® Lotus® Symphony™ Spreadsheets
The order of operations
When you use formulas to perform calculations, you need to know the
sequence of computations that formulas follow to arrive at the desired
result. This order of operations can affect the return value of a formula.
When a combination of operators are used, formulas are executed in the
following order:
1.
Computations enclosed in parentheses, wherever they appear in the
formula.
2.
Computations involving exponents.
3.
Computations involving multiplication and division. Because they are
equal with regard to the order in which Lotus Symphony Spreadsheets
performs them, the operation is performed in the order in which it
encounters them, which is from left to right.
4.
Computations involving addition and subtraction. Lotus Symphony
Spreadsheets also performs them in the order in which it encounters
them.
The following figure shows the order of operations in a formula.
Figure 1-10: The order of operations in a formula
© Copyright IBM Corporation 2008.
15
Topic B: Adding Content to A Spreadsheet
Lesson 1 ■ Introducing IBM® Lotus® Symphony™ Spreadsheets
Activity 1-1: Get Started with Lotus
Symphony Spreadsheets
Scenario
You need to document the company’s sales information for the second half
of the year in a spreadsheet.
To complete this activity:
●
Create a new spreadsheet.
●
Enter the spreadsheet data.
●
Enter and copy a formula.
●
Save the spreadsheet.
Follow these steps to get started with Lotus Symphony Spreadsheets.
Step
16
Action
1.
Double-click the IBM Lotus Symphony icon and then on the Lotus Symphony home page, click Create a new Spreadsheet.
2.
Verify that cell A1 is selected, type Product and press Tab.
3.
In cell B1, type July and press Enter.
4.
Hover the mouse pointer over the bottom-right corner of cell B1, and click
and drag to select cells C1:G1. This will fill the cells with the month names
August through December.
5.
Select cell A2, type Seminars and press Enter.
6.
In cell A3, type Manuals and press Enter.
7.
In cell A4, type Online programs and press Enter.
8.
In cell A5, type Inspirational Speeches and press Enter.
9.
Select cell A7, type Total Sales and press Enter.
© Copyright IBM Corporation 2008.
Using IBM® Lotus® Symphony™ Spreadsheets: Basics
Lesson 1 ■ Introducing IBM® Lotus® Symphony™ Spreadsheets
Step
10.
11.
12.
13.
14.
© Copyright IBM Corporation 2008.
Action
Enter the sales values for Seminars:
●
July: 28563
●
August: 38952
●
September: 51356
●
October: 85620
●
November: 22639
●
December: 19252
Enter the sales values for Manuals:
●
July: 35628
●
August: 54896
●
September: 25362
●
October: 34252
●
November: 23552
●
December: 29635
Enter the sales values for Online programs:
●
July: 35262
●
August: 125632
●
September: 78862
●
October: 25352
●
November: 58963
●
December: 54858
Enter the sales values for Inspirational Speeches:
●
July: 67852
●
August: 29635
●
September: 35621
●
October: 36253
●
November: 59663
●
December: 65235
Verify your content with the following graphic.
17
Topic B: Adding Content to A Spreadsheet
Lesson 1 ■ Introducing IBM® Lotus® Symphony™ Spreadsheets
Step
Action
15.
Select row 1. In the Text and Cell Properties sidebar, in the Font section,
in the Style drop-down list, click Bold.
16.
Select column A. In the Text and Cell Properties sidebar, in the Font section, in the Style drop-down list, click Bold.
17.
In cell B7, type =sum(B2:B5) and press Enter.
18.
Select cell B7 and click Edit→Copy.
19.
Select cells C7:G7 and click Edit→Paste to paste the formula into the other
columns.
20.
Click File→Save. In the Save As dialog box, in the File name field, type
Sales July to Dec and click Save.
Note: Leave the file open; you will use it in the next lesson.
18
© Copyright IBM Corporation 2008.
Using IBM® Lotus® Symphony™ Spreadsheets: Basics
Lesson 1 ■ Introducing IBM® Lotus® Symphony™ Spreadsheets
Lesson Summary
In this lesson, you explored the Lotus Symphony Spreadsheets environment
and entered data into a spreadsheet. Familiarizing yourself with the Lotus
Symphony Spreadsheets environment and basic formula options will help
you get started using the application with ease.
© Copyright IBM Corporation 2008.
19
2
Formatting and Printing an
IBM® Lotus® Symphony™
Spreadsheet
■
Topic A: Formatting Cells
■
Topic B: Formatting Numbers
■
Topic C: Printing a Spreadsheet
© Copyright IBM Corporation 2008.
Lesson 2 ■ Formatting and Printing an IBM® Lotus® Symphony™ Spreadsheet
Introduction
A spreadsheet should be easy to interpret and visually appealing. Formatting a spreadsheet will improve its aesthetic appeal and help avoid cluttered
data. By applying format options, you can visually differentiate one set of
data from another, making it easier to locate and analyze information.
After completing this lesson, you should be able to:
● Format cells.
22
●
Format numbers.
●
Print a spreadsheet.
© Copyright IBM Corporation 2008.
Using IBM® Lotus® Symphony™ Spreadsheets: Basics
Lesson 2 ■ Formatting and Printing an IBM® Lotus® Symphony™ Spreadsheet
A
Topic A: Formatting Cells
Imagine you have created an expense statement workbook for the current
year. You have forgotten to add the company executive’s travel expenses to
the workbook. Rather than creating a new workbook to include the new
data, you can insert columns, rows, or cells and modify the worksheet. By
inserting and deleting cells, columns, and rows, you can modify the layout of
a single workbook rather than create a new workbook every time your data
requirements change.
Inserting and Deleting Rows, Columns, and Cells
You can reorganize your spreadsheet at any time by inserting or deleting
columns or rows. New rows are added above the selected rows. New columns are added to the left of the selected columns. Any formulas in the
spreadsheet are automatically updated to reflect their new location. To insert
rows or columns, select the row or column next to which you want the new
one added. Click Create→Columns or Create→Rows. To delete a row or
column, simply highlight the row or column and click Edit→Delete Cells.
Selecting Multiple Cells
To select cells in a range, you can simply highlight the range with the
mouse, or you can select the first cell, and press and hold Shift, while using
the arrow keys to select the other cells in the range. To select various dispersed cells, select the first cell using the mouse, then press and hold Ctrl
while using the mouse to select the other cells.
Merging and Splitting Cells
The cell merge options in IBM® Lotus® Symphony™ Spreadsheets allow you
to merge cells across columns and rows and also to split cells that have
been merged. To merge cells, select the cells you want to merge, and then
click Layout→Merge Cells→Merge. The merged cell receives the name of
the first cell of the original cell range. Merged cells cannot be merged a second time with other cells. The range must form a rectangle; multiple
selection is not supported. To split cells that have already been merged,
select the currently merged cells, and then click Layout→Merge Cells→
Split.
© Copyright IBM Corporation 2008.
23
Topic A: Formatting Cells
Lesson 2 ■ Formatting and Printing an IBM® Lotus® Symphony™ Spreadsheet
Cell Borders
Border options are used to apply borders to cells. Lotus Symphony Spreadsheets provides you with options to apply a border to some or all the sides
of a cell or a range of cells. You can access border options by clicking
Layout→Properties→Text and Cell Properties, and then clicking the Borders tab.
The following figure shows the border options.
Figure 2-1: Border options
Changing Row Height or Column Width
You can adjust column width and row height in Lotus Symphony Spreadsheets using a couple of methods:
●
Using the mouse: In the row or column header area, click the separator
line between two rows or columns. When you see the mouse pointer
change from an arrow to a cross indicator, press and hold the left
mouse button and drag the separator line to the width or height desired.
●
24
Using the Row Height or Column Width dialog box: Click Layout→
Row Height or Layout→Column Width. In the dialog box, specify the
row height or column width desired and then click OK.
© Copyright IBM Corporation 2008.
Using IBM® Lotus® Symphony™ Spreadsheets: Basics
Lesson 2 ■ Formatting and Printing an IBM® Lotus® Symphony™ Spreadsheet
Sorting Data
A sort is a method of viewing data that arranges all the data into a specific
order. Data can be sorted in either ascending order or descending order,
based on numeric or alphabetic information. Data can be sorted on a single
criterion or multiple criteria. You can sort data within tables or within ordinary
worksheet data ranges.
Figure 2-2: Sample data sorted in ascending order
© Copyright IBM Corporation 2008.
25
Topic A: Formatting Cells
Lesson 2 ■ Formatting and Printing an IBM® Lotus® Symphony™ Spreadsheet
To sort data in a Lotus Symphony Spreadsheet, click Manipulate→Sort. In
the Sort dialog box, select which data to sort by in which order. Click OK to
activate the sort.
Figure 2-3: The Sort dialog box
26
© Copyright IBM Corporation 2008.
Using IBM® Lotus® Symphony™ Spreadsheets: Basics
Lesson 2 ■ Formatting and Printing an IBM® Lotus® Symphony™ Spreadsheet
B
Topic B: Formatting Numbers
You have an inventory worksheet that has a column for value of the stock.
Rather than manually entering a dollar sign ($) when you enter the stock
value, you can apply a number format to this column so that the entered
number is displayed in currency format. Applying number formats changes
the appearance of numeric data, making it easier to identify the type of data
within cells.
Numbers with Decimals
In IBM® Lotus® Symphony™ Spreadsheets, no default decimal number formatting is configured. To format numbers with decimals, select the cells you
want to modify, click Layout→Properties→Text and Cells Properties, and
click the Numbers tab. In the Options section, specify the number of decimal spaces you wish to display and click OK. If you wish to permanently
apply the decimal number formatting to any spreadsheet you create, click
File→Preferences→IBM Lotus Symphony→Lotus Symphony
Spreadsheets→Calculate. Specify the number of decimal spaces you wish
to display and click OK.
Number Formats
A number format is a data format that changes the appearance of the
numerical data in a cell. Each number format applies specialized formatting
on the data. Only the appearance of the data in a cell changes, not the data
itself. You can apply a number format to a cell or a range of cells before or
after you type in the numerical data. Number formats applied can vary
according to the type of data, such as currency, date, or time.
The following figure shows number formats.
Figure 2-4: Number formats
Lotus Symphony Spreadsheets’ pre-installed number formats come in a
variety of categories. They can be accessed from the Number tab of the
Text and Cell Properties dialog box. The following table describes the
number format categories and what they are used for.
© Copyright IBM Corporation 2008.
27
Topic B: Formatting Numbers
Lesson 2 ■ Formatting and Printing an IBM® Lotus® Symphony™ Spreadsheet
Number format category
Used for
General
Default number formatting applied when you type a
number. No decimals are displayed.
User Defined
Modifying a copy of an existing number format code
to create a custom number format.
Number
Displaying numbers. You can specify the number of
decimal places and the way the negative numbers
need to be displayed.
Percentage
Multiplying the cell value by 100 and displaying the
result with a percent symbol.
Currency
Displaying monetary values. The default currency
symbol with numbers will be displayed.
Date
Displaying date and time serial numbers as date values. The type and the language setting that you
want can be specified to display date and time in
other language formats.
Time
Displaying date and time serial numbers as time values. The type and the language setting that you
want can be specified to display the date and time in
other language formats.
Scientific
Displaying a number in exponential notation.
Fraction
Displaying a number as a fraction, according to the
type of fraction that you specify.
Boolean Value
Displaying a number as a postal code (zip code),
phone number, or Social Security number.
Text
Treating the content of a cell as text. Even when
numbers are typed, this will display the content
exactly as you type it. Use if leading zeros are necessary, as in an employee number.
Formatting Numbers as Text
Usually text is used in spreadsheets to label and organize data. However,
there are also times when you need to have numbers recognized as text,
such as zip codes or phone numbers. When numbers are formatted as text,
they cannot be used in calculations or formulas. If you have already entered
numeral numbers in cells and have afterwards changed the format of the
28
© Copyright IBM Corporation 2008.
Using IBM® Lotus® Symphony™ Spreadsheets: Basics
Lesson 2 ■ Formatting and Printing an IBM® Lotus® Symphony™ Spreadsheet
cells to text, the numbers will remain numerals. They will not be converted.
Only numbers entered afterwards, or numbers which are then edited, will
become text numbers. If you decide to enter a number directly as text, enter
an apostrophe (’) first. For example, for zip codes in column headings, you
can enter '13626, '14472, and '13219. The apostrophe is not visible in
the cell; it only indicates that the entry is to be recognized as a text. This is
useful if you enter text numbers that begins with a zero (0), because a zero
(0) at the start of a sequence of digits is removed in numeral number formats.
Using Rounded Off Numbers
To use rounded off numbers in your spreadsheet calculations instead of
exact values, click File→Preferences→IBM Lotus Symphony→Lotus
Symphony Spreadsheets→Calculate. In the Calculate options section,
select Precision as shown click OK.
The following figure shows the options available in the Calculate options
section.
Figure 2-5: Precision as shown option
© Copyright IBM Corporation 2008.
29
Topic B: Formatting Numbers
Lesson 2 ■ Formatting and Printing an IBM® Lotus® Symphony™ Spreadsheet
Highlighting Negative Numbers
You can format cells with a number format that highlights negative numbers
in red, or you can define your own number format in which negative numbers are highlighted in other colors. To use the default highlight color of red,
select the cells, click Layout→Properties→Text and Cells Properties, and
then click the Numbers tab. After you have chosen a number format, in the
Options section, select Negative numbers red and click OK.
The cell number format is defined in two parts. The format for positive numbers and zero is defined in front of the semicolon; after the semicolon the
formula for negative numbers is defined. You can change the code (RED)
under Format code. For example, instead of RED, enter YELLOW. If the
new code appears in the list after clicking the Add icon, this is a valid entry.
The following figure shows the default format code for highlighting negative
numbers in red.
Figure 2-6: Default format code for highlighting negative numbers in
red
Changing Currency Format for Cells
Lotus Symphony Spreadsheets allows you to apply any currency format to
numbers. By default, when you select the currency number format, the cell
is given the default currency format set by the locale. This can cause problems when you are calculating costs based on a specific currency, but the
spreadsheet will be shared internationally. If your Lotus Symphony Spreadsheets document is loaded by a user who uses a different default currency
format, then the currency amounts originally noted as USD is suddenly
listed as EURO. To ensure that a number you have defined in a specific
currency remains in that currency, regardless of the default currency format
a user has enabled, click Layout→Properties→Text and Cells Properties,
and then click the Numbers tab. In the Language combo box, select the
basic setting for currency symbol, and the relevant options for Decimal
places and Thousands separator. In the Format list box, you can select
possible variations from the default format for the language.
30
© Copyright IBM Corporation 2008.
Using IBM® Lotus® Symphony™ Spreadsheets: Basics
Lesson 2 ■ Formatting and Printing an IBM® Lotus® Symphony™ Spreadsheet
C
Topic C: Printing a Spreadsheet
Assume that you have a long worksheet that contains data on sales associates, and you need a printout of data related to sales associates working in
a particular city. To do so, you can define a range for this subset and take a
printout then print only the defined range. Printing only a range of cells
saves resources and also presents the reader with only the relevant information.
Basic Print Options
The Print dialog box provides options to set the various printing options
before you print a worksheet. The following table describes these options.
Print option
Description
Printer section
Options to find or select the printer. You can select or type the
printer name in the Name text box.
Print Range
section
Options to specify the range for printing. You can use these
options to specify exactly which pages you want to print. If
you need to print the entire workbook or worksheet, you can
use the All option. To print selected pages, you can use the
Page(s) option and specify the pages to be printed in the
From and To spin boxes.
Copies section
Option to specify the number of copies to be printed using the
Number of Copies text box and whether they are to be collated or not using the Collate check box.
Properties
button
Enables you to set the printer properties.
Options button
Provides additional print options that enable you to print only
the selected sheets or suppress output of empty pages.
Printing Rows or Columns on Every Page
When you have a large spreadsheet that will print on multiple pages, you
can designate specific rows or columns to repeat on each printed page.
This repeating information is usually data labels that will help keep a reader
oriented through each page. To designate repeating rows or columns for
print, click Layout→Print Ranges→Edit. In the Edit Print Ranges dialog
icon. The Edit Print Ranges dialog box will reduce in
box, click the
size, allowing you to select the rows you want to repeat. For example, if you
© Copyright IBM Corporation 2008.
31
Topic C: Printing a Spreadsheet
Lesson 2 ■ Formatting and Printing an IBM® Lotus® Symphony™ Spreadsheet
want to select rows 1 and 2, click in cell A1 and drag to cell A2. In the dialog box, $1:$2 will display, indicating which rows you have selected. Then
icon to return to the Edit Print Ranges dialog box. Repeat
click the
this step using the icon for Columns to repeat to select columns.
The following figure shows the Edit Print Ranges dialog box.
Figure 2-7: The Edit Print Ranges dialog box
Printing Sheet Details
When printing a sheet, you can select which details are to be printed:
●
Column and row headers – Specifies whether you want the column
and row headers to be printed.
●
Grid: Prints out the borders of the individual cells as a grid.
●
Notes: Prints the notes defined in your spreadsheet. They will be
printed on a separate page, along with the corresponding cell reference.
●
Objects/graphics: Includes all inserted objects (if printable) and graphics with the printed document.
●
Charts: Prints the charts that have been inserted into your spreadsheet.
●
Drawing objects: Includes all draw objects in the printed document.
●
Formulas: Prints the formulas contained in the cells, instead of the
results.
●
Zero values: Specifies that cells with a zero value are printed.
To choose the details, select the sheet you want to print, and then click
File→Page Setup. Click the Sheet tab. In the Print section, select the
details you wish to be printed and click OK.
The following graphic shows the Sheet tab of the Page Properties dialog
box.
32
© Copyright IBM Corporation 2008.
Using IBM® Lotus® Symphony™ Spreadsheets: Basics
Lesson 2 ■ Formatting and Printing an IBM® Lotus® Symphony™ Spreadsheet
Note: The Page Setup option is not visible if the sheet was opened with write protection on.
Figure 2-8: The Sheet tab of the Page Properties dialog box
Printing Multiple Sheets
When you are printing a large spreadsheet or workbook, specifying the print
order and adding page numbers will help to keep the printed materials in
order. To specify print order and page numbers, click File→Page Setup.
Then click the Sheet tab. In the Page order section, click either Top to bottom, then right or Left to right, then down. Then designate which number
the first page should start with.
© Copyright IBM Corporation 2008.
33
Topic C: Printing a Spreadsheet
Lesson 2 ■ Formatting and Printing an IBM® Lotus® Symphony™ Spreadsheet
Activity 2-1: Format and Print a Lotus
Symphony Spreadsheet
Before you begin:
If necessary, open Sales July to Dec.ods.
Scenario
As you review the information you have already entered into the spreadsheet, you realize that you left out one category of sales figures. You want
to add that information and then format the spreadsheet and configure print
options before you deliver it to your manager.
To complete this activity:
●
Insert a new row of data.
●
Format the numbers in the spreadsheet.
●
Add cell borders to visually format the data.
●
Configure print options.
Follow these steps to format and configure print options for your Lotus Symphony Spreadsheet.
Step
1.
Select row 4 and click Create→Rows. A new blank row will display as row
4.
2.
In cell A4, type Instructor-led sessions and press Enter.
3.
Enter the sales values for Instructor-led sessions:
4.
34
Action
●
July: 75852
●
August: 32522
●
September: 36658
●
October: 42563
●
November: 42352
●
December: 45632
Select cell B8 and in the Formula bar, verify that the formula has automatically adjusted to =SUM(B2:B6).
© Copyright IBM Corporation 2008.
Using IBM® Lotus® Symphony™ Spreadsheets: Basics
Lesson 2 ■ Formatting and Printing an IBM® Lotus® Symphony™ Spreadsheet
Step
Action
5.
Select cells B2:G8 as shown in the following graphic.
6.
Click Layout→Properties→Text and Cell Properties and click the Numbers tab.
7.
In the Category list, click Currency.
8.
In the Format list, select the red text ($1,234.00).
9.
In the Options section, verify that Decimal places is 2 and Negative numbers red is selected.
10.
Click OK.
11.
Select row 1, click Layout→Properties→Text and Cell Properties, and
click the Borders tab.
12.
In the Line section, in the Style list, click 1.00 pt.
© Copyright IBM Corporation 2008.
35
Topic C: Printing a Spreadsheet
Lesson 2 ■ Formatting and Printing an IBM® Lotus® Symphony™ Spreadsheet
Step
36
Action
13.
In the Line arrangement section, in the User-defined box, click to add a
bottom line. Click OK.
14.
Select row 8, click Layout→Properties→Text and Cell Properties, and
click the Borders tab.
15.
In the Line section, in the Style list, click 1.10 pt.
16.
In the Line arrangement section, in the User-defined box, click to add a
top line. Click OK.
© Copyright IBM Corporation 2008.
Using IBM® Lotus® Symphony™ Spreadsheets: Basics
Lesson 2 ■ Formatting and Printing an IBM® Lotus® Symphony™ Spreadsheet
Step
Action
17.
Select column A. Hover the mouse pointer over the right column border
between Column A and B, and when the mouse pointer changes to a cross,
click and drag the right border to the right until all of the text displays in the
column.
18.
Click File→Page Setup.
19.
On the Sheet tab, in the Print section, verify that Notes, Objects/graphics,
Charts, Drawing objects, and Zero values are selected.
20.
Click OK. The file is now formatted to print.
21.
Save and close the file.
© Copyright IBM Corporation 2008.
37
Topic C: Printing a Spreadsheet
Lesson 2 ■ Formatting and Printing an IBM® Lotus® Symphony™ Spreadsheet
Lesson Summary
In this lesson, you formatted cells and numbers and explored the various
print options for a spreadsheet. Understanding the formatting options allows
you to create unique and attractive spreadsheets.
38
© Copyright IBM Corporation 2008.
Using IBM® Lotus® Symphony™ Spreadsheets: Basics
Lesson Follow-up ■
Follow-up
In this course, you used Lotus Symphony Spreadsheets to manage, edit,
and print data. Storing data electronically is more efficient than storing it in a
paper-based system because it allows you to quickly update existing data
and run reports on the data.
What’s Next?
After completing the Using IBM® Lotus® Symphony™ Spreadsheets: Basics
course, you may want to continue with the Using IBM® Lotus® Symphony™
Spreadsheets: Beyond Basics and Using IBM® Lotus® Symphony™ Spreadsheets: Power User courses.
Also available are:
●
Using IBM® Lotus® Symphony™ Documents: Basics
●
Using IBM® Lotus® Symphony™ Documents: Beyond Basics
●
Using IBM® Lotus® Symphony™ Documents: Power User
●
Using IBM® Lotus® Symphony™ Presentations: Basics
●
Using IBM® Lotus® Symphony™ Presentations: Beyond Basics
●
Using IBM® Lotus® Symphony™ Presentations: Power User
39
Appendix
A
Additional Resources
The following additional resources are available for more information on
Lotus Symphony Spreadsheets:
●
Tour: http://symphony.lotus.com/idcontents/pdf/N8T40/start_
n8t40.htm
●
Demo: http://symphony.lotus.com/software/lotus/symphony/help.nsf/
DemoForSpreadSheets
●
Tutorial: http://symphony.lotus.com/idcontents/tutorial/en/
spreadsheets_tutorial/start_spreadsheets.htm
●
Toolbar Reference Card: http://symphony.lotus.com/idcontents/
refcard/en/n8r40_refcarddita-pdf-minimal.pdf
●
Keyboard Reference Card: http://symphony.lotus.com/idcontents/
refcard/en/n8r40_shortcutdita-pdf-minimal.pdf
As they are developed, other resources may be added to this location:
http://symphony.lotus.com/software/lotus/symphony/help.nsf/home.
Available Plug-Ins
Extend the value of Lotus Symphony with plug-ins from IBM, partners,
and developers. A complete list of all available plug-ins can be found
here: http://symphony.lotus.com/software/lotus/symphony/plugin.nsf/
home
© Copyright IBM Corporation 2008
Moving from Microsoft® Excel® 2003 to IBM® Lotus® Spreadsheets
Launch other
productivity tools
Menus
Universal
Toolbar
Tabs row to access
open documents
Drawing Toolbar
Main Toolbar
Editing
Toolbar
Properties Sidebar
can dock, float, or
be minimized
Input Line
Columns
Active Cell
Rows
Opens dialog box with
advanced options
Worksheet Tab
Status bar Shows Sheet
Number, Page Format,
Zoom, and a Quick
Calculation
Creating and editing spreadsheets
Microsoft Excel
To open a spreadsheet, click
.
To create a new spreadsheet,
click
Creating and editing spreadsheets, cont.’d
Lotus Spreadsheets
Click
Microsoft Excel
To insert a new sheet, click
InsertÆWorksheet.
.
Click
To spell-check, click
.
Lotus Spreadsheets
.
Click
.
Select FileÆNewÆFrom
Template or press
Ctrl+Shift+N.
,
, or
.
To change cell alignment, click
,
,
, or
.
To adjust column, row, or cell size,
drag borders.
Click
,
, or
Click
,
,
.
, or
.
Click
.
Drag borders or enter measurements in
.
Click
Click
Lotus Spreadsheets
.
To copy formatting, click
.
To print, click
.
To insert cells/rows/columns,
click InsertÆCells, InsertÆRows, or
InsertÆColumns.
.
Formatting
Microsoft Excel
To change font appearance, click
To create a spreadsheet from a
template, click FileÆNew, select the template location, and
browse for the template.
To save a spreadsheet, click
.
Click
.
Click
To change the cell appearance,
click FormatÆCells, select a tab in
Format Cells box, and then
change the required elements.
on Properties sidebar.
In the properties sidebar,
select
,
and then change the required
elements.
.
© Copyright IBM Corporation 2007
MOVING FROM MICROSOFT® EXCEL® 2003 TO IBM® LOTUS® SPREADSHEETS
Creating and editing charts
Microsoft Excel
Formulas and functions, cont.’d
Lotus Spreadsheets
To create a chart, click
.
Microsoft Excel
To format values, click any
of
Lotus Spreadsheets
Click
.
Click
To edit chart type, click
.
.
Click
Double-click chart.
To format chart area, click
.
To have data appear by rows
or by columns, click
.
Click
To edit chart style, click
ChartÆChart Options.
Shortcuts
Click
or
.
To turn on horizontal or vertical
grids, click ChartÆChart Options, select gridlines tab and
select or deselect the gridlines
to display.
To hide/ display axis descriptions, click ChartÆChart Options select axis tab and select
or deselect the axis to display.
To hide/ display titles, click
ChartÆChart Options select
Titles tab and type in or delete
title.
To display/hide legend, click
or
Click
or
Click
.
Click
for main title.
Click
for axes titles.
.
.
Click
.
.
Formulas and functions
Microsoft Excel
To total a cell range, select the range, and then
Lotus Spreadsheets
Select the range, and then click
.
click
.
To enter a formula, type =,
enter formula, and hit
<Enter> when done.
To choose a function, click
.
To show the formula list,
click InsertÆFunction.
To sort cell contents, select the contents then click
.
To merge cells, click FormatÆCellsÆAlignment
Tab then click the box
beside Merge Cells, and
then click OK.
Click
then enter formula.
Clicking a cell enters that cell into
the formula.
Click
tion.
then choose a func-
To . . .
Create a PDF
Create cells
Select cells
Select a row
Select a column
Select all
Select all cells with values
Switch to edit mode
Choose a function
Switch to function edit mode
Recalculate all formulas
Create a new spreadsheet
Create a new spreadsheet from
template
Save as
Open Print Preview
Increase row height
Decrease row height
Increase column width
Decrease column width
Optimize row and column size
Open Style List
Center cell contents
Justify cell contents
Left align cell contents
Right align cell contents
Copy
Do this . . .
Click FileÆExport as PDF.
Press Ctrl+1.
Press Shift+arrow keys.
Press Shift+space bar.
Press Ctrl+Shift+C.
Press Ctrl+A.
Press Ctrl+Shift+X.
Press F2.
Press Ctrl+F2.
Press Ctrl+Shift+F2.
Press F9.
Press Ctrl+N.
Press Ctrl+Shift+N.
Press Ctrl+Shift+S.
Press Ctrl+Alt+P.
Press Alt+Down Arrow.
Press Alt+Up Arrow.
Press Alt+Right Arrow.
Press Alt+Left Arrow.
Press Alt+Shift+arrows.
Press F11.
Press Ctrl+H.
Press Ctrl+J.
Press Ctrl+L.
Press Ctrl+R.
Press Ctrl+C or click
.
Press Ctrl+V or click
.
Paste
Click
then choose a formula.
Select the contents, and then
click
.
Click LayoutÆMerge Cells, and
then click Define.
Cut
Undo
Copy or move using drag and
drop
Navigate within the spreadsheet
Press Ctrl+X or click
.
Press Ctrl+Z.
Select the cells and drag by
the borders to move. Hold
Ctrl while dragging to copy.
Press F5 to open the Navigator.
© Copyright IBM Corporation 2007
Glossary
active cell
The cell that is selected in any spreadsheet is the active cell.
cell style
A collection of individual format options that you can apply to selected
cells.
contiguous range
Cells that are adjacent to each other.
fill handle
The box at the corner of a cell or range that you use to activate the Auto
Fill feature.
Formula bar
An interface component that contains the Sheet Area drop-down list, the
Choose Function button, the Sum button, the Function button, and the
formula field for specifying formulas.
formula
A set of mathematical instructions that can be used to perform calculations in Excel worksheets.
margin
A margin determines the amount of space between the worksheet data
and the edge of the paper.
noncontiguous range
Cells that are not adjacent to each other.
number format
A number format is a data format that changes the appearance of the
numerical data in a cell.
page orientation
The arrangement of content in a page.
© Copyright IBM Corporation 2008.
spreadsheet
A paper or electronic document that stores various types of data, such as
numbers, text, and non-alphanumeric symbols, in a tabular format.
workbook
A repository of related spreadsheets.
44
© Copyright IBM Corporation 2008.
Index
A
L
automatic fill, 13
Lotus Symphony interface, 3
C
N
cell borders, 24
cells
deleting, 23
filling instantly, 13
inserting, 23
merging and splitting, 23
selecting multiple, 23
columns
changing width, 24
deleting, 23
inserting, 23
currency format, 30
notes
editing, 8
inserting, 8
number format, 27
numbers
formatting as text, 29
negative, 30
rounded off, 29
D
P
data
entering, 8
decimals, 27
preferences, 6
print options, 31
rows and columns, 32
Properties sidebar, 4
F
Formula bar, 11
formulas, 11
copying, 12
O
order of operations, 15
R
rows
changing height, 24
deleting, 23
© Copyright IBM Corporation 2008.
Index
inserting, 23
46
saving, 7
S
T
sheet details
printing, 32
special characters, 10
spreadsheets
calculating in, 14
creating, 7
creating from templates, 7
opening existing, 7
text
formatting, 10
multi-line, 9
rotating, 9
V
values, 11
© Copyright IBM Corporation 2008.


© Copyright 2026