
BES12 Cloud Administration Guide
Administration Guide
BES12 Cloud
Published: 2015-03-31
SWD-20150325102159124
Contents
Introduction..................................................................................................................... 9
About this guide..............................................................................................................................................................10
What is BES12?...............................................................................................................................................................11
Key features of BES12............................................................................................................................................. 11
How to use this guide...................................................................................................................................................... 12
Steps to administer BES12.......................................................................................................................................12
Examples of everyday administration scenarios........................................................................................................ 13
Log in to BES12 ..............................................................................................................................................................14
About BES12 Self-Service............................................................................................................................................... 15
Setting up BES12 Self-Service for users....................................................................................................................15
Administrators................................................................................................................17
Setting up administrators................................................................................................................................................ 18
Steps to set up administrators..................................................................................................................................18
How BES12 chooses which role to assign................................................................................................................. 18
Creating and managing administrator groups .......................................................................................................... 19
Creating and managing administrators.....................................................................................................................20
Managing roles ....................................................................................................................................................... 22
APNs setup.................................................................................................................... 31
Obtaining an APNs certificate to manage iOS devices...................................................................................................... 32
Data flow: Sending data to an iOS device.................................................................................................................. 32
Steps to manage iOS devices................................................................................................................................... 32
Obtain a signed CSR from BlackBerry...................................................................................................................... 33
Request an APNs certificate from Apple...................................................................................................................33
Register the APNs certificate................................................................................................................................... 33
Renew the APNs certificate..................................................................................................................................... 34
Troubleshooting APNs............................................................................................................................................. 34
Company directory......................................................................................................... 37
Accessing your company directory.................................................................................................................................. 38
Architecture: BlackBerry Cloud Connector............................................................................................................... 38
Installing two BlackBerry Cloud Connector instances for redundancy....................................................................... 39
Steps to access your company directory...................................................................................................................39
Prerequisites: Installing the BlackBerry Cloud Connector..........................................................................................40
Download the installation and activation files............................................................................................................40
Install and configure the BlackBerry Cloud Connector.............................................................................................. 41
Configure proxy settings for the BlackBerry Cloud Connector....................................................................................44
View the status of the BlackBerry Cloud Connector...................................................................................................45
Change when user data is synchronized with the directory........................................................................................45
Verify the connection with BES12 Cloud................................................................................................................... 46
Troubleshooting BlackBerry Cloud Connector issues................................................................................................ 46
Secure Work Space........................................................................................................ 49
Setting up Secure Work Space for iOS and Android devices............................................................................................. 50
Managing devices that have a work space................................................................................................................ 50
Upgrading work space apps.....................................................................................................................................51
Test the Secure Work Space connection.................................................................................................................. 51
Recreating the Secure Work Space connection........................................................................................................ 51
Profiles and variables......................................................................................................53
Using profiles..................................................................................................................................................................54
Assigning profiles.....................................................................................................................................................54
How BES12 chooses which profiles to assign............................................................................................................55
Managing profiles........................................................................................................................................................... 57
Rank profiles........................................................................................................................................................... 57
View a profile........................................................................................................................................................... 57
Change profile settings............................................................................................................................................ 57
Remove a profile from user accounts or user groups.................................................................................................58
Delete a profile........................................................................................................................................................ 59
Using variables............................................................................................................................................................... 60
Using variables in profiles........................................................................................................................................ 60
Default variables......................................................................................................................................................60
Custom variables..................................................................................................................................................... 62
Certificates.....................................................................................................................65
Managing certificates using profiles................................................................................................................................ 66
Sending certificates to devices........................................................................................................................................ 67
Creating CA certificate profiles.................................................................................................................................67
Creating SCEP profiles............................................................................................................................................. 68
Creating shared certificate profiles...........................................................................................................................70
Integrating BES12 with your organization's Entrust software............................................................................................ 71
Steps to integrate BES12 with your organization's Entrust software...........................................................................71
Add a connection to your organization’s Entrust software......................................................................................... 71
Sending the Entrust CA certificate to devices............................................................................................................72
Providing Entrust client certificates to devices.......................................................................................................... 72
Work connections...........................................................................................................75
Setting up work connections for devices.......................................................................................................................... 76
Steps to set up work connections for devices............................................................................................................76
Managing work connections using profiles............................................................................................................... 76
Best practice: Creating work connection profiles...................................................................................................... 77
Setting up work email for devices............................................................................................................................. 79
Setting up proxy configurations for devices...............................................................................................................86
Setting up work Wi-Fi networks for devices............................................................................................................... 88
Setting up work VPNs for devices............................................................................................................................. 90
Setting up single sign-on authentication for devices..................................................................................................92
Device standards............................................................................................................97
Setting your organization's standards for devices.............................................................................................................98
Steps to set up your organization's standards for devices..........................................................................................98
Managing your organization's standards using profiles............................................................................................. 98
Enforcing compliance rules for devices.................................................................................................................... 99
Filtering web content on iOS devices...................................................................................................................... 102
Limiting devices to a single app..............................................................................................................................104
Controlling the software releases that users can install on BlackBerry 10 devices....................................................105
Managing email and web domains for iOS 8 devices............................................................................................... 107
Configuring allowed and restricted domains on devices with a work space.............................................................. 108
Creating organization notices to display on BlackBerry 10 devices..........................................................................109
Displaying organization information on devices ......................................................................................................110
IT policies.....................................................................................................................113
Controlling device capabilities using IT policies..............................................................................................................114
Steps to manage IT policies................................................................................................................................... 114
Restricting or allowing device capabilities.............................................................................................................. 114
How BES12 chooses which IT policy to assign........................................................................................................ 115
Creating and managing IT policies..........................................................................................................................116
Apps............................................................................................................................ 119
Managing apps on devices............................................................................................................................................ 120
Steps to manage apps........................................................................................................................................... 120
Adding and deleting apps from the available app list.............................................................................................. 120
Preventing users from installing specific iOS, Android, and Windows Phone apps....................................................124
Managing app groups............................................................................................................................................ 125
Managing Apple VPP accounts.............................................................................................................................. 126
Change whether an app is required or optional....................................................................................................... 128
View the status of apps and app groups assigned to user accounts......................................................................... 129
View which apps are assigned to user groups......................................................................................................... 129
Update the information in the available app list...................................................................................................... 129
Set the organization name for BlackBerry World..................................................................................................... 130
Users and devices........................................................................................................ 131
Managing user groups and user accounts......................................................................................................................132
Steps to create user groups and user accounts.......................................................................................................132
Creating and managing user groups....................................................................................................................... 133
Creating and managing user accounts................................................................................................................... 139
Using filters to customize the users and devices view .............................................................................................149
Managing device groups............................................................................................................................................... 151
Steps to create and manage device groups............................................................................................................ 151
Creating a device group......................................................................................................................................... 151
View a device group............................................................................................................................................... 154
Change the name of a device group....................................................................................................................... 154
Delete a device group............................................................................................................................................ 154
Activating devices.........................................................................................................................................................155
Steps to activate devices........................................................................................................................................155
Requirements: Activation.......................................................................................................................................155
License requirements for activation types...............................................................................................................156
Manage default activation password expiration and length..................................................................................... 157
Turn off user registration with the BlackBerry Infrastructure................................................................................... 158
Update the template for the activation email ......................................................................................................... 158
Controlling device activation settings using activation profiles.................................................................................159
Set an activation password and send an activation email message..........................................................................163
Allowing users to set activation passwords..............................................................................................................164
Activate a BlackBerry 10 device.............................................................................................................................164
Activate an iOS device........................................................................................................................................... 165
Activate an Android device.................................................................................................................................... 166
Activate a Windows Phone device.......................................................................................................................... 166
Troubleshooting device activation issues................................................................................................................167
Managing devices......................................................................................................................................................... 170
Using dashboard reports........................................................................................................................................170
Using IT administration commands to manage devices...........................................................................................171
View and save a device report................................................................................................................................ 178
Deactivating devices..............................................................................................................................................178
Profile settings..............................................................................................................179
Email profile settings.....................................................................................................................................................180
Common: Email profile settings..............................................................................................................................180
BlackBerry 10: Email profile settings......................................................................................................................180
iOS: Email profile settings...................................................................................................................................... 190
Android: Email profile settings................................................................................................................................193
Windows Phone: Email profile settings................................................................................................................... 195
IMAP/POP3 email profile settings.................................................................................................................................. 197
Common: IMAP/POP3 email profile settings........................................................................................................... 197
iOS: IMAP/POP3 email profile settings....................................................................................................................198
Android: IMAP/POP3 email profile settings.............................................................................................................199
Windows Phone: IMAP/POP3 email profile settings.................................................................................................199
SCEP profile settings.....................................................................................................................................................201
Common: SCEP profile settings.............................................................................................................................. 201
BlackBerry 10: SCEP profile settings...................................................................................................................... 203
iOS: SCEP profile settings.......................................................................................................................................206
Wi-Fi profile settings..................................................................................................................................................... 208
Common: Wi-Fi profile settings...............................................................................................................................208
BlackBerry 10: Wi-Fi profile settings.......................................................................................................................208
iOS: Wi-Fi profile settings....................................................................................................................................... 213
Android: Wi-Fi profile settings................................................................................................................................ 218
Windows Phone: Wi-Fi profile settings.................................................................................................................... 222
VPN profile settings...................................................................................................................................................... 226
BlackBerry 10: VPN profile settings........................................................................................................................226
iOS: VPN profile settings........................................................................................................................................ 237
Product documentation................................................................................................243
Glossary....................................................................................................................... 245
Legal notice..................................................................................................................247
Introduction
Learn more about BES12 and how to use this guide.
Introduction
About this guide
1
BES12 helps you manage the devices in your organization. This guide describes how to administer BES12, from creating
administrators to getting your device users up and running to maintaining and monitoring BES12.
10
Introduction
What is BES12?
2
BES12 is an EMM solution from BlackBerry. EMM solutions help you do the following:
•
Manage mobile devices for your organization to protect business information
•
Keep mobile workers connected with the information that they need
•
Provide administrators with efficient business tools
With BES12, you can manage the following device types:
•
BlackBerry 10
•
iOS
•
Android (including Samsung KNOX)
•
Windows Phone
You can manage these devices from a single, simplified UI with industry-leading security.
Key features of BES12
Feature
Description
Management of many types of devices
You can manage BlackBerry 10, iOS, Android, and Windows Phone devices.
Single, unified UI
You can view all devices in one place and access all management tasks in a
single, web-based UI. You can share administrative duties with multiple
administrators who can access the management console at the same time.
Trusted and secure experience
Device controls give you precise management of how devices connect to your
network, what capabilities are enabled, and what apps are available. Whether
the devices are owned by your organization or your users, you can protect your
organization's information.
Balance of work and personal needs
BlackBerry Balance and Secure Work Space technologies are designed to
make sure that personal information and work information are kept separate
and secure on devices. If the device is lost or the employee leaves the
organization, you can delete only work-related information or all information
from the device.
11
Introduction
How to use this guide
3
The tasks in this guide are presented in a particular order to help get you up and running in the most efficient way, particularly if
you are administering BES12 for the first time.
You might not need to complete all of these tasks. You can choose to activate certain device types, separate work and personal
data in different ways, or enforce different compliance rules, device capabilities, and connections.
Steps to administer BES12
When you administer BES12, you perform the following actions:
If you want to share administration work with other IT staff, set up administrators.
Set up work connections (for example, email, Wi-Fi, and VPN).
Set up device standards (for example, compliance rules).
Update the Default IT policy or create new IT policies.
Determine which apps to send to devices.
Create users and groups.
Assign work connections, device standards, IT policies, and apps to users and groups.
Help users activate their devices.
Maintain and monitor BES12.
12
Introduction
Examples of everyday administration scenarios
The following scenarios provide examples of choices that you might make when setting up different devices for different users.
Scenario
Manage BlackBerry 10 devices for work
and personal
Manage iOS, Android, or Windows Phone
devices with basic management
Set up iOS or Android devices with extra
security for work data
Set up BlackBerry 10 devices for work
only
Set up an iOS device that is limited to
one app for software demonstrations
You might want to
•
Create profiles for certificates
•
Create a profile for single sign-on to secure work domains
•
Create a profile for a proxy server
•
Choose the "Work and personal - Corporate" or "Work and personal Regulated" activation type
•
Create profiles for work email and work Wi-Fi
•
Change the Default IT policy to enforce a device password
•
Choose a work app to send to the device
•
Choose the "MDM controls" activation type
•
Enable S/MIME for extra email security
•
Create a compliance profile to prevent access to work resources if the
device is jailbroken or rooted
•
Create a web content filter profile to limit the websites that the device
user can access
•
Set up Secure Work Space to separate and secure work data
•
Secure an app to send to the device
•
Create profiles for certificates and VPN
•
Enable S/MIME for extra email security
•
Create an IT policy to prevent the use of the device camera
•
Choose the "Work space only" activation type
•
Create an app lock mode profile
13
Introduction
Log in to BES12
4
The management console allows you to perform administrative tasks for devices in your organization that are managed by
BES12.
Before you begin:
•
Locate the web address (for example, https://<hostname>/admin/index.jsp?tenant=<tenant>) and login information
for the management console. You can find the information in the inbox of the email account that is associated with
your BES12 account.
1.
In the browser, type the web address for the BES12 management console of your organization.
2.
In the Username field, type your username.
3.
In the Password field, type your password.
4.
Click Sign in.
After you finish: You can change your login password by clicking the user icon in the top-right corner of the management
console.
14
Introduction
About BES12 Self-Service
5
BES12 Self-Service is a web application that you can make available to users so that they can perform certain tasks such as
creating activation passwords, locking devices, or deleting data from devices. Users do not need to install any software on their
computers to use BES12 Self-Service.
You must provide the BES12 Self-Service login information to users. You can send this information in an email message, or edit
the activation email template to include the information. You can also force the users to read and accept an advisory notice
before they can log in to BES12 Self-Service. For more information, see "Displaying a login notice". Users need the following
information:
•
Web address: The web address for BES12 Self-Service is displayed in the management console at Settings > SelfService.
•
Username and password: Company directory users can log in with their organization usernames and passwords. For
local users, you must create the usernames and temporary passwords.
•
Domain name: The domain name is required for Microsoft Active Directory users.
Related information
Displaying a login notice, on page 21
Setting up BES12 Self-Service for users
BES12 Self-Service is a web-based application that you can make available to users so that they can perform management
tasks such as creating activation passwords, remotely locking their devices, or deleting data from their devices. Users do not
need to install any software on their computers to use BES12 Self-Service. You must provide the web address and login
information to users.
Set up BES12 Self-Service
Set up BES12 Self-Service so that users can log in and perform some self-service tasks.
1.
On the menu bar, click Settings.
2.
In the left pane, click General settings > Self-Service.
3.
Verify that Allow users to access the self-service console is selected.
4.
To allow users to create activation passwords, select Allow users to activate devices in the self-service console and
complete the following tasks:
a.
Specify the number of minutes, hours, or days that a user can activate a device before the activation password
expires.
b.
Specify the minimum number of characters required in an activation password.
15
Introduction
c.
5.
In the Minimum password complexity drop-down list, select the level of complexity required for activation
passwords.
Click Save.
After you finish: Provide the BES12 Self-Service web address and login information to users.
16
Set up administrators with permissions that are appropriate for their job responsibilities.
Simple
Administrators
Administrators
Setting up administrators
6
Administrators are users that are assigned an administrative role by user group or user account. The actions that administrators
can perform are defined in the role that is assigned to them. You can assign a preconfigured role or a custom role that you
create. Each role has a set of permissions that specifies the information that administrators can view and the actions that they
can perform in the BES12 management console.
Roles help your organization to do the following:
•
Reduce security risks associated with allowing all administrators to access all administrative options
•
Define different types of administrators to better distribute job responsibilities
•
Increase efficiency for administrators by limiting accessible options to their job responsibilities
Steps to set up administrators
When you set up administrators, you perform the following actions:
If necessary, create a custom role.
If necessary, rank the roles.
Create a user group for administrators.
Assign a role to a user group for administrators.
Create a user account with an email address and add it to an administrator group.
How BES12 chooses which role to assign
Only one role is assigned to each administrator. BES12 uses the following rules to determine which role to assign to an
administrator:
•
The role that is assigned directly to a user account takes precedence over a role that is assigned indirectly by a user
group.
•
If an administrator is a member of multiple groups that have been assigned a role, BES12 assigns the role that has a
higher rank. You can specify the ranking of roles.
18
Administrators
Creating and managing administrator groups
Administrator groups are user groups that have a role assigned to them. You can assign a role to a local group. A user can be a
member of multiple administrator groups but is assigned only one role.
Only Security Administrators can add or remove members of a user group that has a role assigned to it.
Create an administrator group
When you create an administrator group, you assign a role to a user group.
Before you begin:
•
You must be a Security Administrator to create an administrator group.
•
You must create a user group for administrators.
•
You must have a role that is ready to be assigned.
1.
On the menu bar, click Settings.
2.
In the left pane, expand Administrators.
3.
Click Groups.
4.
Click
5.
Search for and select the user group that you want to assign a role to.
6.
In the Role drop-down list, click the role that you want to assign.
7.
Click Save.
.
BES12 sends the users an email message with their username and a link to the management console. BES12 also sends the
users a separate email message with their password to the management console. If a user does not have a console password,
BES12 generates a temporary password and sends it to the user.
After you finish: To add users to the administrator group, add them to the user group that is assigned a role. For more
information, see "Creating and managing user groups."
Related information
Creating and managing user groups, on page 133
Assign a different role to an administrator group
Before you begin: You must be a Security Administrator to assign a different role to an administrator group.
1.
On the menu bar, click Settings.
2.
In the left pane, expand Administrators.
3.
Click Groups.
4.
Click the group of administrators whose role you want to change.
19
Administrators
5.
In the Role drop-down list, click the role that you want to assign.
6.
Click Save.
Remove a role from an administrator group
When you remove a role from an administrator group, the users in the group are no longer administrators (unless they have
other roles assigned to them). The users and the user group remain in the management console. The users' devices are not
affected.
Before you begin: You must be a Security Administrator to remove a role from an administrator group.
1.
On the menu bar, click Settings.
2.
In the left pane, expand Administrators.
3.
Click Groups.
4.
Select the name of the administrator group that you want to remove a role from.
5.
Click
6.
Click Delete.
.
Creating and managing administrators
You can create an individual administrator by assigning a role to a user account. Only one role can be assigned directly to a user
account.
Related information
How BES12 chooses which role to assign, on page 18
Create an administrator
Before you begin:
•
You must be a Security Administrator to create an administrator.
•
Create a user account that has an email address associated with it.
•
Create a role, if necessary.
1.
On the menu bar, click Settings.
2.
In the left pane, expand Administrators.
3.
Click Users.
4.
Click
5.
Search for and select the user account that you want to assign a role to.
6.
In the Role drop-down list, click the role that you want to assign.
.
20
Administrators
7.
Click Save.
BES12 sends the user an email message with the username and a link to the management console. BES12 also sends the user
a separate email message with the password for the management console. If the user does not have a console password,
BES12 generates a temporary password and sends it to the user.
Assign a different role to an administrator
You can change the role of another administrator. You cannot change your own role.
Before you begin: You must be a Security Administrator to assign a different role to an administrator.
1.
On the menu bar, click Settings.
2.
In the left pane, expand Administrators.
3.
Click Users.
4.
Click the administrator whose role you want to change.
5.
In the Role drop-down list, click the role that you want to assign.
6.
Click Save.
Remove a role from an administrator
When you remove a role from an administrator, you remove the role that is assigned directly to the user account. If no other
roles are assigned by user group, the user is no longer an administrator. The user can still be found in the management console
and the user's devices are not affected.
Before you begin: You must be a Security Administrator to remove a role from an administrator.
1.
On the menu bar, click Settings.
2.
In the left pane, expand Administrators.
3.
Click Users.
4.
Select the name of the administrator that you want to remove a role from.
5.
Click
6.
Click Delete.
.
Displaying a login notice
You can configure a login notice to display whenever an administrator accesses the management console or a user logs in to
BES12 Self-Service. The notice informs the administrator or user about the terms and conditions involved with using the
management console or BES12 Self-Service. When you have configured the login notice to display, the administrator or user
must click OK before they can log in.
21
Administrators
Display a login notice
1.
On the menu bar, click Settings.
2.
In the left pane, expand General settings.
3.
Click Login notices.
4.
Click
5.
Perform one of the following tasks:
.
Task
Steps
Configure the login notice for the
management console
Click the Enable a login notice for the management console option and fill in
the text box with the information that you want to display to administrators when
they access the management console.
Configure the login notice for the
BES12 Self-Service
Click the Enable a login notice for the self-service console option and fill in the
text box with the information that you want to display to the users when they
access BES12 Self-Service.
6.
Click Save.
Managing roles
You can create roles and assign them to user accounts or user groups. When you assign a role, you grant administrator
permissions to a user or user group. You must be a Security Administrator to create, view, change, rank, or assign roles.
Preconfigured roles
In BES12, the Security Administrator role has full permissions to the management console, including creating and changing
administrator users and roles. The Security Administrator role cannot be edited or removed. At least one administrator must be
a Security Administrator.
BES12 includes preconfigured roles in addition to the Security Administrator role. You can edit or remove all roles except the
Security Administrator role.
The following preconfigured roles are available:
Role
Description
Security Administrator
Full permissions
Enterprise Administrator
All permissions except for creating and changing administrator users and roles
Senior HelpDesk
Intermediate administrative tasks
Junior HelpDesk
Basic administrative tasks
22
Administrators
Permissions for preconfigured roles
The following tables list the permissions that are turned on for each preconfigured role in BES12. The Security Administrator
role in BES12 has full permissions to the management console, including managing administrator users and roles.
Users and devices
Permission
Enterprise Administrator
Senior HelpDesk
Junior HelpDesk
View users and activated
devices
√
√
√
Create users
√
√
Edit users
√
√
Delete users
√
√
Export user list
√
Generate an activation
password and send email
√
√
√
Specify an activation
password
√
√
√
Specify console password
√
√
√
Manage devices
√
√
√
Specify device password
√
√
√
Lock device and set message
√
√
√
Unlock and clear password
√
√
√
Delete only work data
√
√
√
Delete all device data
√
√
√
Specify work password and
lock
√
√
√
Enterprise Administrator
Senior HelpDesk
Junior HelpDesk
View group settings
√
√
√
Create and edit user groups
√
√
Add and remove users from
user groups
√
√
Delete user groups
√
√
Groups
Permission
23
Administrators
Permission
Enterprise Administrator
Senior HelpDesk
Create and edit device groups
√
√
Delete device groups
√
Junior HelpDesk
Policies and profiles
Permission
Enterprise Administrator
Senior HelpDesk
Junior HelpDesk
View IT policies and profiles
√
√
√
Create and edit IT policies and
profiles
√
Delete IT policies and profiles
√
Assign IT policies and profiles
to users
√
√
Assign IT policies and profiles
to user groups
√
√
Assign IT policies and profiles
to device groups
√
√
Rank IT policies and profiles
√
Apps
Enterprise Administrator
Senior HelpDesk
Junior HelpDesk
View apps and app groups
√
√
√
Create and edit apps and app
groups
√
Delete apps and app groups
√
Assign apps and app groups
to users
√
√
Assign apps and app groups
to user groups
√
√
Assign apps and app groups
to device groups
√
√
View app licenses
√
√
Create app licenses
√
Edit app licenses
√
Permission
24
√
Administrators
Permission
Enterprise Administrator
Senior HelpDesk
Junior HelpDesk
Delete app licenses
√
Assign app license to apps or
app groups
√
√
Enterprise Administrator
Senior HelpDesk
Junior HelpDesk
View restricted apps
√
√
√
Create restricted apps
√
Delete restricted apps
√
Enterprise Administrator
Senior HelpDesk
Junior HelpDesk
View general settings
√
√
Edit activation defaults
√
Edit activation email
√
Edit console password
settings
√
Edit self-service console
settings
√
Edit custom variables
√
View app management
√
Edit BlackBerry World for
Work
√
View external integration
settings
√
Edit iOS management
√
View administrator users and
roles
√
√
View licensing summary
√
√
Manage subscriptions
√
View server certificates
√
Update server certificates
√
Restricted apps
Permission
Settings
Permission
√
√
25
√
Administrators
Permission
Enterprise Administrator
Senior HelpDesk
√
√
Enterprise Administrator
Senior HelpDesk
Junior HelpDesk
√
√
√
View infrastructure settings
Junior HelpDesk
Dashboard
Permission
View dashboard
Custom roles
If the preconfigured roles do not meet the needs of your organization, you can create custom roles for administrators. You can
also create custom roles to restrict administrative tasks to a defined list of user groups. For example, you can create a role for
new administrators that restricts their permissions to a user group for training only.
Create a custom role
Before you begin: You must be a Security Administrator to create a role.
1.
On the menu bar, click Settings.
2.
In the left pane, expand Administrators.
3.
Click Roles.
4.
Click
5.
Type a name and description for the role.
6.
To copy permissions from another role, click a role in the Permissions copied from role drop-down list.
7.
Perform one of the following tasks:
.
Task
Steps
Allow administrators in this role to
search all company directories
1.
Select the All company directories option.
Allow administrators in this role to
search selected company directories
1.
Select the Selected company directories only option.
2.
Click Select directories.
3.
Select one or more directories and click .
4.
Click Save.
8.
Perform one of the following tasks:
26
Administrators
Task
Steps
Allow administrators in this role to
manage all users and groups
1.
Select the All groups and users option.
Allow administrators in this role to
manage selected groups
1.
Select the Selected groups only option.
2.
Click Select groups.
3.
Select one or more groups and click .
4.
Click Save.
9.
Select the permissions for administrators in this role.
10. Click Save.
After you finish: If necessary, adjust the ranking of the role that you created.
View the settings of a role
Before you begin: You must be a Security Administrator to view the settings of a role.
1.
On the menu bar, click Settings.
2.
In the left pane, expand Administrators.
3.
Click Roles.
4.
Click the role that you want to view.
Change the settings of a role
You can change the settings of all roles except the Security Administrator role.
Before you begin: You must be a Security Administrator to change the settings of a role.
1.
On the menu bar, click Settings.
2.
In the left pane, expand Administrators.
3.
Click Roles.
4.
Click the role that you want to change.
5.
Click
6.
Type a name and description for the role.
7.
Perform one of the following tasks:
.
27
Administrators
Task
Steps
Allow administrators in this role to
search all company directories
1.
Select the All company directories option.
Allow administrators in this role to
search selected company directories
1.
Select the Selected company directories only option.
2.
Click Select directories.
3.
Select one or more directories and click .
4.
Click Save.
8.
Perform one of the following tasks:
Task
Steps
Allow administrators in this role to
manage all users and groups
1.
Select the All groups and users option.
Allow administrators in this role to
manage selected groups
1.
Select the Selected groups only option.
2.
Click Select groups.
3.
Select one or more groups and click .
4.
Click Save.
9.
Change the permissions for administrator users in this role.
10. Click Save.
Delete a role
You can delete all roles except the Security Administrator role.
Before you begin:
•
You must be a Security Administrator to delete a role.
•
You must remove all administrators and administrator groups from the role that you want to delete.
1.
On the menu bar, click Settings.
2.
In the left pane, expand Administrators.
3.
Click Roles.
4.
Click the role that you want to delete.
5.
Click
.
28
Administrators
Ranking roles
When an administrator belongs to more than one administrator group, the role that is ranked higher is assigned to the
administrator. For example, if an administrator belongs to both Director and Supervisor administrator groups, and the Director
role is ranked higher, the administrator is assigned the Director role.
After you create a custom role, the role is ranked lowest by default. You can adjust the ranking of roles to help BES12 choose
which role to assign.
Related information
How BES12 chooses which role to assign, on page 18
Rank roles
Before you begin: You must be a Security Administrator to rank roles.
1.
On the menu bar, click Settings.
2.
In the left pane, expand Administrators.
3.
Click Roles.
4.
Use the arrows to move the roles up or down the ranking.
5.
Click Save.
29
Obtain and register an APNs certificate so that you can manage iOS devices.
Secure
APNs setup
APNs setup
Obtaining an APNs certificate to manage
iOS devices
7
APNs is the Apple Push Notification Service. You must obtain and register an APNs certificate if you want to use BES12 to
manage iOS devices.
You can obtain and register the APNs certificate using the first login wizard or by using the external integration section of the
administration console.
Note: Each APNs certificate is valid for one year. The administration console displays the expiry date. You must renew the APNs
certificate before the expiry date, using the same Apple ID that you used to obtain the certificate. If the certificate expires, iOS
devices do not receive data from BES12. If you register a new APNs certificate, iOS device users must reactivate their devices to
receive data.
For more information, visit https://developer.apple.com to read Issues with Sending Push Notifications in article TN2265.
It is a best practice to access the administration console and the Apple Push Certificates Portal using the Google Chrome
browser or the Safari browser. These browsers provide optimal support for requesting and registering an APNs certificate.
Data flow: Sending data to an iOS device
1.
BES12 sends a notification to the APNs.
2.
The APNs authenticates BES12 using the APNs certificate that you registered.
3.
The APNs sends the notification to the iOS device.
4.
The iOS device receives the notification and retrieves the data from BES12.
Steps to manage iOS devices
To obtain and register an APNs certificate, perform the following actions:
Obtain a signed CSR from BlackBerry.
Use the signed CSR to request an APNs certificate from Apple.
Register the APNs certificate.
32
APNs setup
Obtain a signed CSR from BlackBerry
You must obtain a signed CSR from BlackBerry before you can obtain an APNs certificate.
1.
On the menu bar, click Settings.
2.
In the left pane, click External integration > iOS management.
3.
Click Get APNs Certificate.
If you want to renew the current APNs certificate, click Renew certificate instead.
4.
In the Step 1 of 3 - Download signed CSR certificate from BlackBerry section, click Download certificate.
5.
Click Save to save the signed CSR file (.scsr) to your computer.
After you finish: Request an APNs certificate from Apple.
Request an APNs certificate from Apple
Before you begin: Download and save the signed CSR provided by BlackBerry.
1.
On the menu bar, click Settings.
2.
In the left pane, click External integration > iOS management.
3.
In the Step 2 of 3 - Request APNs certificate from Apple section, click Apple Push Certificate Portal. You are directed to
the Apple Push Certificates Portal.
4.
Sign in to the Apple Push Certificates Portal using a valid Apple ID.
5.
Follow the instructions to upload the signed CSR (.scsr).
6.
Download and save the APNs certificate (.pem) on your computer.
After you finish: Register the APNs certificate.
Register the APNs certificate
Before you begin: Request an APNs certificate from Apple using the signed CSR from BlackBerry and save the APNs certificate
on your computer.
1.
On the menu bar, click Settings.
2.
In the left pane, click External integration > iOS management.
3.
In the Step 3 of 3 - Register APNs certificate section, click Browse. Navigate to and select the APNs certificate (.pem).
4.
Click Submit.
After you finish:
•
To test the connection between BES12 and the APNs server, click Test APNS certificate.
33
APNs setup
•
To view the status and expiry date of the APNs certificate, click Settings > External integration > iOS management.
For more information about renewing the APNs certificate, see Renew the APNs certificate.
Renew the APNs certificate
The APNs certificate is valid for one year. You must renew the APNs certificate each year before it expires.
Before you begin: Obtain a new signed CSR from BlackBerry (see Obtain a signed CSR from BlackBerry).
1.
On the menu bar, click Settings.
2.
In the left pane, click External integration > iOS management.
3.
In the Step 2 of 3 - Request APNs certificate from Apple section, click Apple Push Certificate Portal. You are directed to
the Apple Push Certificates Portal.
4.
Sign in to the Apple Push Certificates Portal using the same Apple ID that you used to obtain the original APNs certificate.
5.
Follow the instructions to renew the APNs certificate (.pem). You will need to upload the new signed CSR.
6.
Download and save the renewed APNs certificate on your computer.
7.
In the Step 3 of 3 - Register APNs certificate section, click Browse. Navigate to and select the renewed APNs certificate.
8.
Click Submit.
After you finish:
•
To test the connection between BES12 and the APNs server, click Test APNS certificate.
•
To view the status and expiry date of the APNs certificate, click Settings > External integration > iOS management.
Troubleshooting APNs
The APNs certificate does not match the CSR. Provide the
correct APNs file (.pem) or submit a new CSR.
Description
You may receive an error message when you try to register the APNs certificate if you did not upload the most recently signed
CSR file from BlackBerry to the Apple Push Certificates Portal.
Possible solution
If you downloaded multiple CSR files from BlackBerry, only the last one that you downloaded is valid. If you know which CSR is
the most recent, return to the Apple Push Certificates Portal and upload it. If you are not sure which CSR is the most recent,
obtain a new one from BlackBerry, then return to the Apple Push Certificates Portal and upload it.
34
APNs setup
I cannot activate iOS devices
Possible cause
If you are unable to activate iOS devices, the APNs certificate may not be registered correctly.
Possible solution
Perform one or more of the following actions:
•
In the administration console, on the menu bar, click Settings > External integration > iOS management. Verify that
the APNs certificate status is "Installed." If the status is not correct, try to register the APNs certificate again.
•
Click Test APNS certificate to test the connection between BES12 and the APNs server.
•
If necessary, obtain a new signed CSR from BlackBerry and a new APNs certificate.
35
Install and configure the BlackBerry Cloud Connector to securely access your company directory from
BES12 Cloud.
Simple
Company directory
Company directory
Accessing your company directory
8
If you allow BES12 Cloud to access your company directory, you can take advantage of the following features:
•
You can create directory user accounts by searching for and importing user data from the company directory.
Directory user accounts are different from local user accounts, which you create by manually adding user information
in the management console.
•
BES12 Cloud synchronizes user data with the directory daily. You can configure when the automatic synchronization
begins. You can also start the synchronization process manually for an individual.
•
Directory users can use their directory credentials to access BES12 Self-Service.
•
You can assign an administrative role to directory users to make them administrators. The users can then log in to the
management console using their directory credentials.
To enable company directory access, you must install, activate, and configure the BlackBerry Cloud Connector. The BlackBerry
Cloud Connector is a Java process that provides a secure connection between BES12 Cloud and your company directory. The
installation and activation files for the BlackBerry Cloud Connector are available from the management console.
Architecture: BlackBerry Cloud Connector
The diagram above presents the key components related to the BlackBerry Cloud Connector.
For more information about the full architecture of BES12 Cloud, visit docs.blackberry.com/bes12cloud to see the Overview
content.
38
Company directory
Component
Description
BlackBerry Cloud Connector
The BlackBerry Cloud Connector is a Java process that provides a secure
connection between BES12 Cloud and your company directory. You install the
BlackBerry Cloud Connector behind your organization's firewall. Using the
management console, you activate the BlackBerry Cloud Connector with BES12
Cloud and you connect it to the company directory.
Company directory
The company directory is any service that your organization uses to manage user
accounts for employees. BES12 Cloud supports:
•
Microsoft Active Directory
•
LDAP
Proxy server (optional)
You can configure the BlackBerry Cloud Connector to send data to and from BES12
Cloud through a proxy server that is behind your organization’s firewall.
BES12
BES12 Cloud is a cloud-based service that you can use to manage BlackBerry 10,
iOS, Android, and Windows Phone devices. You access the management console,
which is hosted in the cloud, to manage users’ devices.
Installing two BlackBerry Cloud Connector
instances for redundancy
You can install two instances of the BlackBerry Cloud Connector to provide redundancy for company directory lookups and
synchronization processes. BES12 Cloud does not support more than two BlackBerry Cloud Connector instances.
You must install each instance on a different computer that is reserved for technical use. Do not use a computer that is used for
daily tasks such as email. Use the same company directory configuration for both instances.
Steps to access your company directory
To allow BES12 Cloud to access your company directory, perform the following actions:
Download the installation file and the activation file for the BlackBerry Cloud Connector from the
management console.
Install, activate, and configure the BlackBerry Cloud Connector.
If necessary, configure proxy settings for the BlackBerry Cloud Connector.
39
Company directory
Test the connection between the BlackBerry Cloud Connector and BES12 Cloud.
Prerequisites: Installing the BlackBerry Cloud
Connector
•
Visit docs.blackberry.com/bes12cloud to review the Compatibility Matrix in the Installation and upgrade content.
Verify that the computer meets the requirements for installing the BlackBerry Cloud Connector.
•
Verify that the BlackBerry Cloud Connector will be installed on a computer that is reserved for technical purposes,
instead of a computer that is used for everyday work. The computer must be able to access the Internet and your
company directory.
•
Choose a directory account with read permissions that the BlackBerry Cloud Connector can use to access the
company directory.
•
Use a BES12 Cloud account with sufficient permissions to download the BlackBerry Cloud Connector software and
activation file.
•
Use a Windows account with sufficient permissions to install and configure software on the computer designated for
the installation of the BlackBerry Cloud Connector.
•
Verify that the following outbound ports are open in your organization's firewall so that the BlackBerry Cloud
Connector (and any proxy servers that you want it to use) can communicate with BES12 Cloud:
◦
3101 (TCP)
◦
443 (HTTPS)
Note:
You can access the BlackBerry Cloud Connector only from a browser on the same computer that the BlackBerry Cloud
Connector is installed on.
Download the installation and activation files
Before you begin: Use an administrator account with sufficient permissions to perform installation and configuration tasks.
1.
In the BES12 Cloud management console, on the menu bar, click Settings.
2.
In the left pane, click External integration > BlackBerry Cloud Connector.
3.
Click Add BlackBerry Cloud Connector.
4.
In the Step 1: Download BlackBerry Cloud Connector section, click Download.
5.
On the software download page, answer the required questions and click Download. Save the BlackBerry Cloud Connector
installation file (.exe).
40
Company directory
6.
In the Step 2: Generate and download activation file section, click Generate and download activation file.
7.
Save the activation file (.txt).
The activation file is valid for 60 minutes. If you wait longer than 60 minutes before you use the activation file, repeat steps
6 and 7 to generate a new activation file. Only the latest activation file is valid.
After you finish: Install and configure the BlackBerry Cloud Connector
Related information
Install and configure the BlackBerry Cloud Connector, on page 41
Install and configure the BlackBerry Cloud
Connector
Before you begin:
1.
•
Download the installation and activation files.
•
Use an administrator account with sufficient permissions to install and configure software.
Open the BlackBerry Cloud Connector installation file (.exe) that you downloaded from the management console.
If a Windows message appears and requests permission to make changes to the computer, click Yes.
2.
Choose your language. Click OK.
3.
On the splash screen, click Next.
4.
Select your country or region. Read and accept the license agreement. Click Next.
5.
To change the installation file path, click ... and navigate to the file path that you want to use (optional). Click Next.
6.
To change the default port, enter the new port (optional). The default port is 8088. Click Next.
The installation process begins.
7.
When the installation completes, click Next.
A console addresses panel for the BlackBerry Cloud Connector opens.
8.
To open the BlackBerry Cloud Connector management console, click the link on the console addresses panel before you
close the setup application, or manually enter the address in your browser. Click Close to close the setup application.
9.
When you activate the BlackBerry Cloud Connector, it sends data over HTTPS to enroll with BES12. After it is activated,
the BlackBerry Cloud Connector sends and receives data over TCP. If you want to send data through a proxy computer
behind your organization's firewall, see "Configure proxy settings for the BlackBerry Cloud Connector."
10. In the Friendly name field, type a name for the BlackBerry Cloud Connector. Click Next.
11. Click Browse. Select the activation file that you downloaded from the management console.
12. Click Activate.
13. In the drop-down list, click the type of company directory that your organization uses.
41
Company directory
14. Click Configure.
15. Follow the steps for your organization’s directory type:
Directory type
Steps
Microsoft Active
Directory
1.
In the Username field, type the username of the Microsoft Active Directory account.
2.
In the Domain field, type the FQDN of the domain that hosts Microsoft Active Directory.
For example: domain.example.com.
3.
In the Password field, type the password of the Microsoft Active Directory account.
4.
In the Domain controller discovery drop-down list, click one of the following:
LDAP directory
•
If you want automatic discovery, click Automatic.
•
If you want to specify the domain controller computer, click Select from list
below. Click + and type the FQDN of the computer. Repeat this step to add
more computers.
5.
In the Global catalog search base field, type the search base that you want to access
(for example, OU=Users,DC=example,DC=com). To search the entire Global Catalog,
leave the field blank.
6.
In the Global catalog discovery drop-down list, click one of the following:
•
If you want automatic catalog discovery, click Automatic.
•
If you want to specify the catalog computer, click Select from list below. Click
+ and type the FQDN of the computer. If necessary, repeat this step to specify
more computers.
7.
Click Save.
1.
In the LDAP computer discovery drop-down list, click one of the following:
•
If you want automatic discovery, click Automatic. In the DNS domain name
field, type the DNS domain name.
•
If you want to specify the LDAP computer, click Select from list below. Click +
and type the FQDN of the computer. Repeat this step to add more computers.
2.
In the Enable SSL drop-down list, select whether you want to enable SSL authentication
for LDAP traffic. If you click Yes, click Browse and select the SSL certificate for the LDAP
computer.
3.
In the LDAP port field, type the port number of the LDAP computer.
4.
In the Authorization required drop-down list, select whether BES12 must authenticate
with the LDAP computer. If you click Yes, type the username and password of the LDAP
42
Company directory
Directory type
Steps
account. The username must be in DN format (for example, CN=Megan
Ball,OU=Sales,DC=example,DC=com).
5.
In the Search base field, type the search base that you want to access (for example,
OU=Users,DC=example,DC=com).
6.
In the LDAP user search filter field, type the filter that you want to use for LDAP users.
For example: (&(objectCategory=person)(objectclass=user)
(memberOf=CN=Local,OU=Users,DC=example,DC=com)).
7.
In the LDAP user search scope drop-down list, click one of the following:
•
If you want user searches to apply to all levels below the base DN, click All
levels.
•
If you want to limit user searches to one level below the base DN, click One
level.
8.
In the Unique identifier field, type the attribute for each user’s unique identifier (for
example, uid). The attribute must be immutable and globally unique for every user.
9.
In the First name field, type the attribute for each user’s first name (for example,
givenName).
10. In the Last name field, type the attribute for each user’s last name (for example, sn).
11. In the Login attribute field, type the attribute for each user’s login attribute (for example,
cn). This attribute is used for the value that users type to log in to BES12 Self-Service
with their directory credentials.
12. In the Email field, type the attribute for each user’s email (for example, mail).
13. In the Display name field, type the attribute for each user’s display name (for example,
displayName).
14. In the Email profile account name field, type the attribute for each user’s email profile
account name (for example, mail).
15. Click Save.
16. In the BES12 management console, click Settings.
17. In the left pane, click External integration > BlackBerry Cloud Connector.
18. In the Step 4: Test connection section, click Next.
After you finish:
•
To install a second BlackBerry Cloud Connector instance for redundancy, download another set of installation and
activation files and repeat this task on a different computer. When you configure a second instance, use the same
directory configuration. This should be done after the first instance has been installed and activated.
43
Company directory
•
If necessary, configure proxy settings for the BlackBerry Cloud Connector.
•
To change the directory settings that you configured, in the BlackBerry Cloud Connector setup console, click the edit
icon.
•
To delete a directory configuration, in the BlackBerry Cloud Connector setup console, click the delete icon.
Warning: If you upgrade from a previous version of the BlackBerry Cloud Connector, the desktop shortcut may not be updated
with the new port until the computer has been restarted.
This issue occurs only if:
•
You upgraded from a previous version of the BlackBerry Cloud Connector
•
You have changed to a different port than the one used in the previous installation
•
You are using Google Chrome as your default browser
The BlackBerry Cloud Connector management console is still accessible by manually typing in the address with the new port
number.
Related information
Download the installation and activation files, on page 40
Configure proxy settings for the BlackBerry Cloud Connector, on page 44
Configure proxy settings for the BlackBerry
Cloud Connector
When you activate the BlackBerry Cloud Connector, it sends data over HTTPS to activate with BES12 Cloud. After it is activated,
the BlackBerry Cloud Connector sends and receives data over TCP. You can configure the BlackBerry Cloud Connector to route
HTTPS or TCP data through a proxy server that is behind your organization’s firewall. The BlackBerry Cloud Connector does not
support authentication with a proxy server.
Before you begin: Use an administrator account with sufficient permissions to configure the BlackBerry Cloud Connector
settings.
1.
In the BlackBerry Cloud Connector setup console, click Settings > Proxy.
2.
Perform any of the following tasks:
Task
Steps
Route HTTPS activation data
through a proxy server
1.
Select the Enable activation proxy check box.
2.
In the Server name or IP address field, type the FQDN or IP address of the proxy
server.
3.
In the Port number field, type the port number of the proxy server.
44
Company directory
Task
Steps
Route TCP data through a TCP
proxy server
1.
Select the Enable TCP proxy check box.
2.
In the Server name or IP address field, type the FQDN or IP address of the proxy
server.
3.
In the Port number field, type the port number of the proxy server.
3.
Click Save.
View the status of the BlackBerry Cloud
Connector
Before you begin: Use an administrator account in the BlackBerry Cloud Connector management console with sufficient
permissions to view the settings.
1.
On the menu bar, click Settings.
2.
In the left pane, click External integration > BlackBerry Cloud Connector.
Change when user data is synchronized with the
directory
BES12 Cloud synchronizes user data with your company directory each day at the same time. You can view the default time in
the management console. You can change when the automatic synchronization begins. To minimize the performance impact,
try to schedule the synchronization at a time when user activity is low.
If you want to start the synchronization process manually for an individual, refresh the user account information.
Before you begin: Use an administrator account with sufficient permissions to change settings in the management console.
1.
On the menu bar, click Settings.
2.
In the left pane, click External integration > Company directory.
3.
In the Synchronization time drop-down lists, select the synchronization time.
4.
Click Save.
After you finish: If you want to turn off user data synchronization, clear the Turn on synchronization check box.
Related information
Refresh user account information, on page 144
45
Company directory
Verify the connection with BES12 Cloud
To help you troubleshoot issues, you can verify the connection between the BlackBerry Cloud Connector and BES12 Cloud. The
following task verifies the connection for each instance that you installed.
Before you begin: Use an administrator account on the computer that hosts BlackBerry Cloud Connector with sufficient
permissions to run the test.
1.
On the menu bar, click Settings.
2.
In the left pane, click External integration > BlackBerry Cloud Connector.
3.
Click Poll now.
Troubleshooting BlackBerry Cloud Connector
issues
When you troubleshoot issues with the BlackBerry Cloud Connector, consider the following common issues.
The BlackBerry Cloud Connector does not activate with BES12
Cloud
Description
After you upload the activation file and click Activate, you receive an error message that the activation was not successful.
Possible solutions
Try any of the following:
•
Verify that you uploaded the latest activation file that you generated in the management console. Only the latest
activation file is valid.
•
Activation files expire after 60 minutes. Generate and upload a new activation file, then try to activate again.
The BlackBerry Cloud Connector does not connect with the
company directory
Description
After you specify the information for your company directory and click Save, you receive an error message that the BlackBerry
Cloud Connector cannot connect with the company directory.
46
Company directory
Possible solutions
Try any of the following:
•
Verify that you specified the correct settings for the company directory.
•
Verify that you specified the correct login information for the directory account, and that the account has the
necessary permissions to access the company directory.
•
Verify that the correct ports are open in your organization's firewall.
•
Verify that you did not use the same activation file for two different installations.
•
Verify that you are using the most recent activation file.
•
Review the most recent log file for details about why the BlackBerry Cloud Connector cannot access the company
directory. By default, the log files for the BlackBerry Cloud Connector are located in <drive:>:\Program Files
\BlackBerry Cloud Connector\logs.
The BlackBerry Cloud Connector does not connect with BES12
Cloud
Description
When you test the connection between the BlackBerry Cloud Connector and BES12 Cloud, you receive an error message that
the test was not successful.
Possible solutions
Try any of the following:
•
•
Verify that the following outbound ports are open in your organization's firewall so that the BlackBerry Cloud
Connector and any proxy servers that you want it to use can communicate with BES12 Cloud:
◦
3101 (TCP)
◦
443 (HTTPS)
Review the most recent log file for information about why the BlackBerry Cloud Connector cannot connect with BES12
Cloud. By default, the log files for the BlackBerry Cloud Connector are located in <drive:>:\Program Files\BlackBerry
Cloud Connector\logs.
47
Separate work data and personal data on iOS and Android devices.
Secure
Secure Work Space
Secure Work Space
Setting up Secure Work Space for iOS
and Android devices
9
Secure Work Space is an option for providing extra security for work data on iOS and Android devices. Secure Work Space is
similar to the BlackBerry Balance feature on BlackBerry 10 devices.
Using containerization and app wrapping, Secure Work Space separates personal information from work information by
creating a personal space and a work space on devices. You can choose whether you want administrative control of the entire
device, or only the work space on a user's device.
To set up Secure Work Space so that users can activate devices with a work space, you must complete the following tasks:
•
Purchase Gold - Secure Work Space licenses
•
Create an activation profile with the appropriate activation type and assign it to users or groups
•
Send activation information to users
When users activate their devices, they are prompted to set up a work space, create a work space password, and install the
default work space apps.
Related information
Using activation types to configure your control over devices, on page 159
Managing devices that have a work space
Having a work space on devices helps to keep work information separate and secure, and allows you to manage the work data
on devices. Data that any of the apps in the work space use is saved securely and cannot be accessed outside of the work
space.
For more information about work space security, visit docs.blackberry.com/bes12cloud to see the Security content.
When users activate their devices, a work space is installed on devices and users are prompted to create work space
passwords. To complete the work space setup, users must download the following apps on their devices:
Device type
iOS
Android
Apps
•
Work Connect: for email, calendar, contacts, notes, and tasks
•
Work Browser: for browsing
•
Documents To Go: for securely viewing and editing work documents
•
Work Space Manager: required to run the other work space apps on the device
•
Secure Work Space: for email, calendar, contacts, and browsing
50
Secure Work Space
Device type
Apps
•
Documents To Go: for securely viewing and editing work documents
The work space allows you to take advantage of the following features:
•
Control specific behaviors of the work space on devices, such as password requirements and connection preferences,
by assigning an IT policy to user accounts.
•
Use IT administration commands to reset the work space password or delete the work space on devices.
Upgrading work space apps
To support new features and more operating systems, BlackBerry posts new versions of the work space apps in the App Store
and Google Play.
Users should upgrade the work space apps when new versions become available. If users upgrade their device operating
system and do not upgrade to the latest version of the work space apps, the work space may not function as expected.
For more information about the supported device operating systems, visit docs.blackberry.com/bes12cloud to see the
Compatibility Matrix in the Installation and upgrade content.
Test the Secure Work Space connection
You can test the connection between BES12 and the Secure Work Space infrastructure at any time to verify that Secure Work
Space is enabled.
1.
On the menu bar, click Settings.
2.
In the left pane, in the External integration section, click Secure Work Space.
3.
Verify that Secure Work Space is enabled and the connection to the Secure Work Space infrastructure is Successful.
4.
Optionally, click Test connection to test the work space connection.
Recreating the Secure Work Space connection
If the Secure Work Space connection to the BlackBerry Infrastructure is disabled, you must recreate the connection.
Consider the following example: You create a test environment that includes a virtual computer, BES12 instance, Secure Work
Space, and BES12 database using an SRP ID. You then uninstall the test environment and create a production environment
using the same SRP ID. The production environment cannot connect to the BlackBerry Infrastructure because the Secure Work
Space connection that used the SRP ID the test environment still exists in the BlackBerry Infrastructure. In this situation, you
must recreate the Secure Work Space connection.
51
Secure Work Space
Recreate the Secure Work Space connection
1.
On the menu bar, click Settings.
2.
In the left pane, in the External integration section, click Secure Work Space.
3.
Click Recreate Secure Work Space tenant.
In the Recreate Secure Work Space connection window, you are notified of the number of devices that require reactivation
when you recreate the Secure Work Space connection.
4.
Click Recreate.
5.
Verify that Secure Work Space is enabled.
After you finish: Make sure that users reactivate their iOS and Android devices that use Secure Work Space.
52
Learn how to use profiles and variables to set up certificates, work connections, and device standards.
Simple
Profiles and variables
Profiles and variables
Using profiles
10
A profile contains configuration information for devices and each profile type supports a particular configuration, such as
certificates, work connection settings, or settings that enforce certain standards for devices. You can specify settings for
BlackBerry 10, iOS, Android, and Windows Phone devices in the same profile and then distribute the configuration information
to devices by assigning the profile to user accounts, user groups, or device groups.
Profiles are an efficient way for your organization to configure devices. If you need to specify many settings or configure a large
number of devices, profiles allow you to store all the settings for a specific configuration in one place and quickly deliver the
settings to the appropriate devices.
Assigning profiles
You can assign profiles to user accounts, user groups, and device groups. Some profile types may use ranking to determine
which profile is sent to a device.
•
Ranked profile type: You can assign one profile to a user and one profile to the groups they belong to, and BES12
sends only one of the assigned profiles to the user's device.
•
Non-ranked profile type: You can assign multiple profiles to a user and multiple profiles to the groups they belong to,
and BES12 sends all the assigned profiles to the user's device.
Note: You cannot assign an activation profile to a device group.
User or group assignment
Profile types
One profile of each type can be assigned The following ranked profile types are available in BES12:
•
Email
•
Certificate retrieval
•
OCSP
•
CRL
•
Proxy
•
Single sign-on
•
Compliance
•
Device SR requirements
•
App lock mode
•
Device
•
Activation
54
Profiles and variables
User or group assignment
Profile types
Multiple profiles of each type can be
assigned
The following non-ranked profile types are available in BES12:
•
CA certificate
•
SCEP
•
Shared certificate
•
User credential
•
IMAP/POP3 email
•
VPN
•
Wi-Fi
•
Web content filter
•
Managed domains
Related information
How BES12 chooses which profiles to assign, on page 55
Assign a profile to a user group, on page 136
Assign a profile to a user account, on page 146
Create a device SR requirements profile, on page 106
Rank profiles, on page 57
How BES12 chooses which profiles to assign
For ranked profile types, BES12 sends only one profile of each type to a device and uses predefined rules to determine which
profile to assign to a user and the devices that the user activates.
Assigned to
Rules
User account
1.
A profile assigned directly to a user account takes precedence over a profile of
the same type assigned indirectly by user group.
2.
If a user is a member of multiple user groups that have different profiles of the
same type, BES12 assigns the profile with the highest ranking.
3.
If applicable, the preconfigured Default profile is assigned if no profile is
assigned to a user account directly or through user group membership.
(view User summary tab)
Note: BES12 includes a Default compliance profile and Default activation profile
with preconfigured settings for each device type.
Device
(view device tab)
By default, a device inherits the profile that BES12 assigns to the user who activates
the device. If a device belongs to a device group, the following rules apply:
55
Profiles and variables
Assigned to
Rules
1.
A profile assigned to a device group takes precedence over the profile of the
same type that BES12 assigns to a user account.
2.
If a device is a member of multiple device groups that have different profiles of
the same type, BES12 assigns the profile with the highest ranking.
BES12 might have to resolve conflicting profiles when you perform any of the following actions:
•
Assign a profile to a user account, user group, or device group
•
Remove a profile from a user account, user group, or device group
•
Change the profile ranking
•
Delete a profile
•
Change user group membership (user accounts and nested groups)
•
Change device attributes
•
Change device group membership
•
Delete a user group or device group
Related information
Assigning profiles, on page 54
Assign a profile to a user group, on page 136
Assign a profile to a user account, on page 146
Create a device SR requirements profile, on page 106
Rank profiles, on page 57
56
Profiles and variables
Managing profiles
11
In the Policies and Profiles library, you can manage the profiles that your organization uses. You can rank profiles, view
information about a profile, change profile settings, remove a profile from user accounts or user groups, or delete a profile.
Rank profiles
Ranking is used to determine which profile BES12 sends to a device in the following scenarios:
•
A user is a member of multiple user groups that have different profiles of the same type.
•
A device is a member of multiple device groups that have different profiles of the same type.
1.
On the menu bar, click Policies and Profiles.
2.
In the left pane, expand a profile type.
3.
Click Rank <profile_type> profiles.
4.
Use the arrows to move profiles up or down the ranking.
5.
Click Save.
Related information
Assigning profiles, on page 54
How BES12 chooses which profiles to assign, on page 55
View a profile
You can view the following information about a profile:
•
Settings common to all device types and specific to each device type
•
List and number of user accounts that the profile is assigned to (directly and indirectly)
•
List and number of user groups that the profile is assigned to (directly)
1.
On the menu bar, click Policies and Profiles.
2.
In the left pane, expand a profile type.
3.
Click the name of the profile that you want to view.
Change profile settings
If you update an activation profile, the new profile settings apply only to additional devices that a user activates. Activated
devices do not use the new profile settings until the user reactivates them.
57
Profiles and variables
1.
On the menu bar, click Policies and Profiles.
2.
In the left pane, expand a profile type.
3.
Click the name of the profile that you want to change.
4.
Click
5.
Make changes to any common settings.
6.
Make changes on the appropriate tab for each device type.
7.
Click Save.
.
After you finish: If necessary, change the profile ranking.
Related information
Rank profiles, on page 57
Remove a profile from user accounts or user
groups
If a profile is assigned directly to user accounts or user groups, you can remove it from users or groups. If a profile is assigned
indirectly by user group, you can remove the profile from the group or remove user accounts from the group. When you remove
a profile from user groups, the profile is removed from every user that belongs to the selected groups.
Note: The Default compliance profile and Default activation profile can only be removed from a user account if you assigned
them directly to the user.
1.
On the menu bar, click Policies and Profiles.
2.
In the left pane, expand a profile type.
3.
Click the name of the profile that you want to remove from user accounts or user groups.
4.
Perform one of the following tasks:
Task
Steps
Remove a profile from user accounts
1.
Click the Assigned to users tab.
2.
If necessary, search for user accounts.
3.
Select the user accounts that you want to remove the profile from.
4.
Click
1.
Click the Assigned to groups tab.
2.
If necessary, search for user groups.
3.
Select the user groups that you want to remove the profile from.
Remove a profile from user groups
.
58
Profiles and variables
Task
Steps
4.
Click
.
Related information
How BES12 chooses which profiles to assign, on page 55
Delete a profile
When you delete a profile, BES12 removes the profile from the users and devices that it is assigned to. To delete a profile that is
associated with other profiles, you must first remove all existing associations. For example, before you can delete a proxy profile
that is associated with a VPN profile and a Wi-Fi profile, you must change the associated proxy profile value in both the VPN
profile and the Wi-Fi profile.
Note: You cannot delete the Default compliance profile or Default activation profile.
1.
On the menu bar, click Policies and Profiles.
2.
In the left pane, expand a profile type.
3.
Click the name of the profile that you want to delete.
4.
Click
5.
Click Delete.
.
Related information
How BES12 chooses which profiles to assign, on page 55
59
Profiles and variables
Using variables
12
BES12 supports default and custom variables. Default variables represent standard account attributes (for example, username)
and other predefined attributes (for example, server address used for device activation). You can use custom variables to define
additional attributes.
You can use variables in profiles and to customize compliance notifications and activation email messages. You can use
variables to reference values instead of specifying the actual values. When the profile, compliance notification, or activation
email message is sent to devices, any variables are replaced with the values that they represent.
Note: IT policies do not support variables.
Using variables in profiles
Variables in profiles help you to efficiently manage profiles for the users in your organization. Variables provide more flexibility
for profiles and can help limit the number of profiles that you require for each profile type. For example, you can create a single
VPN profile for multiple users that specifies the %UserName% variable instead of creating a separate VPN profile for each user
that specifies the actual username value.
You can use a variable in any text field in a profile except the Name and Description fields. For example, you can specify
"%UserName%@example.com" in the Email address field in an email profile.
In compliance profiles, you can use variables to customize the compliance notifications that BES12 sends to users.
Default variables
The following default variables are available in BES12:
Variable name
Description
Where to use
%ActivationPassword%
Activation password that is automatically
generated or that you set for a user
Activation email messages
%ActivationPasswordExpiry%
Date and time that an activation password
expires
Activation email messages
%ActivationURL%
Web address of the server that receives activation Activation email messages
requests
%ActivationUserName%
Username for activation requests
Equivalent to %UserEmailAddress% (if available
for a user) or SRP ID\%UserName%
60
Activation email messages
Profiles and variables
Variable name
Description
Where to use
%AdminPortalURL%
Web address of BES12 management console
Administrator access email
messages (not customizable)
%ComplianceApplicationList%
List of apps that violate compliance rules (nonassigned apps are installed, required apps are
not installed, or restricted apps are installed)
Compliance notifications
%ComplianceEnforcementAction%
Enforcement action that BES12 performs if a
device is non-compliant
Compliance notifications
%ComplianceEnforcementActionWit Enforcement action that BES12 performs if a
hDescription%
device is non-compliant, including a description
of the enforcement action
Compliance notifications
%ComplianceRuleViolated%
Compliance rule that a device violated
Compliance notifications
%DeviceIMEI%
International Mobile Equipment Identity number
of a device
Profiles
%DeviceModel%
Model number of a device
Compliance notifications
%SSLCertName%
Common Name of the secure communication
certificate
Activation email messages
%SSLCertSHA%
Fingerprint of the secure communication
certificate
Activation email messages
%UserDisplayName%
Display name of a user
Activation email messages
%UserDistinguishedName%
Directory user's distinguished name
Profiles
For a local user, equivalent to %UserName%
%UserDomain%
Microsoft Active Directory domain that a
directory user belongs to
Profiles
%UserEmailAddress%
Email address of a user
Activation email messages, profiles
%UserName%
Username of a user
Activation email messages, profiles
%UserPrincipalName%
Directory user's principal name
Profiles
For a local user, equivalent to
%UserEmailAddress%
61
Profiles and variables
Variable name
Description
Where to use
%UserSelfServicePortalURL%
Web address of BES12 Self-Service
Activation email messages
Custom variables
You use labels to define the attributes and passwords that custom variables represent. For example, you can specify "VPN
password" as the label for the %custom_pswd1% variable. When you create or update a user account, labels are used as field
names and you specify the appropriate values for the custom variables that your organization uses. All user accounts support
custom variables, including administrator user accounts.
Custom variables support text values or masked text values. For security reasons, you should use custom variables that support
masked text values to represent passwords.
The following custom variables are available in BES12:
Variable name
Description
%custom1%, %custom2%, %custom3%, You can use up to five different variables for attributes that you define (text values).
%custom4%, %custom5%
%custom_pswd1%, %custom_pswd2%, You can use up to five different variables for passwords that you define (masked
%custom_pswd3%, %custom_pswd4%, text values).
%custom_pswd5%
Define custom variables
You must define custom variables before you can use them. Only custom variables that have a label are displayed when you
create or update a user account.
1.
On the menu bar, click Settings.
2.
In the left pane, expand General settings.
3.
Click Custom variables.
4.
Select the Show custom variables when adding or editing a user check box.
5.
Specify a label for each custom variable that you plan to use. The labels are used as field names in the Custom variables
section when you create or update a user account.
6.
Click Save.
62
Profiles and variables
Using custom variables
After you define custom variables, you must specify the appropriate values when you create or update a user account. You can
then use custom variables in the same way as default variables. You specify the variable name when you create profiles or
customize compliance notifications and activation email messages.
Example: Using the same VPN profile for several users who have their own VPN passwords
In the following example, "VPN password" is the label that you specified for the %custom_pswd1% variable
and it is used as a field name in the Custom variables section when you update a user account.
1.
On the menu bar, click Users and Devices.
2.
Search for a user account.
3.
In the search results, click the name of a user account.
4.
On the User summary tab, in the User details section, click
5.
Expand Custom variables.
6.
In the VPN password field, type a user's VPN password.
7.
Click Save.
8.
Repeat steps 2 to 7 for each user that will use the VPN profile.
9.
When you create the VPN profile, in the Password field, type %custom_pswd1%.
63
.
Send any required certificates to devices.
Secure
Certificates
Certificates
Managing certificates using profiles
13
You can manage certificates using the profiles available in the Policies and Profiles library.
You can use the following profiles to send certificates to devices:
Profile
Description
CA certificate
A CA certificate profile specifies a CA certificate that devices can use to establish
trust with a work network or server.
SCEP
A SCEP profile specifies how devices obtain certificates used for authentication with
a work network or mail server from your organization's CA using a SCEP service.
Shared certificate
A shared certificate profile specifies a client certificate that iOS and Android
devices can use to authenticate users with a work network or server. BES12 sends
the same client certificate to every user that the profile is assigned to.
66
Certificates
Sending certificates to devices
14
A certificate is a digital document issued by a CA that verifies the identity of certificate subject and binds the identity to a public
key. Each certificate has a corresponding private key that is stored separately. The public key and private key form an
asymmetric key pair that can be used for data encryption and identity authentication. A CA signs the certificate to verify that
entities that trust the CA can also trust the certificate.
Devices can use certificates to:
•
Authenticate using SSL/TLS when connecting to webpages that use HTTPS
•
Authenticate with a work mail server
•
Authenticate with a work Wi-Fi network or VPN
•
Encrypt and sign email messages using S/MIME protection
Many certificates used for different purposes can be stored on a device. You can use certificate profiles to send CA certificates
and client certificates to devices.
Related information
Creating CA certificate profiles, on page 67
Creating SCEP profiles, on page 68
Creating shared certificate profiles, on page 70
Add a client certificate to a user account, on page 147
Creating CA certificate profiles
You might need to distribute CA certificates to devices if your organization uses S/MIME or if the devices use certificate-based
authentication to connect to a network or server in your organization’s environment.
When you send a CA certificate to a device, the device trusts the identity associated with any client or server certificate signed
by the CA. When the certificate for the CA that signed your organization's network and server certificates is stored on devices,
the devices can trust your networks and servers when they make secure connections. When the CA certificate that signed your
organization's S/MIME certificates is stored on devices, the devices can trust the sender's certificate when a secure email
message is received.
Many CA certificates that are used for different purposes can be stored on a device. You can use CA certificate profiles to send
CA certificates to devices.
Create a CA certificate profile
Before you begin: You must obtain the CA certificate file that you want to send to devices. It must have a .der file name
extension.
1.
On the menu bar, click Policies and Profiles.
67
Certificates
2.
Click
3.
Type a name and description for the profile. Each CA certificate profile must have a unique name. Some names (for
example, ca_1) are reserved.
4.
In the Certificate file field, click Browse to locate the certificate file.
5.
If the CA certificate is sent to BlackBerry devices, specify one or more of the following certificate stores to send the
certificate to on the device:
6.
beside CA certificate.
•
Browser certificate store
•
VPN certificate store
•
Wi-Fi certificate store
•
Enterprise certificate store
Click Add.
Related information
Assign a profile to a user account, on page 146
Assign a profile to a user group, on page 136
CA certificate stores on BlackBerry 10 devices
CA certificates that are sent to BlackBerry 10 devices can be stored in different certificate stores, depending on the purpose of
the certificate.
Store
Description
Browser certificate store
The work browser on BlackBerry 10 devices uses the certificates in this store to establish SSL
connections with servers in your organization's environment.
VPN certificate store
BlackBerry 10 devices use certificates in this store for VPN connections. You must set the
"Trusted certificate source" setting in the VPN profile to "Trusted certificate store" to use the
certificates in this store for work VPN connections.
Wi-Fi certificate store
BlackBerry 10 devices use certificates in this store for Wi-Fi connections. You must set the
"Trusted certificate source" setting in the Wi-Fi profile to "Trusted certificate store" to use
certificates in this store for work Wi-Fi connections.
Enterprise certificate store BlackBerry 10 devices use certificates in this store to authenticate S/MIME-protected email
messages that are received.
Creating SCEP profiles
You can use a SCEP profile to specify how BlackBerry 10 and iOS devices obtain certificates from your organization's CA
through a SCEP service. SCEP is an IETF protocol that simplifies the process of enrolling certificates to a large number of
68
Certificates
devices without any administrator input or approval required to issue each certificate. Devices can use SCEP to request and
obtain client certificates from a SCEP-compliant CA that is used by your organization. The CA that you use must support
challenge passwords. The CA uses challenge passwords to verify that the device is authorized to submit a certificate request.
Devices can use the certificates obtained using SCEP to connect to a work Wi-Fi network, work VPN, or work mail server.
Android and Windows Phone devices do not support SCEP.
Create a SCEP profile
The required profile settings vary for each device type and depend on the SCEP service configuration in your organization's
environment.
Before you begin: If you want to use a SCEP profile to provide Entrust client certificates to devices, complete the instructions in
“Integrating BES12 with your organization’s Entrust software.”
1.
On the menu bar, click Policies and Profiles.
2.
Click
3.
Type a name and description for the profile.
4.
In the URL field, type the URL for the SCEP service. The URL should include the protocol, FQDN, port number, and SCEP
path.
5.
In the Instance name field, type the instance name for the CA.
6.
In the Certification authority connection drop-down list, perform one of the following actions:
beside SCEP.
•
To use an Entrust connection that you configured, click the appropriate connection. In the Profile drop-down
list, click a digital ID profile. Specify the values for the digital ID profile.
•
To use another certification authority, click Generic. In the SCEP challenge type list, select Static or Dynamic,
and then specify the required settings for the challenge type.
7.
Optionally, clear the check box for any device type that you do not want to configure the profile for.
8.
Perform the following actions:
9.
a.
Click the tab for a device type.
b.
Configure the appropriate values for each profile setting to match the SCEP service configuration in your
organization's environment.
Repeat step 8 for each device type in your organization.
10. Click Add.
After you finish: If devices use the certificate to authenticate with a work Wi-Fi network, work VPN, or work mail server,
associate the SCEP profile with a Wi-Fi, VPN, or email profile.
Related information
SCEP profile settings, on page 201
Integrating BES12 with your organization's Entrust software, on page 71
69
Certificates
Creating shared certificate profiles
If you use certificate-based authentication for connections to networks or servers in your organization's environment, you may
need to use BES12 to send client certificates to devices.
Shared certificate profiles send client certificates to all of the assigned users' iOS and Android devices. The devices can present
the client certificate for authentication to a network or server in your organization's environment. You should use shared
certificate profiles only if you want to allow more than one user to share a client certificate.
If your organization has a SCEP service, you can use SCEP profiles to distribute client certificates to BlackBerry 10 and iOS
devices.
To specify a different client certificate for each user, you can add a client certificate to a user account on the User summary tab
and BES12 sends the certificate to the user's iOS and Android devices. For more information, see "Add a client certificate to a
user account."
Related information
Add a client certificate to a user account, on page 147
Create a shared certificate profile
Before you begin: You must obtain the client certificate file that you want to send to devices. It must have a .pfx or .p12 file
name extension.
1.
On the menu bar, click Policies and Profiles.
2.
Click
3.
Type a name and description for the profile. Each shared certificate profile must have a unique name. Some names (for
example, ca_1) are reserved.
4.
In the Password field, type a password for the shared certificate profile.
5.
In the Certificate file field, click Browse to locate the certificate file.
6.
Click Add.
beside Shared certificate.
Related information
Assign a profile to a user group, on page 136
Assign a profile to a user account, on page 146
70
Certificates
Integrating BES12 with your
organization's Entrust software
15
If your organization uses Entrust software to provide PKI services, you can extend Entrust certificate-based authentication to the
devices that you manage with BES12.
Entrust products such as Entrust IdentityGuard and Entrust Authority Administration Services provision client certificates. Using
BES12, you can configure a connection with your organization’s Entrust product and use profiles to provide the Entrust CA
certificate and client certificates to devices. Devices can use client certificates for SSL connections with webpages, for
authentication with a work mail server, Wi-Fi network, or VPN, and for encryption and signing of email messages using S/MIME.
Steps to integrate BES12 with your
organization's Entrust software
To integrate BES12 with your organization's Entrust software, perform the following actions:
Connect BES12 with your organization’s Entrust software.
If necessary, use a CA certificate profile to send the Entrust CA certificate to devices.
Set up a profile to provide Entrust client certificates to devices. The type of profile (SCEP or user
credential) depends on how your organization uses the Entrust software and the types of devices your
organization supports.
If necessary, add the SCEP or user credential profile to Wi-Fi, VPN, or email profiles.
Assign the profiles to user groups and user accounts.
Add a connection to your organization’s Entrust
software
To integrate BES12 with your organization’s Entrust software, you must add a connection to Entrust IdentityGuard or Entrust
Authority Administration Services.
71
Certificates
Before you begin: Contact your organization’s Entrust administrator to obtain the URL of the Entrust MDM Web Service and the
login information for an Entrust administrator account that you can use to connect BES12 to the Entrust software.
1.
On the menu bar, click Settings.
2.
In the left pane, click External integration > Certification authority.
3.
Click Add an Entrust connection.
4.
In the Connection name field, type a name for the connection.
5.
In the URL field, type the URL of the Entrust MDM Web Service.
6.
In the Username field, type the username of the Entrust administrator account.
7.
In the Password field, type the password of the Entrust administrator account.
8.
Click Test connection.
9.
Click Save.
After you finish:
•
To edit a connection, click the connection name.
•
To remove a connection, click .
Sending the Entrust CA certificate to devices
If your organization requires users’ devices to have the Entrust CA certificate to authenticate with the work network, to make
SSL connections with webpages, or for other purposes, you can send the Entrust CA certificate to devices using a CA certificate
profile.
Contact your organization’s Entrust administrator to obtain the Entrust CA certificate. For more information about creating a CA
certificate profile, see “Creating CA certificate profiles.”
Related information
Creating CA certificate profiles, on page 67
Providing Entrust client certificates to devices
You can use different types of profiles to provide Entrust client certificates to devices. The type of profile you choose depends on
how your organization uses the Entrust software, the types of devices your organization supports, and how you want to manage
certificates.
If more than one option is listed, use only one of the profile types.
72
Certificates
Device
Mail server
authentication
(Exchange ActiveSync)
Message signing and
encryption (S/MIME)
Wi-Fi authentication
VPN authentication
BlackBerry 10*
•
SCEP profile
Configured by user
•
SCEP profile
•
SCEP profile
•
User credential
profile
•
User credential
profile
•
User credential
profile
•
SCEP profile
•
SCEP profile
•
SCEP profile
•
SCEP profile
•
User credential
profile
•
User credential
profile
•
User credential
profile
•
User credential
profile
Android**
•
User credential
profile
Not supported
•
User credential
profile
Not supported
Windows Phone
Not supported
Not supported
Not supported
iOS
Not supported
*User credential profiles require a version of BlackBerry 10 OS that is later than 10.3. BlackBerry 10 devices can sign and
encrypt messages using S/MIME, but this feature must be enabled and configured by the device user (you can send the
required certificates to devices).
**User credential profiles cannot be used to provide client certificates to Android devices that are managed using KNOX MDM.
User credential profiles allow devices to obtain client certificates from the Entrust CA. SCEP profiles offer the same feature with
more options for how devices communicate with the Entrust CA. User credential profiles and SCEP profiles allow devices to
automatically renew client certificates before they expire.
Related information
Creating SCEP profiles, on page 68
Create a user credential profile, on page 73
Create a user credential profile
Before you begin:
•
Contact your organization’s Entrust administrator to confirm which digital ID profile you should send to devices.
BES12 provides a list of digital ID profiles based on what the Entrust administrator has configured.
•
User credential profiles do not support digital ID profiles that have both the signing and encryption keys for S/MIME.
The Entrust administrator must configure two separate digital ID profiles, one for signing and one for encryption.
•
Ask the Entrust administrator for the digital ID values that you must provide. For example, the values for device type
(devicetype), Entrust IdentityGuard group (iggroup), and Entrust IdentityGuard username (igusername).
1.
On the menu bar, click Policies and Profiles.
2.
In the left pane, click
beside User credential.
73
Certificates
3.
Type a name and description for the profile.
4.
In the Certification authority connection drop-down list, click the Entrust connection that you configured.
5.
In the Profile drop-down list, click the appropriate digital ID profile.
6.
Specify the values for the digital ID profile.
7.
If devices use the client certificate to encrypt email messages using S/MIME, and you want devices to retain access to
expired certificates so that users can open older email messages that were encrypted with those certificates, select
Include certificate history.
8.
Click Add.
After you finish:
•
Assign the profile to user accounts and user groups. Android users are prompted to enter a password when they
receive the profile (the password displays on-screen).
•
If devices use Entrust client certificates to authenticate with a Wi-Fi network, VPN, or mail server, associate the user
credential profile with a Wi-Fi, VPN, or email profile.
Related information
Assign a profile to a user group, on page 136
Assign a profile to a user account, on page 146
Create a Wi-Fi profile, on page 89
Create a VPN profile, on page 90
Create an email profile, on page 79
74
Set up work connections for devices, such as connections to mail servers, Wi-Fi networks, and VPNs.
Multiplatform
Work connections
Work connections
Setting up work connections for devices
16
You can use profiles to set up and manage work connections for devices in your organization. Work connections define how
devices connect to work resources in your organization's environment, such as mail servers, proxy servers, Wi-Fi networks, and
VPNs. You can specify settings for BlackBerry 10, iOS, Android, and Windows Phone devices in the same profile and then
assign the profile to user accounts, user groups, or device groups.
Steps to set up work connections for devices
When you set up work connections for devices, you perform the following actions:
Create profiles to configure how devices connect to work resources.
If necessary, rank profiles.
Assign profiles to user accounts, user groups, or device groups.
Managing work connections using profiles
You can manage work connections using the profiles available in the Policies and Profiles library.
You can use the following profiles to configure how devices connect to work resources:
Profile
Description
Email
An email profile specifies how devices connect to a work mail server and
synchronize data.
IMAP/POP3 email
An IMAP/POP3 email profile specifies how iOS, Android, and Windows Phone
devices connect to IMAP or POP3 mail servers and synchronize email messages.
Certificate retrieval
A certificate retrieval profile specifies how BlackBerry 10 devices retrieve
certificates from LDAP servers.
OCSP
An OCSP profile specifies the OCSP responders that BlackBerry 10 devices can use
to check the status of certificates.
76
Work connections
Profile
Description
CRL
A CRL profile specifies the CRL configurations that BES12 can use to check the
status of certificates.
Proxy
A proxy profile specifies how devices use a proxy server to access web services on
the Internet or a work network.
VPN
A VPN profile specifies how devices connect to a work VPN.
Wi-Fi
A Wi-Fi profile specifies how devices connect to a work Wi-Fi network.
Single sign-on
A single sign-on profile specifies how devices authenticate with secure domains
automatically after users type their username and password for the first time.
Best practice: Creating work connection profiles
Some work connection profiles can include one or more associated profiles. When you specify an associated profile, you link an
existing profile to a work connection profile, and devices must use the associated profile when they use the work connection
profile.
Consider the following guidelines:
•
Determine which work connections are required for devices in your organization.
•
Create profiles that you can associate with other profiles before you create the work connection profiles that use them.
•
Use variables where appropriate.
The following table lists profiles in the order that you should create them. You can associate profiles listed earlier with profiles
listed later. For example, if you create a Wi-Fi profile first, you cannot associate a proxy profile with the Wi-Fi profile when you
create it. After you create a proxy profile, you must change the Wi-Fi profile to associate the proxy profile with it.
Profile
Can associate with
CA certificate
•
SCEP
Applicable devices
Wi-Fi profiles for iOS, Android, and Windows •
Phone devices
•
BlackBerry 10
iOS
•
Android
•
Windows Phone
•
Email profiles
•
BlackBerry 10
•
VPN profiles
•
iOS
•
Wi-Fi profiles
77
Work connections
Profile
Can associate with
Applicable devices
Shared certificate
•
Email profiles
•
iOS
•
VPN profiles for iOS devices only
•
Android
•
Wi-Fi profiles
•
Email profiles
•
BlackBerry 10
•
VPN profiles for BlackBerry 10 and iOS
devices
•
iOS
•
Android
•
BlackBerry 10
•
iOS
•
Android
•
Windows Phone
•
iOS
•
Android
•
Windows Phone
User credential
•
Wi-Fi profiles
Email
—
IMAP/POP3 email
—
Certificate retrieval
—
•
BlackBerry 10
OCSP
—
•
BlackBerry 10
CRL
—
•
BlackBerry 10
Proxy
VPN
Wi-Fi
•
VPN profiles
•
BlackBerry 10
•
Wi-Fi profiles
•
iOS
•
Wi-Fi profiles for BlackBerry 10 devices only •
—
78
BlackBerry 10
•
iOS
•
BlackBerry 10
•
iOS
•
Android
•
Windows Phone
Work connections
Profile
Can associate with
Single sign-on
Applicable devices
—
•
BlackBerry 10
•
iOS
Related information
Managing certificates using profiles, on page 66
Using variables in profiles, on page 60
Setting up work email for devices
You can use email profiles to specify how devices connect to your organization's mail server and synchronize email messages,
calendar entries, and organizer data using Exchange ActiveSync or IBM Notes Traveler.
If you want to use Exchange ActiveSync, you should note the following:
•
If you require support for extended email security, you can enable S/MIME for iOS devices and S/MIME or PGP for
BlackBerry 10 devices. PGP is supported by BlackBerry 10 OS version 10.3.1 and later.
•
If you enable S/MIME for BlackBerry 10 devices, you can use additional profiles to allow devices to automatically
retrieve S/MIME certificates and check certificate status.
If you want to use Notes Traveler, you should note the following:
•
To use Notes Traveler with iOS or Android devices, you must enable Secure Work Space.
•
To use Notes Traveler with BlackBerry 10 or Windows Phone devices, you must configure the appropriate settings in
the email profile.
•
To Do data synchronization is only supported on BlackBerry 10 devices. It uses the SyncML communication protocol
on the Notes Traveler server.
•
If you require support for extended email security on BlackBerry 10 devices, only IBM Notes encryption is supported
(S/MIME is not supported).
You can also use IMAP/POP3 email profiles to specify how iOS, Android, and Windows Phone devices connect to IMAP or POP3
mail servers and synchronize email messages.
Create an email profile
The required profile settings vary for each device type and depend on the settings that you select.
Before you begin:
•
If you use certificate-based authentication for BlackBerry 10 or iOS devices, create a CA certificate profile and assign
it to users. For iOS devices, you may also need to create a SCEP, user credential, or shared certificate profile and
associate it with the email profile. BlackBerry 10 devices support SCEP and user credential profiles. iOS devices
support SCEP, user credential, and shared certificate profiles.
79
Work connections
•
To automatically apply an email profile to Android devices, use any of the following options. If you do not use one of
these options, BES12 still sends the email profile to Android devices, but the user must manually configure the
connection to the mail server:
◦
Set up Secure Work Space.
◦
Install the TouchDown app on Android devices. For more information about the TouchDown app, visit
nitrodesk.com.
◦
Motorola devices support the automatic application of an email profile.
◦
For devices that are managed using KNOX MDM, use Exchange ActiveSync to connect to the mail server.
1.
On the menu bar, click Policies and Profiles.
2.
Click
3.
Type a name and description for the profile.
4.
If necessary, type the domain name of the mail server. If the profile is for multiple users who may be in different Microsoft
Active Directory domains, you can use the %UserDomain% variable.
5.
In the Email address field, perform one of the following actions:
beside Email.
•
If the profile is for one user, type the email address of the user.
•
If the profile is for multiple users, type %UserEmailAddress%.
6.
Type the host name or IP address of the mail server.
7.
In the Username field, perform one of the following actions:
•
If the profile is for one user, type the username.
•
If the profile is for multiple users, type %UserName%.
•
If the profile is for multiple users in an IBM Notes Traveler environment, type %UserDisplayName%.
8.
Click the tab for each device type in your organization and configure the appropriate values for each profile setting.
9.
Click Add.
After you finish: If you create more than one email profile, rank the profiles.
Related information
Assign a profile to a user group, on page 136
Assign a profile to a user account, on page 146
Integrating BES12 with your organization's Entrust software, on page 71
Email profile settings, on page 180
Create an IMAP/POP3 email profile
The required profile settings vary for each device type and depend on the settings that you select.
80
Work connections
Note: BES12 sends the email profile to Android devices, but the user must manually configure the connection to the mail
server.
1.
On the menu bar, click Policies and Profiles.
2.
Click
3.
Type a name and description for the profile.
4.
In the Email type field, select the type of email protocol.
5.
In the Email address field, perform one of the following actions:
beside IMAP/POP3 email.
•
If the profile is for one user, type the email address of the user.
•
If the profile is for multiple users, type %UserEmailAddress%.
6.
In the Incoming mail settings section, type the host name or IP address of the mail server for receiving mail.
7.
If necessary, type the port for receiving mail.
8.
In the Username field, perform one of the following actions:
9.
•
If the profile is for one user, type the username.
•
If the profile is for multiple users, type %UserName%.
In the Outgoing mail settings section, type the host name or IP address of the mail server for sending mail.
10. If necessary, type the port for sending mail.
11. If necessary, select Authentication required for outgoing mail and specify the credentials used for sending mail.
12. Click the tab for each device type in your organization and configure the appropriate values for each profile setting.
13. Click Add.
Related information
IMAP/POP3 email profile settings, on page 197
Extending email security using S/MIME
You can extend email security for BlackBerry 10 and iOS device users by enabling S/MIME. S/MIME provides a standard method
of encrypting and signing email messages. Users can encrypt, sign, or encrypt and sign email messages using S/MIME
protection when they use a work email account that supports S/MIME-protected messages on devices. S/MIME cannot be
enabled for personal email addresses.
Users can store recipients' S/MIME certificates on their devices. Users can store their private keys on their devices or a smart
card.
You enable S/MIME for users in an email profile. You can force BlackBerry 10 device users to use S/MIME, but not iOS device
users. When S/MIME use is optional, a user can enable S/MIME on the device and specify whether to encrypt, sign, or encrypt
and sign email messages.
S/MIME settings take precedence over PGP settings. When S/MIME support is set to "Required," PGP settings are ignored.
81
Work connections
For more information about S/MIME, visit docs.blackberry.com/bes12cloud to see the Security content.
Retrieving S/MIME certificates on BlackBerry 10 devices
You can use certificate retrieval profiles to allow BlackBerry 10 devices to search for and retrieve recipients' S/MIME certificates
from LDAP servers. If a required S/MIME certificate is not already in a device's certificate store, the device retrieves it from the
server and imports it into the certificate store automatically.
A device searches each LDAP server that you specify in the profile and retrieves the S/MIME certificate. If there is more than
one S/MIME certificate and the device is unable to determine the preferred one, the device displays all the S/MIME certificates
so that the user can choose which one to use.
If you do not create a certificate retrieval profile and assign it to user accounts, user groups, or device groups, users must
manually import S/MIME certificates from a work email attachment or a computer.
You can require that devices use either simple authentication or Kerberos authentication to authenticate with LDAP servers. If
you require that devices use simple authentication, you can include the required authentication credentials in certificate
retrieval profiles so that devices can automatically authenticate with LDAP servers. If you require that devices use Kerberos
authentication, you can include the required authentication credentials in certificate retrieval profiles so that devices that are
running BlackBerry 10 OS version 10.3.1 and later can automatically authenticate with LDAP servers. Otherwise, the device
prompts the user for the required authentication credentials the first time that the device attempts to authenticate with an
LDAP server. For devices that are running BlackBerry 10 OS version 10.2.1 to 10.3, the device prompts the user for the
required authentication credentials the first time that the device attempts to authenticate with an LDAP server.
Create a certificate retrieval profile
Before you begin: To allow devices to trust LDAP servers when they make secure connections, you might need to distribute CA
certificates to devices. If necessary, create CA certificate profiles and assign them to user accounts, user groups, or device
groups.
1.
On the menu bar, click Policies and Profiles.
2.
Click
3.
Type a name and description for the certificate retrieval profile.
4.
In the table, click
5.
In the Service URL field, type the FQDN of an LDAP server using the format ldap://<fqdn>:<port> (for example, ldap://
server01.example.com:389). For secure connections, use the format ldaps://<fqdn>:<port>.
6.
In the Search base field, type the base DN that is the starting point for LDAP server searches.
7.
In the Search scope drop-down list, perform one of the following actions:
beside Certificate retrieval.
.
•
To search the base object only (base DN), click Base. This option is the default value.
•
To search one level below the base object, but not the base object itself, click One level.
•
To search the base object and all levels below it, click Subtree.
•
To search all levels below the base object, but not the base object itself, click Children.
82
Work connections
8.
If authentication is required, perform the following actions:
9.
a.
In the Authentication type drop-down list, click Simple or Kerberos.
b.
In the LDAP user ID field, type the DN of an account that has search permissions on the LDAP server (for example,
cn=admin,dc=example,dc=com).
c.
In the LDAP password field, type the password for the account that has search permissions on the LDAP server.
If necessary, select the Use secure connection check box.
10. In the Connection timeout field, type the amount of time, in seconds, that the device waits for the LDAP server to respond.
11. Click Add.
12. Repeat steps 4 to 11 for each LDAP server.
13. Click Add.
After you finish:
•
To allow devices to check certificate status, create an OCSP or CRL profile.
•
If you create more than one certificate retrieval profile, rank the profiles.
Related information
Create an OCSP profile, on page 83
Create a CRL profile, on page 84
Rank profiles, on page 57
Assign a profile to a user group, on page 136
Assign a profile to a user account, on page 146
Determining the status of S/MIME certificates on BlackBerry 10 devices
You can use OCSP and CRL profiles to allow BlackBerry 10 devices to check the status of S/MIME certificates. You can assign
an OCSP profile and a CRL profile to user accounts, user groups, or device groups.
A device searches each OCSP responder that you specify in an OCSP profile and retrieves the S/MIME certificate status. Devices
that are running BlackBerry 10 OS version 10.3.1 and later can send certificate status requests to BES12, and you can use CRL
profiles to configure BES12 to search for the status of S/MIME certificates using HTTP, HTTPS, or LDAP.
For more information about certificate status indicators, see the user guide for the device to read about secure email icons.
Create an OCSP profile
1.
On the menu bar, click Policies and Profiles.
2.
Click
3.
Type a name and description for the OCSP profile.
4.
Perform the following actions:
beside OCSP.
a.
In the table, click
b.
In the Service URL field, type the web address of an OCSP responder.
.
83
Work connections
c.
In the Connection timeout field, type the amount of time, in seconds, that the device waits for the OCSP response.
d.
Click Add.
5.
Repeat step 4 for each OCSP responder.
6.
Click Add.
After you finish: If you create more than one OCSP profile, rank the profiles.
Related information
Rank profiles, on page 57
Assign a profile to a user group, on page 136
Assign a profile to a user account, on page 146
Create a CRL profile
1.
On the menu bar, click Policies and Profiles.
2.
Click
3.
Type a name and description for the CRL profile.
4.
To allow devices to use responder URLs defined in the certificate, select the Use certificate extension responders check
box.
5.
Perform any of the following tasks:
beside CRL.
Task
Steps
Specify an HTTP CRL configuration
1.
In the HTTP for CRL section, click
2.
Type a name and description for the HTTP CRL configuration.
3.
In the Service URL field, type the web address of an HTTP or HTTPS
server.
4.
Click Add.
5.
Repeat steps 1 to 4 for each HTTP or HTTPS server.
1.
In the LDAP for CRL section, click
2.
Type a name and description for the LDAP CRL configuration.
3.
In the Service URL field, type the FQDN of an LDAP server using the
format ldap://<fqdn>:<port> (for example, ldap://server01.example.com:
389). For secure connections, use the format ldaps://<fqdn>:<port>.
4.
In the Search base field, type the base DN that is the starting point for
LDAP server searches.
5.
If necessary, select the Use secure connection check box.
Specify an LDAP CRL configuration
84
.
.
Work connections
Task
6.
Steps
6.
In the LDAP user ID field, type the DN of an account that has search
permissions on the LDAP server (for example,
cn=admin,dc=example,dc=com).
7.
In the LDAP password field, type the password for the account that has
search permissions on the LDAP server.
8.
Click Add.
9.
Repeat steps 1 to 8 for each LDAP server.
Click Add.
After you finish: If you create more than one CRL profile, rank the profiles.
Related information
Rank profiles, on page 57
Assign a profile to a user group, on page 136
Assign a profile to a user account, on page 146
Extending email security using PGP
For devices that are running BlackBerry 10 OS version 10.3.1 and later, you can extend email security for device users by
enabling PGP. PGP protects email messages on devices using OpenPGP format. Users can sign, encrypt, or sign and encrypt
email messages using PGP protection when they use a work email address. PGP cannot be enabled for personal email
addresses.
You enable PGP for users in an email profile. You can force BlackBerry 10 device users to use PGP, disallow the use of PGP, or
make it optional. When PGP use is optional (the default setting), a user can enable PGP on the device and specify whether to
encrypt, sign, or encrypt and sign email messages.
To sign and encrypt email messages, users must store PGP keys for each recipient on their devices. Users can store PGP keys
by importing the files from a work email message.
You can configure PGP using the appropriate email profile settings.
For more information about PGP, visit docs.blackberry.com/bes12cloud to see the Security content.
Related information
BlackBerry 10: Email profile settings, on page 180
Enforcing secure email using message classification
Message classification allows your organization to specify and enforce secure email policies and add visual markings to email
messages on BlackBerry 10 devices. You can use BES12 to provide BlackBerry 10 device users with similar options for
message classification that you make available on their computer email applications. You can define the following rules to apply
to outgoing messages, based on the messages' classifications:
85
Work connections
•
Add a label to identify the message classification (for example, Confidential)
•
Add a visual marker to the end of the subject line (for example, [C])
•
Add text to the beginning or end of the body of an email (for example, This message has been classified as
Confidential)
•
Set S/MIME or PGP options (for example, sign and encrypt)
•
Set a default classification
For devices that are running BlackBerry 10 OS version 10.3.1 and later, you can use message classification to require users to
sign, encrypt, or sign and encrypt email messages, or add visual markings to email messages that they send from their devices.
You can use email profiles to specify message classification configuration files (with .json file name extensions) to send to users’
devices. When users either reply to email messages that have message classification set or compose secure email messages,
the message classification configuration determines the classification rules that devices must enforce on outgoing messages.
The message protection options on a device are limited to the types of encryption and digital signing that are permitted on the
device. When a user applies a message classification to an email message on a device, the user must select one type of
message protection that the message classification permits, or accept the default type of message protection. If a user selects a
message classification that requires signing, encrypting, or signing and encrypting of the email message, and the device does
not have S/MIME or PGP configured, the user cannot send the email message.
S/MIME and PGP settings take precedence over message classification. Users can raise, but not lower, the message
classification levels on their devices. The message classification levels are determined by the secure email rules of each
classification.
When message classification is enabled, users cannot use the BlackBerry Assistant to send email messages from their devices.
You can configure message classification using the appropriate email profile settings.
For more information about how to create message classification configuration files, visit blackberry.com/go/kbhelp to read
article KB36736.
Setting up proxy configurations for devices
You can use a proxy profile to specify how devices use a proxy server to access web services on the Internet or a work network.
Device
Proxy profile assignment
BlackBerry 10
To use a proxy profile, you must associate it with the profiles that your organization
uses, which can include any of the following:
iOS
•
Wi-Fi
•
VPN
To use a proxy profile, you must associate it with the profiles that your organization
uses, which can include any of the following:
86
Work connections
Device
Proxy profile assignment
•
Wi-Fi
•
VPN
You can also assign a proxy profile to user accounts, user groups, or device groups.
Note: A proxy profile that is assigned to user accounts, user groups, or device
groups is a global proxy for supervised devices only and takes precedence over a
proxy profile that is associated with a Wi-Fi or VPN profile. Supervised devices use
the global proxy settings for all HTTP connections.
Create a proxy profile
If your organization uses a PAC file to define proxy rules, you can select PAC configuration to use the proxy server settings from
the PAC file that you specify. Otherwise, you can select manual configuration and specify the proxy server settings directly in the
profile. Proxy profiles support proxy servers that use basic or no authentication.
1.
On the menu bar, click Policies and Profiles.
2.
Click
3.
Type a name and description for the proxy profile.
4.
Click the tab for a device type.
5.
Perform one of the following tasks:
beside Proxy.
Task
Steps
Specify PAC configuration settings
1.
In the Type drop-down list, verify that PAC configuration is selected.
2.
In the PAC URL field, type the URL for the web server that hosts the PAC
file and include the PAC file name (for example, http://www.example.com/
PACfile.pac).
3.
On the BlackBerry tab, perform the following actions:
a
If your organization requires that users provide a username and
password to connect to the proxy server and the profile is for multiple
users, in the Username field, type %UserName%. If the proxy server
requires the domain name for authentication, use the format
<domain>\<username>.
b
In the User can edit drop-down list, click the proxy settings that
BlackBerry 10 device users can change. The default setting is Read
only.
87
Work connections
Task
Steps
Specify manual configuration settings
1.
In the Type drop-down list, click Manual configuration.
2.
In the Host field, type the FQDN or IP address of the proxy server.
3.
In the Port field, type the port number of the proxy server.
4.
If your organization requires that users provide a username and password
to connect to the proxy server and the profile is for multiple users, in the
Username field, type %UserName%. If the proxy server requires the
domain name for authentication, use the format <domain>\<username>.
5.
On the BlackBerry tab, perform the following actions:
a
In the User can edit drop-down list, click the proxy settings that
BlackBerry 10 device users can change. The default setting is Read
only.
b
Optionally, you can specify a list of addresses that users can access
directly from their BlackBerry 10 devices without using the proxy
server. In the Exclusion list field, type the addresses (FQDN or IP)
and use a semicolon (;) to separate the values in the list.
6.
Repeat steps 4 and 5 for each device type in your organization.
7.
Click Add.
After you finish:
•
Associate the proxy profile with a Wi-Fi or VPN profile.
•
If you create more than one proxy profile, rank the profiles. The ranking that you specify applies only if you assign a
proxy profile to user groups or device groups.
Related information
Rank profiles, on page 57
Assign a profile to a user group, on page 136
Assign a profile to a user account, on page 146
Setting up work Wi-Fi networks for devices
You can use a Wi-Fi profile to specify how devices connect to a work Wi-Fi network behind the firewall. You can assign a Wi-Fi
profile to user accounts, user groups, or device groups.
88
Work connections
Device
Apps and network connections
BlackBerry 10
By default, both work and personal apps can use the Wi-Fi profiles stored on the
device to connect to your organization's network. If your organization's security
standards do not allow personal apps to access your organization's network, you
can restrict connection options. For more information, visit docs.blackberry.com/
bes12cloud to see the Security content.
iOS
The following apps can use the Wi-Fi profiles stored on the device to connect to
your organization's network:
Android
•
Work and personal apps
•
Secured apps (on devices with Secure Work Space)
The following apps can use the Wi-Fi profiles stored on the device to connect to
your organization's network:
Windows Phone
•
Work and personal apps
•
Secured apps (on devices with Secure Work Space)
Work and personal apps can use the Wi-Fi profiles stored on the device to connect
to your organization's network.
Create a Wi-Fi profile
The required profile settings vary for each device type and depend on the Wi-Fi security type and authentication protocol that
you select.
Before you begin:
•
If devices use certificate-based authentication for work Wi-Fi connections, create a CA certificate profile and assign it
to user accounts, user groups, or device groups. To send client certificates to devices, create a SCEP, shared
certificate, or user credential profile to associate with the Wi-Fi profile.
•
If BlackBerry 10 or iOS devices use a proxy server for work Wi-Fi connections, create a proxy profile to associate with
the Wi-Fi profile.
•
If BlackBerry 10 devices use a VPN for work Wi-Fi connections, create a VPN profile to associate with the Wi-Fi profile.
1.
On the menu bar, click Policies and Profiles.
2.
Click
3.
Type a name and description for the Wi-Fi profile. This information is displayed on devices.
4.
In the SSID field, type the network name of a Wi-Fi network.
5.
If the Wi-Fi network does not broadcast the SSID, select the Hidden network check box.
6.
Optionally, clear the check box for any device type that you do not want to configure the profile for.
beside Wi-Fi.
89
Work connections
7.
Perform the following actions:
a.
Click the tab for a device type.
b.
Configure the appropriate values for each profile setting to match the Wi-Fi configuration in your organization's
environment. If your organization requires that users provide a username and password to connect to the Wi-Fi
network and the profile is for multiple users, in the Username field, type %UserName%.
8.
Repeat step 7 for each device type in your organization.
9.
Click Add.
Related information
Assign a profile to a user group, on page 136
Assign a profile to a user account, on page 146
Managing certificates using profiles, on page 66
Wi-Fi profile settings, on page 208
Integrating BES12 with your organization's Entrust software, on page 71
Setting up work VPNs for devices
You can use a VPN profile to specify how BlackBerry 10 and iOS devices connect to a work VPN. You can assign a VPN profile to
user accounts, user groups, or device groups. For BlackBerry 10 devices, you can also associate a VPN profile with a Wi-Fi
profile.
To connect to a work VPN, Android and Windows Phone device users must manually configure the VPN settings on their
devices.
Device
Apps and network connections
BlackBerry 10
•
By default, both work and personal apps can use the VPN profiles stored on
the device to connect to your organization's network. If your organization's
security standards do not allow personal apps to access your organization's
network, you can restrict connection options. For more information, visit
docs.blackberry.com/bes12cloud to see the Security content.
iOS
•
You can configure VPN profiles to allow apps to connect to your organization's
network.
Create a VPN profile
The required profile settings vary for each device type and depend on the VPN connection type and authentication type that you
select.
Note: Some devices may be unable to store the xAuth password. For more information, visit www.blackberry.com/go/kbhelp to
read KB30353.
90
Work connections
Before you begin:
•
If devices use certificate-based authentication for work VPN connections, create a CA certificate profile and assign it
to user accounts, user groups, or device groups. To send client certificates to devices, create a SCEP, shared
certificate, or user credential profile to associate with the VPN profile.
•
If devices use a proxy server for work VPN connections, create a proxy profile to associate with the VPN profile.
1.
On the menu bar, click Policies and Profiles.
2.
Click
3.
Type a name and description for the VPN profile. This information is displayed on devices.
4.
Optionally, clear the check box for any device type that you do not want to configure the profile for.
5.
Perform the following actions:
beside VPN.
a.
Click the tab for a device type.
b.
Configure the appropriate values for each profile setting to match the VPN configuration in your organization's
environment. If your organization requires that users provide a username and password to connect to the VPN and
the profile is for multiple users, in the Username field, type %UserName%.
6.
Repeat step 5 for each device type in your organization.
7.
Click Add.
Related information
Assign a profile to a user group, on page 136
Assign a profile to a user account, on page 146
Managing certificates using profiles, on page 66
VPN profile settings, on page 226
Integrating BES12 with your organization's Entrust software, on page 71
Enabling VPN on demand for iOS devices
VPN on demand allows you to specify whether an iOS device connects automatically to a VPN in a particular domain.
Certificates, such as SCEP or Shared certificates, provide authentication for the user's device when accessing the particular
domain. For example, you can specify your organization's domain to allow users access to your intranet content using VPN on
demand.
Enabling per-app VPN for iOS apps
You can use per-app VPN to specify which work apps and secured apps on iOS devices must use a VPN for their data in transit.
Per-app VPN helps decrease the load on your organization’s VPN by enabling only certain work traffic to use the VPN (for
example, accessing application servers or webpages behind the firewall). This feature also supports user privacy and increases
connection speed for personal apps by not sending the personal traffic through the VPN.
You then associate apps with per-app VPN by assigning the VPN profile to apps or app groups.
Related information
91
Work connections
iOS: VPN profile settings, on page 237
How BES12 chooses which per-app VPN settings to assign
Only one VPN profile can be assigned to an app or app group. BES12 uses the following rules to determine which per-app VPN
settings to assign to an app:
•
Per-app VPN settings that are associated with an app directly take precedence over per-app VPN settings associated
indirectly by an app group.
•
Per-app VPN settings that are associated with a user directly take precedence over per-app VPN settings associated
indirectly by a user group.
•
Per-app VPN settings that are assigned to a required app take precedence over per-app VPN settings assigned to an
optional instance of the same app.
•
Per-app VPN settings that are associated with the user group name that appears earlier in the alphabetical list takes
precedence if the following conditions are met:
◦
An app is assigned to multiple user groups
◦
The same app appears in the user groups
◦
The app is assigned in the same way, either as a single app or an app group
◦
The app has the same disposition in all assignments, either required or optional
For example, you assign Cisco WebEx Meetings as an optional app to the user groups Development and Marketing.
When a user is in both groups, the per-app VPN settings for the Development group is applied to the WebEx Meetings
app for that user.
If a per-app VPN profile is assigned to a device group, it takes precedence over the per-app VPN profile that is assigned to the
user account for any devices that belong to the device group.
Setting up single sign-on authentication for
devices
Using a single sign-on profile, you can enable BlackBerry 10 devices and certain iOS devices to authenticate automatically with
domains and web services in your organization’s network. After you assign a single sign-on profile, the user is prompted for a
username and password the first time they try to access a secure domain that you specified. The login information is saved on
the user’s device and used automatically when the user tries to access any of the secure domains specified in the profile. When
the user changes the password, the user is prompted the next time they try to access a secure domain.
Single sign-on profiles support the following authentication types:
Authentication type
Device OS
Kerberos
iOS
Applies to
•
92
Browser and apps
Work connections
Authentication type
NTLM
Device OS
Applies to
•
Can restrict which apps can use the profile
BlackBerry 10 OS
•
Browser and apps in the work space
BlackBerry 10 OS version
10.2.1 and later
•
Browser and apps in the work space
Prerequisites: Using Kerberos authentication for BlackBerry 10
devices
To configure Kerberos authentication for specific domains, you can upload your organization’s Kerberos configuration file
(krb5.conf). BES12 supports the Heimdal implementation of Kerberos.
Verify that the configuration file meets the following requirements:
•
The Kerberos configuration must use TCP by default instead of UDP. Use the prefix tcp/ for KDC hosts.
•
If your organization uses VPN, the VPN gateway must allow traffic to the KDCs.
Certificate-based authentication for iOS 8 and later
For devices that run iOS 8.0 and later, you can use certificates to authenticate iOS devices with domains and web services in
your organization’s network. You can add an existing shared certificate profile or SCEP profile to a single sign-on profile. When
the browser or apps on iOS devices use certificate-based single sign-on, users are authenticated automatically (as long as the
certificate is valid) and do not have to enter login information when they access the secure domains that you specified.
Related information
Creating SCEP profiles, on page 68
Creating shared certificate profiles, on page 70
Create a single sign-on profile
Before you begin:
•
If you want to configure Kerberos authentication for BlackBerry 10 devices, locate your organization’s Kerberos
configuration file (krb5.conf).
•
If you want to use certificate-based authentication for devices that run iOS 8.0 and later, create the necessary shared
certificate profile or SCEP profile.
1.
On the menu bar, click Policies and Profiles.
2.
Click
3.
Type a name and description for the profile.
beside Single sign-on.
93
Work connections
4.
Perform any of the following tasks:
Task
Steps
Configure Kerberos
authentication for iOS devices
1.
Click the iOS tab.
2.
Under Kerberos, click
3.
In the Name field, type a name for the configuration.
4.
In the Principal name field, type the name of the Kerberos Principal, using the
format <primary>/<instance>@<realm> (for example, user/
[email protected]).
5.
In the Realm field, type the Kerberos realm in uppercase letters (for example,
EXAMPLE.COM).
6.
In the URL prefixes field, type the URL prefix for the sites that you want devices
to authenticate with. The prefix must begin with http:// or https://, and can
include wildcard values (*) (for example, https://
www.blackberry.example.com/*).
7.
To specify more URL prefixes, click
8.
If you want to limit the configuration to specific apps, click
beside App
identifiers. Type the app bundle ID. You can use a wildcard value (*) to match
the ID to multiple apps. (for example, com.company.*).
9.
To specify more app identifiers, click
.
to add more fields.
to add more fields.
10. If you want devices that run iOS 8.0 and later to use certificate-based
authentication, in the Credentials drop-down list, click Certificate or SCEP. In
the Shared certificate profile or Associated SCEP profile drop-down list, click
the shared certificate profile or SCEP profile that you want to use.
11. Click Add.
12. If necessary, repeat steps 2 to 11 to add another Kerberos configuration.
Configure Kerberos
1.
authentication for BlackBerry 10
2.
devices
Configure NTLM authentication
for devices that run BlackBerry
10 OS version 10.2.1 and later
Click the BlackBerry tab.
Click Browse. Navigate to and select your organization’s Kerberos configuration
file (krb5.conf).
1.
Click the BlackBerry tab.
2.
Under Trusted domains, click
3.
In the Name field, type a name for the configuration.
4.
In the Domain field, type a trusted subdomain or individual host where the
domain credentials can be used to authenticate automatically. Type the server
94
.
Work connections
Task
Steps
name as an FQDN, hostname, alias, or IP address. DNS names can contain
wildcards (*).
5.
5.
To specify more subdomains, click
6.
Click Add.
7.
If necessary, repeat steps 2 to 6 to add another trusted domain.
to add more fields.
Click Add.
After you finish: If you create more than one single sign-on profile, rank the profiles.
Related information
Assign a profile to a user group, on page 136
Assign a profile to a user account, on page 146
Rank profiles, on page 57
Creating SCEP profiles, on page 68
Creating shared certificate profiles, on page 70
95
Define and enforce organizational standards and other conditions on devices.
Simple
Device standards
Device standards
Setting your organization's standards for
devices
17
You can use profiles to enforce certain standards for devices in your organization. Different profiles support particular
configurations such as compliance rules, web content restrictions, or app restrictions. You can specify settings for BlackBerry
10, iOS, Android, and Windows Phone devices in the same profile, and then assign the profile to user accounts, user groups, or
device groups.
Steps to set up your organization's standards for
devices
When you set up your organization's standards for devices, you perform the following actions:
Create profiles to enforce certain standards on devices.
If necessary, rank profiles.
Assign profiles to user accounts, user groups, or device groups.
Managing your organization's standards using
profiles
You can manage certain standards for devices using the profiles available in the Policies and Profiles library.
Profile
Description
Compliance
A compliance profile defines the device conditions that are not acceptable in your
organization and sets enforcement actions.
BES12 includes a Default compliance profile.
Web content filter
A web content filter profile limits the websites that a user can view on supervised
iOS devices.
98
Device standards
Profile
Description
App lock mode
An app lock mode profile configures supervised iOS devices and devices managed
using KNOX MDM to run only one app (for example, for training purposes or pointof-sales demonstrations).
Device SR requirements
A device SR requirements profile defines the software release versions that
BlackBerry 10 devices must have installed.
Managed domains
A managed domains profile configures iOS 8 devices to notify users about sending
email outside of trusted domains and restricts the apps that can view documents
downloaded from internal domains.
Device
A device profile allows you to configure the information that displays on devices.
Enforcing compliance rules for devices
You can use compliance profiles to encourage device users to follow your organization’s standards for the use of BlackBerry 10,
iOS, Android, and Windows Phone devices. A compliance profile defines the device conditions that are not acceptable in your
organization. For example, you can choose to disallow devices that are jailbroken, rooted, or have an integrity alert due to
unauthorized access to the operating system.
A compliance profile specifies the following information:
•
Conditions that would make a device non-compliant with BES12
•
Notifications that users receive if they violate the compliance conditions, and the amount of time that users have to
correct the issue
•
Notifications that users receive if they install restricted apps, and the amount of time that users have to correct the
issue
•
Action that is taken if the user does not correct the issue, including limiting a user’s access to the organization's
resources, deleting work data from the device, or deleting all data from the device
For Android devices that use KNOX MDM, you can add a list of restricted apps to a compliance profile. However, BES12 does
not enforce the compliance rules. Instead, the restricted app list is sent to devices and the device enforces compliance. Any
restricted apps cannot be installed, or if they are already installed, they are disabled. When you remove an app from the
restricted list, the app is re-enabled if it is already installed. For information about which Android devices support KNOX MDM,
visit docs.blackberry.com/bes12cloud to see the Compatibility Matrix in the Installation and upgrade content.
BES12 includes a Default compliance profile. By default, the Default compliance profile does not enforce any compliance
conditions. To enforce compliance rules, you can change the settings of the Default compliance profile or you can create and
assign custom compliance profiles. Any user accounts that are not assigned a custom compliance profile are assigned the
Default compliance profile.
99
Device standards
Create a compliance profile
Before you begin:
•
If you are defining rules for restricted apps, add any necessary apps to the restricted apps list. For more information,
see "Add an app to the restricted app list."
•
To be able to monitor Windows apps in compliance profiles, you must upload an AET. For more information, see
"Upload an application enrollment token."
1.
On the menu bar, click Policies and Profiles.
2.
Click
3.
Type a name and description for the compliance profile.
4.
Click the tab for the appropriate device type and perform any of the following actions:
5.
beside Compliance.
•
If you want devices with an operating system violation to be considered non-compliant, select the Integrity alert
(BlackBerry 10), Jailbroken OS (iOS), or Rooted OS (Android) check box.
•
For BlackBerry 10 devices : If you want devices that are using a restricted software release included in a device
SR requirements profile to be considered non-compliant, select Restricted software release is installed. This
condition does not apply to devices with the Work and personal - Corporate activation type.
•
For iOS or Android devices: If you want devices with apps that you did not install to be considered noncompliant, select the Non-assigned app is installed check box. This condition does not apply to devices with the
"Work and personal - user privacy" activation type.
•
For iOS, Android, and Windows Phone devices:
◦
If you want devices that do not have a required app to be considered non-compliant, select the
Required app is not installed check box. This condition does not apply to devices with the "Work and
personal - user privacy" activation type.
◦
If you want devices that have a restricted app to be considered non-compliant, select the Restricted
app is installed check box and add the restricted apps to the table. This condition does not apply to
devices with the "Work and personal - user privacy" activation type.
For all devices except for Android devices that use KNOX MDM, and for each condition you selected in step 4, choose the
action that you want BES12 to perform when a user's device is non-compliant:
Action
Steps
Automatically notify the user that their
device is non-compliant, and carry out an
enforcement action if the user does not
correct the issue.
1.
In the Enforcement action drop-down list, click Prompt for
compliance.
2.
In the Prompt method drop-down list, click the type of message to
send to the user.
3.
In the Prompt count field, type the number of times the notification
message is sent before BES12 carries out the action.
100
Device standards
Action
Steps
4.
In the Prompt interval field and drop-down list, specify the time
between prompts.
5.
In the Prompt interval expired action drop-down list, click the action
that you want BES12 to take when the prompt period expires:
•
If you do not want an enforcement action, select None.
•
To prevent the user from accessing work resources and
applications from the device, select Quarantine
(BlackBerry 10) or Untrust (iOS or Android). Data and
applications are not deleted from the device.
•
To delete work data from the device, select Delete only
work data.
•
To delete all data from the device, select Delete all data.
On devices activated with "Work and personal - Corporate"
or "Work and personal - user privacy", only work data is
deleted.
Prevent the user from accessing work
resources and applications from the device.
Data and applications are not deleted from
the device.
In the Enforcement action drop-down list, click Quarantine (BlackBerry
10) or Untrust (iOS or Android).
Delete work data from the device.
In the Enforcement action drop-down list, click Delete only work data.
Delete all data from the device. On devices
activated with "Work and personal Corporate" or "Work and personal - user
privacy," only work data is deleted.
In the Enforcement action drop-down list, click Delete all data.
6.
Repeat steps 4 and 5 for each device type that you want to configure the compliance conditions for.
7.
If you chose to send a notification message to users when their devices become non-compliant, perform any of the
following actions:
•
To change the email notification, expand Email notification sent out when violation is detected. Change the
subject and message.
•
To change the device notification, expand Device notification sent out when violation is detected. Change the
message.
101
Device standards
If you want to use variables to populate notifications with user, device, and compliance information, see "Using
variables.". You can also define and use your own custom variables using the management console. For more information,
see "Custom variables."
8.
Click Add.
After you finish: Rank the compliance profiles.
Related information
Assign a profile to a user group, on page 136
Assign a profile to a user account, on page 146
Add an app to the restricted app list, on page 124
Rank profiles, on page 57
Upload an application enrollment token, on page 123
Using variables, on page 60
Custom variables, on page 62
Filtering web content on iOS devices
You can use web content filter profiles to limit the websites that a user can view in Safari or other browser apps on an iOS device.
For iOS devices with Secure Work Space, web content filter profiles also limit the websites that a user can view in the work
browser. You can assign web content filter profiles to user accounts, user groups, or device groups.
When you create a web content filter profile, you can choose the allowed websites option that supports your organization's
standards for the use of mobile devices.
Note: This profile applies to supervised iOS devices only.
Allowed websites
Description
Specific websites only
This option allows access to only the websites that you specify. A bookmark is
created in Safari for each allowed website.
Limit adult content
This option enables automatic filtering to identify and block inappropriate content.
You can also include specific websites using the following settings:
•
Permitted URLs: You can add one or more URLs to allow access to specific
websites. Users can view websites in this list regardless of whether automatic
filtering blocks access.
•
Blacklisted URLs: You can add one or more URLs to deny access to specific
websites. Users cannot view websites in this list regardless of whether
automatic filtering allows access.
102
Device standards
Create a web content filter profile
When you create a web content filter profile, each URL that you specify must begin with http:// or https://. If necessary, you
should add separate entries for http:// and https:// versions of the same URL. DNS resolution does not occur, so restricted
websites could still be accessible (for example, if you specify http://www.example.com, users might be able to access the
website using the IP address).
1.
On the menu bar, click Policies and Profiles.
2.
Click
3.
Type a name and description for the web content filter profile.
4.
Perform one of the following tasks:
beside Web content filter.
Task
Steps
Allow access to specific websites only
1.
In the Allowed websites drop-down list, verify that Specific websites only
is selected.
2.
In the Specific website bookmarks section, click
3.
Perform the following actions:
Limit adult content
.
a
In the URL field, type a web address that you want to allow access to.
b
Optionally, in the Bookmark path field, type the name of a bookmark
folder (for example, /Work/).
c
In the Title field, type a name for the website.
d
Click Add.
4.
Repeat steps 2 and 3 for each allowed website.
1.
In the Allowed websites drop-down list, click Limit adult content to enable
automatic filtering.
2.
Optionally, perform the following actions:
3.
a
Click
b
Type a web address that you want to allow access to.
c
Repeat steps 2.a and 2.b for each allowed website.
beside Permitted URLs.
Optionally, perform the following actions:
a
Click
b
Type a web address that you want to deny access to.
beside Blacklisted URLs.
103
Device standards
Task
Steps
c
5.
Repeat steps 3.a and 3.b for each restricted website.
Click Add.
Related information
Assign a profile to a user group, on page 136
Assign a profile to a user account, on page 146
Limiting devices to a single app
On supervised iOS devices or Android devices managed using KNOX MDM, you can use an app lock mode profile to limit
devices to run only one app. For example, you can limit access to a single app for training purposes or for point-of-sales
demonstrations. On iOS devices, the home button on a device is disabled and the device automatically opens the app when the
user wakes up the device or restarts it.
Create an app lock mode profile
Specify an app and select the device settings that you want to enable for the user. For iOS devices, you can select an app in the
app list, specify the bundle ID of the app, or select a built-in app. For Android devices that are managed using KNOX MDM,
specify the app package identifier that you want to set as the homescreen.
Note: If the user does not install the app on a device, when you assign the profile to a user or user group the device is not
restricted to the app.
Before you begin: For iOS devices, if you plan to use the app list to select an app, make sure that the app is available in the app
list.
1.
On the menu bar, click Policies and Profiles.
2.
Click
3.
Type a name and description for the profile.
4.
Specify whether the profile applies to iOS devices, Android devices, or both.
5.
Perform one of the following tasks:
beside App lock mode.
Task
Steps
Specify the app to run on iOS devices
In the Specify the app to run on the device section, perform one of the
following actions:
•
Click Add an app, and click an app in the list.
104
Device standards
Task
Steps
Specify the app to run on Android
devices
•
Click Specify the bundle ID of an app and type the bundle ID (for
example, <com.company.appname>). Valid characters are uppercase
and lowercase letters, 0 to 9, hyphen (-), and period (.).
•
Click Select a built-in iOS app and select an app from the drop-down
list.
In the Specify the app to run on the device field, type the app package
identifier of the app that you want to set as the home screen. For example, if you
want BBM Meetings to be the app, type com.blackberry.bbm.meetings.
6.
In the Administrator-enabled settings, select the options that you want to enable for the user when using the app.
7.
For iOS devices, in the User-enabled settings, select the options that the user can enable.
8.
Click Add.
Related information
Assign a profile to a user group, on page 136
Assign a profile to a user account, on page 146
Add an Android app to the app list, on page 122
Add an iOS app to the app list, on page 121
Controlling the software releases that users can
install on BlackBerry 10 devices
For devices running BlackBerry 10 OS version 10.3.1 or later that are activated with Work and personal - Regulated or Work
space only, you can limit which software release versions that BlackBerry 10 devices can have installed using a device SR
restrictions profile. You can also add exceptions to the global settings for specific device models.
To enforce a particular action if a restricted software release version is installed on a device, you must create a compliance
profile and assign the compliance profile to users, user groups, or device groups. The compliance profile specifies the actions
that occur if the user does not remove the restricted software release from the device.
Steps to manage device SR requirements profiles
When you manage device SR requirements profiles, you perform the following actions:
Create the profile.
105
Device standards
Create or edit a compliance profile that specifies the actions that occur if a restricted software release is
installed on a device.
If necessary, rank the profile.
If necessary, assign the profile.
Create a device SR requirements profile
1.
On the menu bar, click Policies and Profiles.
2.
Click
3.
To view a list of all of the BlackBerry 10 device software releases and corresponding carrier, device model, hardware ID,
software release version, and revocation status information, click View a list of device software releases.
4.
Type a name and description for the profile.
5.
Select the Make update required check box to force users to update their devices to a software release defined in the
profile.
6.
In the Grace period field, type a value, in hours, can elapse before users must update their devices.. If users do not update
their devices within the grace period, or if you set the grace period to 0, the software update is automatically installed on
devices.
7.
In the Minimum software release version drop-down list, select the minimum software version that a BlackBerry 10
device must be running.
8.
In the Maximum software release version drop-down list, select the maximum software version that a BlackBerry 10
device must be running.
9.
To override the global setting for a device model, perform the following tasks:
beside Device SR requirements.
a.
In the Exceptions table, click
b.
In the Disposition drop-down list, select whether you want to allow or disallow software release versions. If you
specify a disallowed range, and you have not specified an allowed range for a device model, a second column
appears where you are required to specify an allowed range. If an allowed rangeis not specified the global settings no
longer apply to the device model, and all software release versions, other than the exception, are allowed
automatically.
c.
In the Device model drop-down list, select the device model that you want to set the exception for.
d.
In the Minimum drop-down list, select the minimum software version that you want to allow or disallow.
e.
In the Maximum drop-down list, select the maximum software version that you want to allow or disallow.
f.
If you disallowed a software release version, select the minimum software version that you want to allow.
g.
If you disallowed a software release version, select the maximum software version that you want to allow.
.
10. Click Save.
106
Device standards
11. Click Add.
Related information
Assigning profiles, on page 54
How BES12 chooses which profiles to assign, on page 55
View users who are running a revoked software release
You can view a list of users who are running a revoked software release. A revoked software release is a software release that is
no longer accepted by a service provider but might still be installed on a user’s device.
1.
On the menu bar, click Policies and Profiles.
2.
In the left pane, expand Device SR requirements.
3.
Click the name of the profile that you want to view.
4.
Click the x users running revoked SR tab to see the list of users who are running a revoked software release.
Managing email and web domains for iOS 8
devices
You can create a managed domains profile to define managed email and web domains for iOS devices that run iOS 8 or later.
The following table describes these domains:
Domain type
Description
Email domain
Email domains listed in the managed domains profile are viewed as internal to the
organization. If a user sends an email from an iOS 8 device to an email domain that
is not listed in the managed domains profile, the device warns the user that the
recipient is external to the organization. The device does not prevent the user from
sending email to external recipients.
Web domain
Web domains listed in the managed domains profile are viewed as internal to the
organization. Documents viewed on or downloaded from a managed web domain
can only be opened on the iOS 8 device by using a managed app. The device does
not prevent the user from visiting or viewing documents from other web domains.
Create a managed domains profile
Before you begin: Managed domains profiles apply only to iOS devices running iOS 8 or later.
1.
On the menu bar, click Policies and profiles.
2.
Click
beside Managed domains.
107
Device standards
3.
In the Name field, type a name for the profile.
4.
Optionally, in the Description field, type a description for the profile.
5.
In the Managed email domains section, click
6.
In the Email domain field, type a domain name.
.
Include only the top-level domain name. For example, use example.com instead of example.com/canada.
7.
Click Add.
8.
In the Managed web domains section, click
9.
In the Web domain field, type a domain name.
.
10. Click Add.
11. Click Add.
Configuring allowed and restricted domains on
devices with a work space
To help prevent data leakage, you can configure the domains that users can access from email, calendar, and organizer data in
the work space on iOS and Android devices.
•
If you configure an allowed list of domains, users can access allowed domains without restrictions. For example, they
can click links to the domain or add recipients with email addresses in the domain to send email messages or
calendar invitations. If a particular domain is not in the allowed list, the app displays a warning message when a user
attempts to access it. If the user taps OK, they can access the domain.
•
If you configure a restricted list of domains, users cannot access any of the domains on the list. If they click links to the
domain or try to add recipients with email addresses in the domain, the app presents an error message and does not
permit a user to complete the task. A user can access domains that aren't on the restricted list.
Note: For BlackBerry 10 devices, you can configure allowed and restricted domains using the “External email domain allowed
list” and “External email domain restricted list” IT policy rules. For more information, visit docs.blackberry.com/bes12cloud to
see the Policy Reference Spreadsheet in the Administration content.
Configure allowed and restricted domains in the work space
1.
On the menu bar, click Policies and Profiles.
2.
Select the email profile that you want to change.
3.
Click
4.
Click the iOS or Android tab.
5.
In the External email domains section, add the domains that you want to allow and the domains that you want to restrict.
For more information, see "iOS: Email profile settings" or "Android: Email profile settings".
.
108
Device standards
6.
Click Save.
Related information
iOS: Email profile settings, on page 190
Android: Email profile settings, on page 193
Creating organization notices to display on
BlackBerry 10 devices
You can configure BES12 to display custom organization notices on BlackBerry 10 devices. For example, during activation you
can choose to display the conditions that a user must follow to comply with your organization’s security requirements. The user
must accept the notice to continue. You can create multiple notices to cover different requirements and you can create
separate versions of each notice to support different languages.
For devices that are running BlackBerry 10 OS version 10.3.1 and later, you can also configure BES12 to display an
organization notice when a user restarts a device.
When to display the organization notice How to configure the organization notice
On activation
Create an organization notice and assign it to an activation profile. To change the
notice that displays during activation, you must update the activation profile and
then reactivate the device.
On device restart
Create an organization notice and assign it to a device profile. Verify that the
"Display organization notice after device restart" IT policy rule is selected. To
change the notice that displays on device restart, you must update the device
profile.
Note: The IT Policy rule applies only to the "Work space only" and "Work and
personal - Regulated" activation types on devices that are running BlackBerry 10
OS 10.3.1 and later.
Create organization notices
1.
On the menu bar, click Settings.
2.
In the left pane, expand General settings.
3.
Click Organization notices.
4.
Click
5.
In the Name field, type a name for the organization notice.
6.
Optionally, you can reuse text from an existing organization notice by selecting it in the Text copied from organization
notice drop-down list.
at the right side of the screen.
109
Device standards
7.
In the Device language drop-down list, select the language to use as the default language for the organization notice.
8.
In the Organization notice field, type the text of the organization notice.
9.
Optionally, you can click Add an additional language multiple times to post the organization notice in more languages.
10. If you post the organization notice in more than one language, you can change which one is the default using the Default
language options.
11. Click Save.
After you finish:
•
To display the organization notice during activation, assign the organization notice to an activation profile.
•
To display the organization notice during a device restart, assign the organization notice to a device profile.
Displaying organization information on devices
You can create device profiles to customize and display information about your organization on BlackBerry 10, iOS, and Android
devices.
Create a device profile
Before you begin: Create organization notices for BlackBerry 10 devices.
You can create a device profile to display organization information on BlackBerry 10, iOS, and Android devices. For BlackBerry
10 devices, an organization notice is displayed when a user restarts the device. For iOS and Android devices, the information is
displayed in the BES12 Client.
1.
On the menu bar, click Policies and Profiles.
2.
Click
3.
Type a name and description for the profile. Each device profile must have a unique name.
4.
Perform one of the following tasks:
beside Device.
Task
Steps
Assign an organization notice to
display on BlackBerry 10 devices
during device restart
1.
Click BlackBerry.
2.
In the Assign organization notice drop-down list, select the organization
notice that you want to display on devices.
Define the organization information to
display in the BES12 Client for iOS or
Android devices
1.
Click iOS or Android.
2.
Type the name, address, phone number, and email address for your
organization.
5.
Click Add.
110
Device standards
Related information
Assign a profile to a user group, on page 136
Assign a profile to a user account, on page 146
111
Use IT policies to manage the security and behavior of devices.
Secure
IT policies
IT policies
Controlling device capabilities using IT
policies
18
You can use IT policies to manage the security and behavior of devices in your organization. An IT policy is a set of rules that
control features and functionality on devices. You can configure rules for BlackBerry 10, iOS, Android, and Windows Phone
devices in the same IT policy.
BES12 includes a Default IT policy with preconfigured rules for each device type. If no IT policy is assigned to a user account, a
user group that a user belongs to, or a device group that a user's devices belong to, BES12 sends the Default IT policy to a
user's devices. BES12 automatically sends an IT policy to a device when a user activates it, when you update an assigned IT
policy, or when a different IT policy is assigned to a user account or device.
BES12 synchronizes daily with the BlackBerry Infrastructure over port 3101 to determine whether any updated IT policy
information is available. If updated IT policy information is available, BES12 downloads it, stores the updates in the BES12
database. The update is only sent to devices after you save changes to affected IT policies.
Steps to manage IT policies
When you manage IT policies, you perform the following actions:
Review the Default IT policy and, if necessary, make updates.
Optionally, create custom IT policies.
If necessary, rank IT policies.
If you create custom IT policies, assign them to user accounts, user groups, or device groups.
Restricting or allowing device capabilities
When you configure IT policy rules, you can restrict or allow device capabilities. The IT policy rules available for each device type
are generally determined by the device OS and version. Some rules for iOS and Android are determined by options such as
Secure Work Space and KNOX MDM. For example, depending on the device type, you can use IT policy rules to:
•
Enforce password requirements
•
Prevent users from using the device camera
114
IT policies
•
Control connections that use Bluetooth wireless technology
•
Control the availability of certain apps
You can use IT policy rules to control device features, the work space on devices, or both. The device activation type and, if
applicable, options such as Secure Work Space and KNOX MDM determine which rules in the IT policy apply to the device. For
more information about the IT policy rules for each device type, visit docs.blackberry.com/bes12cloud to see the Policy
Reference Spreadsheet in the Administration content.
How BES12 chooses which IT policy to assign
BES12 sends only one IT policy to a device and uses predefined rules to determine which IT policy to assign to a user and the
devices that the user activates.
Assigned to
Rules
User account
1.
An IT policy assigned directly to a user account takes precedence over an IT
policy assigned indirectly by user group.
2.
If a user is a member of multiple user groups that have different IT policies,
BES12 assigns the IT policy with the highest ranking.
3.
The Default IT policy is assigned if no IT policy is assigned to a user account
directly or through user group membership.
(view User summary tab)
Device
(view device tab)
By default, a device inherits the IT policy that BES12 assigns to the user who
activates the device. If a device belongs to a device group, the following rules apply:
1.
An IT policy assigned to a device group takes precedence over the IT policy
that BES12 assigns to a user account.
2.
If a device is a member of multiple device groups that have different IT
policies, BES12 assigns the IT policy with the highest ranking.
BES12 might have to resolve conflicting IT policies when you perform any of the following actions:
•
Assign an IT policy to a user account, user group, or device group
•
Remove an IT policy from a user account, user group, or device group
•
Change the IT policy ranking
•
Delete an IT policy
•
Change user group membership (user accounts and nested groups)
•
Change device attributes
•
Change device group membership
•
Delete a user group or device group
Related information
115
IT policies
Rank IT policies, on page 116
Creating and managing IT policies
You can use the Default IT policy or create custom IT policies (for example, to specify IT policy rules for different user groups or
device groups in your organization). If you plan to use the Default IT policy, you should review it and, if necessary, update it to
make sure that the rules meet your organization's security standards.
Create an IT policy
1.
On the menu bar, click Policies and Profiles.
2.
Click
3.
Type a name and description for the IT policy.
4.
Click the tab for each device type in your organization and configure the appropriate values for the IT policy rules.
5.
Click Add.
beside IT policies.
After you finish: Rank IT policies.
Related information
Assign an IT policy to a user group, on page 135
Assign an IT policy to a user account, on page 146
Rank IT policies
Ranking is used to determine which IT policy BES12 sends to a device in the following scenarios:
•
A user is a member of multiple user groups that have different IT policies.
•
A device is a member of multiple device groups that have different IT policies.
1.
On the menu bar, click Policies and Profiles.
2.
In the left pane, expand IT policies.
3.
Click Rank IT policies.
4.
Use the arrows to move IT policies up or down the ranking.
5.
Click Save.
Related information
How BES12 chooses which IT policy to assign, on page 115
View an IT policy
You can view the following information about an IT policy:
116
IT policies
•
IT policy rules specific to each device type
•
List and number of user accounts that the IT policy is assigned to (directly and indirectly)
•
List and number of user groups that the IT policy is assigned to (directly)
1.
On the menu bar, click Policies and Profiles.
2.
In the left pane, expand IT policies.
3.
Click the name of the IT policy that you want to view.
Change an IT policy
1.
On the menu bar, click Policies and Profiles.
2.
In the left pane, expand IT policies.
3.
Click the name of the IT policy that you want to change.
4.
Click
5.
Make changes on the appropriate tab for each device type.
6.
Click Save.
.
After you finish: If necessary, change the IT policy ranking.
Related information
Rank IT policies, on page 116
Remove an IT policy from user accounts or user groups
If an IT policy is assigned directly to user accounts or user groups, you can remove it from users or groups. If an IT policy is
assigned indirectly by user group, you can remove the IT policy from the group or remove user accounts from the group. When
you remove an IT policy from user groups, the IT policy is removed from every user that belongs to the selected groups.
Note: The Default IT policy can only be removed from a user account if you assigned it directly to the user.
1.
On the menu bar, click Policies and Profiles.
2.
In the left pane, expand IT policies.
3.
Click the name of the IT policy that you want to remove from user accounts or user groups.
4.
Perform one of the following tasks:
Task
Steps
Remove an IT policy from user
accounts
1.
Click the Assigned to users tab.
2.
If necessary, search for user accounts.
3.
Select the user accounts that you want to remove the IT policy from.
117
IT policies
Task
Steps
Remove an IT policy from user groups
4.
Click
1.
Click the Assigned to groups tab.
2.
If necessary, search for user groups.
3.
Select the user groups that you want to remove the IT policy from.
4.
Click
.
.
Related information
How BES12 chooses which IT policy to assign, on page 115
Delete an IT policy
You cannot delete the Default IT policy. When you delete a custom IT policy, BES12 removes the IT policy from the users and
devices that it is assigned to.
1.
On the menu bar, click Policies and Profiles.
2.
In the left pane, expand IT policies.
3.
Click the name of the IT policy that you want to delete.
4.
Click
5.
Click Delete.
.
Related information
How BES12 chooses which IT policy to assign, on page 115
118
Distribute and manage public, and secured apps on devices.
Multiplatform
Apps
Apps
Managing apps on devices
19
You can create a library of apps that you want to manage and monitor on BlackBerry 10, iOS, Android, and Windows Phone
devices. To manage apps, you can add the apps to the app list and assign them to user accounts, user groups, or device groups.
Steps to manage apps
When you manage apps, you perform the following actions:
Add the apps that you want to manage to the app list.
Optionally, create app groups to manage multiple apps at the same time.
Assign apps or app groups to user accounts, user groups, or device groups so users can install them.
Adding and deleting apps from the available app
list
The available app list contains all of the apps that you can assign to users, user groups, and device groups. Apps listed with a
lock icon are secured apps that can be installed in the work space on iOS and Android devices.
Adding public apps to the app list
A public app is an app that is available from the BlackBerry World storefront, the App Store online store, the Google Play store,
or the Windows Phone Store. Apps added from BlackBerry World can be installed on compatible BlackBerry 10 devices and
appear in the Public Apps tab in BlackBerry World for Work. Apps added from the App Store can be installed on compatible iOS
devices and appear in the Work Apps app. Apps added from Google Play can be installed on compatible Android devices and
appear in the Assigned work apps list in the BES12 Client. Apps added from the Windows Phone Store can be installed on
compatible Windows Phone devices and appear in the Assigned work apps list in the BES12 Client.
Add a BlackBerry app to the app list
1.
On the menu bar, click Apps.
2.
Click
.
120
Apps
3.
Click BlackBerry World.
4.
In the search field, search for the app that you want to add. You can search by app name, vendor, or BlackBerry World
URL.
5.
In the drop-down list, select the country of the store that you want to search in.
6.
Click Search.
7.
In the search results, click Add to add an app.
8.
On the app information screen, click Add.
Related information
Assign an app or app group to a user group, on page 136
Assign an app or app group to a user, on page 147
Add an iOS app to the app list
1.
On the menu bar, click Apps.
2.
Click
3.
Click App Store.
4.
In the search field, search for the app that you want to add. You can search by app name, vendor, or App Store URL.
5.
In the drop-down list, select the country of the store that you want to search in.
6.
Click Search.
7.
In the search results, click Add to add an app.
8.
In the Supported device form factor drop-down list, select the form factors that the app can be installed on. For example,
you can prevent the app from being available in the Work Apps app for iPad
9.
If you want the app to be deleted from the device when the device is removed from BES12, select Remove the app from
the device when the device is removed from BES12. This option applies only to apps with a disposition marked as
required and the default installation for required apps is set to prompt once.
.
10. If you want to prevent apps on iOS devices from being backed up to the iCloud online service, select Disable iCloud
backup for the app. This option applies only to apps with a disposition marked as required. You set the disposition of the
app when you assign the app to a user or group.
11. In the Default installation for required apps drop-down list, perform one of the following actions:
•
If you want users to receive one prompt to install the app on their iOS devices, select Prompt once. If users
dismiss the prompt, they can install the app later using the Work Apps screen in the BES12 Client or the Work
Apps icon on the device.
•
If you don't want users to receive a prompt, select No prompt.
The default installation method applies only to apps with a disposition marked as required. You set the disposition of the
app when you assign the app to a user or group.
121
Apps
12. Click Add.
Related information
Assign an app or app group to a user group, on page 136
Assign an app or app group to a user, on page 147
Add an Android app to the app list
Add only apps to the available app list. Movies, music, and newsstand media cannot be delivered to devices. If you assign media
to a user and set the disposition of the media as required, the device is subject to the enforcement action defined in the
compliance profile that is assigned to it.
1.
On the menu bar, click Apps.
2.
Click
3.
Click Google Play.
4.
Click Open Google Play and search for the app that you want to add. You can then copy and paste information from
Google Play in the following steps and also download icons and screen shots.
5.
In the App name field, type the app name.
6.
In the App description field, type a description for the app.
7.
In the Vendor field, type the name of the app vendor.
8.
In the App icon field, click Browse. Locate and select an icon for the app. The supported formats are .png, .jpg, .jpeg,
or .gif. Do not use Google Chrome to download the icon because an incompatible .webp image is downloaded.
9.
In the App web address field, type the web address of the app in Google Play.
.
10. To add screen shots of the app, click Add and browse to the screen shots. The supported image types are .jpg, .jpeg, .png,
or .gif.
11. In the Default installation for required apps drop-down list, perform one of the following actions:
•
If you want users to receive one prompt to install the app on their devices, select Prompt once. If users dismiss
the prompt, they can install the app later in the Assigned work apps list in the BES12 Client
•
If you don't want users to receive a prompt, select No prompt.
12. Click Add.
Related information
Assign an app or app group to a user group, on page 136
Assign an app or app group to a user, on page 147
Add a Windows Phone app to the app list
1.
On the menu bar, click Apps.
2.
Click
.
122
Apps
3.
Click Windows Phone Store.
4.
Click Open Windows Phone Store and search for the app that you want to add. You can then copy and paste information
from the Windows Phone Store in the following steps and also download icons and screenshots.
5.
In the App name field, type the app name.
6.
In the App description field, type a description for the app.
7.
In the Vendor field, type the name of the app vendor.
8.
In the App icon field, click Browse. Locate and select an icon for the app. The supported formats are .png, .jpg, .jpeg,
or .gif.
9.
In the App web address from Windows Phone Store field, type the web address of the app in the Windows Phone Store.
10. To add screen shots of the app, click Add and browse to the screen shots. The supported image types are .jpg, .jpeg, .png,
or .gif.
11. Click Add.
Upload an application enrollment token
You require an AET if you want to monitor Windows apps in compliance profiles.
1.
On the menu bar, click Settings.
2.
In the left pane, expand App management.
3.
Click Windows Phone apps.
4.
Click Browse and navigate to the AET that you want to upload.
5.
Click Save.
Delete an app from the app list
When you delete an app from the app list, the app is unassigned from any users or groups that it is assigned to and it no longer
appears in a device's work app catalog. For Android devices that use KNOX MDM, when you delete a public app, the uninstall
option becomes available on the device.
1.
On the menu bar, click Apps.
2.
Select the check box beside the apps that you want to delete from the app list.
3.
Click
4.
Click Delete.
.
123
Apps
Preventing users from installing specific iOS,
Android, and Windows Phone apps
You can create a list of iOS, Android, and Windows Phone apps that you do not want users to install on their devices. For
example, you can prevent users from installing malicious apps or apps that require a lot of resources.
To enforce a particular action if a restricted app is installed on an iOS device or an Android device that does not use KNOX
MDM, you must create a compliance profile and assign the compliance profile to users or user groups. The compliance profile
specifies the actions that will occur if the user does not remove the restricted app from the device. If a restricted app is installed
by a user, the user's device reports that it is not compliant and the restricted apps, and the actions that will occur if the app is
not uninstalled are displayed in the compliance report.
For Windows Phone 8.1 or later and for Android devices that use KNOX MDM, you only have to add the app to the compliance
profile. The user is prevented from installing any app that you add to the compliance profile. If a user tries to install a restricted
app, the device displays a message that the app is restricted and cannot be installed.
You do not have to create a restricted app list for BlackBerry 10 devices because users can only install apps in the work space
that you have allowed.
Steps to prevent users from installing apps
When you prevent users from installing apps, you perform the following actions:
Add the app to the restricted app list.
Create or edit a compliance profile that specifies the actions that occur if a restricted app is installed
on a device.
Assign the compliance profile to a user, user group, or device group.
Add an app to the restricted app list
The restricted app list is the library of apps that you want to prevent users from installing on an iOS, Android, or Windows Phone
device.
1.
On the menu bar, click Apps.
2.
Click Restricted apps.
3.
Click
4.
Perform one of the following tasks:
.
124
Apps
Task
Steps
Add an iOS app to the restricted list
1.
Click App Store.
2.
In the search field, search for the app that you want to add. You can
search by app name, vendor, or App Store URL.
3.
Click Search.
4.
In the search results, click Add to add an app.
1.
Click Google Play.
2.
In the App name field, type the app name.
3.
In the App web address field, type the web address of the app in Google
Play.
4.
Click Add to add the app or click Add and new to add another app after
you add the current one.
1.
Click Windows Phone Store.
2.
In the App name field, type the app name.
3.
In the App web address from Windows Phone Store field, type the web
address of the app in the Windows Phone Store.
4.
Click Add to add the app or click Add and new to add another app after
you add the current one.
Add an Android app to the restricted
list
Add a Windows Phone app to the
restricted list
Managing app groups
App groups allow you to create a collection of apps that can be assigned to users, user groups, or device groups at the same
time. Grouping apps helps to increase efficiency and consistency when managing apps. For example, you can use app groups
to group the same app for multiple device types, or to group apps for users with the same role in your organization.
Create an app group
Before you begin: Add the apps to the available app list.
1.
On the menu bar, click Apps.
2.
Click
3.
Type a name and description for the app group.
4.
Click
5.
If you are adding an iOS app, perform one of the following tasks:
.
.
125
Apps
Task
Steps
If you have not added a VPP account
1.
Click Add.
If you have added at least one VPP account
1.
Click Next.
2.
Select Yes if you want to assign a license to the iOS
app. Select No, if you do not want to assign a license
or you do not have a license to assign to the app.
3.
If you assigned a license to the app, in the Grant app
license drop-down list, select the VPP account to
associate with the app.
4.
Click Add.
Users must follow the instructions on their devices to enroll
in your organization's VPP before they can install prepaid
apps. Users have to complete this task once.
Note: If you grant access to more licenses than you have
available, the first users who access the available licenses
can install the app.
6.
Select the apps that you want to add to the app group.
7.
Click Add.
8.
Click Add.
Related information
Assign an app or app group to a user group, on page 136
Assign an app or app group to a user, on page 147
Edit an app group
1.
On the menu bar, click Apps.
2.
Click the app group that you want to edit.
3.
Make the necessary edits.
4.
Click Save.
Managing Apple VPP accounts
The Apple Volume Purchase Program (VPP) allows you to buy and distribute iOS apps in bulk. You can link Apple VPP accounts
to a BES12 so that you can distribute purchased licenses for iOS apps associated with the VPP accounts.
126
Apps
Add an Apple VPP account
1.
On the menu bar, click Apps.
2.
Click App Licenses.
3.
Click
4.
Type a name and the account information for the VPP account.
5.
In the Service token field, copy and paste the 64-bit code from the .vpp token file. This is the file that the VPP account
holder downloaded from the VPP store.
6.
Click Next.
7.
Select the apps that you want to add to the app list. If the app has already been added to the app list, you cannot select it
and it has a status of "Already added".
8.
If you want the apps to be removed from devices when the apps are deleted from BES12, select Remove the app from the
device when the device is removed from the system.
9.
If you want to prevent apps on iOS devices from being backed up to the iCloud online service, select the check box for that
option. This option applies only to apps with a disposition marked as required. You set the disposition of the app when you
assign the app to a user or group.
.
10. In the Default installation method drop-down list, perform one of the following actions:
•
If you want users to receive one prompt to install the apps on their iOS devices, select Prompt once. If users
dismiss the prompt, they can install the apps later using the Work Apps screen in the BES12 Client or the Work
Apps icon on the device.
•
No prompt
The default installation method applies only to apps with a disposition marked as required. You set the disposition of the
app when you assign the app to a user or group.
11. Click Add.
Edit an Apple VPP account
1.
On the menu bar, click Apps.
2.
Click App Licenses.
3.
Click
4.
Edit the VPP account information.
5.
Click Save.
.
127
Apps
Update Apple VPP account information
When the App Licenses page is opened, the most current licensing information is synced automatically from the Apple VPP
servers. If necessary, you can also manually update the licensing information that you have added to BES12.
1.
On the menu bar, click Apps.
2.
Click App licenses.
3.
Click
.
Delete an Apple VPP account
Before you begin: Remove apps that have associated licenses from users before deleting the VPP account.
1.
On the menu bar, click Apps.
2.
Click App Licenses.
3.
Click
4.
Click Delete.
.
Change whether an app is required or optional
You can change whether iOS, Android, and Windows Phone apps are required or optional.BlackBerry 10 apps added from the
BlackBerry World storefront can be optional only. You can configure a compliance rule that performs actions, including deleting
work data from the device, or deleting all data from the device, when users do not install a required app. These apps are also
reported as a compliance issue in the Non-assigned app installed list.
For Android devices that use KNOX MDM, when you change an app from required to optional, the app uninstall option becomes
available on the device.
1.
On the menu bar, click User and Devices.
2.
If the app that you want to change is assigned to a user account, in the search results, click the name of a user account.
3.
If the app that you want to change is assigned to a group, in the left pane, click Groups to expand the list of user groups
and click the name of the group.
4.
In the Groups assigned and user assigned apps section, click the disposition for the app that you want to change.
5.
In the Disposition drop-down list for the app, perform one of the following actions:
•
To require users to follow the actions defined in the compliance profile assigned to them, select Required.
•
To permit users to install and remove the app, select Optional.
Note: If the same app is assigned to a user account and to the user group that the user belongs to, the
disposition of the app assigned to the user account takes precedence
128
Apps
6.
Click Assign.
View the status of apps and app groups assigned
to user accounts
1.
On the menu bar, click Apps.
2.
Under Assigned to users for the app or app group that you want to view, click the number.
3.
Click the Assigned to x users to view the user accounts that this app is assigned to.
4.
View the Assigned by column to verify whether the app or app group was assigned directly to the user account or to a
group.
5.
View the Status column to verify whether an app was installed on a device. The following are the possible statuses:
•
Installed: The app was successfully installed on the user's device.
•
Not installed: The app has not been installed on the user's device yet.
•
Cannot be installed: The app is not supported on the user's devices.
•
Not supported: The device's OS does not support this app.
View which apps are assigned to user groups
1.
On the menu bar, click Apps.
2.
Under Assigned to users for the app that you want to view, click the number.
3.
Click the Assigned to x groups to view the user groups that this app is assigned to.
Update the information in the available app list
You can update the app list to make sure that you have the latest information about the BlackBerry 10 and iOS apps in the apps
list. Information about Google Play and Windows Phone apps must be updated manually. Updating the app information does
not mean that the app is updated on a user’s device. Users receive update notifications for their work apps in the same way that
they receive update notifications for their personal apps.
1.
On the menu bar, click Apps.
2.
Click
.
129
Apps
Set the organization name for BlackBerry World
You can add your organization's name to the BlackBerry World for Work corporate app storefront.
1.
On the menu bar, click Settings.
2.
Expand App management and click BlackBerry World for Work.
3.
In Organization name, type the name of your organization.
4.
Click Save.
130
Create user accounts and set up groups of users or device groups so that you can manage profiles and
devices collectively.
Secure
Users and devices
Users and devices
Managing user groups and user accounts
You can create user accounts and then create groups of users to help manage users and devices efficiently.
Steps to create user groups and user accounts
When you manage your organization's users and devices, you perform the following actions:
Create user groups.
Create user accounts.
Assign IT policies, profiles, and apps to user groups and user accounts.
132
20
Users and devices
Creating and managing user groups
A user group is a collection of related users who share common properties. Administering users as a group is more efficient than
administering individual users because properties can be added, changed, or removed for all members of the group at the same
time.
Users can belong to more than one group at a time. You can assign an IT policy, profiles, and apps in the management console
when you create or update the settings for a user group. Local groups are created and maintained in BES12 and can have local
user accounts and directory user accounts assigned to them.
After you create user groups, you can define a group as a member of another group. When you nest a group within a user group,
members of the nested group inherit the properties of the user group. You create and maintain the nesting structure in BES12.
Create a local group
1.
On the menu bar, click Groups.
2.
Click
3.
Type a name for the user group.
4.
To assign an IT policy or profile to the local group, perform the following actions:
.
a.
In the IT policy and profiles section, click
b.
Click IT policy or a profile type.
c.
In the drop-down list, click the name of the IT policy or profile that you want to assign to the group.
d.
Click Assign.
.
5.
To assign an app to the user group, in the Assigned apps section, click
.
6.
Search for the app.
7.
In the search results, select the app.
8.
Click Next.
9.
In the Disposition drop-down list for the app, perform one of the following actions:
•
To install the app automatically on devices, and to prevent users from removing the app, select Required. This
option is not available for BlackBerry apps.
•
To permit users to install and remove the app, select Optional.
Note: If the same app is assigned to a user account and to the user group that the user belongs to, the
disposition of the app assigned to the user account takes precedence.
10. Click Assign.
11. If required, perform one of the following actions for an assigned app
•
To view details about the app, click the app name.
133
Users and devices
•
To change the Disposition for an app:
1.
Click the disposition for the app.
2.
Select a new disposition.
3.
Click Save.
• To remove an assigned app, beside the app, click .
12. When you are finished specifying the user group properties, click Add.
View a user group
1.
On the menu bar, click Groups.
2.
Search for a user group.
3.
In the search results, click the name of a user group.
4.
To view the members of a user group, perform the following actions:
5.
a.
Click Users to view the assigned user accounts.
b.
Click Nested groups to view the assigned nested groups.
Click Settings to view the following information about a user group:
•
Assigned IT policy, profiles, and apps
Change the name of a user group
1.
On the menu bar, click Groups.
2.
Search for the user group you want to view.
3.
Click the user group.
4.
Click
5.
Change the name of the user group.
6.
Click Save.
.
Delete a user group
1.
On the menu bar, click Groups.
2.
Search for the user group you want to view.
3.
Click the user group.
134
Users and devices
4.
Click
.
5.
Click Delete.
Add nested groups to a user group
When you add a nested group to a user group, any groups that belong to the nested group are also added.
Before you begin: Create user groups.
1.
On the menu bar, click Groups.
2.
Search for a user group.
3.
In the search results, click the name of a user group.
4.
Click the Nested groups tab.
5.
Click
6.
Select one or more available groups.
7.
Click Add.
.
Remove nested groups from a user group
You can remove nested groups that are assigned directly to a user group.
1.
On the menu bar, click Groups.
2.
Search for a user group.
3.
In the search results, click the name of a user group.
4.
Click the Nested groups tab.
5.
Click
beside each nested group that you want to remove.
Assign an IT policy to a user group
Before you begin: Create an IT policy.
1.
On the menu bar, click Groups.
2.
Search for a user group.
3.
In the search results, click the name of a user group.
4.
Click the Settings tab.
5.
In the IT policy and profiles section, click
6.
Click IT policy.
7.
In the drop-down list, click the name of the IT policy that you want to assign to the group.
.
135
Users and devices
8.
If an IT policy is already assigned directly to the group, click Replace. Otherwise, click Assign.
Related information
Create an IT policy, on page 116
How BES12 chooses which IT policy to assign, on page 115
Assign a profile to a user group
Before you begin: Create profiles.
1.
On the menu bar, click Groups.
2.
Search for a user group.
3.
In the search results, click the name of a user group.
4.
Click the Settings tab.
5.
In the IT policy and profiles section, click
6.
Click a profile type.
7.
In the drop-down list, click the name of the profile that you want to assign to the group.
8.
For ranked profile types, if the profile type that you selected in step 6 is already assigned directly to the group, click
Replace. Otherwise, click Assign.
.
Related information
Assigning profiles, on page 54
How BES12 chooses which profiles to assign, on page 55
Assign an app or app group to a user group
When you assign apps to a user group, the apps are made available to any applicable devices that the members of the user
group have activated. You can also assign apps to user groups for device types that the members of the user group have not
activated yet. This makes sure that if any member of the group activates a different device type in the future, the proper apps
are made available to new devices.
If a user account is a member of multiple user groups that have the same apps or app groups assigned to them, only one
instance of the app or app group appears in the list of assigned apps for that user account. The same app can be assigned
directly to the user account, or inherited from user groups or device groups. The settings for the app (for example, whether the
app is required) are assigned based on priority: device groups have the highest priority, then user accounts, then user groups.
Before you begin:
•
Add the app to the available app list.
•
Optionally, add the apps to an app group.
1.
On the menu bar, click Groups.
2.
Click the name of a group.
136
Users and devices
3.
On the Settings tab, in the Assigned apps section, click
.
4.
In the search field, type the app name, vendor, or URL of the app that you want to add.
5.
Select the check box beside the apps or app group that you want to assign to the user group.
6.
Click Next.
7.
In the Disposition drop-down list for the app, perform one of the following actions:
•
If the app is an iOS or Android app: To require users to follow the actions defined for apps in the compliance
profile assigned to them, select Required.
•
If the app is a Windows Phone app: For apps added from Windows Phone Store, select Required to make users
follow the actions defined for apps in the compliance profile assigned to them. This applies only to devices
running Windows Phone 8.1 or later.
•
To permit users to install and remove the app, select Optional.
Note: If the same app is assigned to a user account, a user group that the user belongs to, and the device group
the device belongs to, the disposition of the app assigned in the device group takes precedence.
8.
If you want to assign per-app VPN settings to an app group, in the Per app VPN drop-down list for the app, select the
settings to associate with the app group.
9.
Perform one of the following tasks:
Task
Steps
If you have not added a VPP account or are not adding an
iOS app
1.
Click Assign.
If you are adding an iOS app and you have added at least
one VPP account
1.
Click Next.
2.
Select Yes if you want to assign a license to the iOS
app. Select No, if you do not want to assign a license
or you do not have a license to assign to the app.
3.
If you have assigned a license to the app, in the Grant
app license drop-down list, select the VPP account to
associate with the app.
4.
Click Assign.
Users must follow the instructions on their devices to enroll
in your organization's VPP before they can install prepaid
apps. Users have to complete this task once
Note: If you grant access to more licenses than you have
available, the first users who access the available licenses
can install the app.
137
Users and devices
Change the per-app VPN settings assigned to a user group
You can change the per-app VPN settings that are associated with an app or app group for iOS devices after you assign the app
or app groups to the user or user group.
1.
On the menu bar, click Groups.
2.
Click the name of a user group.
3.
Click the Settings tab.
4.
In the Assigned apps section, click the per-app VPN settings that you want to change.
5.
In the Edit per app VPN dialog box, click the Per app VPN drop-down list and select the settings from the drop-down list.
6.
Click Save.
138
Users and devices
Creating and managing user accounts
You can add user accounts directly to BES12 or you can add user accounts from your company directory.
You can also use a .csv file to add multiple user accounts to BES12 at the same time.
Create a user account
Before you begin: If you want to add a directory user, verify that BES12 is connected to your company directory.
1.
On the menu bar, click Users and Devices.
2.
In the left pane, click Add user.
3.
Perform one of the following tasks:
Task
Steps
Add a directory user
1.
On the Company directory tab, in the search field, specify the search
criteria for the directory user that you want to add. You can search by first
name, last name, display name, username, or email address.
2.
Click
3.
In the search results, select the user account.
1.
Click the Local tab.
2.
In the First name field, type a first name for the user account.
3.
In the Last name field, type a last name for the user account.
4.
In the Display name field, make changes if necessary. The display name is
automatically configured with the first and last name that you specified.
5.
In the Username field, type a unique username for the user account.
6.
In the Email address field, type a contact email for the user account.
Add a local user
.
4.
If local groups exist in BES12 and you want to add the user account to groups, in the Available groups list, select one or
more groups and click .
5.
If you add a local user, in the Console password field, type a BES12 Self-Service password. The user can also use the
password to access the management console if you assign an administrative role to the user.
6.
Perform one of the following tasks:
139
Users and devices
Task
Steps
Autogenerate device activation
password and send email with
activation instructions
1.
Select the Autogenerate device activation password and send email with
activation instructions option.
2.
In the Activation period expiration field, specify the number of minutes,
hours, or days that the user can activate a device before the activation
password expires.
Set device activation password
1.
Select the Set device activation password option.
2.
Type an activation password.
3.
To send activation information to the user, verify that the Send email with
activation instructions and activation password check box is selected.
4.
In the Activation period expiration field, specify the number of minutes,
hours, or days that the user can activate a device before the activation
password expires.
1.
Select the Do not set device activation password option. You can specify
an activation password later.
Do not set device activation password
7.
If you use custom variables, expand Custom variables and specify the appropriate values for the variables that you
defined.
8.
Perform one of the following actions:
•
To save the user account, click Save.
•
To save the user account and create another user account, click Save and new.
Related information
Custom variables, on page 62
Creating user accounts from a .csv file
You can create the .csv file manually using the BES12 sample .csv file, which is available for download from the Import tab in
the Add a user window.
About the user accounts .csv file
You can import user accounts in a .csv file into BES12 from to create many user accounts at once. Depending on your
requirements, you can also specify group membership and activation settings for the user accounts by including the following
columns in the .csv file:
140
Users and devices
Column Header
Description
Group membership
Assign one or more user groups to each user account.
Use the semicolon (;) to separate multiple user groups.
If you do not include the “Group membership” column, when you import the
file, you are given the option to select the group that you want all of the
imported user accounts added to. If you want to assign each user account to
a specific user group, you use this column before you import the file.
Activation password
Enter the activation password.
This value is mandatory if the “Activation password generation” value is set
to “manual.”
Activation password expiration
Enter the number of seconds the activation password exists before it expires.
Activation password generation
Enter one of the following:
•
Auto. The activation password is automatically created and sent to
the user.
•
Manual. The activation password is set in the "Activation
password" column.
If the value is left blank, the default is Auto.
Send activation email
Enter one of the following:
•
True. The activation email is sent to the user.
•
False. The activation email is not sent to the user.
If the “Activation password generation” is set to “Auto,” the activation email
is sent to the user regardless of the value in this column. If the “Activation
password generation” value is "Manual" and this value is empty, then the
default is True.
User type
Directory UID
This column is required whenever the .csv file includes both local and
directory user accounts. Enter one of the following:
•
L for local user accounts
•
D for directory user accounts
(Optional) An alternative to entering the email address for directory user
accounts. By default, the email address is used to validate the directory user
accounts; however, you can specify that the directory UID be used instead. If
141
Users and devices
Column Header
Description
the user account cannot be validated against the directory UID, an error is
reported.
Here is an example of the .csv file:
Username, First name, Last name, Display name, Contact email, Group membership,
Activation password, Activation Password Expiration, Activation Password Generation,
Send activation email, User Type
JJones1, Justin1, Jones, Justin1 Jones, [email protected], Sales, password, 172800,
manual, true, d
JJones2, Justin2, Jones, Justin2 Jones, [email protected], Sales;Pre Sales, , ,
auto, true, l
JJones3, Justin3, Jones, Justin3 Jones, [email protected], Sales;Pre Sales,
password, 172800, manual, true, d
JJones4, Justin4, Jones, Justin4 Jones, [email protected], Sales, password, 172800,
manual, true, d
How BES12 validates the user accounts .csv file
BES12 validates the user accounts .csv file before, during, and immediately after it loads the .csv file and reports any errors that
it encounters.
The following are some of the errors that will prevent BES12 from loading the .csv file:
•
An invalid file format or file extension
•
No data in the file
•
The number of columns does not match the number of headers in the file
When BES12 encounters an error, it stops loading the file and displays an error message. You must correct the error and then
reload the .csv file.
After the .csv file is loaded, BES12 displays a list of user accounts that will be imported and, if applicable, any directory user
accounts that will not be imported as a result of an error (for example, a duplicate entry or invalid email address). You can do
one of the following:
•
Cancel the operation, correct the errors, and then reload the .csv file.
•
Continue and load the valid user accounts. The directory user accounts with errors are not loaded. You must copy and
correct the directory user accounts that were not loaded in a separate .csv file. Otherwise, reloading the same .csv file
will result in duplication errors for the user accounts that were successfully loaded.
BES12 performs a final validation on the imported user accounts just before it creates the user accounts to ensure that no
errors have been introduced as the file was being imported (for example, another administrator created a user account just as
a .csv file containing that same user account was being imported).
142
Users and devices
Add user accounts using a .csv file
Before you begin:
•
If the .csv file contains directory user accounts, verify that BES12 is connected to your company directory.
•
Verify the number of columns match the number of headers in the .csv file.
•
Verify the mandatory columns are included.
•
Verify the information in the columns is correct.
1.
On the menu bar, click Users and Devices.
2.
In the left pane, click Add user.
3.
Click the Import tab.
4.
Click Browse and navigate to the .csv file that contains the user accounts that you want to add.
5.
Click Load.
6.
If errors are reported, perform the following actions:
7.
a.
Correct the errors in the .csv file.
b.
Click Browse and navigate to the .csv file.
c.
Click Load.
d.
Repeat step 6 until all errors are corrected.
If the .csv file does not use the "Group membership" column and local groups exist in BES12, perform the following
actions if you want to add user accounts to groups:
8.
a.
In the Available groups list, select one or more groups and click .
b.
Click Next.
Review the list of user accounts and perform one of the following actions:
•
To correct the errors for any invalid directory user accounts, click Cancel and go to step 6.
•
To add the valid user accounts, click Import. Any invalid directory user accounts are ignored.
View a user account
You can view information about a user account on the User summary tab. For example, you can view the following information:
•
Activated devices
•
User groups that a user account belongs to
•
Assigned IT policy, profiles, and apps
1.
On the menu bar, click Users and Devices.
2.
Search for a user account.
143
Users and devices
3.
In the search results, click the name of a user account.
Send an email to a user
You can send an email message to an individual directly from the management console. The user must have an email address
associated with the account.
1.
On the menu bar, click Users and Devices.
2.
Search for a user account.
3.
In the search results, click the name of a user account.
4.
Under the user's name at the top of the screen, click Send message.
5.
Optionally, click CC and type one or more email addresses (separated by commas or semicolons) to copy the email to
yourself or others.
6.
Type a subject and message.
7.
Click Send.
Edit user account information
You can edit user group membership for directory and local user accounts. If you use custom variables, you can also edit
variable information for directory and local user accounts. You can edit the name, username, contact email, and console
password for local user accounts.
1.
On the menu bar, click Users and Devices.
2.
Search for a user account.
3.
In the search results, click the name of a user account.
4.
On the User summary tab, in the User details section, click
5.
Edit the user account information.
6.
Click Save.
.
Refresh user account information
If you have added a user account from your company directory, you can manually synchronize that user's information with your
company directory at any time instead of waiting for the automatic synchronization time.
1.
On the menu bar, click Users and Devices.
2.
Search for a user account.
3.
In the search results, click the name of a user account.
4.
Click
.
144
Users and devices
Delete a user account
When you delete a user account, the work data is also deleted from all of the user's devices.
Before you begin: Delete any activated devices associated with the user account that you want to delete.
1.
On the menu bar, click Users and Devices.
2.
Search for a user account.
3.
In the search results, select the name of a user account.
4.
Click
5.
Click Delete.
.
Add users to user groups
1.
On the menu bar, click Users and Devices.
2.
Select the check box beside the users that you want to add to user groups.
3.
Click
4.
In the Available groups list, select one or more groups and click .
5.
Click Save.
.
Change which user groups a user belongs to
1.
On the menu bar, click Users and Devices.
2.
Search for a user account.
3.
In the search results, click the name of a user account.
4.
On the User summary tab, in the Group membership section, click
5.
Perform any of the following actions:
.
• To add the user to user groups, in the Available groups list, select one or more groups and click .
• To remove the user from user groups, in the Member of groups list, select one or more groups and click .
6.
Click Save.
Remove a user from a user group
1.
On the menu bar, click Groups.
2.
Search for the user group you want to edit.
145
Users and devices
3.
Click the user group.
4.
Search for the user you want to remove.
5.
Select the user.
6.
Click
.
Assign an IT policy to a user account
Before you begin: Create an IT policy.
1.
On the menu bar, click Users and Devices.
2.
Search for a user account.
3.
In the search results, click the name of a user account.
4.
On the User summary tab, in the IT policy and profiles section, click
5.
Click IT policy.
6.
In the drop-down list, click the name of the IT policy that you want to assign to the user.
7.
If an IT policy is already assigned directly to the user, click Replace. Otherwise, click Assign.
.
Related information
Create an IT policy, on page 116
How BES12 chooses which IT policy to assign, on page 115
Assign a profile to a user account
Before you begin: Create profiles.
1.
On the menu bar, click Users and Devices.
2.
Search for a user account.
3.
In the search results, click the name of a user account.
4.
On the User summary tab, in the IT policy and profiles section, click
5.
Click a profile type.
6.
In the drop-down list, click the name of the profile that you want to assign to the user.
7.
For ranked profile types, if the profile type that you selected in step 5 is already assigned directly to the user, click
Replace. Otherwise, click Assign.
Related information
Assigning profiles, on page 54
How BES12 chooses which profiles to assign, on page 55
146
.
Users and devices
Add a client certificate to a user account
If devices use certificate-based authentication to connect to a network or server in your organization’s environment, you might
need to distribute client certificates to the devices. You can add a client certificate to an individual user account and send the
certificate to the user's iOS and Android devices. The client certificate has a .pfx or .p12 file name extension. You can send
more than one client certificate to devices.
You can also use SCEP profiles to enroll client certificates to BlackBerry 10 and iOS devices. If you need to send the same client
certificate to multiple iOS and Android device users, you can use a shared certificate profile.
1.
On the menu bar, click Users and Devices.
2.
Search for a user account.
3.
In the search results, click the name of a user account.
4.
In the IT policy and profiles section, click
5.
Click User certificate.
6.
Type a name and description for the certificate.
7.
In the Password field, type a password for the certificate.
8.
In the Certificate file field, click Browse to locate the certificate file.
9.
Click Add.
.
Assign an app or app group to a user
If you need to control apps at the user level, you can assign apps or app groups to user accounts. When you assign an app to a
user, the app is made available to any devices that the user has activated for that device type, and the app is listed in the work
app catalog on the device.
You can also assign apps to users for device types that the user has not activated yet. This makes sure that if the user activates
a different device type in the future, the proper apps are made available to that user's new device.
The same app can be assigned directly to the user account, or inherited from user groups or device groups. The settings for the
app (for example, whether the app is required) are assigned based on priority: device groups have the highest priority, then user
accounts, then user groups.
Before you begin:
•
Add the app to the available app list
•
Optionally, add the apps to an app group
1.
On the menu bar, click Users and Devices.
2.
Search for a user account.
3.
In the search results, click the name of a user account.
4.
In the Group assigned and user assigned apps section, click
147
.
Users and devices
5.
Select the check box beside the apps or app group that you want to assign to the user account.
6.
Click Next.
7.
In the Disposition drop-down list for the app, perform one of the following actions:
•
If the app is an iOS or Android app: To require users to follow the actions defined for apps in the compliance
profile assigned to them, select Required.
•
If the app is a Windows Phone app: For apps added from the Windows Phone Store, select Required to make
users follow the actions defined for apps in the compliance profile assigned to them. This applies to Windows
Phone 8.1 devices or later only.
•
To permit users to install and remove the app, select Optional.
8.
If you want to assign per-app VPN settings to an app, in the Per app VPN drop-down list for the app, select the settings to
associate with the app.
9.
If you are adding an iOS app, perform one of the following tasks:
Task
Steps
If you have not added a VPP account or are not adding an
iOS app
1.
Click Assign.
If you are adding an iOS app and you have added at least
one VPP account
1.
Click Next.
2.
Select Yes if you want to assign a license to the iOS
app. Select No, if you do not want to assign a license
or you do not have a license to assign to the app.
3.
If you have assigned a license to the app, in the Grant
app license dropdown list, select the VPP account to
associate with the app.
4.
Click Assign.
Users must follow the instructions on their devices to
enroll in your organization's VPP before they can
install prepaid apps. Users have to complete this task
once
Note: If you grant access to more licenses than you have
available, the first users who access the available licenses
can install the app.
Change the per-app VPN settings assigned to a user
You can change the per-app VPN settings that are associated with an app or app group for iOS devices after you assign the app
or app groups to the user or user group.
148
Users and devices
1.
On the menu bar, click Users and Devices.
2.
If the per-app VPN settings that you want to change are assigned to a user account, in the search results, click the name of
a user account.
3.
In the Groups assigned and user assigned apps section, click the per-app VPN settings that you want to change.
4.
In the Edit per app VPN dialog box, click the Per app VPN drop-down list and select the settings from the drop-down list.
5.
Click Save.
Using filters to customize the users and devices
view
You can use filters to view only the users and information that is relevant to your task. For example, you can filter and view users
by group membership, assigned policies, compliance state, OS family and version, hardware vendor, service provider, and
roaming status. You can choose to filter the list by selecting one filter at a time, or by selecting multiple filters. When you select
filters, any filter that would display zero results is automatically omitted from each category.
When you turn off multiple selection, each filter is applied when you select it, and you can select only one filter under each
category.
When you turn on multiple selection, you can select multiple filters before you apply them, and you can select multiple filters
under each category.
For further analysis and reporting purposes, you can export the list of users to a .csv file.
Filter users and devices
1.
On the menu bar, click Users and Devices.
2.
In the left pane, click
3.
Under Filters, click a category to expand it.
4.
Select the filters that you want to apply. Beside each filter, you can see the number of results if you apply that filter.
5.
If you enabled multiple selection, click Submit.
6.
Optionally, do one of the following:
•
to turn multiple selection on or off.
To apply more filters, in the left pane, repeat steps 3 to 5.
• To remove filters, in the right pane, click
•
beside the filter that you want to remove.
To clear all filters, in the right pane, click Clear all.
149
Users and devices
Export a user list to a .csv file
1.
On the menu bar, click Users and Devices.
2.
In the left pane, filter the details that you want to include in the report.
3.
From the filtered list, select the users that you want to include in the report.
4.
Click
and save the file.
150
Users and devices
Managing device groups
21
You can define and create device groups to efficiently manage devices that are alike.
Steps to create and manage device groups
When you create and manage device groups, you perform the following actions:
Optional: Select user groups to restrict the query to those groups.
Create a query to define a specific set of devices.
Assign IT policies, profiles, and apps to the devices defined in the query.
Creating a device group
A device group is a group of devices that have common attributes, such as device model and manufacturer, OS type and
version, service provider, and whether the device is owned by your organization or by the user. BES12 automatically moves
devices into or out of the device group based on the device attributes that you define.
You can use device groups to apply different sets of policies, profiles, and apps to devices assigned to a single user. For
example, you can use a device group to apply a specific IT policy to all devices running BlackBerry 10 OS, or to all HTC EVO
devices running Android OS 4.0 or later on the T-Mobile network.
Policies, profiles, and apps assigned to a device group take priority over those assigned to a user or a user group. However, you
cannot assign activation profiles or user certificates to device groups.
Create a device group
1.
On the menu bar, click Groups.
2.
Click the Device groups tab.
3.
Click
4.
Type a name for the device group.
5.
In the Scope to user groups section, you can select one or more user groups to apply the device group to. If you don't
select any user groups, the device group applies to all activated devices.
6.
In the Device query section, in the first drop-down list, click Any or All.
.
151
Users and devices
If you select All, devices must match all the attributes you define to be included in the device group. If you select Any,
devices need to match only one of the attributes you define to be included in the device group.
7.
In the Device query section, perform the following actions:
•
In the Attribute drop-down list, click an attribute.
•
In the Operator drop-down list, click an operator.
•
In the Value drop-down list, click or type a value.
You can add or remove rows to focus your query.
8.
Click Next.
9.
To assign an IT policy or profile to the device group, perform the following actions:
a.
In the IT policy and profiles section, click
b.
Click IT policy or a profile type.
c.
In the drop-down list, click the name of the IT policy or profile that you want to assign to the group.
d.
Click Assign.
.
10. To assign an app to the device group, in the Assigned apps section, click
.
11. Search for the app.
12. In the search results, select the app.
13. Click Next.
14. In the Disposition drop-down list for the app, perform one of the following actions:
•
If the app is an iOS or Android app: To require users to follow the actions defined for apps in the compliance
profile assigned to them, select Required.
•
If the app is a Windows Phone app: For apps added from the Windows Phone Store, select Required so that
users must follow the actions defined for apps in the compliance profile assigned to them. This applies only to
devices running Windows Phone 8.1 or later.
•
To permit users to install and remove the app, select Optional.
Note: The same app can be assigned directly to the user account, or inherited from user groups or device
groups. The settings for the app (for example, whether the app is required) are assigned based on priority:
device groups take precedence over user accounts and user groups.
15. Click Assign.
16. If necessary, perform one of the following actions for an assigned app
•
To view details about the app, click the app name.
•
To change the Disposition for an app:
1.
Click the disposition for the app.
152
Users and devices
2.
Select a new disposition.
3.
Click Save.
• To remove an assigned app, beside the app, click .
17. When you are finished specifying the device group properties, click Save.
Defining parameters for device groups
When you create a device group, you configure a device query that includes one or more attribute statements. You can specify
whether a device belongs to the device group if it matches any one attribute statement, or only if it matches all the attribute
statements. Each attribute statement contains an attribute, an operator, and a value. The table below describes each of these
elements.
Attribute
Operators
Values
Carrier
•
=
•
!=
Text field. Type the name of a service provider, such as TMobile or Bell.
•
Starts with
•
=
•
!=
•
Starts with
•
=
•
!=
•
Starts with
•
=
•
!=
•
=
•
!=
•
>=
•
<=
•
=
•
!=
Manufacturer
Model
OS
OS version
Ownership
Text field. Type the name of a device manufacturer, such as
Apple or BlackBerry.
Text field. Type the name of a device model, such as iPhone
5S or BlackBerry Q10.
Drop-down list. Choose Android, BlackBerry 10, iOS, or
Windows Phone.
Text field. Type an OS version, such as 7.1.1 or 10.3. If you
use this attribute, you should also specify the OS attribute to
avoid overlap of OS versions.
Drop-down list. Choose Work, Personal, or Not specified.
153
Users and devices
View a device group
1.
On the menu bar, click Groups.
2.
Click the Device groups tab.
3.
Search for the device group you want to view.
4.
Click the device group.
5.
Perform one of the following actions:
•
To view the devices assigned to the device group, click the Devices tab.
•
To view the user groups, device queries, IT policies, profiles, or apps assigned to the device group, select the
Settings tab.
Change the name of a device group
1.
On the menu bar, click Groups.
2.
Click the Device groups tab.
3.
Search for the device group that you want to view.
4.
Click the device group.
5.
Click
6.
Change the name of the device group.
7.
Click Next.
8.
Click Save.
.
Delete a device group
1.
On the menu bar, click Groups.
2.
Click the Device groups tab.
3.
Search for the device group that you want to view.
4.
Click the device group.
5.
Click
6.
Click Delete.
.
154
Users and devices
Activating devices
22
When you activate a device, you associate the device with BES12 so that you can manage devices and users can access work
data on their devices.
When a device is activated, you can send IT policies and profiles to control the available features and manage the security of
work data. You can also assign apps for the user to install. Depending on how much control the selected activation type allows,
you may also be able to protect the device by restricting access to certain data, remotely setting passwords, locking the device,
or deleting data.
You can assign activation types to accommodate the requirements of devices owned by your organization and devices owned by
users. Different activation types give you different degrees of control over the work and personal data on devices, ranging from
full control over all data to specific control over work data only.
Steps to activate devices
When you activate devices, you perform the following actions.
Verify that all activation requirements are met.
Configure the default activation settings.
Update the template for the activation email.
Create an activation profile and assign it to a user account or to a group that the user belongs to.
Set an activation password for the user.
Requirements: Activation
For all devices:
•
An available license for the activation type that you're using
•
A working wireless connection
For Android, iOS and Windows Phone devices:
155
Users and devices
•
BES12 Client installed on the device
For more information about licenses, see the following pages or visit docs.blackberry.com/bes12cloud to see the Licensing
content.
License requirements for activation types
The following table lists the required license for each activation type. BES12 checks for available licenses in the order listed. For
example, if you activate a BlackBerry 10 device with the "Work and personal - Corporate" activation type, and BES12 has Silver
and Gold - BlackBerry server licenses available, the device uses a Silver license.
If you want to check what type of license a device is using, see the user's device details in the management console.
Activation type
Devices
Description
Required license
Work and personal Corporate
BlackBerry 10
Devices have a personal space and a
work space. Administrators have
control of the work space only.
One of the following:
Work and personal Regulated
Work space only
MDM controls
Work and personal full control
BlackBerry 10
BlackBerry 10
iOS, Android
(including devices
using KNOX
MDM), and
Windows Phone
iOS
1.
Silver SIM license
2.
Gold SIM license
3.
Silver server license
4.
Gold - BlackBerry server license
Devices have a personal space and a
work space. Administrators have
control of both spaces.
One of the following:
Devices have a work space only.
Administrators have full control of
devices.
One of the following:
A separate work space is not installed
on devices. Administrators have basic
device management controls.
One of the following:
A separate work space is created on
devices. Administrators have full
control of devices.
156
1.
Gold SIM license
2.
Gold - BlackBerry server license
1.
Gold SIM license
2.
Gold - BlackBerry server license
1.
Silver SIM license
2.
Gold SIM license
3.
Silver server license
4.
Gold - Secure Work Space server
license
One of the following:
1.
Gold SIM license
Users and devices
Activation type
Devices
Description
Required license
2.
Gold - Secure Work Space server
license
Work and personal full control (Secure
Work Space)
Android (including A separate work space is created on
devices using
devices. Administrators have full
KNOX MDM)
control of devices.
One of the following:
Work and personal user privacy
iOS
A separate work space is created on
One of the following:
devices. Administrators have control of
1. Gold SIM license
the work space only.
2. Gold - Secure Work Space server
license
Work and personal user privacy (Secure
Work Space)
Android
A separate work space is created on
One of the following:
devices. Administrators have control of
1. Gold SIM license
the work space only.
2. Gold - Secure Work Space server
license
1.
Gold SIM license
2.
Gold - Secure Work Space server
license
Manage default activation password expiration
and length
You can specify the default time an activation password remains valid before it expires. You can also specify the password
length for the automatically generated password that is sent to users in one of the activation email messages and you can
specify whether or not the activation period expires after the first device is activated.
The value that you enter for the activation password expiration appears as the default setting in the Activation password
expiration field in the Set device activation password and Add a user windows.
1.
On the menu bar, click Settings.
2.
In the left pane, expand General settings.
3.
Click Activation defaults.
4.
In the Activation password expiration field, enter the default time an activation password remains valid before it expires.
The default time can be 1 minute to 30 days.
5.
If necessary, select the Activation period expires after the first device is activated check box.
157
Users and devices
6.
In the Auto-generated activation password length field, change the value to be the length of the automatically generated
activation password. The value can be 4 to 16.
7.
Select or deselect the Turn on registration with the BlackBerry Infrastructure option to modify how users activate their
mobile devices. If you deselect this option, users will be asked to provide the server address for BES12 when activating
devices. For more information, see "Turn off user registration with the BlackBerry Infrastructure."
8.
Click Save.
Related information
Turn off user registration with the BlackBerry Infrastructure, on page 158
Turn off user registration with the BlackBerry
Infrastructure
Registration with the BlackBerry Infrastructure simplifies the way users activate their mobile devices. With registration turned
on, users do not need to enter the server address when they activate devices. If you change this setting, you might need to
update the activation email with the steps that users must take to activate their devices.
Registration is enabled by default. However you must enable communication to the BlackBerry Infrastructure using SSL for
registration to work.
1.
On the menu bar, click Settings.
2.
In the left pane, expand General settings.
3.
Click Activation defaults.
4.
Clear the Turn on registration with the BlackBerry Infrastructure check box.
5.
Click Save.
Update the template for the activation email
You can customize the activation email that you send to users. You can send the activation email when you add a user account
or any time after you add a user account to BES12. You can also send users the activation instructions in two separate email
messages, which allows you to send the information such as the activation password separately from the rest of the login
information.
1.
On the menu bar, click Settings.
2.
In the left pane, expand General settings.
3.
Click Activation email.
4.
In the First email notification sent out when user requests activation section, edit the text in the Subject field.
5.
Customize the body text of the activation email message that you send to users. To see an example of message text that
you can use to customize the message for different users, click Suggested text. If you decide to send only one activation
158
Users and devices
email message, be sure to include the activation password. You can use variables in the text to customize the email
message for different users. For a list of variables, see "Default variables."
6.
To create a second activation email message so that you can send the activation password separately from the activation
instructions to users, select Send two separate activation emails - first for complete instructions, second for password.
7.
In the Subject field, type a subject line for the second activation email.
8.
Customize the body text of the second activation email message that you send to users. Make sure that you include the
activation password.
9.
Click Save.
Related information
Default variables, on page 60
Controlling device activation settings using
activation profiles
You can control how devices are activated and managed using activation profiles. An activation profile specifies how many and
what types of devices a user can activate, whether devices have a separate work space installed, and how you are allowed to
manage the work and personal data on the device.
The assigned profile applies only to devices the user activates after you assign the profile. Devices that are already activated are
not automatically updated to match the new or updated activation profile.
When you add a user to BES12, the Default activation profile is assigned to the user account. You can change the Default
activation profile to suit your requirements, or you can create a custom activation profile and assign it to users or user groups.
Using activation types to configure your control over devices
You can use activation types to configure how much control you have over activated devices. This flexibility of control is useful if
you want to have full control over a device that you issue to a user or if you want to make sure that you have no control over the
personal data on a device that the user owns and brings to work. The following tables list the activation types available for
devices.
BlackBerry 10 devices
Activation type
Description
Work and personal - Corporate
This activation type provides control of work data on devices, while making sure
that there is privacy for personal data. When a device is activated, a separate work
space is created on the device and the user must create a password to access the
work space. Work data is protected using encryption and password authentication.
159
Users and devices
Activation type
Description
You can control the work space on the device using IT administration commands
and IT policies, but you cannot control any aspects of the personal space on the
device.
Work space only
This activation type provides full control of the device and does not provide a
separate space for personal data. When a device is activated, the personal space
is removed, a work space is installed, and the user must create a password to
access the device. Work data is protected using encryption and password
authentication.
You can control the device using IT administration commands and IT policies.
Note:
For devices with the Work space only activation type, you must create and assign a
VPN profile to allow access to the Internet through your organization's network.
Without a VPN connection to your organization's network, devices with the Work
space only activation type can access the Internet only through a work Wi-Fi
network.
For more information, see "Setting up work VPNs for devices."
Work and personal - Regulated
This activation type provides control of both work and personal data. When a
device is activated, a separate work space is created on the device and the user
must create a password to access the work space. Work data is protected using
encryption and password authentication.
You can control both the work space and the personal space on the device using IT
administration commands and IT policies.
Android devices
When you configure the activation type for Android devices, you can select multiple activation types and rank them to make
sure that BES12 assigns the best activation type for that device.
Activation type
Description
MDM controls
This activation type applies to:
•
Android devices, including devices that use KNOX MDM
This activation type provides basic device management using device controls
made available by Android and by Samsung KNOX. There is no separate work
space installed on the device, and no added security for work data. If the device
supports KNOX MDM, this activation type will apply the KNOX MDM IT policy
rules instead of the other IT policy rules available for Android devices.
160
Users and devices
Activation type
Description
You can control the device using IT administration commands and IT policies.
During activation users must permit Administrator permissions for the BES12
Client.
Work and personal - full control (Secure
Work Space)
This activation type applies to:
•
Android devices, including devices that use KNOX MDM
This activation type provides full control of devices. When a device is activated, a
separate work space is created on the device and the user must create a
password to access the work space. Work data is protected using encryption
and password authentication. If the device supports KNOX MDM, this activation
type will apply the KNOX MDM IT policy rules instead of the other IT policy rules
available for Android devices.
You can control the work space, and some other aspects of the device that
affect both the personal and work space using IT administration commands and
IT policies. During activation users must permit Administrator permissions for
the BES12 Client.
Work and personal - user privacy (Secure
Work Space)
This activation type applies to:
•
Android devices
This activation type provides control of work data on devices, while making sure
that there is privacy for personal data. When a device is activated, a separate
work space is created on the device and the user must create a password to
access the work space. Work data is protected using encryption and password
authentication. This activation type does not permit you to use the KNOX IT
policy rules.
You can control the work space on the device using IT administration
commands and IT policies, but you cannot control any aspects of the personal
space on the device. Users do not have to permit Administrator permissions for
the BES12 Client.
iOS and Windows Phone devices
Activation type
Description
MDM controls
This activation type applies to:
•
iOS devices
•
Windows Phone devices
161
Users and devices
Activation type
Description
This activation type provides basic device management using device controls
made available by iOS and Windows Phone. There is no separate work space
installed on the device, and no added security for work data.
You can control the device using IT administration commands and IT policies.
During activation, users with an iOS device must install a mobile device
management profile and users with a Windows Phone device must enroll their
device through the Windows Phone company or workplace apps.
Work and personal - full control
This activation type applies to:
•
iOS devices
This activation type provides full control of devices. When a device is activated, a
separate work space is created on the device and the user must create a
password to access the work space. Work data is protected using encryption
and password authentication.
You can control the work space, and some other aspects of the device that
affect both the personal and work space using IT administration commands and
IT policies. During activation, users must install a mobile device management
profile.
Work and personal - user privacy
This activation type applies to:
•
iOS devices
This activation type provides control of work data on devices, while making sure
that there is privacy for personal data. When a device is activated, a separate
work space is created on the device and the user must create a password to
access the work space. Work data is protected using encryption and password
authentication.
You can control the work space on the device using IT administration
commands and IT policies, but you cannot control any aspects of the personal
space on the device. Users are not required to install a mobile device
management profile.
Related information
Setting up work VPNs for devices, on page 90
Create an activation profile
1.
On the menu bar, click Policies and Profiles.
2.
Click
beside Activation.
162
Users and devices
3.
Type a name and description for the profile.
4.
In the Number of devices that a user can activate field, specify the maximum number of devices the user can activate.
5.
In the Device ownership drop-down list, perform one of the following actions:
•
If some users activate personal devices and some users activate work devices, select Not specified.
•
If users typically activate work devices, select Work.
•
If users typically activate personal devices, select Personal.
6.
In the Device types that users can activate section, select or deselect device types as required. Device types that are
deselected will not be included in the activation profile and cannot be activated by users assigned to this activation profile.
7.
Perform the following actions for each device type included in the activation profile:
8.
•
Click the tab for the device type.
•
In the Device model restrictions drop-down list, select whether to allow only specified devices, to restrict only
specified devices, or to apply no restrictions at all. If you choose an option other than No restrictions, click Edit,
select the devices you want to restrict or allow, and click Save.
•
In the Allowed version drop-down list, select the minimum allowed version.
•
In the Activation type section, select an activation type.
•
Optionally, on the BlackBerry tab, select an organization notice in the Assign organization notice drop-down list.
•
Optionally, on the Android tab, rank the activation types to meet your organization's requirements.
Click Add.
After you finish: Rank profiles.
Related information
Assign a profile to a user group, on page 136
Assign a profile to a user account, on page 146
Rank profiles, on page 57
Set an activation password and send an
activation email message
You can set an activation password and send a user an activation email with the information needed to activate one or more
BlackBerry 10, iOS, Android, or Windows Phone devices.
Before you begin: Update the template for the activation email message.
1.
On the menu bar, click Users and Devices.
2.
Search for a user account.
3.
In the search results, click the name of the user account.
163
Users and devices
4.
In the User details pane, click Set activation password.
5.
In the Set device activation password window, perform one of the following tasks:
Task
Step
Automatically generate an activation 1.
password for the user account and
send the activation email.
2.
Click Autogenerate device activation password and send email with
activation instructions.
Set the activation password for the
user account and send the
activation email, if necessary.
1.
Click Set activation password.
2.
Enter the activation password. Click
activation password field.
3.
Select the Send email with activation instructions and activation password
check box, if necessary. If you don't select this option, remember to
communicate the password to the user yourself.
4.
In the Activation period expiration field, select the time the activation
password remains valid.
6.
In the Activation period expiration field, select the time an activation
password remains valid.
to display the text in the Device
Click Save.
Allowing users to set activation passwords
Users can create activation passwords to activate devices over the wireless network using BES12 Self-Service.
For more information about BES12 Self-Service, visit docs.blackberry.com/bes12cloud to see the BES12 Self-Service content.
Activate a BlackBerry 10 device
Send the following activation instructions to the device user.
1.
On the device, navigate to Settings.
2.
Tap Accounts.
3.
If you have existing accounts on this device, tap Add Account. Otherwise, continue to Step 4.
4.
Tap Email, Calendar and Contacts.
5.
Type your work email address and tap Next.
6.
In the Password field, type the activation password you received. Tap Next.
7.
If you receive a warning that your device could not look up connection information, complete the following steps:
164
Users and devices
8.
a.
Tap OK.
b.
Tap Advanced.
c.
Tap Work Account.
d.
In the Server Address field, type the server address. Tap Done. You can find the server address in the activation
email message you received or in BES12 Self-Service.
Follow the instructions on the screen to complete the activation process.
After you finish: To verify that the activation process completed successfully, perform one of the following actions:
•
On the device, navigate to the BlackBerry Hub and confirm that the email address is present. Navigate to the
Calendar and confirm that the appointments are present.
•
In BES12 Self-Service, verify that your device is listed as an activated device. It can take up to two minutes for the
status to update after you activate the device.
Activate an iOS device
Send the following activation instructions to the device user.
1.
On the device, install the BES12 Client. You can download the BES12 Client from the App Store.
2.
On the device, tap BES12.
3.
Read the license agreement and tap I Agree.
4.
Type your work email address and tap Go.
5.
If necessary, type the server address and tap Go. You can find the server address in the activation email message you
received or in BES12 Self-Service.
6.
Confirm that the certificate details displayed on the device are accurate, and tap Accept. If your administrator sent you
the certificate details separately, you can compare the information displayed with the information you received.
7.
Type your activation password and tap Activate My Device.
8.
Tap OK to install the required certificate.
9.
Follow the instructions on the screen to complete the activation.
10. If you are prompted to enter the password for your email account or the passcode for your device, follow the instructions
on the screen.
After you finish: To verify that the activation process completed successfully, perform one of the following actions:
•
On the device, open the BES12 Client and tap About. In the Activated Device and Compliance Status sections, verify
that the device information and the activation time stamp are present.
•
In BES12 Self-Service, verify that your device is listed as an activated device. It can take up to two minutes for the
status to update after you activate the device.
165
Users and devices
Activate an Android device
Send the following activation instructions to the device user.
1.
On the device, install the BES12 Client. You can download the BES12 Client from Google Play.
2.
On the device, tap BES12.
3.
Read the license agreement and tap I Agree.
4.
Type your work email address and tap Next.
5.
If necessary, type the server address and tap Next. You can find the server address in the activation email message you
received or in BES12 Self-Service.
6.
Confirm that the certificate details displayed on the device are accurate, and tap Accept. If your administrator sent you
the certificate details separately, you can compare the information displayed with the information you received.
7.
Type your activation password and tap Activate My Device.
8.
Tap Next.
9.
Tap Activate.
After you finish: To verify that the activation process completed successfully, perform one of the following actions:
•
On the device, open BES12 Client and tap About. In the Activated Device section, verify that the device information
and the activation time stamp are present.
•
In BES12 Self-Service, verify that your device is listed as an activated device. It can take up to two minutes for the
status to update after you activate the device.
Activate a Windows Phone device
Send the following activation instructions to the device user.
1.
On the device, install the BES12 Client. You can download the BES12 Client from the Windows Phone Store.
2.
On the device, go to the app list and tap BES12.
3.
Read the license agreement and tap I Agree.
4.
Type your work email address and tap next.
5.
If necessary, type the server address and tap next. You can find the server address in the activation email message you
received or in BES12 Self-Service.
6.
Type the activation password you received in the activation email message or that you set in BES12 Self-Service and tap
Activate My Device.
7.
Tap copy and proceed to copy the server address shown and proceed to the Windows Phone Workplace app.
8.
Tap add account.
9.
Type your email address and tap sign in.
166
Users and devices
10. With your cursor in the Server field, tap the Paste icon.
11. Tap sign in.
12. If you receive a warning about a certificate, tap continue.
13. Leave the User name and Domain fields blank. In the Password field, type the activation password you received in the
activation email message or that you set in BES12 Self-Service. Tap sign in.
14. Tap done.
15. Press the Back button on your Windows Phone to return to BES12 Client.
16. The activation completes automatically.
After you finish: To verify that the activation process completed successfully, perform one of the following actions:
•
On the device, open BES12 Client, tap the Menu icon at the bottom right (three horizontal dots), and tap about. In the
Activated Device section, verify that the device information and the activation time stamp are present.
•
In BES12 Self-Service, verify that your device is listed as an activated device. It can take up to two minutes for the
status to update after you activate the device.
Troubleshooting device activation issues
Before looking at other issues, you should verify that:
•
The device has wireless connectivity.
•
The device meets the requirements in the compliance profile assigned to the user (iOS and Android devices only).
•
The device user has an account in BES12.
•
The device user has received their username, password, and server address (if required), from you and that this
information is correct.
Device activation can't be completed because the server is out
of licenses. For assistance, contact your administrator.
Description
This error is displayed on the device during activation when licenses are not available or the licenses have expired.
Possible solution
In BES12, perform the following actions:
•
Verify that licenses are available to support activation.
•
If necessary, activate licenses or purchase additional licenses.
167
Users and devices
Please check your username and password and try again
Description
This error is displayed on a device during activation when a user has entered an incorrect username, password, or both.
Possible solution
Enter the correct username and password.
Profile failed to install. The certificate "AutoMDMCert.pfx"
could not be imported.
Description
This error is displayed on an iOS device during activation when a profile already exists on the device.
Possible solution
Go to Settings > General > Profiles on the device and verify that a profile already exists. Remove the profile and reactivate. If the
issue persists, you might have to reset the device because data might be cached.
Error 3007: Server is not available
Description
This error is displayed on the device during activation if the SSL certificate used by BES12 is not trusted by the iOS device.
Possible solution
The Certification Authority certificate of the server that was used to create the SSL certificate for BES12 must be installed on the
iOS device.
Unable to contact server, please check connectivity or server
address
Description
This error can appear on the device during activation because of the following:
•
The username was entered incorrectly on the device.
•
The customer address for device activation was entered incorrectly on the device.
Note: This is only required when registration with the BlackBerry Infrastructure has been disabled.
168
Users and devices
•
No activation password has been set, or the password has expired.
Possible solutions
Possible solutions include:
•
Verify the username and password.
•
Verify the customer address for device activation.
•
Set a new activation password using BES12 Self-Service.
iOS device activations fail with an invalid APNs certificate
Possible cause
If you are unable to activate iOS devices, the APNs certificate may not be registered correctly.
Possible solution
Perform one or more of the following actions:
•
In the management console, on the menu bar, click Settings > External integration > iOS management. Verify that
the APNs certificate status is "Installed." If the status is not correct, try to register the APNs certificate again.
•
To test the connection between BES12 and the APNs server, click Test APNS certificate.
•
If necessary, obtain a new signed CSR from BlackBerry, and request and register a new APNs certificate.
Users are not receiving the activation email
Description
Users are not receiving their activation email, even though all of the settings in BES12 are correct.
Possible solution
If users are using a third-party mail server, email messages from BES12 can be marked as spam and end up in the spam email
folder or the junk mail folder.
Make sure that users have checked their spam email folder or junk mail folder for the activation email.
169
Users and devices
Managing devices
23
BES12 includes commands that you can send to devices over the wireless network to protect data on devices. You can view
detailed information about individual devices in device reports.
Using dashboard reports
The dashboard uses graphs to present information from the BES12 services about users and devices on your system. You can
use the cursor to hover over a data point (for example, a slice in a pie chart) to see information about the users or devices.
If you need more information, you can display a report from the graph to see detailed information about users or devices. The
maximum number of records in a report is 2000. You can generate a .csv file from a report and export the file for further analysis
or reporting purposes.
To open and manage a user account, you can click the user or device in a report. When you are finished with an account, you
can click Back on the page (not the browser) to return to the report.
The following table describes the information each dashboard report displays.
Dashboard report
Description
Devices roaming and not
roaming
A list of users with devices that are currently in a roaming state
Device activations
A dynamic representation of the devices activated each month in your organization over a
12-month period, based on when the devices were initially activated. The numbers change
to reflect currently activated devices. For example, if a device that you activated in August
is deactivated, the number of devices shown in August is reduced by one.
Top 5 managed apps installed
The five most common apps assigned by your organization and installed on devices
Devices by platform
A list of the devices in your organization, by platform
Device compliance
A list of issues detected on BlackBerry 10, iOS, Android, and Windows Phone devices in
your organization
Devices by last contact time
The number of days that have passed since devices last contacted the server
Devices by carrier
A list of devices by service provider in your organization
Top 5 mobile devices
The five most common mobile device models in your organization
170
Users and devices
Change the type of graph
You can change the type of graph used to graph information.
Click
beside a graph and select a type of graph from the drop-down list.
Export a dashboard report to a .csv file
1.
To open a report, click a graph.
2.
To sort the records based on the column selected, click a column header.
3.
Click Export and save the file.
Using IT administration commands to manage
devices
You can send various IT administration commands over the wireless network allowing you to manage devices remotely.
For example, you can use IT administration commands in one of the following circumstances:
•
If a device is temporarily misplaced, you can send a command to lock the device, or delete work data from the device.
•
If you want to redistribute a device to another user in your organization, or if a device is lost or stolen, you can send a
command to delete all the data on a device.
•
When an employee leaves your organization, you can send a command to the user's personal device to delete only the
work data.
•
If a user forgets the work space password, you can send a command to reset the work space password.
The list of IT administration commands that are available depends on the device type and activation type.
Send an IT administration command to a device
You can send various commands to a device over the wireless network.
1.
On the menu bar, click Users and Devices.
2.
Search for a user account.
3.
In the search results, click the name of the user account.
4.
Click the device tab.
5.
In the Manage device window, select the command that you want to send to the device.
171
Users and devices
IT administration commands
The following tables list the IT administration commands that are available, organized by device type.
BlackBerry 10
IT administration
command
Activation types
Description
Specify device
This command lets you create a device password and set a
•
password, lock device home screen message, then locks the device. You must create
•
and set message
a password that complies with existing password rules. When
•
the user unlocks the device, the device prompts the user to
accept or reject the new password.
Work and personal - Corporate
Work space only
Work and personal - Regulated
If an IT policy requires the device to have the same password
for the device and the work space, this command also
changes the work space password.
Delete all device data
This command deletes all user information and app data that
the device stores, including information in the work space. It
returns the device to factory defaults and optionally, deletes
the device from BES12.
•
Work and personal - Corporate
•
Work space only
•
Work and personal - Regulated
This command lets you create a new work space password on •
the device and lock the work space. You must create a
•
password that complies with existing password rules. To
unlock the work space, the user must type the new password
you create.
Work and personal - Corporate
After you send this command, you are given the option of
deleting the device from BES12. If the device is unable to
connect to BES12, you can remove the device from BES12. If
the device connects to BES12 after you removed it, only the
work data is deleted from the device, including the work
space, if applicable.
Specify work space
password and lock
Work and personal - Regulated
If an IT policy requires the device to have the same password
for the device and the work space, this command also
changes the device password.
Delete only work data
This command deletes work data, including the IT policy,
profiles, apps, and certificates that are on the device, and
optionally, deletes the device from BES12.
If the device has a work space, the work space information is
deleted and the work space is deleted from the device.
172
•
Work and personal - Corporate
•
Work and personal - Regulated
Users and devices
IT administration
command
Activation types
Description
The user account is not deleted when you send this
command.
After you send this command, you are given the option of
deleting the device from BES12. If the device is unable to
connect to BES12, you can remove the device from BES12. If
the device connects to BES12 after you removed it, only the
work data is deleted from the device, including the work
space, if applicable.
Update device
information
This command sends and receives updated device
•
information. For example, you can send newly updated IT
•
policy rules or profiles to a device, and receive updated
information about a device such as OS version or battery level. •
Work and personal - Corporate
Work space only
Work and personal - Regulated
iOS
IT administration
command
Description
Activation types
Delete all device data
This command deletes all user information and app data that
the device stores, including information in the work space. It
returns the device to factory defaults and optionally, deletes
the device from BES12.
•
MDM controls
•
Work and personal - full control
•
MDM controls
•
Work and personal - full control
•
Work and personal - user privacy
After you send this command, you are given the option of
deleting the device from BES12. If the device is unable to
connect to BES12, you can remove the device from BES12. If
the device connects to BES12 after you removed it, only the
work data is deleted from the device, including the work
space, if applicable.
Delete only work data
This command deletes work data, including the IT policy,
profiles, apps, and certificates that are on the device, and
optionally, deletes the device from BES12.
If the device has a work space, the work space information is
deleted and the work space is deleted from the device.
The user account is not deleted when you send this
command.
173
Users and devices
IT administration
command
Activation types
Description
After you send this command, you are given the option of
deleting the device from BES12. If the device is unable to
connect to BES12, you can remove the device from BES12. If
the device connects to BES12 after you removed it, only the
work data is deleted from the device, including the work
space, if applicable.
Lock device
This command locks a device. The user must type the existing •
device password to unlock the device. If a device is
•
temporarily lost, you might use this command.
MDM controls
Work and personal - full control
When you send this command, the device locks only if there is
an existing device password. Otherwise, no action is taken on
the device.
Unlock and clear
password
This command unlocks a device and deletes the existing
password. The user is prompted to create a device password.
You can use this command if the user forgets the device
password.
Lock work space
•
MDM controls
•
Work and personal - full control
This command locks the work space on a device so that the
•
user must type the existing work space password to unlock the
•
device.
Work and personal - full control
Reset work space
password
This command deletes the current work space password from •
the device. When the user opens the work space, the device
•
prompts the user to set a new work space password.
Disable/enable work
space
This command disables or enables access to the work space
apps on the device.
Update device
information
This command sends and receives updated device
•
information. For example, you can send newly updated IT
•
policy rules or profiles to a device, and receive updated
information about a device such as OS version or battery level.
174
Work and personal - user privacy
Work and personal - full control
Work and personal - user privacy
•
Work and personal - full control
•
Work and personal - user privacy
MDM controls
Work and personal - full control
Users and devices
Android
IT administration
command
Description
Activation types
Delete all device data
This command deletes all user information and app data that
the device stores, including information in the work space. It
returns the device to factory defaults and optionally, deletes
the device from BES12.
•
MDM controls
•
Work and personal - full control
(Secure Work Space)
This command deletes work data, including the IT policy,
profiles, apps, and certificates that are on the device, and
optionally, deletes the device from BES12.
•
MDM controls
•
Work and personal - user privacy
(Secure Work Space)
If the device has a work space, the work space information is
deleted and the work space is deleted from the device.
•
Work and personal - full control
(Secure Work Space)
After you send this command, you are given the option of
deleting the device from BES12. If the device is unable to
connect to BES12, you can remove the device from BES12. If
the device connects to BES12 after you removed it, only the
work data is deleted from the device, including the work
space, if applicable.
Delete only work data
The user account is not deleted when you send this
command.
After you send this command, you are given the option of
deleting the device from BES12. If the device is unable to
connect to BES12, you can remove the device from BES12. If
the device connects to BES12 after you removed it, only the
work data is deleted from the device, including the work
space, if applicable.
Lock device
This command locks a device. The user must type the existing •
device password to unlock the device. If a device is
•
temporarily lost, you might use this command.
MDM controls
Work and personal - full control
(Secure Work Space)
When you send this command, the device locks only if there is
an existing device password. Otherwise, no action is taken on
the device.
Unlock and clear
password
This command unlocks a device and deletes the existing
password. The user is prompted to create a device password.
You can use this command if the user forgets the device
password.
175
•
MDM controls
•
Work and personal - full control
(Secure Work Space)
Users and devices
Activation types
IT administration
command
Description
Lock work space
This command locks the work space on a device so that the
•
user must type the existing work space password to unlock the
device.
•
Reset work space
password
Disable/enable work
space
This command deletes the current work space password from •
the device. When the user opens the work space, the device
prompts the user to set a new work space password.
•
This command disables or enables access to the work space
apps on the device.
Work and personal - full control
(Secure Work Space)
Work and personal - user privacy
(Secure Work Space)
Work and personal - full control
(Secure Work Space)
Work and personal - user privacy
(Secure Work Space)
•
Work and personal - full control
(Secure Work Space)
•
Work and personal - user privacy
(Secure Work Space)
•
MDM controls
•
Work and personal - full control
(Secure Work Space)
Specify device
password and lock
(Android only)
This command lets you create a device password and then
locks the device. You must create a password that complies
with existing password rules. When the user unlocks the
device, the device prompts the user to accept or reject the
new password.
Update device
information
This command sends and receives updated device
•
information. For example, you can send newly updated IT
•
policy rules or profiles to a device, and receive updated
information about a device such as OS version or battery level.
MDM controls
Work and personal - full control
(Secure Work Space)
Windows Phone
Activation types
IT administration
command
Description
Lock device
This command locks a device. The user must type the existing MDM controls
device password to unlock the device. If a device is
temporarily lost, you might use this command.
When you send this command, the device locks only if there is
an existing device password. Otherwise, no action is taken on
the device.
176
Users and devices
IT administration
command
Activation types
Description
This command is supported on devices running Windows
Phone 8.1 or later.
Generate device
password and lock
This command generates a device password and locks the
device. The generated password is sent to the user by email.
You can use the preselected email address, or specify an
email address. The generated password complies with any
existing password rules.
MDM controls
This command is supported on devices running Windows
Phone OS version 8.10.14176 or later.
Delete only work data
This command deletes work data, including the IT policy,
profiles, apps, and certificates that are on the device, and
optionally, deletes the device from BES12.
MDM controls
The user account is not deleted when you send this
command.
After you send this command, you are given the option of
deleting the device from BES12. If the device is unable to
connect to BES12, you can remove the device from BES12. If
the device connects to BES12 after you removed it, only the
work data is deleted from the device, including the work
space, if applicable.
Delete all device data
This command deletes all user information and app data that
the device stores. It returns the device to factory defaults and
optionally, deletes the device from BES12.
MDM controls
After you send this command, you are given the option of
deleting the device from BES12. If the device is unable to
connect to BES12, you can remove the device from BES12. If
the device connects to BES12 after you removed it, only the
work data is deleted from the device, including the work
space, if applicable.
Update device
information
MDM controls
This command sends and receives updated device
information. For example, you can send newly updated IT
policy rules or profiles to a device, and receive updated
information about a device such as OS version or battery level.
177
Users and devices
View and save a device report
You can generate a device report to view detailed information about each device that is associated with BES12.
1.
On the menu bar, click Users and Devices.
2.
Search for a user account.
3.
In the search results, click the name of the user account.
4.
Select the device tab.
5.
Click View device report.
6.
Click Export to save the device report to a file on the computer, if required.
Deactivating devices
When you or a user deactivates a device, the connection between the device and the user account in BES12 is removed. You
cannot manage the device, and the device is not displayed in the management console. The user cannot access work data on
the device.
You can deactivate a device using the Delete only work data command.
A user can deactivate an iOS, Android, or Windows Phone device by selecting Deactivate My Device on the About screen in the
BES12 Client.
A user can deactivate the work space on a BlackBerry 10 device by selecting Settings > BlackBerry Balance > Delete work
space.
For Android devices that use KNOX MDM, the uninstall option becomes available for any public apps that were installed from
the app list as required.
178
See detailed descriptions of profile settings to help you configure email, SCEP, Wi-Fi, and VPN profiles.
Multiplatform
Profile settings
Profile settings
Email profile settings
24
You can use a variable in any profile setting that is a text field to reference a value instead of specifying the actual value. BES12
supports default variables that are predefined and custom variables that you define. Email profiles are supported on the
following device types:
•
BlackBerry 10
•
iOS
•
Android
•
Windows Phone
In some cases, the minimum version of the device OS required to support a setting is a version not supported by BES12. For
more information about supported versions, visit docs.blackberry.com/bes12cloud to see the Compatibility Matrix in the
Installation and upgrade content.
Common: Email profile settings
Common: Email profile
setting
Description
Domain name
This setting specifies the domain name of the mail server.
Email address
This setting specifies the user's email address. If the profile is for multiple users, you can use
the %UserEmailAddress% variable.
Host name or IP address
This setting specifies the host name or IP address of the mail server.
Username
This setting specifies the user's username. If the profile is for multiple users, you can use the
%UserName% variable.
BlackBerry 10: Email profile settings
BlackBerry 10: Email profile
setting
Description
Account name
This setting specifies the work email account name that appears in the BlackBerry Hub and in
the device settings. You can use a variable, such as %UserEmailAddress%.
Port
This setting specifies the port that is used to connect to the mail server.
180
Profile settings
BlackBerry 10: Email profile
setting
Profile type
Description
This setting specifies whether you want this profile to support Exchange ActiveSync or IBM
Notes Traveler.
Possible values:
•
Exchange ActiveSync
•
IBM Notes Traveler
The default value is Exchange ActiveSync.
SyncML server
This setting specifies the FQDN of the IBM Notes Traveler server that a BlackBerry 10 device
can use to synchronize To Do data.
This setting is valid only if the "Profile type" setting is set to "IBM Notes Traveler."
SyncML port
This setting specifies the port of the Notes Traveler server that a BlackBerry 10 device can use
to synchronize To Do data.
This setting is valid only if the "Profile type" setting is set to "IBM Notes Traveler."
Use SSL for SyncML
This setting specifies whether a BlackBerry 10 device needs to make an SSL connection to the
Notes Traveler server.
This setting is valid only if the "Profile type" setting is set to "IBM Notes Traveler."
Push enabled
This setting specifies whether the mail server can push email messages to a BlackBerry 10
device.
Interval between
synchronizations
This setting specifies how often a BlackBerry 10 device checks the mail server for new email
messages.
This setting is valid only if the "Push enabled" setting is not selected.
Possible values:
•
Manual
•
5 minutes
•
15 minutes
•
30 minutes
•
1 hour
•
2 hours
•
4 hours
•
24 hours
181
Profile settings
BlackBerry 10: Email profile
setting
Description
The default value is 15 minutes.
Days to synchronize
This setting specifies the number of days in the past to synchronize email messages and
organizer data to a BlackBerry 10 device.
Possible values:
•
1 day
•
3 days
•
7 days
•
14 days
•
1 month
•
Forever
The default value is 1 month.
Require manual
synchronization when
roaming
This setting specifies whether a user must start synchronization between a BlackBerry 10
device and the mail server when the user is roaming.
Use SSL
This setting specifies whether a device must use SSL to connect to the mail server.
Calendar synchronization
This setting specifies whether a BlackBerry 10 device synchronizes calendar entries with the
mail server.
Contacts synchronization
This setting specifies whether a BlackBerry 10 device synchronizes contacts with the mail
server.
Email synchronization
This setting specifies whether a BlackBerry 10 device synchronizes email messages with the
mail server.
Memo synchronization
This setting specifies whether a BlackBerry 10 device synchronizes memo data with the mail
server.
Task synchronization
This setting specifies whether a BlackBerry 10 device synchronizes task data with the mail
server.
This setting is valid only if the "Profile type" setting is set to "Exchange ActiveSync."
ToDo synchronization
This setting specifies whether a BlackBerry 10 device synchronizes the To Do data using
Notes Traveler.
This setting is valid only if the "Profile type" setting is set to "IBM Notes Traveler."
182
Profile settings
BlackBerry 10: Email profile
setting
Suggest default encoding for
outgoing messages
Description
This setting specifies whether a BlackBerry 10 device suggests the default encoding, (for
example, plain text, sign, encrypt, or sign and encrypt) for all outgoing email messages. If this
setting is set to "Allow," a user can choose whether the device suggests the default encoding
or suggests the encoding based on message history. If this setting is set to "Required," the
device suggests the default encoding. If this setting is set to "Disallow," the device suggests
the encoding based on message history.
Possible values:
•
Allow
•
Required
•
Disallow
The default value is Allow.
The minimum requirement is BlackBerry 10 OS version 10.3.1.
S/MIME support
This setting specifies whether S/MIME is enabled on a BlackBerry 10 device. If this setting is
set to "Allow," a user can choose whether or not to enable S/MIME protection on the device. If
this setting is set to "Required," S/MIME protection is enabled on the device and the user can't
disable it. If this setting is set to "Disallow," S/MIME protection is disabled on the device and
the user can't enable it.
To send encrypted email messages, a user must have the recipient's public key on the device
or smart card. To send digitally signed email messages, the user's private key must be on the
device or smart card.
This setting takes precedence over the "Digitally signed S/MIME messages" setting and the
"Encrypted S/MIME messages" setting.
This setting affects the "PGP support" setting. If this setting is set to "Required," the "PGP
support" setting must be set to "Disallow."
Possible values:
•
Allow
•
Required
•
Disallow
The default value is Allow.
Digitally signed S/MIME
messages
This setting specifies whether a BlackBerry 10 device sends outgoing email messages with a
digital signature. If this setting is set to "Allow," a user can choose whether to digitally sign
outgoing email messages. If this setting is set to "Required," a user must digitally sign outgoing
183
Profile settings
BlackBerry 10: Email profile
setting
Description
email messages. If this setting is set to "Disallow," a user can't digitally sign outgoing email
messages
To send digitally signed email messages, the user's private key must be on the device or smart
card.
This setting is valid only if the "S/MIME support" setting is set to "Allow" or "Required."
If the "S/MIME support" setting is set to "Required," and both this setting and the "Encrypted
S/MIME messages" setting are set to "Disallow," the "Encrypted S/MIME messages" setting
and this setting are ignored and the default setting of "Allow" is used for both settings.
Possible values:
•
Allow
•
Required
•
Disallow
The default value is Allow.
Encrypted S/MIME messages
This setting specifies whether a BlackBerry 10 device encrypts outgoing email messages
using S/MIME encryption. If this setting is set to "Allow," a user can choose whether or not to
encrypt outgoing email messages. If this setting is set to "Required," a user must encrypt
outgoing email messages. If this setting is set to "Disallow," a user can't encrypt outgoing
email messages.
To send encrypted email messages, a user must have the recipient's public key on the device
or smart card.
This setting is valid only if the "S/MIME support" setting is set to "Allow" or "Required."
If the "S/MIME support" setting is set to "Required," and both this setting and the "Digitally
signed S/MIME messages" setting are set to "Disallow," the "Digitally signed S/MIME
messages" setting and this setting are ignored and the default setting of "Allow" is used for
both settings.
Possible values:
•
Allow
•
Required
•
Disallow
The default value is Allow.
Encryption algorithms
This setting specifies the encryption algorithms that a BlackBerry 10 device can use to
encrypt S/MIME-protected email messages.
184
Profile settings
BlackBerry 10: Email profile
setting
Description
Possible values:
•
AES (256-bit)
•
AES (192-bit)
•
AES (128-bit)
•
Triple DES
•
RC2
The default value is a null value.
PGP support
This setting specifies whether PGP protection is enabled on a BlackBerry 10 device. If this
setting is set to "Allow," a user can choose whether or not to enable PGP protection on the
device. If this setting is set to "Required," PGP protection is enabled on the device and the
user can't disable it. If this setting is set to "Disallow," PGP protection is disabled on the device
and the user can't enable it.
To send encrypted email messages, a user must have the recipient's public key on the device.
To send digitally signed email messages, the user's private key must be on the device.
The "S/MIME support" setting affects this setting. If the "S/MIME support" setting is set to
"Required," or if the "S/MIME support" setting is set to "Allow" and the "Digitally signed S/
MIME messages" setting or the "Encrypted S/MIME messages" setting is set to "Required,"
this setting must be set to "Disallow."
Possible values:
•
Allow
•
Required
•
Disallow
The default value is Allow.
The minimum requirement is BlackBerry 10 OS version 10.3.1.
Symantec Encryption
Management Server address
This setting specifies the FQDN or IP address of your organization’s Symantec Encryption
Management Server to require a BlackBerry 10 device user to enroll the device with this server
to send PGP messages.
The "PGP support" setting affects this setting. The device uses this setting if the "PGP
support" setting is set to "Allow" or "Required."
The minimum requirement is BlackBerry 10 OS version 10.3.1.
185
Profile settings
BlackBerry 10: Email profile
setting
Symantec Encryption
Management Server
enrollment method
Description
This setting specifies the method that a BlackBerry 10 device user must use to enroll the
device with your organization’s Symantec Encryption Management Server. If this setting is set
to "Email authentication", the device prompts the user to type their email address. If this
setting is set to "Microsoft Active Directory authentication", the device prompts the user to
type their domain username and password.
The "PGP support" setting affects this setting. The device uses this setting if the "PGP
support" setting is set to "Allow" or "Required."
Possible values:
•
Email authentication
•
Microsoft Active Directory authentication
The default value is Email authentication.
The minimum requirement is BlackBerry 10 OS version 10.3.1.
Authentication type
This setting specifies the type of authentication that a BlackBerry 10 device uses to connect to
the mail server.
Possible values:
•
None
•
SCEP
•
User credential
The default value is None.
Associated SCEP profile
This setting specifies the associated SCEP profile that a BlackBerry 10 device uses to enroll a
client certificate to use for authentication with the mail server.
This setting is valid only if the "Authentication type" setting is set to "SCEP."
Associated user credential
profile
This setting specifies the associated user credential profile that a BlackBerry 10 device uses
to obtain a client certificate to use for authentication with the mail server.
This setting is valid only if the "Authentication type" setting is set to "User credential."
The minimum requirement is BlackBerry 10 OS version 10.3.1.
Message classification file
(.json)
This setting specifies the message classification file to send to users' devices.
The minimum requirement is BlackBerry 10 OS version 10.3.1.
186
Profile settings
S/MIME profile and device setting dependencies
The following table shows the dependencies between the S/MIME settings that you can configure in BES12 and the S/MIME
settings that users can configure on BlackBerry 10 devices. Depending on what these are set to, the options in the Encoding
drop-down list on devices change. Devices ignore the value for some settings if a higher priority setting (for example, the "S/
MIME support" setting) conflicts with the value for that setting.
S/MIME support
setting
Digitally signed S/
MIME messages
setting
Encrypted S/
MIME
messages
setting
S/MIME settings on device
Allowed
Allowed
Allowed
User can turn S/MIME protection
on or off.
Allowed
Allowed
Required
Required
•
Plain text
•
Sign (S/MIME)
•
Encrypt (S/
MIME)
•
Sign and
Encrypt (S/
MIME)
•
Encrypt (S/
MIME)
•
Sign and
Encrypt (S/
MIME)
User can turn S/MIME protection
on or off.
•
Plain text
•
Sign (S/MIME)
S/MIME protection is on. User
can't turn it off.
•
Sign (S/MIME)
•
Sign and
Encrypt (S/
MIME)
S/MIME protection is on. User
can't turn it off.
Disallowed
Allowed
Encoding drop-down on
device
Required
Required
S/MIME protection is on. User
can't turn it off.
Sign and Encrypt (S/
MIME)
Required
Disallowed
S/MIME protection is on. User
can't turn it off.
Sign (S/MIME)
Disallowed
Allowed
User can turn S/MIME protection
on or off.
187
•
Plain text
Profile settings
S/MIME support
setting
Digitally signed S/
MIME messages
setting
Encrypted S/
MIME
messages
setting
S/MIME settings on device
Encoding drop-down on
device
•
Required
Disallowed
Required
S/MIME protection is on. User
can't turn it off.
Disallowed
Disallowed
User can turn S/MIME protection Plain text
on or off but can't encrypt or sign
messages because the
necessary profiles are set to
Disallowed.
Allowed
Allowed
S/MIME protection is on. User
can't turn it off.
Allowed
Required
S/MIME protection is on. User
can't turn it off.
Allowed
Disallowed
S/MIME protection is on. User
can't turn it off.
Required
Allowed
S/MIME protection is on. User
can't turn it off.
Required
Required
S/MIME protection is on. User
can't turn it off.
188
Encrypt (S/
MIME)
Encrypt (S/MIME)
•
Sign (S/MIME)
•
Encrypt (S/
MIME)
•
Sign and
Encrypt (S/
MIME)
•
Encrypt (S/
MIME)
•
Sign and
Encrypt (S/
MIME)
Sign (S/MIME)
•
Sign (S/MIME)
•
Sign and
Encrypt (S/
MIME)
Sign and Encrypt (S/
MIME)
Profile settings
S/MIME support
setting
Disallowed
Digitally signed S/
MIME messages
setting
Encrypted S/
MIME
messages
setting
S/MIME settings on device
Encoding drop-down on
device
Required
Disallowed
S/MIME protection is on. User
can't turn it off.
Sign (S/MIME)
Disallowed
Allowed
S/MIME protection is on. User
can't turn it off.
Encrypt (S/MIME)
Disallowed
Required
S/MIME protection is on. User
can't turn it off.
Encrypt (S/MIME)
Disallowed
Disallowed
(This setting is
ignored)
(This setting is
ignored)
S/MIME protection is on. User
can't turn it off.
Any setting is ignored Any setting is
ignored
S/MIME protection is off. User
can't turn it on.
•
Sign (S/MIME)
•
Encrypt (S/
MIME)
•
Sign and
Encrypt (S/
MIME)
Plain text
PGP profile and device setting dependencies
The following table shows the dependencies between the "PGP support" setting that you can configure in BES12 and the PGP
settings that users can configure on BlackBerry 10 devices. Depending on what the "PGP support" setting is set to, the options
in the Encoding drop-down list on devices change. Devices ignore the value of this setting if a higher priority setting (for
example, the S/MIME support" setting) conflicts with the value for that setting.
"PGP support" setting
PGP settings on device
Encoding drop-down on device
Allow
Users can turn PGP protection on or off.
•
Plain text
•
Sign (PGP)
•
Encrypt (PGP)
•
Sign and Encrypt (PGP)
•
Sign (PGP)
•
Encrypt (PGP)
•
Sign and Encrypt (PGP)
Required
PGP protection is on. User can't turn it
off.
189
Profile settings
"PGP support" setting
PGP settings on device
Encoding drop-down on device
Disallow
PGP protection is off. User can't turn it
on.
No drop-down. Plain text is used.
iOS: Email profile settings
iOS: Email profile setting
Description
Allow messages to be moved
This setting specifies whether users can move email messages from this account to another
existing email account on an iOS device.
Allow recent addresses to be
synced
This setting specifies whether an iOS device user can sync recently used addresses across
devices.
Use only in Mail
This setting specifies whether apps other than the Mail app on an iOS device can use this
account to send email messages.
Enable S/MIME
This setting specifies whether an iOS device user can send S/MIME protected email messages.
Signing credentials
This setting specifies how devices find the certificates required to sign messages. This setting
takes effect only if the "Enable S/MIME" setting is selected.
Possible values:
•
Shared certificate
•
SCEP
•
User credential
After you choose the profile type you want to use, you specify the shared certificate, SCEP, or
user credential profile.
Signing shared certificate
This setting specifies the shared certificate profile for a client certificate that an iOS device
uses to sign email messages.
This setting takes effect only if the "Enable S/MIME" setting is selected.
Signing SCEP
This setting specifies the SCEP profile that devices can use to retrieve the certificates required
to sign email messages using S/MIME.
This setting takes effect only if the "Enable S/MIME" setting is selected.
Signing user credential
This setting specifies the user credential profile that devices can use to obtain the client
certificates required to sign email messages using S/MIME.
This setting takes effect only if the "Enable S/MIME" setting is selected.
190
Profile settings
iOS: Email profile setting
Description
Encryption credentials
This setting specifies how devices find the certificates required to encrypt messages.
Possible values:
•
Shared certificate
•
SCEP
•
User credential
After you select the profile type, you select the shared certificate, SCEP, or user credential
profile that you want to use.
This setting takes effect only if the "Enable S/MIME" setting is selected.
Encryption shared certificate
This setting specifies the shared certificate profile for a client certificate that an iOS device can
use to encrypt email messages.
Devices choose the appropriate certificate for the recipient to encrypt messages using S/
MIME.
This setting takes effect only if the "Enable S/MIME" setting is selected.
Encryption SCEP
This setting specifies the SCEP profile that devices can use to retrieve the certificates required
to encrypt email messages using S/MIME.
This setting takes effect only if the "Enable S/MIME" setting is selected.
Encryption user credential
This setting specifies the user credential profile that devices can use to retrieve the client
certificates required to encrypt email messages using S/MIME.
This setting takes effect only if the "Enable S/MIME" setting is selected.
Encrypt messages
This setting specifies whether all messages must be encrypted before they are sent, or if the
user can choose which messages to encrypt. By default, if you select the "Enable S/MIME"
setting, all messages must be encrypted.
The default value is Required.
This setting takes effect only if the "Enable S/MIME" setting is selected.
The minimum requirement is iOS version 8.0.
Days to synchronize
This setting specifies the number of days in the past to synchronize email messages and
organizer data to an iOS device.
Possible values:
•
1 day
•
3 days
191
Profile settings
iOS: Email profile setting
Description
•
7 days
•
14 days
•
1 month
•
Forever
The default value is 7 days.
Note: This setting applies only to the default mail and organizer apps on iOS devices with the
MDM controls activation type. If the device is assigned the Work and personal - user privacy or
Work and personal - full control activation type, this setting does not affect the synchronization
settings for the default mail and organizer app or the Work Connect app.
Authentication type
This setting specifies the type of authentication an iOS device uses to connect to the mail
server.
Possible values:
•
None
•
Shared certificate
•
SCEP
•
User credential
The default value is None.
Shared certificate profile
This setting specifies the shared certificate profile for the client certificate that an iOS device
uses to connect to the mail server.
This setting is valid only if the "Authentication type" setting is set to "Shared certificate."
Associated SCEP profile
This setting specifies the associated SCEP profile that an iOS device uses to enroll a client
certificate to use for authentication with the mail server.
This setting is valid only if the "Authentication type" setting is set to "SCEP."
Associated user credential
profile
This setting specifies the associated user credential profile that an iOS device uses to enroll a
client certificate to use for authentication with the mail server.
This setting is valid only if the "Authentication type" setting is set to "User credential."
Use credentials and
certificate
Specifies whether a device uses credentials and a client certificate obtained using the
associated SCEP profile to authenticate with the mail server.
This setting is valid only if the "Authentication type" setting is set to "SCEP."
Use SSL
This setting specifies whether a device must use SSL to connect to the mail server.
192
Profile settings
iOS: Email profile setting
Description
Accept all SSL certificates
This setting specifies whether devices with Secure Work Space accept untrusted SSL
certificates from the mail server.
This setting is valid only if the "Use SSL" setting is selected.
External email domain
allowed list
This setting specifies the list of domains that a user can send work email or calendar entries to.
For example, when a user adds a recipient who has an email address in the allowed domain to
an email message or calendar entry, no warning message is displayed. This setting applies to
the work space only.
If you list multiple domain names, separate the domain names with a comma (,), semicolon (;),
or space.
External email domain
restricted list
This setting specifies the list of domains that users cannot send work email or calendar entries
to. For example, if a user tries to add a recipient with an email address from the restricted
domain to an email message or calendar invitation, the Work Connect app prevents the user
from completing the task. This setting applies to the work space only.
If you list multiple domain names, separate the domain names with a comma (,), semicolon (;),
or space.
Android: Email profile settings
Android: Email profile setting Description
Days to synchronize
This setting specifies the number of days in the past to synchronize email messages and
organizer data to an Android device.
Possible values:
•
Unlimited
•
1 day
•
3 days
•
7 days
•
14 days
•
1 month
The default value is 1 month.
For Android devices that use KNOX MDM, if you set the value to Unlimited, only one month is
synchronized.
193
Profile settings
Android: Email profile setting Description
Note: This setting applies only to the default mail and organizer apps on Android devices with
the MDM controls activation type. If the device is assigned the Work and personal - user
privacy or Work and personal - full control activation type, this setting does not affect the
synchronization settings for the default mail and organizer apps or the Work Space Manager
app.
Authentication type
This setting specifies the type of authentication an Android device uses to connect to the mail
server.
Possible values:
•
None
•
Shared certificate
•
User credential
The default value is None.
Shared certificate profile
This setting specifies the shared certificate profile for the client certificate that an Android
device uses to connect to the mail server.
This setting is valid only if the "Authentication type" setting is set to "Shared certificate."
Associated user credential
profile
This setting specifies the user credential profile for the client certificate that an Android device
uses to connect to the mail server.
This setting is valid only if the "Authentication type" setting is set to "User credential."
Use SSL
This setting specifies whether a device must use SSL to connect to the mail server.
Accept all SSL certificates
This setting specifies whether devices with Secure Work Space accept untrusted SSL
certificates from the mail server.
This setting is valid only if the "Use SSL" setting is selected.
External email domain
allowed list
This setting specifies the list of domains that a user can send work email or calendar entries to.
For example, when a user adds a recipient who has an email address in the allowed domain to
an email message or calendar entry, no warning message is displayed. This setting applies to
the work space only.
If you list multiple domain names, separate the domain names with a comma (,), semicolon (;),
or space.
External email domain
restricted list
This setting specifies the list of domains that users cannot send work email or calendar entries
to. For example, if a user tries to add a recipient with an email address from the restricted
domain to an email message or calendar invitation, the Email app or Calendar app prevents
the user from completing the task. This setting applies to the work space only.
194
Profile settings
Android: Email profile setting Description
If you list multiple domain names, separate the domain names with a comma (,), semicolon (;),
or space.
Windows Phone: Email profile settings
Windows Phone: Email
profile setting
Description
Profile type
This setting specifies whether you want this profile to support Exchange ActiveSync or IBM
Notes Traveler.
Synchronization interval
This setting specifies how often a Windows Phone device downloads new email messages from
the mail server.
Possible values:
•
As items are received
•
Manual
•
Every 15 minutes
•
Every 30 minutes
•
Every 60 minutes
The default value is "As items are received."
Days to synchronize
This setting specifies the number of days in the past to synchronize email messages and
organizer data to a Windows Phone device.
Possible values:
•
Forever
•
3 days
•
7 days
•
14 days
•
1 month
The default value is 7 days.
Use SSL
This setting specifies whether a Windows Phone device must use SSL to connect to the mail
server.
195
Profile settings
Windows Phone: Email
profile setting
Description
Email
This setting specifies whether a Windows Phone device synchronizes email messages with the
mail server.
Contacts
This setting specifies whether a Windows Phone device synchronizes contacts with the mail
server.
Calendar
This setting specifies whether a Windows Phone device synchronizes calendar entries with the
mail server.
Task
This setting specifies whether a Windows Phone device synchronizes task data with the mail
server.
This setting is valid only if the "Profile type" setting is set to "Exchange ActiveSync."
196
Profile settings
IMAP/POP3 email profile settings
25
You can use a variable in any profile setting that is a text field to reference a value instead of specifying the actual value. BES12
supports default variables that are predefined and custom variables that you define. IMAP/POP3 email profiles are supported on
the following device types:
•
iOS
•
Android
•
Windows Phone
In some cases, the minimum version of the device OS required to support a setting is a version not supported by BES12. For
more information about supported versions, visit docs.blackberry.com/bes12cloud to see the Compatibility Matrix in the
Installation and upgrade content.
Common: IMAP/POP3 email profile settings
Common: IMAP/POP3 email
profile setting
Description
Email type
This setting specifies the type of mail server.
Possible values:
•
IMAP
•
POP3
The default value is IMAP.
Display name
This setting specifies the display name of the account. If the profile is for multiple users, you
can use the %UserDisplayName% variable.
Email address
This setting specifies the user's email address. If the profile is for multiple users, you can use
the %UserEmailAddress% variable.
Server address or IP
This setting specifies the server address or IP address of the mail server.
Port
This setting specifies the port that is used to connect to the mail server for incoming (or
outgoing) mail.
Username
This setting specifies the user's username. If the profile is for multiple users, you can use the
%UserName% variable.
197
Profile settings
Common: IMAP/POP3 email
profile setting
Description
Use SSL for incoming mail
This setting specifies whether an iOS, Android, or Windows Phone device must use SSL to
connect to the mail server to get received mail.
Use SSL for outgoing mail
This setting specifies whether an iOS, Android, or Windows Phone device must use SSL to
connect to the mail server to send mail.
Authentication required for
outgoing mail
This setting specifies whether a device must authenticate with the server to send mail.
Use the same credentials as
incoming settings
This setting specifies whether an iOS, Android, or Windows Phone device uses the same
credentials to receive email messages that it uses to send email messages to authenticate
with the mail server.
If a device does not use the same credentials to receive email messages that it uses to send
email messages to authenticate with the mail server, then you can specify the username and
password that a device uses.
This setting is valid only if "Authentication required for outgoing mail" setting is selected.
iOS: IMAP/POP3 email profile settings
iOS: IMAP/POP3 email
profile setting
Description
IMAP path prefix
This setting specifies the IMAP path prefix, if necessary.
If necessary, contact your ISP for more information.
This setting is valid only if the value for the "Email type" setting is set to "IMAP."
Allow messages to be moved
This setting specifies whether users can move email messages from this account to another
email account on an iOS device.
Allow recent addresses to be
synced
This setting specifies whether an iOS device user can synchronize recently used email
addresses across devices.
Use only in Mail
This setting specifies whether apps other than the Mail app on an iOS device can use this
account to send email messages.
198
Profile settings
Android: IMAP/POP3 email profile settings
Android: IMAP/POP3 email
profile setting
Description
IMAP path prefix
This setting specifies the IMAP path prefix, if necessary.
If necessary, contact your ISP for more information.
This setting is valid only if the value for the "Email type" setting is set to "IMAP."
Delete email from server
This setting specifies when to delete an email from the mail server.
Possible values:
•
Never
•
When deleted from inbox
The default value is Never.
This setting is valid only if the value for the "Email type" setting is set to "POP3."
Windows Phone: IMAP/POP3 email profile
settings
Windows Phone: IMAP/POP3
Description
email profile setting
Domain
This setting specifies the domain of the mail server.
Synchronization interval
This setting specifies how often a Windows Phone device downloads new content from the
mail server.
Possible values:
•
Manual
•
15 minutes
•
30 minutes
•
60 minutes
•
2 hours
The default value is 15 minutes.
199
Profile settings
Windows Phone: IMAP/POP3
Description
email profile setting
Initial retrieval amount
This setting specifies the number of days in the past to synchronize email messages and
organizer data to a Windows Phone device.
Possible values:
•
All
•
7 days
•
14 days
•
30 days
The default value is 7 days.
200
Profile settings
SCEP profile settings
26
You can use a variable in any profile setting that is a text field to reference a value instead of specifying the actual value. BES12
supports default variables that are predefined and custom variables that you define. SCEP profiles are supported on the
following device types:
•
BlackBerry 10
•
iOS
In some cases, the minimum version of the device OS required to support a setting is a version not supported by BES12. For
more information about supported versions, visit docs.blackberry.com/bes12cloud to see the Compatibility Matrix in the
Installation and upgrade content.
Common: SCEP profile settings
Common: SCEP profile
setting
URL
Description
This setting specifies the URL of the SCEP service. The URL should include the protocol,
FQDN, port number, and SCEP path (CGI path that is defined in the SCEP specification). You
must set a value for this setting to activate a device successfully.
SCEP HTTPS URLs are supported by iOS devices and BlackBerry 10 OS version 10.3.0 and
later.
Instance name
This setting specifies the name of the CA instance.
The value can be any string that is understood by the SCEP service. For example, it could be a
domain name like example.org. If a CA has multiple CA certificates, this field can be used to
distinguish which one is required.
Certification authority
connection
This setting specifies whether the CA is Entrust or another CA. If you configured one or more
connections to your organization’s Entrust software, you can select one of the connections in
the drop-down list. Select Generic if you are using any other CA.
If you select an Entrust connection, you must then select the appropriate digital ID profile and
specify the necessary values. The available digital ID profiles vary based on what the Entrust
administrator has configured.
The default value is Generic.
SCEP challenge type
This setting specifies whether the SCEP challenge password is dynamically generated or
provided as a static password. If this setting is set to "Static," every device uses the same
201
Profile settings
Common: SCEP profile
setting
Description
challenge password. If this setting is set to "Dynamic," every device receives a unique
challenge password.
Possible values:
•
Static
•
Dynamic
The default value is Dynamic.
Challenge password
generation URL
This setting specifies the URL that devices use to obtain a dynamically generated challenge
password from the SCEP service. The URL should include the protocol, domain, port, and
SCEP path (CGI path that is defined in the SCEP specification). If you use a dynamic challenge
password, you must set a value to activate BlackBerry 10 devices successfully.
This setting is valid only if the "SCEP challenge type" setting is set to "Dynamic."
Authentication type
This setting specifies the authentication type devices use to connect to the SCEP service and
obtain a challenge password.
This setting is valid only if the "SCEP challenge type" setting is set to "Dynamic."
Possible values:
•
Basic
•
NTLM
The default value is Basic.
Domain
This setting specifies the domain used for NTLM authentication when devices connect to the
SCEP service to obtain a challenge password.
This setting is valid only if the "Authentication type" setting is set to "NTLM."
Username
This setting specifies the username required to obtain a challenge password from the SCEP
service.
This setting is valid only if the "SCEP challenge type" setting is set to "Dynamic."
Password
This setting specifies the password required to obtain the challenge password from the SCEP
service.
This setting is valid only if the "SCEP challenge type" setting is set to "Dynamic."
Challenge password
This setting specifies the challenge password that a device uses for certificate enrollment. If
you use a static challenge password, you must set a value for this setting to activate
BlackBerry 10 devices successfully.
202
Profile settings
Common: SCEP profile
setting
Description
This setting is valid only if the "SCEP challenge type" setting is set to "Static."
BlackBerry 10: SCEP profile settings
BlackBerry 10: SCEP profile
setting
Subject
Description
This setting specifies the subject for the certificate, if required for your organization's SCEP
configuration. Type the subject in the format "/CN=<common_name>/O=<domain_name>" If
the profile is for multiple users, you can use the %UserDistinguisedName% or
%UserPrincipalName% variable.
The minimum requirement is BlackBerry 10 OS version 10.3.1.
Key algorithm
This setting specifies the algorithm that a BlackBerry 10 device uses to generate the client
key pair. You must select an algorithm that is supported by your CA.
Possible values:
•
None
•
RSA
•
ECC
The default value is RSA.
RSA strength
This setting specifies the RSA strength that a BlackBerry 10 device uses to generate the client
key pair. You must enter a key strength that is supported by your CA.
This setting is valid only if the "Key algorithm" setting is set to "RSA.".
Possible values:
•
1024
•
2048
•
4096
•
8192
•
16384
The default value is 1024.
203
Profile settings
BlackBerry 10: SCEP profile
setting
ECC strength
Description
This setting specifies the elliptic curve that a BlackBerry 10 device uses to generate a client
key pair. The elliptic curve defines the strength of the client key pair. You must select an
elliptic curve that is supported by your CA.
This setting is valid only if the "Key algorithm" setting is set to "ECC."
Possible values:
•
sect163k1
•
sect283k1
•
secp192r1
•
secp256r1
•
secp384r1
•
secp521r1
The default value is secp521r1.
Encryption algorithm
This setting specifies the encryption algorithm that a BlackBerry 10 device uses for the
certificate enrollment request.
Possible values:
•
None
•
Triple DES
•
AES (128-bit)
•
AES (196-bit)
•
AES (256-bit)
The default value is Triple DES.
Hash function
This setting specifies the hash function that a BlackBerry 10 device uses for the certificate
enrollment request.
Possible values:
•
None
•
SHA-1
•
SHA-224
•
SHA-256
•
SHA-384
•
SHA-512
204
Profile settings
BlackBerry 10: SCEP profile
setting
Description
The default value is SHA-1.
Certificate thumbprint
This setting specifies the hexadecimal-encoded hash of the root certificate for the CA. You
can use the following algorithms to specify the thumbprint: MD5, SHA-1, SHA-224, SHA-256,
SHA-384, and SHA-512. You must set a value for this setting to activate a BlackBerry 10
device successfully.
Automatic renewal
This setting specifies how many days before a certificate expires that automatic certificate
renewal occurs.
The possible values are from 1 to 999,999,999 days.
The default value is 30 days.
Key usage
This setting specifies the cryptographic operations that can be performed using the public key
contained in the certificate.
Possible selections:
•
Digital signature
•
Non-repudiation
•
Key encipherment
•
Data encipherment
•
Key agreement
•
Key certificate signing
•
CRL signing
•
Encipher only
•
Decipher only
The default selections are "Digital signature," "Key encipherment," and "Key agreement."
The minimum requirement is BlackBerry 10 OS version 10.3.1.
Extended key usage
This setting specifies the purpose of the key contained in the certificate.
Possible selections:
•
Server authentication
•
Client authentication
•
Code signing
•
Email protection
205
Profile settings
BlackBerry 10: SCEP profile
setting
Description
•
Time stamping
•
OCSP signing
•
Secure shell client
•
Secure shell server
The default selection is "Client authentication."
The minimum requirement is BlackBerry 10 OS version 10.3.1.
iOS: SCEP profile settings
iOS: SCEP profile setting
Description
Use BES12 as a proxy for
SCEP requests
This setting specifies whether all SCEP requests from devices are sent through BES12. If the
CA is behind your firewall, this setting allows you to enroll client certificates to devices without
exposing the CA outside of the firewall.
Subject
This setting specifies the subject for the certificate, if required for your organization's SCEP
configuration. Type the subject in the format "/CN=<common_name>/O=<domain_name>" If
the profile is for multiple users, you can use the %UserDistinguisedName% or
%UserPrincipalName% variable.
Retries
This setting specifies how many times to retry connecting to the SCEP service if the
connection attempt fails.
The possible values are from 1 to 999.
The default value is 3.
Retry delay
This setting specifies the time in seconds to wait before retrying to connect to the SCEP
service.
The possible values are from 1 to 999.
The default value is 10 seconds.
Key size
This setting specifies the key size for the certificate.
Possible values:
•
1024
•
2048
206
Profile settings
iOS: SCEP profile setting
Description
The default value is 1024.
Use as digital signature
This setting specifies whether the enrolled certificate can be used for digital signatures.
Use for key encipherment
This setting specifies whether the enrolled certificate can be used for encryption.
Fingerprint
This setting specifies the fingerprint for enrolling a SCEP certificate. If your CA uses HTTP
instead of HTTPS, devices use the fingerprint to confirm the identity of the CA during the
enrollment process.
Subject Alternative Name
type
This setting specifies the subject alternative name type for the certificate, if it is required.
Possible values:
•
None
•
RFC822 name
•
DNS name
•
Uniform Resource Identifier
The default value is None.
Subject Alternative Name
value
This setting specifies the alternative representation of the certificate subject. The value must
be an email address, the DNS name of the CA server, or the fully qualified URL of the server.
The "Subject Alternative Name type" setting determines the type of value to specify.
NT principal name
This setting specifies the NT principal name for certificate generation.
This setting is valid only if the "Subject Alternative Name type" setting is set to something
other than "None."
207
Profile settings
Wi-Fi profile settings
27
You can use a variable in any profile setting that is a text field to reference a value instead of specifying the actual value. BES12
supports default variables that are predefined and custom variables that you define. Wi-Fi profiles are supported on the
following device types:
•
BlackBerry 10
•
iOS
•
Android
•
Windows Phone
In some cases, the minimum version of the device OS required to support a setting is a version not supported by BES12. For
more information about supported versions, visit docs.blackberry.com/bes12cloud to see the Compatibility Matrix in the
Installation and upgrade content.
Common: Wi-Fi profile settings
Common: Wi-Fi profile
setting
SSID
Description
This setting specifies the network name of a Wi-Fi network and its wireless access points. The
SSID is case-sensitive and must contain alphanumeric characters.
Possible values are limited to 32 characters.
Hidden network
This setting specifies whether the Wi-Fi network hides the SSID.
BlackBerry 10: Wi-Fi profile settings
BlackBerry 10: Wi-Fi profile
setting
Description
Security type
This setting specifies the type of security that the Wi-Fi network uses.
Possible values:
•
None
•
WEP personal
•
WPA-Personal
208
Profile settings
BlackBerry 10: Wi-Fi profile
setting
Description
•
WPA-Enterprise
•
WPA2-Personal
•
WPA2-Enterprise
The default value is None.
WEP key
This setting specifies the WEP key for the Wi-Fi network. The WEP key must be 10 or 26
hexadecimal characters (0-9, A-F) or 5 or 13 alphanumeric characters (0-9, A-Z).
Examples of hexadecimal key values are ABCDEF0123 or
ABCDEF0123456789ABCDEF0123. Examples of alphanumeric key values are abCD5 or
abCDefGHijKL1.
This setting is valid only if the "Security type" setting is set to "WEP personal."
Preshared key type
This setting specifies the type of preshared key for the Wi-Fi network.
This setting is valid only if the "Security type" setting is set to "WPA-Personal" or "WPA2Personal."
Possible values:
•
ASCII
•
HEX
The default value is ASCII.
Preshared key
This setting specifies the preshared key for the Wi-Fi network.
This setting is valid only if the "Security type" setting is set to "WPA-Personal" or "WPA2Personal."
Possible values are limited to 64 characters.
Authentication protocol
This setting specifies the EAP method that the Wi-Fi network uses.
This setting is valid only if the "Security type" setting is set to "WPA-Enterprise" or "WPA2Enterprise."
Possible values:
•
PEAP
•
TTLS
•
EAP-FAST
•
TLS
209
Profile settings
BlackBerry 10: Wi-Fi profile
setting
Description
The default value is PEAP.
Inner authentication
This setting specifies the inner authentication method used with a TLS tunnel.
If you want to use PAP for inner authentication, set this setting to "Auto."
This setting is valid only if the "Authentication protocol" setting is set to "PEAP" or "TTLS."
Possible values:
•
Auto
•
MS-CHAPv2
•
GTC
The default value is Auto.
EAP-FAST provisioning
method
This setting specifies the provisioning method for EAP-FAST authentication.
This setting is valid only if the "Authentication protocol" setting is set to "EAP-FAST."
Possible values:
•
Anonymous
•
Authenticated
The default value is Anonymous.
Username
This setting specifies the username that a BlackBerry device uses to authenticate with the WiFi network. If the profile is for multiple users, you can specify the %UserName% variable.
This setting is valid only if the "Authentication protocol" setting is set to "PEAP," "TTLS,"
"EAP-FAST," or "TLS."
Password
This setting specifies the password that a BlackBerry device uses to authenticate with the WiFi network.
This setting is valid only if the "Authentication protocol" setting is set to "PEAP," "TTLS," or
"EAP-FAST."
Band type
This setting specifies the frequency band that the Wi-Fi network uses.
Possible values:
•
Dual
•
2.4 GHz
•
5.0 GHz
210
Profile settings
BlackBerry 10: Wi-Fi profile
setting
Description
The default value is Dual.
Enable DHCP
This setting specifies whether the Wi-Fi network uses DHCP.
IP address
This setting specifies the IP address of the host for the Wi-Fi network.
This setting is valid only if the "Enable DHCP" setting is not selected.
Subnet mask
This setting specifies the subnet mask in dot-decimal notation (for example, 192.0.2.0).
This setting is valid only if the "Enable DHCP" setting is not selected.
Primary DNS
This setting specifies the primary DNS server in dot-decimal notation (for example, 192.0.2.0).
This setting is valid only if the "Enable DHCP" setting is not selected.
Secondary DNS
This setting specifies the secondary DNS server in dot-decimal notation (for example,
192.0.2.0).
This setting is valid only if the "Enable DHCP" setting is not selected.
Default gateway
This setting specifies the default gateway in dot-decimal notation (for example, 192.0.2.0).
This setting is valid only if the "Enable DHCP" setting is not selected.
Domain suffix
This setting specifies the FQDN of the DNS suffix.
This setting is valid only if the "Enable DHCP" setting is not selected.
Enable IPv6
This setting specifies whether the Wi-Fi network supports IPv6.
Enable access point handover This setting specifies whether a BlackBerry device can perform Wi-Fi handovers between
wireless access points.
User can edit
This setting specifies the Wi-Fi settings that a BlackBerry device user can change. If this
setting is set to "Read only," the user can't change any settings. If this setting is set to
"Credentials only," the user can change the username and password.
Possible values:
•
Read only
•
Credentials only
The default value is Read only.
Data security level
This setting specifies the domain in the work space where the Wi-Fi profile is stored when the
work space uses advanced data at rest protection. This setting is valid only if the "Force
211
Profile settings
BlackBerry 10: Wi-Fi profile
setting
Description
advanced data at rest protection" IT policy rule is selected. If this setting is set to "Always
available," the profile is stored in the Startup domain and is available when the work space is
locked. If this setting is set to "Available after authentication," the profile is stored in the
Operational domain and is available after the work space is unlocked once until the device
restarts. If this setting is set to "Available only when work space unlocked," the profile is stored
in the Lock domain and can be used for Wi-Fi connections only when the work space is
unlocked.
Possible values:
•
Always available
•
Available after authentication
•
Available only when work space unlocked
The default value is Always available.
The minimum requirement is BlackBerry 10 OS version 10.3.1.
Client certificate source
This setting specifies how BlackBerry 10 devices can obtain the client certificate. There are
four options for devices to obtain client certificates:
•
If you choose "SCEP", you must also specify the associated SCEP profile that the device
can use to download the client certificate.
•
If you choose "User credential", you must also specify the user credential profile that the
device can use to download the client certificate.
•
If you choose "Smart card", the user must pair the device with a smart card that includes
the client certificate.
•
If you choose "Other", the user must add the client certificate to the device manually.
Smart card support is available for devices that are running BlackBerry 10 OS version 10.3.1
and later.
Possible values:
•
Smart card
•
SCEP
•
User credential
•
Other
The default value is Other.
Associated SCEP profile
This setting specifies the associated SCEP profile that a BlackBerry 10 device uses to enroll a
client certificate to use for authentication with the Wi-Fi network.
212
Profile settings
BlackBerry 10: Wi-Fi profile
setting
Description
This setting is valid only if the "Client certificate source" setting is set to "SCEP."
Associated user credential
profile
This setting specifies the associated user credential profile that a BlackBerry 10 device uses
to enroll a client certificate to use for authentication with the Wi-Fi network.
This setting is valid only if the "Client certificate source" setting is set to "User credential."
The minimum requirement for using a user credential profile is BlackBerry 10 OS version
10.3.1.
Trusted certificate source
This setting specifies the source of the trusted certificate. If this setting is set to "Trusted
certificate store," a BlackBerry device can connect to a Wi-Fi network that uses any certificate
in the Wi-Fi certificate store.
Possible values:
•
None
•
Trusted certificate store
The default value is None.
Associated VPN profile
This setting specifies the associated VPN profile that a BlackBerry device uses to connect to a
VPN when the device is connected to the Wi-Fi network.
Associated proxy profile
This setting specifies the associated proxy profile that a BlackBerry device uses to connect to
a proxy server when the device is connected to the Wi-Fi network.
iOS: Wi-Fi profile settings
iOS: Wi-Fi profile setting
Description
Automatically join network
This setting specifies whether an iOS device can automatically join the Wi-Fi network.
Associated proxy profile
This setting specifies the associated proxy profile that an iOS device uses to connect to a proxy
server when the device is connected to the Wi-Fi network.
Network type
This setting specifies a configuration for the Wi-Fi network.
Hotspot configurations apply only to iOS devices. To configure Wi-Fi settings for BlackBerry,
Android, and Windows Phone devices, create a separate Wi-Fi profile.
Possible values:
•
Standard
213
Profile settings
iOS: Wi-Fi profile setting
Description
•
Legacy hotspot
•
Hotspot 2.0
The default value is Standard.
Displayed operator name
This setting specifies the friendly name of the hotspot operator.
This setting is valid only if the "Network type" setting is set to "Hotspot 2.0."
Domain name
This setting specifies the domain name of the hotspot operator.
This setting is valid only if the "Network type" setting is set to "Hotspot 2.0."
The "SSID" setting is not required when you use this setting.
Roaming consortium OIs
This setting specifies the organization identifiers of roaming consortiums and service providers
that are accessible through the hotspot.
This setting is valid only if the "Network type" setting is set to "Hotspot 2.0."
NAI realm names
This setting specifies the NAI realm names that can authenticate an iOS device.
This setting is valid only if the "Network type" setting is set to "Hotspot 2.0."
MCC/MNCs
This setting specifies the MCC/MNC combinations that identify mobile network operators.
Each value must contain exactly six digits.
This setting is valid only if the "Network type" setting is set to "Hotspot 2.0."
Allow connecting to roaming
partner networks
This setting specifies whether an iOS device can connect to roaming partners for the hotspot.
Security type
This setting specifies the type of security that the Wi-Fi network uses.
This setting is valid only if the "Network type" setting is set to "Hotspot 2.0."
If the "Network type" setting is set to "Hotspot 2.0," this setting is set to "WPA2-Enterprise."
Possible values:
•
None
•
WEP personal
•
WEP enterprise
•
WPA-Personal
•
WPA-Enterprise
•
WPA2-Personal
•
WPA2-Enterprise
214
Profile settings
iOS: Wi-Fi profile setting
Description
The default value is None.
WEP key
This setting specifies the WEP key for the Wi-Fi network. The WEP key must be 10 or 26
hexadecimal characters (0-9, A-F) or 5 or 13 alphanumeric characters (0-9, A-Z).
Examples of hexadecimal key values are ABCDEF0123 or
ABCDEF0123456789ABCDEF0123. Examples of alphanumeric key values are abCD5 or
abCDefGHijKL1.
This setting is valid only if the "Security type" setting is set to "WEP personal."
Preshared key
This setting specifies the preshared key for the Wi-Fi network.
This setting is valid only if the "Security type" setting is set to "WPA-Personal" or "WPA2Personal."
Authentication protocol
This setting specifies the EAP methods that the Wi-Fi network supports. You can select
multiple EAP methods.
This setting is valid only if the "Security type" setting is set to "WEP enterprise," "WPAEnterprise," or "WPA2-Enterprise."
Possible selections:
Inner authentication
•
TLS
•
TTLS
•
LEAP
•
PEAP
•
EAP-FAST
•
EAP-SIM
This setting specifies the inner authentication method for use with TTLS.
This setting is valid only if the "Authentication protocol" setting is set to "TTLS."
Possible values:
•
None
•
PAP
•
CHAP
•
MS-CHAP
•
MS-CHAPv2
The default value is MS-CHAPv2.
215
Profile settings
iOS: Wi-Fi profile setting
Description
Use PAC
This setting specifies whether the EAP-FAST method uses a Protected Access Credential.
This setting is valid only if the "Authentication protocol" setting is set to "EAP-FAST."
Provision PAC
This setting specifies whether the EAP-FAST method allows PAC provisioning.
This setting is valid only if the "Authentication protocol" setting is set to "EAP-FAST" and the
"Use PAC" setting is selected.
Provision PAC anonymously
This setting specifies whether the EAP-FAST method allows anonymous PAC provisioning.
This setting is valid only if the "Authentication protocol" setting is set to "EAP-FAST," the "Use
PAC" setting is selected, and the "Provision PAC" setting is selected.
Outer identity for TTLS, PEAP, This setting specifies the outer identity for a user that is sent in clear text. You can specify an
and EAP-FAST
anonymous username to hide the user's real identity (for example, anonymous). The
encrypted tunnel is used to send the real username to authenticate with the Wi-Fi network. If
the outer identity includes the realm name to route the request, it must be the user's actual
realm (for example, [email protected]).
This setting is valid only if the "Authentication protocol" setting is set to "TTLS," "PEAP," or
"EAP-FAST."
Use password included in WiFi profile
This setting specifies whether the Wi-Fi profile includes the password for authentication.
Password
This setting specifies the password that an iOS device uses to authenticate with the Wi-Fi
network.
This setting is valid only if the "Security type" setting is set to "WEP enterprise," "WPAEnterprise," or "WPA2-Enterprise."
This setting is valid only if the "Use password included in Wi-Fi profile" setting is selected.
Username
This setting specifies the username that an iOS device uses to authenticate with the Wi-Fi
network. If the profile is for multiple users, you can specify the %UserName% variable.
This setting is valid only if the "Security type" setting is set to "WEP enterprise," "WPAEnterprise," or "WPA2-Enterprise."
Authentication type
This setting specifies the type of authentication that an iOS device uses to connect to the Wi-Fi
network.
This setting is valid only if the "Security type" setting is set to "WEP enterprise," "WPAEnterprise," or "WPA2-Enterprise."
Possible values:
•
None
216
Profile settings
iOS: Wi-Fi profile setting
Description
•
Shared certificate
•
SCEP
•
User credential
The default value is None.
Type of certificate linking
This setting specifies the type of linking for the client certificate associated with the Wi-Fi
profile.
This setting is valid only if the "Authentication type" setting is set to "Shared certificate."
Possible values:
•
Single reference
•
Variable injection
The default value is Single reference.
Shared certificate profile
This setting specifies the shared certificate profile with the client certificate that an iOS device
uses to authenticate with the Wi-Fi network.
This setting is valid only if the "Type of certificate linking" setting is set to "Single reference."
Client certificate name
This setting specifies the name of the client certificate that an iOS device uses to authenticate
with the Wi-Fi network.
This setting is valid only if the "Type of certificate linking" setting is set to "Variable injection."
Associated SCEP profile
This setting specifies the associated SCEP profile that an iOS device uses to obtain a client
certificate to authenticate with the Wi-Fi network.
This setting is valid only if the "Authentication type" setting is set to "SCEP."
Associated user credential
profile
This setting specifies the associated user credential profile that an iOS device uses to obtain a
client certificate to authenticate with the Wi-Fi network.
This setting is valid only if the "Authentication type" setting is set to "User credential."
Certificate common names
This setting specifies the common names in the certificate that the authentication server
expected from authentication sends to the device (for example, *.example.com).
server
This setting is valid only if the "Security type" setting is set to "WEP enterprise," "WPAEnterprise," or "WPA2-Enterprise."
Type of certificate linking
This setting specifies the type of linking for the trusted certificates associated with the Wi-Fi
profile.
217
Profile settings
iOS: Wi-Fi profile setting
Description
This setting is valid only if the "Security type" setting is set to "WEP enterprise," "WPAEnterprise," or "WPA2-Enterprise."
Possible values:
•
Single reference
•
Variable injection
The default value is Single reference.
CA certificate profiles
This setting specifies the CA certificate profiles with the trusted certificates that an iOS device
uses to establish trust with the Wi-Fi network.
This setting is valid only if the "Type of certificate linking" setting is set to "Single reference."
Trusted certificate names
This setting specifies the names of the trusted certificates that an iOS device uses to establish
trust with the Wi-Fi network.
This setting is valid only if the "Type of certificate linking" setting is set to "Variable injection."
Trust user decisions
This setting specifies whether an iOS device prompts the user to trust a server when the chain
of trust can't be established. If this setting is not selected, only connections to trusted servers
that you specify are allowed.
This setting is valid only if the "Security type" setting is set to "WEP enterprise," "WPAEnterprise," or "WPA2-Enterprise."
Android: Wi-Fi profile settings
Android: Wi-Fi profile setting Description
BSSID
This setting specifies the MAC address of a wireless access point in the Wi-Fi network.
Security type
This setting specifies the type of security that the Wi-Fi network uses.
Possible values:
•
None
•
Personal
•
Enterprise
The default value is None.
Personal security type
This setting specifies the type of personal security that the Wi-Fi network uses.
218
Profile settings
Android: Wi-Fi profile setting Description
This setting is valid only if the "Security type" setting is set to "Personal."
Possible values:
•
None
•
WEP personal
•
WPA-Personal/WPA2-Personal
The default value is None.
WEP key
This setting specifies the WEP key for the Wi-Fi network. The WEP key must be 10 or 26
hexadecimal characters (0-9, A-F) or 5 or 13 alphanumeric characters (0-9, A-Z).
Examples of hexadecimal key values are ABCDEF0123 or
ABCDEF0123456789ABCDEF0123. Examples of alphanumeric key values are abCD5 or
abCDefGHijKL1.
This setting is valid only if the "Personal security type" setting is set to "WEP personal."
Preshared key
This setting specifies the preshared key for the Wi-Fi network.
This setting is valid only if the "Personal security type" setting is set to "WPA-Personal/WPA2Personal."
Authentication protocol
This setting specifies the EAP method that the Wi-Fi network uses.
This setting is valid only if the "Security type" setting is set to "Enterprise."
Possible values:
•
TLS
•
TTLS
•
PEAP
•
LEAP
The default value is TLS.
Inner authentication
This setting specifies the inner authentication method for use with TTLS.
This setting is valid only if the "Authentication protocol" setting is set to "TTLS."
Possible values:
•
None
•
PAP
•
CHAP
219
Profile settings
Android: Wi-Fi profile setting Description
•
MS-CHAP
•
MS-CHAPv2
•
GTC
The default value is MS-CHAPv2.
Outer identity for TTLS
This setting specifies the outer identity for a user that is sent in clear text. You can specify an
anonymous username to hide the user's real identity (for example, anonymous). The
encrypted tunnel is used to send the real username to authenticate with the Wi-Fi network. If
the outer identity includes the realm name to route the request, it must be the user's actual
realm (for example, [email protected]).
This setting is valid only if the "Authentication protocol" setting is set to "TTLS."
Outer identity for PEAP
This setting specifies the outer identity for a user that is sent in clear text. You can specify an
anonymous username to hide the user's real identity (for example, anonymous). The
encrypted tunnel is used to send the real username to authenticate with the Wi-Fi network. If
the outer identity includes the realm name to route the request, it must be the user's actual
realm (for example, [email protected]).
This setting is valid only if the "Authentication protocol" setting is set to "PEAP."
Username
This setting specifies the username that an Android device uses to authenticate with the Wi-Fi
network. If the profile is for multiple users, you can specify the %UserName% variable.
This setting is valid only if the "Security type" setting is set to "Enterprise."
Use password included in WiFi profile
This setting specifies whether the Wi-Fi profile includes the password for authentication.
Password
This setting specifies the password that an Android device uses to authenticate with the Wi-Fi
network.
This setting is valid only if the "Security type" setting is set to "Enterprise."
This setting is valid only if the "Use password included in Wi-Fi profile" setting is selected.
Authentication type
This setting specifies the type of authentication that an Android device uses to connect to the
Wi-Fi network.
This setting is valid only if the "Security type" setting is set to "Enterprise."
Possible values:
•
None
•
Shared certificate
•
User credential
220
Profile settings
Android: Wi-Fi profile setting Description
The default value is None.
Type of certificate linking
This setting specifies the type of linking for the client certificate associated with the Wi-Fi
profile.
This setting is valid only if the "Authentication type" setting is set to "Shared certificate."
Possible values:
•
Single reference
•
Variable injection
The default value is Single reference.
Shared certificate profile
This setting specifies the shared certificate profile with the client certificate that an Android
device uses to authenticate with the Wi-Fi network.
This setting is valid only if the "Type of certificate linking" setting is set to "Single reference."
Associated user credential
profile
This setting specifies the associated user credential profile that an Android device uses to
obtain a client certificate to authenticate with the Wi-Fi network.
This setting is valid only if the "Authentication type" setting is set to "User credential."
Client certificate name
This setting specifies the name of the client certificate that an Android device uses to
authenticate with the Wi-Fi network.
This setting is valid only if the "Type of certificate linking" setting is set to "Variable injection."
Certificate common names
This setting specifies the common names in the certificate that the authentication server
expected from authentication sends to the device (for example, *.example.com).
server
This setting is valid only if the "Security type" setting is set to "Enterprise."
Type of certificate linking
This setting specifies the type of linking for the trusted certificates associated with the Wi-Fi
profile.
This setting is valid only if the "Security type" setting is set to "Enterprise."
Possible values:
•
Single reference
•
Variable injection
The default value is Single reference.
CA certificate profile
This setting specifies the CA certificate profile with the trusted certificate that an Android
device uses to establish trust with the Wi-Fi network.
221
Profile settings
Android: Wi-Fi profile setting Description
This setting is valid only if the "Type of certificate linking" setting is set to "Single reference."
Trusted certificate names
This setting specifies the names of the trusted certificates that an Android device uses to
establish trust with the Wi-Fi network.
This setting is valid only if the "Type of certificate linking" setting is set to "Variable injection."
Windows Phone: Wi-Fi profile settings
Windows Phone: Wi-Fi profile
Description
setting
Security type
This setting specifies the type of security that the Wi-Fi network uses.
Possible values:
•
Open
•
WPA-Enterprise
•
WPA-Personal
•
WPA2-Enterprise
•
WPA2-Personal
The default value is Open.
Encryption type
This setting specifies the encryption method that the Wi-Fi network uses.
The "Security type" setting determines which authentication types are supported and the
default value for this setting.
Possible values:
WEP key
•
None
•
WEP
•
TKIP
•
AES
This setting specifies the WEP key for the Wi-Fi network. The WEP key must be 10 or 26
hexadecimal characters (0-9, A-F) or 5 or 13 alphanumeric characters (0-9, A-Z).
Examples of hexadecimal key values are ABCDEF0123 or
ABCDEF0123456789ABCDEF0123. Examples of alphanumeric key values are abCD5 or
abCDefGHijKL1.
222
Profile settings
Windows Phone: Wi-Fi profile
Description
setting
This setting is valid only if the "Encryption type" setting is set to "Open" or "WPA-Personal."
Preshared key
This setting specifies the preshared key for the Wi-Fi network.
This setting is valid only if the "Security type" setting is set to "WPA-Personal" or "WPA2Personal" or the "Security type" setting is set to "Open" and the "Encryption type" is set to
"WEP".
Key index
This setting specifies the position of the matching key stored on the wireless access point.
The possible values are from 1 to 4.
This setting is valid only if the "Security type" setting is set to "Open" and the "Encryption
type" is set to "WEP."
Enable single sign-on
This setting specifies whether the Wi-Fi network supports single sign-on authentication.
This setting is valid only if the "Security type" setting is set to "WPA-Enterprise" or "WPA2Enterprise."
Single sign-on type
This setting specifies when single sign-on authentication is performed. When set to “Perform
immediately before user login”, single sign-on is performed before the user logs in to your
organization’s Active Directory. When set to “Perform immediately after user login”, single
sign-on is performed immediately after the user logs in to your organization’s Active Directory.
This setting is valid only if “Enable single sign-on" is selected.
Possible values:
•
Perform immediately before user login
•
Perform immediately after user login
The default value is “Perform immediately before user login.”
Maximum delay for
connectivity
This setting specifies, in seconds, the maximum delay before the single sign-on connection
attempt fails.
This setting is valid only if “Enable single sign-on" is selected.
The possible values are from 0 to 120 seconds.
The default value is 10.
Allow additional dialogs to be
displayed during single signon
This setting specifies whether a device can display dialog boxes beyond the login screen. For
example, if an EAP authentication type requires a user to confirm the certificate sent from
server during authentication, the device can display the dialog box.
This setting is valid only if “Enable single sign-on" is selected.
223
Profile settings
Windows Phone: Wi-Fi profile
Description
setting
This network uses separate
virtual LANs for machine and
user authentication
This setting specifies whether the VLAN used by a device changes based on the user's login
information. For example, if the device is placed on one VLAN when it starts, and then —
based on user permissions — transitions to a different VLAN network after the user logs in.
This setting is valid only if “Enable single sign-on" is selected.
Validate server certificate
This setting specifies whether a device must validate the server certificate that verifies the
identity of the wireless access point.
This setting is valid only if the "Security type" setting is set to "WPA-Enterprise" or "WPA2Enterprise."
Do not prompt user to
authorize new servers or
trusted certification
authorities
This setting specifies whether a user is prompted to trust the server certificate.
CA certificate profiles
This setting specifies the CA certificate profile that provides the root of trust for the server
certificate that the wireless access point uses.
This setting is valid only if “Validate server certificate" is selected.
This setting limits the root CAs that devices trust to the selected CAs. If you do not select any
trusted root CAs, devices trust all root CAs listed in their trusted root certification authority
store.
This setting is valid only if “Validate server certificate" is selected.
Enable fast reconnect
This setting specifies whether the Wi-Fi network supports fast reconnect for PEAP
authentication across multiple wireless access points.
This setting is valid only if the "Security type" setting is set to "WPA-Enterprise" or "WPA2Enterprise."
Enforce NAP
This setting specifies whether the Wi-Fi network uses NAP to perform system health checks on
devices to verify that they meet health requirements, before connections to the network are
permitted.
This setting is valid only if the "Security type" setting is set to "WPA-Enterprise" or "WPA2Enterprise."
Enable PMK caching
This setting specifies whether a device can cache the PMK to turn on WPA2 fast roaming. Fast
roaming skips 802.1X settings with a wireless access point that the device authenticated with
previously.
This setting is valid only if the "Security type" setting is set to "WPA2-Enterprise."
PMK time to live
This setting specifies the duration, in minutes, that a device can store the PMK in cache.
224
Profile settings
Windows Phone: Wi-Fi profile
Description
setting
This setting is valid only if “Enable PMK caching" is selected.
The possible values are from 5 to 1440.
The default value is 720.
Number of entries in PMK
cache
This setting specifies the maximum number of PMK entries that a device can store in cache.
This setting is valid only if “Enable PMK caching" is selected.
The possible values are from 1 to 255.
The default value is 128.
This network uses
preauthentication
This setting specifies whether the access point supports preauthentication for WPA2 fast
roaming.
Preauthentication allows devices that connect to one wireless access point to perform 802.1X
settings with other wireless access points within its range. Preauthentication stores the PMK
and its associated information in the PMK cache. When the device connects to a wireless
access point with which it has preauthenticated, it uses the cached PMK information to
reduce the time required to authenticate and connect.
This setting is valid only if “Enable PMK caching" is selected.
Maximum preauthentication
This setting specifies the maximum number of allowed preauthentication attempts.
This setting is valid only if “This network uses preauthentication" is selected.
The possible values are from 1 to 16.
The default value is 3.
225
Profile settings
VPN profile settings
28
You can use a variable in any profile setting that is a text field to reference a value instead of specifying the actual value. BES12
supports default variables that are predefined and custom variables that you define. VPN profiles are supported on the following
device types:
•
BlackBerry 10
•
iOS
In some cases, the minimum version of the device OS required to support a setting is a version not supported by BES12. For
more information about supported versions, visit docs.blackberry.com/bes12cloud to see the Compatibility Matrix in the
Installation and upgrade content.
BlackBerry 10: VPN profile settings
BlackBerry 10: VPN profile
setting
Description
Server address
This setting specifies the FQDN or IP address of a VPN server.
Gateway type
This setting specifies the type of VPN client that the VPN client on a BlackBerry 10 device
emulates.
Possible values:
•
Check Point VPN-1
•
Cisco VPN 3000 Series Concentrator
•
Cisco Secure PIX Firewall
•
Cisco IOS Easy VPN
•
Cisco ASA Series
•
Cisco AnyConnect
•
Juniper SRX Series (IPsec VPN)
•
Juniper MAG Series or Juniper SA Series (SSL VPN)
•
Microsoft IKEv2 VPN server
•
Generic IKEv2 VPN server
The default value is Check Point VPN-1.
Authentication type
This setting specifies the authentication type for the VPN gateway.
226
Profile settings
BlackBerry 10: VPN profile
setting
Description
The "Gateway type" setting determines which authentication types are supported and the
default value for this setting.
Possible values:
•
PSK
•
PKI
•
XAUTH-PSK
•
XAUTH-PKI
•
EAP-TLS
•
EAP-MS-CHAPv2
Preshared key or group
password
This setting specifies the preshared key or group password for the VPN gateway.
Username
This setting specifies the username that a BlackBerry 10 device uses to authenticate with the
VPN gateway. If the profile is for multiple users, you can use the %UserName% variable.
This setting is valid only if the "Authentication type" setting is set to "PSK" or "XAUTH-PSK."
This setting is valid only if the "Gateway type" setting is set to "Cisco AnyConnect" or if the
"Authentication type" setting is set to "XAUTH-PSK" or "XAUTH-PKI."
Hardware token
This setting specifies whether a user must use a hardware token to authenticate with the VPN
gateway.
This setting is valid only if the "Authentication type" setting is set to "XAUTH-PSK" or "XAUTHPKI."
Password
This setting specifies the password that a BlackBerry 10 device uses to authenticate with the
VPN gateway.
This setting is valid only if the "Gateway type" setting is set to "Cisco AnyConnect" or if the
"Authentication type" setting is set to "XAUTH-PSK" or "XAUTH-PKI" and the "Hardware
token" setting is not selected.
EAP identity
This setting specifies the EAP identity that a BlackBerry 10 device uses to authenticate with
the VPN gateway.
This setting is valid only if the "Authentication type" setting is set to "EAP-TLS."
MS-CHAPv2 EAP identity
This setting specifies the MS-CHAPv2 EAP identity that a BlackBerry 10 device uses to
authenticate with the VPN gateway.
This setting is valid only if the "Authentication type" setting is set to "EAP-MS-CHAPv2."
227
Profile settings
BlackBerry 10: VPN profile
setting
MS-CHAPv2 username
Description
This setting specifies the MS-CHAPv2 username that a BlackBerry 10 device uses to
authenticate with the VPN gateway.
This setting is valid only if the "Authentication type" setting is set to "EAP-MS-CHAPv2."
MS-CHAPv2 password
This setting specifies the MS-CHAPv2 password that a BlackBerry 10 device uses to
authenticate with the VPN gateway.
This setting is valid only if the "Authentication type" setting is set to "EAP-MS-CHAPv2."
Authentication ID type
This setting specifies the authentication ID type for the VPN gateway.
This setting is valid only if the "Gateway type" setting is set to "Juniper MAG Series or Juniper
SA Series (SSL VPN)," "Microsoft IKEv2 VPN server," or "Generic IKEv2 VPN server."
The "Gateway type" setting determines which authentication ID types are supported and the
default value for this setting.
Possible values:
•
IPv4
•
Fully qualified domain name
•
Email address
•
Identity certificate distinguished name
•
Identity certificate general name
Authentication ID or Group
username
This setting specifies the authentication ID or group username for the VPN gateway.
Gateway authentication type
This setting specifies the gateway authentication type for the VPN gateway.
This setting is valid only if the "Gateway type" setting is set to "Juniper MAG Series or Juniper
SA Series (SSL VPN)," "Microsoft IKEv2 VPN server," or "Generic IKEv2 VPN server," or if the
"Authentication type" setting is set to "PSK" or "XAUTH-PSK."
This setting is valid only if the "Gateway type" setting is set to "Juniper MAG Series or Juniper
SA Series (SSL VPN)," "Microsoft IKEv2 VPN server," or "Generic IKEv2 VPN server."
Possible values:
•
None
•
PSK
•
PKI
The default value is None.
228
Profile settings
BlackBerry 10: VPN profile
setting
Description
Gateway preshared key
This setting specifies the gateway preshared key for the VPN gateway.
This setting is valid only if the "Gateway authentication type" setting is set to "PSK."
Gateway authentication ID
type
This setting specifies the gateway authentication ID type for the VPN gateway.
This setting is valid only if the "Gateway type" setting is set to "Juniper MAG Series or Juniper
SA Series (SSL VPN)," "Microsoft IKEv2 VPN server," or "Generic IKEv2 VPN server."
Possible values:
•
IPv4
•
Fully qualified domain name
•
Email address
•
Identity certificate distinguished name
•
Identity certificate general name
The default value is IPv4.
Gateway authentication ID
This setting specifies the gateway authentication ID for the VPN gateway.
This setting is valid only if the "Gateway authentication ID type" setting is set to "Fully qualified
domain name" or "Email address."
Secondary username
This setting specifies the username that a BlackBerry 10 device uses for secondary
authentication with the VPN gateway. If the profile is for multiple users, you can use the
%UserName% variable.
This setting is valid only if the "Gateway type" setting is set to "Cisco AnyConnect."
The minimum requirement is BlackBerry 10 OS version 10.3.1.
Secondary password
This setting specifies the password that a BlackBerry 10 device uses for secondary
authentication with the VPN gateway.
This setting is valid only if the "Gateway type" setting is set to "Cisco AnyConnect."
The minimum requirement is BlackBerry 10 OS version 10.3.1.
Group name
This setting specifies the group name for the VPN gateway.
This setting is valid only if the "Gateway type" setting is set to "Cisco AnyConnect."
The minimum requirement is BlackBerry 10 OS version 10.3.1.
Allow personal apps on work
networks
This setting specifies whether personal apps on a BlackBerry 10 device can use the VPN
connection.
229
Profile settings
BlackBerry 10: VPN profile
setting
Description
This setting is valid only if the "Gateway type" setting is set to "Cisco AnyConnect" and if the
"Allow personal apps to use work networks" IT policy rule is selected.
The minimum requirement is BlackBerry 10 OS version 10.3.1.
Enable automatic client
certificate processing
This setting specifies whether a client certificate is automatically selected when a VPN
connection is made.
This setting is valid only if the "Gateway type" setting is set to "Cisco AnyConnect."
The minimum requirement is BlackBerry 10 OS version 10.3.1.
Enable IPsec authentication
This setting specifies whether the VPN gateway uses IPsec authentication.
This setting is valid only if the "Gateway type" setting is set to "Cisco AnyConnect."
The minimum requirement is BlackBerry 10 OS version 10.3.1.
IPsec authentication type
This setting specifies the authentication type for an IPsec VPN connection.
This setting is valid only if the "Enable IPsec authentication" setting is selected.
Possible values:
•
EAP-MS-CHAPv2
•
EAP-MD5
•
EAP-GTC
•
EAP-AnyConnect
•
IKE-RSA
The default value is EAP-MS-CHAPv2
The minimum requirement is BlackBerry 10 OS version 10.3.1.
EAP authentication ID
This setting specifies the EAP identity that a BlackBerry 10 device uses to authenticate with
the VPN gateway.
This setting is valid only if the "IPSec authentication type" setting is set to "EAP MSCHAPv2,"
"EAP MD5," or "EAP GTC."
Exclude subnets
This setting specifies whether to exclude specified subnets from using the VPN connection.
This setting is valid only if the "Gateway type" setting is set to "Cisco AnyConnect."
The minimum requirement is BlackBerry 10 OS version 10.3.1.
Exclusion subnets
This setting specifies the subnets and subnet masks that are not sent through the VPN
connection.
230
Profile settings
BlackBerry 10: VPN profile
setting
Description
This setting is valid only if the "Exclude subnets flag" setting is selected.
Cisco AnyConnect
configuration file (.xml)
This setting specifies the location of the Cisco AnyConnect configuration file to send to
BlackBerry 10 devices.
This setting is valid only if the "Gateway type" setting is set to "Cisco AnyConnect."
The minimum requirement is BlackBerry 10 OS version 10.3.1.
Automatically determine IP
This setting specifies whether a BlackBerry 10 device automatically determines the IP
configuration of the VPN gateway.
Private IP
This setting specifies the private IP of the VPN gateway.
This setting is valid only if the "Automatically determine IP" setting is not selected.
Private IP mask
This setting specifies the private IP mask of the VPN gateway.
This setting is valid only if the "Automatically determine IP" setting is not selected.
Subnet
This setting specifies the subnet of the VPN gateway.
This setting is valid only if the "Automatically determine IP" setting is not selected.
Subnet mask
This setting specifies the subnet mask of the VPN gateway.
This setting is valid only if the "Automatically determine IP" setting is not selected.
Automatically determine DNS This setting specifies whether a BlackBerry 10 device automatically determines the DNS
configuration of the VPN gateway.
Primary DNS
This setting specifies the primary DNS server in dot-decimal notation (for example, 192.0.2.0).
This setting is valid only if the "Automatically determine DNS" setting is not selected.
Secondary DNS
This setting specifies the secondary DNS server in dot-decimal notation (for example,
192.0.2.0).
This setting is valid only if the "Automatically determine DNS" setting is not selected.
Domain suffix
This setting specifies the FQDN of the DNS suffix.
This setting is valid only if the "Automatically determine DNS" setting is not selected.
Perfect forward secrecy
This setting specifies whether the VPN gateway supports PFS.
If this setting is selected, the "IPsec DH group" setting must not be set to 0.
231
Profile settings
BlackBerry 10: VPN profile
setting
Description
Manual algorithm selection
This setting specifies whether you must set the cryptographic algorithms for the VPN gateway.
IKE DH group
This setting specifies the DH group that a BlackBerry 10 device uses to generate key material.
This setting is valid only if the "Manual algorithm selection" setting is selected.
Possible values:
•
1 to 26, except 3, 4, and 6
•
Custom 1 to Custom 5
The default value is 1.
Custom IKE DH provider
This setting specifies the name of the provider for custom IKE DH.
This setting is valid only if the "IKE DH group" setting is set to one of the Custom values.
Enable MOBIKE
This setting specifies whether the VPN gateway supports MOBIKE.
This setting is valid only if the "Gateway type" setting is set to "Microsoft IKEv2 VPN server," or
"Generic IKEv2 VPN server," the "Authentication type" setting is set to "PKI," and the "IKE DH
group" setting is set to one of the Custom values.
The minimum requirement is BlackBerry 10 OS version 10.3.1.
IKE cipher
This setting specifies the algorithm that a BlackBerry 10 device uses to generate a shared
secret key.
This setting is valid only if the "Manual algorithm selection" setting is selected.
Possible values:
•
None
•
DES (56-bit key)
•
Triple DES (168-bit key)
•
AES (128-bit key)
•
AES (192-bit key)
•
AES (256-bit key)
The default value is None.
IKE hash
This setting specifies the hash function that a BlackBerry 10 device uses with IKE.
This setting is valid only if the "Manual algorithm selection" setting is selected.
Possible values:
232
Profile settings
BlackBerry 10: VPN profile
setting
Description
•
None
•
MD5
•
AES-XCBC
•
SHA-1
•
SHA-256
•
SHA-384
•
SHA-512
The default value is None.
IKE PRF
This setting specifies the PRF that a BlackBerry 10 device uses with IKE.
This setting is valid only if the "Manual algorithm selection" setting is selected.
Possible values:
•
None
•
HMAC
•
HMAC-MD5
•
AES-XCBC
•
HMAC-SHA-1
•
HMAC-SHA-256
•
HMAC-SHA-384
•
HMAC-SHA-512
The default value is None.
IPsec DH group
This setting specifies the DH group that a BlackBerry 10 device uses with IPsec.
This setting is valid only if the "Manual algorithm selection" setting is selected.
The possible values are from 0 to 26, except 3, 4, and 6.
The default value is 0.
IPsec cipher
This setting specifies the algorithm that a BlackBerry 10 device uses with IPsec.
This setting is valid only if the "Manual algorithm selection" setting is selected.
Possible values:
•
None
233
Profile settings
BlackBerry 10: VPN profile
setting
Description
•
DES (56-bit key)
•
Triple DES (168-bit key)
•
AES (128-bit key)
•
AES (192-bit key)
•
AES (256-bit key)
The default value is None.
IPsec hash
This setting specifies the hash function that a BlackBerry 10 device uses with IPsec.
This setting is valid only if the "Manual algorithm selection" setting is selected.
Possible values:
•
None
•
MD5
•
AES-XCBC
•
SHA-1
•
SHA-256
•
SHA-384
•
SHA-512
The default value is None.
IKE lifetime
This setting specifies the lifetime, in seconds, of the IKE connection. If you set an unsupported
value or a null value, the BlackBerry 10 device default value is used.
The possible values are from 1 to 2,147,483,647.
IPsec lifetime
This setting specifies the lifetime, in seconds, of the IPsec connection. If you set an
unsupported value or a null value, the BlackBerry 10 device default value is used.
The possible values are from 1 to 2,147,483,647.
NAT keepalive
This setting specifies how often a device sends a NAT keepalive packet. If you set an
unsupported value or a null value, the BlackBerry 10 device default value is used.
The possible values are from 1 to 2,147,483,647.
DPD frequency
This setting specifies the DPD frequency, in seconds. A BlackBerry 10 device supports a
minimum setting of 10 seconds. If you set an unsupported value or a null value, the device
default value is used.
234
Profile settings
BlackBerry 10: VPN profile
setting
Description
The possible values are from 1 to 2,147,483,647.
Split tunneling
This setting specifies whether a BlackBerry 10 device can use split tunneling to bypass the
VPN gateway, if the VPN gateway supports it.
Disable banner
This setting specifies whether a BlackBerry 10 device blocks the VPN banner.
User can edit
This setting specifies the VPN settings that a BlackBerry 10 device user can change. If this
setting is set to "Read only," the user can't change any settings. If this setting is set to
"Credentials only," the user can change the username and password.
Possible values:
•
Read only
•
Credentials only
The default value is Read only.
Display VPN information on
device
This setting specifies whether VPN information is displayed on a BlackBerry 10 device. If this
setting is set to "Visible," most of the VPN profile information appears on the device. If this
setting is set to "Invisible," only the profile name appears on the device. If this setting is set to
"Credentials only," the profile name and the credential fields appear on the device.
Possible values:
•
Visible
•
Invisible
•
Credentials only
The default value is Visible.
Client certificate source
This setting specifies how BlackBerry 10 devices can obtain the client certificate. There are
four options for devices to obtain client certificates:
•
If you choose "SCEP", you must also specify the associated SCEP profile that the device
can use to download the client certificate.
•
If you choose “User credential”, you must also specify the user credential profile that the
device can use to download the client certificate.
•
If you choose "Smart card", the user must pair the device with a smart card that includes
the client certificate.
•
If you choose "Other", the user must add the client certificate to the device manually.
235
Profile settings
BlackBerry 10: VPN profile
setting
Description
Smart card support is available for devices that are running BlackBerry 10 OS version 10.3.1
and later.
This setting is valid only if the "Authentication type" setting is set to "PKI" or "XAUTH-PKI."
Possible values:
•
Smart card
•
SCEP
•
User credential
•
Other
The default value is Other.
Associated SCEP profile
This setting specifies the associated SCEP profile that a BlackBerry 10 device uses to obtain a
client certificate to authenticate with the VPN.
This setting is valid only if the "Client certificate source" setting is set to "SCEP."
Associated user credential
profile
This setting specifies the associated user credential profile that a BlackBerry 10 device uses
to obtain a client certificate to use for authentication with the VPN.
This setting is valid only if the "Client certificate source" setting is set to "User credential."
The minimum requirement for using a user credential profile is BlackBerry 10 OS version
10.3.1.
Trusted certificate source
This setting specifies the source of the trusted certificate. If this setting is set to "Trusted
certificate store," a BlackBerry 10 device can connect to a VPN that uses any certificate in the
VPN certificate store.
This setting is valid only if the "Authentication type" setting is set to "PKI" or "XAUTH-PKI."
Possible values:
•
None
•
Trusted certificate store
The default value is None.
Data security level
This setting specifies the domain in the work space where the VPN profile is stored when the
work space uses advanced data at rest protection. This setting is valid only if the "Force
advanced data at rest protection" IT policy rule is selected. If this setting is set to "Always
available," the profile is stored in the Startup domain and is available when the work space is
locked. If this setting is set to "Available after authentication," the profile is stored in the
Operational domain and is available after the work space is unlocked once until the device
236
Profile settings
BlackBerry 10: VPN profile
setting
Description
restarts. If this setting is set to "Available only when work space unlocked," the profile is stored
in the Lock domain and can be used for VPN connections only when the work space is
unlocked.
Possible values:
•
Always available
•
Available after authentication
•
Available only when work space unlocked
The default value is Always available.
The minimum requirement is BlackBerry 10 OS version 10.3.1.
Associated proxy profile
This setting specifies the associated proxy profile that a BlackBerry 10 device uses to connect
to a proxy server when the device is connected to the VPN.
iOS: VPN profile settings
iOS: VPN profile setting
Description
Connection type
This setting specifies the connection type that an iOS device uses for a VPN gateway. Some
connection types also require users to install the appropriate VPN app on the device.
Possible values:
•
L2TP
•
PPTP
•
IPsec
•
Cisco AnyConnect
•
Juniper
•
F5
•
SonicWALL Mobile Connect
•
Aruba VIA
•
Check Point Mobile
•
OpenVPN
•
Custom
The default value is L2TP.
237
Profile settings
iOS: VPN profile setting
Description
VPN bundle ID
This setting specifies the bundle ID of the VPN app for a custom SSL VPN. The bundle ID is in
reverse-DNS format (for example, com.example.VPNapp).
This setting is valid only if the "Connection type" setting is set to "Custom."
Server
This setting specifies the FQDN or IP address of a VPN server.
Username
This setting specifies the username that an iOS device uses to authenticate with the VPN
gateway. If the profile is for multiple users, you can specify the %UserName% variable.
Custom key-value pairs
This setting specifies the keys and associated values for the custom SSL VPN. The
configuration information is specific to the vendor's VPN app.
This setting is valid only if the "Connection type" setting is set to "Custom."
Login group or Domain
This setting specifies the login group or domain that the VPN gateway uses to authenticate
an iOS device.
This setting is valid only if the "Connection type" setting is set to "SonicWALL Mobile
Connect."
Realm
This setting specifies the name of the authentication realm that the VPN gateway uses to
authenticate an iOS device.
This setting is valid only if the "Connection type" setting is set to "Juniper."
Role
This setting specifies the name of the user role that the VPN gateway uses to verify the
network resources that an iOS device can access.
This setting is valid only if the "Connection type" setting is set to "Juniper."
Authentication type
This setting specifies the authentication type for the VPN gateway.
The "Connection type" setting determines which authentication types are supported and the
default value for this setting.
Possible values:
•
Password
•
RSA SecurID
•
Shared secret/Group name
•
Shared certificate
•
SCEP
•
User credential
238
Profile settings
iOS: VPN profile setting
Description
Password
This setting specifies the password that an iOS device uses to authenticate with the VPN
gateway.
This setting is valid only if the "Authentication type" setting is set to "Password."
Group name
This setting specifies the group name for the VPN gateway.
This setting is valid only if the "Connection type" setting is set to "Cisco AnyConnect," or if
the "Connection type" setting is set to "IPsec" and the "Authentication type" setting is set to
"Shared secret/Group name."
Shared secret
This setting specifies the shared secret for the VPN gateway.
This setting is valid only if the "Connection type" setting is set to "L2TP," or if the
"Connection type" setting is set to "IPsec" and the "Authentication type" setting is set to
"Shared secret/Group name."
Shared certificate profile
This setting specifies the shared certificate profile with the client certificate that an iOS
device uses to authenticate with the VPN gateway.
This setting is valid only if the "Authentication type" setting is set to "Shared certificate."
Associated SCEP profile
This setting specifies the associated SCEP profile that an iOS device uses to obtain a client
certificate to authenticate with the VPN.
This setting is valid only if the "Authentication type" setting is set to "SCEP."
Associated user credential
profile
This setting specifies the associated user credential profile that an iOS device uses to obtain
a client certificate to authenticate with the VPN.
This setting is valid only if the "Authentication type" setting is set to "User credential."
Encryption level
This setting specifies the level of data encryption for the VPN connection. If this setting is set
to "Automatic," all available encryption strengths are allowed. If this setting is set to
"Maximum," only the maximum encryption strength is allowed.
This setting is valid only if the "Connection type" setting is set to "PPTP."
Possible values:
•
None
•
Automatic
•
Maximum
The default value is None.
Route network traffic through
VPN
This setting specifies whether to send all network traffic through the VPN connection.
239
Profile settings
iOS: VPN profile setting
Description
This setting is valid only if the "Connection type" setting is set to "L2TP" or "PPTP."
Use hybrid authentication
This setting specifies whether to use a server-side certificate for authentication.
This setting is valid only if the "Connection type" setting is set to "IPsec" and "Authentication
type" is set to "Shared secret/Group name"
Prompt for password
This setting specifies whether an iOS device prompts the user for a password.
This setting is valid only if the "Connection type" setting is set to "IPsec" and "Authentication
type" is set to "Shared secret/Group name"
Prompt for user PIN
This setting specifies whether the iOS device prompts the user for a PIN.
This setting is valid only if the "Connection type" setting is set to "IPsec" and the
"Authentication type" setting is set to "Shared Certificate," "SCEP," or "User credential."
Enable VPN on demand
This setting specifies whether a device can start a VPN connection automatically when it
accesses certain domains.
This setting applies to work apps.
This setting is valid only if the "Connection type" setting is set to "IPsec," "Cisco
AnyConnect," "Juniper," "F5," "SonicWALL Mobile Connect," "Aruba VIA," "Check Point
Mobile," "OpenVPN," or "Custom" and the "Authentication type" is set to "Shared
certificate," "SCEP," or "User credential."
Domain or host names that can This setting specifies the domains and the associated actions for VPN on demand.
use VPN on demand
This setting is valid only if the "Enable VPN on demand" setting is selected.
Possible values for "On demand action":
VPN on demand rules for iOS
7.0 and later
•
Always establish
•
Establish if needed
•
Never establish
This setting specifies the connection requirements for VPN on demand. You must use one or
more keys from the payload format example.
This setting overrides the "Domain or host names that can use VPN on demand" setting.
This setting is valid only if the "Enable VPN on demand" setting is selected.
Enable per-app VPN
This setting specifies whether the VPN gateway supports per-app VPN. This feature helps
decrease the load on an organization’s VPN. For example, you can enable only certain work
traffic to use the VPN, such as accessing application servers or web pages behind the
firewall.
240
Profile settings
iOS: VPN profile setting
Description
This setting is valid only if the "Connection type" setting is set to "Cisco AnyConnect,"
"Juniper," "F5," "SonicWALL Mobile Connect," "Aruba VIA," "Check Point Mobile,"
"OpenVPN," or "Custom."
Safari domains
This setting specifies the domains that can start the VPN connection in Safari.
This setting is valid only if the "Enable per-app VPN" setting is selected.
Allow apps to connect
automatically
This setting whether apps associated with per-app VPN can start the VPN connection
automatically.
This setting is valid only if the "Enable per-app VPN" setting is selected.
Associated proxy profile
This setting specifies the associated proxy profile that an iOS device uses to connect to a
proxy server when the device is connected to the VPN.
241
Product documentation
Product documentation
Resource
Description
BES12 Cloud Product Overview
•
Introduction to BES12 and its features
•
Finding your way through the documentation
•
Architecture
BES12 Cloud Architecture and Data
Flow Reference Guide
•
Descriptions of BES12 components
•
Descriptions of activation and other data flows, such as
configuration updates and email, for different types of
devices
Release notes
BES12 Cloud Release Notes
•
Descriptions of known issues and potential workarounds
Licensing
BES12 Cloud Licensing Guide
•
Descriptions of different types of licenses
•
Instructions for registering with BES12 Cloud and
managing licenses
•
Basic and advanced administration for all supported device
types, including BlackBerry 10 devices, iOS devices,
Android devices, and Windows Phone devices
•
Instructions for creating user accounts, groups, roles, and
administrator accounts
•
Instructions for activating devices
•
Instructions for creating and assigning IT policies and
profiles
•
Instructions for managing apps on devices
•
Descriptions of profile settings
•
Descriptions of IT policy rules for BlackBerry 10 devices,
iOS devices, Android devices, and Windows Phone devices
Overview
Administration
BES12 Cloud Administration Guide
BES12 Cloud Policy Reference
Spreadsheet
243
Product documentation
Security
Resource
Description
BES12 Cloud Security Guide for
BlackBerry
•
Description of the security maintained by BES12, the
BlackBerry Infrastructure, and BlackBerry 10 devices to
protect data and connections
•
Description of the BlackBerry 10 OS
•
Description of how work data is protected on BlackBerry 10
devices when you use BES12
•
Description of the security maintained by BES12, the
BlackBerry Infrastructure, and work space-enabled
devices to protect work space data at rest and in transit
•
Description of how work space apps are protected on work
space-enabled devices when you use BES12
BES12 Cloud Security Guide for iOS,
Android, and Windows Phone
244
Glossary
Glossary
AES
Advanced Encryption Standard
BES12
BlackBerry Enterprise Service 12
CA
certification authority
certificate
A certificate is a digital document that binds the identity and public key of a certificate subject. Each
certificate has a corresponding private key that is stored separately. A certificate authority signs the
certificate to indicate that it is authentic and can be trusted.
CRL
certificate revocation list
DNS
Domain Name System
DPD
Dead Peer Detection
EAP
Extensible Authentication Protocol
EAP-FAST
Extensible Authentication Protocol Flexible Authentication via Secure Tunneling
EAP-MS-CHAP
Extensible Authentication Protocol Microsoft Challenge Handshake Authentication Protocol
EAP-TLS
Extensible Authentication Protocol Transport Layer Security
EMM
Enterprise Mobility Management
FQDN
fully qualified domain name
GTC
Generic Token Card
HMAC
keyed-hash message authentication code
HTTP
Hypertext Transfer Protocol
HTTPS
Hypertext Transfer Protocol over Secure Sockets Layer
IKE
Internet Key Exchange
IP
Internet Protocol
IPsec
Internet Protocol Security
IT policy
An IT policy consists of various rules that control the security features and behavior of devices.
MD5
Message-Digest Algorithm, version 5
MDM
mobile device management
MS-CHAP
Microsoft Challenge Handshake Authentication Protocol
NAT
network address translation
PFS
Perfect Forward Secrecy
245
Glossary
PKI
Public Key Infrastructure
PMK
pairwise master key
PRF
pseudorandom function family
PSK
pre-shared key
SCEP
simple certificate enrollment protocol
SHA
Secure Hash Algorithm
S/MIME
Secure Multipurpose Internet Mail Extensions
space
A space is a distinct area of the device that enables the segregation and management of different
types of data, applications, and network connections. Different spaces can have different rules for
data storage, application permissions, and network routing. Spaces were formerly known as
perimeters.
SSL
Secure Sockets Layer
Supervised iOS
devices
Supervised devices are configured to allow additional control of iOS device features. To enable
supervision of iOS devices that are owned by your organization, you can use Apple Configurator or
the Device Enrollment Program.
TCP
Transmission Control Protocol
TLS
Transport Layer Security
USB
Universal Serial Bus
VPN
virtual private network
xAuth
Extended Authentication
246
Legal notice
Legal notice
©2015 BlackBerry. All rights reserved. BlackBerry® and related trademarks, names, and logos are the property of BlackBerry
Limited and are registered and/or used in the U.S. and countries around the world.
Android, Google Chrome, and Google Play are trademarks of Google Inc. Apple, App Store, Apple Configurator, iCloud, and
Safari are trademarks of Apple Inc. Aruba and VIA are trademarks of Aruba Networks, Inc. Bluetooth is a trademark of Bluetooth
SIG. Check Point and VPN-1 are trademarks of Check Point Software Technologies Ltd. Cisco, Cisco AnyConnect, Cisco IOS,
and PIX are trademarks of Cisco Systems, Inc. and/or its affiliates in the United States and certain other countries. F5 is a
trademark of F5 Networks, Inc. HTC EVO is a trademark of HTC Corporation. IBM, Domino, and Notes are trademarks of
International Business Machines Corporation. iOS is a trademark of Cisco Systems, Inc. and/or its affiliates in the U.S. and
certain other countries. iOS® is used under license by Apple Inc. Juniper is a trademark of Juniper Networks, Inc. Microsoft,
Active Directory, ActiveSync, Windows, and Windows Phone are trademarks of Microsoft Corporation. OpenVPN is a trademark
of OpenVPN Technologies, Inc. RSA is a trademark of RSA Security. SonicWALL and Mobile Connect are trademarks of Dell,
Inc. T-Mobile is a trademark of Deutsche Telekom AG. Wi-Fi, WPA, and WPA2 are trademarks of the Wi-Fi Alliance. Entrust,
Entrust IdentityGuard, and Entrust Authority Administration Services are trademarks of Entrust, Inc. KNOX and Samsung KNOX
are trademarks of Samsung Electronics Co., Ltd. All other trademarks are the property of their respective owners.
This documentation including all documentation incorporated by reference herein such as documentation provided or made
available on the BlackBerry website provided or made accessible "AS IS" and "AS AVAILABLE" and without condition,
endorsement, guarantee, representation, or warranty of any kind by BlackBerry Limited and its affiliated companies
("BlackBerry") and BlackBerry assumes no responsibility for any typographical, technical, or other inaccuracies, errors, or
omissions in this documentation. In order to protect BlackBerry proprietary and confidential information and/or trade secrets,
this documentation may describe some aspects of BlackBerry technology in generalized terms. BlackBerry reserves the right to
periodically change information that is contained in this documentation; however, BlackBerry makes no commitment to provide
any such changes, updates, enhancements, or other additions to this documentation to you in a timely manner or at all.
This documentation might contain references to third-party sources of information, hardware or software, products or services
including components and content such as content protected by copyright and/or third-party websites (collectively the "Third
Party Products and Services"). BlackBerry does not control, and is not responsible for, any Third Party Products and Services
including, without limitation the content, accuracy, copyright compliance, compatibility, performance, trustworthiness, legality,
decency, links, or any other aspect of Third Party Products and Services. The inclusion of a reference to Third Party Products
and Services in this documentation does not imply endorsement by BlackBerry of the Third Party Products and Services or the
third party in any way.
EXCEPT TO THE EXTENT SPECIFICALLY PROHIBITED BY APPLICABLE LAW IN YOUR JURISDICTION, ALL CONDITIONS,
ENDORSEMENTS, GUARANTEES, REPRESENTATIONS, OR WARRANTIES OF ANY KIND, EXPRESS OR IMPLIED, INCLUDING
WITHOUT LIMITATION, ANY CONDITIONS, ENDORSEMENTS, GUARANTEES, REPRESENTATIONS OR WARRANTIES OF
DURABILITY, FITNESS FOR A PARTICULAR PURPOSE OR USE, MERCHANTABILITY, MERCHANTABLE QUALITY, NONINFRINGEMENT, SATISFACTORY QUALITY, OR TITLE, OR ARISING FROM A STATUTE OR CUSTOM OR A COURSE OF
DEALING OR USAGE OF TRADE, OR RELATED TO THE DOCUMENTATION OR ITS USE, OR PERFORMANCE OR NONPERFORMANCE OF ANY SOFTWARE, HARDWARE, SERVICE, OR ANY THIRD PARTY PRODUCTS AND SERVICES
REFERENCED HEREIN, ARE HEREBY EXCLUDED. YOU MAY ALSO HAVE OTHER RIGHTS THAT VARY BY STATE OR
247
Legal notice
PROVINCE. SOME JURISDICTIONS MAY NOT ALLOW THE EXCLUSION OR LIMITATION OF IMPLIED WARRANTIES AND
CONDITIONS. TO THE EXTENT PERMITTED BY LAW, ANY IMPLIED WARRANTIES OR CONDITIONS RELATING TO THE
DOCUMENTATION TO THE EXTENT THEY CANNOT BE EXCLUDED AS SET OUT ABOVE, BUT CAN BE LIMITED, ARE HEREBY
LIMITED TO NINETY (90) DAYS FROM THE DATE YOU FIRST ACQUIRED THE DOCUMENTATION OR THE ITEM THAT IS THE
SUBJECT OF THE CLAIM.
TO THE MAXIMUM EXTENT PERMITTED BY APPLICABLE LAW IN YOUR JURISDICTION, IN NO EVENT SHALL BLACKBERRY
BE LIABLE FOR ANY TYPE OF DAMAGES RELATED TO THIS DOCUMENTATION OR ITS USE, OR PERFORMANCE OR NONPERFORMANCE OF ANY SOFTWARE, HARDWARE, SERVICE, OR ANY THIRD PARTY PRODUCTS AND SERVICES
REFERENCED HEREIN INCLUDING WITHOUT LIMITATION ANY OF THE FOLLOWING DAMAGES: DIRECT, CONSEQUENTIAL,
EXEMPLARY, INCIDENTAL, INDIRECT, SPECIAL, PUNITIVE, OR AGGRAVATED DAMAGES, DAMAGES FOR LOSS OF PROFITS
OR REVENUES, FAILURE TO REALIZE ANY EXPECTED SAVINGS, BUSINESS INTERRUPTION, LOSS OF BUSINESS
INFORMATION, LOSS OF BUSINESS OPPORTUNITY, OR CORRUPTION OR LOSS OF DATA, FAILURES TO TRANSMIT OR
RECEIVE ANY DATA, PROBLEMS ASSOCIATED WITH ANY APPLICATIONS USED IN CONJUNCTION WITH BLACKBERRY
PRODUCTS OR SERVICES, DOWNTIME COSTS, LOSS OF THE USE OF BLACKBERRY PRODUCTS OR SERVICES OR ANY
PORTION THEREOF OR OF ANY AIRTIME SERVICES, COST OF SUBSTITUTE GOODS, COSTS OF COVER, FACILITIES OR
SERVICES, COST OF CAPITAL, OR OTHER SIMILAR PECUNIARY LOSSES, WHETHER OR NOT SUCH DAMAGES WERE
FORESEEN OR UNFORESEEN, AND EVEN IF BLACKBERRY HAS BEEN ADVISED OF THE POSSIBILITY OF SUCH DAMAGES.
TO THE MAXIMUM EXTENT PERMITTED BY APPLICABLE LAW IN YOUR JURISDICTION, BLACKBERRY SHALL HAVE NO
OTHER OBLIGATION, DUTY, OR LIABILITY WHATSOEVER IN CONTRACT, TORT, OR OTHERWISE TO YOU INCLUDING ANY
LIABILITY FOR NEGLIGENCE OR STRICT LIABILITY.
THE LIMITATIONS, EXCLUSIONS, AND DISCLAIMERS HEREIN SHALL APPLY: (A) IRRESPECTIVE OF THE NATURE OF THE
CAUSE OF ACTION, DEMAND, OR ACTION BY YOU INCLUDING BUT NOT LIMITED TO BREACH OF CONTRACT,
NEGLIGENCE, TORT, STRICT LIABILITY OR ANY OTHER LEGAL THEORY AND SHALL SURVIVE A FUNDAMENTAL BREACH OR
BREACHES OR THE FAILURE OF THE ESSENTIAL PURPOSE OF THIS AGREEMENT OR OF ANY REMEDY CONTAINED
HEREIN; AND (B) TO BLACKBERRY AND ITS AFFILIATED COMPANIES, THEIR SUCCESSORS, ASSIGNS, AGENTS, SUPPLIERS
(INCLUDING AIRTIME SERVICE PROVIDERS), AUTHORIZED BLACKBERRY DISTRIBUTORS (ALSO INCLUDING AIRTIME
SERVICE PROVIDERS) AND THEIR RESPECTIVE DIRECTORS, EMPLOYEES, AND INDEPENDENT CONTRACTORS.
IN ADDITION TO THE LIMITATIONS AND EXCLUSIONS SET OUT ABOVE, IN NO EVENT SHALL ANY DIRECTOR, EMPLOYEE,
AGENT, DISTRIBUTOR, SUPPLIER, INDEPENDENT CONTRACTOR OF BLACKBERRY OR ANY AFFILIATES OF BLACKBERRY
HAVE ANY LIABILITY ARISING FROM OR RELATED TO THE DOCUMENTATION.
Prior to subscribing for, installing, or using any Third Party Products and Services, it is your responsibility to ensure that your
airtime service provider has agreed to support all of their features. Some airtime service providers might not offer Internet
browsing functionality with a subscription to the BlackBerry® Internet Service. Check with your service provider for availability,
roaming arrangements, service plans and features. Installation or use of Third Party Products and Services with BlackBerry's
products and services may require one or more patent, trademark, copyright, or other licenses in order to avoid infringement or
violation of third party rights. You are solely responsible for determining whether to use Third Party Products and Services and if
any third party licenses are required to do so. If required you are responsible for acquiring them. You should not install or use
Third Party Products and Services until all necessary licenses have been acquired. Any Third Party Products and Services that
are provided with BlackBerry's products and services are provided as a convenience to you and are provided "AS IS" with no
express or implied conditions, endorsements, guarantees, representations, or warranties of any kind by BlackBerry and
BlackBerry assumes no liability whatsoever, in relation thereto. Your use of Third Party Products and Services shall be governed
248
Legal notice
by and subject to you agreeing to the terms of separate licenses and other agreements applicable thereto with third parties,
except to the extent expressly covered by a license or other agreement with BlackBerry.
The terms of use of any BlackBerry product or service are set out in a separate license or other agreement with BlackBerry
applicable thereto. NOTHING IN THIS DOCUMENTATION IS INTENDED TO SUPERSEDE ANY EXPRESS WRITTEN
AGREEMENTS OR WARRANTIES PROVIDED BY BLACKBERRY FOR PORTIONS OF ANY BLACKBERRY PRODUCT OR SERVICE
OTHER THAN THIS DOCUMENTATION.
BlackBerry Enterprise Software incorporates certain third-party software. The license and copyright information associated with
this software is available at http://worldwide.blackberry.com/legal/thirdpartysoftware.jsp.
BlackBerry Limited
2200 University Avenue East
Waterloo, Ontario
Canada N2K 0A7
BlackBerry UK Limited
200 Bath Road
Slough, Berkshire SL1 3XE
United Kingdom
Published in Canada
249
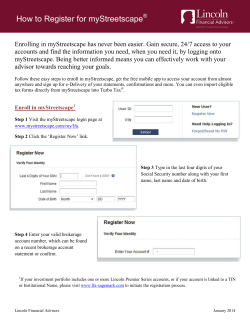


© Copyright 2026