
Using the Salesforce1 App
Using the Salesforce1 App
Salesforce, Summer ’15
@salesforcedocs
Last updated: June 20, 2015
© Copyright 2000–2015 salesforce.com, inc. All rights reserved. Salesforce is a registered trademark of salesforce.com, inc.,
as are other names and marks. Other marks appearing herein may be trademarks of their respective owners.
CONTENTS
OVERVIEW
........................................................1
Introducing the Salesforce1 Mobile App . . . . . . . . . . . . . . . . . . . . . . . . . . . . . . . . . . . . . . . 1
Requirements for Using Salesforce1 . . . . . . . . . . . . . . . . . . . . . . . . . . . . . . . . . . . . . . . . . . 1
Salesforce1 Accessibility Considerations . . . . . . . . . . . . . . . . . . . . . . . . . . . . . . . . . . . . . . . 3
SALESFORCE1 BASICS . . . . . . . . . . . . . . . . . . . . . . . . . . . . . . . . . . . . . . . . . . . . . . 4
Getting Around in Salesforce1 . . . . . . . . . . . . . . . . . . . . . . . . . . . . . . . . . . . . . . . . . . . . . 4
Data You Can Work With . . . . . . . . . . . . . . . . . . . . . . . . . . . . . . . . . . . . . . . . . . . . . . . . . 5
Get More Done with Actions . . . . . . . . . . . . . . . . . . . . . . . . . . . . . . . . . . . . . . . . . . . . . . 6
Work with Your Records . . . . . . . . . . . . . . . . . . . . . . . . . . . . . . . . . . . . . . . . . . . . . . . . . 7
Notifications . . . . . . . . . . . . . . . . . . . . . . . . . . . . . . . . . . . . . . . . . . . . . . . . . . . . . . . . . 8
Access Communities from Salesforce1 . . . . . . . . . . . . . . . . . . . . . . . . . . . . . . . . . . . . . . . . 9
Salesforce1 without Chatter . . . . . . . . . . . . . . . . . . . . . . . . . . . . . . . . . . . . . . . . . . . . . . 10
COLLABORATE IN SALESFORCE1
. . . . . . . . . . . . . . . . . . . . . . . . . . . . . . . . . . . . 11
Switch and Sort Your Feeds . . . . . . . . . . . . . . . . . . . . . . . . . . . . . . . . . . . . . . . . . . . . . . . 11
Post to a Feed . . . . . . . . . . . . . . . . . . . . . . . . . . . . . . . . . . . . . . . . . . . . . . . . . . . . . . . . 11
Like or Comment on a Post . . . . . . . . . . . . . . . . . . . . . . . . . . . . . . . . . . . . . . . . . . . . . . . 11
Mention People and Groups in Posts and Comments . . . . . . . . . . . . . . . . . . . . . . . . . . . . . 12
Post a Link . . . . . . . . . . . . . . . . . . . . . . . . . . . . . . . . . . . . . . . . . . . . . . . . . . . . . . . . . . 12
Add a Poll . . . . . . . . . . . . . . . . . . . . . . . . . . . . . . . . . . . . . . . . . . . . . . . . . . . . . . . . . . 12
Vote on a Poll . . . . . . . . . . . . . . . . . . . . . . . . . . . . . . . . . . . . . . . . . . . . . . . . . . . . . . . . 12
Search within a Feed . . . . . . . . . . . . . . . . . . . . . . . . . . . . . . . . . . . . . . . . . . . . . . . . . . . 12
Bookmark Posts . . . . . . . . . . . . . . . . . . . . . . . . . . . . . . . . . . . . . . . . . . . . . . . . . . . . . . 13
FIND INFORMATION
. . . . . . . . . . . . . . . . . . . . . . . . . . . . . . . . . . . . . . . . . . . . . . 14
Search Overview . . . . . . . . . .
Find Recently Accessed Objects
Find Items with Record Search .
Find Items with Global Search . .
Search Requirements and Tips .
.
.
.
.
.
.
.
.
.
.
.
.
.
.
.
.
.
.
.
.
.
.
.
.
.
.
.
.
.
.
.
.
.
.
.
.
.
.
.
.
.
.
.
.
.
.
.
.
.
.
.
.
.
.
.
.
.
.
.
.
.
.
.
.
.
.
.
.
.
.
.
.
.
.
.
.
.
.
.
.
.
.
.
.
.
.
.
.
.
.
.
.
.
.
.
.
.
.
.
.
.
.
.
.
.
.
.
.
.
.
.
.
.
.
.
.
.
.
.
.
.
.
.
.
.
.
.
.
.
.
.
.
.
.
.
.
.
.
.
.
.
.
.
.
.
.
.
.
.
.
.
.
.
.
.
.
.
.
.
.
.
.
.
.
.
.
.
.
.
.
.
.
.
.
.
.
.
.
.
.
.
.
.
.
.
.
.
.
.
.
.
.
.
.
.
.
.
.
.
.
.
.
.
.
.
.
.
.
.
.
.
.
.
.
.
14
14
15
16
16
WORK WITH RECORDS . . . . . . . . . . . . . . . . . . . . . . . . . . . . . . . . . . . . . . . . . . . . 18
View Records . . . . . . . . . . . . . . . . . . . . . . . . . . . . . . . . . . . . . . . . . . . . . . . . . . . . . . . . 18
See a Record’s Related Information . . . . . . . . . . . . . . . . . . . . . . . . . . . . . . . . . . . . . . . . . 18
Update Data in Your Records . . . . . . . . . . . . . . . . . . . . . . . . . . . . . . . . . . . . . . . . . . . . . 19
Add New Records . . . . . . . . . . . . . . . . . . . . . . . . . . . . . . . . . . . . . . . . . . . . . . . . . . . . 20
About Entering Data in Salesforce1 . . . . . . . . . . . . . . . . . . . . . . . . . . . . . . . . . . . . . . . . . 20
Contents
MANAGE RELATIONSHIPS AND DATA . . . . . . . . . . . . . . . . . . . . . . . . . . . . . . 22
Make a Phone Call from Salesforce1
Log a Previous Call . . . . . . . . . . . .
Send Email . . . . . . . . . . . . . . . . .
View an Account's Website . . . . . .
View News About an Account . . . .
Map a Location . . . . . . . . . . . . . .
Edit a Twitter Profile Association . . .
Use Twitter People in Common . . .
.
.
.
.
.
.
.
.
.
.
.
.
.
.
.
.
.
.
.
.
.
.
.
.
.
.
.
.
.
.
.
.
.
.
.
.
.
.
.
.
IMPROVE SALES PRODUCTIVITY
.
.
.
.
.
.
.
.
.
.
.
.
.
.
.
.
.
.
.
.
.
.
.
.
.
.
.
.
.
.
.
.
.
.
.
.
.
.
.
.
.
.
.
.
.
.
.
.
.
.
.
.
.
.
.
.
.
.
.
.
.
.
.
.
.
.
.
.
.
.
.
.
.
.
.
.
.
.
.
.
.
.
.
.
.
.
.
.
.
.
.
.
.
.
.
.
.
.
.
.
.
.
.
.
.
.
.
.
.
.
.
.
.
.
.
.
.
.
.
.
.
.
.
.
.
.
.
.
.
.
.
.
.
.
.
.
.
.
.
.
.
.
.
.
.
.
.
.
.
.
.
.
.
.
.
.
.
.
.
.
.
.
.
.
.
.
.
.
.
.
.
.
.
.
.
.
.
.
.
.
.
.
.
.
.
.
.
.
.
.
.
.
.
.
.
.
.
.
.
.
.
.
.
.
.
.
.
.
.
.
.
.
.
.
.
.
.
.
.
.
.
.
.
.
.
.
.
.
.
.
.
.
.
.
.
.
.
.
.
.
.
.
.
.
.
.
.
.
.
.
.
.
.
.
.
.
.
.
.
.
.
.
.
.
.
.
.
.
.
.
.
.
.
.
.
.
.
.
.
.
22
22
22
23
23
23
24
24
. . . . . . . . . . . . . . . . . . . . . . . . . . . . . . . . . . . 25
Increase Close Rates with the Sales Path . . . . . . . . . . . . . . . . . . . . . . . . . . . . . . . . . . . . . 25
Convert Leads to Contacts (Beta) . . . . . . . . . . . . . . . . . . . . . . . . . . . . . . . . . . . . . . . . . . . 26
MANAGE YOUR DAY WITH TODAY . . . . . . . . . . . . . . . . . . . . . . . . . . . . . . . . . 27
Get to Know Today . . . . . . . . . . . . . . . . . . . . . . . . . . . . . . . . . . . . . . . . . . . . . . . . . . . . 27
Set Up Today . . . . . . . . . . . . . . . . . . . . . . . . . . . . . . . . . . . . . . . . . . . . . . . . . . . . . . . . 27
How Today Matches Salesforce Data with Mobile Calendar Events . . . . . . . . . . . . . . . . . . . 28
Prepare for a Meeting . . . . . . . . . . . . . . . . . . . . . . . . . . . . . . . . . . . . . . . . . . . . . . . . . . 29
Dial In to a Conference Call . . . . . . . . . . . . . . . . . . . . . . . . . . . . . . . . . . . . . . . . . . . . . . 30
Supported Conference Call Providers and Invitation Formats . . . . . . . . . . . . . . . . . . . . . . . . 30
Get Directions to a Meeting . . . . . . . . . . . . . . . . . . . . . . . . . . . . . . . . . . . . . . . . . . . . . . 31
Send “Running Late” Email Messages . . . . . . . . . . . . . . . . . . . . . . . . . . . . . . . . . . . . . . . 31
TRACK YOUR ACTIVITIES . . . . . . . . . . . . . . . . . . . . . . . . . . . . . . . . . . . . . . . . . . 33
View Events . . . . . . . . . . . . . . . . . . . . . . . . . . . . . . . . . . . . . . . . . . . . . . . . . . . . . . . . . 33
Create Events . . . . . . . . . . . . . . . . . . . . . . . . . . . . . . . . . . . . . . . . . . . . . . . . . . . . . . . 33
About Task Lists . . . . . . . . . . . . . . . . . . . . . . . . . . . . . . . . . . . . . . . . . . . . . . . . . . . . . . 34
View Task Lists . . . . . . . . . . . . . . . . . . . . . . . . . . . . . . . . . . . . . . . . . . . . . . . . . . . . . . . 34
View Tasks . . . . . . . . . . . . . . . . . . . . . . . . . . . . . . . . . . . . . . . . . . . . . . . . . . . . . . . . . 35
Close or Reopen Tasks . . . . . . . . . . . . . . . . . . . . . . . . . . . . . . . . . . . . . . . . . . . . . . . . . 35
Edit Task Details . . . . . . . . . . . . . . . . . . . . . . . . . . . . . . . . . . . . . . . . . . . . . . . . . . . . . . 36
Create Tasks . . . . . . . . . . . . . . . . . . . . . . . . . . . . . . . . . . . . . . . . . . . . . . . . . . . . . . . . 37
ANALYZE YOUR DATA
. . . . . . . . . . . . . . . . . . . . . . . . . . . . . . . . . . . . . . . . . . . . 38
View Your Dashboards . . . . . . . . . . . . . . . . . . . . . . . . . . . . . . . . . . . . . . . . . . . . . . . . . 38
Drill Down from a Dashboard to a Report . . . . . . . . . . . . . . . . . . . . . . . . . . . . . . . . . . . . . 38
View Your Reports . . . . . . . . . . . . . . . . . . . . . . . . . . . . . . . . . . . . . . . . . . . . . . . . . . . . 39
WORK WITH FILES . . . . . . . . . . . . . . . . . . . . . . . . . . . . . . . . . . . . . . . . . . . . . . . . 40
Files You Can Access . . . . . . . . . . . . . . . . . . . . . . . . . . . . . . . . . . . . . . . . . . . . . . . . . . 40
Upload a Photo . . . . . . . . . . . . . . . . . . . . . . . . . . . . . . . . . . . . . . . . . . . . . . . . . . . . . . 41
Share a File . . . . . . . . . . . . . . . . . . . . . . . . . . . . . . . . . . . . . . . . . . . . . . . . . . . . . . . . . 41
Contents
Find a File . . . . . . . . . . . . . . . . . . . . . . . . . . . . . . . . . . . . . . . . . . . . . . . . . . . . . . . . . . 41
Add a Folder . . . . . . . . . . . . . . . . . . . . . . . . . . . . . . . . . . . . . . . . . . . . . . . . . . . . . . . . 41
Access Files When Offline . . . . . . . . . . . . . . . . . . . . . . . . . . . . . . . . . . . . . . . . . . . . . . . 42
MANAGE SALESFORCE1
. . . . . . . . . . . . . . . . . . . . . . . . . . . . . . . . . . . . . . . . . . . 43
Connect to a Different Instance . . . . . . . . . . . . . . . . . . . . . . . . . . . . . . . . . . . . . . . . . . . . 43
INDEX
. . . . . . . . . . . . . . . . . . . . . . . . . . . . . . . . . . . . . . . . . . . . . . . . . . . . . . . . . . . 44
OVERVIEW
Introducing the Salesforce1 Mobile App
The Salesforce1 mobile app is Salesforce on the go! This enterprise-class mobile experience gives you real-time access to the same
information you see in the office, but organized for getting work done faster between customer meetings, waiting for a flight, even
when you’re in line for coffee. The intuitive interface makes it easy to navigate and interact with data on a touchscreen, so you can review
and update information with just a few taps. And Salesforce1 includes many of your organization’s customizations, so the app is tailored
to your business needs.
The intuitive interface is optimized for easy navigation and data interaction on a touchscreen, so you can review details, update data,
and create new records with just a few taps. And Salesforce1 includes many of your organization’s Salesforce customizations, which
means your mobile experience is as tailored to your specific business needs as you need it to be.
Note: This release of Salesforce1 doesn’t have all of the functionality of the full Salesforce site. To see data or do actions that aren’t
supported in Salesforce1, use the full site instead.
You can get Salesforce1 in different ways:
• As a downloadable app from the App Store and Google Play™.
• As a mobile browser app that runs in supported mobile browsers. This option doesn’t require anything to be installed.
This guide covers all of the Salesforce1 apps. It assumes that your organization is using the out-of-the-box configuration of Salesforce1.
If you don’t see an option discussed here, ask your administrator if the feature was disabled.
Requirements for Using Salesforce1
Before getting started with the Salesforce1 mobile app, make sure that your Salesforce organization and your mobile device meet these
requirements.
Downloadable Apps: Supported Devices
You can run the Salesforce1 downloadable apps on these mobile devices.
• Apple mobile devices with iOS 7 or later:
– iPhone® 5 and later models
– iPad® 4 and later models
– iPad mini 2 and later models
• Android phones with Android 4.2 or later
Mobile Browser App: Supported Browsers and Devices
You can access the Salesforce1 mobile browser app in these environments.
• Apple Safari® browser on iPhone® 5 and later models, iPad® 4 and later models, or iPad mini 2 and later models, with iOS 7 or later
• BlackBerry® Browser on BlackBerry Z10 devices with BlackBerry OS 10.2 or later and BlackBerry Z30 devices with BlackBerry OS
10.2.1.3175 or later. (Salesforce1 isn’t supported on BlackBerry Q10 devices.)
• Good Access™ secure mobile browser on supported Android™ mobile devices with Android 4.2 or later and on supported Apple®
mobile devices with iOS 7 or later.
1
Overview
Requirements for Using Salesforce1
• Google Chrome browser on Android phones, and Google® Nexus 7™ and Nexus 10™ tablets, with Android 4.2 or later.
• Microsoft® Internet Explorer® 11 browser on Nokia™ Lumia™ 1020 and HTC™ 8X phones and Microsoft Surface 2 and Surface Pro 3
tablets, with Windows® 8.1 Update. (Salesforce1 isn’t supported on mobile phones and tablets with earlier versions of Windows 8.)
When using the mobile browser app, we recommend turning off Incognito Mode in Chrome, InPrivate Browsing in Internet Explorer, or
Private Browsing in Safari or BlackBerry Browser.
Salesforce Editions and Licenses
These Salesforce editions allow the use of Salesforce1. A special Salesforce1 or mobile license isn’t required.
• Contact Manager Edition
• Developer Edition
• Enterprise Edition
• Group Edition
• Performance Edition
• Personal Edition
• Professional Edition
• Unlimited Edition
Database.com Edition isn’t supported.
These user license types can access Salesforce1.
• Salesforce users
• Salesforce Platform and Force.com users
*
• Chatter Plus (also known as Chatter Only) users, Chatter Free users, and Chatter External users
• Customer Community and Partner Community external users
• Portal users who are a member of a Salesforce community
These user license types aren’t supported: portal users (unless a member of a Salesforce community), Database.com users, Sites and
Site.com users, Data.com users, and Work.com users.
Note: You can access the same data and functionality that’s available to you in the full site, as determined by your organization’s
Salesforce edition, your user license type, and your assigned user profile and permission sets.
*
Chatter Plus, Chatter Free, and Chatter External users must have the “API Enabled” profile permission turned on to use any of the
Salesforce1 downloadable apps. Chatter External users who have API access can’t access Groups or People list views when using
a downloadable app.
Wireless Connection
A Wi-Fi® or cellular network connection is needed to communicate with Salesforce. For cellular connections, a 3G network or faster is
required. For the best performance, we recommend using Wi-Fi or LTE.
If you’re using one of the Salesforce1 downloadable apps, you can view your most recently accessed records when your device is offline.
Locales and Languages
Salesforce1 works with almost all Salesforce-supported locales and the fully supported and end-user languages. (The Salesforce Help
includes a complete list of supported locales and languages.) Languages that are read right to left, including Arabic and Hebrew, aren’t
supported in this release.
Salesforce1 includes multi-currency support, but advanced currency management isn’t available.
2
Overview
Salesforce1 Accessibility Considerations
Salesforce1 Accessibility Considerations
The Salesforce1 mobile app is designed to give users working with screen readers and other accessibility features a fully accessible mobile
experience. Unlike the full Salesforce site, Salesforce1 doesn’t require accessibility mode. If you use Salesforce1 with an assistive device,
look here for considerations to keep in mind.
Salesforce1 works with all the accessibility features built into your mobile device, including VoiceOver and AssistiveTouch on iOS devices
and TalkBack and Explore by Touch on Android devices. The following, however, are known issues that affect those accessibility features.
On an iOS device, assistive technology users should consider these issues:
• Three-finger swiping to scroll doesn’t work on some pages, including the main feed, list views, record view pages, Today, and
drill-to-report data tables. To access items further down the page, flick right from an item on the bottom of the screen and keep
flicking until you reach the items you want. Alternatively, you can use the pass-through gesture to initiate scrolling.
• On some pages, the Pull to Refresh gesture doesn’t refresh the screen.
• Hidden hyperlinks are not active.
• Using pinch and spread to zoom isn’t currently supported. To zoom, use the iOS zoom function.
• Introductory screens have decorative images that are called out but not identified as decorative.
On an Android device, assistive technology users should consider the following:
• When you post to Chatter, the area for writing your post isn’t announced.
• Introductory screens have decorative images that are called out but not identified as decorative.
On all devices, the close button for the notifications list doesn’t have a description. The notifications list is located in the upper left of the
screen.
3
SALESFORCE1 BASICS
Getting Around in Salesforce1
Get to your data using the navigation menu and a few simple gestures.
When you log in to Salesforce1, you see your landing page. Depending on how your administrator has set up Salesforce1, this might be
your Chatter feed, your task list, or another page or app.
• From the landing page, tap
to go to the navigation menu.
4
Salesforce1 Basics
Data You Can Work With
What you see in the navigation menu depends on how your administrator has set up Salesforce1 and what’s available in your
organization. The default navigation menu includes:
– Your Chatter feed (1), if Chatter is enabled. There are also separate items for People and Groups.
– The Today app (2), your one-stop place to review account and contact information before meetings, instantly join conference
calls, quickly log notes about events, and more. (Available in the downloadable apps only.)
– Your task lists, Salesforce events calendar, dashboards and reports, and your organization’s custom pages or apps (3).
– Objects you’ve accessed recently (4). Tap More at the bottom of the Recent section to see the full list of all objects available to
you in Salesforce1.
– Help for Salesforce1 (5).
• Tap
to return to previously viewed pages.
When you tap links, like the ones in feeds or on record detail pages, the new pages open on top of the page you started from. This
means that you may have to tap
more than once to return to the navigation menu.
• To refresh a page, pull down at the top of it.
To see more information than what’s currently loaded on a page, pull up at the bottom of it.
SEE ALSO:
Search Overview
Work with Your Records
Data You Can Work With
Salesforce1 uses your organization’s Salesforce edition, your user license type, and your assigned user profile and permission sets to
determine the data that’s available to you. In most cases you see the same objects, record types, fields, and page layouts that you do
when working in the full Salesforce site. Not all Salesforce data or functionality is supported in Salesforce1, however.
If Chatter is enabled, you can access feeds, people, groups, and files.
If you’re using a Salesforce1 downloadable app, you can use Salesforce Today to prepare for meetings, stay in touch with customers,
quickly join conference calls, and generally manage your day.
These objects are available in Salesforce1. Unless noted otherwise, you can view, edit, or create records for these objects.
• Accounts and Person Accounts
• Campaigns
• Cases
• Contacts
• Contracts
• D&B Company (view only, for Data.com Premium Prospector and Data.com Premium Clean customers)
• Dashboards (view only)
• Events
• Leads
• Live Chat Transcripts
• Opportunities
• Orders (view or edit only)
5
Salesforce1 Basics
Get More Done with Actions
• Reports (view only)
• Salesforce Knowledge Articles (view only; mobile browser app only)
• Tasks
• Work.com Coaching, Goals, Thanks, Rewards, and Skills (Skills not available in the iOS downloadable app)
• External objects via Lightning Connect (view only; not available in the Android downloadable app)
• Custom objects that have a tab you can access
With some exceptions, all of the standard and custom fields are available on these records. And you can work with most of the related
lists for supported objects.
If you’re new to Salesforce and don’t yet have a history of recent objects, you initially see a set of default objects in the Recent section
in the Salesforce1 navigation menu. As you spend time working in Salesforce1 and the full Salesforce site, the objects that you use the
most eventually replace the default ones in the Recent section and become the objects that are available for global searches in Salesforce1.
Tip: It can take up to 15 days for the objects that you work with regularly to appear in the Recent section. To make objects appear
under Recent immediately, pin them from your search results in the full site.
Tap More at the bottom of the Recent section to see the full list of all objects available to you in Salesforce1.
SEE ALSO:
Getting Around in Salesforce1
Update Data in Your Records
Find Items with Global Search
Get More Done with Actions
Actions in Salesforce1 save time by letting you quickly and easily create records, log calls, and do other common tasks, from just about
anywhere in the app.
Most pages have an action bar, with a set of actions relevant to that page.
List views, task lists, and related lists on records let you do actions for specific items in the list without having to open any records. (If
you’re using the mobile browser app on a tablet, this option isn’t available for list views.) Simply swipe left on a row in a list. List item
actions show the same actions that are available in the action bar when actually viewing the record.
6
Salesforce1 Basics
Work with Your Records
The action bar and list item actions show the three or four most relevant actions for the page you’re viewing. To see the complete set
of actions that are available, tap
. This opens the action menu.
Note: The actions that you see depend on where you are in the app. For example, on an account, you might see actions for
creating a contact or case related to the account, while on a case record you might see actions that let you create a child case or
a note. Available actions are also affected by how your administrator has set up Salesforce and Salesforce1.
If you’re a Chatter Free user, only the basic Chatter actions—Post, File, Link, Poll, and Thanks—are available.
Work with Your Records
Record information is displayed in a multi-page record view.
Record views call out important details in the highlights area at the top of each page. You see up to four fields (1), which are specified
by your administrator and are unique to each object.
7
Salesforce1 Basics
Notifications
Depending on the object, the record view may include the record’s feed page, the record detail page, and the related information page.
For most objects, the record view opens on the record detail page. Swipe, or tap on the desired tab, to move between the pages (2).
As with the full Salesforce site, you need the “Read” user permission on each object for which you want to view records. In most cases,
Salesforce1 shows you the same information about a record that you see in the full site. However, some Salesforce data isn’t available
in this release of Salesforce1.
SEE ALSO:
View Records
See a Record’s Related Information
Update Data in Your Records
Make a Phone Call from Salesforce1
Log a Previous Call
Notifications
Salesforce1 uses notifications to alert you when key events occur that you should know about or that require your attention—such as
when you’ve received an approval request or someone has mentioned you in Chatter.
There are two types of notifications in Salesforce1: push and in-app.
Push notifications are alerts that appear on your mobile device when you're not using Salesforce1. These alerts are available in the
downloadable apps only, and can consist of text, icons, and sounds, depending on the device type. You can choose whether to receive
push notifications; however, you can't enable push notifications if they were disabled by your administrator. You can also set the types
of push notifications that you want to receive, by tapping
then selecting Settings > Push Notifications Settings.
8
Salesforce1 Basics
Access Communities from Salesforce1
In-app notifications are alerts that keep you aware of activity while you’re using Salesforce1. By tapping , you can view the 20 most
recent notifications you received in the last 90 days. When you navigate away from the notifications list, all existing notifications are
marked as read.
Tapping a notification takes you to the relevant record. For example, if you tap a notification that someone has mentioned you, the post
in which you were mentioned is displayed.
Tip: If Salesforce Communities is enabled for your organization, you see notifications from all communities you’re a member of.
To help identify which community a notification comes from, the community name is listed after the time stamp.
SEE ALSO:
Access Communities from Salesforce1
Access Communities from Salesforce1
You can use Salesforce1 to switch between your internal organization and your Salesforce Communities if you have a Customer Community,
Partner Community, or other supported portal license.
You can switch between your internal organization and any communities you’re a member of.
then tap the arrow at the top of the navigation menu and select the community you want to access from the drop-down
• Tap
menu.
• To switch back to your internal organization, tap
name> Internal.
then tap the arrow next to the community name and select <Company
When you switch to a community:
• Salesforce1 refreshes to display only content from the selected community.
• Global search is scoped to the community. To reflect this, the text in the search box shows: Search <Community Name>.
• You see notifications from all communities you’re a member of. To help identify which community a notification comes from, the
community name is listed after the time stamp.
SEE ALSO:
Notifications
Find Items with Global Search
9
Salesforce1 Basics
Salesforce1 without Chatter
Salesforce1 without Chatter
Salesforce1 is available without the collaboration tool Chatter.
If your administrator has turned off Chatter, Chatter features like feeds and posts won’t be available and you won’t see the Feed, People,
Groups, and Files items in the navigation menu. However, you can still access your accounts, opportunities, and other objects, tap a
record to see record details, work with tasks and events, and use available apps, including Today.
10
COLLABORATE IN SALESFORCE1
Switch and Sort Your Feeds
View different feeds and sort posts in a feed by date or by most recent activity.
• From the navigation menu, tap Feed to see everything you follow.
If you don’t see Feed in your navigation menu, your administrator didn’t turn on Chatter for your company.
• Tap
at the top of your feed to switch between feeds.
– What I Follow: Updates from people and records you follow, and groups you’re a member of
– To Me: Posts others make on your profile and posts and comments where others mentioned you
– Bookmarked: Posts you bookmarked
– All Company: Posts and comments from your entire company, including from people, groups, and feed tracked changes for
records and fields
• At the top of your feed, tap
to sort your feed by post date or by posts with the most recent activity.
• Tap a post to see all comments on that post.
Post to a Feed
Write a post to let people know what you’re working on, to ask questions, and to share information.
1. Tap
in the action bar.
2. Write your post.
3. Tap Submit.
SEE ALSO:
Mention People and Groups in Posts and Comments
Like or Comment on a Post
Post a Link
Vote on a Poll
Bookmark Posts
Like or Comment on a Post
Comment on a post or like a post or comment to show your support.
When you comment or like a post or comment, you’ll receive email notifications if others comment on that post.
• Tap Comment and write your comment.
• Tap
to like a post or comment.
11
Collaborate in Salesforce1
• Tap
Mention People and Groups in Posts and Comments
on a liked post or comment to stop liking it.
Mention People and Groups in Posts and Comments
Mention people or a group to keep them informed when you’re discussing something relevant to them.
• When writing a post or comment, type @ followed by the first few letters of the person’s or group’s name to see the five best matches,
then tap the person’s or group’s name in the list. To see more matches or search for a person or group, tap . Drag the list up or
down to scroll through the list.
Post a Link
1. Tap
in the action bar, then tap
in the action menu.
2. Type the link’s URL and a descriptive name for the link.
3. Write something about the link.
4. Tap Share.
Add a Poll
Conduct a survey. Add a poll with a list of choices for people to cast a vote.
1. Tap
in the action bar, then tap
in the action menu.
2. Write a question.
You can also mention people or a group.
3. Provide at least two choices.
Tap Add a choice to add more choices.
4. Tap Submit.
Vote on a Poll
Cast your vote on a poll and view the poll results.
• On a poll, tap one of the choices, then tap Vote.
You can only select one choice.
• Tap View results to see the latest poll results.
• Tap Change vote and select another choice to change your vote.
Search within a Feed
Search the main feed to find something that was previously discussed.
Search in the feed locates information within the main feed’s posts, comments, hashtag topics, mentions, and files.
12
Collaborate in Salesforce1
Bookmark Posts
1. At the top of your feed, tap in the search box where it says Search the feed. In the iOS downloadable app, drag the page down to
expose the search box.
2. Type your search terms.
3. Start the search from your keyboard.
Feed items with matching terms are displayed.
4. Click a feed item to open it and view the matching terms.
If no results are found, tap in the search box again and change your search terms.
Bookmark Posts
Bookmark posts you want to keep track of.
In you’re using a downloadable app, simply double-tap the post you want to bookmark.
If you’re using the mobile browser app:
1. Tap a post to see the post’s expanded view.
2. At the top right of the post, tap
The
, then tap Bookmark Post.
icon appears at the top right corner of the bookmarked post.
Navigate to your Bookmarked feed to see all the posts you’ve bookmarked.
To remove a bookmark using a downloadable app, double-tap the bookmarked post. In the mobile browser app, tap the post, then tap
and select Remove Bookmark.
13
FIND INFORMATION
Search Overview
Use search in Salesforce1 to quickly get to the data you need. You can search for Chatter people, groups, and files if Chatter is enabled,
and all the objects you have access to from Salesforce1, except tasks and events.
There are three ways to search for information in Salesforce1.
• Find an item by the type of object, such as a specific contact or lead. Tap the object in the navigation
object home page, where you can:
menu. This opens the
– Select a specific record from the list of recently accessed items or from a list view.
– Search in the record search box, where it says Search Object.
• Find an item by keyword search, such as a person who could be either a contact or lead, using global search.
– In a downloadable app, scroll to the top of the navigation menu and tap in the Search box.
– In the mobile browser app, tap
in the header.
On the global search page, you can:
– Select a specific record from the list of recently accessed items.
– Search in the global search box.
• Search for posts, comments, hashtag topics, mentions, and files using the search box in the main feed.
Find Recently Accessed Objects
In the Salesforce1 navigation menu, the Recent section shows the objects you access the most.
If you’re new to Salesforce and don’t yet have a history of recent objects, you initially see a set of default objects in the Recent section
in the Salesforce1 navigation menu. As you spend time working in Salesforce1 and the full Salesforce site, the objects that you use the
most eventually replace the default ones in the Recent section and become the objects that are available for global searches in Salesforce1.
Tip: It can take up to 15 days for the objects that you work with regularly to appear in the Recent section. To make objects appear
under Recent immediately, pin them from your search results in the full site.
Tap an object in the Recent section to open the object’s home page.
• This page includes up to four of your mostly recently accessed list views (1) and your recently accessed records (2) within the object.
You can select records directly from this list or from your list views.
14
Find Information
Find Items with Record Search
• If you’ve accessed five or more list views in the full site, the More List Views option displays (3). Tap this option to see up to 200
standard and custom list views for the object. (In the mobile browser app, this option is available regardless of the number of list
views you’ve used in the full site.)
• Use the search box (4) to find records that you haven’t accessed recently. (If you’re using the mobile browser app on a tablet, tap
in the header to access the search box.)
SEE ALSO:
Data You Can Work With
Find Items with Global Search
Find Items with Record Search
Find Items with Record Search
Tapping the name of an object in the navigation menu, such as Contacts or Opportunities, opens the object’s home page where you
can search for specific records.
If the record you want isn’t in the list of recently accessed items, search the object.
1. Tap in the search box where it says Search Object. (If you’re using the mobile browser app on a tablet, tap
first.
in the header
2. Type your search terms.
As you type, the list of recently accessed records filters to show matching items. You can select an item from this list at any time.
3. If there are no matching items, start the search from your keyboard or tap Search for your keywords at the bottom of the
search page.
Search results include all the matching records that you can access for this object. Matching list views are excluded.
15
Find Information
Find Items with Global Search
If no results are found, tap in the search box again and change your search terms.
Find Items with Global Search
Use global search to find records for the objects that are in the Recent section of the Salesforce1 navigation menu. Tasks and events
aren’t available in global search.
The way you access the global search box depends on the Salesforce1 app you’re using.
• Downloadable apps: open the Salesforce1 navigation menu and tap the search box.
• Mobile browser app: tap
in the header.
To do a global search:
1. Tap in the search box.
Note: In the mobile browser app, the global search page is organized by object so you can see recently accessed items and
search results on an object-by-object basis. The search scope bar below the search box shows the object that you’re currently
searching. Tap a different object in the bar to change your view. Swipe to the left on the bar to see objects that aren’t currently
visible.
2. Type your search terms. The list of recently accessed items changes to show only items that match what you’ve typed so far. (In the
mobile browser app, when three or more characters are entered, the list continues to filter matching recently accessed items and
also starts to show matching records that haven’t been accessed recently.) At any point, you can tap an item in the list to open it.
3. If no matching items are displayed by the time all keywords are entered, start the search from your keyboard or tap Search for
keywords at the bottom of the search page.
Note: When doing a global search in Salesforce1, you can find records for the objects that appear in the Recent section only. To
find records for the other objects that are in the full object list when the Recent section is expanded, search from the object’s home
page.
It can take up to 15 days for the objects that you work with regularly to appear in the Recent section. To make objects appear
under Recent immediately, pin them from your search results in the full site.
SEE ALSO:
Access Communities from Salesforce1
Search Requirements and Tips
Keep in mind these requirements for search terms, and these tips for enhancing your search results.
• Your search term must have two or more characters. Special characters, such as " ? * ( ), aren't included in the character count. For
example, a search for (a) won't return any search results.
• Search isn't case-sensitive. For example, a search for california finds the same items as a search for California.
• Find phone numbers by entering part or all of a number. For example, to find (415) 999-3434, enter 4159993434, 999, or 3434.
To search for the last seven digits, you must enter the punctuation, such as 999-3434.
• List views aren’t included in global search or record search results. To find list views, open the record search page and type your
search terms. As you type, the list of matching items expands to show list views you can access for the object.
16
Find Information
Search Requirements and Tips
• In Chinese, Japanese, Korean, and Thai (CJKT) you can find a person by entering last name before first name; searching for 佐々木
律子 returns any person who has both the last name 佐々木 and first name 律子.
Note: Before you search using CJKT characters in sidebar search, ask your administrator to enable the “Enable Search
Optimization if your Content is Mostly in Japanese, Chinese, or Korean” permission.
• It can take up to 15 days for the objects that you work with regularly to appear in the Recent section. To make objects appear under
Recent immediately, pin them from your search results in the full site.
Refine Search Results Using Operators and Wildcards
Note: Wildcards and operators aren’t recognized when searching for dashboards.
• Search for exact phrases by putting quotation marks around multiple keywords. For example, "call john smith" finds items
with call john smith, but not items with call john p. smith or john smith called.
• Narrow or broaden your search using operators such as AND, OR, and AND NOT.
• If you don’t know the exact name or phrase that you’re looking for, use a wildcard character as a placeholder for characters or words.
– Asterisks match zero or more characters at the middle or end (not the beginning) of your search term. For example, a search for
john* finds items that start with john, such as, john, johnson, or johnny. A search for mi* meyers finds items with mike
meyers or michael meyers. (Searches for groups or people are always automatically appended with an asterisk.)
– Question marks match only one character in the middle or end (not the beginning) of your search term. For example, a search
for jo?n finds items with the term john or joan but not jon or johan.
17
WORK WITH RECORDS
View Records
You can use Salesforce1 to view the same records that you access in the full Salesforce site.
1. Tap
then do one of the following:
• Use global search to find a record.
• Tap the desired object in the Recent section, then select a record from the list of recently accessed items, from a list view, or do
a record search.
2. In the record view, swipe right or left to move through the record’s pages, or move directly to a specific page by tapping its tab.
3. On a page in the record view:
• Do actions from the action bar, like post to the record’s feed or create a related record.
• Tap links in fields on the record detail page to make a phone call, send an email, open another record, or view an external website.
• View other information, like account news, related lookups, related lists, or Visualforce pages on the related information page.
SEE ALSO:
See a Record’s Related Information
Get More Done with Actions
See a Record’s Related Information
When you view a record, you can also access information that’s related to the record, including related lookups that show other objects
associated with the record, related lists, and Visualforce pages. You can also see Twitter profiles and account news on some objects. In
Salesforce1, this information displays in separate cards on the related information page. The related cards you see depends on your
permissions and your organization’s page layout customizations.
1. When viewing a record, swipe to the related information page, which is usually the third page in the record view.
18
Work with Records
Update Data in Your Records
2. Scroll the page to see the available related lists and other cards. At the bottom of the page, you may need to pull up to load additional
cards.
• Use the Twitter card to associate and view Twitter profiles for accounts, contacts, and leads. If you don’t see this card for these
objects, ask your administrator to set up the Twitter feature for Salesforce1.
• Use the Account News card to see top news items for accounts. If you don’t see this card on your accounts, ask your administrator
to enable Account News.
• Use a related lookup card to see other objects that have a relationship with the record; for example, opportunities that are
associated with the event record you’re viewing. These cards display only when associated records exist.
• Tap a related list card to view the complete related list, then select a related record to view it in a new page.
• Tap a Visualforce card to open the mobile-optimized Visualforce page.
SEE ALSO:
View News About an Account
Edit a Twitter Profile Association
Update Data in Your Records
You can use Salesforce1 to edit the same records that you have permission to edit in the full Salesforce site. As with the full site, you
need the “Edit” user permission on each object for which you want to edit records.
1. When viewing a record, tap
in the action bar.
2. Update the record’s information on the edit page.
3. Tap Save.
19
Work with Records
Add New Records
Unsupported fields can’t be edited in Salesforce1. Use the full site to update data in unsupported fields.
SEE ALSO:
About Entering Data in Salesforce1
Data You Can Work With
Edit Task Details
Add New Records
You can create records for any standard or custom object that you’re able to access. You need the “Create” user permission on any object
for which you want to create records.
Note: The way you create tasks and events is a bit different from the steps described here.
To create records for standard or custom objects:
1. Select one of these options.
• In the navigation
tablet, tap
menu, tap an object in the Recent section, then tap New. (If you’re using the mobile browser app on a
in the action bar.)
• In the action bar on a feed or in a record view, tap the action for the type of record you want to create; for example,
or
(The actual icons that you see in the action bar and action menu depend on where you’re working in the app, how your
administrator has set up actions for your organization, and whether your organization has Chatter enabled.)
2. Select a record type, if prompted.
3. Enter information for the record on the create page.
You aren’t able to enter data to fields that aren’t supported in the Salesforce1 app. You’ll need to use the full Salesforce site to
populate these types of fields.
4. Tap Save.
SEE ALSO:
See a Record’s Related Information
About Entering Data in Salesforce1
Create Tasks
Create Events
About Entering Data in Salesforce1
Here are some notes about working with different types of fields when creating or editing records in the mobile app.
• You can’t modify a record’s owner or its record type.
• There are a few fields that aren’t currently supported and can’t be populated in Salesforce1, or that have restricted functionality in
Salesforce1.
– division fields
– state and country picklists
20
.
Work with Records
About Entering Data in Salesforce1
– territory management fields
• Combo boxes, which combine a picklist with a text field (for example, the Subject field on task records), aren’t available. Salesforce1
eliminates the picklist and includes the text field only.
• Lookup fields:
– Enhanced lookups aren’t supported, so you can’t use wildcards in lookup searches and you can’t sort, filter, and page through
search results.
– Dependent lookups aren’t supported.
– Lookup filters aren’t respected, so lookup search results aren’t restricted in any way. You may wind up selecting an item that
isn’t valid for your organization, resulting in an error message when you save your record.
• Phone number fields display a keypad, from which you tap out the phone number. The keypad doesn’t include parentheses, hyphens,
or periods, and Salesforce1 doesn’t apply any phone number formatting when you save the record. If you want to apply a specific
phone number format, edit the record in the full site.
• Controlling and dependent picklists are supported, but Salesforce1 doesn’t display indicators for these fields on create and edit
pages. To determine if a picklist field is dependent, and which picklist field controls it, view the record in the full site.
• Salesforce1 automatically adds http:// to addresses in URL fields. For secure web pages, however, you need to manually enter
https://.
SEE ALSO:
Update Data in Your Records
Edit Task Details
Add New Records
Create Tasks
Create Events
21
MANAGE RELATIONSHIPS AND DATA
Make a Phone Call from Salesforce1
Make a call to a contact, account, or lead directly from Salesforce1.
1. When viewing a record, tap
in the action bar.
Note: If this option doesn’t appear in the action bar on your record, verify that you have the required “Edit Task” user permission,
the record includes a phone number to call, and you have access to view phone numbers for the record.
2. If more than one phone number is available, select the number to call.
3. When your call is finished, complete the Log a Call form if desired and tap Save.
Log a Previous Call
When you make a phone call to an account, contact, or lead using Salesforce1, you’re automatically prompted to log the call. You can
also choose to log a call that you made at another time.
1. When viewing a record, tap
in the action bar.
Note: If this option doesn’t appear in the action bar on your record, verify that you have the required “Edit Task” user permission,
the record includes a phone number to call, and you have access to view phone numbers for the record.
2. Select:
• A phone number to initiate and complete a call.
• Log Without Calling to enter notes about a call made at a different time.
3. Complete the Log a Call form and tap Save.
If you log a call you made outside Salesforce1, the date and time reflect when you create the log and can’t be changed to match the
date and time you actually made the call.
Send Email
Send an email message to a contact, lead, or person in your organization.
1. When viewing a record, tap
in the action bar.
Note: This option doesn’t appear in the action bar if there aren’t any email addresses for your contact, lead, or colleague, or
if you don’t have access to view email address fields.
2. If more than one email address is available, select an address to send mail to.
Email is sent from your device’s email app. When you’re finished, switch back to the Salesforce1 app.
22
Manage Relationships and Data
View an Account's Website
View an Account's Website
Quickly view websites associated with your accounts.
1. When viewing an account, tap
in the action bar.
Note: This option doesn’t appear in the action bar if the account record doesn’t include any website URLs or if you don’t have
access to website URL fields.
2. Select a website, if more than one is listed.
The website opens in your device’s Web browser.
View News About an Account
Check out the latest news about your accounts.
The Account News card appears on Account related information pages. The card shows one top news item for the account. Tap More
to see up to 10 news items.
Note: In the downloadable apps, Account News also appears in Salesforce Today.
If this card isn’t displaying on your account records, ask your administrator to enable Account News.
The news items that you see are unique, based on the account’s name and industry. In Today, articles are also selected based on the
accounts that are associated with attendees on your upcoming mobile calendar events and on recently viewed accounts.
Account News is curated using technology provided by Data.com. Salesforce pre-processes all news articles to ensure relevance, and
to filter out spam and inappropriate content. It’s not possible to add or change news sources.
Note: For most accounts, Salesforce provides articles from our own news processing platform, which collects news from Yahoo,
RSS feeds, and Twitter content of news providers. On occasion, if a match isn’t found in our database, we may search Yahoo for
news specific to your account, using the account name you’ve listed in Salesforce. Queries performed by Salesforce are performed
using secure protocols and are not linked to individual Salesforce users.
You can also search Google News for account information, directly from Salesforce1.
1. When viewing an account, tap
in the action bar.
2. The account’s name is used as the Google News search term. To search for a variation on the name or by another term, just change
the search term and search again.
Google News about the account displays in your device’s Web browser.
Map a Location
View a map of your account’s, contact’s, or lead’s address or geolocation.
1. When viewing a record, tap
in the action bar.
Note: This option doesn’t appear in the action bar if your account, contact, or lead record doesn’t include any addresses or
geolocation coordinates.
2. If more than one location is available, tap the address you’d like to map.
23
Manage Relationships and Data
Edit a Twitter Profile Association
3. Confirm your map request, if prompted.
Maps open in your device’s map app.
Records with standard address fields display a Google Maps image of the address. The address must include the street and city fields
and either the state, postal code, or the country. Tap the map image to open the address in your device’s map app.
Edit a Twitter Profile Association
If your organization uses Social Accounts and Contacts, you can associate accounts, contacts, and leads with Twitter profiles, or change
or remove existing associations.
Note: As in the full Salesforce site, you must have a Twitter account to set up or edit associations with Twitter user profiles, and
“Edit” permission for accounts, contacts, or leads.
If the Twitter card isn’t available on account, contact, or lead related information pages, ask your administrator to set up the Twitter
feature for Salesforce1.
1. Associate or view Twitter profiles from the Twitter card on the related information page in a record view.
• To associate a Twitter profile, tap Sign in to Twitter and log in to Twitter, or tap Search for Twitter Profile.
•
•
To change the Twitter profile association, tap
, then tap Change Association.
To remove the Twitter profile association, tap
, then tap Remove Association. The association will be removed.
2. Salesforce1 searches for Twitter profiles matching the name of your account, contact, or lead. If the search doesn’t return any results,
or if none of the results appear to be the right profile, you can change the search and try again.
Note: You can associate up to 15 Twitter profiles in a 15 minute period.
3. Tap a Twitter profile to associate it.
Note: Associating a Twitter profile doesn’t make you follow the user on Twitter.
Changes made to associations with Twitter are shared between the full site and Salesforce1.
Use Twitter People in Common
Discover common connections you share with your accounts, contacts, or leads.
People in Common lists up to five Twitter users who you follow, and who your account, contact, or lead also follows.
Tap a Twitter user icon to view that user’s Twitter profile.
24
IMPROVE SALES PRODUCTIVITY
Increase Close Rates with the Sales Path
Now it’s easy to follow your organization’s sales process and get your deals to closed! Sales Path is a visual assistant that guides you
through each of the stages required to complete a sale. At each stage, Sales Path highlights key opportunity fields and offers additional
information, such as tips and Chatter links, that can help with closing the sale.
Note: If you don’t see Sales Path when viewing opportunities, ask your administrator to enable this feature.
When you view an opportunity in Salesforce1, Sales Path shows the opportunity’s stage, the key fields to complete, and additional
stage-relevant information, such as links to Chatter posts and files, tips for the stage, and policy notes. When the stage is completed,
simply tap Mark Stage as Complete to continue. The opportunity updates to the next stage, displaying the key fields and information
for the new stage.
If it turns out you marked a stage as complete too soon, you can easily go back to an earlier stage. Select the stage name then tap Mark
as Current Stage or change the stage in the opportunity record. Fast tracking a sale? You can skip ahead to a later stage using the same
process.
25
Improve Sales Productivity
Convert Leads to Contacts (Beta)
When you’re working with an opportunity, you can hide Sales Path by tapping Show Less and recall it by tapping Show More. In either
case, the entire opportunity, including all of its fields, appears under All Details.
Convert Leads to Contacts (Beta)
Convert qualified leads to contacts and create opportunities, so you can grow your revenue pipeline on the go.
Note: Converting leads in Salesforce1 is a beta feature that is production quality but has known limitations. You can provide
feedback and suggestions for Lead Conversions on the IdeaExchange.
If you don’t see this option when working with Leads in the mobile app, ask your administrator to enable it.
To convert qualified leads to contacts and create opportunities, open the lead record and tap
on the action bar.
If Duplicate Management is enabled for your organization, Salesforce1 will warn you if you’re about to create a duplicate contact.
26
MANAGE YOUR DAY WITH TODAY
Get to Know Today
Salesforce Today in Salesforce1 gets you ahead of your day from the start, and helps keep you there as the day progresses. By collating
the meetings, appointments, and other events from your selected mobile calendars, together with your Salesforce tasks, contacts,
accounts, and other recent records, Today gives you a central place to manage your entire day. Today is available in the Salesforce1
downloadable apps only.
Your day’s mobile calendar events are listed in the Current Event card, where you see the starting time, duration, location, and number
of invitees for your next meeting—and in the Agenda card, which has several states that allow you to see upcoming events, earlier
events, or all events for the day. When it’s time to prepare for a meeting, tap an event. You can review the full list of invitees and any
notes from the original invitation. And perhaps best of all, if Today finds that any invitees or the organizer have email addresses that
match Salesforce contacts, person accounts, or users, it creates links to those records, as well as any related accounts, so you can access
customer details directly from the event.
In addition to mobile calendar events, you can also work with important tasks, your recently accessed Salesforce records, current posts
from your To Me feed, news items for accounts you’re meeting with today, and the first chart from your most recent dashboard—making
Today your one-stop place for accessing key information.
Today also simplifies customer interactions with helpful actions that cut down on the amount of time spent switching between different
apps.
• Quickly email an event’s attendees to clarify a detail or to let people know you’re running a little late using the
• Join a conference call with a few taps using the
icon.
icon.
• See a map of where your next meeting is located and get directions with the
icon.
• Log a mobile calendar event in Salesforce with the Log this Event button.
• Add new contacts to Salesforce directly from a meeting’s list of invitees.
To get started, tap Today in the navigation
menu.
Note: If Today isn’t visible in the Salesforce1 app, ask your administrator to add the Today item to the navigation menu.
SEE ALSO:
How Today Matches Salesforce Data with Mobile Calendar Events
Set Up Today
About Task Lists
Set Up Today
To get started using Today, select the mobile calendars that you want to see in the app.
Note: Today is available in the Salesforce1 downloadable apps only. If you don’t see Today in the app, ask your administrator to
add the Today item to the navigation menu.
1. From the navigation
menu, tap Today.
27
Manage Your Day with Today
How Today Matches Salesforce Data with Mobile Calendar
Events
2. Tap Get Started.
3. iOS devices only: Tap OK to grant calendar access to Salesforce1.
You can’t use Today if you don’t grant this access.
4. In the list of mobile calendars that are available on your device, select or deselect the calendars that you want Today to use.
5. Tap Save.
6. If you later add or change calendars on your mobile device, use the
settings.
icon at the bottom of the main Today page to update your
Tip: Today collects all of the events for the current day from the mobile calendars you selected during setup and displays them
in the event list. If your calendar servers don’t push data to your mobile device, you’ll need to keep your calendars up to date in
order for Today to show you the most current event information.
If you use an iOS device and decide not to grant calendar access, or turn off calendar access after initially granting it, you won’t be able
to use Today. To start using Today again:
1. Go to your iOS Settings and select Privacy > Calendars, then turn on access for Salesforce1.
2. Return to Today, scroll to the bottom of the main page and tap the
icon.
3. Select or deselect the calendars that you want Today to use, then tap Save.
How Today Matches Salesforce Data with Mobile Calendar Events
When you view a mobile calendar event, Today looks to see if there are existing Salesforce contacts, person accounts, or users that are
related to the meeting’s organizer and invitees. And if there are matching contacts, Today also looks for related accounts. (Today is
available in the Salesforce1 downloadable apps only.)
Matching Salesforce Contacts, Person Accounts, or Users to Meeting Attendees
If an existing Salesforce contact, person account, or user record is related to a meeting’s organizer or invitees, Today updates the event
so the person’s name links to the matching record and changes the person’s avatar. The
avatar indicates there’s a matching contact
or person account. If there’s a matching user, either the user’s profile image is displayed, or if the user doesn’t have a profile image, the
avatar is displayed along with the person’s job title. The avatar also means Today is still looking for a match or there is no matching
Salesforce record for the person.
Today uses this criteria to decide if there are appropriate contacts, person accounts, or users to associate with an event’s participants.
• A record is a match if the record’s Email field contains the same email address that’s used in the event for an invitee or the meeting
organizer. The email addresses must include the same characters exactly. For example, [email protected] doesn’t match
[email protected].
• If multiple contacts or person accounts have the same Email field data, Today picks a record based on your organization’s
configuration:
– If Salesforce for Outlook is enabled, Today uses the matching criteria option selected for your Salesforce for Outlook configuration.
You can see the matching criteria in your personal settings in the full Salesforce site. Select Setup > Desktop Integration >
Salesforce for Outlook > View My Configuration or My Settings > Desktop Add-Ons > Salesforce for Outlook > View
My Configuration.
– If Salesforce for Outlook is enabled but your configuration doesn’t specify matching criteria, Today picks the record that was
most recently modified.
– If your organization doesn’t use Salesforce for Outlook, Today picks the record that shows the most recent activity, as shown in
the record’s Activity History related list.
28
Manage Your Day with Today
Prepare for a Meeting
• If multiple users have the same Email field data, Today links to the user record that was last modified.
• If a user and contact or person account have the same Email field data, Today links to the user record.
• Today won’t create links to portal users or inactive users.
It’s not possible to manually associate a Salesforce record with an invitee or meeting organizer.
When Today finds matching Salesforce records:
• Links to the records are added to event invitees and organizers. Links to contacts or person accounts are added if you have permission
to use these objects, and permission to access the Email field on these records.
• When a link is added, Today changes the invitee or organizer’s name to the value of the first field in the compact layout for the
matching contact, person account, or user profile record. By default, this is the Name field.
• If an event has a large invitee list, links may not display all at once.
To stay in sync with changes in Salesforce, Today re-matches invitees and organizers each time you view an event.
Related Accounts
A mobile calendar event may include an Account card, which lists accounts that are related to the event, so you can quickly review
information like account details, pending opportunities, or open cases in advance of a meeting. You must have the “Read” user permission
on accounts to see this card.
Today determines that an account is related to an event if it’s associated with a contact record that matches one of the meeting invitees.
Person accounts aren’t included in this card.
If a meeting includes contacts from a variety of different accounts, Today lists up to three accounts, picking those that are associated
with the largest number of contacts. To see how Today chooses the most relevant related accounts for an event, consider a meeting
that includes 10 invitees who are all contacts in Salesforce, representing five different companies:
• Three contacts from PetEdge.com
• Three contacts from Chewy, Inc.
• Two contacts from Pet Food Express
• One contact from Joe’s Pet Supply
• One contact from Petopia
The Account card for this event will list PetEdge.com, Chewy, Inc., and Pet Food Express because PetEdge.com and Chewy, Inc. have
three representatives each and Pet Food Express has two representatives.
Prepare for a Meeting
Before a meeting, you’ll probably want to check for last minute updates or refresh your memory about important details, including
details that are stored in your associated Salesforce account, contact, person account, and user records. With Today, you can do your
meeting preparation from a single place. (Today is available in the Salesforce1 downloadable apps only.)
Tap an event in the Current Event or Agenda card. Then:
• Check out the list of invitees and see who has accepted (
large meeting, tap More to see additional invitees.
), who hasn’t responded yet (
), and who isn’t attending (
). If it’s a
avatar, a user profile avatar, or the
avatar
• Review Salesforce data for invitees or the organizer by tapping on names with the
if accompanied by the person’s job title. The matching contact, person account, or user record opens. (The
avatar without a job
title means there isn’t a matching Salesforce record.)
• Review related account information, such as account details, pending opportunities, or open cases, by tapping on items in the
Account card.
29
Manage Your Day with Today
Dial In to a Conference Call
• Review notes from the meeting invitation, including any conference call details. Links in the Notes card open in a new page.
SEE ALSO:
How Today Matches Salesforce Data with Mobile Calendar Events
Dial In to a Conference Call
Dial In to a Conference Call
Are you tired of struggling with long conference call numbers while you’re juggling your meeting materials and coffee? Using Today,
you can quickly join online meetings with just a few taps. (Today is available in the Salesforce1 downloadable apps only.)
The conference call dialer automates as much of the dial-in process as possible, based on the information available in the event. It’s
completely automatic to join Citrix® GoToMeeting® events that include a GoToMeeting URL and dial-in number, or conference calls that
include a dial-in number and access code in this format: <dial-in number>,,,<access code>. Joining calls that are hosted
by other conference providers takes a few more taps but is significantly easier than manually entering a phone number and access code.
1. From the event list in Today, tap an event card.
2. Tap
in the action bar.
3. The next step depends on the conference call details included in the event.
• If Today can identify both the dial-in phone number and the access code, simply tap Call. Today automatically dials you in to
the conference call.
• If there are multiple phone numbers in the event—or if Today can’t identify the phone number, the access code, or both with
a certainty—select the correct information in the “Choose a Phone Number” or “Choose an Access Code” lists.
Then tap Call. Today automatically dials the phone number you selected. When the conference provider prompts for the access
code, tap Dial “<number>” on your mobile device to automatically enter the access code you selected. Manually enter any
other required information using your device’s keypad.
Note: If Today isn’t certain about what the meeting access code is, or if the meeting doesn’t include an access code at
all, the “Choose an Access Code” list includes the Skip this Step option. In this case, Today dials the phone number only
and you can manually enter the access code and any other required information.
4. When the meeting is finished, switch back to the Salesforce1 app.
SEE ALSO:
Supported Conference Call Providers and Invitation Formats
Supported Conference Call Providers and Invitation Formats
The Today conference call dialer is available if your mobile device supports making phone calls and if the event you’re viewing includes
a valid conference call dial-in number. (Today is available in the Salesforce1 downloadable apps only.)
The conference call dialer automates as much of the dial-in process as possible. The level of automation available depends on the
conference call provider and the details included in the event.
• It’s completely automatic to join Citrix GoToMeeting online meetings if an event includes a valid GoToMeeting URL and a single
valid dial-in phone number. You simply tap to start the dial-in process and wait to be connected.
30
Manage Your Day with Today
Get Directions to a Meeting
• It’s also automatic to join online meetings from any provider if an event includes a dial-in number and an access code, in this format:
<dial-in number>,,,<access code><other>, where <other> can include additional numbers, # symbols, commas,
and asterisks. The numbers must be entered on a single line and there can’t be any spaces after the first comma. For example:
1234567890,,,1234567#11#
• It’s slightly less automated to dial in to an event that includes multiple phone numbers, to a GoToMeeting event that doesn’t include
a meeting URL, or to an event hosted by other conference providers such as WebEx®, InterCall®, and Microsoft® Lync®. Depending
on the information available in the event, you may need to tap to select the dial-in phone number, the access code, or both.
The conference call dialer also has these requirements:
• The conference call invitation details must be included in the Location field or in the Notes (iOS device) or Description
(Android device) section of the event.
• GoToMeeting URLs must exist on a single line.
• The dialer supports local and international phone numbers that contain between 7 and 15 digits. The phone number can be in any
format.
• An access code must contain a minimum of seven numbers.
SEE ALSO:
Dial In to a Conference Call
Get Directions to a Meeting
Today shows you where your next meeting is located, using the default map app on your mobile device. You can also ask your map app
to give you directions to the meeting location. (Today is available in the Salesforce1 downloadable apps only.)
1. From the event list in Today, tap an event card.
2. Tap
in the action bar.
3. Tap on the location marker to get directions from your current location to the meeting.
4. Switch back to the Salesforce1 app.
If an event doesn’t include a location for the meeting, the
icon isn’t available.
Send “Running Late” Email Messages
Quickly send an email to let a meeting organizer or other attendees know that you’re going to be delayed or miss the meeting altogether.
Today includes several pre-written, “quick” messages so you don’t have to do any typing. Or you can write your own message. (Today
is available in the Salesforce1 downloadable apps only.)
1. From the event list in Today, tap an event card.
2. Tap
in the action bar.
3. Tap an appropriate quick message or tap Write your own... to create a custom email message.
4. Tap All to send the message to everyone involved in the meeting or select a specific person to contact.
5. Review the message then tap Send to deliver the email message.
31
Manage Your Day with Today
Send “Running Late” Email Messages
The default subject of the email is Re: <Event Title>. You can change the subject text before delivering the message. You can
also customize or expand the quick message that you selected.
32
TRACK YOUR ACTIVITIES
View Events
View your events from the Salesforce1 navigation menu. Or view events related to a specific record, such as a lead or an account, on the
record’s related information page or in the record feed.
1. You can view Salesforce events in these places:
• My Events list. Go to the navigation menu and tap Events.
You see a weekly view that allows you to see event lists for specific days. An event list includes events that you created for yourself
and that you or your groups are invited to. Events that are available to you through your organization’s role hierarchy settings
aren’t displayed, nor are proposed events.
To see events for a different day, tap a date in the date bar. Swipe left on the date bar to see the next week; swipe right to see
the previous week. The date bar shows up to the four future weeks and four previous weeks. (If you’re using the mobile browser
app on a Windows device, you’re able to view the current week only.)
• An activities related list. Go to a record view and swipe to the related information page. Tap Open Activities or Activity
History to see events related to the record.
• A record feed. In a record view, swipe to the record feed page. If an event is related to a record when the event is created, the
record feed displays a post about the event. (The feed doesn’t display posts about updates to events. Additionally, depending
on your organization’s settings, feeds may not display events, or feeds may be unavailable altogether.)
2. Tap an event to see the event record.
SEE ALSO:
Create Events
Create Events
Create an event on the spot for a record you’re viewing in Salesforce1, such as a lead or a contact. Or create an event when working with
your event lists.
If you’re working with a record or in the feed:
1. Tap
(The
in the action bar.
icon may not be available for some or all objects, depending on your organization’s settings.)
2. Enter the event details and tap Save.
If you selected Events from the navigation menu to work with your event lists:
1. Tap
in the action bar.
33
Track Your Activities
About Task Lists
2. Enter the event details and tap Submit.
SEE ALSO:
View Events
About Task Lists
Salesforce1 includes lists of open, closed, and delegated tasks to help you manage your time while you’re in the field.
Types of Task Lists
My Tasks
All tasks owned by you and not marked closed
Completed
Closed tasks that you own and that you’ve assigned to others
Delegated
Open tasks you’ve assigned to others whose tasks you have permission to view
Today
All tasks owned by you that are due today or are overdue
How the Lists Work
Overdue tasks
If the My Tasks, Delegated, or Today list contains 10 or more overdue tasks, those tasks are collapsed until you tap to see them. Tap
Show Overdue Tasks at the top of the list to display the 10 tasks with the most recently passed due dates. Tap again to show more
overdue tasks. To collapse the list again, refresh it by pulling down.
Sort order
In the My Tasks and Delegated lists, tasks are sorted by due date (earliest first), then priority ( first), then the date they were created
(earliest first). Tasks with no due date appear last. In the Completed list, tasks are sorted by the date they were last modified instead
of by due date.
SEE ALSO:
View Tasks
Create Tasks
View Task Lists
View a list of your open tasks, or switch to a list of your completed or delegated tasks or tasks to do today.
• View your open tasks. Go to the Salesforce1 navigation menu and tap Tasks.
The default list is My Tasks.
34
Track Your Activities
View Tasks
• Switch lists. In My Tasks or any other task list, tap
Today).
. In the drop-down menu, tap the list you want (Completed, Delegated, or
SEE ALSO:
About Task Lists
View Tasks
View tasks when and where you need to see them—in the context of all your tasks or just for an individual record.
1. You can view a task in any of the following places:
• A task list. Go to the navigation menu and tap Tasks.
• An activities related list. Go to a record view and swipe to the related information page. Tap Open Activities to see open
tasks or Activity History to see closed tasks.
• A record feed. In a record view, swipe to the record feed page. If a task is related to a record when the task is created, the record
feed displays a post about the task. (The feed doesn’t display posts about updates to tasks. Additionally, depending on your
organization’s settings, feeds may not display tasks, or feeds may be unavailable altogether.)
2. Tap a task to see the task record.
SEE ALSO:
About Task Lists
Close or Reopen Tasks
Keep your task lists up to date: Just tap to close tasks you’ve completed or to reopen tasks that need renewed attention. The “Edit Task”
user permission is required.
1. Go to any of these locations:
• A task list. In the navigation menu, tap Tasks.
• A task’s record view. In a task list, tap a task.
• A record’s related activities list. In a record view, swipe to the related information page. Tap Open Activities to see open
tasks or Activity History to see closed tasks.
2. Close or reopen a task. You can do this in the task’s record view or from a list.
• To close a task, tap
• To reopen a task, tap
.
.
35
Track Your Activities
Edit Task Details
Considerations for closing and reopening tasks:
• If your administrator has created conditions for closing a task (for example, requiring you to enter a comment), you may need to
open the task details and edit them before you can close the task.
• If your administrator has set up more than one Closed or Open status for tasks, a menu requiring you to choose a status may appear
when you reopen or close a task.
SEE ALSO:
Edit Task Details
View Tasks
Edit Task Details
Update any details of a task. The “Edit Tasks” user permission is required.
1. In one of these locations, find the task you want to edit:
• A task list. From the navigation menu, tap Tasks. Choose a list, then tap the task you want to edit.
• An activities related list. In a record view, swipe to the related information page. Tap Open Activities or Activity History to
see tasks related to the record. Tap a task you want to edit to see the task’s record view.
2. Tap
from the action
menu on the action bar.
3. Make your changes and tap Save.
SEE ALSO:
Close or Reopen Tasks
View Tasks
36
Track Your Activities
Create Tasks
Create Tasks
Create a task on the spot, whether you’re working with your whole task list or just an individual record.
1. Do one of the following:
• Go to any task list. Tap New Task.
• Go to a record you’re working on or your main feed. Tap
or all objects, depending on your organization’s settings.)
2. Enter task details and tap Save.
SEE ALSO:
View Tasks
About Task Lists
37
in the action bar. (The
icon may not be available for some
ANALYZE YOUR DATA
View Your Dashboards
You can view the same dashboards in Salesforce1 that you’re able to access in the full Salesforce site.
1. Tap
to open the navigation menu.
2. Tap Dashboards.
Note: If you have permissions to view dashboards in the full site but the Dashboards item doesn’t appear in the navigation
menu, ask your administrator to add dashboards access to the mobile app.
3. Tap a dashboard in the list of recently viewed dashboards to open it. Or search for a dashboard that isn’t in the recent list.
4. If you’re working on a smartphone or using the Android downloadable app, swipe right or left in the dashboard view to see all of
the dashboard’s columns, or move directly to a specific column by tapping its position in the page indicator. Swipe vertically through
a column to see all of dashboard components. (If you’re using a tablet, up to three columns of components are displayed on the
page, reducing the need to swipe through the columns.)
Information, such as the running user or the last refresh date, is displayed in the highlights area at the top of the dashboard view.
Drill Down from a Dashboard to a Report
When viewing a dashboard, you can tap a dashboard component to see the report that’s delivering the data to the dashboard. This is
available for matrix, summary, and tabular reports.
You can see a maximum of 2,000 records. To see all records, log into the full Salesforce site.
Tip: When you drill from a dashboard to a report, you may see slightly different data in the report view from what you saw in the
dashboard view. This is because the data displayed in a dashboard is from the last dashboard refresh (the date and time are shown
in the dashboard header), but drilling down to a report actually runs the report, so in this case you’re seeing the most current
report data.
Some tips when working with reports in Salesforce1:
Stay in Context with Floating Report Headers
As you scroll down to read a report, the header rows at the top always stay visible.
Access Columns That Are Off the Screen
If all of the columns in a report don’t fit on your device’s screen, swipe right or left to see all the columns. The first column is anchored
and can’t be moved off the screen.
Truncated Text in Report Columns
To fit multiple columns on a small mobile screen, parts of the content of a field (the middle words of a text field or the trailing digits
for a numeric field) may be dropped out. Tap the the field to see the full text.
Sort Reports
You can easily sort numeric and text fields. Tap a numeric field to sort in descending order; tap it again to reverse the sort order.
Tapping a text field sort from A to Z or tap it again to sort from Z to A.
38
Analyze Your Data
View Your Reports
View Your Reports
You can view your recently viewed reports from the Salesforce1 navigation menu. To access other reports, drill into them from dashboards.
1. Tap
to open the navigation menu.
2. Tap Reports.
All reports are shown in tabular format, with groupings added as columns to the end of the report. For example, on a summary report
grouped by Industry and Type, those fields appears as the last two columns of the report.
Reports with the joined format aren’t shown.
39
WORK WITH FILES
Files You Can Access
Files you own and have access to are available to share or attach to Chatter posts, comments, and record feeds. Salesforce Files is available
for organizations that have Chatter enabled.
Access Files from the Recent section in the Salesforce1 navigation menu. From the Files list, you can:
• See all the files you own or have access to, and filter your list of files.
• Tap
to view file information, including the owner, file version, and who the file is shared with.
• Upload private photos or upload and share photos with people, groups, or via email. (Downloadable apps only)
• Search for files by filename. In the downloadable apps, you can also search by owner name.
• Access your files without a network connection by making a file available offline. (Downloadable apps only)
Files Filters
You can filter the list of files to make it easier to find what you want. Tap
at the top of the Files list.
• Recent: The most recent files you’ve viewed.
• Synced: All files that have been synced in your Salesforce Files Sync folder. This filter is available if Salesforce Files Sync is enabled
for your organization and if you have the “Sync Files” permission.
• Owned By Me: Only the files you own.
• Shared With Me: Only the files that have been shared with you by either a private share or a public post to your profile.
• Following: Only the files that you’re following on Chatter. (Mobile browser app only)
• Offline: The files that you’ve marked for offline access. (Downloadable apps only)
In the mobile browser app only, external files are accessible from the Files list if Files Connect is set up for your organization and if you
have connected file sources. You can browse and share files from external sources such as Microsoft SharePoint and OneDrive for Business.
Relevant external files appear in the Files list when the Recent, Owned by Me, Shared With Me, or Following filters are applied. If the Files
list is collapsed, an External section lets you navigate directly to outside files.
Note: If you’re using the mobile browser app in Safari on an iOS device with iOS 7 or later, you must disable the Safari pop-up
blocker setting to access external files. On your iOS device, go to Settings > Safari and disable Block Pop-ups.
SEE ALSO:
Upload a Photo
Share a File
Find a File
Access Files When Offline
Add a Folder
40
Work with Files
Upload a Photo
Upload a Photo
Easily upload photos from your device to Salesforce Files, so you can share them with your coworkers and business contacts.
In a downloadable app:
1. On the Files home page, tap Add.
• Tap Use Latest Photo to automatically upload the most recent photo taken with your device. (iOS downloadable app only)
• Tap Take Photo, snap a picture with your device’s camera, then tap Use Photo.
• Tap Pick from Camera Roll, select an existing photo on your device, then tap Upload.
In the mobile browser app:
1. Tap the new icon in the action bar.
• Tap Take Photo or Video, snap a picture with your device’s camera, then tap Use Photo.
• Tap Choose Existing, then select an existing photo on your device.
Share a File
Share files with your coworkers and business contacts. This option is available in the downloadable apps only.
1. Tap a file to view it.
2. On an iOS device, tap
.
On an Android device, tap
then select
.
3. Tap Share with People or Groups.
4. Enter the name of the people or groups you want to share the file with.
5. Tap Share.
Find a File
You can search for files by filename. In the downloadable apps, you can also search by owner name.
On the Files home page, drag down on the page to expose the search box, then enter your search terms. (In the mobile browser app,
tap
in the header to access the search box.)
You can also use global search to find Files. See Find Items with Global Search on page 16 for details.
Add a Folder
Create a folder to store and organize your files. Folders are available if Salesforce Files Sync is enabled for your organization. This feature
is available in the downloadable apps only.
In the iOS downloadable app:
1. Tap
on the Files page to select the Synced view, then tap Add.
2. Tap Create Folder.
3. Enter a name for your folder.
41
Work with Files
Access Files When Offline
4. Tap Save.
In the Android downloadable app:
1. Tap
on the Files page to select the Synced view, then tap Add.
2. Tap New Folder.
3. Enter a name for your folder.
4. Tap Add.
Access Files When Offline
Access files securely on your device when you don’t have a network connection. This feature is available in the downloadable apps only.
Mark the files that you’d like to see when you’re working offline.
In the iOS downloadable app:
1. Tap a file to view it.
2. Tap
.
In the Android downloadable app:
1. Tap a file to view it.
2. Tap
.
3. Tap
.
Use the Offline filter on the Files home page to see all files marked for offline access.
Remove an offline file from your device by tapping
.
42
MANAGE SALESFORCE1
Connect to a Different Instance
By default, the Salesforce1 downloadable apps are set up to connect to your production environment. If you want to connect to your
sandbox environment for testing purposes or redirect to a single sign-on location, you can configure the app to point to a different page
during login.
To change the login host when using the iOS downloadable app:
1. On the Log In page, tap
.
2. Tap + to add a new login host.
Or select one of the predefined instances: Production or Sandbox.
3. Enter the host name of the new instance.
Important: Don’t include http:// in the host name.
4. Enter a label for the new instance, if desired.
5. Tap Done.
6. Tap the name of the newly created instance, then log in.
To change the login host when using the Android downloadable app:
1. On the Log In page, tap either
or the menu button on your device.
2. Tap Change Server.
3. Tap Add Connection.
Or select one of the predefined instances: Production or Sandbox.
4. Enter the host name of the new instance and enter the URL you use to log in to that instance, then tap Apply.
Important: The URL must start with https://.
5. Tap the name of the newly created instance, then tap Apply.
6. Log in.
43
INDEX
Directions to a meeting
Today 31
A
accessibility
app navigation 3
mobile 3
Account matching
Today 28
accounts
calling 22
edit Twitter profile associations 24
log without calling 22
mapping addresses 23
viewing news 23
viewing websites 23
E
edit task details 36
Event management
Today 27
F
Files
overview 40
search 41
L
C
leads
calling 22
edit Twitter profile associations 24
log without calling 22
mapping addresses 23
send email 22
log without calling
accounts 22
contacts 22
leads 22
calling
accounts 22
contacts 22
leads 22
change task details 36
close a task 35
Conference calls
Today 30
Contact matching
Today 28
contacts
calling 22
edit Twitter profile associations 24
log without calling 22
mapping addresses 23
send email 22
create a task 37
create event 33
M
mapping addresses
accounts 23
contacts 23
leads 23
Meeting location
Today 31
Meeting preparation
Today 29
Mobile 4, 6, 9
D
N
dashboards
app navigation 38–39
mobile 38–39
Data
Salesforce1 5
Data Entry
in Salesforce1 20
Dial in to conference calls
Today 30
Notifications 8
O
Online meetings
Today 30
P
Person account matching
Today 28
44
Index
Prepare for a meeting
Today 29
send email
contacts 22
leads 22
social accounts, contacts, and leads
edit Twitter profile associations 24
People in Common 24
R
Records
create 20
edit 19
entering data 20
Lookup Cards 18
Related Lists 18
Salesforce1 7
view in Salesforce1 18
Visualforce Cards 18
reopen a task 35
Requirements
Salesforce1 app 1
Running late messages
Today 31
T
task lists 34
Time management
Today 27
Today
Conference call dialer 30
Connect calendars 27
Meeting location 31
Meeting preparation 29
Record matching 28
Running late messages 31
Salesforce1 27–31
Supported conference call invitation formats 30
Supported conference call providers 30
types of task lists 34
S
Sales Path 25–26, 38
Sales Process 25–26, 38
Salesforce1
Overview 1
Supported data 5
Today 27–31
Salesforce1 app
Requirements 1
Search
feed 12
global 16
overview 14
recently accessed objects 14
records and list views 15
tips 16
U
User matching
Today 28
V
view events 33
view tasks 35
viewing news
accounts 23
viewing websites
accounts 23
45
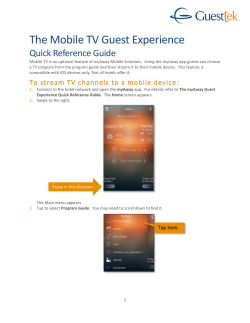


© Copyright 2026