
SmartCloud Notes - (Lotus) documentation
SmartCloud Notes
Administering SmartCloud Notes:
Hybrid Environment
March 2015
SmartCloud Notes
Administering SmartCloud Notes:
Hybrid Environment
March 2015
Note
Before using this information and the product it supports, read the information in Chapter 11, “Notices,” on page 305.
Contents
Chapter 1. Overview of SmartCloud
Notes . . . . . . . . . . . . . . . . 1
What's new in SmartCloud Notes . . . . . . . 1
What's new for SmartCloud Notes administrators 2
Administrators can be notified of directory
synchronization errors . . . . . . . . . 2
Administrators can set policies for Notes client
archiving . . . . . . . . . . . . . 2
Administrators can restore deleted user
accounts . . . . . . . . . . . . . . 2
What's new for SmartCloud Notes users . . . . 3
Invitee status viewable by meeting chair on
Notes Traveler devices . . . . . . . . . 3
More Windows devices are supported for
Traveler . . . . . . . . . . . . . . 3
Notes Traveler 9.0.1.1 features are available . . 3
Notes Traveler 9.0.1.2 features are available . . 4
Setup improvements for the Notes Traveler
Android client . . . . . . . . . . . . 5
Enhancements to supported email encoding
standards for inbound internet mail . . . . 5
Accessibility . . . . . . . . . . . . . . 5
Using SmartCloud Notes in a hybrid environment. . 5
User experience in a hybrid environment . . . . 7
Company administrator experience in a hybrid
environment . . . . . . . . . . . . . 8
SmartCloud Notes clients . . . . . . . . . . 9
Web client . . . . . . . . . . . . . . 10
Traveler devices . . . . . . . . . . . . 10
Notes client . . . . . . . . . . . . . 11
IMAP client . . . . . . . . . . . . . 12
BlackBerry devices with a Hosted BlackBerry
Services subscription . . . . . . . . . . 12
Feature differences between Notes and Domino and
the SmartCloud Notes service . . . . . . . . 12
Frequently asked questions about administering the
service . . . . . . . . . . . . . . . . 13
Information resources . . . . . . . . . . . 15
Chapter 2. Planning to deploy the
service. . . . . . . . . . . . . . . 17
Planning security . . . . . . . . . . .
Planning network connections . . . . . . .
Network capacity for the web client . . . .
Network capacity for the Notes client . . .
Planning directory services . . . . . . . .
Requirements for synchronized directories . .
How directory synchronization works . . .
How the service resolves duplicate Person
documents. . . . . . . . . . . . .
Planning mail routing and mail settings . . . .
Planning calendars and scheduling . . . . .
Planning free-time requests in a hybrid
environment . . . . . . . . . . . .
Resource reservations in a hybrid environment
© Copyright IBM Corp. 2011
.
.
.
.
.
.
.
17
19
20
20
21
22
26
. 28
. 29
. 31
. 35
36
Certifier requirements in a hybrid environment .
Version requirements for on-premises Domino
servers . . . . . . . . . . . . . . .
. 37
. 38
Chapter 3. Preparing your environment 39
Creating a certifier for your mail servers. . . . .
Preparing your network . . . . . . . . . .
Preparing passthru servers . . . . . . . .
Preparing the firewall . . . . . . . . . .
Configuring the firewall for inbound
connections . . . . . . . . . . . .
Configuring the firewall for outbound
connections . . . . . . . . . . . .
How NRPC connections are made in a hybrid
environment . . . . . . . . . . . . .
Preparing for directory synchronization . . . . .
Setting up directory synchronization servers . .
Preparing to replicate Domino directories . . .
Preparing to replicate an extended directory
catalog . . . . . . . . . . . . . . .
Preparing Global Domain documents . . . . . .
Preparing for mail routing . . . . . . . . .
Setting up mail hub servers in the on-premises
hub domain . . . . . . . . . . . . .
Preparing to route mail from service users . . .
Preparing to route mail from service users to
on-premises users and devices . . . . . .
Preparing to use a company SMTP server to
route outbound Internet mail . . . . . .
Preparing to route mail to service users . . . .
Preparing to route mail to service users
registered in the on-premises hub domain . .
Preparing to route mail to service users in a
secondary domain . . . . . . . . . .
Examples: Routing internal mail . . . . . .
Example: Routing mail between users in the
on-premises hub domain . . . . . . . .
Example: Routing mail between users in a
secondary domain . . . . . . . . . .
Example: Routing mail between users in
different Domino domains . . . . . . .
Examples: Routing external mail . . . . . .
Example: Routing mail from an external user
to a service user . . . . . . . . . . .
Example: Routing mail from a service user to
an external user using a service SMTP host . .
Example: Routing mail from a service user to
an external user using a company SMTP host .
Preparing for calendars and scheduling . . . . .
Example: Free-time requests between users in the
on-premises hub domain . . . . . . . . .
Example: Free-time requests between users in
different domains . . . . . . . . . . .
Helping service users connect to application servers
in secondary domains . . . . . . . . . . .
39
40
40
41
41
42
44
45
45
47
48
49
52
52
53
53
54
55
55
57
60
60
62
65
68
69
70
71
73
75
78
81
iii
Chapter 4. Configuring the service . . . 83
Roadmap to configuring a hybrid environment . . 83
Logging on as the first company administrator . . 86
Completing a checklist to prepare for configuration 87
Configuring your hybrid account settings . . . . 89
Configuring directory synchronization . . . . 89
Specifying a mail routing server . . . . . . 90
Creating a base name for your mail servers. . . 91
Specifying one or more passthru servers. . . . 91
Providing a certifier ID file . . . . . . . . 92
Using the Pre-configuration Test tool to check your
environment . . . . . . . . . . . . . . 93
Reviewing your setup and enabling your account
94
Downloading and running the Domain
Configuration tool . . . . . . . . . . . . 94
Verifying Internet domains . . . . . . . . . 97
Activating your account . . . . . . . . . . 99
Running configuration tests . . . . . . . . . 99
Completing the configuration . . . . . . . . 100
Checking network connections from
on-premises servers to the service . . . . . 100
Issuing a Vault Trust Certificate . . . . . . 101
Chapter 5. Customizing service
settings . . . . . . . . . . . . . . 103
Enabling the accessible experience for the web
client . . . . . . . . . . . . . . . .
Setting up administration notifications . . . . .
Restricting access to groups . . . . . . . .
Using administrative policies . . . . . . . .
Creating policies for service users . . . . .
Creating an archiving policy settings
document . . . . . . . . . . . .
Policy precedence . . . . . . . . . . .
Policy settings restrictions . . . . . . . .
Archiving Settings restrictions . . . . . .
Desktop Settings restrictions . . . . . .
Registration Settings restrictions . . . . .
Mail Settings restrictions. . . . . . . .
Security Settings restrictions . . . . . .
Roaming Settings restrictions . . . . . .
Notes Traveler Settings restrictions . . . .
Using Desktop Settings to configure managed
mail replicas. . . . . . . . . . . . .
Configuring logins . . . . . . . . . . .
Resetting service login passwords . . . . .
Setting service login password expiration . . .
Managing Notes IDs . . . . . . . . . .
Resetting passwords for Notes IDs . . . .
Setting password expiration for Notes IDs
Enabling password synchronization . . . .
Notes IDs and passwords . . . . . . .
Limitations when Notes IDs are not in the
vault . . . . . . . . . . . . . .
Setting up federated identity management. . .
SAML federated identity concepts . . . .
Preparing for federated identity management
Enabling federated identity management . .
Configuring the Sametime rich client for
SAML and downloading . . . . . . .
iv
103
103
104
105
105
106
112
114
114
114
115
115
117
118
118
120
124
124
124
125
125
126
128
130
131
132
133
135
136
136
Restricting the IP address range . . . . . .
Enabling application passwords . . . . . .
Authentication methods by client. . . . . .
Password rules by authentication method . . .
Configuring the name finder . . . . . . . .
Standard and Advanced Name Finder options
Adding photos to Person documents . . . .
Basic name finder illustration . . . . . . .
Basic Quick Search Only name finder
illustration . . . . . . . . . . . . .
Standard name finder illustration. . . . . .
Advanced name finder illustration . . . . .
Browse corporate hierarchy name finder
illustration . . . . . . . . . . . . .
Configuring mail settings . . . . . . . . .
Changing the size limit for incoming messages
Prevent automatic forwarding of messages . .
Specifying how Notes links display in the web
client . . . . . . . . . . . . . . .
Configuring how long mail remains in the Trash
folder . . . . . . . . . . . . . . .
Deleting older email and meetings . . . . .
Enabling the ActiveX control for Internet
Explorer users . . . . . . . . . . . .
Specifying an SMTP server to route mail to the
Internet . . . . . . . . . . . . . .
Preparing to use custom mail file templates . . .
Handling execution security alerts caused by
custom templates . . . . . . . . . . .
Configuring mail file templates . . . . . . .
Using extension forms files to customize the look
of the web client . . . . . . . . . . . .
Extension forms file requirements . . . . .
Preparing customized mail file ACLs . . . . .
Enabling busytime details in calendars . . . . .
Configuring instant messaging . . . . . . .
Configuring the web client to connect to an
on-premises Sametime community . . . . .
Manually configuring Notes clients to connect
to the service instant messaging community . .
Instant messaging features . . . . . . . .
Configuring IMAP access . . . . . . . . .
IMAP client limitations . . . . . . . . .
Logging activity in journal files . . . . . . .
Downloading journal files . . . . . . . .
Format of the Notes mail journal file . . . .
Format of the Notes client session journal file
Chapter 6. Onboarding users
149
151
152
153
154
154
154
155
156
157
159
160
161
162
164
165
167
168
170
171
172
175
176
178
180
180
181
182
184
. . . . 187
Choosing a client deployment strategy . . . . .
Deciding whether to use the Notes client . . .
Deciding whether to transfer mail files . . . .
Preparing for onboarding . . . . . . . . .
Preparing for the web client . . . . . . .
Preparing for Notes Traveler devices . . . .
Preparing for Notes clients . . . . . . . .
How the Client Configuration tool configures
the Notes client. . . . . . . . . . .
Downloading Notes client software and other
entitled software . . . . . . . . . .
SmartCloud Notes: Administering SmartCloud Notes: Hybrid Environment March 2015
138
139
141
141
142
145
147
148
187
188
189
191
193
195
196
199
201
Connecting to cloud Activities through the
Notes client sidebar . . . . . . . . .
Preparing for IMAP clients . . . . . . . .
Preparing to use BlackBerry devices . . . . .
Settings enforced for BlackBerry smartphones
Preparing communications and training . . .
Adding multiple Internet email addresses to
Person documents . . . . . . . . . . .
Mail file quota . . . . . . . . . . . .
Mail file delegation . . . . . . . . . .
Transferring mail files . . . . . . . . . .
Preparing for mail file transfer . . . . . .
Preparing the staging server . . . . . .
Preparing mail file ACLs before mail file
transfer . . . . . . . . . . . . .
Preventing local database encryption in new
mail file replicas . . . . . . . . . .
Importing IDs into mail files . . . . . .
Scanning mail files for viruses . . . . . .
Transferring mail files with help from an IBM
partner . . . . . . . . . . . . . .
How the transfer manager creates a mail file
transfer request. . . . . . . . . . .
Transferring mail files to the service data
center . . . . . . . . . . . . . .
Provisioning users . . . . . . . . . . . .
Provisioning users without transferring mail
files . . . . . . . . . . . . . . .
Registering a new user on-premises . . . .
Provisioning users and mail files . . . . . .
Deleting on-premises mail files . . . . .
Decommissioning on-premises mail servers
Checking user provisioning status . . . . . .
Helping users get started . . . . . . . . .
Providing account information to users. . . .
Getting started with the web client . . . . .
Getting started with the Notes Traveler devices
Adding a Notes Traveler subscription to a
user account. . . . . . . . . . . .
Removing user accounts from on-premises
Notes Traveler servers . . . . . . . .
Getting started with the Notes client . . . .
Getting started with IMAP clients . . . . .
Getting started with BlackBerry devices . . .
Accepting the Research In Motion terms of
use . . . . . . . . . . . . . . .
Adding a BlackBerry subscription to a user
account . . . . . . . . . . . . .
Removing user accounts from an on-premises
BlackBerry Enterprise Server . . . . . .
Activating a user's BlackBerry smartphone
Ensuring that mail encryption is available for
BlackBerry smartphone users . . . . . .
Providing documentation to your BlackBerry
smartphone users . . . . . . . . . .
202
202
203
205
206
207
207
208
209
209
209
212
212
212
213
213
214
215
218
219
222
224
228
228
229
230
231
232
233
234
235
237
237
238
238
238
239
239
241
242
Chapter 7. Administering user
accounts . . . . . . . . . . . . . 243
Best practices for maintaining your on-premises
environment. . . . . . . . . . . . .
Changing user mail file templates . . . . .
. 243
. 246
Viewing assigned mail file templates . . . . .
Language versions of the standard mail file
template . . . . . . . . . . . . . .
Assigning extension forms files to users . . . .
Setting a default extension forms file . . . .
Explicitly assigning an extension forms file to
many current users . . . . . . . . . .
Explicitly assigning an extension forms file to
individual current users . . . . . . . . .
Resetting service login passwords . . . . . .
Resetting passwords for Notes IDs . . . . . .
Changing a Notes user name . . . . . . . .
Rules to follow when you change a Notes name
Changing an Internet email address . . . . . .
Removing a SmartCloud Notes subscription from a
user account. . . . . . . . . . . . . .
Suspending a user account . . . . . . . . .
Deleting a user account . . . . . . . . . .
Restoring a deleted user account . . . . . . .
Permanently deleting a user account . . . . .
Removing the SmartCloud Notes data for a deleted
user account or subscription . . . . . . . .
Moving users to different Domino directories . .
Converting a service user to an on-premises user in
a hybrid environment . . . . . . . . . .
Uploading a Notes ID to the vault . . . . . .
Viewing subscriptions . . . . . . . . . .
Viewing assigned subscriptions . . . . . .
Managing IBM Notes Traveler devices . . . . .
Managing BlackBerry smartphones . . . . . .
Reactivating a user's BlackBerry smartphone
Wiping a user's BlackBerry smartphone if it is
lost or stolen . . . . . . . . . . . .
Setting a device password on a user's
BlackBerry smartphone . . . . . . . . .
Removing a BlackBerry subscription from a user
account . . . . . . . . . . . . . .
Frequently asked questions about BlackBerry
smartphone administration . . . . . . . .
247
248
248
249
250
251
252
253
255
257
258
259
260
261
263
263
264
265
267
269
271
271
272
274
274
276
277
278
278
Chapter 8. Integrating a single domain
(Example) . . . . . . . . . . . . . 281
Preparing the on-premises environment (Example)
Preparing the on-premises directory
synchronization and mail hub servers (Example)
Preparing the on-premises passthru server
domain (Example) . . . . . . . . . . .
Configuring firewalls (Example) . . . . . .
Preparing the Global Domain document
(Example) . . . . . . . . . . . . .
Creating the certifier and names for mail servers
(Example) . . . . . . . . . . . . .
Configuring the service (Example) . . . . . .
Completing an account settings worksheet
(Example) . . . . . . . . . . . . .
Configuring account settings (Example) . . .
Downloading and running the Domain
Configuration tool (Example) . . . . . . .
Verifying the Internet domain name (Example)
Testing network connections (Example). . . .
Issuing a Vault Trust Certificate (Example) . .
281
Contents
v
282
282
283
284
285
286
286
287
287
288
289
289
Example illustrations . . . . . . . . .
Directory synchronization at Renovations .
Service user sending Notes mail to an
on-premises user . . . . . . . . .
On-premises user sending Notes mail to a
service user . . . . . . . . . . .
Service user receiving Internet mail . . .
Service user sending Internet mail . . .
Service user requesting the free time of an
on-premises user . . . . . . . . .
On-premises user requesting free time of a
service user . . . . . . . . . . .
Service user requesting the free time of a
resource . . . . . . . . . . . .
Service user reserving a resource . . . .
.
.
. 290
. 290
Finding troubleshooting tips in the Support Portal 303
Contacting Support . . . . . . . . . . . 303
.
. 291
Chapter 11. Notices . . . . . . . . . 305
.
.
.
. 292
. 294
. 294
.
. 295
.
. 296
.
.
. 297
. 299
Trademarks . . . . . . .
Privacy policy considerations .
Chapter 10. Troubleshooting the
service . . . . . . . . . . . . . . 303
vi
.
.
.
.
.
.
.
.
.
.
.
.
.
.
.
. 306
. 307
Index . . . . . . . . . . . . . . . 309
Chapter 9. Integrating additional
domains . . . . . . . . . . . . . 301
Using the Configuration Test tool.
.
.
. 303
SmartCloud Notes: Administering SmartCloud Notes: Hybrid Environment March 2015
Chapter 1. Overview of SmartCloud Notes
IBM SmartCloud® Notes® is a multi-tenant cloud mail service. When you use the
service, administrators at IBM® set up and maintain IBM Domino® mail servers for
you in the cloud on external IBM servers. The service offers you the benefits of
Domino mail server security features and architecture without the mail server
maintenance overhead.
Using the following clients, users connect to the SmartCloud Notes service over the
Internet to access their mail:
v Web client through a browser interface available at http://www.ibmcloud.com/
social;
v Notes;
v Mobile devices.
Any combination of these clients can be used.
At least one person at a company is designated as a company administrator. A
company administrator has a user account with the Administrator role and is
responsible for configuring the service and administering user accounts.
The SmartCloud Notes service provides various options that are designed to help
you deploy the service in a way that best satisfies your business needs.
v You can deploy the service with the assistance of an IBM Software Services for
Collaboration representative or a certified IBM Business Partner. Whether you
choose this option depends on factors such as the type of SmartCloud Notes
environment you deploy and your in-house IT expertise and priorities.
v You can choose from a list of standard mail file templates that are available
within the service by default, or develop a custom template for your company.
You can develop a custom template in-house or contract with an IBM or a
third-party representative to develop the template. Approval of a custom
template requires a short service engagement with IBM Software Services for
Collaboration.
v A Notes Traveler subscription is available automatically. This subscription
enables users to access the service through supported mobile handheld devices.
Note that the ultra-light mode of the web client supports the use of some mobile
devices for no additional purchase.
v If you purchase a SmartCloud Notes for Hosted BlackBerry® Services
subscription, users can access the service through BlackBerry® smartphones. To
use BlackBerry® 10 devices, use Notes Traveler instead.
v If you purchase the Connections Archive Essentials subscription, the content of
user email can be captured and retained for later legal discovery. For more
information about this service, see the Using Connections Archive Essentials
documentation.
What's new in SmartCloud Notes
The following features and enhancements are new in IBM SmartCloud Notes.
© Copyright IBM Corp. 2011
1
What's new for SmartCloud Notes administrators
The following features are new for IBM SmartCloud Notes administrators.
Administrators can be notified of directory synchronization
errors
Administrators can configure the service to send email notifications if directory
synchronization errors occur.
Administrators specify the addresses of one or more people to receive the
notifications. A notification describes the error and provides a link to information
about how to resolve it.
Related tasks:
“Setting up administration notifications” on page 103
Set up the service to send email notifications that report when specific types of
errors occur in the service.
Administrators can set policies for Notes client archiving
In hybrid environments, administrators can now use Archive Settings in policies to
set standard archiving behavior for Notes client users.
Mail archiving is run on the Notes client. Users can archive local mail replicas or
managed mail replicas and create the archives on the client or on-premises servers.
Users cannot create archives on cloud servers.
For more information, see the section Customizing service settings > Using
administrative policies.
Administrators can restore deleted user accounts
Administrators have 30 days to restore user accounts after deleting them. The
accounts are restored with complete functionality, including mail file access.
Related tasks:
2
SmartCloud Notes: Administering SmartCloud Notes: Hybrid Environment March 2015
“Deleting a user account” on page 261
When you delete a user's account, the user no longer has access to any cloud
services. If you change your mind about the deletion, you have up to 30 days to
restore the account to full functionality.
“Restoring a deleted user account” on page 263
After you delete a user account, you have up to 30 days to restore it if you change
your mind. Restoring the account returns it to full functionality, including full mail
file access.
What's new for SmartCloud Notes users
The following features are new for IBM SmartCloud Notes users.
Invitee status viewable by meeting chair on Notes Traveler
devices
Invitee status display is now supported on Apple, BlackBerry 10, Windows Phone,
Windows Tablet, and Android devices. The meeting chair can view the status of
each invitee's response to the current version of the meeting. Possible statuses are
accepted, tentative, declined, and no response. Additionally, the Android client can
show a status of delegated.
More Windows devices are supported for Traveler
IBM SmartCloud Notes Traveler users can now use Windows Phone and Windows
Tablet (Windows Pro and Windows RT) devices with the service. There is no need
to install client software on these devices to use them with the service.
For device requirements, see the SmartCloud Notes client requirements.
Related information:
SmartCloud Notes client requirements
Using Notes Traveler documentation
Notes Traveler 9.0.1.1 features are available
The IBM Notes Traveler 9.0.1.1 client provides the following new features:
Calendar improvements for Android clients
Local calendar information displays in IBM Notes Traveler calendar
You can now add the information from your local device calendars into
your IBM Notes Calendar view.
Create calendar events from mail messages
You can now create a calendar event while viewing mail, using the
overflow menu. Calendar events created from mail messages will form
with the invitees populated with the message recipients, and the event
details information pre-filled with the content of the mail.
Interface improvements for Android clients
Action bar
The action bar is a mobile feature that identifies your location within IBM
Notes Traveler, as well as provides action icons and navigation modes.
Navigation drawer for mail
The navigation drawer is a panel that slides in from the left of the screen
to display IBM Notes Traveler's main navigation options. For mail, the
Chapter 1. Overview of SmartCloud Notes
3
navigation drawer displays your user account and mail folders (inbox,
outbox, sent, and personal). The navigation drawer is only available from
the parent list view of a mail folder.
Android Contacts application
IBM Notes Traveler on Android now provides its own dedicated Contacts
application, rather than utilizing the device Contacts application.
New mail item list layout with thumbnail photos
The mail item list has been redesigned to make it easier to consume the
sender, subject, and message body where applicable. If the screen is wide
enough, a person thumbnail image displays using the sender's mail
address to search for available photos, either from local contacts, IBM
Notes Traveler contacts, or from the new Sametime® Integration feature.
New mail list selection mode
A new selection mode overlays a 'Contextual Action Bar' over the existing
action bar, showing the number of selected items. It also provides batch
operations on the selected items, such as: Move to Folder, Discard, Mark as
Read, or Mark as Unread. Only the actions which are applicable to all
selected items displays.
Gesture actions for mail and contacts
To quickly act on mail items in a list or take action on a contact, you can
now swipe the item from right to left to display a list of action buttons
without having to open the mail or contact itself. Available on phones with
Android 3.0 (Honeycomb) and above.
Add to Contacts from mail
When viewing a mail item, you can now add the sender to your contacts.
Mail list person actions
You can now tap a user photo from a mail message and see a list of
possible actions to take with that person. The actions available depend on
the information available for the person. If there is a mail address
associated with the person, you can perform the following actions:
v View the person's IBM Connections Profile (only if IBM Connections
mobile is installed)
v Chat with the person (only if IBM Sametime mobile chat is installed and
connected)
v Mail the person (opens the Android mail selection dialog).
If there is at least one phone number associated with the person, and your
device is a phone, you can also call and text the person directly.
These options are only available where a person photo displays: mail,
calendar and contacts.
Notes Traveler 9.0.1.2 features are available
The IBM Notes Traveler 9.0.1.2 client provides the following new features.
New reply options for mail messages in Android devices
When replying to a mail message on Android devices, you can now choose to
reply with or without message history and attachments.
4
SmartCloud Notes: Administering SmartCloud Notes: Hybrid Environment March 2015
Add Notes Traveler contact from a phone number
On Android phones that support the option, you can now choose to make a new
Notes Traveler contact from a phone number.
Setup improvements for the Notes Traveler Android client
When setting up a new IBM Notes Traveler Android 9.0.1.3 client, you are no
longer required to type in your datacenter URL to connect to the service. You are
now automatically connected to the correct data center based on your login
identity.
Enhancements to supported email encoding standards for
inbound internet mail
IBM SmartCloud Notes web and IBM Notes Traveler clients now support the RFC
2231 standard for inbound Internet email.
This standard provides email improvements, including the correct display of
attachment file names that are specified in character sets other than US-ASCII.
The service supports the new standard for incoming messages that are encoded to
support RFC 2231. The RFC 2231 encoding is retained when a recipient replies to
or forwards a message. The service does not use the new encoding in new
outbound messages.
Accessibility
IBM SmartCloud Notes Administration, the interface that is used to administer
SmartCloud Notes, is accessible.
The version of this documentation that is in the Knowledge Center is accessible.
All OS level keystrokes for accessibility are recognized. For the best accessibility
experience, use a version of Mozilla Firefox supported by the service and the latest
version of the JAWS screen reader.
See the IBM Human Ability and Accessibility Center for more information about
the commitment that IBM has to accessibility.
Related tasks:
“Enabling the accessible experience for the web client” on page 103
You can submit a request to enable the accessible experience for the web client for
everyone in your organization. Mail, Calendar, Contacts, and Preferences features
provided with this experience are all accessible.
Related information:
System Requirements
Knowledge Center documentation
Using SmartCloud Notes in a hybrid environment
When you deploy the IBM SmartCloud Notes service in a hybrid environment, it
functions as a virtual extension of your on-premises IBM Domino domain
configuration. With a hybrid environment, company administrators continue to
manage users and groups using the on-premises tools with which they are familiar.
Chapter 1. Overview of SmartCloud Notes
5
Mail routing and directory synchronization between your on-premises servers and
the SmartCloud Notes service occur through an on-premises hub domain. You
designate at least one server in the domain as a directory synchronization server to
handle replication of Domino directories in your environment to the service. You
also designate at least one mail routing server to handle mail routing between
on-premises servers and the service.
Note: Routing of incoming Internet mail addressed to users in the service is
configured and done on-premises. The SmartCloud Notes service performs
outbound Internet mail routing only.
You can have a combination of on-premises users (users with mail servers at the
company site) and service users who use SmartCloud Notes mail servers. The two
groups of users can communicate by Notes mail, look up each other's free time,
reserve shared rooms and resources, and schedule meetings with each other.
If you have Domino application servers on-premises, service users can access
Domino applications in the same way they did before using the service. A
customer provides a unique organizational unit (OU) certifier ID to be used for
their SmartCloud Notes mail servers. This OU certifier is within the trust hierarchy
of both the service users and the on-premises Domino application servers.
Therefore a service user's Notes ID provides access to both the SmartCloud Notes
mail servers and the on-premises application servers.
In the following illustration, Dan Misawa is a service user at the fictional company
Renovations. His Notes ID, which is certified under /Renovations, enables him to
access his SmartCloud Notes mail servers, which are certified under the OU
/SMC/Renovations. He can also continue to access an on-premises Domino
application server which is certified under /Renovations.
6
SmartCloud Notes: Administering SmartCloud Notes: Hybrid Environment March 2015
Inbound connections from the service to the customer's on-premises environment
occur via a passthru server domain in the customer's demilitarized zone (DMZ).
The passthru servers authenticate SmartCloud Notes servers and allow passthru
connections only for those servers with IDs that are certified by the OU certifier
you provide.
SmartCloud Notes provides a Domain Configuration tool that you configure and
then download and run on-premises. The tool creates all the Domino Directory
documents in the passthru domain and the on-premises hub domain that are
required for communication between on-premises servers and the service.
User experience in a hybrid environment
In a hybrid environment, the experience of service users and on-premises users is
similar.
Chapter 1. Overview of SmartCloud Notes
7
v A service user's IBM Notes ID provides access to both on-premises IBM Domino
application servers and IBM SmartCloud Notes mail servers. A Location
document and Connection document added to Notes clients enables the clients
to connect to the mail servers.
v Existing Notes client bookmarks and links to Domino application servers work
without modification.
v A service user can look up the people, groups, and mail-in databases in any
on-premises Domino directory that has been replicated to the service through
directory synchronization.
v A service user can look up names in a Domino directory indirectly, for example,
by clicking To in a mail memo. The user cannot use File > IBM Notes
Application > Open to open the directory, however.
Service users who use the Notes client and who have a collaboration subscription
can access both service Activities and on-premises Activities through the client
sidebar.
Company administrator experience in a hybrid environment
IBM administrators maintain user mail servers in the service. Company
administrators administer service users.
Company administrators continue to perform many user administration tasks
on-premises with familiar tools such as the Domino Administrator client. Some
tasks are performed through web administration features in the service at
http://www.ibmcloud.com/social. To use the administration features, a company
administrator logs on to the service using an account name that is assigned the
Administrator role.
Table 1. Tasks to administer service users in a hybrid environment
Task
Where task is performed
Additional information
Adding users to the service
On-premises and through
http://www.ibmcloud.com/
social
“Provisioning users” on page
218
Deleting users from the
service
On-premises and through
http://www.ibmcloud.com/
social
v See the topic about
deleting a user in the
Domino documentation.
v “Removing a SmartCloud
Notes subscription from a
user account” on page 259
v “Deleting a user account”
on page 261
v “Removing the
SmartCloud Notes data for
a deleted user account or
subscription” on page 264
8
Adding and managing
groups
On-premises
See the topic about using
groups in the Domino
documentation.
Changing the Notes names
of service users
On-premises and through
http://www.ibmcloud.com/
social
“Changing a Notes user
name” on page 255
Configuring policies
On-premises, with a few
restrictions
“Creating policies for service
users” on page 105
SmartCloud Notes: Administering SmartCloud Notes: Hybrid Environment March 2015
Table 1. Tasks to administer service users in a hybrid environment (continued)
Task
Where task is performed
Additional information
Managing Notes ID
passwords.
On-premises through policies v “Resetting passwords for
and through
Notes IDs” on page 125
http://www.ibmcloud.com/
v “Creating policies for
social
service users” on page 105
v “Setting password
expiration for Notes IDs”
on page 126
Selecting mail file templates
for mail files
http://www.ibmcloud.com/
social
“Configuring mail file
templates” on page 164
Configuring service-specific
mail settings
http://www.ibmcloud.com/
social
v “Configuring mail
settings” on page 154
v “Specifying an SMTP
server to route mail to the
Internet” on page 160
Configuring IMAP access
http://www.ibmcloud.com/
social
“Configuring IMAP access”
on page 178
Configuring instant
messaging
http://www.ibmcloud.com/
social
“Configuring instant
messaging” on page 171
Managing mobile devices if a http://www.ibmcloud.com/
Notes Traveler for Notes
social
subscription is purchased
v “Managing IBM Notes
Traveler devices” on page
272
v “Creating policies for
service users” on page 105
http://www.ibmcloud.com/
Managing BlackBerry®
smartphones if a SmartCloud social
Notes for Hosted
BlackBerry® Services
subscription is purchased.
“Managing IBM Notes
Traveler devices” on page
272
Configuring mail archiving
http://www.ibmcloud.com/
to allow email retrieval for
social
legal purposes if an IBM
Connections Archive
Essentials Cloud subscription
is purchased
Using Connections Archive
Essentials
Related tasks:
Chapter 4, “Configuring the service,” on page 83
After you have prepared your on-premises environment, configure the service to
work with your environment.
“Completing the configuration” on page 100
After you have completed the account setup for your organization, perform the
tasks in this section to complete the configuration.
SmartCloud Notes clients
IBM SmartCloud Notes clients provide mail, personal Information Management
features such as calendars, contacts, and to do lists, and with some clients,
integrated collaboration features, such as embedded chat.
Chapter 1. Overview of SmartCloud Notes
9
Web client
The IBM SmartCloud Notes web client provides access to mail servers through a
browser.
The web client is a hosted mail client; there is no client for users to install. Users
simply log on to http://www.ibmcloud.com/social using their service login email
address and password. The service authenticates the client and then the client is
redirected to the mail file in the service. User can access the web client in either of
these ways:
v On a computer -- after logging on, users click Mail.
v On a mobile device -- users point the browser on the device to the service, and
then log on to the ultra-light mode.
Users need a subscription for either SmartCloud Notes or SmartCloud Notes Entry
to use the web client. Each subscription provides a full mail client with mail,
calendar, and contacts, as well as to do and notebook applications. Each
subscription provides access to the service through either full or ultra-light mode.
v Full mode -- The full mode offers the widest range of features including mail,
contacts, calendar and scheduling, as well as notebook and to do tasks.
v Ultra-light mode -- The ultra-light mode is available at no extra cost on a mobile
device, and on a personal computer. There is no additional setup or client install
on the mobile device required. Users simply point their device browser to
https://www.collabserv.com to access their mail. The ultra-light mode supports
Android, as well as Apple iPhone, iPod Touch, and iPad devices. See the client
requirements for details on the supported levels of device operating systems.
Decide which web client subscription best fits your needs. The SmartCloud Notes
Entry subscription includes many of the same features that are available with the
standard SmartCloud Notes subscription, but with the following limitations:
v Users are provisioned with a new mail file. There is no data migration of an
existing mail file.
v Users cannot access mail using either the Notes client or an IMAP client.
v Users cannot access mail using Blackberry smartphones.
v User mail files have a 1 GB quota.
For a list of browsers supported for use with the web client, see the client
requirements.
Related tasks:
“Preparing for the web client” on page 193
Before you provision users who will access IBM SmartCloud Notes using the web
client, prepare for the web client.
Related information:
SmartCloud Notes client requirements
Using the web client
Traveler devices
A Notes Traveler subscription supports Apple, Android, Windows Phone and
Windows Tablets, Windows Mobile, and BlackBerry® 10 devices.
See the device requirements for details on the supported levels of device operating
systems. To get started, users perform simple steps to install and configure Notes
10
SmartCloud Notes: Administering SmartCloud Notes: Hybrid Environment March 2015
Traveler on their devices using the installation and configuration information in the
SmartCloud Notes product documentation for their specific device.
Related tasks:
“Preparing for Notes Traveler devices” on page 195
Before enabling users to use IBM Notes Traveler mobile devices with the service,
prepare your environment and the devices.
Related information:
Notes Traveler device requirements
Using Notes Traveler
Notes client
Use of the IBM Notes to connect to the service is optional. A IBM SmartCloud
Notes subscription entitles you to the Notes client license.
Users who access mail by using a Notes client can take advantage of the many
collaboration features that are available through the client. As with the web client,
the Notes client provides mail, calendar, and contacts, as well as to do and
notebook applications. You can manage your Inbox using full-text search,
delegation, mail filtering and sorting, conversation views, and flags.
The following features and applications are also available to you when you use the
Notes client.
v Activities - Beginning with Notes 8.5.2, if your organization has a collaboration
subscription, then the sidebar is automatically configured to access Activities in
the service without further authentication.
v IBM Sametime - Use the embedded Sametime client to manage instant
messaging contacts and initiate chats.
v RSS feeds - Subscribe to RSS feeds that display in the sidebar.
v Widgets - Add widgets to the sidebar. Widgets are available only in hybrid
environments in which they are deployed through company servers.
v Create and manage IBM Notes applications - Using Notes templates, create and
manage Notes applications, such as teamrooms, or discussion databases. Notes
applications on servers are only available through on-premises company servers.
Keep the following in mind if your users will use the Notes client:
v SmartCloud Notes supports only the standard configuration of Notes, and not
the basic configuration.
v You should decide which supported version of the client to use in your
environment. See the SmartCloud Notes client requirements for information on
supported versions.
Related tasks:
“Preparing for Notes clients” on page 196
Use of the IBM Notes client to connect to the service is optional. If you want your
users to use the Notes client, understand the steps to prepare.
Related information:
SmartCloud Notes client requirements
Using Notes
Chapter 1. Overview of SmartCloud Notes
11
IMAP client
If you enable IMAP access, users can configure third-party email clients to access
mail in the service.
The following IMAP clients are supported:
v Apple email
v Microsoft Outlook 2003, 2007
v Thunderbird
There is no additional charge or subscription required to use IMAP clients.
Related tasks:
“Preparing for IMAP clients” on page 202
If you plan to use IMAP clients, complete these tasks to prepare.
BlackBerry devices with a Hosted BlackBerry Services
subscription
If your company has an IBM SmartCloud Notes for Hosted BlackBerry® Services
subscription, users can use BlackBerry® smartphones to access mail and personal
information management features.
IBM administrators set up and maintain BlackBerry Enterprise Servers for you on
sites that they manage. The Blackberry subscription provides the following
features:
v Mail, Calendar, Task, To Do, and Contact applications
v Corporate directory lookup
v Smartphone management through http://www.ibmcloud.com/social.
This subscription does not support BlackBerry® 10 devices. Those devices are
supported by IBM Notes Traveler.
Related tasks:
“Preparing to use BlackBerry devices” on page 203
If you plan to use BlackBerry devices that are supported by a Hosted BlackBerry
Services subscription, complete these tasks to prepare.
Feature differences between Notes and Domino and the SmartCloud
Notes service
Some features in IBM Notes, IBM iNotes®, and IBM Domino are unavailable or
have limitations within the IBM SmartCloud Notes service.
For an explanation of the differences, see the following article in the IBM
Connections Cloud wiki: Feature differences between Notes and Domino and the
SmartCloud Notes service.
12
SmartCloud Notes: Administering SmartCloud Notes: Hybrid Environment March 2015
Frequently asked questions about administering the service
The following table provides answers to questions frequently asked about the tasks
that company administrators perform in a IBM SmartCloud Notes environment.
Table 2. Frequently asked questions about administering SmartCloud Notes
Question
Answer
Do company administrators have access to
user mail files?
By default, administrators do not have
access to user mail files. However, new users
can be provisioned with mail files that have
customized access control lists (ACLs). In
addition, the mail delegation feature can be
used to delegate management of a mail file
to an administrator or to a group of
administrators. For more information, see
“Preparing customized mail file ACLs” on
page 168 and “Mail file delegation” on page
208.
Do mail files have a size limit?
Currently a size limit (quota) of 25 GB is
enforced on most mail files. An exception is
the mail files of SmartCloud Notes Entry
users, whose mail files have a 1 GB limit.
For more information, see “Mail file quota”
on page 207.
What options are available for managing
mail file size?
Company administrators can manage the
size of mail files by setting limits on the size
of incoming messages. Additionally, they can
specify how long mail remains in mail files
by enabling automatic mail deletion for
older mail. For more information, see
“Configuring mail settings” on page 154.
Can we use a customized mail file template? Yes, company administrators can apply a
customized template to user mail files. This
is done through SmartCloud Notes
Administration. The template must meet
specific design requirements. A
representative of IBM Software Services for
Collaboration must approve it as part of a
short consulting services engagement. For
more information, see “Preparing to use
custom mail file templates” on page 161.
Chapter 1. Overview of SmartCloud Notes
13
Table 2. Frequently asked questions about administering SmartCloud Notes (continued)
Question
Answer
Can users create local replicas of their mail
files?
In a hybrid environment, administrators can
provide local access by using policies to
enable the managed mail replica feature.
This feature creates automatically a local
cached version of user mail files. For more
information, see “Using Desktop Settings to
configure managed mail replicas” on page
120.
Although managed mail replicas are
recommended, as an alternative, users can
create local replicas of their mail files and
schedule replication between the local
replicas and the server replicas. For more
information about creating local replicas, see
Getting started with replication in the Notes
documentation.
Are company administrators responsible for
mail database maintenance?
No, compacting and other mail database
maintenance tasks are handled within the
service for you.
In a hybrid environment, do company
administrators manage service users through
an on-premises IBM Domino Administrator
client and on-premises Domino servers?
Yes, the tasks to administer service users
and on-premises users primarily are the
same. Some differences are:
v You must use explicit policies when
applying policy settings to service users;
v The ID vault tool in the Domino
Administrator is not used to manage the
Notes ID files of service users;
v some administration tasks, for example,
Notes ID file password resets, are done
through the SmartCloud Notes
Administration, which is accessed through
the IBM Connections Cloud website at
http://www.ibmcloud.com/social.
For more information, see Chapter 7,
“Administering user accounts,” on page 243.
How does a company administrator change
a user's Notes name?
In a hybrid environment, company
administrators change the Notes name in the
on-premises Domino directory using the
Domino Administrator client, as they do for
on-premises users. The name change
replicates to the service during directory
synchronization. To change a user's service
web login name, company administrators
edit the user account in the service.
For more information, see “Changing a
Notes user name” on page 255.
14
SmartCloud Notes: Administering SmartCloud Notes: Hybrid Environment March 2015
Table 2. Frequently asked questions about administering SmartCloud Notes (continued)
Question
Answer
How do I reset a user's password?
There are two passwords. One is the service
login password that is used to log on to the
IBM Connections Cloud website at
http://www.ibmcloud.com/social. Another is
the Notes ID password used to log in to
mail servers through Notes. Reset the service
login password through the service user
account. Reset the Notes ID password
through the SmartCloud Notes
Administration. For more information, see
“Resetting service login passwords” on page
124 and “Resetting passwords for Notes
IDs” on page 125
Information resources
The following information resources are available for IBM SmartCloud Notes. Be
sure to use these resources to keep up-to-date on technical content, known issues,
and product news.
Table 3. Information resources for SmartCloud Notes
Resource
Description
IBM Connections Cloud wiki
The wiki provides the following information:
v Known issues and troubleshooting
information
v Getting started information
v Technical articles by IBM employees and
other community members
v Links to other resources such as
courseware and multi-media content
SmartCloud Notes known issues
This wiki article links to a comprehensive list
of SmartCloud Notes technotes on the
Support site. These technotes describe known
issues and workarounds. The article also
links to technotes about the Notes client.
SmartCloud Notes Fix List
This page shows a chronological list of fixes
made to the SmartCloud Notes service.
SmartCloud Notes Support newsletter
This newsletter highlights important
technotes and new technical articles and
courseware. To receive automatic notification
when a new edition of this newsletter is
available, add SmartCloud Notes to your
My Notifications subscription
and include the “Product information and
publications” document type in your
subscription.
Chapter 1. Overview of SmartCloud Notes
15
Table 3. Information resources for SmartCloud Notes (continued)
16
Resource
Description
My Notifications from SmartCloud Notes
Support
My Notifications enables you to receive daily
or weekly announcements through e-mail,
custom Web pages and RSS feeds. These
customizable communications can contain
important news, new or updated support
content, such as publications, hints and tips,
technical notes, product flashes (alerts).
Support page
Click Support > Technical Support from this
page for information about how to contact
SmartCloud Notes Support.
SmartCloud Notes: Administering SmartCloud Notes: Hybrid Environment March 2015
Chapter 2. Planning to deploy the service
To plan for the IBM SmartCloud Notes service, understand the features it offers,
the deployment options that are available, and the planning considerations.
Planning security
Before you prepare your environment for the service, make decisions about
implementing security in the service by answering questions described in this
topic.
About this task
Table 4. Security questions
Question
Considerations
Will you use federated identity
management?
Federated identity management allows users
who are logged on to your company system
to use the service without logging on again.
To enable federated identity management,
you register your organization as a trusted
identity provider in the IBM Connections
Cloud service. Before you register, you must
implement and test a federated identity
management system that uses Security
Assertion Markup Language (SAML). While
you are implementing your system, you
must make some choices and prepare
several artifacts.
For more information about this option and
other login options, see “Configuring logins”
on page 124.
© Copyright IBM Corp. 2011
17
Table 4. Security questions (continued)
Question
Considerations
Do your company top-level organization
certifiers comply with service requirements?
There are some restrictions on organization
certifier names. Your organization certifiers
must be different from certifiers used by
other companies in the service. In addition,
specific organization certifier names are
prohibited for use with the service.
If you use more than one organization
certifier, decide which one to use for the
following servers. All of these servers must
be certified under the same organization
certifier.
v Passthru servers that the service uses to
connect to your environment
v Directory synchronization servers and
mail hub servers in the on-premises hub
domain
v Your mail servers in the service, which are
created for you in the service using the
OU certifier that you provide
If there will be service users who are
certified under a different organization
certifier than the one used for these servers,
you must create cross-certificates to establish
trust between the two certifiers. The
cross-certificates must be in a Domino
directory that is synchronized with the
service so that they replicate to the service.
The cross-certificates allow the users to
access their mail servers.
For more information, see “Certifier
requirements in a hybrid environment” on
page 37.
What decisions do you need to make about Decide on a name for the OU certifier. A
the OU certifier to use for your mail servers? short name is best. Consider carefully the
name you choose; after you upload the OU
certifier ID file to the service during service
configuration, you cannot change to a
certifier of a different name.
Decide who will create the OU certifier and
who will upload the certifier ID file to the
service. Uploading the ID file to the service
requires physical access to the ID file.
Companies often allow only specific people
to create certifiers and to access certifier ID
files, so account for this possibility in your
planning.
18
SmartCloud Notes: Administering SmartCloud Notes: Hybrid Environment March 2015
Table 4. Security questions (continued)
Question
Considerations
Is public key checking enabled on
on-premises servers that the service will
connect to?
If public key checking is enabled on the
following servers, it must be disabled.
v Passthru servers that the service uses to
connect to your environment
v Directory synchronization servers and
mail hub servers in the on-premises hub
domain
What firewall changes are required?
Your firewall must be opened to specific
ports and host names. For more information,
see “Planning network connections.”
Planning network connections
Before preparing your environment, answer questions described in this topic to
help you make decisions related to network connectivity with the service.
About this task
Table 5. Network planning questions
Question
Considerations
What process does your company use to
make network changes?
Your company might have a review and
approval process for making the network
changes required by the service. Ensure that
you understand the process and allow time
to implement the required changes.
Does your network have sufficient
bandwidth and Internet connectivity?
Clients and servers that connect to the
service are likely to increase the amount of
network traffic to the Internet and also
change the load on particular parts of your
network.
It is important to assess whether your
current network has sufficient bandwidth
and Internet connectivity to handle these
changes. You may need to work with your
Internet Service Provider to increase network
bandwidth before you provision users for
the service.
For information, see the topics about
network capacity for the web and IBM
Notes clients.
What firewall changes are required?
Port 1352 must be opened for inbound
connections. Ports 1352 and 443 must be
opened for outbound connections. You
might need to open additional ports,
depending on which features you use with
the service. For complete information, see
the topics “Configuring the firewall for
inbound connections” on page 41 and
“Configuring the firewall for outbound
connections” on page 42.
Chapter 2. Planning to deploy the service
19
Table 5. Network planning questions (continued)
Question
Considerations
Do you use a forward proxy to control user
access to the Internet?
If so, you must allow network traffic to pass
transparently through the proxy over ports
1352 (NRPC) and 443 (HTTPS).
Which servers will function as your
on-premises passthru servers?
All connections from the service to your
on-premises environment occur through one
or two on-premises Domino passthru
servers. For security reasons, these servers
must be set up in a unique Domino domain.
Putting them in a network demilitarized
zone (DMZ) between an inner and outer
firewall is recommended. For more
information, see “Preparing passthru
servers” on page 40
Related tasks:
“Preparing your network” on page 40
Prepare your network for connections between IBM SmartCloud Notes servers and
on-premises servers. Configure inner and outer firewalls. Then set up a dedicated
IBM Domino domain between the firewalls. The domain will function as a
passthru server domain through which connections from SmartCloud Notes
servers to your on-premises servers occur.
Network capacity for the web client
Before using the web client, have an understanding of the approximate network
capacity that your Internet Service Provider will need to provide to support
connections from the web clients to the service.
Use the following formula as a general guideline only:
number_of_clients x 2.5 Kbps
where number_of_clients is the expected number of web clients and 2.5 Kbps is the
average network kilobits per second required for each client to connect to the
service.
This formula assumes an average level of client activity based on IBM Domino
mail benchmarks for server-based mail files. Your actual network capacity
requirements will depend on the client usage patterns in your environment.
Network capacity for the Notes client
Before configuring Notes clients to connect to the service, have an understanding
of the approximate network capacity that your Internet Service Provider must
provide to support those connections.
Use the following formula as a general guideline only:
number_of_clients x 3.1 Kbps
where number_of_clients is the number of Notes clients used and 3.1 Kbps is the
average network kilobits per second required for each client.
This formula assumes an average level of client activity based on IBM Domino
mail benchmarks for server-based mail files. Your actual network capacity
requirements will depend on the client usage patterns in your environment.
20
SmartCloud Notes: Administering SmartCloud Notes: Hybrid Environment March 2015
Planning directory services
Before preparing your environment, answer questions described in this topic to
help you make decisions about directory services.
About this task
Table 6. Directory services questions
Question
Considerations
How many directory synchronization servers Directory synchronization servers are
will you use?
on-premise hub servers that handle
replication of Domino directories between
your on-premises environment and the
service. You can configure one or two
directory synchronization servers. Using two
to provide failover is recommended. For
pilot deployments, one directory
synchronization server might suffice.
Which servers will be directory
synchronization servers?
Use existing Domino servers or install and
set up new servers.
If a directory synchronization server is also
the administration server for the
on-premises hub domain, see the next row
in this table for version requirements.
Otherwise, a directory synchronization
server can run any Domino version.
Directory synchronization servers must
comply with certifier requirements for the
service. For more information, see “Planning
security” on page 17.
Do you need to upgrade the administration
server for the on-premises hub domain?
The on-premises hub domain administration
server must run Domino 8.5.2 Fix Pack 2 or
a later version, with the corresponding
Domino Directory template. The
administration server is the server that
handles administration process requests for
the domain Domino Directory.
Do you have directory servers in your
environment that access directories through
the Lightweight Directory Access Protocol
(LDAP)?
These directories can be used in the service
only if they are a Domino directory or an
extended directory catalog that is replicated
to the service.
Which directories will you replicate to the
service?
If a Domino directory contains services
users, you must replicate the full directory
to the service.
If a Domino directory contains only
on-premises users but no service users,
replicate the directory contents to the service
if you want service users to address mail or
schedule meetings with the on-premises
users. In this case, you can replicate the full
Domino directory to the service or you can
aggregate the directory contents into an
extended directory catalog and replicate the
directory catalog to the service.
Chapter 2. Planning to deploy the service
21
Table 6. Directory services questions (continued)
Question
Considerations
Do you want service users to be able to
select the names of users and devices in
internal foreign domains from the corporate
directory?
To enable service users to select the names
of users and devices associated with an
internal foreign domain that is not a Domino
domain, add Person documents for the users
and devices to a directory that is replicated
to the service. In the Mail system field of
the Person document, select Other Internet
Mail to ensure that mail addressed to the
names is routed to the on-premises hub
domain.
If you do not create Person documents for
users and devices in foreign domains,
service users can still send mail to the users
and devices if they know their addresses.
If you replicate multiple directories to the
service, are there policies with the same
name in two or more directories?
A policy name must be unique across all
directories that are replicated to the service.
If you replicate multiple directories to the
service, are there groups with the same
name in two or more directories?
It is a good practice to make group names
unique across directories that replicate to the
service.
Do you use the directory ACL feature
Extended Access?
The Extended Access feature is not
supported for directories that are replicated
to the service.
Related tasks:
“Preparing for directory synchronization” on page 45
Set up at least one Domino server in the on-premises hub domain to be a directory
synchronization server. Then prepare to replicate directories to the service.
Requirements for synchronized directories
Understand the requirements and limitations for directories that are synchronized
with the service.
General
Note the following general requirements for synchronized directories:
v Each directory synchronization server must have a replica, not a copy, of each
Domino directory to be synchronized. You must schedule regular replication of
each synchronized directory between the directory synchronization servers and
other servers in your environment.
v Each synchronized directory database must inherit its design from the master
template StdR4PublicAddressBook. This master template is the standard directory
template used with any supported version of Domino. To determine whether a
directory inherits from this template, click File > Application > Properties, click
the fourth tab, and verify that StdR4PublicAddressBook is shown in the Template
name field in the Inheritance section of the property page.
v If you use two directory synchronization servers, each replica of a synchronized
directory must have the same file path and file name on each server.
v You must synchronize any Domino directory that contains Person documents of
users to be provisioned for the service. The Access Control List (ACL) of the
22
SmartCloud Notes: Administering SmartCloud Notes: Hybrid Environment March 2015
directory must have the following entries. The Domain Configuration tool adds
these entries and you must not modify them.
ACL entry
Additional information
Name: Explicit name of the on-premises
directory synchronization server and any
backup directory synchronization server; for
example, Dirhub1/Renovations,
Dirhub2/Renovations
This entry allows directory changes to
replicate to the service.
Access Manager
User type: Server
Privileges: Delete documents
Name: LLNServers
Access Editor
User type Server group
Roles UserModifier, GroupCreator,
GroupModifier
Name: SaaSLocalDomainServers
Access Manager
User type Server group
Privileges: Delete documents
This entry allows the service to make some
limited changes to the on-premises directory.
The UserModifier roles allows the service to
update the Mail file and Mail server fields
in the Person documents of service users.
The GroupCreator and GroupModifier roles
allow the service to create and modify
specific groups in the directory that are
required for communication with the service.
The service only modifies groups that it
creates, never groups that you create.
SaaSLocalDomainServers is a group used
within the service for replication of the
directory between servers in the service. It
has a similar function to the
LocalDomainServers group used in
on-premises Domino environments.
Do not create a group of this name in your
directory.
v A directory that you synchronize must be a Domino directory replica on a
directory synchronization server. A directory synchronization server cannot use
directory assistance to access a synchronized directory on another server.
v A synchronized directory’s primary Notes mail domain must be specified in the
Domain defined by this Domino Directory field in the Directory Profile. The
Directory Profile is found by opening the directory and clicking Actions > Edit
Directory Profile.
v The Access Control List (ACL) setting Enable Extended Access is not supported
for use with synchronized directories. This setting, which is found by clicking
Advanced in the Access Control List box, must be disabled if it is not currently
disabled.
v Do not delete any directory that is configured for synchronization from the
on-premises directory synchronization servers.
Person documents
Note the following requirements and recommendations for Person documents in a
synchronized directory:
v Do not change the names of service users in Person documents by manually
editing the documents. Instead always initiate name changes through the
Chapter 2. Planning to deploy the service
23
Domino Administrator client. When the Domino Administrator client is used,
the Administration Process can then make the changes throughout your
environment including replicating the change to your on-premises directory
synchronization servers.
v A SmartCloud Notes user does not require a first name if provisioned through
the SmartCloud Notes Administration interface. If a user is registered
on-premises with a last name only, that one name will be correctly displayed in
the SmartCloud Notes directory and in the mail file after user provisioning. In
the Connections Cloud account settings and user accounts however, the last
name is also used as the first name. For example, if you register a user with the
last name HelpDesk, when you log on to the service as an administrator and
click User Accounts, the user’s name is HelpDesk HelpDesk.
Note: A user requires both a first name and last name if provisioned through
the Connections Cloud integration server.
v The first two values in the FullName field (labeled User name) can only be a
standard Notes hierarchical or flat name. For example, Samantha Daryn and
Samantha Daryn/Renovations are allowed but not [email protected].
v The Internet address field in the Person documents of service users must
contain a full valid Internet address for a domain that has been verified by the
service. An example of an Internet address is [email protected].
v The Short name/UserID field can also contain a valid Internet address for a
domain that has been verified by the service. You cannot specify an Internet
address in this field during user registration. You can add an Internet address to
this field after user registration is complete. If you do, add it as a secondary
entry in the Short name/UserID field; do not add the Internet address as the
first entry in this field.
v You can add Person documents for external users at another company to a
synchronized Domino directory. Then service users within your company can
use type-ahead and other addressing features to address mail to the external
users. You can add Person documents for these external users in any way that
you want. However, service users within your company must always have
Person documents created through the normal Domino Administrator client user
registration.
v Set the field Format preference for incoming mail to Keep in sender’s format
for best performance and message fidelity.
Group documents
Note the following information about groups:
v Do not use the following names for groups that you create. These names are
reserved for the service.
– LLNServers
– LLNMailHubs
– Names that begin with Certifiers_ or SAAS
v Do not delete or edit the following groups. These are created and maintained by
the service.
– LLNServers
– LLNMailHubs
24
SmartCloud Notes: Administering SmartCloud Notes: Hybrid Environment March 2015
Multiple directories
If you synchronize multiple directories, they are combined into a single directory
on servers in the service. As a result, keep in mind the following requirements and
recommendations:
v Each policy name must be unique across directories. If two policies have the
same name, the service uses one only, which can cause unexpected, incorrect
results.
v It is a good practice to make group names unique across synchronized
directories. Unique group names are important for security if groups are used in
the ACLs of mail files being transferred to the service. If a name that matches
two customer-created groups is used in a mail file ACL, the ACL determines
access for members of both groups. If there are mail groups that have the same
name, users must choose which one to use each time they send mail to the
group name. Using unique group names avoids this step.
v If you use Resource Reservations as part of calendar scheduling, it is best, but
not required, to make site names unique across Domino domains. If two sites
have the same name, the service lists resources from both sites under one site
name. This situation can lead users to reserve resources at the wrong site. See
Technote 1473022 for instructions on making site names unique.
Extended Directory Catalog
Using an extended directory catalog (EDC) in the service in which multiple
directories are aggregated is optional. Note the following important points about
EDC use:
v The content of the following directory fields must be aggregated into the
directory catalog:
–
–
–
–
–
–
–
–
FirstName
MiddleInitial
LastName
Location
MailAddress
Shortname
MailDomain
InternetAddress
– MessageStorage
– Members
– AltFullName
– AltFullNameLanguage
– GroupType
To support resource reservations, Mail-in Database documents and the following
fields must also be aggregated
– ResourceFlag
– ResourceType
– ResourceCapacity
v Aggregate all the directories to be used by the service in the EDC, including the
directories in which service users are registered.
v Only Person, Group, and Mail-in Database documents in an EDC replicate to the
service. To replicate Policy, Policy Settings, Certifier, Cross-certificate, or Domain
Chapter 2. Planning to deploy the service
25
documents to the service, the documents must be in a full Domino directory that
is synchronized with the service and used for provisioning.
v The service has read-only access to an EDC and does not change the
on-premises EDC replica during directory synchronization. Any users to be
provisioned for the service must therefore have Person documents in an
individual Domino directory that the service can update.
v The primary Domino directory of your directory synchronization servers cannot
be configured as an EDC. If the primary directory is currently configured this
way, you must remove the EDC configuration from it before configuring your
environment to connect to the service. To do so, open the directory, go to the
Configuration > Directory > Extended Directory Catalog view, and delete all
the documents from the view. Then build the EDC in a separate database.
Related tasks:
“Downloading and running the Domain Configuration tool” on page 94
The Domain Configuration tool configures your on-premises servers to connect to
your hosted IBM SmartCloud Notes servers. The server configuration information
that you provide in the Account Settings of SmartCloud Notes Administration is
the data that is used to configure the connections.
Related information:
Technote 1473022
How directory synchronization works
A server in the service connects regularly to an on-premises directory
synchronization server to replicate on-premises directories.
To provide failover, you can set up two directory synchronization servers in the
on-premises hub domain. When you configure the service, you configure one as
the primary directory server and the other as the optional secondary directory
server. After the service replicates successfully with the primary directory server, it
continues to use that server as long as it is available. If the server becomes
unavailable, the service attempts to replicate with the optional secondary directory
server. When the primary directory server becomes available, the service switches
back to it.
The frequency of replication varies, depending on server load. The service always
initiates the replication.
When you configure directory synchronization in IBM SmartCloud Notes
Administration, you specify whether a directory is used for provisioning. A
directory that is used for provisioning is a full Domino directory in which service
users are registered on-premises. When the service replicates a directory that is
designated as used for provisioning, it pulls on-premises information from a
specific set of documents. The service can also push information to the on-premises
directory. For example, it pushes the service users' mail server and mail file names
to the on-premises Person documents.
You can select the option Do not use this Domino Directory for user provisioning
when you configure a directory in SmartCloud Notes Administration. In this case,
the service pulls the contents of Person, Group, and Mail-in Database documents
from the on-premises directory, but never pushes changes to the directory. An
Extended Directory Catalog is an example of a directory that is not used for
provisioning.
26
SmartCloud Notes: Administering SmartCloud Notes: Hybrid Environment March 2015
The following tables provide additional information about documents replicated in
directories that are used for provisioning.
Table 7. Documents pulled from on-premises directories that are used for provisioning
Document
Comments
Person
v Person documents for both on-premises
users and users in the service are pulled.
v The service does not pull the contents of
the Mail server and Mail file fields in the
Person documents of users in the service
because the service controls the content of
these fields.
Note: All users in the service must have an
address specified in the Internet address
field in their Person documents, for
example, [email protected]. A user
cannot be provisioned for the service
without an Internet address.
Group
v On-premises administrators manage all
groups on-premises except the server
groups created by the service operations
within the service. See the following table
for more information about server groups
created by the service.
Mail-in database
Policies and Policy Settings
v Some settings are controlled by the
service. For information, see the topic
“Using administrative policies” and
“Policy settings supported in a hybrid
environment.”
Certifier
Cross Certificate
ECL
Domain
Vault Trust Certificate
Account
Table 8. Documents pushed to on-premises directories used for provisioning
Document
Comments
Person
v Only the content of the Mail server and
Mail file fields in the Person documents
of users in the service are pushed
on-premises.
LLNServers group
v This group contains the names of the mail
and directory servers in the service.
LLNMailHubs group
v This group contains the names of mail
hub servers in the service that route mail
to user mail servers in the service and to
the primary mail hub servers on-premises.
Chapter 2. Planning to deploy the service
27
Table 8. Documents pushed to on-premises directories used for provisioning (continued)
Document
Comments
CustomerMailHubs group
v This group contains the names of the
primary mail hub servers on-premises.
v If you change a mail hub server, do not
edit this group. Instead, change the server
through the Account Settings > Mail
Routing Server administration page. Then
download and run the Domain
Configuration Tool to update your
on-premises configuration.
Vault
v This is the document for the ID vault on
the ID vault server in the service. The ID
vault is used for ID backup and recovery.
The initial directory synchronization also creates Connection documents in the
directory of your primary mail hub servers to enable the servers to route mail to
mail servers in the service. The Connection documents are not replicated to the
service.
How the service resolves duplicate Person documents
The service can encounter duplicate Person documents within or across
synchronized directories. In this case, the service picks one to be the authoritative
version.
To determine whether two Person documents are duplicates, the service first
compares their unique identifier (UNID) values. If their UNID values are the same
the service treats the documents as duplicates. If their UNID values are not the
same but the distinguished name values are the same, the service also treats the
documents as duplicates.
When duplicate Person documents are found, the service chooses one to be the
authoritative document to use in the service. If a duplicate Person document
occurs between an extended directory catalog (EDC) and a Domino directory, the
service uses the document in the Domino directory. If the EDC document replicates
to the service first, it is the temporary authoritative version. The Domino directory
document becomes the authoritative version when it replicates to the service.
If a duplicate Person document occurs within or across Domino directories, the
service chooses the Person document with a Domain field value that matches the
domain in the Directory Profile of its directory. If the Domain field in each
document matches its Directory Profile domain, the service uses the first Person
document that it encounters.
Note: If you aggregate Person documents that contain identical distinguished
names into an EDC, the service uses only the first one it encounters. Therefore
each Person document in an EDC that represents a distinct user should have a
unique distinguished name. Select Yes for the Remove duplicate users setting to
prevent the aggregation of duplicate user names into an EDC. For more
information, see the topic in the Domino documentation about removing duplicate
user entries from a directory catalog.
Related information:
28
SmartCloud Notes: Administering SmartCloud Notes: Hybrid Environment March 2015
Domino documentation
Planning mail routing and mail settings
Answer the questions in this topic to help you make decisions about mail routing
and mail settings.
About this task
Table 9. Mail routing and mail settings questions
Question
Considerations
Which servers will function as your mail
Mail hub servers in the on-premises hub
hub servers in the on-premises hub domain? domain handle the routing of all mail that
service users send to on-premises users and
devices. The servers must have sufficient
hardware and network resources to handle
this mail routing load.
If service users send mail to on-premises
users who are registered in a different
domain than the on-premises hub domain,
the mail hub servers in the on-premises hub
domain must be able to route mail to the
other domains.
You can use one or two mail hub servers.
Use two for high availability. For pilot
deployments, one mail hub server might
suffice.
Mail hub servers in the on-premises hub
domain must be certified under the same
parent organization certifier as your
directory synchronization servers, passthru
servers, and user mail servers in the service.
Public key checking must be disabled on the
mail hub servers in the on-premises hub
domain. For more information, see the topic
For more information, see “Setting up mail
hub servers in the on-premises hub domain”
on page 52.
Do you need to upgrade any mail servers?
Mail hub servers in each Domino domain in
which service users are registered handle
routing mail from your on-premises
environment to the service users in the
domain.
Each on-premises server that routes mail to
the service must run Domino 8.5.1 Fix Pack
2 or a later version.
Chapter 2. Planning to deploy the service
29
Table 9. Mail routing and mail settings questions (continued)
Question
Considerations
What Internet domains do you want to
define in the service?
You use at least one Global Domain
document to define the Internet domains
that your company owns and that you want
to use in the service. Global Domain
documents replicate to the service during
directory synchronization. The service uses
Global Domain documents only to
determine the domains that a company
owns.
As part of service configuration, you will
verify ownership of the domains specified in
Global Domain documents. Verification
involves creating a CNAME record in your
domain DNS record. If you don’t have
access to the DNS record, you will need to
allow time for your Internet Service Provider
(ISP) to create the required CNAME record
for you
You can route mail between service users
and on-premises users or devices in foreign
domains not associated with Domino mail
servers. To define a foreign domain, you
must create a Global Domain document in a
new Domino directory that is not the
primary Domino Directory of a Domino
domain.
For more information, see the topics
“Preparing Global Domain documents” on
page 49 and “Verifying Internet domains” on
page 97.
Note: The service does not support using
Foreign Domain documents to route mail to
external Internet domains through the
service.
Do you use Internet domain aliases in
Global Domain documents?
Domains specified in the Global Domain
document field Alternate Internet domain
aliases are not handled as alias domains by
the service. Instead, each domain in this
field is listed and verified in the service as a
separate domain, similar to the domain
specified in the Local primary Internet
domain field. To enable a user to receive
mail addressed to a domain in the Alternate
Internet domain aliases field, you must
specify the user’s address for the domain in
the Person document.
For more information, see “Adding multiple
Internet email addresses to Person
documents” on page 207.
30
SmartCloud Notes: Administering SmartCloud Notes: Hybrid Environment March 2015
Table 9. Mail routing and mail settings questions (continued)
Question
Considerations
When service users send mail to external
By default, the service routes mail that
users on the Internet, do you want to use an service users address to external users. You
on-premises SMTP server to route the mail? can use a company-controlled SMTP server
to route the mail, instead. When you use
your own server, you can perform actions
such as filtering and auditing before routing
the mail. For more information, see the topic
“Preparing to use a company SMTP server
to route outbound Internet mail” on page 54
You are responsible for routing inbound
SMTP mail that is addressed to service
users. The mail must be routed to a mail
hub server in the Domino domain in which
the service user is registered.
Do you want to use any of the optional mail You can limit the size of incoming messages,
settings the service provides?
prevent auto-forwarding of external
messages, customize the display of IBM
Notes document links in web client mail,
configure mail retention in the trash folder,
and control the deletion of older email. For
more information, see “Configuring mail
settings” on page 154
Related concepts:
“Certifier requirements in a hybrid environment” on page 37
It is important to understand the following certifier requirements when planning a
hybrid environment.
“Version requirements for on-premises Domino servers” on page 38
This topic describes the IBM Domino version requirements for on-premises
Domino servers.
Related tasks:
“Preparing for mail routing” on page 52
To prepare for mail routing between the service and your on-premises
environment, first set up at least one mail hub server in your on-premises hub
domain. Then prepare to route mail from service users and to service users.
Related information:
Domino documentation
Planning calendars and scheduling
Answer the questions in this topic to help you understand and plan for the use of
calendars and scheduling in the service.
Chapter 2. Planning to deploy the service
31
About this task
Table 10. Calendars and scheduling questions
Question
Considerations
Do you want on-premises users to look up
the free-time of service users?
When an on-premises user requests the
free-time of a service user, the request is sent
to the service user’s mail server. The
following on-premises configuration is
required:
v The on-premises user’s mail server must
run the Calendar Connector (CalConn)
server task.
v An on-premises server in the service
user’s domain must send the request to
the service. This server must be Domino
8.5.1 Fix Pack 2 or a later version and
must run the CalConn server task.
v If the on-premises user making the
request is in a different Domino domain
than the service user, the Calendar server
in the on-premises user’s domain must be
able to send the request to the Calendar
server in the service user’s domain. The
Calendar server in the service user’s
domain then sends the free-time request
to the service user’s mail server.
v If the service user is not in the
on-premises hub domain, you must create
a Connection document that enables
servers in the domain to connect to the
service to send the free-time request. This
same Connection document is also
required to connect to the service to route
mail. This step is unnecessary for the
on-premises hub domain because the
Domain Configuration tool creates the
required Connection document.
32
SmartCloud Notes: Administering SmartCloud Notes: Hybrid Environment March 2015
Table 10. Calendars and scheduling questions (continued)
Question
Considerations
Do you want service users to look up the
free-time of on-premises users?
When a service user requests the free-time of
an on-premises user, the service user’s mail
server sends the request to a mail hub server
in the on-premises hub domain. The
following on-premises configuration is
required to process the request:
v The CustomerMailHubs group, which
includes the names of the on-premises
mail hub servers, must replicate to the
service. This step provides the service
user’s mail server with the information
necessary to connect to the mail hub
servers. The Domain Configuration tool
creates the group in the primary directory
of the on-premises hub domain. If you do
not synchronize this directory, you must
copy the group to a directory that you do
synchronize.
v If the on-premises user’s domain is not
the on-premises hub domain, a Calendar
server in the hub domain must be able to
connect to the Calendar server in the
on-premises user’s domain to forward the
request.
v If the on-premises user information is
available in the on-premises hub domain
only through an extended directory
catalog, the mail hub servers in the
on-premises hub domain must use
directory assistance to look up names in
the directory catalog.
Chapter 2. Planning to deploy the service
33
Table 10. Calendars and scheduling questions (continued)
Question
Considerations
Do you want service users to reserve rooms
and resources when scheduling meetings?
A service user can schedule rooms and
resources in on-premises Resource
Reservations databases. The following
on-premises configuration is required to
process the request:
v You must synchronize the directory of the
domain in which a Resource Reservations
database is located. Synchronization
replicates the Mail-in database documents
that are required to route the reservations
on-premises.
v When a service user reserves a room or
resource, the reservation is mailed to a
mail hub server in the on-premises hub
domain. If the Resource Reservations
database that contains the room or
resource is in another domain, you must
configure mail routing to the other
domain. This requirement is similar to the
requirement for routing mail to an
on-premises user in another domain.
v To enable a service user to look up the
free-time of a room or resource, the
service user’s mail server must be able to
connect to a mail hub server in the
on-premises hub domain. An on-premises
server must be able to look up the
free-time in the Resource Reservations
database and return it to the service.
These requirements are similar to the
requirements to look up free-time of
on-premises users.
v You can replicate the directory of the
domain that contains a Resource
Reservation database to the service
through a directory catalog. In this case,
specific fields required for resource
reservations must be aggregated in the
catalog.
v Avoid the use of duplicate site names that
are used for rooms and resources. If two
sites have the same name, the service lists
resources from both sites under one site
name. This situation can lead users to
reserve resources at the wrong site.
Related concepts:
“Example: Free-time requests between users in the on-premises hub domain” on
page 75
This example illustrates how free-time requests occur between a service user and
an on-premises user who are both registered in the on-premises hub domain.
“Example: Free-time requests between users in different domains” on page 78
This example illustrates how free-time requests occur between an on-premises user
in a secondary domain and a service user in the on-premises hub domain.
Related tasks:
34
SmartCloud Notes: Administering SmartCloud Notes: Hybrid Environment March 2015
“Preparing for calendars and scheduling” on page 73
You can prepare for on-premises users and service users to look up each others’
free time when scheduling meetings. You can also prepare for service users to
reserve resources in on-premises Resource Reservations databases.
Planning free-time requests in a hybrid environment
When an on-premises user requests the free time of service user, the on-premises
user’s mail server makes a free-time request to the service user’s mail server.
When a service user requests free time for an on-premises user, the service user’s
mail server makes a free-time request to an on-premises primary mail hub server.
Steps that occur when a service user looks up free time for an
on-premises user
The following steps occur when a service user looks up free time for an
on-premises user whose mail server is in the same domain as a primary mail hub
server:
1. The service user’s client sends a free-time request to the service users mail
server.
2. The service user’s mail server sends the free-time request to a primary mail
hub server on premises.
3. The primary mail hub server sends the free-time request to the on-premises
user’s mail server.
4. The on-premises user’s mail server looks up the on-premises users free time in
its Free Time database.
5. The on-premises user's mail server returns the free time to the service user's
mail server.
6. The service user's mail server returns the free time to the service user's client.
The following steps occur when a service user looks up free time for an
on-premises user whose mail server is in a different Domino domain than a
primary mail hub server:
1. The service user's client sends a free-time request to the service user's mail
server.
2. The service user's mail server sends the free-time request to a primary mail hub
server on premises.
3. The primary mail hub server sends the free-time request to the Calendar server
for the Domino domain of the on-premises user.
4. The Calendar server looks up the on-premises user's free time in its Free Time
database.
5. The Calendar server returns the user’s free time to the primary mail hub server.
6. The primary mail hub server returns the free time to the service user's mail
server.
7. The service user's mail server returns the free time to the service user's client.
Related concepts:
“Version requirements for on-premises Domino servers” on page 38
This topic describes the IBM Domino version requirements for on-premises
Domino servers.
“Example: Free-time requests between users in the on-premises hub domain” on
page 75
This example illustrates how free-time requests occur between a service user and
Chapter 2. Planning to deploy the service
35
an on-premises user who are both registered in the on-premises hub domain.
“Example: Free-time requests between users in different domains” on page 78
This example illustrates how free-time requests occur between an on-premises user
in a secondary domain and a service user in the on-premises hub domain.
Related tasks:
“Preparing for calendars and scheduling” on page 73
You can prepare for on-premises users and service users to look up each others’
free time when scheduling meetings. You can also prepare for service users to
reserve resources in on-premises Resource Reservations databases.
Resource reservations in a hybrid environment
Room and resource Mail-in Database documents replicated to the service allow
service users to reserve rooms and resources in an on-premises Resource
Reservations database.
Note: Each site in all the room and resource databases across all domains should
have a unique name. If multiple sites have the same name, their resources are
listed together under that name and users may inadvertently reserve a resource at
an unintended site. For information on making site names unique, see Technote
1473022.
The following steps occur when a service user reserves a room or resource:
1. To display sites, and the rooms and resources in each site, the service user's
mail server looks up room and resource Mail-in Database documents in its
directory. The Mail-in Database documents have replicated from the
on-premises Domino directory during directory synchronization.
2. To display the free time for the rooms and resources, the client submits a free
time request for the period of the meeting to the service mail server.
3. The service mail server sends the free time request to a primary mail hub
server on-premises.
4. The primary mail hub server looks up the available free time for the room or
resource in its Resource Reservations database, or if the database is not local,
routes the lookup to another server.
5. The available times are returned to the service mail server, which returns them
to the client.
6. When the user reserves a room or resource, the service mail server mails the
reservation to the corresponding on-premises Mail-in Database document,
which creates the reservation in the on-premises Resource Reservations
database.
Related concepts:
“Version requirements for on-premises Domino servers” on page 38
This topic describes the IBM Domino version requirements for on-premises
Domino servers.
“Service user requesting the free time of a resource” on page 297
This picture illustrates a service user requesting the free time of a resource at
Renovations.
“Service user reserving a resource” on page 299
This picture illustrates a service user reserving a resource.
Related tasks:
“Preparing for calendars and scheduling” on page 73
You can prepare for on-premises users and service users to look up each others’
free time when scheduling meetings. You can also prepare for service users to
36
SmartCloud Notes: Administering SmartCloud Notes: Hybrid Environment March 2015
reserve resources in on-premises Resource Reservations databases.
Certifier requirements in a hybrid environment
It is important to understand the following certifier requirements when planning a
hybrid environment.
v The OU certifier you provide for your service mail servers must be under the
same organization certifier as the passthru servers, directory synchronization
servers, and primary mail hub servers. It can be at any level below the
organization certifier. This OU certifier must be unique and used only for the
service mail servers; the OU certifier cannot be used on-premises.
v It is important that you choose and create your service mail server OU certifier
carefully. After you upload the OU certifier ID to the service, you cannot change
to an ID with a different certifier name.
v The certifier used for service users must trust the service mail server OU
certifier, and vice versa. If any users are certified under a different organization
than the OU certifier, you must create the required cross-certificates to establish
trust. The cross-certificates must be replicated to the directory synchronization
servers.
v The names of organization certifiers must be unique to a company; two
companies in the service cannot use the same organization certifier name
because of the multi-tenant messaging architecture of a cloud environment. The
use of generic organization certifier names is discouraged.
v The names of the on-premises passthru servers, directory synchronization
servers, and primary mail hub servers must all be under one organization
certifier. Cross-certificates cannot be used to establish trust between these
servers. It is acceptable to name these servers under organizational units (OUs)
below the organization certifier.
v Though the passthru servers must be under the same organization certifier as
the directory synchronization and primary mail hub servers, they should be in a
separate Domino domain from those servers. You may be accustomed to using
the same name for a Domino domain and an organization certifier, but there is
no relationship between the two names. So it is acceptable to certify the passthru
servers under your main corporate certifier (often the name of your company)
but name the domain of the passthru servers something else.
For example, the company Renovations initially has one, top-level organization
certifier, /Renovations. They create the on-premises passthru servers, directory
synchronization servers, and mail hub servers under this certifier, for example:
Passthru/Renovations, Dirhub/Renovations, Mailhub/Renovations. The passthru
servers are in a unique Domino domain.
They also create the OU certifier /SCN/Renovations to use as their service mail
server certifier. This OU certifier is under the same organization certifier as the
passthru, directory synchronization, and mailhub servers, as required.
The company then purchases a second company that uses a different top-level
organization certifier, /Acme. They create cross-certificates to establish trust
between the two certifiers.
For more information on certifiers and cross-certificates, see the Domino
documentation.
Related information:
Chapter 2. Planning to deploy the service
37
Domino documentation
Version requirements for on-premises Domino servers
This topic describes the IBM Domino version requirements for on-premises
Domino servers.
Table 11. Version requirements for on-premises Domino servers
On-premises server type
Supported versions
Mail routing servers that connect directly to
service mail servers for mail routing.
v IBM Domino 8.5.1 Fix Pack 2 or later fix
pack
v IBM Domino 8.5.2 or later
v IBM Domino 9 Social Edition
Administration server (used by the
Administration Process) for the Domino
directory of the on-premises hub domain.
v IBM Domino 8.5.1 Fix Pack 2 or later fix
pack
v IBM Domino 8.5.2 or later
v IBM Domino 9 Social Edition
Note: The Domino directory template must
be at least the version provided with IBM
Domino 8.5.1 Fix Pack 2.
Directory synchronization servers (if not the
administration server)
Any version of Domino supported by IBM.
Mail servers that request the free time of
service users
v IBM Domino 8.5.1 Fix Pack 2 or later fix
pack
v IBM Domino 8.5.2 or later
v IBM Domino 9 Social Edition
Passthru domain servers
Any version of Domino supported by IBM.
Use IBM Domino 8.5.2 or later for fastest
response time for connections from servers
in the service to on-premises servers.
Related tasks:
“Preparing passthru servers” on page 40
Install and set up at least one Domino server to be used as a passthru server
through which the service connects to servers in your on-premises hub domain.
“Setting up directory synchronization servers” on page 45
In the on-premises hub domain, set up at least one Domino server to be a hub
server for directory synchronization with the service.
“Preparing for mail routing” on page 52
To prepare for mail routing between the service and your on-premises
environment, first set up at least one mail hub server in your on-premises hub
domain. Then prepare to route mail from service users and to service users.
38
SmartCloud Notes: Administering SmartCloud Notes: Hybrid Environment March 2015
Chapter 3. Preparing your environment
Perform the steps in this section to prepare your on-premises servers for a hybrid
environment. Perform these steps after you have planned for the service and
before you configure the service.
Related tasks:
Chapter 2, “Planning to deploy the service,” on page 17
To plan for the IBM SmartCloud Notes service, understand the features it offers,
the deployment options that are available, and the planning considerations.
Creating a certifier for your mail servers
Create an IBM Domino organizational unit (OU) certifier to use for certification of
your IBM SmartCloud Notes mail servers.
Create an OU certifier that is unique in your company. For example, if you use the
organization certifier /Renovations, you could create the OU certifier
/SCN/Renovations. Then your mail servers have names such as
Mail1/SCN/Renovations and Mail2/SCN/Renovations. The certifier name is part of
the mail server names that IBM Notes client users see, so keep it short for better
readability.
Before you begin
To ensure that the certifier you create complies with the general certifier
requirements in a hybrid environment, read the topic Certifier requirements in a
hybrid environment.
Procedure
1. Create an OU certifier. For information, see the topic about creating an
organizational unit certifier in the Domino documentation.
2. The certifiers of your service users must trust the Organization certifier of the
OU certifier you create, and vice versa. If some service users are certified under
a different Organization certifier, create each necessary cross certificate on the
directory synchronization server to establish trust. The cross-certificates
replicates to the service during directory synchronization.
For information, see the topic about creating a cross-certificate from a Notes
certifier in the Domino documentation.
Related tasks:
“Providing a certifier ID file” on page 92
As a part of preparing your on-premises environment for a hybrid deployment,
you create an IBM Domino organizational unit (OU) certifier for your IBM
SmartCloud Notes servers. In this task, you provide an OU certifier ID file and
password when you set up the hybrid environment.
Related information:
Domino documentation
© Copyright IBM Corp. 2011
39
Preparing your network
Prepare your network for connections between IBM SmartCloud Notes servers and
on-premises servers. Configure inner and outer firewalls. Then set up a dedicated
IBM Domino domain between the firewalls. The domain will function as a
passthru server domain through which connections from SmartCloud Notes
servers to your on-premises servers occur.
Preparing passthru servers
Install and set up at least one Domino server to be used as a passthru server
through which the service connects to servers in your on-premises hub domain.
About this task
v To provide failover, install and set up two servers. If the service is unable to
connect to one server, it tries the other. After the service is successful in
connecting to one server, it continues to use it as long as it remains available. If
a server becomes unavailable, the service attempts to connect to the other server,
and if successful, then continues to use that server as long as it is available. The
service does not use Domino cluster failover.
v Passthru servers handle the transfer of network packets and do not perform mail
routing or replication. As such, they do not require significant disk space or
processing speed.
v For security reasons, do not set up passthru servers in the on-premises hub
domain that holds your directory synchronization servers and mail hub servers.
Instead, install and set up the servers in a new unique Domino domain. The
servers can be in separate unique domains.
v For optimum security, configure your corporate firewalls so that connections to
the passthru servers occur in your corporate demilitarized zone.
v A passthru server must be certified under the same parent organization certifier
as the following servers:
– Directory synchronization servers in the on-premises hub domain
– Mail hub servers in the on-premises hub domain
– Your mail servers in the service
v For the fastest response time for connections from the service, install Domino
8.5.2 or later servers. To optimize passthru server performance, Domino 8.5.2
provides the notes.ini setting passthru_connect_wait=1. This setting is useful for
improving the response time when service users request the free time of
on-premises users. The Domain Configuration tool enables this setting on the
Domino 8.5.2 passthru servers for you.
v Public key checking should not be enforced on the passthru servers. Public key
checking, which is controlled through the Compare public keys field in the
Security tab of the Server document, is disabled on Domino servers by default.
Procedure
1.
40
Install and set up at least one IBM Domino server.
v Set up the server as the first server in the domain.
v During server setup, select the option I want to use an existing certifier ID
file. Then certify the new server under the same organization certifier that is
used to certify the directory synchronization servers and the mail hub servers
in the on-premises hub domain. A certifier name is independent of a Domino
domain name. In this case, the certifier name and the domain name are likely
to be different.
SmartCloud Notes: Administering SmartCloud Notes: Hybrid Environment March 2015
v For more information on installing and setting up servers, see the Domino
documentation,
2. If required, create LAN Connection documents that enable the passthru server
to connect to the directory synchronization servers and mail hub servers in the
on–premises hub domain. For more information, see the topic on creating LAN
Connection documents in the Domino documentation.
What to do next
Test that each passthru server can resolve the host name of each directory
synchronization server and mail hub server in the on-premises hub domain. If a
passthru server cannot resolve a host name, verify that required Connection
documents are in place. Also verify that your firewall rules allow the passthru
server to access the servers.
Record the Domino hierarchical name, DNS host name (recommended) or IP
address, and Domino domain name of each passthru server. You provide this
information later when you configure the service.
Related concepts:
“Certifier requirements in a hybrid environment” on page 37
It is important to understand the following certifier requirements when planning a
hybrid environment.
Related tasks:
“Planning network connections” on page 19
Before preparing your environment, answer questions described in this topic to
help you make decisions related to network connectivity with the service.
Related information:
Domino documentation
Preparing the firewall
Configure the corporate firewall to allow connections to and from the service.
About this task
When configuring the firewall, specify the host names as described to minimize the
risk of network attacks from the Internet. The risk of attack increases if you relax
the host name rules.
Configuring the firewall for inbound connections
Configure the firewall to allow inbound connections from the service to servers in
your on-premises environment.
About this task
Table 12. Firewall settings for inbound connections
Protocol Port
Source
Target
NRPC
The IBM SmartCloud Notes
addresses generated by the outer
firewall of the service.
Passthru server host names,
for example:
pthru1.renovations.com
pthru2.renovations.com
1352
Contact your IBM Customer Service
Representative for this information.
Chapter 3. Preparing your environment
41
Table 12. Firewall settings for inbound connections (continued)
Protocol Port
Source
Target
NRPC
1352
Passthru server host names,
for example:
pthru1.renovations.com
pthru2.renovations.com
Host names of the on-premises
directory synchronization servers
and mail hub servers,
for example:
dirhub.renovations.com
mailhub.renovations.com
SMTP
25
The IBM SmartCloud Notes
addresses generated by the outer
firewall of the service.
Optional SMTP host that routes
mail to the Internet. The host is
specified in SmartCloud Notes
Administration at Account
Contact your IBM Customer Service Settings > Email Management >
Representative for this information. Manage Routing to External
Internet Domains.
Related tasks:
“Preparing to use a company SMTP server to route outbound Internet mail” on
page 54
You can configure a company SMTP host server to route mail that service users
send to external users.
Configuring the firewall for outbound connections
Configure the firewall to allow outbound connections to the service.
About this task
The following table describes the firewall settings required to allow connections
from on-premises servers and clients to specific hosts in the service. You can
substitute *.collabserv.com for the host names to represent all hosts in the service.
If your current firewall settings reference the original service domain name,
lotuslive.com, retain those settings and add the settings described in the table.
In addition to allowing connections over HTTPS port 443, you can allow
connections over HTTP 80. If you do, connections over HTTP are redirected to
HTTPS.
Table 13. Firewall settings for outbound connections
Port
Host name
NRPC
1352
North American data center:
notes.na.collabserv.com
Asia Pacific data center:
notes.ap.collabserv.com
European data center:
notes.ce.collabserv.com
Domino servers
North American data center:
notes.na.collabserv.com
mail.notes.na.collabserv.com
Asia Pacific data center:
notes.ap.collabserv.com
mail.notes.ap.collabserv.com
European data center:
notes.ce.collabserv.com
mail.notes.ce.collabserv.com
IBM
SmartCloud
Notes web
HTTPS
42
Applicable
server or client
Protocol
443
SmartCloud Notes: Administering SmartCloud Notes: Hybrid Environment March 2015
IBM Notes
clients
Table 13. Firewall settings for outbound connections (continued)
Applicable
server or client
Protocol
Port
Host name
HTTPS
443
North American data center:
admin.notes.na.collabserv.com
Asia Pacific data center:
admin.notes.ap.collabserv.com
European data center:
admin.notes.ce.collabserv.com
Web browser
access to
SmartCloud
Notes
Administration
HTTPS
443
North American data center:
traveler.notes.na.collabserv.com
apps.na.collabserv.com
Asia Pacific data center :
traveler.notes.ap.collabserv.com
apps.ap.collabserv.com
European data center:
traveler.notes.ce.collabserv.com
apps.ce.collabserv.com
IBM Notes
Traveler
devices
accessing the
service via
WiFi
IMAP
993
North American data center:
imap.notes.na.collabserv.com
Asia Pacific data center:
imap.notes.ap.collabserv.com
European data center:
imap.notes.ce.collabserv.com
IMAP clients
(receiving mail)
IMAP
465
North American data center:
submit.notes.na.collabserv.com
Asia Pacific data center:
submit.notes.ap.collabserv.com
European data center:
submit.notes.ce.collabserv.com
IMAP clients
(sending mail)
VP (Virtual 1533
Places used for
instant
messaging)
North American data center:
im.na.collabserv.com
Asia Pacific data center:
im.ap.collabserv.com
European data center:
im.ce.collabserv.com
IBM Notes
clients that
connect to the
instant
messaging
community in
the service
VP (Virtual 1533
Places used for
instant
messaging)
North American data center:
webchat.na.collabserv.com
Asia Pacific data center:
webchat.ap.collabserv.com
European data center:
webchat.ce.collabserv.com
IBM
SmartCloud
Notes web
clients that
connect to the
instant
messaging
community in
the service
SMTP
North American data center:
smtp.notes.na.collabserv.com
Asia Pacific data center:
smtp.notes.ap.collabserv.com
European data center:
smtp.notes.ce.collabserv.com
SMTP servers
that route
Internet mail to
service users
25
Chapter 3. Preparing your environment
43
Table 13. Firewall settings for outbound connections (continued)
Protocol
Port
FTP
990
PASV (FTP) 60000 - 61000
Host name
North American data center:
ftp.notes.na.collabserv.com
Asia Pacific data center:
ftp.notes.ap.collabserv.com
European data center:
ftp.notes.ce.collabserv.com
Applicable
server or client
Temporary
requirement for
clients that
transfer mail
files to the
service over
FTP
Hybrid
environments
only
FTP
990
PASV (FTP) 60000 - 61000
North American data center:
ftp.na.collabserv.com
Asia Pacific data center:
ftp.ap.collabserv.com
European data center:
ftp.ce.collabserv.com
Client that
downloads
journal files
How NRPC connections are made in a hybrid environment
Connections from on-premises Notes clients and Domino servers to IBM
SmartCloud Notes mail servers occur via a proxy server in the service.
Connections from SmartCloud Notes servers to on-premises servers occur via a
passthru server in the on-premises passthru server domain.
For information on on-premises server version requirements, see Version
requirements for on-premises Domino servers.
How on-premises servers and clients connect to the service
All Notes Remote Procedure Call (NRPC) connection requests that on-premises
clients and servers make to servers in the service occur over TCP/IP port 1352. The
requests are made via a proxy server in the service, notes.na.collabserv.com or
notes.ap.collabserv.com, depending on the data center your company uses. The
proxy server authenticates the requesting on-premises users and servers and then
"proxies" the connection requests to the target mail servers in the service. The
proxy server authenticates using the organizational unit (OU) certifier that you
have provided for certification of your mail servers.
When you run the Domain Configuration tool on-premises, the tool creates a
Connection document in the Domino directory of the on-premises hub domain that
enables connections to the proxy server. The Connection document contains the
following values for the Source and Destination fields:
v Source server: *
v Source domain On-premises hub domain, for example, Renovations
v Destination server: mail servers in the service, for example, */SCN/Renovations.
v Optional network address: notes.na.collabserv.com or
notes.ap.collabserv.com (proxy)
44
SmartCloud Notes: Administering SmartCloud Notes: Hybrid Environment March 2015
How servers in the service connect to on-premises servers
All connection requests that servers in the service make to on-premises servers are
handled by servers in the on-premises passthru server domain. The passthru server
domain is a dedicated domain with its own Domino directory situated inside your
corporate network demilitarized zone (DMZ). The passthru servers authenticate
servers in the service and allow passthru connections only for those servers with
IDs that are certified by the OU certifier you provide.
To optimize the speed of connections from the service to on-premises servers,
running Domino 8.5.2 or later on the server or servers in the passthru server
domain is recommended. Domino 8.5.2 provides the notes.ini setting
passthru_connect_wait=1 to optimize passthru server performance. This setting is
particularly useful for improving the response time of freetime requests from users
in the service to on-premises users. The Domain Configuration tool enables this
setting on the passthru servers for you.
When the Domain Configuration tool is run on-premises, the tool adds the
following field values to the Server document of each passthru server in the
passthru server domain Domino Directory. These values enable connections from
authenticated mail servers in the service to pass through to directory
synchronization servers and mail hub servers on-premises.
v Security - Passthru Use - Route through: mail servers in the service, for example,
*/SCN/Renovations.
v Security - Passthru Use / Destinations allowed: On-premises directory
synchronization servers and primary mail hub servers, for example,
Directory1/Renovations; Mail1/Renovations
The Domain Configuration tool also creates a Connection document in the Domino
directory to each on-premises directory synchronization and primary mail hub
servers follows:
v Source server: Passthru servers, for example, Passthru1/Renovations;
Passthru2/Renovations
v Source domain Passthru server domain, for example, SCNPassthru
v Destination server: Directory synchronization server or primary mai hub server, for
example, Directory1/Renovations or Mail1/Renovations
All tasks and schedules are disabled in each Connection document.
Preparing for directory synchronization
Set up at least one Domino server in the on-premises hub domain to be a directory
synchronization server. Then prepare to replicate directories to the service.
Before you begin
Before you prepare for directory synchronization, make the directory services
decisions described in the topic “Planning directory services” on page 21.
Setting up directory synchronization servers
In the on-premises hub domain, set up at least one Domino server to be a hub
server for directory synchronization with the service.
Chapter 3. Preparing your environment
45
About this task
To provide failover, you can set up two directory synchronization servers in the
on-premises hub domain. When you configure the service, you configure one as
the primary directory server and the other as the optional secondary directory
server. After the service replicates successfully with the primary directory server, it
continues to use that server as long as it is available. If the server becomes
unavailable, the service attempts to replicate with the optional secondary directory
server. When the primary directory server becomes available, the service switches
back to it.
Perform this procedure for each directory synchronization server you plan to use.
Procedure
1. Install and set up a Domino server in the on-premises hub domain, or use an
existing server. The server must comply with the following requirements:
v If the server is the administration server for the domain, the server must be
Domino 8.5.1 Fix Pack 2 or a later version with the corresponding Domino
Directory template. If the server is not the administration server, any
supported version of Domino is allowed.
v The server must be certified under the same top-level Notes certifier as the
mail hub servers in the on-premises hub domain, the passthru servers, and
the mail servers in the service.
2. Perform the following steps to disable public key checking on the server and to
give the server access to the LLNServers group:
a. Open the Server document in the Domino Directory in edit mode.
b. Click the Security tab.
c. In the Compare public keys field in the Security Settings section, select Do
not enforce key checking and click OK.
d. Perform one of the following steps to give the server access to the
LLNServers group:
v Add LLNServers to the Access server field.
v Clear the users listed in all trusted directories check box and make sure
that the Not access server does not prevent access to LLNServers.
When you configure the service, the LLNServers group is created in the
Domino Directory of the on-premises hub domain when you run the
Domain Configuration tool.
e. Click Save & Close.
Related concepts:
“Version requirements for on-premises Domino servers” on page 38
This topic describes the IBM Domino version requirements for on-premises
Domino servers.
“Certifier requirements in a hybrid environment” on page 37
It is important to understand the following certifier requirements when planning a
hybrid environment.
Related tasks:
“Configuring directory synchronization” on page 89
A directory server in the service has a replica of one or more on-premises IBM
Domino directories. To support directory synchronization, provide the name of the
primary server and file path of at least one on-premises directory that you want to
synchronize. The directory server performs a regular pull and push replication of
the directories to keep the contents of both the service and the on-premises replicas
46
SmartCloud Notes: Administering SmartCloud Notes: Hybrid Environment March 2015
synchronized.
“Using the Pre-configuration Test tool to check your environment” on page 93
After you prepare your on-premises environment but before you run the Domain
Configuration tool to configure it to connect to the IBM SmartCloud Notes service,
download and run the SmartCloud Notes Hybrid Pre-configuration tool. This tool
runs a series of tests to determine if the servers in your environment are set up
correctly. The tool provides a report that identifies any issues that might prevent
communication between your environment and the service. The tool does not
change your configuration.
Preparing to replicate Domino directories
Prepare to replicate Domino directories in which service users are registered. You
might also want to replicate other Domino directories.
Before you begin
Read the topics “Planning directory services” on page 21 and “Requirements for
synchronized directories” on page 22
About this task
You must replicate to the service Domino directories in which users are registered
whom you plan to provision for the service.
You can also replicate Domino directories that contain only Person documents of
non-service users. When you replicate these directories, service users can look up
the names and addresses of the non-service users in the service directory. The
non-service users can be:
v On-premises users registered in a Domino domain
v On-premises users in a foreign mail domain for whom you manually create
Person documents
v External users in an external Internet domain for whom you manually create
Person documents
To define an internal foreign mail domain in the service, you must create a Global
Domain document. The document must be in a directory that is not the primary
directory of the on-premises hub domain, and you must replicate this directory to
the service.
If there are multiple directories of non-service users, you might want to aggregate
the directories into an extended directory catalog. Then you can replicate the
directory catalog rather than each directory.
To prepare to replicate a Domino directory to the service, perform the steps in this
procedure on each directory synchronization server.
Procedure
1. If the directory is not the primary directory of the on-premises hub domain,
perform the following steps:
a. Create a replica of the directory on each directory synchronization server.
Each replica of the directory must use the same path and file name on both
directory synchronization servers.
Chapter 3. Preparing your environment
47
b. If you created the replica from a source replica on another server, schedule
regular replication of the directory between each directory synchronization
server and the source server.
v If the directory contains users to be provisioned for the service, schedule
two-way replication.
v If the directory does not contain users to be provisioned for the service,
schedule one-way replication from the source server to the directory
synchronization server. Scheduling replication from the directory
synchronization server to the source server is optional.
2. Verify that a unique Domino domain is specified in the directory profile:
a. Open the Domino Directory.
b. Click Actions > Edit Directory Profile.
c. Verify that the Domain defined by this Domino Directory field specifies a
Domino domain that is unique within your company.
Note: The Pre-configuration Test tool that you run to check your
on-premises environment during service configuration also verifies the
domain name.
3. If a directory contains users to be provisioned for the service, make sure that
the Internet address field in their Person documents has a valid address, for
example, sdaryn@renovations. A valid Internet address contains the name of an
Internet domain that is owned by your company, defined in a Global Domain
document, and validated by the service.
4. If a directory contains users or devices from an internal foreign domain, make
sure that Other Internet Mail is selected in the Mail system field of their
Person documents. This setting is required for the service to route messages
addressed to these users to the on-premises mail hub servers.
Related tasks:
“Preparing Global Domain documents” on page 49
Prepare at least one Global Domain document to define the Internet domains that
your company owns.
Preparing to replicate an extended directory catalog
An extended directory catalog (EDC) can be used to aggregate entries from
multiple Domino directories and replicate the entries to the service. An EDC is
supported for read-only use in the service. This procedure is useful only for
companies that have more than one Domino directory.
About this task
In an environment with multiple Domino directories, aggregating the directories
into an EDC improves directory lookup performance.
Aggregating a Domino directory that contains service users into an EDC is
recommended for directory lookup performance. However, you must also replicate
the full Domino directory to the service, separately.
Although the use of multiple EDCs is supported, for ease of management, use one.
To prepare to replicate an EDC to the service during directory synchronization,
perform the following steps.
48
SmartCloud Notes: Administering SmartCloud Notes: Hybrid Environment March 2015
Procedure
1. Set up the EDC to aggregate all the directories that you want to make available
in the service. For more information, see the topic on setting up an extended
directory catalog in the Domino documentation.
Note: The EDC must comply with the requirements specific to the service. For
example, specific fields must be aggregated into an EDC. For information, see
the information about the EDC described in the topic “Requirements for
synchronized directories” on page 22.
2. Create a replica of the EDC on each directory synchronization server and on
each mail hub server in the on-premises hub domain. Also make sure that the
directories aggregated in it are kept up-to-date by the Dircat task.
3. Verify that a unique Domino domain is specified in the directory profile:
a. Open the EDC.
b. Click Actions > Edit Directory Profile.
c. Verify that the Domain defined by this Domino Directory field specifies a
unique Domino domain for the directory. If necessary, add a domain name
that is unique in your environment to this field.
Note: The Pre-configuration Test tool that you run to check your
on-premises environment during service configuration also verifies the
domain name.
4. To enable the EDC to be used for free-time lookups, set up your mail hub
servers in the on-premises hub domain to use directory assistance to find the
EDC. Directory assistance is not required on the directory synchronization
servers or passthru servers. For information on directory assistance, see the
Domino documentation.
a. Create a directory assistance database on one primary mail hub server.
b. Create a directory assistance document in that database for the extended
directory catalog. Configure the document to point to at least one replica of
the EDC on a directory synchronization server or primary mail hub server.
Configure the document to point to additional EDC replicas to provide
failover.
c. If you use an additional primary mail hub server, replicate the directory
assistance database to that server. Schedule regular replication of the
directory assistance database between the two mail hub servers.
Related information:
Domino documentation
Preparing Global Domain documents
Prepare at least one Global Domain document to define the Internet domains that
your company owns.
About this task
The Global Domain documents must be in synchronized Domino directories that
replicate to the service. When you configure the service, you verify ownership of
the domains that are defined in the replicated Global Domain documents. Global
Domain documents are used in the service only to define your Internet domains
and not to route mail.
Chapter 3. Preparing your environment
49
Usually you can use Global Domain documents that already exist in production
Domino directories. Follow the procedure in this topic to verify that they are
configured correctly for the service.
In some situations, you must create a new Domino Directory manually from the
pubnames.ntf template, add a new Global Domain document to it, and replicate
the new directory to the service. Otherwise, if you put the Global Domain
document in the primary Domino directory for a domain, it can prevent proper
on-premises mail routing in the domain.
Put a Global Domain document in a manually-created Domino directory to define
a Foreign Domain that includes devices, such as printers or faxes. Typically, a
Foreign Domain document is used on-premises to route requests to the devices.
Also put a Global Domain document in a manually-created Domino directory if
you want to use an asterisk (*) wildcard to define multiple subdomains below one
root domain. The root domain is defined in a separate Global Domain document.
When you verify the root domain during service configuration, the subdomains are
automatically verified, too. This approach is useful if there are many subdomains
that do not include service users.
Note: If service users are in a subdomain, you must specify the complete
subdomain name in a Global Domain document. The subdomain can also be
defined through a wildcard entry.
Domains specified in the Global Domain document field Alternate Internet
domain aliases are not handled as alias domains by the service. Instead, each
domain in this field is listed and verified in the service as a separate domain,
similar to the domain specified in the Local primary Internet domain field. To
enable a user to receive mail addressed to a domain in the Alternate Internet
domain aliases field, you must specify the user’s address for the domain in the
Person document.
If multiple Global Domain documents specify the same domain, the service
removes the duplicate domain occurrences.
Perform the following steps to create or verify at least one Global Domain
document.
Procedure
1. Open the Domino directory in which you want to add or verify a Global
Domain document.
2. Click Configuration and then expand the Messaging section.
3. Click Domains and perform one of the following steps:
v To verify an existing Global Domain document, select the document and
click Edit Domain.
v To create a new Global Domain document, click Add Domain.
4. Specify the following fields on the Basics tab.
Table 14. Basics tab of Global Domain document
50
Field
Step
Domain type
Select Global Domain.
Global domain name
Type any descriptive name.
SmartCloud Notes: Administering SmartCloud Notes: Hybrid Environment March 2015
Table 14. Basics tab of Global Domain document (continued)
Field
Step
Global domain role
Select R5/R6/R7/R8.
Use as default Global Domain
Select if you use more than one Global
Domain document and you want this
domain to be the default.
5. Ignore the Restrictions tab. The service does not use information in this tab.
6. Verify that the following fields on the Conversions tab correctly define an
Internet domain. Ignore the other fields in this tab; the service does not use
them.
Table 15. Conversions tab of Global Domain document
Field
Step
Local primary Internet domain
Type a domain name, for example,
renovations.com.
To specify multiple subdomains at once, use
an asterisk (*) as a wildcard. For example, if
your company owns these subdomains:
west.renovations.com
east.renovations.com
north.renovations.com
type:
*.renovations.com
If you use a wildcard, you must specify the
root domain in a separate Global Domain
document.
Note: If a service user is in a subdomain,
you must specify the complete subdomain
name in a separate Global Domain
document.
Alternate Internet domain aliases
Type any additional domain names,
separated by a comma (,). For example, type
renovations.org, renovations.net.
Note: When you configure the service, each
domain in this field is listed as a separate
domain to be verified.
7. Click Save & Close.
8. Restart the server. This step is not necessary if the Global Domain document is
in a new directory created only for use with the service.
What to do next
Prepare to replicate the directory that contains the Global Domain document to the
service.
Related tasks:
“Adding multiple Internet email addresses to Person documents” on page 207
You can include multiple Internet email addresses in a Person document.
Chapter 3. Preparing your environment
51
Preparing for mail routing
To prepare for mail routing between the service and your on-premises
environment, first set up at least one mail hub server in your on-premises hub
domain. Then prepare to route mail from service users and to service users.
No configuration is required to route mail sent between service users at your
company. This mail is routed automatically within the service.
Setting up mail hub servers in the on-premises hub domain
In the on-premises hub domain, set up at least one IBM Domino server to be a hub
server for mail routing with the service.
Before you begin
Make the mail routing decisions described in the topic “Planning mail routing and
mail settings” on page 29.
About this task
When any service user sends mail to any on-premises user or device, the service
routes the mail to a mail hub server in the on-premises hub domain. The mail hub
server then routes the mail to the final destination or next hop to the final
destination, if required.
To provide failover, set up two mail hub servers in the on-premises hub domain.
The service attempts to route to the primary mail hub server first, which is the
server with the name that comes first in alpha-numeric order. For example, if the
two server names are MailA/Renovations and MailB/Renovations, the primary
server is MailA/Renovations. If the two servers are Mail1/Renovations and
Mail2/Renovations, the primary server is Mail1/Renovations.
If the service is unable to route to the primary mail hub server due to network or
server unavailability, it attempts to use the secondary server. When the primary
mail hub server becomes available, the service begins using it again after a period
of time. The service may use both servers simultaneously for brief intervals.
If there are service users registered in the on-premises hub domain, the mail hub
server handles routing their mail to the service.
For information on installing and setting up Domino servers, see the Domino
documentation.
Procedure
1. Install and set up a Domino server in the on-premises hub domain, or use an
existing server. The server must comply with the following requirements:
v Domino version requirement: 8.5.1 Fix Pack 2 or later version.
v Notes certifier requirement: The same top-level organization certifier as the
directory synchronization servers, passthru servers, and mail servers in the
service.
2. Perform the following steps to disable public key checking on the server and to
give the server access to the LLNServers group:
a. Open the Server document in the Domino directory in edit mode.
b. Click the Security tab.
52
SmartCloud Notes: Administering SmartCloud Notes: Hybrid Environment March 2015
c. In the Compare public keys field in the Security Settings section, select Do
not enforce key checking and click OK.
d. Perform one of the following steps to give the server access to the
LLNServers group:
v Add LLNServers to the Access server field.
v Clear the users listed in all trusted directories check box and make sure
that the Not access server does not prevent access to LLNServers.
When you configure the service, LLNServers group is created in the Domino
directory of the on-premises hub domain when you run the Domain
Configuration tool.
e. Click Save & Close.
What to do next
Prepare for mail routing.
Related concepts:
“Version requirements for on-premises Domino servers” on page 38
This topic describes the IBM Domino version requirements for on-premises
Domino servers.
“Certifier requirements in a hybrid environment” on page 37
It is important to understand the following certifier requirements when planning a
hybrid environment.
Related information:
Domino documentation
Preparing to route mail from service users
Prepare to route mail from service users to on-premises users and devices or to
external users.
Preparing to route mail from service users to on-premises users
and devices
When service users send mail to on-premises users or devices, the mail is routed to
a mail hub server in the on-premises hub domain. If recipients are in a different
domain, you configure the routing to the final destination.
Before you begin
Make sure that you have set up at least one mail hub server in the on-premises
hub domain.
About this task
When service users address mail to any on-premises user or device, the service
routes the mail to a mail hub server in the on-premises hub domain. This routing
is done automatically using Connection documents created when the Domain
Configuration tool is run during service configuration.
If recipients are in a different domain, you are responsible for configuring routing
to that domain. Recipients might be:
v On-premises users in other Domino domains.
v On-premises users in foreign domains who do not use Domino mail servers.
v On-premises devices in foreign domains, such as printers and faxes.
Chapter 3. Preparing your environment
53
For more information, see the topic “Setting up Notes routing” in the Domino
documentation.
Related concepts:
“Examples: Routing internal mail” on page 60
These examples illustrate mail routing between service users and on-premises
users and devices.
Related tasks:
“Preparing Global Domain documents” on page 49
Prepare at least one Global Domain document to define the Internet domains that
your company owns.
Related information:
Domino documentation
Preparing to use a company SMTP server to route outbound
Internet mail
You can configure a company SMTP host server to route mail that service users
send to external users.
About this task
Skip this procedure if you want the service to handle routing the mail that is sent
to external users. In this case (default behavior), the service filters the messages for
virus and spam before routing them to the Internet.
By using a company SMTP host server for external routing, you can act on
messages before routing them, for example, filter or audit messages. When you use
this feature, the service filters messages for viruses and spam and then routes them
directly to your designated SMTP host server. Messages addressed to any domain
that is not an internal, service-verified domain are routed to the SMTP host server.
The service uses Transport Layer Security (TLS) to route mail to the SMTP host
server if the host server uses TLS. The connection is made using STARTTLS over
SSL TCP/IP port 25.
Procedure
1. Configure your SMTP host server to accept mail from one of the following
SMTP host servers in the service:
v If you use the United States data center: smtp.notes.na.collabserv.com
v If you use the Asia Pacific data center: smtp.notes.ap.collabserv.com
v If you use the European data center: smtp.notes.ce.collabserv.com
For more information on this step if you use a Domino SMTP server, see the
topic about enabling a server to receive mail sent over SMTP routing in the
Domino documentation.
2. Configure the corporate firewall to allow inbound connections over port 25
from the service SMTP host server specified in the previous step. For more
information, see the topic Configuring the firewall for inbound connections.
3. If specifying a maximum message size, configure your SMTP host server to
accept messages up to 100 MB in size, the maximum message size allowed by
the service. For more information on this step if you use a Domino SMTP
server, see the topic about restricting mail routing based on message size in the
Domino documentation.
54
SmartCloud Notes: Administering SmartCloud Notes: Hybrid Environment March 2015
4. Configure your SMTP host server to relay mail to external Internet domains.
For more information on this step if you use a Domino SMTP server, see the
topic about setting inbound relay controls in the Domino documentation.
5. Configure your SMTP host server to route mail to the Internet. For more
information on this step if you use a Domino SMTP server, see the topic about
setting up SMTP routing to external Internet domains in the Domino
documentation.
What to do next
When you complete the service configuration, perform the procedure “Specifying
an SMTP server to route mail to the Internet” on page 160.
Related concepts:
“Example: Routing mail from a service user to an external user using a service
SMTP host” on page 70
This example illustrates how mail is routed from a service user to an external user
on the Internet when the service manages the routing.
“Example: Routing mail from a service user to an external user using a company
SMTP host” on page 71
This example illustrates how mail is routed from a service user to an external user
on the Internet when a company SMTP server routes the mail.
Related information:
Domino documentation
Preparing to route mail to service users
Prepare mail servers in the Domino domains in which service users are registered
to route mail to the users.
Preparing to route mail to service users registered in the
on-premises hub domain
If service users are registered in the on-premises hub domain, prepare to route
mail to those users through the mail hub servers in the domain.
Before you begin
Prepare your on-premises mail hub servers.
About this task
If there are no service users in the hub domain, skip this procedure.
The mail hub servers in the hub domain route mail to service users who are
registered in the domain. Connection documents that the Domain Configuration
tool creates when you configure the service are used to route the mail. You specify
settings for the mail hub servers to optimize mail routing performance.
Mail sent from on-premises users in the on-premises hub domain to service users
in the domain is routed automatically. To route mail from on-premises users in
other domains to the service users in the on-premises hub domain, configure mail
routing from the other domains to the on-premises hub domain. You can route
mail from other Domino domains or foreign domains that do not include Domino
mail servers. For more information, see the topic “Setting up Notes routing” in the
Domino documentation.
Chapter 3. Preparing your environment
55
To route mail from external users on the Internet to the service users in the
on-premises hub domain, configure an SMTP server to accept the mail. Then route
the mail to a mail hub server in the on-premises hub domain. You are responsible
for configuring virus scanning and spam filtering on mail received from the
Internet. For more information, see the topic “Configuring Domino to send and
receive mail over SMTP” in the Domino documentation.
Perform the steps in this procedure to optimize mail routing for each mail hub
server in the on-premises hub domain.
Procedure
1. Customize the routing retry interval by performing the following steps on each
mail hub server:
a. From the Domino Administrator client, open a server in the domain.
b. Click Configuration > Server > Configurations.
c. Create or edit a Configuration Settings document that applies to the mail
hub server.
d. Click Router/SMTP > Restrictions and Controls > Transfer Controls.
e. In the Initial transfer retry interval field, specify 1 minutes.
2. To allow the use of multiple transfer threads for mail routing, perform the
following steps on each mail hub server:
a. Add the following setting to the server notes.ini file:
RouterAllowConcurrentXferToAll=1
b. Perform the following steps to limit the number of transfer threads used for
routing to any single destination. This setting reduces the chance that
routing to one destination over a slow connection will monopolize transfer
threads and prevent routing to other destinations.
1) From the Domino Administrator, click Configuration > Server >
Configurations
2) Add or edit a Configuration Settings document that applies to the mail
server.
3) Click Router/SMTP > Restrictions and Controls > Transfer Controls.
4) In the Maximum concurrent transfer threads field, specify 4.
Note: These steps allow the use of multiple transfer threads when routing
mail to any destination, not only to the service. After users are provisioned
for the service, monitor mail routing. Ensure that the setting does not
negatively affect the performance of routing to destinations other than the
service.
Related concepts:
“Examples: Routing internal mail” on page 60
These examples illustrate mail routing between service users and on-premises
users and devices.
“Examples: Routing external mail” on page 68
These examples illustrate routing mail between service users and external users
over the Internet.
Related information:
Domino documentation
56
SmartCloud Notes: Administering SmartCloud Notes: Hybrid Environment March 2015
Preparing to route mail to service users in a secondary domain
If service users are in a secondary Domino domain (a domain that is not the
on-premises hub domain) prepare to route mail to the users through mail hub
servers in the secondary domain.
About this task
Skip this procedure if all service users are in the on-premises hub domain.
To configure mail routing to service users in a secondary domain, create required
Connection documents in the Domino directory of the domain, as described in this
procedure. Also configure settings to optimize mail routing performance, as
described in this procedure.
The steps in this procedure enable mail sent from on-premises users in the
secondary domain to be routed to service users also in the domain. To route mail
from on-premises users in other domains to the service users in the secondary
domain, configure mail routing from the other domains to the secondary domain.
You can route mail from other Domino domains or foreign domains that do not
include Domino mail servers. For more information, see the topic “Setting up
Notes routing” in the Domino documentation.
To route mail from external users on the Internet to the service users in the
secondary domain, configure an SMTP server to accept the mail. Then route the
mail to a mail hub server in the secondary domain. For more information, see the
topic “Configuring Domino to send and receive mail over SMTP” in the Domino
documentation. You are responsible for configuring virus scanning and spam
filtering on mail received from the Internet.
Procedure
1. Install and set up at least one Domino server in the domain to be a mail hub
server, or use an existing server. Servers that route mail to the service must be
Domino 8.5.1 Fix Pack 2 or a later version.
2. Create the following Connection documents in the Domino directory of the
service user domain. These Connection documents enable servers to connect
and route mail to the service.
Table 16. Connection document used to connect to the service
Field
Value
Additional information
Basics - Connection type
Local Area Network
None
Basics - Source server
*
None
Basics - Source domain
Name of the service user
domain, for example,
PowerRenovations
Specify the same value for
the Source and Destination
domains.
Basics - Use the ports
Appropriate TCP/IP port
None
Basics - Usage priority
Normal
None
Basics - Destination server
*mail_server_certifier
For example, if your service
mail server certifier is
/SCN/Renovations, specify
*/SCN/Renovations.
Basics - Destination domain Name of the service user
domain, for example,
PowerRenovations
Specify the same value for
the Source and Destination
domains.
Chapter 3. Preparing your environment
57
Table 16. Connection document used to connect to the service (continued)
Field
Value
Additional information
Basics - Optional network
address
notes.na.collabserv.com or DNS host name of the proxy
notes.ap.collabserv.com,
server in the service.
depending on the data center
that your company uses.
Replication/Routing Replication task
Disabled
None
Replication/Routing Routing task
None
None
Schedule
Disabled
None
Table 17. Connection document used to route mail from mail servers in the on-premises
domain to mail hub servers in the service.
Field
Value
Additional information
Basics - Connection type
Local Area Network
None
Basics - Source server
Name of a local mail hub
server or mail hub server
group in a service user
domain to route mail to the
service, for example,
Mailhub2/Renovations or
HubMailGroup.
If you specify a group:
v The group name must
occur before the name
LLNMailHubs alphabetically.
For example, use
HubMailGroup but not
MailGroupHub.
Other servers in the domain v The group name should
not be CustomerMailHubs,
must be able to route mail to
which is a group that
this server or group.
already exists for use in
the service.
v The group type must be
Servers only.
v
Basics - Source domain
Name of the service user
domain, for example,
PowerRenovations
Specify the same value for
the Source and Destination
domains
Basics - Usage priority
Normal
None
Basics - Destination server
LLNMailHubs
None
Basics - Destination domain Name of the service user
domain, for example,
PowerRenovations.
58
The members must be the
names of servers to route
mail to the service.
Specify the same value for
the Source and Destination
domains
Basics - Optional network
address
notes.na.collabserv.com or DNS host name of the proxy
notes.ap.collabserv.com,
server in the service.
depending on the data center
that your company uses.
Replication/Routing Replication task
Disabled
None
Replication/Routing Routing task
Mail routing
None
Schedule
Enabled
None
SmartCloud Notes: Administering SmartCloud Notes: Hybrid Environment March 2015
Table 18. Connection document used to messages from mail hub servers in the service to
service user mail servers
Field
Value
Additional information
Basics - Connection type
Local Area Network
None
Basics - Source server
LLNMailHubs
This is the group of mail hub
servers in the service.
Basics - Source domain
Name of the service user
domain, for example,
PowerRenovations
Specify the same value for
the Source and Destination
domains.
Basics - Usage priority
Normal
None
Basics - Destination server
LLNServers
This is the group of mail and
directory servers in the
service.
Basics - Destination domain Name of the service user
domain, for example,
PowerRenovations
Specify the same value for
the Source and Destination
domains.
Basics - Optional network
address
Leave blank
None
Replication/Routing Replication task
Disabled
None
Replication/Routing Routing task
Mail routing
None
Schedule
Enabled
None
3. Perform the followings steps to give each server access to the LLNServers
group.
a. Open the Server document in the Domino Directory for the domain.
b. Click the Security tab.
c. Perform one of the following steps:
v Add LLNServers to the Access server field.
v Clear the users listed in all trusted directories check box and make sure
that the Not access server does not prevent access to LLNServers.
4. Customize the routing retry interval by performing the following steps on each
mail hub server:
a. From the Domino Administrator client, open a server in the domain.
b. Click Configuration > Server > Configurations.
c. Create or edit a Configuration Settings document that applies to the mail
hub server.
d. Click Router/SMTP > Restrictions and Controls > Transfer Controls.
e. In the Initial transfer retry interval field, specify 1 minutes.
5. To allow the use of multiple transfer threads for mail routing, perform the
following steps on each mail hub server:
a. Add the following setting to the server notes.ini file:
RouterAllowConcurrentXferToAll=1
b. Perform the following steps to limit the number of transfer threads used for
routing to any single destination. This setting reduces the chance that
routing to one destination over a slow connection will monopolize transfer
threads and prevent routing to other destinations.
Chapter 3. Preparing your environment
59
1) From the Domino Administrator, click Configuration > Server >
Configurations
2) Add or edit a Configuration Settings document that applies to the mail
server.
3) Click Router/SMTP > Restrictions and Controls > Transfer Controls.
4) In the Maximum concurrent transfer threads field, specify 4.
Note: These steps allow the use of multiple transfer threads when routing
mail to any destination, not only to the service. After users are provisioned
for the service, monitor mail routing. Ensure that the setting does not
negatively affect the performance of routing to destinations other than the
service.
Related concepts:
“Examples: Routing internal mail”
These examples illustrate mail routing between service users and on-premises
users and devices.
“Examples: Routing external mail” on page 68
These examples illustrate routing mail between service users and external users
over the Internet.
Related information:
Domino documentation
Examples: Routing internal mail
These examples illustrate mail routing between service users and on-premises
users and devices.
Example: Routing mail between users in the on-premises hub
domain
This example illustrates how mail is routed between a service user and
on-premises user when both are registered in the on-premises hub domain.
Table 19. Servers used in this example
Server
Description
Mail1/Renovations
On-premises user’s mail server in the
on-premises hub domain, Renovations
Mailhub/Renovations
Mail hub server in the Renovations domain
Passthru1/Renovations
On-premises passthru server in the
SCNPassthru domain used for inbound
connections from the service.
Mail1/SCN/Renovations
Service user’s mail server in the Renovations
domain.
How mail is routed from the on-premises user to the service user
When the on-premises user addresses mail to the service user, the following steps
occur to route the mail.
1. The on-premises users’s mail server, Mail1/Renovations, routes the mail to the
on-premises hub server, Mailhub/Renovations.
2. Mailhub/Renovations routes the mail to a mail hub server in the service,
connecting through a proxy server in the service. Connection documents
created by the Domain Configuration tool are used to route the mail.
60
SmartCloud Notes: Administering SmartCloud Notes: Hybrid Environment March 2015
3. The mail hub server in the service routes the mail to the service user’s mail
server, Mail1/SCN/Renovations. A Connection document created by the
Domain Configuration tool is used to route the mail.
.
Routing mail from an on-premises user to a service user when both users are in the on-premises hub domain
How mail is routed from the service user to the on-premises user
When the service user sends mail to the on-premises user, the following steps
occur to route the mail.
1. The service user’s mail server, Mail1/SCN/Renovations, routes the mail to a
mail hub server in the service.
2. The mail hub server in the service routes the mail to the on-premises mail hub
server, Mailhub/Renovations. The mail hub server connects through the
on-premises passthru server, Passthru1/Renovations, in the SCNPassthru
domain.
3. The on-premises mail hub server, Mailhub/Renovations, routes the mail to the
on-premises user’s mail server, Mail1/Renovations.
Chapter 3. Preparing your environment
61
.
Routing mail from a service user to an on-premises user when both users are in the on-premises hub domain
Example: Routing mail between users in a secondary domain
This example illustrates how mail is routed between a service user and an
on-premises user when both users are registered in a Domino domain that is not
the on-premises hub domain.
Table 20. Servers used in this example
62
Server
Description
Mail2/Renovations
On-premises user’s mail server in the
PowerRenovations domain
Mailhub2/Renovations
Mail hub server in the PowerRenovations
domain
Mailhub/Renovations
Mail hub server in the on-premises hub
domain, Renovations
Passthru1/Renovations
On-premises passthru server in the
SCNPassthru domain used for inbound
connections from the service
SmartCloud Notes: Administering SmartCloud Notes: Hybrid Environment March 2015
Table 20. Servers used in this example (continued)
Server
Description
Mail2/SCN/Renovations
Service user’s mail server in the
PowerRenovations domain
How mail is routed from the on-premises user to the service user
When the on-premises user sends mail to the service user, the following steps
occur to route the mail.
1. The on-premises users’s mail server, Mail2/Renovations, routes the mail to the
mail hub server in the PowerRenovations domain, Mailhub2/Renovations.
2. Mailhub2/Renovations routes the mail to a mail hub server in the service.
v Mailhub2/Renovations connects through a proxy server in the service.
v Connection documents that a company administrator creates in the
PowerRenovations directory are used to route the mail.
3. The mail hub server in the service routes the mail to the service user’s mail
server, Mail2/SCN/Renovations.
v A Connection document that a company administrator creates in the
PowerRenovations directory is used to route the mail.
Chapter 3. Preparing your environment
63
.
Routing mail from an on-premises user to a service user when both users are in a secondary Domino domain.
How mail is routed from the service user to the on-premises user
When the service user sends mail to the on-premises user, the following steps
occur to route the mail.
1. The service user’s mail server, Mail1/SCN/Renovations, routes the mail to a
mail hub server in the service.
2. The mail hub server in the service routes the mail to the mail hub server in the
Renovations domain, Mailhub/Renovations.
v The mail hub server in the service connects through the on-premises
passthru server, Passthru1/Renovations, in the SCNPassthru domain.
3. Mailhub/Renovations routes the mail to the mail hub server in the
PowerRenovations domain, Mailhub2/Renovations.
64
SmartCloud Notes: Administering SmartCloud Notes: Hybrid Environment March 2015
v A Connection document created by the company administrator is used to
route the mail.
4. Mailhub2/Renovations routes the mail to the on-premises user’s mail server,
Mail2/Renovations.
.
Routing mail from a service user to an on-premises user when both users are in a secondary domain.
Example: Routing mail between users in different Domino
domains
This example illustrates how mail is routed between a service user registered in the
on-premises hub domain and an on-premises user registered in a secondary
domain.
Chapter 3. Preparing your environment
65
Table 21. Servers used in this example
Server
Description
Mail2/Renovations
On-premises user’s mail server in the
PowerRenovations domain
Mailhub2/Renovations
Mail hub server in the PowerRenovations
domain
Mailhub/Renovations
Mail hub server in the Renovations domain,
which is the on-premise hub domain and the
service user’s domain.
Passthru1/Renovations
On-premises passthru server in the
SCNPassthru domain used for inbound
connections from the service
Mail1/SCN/Renovations
Service user’s mail server in the Renovations
domain
How mail is routed from the on-premises user to the service user
When the on-premises user sends mail to the service user, the following steps
occur to route the mail.
1. The on-premises users’s mail server, Mail2/Renovations, routes the mail to the
mail hub server in the PowerRenovations domain, Mailhub2/Renovations.
2. Mailhub2/Renovations routes the mail to the mail hub server in the service
user’s domain, in this case, the server Mailhub/Renovations in the Renovations
domain.
v Connection documents created by a company administrator are used to route
the mail.
3. Mailhub/Renovations routes the mail to a mail hub server in the service.
v Mailhub/Renovations connects to the service through a proxy server in the
service.
v Connection documents that the Domain Configuration tool created in the
Renovations domain directory are used to route the mail.
4. The mail hub server in the service routes the mail to the service user’s mail
server, Mail1/SCN/Renovations.
v A Connection document that the Domain Configuration tool creates in the
Renovations domain directory is used to route the mail.
66
SmartCloud Notes: Administering SmartCloud Notes: Hybrid Environment March 2015
.
Routing mail from an on-premises user in a secondary domain to a service user in the on-premises hub domain.
How mail is routed from the service user to the on-premises user
When the service user sends mail to the on-premises user, the following steps
occur to route the mail.
1. The service user’s mail server, Mail1/SCN/Renovations, routes the mail to a
mail hub server in the service.
2. The mail hub server in the service routes the mail to the on-premises mail hub
server in the Renovations domain, Mailhub/Renovations.
v The mail hub server in the service connects through the on-premises
passthru server, Passthru1/Renovations, in the SCNPassthru domain.
Chapter 3. Preparing your environment
67
3. The on-premises mail hub server, Mailhub/Renovations, routes the mail to the
mail hub server in the PowerRenovations domain, Mailhub2/Renovations.
v Connection documents that the company administrator creates are used to
route the mail.
4. Mailhub2/Renovations routes the mail to the on-premises user’s mail server,
Mail2/Renovations.
.
Routing mail from a service user in the on-premises hub domain to an on-premises user in secondary Domino
domain.
Examples: Routing external mail
These examples illustrate routing mail between service users and external users
over the Internet.
68
SmartCloud Notes: Administering SmartCloud Notes: Hybrid Environment March 2015
Example: Routing mail from an external user to a service user
This example illustrates how mail is routed from an external user on the Internet
to a service user.
In this example:
v The external user is in the zetabank.com domain.
v The external SMTP server is smtp.zetabank.com.
v The on-premises SMTP server is smtp.renovations.com.
v The service user is in the renovations.com Internet domain and in the
Renovations Domino domain.
v The on-premises hub domain is Renovations.
v The on-premises mail hub server is Mailhub/Renovations.
v The service user’s mail server is Mail1/SCN/Renovations.
When the external user from the zetabank.com domain sends mail to the service
user in the internal domain renovations.com, the following steps occur to route the
mail.
1. The external SMTP server, smtp.zetabank.com, routes the mail to the
on-premises SMTP server, smtp.renovations.com, over the Internet.
2. smtp.renovations.com receives the mail, scans it for viruses and spam, and then
routes the mail to the on-premises mail hub server, Mailhub/Renovations, in
the Renovations Domino domain.
v A company administrator configures the routing to Mailhub/Renovations.
3. Mailhub/Renovations routes the mail to a mail hub server in the service over
NRPC.
v Mailhub/Renovations connects through a proxy server in the service.
v Connection documents created by the Domain Configuration tool are used to
route the mail.
4. The mail hub server in the service routes the mail to the service user’s mail
server, Mail1/SCN/Renovations.
v A Connection document created by the Domain Configuration tool is used to
route the mail.
Chapter 3. Preparing your environment
69
.
Routing mail from an external user to a service user
Example: Routing mail from a service user to an external user
using a service SMTP host
This example illustrates how mail is routed from a service user to an external user
on the Internet when the service manages the routing.
In this example:
v The external user is in the zetabank.com domain.
v The external SMTP server is smtp.zetabank.com.
v The service user is in the renovations.com Internet domain.
v The service user’s mail server is Mail1/SCN/Renovations.
70
SmartCloud Notes: Administering SmartCloud Notes: Hybrid Environment March 2015
When the service user sends mail to the external user in the zetabank.com domain,
the following steps occur to route the mail.
1. The service user’s mail server, Mail1/SCN/Renovations, routes the mail to an
SMTP server in the service.
2. The SMTP server in the service routes the mail to a mail hygiene server in the
service.
3. The mail hygiene server scans the mail for viruses and spam and then routes
the mail to the external SMTP server, smtp.zetabank.com, over the Internet.
.
Service routing mail from a service user to an external user
Example: Routing mail from a service user to an external user
using a company SMTP host
This example illustrates how mail is routed from a service user to an external user
on the Internet when a company SMTP server routes the mail.
In this example:
v The external user is in the zetabank.com domain.
Chapter 3. Preparing your environment
71
v
v
v
v
The
The
The
The
external SMTP server is smtp.zetabank.com.
on-premises SMTP server is smtp.renovations.com.
service user is in the renovations.com domain.
service user’s mail server is Mail1/SCN/Renovations.
When the service user addresses mail to the external user in the zetabank.com
domain, the following steps are taken to route the mail.
1. The service user’s mail server, Mail1/SCN/Renovations, routes the mail to an
SMTP server in the service.
2. The SMTP server in the service routes the mail to a mail hygiene server in the
service.
3. The mail hygiene server in the service scans the mail for viruses and spam and
then routes the mail to the on-premises SMTP server, smtp.renovations.com.
4. The on-premises SMTP server, smtp.renovations.com, filters and audits the
mail, and then routes the mail to the external SMTP server, smtp.zetabank.com.
72
SmartCloud Notes: Administering SmartCloud Notes: Hybrid Environment March 2015
.
Company-controlled SMTP server routing mail from a service user to an external user
Preparing for calendars and scheduling
You can prepare for on-premises users and service users to look up each others’
free time when scheduling meetings. You can also prepare for service users to
reserve resources in on-premises Resource Reservations databases.
Before you begin
Read “Planning calendars and scheduling” on page 31 to understand how
calendars and scheduling works in the service and the requirements to use it.
For more information on IBM Domino scheduling, see the Domino documentation.
Chapter 3. Preparing your environment
73
Procedure
1. Perform the following tasks to prepare for free-time requests between service
users and on-premises users:
v Make sure that any on-premises server that will request free-time of service
users runs Domino 8.5.1 Fix Pack 2 or a later version.
v Disable public key checking on any on-premises server that will request
free-time of service users. On the Security tab of the Server document, in the
Compare public keys field, select Do not enforce key checking.
v Verify that the CalConn server task is specified in the ServerTasks line in the
notes.ini file of each on-premises mail server and Calendar server that will
request free time of service users. The task uses CPU or memory resources
only when handling free-time requests.
v In a multi-domain environment, perform the following additional steps to
enable service users to request free-time of on-premises users:
– If on-premises users are not in the on-premises hub domain, make sure
the primary directory of the on-premises hub domain has a domain
document that specifies a Calendar server for the domain of the
on-premises users.
– If a directory catalog is used in the on-premises hub domain, make sure
that mail hub servers in the domain are configured to use directory
assistance to look up names in it.
– If you do not synchronize the primary Domino directory of the
on-premises hub domain, copy the CustomerMailHubs group in it to a
synchronized directory. Keep the group type as Servers only. This step
must be done after you configure the service and run the Domain
Configuration tool, because the tool creates the group initially.
v In a multi-domain environment, perform the following additional steps to
enable on-premises users to request the free-time of service users:
– If the service users are not in the on-premises hub domain, create a
Connection document in the primary directory of the service users’
domain that enables mail servers in the domain to connect to the service
to send the free-time request. If you configure mail routing from the
service user domain to the service, this step is complete as part of that
configuration.
– If the on-premises users are in a different domain than the service users,
make sure the primary directory of the on-premises user domain has a
domain document that specifies the Calendar server for the domain of the
service users.
2. Perform the following steps to prepare for service users to reserve rooms and
resource in an on-premises Resource Reservations database:
v Synchronize the directory of the domain in which a Resource Reservations
database is located.
v If a Resource Reservations database is not in the on-premises hub domain,
configure mail routing from the on-premises hub domain to the other
domain.
v To enable a service user to look up the free-time of a room or resource, make
sure a server in the on-premises hub domain can look up free-time in the
Resource Reservations database or can connect to a server that can.
v If the directory of the domain that contains the Resource Reservations
database is aggregated in a directory catalog, specify the following settings in
the Extended Directory Catalog configuration document:
74
SmartCloud Notes: Administering SmartCloud Notes: Hybrid Environment March 2015
– Include the following field names in the Additional fields to include
field: ResourceFlag, ResourceType, and ResourceCapacity
– In the Include Mail-In Databases field, select Yes.
v Remove duplicate site names that are used for rooms and resources across
directories. If two sites have the same name, the service lists resources from
both sites under one site name. This situation can lead users to reserve
resources at the wrong site. See Technote 1473022 for instructions on making
site names unique.
What to do next
Related tasks:
“Preparing to replicate an extended directory catalog” on page 48
An extended directory catalog (EDC) can be used to aggregate entries from
multiple Domino directories and replicate the entries to the service. An EDC is
supported for read-only use in the service. This procedure is useful only for
companies that have more than one Domino directory.
“Downloading and running the Domain Configuration tool” on page 94
The Domain Configuration tool configures your on-premises servers to connect to
your hosted IBM SmartCloud Notes servers. The server configuration information
that you provide in the Account Settings of SmartCloud Notes Administration is
the data that is used to configure the connections.
Related information:
Domino documentation
Technote 1473022
Example of integrating a secondary domain with the service
Example: Free-time requests between users in the
on-premises hub domain
This example illustrates how free-time requests occur between a service user and
an on-premises user who are both registered in the on-premises hub domain.
Table 22. Servers used in this example
Server
Description
Mail1/Renovations
On-premises user’s mail server in the
on-premises hub domain, Renovations
Mailhub/Renovations
Mail hub server in the Renovations domain
Passthru1/Renovations
On-premises passthru server in the
SCNPassthru domain used for inbound
connections from the service.
Mail1/SCN/Renovations
Service user’s mail server in the Renovations
domain.
On-premises user requesting free time of service user
When the on-premises user requests the free-time of the service user, the following
steps occur to process the request:
1. The on-premises user’s mail server, Mail1/Renovations, looks up the name of
the service user’s mail server, Mail1/SCN/Renovations, in the Renovations
directory.
Chapter 3. Preparing your environment
75
2. Mail1/Renovations sends the free-time request to Mail1/SCN/Renovations.
v Mail1/Renovations runs the CalConn server task.
v A Connection document created by the Domain Configuration tool in the
Renovations domain directory enables Mail1/Renovations to send the
request through the proxy server in the service.
3. Mail1/SCN/Renovations looks up the user’s free time in its Free Time database
and returns it to Mail1/Renovations.
.
On-premises user requesting free-time of service user when both are in the on-premises hub domain.
Service user requesting free time of on-premises user
When the service user requests the free-time of the on-premises user, the following
steps occur to process the request:
1. The service user’s mail server, Mail1/SCN/Renovations, looks up the name of
the on-premises user in the service directory and determines that the user’s
mail server is on-premises.
2. Mail1/SCN/Renovations sends a free-time request to the mail hub server,
Mailhub/Renovations, in the on-premises hub domain.
76
SmartCloud Notes: Administering SmartCloud Notes: Hybrid Environment March 2015
v Mail1/SCN/Renovations finds the names of all servers in the
CustomerMailHubs and attempts to fetch free-time for each one until it
succeeds when trying Mailhub/Renovations. The Domain Configuration tool
creates the group in the directory of the on-premises hub domain and the
group replicates to the service during directory synchronization.
v Connection documents created in the service at time of customer creation
enable Mail1/SCN/Renovations to connect to Mailhub/Renovations through
the server Passthru1/Renovations.
3. Mailhub/Renovations sends the request to the on-premises user’s mail server,
Mail1/Renovations.
4. Mail1/Renovations looks up the user’s free time in its Free Time database and
returns it to Mailhub/Renovations.
5. Mailhub/Renovations returns the free time to Mail1/SCN/Renovations.
.
Service user requesting free-time of on-premises user when both are in the on-premises hub domain.
Chapter 3. Preparing your environment
77
Example: Free-time requests between users in different
domains
This example illustrates how free-time requests occur between an on-premises user
in a secondary domain and a service user in the on-premises hub domain.
Table 23. Servers used in this example
Server
Description
Mail2/Renovations
On-premises user’s mail server in the
PowerRenovations domain
Mailhub2/Renovations
Calendar server for the PowerRenovations
domain
Mailhub/Renovations
Mail hub server and Calendar Server for the
on-premises hub domain, Renovations
Passthru1/Renovations
On-premises passthru server in the
SCNPassthru domain used for inbound
connections from the service
Mail2/SCN/Renovations
Service user’s mail server in the Renovations
domain
On-premises user requesting free time of service user
When the on-premises user requests the free-time of the service user, the following
steps occur to process the request:
1. The on-premises user’s mail server, Mail2/Renovations, looks up the service
user’s mail server in a local directory catalog.
2. Mail2/Renovations sends a free-time request to Mailhub2/Renovations, the
Calendar Server for the PowerRenovations domain.
v Both servers run the CalConn server task.
3. Mailhub2/Renovations sends the request to Mailhub/Renovations, the
Calendar Server for the Renovations domain.
v Mailhub/Renovations runs the CalConn server task.
4. Mailhub/Renovations sends the requests to the service user’s mail server,
Mail1/SCN/Renovations.
v A Connection document created by the Domain Configuration tool in the
Renovations domain directory enables Mailhub/Renovations to send the
request through the proxy server in the service.
5. Mail1/SCN/Renovations looks up the user’s free time in its Free Time database
and returns it to Mailhub/Renovations.
6. Mailhub/Renovations returns the free time to Mailhub2/Renovations.
7. Mailhub2/Renovations returns the free time to Mail2/Renovations.
78
SmartCloud Notes: Administering SmartCloud Notes: Hybrid Environment March 2015
.
On-premises user in secondary domain requesting free-time of service user in on-premises hub domain
Service user requesting free time of on-premises user
When the service user requests the free-time of the on-premises user, the following
steps occur to process the request:
1. The service user’s mail server, Mail1/SCN/Renovations, looks up the name of
the on-premises user in the service directory and determines that the user’s
mail server is on-premises.
2. The service user’s mail server, Mail1/SCN/Renovations, sends a free-time
request to the mail hub server, Mailhub/Renovations, in the on-premises hub
domain.
v Mail1/SCN/Renovations finds the names of all servers in the
CustomerMailHubs and attempts to fetch free-time for each one until it
succeeds when trying Mailhub/Renovations. The Domain Configuration tool
Chapter 3. Preparing your environment
79
creates the group in the directory of the on-premises hub domain and the
group replicates to the service during directory synchronization.
v Connection documents created in the service at time of customer creation
enable Mail1/SCN/Renovations to connect to Mailhub/Renovations through
the server Passthru1/Renovations.
3. Mailhub/Renovations, the Calendar Server for the Renovations domain, sends
the request to Mailhub2/Renovations, the Calendar Server for the
PowerRenovations domain.
4. Mailhub2/Renovations sends the request to Mail2/Renovations, the
on-premises user’s mail server.
5. Mail2/Renovations looks up the user’s free time in its Free Time database and
returns it to Mailhub2/Renovations.
6. Mailhub2/Renovations returns the free time to Mailhub/Renovations.
7. Mailhub/Renovations returns the free time to Mail1/SCN/Renovations.
80
SmartCloud Notes: Administering SmartCloud Notes: Hybrid Environment March 2015
.
Service user in on-premises hub domain requesting free-time of on-premises user in a secondary domain.
Helping service users connect to application servers in secondary
domains
Service users can connect to on-premises IBM Domino servers to open applications.
If the application servers are in the same Domino domain as your primary mail
hub servers, service users see them listed in the Open Application window in IBM
Notes. If the application servers are in a secondary domain, use an External
Domain Network Information (EDNI) document. Then run the GETADRS program
to enable the secondary domain servers to be listed in the Open Application
window. In this case, users click Other in the window to see the servers listed.
Chapter 3. Preparing your environment
81
Create an EDNI document for each secondary domain in the Domino directory of
the primary mail hub server domain. Then schedule the GETADRS program to run
regularly on one server in the primary mail hub server domain. GETADRS pulls
the names and addresses of each server from the secondary domain into Response
documents to the EDNI document. To determine how to connect to a server in the
secondary domain, a server in the service uses the Response document for that
server. The EDNI document and Response documents do not replicate to the mail
servers in the service. Rather, the servers in the service look them up on one of
your primary mail hub servers.
EDNI documents make it easier for users to connect to application servers, but
they are not required. If you do not use EDNI documents, Connection documents
and bookmarks used previously to connect to the servers still work after users are
provisioned for the service. Users can also connect to the servers by typing the
server names in the Open Application window.
For more information, see the topic on setting up external domain lookups in the
Domino documentation.
Related information:
Domino documentation
82
SmartCloud Notes: Administering SmartCloud Notes: Hybrid Environment March 2015
Chapter 4. Configuring the service
After you have prepared your on-premises environment, configure the service to
work with your environment.
Related tasks:
Chapter 3, “Preparing your environment,” on page 39
Perform the steps in this section to prepare your on-premises servers for a hybrid
environment. Perform these steps after you have planned for the service and
before you configure the service.
Roadmap to configuring a hybrid environment
When you configure a hybrid environment, you establish connections between
your on-premises IBM Domino servers and IBM SmartCloud Notes servers. To
help you accomplish this task, a Domain Configuration tool is provided for you
that makes the necessary configuration changes to your environment, based on
information you provide. During configuration you also provide a certifier ID for
your SmartCloud Notes mail servers and you enable the service to verify
ownership of at least one Internet domain.
Before you begin
Before you configure a hybrid environment, perform the procedures in Preparing
your environment. Also make sure that IBM has created the SmartCloud Notes
account for your company, and that you have completed the task Logging on as
the first company administrator.
The following table describes the tasks required to configure a hybrid environment
and includes links to topics that describe the corresponding procedures.
Table 24. Tasks to configure a hybrid environment
Task
Estimated time to complete
How to confirm completion
Complete a checklist to make Varies, depending how many Review the worksheet for
sure all prerequisite tasks are required tasks are complete. accuracy and completeness.
done and to record
information you will provide
to configure account
sesttings. For more
information, see “Completing
a checklist to prepare for
configuration” on page 87.
© Copyright IBM Corp. 2011
83
Table 24. Tasks to configure a hybrid environment (continued)
Task
Estimated time to complete
How to confirm completion
Configure account settings
by performing the following
tasks in any order. Account
settings provide the
information about your
on-premises environment
that is required by the
Domain Configuration tool.
15-30 minutes, total
Confirm that there is a
checkmark next to each
setting in the Account Setup
window in SmartCloud
Notes Administration.
Use the Pre-configuration
Test tool to check that your
on-premises environment is
prepared to be configured for
the SmartCloud Notes
service.
5-15 minutes, after you have
completed the form. Time
depends on how many tests
run, which varies according
to the amount of information
provided.
A report displays, listing the
tests that were performed,
and identifying issues that
need to be resolved.
Check that the account
settings are accurate and
then enable the settings.
10 minutes
Confirm that the Account
Setup window in the
SmartCloud Notes
Administration interface
displays the text Prepare for
account activation and the
text Select Domain
Configuration Tool.
15-30 minutes
Confirm that the tool
displays a success message.
Note: If the tool does not
run successfully, you must
investigate and resolve any
issues before continuing. Do
not proceed until the tool
runs successfully.
v Providing a certifier ID
v Specifying a passthru
server
v Specifying a mail routing
server
v Creating a base name for
your mail server
v Specifying a Domino
Directory synchronization
server
This information is used
when the Domain
Configuration tool runs, so it
is important that it is
accurate.
Download and run the
Domain Configuration tool.
The tool uses the information
provided in account settings
to edit the Domino
directories of the on-premises
hub domain and the
on-premises passthru
domain. The edits allow the
servers in the service and
your on-premises servers to
connect to each other and to
perform directory
synchronization and mail
routing.
84
SmartCloud Notes: Administering SmartCloud Notes: Hybrid Environment March 2015
Table 24. Tasks to configure a hybrid environment (continued)
Task
Estimated time to complete
The time for the initial
directory synchronization to
complete varies depending
on the number of directories
Directory synchronization
replicated and the network
replicates to the service some bandwidth.
of the documents in the
For example, replicating one
Domino directories that are
directory over a fast
configured for
connection might take 2-6
synchronization. These
hours. Replicating multiple
include Global Domain
directories or replicating over
documents, at least one of
slower connections might
which is required by the
take 3-5 days.
service for Internet domain
verification.
.
The corporate firewall must
allow inbound connections
over port 1352 so that the
service can connect to a
directory synchronization
server and initiate
replication.
Confirm that directory
synchronization has
completed.
After directory
synchronization has
completed, verify at least one
Internet domain name by
creating a CNAME record for
it to which the SmartCloud
Notes service can connect.
It can take from a few
minutes or a few hours to as
long as 48 hours to verify
domain ownership.
If you do not have the
authority to create a CNAME
record for your domain,
extra time may be required
to contact your domain
hosting service and have
them create the record for
you.
How to confirm completion
Confirm that the Account
Setup window in the
SmartCloud Notes
Administration interface
displays the message
Directory synchronization is
complete.
Confirm that the Internet
Domain Verification window
in the SmartCloud Notes
Administration interface
indicates that at least one
domain is verified.
After the CNAME record is
created, it may take time for
your hosting service to
replicate it to the Internet.
The CNAME record must
replicate to the Internet so
that the service can connect
to it.
After you have verified at
least one Internet domain,
Activate your account.
5 minutes
Confirm that the Account
Setup window in the
SmartCloud Notes
Administration interface
indicates that the account has
been successfully activated.
Run configuration tests to
verify that your on-premises
environment is configured
correctly to work with the
service.
2 - 5 minutes
Confirm that no errors are
shown in the Configuration
Test window.
Chapter 4. Configuring the service
85
Table 24. Tasks to configure a hybrid environment (continued)
Task
Estimated time to complete
How to confirm completion
Check network connections
from on-premises servers to
SmartCloud Notes servers.
5 - 10 minutes
Confirm a successful
authenticated connection to a
mail server.
The corporate firewall must
allow outbound connections
over TCP/IP port 1352.
Issue a Vault Trust Certificate 5 - 10 minutes
to enable the Notes IDs of
provisioned users to be
uploaded to a SmartCloud
Notes ID vault.
After a user is provisioned
for SmartCloud Notes,
confirm that the Notes ID of
the user is uploaded to the
ID vault.
Logging on as the first company administrator
An IBM Customer Service Representative creates the IBM SmartCloud Notes
account for your company. This step creates a company administrator account
under a name and email address provided by your company. IBM sends an email
to the address confirming your purchase. To activate the account for your
company, follow the URL link in this email and log on to the IBM Connections
Cloud website as the company administrator.
About this task
Perform the following steps to activate the account for your company and log on
as the first company administrator.
Procedure
1. Open the email that was sent to the company administrator email address
confirming your purchase.
2. Click the URL link in the email, to open the Registration page.
3. Perform the following steps on the Registration page:
a. Create and confirm a service logon password.
Important: The email address that is shown is the logon name for the
company administrator account. Be sure to remember it and the new
password.
b. Select a country, language, and time zone.
c. Read the terms of use and privacy practices information, and if you agree to
them, click I accept the Terms of Use.
d. Click Submit.
e. Log on using the company administrator email logon and new password.
Results
You are now logged on to your home page. To log on in the future, go to
http://www.ibmcloud.com/social.
What to do next
Configure the SmartCloud Notes service, if IBM is not configuring it for you.
86
SmartCloud Notes: Administering SmartCloud Notes: Hybrid Environment March 2015
Completing a checklist to prepare for configuration
Before you prepare account settings and configure the service, complete the
checklist in this topic to verify that all prerequisite tasks are complete.
About this task
Table 25. Tasks to complete before you configure the service
Task
Corresponding information
to provide in account
settings
Configure the corporate
firewall to allow connections
to and from the service. For
information, see “Preparing
the firewall” on page 41.
Not applicable
Prepare a primary
synchronization server, and
optionally, a secondary
synchronization server. For
information, see “Setting up
directory synchronization
servers” on page 45.
The hierarchical server name
of each server, for example,
Dirhub/Renovations
Prepare at least one Domino
directory to replicate to the
service. For information, see
“Preparing to replicate
Domino directories” on page
47.
The file path to the directory
file name, relative to the data
directory on the
synchronization server, for
example, dir\names.nsf
Optionally, prepare an
Extended Directory Catalog
(EDC) to replicate to the
service. For information, see
“Preparing to replicate an
extended directory catalog”
on page 48.
The file path to the EDC file
name, relative to the data
directory on the
synchronization server, for
example, dir\edc.nsf
Complete?
Prepare a primary passthru
v The host name or IP
server, and optionally, a
address of a server, for
secondary passthru server.
example,
For information, see
passthru.renovations.com
“Preparing passthru servers”
v The hierarchical name of
on page 40.
the server, for example,
Passthru/Renovations
v The Domino domain of
the server, for example,
SCNPassthru
Chapter 4. Configuring the service
87
Table 25. Tasks to complete before you configure the service (continued)
Task
Corresponding information
to provide in account
settings
Complete?
Prepare a primary mail hub v The host name or IP
server, and optionally, a
address of a server, for
secondary mail hub server.
example,
For information, see “Setting
mailhub.renovations.com
up mail hub servers in the
v The hierarchical name of
on-premises hub domain” on
the server, for example,
page 52.
Mailhub/Renovations
v The Domino domain of
the server, for example,
Renovations
Create an OU certifier to use A local file path to the
to name your mail servers in certifier ID file
the service. For information,
see “Creating a certifier for
your mail servers” on page
39.
Decide on a base name for
users’ mail servers in the
service. The base name
combines with the mail
server OU certifier to form
the server names.
The base name, for example,
Mail, which is the default
value
Prepare Global Domain
documents to define the
Internet domains owned by
your company. For
information, see “Preparing
Global Domain documents”
on page 49.
Not applicable
Determine who will create
the CNAME records in your
domain hosting service that
are used to verify ownership
of your company Internet
domains. For information,
see “Verifying Internet
domains” on page 97
Not applicable
Not applicable
To prepare to use the
Domain Configuration tool,
find an IBM Notes client or
IBM Domino Administrator
client that can connect to
each directory
synchronization server, mail
hub server, and passthru
server. Make sure the ID file
you use with the client has
Administrator access to these
servers. For information, see
“Downloading and running
the Domain Configuration
tool” on page 94.
88
SmartCloud Notes: Administering SmartCloud Notes: Hybrid Environment March 2015
A list of Internet domains to
be verified is generated from
the documents and displayed
in SmartCloud Notes
Administration.
Configuring your hybrid account settings
Perform the tasks in this section to configure a hybrid environment, one in which
the IBM SmartCloud Notes service is integrated with IBM Domino servers at your
company site.
About this task
Make sure that IBM has created the SmartCloud Notes account for your company
and that you have activated it by logging on to the service as the first company
administrator.
Procedure
1. Log on to the service as an administrator.
2. If your account also has the User role, click Admin > Manage Organization.
3. In the System Settings section of the navigation pane, click IBM SmartCloud
Notes and then click Account Settings.
4. In the "Welcome to SmartCloud Notes!" window, select Hybrid Environment,
and then click Set Up My Account.
5. In the next window, click Continue.
Results
You are now ready to begin completing the information in the hybrid Account
Settings.
Configuring directory synchronization
A directory server in the service has a replica of one or more on-premises IBM
Domino directories. To support directory synchronization, provide the name of the
primary server and file path of at least one on-premises directory that you want to
synchronize. The directory server performs a regular pull and push replication of
the directories to keep the contents of both the service and the on-premises replicas
synchronized.
About this task
In addition to specifying a primary server, you can specify a secondary server that
you synchronize for high availability purposes. Each directory synchronization
server must have a local replica of each Domino directory that you provide.
You can also specify an extended directory catalog (EDC) to be synchronized.
However, if you do, make sure to select the option Do not use this directory for
user provisioning. The EDC is a read-only composite of information from your
other directories; the service receives information from it but does not update it.
For additional information about how Domino directories remain synchronized in
a hybrid environment, read Planning directory synchronization.
Procedure
1. Log on to the service as an administrator.
2. If your account also has the User role, click Admin > Manage Organization.
3. In the System Settings section of the navigation pane, click IBM SmartCloud
Notes and then click Account Settings.
Chapter 4. Configuring the service
89
4. In the navigation pane, click Directory Sync Server.
5. Click Add Domino Directory. The name of the directory is displayed in the
Directory server column.
6. In the field Primary directory server name, specify the name of the server on
which your Domino directory resides, such as Directory1/Renovations. If you
are adding a secondary server, specify the name of the server in the field
Optional: Secondary directory server name instead.
7. In the field Domino Directory database file name, specify the file path of the
Domino directory or EDC.
8. If the directory is an EDC or any other directory that is not used for user
provisioning, select Do not use this Domino Directory for user provisioning.
9. Repeat steps 5 through 8 for each additional Domino directory that you want
to synchronize with hosted directory servers. You can return to this window
to add subsequent directories after you have saved this information.
10. Click Save.
11. Optional: To edit the name of a directory server, return to this window and
click the server link.
What to do next
Complete the task Specifying a mail routing server.
Specifying a mail routing server
IBM SmartCloud Notes servers and on-premises IBM Domino servers route mail to
each other. Provide the name of one or more Domino servers to use as the
on-premises mail routing server. You can use the same servers to perform mail
routing and directory synchronization or use separate servers for each function.
Although only one server is required, for high availability designate two servers.
Both the primary and the secondary mail servers must be in the same domain.
About this task
To provide failover, set up two mail hub servers in the on-premises hub domain.
The service attempts to route to the primary mail hub server first, which is the
server with the name that comes first in alpha-numeric order. For example, if the
two server names are MailA/Renovations and MailB/Renovations, the primary
server is MailA/Renovations. If the two servers are Mail1/Renovations and
Mail2/Renovations, the primary server is Mail1/Renovations.
If the service is unable to route to the primary mail hub server due to network or
server unavailability, it attempts to use the secondary server. When the primary
mail hub server becomes available, the service begins using it again after a period
of time. The service may use both servers simultaneously for brief intervals.
Procedure
1. Log on to the service as an administrator.
2. If your account also has the User role, click Admin > Manage Organization.
3. In the System Settings section of the navigation pane, click IBM SmartCloud
Notes and then click Account Settings.
4. From the navigation pane, click Mail Routing Server.
5. In the field Primary Domino mail server name, specify the name of your
on-premises Domino mail server, such as Mail1/Renovations.
90
SmartCloud Notes: Administering SmartCloud Notes: Hybrid Environment March 2015
6. Optional: In the field Optional Secondary Domino mail server name, provide
the name of a second mail server, such as Mail2/Renovations.
7. In the field Domino domain name, specify the name of the on-premises
Domino domain. Remember, both the primary and the secondary mail servers
must be in the same domain.
8. Click Save.
What to do next
Complete the task Creating a base name for your mail server.
Creating a base name for your mail servers
IBM SmartCloud Notes server names are created with a name that you provide as
a base name, and are then numbered sequentially. For example, if your base name
is Mail, and your organizational unit (OU) certifier is SCN/Renovations, then your
SmartCloud Notes server names are Mail1/SCN/Renovations,
Mail2/SCN/Renovations, and so on.
Procedure
1. Log on to the service as an administrator.
2. If your account also has the User role, click Admin > Manage Organization.
3. In the System Settings section of the navigation pane, click IBM SmartCloud
Notes and then click Account Settings.
4. From the navigation pane, click Mail Server Base Name.
5. Enter a base name for your mail servers.
6. Click Save.
What to do next
Complete the task Specifying a passthru server.
Specifying one or more passthru servers
All connections from the service to on-premises servers are directed through an
IBM Domino passthru server. For high availability, set up at least two passthru
servers for failover to prevent mail routing delays if a server is unavailable.
Before you begin
Make sure that you have installed and set up one or more passthru servers by
following the steps in the topic Preparing the passthru server domain.
Procedure
1. Log on to the service as an administrator.
2. If your account also has the User role, click Admin > Manage Organization.
3. In the System Settings section of the navigation pane, click IBM SmartCloud
Notes and then click Account Settings.
4. From the navigation pane, click Passthru Server.
5. In the Primary passthru server name field, specify the passthru server, such
as PassthruMain/Renovations.
Chapter 4. Configuring the service
91
6. In the Internet host name or IP address field, specify the Internet host name,
such as pthru1.renovations.com. Specify a host name rather than an IP
address, if possible. Then if the IP address changes, you do not need to
reconfigure this setting.
7. In the Domino domain name field, specify the name of the Domino domain,
such as RenovationsFirewall.
8. Optional: In the Optional secondary passthru server name field, provide the
name of a server to use in the case of failover.
9. Optional: Provide the Internet host name or IP address for the secondary
server.
10. Click Save.
What to do next
Complete the task Providing a certifier ID.
Providing a certifier ID file
As a part of preparing your on-premises environment for a hybrid deployment,
you create an IBM Domino organizational unit (OU) certifier for your IBM
SmartCloud Notes servers. In this task, you provide an OU certifier ID file and
password when you set up the hybrid environment.
Before you begin
Make sure that you have created a unique first-level organization unit (OU)
certifier using the steps in Creating a certifier for your mail servers.
Before you upload an ID file, make sure that you have selected the correct file.
After you upload the ID file, you cannot switch to an ID with a different certifier
name.
Make sure that you have read the topic Certifier requirements in a hybrid
environment.
Procedure
1. Log on to the service as an administrator.
2. If your account also has the User role, click Admin > Manage Organization.
3. In the System Settings section of the navigation pane, click IBM SmartCloud
Notes and then click Account Settings.
4. From the navigation pane, click Certifier ID File.
5. Browse to the certifier ID file you created for your hybrid environment.
6. If this file has a password, type the password in the Certifier password field.
7. Click Upload.
What to do next
Complete the task “Using the Pre-configuration Test tool to check your
environment” on page 93.
92
SmartCloud Notes: Administering SmartCloud Notes: Hybrid Environment March 2015
Using the Pre-configuration Test tool to check your environment
After you prepare your on-premises environment but before you run the Domain
Configuration tool to configure it to connect to the IBM SmartCloud Notes service,
download and run the SmartCloud Notes Hybrid Pre-configuration tool. This tool
runs a series of tests to determine if the servers in your environment are set up
correctly. The tool provides a report that identifies any issues that might prevent
communication between your environment and the service. The tool does not
change your configuration.
Before you begin
v To perform this task you must have Administrator access and Full Remote
Console access to the servers you are testing.
v The thoroughness of this test depends on the completeness of the information
you provide. However, if you do not know the answer, you can leave fields
blank .
v Do not use a virtual private network (VPN) connection. This tool performs
firewall tests, so you must run it from an IBM Notes client computer inside your
firewall.
About this task
When you download this tool, it contains the information that you have entered in
your Hybrid Account Setup up to this point. For instance, it might list your mail
hubs, but not your passthru servers, if you have not yet entered that information.
You can update the information using the IBM Notes client. However, if you
update the information this way, the information is used only when you run the
test; it is not passed back to the SmartCloud Notes servers. You will have to return
to the Hybrid Account Setup to enter the information there as well. Alternatively,
you can update the information in the Hybrid Account Setup and then download a
fresh copy of the tool that includes all of the updated information.
The more information you provide, the more complete your test results are.
However, you can leave a field blank if you do not know the correct information.
Run the tool as many times as needed, resolving issues identified before running it
again.
Procedure
1. Log on to the service as an administrator.
2. If your account also has the User role, click Admin > Manage Organization.
3. In the System Settings section of the navigation pane, click IBM SmartCloud
Notes and then click Account Settings.
4. From the navigation pane, click Pre-configuration Test Tool.
5. Click Download to download the file.
6. Agree to the terms and conditions for the pre-configuration test application,
and then click Continue.
7. Follow the steps in the resulting screen to download the file
liveservercheck.nsf and save it in your local Notes data directory.
8. From the Notes client, open the tool by clicking File > Open > IBM Notes
Application, and then selecting liveservercheck.nsf.
9. Follow the on-screen instructions that the tool displays, including checking the
information displayed there.
10. Click Run Test.
Chapter 4. Configuring the service
93
11. Review the report and address any on-premises issues reported by the tool.
12. Optional: If you change your environment, rerun the test.
13. Optional: Make any necessary changes to the information in the tool, and then
click Run Test.
What to do next
After you are satisfied that your environment is prepared, complete the task
“Reviewing your setup and enabling your account.”
Reviewing your setup and enabling your account
Before you can download and run the Domain Configuration tool, all of the
required hybrid account setup information must be complete. When you check the
status of the information you provided, any incomplete items are identified.
Before you begin
Complete these tasks in any order.
v Specifying the Domino directory server
v
v
v
v
Specifying a mail routing server
Creating a base name for your mail server
Specifying a passthru server
Providing a certifier ID
Procedure
1. Log on to the service as an administrator.
2. If your account also has the User role, click Admin > Manage Organization.
3. In the System Settings section of the navigation pane, click IBM SmartCloud
Notes and then click Account Settings.
4. In the navigation pane, click Account Setup.
5. For any items that have not been configured, click the corresponding task in
the navigation pane, and provide the information that is requested.
6. When the status of all items shows successful completion, click Enable my
account.
What to do next
Complete the task “Downloading and running the Domain Configuration tool.”
Downloading and running the Domain Configuration tool
The Domain Configuration tool configures your on-premises servers to connect to
your hosted IBM SmartCloud Notes servers. The server configuration information
that you provide in the Account Settings of SmartCloud Notes Administration is
the data that is used to configure the connections.
Before you begin
Before you can download and run the Domain Configuration tool for the first time,
all of the required Account Settings information must be complete. To confirm that
94
SmartCloud Notes: Administering SmartCloud Notes: Hybrid Environment March 2015
all of the required information is available, complete the task Checking the status
of your hybrid account setup. If any information is incomplete, provide the
missing information.
The IBM Notes client from which the tool is run must be able to connect to the
passthru servers in the passthru domain. The client must also be able to connect to
the directory synchronization and mail hub servers in the on-premises hub
domain. Firewall rules at your company might prevent connections from systems
inside the firewall to the passthru servers. In this case, use a Notes client running
on a system connected outside the firewall. Allow a direct connection to the
passthru servers, and through them, connect to the servers in the on-premises hub
domain.
If you are configuring the service for the first time, to make sure your on-premises
environment is prepared, complete the task Using the pre-configuration tool to
check your environment.
About this task
You run the Domain Configuration tool when you first configure the service to
interoperate with your on-premises environment.
You also run the tool after the initial configuration. Run the tool again if you
change a server configuration in Account Settings or if you correct a configuration
problem in your on-premises environment.
If you are performing the initial service configuration, the Domain Configuration
tool includes pre-configuration options you can use to test your on-premises
environment before you actually configure it. No changes are made to your
environment as a result of these tests.
v Pre-configuration Test - Runs the same series of pre-configuration tests as the
SmartCloud Notes Hybrid Pre-configuration tool (liveservercheck.nsf). If you
did not complete the task Using the pre-configuration tool to check the status of
your hybrid account setup, you can run those tests now. The tool then provides
a report that identifies configuration issues that you can address before
configuration.
v Pre-configuration Report - Simulates the configuration, and provides a report of
the configuration changes that would be made to your environment during the
actual configuration process.
After you run the Domain Configuration tool, a detailed report lists the changes
that were made to your on-premises server configuration. Typical changes include:
v Allowing SmartCloud Notes servers sufficient access to your Domino directories
to perform directory synchronization
v Creating connection documents to support server passthrough and mail routing
to SmartCloud Notes servers
v Modifying server configuration documents to allow passthrough access to these
servers
v Setting a server environment variable
Note: Do not edit the directory content added by the tool. For example, do not
edit changes to the ACL or to Connection documents. Doing so prevents proper
operation of the service. Refer to the report generated by the tool to see the exact
directory changes the tool makes
Chapter 4. Configuring the service
95
Procedure
1. Log on to the service as an administrator.
2. If your account also has the User role, click Admin > Manage Organization.
3. In the System Settings section of the navigation pane, click IBM SmartCloud
Notes and then click Account Settings.
4. In the navigation pane, click Domain Configuration Tool.
5. Follow the steps in the window that opens to download the file
liveserverconfig.nsf, and save it in your local Notes data directory.
If you are trying to overwrite a previously downloaded copy, and you get the
error message File is in use from your browser, it means that the IBM
Notes client has the old copy of liveserverconfig.nsf open. If that does not
seem to be the case, close Notes or use a different filename.
6. From the Notes client using an ID that has Manager access to your Domino
directory, click File > Open > IBM Notes Application, and then select the
liveserverconfig.nsf file.
7. Optional: Select Pre-configuration Test to run a series of pre-configuration
tests based on information provided in the Hybrid Account Settings.
a. Make any changes to your configuration environment, based on
information in the report.
b. To correct any account settings information, return to the SmartCloud
Notes Administration windows where you first entered the hybrid account
setup information, and make the corrections.
c. Repeat steps 4 and 5 to download a new copy of liveserverconfig.nsf.
8. Optional: Select Run a Pre-configuration Report to simulate the configuration
that will occur. No changes are made to your environment.
9. If all of the information is correct, select Configure Servers, and then click
Begin.
10. Review the resulting detailed report so that you know the changes that the
tool made to your on-premises server configuration. Optionally, print the
report for reference later.
Note: If you failed to save the original report, the file liveserverconfig.log
in your Notes data directory contains the same information. This log file is in
English only. Running the tool again does not produce an identical report
because the report lists the changes that were made when the tool runs.
During a second run no changes are made.
11. Allow time for the Domino directory changes to replicate to other servers in
your environment.
What to do next
If you must run the tool again to make sure that your setup is still correct, perform
steps 1-5 to get a new copy of liveserverconfig.nsf. When troubleshooting any
communication issues with the service, running the tool is a good way to check
whether anything has been changed, and whether you must return to the previous
settings.
When you are satisfied that your environment is set up correctly after the initial
service configuration, complete the task Verifying Internet domain names in a
hybrid environment.
96
SmartCloud Notes: Administering SmartCloud Notes: Hybrid Environment March 2015
Verifying Internet domains
Internet domain name verification is a standard industry practice among domain
hosting services to confirm domain name ownership and to prevent abuse of user
accounts. You need to verify only the domain names that correspond to Internet
addresses of users that you are provisioning.
Before you begin
Complete the tasks Downloading and running the Domain Configuration tool and
Preparing Global Domain documents. Also make sure that directory synchronization
has completed to replicate the Global Domain documents to the service.
About this task
There are different methods to verify domain names. The service uses a CNAME
record for this purpose by requiring you to create a CNAME record to prove
ownership. Your domain hosting service should provide instructions for creating a
CNAME record; however, if they do not, contact them directly.
A CNAME record is an entry in the Domain Name System that is used to define a
host name alias for an Internet domain. To prove ownership of a domain, you sign
in to your domain hosting service and use the DNS Management settings to create
a temporary CNAME record for the domain. Then the service uses the alias in the
CNAME record to query your domain. A successful query proves that you were
able to create the CNAME record and therefore that you own the domain.
If you do not have the authority to create a CNAME record for your domain, extra
time may be required to contact your domain hosting service and have them create
the record for you.
Verifying a root domain also verifies any subdomains of it that are listed. For
example, verifying renovations.com verifies west.renovations.com if listed in the
Internet Domain Verification window. After you verify a root domain, no other
company can use it or any subdomain of it.
You can perform this procedure even if you are in the process of switching domain
hosting services.
The list of Internet domain names that populate the Internet Domain Verification
window is derived from your on-premises Global Domain documents. These
documents replicate during directory synchronization of your on-premises server
with the service servers. If the list is incomplete or includes unwanted Internet
domains, edit your Global Domain documents on premises to include the correct
domain name information. After directory synchronization has completed, return
to this window and verify that the correct domain names are listed.
Procedure
1. Log on to http://www.ibmcloud.com/social using the email address and
password of a user with the Administrator role.
2. If your account also has the User role, click Admin > Manage Organization.
3. In the System Settings section of the navigation pane, click IBM SmartCloud
Notes and then click Account Settings.
4. In the navigation pane, click Internet Domain Verification.
Chapter 4. Configuring the service
97
5. In the Internet Domain Verification window, click Verify Ownership next to the
domain to verify.
6. Sign in to your domain hosting service and use the DNS management settings
to create a new CNAME record. Use the information that is shown in the
Internet Domain Verification window to create the CNAME record.
v Put the unique key that is shown into the first field of the CNAME record.
The name of this field varies by vendor, but it is sometimes named prefix or
alias.
v Put collabserv.com into the second field of the CNAME record. This field is
sometimes named destination or target host.
7. After you create the CNAME record, click Begin Verification to begin
verification of the domain.
The unique key continues to be shown in the Internet Domain Verification
window until verification completes successfully.
Results
To verify domain ownership, the service uses the alias in the CNAME record to
query your domain. For example, if the CNAME key is domino-1jkkiaojd-rules
and your domain name is renovations.com, the service queries
domino-1jkkiaojd-rules.renovations.com.
If verification is not successful, check that the unique key shown exactly matches
the one added to the CNAME record. If the values are different, do not restart
verification. Rather, update the CNAME record with the correct key and simply
wait again for verification to complete.
Domain verification can take up to 48 hours, although usually it takes much less
time. If after 48 hours domain verification has not completed, click Restart
Verification. Restarting verification generates a new unique key and you must
then replace the old key with the new key in the CNAME record. Only restart
verification if 48 hours have passed since you clicked Begin Verification.
After a domain is verified, you can remove the CNAME record you created.
What to do next
Perform the task “Activating your account” on page 99.
Related tasks:
“Downloading and running the Domain Configuration tool” on page 94
The Domain Configuration tool configures your on-premises servers to connect to
your hosted IBM SmartCloud Notes servers. The server configuration information
that you provide in the Account Settings of SmartCloud Notes Administration is
the data that is used to configure the connections.
“Preparing Global Domain documents” on page 49
Prepare at least one Global Domain document to define the Internet domains that
your company owns.
98
SmartCloud Notes: Administering SmartCloud Notes: Hybrid Environment March 2015
Activating your account
After you have set up and configured your on-premises environment by
downloading and running the Domain Configuration tool, you must activate your
account. When your account is activated, your on-premises servers can connect to
the IBM SmartCloud Notes servers, and the SmartCloud Notes servers can connect
to your on-premises servers.
Before you begin
Ensure that you have completed the task Verifying Internet domain names.
Procedure
1. Log on to http://www.ibmcloud.com/social using the email address and
password of a user with the Administrator role.
2. If your account also has the User role, click Admin > Manage Organization.
3. In the System Settings section of the navigation pane, click IBM SmartCloud
Notes and then click Account Settings.
4. Click Activate My Account.
What to do next
Make sure that the servers in the service can connect to your on-premises servers
by completing the task Checking network connections from the service to
on-premises servers.
Running configuration tests
After you run the Domain Configuration tool, verify that servers in the service can
connect to your on-premises servers.
Before you begin
Make sure that you have completed Downloading and running the Domain
Configuration tool and Activating your account.
Procedure
1. Log on to the service as an administrator.
2. If your account also has the User role, click Admin > Manage Organization.
3. In the System Settings section of the navigation pane, click IBM SmartCloud
Notes and then click Account Settings.
4. In the navigation pane, click Configuration Test, and then click Run Tests.
5. Correct any problems that are reported and click Run Tests again.
What to do next
If your network connections are not working:
v Make sure that the information that you provided in the Account Settings is
correct, and that there are no typographical errors.
v Make sure that you completed all of the preparation tasks in the section
Preparing your environment for a hybrid deployment.
v Make sure that all of your on-premises servers are running.
Chapter 4. Configuring the service
99
Completing the configuration
After you have completed the account setup for your organization, perform the
tasks in this section to complete the configuration.
Checking network connections from on-premises servers to
the service
After you run the Domain Configuration tool, check that your on-premises servers
are reaching the IBM SmartCloud Notes servers by using the trace command.
Before you begin
Make sure that you have completed these tasks:
v Downloading and running the Domain Configuration tool
v Checking network connections from the service to on-premises servers
About this task
To determine the name of your SmartCloud Notes servers, use the format
basename1/ou/o, using the base name you provided when you completed the
account settings. Remember that if you used Mail (the default) as the base name,
then your mail servers are named Mail1, Mail 2, and so on. When you run this
trace, you get an authentication error, which is an expected error. Review the lines
that follow the error to determine if the connection was successful.
Procedure
1. From an on-premises primary mail hub server, type the following command
into the Domino server console, based on the mail base name, your
organizational unit, and organization name:
trace basename1/ou/o
For example: trace Mail1/scn/renov
2. Review the results of the trace command to make sure that they include the
confirmation Connected to server basename1/ou/o.
Results
The following sample output shows a successful trace.
> trace Mail1/scn/renov
Determining path to server MAIL1/SCN/RENOV
Available Ports: TCP
Checking normal priority connection documents only...
Allowing wild card connection documents...
Local network connection document found for */scn/renov
Verifying address ’9.12.123.456’ for LMAIL1/SCN/RENOV on TCP
Connected to server MAIL1/SCN/RENOV
Connecting to MAIL1/SCN/RENOV over TCP
Using address ’9.12.123.456’ for MAIL1/SCN/RENOV on TCP
Error connecting to server MAIL1/SCN/RENOV: Server error:
You are not authorized to use the server
Connected to server MAIL1/SCN/RENOV
Attempting Authenticated Connection
Compression is Disabled
Encryption is Enabled
In the sample output, the error received when attempting to connect to
MAIL1/SCN/RENOV is the expected response because SmartCloud Notes servers
100
SmartCloud Notes: Administering SmartCloud Notes: Hybrid Environment March 2015
do not allow unauthenticated connections. However, these lines show that the
subsequent authenticated connection was successful and indicates that the
on-premises servers are successfully communicating with SmartCloud Notes:
Connected to server MAIL1/SCN/RENOV
Attempting Authenticated Connection
Compression is Disabled
Encryption is Enabled
Issuing a Vault Trust Certificate
You must issue a Vault Trust Certificate from a parent certifier of service users’
Notes ID files to the certifier of the service ID vault. This step is a prerequisite for
user provisioning.
Before you begin
After you have configured your company account settings, wait for directory
synchronization to replicate the service ID vault document to your on-premises
directory. You can confirm that replication has completed in SmartCloud Notes
Administration. Click Account Settings, and then click Directory Sync Server.
Under Sync Status, the status should be OK.
Make sure you have a local copy of the certifier ID file of the parent certifier that
you will use to create the Vault Trust Certificate. For example, to issue a Vault
Trust Certificate that applies to the user Samantha Daryn/Renovations, make sure
you have a local copy of the certifier ID file for the /Renovations certifier.
About this task
If users are certified under an organizational unit (OU) certifier, you can use either
the OU certifier or the top-level certifier to issue the Vault Trust Certificate. For
example, if users are certified under the OU /North/Renovations, issue a Vault
Trust Certificate from either /North/Renovations or /Renovations.
If your service users are certified under different top-level organization certifiers,
you must issue a Vault Trust Certificate for each organization. For example, if some
service users are certified under the organization /Renovations and others are
certified under the organization certifier /ZetaBank, issue a Vault Trust Certificate
from both organizations.
The Vault Trust Certificate certifies that the parent certifier of Notes user ID files
trusts the service ID vault to store the ID files. ID files must be in the vault for
administrators to reset the ID passwords for Notes client users. ID files must also
be in the vault for web client users and mobile client users to be able to sign,
encrypt, and decrypt messages.
Although all user IDs under the parent certifier that issues the Vault Trust
Certificate are authorized for storage in the service ID vault, only the IDs of service
users can be uploaded to the vault.
For more information about Vault Trust Certificates, see the information about ID
vault trust in the IBM Domino documentation.
Perform the following steps to issue a Vault Trust Certificate.
Chapter 4. Configuring the service
101
Procedure
1. Log on to a Domino Administrator client that you use for on-premises
Domino server administration.
2. Open an on-premises hub server that you use for directory synchronization.
3. Click the Configuration tab and then click Security > ID Vaults.
Note: If you do not see the ID Vaults view, you must upgrade the Domino
directory on the server to the template version for 8.5.1 fix pack 2 or later.
4. Select the ID Vault document for the service ID vault. The format of the
document name is /IDVault_customernumber, for example /IDVault_15679841.
5. Click Tools > ID Vaults > Manage. If a window that describes the ID vault is
shown, click Next.
6. Select the task Add or remove organizations that trust the vault and then
click Next.
7. Click Add or Remove.
8. Under Available organizations, select a certifier of your service users.
9. Click Add to add the certifier to Organizations that trust the ID vault, and
click OK.
The certifier is now shown under Organizations.
10. Click Next and click Configure to confirm the change.
11. At the Choose a Certifier prompt, browse for and select the certifier ID file of
the certifier, for example cert.id, and click OK.
12. Provide the certifier password and click OK.
13. In the You have successfully completed the management of the Notes ID
vault window, click Done.
14. From the Configuration tab, click Security > Certificates > Certificates.
Expand Vault Trust Certificates and verify that there is a Vault Trust
Certificate issued by the parent certifier to the ID vault.
Note: The Vault Trust Certificate is created on the administration server for
the directory. If you issued the certificate on a server that is not the
administration server, the certificate will be visible on that server after it
replicates from the administration server.
Results
The Vault Trust Certificate replicates to the service during directory
synchronization.
Related information:
Domino documentation
102
SmartCloud Notes: Administering SmartCloud Notes: Hybrid Environment March 2015
Chapter 5. Customizing service settings
After you configure the service to integrate with your on-premises environment,
optionally customize service settings to suit your needs.
About this task
You can customize settings before or after you onboard users.
Enabling the accessible experience for the web client
You can submit a request to enable the accessible experience for the web client for
everyone in your organization. Mail, Calendar, Contacts, and Preferences features
provided with this experience are all accessible.
About this task
Accessibility features help users who have a disability, such as restricted mobility
or limited vision, to use information technology products successfully.
Another accessible experience for the web client is the desktop ultra-light mode.
For more information on this mode, see the topic about web client accessibility
features in the user documentation.
Both accessible experiences are supported on a computer using Mozilla Firefox 24+
ESR or higher.
See the IBM Human Ability and Accessibility Center for more information about
the commitment that IBM has to accessibility.
Procedure
To enable the accessible experience for the web client for all users in your
organization, contact Support.
Related information:
Web client accessibility features
Support
Setting up administration notifications
Set up the service to send email notifications that report when specific types of
errors occur in the service.
About this task
Directory synchronization errors are the types of errors that are reported, currently.
Procedure
1. Log on to the service as an administrator.
2. If your account also has the User role, click Admin > Manage Organization.
© Copyright IBM Corp. 2011
103
3. In the System Settings section of the navigation pane, click IBM SmartCloud
Notes.
4. Click Account Settings.
5. Click Email Notifications.
6. In the Send administrator notifications to these addresses box, type each
address to send notifications to. Specify any Internet-formatted address, either
internal or external to the service. For example, type
[email protected].
7. Optional: To send a test notification to each new or changed address, select
Send test notification to newly added addresses.
8. Select the language to use in the notifications.
9. In the Reminder interval field, specify how frequently to resend notifications
that are related to the same error. Acceptable values are 1 - 7 days.
10. Click Save.
Results
If a directory synchronization error occurs in the service, an email that is formatted
as follows is sent:
Sender: SmartCloud
Subject: message summary[SCN-dirsyncNotify]
Body: message details
The body of the email provides a link to a page in SmartCloud Notes
Administration Account Settings that provides more information about the error.
Note: If you select the Send test notification to newly added addresses, a test
email with the subject New administration email address added [SCN-admintest]
is sent to each new or changed address. If an expected test notification is not
received, verify that the address is specified correctly. No error message is shown if
the email cannot be delivered.
Restricting access to groups
Add a Readers list to a group to restrict access to it. For example, a Readers list
comes in handy if you have a large mailing group that you want to allow only a
few users to send mail to.
About this task
1.
2.
3.
4.
5.
104
Right-click the group in the directory and then click Document Properties.
Click the Security tab (fourth tab).
In the Who can read this document field, clear the All readers and above box.
Add the names that you want to allow access to the group.
Add the following groups to the access list:
v (Required) SaaSLocalDomainServers. Granting access to this group allows the
group to replicate to replicas of the directory in the service.
v (Recommended) LocalDomainServers
v (Recommended) LocalDomainAdmins
SmartCloud Notes: Administering SmartCloud Notes: Hybrid Environment March 2015
6. Make a minor edit to the group. This step ensures that the change to the group
replicates to the service.
Using administrative policies
If you use administrative policies on premises, you can apply many of those same
policy settings to service users as well. Administrative policies enable all users to
have the same working experience.
There are two types of policies, organizational and explicit. An organizational
policy automatically assigns settings to all people within an organization or
organizational unit. You cannot use this type of policy for service users because an
organizational policy with a few pre-defined settings is already used within the
service.
To assign policies to service users, use an explicit policy. In this type of policy, you
use the Policy Assignment field to assign users to the policy.
If you use an organizational policy on premises and want to apply the settings to
users in the service, create an explicit policy that mirrors the on-premises
organizational policy. For example, the fictitious Renovations Corporation has an
organizational policy on-premises that applies to anyone in the Renovations
organization. Because it is an organizational policy, anyone whose hierarchical
name includes */Renovation, such as Samantha Daryn/Renovations, is assigned this
policy. The Renovations organizational policy cannot be used for users in the
service. Therefore, the administrator creates an explicit policy, named
Renov-Explicit, that includes policy settings identical to the settings that are in the
on-premises Renovations organizational policy. Next, the administrator adds the
name */Renovations as a name in the Policy Assignment field. This way, users
who have /Renovations in their name are automatically assigned this policy.
Note: The service does not support assigning policies by specifying the policy
name in a user's Person record in the Domino directory. If you are using this kind
of policy model, you must switch to a direct assignment in the Policy document
itself.
Although most settings in policies are supported in the service, there are a few
restrictions. If you plan to use explicit policies for your service users, read about
policy settings restrictions before you do.
If you are unfamiliar with administrative policies, see the topics on policies in the
Configuring users and servers section of the IBM Domino documentation.
Related information:
IBM Domino documentation
Creating policies for service users
To ensure that users in the service have the same experience as on-premises users,
you can create explicit policies. Any organizational policies that you might be
using on premises are not supported.
Before you begin
Read the following topics:
v “Using administrative policies”
Chapter 5. Customizing service settings
105
v “Policy settings restrictions” on page 114
About this task
Use these general steps to create explicit policies that mirror your on-premises
policies. If you include policy settings that are pre-defined for all users in the
service, or that are not supported, the service ignores the settings.
Important: If you plan to support multiple domains in your organization, use a
naming convention that includes the domain name when you create any of your
policy documents. Supporting multiple domains essentially means that multiple
names.nsf files from different company domains are synced to the service.
Therefore, it is critical that all Policy Settings documents and all master Policy
documents have unique names.
For more information about creating policies, see the IBM Domino 9
documentation. Refer to the topics on policies in the section on configuring users
and servers.
For information about IBM Notes Traveler policy settings, see the topic on creating
a Notes Traveler policy settings document in the Notes Traveler documentation.
Procedure
1. Identify the policies that you are currently using in your on-premises policies.
2. Note any settings in the current policy that have restrictions when used in the
service.
3. Use the information that you identified in the previous steps to create an
explicit policy.
4. To assign the policy, add the names of users or groups from the directory to the
Policy Assignment field of the Policy document. Or, type a wildcard entry to
represent all names in an organization, for example, */Renovations.
Note: The service does not support assigning policies by specifying the policy
name in a user's Person record in the Domino directory. If you are using this
kind of policy model, you must switch to a direct assignment in the Policy
document itself.
What to do next
You cannot open a service policy to view the settings. However, to view a detailed
summary of the effective policy settings, use the Policy Viewer in the Domino
Administrator client. You can view a policy synopsis for a selected user or group.
Related information:
IBM Domino documentation
Creating an IBM Notes Traveler policy settings document
Creating an archiving policy settings document
To use policies to set up mail file archiving for IBM Notes clients, you use both
Archiving Policy Settings documents and Archive Criteria Settings documents.
106
SmartCloud Notes: Administering SmartCloud Notes: Hybrid Environment March 2015
Before you begin
v Create an explicit policy to use with the service. For more information, see the
topics “Using administrative policies” on page 105 and “Creating policies for
service users” on page 105.
v Make sure that you have at least Editor access to the Domino Directory and one
of these roles: PolicyCreator role to create a settings document; PolicyModifier
role to modify a settings document.
About this task
In the cloud, mail archiving is always run on the Notes client. The source mail file
to archive must be a local mail replica or managed mail replica on the client. The
destination archive database can be created on the client or on an on-premises
server. Users cannot create archives on the cloud servers.
When Archive Settings are configured, Notes users can select File > Application >
Archive to archive local replicas of their mail files. If you do not configure Archive
Settings, users can still click Archive Settings in the application properties box to
archive a mail file.
The information provided here applies only to Notes clients. Archive Settings do
not apply to web client users.
Note the following additional information:
This procedure applies to archiving mail that is in the cloud. To preserve an
archive of an on-premises mail file, you must archive the contents before the
user moves to cloud mail.
v Users in the cloud cannot create local archives of on-premises mail files. As a
best practice, remove on-premises mail files after users move to the cloud.
v
v Archiving policy settings do not apply to non-mail databases.
Procedure
1. Open the explicit policy that you created in the Domino Directory.
2. In the Setting Type section, next to Archiving, click New.
3. On the Basics tab, complete these fields:
v Name. Enter a name that identifies the users or the settings themselves.
v Description. Enter a description of the settings.
4. Optional: Under Archiving Options, choose one of the following options if
you want to prohibit archiving. The default is to allow both.
v Prohibit archiving. Use this option to prohibit all archiving. The Allow
Calendar Cleanup check box displays. It is selected by default but you can
deselect if you choose to prevent users from performing calendar cleanup
functions. Save the document.
v Prohibit private archiving criteria. Use this option to prohibit users from
creating private archive settings or modifying the archive settings that are
defined in this settings document.
5. Under Archiving will be performed on, choose User's local workstation.
Archiving cannot be performed on a server.
6. Under Archiving source database is on, choose Local. The mail file to be
archived must be a local replica or managed mail replica on the client.
7. Under Destination database is on, choose one of the following options:
Chapter 5. Customizing service settings
107
v Local. Use this option to create the mail archive database on the user's local
client.
v Specific server Use this option to create the mail archive database on an
on-premises server. Specify the name of the on-premises server. You must
give users Create access to this server.
Do not select Mail server. The destination database cannot be on the cloud
mail server.
8. On the Selection Criteria tab, do one or more of the following steps:
v Click New Criteria to create a new Archive Criteria Settings document.
Then, click Add Criteria and select your newly-defined criteria document.
See the topic “Creating an archive criteria settings document” on page 110
for instructions on specifying details of the criteria in the new document.
v Click Add Criteria, and then choose one or more Archive Criteria Settings
documents to add to your archiving settings. These settings must comply
with the information in the topic Creating an archive criteria settings
document.
v Click Remove Criteria, and then choose one or more Archive Criteria
Settings document to remove from your archiving settings.
9. Click the Logging tab. Under Archive Logging, enable the field Log all
archiving activity into a log database to log archiving activity to a log
database (the default).
10. Optional: Change any of the following fields if you want to change the
location of the log directory and log file name.
Table 26. Fields used to specify the log directory and file name
Field
Action
Log Directory
The default is archive. Enter a new name if you want to
change it.
Log Prefix
The default is the letter l, followed by an underscore (_).
Enter a new prefix if you want to change it.
Log Suffix
The default is .NSF. Enter any other suffix that you
would like to use.
Number of characters from
original file name
The default is 50. To change the default, enter the
number of characters you want to use from the user's
mail file name to create the archive log name.
11. In the field Include document links to archived documents, choose one of the
following options:
v Enable this field to include links to archived documents in the log (default).
If you include links, users can open archived documents from within the
log database.
v Disable the field to exclude links to archived documents in the log. If you
exclude links, users must open the archive database to view archived
documents.
12. On the Schedule tab, for the field Specify a client-based scheduled archive,
choose one of the following options:
v Enable this field to set up a schedule for client-based archiving, and then
specify the schedule by completing Step 13.
v Disable this field and continue to Step 14. No archiving schedule is set for
the users; however, users can still set their own archiving schedule.
108
SmartCloud Notes: Administering SmartCloud Notes: Hybrid Environment March 2015
13. Optional: If you enabled Specify a client-based scheduled archive, complete
one or more of these fields.
Table 27. Fields used to define an archive schedule for an end user
Field
Action
Allow users to modify schedule
Users modify the default schedule to set their own
schedule.
Frequency
Choose one:
v Daily – and then select the days of the week on
which to archive.
v Weekly – (default) and then choose the day of the
week on which to archive.
Run at
Specify the time. The default is 12:00 PM.
Note: The Notes client must be running for scheduled
archiving to occur.
Every week on
When Weekly is set, specify the day. The default is
Tuesday.
14. Also on the Schedule tab, under Location, specify the Locations from which
to archive.
v Any Location -- to archive from any Location.
v Specific Location -- and then specify one or more Locations.
15. On the Advanced tab, complete these fields:
Table 28. Advanced tab fields
Field
Action
Delete a document only when the criteria
can delete all responses as well
Do one of these:
v Enable (default) to ensure that a
document is deleted only when the
document's response documents meet
archiving criteria and can also be deleted.
Use this option to prevent orphaned
documents in hierarchical views.
v Disable the field to delete documents
without prior checking of response
documents.
Note: This setting does not apply to
Calendaring and Scheduling documents
which are always enabled to prevent
accidental "orphaning."
Chapter 5. Customizing service settings
109
Table 28. Advanced tab fields (continued)
Field
Action
Maximum document retention selection is:
Specify for all users to whom the policy
applies, the number of days, months, or
years that comprise the maximum retention
period for deleting and archiving
documents. If private archiving is enabled,
and a maximum retention setting is in effect,
users cannot define criteria with a scope that
is larger than the maximum retention
setting.
For example, assume the maximum
retention is set to two years. Users can
define criteria that selects documents
created, modified, accessed, or expired up to
24 months. An error is generated if users try
to save criteria whose scope is greater than
24 months (two years).
Use customer-generated expiration field:
Click to enable administrators to define their
own field name for an archive document
expiration date.
Customer generated expiration field name:
Specify a field name for the expiration date
of archived documents. Any archive criteria
that selects documents based on expiration
date now uses the field name specified here.
16. Save the document.
Creating an archive criteria settings document:
Use an archive criteria settings document to define a set of criteria to be used by
an archiving policy settings document when you archive an IBM Notes user's mail
documents.
Before you begin
v See the task “Creating an archiving policy settings document” on page 106. This
procedure is part of that task.
v Make sure that you have at least Editor access to the Domino directory and one
of these roles: PolicyCreator role to create a settings document; PolicyModifier
role to modify a settings document.
Procedure
1. Open the Settings view in the Domino Directory.
2. Select the Archive policy settings document for which you want to create
archive criteria settings, and then click Edit Settings.
3. Click the Selection Criteria tab, and then click New Criteria.
4. Provide the following information on the Basics tab.
110
SmartCloud Notes: Administering SmartCloud Notes: Hybrid Environment March 2015
Table 29. Basics tab fields
Field
Action
Name
Enter a name that identifies the archive
criteria. When you add criteria to an archive
policy settings document, this name appears
in the selection box. This name also appears
in the user's mail folder outline under
Actions > Archive.
Description
Enter a description of the criteria.
Enable archive criteria
Choose one of the following options:
v Enable the check box to use this archive
criteria.
v Disable the check box if you are creating
archive criteria to use later.
5. For How should documents be archived? choose one:
v Copy old documents into archive database; then clean up database. Use
this option to archive (copy) documents to the archive database and then
clean up (delete or reduce those documents) from the user's mail database.
v Clean up database without archiving. Use this option to delete documents
from the user's mail database without copying them into an archive
database. Use this setting to enforce document-retention policies that delete
all documents after a specified time.
6. If you chose to copy old documents for How should documents be cleaned
up? choose one:
v Delete older documents from the database. Use this option to delete copies
of archived documents that remain in the user's mail database.
v Reduce the size of the documents in the database. Use this option to
truncate copies of the archived documents that remain in the user's mail
database.
7. For Which documents should be cleaned up? specify the criteria that
determines which documents are candidates for archiving. Choose one of the
following options:
v Older than. Use this option to specify the date the archive criteria settings
document was created as the start date for the document retention period.
Documents that are created before this date are eligible for archiving.
v Not accessed in more than. Use this option to specify documents not
opened in the specified time frame. Do not use this option unless the
database property Maintain Last Accessed is set. If this property is not set,
the criteria does not find any documents to archive. Specify a time period.
v Not modified in more than. Use this option to specify documents that have
not been modified in the specified time frame (default). Then specify a time
period. This setting is recommended.
v With expiration date older than. Use to specify documents that are marked
as expired. A document is eligible for archiving if it has an expiration date
earlier than the specified date.
8. Do not complete the fields in the Archive By View/Folder section of the
document.
9. Optional: Click the Destination tab and change any of these fields.
Chapter 5. Customizing service settings
111
Table 30. Destination tab fields
Field
Action
Archive Directory
The default is archive. Enter a new name if you want to
change it.
Archive Prefix
The default is the letter a, followed by an underscore (_).
Enter a new prefix if you want to change it.
Archive suffix
The default is .NSF. Enter a different suffix for the
archive database name if you want to use a suffix other
than NSF.
Number of Characters from
original file name
The default is 50. To change the default, enter the
number of characters to use from the user's mail file
name to create the archive database name.
Note: Click the link Preview an example to see the result of your choices
before you save the archive criteria settings.
10. Save the document.
Policy precedence
When multiple policies apply to a user and there is a setting conflict, precedence
rules determine which setting value is applied.
Note: There are some policy settings that are enforced in the cloud that you cannot
override with on-premises policy settings. For more information, see the topics on
policy settings restrictions.
You can create multiple policies that are assigned to different groups of users. For
example, you could have a separate policy for each of the following users:
v
v
v
v
All users in an organization, for example, /Renovations.
All users in an organizational unit, for example, /Boston/Renovations
All users in a group in the directory, for example, Admin Group Renovations
Individual users
Note: Use the fewest number of policies and settings documents as possible to
avoid complexity. In addition, avoid assigning individual users to policies,
whenever possible.
When a user is assigned to more than one policy for which a setting conflicts, often
you want the setting for the policy with the narrowest assignment scope to take
precedence. For example, you might create one policy for your entire organization,
/Renovations, that sets the Warning Period for password expiration to 10 days.
Then, you might create another policy assigned to /Boston/Renovations that sets a
Warning Period of 20 days. You want /Boston/Renovations policy to take
precedence so that a user under /Boston/Renovations has the 20 day warning
period.
In traditional on-premises Domino environments, you use the Organizational type
policy to assign settings based on organization name hierarchy. In that case, the
policy with the most specific scope in the hierarchy takes precedence automatically.
For example, /Boston/Renovations automatically takes precedence over
/Renovations.
112
SmartCloud Notes: Administering SmartCloud Notes: Hybrid Environment March 2015
In the cloud, only Explicit policies (sometimes referred to as dynamic policies) are
supported. You can use them to create the equivalent of Organizational policies,
however. To do so, create an Explicit policy and give it a hierarchical name, for
example, /Renovations or /Boston/Renovations. Assign users to it by specifying a
wildcard hierarchical name in the Policy Assignment field, for example,
*/Renovations or */Boston/Renovations.
In the cloud, the hierarchically named policy with the narrowest scope does not
automatically have precedence. Instead, it is important to use the Policy
Precedence value to specify that order of precedence. To specify precedence, use
the Policies > Dynamic Policies view in the directory . The lower the precedence
value, the higher the precedence.
For example, assume the policies in the following table, each with a different
Warning Period for password expiration specified in Security Settings.
Table 31. Policies with a different password expiration warning period
Policy name
Policy assignment
Policy precedence
Warning period
/Renovations
Admins Group
Renovations Admin
Group
1
5 days
/Boston/Renovations */Boston/
Renovations
2
20 days
/Renovations
3
10 days
*/Renovations
Someone who is assigned to all three policies has a warning period of 5 days
because the /Renovations Admins Group policy has the lowest Policy Precedence
value, 1. Someone who is under /Renovations and /Boston/Renovations but is not
a member of the Renovations Admins Group, has a warning period of 20 days,
because the Policy Precedence value 2 is lower than 3.
Inherit and Enforce settings. Each field in a policy settings document has Inherit
and Enforce fields that are not selected, by default. These two settings can be used
with hierarchically named policies to override policy precedence for specific
settings. For example, assume the following policy configuration:
Table 32. Policies with Inherit and Enforce settings
Policy name
Policy
assignment
Policy
precedence
Warning period
Required
Password
quality
/Renovations
Admins Group
Renovations
Admin Group
1
5 days
7
/Boston/
Renovations
*/Boston/
Renovations
2
20 days
7 (Inherit)
/Renovations
*/Renovations
3
10 days
8 (Enforce)
A user who is assigned to the /Boston/Renovations and /Renovations policies but
not the /Renovations Admins Group policy, gets a Required Password Quality of
8. The Inherit value (from the Security Settings document for /Boston/
Renovations) and the Enforce value from the (Security Settings document for
/Renovations) cause the password quality to be derived from the /Renovations
policy, even though /Boston/Renovations is listed with precedence. The Warning
Period is still determined by the precedence of the /Boston/Renovations policy
and so is 20 days.
Chapter 5. Customizing service settings
113
The Inherit and Enforce values are evaluated only for multiple,
hierarchically-named policies within one hierarchy. So, a user who belongs to all
three policies, gets the Required Password Quality 7 because the /Renovations
Admins Group policy has precedence and the Enforce value on the /Renovations
policy does not apply.
Don't set value field. Select Don't set value next to a setting to cause it to be
ignored during precedence evaluation. This field is used to prevent an unintended
default setting from taking precedence over a customized setting in a policy with
less precedence. For example, in a Security Settings document, the default
Required Password Quality is 8. Assume you want to enforce a higher value for
your entire organization. You would set the higher value in the Security Settings
document that is associated with a policy assigned to the organization. Then, for
Security Settings documents that are associated with all other policies that have
higher precedence, select Don't set value for Required Password Quality. Then,
the default value, 8, is ignored in those documents.
Use Don't set value as a general rule for all settings that you want to derive from
a policy with lower precedence.
Related concepts:
“Policy settings restrictions”
Most policy settings are supported for service users. However, there are a few
restrictions to be aware of before you assign service users to an explicit policy.
Policy settings restrictions
Most policy settings are supported for service users. However, there are a few
restrictions to be aware of before you assign service users to an explicit policy.
Archiving Settings restrictions
Archive Settings policies are used to set standard archiving behavior for IBM Notes
client users.
In the cloud, mail archiving is always run on the Notes client. The source mail file
to archive must be a local mail replica or managed mail replica on the client. The
destination archive database can be created on the client or on an on-premises
server. Users cannot create archives on the cloud servers.
Related tasks:
“Creating an archiving policy settings document” on page 106
To use policies to set up mail file archiving for IBM Notes clients, you use both
Archiving Policy Settings documents and Archive Criteria Settings documents.
Desktop Settings restrictions
Desktop Settings are supported in on-premises policies for service users, but with a
few restrictions.
The service enforces the following settings, found on the Mail tab, for all users in
the service. The service ignores these settings in an on-premises policy.
Note: For information on using Desktop Settings to enable managed mail replicas,
see “Using Desktop Settings to configure managed mail replicas” on page 120.
114
SmartCloud Notes: Administering SmartCloud Notes: Hybrid Environment March 2015
Table 33. Desktop Settings that apply to all users in the service
Settings in the Mail tab
Value
Description
Use local mail.box to send
messages (faster)
1
The client uses a local outgoing mail
box for sending mail from the user
interface. The client replicator transfers
the sent messages from the local mail
box to the mail box on the server. The
value indicates how many messages
need to be queued in the local mail
box before triggering the replicator to
transfer them to the server.
Enable upgrade of all local NSFs
to latest ODS version
Disable
(default)
Local replicas are not updated
automatically
Enable server to poll for new
mail and trigger replication on
notification of new mail
Enable
Provides the fastest performance.
Registration Settings restrictions
You can use Registration Settings in a policy for registering users on-premises.
These settings are not used in the service, however.
Mail Settings restrictions
Mail Settings are supported in on-premises policies for service users, but with a
few restrictions.
Chapter 5. Customizing service settings
115
Table 34. Mail Settings restrictions
Settings
Restriction
Delete documents in the user's Trash folder
after how many hours setting on the Mail >
Basics tab
The policy setting controls automatic
deletion in local mail file replicas on IBM
Notes clients.
To control when documents are
automatically deleted from the Trash in
mail files on cloud servers, do not use a
policy. Instead, use the following service
setting: SmartCloud Notes Administration
> Account Settings > Email Management >
Configure Mail Retention in the Trash
Folder > Retain deleted messages for how
many days? The value must be 14 - 90
days. If you do not specify a value,
documents are automatically deleted from
the Trash folder on mail files on cloud
servers after 14 days. For more information,
see the topic "Configuring how long mail
remains in the Trash folder."
In the Delete documents in the user's
Trash folder after how many hours policy
field, specify a value that is equivalent to
the service setting. For example, if you
specify 21 days as the service deletion
interval, specify 504 hours in the policy.
When you keep the policy setting and
service setting the same, documents in
Trash are automatically deleted from local
mail file replicas and mail file replicas on
cloud servers at the same interval. If you do
not specify a service setting explicitly and
accept the default service deletion interval
of 14 days, set the policy setting value to
the equivalent value, 336 hours.
List of trusted websites for images in
MIME messages setting on the Mail >
Basics tab
This setting is not supported in the cloud.
The service ignores any values specified in
this field.
IBM iNotes
Some of these settings, which apply to web
client users, relate to features that are not
supported in the service.
Related tasks:
“Configuring how long mail remains in the Trash folder” on page 156
When a user deletes a message from a mail file on a cloud server or the service
automatically deletes an older message, the message is moved to the Trash folder
where it remains for 14 days, by default. After 14 days, the message is
permanently deleted. You can change how long deleted mail remains in the Trash
folder. You can also prevent users from emptying the Trash folder themselves.
Related information:
Comparison tables of features between IBM Notes, IBM iNotes and IBM
SmartCloud Notes web
116
SmartCloud Notes: Administering SmartCloud Notes: Hybrid Environment March 2015
Security Settings restrictions
Security Settings are supported in on-premises policies for service users, but with
the restrictions described in the following table.
Table 35. Security Settings restrictions
Settings
Restrictions
ID Vault tab
The ID vault settings are enforced by the
service and ignored in on-premises policies.
The services enforces the following settings
for the ID vault in the service:
v Assigned Vault: A name derived from
customerID
v Forgotten password help text: Contact
your administrator for help (default)
v Enforce password change after password
has been reset: Yes
v Allow automatic ID downloads: No
v Allow ID downloads for: 5 days
Password Management > Password
Management Basics tab, Password
Expiration Settings
If you want to enable Notes ID password
expiration, you must do so through
SmartCloud Notes Administration. An
on-premises Security Settings policy can be
used only to enable password expiration
warnings that notify users when password
expiration approaches. For important details
on how to use Security Settings to enable
password expiration warnings, see the topic
Setting password expiration for Notes IDs.
Password Management > Custom Password You can use SmartCloud Notes
Policy tab
Administration to enable password
synchronization. When service login
passwords change, this feature allows Notes
ID passwords to change to match. If you
enable this feature, do not make custom
password requirements in a policy more
restrictive than the service login password
requirements. For more information, see the
topic Enabling password synchronization.
Keys and Certificates tab
The service does not support key rollover for
Notes IDs. The service therefore ignores the
values of fields in the Default Public Key
Requirements and User Public Key
Requirements sections of Security Settings.
Related tasks:
“Setting password expiration for Notes IDs” on page 126
For users who access the service with the IBM Notes client, you can specify when
Notes ID passwords expire. This password expiration does not apply to web users
because they log in using their web login password rather than a Notes ID
password.
“Enabling password synchronization” on page 128
When users change their service login passwords, password synchronization
enables the users to use the new passwords when they log in to the IBM Notes
client.
Chapter 5. Customizing service settings
117
Roaming Settings restrictions
Roaming Settings in a policy are not supported. The service does not support
roaming.
Notes Traveler Settings restrictions
IBM Notes Traveler Settings are supported in on-premises policies for service
users. Be aware of the default settings and policy restrictions within the service.
For detailed information about Notes Traveler Settings in policies, see the topic on
creating a Notes Traveler policy settings document in the Notes Traveler 9
documentation.
Note: Security Settings can determine which devices and device versions can
connect to the service. For information on supported devices and operating
systems, see the IBM SmartCloud Notes client requirements.
The following table describes the Notes Traveler policy settings that the service
enforces. You cannot use an on-premises policy to change the setting values.
Table 36. Notes Traveler Settings that the service enforces
Setting
Enforced value
Require device password
Enabled
Although passwords are required, you can
customize some password settings. For more
information, see the table that follows this
one.
Note: Apple 5S and higher device users
choose whether to enable the fingerprint
identity sensor. If they enable the sensor,
they are not required to enter the device
password when they unlock the device.
They are still prompted for the device
password when they power on the device
and at least once every 48 hours. Apple does
not yet provide an API function that enables
administrative control over the use of the
fingerprint identity sensor.
Note: Windows Tablet requires a device
password of at least eight characters. The
password must include at least three of the
following types of characters: upper case,
lower case, number, special character.
118
Require device password > Prohibit
ascending, descending and repeating
sequences (Apple devices only)
Enabled
Prohibit devices incapable of security
enablement
Enabled
This setting is always enabled in the service.
Therefore, ascending, descending and
repeating sequences are not allowed. A
sequence is three or more consecutive
numbers or characters.
In general, this setting applies only to older
mobile devices that do not support security
enablement. For supported devices, see the
IBM SmartCloud Notes client requirements.
SmartCloud Notes: Administering SmartCloud Notes: Hybrid Environment March 2015
Table 36. Notes Traveler Settings that the service enforces (continued)
Setting
Enforced value
Device Access
v Require approval for device access
(disabled)
v Number of devices to allow per user
before approval is required (1)
v Optional: Addresses to notify when
approval action is pending (none)
Maximum Email Attachment Size Allowed
- Administrator
v Android: no limit*
v Windows Mobile and Nokia Symbian^3: 4
MB limit. When the combined attachment
size exceeds the limit, attachments are
removed from emails that are synced to
the device.
v Apple: no limit*
v BlackBerry® 10: no limit*
v Windows Phone, Windows Tablet: no
limit*
*The service always syncs attachments to the
devices
The following password Security Settings are used by default in the service.
Passwords are required but you can use an on-premises policy to customize these
settings.
Note: Apple 5S and higher device users choose whether to enable the fingerprint
identity sensor. If they enable the sensor, they are not required to enter the device
password when they unlock the device. They are still prompted for the device
password when they power on the device and at least once every 48 hours. Apple
does not yet provide API function that enables administrative control over the use
of the fingerprint identity sensor.
Table 37. Security Settings used by default in the service
Setting
Default value in the service
Require device password > Minimum
password length
4
Require device password > Require
alphanumeric value
Disabled
Require device password > Auto lock
period (maximum)
30 minutes
Require device password > Wrong
passwords before wiping device
Disabled
There is no Security Settings tab for Android devices in Domino directory
templates version 8.5.2 or earlier. For these template versions, the service applies
Apple device security settings to Android devices. Android devices do not support
all of the Apple device security policy settings, just the following ones:
v Require device password
v Require alphanumeric value
v Minimum password length
Chapter 5. Customizing service settings
119
v Auto lock period (maximum)
v Wrong passwords before wiping device
v Prohibit devices incapable of security enablement *
* Compliance requires Android OS 2.2 or later with the Notes Traveler Device
Administrator feature enabled by the user. The Device Administrator feature was
added in Android 2.2.
There is no Security Settings tab for BlackBerry®, Windows Phone, and Windows
Tablet devices in Domino directory templates version 9.0 or earlier. For these
template versions, the service applies the following Apple device security settings
to BlackBerry®, Windows Phone, and Windows Tablet devices:
v Require device password
v Require alphanumeric value
v Minimum password length
v Auto lock period (maximum)
v Wrong passwords before wiping device
Related tasks:
“Managing IBM Notes Traveler devices” on page 272
For each user with an IBM Notes Traveler subscription, you can view information
about the user's mobile device. You can also wipe the device to remove sensitive
data from it, for example, if the device is lost or stolen.
Related information:
Creating an IBM Notes Traveler policy settings document
Client requirements
Using Desktop Settings to configure managed mail replicas
In a hybrid environment, use Desktop Policy settings to enable managed mail
replicas. Managed mail replicas helps ensure that IBM Notes users in the service
have quick, local access to their mail when connected or disconnected from the
network.
Before you begin
Enable managed mail replicas through a Desktop Settings document that is
assigned to a policy. Read about using administrative policies to understand the
requirements for assigning policies to users in the service.
Note: Best practice is to configure managed mail replicas before you provision
users. If you use this approach, you can resolve any managed mail replica issues
ahead of user provisioning.
About this task
Managed mail replicas are available beginning with Notes 8.5.2. They provide the
following advantages to Notes users in the service and are recommended:
v They are created automatically on the clients.
v They are used automatically when the client Location is configured to connect to
the mail server.
v Replication between managed mail replicas and server-based mail replicas
occurs automatically and in the background.
120
SmartCloud Notes: Administering SmartCloud Notes: Hybrid Environment March 2015
v When clients are connected to the server, user mail actions are done on the local
managed mail replicas. Users are not interrupted by network I/O or replication
operations between the client and server.
v They provide users with local access to previously synchronized mail when the
client is disconnected from the network.
The following tables describe the most important settings in a Desktop Settings
document to consider when you configure managed mail replicas. For settings not
shown, the default settings are generally good to use.
Table 38. Managed mail replicas: Desktop Settings > Mail > Mail Settings
How to apply
this setting
Setting
Value to set
Local mail file
Created
Set value
managed replica whenever
or Convert local modified
replica to
managed replica
Applicability
Comments
At managed
mail replica
creation or
conversion.
Converting a
local replica to a
managed replica
allows your
company to
standardize on
managed
replicas.
When the mail
application is
opened.
The Notes client
automatically
uses the local
copy after it is
created. At other
times, the client
uses the server.
When mail is
sent.
The service
enforces this
setting,
regardless of the
value that is
specified here.
(Required)
Mail file
location
On server
(Required)
1
Use local
mail.box to send
(Required)
messages
(faster)
Set value
whenever
modified
A sent mail
message is
placed in the
local mail.box
and sent in the
background.
Chapter 5. Customizing service settings
121
Table 39. Managed mail replicas: Desktop Settings > Mail > Managed Replica Settings
Setting
Value to set
Amount of free
space required
before cache is
created
value Mb
How to apply
this setting
Set value
whenever
modified
Applicability
Comments
When the
managed mail
replica is
created.
Type a value
that you choose.
Setting field to a
value such as
1,000 (1 Gb)
ensures that a
managed replica
does not use the
remaining free
space on initial
creation.
If you do not
specify a value,
no free space
check is done.
Table 40. Managed mail replicas: Desktop Settings > Mail > Client Settings
Setting
Value to set
Auto-retrieve
document
setting
Enable document
without
attachment
How to apply
this setting
Applicability
Comments
When a
truncated
(partial)
document is
opened.
If setting is not
enabled, users
are prompted to
retrieve
truncated
documents.
When the client
is notified that
new mail is
received on the
server.
Enable server to Enable
poll for new
mail and trigger (Required)
replication on
notification of
new mail
Table 41. Managed mail replicas: Desktop Settings > Preferences > Replication >
Default settings for a local replica
Setting
Value to set
Create a
full-text index
for faster
searching
Enable
Encrypt replicas Locally encrypt
122
How to apply
this setting
Applicability
Comments
Set value
whenever
modified
When the
managed mail
replica is
created.
The setting is
optional.
Set value
whenever
modified
When the
managed mail
replica is
created.
The setting is
optional.
SmartCloud Notes: Administering SmartCloud Notes: Hybrid Environment March 2015
Table 42. Managed mail replicas: Desktop Settings > Preferences > Replication >
Default replication schedule
Setting
Value to set
All settings
Schedule as you
normally do.
How to apply
this setting
Applicability
Comments
When the Notes
Client is open
Table 43. Managed mail replicas: Desktop Settings > Preferences > Mail
How to apply
this setting
Setting
Value to set
Applicability
Comments
Check for new
mail
Not necessary
The Enable
server to poll for
new mail and
trigger
replication on
notification of
new mail setting
enables this
behavior.
Mail checking
internal
Any value
Specify any
value. The
Enable server to
poll for new
mail and trigger
replication on
notification of
new mail
controls this
behavior.
Results
It is possible for users to see the following message after they are provisioned
when managed mail replicas are enabled:
Access to this server has been restricted due to excessive load.
Creating many managed mail replicas simultaneously can degrade server
performance. For this reason, the service controls the number of managed mail
replicas that can be created simultaneously on a mail server in the cloud. If a mail
server in the cloud reaches the limit, a user can see this error on the Replication
and Sync page during initial replication of the managed mail replica.
This error reflects a temporary condition. If the mail server cannot create the initial
managed mail replica, it tries to create it again automatically at the next replication
schedule interval or when the client is restarted.
A user who sees this error can open and use the server-based mail file in the
meantime. One way to open the mail file is to click File > Open > IBM Notes
Application and browse to the server and mail file replica.
Related concepts:
“Using administrative policies” on page 105
If you use administrative policies on premises, you can apply many of those same
policy settings to service users as well. Administrative policies enable all users to
have the same working experience.
Chapter 5. Customizing service settings
123
Related information:
Managed mail replicas explained
Configuring logins
Reset passwords, manage password expiration periods, set up federated identity
management, restrict logins to an IP range, and enable application passwords.
Resetting service login passwords
Users can reset their own service login passwords once within a 24 hour period by
clicking Forgot password?. An administrator or administrator assistant can reset
service login passwords for any user at any time.
About this task
Reset passwords when userd forget their passwords, or when the password might
be compromised. Users that log in by clicking Use My Organization's Login are
using a federated identity and can reset their passwords only by following their
company's process.
If administrators enable password synchronization, when users change their
service login passwords, they can also use the new passwords to log in to the IBM
Notes client.
Follow these steps to reset any user's password:
Procedure
1. Click Administration > Manage Organization.
2. Click User Accounts.
3. Select the arrow next to the user that needs the password changed.
4. Select Reset password and enter the new password. This password is a
temporary password that the user enters the next time that they log in. At that
time, the user is asked to create a password.
You can also reset the password by editing the user account. Click the
appropriate user name in User Accounts and enter a new password in the
Account Login tab.
5. Notify the user of the password change. The user is not automatically notified
that the password was reset. Make sure to communicate this change to the user,
along with the new password if needed.
What to do next
Administrators can enable security settings to enforce password expiration through
System Settings > Security. When s user logs in with an expired password, the
user is prompted to reset that password.
Setting service login password expiration
By default, service login passwords do not expire. Enforcing a password expiration
period helps ensure that passwords are changed frequently. Administrators can set
a password expiration interval for all users.
124
SmartCloud Notes: Administering SmartCloud Notes: Hybrid Environment March 2015
Procedure
1. Click Administration > Manage Organization
2. Click Security.
3. Click Edit Settings in the Password Settings section. Select the number of days
before a password expires, how the password can be reset, and add password
reset support for your users.
Managing Notes IDs
You can reset Notes ID passwords, set Notes ID password expiration, and
synchronize Notes ID passwords with service login passwords.
Resetting passwords for Notes IDs
Reset the password on an IBM Notes ID file to change the current password.
Typically you do this because a user has forgotten the current password.
About this task
This procedure applies only to passwords associated with Notes ID files used with
Notes clients, and not to service login passwords.
Procedure
1. Log on to http://www.ibmcloud.com/social using the e-mail address and
password of a SmartCloud Notes user with the Administrator role.
2. If your account also has the User role, click Admin > Manage Organization.
3. In the System Settings section of the navigation pane, click IBM SmartCloud
Notes.
4. Click Users.
5. In the Search box, type the beginning characters of any of the following user
values to display the user's name:
v Distinguished name, for example, Samantha Daryn/Renovations.
v Internet email address, for example, sdaryn@renovations.
v Last name, for example, Daryn.
Note: You cannot use the wildcard character (*) when you search.
A “starts with” search is done and the names of any users with matching
values in the directory are displayed. For example, the results of a search on ma
include the names of users with the following values in the directory:
v Madison Armond/Renovations
v masmith@renovations
v Kristin MacGyver
This search does not match the following values:
v Emarie Klein/Renovations
v tamado@renovations
v Ted Amado
Search results can include a maximum of 1000 names.
6. Click the user's name in the search results.
7. Under Available actions for this user, click Reset IBM Notes Password.
8. Enter a new password, and then click Save Changes. The password must be at
least eight characters in length.
Chapter 5. Customizing service settings
125
9. Provide the new password to the user in a way that complies with your
company security policies.
Results
After you complete this procedure, the user can log on to a SmartCloud Notes
server from an IBM Notes client using the new password. After logging on with
the new password, the user is prompted to change the password.
Note: If the Wrong Password prompt is displayed, tell the user to re-enter the new
password that you provided. If that step does not solve the problem, tell the user
to delete the local ID file and then re-enter the password.
The user has five days from the time you reset a password to use the password to
log on to a SmartCloud Notes mail server and download the new password to the
Notes client. If the 5-day limit is exceeded, the user sees the following message
and you must reset the password again:
Contact your company administrator to have your Notes ID password reset.
Related concepts:
“Notes IDs and passwords” on page 130
When users connect to their mail servers in the cloud with IBM Notes clients and
Notes IDs, they are authenticated using Notes Remote Procedure Call (NRPC)
authentication.
Related tasks:
“Resetting service login passwords” on page 124
Users can reset their own service login passwords once within a 24 hour period by
clicking Forgot password?. An administrator or administrator assistant can reset
service login passwords for any user at any time.
“Setting password expiration for Notes IDs”
For users who access the service with the IBM Notes client, you can specify when
Notes ID passwords expire. This password expiration does not apply to web users
because they log in using their web login password rather than a Notes ID
password.
“Enabling password synchronization” on page 128
When users change their service login passwords, password synchronization
enables the users to use the new passwords when they log in to the IBM Notes
client.
Setting password expiration for Notes IDs
For users who access the service with the IBM Notes client, you can specify when
Notes ID passwords expire. This password expiration does not apply to web users
because they log in using their web login password rather than a Notes ID
password.
Before you begin
For information on how this feature interacts with the password synchronization
feature, see “Enabling password synchronization” on page 128.
About this task
You must enable password expiration through SmartCloud Notes Administration.
An on-premises Security Settings policy can be used only to enable password
expiration warnings that notify users when password expiration approaches.
126
SmartCloud Notes: Administering SmartCloud Notes: Hybrid Environment March 2015
If users click File > Security > User Security, the Password must be changed by
field does not show the password expiration date.
Perform the following procedure to set password expiration for Notes IDs.
Procedure
1. Log on to the service as an administrator.
2. If your account also has the User role, click Admin > Manage Organization.
3. In the System Settings section of the navigation pane, click IBM SmartCloud
Notes and then click Account Settings.
4. Click Password Management
5. Click Enable password expiration for IBM Notes clients.
6. Enter the number of days a password can be used before it expires. The
minimum value for this setting is 30 days; the maximum is 3650 days.
7. Optional: To warn users when password expiration approaches in a hybrid
environment:
Note: Perform these steps only if you complete the previous steps to enable
password expiration in the service. Enabling a warning period for service users
without enabling password expiration in the service produces unexpected
results and is not supported.
a. Create an explicit group policy for service users. For more information, see
“Creating policies for service users” on page 105. Note that if the policy is
also assigned to any on-premises users who are not in the cloud, password
expiration will be enabled for those users as well, with the specified change
interval and warning period.
b. In a Security Settings document that is assigned to the group policy, specify
the following settings in the Password Management > Password
Management Basics tab.
Table 44. Security settings required for password expiration warnings
Setting
Value
Enforce Password Expiration
Notes Only
Required Change Interval
The expiration period that you specified in
Step 6.
Warning Period
The number of days before password
expiration at which the user receives an
expiration warning message.
Results
v When password expiration is first enabled, the passwords of all current users
expire on a random basis after the expiration period, regardless of when the
passwords were last changed. For example, if the expiration period is 90 days,
all current users are prompted to change their passwords on a random basis
when first authenticating after the 90-day expiration period.
v The passwords of new users also expire on a random basis after the expiration
period.
v If you configured a warning period through policy settings, users receive
password expiration warnings.
v Users who are logged in when this setting becomes effective are not prompted
to change the password during the current login session.
Chapter 5. Customizing service settings
127
v Users might experience a lag time of a few seconds between the time they
change their password and authentication. This lag occurs while the updated ID
is synchronizing with the vault. If the synchronization does not complete,
authentication can fail. In that case, users can wait a few minutes, and then try
again. If the synchronization continues to fail and the user cannot access the
client, reset the Notes ID using SmartCloud Notes Administration.
What to do next
You might want to communicate the following information to your users:
v How often they will be prompted to reset their passwords.
v What to do if authentication fails after they change their passwords.
Related concepts:
“Using administrative policies” on page 105
If you use administrative policies on premises, you can apply many of those same
policy settings to service users as well. Administrative policies enable all users to
have the same working experience.
Related tasks:
“Resetting passwords for Notes IDs” on page 125
Reset the password on an IBM Notes ID file to change the current password.
Typically you do this because a user has forgotten the current password.
Enabling password synchronization
When users change their service login passwords, password synchronization
enables the users to use the new passwords when they log in to the IBM Notes
client.
About this task
Password synchronization benefits users who are active users of both the web and
Notes clients by allowing them to use one password for both clients.
After you enable password synchronization, when users change their service login
passwords, the new passwords are added to the Notes ID files in the ID vault.
Users can then use the new passwords the next time they log in to the service from
the Notes client.
Password synchronization occurs whenever users change their service login
passwords. Users can change the service login passwords at any time through
Connections Cloud My Account Settings. They also change the passwords:
v After they log in to the service for the first time with temporary passwords;
v After they log in to the service after an administrator resets their service login
passwords;
v After they log in to the service when service login password expiration is
enabled and their passwords expire.
Before you enable password synchronization, be aware of the following
information:
v The feature does not apply to users who log in to the service with a federated
identity that your organization defines.
v Synchronization occurs in one direction: from the service login password to the
Notes ID password. Changing the Notes ID password does not change the
service login password.
128
SmartCloud Notes: Administering SmartCloud Notes: Hybrid Environment March 2015
v When service login passwords change, Notes client users are not required to use
the new passwords. Their old passwords remain valid until they use the new
passwords to log in to the service from the Notes client. Because the continued
use of the old password prevents ID synchronization with the ID vault, as a best
practice, recommend to users that they use the new passwords on the Notes
client.
v Synchronization occurs after Notes clients are connected to the service.
v Notes client users can change their Notes ID passwords, either by choice or
because you enable the Password Expiration setting in SmartCloud Notes
Administration and their passwords expire. When Notes users change the Notes
ID passwords, the service login passwords do not change automatically.
However, users can use Connections Cloud My Account Settings to change the
service login passwords to match the new Notes ID passwords.
v If you enable password expiration for Notes IDs, a Notes ID password might
expire before a user logs in to Notes with a new service login password. In this
case, the user can log in to the Notes client with the old Notes ID password but
the user is prompted to change the password when opening mail or another
application. At this point the user can provide the new service login password.
v If you use an on-premises policy to specify Notes ID password requirements for
service users, as a best practice, do not make the requirements more restrictive
than the service login password requirements. If the Notes ID password
requirements are more restrictive, a password that is acceptable for the service
password can be unacceptable for Notes. For example, if the policy requires that
passwords be 10 characters and a user's service login password is only 8
characters, the service login password cannot be used for Notes. Service login
passwords must:
– Include at least eight characters
– Include at least one non-alphabetic character and four alphabetic characters
–
–
–
–
Include no more than two repeated characters
Be different from the previous eight passwords
Not include the user's given name, surname, or email address
Not include the space character
Note: Although service login passwords can be any length, Notes ID passwords
must be 63 or fewer characters. If you use password synchronization, tell users
to use service login passwords that are within the 63 character limit so they can
be used for the Notes ID, too.
To enable password synchronization, complete the following procedure.
Procedure
1. Log on to the service as an administrator.
2. If your account also has the User role, click Admin > Manage Organization.
3. In the System Settings section of the navigation pane, click IBM SmartCloud
Notes and then click Account Settings.
4. Click Password Management.
5. In the Password Synchronization section of the page, select Enable password
synchronization.
6. Click Save.
Chapter 5. Customizing service settings
129
Results
When users change their service login passwords, they can use the new passwords
to log in to the Notes client.
If users change the Notes ID password, the service login password does not
change automatically.
What to do next
Notify users that the feature is enabled. Recommend that when they change the
service login passwords that they use the new passwords to log in to the Notes
client.
Related tasks:
“Resetting service login passwords” on page 124
Users can reset their own service login passwords once within a 24 hour period by
clicking Forgot password?. An administrator or administrator assistant can reset
service login passwords for any user at any time.
“Setting service login password expiration” on page 124
By default, service login passwords do not expire. Enforcing a password expiration
period helps ensure that passwords are changed frequently. Administrators can set
a password expiration interval for all users.
Related information:
Federated identity management
Notes IDs and passwords
When users connect to their mail servers in the cloud with IBM Notes clients and
Notes IDs, they are authenticated using Notes Remote Procedure Call (NRPC)
authentication.
In service-only environments, and in hybrid environments that do not use
on-premises security policy settings to configure password requirements, Notes ID
passwords must be at least eight characters. Passwords must also have a password
quality of 8, on a quality scale of 0 (weakest) to 16 (strongest). Password quality
refers to the required character complexity of passwords. In hybrid environments,
you can use on-premises security policy settings to control password requirements.
By default, Notes ID passwords do not expire and keeping this default behavior is
recommended. Nevertheless, you can configure a password expiration interval of
from 30 to 3650 days through the SmartCloud Notes Administration interface. In
hybrid environments, you do not control password expiration through an
on-premises policy, but you can use a policy to enable a warning to be displayed
to users when their passwords are due to expire.
If users forget their Notes ID passwords, company administrators can use the
SmartCloud Notes Administration interface to reset the passwords to temporary
values. The users use the temporary passwords to log in to the service from a
Notes client and then are prompted to change the passwords.
The Notes shared login feature is supported in hybrid environments. This feature
allows users to log in to Microsoft Windows and then use the Notes client without
providing a Notes ID password. A benefit of this feature is there are no Notes ID
passwords to use or remember.
130
SmartCloud Notes: Administering SmartCloud Notes: Hybrid Environment March 2015
The Notes client can connect automatically to the cloud service instant messaging
community and to cloud service Activities through the client sidebar. (Access to
service Activities requires a collaboration subscription). After users log on to the
service mail server from the Notes client, a single-sign on capability enables them
to access these cloud services during the session without providing their cloud
service account login credentials. A Notes client can be configured to connect to
both on-premises and cloud instant messaging servers or Activities servers through
the sidebar. In this case, users must provide their cloud service login credentials to
access the cloud servers.
Related tasks:
“Resetting passwords for Notes IDs” on page 125
Reset the password on an IBM Notes ID file to change the current password.
Typically you do this because a user has forgotten the current password.
“Setting password expiration for Notes IDs” on page 126
For users who access the service with the IBM Notes client, you can specify when
Notes ID passwords expire. This password expiration does not apply to web users
because they log in using their web login password rather than a Notes ID
password.
Limitations when Notes IDs are not in the vault
There are advantages to using and storing IBM Notes ID files in a vault in the
service. All Notes client users have a Notes ID, which is automatically uploaded to
the vault at some point after the client connects to the service. Users who will not
use a Notes client to access the service are not a required to have a Notes ID.
However, these users are limited if they do not have a Notes ID in the service
vault.
Service users who will use only the web client, and who do not have a Notes ID
stored in the vault, cannot perform secure mail operations (signing mail, and
reading or sending encrypted mail). These limitations also apply to IBM Notes
Traveler and BlackBerry® smartphone users. If your users do not now and never
have had a Notes ID, and they do not need to perform secure operations, then
they do not require Notes IDs.
If, however, they previously had a Notes ID, but it will not be stored in the service
vault, then these additional limitations apply:
v If the mail file is transferred to the service without an imported Notes ID, then
users cannot read old encrypted messages if there are any.
v Administrators cannot reset the Notes password
v Notes ID password resets and ID recovery are not available.
v If the user's name changes, the user's Notes name cannot be changed.
If you are transferring mail files of users who currently have a Notes ID, users can
import their Notes ID into the mail file before you transfer mail files. The Notes ID
is uploaded to the vault the first time a user performs a secure mail operation,
such as sending signed mail or reading encrypted mail. Alternatively, users can use
the web client to upload the ID file to the service after they have been provisioned,
or administrators can upload ID files.
If a user has a Notes ID, but the Notes ID is not stored in the vault in the service,
you cannot rename the user. If however, you want to be able to rename a user, but
do not want to store the user's Notes ID in the vault, you can modify the user's
Person document to reflect that the user will not use a Notes ID file again. Then,
you can rename the user on premises using the Rename feature in the Domino
Chapter 5. Customizing service settings
131
Administrator client. To allow renames to succeed, remove the following items
from the user's Person document in the Domino Directory on a server that you
synchronize with the service:
v Certificate
v CertificateExpiration
v CertificateIssuer
Related tasks:
“Uploading a Notes ID to the vault” on page 269
In a hybrid environment, if a service user has an IBM Notes ID file, the ID must be
stored in the ID vault in the service. In some cases, for users who have a Notes ID,
but who will not use the Notes client, you might need to upload the Notes ID to
the vault manually. If it is not stored in the vault, web client, Notes Traveler, and
BlackBerry® smartphone users cannot perform secure mail operations. Other
limitations also apply, as outlined in this topic.
Setting up federated identity management
When you set up federated identity management, users log on to the service using
your on-premises authentication mechanism.
About this task
Federated identity management provides the following benefits:
v It allows your company to control the type of authentication and authentication
options. For example, you might restrict access to specific networks, use VPN
connections, define custom password strength or password expiration periods,
use smartcards, or require two-factor authentication.
v Users can use their familiar, on-premises credentials to access the cloud service.
v While users are logged on to the on-premises identity provider, they can access a
cloud service without being re-prompted for credentials.
After you implement federated identity management, you must accommodate
users of mobile apps. If all of your mobile users have one or more IBM mobile
apps such as Connections, Chat, Meetings, or most versions of IBM Notes Traveler,
you have the following options:
v Set up an additional, separate federated identity management endpoint for the
IBM mobile apps. For more information about this, see the Flow models section of
“SAML federated identity concepts” on page 133.
v Use the partial authentication type when setting up federated identity
management, which allows you to specify a group of users to whom federated
identity management does not apply. In this case, you would specify your
mobile device users. For more information about the partial authentication type,
see the Authentication types section of “SAML federated identity concepts” on
page 133.
v Use application passwords. For information about application passwords, see
“Enabling application passwords” on page 139.
All other mobile apps must use application passwords when federated identity
management is implemented.
Notes Traveler version 9.0.1.3 or greater for Android is an exception to the rule. It
can connect to the same federated identity management system that non-mobile
apps use.
132
SmartCloud Notes: Administering SmartCloud Notes: Hybrid Environment March 2015
Note: Users to whom federated identity management applies cannot connect to the
service with IMAP clients or FTP clients.
SAML federated identity concepts
Learn about the federated identity process as implemented in the cloud service, the
flow models that are supported, and the authentication types.
Overview of the process using SAML
Cloud services rely on SAML to provide the SSO services. In this implementation,
your organization is the identity provider, and the cloud service is the service
provider. You can use either SAML 1.1 or SAML 2.0.
As the identity provider, your organization authenticates users. The authentication
can be by a login with a user name and password, or by some other method. For
mobile apps, the authentication must be by a login with user name and password.
When a user gains access to your intranet and attempts to use a cloud service, a
SAML assertion is sent from your organization to the SAML endpoint in the cloud
service. The SAML assertion securely identifies the user. The cloud service uses the
SAML assertion to decide whether the user can access it.
Flow models
Two flow models exist in federated identity management. One model is the
identity provider initiated model (IdP-initiated), and the other is the service
provider initiated model (SP-initiated). Mobile apps use the SP-initiated model.
Normally, the SP-initiated flow model is not available in SAML 1.1 because SAML
1.1 does not support Identity Provider Discovery Profile. However, the cloud
services use a hybrid version of SP-initiated that allows both SAML 1.1 and SAML
2.0. As a result, Identity Provider Discovery Profile is not required by cloud
services, and is not implemented.
The cloud services implement the Browser/POST profile that is used in SAML 1.1
and is compatible with the Web Browser SSO profile in SAML 2.0. Other profiles
are not supported at this time.
The following outlines describe the two flows:
IdP-initiated
1. The user gains access to your intranet via your organization's
authentication mechanism.
2. The user navigates to a web page on your intranet that contains a link
to a cloud product such as Connections Cloud or SmartCloud Notes
web.
3. The user clicks the link.
4. The SSO process is initiated. A SAML assertion is sent to the cloud
endpoint via HTTP POST. If the user has a valid account, access is
granted.
5. The user interacts with the cloud product.
SP-initiated hybrid
1. The user navigates to the cloud service login page.
2. The user clicks Use My Organization's Login.
Chapter 5. Customizing service settings
133
3. The user enters the email address that is associated with the user’s
account.
4. The cloud service looks up the email address and then redirects the
user to your organization’s authentication mechanism.
5. The flow continues from Step 4 of the IdP-initiated model.
The SP-initiated hybrid flow model also applies to mobile apps. Before using a
mobile app, the user must do a one-time setup of the mobile app to use a cloud
server. The setup process is different for each mobile app; instructions are included
in the documentation of each app.
The following outline describes the flow for mobile apps:
SP-initiated hybrid for mobile apps
1. A mobile app initiates a connection to a cloud service.
2. The cloud server looks up the email address and then responds with
the mobile login URL of your organization’s mobile authentication
mechanism.
3. The mobile client issues a basic authentication request to the mobile
login URL with the user's email address and password.
4. If the basic authentication is successful, a SAML assertion is returned to
the mobile app.
5. The mobile app sends the SAML assertion to the cloud endpoint via
HTTP POST. If the user has a valid account, access is granted.
6. The mobile user interacts with the cloud product.
Authentication types
Four types of federated identity management are available: Federated, Modified,
Partial, and Non-federated. By default, all users in your organization are assigned
the Non-federated type unless you enable one of the other types.
Federated
Users must authenticate with your organization before they can access
cloud services. Users do not have a user name or password in the cloud
user account. If they go to the service login page, they must click Use My
Organization's Login. The Federated type applies to all users in your
organization.
The Federated type is convenient for your users who normally work from
the office. They can log on to your system and use cloud services without
needing a separate user name and password combination. However, if any
of your users work from home or work while traveling, your directory
servers must be accessible from the Internet. Also, because your users
cannot log in with a name and password that is defined in the service,
services such as chat and IMAP are not available.
If you choose the Federated type, you must implement the SP-initiated
flow model.
Modified
Users have the option of authenticating with your organization before
accessing the cloud-based services, or using a name and password defined
in the service to log on. The Modified type applies to all users in your
organization.
134
SmartCloud Notes: Administering SmartCloud Notes: Hybrid Environment March 2015
The Modified type allows your users to access cloud services from the
Internet, but you do not need to make your directory servers accessible
from the Internet. Your users can use the single sign-on services when they
are in the office, and the cloud service login when they are outside the
office.
Partial
Each user in your organization is assigned one of the previously listed
types: Non-federated, Federated, or Modified. If you do not specify a type
for a particular user, the user is assigned the Non-federated type.
Use the Partial type if you have one group of users who normally work in
the office, and another group of users who normally work from home or
who travel frequently. For example, the office workers can be assigned the
Federated type, and the traveling sales team can be assigned the Modified
type.
You can also use the Partial type to group users by the services that are
available to them. Users with the Federated type do not have access to chat
or POP/IMAP, but users of the Modified type do have access to chat and
POP/IMAP.
If you choose the Partial type, you must implement the SP-initiated flow
model to support users with the Federated type.
Non-federated
The login for the cloud service is independent of, and separate from, your
organization's login procedure. Users must log on using the name and
password defined in the service to use the cloud-based services.
The Non-federated type is the default type, and is the simplest and easiest
type to set up because it requires no action on your part.
After one of the federation types is implemented, you can change to one of the
other types by contacting your customer services representative. The customer
services representative will advise you on the process. If you are using the Partial
type, you can change individual users from one type to another without the need
to contact your customer services representative.
Preparing for federated identity management
The difficulty of getting your system ready for federated identity management
depends on both the state of your system, and on your knowledge and experience
with SAML, SSO, LDAP, and related technologies.
Before contacting your IBM customer service representative to enable federated
identity management, review the following checklist:
v Choose the version of SAML that you want to use. You can use either SAML 1.1
or SAML 2.0.
v Choose the type of federation that you want to employ: Federated, Modified, or
Partial. See the topic SAML federated identity concepts for more information.
v Review the IdP-initiated flow model and the SP-initiated hybrid flow model. See
the topic SAML federated identity concepts for more information.
v Implement SAML on your web server. You can use Tivoli® Federated Identity
Manger, OpenSAML, Active Directory Federation, or some other federated
identity manager.
Chapter 5. Customizing service settings
135
v If you are setting up federated identity for users of mobile apps, create a second
endpoint that accepts basic authorization. The mobile apps work with the
SP-initiated flow model only.
v Retrieve or create the private/public key pair that will be used in digital
signatures.
v Integrate your directory server with your SAML service. Administration is easier
if all of your users are on the same directory server.
v Implement and test the SAML Browser/POST profile in either SAML 1.1 or
SAML 2.0.
v Create a dummy service provider and conduct an IdP-initiated single sign-on
test to make sure that everything is working correctly.
v Create a SAML metadata file to transmit your identity provider metadata to the
IBM customer service representative. If you are using SAML 1.1, you have the
option of transmitting most of the information in an email or by some other
means that you negotiate with the IBM customer service representative.
However, in this case you must transmit the public key inside a Java™ keystore.
Enabling federated identity management
When your system is ready for testing with the cloud system, contact an IBM
customer services representative.
Before you begin
Before you start the enablement process, review the following list:
1. Implement and test a federated identity management system that uses SAML.
Make sure that your system is configured to send the user’s email address as
the subject in a SAML assertion.
2. Test your system to make sure that it is configured for the type and flow model
that you have chosen. See the topic SAML federated identity concepts for more
information.
3. Complete the checklist in the topic Preparing for federated identity management
Procedure
To enable federated identity management:
Send an email to [email protected]. In the email, request to have federated
identity management enabled for your organization. An IBM customer services
representative will contact you with instructions and provide details of the process.
What to do next
After federated identity management is enabled, notify users of IBM mobile apps
such as Traveler, Chat, or Meetings that they must generate application passwords.
Users enter the application password instead of their regular login passwords
when logging in with a mobile app. In the notification, include the following link,
which has instructions for generating application passwords: https://
apps.na.collabserv.com/help/topic/com.ibm.cloud.welcome.doc/
logins_application_passwords.html
Configuring the Sametime rich client for SAML and downloading
Your users can chat using the IBM Sametime Connect rich client.
136
SmartCloud Notes: Administering SmartCloud Notes: Hybrid Environment March 2015
About this task
If your organization uses a standard login, your users can use any standalone
Sametime Connect client at version 8.5.1 or later. They can also use the embedded
version in Notes 9.0 or later.
If your users log in with your organization's authentication credentials and use
SAML token authentication for federated identity management, you can create a
pre-configured installation package for Sametime Connect or for Notes. SAML
support in Sametime and in Notes uses the Form based user/password login type.
Alternatively, Users can download the SAML-enabled Sametime client that is
available in SmartCloud and configure it themselves. Instructions to do this are in
the user help https://apps.na.collabserv.com/help/topic/com.ibm.cloud.chat.doc/
imb_download_saml.html. However, users will need SAML IDP information from
you to complete the configuration.
Procedure
To create a pre-configured installation package:
1. Locate the plugin_customization.ini file.
The file is in one of the following locations, depending on the operating
system:
Windows
Inside the deploy folder of the package root.
RedHat Linux
Inside the RedHat .rpm package at one of the following locations:
For Sametime Connect: \opt\ibm\Sametime\framework\rcp\deploy
For Notes: \opt\ibm\notes\framework\rcp\deploy
MacOS
Inside sametime-*.pkg\Contents\deploy.
2. Add the following configuration lines in the plugin_customization.ini file,
based on your company's Sametime community and SAML IDP information.
Note: To fit the width of this page, some records are shown on more than one
line. In the plugin_customization.ini file, each record is a single line.
# ";" is used to separate multiple communities
com.ibm.collaboration.realtime.community/saml_communities=<Sametime community server host name>
# IDP server url
com.ibm.collaboration.realtime.community/<Sametime community server host name>.idp=
<SAML authentication login URL>
# login type of IDP server
com.ibm.collaboration.realtime.community/<Sametime community server host name>.idp.type=form
# html tag id or tag name of the user name field in IDP web page.
com.ibm.collaboration.realtime.community/<Sametime community server host name>.idp.form.username.tag=
<form_username_field_id> | <form_username_field_name>
# html tag id or tag name of the user password field in IDP web page.
com.ibm.collaboration.realtime.community/<Sametime community server host name>.idp.form.password.tag=
<form_password_field_id> | <form_password_field_name>
# html tag id or tag name of the submit field in IDP web page.
com.ibm.collaboration.realtime.community/<Sametime community server host name>.idp.form.submit.tag=
<form_submit_field_id> | <form_submit_field_name>
# Optional. The default value is "false". If "true", all on-premises communities are deleted
com.ibm.collaboration.realtime.community/<Sametime community server host name>.primary=false
Chapter 5. Customizing service settings
137
# Optional. The default value is "false". if "true", the SmartCloud community can be
# removed from the communities preference page
com.ibm.collaboration.realtime.community/<Sametime community server host name>.editable=false
Sample:
Note: To fit the width of this page, some records are shown on more than one
line. In the plugin_customization.ini file, each record is a single line.
com.ibm.collaboration.realtime.community/saml_communities=im.na.collabserv.com
com.ibm.collaboration.realtime.community/
im.na.collabserv.com.idp=https://www.example.com/FIM/sps/SAML20/logininitial?
PartnerId=https://apps.na.collabserv.com/sps/sp/saml/v2_0&
TARGET=https://apps.na.collabserv.com&PROTOCOL=POST
com.ibm.collaboration.realtime.community/im.na.collabserv.com.idp.type=form
com.ibm.collaboration.realtime.community/im.na.collabserv.com.idp.form.username.tag=Intranet_ID
com.ibm.collaboration.realtime.community/im.na.collabserv.com.idp.form.password.tag=password
com.ibm.collaboration.realtime.community/im.na.collabserv.com.idp.form.submit.tag=ibm-submit
3. Replace the existing plugin_customization.ini file in the Sametime installation
package or in the Notes installation package with the file that you updated.
4. Distribute the updated Sametime installation package or Notes installation
package to your users. The SAML configuration information is automatically
populated when your users install the client.
Note: The installation package that you distribute to Mac users must be
digitally signed by IBM. Before distributing the installation package to Mac
users, email your modified plugin_customization.ini file to
[email protected]. A signed installation package will be created and
returned to you.
Restricting the IP address range
To ensure that users log in from an approved network connection, administrators
can define an approved range of IP addresses.
About this task
By restricting the IP addresses that have access to your organization, you provide a
level of protection against user's credentials being stolen or phished. If IP ranges
are restricted to your network, an attacker would need to authenticate to the server
from within your network to access any stolen credentials.
If your company uses SMTP, POP or iMAP protocols, restrictions are not applied.
Also, restrictions are not applied to SmartCloud Notes Notes Remote Procedure
Calls (NRPC).
Procedure
1. Click Administration > Manage Organization
2. Click Security.
3. Click Add Range in the IP Address Ranges section to enter the beginning and
ending IP addresses. You must specify the IP address at which you are
currently logged in.
Results
Enabling IP address restrictions might block mobile user access to your
organization. For example, Blackberry users must authenticate through a
Blackberry Enterprise Server (BES) which authenticates both the mobile device and
the user. Because the IP address for the authenticated user is that of the BES server,
138
SmartCloud Notes: Administering SmartCloud Notes: Hybrid Environment March 2015
IP address restrictions can block access, depending on the range specified. Use
VPN tools on the mobile device to route traffic to your organization using your
network
What to do next
You can use IP address restrictions as a secondary authentication mechanism in
combination with SAML single sign-on authentication.
Enabling application passwords
Application passwords can be used to provide a secure login for applications that
do not support forms-based authentication. For example, they can be used to
access applications that require passwords on a mobile device or for organizations
that use federated identity and service login passwords are not used. When you
enable application passwords, you also have the option of requiring the use of
application passwords, and of allowing mobile users to bypass IP restrictions.
About this task
If you require an application password, then the service login password is disabled
for the application, and users must log in using the application password. For
example, users would be required to use the application password to log in to the
service on a mobile device or in a browser. However, they could still use the
service login password to log in to the service web site and for other applications.
If you do not require an application password, then users can continue to log in
from a browser, for example, using their service login password.
If you allow mobile users to bypass IP restrictions, application passwords provide
an additional layer of password strength. This is due in part to their length (16
characters) and because they are generated using a strong random number
generator. If a mobile device is lost or stolen, you can then disable the IP restriction
bypass which prevents access to the application outside your organization's
designated IP range.
Note: If you enable application passwords and select the Ignore IP range
restrictions for applications setting to allow users to bypass IP restrictions, the
setting does not apply to Windows Phone or Windows Tablet users. If you restrict
login to a specific IP range, Windows Phone and Windows Tablet users must log in
from network locations within the range.
You can also disable the use of application passwords at any time. Then, if users
have created an application password, the application cannot be accessed because
the password is no longer effective.
Tip: Users can also prevent access to the application by revoking their application
password, which they can do at any time.
Organizations that do not use federated identity can disable the use of the
standard service password for mobile applications.
Procedure
1. Select Administration > Manage Organization.
2. In the navigation pane, under System Settings, click Security.
3. Under Password Settings, click Edit Settings.
Chapter 5. Customizing service settings
139
4. Select Allow users to generate application passwords.
5. Select any of the following options that apply, and then click Save Changes.
Table 45. Application Password Options
Option
Result
Expiration
Select a password expiration interval or
select No expiration if you do not want
application passwords to expire.
Ignore IP range restrictions for applications Users will be able to access applications
from outside the organization's designated
IP range. However, they cannot access it
using the service login, they must use an
application password instead. For more
information about specifying IP address
ranges, refer to “Restricting the IP address
range” on page 138
Require applications to use application
passwords to access this site
This option restricts the supported
authentication flow to application
passwords. It prevents users from logging to
this site using their service login password.
This option does not display for
organizations that use federated identity.
Results
After you enable this feature, users can create and manage application passwords
in My Account Settings in the service. General information about how users
manage their application passwords is listed here.
v If enabled, users can generate an application password for the IBM Notes
Traveler.
v Application passwords can be shared across mobile products, including IBM
Traveler, IBM Sametime, and Connections Cloud.
v If you did not select the option Require applications to use application
passwords to access this site, then using an application password is optional for
users. However, if you have IP range restrictions enabled, they will not be able
to log in using their service password unless they are within the IP range.
v Application passwords are generated by the service when requested by users.
The generated passwords displays to the user only once, and cannot be
recovered.
v Users can revoke and generate a new application password at any time. There is
no limit to the number that can be generated.
v Passwords are generated using cryptographically strong random number
generator. They are 16 characters long, and not case sensitive. Users should enter
the password once into their device and allow the device to save the password.
v If there are ten failed login attempts, the account is locked for three minutes.
What to do next
If you selected Applications must use the generated password to access this site,
or if you allowed users to bypass the specified IP range, instruct them to generate
application passwords. For information on how users generate application
passwords see Application passwords for mobile access.
140
SmartCloud Notes: Administering SmartCloud Notes: Hybrid Environment March 2015
Authentication methods by client
The following table lists the authentication methods supported for each type of
IBM SmartCloud Notesclient.
Table 46. Authentication methods by SmartCloud Notes client
Authentication method
Supported clients
Cloud service account identity and
password
v SmartCloud Notes web
v IMAP clients
v IBM Notes Traveler devices
v FTP client that is used to connect to the
integration server to download journal
files or to upload change files to manage
user accounts
SAML Federated Identity
v SmartCloud Notes web
v Notes Traveler Android 9.0.1.3 and higher
client
Cloud service account identity with
application password
Notes Traveler devices
NRPC
IBM Notes
Research in Motion data center
authentication
BlackBerry® devices that access the service
through Hosted BlackBerry subscriptions
Password rules by authentication method
The following table summarizes the password rules and settings for each
supported IBM SmartCloud Notes client.
Table 47. Password rules and settings by authentication method
Authentication
method
Cloud service
account identity and
password
Password rules
Password expiration1 Password changes
v At least eight
characters
v Disabled by
default
v At least four
alphabetic
characters
v Administrators can
enable a password
expiration interval
of 30, 60, 90, 180,
or 365 days.
v At least one
non-alphabetic
character
v By administrator
v By user
v No spaces
v No more than two
consecutive
characters
v No match of any
of the eight
previous
passwords
v Cannot contain
user name or email
address
SAML Federated
Identity
Controlled by
company
Controlled by
company
Controlled by
company
Chapter 5. Customizing service settings
141
Table 47. Password rules and settings by authentication method (continued)
Authentication
method
Password rules
Cloud service
16 characters
account identity and (non-case sensitive)
application password
NRPC
Password expiration1 Password changes
v Disabled by
default
v Password changes
not allowed
v Administrators can v Administrators or
users can revoke
enable
passwords and
users then generate
new ones
In service-only
v Disabled by
v By administrator
environments, and in
default
v By user
hybrid environments
v Administrators can
that do not use
enable through
policy security
SmartCloud
settings to configure
NotesAdministration
password
requirements, IBM
Notes ID passwords
must be at least eight
characters and have a
password quality of
8, on a password
quality scale of 0
(weakest) to 16
(strongest).
1
While it may seem that requiring passwords to expire provides more security,
most security experts believe the opposite is true. Password expiration often leads
to the use of simpler, more easily-guessed passwords, and to users writing down
passwords to remember them. A better policy is to use more complex password
phrases that do not expire, whenever possible. In addition to providing better
security, this policy also reduces the number of help desk calls generated from
users who forget their ever-changing passwords.
Configuring the name finder
Complete this procedure to configure how users find names in a directory.
Before you begin
Read the topic “Standard and Advanced Name Finder options” on page 145for
details about and a comparison of the Standard and Advanced name finder
options.
If you plan to use the Show user photos option to show photos that are stored in
an on-premises Domino directory, complete the procedure “Adding photos to
Person documents” on page 147.
If you plan to use the Browse corporate hierarchy feature without the Use ranked
sort order option, assign corporate hierarchy categories to Person documents in the
on-premises directory. For more information, see the topic about categorizing users
by corporate hierarchy in the IBM Domino documentation.
142
SmartCloud Notes: Administering SmartCloud Notes: Hybrid Environment March 2015
If you plan to use the Use ranked sort order option, use the Domino Japanese
Extension (DJX) tool to customize the on-premises directory to support it.
About this task
The name finder settings control how users find names in a directory. For example,
the settings are used when users find names by clicking the To link in a new mail
message or the Required link in a new meeting invitation.
Name Finder settings are not related to type ahead addressing, the feature that
automatically finds matches to names that users type in address fields.
Procedure
1. Log on to the service as an administrator.
2. If your account also has the User role, click Admin > Manage Organization.
3. In the System Settings section of the navigation pane, click IBM SmartCloud
Notes.
4. Click Account Settings.
5. Click Name Finder.
6. Select options, as described in the following table:
Option
Description
Basic
The name finder lists all names in a
directory, in alphabetical order by surname.
Users type the first few characters of the
surname they are looking for, and the cursor
moves to the first matching name. From
there, users can use the scroll bar to find the
name.
This setting is the default and it applies to
Notes users and web client users.
Basic Quick Search Only
The name finder shows no names in a
directory, initially. Users type the first few
characters of a given name or surname and
click Search. The name finder then shows
directory entries whose surnames or given
names begin with the characters searched
for.
For example, a search for Jack can return
the names Jackie Roberts or Tony Jackson
but not Tony Blackjack.
This setting provides more flexibility for
finding names in large directories.
This setting applies to Notes users and web
client users.
Chapter 5. Customizing service settings
143
Option
Description
Standard
Users search for names and search results
show directory entries that match. Unlike
the Basic and Basic Quick Search Only
options, users can sort the search results and
see details about the user entries that are
returned in search results.
This search capability applies to web client
users only.
Advanced
Users get the name finder capabilities of the
Standard option. In addition, they are able
to narrow search results by manager,
department, job title, location.
This option is available for hybrid
environments only.
This search capability applies to web client
users only.
Show user photos
Search results show user photos.
In service-only environments, the photos
come from IBM Connections Cloud user
profiles.
In hybrid environments, the photos can
come from IBM Connections Cloud user
profiles or from Person documents in an
on-premises directory. To use an on-premises
directory, clear the Use SmartCloud Engage
photos field.
This option is available when you select the
Standard or Advanced options.
The feature applies to web client users only.
Browse corporate hierarchy
Users can browse a directory by hierarchy
categories that you assign to Person
documents in an on-premises Domino
directory.
This option is available for hybrid
environments when you select the Standard
or Advanced options.
The feature applies to Notes users and to
web client users.
Browse corporate hierarchy > Used ranked
sort order
Users can browse a directory by ranked
categories that you define in an on-premises
Domino directory by using the Domino
Japanese Extension (DJX) tool.
This option is available for hybrid
environments when you select the Standard
or Advanced options.
The feature applies to Notes users and to
web client users.
144
SmartCloud Notes: Administering SmartCloud Notes: Hybrid Environment March 2015
Results
The change usually takes effect within 15 minutes or less.
Related information:
Domino documentation
Standard and Advanced Name Finder options
The Standard and Advanced Name Finder configuration options provide several
features to help users to find names in directories.
The Standard option is available for service-only environments and hybrid
environments. The Advanced option is available for hybrid environments only.
The following table compares the features that are provided by each option. All of
these features are available for the web client. The features currently available for
the IBM Notes client are the browse features only. When you enable the Standard
or Advanced option, the Basic Quick Search Only search option is put in effect
for Notes client users.
Table 48. Comparison of the Standard and Advanced Name Finder configuration options
Feature
Standard Name Finder
Advanced Name Finder
Name search
Users can search by:
Users can search by:
v First name
v First name
v Last name
v Last name
v Notes full name
v Notes full name
v Internet address
v Internet address
v Short name
v Short name
v Alternate name
v Alternate name (if value
populated in directory)
v Phonetic name
v Phonetic name (if value
populated in directory)
Search conditions to narrow
the results of name searches
Not available
Users can narrow name
searches by:
v Manager
v Department
v Job Title
v Location
Each condition added
narrows results further.
These fields must be
populated in Person
documents in the
on-premises directory.
Maximum search results
returned
200
200
Chapter 5. Customizing service settings
145
Table 48. Comparison of the Standard and Advanced Name Finder configuration
options (continued)
Feature
Standard Name Finder
Advanced Name Finder
Sort entries in search results
All users can sort results by:
All users can sort results by:
v Last name, first name
v Last name, first name
v First name, last name
v First name, last name
v Directory
v Directory
Users in hybrid
environments can sort results
by the following information,
if the corresponding fields
are populated in Person
documents:
Users can sort results by the
following information, if the
corresponding fields are
populated in Person
documents:
v Manager
v Job Title
v Job Title
v Department
v Department
v Location
v Manager
v Location
Show details about names in
search results
146
All users can see the
following details:
All users can see the
following details:
v User name
v User name
v Internet address
v Internet address
v Domain
v Domain
v Directory
v Directory
Users in hybrid
environments can see several
additional details, if the
fields are populated in
Person documents.
Users can see several
additional details, if the
fields are populated in
Person documents.
Show user photos from IBM
Connections Cloud user
profiles in search results
This feature requires users to
have a collaboration
subscription in addition to a
SmartCloud Notes
subscription.
Shows user photos from
on-premises Person
documents
Available in hybrid
environments only and
requires a change to the
Domino directory design to
support photos in Person
documents.
Requires a change to the
Domino directory design to
support photos in Person
documents.
Browse entries in a directory
by categories that are defined
by use of the Domino
Corporate Hierarchy feature
Available in hybrid
environments for directories
with Person documents that
are assigned corporate
hierarchy categories. For
more information, see the
topic about categorizing a
user by corporate hierarchy
in the Domino
documentation.
Available for directories with
Person documents that are
assigned corporate hierarchy
categories. For more
information, see the topic
about categorizing a user by
corporate hierarchy in the
Domino documentation.
SmartCloud Notes: Administering SmartCloud Notes: Hybrid Environment March 2015
This feature requires users to
have a collaboration
subscription in addition to a
SmartCloud Notes
subscription.
Table 48. Comparison of the Standard and Advanced Name Finder configuration
options (continued)
Feature
Standard Name Finder
Advanced Name Finder
Browse entries in a directory
by ranking
Available in hybrid
environments. You use the
Domino Japanese Extension
tool (DJX) to configure the
directory to support this
option.
You use the Domino
Japanese Extension tool
(DJX) to configure the
directory to support this
option.
Related information:
Domino documentation
Adding photos to Person documents
In a hybrid environment, you can enable the Name Finder Show user photo
option to use photos in the IBM Domino directory. Before you do, add photo fields
to the directory design and then add photo image files to the directory.
About this task
Make the changes described in this procedure to a synchronized directory that
replicates to the service.
Procedure
1. Make a backup copy of your pubnames.ntf file.
2. From IBM Domino Designer, open pubnames.ntf.
3. Click Shared Elements > Subforms.
4. Double-click the $PersonInheritableSchema subform.
5. Create a field called Photo:
a. In the Basics tab, click Create > Field.
b. In the Name field of the properties box, type Photo. In the Type field, select
RichTextLite.
c. Click the second tab of the properties box and complete the following fields:
v In the Only allow field, select Thumbnail.
v Select Resize Thumbnail Image, in pixels.
v In the Width field, select 85.
v In the Height field, select 74.
v In the Image attachment name field, type ContactPhoto.
d. Click the sixth tab of the properties box. Clear the following Hide
paragraph from fields to ensure they are not selected so that the field is
visible:
v Notes R4.6 or later
v Web browsers
v Mobile
e. Select the new Photo field. In the Objects panel, click the onChange event
and add the following code to it:
Sub Onchange(Source As Field)
Dim ws As New NotesUIWorkspace
Dim uidoc As NotesUIDocument
Dim doc As NotesDocument
Chapter 5. Customizing service settings
147
Set uidoc = ws.CurrentDocument
Set doc = uidoc.Document
Call doc.ReplaceItemValue("PhotoModified", Now())
End Sub
6. At the bottom of the $PersonInheritableSchema subform, create a hidden field
called PhotoModified:
a. In the Basics tab, click Create > Field.
b. In the Name field of the properties box, type PhotoModified. In the Type
field, select Date/Time.
c. Click the second tab of the properties box and complete the following fields:
v Select DisplayTime.
v In the Show field, select Hours and minutes.
v In the Time zone field, select Adjust time to local zone.
7. Save and close the subform.
8. Replace the design of your directory database with the new version of the
pubnames.ntf template.
9. To add a photo to a Person document, open the Person document in the
directory, click the photo field that you created, select the image file, and save
the document.
What to do next
Enable the Name Finder option Show user photos and do not select Use
SmartCloud Engage photos.
Related tasks:
“Configuring the name finder” on page 142
Complete this procedure to configure how users find names in a directory.
Basic name finder illustration
The following pictures illustrate finding names in a directory when the Basic name
finder option is enabled.
148
SmartCloud Notes: Administering SmartCloud Notes: Hybrid Environment March 2015
Basic Quick Search Only name finder illustration
The following pictures illustrate finding names in a directory when the Basic Quick
Search Only name finder option is enabled.
Chapter 5. Customizing service settings
149
150
SmartCloud Notes: Administering SmartCloud Notes: Hybrid Environment March 2015
Standard name finder illustration
The following pictures illustrate finding names in a directory when the Standard
name finder option is enabled.
Chapter 5. Customizing service settings
151
Advanced name finder illustration
The following pictures illustrate finding names in a directory by narrowing search
results when the Advanced name finder option is enabled.
152
SmartCloud Notes: Administering SmartCloud Notes: Hybrid Environment March 2015
Browse corporate hierarchy name finder illustration
The following pictures illustrate browsing a directory to find names when the
Browse corporate hierarchy option is used with the Standard or Advanced name
finder.
Chapter 5. Customizing service settings
153
Configuring mail settings
There are several settings related to mail that you configure from SmartCloud
Notes Administration.
Changing the size limit for incoming messages
The service does not deliver inbound messages that are larger than 100MB, by
default. You can specify a different inbound message size limit. The limit applies to
all mail that is sent to users in the service.
Procedure
1. Log on to the service as an administrator.
2. If your account also has the User role, click Admin > Manage Organization.
3. In the System Settings section of the navigation pane, click IBM SmartCloud
Notes.
4. Click Account Settings and then click Email Management.
5. Under Limit Message Size, specify the size limit for incoming messages.
Prevent automatic forwarding of messages
You can prevent users from using mail rules to automatically forwarding email to
external addresses.
About this task
Users can create mail rules that include the action send copy to, which
automatically forwards a copy of the email to other users. Select this option so that
mail addressed to users in domains that are not owned by your company are
ignored when the message is forwarded. Users can still forward email to any
address manually.
Procedure
1. Log on to the service as an administrator.
2. If your account also has the User role, click Admin > Manage Organization.
154
SmartCloud Notes: Administering SmartCloud Notes: Hybrid Environment March 2015
3. In the System Settings section of the navigation pane, click IBM SmartCloud
Notes.
4. Click Account Settings and then click Email Management.
5. Under External Forwarding, select Do not allow automatic forwarding to
external addresses.
Specifying how Notes links display in the web client
You can specify how IBM Notes links, such as doc links, application links, and
view links, display in web client email.
Procedure
1. Log on to the service as an administrator.
2. If your account also has the User role, click Admin > Manage Organization.
3. In the System Settings section of the navigation pane, click IBM SmartCloud
Notes.
4. Click Account Settings and then click Email Management.
5. Under Link Style, select how Notes document, view, and application links
display when users read mail in a browser:
Table 49. Link Style Options and Icons
Style
Description
Web links only
The default. Uses web addresses
(https://...). In email, the address displays
as an Internet icon:
Document link
View link
Application link
Notes links only
Uses Notes URLs (notes://...). In email, the
address displays as a Notes icon:
Document link
View link
Application links
Note: A web client user can open this style
of link only if the target is located in the
service. For example, a web client user
cannot open a link to an application on an
on-premises server.
Notes and web links
Uses both web and Notes addresses, and
includes both icons to represent each link.
Example of a link to a document:
Chapter 5. Customizing service settings
155
Configuring how long mail remains in the Trash folder
When a user deletes a message from a mail file on a cloud server or the service
automatically deletes an older message, the message is moved to the Trash folder
where it remains for 14 days, by default. After 14 days, the message is
permanently deleted. You can change how long deleted mail remains in the Trash
folder. You can also prevent users from emptying the Trash folder themselves.
Before you begin
In a hybrid environment that includes IBM Notes clients, you can use an
on-premises Mail Settings policy to specify automatic deletion from the Trash
folder on local mail file replicas. For more information, see the topic “Mail Settings
restrictions” on page 115.
About this task
Documents that are deleted from the Trash folder cannot be recovered. While
deleted mail is in the Trash folder, users can restore it to its original folder.
The Trash folder can contain a maximum of 32,768 messages. If this limit is
reached, each message added to the Trash folder causes a message that has been in
the Trash folder the longest to be permanently deleted. This deletion occurs even if
a message has been in the Trash folder less time than the specified deletion
interval. Premature deletion from Trash stops when either manual or automatic
deletion of messages causes the number of messages in the Trash folder to fall
below the limit. This behavior is not common but can occur in mail files where
many messages are frequently received and deleted.
Procedure
1. Log on to the service as an administrator.
2. If your account also has the User role, click Admin > Manage Organization.
3. In the System Settings section of the navigation pane, click IBM SmartCloud
Notes.
4. Click Account Settings and then click Email Management.
5. Under Configure Mail Retention in the Trash Folder, complete these fields to
manage mail in the Trash folder.
Table 50. Trash Folder Mail Retention Settings
Option
Description
Retain deleted messages for how many
days?
Enter a number from 14 - 90. The default
value is 14.
If you decrease an interval that was
previously set, then all messages that meet
the new criteria are deleted. For example, if
you decrease the interval from 20 days to 16
days, then mail in the Trash folder older
than 16 days is deleted.
156
SmartCloud Notes: Administering SmartCloud Notes: Hybrid Environment March 2015
Table 50. Trash Folder Mail Retention Settings (continued)
Option
Description
Allow users to empty the Trash folder
When this option is selected, users can
permanently delete messages from the Trash
folder by clicking Empty Trash or by
selecting a message and deleting it.
This option is enabled by default. To prevent
users from deleting mail from the Trash
folder, deselect the option. Then, mail
remains in the Trash folder for the duration
specified in Retain deleted messages for
how many days? before being permanently
deleted.
Note: If you prevent users from deleting
mail in the Trash, IBM Notes client users can
still delete mail from the Trash on local mail
replicas. However, the deletion does not
carry over to the server mail file replicas.
Deleting older email and meetings
You can reduce the size of mail files and improve email usability by automatically
deleting older email messages and meetings. By default, email messages and
meetings remain indefinitely unless users delete them.
About this task
When you enable email deletion, you can:
v Control how many days messages and meetings remain before they are
processed for deletion.
v Exclude messages in user-created folders from automatic message deletion.
v Send reports of automatically deleted messages and meetings to specific user
addresses.
v Exclude the mail files of specific users from the automatic deletion.
Non-mail documents added by web client users, such as Person documents, are
not deleted.
Messages that are flagged for follow-up are not deleted, except for messages that
are flagged by the sender before being sent, which are deleted.
When email deletion is enabled, the service takes the following steps to delete
older messages and meetings:
1. Messages that are older than the Delete email after how many days? value are
moved temporarily to a folder created by the service. Meetings are moved to
the temporary folder when it is longer than the specified number of days since
the meetings occurred. Repeat meetings are processed based on the date of the
last meeting.
2. The default name of the folder to which deleted messages and meetings are
moved temporarily is *To Be Deleted*. You can specify a different name. Users
can prevent messages in this folder from being deleted by moving them to a
folder that is exempted from automatic deletion.
3. Messages and meetings are moved weekly from the temporary folder location
to the Trash folder. The service staggers this processing so that not all mail files
Chapter 5. Customizing service settings
157
are processed at the same time. Users can prevent messages and meetings in
the Trash folder from being deleted by moving them to a folder that is
exempted from automatic deletion.
4. Messages and meetings are deleted from the Trash folder after 14 days, by
default. You can use the Retain deleted messages for how many days? setting
in the Configure Mail Retention in the Trash Folder section of the Email
Management window to change the number of days messages remain in the
Trash folder. After messages are deleted from the Trash folder, they cannot be
recovered.
The value of Delete email after how many days? plus the value of Retain deleted
messages for how many days? determine when messages are deleted from mail
files. For example, if the value of Delete email after how many days? is 365 and
the value of Retain deleted messages for how many days? is 90, messages are
permanently deleted from mail files after one year and three months (455 days).
Perform the following steps to enable and configure automatic deletion of older
email.
Procedure
1. Log on to the service as an administrator.
2. If your account also has the User role, click Admin > Manage Organization.
3. In the System Settings section of the navigation pane, click IBM SmartCloud
Notes.
4. Click Account Settings and then click Email Management.
5. Under Delete Older Email, select Enable email deletion.
6. Use the following settings to specify how to manage older email deletion:
Table 51. Mail Deletion Settings
Option
Description
Delete email after how many days?
Specify the number of days email messages
remain before being processed for deletion.
If no value is specified, 14 days is the
default value.
Keep email that is filed in folders.
Select this option to prevent mail that is
stored in all user-created folders from being
deleted.
Keep email only if it is in one of these
folders or their subfolders
Select this option to keep mail only
messages in specific folders or subfolders
from being deleted. In the Exempt Folders
box, specify the folder names, one name per
line.
To specify a single subfolder, enter
parentfolder\subfolder. For example, enter
Suppliers\Tools to prevent messages in the
\Tools subfolder from being automatically
deleted, but to allow messages in the
Suppliers parent folder and any other of its
subfolders to be deleted.
158
SmartCloud Notes: Administering SmartCloud Notes: Hybrid Environment March 2015
Table 51. Mail Deletion Settings (continued)
Option
Description
Folder name
Specify the name of a folder to temporarily
store messages that are targeted for deletion.
If the folder does not exist, the service
creates it. Messages remain in this folder for
a week and then are moved to the Trash
folder.
If you do not specify a folder name, the
name *To Be Deleted* is used.
Send email report of the number of emails
deleted to the following addresses
List the addresses of users you want to
receive email deletion reports.
Do not delete the email of the following
users
List the names of users you want to exempt
from mail deletion.
Enabling the ActiveX control for Internet Explorer users
The Internet Explorer ActiveX control provides mail enhancements to IBM
SmartCloud Notes web users who use Internet Explorer.
About this task
You enable use of the ActiveX control through SmartCloud Notes Administration
Account Settings. ActiveX is disabled by default to allow and encourage more
secure web browser configurations. If you enable ActiveX to provide additional
mail features to Internet Explorer users, be aware that doing so might result in less
secure browser configurations.
If you enable ActiveX, when users who use Internet Explorer log in to the
SmartCloud Notes service, they see prompts that allow them to install the ActiveX
control. The prompts refer to the ActiveX control as the IBM iNotes control.
After users install the control, they can do the following tasks:
v Make SmartCloud Notes web the default email client through Preferences.
v Send email from Windows Explorer, the desktop, or the Start menu.
v Create new email messages by clicking a Mailto:// link from external web
pages.
v Select multiple files to attach to an email, detach and save multiple attachments,
open attachments by double-clicking without having to save them first, and drag
multiple attachments to Windows Explorer or the desktop.
v Copy an image to the clipboard and then press Ctrl+V or click the image icon in
the message toolbar to paste the image into an email.
Note: Running Internet Explorer in Protected Mode can prevent users from being
able to save attachments, drag attachments from mail to the desktop, or set the
default mail client. For information about options to resolve this issue and about
Protected Mode, see IBM Technote 1655831. One option is to resolve the issue by
adding the mail server or domain as a trusted site. If you use this option, as the
trusted site, specify notes.<dc>.collabserv.com (where dc is your data center) or
*.collabserv.com.
Users might occasionally be prompted to install updates to the ActiveX control
when enhancements to the control are deployed in the service. If users do not
Chapter 5. Customizing service settings
159
install an update, features that require the control are no longer available during
the current session. Users are prompted again to install the update when they next
log in to the service.
Complete the following steps to enable all web users who use Internet Explorer to
download and use the ActiveX control.
Procedure
1. Log on to the service as an administrator.
2. If your account also has the User role, click Admin > Manage Organization.
3. In the System Settings section of the navigation pane, click IBM SmartCloud
Notes.
4. Click Account Settings.
5. Click Email & Calendar Options.
6. Select Enable ActiveX attachment control.
Related information:
IBM Technote 1655831
Specifying an SMTP server to route mail to the Internet
By default, the service routes mail that service users send to external users over the
Internet. You have the option to route this mail through a company-controlled
SMTP host server instead.
Before you begin
Prepare your on-premises environment. For more information, see “Preparing to
use a company SMTP server to route outbound Internet mail” on page 54.
About this task
Skip this procedure if you want the service to handle routing the mail that is sent
to external users. In this case (default behavior), the service filters the messages for
virus and spam before routing them to the Internet.
By using a company SMTP host server for external routing, you can act on
messages before routing them, for example, filter or audit messages. When you use
this feature, the service filters messages for viruses and spam and then routes them
directly to your designated SMTP host server. Messages addressed to any domain
that is not an internal, service-verified domain are routed to the SMTP host server.
The service uses Transport Layer Security (TLS) to route mail to the SMTP host
server if the host server uses TLS. The connection is made using STARTTLS over
SSL TCP/IP port 25.
Perform the following steps to specify the name of your SMTP host server in
Account Settings.
Procedure
1. Log on to the service as an administrator.
2. If your account also has the User role, click Admin > Manage Organization.
3. In the System Settings section of the navigation pane, click IBM SmartCloud
Notes.
160
SmartCloud Notes: Administering SmartCloud Notes: Hybrid Environment March 2015
4. Click Account Settings > Email Management.
5. In the SMTP server field under Manage Routing to External Internet
Domains, enter an SMTP host name to use for routing.
6. Click Save.
Preparing to use custom mail file templates
You can apply a custom mail file template to mail files of service users. The
template must meet design requirements that minimize the risk and impact to your
users and to the service. You submit the template for approval to an IBM Software
Services for Collaboration representative.
About this task
The template design development can be done in-house or through a contract with
a third-party developer or an IBM representative. A short professional services
engagement with IBM Software Services for Collaboration is required to approve a
custom template.
A custom mail file template allows you to customize the design of user mail files.
It is also used to customize the mail file access of new mail files to enable
administrators or server-based agents to access them. Customized mail file access
is strongly recommended; without it only mail file owners and mail file delegates
can access mail files.
The following steps outline the high-level tasks and identify who is responsible for
developing and applying a custom template.
Procedure
1. Customer Contacts an IBM Software Services for Collaboration representative
to procure a statement of work.
This step should be done as soon as it is determined that the business requires
a custom mail template. This prior notice ensures that they are prepared to
validate the template soon after receiving it
2. Developer Reviews the design requirements for custom mail templates.
To be approved for use with the service, a custom mail template must meet
specific design requirements. For example, a custom template must contain
specific design elements from the standard mail template of a IBM Notes
version supported by the service. For information about template design
requirements, see the wiki article SmartCloud Notes Template Validation
Requirements.
3. Developer Designs and implements the template changes in the on-premises
environment. When preparing a custom template that is already in use, the
developer should:
v Assess and document the current customizations.
v Compare each customization to the standard mail template. Determine
whether each is still needed or if it can be deleted. If a customization is still
needed, determine whether it requires modification.
v Document the requirements for the new version of the custom template.
4. Customer Tests the template in the on-premises environment.
You are responsible for testing the template in your company environment to
ensure that it functions as intended.
Chapter 5. Customizing service settings
161
5. Customer Emails a request to [email protected] to be
set up for the Mail Analyzer application.
The email should include the Customer ID and also be sent to the IBM
Software Services for Collaboration representative. The customer receives a
confirmation email when setup is complete. The Mail Analyzer application is
used to do preliminary checks of the custom template.
6. Customer After receiving notification that the Mail Analyzer application setup
is complete, the customer emails the custom template to
[email protected] to perform an automated analysis.
The customer receives an email summary of the results. This step can be
repeated as often as needed during the development and testing cycle.
7. Customer Submits the template to an IBM representative for a final manual
validation.
Template validation requires a short professional services engagement with
IBM Software Services for Collaboration.
8. IBM representative Validates the template and report results to the customer.
This step ensures that the template meets the template validation
requirements. The IBM representative sends the customer a short, written
report summarizing the assessment, and indicating approval or rejection.
9. IBM representative Loads the template to the service, after approval of the
template.
10. Company administrator Applies the template to user accounts.
When the template is approved, a company administrator for the service uses
SmartCloud Notes Administration to apply the template to the accounts of
new or existing users.
Alternatively, the template can be applied through the integration server and a
user provisioning change file. For more information, see the topic on creating
user provisioning change files in the integration server documentation.
Related tasks:
“Preparing customized mail file ACLs” on page 168
An important reason to customize mail file access is to allow administrators or
server-based agents to access mail files. Without customized mail file access, only
mail file owners and mail file delegates can access mail files.
“Configuring mail file templates” on page 164
Configure which mail file templates can be applied to user mail files and configure
a mail file template to use by default.
“Changing user mail file templates” on page 246
You can change the mail file template assigned to a user. For example, change the
mail template if the IBM Notes client of a user is upgraded to a new version.
Related information:
Integration server documentation
Handling execution security alerts caused by custom
templates
The service signs a custom mail file template with a unique customer signature.
IBM Notes users that use a custom mail file template see an execution security
alert if the Execution Control List (ECL) on the client does not allow access to the
signature.
162
SmartCloud Notes: Administering SmartCloud Notes: Hybrid Environment March 2015
About this task
The first time Notes users authenticate with the service after the application of a
custom template, they see an execution security alert. The alert states that the
template signer, customerID LotusLive Template Signer/customercertifier, is
attempting to perform an ECL update action. Selecting Start trusting the signer
prevents all future alerts for the template signature.
For more information about execution security alerts, see the topic about the
execution control list in the Domino documentation.
In a hybrid environment, you can prevent the security alerts by using a Security
Settings document that is assigned to an explicit policy. To do so, perform the
following steps before you deploy the custom template:
Procedure
1. Read the topic on using administrative policies to understand the
requirements for using policies with the service.
2. From the Domino Administrator, open a server with the directory in which
you want to configure the policy.
3. Select the People & Groups tab, and then open the Settings view.
4. Choose one of the following options:
v To add a Security Settings document, click Add Settings > Security, and
type a name for the new document.
v To edit an existing Security Settings document, click Edit Settings.
5. Click the Execution Control List tab.
6. In the Admin ECL field, click Edit.
7. Click Add.
8. Type */customercertifier, where customercertifier is the name of the certifier
that you uploaded to the service and that is used to name your mail servers
in the service.
For example, type */SCN/Renovations.
9. Select the certifier name that you added, select the allowed access levels, and
click OK.
You must select Workstation security and then select Access to Workstation
Security ECL. If you are unsure which other access levels to allow, select the
same access levels that are specified for Notes Template Development.
10. In the Update Mode field, select Refresh.
11. In the Update Frequency field, select When Admin ECL Changes.
12. Click Save & Close.
13. Make sure that the Security Settings document is assigned to an explicit policy
that is used for users in the service.
14. Before you deploy the custom template, allow time for the policy change to
replicate to the service.
Related concepts:
“Using administrative policies” on page 105
If you use administrative policies on premises, you can apply many of those same
policy settings to service users as well. Administrative policies enable all users to
have the same working experience.
Related information:
Chapter 5. Customizing service settings
163
Domino documentation
Configuring mail file templates
Configure which mail file templates can be applied to user mail files and configure
a mail file template to use by default.
About this task
The service provides standard mail file templates to apply to user mail files.
Custom mail file templates that are designed for your company and approved by
an IBM Software Services for Collaboration representative might also be available
for use. Apply the mail file template after user provisioning.
Procedure
1. Log on to http://www.ibmcloud.com/social as a user with the Administrator
role.
2. If your account also has the User role, click Admin > Manage Organization.
3. In the System Settings section of the navigation pane, click IBM SmartCloud
Notes.
4. From SmartCloud Notes Administration, click Mail Templates.
5. Perform any of the following template management tasks.
Table 52. Mail template management tasks
Task
Steps
Additional information
Select a mail template
to apply to new user
accounts by default.
1. Click Custom Mail Templates
or Standard Mail Templates.
If you do not select a
default template, the most
recent English version of the
standard template is used as
the default.
2. Select a template.
3. Click Set as default
You can change the mail
template after you add a
new user, as necessary.
Download a template to 1. Click Custom Mail Templates
make design changes to
or Standard Mail Templates.
it.
2. Select a template.
3. Click Download.
Remove a custom
1. Click Custom Mail Templates.
template from the list of
2. Select a template.
available templates.
3. Click Delete Selected.
When the design changes
are complete, you must
submit the template to an
IBM Software Services for
Collaboration representative
for approval before it can be
applied to user mail files.
Remove a template if it is
no longer used. If you
remove a template that is
currently assigned to a user,
you should assign a new
one.
Be careful when removing a
template. If you change
your mind, you must
contract the services of IBM
Software Services for
Collaboration to add it back.
164
SmartCloud Notes: Administering SmartCloud Notes: Hybrid Environment March 2015
Related tasks:
“Changing user mail file templates” on page 246
You can change the mail file template assigned to a user. For example, change the
mail template if the IBM Notes client of a user is upgraded to a new version.
“Preparing to use custom mail file templates” on page 161
You can apply a custom mail file template to mail files of service users. The
template must meet design requirements that minimize the risk and impact to your
users and to the service. You submit the template for approval to an IBM Software
Services for Collaboration representative.
“Viewing assigned mail file templates” on page 247
You can view the mail file template that is assigned to a service user.
Using extension forms files to customize the look of the web client
You can use an extension forms file to customize the visual theme, fonts, the action
bar, and other aspects of the web client. For example, you can add graphics,
change colors, and add new menu items.
Before you begin
Read the topic “Extension forms file requirements” on page 167.
Note: IBM reserves the right to disable any extension forms file that causes a
degradation in the service.
About this task
Deploying an extension forms file in the service requires a brief service contract
with an IBM Software Services for Collaboration representative. The representative
validates extension forms files to ensure that they comply with requirements that
reduce risk to your users and to the service. Once approved, the IBM
representative uploads the extension forms file to the service for your use. You can
deploy more than one extension forms file and apply each to different users.
Extension forms files must be based on the IBM iNotes 9.0 Social Edition
forms9_x.ntf template that is downloaded from the service.
To deploy an extension forms file in the service, perform the following steps.
Procedure
1. Download the extension forms template or a currently deployed extension
forms file from the service:
a. Log in to the service as an administrator.
b. If your account has the user role, click Admin > Manage Organization.
c. In the System Settings section of the navigation pane, click IBM
SmartCloud Notes.
d. Click Extension Forms Files.
e. Perform one of the following steps:
v To use the default design as a starting point, click Extension Forms
Templates and download the template file.
v To download an extensions forms file that is already deployed, select the
file in the Extension Forms File page and click Download.
Chapter 5. Customizing service settings
165
2. If you download the extension forms template in the previous step, use the
template to create the extension forms file.
3. To transfer changes in an extension forms file currently used at your company
to the extension forms file used in the service:
v Assess and document the design changes in the on-premises extension forms
file.
v Note any design changes that are no longer needed and can be deleted.
v Determine whether the remaining design changes in the on-premises
extension forms file are supported in the service or need modification.
v Document the changes to the new extension forms file that are required.
4. Make the design changes to the extension forms file to be used in the service.
5. Test the design changes on an IBM Domino iNotes server in the on-premises
environment:
Note: You might want to install and set up a test server for this purpose.
a. In a Mail Settings document applied to a policy, click IBM iNotes and in
the Basics tab, add the name of the extension forms file to the Extension
Forms File Name field.
This step is needed only if the extension forms file name is not
Forms9_x.nsf, or if you want to use a policy to enable the forms file for
specific users.
b. Use the following server command to flush the server database cache:
dbcache flush
c. Copy the extension forms file to the iNotes directory under the server data
directory.
d. Use the following server command to stop and restart the HTTP task:
tell http restart
e. Start a web browser and clear the browser cache.
f. Test the changes from the browser.
6. Submit the extension forms file to an IBM Software Services for Collaboration
representative for validation.
The IBM representative validates the extension forms file and sends you a
summary report that indicates whether the extension forms file is approved.
After it is approved, the IBM representative uploads the extension forms file to
the service.
What to do next
Assign the extension forms file to users.
Related tasks:
“Assigning extension forms files to users” on page 248
After an IBM representative uploads an approved extension forms file to the
service, you can assign the forms file to users. Extension forms file enable you to
customize the visual theme, fonts, the action bar, and other aspects of the web
client.
“Preparing to use custom mail file templates” on page 161
You can apply a custom mail file template to mail files of service users. The
template must meet design requirements that minimize the risk and impact to your
users and to the service. You submit the template for approval to an IBM Software
Services for Collaboration representative.
166
SmartCloud Notes: Administering SmartCloud Notes: Hybrid Environment March 2015
Extension forms file requirements
Before you develop an extension forms file to customize the web client, be aware
of the requirements. You can use multiple extension forms files, each applied to
different sets of users.
v Extension forms files must be based on the IBM iNotes 9.0 Social Edition
forms9_x.ntf template that you download from the service.
v Extension forms files can reference only mail files within the IBM SmartCloud
Notes service. In particular, they cannot reference IBM Notes databases on
on-premises servers or images on web servers outside the service.
v Customization must be self-contained. Any resources, such as images, style
sheets and JavaScript, must be included in the Extension Forms File. References
to external sources are not allowed. Customization such as ActiveX controls or
Java classes where the source code cannot be inspected are also not allowed.
v Local encryption must be disabled on extension forms file databases:
1. From Notes, open the extension forms file database.
2. Click File > Application > Properties.
3. Click Encryption Settings. If the text Current encryption
strength :
None is shown in the dialog box, the database is not encrypted. If the
database is encrypted, complete the remaining steps.
4. Click Do not locally encrypt this database.
5. Close the extension forms file database.
6. Open the database. A progress bar is shown as the database is unencrypted.
7. Repeat steps 2 and 3 to verify that the database is unencrypted.
You can use an extension forms file to make the following types of changes to the
web client:
v Modify the visual theme in the following ways:
– Override CSS styles.
– Override gradient fill color specifications.
– Replace images. New images must be in the extension forms file.
v Add fonts to the rich text editor that is used when users create email messages,
calendar entries, and so forth.
v Add fields to documents such as mail messages and calendar entries.
v Add, remove, or modify items in the action bar menu.
v Use global settings to extend the session information, for example, override a
preference setting or read a profile note field.
v Add JavaScript code to the document save function to verify items when
documents are saved or sent.
You can customize the following subforms in an extension forms file:
Table 53. Subforms that can be customized
Subform
Purpose
Custom_Common_Utils
Adds functions that are called from
Custom_JS.
Custom_CSS
Adds new CSS styles.
Chapter 5. Customizing service settings
167
Table 53. Subforms that can be customized (continued)
Subform
Purpose
Custom_JS
Contains callback functions to use to add or
remove action bar items, add code when
pages are displayed or submitted. This
subform is used for forms that use an older
architecture. Most of the code uses the
newer forms, however a few older forms
remain.
Custom_JS_Edit
Adds fonts to the rich text editor.
Custom_Name_Lite
The code to display names in Korean
format.
Custom_Page_Dictionary
Adds new variable values for use with the
Custom_CSS subform.
Custom_WelcomePage
Adds choices for the Welcome Page.
Custom_Page_Dictionary
Adds variable values that are available for
use in the Custom_CSS subform.
Custom_xxx_Dictionary
These custom dictionary subforms are
included with each main area form, Mail,
Calendar, ToDo, and so forth, to allow easier
inclusion of new NotesFields and NotesVars.
Custom_LazyLoad_Subforms
Adds custom code to the lazy load table.
Custom_Logout
Adds custom code that runs on logout.
Custom_About
Displays the forms file version and a
user-specified file version number in the
client console log when the client starts.
Custom_SessionInfo
Add items to the iNotes session info object.
Preparing customized mail file ACLs
An important reason to customize mail file access is to allow administrators or
server-based agents to access mail files. Without customized mail file access, only
mail file owners and mail file delegates can access mail files.
About this task
To customize mail file access, modify the access control list (ACL) in a custom IBM
Notes mail file template. Then, apply the custom template to the new mail files
when you provision users for the service. Using a custom mail file template
requires a short service contract with IBM Software Services for Collaboration to
approve and upload the template to the service.
Note: If you transfer mail files to the service, you must modify the ACLs on the
individual mail files before you transfer the files. When you provision users whose
mail files are transferred, the ACL in a custom mail file template is ignored. For
additional ACL requirements specific to transferring mail files, see the topic about
preparing mail file ACLs before mail file transfer.
Important: It is important to customize mail file ACLs before users are
provisioned. After users are provisioned, you can no longer use the ACL to change
access to their mail files. At that point, the mail file ACL is changed only indirectly
in the following circumstances:
168
SmartCloud Notes: Administering SmartCloud Notes: Hybrid Environment March 2015
v A user is given access to a mail file through mail file delegation.
v A user's name changes, which causes the name to change in the mail file ACL.
(Renaming a group does not update a group name in the ACL.)
Note the following additional restrictions to ACLs of mail files in the service:
v You cannot use the following ACL group entries that are seen in traditional IBM
Domino environments: LocalDomainAdmins, LocalDomainServers, and
OtherDomainServers. If you add these entries, they are stripped from ACLs.
v To allow administrators to access mail files, add a group to the directory that
includes their names, and then add the group to mail file ACLs.
v Editor access is the highest level of access that is allowed for any ACL entry. If
you give a user or group Manager or Designer access, the access is lowered to
Editor. The user or group does not become a mail file delegate.
v The mail file owner always has Editor access and you cannot change this access.
You can give another user or group Editor access. In this case, they become mail
file delegates, by default. You can prevent people with Editor access from
becoming delegates. To do so, assign them the [ExcludeDelegate] role in the
ACL.
v You can use the following types of ACL entries: Person, Person group, Server
group, Mixed group, or Unspecified.
v Server type entries are not allowed. If you add them, they are stripped from
ACLs.
v You can allow an on-premises server-based agent to run on mail files. Doing so
requires that you add the server that runs the agent to a group in your directory,
then add the group to mail file ACLs as type Server group or Mixed group. For
additional requirements, see the wiki article on using server-based agents in a
SmartCloud Notes hybrid environment.
v You cannot customize the -Default- and Anonymous entries. These entries are
always set to No Access.
To use a custom mail file template to modify mail file ACLs, add entries that are
enclosed in brackets [ ] to the ACL of the custom mail file template. The ACLs of
the new mail files in the service inherit the entries in brackets. For example, to give
Editor access to the group SCN Administrators, add [SCN Administrators] to the
ACL, select Editor access and the type Person group or Mixed group . If you
apply the custom mail file template when you provision Samantha
Daryn/Renovations with a brand new mail file in the service, her mail file ACL
includes the following entries:
-Default- (No Access)
Anonymous (No Access)
Samantha Daryn/Renovations (Editor)
SCN Administrators (Editor)
SaaSLocalDomainServers1
Mail1/SCN/Renovations2
1
This group is reserved for use in the service. Do not create a group by this name
on-premises, or a group that begins with the characters SaaS.
2
This entry is the name of a user's home mail server in the service.
Related tasks:
“Preparing mail file ACLs before mail file transfer” on page 212
Before mail files are replicated to the staging server, prepare the mail file ACLs to
set mail file access.
Chapter 5. Customizing service settings
169
“Configuring mail file templates” on page 164
Configure which mail file templates can be applied to user mail files and configure
a mail file template to use by default.
“Preparing to use custom mail file templates” on page 161
You can apply a custom mail file template to mail files of service users. The
template must meet design requirements that minimize the risk and impact to your
users and to the service. You submit the template for approval to an IBM Software
Services for Collaboration representative.
Related information:
Using server-based agents in a SmartCloud Notes hybrid environment
SmartCloud Notes Template Validation Requirements
Enabling busytime details in calendars
You can enable IBM Notes users and web client users to see busytime details in
calendars.
About this task
If you enable this feature, when users schedule a meeting or use a group calendar,
they can click a block of busytime in someone's calendar to see details about the
calendar entry. Users can see calendar details only if users grant them this access
to their calendars. The following types of detailed information can be seen:
v Type of calendar entry, for example, meeting or appointment
v Optionally assigned calendar category
v Meeting chair
v Location
v Room
This feature is disabled, by default. When it is disabled, users can still see the
blocks of time when users are busy, they just cannot see details about those blocks
of time.
Complete the following steps to enable busytime details.
Procedure
1. Log on to the service as an administrator.
2. If your account also has the User role, click Admin > Manage Organization.
3. In the System Settings section of the navigation pane, click IBM SmartCloud
Notes.
4. Click Account Settings.
5. Click Email & Calendar Options.
6. In the Calendar Details section, select Enable calendar detail collection.
Results
When Notes client users and web client users schedule a meeting or use a group
calendar, they can click a block of busytime in a calendar to see details if they are
given the access to do so. Users control who can see their calendar information
and whether detailed calendar information is visible or only users' availability. To
control access to their calendars, web client users click Preferences > Delegation >
170
SmartCloud Notes: Administering SmartCloud Notes: Hybrid Environment March 2015
Schedule. Notes users click More > Preferences then Access and Delegation >
Access to Your Schedule.
Configuring instant messaging
Use the Instant Messaging settings in IBM SmartCloud Notes Administration to
specify whether to enable an instant messaging community in clients automatically.
Instant messaging enables users to chat with and see the availability of other users
in the service. You can automatically enable use of the service instant messaging
community. For web users, you can automatically enable an on-premises IBM
Sametime community managed by your company.
About this task
By default, web users automatically connect to the instant messaging community
in the service if the Enable instant messaging preference is selected on the client.
By default, IBM Notes 8.5.2 or later clients automatically connect to the instant
messaging community in the service if the clients are installed with the Sametime
(integrated) option. Users are also logged on to the community automatically.
You can change the default setting and allow web users to instead connect
automatically to an on-premises Sametime community at your company site. You
must use a Sametime Proxy Server 8.5.2 (IFR1 or later) and configure it to support
this capability. Notes clients can also connect to an on-premises community if you
configure the clients to connect to the community yourself.
Procedure
1. Log on to the service as an administrator.
2. If your account also has the User role, click Admin > Manage Organization.
3. In the System Settings section of the navigation pane, click IBM SmartCloud
Notes.
4. Click Account Settings
5. Click Instant Messaging.
6. In the Instant Messaging Integration window, select an option described in the
following table and then click Save.
If you switch from one option to another, the service pushes the change to the
clients immediately.
Chapter 5. Customizing service settings
171
Table 54. Instant messaging configuration options
Option
Result - web users
Enable the service instant
messaging community for
IBM Notes and SmartCloud
Notes web users
Web users are logged on to
the service instant messaging
community if they perform
the following steps from the
Inbox:
Result - Notes
Notes users who use Notes
8.5.2 or later installed with
the Sametime (integrated)
option are logged on to the
service instant messaging
1. Click More > Preferences community.
2. Under Instant
messaging, select Enable
instant messaging.
Multiple communities are
not supported.
The connection to the service
community overwrites any
pre-existing embedded
connection to an on-premises
Sametime community.
Notes 8.5.1 clients are not
affected by this option. To
enable them to access the
service instant messaging
community, manually
configure the clients to
connect to the community.
Enable an on-premises IBM
Web users can connect to an
Sametime community for
on-premises Sametime
SmartCloud Notes web users community managed by
your company after you
configure the on-premises
environment.
Disable instant messaging
integration
Notes users can use instant
messaging, but you must
configure the clients
manually to connect to
communities.
Web users cannot use instant Notes users can use instant
messaging.
messaging, but you must
configure the clients
manually to connect to
communities.
Configuring the web client to connect to an on-premises
Sametime community
Complete this procedure to configure IBM SmartCloud Notes web clients to
connect to an IBM Sametime community at your company site.
Before you begin
The following Sametime server components must be installed on-premises. For
instructions, see the Sametime documentation.
v Sametime Server 8.0.2, or Sametime Community Server 8.5 or later. For
installation instructions, see the Sametime documentation.
v Sametime Proxy Server 8.5.2IFR1. For installation instructions, see the Sametime
documentation.
v The Sametime Proxy Server requires the latest hot fix, which is available on IBM
Fix Central. The hot fix includes installation instructions. This link retrieves the
list of fixes for Sametime 8.5.2 IFR1 for all operating systems; find the latest fix
for the Sametime Proxy Server on the operating system you use.
Note: The Sametime System Console is not used in this deployment.
172
SmartCloud Notes: Administering SmartCloud Notes: Hybrid Environment March 2015
About this task
Allowing the web client to connect to the on-premises Sametime community
requires that users be able to access the Sametime Proxy Server from the same
location where they access SmartCloud Notes. If your organization chooses to
restrict access to the Sametime Proxy Server to users inside the corporate network,
then all users must connect to that corporate network in order to access Sametime
functionality in SmartCloud Notes.
If your organization wants to allow users to access Sametime functionality in
SmartCloud Notes from locations outside the corporate network, you must ensure
that requests to https://Server_name:Port_number/ are correctly forwarded to the
Sametime Proxy Server, regardless of where they originate. To support external
connections, the following requirements must be satisfied:
v Server_name must be listed in the public DNS (domain name server).
v The firewall must allow connections to Server_name on Port_number.
v You must create network routes that allow connections to reach the Sametime
Proxy Server.
Procedure
1. Configure the on-premises Sametime Proxy Server to allow connections from
the SmartCloud Notes domain by completing the following steps:
a. On the computer where the Sametime Proxy Server is installed, open the
stproxyconfig.xml file that is stored in the deployment manager's profile:
The deployment manager's stproxyconfig.xml file is typically located in the
following directory:
WebSphere_AppServer_install_root/profiles/Deployment_Manager_Profile_Name/
config/cells/Cell_Name/nodes/Node_Name/servers/STProxyServer/
For example, on IBM AIX® or Linux:
/opt/IBM/WebSphere/AppServer/profiles/dmgr/config/cells/STProxyCell1/nodes/
STProxyNode1/servers/STProxyServer
On Microsoft Windows:
C:\Program Files\IBM\WebSphere\AppServer\profiles\dmgr\config\cells\
STProxyCell1\nodes\STProxyNode1\servers\STProxyServer
b. In the stproxyconfig.xml file, look for the closing </server> tag and add
the following statement immediately after it:
<domainList>Your_organization_domain_name,SmartCloud_Notes_domain_name
</domainList>
Specify your own organization's domain name for
Your_organization_domain_name. To determine the SmartCloud Notes domain
your company uses, open the Inbox and look at the domain name that is
shown in the browser URL. For example, in the following browser URL, the
SmartCloud Notes domain is notes.na.collabserv.com:
https://mail.notes.na.collabserv.com/livemail/iNotes/Mail/?OpenDocument
Note: The server, mail, is not part of the domain name.
Specify one of the following values for the SmartCloud_Notes_domain_name:
v If you use the North America data center: notes.na.collabserv.com
v If you use the Asia Pacific data center: notes.ap.collabserv.com
For example, if the Renovations company uses the North America data
center, the statement looks like the following line:
<domainlist>renovations.com,notes.na.collabserv.com</domainlist>
Chapter 5. Customizing service settings
173
c. Copy the new statement so you can use it again, and then save and close
the file.
d. On the same computer, open the copy of the stproxyconfig.xml file that is
stored in the Sametime Proxy Server's profile:
The Sametime Proxy Server node's copy of stproxyconfig.xml file is
typically located in the following directory:
WebSphere_AppServer_install_root/profiles/Sametime_Proxy_Profile_Name/
config/cells/Cell_Name/nodes/Node_Name/servers/STProxyServer/
For example, on IBM AIX or Linux:
/opt/IBM/WebSphere/AppServer/profiles/STPAppProfile/config/cells/
STProxyCell1/nodes/STProxyNode1/servers/STProxyServer
On Microsoft Windows:
C:\Program Files\IBM\WebSphere\AppServer\profiles\STPAppProfile\config\
cells\STProxyCell1\nodes\STProxyNode1\servers\STProxyServer
The Sametime Proxy Server's path looks very similar to the deployment
manager's path, but references the Sametime_Proxy_Profile_Name instead of
the Deployment_Manager_Profile_Name.
e. Add the same new statement to the Sametime Proxy Server's copy of the
stproxyconfig.xml file (after the closing </server> tag as before), and then
save and close the file.
f. Restart the Sametime Proxy Server.
2. If web clients do not have VPN access to the Sametime Proxy Server, provide
external access to the server.
3. If your Sametime server restricts access to certain types of clients, allow access
to web clients by adding the following value to the VPS_ALLOWED_LOGIN_TYPES
setting in the [Config] section of the sametime.ini file:
14A4
For more information, see Technote 1114318.
4. Complete the following steps to enable the service to connect to the
on-premises community:
a. Log on to the service as an administrator.
b. Click Administration > Manage Organization.
c. In the System Settings section of the navigation pane, click IBM
SmartCloud Notes.
d. Click Account Settings.
e. Click Instant Messaging.
f. Click Enable an on-premises IBM Sametime community for SmartCloud
Notes web users.
g. Provide the Sametime Proxy Server URL, for example, https://
stproxy01.renovations.com.
5. Instruct Internet Explorer users to modify the browser trusted sites list as
follows:
a. Click Tools > Internet Options
b. Click Security.
c. In the Select a Zone to view or change security settings section, click
Trusted sites and then click Sites.
d.
Add the following sites to the Websites box:
*.lotuslive.com
*.collabserv.com
174
SmartCloud Notes: Administering SmartCloud Notes: Hybrid Environment March 2015
In addition, add the Sametime Proxy Server URL, for example:
https://stproxy01.renovations.com.
6. Instruct users to complete the following steps from their SmartCloud Notes
web Inbox:
a. Click More > Preferences
b. Click Instant messaging > Enable instant messaging.
Related information:
Sametime documentation
Manually configuring Notes clients to connect to the service
instant messaging community
If you performed the procedure “Configuring instant messaging” and selected the
option Enable an on-premises IBM Sametime community for SmartCloud Notes
web users or the option Disable instant messaging integration, IBM Notes clients
are not configured automatically to connect to the instant messaging community in
the service. This topic describes how to configure Notes clients to connect to the
service instant messaging community yourself if you selected either of these
options.
Before you begin
Notes must be installed with the Sametime (integrated) option selected.
About this task
Perform this procedure for any of the following reasons.
v You want to allow Notes 8.5.1 clients to connect to the service instant messaging
community.
v You want to allow Notes clients to connect to an on-premises Sametime
community and to the service instant messaging community. You will configure
the service instant messaging community as a secondary community.
Note: To provide dual-community enablement, the on-premises IBM Sametime
server must be configured to support IBM Sametime Standard clients. You must
purchase the Sametime Standard license separately, as the SmartCloud Notes
entitlement supports IBM Sametime Entry only.
v You want to allow some, but not all, Notes 8.5.2 or later clients to connect to the
service community as the primary community. If you want all Notes 8.5.2 or
later clients to connect to the service instant messaging community as the
primary community, instead perform the procedure “Configuring instant
messaging” and select the option Enable the service instant messaging
community for IBM Notes and SmartCloud Notes web users.
Perform the following steps to configure a Notes client to connect to the service
instant messaging community.
Procedure
1.
2.
3.
4.
Start Notes.
Click File > Preferences.
Click Sametime.
Click Server Communities.
Chapter 5. Customizing service settings
175
5. Perform the following steps to add the service instant messaging community to
the sidebar:
a. Click Add New Server Community.
b. Complete the fields in the Add Sametime Server Community window as
described in the following table, and then click OK.
Tab
Field
Field value
Not applicable
Server community type
Sametime
Not applicable
Server community name
Provide a name that identifies
the new community.
Log in
User name
Service login name, for
example,
[email protected]
Log in
Password
SmartCloud Notes web logon
password
Do not specify the Notes client
login password.
Log in
Use token based single
sign on
Do not select
Server
Host server
im.na.collabserv.com (if your
company uses the North
American data center)
im.ap.collabserv.com (if your
company uses the Asia Pacific
data center)
im.ce.collabserv.com (if your
company uses the European
data center)
Server
Server community port
1533
Server
Send keep alive signal
60 (default)
after the following number
of seconds
Connection
Connection
Direct connection (default)
Options
Use this server for
awareness status lookup
Select (default)
Options
Use canonical names for
status lookup
Do not select (default)
6. If the client also connects to an on-premises community, make sure the service
community is not the default community.
7. Click OK to save your changes.
Instant messaging features
The table in this topic summarizes the instant messaging features that are available
through the service instant messaging community.
Note: If IBM Notes clients connect to an on-premises IBM Sametime community
and to the service community, the version of Sametime that is used on-premises
determines the features that are available for both communities.
176
SmartCloud Notes: Administering SmartCloud Notes: Hybrid Environment March 2015
Table 55. Features supported by the service instant messaging community
Feature
Available
Online presence status;
availability status icons;
custom status message
X
Not available
The web client shows online
presence status for names in
the sidebar but not for
names in documents or
views. This limitation does
not apply if an on-premises
Sametime community is
used.
Automated geographic
awareness
X
Telephony status
X
Set alerts when users are
available; privacy lists,
selective do not disturb
X
Business card display
X
The name and email address
are displayed but not other
information, such as title and
telephone number.
In a hybrid environment, the
name and email address are
taken from the service user
account rather than from the
customer Domino directory.
Primary, frequent, and recent X
contact list views
There is a 500-contact limit.
Public groups are not
supported.
The web client supports only
the primary contact list.
Initiate chats with users not
in your contact list
X
Security-rich one-on-one text X
chat and multi-way text chat.
Rich text formatting; spell
check; emoticons and
emoticon palettes
X
Time and date stamps; chat
history
X
Log in to multiple
communities
X
The web client does not
support chat history.
Supported by Notes clients
only.
Chapter 5. Customizing service settings
177
Table 55. Features supported by the service instant messaging community (continued)
Feature
Available
Screen capture tool; file
transfers
X
Not available
Supported by Notes clients
only.
Note: To provide
dual-community enablement,
the on-premises IBM
Sametime server must be
configured to support IBM
Sametime Standard clients.
You must purchase the
Sametime Standard license
separately, as the
SmartCloud Notes
entitlement supports IBM
Sametime Entry only.
Instant screen share
X
Zero-download browser chat X
client
Supported by web clients
only.
Online meetings
X
Voice and video
X
Community collaboration
features, such as instant
polls, broadcast chats, and
persistent group chat
X
Mobile use
X
Telephony integration
X
Configuring IMAP access
You can allow users to access IBM SmartCloud Notes from third-party email
clients using IMAP. IMAP access is disabled by default, but you can enable it for
all users or only for specific users.
Before you begin
To allow IMAP access on a per user basis, you add the text item
SaaSAllowIMAP=value to the user's Person document in the Domino Directory on a
server that you synchronize with the service. There are a number of ways you can
do this. For example, you can add a field to the Person document, or you can add
an item element to a note.
If you are unfamiliar with the methods used to add a text item to a form in the
Domino Directory, see the information about customizing the Domino Directory
template in the Reference section of the Domino 8.5.3 documentation.
Note: Users who have Author rights to their Person document can enable IMAP
for themselves by setting the field SaaSAllowIMAP to 2. To prevent this, on the
Advanced tab of the Field Properties dialog for the SaaSAllowIMAP field, set the
Security Options to Must have at least Editor access to use.
178
SmartCloud Notes: Administering SmartCloud Notes: Hybrid Environment March 2015
About this task
After you enable IMAP access, service users can configure their mail clients for
IMAP access using information provided by the service. The following IMAP
clients are supported:
v Apple email
v Microsoft Outlook 2003, 2007
v Thunderbird
Procedure
1. Log on to the service as an administrator.
2. If your account also has the User role, click Admin > Manage Organization.
3. In the System Settings section of the navigation pane, click IBM SmartCloud
Notes.
4. Click Account Settings and then click IMAP Email Access.
5. Select one of the following, and then click Save:
v Enable IMAP for all users. If you select this option, you do not need to
complete any further steps.
v Enable IMAP for specific users only. If you select this option, you have
enabled IMAP access for your organization. Continue to the next step to
customize your on-premises Domino Directory so that you can specify IMAP
access for individual users.
v Disable IMAP for all users. If you select this option, no users have IMAP
access and you do not need to complete any further steps.
6. From the Domino Administrator client, open the Domino Directory, on an
on-premises Domino server whose directory you synchronize with the service.
7. For each user you want to specify IMAP access, add a TYPE_TEXT item named
SaaSAllowIMAP to their Person document with either of the following values:
v "2" -- to allow IMAP access. If you later change access from specific users to
all users, no additional steps are needed to allow these users to continue to
have access.
v "3" -- to deny IMAP access. A user who is denied access using this value will
be denied access under all circumstances. If you later change access from
specific users to all users, this user will continue to have no access.
An example of an agent that assigns the value "2" is FIELD SaaSAllowIMAP :=
"2"
Note: If you have enabled IMAP access for all users, any value other than "2"
or "3" defaults to allowing access.
Results
If you enabled IMAP for all users, then service users can set up their IMAP clients
for IMAP access to SmartCloud Notes mail.
If you added the text item to the Domino Directory, during directory
synchronization, the servers in the service are updated with the new information.
Users cannot enable IMAP access and set up their IMAP mail clients until the
synchronization is complete.
Related reference:
Chapter 5. Customizing service settings
179
“IMAP client limitations”
There are a few limitations when using an IMAP client to access IBM SmartCloud
Notes.
Related information:
Domino documentation
Setting up IMAP clients
IMAP client limitations
There are a few limitations when using an IMAP client to access IBM SmartCloud
Notes.
Folder limitations
The following restrictions apply to folders used with IMAP:
v A single folder name cannot exceed 64 bytes.
v An unlimited number of nested folders is allowed, but the combined length of
all nested folder names (including delimiters) cannot exceed 129 bytes.
View limitations
The service provides IMAP clients access to folders in user mail files but not to
views. The Drafts, Sent, and Trash views in mail files therefore are not available
through IMAP clients. To work around this limitation, IMAP client users can create
folders that correspond to these views and put messages in the folders instead.
IBM Notes or web client users must open these folders to see the messages in
them.
Return receipt
The service does not support the use of return receipts with IMAP clients. If you
request a return receipt and the recipient opens the message using the IBM Notes
or web client, no return receipt is generated.
Logging activity in journal files
You can log different types of activity in journal files that you then download from
the service.
Before you begin
Before you complete this procedure, you must request integration server
enablement from an IBM Connections Cloud customer services representative
(CSR). When you do so, you provide an account identity to use to connect to the
FTP site to download the journal files. You are notified when your enablement
request is complete. For more information, see Requesting integration server
enablement in the Connections Cloud integration server documentation.
About this task
The following types of journal files are available for Notes:
v Notes mail delivery, which records each email message that service users send.
180
SmartCloud Notes: Administering SmartCloud Notes: Hybrid Environment March 2015
v Notes client session, which records each attempt to log in to the service from a
Notes client to access an application such as mail or the company directory.
The journal service produces gzip-compressed journal files about every 24 hours.
You use an FTP client to download the journal files from the IBM Connections
Cloud integration site. Files are removed from the integration site after seven days.
Journal files are available for other Connections Cloud services, as well. For more
information, see the Connections Cloud journaling documentation.
After you are notified that your request for integration server enablement is
complete, complete the following steps to enable journaling through SmartCloud
Notes Administration.
Procedure
1. Log on to the service as an administrator.
2. In the System Settings section of the navigation pane, click IBM SmartCloud
Notes.
3. Click Account Settings.
4. Click Journaling Options.
5. Select any of the following options to specify the type of journal files to
generate:
v Notes mail delivery
v Notes client sessions
6. Click Save.
What to do next
You can begin downloading journal files in about 24 hours.
Related information:
Connections Cloud journaling documentation
Downloading journal files
You can begin to download journal files about 24 hours after you enable
journaling.
Before you begin
Request integration server enablement, then enable journaling options in
SmartCloud Notes administration. For more information, see “Logging activity in
journal files” on page 180.
Make sure that your corporate firewall allows outbound connections to the
following hosts over FTP port 990 and FTP PASV port range 60000 - 61000:
v North America data center: ftp.na.collabserv.com
v Asia Pacific data center: ftp.ap.collabserv.com
v European data center: ftp.ce.collabserv.com
Chapter 5. Customizing service settings
181
Procedure
1. From an FTP client, specify the following connections settings:
Setting
Value
Host
If you use the United States data center:
ftp.na.collabserv.com
If you use the Asia Pacific data center:
ftp.ap.collabserv.com
If you use the European data center:
ftp.ce.collabserv.com
Protocol
FTP
Port
990
Encryption
Implicit FTP over TLS
User and password
Account name and password that is used to
connect to the FTP site.
2. Connect to the FTP host.
3. Change to the journal directory.
4. Select and download the following files:
v If you enabled Notes mail journaling, download files named
<date>.NOTESMAIL.txt.gz
v If you enabled Notes client session journaling, download files
named<date>.NOTES_NRPC_SESSION.txt.gz.
<date> is the file creation date.
Related tasks:
“Configuring the firewall for outbound connections” on page 42
Configure the firewall to allow outbound connections to the service.
Related information:
Integration server documentation
Format of the Notes mail journal file
A Notes mail journal file records each message that users send.
File name
The name of the compressed file that you download is <date>.NOTESMAIL.txt.gz,
where <date> is the file creation date , in YYYY-MM-DD format. For example:
2012-12-23.NOTESMAIL.txt.gz.
Syntax
Each record in a Notes mail journal file conforms to the following syntax:
date user name (id=customerId, customerId=customerId) performed ACTION
[on object (type=TYPE, id=OBJECTID, name=name, customerId=customerId)]
[targeted at (type=TYPE, id=TARGETID, name=name, customerId=customerId)]
with outcome OUTCOME [REASON][(EXTRA)]
Each record in a journal file is contained in a single line.
Parameters
date
182
SmartCloud Notes: Administering SmartCloud Notes: Hybrid Environment March 2015
A date and time, for example, 2012-12-18T13:23:47+0000. One of the
following values is logged:
v The date and time that a user sends a message to another user at the
company
v The date and time that a message failed to be delivered to a user at the
company
v The date and time that a user sends a message to an external user at
another company
name
The user’s Notes name, if an internal user sends the message, for example,
CN=Samantha Daryn/O=Renovations. An Internet email address, if an
external user sends the message.
customerId
The unique number that identifies the company subscription in the service.
ACTION
SENT_MAIL
TYPE
The type of object or target. The object type is always MAIL_MESSAGE. The
target type is always RECIPIENT.
OBJECTID
The unique identifier of the mail message that is sent.
name
The name of the OBJECTID or the TARGETID. The name for the
OBJECTID is always MAIL. The name for the TARGETID is the email
address of the recipient.
TARGETID
The unique identifier for the recipient. This value is always null because
the email address specified in the name parameter uniquely identifies the
recipient.
OUTCOME
The result of the action, either SUCCESS or FAILURE. If the outcome of an
event is FAILURE, the reason is given. The reason is in uppercase and can
be multiple words separated by underscores. For example: FAILURE
“USER_NOT_FOUND”.
EXTRA
Contains the size of the message in kilobytes.
Examples
Note: The following example records are shown on multiple lines. In the journal
file, each record is a single line.
1. Samantha Daryn sends a message to another internal user at the company, Allie
Singh. Allie receives the message.
2012-12-30T19:03:01+0000 user CN=Samantha Daryn/O=Renovations
(id=20076547, customerId=20076547) performed SENT_MAIL
on object (type=MAIL_MESSAGE, id=<OFF0EBF61D.5CAAD94F-ON85257A
Chapter 5. Customizing service settings
183
78.005C2BF7-85257A78.005C3063@LocalDomain>, name=“MAIL”,
customerId=20076547) targeted at (type=RECIPIENT, id=,
name=“CN=allie singh/[email protected]”, customerId=20076547)
with outcome SUCCESS (size=“1”)
2. Samantha Daryn sends a message to another internal user at the company, Allie
Singh. Allie’s name is not found in the directory and the message is not
delivered.
2012-12-28T15:02:01+0000 user CN=Samantha Daryn/O=Renovations
(id=20076547, customerId=20076547) performed SENT_MAIL
on object (type=MAIL_MESSAGE,
id=<OF0645EB2C.8B339FE8-ON00257A9B.0054F723-00257A9B.0054F726@LocalDomain>,
name=“MAIL”, customerId=20076547) targeted at (type=RECIPIENT, id=,
name=“CN=allie singh/[email protected]”, customerId=20076547)
with outcome “FAILURE RECIPIENT NOT FOUND IN COMPANY DIRECTORY” (size=“2”)
3. Samantha Daryn sends a message over the Internet to an external user,
[email protected].
2012-12-28T15:02:01+0000 user CN=Samantha Daryn/O=Renovations
(id=20076547, customerId=20076547) performed SENT_MAIL
on object (type=MAIL_MESSAGE, id=<OF8E758E11.39C4D326-ON00257A9B.
00550042-00257A9B.00550046@LocalDomain>, name=“MAIL”,
customerId=20076547) targeted at (type=RECIPIENT, id=,
name=“[email protected]”, customerId=20076547)
with outcome SUCCESS (size=“1”)
Format of the Notes client session journal file
A Notes client session journal file records information about each IBM Notes client
login session within the service.
File name
The name of the compressed file that you download is
<date>.NOTES_NRPC_SESSION.txt.gz, where <date> is the file creation date, in
YYYY-MM-DD format. For example: 2012-12-23.NOTES_NRPC_SESSION.txt.gz.
Syntax
Each record in a Notes client session journal file conforms to the following syntax:
date user name (id=customerId, customerId=customerId) performed ACTION
[on object (type=TYPE, id=OBJECTID, name=name, customerId=customerId)]
[targeted at (type=TYPE, id=TARGETID, name=name, customerId=customerId)]
with outcome OUTCOME [REASON][(EXTRA)]
Each record in a journal file is contained in a single line.
Parameters
date
The date and time a Notes client user logs in to the service or attempts to
log in, for example, 2012-12-18T13:23:47+0000.
name
The user’s Notes name, for example, CN=Samantha Daryn/O=Renovations
customerId
The unique number that identifies the company subscription in the service.
ACTION
NRPC_SESSION
184
SmartCloud Notes: Administering SmartCloud Notes: Hybrid Environment March 2015
TYPE
The type of object or target. The object type is always NRPC_SESSION. The
target type is always USER.
OBJECTID
A unique session ID
name
The name of the OBJECTID or the TARGETID. The name for the
OBJECTID is always NRPC_SESSION. The name for the TARGETID is the
user’s Notes name, for example, CN=Samantha Daryn/O=Renovations.
TARGETID
The unique identifier for the user. This value is always null because the
name parameter uniquely identifies the user.
OUTCOME
The result of the action, which is always SUCCESS.
EXTRA
The following information is provided:
v Number of databases accessed
v Number of documents that are read and written
v Time to connect to the service, in seconds
v The client versions being used
Examples
Note: The following example records are shown on multiple lines. In the journal
file, each record is a single line.
1. Samantha Daryn logs in to the mail server in the service successfully from
Notes.
2013-04-09T14:35:12+0000 user CN=Samantha Daryn/O=Renovations(id=20076547,
customerId=20076547) performed NRPC_SESSION on object (type=NRPC_SESSION,
id=02E31600, name=“NRPC_SESSION”, customerId=20076547) targeted at (type=USER,
id=, name=“CN=Samantha Daryn/O=Renovations”, customerId=20076547) with outcome
SUCCESS (DBs accessed=“1”, docs read=“0”, docs written=“0”, connect time=“302”,
client version=“90010”,)
Chapter 5. Customizing service settings
185
186
SmartCloud Notes: Administering SmartCloud Notes: Hybrid Environment March 2015
Chapter 6. Onboarding users
Onboarding refers to all the steps that are done to get users up and running with
mail files and mail servers in the cloud.
Before you begin
Before you onboard users, configure the service and, optionally, customize service
settings.
Choosing a client deployment strategy
Choose a strategy for deploying clients in the service.
Before you begin
Complete the following tasks: “Deciding whether to use the Notes client” on page
188 and “Deciding whether to transfer mail files” on page 189.
About this task
The following table describes common client deployment strategies.
Table 56. Common strategies for deploying clients
Strategy
Additional information
New mail files
v This option is the quickest and least
expensive.
SmartCloud Notes web and mobile clients
only
v All users can quickly use the web client
and mobile clients to access their mail.
v Users who decide that they want to use
the IBM Notes client can do so when it is
convenient, and can continue to use cloud
mail in the meantime.
New mail files
Notes, SmartCloud Notes web, and mobile
clients
v This option causes the least disruption for
users and is typically less time consuming
than transferring mail files.
v This option might be a good one to
choose if current Notes clients meet the
service requirements and do not need to
be upgraded.
v Notes client users can export contacts
from current mail files and import them
into new mail files.
v Notes client users can access on-premises
archives of their original mail files.
v The use of managed mail replicas can
boost performance for Notes client users.
© Copyright IBM Corp. 2011
187
Table 56. Common strategies for deploying clients (continued)
Strategy
Additional information
Transferred mail files and Notes clients for
some users
v This option allows some critical users
such as executives and managers to
continue to use the Notes client and to
continue to work with current and past
mail file content.
New mail files and SmartCloud Notes web
and mobile clients for other users
v This option can be more time consuming
to deploy, depending on the quantity and
size of the mail files that are transferred.
v Your company sets up a IBM Domino
staging server and uses IT resources to
prepare mail files.
Transferred mail files for all users
A mixture of Notes, SmartCloud Notes web,
and mobile clients
v This option is the most expensive and
time consuming but can be the least
disruptive for users, especially if Notes
client upgrades are not required.
Deciding whether to use the Notes client
IBM SmartCloud Notes web is the mail client that is available automatically to all
IBM SmartCloud Notes users through a browser. Before you prepare to onboard
users, decide whether you want them to use the optional IBM Notes client in
addition to or instead of SmartCloud Notes web.
About this task
For the following reasons, many companies decide to use SmartCloud Notes web
and not the Notes client:
v Users get access to new features automatically as they are available in the
service.
v IT departments save money by avoiding the need to upgrade and maintain
Notes clients.
v SmartCloud Notes web is easy to use and the interface is similar to that of
recent versions of IBM iNotes and Notes. There might be little or no training
needed.
v Most Notes clients features are available in SmartCloud Notes web.
A recommended approach is to start all users in the service with SmartCloud
Notes web. After users become familiar with it, you have a better sense of which
users, if any, still need the Notes client. The following table describes some reasons
to use the Notes client, as well as alternative options.
Table 57. Reasons you might use the Notes client
188
Reason
Considerations and alternatives
Users need access to IBM Domino
applications on-premises.
The Notes Browser Plug-in is an alternative
option to the Notes client. This plug-in
provides access to on-premises Notes
applications through a browser.
SmartCloud Notes: Administering SmartCloud Notes: Hybrid Environment March 2015
Table 57. Reasons you might use the Notes client (continued)
Reason
Considerations and alternatives
Users need access to mail when
disconnected from the network.
Currently, only the Notes client supports
local, disconnected access to mail. Local mail
file access is provided through managed
mail replicas (in hybrid environments) or
standard local mail file replicas (in
service-only environments).
Before you choose the Notes client for this
reason, consider that with the increased use
of mobile devices, some users might no
longer require offline access through
notebooks or desktops.
Internet connections are slow.
In hybrid environments, users with slow
Internet connections, for example, users with
limited bandwidth connections, see better
performance if they use managed mail
replicas on Notes clients. In service-only
environments, these users benefit from using
standard local mail file replicas on Notes
clients.
Users are starting with new mail files in the Currently, accessing mail that is archived
service and want access to old mail archived on-premises requires a Notes client.
on-premises.
Users want features that are available only
with the Notes client.
For a feature comparison, see the technote
“Comparison tables of features between IBM
Notes, IBM iNotes, and IBM SmartCloud
Notes web”.
In hybrid environments, users want to
manage (be delegates for) the mail files of
on-premises users.
Managing on-premises mail files of users
who are not provisioned for the service
requires the Notes client.
Related tasks:
“Using Desktop Settings to configure managed mail replicas” on page 120
In a hybrid environment, use Desktop Policy settings to enable managed mail
replicas. Managed mail replicas helps ensure that IBM Notes users in the service
have quick, local access to their mail when connected or disconnected from the
network.
Related information:
Technote: Comparison tables of features between IBM Notes, IBM iNotes &
IBM SmartCloud Notes web
Notes Browser Plug-in
IBM SmartCloud Notes client requirements
Deciding whether to transfer mail files
An important aspect of planning to move to the service is deciding whether to
start with new IBM Notes mail files or to transfer current mail files.
Chapter 6. Onboarding users
189
About this task
You can combine approaches. For example, you might create new mail files for a
majority of users and transfer the mail files of remaining users.
There are a several advantages to starting users with brand new mail files in the
service:
v Users can begin to use the service quickly because the steps to prepare and
transfer mail files are unnecessary.
v No company IT resources are required to prepare mail files for transfer.
v If you have users who infrequently use past mail and calendar entries, or if your
company mail retention policy is to retain mail for only a short period, a new
mail file might not be an inconvenience.
v Notes client users can export contacts and selected calendar entries from their
original mail files to a Calendar (.ics) file, and then import the entries into their
new mail files after they are provisioned.
In some cases, it might be important to transfer mail files. For example, you might
want to transfer the mail files of users such as company executives or managers
who work heavily with past and current mail messages and calendar events.
You can pay for the services of a professional transfer manager to work with your
company to transfer mail files. The transfer manager can be an IBM Software
Services for Collaboration representative or an IBM Certified Business Partner. The
transfer manager performs tasks such as helping you to prepare mail files and to
develop a transfer schedule. The transfer manager also sets up an on-premises IBM
Domino server that is provided by your company to use as a staging server for the
transfer.
When you transfer mail files, you can choose whether to transfer full mail files or
to selectively transfer just some of the content. Selective transfer is helpful for
expediting the transfer of large mail files and also for preventing large mail files
from exceeding the mail file quota in the service.
When you use selective transfer, you specify which of the following types of
content to transfer:
v Contacts (Requires Preferences > Contacts > Enable Synchronize Contacts on
the Replication and Sync tab to be selected in the mail file before the transfer.)
v Mail rules
v Group calendars
v Draft documents
v Calendar events, optionally including events up to 365 days in the past
v Messages, optionally including messages sent and received up to 365 days in the
past.
v To Do's, optionally including To Do's with due dates up to 365 days in the past
The following content is always transferred:
v Preferences settings
v Embedded Notes IDs
v Folders, which can be empty after the transfer if content is older than the
transfer criteria
190
SmartCloud Notes: Administering SmartCloud Notes: Hybrid Environment March 2015
You decide whether and how to preserve data that is not transferred. For example,
you might retain the original on-premises mail files. The original files and
transferred files have different replica IDs and do not replicate.
Related tasks:
“Preparing for mail file transfer” on page 209
If you configure the service as a hybrid environment, as part of onboarding, you
have the option to transfer users’ on-premises mail files to the service. Before you
transfer mail files, complete the tasks to prepare.
Preparing for onboarding
To prepare for onboarding, complete these tasks to prepare users, clients, and mail
files.
Before you begin
Before you prepare for onboarding, complete the following tasks:
v Chapter 4, “Configuring the service,” on page 83
v “Choosing a client deployment strategy” on page 187
About this task
Table 58. Tasks to prepare for onboarding
Why the task is
important
Additional
information
Create a detailed
provisioning
schedule and require
your project team to
sign off on it.
This step ensures that
provisioning happens
in planned stages
that take into account
factors such as pilot
users, work
schedules,
geographic locations,
and clients used.
Delegates of mail
files must
provisioned to
manage mail files of
provisioned users.
For more information
see “Mail file
delegation” on page
208.
Prepare
communications and
training.
This step allows for a “Preparing
smooth transition to communications and
training” on page 206
the service and
reduces help desk
calls.
Task
Complete?
Develop a method to This step helps you
track provisioning.
understand at what
stage users are at in
the transition to the
cloud and is also
useful for providing
status reports to
executive
management.
Request removal of
trial accounts.
Provisioning can fail
for users who have
trial accounts.
Contact Support to
determine whether
users at your
company have trial
accounts.
Chapter 6. Onboarding users
191
Table 58. Tasks to prepare for onboarding (continued)
Task
192
Why the task is
important
Additional
information
In hybrid
environments, if
users will not use the
IBM Notes client
with the service,
verify that the users
have Notes ID files to
which they or
administrators have
local access.
Though not
v “Limitations when
required,Notes ID
Notes IDs are not
files enable users to
in the vault” on
sign email, read
page 131
encrypted email, and
v Importing your
to recall mail
Notes ID
messages. ID files are
typically required to v “Uploading a
Notes ID to the
enable administrators
vault” on page 269
to change users'
Notes names.
Customize mail file
access.
This step is required “Preparing
if you want to allow customized mail file
ACLs” on page 168
people who are not
the owners of mail
files to access mail
files without being
delegates. Typically
this access is
provided by adding a
customer-specific
administrator group
to mail file ACLs.
Familiarize yourself
with password
requirements for
logging in to the
service
The password
requirements might
be different from
ones that are
currently used in
your on-premises
environment.
“Password rules by
authentication
method” on page 141
In hybrid
environments only,
verify that users’
Person documents
comply with service
requirements.
This step helps to
ensure a smooth
transition to the
service.
See the section about
Person documents in
the topic
“Requirements for
synchronized
directories” on page
22.
(Optional) In hybrid
environments only,
configure multiple
Internet addresses for
users
This step applies
only if users have
more than one
Internet email
address, for example,
if users have two
email addresses as a
result of a company
merger.
“Adding multiple
Internet email
addresses to Person
documents” on page
207
(Optional) Ensure
that a custom mail
template is uploaded
to the service, if you
plan to use one.
You can apply the
custom template
during user
provisioning so that
users see the custom
design when they
first use the service.
See “Preparing to use
custom mail file
templates” on page
161.
SmartCloud Notes: Administering SmartCloud Notes: Hybrid Environment March 2015
Complete?
Table 58. Tasks to prepare for onboarding (continued)
Why the task is
important
Additional
information
(Optional) Set up
batch user
provisioning with the
integration server.
This step allows you
to use
comma-separatedvalue (CSV) files to
provision batches of
users.
See the section on
user provisioning
and identity
management in the
Integration server
documentation.
Prepare for specific
clients.
There are special
v “Preparing for the
considerations for
web client”
each type of client
v “Preparing for
that can be used with
Notes Traveler
the service.
devices” on page
195
Task
Complete?
v “Preparing for
Notes clients” on
page 196
v “Preparing for
IMAP clients” on
page 202
Preparing for the web client
Before you provision users who will access IBM SmartCloud Notes using the web
client, prepare for the web client.
Before you begin
Read about the web client.
About this task
Table 59. Tasks to prepare for the web client
Task
Why the task is
important
Additional
information
Complete?
Prepare for
onboarding.
There are tasks to
“Preparing for
prepare that apply to onboarding” on page
all or most clients.
191
Review the
supported browsers
and browser
versions, decide
which to use, and
upgrade browsers if
necessary.
Using a supported
browser version
ensures the best
experience for your
users.
SmartCloud Notes
web requirements
Chapter 6. Onboarding users
193
Table 59. Tasks to prepare for the web client (continued)
Why the task is
important
Additional
information
If users currently use
IBM iNotes, compare
the features that are
supported for
SmartCloud Notes
web.
Most IBM iNotes
features are
supported in the
cloud. Making your
users aware of the
few differences can
reduces help desk
calls and improve
user satisfaction.
Technote:
Comparison tables of
features between
IBM Notes, IBM
iNotes & IBM
SmartCloud Notes
web
Assess network
capacity.
“Network capacity
This step ensures
that your site has the for the web client”
network capacity to
on page 20
support the number
of web client users
you plan to have
If the Notes client is
used with shared
login enabled, but
the client won't be
used in the cloud,
disable the shared
login feature before
you provision users.
This step enables
administrators or
web client users to
upload Notes ID files
to the vault in the
service manually
after provisioning.
An ID enabled for
shared login cannot
be uploaded to the
service ID vault
manually by a web
client user or an
administrator. It can
only be uploaded
automatically
through the use of a
Notes client. For
more information on
shared login, see the
Securing section of
the Domino
documentation.
(Optional) Deploy an
extension forms file
to customize the web
client
Use an extension
forms file if you
want to customize
the visual theme,
fonts, the action bar,
and other aspects of
the web client.
“Using extension
forms files to
customize the look of
the web client” on
page 165
Disable on-premises
IBM iNotes login
redirection, if used.
This step ensures
that users are not
redirected to their
on-premises mail
servers after the
move to the cloud.
For information on
Using iNotes IBM
iNotes redirect, see
the Domino
documentation.
Task
194
An IBM Software
Services for
Collaboration
representative can
provide a custom
redirector for cloud
login.
SmartCloud Notes: Administering SmartCloud Notes: Hybrid Environment March 2015
Complete?
Preparing for Notes Traveler devices
Before enabling users to use IBM Notes Traveler mobile devices with the service,
prepare your environment and the devices.
Before you begin
Read about Notes Traveler devices.
About this task
Before you provision users with a Notes Traveler subscription, complete the tasks
in the following table to prepare.
Table 60. Tasks to prepare for Notes Traveler devices
Why the task is
important
Additional
information
Prepare for
onboarding.
There are tasks to
prepare that are not
client-specific.
“Preparing for
onboarding” on page
191
Ensure that your
firewall configuration
allows devices to
access the service
over WiFi.
Connections to hosts
in the service over
Port 443 are required
for WiFi access.
“Configuring the
firewall for outbound
connections” on page
42
Review the Notes
Traveler device
memory and
operating system
requirements.
Notes Traveler
Using a mobile
device that complies requirements for the
cloud.
with these
requirements ensures
the best experience
for your users.
If you plan to use
BlackBerry 10
devices, first verify
that your wireless
carrier supports the
minimum operating
system level that is
required in the
cloud.
Some carriers might
not support the
minimum required
Blackberry 10
operating system
level.
Enable cookies in
device browsers.
Cookies must be
enabled to connect to
the service and to
sync mail on devices.
Review Notes
Traveler device
policy settings.
Be aware of policy
settings that the
service enforces that
might be different
than your current
settings. Also,
optionally customize
settings.
Task
Complete?
Notes Traveler
requirements for the
cloud.
v “Notes Traveler
Settings
restrictions” on
page 118
v “Using
administrative
policies” on page
105
Chapter 6. Onboarding users
195
Table 60. Tasks to prepare for Notes Traveler devices (continued)
Why the task is
important
Additional
information
Review device
limitations in the
cloud.
This step makes you
aware of any
changes that users
might see after the
move to the cloud.
Notes Traveler
Troubleshooting,
known limitations,
and restrictions.
(Optional) Enable
application
passwords.
This step is required v “Enabling
only if your
application
company enables full
passwords” on
federated identity
page 139
authentication and
v “Setting up
Android devices that
federated identity
run Notes Traveler
management” on
9.0.1.3 or a higher
page 132
are not used.
Task
Complete?
Preparing for Notes clients
Use of the IBM Notes client to connect to the service is optional. If you want your
users to use the Notes client, understand the steps to prepare.
Before you begin
Read about the “Notes client” on page 11 and decide whether to use it.
About this task
Skip this task is you do not plan to use the Notes client.
Table 61. Tasks to prepare for the Notes client
Task
196
Why the task is
important
Additional
information
Prepare for
onboarding.
There are tasks to
“Preparing for
prepare that apply to onboarding” on page
all or most clients.
191
Compare the features
that are supported
for the on-premises
client to the featured
that are supported in
the cloud.
Most features are
also supported in the
cloud, but there are
some differences to
be aware of.
Technote:
Comparison tables of
features between
IBM Notes, IBM
iNotes & IBM
SmartCloud Notes
web
SmartCloud Notes: Administering SmartCloud Notes: Hybrid Environment March 2015
Complete?
Table 61. Tasks to prepare for the Notes client (continued)
Task
Why the task is
important
Additional
information
Evaluate your
currently deployed
clients. If necessary,
upgrade to newer
versions of the client.
A version of Notes
(Standard
configuration) that is
supported in the
cloud is required.
To ensure a smooth
transition, leave
plenty of time to
complete client
upgrades, and, if
necessary, related
hardware upgrades,
before you provision
users for the cloud.
Complete?
There are various
upgrade methods
available, including
desktop push
technology, Notes
Smart Upgrade, and
end-user controlled
upgrades.
v Technote:
SmartCloud Notes
client requirements
v Upgrade Central:
Planning your
upgrade to IBM
Notes and Domino
9.0 Social Edition
v Search for “Using
Notes Smart
Upgrade” in the
IBM Domino
documentation.
.
Chapter 6. Onboarding users
197
Table 61. Tasks to prepare for the Notes client (continued)
Task
In hybrid
environments,
configure managed
mail replicas
Why the task is
important
Additional
information
Managed mail
replicas are
recommended to
provide Notes users
quick, local access to
their mail when
connected or
disconnected from
the service.
Use an on-premises
policy to configure
managed mail
replicas. Complete
this step before you
provision users so
that you can resolve
any issues specific to
this feature ahead of
time.
For more
information, see
“Using Desktop
Settings to configure
managed mail
replicas” on page
120.
Note: In service-only
environments, users
can get similar
benefits by creating
local replicas of their
mail files after they
are provisioned.
Assess network
capacity
“Network capacity
This step ensures
that your site has the for the Notes client”
on page 20
network capacity to
support the number
of Notes client users
that will connect to
the cloud.
(Optional) Use a
custom mail file
template to
customize the mail
file design.
If you prepare a
custom mail file
template in advance,
you can apply the
custom template
during user
provisioning so that
users' first experience
with the cloud is
with the custom
design.
Be aware of policy
In hybrid
environments, review settings that the
service enforces that
policy settings
might be different
than your current
settings. Also,
optionally customize
settings.
198
A short contract with
IBM Software
Services for
Collaboration is
required to test and
approve the template
design. For more
information on
requirements and
steps, see “Preparing
to use custom mail
file templates” on
page 161.
“Using
administrative
policies” on page 105
SmartCloud Notes: Administering SmartCloud Notes: Hybrid Environment March 2015
Complete?
Table 61. Tasks to prepare for the Notes client (continued)
Why the task is
important
Additional
information
(Optional) In hybrid
environments, if you
are not transferring
mail files, export
contacts, and
calendar entries that
have future dates.
After users move to
the cloud, they can
import the contacts
and calendar entries
into their new mail
files.
Exporting calendar
entries allows users
to save calendar
entries in local .ics
files. After users are
provisioned, they can
import the files into
their new mail files
in the service.
Contacts are
imported along with
the saved calendar
entries. For more
information, see the
topic about exporting
and importing
calendars in the
Notes client help.
(Optional) In hybrid
environments, if you
are not transferring
mail files, create mail
archives on-premises
before the move to
the cloud.
Mail archives
provide users with
access to old mail
content after the
move to the cloud.
Note: Users cannot
create local archives
of their on-premises
mail after the move
to the cloud.
You can use Domino
policies to archive
mail. For
information, see the
topic about
understanding mail
archiving and
policies in the IBM
Domino
documentation.
Alternatively, you
can use a third-party
archiving
application.
(Optional) Install the
IBM Connections
Activity Plug-in
If your company
purchases a
collaboration
subscription, this
step provides access
to cloud Activities
from the Notes client
sidebar.
“Connecting to cloud
Activities through
the Notes client
sidebar” on page 202
Task
Complete?
How the Client Configuration tool configures the Notes client
To set up the IBM Notes client for use with the service, users download and run
the Client Configuration tool (config.nsf) from their workstations. The tool
performs the following configuration checks and tasks on the client.
v Checks for the following information:
– The client is a version supported for IBM SmartCloud Notes access.
– The config.nsf file contains information needed to perform the configuration.
– The downloaded data is less than 24 hours old. If it is older than 24 hours, an
message informs users. They can continue to use the tool if they choose.
v Confirms that the user is logged in using the ID that they will use in the service.
Chapter 6. Onboarding users
199
v Performs other small consistency tests, such as checking that the current
Location document can be located.
v Creates a wildcard Connection document that the client will use to connect to a
mail server in the service through the proxy server in the service. The server
name in the Connection is */your_certifier, where your_certifier is the name
of the OU certifier you provided for your mail servers during service
configuration.
v If the user is already using the Notes ID that they will use in the service, tests
connectivity to their new mail server on port 1352.
v If the user has a mail file that is being transferred, confirms that their old and
new mail files can be located.
Note: If the tests confirm that the user's mail file has already been transferred
successfully using replication, then the tool does not attempt to find the old mail
file, which might have already been deleted.
v If the tool needs to close the Notes client to force a download of the user ID file,
it attempts to find an Offline location:
– If an Offline location is found, the tool switches to it to prevent the client
from doing a final replication when it closes.
– If no Offline location is found, the tool creates an Offline location (named
Offline) for this purpose.
– If a location named Offline already exists, but is not suitable for configuration
purposes, a the tool creates a location named “Temporary location for cloud
mail setup - safe to delete”.
Note: If the tool closes the Notes client for reasons other than to download
the Notes ID an Offline location is not needed.
v Creates a Location document called SmartCloud for
username, or updates
it if it already exists and is incorrect.
v If the user has an existing mail file that is being transferred, the tool locates
existing bookmarks that point to the on-premises mail file and changes them to
point to the replica of the mail file in the service.
v If the user has Location documents that point to the on-premises mail file, the
tool updates the location documents to point to the new SmartCloud Notes mail
file. For example, if the user has a working Office Location document, it changes
to a virtual duplicate of the cloud Location document.
v If the user has Connection documents (Contacts > Advanced view) that restrict
which locations can be used, and the list includes the current location, then the
tool updates those connections to allow the cloud location document. This is
necessary so that users can continue to access on-premises application servers
using the new cloud location.
v If the user has Account documents (Contacts > Advanced view) that restrict
which locations can be used, and one of the locations is the current location, the
tool updates the Account documents so that they can be used from the cloud
location.
v If the user has an existing mail file that will be transferred, but the transfer has
not yet taken place, the tool replicates the existing on-premises mail file with
service mail file. If this succeeds, the field LLNMigrated=1 is set in the Calendar
Profile document, which signals that another replication is not needed. The tool
then sends email to LLNStatusUpdates advising of the successful transfer.
LLNStatusUpdates is a mail-in database that can be used by IBM support or the
administrator who is managing the on-premises deployment.
200
SmartCloud Notes: Administering SmartCloud Notes: Hybrid Environment March 2015
v If the user has an existing mail file that will be transferred, and there is a local
mail file, the tool replicates the local mail file with the service mail file.
v Depending on the configuration tasks that have been completed at this time, the
tool might shut down the Notes client. If so, a message informs the user, and
provides instruction for what to do next (for example, restart Notes and enter
the password for your SmartCloud Notes ID, to download the ID file). Again
note that sometimes the shutdown is done for purposes other than downloading
an ID file.
Downloading Notes client software and other entitled software
You can easily access the IBM Software Download Center to download IBM Notes
and other software to which your company is entitled. Software entitlement is
governed by the service Terms of Use and applicable License documents.
About this task
You can access the site if you have the Administrator account role. You can use the
site to download software before or after user subscriptions are activated.
To access the Download Center, complete the following steps:
1. Log in to the service as an administrator.
2. Click Apps > Downloads and Setup.
3. In the Software Entitlements section, click View available software to get to
the Download Center.
4. In the Software Downloads page, type the partial or full name of the entitled
software in the Find by search text box. Then, click the search icon.
Chapter 6. Onboarding users
201
Search filter options are available to narrow product results by language and
operating system. For more information, see Technote 1674504.
Related information:
Technote 1674504
Connecting to cloud Activities through the Notes client sidebar
Users with collaboration subscriptions in addition to SmartCloud Notes
subscriptions are automatically logged in to the cloud Activities server through the
Activities sidebar.
About this task
The Activities sidebar must be installed on the client. To install the Activities
sidebar in Notes 8.5.2 or later 8.5x versions, select the IBM Connections Notes
installation option.
To install the sidebar in IBM Notes 9.0 Social Edition or later versions, install the
IBM Connections Plug-ins. For more information, see the wiki article Where is the
Activities Sidebar for Notes 9.0 Social Edition?
Activities integration is not supported for Notes 8.5.1.
Preparing for IMAP clients
If you plan to use IMAP clients, complete these tasks to prepare.
Before you begin
Read about IMAP clients.
About this task
Table 62. Tasks to prepare for IMAP clients
Task
Prepare for
onboarding.
202
Why this task is
important
Additional
information
There are tasks to
“Preparing for
prepare that apply to onboarding” on page
all or most clients.
191
SmartCloud Notes: Administering SmartCloud Notes: Hybrid Environment March 2015
Complete?
Table 62. Tasks to prepare for IMAP clients (continued)
Task
Why this task is
important
Additional
information
Complete?
Verify that users have Using a supported
a supported IMAP
client is required
client installed.
because it provides
the best experience
for users.
IMAP client
requirements
Be aware of the
IMAP client
limitations.
This information can
help with
troubleshooting.
IMAP client
limitations
Open the firewall
ports that are
required for IMAP
access.
Ports 993 and 465
must be open to
allow connections to
the service via IMAP.
“Configuring the
firewall for outbound
connections” on page
42
Enable IMAP access IMAP access is not
in IBM SmartCloud
enabled by default.
NotesAdministration.
Decide whether to
enable IMAP access
for all users or for
specific users. To
enable IMAP access
for specific users
requires time to make
necessary edits to the
on-premises
directory. For more
information, see
“Configuring IMAP
access” on page 178.
Preparing to use BlackBerry devices
If you plan to use BlackBerry devices that are supported by a Hosted BlackBerry
Services subscription, complete these tasks to prepare.
Before you begin
Read about “BlackBerry devices with a Hosted BlackBerry Services subscription”
on page 12.
About this task
Table 63. Tasks to prepare for BlackBerry devices
Task
Prepare for
onboarding.
Why this task is
important
Additional
information
Complete?
There are tasks to
“Preparing for
prepare that apply to onboarding” on page
all or most clients.
191
Chapter 6. Onboarding users
203
Table 63. Tasks to prepare for BlackBerry devices (continued)
204
Task
Why this task is
important
Additional
information
Verify that this
subscription supports
the BlackBerry
devices that you
want to use.
The Hosted
BlackBerry Services
subscription does not
support BlackBerry
10.
An IBM SmartCloud
Notes for Hosted
BlackBerry Services
subscription enables
users to access the
service through
BlackBerry devices
that run operating
system versions 4.0
through 7.x. Users
who use BlackBerry
10 devices require
SmartCloud Traveler
for Notes
subscriptions instead.
For more information
about device
requirements for each
of these
subscriptions, see the
client requirements.
Plan for time that is
required to accept
and process the
Research in Motion
terms of use
agreement.
This step must be
complete before you
can provision users
and can take three to
four weeks.
After your company
purchases a Hosted
BlackBerry Services
subscription, you
must accept the
Research in Motion
terms of use
agreement. Then,
wait for an IBM
representative to
indicate that your
subscription setup is
complete.
SmartCloud Notes: Administering SmartCloud Notes: Hybrid Environment March 2015
Complete?
Table 63. Tasks to prepare for BlackBerry devices (continued)
Why this task is
important
Additional
information
Ensure that devices
are set up to use an
Enterprise data plan.
An enterprise data
plan is required to
activate the
BlackBerry devices
for the service.
If users currently use
personal plans such
as BlackBerry
Internet Service, they
must convert to
enterprise data plans.
Allow time for users
to contact the phone
company to make the
change and to set up
the new plans on
their devices. Users
should know that
they can no longer
use personal accounts
in the cloud. When
users switch from
personal plans to
enterprise plans, you
are likely to see
increased costs that
are associated with
purchasing the new
plans and with data
usage.
Be aware of the
BlackBerry device
settings that are
enforced in the
service, such as
password
requirements.
These setting
requirements might
be different from
ones that are
currently
implemented at your
company.
If your current
policies are different
from the cloud
policies,
communicate this
change to users. For
more information, see
“Settings enforced for
BlackBerry
smartphones.”
Task
BlackBerry browser is You can notify users
not supported
if this behavior is
different from what
they are accustomed
to.
Complete?
Access to web
applications in your
corporate intranet or
on the Internet
through the device is
not supported.
Settings enforced for BlackBerry smartphones
This topic describes the settings that the service currently enforces for BlackBerry®
smartphones.
Table 64. Settings enforced for BlackBerry smartphones
Policy
Value
Allow users to send outbound messages
No
through services other than IBM SmartCloud
Notes
Chapter 6. Onboarding users
205
Table 64. Settings enforced for BlackBerry smartphones (continued)
Policy
Value
The maximum size of a single native
attachment that can be downloaded to a
smartphone
10240 (KB)
The total size of all native attachments that
can be uploaded from a smartphone
5242880 (Bytes)
The maximum size of a single native
attachment that can be uploaded from a
smartphone
3145728 (Bytes)
Allow users to disable smartphone
passwords
No
Password pattern checks
At least 1 alphabetic character and 1
numeric character
Number of days after which a smartphone
password expires and the smartphone
prompts the user to set a new password
90
The number of minutes of inactivity allowed 30
before the smartphone is locked and the
user must provide a password to unlock it.
Minimum smartphone password length
8 characters
Smartphone password required
Yes
The number of previous passwords that are
prevented from being used as new
passwords
8
Reset smartphone to factory default settings
when smartphone is wiped
Yes
Allow users to place calls while the
smartphone is locked
Yes
Preparing communications and training
Prepare a communications and training plan to help your users, administrators,
and help desk personnel make the transition to the service.
About this task
Prepare to communicate to your users the benefits of the service, the changes to
expect, and the steps to take to make the transition. Ensure that your help desk
personnel are aware of the communications plan and are prepared to help users
follow instructions that are provided in it. For several client-specific sample
communications to use as a starting point, see the wiki article Preparing
communications about the transition to SmartCloud Notes.
Consider use of the following training resources to help users, help desk personnel,
and administrators become familiar with the clients and features available with the
service:
v Preparing training for IBM SmartCloud Notes wiki article
v Technote 7040248: Comparison tables of features between IBM Notes, IBM
iNotes & IBM SmartCloud Notes web
v IBM Multimedia Library for IBM Notes, affordable and proven resource for
Notes client training
206
SmartCloud Notes: Administering SmartCloud Notes: Hybrid Environment March 2015
v Getting started with SmartCloud Notes clients, getting started resources that are
provided through the wiki
Adding multiple Internet email addresses to Person
documents
You can include multiple Internet email addresses in a Person document.
About this task
Domains specified in the Global Domain document field Alternate Internet
domain aliases are not handled as alias domains by the service. Instead, each
domain in this field is listed and verified in the service as a separate domain,
similar to the domain specified in the Local primary Internet domain field. To
enable a user to receive mail addressed to a domain in the Alternate Internet
domain aliases field, you must specify the user’s address for the domain in the
Person document.
Specify one Internet email address when you register the user. This address is
added to the Internet address field of the Person document in the directory. After
registration, add any additional addresses as secondary values in the Short
name/User ID field in the Person document.
You can use the Alternate Internet domain aliases field in a Global Domain
document to define an Internet domain. If you do, a user can only receive email
addressed to the domain if the domain address is added to the Person document,
either during or after user registration.
Related tasks:
“Preparing Global Domain documents” on page 49
Prepare at least one Global Domain document to define the Internet domains that
your company owns.
Mail file quota
Currently a size limit (quota) of 25 GB is enforced on the mail files of users who
were provisioned before November 22, 2014; the mail file size limit of users who
are provisioned after this date is 50 GB. An exception is the mail files of
SmartCloud Notes Entry users, whose mail files have a 1 GB limit.
The sizes of the following mail file elements are factored into the quota calculation:
v design elements
v documents
v view index
v Domino Attachment and Object Store (DAOS) element
v white space
v attachments
Full-text index size is not a factor in the quota calculation.
Users do not receive warning notifications if they are approaching their mail quota.
However, web client users and Notes client users can see how close they are to
quota by clicking the quota status bar that is shown near their name in the mail
file.
Chapter 6. Onboarding users
207
When a user’s mail file quota is reached, the user cannot receive mail and the
sender of a message receives a delivery failure notification.
Some clients continue to allow mail to be sent when quota is reached, as described
in the following table. When a user with an over-quota mail file sends a message
that cannot be delivered, the user does not receive a delivery notification failure.
The service retries sending the delivery failure notification for about a day, and if
not successful, deletes the notification.
Table 65. Send mail behavior when quota is reached
Client
Sending mail without
saving a copy
Sending mail and saving a
copy
Notes
Mail is sent.
Mail is sent but not saved.
web client
Mail is sent.
Mail is not sent or saved.
Notes Traveler
Not supported.
Mail is not sent. Mail stays
in the Outbox and the client
tries to resend.
BlackBerry® smartphone
Mail is sent.
Mail is not sent. Mail stays
in the Sent folder and can be
resent later.
Mail file delegation
Using delegation preferences, users can allow other users to manage their mail,
calendar, contacts, and to do items. Depending on which client is used, there are
some differences in how delegation works with IBM SmartCloud Notes.
Notes client
Delegation works in the following way for users who access their mail using the
IBM Notes client:
v To set up delegation, users set a Mail > Access & Delegation preference. Once
set, this preference applies to both the Notes client and the web client.
v In the Notes client, users can also delegate management of their Calendar,
Contacts, and To Do tasks.
v A delegate cannot assign other delegates to a mail file.
v In a hybrid environment, delegates must be provisioned for the service to
manage a mail file in the service. After delegates are provisioned, they can
manage mail for both provisioned users with mail files in the service and
on-premises users who have mail files on company servers. Users whose mail
files are on company servers cannot manage a mail file in the service.
If your on-premises environment includes delegates who manage mail for other
users, consider provisioning the delegates first. After delegates are provisioned,
they can manage mail for both provisioned users and for on-premises users who
have mail files on company servers.
Web client
Delegation works in the following way for users who access mail using the web
client:
v To set up delegation, users set a Delegation user preference. Once set, this
preference applies to both the Notes client and the web client.
208
SmartCloud Notes: Administering SmartCloud Notes: Hybrid Environment March 2015
v In the web client, users can also delegate management of their Calendar,
Contacts, To Do tasks, and Notebook.
v A delegate cannot assign other delegates to a mail file.
v In a hybrid environment, delegates who are provisioned for the service can only
manage the mail files of other provisioned users; once provisioned, they cannot
manage an on-premises mail file. Conversely, a person whose mail file is on a
company IBM Domino server cannot manage the mail file of a provisioned user.
Reassigning delegation after a user name change
If a delegate’s Notes user name changes, then the owner of the mail file must
reassign delegation to the new name. Doing so updates the mail file ACL (access
control list) with the new name, which allows the user access to the database.
Related tasks:
“Changing a Notes user name” on page 255
In a hybrid environment, you use the Domino Administrator client on-premises to
change a user's Notes name. The steps initiate a series of administration process
requests.
Transferring mail files
As a convenience to your users, their current mail files can be transferred to the
service before they are provisioned. Transferring mail files is optional.
Before you begin
Complete the tasks “Deciding whether to transfer mail files” on page 189 and
“Choosing a client deployment strategy” on page 187
About this task
Transfer mail files before you provision users. Essentially, the transfer process
moves the current on-premises mail files to new mail servers in the cloud. If you
transfer mail files, users continue to have access to their original mail after they are
provisioned for the service. Users continue to use their existing Notes IDs after
switching to the service. As a result, they can continue to access private content
such as encrypted mail data.
Note: Mail file folders with a type set to private rather than shared (the default
type) are not transferred to the service. This limitation applies only to the private
folders themselves. The messages within the folders are transferred, and they are
visible in the All Documents view in the mail file.
Preparing for mail file transfer
If you configure the service as a hybrid environment, as part of onboarding, you
have the option to transfer users’ on-premises mail files to the service. Before you
transfer mail files, complete the tasks to prepare.
Preparing the staging server
To prepare for mail file transfer, mail files are replicated to an on-premises IBM
Domino server, referred to as the staging server. You must perform steps to
prepare and set up the staging server.
Chapter 6. Onboarding users
209
Setting up a Domino staging server:
You provide an IBM Domino server on-premises to use as a staging server for the
mail file transfer.
About this task
To avoid the risk of impacting production systems during user provisioning, use a
dedicated server that is not used in your production environment. If you choose to
use a production server, the following requirements are in addition to any
resources required by production workloads. If you do choose an existing server to
use as the staging server, select one that does not have any mail file replicas.
The minimum requirements for the staging server are as follows:
v A 32-bit Domino server version 8.5.3 or later on any supported version of
Microsoft Windows.
v Dual Core Intel / AMD CPU
v 2 GB RAM
v Available local storage of up to double the data volume for users that are being
processed at any one time. Space is required for the mail files as well as
encrypted copies of the mail files.
For information about installing and setting up Domino servers, see the Domino
documentation.
Mail files can be transferred via FTP or removable storage. Removable storage can
be a Network Attached Storage (NAS) device or a USB device. Your transfer
manager indicates which type is available to you.
Note the following requirements for removable storage:
v For NAS transfers, the staging server requires an available Gigabit Ethernet
network port, for optimum performance.
v For USB device transfer, see the USB device hardware requirements that are
described in the web page What is Media Data Transfer Service?
Related information:
What is Media Data Transfer Service?
Domino documentation
Register a server ID for the staging server:
Register a server ID, and optionally an administrator ID, for the staging server.
Give mail servers access to the staging server.
About this task
The staging server requires access to your mail servers. To avoid the need for
cross-certification, register the server ID under a certifier that your mail servers
trust.
If access to mail servers in your environment is granted through a server-specific
organizational unit (OU) wildcard, register the staging server under that OU. Then,
the staging server has access to the mail servers automatically. For example, if your
210
SmartCloud Notes: Administering SmartCloud Notes: Hybrid Environment March 2015
mail servers are registered under /SERVER/RENOVATIONS and access to them is
controlled through the wildcard entry */SERVER/RENOVATIONS, you might register
the staging server ID as SCNSTAGING1/SERVER/RENOVATIONS.
For more information, see the topic on registering a server in the Domino
documentation.
Procedure
1. Register the server ID with a common name of your choice, for example,
SCNSTAGING1.
2. Optional: To use a dedicated ID to administer the staging server rather than
one used in your production environment, register a new ID file within the
trust hierarchy of the staging server ID.
3. Open the Server document of each mail server in the Domino directory in
which the mail server is registered. Click the Security tab.
v Make sure that the Access server field allows the staging server at least
Reader access.
v Add the staging server to the Trusted servers field. This access allows the
scheduled agents in the onboarding tools to access the mail servers.
4. Delete the Server document for the newly created staging server from the
directory. The new server will be set up in its own domain.
Related information:
Domino documentation
Enabling the staging server to receive client configuration status reports:
The transfer manager creates documents in the Domino directory that allow the
Notes client configuration tool to mail status messages to the staging server.
About this task
Users run the Notes client configuration tool to configure a Notes client to connect
to the service. The tool mails a status message to the staging server. To enable
routing of these messages, the transfer manager completes the following steps.
Procedure
1. Open the Domino Directory of your on-premises mail hub domain.
2. Perform the following steps to create a Mail-In Database document:
a. Click Configuration > Messaging > Mail-In Databases and Resources.
b. Click Add Mail-In Database.
In the Mail-in name field, type the required name, LLNStatusUpdates.
In the Description field, type a description, for example, OTT.
Leave the Internet Address field blank.
In the Internet message storage field, select No Preference.
In the Domain field, type the Domino domain of the staging server, for
example, SCNStaging.
h. In the Server field, type the name of the staging server, for example
SCNSTAGING1/SERVER/RENOVATIONS.
c.
d.
e.
f.
g.
i. In the File name field, type the file name of your OTT database, for example
ott.nsf.
Chapter 6. Onboarding users
211
j. In the Encrypt incoming mail field, select No.
k. Click Save & Close.
3. Click Connections > Add Connection, and create a Connection document to
route mail from this domain to the domain SCNStaging.
Preparing mail file ACLs before mail file transfer
Before mail files are replicated to the staging server, prepare the mail file ACLs to
set mail file access.
Procedure
1. Make sure that the staging server has Author access to each mail file that will
be transferred.
Server access to mail files is often controlled through a wildcard ACL entry, for
example, */SERVER/RENOVATIONS, or a group, for example, LocalDomainServers.
2. Make sure that the mail file access is set as you want it to be for use in the
service. For important information about ACL requirements, see “Preparing
customized mail file ACLs” on page 168.
3. Make sure that each mail file ACL has no more than 74 customer-defined roles.
To see the roles in an ACL, click File > Application > Access Control > Roles.
4. Disable the Enforce a consistent ACL across all replicas of this database
setting in the ACL of each mail file. To do so, you can use the Manage ACL
tool available in the Domino Administrator, as described in the following steps.
Or you can use a procedure that has been established in your environment.
a. From the Domino Administrator, click the Files tab.
b. Select multiple mail databases to be provisioned.
c. Click Database > Manage ACL.
d. In the Manage Multiple ACLs dialog box, click Advanced.
e. Select Modify Consistent ACL setting > Do not enforce a consistent ACL.
Preventing local database encryption in new mail file replicas
Prevent sending the local database encryption setting to new replicas.
About this task
The transfer manager copies replicas of mail files to the import server in the
service. Use of local database encryption on the staging server replicas prevents
this step. Perform the following steps on each mail file to prevent propagation of
local database encryption to the replicas on the staging server.
Procedure
1. From IBM Notes, click File > Replication > Options for this Application.
2. Click Send.
3. To disable propagation of database encryption to new replicas, clear the field
Send changes in local security property to other replicas.
Importing IDs into mail files
If users will not use the IBM Notes client with the service and their Notes ID files
are not embedded in their mail files, you might want to have them import the ID
files into their mail files before the mail files are transferred to the service.
212
SmartCloud Notes: Administering SmartCloud Notes: Hybrid Environment March 2015
About this task
This step enables user ID files to be uploaded to the ID vault in the service easily
after user provisioning. Users require an ID in the vault to perform such actions as
reading encrypted mail and to enable administrators to change their Notes names.
Users might already have ID files that are embedded in their mail files, in which
case this procedure is not necessary.
Importing the ID file before you transfer mail files is not required. Alternatively,
users can import their ID files themselves after they begin to usethe service. In
addition, administrators can upload user ID files to the service vault after users are
provisioned.
If you want to import ID files before you transfer mail files, tell users to complete
the following steps.
Note: Users who use the Notes shared login feature cannot perform this procedure
because they do not have the required passwords that are associated with their ID
files.
Procedure
1. Log on to IBM iNotes
2. Make sure that your ID is not smart card enabled.
3. Click Preferences, and then click Security.
4. Click Import Notes ID.
5. Locate your ID file and type your password as prompted.
Results
Related tasks:
“Provisioning users and mail files” on page 224
If you are transferring user mail files to the service with the assistance of an IBM
partner, after the transfer manager imports a batch of users and mail files into the
service, you can provision the users for IBM SmartCloud Notes.
“Uploading a Notes ID to the vault” on page 269
In a hybrid environment, if a service user has an IBM Notes ID file, the ID must be
stored in the ID vault in the service. In some cases, for users who have a Notes ID,
but who will not use the Notes client, you might need to upload the Notes ID to
the vault manually. If it is not stored in the vault, web client, Notes Traveler, and
BlackBerry® smartphone users cannot perform secure mail operations. Other
limitations also apply, as outlined in this topic.
Scanning mail files for viruses
Before you replicate mail files to the staging server, scan them for viruses using a
virus program that is compatible with the service. This step is optional but gives
you control over how to handle and communicate any issues with viruses. The
service also scans for viruses as part of preparing for mail file provisioning.
Transferring mail files with help from an IBM partner
You can hire a certified IBM partner or IBM Software Services for Collaboration to
help you transfer IBM Notes mail files to the cloud.
Before you begin
Complete the tasks in the section “Preparing for mail file transfer” on page 209.
Chapter 6. Onboarding users
213
About this task
The person who helps you is known as the transfer manager. A company
administrator and the transfer manager work together to complete the following
steps. Contact an IBM representative directly for in-depth information.
1. Establish a transfer schedule.
2. Prepare for mail file transfer. Preparing includes setting up a IBM Domino
staging server, to which mail files are replicated prior to being transferred to
the cloud.
3. Use the Onboarding Planning Tool (OPT) to do quality checks that validate that
on-premises mail files and Person documents comply with cloud requirements.
4. Replicate mail files to the staging server.
5. Create a mail file transfer request. The transfer manager performs this step. The
request specifies a transfer method (NAS/USB or FTP) and downloads an
encryption key to the staging server that is used to encrypt the mail files before
transfer. If FTP is the transfer method, the request also generates and FTP user
account and password to be used to upload files to the IBM data center.
6. Transfer mail files to a data center. If NAS/USB is the transfer method, ship the
files to the data center. Otherwise, use an FTP client to upload the files to the
data center.
7. Import the mail files into the service so that they are ready for provisioning.
The transfer manager performs the step.
8. Provision users. The company administrator performs this step.
Related information:
IBM software services for collaboration
How the transfer manager creates a mail file transfer request
After the mail files are replicated to the staging server, the transfer manager creates
a Control document to initiate a mail file transfer request.
Before you begin
A Customer Service Representative must create a user account for the transfer
manager, and assign the account a role that is required specifically to perform this
procedure.
About this task
The transfer manager performs the following steps to create a Control document.
Procedure
1. In SmartCloud Notes Administration, click User Provisioning with Mail File
Transfer.
2. Click New Control Document.
3. Enter the required information, including Transfer Method, which is either
NAS (Network Attached Storage) or FTP (File Transport Protocol).
4. If you select FTP as the transfer method:
a. In the Transfer Size field, specify the total size of the files to be transferred
in this batch.
The size must be no greater than the size shown in the FTP Available field,
which is the space available for new requests. Do not underestimate the
214
SmartCloud Notes: Administering SmartCloud Notes: Hybrid Environment March 2015
size. It is better to overestimate the size to ensure that there is enough space
allocated on the server for this request.
The FTP Reserved fields shows the space reserved for all active requests.
b. Specify a password for the FTP account.
5. Click Submit.
6. Click Download Key.
Results
An encryption key is downloaded to the on-premises staging server. If FTP is the
transfer method, an account name is displayed, for example,
20103212_0000409801002. An account is created on the FTP server in the service
and assigned that account name and the specified password.
What to do next
The transfer manager uses the downloaded key to encrypt the mail files on the
staging server.
Transferring mail files to the service data center
After the transfer manager creates the mail file transfer request and encrypts the
mail files, the company administrator transfers the mail files to the service data
center. The customer uses the transfer method that is specified in the transfer
request.
Transferring mail files using a removable storage device:
If the transfer manager specifies NAS/USB as the transfer method in the transfer
request, a removable storage device is used to transfer the batch of mail files. This
transfer method is required if the total size of the files being transferred is greater
than 250 GB. To transfer using this method, the transfer manager copies the mail
files from the staging server to the removable storage device. The files are
encrypted during the process. The company administrator is then responsible for
securely shipping the device to the designated service data center.
What to do next
After the transfer manager imports the mail files into the service, provision the
users.
Related tasks:
“Provisioning users and mail files” on page 224
If you are transferring user mail files to the service with the assistance of an IBM
partner, after the transfer manager imports a batch of users and mail files into the
service, you can provision the users for IBM SmartCloud Notes.
Uploading mail files to an FTP server:
The transfer manager can specify FTP as the transfer method in the transfer
request. If so, you use an FTP client to upload the mail files to an FTP server in the
service.
Before you begin
Uploading the mail files to the FTP server requires an FTP client. This procedure
describes how to use FileZilla Client version 3 to upload the files. FileZilla is a free
Chapter 6. Onboarding users
215
FTP client that is subject to the terms and conditions of the GNU General Public
License agreement. If you use a different FTP client, it must support implicit
SSL/TLS over FTP, passive data transfer, and SSL session reuse.
Make sure that the firewall used by your FTP client computer allows outbound
connections over port 990 and over the port range 60000 - 61000. You can restrict
these firewall rules to the client computer and the FTP server.
The transfer manager must complete the following steps before you upload the
mail files:
v Use an encryption key downloaded from the service to encrypt the mail files.
v Give you the host name of the FTP server in the service, and the account name
and password to use to connect to the server.
Note: Your transfer manager might complete these steps for you.
About this task
The FTP server accepts only encrypted connections using implicit SSL/TLS over
FTP and it supports only the passive transfer mode. Use of the passive transfer
mode allows the FTP client to initiate both the control and data connections. The
FTP server does not support active transfer.
Procedure
1. Perform the following steps to create a site entry for the FTP server on FileZilla
Client:
a. Start FileZilla.
b. Click File > Site Manager.
c. In the Site Manager window, click New Site and enter a name for the site,
for example, Mail transfer.
d. In the General tab of the Site Manager window, complete the fields as
described in the following table.
Field
Value
Host
Host name of the FTP server that the
transfer manager gave you
Port
Blank
Protocol
FTP - File Transfer Protocol
Encryption
Require implicit FTP over TLS
Login Type
Normal
User
FTP server account name that your transfer
manager gave you, for example,
20103212_00004098010002
Password
Account password that your transfer
manager gave you
e. In the Transfer Settings tab of the Site Manager window, select Passive as
the Transfer mode.
f. Click OK.
2. Performs the following steps to upload the encrypted batch of mail files to the
FTP server:
a. From FileZilla, click File > Site Manager.
216
SmartCloud Notes: Administering SmartCloud Notes: Hybrid Environment March 2015
b. Select the site you created.
c. Click Connect.
If you see errors indicating that the login is incorrect and that the client
cannot connect to the server, ask your transfer manager to reset the FTP
password for your account. After you receive the new password from the
migration manager, in the site entry you created, replace the original
password with the new password. Then try uploading the batch of mail
files again.
d. In the "Unknown certificate" window, examine the certificate that is shown.
If you trust that the certificate is valid, select Always trust certificate in
future sessions, and click OK. If you select this option, in the future you do
not see the "Unknown certificate" window when connecting to the server.
e. In the Local site panel, go to the folder on the staging server in which the
encrypted mail files are stored.
f. Select the files that you want to upload and then drag or copy them to the
Remote site panel. The files can be placed only in the top-level directory.
Space in this directory is allocated specifically for your company.
g. In the bottom of the FileZilla window, click Successful Transfers and
confirm that the transfer was successful.
h. To disconnect from the FTP server, at the top of the FileZilla window, click
Server > Disconnect.
Note: If there is a period of inactivity after connecting FileZilla to the FTP
server, FileZilla is disconnected. In this case, you might see the error messages
A record packet with illegal version was received and Disconnected from
server: Connection aborted. These messages do not indicate a problem. Use
the Site Manager menu option again to reconnect to the server.
Results
The following steps occur to establish the connection between FTP client and
server:
The client initiates a connection to the FTP server over port 990.
The server validates the client credentials.
The client switches to passive mode (PASV).
The server selects a port in the 60000 - 61000 range and returns the port to the
client to use for secure data transfer.
5. The client initiates a second secure connection to the port returned by the
server.
1.
2.
3.
4.
The following sample output provides an example of messages seen on the FTP
client when connecting to the FTP server. You might see different output
depending on the FTP client you use. See the table that follows the sample output
for an explanation of the more important messages.
Status: Resolving address of ftp.notes.na.collabserv.com
Status: Connecting to 74.220.123.77:990... (See table)
Status: Connection established, initializing TLS...
Status: Verifying certificate...
Status: TLS/SSL connection established, waiting for welcome message...
Response: 220 LotusLive FTP upload server
Command: USER 20745886_0054824112001
Response: 331 Please specify the password.
Command: PASS ********
Response: 230 Login successful.
Chapter 6. Onboarding users
217
Command: SYST
Response: 215 UNIX Type: L8
Command: OPTS UTF8 ON
Response: 200 Always in UTF8 mode.
Command: PBSZ 0
Response: 200 PBSZ set to 0.
Command: PROT P
Response: 200 PROT now Private.
Status: Connected
Status: Retrieving directory listing...
Command: PWD
Response: 257 "/"
Command: TYPE I
Response: 200 Switching to Binary mode.
Command: PASV (See table)
Response: 227 Entering Passive Mode (74,220,123,77,235,42).(See table)
Command: LIST (See table)
Response: 150 Here comes the directory listing.
Response: 226 Directory send OK.
Status: Directory listing successful
Table 66. Explanation of important messages in the example FTP connection output
Message
Explanation
Status: Connecting to
74.220.123.77:990...
The initial connection using port 990 is
established.
If you see an error here, verify that port 990
is open on the firewall for outbound
connections.
Command: PASV
Client switches to passive mode to prepare
the data channel.
Response: 227 Entering Passive Mode
(74,220,123,77,235,42).
Server returns the IP address for the FTP
server (74.220.123.77) and the port
(235*256+42=60202)
Command: LIST
The directory listing is initiated.
If you see an error here, verify that port
range 60000 - 61000 is open on the firewall
for outbound connections.
What to do next
The transfer manager must click Upload Complete in the Control document
associated with this transfer.
After the transfer manager imports the mail files into the service, provision the
users.
Related tasks:
“Provisioning users and mail files” on page 224
If you are transferring user mail files to the service with the assistance of an IBM
partner, after the transfer manager imports a batch of users and mail files into the
service, you can provision the users for IBM SmartCloud Notes.
Provisioning users
Provisioning users adds IBM SmartCloud Notes subscriptions to user accounts in
the service. After users are provisioned, they can begin to access their mail in the
cloud.
218
SmartCloud Notes: Administering SmartCloud Notes: Hybrid Environment March 2015
Before you begin
Before you provision users, Prepare for onboarding. Optionally, transfer mail files.
Provisioning users without transferring mail files
This procedure adds an IBM SmartCloud Notes subscription to a user account and
creates a new mail file for the user on a mail server in the cloud. You can also add
optional subscriptions purchased by your company.
Before you begin
Prepare for onboarding to ensure that all required preparation is complete. If you
are provisioning a new user at your company, make sure that you first register the
user on-premises.
Your company might purchase a bundled subscription that allows you to enable
services independently. For example, you might be able to enable Connections and
Meetings services for users before you enable the IBM SmartCloud Notes (Email)
service. To enable other services separately, create the user accounts through the
IBM Connections Cloud User Accounts page. When you complete the procedure in
this topic, all bundled services are enabled.
About this task
If your on-premises environment includes delegates who manage mail for other
users, consider provisioning the delegates first. After delegates are provisioned,
they can manage mail for both service users and on-premises users whose mail
files are still on company servers. Users whose mail files are on company servers
cannot manage the mail of a service user.
The first step in provisioning users is searching the service directory for the names
of the users that you want to provision. To provision users, you select their names
from the search results. If you are provisioning many users, it is likely that you
will repeat this search-then-provision step.
As an alternative to this procedure, you can use the Connections Cloud integration
server to provision many users at once.
Note: If you are transferring mail files to the service during user provisioning, do
not perform this procedure. Instead, refer to the procedure “Provisioning users and
mail files” on page 224.
Procedure
1. Log on to the service as an administrator.
2. If your account also has the User role, click Admin > Manage Organization.
3. In the System Settings section of the navigation pane, click IBM SmartCloud
Notes.
4. In the Provisioning section of the SmartCloud Notes Administration window,
click User Provisioning.
Note: Do not click User Provisioning with Mail File Transfer.
5. Display the names of the users to provision. In the Search box, type the
beginning characters of any of the following user values:
v Distinguished name, for example, Samantha Daryn/Renovations.
Chapter 6. Onboarding users
219
v Internet email address, for example, sdaryn@renovations.
v Last name, for example, Daryn.
Note: You cannot use the wildcard character (*) when you search.
A “starts with” search is done and the names of any users with matching
values in the directory are displayed. For example, the results of a search on
ma include the names of users with the following values in the directory:
v Madison Armond/Renovations
v masmith@renovations
v Kristin MacGyver
This search does not match the following values:
v Emarie Klein/Renovations
v tamado@renovations
v Ted Amado
Search results can include a maximum of 1000 names.
6. Select one user or multiple users to whom you want to assign the same
subscription settings. Optionally, search again and select additional names.
The previously selected names remain selected.
7. Click Provision Selected.
8. In the Provisioning Options window, select subscriptions for the user. You
must select a SmartCloud Notes subscription. Other optional subscriptions
may be available. When you are done, click Next.
Table 67. Subscription fields
Subscription field
Description
Mail
Select a SmartCloud Notes subscription.
Alternatively, select a bundled subscription,
if available.
Collaboration
If available, optionally select a collaboration
subscription . Alternatively, select a bundled
subscription, if available.
Bundled
If available, select a bundled subscription
that includes both a SmartCloud Notes
subscription and a collaboration
subscription.
Other
If available, optionally select add-on
subscriptions.
9. Select an optional extension forms file for the web client and a mail template
for the IBM Notes client:
a. Optional: If an extension forms file is available for your company, you see
the Select Extension Forms File option. To apply an extension forms file to
web clients, select a forms file.
An extension forms files provides a customized experience for the web
client. Extension form files are available only if your company implements
them.
b. In the Select Mail Template section, the default mail template is selected.
If you want to apply a different template to the user mail files, click Select
next to the template name.
220
SmartCloud Notes: Administering SmartCloud Notes: Hybrid Environment March 2015
v If the Notes client is used, select a template version that is compatible
with the Notes client version that is used. Click Next to scroll through
the list of available templates until you find the correct one.
v If the Notes client is not used, select the latest template version in the
language that you want to use.
v To see only custom mail templates developed for your company, click
Hide Standard Mail Templates. If you select a custom mail file
template, after provisioning is complete, the design of the Inbox folder is
applied to any custom mail folders created by your company.
c. Click Next.
10. In the Provide an initial password section, provide a temporary password
that complies with the requirements that are shown.
Users provide this password when they log in to the service for the first time
with a web browser. After logging in, they are prompted to create new
passwords. This password is a different password than the one associated
with a Notes client ID file or any on-premises HTTP password.
If users you are provisioning already use the service through another
subscription, they continue to use their current passwords, and do not use this
password.
If your company uses federated identity management, users do not provide
this password. Instead, they use the Use My Organization's Login page to
provide a password that allows them to authenticate using a company
security application.
11. Click Next and review your selections. Note the password that is shown in the
Initial Password field because you must provide it to each user who is new to
the service.
12. Click Confirm to open the User Provisioning Requests page. Review the list of
users again, and when you are ready to provision them, click Request
Provisioning.
v As users are added to the provisioning queue, the User Provisioning
Requests page removes their names from the list.
v The page shows the percentage of requests that are complete because they
are added to the provisioning queue and the number that remain to be
processed.
v The names of any users who cannot be added to the provisioning queue are
listed with error messages. Resolve errors and repeat the steps to provision
the users. Missing user Internet addresses and directory synchronization
problems are examples of errors that can prevent a user from being added
to the provisioning queue.
To cancel provisioning of any users that are not yet processed, click Cancel.
13. When the provisioning request is complete, click Return to User Provisioning.
What to do next
After users are successfully added to the provisioning queue, check user
provisioning status to determine when provisioning is complete or if any
provisioning errors occur.
When users are listed in the Provisioning Status page as Done and in the Pending
state, help users get started with the service.
Related tasks:
Chapter 6. Onboarding users
221
“Checking user provisioning status” on page 229
After you provision users, check the status of their IBM SmartCloud Notes
subscriptions.
“Helping users get started” on page 230
After user provisioning is complete, help users get started with their mail in the
cloud.
Related information:
Integration server and subscription provisioning for Smartcloud Notes hybrid
users
Registering a new user on-premises
To provision a user in a hybrid environment, the user must be registered in an
on-premises IBM Domino directory. If a user you are provisioning is new at your
company, perform this procedure to register the user on-premises.
Before you begin
You can apply a policy to the user so that the policy is in effect when the user is
provisioned for IBM SmartCloud Notes. To do so, create an explicit policy before
you continue. Then, select the policy during this procedure. If you do not apply a
policy during user registration, you can apply it later. For more information, see
“Using administrative policies” on page 105.
The Domino directory in which you register the user must be configured as a
synchronized directory that is used for user provisioning. For more information,
see “Configuring directory synchronization” on page 89.
Procedure
1. From an on-premises Domino Administrator client, open a server that is in the
Domino domain in which you want to register the user.
2. Click the tab People & Groups.
3. Click Tools and click People > Register.
4. Use any of the following methods to specify the certifier to use to certify the
new user ID.
v If you are prompted to provide a password for the certifier that you want
to use, enter the password. Otherwise, click Cancel.
v Click Certifier ID, select the certifier ID, and click OK.
v Click Use the CA Process and select the certifier.
Note: There must be a trust relationship between this certifier and the OU
certifier you uploaded to the service to certify your mail servers. For example,
if your mail server OU certifier is /SCN/Renovations, there is an automatic
trust relationship if the user ID certifier is /Renovations. However, if the user
ID certifier is /Zetabank, you must create cross-certificates to establish trust.
5. Complete the following fields in the Basics tab of the Register Person window.
222
Field
Value
Registration Server
The name of the server to use to register
the user. The domain Domino directory for
this server must be configured as a
synchronized directory that is used for user
provisioning.
SmartCloud Notes: Administering SmartCloud Notes: Hybrid Environment March 2015
Field
Value
First name, Middle name, Last name
The user's name.
If you plan to use the integration server to
provision users, a first name and a last
name are required. Otherwise, only a last
name is required.
If you specify a last name only, after the
user is provisioned, the one name is
displayed in the SmartCloud Notes
directory and in the mail file. However, in
Connections Cloud account settings and
user accounts, the name is also the first
name. For example, if you register a user
with the last name HelpDesk, when you log
on to the service as an administrator and
click User Accounts, the name is shown as
HelpDesk HelpDesk.
Short name
A short version of the name that is
generated automatically. You can change
the default value.
You cannot enter an email address here.
Password
A password for the Notes ID.
Password Options
v Password Quality Scale
v Encryption Strength
v Set internet password (optional). The
service does not use the Internet
password. However, it might be required
for access to on-premises web
applications.
Mail system
IBM Notes
Select this option regardless of the type of
client you plan to use with the service.
Explicit policy
(Optional) Select an explicit policy to apply
to the user. Organizational policies are not
supported.
Enable roaming for this person
Do not select this option. Roaming is not
supported.
Create a Notes ID for this person
Select.
6. Select the Advanced box in the Register Person window.
7. Click Mail and complete the fields that are displayed to create a required,
temporary on-premises mail file. When the user is provisioned for the service,
a new mail file is created in the service. Make a note of the location of the
temporary mail file; after user provisioning is complete you can delete it.
8. Click Address and complete the fields that are described in the following
table.
Field
Value to specify
Internet address
The user's Internet mail address, for
example, [email protected].
Chapter 6. Onboarding users
223
Field
Value to specify
Internet domain
The domain portion of the user's Internet
address, for example, renovations.com. The
domain must be one that is verified by the
service.
Address name format; Separator
Select options to determine the format of the
Internet address.
9. Click ID info and complete the fields that are described in the following table.
Field
Value to specify
Create a Notes ID for this person
Select this option.
Certifier ID
Confirm the certifier to use to create the ID.
There must be a trust relationship between
this certifier and the certifier you provided
to certify your mail servers in the service.
Public key specification
Select one of the listed specifications.
License type
Select North American or International.
The license type determines the type of ID
file that is created. It affects encryption of
sent and received mail and of data. North
American is the stronger type.
Location for storing user ID
Select any of the following options:
v In Domino directory to store the ID file
as an attachment in the Person
document.
v In file to store the ID in a file that you
provide to the user.
v In Notes ID vault to store in an
on-premises ID vault. This option is
useful only to retrieve the ID during
initial setup of a Notes client
on-premises. After the client connects to
the service, the ID is uploaded to the ID
vault in the service. Then, the
on-premises ID vault is no longer used.
10. Optional: Click Groups and assign the user to groups in the Domino
directory.
11. Click the green check mark to add the user to the registration queue.
12. Select the Registration Queue and click Register.
Results
A Person document for the user is added to the Domino directory of the
registration server. After the Person document replicates to the service during
directory synchronization, a company administrator can provision the user from
the User Provisioning window of SmartCloud Notes Administration. To provision
the user, the administrator first searches for the user name.
Provisioning users and mail files
If you are transferring user mail files to the service with the assistance of an IBM
partner, after the transfer manager imports a batch of users and mail files into the
service, you can provision the users for IBM SmartCloud Notes.
224
SmartCloud Notes: Administering SmartCloud Notes: Hybrid Environment March 2015
Before you begin
Prepare for onboarding and transfer mail files.
Your company might purchase a bundled subscription that allows you to enable
services independently. For example, you might be able to enable Connections and
Meetings services for users before you enable the IBM SmartCloud Notes (Email)
service. To enable other services separately, create the user accounts through the
IBM Connections Cloud User Accounts page. When you complete the procedure in
this topic, all bundled services are enabled.
About this task
As an alternative to this procedure, you can use the Connections Cloud integration
server to provision many users at once.
You must provision users within 60 days from the time their status shows Ready
to Provision. After 60 days the status changes to Cancelled and the users and their
mail files must be transferred to the service again in a new batch.
If your on-premises environment includes delegates who manage mail for other
users, consider provisioning the delegates first. After delegates are provisioned,
they can manage mail for both service users and on-premises users whose mail
files are still on company servers. Users whose mail files are on company servers
cannot manage the mail of a service user.
After provisioning is complete, the design of the Inbox folder is applied to custom
mail file folders. Custom folders are user-created folders or company-created
folders from a custom template that is used in the service.
The mail template specified during user provisioning controls the design of the
mail file in the service.
Tip: After you provision users who will use only the web client and whose IBM
Notes ID files were attached to the transferred mail files, tell the users to sign or
encrypt a mail message after logging on to the service for the first time. That step
triggers the upload of their ID files to the ID vault in the service. When doing so,
they may need to provide the Notes ID password. After the ID is uploaded to the
ID vault, they are no longer prompted for that password when signing or
encrypting mail.
Perform the following steps to provision users and mail files:
Procedure
1. Log on to the service as an administrator.
2. If your account also has the User role, click Admin > Manage Organization.
3. In the System Settings section of the navigation pane, click IBM SmartCloud
Notes.
4. Click User Provisioning with Mail File Transfer.
A Control Document created by the transfer manager, who has the Data
Transfer Manager role, is shown for each batch of users. Each Control
Document shows the status for that batch of users. When all provisioning of
users in a batch is either completed or cancelled, the Control Document shows
the status Complete.
Chapter 6. Onboarding users
225
5. When any Control document shows the status Ready, click the Users tab to
see a list of user names that are ready to be provisioned.
Note: Each user's Internet mail address is shown. If a user is new to IBM
Connections Cloud, the address is also the identity used to log in to the
service from a browser at http://www.ibmcloud.com/social. If a user already
has another Connections Cloud subscription, the log in identity is the current
value of the Email field in the Account Login tab of the Connections Cloud
user account.
6. Select one or more users whose status shows Ready to Provision
Note: If a user status shows Error, work with your transfer manager to
resolve the problem, and then wait for the status to change to Ready to
Provision.
7. Optional: Click Provisioning Estimate to see an estimate of the time it will
take to provision the selected users. The estimate is based on the size of the
mail files in this request and on the number of requests in the queue.
8. Click Provision Selected.
9. In the Provisioning Options window, select subscriptions for the user. You
must select a SmartCloud Notes subscription. Other optional subscriptions
may be available. When you are done, click Next.
Table 68. Subscription fields
Subscription field
Description
Mail
Select a SmartCloud Notes subscription.
Alternatively, select a bundled subscription,
if available.
Collaboration
If available, optionally select a collaboration
subscription . Alternatively, select a bundled
subscription, if available.
Bundled
If available, select a bundled subscription
that includes both a SmartCloud Notes
subscription and a collaboration
subscription.
Other
If available, optionally select add-on
subscriptions.
10. Select an optional extension forms file for the web client and a mail template
for the IBM Notes client:
a. Optional: If an extension forms file is available for your company, you see
the Select Extension Forms File option. To apply an extension forms file to
web clients, select a forms file.
An extension forms files provides a customized experience for the web
client. Extension form files are available only if your company implements
them.
b. In the Select Mail Template section, the default mail template is selected.
If you want to apply a different template to the user mail files, click Select
next to the template name.
v If the Notes client is used, select a template version that is compatible
with the Notes client version that is used. Click Next to scroll through
the list of available templates until you find the correct one.
v If the Notes client is not used, select the latest template version in the
language that you want to use.
226
SmartCloud Notes: Administering SmartCloud Notes: Hybrid Environment March 2015
v To see only custom mail templates developed for your company, click
Hide Standard Mail Templates. If you select a custom mail file
template, after provisioning is complete, the design of the Inbox folder is
applied to any custom mail folders created by your company.
c. Click Next.
11. In the Provide an initial password section, provide a temporary password
that complies with the requirements that are shown.
Users provide this password when they log in to the service for the first time
with a web browser. After logging in, they are prompted to create new
passwords. This password is a different password than the one associated
with a Notes client ID file or any on-premises HTTP password.
If users you are provisioning already use the service through another
subscription, they continue to use their current passwords, and do not use this
password.
If your company uses federated identity management, users do not provide
this password. Instead, they use the Use My Organization's Login page to
provide a password that allows them to authenticate using a company security
application.
12. Click Next and review your selections. Note the password that is shown in
the Initial Password field because you must provide it to each user who is
new to the service.
13. Click Confirm to open the User Provisioning Requests page. Review the list of
users again, and when you are ready to provision them, click Request
Provisioning.
v As users are added to the provisioning queue, the User Provisioning
Requests page removes their names from the list.
v The page shows the percentage of requests that are complete because they
are added to the provisioning queue and the number that remain to be
processed.
v The names of any users who cannot be added to the provisioning queue are
listed with error messages. Resolve errors and repeat the steps to provision
the users. Missing user Internet addresses and directory synchronization
problems are examples of errors that can prevent a user from being added
to the provisioning queue.
To cancel provisioning of any users that are not yet processed, click Cancel.
Results
User provisioning with mail file transfer creates replicas of user mail files on the
mail servers in the service. At the next directory synchronization with on-premises
servers after user provisioning is complete, the Person documents in the
on-premises Domino directory are updated to show the new mail server names
and mail file path.
When the staging server application detects the name of the new SmartCloud
Notes mail server in the Person document, it deposits a welcome email in a user's
original, on-premises mail file. You can customize the content of this notification.
The notification should include suitable links for your users to use to log on to the
service for the first time. For example, you might include http://
www.ibmcloud.com/social or a link to a logon page used by your company.
Chapter 6. Onboarding users
227
A user can run the Notes client configuration tool to configure a Notes client to
connect to the service. In this case, the tool initiates a final replication between the
on-premises mail file replica and the replica in the service after client configuration
is complete.
If a user does not use the Notes client, the staging server application initiates the
final replication when it detects the name of the new SmartCloud Notes mail
server in the Person document.
What to do next
After users are successfully added to the provisioning queue:
v Track the status of mail file provisioning by returning to the Users tab in the
Control Document and refreshing the page or using the Status field filter.
v Check user provisioning status to determine when provisioning is complete or if
any provisioning errors occur.
Related concepts:
“Mail file delegation” on page 208
Using delegation preferences, users can allow other users to manage their mail,
calendar, contacts, and to do items. Depending on which client is used, there are
some differences in how delegation works with IBM SmartCloud Notes.
Related tasks:
“Managing IBM Notes Traveler devices” on page 272
For each user with an IBM Notes Traveler subscription, you can view information
about the user's mobile device. You can also wipe the device to remove sensitive
data from it, for example, if the device is lost or stolen.
“Managing BlackBerry smartphones” on page 274
After activating a user’s BlackBerry® smartphone, perform any of the following
tasks to manage it.
“Checking user provisioning status” on page 229
After you provision users, check the status of their IBM SmartCloud Notes
subscriptions.
Related information:
Using Connections Archive Essentials
Integration server
Deleting on-premises mail files
After users have set up clients to complete the provisioning process, the staging
server application creates Administration Process requests to delete on-premises
mail files.
About this task
The requests, called "Approve File Deletion," are put in the Pending Administrator
Approval view in your on-premises Administration Requests database where they
await your approval. Do not approve a deletion request immediately. Instead, wait
at least a few days to ensure that the user provisioning is complete before
approving the deletion.
Decommissioning on-premises mail servers
Once an on-premises IBM Domino mail server is no longer providing mail service
to users, you can decommission the server using your standard processes.
228
SmartCloud Notes: Administering SmartCloud Notes: Hybrid Environment March 2015
Checking user provisioning status
After you provision users, check the status of their IBM SmartCloud Notes
subscriptions.
Before you begin
Complete one of the following procedures:
v “Provisioning users without transferring mail files” on page 219
v “Provisioning users and mail files” on page 224
Procedure
1. Log on to the service as an administrator.
2. If your account also has the User role, click Admin > Manage Organization.
3. In the System Settings section of the navigation pane, click IBM SmartCloud
Notes.
4. In the Provisioning section of the SmartCloud Notes Administration window,
click Provisioning Status.
5. Display the names of the users whose status you want to check. In the Search
box, type the beginning characters of any of the following user values:
v Distinguished name, for example, Samantha Daryn/Renovations.
v Internet email address, for example, sdaryn@renovations.
v Last name, for example, Daryn.
Note: You cannot use the wildcard character (*) when you search.
A “starts with” search is done and the names of any users with matching
values in the directory are displayed. For example, the results of a search on ma
include the names of users with the following values in the directory:
v Madison Armond/Renovations
v masmith@renovations
v Kristin MacGyver
This search does not match the following values:
v Emarie Klein/Renovations
v tamado@renovations
v Ted Amado
Search results can include a maximum of 1000 names.
6. In the Status field, select one of the following options:
Chapter 6. Onboarding users
229
Option
Description
In Progress
Show all users in the search results who are
in the process of being provisioned. The
service is setting up mail files and doing
other steps to prepare user accounts. Users
that are shown in this view cannot use the
SmartCloud Notes service yet.
Note: It is possible for user accounts to be
in a Held state. This state can be seen only
in IBM Connections Cloud user accounts by
clicking Home and then User Accounts. The
Held state indicates that service is
performing routine checks. It does not
indicate that there is a problem. Do not
delete and then re-add the account.
Resolution often takes a few hours or less;
however, on some occasions it can take a
few days. If you are concerned that the Held
state is not changing, contact customer
support.
Done
Show all users in the search results who are
successfully provisioned. The service has
finished preparing the mail files and
accounts of these users, and the users can
use the service.
One of the following states is shown for
each user:
v Pending: This state indicates that a user
has not yet logged in to the SmartCloud
Notes service and accepted the terms of
use.
v Active: this state indicates that a user has
logged in to the service and accepted the
terms of use.
Error
Show all users in the search results who
cannot be provisioned because of an error. If
you see a user in this state, contact support
to help you resolve the error.
What to do next
When users are listed in the Provisioning Status page as Done and in the Pending
state, help users get started with the service.
Related tasks:
“Helping users get started”
After user provisioning is complete, help users get started with their mail in the
cloud.
Helping users get started
After user provisioning is complete, help users get started with their mail in the
cloud.
230
SmartCloud Notes: Administering SmartCloud Notes: Hybrid Environment March 2015
Before you begin
Check user provisioning status; users in the Pending state are ready to begin to
use the service.
Providing account information to users
After you add a IBM SmartCloud Notes subscription to user account, provide the
user with the information that is required to log in to the service.
Before you begin
Complete the procedure “Checking user provisioning status” on page 229 and
verify that users are listed in the provisioning status page as Done and in the
Pending state.
About this task
Users must log in to the service from a browser within 30 days after being
assigned a SmartCloud Notes subscription. After logging in, users can begin to use
the web client immediately.
Users who want to use the IBM Notes client must download and run the
SmartCloud Notes client configuration tool to connect the client to the mail server
in the service. This tool is available within the service after logging in from a
browser. A version of the Notes client that is supported by the service must be
installed and set up. The Notes client is available for download from the IBM
Notes product page. A SmartCloud Notes subscription includes a license for the
client.
Note: If a user sees the error ID in vault has expired download time when
attempting to connect to the service for the first time from a Notes client, reset the
Notes ID password and instruct users to log in again with the new password.
Users whose on-premises mail files are transferred to the service receive a welcome
email in their original, on-premises mail file. The welcome email contains content
that is customized for your company.
Procedure
1.
Provide the following information to each user:
v The login URL – http://www.ibmcloud.com/social.
v The web login name – The value of the Email field in the Account Login tab
of the user's Connections Cloud user account. To see user accounts, log in to
the service as an administrator, click Administration > Manage
Organization, and click User Accounts.
v The temporary password -- The first time users log on, they use a temporary
password that is created for them at the time their account is created. They
are asked to change this password the first time they log on.
2. If you use a hybrid environment, you may also need to provide the Notes ID
file to a user who is using the Notes client for the first time.
Chapter 6. Onboarding users
231
Results
When users log in from the browser, they are presented with the Account Updates
form. They must click Submit to complete the user registration and activate their
account.
What to do next
Help users get started with the clients they will use in the cloud.
Related tasks:
“Getting started with the web client”
Complete the following tasks to help users get started with the web client.
“Getting started with the Notes Traveler devices” on page 233
Complete the following tasks to help users get started in the cloud with IBM Notes
Traveler devices.
“Getting started with the Notes client” on page 237
If the IBM Notes client is used with the service, complete the following tasks to
help users get started.
“Getting started with IMAP clients” on page 237
If IMAP clients are used, complete the following tasks to help users get started
with them.
Getting started with the web client
Complete the following tasks to help users get started with the web client.
Before you begin
Complete the procedures “Providing account information to users” on page 231
and “Preparing for the web client” on page 193.
About this task
Table 69. Getting started with the web client
Task
232
Why this task is
important
Additional
information
Point users to the
web client
documentation.
Users can refer to the SmartCloud Notes
documentation as
web documentation
they begin using the
client.
Prepare to
troubleshoot any
login problems.
If any user has
trouble logging in to
the service, you can
quickly resolve the
problem.
See Technote 1496881:
SmartCloud Notes
user cannot log on
SmartCloud Notes: Administering SmartCloud Notes: Hybrid Environment March 2015
Complete?
Table 69. Getting started with the web client (continued)
Task
(Optional) If instant
messaging is enabled
for your company,
make sure that users
also enable it in
client preferences.
Why this task is
important
Additional
information
Instant messaging
must be enabled in
client preferences and
in SmartCloud Notes
Administration.
To enable instant
messaging in the web
client, users click
More > Preferences
> Instant Messaging
and select Enable
instant messaging.
Complete?
For information on
configuring instant
messaging in
SmartCloud Notes
Administration, see
“Configuring instant
messaging” on page
171.
(Optional) In hybrid
environments, install
and configure the
IBM Notes Browser
Plug-in
The plug-in allows
web client users to
access Notes
applications on
on-premises Domino
servers.
v Notes Browser
Plug-in
requirements
v Notes Browser
Plug-in
documentation for
the service
Getting started with the Notes Traveler devices
Complete the following tasks to help users get started in the cloud with IBM Notes
Traveler devices.
Before you begin
Complete the procedures “Providing account information to users” on page 231
and “Preparing for Notes Traveler devices” on page 195.
About this task
Table 70. Getting started with Notes Traveler devices
Task
If you did not add
the Notes Traveler
add-on subscription
during user
provisioning, add it
now.
Why this task is
important
Additional
information
This subscription
must be added for
users to access their
mail in the cloud
through mobile
devices that are
supported by the
Notes Traveler
service.
“Adding a Notes
Traveler subscription
to a user account” on
page 234
Complete?
Chapter 6. Onboarding users
233
Table 70. Getting started with Notes Traveler devices (continued)
Task
Why this task is
important
Additional
information
Uninstall any
previous Notes
Traveler accounts
from devices.
This step prevents
devices from
attempting to
continue to get mail
from an on-premises
server.
Remove user
accounts from any
on-premises Notes
Traveler servers.
This step prevents
the on-premises
servers from
attempting to connect
to mail files in the
service to which they
no longer have
access.
“Removing user
accounts from
on-premises Notes
Traveler servers” on
page 235
Point users to the
Notes Traveler
documentation.
The documentation
describes how to get
started with each of
the supported
devices.
Notes Traveler
documentation
(Optional) On the
Apple iPhone,
recommend that
users enable the Ask
Before Deleting
setting.
This setting helps
prevent users from
deleting messages by
mistake.
On the phone, select
Settings > Mail,
Contacts, Calendars
> Ask Before
Deleting
Prepare to
troubleshoot.
You can quickly
resolve any
problems.
Refer to the
following section of
the Notes Traveler
documentation:
Troubleshooting,
known limitations,
and restrictions
Complete?
Related tasks:
“Managing IBM Notes Traveler devices” on page 272
For each user with an IBM Notes Traveler subscription, you can view information
about the user's mobile device. You can also wipe the device to remove sensitive
data from it, for example, if the device is lost or stolen.
Adding a Notes Traveler subscription to a user account
To enable a user to connect to the service through a mobile device supported by
IBM Notes Traveler, add the subscription to the user’s account.
About this task
The following steps describe how to add a subscription to the account of a user
who already has a Notes Traveler subscription. You can also add the subscription
when you first add the user account. For information about adding user accounts,
see the topic Administering user accounts.
234
SmartCloud Notes: Administering SmartCloud Notes: Hybrid Environment March 2015
Procedure
1.
2.
3.
4.
Log on to the service as an administrator.
If your account also has the User role, click Admin > Manage Organization.
In the navigation pane, click User Accounts.
Click the arrow next to a user's name and select Edit User Account.
5. Click Next.
6. In the Subscription Add-ons section, select the Notes Traveler subscription.
7. Click Save.
What to do next
The user can now set up the mobile device to connect to the service. For
information, see theNotes Traveler documentation.
After the user sets up the device to connect to the service, if you use a hybrid
environment, remove the user’s account from any on-premises Notes Traveler
servers.
Related tasks:
Chapter 7, “Administering user accounts,” on page 243
Though IBM is responsible for the administration and maintenance of the mail
servers, there are tasks that you perform through an administration interface at
http://www.ibmcloud.com/social.
Related information:
Notes Traveler
Removing user accounts from on-premises Notes Traveler
servers
After a user sets up a device to connect to the service, if you use a hybrid
environment, remove all accounts the user has on on-premises IBM Notes Traveler
servers.
About this task
To remove users’ on-premises Notes Traveler accounts, deny users access to the
on-premises Notes Traveler server as described in the topic "“Restricting access
using server document access fields”." Then delete the users from the Notes
Traveler server.
In addition, remove any previous on-premises Notes Traveler client software or
account from mobile devices.
Restricting access using server document access fields:
Deny service users access to on-premises IBM Notes Traveler servers.
Procedure
1. From the Domino Administrator client, select the IBM Notes Traveler Server
document.
2. Click Edit Server.
3. Click the IBM Notes Traveler tab.
4. Populate either the Access Server or Not Access Server field with the names of
users and groups.
Chapter 6. Onboarding users
235
Users defined as Domino 'Full Access Administrators' have access regardless of
how the Not Access Server or Access Server fields are configured. Users
denied access to Domino through the Domino Not Access Server or Access
Server fields under the Security tab of the server document cannot access Notes
Traveler.
Table 71. Server access fields
Field
Description
Access Server
Select the option users listed in all trusted
directories to allow access to Notes Traveler
only to people that have person documents
in either the primary directory of this server
or any secondary directories that trusted
credentials using Domino directory
assistance.
You can also select individual names of
users and groups to allow access to this
Notes Traveler server. A blank entry means
that all users can access Notes Traveler
except any who are listed in the Not Access
Server field.
Not Access Server
Select the names of users and groups that
should be denied access to this Notes
Traveler server. A blank entry means that no
users are denied access.
Note: Entering names in the Access Server
field automatically denies access to those
names not listed.
5. Click Save & Close.
What to do next
Delete users from on-premises Notes Traveler servers.
Deleting a user from Notes Traveler servers:
Remove service users from all on-premises IBM Notes Traveler servers.
Procedure
1. Run the following command:
tell traveler delete * <username>
2. Run the following command:
tell traveler security delete * <username>
Note: If the user has already been deleted from the Domino directory, then the
full user name must be specified. For example:
tell traveler delete * "CN=John Doe/OU=Raleigh/O=IBM"
The previous two steps should completely remove the user, but you can verify
with these additional steps:
3. Open the Notes Traveler administration application and verify that there are no
entries for the user.
4. Open ntsclcache.nsf and verify that there are no entries for the user.
236
SmartCloud Notes: Administering SmartCloud Notes: Hybrid Environment March 2015
Getting started with the Notes client
If the IBM Notes client is used with the service, complete the following tasks to
help users get started.
Before you begin
Complete the procedures “Providing account information to users” on page 231
and “Preparing for Notes clients” on page 196.
About this task
Table 72. Getting started with the Notes client
Why this task is
important
Additional
information
Users require
instructions to
download and run
the client
configuration tool to
connect to a mail
server in the cloud.
For more
information, see the
Notes section of the
IBM SmartCloud
Notes user
documentation.
Prepare to
troubleshoot any
problems.
If a user has trouble
connecting the Notes
client to the cloud
mail server, you can
quickly resolve the
problem.
Technote: Could not
connect to server
when running IBM
SmartCloud Notes
liveConfig
application
(config.nsf)
(Optional) If users
exported contacts
and calendar entries
from their original
mail files, import the
entries into the new
mail files in the
cloud.
If mail files are not
transferred to the
service, this step
enables users to
preserve their
existing calendar and
contacts.
For more
information, see the
topic about exporting
and importing
calendars in the
Notes client help.
(Optional) Manually
configure the client
to connect to the
service instant
messaging
community.
One reason to do this
is if you want users
to be able to connect
to both an
on-premises
community and the
service community.
“Manually
configuring Notes
clients to connect to
the service instant
messaging
community” on page
175
Task
Point users to the
documentation.
Complete?
For complete
documentation on
using Notes, see the
help that comes with
the client.
Getting started with IMAP clients
If IMAP clients are used, complete the following tasks to help users get started
with them.
Chapter 6. Onboarding users
237
Before you begin
Complete the procedures “Provisioning users” on page 218 and “Configuring
IMAP access” on page 178.
About this task
Table 73. Getting started with IMAP clients
Why this task is
important
Additional
information
Point users to the
documentation.
The documentation
describes how to get
started with each
supported IMAP
client.
Enabling IMAP
access
Read the
documentation on
IMAP client
limitations.
This information can
be helpful with
troubleshooting.
IMAP client
limitations
Task
Complete?
Getting started with BlackBerry devices
If BlackBerry devices supported by a Hosted BlackBerry Services subscription are
used, complete the following tasks to begin using the devices with the service.
Before you begin
Complete the procedures “Providing account information to users” on page 231
and “Preparing to use BlackBerry devices” on page 203.
About this task
Note: If BlackBerry 10 devices are used, see “Getting started with the Notes
Traveler devices” on page 233, instead.
Accepting the Research In Motion terms of use
An authorized person from your company must accept the Research In Motion®
terms of use. This person receives an email notification with instructions that
include a link to the terms of use document.
About this task
After you accept the Research in Motion terms of use, you must wait to receive a
notification from an IBM Customer Service Representative indicating that your
company’s BlackBerry® subscription setup is complete. You must receive this
notification before you can add BlackBerry subscriptions to user accounts.
Related tasks:
“Preparing to use BlackBerry devices” on page 203
If you plan to use BlackBerry devices that are supported by a Hosted BlackBerry
Services subscription, complete these tasks to prepare.
Adding a BlackBerry subscription to a user account
To enable a user to connect to the service through a BlackBerry® smartphone, add
a SmartCloud Notes for Hosted BlackBerry® Services subscription to the user
account.
238
SmartCloud Notes: Administering SmartCloud Notes: Hybrid Environment March 2015
Before you begin
Before you can add BlackBerry® subscriptions to user accounts, you must receive a
notification from an IBM Customer Service Representative that the subscription for
your company has been set up.
About this task
The following steps describe how to add the subscription to the account of a user
that is already provisioned for SmartCloud Notes. You can also add the
subscription during user provisioning.
Procedure
1.
2.
3.
4.
Log on to the service as an administrator.
If your account also has the User role, click Admin > Manage Organization.
In the navigation pane, click User Accounts.
Click the arrow next to a user's name and select Edit User Account.
5. Click Next.
6. Under Subscription Add-ons, select SmartCloud Notes for Hosted BlackBerry
Services.
7. Click Next and then Finish.
Related tasks:
“Provisioning users” on page 218
Provisioning users adds IBM SmartCloud Notes subscriptions to user accounts in
the service. After users are provisioned, they can begin to access their mail in the
cloud.
Removing user accounts from an on-premises BlackBerry
Enterprise Server
If your company uses a hybrid environment and you have transferred user mail
files to the service, before you activate devices for the service, remove all accounts
users have from any on-premises BlackBerry® Enterprise Servers, and then wipe
the user devices. If you do not complete these steps, obsolete on-premises
information can be provided to the service. Completing these steps is also
important to prevent on-premises servers from consuming resources by repeatedly
attempting to access mail files in the service to which they no longer have access.
About this task
For information on removing accounts, see BlackBerry Knowledge Base document
KB04169.
Related information:
BlackBerry Knowledge Base document KB04169
Activating a user's BlackBerry smartphone
After you add a BlackBerry® subscription to a user account, the user's smartphone
must be activated to enable it to be used with the service.
Before you begin
The user's wireless carrier plan must be an Enterprise plan rather than a Personal
plan. A smartphone cannot be activated for the service when a Personal plan is
used.
Chapter 6. Onboarding users
239
Complete the procedures “Adding a BlackBerry subscription to a user account” on
page 238 and “Removing user accounts from an on-premises BlackBerry Enterprise
Server” on page 239.
About this task
To begin the activation process, a one-time activation password is created in the
service. You can create this activation password, or the user can create it.
After creation of the activation password, the user's smartphone is ready to be
activated. To activate the smartphone, the activation password and the user's
service Internet email address are entered on the smartphone using the Enterprise
Activation option.
The following steps are performed to activate a user's smartphone. You can
perform these steps, or the user can perform them as described in Using your
BlackBerry smartphone with SmartCloud Notes.
Procedure
1. If the smartphone has been used before, perform the following steps.
a. Back up any existing data. For instructions, see the BlackBerry Knowledge
Base article How to back up the data on a BlackBerry smartphone.
b. Wipe the smartphone. For instructions, see the BlackBerry Knowledge Base
article How to delete all data and applications from the BlackBerry
smartphone using the Wipe Handheld option.
2. To begin the activation process, perform the following steps to create an
activation password:
a. Log on to the service as an administrator.
b. If your account has the user role, click Admin > Manage Organization.
c. In the System Settings section of the navigation pane, click IBM
SmartCloud Notes.
d. Under User and Groups, click Users.
e. In the Search box, type the beginning characters of any of the following
user values to display the user's name:
v Distinguished name, for example, Samantha Daryn/Renovations.
v Internet email address, for example, sdaryn@renovations.
v Last name, for example, Daryn.
Note: You cannot use the wildcard character (*) when you search.
A “starts with” search is done and the names of any users with matching
values in the directory are displayed. For example, the results of a search on
ma include the names of users with the following values in the directory:
v Madison Armond/Renovations
v masmith@renovations
v Kristin MacGyver
This search does not match the following values:
v Emarie Klein/Renovations
v tamado@renovations
v Ted Amado
Search results can include a maximum of 1000 names.
240
SmartCloud Notes: Administering SmartCloud Notes: Hybrid Environment March 2015
f. Click the user's name in the search results.
g. Click Manage BlackBerry Smartphone.
h. Click Activate Now, create a one-time activation password, and then click
Set Password.
Note: Alternatively, the user can create the activation password through the
service web site.
3. To activate the smartphone, refer to the following table and perform the steps
that are shown for the operating system (OS) version of the smartphone.
Activation can take from a few minutes to an hour, depending on the size of
the mail file. After performing these steps, look for the Activation Complete
message on the smartphone, which indicates that activation is successful.
OS version
Steps to activate
OS4, OS5
1. From the Home screen of the
smartphone, click Manage Connections
and then enable your Mobile
Connection.
2. From the Home screen of the
smartphone, click Options > Advanced
Options > Enterprise Activation.
3. Enter your SmartCloud Notes Internet
email address, for example
[email protected].
4. Enter the activation password.
5. Click the track ball and select Activate.
Note: Leave the Activation Server Address
field blank, if you see it.
OS6, OS7
1. From the Main screen of the smartphone,
click Options > Device > Advanced
System Settings > Enterprise Activation.
2. Enter the SmartCloud Notes Internet
email address, for example
[email protected].
3. Enter the activation password.
4. Click the Activate button.
4. If you backed up data before activating, restore the data now. For information,
see the BlackBerry Knowledge Base article How to use BlackBerry Desktop
Software to restore data to a BlackBerry smartphone from a backup file.
Related tasks:
“Providing documentation to your BlackBerry smartphone users” on page 242
BlackBerry® smartphone users with a hosted BlackBerry subscription can activate
and manage their smartphones themselves using options available through the
service website at http://www.ibmcloud.com/social. To help users perform these
tasks and to troubleshoot problems, point them to the user documentation.
Ensuring that mail encryption is available for BlackBerry
smartphone users
To encrypt and sign mail with a BlackBerry® smartphone, a user’s IBM Notes ID
file must be uploaded to the ID vault in the service.
Chapter 6. Onboarding users
241
About this task
A Notes ID file is uploaded to the ID vault automatically under the following
circumstances:
v A user connects to the service with a Notes client. The ID is uploaded to the
vault at some point afterward.
v An ID is imported in the user’s mail file and the mail file is transferred to the
service. The ID is uploaded to the vault during user provisioning.
If neither circumstance applies, administrators can use SmartCloud Notes
Administration to upload an ID file to the vault. After the ID file is uploaded, the
smartphone prompts the user for the password. After that point, the user no longer
provides a Notes password. The user provides only the smartphone password.
Related tasks:
“Uploading a Notes ID to the vault” on page 269
In a hybrid environment, if a service user has an IBM Notes ID file, the ID must be
stored in the ID vault in the service. In some cases, for users who have a Notes ID,
but who will not use the Notes client, you might need to upload the Notes ID to
the vault manually. If it is not stored in the vault, web client, Notes Traveler, and
BlackBerry® smartphone users cannot perform secure mail operations. Other
limitations also apply, as outlined in this topic.
Providing documentation to your BlackBerry smartphone users
BlackBerry® smartphone users with a hosted BlackBerry subscription can activate
and manage their smartphones themselves using options available through the
service website at http://www.ibmcloud.com/social. To help users perform these
tasks and to troubleshoot problems, point them to the user documentation.
About this task
BlackBerry smartphone users can perform the following tasks themselves:
v Activate a smartphone
v Reactivate a smartphone to correct a problem
v Activate a different smartphone
v Wipe a smartphone
Instructions for performing these tasks can be found in the “Using your BlackBerry
smartphone with SmartCloud Notes ” section of the user documentation.
Note: For information on using a BlackBerry® 10 device, see the Notes Traveler
documentation for SmartCloud Notes.
Related information:
Using your BlackBerry smartphone with SmartCloud Notes
Notes Traveler documentation
242
SmartCloud Notes: Administering SmartCloud Notes: Hybrid Environment March 2015
Chapter 7. Administering user accounts
Though IBM is responsible for the administration and maintenance of the mail
servers, there are tasks that you perform through an administration interface at
http://www.ibmcloud.com/social.
About this task
You must have the Administrator role assigned in a user account to perform most
administration tasks. An exception is resetting the service login password for a
user account, which can also be performed by someone with the Admin Assistant
role.
Best practices for maintaining your on-premises environment
Follow these best practices to help ensure that your on-premises environment
remains properly configured to work with the service.
Table 74. Best practices for maintaining your on-premises environment
Best practice
More information
Run the Configuration Test tool about once a This tool detects problems with your
month.
on-premises configuration that can prevent
proper operation of the service.
If an error in your on-premises configuration
is reported, after you fix the problem that
caused the error, download and run a new
copy of the Domain Configuration tool
on-premises. Running the tool can fix many
problems with your on-premises
configuration.
For more information, see the topics
“Running configuration tests” on page 99
and “Downloading and running the Domain
Configuration tool” on page 94.
Follow the guidelines for maintaining
on-premises Domino servers.
For more information, see the server
maintenance checklist topic in the Domino
documentation.
Do not delete or modify the following
entries in the ACL of any synchronized
directory:
The Domain Configuration tool creates these
ACL entries. Download and run the tool to
ensure that these ACL entries are correct.
v Entries for your on-premises directory
synchronization servers
v The LLNServers group entry
If these ACL entries are missing or modified,
directory synchronization fails and user
provisioning fails.
v The SaaSLocalDomainServers group entry.
Do not edit the CustomerMailHubs group
© Copyright IBM Corp. 2011
Change on-premises hub servers through
administration Account Settings. For
example, change a mail hub server through
the Account Settings > Mail Routing Server
administration page. Then download and
run the Domain Configuration Tool to
update your on-premises configuration.
243
Table 74. Best practices for maintaining your on-premises environment (continued)
Best practice
More information
Do not delete or edit the following groups
that the service creates in a synchronized
directory:
These groups are created and maintained by
the service.
LLNServers
LLNMailHubs
CustomerMailHubs
Do not create groups with the following
names:
These names are reserved for use in the
service.
LLNServers
LLNMailHubs
CustomerMailHubs
Do not create groups with names that begin
with Certifiers_ or SAAS.
Disable the advanced ACL setting Enable
Extended Access in any synchronized
Domino directory.
If this setting is enabled, directory
synchronization fails. If the directory is used
for provisioning, user provisioning fails.
To move a synchronized directory to another Follow these steps:
server or to change the file name of a
1. Move the directory or change the file
synchronized directory, follow the correct
name on-premises.
procedure.
If you are moving the directory, from
Notes select File > Replication > New
Replica to create a replica at the new
location.
2. In the Directory Sync Server
Configuration page of SmartCloud
Notes Administration, update the
existing entry for the directory to match
the new on-premises server location or
file name.
Important: Do not delete the existing
entry and create a new one. If you do, all
directory documents are deleted and
then re-created, a process that can take
multiple days to complete.
3. Download and run the Domain
Configuration tool.
To delete a synchronized directory, follow
the correct procedure.
To delete a synchronized directory, follow
these steps:
Note: If you are moving a directory, do not
delete it.
1. In the Directory Sync Server
Configuration page of SmartCloud
Notes Administration, open the entry for
the directory and click Remove.
2. Download and run the Domain
Configuration tool.
3. Delete the directory on-premises.
244
SmartCloud Notes: Administering SmartCloud Notes: Hybrid Environment March 2015
Table 74. Best practices for maintaining your on-premises environment (continued)
Best practice
More information
In environments with multiple Domino
domains that use policies, do not use the
same policy name in more than one domain
directory.
If two policies have the same name, the
service uses one only, which can cause
unexpected, incorrect results.
The Domain Configuration tool warns you
when duplicate policy names are found.
In environments with multiple Domino
If a group name in a mail file ACL matches
domains, do not a use the same group name two on-premises groups, the one ACL entry
in more than one synchronized directory.
controls access for members of both groups.
If mail groups have the same name, users
must choose which one to use each time
they send mail to the group name. Using
unique group names avoids this step.
The Domain Configuration tool warns you
when duplicate group names are found.
In environments with multiple Domino
domains that use Resource Reservations, do
not use the same site name in more than one
domain.
If sites in two domains have the same name,
the service lists resources from both sites
under one site name. This situation can lead
users to reserve resources at the wrong site.
See Technote 1473022 for instructions on
making site names unique.
The Domain Configuration tool warns you
when duplicate site names are found.
Keep public key checking disabled on the
following on-premises servers:
v Mail hub servers that route mail directly
to the service
v Mail servers of on-premises users that
look up the free-time of service users
If public key checking is not disabled, mail
routing and free-time lookups fail. To
disable public key checking on a server:
1. Open the Server document in the
Domino directory in edit mode.
2. Click the Security tab.
3. In the Compare public keys field in the
Security Settings section, select Do not
enforce key checking then click OK.
Continue to use your on-premises SMTP
gateway server to route incoming mail.
When users on the Internet send mail to
service users, the mail is sent to an
on-premises SMTP server. From there it is
routed to the service over NRPC. If the
SMTP server is not available, service users
cannot receive mail from the Internet.
For more information, see the topic
“Preparing to route mail to service users” on
page 55
For mail hub servers that route directly to
the service, configure the retry interval and
multiple transfer threads for optimum mail
routing performance.
For more information, see “Preparing to
route mail to service users registered in the
on-premises hub domain” on page 55 and
“Preparing to route mail to service users in a
secondary domain” on page 57.
Chapter 7. Administering user accounts
245
Changing user mail file templates
You can change the mail file template assigned to a user. For example, change the
mail template if the IBM Notes client of a user is upgraded to a new version.
Before you begin
Make sure that users are offline when you change their templates.
About this task
When you change a user's mail file template, custom folders in the mail file inherit
the design of the Inbox folder. Custom folders are user-created folders or
company-created folders from a custom template that is used in the service.
Note: If you change the languages of a user's IBM SmartCloud Notes subscription,
you then also need to change the language of the mail file template.
Procedure
1. Log on to http://www.ibmcloud.com/social using the email address and
password of a SmartCloud Notes user with the Administrator role.
2. If your account also has the User role, click Admin > Manage Organization.
3. In the System Settings section of the navigation pane, click IBM SmartCloud
Notes.
4. Click Users.
5. In the Search box, type the beginning characters of any of the following user
values to display the user's name:
v Distinguished name, for example, Samantha Daryn/Renovations.
v Internet email address, for example, sdaryn@renovations.
v Last name, for example, Daryn.
Note: You cannot use the wildcard character (*) when you search.
A “starts with” search is done and the names of any users with matching
values in the directory are displayed. For example, the results of a search on
ma include the names of users with the following values in the directory:
v Madison Armond/Renovations
v masmith@renovations
v Kristin MacGyver
This search does not match the following values:
v Emarie Klein/Renovations
v tamado@renovations
v Ted Amado
Search results can include a maximum of 1000 names.
6. Select the name of each user to change to a specific template. You can search
for and select more names; previously selected names remain selected.
7. Click Apply Mail Template.
8. Select the template to use.
9. Click Apply Mail Template.
10. Click Confirm.
11. Click Continue.
246
SmartCloud Notes: Administering SmartCloud Notes: Hybrid Environment March 2015
Related information:
Integration server and user provisioning change files
Viewing assigned mail file templates
You can view the mail file template that is assigned to a service user.
About this task
If only the template ID displays in the field, the template assigned to the user has
been removed from the template repository. Although the user's mail file is not
affected, you should assign a new template.
Procedure
1. Log on to the service as an administrator.
2. If your account also has the User role, click Admin > Manage Organization.
3. In the System Settings section of the navigation pane, click IBM SmartCloud
Notes.
4. Click Users.
5. In the Search box, type the beginning characters of any of the following user
values to display the user's name:
v Distinguished name, for example, Samantha Daryn/Renovations.
v Internet email address, for example, sdaryn@renovations.
v Last name, for example, Daryn.
Note: You cannot use the wildcard character (*) when you search.
A “starts with” search is done and the names of any users with matching
values in the directory are displayed. For example, the results of a search on ma
include the names of users with the following values in the directory:
v Madison Armond/Renovations
v masmith@renovations
v Kristin MacGyver
This search does not match the following values:
v Emarie Klein/Renovations
v tamado@renovations
v Ted Amado
Search results can include a maximum of 1000 names.
6. Click the user's name in the search results.
7. Look in the Mail Template field, which includes the following information:
v Name
v Version
v Language
v Template ID number
Related concepts:
“Language versions of the standard mail file template” on page 248
The mail file template supported in the service is the IBM Notes Standard 8.5
template (STDR85Mail). This topic lists the languages in which this template is
provided.
Chapter 7. Administering user accounts
247
Related tasks:
“Configuring mail file templates” on page 164
Configure which mail file templates can be applied to user mail files and configure
a mail file template to use by default.
Language versions of the standard mail file template
The mail file template supported in the service is the IBM Notes Standard 8.5
template (STDR85Mail). This topic lists the languages in which this template is
provided.
v
v
v
v
v
v
v
English (en)
Arabic (ar)
Catalan (ca)
Czech (cs)
Danish (da)
German (de)
Greek (el)
v Finnish (fi)
v French (fr)
v Hebrew (he)
v
v
v
v
v
Hungarian (hu)
Italian (it)
Japanese (ja)
Korean (ko)
Dutch (nl)
v Norwegian (no)
v Polish (pl)
v Portuguese (pt)
v
v
v
v
v
Portuguese, Brazil) (pt_BR)
Russian (ru)
Slovak (sk)
Slovenian (sl)
Swedish (sv)
v Thai (th)
v Turkish (tr)
v Chinese, China (zh_CN)
v Chinese, Taiwan (zh_TW)
v Spanish (es)
Assigning extension forms files to users
After an IBM representative uploads an approved extension forms file to the
service, you can assign the forms file to users. Extension forms file enable you to
customize the visual theme, fonts, the action bar, and other aspects of the web
client.
248
SmartCloud Notes: Administering SmartCloud Notes: Hybrid Environment March 2015
About this task
You can assign extension forms files to users explicitly. You can also assign
extension forms files to users implicitly by setting a default extension forms file.
The following topics describe how to use IBM SmartCloud Notes Administration to
assign extension forms files. You can also use user provisioning change files and
the IBM Connections Cloud integration server. For more information, see the
integration server section of the Connections Cloud documentation.
Related tasks:
“Using extension forms files to customize the look of the web client” on page 165
You can use an extension forms file to customize the visual theme, fonts, the action
bar, and other aspects of the web client. For example, you can add graphics,
change colors, and add new menu items.
Related information:
IBM Connections Cloud documentation
Setting a default extension forms file
Optionally set a default extension forms file that applies to all current and future
web client users who are not explicitly assigned an extension forms file.
Before you begin
An IBM representative must upload the approved extension forms file to the
service.
About this task
If you do not specify a default extension forms file, users without an explicit
extension forms file see the default service behavior. The default service behavior is
similar to IBM iNotes 9.0.
Procedure
1. Log on to the service as an administrator.
2. If your account also has the User role, click Admin > Manage Organization.
3. In the System Settings section of the navigation pane, click IBM SmartCloud
Notes.
4. Click Extension Forms Files.
5. Select the forms file and click Set as Default.
Results
The change takes effect the next time web client users log in to the service.
In the list of files in the Extension Forms Files page, the text [default] is shown
after the file name. The file is also shown in the Defaults page, in the Default
Extension Forms File section.
To see whether a user uses the default forms file, from SmartCloud Notes
Administration, click Users and select the name of the user. If the user uses the
default extension forms file, the value of the Forms extension field is Default
(forms file), where forms file is the name of the default extension forms file.
Chapter 7. Administering user accounts
249
You can disable a default extension forms file and revert to the default service
behavior. To do so, perform this procedure and in the last step select None in the
files list and click Set as Default. The extension forms file remains available and
you can re-enable it as the default at any time.
Explicitly assigning an extension forms file to many current
users
You can assign a forms file to all current users, to users who are explicitly assigned
a different extension forms file, or to users who are not explicitly assigned an
extension forms file who use the default behavior.
Before you begin
An IBM representative must upload the extension forms file to the service.
About this task
To apply an extension forms file during user provisioning, see the user
provisioning topics, instead.
Procedure
1. Log on to the service as an administrator.
2. If your account also has the User role, click Admin > Manage Organization.
3. In the System Settings section of the navigation pane, click IBM SmartCloud
Notes.
4. Click Extension Forms Files.
5. Select the extension forms file to assign and click Apply to Users.
Note: To remove an explicit forms file assignment and revert to the default
forms file or the default service behavior, select None [default].
6. Perform the steps in the following table that correspond to your objective.
Table 75. Steps to assign an extension forms file to many users
Objective
Steps
Assign to all users in the service.
Click Apply to > All users.
Note: An alternative approach is to set a
default extension forms file. A default file is
used by all current and future users who are
not assigned an extension forms file
explicitly.
Assign to all users who are not currently
assigned to the selected forms file.
1. Click Apply to > Users of a different
extension forms file.
2. Select the current extension forms file of
the users.
Assign to all users who are not explicitly
assigned an extension forms file.
1. Click Apply to > Users of a different
extension forms file.
2. Select None (default).
7. Click Apply.
250
SmartCloud Notes: Administering SmartCloud Notes: Hybrid Environment March 2015
Results
If you click Cancel or close the window before the changes are complete, the
change is cancelled only for users not yet processed.
The extension forms file changes take effect the next time the web client users log
in to the service.
If you click Users from SmartCloud Notes Administration and select the name of a
user, the Forms extension field shows the extension forms file.
Related tasks:
“Provisioning users without transferring mail files” on page 219
This procedure adds an IBM SmartCloud Notes subscription to a user account and
creates a new mail file for the user on a mail server in the cloud. You can also add
optional subscriptions purchased by your company.
“Provisioning users and mail files” on page 224
If you are transferring user mail files to the service with the assistance of an IBM
partner, after the transfer manager imports a batch of users and mail files into the
service, you can provision the users for IBM SmartCloud Notes.
Explicitly assigning an extension forms file to individual
current users
You can explicitly assign an extension forms file to individual current users. The
explicit assignment overrides the default behavior for your company.
Before you begin
An IBM representative must upload the extension forms file to the service.
About this task
To apply an extension forms file during user provisioning, see the user
provisioning topics, instead.
Procedure
1. Log on to the service as an administrator.
2. If your account also has the User role, click Admin > Manage Organization.
3. In the System Settings section of the navigation pane, click IBM SmartCloud
Notes.
4. Click Users.
5. Display the names of the users to whom you want to assign the forms file. In
the Search box, type the beginning characters of any of the following user
values:
v Distinguished name, for example, Samantha Daryn/Renovations.
v Internet email address, for example, sdaryn@renovations.
v Last name, for example, Daryn.
Note: You cannot use the wildcard character (*) when you search.
A “starts with” search is done and the names of any users with matching
values in the directory are displayed. For example, the results of a search on ma
include the names of users with the following values in the directory:
v Madison Armond/Renovations
Chapter 7. Administering user accounts
251
v masmith@renovations
v Kristin MacGyver
This search does not match the following values:
v Emarie Klein/Renovations
v tamado@renovations
v Ted Amado
Search results can include a maximum of 1000 names.
6. Select the names of the users from the search results.
7. Click Apply Extension Forms File.
8. Select the file and click Apply.
Results
If you click Cancel or close the window before the changes are complete, the
change is cancelled only for users not yet processed.
The extension forms file changes are visible the next time the user uses the web
client to log in to the service.
If you click Users from SmartCloud Notes Administration and click a user name to
see details about the user, the Forms extension field shows the extension forms
file.
To remove an explicit extension forms file assignment, repeat the procedure and in
the last step select None in the list of file names and click Apply. Users then use
the default extension forms file, if specified, or the default service behavior.
Related tasks:
“Provisioning users without transferring mail files” on page 219
This procedure adds an IBM SmartCloud Notes subscription to a user account and
creates a new mail file for the user on a mail server in the cloud. You can also add
optional subscriptions purchased by your company.
“Provisioning users and mail files” on page 224
If you are transferring user mail files to the service with the assistance of an IBM
partner, after the transfer manager imports a batch of users and mail files into the
service, you can provision the users for IBM SmartCloud Notes.
Resetting service login passwords
Users can reset their own service login passwords once within a 24 hour period by
clicking Forgot password?. An administrator or administrator assistant can reset
service login passwords for any user at any time.
About this task
Reset passwords when userd forget their passwords, or when the password might
be compromised. Users that log in by clicking Use My Organization's Login are
using a federated identity and can reset their passwords only by following their
company's process.
If administrators enable password synchronization, when users change their
service login passwords, they can also use the new passwords to log in to the IBM
Notes client.
252
SmartCloud Notes: Administering SmartCloud Notes: Hybrid Environment March 2015
Follow these steps to reset any user's password:
Procedure
Click Administration > Manage Organization.
Click User Accounts.
Select the arrow next to the user that needs the password changed.
Select Reset password and enter the new password. This password is a
temporary password that the user enters the next time that they log in. At that
time, the user is asked to create a password.
You can also reset the password by editing the user account. Click the
appropriate user name in User Accounts and enter a new password in the
Account Login tab.
5. Notify the user of the password change. The user is not automatically notified
that the password was reset. Make sure to communicate this change to the user,
along with the new password if needed.
1.
2.
3.
4.
What to do next
Administrators can enable security settings to enforce password expiration through
System Settings > Security. When s user logs in with an expired password, the
user is prompted to reset that password.
Resetting passwords for Notes IDs
Reset the password on an IBM Notes ID file to change the current password.
Typically you do this because a user has forgotten the current password.
About this task
This procedure applies only to passwords associated with Notes ID files used with
Notes clients, and not to service login passwords.
Procedure
1. Log on to http://www.ibmcloud.com/social using the e-mail address and
password of a SmartCloud Notes user with the Administrator role.
2. If your account also has the User role, click Admin > Manage Organization.
3. In the System Settings section of the navigation pane, click IBM SmartCloud
Notes.
4. Click Users.
5. In the Search box, type the beginning characters of any of the following user
values to display the user's name:
v Distinguished name, for example, Samantha Daryn/Renovations.
v Internet email address, for example, sdaryn@renovations.
v Last name, for example, Daryn.
Note: You cannot use the wildcard character (*) when you search.
A “starts with” search is done and the names of any users with matching
values in the directory are displayed. For example, the results of a search on ma
include the names of users with the following values in the directory:
v Madison Armond/Renovations
v masmith@renovations
v Kristin MacGyver
Chapter 7. Administering user accounts
253
This search does not match the following values:
v Emarie Klein/Renovations
v tamado@renovations
v Ted Amado
6.
7.
8.
9.
Search results can include a maximum of 1000 names.
Click the user's name in the search results.
Under Available actions for this user, click Reset IBM Notes Password.
Enter a new password, and then click Save Changes. The password must be at
least eight characters in length.
Provide the new password to the user in a way that complies with your
company security policies.
Results
After you complete this procedure, the user can log on to a SmartCloud Notes
server from an IBM Notes client using the new password. After logging on with
the new password, the user is prompted to change the password.
Note: If the Wrong Password prompt is displayed, tell the user to re-enter the new
password that you provided. If that step does not solve the problem, tell the user
to delete the local ID file and then re-enter the password.
The user has five days from the time you reset a password to use the password to
log on to a SmartCloud Notes mail server and download the new password to the
Notes client. If the 5-day limit is exceeded, the user sees the following message
and you must reset the password again:
Contact your company administrator to have your Notes ID password reset.
Related concepts:
“Notes IDs and passwords” on page 130
When users connect to their mail servers in the cloud with IBM Notes clients and
Notes IDs, they are authenticated using Notes Remote Procedure Call (NRPC)
authentication.
Related tasks:
“Resetting service login passwords” on page 124
Users can reset their own service login passwords once within a 24 hour period by
clicking Forgot password?. An administrator or administrator assistant can reset
service login passwords for any user at any time.
“Setting password expiration for Notes IDs” on page 126
For users who access the service with the IBM Notes client, you can specify when
Notes ID passwords expire. This password expiration does not apply to web users
because they log in using their web login password rather than a Notes ID
password.
“Enabling password synchronization” on page 128
When users change their service login passwords, password synchronization
enables the users to use the new passwords when they log in to the IBM Notes
client.
254
SmartCloud Notes: Administering SmartCloud Notes: Hybrid Environment March 2015
Changing a Notes user name
In a hybrid environment, you use the Domino Administrator client on-premises to
change a user's Notes name. The steps initiate a series of administration process
requests.
Before you begin
Important: Read the topic “Rules to follow when you change a Notes name” on
page 257. It is important to understand these rules before you continue.
About this task
After you initiate a rename on-premises, the change replicates to the service. Then,
the rename is initiated for the servers in the service as well. This process changes
the Notes user name, but does not change the name in the Connections Cloud user
account. You or the user change the name in the user account.
Procedure
1. From the IBM Domino Administrator client, on a server whose directory you
synchronize with servers in the service, perform the steps that correspond to
your goal.
Table 76. Steps to change a user's names
Goal
Steps
You want to change any of the following
names:
Tools > People > Rename > Change
Common Name
v Common name, for example, change
Samantha Daryn/Renovations to Samantha
Brown/Renovations
v Alternate name
For more information, see the topic about
renaming a Notes user's common or
alternate name in the Domino
documentation.
v Short name
Important: If you want to change multiple
names for one user, do so in one rename
operation. If you want to change a name and
the Internet address, do so as part of one
rename operation.
You want to change the certifier portion of
the name. For example, change Samantha
Daryn/Renovations to Samantha
Daryn/PowerRenovations. Optionally, you
also want to change any of the following
values:
Tools > People > Rename > Request Move
to New Certifier
For more information, see the topic about
moving a user name in the name hierarchy
in the Domino documentation.
v Common name
v Alternate name
v Short name
v Internet address
Important: If you want to change the
certifier name and other names or the
Internet address for one user, do so as part
of one rename operation.
2. Optional: If you changed the common name or Internet address, optionally edit
the user account to match:
Chapter 7. Administering user accounts
255
Note: Users can change their common names themselves by editing the My
Account Settings page. Users cannot change their own login email addresses.
a. Log on to the service as an administrator.
b. If your account has the user role, click Admin > Manage Organization.
c. Click User Accounts, click the arrow next to the account to edit, and select
Edit User Account.
d. In the User Information tab, update one or both of the name fields.
e. If you changed the Internet address, in the Account Login tab, optionally
update the Email field to match the new address. The Email field serves
only as the identity used to log in to the service from a browser; the
SmartCloud Notes service uses the Internet address field in the Person
document to determine the Internet address for mail routing.
Results
The following table provides an estimate of the time required to complete each
type of name change and how to determine whether the change is complete.
Table 77. Rename time estimate and verification
Type of name change
Rename completion
Notes name change
The Notes name change is usually complete
in about a day. However, because renaming
is a multi-step sequential process, a delay in
any step can cause the rename to take
longer. While the name is being changed, the
current user name remains valid.
When a rename is complete, the change is
visible in the following places:
v Directories1,2, database ACLs, and groups
that include the name on servers in the
service and on-premises servers.
v Web client navigation pane and new mail
messages.
v The User name field in the Notes client
login window.
v The user's mail file ACL.
v The Users page in SmartCloud Notes
Administration.2
1
New short name or alternate name is
visible here.
2
User account name change
New Internet address is visible here.
The change occurs immediately after an
administrator or user edits the user account.
A new name and email login address
display the next time that the user logs in
from a browser.
What to do next
If the name of a mail file delegate changes, the mail file owner must reassign
delegation to the new name. Doing so updates the mail file ACL to allow the
delegate access under the new name.
256
SmartCloud Notes: Administering SmartCloud Notes: Hybrid Environment March 2015
Related information:
Domino documentation
Rules to follow when you change a Notes name
When you change a user’s Notes name, you must follow these rules.
v If you want to change multiple parts of a user's name, do so in one rename
request. Do not issue one request to change a common name and then a separate
request to change a certifier name. For example, change Samantha
Daryn/Renovations to Samantha Brown/Power Renovations with one rename
request.
v To change both a user's name and Internet address, change the Internet address
as part of the rename request. Do not issue a rename request for the name
change and then edit the Person document separately to change the Internet
address.
v Never start a second rename until the first rename is complete, for example, if
you make a mistake in a rename request. Wait until the first rename is complete
and the user accesses the service under the first changed name before you
rename the user again. If the first rename is not complete, fields with names that
begin with AdminpOld remain in the Person document.
v Never change the Notes name by editing the name manually in the Person
document. Instead, always initiate the name change through the Domino
Administrator client. When you use the Domino Administrator client, the
Administration Process makes the changes throughout your environment and
required directory changes can replicate to the service during directory
synchronization.
v Never rename a user who is being provisioned or whose mail is being
transferred to the service. Wait until the user accesses the SmartCloud Notes
service at least one time under the current name before you rename the user.
v If a rename does not complete within a reasonable amount of time, contact
SmartCloud Notes Support. Do not remove the user account, the SmartCloud
Notes subscription, or the Person document and attempt to re-create a user.
v After you start a rename of a Notes client user, tell the user not to switch to a
Location document that refers to an on-premises mail server. Doing so can cause
the user to accept the new name on-premises rather than in the service, which is
not allowed.
v Never rename a user at the same time that you change the user’s Domino
domain.
v If the user has a Notes ID file and uses it in the service, the ID file must be
stored in the service ID vault before you rename the user. To determine whether
a user ID is stored in the vault, open SmartCloud Notes Administration, click
Users, search for the user page, and look at the Notes ID file field. If the ID is
not in the vault, an administrator can upload the ID file to the vault manually
from the user page in SmartCloud Notes Administration.
v If the rename includes a move to a different certifier, verify that the directory
contains a Vault Trust Certificate issued from the new certifier (or an ancester of
the certifier) to the service ID vault. If such a certificate does not exist, create one
and wait for directory synchronization to replicate it to the service before you
rename the user.
v A web client user, Notes Traveler user, or BlackBerry® user can have a Notes ID
file that is never used in the service and that is not stored in the service ID
Chapter 7. Administering user accounts
257
vault. Before you rename a user such as this, either upload the ID to the vault or
delete the public key information from the following fields in the user’s Person
document:
– Certificate
– CertificateExpiration
– CertificateIssuer
v If the name of a mail file delegate changes, the mail file owner must reassign
delegation to the new name. Doing so updates the mail file ACL to allow the
delegate access under the new name.
Related tasks:
“Uploading a Notes ID to the vault” on page 269
In a hybrid environment, if a service user has an IBM Notes ID file, the ID must be
stored in the ID vault in the service. In some cases, for users who have a Notes ID,
but who will not use the Notes client, you might need to upload the Notes ID to
the vault manually. If it is not stored in the vault, web client, Notes Traveler, and
BlackBerry® smartphone users cannot perform secure mail operations. Other
limitations also apply, as outlined in this topic.
“Issuing a Vault Trust Certificate” on page 101
You must issue a Vault Trust Certificate from a parent certifier of service users’
Notes ID files to the certifier of the service ID vault. This step is a prerequisite for
user provisioning.
Changing an Internet email address
Use this procedure to change a user's Internet email address if you are not also
changing the user's Notes name.
About this task
There are two places that an Internet address is used. The SmartCloud Notes
service uses the Internet address in the Person document for Internet email
addressing and delivery. In addition, there is an Internet address in the Email field
in the service user account. This address is the account identity used to log in to
the service with any subscription from a browser. Changing the value of the Email
field to match the new Internet email address in the Person document provides a
consistent experience for the user.
Important: If you are changing both the Notes name and Internet address,
complete the steps for changing a Notes user name, instead.
Procedure
1. To change the Internet email address in the on-premises Domino directory if
you are not also changing the Notes name:
a. From an on-premises Domino Administrator, open the Domino directory in
which the user is registered.
b. From the People view, select the user's Person document.
c. Click Edit Person.
d. In the Basics tab, in the Mail section, change the address in the Internet
address field.
e. Click Save & Close.
f. Wait for the change to replicate to the service during directory
synchronization.
258
SmartCloud Notes: Administering SmartCloud Notes: Hybrid Environment March 2015
Tip: To verify that the change has been made in the service, open the Users
page in SmartCloud Notes Administration, search for the user, and in the
user page look at the Internet address field.
2. To
a.
b.
c.
d.
change the account login identity to match the new Internet email address:
Log in to the service as an administrator.
If your account has the user role, click Admin > Manage Organization.
Click User Accounts.
Click the arrow next to the user account to change and select Edit User
Account.
e. Click Account Login.
f. In the Email field, click change.
g. In the New email address field, provide the new address and click Finish.
What to do next
Provide the user with their new address and account login identity.
Related tasks:
“Changing a Notes user name” on page 255
In a hybrid environment, you use the Domino Administrator client on-premises to
change a user's Notes name. The steps initiate a series of administration process
requests.
Removing a SmartCloud Notes subscription from a user account
When you remove a SmartCloud Notes subscription from a user's account, the
subscription is available for another user. The account identity still exists, unless
you delete the user account, and is still active, unless you suspend the user. The
user can still log in to the cloud service, but the user no longer has access to
SmartCloud Notes.
Procedure
1. Log on to the service as an administrator.
2. If your account also has the User role, click Admin > Manage Organization.
In the navigation pane, click User Accounts.
Click the name of the user to edit the user account settings.
Click Next to select the Subscriptions tab.
Perform one of the following steps:
v If the user has more than one subscription, select Customize the
subscriptions for this user and in the Mail field select None selected.
v If the user has only a SmartCloud Notes subscription, select None.
7. Click Next and then Finish.
8. The Edit User Summary window indicates that subscription removal is in
progress. When you click Back to User Accounts, SmartCloud Notes is
removed from the Subscription column for the user.
3.
4.
5.
6.
Results
v The subscription is no longer assigned and is available for another user.
v The mail file becomes inactive. The owner, or a user who has delegation access,
cannot open it. Mail is no longer delivered to the mail file.
Chapter 7. Administering user accounts
259
v User data (including the mail file and vaulted Notes ID) remains on the servers
in the service for 30 days. To see whether a user's data is still in the service,
from SmartCloud Notes Administration, click Users and then Deleted Users. If
the user's name is listed, the data is still in the service. You can force the data to
be deleted by clicking Delete Data.
What to do next
If you want to add the subscription to the user account once again, be aware of the
following considerations:
v If you removed the user's SmartCloud Notes subscription and the user name is
still shown in the Users > Deleted Users page of SmartCloud Notes
Administration, the user data is still in the service. In this case, to add back the
subscription, you edit the Connections Cloud user account. The user regains
access to the mail file and the name is removed from the Deleted Users page.
v If you removed the user's SmartCloud Notes subscription and the user name is
no longer shown in the Users > Deleted Users page, the user data has been
removed from the service. In this case, to add back the subscription, you must
provision the user again through SmartCloud Notes Administration. The user
starts with a new mail file, unless you transfer the mail file to the service before
you provision the user.
Related tasks:
“Deleting a user account” on page 261
When you delete a user's account, the user no longer has access to any cloud
services. If you change your mind about the deletion, you have up to 30 days to
restore the account to full functionality.
“Suspending a user account”
You can suspend a user account. When an account is suspended, the user cannot
log in to the service. If the user is logged in at the time the account is suspended,
the user can continue working, but cannot log in again after logging out. No
subscriptions are available to the user, but they remain assigned to the user. Also,
the user identity and user data remain on servers in the service.
Related information:
Integration server
Suspending a user account
You can suspend a user account. When an account is suspended, the user cannot
log in to the service. If the user is logged in at the time the account is suspended,
the user can continue working, but cannot log in again after logging out. No
subscriptions are available to the user, but they remain assigned to the user. Also,
the user identity and user data remain on servers in the service.
About this task
Use these steps to suspend a user account, which affects all subscriptions assigned
to a user.
If a user has other subscriptions that you want to remain available to the user, a
Customer Service Representative can suspend a subscription, rather than
suspending an entire account. In that case, the user can log in to the service and
there is no interruption to other subscriptions.
260
SmartCloud Notes: Administering SmartCloud Notes: Hybrid Environment March 2015
Procedure
1.
2.
3.
4.
Log on to the service as an administrator.
If your account also has the User role, click Admin > Manage Organization.
In the navigation pane, click User Accounts.
Click the arrow next to a user name and then click Suspend.
Results
The following results occur when a user account is suspended:
v Subscriptions remain assigned, and cannot be assigned to other users.
v The user cannot log in and is not listed in the company directory.
v The mailbox becomes inactive and the owner cannot open it. However, someone
who has delegation access to the mail file can open it.
v Mail is not delivered to the mailbox.
v You can reset the user account password.
Note: To return a suspended account to active status, edit the user account using
the previous steps, and in Step 4, click Unsuspend Account. When the account is
returned to active status, the mail file is once again available to the user.
Related information:
Integration server
Deleting a user account
When you delete a user's account, the user no longer has access to any cloud
services. If you change your mind about the deletion, you have up to 30 days to
restore the account to full functionality.
Procedure
1.
2.
3.
4.
Log on to the service as an administrator.
If your account also has the User role, click Admin > Manage Organization.
In the navigation pane, click User Accounts.
Click the arrow next to a user name and then select Delete User.
5. Optional: Enter the email address of a user in your organization to whom you
want to transfer the deleted user's collaboration resources, such as files.
Note: You cannot transfer ownership of the mail file.
6. Click Trash.
Results
The user whose account is deleted can no longer log in to the service. If the user is
logged in at the time of account deletion, he or she can continue to use the service
until the session expires.
Up to 30 days from the initial account deletion, the following conditions exist:
v The user account has the status Trash in the User Accounts page.
v The mail file is inactive and cannot be opened by the owner, or by another user
who has delegation access to the mail file. Mail is not delivered to the mail file.
Chapter 7. Administering user accounts
261
v The subscriptions associated with the deleted account cannot yet be assigned to
other users.
v The user data remains in the service. If you deleted the account by mistake, you
can restore the account to full functionality, including mail.
v You can permanently delete the account to remove the user data and free the
subscriptions to be assigned to other users.
31 to 90 days from the initial account deletion, the following conditions exist if you
did not permanently delete the account:
v The account is no longer visible and you cannot restore it or permanently delete
it.
v An IBM customer service representative can restore the account.
v The subscriptions associated with the deleted account cannot yet be assigned to
other users.
After 90 days from the initial account deletion, the account is permanently deleted
and the following conditions exist:
v The account subscriptions can be assigned to other users.
v The user data for collaboration subscriptions is permanently deleted.
v The SmartCloud Notes user data, such as the mail file, remains for 30 more
days. You can permanently delete this data yourself, if you do not want to wait
the 30 days.
Note: While the SmartCloud Notes data remains, you cannot create a user
account with the same common name and email address as that of the deleted
account.
After 120 days from the initial account deletion, SmartCloud Notes user data is
permanently deleted, if it was not deleted previously.
Related tasks:
“Restoring a deleted user account” on page 263
After you delete a user account, you have up to 30 days to restore it if you change
your mind. Restoring the account returns it to full functionality, including full mail
file access.
“Permanently deleting a user account” on page 263
After you delete an account, it remains inactive in the service, and you have 30
days to restore it. If you are sure that you will not need to restore the account, you
can permanently delete it within 30 days of the initial account deletion.
Permanently deleting an account frees its subscriptions for other users.
“Removing the SmartCloud Notes data for a deleted user account or subscription”
on page 264
After a user account is permanently deleted or an IBM SmartCloud Notes
subscription is removed from a user account, the SmartCloud Notes data such as
the mail file remains for 30 days. Use this procedure to force the deletion of the
user data from the service, if you do not want to wait the 30 days.
Related information:
Integration server
262
SmartCloud Notes: Administering SmartCloud Notes: Hybrid Environment March 2015
Restoring a deleted user account
After you delete a user account, you have up to 30 days to restore it if you change
your mind. Restoring the account returns it to full functionality, including full mail
file access.
About this task
An IBM customer service representative can restore a user account up to 90 days
after the account deletion.
Procedure
Log on to the service as an administrator.
If your account also has the User role, click Admin > Manage Organization.
In the navigation pane, click User Accounts.
Select Status in the drop-down box and then select Trash to show the deleted
user accounts that can be restored.
5. Click the arrow next to the user name and select Restore User.
6. In the window that is shown, click Restore.
1.
2.
3.
4.
Related tasks:
“Deleting a user account” on page 261
When you delete a user's account, the user no longer has access to any cloud
services. If you change your mind about the deletion, you have up to 30 days to
restore the account to full functionality.
Permanently deleting a user account
After you delete an account, it remains inactive in the service, and you have 30
days to restore it. If you are sure that you will not need to restore the account, you
can permanently delete it within 30 days of the initial account deletion.
Permanently deleting an account frees its subscriptions for other users.
About this task
You cannot restore an account after you permanently delete it. If there is a chance
you might need to restore the account, do not complete this procedure.
A user account is permanently deleted automatically 90 days after the initial
account deletion.
Procedure
1. Log on to the service as an administrator.
2. If your account also has the User role, click Admin > Manage Organization.
3.
4.
5.
6.
In the navigation pane, click User Accounts.
Select Status in the drop-down box and then select Trash.
Click the arrow next to the user name and then select Delete User.
Optional: Enter the email address of a user in your organization to whom you
want to transfer the deleted user's collaboration resources, such as files.
Note: You cannot transfer ownership of the mail file.
7. Click Delete.
Chapter 7. Administering user accounts
263
Results
v The account cannot be restored.
v The subscriptions associated with the account are free to be assigned to other
users.
v The SmartCloud Notes data such as the mail file remains for 30 more days and
is automatically deleted after that period. You can delete this data before then
yourself. While this data remains, you cannot create a user account with the
same common name and email address as that of the deleted account.
What to do next
If you want to permanently delete the SmartCloud Notes data immediately,
complete the procedure “Removing the SmartCloud Notes data for a deleted user
account or subscription.”
Related tasks:
“Deleting a user account” on page 261
When you delete a user's account, the user no longer has access to any cloud
services. If you change your mind about the deletion, you have up to 30 days to
restore the account to full functionality.
“Restoring a deleted user account” on page 263
After you delete a user account, you have up to 30 days to restore it if you change
your mind. Restoring the account returns it to full functionality, including full mail
file access.
Removing the SmartCloud Notes data for a deleted user account or
subscription
After a user account is permanently deleted or an IBM SmartCloud Notes
subscription is removed from a user account, the SmartCloud Notes data such as
the mail file remains for 30 days. Use this procedure to force the deletion of the
user data from the service, if you do not want to wait the 30 days.
About this task
In most situations, there is no need to force the deletion of the SmartCloud Notes
data. However, if an account is permanently deleted and you want to create a new
account that uses the same email address and common name, the SmartCloud
Notes data must first be deleted.
You can delete the data of a user whose SmartCloud Notes subscription was
removed but who still has a user account. However, do so with caution; to add
back the SmartCloud Notes subscription, you must provision the user again
through SmartCloud Notes Administration. In this case, the user starts with a new
mail file, unless you transfer an on-premises mail file before you provision the user
again.
Procedure
1. Log on to the service as an administrator.
2. If your account also has the User role, click Admin > Manage Organization.
3. In the System Settings section of the navigation pane, click IBM SmartCloud
Notes.
4. In SmartCloud Notes Administration, under Users and Groups, click Users.
5. In the navigation pane, click Deleted Users.
264
SmartCloud Notes: Administering SmartCloud Notes: Hybrid Environment March 2015
6. Optional: To search for a name if many users are listed, type the beginning
characters of any of the following user values:
v Distinguished name, for example, Samantha Daryn/Renovations.
v Internet email address, for example, sdaryn@renovations.
v Last name, for example, Daryn.
Note: You cannot use the wildcard character (*) when you search.
A “starts with” search is done and the names of any users with matching
values in the directory are displayed. For example, the results of a search on ma
include the names of users with the following values in the directory:
v Madison Armond/Renovations
v masmith@renovations
v Kristin MacGyver
This search does not match the following values:
v Emarie Klein/Renovations
v tamado@renovations
v Ted Amado
Search results can include a maximum of 1000 names.
7. Click Delete Data next to the name of the user whose data you want to
remove, and then confirm the deletion.
Results
The user data is removed from the service and the user name is removed from the
Deleted Users page.
Related tasks:
“Deleting a user account” on page 261
When you delete a user's account, the user no longer has access to any cloud
services. If you change your mind about the deletion, you have up to 30 days to
restore the account to full functionality.
“Permanently deleting a user account” on page 263
After you delete an account, it remains inactive in the service, and you have 30
days to restore it. If you are sure that you will not need to restore the account, you
can permanently delete it within 30 days of the initial account deletion.
Permanently deleting an account frees its subscriptions for other users.
“Removing a SmartCloud Notes subscription from a user account” on page 259
When you remove a SmartCloud Notes subscription from a user's account, the
subscription is available for another user. The account identity still exists, unless
you delete the user account, and is still active, unless you suspend the user. The
user can still log in to the cloud service, but the user no longer has access to
SmartCloud Notes.
Moving users to different Domino directories
You can move the Person document of a user who is currently provisioned in the
service to a different Domino directory.
About this task
If an on-premises Notes rename request is underway for a user, wait until the
request is complete before moving the user’s Person document.
Chapter 7. Administering user accounts
265
Procedure
Copy the Person document to the new Domino directory and then delete the
original Person document. Follow these guidelines:
v Move a Person document only to a Domino directory that is used for
provisioning. In other words, move a Person document to a full Domino
directory that is listed in the Directory Sync Server Configuration window of
SmartCloud Notes Administration. The Do not use this Domino Directory for
user provisioning must not be selected for the directory.
v If you want to change the values of the following fields in the new Person
document, do not do so yet. These values must be the same as in the original
Person document while the move of the Person document is underway. You can
change the value of any other field.
– First name (FirstName)
– Middle name (MiddleInitial)
– Last name (LastName)
– User name (FullName)
– Internet address (InternetAddress)
– Domain (MailDomain)
v The deletion of the original Person document can replicate to the service before
the addition of the new Person document, or vice versa. The replication order is
not important.
v The document identifier value of the new Person document will be different
from the one in the original Person document. A document identifier, for
example Notes:///632576F5004E65D4/85255E01001356A8852554C200753106/
14BD98F6358E2E818525785C0041046, is displayed in Notes document properties.
What to do next
If you want to change the user name, Internet address, or Domino domain name,
contact Support before you do so. Support must verify that the Person document
change is complete in the service before you make these changes. After Support
confirms that the Person document change is complete, make the additional
changes.
v If you want to change the Domino domain name, do so before you change the
user name or Internet address. To change the domain, edit the Domain
(MailDomain) field.
v To change the user name, follow the documented procedure for changing a
Notes user name. Do not edit name fields directly in the Person document.
Related tasks:
“Changing a Notes user name” on page 255
In a hybrid environment, you use the Domino Administrator client on-premises to
change a user's Notes name. The steps initiate a series of administration process
requests.
“Configuring directory synchronization” on page 89
A directory server in the service has a replica of one or more on-premises IBM
Domino directories. To support directory synchronization, provide the name of the
primary server and file path of at least one on-premises directory that you want to
synchronize. The directory server performs a regular pull and push replication of
the directories to keep the contents of both the service and the on-premises replicas
synchronized.
266
SmartCloud Notes: Administering SmartCloud Notes: Hybrid Environment March 2015
“Contacting Support” on page 303
If you are unable to resolve a problem, contact Support.
Converting a service user to an on-premises user in a hybrid
environment
If you use a hybrid environment, you can convert a service user to an on-premises
user. Conversion removes the SmartCloud Notes subscription from the user
account. You then switch the user to a Domino mail server at your company site.
About this task
Steps 1 - 5 in this procedure assume that you want to create a replica of the current
SmartCloud Notes mail file on your on-premises server. By creating a replica, you
preserve the current content of the mail file. However, replicating the mail file is
not required. You can instead convert the user to a new mail file or to an existing
mail file that you have on-premises. In this case, substitute Steps 1 - 5 with your
own procedure to create the user mail file on your server.
After users are converted to on-premises mail servers, they cannot be delegates for
the mail files of service users.
Perform the following steps to convert a service user to an on-premises user.
Procedure
1. Perform the following steps to create a local replica of the service mail file on
an IBM Notes client that can connect to the service:
Note: The owner of a mail file who uses a managed mail replica already has a
local mail file replica and can skip this step.
a. Make sure that you have a SmartCloud Notes subscription with the User
role.
b. From the Notes client, log on to the service using a Notes ID that has access
to the mail file in the service. The IDs of the following users have access to
the mail file:
v The owner of the mail file
v Someone who the owner gives delegate access
v Someone who has access through an entry in a customized mail file ACL.
c. Open the mail file on the SmartCloud Notes server, following the
appropriate procedure in the following table:
Table 78. Opening a mail file in the service
Person
Steps
Owner
Open your mail file as you normally do. For
example, from the home page, click Mail.
Delegate
Open your mail file as you normally do,
then complete the following steps:
1. In the navigation pane, expand Other
Mail.
2. Click Open Other Mail.
3. Select the name of the mail file owner
from the company directory.
Chapter 7. Administering user accounts
267
Table 78. Opening a mail file in the service (continued)
Person
Steps
Administrator with access to the mail file
through a custom ACL
Determine the mail server name and mail
file name in the service:
1. From SmartCloud Notes Administration,
click Users.
2. Click the name of the mail file owner.
3. In the Mail servers field, note the name
of the first server that is listed, for
example, MAIL16/SCN/RENOVATIONS.
4. In the Mail databases field, note the
name of the first database that is listed,
for example, data0/20559530/
20892244.nsf.
Open the mail file:
1. From Notes, click File > Open > IBM
Notes application.
2. In the Look in field, type the mail server
name.
3. In the File name field, type the mail file
name.
4. Click Open.
d. From the open mail file, click File > Replication > New Replica.
e. Make selections in the Create Replica dialog box:
v In the Server field, be sure to select Local.
v If you plan to use an operating system command to create the replica on
the on-premises server in Step 3, do not select Encrypt the replica using.
2. (Optional) To minimize message loss during the conversion process, perform
the following steps to suspend the account for the user. Suspending the account
stops mail delivery to the Notes mail file.
a. Perform a final replication between the mail file replica on the SmartCloud
Notes server and the replica on the Notes client.
b. Log on to the service as an administrator.
c. If your account has the user role, click Admin > Manage Organization.
d. From the navigation pane, click User Accounts.
e. Click the arrow next to the name of the user being converted and select
Suspend Account.
Note: This step suspends all of the subscriptions that the user has.
3. Replicate the mail file on the client to the on-premises mail server the user is
switching to.
4. Adjust the mail file ACL as necessary, for example, to allow access by
on-premises servers.
5. Apply an on-premises mail file template to replace the template from the
service.
6. Perform the following steps to remove the SmartCloud Notes subscription from
the account of the user.
a. Log on to the service as an administrator.
b. If your account has the user role, click Admin > Manage Organization.
268
SmartCloud Notes: Administering SmartCloud Notes: Hybrid Environment March 2015
c. From the navigation pane, click User Accounts.
d. If you completed Step 2, click the arrow next to the name of the user to
convert and select Unsuspend Account.
e. Click the arrow next to the name of the user and select Edit User Account.
Note: If the user has only a SmartCloud Notes subscription, you can
instead select Delete user to delete the account. In this case, skip the
remaining substeps.
f. Click Next to move to the Subscriptions tab.
g. Perform one of the following steps:
v If the user has more than one subscription, select Customize the
subscriptions for this user and in the Mail field select None selected.
v If the user has only a SmartCloud Notes subscription, select None.
h. Click Next and then Finish.
Note: You can reinstate the account for up to 30 days. To reinstate, add the
SmartCloud Notes back to the account, or restore the account, if you deleted
it. If you continue to step 7, the 30-day period does not apply; the user is
returned to being an on-premises user, and the account cannot be reinstated.
7. To switch the user to an on-premises mail server and mail file, edit the Domino
directory Person document of the user as follows:
v Change the Mail server field to refer to the on-premises mail server
v Change the Mail file field to refer to the on-premises mail file
Results
After Step 7 is completed and directory synchronization occurs between the service
and the on-premises environment, the user can no longer access the mail file on
the SmartCloud Notes server.
Uploading a Notes ID to the vault
In a hybrid environment, if a service user has an IBM Notes ID file, the ID must be
stored in the ID vault in the service. In some cases, for users who have a Notes ID,
but who will not use the Notes client, you might need to upload the Notes ID to
the vault manually. If it is not stored in the vault, web client, Notes Traveler, and
BlackBerry® smartphone users cannot perform secure mail operations. Other
limitations also apply, as outlined in this topic.
Before you begin
Make sure that you have a copy of the user's Notes ID file and password.
If you are unsure whether to store a Notes ID in the vault for web client users,
read Planning for Notes IDs.
About this task
Upload a Notes ID to the ID vault for users who have an ID file, but who do not
use the Notes client:
v If they are starting with new mail files.
Chapter 7. Administering user accounts
269
v If the mail file was transferred to the service without an imported Notes ID. In
this case, if you do not store the ID in the vault, the user cannot read old
encrypted messages if there are any.
Note: Alternatively, web client users can upload Notes IDs themselves. For more
information, see the topic about importing a Notes ID in the SmartCloud Notes
web section of the SmartCloud Notes user documentation.
Typically, this procedure is not necessary in these situations:
v For Notes client users, because the ID is automatically uploaded to the vault at
some point after the client connects to the service.
v For web client users whose existing on-premises mail files were transferred to
the service, and whose Notes ID was imported into the mail file before the
transfer. In this case, the Notes ID is uploaded to the vault the first time a user
performs a secure mail operation, such as signing mail, or reading or sending
encrypted mail.
v For web client users who never had a Notes ID and who do not want to
perform secure operations.
For users who have a Notes ID, if the ID is not stored in the service vault, the
following limitations apply:
v Web client, IBM Notes Traveler, and BlackBerry® smartphone users cannot
perform secure operations, which include signing mail, and reading or sending
encrypted mail.
v Notes ID password resets and ID recovery are not available.
v If a user's name changes, the user's Notes name cannot be changed.
You can also use this procedure to replace a Notes ID in the vault.
Note: You cannot use this procedure to upload an ID file that is enabled for Notes
shared login (NSL). To allow the ID to be uploaded manually, disable NSL. Or, use
the Notes client with the service, so that the ID file can be uploaded to the vault
automatically. For more information about Notes shared login, see the security
section of the IBM Domino documentation.
Procedure
1. Log on to the service as an administrator.
2. If your account also has the User role, click Admin > Manage Organization.
3. In the System Settings section of the navigation pane, click IBM SmartCloud
Notes.
4. Click Users.
5. In the Search box, type the beginning characters of any of the following user
values to display the user's name:
v Distinguished name, for example, Samantha Daryn/Renovations.
v Internet email address, for example, sdaryn@renovations.
v Last name, for example, Daryn.
Note: You cannot use the wildcard character (*) when you search.
A “starts with” search is done and the names of any users with matching
values in the directory are displayed. For example, the results of a search on ma
include the names of users with the following values in the directory:
v Madison Armond/Renovations
270
SmartCloud Notes: Administering SmartCloud Notes: Hybrid Environment March 2015
v masmith@renovations
v Kristin MacGyver
This search does not match the following values:
v Emarie Klein/Renovations
v tamado@renovations
v Ted Amado
Search results can include a maximum of 1000 names.
6. Click the user's name in the search results.
7. Under Available actions for this user, click Upload Notes ID File.
8. Browse for the Notes ID file, and optionally provide the password if one exists.
Results
The Notes ID is stored in the vault. Note, however, that the password for the ID is
not stored in the vault.
Related information:
SmartCloud Notes user documentation
IBM Domino documentation
Viewing subscriptions
You can view the subscriptions assigned to existing users, or view the
subscriptions that are available to assign to new service users. In addition to the
mail service, other subscriptions can include collaboration services. Third-party
integrated applications may also display if your organization has enabled them.
About this task
Use these steps to view the available subscriptions, and find out how many user
accounts are available for each subscription.
Procedure
1. Log on to the service as an administrator.
2. If your account also has the User role, click Admin > Manage Organization.
3. In the navigation pane, click Subscriptions.
Viewing assigned subscriptions
About this task
To view the subscriptions that are assigned to an existing user, perform the
following steps.
Procedure
1.
2.
3.
4.
Log on to the service as an administrator.
If your account also has the User role, click Admin > Manage Organization.
In the navigation pane, click User Accounts.
Locate the user name. The assigned subscriptions are listed in the Subscription
column.
Chapter 7. Administering user accounts
271
Managing IBM Notes Traveler devices
For each user with an IBM Notes Traveler subscription, you can view information
about the user's mobile device. You can also wipe the device to remove sensitive
data from it, for example, if the device is lost or stolen.
About this task
Note the following information about wiping a device:
v After you issue a wipe request, the device cannot be used with the service again
unless you cancel a pending wipe or reactivate the device.
v If you remove a user's IBM Notes Traveler subscription, the device information
is no longer available in the service and you cannot perform this procedure. In
this case, the user can request a device reset through the mobile carrier.
v If you cancel a pending wipe, the data is not wiped from the device.
v Wipe options can be shown for devices that do not support them. If you select
a wipe option, the status field indicates if a device does not support it.
v If a wipe is done outside the IBM Notes Traveler service, for example, if a user
resets a device, the status is not shown.
Procedure
1. Log on to the service as an administrator.
2. If your account also has the User role, click Admin > Manage Organization.
3. In the System Settings section of the navigation pane, click IBM SmartCloud
Notes.
4. Click Users in SmartCloud Notes Administration.
5. In the Search box, type the beginning characters of any of the following user
values to display the user's name:
v Distinguished name, for example, Samantha Daryn/Renovations.
v Internet email address, for example, sdaryn@renovations.
v Last name, for example, Daryn.
Note: You cannot use the wildcard character (*) when you search.
A “starts with” search is done and the names of any users with matching
values in the directory are displayed. For example, the results of a search on ma
include the names of users with the following values in the directory:
v Madison Armond/Renovations
v masmith@renovations
v Kristin MacGyver
This search does not match the following values:
v Emarie Klein/Renovations
v tamado@renovations
v Ted Amado
Search results can include a maximum of 1000 names.
6. Click the user's name in the search results.
7. Click Manage IBM Notes Traveler Devices to see information about the user's
device such as the name, the time it was last synchronized, and the status of a
wipe request.
272
SmartCloud Notes: Administering SmartCloud Notes: Hybrid Environment March 2015
If you do not see this option, the selected user does not have a IBM Notes
Traveler subscription.
8. To remove data from the device, click one of the following options:
Option
Description
Wipe Device
Select this option to remove the IBM Notes
Traveler application and all personal data
and settings from the device. After device
confirmation, the device is reset to the
factory default settings. This option affects
all users of the device.
Wipe Traveler Data
Select this option to remove only the IBM
Notes Traveler application and its data, but
leave personal data on the device. This
option affects only the selected user.
9. If you issue a wipe request, the following options are available:
Option
Description
Refresh Device List
Shows the status of a wipe request.
Cancel Wipe
Cancels a wipe request that shows the status
Wipe pending.
Reactivate
Reactivates a device in the service after a
wipe request is complete or fails with an
error.
Results
The following table describes the messages that you might see in the Wipe status
field after you issue a wipe request and click Refresh Device List.
Table 79. Wipe status messages
Wipe status message
Description
Wipe pending
Wipe Device or Wipe Traveler Data was
selected. The request will be processed when
the device is turned on.
Deactivated
The device was wiped successfully and is no
longer connected to IBM Notes Traveler. If
Wipe Traveler Data was selected, Wipe
Device can still be selected.
Hard reset failed
Wipe Device was selected but the device
cannot be reset to factory default settings.
This error usually indicates that the device is
an older model that does not support hard
resets.
Hard reset confirmed
Wipe Device was selected and the device
confirmed the request.
Application wipe failed
A Wipe Traveler Data request failed. This
error can occur for older device models.
Application wipe confirmed
Wipe Traveler Data was selected and the
device confirmed the request.
Not requested
No wipe has been requested.
Chapter 7. Administering user accounts
273
Related tasks:
“Enabling application passwords” on page 139
Application passwords can be used to provide a secure login for applications that
do not support forms-based authentication. For example, they can be used to
access applications that require passwords on a mobile device or for organizations
that use federated identity and service login passwords are not used. When you
enable application passwords, you also have the option of requiring the use of
application passwords, and of allowing mobile users to bypass IP restrictions.
“Preparing for Notes Traveler devices” on page 195
Before enabling users to use IBM Notes Traveler mobile devices with the service,
prepare your environment and the devices.
Managing BlackBerry smartphones
After activating a user’s BlackBerry® smartphone, perform any of the following
tasks to manage it.
Related concepts:
“Settings enforced for BlackBerry smartphones” on page 205
This topic describes the settings that the service currently enforces for BlackBerry®
smartphones.
Related tasks:
“Getting started with BlackBerry devices” on page 238
If BlackBerry devices supported by a Hosted BlackBerry Services subscription are
used, complete the following tasks to begin using the devices with the service.
Reactivating a user's BlackBerry smartphone
If a user experiences a problem using a BlackBerry® smartphone, activating it again
often resolves the problem. Before activating again, back up the smartphone and
then wipe it. Wiping removes all data and prevents duplicate Contacts and
Calendar entries from occurring when you activate it again.
About this task
Alternatively, the user can reactivate the BlackBerry.
Procedure
1. Back up the smartphone. For instructions, see the BlackBerry Knowledge Base
article How to back up the data on a BlackBerry smartphone.
2. Log on to the service as an administrator.
3. If your account also has the User role, click Admin > Manage Organization.
4. In the System Settings section of the navigation pane, click IBM SmartCloud
Notes.
5. Under User and Groups, click Users.
6. In the Search box, type the beginning characters of any of the following user
values to display the user's name:
v Distinguished name, for example, Samantha Daryn/Renovations.
v Internet email address, for example, sdaryn@renovations.
v Last name, for example, Daryn.
Note: You cannot use the wildcard character (*) when you search.
A “starts with” search is done and the names of any users with matching
274
SmartCloud Notes: Administering SmartCloud Notes: Hybrid Environment March 2015
values in the directory are displayed. For example, the results of a search on
ma include the names of users with the following values in the directory:
v Madison Armond/Renovations
v masmith@renovations
v Kristin MacGyver
This search does not match the following values:
v Emarie Klein/Renovations
v tamado@renovations
v Ted Amado
Search results can include a maximum of 1000 names.
7. Click the user's name in the search results.
8. Click Manage BlackBerry Smartphone.
9. Perform the following steps to wipe the smartphone:
a. Click Wipe
b. Click Wipe again to confirm.
10. To begin the activation process, perform the following steps to create an
activation password:
a. Click Reactivate or Activate Now, depending on the option that is
displayed
b. Create a one-time activation password and then click Set Password.
Remember the password because you or the user enter it on the
smartphone in the next step. If you do forget it, you can simply repeat this
step to set a new one.
11. To activate the smartphone, refer to the following table and perform the steps
that are shown for the operating system (OS) version of the smartphone.
Activation can take from a few minutes to an hour, depending on the size of
the mail file. After performing these steps, look for the Activation Complete
message on the smartphone, which indicates that activation is successful.
OS version
Steps to activate
OS4, OS5
1. From the Home screen of the
smartphone, click Manage Connections
and then enable your Mobile
Connection.
2. From the Home screen of the
smartphone, click Options > Advanced
Options > Enterprise Activation.
3. Enter your SmartCloud Notes Internet
email address, for example
[email protected].
4. Enter the activation password.
5. Click the track ball and select Activate.
Note: Leave the Activation Server Address
field blank, if you see it.
Chapter 7. Administering user accounts
275
OS version
Steps to activate
OS6, OS7
1. From the Main screen of the smartphone,
click Options > Device > Advanced
System Settings > Enterprise Activation.
2. Enter the SmartCloud Notes Internet
email address, for example
[email protected].
3. Enter the activation password.
4. Click the Activate button.
12. If you backed up data before activating, restore the data now. For information,
see the BlackBerry Knowledge Base article How to use BlackBerry Desktop
Software to restore data to a BlackBerry smartphone from a backup file.
Wiping a user's BlackBerry smartphone if it is lost or stolen
If a user's BlackBerry® smartphone is lost or stolen, wipe it to remove all data and
deactivate it.
About this task
Wiping a smartphone removes all data from it and deactivates it. If the
smartphone is off, it is wiped the next time it is turned on. Alternatively, users can
wipe their smartphones themselves.
For information on wiping a smartphone as part of reactivating it to correct a
problem, see “Reactivating a user's BlackBerry smartphone”.
Procedure
1. Log on to the service as an administrator.
2. If your account also has the User role, click Admin > Manage Organization.
3. In the System Settings section of the navigation pane, click IBM SmartCloud
Notes.
4. Under User and Groups, click Users.
5. In the Search box, type the beginning characters of any of the following user
values to display the user's name:
v Distinguished name, for example, Samantha Daryn/Renovations.
v Internet email address, for example, sdaryn@renovations.
v Last name, for example, Daryn.
Note: You cannot use the wildcard character (*) when you search.
A “starts with” search is done and the names of any users with matching
values in the directory are displayed. For example, the results of a search on ma
include the names of users with the following values in the directory:
v Madison Armond/Renovations
v masmith@renovations
v Kristin MacGyver
This search does not match the following values:
v Emarie Klein/Renovations
v tamado@renovations
v Ted Amado
276
SmartCloud Notes: Administering SmartCloud Notes: Hybrid Environment March 2015
6.
7.
8.
9.
Search results can include a maximum of 1000 names.
Click the user's name in the search results.
Click Manage BlackBerry Smartphone.
Click Wipe
Click Wipe again to confirm.
Setting a device password on a user's BlackBerry smartphone
A device password helps to prevent unauthorized access to a user's BlackBerry®
smartphone. Use this procedure to set an initial device password on a user's
smartphone or to set a new device password if a user has forgotten the current
one.
About this task
The device password is a different password than the one-time activation
password used to activate the smartphone.
Procedure
1. Log on to the service as an administrator.
2. If your account also has the User role, click Admin > Manage Organization.
3. In the System Settings section of the navigation pane, click IBM SmartCloud
Notes.
4. Under User and Groups, click Users.
5. In the Search box, type the beginning characters of any of the following user
values to display the user's name:
v Distinguished name, for example, Samantha Daryn/Renovations.
v Internet email address, for example, sdaryn@renovations.
v Last name, for example, Daryn.
Note: You cannot use the wildcard character (*) when you search.
A “starts with” search is done and the names of any users with matching
values in the directory are displayed. For example, the results of a search on ma
include the names of users with the following values in the directory:
v Madison Armond/Renovations
v masmith@renovations
v Kristin MacGyver
This search does not match the following values:
v Emarie Klein/Renovations
v tamado@renovations
v Ted Amado
Search results can include a maximum of 1000 names.
6. Click the user's name in the search results.
7. Click Manage BlackBerry Smartphone.
8. Click Set Device Password.
9. Enter a password and then click Set Password. The password must be at least
eight characters, including at least one numeric character and at least one
alphabetic character.
Chapter 7. Administering user accounts
277
Results
A message indicating that you have changed the password is displayed on the
smartphone.
What to do next
Provide the password to the user.
Related concepts:
“Settings enforced for BlackBerry smartphones” on page 205
This topic describes the settings that the service currently enforces for BlackBerry®
smartphones.
Removing a BlackBerry subscription from a user account
You can remove a BlackBerry® subscription from a user account.
Procedure
1. Log on to the service as an administrator.
2. If your account also has the User role, click Admin > Manage Organization.
3. In the navigation pane, click User Accounts.
4. Click the arrow next to a user's name, select Edit User Account, and click Next.
5. In the Subscription Add-ons section, clear SmartCloud Notes for Hosted
BlackBerry Services.
6. Click Next and Finish.
Results
The user can no longer use a BlackBerry smartphone with SmartCloud Notes.
Frequently asked questions about BlackBerry smartphone
administration
Table 80. Frequently asked questions about BlackBerry® smartphone administration
Question
Answer
How do I know if a user has a BlackBerry
smartphone subscription?
1. From SmartCloud Notes Administration,
click Users.
2. Search for the user's name and then
select it.
3. Do either of the following steps:
v Select Show BlackBerry only to show
only users with BlackBerry
smartphone subscriptions and see if
the user's name is listed.
v Click the user's name and see if the
value of the BES subscription field
has been set to Enabled.
278
SmartCloud Notes: Administering SmartCloud Notes: Hybrid Environment March 2015
Table 80. Frequently asked questions about BlackBerry® smartphone
administration (continued)
Question
Answer
How do I know if a user's smartphone is
activated?
1. From SmartCloud Notes Administration,
click Users.
2. Search for the user's name and then
select it.
3. Click Manage BlackBerry Smartphone.
4. If the user's smartphone is not activated,
a message is displayed indicating that it
needs to be activated.
What do I do if BlackBerry activations fails?
Perform these steps:
1. If the BlackBerry smartphone is an OS5
or earlier version, from the Home screen
click Manage Connections and then
enable your Mobile Connection.
2. Make sure that the user has an
Enterprise plan with the wireless carrier
rather than a Personal plan. If there is
no Enterprise Activation option on the
smartphone, the user has a Personal
plan and needs to change to an
Enterprise Plan. After changing to the
Enterprise Plan, reactivate the
BlackBerry.
3. Reactivate the BlackBerry smartphone.
If I set an activation password, can a user
override it?
Yes, the activation password is the last one
set by either the administrator or the user.
What do I do if there are duplicate Calendar
or Contact entries on a smartphone?
Wipe the smartphone and then reactivate it.
How do I tell which operating system (OS)
version a BlackBerry smartphone uses?
See the BlackBerry Knowledge Base article
How to check the model number and
version of installed BlackBerry device
software on a BlackBerry smartphone.
How can I display a user's BlackBerry
smartphone device model and other device
information?
1. From SmartCloud Notes Administration,
click Users.
2. Search for the user's name and then
select it.
3. Click Manage BlackBerry Smartphone.
Chapter 7. Administering user accounts
279
280
SmartCloud Notes: Administering SmartCloud Notes: Hybrid Environment March 2015
Chapter 8. Integrating a single domain (Example)
This example illustrates how a fictitious company, Renovations, integrates servers
in a single IBM Domino domain with the IBM SmartCloud Notes service.
About this task
Renovations plans to move the mail files of 500 of its 1000 users to mail servers in
the service. The mail files of the other 500 users will remain on-premises on the
company mail servers. The service users and the on-premises users will
communicate by mail, look up free time for each other, schedule meetings with
each other, and reserve shared meeting resources.
The current Domino deployment at Renovations consists of a single Domino
domain, Renovations. This domain includes the servers described in the following
table.
Table 81. Servers in the Renovations domain
Domino server name
Current Domino version
Current server function
Dirhub1/Renovations
8.0
Directory hub that replicates
to the other servers in the
domain
Mailhub1/Renovations
8.0
Mail routing hub that routes
mail to and from other
servers in the domain
Mail1/Renovations
8.0
User mail server that is also
used to look up the free time
of users
Mail2/Renovations
8.0
User mail server that is also
used to look up the free time
of users
To integrate these on-premises servers with the service, Bill Ranney, the lead
Domino administrator at Renovations, performs the following steps.
1. Preparing the on-premises environment.
2. Configuring the service.
Note: This example does not illustrate the process of provisioning users, which
occurs after the service is configured.
Preparing the on-premises environment (Example)
To prepare the on-premises environment, Bill Ranney prepares the on-premises
directory synchronization and mail hub servers, prepares the on-premises passthru
server domain, configures firewalls, prepares the Global Domain document, and
creates the certifier and names for mail servers.
© Copyright IBM Corp. 2011
281
Preparing the on-premises directory synchronization and mail
hub servers (Example)
Bill Ranney prepares a directory synchronization server and a mail hub server in
the Renovations domain.
About this task
A directory synchronization server is an on-premises server with which the service
connects to replicate Domino directories. The service regularly initiates a Pull and
Push replication operation to synchronize the on-premises Domino directories with
replicas on servers in the service.
A mail hub server is an on-premises server used to route mail between service
users and on-premises users.
After getting input from other members of the Renovations IT staff, Bill decides to
use one directory synchronization server, the existing server, Dirhub1/Renovations.
He also decides to use one mail hub server, the existing server,
Mailhub1/Renovations.
Bill upgrades all of the servers in the domain from Lotus® Domino 8.0 to the latest
version available, Lotus Domino 8.5.2. He also upgrades the user mail servers,
Mail1/Renovations and Mail2/Renovations, so that on-premises users who use
those mail servers can look up free time for service users.
The following information about this task is important to remember.
v On-premises mail hub servers must run Lotus Domino 8.5.1 Fix Pack 2 or
higher.
v Mail servers of on-premises users that look up free time for service users must
run Lotus Domino 8.5.1 Fix Pack 2 or higher.
v One or two on-premises directory synchronization servers are allowed.
v One or two on-premises mail hub servers are allowed.
v One server can function as both a directory synchronization server and as a mail
hub server.
Preparing the on-premises passthru server domain (Example)
Bill Ranney prepares the on-premises passthru servers, placing them in their own
Domino domain. The service uses the servers in the domain as passthru servers
through which it connects to the on-premises directory synchronization servers and
mail hub servers.
About this task
Bill installs and sets up two new Domino 8.5.2 servers, Passthru1/Renovations and
Passthru2/Renovations, in a new Domino domain, SCNPassthru.
During server setup, he selects the option "I want to use an existing certifier ID
file" so that he can certify the new servers under the existing /Renovations
282
SmartCloud Notes: Administering SmartCloud Notes: Hybrid Environment March 2015
organization certifier. Although an organization certifier and Domino domain often
share the same name, they are independent entities. In this case, the passthru
domain name and the certifier name are different.
When Bill runs the Domain Configuration tool later, connection documents are
created that enable the passthru connections to Dirhub1/Renovations and
Mailhub1/Renovations in the Renovations domain.
The following information about this task is important to remember.
v For optimum security, a on-premises passthru server domain should be in a
dedicated Domino domain that is located in the corporate demilitarized zone
(DMZ) between an inner and outer firewall.
v Servers in an on-premises passthru server domain must be certified under the
same organization certifier as the directory synchronization servers and mail hub
servers.
v One or two servers passthru servers are allowed. In this example, they are in
one Domino domain, but they can be in separate domains.
v A passthru server domain manages only incoming connections from the service.
Connections from on-premises clients and servers to the service do not use the
passthru domain.
v Install Domino 8.5.2 or later on servers in a passthru domain for fastest response
time for freetime requests from service users to on-premises users
Configuring firewalls (Example)
Bill works with the Renovations IT staff to configure inner and outer firewalls.
About this task
The following tables summarizes the configuration. Note that this example
illustrates just one approach to firewall configuration; others are possible.
Table 82. Outer firewall - inbound connections
Setting
Value
Port
TCP/IP port 1352
Source addresses
Unpublished IP addresses that the service
firewall generates. The IBM Customer
Service Representative provided these to the
company.
Destination addresses
passthru1.renovations.com
passthru2.renovations.com
Table 83. Outer firewall - outbound connections at Renovations
Setting
Value
Port
TCP/IP port 1352
Source addresses
All
Chapter 8. Integrating a single domain (Example)
283
Table 83. Outer firewall - outbound connections at Renovations (continued)
Setting
Value
Destination addresses
notes.na.collabserv.com
Table 84. Inner firewall - inbound connections at Renovations
Setting
Value
Port
TCP/IP 1352
Source addresses
passthru1.renovations.com
passthru2.renovations.com
Destination addresses
dirhub1.renovations.com
mailhub1.renovations.com
Table 85. Inner firewall - outbound connections
Setting
Value
Port
TCP/IP 1352
Source addresses
All
Destination addresses
notes.na.collabserv.com
Preparing the Global Domain document (Example)
Bill Ranney ensures that the Internet domain, renovations.com, is correctly defined
in a Global Domain document.
About this task
Renovations owns the Internet domain renovations.com. The domain is used to
form the Internet address of users in the Renovations Domino Directory, for
example, [email protected].
Bill performs the following steps to verify that the domain has a Global Domain
document that is correctly configured.
1. Open the Renovations Domino Directory.
2. Select Configuration > Messaging > Domains.
3. Open the Global Domain document for renovations.com.
4. Verify that the document is correctly configured.
The following table shows the verified Global Domain document for
renovations.com
Table 86. Verified Global Domain document for renovations.com
284
Tab
Field
Value
Basics
Domain type
Global Domain
Basics
Global domain name
renovations.com
Basics
Global domain role
R5/R6/R7/R8
Basics
Use as default Global
Domain
Not applicable because there
is only one Global Domain
document in the Renovations
Domino Directory.
SmartCloud Notes: Administering SmartCloud Notes: Hybrid Environment March 2015
Table 86. Verified Global Domain document for renovations.com (continued)
Tab
Field
Value
Restrictions
Domino domains and aliases Not applicable because the
service does not use Domino
domain information for
routing.
Conversions - SMTP Address Local primary Internet
Conversions
domain
renovations.com
Conversions - SMTP Address Alternate Internet domain
Conversions
aliases
None
The following information about this task is important to remember.
v Each Internet domain that a company owns and uses for Internet mail requires a
corresponding valid Global Domain document. The document must be in a
Domino Directory that replicates to the service during directory synchronization.
During account setup, the Global Domain document is used to show the domain
in a list of domains to be verified.
v Routing of incoming Internet mail addressed to service users is configured and
done on-premises. The service performs outbound Internet mail routing only.
v Only two fields in the Conversions > SMTP Address Conversions section of a
Global Domain document are used by the service: Local primary Internet
domain and Alternate Internet domain aliases. The remaining fields in the
SMTP Address Conversions section apply to incoming Internet mail and are
therefore ignored by the service.
Creating the certifier and names for mail servers (Example)
Bill Ranney creates the OU certifier used to certify and name the Renovations mail
servers in the service.
About this task
Bill decides to use Mail as the base name for the company mail servers in the
service. He provides the base name later when configuring account settings. The
base name and OU certifier combine to form mail server names
Mail1/SCN/Renovations, Mail2/SCN/Renovations, and so on.
Bill creates the OU certifier /SCN/Renovations to use to certify and name the
Renovations service mail servers. He saves the password-protected certifier ID file,
scn_renovations.id, to a local, secure location so that he can easily select it when
uploading it to the service when configuring account settings later.
The following information about this task is important to remember.
Chapter 8. Integrating a single domain (Example)
285
v It is important that you choose and create your service mail server OU certifier
carefully. After you upload the OU certifier ID to the service, you cannot change
to an ID with a different certifier name.
v The OU certifier you provide for your service mail servers must be under the
same organization certifier as the passthru servers, directory synchronization
servers, and primary mail hub servers. It can be at any level below the
organization certifier. This OU certifier must be unique and used only for the
service mail servers; the OU certifier cannot be used on-premises.
v The certifier used for service users must trust the service mail server OU
certifier, and vice versa. If any users are certified under a different organization
than the OU certifier, you must create the required cross-certificates to establish
trust. The cross-certificates must be replicated to the directory synchronization
servers.
Configuring the service (Example)
After preparing the on-premises environment, Bill Ranney perform the steps
required to configure the service to integrate with on-premises servers.
Completing an account settings worksheet (Example)
Bill Ranney completes the following worksheet to gather the information required
to configure account settings.
About this task
Table 87. Account settings worksheet
Information required to configure account
settings
Value
Local file path of the OU certifier ID file
used to certify the mail servers of service
users
C:\scn_renovations.id (password-protected)
Domino passthru server domain
SCNPassthru
Primary Domino passthru server
Passthru1/Renovations
Primary passthru server hostname or IP
address
passthru1.renovations.com
Secondary Domino passthru server
Passthru2/Renovations
Secondary passthru server hostname or IP
address
passthru2.renovations.com
Primary Domino on-premises mail hub
server
Mailhub1/Renovations
Secondary on-premises mail hub server
None
Base name for mail servers of service users
Mail
Primary on-premises directory
synchronization server
Dirhub1/Renovations
(Certifier name: /SCN/Renovations
Local file path of each Domino Directory on C:\syncdir\names.nsf
the primary directory synchronization server
to replicate to the service
Secondary directory synchronization server
286
None
SmartCloud Notes: Administering SmartCloud Notes: Hybrid Environment March 2015
Configuring account settings (Example)
Bill Ranney uses IBM SmartCloud Notes Administration on http://
www.ibmcloud.com/social to configure account settings for the company.
About this task
Bill logs on to http://www.ibmcloud.com/social as the first company administrator.
He uses the completed account settings worksheet to configure account settings.
He performs the following tasks to configure account settings, as described in the
topic Roadmap to configuring a hybrid environment.
v Providing a certifier ID file
v Specifying one or more passthru servers
v Specifying a mail routing server
v Creating a base name for your mail servers
v Specifying a Domino Directory synchronization server
The following information about this task is important to remember.
v An IBM Customer Service Representative must add the SmartCloud Notes
subscription for a company before account settings can be configured.
v Adding the company subscription creates the first company administrator
account for the company. The first company administrator receives an email
invitation with a URL to use to log on to the Connections Cloud website for the
first time.
v When configuring account settings, the company administrator uploads the
organizational unit certifier ID file to use for certification of the mail servers of
service users. It is important that the administrator verifies that the selected
Certifier ID file is correct before clicking the Upload button. After the certifier ID
file is uploaded, it cannot be changed to an ID with a different certifier name.
v When configuring account settings, you can provide the host name or the IP
address of a passthru server. Best practice is to provide a host name. If you
provide an IP address and the IP address changes in the future, you must
configure account settings and run the Domain Configuration tool again.
Downloading and running the Domain Configuration tool
(Example)
After Bill Ranney configures account settings, he downloads and runs the Domain
Configuration tool. The tool takes the information Bill provides in account settings
and makes required changes to the Domino directories of the SCNPassthru domain
and Renovations domain.
About this task
The directory changes made by the tool configure connections, routing, and
replication between the servers in the service and the on-premises servers.
Chapter 8. Integrating a single domain (Example)
287
The following information about this task is important to remember.
v Do not edit the directory content added by the tool. For example, do not edit
changes to the ACL or to Connection documents. Doing so prevents proper
operation of the service. Refer to the report generated by the tool to see the exact
directory changes the tool makes
v The IBM Notes client from which the tool is run must be able to connect to the
passthru servers in the passthru domain. The client must also be able to connect
to the directory synchronization and mail hub servers in the on-premises hub
domain. Firewall rules at your company might prevent connections from
systems inside the firewall to the passthru servers. In this case, use a Notes
client running on a system connected outside the firewall. Allow a direct
connection to the passthru servers, and through them, connect to the servers in
the on-premises hub domain.
v The person who runs the tool must have Full Remote Console access to the
passthru servers, directory synchronization servers, and mail hub servers. This
access is granted through the Full Remote Console Administrators field in each
Server document.
Verifying the Internet domain name (Example)
After Bill Ranney tests network connections, he verifies ownership of the Internet
domain, renovations.com.
About this task
This step confirms that the service is allowed to use renovations.com for the
Internet mail address of users at Renovations. To verify ownership, Bill creates a
CNAME record for renovations.com through the domain hosting service that the
company uses. A CNAME record is a type of resource record for a domain. The
fact that Bill can access DNS settings to create a CNAME record for
renovations.com is what proves ownership of the domain to the service.
To verify domain ownership, Bill follows instructions in the topic "Verifying
Internet domain names in a hybrid environment." When he clicks Verify
Ownership in the Internet Domain Verification window, he is given the following
information just for his company to use to add to a new CNAME record:
v The unique key, domino-3ktteaarn-rules
v The domain to point to, collabserv.com
He clicks Begin Verification and then creates the CNAME record on the hosting
service with the required information. To verify ownership, the LotusLive Notes™
service connects to domino-3ktteaarn-rules.renovations.com.
The following information about this task is important to remember.
288
SmartCloud Notes: Administering SmartCloud Notes: Hybrid Environment March 2015
v The list of domain names to be verified that is shown in the Internet Domain
Verification window is derived from on-premises Global Domain documents.
These documents replicate to the service during directory synchronization.
v The key that is provided in the Internet Domain Verification window must
exactly match the key used to create the CNAME record. If there is a mismatch,
domain verification fails.
v The service can take up to 48 hours to verify ownership, but it usually takes less
time.
Testing network connections (Example)
After Bill Ranney runs the Domain Configuration tool, he waits for directory
synchronization to complete, and then tests network connections between
on-premises servers and the service.
About this task
To test network connections, Bill first performs the task described in "Checking
network connections from the service to on-premises servers." After doing so, he
sees the following pair of messages listed for the server Dirhub1/Renovations and
for the server Mailhub1/Renovations. These messages indicate that the service can
connect to the on-premises servers.
"Successfully accessed mail.box"
"Successfully accessed Domino Directory"
Next, Bill performs the task, "Checking network connections from on-premises
servers to the service." He tests that the on-premises mail hub server
Mailhub1/Renovations can connect to the service mail server Mail1/SCN/
Renovations. To do so, he enters the command trace Mail1/SCN/Renovations from
the Domino server console of the Mailhub1/Renovations server. He sees the
message Connected to server Mail1/SCN/Renovations in the output, which
indicates a successful connection.
When using the trace command, Bill ignores the message Error connecting to
server_name: Server error: You are not authorized to use the server. This
message indicates only that an attempt to connect anonymously failed.
Anonymous connections are not allowed, so this is expected behavior.
The following information about this task is important to remember.
v The on-premises directory synchronization servers and mail hub servers in the
on-premises hub domain must be running.
Issuing a Vault Trust Certificate (Example)
Bill Ranney issues a Vault Trust Certificate to the ID vault in the service. The Vault
Trust Certificate establishes that the vault is trusted to store user IDs that are
certified under the certifier that issues the certificate.
Chapter 8. Integrating a single domain (Example)
289
About this task
All the service users at Renovations are certified under the /Renovations certifier,
so just one Vault Trust Certificate is required, issued from /Renovations. Bill
follows the steps described in Issuing a Vault Trust Certificate. From an
on-premises Domino Administrator client, he issues a Vault Trust Certificate in the
Domino Directory of the Renovations domain. He sees the vault document
/IDVault_97656623 for Renovations in the Configuration > Security > ID Vaults
view of the Domino Directory. He issues the trust certificate from the certifier
/Renovations to /IDVault_97656623.
The following information about this task is important to remember.
v After the Vault Trust Certificate is created, it replicates to the service during
directory synchronization.
Example illustrations
The following topics provide pictures to illustrate the operation of the service at
Renovations with single-domain integration.
Directory synchronization at Renovations
This picture illustrates directory synchronization of the Renovations domain
Domino Directory.
290
SmartCloud Notes: Administering SmartCloud Notes: Hybrid Environment March 2015
The directory synchronization servers in the service regularly perform a pull and
push replication operation. The servers pull changes from the Renovations Domino
Directory on the on-premises directory synchronization server,
Dirhub1/Renovations. They push directory changes from the service to
Dirhub1/Renovations. The directory synchronization servers in the service connect
to Dirhub1/Renovations through a passthru server in the SCNPassthru domain.
The Dirhub1/Renovations server performs two-way replication of the Renovations
Domino directory with the other on-premises servers. Directory synchronization
servers and mail servers in the service also replicate directory changes.
Service user sending Notes mail to an on-premises user
This picture illustrates how Notes mail is routed from a service user to an
on-premises user at Renovations.
Chapter 8. Integrating a single domain (Example)
291
1. The client of the service user connects to the service user’s mail server,
Mail1/SCN/Renovations, to send the message. The client connects through the
service proxy, notes.na.collabserv.com.
2. The Mail1/SCN/Renovations server routes the message to a mail hub server in
the service.
3. The mail hub server routes the message to the on-premises mail hub server,
Mailhub1/Renovations. The server connects through a server in the
SCNPassthru domain.
4. Mailhub1/Renovations routes the message to Mail2/Renovations, the mail
server of the on-premises user.
5. The client of the on-premises user connects to Mail2/Renovations to open the
message.
The service scrubs viruses from the outbound messages.
On-premises user sending Notes mail to a service user
This picture illustrates how Notes mail is routed from an on-premises user to a
service user at Renovations.
292
SmartCloud Notes: Administering SmartCloud Notes: Hybrid Environment March 2015
1. The client of the on-premises user connects to the on-premises mail server,
Mail2/Renovations, to send the message.
2. Mail2/Renovations routes the message to the on-premises mail hub server,
Mailhub1/Renovations.
3. Mailhub1/Renovations routes the message to a mail hub server in the service.
The server connects through the service proxy, notes.na.collabserv.com.
4. The mail hub server in the service routes the message to the service user’s mail
server, Mail1/SCN/Renovations.
5. The client of the service user connects to Mail1/SCN/Renovations to open the
message. The client connects through the service proxy,
notes.na.collabserv.com.
The service scrubs viruses from the inbound messages.
Chapter 8. Integrating a single domain (Example)
293
Service user receiving Internet mail
This picture illustrates how Internet mail is routed to a service user at Renovations.
1. A client on the Internet addresses mail to the service user at renovations.com.
The mail is sent to the on-premises SMTP router on Mailhub1/Renovations,
which is configured to route incoming mail for users in the renovations.com
domain.
2. Mailhub1/Renovations routes the message to a mail hub server in the service.
Malhub1/Renovations connects to the hub server through the service proxy,
notes.na.collabserv.com. An SMTP server in the on-premises DMZ performs
mail hygiene on the message beforehand.
3. The mail hub server routes the message to Mail1/SCN/Renovations, the
service user’s mail server.
4. The service user client connects to Mail1/SCN/Renovations to open the
message. The client connects to the server through the service proxy,
notes.na.collabserv.com
Service user sending Internet mail
This picture illustrates how Internet mail is routed from a service user at
Renovations. The service manages the routing; a company-controlled SMTP host is
not used in this example.
294
SmartCloud Notes: Administering SmartCloud Notes: Hybrid Environment March 2015
1. The client of the service user sends the mail to the service user’s mail server,
Mail1/SCN/Renovations. The client connects to the server through the service
proxy, notes.na.collabserv.com.
2. Mail1/SCN/Renovations sends the mail to the mail hygiene servers in the
service for virus checking.
3. The SMTP server routes the mail to the mail hygiene servers.
4. The mail hygiene servers route the mail to the Internet.
Service user requesting the free time of an on-premises user
This picture illustrates a service user at Renovations requesting the free time of an
on-premises user.
Chapter 8. Integrating a single domain (Example)
295
1. The client of the service user sends a free-time request to the server user’s mail
server, Mail1/SCN/Renovations. The client connects to the server through the
service proxy, notes.na.collabserv.com.
2. Mail1/SCN/Renovations sends the free-time request to the on-premises mail
hub server, Mailhub1/Renovations. It connects to Mailhub1/Renovations
through a passthru server in the SCNPassthru domain.
3. Mailhub1/Renovations sends the free-time request to Mail2/Renovations, the
mail server of the on-premises user.
4. Mail2/Renovations looks up the free time of the on-premises user in its Free
Time database and returns the free time to Mailhub1/Renovations.
5. Mailhub1/Renovations returns the free time to Mail1/SCN/Renovations.
6. Mail1/SCN/Renovations returns the free time of the on-premises user to the
client of the service user.
On-premises user requesting free time of a service user
This picture illustrates an on-premises user at Renovations requesting the free time
of a service user.
296
SmartCloud Notes: Administering SmartCloud Notes: Hybrid Environment March 2015
1. The client of the on-premises user sends a free-time request to
Mail2/Renovations, the on-premises user’s mail server.
2. Mail2/Renovations sends the free-time request to Mail1/SCN/Renovations, the
service users’s mail server. Mail2/Renovations connects to
Mail1/SCN/Renovations through the service proxy, notes.na.collabserv.com.
3. Mail1/SCN/Renovations looks up the free time of the service user in its Free
Time database and returns the free time to Mail2/Renovations.
4. Mail2/Renovations returns the free time to the client of the on-premises user.
Service user requesting the free time of a resource
This picture illustrates a service user requesting the free time of a resource at
Renovations.
Chapter 8. Integrating a single domain (Example)
297
1. The client of the service user sends a request for the free-time of the resource to
the service user’s mail server, Mail1/SCN/Renovations. The client connects to
Mail1/SCN/Renovations through the service proxy, notes.na.collabserv.com.
2. Mail1/SCN/Renovations sends the free-time request to Mailhub1/Renovations,
the on-premises mail hub server. It connects to Mailhub1/Renovations through
a server in the SCNPassthru domain.
3. Mailhub1/Renovations looks up the free time for the resource in its local
Resource Reservations database and returns the free time to
Mail1/SCN/Renovations.
4. Mail1/SCN/Renovations returns the free time for the resource to the client of
the service user.
298
SmartCloud Notes: Administering SmartCloud Notes: Hybrid Environment March 2015
Service user reserving a resource
This picture illustrates a service user reserving a resource.
1. The client of the service user sends the resource reservation to the service
user’s mail server, Mail1/SCN/Renovations. The client connects to the server
through the service proxy, notes.na.collabserv.com.
2. Mail1/SCN/Renovations mails the reservation to a mail hub server in the
service.
3. The mail hub server mails the reservation to the Mail-in Resource document for
the resource on Mailhub1/Renovations, the on-premises mail hub server. The
mail hub server connects to Mailhub1/Renovations through a server in the
SCNPassthru domain.
4. Mailhub1/Renovations creates the reservation in its local Resource Reservations
database.
Chapter 8. Integrating a single domain (Example)
299
300
SmartCloud Notes: Administering SmartCloud Notes: Hybrid Environment March 2015
Chapter 9. Integrating additional domains
You can integrate additional domains in a hybrid environment.
About this task
For an example of integrating a secondary Domino domain in a hybrid
environment, see the wiki article Integrating additional domains with the
SmartCloud Notes service.
© Copyright IBM Corp. 2011
301
302
SmartCloud Notes: Administering SmartCloud Notes: Hybrid Environment March 2015
Chapter 10. Troubleshooting the service
Use the following tools and resources to help you troubleshoot a problem with the
service.
Using the Configuration Test tool
In a hybrid environment, you can use the Configuration Test tool inIBM
SmartCloud Notes Administration Account Settings on an ongoing basis. The tool
checks for problems with your on-premises server environment that can prevent
proper operation of the service.
About this task
If you change Account Settings, for example, add a new directory to be
synchronized or change a mail hub server, you must download and run the
Domain Configuration tool to enable the change in the service. After running the
Domain Configuration tool, run the Configuration Test tool to ensure that the
change has not introduced any problems.
It can be useful to run the Configuration Test tool even if you have not changed
Account Settings. The tool can detect inadvertent changes in your environment
that cause problems in the service. For example, it can detect directory changes
made on-premises that prevent directory synchronization.
Related tasks:
“Running configuration tests” on page 99
After you run the Domain Configuration tool, verify that servers in the service can
connect to your on-premises servers.
Finding troubleshooting tips in the Support Portal
If you need additional troubleshooting information, go to the IBM SmartCloud
Notes Support Portal. There you can find troubleshooting information authored by
IBM specifically for SmartCloud Notes..
Related information:
SmartCloud Notes Support Portal
Contacting Support
If you are unable to resolve a problem, contact Support.
About this task
For information, go to http://www.ibmcloud.com/social and select Support >
Technical Support.
© Copyright IBM Corp. 2011
303
304
SmartCloud Notes: Administering SmartCloud Notes: Hybrid Environment March 2015
Chapter 11. Notices
This information was developed for products and services offered in the U.S.A.
IBM may not offer the products, services, or features discussed in this document in
other countries. Consult your local IBM representative for information on the
products and services currently available in your area. Any reference to an IBM
product, program, or service is not intended to state or imply that only that IBM
product, program, or service may be used. Any functionally equivalent product,
program, or service that does not infringe any IBM intellectual property right may
be used instead. However, it is the user's responsibility to evaluate and verify the
operation of any non-IBM product, program, or service.
IBM may have patents or pending patent applications covering subject matter
described in this document. The furnishing of this document does not grant you
any license to these patents. You can send license inquiries, in writing, to:
IBM Director of Licensing
IBM Corporation
North Castle Drive
Armonk, NY 10504-1785
U.S.A.
For license inquiries regarding double-byte (DBCS) information, contact the IBM
Intellectual Property Department in your country or send inquiries, in writing, to:
Intellectual Property Licensing
Legal and Intellectual Property Law
IBM Japan Ltd.
19-21, Nihonbashi-Hakozakicho, Chuo-ku
Tokyo 103-8510 Japan
The following paragraph does not apply to the United Kingdom or any other
country where such provisions are inconsistent with local law: INTERNATIONAL
BUSINESS MACHINES CORPORATION PROVIDES THIS PUBLICATION "AS IS"
WITHOUT WARRANTY OF ANY KIND, EITHER EXPRESS OR IMPLIED,
INCLUDING, BUT NOT LIMITED TO, THE IMPLIED WARRANTIES OF
NON-INFRINGEMENT, MERCHANTABILITY OR FITNESS FOR A PARTICULAR
PURPOSE. Some states do not allow disclaimer of express or implied warranties in
certain transactions, therefore, this statement may not apply to you.
This information could include technical inaccuracies or typographical errors.
Changes are periodically made to the information herein; these changes will be
incorporated in new editions of the publication. IBM may make improvements
and/or changes in the product(s) and/or the program(s) described in this
publication at any time without notice.
Any references in this information to non-IBM Web sites are provided for
convenience only and do not in any manner serve as an endorsement of those Web
sites. The materials at those Web sites are not part of the materials for this IBM
product and use of those Web sites is at your own risk.
© Copyright IBM Corp. 2011
305
IBM may use or distribute any of the information you supply in any way it
believes appropriate without incurring any obligation to you.
Licensees of this program who wish to have information about it for the purpose
of enabling: (i) the exchange of information between independently created
programs and other programs (including this one) and (ii) the mutual use of the
information which has been exchanged, should contact:
IBM Director of Licensing
IBM Corporation
North Castle Drive
Armonk, NY 10504-1785
U.S.A.
Such information may be available, subject to appropriate terms and conditions,
including in some cases, payment of a fee.
The licensed program described in this document and all licensed material
available for it are provided by IBM under terms of the IBM Customer Agreement,
IBM International Program License Agreement or any equivalent agreement
between us.
Any performance data contained herein was determined in a controlled
environment. Therefore, the results obtained in other operating environments may
vary significantly. Some measurements may have been made on development-level
systems and there is no guarantee that these measurements will be the same on
generally available systems. Furthermore, some measurements may have been
estimated through extrapolation. Actual results may vary. Users of this document
should verify the applicable data for their specific environment.
Information concerning non-IBM products was obtained from the suppliers of
those products, their published announcements or other publicly available sources.
IBM has not tested those products and cannot confirm the accuracy of
performance, compatibility or any other claims related to non-IBM products.
Questions on the capabilities of non-IBM products should be addressed to the
suppliers of those products.
All statements regarding IBM's future direction or intent are subject to change or
withdrawal without notice, and represent goals and objectives only.
This information contains examples of data and reports used in daily business
operations. To illustrate them as completely as possible, the examples include the
names of individuals, companies, brands, and products. All of these names are
fictitious and any similarity to the names and addresses used by an actual business
enterprise is entirely coincidental.
Trademarks
IBM, the IBM logo, and ibm.com are trademarks or registered trademarks of
International Business Machines Corp., registered in many jurisdictions worldwide.
Other product and service names might be trademarks of IBM or other companies.
A current list of IBM trademarks is available on the Web at “Copyright and
trademark information” at www.ibm.com/legal/copytrade.shtml.
Intel is a registered trademark of Intel Corporation or its subsidiaries in the United
States and other countries.
306
SmartCloud Notes: Administering SmartCloud Notes: Hybrid Environment March 2015
Linux is a registered trademark of Linus Torvalds in the United States, other
countries, or both.
Microsoft and Windows are trademarks of Microsoft Corporation in the United
States, other countries, or both.
Java and all Java-based trademarks and logos are trademarks or registered
trademarks of Oracle and/or its affiliates.
The RIM and BlackBerry families of related marks, images and symbols are the
exclusive properties and trademarks of Research In Motion Limited — used by
permission. Research In Motion, RIM, BlackBerry, BlackBerry Enterprise Server and
“Always On, Always Connected” are registered with the U.S. Patent and
Trademark Office and may be pending or registered in other countries.
UNIX is a registered trademark of The Open Group in the United States and other
countries.
Privacy policy considerations
IBM Software products, including software as a service solutions, (“Software
Offerings”) may use cookies or other technologies to collect product usage
information, to help improve the end user experience, to tailor interactions with
the end user or for other purposes. In many cases no personally identifiable
information is collected by the Software Offerings. Some of our Software Offerings
can help enable you to collect personally identifiable information. If this Software
Offering uses cookies to collect personally identifiable information, specific
information about this offering’s use of cookies is set forth below.
Depending upon the configurations deployed, this Software Offering may use
session cookies that collect each user's user name, session ID, or other
application-specific state information for purposes of session management,
authentication, or enhanced usability. These cookies cannot be disabled.
If the configurations deployed for this Software Offering provide you as customer
the ability to collect personally identifiable information from end users via cookies
and other technologies, you should seek your own legal advice about any laws
applicable to such data collection, including any requirements for notice and
consent.
For more information about the use of various technologies, including cookies, for
these purposes, See IBM’s Privacy Policy at http://www.ibm.com/privacy and
IBM’s Online Privacy Statement at http://www.ibm.com/privacy/details the
section entitled “Cookies, Web Beacons and Other Technologies” and the “IBM
Software Products and Software-as-a-Service Privacy Statement” at
http://www.ibm.com/software/info/product-privacy.
Chapter 11. Notices
307
308
SmartCloud Notes: Administering SmartCloud Notes: Hybrid Environment March 2015
Index
A
access
restricting to on-premises servers 235
access control lists
see ACL 168
accessibility
described 5
account
activating 99
enabling 94
account identity
deleting 261
removing 263, 264
restoring 263
account settings
configuration example 287
in a hybrid environment 89
ACL
customizing for mail files 168
preparing for mail file transfer 212
ActiveX
enabling 159
administration tasks
best practices 243
described 13
in a hybrid environment 8
administrative policies
See also policies
for user registration 222
Notes Traveler 118
overview 105
preparing 105
restrictions 114
administrator role
requirement 243
administrators
first logon 86
Alias domains
addresses for 207
application passwords
enabling for mobile applications 139
application servers
connecting to 82
attachment size limits
Traveler devices 118
B
bandwidth
Notes client 196
web client 193
base name
creating 91
best practices
maintaining on-premises
environment 243
BlackBerry devices
activating 239
reactivating 274
© Copyright IBM Corp. 2011
BlackBerry documentation
providing to users 242
BlackBerry on-premises servers
removing accounts 239
BlackBerry smartphones
backing up data 274
encrypted mail 242
frequently asked questions 278
management tasks 274
resetting passwords 277
wiping 276
BlackBerry subscriptions
adding a subscription 239
removing a subscription 278
C
calendar details
enabling 170
calendar scheduling
planning 32
preparing for 73
certifier
creating for organizational units 39
mail server example 285
organization 37
certifier ID file
providing 92
certifier requirements
in a hybrid environment 37
chat
See also instant messaging
see instant messaging 176
checklists
for configuration preparation 87
client configuration tool
changes made to Notes client 199
Client Configuration tool
for Notes client 199
CNAME records
in Internet domain verification 97
comparison
service and on-premises 12
configuration
Configuration Test tool 303
hybrid environment roadmap 83
inbound connections 41
testing hybrid setup 93, 99
troubleshooting 303
configuration tasks
hybrid environment 83
control documents
for mail file transfers 214
custom templates
execution security alerts 163
preparing 161
D
delegation
planning for mail files 208
deployment
planning 17
Desktop Settings
restrictions 114
device passwords
resetting for BlackBerry devices 277
device wipe
for SmartCloud Traveler devices 272
differences
between service and on-premises
deployments 12
dir sync
see directory synchronization 89
directories
adding photos 147
finding names in 142
preparing for synchronization 45
replicating 21
directory synchronization
configuring 89
example 291
explanation 26
planning 21
preparing for 45
requirements and limitations 22
setting up servers 46
directory synchronization server
example 282
Domain Configuration tool
downloading and using 94
example 287
domain documents
Global Domain documents 49
domains
aliases 207
integrating additional 301
verifying Internet domains 97
Domino directories
preparing for replication 47
Domino versions
required 38
E
ECLs
custom templates 163
EDC
see extended directory catalog 48
EDNI
see External Domain Network
document 82
enabling federated identity
management 136
encrypted mail
on BlackBerry smartphones 242
309
examples
account settings
completing a worksheet 286
configuring 287
creating mail server certifier 285
directory synchronization 282, 291
firewall configuration 283
free time request
of a resource 298
of on-premises user 296
of service user 297
Global Domain document 284
integrating a secondary domain 301
integrating single domain 281
internal mail routing
between Domino domains 66
between users in a secondary
domain 62
from on-premises to service 293
from service to on-premises 292
Internet mail routing
from external user 69
inbound 294
using company SMTP host 71
using service SMTP host 70
issuing Vault Trust Certificate 290
preparing a passthru server
domain 282
preparing your environment 282
testing network connections 289
using the Domain Configuration
tool 287
verifying Internet domains 288
execution security alerts
custom templates 163
extended directory catalog
preparing for replication 48
synchronizing 89
extension forms files
assigning 249
assigning with integration server 249
overview 165
requirements 167
using as default 249
External Domain Network document
creating 82
F
FAQs
administering the service 13
BlackBerry administration 278
FAS
transfer method 214
federated identity checklist 135
file deletion
on-premises 228
firewalls
configuration example 283
configuring inbound connections
configuring outbound 42
preparing 41
folders
trash folder management 156
free time
example of request 296, 297
310
41
J
FTP
downloading journal files 181
transfer method 214
using for mail file transfer 215
journal files
downloading 181
Notes client sessions
Notes mail 182
overview 180
G
getting started
preparing a communications
plan 206
Global Domain documents
example 284
preparing 49
groups 104
L
Licenses
Notes 11
logon
first time by administrator
86
M
H
hybrid account setup
checking status 94
hybrid environment
account activation 99
administration 8
best practices 243
configuring 89, 94
overview 6
preparing 39
testing the configuration
184
99
I
IBM iNotes control
enabling 159
IBM Notes clients
described 11
preparing for deployment 196
ID files
for certifier ID 92
Notes IDs 131
uploading 213
ID vault
storing a Notes ID 213
IMAP
configuring access 178
folder names 180
information
available resources 15
instant messaging
configuring 171
configuring communities 175
described 176
on-premises 172
integration server
journal files 180
Internet domains
verification example 288
verifying 97
Internet email addresses
changing 258
multiple 207
IP range
bypassing in mobile applications
139
Mail
archiving policy settings
document 107, 110
mail file
reducing size of file 157
mail file templates
changing 246
configuring 164
language versions 248
preparing custom 161
viewing assigned template 247
mail file transfer 210
mail file transfers
control documents 214
initiating a request 214
preparing 209
preparing ACL 212
preparing for 209
using FTP 215
using NAS 215
using removable storage device 215
mail files
changing templates 246
configuring mail settings 154
configuring trash retention 156
customizing access 168
deleting on-premises files 228
planning delegation 208
preparing the staging server 210
quotas 207
scanning for viruses 213
viewing templates 247
mail hub servers
example 282
setting up 52
mail routing
between Domino domains 66
example 294
examples 62
external mail routing examples 69
from external to service user 69
internal examples 60
planning 29
preparing
from service to on-premises 53
from service users 53
to service users 55
to service users in a secondary
domain 57
SmartCloud Notes: Administering SmartCloud Notes: Hybrid Environment March 2015
mail routing (continued)
preparing (continued)
to service users in on-premises hub
domain 55
using SMTP 54
specifying server 90
using SMTP 70, 71, 160
mail rules
limiting use 154
mail servers
base name 91
certifier 39
decommissioning 229
preparing for routing 55
mail settings
configuring 154
configuring Notes links 155
deleting older mail 157
limiting incoming message size 154
preventing automatic forward 154
Mail Settings
restrictions 116
mail transfers
provisioning users 225
mail-in database
creating 211
meetings
calendar scheduling 32
messages
limiting size 154
mobile applications
enabling passwords for 139
Notes links
setting style 155
Notes Traveler
adding subscriptions 234
deleting users from on-premises
servers 236
policies 118
preparing devices 195
removing accounts from on-premises
servers 235
restricting access to on-premises
servers 235
NRPC
authentication 130
NRPC connections
in a hybrid environment 44
O
on-premises accounts
removing Notes Traveler 235
on-premises environment
preparing 39
on-premises servers
decommissioning 229
organizational unit
certifier 92
OU
See also see organizational unit
see organizational unit 92
P
N
name finder
configuring 142
Name finder
Standard and Advanced options 145
names
changing 255
NAS
using to transfer mail files 215
network bandwidth
Notes client 196
web client 193
network connections
planning 19
testing 289
testing using the trace command 100
networks
preparing 40
new user accounts
providing information to users 231
registering on-premises 222
Notes client
deciding whether to use 188
Notes clients
authentication 130
changes made by Client Configuration
tool 199
Notes ID
importing 213
on BlackBerry smartphones 242
resetting passwords 125, 253
uploading to the vault 269
passthru servers
preparing 40
preparing on-premises domain
example 282
see pass thru servers 40
specifying 91
password rules
by authentication method 141
passwords
enabling for mobile applications 139
resetting
for Notes ID 125, 253
set expiration dates 125
setting expiration for Notes
clients 126
setting for BlackBerry
smartphones 277
synchronizing 128
Person documents
alias domains 207
resolving duplicate documents 28
photos
adding to directories 147
policies
see administrative policies 105
Pre-configuration Test tool
using to test configuration 93
preparing federated identity
management 135
Provisioning
checking status 229
described 219
proxy servers
using 44
Q
quotas
for mail files
207
R
reactivation
for BlackBerry smartphone
devices 274
for Traveler devices 272
references
information resources 15
Registration Settings
restrictions 115
replication
preparing extended directory
catalog 48
preparing for 47
Research In Motion
accepting terms of use 238
reservations
for resources 36
resource databases
in a hybrid environment 36
restricting access 104
RIM
see Research In Motion 238
roadmap
hybrid configuration tasks 83
Roaming Settings
restrictions 118
S
Sametime
configuring 171
feature comparison 176
on-premises 172, 175
scheduling
preparing for 73
security
planning 17
Security Settings
restrictions 117
server ID
registering 210
server requirements
Domino version 38
servers
connecting to on-premises 82
connecting to the service 44
directory synchronization 46
mail routing 90
passthru 91
service user
converting to on-premises user 267
settings
for BlackBerry smartphones 205
size limits
mail files 207
SmartCloud Notes
overview 1
Index
311
SmartCloud Notes (continued)
what's new 2
SmartCloud Notes entry
described 10
SmartCloud Notes web
described 10
SmartCloud Traveler
managing devices 272
SMTP server
using to route mail 160
software versions
for Domino servers 38
staging server 210
enabling for status reports 211
preparing 210
server ID 210
status
hybrid account setup 94
status reports
from client configuration tool 211
subscriptions
activating BlackBerry service 239
adding
BlackBerry services 239
Notes Traveler 234
converting
from service to on-premises
user 267
in suspended account 260
removing
BlackBerry services 278
SmartCloud Notes 259
status of new 229
viewing 271
support
troubleshooting tips 303
suspended account
status 260
synchronization
directory synchronization 26
requirements and limitations 22
T
Troubleshooting
Resetting Notes ID passwords
253
troubleshooting tips
in the Support Portal 303
125,
U
user accounts
administering 243
converting from service to
on-premises 267
deleting 261
provisioning 225
provisioning without mail file
transfer 219
registering on-premises 222
removing from BlackBerry
on-premises servers 239
restoring 263
revoking 263, 264
suspending 260
user experience
in a hybrid environment 8
user names
changing in a hybrid
environment 255
V
Vault Trust Certificate
example of issuing
issuing 101
viruses
scanning for 213
290
W
web client
customizing 165
description 10
preparing for 193
what's new 2
templates
changing 246
configuring 164
language versions 248
using custom 246
viewing assigned 247
third-party email
using IMAP 178
trace command
using to test network
connections 100
transfer method
FTP and FAS 214
transfer requests
initiating 214
troubleshooting
contacting support 303
execution security alerts 163
hybrid configuration 93, 94
lost BlackBerry smartphone 276
tools and resources 303
using the Configuration Test tool 303
312
SmartCloud Notes: Administering SmartCloud Notes: Hybrid Environment March 2015
Printed in USA
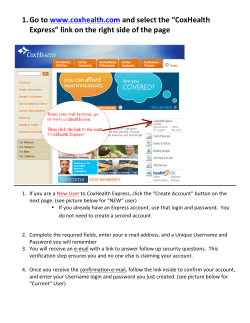


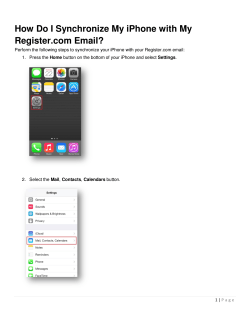


© Copyright 2026