
How to Setup an Email Account in Microsoft Outlook 2000/2002/XP
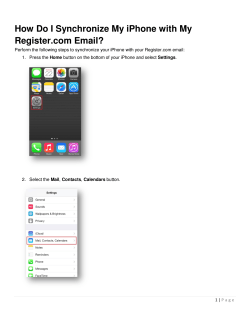
How to Setup an Email Account in Microsoft Outlook 2000/2002/XP
1. Open Microsoft Outlook
2. In the “Tools” Menu, select “Email Accounts” (In older versions of Outlook, this may be listed as simply
“Accounts”). If you don’t see it listed, you may need to click on the double down-arrow at the bottom of the
menu (This un-hides, rarely used items).
3. After selecting the Email Accounts menu item you should see the following window. Make sure “Add a
new e-mail account” is checked. Click “Next”.
4. Then, you must select the type of account. Select “POP3”. Click “Next”.
5. The following window will appear with all fields blank. This is the most important window. This is where
we enter the addresses or our email servers.
BAP General Email Settings
Your Name:
E-mail Address:
Incoming mail server (POP3):
Outgoing mail server (SMTP):
User Name:
Password:
<First Name> <Last Name>
<First Name><Last Initial>@bayareaproduce.com
mail.bayareaproduce.com
mail.gobeam.net
<First Name><Last Initial>@bayareaproduce.com
<Your Password>
6. Click on the Test Account Setting button and this next window should appear. It may take a few minutes for
the tasks to complete so please be patient. If any red check marks appear to the left of the tasks… you probably
made a typo in the previous window. Go back and check your work.
7. The options in this next window are optional but recommended. First, you may leave the Mail Account
name as is or you may change it to something that means more to you. Under organization you should
enter “Bay Area Produce, Inc.”. Under Reply E-mail, you should enter your BAP email address.
8. Now click on the Advanced tab at the top of the window. I highly suggest that you check the “Leave a copy
of messages on the server” option as well as the “Remove from server when deleted from ‘Deleted Items’”.
Click “Ok”.
9. You will then be back at this screen. Click “Finish” and you should be all set up!


© Copyright 2026