
Reciprocal Listing Packet - Ithaca Board of Realtors
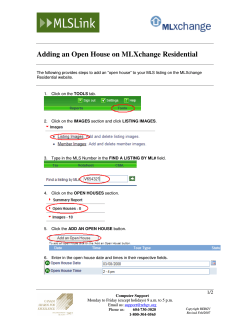
Ithaca Board of REALTORS Reciprocal Packet Thank you for your interest in listing property with the Ithaca Board of REALTORS® (IBR) Multiple Listing Service (MLS). The IBR allows REALTORS® to enter their own listings into its MLS once all of the appropriate documents are received. Please carefully read the following instructions. Once all documents are received, then IBR staff will give you a login and password. You will have 24 hours from the time you receive the login and password to enter the listing. If for some reason you are unable to complete the listing within that time, then the IBR will schedule a new 12-hour timeframe during which time you may enter the listing. Only one 12 hour extension will be granted. Cost Reciprocal Listings are $45 and may be paid for with a credit card or check. Send checks to Ithaca Board of REALTORS, 200 Pleasant Grove Road, Ithaca NY 14850 General Information about Filling out Forms The Exclusive Right to Sell/Agency (from your Board) and IBR Listing paperwork, signed by the seller, must be submitted and approved before a reciprocal can be entered into the IBR MLS. IMPORTANT NOTE: It is necessary to fill in all required fields for the MLS, because without them the MLS will not allow you to submit your listing. Required fields are indicated with an asterisk (*) next to the name on the form. Page 1: If no “Lake” is applicable, please choose “none” Bathrooms - if there is no bathroom on a level enter “0”. Lot Size is required but if Apx. Acreage is given, then lot size can be 0 Page 1 needs to be signed and dated by the owners and the listing agent. Approximate square footage on levels of the house is not required but is recommended. If information about rooms is entered, then both the level and the size of the room are required. If no information about rooms is available nothing needs to be entered. These fields are not required, but much appreciated by other agents. Page 2: “Directions” and the “Remarks for Agents Only” needs to be signed by the owners. “Public Description” is the description that appears on all websites and is also seen in listings that are emailed by agents to their buyers. BC stands for Blanket Consent BC show – “Yes” means the showing instructions are clear and nothing additional needs to be noted. BC advertise – “Yes” means anyone can advertise the listing even though it’s not their listing BC negotiate – “Yes” means other agents can negotiate offers with owner Internet y/n – “Yes” means the owner wants the listing on the internet Allow Comments y/n – “Yes” means the owner allows third party comments to be allowed on websites where the listing is displayed Allow AVM y/n – “Yes” means the owner wants to allow websites to make automated valuations of the worth of their property. Page 3: Each of the Coded Features must have at least one entry. o Style, Type of Listing and Survey will take only one entry. Needs to be initialed by the owners and the listing agent. 1 NOTE: List Date must be current not the date the property was listed with your Board. Owners must sign or initial all pages. Adding Listings to the InnoVia MLS Once you have received your login and password you should follow these steps: 1 2 3 To access InnoVia, go to http://www.ithacarealtorsmls.com. Enter the Login ID and Password. If there is “Important Board News”, then scroll to the bottom and click on “Continue”. Add Listing Content 4 5 On the InnoVia “Home” page, move your cursor over “Maintenance” and then click on “Listings”. Click on “New”, then move your cursor over “Listing”, and then click on the property type from the menu (Residential, Land, etc.). 6 The input screen follows the paperwork. Every field in red text is required. a. Room Dimensions are not a required field, but if you want to enter them, you need to have the respective Room Level as well. One cannot be entered without the other for each respective room. b. The Coded Features on Page 3 need at least one entry in every field. Note that there is usually a “None” option or something similar. 7 When you finished entering all of the listing information, click on “Save As…” and then click on “Partial”. This will save your progress thus far without publishing the listing to the MLS. 2 Add Photos 8 On the left-hand side, click on “Photos”. Follow the instructions in the blue box on the page, which are essentially to click on “Add Photos”, select the photos you wish to use for the listing, and then click on “Upload”. Alternatively, you may drag and drop the photos onto the page and then click on “Upload”. a. The photos do not upload in the order you prescribe. Instead, they will upload and be put into the order by whichever photos upload the fastest. To choose a different order, click on “Sort” and then drag the photos into the order you wish. When you are finished sorting, click on “Save Sort”. b. By default, the first photo will be automatically selected as the Primary photo, or the one that will appear first in the listing and in the main listing displays. The Primary photo will be highlighted in green. To select a different primary photo, move your cursor over the photo in question. Within the photo box, another smaller box should appear in the upper-right corner containing three icons: a star, a pencil, and a trash can. Click on the star icon. This photo will now be the Primary photo. c. By default, all photos are displayed in landscape (horizontal) orientation, even when the original photo is in portrait (vertical) orientation. InnoVia automatically displays the middle of the portrait 3 photo as a landscape photo. To display the entire portrait photo, move your cursor over the photo in question. The aforementioned smaller box should appear in the upper-right corner again. Click on the pencil icon. In the new box that pops up, under Options, check the box next to “Use letterboxing”. Drag a box around the entire photo (or whichever part of the photo you want to display in the listing). Click on “Save”. d. To add a comment (such as a photo description), move your cursor over the photo in question. The aforementioned smaller box should appear in the upper-right corner again. Click on the pencil icon. In the new box that pops up, under “Photo Comment”, type your comment. Click on “Save”. 4 Upload Documents 9 On the left-hand side, click on “Documents”. Click on the box next to “Label” to select the type of document you are uploading. Click on the “Browse…” button to select the document for upload. Check the box next to “MLS Only” so that the document will only be viewable within the MLS. Click on “Upload”. Repeat this process for all necessary documents for uploading. Publish Listing to MLS 10 After all relevant information, photos, and documents have been entered and uploaded and you are ready to publish the listing to the MLS, on the left-hand side, click on “Listing Data”. At the top, click on “Save As…” and then click on “Listing”. You should see a message saying you have successfully saved the listing, along with your new MLS number. 5 Print Listing If you want to print a copy of the listing at this time go back to the home screen type the MLS number into the “Quick Lookup” box. This should return a full display of your listing. You can review the listing to make sure it looks OK and then click on the office. icon. If there is an error please call the Board Changes to the Listing Send a change form to the Board Office signed by the owner to make the changes. Forms to submit prior to receiving your login and password: The Exclusive Right to Sell/Agency (from your Board), and IBR Listing paperwork, signed by the seller. If there are any problems or concerns please call the Board office Ithaca Board of REALTORS 200 Pleasant Grove Road Ithaca NY 14850 Phone: 607-257-1001 Fax: 607-257-1221 E-mail: [email protected] 6


© Copyright 2026