
Track Assembly - Lumber Smith
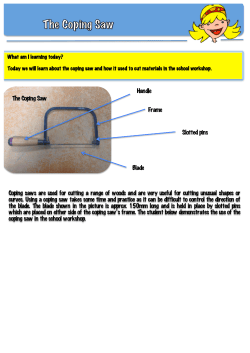
®
LumberSmith
Portable Band Saw Sawmill
Manual for Track Construction.
Read safety instructions before unpacking a blade or
operating the saw
Pat. Pending
REV 2
LumberSmith manual Page1
Safety Instructions
Failure to follow these instructions can lead to serious injury or death.
General
Band saw sawmills are extremely dangerous. Your butcher uses a band saw to cut through meat
and bone. The butcher’s saw is not as powerful as your Lumber Smith. Think, a butcher’s saw can cut
through a bovine leg in a few seconds. Your saw can cut through your leg in a few seconds.
Contributing to your danger, the environment in which you are working could cause major
distractions. Stop. Think. What will be your reaction if you spot a rattle snake while cutting a log? In
these instructions we cannot think of all of the hazardous situations you may find yourself in. The
hazardous situations we list are but a few of all of the possibilities. You are the one who must take
charge of your safety and the ones around you.
There are multiple hazards around you. For example, failure to replace the gas cap on the
engine could cause a fire while the saw is running. What will you reaction be? Make sure it is a safe one.
The saw setup
Are the tracks level? It is not necessary for the track for you saw to be perfectly level. However,
it should be sufficiently level so that the saw does not move by gravity (i.e. by itself) Side to side the
tracks should be sufficiently level so that the saw cannot tip over.
Tracks may either be well supported on flat level ground or on cross members if the ground is
uneven. If you use cross members, are the tracks fastened to the cross members? The track must be
fastened to the cross members in order in order to prevent the track from lifting out of a cross member
when the weight of the saw is on the extreme end of the track.
Does the track have stops at the end? Stops at the end of the track prevent the saw from rolling
off of the end of the track.
Are the track cross members well supported? The track cross members should be sufficiently
supported so that no movement of the track can occur while cutting a log.
Adjusting the saw
Stop the engine while making height (board thickness) adjustments.
Some blade adjustments require the cover to be removed and the engine to be slowly cranked.
Stop the engine and remove the spark plug wire when making these adjustments. Observe safety
precautions elsewhere in this manual. Make sure that the saw is in proper operating condition with
bolts properly tightened.
Proper clothing
Think of proper clothing in from two perspectives. 1) Your clothing may contribute to your
danger. 2) Your clothing may offer you protection.
Clothing can contributes to your danger by having strap or ties that can get caught in the
machinery. For example a draw string on a hood could get caught in the teeth of the blade and pull your
face into the blade.
Clothing that may offer you protection includes but is not limited to the following: Heavy gloves
to protect you hands from the sharp teeth of the band blade when handling the blade. Heavy glove may
protect your hand from burns on the engine muffler. Eye protection may protect you from any debris
coming from by the blade. Ear protection may protect you from engine noise. While this noise is not
excessive, we recommend ear protection. Other safety clothing may be necessary because of the type of
work you may be doing, i.e., lumbering with a chain saw, using a tractor, etc. Think of clothing as a
second line of defense for protection. You first line of defense is to avoid the danger.
LumberSmith manual Page2
The people around you
No one should stand in front (the direction in which the saw cuts) while the saw is in operation.
Bystanders should stand well back from the sawing operation. The sawing operation is no place for
children. Children can actually endanger you (as well as themselves) by distracting your attention from
your work. The people around you must be advised of the dangers of a band saw sawmill. Keep animals
away from the work area.
You and the people around you must be free of fatigue, the influence of alcohol and drugs and
be of good physical fitness.
The work area must be clear of obstacles and debris that can cause tripping hazards. It must
have adequate light.
Other equipment and operations
You may be operating other equipment and doing other things in conjunction with the band saw
operations. You must observe the safety precautions associated with these operations and be aware
that multiple operations can cause distractions that can increase danger hazards.
Unpacking a blade
Safety: a folded blade is like a coiled up spring with sharp teeth, it can unfold with force and cut
anyone around it. It can bounce up and cut a someone’s face. Put on gloves and face protection and
open the blade carefully.
Note: Sometimes the blade appears to have the teeth facing the wrong way. Hold the blade up to the
saw. The teeth should cut towards the motor. If, the teeth are facing the wrong way put the blade in a
workbench vise so that the blade is in a circle over the work bench. With gloves, grasp the far side of the
blade over the workbench lift it up over the vice towards you. As you pull the blade into a circle in front
of you, you will be able reverse the blade so that the surface of the blade that was towards the inside of
the circle formed by the blade is now on the outside.
LumberSmith manual Page3
Building a Track
Track Member
Cross Member
NOTE: The track shown is missing an important safety element. There are no
blocks on the track to keep the saw from rolling off the end! Further note the
Although, under certain circumstance, it may not be necessary to use a track, the use of a track assures
a straight and flat cut.
The track consists of at least two cross members and two track members. The track members should be
approximately 4 feet longer than the longest board you wish to cut.
Make two cross members from 2x4’s in accordance with the drawing below. We prefer pressure treated
lumber, but it is probably only needed for the bottom of the cross piece.
LumberSmith manual Page4
Step #1, Make the Cross Member.
This is achieved by simply cutting 2x4’s to the dimensions below and nailing them together using the
exploded view. Screws work well but are more expensive.
LumberSmith manual Page5
Second, make a track.
For a long stiff track we recommend using 2x6’s of framing lumber. For a short track, you may use 2x4’s.
It is not necessary to use treated lumber because the track will not be in contact with the ground. Hand
select the clearest and straightest 2x6’s you can find at your local lumber yard. The track has two
members. Make the “V” shaped member as illustrated below.
Note the small spacer blocks where the two boards will be joined. These blocks are about ½” thick and
are spaced approximately 16” apart. These blocks create a crack to allow sawdust to fall to the ground
and thus not interfere with the wheels of the LumberSmith.
We recommend gluing and using 3” drywall screws (on the 16” centers) to make the track really stiff.
The angle on the spacer blocks don’t really mater, and serve merely to shed the sawdust. 30 degrees is
fine.
The other member (right angle) of the track is made just like the track above except that it is not
necessary to use spacer blocks.
The picture below shows the track mounted on the cross members with the LumberSmith (without
engine) on the track.
LumberSmith manual Page6
Using the Track.
Safety!! Fasten blocks at the ends of the tracks to prevent the LumberSmith
from rolling off the end of the track!! (Not shown above)
Setting up the track.
Remember just because the cross members hold the track members a fixed distance apart the won’t
necessarily parallel.
The two illustrations below show examples of parallel tracks and skewed tracks as viewed from the side
with your eye level close to the ground.
Parallel Tracks
Skewed Tracks
Skewed tracks will cause the lumber to be cut with a twist
twist.
LumberSmith manual Page7
Setting up the tracks by method one.
Step 1. Lay the two cross member on firm ground with their distance apart slightly less than the length
of the log you wish to cut. Lay the track members in cross members as illustrated above. When you
finish this step the track should be sufficiently level so when the saw is place on the track it will not roll
by gravity.
Step 2. Block one cross member so that it rests firmly on the ground. It should be close to level, but it is
not necessary for it to be perfectly level.
Step 3. Sight the tracks by looking from the side with your eye close to the ground. Firmly block the
other cross member so that the tracks appear parallel as in the illustration above.
Step 4. Important safety !! Fasten the tracks to the cross members. Deck screws work well for this.
Make sure the placement of the screws does not interfere with the wheels of the LumberSmith.
Step 5. Double check your work.
Setting up the tracks by method two.
Step 1. Perform step 1 above.
Step 2. Perform step 2 above.
Step 3. Place the LumberSmith on the track above the cross member you blocked in step 2. Place a small
level on the top of the lumber Smith casting. Adjust one leg of the LumberSmith so that the spirit level
shows level.
Step 4. Roll the LumberSmith so that it is over the other cross member. Block the cross member so that
the spirit level shows level.
Step 5. Important safety !! Fasten the tracks to the cross members. Deck screws work well for this.
Make sure the placement of the screws does not interfere with the wheels of the LumberSmith.
Step 6. Roll the LumberSmith along the track checking that the spirit level show level.
LumberSmith manual Page8
Making stops to hold the logs.
After you place a log on the cross members you will need a way to hold the logs in place. You
can hold the log in place with the use of stops made from 2x4’s. Make the stops in accordance with the
drawing below.
Using the log stop.
After placing the log on the cross members, place one log stop on each side of the log on the
cross member as shown below. Tap the log stop with a hammer to cause the cut off nail to grip the log.
Drive the 16d nail in enough to prevent the log stop from slipping. You may wish to use a deck screw and
a power driver in place of the 16d nail. Also, you may also wish to place one log stop on top of another
to further support the log. You may also wish to make a spacer to lift the log. A spacer is made just like a
log stop except it is longer and has no nails.
LumberSmith manual Page9
Tips…
Tip: Do not use your best log for practice. The Lumber Smith is a great saw, but don’t use that pretty
walnut tree (or whatever) for your first cutting experience. You will learn how to maximize lumber and
make prettier cuts with a little practice.
Tip: Much of the work in a portable sawmill is set up, not cutting. Therefore, longer tracks can reduce
your time by allowing you to make, for example, on 12’ cut instead of cutting two different 6’ logs.
Tip. To cut the final boards from a log, place the partially cut log aside. When you are halfway cutting
the next log place the partially cut log with the flat side down on the half way cut log. You may wish to
fasten the two logs together so that the partially cut log cannot slip. You can now finish cutting your first
partially cut log. Aluminum nails are handy to fasten the logs together because you will not ruin the
blade if you accidently cut them with the saw.
Tip. The best cuts are made by using a constant force of the saw into the wood. That is, do not move the saw at a
predetermined speed. Instead use a constant force on the saw and let the saw cut at its own speed. The speed of
the cut is determined by many things including the type of wood, the size of the log, the sharpness of the blade,
and how fast the blade can remove the saw dust. With a constant force, the speed of cut will adjust to the
conditions. See our video for automation system to help propel the saw.
Tip. Use the leg jam-stop when adjusting for the thickness of board to cut. Make a sample block of
wood the thickness of the board you wish to cut. After making a cut place the block of wood as a gauge
block under the tab that extends below the leg supports of the casting. Place the leg jam-stop under the
block of wood. Remove the block of wood. Lower the saw to the leg jam-stop as shown in the following
photo. Store the leg jam-stop by inserting its handle into the top of one of the legs.
Tip. Rack and Stack your wood right away. It is easier to prevent wood from warping than to get a warp
out of a board. This is not to say that you cannot get the warp out of a board with a wet cloth on one
side and sunshine on the other. Right after you cut your wood stack it in a dry covered place with at
least half inch spacers between the boards spaced about 12 inches apart. Cover the boards for a few
days or so initially to prevent the wood from cracking. It is very important to cut the sap wood off the
boards right away. The sap wood on the outside just under the bark on a tree is saturated with water
and will shrink dramatically as it dries and crack your board. With large timbers we often wrap the wood
in shrink wrap to slow the drying to avoid splitting.
LumberSmith manual Page10


© Copyright 2026