
Small Budget Emergency Preparedness handout
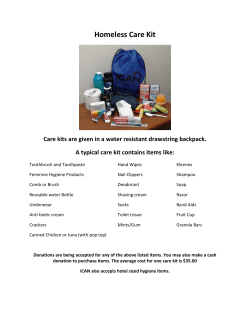
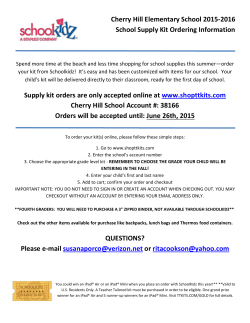
Small Budget Emergency Preparedness MYTH #1: I can’t afford to be safe. It’s true that having money makes it easier to buy stuff, but it’s completely FALSE that you have to buy stuff in order to be safe. Q: Why do people try to sell you emergency preparedness stuff? A: Sometimes they’re trying to make things easier by giving you a pre-packed kit. Other times, they’re trying to make a profit. Either way, you can make a kit on your own that will be cheaper and more appropriate to your own family and your individual situation. MYTH #2: We’re all doomed, so there’s no point. We are not doomed. We have survived lots of disasters before and we will survive the next ones, too. The 1906 San Francisco earthquake was the worst earthquake in US history. Around 3,000 people died. More than 350,000 people survived. Disasters will never be fun, but you can be one of the survivors. Step 1: Have a Plan Cost: FREE 1. Write down important phone numbers. Make enough copies so everyone can keep one in their purses or wallets, and put another one in the home where everyone can find it. (It needs to be written down so that if cell phones are dead/lost/broken, you still have a copy.) 2. Pick a family meeting place that’s close to the home and one that’s farther away. You should be able to walk or bike to both of them. 3. Phone numbers to include: Your kids’ school, your close family members, anyone you live with, your insurance agent, and your doctor’s office. The close one is the one you head for if there’s an emergency like a house fire. The far away one is the one you use if there’s a bigger emergency and it’s not safe to stay at the close one. Tell the people you love where those meeting places are. Talk about how you will meet up if there is a fire or an earthquake. Step 2: Make some kits Cost: FREE or cheap The way to keep this free or cheap is to not buy anything until you’ve finished packing the things you already own. Three sizes of kits: You should have a couple of stashes of stuff if you can, not just one. The different sizes and locations are so that you can always grab something, no matter what just happened. Under the bed: This is the littlest kit and it should live in a bag under your bed. This is in case you need to leave in a hurry in the middle of the night, and it’s small enough that a plastic grocery bag will work if you don’t have a bag you like better. Grab-and-go bag: You put this kit in something you can carry. A gym bag or paper grocery bag will work. You want to store it somewhere that you can get to it on your way out the door without spending too much time digging for it. Shelter-in-place Kit: You put this kit in a closet or somewhere out of the way. It doesn’t need to be in a container, but it should be all together so you can find it quickly. You probably won’t ever carry this one around, so it’s okay if it’s not in a container if you don’t have one. How to make kits for free or cheap 1. Get bags or boxes for your kits. 2. Find a bag or a box for each of the kits you want to build. If you don’t have any sturdy bags, shopping bags will work and you can use more than one for each kit if you need to. The goal is to make it so you can grab a bag or two instead of trying to juggle an armful of supplies. Check your closets for clothes and shoes. 3. Look through your closet for clothes you don’t wear very often but that still fit. It’s okay if they have stains or rips as long as they will keep you warm and (hopefully) dry. Find old pairs of shoes that still fit and would be better than walking over glass with bare feet. It’s okay if they’re ugly or damaged as long as they fit and still work. The most common injury after earthquakes is from stepping on broken glass without shoes. Go through junk drawers and closets you don’t get into very often. 4. With things like hammers and screwdrivers, you might as well store them in your emergency kit if you don’t use them very often. You can take them out to use them as long as you remember to put them back again afterward. Make lists of important information. Everyone struggles to remember things when they’re stressed. Write down important things like medications, phone numbers, and insurance policy numbers. Put copies in each of your kits. 5. Start packing your kits with the checklists at the back of this booklet. 6. Make a checkmark next to items as you pack them. Watch for sales and good deals. 7. Keep your packing lists with you when you go shopping so you know what you still need. This keeps you from accidentally buying something you already have. Take advantage of coupons and customer-loyalty programs. Buy food and other small items in very small batches. 8. Add a single can of food or a small item like a package of batteries to each shopping trip. This spreads out the cost of buying things you’d like to add to your kit. Ask for things you still need for Christmas and birthdays. Everyone gets gifts that they don’t want and will never use. How much better would it be if you got useful things that help you to be safer? What if I can’t afford food? If you can’t store a couple of days’ worth of food, store what you can. If you can’t afford to store a whole day’s worth of food, try to set aside something like a giant jar of peanut butter. It has a lot of calories and protein and it’s better than nothing. If you really can’t store food in your kit at all, then forget about food and just have the best kit you can make without it. If a kit has no food, it’s still better than no kit. What if I can’t do this all at once? Don’t try to do everything all at once. If you take a lot of small steps, they add up over time. Just keep at it and don’t give up. Step 3: Stay Informed Cost: FREE or cheap There are many places that will give you free information about how to be prepared for emergencies or to find out what hazards are in your area. Here are some good places to start: Yamhilll County Community Emergency Response Team (CERT) This group has monthly meetings to discuss emergency preparedness ideas and there is a free 8-week course that prepares individuals to help themselves and their local community if a disaster happens. For information, go to http://www.yccert.org/ or email them at [email protected] Yamhill County Emergency Management The county’s emergency management office has information about a wide variety of topics, including emergency preparedness for seniors, earthquake safety, planning for the needs of pets, and many other topics. Speakers can also give presentations to interested groups. For more information, just email [email protected] or call 503-434-7343 and ask for Angela. American Red Cross http://www.redcross.org/ The Red Cross teaches classes in basic family safety and in first aid & CPR. They also have free pamphlets and booklets of preparedness information. Ready.gov http://www.ready.gov/ This is a FEMA website that has information on how to prepare yourself & family. Just don’t give up. Every step you take moves you closer to the goal. 1. Under bed Kit 2. Grab & Go Bag 3. Shelter-in-place kit Packing List: Under the Bed Kit This is the smallest kind of kit. Keep it under your bed or somewhere you can find it quickly in your bedroom. It’s the one you grab if you wake up to the smoke alarm or an earthquake in the middle of the night. The bold items are the really important ones. The others are a good idea, but less important. Small bag or shoebox Shoes Flashlight List of important phone numbers & info Bottle of water Small snack like a cereal bar Hard hat ($10 at hardware store) Dust mask ($2 at hardware store) Work gloves ($2 at hardware store) Packing List: Grab-and-Go Kit This is a medium-sized kit that you can carry with you. This is the one you grab if you can when you have to leave the house in a hurry, like if you need to go to the hospital or if there’s a fire and you can grab it safely on your way out of the house. The bold items are the really important ones. The others are a good idea, but less important. Medium-sized bag or box Changes of clothes (3 days) Flashlight Water & food (3 days if you can) Can opener (if food cans need it) Special needs items (meds, etc.) List of important phone numbers & info Toiletries (toothbrush, soap, etc.) Cordless radio (AM/FM or weather radio, $30 at hardware store) Dust masks ($2 at hardware store) Work gloves ($2 at hardware store) Packing List: Shelter-in-Place Kit This is a large kit that you use if there’s an emergency where it’s safer to stay inside your house, like a snow storm, flood, or a chemical spill outside. The bold items are the really important ones. The others are a good idea, but less important. Large bag or box Flashlights & batteries (or wind-up flashlights) Gallons of water (1 gallon per person per day) Food (as many days as you can) Can opener (if food cans need it) Special needs items (meds, etc.) List of important phone numbers & info Toiletries (toothbrush, soap, etc.) Cordless radio (AM/FM or weather) Dust masks ($2 at hardware store) Work gloves ($2 at hardware store) Plastic & duct tape to seal windows ($10 at hardware store)


© Copyright 2026