
Guide this book to illustrate informati on Diagrams
ABC First Aid Guide
Clear & Simple First Aid Advice
Diagrams and photographs are used throughout
this book to illustrate information
By Dr Audrey Sisman, MBChB
In conjunction with an
approved First Aid course,
this book will assist you in
learning the skills to handle
most emergency situations
ABC FIRST AID GUIDE
2nd Edition 2009
Published by:
ABC Publications
PO Box 5669, Maroochydore BC, Qld 4558
Author:
Dr Audrey Sisman, MBChB
ISBN:
978-0-646-50354-7
Copyright © 2008-2009 by ABC Publications
All rights reserved. Reproduction of this book, in part or entirely, without written permission
is prohibited.
ABC Publications would like to thank the following organisations for their support, advice
and contributions to the contents of the ABC First Aid Guide.
•
•
•
•
•
•
•
•
The Australian Resuscitation Council
Epilepsy Association of Tasmania
Queensland Ambulance Service
Roads and Traffic Authority
National Heart Foundation of Australia
Australasian Society of Clinical Immunology & Allergy (ASCIA)
Asthma Foundation of Queensland
WorkCover QLD
For more information about this manual, and for the latest updates visit:
www.abcpublications.com.au
The information in this book contains, at the time of printing, the most current
guidelines of the Australian Resuscitation Council (ARC). This book is designed to be an
information resource and is not a substitute for attending a first aid course conducted
by an approved provider. The author of this book accepts no responsibility for any injury
or damage that may occur as a result of using this book in first aid management. If you
have any problems or queries regarding information contained in this book, please
refer to the Australian Resuscitation Council: www.resus.org.au
Introduction
Congratulations in taking positive steps towards
learning first aid. Basic first aid is something we
should all learn in order to help others in need and
possibly save a life.
ABC First Aid Guide is designed for Australian
conditions, and contains clear simple first aid advice
for most emergencies.
In conjunction with an approved first aid course, this
book will assist you learn the skills to handle most
emergency situations.
Keep this book with your first aid kit and use it as a
quick reference guide if required.
ABC First Aid Guide incorporates the latest 2008 ARC
guidelines and is written by a medical practitioner
with experience in emergency medicine, hospital
medicine, general practice and natural therapies.
How to use this book
ABC First Aid Guide is divided into four main colour
coded sections:
•Essential First Aid •Trauma
•Medical Emergencies •General First Aid
At the back of the book, there is a ‘First Aid Report
Form’ which can be torn off and used in a first aid
incident.
The yellow, back inside page has Australian National
Emergency Numbers with space to fill in your local
emergency numbers.
Each subsection shows you step-by-step how
to recognise and deal with an emergency
situation. Emergencies are recognised by SIGNS
& SYMPTOMS which are contained in a red
box. Displayed in a green box is the FIRST AID
management of an emergency situation.
Contents
Essential First Aid
Unconscious ...................................2
DRABCD ........................................3
CPR................................................4
Choking .........................................6
Drowning........................................7
Trauma
Soft Tissue Injury & Fracture............. 8
Upper Limb Injury ........................... 9
Lower Limb / Pelvic Injury ..............10
Bleeding .......................................12
Shock ...........................................14
Crush Injury ..................................14
Burns ...........................................15
Electric Shock................................16
Multiple Casualties/ Prioritizing ......16
Chest ...........................................17
Abdomen .....................................18
Eye...............................................19
Head Injury ..................................20
Spinal Injury .................................21
Medical Emergencies
Heart Conditions ..........................22
Asthma ........................................23
Croup/ Epiglottitis .........................24
Faint ............................................24
Seizure/ Epilepsy ...........................25
Febrile Convulsion ........................25
Diabetes .......................................26
Stroke ..........................................27
Hyperventilation............................27
Heat Exposure ..............................28
Cold Exposure ..............................29
Bites and Stings ............................30
Poisons .........................................32
Allergy/ Anaphylaxis .....................33
General First Aid
Principles of First Aid .....................34
Legal Issues ..................................34
Communication/ Reports...............35
Record Keeping/ Self-Help ............35
Safe Manual Handling/ Hygiene ....36
First Aid Kits/Needlestick Injury ......36
Casualty Assessment .....................37
Natural Medicine in First Aid .........38
First Aid Report Form
Emergency Numbers
2|Essential first Aid
Essential first Aid|3
Unconsciousness
is a state of unresponsiveness, where the casualty is unaware
of their surroundings and no purposeful response can be obtained.
Unconscious
Not Breathing
Follow Basic Life Support Chart
No Signs of Life
The sense of hearing
is always the last sense
to go, so be careful of
what you say near an
unconscious casualty.
Breathing
Recovery Position, Call 000, monitor
Causes of an unconscious, breathing state:
• A - Alcohol
• T - Trauma (head/ spinal)
• E - Epilepsy (Pg 25 )
• I - Infections (meningitis)
• I - Insulin (Diabetes Pg 26 )
• P - Pretending
• O - Overdose (Poisons Pg 32) • S - Stroke (Pg 27 )
• U - Uraemia (renal failure)
All unconscious casualties must be handled gently and every effort made to avoid any
twisting or forward movement of the head and spine.
(An unconscious, breathing woman in advanced pregnancy should be placed on her left side).
D
R
Check for Danger
Check for Response
A
Not Breathing
Breathing
Recovery Position
Call “000” and
monitor signs of life
Foreign
Material
Recovery Position
Clear Airway
No Signs of Life
Airway management
takes priority over
spinal injury
Step 2
Step 3
•Stabilise the casualty by flexing •Carefully tilt the head
the bent knee to 90° when
slightly backwards
resting on the ground.
and downwards. This
•Tuck the casualty’s hand under
facilitates drainage of
their armpit.
saliva and/or stomach
•Ensure the casualty’s head is
contents and reduces
resting on their outstretched
the risk of inhalation
arm.
which may cause
pneumonia.
Obtain history, monitor,
get help
Airway – Check &
Open
No Foreign Material
B
No Normal Breathing
Normal Breathing
Call “000”
Recovery Position
Call “000” and
monitor signs of life
2 Rescue Breaths
Step 1
•Raise the casualty’s furthest
arm above the head.
•Place the casualty’s nearest
arm across the body.
•Bend-up the casualty’s
nearest leg.
•With one hand on the
shoulder and the other
on the knee, roll casualty
away from you.
Responsive
Unconscious
The recovery position:
• Maintains a clear airway - allows the tongue to fall forward.
• Facilitates drainage and lessens the risk of inhaling
foreign material.
• Permits good observation and access to the airway.
• Avoids pressure on the chest which facilitates
breathing.
• Provides a stable position and minimises injury to casuality.
© ABC Publications
C
D
30 Compressions
Defibrillation – use AED
(Automated External Defibrillator)
CPR
30:2
No Signs of Life =
• Unconscious
• Unresponsive
• Not breathing Normally
• Not moving
• If unsure if breathing is normal,
treat as though it is not.
• If unsure if there are signs of life,
commence CPR.
• Only stop to recheck casualty if
normal breathing resumes.
In the first few minutes of a casualty’s cardiac arrest, sounds of gurgling, sighing or
coughing may be present, but this is ineffective breathing and CPR should be commenced.
In an EMERGENCY CALL 000 or 112
(Mobile)
4|Essential first Aid
Essential first Aid|5
CPR
Danger
• Survey Scene
• Remove or Minimise Hazards
Protect yourself
- use antiseptics
and barrier
protection:
gloves, mask,
goggles.
Response •Talk and touch
HAZARDS!
• Biohazards – blood, bodily fluids
• Chemicals – spills, fumes, fuel
• Electricity – power-lines
• On coming traffic
• Fire, explosion
• Unstable structures
• Slippery surfaces
• Broken glass
• Sharp metal edges
• Needle stick
• Aggressive behaviour
SPEAK LOUDLY – Don’t shout
“Hello, can you hear me”?
“Open your eyes”
“Squeeze my hands”
SQUEEZE SHOULDERS firmly – Don’t shake
NB. When approaching a collapsed casualty with
caution, ascertain a response from a standing position
by tapping casualty’s foot with your foot before kneeling
down.
- for foreign material which could be obstructing the airway.
Airway •Check
•Open - use chin lift and backward head tilt to open airway.
Chin lift
To clear foreign material
Head Use pistol grip to achieve chin
lift.
Watch
that
your
knuckle
tilt
doesn’t compress neck and
obstruct airway and breathing.
Spinal injury and infants(<1yr):
Keep head in a neutral position
(i.e. minimise backward head tilt)
•The airway takes precedence over any other injury including a possible spinal injury.
•Check airway and breathing in recovery position if incident involves drowning or vomiting.
• Look - for rise and fall of lower chest/ upper abdomen
Breathing • Listen - for breath sounds
• Feel - for movement of chest and escape of air from mouth
Take 10secs
If the unconscious casualty is not breathing after
to check
the airway has been cleared and opened, give
for normal
2 initial Rescue Breaths (RB).
breathing
If a resuscitation mask is not available, place a
handkerchief, casualty’s shirt, plastic bag with hole
punched through over casualty’s mouth as barrier
protection.
If unwilling or unable to give RB, do chest
compressions only.
2 Rescue Breaths
Take a breath.
Close casualty’s nostrils
(pinch with fingers).
Mouth to mouth (good seal).
Blow to inflate lungs.
Compressions
CPR
•2 breaths over 2 secs
• Inflate until chest starts to
rise.
• Over-inflation forces air
into the stomach causing
regurgitation.
• Infants – perform mouth
to mouth/nose RB and
Turn head after each RB.
inflate with puff of air from
Listen and feel for air exhaled
cheeks.
from mouth.
Avoid inhaling re-expired air.
• 30 chest compressions • Depth = 1/3 of chest wall
• Rate = 100 per min (almost 2 compressions per sec)
• Place hands in centre of chest.
• Keeping elbows straight, direct
pressure through heel of hands using
your body weight.
• Place casualty on a firm surface
(not a mattress).
CPR
30:2
•Cardio Pulmonary Resuscitation • Rate = 5 cycles every 2 mins
•Combines 30 compressions with 2 breaths (30:2) = 1 cycle
Same ratio
for infant,
child, adult
• Change rescuers every 2 mins to reduce
Stop CPR when:
fatigue.
• Casualty shows signs of life.
• Do chest compressions only if unwilling to
• Qualified help arrives and takes over.
give rescue breaths - this still circulates oxygen. • Exhaustion – can’t continue.
• Do not give more than 2 RB each time before
• Doctor pronounces life extinct.
returning to chest compressions.
• Scene becomes unsafe.
An AED (Automated External Defibrillator) delivers electric shock to
Defibrillation reverse abnormal heart rhythms. Not all heart rhythms are reversible
• When there are 2 rescuers, continue CPR while one
rescuer organises and attaches AED pads:
• Expose chest – cut clothing.
• Remove any medication patch, remove jewelry, wipe
chest dry, remove chest hair with razor.
• Attach AED pads – peel backing off first.
• Follow voice/ visual prompts of the AED.
DO NOT have casualty in contact with metal.
DO NOT use in a wet area.
ENSURE nobody is touching casualty.
Chain of survival: is the key to improving the survival rate from cardiac arrest. Time is
the essence. The 4 steps required are: 1) Call “000” Early 2) Begin CPR immediately
3) Early Defibrillation 4) Advanced cardiac life support by paramedics
6|Essential first Aid
Essential first Aid|7
Inhalation of a foreign body can cause partial or
Choking
complete airway obstruction.
Partial Airway Obstruction (Effective cough):
SIGNS & SYMPTOMS
• Coughing
• Wheezing
• Difficulty breathing
• Noisy breathing
• Cyanosis
(blue skin colour)
FIRST AID
• Encourage casualty to keep
coughing
• Reassurance
• DO NOT deliver back-blows
if cough is effective
• Call “000” If blockage
doesn’t clear
Complete Airway Obstruction (Ineffective cough):
SIGNS &
SYMPTOMS
• Unable to breathe,
speak or cough
• Agitated/
distressed
• Grips the throat
• Cyanosis (blue)
• Rapid loss of
consciousness
Back blows are delivered
standing or lying using the
heel of the hand between the
shoulder blades.
If after 5 back
blows the
airway is still
obstructed, use chest
thrusts.
Back blows Back blows
FIRST AID
• Deliver 5 back-blows.
• Check and clear mouth after each blow.
• Deliver 5 chest thrusts.
• Check and clear mouth after each blow.
• Repeat back blows and chest thrusts if
obstruction not relieved.
• Call “000”.
• If unconscious, commence CPR (Pg 4,5).
DO NOT apply abdominal pressure – may
cause internal injury.
Chest thrusts are delivered standing
or lying using one or two hands- a
wall or firm surface is required. The
elbow(s) are slightly bent and chest
thrusts are sharper
and slower than chest
compressions (CPR).
Check airway after
each chest thrust.
Chest Thrusts
are delivered
with the
infant lying
face down
across the
lap. Check
airway after
each back
blow.
When giving Rescue Breaths in an attempt to blow past the obstruction, there will be
resistance. If the obstruction is blown further down the airways, the obstruction can be
removed later by bronchoscope.
Drowning or near drowning is the process of experiencing
respiratory impairment from immersion in liquid. Interruption
of the oxygen supply to the brain is the most important
consequence of drowning so early rescue and
resuscitation are the major factors in survival.
• DO NOT attempt to save a
SIGNS & SYMPTOMS
drowning casualty beyond your
•Coughing •Chest pain •Frothy sputum
swimming ability.
•Clenched teeth •Shortness of breath
• Remove casualty from water as
•Blue lips and tongue •Unconscious
soon as possible.
•Irregular or no breathing
• Only begin Rescue Breathing in
water if trained to do so (requires
a floatation aid) and immediate
exit is impossible.
• Cardiac compressions in water
are both difficult and hazardous
and should not be attempted.
Drowning
A Drowning Victim
The risk of regurgitation and inhalation is high
following immersion. This is due to distension
of the stomach from swallowing large volumes
of water. The airway and breathing is assessed
in the recovery position to minimise risk of
inhalation.
FIRST AID
• On land or boat:
• Call “000”
• Roll casualty into recovery position
for assessment of airway and
breathing.
• Commence CPR if required (Pg4,5)
• Roll into recovery position if vomiting
or regurgitation occurs.
• DO NOT attempt to empty
distended stomach by external
compression.
• Treat for Hypothermia (Pg 29) - often
associated with immersion.
• Give oxygen if available.
• All immersion casualties must
be assessed in hospital as
complications often follow.
Rescuing a Drowning Victim
• If conscious: throw a buoyant aid (life jacket, surf board) or drag from water using an
umbrella, rope, towel, stick.
• If unconscious: Turn casualty face up and remove from water.
• Consider possibility of spinal injury – remove from water gently, maintaining spinal
alignment as much as possible.
8|Trauma
Trauma|9
Sprain: Over-extension of a joint with stretching and tearing of
Soft
ligaments.
Tissue
Strain: Over-stretching of muscles and tendons with tearing of
Injury
muscle tissue or tendon fibres.
Dislocation: Displacement of bone ends in a joint.
Fracture(#): Broken bone, classified as:
Closed: Fractured bone doesn’t penetrate skin.
Open: Fracture is exposed through open wound or penetrates skin.
Complicated: Vital organ, major nerve or blood vessel is damaged
by a broken bone.
The Signs & Symptoms and First Aid for a fracture and soft tissue injury are very similar.
FIRST AID
SIGNS & SYMPTOMS
• Control external bleeding or cover wound (Pg 12)
• Pain
• Tenderness
• Remove rings from fingers – swelling likely
• Snap or pop at time of injury
• Support or Immobilise +/_ R.I.C.E
• Restricted movement
• Medical Assistance: X-rays are the only sure
• Discolouration
way of diagnosing the type of injury.
• Swelling
• Call 000 if: Deformity as blood vessels
• Deformity*
and nerves can be damaged.
* Indicative of fracture or dislocation
Open Fracture: Risk of blood loss
and infection.
Fracture Management:
Breathing difficulty
The main aim of fracture treatment is
• Monitor Vital Signs (Pg 37,40)
to support or immobilise an injured part
which: •minimises pain •prevents further damage •minimises bleeding and •prevents a
closed fracture becoming an open fracture.
Support:
•Leave injured part as found and pack around to give support.
•Use Splint, Sling or bandage to prevent movement.
•Stabilise joint above and below fracture site.
•Apply triangular or broad bandages above and below fracture site.
•Check circulation every 15mins (Pg 11).
•DO NOT elevate a suspected fracture until it has been immobilised.
Soft Tissue Management:
R.I.C.E: Method used to treat soft tissue injuries (sprains/ strains) and fractures.
Rest: Rest casualty and injured part; this prevents further damage and reduces bleeding.
Ice: Reduces pain, fluid and swelling by constricting blood vessels. Apply wrapped ice pack
for 10 - 20mins – do not place ice directly on skin. Ice pack or frozen peas can be placed
over a bandage. Continue to cool injury three times/day for 2-3 days after the injury.
Compression: Apply a firm supporting bandage to injured part. This restricts movement
of injured part and reduces bleeding and swelling.
Elevation: Raise injured area above the level of the heart if possible. This slows the flow of
blood and reduces swelling.
• Degree of pain is not a good indicator of injury type since pain tolerance varies in
individuals.
• Never manipulate a dislocation - there may be an associated fracture.
• When in doubt, always treat an injury as a fracture.
• Check circulation (pg11) after immobilisation ie after bandaging, splinting, sling.
• May need to slowly adjust position of limb if no circulation is present.
Upper
Limb Injury
Arm Sling: Use a triangular
bandage or improvise.
Soft
Tissue
Injury &
Fracture
Improvise:
By using a belt or
buttons on shirt
Elevation Sling
The radius
always
attaches to
the thumb.
Finger Splints: Immobilisation reduces
pain. After splinting, apply an elevation
sling to minimise swelling.
Arm Sling
Rigid Splint: Rolled up newspaper,
tied either end with triangular
bandages.
Fractured
humerus:
Notice
deformity
Immobilise:
Collar
& Cuff Sling
Pain in:
Could be:
Shoulder
•Fractured clavicle •Dislocated shoulder
•Fractured upper humerus •Sprain/ strain
Upper Arm
•Fractured mid-humerus •Sprain/ strain
Fore Arm/
Wrist
•Fractured radius/ ulna •Sprain/ strain
•Fractured carpal bone
Hand
•Fractured/ dislocated metacarpal
•Fractured/ dislocated phalange
•Sprain/ strain
Management:
•Allow casualty to adopt
position of comfort.
•Apply sling which best
suits casualty.
•Keep hand higher than
elbow to reduce swelling
•If unsure whether injury
is a fracture or soft
tissue injury, treat as for
fracture (Pg 8)
10|Trauma
Trauma|11
Lower Limb
Pelvic Injury:
Injury
SIGNS &
SYMPTOMS
• Pain in hip or
groin region
• Pain worse on
movement
• Inability to walk
• Shock (Pg 14)
FIRST AID
• Call 000
• Reassure casualty
• Control any external bleeding.
• Lie casualty flat with knees slightly bent and
supported.
• Place padding between legs and on either side
of hips (eg blanket, towel, pillow).
• ‘Figure-of-eight’ bandage around ankles and
feet.
• Apply broad bandage above knees.
• Don’t attempt to move casualty.
• Discourage attempts to urinate.
• Maintain body temperature.
• Monitor vital signs (Pg37,40)
Consider internal
bleeding from
bladder, uterus,
bowel damage.
Hip Injury
Ankle Injury
Left leg appears
shorter and is rotated
outwards.
Notice swelling over
hip due to internal
bleeding. This is the
typical position of the
leg with a fractured
hip (fractured neck of
femur) and is common
in the elderly after a
minor fall.
A 1.5 litre blood loss
can result from a
closed fracture of the
femur. In this case
a 3 litre blood loss
could result in shock
(Pg 14) and death.
This type of injury
is common in road
traffic accidents.
Thigh Injury
R.I.C.E for a
sprained ankle:
Rest: Casualty doesn’t
move ankle
Ice: Cool injured area
Compression: Use a
crepe bandage
Elevation: Place foot
higher than hip
Knee Injury
R.I.C.E
Support knee
in position
of comfort.
Do not try
to straighten
knee if
painful.
Immobilising Lower limb:
• A body splint is an effective
way to immobilise lower limb
fractures.
• The key to immobilising leg
fractures is a figure of 8
bandage around the feet.
• Place padding in natural
hollows between legs.
• Stabilise joints above and
below fracture site.
• Position all bandages before
tying off.
• Apply broad bandages above
and below injured area.
• Tie bandages off on uninjured
side of body.
• If using a rigid splint (eg stick)
ensure splint doesn’t extend
further than length of legs.
• Ensure splint stabilises joints
above and below injury.
• Pad over splint to make more
comfortable.
• Check circulation
Fracture site.
Lower Limb
Injury
Use triangular
bandages,
broad bandages,
belts, clothing or
sheets to tie legs
together. Tie-off
on uninjured leg,
above and below
fracture site.
Fracture site.
Splints can be classified as:
• Body Splint: Uses uninjured, adjoining body part to
immobilise an injury. Lower limbs, fingers and toes
are commonly strapped together as body splints.
• Soft Splint: Folded blankets, towels, pillows
• Rigid Splint: Boards, sticks, metal strips, folded
magazines and newspapers
Checking Circulation:
• Check skin colour below injury - if pale or discoloured,
there may be impaired circulation.
• Assess skin temperature by gently placing hand below
SIGNS AND SYMPTOMS that
level of injury. Compare to other side. If colder, there
a bandage is too tight:
may be impaired circulation.
•Pain •Numbness •Cold
• Squeeze fingernail until nail turns white. Colour should
to touch •Tingling •Pale or
return within a few seconds.
discoloured •Pulse weak/absent • Compare pulse below injury with other side - If weaker
below injury
or absent, circulation may be impaired.
Pain in:
Hip/groin
Could be:
•Fractured Pelvis •Fractured neck of femur
•Dislocated head of femur •Sprain/strain
Thigh
•Fractured femur •Strain: front of thigh
(quadriceps) •Strain: back (hamstrings)
Knee
•Fractured patella •Dislocated patella
•Cartilage tear
•Sprain
Lower Leg/
Ankle
Foot
•Fractured tibia •Fractured fibula
•Dislocation •Sprain/ strain
•Fractured tarsal/metatarsal/phalange
•Dislocation •Sprain/ strain
Management:
• Allow casualty to
adopt position of
comfort.
• If unsure whether
injury is a fracture or
soft tissue injury, treat
as for fracture (Pg 8).
• Elevate a suspected
fracture after it has
been immobilised.
• Minimise movement to
avoid further injury.
• Check circulation after
immobilisation (above).
12|Trauma
Trauma|13
Embedded Object: eg knife, glass, stick or metal.
Bleeding
Bleeding (haemorrhage) can be external and obvious or internal (within the body) and
often not seen.
Bleeding is classified according to the type of blood vessel damaged:
Artery - bright red, spurting; Vein - dark red, flowing; Capillary - bright red, oozing
Types of wounds associated with bleeding are: Abrasions, incisions, laceration, puncture,
embedded object, tear, amputation.
Major External Bleeding:
The aim is to
reduce blood
loss from the
casualty.
Direct Pressure and Elevation
FIRST AID
• Check for Dangers to self, casualty & bystanders.
• Use disposable gloves if available.
• Direct Pressure Method:
• Quickly check for embedded objects (Pg13)
• Apply firm direct pressure untill bleeding stops.
• Maintain pressure over the wound using hands or
pad (sterile dressing, tea towel or handkerchief).
• Bandage firmly to hold pressure pad in place.
• If bleeding continues - apply another pad and a
tighter bandage.
• Elevate, immobilise and rest injury.
• Call “000”
• Reassure casualty.
• Assist casualty into comfortable position.
• Monitor vital signs (Pg37, 40)
• Give oxygen if available.
• DO NOT give casualty food, alcohol, medication.
• If major bleeding continues - remove all pads
to locate a bleeding point, then apply a more
direct pressure over bleeding point.
• If above methods fail - use a tourniquet.
• Treat for shock (pg 14) if required.
Direct, sustained pressure is the
fastest, easiest, most effective
way to stop bleeding.
TOURNIQUET: Used to control
life-threating bleeding.
• Use as a LAST RESORT.
• Use a wide bandage (>5cm
wide).
• Apply high above wound.
• Ensure tourniquet is clearly
visible.
• Tighten until bleeding stops.
• Note the time of application;
write time of application on
casualty.
• Continue to maintain direct
pressure over wound.
• DO NOT apply tourniquet over
a joint or wound.
• DO NOT remove tourniquet
until casualty receives specialist
care.
FIRST AID
• DO NOT remove the object - it could be plugging the wound.
• Build up padding around the object.
• Apply sustained pressure over the pad (indirect pressure).
• Bandage firmly over the pad.
• DO NOT apply pressure over the object.
• DO NOT shorten object unless its size is unmanageable.
• Elevate, immobilise, restrict movment of the limb.
• Advise casualty to remain at rest.
• Call “000”
Internal Bleeding: Signs, symptoms and management as for Shock (Pg 14)
• Suspect internal bleeding if a large blunt
force is involved - road traffic accident, fall
from a height; or a history of stomach ulcers,
early pregnancy (ectopic pregnancy) or
penetrating injury.
• Internal bleeding may be concealed or
revealed.
• If a casualty is coughing up frothy blood,
allow casualty to adopt position of comfort
– normally half-sitting.
• First aiders can’t control internal bleeding but
early recognition and calling “000” can save
lives.
Concealed:
Spleen, liver, pancreas, brain (no
bleeding visible).
Revealed:
Lungs – Cough up frothy pink sputum.
Stomach – Vomit brown coffee grounds
or red blood.
Kidneys/ Bladder – Blood stained urine.
Bowels – Rectal bleeding: bright red or
black and “tarry”.
Uterus - Vaginal bleeding.
Nose bleed:
FIRST AID
• Pinch soft part of nose just below the bone.
• Have casualty seated and leaning forward.
• Ask casualty to breathe through their mouth.
• Maintain pressure and posture for at least 10mins (longer may
be required after exercise, hot weather or if casualty has high
blood pressure or takes aspirin or warfarin tablets - maintain
pressure for at least 20 minutes).
• If bleeding continues >20mins - seek medical assistance.
• Apply cold compress to forehead and neck.
• Advise casualty not to blow or pick their nose for a few hours.
Amputation:
Tourniquet with time of application noted
Bleeding
Manage amputated limb as for major external bleeding (Pg 12).
Amputation of a limb often requires a tourniquet (Pg12) to control life-threatening bleeding.
• DO NOT wash or soak amputated part in water or any other liquid.
• Wrap the part in gauze or a clean handkerchief and place in watertight plastic bag.
• Place sealed bag or container in cold water which has ice added to it
(The part should not be in direct contact with ice).
• Send to hospital with the casualty.
14|Trauma
Trauma|15
Shock: Shock is a term used to describe an ineffective blood circulation.
CAUSES
Loss of blood volume: Bleeding or fluid loss
Loss of blood pressure: Heart/ pump failure
or abnormal blood vessel dilatation.
• Internal or external bleeding
bleeding
• Major or multiple fractures
• Severe burns or scalds
• Severe diarrhea and vomiting
fluid loss
• Heat stroke
• Heart attack
pump failure
• Severe infection
abnormal
• Allergic reactions
dilatation of
• Brain/ spinal cord injury
blood vessels
SIGNS & SYMPTOMS
• Pale, cool, clammy skin
• Thirst
• Feeling cold
• Rapid, shallow breathing.
• Nausea/ vomiting
• Confusion
• Reduced level of consciousness.
• Rapid, weak pulse
• Ridged, painful abdomen (from
internal abdominal bleeding).
NOTE: In early stages of blood loss,
children may have a normal pulse
rate, but pallor is the warning sign.
The total blood volume in the body
is about 6 litres. Blood loss of >1
litre (20%) may result in shock.
Rapid blood loss leads to more
severe shock.
FIRST AID
• DRABCD - Ensure your own safety
• Call “000”
• If conscious – lie casualty flat with legs
elevated.
• Control external bleeding (Pg12); stabilise
fractures; treat injuries (use disposable gloves
if available).
• Reassure
• Give nothing by mouth (may cause vomiting
and delay surgery).
• Keep casualty warm but don’t overheat.
• Monitor vital signs (Pg 37, 40).
• If casualty becomes unconscious, vomits
or has breathing difficulty, place in recovery
position, legs elevated if possible.
Crush Injury:
A heavy, crushing force to part of the body usually causing
extensive tissue damage from internal bleeding, fractures, ruptured organs, or an impaired
blood supply.
FIRST AID
• DRABCD - ensure your own safety.
• Call “000”
• If safe - remove crushing force as soon as possible.
• Control external bleeding (Pg12).
• DO NOT use a tourniquet (Pg12) to manage a crush
injury.
• Manage other injuries.
• Comfort and reassure.
• Monitor vital signs (Pg 37, 40)
NB - the casualty’s condition may deteriorate quickly
due to extensive damage.
Crush Injury Syndrome: Is
a complication of crush injury
usually involving a thigh or
pelvis (ie not a hand or foot).
The crushing force must be
in place for >1hr before the
syndrome develops. Toxins
from damaged tissuse are
released causing shock (pg14)
and renal failure. Drugs are
given to counteract the effect of
toxins.
Burns may result from: heat (flame, scald, direct contact), cold, friction,
chemical (acid, alkali), electrical or radiation (sunburn, welders arc).
FIRST AID
• DRABCD
• Cool affected area with water for as
long as necessary - usually 20mins.
• Remove rings, watches, jewelry from
affected area.
• Cut off contaminated clothing – do not
remove clothing contaminated with
chemicals over the head or face.
• Elevate burnt limb if possible.
• Cover burnt area with a loose, nonstick dressing (sterile non-adherent
dressing, plastic cling wrap, wet
handkerchief, sheet, pillow case).
• DO NOT allow shivering to occur.
• Hydrogel products are an alternative if
water is not available.
Burns
• DO NOT apply ice directly to burns.
• DO NOT break blisters.
• DO NOT apply lotions, ointments, creams
or powders (except hydrogel).
• DO NOT peel off adherent clothing or
other substances.
• DO NOT use “fluffy” dressings to cover
burn (towels, tissues, cotton wool).
Seek medical help for:
• Chemical burns • Electrical burns
• Inhalation burns • Full thickness burn
• Infant, child or elderly.
• Burns to hands, face, feet, major joints, or
genital area.
• Burn size > casualty’s palm.
• Burns encircling limbs or chest.
• Burns associated with trauma.
Extensive burns may result in shock from fluid loss
(pg14).
Full Thickness Burn
Partial Thickness Burn
Superficial Burn
(1st degree)
(2nd degree)
(3rd degree)
Reddening (like sunburn)
Red and Blistering
White or blackened
Painful
Very Painful
Not painful
Flame: • STOP, DROP, COVER, ROLL the casualty to put out flames • Smother flames with a
blanket, coat or rug and force casualty to lie on the ground • Move to safety • Call “000”
Inhalation: (See also Pg 32, Poisions) • Inhalation of flames or heated air can cause severe
damage to the airways resulting in swelling and possible airway obstruction • DO NOT enter
a buring or toxic atmosphere without appropriate protection • Remove to a safe, ventilated
area ASAP • Look for evidence of inhalation injury around nose or face • Coughing or
hoarseness may indicate exposure • Give oxygen if available • Call “000”
Chemical: • Acids and alkalis cause chemical burns • Brush powered chemicals from the
skin before cooling with water • Do not neutralise either acid or alkali burns because this will
increase heat generation and cause more tissue damage • Call “000”
Bitumen: • Bitumen holds heat therefore cool with water for 30mins • DO NOT remove
from skin unless it’s obstructing the airway • If the limb is completely encircled, split the
bitumen lengthwise as it cools • Call “000”
Electrical: • Burns are usually more severe than they appear and often associated with other
injuries (Pg 16) • Call “000”
16|Trauma
Electric
Shock
Trauma|17
Electric shock may cause: •Respiratory Arrest •Cardiac Arrest •Burns
FIRST AID
• ENSURE SAFETY OF YOURSELF AND BYSTANDERS.
• Call “000”
• Disconnect Electricity supply where possible (switch
off at fuse box or main circuit breaker and/ or unplug
appliance).
• If not possible, use non-conducting material (wooden
stick, dry clothing) to move casualty from electrical
supply.
• Commence CPR if required (Pg 4,5).
• Apply first aid to burns (Pg 15).
DO NOT touch casualty’s skin before electrical source is disconnected.
BEWARE: Water on floor and metal materials can conduct electricity from casualty to you.
• When POWERLINES are in contact with a vehicle or
a person, there should be no attempt at removal or
resuscitation of the casualty until the situation is declared
safe by electrical authorities.
• Remain at least 6m from energized material (car body, pool
of water, cable).
• You can do nothing for a casualty within the danger zone!
Protect yourself and others.
Multiple Casualties/ Prioritizing: You may be faced with the
dilemma of two or more casualties needing your care. In making a decision who to treat
first, remember the goal is for the greatest good for the greatest number of people.
In all cases remember the principles of safety to yourself, bystanders and casualty.
PRIORITIES: 1= top priority, 5 = lowest priority
manage an UNCONSCIOUS casualty first. Opening the airway and rolling
1 ALWAYS
the casualty into the recovery position may be all that’s required initially.
• Moderate bleeding (< 1 litre)
bleeding (> 1 litre)
injury
3 •• Spinal
2 •Severe
•Crush injury
Multiple fractures
•Shock
• Open chest wound
• Open abdominal wound
• Open fractures
• Burns to 30% of body
• Head injury, showing
deterioration
• Burns (10-30% of body)
4 • “Walking Wounded”
Obvious death – decapitation,
5 • massive
head or torso injuries
Remember: A casualty is always in a changing, non static condition. This is especially
important in head and abdominal injuries in which deterioration can occur.
Major chest injuries include fractured rib, flail chest (multiple
rib fractures, producing a floating segment of ribs), and sucking
chest wound. A fractured rib or penetrating injury may puncture
the lung.
Fractured Rib/
Flail Chest:
SIGNS & SYMPTOMS
• Holding chest
• Pain at site
• Pain when breathing
• Rapid, shallow
breathing
• Bruising
• Tenderness
• Blue lips (flail chest or
punctured lung)
• Flail Chest –section
of chest wall moves
in opposite direction
during breathing.
• Onset of shock (Pg 14)
Sucking
Chest Wound:
Chest
FIRST AID
• Position casualty in position of
comfort; half-sitting, leaning
toward injured side, if other
injuries permit.
• Encourage casualty to breathe
with short breaths.
• Place padding over injured
area.
• Bandage the upper arm on
injured side to the body.
• If bandages increase discomfort,
loosen or remove them.
• Apply a ’Collar & Cuff’ sling to
arm on injured side.
• Call “000” for an ambulance
• Monitor for internal bleeding/
shock (Pg 13, 14)
• If Unconscious: Recovery
position, injured side down.
SIGNS & SYMPTOMS
• Pain
• Breathing difficulty
• Sucking sound over wound
when casualty breathes.
• Bloodstained bubbles
around wound when casualty
breathes.
• Coughing up bloodstained
frothy sputum.
• Onset of shock (Pg 14).
FIRST AID
• Position casualty in position of comfort; half-sitting,
leaning toward injured side.
• If the object is still in place, stabilise with padding
around the wound.
• If the wound is open, cover with plastic or non-stick
pad taped on 3 sides: This allows air to escape
from pleural cavity and prevents lung collapse
(pneumothorax).
• Call “000” for an ambulance .
• Monitor for internal bleeding/ shock (Pg 13, 14).
18|Trauma
Abdomen
Trauma|19
An injury to the abdomen can be an open or closed wound. Even with
a closed wound the rupture of an organ can cause serious internal
bleeding (Pg 13, 14), which results in shock (Pg 14). With an open injury,
abdominal organs sometimes protrude through the wound.
FIRST AID
• Call “000”
• Place casualty on their back with pillow
under head and shoulders and
support under bent knees.
• If unconscious, place in recovery
position, legs elevated if possible.
• Cover exposed bowel with moist nonstick dressing, plastic cling wrap or
aluminium foil.
• Secure with surgical tape or bandage
(not tightly).
• Rest and reassure.
• Monitor vital signs (Pg 37, 40).
• Elevate legs if shock develops (Pg 14).
• DO NOT push bowel back into
abdominal cavity.
• DO NOT apply direct pressure to the
wound.
• DO NOT touch bowel with your fingers
(may cause spasm).
• DO NOT give food or drink (this may
delay surgery for wound repair).
Plastic cling wrap has been placed over an
open abdominal wound and secured with
surgical tape.
Types of eye injuries:•Burns •Foreign bodies •Penetrating injury •Direct blow
Burns:
Chemical - acids, caustic soda, lime
UV - Welder’s flash, snow blindness
(the eyes are red and feel gritty hours later)
Heat - flames or radiant heat
Contact Lenses: •DO NOT remove if the
surface of eye is badly damaged •Casualty
should remove own lenses •Lenses may
initially protect the eye but if a chemical or
foreign body tracks under the lens, severe
injury may occur.
Eye
FIRST AID
• IRRIGATE with cool running water or sterile
eye (saline) solution for
20 -30mins.
• Flush from the inside to the outside of eye.
• Irrigate under the eyelids.
• Lightly pad affected eye(s).
• Seek urgent medical assistance.
• If chemical burn, DO NOT waste time
looking for neutralizing agent.
(alkaline burn is worse than acid burn).
Foreign body: Grit, dust, metal particles, insects, eyelashes
FIRST AID
• Gently irrigate eye to wash out object – use sterile eye
(saline) solution or gentle water pressure from hose/ tap.
• If this fails, and the particle is on white of eye or eyelid,
gently lift particle off using a moistened cotton bud or the
corner of a clean handkerchief.
(DO NOT attempt this if particle is on coloured part of eye
– irrigate only)
• If still unsuccessful, cover the eye with a clean pad ensuring
no pressure is placed over injured eye.
• Seek medical aid.
• DO NOT allow casualty to rub eye.
Penetrating Injury:
FIRST AID
• Lay the casualty flat
• Reassure
• Call “000”
• Place padding around the object.
• Place a paper cup over the object to stabilize it.
• Tape or bandage to hold in place.
• Advise casualty to avoid moving unaffected eye, because
this will cause movement of injured eye.
• Cover the unaffected eye, but remove if casualty becomes
anxious.
• DO NOT remove embedded object.
• DO NOT apply pressure over the object.
Direct Blow: Any direct blow to the eye such as a fist or squash ball can cause
fracture of the eye socket or retinal detachment.
FIRST AID •Rest and Reassure •Place padding over eye
•Secure with tape or bandage •Ask casualty to limit eye movement
•Seek urgent medical aid
20|Trauma
Trauma|21
The key to managing a spinal cord injury:
PROTECT AIRWAY and MINIMISE MOVEMENT of the spine.
Head
Injury
SIGNS & SYMPTOMS
• Headache or giddiness
• Nausea or vomiting
• Drowsy or irritable
• Slurred speech
• Blurred vision
• Confused or disorientated.
• Loss of memory
• Swelling and bruising around
eyes.
• Bleeding into corner of eyes.
• Bruising behind ears.
• Straw coloured fluid or bleeding
from nose or ear.
• Loss of power in limbs.
• Loss of co-ordination.
• Seizure
• Unequal pupils
• Loses consciousness, even briefly.
Concussion: “Brain Shake” is a
temporary loss or altered state of
consciousness followed by complete
recovery. Subsequent decline
(see signs and symptoms above)
suggests a more serious brain injury.
bleeding
Cervical
Conscious:
brain
skull
Lumbar
Thoracic
Spinal Column
Blood or fluid from the ear may indicate
a ruptured eardrum or skull fracture:
Position casualty injured side down to
allow free drainage of fluid from the
ear. DO NOT plug or bandage ear.
• AIRWAY management takes priority
over any other injuries.
• ALL cases of unconsciousness, even if
casualty was unconscious only briefly,
must be assessed by a doctor.
• If casualty didn’t lose consciousness,
but later develops any of the following
signs and symptoms (below), urgent
medical advice must be sought.
• Monitor all casualties closely for the
first 8 hrs after a head injury.
• All head injuries should be suspected
as a spinal injury until proven
otherwise.
FIRST AID
Check DRABCD (Pg 3)
Conscious:
• Support casualty’s head as best as possible.
• Reassurance, especially if confused.
• If blood or fluid coming from ear or nostril,
loosely cover with a dressing (do not plug).
• Control bleeding and cover wounds (Pg 12).
• DO NOT give anything to eat or drink.
• DO NOT give aspirin for headache (may cause
bleeding within skull).
• Prepare for possible vomit – locate bowl, towel.
• Seek urgent medical aid.
Unconscious:
• Recovery position with head & neck support.
• Call “000”
• Monitor Vital Signs every 5-10mins (Pg 37, 40).
• Control bleeding and cover wounds.
• Support/stabilize head and neck.
• Keep warm with a blanket.
• Prepare for possible vomit.
Cerebral Compression: Brain swelling or bleeding
within the skull shows deteriorating signs and
symptoms (above). This is a serious brain injury and
could be life threatening.
SIGNS & SYMPTOMS
• Pain in neck or back.
• Pins and needles in any part of
body.
• Numbness or weakness.
• Unable to move legs or arms.
• Uncontrolled penile erection.
• Onset of shock (Pg 14).
Spinal
Injury
FIRST AID
• Prevent further injury by AVOIDING movement
of patient - leave this to the experts.
• Advise casualty to remain still.
• Call “000”
• Support the head and neck.
• Reassure casualty.
• Maintain body temperature with a blanket.
QUICK CHECK
• Can you wriggle your fingers and toes
for me?
• Can you make a fist?
• Can you shrug your shoulders?
• Can you pull your toes up towards you
and point them away?
• Do you have pins and needles
anywhere?
• Can you feel me touch your hands/ feet?
NB. If the casualty has neck or back paintreat as a spinal injury. The pain may
be due to an unstable vertebral fracture
Support the head and neck in a conscious
which may result in spinal cord damage if casualty with neck pain. Do not remove
handled incorrectly.
helmet and ask casualty to remain still.
Suspect spinal injury with: motor vehicle accidents, motor bike and cyclists, diving, falls
from a height, minor falls in the elderly and sports injuries such as rugby and horse riding.
Unconscious:
Any person found unconscious is potentially spinal injured until proven otherwise.
REMEMBER: Airway management takes priority over spinal injury.
Roll casualty into recovery position (carefully).
Helmet Removal: Helmets could
be preventing further spinal or head
injuries. If a full-face (motorcycle)
helmet is impeding proper airway
management in an unconscious
casualty and/ or you need to perform
CPR, the helmet needs to be removed
carefully. Otherwise leave helmet
removal to the experts.
FIRST AID
• Recovery position with head & neck support
• Call “000”
• Monitor Vital Signs every 5-10mins (Pg 37, 40)
• Control bleeding and cover wounds
• Support/ stabilize head and neck
• Keep warm with a blanket
• Prepare for possible vomit
22|Medical Emergencies
Heart Conditions
Medical Emergencies|23
Angina is a “cramping” of the heart muscle; relieved
by rest, with no permanent muscle damage.
Heart attack is caused by a blocked coronary artery,
resulting in muscle damage which may lead to
complications such as cardiac arrest.
Cardiac arrest is a condition in which the heart stops
beating and pumping effectively. The damage caused by
a heart attack may cause abnormal rhythms (Venticular
Fibrillation) which result in cardiac arrest.
Some abnormal rhythms can be reversed by an AED.
Cardiac arrest is fatal without basic life support (Pg 3).
“Heart attack” and “Angina” are heart conditions
which present with similar signs and symptoms.
SIGNS & SYMPTOMS – vary greatly, and not all symptoms and signs are present!
• Central chest pain – may be described as •Crushing •Tightness •Heaviness
• Breathlessness or difficulty “catching the breath”
• Indigestion type pain in the upper abdomen (referred pain from the heart)
• Pain radiating to the •Jaw •Neck •Shoulder •Left arm
• Heaviness or weakness in left arm
• Dizzy
NB. Casualties having a heart attack may present with
• Nauseous
breathlessness alone while others may have heaviness
• Pale and sweaty
in the arm or believe they have indigestion.
• Irregular pulse
FIRST AID
• STOP and REST – in position of comfort (usually sitting).
• Reassure and talk to casualty – Are you on prescribed heart medication?
Do you have angina? Can you take aspirin?
• If casualty has no heart medication and has never been diagnosed with heart
problems – treat as for HEART ATTACK • Call ‘000’ •Give aspirin •Monitor
• Assist casualty to take prescribed heart medication (anginine tabs or GTN spray).
• If after 5 mins symptoms are not relieved, give another dose of heart medication.
ANGINA should be relieved by rest and medication (tablets or spray).
• If after 3 doses of medication over 10mins, the pain has not diminished,
then the condition should be considered a HEART ATTACK
Warning signs:
DON’T WAIT
Pain lasts > 10 mins
Pain gets suddenly worse ACT NOW
Aspirin should be given if directed.
DO NOT give aspirin if:
• Casualty takes Warfarin
(blood thinning medication)
• Allergic to aspirin
• History of Asthma or Stomach ulcers
Call “000”
Give Aspirin 300mg
(one chewable tablet)
Monitor vital signs
Give Oxygen if trained
Vital Signs
(Pg 37, 40)
Prepare for CPR
Asthma
Asthma is spasm and narrowing of the airways with inflammation and
increased mucus production which causes breathing difficulties. Asthma
attacks are triggered in sensitive airways by changes in the weather, exercise,
emotional stress, pollen, dust-mite, food preservatives, smoke, fumes or cold
and flu infection.
FIRST AID
SIGNS & SYMPTOMS
• Sit casualty comfortably upright.
Mild:
• Calm and reassure.
• Dry cough
• Follow casualty’s Asthma Action Plan
• Wheeze – during exhalation
or give
• Breathless but speaks in sentences
• Reliever Medication
Moderate:
(4 puffs every 4 mins)
• Wheeze - during exhalation and inhalation
• If no improvement, repeat
• Rapid breathing
• Call “000” if no improvement
• Breathless - speaks in phrases
• Give oxygen if available (8L / min)
• Anxious
• Keep giving 4 puffs every 4 mins
• Pale and sweaty
until ambulance arrives or casualty
• Rapid pulse
improves significantly.
Collapse:
Severe:
• Commence DRABCD (Pg 3)
• Can’t speak (too breathless)
• Wheeze inaudible (no air movement)
• Cyanosis (blue lips)
Rescue breaths require much greater
• Exhaustion
force due to narrowed airways. Slowly
• Distressed
inflate with a steady pressure until chest
• Altered state of consciousness
begins to rise. Allow time for chest to fall
• Collapse -Respiratory arrest
during expiration. May only achieved a
rate of 6 breaths/ min.
Give Reliever Medication via
spacer. Use puffer on it’s
own if spacer not available.
Spacer
Reliever Medication:
• Blue - grey coloured
inhalers (puffers) eg
Ventolin, Respolin,
Atrovent, Salbutamol.
•Borrow an inhaler if
necessary.
• No harm is likely to
result from giving a
Reliever to someone who
does not have asthma.
• Shake inhaler (Puffer).
• Shake inhaler and place
• Place mouthpiece in
mouthpiece into spacer.
casualty’s mouth.
• Place spacer mouthpiece into
• Administer 1 puff as casualty casualty’s mouth.
inhales slowly and steadily. • Administer 1 puff and ask
• Casualty holds breath for
casualty to breath in and out
4 secs then takes 4 normal
for 4 breaths.
breaths.
• Continue until 4 puffs have
• Continue until 4 puffs have
been given.
been given.
• Wait 4mins and repeat.
• Wait 4mins and repeat.
(Spacers can be improvised using
a paper or styrofoam cup)
24|Medical Emergencies
SIGNS & SYMPTOMS
CROUP:
• Cold-like symptoms
• Barking cough
• Noisy breathing
• Slight temperature
• Worse at night
• Breathing difficulties
• Cyanosis (blue lips)
EPIGLOTTITIS:
• Drools –can’t swallow
• Quiet, doesn’t cough
• Leans forward
• Won’t talk
• High temperature
• Skin flushed
Mild
Croup and Epiglottitis are infections of the upper airways (larynx,
pharynx and trachea) and occurs in young children.
Both conditions start with similar signs and symptoms but epiglottitis
progresses to a life-threatening state.
Severe
Croup/
Epiglottitis
Medical Emergencies|25
FIRST AID
• DO NOT examine child’s
throat – this may cause
complete blockage.
• Calm and Reassure.
• Steamy shower room.
• Paracetamol
• Seek medical aid.
• Call “000”
• Comfort, reassure
• Sit upright on your lap.
• Lots of TLC until
ambulance arrives.
Steam helps alleviate
symptoms of ‘Croup’
but won’t cure the
problem.
Doctors find it
difficult to clinically
differentiate between
‘Croup’ and
‘Epiglottitis’ - further
tests are usually
required.
Croup: Viral infection
affecting upper airways
in infants and children
< 4yrs. Slow onset,
usually follows a cold or
sore throat and lasts 3
– 4 days.
Epiglottitis: Bacterial
infection of the epiglottis
(flap above the vocal
cords) causing upper
airway obstruction. It
occurs in the 4 - 7yr age
group and has a rapid
onset over 1-2hrs.
This is an emergency
and requires urgent
ambulance transport to
the hospital.
SIGNS & SYMPTOMS
• Dizzy or light headed.
• Nausea
• Sweating
• Return of consciousness
within a few seconds of
lying flat.
• Pale and sweaty
• Mild confusion or
embarrassment.
Seizure/ Epilepsy
Febrile Convulsion
Faint
Fainting is a sudden, brief
loss of consciousness caused
by lack of blood flow to the
brain with full recovery. It
often occurs in hot conditions
with long periods of standing;
sudden postural changes
(eg from sitting to standing);
pregnancy (lower blood
pressure); pain or emotional
stress (eg sight of blood).
A seizure is caused by abnormal electrical activity in the
brain. Seizures vary from the briefest lapses of attention to
prolonged convulsions (tonic-clonic or grand mal seizure).
A seizure can occur in a person with •Epilepsy •Head Injury •Stroke •Meningitis
•Fever (febrile convulsion) • Hypoglycaemia (diabetics) •Poisoning •Alcohol and
Drug Withdrawal.
FIRST AID
• Protect from harm – remove dangerous objects
SIGNS & SYMPTOMS
or protect head with cushion/ pillow.
Tonic-Clonic Seizure (Grand Mal)
• Note the time.
• Aura (warning sign: eg abnormal
• AVOID restraining unless this is essential to
taste, smell, sound or sight).
avoid injury.
• Cry out or make moaning sound.
• DO NOT put anything into casualty’s mouth.
• Collapse and momentary rigidity
• Roll into Recovery position as soon as possible.
(tonic phase – lasts few secs).
• Monitor Vital Signs (Pg 37, 40).
• Eyes roll upwards or stare.
• Reassure casualty and allow to sleep under
• Jerking movements of body
supervision at end of seizure.
(clonic phase – lasts few mins).
• Call “000” if:
• Blue discolouration of face/ lips
• Seizure lasts longer than 5mins.
• Excessive salivation
• Another seizure quickly follows.
• Tongue biting may result in blood
• Casualty is pregnant or has diabetes.
stained saliva.
• Seizure occurred in water.
• Loss of bladder or bowel control.
• This is casualty’s first ever seizure.
• Breathing ceases – resumes once
• Casualty is injured or you’re in doubt.
seizure finishes.
A person known to have epilepsy may not require
• Drowsiness and lethargy follows.
ambulance care and may get upset when one is called.
FIRST AID
• Lie casualty flat
• Raise legs
• Pregnant woman turn onto
left side.
• Recovery position if
unconscious > few secs.
• DO NOT give food or
drink.
• Check for other injuries.
(Normal body temperature = 37°C)
Febrile convulsions are associated with a high body temperature (>38°C). It is the rate of
rise in temperature, not how high it gets, which causes the convulsion. They occur in 3% of
all children between the age of 6mths and 6yrs.
SIGNS & SYMPTOMS
FIRST AID
(Similar to epilepsy + fever)
• Manage as for ‘Seizure/
• Fever
Epilepsy’.
• Skin hot, flushed
PLUS:
• Eyes roll up
• Remove excess clothing
• Body stiffens
• Apply cold compress to
• Back and neck arches
forehead
•
Jerking
of
face,
limbs
•
DO NOT allow shivering
• Protect from harm • Place
•
Frothing
at
mouth
to
occur
in recovery position after
•
Blue
face
and
lips
•
DO
NOT put in cold
seizure stops • Remove
•
Lethargy
follows
bath
excess clothing
26|Medical Emergencies
Medical Emergencies|27
Diabetes
DIFFERENCES
Diabetes is an imbalance between glucose and insulin levels in the body.
The imbalance may result in Hypoglycaemia (Low blood sugar) or
Hyperglycaemia (High blood sugar). Both conditions, if left untreated, result in altered
states of consciousness which are medical emergencies.
SIGNS & SYMPTOMS - Both conditions share similar signs and symptoms:
•Appear to be drunk (Dizzy, drowsy, confused, altered level of consciousness)
•Rapid breathing
•Rapid pulse
•Unconscious
HYPOglycaemia (LOW)
HYPERglycaemia (HIGH)
• Pale, cold sweaty skin
• Warm, dry skin
• Fast progression
• Slow progression
• Hunger
• Acetone smell on breath (nail polish remover)
• Trembling
• Thirst
• Weakness
• Passes urine frequently
• Seizure
• Nausea and vomiting
• Abdominal Pain
• The most common type of diabetic emergency is Hypoglycaemia.
• Hyperglycaemia is not common, as its slow onset allows diabetics to take corrective
measures.
FIRST AID
Hypoglycaemia can occur if a
Both conditions (Hypo and Hyperglycaemia) are
person with diabetes:
managed the same way by first aiders.
• Takes too much insulin
Conscious:
• Fails to eat adequately
• Give sweet drink/ food: 5-7 jelly beans, 2-4
• Over-exercises ie burns off sugar
teaspoons of sugar or honey, glass of fruit juice
faster than normal
(not diet or low sugar type).
• Becomes ill – viral infection
• Repeat if casualty responds
eg. diarrhoea and vomiting
• On recovery assist with high carbohydrate food:
• Experiences great emotional
sandwich, few biscuits, pasta or rice meal.
stress
• Call “000” if no improvement within a few minutes The reason sugar is given to
of giving sugar (could be hyperglycaemia or
diabetics with an altered state of
another medical condition).
consciousness is that most will be
Unconscious:
hypoglycaemic. The symptoms
• Place in recovery position
of hypoglycaemia progress more
• Call “000”
rapidly and must be addressed
• DO NOT administer insulin – could be fatal
quickly.
• GIVE NOTHING by mouth
If the casualty is hyperglycaemic,
the small amount of sugar given
by a first aider will not significantly
raise blood sugar levels and will
do no harm.
Fruit Juice
Sugar
Jelly Beans
Don’t give diet or diabetic food/
drink which contains artificial
sweetener – this doesn’t correct low
blood sugar.
Stroke
The blood supply to part of the brain is disrupted, resulting in damage to brain
tissue.
This is caused by either a blood clot blocking an artery (cerebral thrombosis) or a ruptured
artery inside the brain (cerebral haemorrhage).
The signs and symptoms of a “stroke” vary, depending on which part of the brain is
damaged.
SIGNS & SYMPTOMS
• Confusion or dazed state
• Headache
• Unequal-sized pupils
• Blurred vision
• Drooping of one side of face
• Slurred speech
• Difficulty swallowing - drool
• Weakness or paralysis affecting
one side of body.
• Loss of balance
• Incontinence of bladder/ bowel.
• Seizure
• Unconsciousness
FAST is a simple way of
remembering the signs of a
stroke:
• Facial weakness – Can the
casualty smile? Has their mouth
or eye drooped?
• Arm weakness – Can casualty
raise both arms?
• Speech – Can casualty speak
clearly and understand what you
say?
• Time to act fast - Call “000”
FIRST AID
• If casualty fails one of the FAST tests, act fast
and Call ”000”
• Adopt position of comfort
• Reassure
• Recovery position if unconscious
• Maintain body temperature
• Give oxygen if available
• Monitor Vital Signs (Pg 37, 40)
New drugs and medical procedures can limit or
reduce damage caused by a stroke.
Therefore, prompt action is essential for
optimum recovery.
TIA (Transient Ischaemic Attack) is a mini-stroke
with signs and symptoms lasting < 60mins.
The risk of a stroke subsequent to a TIA is high,
therefore early recognition and treatment is vital.
ruptured
artery
normal
artery
bleed into
brain
brain
Cerebral haemorrhage
artery
blood
clot in
artery
causing
tissue
damage
Cerebral thrombosis
Hyperventilation Hyperventilation syndrome is the term used to describe
SIGNS & SYMPTOMS
• Rapid breathing
• Light-headedness
• Tingling in fingers and
toes.
• Blurred vision
• Spasms in hands and
fingers.
• Severe Anxiety
• Chest discomfort
• Rapid pulse
the signs and symptoms resulting from stress-related or
deliberate over-breathing. The increased depth and rate of
breathing upsets the balance of oxygen and carbon dioxide
which results in diverse symptoms and signs.
NB. Other conditions
which may present with
FIRST AID
rapid breathing:
• Calm and Reassure.
• Asthma attack
• Encourage slow regular
breathing - count breaths aloud. • Heart failure
• Heart attack
• Seek medical aid – exclude
• Collapsed lung
other medical condition.
• Embolus (clot) in lung
• DO NOT use a bag for
• Diabetes
rebreathing.
• Some poisons
28|Medical Emergencies
Medical Emergencies|29
Heat Exposure
HEAT EXHAUSTION: occurs when the body cannot lose heat
fast enough. Profuse sweating occurs in an effort to lower
body temperature but this leads to fluid loss and decreased
Normal body
blood volume (mild shock). If not treated quickly, it can lead to
temp = 37°C
heat-stroke.
HEAT STROKE: occurs when the body’s normal cooling system fails and the body
temperature rises to the point where internal organs (eg brain, heart, kidneys) are
damaged: Blood vessels near the skin’s surface dilate in an attempt to release heat, but
the body is so seriously dehydrated that sweating stops (red, hot, dry skin). Consequently,
the body temperature rises rapidly because the body can no longer cool itself.
This is a life-threatening condition.
Organs cook at 42°C FIRST AID
HEAT EXHAUSTION
• Move casualty to cool,
(Mild – Moderate Hyperthermia)
shaded, ventilated area.
• Body Temp 37°C – 40°C
HEAT STROKE
• Lie flat with legs elevated.
SIGNS & SYMPTOMS
(Severe hyperthermia)
• Loosen and remove excess
• Sweating
• Body Temp > 40°C
clothing.
• Pale, cold, clammy skin
• Cool by: •fanning •spraying
SIGNS
&
SYMPTOMS
• Headache
with water •applying
• NO Sweating
• Muscle cramps
wrapped ice packs to neck,
•
Red,
hot,
dry
skin
• Thirst
groin and armpits •draping
•
Nausea
and
vomiting
• Fainting
wet sheet over body and
•
Visual
disturbances
• Nausea
fanning.
•
Irritability/
confusion
• Rapid pulse
• Give cool water to drink if
• Staggering/ unsteady
(Onset of mild shock due to fluid
fully conscious.
• Seizures
loss, Pg 8)
• Seek medical help or
• Unconscious
Progresses to
(Sometimes profuse sweating occurs) • Call “000” if in doubt
Heat radiates from the
body, especially the head
into the surrounding air
Breeze or fan
During breathing, cold air
is inhaled and warm air is
exhaled
Heat is lost through
evaporation (sweat) on
the skin
Heat is
conducted
from the
warm body to
a cold object
Heat Exhaustion and Heat Stroke are
usually caused by over-exertion in hot,
humid conditions with poor fluid intake.
Heat is lost through
convection ie warm
air around the body is
replaced with cold air
- worse on windy days
Body heat can be lost quickly in high, exposed areas
Exposure to cold conditions can lead to hypothermia (generalised cooling of the body) or frostbite (localised cold injury).
Cold
Exposure
• HYPOTHERMIA: is a condition where the body temperature drops below 35°C
• Hypothermia can be mistaken for drunkenness, stroke or drug abuse.
• Suspect hypothermia when conditions are cold, wet and windy, especially in the young
and elderly or individuals under the influence of alcohol or drugs.
• As the core body temperature drops, so does the metabolic rate which means the cells
require less oxygen. Hypothermia protects the brain from the effects of hypoxia so
resuscitation should be continued until the casualty can be rewarmed in hospital.
MILD Hypothermia
35°– 34°C
• Maximum shivering
• Pale, cool skin, blue lips
• Poor coordination
• Slurred speech
• Apathy and slow thinking
• Irritable or confused
• Memory loss
MODERATE Hypothermia
33°– 30°C
• Shivering ceases
• Muscle rigidity increases
• Consciousness clouded
• Slow breathing hard to
• Slow pulse
detect
}
SEVERE Hypothermia
<30°C
• Unconscious
• Cardiac arrhythmias
• Pupils fixed and dilated
• Appears dead
• Cardiac arrest
FIRST AID
• Call “000”
• DO NOT re-warm too quickly• Seek shelter – protect from wind chill.
can cause heart arrhythmias.
• Handle gently to avoid heart arrhythmias.
• DO NOT use radiant heat (eg fire • Keep horizontal to avoid changes in blood
or electric heater) - re-heats too
supply to brain.
quickly.
• Replace wet clothing with dry.
• DO NOT rub or massage
• Wrap in blankets/ sleeping bag or space
extremities- dilates blood vessels in
blanket and cover head.
skin so body heat is lost.
• Give warm, sweet drinks if conscious.
• DO NOT give alcohol – dilates
IF NOT SHIVERING:
blood vessels in skin and impairs
• Apply heat packs to groins, armpits, trunk
shivering.
and side of neck.
• DO NOT put casualty in hot bath
• Body-to-body contact can be used.
as monitoring and resuscitation if
IF UNCONSCIOUS:
needed may be difficult.
• DRABCD (Pg 3) - Check breathing/ pulse
for 30- 45secs as hypothermia slows down
is the freezing of body everything.
tissues and occurs in parts exposed to • If no signs of life – commence CPR while
re-warming casualty.
the cold.
Frostbite:
SIGNS & SYMPTOMS •White, waxy skin • Skin feels hard •Pain or numbness
Frost bite
FIRST AID
•Seek shelter •Treat hypothermia before frostbite •Gently remove clothing from affected
area •Rewarm affected area with body heat - place in armpit (rewarming can be very
painful) •DO NOT rub or massage affected area – tiny ice crystals in tissue may cause
more damage •DO NOT use radiant heat •DO NOT break blisters
•NEVER thaw a part if there is any chance of it being re-frozen. Thawing and refreezing
results in far more tissue damage than leaving tissue frozen for a few hours.
30|Medical Emergencies
Medical Emergencies|31
(Found in Tropical waters)
Box Jellyfish
Irukandji Jellyfish
Bites/ Stings
LAND
ANIMALS
TYPE
FIRST AID
FATAL
Snakes
Funnel web Spiders
Red back spiders/ others
Bees
Pressure Immobilisation Technique (PIT)
COLD COMPRESS/ ICE PACK
(PIT if allergic to bite/ sting)
SIGNS & SYMPTOMS
• Severe immediate skin pain
• Frosted pattern of skin marks
• Collapse
• Cardiac Arrest
(Anti-venom available)
Bites/ Stings
SIGNS & SYMPTOMS
• Mild sting followed 5-40mins later by:
• Severe generalised pain
• Nausea, vomiting, sweating
• Collapse /Respiratory arrest
(No anti-venom)
Wasps
Scorpion
Red Back Spider
Ants
SEA
CREATURES
TYPE
FATAL
Sea Snakes
FIRST AID
Tropics
Blue-Ringed Octopus
Pressure Immobilisation Technique (PIT)
Cone Shell
Box Jelly Fish
Irukandji Jelly Fish
VINEGAR - Use salt water (not fresh water) if vinegar not available
Fish stings: •Sharp barb •Painful wound •Bleeding
•Place wound in hot water
Red Back Spider: •Intense local pain at bite site •Not life-threatening •Apply cold pack
Bee/Wasp stings: •Scrape sting off sideways •Apply cold pack •PIT if allergic to sting
Ant/ Scorpion: •Painful sting •Not life-threatening •Apply cold pack for pain relief
Bluebottles
Fish Stings
: Stingray
: Stonefish
HOT WATER - Use cold compress if no pain relief
with hot water
: Bullrouts
Snakes
FIRST AID
•DRABCD •Remove casualty from water •Call “000” •Reassure •AVOID rubbing
sting area •Flood sting with VINEGAR for 30 secs •If no vinegar–pick off remnants of
tentacles and rinse with seawater (NOT freshwater) •If no signs of life, commence CPR
Funnel web Spider
Cone Shell
Blue-Ringed Octopus
SIGNS & SYMPTOMS: similar for all 4 species with death from Respiratory Arrest
within minutes to hours.
•Painless bite •Droopy eyelids •Blurred vision •Difficulty speaking and swallowing
•Breathing difficulties •Abdominal pain •Nausea and vomiting
•Headache
•Tingling/numbness around mouth •Profuse sweating •Copious salivation •Collapse
FIRST AID
• DRABCD
• Rest and reassurance.
• Call “000”
• Pressure Immobilisation Technique
• Resuscitation if needed, takes
priority over PIT.
• DO NOT wash bite site (land
animals).
• DO NOT suck venom from a bite.
• DO NOT kill animal –
identification of species is made
from venom on skin.
Snake
Pressure Immobilisation Technique (PIT): This method is used to treat a variety of bites
and stings: •Snake •Funnel web spider •Blue-ringed octopus •Cone shell
•Bee, wasp and ant bites in allergic individuals.
BlueRinged
Octopus
Funnel web
Spider
Cone Shell
1. Apply a pressure
bandage over the bite area
as firmly as a bandage to
a sprain.
•DO NOT wash bite site
•Mark “X” over bite site
(If only one bandage
available: start from
fingers/ toes and wind as
far up limb as possible
covering the bite).
2. Apply a second
bandage from fingers or
toes extending upwards
covering as much of limb
as possible.
•Bandage over the top of
jeans/ shirts as undressing
causes unnecessary movement
•Mark “X” over bite site
3.
Splint the bandaged
limb, including joints either
side of bite site.
•Rest casualty and limb.
•Check circulation (Pg 11)
•DO NOT elevate limb.
•DO NOT remove
bandage and splint once it
has been applied.
• DO NOT suck venom
from bite site.
PIT (Pressure Immobilisation Technique) slows the lymph flow and inactivates certain
venoms by trapping them in the tissues.
32|Medical Emergencies
Poisons
Medical Emergencies|33
A poison is any substance which causes harm to body tissues. A toxin is a
poison made by a living organism (eg animal, plant, micro-organism).
A venom is a toxin which is injected by a fang or sting (eg snake, spider,
fish).
13 11 26 Poisons Information Centre: Free Call, Available 24hrs, Australia wide.
Poisons can be inhaled, ingested (swallowed), absorbed or injected. The effect of a
poison will vary depending on what the substance actually is and how much has been
absorbed.
Ingestion:
Swallowed substances can be broadly categorised into ‘corrosive’ or
‘non-corrosive’.
Corrosive: Burning substances eg dish washer detergents, caustics, toilet/ bathroom
cleaners and pertoleums.
Non-Corrosive: Non-burning substances eg medications (tablets/ liquids) and plants.
SIGNS & SYMPTOMS of a corrosive
substance: •pain in the mouth/
abdomen •Burns to lips/ mouth
•Nausea/ vomiting •Tight chest
•Difficulty breathing •Sweating
•Unconscious
FIRST AID
• Identify type and quantity of poison
(from container/ bottle).
• Establish the time of poisoning.
• DO NOT induce vomiting.
• DO NOT give anything by mouth.
• If rescue breathing is required, wipe
away any contamination from around the
mouth.
• Use a resuscitation mask if available.
• DO NOT use ‘Syrup of Ipecec’ to induce
vomiting unless advised by Poisons
Information Centre.
FOR ALL POISONING:
• DRABCD
• What? When? How Much?
• Call Poisons Information Centre for specific
advice on management.
• Monitor Vital Signs (Pg 37, 40)
• Send any containers and/ or suicide notes
with casualty to hospital.
Chemical splash from eg • Send any vomit with casualty to hospital.
pesticide, weed killer.
FIRST AID
• DO NOT become contaminated yourself – wear gloves, goggles, protective clothing.
• Ask casualty to remove all contaminated clothing.
• Flood affected area with running water • Seek medical advice if required
Allergy/
Anaphylaxis
Anaphylaxis is a life-threatening allergic reaction which can be
triggered by nuts (especially peanuts), insect stings (bee, wasp,
ant), shellfish, latex products and certain drugs (eg Penicillin).
The airways rapidly swell and constrict, interfering with breathing, and the blood vessels
widen, leading to shock (Pg 14). Casualties need an immediate injection of adrenaline.
People who know they are at risk may wear a medical alert bracelet and carry their own
injectable adrenaline (Epi-Pen).
FIRST AID
• Assist casualty to position of comfort.
SIGNS & SYMPTOMS
• Call “000”
Mild to moderate Allergic
• Apply Pressure Immobilization Technique
reaction:
if allergic to bite/ sting (Pg 31).
• Swelling of lips, face, eyes
• Follow casualty’s Action Plan for Anaphylaxis.
• Hives or rash (red, itchy)
• Assist casualty with EpiPen.
• Metallic taste in mouth
• Record time EpiPen was given.
• Dizziness and Weakness
• Administer oxygen if available.
• Rapid pulse
• Collapse or unconsciousness - DRABCD (Pg 3).
• Nausea
NB - Rescue Breaths require more force due to narrowed airways
• Abdominal cramps
Severe Allergic Reaction
Use EpiPen when symptoms become severe.
(Anaphylaxis):
EpiPen is a pre-loaded auto-injecting pen containing
• Swelling of throat, tongue
a measured dose of adrenaline (Epinephrine).
• Difficulty swallowing
It takes only 1- 2mins for a mild allergic reaction to
• Noisy breathing (stridor)
escalate to anaphylaxis.
• Wheezing
• Difficulty talking/ hoarseness
How to use an EpiPen:
• Pale and floppy (young child)
• Collapse or unconsciousness
Absorbed:
Inhaled:
Toxic fumes from gas, burning solids or liquids. Inhaled poisons include:
carbon monoxide (car exhausts); methane (mines, sewers); chlorine (pool chemicals,
cleaning products); fumes from paints, glues, and industrial chemicals.
1.
Form fist around
EpiPen and pull off
grey safety cap.
Place black end
against outer midthigh. (with or without
clothing)
Hives
SIGNS & SYMPTOMS •Breathing problems •Headache •Nausea •Dizziness •Confusion
3.
FIRST AID •Move casualty to fresh air •Loosen tight clothing •Give oxygen if available
•Call “000”
Push down hard until
a click is heard or felt
and hold in place for 10
secs.
Injected:
As a result of a bite or sting (Pg 30, 31) or may be injected with a needle:
The most common type of drug overdose via injection are narcotics which cause respiratory
depression (slow breathing), respiratory arrest (no breathing) or unconsciousness. The most
common injection sites are: hands, feet, crease of elbow, between toes and fingers.
NB. Narcotic users may be carriers of Hepatitis B, C, and/ or HIV (AIDS).
2.
Swelling
4.
Remove EpiPen and
massage injection site
for 10secs.
DO NOT remove grey cap until ready to use.
BEWARE of needle protruding from black end after use.
34|General First Aid
Principles of
First Aid
General First Aid|35
What is First Aid? It’s the immediate care of an injured or
suddenly sick casualty until more advanced care arrives.
The aims of first aid are to:
• Preserve life – This includes the life of rescuer, bystander and casualty.
• Protect from further harm – Ensure the scene is safe and avoid harmful intervention.
• Prevent condition worsening – Provide appropriate treatment.
• Promote recovery – Act quickly, provide comfort and reassurance, get help, call “000”.
Helping at an emergency may involve:
•Phoning for help •Comforting casualty or family •Keeping order at an emergency scene
•Administering first aid
There are many ways you can help, but first you must decide to act.
Reasons why people do not help:
•Fear of doing something wrong •Fear of disease transmission •Uncertainty about
the casualty •Nature of injury or illness (blood, vomit, burnt skin can be unpleasant)
•Presence of bystanders (embarrassed to come forward or take responsibility)
You may need to compose yourself before acting. Do not panic – a calm and controlled
first aider gives everyone confidence. If you follow basic first aid procedures, you
should deliver appropriate care, even if you don’t know what the underlying problem is.
Remember, at an emergency scene, your help is needed.
Getting Help:
Call ’000’ for ambulance, fire or police. If ‘000’ from a mobile phone fails, call ‘112’.
If you ask for ‘ambulance’ a trained communications officer will ask you the following:
•What is the exact location of the incident? •What is the phone number from which
you are calling? •Caller’s name •What has happened? •How many casualties?
•Condition of the casualty(s)
Stay calm and respond clearly. The communications officer will provide you with first aid
instructions and dispatch the ambulance and paramedics.
DO NOT hang-up until you are told to do so or the operator hangs up first.
If a bystander is making the ‘000’ call, ensure they confirm with you that the call has been
made and that the location is exact.
Legal Issues
No ‘Good Samaritan’ or volunteer in Australia has ever been successfully sued for the
consequences of rendering assistance to a person in need. A ‘Good Samaritan’ is a person
acting in ‘good faith’ without the expectation of financial or other reward.
Duty of care: In a workplace environment there is an automatic duty of care to staff
and customers - a failure to act in a way that is consistent with an obligation to provide
reasonable assistance, to the best of our ability, may result in negligence and possible
litigation. In the community, you are under no legal obligation to provide first aid.
Consent: Before providing first aid, you must first gain consent from the casualty. If the
casualty refuses help, you must respect their decision. If the casualty is unresponsive or of
unsound mind and therefore unable to give consent, it is assumed they would give consent
if they were conscious and/ or orientated. If the casualty is a child, the parent/ guardian
should be asked permission, but if no parent/guardian is present and the injury/illness is
life-threatening, immediate first aid should be given.
Confidentiality: Personal information about the health of a casualty is confidential. This
information includes details of medical conditions, treatment provided and the results of
tests. Disclosure of personal information, without the person’s written consent is unethical
and in some cases may be illegal.
The role of the first aider depends on gaining and
honouring the trust of casualties. Maintaining trust requires
attentiveness to body language, quality of listening and finding culturally appropriate
ways of communicating that are courteous and clear. It may sometimes be necessary
to communicate through verbal and non-verbal communication and you may need to
identify issues that may cause conflict or misunderstanding. The first aider also needs to
maintain respect for privacy and dignity and pay careful attention to client consent and
confidentiality.
Communication
While waiting for help and if time permits, make a brief written report
to accompany the casualty to hospital. This will reduce time spent at the
scene for ambulance crew and further assist medical and nursing staff with initial patient
management. A report can be written on a spare piece of paper and should include the
following:
• Date, time, location of incident
The back inside page
• Casualty details - Name, DOB, Address.
contains a ‘First Aid Report
Form,’ which can be torn
• Contact Person for casualty - Family member, friend.
off and used at a first aid
• What happened - Brief description of injury or illness.
incident.
• First aid action taken – What you did to help the casualty.
• Other health problems – Diabetes, epilepsy, asthma, heart problems, operations.
• Medications/ allergies – Current tablets, medicines.
• When casualty last ate or drank – Tea, coffee, water, food.
• Observations of Vital Signs - Conscious state, pulse, breathing, skin state, pupils.
• First Aider’s name/ phone number incase medical staff need any further information.
Reports
Record
Keeping
In the workplace, it is important to be aware of the correct documentation
and record keeping used in first aid situations.
Each organisation has its own set of procedures and documentation so
familiarize yourself with the correct process.
All documentation must be legible and accurate and must contain a description of the
illness or injury and any treatment given. Thorough and accurate medical records are
essential in any court case or workers compensation issue.
In addition:
•Write in pen (not pencil) •Never use correction fluid – cross out and initial any changes
•Sign and date the form •Keep contents strictly confidential
Each person reacts differently to traumatic events and in some instances
strong emotions may affect wellbeing and work performance.
Symptoms may appear immediately or sometimes months later after
an event and may develop into chronic illness.
There is no right or wrong way to feel after an event but what a person experiences is valid
for that person. It is useful to identify and work through these reactions/feelings as early as
possible. Speaking to an understanding friend, counselor or medical professional may be
beneficial in assisting you to cope with the situation.
In addition, seeking feedback from medical personnel about your first aid performance
may assist with self-improvement and prepare you better for any future events.
Some Reactions/ Symptoms •Crying for no apparent reason •Difficulty making decisions
•Difficulty sleeping •Disbelief •Irritability •Disorientation •Apathy •Sadness •Depression
•Excessive drinking or drug use •Extreme hunger or lack of appetite •Fear/anxiety about
the future •Feeling powerless •Flashbacks •Headaches •Stomach problems •Heart
palpitations •Muscle aches •Stiff neck
Self-help/
Evaluation
36|General First Aid
General First Aid|37
Safe Manual Handling
When lifting or moving a casualty it’s important the first aider protects him/herself from
injury by using correct lifting techniques - bending the knees and using leg muscles will
help protect against back injury. However, knowing your own limitations and asking for
assistance if required is also important in preventing injury. In addition, learning the correct
procedures for moving a casualty (eg rolling casualty into recovery position) further minimises injury to the casualty and first aider.
Needlestick Injury
The risk of catching a serious infection (Hepatitis B, C
and HIV) from needle stick injury is very low.
Reduce the risk of needlestick injury:
•Never bend or snap used needles
•Never re-cap a needle
•Place used needles into a sharps approved container
•Hepatitis B vaccination for workers who regularly
come in contact with blood/ body fluids
NB. Disposable gloves will not protect against needlestick injury.
FIRST AID
• Squeeze blood out of injury site.
• Wipe with alcohol swab.
• Wash hands.
• Place syringe in plastic drink
bottle or sharps container.
• Take syringe with you to
hospital for analysis.
Hygiene Minimise the risk of cross infection to yourself, bystanders and casualty by
taking appropriate precautions:
During treatment:
Prior to treatment:
• Use a face shield/
• Wash hands with soap
mask, if available
and water, or rinse with
when performing
antiseptic.
resuscitation.
• Cover cuts on your
hands with a waterproof • DO NOT cough,
dressing before putting
sneeze or breath
on gloves.
over a wound.
• Wear disposable gloves. • Avoid contact with
• Do not touch any unclean body fluids.
object when wearing
• DO NOT treat
gloves .
more than one
• Use a plastic apron and
casualty without
eye protection.
washing hands
• Cover any adjacent areas and changing
likely to produce infection. gloves.
After treatment:
• Clean up the casualty, yourself and
immediate vicinity.
• Safely dispose of used dressings,
bandages and disposable gloves
• Wash hands thoroughly with soap and
water, even if gloves were used.
• Restock first aid kit.
Recommended Contents of
a Personal First Aid Kit
Adhesive Strips (Band Aids)
10
Adhesive Tape
1
Alcohol Swab
3
Combine Dressing - Large
1
Crepe Bandage 5cm
1
Crepe Bandage 7.5cm
1
Eye Pad - Sterile
1
• Keep a first aid kit at home, in your car and at
First Aid Booklet/Guide
1
work in a clean, dry location.
Gauze Swab
3
• Make sure it is kept in easy reach and that all family Gloves Disposable
2
members and staff know where the kit is located.
Hand Towels
3
• A regular check of contents is essential to ensure
Non-Adhesive Dressing
2
contents are present, not out of date and are in
Plastic Bag for Amputations
1
good condition.
Resuscitation Mask
1
• First aid kits will vary depending on the number of Safety Pins
5
employees, and even the industry you work in. If
Scissors - Blunt/Sharp
1
living in a remote area the contents will vary from Splinter Probe
1
kits kept at homes in the city.
Sterile Eye (saline) Solution- 15ml 2
• Under State and Territory legislation first aid kits Triangular Bandage
2
are required in all workplaces.
Wound Dressing No. 14
1
First Aid Kits
When dealing with a person who is ill or injured, you
need a clear Plan of Action:
1.Start with a Primary Survey (DRABCD), (pg 3) which
enables identification and management of lifethreatening conditions.
2.If there are no life-threatening conditions which
require immediate first aid (severe bleeding, no
signs of life) then proceed to Secondary Survey.
Casualty Assessment
Radial pulse
Secondary Survey: is a systematic check of the casualty involving
•Questions •Examination •Clue Finding to help identify any problems that may have
been missed.
• If the casualty is unconscious, the secondary survey is conducted in the recovery
position. You may need to look for external clues and ask bystanders some questions.
• If the casualty is conscious start with questions followed by examination. Remember to
introduce yourself, ask for consent to help and ask their name.
Questions
Examination
• What happened?
Vital Signs: are indicators of body function and provide
• Do you feel pain or numbness a guide to the casualty’s condition and response to
anywhere?
treatment.
• Can you move your arms and • Conscious State: There are 3 broad levels –
legs?
•Conscious •Altered consciousness •Unconscious
• Do you have any medical
Altered consciousness = uncooperative, aggressive,
conditions?
confused, drowsy.
• Do you take any medications? • Pulse: The carotid pulse in the neck is the best pulse
• Do you have any allergies?
to check. Feel for rate, rhythm, force, irregularities.
• When did you last eat?
Normal pulse rates: Adults: 60-80 /min
(Bystanders may be helpful)
Children: 80-100/min
•
Breathing:
Look,
listen
and/or feel for breathing rate,
External Clues
depth
and
other
noises
eg
wheezing, noisy breathing.
Medical Alert: casualties with
Normal breathing rates: Adults 16-20 breaths/min
medical conditions such as
Children: 25-40 breaths/min
diabetes, epilepsy or severe
(Check
pulse/
breathing
for 15secs then x by 4 to
allergy usually have a bracelet,
get
rate/min.
Use
a
watch)
pendant or card to alert people
• Skin State: Look at face and lips.
of their condition.
Red, hot skin – fever, heat exhaustion, allergy
Medications: People on regular
Cool, pale, sweaty – shock, faint, pain, anxiety
medication usually carry it with
Blue lips (cyanosis) – airway obstruction, asthma, flail
them.
chest, collapsed lung, heart failure, hypothermia
carotid pulse • Pupils: Unequal, reactive to light
Head to Toe:
• Seek consent from the conscious casualty before you
begin.
• Look and feel for bruises, cuts, deformities and painful
areas.
• Start from the head and work down.
• Explain to casualty what you are about to do at each
stage eg “I’m just going to move your arm”.
• Ask casualty for feedback at each stage eg “Does it
hurt when I move your arm?”
38|General First Aid
Some natural remedies may be of benefit in first aid
management.
REMEDY
USE
DESCRIPTION
Aloe Vera
Burns
Aloe vera gel (a Hydrogel) is very soothing when applied topically
to superficial burns (eg, sunburn).
Arnica
Bruising
Arnica ointment or tincture applied topically to a bruised area
assists healing. DO NOT apply to broken skin. Homoeopathic
arnica taken orally is also effective.
Calendula
Antiseptic
Calendula tincture or ointment can be applied topically to minor
cuts and grazes.
Cantharis
Burns
Homoeopathic cantharis dissolved under the tongue assists healing
of all burn types.
Comfrey
(Symphytum)
Fractures/ Soft
Tissue Injury
Grind fresh comfrey leaf in a mortar/ pestle to form a rough
paste. Apply paste to a dressing and secure in place over injury.
Homoeopathic comfrey (Symphytum) under tongue also assists
healing.
Epsom Salts
Soft Tissue
injury
On day 3 or 4 after injury, soak injury for 20mins in bucket of
Epsom salts and warm water to draw inflammation and swelling.
Hydrogen
Peroxide
Antiseptic/
Throat Gargle
6% H2O2 kills infection in wounds when applied topically. Effective
for sore throat when gargled –froths in mouth. NOT poisonous if
swallowed.
Hypericum
Nerve Injury
Remedy for nerve injuries, especially crushed finger and toenails.
Homoeopathic hypericum taken orally helps relieve pain and assist
healing.
Mulla Mulla
Burns/ Fever
Mulla mulla, an Australian Bush Flower Essence, taken orally helps
to lower fevers and heal burns.
Rescue
Remedy
Emotional
stress
Bach flower, ’Rescue Remedy’ and Australian Bush Flower,
‘Emergency Essence’ taken orally are effective remedies for
emotional stress.
Rhus Tox
Ruta Grav
Soft tissue
injury
Homoeopathic Rhus Tox and Ruta Grav taken orally are effective
for ligament and tendon injuries. Combine with homoeopathic
Arnica and Symphytum for fracture and soft tissue injuries.
Peppermint
Fever/ Heat
Exhaustion
Peppermint essential oil rubbed onto soles of feet helps lower body
temperature.
Sea Salt
Wound
Cleaner
Clean wounds with sterile gauze swabs soaked in warm water and
sea salt. DO NOT use cotton wool for cleaning – cotton fibres stick
to wound.
Antiseptic
A few drops of tea tree essential oil mixed with
Papaw ointment makes an effective antiseptic for minor cuts and
grazes.
Tea tree
Topical: Apply to skin
Oral: Homoeopathic and flower remedies are dissolved under the tongue
First Aid Report Form
(Complete this form as best you can and give to ambulance officer/ medical personnel)
Date: /
/
Casualty Details:
Time:
Location:
Pension No:
Name:
DOB:
/
/
M/F
Address:
Postcode:
Contact Person for Casualty (friend/ relative):
Name:
Phone:
What Happened (a brief description):
First Aid Action Taken:
Other health problems:
Diabetes
Epilepsy
Asthma
Heart problems
Cancer
Operations
Current Medications:
Allergies:
Previous injuries
Last ate or drank:
cut here
Natural Medicine
in First Aid
Turn over
Casualty Examination:
mark location of injuries on diagram and briefly
describe injury eg cut, bruise, pain, swelling, burn.
EMERGENCY NUMBERS
000 Ambulance, Fire or Police. Free Call from a landline, mobile or
public pay phone anywhere in Australia.
112 from a digital mobile phone if ‘000’ fails.
•Dial 112 if you have a digital mobile phone and you are outside
your own providers GSM network area.
•You may not be able to access 112 if there is no network coverage
in the area.
•112 can be dialed anywhere in the world with GSM coverage and
is automatically translated to that country’s emergency number.
13 11 26
106
Observations
of Vital Signs:
Electrical Emergency Service:
Every
State is
different
Gas Emergency Service:
Time
Water Emergency Service:
Conscious State
Fully Conscious
Drowsy
Unconscious
Pulse
Poisons Information Centre
Freecall 24h advice on all exposures to poisons,
medicines, plants, bites/stings
Deaf, Hearing or Speech Impaired Emergency Service
This service operates using a teletypewriter (TTY) or computer with
a modem to access the telephone network. It does not accept voice
calls or SMS messages.
rate:
description:
DOCTOR:
DENTIST:
24h PHARMACY:
Name:
Name:
Name:
Address:
Address:
Address:
Tel:
Tel:
Tel:
A/H:
A/H:
A/H:
Breathing
rate:
description:
Skin State
Colour:
Temp:
Dry/Clammy:
Pupils
HOSPITAL:
R
L
First Aider’s Details:
(Incase the hospital needs to contact you for more information regarding the incident).
Name:
Vehicle Breakdown Service:
Address:
Local Police Station:
Taxi:
Phone:
Mobile:
cut here
Name:__________________________________________________
Tel:
ABC First Aid Guide is divided up into four main colour coded sections:
1. Essential First Aid
2. Trauma
3. Medical Emergencies
4. General First Aid
Each subsection shows you step-by-step
how to recognise and deal with an emergency
situation.
Diagrams and photographs are used throughout
this book to illustrate information.
ABC First Aid Guide
Clear & Simple First Aid Advice
This book is designed for Australian
conditions, and contains clear simple
first aid advice for most emergencies.
In conjunction with an approved
first aid course, this book will assist
you learn the skills to handle most
emergency situations.
Keep this book with your first aid kit
and use it as a quick reference guide
if required.
This book incorporates the latest ARC
Guidelines and satisfies the Apply
First Aid competency units from the
Health Training Package: HLTFA301B,
HLTFA201A, HLTCPR201A.
The author of this book is a medical
practitioner with experience in
emergency medicine, general practice
and natural therapies.


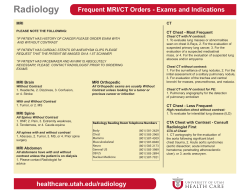


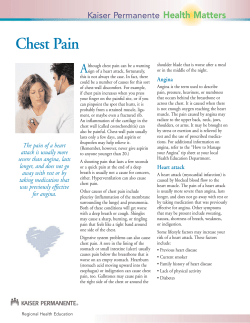


© Copyright 2026