
USER GUIDE
USER GUIDE Whether you’re a fan of flawless High-Definition TV, ultra-fast downloads, or unlimited nation-wide calling, Service Electric Cablevision is sure to have a product or service that will put a smile on your face. Visit secv.com and also become a fan of SECV on Facebook to stay up-to-date with new features, special offers, Pay-Per-View events, and MORE! There’s always something new going on, which means there’s always something good in store for YOU! Bundle More, Save More! How to Set up Your Voicemail 1. Enter your voicemail access code *84 from your home phone. 2. Enter password (default is 0000) and press #. 3. The voicemail prompts you to select your language preference. • To hear instructions in English press 1. • To hear instructions in Spanish press 3 (Spoken in Spanish). 4. Select your language preference. • The voicemail verifies your language change. 5. The voicemail prompts you to change your password. 6. Enter new password and press #. • The voicemail prompts you to verify your password. 7. Re-enter password and press # to verify. • The voicemail verifies your password change. 8. The voicemail prompts for new messages. • If there are no new messages, you are taken to main menu. 9. Voicemail to email. • To activate voicemail to email, contact your local office. • If activated, go to the “Web Portal Setup” section on page 38. Features At A Glance FEATURE TOUCH TONE USE STOP Anonymous Call Rejection *77 *87 Per Call Blocking*67---- Deactivate Line Blocking *67----Call Forwarding*72 *73 Deactivate Call Waiting 70----* Repeat Call*66 *86 Return Call*69 *89 Call Trace*57---- Voicemail Access *84----1 Table of Contents How to Set Up Your Voicemail..................................................................... 1 Features At A Glance...................................................................................... 1 Voicemail How Voicemail Works...............................................................................4 Accessing Your Mailbox From Your Home Phone............................5 Accessing Your Mailbox From Another Phone..................................6 Line Block & Voicemail.............................................................................7 Voicemail At A Glance..............................................................................8 Listening To Your New Messages.........................................................9 Listening To Your Saved Messages....................................................10 Replying To A Message..........................................................................11 Changing Your Password......................................................................12 Recording Your First Greeting.............................................................13 Recording Alternate Greetings............................................................14 Re-Recording Your Greetings...............................................................15 Changing Your Greeting........................................................................16 Recording Your Name.............................................................................17 Changing Your Language Settings.....................................................18 Playing The Current Time And Date....................................................19 Anonymous Call Rejection....................................................................20 Call Blocking Caller ID Block (Per Call Blocking)....................................................21 Caller ID Unblock (Per Call Unblocking)...........................................21 International Call Blocking...................................................................22 900 Call Blocking....................................................................................22 Call Forwarding...............................................................................................22 Caller ID With Name.......................................................................................24 Call Waiting......................................................................................................25 Call Waiting With Caller ID..........................................................................25 Repeat Call.......................................................................................................26 Return Call........................................................................................................27 2 Table of Contents Services Call Trace..................................................................................................28 Referral Service......................................................................................29 Three (3) Way Calling.....................................................................................29 National Directory Assistance - 411 Service............................................30 Operator Assisted Calls................................................................................31 Unlimited Long Distance (ULD)...................................................................32 Toll Restriction.................................................................................................33 Caller ID On TV Turn Off Caller ID.....................................................................................34 Turn On Caller ID......................................................................................34 Access Main Menu..................................................................................34 Receiving Call On TV Screen................................................................35 Clear An Incoming Call From Your TV Screen.................................35 Display The Call Log................................................................................35 Information Displayed In Call Log......................................................36 Save A Call From The Call Log.............................................................36 Delete Call From The Call Log..............................................................36 Delete All Entries On Call Log..............................................................37 Web Portal Table Of Contents.....................................................................38 Digital Phone Service Agreement..............................................................57 3 How Voicemail Works Voicemail Answers A Call A call is answered by your voicemail when you do not answer your phone after a designated number of rings, or when you are on the phone and do not subscribe to call waiting. The Message Is Stored In Your Mailbox The caller hears your greeting and can then leave a message. The message is stored in your mailbox until you listen to it. The mailbox holds 30 minutes of messages. You can then delete the message or keep it to play again later. New messages are held for 30 days. Saved messages are saved for 7 days and then are deleted automatically unless they are resaved as new. How Your Mailbox Works Your mailbox contains your messages, your personalized greeting, and your password. You play your messages at your home phone or any other touch tone phone by calling your system access number to reach your mailbox. You will also record your greeting and change your password through your mailbox. All the interaction with the voicemail system is confidential: no one else has access to your mailbox without your password. The Voicemail Guides You At each step, prompts tell you which key to press or what your options are. Pressing 0 (zero) will repeat the prompts for the menu you are using. Pressing the star key (*) will take you back to the previous level. Your Telephone For complete system use, a touch tone telephone and touch tone service is required. Getting Started Call Answering starts working as soon as you subscribe by answering callers with a standard greeting and storing their messages for you. You can listen to your messages from your own phone simply by calling the system access number. To play, keep, or delete your messages, see “Listening to Your New/Saved Messages.” When you use call answering for the first time, you will be prompted to select between English and Spanish. You will be prompted to set up a password and then taken to your new messages or taken to the main menu. Once entering the main menu, you can navigate to mailbox setup to record your personalized greeting or leave the default greeting in place. 4 Accessing Your Mailbox From Your Home Phone NOTE: When you pick up a phone from your primary phone number or location, you will hear stutter dial tone if you have new messages. If there is a normal dial tone, you have no new messages, but you may still access the voicemail service to review saved messages. 1. Dial your voicemail speed dial number to enter the voicemail system. • Speed dial numbers *84 - Residential Subscribers - Service Electric Cablevision • If you have a private number or are using Line Block, please refer to “Line Block & Voicemail” for further instructions. 2. The system will play the message “Please enter your password followed by the pound key (#)”. 3. Enter your password then press the pound key (#). • Your password is initially set as four zeros (0000). You are prompted to change the password during the mailbox initialization process. • If you cannot remember your password, call your customer service representative. • Your password will be reset to four zeros (0000). 4. You hear the mailbox message summary. • If there are no new or saved messages, you will be taken to the main menu. 5 Accessing Your Mailbox From Another Phone NOTE: Toll charges may apply when dialing the access number depending on the location of the phone you are using. 1. Dial your voicemail access number to enter the voicemail system. • Voicemail access numbers: 610-799-0021 610-799-0157 570-495-4555 570-495-4050 2. The system will play the message “Please enter your mailbox number followed by the pound key (#)”. • If the system plays the following message “Please enter your password followed by the pound key (#)”. • Interrupt the system by dialing the star key ( ). You will then be asked to enter your mailbox number (10-digit-phone number), this will allow you to enter the system as normal. * 3. Enter your 10-digit phone number then press the pound key (#). 4. The system will play the message “Please enter your password followed by the pound key (#)”. 5. Enter your password then press the pound key (#) . • Your password is initially set as four zeros (0000). You are prompted to change the password during the mailbox initialization process. 6. You hear the mailbox message summary. • If there are no new or saved messages, you will be taken to the main menu. 6 Line Block & Voicemail If you have ordered Line Block on your number, on the initial mailbox setup you must unsuppress your telephone number by dialing *67 before the access number. This will allow your telephone number to be recognized by the voicemail system. If you do not send your number to our voicemail system, it will not recognize your attempt to do the initial setup. Thereafter, you may access your mailbox by one of the following ways: • Dial *67 and then the 10-digit access number. • Dial *67 to unsuppress your telephone number before dialing the access number or speed dial number *84. • Dial the speed dial number *84 to enter voicemail and then enter your voicemail box number (10-digit telephone number) followed by the pound key (#). • Dial the 10-digit access number and then your voicemail box number (10-digit telephone number) followed by the pound key (#). Note • You can call the system access number from a local or long distance area, however, long distance charges may apply. • The way you will know if you have messages is by hearing a stutter dial tone (beep, beep, beep). • You can choose to listen to the messages right away or simply dial. 7 Voicemail at a Glance Message Menu 1 2 New Msgs Saved Msgs 3 Delete Msgs Main Menu 1 Message Retrieval 4 2 Message Retrieval Menu 3 1 Play 5 6 4 Save as New 7 Play Date & Time * Return to Main Menu 8 0 Help 9 7 Skip Mailbox Setup # 2 # Help Mailbox Setup Menu 3 1 6 4 7 8 9 7 * 0 # Help 9 0 5 Return to Setup 8 * Greeting Options Pick New Greeting 6 Skip Forward Delete Greeting 4 5 Reply to Msg Pause / Continue Re-Record Greeting Greeting 3 Delete & Next Msg Back Return to Main Menu Greeting Menu 1 Listen to 2 Keep & Next Msg * Return to Main 8 2 3 5 6 8 9 0 # Change Password Language Options Record Name Help Listening To Your New Messages NOTE: Your phone may have a message-waiting light to indicate new messages, or you may hear a special dial tone when you pick up the handset. When you play your messages, you hear new messages first, followed by stored messages. 1. Access the voicemail system. • Refer to one of the following sections. Accessing Your Mailbox from Your Home Phone. Accessing Your Mailbox from Another Phone. 2. The system will play the message “You have (X) new messages and (X) saved messages”. • The system will play the message menu. 3. Press 1 to listen to new messages. 4. Hear your first new message and call information. • The system will play the message retrieval menu. 5. Select how to handle the message. • To play the message press 1 . • To save this message and play the next message press 2 . • To delete this message and play the next message press 3 . • To save this message as new press 4 . • To return this call press 5 . • To forward the message to another mailbox press 6 . • To hear these instructions again press 0 . • To return to the main menu press the star key (*). 6. When you have retrieved all of your new messages, the system will play a message associated with how you handled the message(s). • If you are finished with your voicemail session, you may hang up the phone. • Press the star key (*) to return to the main menu. Note If you hang up or end your session before selecting how you wish to handle a message in step 5, the system will keep the message as new. 9 Listening To Your Saved Messages NOTE: The voicemail system will automatically delete unheard new messages after 30 days and saved messages 7 days after they have been saved. Once they have been deleted, they cannot be recovered. To prevent the deletion of saved messages you wish to keep, save the desired message as new and re-save the message before the 7-day deletion period or leave as new for the 30-day retention period. 1. Access the voicemail system. • Refer to one of the following sections: Accessing Your Mailbox From Your Home Phone. Accessing Your Mailbox From Another Phone. 2. The system will play the message “You have (X) new messages and (X) saved messages”. • The system will play the message menu. 3. Press 2 to listen to saved messages. 4. Hear your first new message and call information. • The system will play the message menu. 5. Select how to handle the message. • To play the message press 1 . • To save this message and play the next message press 2 . • To delete this message and play the next message press 3 . • To save this message as new press 4 . • To return this call press 5 . • To forward the message to another mailbox press 6 . • To hear these instructions again press 0 . • To return to the main menu press the star key (*). 6. When you have retrieved all of your new messages, the system will play a message associated with how you handled the message(s). • If you are finished with your voicemail session, you may hang up the phone. • Press the star key ( ) to return to the main menu. * 10 Replying To A Message Automatically dials back the number of the person who left you a message. NOTE: Toll charges may apply depending on LD plan and termination number’s location. 1. Access the voicemail system. • Refer to one of the following sections: Accessing Your Mailbox From Your Home Phone. Accessing Your Mailbox From Another Phone. 2. If you have any new or saved messages, the system will play the message “You have (X) new messages and (X) saved messages”. • The system will play the message menu. 3. Listen to your message and call information. • The system will play the message menu. 4. Press 5 to reply to the message. • The system will play the message “Reply to phone number 610-XXXXXXX”. • The system will call number announced. 5. Hang up phone to end call and voicemail session. • This step is required if you reach an answering machine or voicemailbox. 6. (OR) Allow called party to hang up phone. • The system will play the message menu. 7. Select how to handle the message. • To play the message press 1 . • To save this message and play the next message press 2 . • To delete this message and play the next message press 3 . • To save this message as new press 4 . • To return this call press 5 . • To forward the message to another mailbox press 6 . • To hear these instructions again press 0 . • To return to the main menu press the star key (*). 8. When you have retrieved all of your new messages, the system will play a message associated with how you handled the message(s). • If you are finished with your voicemail session, you may hang up the phone. • Press the star key (*) to return to the main menu. 11 Changing Your Password Your password protects the security of your mailbox. Your password can only be changed by a user who has already logged into the mailbox. If you forget your password, the system administrator can only reset it to four zeros (0000). 1. Access the voicemail system. • Refer to one of the following sections: Accessing Your Mailbox From Your Home Phone. Accessing Your Mailbox From Another Phone. 2. If you have any new or saved messages, the system will play the message “You have (X) new messages and (X) saved messages”. • The system will play the message menu. • Press the star key ( ) to return to the main menu. * 3. If you do not have any new or saved messages, the system will play the message “There are no messages”. • The system will take you to the main menu. 4. Press 9 to access the mailbox setup menu. • The system will play the setup menu. 5. Press 2 to change your password. • The system will play the message “Please enter your new password followed by the pound key (#)”. 6. Enter your new password then the pound key (#). • The system will play the message “Verify your new password by re entering it now followed by the pound key (#)”. 7. Re-enter your password then the pound key (#). • The system will play the message “Your password has been changed”. 8. The system will play the mailbox setup menu. • Select another option if you wish to continue with mailbox setup. • If you are finished with mailbox setup, you may now hang up the phone. • Press the star key (*) to return to the main menu. 12 Recording Your First Greeting You can record a personalized greeting, including information such as your number or name, or you can use the standard greeting supplied by the voicemail system, which does not contain any personal identification. The First Greeting Recorded Is Greeting Zero (0). 1. Access the voicemail system. • Refer to one of the following sections: Accessing Your Mailbox From Your Home Phone. Accessing Your Mailbox From Another Phone. 2. If you have any new or saved messages, the system will play the message “You have (X) new messages and (X) saved messages”. • The system will play the message menu. • Press the star key (*) to return to the main menu. 3. If you do not have any new or saved messages, the system will play the message “There are no messages”. • The system will take you to the main menu. 4. Press 9 to access the setup menu. • The system will play the setup menu. 5. Press 1 to access the greeting menu. • The system will play the message “There is currently no greeting recorded”. • The system will play the greeting menu. 6. Press 2 to record your greeting. • The system will play the message “Please record your custom greeting after the tone. When you are finished press the pound key (#)”. 7. Record your greeting after the tone and press the pound key (#). • The system will play the message “Greeting saved”. 8. The system will play the greeting menu. • If desired, press 1 to review your greeting. • If desired, press 2 to re-record your greeting. • If you are finished with mailbox setup, you may now hang up the phone. • Press the star key (*) to return to the main menu. 13 Recording Alternate Greetings Alternate greetings can be recorded for special occasions or to change the style of greeting. Alternate Greetings can be recorded As Greetings 1-9. 1. Access the voicemail system. • Refer to one of the following sections: Accessing Your Mailbox From Your Home Phone. Accessing Your Mailbox From Another Phone. 2. If you have any new or saved messages, the system will play the message “You have (X) new messages and (X) saved messages”. • The system will play the message menu. • Press the star key (*) to return to the main menu. 3. If you do not have any new or saved messages, the system will play the message “There are no messages”. • The system will take you to the main menu. 4. Press 9 to access the setup menu. • The system will play the setup menu. 5. Press 1 to access the greeting menu. • The system will play the greeting menu. 6. Press 5 to pick a new greeting. • The system will play the message “Please enter the greeting number or press star (*) for the current active greeting”. 7. Press the greeting number you wish to record. • The system will play the message “Your current greeting is (X). There is currently no greeting recorded”. • The system will play the greeting menu. 8. Press 2 to record your greeting. • The system will play the message “Please record your custom greeting after the tone. When you are finished press the pound key (#)”. 9. Record your greeting after the tone and press the pound key (#). • The system will play the message “Greeting saved”. 10. The system will play the greeting menu. • If desired, press 1 to review your greeting. • Press 5 to set your greeting back to greeting 0 if desired. • Select another option if you wish to continue with the greeting setup. • If you are finished with mailbox setup, you may now hang up the phone. • Press the star key (*) to return to the main menu. 14 Re-Recording Your Greetings The First Greeting recorded is Greeting Zero (0). Alternate Greetings are recorded as Greetings 1-9. 1. Access the voicemail system. • Refer to one of the following sections: Accessing Your Mailbox From Your Home Phone Accessing Your Mailbox From Another Phone. 2. If you have any new or saved messages, the system will play the message “You have (X) new messages and (X) saved messages”. • The system will play the message menu. • Press the star key (*) to return to the main menu. 3. If you do not have any new or saved messages, the system will play themessage “There are no messages”. • The system will take you to the main menu. 4. Press 9 to access the setup menu. • The system will play the setup menu. 5. Press 1 to access the greeting menu. • The system will play the greeting menu. 6. Press 2 to re-record current greeting. • The system will play the message “Please record your custom greeting after the tone. When you are finished press the pound key (#)”. • Record your greeting after the tone and press the pound key (#). The system will play the message “Greeting saved”. 7. Press 5 to pick a new greeting. • The system will play the message “Please enter the greeting number or press star (*) for the current active greeting”. • Press the greeting number you wish to record. The system will play the message “Your current greeting is (X)”. The system will play the greeting menu. • Press 2 to re-record your greeting. The system will play the message “Please record your custom greeting after the tone. When you are finished press the pound key (#)”. • Record your greeting after the tone and press the pound key (#). The system will play the message “Greeting saved”. 8. The system will play the greeting menu. • If desired, press 1 to review your greeting. • If you are finished with mailbox setup, you may now hang up the phone. • Press the star key (*) to return to the main menu. 15 Changing Your Greetings The First Greeting recorded is Greeting Zero (0). Alternate Greetings are recorded as Greetings 1-9. 1. Access the voicemail system. • Refer to one of the following sections: Accessing Your Mailbox From Your Home Phone. Accessing Your Mailbox From Another Phone. 2. If you have any new or saved messages, the system will play the message “You have (X) new messages and (X) saved messages”. • The system will play the message menu. • Press the star key (*) to return to the main menu. 3. If you do not have any new or saved messages, the system will play the message “There are no messages”. • The system will take you to the main menu. 4. Press 9 to access the setup menu. • The system will play the setup menu. 5. Press 1 to access the greeting menu. • The system will play the greeting menu. 6. Press 5 to pick a new greeting. • The system will play the message “Please enter the greeting number or press star (*) for the current active greeting”. 7. Press the greeting number you wish to have active. • The system will play the message “Your current greeting is (X)”. If no greeting is recorded, see the “Recording Alternate Greetings” section. 8. The system will play the greeting menu. • If desired, press 1 to review your greeting. • Press 5 to select a different greeting. • Select another option if you wish to continue with the greeting setup. • If you are finished with mailbox setup, you may now hang up the phone. • Press the star key (*) to return to the main menu. 16 Recording Your Name Your recorded name is called your personal verification. This option plays for your callers and other call answering and voice messaging users to identify your mailbox or submailbox. 1. Access the voicemail system. • Refer to one of the following sections: Accessing Your Mailbox From Your Home Phone. Accessing Your Mailbox From Another Phone. 2. If you have any new or saved messages, the system will play the message “You have (X) new messages and (X) saved messages”. • The system will play the message menu. • Press the star key (*) to return to the main menu. 3. If you do not have any new or saved messages, the system will play the message “There are no messages”. • The system will take you to the main menu. 4. Press 9 to access the setup menu. • The system will play the setup menu. 5. Press 8 to record your name. • The system will play the message “Please record your name after the tone. When you are finished press the pound key (#)”. 6. Record your name then press the pound key (#). • The system will play the message “Name saved”. 7. The system will play the setup menu. • To re-record your name press 8 . • Select another option if you wish to continue with the setup menu. • If you are finished with mailbox setup, you may now hang up the phone. • Press the star key (*) to return to the main menu. 17 ChangING Your Language Settings Allows changing the languages between English and Spanish. 1. Access the voicemail system. • Refer to one of the following sections: Accessing Your Mailbox From Your Home Phone. Accessing Your Mailbox From Another Phone. 2. If you have any new or saved messages, the system will play the message “You have (X) new messages and (X) saved messages”. • The system will play the message menu. • Press the star key (*) to return to the main menu. 3. If you do not have any new or saved messages, the system will play the message “There are no messages”. • The system will play the main menu. 4. Press 9 to access the setup menu. • The system will play the setup menu. 5. Press 5 to change your language setting. • The system will play the message “To hear instructions in English press 1 . To hear instructions in Spanish press 3 ” (Spoken in Spanish). 6. Select your Language Preference. • The system will play the message “Language changed”. 7. The system will play the setup menu. • If you are finished with mailbox setup, you may now hang up the phone. • Press the star key (*) to return to the main menu. 18 Playing The Current Time & Date Plays the current time and date in the voicemail system. 1. Access the voicemail system. • Refer to one of the following sections: Accessing Your Mailbox From Your Home Phone. Accessing Your Mailbox From Another Phone. 2. If you have any new or saved messages, the system will play the message “You have (X) new messages and (X) saved messages”. • The system will play the message menu. • Press the star key (*) to return to the main menu. 3. If you do not have any new or saved messages, the system will play the message “There are no messages”. • The system will play the main menu. 4. Press 7 to play the current time and date. • The system will play the current time and then the current date. 5. The system will play the main menu. • If you are finished, you may now hang up the phone. • Press the star key (*) to return to the main menu. 19 ANONYMOUS CALL REJECTION Allows you to refuse calls from those who have blocked their numbers. How Anonymous Call Rejection Works: When you have turned this service “on” any callers who have blocked their number from your Caller ID display will hear an annoucement that you do not accept anonymous calls - and they should unblock their number and call back. All other calls will ring through as usual. How to “Turn On” the Service: 1. Pick up the handset and listen for the dial tone. 2. Press: 7 7 3. Listen for the confirmation tone or annoucement. Hang up the handset. How to “Turn Off” the Service: 1. Pick up the handset and listen for the dial tone. 2. Press: 8 7 3. Listen for the confirmation tone or annoucement. Hang up the handset. NOTE • Available free to all residences and businesses. • You will not be notified when or how many calls have been rejected. 20 CALLER ID BLOCK (Per Call Blocking) Blocks the delivery of your name and number to the location you are calling. How to Use Per Call Blocking: 1. Pick up your handset and listen for the dial tone. 2. Press: 6 7 3. Dial the number you are calling as usual. 4. The person you have called will not be able to see your number displayed on their display screen. Instead, the word “private” or “anonymous” will be displayed. CALLER ID UNBLOCK (Per Call UNBlocking) This will allow your number to be displayed when subscribed to Line Blocking. How to Use Per Call Unblocking: 1. Pick up your handset and listen for the dial tone. 2. Press: 6 7 3. Place your call as normal. Note If you have Line Block on your number, you must unsuppress your telephone number by enter *67 before the voicemail access number. This will allow your phone to be recognized by our voicemail system. 21 International Call BlockING Blocks International dialing. You will not need to worry about unintended International Calls that may increase your phone bills. 900 Call BlockING Blocks access from phone numbers that begin with the area code 900. The 900 area code is commonly used by entertainment or informational services that can carry considerable per-call or by-the-minute charges. However, be aware that it may be possible to dial around blocks by dialing a regular long distance phone number, 800 access numbers, or an international toll number to another country. Note The above features are available free to all residences and businesses. Call Forwarding Allows subscribers to forward all incoming calls to any telephone number that can be dialed directly, while still being able to make outgoing calls. • While your calls are being forwarded, your telephone will ring briefly each time your number is dialed. • You cannot answer calls while Call Forwarding is active. • Call Forwarding will remain active until it is deactivated. 22 Call Forwarding (continued) How to Use Call Forwarding: 1. Pick up the handset and listen for the dial tone. 2. Press: 7 2 3. Dial the number to which you want the calls forwarded. 4. Wait for the forwarded party to answer. In order for Call Forwarding to become active, keep the connection for at least six seconds. 5. If the number you dialed is busy or does not answer, hang up and repeat steps 1 through 4. 6. If you wish to confirm the activation of Call Forwarding, redial the Call Forward activation code *72. You will hear two short tones when Call Forwarding has been activated. How To Deactivate Call Forwarding: 1. Pick up the handset and listen for the dial tone. 2. Press: 7 3 3. When you hear two short tones and a dial tone, Call Forwarding is cancelled. 23 Caller ID wITH Name Caller ID with Name is an enhancement of the Caller ID Service. Caller ID with Name allows the subscriber to view the telephone number of the incoming call and the name of the person listed as the holder of the telephone number on a customer provided display unit before the call is answered. • The Caller ID with Name feature requires customer provided equipment. The customer must select and purchase a unit, display box or feature compatible equipped telephone. Products are sold at most retail stores. Check instructions and information provided by the product manufacturer. • Display units/telephones may display a message of: “No Data Sent”, “Unavailable”, or “Out of Area” from calls outside of especially equipped areas, calls made through an operator and / or calls from lines not accepting incoming calls. • Blocked callers will display “Blocked Call” or “Private Call” unless customers have activated Anonymous Call Rejection. For more information, see “Anonymous Call Rejection” section. 24 Call Waiting Alerts you to an incoming call with a special tone to let you know that someone else is calling. How to Use Call Waiting: 1. Briefly press (do not hold down) your telephone receiver or flash button to answer the second call. 2. To return to the first call, just press the receiver or flash button again. 3. You can switch between callers as often as you like by pressing the receiver or flash button. 4. Each conversation is private and can’t be heard by the other caller. How to Deactivate Call Waiting: 1. Pick up the receiver. 2. Press: 7 0 3. Make your outgoing call. 4. The Call Waiting is deactivated after you complete your call and hang up the receiver. Call Waiting wITH Caller ID A combination of Caller ID and Call Waiting which displays the name of the call waiting. 1. Refer to “How to Use Call Waiting”. 2. Displays the name of the call waiting when alert tone sounds. 3. Features requires customer provided Caller ID display box or feature compatible equipped telephone. 25 Repeat Call Redials a busy number for you, then alerts you when it is available. Repeat Call can check as many as 12 busy lines at once for you. NOTE: This service does not work to redial calls to 800 numbers, 900 numbers, 1+ dialing outside of the 610, 570, 908, and 973 service areas or on lines where Call Forward and some other call services have been activated. How to Use Repeat Call: 1. When you hear a busy signal, depress the “switchhook” and release quickly. Listen for a special dial tone. If you’ve already hung up, just pick up the handset again and listen for a normal dial tone. 2. Press: 6 6 3. If the line is still busy, hang up. Your phone will check the number for up to 30 minutes. 4. A special callback ring alerts you if the line becomes free. 5. Pick up the handset to automatically place the call. How To Deactivate Repeat Call: 1. Press: 8 6 NOTE To restart the 30-minute clock, repeat steps 1 through 3. You may still place and receive calls while waiting for a busy line to become free. 26 Return Call Allows you to automatically dial the number of your last incoming call, whether you answered it or not. How to Use Return Call: 1. Pick up your handset and listen for the dial tone. 2. Press: 6 9 3. You will hear the number of the last incoming call. To place the call, press 1. If the Line is Busy: 1. Hang up. Your phone will keep trying the line for up to 30 minutes. 2. A special callback ring alerts you if the line becomes free. 3. Pick up the handset to automatically place the call. How To Deactivate Return Call: 1. Press: 8 9 NOTE • Return Call does not work on 800 numbers, 900 numbers, numbers outside the specified service area, or lines using Call Forward and some other call services. • You may still place and receive calls while waiting for a busy line to become free. 27 Call Trace Allows you to trace the telephone number of harassing calls through the phone company. Only law enforcement officers may retrieve this information from the phone company. How to Use Call Trace: 1. When you get a threatening or obscene call, depress the “switchhook” and release quickly. Listen for a special dial tone. 2. Press: 5 7 3. Listen for the confirmation announcement that the last call has been traced. 4. Hang up. 5. The number you traced will be recorded at the phone company. If you decide to follow up on the matter, contact the proper authorities. NOTE • Call Trace should be used immediately after you hang up on the call you wanted traced. If you get another call, or hear a Call Waiting tone first, you will trace the wrong call. • If you wish, you may still place outgoing calls before activating Call Trace. 28 Referral Service This Service will give callers your new number for up to one year through an automated announcement if you disconnect your service. Referral Service is available for three months free of charge. A customer may request additional months not to exceed one year total for an additional charge. Additional months must be prepaid prior to receiving service. Three (3) Way CAlling Allows you to add a third person to your phone conversation. How Three (3) Way Calling Works: 1. Press and release the receiver or flash button to put your first call on hold. 2. You will hear chirp-beeps and then dial tone. 3. Dial the second party. (You may talk without including the first call.) 4. Press and release the receiver or flash button to bring the first call back on the line. 5. All three parties will be on the line. 29 National Directory Assistance 411 Service 1. Dial 411 and get ANY number ANYWHERE in America. 2. Now you can use 411 for all your directory assistance needs. 411 is the quick and easy way to get: • Local Listings • National Listings • Canadian Listings • 800 Numbers 3. We have got your number for directory assistance. • $1.00 for Local and National NOTE • If a customer requests a number from 411 and the number is non-pub, the customer will be told non-pub and charged for this inquiry. We will not give credit for this call. • If a customer requests a number from 411 and the number is not found, the customer will be told not found and charged for this inquiry. We will not give credit for this call. 30 Operator Assisted Calls “Direct Dial” is a telecommunications term for a network provided service in which a call originator may, WITHOUT operator assistance, call any other user. An Operator Assisted Call is one in which the calling party places a telephone call which requires an operator to provide some form of assistance in completing the call. Operator Assisted Calls are more expensive, than direct dial calls. Operator Assisted Calls may include the following telephone calls: • Collect - the calling party wants to place a call at the called party’s expense. • Third Number Calls - calls can be billed to the party other than the calling and called party. • Person-to-Person - is a method of placing a telephone call, in which the calling party wants to speak to a specific party and not simply to anyone who answers. The caller is not charged for the call unless the requested party can be reached. • Station-to-Station - is a method of placing a telephone call, in which the calling party agrees to talk to whoever answers the telephone. Other Operator Assisted Calls may include calls billed to a credit card and certain international calls which cannot be dialed directly. NOTE PLEASE REMEMBER when an Operator helps you place your call it is an Operator Assisted Call and fees will apply. 31 Unlimited Long Distance (ULD) The Unlimited Long Distance service area includes the Continental United States, plus Alaska, Hawaii, Canada, Puerto Rico, and Mexico. In order to have Mexico included in the unlimited long distance service area, customers must use the Unlimited Long Distance plan carrier. This service is provided and powered by Ironton Long Distance-ILD. If the customer opts to select another long distance carrier, for their international calling then Mexico will not be part of the Unlimited Long Distance service area. This is due to the fact that Mexico is not part of the North American Number dialing plan; it is part of the International dialing codes. The Service Electric Unlimited Long Distance plan was specifically designed, customized and uniquely provisioned for Service Electric customers to allow unlimited calling in both the North American Numbering Plan and International Plan, thus allowing ‘Mexico’ as a service area. Additionally, at no charge to the customer, when subscribing to the Unlimited Long Distance the line is/can be programmed with ‘International Line Block’, which blocks international calls from being made. However, international block does not block 10-digit dialed calls to US territories outside the continental United States. Note: International block will not block the unlimited long distance to Mexico, as long as the Unlimited Long Distance plan carrier is not changed, as explained above. A telephone numbering plan is a system of allocating and routing telephone numbers in a telephone network. The term dial plan should not be confused with numbering plan. A dial plan establishes the expected number and pattern of digits for a telephone number. This includes access codes, country codes, area codes and all combinations of digits dialed. For instance, the North American Numbering Plan uses a 10-digit dial plan that includes a 3-digit area code and a 7-digit telephone number. Every country has both an ‘international access code’ used to dial out of the country and a ‘country calling code’ used to dial into a country. An International call that is part of the International dialing plan requires a customer to dial a valid international access code such as 011 (USA) , and a country code, and then the ten digit phone number. The North American Numbering Plan (NANP) is an integrated telephone numbering plan serving 19 North American countries that share its resources. These countries include the United States and its territories, Canada, Bermuda, Anguilla, Antigua & Barbuda, the Bahamas, Barbados, the British Virgin Islands, the Cayman Islands, Dominica, the Dominican Republic, Grenada, Jamaica, Montserrat, St. Kitts and Nevis, St. Lucia, St. Vincent and the Grenadines, Trinidad and Tobago, and Turks & Caicos. 32 Although the locations above may appear to be international locations, they are actually part of the North American Numbering Plan Area. Therefore, these calls do not require the international dialing pattern (‘international access code’ and/or a ‘country calling code’). These calls can be dialed using 1+ 10 digit dialing. Therefore, they will not be blocked by the ‘international block’ service feature. Additionally, please be aware that they are not included in the Unlimited Long Distance service area. While there is a general geographic NANPA grouping, many exceptions exist for various political and historical reasons. Thus, the geographical indicators below are approximations and provided for informational purpose only. Please verify information prior to placing your call. Areas within NANPA (North American Numbering Plan Area) are assigned area codes as if they were all areas within one country. The codes below in format +1-XXX represent area code XXX within the +1 NANPA zone — not a separate country code. The North American Numbering Plan Area includes: +1 United States of America, including U.S. territories: +1-340 U.S. Virgin Islands +1-670 Northern Mariana Islands +1-671 Guam +1-684 American Samoa +1-787 and +1-939 Puerto Rico +1 Canada +1 Many, but not all, Caribbean nations: +1-264 Anguilla +1-268 Antigua and Barbuda +1-242 Bahamas +1-246 Barbados +1-441 Bermuda +1-284 British Virgin Islands +1-345 Cayman Islands +1-767 Dominica +1-809, +1-829 and +1-849 Dominican Republic +1-473 Grenada +1-876 Jamaica +1-664 Montserrat +1-869 Saint Kitts and Nevis +1-758 Saint Lucia +1-784 Saint Vincent and the Grenadines +1-868 Trinidad and Tobago +1-649 Turks and Caicos Islands Toll Restriction 33 • Toll restriction blocks all long distance calls and calls to 411 National Directory Assistance. • Toll restriction does not block toll free numbers or the use of a calling card. 33 Turn off Caller ID The Caller ID on TV feature is FREE for customers who have both a Digital Converter and Digital Phone. Caller ID on TV displays the name (if available) and telephone number of the party calling on your TV screen. 1. Press “C” on your digital remote control. 2. Scroll to “Alert off”. 3. Press “OK/SELECT” and “Alert off” will be set with an “*”. 4. Press “EXIT” to return to your TV screen NOTE: To turn off Caller ID on TV for Motorola converter boxes, please contact your local office. Turn ON Caller ID 1. Press “C” on your digital remote control. 2. Scroll to “Alert on”. 3. Press “OK/SELECT” and “Alert on” will be set with an “*”. 4. Press “EXIT” to return to your TV screen. NOTE: To turn off Caller ID on TV for Motorola converter boxes, please contact your local office. ACcess Main Menu 1. Press “C” on your digital remote control. 34 Receiving Call on TV Screen 1. A Caller ID notification banner will display on your TV when a new call arrives on a phone in your household. 2. Banner includes the name (if available) and telephone number of party calling. 3. If the calling party number is not known, “Unknown” is displayed. 4. If the calling party number is private, “Private” is displayed. 5. If the calling party name is not known, a caller name is not displayed. 6. If the calling party number is private, the calling party name is not displayed even if it is known to the system. Clear AN Incoming Call From Your TV Screen 1. Press “C” on your digital remote control. Display the Call Log 1. Press “C” on your digital remote control. 2. Scroll to “Call Log”. 3. Press “OK/SELECT” and the Call Log screen displays up to 30 recent calls for each phone line. 4. Press “EXIT” to return to your TV screen. 35 Information displayed in call log 1. The calling party number, or “Unknown” or “Private”. 2. The calling party name (unless the number is unknown or private). 3. The time and date of the call. 4. An asterisk at the beginning of the line indicating a new call that has arrived after the Call Log was last viewed. 5. A maximum of 8 calls per page (30 calls per phone line). Save a Call From the Call Log 1. Press “C” on your digital remote control. 2. Scroll to call you would like to save using the Up/Down arrow buttons on your digital remote control. 3. When call is highlighted, press “OK/SELECT” on your digital remote control and the call will be saved. This also marks the call as viewed and the asterisk will be removed. Delete Call From the Call Log 1. Press “C” on your digital remote control. 2. Scroll to call you would like to delete using the Up/Down arrow buttons on your digital remote control. 3. When call is highlighted, press “B” on your digital remote control and the call will be deleted. This also marks the call as viewed and the asterisk will be removed. 36 Delete All Entries on Call Log 1. Press “A” on your digital remote control. NOTE • The Caller ID on TV notification banner will not be recorded along with DVR program. Therefore, if the phone rang while you were recording a program, the Caller ID notification banner did not record with the program. If the phone rings while you are watching a previously recorded DVR program that live alert will display on the TV screen. • Caller ID is automatically turned on and FREE for customers who have both an SECV Digital Converter and Digital Phone. 37 WEB PORTAL SETUP TABBED PAGE Web portal TABLE OF CONTENTS Logging Into & Setting Up The Web Portal Voicemail Logging Into The Web Portal Service For The First Time................39 To Login To The Web Portal For The First Time..................................40 Navigating To Change The Password...................................................40 To Change The Password.........................................................................40 Setting Up Email Notification Of Voicemail Messages...................40 Home Tab Voicemail Messages..................................................................................42 My Settings Tab General Category To Change The Password....................................................................44 Adding An Email Address To The Email List..................................44 Deleting An Email Address From The Email List..........................45 Voicemail Category General Settings....................................................................................45 Notifications...........................................................................................48 Daily Notify........................................................................................49 Email Notify.......................................................................................49 Pager Notify......................................................................................50 Greetings.................................................................................................51 Greetings List....................................................................................51 Schedules..........................................................................................53 Events.................................................................................................54 Specific Callers.................................................................................55 Distribution Lists - Business Subscribers With Multiple Mailboxes Only......................................................................................56 38 Logging Into & Setting Up the Web Portal Voicemail The Web Portal Voicemail feature allows subscribers to administer their Voicemail Service account settings (see Section 2) and also to play, delete, and email voice messages in their mailbox (see Section 10). 1. Logging into the Web Portal Service for the first time. • The Web Portal Service is an internet-based program which allows each subscriber to manage their voicemail from any computer with Internet access. • Open https://maxmail.ironton.com/Portal/SECV in your Internet browser. This website requires the use of Microsoft Silverlight. - Download the program and install if you are prompted (see Figure 1-1). - You may need to restart your browser before the login screen appears (see Figure 1-2). Figure 1-1 Microsoft Silverlight Installation Figure 1-2 Login Screen 39 2. To login to the Web Portal for the first time. • Enter your 10-digit phone number as your Username. • Enter the default Password of 0000. • Select the Login button or hit “Enter” on your keyboard. The Home Screen will open. • It is recommended to change the Password to a Strong Password using all of the following: Capital letters Lowercase letters Special characters (!@#$%) 3. Navigating to change the password. • Select the My Settings tab. Select the General Category. The General Category Screen will open (see Figure 2-1). Figure 2-1 General Category Screen 4. To change the password. • Enter the default password as the Old Password. • Enter the New Password until the Password Strength is where desired. • Re-enter the New Password to verify. • Select the Save button if not setting up email addresses. 5. Setting up email notification of voicemail messages. • Select the Voicemail Category. • The Voicemail Settings Window will open on the right (see Figure 2-2). 40 Figure 2-2 Voicemail Settings Window A. B. • Expand the Notification section if required. Select the expand icon. • To add an email address to the notification list, select the Add button in the Email Notify section. The Add Email Address Window will open (see Figure 3-1). Figure 3-1 Add Email Address Window New Email Address is the default selection. - Enter the new email address. Select Existing Email Address if the desired email account was added to the Email Address List in the General Category while changing the Web Portal password. Select the desired email address. Select the OK button to save. Select the Cancel button to cancel entry. Repeat this process if additional email addresses need to be added. Select the Save button to save all changes. 1. 2. 41 • The Email Notify Section will appear as in Figure 3-2. Figure 3-2 Email Notification Section Completed • Refer to My Settings Tab - Section 2-B for more information on notifications. HOME TAB Voicemail Messages • Voicemail Service subscribers who have had their account Internet access-enabled can play and delete voicemail messages in their mailbox. • Basic Message Management This section describes the Web Portal Voicemail message management interface available to subscribers who are not enabled for Integrated Web Portal features. The Home Tab in Web Portal will be selected by default and will display a list of the logged in subscriber’s calls, as illustrated in Figure 3-1. Calls that resulted in a new voicemail message will have a icon in the Type column of the call list. Saved messages are indicated by a icon. 42 Figure 3-1 Web Portal Basic Home Tab • To play a voicemail message, select the row of the call in the Home Tab. The Play Sound and Volume Control (see Figure 10-2) for the message in the selected call will be displayed below the call. Figure 10-2 Voicemail Play Sound and Volume Controls • To download the message to your computer. Select the Download button. Save the file to your computer after selecting the location. • Voicemail messages can be deleted by checking the box on the left hand side of the call row, and then pressing the Delete button in the lower right-hand corner of the Home Tab. 43 MY SETTINGS TAB 1. General Category • End users can modify the Password they use to login to Web Portal. • The Email Address List interface (see the right-hand side of Figure 4-1) is used to manage the email addresses associated with the logged in user. Figure 4-1 General Category Screen 1) To change the password. • Enter the default password as the Old Password. • Enter the New Password until the Strength Level is where desired. • Re-enter the New Password to verify. • Select the Save button. 2) Adding an email address to the email list. • Select the Add button. • The Add Email Address window will open (see Figure 4-2). Figure 4-2 Add Email Address Window Enter the desired email address. Select the OK button to save. Repeat steps 3 & 4. Select the Save button. 44 Figure 5-1 Email Address List 3) Deleting an email address from the email list. • Select the address to delete (see Figure 5-1). • Press the Delete button located below the list. • A delete confirmation prompt will be displayed (see Figure 5-2). Figure 5-2 Delete Confirmation Window • Select the OK • Select the Cancel button to complete the deletion. button to cancel the deletion. 2. Voicemail Category • The Settings interface for Web Portal Voicemail allows service subscribers to manage many of their voicemail account settings. This interface is available to all Voicemail Service subscribers who have had their account Internet access-enabled. • The Voicemail Settings interface (see Figure 6-1) is accessed by following these steps: Login to the Web Portal Service (see “Logging Into The Web Portal Service For The First Time” for more information). Select the My Settings tab. Click Voicemail in the Categories section. The Settings interface for Web Portal Voicemail will be displayed on the right-hand side of the screen. The Settings interface may contain one or more sections (e.g. General, Notification, Greetings, Distribution Lists) depending on the features that are enabled for this subscriber. 45 Figure 6-1 Voicemail Settings Interface - The hide and show buttons next to the General (Section 1), Notification (Section 2), Greetings (Section 3), and Distribution Lists (Section 4) section headings are used to expand or collapse the sections. - Changes to fields in the Settings interface will not become active until they are saved by pressing the Save button in the lower-right corner of the screen. 1) General Settings • The General section (see Figure 7-1) is used to configure the Voicemail Service mailbox options that are available to the subscriber. Figure 7-1 General Section 46 The following settings are found in this section: • PIN The personal identification number used to access this mailbox (16-digits maximum). - Highlight the PIN number in selection box to change. - Use only a numeric sequence. - Select the Save button when finished. • Playback Order The order in which different components of messages will be played back. There are five playback options: Urgent, Private, Timestamp, Caller, and Recording. - The Current Playback Order list shows the options in the order that they will be played back. - The Options list shows the options that will not be played back. To move an option between these lists, select the option and press the left and right arrow buttons that are between the lists. To rearrange the order in which options in the Current Playback Order list are played, select the option and use the up and down arrow buttons on the right side of the window to move the option up and down the list. Select the Save button when finished. 2) Notifications • The Notification section (see Figure 8-1) is used by the subscriber to configure their Daily Notify, Email Notify, and Pager Notify feature settings. This section is available to all subscribers, but some of the features in this section may not be available if the subscriber does not have the associated notification feature enabled or if the subscriber has a package where the notification feature is not subscriber changeable. More information on the availability of these features and the properties available for each feature is given below Figure 2-1. Figure 8-1 Notification Section 47 A. Daily Notify This section will not be displayed if the subscriber is assigned a package that disables Daily Notify. - Daily Notify Select On to allow daily phone notifications of new Voicemail messages, or Off to turn off daily notification calls. - Time The time the notification call will be placed. This time should always be the subscriber’s time, and will be automatically adjusted if any changes are made to the subscriber’s Time Zone property in the Default Subscriber System. The actual time the call will be placed may not be exact since it is subject to the amount of traffic and resources available at that time. Highlight the selection box and enter the time desired. = Example: 6:00pm B. Email Notify This section will not be displayed if the subscriber is assigned a package that disables Email Notify. - Email Notify Select On to send new voicemail messages to the email addresses specified for this mailbox, or Off to not send email notifications. Selecting either option will not remove the voicemail message from the APmax. - Audio Encoding MSADPCM Default option for attaching a wav file of the message to the email. MP3 Optional selection for attaching an mp3 file of the message to the email. Select this option for playback on Smart phones. - Email To Add an Email address to the notification list, select the Add button. Select the option to add an email address in the Add Email Address Window (see Figure 9-1). Select New Email Address if the desired email account has not been added to the Email Address List (see Section 1 Logging into the Web Portal Service for the first time). = Enter the new email address. Select Existing Email Address if the desired email account has been added to the Email Address List. = Select the desired Email Address. Select the OK button to save. Select the Cancel button to cancel entry. Select the Save button to save all changes. 48 Figure 9-1 Add Email Address Window Figure 9-2 Email Drop Box To delete an Email Address. Select the desired Email Address in the Email Notify Window (see Figure 9-1). Select the Delete button to remove email address from notification list. Select the Save button to save all changes. To change Email Format sent to Email Account. Select the drop box for the desired Email Address in the Email Notify Window (see Figure 9-2). Select the desired format. Select the Save button to save all changes. C. Pager Notify This section will not be displayed if the subscriber is assigned a package that disables Pager Notify or if there are no pagers configured for the subscriber. The settings displayed in this section will be determined by the type (Phone, Shared, Unique, or Menu) of the first pager configured for this subscriber by your provider. - Pager Notify Select On to send notifications of new voicemail messages to the pager configured for this mailbox, or Off to not send pagers notifications. - Only Page Urgent Calls Whether or not to notify only when an urgent page is received. - Pager DN 10-digit directory number of the pager. - Pager Service DN 10-digit directory number of the pager service. Used for Shared pagers. - Callback DN 10-digit callback number. Used for Menu, Shared, and Unique pagers. - Menu Option The single digit number to dial when connected to a pager service. Used for Menu pagers. - Select the Save button to save all changes. 49 3) Greetings • The Greetings section (see Figure 11-1) is used to manage this mailbox’s greetings and greeting schedules. Figure 11-1 Greetings Section • The top of the Greetings section may contain one or more tabs, depending on whether or not Schedules, Events, and Specific Callers are enabled for this mailbox. • See the following for more information about specific parts of the Greetings section. Section 3-A - Greeting List Section 3-B - Schedules Section 3-C - Events Section 3-D - Specific Callers A. Greeting List Greetings defined for this mailbox are displayed in the Greeting List, with the active greeting indicated by the active greeting icon and bold text. Functions for adding, editing, deleting, playing and activating greetings are available through the buttons located on the right hand side of the greeting list and the audio controls below the list. These functions are described below. - Add - PreRecorded .wav file made through computer audio recording device. To make a new greeting file available to this mailbox, press the add button on the right-hand side of the greeting list. An Enter Greeting Information popup window will be displayed, as illustrated in Figure 12-2. Enter a description of the greeting into the Description field and use the browse button to navigate to a 16-bit .wav file using the standard file selection mechanism. Once the audio file is selected, the location of the file will be displayed in the File field. Press the Save button in the Enter Greeting Information window to complete the addition of the greeting. 50 - Edit To change the description or .wav file associated with a greeting, select the greeting in the list and press the edit button on the right-hand side of the greeting list. An Enter Greeting Information popup window similar to Figure 12-2 will be displayed. The Enter Greeting Information window for editing functions the same as it does when adding a greeting, as described above. Once the changes are complete, press the Save button to apply the changes to the selected greeting. - Delete To delete a greeting, select the greeting and press the delete button on the right-hand side of the list. - Activate To change the active greeting for this mailbox, select a greeting in the list and press the activate button on the right-hand side of the list. The active greeting icon will be displayed next to the selected greeting. - Play Greetings can be played by selecting the greeting in the list and using the audio control bar below the list (see Figure 12-1). If the selected greeting has not been saved to the APmax then the greeting will be played directly from the local PC. If the selected greeting has been saved to the APmax then it will first be retrieved from the APmax system and then played, resulting in a short delay. Figure 12-1 Greeting Audio Control Bar Figure 12-2 Enter Greeting Information Popup - Select the Save button to save all changes. 51 B. Schedules The Schedules tab (see Figure 13-1) in the Greetings section is used to specify greetings to be played at specific times during the week. This section displays a weekly calendar that allows currently scheduled greetings to be easily managed. Figure 13-1 Schedules Tab - To add a greeting to the schedule. Enter a short description of the greeting into the Description field. Select the Day of the week on which the greeting should be played. Specify the Start Time and End Time for the greeting. Select the Greeting audio file which will be played. Press the Add button once all of the settings have been completed. The new schedule entry will appear in the weekly calendar. - To modify an existing scheduled greeting. Click on the greeting in the weekly calendar. It will begin flashing and the details of the selected greeting will be displayed in the fields below the calendar. Change the fields to their new values. Press the Save button that is located below the Greeting field on the left-hand side of the window. - To delete a scheduled greeting. Click on the greeting in the weekly calendar. It will begin flashing and the details of the selected greeting will be displayed in the fields below the calendar. Press the Delete button that is located below the Greeting field to remove the scheduled greeting from the weekly calendar. 52 C. Events The Events tab (see Figure 14-1) in the Greetings section is used to configure greetings to be played on specific days of the year, such as holidays. This section displays a column heading for each date that has been defined. Figure 14-1 Events Tab - To add an event greeting. Enter a short description of the event into the Description field. Select the Month and Day on which the event will occur, specify the Start Time and End Time for the event. Select the Greeting audio file which will be played. Press the Add button once all of the settings have been completed. The new event greeting will appear in the Events tab. - To modify an existing event greeting. Click on the event’s column in the Events tab. It will begin flashing and the details of the selected event will be displayed in the fields at the bottom of the tab. Change the fields to their new values. Press the Save button that is located below the Greeting field on the left-hand side of the window. 53 D. Specific Callers The Specific Callers tab (see Figure 15-1) in the Greetings section is used to configure greetings to be played when calls from specific phone numbers are received. Figure 15-1 Specific Callers Tab - To add a specific caller greeting. Enter a 10-digit calling number into the Address field. Fill out the Description field. Select the Greeting audio file which will be played. Press the Add button once all of the settings have been completed. The new specific caller entry will appear in the list. - To modify an existing specific caller entry. Click on the entry in the list of specific callers and the details of the selected entry will be displayed in the fields below the list. Change the fields to their new values. Press the Save button that is located below the Greeting field on the left-hand side of the window. - To delete an specific caller entry. Click on the entry in the list. Press the Delete button located below the Greeting field. 54 4) Distribution Lists - Business Subscribers With Multiple Mailboxes Only. • A distribution list is a collection of mailboxes or phone numbers assigned to a numerical List ID. Subscribers who have access to this feature may record and send new messages, or transfer existing messages, to all mailboxes on a distribution list by entering the associated List ID. • The Distribution Lists section displays the distribution lists for the current subscriber and provides functions for adding, editing, or deleting distribution lists. This section is only available to subscribers if they are assigned a package with Distribution Lists enabled. • An example of the Distribution Lists section can be seen in Figure 16-1 below. Figure 16-1 Distribution Lists Management operations of distribution lists and list members are described below: • Add List Fill out the Description field for the new list and press the Add button below the Description field. • Edit List Description Select an existing list. Edit the Description and press the Update button below the Description field. • Delete List Select an existing list and press the Delete button below the Description field. - A confirmation prompt will be displayed. Select the OK button in the prompt to complete the deletion. 55 • Add List Member Select the distribution list to which the new list member will be added. Below the Address list, select the Type (Mailbox Number or Phone Number) of the new list member. Enter the mailbox number or phone number into the field next to the Type selection box. Press the Add button. - If the Type is set to Mailbox Number and the entered number is not found in the APmax system then a warning will be displayed and the entry will not be added unless the Type is changed to Phone Number. • Edit List Member Select the list member to be edited. The Type and number fields will be filled out with the values of the selected list member. Change the Type or number values and press the Update button below the Type field. • Delete List Member Select the list member and press the Delete button below the Type field. A confirmation prompt will be displayed. Select OK in the prompt to complete the deletion. 56 DIGITAL PHONE SERVICE AGREEMENT EFFECTIVE DECEMBER 1, 2008 This is an agreement between you, the “Customer” and Service Electric Cablevision, Inc. (“SECV”) for Digital Phone Services (“Services”) and any related services or devices used in connection with the Services. Use of the Services indicates that you accept the rates, terms, conditions and policies contained herein and set forth on the Digital Phone Price List posted on the SECV website located at www.secv.com. WHEN YOU ENROLL IN, USE OR PAY FOR THE SERVICES, YOU AGREE TO THE PRICING, TERMS AND CONDITIONS SET FORTH IN THIS AGREEMENT, INCLUDING THOSE RELATED TO 911/ENHANCED 911 FUNCTIONS (“911/E911”) AND SERVICE INTERRUPTIONS. WE ENCOURAGE YOU TO READ THE ENTIRE AGREEMENT AND TO CHECK OUR WEBSITE AT WWW.SECV.COM(OR AT AN ALTERNATIVE SITE IF WE SO NOTIFY YOU) PERIODICALLY FOR ANY CHANGES OR UPDATES. 1. Customer agrees to abide by the terms, conditions and policies contained herein, and to pay the rates for the services contained on the Digital Phone Price List, as either may change from time to time. The current version of this Agreement and the Digital Phone Price List shall be posted on SECV’s internet site at www.secv.com. 2. Customer expressly agrees not to use the Services for auto-dialing, continuous or extensive call forwarding, telemarketing, fax broadcasting or fax blasting, or for any other use that results in excessive usage inconsistent with normal calling patterns. If SECV determines, in its sole discretion, that the Services are being used for any of the aforementioned activities or in the event of an excessive number of calls during a fixed period, heavy usage during business hours, heavy usage concentrated over consecutive dates, or usage that may be deemed to be business use, SECV reserves the right to terminate the Services immediately and without notice or to assess additional charges for each month in which excessive usage occurred. 3. The Services are being provisioned by means of a wholesale contract between SECV and Service Electric Telephone. As a result, SECV may be required to disclose certain information regarding Customer to Service Electric Telephone. Customer consents to the disclosure of such information to Service Electric Telephone. Customer acknowledges, however, that SECV, and not Service Electric Telephone, is Customer’s provider of Digital Phone Services and that any and all account questions or inquiries will be directed to SECV. 4. Customer will not resell or redistribute (whether for a fee or otherwise) the Services, or any portion thereof, or otherwise charge others to use the Services, or any portion thereof. 57 5. The Services shall not be used for any unlawful purpose or for any use as to which Customer or user has not obtained all required governmental consents, approvals, authorizations, licenses and permits. SECV reserves the right to act immediately and without notice to terminate or suspend the Services and/or to remove from the Services any information transmitted by or to Customer or users (e.g., voicemail), if SECV (a) determines that such use or information does not conform with the requirements set forth in this Agreement, (b) determines that such use or information interferes with SECV’s ability to provide the Services to the Customer or others, or (c) reasonably believes that such use or information may violate any laws, regulations, or written and electronic instructions for use. SECV’s action or inaction under this section shall not constitute review or approval of Customer’s or any other users’ use or information. 6. To receive Services offered and provided under this Agreement, any and all of Customer’s accounts with SECV must be paid to current. Customer understands and acknowledges that the non-payment of charges associated with Customer’s cable television service, cable modem service, and/or the Services may result in disconnection of the Services with notice as required by applicable law. 7. Customer acknowledges that the Services do not have an independent power source. Customer agrees to keep the Multimedia Terminal Adapter (“MTA”) plugged into a working electrical power outlet at all times. Under certain circumstances, including if the electrical power and/or SECV’s cable network or facilities are not working, the Services, including the ability to access emergency 911 services, will not be available. 8. Customer acknowledges that the Services may not be compatible with all security systems and medical monitoring systems and that, in order to maintain any necessary alarm monitoring functions, Customer may be required to maintain a telephone connection through another local exchange carrier. In the event SECV installs and configures the Services to operate with Customer’s security or medical monitoring system(s), Customer acknowledges that it must contact the provider of the monitoring services in order to test the compatibility with the Services. Further, the Services may not be compatible with certain voice and non-voice communications equipment, including certain fax machines, certain “dial-up” modems, rotary dial phone handsets, pulse-dial phone handsets, private branch exchange (PBX) equipment, answering machines, traditional Caller ID units, casual/ dial around (10-10) calling, 976, 900, 700 or 500 number calling, and 311, 511 or other x11 (other than 411, 611, 711 and 911). BY ACCEPTING THIS AGREEMENT, CUSTOMER WAIVES ALL CLAIMS AGAINST SECV FOR INTERFERENCE, DISRUPTION, OR INCOMPATIBILITY BETWEEN THE SECV EQUIPMENT OR THE SERVICES AND ANY OTHER SERVICE, SYSTEMS OR EQUIPMENT. IN THE EVENT OF SUCH INTERFERENCE, DISRUPTION OR INCOMPATIBILITY, CUSTOMER’S SOLE REMEDY SHALL BE TO TERMINATE THE SERVICES. 9. The installation of Services and related equipment that will be available from SECV for a standard installation are described in SECV’s Digital 58 Phone Price List. Customer authorizes SECV to enter the premises to make any preparations or take any actions necessary for the installation, maintenance, inspection or removal of equipment, including periodic access to the SECV Equipment during the term of this Agreement and after its termination. Any equipment provided by SECV, including but not limited to the MTA and cabling installed by SECV, shall be considered “SECV Equipment” and shall remain the sole and exclusive property of SECV; upon termination of Services to the Customer, Customer’s right to possess and use SECV Equipment shall likewise terminate and Customer shall return SECV Equipment, by any method reasonably requested by SECV, within ten (10) days of termination. Customer will not service, open, relocate, alter, misuse or tamper with SECV Equipment. If SECV Equipment is damaged, destroyed, lost or stolen while in Customer’s possession, Customer shall be liable for the cost of repair or replacement of the SECV Equipment. SECV shall have no obligation to install, support, maintain, repair or replace any equipment that is not SECV Equipment, including any computer, computer modem, phone handset (or equivalent), inside phone wiring and outlets, and electric power outlet. If Customer is not the owner of the premises upon which the SECV 10. Equipment is to be installed, Customer warrants that he/she has obtained the consent of the owner of the premises for the purposes described in the previous section. Customer agrees to indemnify and hold SECV harmless from and against any claims of the owner of the premises arising out of performance of this Agreement. 11. Switching to SECV from another Provider: If switching to the Services from another service provider, Customer may transfer existing phone number (if any) to SECV’s Services, provided that: a. Customer requests the phone number transfer when placing the order for SECV’s Services; b. Customer agrees not to contact the other phone service provider during the transfer period(which may take up to 30 days) in order to allow SECV the time to complete the phone numbertransfer. Contacting the other service provider can act to delay the phone number transfer. c. Customer’s current service provider releases the existing phone number, at SECV (or its agent’s) request, without delay or charge; and d. Transfer of Customer’s existing phone number to SECV’s Services would not, in SECV’s view, violate applicable law or SECV’s procedures. Switching from SECV to another Provider: To transfer a phone number from SECV to another service provider, the Customer must place a transfer order through your new service provider (and not through SECV), and the existing telephone number and the telephone service must remain active. SECV will honor such request provided that: 59 a. Customer’s new service provider requests the transfer of numbers for local number portability (“LNP”), of active existing telephone number(s) to be ported, prior to the termination of service. (A disconnected number cannot be ported.) b. The new service provider is willing to accept transfer without delay or charge; and c. Transfer of Customer’s existing phone number to the new service provider would not, in SECV’s view, violate applicable law or SECV’s procedures. 12. Customer hereby certifies that he or she is eighteen (18) years of age or older. 13. Charges a.Customer agrees to pay all charges associated with the Services. These charges may include but are not limited to installation charges, monthly service charges, charges for the use of SECV Equipment, charges for service calls, and other charges. The current list of applicable charges and fees are included on SECV’s Digital Phone Price List. b.Customer agrees to pay any and all applicable federal, state and local taxes (however designated) levied upon SECV and its affiliates in connection with the sale, installation, use and provision of the Services. c.SECV reserves the right to invoice Customer for any fees or payment obligations in connection with the Services imposed on SECV and its agents or affiliates by order, rule or regulation of a regulatory body or a court of competent jurisdiction. SECV also reserves the right to invoice Customer to recover amounts that SECV, its affiliates and agents are required by governmental or quasi-governmental authorities to collect from or to pay to others in support of statutory or regulatory programs, including but not limited to universal service fees, 911/E911 surcharges, telecommunications relay service surcharges, franchise fees, right-ofway fees, and the like. d.SECV may change the fees and charges for the Services from time to time at SECV’s discretion; specifically, SECV may decrease fees and charges with or without advanced notice and may increase the fees and charges for the Services by posting them as part of the Digital Phone Price List. Taxes and other government-related fees and surcharges may be changed with or without notice. Customer will also be responsible to pay any fees, payment obligations, and taxes that become applicable retroactively. e.Per-Call and Measured-Call Charges: SECV’s calling plans billed on a flat monthly fee basis may not include certain types of calls. These call types will instead be charged on a per-call basis (e.g., operator services) or a measured basis (e.g., international calls). For billing purposes, a 60 measured call begins when the call is answered by the called party or an automated answering device (such as an answering machine or fax machine) and ends when one of the parties disconnects the call. Measured calls are recorded in whole minutes, with partial minutes rounded up to the next whole minute. If a third party provider (such as a telephone company in a foreign country) charges SECV, its affiliates or suppliers for a completed call when the called party’s line rings or after a certain number of rings, then SECV will charge for the call as if it were answered by the called party. f. Rounding of Fractional Charges: If the computed charge for a measured call, a tax or a surcharge includes a fraction of a cent, the fraction is rounded up to the next nearest whole cent. g.Third Party Charges: The Services may allow Customer to access “dial-up” Internet service providers, other enhanced service providers (e.g., information services accessible through 800, 888, 900 and 877 numbers) and other third-party providers. Customer acknowledges that he or she may incur charges with such providers that are separate and apart from the amount charged by SECV. Customer agrees that all such charges, including all applicable taxes, shall be the sole responsibility of Customer. Customer is solely responsible for protecting the security of credit card information provided to others in connection with such transactions. h.Billing: SECV generally bills monthly, in advance, for service charges, equipment charges and other recurring fees. Customer will be billed for installation and other one-time charges, measured and per-call charges, and for all other charges, according to SECV’s billing policies. Customer’s invoice may also contain charges for other services provided by SECV or its subsidiaries or affiliates. Partial payments on any invoice will be applied to the outstanding charges in the amounts and proportions that SECV determines. Acceptance of a partial payment does not waive SECV’s rights to subsequently collect the full balance owed. i. Late or Non-Payments: Customer agrees to pay SECV for all fees and charges for Services, including any late fees and related fees, charges, and assessments due to late payments or non-payments. Customer may be assessed such fees, charges, and assessments (i) if for any reason SECV does not receive from Customer any required payment for the Services by the date on which the payment is due; (ii) if Customer pays less than the full amount due for the Services; or (iii) if SECV provides more than one product or service and Customer pays less than the full amount due for any or all of them. In such circumstances, SECV may also disconnect any or all of the SECV and SECV-affiliated services and products. To the extent authorized by applicable law, SECV also may prevent the customer from reconnecting service or transferring the telephone number to another service provider until all past due amounts are paid. j. Subject to applicable law, Customer must notify SECV of any billing errors or other requests for refund within sixty (60) days of the date on the bill. 61 k.If Customer desires to resume the Services after a suspension of the Services, SECV may require Customer to pay a restoration or reconnection fee, as applicable. If Customer desires to reinstate the Services after disconnection of the Services, SECV may require Customer to pay a new installation fee and/or service activation fee, as applicable. These fees are listed on the Digital Phone Price Lists, or the price list or contract related to the particular product or service that was disconnected, and are in addition to all past due charges and other fees. SECV’s late fee practices may be revised from time to time to comply with applicable state or local laws, rules or regulations. LIMITATIONS OF 911/E911 14. a.The Services include 911/E911 functions that may differ from the 911 or E911 function furnished by other providers. As such, it may have certain limitations. CAREFULLY READ THE INFORMATION BELOW. CUSTOMER ACKNOWLEDGES AND ACCEPTS ANY LIMITATIONS OF 911/E911. YOU AGREE TO CONVEY THESE LIMITATIONS TO ALL PERSONS WHO MAY PLACE CALLS OVER THE SERVICES. IF YOU HAVE ANY QUESTIONS, PLEASE CONTACT SECV. b.In order for 911/E911 calls to be properly directed to emergency services, SECV must have Customer’s correct service address. If Customer moves the Services to a different address without SECV’s approval, 911/E911 calls may be directed to the wrong address, and/ or the Services (including 911/E911) may fail altogether. Therefore, Customer must call SECV before moving the Services to a new address. SECV will need several business days to update the service address in the E911 system to enable 911/E911 calls to be properly directed. All changes in service address require SECV’s prior approval. c.The Services use the electrical power in at Customer’s property. If there is an electrical power outage, 911 calling may be interrupted if the battery backup in the associated MTA is not installed, fails, or is exhausted after several hours. Furthermore, calls, including calls to 911/E911, may not complete if there is a problem with network facilities, including network congestion, network/equipment/power failure, or another technical problem. d.LIABILITY: CUSTOMER ACKNOWLEDGES AND AGREES THAT SECV WILL NOT BE LIABLE FOR ANY SERVICE OUTAGE, INABILITY TO DIAL 911 USING THE SERVICES, AND/OR INABILITY TO ACCESS EMERGENCY SERVICE PERSONNEL. CUSTOMER AGREES TO DEFEND, INDEMNIFY, AND HOLD HARMLESS SECV AND ITS ASSOCIATED PARTIES FROM ANY AND ALL CLAIMS, LOSSES, DAMAGES, FINES, PENALTIES, COSTS, AND EXPENSES (INCLUDING BUT NOT LIMITED TO REASONABLE ATTORNEY FEES) BY, OR ON BEHALF OF, CUSTOMER OR ANY THIRD PARTY OR USER OF THE SERVICES RELATING TO THE FAILURE OR OUTAGE OF THE SERVICES, INCLUDING THOSE RELATED TO 911/E911. 62 Customer understands and acknowledges that Customer will not be able 15. to use the Services, including 911/E911, under certain circumstances, including but not limited to the following: (a) if SECV’s network or facilities are not operating; or (b) if normal electrical power to the MTA is interrupted and the MTA does not have a functioning battery backup. Customer also understands and acknowledges that the performance of the battery backup is not guaranteed. Customer Privacy 16. a. Customer’s privacy interests, including Customer’s ability to limit disclosure of certain information to third parties, are addressed by, among other laws, the Communications Act and the Electronic Communications Privacy Act. Personally identifiable information that may be collected, used or disclosed in accordance with applicable laws is described in the Customer Privacy Notice delivered to Customer by SECV, which is incorporated herein by reference. Subscriber acknowledges receipt of the Customer Privacy Notice. b. SECV may collect (whether automatically or otherwise) information of the type described in the Customer Privacy Notice (some of which may be deemed personally identifiable information as that term is used in the Communications Act) relating to Customer that SECV may use to market additional services to Customer. SECV may also disclose such information to its agent, Service Electric Telephone, as necessary for the provisioning of the Services. c. In addition to the actions and disclosures specifically authorized by law or statute or authorized elsewhere in this Agreement, SECV shall have the right (except where prohibited by law notwithstanding Customer’s consent), but not the obligation, to disclose any information to protect its rights, property and/or operations, or where circumstances suggest that individual or public safety is in peril. Customer consents to such actions or disclosures. 17. License for Firmware and Software. The Services and SECV Equipment, including but not limited to any firmware or software embedded in the SECV Equipment or used to provide the Services, are protected by trademark, copyright, and/or other intellectual property laws and international treaty provisions. Customer is granted a revocable license to use such firmware and software in object code form (without making any modification thereto) strictly in accordance with this Agreement. Customer acknowledges and understands that Customer is not granted any other license to use the firmware or software embedded in the SECV Equipment or used to provide the Services. Customer expressly agrees to use the SECV Equipment only in connection with the Services. Customer shall not take any action nor allow anyone else to take any action that will reverse compile, disassemble, or reverse engineer or otherwise attempt to derive the source code from the binary code of the firmware or software. 63 18. This Agreement shall commence on the first date that Services are provided hereunder and shall continue thereafter until terminated by Customer or SECV as set forth in this section. Customer can terminate this Agreement for any reason by providing notice of termination to SECV in one of three ways: (a) by sending written notice to SECV at the address specified in Section 27 of this Agreement; (b) by sending an electronic notice to the email address specified in Section 27 of this Agreement; or (c) by calling SECV’s customer service line specified in Section 27 of this Agreement during normal business hours. SECV may suspend Service or terminate this Agreement for any reason. If SECV suspends Service or terminates this Agreement because Customer fails to comply in full with any term of the Agreement, SECV will give Customer seven (7) days notice, unless the Agreement expressly permits suspension or termination without notice or on less than seven days notice. SECV will provide at least thirty (30) days notice for suspension or termination for any other reason. Regardless of the party terminating the Agreement, all applicable fees and charges will accrue until the date of termination, but SECV will refund all prepaid monthly service fees charged for Services after the termination date (less any outstanding amounts due SECV for the Services, affiliate services, equipment or other applicable fees and charges). Nothing herein shall be construed to limit SECV’s rights and remedies 19. available at law or in equity. SECV and its suppliers reserve the right both during the term of this Agreement and upon its termination to delete Customer’s voicemail, call detail, data, files, or other Customer information that is stored on SECV’s or its suppliers’ servers or systems. Customer understands and acknowledges that SECV shall have no liability whatsoever as a result of the loss or removal of any such voicemail, call detail, data, files or other Customer information. THE SECV EQUIPMENT AND THE SERVICES ARE PROVIDED “AS 20. IS” WITHOUT WARRANTY OF ANY KIND, EITHER EXPRESS OR IMPLIED. NEITHER SECV NOR ITS ASSOCIATED PARTIES WARRANT THAT THE SECV EQUIPMENT OR THE SERVICES WILL MEET YOUR REQUIREMENTS, PROVIDE UNINTERRUPTED USE, OR OPERATE AS REQUIRED, WITHOUT DELAY, OR WITHOUT ERROR. NEITHER SECV NOR ITS ASSOCIATED PARTIES WARRANT THAT ANY COMMUNICATIONS WILL BE TRANSMITTED IN UNCORRUPTED FORM. ALL REPRESENTATIONS OF ANY KIND, EXPRESS OR IMPLIED, INCLUDING BUT NOT LIMITED TO ANY WARRANTIES OF PERFORMANCE, NONINFRINGEMENT, FITNESS FOR A PARTICULAR PURPOSE OR MERCHANTIBILITY ARE HEREBY EXCLUDED. 21. EXCEPT AS SPECIFICALLY PROVIDED IN THIS AGREEMENT, SECV AND ITS ASSOCIATED PARTIES SHALL NOT UNDER ANY CIRCUMSTANCE OR UNDER ANY LEGAL THEORY (INCLUDING BUT NOT LIMITED TO TORT OR CONTRACT) HAVE ANY LIABILITY TO THE CUSTOMER OR TO ANY OTHER PERSON OR ENTITY FOR ANY DIRECT, INDIRECT, INCIDENTAL, SPECIAL, TREBLE, PUNITIVE, EXEMPLARY, OR CONSEQUENTIAL LOSSES OR DAMAGES (INCLUDING BUT 64 NOT LIMITED TO LOSS OF PROFITS, LOSS OF EARNINGS, LOSS OF BUSINESS OPPORTUNITIES, PERSONAL INJURIES OR DEATH) THAT RESULT DIRECTLY OR INDIRECTLY FROM CUSTOMER’S RELIANCE ON OR USE OF THE SECV EQUIPMENT OR THE SERVICES, OR THE INSTALLATION, MAINTENANCE, FAILURE, REMOVAL OR USE OF THE SERVICES. THIS LIMITATION SHALL APPLY WHERE SECV MAKES AVAILABLE AN OPTION TO LIST CUSTOMER’S NAME, ADDRESS, AND/OR TELEPHONE NUMBER IN A PUBLISHED DIRECTORY OR DIRECTORY ASSISTANCE DATA BASE. Customer equipment may be damaged or suffer service outages as a result 22. of the installation, use, inspection, maintenance, repair and removal of the SECV Equipment and the Services. Except for gross negligence or willful misconduct by SECV, neither SECV nor is affiliates/agents shall have any liability whatsoever for any damage, loss, or destruction of Customer equipment. In the event of gross negligence or intentional misconduct by SECV, SECV shall pay at its sole discretion for the repair or replacement of the damaged parts up to a maximum of $250. This shall be Customer’s sole remedy relating to such activity. Customer understands and acknowledges that the Services may be subject 23. to regulatory or tax treatment that differs from the regulatory or tax treatment applicable to traditional telephone service. This different treatment may limit or otherwise affect your rights of redress before federal or state regulatory or tax agencies. All representations, warranties, indemnifications, and limitations of liability 24. contained in this Agreement shall survive the termination of the Agreement; any other obligations of the parties hereunder shall also survive, if they relate to the period before termination or if by their terms they would be expected to survive termination. This Agreement and the Digital Phone Price List, which is incorporated 25. herein by reference, constitute the entire agreement and understanding of the parties with respect to the subject matter of this Agreement, and they supersede and replace any and all prior written or verbal agreements. If any portion of this Agreement and/or the Digital Phone Price List is held to be unenforceable, the unenforceable portion shall be construed in accordance with applicable law as nearly as possible to reflect the original intentions of the parties, and the remainder of the provisions shall remain in full force and effect. SECV’s failure to insist upon or enforce strict performance of any provision of this Agreement or the Digital Phone Price List shall not be construed as a waiver of any provision or right. Neither the course of conduct nor trade practice shall act to modify any provision of this Agreement or the Digital Phone Price List. 26. Unless this Agreement specifies otherwise, SECV will give Customer thirty (30) days notice of any modification of this Agreement. SECV may, at its sole discretion, change, add to, or remove portions of the Services (including but not limited to features and equipment requirements) at any time without 65 notice. If Customer continues to use the Services after any modification of this Agreement or the Services, Customer shall be deemed to have accepted the modification. If Customer does not agree to any modifications, Customer must immediately stop using the Services and notify SECV that it is terminating this Agreement. Customer then will be entitled to a refund of any unused portion of any recurring monthly service fee for the Services that have been paid by Customer in advance (less any outstanding amounts due SECV and/or its affiliates for equipment or other applicable fees and charges). Notices to SECV. Any notice to SECV hereunder can be sent to your local 27. office via: Mail: Email: Fax: Service Electric Cablevision, Inc. Birdsboro System 6400 Perkiomen Avenue Birdsboro, PA 19508 [email protected] 610.582.3094 Mail: Service Electric Cablevision, Inc. Hazleton/Mahanoy City System 380 Maplewood Drive Hazle Township, PA 18202 [email protected] 570.454.3652 Email: Fax: Mail: Email: Fax: Service Electric Cablevision, Inc. Sunbury/CATV System 3662 Point Township Drive Northumberland, PA 17857 [email protected] 570.286.9710 Notices to Customer. Any notice to Customer hereunder can, at SECV’s 28. option, be sent to themailing address designated for receipt of customer’s invoices or the email address provided by Customer. SECV will not use electronic notice if Customer informs SECV of its desire to omit this type of notice. 66 SECV HDTV Many Channels. One Choice. Wideband 50* Kick Your Internet Into Overdrive with up to 50 Mbps of SECV’s FASTEST Internet Speed. Caller ID on TV A new meaning to the concept of “screening your calls.” * Not all High-Speed Internet (HSI) speeds are available in every system. For available Internet speeds in your area, please refer to your system’s HSI product page. DIGITAL PHONE • Unlimited Local & Long Distance • • • • United States Canada Mexico Puerto Rico • Caller ID • Call Waiting • Keep Your Existing Number • Caller ID on TV • Voicemail to Email Birdsboro 6400 Perkiomen Avenue Birdsboro, PA 19508 800.344.0347 • 3-Way Calling • Voicemail Hazleton/Mahanoy City 380 Maplewood Drive Hazle Township, PA 18202 800.242.3707 Sunbury/CATV 3662 Point Township Drive Northumberland, PA 17857 800.522.2389 secv.com | BRO-DPUG (Rev. 11.04.13) Like Us On Facebook © 2013 SECV


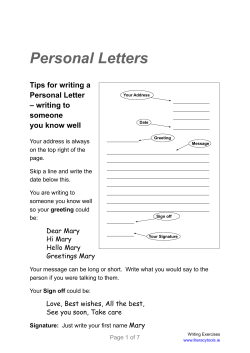
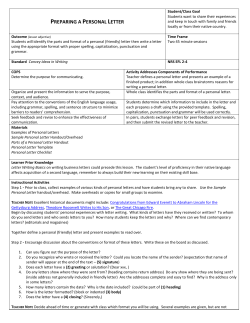

© Copyright 2026